

Page 1

DX01
DX02
GB Dust Extraction System Instruction Manual
F Système d’Aspiration Manuel d’instructions
E Sistema de Extracción de Polvo Manual de instrucciones
Page 2
2
1
2
3
1 2
1
4
5
6
7
8
9
3 4
5 6
7 8
Page 3

10
11
12
9 10
12
9
13
11 12
13 14
3
Page 4

ENGLISH (Original instructions)
Explanation of general view
1 Switch trigger
2 Attachment (Dust extraction
system)
3 Release button
4 Stroke adjusting button
5 Depth gauge button
6 Depth gauge button carriage
7 Distance (X) equal to the drilling
depth
8 Dust container release button
9 Dust container
10 Filter cover
11 Slit
12 Filter
13 Sealing cap
Specications
Model DX01 DX02
Suction performance 350 l/min
Net weight 1.3 kg (3.0 lbs) 1.4 kg (3.0 lbs)
Rated voltage 18 V
Standard battery cartridge(s)
Warning: Use only the battery cartridge(s)
Due to our continuing programme of research and development, the specications herein are subject to change
•
without notice.
Specications and battery cartridge may differ from country to country.
•
Weight, with battery cartridge, according to EPTA-Procedure 01/2003
•
described.
Operating stroke 96 mm MAX
Suitable hammer drill bit 24 mm MAX
Symbols
The following show the symbols used for the equipment. Be sure that you understand their meaning before use.
Take particular care and attention.•
BL1830
Read instruction manual.•
IMPORTANT SAFETY INSTRUCTIONS
WARNING! Read all safety warnings and all instructions before operating the attachment. Failure to follow
the warnings and instructions may result in electric shock, re and/or serious injury.
Save all warnings and instructions for future reference.
1. Use the attachment in accordance with these instructions. Use of the attachment for operations different from
those intended could result in a hazardous situation.
2. Keep children and bystanders away while operating a power tool. Distractions can cause you to lose control.
3. Keep work area clean and well lit. Cluttered or dark areas invite accidents.
4. Always wear eye and respiratory protections.
4
Page 5

BEFORE USE
Installing or removing the dust extraction system
WARNING:
Always be sure that the tool is switched off and battery cartridge is removed before carrying out any work on
•
the tool. Failure to switch off and remove the battery cartridge may result in serious personal injury from accidental
start-up.
Before installing the dust extraction system, make sure that the attachment points and the power tool itself, particularly
•
the electrical interface on the power tool, are free from dust and foreign matter. After installing the dust extraction
system, also make sure that it is securely installed.
NOTE:
This dust extraction system is intended for use when drilling in only concrete. Never use this system when drilling in
•
metal or wood.
This dust collection system collect a signicant percentage of the dust produced at work but not all of it.
•
Empty the lter container regularly. Failure to empty the lter container regularly may cause dust to release.
•
Do not use the dust extraction system in core drilling or chiseling applications.
•
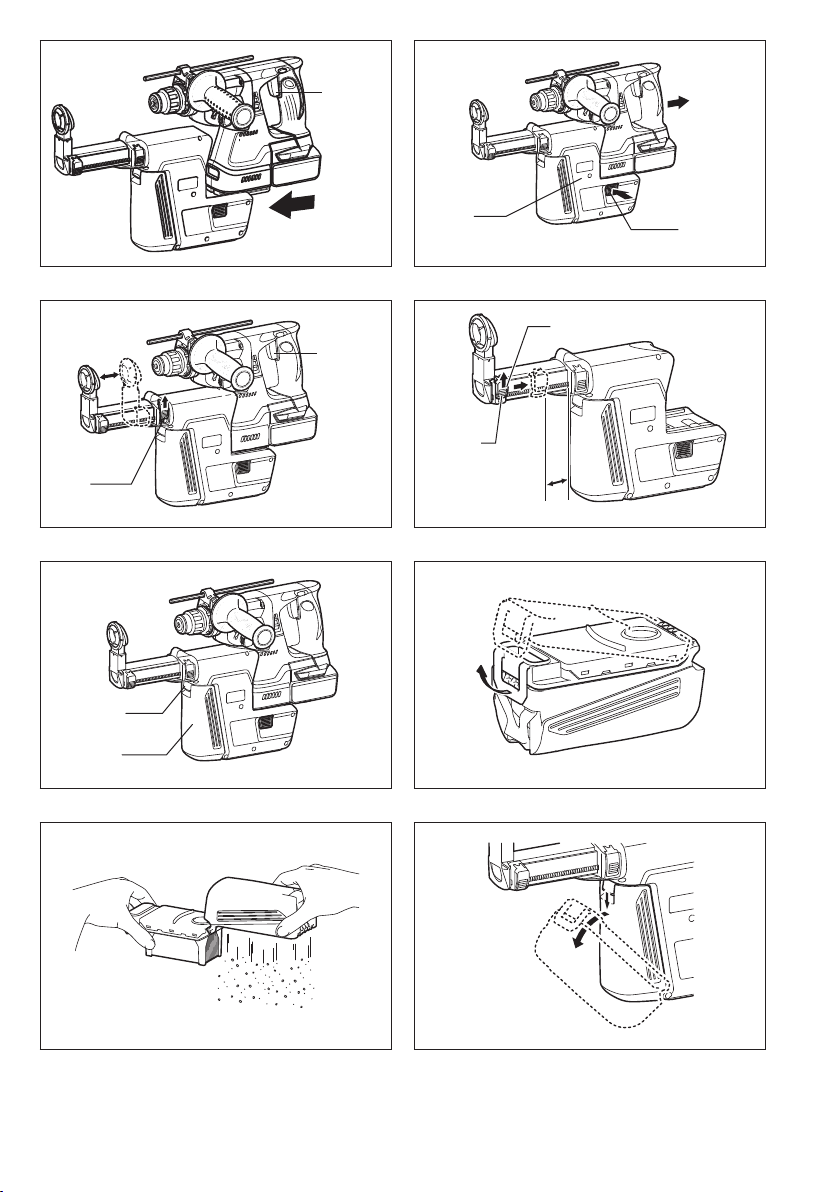
To install the dust extraction system, follow the procedure below.
1. Hold the power tool so that nger(s) does not press the switch trigger.
2. Align the interface of the attachment with the power tool guide and slide it on the tool until it locks with a double click
sound.
3. After installing the attachment on the power tool, make sure that it is secured properly.
To remove the dust extraction system, follow the procedure below.
1. Hold the power tool so that nger(s) does not press the switch trigger.
2. Press the release button on the attachment and with the button pressed pull it away from the power tool.
(Fig. 1)
(Fig. 2)
OPERATION
CAUTION:
Do not use the tool in wet conditions such as work on concrete surface and the similar.
•
Adjusting the tip protrusion length
The protrusion of the tip is adjustable according to your hammer drill bit length.
1. Hold the power tool so that nger(s) does not press the switch trigger. (Fig. 3)
2. CAUTION: When the stroke adjusting button is pressed, the telescopic section is released and then it may jump
out up to 100 mm under spring pressure. Wear goggles.
Keep the bar tip of the attachment away from any objects keeping the above jumping-out distance in mind and
never point the attachment at yourself, a bystander or animals.
Press the stroke adjusting button and keep pressing it.
NOTE:
When starting pressing the stroke adjusting button, always leave the sliding bar free and not held with hand.
•
3. Press the power tool with the hammer drill bit installed against the wall until the drill bit tip touches the wall.
4. Release the stroke adjusting button to lock it.
Setting the drilling depth (depth gauge)
If holes require to be drilled to an exact depth, the correct depth needs to be determined by drilling test holes.
1. Hold the power tool so that nger(s) does not press the switch trigger. (Fig. 4)
2. Press the depth gauge button and with the button pressed slide the lock button carriage to the desired length and
release it.
The distance (X) between the attachment housing and the depth gauge button is equal to the drilling depth.
Operation
CAUTION:
Always follow the instruction in OPERATION of the instruction manual for Makita hammer drills. Failure to observe
•
the instruction manual may cause personal injury.
WARNING:
Always follow national laws, regulations and ordinance which prescribe working with materials hazardous to health.
•
Drilling
When drilling into concrete, hold the power tool rmly with both hands so that the entire nozzle top keeps in tight contact
with the concrete surface. Any part of the nozzle away from the concrete surface may cause poor dust collection.
5
Page 6

Switch-off delay function
After turning off, the dust extraction system will run for a few seconds longer to collect the remaining dust in the duct
in the dust container.
Emptying the dust container
NOTE:
Too much dust in the dust container would result in a considerable loss of dust extracting power. Accordingly, clean
•
out the dust container regularly.
CAUTION:
Wear respiratory protection when emptying the dust container.
•
Do not touch the lter section when cleaning it.
•
Do not use a brush or air duster to clean the lter section. Using a brush or compressed air may damage the lter.
•
1. Before removing the dust container from the attachment, hold the power tool horizontally. (Fig. 5)
2. Press the dust container release button and with the button depressed pivot it on the lower side axis.
3. Remove the dust container from the attachment. (Fig. 6)
4. To open the dust container, raise the lever lightly and then pivot the transparent section. (Fig. 7)
5. Empty the dust container by tapping it lightly.
Be careful not to let out excessive dust into the air.
6. Remount the dust container in place on the attachment.
MAINTENANCE
WARNING:
Always be sure that the tool is switched off and battery cartridge is removed before attempting to perform inspection
•
or maintenance.
NOTE:
Do not use water, oil, grease, detergent or cleaning agents.
•
Never use gasoline, benzine, thinner, alcohol or the like. Discoloration, deformation or cracks may result.
•
Cleaning of the attachment
Clean the attachment using only a dry rug and a dry brush.
Wear respiratory protection when cleaning.
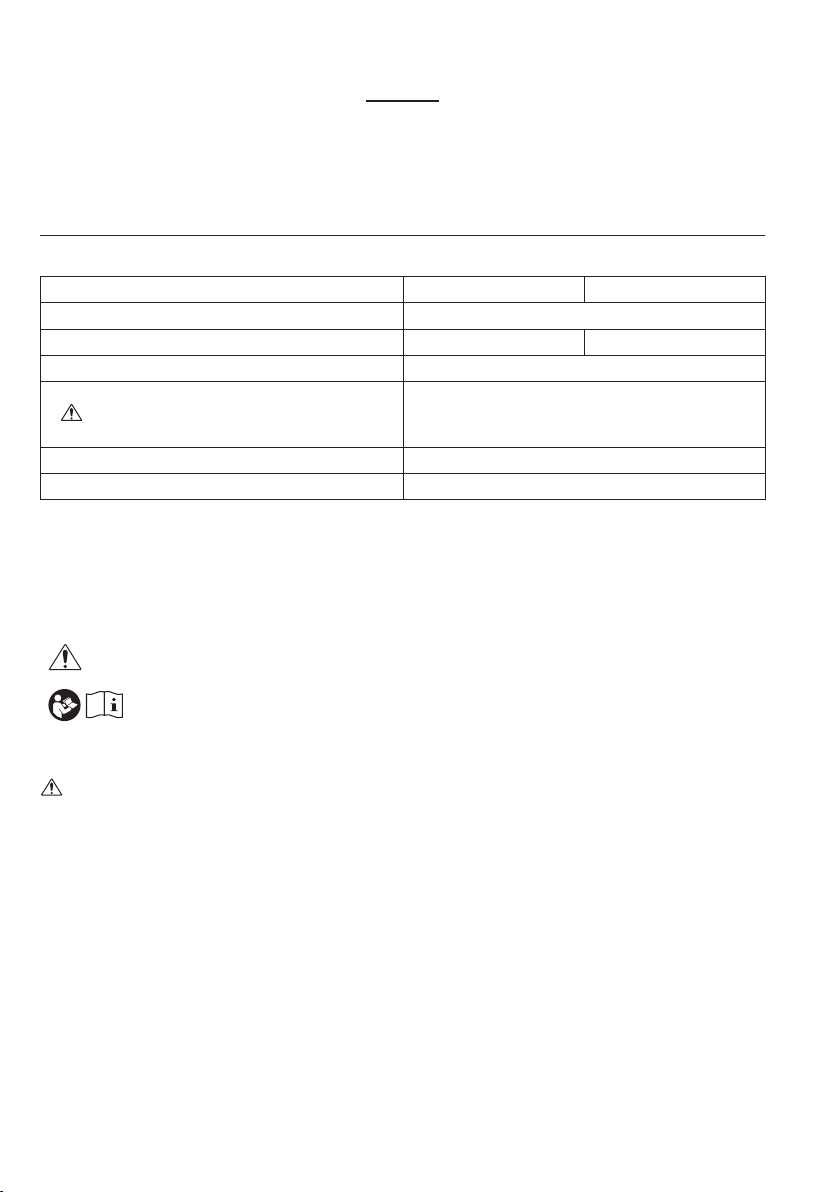
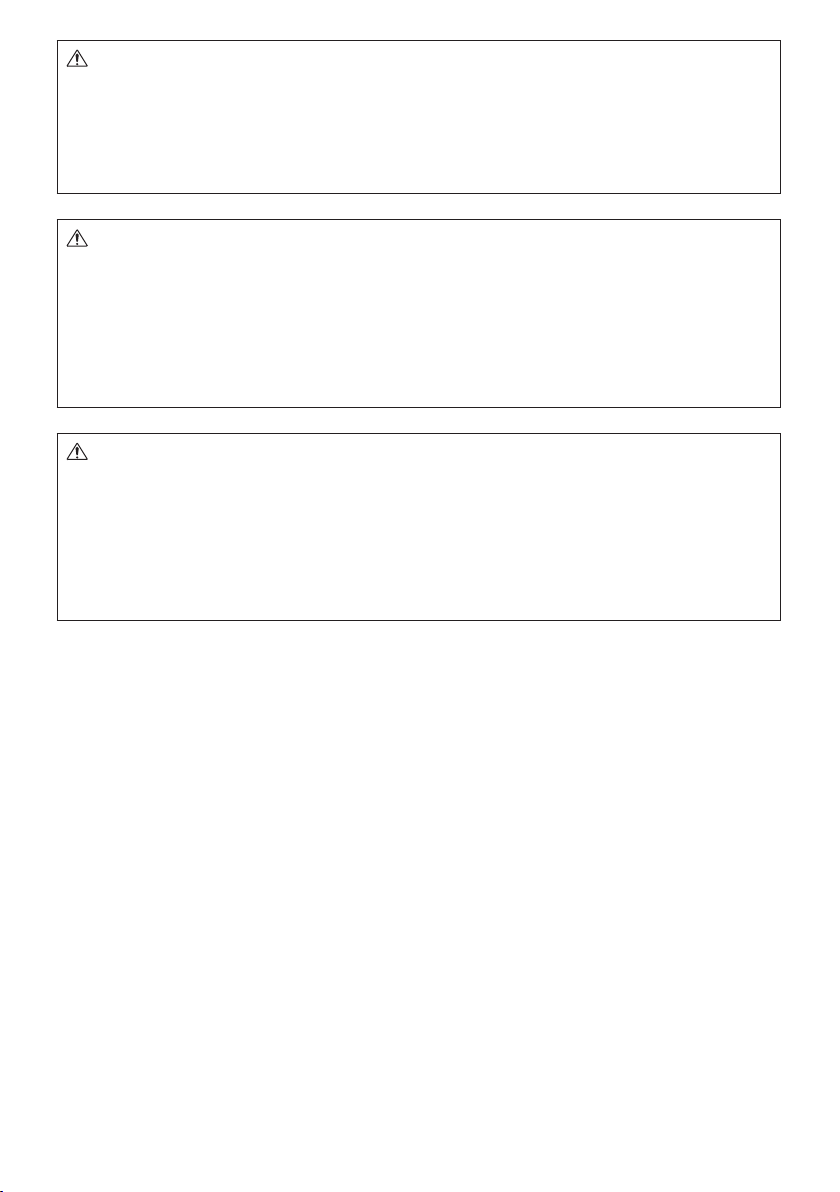
Replacing the lter
Check the lter regularly for damage and if damaged, replace the old lter with a new one.
To replace the lter, follow the procedure below. (Fig. 8)
1. Press the dust container release button and with the button depressed pivot it on the lower side axis.
2. Remove the dust container from the attachment. (Fig. 9)
3. Pry up the lter cover on the dust container using a slotted bit screwdriver to be inserted into the slit. (Fig. 10)
4. Pull the old lter away from the dust container by hand. (Fig. 11)
5. Put a new lter in the original position. (Fig. 12)
6. Snap the lter cover on the dust container. (Fig. 13)
7. Remount the dust container in place on the attachment.
Replacing the sealing cap (Fig. 14)
Using a worn or damaged sealing cap may cause poor dust collection.
Check the sealing cap regularly. When the sealing cap is worn or damaged, replace it as follows.
1. Remove the sealing cap from the dust extraction system by hand.
2. Put a new sealing cap on the dust extraction system so that the protrusion on it is positioned on the upper side.
To maintain product SAFETY and RELIABILITY, any other maintenance or adjustment should be performed by Makita
Authorized Service Centers, always using Makita replacement parts.
TROUBLESHOOTING
Fault Possible cause Remedy
The dust container is full. Emptying the dust container.
Unusual dust emission
The sealing cap is worn or
damaged.
Replace the sealing cap.
6
Page 7

OPTIONAL ACCESSORIES
CAUTION:
These accessories or attachments are recommended for use with your Makita dust extraction system specied in
•
this manual. The use of any other accessories or attachments might present a risk of injury to persons. Only use
accessory or attachment for its stated purpose.
If you need any assistance for more details regarding these accessories, ask your local Makita Service Center.
Dust container (with lter)
•
Filter
•
NOTE:
Some items in the list may be included in the tool package as standard accessories. They may differ from country
•
to country.
7
Page 8
FRANÇAIS (Instructions originales)
Descriptif
1 Gâchette
2 Accessoire (Système
d’aspiration)
3 Bouton de dégagement
4 Bouton de réglage de la course
5 Bouton de la jauge de
profondeur
6 Guide du bouton de la jauge de
profondeur
7 Distance (X) égale à la
profondeur de perçage
8 Bouton de dégagement du
réservoir de poussière
9 Réservoir de poussière
10 Couvercle du ltre
11 Fente
12 Filtre
13 Bouchon d’étanchéité
Spécications
Modèle DX01 DX02
Performance d’aspiration 350 l/min
Poids net 1,3 kg (3,0 lbs) 1,4 kg (3,0 lbs)
Tension nominale 18 V
Batterie(s) standard
Avertissement : N’utilisez que la ou les batteries
Foret de marteau-piqueur adéquat 24 mm MAX
En raison de l’évolution constante de notre programme de recherche et développement, les spécications contenues
•
dans ce manuel sont sujettes à modication sans préavis.
Les spécications et la batterie peuvent varier d’un pays à l’autre.
•
Poids, batterie incluse, selon la procédure EPTA 01/2003
•
spéciées.
Course de travail 96 mm MAX
Symboles
Vous trouverez ci-dessous les symboles utilisés pour l’appareil. Veillez à comprendre leur signication avant d’utiliser
l’appareil.
BL1830
Redoublez de précaution.•
Lisez le manuel d’instructions.•
CONSIGNES DE SÉCURITÉ IMPORTANTE
AVERTISSEMENT ! Veuillez lire tous les avertissements et toutes les instructions avant d’utiliser
l’accessoire. Le non-respect des avertissements et instructions peut entraîner une électrocution, un incendie et/ou
de graves blessures.
Conservez tous les avertissements et toutes les instructions pour référence ultérieure.
1. Utilisez l’accessoire conformément à ces instructions. L’utilisation d’un accessoire à des ns autres que celles
prévues est potentiellement dangereuse.
2. Tenez à distance enfants et passants pendant que vous opérez un outil électrique. Une distraction peut vous
faire perdre le contrôle de l’outil.
3. Maintenez l’aire de travail propre et bien éclairée. Une aire de travail en désordre ou mal éclairée augmente les
risques d’accident.
4. Portez toujours des protections pour les yeux et les voies respiratoires.
8
Page 9

AVANT UTILISATION
Mise en place ou retrait du système d’aspiration
AVERTISSEMENT :
Assurez-vous toujours que l’outil est éteint et que la batterie est retirée avant de procéder à n’importe quelle
•
tâche sur l’outil. Ne pas éteindre l’outil ni retirer la batterie pourrait provoquer de graves blessures corporelles suite
au démarrage involontaire.
•
Avant d’installer le système d’aspiration, assurez-vous que les points clés de l’accessoire et l’outil électrique luimême, en particulier l’interface électrique de ce dernier, sont exempts de poussières ou de corps étrangers. Après
avoir installé le système d’aspiration, assurez-vous également qu’il est solidement installé.
NOTE :
•
Ce système d’aspiration est destiné à être utilisé lors du perçage dans du béton seulement. Ne l’utilisez jamais lors
du perçage dans du métal ou du bois.
•
Ce système de dépoussiérage recueille un pourcentage important de la poussière produite, mais pas toute la
poussière.
Videz régulièrement le réservoir du ltre, sous peine de laisser s’échapper la poussière.
•
N’utilisez pas le système d’aspiration pour percer au foret-aléseur ou buriner.
•
Procédez comme il est indiqué ci-dessous pour installer le système d’aspiration.
1. Tenez l’outil électrique de sorte que votre ou vos doigts n’appuient pas sur la gâchette.
2. Alignez l’interface de l’accessoire sur le guide de l’outil électrique et faites-le glisser sur l’outil jusqu’à ce qu’il se
verrouille en place (vous devez entendre deux clics).
3. Après avoir installé l’accessoire sur l’outil électrique, assurez-vous qu’il est solidement xé.
Procédez comme il est indiqué ci-dessous pour retirer le système d’aspiration.
1. Tenez l’outil électrique de sorte que votre ou vos doigts n’appuient pas sur la gâchette.
2. Appuyez sur le bouton de dégagement de l’accessoire et avec le bouton enfoncé, détachez-le de l’outil
électrique.
(Fig. 1)
(Fig. 2)
FONCTIONNEMENT
ATTENTION :
N’utilisez pas l’outil dans un environnement humide lorsque vous travaillez sur une surface en béton et
•
similaire.
Réglage de la longueur de l’extrémité
L’avancée de l’extrémité est réglable selon la longueur de la foret du marteau-piqueur.
1. Tenez l’outil électrique de sorte que votre ou vos doigts n’appuient pas sur la gâchette.
2. ATTENTION : Lorsque le bouton de réglage de la course est enfoncé, la section télescopique est libérée et elle
peut sauter jusqu’à 100 mm sous la pression du ressort. Portez des lunettes de protection.
Tenez la pointe de la barre de l’accessoire à l’écart de tout objet en ayant à l’esprit la distance de saut ci-dessus et
ne dirigez jamais l’accessoire vers vous, un passant ou un animal.
Maintenez enfoncé le bouton de réglage de la course.
NOTE :
•
Lorsque vous commencez à appuyer sur le bouton de réglage de la course, laissez toujours la barre coulissante libre
sans la tenir par la main.
3. Appuyez l’outil électrique avec le foret du marteau-piqueur en place contre le mur jusqu’à ce que la pointe du foret
touche le mur.
4. Relâchez le bouton de réglage de la course pour le verrouiller.
Réglage de la profondeur de perçage (jauge de profondeur)
S’il est nécessaire de percer des trous à une profondeur précise, la profondeur correcte doit être déterminée en
perçant des trous d’essai.
1. Tenez l’outil électrique de sorte que votre ou vos doigts n’appuient pas sur la gâchette. (Fig. 4)
2. Appuyez sur le bouton de la jauge de profondeur et avec le bouton enfoncé, faites glisser le guide du bouton de
verrouillage sur la longueur souhaitée, puis relâchez-le.
La distance (X) entre le boîtier de l’accessoire et le bouton de la jauge de profondeur est égale à la profondeur du
perçage.
Fonctionnement
ATTENTION :
Suivez toujours les instructions fournies dans la section FONCTIONNEMENT du manuel d’instructions pour les
•
marteaux-piqueurs Makita. Ne pas suivre le manuel d’instructions peut entraîner des blessures corporelles.
(Fig. 3)
9
Page 10

AVERTISSEMENT :
Respectez toujours les lois, réglementations et ordonnances nationales en matière de travail avec des matériaux
•
dangereux pour la santé.
Perçage
Lorsque vous percez dans le béton, tenez l’outil électrique fermement des deux mains an que l’intégralité de la pointe
de l’embout soit en contact étroit avec la surface en béton. Toute portion de l’embout éloignée de la surface en béton
risque de diminuer la capacité de collecte de la poussière.
Fonction de retard de la mise hors tension
Après sa mise hors tension, le système d’aspiration tourne encore pendant quelques secondes pour recueillir la
poussière restante dans le conduit du réservoir de poussière.
Vider le réservoir de poussière
NOTE :
Une trop grande quantité de poussière dans le réservoir de poussière risque de réduire considérablement la capacité
•
d’aspiration de la poussière. Par conséquent, nettoyez régulièrement le réservoir de poussière.
ATTENTION :
Portez une protection pour les voies respiratoires lorsque vous videz le réservoir de poussière.
•
Ne touchez pas la section du ltre lors de son nettoyage.
•
N’utilisez pas de brosse ou d’aspirateur pour nettoyer la section du ltre. L’utilisation d’une brosse ou d’air comprimé
•
peut endommager le ltre.
1. Avant de retirer le réservoir de poussière de l’accessoire, tenez l’outil électrique à la horizontale. (Fig. 5)
2. Appuyez sur le bouton de dégagement du réservoir de poussière et avec le bouton enfoncé, faites-le pivoter sur
l’axe latéral inférieur.
3. Retirez le réservoir de poussière de l’accessoire. (Fig. 6)
4. Pour ouvrir le réservoir de poussière, soulevez légèrement le levier, puis faites pivoter la section transparente.
(Fig. 7)
5. Videz le réservoir de poussière en tapotant légèrement dessus.
Prenez garde de ne pas relâcher trop de poussière dans l’air.
6. Remettez le réservoir de poussière en place sur l’accessoire.
ENTRETIEN
AVERTISSEMENT :
Assurez-vous toujours que l’outil est hors tension et la batterie retirée avant d’effectuer tout travail d’inspection ou
•
d’entretien.
NOTE :
N’utilisez pas d’eau, d’huile, de graisse, de détergents ou de produits nettoyants.
•
N’utilisez pas d’essence, de benzène, de diluant, d’alcool ou produits similaires. Ils présentent un risque de
•
décoloration, de déformation ou de ssuration.
Nettoyage de l’accessoire
Nettoyez l’accessoire uniquement avec un chiffon sec et une brosse sèche.
Portez une protection pour les voies respiratoires lors du nettoyage.
Remplacement du ltre
Vériez régulièrement que le ltre n’est pas endommagé et le cas échéant, remplacez l’ancien ltre par un neuf.
Pou remplacer le ltre, procédez comme il est indiqué ci-dessous. (Fig. 8)
1. Appuyez sur le bouton de dégagement du réservoir de poussière et avec le bouton enfoncé, faites-le pivoter sur
l’axe latéral inférieur.
2. Retirez le réservoir de poussière de l’accessoire. (Fig. 9)
3. Soulevez le couvercle du ltre en faisant levier sur le réservoir de poussière avec un tournevis plat que vous
insérerez dans la fente. (Fig. 10)
4. Retirez manuellement l’ancien ltre du réservoir de poussière. (Fig. 11)
5. Placez le ltre neuf sur l’emplacement d’origine. (Fig. 12)
6. Enclenchez le couvercle du ltre sur le réservoir de poussière. (Fig. 13)
7. Remettez le réservoir de poussière en place sur l’accessoire.
10
Page 11

Remplacement du bouchon d’étanchéité (Fig. 14)
Si vous utilisez un bouchon d’étanchéité usé ou abîmé, la capacité de collecte de la poussière peut diminuer.
Vériez régulièrement le bouchon d’étanchéité. Lorsque le bouton d’étanchéité est usé ou abîmé, remplacez-le comme
suit.
1. Retirez manuellement le bouchon d’étanchéité du système d’aspiration.
2. Placez un bouchon d’étanchéité neuf sur le système d’aspiration de sorte que sa partie saillante se trouve sur la
face supérieure.
Pour maintenir la SÉCURITÉ et la FIABILITÉ du produit, tout autre travail d’entretien ou de réglage doit être effectué
dans un centre de service après-vente Makita agréé, exclusivement avec des pièces de rechange Makita.
GUIDE DE DÉPANNAGE
Défaillance Cause possible Solution
Le réservoir de poussière est plein. Vider le réservoir de poussière.
Émission inhabituelle de poussière
Le bouchon d’étanchéité est usé
ou abîmé.
Remplacer le bouchon d’étanchéité.
ACCESSOIRES EN OPTION
ATTENTION :
Ces accessoires ou pièces complémentaires sont recommandés pour l’utilisation avec le système d’aspiration Makita
•
spécié dans ce manuel. L’utilisation de tout autre accessoire ou pièce complémentaire peut comporter un risque de
blessure. N’utilisez les accessoires ou pièces complémentaires qu’aux ns pour lesquelles ils ont été conçus.
Si vous désirez obtenir plus de détails concernant ces accessoires, veuillez contacter votre centre de service aprèsvente Makita local.
Réservoir de poussière (avec ltre)
•
Filtre
•
NOTE :
Il se peut que certains éléments de la liste soient compris dans l’emballage de l’outil en tant qu’accessoires standard.
•
Ils peuvent varier d’un pays à l’autre.
11
Page 12

ESPAÑOL (Instrucciones originales)
Explicación de los dibujos
1 Interruptor de gatillo
2 Accesorio (Sistema de
extracción de polvo)
3 Botón de liberación
4 Botón de ajuste de carrera
5 Botón de tope de profundidad
6 Carro del botón de tope de
profundidad
7 Distancia (X) igual a la
profundidad de perforación
8 Botón de liberación del
contenedor de polvo
9 Contenedor de polvo
10 Cubierta del ltro
11 Hendidura
12 Filtro
13 Tapa de sellado
Especicaciones
Modelo DX01 DX02
Rendimiento de succión 350 l/min
Peso neto 1,3 kg (3,0 lbs) 1,4 kg (3,0 lbs)
Tensión nominal 18 V
Cartucho(s) de batería estándar
Advertencia: Utilice solamente el cartucho(s) de
Broca de taladro de percusión apropiada 24 mm MAX
Debido a nuestro continuado programa de investigación y desarrollo, las especicaciones indicadas aquí están
•
sujetas a cambio sin previo aviso.
Las especicaciones y el cartucho de batería pueden variar de un país a otro.
•
Peso, con el cartucho de batería, de acuerdo con el procedimiento EPTA 01/2003
•
batería descrito.
Carrera de operación 96 mm MAX
Símbolos
A continuación se muestran los símbolos utilizados para el equipo. Asegúrese de que entiende sus signicados antes
de utilizar la herramienta.
BL1830
Preste cuidado y atención especiales.•
Lea el manual de instrucciones.•
INSTRUCCIONES DE SEGURIDAD IMPORTANTES
¡ADVERTENCIA! Lea todas las advertencias de seguridad y todas las instrucciones antes de utilizar el
accesorio. Si no sigue todas las advertencias e instrucciones podrá ocasionar una descarga eléctrica, un incendio
y/o heridas graves.
Guarde todas las advertencias e instrucciones para futuras referencias.
1. Utilice el accesorio de acuerdo con estas instrucciones. La utilización del accesorio para operaciones distintas
de las previstas podrá ponerle en una situación peligrosa.
2. Mantenga a los niños y transeúntes alejados mientras utiliza una herramienta eléctrica. Las distracciones le
pueden hacer perder el control.
3. Mantenga el área de trabajo limpia y bien iluminada. Las áreas de trabajo atestadas u oscuras son una
invitación a accidentes.
4. Póngase siempre protección para los ojos y respiratoria.
12
Page 13

ANTES DE UTILIZAR
Instalación o desmontaje del sistema de extracción de polvo
ADVERTENCIA:
Asegúrese siempre de que la herramienta esté apagada y el cartucho de batería extraído antes de realizar
•
cualquier trabajo en la herramienta. Si no apaga la herramienta y desmonta el cartucho de batería podrá sufrir
graves heridas personales a causa de un arranque accidental.
Antes de instalar el sistema de extracción de polvo, asegúrese de que los puntos de jación y la propia herramienta
•
eléctrica, particularmente la interfaz eléctrica de la herramienta eléctrica, estén libres de polvo y materia extraña.
Después de instalar el sistema de extracción de polvo, asegúrese también de que está instalado rmemente.
NOTA:
Este sistema de extracción de polvo ha sido previsto para ser utilizado cuando se perfora en cemento solamente. No
•
utilice nunca este sistema cuando perfore en metal o madera.
Este sistema de recogida de polvo recoge un porcentaje signicativo del polvo producido en el trabajo pero no todo
•
el polvo.
Vacíe el contenedor del ltro regularmente. Si no vacía el contenedor del ltro regularmente es posible que salga
•
polvo.
No utilice el sistema de extracción de polvo en operaciones de perforación con corona o cincelado.
•
Para instalar el sistema de extracción de polvo, siga el procedimiento de abajo.
1. Sujete la herramienta eléctrica de forma que el dedo(s) no apriete el interruptor de gatillo.
2. Alinee la interfaz del accesorio con la guía de la herramienta eléctrica y deslícela en la herramienta hasta que se
bloquee con un sonido de chasquido doble.
3. Después de instalar el accesorio en la herramienta eléctrica, asegúrese de que está sujetado debidamente.
Para desmontar el sistema de extracción de polvo, siga el procedimiento de abajo.
1. Sujete la herramienta eléctrica de forma que el dedo(s) no apriete el interruptor de gatillo.
2. Presione el botón de liberación del accesorio y con el botón presionado retírelo de la herramienta eléctrica.
(Fig. 1)
(Fig. 2)
OPERACIÓN
PRECAUCIÓN:
No utilice la herramienta en condiciones húmedas tales como para trabajos en supercies de cemento y
•
similares.
Ajuste de la longitud de protuberancia de la punta
La protuberancia de la punta se puede ajustar de acuerdo con la longitud de su broca de taladro de percusión.
1. Sujete la herramienta eléctrica de forma que el dedo(s) no apriete el interruptor de gatillo.
2. PRECAUCIÓN: Cuando se presiona el botón de ajuste de carrera, se libera la sección telescópica y después
ésta puede saltar hacia afuera hasta 100 mm debido a la presión del resorte. Póngase gafas de seguridad.
Mantenga la punta de la barra del accesorio alejada de cualquier objeto teniendo en cuenta la distancia de salto
hacia fuera y nunca apunte el accesorio hacia usted, hacia un transeúnte o hacia animales.
Presione el botón de ajuste de carrera y manténgalo presionado.
NOTA:
Cuando comience a presionar el botón de ajuste de carrera, deje siempre libre la barra deslizable y no la sujete con
•
la mano.
3. Presione la herramienta eléctrica con la broca de taladro de percusión instalada contra la pared hasta que la punta
de la broca toque la pared.
4. Libere el botón de ajuste de carrera para bloquearlo.
Ajuste de la profundidad de perforación (tope de profundidad)
Si se requiere perforar los agujeros a una profundidad exacta, será necesario determinar la profundidad correcta
perforando agujeros de prueba.
1. Sujete la herramienta eléctrica de forma que el dedo(s) no apriete el interruptor de gatillo. (Fig. 4)
2. Presione el botón de tope de profundidad y con el botón presionado deslice el carro del botón de bloqueo hasta la
longitud deseada y libérelo.
La distancia (X) entre el alojamiento del accesorio y el botón de tope de profundidad es igual a la profundidad de
perforación.
Operación
PRECAUCIÓN:
Siga siempre las instrucciones en OPERACIÓN del manual de instrucciones para los taladros de percusión de
•
Makita. Si no observa las indicaciones del manual de instrucciones podrá sufrir heridas personales.
(Fig. 3)
13
Page 14

ADVERTENCIA:
Siga siempre las leyes, reglamentos y ordenanzas nacionales relacionados con el trabajo con materiales peligrosos
•
para la salud.
Perforación
Cuando perfore en cemento, sujete la herramienta eléctrica rmemente con ambas manos de manera que toda la
parte superior de la boquilla se mantenga en estrecho contacto con la supercie del cemento. Cualquier parte de la
boquilla que quede separada de la supercie de cemento podrá ocasionar una deciente recogida de polvo.
Función de retardo del apagado
Después de apagar la herramienta, el sistema de extracción de polvo seguirá funcionando durante unos cuantos
segundos más para recoger el polvo restante en el conducto del contenedor de polvo.
Vaciado del contenedor de polvo
NOTA:
Un exceso de polvo en el contenedor de polvo resultará en una considerable pérdida de potencia de la extracción
•
de polvo. Por consiguiente, limpie el contenedor de polvo regularmente.
PRECAUCIÓN:
Póngase protección respiratoria cuando vacíe el contenedor de polvo.
•
No toque la sección del ltro cuando lo limpie.
•
No utilice un cepillo ni un soplador de aire para limpiar la sección del ltro. La utilización de un cepillo o aire
•
comprimido puede dañar el ltro.
1. Antes de desmontar el contenedor de polvo del accesorio, sujete la herramienta eléctrica horizontalmente.
(Fig. 5)
2. Presione el botón de liberación del contenedor de polvo y con el botón presionado hágalo pivotar en el eje del lado
inferior.
3. Desmonte el contenedor de polvo del accesorio. (Fig. 6)
4. Para abrir el contenedor de polvo, suba la palanca ligeramente y después haga pivotar la sección transparente.
(Fig. 7)
5. Vacíe el contenedor de polvo golpeándolo ligeramente.
Tenga cuidado de no dejar salir demasiado polvo al aire.
6. Vuelva a montar el contenedor de polvo en su sitio en el accesorio.
MANTENIMIENTO
ADVERTENCIA:
Asegúrese siempre de que la herramienta está apagada y el cartucho de batería desmontado antes de intentar
•
realizar una inspección o mantenimiento.
NOTA:
No utilice agua, aceite, grasa, detergente ni productos de limpieza.
•
No utilice nunca gasolina, bencina, disolvente, alcohol o similares. Podría resultar en descolocación, deformación
•
o grietas.
Limpieza del accesorio
Limpie el accesorio utilizando solamente un trapo seco y un cepillo seco.
Póngase protección respiratoria cuando haga la limpieza.
Reemplazo del ltro
Compruebe el ltro regularmente para ver si está dañado y si está dañado, reemplace el ltro viejo con uno nuevo.
Para reemplazar el ltro, siga el procedimiento de abajo. (Fig. 8)
1. Presione el botón de liberación del contenedor de polvo y con el botón presionado pivótelo en el eje del lado
inferior.
2. Desmonte el contenedor de polvo del accesorio. (Fig. 9)
3. Haga palanca en la cubierta del ltro del contenedor de polvo utilizando un destornillador de punta plana a insertar
en la hendidura. (Fig. 10)
4. Extraiga el ltro viejo del contenedor de polvo con la mano. (Fig. 11)
5. Ponga un ltro nuevo en la posición original. (Fig. 12)
6. Encaje la cubierta del ltro en el contenedor de polvo. (Fig. 13)
7. Vuelva a montar el contenedor de polvo en su sitio en el accesorio.
14
Page 15

Reemplazo de la tapa de sellado (Fig. 14)
La utilización de una tapa de sellado desgastada o dañada podrá ocasionar una deciente recogida de polvo.
Compruebe la tapa de sellado regularmente. Cuando la tapa de sellado esté desgastada o dañada, reemplácela de
la forma siguiente.
1. Desmonte la tapa de sellado del sistema de extracción de polvo con la mano.
2. Ponga una tapa de sellado nueva en el sistema de extracción de polvo de forma que la protuberancia en ella quede
posicionada en el lado superior.
Para mantener la SEGURIDAD y FIABILIDAD del producto, cualquier otro mantenimiento o ajuste deberán ser
realizados en Centros de servicio autorizados por Makita, empleando siempre repuestos Makita.
SOLUCIÓN DE PROBLEMAS
Fallo Causa posible Remedio
El contenedor de polvo está lleno. Vacíe el contenedor de polvo.
Emisión de polvo inusual
La tapa de sellado está desgastada
o dañada.
Reemplace tapa de sellado.
ACCESORIOS OPCIONALES
PRECAUCIÓN:
Estos accesorios o acoplamientos están recomendados para utilizar con el sistema de extracción de polvo de
•
Makita especicado en este manual. La utilización de cualquier otro accesorio o acoplamiento podrá suponer un
riesgo de sufrir heridas personales. Utilice los accesorios o acoplamientos solamente para el propósito que han sido
diseñados.
Si necesita cualquier tipo de asistencia para obtener más detalles en relación con estos accesorios, pregunte al centro
de servicio Makita local.
Contenedor de polvo (con ltro)
•
Filtro
•
NOTA:
Algunos elementos de la lista podrán estar incluidos en el paquete de la herramienta como accesorios estándar.
•
Pueden variar de un país a otro.
15
Page 16
WARNING!
Some dust created by power hammering/drilling, and other construction activities contains chemicals known to
•
cause cancer, birth defects or other reproductive harm. Some examples of these chemicals are:
lead from lead-based paints,
–
crystalline silica from bricks and cement and other masonry products.
–
Your risk from these exposures varies, depending on how often you do this type of work. To reduce your exposure
•
to these chemicals: work in a well ventilated area, and work with approved safety equipment, such as those dust
masks that are specially designed to lter out microscopic particles.
AVERTISSEMENT !
Certaines poussières générées par un martelage/perforage puissant et d’autres activités de construction
•
contiennent des produits chimiques connus pour causer cancer, malformations congénitales et autres effets
néfastes sur la fonction de reproduction. Voici quelques exemples de ces produits chimiques :
plomb des peintures à base de plomb,
–
silice cristallisée provenant de briques et de ciment, ainsi que d’autres produits de maçonnerie.
–
Le risque présenté par l’exposition à ces produits varie en fonction de la fréquence de ce type de travail. Pour
•
réduire l’exposition à ces produits chimiques : travaillez dans un endroit bien aéré et utilisez des équipements
de sécurité approuvés comme les masques anti-poussière spécialement conçus pour ltrer les particules
microscopiques.
¡ADVERTENCIA!
Algunos de los polvos creados en la percusión/perforación con herramientas eléctricas, y otras actividades de
•
la construcción, contienen productos químicos que se sabe ocasionan cáncer, defectos de nacimiento u otros
peligros relacionados con la reproducción. Algunos ejemplos de estos productos químicos son:
plomo de pinturas a base de plomo,
–
sílice cristalino de ladrillos y cemento y otros productos de albañilería.
–
El riesgo al que se expone variará, dependiendo de la frecuencia con la que realice este tipo de trabajo. Para
•
reducir la exposición a estos productos químicos: trabaje en un área bien ventilada, y póngase el equipo de
seguridad indicado, tal como esas máscaras contra el polvo que están especialmente diseñadas para ltrar
partículas microscópicas.
885094-941
IDE
Makita Corporation
3-11-8, Sumiyoshi-cho,
Anjo, Aichi 446-8502 Japan
www.makita.com
DX01-1
 Loading...