

Makita DMR200C, DMR200 Instruction Manual

Cordless Job Site Speaker Instruction manual
EN
FRCA
Enceinte de chantier sans fil Manuel d’utilisation
ES
Altavoz Inalámbrico de Trabajo Manual de instrucciones
PT
Alto-Falante Portátil a Bateria para
Ambientes de Trabalho
DMR200
DMR200C
Manual de instruções
Makita Corporation
3-11-8, Sumiyoshi-cho,
Anjo, Aichi 446-8502 Japan
3A81b35Z3000D
DMR200(12VMAX)-NA4-1805 www.makita.com
SJN
IMPORTANT: Read Before Using
IMPORTANT: Lisez les instructions avant l’utilisation.
IMPORTANTE: Leer antes de usar.
IMPORTANTE: Leia antes de usar.
Explanation of general view
12
14
19
1
2
3
4
8 71011
569
13
18
1617
25
20 21
15
1
1
1
24
23
22
2
23
4 5
3
16
17
15
2

IMPORTANT SAFETY
ENGLISH (Original instructions)
Symbols
The following show the symbols used for the equipment.
Be sure that you understand their meaning before use.
Read instruction manual.
INSTRUCTIONS
WARNING:
When using electric tools, basic safety precautions should
always be followed to reduce the risk of fire, electric
shock, and personal injury, including the following:
1.
Read this instruction manual and the charger
instruction manual carefully before use.
2.
Clean only with dry cloth.
3.
Do not install near any heat sources such as radiators,
heat registers, stoves, or other apparatus (including
ampliers) that produce heat.
4.
Only use attachments/accessories specified by the
manufacturer.
5.
Unplug this apparatus during lighting storms or when
unused for long periods of time.
6.
A battery operated speaker with integral batteries or a
separate battery pack must be recharged only with the
specied charger for the battery. A charger that may be
suitable for one type of battery may create a risk of re
when used with another battery.
7.
Use battery operated speaker only with specifically
designated battery packs. Use of any other batteries
may create a risk of re.
8.
When battery pack is not in use, keep it away from
other metal objects like: paper clips, coins, keys, nails,
screws, or other small metal objects that can make a
connection from one terminal to another. Shorting the
battery terminals together may cause sparks, burns, or
a re.
9.
Avoid body contact with grounded surfaces such
as pipes, radiators, ranges and refrigerators. There
is an increased risk of electric shock if your body is
grounded.
10.
Under abusive conditions, liquid may be ejected from
the battery; avoid contact. If contact accidentally
occurs, flush with water. If liquid contacts eyes,
additionally seek medical help. Liquid ejected from the
battery may cause irritation or burns.
11.
The MAINS plug is used as the disconnect device, and
it shall remain readily operable.
4.
If electrolyte gets into your eyes, rinse them out with
clear water and seek medical attention right away. It
may result in loss of your eyesight.
5.
Do not short the battery cartridge:
Do not touch the terminals with any conductive
(1)
material.
Avoid storing battery cartridge in a container with
(2)
other metal objects such as nails, coins, etc.
Do not expose battery cartridge to water or
(3)
rain.A battery short can cause a large current
flow, overheating, possible burns and even a
breakdown.
6.
Do not store the tool and battery cartridge in locations
where the temperature may reach or exceed 50 °C(122°F)
7.
Do not incinerate the battery cartridge even if it is
severely damaged or is completely worn out. The
battery cartridge can explode in a re.
8.
Be careful not to drop or strike battery.
9.
Do not use a damaged battery.
Tips for maintaining maximum battery life
1.
Charge the battery cartridge before completely
discharged. Always stop tool operation and charge the
battery cartridge when you notice less tool power.
2.
Never recharge a fully charged battery cartridge.
Overcharging shortens the battery service life.
3.
Charge the battery cartridge with room temperature
at 10 °C - 40 °C (50 °F - 104 °F). Let a hot battery
cartridge cool down before charging it.
4.
Charge the battery cartridge if you do not use it for a
long period (more than six months).
SAVE THESE INSTRUCTIONS
SPECIFIC SAFETY RULES
FOR BATTERY CARTRIDGE
1.
Before using battery cartridge, read all instructions and
cautionary markings on (1) battery charger, (2) battery,
and (3) product using battery.
2.
Do not disassemble battery cartridge.
3.
If operating time has become excessively shorter,
stop operating immediately. It may result in a risk of
overheating, possible burns and even an explosion.
3
Cautions to the user
The changes or modications not expressly approved
by the party responsible for compliance could void the
user’s authority to operate the equipment.
RF exposure statements
IMPORTANT NOTE:
exposure compliance requirements, the antenna(s)
used for this transmitter must be installed to provide a
separation distance of at least 20 cm from all persons
and must not be co-located or operating in conjunction
with any other antenna or transmitter. No change to
the antenna or the device is permitted. Any change to
the antenna or the device could result in the device
exceeding the RF exposure requirements and void
user’s authority to operate the device.
Note:
This equipment has been tested and found to
comply with the limits for a Class B digital device,
pursuant to part 15 of the FCC Rules. These limits
are designed to provide reasonable protection against
harmful interference in a residential installation. This
equipment generates, uses and can radiate radio
frequency energy and, if not installed and used in
accordance with the instructions, may cause harmful
interference to radio communications. However, there
is no guarantee that interference will not occur in a
particular installation. If this equipment does cause
harmful interference to radio or television reception,
which can be determined by turning the equipment
off and on, the user is encouraged to try to correct the
interference by one or more of the following measures:
• Reorient or relocate the receiving antenna.
• Increase the separation between the equipment and
receiver.
• Connect the equipment into an outlet on a circuit
different from that to which the receiver is connected.
• Consult the dealer or an experienced radio/TV
technician for help.
For Canada:
Cautions to the user
The changes or modications not expressly approved
by the party responsible for compliance could void the
user’s authority to operate the equipment.
RF exposure statements
To comply with the IC RF exposure compliance
requirements, the antenna(s) used for this transmitter
must be installed to provide a separation distance of at
least 20 cm from all persons and must not be colocated or operating in conjunction with any other
antenna or transmitter. No change to the antenna or the
device is permitted. Any change to the antenna or the
device could result in the device exceeding the RF
exposure requirements and void user’s authority to
operate the device.
This device complies with Industry Canada licence-
exempt RSS standard(s).
Operation is subject to the following two conditions: (1)
this device may not cause interference, and (2) this
device must accept any interference, including
interference that may cause undesired operation of the
device.
To comply with the FCC RF
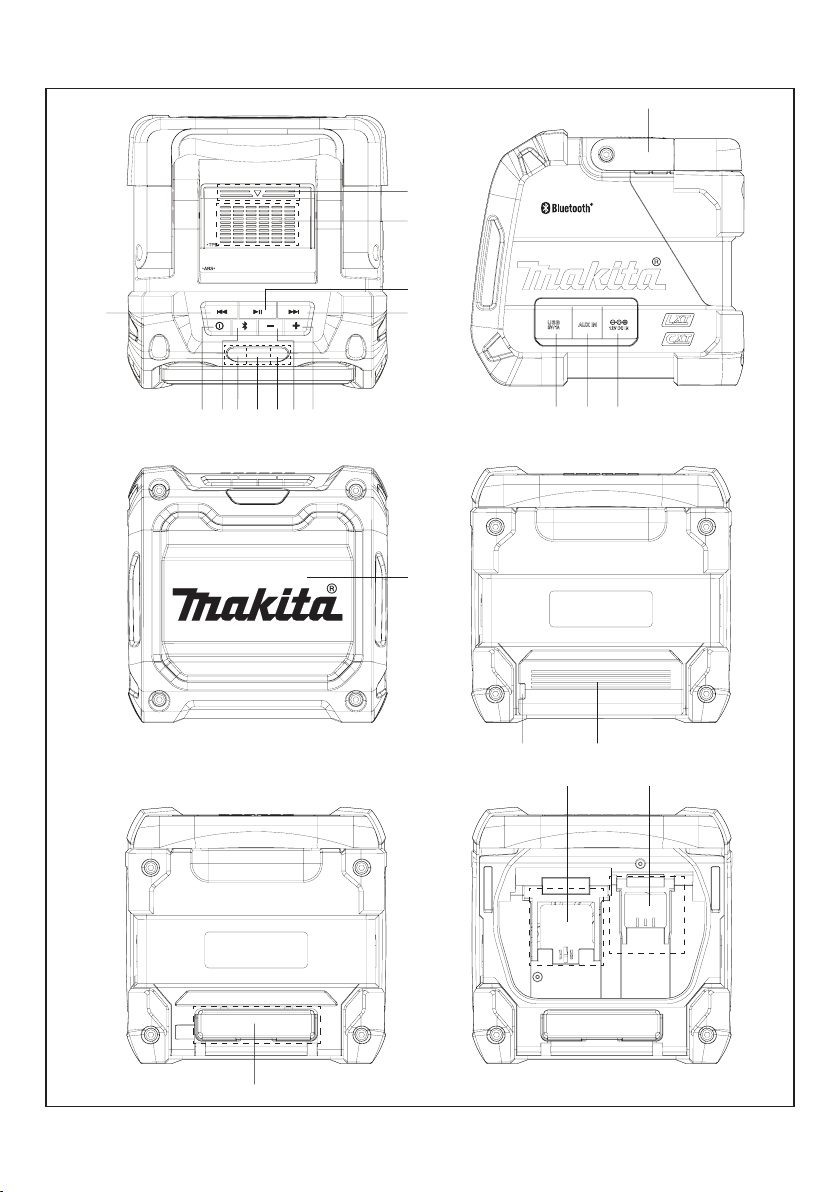
Explanation of general view (Fig.1)
Battery compartment locker
1.
Mobile (Cell phone) placing panel
2.
Play/Pause button
3.
Next track button/Fast-forward button
4.
Volume up button
5.
Volume down button
6.
Aux in indicator
7.
Volume max. or min. indicator/ Low battery indicator
8.
Bluetooth indicator
9.
Bluetooth pairing button
10.
Power button
11.
Previous track button/ Rewind button
12.
Speaker
13.
Handle
14.
DC in socket
15.
Auxiliary input socket
16.
USB charging socket
17.
Cable hole
18.
Mobile (Cell phone) storage cabinet
19.
14.4 V/18V battery terminal
20.
10.8 V battery terminal
21.
Battery cover
22.
Battery cartridge
23.
Button
24.
Mobile storage cabinet cover
25.
4

Power
The speaker can be powered by Makita battery packs or a
standard wall outlet.
Power by battery
The following table indicates the operating time on a single charge.
Battery Cartridge Voltage
Battery
capacity
1.3Ah
1.5Ah
2.0Ah
3.0Ah
4.0Ah
5.0Ah
6.0Ah
10.8V
-12Vmax
BL1016
BL1021B
BL1041B
14.4V 18V AUX IN Bluetooth
BL1415 7.5 7.0
BL1415N
BL1430/
BL1430B
BL1440
BL1450
BL1460B
BL1815
BL1815N
BL1820/
BL1820B
BL1830/
BL1830B
BL1840/
BL1840B
BL1850/
BL1850B
BL1860B
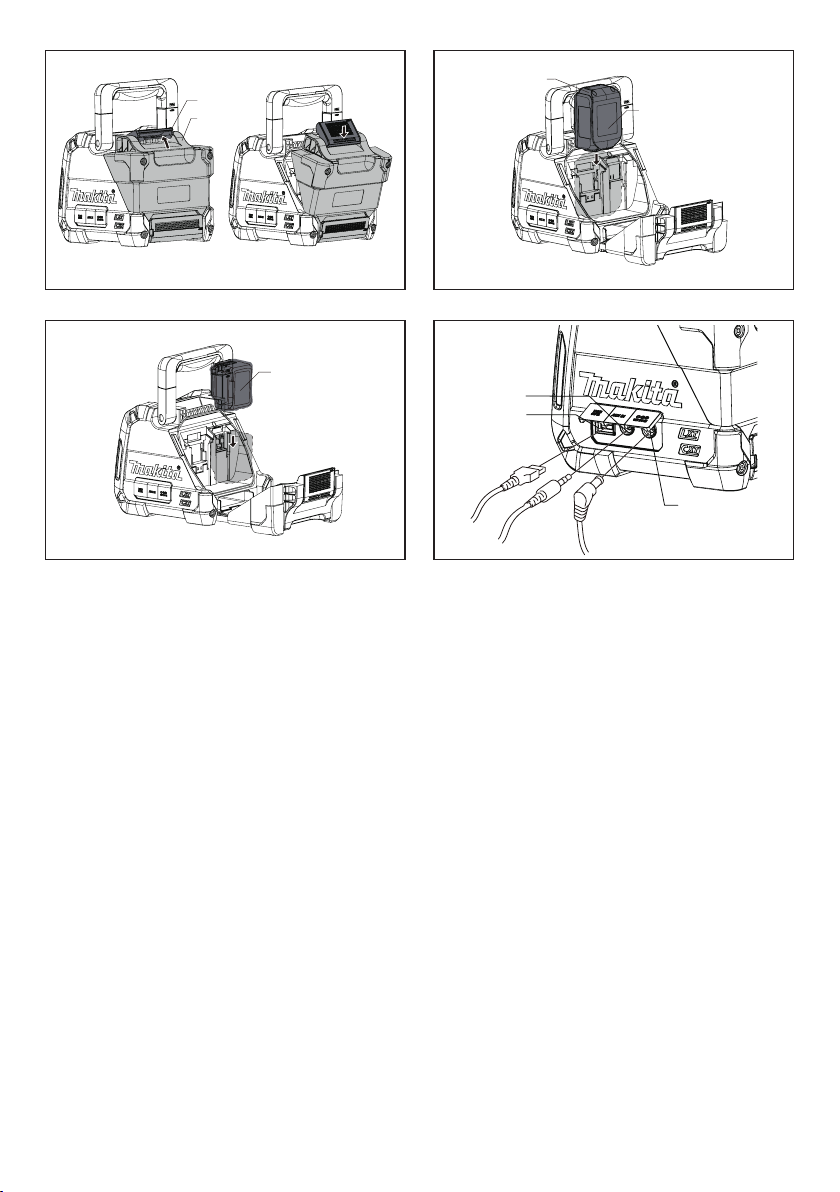
Installing or removing slide battery
4)
To install the battery cartridge, align the tongue on
•
the battery cartridge with the groove in the housing
and slip it into place. Always insert it all the way until it
locks in place with a little click.
If you can see the red indicator on the upper side of
•
the button, it is not locked completely. Install it fully
until the red indicator cannot be seen. If not, it may
accidentally fall out of the tool, causing injury to you or
someone around you.
Do not use force when inserting the battery cartridge.
•
If the cartridge does not slide in easily, it is not being
inserted correctly.
To remove the battery cartridge, sliding it from the tool
•
while pressing the button on the front of the cartridge.
Note:
When the speaker is in low battery, the middle LED
will ash in red.
AT SPEAKER OUTPUT = 100mW (unit: Hour)
12
10
9.5
15
13
31
26
32
34
39
(Approximately)
AUX IN
+USB(2.1A)
11
9.0
9.0
14
12
15 2.016
17 3.018
28
24
24 4.025
29 3.531
31
32
37
Bluetooth
+USB(2.1A)
1.0
1.0
1.0
1.5
1.0
2.0
2.5
3.0
5.5
4.0
6.5
Indicating the remaining battery
capacity
Only for battery cartridges with "B" at the end of the
model number
1
2
5
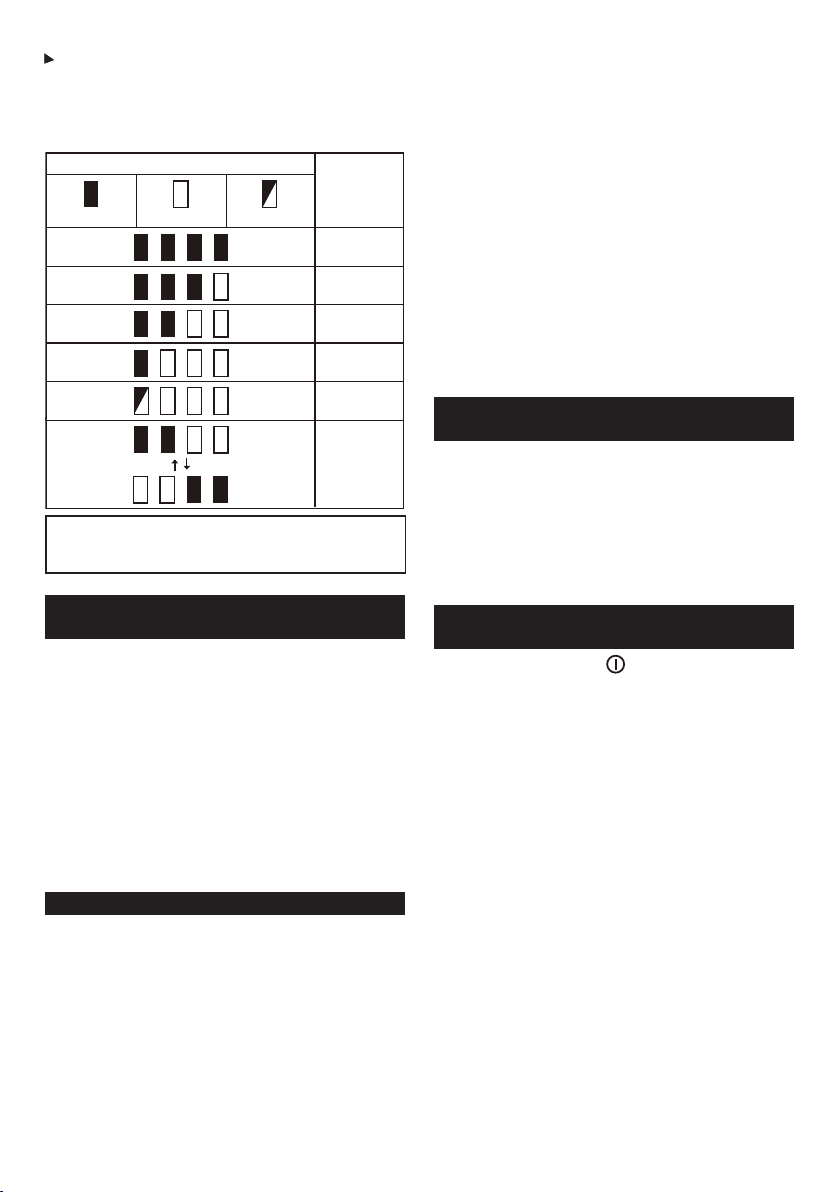
1. Indicator lamps 2. Check button
Press the check button on the battery cartridge to
indicate the remaining battery capacity. The indicator
lamps light up for few seconds.
Indicator lamps
Lighted Off Blinking
NOTE:
Depending on the conditions of use and the
ambient temperature, the indication may differ slightly
from the actual capacity.
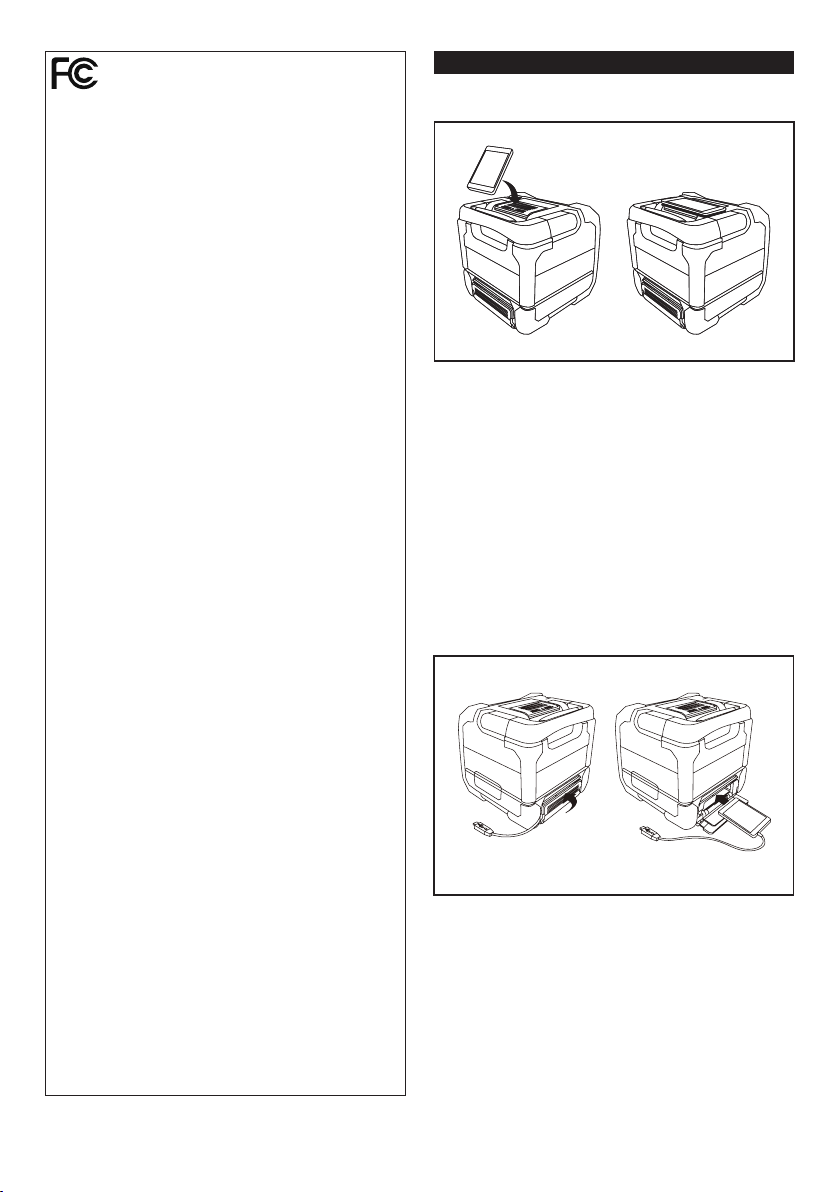
Using Supplied AC power adaptor
Remaining
capacity
75% to 100%
50% to 75%
25% to 50%
0% to 25%
Charge the
battery
The battery
may have
malfunctioned
(Fig. 5)
Remove the rubber protector and insert the adaptor plug
into the DC socket on the right side of the speaker. Plug
the adaptor into a standard mains socket outlet. Whenever
the adaptor is used, the battery pack is automatically
disconnected. The AC adaptor should be disconnected
from the main supply when not in use.
IMPORTANT:
The mains adaptor is used as the means of connecting
the speaker to the mains supply. The mains socket used
for the speaker must remain accessible during normal
use. In order to disconnect the speaker from the mains
completely, the mains adaptor should be removed from
the mains outlet completely.
USB power supply socket
This jack can be used to charge a mobile phone or any
other device that uses less than 2.1A of DC current.
Charging will only occur when the speaker is switched on.
Note:
Ensure the specification of your external device
such as mobile phone, mp3 player or iPod is compatible
with the speaker. Please read instruction manual of your
external device before charging.
IMPORTANT:
Before connecting USB device to the charger, always
•
backup your data of USB device. Otherwise your data
may lose by any possibility.
The charger may not supply power to some USB
•
devices.
When not using or after charging, remove the USB
•
cable and close the cover.
Do not connect power source to USB port. Otherwise
•
there is risk of re. The USB port is only intended for
charging lower voltage device. Always place the cover
onto the USB port when not charging the lower voltage
device.
Do not insert a nail, wire, etc. into USB power supply
•
port. Otherwise a circuit short may cause smoke and
re.
Do not connect this USB socket with your PC
•
USB port, as it is highly possible that it may cause
breakdown of the units.
Pairing and connecting a device to
the speaker
You need to pair your Bluetooth device with the speaker
before you can auto-link to play/stream Bluetooth music
through the speaker. Paring creates a `bond' so two
devices can recognize each other.
To have the better sound quality, we recommend setting
the volume to more than two-thirds level on your Bluetooth
device and then adjust the volume on the speaker as
required.
Pairing and playing your Bluetooth
device for the rst time
1.
Press the Power button to turn on the speaker and
the Bluetooth indicator will ash in blue. The indicator
flashes fast flashing blue indicating the speaker is
discoverable.
2.
Activate Bluetooth on your device according to the
device's user manual to link to the speaker. Locate the
Bluetooth device list and select the device named
‘DMR200.’ With some mobiles (which are equipped
with earlier versions than BT2.1 Bluetooth device), you
may need to input the pass code “0000”.
3.
Once connected, there will be a beep sound and the
Bluetooth indicator will remain in solid blue. You can
simply select and play any music from your source
device. Volume control can be adjusted from your
source device, or directly from the speaker.
4.
Use the controls on your Bluetooth-enabled device or
on the speaker to play/pause and navigate tracks.
Note:
1.
If 2 Bluetooth devices, pairing for the rst time, both
search for the speaker, it will show its availability on
both devices. However, if one device links with this
unit rst, then the other Bluetooth device won't nd it
on the list.
2.
If your Bluetooth device is temporarily disconnected
to the speaker, then you need to manually reconnect
your device again to the speaker.
3.
If ‘DMR200” shows in your Bluetooth device list but
6
MAINTENANCE
•N
.
your device cannot connect with it, please delete the
item from your list and pair the device with the speaker
again following the steps described previously.
4.
The effective operation range between the system and
the paired device is approximately 10 meters (30 feet).
Any obstacle between the system and the device can
reduce the operational range.
5.
Bluetooth connectivity performance may vary
depending on the connected Bluetooth devices.
Please refer to the Bluetooth capabilities of your
device before connecting to the speaker. All features
may not be supported on some paired Bluetooth
devices.
Playing audio les in Bluetooth
mode
When you have successfully connected the speaker with
the chosen Bluetooth device you can start to play your
music using the controls on your connected Bluetooth
device.
Once playing has started adjust the volume to the
1.
required setting using the Volume buttons on the
speaker or on your enabled Bluetooth device.
When you press the Volume up/down button,
the volume indicator will ash in fast ashing red. If
the indicator light in solid red, it indicates the volume is
in maximum volume or minimum volume.
2.
Use the controls on your device to play/pause and
navigate tracks. Alternatively, control the playback
using Play/Pause ( ), Next track ( ) , Previous
track buttons ( ) on the speaker.
3.
Press and hold the Next track or Previous button
to fast-forward/Rewind the current track. Release
the button when the desired point in the track is reached.
Note:
1.
That not all player applications or devices may
respond to all of these controls.
Some mobile phones may temporarily disconnect from
2.
the speaker when you make or receive calls. Some
devices may temporarily mute their Bluetooth audio
streaming when they receive text messages, emails or
for other reasons unrelated to audio streaming.Such
behaviour is a function of the connected device and
does not indicate a fault with the speaker.
The speaker can memorize up to 8 sets of paired device,
when the memory exceed this amount, the oldest pairing
history will be over written. If your Bluetooth device
already paired with the speaker previously, the unit
will memorize your Bluetooth device and it attempts to
reconnect with a device in memory which is last
Speaker memory and reconnecting
a device
connected. If the last connected device is not available,
the speaker will be discoverable.
Disconnecting your Bluetooth
device
Press and hold the Bluetooth pairing button for 2-3
seconds to disconnect with your Bluetooth device. The
Bluetooth indicator ashes in blue indicating the speaker
is discoverable again for pairing.
7
Playing music via auxiliary input
socket
A 3.5mm Auxiliary input socket is provided on the right
side of the unit to permit an audio signal to be fed into the
unit from any devices that features a headphone or audio
output, such as an iPod, MP3 or CD player.
Connect a stereo or mono audio source (for example,
1.
iPod, MP3 or CD player) to the Auxiliary input socket
(marked 'AUX') and the Aux in indicator turns green
indicating the speaker is in auxiliary input mode.
Adjust the Volume control on your iPod, MP3 or CD
2.
player to ensure an adequate signal and then adjust
the volume on the speaker for comfortable listening.
To have the better sound quality, we recommend
3.
setting the volume to more than two-thirds level on
your audio device and then adjust the volume on the
speaker as required.
Note:
When Aux in socket is connected an audio device,
Bluetooth function will be disabled to minimize power
consumption.
MAINTENANCE
CAUTION:
ever use gasoline, benzine, thinner, alcohol or the
like. Discoloration, deformation or cracks may result
Specication
Amplier
Output power 10.8V:3.5W
14.4V:6W
18V:10W
Frequency response 50Hz~20kHz
Aux In
Input sensitivity 250mVrms @100Hz
Speaker
Main speaker 101.6mm 8 ohm 10W
Tweeter speaker 36mm 8ohm 10W
Bluetooth
(The Bluetooth® word mark and logos are registered
trademarks owned by Bluetooth SIG, Inc.)
Bluetooth version 4.0
Bluetooth proles A2DP/ SCMS-T/ AVRCP
Transmission power Bluetooth specication
power Class 2
Transmission range Max. 10m (varies according
to usage conditions)
Supported codec SBC
Compatible Bluetooth prole A2DP
General
AC power adaptor DC in 12V 1.5A, center pin
positive
Battery Slide battery: 10.8V-12Vmax /
14.4 V/ 18 V
Weight 2.7KG (without battery)
The company reserves the right to amend the specication
without notice.
MAKITA LIMITED WARRANTY
Please refer to the annexed warranty sheet for the
most current warranty terms applicable to this product.
If annexed warranty sheet is not available, refer to the
warranty details set forth at below website for your
respective country.
United States of America: www.makitatools.com
Canada: www.makita.ca
Other countries: www.makita.com
 Loading...