

Page 1
INSTRUCTION MANUAL
MANUEL D'INSTRUCTION
MANUAL DE INSTRUCCIONES
Cordless Lawn Mower
Tondeuse Sans Fil
Cortadora de Cesped
DLM431
IMPORTANT: Read Before Using.
IMPORTANT : Lire avant usage.
IMPORTANTE: Lea antes de usar.
Page 2
ENGLISH (Original instructions)
SPECIFICATIONS
Model: DLM431
Mowing width (blade diameter) 430 mm (17″)
No load speed 3,600 /min
Dimensions
(L x W x H)
Rated voltage D.C. 36 V
Standard battery cartridge(s)
Warning: Use only the battery cartridge(s) described.
Net weight 18.1 kg (39.8lbs) 18.7 kg (41.2 lbs)
• Due to our continuing program of research and development, the specications herein are subject to change
without notice.
• Specications and battery cartridge may differ from country to country.
• Weight, with battery cartridge, according to EPTA-Procedure 01/2003
IMPORTANT SAFETY
INSTRUCTIONS
WARNING: When using electric lawn mow-
ers, basic safety precautions should always be
followed to reduce the risk of re, electric shock,
and personal injury; including the following.
Read All Instructions
Read, understand, and follow all instructions on the
mower and in the instruction manuals. Be thoroughly
familiar with the controls and the proper use of the
mower before starting.
WARNING!
1. Avoid Dangerous Environment - Never operate
the mower in damp or wet locations. Always be
sure of your footing: keep a rm hold on the han-
dle and walk; never run.
2. Don't Use In Rain.
3. Keep Children Away - All visitors should be kept
a safe distance from work area. Be alert and turn
mower off if a child enters the area. Use extra care
when approaching blind corners, shrubs, trees, or
other objects that may block your view of a child.
4.
Dress Properly - Do not wear loose clothing or
jewelry. They can be caught in moving parts. Use
of rubber gloves and substantial footwear is recommended when working outdoors. Do not operate
the mower when barefoot or wearing open sandals.
5. Use Safety Glasses- Always use face or dust
mask if operation is dusty.
6. Use Right Appliance - Do not use lawn mower for
any job except that for which it is intended.
7. Don't Force Lawn Mower - It will do the job better
and safer at the rate for which it was designed.
8. Don't Overreach - Keep proper footing and
balance at all times. Do not mow near drop offs,
ditches, or embankments. You could lose your
footing or balance.
during operation
when stored
(without grass basket)
Max. 1,490 mm x 460 mm x 1,020 mm (58-3/4″ x 18-1/8″ x 40-1/4″)
Min. 1,450 mm x 460 mm x 950 mm (57″ x 18-1/8″ x 37-1/2″)
490 mm x 460 mm x 910 mm (19-1/4″ x 18-1/8″ x 35-3/4″)
BL1815N/BL1820B BL1830/BL1830B/BL1840B/
9. Stay Alert - Watch what you are doing. Use com-
mon sense. Do not operate lawn mower when you
are tired. Do not operate machine while under the
inuence of alcohol or drugs. A moment of inattention while operating the mower may result in
serious personal injury.
10. Disconnect Lawn Mower - Disconnect the lawn
mower from the power supply or remove the battery when not in use, before servicing, cleaning,
removing material from the lawn mower, or changing accessories such as blades, and the like.
11. Store Idle Lawn Mower Indoors - When not in
use, lawn mower should be stored in an indoor dry
and locked-up place - out of reach of children.
12. Maintain Lawn Mower With Care - Keep cutting
edges sharp and clean for best and safest performance. Follow instructions for lubricating and
changing accessories. Inspect lawn mower cord
periodically and if damaged, have it repaired by
an authorized service facility. Keep handles dry,
clean, and free from oil and grease.
13. Keep machine free of grass, leaves, or other
debris build up.Keep guards in place and in
working order.
14. Keep blades sharp.
15. Keep hands and feet away from cutting area.
Keep clear of the discharge opening at all
times.
16. Objects struck by the lawn mower blade can
cause severe injuries to persons. The lawn
should always be carefully examined and
cleared of all objects prior to each mowing.
Stay behind the handle when the engine
(motor) is running.
17. If the mower strikes a foreign object, follow
these steps:
• Stop the mower. Release the switch. Wait
until the blade comes to a complete stop.
• Remove the key and the battery cartridge.
• Inspect the mower for any damage.
2 ENGLISH
BL1850B/BL1860B
Page 3

• Repair any damage before restarting and
operating the mower. Replace the blade if it
is damaged in any way.
18. Use identical replacement blades only.
19. This cutting machine is capable of amputating
hands and feet and throwing objects. Failure
to observe the following safety instructions
could result in serious injury or death.
20. Only allow responsible adults, who are familiar
with the instruction, to operate the mower.
21. Be sure the area is clear of other people before
mowing. Stop mower if anyone enters the area.
22. Never direct discharged material toward
anyone. Avoid discharging material against a
wall or obstruction. Material may ricochet back
toward the operator. Stop the blade when crossing
gravel surfaces.
23. Do not pull the mower backwards unless
absolutely necessary. When you are compelled
to back the mower from a fence or other similar
obstruction, look down and behind before and
while moving backwards.
24. Release switch lever and wait for blade
rotation to stop before crossing driveways,
walks, roads and any gravel-covered areas.
Also remove key if you leave it, reach to pick up
or remove something out of your way, or for any
other reason that may distract you from what you
are doing.
25. Do not operate machine without the entire
grass catcher, discharge guard, rear guard, or
other safety protective devices in place and
working.
26. Stop the motor and remove the key whenever
you leave the equipment, before cleaning the
mower or unclogging the chute and making
any repairs or inspections.
27. Shut the motor off and wait until the blade
comes to a complete stop before removing the
grass catcher. Beware that the blades coast after
turn off.
28. Mow only in daylight or good articial light.
29. Disengage the self-propelled mechanism or drive
clutch on the mower so equipped before starting
the motor.
30. If the equipment should start to vibrate unusu-
ally, stop the motor and check immediately
for the cause. Vibration is generally a warning of
trouble.
31. Do not insert key into mower until it is ready to
be used.
32. Don't grasp the exposed cutting blades or
cutting edges when picking up or holding the
appliance.
33. Check the blades carefully for cracks or damage before operation. Replace cracked or
damaged blades immediately.
34. Never attempt to make wheel height adjustments while mower is running.
35. Check the grass basket frequently for wear or
deterioration. For storage, always make sure
the grass basket is empty. Replace a worn grass
basket with a new factory replacement one for
safety.
36. Check grass basket components and the
discharge guard frequently and replace with
manufacturer’s recommended parts, when
necessary.
37. Mow across the face of slopes, never up and
down. Exercise extreme caution when changing direction on slopes. Do not mow excessively steep slopes.
38. Watch for holes, ruts, bumps, rocks, or other
hidden objects. Uneven terrain could cause a slip
and fall accident. Tall grass can hide obstacles.
39. Do not mow on wet grass or excessively steep
slopes. Poor footing could cause a slip and fall
accident.
40. Do not wash with a hose; avoid getting water
in motor and electrical connections.
41. Check the blade mounting bolt at frequent
intervals for proper tightness.
42. Keep all nuts, bolts, and screws tight to
be sure the equipment is in safe working
condition.
43. Never remove or tamper with safety devices.
Check their proper operation regularly. Never
do anything to interfere with the intended
function of a safety device or to reduce the
protection provided by a safety device.
44. Maintain or replace safety and instruction
labels, as necessary.
45. Battery tool use and care
• Recharge only with the charger specied
by the manufacturer. A charger that is
suitable for one type of battery cartridge may
create a risk of re when used with another
battery cartridge.
• Do not charge lawn mower in rain, or in
wet locations.
• When replacing batteries, all batteries
should be replaced at the same time.
Mixing fresh and discharged batteries could
increase internal cell pressure and rupture
the discharged battery.
• Use power tools only with specically
designated battery cartridges. Use of any
other battery cartridges may create a risk of
injury and re.
• When battery cartridge is not in use, keep
it away from other metal objects, like
paper clips, coins, keys, nails, screws
or other small metal objects, that can
make a connection from one terminal
to another. Shorting the battery terminals
together may cause burns or a re.
• Under abusive conditions, liquid may be
ejected from the battery; avoid contact.
If contact accidentally occurs, ush with
water. If liquid contacts eyes, additionally
seek medical help. Liquid ejected from the
battery may cause irritation or burns.
SAVE THESE INSTRUCTIONS.
3 ENGLISH
Page 4
WARNING: Use of this product can create
dust containing chemicals which may cause
respiratory or other illnesses. Some examples of
these chemicals are compounds found in pesticides, insecticides, fertilizers and herbicides.
Your risk from these exposures varies, depending on how often you do this type of work. To
reduce your exposure to these chemicals: work
in a well ventilated area, and work with approved
safety equipment, such as those dust masks that
are specially designed to lter out microscopic
particles.
Symbols
The followings show the symbols used for tool.
volts
direct current
no load speed
revolutions or reciprocation per minute
Important safety instructions for
battery cartridge
1. Before using battery cartridge, read all instructions and cautionary markings on (1) battery
charger, (2) battery, and (3) product using
battery.
2. Do not disassemble battery cartridge.
3. If operating time has become excessively
shorter, stop operating immediately. It may
result in a risk of overheating, possible burns
and even an explosion.
4. If electrolyte gets into your eyes, rinse them
out with clear water and seek medical attention right away. It may result in loss of your
eyesight.
5. Do not short the battery cartridge:
(1) Do not touch the terminals with any con-
ductive material.
(2) Avoid storing battery cartridge in a con-
tainer with other metal objects such as
nails, coins, etc.
(3) Do not expose battery cartridge to water
or rain.
A battery short can cause a large current
ow, overheating, possible burns and even a
breakdown.
6. Do not store the tool and battery cartridge in
locations where the temperature may reach or
exceed 50 °C (122 °F).
7. Do not incinerate the battery cartridge even if
it is severely damaged or is completely worn
out. The battery cartridge can explode in a re.
8. Be careful not to drop or strike battery.
9. Do not use a damaged battery.
10. The contained lithium-ion batteries are subject
to the Dangerous Goods Legislation requirements.
For commercial transports e.g. by third parties,
forwarding agents, special requirement on packaging and labeling must be observed.
For preparation of the item being shipped, consulting an expert for hazardous material is required.
Please also observe possibly more detailed
national regulations.
Tape or mask off open contacts and pack up the
battery in such a manner that it cannot move
around in the packaging.
11. Follow your local regulations relating to dis-
posal of battery.
SAVE THESE INSTRUCTIONS.
CAUTION: Only use genuine Makita batteries.
Use of non-genuine Makita batteries, or batteries that
have been altered, may result in the battery bursting
causing res, personal injury and damage. It will
also void the Makita warranty for the Makita tool and
charger.
Tips for maintaining maximum
battery life
1. Charge the battery cartridge before completely
discharged. Always stop tool operation and
charge the battery cartridge when you notice
less tool power.
2. Never recharge a fully charged battery cartridge. Overcharging shortens the battery
service life.
3. Charge the battery cartridge with room temperature at 10 °C - 40 °C (50 °F - 104 °F). Let
a hot battery cartridge cool down before
charging it.
4. Charge the battery cartridge if you do not use
it for a long period (more than six months).
4 ENGLISH
Page 5
FUNCTIONAL
DESCRIPTION
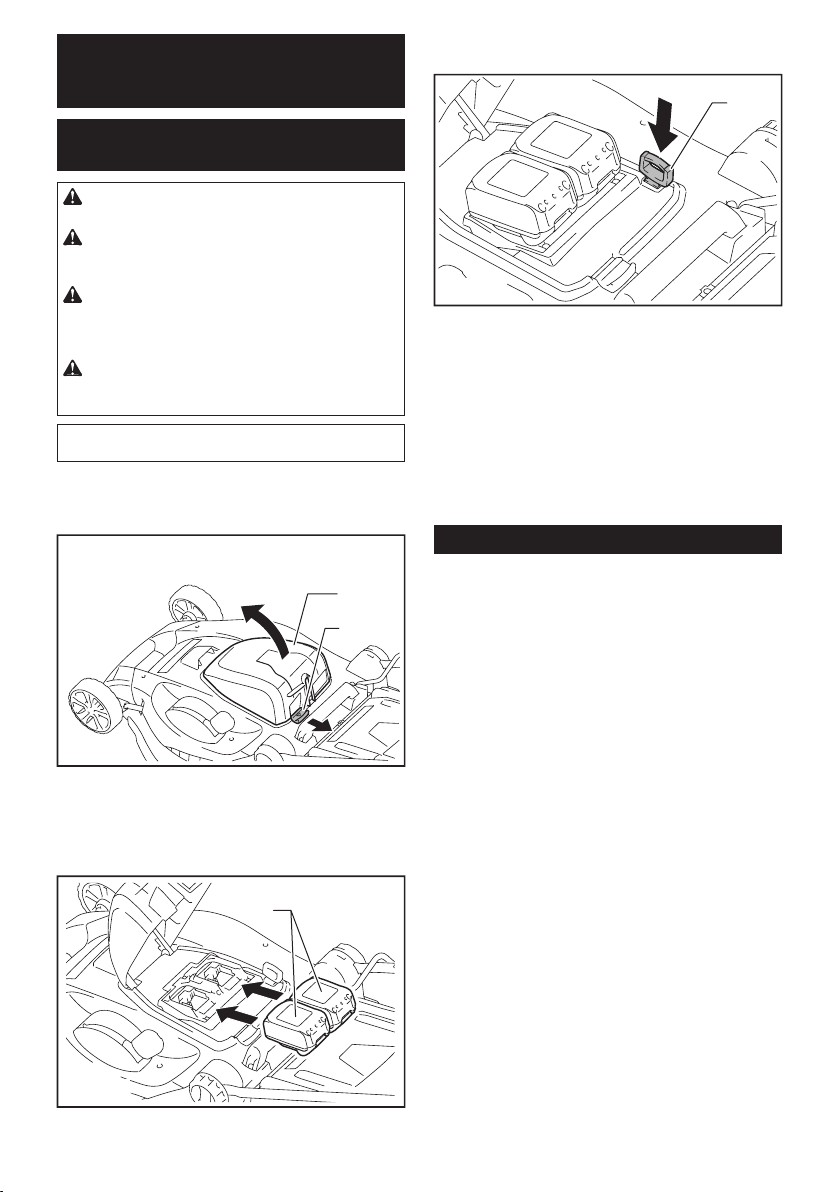
Installing or removing battery
cartridge
CAUTION: Always switch off the tool before
installing or removing of the battery cartridge.
CAUTION: Make sure that you lock the battery
cover before use. Otherwise, mud, dirt, or water may
cause damage to the product or the battery cartridge.
CAUTION: Always install the battery cartridge
fully until the red indicator cannot be seen. If not,
it may accidentally fall out of the tool, causing injury to
you or someone around you.
CAUTION: Do not install the battery cartridge
forcibly. If the cartridge does not slide in easily, it is
not being inserted correctly.
NOTE: The tool does not work with only one battery
cartridge.
To install the battery cartridge;
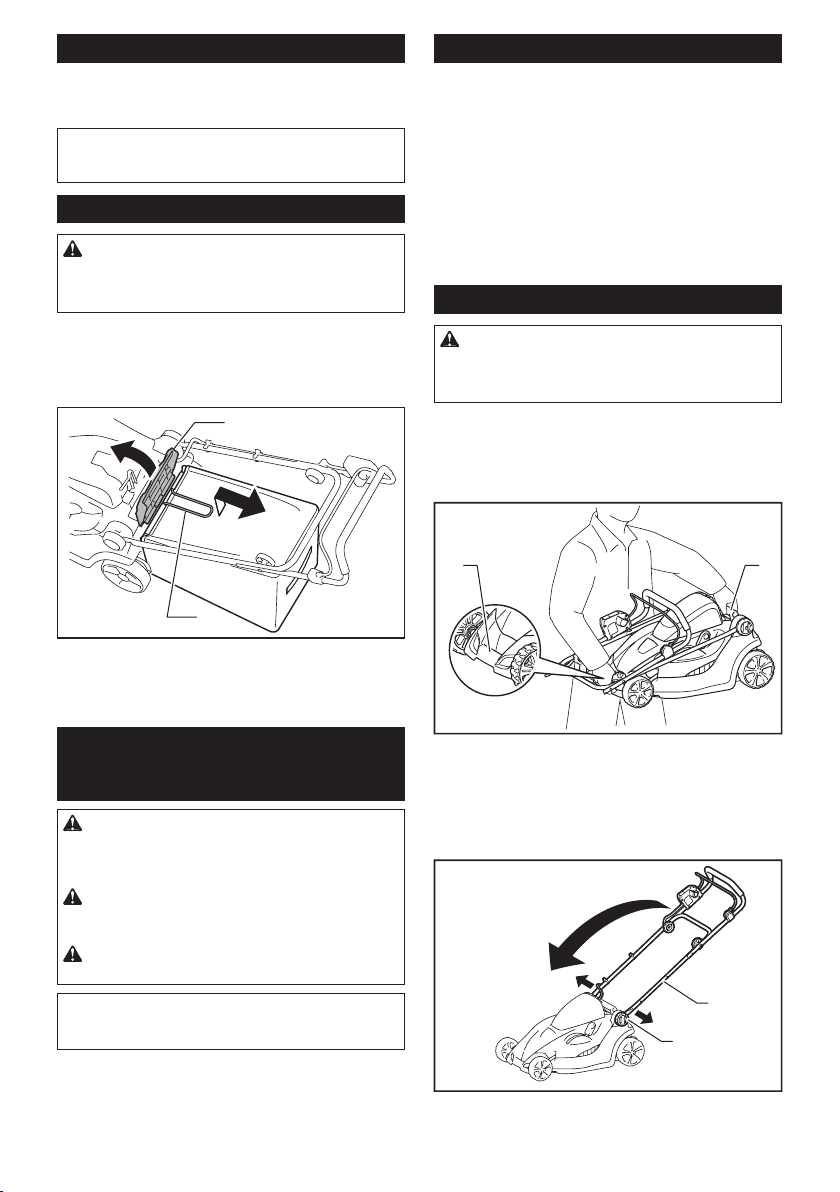
1. Slide the battery cover locking lever and open the
battery cover.
1
2
3. Insert the lock key in the place shown in the gure
as far as it will go.
1
► 1. Lock key
4. Close the battery cover and push it until it is
latched with the locking lever.
To remove the battery cartridge from the mower;
1. Slide the battery cover locking lever and open the
battery cover.
2. Pull out the battery cartridge from the mower while
sliding the button on the front of the cartridge.
3. Pull out the lock key.
4. Close the battery cover.
Tool / battery protection system
The tool is equipped with a tool/battery protection system. This system automatically cuts off power to the
motor to extend tool and battery life. The tool will auto-
matically stop during operation if the tool or battery is
placed under one of the following conditions.
► 1. Battery cover 2. Battery cover locking lever
2.
Align the tongue on the battery cartridge with the slot
on the mower then slide the cartridge until it locks in place
with a little click. If you can see the red indicator on the upper
side of the button, battery cartridge is not locked completely.
1
► 1. Battery cartridge
Overload protection
When the tool is operated in a manner that causes it to
draw an abnormally high current, the tool automatically
stops without any indication. In this situation, turn the
tool off and stop the application that caused the tool to
become overloaded. Then turn the tool on to restart.
Overheat protection
When the tool is overheated, the tool stops automatically. Let the tool cool down before turning the tool on
again.
Overdischarge protection
When the battery capacity becomes low, the tool stops
automatically. If the product does not operate even
when the switches are operated, remove the batteries
from the tool and charge the batteries.
5 ENGLISH
Page 6
Indicating the remaining battery
capacity
1
Indicator lamps Remaining
Lighted Off Blinking
capacity
75% to 100%
50% to 75%
25% to 50%
0% to 25%
2
► 1. Battery indicator 2. Check button
Press the check button to indicate the remaining battery
capacities. The battery indicators correspond to each battery.
Battery indicator status
On
Off
Remaining battery
capacity
50% - 100%
20% - 50%
0% - 20%
Indicating the remaining battery
capacity
Only for battery cartridges with the indicator
Charge the
battery.
The battery
may have
malfunctioned.
NOTE: Depending on the conditions of use and the
ambient temperature, the indication may differ slightly
from the actual capacity.
Switch action
WARNING: Before installing the battery car-
tridge, always check to see that the switch lever
actuates properly and returns to the original position when released. Operating a tool with a switch
that does not actuate properly can lead to loss of
control and serious personal injury.
NOTE: The mower does not start without pressing the
switch button even the switch lever is pulled.
NOTE: Mower may not start due to the overload
when you try to mow long or dense grass at a time.
Increase the mowing height in this case.
This mower is equipped with the interlock switch and
handle switch. If you notice anything unusual with either
of these switches, stop operation immediately and
have them checked by your nearest Makita Authorized
Service Center.
1. Install the battery cartridges. Insert the lock key
into the interlock switch and then close the battery
cover.
1
2
► 1. Indicator lamps 2. Check button
Press the check button on the battery cartridge to indicate the remaining battery capacity. The indicator lamps
light up for few seconds.
21
► 1. Battery cartridge 2. Lock key
6 ENGLISH
Page 7
2. Press the switch button and hold it.
3. Grab the upper handle and pull the switch lever.
ASSEMBLY
1
► 1. Switch button 2. Switch lever
4. Release the switch button as soon as the motor
starts running. The mower will continue to run until you
release the switch lever.
5. Release the switch lever to stop the motor.
2
Adjusting the mowing height
WARNING: Never put your hand or leg under
the mower body when adjusting the mowing
height.
WARNING: Always make sure that the lever
ts in the groove properly before operation.
The mowing height can be adjusted in the range of
between 20 mm (13/16″) - 75 mm (2-15/16″).
1. Remove the lock key.
2. Pull the mowing height adjusting lever to the
outward of the mower body and move it to your desired
mowing height.
1
WARNING: Always be sure that the lock key
and battery cartridge are removed before carrying
out any work on the mower. Failure to remove the
lock key and the battery cartridge may result in seri-
ous personal injury from accidental start-up.
WARNING: Never start the mower unless it is
completely assembled. Operation of the tools in a
partially assembled state may result in serious per-
sonal injury from accidental start-up.
Installing the battery cover
WARNING: Do not insert the lock key and bat-
tery cartridge before installing the battery cover.
Failure to do so may cause a serious injury.
Install the battery cover completely before the opera-
tion. The battery cover protects the mower and battery
cartridge from mud, dirt, and water.
1. Place the battery cover with the protrusions on the
mower aligned to the holes on the battery cover.
2
1
► 1. Protrusion 2. Hole 3. Battery cover
2. Place your hands in the middle of the battery
cover and push it.
3
► 1. Mowing height adjusting lever
NOTE: The mowing height gures should be used
just as a guideline. Depending on the conditions of
the lawn or the ground, the actual lawn height may
become slightly different from the set height.
NOTE: Try a test mowing of grass in a less conspicu-
ous place to get your desired height.
3. Before the rst operation, check that the pivot
point of the battery cover is attached properly. If the
battery cover is installed correctly, it will not open until
the battery cover locking lever is pulled.
7 ENGLISH
Page 8
3. Attach the holders to the handle. Position the
power supply cord as shown in the gure.
1
► 1. Pivot point 2. Battery cover locking lever
Installing the handle
NOTICE: When installing handles, position the
cords so that they are not caught by anything
between the handles. If the cord is damaged, the
mower switch may not work.
1. Slide the both ends of lower handle into the
grooves of the mower then fully tighten the clamping
screws.
1
2
► 1. Clamping screw 2. Lower handle
2
► 1. Holder
1
Removing or installing the mower
blade
WARNING: Always remove the lock key and
battery cartridge when removing or installing the
blade. Failure to remove the lock key and battery
cartridge may cause a serious injury.
WARNING: The blade coasts for a few sec-
onds after releasing the switch. Do not start any
operation until the blade comes to a complete
stop.
WARNING: Always wear gloves when han-
dling the blade.
To remove the mower blade, take the following steps.
1. Put the mower on its side so that the mowing
height adjusting lever comes to the upper side.
2. To lock the blade rotation, insert a screwdriver or a
similar tool into a hole on the base of the blade.
3. Turn the bolt counterclockwise with the wrench.
2. Align the screw holes of upper handle and lower
handle. Secure them with the clamping screws and
nuts.
2
2
1
► 1. Clamping nut 2. Clamping screw
NOTE: Hold the upper handle rmly so that it does
not drop off your hand.
1
2
► 1. Mower blade 2. Screwdriver 3. Wrench
4. Remove the bolt, outer ange, mower blade, and
inner ange in order.
8 ENGLISH
3
Page 9
1
1
2
5
3
4
► 1. Inner ange 2. Rotational direction arrow 3. Outer
ange 4. Bolt 5. Mower blade
To install the mower blade, take the removal procedure
in reverse.
WARNING: Install the blade carefully. It has
a top/bottom facing. Place the blade so that the
rotational direction arrow faces outward.
WARNING: Tighten the bolt clockwise rmly
to secure the blade.
WARNING: Make sure that the blade and all
the xing parts are installed correctly and tightened securely.
WARNING: When you replace the blades,
always follow the instructions provided in this
manual.
Installing the grass basket
1. Remove the lock key.
2. Lift the rear guard of the mower body.
2
3
► 1. Hook 2. Groove 3. Grass basket
OPERATION
Mowing
WARNING: Before mowing, clear away sticks
and stones from mowing area. Furthermore, clear
away any weeds from mowing area in advance.
WARNING: Always wear the safety goggles or
safety glasses with side shields when operating
the mower.
3. Hook the grass basket on the groove of the mower
body as shown in the gure.
Firmly hold the lawn mower handle with both hands
when mowing.
The outside edges of the front wheels is the guideline
for mowing width. Using the two front wheel outside
edges as a guideline, mow in strips, overlapping by
one half to one third the previous strip, to mow the lawn
evenly.
Periodically check the grass basket for mowed grass.
Empty the grass before it becomes full. Before every
periodical check, be sure to stop the mower then
remove the lock key and the battery cartridge.
NOTE: Using the mower with the grass basket full
prevents smooth blade rotation and places an extra
load on the motor, which may cause breakdown.
9 ENGLISH
Page 10
Mowing a long-grass lawn
Do not try to cut long grass all in one go. Instead, mow
the lawn in some steps. Leave a day or two between
mows until the lawn becomes evenly short.
NOTE: Mowing long grass to a short length all in one
go may cause the grass to die. The cut grass may
also block up inside of the mower body.
Emptying the grass basket
WARNING: To reduce a risk of accident, reg-
ularly check the grass basket for any damage or
weakened strength. Replace the grass basket if
necessary.
1. Release the switch lever.
2. Remove the lock key.
3. Lift the rear guard and take out the grass basket
by holding the handle.
1
Maintenance
1. Remove the lock key. Store it in a safe place out of
the reach of children.
2. Clean the mower using only a wet cloth. Do not
spray or pour water on the mower when cleaning.
3. Put the mower on its side and clean grass clip-
pings accumulated on the underside of mower deck.
4. Check all nuts, bolts, knobs, screws, fasteners etc.
for tightness.
5. Inspect moving parts for damage, breakage, and
wear. Damaged or missing parts should be repaired or
replaced.
Storage
WARNING: When carrying or storing the
mower, do not hold the folded handles but the
front grip of the mower. Holding the folded handles
may cause a serious injury or damage to the mower.
Before storing the mower, remove the battery cartridge
from it.
Store mower indoors in a cool, dry and locked place.
Don't store the mower and charger in locations where
the temperature may reach or exceed 40 °C (104 °F).
2
► 1. Rear guard 2. Handle
4. Empty the grass basket.
MAINTENANCE &
STORAGE
WARNING: Always be sure that the lock
key and battery cartridge are removed from the
mower before storage or attempting to perform
inspection or maintenance.
WARNING: Always remove the lock key when
the mower is not in use. Store the lock key in a
safe place out of reach of children.
WARNING: Wear gloves when performing
inspection or maintenance.
NOTICE: Never use gasoline, benzine, thinner,
alcohol or the like. Discoloration, deformation or
cracks may result.
1
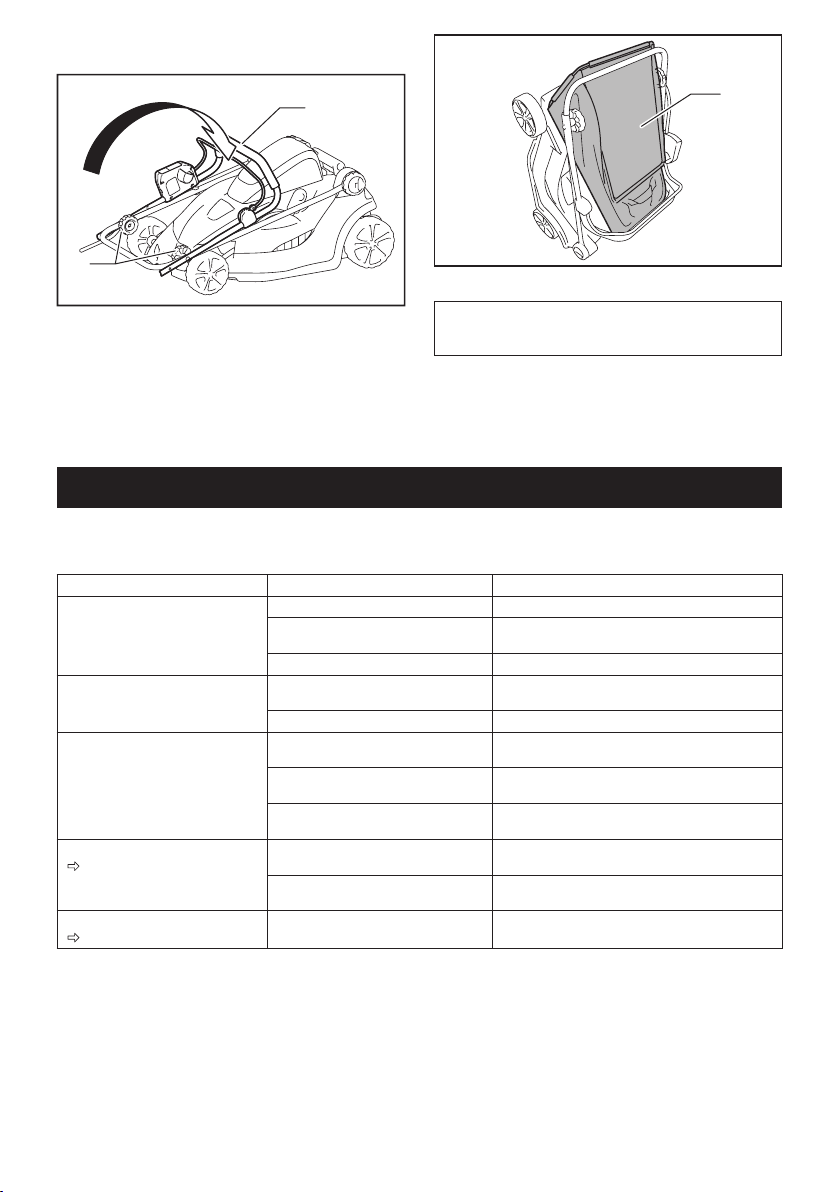
► 1. Front grip 2. Rear grip
1. Loosen the clamping screws and expand the
lower handle to both sides. Move down the handle for-
ward. At this time, keep a rm grip on the lower handle
so that the handle does not fall down to the far side from
the mower body.
2
2
1
► 1. Clamping screw 2. Lower handle
10 ENGLISH
Page 11
2. Loosen the clamping nuts and pivot the upper
handle back while expanding the both sides.
2
1
► 1. Clamping nut 2. Upper handle
3. Store the grass basket between the handle and
the mower body.
► 1. Grass basket
NOTE: When putting the mower in the upright posi-
tion, do not hold the handle but use the front grip of
the mower.
To maintain product SAFETY and RELIABILITY,
1
repairs, any other maintenance or adjustment should
be performed by Makita Authorized or Factory Service
Centers, always using Makita replacement parts.
TROUBLESHOOTING
Before asking for repairs, conduct your own inspection rst. If you nd a problem that is not explained in the manual,
do not attempt to dismantle the tool. Instead, ask Makita Authorized Service Centers, always using Makita replace-
ment parts for repairs.
State of abnormality Probable cause (malfunction) Remedy
Mower does not start. Two battery cartridges are not installed. Install the charged battery cartridges.
Battery problem (under voltage) Recharge the battery cartridge. If recharging is not
The lock key is not inserted. Insert the lock key.
Motor stops running after a little use. Battery's charge level is low. Recharge the battery cartridge. If recharging is not
Cutting height is too low. Raise the cutting height.
Motor does not reach maximum
RPM.
Cutting tool does not rotate:
stop the mower immediately!
Abnormal vibration:
stop the mower immediately!
Battery cartridge is installed improperly. Install the battery cartridge as described in this
Battery power is dropping. Recharge the battery cartridge. If recharging is not
The drive system does not work
correctly.
Foreign object such as a branch is
jammed near the blade.
The drive system does not work
correctly.
Blade is imbalanced, excessively or
unevenly worn.
effective, replace battery cartridge.
effective, replace battery cartridge.
manual.
effective, replace battery cartridge.
Ask your local authorized service center for repair.
Remove the foreign object.
Ask your local authorized service center for repair.
Replace the blade.
11 ENGLISH
Page 12

OPTIONAL
ACCESSORIES
CAUTION: These accessories or attachments
are recommended for use with your Makita tool
specied in this manual. The use of any other
accessories or attachments might present a risk of
injury to persons. Only use accessory or attachment
for its stated purpose.
If you need any assistance for more details regarding these accessories, ask your local Makita Service
Center.
• Mower blade
• Makita genuine battery and charger
NOTE: Some items in the list may be included in the
tool package as standard accessories. They may
differ from country to country.
MAKITA LIMITED ONE YEAR
WARRANTY
Warranty Policy
Every Makita tool is thoroughly inspected and tested
before leaving the factory. It is warranted to be free of
defects from workmanship and materials for the period
of ONE YEAR from the date of original purchase.
Should any trouble develop during this one year period,
return the COMPLETE tool, freight prepaid, to one
of Makita’s Factory or Authorized Service Centers. If
inspection shows the trouble is caused by defective
workmanship or material, Makita will repair (or at our
option, replace) without charge.
This Warranty does not apply where:
• repairs have been made or attempted by others:
• repairs are required because of normal wear and
tear:
• the tool has been abused, misused or improperly
maintained:
• alterations have been made to the tool.
IN NO EVENT SHALL MAKITA BE LIABLE FOR ANY
INDIRECT, INCIDENTAL OR CONSEQUENTIAL
DAMAGES FROM THE SALE OR USE OF THE
PRODUCT. THIS DISCLAIMER APPLIES BOTH
DURING AND AFTER THE TERM OF THIS
WARRANTY.
MAKITA DISCLAIMS LIABILITY FOR ANY IMPLIED
WARRANTIES, INCLUDING IMPLIED WARRANTIES
OF "MERCHANTABILITY" AND "FITNESS FOR A
SPECIFIC PURPOSE," AFTER THE ONE YEAR TERM
OF THIS WARRANTY.
This Warranty gives you specic legal rights, and you
may also have other rights which vary from state to
state. Some states do not allow the exclusion or limitation of incidental or consequential damages, so the
above limitation or exclusion may not apply to you.
Some states do not allow limitation on how long an
implied warranty lasts, so the above limitation may not
apply to you.
12 ENGLISH
Page 13

FRANÇAIS (Mode d’emploi original)
SPÉCIFICATIONS
Modèle : DLM431
Largeur de tonte (diamètre de lame) 430 mm (17″)
Vitesse à vide 3 600 /min
Dimensions
(L x P x H)
Tension nominale C.C. 36 V
Batterie(s) standard
Mise en garde : Utilisez uniquement les batteries indiquées.
Poids net 18,1 kg (39,8lbs) 18,7 kg (41,2 lbs)
• Étant donné l’évolution constante de notre programme de recherche et de développement, les spécications
contenues dans ce manuel sont indiquées sous réserve de modication sans préavis.
• Les spécications et la batterie peuvent varier suivant les pays.
• Poids, batterie comprise, selon la procédure EPTA de 01/2003
IMPORTANTES CONSIGNES DE
SÉCURITÉ
MISE EN GARDE : Pour réduire les risques
d’incendie, de décharge électrique et de blessure
lors de l’utilisation des tondeuses électriques,
il importe de toujours prendre des mesures de
sécurité élémentaires, dont les suivantes.
Lisez toutes les instructions.
Vous devez lire, comprendre et respecter toutes les instructions inscrites sur la tondeuse et dans les manuels d’ins-
tructions. Avant de commencer, familiarisez-vous bien avec
les commandes et l’utilisation adéquate de la tondeuse.
MISE EN GARDE !
1. Évitez les environnements dangereux -
N’utilisez jamais la tondeuse dans les emplacements humides ou mouillés. Assurez-vous
toujours d’être en position stable; saisissez fermement le guidon et marchez; ne courez jamais.
2. Évitez l’utilisation sous la pluie.
3.
Tenez les enfants à distance - Tous les visiteurs
doivent être maintenus à une distance raisonnable
de la zone de travail. Soyez attentif et éteignez la
tondeuse si un enfant s’approche de la zone de travail.
Soyez particulièrement vigilant aux abords d’angles
sans visibilité, de buissons, d’arbres ou d’autres obs-
tacles qui pourraient vous empêcher de voir un enfant.
4.
Portez des vêtements adéquats - Ne portez ni vêtements amples ni bijoux. Ils pourraient être happés par
les pièces mobiles. Le port de gants de caoutchouc et de
chaussures robustes est recommandé pour les travaux
extérieurs. Ne faites pas fonctionner la tondeuse si vous
êtes pieds nus ou si vous portez des sandales ouvertes.
5. Portez des lunettes de sécurité - Si le travail
génère de la poussière, portez toujours un écran
facial ou un masque antipoussières.
6.
Utilisez le bon appareil - N’utilisez pas la tondeuse pour
effectuer un travail pour lequel elle n’a pas été conçue.
durant le fonctionnement
lorsque remisé
(sans le collecteur d’herbe)
Max. 1 490 mm x 460 mm x 1 020 mm (58-3/4″ x 18-1/8″ x 40-1/4″)
Min. 1 450 mm x 460 mm x 950 mm (57″ x 18-1/8″ x 37-1/2″)
490 mm x 460 mm x 910 mm (19-1/4″ x 18-1/8″ x 35-3/4″)
BL1815N/BL1820B BL1830/BL1830B/BL1840B/
7.
Ne forcez pas la tondeuse - Elle effectuera un
travail de meilleure qualité et plus sécuritaire si elle
est utilisée au régime pour lequel elle a été conçue.
8. Ne vous étirez pas trop - Assurez-vous d’une
bonne prise au sol et d’une bonne position d’équilibre en tout temps. Ne tondez pas près des descentes abruptes, fossés et talus. Vous risqueriez
de perdre pied ou de perdre l’équilibre.
9. Restez vigilant - Soyez attentif à vos gestes.
Faites preuve de bon sens. N’utilisez pas la ton-
deuse lorsque vous êtes fatigué. N’utilisez pas la
machine si vous avez consommé de l’alcool ou
une drogue. Un moment d’inattention pendant
l’utilisation de la tondeuse peut entraîner une
grave blessure.
10. Débranchez la tondeuse - Débranchez la ton-
deuse ou retirez la batterie après l’utilisation,
avant de réparer la tondeuse, de la nettoyer ou
d’en retirer un matériau, ou avant de remplacer
des accessoires tels que les lames.
11. Après l’utilisation, remisez la tondeuse à l’in-
térieur - Lorsqu’elle n’est pas utilisée, la tondeuse
doit être remisée à l’intérieur dans un emplacement sec et verrouillé, hors d’atteinte des enfants.
12. Entretenez la tondeuse avec soin - Pour un
rendement supérieur et un fonctionnement plus
sécuritaire, gardez les tranchants aiguisés et
propres. Suivez les instructions de lubrication
et de changement des accessoires. Inspectez
régulièrement le cordon de la tondeuse; s’il est
endommagé, faites-le réparer dans un centre de
service après-vente agréé. Maintenez les guidons
secs, propres et exempts d’huile ou de graisse.
13. Évitez l’accumulation d’herbe, de feuilles
ou d’autres débris dans la machine.Gardez
les protections en place et en état de
fonctionnement.
14. Gardez les lames affûtées.
15. N’approchez pas les mains et les pieds de la
zone de coupe. Tenez-vous éloigné de l’ouverture de décharge en tout temps.
13 FRANÇAIS
BL1850B/BL1860B
Page 14

Des objets heurtés par la lame de tondeuse
16.
peuvent causer de graves blessures aux personnes se trouvant à proximité. La pelouse
doit toujours être examinée attentivement et
débarrassée de tout objet avant la tonte. Restez
derrière le guidon pendant que le moteur tourne.
17. Si la tondeuse heurte un corps étranger, suivez ces étapes :
• Arrêtez la tondeuse. Relâchez l’interrupteur.
Attendez l’arrêt complet de la lame.
• Retirez la clé et la batterie.
•
Vériez l’absence de dommages sur la tondeuse.
• Réparez tout dommage sur la tondeuse
avant de la redémarrer et de l’utiliser.
18.
19. Ce dispositif de coupe peut amputer des mains
20.
21. Avant de tondre, assurez-vous qu’il n’y a per-
22.
23.
24. Relâchez le levier d’interrupteur et attendez
25. N’utilisez pas la machine sans que le bac de
26.
27.
28. Ne tondez qu’à la lumière du jour ou avec une
29. Désengagez le mécanisme automoteur ou l’em-
30.
31. N’insérez pas la clé dans la tondeuse si celle-ci
Remplacez la lame si elle est endommagée.
Utilisez uniquement des lames de rechange identiques.
et des pieds et éjecter des objets. Le non-respect des consignes de sécurité suivantes peut
entraîner de graves blessures ou la mort.
N’autorisez que des adultes responsables, qui
connaissent les instructions, à utiliser la tondeuse.
sonne d’autre que vous dans la zone. Arrêtez
la tondeuse si quelqu’un pénètre dans la zone.
Assurez-vous que les matériaux projetés ne le soient
jamais en direction de qui que ce soit. Évitez de projeter les matériaux contre un mur ou un obstacle. Ces
matériaux pourraient ricocher vers l’utilisateur. Arrêtez la
lame lorsque vous traversez une surface de gravier.
Ne tirez pas la tondeuse vers l’arrière, à moins
que cela ne soit absolument nécessaire. Si vous
devez tirer la tondeuse vers l’arrière pour éviter une
clôture ou autre obstacle similaire, regardez en bas
et derrière avant et pendant la marche arrière.
que la lame cesse de tourner avant de traverser une voie d’accès pour autos, une allée,
une route ou toute surface couverte de gravier.
Retirez également la clé si vous vous en éloignez,
si vous vous étirez pour ramasser ou enlever
quelque chose de votre passage, ou pour toute
autre raison qui pourrait détourner votre attention.
ramassage, la protection d’évacuation, la protection arrière et les autres dispositifs de sécurité ne soient installés et en fonctionnement.
Arrêtez le moteur et retirez la clé chaque fois que
vous vous éloignez de l’équipement, avant de
nettoyer la tondeuse ou de déboucher le déecteur et de faire des réparations ou inspections.
Éteignez le moteur et attendez l’arrêt complet
de la lame avant de retirer le bac de ramassage.
Soyez conscient du fait que la lame continue de
tourner en roue libre après l’arrêt du moteur.
bonne lumière articielle.
brayage de la tondeuse avant d’allumer le moteur.
Si l’équipement commence à vibrer anormalement,
arrêtez le moteur et recherchez immédiatement la cause.
Une vibration est en général un signe de dysfonctionnement.
n’est pas prête pour l’utilisation.
Lorsque vous prenez ou tenez l’appareil, ne le faites
32.
pas par les lames nues ou par les bords tranchants.
33. Avant l’utilisation, vériez toujours soigneuse-
ment l’absence de ssures ou de dommages
sur les lames. Remplacez immédiatement
toute lame ssurée ou endommagée.
34. N’essayez jamais de régler la hauteur des
roues alors que la tondeuse est en marche.
35.
Vériez régulièrement l’usure ou la détérioration
du collecteur d’herbe. Assurez-vous toujours que
le collecteur d’herbe est vide avant le remisage.
Si le collecteur d’herbe est usé, faites-le remplacer
en usine par un collecteur neuf pour plus de sécurité.
36. Vériez régulièrement les composants du col-
lecteur d’herbe et la protection de décharge, et
remplacez-les au besoin en utilisant les pièces
recommandées par le fabricant.
37.
Tondez les pentes dans le sens transversal,
jamais en montant ou en descendant. Soyez
particulièrement prudent lors des changements
de direction sur les terrains en pente. Ne tondez
pas sur des pentes excessivement raides.
38. Faites attention aux trous, ornières, bosses,
cailloux ou autres obstacles cachés. Un terrain
irrégulier présente des risques de glissades et de
chutes. Des obstacles peuvent être cachés dans
les herbes hautes.
39. N’utilisez pas la tondeuse sur de l’herbe mouil-
lée ou des pentes excessivement raides. Une
position instable présente des risques de glissades et de chutes.
40. Ne lavez pas la machine avec un tuyau d’ar-
rosage; évitez que de l’eau ne pénètre dans le
moteur et dans les connexions électriques.
41. Vériez à intervalles réguliers si le boulon de
xation de la lame est bien serré.
42. Assurez-vous que tous les écrous, boulons et
vis sont bien serrés pour garantir un fonctionnement sécuritaire de l’équipement.
43. Ne retirez pas et ne modiez pas les dispositifs de sécurité. Vériez régulièrement leur bon
fonctionnement. N’entravez jamais le fonctionnement prévu des dispositifs de sécurité et ne
limitez jamais la protection qu’ils offrent.
44.
Les étiquettes de sécurité et d’instructions doivent
être entretenues ou remplacées si nécessaire.
45. Utilisation et entretien de la batterie
• N’effectuez la recharge qu’avec le char-
geur spécié par le fabricant. Un chargeur
conçu pour un certain type de batterie risque
de déclencher un incendie s’il est utilisé avec
une autre batterie.
• Ne rechargez pas la tondeuse sous la
pluie ou dans un endroit mouillé.
•
Lors du remplacement des batteries, il
convient de remplacer toutes les batteries
en même temps. Mélanger des batteries
fraîches et des batteries déchargées peut faire
augmenter la pression interne de la cellule et
causer la rupture de la batterie déchargée.
• N’utilisez les outils électriques qu’avec
les batteries spéciquement désignées.
L’utilisation d’autres batteries comporte un
risque de blessure et d’incendie.
14 FRANÇAIS
Page 15

Lorsque la batterie n’est pas utilisée, tenez-la
•
à distance des objets métalliques tels que
trombones, pièces de monnaie, clés, clous,
vis ou autres petits objets métalliques,
conducteurs potentiels entre une borne et
une autre. Court-circuiter les bornes de batterie
peut entraîner des brûlures ou un incendie.
•
Dans des conditions abusives, du liquide
peut s’échapper de la batterie; évitez tout
contact. En cas de contact accidentel, rincez
avec beaucoup d’eau. Si le liquide pénètre
dans vos yeux, il faut aussi consulter un
médecin. Le liquide qui s’échappe de la batterie
peut causer des irritations ou des brûlures.
CONSERVEZ CES
INSTRUCTIONS.
MISE EN GARDE : L’utilisation de ce pro-
duit peut générer des poussières contenant des
substances chimiques, lesquelles peuvent causer
des problèmes respiratoires ou autres maladies.
Parmi ces substances chimiques gurent les
composés que l’on retrouve dans les pesticides,
insecticides, fertilisants et herbicides.
Les risques liés à l’exposition varient suivant la fréquence d’exécution du type de travail en question.
Pour réduire votre exposition à ces substances
chimiques : travaillez dans un emplacement bien
aéré et avec des dispositifs de sécurité approuvés,
tels que les masques antipoussières spécialement
conçus pour ltrer les particules microscopiques.
Symboles
Les symboles utilisés pour l’outil sont indiqués
ci-dessous.
volts
courant continu
vitesse à vide
tours ou alternances par minute
5. Ne court-circuitez pas la batterie :
(1) Ne touchez les bornes avec aucun maté-
riau conducteur.
(2)
Évitez de ranger la batterie dans un conteneur avec d’autres objets métalliques tels
que clous, pièces de monnaie, etc.
(3) Évitez d’exposer la batterie à l’eau ou à la
pluie.
Un court-circuit de la batterie pourrait provoquer un fort courant, une surchauffe, parfois
des brûlures et même une panne.
6. Ne rangez pas l’outil ou la batterie dans
des emplacements où la température peut
atteindre ou dépasser 50 °C (122 °F).
7.
Ne jetez pas la batterie au feu même si elle est
sérieusement endommagée ou complètement épuisée. La batterie peut exploser au contact du feu.
8. Prenez garde d’échapper ou de heurter la
batterie.
9. N’utilisez pas une batterie si elle est
endommagée.
10. Les batteries lithium-ion fournies sont soumises aux exigences de la législation sur les
marchandises dangereuses.
Des exigences particulières sur l’emballage et
l’étiquetage doivent être respectées lors du transport commercial par des tiers, des transitaires, etc.
Pour préparer la marchandise à expédier, consultez un expert en matériaux dangereux si nécessaire. Respectez aussi les éventuelles réglementations nationales plus détaillées.
Recouvrez de ruban isolant les contacts exposés,
et emballez la batterie de sorte qu’elle ne puisse
pas se déplacer à l’intérieur de l’emballage.
11. Suivez la réglementation locale concernant
l’élimination de la batterie.
CONSERVEZ CES
INSTRUCTIONS.
ATTENTION : Utilisez exclusivement les bat-
teries fabriquées par Makita. Les batteries autres
que celles fabriquées par Makita ou les batteries
modiées peuvent exploser et causer un incendie,
une blessure ou des dommages. Cela annule aussi la
garantie Makita de l’outil et du chargeur Makita.
Consignes de sécurité importantes
pour la batterie
1. Avant d’utiliser la batterie, lisez toutes les
instructions et les mises en garde apposées
sur (1) le chargeur de batterie, (2) la batterie et
(3) le produit utilisant la batterie.
2. Ne démontez pas la batterie.
3. Cessez immédiatement l’utilisation si le temps
de fonctionnement devient excessivement
court. Il y a risque de surchauffe, de brûlures,
voire d’explosion.
4. Si l’électrolyte pénètre dans vos yeux, rincez-les à l’eau claire et consultez immédiatement un médecin. Il y a risque de perte de la
vue.
Conseils pour maintenir la
durée de service maximale de la
batterie
1. Rechargez la batterie avant qu’elle ne soit
complètement déchargée. Arrêtez toujours
l’outil et rechargez la batterie quand vous
remarquez que la puissance de l’outil diminue.
2. Ne rechargez jamais une batterie complètement chargée. La surcharge réduit la durée de
service de la batterie.
3. Chargez la batterie à une température
ambiante comprise entre 10 °C et 40 °C (50 °F
et 104 °F). Si la batterie est chaude, laissez-la
refroidir avant de la charger.
4. Chargez la batterie si elle est restée inutilisée
pendant une période prolongée (plus de six
mois).
15 FRANÇAIS
Page 16

DESCRIPTION DU
FONCTIONNEMENT
Installation ou retrait de la batterie
ATTENTION : Éteignez toujours l’outil avant
d’installer ou de retirer la batterie.
ATTENTION :
vercle de batterie avant l’utilisation. Autrement la boue, les sale-
tés ou l’eau risqueraient d’endommager le produit ou la batterie.
ATTENTION : Insérez toujours la batterie à
fond, jusqu’à ce que le voyant rouge ne soit plus
visible. Autrement elle risque de tomber accidentelle-
ment de l’outil, ce qui comporte un risque de blessure
pour vous-même et pour les personnes présentes.
ATTENTION : Ne forcez pas sur la batterie
pour l’installer. Si la batterie ne glisse pas facile-
ment, c’est qu’elle n’est pas insérée correctement.
NOTE : L’outil ne fonctionne pas lorsqu’il n’y a qu’une
seule batterie.
Pour installer la batterie :
1. Faites glisser le levier de verrouillage du couvercle
de batterie et ouvrez le couvercle de batterie.
Assurez-vous de verrouiller le cou-
1
2
3. Insérez la clé de sécurité à fond à l’emplacement
indiqué sur la gure.
1
► 1. Clé de sécurité
4. Fermez le couvercle de batterie et appuyez
dessus jusqu’à ce qu’il soit verrouillé par le levier de
verrouillage.
Pour retirer la batterie de la tondeuse :
1. Faites glisser le levier de verrouillage du couvercle
de batterie et ouvrez le couvercle de batterie.
2. Retirez la batterie de la tondeuse tout en faisant
glisser le bouton à l’avant de la batterie.
3. Retirez la clé de sécurité.
4. Fermez le couvercle de batterie.
Dispositif de protection de l’outil et
de la batterie
L’outil est doté d’un dispositif de protection de l’outil et
de la batterie. Ce dispositif coupe automatiquement
l’alimentation du moteur pour augmenter la durée de
service de l’outil et de la batterie. L’outil s’arrête automatiquement pendant l’utilisation lorsque l’outil ou la
batterie est dans l’une des situations suivantes. Dans
certaines situations, les voyants s’allument.
► 1. Couvercle de batterie 2. Levier de verrouillage du
couvercle de batterie
2.
Alignez la languette de la batterie sur la fente de la ton-
deuse, puis glissez la batterie jusqu’à ce qu’elle se verrouille avec
un léger bruit sec. Si le voyant rouge est visible sur la face supérieure du bouton, la batterie n’est pas parfaitement verrouillée.
1
► 1. Batterie
Protection contre la surcharge
Lorsque l’outil est utilisé d’une manière entraînant
une consommation anormale de courant, il s’arrête
automatiquement sans aucune indication. Dans ce
cas, éteignez l’outil et arrêtez l’activité qui entraîne une
surcharge de l’outil. Remettez ensuite le contact pour
redémarrer.
Protection contre la surchauffe
Lorsque l’outil surchauffe, il s’arrête automatiquement.
Laissez l’outil refroidir avant de le rallumer.
Protection contre la décharge
excessive
Lorsque la charge de la batterie est basse, l’outil s’ar-
rête automatiquement. Si l’appareil ne fonctionne pas
même lorsque vous activez les interrupteurs, retirez les
batteries de l’outil et rechargez-les.
16 FRANÇAIS
Page 17

Indication de la charge restante de
la batterie
1
2
► 1. Voyant de batterie 2. Bouton de vérication
Appuyez sur le bouton de vérication pour afcher la
charge restante des batteries. Les voyants de batterie
correspondent à chacune des batteries.
État du voyant de batterie
Allumé
Éteint
Charge restante
de la batterie
Appuyez sur le bouton de vérication de la batterie pour
afcher la charge restante de la batterie. Les témoins
indicateurs s’allument pendant quelques secondes.
Témoins indicateurs Charge
Allumé Éteint Clignotant
NOTE : Suivant les conditions d’utilisation et la
température ambiante, il se peut que l’indication soit
légèrement différente de la charge réelle.
restante
75 % à 100 %
50 % à 75 %
25 % à 50 %
0 % à 25 %
Chargez la
batterie.
La batterie a
peut-être mal
fonctionné.
50 % - 100 %
20 % - 50 %
0 % - 20 %
Afchage de la charge restante de la
batterie
Uniquement pour les batteries avec voyant
1
2
► 1. Témoins indicateurs 2. Bouton de vérication
Interrupteur
MISE EN GARDE : Avant d’installer la bat-
terie, vériez toujours si le levier d’interrupteur
fonctionne correctement et revient en position
originale lorsque relâché. Faire fonctionner un outil
avec un interrupteur qui ne fonctionne pas correctement peut causer une perte de contrôle et de graves
blessures.
NOTE : Même si vous tirez sur le levier d’interrupteur,
la tondeuse ne démarrera pas si vous n’appuyez pas
sur le bouton d’interrupteur.
NOTE : Il se peut que la tondeuse ne démarre pas,
en raison de la surcharge, si vous essayez de tondre
une herbe trop longue ou trop dense en une seule
passe. Dans ce cas, augmentez la hauteur de tonte.
Cette tondeuse est équipée d’un interrupteur d’interverrouillage et d’un interrupteur de guidon. Si vous remarquez quelque chose d’inhabituel avec ces interrupteurs,
arrêtez immédiatement le fonctionnement et faites-les
vérier au centre de service après-vente Makita agréé
le plus près.
1. Installez les batteries. Insérez la clé de sécurité
dans l’interrupteur d’interverrouillage, puis fermez le
couvercle de batterie.
17 FRANÇAIS
Page 18

21
1
► 1. Batterie 2. Clé de sécurité
2. Maintenez le bouton d’interrupteur enfoncé.
3. Saisissez le guidon supérieur et tirez sur le levier
d’interrupteur.
1
► 1. Bouton d’interrupteur 2. Levier d’interrupteur
4. Relâchez le bouton d’interrupteur dès que le
moteur se met en marche. La tondeuse continuera
de fonctionner jusqu’à ce que vous relâchiez le levier
d’interrupteur.
5. Relâchez le levier d’interrupteur pour arrêter le
moteur.
2
Réglage de la hauteur de tonte
MISE EN GARDE : Ne mettez jamais une
main ou une jambe sous le corps de la tondeuse
pendant que vous réglez la hauteur de tonte.
MISE EN GARDE : Veillez toujours à ce que
le levier soit bien dans la rainure avant d’effectuer
l’opération.
La hauteur de tonte est réglable sur une plage de 20
mm (13/16″) à 75 mm (2-15/16″).
1. Retirez la clé de sécurité.
2. Tirez le levier de réglage de la hauteur de tonte
vers l’extérieur du corps de la tondeuse, et déplacez-le
sur la hauteur de tonte désirée.
► 1. Levier de réglage de la hauteur de tonte
NOTE : Les chiffres de la hauteur de tonte ne sont là
qu’à titre indicatif. Suivant l’état du gazon ou du sol,
la hauteur de coupe obtenue peut être légèrement
différente de la hauteur réglée.
NOTE : Testez la tonte de l’herbe dans un endroit
moins visible pour obtenir la hauteur désirée.
ASSEMBLAGE
MISE EN GARDE : Assurez-vous toujours
que la clé de sécurité et la batterie sont retirées
avant d’effectuer toute opération sur la tondeuse.
Si vous ne retirez pas la clé de sécurité et la batterie,
vous risquez une grave blessure suite à un démarrage accidentel.
MISE EN GARDE : Ne démarrez jamais la
tondeuse avant qu’elle ne soit complètement
assemblée. L’utilisation d’outils partiellement assem-
blés peut entraîner une blessure grave suite à un
démarrage accidentel.
Pose du couvercle de batterie
MISE EN GARDE : N’insérez pas la clé de
sécurité et la batterie avant d’avoir installé le
couvercle de batterie. Autrement, il y a risque de
blessure grave.
Avant l’utilisation, installez parfaitement le couvercle de
batterie. Le couvercle de batterie protège la tondeuse et
la batterie contre la boue, les saletés et l’eau.
1. Placez le couvercle de batterie en alignant les par-
ties saillantes de la tondeuse sur les trous du couvercle
de batterie.
18 FRANÇAIS
Page 19

2
3
1
1
► 1. Partie saillante 2. Trou 3. Couvercle de batterie
2. Placez vos mains au milieu du couvercle de batte-
rie et appuyez dessus.
3. Avant la première utilisation, vériez que le point
de pivotement du couvercle de batterie est adéquate-
ment xé. Si le couvercle de batterie est bien installé, il
ne s’ouvrira qu’en tirant sur le levier de verrouillage du
couvercle de batterie.
2
► 1. Vis de serrage 2. Guidon inférieur
2. Alignez les trous de vis des guidons supérieur et
inférieur. Fixez-les à l’aide des vis et écrous de serrage.
2
2
1
► 1. Écrou de serrage 2. Vis de serrage
NOTE : Tenez le guidon supérieur fermement, pour
ne pas l’échapper.
3. Fixez les supports au guidon. Placez le cordon
d’alimentation tel qu’illustré sur la gure.
1
► 1. Point de pivotement 2. Levier de verrouillage du
couvercle de batterie
Pose du guidon
AVIS : Lorsque vous installez les guidons, posi-
tionnez les cordons de sorte qu’ils ne soient pas
pris entre les guidons. La tondeuse risque de ne
pas fonctionner si le cordon est endommagé.
1. Glissez les deux extrémités du guidon inférieur
dans les rainures de la tondeuse, puis serrez fermement les vis de serrage.
1
2
► 1. Support
19 FRANÇAIS
Page 20

Retrait ou pose de la lame de
tondeuse
MISE EN GARDE : Enlevez toujours la clé de
sécurité et la batterie lorsque vous retirez ou installez la lame. Vous risquez une grave blessure si
vous ne retirez pas la clé de sécurité et la batterie.
MISE EN GARDE : La lame continue de tour-
ner pendant quelques secondes après la libération de l’interrupteur. Ne commencer aucune
opération avant l’arrêt parfait de la lame.
MISE EN GARDE : Portez toujours des gants
lorsque vous manipulez la lame.
Pour retirer la lame de tondeuse, suivez les étapes
ci-dessous.
1. Basculez la tondeuse sur le côté, de sorte que le
levier de réglage de la hauteur de tonte se trouve sur le
dessus.
2. Pour empêcher la lame de tourner, insérez un
tournevis ou outil similaire dans le trou à la base de la
lame.
3. Tournez le boulon dans le sens contraire des
aiguilles d’une montre à l’aide de la clé.
1
MISE EN GARDE : Installez la lame soigneu-
sement. Elle a une face supérieure et une face
inférieure. Placez la lame de sorte que la èche de
sens de rotation pointe vers l’extérieur.
MISE EN GARDE : Serrez fermement le bou-
lon dans le sens des aiguilles d’une montre pour
xer la lame.
MISE EN GARDE : Assurez-vous que la lame
et toutes les pièces de xation sont bien installées et serrées fermement.
MISE EN GARDE : Lorsque vous remplacez
les lames, suivez toujours les instructions de ce
manuel.
Pose du collecteur d’herbe
1. Retirez la clé de sécurité.
2. Soulevez la protection arrière du corps de la
tondeuse.
2
► 1. Lame de tondeuse 2. Tournevis 3. Clé
4. Retirez le boulon, le asque externe, la lame de
tondeuse et le asque interne, dans cet ordre.
3
1
2
5
3
4
► 1. Flasque interne 2. Flèche de sens de rotation
3. Flasque externe 4. Boulon 5. Lame de tondeuse
Pour installer la lame de tondeuse, suivez la procédure
de retrait en sens inverse.
3. Accrochez le collecteur d’herbe à la rainure du
corps de la tondeuse, tel qu’illustré sur la gure.
1
2
3
► 1. Crochet 2. Rainure 3. Collecteur d’herbe
20 FRANÇAIS
Page 21

UTILISATION
Tonte
MISE EN GARDE : Avant de tondre, enlevez
de la zone de tonte toutes les branches et pierres.
De plus, enlevez à l’avance les mauvaises herbes
de la zone de tonte.
MISE EN GARDE : Portez toujours des
lunettes à coques ou des lunettes de sécurité à
écrans latéraux lorsque vous utilisez la tondeuse.
Tenez fermement le guidon de la tondeuse à deux
mains lorsque vous tondez.
Les bords extérieurs des roues avant indiquent approxi-
mativement la largeur de tonte. En vous basant sur les
bords extérieurs des deux roues avant comme largeur
de tonte approximative, tondez en bandes, chaque
bande chevauchant la moitié ou le tiers de la bande
précédente, an de tondre le gazon uniformément.
Vériez régulièrement l’accumulation d’herbe tondue
dans le collecteur d’herbe. Videz le collecteur d’herbe
avant qu’il ne soit plein. Avant chaque vérication périodique, vous devez arrêter la tondeuse puis retirer la clé
de sécurité et la batterie.
NOTE : Si vous tondez avec le collecteur d’herbe
rempli, cela empêchera la lame de tourner de
manière uide et surchargera le moteur, ce qui pour-
rait causer une panne.
Tonte d’une pelouse avec herbes
hautes
N’essayez pas de couper toutes les herbes hautes
d’un seul coup. Tondez plutôt la pelouse en plusieurs
passes. Laissez passer un jour ou deux entre les
tontes, jusqu’à ce que le gazon soit uniformément court.
NOTE : Si vous tondez d’un seul coup les hautes
herbes à une longueur courte, l’herbe risque de mourir. L’herbe coupée peut aussi boucher l’intérieur du
corps de la tondeuse.
Vidage du collecteur d’herbe
MISE EN GARDE : Pour réduire les risques
d’accident, assurez-vous régulièrement que le
collecteur d’herbe n’est pas endommagé et affaibli. Si nécessaire, remplacez le collecteur d’herbe.
1. Relâchez le levier d’interrupteur.
2. Retirez la clé de sécurité.
3. Soulevez la protection arrière et retirez le collec-
teur d’herbe en tenant le guidon.
1
2
► 1. Protection arrière 2. Guidon
4. Videz le collecteur d’herbe.
ENTRETIEN ET
REMISAGE
MISE EN GARDE : Veillez toujours à ce que
la clé de sécurité et la batterie soient retirées de la
tondeuse avant de la remiser ou d’effectuer l’inspection ou l’entretien.
MISE EN GARDE : Retirez toujours la clé de
sécurité lorsque la tondeuse n’est pas utilisée.
Mettez la clé de sécurité dans un endroit sûr, hors
d’atteinte des enfants.
MISE EN GARDE : Portez des gants lorsque
vous effectuez l’inspection ou l’entretien.
AVIS : N’utilisez jamais d’essence, de benzine,
de solvant, d’alcool ou autres produits similaires.
Une décoloration, une déformation ou la forma-
tion de ssures peuvent en découler.
Entretien
1. Retirez la clé de sécurité. Mettez-la dans un
endroit sûr, hors d’atteinte des enfants.
2. Nettoyez la tondeuse uniquement avec un linge
humide. Lors du nettoyage, n’arrosez pas et ne versez
pas d’eau sur la tondeuse.
3. Basculez la tondeuse sur le côté et enlevez les
brins d’herbe accumulés sur la face inférieure du châssis de la tondeuse.
21 FRANÇAIS
Page 22

4. Vériez si tous les écrous, boulons, boutons, vis,
xations, etc. sont bien serrés.
5. Vériez les pièces mobiles pour tout dommage,
casse et usure. Les pièces endommagées ou man-
quantes doivent être réparées ou remplacées.
Remisage
MISE EN GARDE : Pour transporter ou remi-
ser la tondeuse, ne la tenez pas par les guidons
repliés mais par sa poignée avant. Vous risqueriez
de vous blesser gravement ou d’endommager la
tondeuse en la tenant par les guidons repliés.
Avant de remiser la tondeuse, retirez la batterie.
Remisez la tondeuse à l’intérieur dans un endroit froid,
sec et verrouillé. Ne remisez pas la tondeuse et le chargeur dans des emplacements où la température peut
atteindre ou dépasser 40 °C (104 °F).
2. Desserrez les écrous de serrage et ramenez le
guidon supérieur tout en déployant les deux côtés.
2
1
► 1. Écrou de serrage 2. Guidon supérieur
3. Rangez le collecteur d’herbe entre le guidon et le
corps de la tondeuse.
1
► 1. Poignée avant 2. Poignée arrière
1. Desserrez les vis de serrage et déployez le gui-
don inférieur des deux côtés. Abaissez le guidon vers
l’avant. Ce faisant, tenez fermement le guidon inférieur
pour éviter qu’il ne tombe du côté éloigné du corps de la
tondeuse.
2
2
1
► 1. Vis de serrage 2. Guidon inférieur
1
► 1. Collecteur d’herbe
NOTE : Pour mettre la tondeuse debout, ne la tenez
pas par le guidon mais par la poignée avant de la
tondeuse.
Pour maintenir la SÉCURITÉ et la FIABILITÉ du produit, les réparations et tout autre travail d’entretien
ou de réglage doivent être effectués dans un centre
de service après-vente autorisé ou une usine Makita,
exclusivement avec des pièces de rechange Makita.
22 FRANÇAIS
Page 23

DÉPANNAGE
Avant de faire une demande de réparation, faites d’abord votre propre inspection. Si vous rencontrez un problème
non indiqué dans ce manuel, n’essayez pas de démonter l’outil. Demandez plutôt à un centre de service après-vente
Makita agréé de faire la réparation avec des pièces de rechange Makita.
État anormal Cause probable (dysfonctionnement) Solution
La tondeuse ne démarre pas.
Le moteur s’arrête peu après le
début de l’utilisation.
Le moteur ne tourne pas à plein
régime.
L’outil tranchant ne tourne pas :
arrêtez immédiatement la ton-
deuse !
Vibrations anormales :
arrêtez immédiatement la ton-
deuse !
Les deux batteries ne sont pas installées.
Problème de batterie (sous-tension) Rechargez la batterie. Si la recharge est sans effet,
La clé de sécurité n’est pas insérée. Insérez la clé de sécurité.
La batterie est faible. Rechargez la batterie. Si la recharge est sans effet,
La hauteur de tonte est trop basse. Augmentez la hauteur de tonte.
La batterie n’est pas bien installée. Installez la batterie en suivant les instructions de
La puissance de la batterie diminue. Rechargez la batterie. Si la recharge est sans effet,
Le dispositif d’entraînement ne fonctionne pas bien.
Un corps étranger tel qu’une branche
est coincé près de la lame.
Le dispositif d’entraînement ne fonctionne pas bien.
La lame est déséquilibrée, trop usée ou
usée de manière inégale.
Installez des batteries chargées.
remplacez la batterie.
remplacez la batterie.
ce manuel.
remplacez la batterie.
Demandez à votre centre de service après-vente
agréé de faire la réparation.
Retirez le corps étranger.
Demandez à votre centre de service après-vente
agréé de faire la réparation.
Remplacez la lame.
ACCESSOIRES EN OPTION
ATTENTION :
plémentaires sont recommandés pour l’utilisation avec
l’outil Makita spécié dans ce manuel. L’utilisation de tout
autre accessoire ou pièce complémentaire peut comporter
un risque de blessure. N’utilisez les accessoires ou pièces
complémentaires qu’aux ns auxquelles ils ont été conçus.
Si vous désirez obtenir plus de détails sur ces accessoires, veuillez contacter le centre de service aprèsvente Makita le plus près.
• Lame de tondeuse
• Chargeur et batterie authentiques Makita
NOTE : Certains éléments de la liste peuvent être
inclus avec l’outil comme accessoires standards. Ils
peuvent varier suivant les pays.
GARANTIE LIMITÉE D’UN AN DE
MAKITA
Politique de garantie
Tous les outils Makita sont soigneusement inspectés et mis
à l’essai avant de quitter l’usine. Ils sont garantis contre les
vices de fabrication et de matériau pour une période d’UN AN
suivant la date de l’achat original. Si un problème survient
pendant cette période d’un an, retournez l’outil COMPLET, fret
payé d’avance, à une usine ou un centre de service aprèsvente autorisé Makita. S’il ressort de l’inspection que le problème est dû à un vice de fabrication ou de matériau, Makita
réparera (ou remplacera, à son gré) l’outil gratuitement.
Ces accessoires ou pièces com-
Cette garantie ne s’applique pas dans les cas où :
• des réparations ont été effectuées ou tentées par
un tiers;
• des réparations sont nécessaires en raison de
l’usure normale;
• l’outil a été malmené, mal utilisé ou non adéquatement entretenu;
• l’outil a subi des modications.
MAKITA NE SERA EN AUCUN CAS RESPONSABLE
DE TOUS DOMMAGES INDIRECTS, ACCESSOIRES
OU CONSÉCUTIFS DE LA VENTE OU DE
L’UTILISATION DU PRODUIT. CET AVIS DE NONRESPONSABILITÉ S’APPLIQUE PENDANT ET
APRÈS LA PÉRIODE COUVERTE PAR CETTE
GARANTIE.
MAKITA DÉCLINE TOUTE RESPONSABILITÉ QUANT
À TOUTES GARANTIES IMPLICITES, Y COMPRIS
LES GARANTIES DE « QUALITÉ MARCHANDE »
OU D’« ADAPTATION À UN USAGE PARTICULIER »
APRÈS LA PÉRIODE DE GARANTIE D’UN AN.
Cette garantie vous donne des droits légaux spéci-
ques, et vous pouvez également avoir d’autres droits
qui varient d’une province à l’autre. Certaines provinces
n’autorisant pas l’exclusion ou la restriction des dommages accessoires ou consécutifs, il se peut que la
restriction ou l’exclusion ci-dessus ne s’applique pas à
vous. Certaines provinces n’autorisant pas de restriction quant à la durée des garanties implicites, il se peut
que la restriction ci-dessus ne s’applique pas à vous.
23 FRANÇAIS
Page 24

ESPAÑOL (Instrucciones originales)
ESPECIFICACIONES
Modelo: DLM431
Amplitud de corte del césped (diámetro de la cuchilla) 430 mm (17″)
Velocidad sin carga 3 600 r/min
Dimensiones
(La x An x Al)
Tensión nominal 36 V c.c.
Cartucho(s) de batería estándar
Advertencia: Use sólo el (los) cartucho(s) de batería
indicado(s).
Peso neto 18,1 kg (39,8 lbs) 18,7 kg (41,2 lbs)
• Debido a nuestro programa continuo de investigación y desarrollo, las especicaciones aquí dadas están
sujetas a cambios sin previo aviso.
• Las especicaciones y el cartucho de batería pueden variar de país a país.
• Peso de acuerdo al procedimiento de EPTA-01/2003 incluyendo el cartucho de batería
INSTRUCCIONES IMPORTANTES
DE SEGURIDAD
ADVERTENCIA: Al utilizar cortadoras de
césped eléctricas, siempre deben tomarse en
cuenta las precauciones básicas de seguridad
a n de reducir el riesgo de incendio, descarga
eléctrica y lesiones personales, incluyendo lo
siguiente.
Lea todas las instrucciones
Lea, comprenda y siga todas las instrucciones en la cortadora de césped y en los manuales de instrucciones.
Familiarícese detalladamente con los controles y el uso
apropiado de la cortadora de césped antes de empezar.
¡ADVERTENCIA!
1. Evite los entornos peligrosos - Nunca use
la cortadora de césped en lugares húmedos o
mojados. Asegúrese siempre de pisar sobre suelo
rme: mantenga una sujeción rme del mango y
camine; nunca corra.
2. No usar bajo la lluvia.
3. Mantenga a los niños alejados - Todos los visi-
tantes deberán ser mantenidos a una distancia
segura del área de trabajo. Esté alerta y apague
la cortadora de césped si algún niño ingresa al
área. Tenga especial cuidado al aproximarse a
esquinas poco visibles, arbustos, árboles u otros
objetos que le impidan divisar a algún niño.
4. Use vestimenta adecuada - No use prendas
sueltas ni joyas. Éstas podrían engancharse en
las piezas móviles. Cuando se trabaje en exterio-
res es recomendable usar guantes de hule y un
calzado resistente. No opere la cortadora de césped estando descalzo o con sandalias abiertas.
5. Use gafas de seguridad - Siempre utilice
careta o máscara contra polvo si la operación es
polvorienta.
durante la operación
durante el almacenamiento
(sin el canasto para césped)
Máx. 1 490 mm x 460 mm x 1 020 mm (58-3/4″ x 18-1/8″ x 40-1/4″)
Mín. 1 450 mm x 460 mm x 950 mm (57″ x 18-1/8″ x 37-1/2″)
490 mm x 460 mm x 910 mm (19-1/4″ x 18-1/8″ x 35-3/4″)
BL1815N/BL1820B BL1830/BL1830B/BL1840B/
6. Use el aparato indicado - No utilice la cortadora
de césped para cualquier trabajo excepto para el
que fue diseñada.
7. No fuerce la cortadora de césped - Ésta hará el
trabajo mejor y de forma más segura a la velocidad para la que fue diseñada.
8. No utilice el aparato donde no alcance -
Mantenga los pies sobre suelo rme y el equilibrio
en todo momento. No pode cerca de declives,
zanjas o diques. Podría perder su equilibrio o su
estabilidad al pisar.
9. Manténgase alerta - Preste atención a lo que
está haciendo. Use el sentido común. No utilice
la cortadora de césped cuando esté cansado. No
opere la máquina cuando esté bajo la inuencia
de alcohol o drogas. Un momento de distracción
mientras opera la cortadora de césped puede
ocasionar lesiones personales graves.
10. Desconecte la cortadora de césped -
Desconecte la cortadora de césped del suministro
eléctrico o quite la batería si no la está usando,
y antes de dar mantenimiento, limpiarla, retirar
material acumulado en la cortadora de césped
o reemplazar accesorios tales como cuchillas y
similares.
11. Almacene la cortadora de césped en interiores
cuando no esté en uso - Cuando no se esté
utilizando, la cortadora de césped deberá almacenarse en interiores en un lugar seco, bajo llave y
fuera del alcance de los niños.
12. Dé un debido mantenimiento a la cortadora de
césped - Mantenga los bordes de corte alados y
limpios para un mejor desempeño y mayor segu-
ridad. Siga las instrucciones para la lubricación y
cambio de accesorios. Inspeccione la cortadora
de césped periódicamente y en caso de presentar daños, solicite su reparación a un centro de
servicio autorizado. Mantenga los mangos secos,
limpios y libres de aceite y grasa.
24 ESPAÑOL
BL1850B/BL1860B
Page 25

13. Mantenga la máquina libre de la acumulación
de césped, hojas y otros residuos.Conserve
los protectores en su lugar y en buenas condiciones de funcionamiento.
14. Mantenga las cuchillas aladas.
15. Mantenga las manos y los pies alejados del
área de corte. Manténgase alejado de la abertura de descarga en todo momento.
16. Los objetos que sean golpeados por la cuchilla de la cortadora de césped pueden causar
lesiones personales graves. El césped debe
ser examinado cuidadosamente y despejado
de cualquier objeto antes de proceder a cortarlo. Manténgase detrás del mango cuando el
motor esté funcionando.
17. Si la cortadora de césped llega a golpear algún
objeto extraño, siga los pasos a continuación:
• Pare la cortadora de césped. Suelte el
interruptor. Espere hasta que la cuchilla se
detenga por completo.
• Retire la llave y el cartucho de batería.
• Inspeccione la cortadora de césped para ver
si hay algún daño.
• Repare cualquier daño antes de reiniciar y
usar la cortadora de césped. Remplace la
cuchilla si presenta algún tipo de daño.
18. Use solamente cuchillas de repuesto
idénticas.
19. Esta máquina cortadora es capaz de amputar
las manos y los pies, así como de lanzar objetos. El no seguir las instrucciones de seguridad indicadas a continuación podría ocasionar
lesiones graves o la muerte.
20. Solamente permita que los adultos responsables que estén familiarizados con las instrucciones operen la cortadora de césped.
21. Asegúrese de que no haya otras personas en
el área de trabajo antes de cortar el césped.
Detenga la cortadora de césped en caso de
que alguna persona ingrese al área.
22. Nunca dirija el material de desecho hacia ninguna persona. Evite descargar el material de
desecho contra alguna pared u obstrucción.
El material puede rebotar y dirigirse al operador.
Detenga la cuchilla al atravesar supercies con
grava.
23. No jale la cortadora de césped hacia atrás
a menos que sea absolutamente necesario.
Cuando sienta que debe hacer retroceder la cor-
tadora de césped para alejarla de alguna valla u
obstrucción similar, mire hacia abajo y detrás de
usted antes de desplazarse hacia atrás.
24. Libere la palanca interruptora y espere a que
la rotación de la cuchilla se detenga antes de
cruzar avenidas, caminos, calles y cualquier
área cubierta con grava. También retire la llave
en caso de dejar la cortadora de césped para
levantar o quitar algo del camino, o por alguna
otra razón que pueda distraerlo de lo que está
haciendo.
25. No opere la máquina sin que el recolector de
césped, protector de descarga, protector trasero o cualquier otro dispositivo de seguridad
estén en su lugar y funcionando.
26. Pare el motor y retire la llave siempre que deje
el equipo, antes de limpiar la cortadora de césped o despejar alguna obstrucción en la tolva
y efectuar alguna reparación o inspección.
27. Apague el motor y espere a que la cuchilla se
haya detenido por completo antes de quitar el
recolector de césped. Tenga en cuenta que las
cuchillas siguen girando por inercia después de
apagar la herramienta.
28. Corte el césped solamente a la luz del día o en
buenas condiciones de iluminación articial.
29. Antes de arrancar el motor, desactive el mecanismo de autopropulsión o el embrague de operación en la cortadora de césped.
30. Si por alguna razón el equipo comienza a
vibrar de manera anormal, pare el motor y
revise de inmediato para detectar la causa.
Generalmente la vibración es señal de que hay
algún problema.
31. No inserte la llave en la cortadora de césped
hasta que esté lista para usarse.
32. No sujete las cuchillas ni los bordes de corte
expuestos al levantar o sostener el aparato.
33. Revise cuidadosamente si hay daños o grietas en las cuchillas antes de la operación.
Reemplace inmediatamente las cuchillas que
presenten grietas o daños.
34. Nunca intente hacer ajustes en la altura de la
rueda mientras la cortadora de césped esté
funcionando.
35. Revise el canasto para césped con frecuencia
para ver si presenta desgaste o deterioro. Al
almacenar el equipo, asegúrese siempre de
vaciar el canasto para césped. Por seguridad,
reemplace un canasto para césped desgastado
con un repuesto nuevo de fábrica.
36.
Verique con frecuencia los componentes del
canasto para césped y el protector de descarga
y reemplace con las piezas de repuesto recomendadas por el fabricante en caso necesario.
37.
Corte el césped transversalmente a través de
las pendientes, nunca hacia arriba ni hacia
abajo. Aplique extrema precaución al cambiar la
dirección en las pendientes. Evite cortar el césped en pendientes excesivamente inclinadas.
38. Esté alerta de hoyos, surcos, protuberancias,
piedras u otros objetos ocultos. Las supercies
no niveladas pueden ocasionar resbalones y
caídas accidentales. El césped alto puede ocultar
algunos obstáculos.
39. No pode sobre césped mojado o en pendientes
excesivamente pronunciadas. El no pisar sobre
suelo rme puede ocasionar resbalones y caídas
accidentales.
40. No lave el equipo con una manguera; evite
que ingrese el agua al motor y las conexiones
eléctricas.
41. Revise el perno de instalación de la cuchilla a
intervalos frecuentes para asegurar una jación apropiada.
42. Mantenga apretadas todas las tuercas, pernos y tornillos para asegurar que el equipo
se encuentre en condiciones seguras de
operación.
25 ESPAÑOL
Page 26

43. Nunca quite ni altere los dispositivos de
seguridad. Verique con regularidad que funcionen correctamente. Nunca haga nada que
interera con la función para la que un dispositivo de seguridad fue diseñado, ni reduzca la
protección ofrecida por algún dispositivo de
seguridad.
44. Mantenga en su lugar o vuelva a colocar las
etiquetas de seguridad y de instrucciones
según se requiera.
45. Uso y cuidado de la herramienta a batería
• Recargue sólo con el cargador especi-
cado por el fabricante. Un cargador ade-
cuado para un tipo de cartucho de batería
especíco puede ocasionar riesgo de incendio al usarse con otro cartucho de batería.
• No cargue la cortadora de césped bajo la
lluvia ni en lugares húmedos.
• Al cambiar baterías, todas las baterías
deberán ser cambiadas al mismo tiempo.
Mezclar baterías nuevas con descargadas
podría aumentar la presión interna en las
celdas y romper la batería descargada.
• Use las herramientas eléctricas sólo con
sus cartuchos de batería designados
especícamente para éstas. El uso de
cualquier otro cartucho de batería puede
ocasionar riesgo de lesiones e incendio.
• Cuando no se esté usando el cartucho
de batería, manténgalo alejado de otros
objetos metálicos, como sujetapapeles
(clips), monedas, llaves, clavos, tornillos
u otros objetos pequeños de metal los
cuales pueden actuar creando una conexión entre las terminales. Ocasionar un
cortocircuito en las terminales de la batería
puede provocar quemaduras o incendios.
• En condiciones de abuso, podría expul-
sarse líquido de la batería; evite el contacto. En caso de contacto accidental,
enjuague con agua. Si el líquido entra en
contacto con los ojos, solicite adicionalmente atención médica. El líquido expul-
sado de la batería puede causar irritación o
quemaduras.
GUARDE ESTAS
INSTRUCCIONES.
ADVERTENCIA: El uso de este producto
puede producir polvo que contenga sustancias
químicas que podrían causar enfermedades
respiratorias o de otro tipo. Algunos ejemplos de
estas sustancias químicas son los compuestos
encontrados en pesticidas, insecticidas, fertilizantes y herbicidas.
El riesgo al que se expone varía, dependiendo
de la frecuencia con la que realice este tipo de
trabajo. Para reducir la exposición a estas sustancias químicas: trabaje en un área bien ventilada y use un equipo de seguridad aprobado,
tal como las máscaras contra polvo que están
especialmente diseñadas para ltrar partículas
microscópicas.
Símbolos
A continuación se muestran los símbolos utilizados
para la herramienta.
volts o voltios
corriente directa o continua
velocidad sin carga
revoluciones o alternaciones por minuto,
frecuencia de rotación
Instrucciones importantes de
seguridad para el cartucho de
batería
1. Antes de utilizar el cartucho de batería, lea
todas las instrucciones e indicaciones de
precaución en el (1) el cargador de batería, (2)
la batería, y (3) el producto con el que se utiliza
la batería.
2. No desarme el cartucho de batería.
3. Si el tiempo de operación se ha acortado en
exceso, deje de operar de inmediato. Podría
correrse el riesgo de sobrecalentamiento,
posibles quemaduras e incluso explosión.
4. En caso de que ingresen electrolitos en sus
ojos, enjuáguelos bien con agua limpia y consulte de inmediato a un médico. Esto podría
ocasionar pérdida de visión.
5. Evite cortocircuitar el cartucho de batería:
(1) No toque las terminales con ningún mate-
rial conductor.
(2) Evite guardar el cartucho de batería en un
cajón junto con otros objetos metálicos,
tales como clavos, monedas, etc.
(3) No exponga el cartucho de batería al
agua o la lluvia.
Un cortocircuito en la batería puede causar
un ujo grande de corriente, sobrecalentamiento, posibles quemaduras e incluso una
descompostura.
6. No guarde la herramienta ni el cartucho de
batería en lugares donde la temperatura pueda
alcanzar o exceder los 50°C (122°F).
7. Nunca incinere el cartucho de batería incluso
en el caso de que esté dañado seriamente o
ya no sirva en absoluto. El cartucho de batería
puede explotar si se tira al fuego.
8. Tenga cuidado de no dejar caer ni golpear la
batería.
9. No use una batería dañada.
10. Las baterías de ión de litio están sujetas a los
requisitos reglamentarios en materia de bienes peligrosos.
Para el trasporte comercial, por ej., mediante
terceros o agentes de transporte, se deben tomar
en cuenta los requisitos especiales relativos al
empaque y el etiquetado.
26 ESPAÑOL
Page 27

Para efectuar los preparativos del artículo que se
va a enviar, se requiere consultar a un experto
en materiales peligrosos. Si es posible, consulte
además otras regulaciones nacionales más detalladas.
Pegue o cubra con cinta adhesiva los contactos
abiertos y empaque la batería de manera que ésta
no pueda moverse dentro del paquete.
11. Siga las regulaciones locales relacionadas al
desecho de las baterías.
GUARDE ESTAS
INSTRUCCIONES.
PRECAUCIÓN: Utilice únicamente baterías
originales de Makita. El uso de baterías no origina-
les de Makita, o de baterías alteradas, puede ocasionar que las baterías exploten causando un incendio,
lesiones personales y daños. Asimismo, esto invalidará la garantía de Makita para la herramienta y el
cargador Makita.
Consejos para alargar al máximo
la vida útil de la batería
1. Cargue el cartucho de batería antes de que
se descargue completamente. Pare siempre la operación y cargue el cartucho de
batería cuando note menos potencia en la
herramienta.
2. No cargue nunca un cartucho de batería que
esté completamente cargado. La sobrecarga
acortará la vida de servicio de la batería.
3. Cargue el cartucho de batería a una temperatura ambiente de 10 °C - 40 °C (50 °F - 104 °F).
Si un cartucho de batería está caliente, déjelo
enfriar antes de cargarlo.
4. Cargue el cartucho de batería si no va a utilizarlo durante un período prolongado (más de
seis meses).
DESCRIPCIÓN DEL
FUNCIONAMIENTO
Instalación o extracción del
cartucho de batería
PRECAUCIÓN: Apague siempre la herra-
mienta antes de instalar o extraer el cartucho de
batería.
PRECAUCIÓN: Asegúrese de haber asegu-
rado la cubierta de la batería antes de utilizar el
equipo. De lo contrario, el lodo, la tierra o el agua
pueden causar daños al producto o al cartucho de
batería.
PRECAUCIÓN: Siempre introduzca com-
pletamente el cartucho de batería hasta que el
indicador rojo no pueda verse. De no hacerlo, éste
podría salirse y caer accidentalmente de la herra-
mienta ocasionándole lesiones a usted o a alguien
cerca de usted.
PRECAUCIÓN: No instale el cartucho de
batería a la fuerza. Si el cartucho no se desliza hacia
adentro fácilmente, esto se debe a que no ha sido
insertado correctamente.
NOTA: La herramienta no funciona con solo un cartucho de batería.
Para instalar el cartucho de batería;
1. Deslice la palanca de bloqueo de la cubierta de la
batería y abra la cubierta de la batería.
1
► 1. Cubierta de la batería 2. Palanca de bloqueo de
la cubierta de la batería
2. Alinee la lengüeta sobre el cartucho de batería
con la ranura en la cortadora de césped y luego deslice
el cartucho hasta que quede asegurado en su lugar y
se escuche un clic. Si puede ver el indicador rojo en el
lado superior del botón, esto indica que el cartucho de
batería no ha quedado asegurado por completo.
27 ESPAÑOL
2
Page 28

1
► 1. Cartucho de batería
3. Inserte la llave de cierre hasta el fondo en el lugar
que se muestra en la gura.
1
► 1. Llave de cierre
4. Cierre la cubierta de la batería y empújela hasta
que quede trabada con la palanca de bloqueo.
Para quitar el cartucho de batería de la cortadora
de césped;
1. Deslice la palanca de bloqueo de la cubierta de la
batería y abra la cubierta de la batería.
2. Jale el cartucho de batería para extraerlo de la
cortadora de césped mientras desliza el botón en la
parte delantera del cartucho.
3. Saque la llave de cierre.
4. Cierre la cubierta de la batería.
Sistema de protección para la
herramienta/batería
La herramienta está equipada con un sistema de protección para la herramienta/batería. Este sistema corta
en forma automática el suministro de energía al motor
para prolongar la vida útil de la herramienta y la batería.
La herramienta se detendrá automáticamente durante
la operación si la herramienta o la batería se someten a
una de las siguientes condiciones. En algunas condiciones, los indicadores pueden encenderse.
Protección contra sobrecarga
Cuando la herramienta se está utilizando de manera
que causa que consuma una cantidad de corriente
inusualmente alta, la herramienta se detiene auto-
máticamente sin que haya indicación alguna. En este
caso, apague la herramienta y detenga la aplicación
que causó que la herramienta se sobrecargara. Luego
encienda la herramienta para reiniciarla.
Protección contra
sobrecalentamiento
Cuando la herramienta se sobrecalienta, ésta se
detiene automáticamente. Espere a que la herramienta
se enfríe antes de volver a encenderla.
Protección contra sobredescarga
Cuando la capacidad de la batería se reduce, la herra-
mienta se detiene automáticamente. Si el producto
no funciona incluso cuando los interruptores están
siendo operados, retire las baterías de la herramienta
y cárguelas.
Indicación de capacidad restante de
la batería
1
2
► 1. Indicador de batería 2. Botón de vericación
Oprima el botón de vericación para indicar las capa-
cidades restantes de la batería. Los indicadores de
batería corresponden a cada batería.
Estado del indicador de batería
Encendido
Apagado
Capacidad res-
tante de la batería
50% - 100%
20% - 50%
28 ESPAÑOL
0% - 20%
Page 29

Indicación de la capacidad restante
de la batería
Únicamente para cartuchos de batería con el indicador
1
2
► 1. Luces indicadoras 2. Botón de vericación
Oprima el botón de vericación en el cartucho de la batería
para que indique la capacidad restante de la batería. Las
luces indicadoras se iluminarán por algunos segundos.
Luces indicadoras Capacidad
Iluminadas Apagadas Parpadeando
restante
75% a 100%
50% a 75%
25% a 50%
Esta cortadora de césped está equipada con un
interruptor de interbloqueo y un mango interruptor. Si
observa alguna anomalía con cualquiera de estos interruptores, detenga la operación de inmediato y llévelos
a su centro de servicio autorizado Makita más cercano
para su inspección.
1. Instale los cartuchos de batería. Inserte la llave de
cierre en el interruptor de interbloqueo y luego cierre la
cubierta de la batería.
21
► 1. Cartucho de batería 2. Llave de cierre
2.
Oprima el botón interruptor y manténgalo presionado.
3.
Tome el mango superior y jale la palanca interruptora.
1
2
0% a 25%
Cargar la
batería.
La batería
pudo haber
funcionado
mal.
NOTA: Dependiendo de las condiciones de uso y
la temperatura ambiente, la indicación podrá diferir
ligeramente de la capacidad real.
Accionamiento del interruptor
ADVERTENCIA: Antes de insertar el car-
tucho de batería, compruebe siempre que la
palanca interruptora se acciona debidamente y
que regresa a la posición original una vez que
la suelta. Usar una herramienta con un interruptor
que no funciona adecuadamente puede ocasionar la
pérdida del control y lesiones personales graves.
NOTA:
La cortadora de césped no arranca si no se presiona el
botón interruptor incluso al estar jalando la palanca interruptora.
NOTA:
La cortadora de césped no arranca debido a la
sobrecarga al intentar cortar césped largo o grueso de
una sola vez. En este caso, aumente la altura de corte.
► 1. Botón interruptor 2. Palanca interruptora
4. Suelte el botón interruptor tan pronto como el
motor arranque. La cortadora de césped continuará
funcionando hasta que usted suelte la palanca
interruptora.
5. Suelte la palanca interruptora para detener el
motor.
Ajuste de la altura de corte del
césped
ADVERTENCIA: Nunca coloque su mano o
pierna debajo del cuerpo de la cortadora de césped cuando esté ajustando la altura de corte del
césped.
ADVERTENCIA: Asegúrese siempre de que
la palanca encaje correctamente en la ranura
antes de la operación.
La altura de corte del césped puede ajustarse en un
rango entre 20 mm (13/16″) - 75 mm (2-15/16″).
29 ESPAÑOL
Page 30

1. Quite la llave de cierre.
2. Jale la palanca de ajuste de la altura de corte
del césped hacia afuera del cuerpo de la cortadora de
césped y muévala hasta la altura de corte deseada.
2
3
1
► 1. Palanca de ajuste de la altura de corte del
césped
NOTA: Las guras que muestran la altura de corte
del césped deben usarse únicamente como guía.
Dependiendo de las condiciones del césped o el
suelo, la altura real del césped puede variar ligeramente de la altura establecida.
NOTA: Procure realizar una prueba de corte de césped en un lugar menos evidente a n de conseguir la
altura de corte deseada.
MONTAJE
ADVERTENCIA: Asegúrese siempre de que
la llave de cierre y el cartucho de batería se hayan
extraído antes de realizar cualquier trabajo en la
cortadora de césped. El no extraer la llave de cierre
y el cartucho de batería puede ocasionar lesiones
personales graves debido a un encendido accidental.
ADVERTENCIA: Nunca ponga en marcha la
cortadora de césped a menos que se encuentre
completamente ensamblada. La operación de
herramientas parcialmente ensambladas puede
ocasionar lesiones personales graves debido a un
encendido accidental.
1
► 1. Protuberancia 2. Oricio 3. Cubierta de la batería
2. Coloque sus manos en medio de la cubierta de la
batería y presiónela.
3. Antes de realizar la primera operación, com-
pruebe que el punto de pivote de la cubierta de la batería esté ensamblado apropiadamente. Si la cubierta de
la batería está instalada en forma correcta, ésta no se
abrirá hasta que la palanca de bloqueo de la cubierta
de la batería sea jalada.
1
2
Instalación de la cubierta de la
batería
ADVERTENCIA: No inserte la llave de cie-
rre y el cartucho de batería antes de instalar la
cubierta de la batería. El hacerlo podría causar
lesiones graves.
Instale en su totalidad la cubierta de la batería antes
de la operación. La cubierta de la batería protege a la
cortadora de césped y al cartucho de batería contra el
lodo, la tierra y el agua.
1. Coloque la cubierta de la batería alineando las
protuberancias en la cortadora de césped con los oricios en la cubierta de la batería.
► 1. Punto de pivote 2. Palanca de bloqueo de la
cubierta de la batería
Instalación del mango
AVISO: Cuando instale los mangos, posicione
los cables de tal manera que no queden enganchados con nada entre los mangos. Si un cable
está dañado, el interruptor de la cortadora de
césped podría no funcionar.
30 ESPAÑOL
Page 31

1. Deslice ambos extremos del mango inferior en las
ranuras de la cortadora de césped y luego apriete lo
más que se pueda los tornillos de jación.
Extracción o instalación de la
cuchilla de la cortadora de césped
1
2
► 1. Tornillo de jación 2. Mango inferior
2. Alinee los oricios para los tornillos en el mango
superior con aquellos en el mango inferior. Asegúrelos
con los tornillos y las tuercas de jación.
2
2
1
► 1. Tuerca de jación 2. Tornillo de jación
NOTA: Sujete rmemente el mango superior de tal
forma que no se desprenda de su mano.
3. Fije los soportes al mango. Coloque el cable de
alimentación tal como se muestra en la gura.
ADVERTENCIA:
cierre y el cartucho de batería al extraer o instalar
la cuchilla. El no retirar la llave de cierre y el cartucho de batería puede ocasionar lesiones graves.
Retire siempre la llave de
ADVERTENCIA: La cuchilla continuará
moviéndose por inercia durante algunos segundos tras haber soltado el interruptor. No realice
ninguna operación hasta que la cuchilla se haya
detenido por completo.
ADVERTENCIA: Use siempre guantes al
manipular la cuchilla.
Para retirar la cuchilla de la cortadora de césped, siga
los pasos a continuación.
1. Coloque de lado la cortadora de césped de tal
forma que la palanca de ajuste de la altura de corte del
césped quede orientada hacia el lado de arriba.
2. Para bloquear la rotación de la cuchilla, inserte un
destornillador o herramienta similar en uno de los ori-
cios en la base de la cuchilla.
3. Gire el perno con la llave en sentido inverso al de
las manecillas del reloj.
1
2
► 1. Cuchilla de la cortadora de césped
2. Destornillador 3. Llave
3
► 1. Soporte
1
4. Retire el perno, la brida exterior, la cuchilla de la
cortadora de césped y la brida interior en orden.
1
2
5
3
4
► 1. Brida interior 2. Flecha de dirección de giro
3. Brida exterior 4. Perno 5. Cuchilla de la cortadora
de césped
31 ESPAÑOL
Page 32

Para instalar la cuchilla de la cortadora de césped, siga
el procedimiento de extracción en orden inverso.
ADVERTENCIA: Instale la cuchilla con
cuidado. Ésta tiene una cara superior e inferior.
Coloque la cuchilla de manera que la echa de
dirección de giro quede orientada hacia afuera.
ADVERTENCIA: Apriete el perno rmemente
en el sentido de las manecillas del reloj para
asegurar la cuchilla.
ADVERTENCIA: Asegúrese de que la cuchi-
lla y todas las piezas de jación sean instaladas
correctamente y apretadas rmemente.
ADVERTENCIA: Para reemplazar las cuchi-
llas, siempre siga las instrucciones proporcionadas en este manual.
Instalación del canasto para césped
1. Quite la llave de cierre.
2. Levante el protector trasero del cuerpo de la
cortadora de césped.
3. Enganche el canasto para césped en la ranura del
cuerpo de la cortadora de césped tal como se muestra
en la gura.
1
2
OPERACIÓN
Corte del césped
ADVERTENCIA: Antes de cortar el césped,
despeje las ramas y piedras del área de podado.
Asimismo, despeje con antelación cualquier
maleza en el área de podado.
ADVERTENCIA: Use siempre gafas protecto-
ras o gafas de seguridad con protección lateral al
usar la cortadora de césped.
Sujete con rmeza el mango de la cortadora de césped
con ambas manos durante el podado.
Los bordes exteriores de las ruedas delanteras sirven
como línea de guía para la amplitud de corte del césped. Usando los bordes exteriores de las dos ruedas
delanteras como línea de guía, pode en franjas, traslapando de una mitad a un tercio de la franja previa
cortada para un podado uniforme.
Revise periódicamente el canasto para césped para ver
el nivel de pasto podado. Vacíe el canasto para césped
antes de que se llene. Antes de cada revisión periódica,
asegúrese de apagar la cortadora de césped y retire la
llave de cierre y el cartucho de batería.
NOTA: El uso de la cortadora de césped con el
canasto para césped lleno impide una rotación uniforme de la cuchilla e implica una sobrecarga del
motor que puede causar alguna avería.
3
► 1. Gancho 2. Ranura 3. Canasto para césped
Corte de césped largo
No intente cortar césped largo en una sola pasada. En
vez de esto, corte el césped en distintas etapas. Deje
pasar uno o dos días entre cada podada hasta que el
césped quede corto y uniforme.
NOTA: Cortar césped largo para lograr que quede
corto en una sola pasada puede causar que el cés-
ped se marchite. Además de que el césped podado
puede causar una obstrucción en el interior del
cuerpo de la cortadora de césped.
32 ESPAÑOL
Page 33

Vaciado del canasto para césped
ADVERTENCIA:
dentes, revise regularmente el canasto para césped
para ver si no hay daños o ha perdido resistencia.
Reemplace el canasto para césped en caso necesario.
1. Suelte la palanca interruptora.
2. Quite la llave de cierre.
3. Levante el protector trasero y retire el canasto
para césped tomándolo del mango.
Para reducir el riesgo de acci-
1
5. Inspeccione las piezas móviles para ver que no
haya daños, roturas o desgastes. Las piezas dañadas o
faltantes deberán ser reparadas o reemplazadas.
Almacenamiento
ADVERTENCIA: Al transportar o almacenar
la cortadora de césped, no la tome de los mangos
plegados sino de la empuñadura delantera de la
cortadora de césped. Tomarla de los mangos ple-
gados puede ocasionar lesiones graves o daños a la
cortadora de césped.
Antes de almacenar la cortadora de césped, extraiga el
cartucho de batería de ésta.
Almacene la cortadora de césped en interiores en un
lugar fresco, seco y bajo llave. No almacene la corta-
dora de césped ni el cargador en lugares donde la temperatura pueda alcanzar o exceder los 40 °C (104 °F).
2
► 1. Protector trasero 2. Mango
4. Vacíe el canasto para césped.
MANTENIMIENTO Y
ALMACENAMIENTO
ADVERTENCIA:
extraído la llave de cierre y el cartucho de batería
de la cortadora de césped antes de almacenarla,
realizar una inspección o darle mantenimiento.
ADVERTENCIA: Siempre retire la llave de
cierre cuando no vaya a utilizar la cortadora de
césped. Almacene la llave de cierre en un lugar
seguro fuera del alcance de los niños.
ADVERTENCIA: Use guantes al realizar una
inspección o dar mantenimiento.
AVISO: Nunca use gasolina, bencina, diluyente
(tíner), alcohol o sustancias similares. Puede que
esto ocasione grietas o descoloramiento.
Mantenimiento
1. Quite la llave de cierre. Almacénela en un lugar
seguro fuera del alcance de los niños.
2. Limpie la cortadora de césped usando solamente
un paño húmedo. No rocíe ni vierta agua en la cortadora de césped al limpiarla.
3. Coloque de lado la cortadora de césped y elimine
los residuos de césped que se hayan acumulado en la
parte interna de la carcasa de la cortadora de césped.
4. Revise que todas las tuercas, pernos, perillas,
tornillos, sujetadores, etc., estén bien apretados.
Asegúrese siempre de haber
1
► 1. Empuñadura delantera 2. Empuñadura trasera
1. Aoje los tornillos de jación y extienda el mango
inferior a ambos lados. Mueva abajo el mango hacia
adelante. En ese momento, sujete rmemente el mango
inferior de manera que no caiga en el lado alejado del
cuerpo de la cortadora de césped.
1
► 1. Tornillo de jación 2. Mango inferior
2. Aoje las tuercas de jación y gire el mango supe-
rior hacia atrás mientras lo extiende a ambos lados.
33 ESPAÑOL
2
2
Page 34

2
1
1
► 1. Tuerca de jación 2. Mango superior
3. Almacene el canasto para césped entre el mango
y el cuerpo de la cortadora de césped.
► 1. Canasto para césped
NOTA: Cuando coloque la cortadora de césped en
posición vertical, en vez de sujetar el mango utilice la
empuñadura delantera de la cortadora de césped.
Para mantener la SEGURIDAD y FIABILIDAD del producto, las reparaciones, y cualquier otra tarea de man-
tenimiento o ajuste deberán ser realizadas en centros
de servicio autorizados o de fábrica Makita, empleando
siempre repuestos Makita.
RESOLUCIÓN DE PROBLEMAS
Antes de solicitar alguna reparación, primero realice una inspección por su cuenta. Si detecta algún problema que
no esté explicado en el manual, no intente desensamblar la herramienta. En vez de esto, solicite la reparación a un
centro de servicio autorizado de Makita, usando siempre piezas de repuesto Makita.
Estado de la anomalía Causa probable (avería) Remedio
La cortadora de césped no arranca. No se han instalado dos cartuchos de
El motor deja de funcionar al poco
tiempo de uso.
El motor no alcanza el nivel máximo
de RPM.
La herramienta de corte no gira:
¡detenga la cortadora de césped
de inmediato!
Vibración anormal:
¡detenga la cortadora de césped
de inmediato!
batería.
Problema con la batería (bajo voltaje) Recargue el cartucho de batería. Si la recarga no
La llave de cierre no está insertada. Inserte la llave de cierre.
El nivel de carga de la batería es bajo. Recargue el cartucho de batería. Si la recarga no
La altura de corte es demasiado baja. Aumente la altura de corte.
El cartucho de batería no está instalado
correctamente.
La potencia de la batería está
disminuyendo.
El sistema de activación no funciona
correctamente.
Se ha atorado un objeto extraño como
una rama cerca de la cuchilla.
El sistema de activación no funciona
correctamente.
La cuchilla está desbalanceada o
desgastada de manera excesiva o no
uniforme.
Instale los cartuchos de batería cargados.
funciona, reemplace el cartucho de batería.
funciona, reemplace el cartucho de batería.
Instale el cartucho de batería como se describe en
este manual.
Recargue el cartucho de batería. Si la recarga no
funciona, reemplace el cartucho de batería.
Solicite la reparación al centro de servicio autorizado de su localidad.
Retire el objeto extraño.
Solicite la reparación al centro de servicio autorizado de su localidad.
Reemplace la cuchilla.
34 ESPAÑOL
Page 35

ACCESORIOS
OPCIONALES
PRECAUCIÓN: Estos accesorios o aditamen-
tos están recomendados para utilizarse con su
herramienta Makita especicada en este manual.
El empleo de cualquier otro accesorio o aditamento
puede conllevar el riesgo de lesiones personales.
Utilice los accesorios o aditamentos solamente para
su n establecido.
Si necesita cualquier ayuda para más detalles en
relación con estos accesorios, pregunte a su centro de
servicio local Makita.
• Cuchilla de la cortadora de césped
• Batería y cargador originales de Makita
NOTA: Algunos de los artículos en la lista pueden
incluirse en el paquete de la herramienta como acce-
sorios estándar. Éstos pueden variar de país a país.
GARANTÍA LIMITADA DE UN AÑO
DE MAKITA
Ésta Garantía no aplica para México
Política de garantía
Cada herramienta Makita es inspeccionada y probada
exhaustivamente antes de salir de la fábrica. Se garantiza que está libre de defectos de mano de obra y materiales por el período de UN AÑO a partir de la fecha ori-
ginal de compra. Si durante este período de un año se
desarrollara algún problema, devuelva la herramienta
COMPLETA, con el envío prepagado, a un centro de
servicio autorizado o de fábrica Makita. Si la inspección
muestra que el problema ha sido a causa de un defecto
de mano de obra o material, Makita hará la reparación
(o a su discreción, el reemplazo) sin ningún cargo.
Esta garantía no aplica cuando:
• las reparaciones se hayan hecho o intentado
hacer por otros;
• se requieran reparaciones debido al desgaste
normal;
• la herramienta haya sido maltratada, recibido
un mal uso o haya recibido un mantenimiento
inapropiado;
• se hayan hecho modicaciones a la herramienta.
EN NINGÚN CASO MAKITA SE HARÁ
RESPONSABLE DE NINGÚN DAÑO INDIRECTO,
INCIDENTAL, O DERIVADO DE LA VENTA O
USO DEL PRODUCTO. ESTE DESCARGO DE
RESPONSABILIDAD APLICA DURANTE Y DESPUÉS
DEL PLAZO DE ESTA GARANTÍA.
MAKITA RENUNCIA A LA RESPONSABILIDAD POR
CUALQUIER GARANTÍA IMPLÍCITA, INCLUYENDO
GARANTÍAS DE “COMERCIABILIDAD” Y
“ADECUACIÓN PARA UN PROPÓSITO ESPECÍFICO”,
DESPUÉS DEL PLAZO DE UN AÑO DE ESTA
GARANTÍA.
Esta garantía le concede derechos legales especícos
y usted podrá tener también otros derechos que varían
de un estado a otro. Algunos estados no permiten la
exclusión o limitación de daños incidentales o consecuentes, por lo que la limitación o exclusión arriba
mencionada podría no aplicar para usted. Algunos
estados no permiten la limitación sobre la duración de
una garantía implícita, por lo que la limitación arriba
mencionada podría no aplicar para usted.
35 ESPAÑOL
Page 36

Makita Corporation
www.makita.com
3-11-8, Sumiyoshi-cho,
Anjo, Aichi 446-8502 Japan
885453-901
DLM431-1
EN, FRCA, ESMX
20161122
 Loading...