

Page 1
INSTRUCTION MANUAL
MANUEL D'INSTRUCTION
MANUAL DE INSTRUCCIONES
Cordless Cleaner
Aspirateur sans fil
Aspiradora Inalámbrica
DCL182
IMPORTANT: Read Before Using.
IMPORTANT: Lire avant usage.
IMPORTANTE: Leer antes de usar.
011538
1
Page 2

ENGLISH (Original instructions)
SPECIFICATIONS
Model DCL182
Capacity
Continuous use
(With battery BL1830)
Overall length 1,004 mm (39-1/2")
Net weight 1.3 kg (2.9 lbs)
Rated voltage D.C. 18 V
• Due to our continuing program of research and development, the specifications herein are subject to change without notice.
• Specifications and battery cartridge may differ from country to country.
• Weight, with battery cartridge, according to EPTA-Procedure 01/2003
Standard battery cartridges BL1815, BL1830, BL1840
IMPORTANT
SAFETY
INSTRUCTIONS
When using an electrical appliance, basic
precautions should always be followed, including
the following:
READ ALL INSTRUCTIONS
BEFORE USING THIS
APPLIANCE.
with a dust bag 0.50 L
with a paper pack 0.33 L
HIGH Approx. 20 min
LOW Approx. 40 min
USA012-1
dust, lint, hair, and anything that may reduce
air flow.
8. Keep hair, loose clothing, fingers, and all parts
of body away from openings and moving
parts.
9. Turn off all controls before removing the
battery cartridge.
10. Use extra care when cleaning on stairs.
11. Do not use to pick up flammable or
combustible liquids, such as gasoline, or use
in areas where they may be present.
12. Use only the charger supplied by the
manufacturer to recharge.
13. Do not pick up anything that is burning or
smoking, such as cigarettes, matches, or hot
ashes.
14. Do not use without filters in place.
15. Do not charge the battery outdoors.
WARNING
To reduce the risk of fire, electric shock or injury:
1. Do not leave appliance when battery fitted.
Remove battery from appliance when not in
use and before servicing.
2. Do not expose to rain. Store indoors.
3. Do not allow to be used as a toy. Close
attention is necessary when used by or near
children.
4. Use only as described in this manual. Use only
manufacturer's recommended attachments.
5. Do not use with damaged battery. If appliance
is not working as it should, has been dropped,
damaged, left outdoors, or dropped into water,
return it to a service center.
6. Do not handle appliance with wet hands.
7. Do not put any object into openings. Do not
use with any opening blocked; keep free of
SAVE THESE
INSTRUCTIONS.
This appliance is intended for household use.
ADDITIONAL SAFETY RULES
1. Read this instruction manual and the charger
instruction manual carefully before use.
2. Do not pick up the following materials:
− Hot materials such as lit cigarettes or
spark/metal dust generated by
grinding/cutting metal
− Flammable materials such as gasoline,
thinner, benzine, kerosene or paint
− Explosive materials like nitroglycerin
2
USB062-2
Page 3

− Ignitible materials such as Aluminum, zinc,
magnesium, titanium, phosphorus or
celluloid
− Wet dirt, water, oil or the like
− Hard pieces with sharp edges, such as
wood chips, metals, stones, glasses, nails,
pins or razors
− Powder to clot such as cement or tonor
− Conductive dust such as metal or carbon
− Fine particle like concrete dust
Such action may cause fire, injury and/or
property damage.
3. Stop operation immediately if you notice
anything abnormal.
4. If you drop or strike the cleaner, check it
carefully for cracks or damage before
operation.
5. Do not bring close to stoves or other heat
sources.
6. Do not block the intake hole or vent holes.
SAVE THESE INSTRUCTIONS.
USD305-1
Symbols
The followings show the symbols used for tool.
・ volts
・ direct current
ENC007-6
IMPORTANT SAFETY
INSTRUCTIONS
FOR BATTERY CARTRIDGE
1. Before using battery cartridge, read all
instructions and cautionary markings on (1)
battery charger, (2) battery, and (3) product
using battery.
2. Do not disassemble battery cartridge.
3. If operating time has become excessively
shorter, stop operating immediately. It may
result in a risk of overheating, possible burns
and even an explosion.
4. If electrolyte gets into your eyes, rinse them
out with clear water and seek medical
attention right away. It may result in loss of
your eyesight.
5. Do not short the battery cartridge:
(1) Do not touch the terminals with any
conductive material.
(2) Avoid storing battery cartridge in a
container with other metal objects such as
nails, coins, etc.
(3) Do not expose battery cartridge to water
or rain.
A battery short can cause a large current flow,
overheating, possible burns and even a
breakdown.
6. Do not store the tool and battery cartridge in
locations where the temperature may reach or
exceed 50 ゚ C (122 ゚ F).
7. Do not incinerate the battery cartridge even if
it is severely damaged or is completely worn
out. The battery cartridge can explode in a fire.
8. Be careful not to drop or strike battery.
9. Do not use a damaged battery.
SAVE THESE INSTRUCTIONS.
Tips for maintaining maximum battery life
1. Charge the battery cartridge before
completely discharged.
Always stop tool operation and charge the
battery cartridge when you notice less tool
power.
2. Never recharge a fully charged battery
cartridge.
Overcharging shortens the battery service life.
3. Charge the battery cartridge with room
temperature at 10 ゚ C - 40 ゚ C (50 ゚ F - 104 ゚ F).
Let a hot battery cartridge cool down before
charging it.
3
Page 4
FUNCTIONAL DESCRIPTION
CAUTION:
• Always be sure that the tool is switched off and the
battery cartridge is removed before adjusting or
checking function on the tool.
• Take care not to trap finger(s) between cleaner and
battery as shown in diagram when loading battery.
Trapping finger(s) may cause injury.
This is caused by the activation of protection system and
does not show the cleaner trouble.
• When the cleaner is overloaded:
At this time, release the switch trigger and
remove causes of overload and then pull the
switch trigger again to restart.
• When the remaining battery capacity gets low:
Recharge the battery cartridge.
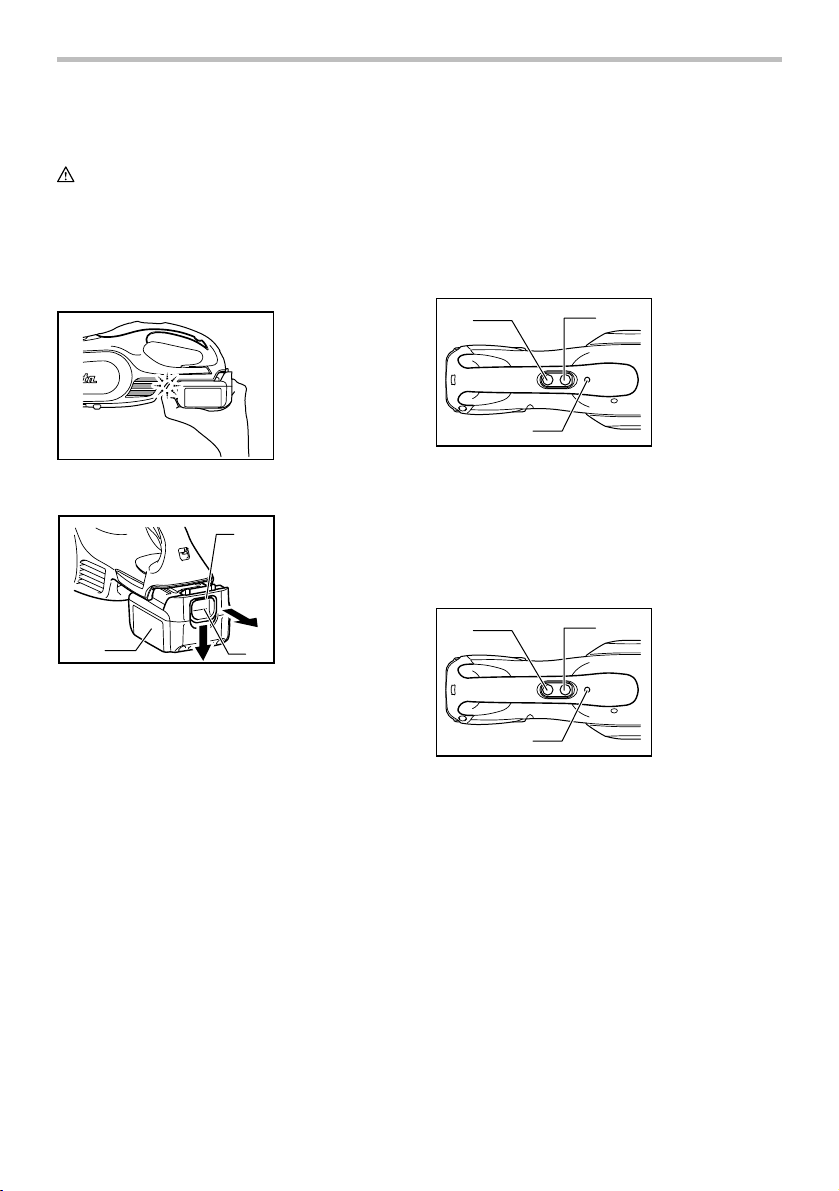
Switch action
1
2
1. OFF button
2. HIGH/LOW
button
3. Battery power
lamp
011539
Installing or removing battery cartridge
1. Red part
1
2. Button
3. Battery cartridge
3
011540
Always switch off the tool before insertion or
•
2
removal of the battery cartridge.
• To remove the battery cartridge, withdraw it from
the tool while sliding the button on the front of the
cartridge.
• To insert the battery cartridge, align the tongue on
the battery cartridge with the groove in the housing
and slip it into place. Always insert it all the way
until it locks in place with a little click. If you can see
the red part on the upper side of the button, it is not
locked completely. Insert it fully until the red part
cannot be seen. If not, it may accidentally fall out of
the tool, causing injury to you or someone around
you.
• Do not use force when inserting the battery
cartridge. If the cartridge does not slide in easily, it
is not being inserted correctly.
Battery protection system
The cleaner is equipped with the protection system,
which automatically cuts off the output power for its long
service life.
The cleaner stops during operation when the cleaner
and/or battery are placed under the following situation.
3
011542
To start the cleaner, simply press the "HIGH/LOW" button.
To switch off, press the "OFF" button. To change the
cleaner speed, press the "HIGH/LOW" button. The first
press on this button is for high speed and the second
press for low speed and then each press on this button
repeats the high/low speed cycle alternatively.
Battery power lamp
1
3
011542
When the remaining battery capacity gets low, the
•
2
battery power lamp blinks.
• When the remaining battery capacity gets much
lower, the tool stops during operation and the
battery power lamp lights up for about ten seconds.
At this time, remove the battery cartridge from the
tool and charge it .
NOTE:
• The time at which the battery power lamp start
blinking or lighting up depends on the temperature
at work place and the battery cartridge conditions.
1. OFF button
2. HIGH/LOW
button
3. Battery power
lamp
4
Page 5
ASSEMBLY
CAUTION:
• Always be sure that the tool is switched off and the
battery cartridge is removed before carrying out
any work on the tool.
Disposing of Dust
CAUTION:
• Empty the cleaner before it becomes too full, or the
suction force weakens.
• Be sure to empty out the dust inside the cleaner
itself. Failure to do so may cause the sponge filter
to be clogged or the motor to be damaged.
• Never throw away the dust stopper because it
should be used whenever either the dust bag or the
dust pack is used.
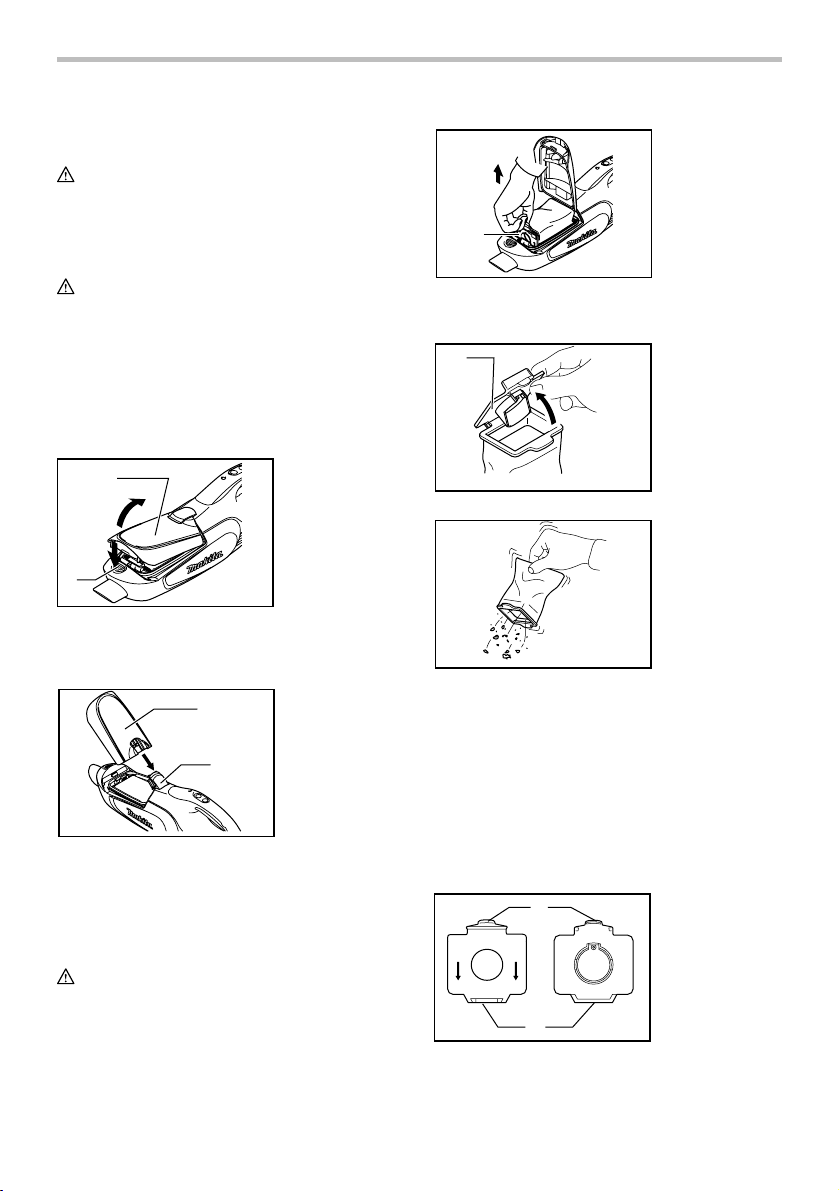
1
2
011551
1. Push the button to open the front cover. Opening it
until a click is heard allows a positive stop at that
position.
1
2
011553
NOTE:
• The cleaner is constructed in such a way that the
front cover comes off when trying to force the front
cover open at the angle of more than 90°. If the
front cover comes off, insert it into the front cover
joint in place.
CAUTION:
• When closing the front cover, be careful not to
pinch your fingers.
1. Front cover
2. Button
1. Front cover
2. Front cover joint
1. Dust stopper
1
011552
2. Pull out both the orange-colored dust stopper and
dust bag together at the same time.
1
008920
008921
1. Dust stopper
3. Remove the dust stopper and empty the cleaner.
Dust bag and paper pack
Install either dust bag or paper pack before using cleaner.
Use the dust stopper when installing either dust bag or
paper pack.
Dust bag are usable many times repeatedly by cleaning it
out.
Paper pack is a throw-away type. Throw away the entire
paper pack without emptying when it has become full.
Installing dust bag
1
2
008930
Use the dust stopper when installing dust bag. Be careful
not to take the upper side for the lower side by mistake
1. Upper side of
dust stopper
2. Lower side of
dust stopper
5
Page 6
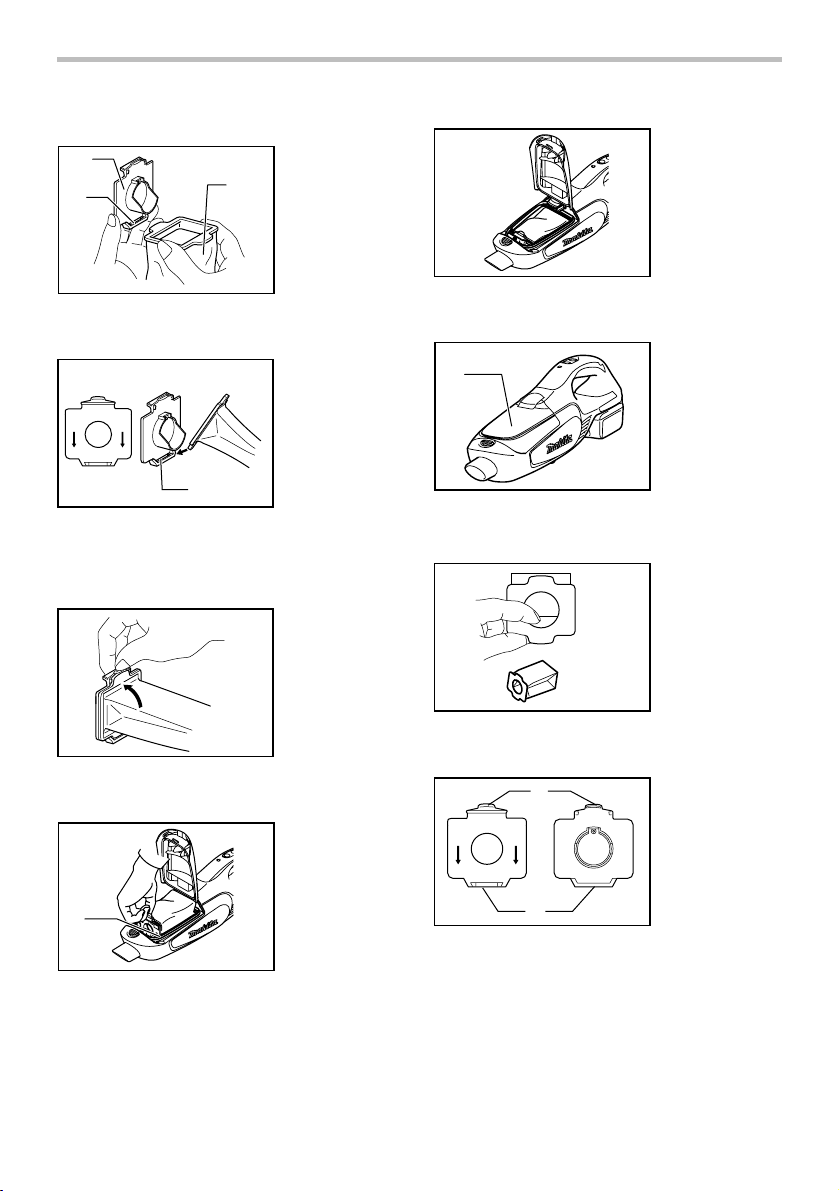
because they are different each other.
1
2
3
1. Dust stopper
2. Groove
3. Dust bag
008935
1. Insert the protrusion of the dust bag into the
groove in the dust stopper as shown in the figure.
1
008932
2. There is no distinction between the upper and
lower sides of the dust bag. You may insert its
protrusion of any side into the lower groove of the
dust stopper.
008933
3. Overlap the frame of dust stopper with that of the
dust bag.
1. Lower groove
1. Cleaner cavity
011555
5. Place the entire cloth part of the dust bag inside
the tool itself.
1
011541
6. Close the front cover completely.
1. Front cover
Installing the paper pack
008928
1. Unfold the entrance of the paper pack before
setting it on the dust stopper.
1
1. Upper side of
dust stopper
2. Lower side of
dust stopper
1
011559
4. Place the dust stopper and the dust bag together
into the cleaner cavity in the same direction of
arrow on the dust stopper. Insert them all the way
into the slots in the cleaner cavity.
008930
2
Use the dust stopper also when installing dust pack. Be
careful not to take the upper side for the lower side by
mistake because they are different each other.
6
Page 7

1
2
1. Dust stopper
2. Dust pack
3. Groove
3
008931
2. Insert the protrusion of the dust pack into the
groove in the dust stopper as shown in the figure.
1
008932
3. There is no distinction between the upper and
lower sides of the dust pack. You may insert its
protrusion of any side into the lower groove of the
dust stopper.
008933
4. Overlap the frame of dust stopper with that of the
dust pack.
1. Lower groove
1. Cleaner cavity
011555
6. Place the entire container part of the dust pack
inside the tool itself.
7. Close the front cover completely.
CAUTION:
• Forgetting to install the dust bag or the dust pack,
failure to insert the dust stopper together with the
dust bag or the dust pack all the way into the slots
or using a broken or ripped bag, may allow dust to
get into the motor. This may result in motor failure.
• Do not fold the cardboard at its opening when
installing the paper pack, .
• Never throw away the dust stopper because it need
to be used repeatedly whenever either the dust bag
or the dust pack is used.
• The paper pack for the cleaner is an important
component for maintaining the tool performance.
Using other than the genuine paper pack may
cause smokes or ignition.
OPERATION
CAUTION:
• To connect attachments, such as nozzle,
twist-insert attachment in direction of arrow to
ensure secure connection during use. To
disconnect attachment, twist-extract also in
direction of arrow.
1
011554
5. Place the dust stopper and the dust pack together
into the cleaner cavity in the same direction of
arrow on the dust stopper. Insert them all the way
into the slots in the cleaner cavity.
7
011543
Page 8
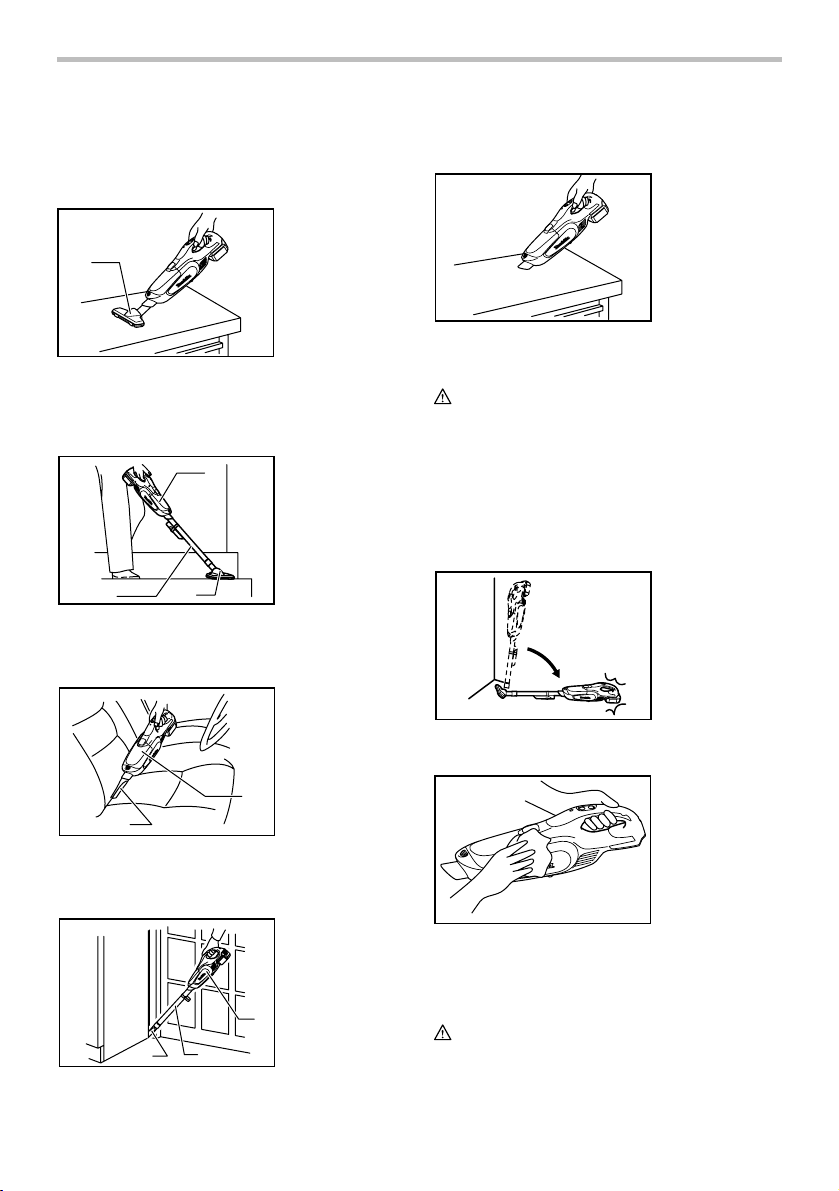
Cleaning (Suction)
Nozzle
Attach the nozzle to clean off tables, desks, furniture, etc.
Nozzle slips on easily.
1. Nozzle
1
Cleaning without nozzle
You can pick up powder and dust without nozzle.
011544
Nozzle + Extension wand (Straight pipe)
The extension wand fits in between the nozzle and the
cleaner itself. This arrangement is convenient for
cleaning a floor while standing erect.
1
2
011545
Corner nozzle
Fit on the corner nozzle for cleaning corners and crevices
of a car or furniture.
011546
Corner nozzle +Extension wand (Straight pipe)
In tight quarters where the cleaner itself cannot squeeze
in, or in high places hard to reach, use this arrangement.
011547
2
3
2
3
1. Cleaner body
2. Extension wand
3. Nozzle
1. Cleaner body
2. Corner nozzle
1
1. Cleaner body
2. Extension wand
3. Corner nozzle
1
011565
MAINTENANCE
CAUTION:
• Always be sure that the tool is switched off before
attempting to perform inspection or maintenance.
After use
NOTE:
• Putting the cleaner against the wall without any
other support cause the cleaner to fall down and be
damaged.
011549
Cleaning
011550
From time to time wipe off the outside (cleaner body) of
the cleaner using a cloth dampened in soapy water.
Clean out also the suction opening, dust bag/dust pack
mounting area and the dust stopper.
CAUTION:
• Never use gasoline, benzine, thinner, alcohol or the
like. Discoloration, deformation or cracks may
result.
8
Page 9
008934
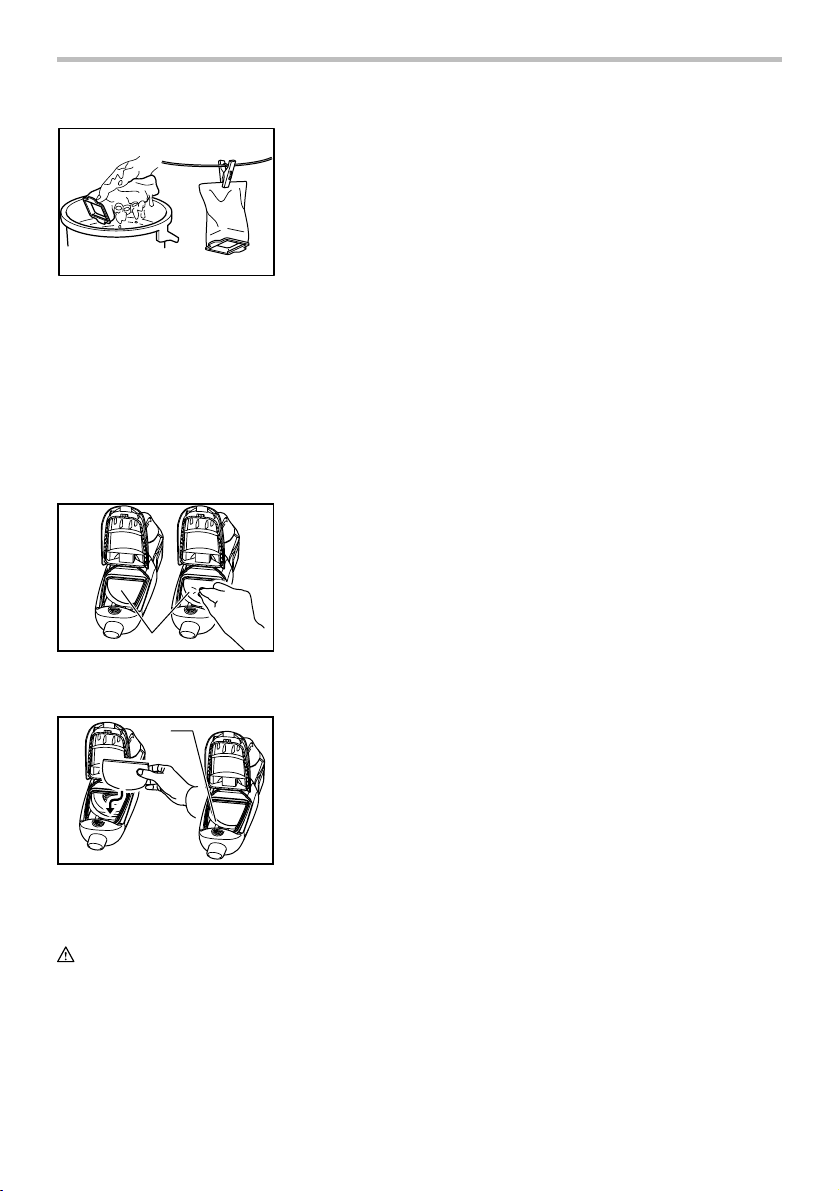
Wash the dust bag in soapy water when it is clogged with
dust and the cleaner power becomes small. Dry it out
thoroughly before use. An insufficiently dried bag may
cause poor suction and shorten the service life of the
motor.
NOTE:
• Dust pack is a throw-away type.
When the sponge filter is clogged with dust, remove it
from the cleaner and then wipe it off or wash in water.
Removing and installing the sponge filter
011557
To remove the sponge filter, remove the dust bag or dust
pack and then pinch and take it out.
011556
Press in the whole edge of the sponge filter against the
recessed wall inside the dust bag/dust pack mounting
area.
CAUTION:
• After cleaning sponge filter, be sure to install it on
1
1
the cleaner. If washed in water, dry it up before
installing. An insufficiently dried sponge filter may
shorten the service life of the motor.
1. Sponge filter
1. Recessed wall
9
Page 10
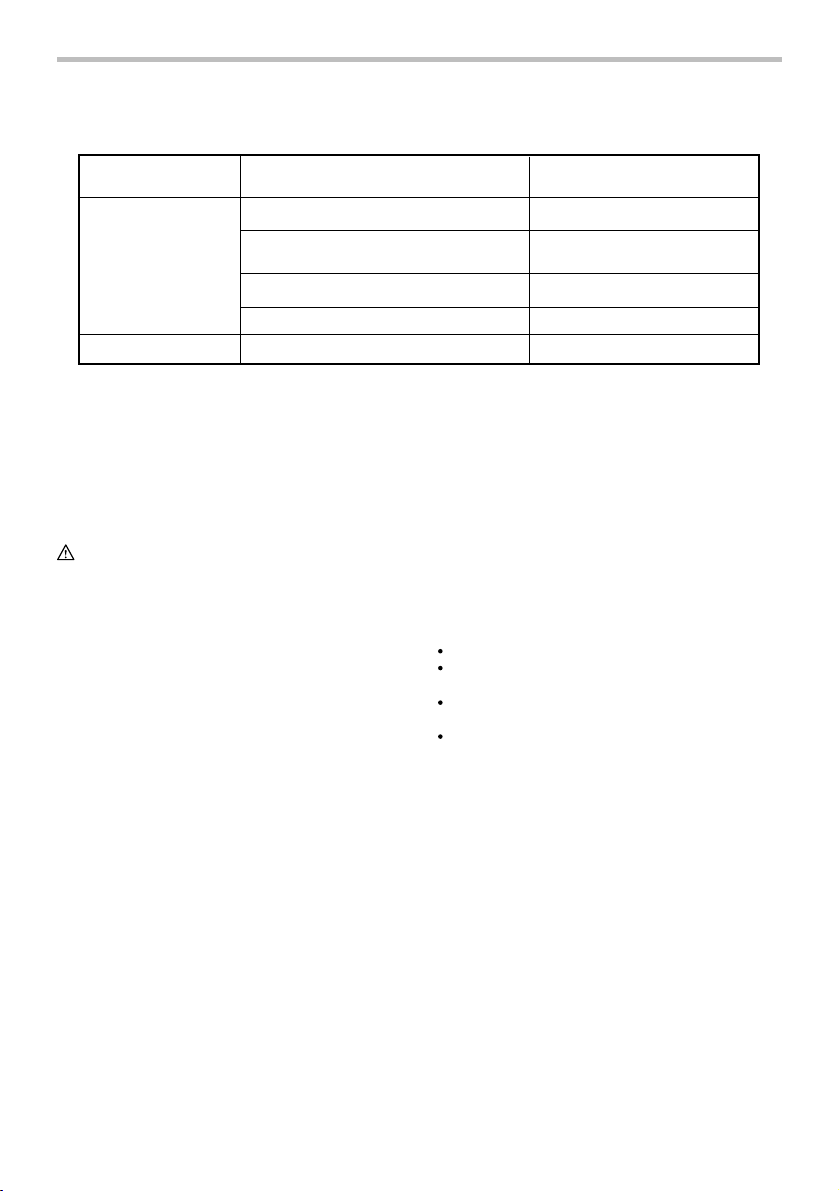
Things to Check Before Asking for Repairs
Symptom
Area to be investigated
Is dust bag or paper pack full of dust ?
Weak suction power
Is dust bag clogged ?
Is paper pack clogged ?
Is battery cartridge exhausted ?
Not working
011566
NOTE:
• Do not attempt to repair cleaner by yourself.
To maintain product SAFETY and RELIABILITY, repairs,
any other maintenance or adjustment should be
performed by Makita Authorized or Factory Service
Centers, always using Makita replacement parts.
Is battery cartridge exhausted ?
ACCESSORIES
CAUTION:
• These accessories or attachments are
recommended for use with your Makita cleaner
specified in this manual. The use of any other
accessories or attachments might present a risk of
injury to persons. Only use accessory or
attachment for its stated purpose.
If you need any assistance for more details regarding
these accessories, ask your local Makita Service Center.
• Extension wand (Straight pipe)
• Nozzle
• Nozzle for carpet
• Shelf brush
• Corner nozzle
• Round brush
• Flexible hose
• Paper pack
• Various type of Makita genuine batteries and
chargers
Fixing method
Empty dust bag or paper pack.
Dust down or wash the dust
bag.
Replace paper pack.
Charge the battery cartridge.
Charge the battery cartridge.
MAKITA LIMITED ONE YEAR WARRANTY
Warranty Policy
Every Makita tool is thoroughly inspected and tested
before leaving the factory. It is warranted to be free of
defects from workmanship and materials for the period
of ONE YEAR from the date of original purchase.
Should any trouble develop during this one year period,
return the COMPLETE tool, freight prepaid, to one of
Makita’s Factory or Authorized Service Centers. If
inspection shows the trouble is caused by defective
workmanship or material, Makita will repair (or at our
option, replace) without charge.
This Warranty does not apply where:
repairs have been made or attempted by others:
repairs are required because of normal wear and
tear:
the tool has been abused, misused or improperly
maintained:
alterations have been made to the tool.
IN NO EVENT SHALL MAKITA BE LIABLE FOR ANY
INDIRECT, INCIDENTAL OR CONSEQUENTIAL
DAMAGES FROM THE SALE OR USE OF THE
PRODUCT. THIS DISCLAIMER APPLIES BOTH
DURING AND AFTER THE TERM OF THIS
WARRANTY.
MAKITA DISCLAIMS LIABILITY FOR ANY IMPLIED
WARRANTIES, INCLUDING IMPLIED WARRANTIES
OF "MERCHANTABILITY" AND "FITNESS FOR A
SPECIFIC PURPOSE," AFTER THE ONE YEAR TERM
OF THIS WARRANTY.
This Warranty gives you specific legal rights, and you
may also have other rights which vary from state to
state. Some states do not allow the exclusion or
limitation of incidental or consequential damages, so
the above limitation or exclusion may not apply to you.
Some states do not allow limitation on how long an
implied warranty lasts, so the above limitation may not
apply to you.
EN0006-1
10
Page 11

FRANÇAIS (Mode d’emploi original)
SPÉCIFICATIONS
Modèle DCL182
Capacité
Utilisation continue
(avec une batterie BL1830)
Longueur totale 1 004 mm (39-1/2")
Tension nominale C.C. 18 V
Batteries standard BL1815, BL1830, BL1840
• Étant donné l'évolution constante de notre programme de recherche et de développement, les spécifications contenues dans ce
manuel sont sujettes à modification sans préavis.
• Les caractéristiques techniques et la batterie peuvent varier suivant les pays.
• Poids, batterie comprise, conforme à la procédure EPTA de 01/2003
IMPORTANT
CONSIGNES DE
SÉCURITÉ
Lors de l'utilisation d'un appareil électrique, vous
devez toujours prendre des précautions de base,
dont les suivantes:
LISEZ TOUTES CES CONSIGNES
AVANT D'UTILISER L'APPAREIL.
AVERTISSEMENT
pour réduire les risques d'incendie, de choc
électrique et de blessure:
1. Ne quittez pas l'appareil alors que la batterie y
est insérée. Retirez la batterie de l'appareil
après l'utilisation et avant de le faire réparer.
2. Ne l'exposez pas à la pluie. Rangez-le à
l'intérieur.
3. Ne laissez pas les enfants l'utiliser comme
jouet. Une attention particulière est nécessaire
lors de l'utilisation par les enfants ou à
proximité des enfants.
4. Utilisez l'outil uniquement de la façon décrite
dans ce manuel. Utilisez uniquement les
accessoires recommandés par le fabricant.
5. Ne l'utilisez pas avec une batterie
endommagée. Si l'appareil ne fonctionne pas
avec un sac à poussière 0,50 l
avec un sac papier 0,33 l
Grande Environ 20 min
Bas Environ 40 min
Poids net 1,3 kg (2,9 lbs)
USA012-1
bien, s'il a été échappé, endommagé, laissé à
l'extérieur ou échappé dans l'eau, retournez-le
à un centre de service après-vente.
6. Ne manipulez pas l'appareil lorsque vous avez
les mains mouillées.
7. Ne mettez rien dans les ouvertures. N'utilisez
jamais l'outil si une des ouvertures est
bouchée ; gardez ces dernières exemptes de
poussières, charpies, cheveux ou tout objet
pouvant réduire la circulation de l'air.
8. Gardez les cheveux, les vêtements amples, les
doigts et toute autre partie du corps à l'écart
des ouvertures et des pièces en mouvement.
9. Mettez toutes les commandes hors tension
avant de retirer la batterie.
10. Soyez tout particulièrement prudent lorsque
vous nettoyez sur les marches d'un escalier.
11. Ne l'utilisez pas pour aspirer des liquides
inflammables ou combustibles tels que
l'essence, ou dans des zones où de tels
liquides peuvent être présents.
12. Utilisez uniquement le chargeur fourni par le
fabricant pour recharger la batterie.
13. N'aspirez aucun objet qui brûle ou dégage de
la fumée, comme par exemple des cigarettes,
des allumettes ou des cendres encore
chaudes.
14. N'utilisez pas l'appareil si le filtre n'est pas
installé correctement.
15. Ne chargez pas la batterie à l'extérieur.
CONSERVEZ CE
MODE D'EMPLOI.
Cet appareil est conçu pour un usage domestique.
11
Page 12

USB062-2
RÈGLES DE SÉCURITÉ
SUPPLÉMENTAIRES
1. Lisez attentivement ce guide et le guide du
chargeur avant d'utiliser l'appareil.
2. N’utilisez pas l’appareil pour aspirer les
matériaux suivants :
− Des matières chaudes comme les
cigarettes allumées ou la poussière
d’étincelles/de métal provoquée par le
meulage/la coupe de métal
− Des matières inflammables comme
l’essence, le solvant, la benzine, le
kérosène ou la peinture
− Des matières explosives comme la
nitroglycérine
− Des matières inflammables comme
l’aluminium, le zinc, le magnésium, le
titane, le phosphore ou le celluloïd
− Des poussières humides, de l’eau, de
l’huile ou autres produits similaires
− Des objets durs ayant des bords coupants
comme les copeaux de bois, des pièces
de métal, des pierres, du verre, des clous,
des broches ou lames de rasoir
− Des poudres qui s’amalgament comme le
ciment ou le toner
− Les poussières conductrices comme
celles de métal ou de carbone
− Les particules fines comme la poussière
de béton
Ces applications pourraient être à l’origine d’un
incendie, de blessures ou de dommages matériels.
3. Arrêtez immédiatement votre outil dès que
vous observez quelque chose d'anormal.
4. Si vous échappez ou cognez l'aspirateur,
examinez-le avec soin avant de l'utiliser à
nouveau pour vérifier s'il a été endommagé.
5. Ne l'approchez pas du four ni de toute autre
source de chaleur.
6. N'obstruez pas le trou d'admission ou les
trous d'évent.
CONSERVEZ CE MODE
D'EMPLOI.
USD305-1
Symboles
Les symboles utilisés pour l'outil sont indiqués
ci-dessous.
・ volts
・ courant continu
CONSIGNES DE SÉCURITÉ
IMPORTANTES
POUR LA BATTERIE
1. Avant d'utiliser la batterie, lisez toutes les
instructions et précautions relatives (1) au
chargeur de batterie, (2) à la batterie, et (3) à
l'outil utilisant la batterie.
2. Ne démontez pas la batterie.
3. Cessez immédiatement l'utilisation si le temps
de fonctionnement devient excessivement
court. Il y a risque de surchauffe, de brûlures,
voire d'explosion.
4.
Si l'électrolyte pénètre dans vos yeux, rincez-les
à l'eau claire et consultez immédiatement un
médecin. Il y a risque de perte de la vue.
5. Ne court-circuitez pas la batterie :
(1) Ne touchez les bornes avec aucun
matériau conducteur.
(2) Évitez de ranger la batterie dans un
conteneur avec d'autres objets
métalliques, par exemple des clous, des
pièces de monnaie, etc.
(3) Évitez d'exposer la batterie à l'eau ou à la
pluie.
Un court-circuit de la batterie pourrait
provoquer un fort courant, une surchauffe,
parfois des brûlures et même une panne.
6. Ne rangez pas l'outil ou la batterie dans des
endroits où la température risque d'atteindre
ou de dépasser 50 ゚ C (122 ゚ F).
7. Ne jetez pas la batterie au feu même si elle est
sérieusement endommagée ou complètement
épuisée. La batterie peut exploser au contact
du feu.
8. Prenez garde d'échapper ou de heurter la
batterie.
9. N'utilisez pas une batterie si elle est
endommagée.
CONSERVEZ CE MODE D'EMPLOI.
Conseils pour obtenir la durée de service
maximale de la batterie
1. Rechargez la batterie avant qu'elle ne soit
complètement déchargée.
Arrêtez toujours l'outil et rechargez la batterie
quand vous remarquez que la puissance de
l'outil diminue.
2. Ne rechargez jamais une batterie
complètement chargée.
La surcharge réduit la durée de service de la
12
batterie.
ENC007-6
Page 13

3. Rechargez la batterie à une température
ambiante comprise entre 10 ゚ C et 40 ゚ C (50 ゚
F - 104 ゚ F). Si la batterie est chaude, laissez-la
refroidir avant de la recharger.
DESCRIPTION DU
FONCTIONNEMENT
ATT EN TI ON :
• Assurez-vous toujours que l'outil est hors tension et
que sa batterie est retirée avant de l'ajuster ou de
vérifier son fonctionnement.
•
Veillez à ne pas vous coincer les doigts entre
l'aspirateur et la batterie lorsque vous chargez cette
dernière, comme indiqué sur le schéma. Vous
pourriez vous blesser en vous coinçant les doigts.
011539
Installation ou retrait de la batterie
3
011540
Mettez toujours l'outil hors tension avant d'insérer
•
ou de retirer la batterie.
• Pour retirer la batterie, sortez-la de l'outil tout en
faisant glisser le bouton à l'avant de la batterie.
•
Pour insérer la batterie, alignez sa languette sur
l'entaille qui se trouve à l'intérieur du carter, puis
glissez la batterie pour la mettre en place. Insérez-la
toujours bien à fond, jusqu'à ce qu'elle se verrouille
en émettant un léger clic. Si vous pouvez voir la
partie rouge de la face supérieure du bouton, la
batterie n'est pas parfaitement verrouillée. Insérez-la
à fond, jusqu'à ce que la partie rouge ne soit plus
visible. Sinon, elle risque de tomber
accidentellement de l'outil, en vous blessant ou en
blessant une personne se trouvant près de vous.
•
N'appliquez pas une force excessive lors de l'insertion
de la batterie. Si la batterie ne glisse pas aisément,
1. Partie rouge
1
2. Bouton
3. Batterie
2
c'est qu'elle n'est pas insérée correctement.
Système de protection de la batterie
L’aspirateur est équipé du système de protection qui
coupe automatiquement la puissance de sortie pour lui
assurer une longue durée de service.
L’aspirateur s’arrête pendant l’utilisation lorsque l’outil
et/ou la batterie sont dans la situation suivante. Cela est
dû à l’activation du système de protection et n’indique
pas un problème de l’aspirateur.
• Lorsque l’aspirateur est surchargé :
Lorsque cela se produit, relâchez la gâchette
et supprimez les causes de surcharge, puis
appuyez de nouveau sur la gâchette pour
redémarrer.
• Lorsque la batterie est presque vide :
Rechargez la batterie.
Interrupteur
1
2
3
011542
Pour démarrer l’aspirateur, appuyez simplement sur le
bouton de mise en marche «HIGH/LOW». Pour l’éteindre,
appuyez sur le bouton d’arrêt «OFF». Pour changer la
vitesse, appuyez sur le bouton «HIGH/LOW». Lorsque
vous appuyez sur ce bouton pour la première fois, vous
actionnez la vitesse supérieure. La deuxième fois que
vous l’appuyez, vous actionnez la vitesse inférieure. Par la
suite, chaque fois que vous appuyez sur ce bouton, vous
alternez entre la vitesse supérieure et la vitesse inférieure.
1. Bouton d’arrêt
«OFF»
2. Bouton de mise
en marche
HIGH/LOW
3. Témoin de
batterie
Témoin de batterie
1
2
3
011542
Lorsque le niveau de batterie est bas, le témoin de
•
batterie clignote.
• Lorsque la batterie est presque vide, l’outil s’arrête
et le témoin de la batterie s’allume pendant environ
10 secondes. Retirez alors la cartouche de batterie
de l’outil et rechargez-la.
1. Bouton d’arrêt
«OFF»
2. Bouton de mise
en marche
HIGH/LOW
3. Témoin de
batterie
13
Page 14

NOTE:
•
Le moment où le témoin de batterie commence à
clignoter ou à s’allumer dépend de la température du
lieu de travail et de l’état de la cartouche de batterie.
ASSEMBLAGE
ATT EN TI ON :
• Assurez-vous toujours que l'outil est hors tension et
que sa batterie est retirée avant d'effectuer tout
travail dessus.
Élimination de la poussière
ATT EN TI ON :
• Videz l'aspirateur avant qu'il ne soit plein pour
éviter une réduction de la puissance de succion.
• Veillez à retirer toute la poussière de l'aspirateur.
Dans le cas contraire, le filtre spongieux pourrait
s’obstruer ou le moteur être endommagé.
• Ne jetez jamais le pare-poussière car il doit être
utilisé lorsque le sac à poussière ou le bloc à
poussière est utilisé.
1
1. Couvercle
2. Bouton
1. Pare-poussière
1
011552
2. Sortez le pare-poussière orange en même temps
que le sac à poussière.
1
008920
1. Pare-poussière
2
011551
1. Appuyez sur le bouton pour ouvrir le couvercle
avant. Si vous l’ouvrez jusqu’au déclic, cela
permet un arrêt positif à cette position.
1
1. Couvercle
2. Joint du
couvercle avant
2
011553
NOTE:
• L'aspirateur est conçu de sorte que le couvercle
avant se détache si vous essayez d'en forcer
l'ouverture à un angle supérieur à 90°. Si le
couvercle avant se détache, insérez-le dans le joint
correspondant.
ATT EN TI ON :
• Lorsque vous fermez le couvercle avant, faites
attention à ne pas vous coincer les doigts.
008921
3. Retirez le pare-poussière et videz l'aspirateur.
Sac à poussière et sac papier
Installez le sac à poussière ou le sac papier avant
d’utiliser l’aspirateur.
Utilisez le pare-poussière lorsque vous installez le sac à
poussière ou le sac papier.
Le sac à poussière est réutilisable après nettoyage.
Le sac papier est jetable. Jetez tout le sac papier sans le
vider, une fois qu’il est plein.
Installation du sac à poussières
1
2
008930
Utilisez le pare-poussière lors de l’installation du sac à
poussière. Faites attention à ne pas confondre le haut du
14
1. Côté supérieur
du
pare-poussière
2. Côté inférieur du
pare-poussière
Page 15

bas, car ils sont différents.
1
2
3
1. Pare-poussière
2. Rainure
3. Sac à
poussières
008935
1. Insérez la saillie du sac à poussière dans la
rainure du pare-poussière, comme illustré sur la
figure.
1
008932
2. Il n’y a aucune différence entre le haut et le bas du
sac à poussière. Vous pouvez insérer la saillie de
l’un ou l’autre côté dans la rainure inférieure du
pare-poussière.
008933
3. Recouvrez le cadre du pare-poussière avec celui
du sac à poussière.
1. Rainure
inférieure
1. Cavité de
l’aspirateur
011555
5. Placez toute la partie chiffon du sac à poussière
dans l’outil.
1
011541
6. Fermez complètement le couvercle avant.
1. Couvercle
Installation du sac papier
008928
1. Dépliez l’entrée du sac papier avant de le placer
sur le pare-poussière.
1
1. Côté supérieur
du
pare-poussière
2. Côté inférieur du
pare-poussière
1
011559
4. Placez le pare-poussière et le sac à poussière en
même temps dans l'aspirateur, dans le sens de la
flèche située sur le pare-poussière. Insérez-les
complètement dans les fentes de l’aspirateur.
008930
2
Utilisez le pare-poussière lors de l’installation du bloc à
poussière. Faites attention à ne pas confondre le haut du
bas, car ils sont différents.
15
Page 16

1
2
1. Pare-poussière
2. Bloc à poussière
3. Rainure
3
008931
2. Insérez la saillie du bloc à poussière dans la
rainure du pare-poussière, comme illustré sur la
figure.
1
008932
3. Il n’y a aucune différence entre le haut et le bas du
bloc à poussière. Vous pouvez insérer la saillie de
l’un ou l’autre côté dans la rainure inférieure du
pare-poussière.
008933
4. Recouvrez le cadre du pare-poussière avec celui
du bloc à poussière.
1. Rainure
inférieure
1. Cavité de
l’aspirateur
011555
6. Placez toute la partie récipient du bloc à poussière
dans l’outil.
7. Fermez complètement le couvercle avant.
ATT EN TI ON :
• Si vous oubliez d’installer le sac ou le bloc à
poussière, si vous n'insérez pas le pare-poussière
en même temps que le sac ou le bloc à poussière
complètement dans les fentes ou si vous utilisez un
sac déchiré, de la poussière risque de pénétrer
dans le moteur. Cela risque de provoquer un
dysfonctionnement du moteur.
• Lors de l'installation du sac papier, ne pliez pas le
carton situé au niveau de son ouverture.
• Ne jetez jamais le pare-poussière car il doit être
utilisé de façon répétée lorsque le sac à poussière
ou le bloc à poussière est utilisé.
• Le sac papier de l’aspirateur est un composant
important pour les performances de l’outil. Si vous
utilisez un autre sac papier que celui d’origine, des
fumées ou des étincelles sont possibles.
UTILISATION
ATT EN TI ON :
• Pour connecter les accessoires, tels que la buse,
insérez-les en les faisant pivoter dans le sens de la
flèche afin de garantir leur maintien pendant
l’utilisation. Pour déconnecter les accessoires,
sortez-les en les faisant pivoter dans le sens de la
flèche.
1
011554
5. Placez le pare-poussière et le bloc à poussière en
même temps dans l'aspirateur, dans le sens de la
flèche située sur le pare-poussière. Insérez-les
complètement dans les fentes de l’aspirateur.
16
011543
Page 17

Nettoyage (fonction d'aspiration)
Buse
Utilisez la buse pour nettoyer les tableaux, bureaux et
autres meubles, etc. Fixez-la simplement à l'aspirateur.
1. Buse
1
Nettoyage sans buse
Sans buse, l'aspirateur peut tout de même ramasser la
poudre et la poussière.
011544
Buse et baguette rallonge (tuyau rectiligne)
La baguette rallonge s'insère entre la buse et l'aspirateur
pour nettoyer le plancher en restant debout.
1
2
011545
Buse à angle
Vous pouvez aussi l'utiliser avec la buse à angle pour
nettoyer les fentes et les recoins de la voiture ou du
mobilier.
011546
Buse à angle et baguette rallonge (tuyau rectiligne)
Utilisez cette configuration dans les endroits trop étroits
pour l'aspirateur ou hors de portée parce que trop élevés.
011547
2
3
2
3
1. Boîtier de
nettoyage
2. Baguette
rallonge
3. Buse
1. Boîtier de
nettoyage
2. Buse en coin
1
1. Boîtier de
nettoyage
2. Baguette
rallonge
3. Buse en coin
1
011565
ENTRETIEN
ATT EN TI ON :
• Assurez-vous toujours que l'outil est hors tension
avant d'y effectuer tout travail d'inspection ou
d'entretien.
Après l'utilisation
NOTE:
• Si vous placez l’aspirateur contre le mur sans autre
soutien, il risque de tomber et d’être endommagé.
011549
Nettoyage
011550
Essuyez régulièrement l'extérieur (le corps) de
l'aspirateur avec un chiffon imprégné d'eau savonneuse.
Nettoyez le suceur, la surface de montage du sac à
poussière ainsi que le pare-poussière.
17
Page 18

ATT EN TI ON :
• N'utilisez jamais d'essence, de benzine, de solvant,
d'alcool ou d'autres produits similaires. Une
décoloration, une déformation, ou la formation de
fissures peuvent en découler.
008934
Nettoyez le sac à poussière à l'eau savonneuse lorsqu’il
est obstrué par la poussière et que la puissance
d’aspiration s’affaiblit. Séchez-le entièrement avant
utilisation. Un sac encore humide peut affaiblir
l'aspiration et écourter la durée de vie du moteur.
NOTE:
• Le bloc à poussière est jetable.
Lorsque de la poussière obstrue le filtre spongieux,
sortez-le de l’aspirateur puis éliminez la poussière ou
lavez le filtre à l’eau.
Retrait et installation du filtre spongieux
011557
Pour retirer le filtre spongieux, retirez le sac à poussière
ou le bloc à poussière puis sortez-le.
011556
Appuyez toute l’extrémité du filtre spongieux contre la
paroi convexe de la zone de fixation du sac/bloc à
poussière.
1
1
1. Filtre spongieux
1. Paroi convexe
ATT EN TI ON :
• Une fois le filtre spongieux nettoyé, remettez-le en
place dans l'aspirateur. Si vous l’avez lavé à l’eau,
séchez-le avant de l’installer. Un filtre spongieux
encore humide peut raccourcir la durée de vie du
moteur.
18
Page 19

Points à vérifier avant de demander une
réparation
Problème
Partie à vérifier
Le sac à poussière ou le sac papier
sont-ils pleins de poussière ?
Puissance
d’aspiration
faible
Le sac à poussière est-il obstrué ?
Le sac papier est-il obstrué ?
La cartouche de batterie est-elle à plat ?
Ne fonctionne pas
011566
NOTE:
• N'essayez pas de réparer l'aspirateur vous-même.
Pour maintenir la SÉCURITÉ et la FIABILITÉ du produit,
les réparations, tout autre travail d'entretien ou de
réglage doivent être effectués dans un centre de service
Makita agréé ou un centre de service de l'usine Makita,
exclusivement avec des pièces de rechange Makita.
La cartouche de batterie est-elle à plat ?
ACCESSOIRES
ATT EN TI ON :
• Ces accessoires et fixations sont recommandés
pour être utilisés avec l’aspirateur Makita spécifié
dans le présent manuel. L’utilisation de tout autre
accessoire ou fixation peut comporter un risque de
blessure. Utilisez l’accessoire ou la fixation
uniquement pour la fonction pour laquelle il a été
conçu.
Si vous désirez obtenir plus de détails concernant ces
accessoires, veuillez contacter le centre de service
après-vente Makita le plus près.
• Baguette rallonge (tuyau rectiligne)
• Buse
• Buse à tapis
• Brosse à épousseter
• Buse à angle
• Brosse ronde
• Tuyau flexible
• Sac papier
• Les divers types de batteries et chargeurs Makita
authentiques
Méthode de fixation
Videz le sac à poussière ou le
sac papier.
Videz la poussière ou lavez le
sac à poussière.
Remplacez le sac papier.
Rechargez la batterie.
Rechargez la batterie.
19
Page 20

GARANTIE LIMITÉE D’UN AN MAKITA
A
À
A
Politique de garantie
Chaque outil Makita est inspecté rigoureusement et
testé avant sa sortie d’usine. Nous garantissons qu’il
sera exempt de défaut de fabrication et de vice de
matériau pour une période d’UN AN à partir de la date
de son achat initial. Si un problème quelconque devait
survenir au cours de cette période d’un an, veuillez
retourner l’outil COMPLET, port payé, à une usine ou à
un centre de service après-vente Makita. Makita
réparera l’outil gratuitement (ou le remplacera, à sa
discrétion) si un défaut de fabrication ou un vice de
matériau est découvert lors de l’inspection.
Cette garantie ne s’applique pas dans les cas où:
des réparations ont été effectuées ou tentées par
un tiers:
des réparations s’imposent suite à une usure
normale:
l’outil a été malmené, mal utilisé ou mal entretenu:
l’outil a subi des modifications.
MAKITA DÉCLINE TOUTE RESPONSABILITÉ POUR
TOUT DOMMAGE ACCESSOIRE OU INDIRECT LIÉ À
LA VENTE OU À L’UTILISATION DU PRODUIT. CET
VIS DE NON-RESPONSABILITÉ S’APPLIQUE À LA
FOIS PENDANT ET APRÈS LA PÉRIODE COUVERTE
PAR CETTE GARANTIE.
MAKITA DÉCLINE TOUTE RESPONSABILITÉ QUANT
TOUTE GARANTIE TACITE, INCLUANT LES
GARANTIES TACITES DE “QUALITÉ MARCHANDE”
ET “ADÉQUATION À UN USAGE PARTICULIER”
PRÈS LA PÉRIODE D’UN AN COUVERTE PAR
CETTE GARANTIE.
Cette garantie vous donne des droits spécifiques
reconnus par la loi, et possiblement d’autres droits, qui
varient d’un État à l’autre. Certains États ne permettant
pas l’exclusion ou la limitation des dommages
accessoires ou indirects, il se peut que la limitation ou
exclusion ci-dessus ne s’applique pas à vous. Certains
États ne permettant pas la limitation de la durée
d’application d’une garantie tacite, il se peut que la
limitation ci-dessus ne s’applique pas à vous.
EN0006-1
20
Page 21

ESPAÑOL (Instrucciones originales)
ESPECIFICACIONES
Modelo DCL182
Capacidad
Uso continuo
(con batería BL1830)
Tensión nominal 18 V c.c.
Cartuchos de batería estándar BL1815, BL1830, BL1840
• Debido a nuestro programa continuo de investigación y desarrollo, las especificaciones aquí dadas están sujetas a cambios sin
previo aviso.
• Las especificaciones y el cartucho de la batería pueden variar de país a país.
• Peso de acuerdo al procedimiento de EPTA-01/2003 incluyendo el cartucho de la batería
IMPORTANTE
INSTRUCCIONES
DE SEGURIDAD
Al usar cualquier aparato eléctrico, siempre deben
seguirse las precauciones básicas, incluyendo las
siguientes:
LEA TODAS LAS
INSTRUCCIONES ANTES DE
USAR ESTE APARATO.
ADVERTENCIA
Para reducir el riesgo de incendio, descarga
eléctrica o lesión:
1. No deje el aparato con la batería puesta. Retire
la batería del aparato cuando no lo use y antes
de hacer algún mantenimiento.
2. No exponga el aparato a la lluvia. Almacene en
interiores.
3. No permita que sea utilizado como un juguete.
Se requiere de una supervisión cuidadosa
durante el uso al haber niños cerca.
4. Use solamente como se describe en este
manual. Sólo use aditamentos recomendados
por el fabricante.
5. No use con batería dañada. Si el aparato no
está funcionando como debiera, se ha dejado
con una bolsa recolectora 0,50 L
con un empaque de papel 0,33 L
Alta Aprox. 20 min
Longitud total 1 004 mm (39-1/2")
Peso neto 1,3 kg (2,9 lbs)
Baja Aprox. 40 min
USA012-1
caer, se ha dañado, se ha dejado a la
intemperie o ha caído sobre el agua, llévelo a
un centro de servicio.
6. No maneje el aparato con las manos mojadas.
7. No coloque ningún objeto sobre las hendijas
de ventilación. No use cuando cualquiera de
las hendijas esté bloqueada; mantenga libre
de polvo, hilachas, cabello y cualquier otra
cosa que pudiera reducir el flujo de aire.
8. Mantenga el cabello suelto, la ropa holgada,
las uñas y todas las partes del cuerpo alejadas
de las rendijas y las partes móviles.
9. Apague todos los controles antes de retirar el
cartucho de la batería.
10. Tenga especial cuidado al estar limpiando
sobre escaleras.
11. No use para recoger líquidos combustibles
como gasolina, o para usarse en áreas donde
éstos puedan estar presentes.
12. Use solo el cargador que se proporciona por
el fabricante para recargar.
13. No recoja nada que esté quemándose o
expidiendo humo, como cigarrillos, fósforos o
cenizas calientes.
14. No utilizar sin los filtros colocados en su
lugar.
15. No recargue la batería en la intemperie (al aire
libre).
GUARDE ESTAS
INSTRUCCIONES.
Este aparato está diseñado para un uso doméstico
solamente.
21
Page 22

USB062-2
NORMAS DE SEGURIDAD
ADICIONALES
Advertencias y precauciones
1. Lea este manual de instrucciones y el manual
de instrucciones del cargador con cuidado
antes de usar.
2. No recoja los siguientes materiales:
− Materiales calientes como cigarrillos
encendidos o partículas de metal
encendidas que se generen por el corte y
esmerilado del metal
− Sustancias inflamables como gasolina,
disolventes (tíner), bencina, queroseno o
pintura
− Materiales explosivos como nitroglicerina
− Materiales combustibles como aluminio,
zinc, magnesio, titanio, fósforo o
celuloide
− Tierra mojada, agua, aceite o similares
− Piezas duras con bordes filosos como
partículas de madera, metales, piedras,
vidrios, clavos, alfileres o navajas
− Mezcla para resanar como cemento o
similar
− Polvo que pueda conducir la electricidad
como el polvo de metal o carbón
− Partículas diminutas como las del polvo
de concreto
Tal acción puede que genere incendios,
lesiones y/o daños materiales.
3. Pare la operación inmediatamente si nota algo
anormal.
4. Si deja caer o golpea la aspiradora, verifique
cuidadosamente si hay grietas o daños antes
de la operación.
5. No la aproxime a estufas ni a otras fuentes de
calor.
6. No obstruya el orificio de flujo de entrada ni
los orificios de ventilación.
GUARDE ESTAS
INSTRUCCIONES.
USD305-1
Símbolos
A continuación se muestran los símbolos utilizados para
la herramienta.
・ volts o voltios
・ corriente directa o continua
INSTRUCCIONES IMPORTANTES
DE SEGURIDAD
PARA CARTUCHO DE BATERÍA
1. Antes de utilizar el cartucho de batería, lea
todas las instrucciones e indicaciones de
precaución sobre (1) el cargador de baterías,
(2) la batería, y (3) el producto con el que se
utiliza la batería.
2. No desarme el cartucho de batería.
3. Si el tiempo de operación se ha acortado en
exceso, deje de operar de inmediato. Podría
correrse el riesgo de sobrecalentamiento,
posibles quemaduras e incluso explosión.
4. En caso de que ingresen electrolitos en sus
ojos, enjuáguelos bien con agua limpia y
consulte de inmediato a un médico. Podría
perder la visión.
5. No cortocircuite el cartucho de batería:
(1) No toque las terminales con ningún
material conductor.
(2) Evite guardar el cartucho de batería en un
cajón junto con otros objetos metálicos,
tales como clavos, monedas, etc.
(3) No exponga la batería de cartucho a la
lluvia o nieve.
Un corto circuito en la batería puede causar un
flujo grande de corriente, sobrecalentamiento,
posibles quemaduras y aún descomposturas.
6. No guarde la herramienta ni el cartucho de
batería en lugares donde la temperatura pueda
alcanzar o exceder los 50 ゚ C (122 ゚ F).
7. Nunca incinere el cartucho de batería incluso
en el caso de que esté dañado seriamente o ya
no sirva en absoluto. El cartucho de batería
puede explotar si se tira al fuego.
8. Tenga cuidado de no dejar caer ni golpear el
cartucho de batería.
9. No use una batería dañada.
GUARDE ESTAS INSTRUCCIONES.
Consejos para alargar al máximo la vida útil
de la batería
1. Cargue el cartucho de batería antes de que se
descargue completamente.
Pare siempre la operación y cargue el
cartucho de batería cuando note menos
potencia en la herramienta.
2. No cargue nunca un cartucho de batería que
esté completamente cargado.
La sobrecarga acortará la vida de servicio de
la batería.
ENC007-6
22
Page 23

3. Cargue el cartucho de batería a temperatura
ambiente de 10 ゚ C - 40 ゚ C (50 ゚ F - 104 ゚ F). Si
un cartucho de batería está caliente, déjelo
enfriar antes de cargarlo.
DESCRIPCIÓN DEL
FUNCIONAMIENTO
PRECAUCIÓN:
• Asegúrese siempre de que la herramienta esté
apagada y el cartucho de batería extraído antes de
realizar cualquier ajuste o comprobación en la
herramienta.
• Tenga la precaución de que su(s) dedo(s) no
quede(n) atrapado(s) entre la aspiradora y la
batería como se ilustra en el diagrama al momento
de colocar la batería. Puede que su(s) dedo(s) al
atraparse resulte(n) lesionado(s).
011539
Instalación o desmontaje del cartucho de
batería
3
011540
Apague siempre la herramienta antes de insertar o
•
desmontar el cartucho de bateria.
• Para extraer la batería, retírela de la herramienta
deslizando el botón que se encuentra en el frente
de la batería.
• Para colocar la batería, alinee la lengüeta de la
batería con la canaleta de la carcasa y colóquela
en su lugar. Asegúrese siempre de que está
insertando la batería hasta el final, en donde hace
tope y emite un pequeño chasquido. Si todavía
puede ver la parte roja en la parte de arriba del
botón, significa que no está completamente
trabada. Empújela suavemente hacia adentro
hasta que no pueda ver la parte roja. Si esto no
1. Parte roja
1
2. Botón
3. Cartucho de
batería
2
sucede, puede que accidentalmente se caiga de la
herramienta ocasionando daños personales a
usted o a terceros.
• No emplee fuerza cuando inserte el cartucho de
batería. Si el cartucho no se desliza al interior
fácilmente, será porque no se está insertando
correctamente.
Sistema de protección de la batería
La aspiradora cuenta con un sistema de protección el
cual automáticamente interrumpe el suministro eléctrico
para prolongar su vida útil.
Esta aspiradora detiene la operación cuando ésta y/o la
batería se sometan a las siguientes circunstancias. Esto
se activa mediante el sistema de protección y no indica
que haya problemas con la aspiradora.
• Cuando hay sobrecarga en la aspiradora:
• Cuando la carga restante en la capacidad de la
Libere el gatillo interruptor en este momento y
despeje las causas de sobrecarga, y luego
vuelva a jalar el gatillo interruptor para
reiniciar.
batería es baja:
Recargue el cartucho de la batería.
Accionamiento del interruptor
1
3
011542
Para encender la aspiradora, simplemente presione el
botón de activación “HIGH/LOW”. Para apagarla,
presione el botón de apagado “OFF". Para cambiar la
velocidad en la aspiradora, vuelva a presionar el botón
“HIGH/LOW”. La primera vez que el botón se presione
se obtendrá la velocidad mayor y la segunda vez que se
presione se obtendrá la velocidad menor, y cada vez que
se presione el botón, se alternará entre estas dos
velocidades.
2
1. Botón “OFF” de
apagado
Botón HIGH/LOW
2.
para volúmen
ALTO/BAJO de
aire
3. Luz indicadora
de la batería
23
Page 24

Luz indicadora de la batería
1
2
3
011542
Cuando la capacidad restante de la batería llega a
•
reducirse, la luz indicadora de la batería
parpadeará.
• Cuando la capacidad restante de la batería llega a
un nivel mucho más reducido, la herramienta se
detiene durante la operación y la luz indicadora de
la batería se enciendo por alrededor de diez
segundos. En este momento, retire el cartucho de
la batería de la herramienta y recárguelo.
NOTA:
• El momento en el que la luz indicadora de la
batería comience a parpadear o a encenderse
dependerá de la temperatura en el lugar de trabajo
y de las condiciones de la batería.
1. Botón “OFF” de
apagado
2.
Botón HIGH/LOW
para volúmen
ALTO/BAJO de
aire
3. Luz indicadora
de la batería
1. Presione el botón y abra la cubierta frontal. Abrirla
hasta escuchar un clic permite un tope
conveniente en esa posición.
1
1. Cubierta frontal
2. Junta de la
cubierta frontal
2
011553
NOTA:
• La aspiradora está construida de tal forma que la
cubierta frontal se desprende al tratar de forzar su
apertura más allá de 90°. Si la cubierta frontal se
desprende, insértela en su lugar de nuevo.
PRECAUCIÓN:
• Al cerrar la cubierta frontal, tenga cuidado de no
machucarse los dedos.
1. Tope para polvo
ENSAMBLE
PRECAUCIÓN:
• Asegúrese siempre de que la herramienta esté
apagada y el cartucho de batería extraído antes de
realizar cualquier trabajo en la misma.
Eliminación del polvo
PRECAUCIÓN:
• Vacíe la aspiradora antes de que se llene, o la
fuerza de succión se debilitará.
•
Asegúrese de vaciar el polvo que haya dentro de la
misma aspiradora. No hacer esto puede que cause que
el filtro de esponja se tape o que el motor se dañe.
• Nunca se deshaga del tope para el polvo porque
deberá usarse cada vez que la bolsa recolectora o
el empaque para polvo se utilicen.
1
2
011551
1. Cubierta frontal
2. Botón
1
011552
2. Saque tanto el tope para el polvo color naranja,
como la bolsa recolectora de polvo en conjunto al
mismo tiempo.
1
008920
008921
1. Tope para polvo
3. Retire el tope para el polvo y vacíe la aspiradora.
24
Page 25

Bolsa recolectora de polvo y empaque de
papel
Coloque ya sea la bolsa recolectora o el empaque de
papel antes de usar la aspiradora.
Use el tope para el polvo al instalar cualquiera de estas
dos piezas.
La bolsa recolectora de polvo es reutilizable numerosas
veces con tan solo limpiarla.
El empaque de papel es desechable. Deseche todo el
empaque de papel sin vaciarlo cuando éste se llene.
Instalación de la bolsa para polvo
1
1. Lado superior
del tope para
polvo
2. Lado inferior del
tope para polvo
008933
3. Empalme el marco del tope para el polvo con el de
la bolsa recolectora.
1
1. Cavidad de la
aspiradora
008930
2
Use el tope para el polvo al colocar la bolsa recolectora.
Tenga cuidado de no confundir el lado superior con el
lado inferior debido a que éstos son diferentes entre sí.
1
2
008935
1. Inserte la protuberancia de la bolsa recolectora de
polvo en la ranura del tope para el polvo como se
ilustra en la figura.
1
008932
2. Es indiferente el uso entre el lado superior o
inferior de la bolsa recolectora de polvo. Puede
insertar la protuberancia en cualquiera de los
lados en la ranura inferior del tope para polvo.
1. Tope para polvo
2. Ranura
3
3. Bolsa para polvo
1. Ranura inferior
011559
4. Coloque el tope para el polvo y la bolsa
recolectora en conjunto en la cavidad de la
aspiradora en la misma dirección indicada por la
flecha en el tope para el polvo. Inserte por
completo dentro de las ranuras en la cavidad de la
aspiradora.
011555
5. Coloque la parte de tela por completo de la bolsa
recolectora adentro de la herramienta.
1
011541
6. Cierre por completo la cubierta frontal.
1. Cubierta frontal
25
Page 26

Instalación del empaque de papel
008928
1. Despliegue la entrada del empaque de papel
antes de ajustarlo sobre el tope para el polvo.
1
2
008930
Use el tope para el polvo también al colocar el empaque
para polvo. Tenga cuidado de no confundir el lado
superior con el lado inferior debido a que éstos son
diferentes entre sí.
1
3
008931
2. Inserte la protuberancia de la empaque para polvo
en la ranura del tope para el polvo como se ilustra
en la figura.
1
008932
3. Es indiferente el uso entre el lado superior o
inferior del empaque para polvo. Puede insertar la
protuberancia en cualquiera de los lados en la
ranura inferior del tope para polvo.
1. Lado superior
del tope para
polvo
2. Lado inferior del
tope para polvo
1. Tope para polvo
2. Empaque para
2
polvo
3. Ranura
1. Ranura inferior
008933
4. Empalme el marco del tope para el polvo con el
del empaque.
1
011554
5. Coloque el tope para el polvo y el empaque en
conjunto en la cavidad de la aspiradora en la
misma dirección indicada por la flecha en el tope
para el polvo. Inserte por completo dentro de las
ranuras en la cavidad de la aspiradora.
011555
6. Coloque la parte del contenedor por completo del
empaque adentro de la herramienta.
7. Cierre por completo la cubierta frontal.
PRECAUCIÓN:
•
Olvidar colocar la bolsa recolectora o el empaque
para polvo, así como no insertar completamente el
tope para el polvo junto con una de esas dos piezas
en las ranuras, o usar una bolsa que esté rota, puede
ocasionar que el polvo se filtre en el motor. Puede
que esto resulte en fallas en el motor.
• No doble el cartoncillo en su abertura al instalar el
empaque de papel.
•
Nunca se deshaga del tope para el polvo porque
deberá usarse repetidamente cada vez que la bolsa
recolectora o el empaque para polvo se utilicen.
•
El empaque de papel para la aspiradora es un
componente importante para mantener el buen
1. Cavidad de la
aspiradora
26
Page 27

desempeño de la herramienta. Usar otro empaque que
no sea el original puede que cause humo o incendio.
OPERACIÓN
PRECAUCIÓN:
•
Para conectar los aditamentos, como la boquilla,
inserte enroscando el aditamento en dirección de la
flecha para asegurar una conexión firme durante la
operación. Para desconectar el aditamento, también
enrosque en dirección de la flecha y extraiga.
011543
Aspirado (succión)
Boquilla
Adjunte la boquilla para aspirar mesas, escritorios,
mubles, etc. La boquilla se anexa en su lugar
fácilmente.
1
1. Boquilla
Boquilla de esquina
Coloque la boquilla de esquina para aspirar esquinas y
hendiduras en autos y muebles.
1. Cuerpo de la
aspiradora
2. Boquilla de
esquina
1
011546
Boquilla de esquina + Vara de extensión (tubo recto)
Utilice esta configuración para espacios estrechos
donde la aspiradora en sí no quepa, o en lugares
elevados difíciles de alcanzar.
011547
2
2
3
1. Cuerpo de la
aspiradora
2. Vara de
extensión
3. Boquilla de
esquina
1
Aspirado sin boquilla
Puede aspirar el polvo sin el uso de la boquilla.
011544
Boquilla + Vara de extensión (tubo recto)
La vara de extensión se coloca entre la boquilla y la
aspiradora en sí. Esta configuración resulta conveniente
para aspirar el suelo mientras se está de pie en postura
recta.
1
011545
2
3
1. Cuerpo de la
aspiradora
2. Vara de
extensión
3. Boquilla
011565
MANTENIMIENTO
PRECAUCIÓN:
• Asegúrese siempre de que la herramienta esté
apagada antes de intentar realizar una inspección
o mantenimiento.
Luego del uso
NOTA:
• Colocar la aspiradora contra la pared sin ningún
otro apoyo puede causar que ésta se caiga y se
dañe.
27
Page 28

Desinstalación e instalación del filtro de esponja
1. Filtro de esponja
011549
Limpieza
011550
De vez en vez, limpie el exterior (cuerpo) de la aspiradora
usando un paño húmedo y agua enjabonada.
Limpie también la abertura de succión, bolsa recolectara
del polvo, el área donde está va puesta y el tope para el
polvo.
PRECAUCIÓN:
• Nunca use gasolina, bencina, diluyente (tíner),
alcohol o sustancias similares. Puede que esto
ocasione grietas o descoloramiento.
008934
Lave la bolsa recolectora en agua enjabonada cuando
éste se haya tapado con el polvo o cuando disminuya la
potencia de la aspiradora. Déjela secar por completo
antes de usar. Una bolsa que no esté completamente
seca podría resultar en una succión deficiente,
reduciendo el tiempo de vida útil del motor.
NOTA:
• El empaque para polvo es desechable.
Cuanto el filtro de esponja se tape con polvo, retírelo de
la aspiradora y sacúdalo o lávelo en agua.
011557
Para retirar el filtro de esponja, quite la bolsa recolectora
o el empaque para polvo y luego pizque con los dedos y
sáquelo.
011556
Presione sobre todo el borde del filtro de la esponja
contra la pared acanalada en el interior de la montura
para la bolsa recolectora o empaque para polvo.
PRECAUCIÓN:
• Después de limpiar el filtro de esponja, asegúrese
1
1
de colocarlo en la aspiradora. Si se lava en agua,
séquelo antes de colocarlo. Un filtro de esponja
que no esté lo suficientemente seco puede reducir
el tiempo de vida útil del motor.
1. Pared acanalada
28
Page 29

Cosas a verificar antes de solicitar un servicio
de reparación
Síntoma
Área a ser investigada
¿Está la bolsa recolectora o el
empaque de papel lleno de polvo?
Poco poder
de succión
¿Está la bolsa recolectora tapada?
¿Está el empaque de papel tapado?
¿Se ha agotado la batería?
No funciona
011566
NOTA:
• No intente reparar la aspiradora usted mismo(a).
Para mantener la SEGURIDAD y FIABILIDAD del
producto, las reparaciones, y cualquier otra tarea de
mantenimiento o ajuste deberán ser realizadas en
Centros de Servicio Autorizados por Makita, empleando
siempre repuestos Makita.
¿Se ha agotado la batería?
ACCESORIOS
PRECAUCIÓN:
• Estos accesorios o aditamentos están
recomendados para utilizarse con su aspiradora
Makita que se especifica en este manual. El
empleo de cualquier otro accesorio o aditamento
puede conllevar el riesgo de lesiones personales.
Use solamente accesorios o aditamentos para su
propósito designado.
Si necesita cualquier ayuda para más detalles en
relación con estos accesorios, pregunte a su centro de
servicio Makita local.
• Vara de extensión (tubo recto)
• Boquilla
• Boquilla para alfombra
• Cepillo para repisa (estante)
• Boquilla de esquina
• Cepillo redondo
• Manguera flexible
• Empaque de papel
• Diferentes tipos de baterías y cargadores genuinos
de Makita
Método de arreglo
Vacía la bolsa recolectora o el
empaque de papel.
Elimine el polvo o lave la bolsa
recolectora.
Reemplace el empaque de papel.
Recargue el cartucho de la batería.
Recargue el cartucho de la batería.
29
Page 30

GARANTÍA LIMITADA MAKITA DE UN AÑO
Ésta Garantía no aplica para México
Política de garantía
Cada herramienta Makita es inspeccionada y probada
exhaustivamente antes de salir de fábrica. Se
garantiza que va a estar libre de defectos de mano de
obra y materiales por el periodo de UN AÑO a partir de
la fecha de adquisición original. Si durante este
periodo de un año se desarrollase algún problema,
retorne la herramienta COMPLETA, porte pagado con
antelación, a una de las fábricas o centros de servicio
autorizados Makita. Si la inspección muestra que el
problema ha sido causado por mano de obra o
material defectuoso, Makita la reparará (o a nuestra
opción, reemplazará) sin cobrar.
Esta garantía no será aplicable cuando:
se hayan hecho o intentado hacer reparaciones
por otros:
se requieran reparaciones debido al desgaste
normal:
la herramienta haya sido abusada, mal usada o
mantenido indebidamente:
se hayan hecho alteraciones a la herramienta.
EN NINGÚN CASO MAKITA SE HARÁ
RESPONSABLE DE NINGÚN DAÑO INDIRECTO,
FORTUITO O CONSECUENCIAL DERIVADO DE LA
VENTA O USO DEL PRODUCTO.
ESTA RENUNCIA SERÁ APLICABLE TANTO
DURANTE COMO DESPUÉS DEL TÉRMINO DE
ESTA GARANTÍA.
MAKITA RENUNCIA LA RESPONSABILIDAD POR
CUALQUIER GARANTÍA IMPLÍCITA, INCLUYENDO
GARANTÍAS IMPLÍCITAS DE “COMERCIALIDAD” E
“IDONEIDAD PARA UN FIN ESPECÍFICO”, DESPUÉS
DEL TÉRMINO DE UN AÑO DE ESTA GARANTÍA.
Esta garantía le concede a usted derechos legales
específicos, y usted podrá tener también otros
derechos que varían de un estado a otro. Algunos
estados no permiten la exclusión o limitación de daños
fortuitos o consecuenciales, por lo que es posible que
la antedicha limitación o exclusión no le sea de
aplicación a usted. Algunos estados no permiten
limitación sobre la duración de una garantía implícita,
por lo que es posible que la antedicha limitación no le
sea de aplicación a usted.
EN0006-1
30
Page 31

31
Page 32

< USA only >
WARNING
Some dust created by power sanding, sawing, grinding, drilling, and other
construction activities contains chemicals known to the State of California
to cause cancer, birth defects or other reproductive harm. Some examples
of these chemicals are:
• lead from lead-based paints,
• crystalline silica from bricks and cement and other masonry products, and
• arsenic and chromium from chemically-treated lumber.
Your risk from these exposures varies, depending on how often you do this
type of work. To reduce your exposure to these chemicals: work in a well
ventilated area, and work with approved safety equipment, such as those
dust masks that are specially designed to filter out microscopic particles.
< Sólo en los Estados Unidos >
ADVERTENCIA
Algunos polvos creados por el lijado, aserrado, esmerilado, taladrado y
otras actividades de la construcción contienen sustancias químicas
reconocidas por el Estado de California como causantes de cáncer, defectos
de nacimiento y otros peligros de reproducción. Algunos ejemplos de estos
productos químicos son:
• plomo de pinturas a base de plomo,
• sílice cristalino de ladrillos y cemento y otros productos de albañilería, y
• arsénico y cromo de maderas tratadas químicamente.
El riesgo al que se expone varía, dependiendo de la frecuencia con la que
realice este tipo de trabajo. Para reducir la exposición a estos productos
químicos: trabaje en un área bien ventilada y póngase el equipo de seguridad
indicado, tal como las máscaras contra polvo que están especialmente
diseñadas para filtrar partículas microscó
picas.
Makita Corporation
3-11-8, Sumiyoshi-cho,
Anjo, Aichi 446-8502 Japan
885263-944 DCL182-1
www.makita.com
32
 Loading...