

Makita BJS100RFE, BJS100, BJS100Z, BJS101Z, BJS101 Technical Information
...
PRODUCT
P 1/ 9
Model No.
Description
CONCEPT AND MAIN APPLICATIONS
BJS100, BJS101
Cordless Metal Shears 1.0mm (20Ga)
Specification
Standard equipment
Optional accessories
Center blade
Side blade (L)
Side blade (R)
Charger DC18SD
Charger DC18SE (for automobile cigarette lighter socket)
Charger DC24SC
Battery BL1430 (for BJS100 only)
Battery BL1830 (for BJS101 only)
Fast charger DC18RA
Note: The standard equipment for the tool shown above may vary by country.
Hex wrench 3 .................................... 1
These products are available in the following variations.
All models also include the accessories listed below in "Standard equipment".
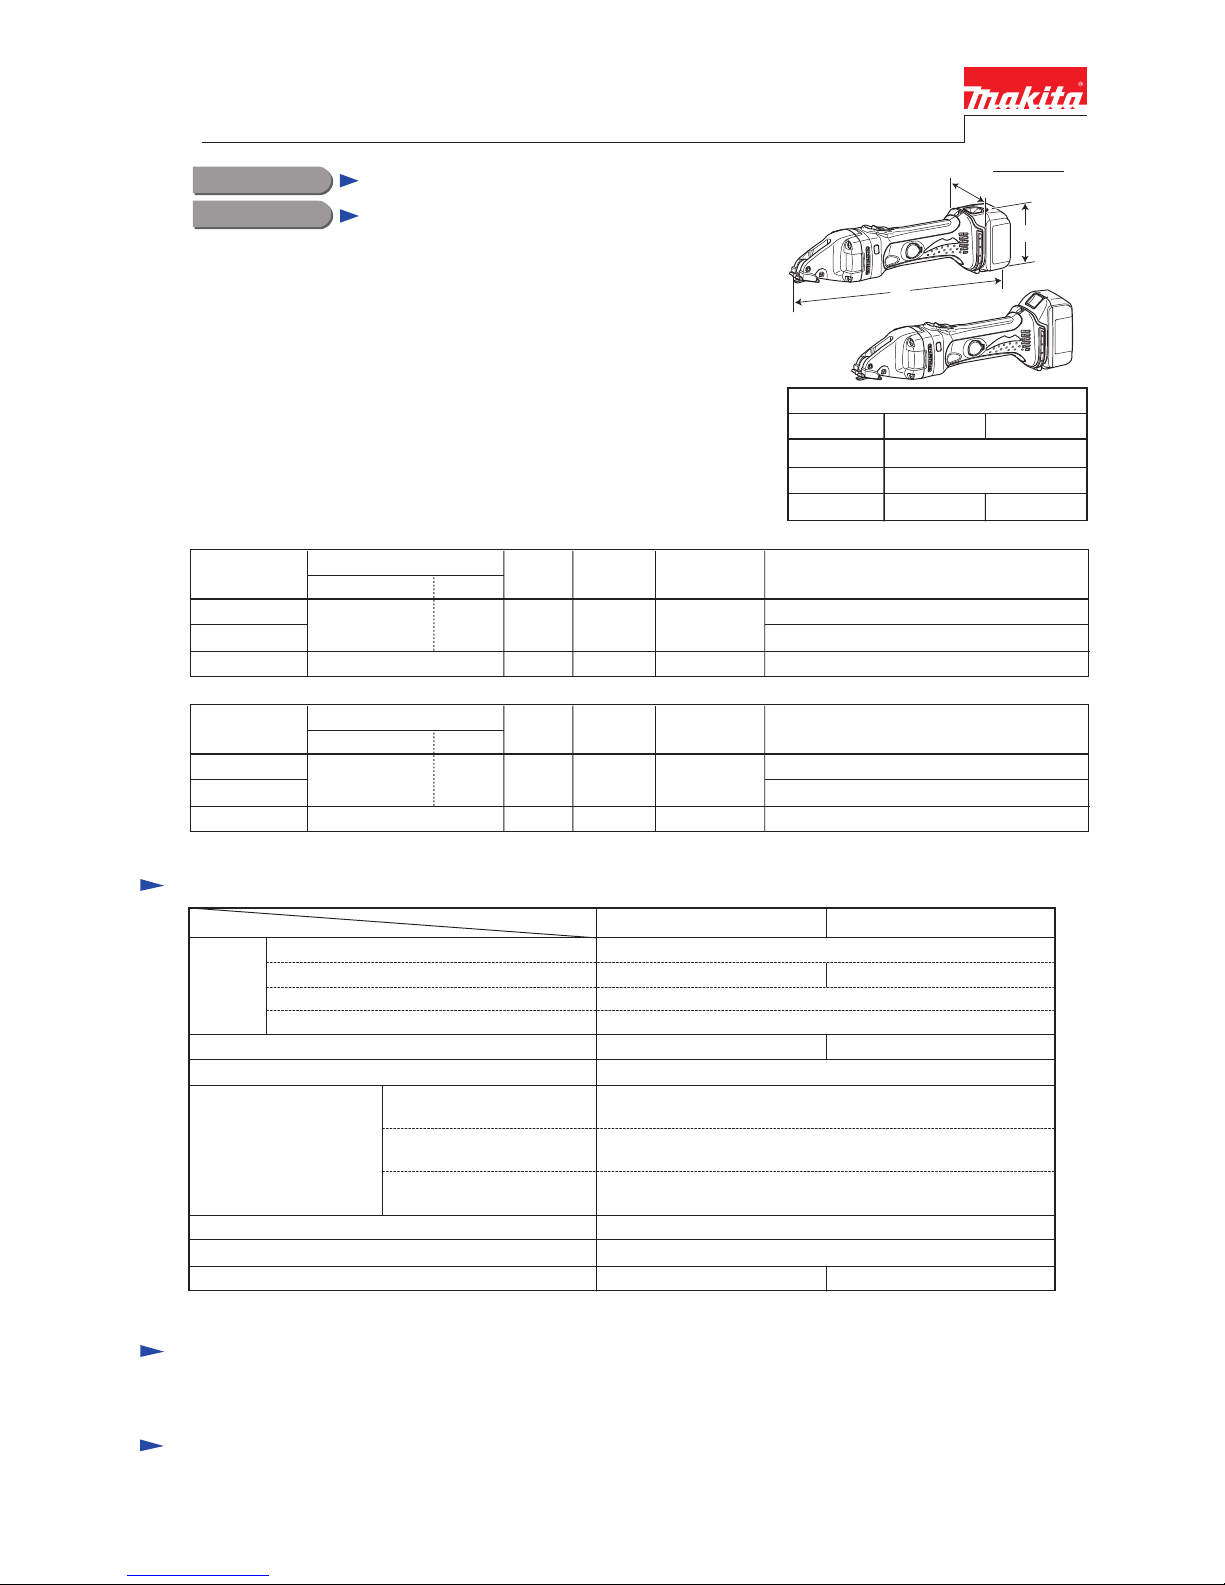
Dimensions: mm (")
Width (W)
Height (H)
Length (L) 364 (14-3/8)
78 (3-1/16)
103 (4-1/16) 118 (4-5/8)
BJS100 BJS101
BJS101
Models BJS100 and BJS101 have been developed as sister models of
cordless straight shears BJS160 and BJS161.
BJS100 is powered by 14.4V/3.0Ah Li-ion battery BL1430, and BJS101
is powered by 18V/3.0Ah Li-ion battery BL1830.
Ability to cut curves with minimum cutting radius of 30mm (1-3/16”) is
obtained by mounting the blades of Model JS1670 on BJS160/ BJS161.
Note: 1.3Ah Li-ion battery BL1415/ BL1815 cannot be used for BJS100/ BJS101.
*Weight according to EPTA-Procedure 01/2003, including battery
Battery
Max cutting capacities:
mm (Ga)
Steel with tensile strength
up to 600N/mm2
Cell
Voltage: V
Capacity: Ah
Li-ion
14.4 18
3.0
Net weight*: kg (lbs)
1.9 (4.2) 2.0 (4.4)
0.7 (23)
Aluminum with tensile
strength up to 200N/mm2
2.5 (12)
Steel with tensile strength
up to 400N/mm2
1.0 (20)
No load speed: min-1=spm (strokes per minute) 4,300
Max output (W)
Minimum cutting radius: mm (") 30 (1-3/16)
Overload protection by current limiter Yes
280 350
Specification
Model
BJS100 BJS101
22 with DC18RACharging time (approx.): min.
BJS100RFE
BJS100Z
BJS100
Model No. Offered to
All countries
Mexico, Panama
All countries except the two listed above
BL1430
(Li-ion 3.0Ah)
DC18RA
No No No
type quantity
Charger
Yes
No
Plastic
carrying case
2 1
Battery
Battery
cover
BJS101RFE
BJS101Z
BJS101
Model No. Offered to
All countries
Mexico, Panama
All countries except the two listed above
BL1830
(Li-ion 3.0Ah)
DC18RA
No No No
type quantity
Charger
Yes
No
Plastic
carrying case
2 1
Battery
Battery
cover
BJS100
BJS101
T
ECHNICAL INFORMATION
L
H
W
BJS100
P 2/ 9
Repair
CAUTION: Remove the Battery from the machine for safety before repair/ maintenance
in accordance with the instruction manual!
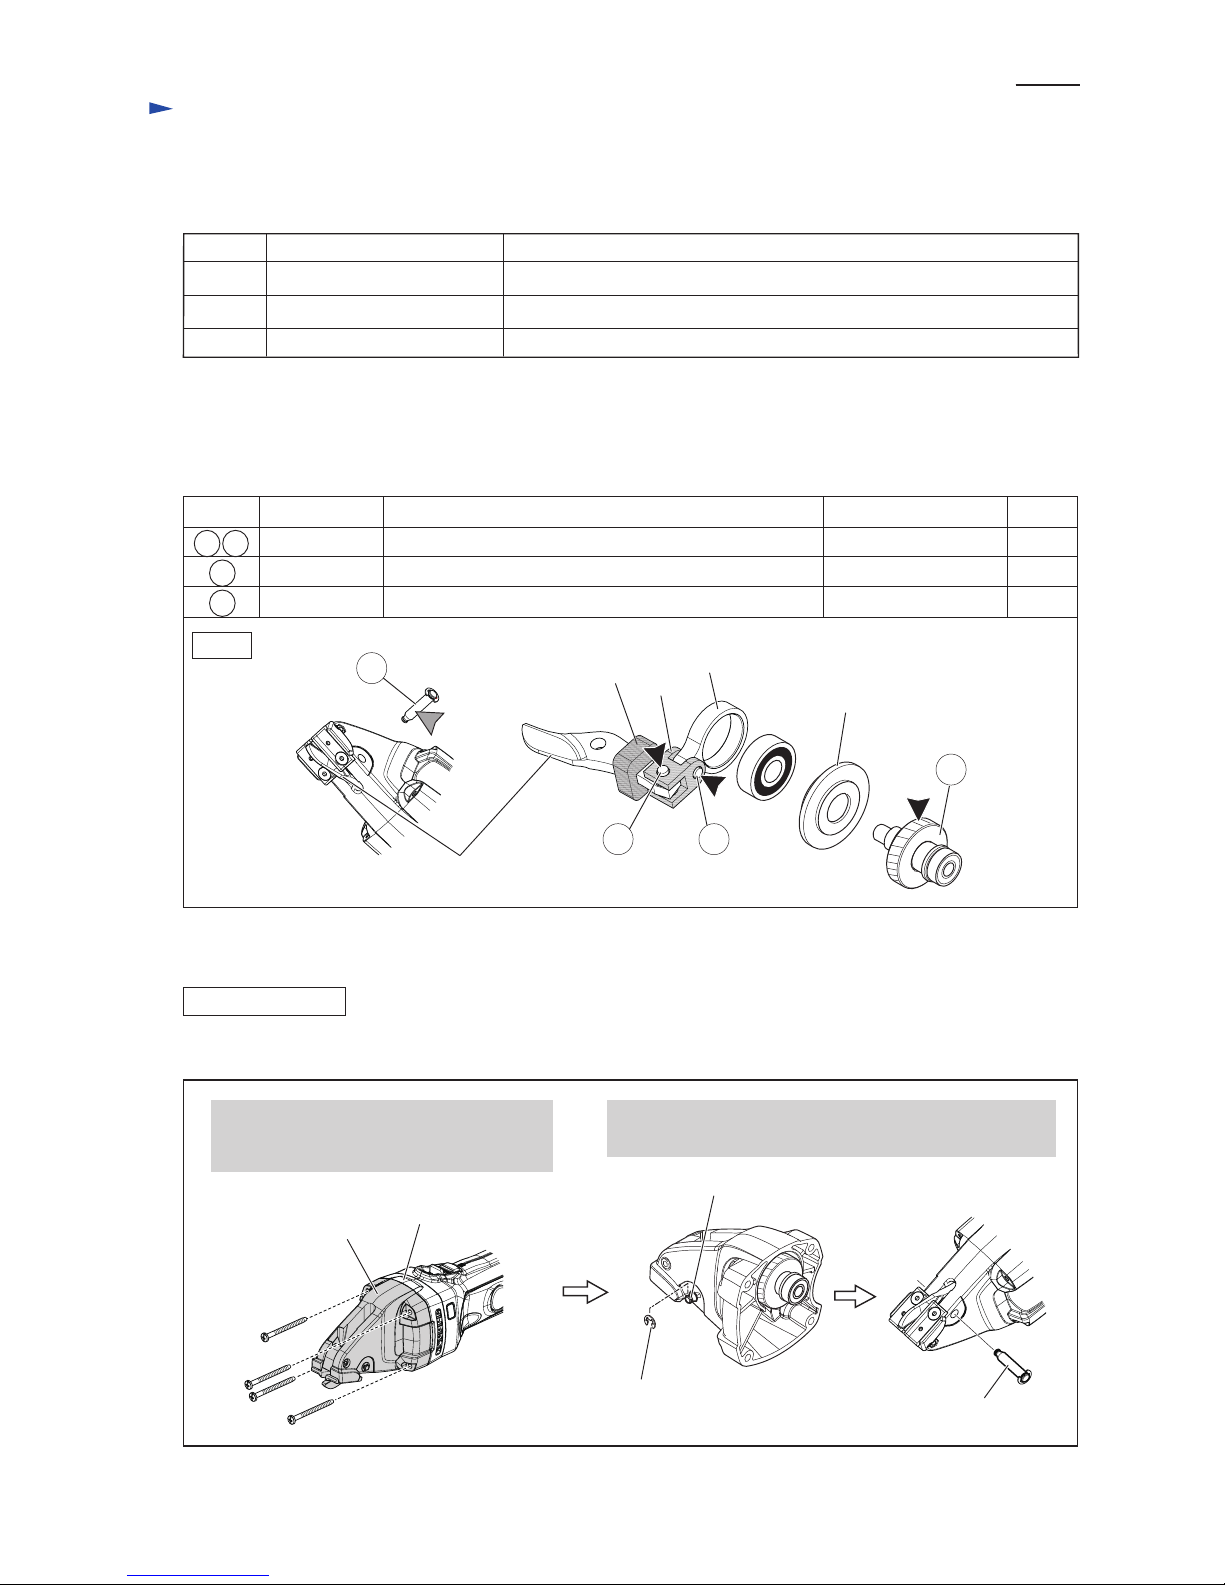
[1] NECESSARY REPAIRING TOOLS
[2] LUBRICATIONS
[3] DISASSEMBLY/ASSEMBLY
[3]-1. Center blade
Fig. 1
Fig. 2
Code No. Description Use for
1R036 Bearing setting plate 17.2 Holding Helical gear 34 when removing Crank shaft
1R269 Bearing extractor (small) Removing Ball bearings
1R366 Feeler gauge set Adjusting the gap between Center blade and Side blades
Item No.
Apply Makita grease FA.No.2 to the following portions designated in the black triangle to protect parts
and product from unusual abrasion.
And to the portion designated in gray triangle, apply the lubricant VG100.
Description
17 18
Sealing screw
Rod
Link
Dust cover
1) Disassemble Shearing mechanism from Crank housing complete as illustrated in Figs. 2, 3.
Center blade
32
Portion to lubricate
DISASSEMBLING
Pin 7
17 18 Pin 5
25 Pin 7
32 Helical gear 34
Drum portion for smooth action of Center blade and Rod
Drum portion for smooth action of Center blade.
Teeth portion for smooth engaging with Armature’s gear
1. Remove four 4x50 Tapping screws,
then separate Crank housing complete
from Gear housing complete.
2. Remove Stop ring E-4 from Pin 7, then remove Pin 7
from Crank housing complete.
Stop ring E-4
Makita grease FA.No.2
Makita grease FA.No.2
a little
a little
Lubricant Amount
30g
VG100
25
Crank housing
complete
Gear housing
complete
Pin 7
[3] DISASSEMBLY/ASSEMBLY
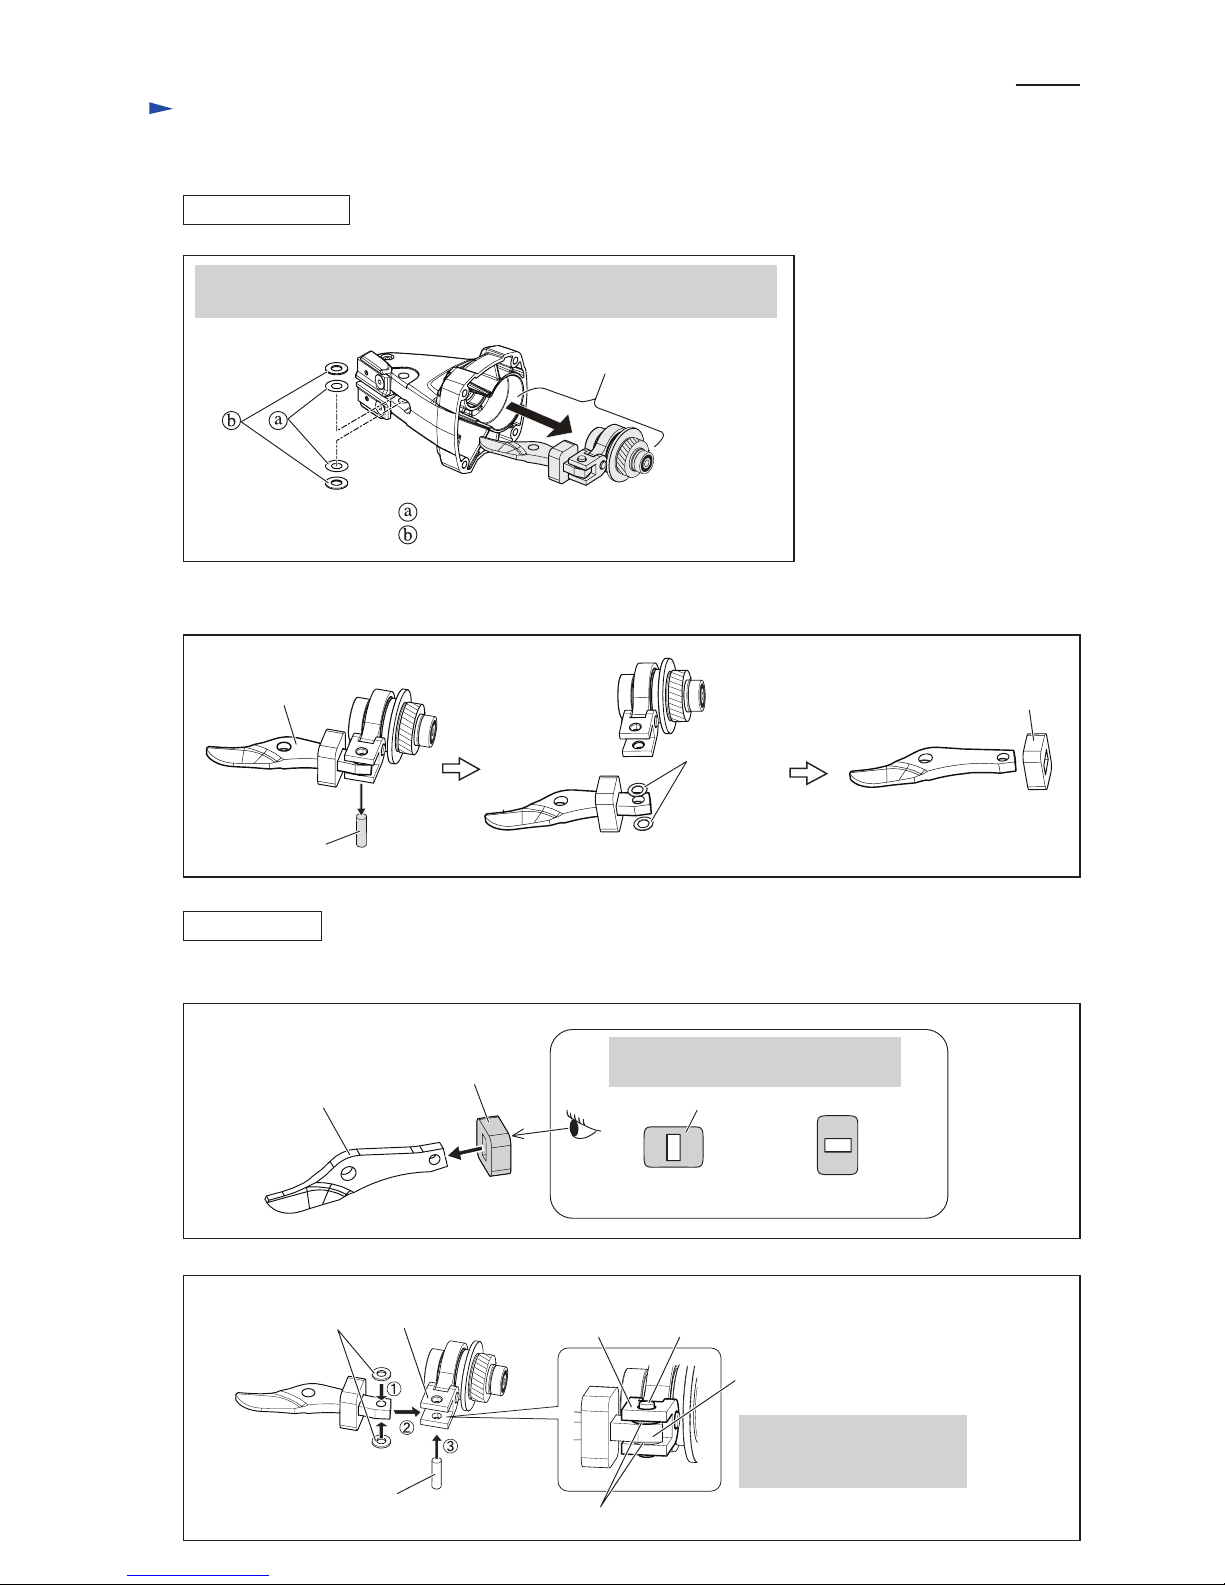
[3]-1. Center blade (cont.)
DISASSEMBLING
ASSEMBLING
Flat washer 5
Center blade
Pin 5
Dust cover
Fig. 3
Fig. 4
Fig. 5
Fig. 6
2) Center blade can be disassembled from Shearing mechanism as illustrated in Fig. 4.
1) Assemble Shearing mechanism as described in Figs. 5, 6.
3. Shearing mechanism can now be from Crank housing complete by hand.
Note: Be careful not to lose the washers.
Thin washer 7
Teflon washer 7
Shearing mechanism
Dust cover has to be assembled to
Center blade as illustrated below left.
Center blade
Center blade
Dust cover
Dust cover
(made of sponge)
[Correct] [Wrong]
Flat washer 5
Flat washer 5
Link
Pin 5
Pin 5Link
Assemble Center blade and
two Flat washers to Link
as illustrated left.
P 3/ 9
Repair
 Loading...