


9036
Makita 9036 Manual
GB
Finishing Sander Instruction Manual
F
Ponceuse orbitale Manuel d’instructions
D
Schwingschleifer Betriebsanleitung
I
Levigatrice orbitale Istruzioni per l’uso
NL
Vlakschuurmachine Gebruiksaanwijzing
E
Lijadora orbital Manual de instrucciones
P
Lixadeira orbital Manual de instruções
DK
Svingsliber Brugsanvisning
S
Osc. planslipmaskin Bruksanvisning
N
Plansliper Bruksanvisning
SF
Viimeistelyhiomakone Käyttöohje
GR Τριβείο φινιρίσµατος Οδηγίες χρήσεως
9036
1
3
4
2
12
5
34
5
2

ENGLISH
Explanation of general view
1 Clamper
2 Abrasive paper
SPECIFICATIONS
Model 9036
Pad size................................................ 93 mm x 185 mm
Orbits per min. ....................................................... 12,000
Overall length ...................................................... 238 mm
Net weight............................................................... 1.4 kg
• Due to our continuing programme of research and
development, the specifications herein are subject to
change without notice.
• Note: Specifications may differ from country to country.
Power supply
The tool should be connected only to a power supply of
the same voltage as indicated on the nameplate, and can
only be operated on single-phase AC supply. They are
double-insulated in accordance with European Standard
and can, therefore, also be used from sockets without
earth wire.
Safety hints
For your own safety, please refer to the enclosed Safety
instructions.
SPECIFIC SAFETY RULES
DO NOT let comfort or familiarity with product
(gained from repeated use) replace strict adherence
to sander safety rules. If you use this tool unsafely or
incorrectly, you can suffer serious personal injury.
1. Hold power tools by insulated gripping surfaces
when performing an operation where the cutting
tool may contact hidden wiring or its own cord.
Contact with a "live" wire will make exposed metal
parts of the tool "live" and shock the operator.
2. Always use safety glasses or goggles. Ordinary
eye or sun glasses are NOT safety glasses.
3. Hold the tool firmly.
4. Do not leave the tool running. Operate the tool
only when hand-held.
5. This tool has not been waterproofed, so do not
use water on the workpiece surface.
6. Ventilate your work area adequately when you
perform sanding operations.
7. Some material contains chemicals which may be
toxic. Take caution to prevent working dust inhalation and skin contact. Follow material supplier
safety data.
8. Use of this tool to sand some products, paints
and wood could expose user to dust containing
hazardous substances. Use appropriate respiratory protection.
9. Be sure that there are no cracks or breakage on
the pad before use. Cracks or breakage may
cause a personal injury.
SAVE THESE INSTRUCTIONS.
WARNING:
MISUSE or failure to follow the safety rules stated in
this instruction manual may cause serious personal
injury.
3 Lock button
4 Switch trigger
GEB021-1
5 Punch plate
OPERATING INSTRUCTIONS
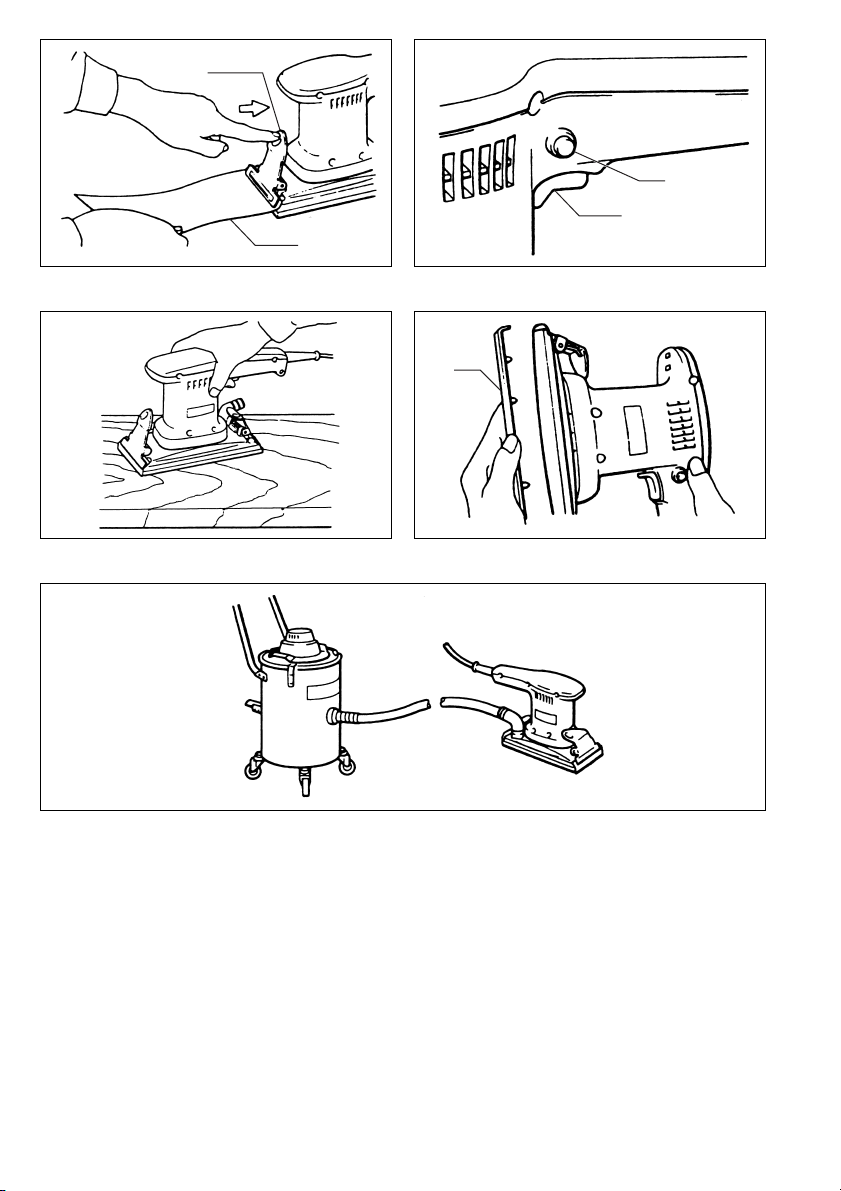
Installing or removing abrasive paper (Fig. 1)
Important:
Always be sure that the tool is switched off and
unplugged before installing or removing the paper.
Press the clamper. Insert the paper end into the clamper,
aligning the paper edges even and parallel with the sides
of the base. Then release the clamper.
Repeat the same process for the other end of the base,
maintaining the proper paper tension.
CAUTION:
After inserting the paper, make sure the teeth of the
clamper hold it securely. Otherwise the paper will be
loose and subject to slippage, resulting in uneven sanding operation.
Switch action (Fig. 2)
CAUTION:
Before plugging in the tool, always check to see that the
switch trigger actuates properly and returns to the “OFF”
position when released.
To start the tool, simply pull the trigger. Release the trigger to stop. For continuous operation, pull the trigger and
then push in the lock button. To stop the tool from the
locked position, pull the trigger fully, then release it.
Operation (Fig. 3)
Hold the tool firmly. Turn the tool on and wait until it
attains full speed. Then gently place the tool on the workpiece surface. A finishing sander is generally used to
remove only a small amount of material at a time. Since
the quality of the surface is more important than the
amount of stock removed, do not bear down on the tool.
Keep the base flush with the workpiece at all times.
Excessive pressure may damage the paper and shorten
tool life.
You can put a high polish on furniture or other fine surfaces by using a cloth under the tool.
CAUTION:
• Do not block motor vent with your finger or hand.
• Never run the tool without paper. You may seriously
damage the pad.
When you wish to perform clean sanding operation, proceed as follows:
Place the punch plate (optional accessory) over the
paper so that the guide of the punch plate is flush with
the sides of the base. Then press the punch plate to
make holes in the paper. (Fig. 4)
Remove the cap from the dust spout on your tool and
connect a vacuum cleaner to your tool using a hose
(optional accessory). Be sure to read cleaner’s instruction manual. (Fig. 5)
3

MAINTENANCE
CAUTION:
Always be sure that the tool is switched off and
unplugged before carrying out any work on the tool.
To maintain product safety and reliability, repairs, maintenance or adjustment should be carried out by a Makita
Authorized Service Centre.
4
 Loading...