


Summary
1. |
Introduction |
3 |
2. |
Safety instructions before the first ride |
4 |
3. |
Safety instructions before every ride |
4-5 |
4. |
Transport of the bicycle |
5 |
5. |
Warranty |
5 |
6. |
Brake installation |
6-8 |
7. Installation FIRM-tech® |
10 |
|
8. |
Shortening and routing the hose |
11-12 |
9. maintenance/ brake pad change |
13 |
|
10. Filling and bleeding |
14-15 |
|
11. Brake pads |
16 |
|
12. Accessories |
17 |
|
WARNING:
This symbol means possible danger for your health and even life if you do not follow the instructions given respectively if the necessary safety measures are not followed.
ATTENTION:
This symbol warns you of inappropriate handling that might cause serious damage to the material and/ or the environment.
NOTE:
This symbol gives you additional information about the general handling of the product or gives hints to paragraphs in this manual which have to be read carefully.
For your own safety you should not overestimate your technical skills! We advise you to leave the following works in case of any doubts to a professional bike mechanic.
THE PASSION PEOPLE |
|
|
|
|
|
|
|
|
2 |
|
|
www.magura.com |
|
|
|
|
|
|
|
|
|
|
|
|
|
|
|
|
|
FELGEN 2011 E.indd 1 |
|
|
07.06.2011 17:08:14 Uhr |
||
|
|
||||
|
|
||||
|
|
|
|
|
|
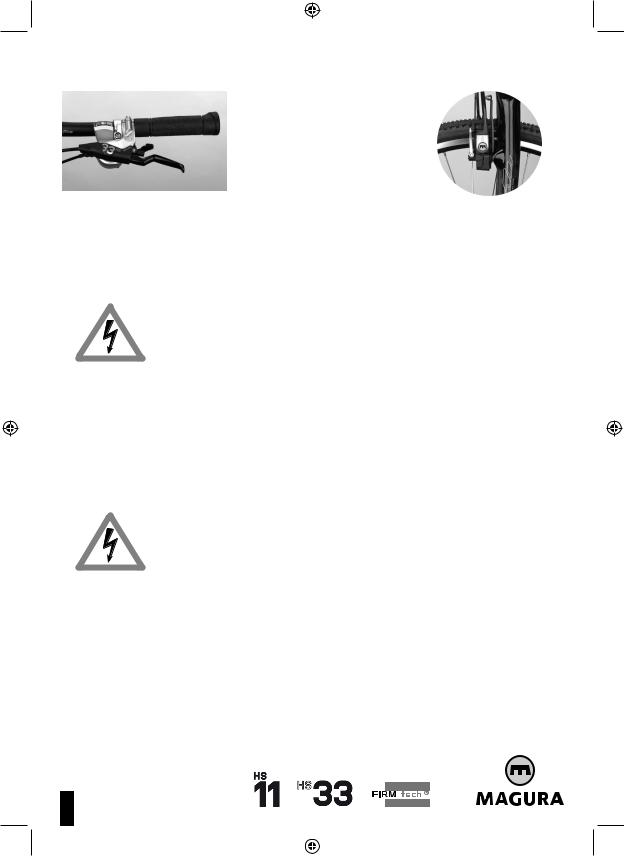
1. Welcome to the Passion People!
Brake lever (master cylinder) MAGURA HS 33
Congratulations! You have purchased a fully hydraulic MAGURA rim brake proudly „Made in Germany“. You will be amazed at the awesome braking power and the minimum amount of maintenance that is necessary on our stoppers. Good to know that you are not alone, millions of riders worldwide rely on them and every day our numbers are increasing
Brake calliper (slave cylinders) MAGURA HS 33
On the fully hydraulic MAGURA rim brake systems HS 33 and HS 11 the braking force is transmitted to the braking surface by a mineral oil column. The movement
of the lever blade moves a piston, which is integrated in the brake lever (master cylinder). The piston pushes the mineral oil column through the brake hose in the direction of the brake calliper (slave cylinders), where two pistons, on which the brake pads are clipsed, are pushed out. The friction between the brake pads and the rim slows down the bicycle and causes a heating of the rim.
Never touch the rim after long braking as this may cause serious burns!
You will be pleased to find out that the MAGURA rim brakes offer a superior braking power even with little hand force applied, no matter what the weather conditions should be. Please note, however, that rim brakes are generally not as powerful in the wet in in snowy conditions mainly and that the reaction of the brake will be slightly retarded under these circumstances.
Our rim brakes cause a wear of your rims. So do not forget to check regularly your rims!
This manual contains important information about the safe installation, operation and maintenance of your MAGURA rim brakes. We urge you to read it carefully, become familiar with its contents and follow our recommendations to help make your new braking experience enjoyable and trouble free.
All setup steps will be explained on the HS 33 rim brake. The HS 11 setup is identical.
Although the MAGURA rim brake systems are relatively simple you should not overestimate your technical skills! We therefore advise you to leave the following works to a trained technician of a professional bike shop.
This manual is part of the product. Do not hand over the product to third parties without this manual. Technical specs are subject to change without prior notice.
In case of any further questions or problems we warmly recommend to visit our website www.magura.com where you will always find the newest and hottest tips about
all our products. On magura.com you can also download this manual in a more convenient A4 format. Stay tuned with the Passion People!
Thank you for your confidence in our products, enjoy your ride and your new MAGURA stoppers!
3
Español Italiano Nederlands Français English Deutsch
FELGEN 2011 E.indd 2 |
|
|
07.06.2011 17:08:17 Uhr |
|
|
2.Before the first ride
1.Are you already familiar with hydraulic rim brakes? Our brakes might be much more powerful than the stoppers on which you relied so far.
Take your bicycle to a safe area to learn the proper braking technique and operation of your new brakes and your bike.
2.Check that the front brake is still actuated by the lever on the side you are used to braking with. Should this not be the case you will have to train to your new setup otherwise any unintended front wheel braking manoeuvre may cause an accident leading to possible serious injury! If in doubt get a trained technician to swap the hoses. For further hints concerning the swapping of the brake hose see page 11
onwards.
3. While riding in extreme conditions (total weight of bike plus rider over 100 kg and/ or a gradient of more than 15 %) always use both brakes simultaneously to slow your bike down.
4. Do not use a MAGURA rim brake for downhill sport! Any misuse might cause serious accidents with fatal injuries both to yourself and others!
5.Are you familiar with the other components on your bike such as gears, clipless pedals and suspension units? Always practise using your bike in a saffe area to improve your handling abilities before using it on road. Consult the user’s manual of your bike to learn more about this.
6.For your own safety always wear a helmet when you ride a bicycle. Make sure
as well that you wear suitable clothing and footwear .
3. Before every ride
always check carefully the following points:
1. Always make sure that the quick release skewers of your wheels and seat post are correctly mounted and closed.
incorrectly installed quick release skewers might cause the fixed items to become loose. Serious accidents with severe injury may result!!
2. Always make sure that the brake lever pressure is o.k. by pulling the lever blade and ensuring that full braking performance is achieved before the lever blade touches
the handlebars.
In case, of changing pressure points during a ride you might have air in the brake system. See hints about filling and bleeding from on pages 14-16.
3. Always make sure that the brake system does not have any leaks by activating the lever blade, holding it and checking the hose connections and brake lever for eventual leaks. (Also see page 11)
|
4. Always protect your rims and brake pads from oil and lubricants (e.g. by lubricating |
|
|
your chain). |
|
|
Contaminating the pads with oil and lubricants will cause a permanent |
|
THE PASSION PEOPLE |
4 |
|
|
|
|
FELGEN 2011 E.indd 3 |
07.06.2011 17:08:18 Uhr |
|
loss of braking power. Clean contaminated rims and pads with isopropyl alcool or with warm dishwater.
See further hints about the brake pad change on page 13.
5. Release your brake lever and check whether your wheel moves freely and without drag. Check eventually whether the wheels are correctly mounted and if the quick release skewers are tightened sufficiently.
6.Are your tires in a good condition, and have they enough air pressure? Test this with your fingers. Lift up your bike and turn the wheels of your bike. An insufficient rotation might be due to damaged tires, broken axles and/or broken spokes.
7.Pick up your bike and let it drop from a moderate height. Listen for any rattling noises. If any are heard check the bearings and all screwed connections.
8.Always follow the instructions given in the owner’s manual of your bicycle.
Never use your bicycle if any of the points mentioned above relate to your bicycle. Consult a professional bike mechanic if you feel unsure. A faulty bicycle may result in serious accidents with possible fatal injuries of the rider!
4. Transport of the bicycle
For a transport in an aircraft you can leave your brake as it is, e.g. you do not have to empty it.
Beside of this there are no further activities necessary. Always make sure that the hose is not snapped or damaged during transport!
5. Warranty
MAGURA is giving a 5-year leakproof warranty on brake levers (master
cylinder) and brake callipers if you register your brake online on magura.com. Watch out for the red info sheet in the middle of this manual!
This warranty is void when damage to the brake has occurred from the following:
abuse
mixing and matching the brake with parts from other manufacturers damage of the exterior finish caused by improper use
any attempt to disassemble the whole brake modifications
non-factory changes or improper service
We expressly point out that a warranty claim is only accepted with a
clear proof of purchase (payment receipt of the dealer!) and online registration on magura.com!
5
Español Italiano Nederlands Français English Deutsch
FELGEN 2011 E.indd 4 |
|
|
07.06.2011 17:08:20 Uhr |
|
|

6.Brake Mounting
1.Tools for mounting (+maintenance)
Allen key 2.5, 4* and 5 mm 8 mm open end wrench sharp knife
(*delivered with the brake)
Please insert the allen key completely to avoid damaging the bolts.
1c
1b
1a |
|
|
5 |
6 |
7 |
|
||
|
|
4
3
2
6
8
1
1d
Unpack your MAGURA brake and arrange all parts (The quantities mentioned here refer to after-market sales boxes including a complete brake set)
1.Preassembled brake, filled and bled, ready for mounting (2 pieces) 1a brake lever (or master cylinder)
1b brake cylinder (or slave cylinder)
1c EVO 2 adaptor
1d Quick release
2.cantistud washers (4 pieces)
3.fitting bolt for EVO 2 adaptor (2 pieces)
4.quick release (or hourglass) bolt (2 pieces)
5.EVO 2 mounting plate
6.olives (2 pieces)
7.sleeve nut (2 pieces)
8.EVO 2 booster and washer (2 pieces)
Contents in the sales box may vary, mainly in the US!
THE PASSION PEOPLE |
|
|
|
|
|
|
|
|
6 |
|
|
|
|
|
|
|
|
|
|
|
|
|
|
FELGEN 2011 E.indd 5 |
|
|
07.06.2011 17:08:21 Uhr |
||
|
|
||||
|
|
||||
|
|
|
|
|
|
 Loading...