

Page 1
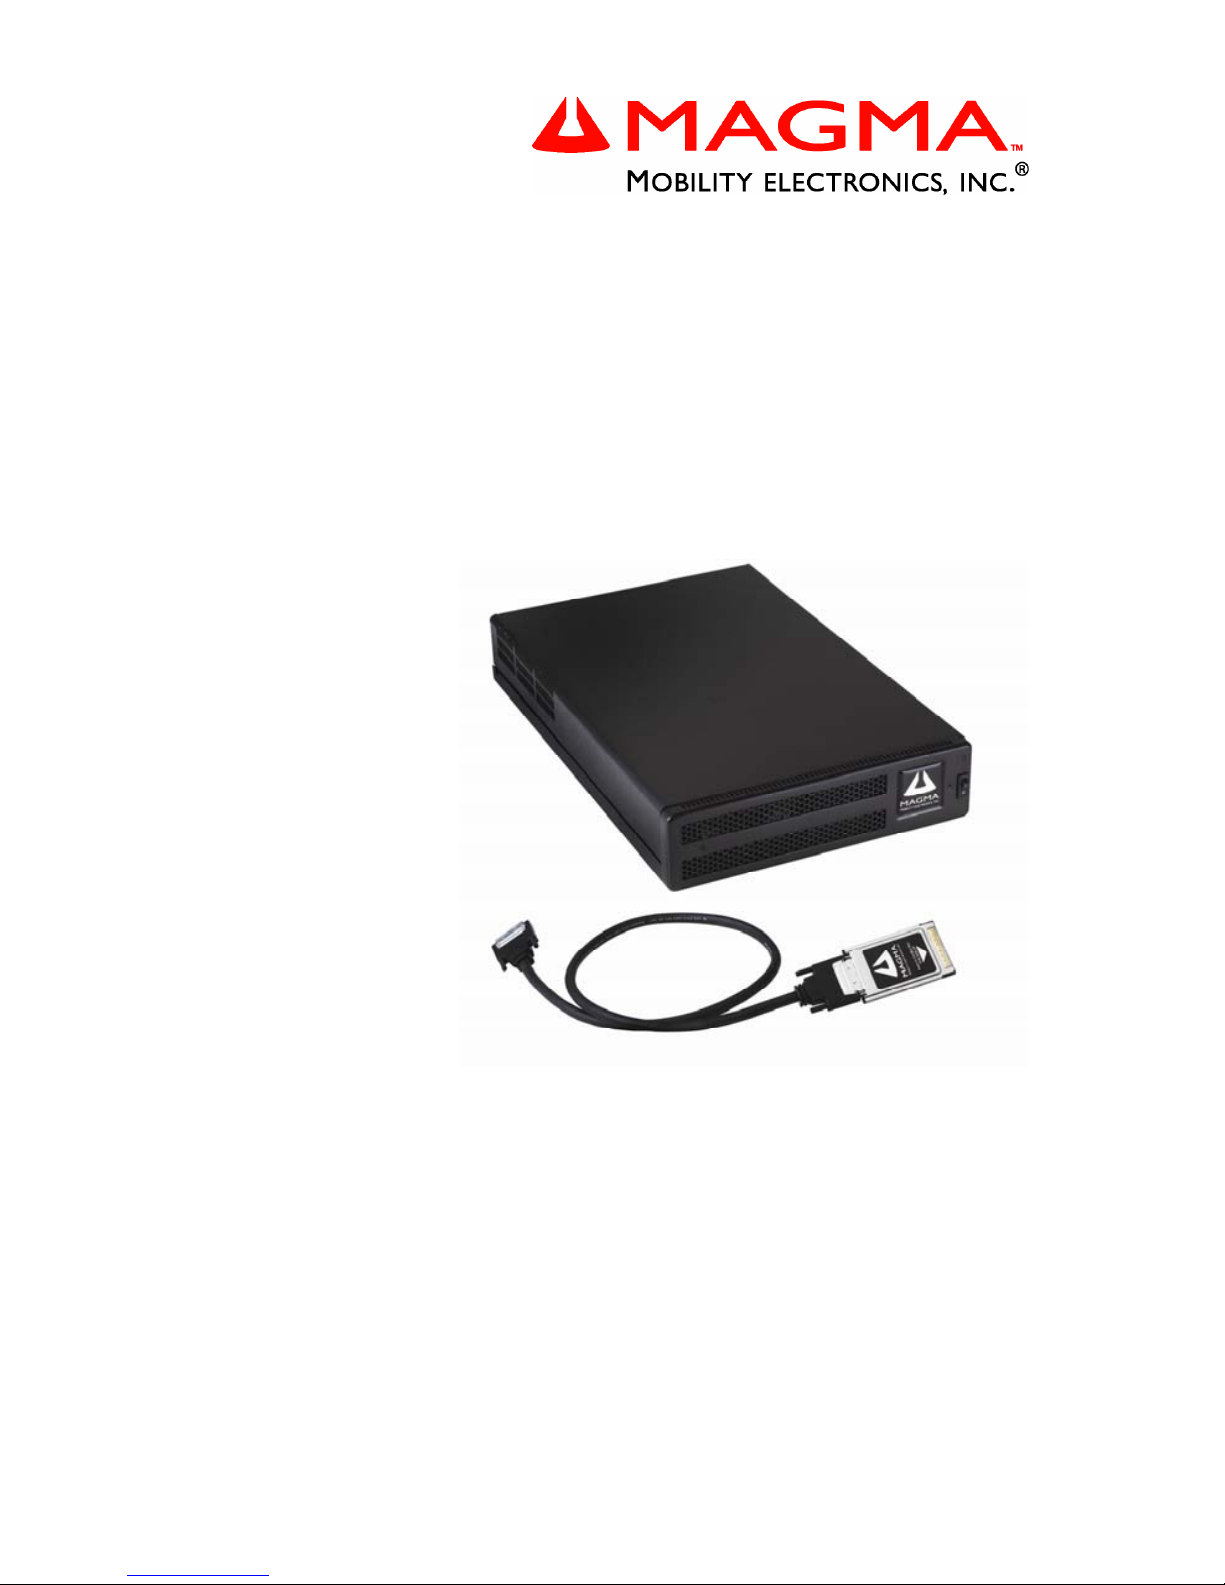
PCI Expansion System
User's Manual
2 Slot CardBus to PCI Expansion
Page 2

Copyright © 2005 Mobility Electronics, Inc.
This publication is protected by Federal Copyright Law, with all rights
reserved. No part of this publication may be copied, photocopied,
reproduced, stored in a retrieval system, translated, transmitted or
transcribed, in any form or by any means manual, electric, electronic,
electro-magnetic, mechanical, optical or otherwise, in whole or in part
without prior written consent from Mobility Electronics, Inc.
Limitation of Liability
Information presented by Mobility in this manual is believed to be
accurate and reliable. However, Mobility assumes no responsibility for
its use. No license is granted by implication or otherwise to any rig hts of
Mobility.
Product specifications and prices are subject to change without notice.
Trademark References
Trademarks and registered trademarks are proprietary to their
respective manufacturers.
Page 3

MAGMA
Table of Contents i
Table of Contents
PREFACE............................................................................................... I
Advisories ............................................................................................... i
Safety Instructions...................................................................................ii
When Working Inside a Computer ..........................................................ii
Protecting Against Electrostatic Discharge ............................................iii
CHAPTER 1 INTRODUCTION ..........................................................1
General Specifications ...........................................................................1
Pre-Installation Information ....................................................................1
Parts List................................................................................................2
Tools Required for Installation................................................................ 2
CHAPTER 2 HARDWARE INSTALLATION .....................................3
Before you Begin.................................................................................... 4
Attach PCI Expansion and Power Cable................................................ 5
Install CardBus PC Card........................................................................ 6
Recheck the Installation.........................................................................6
Applying Power Correctly.......................................................................7
Starting Up:................................................................................................... 7
Shutting Down:.............................................................................................. 9
Install Software Drivers........................................................................10
CHAPTER 3 WINDOWS DRIVER INSTALLATION........................ 11
Install the MAGMA CardBus Expansion Driver....................................12
Uninstall the MAGMA Driver ................................................................14
CHAPTER 4 VERIFY INSTALLATION............................................ 15
Windows 2000 and XP......................................................................... 15
Mac OS X............................................................................................. 16
CHAPTER 5 INSTALL 3
RD
PARTY PCI CARDS.............................19
Remove PCI Expansion Chassis Cover...............................................19
Install PCI Cards in PCI Expansion Chassis........................................ 20
Install Hard Drive(s) ............................................................................. 21
System Should Be Up and Running..................................................... 23
Finishing Touches................................................................................ 23
CHAPTER 6 TROUBLESHOOTING ............................................... 25
Locate the Problem..............................................................................25
Support for 3rd Party PCI Cards ...........................................................26
The PCI to PCI Bridge is Not Found .................................................... 26
Windows 2000/XP:...................................................................................... 27
MAC............................................................................................................ 27
My Computer Hangs During Power Up................................................ 28
Page 4

MAGMA
ii Table of Contents
Windows Error Codes...........................................................................29
Uninstall the MAGMA Driver.................................................................31
CHAPTER 7 HOW TO GET MORE HELP .......................................33
Frequently Asked Questions (FAQ)......................................................33
Contacting Technical Support ..............................................................33
MAGMA Debug Utility................................................................................. 34
PCIScope Software Utility........................................................................... 35
Returning Merchandise to MAGMA......................................................37
APPENDIX A BUS HIERARCHY.....................................................39
Bus Hierarchy.......................................................................................39
APPENDIX B DC POWER INFORMATION......................................41
SUB100WDC .......................................................................................41
Battery Sizing/Selection:.......................................................................42
APPENDIX C COMPLIANCE ..........................................................45
FCC......................................................................................................45
Industry Canada...................................................................................45
CE ........................................................................................................45
Page 5
MAGMA
Preface i
Preface
Advisories
Four types of advisories are used throughout this manual to provide
helpful information, or to alert you to the potential for har dware damage
or personal injury. They are Notes, Cautions, Warnings, and Dangers.
The following is an example of each type of advisory.
NOTE
An amplifying or explanatory comment related to procedural steps or
text.
CAUTION
Used to indicate and prevent the following procedure or step from
causing damage to the equipment.
WARNING
Used to indicate and prevent the following step from causing injury.
DANGER or STOP
Used to indicate and prevent the following step from causing serious
injury or significant data loss.
Disclaimer: We have tried to identify all situations that may pose a
danger, warning, or caution condition i n this manual. However, Mobility
Electronics, Inc. does not claim to have covered all situations that might
require the use of a Caution, Warning, or Danger indicator.
Page 6

MAGMA
ii Preface
Safety Ins tructions
Always use caution when servicing any electrical component. Before
handling the MAGMA PCI Expansion chassis, read the following
instructions and safety guidelines to prevent damage to the product and
to ensure your own personal safety. Refer to the “Advisories” section
for advisory conventions used in this manual, including the distinction
between Dangers, Warnings, Cautions, and Notes.
♦ Always use caution when handling/operating the computer.
Only qualified, experienced, authorized electronics personnel
should access the interior of the computer. The po wer supplies
produce high voltages and energy hazards, which can cause
bodily harm.
♦ Use extreme caution when installing or removing components.
Refer to the installation instructions in this manual for
precautions and procedures. If you have any questions,
please contact Mobility Technical Support.
WARNING
High voltages are present inside the expansion chassis when the
unit’s power cord is plugged into an electrical outlet. Disconnect the
power cord from its source before removing the system cover.
Never modify or remove the radio frequency interference s hielding from
your workstation or expansion unit. To do so may cause your installation
to produce emissions that could interfere with other electronic
equipment in the area of your system.
When Working Inside a Computer
Before taking covers off a computer, perform the following steps:
1. Turn off the computer and any peripherals
2. Disconnect the computer and peripherals from their power
sources to prevent electric shock or system board damage.
3. Disconnect any telephone or telecommunications lines from
the computer.
Page 7
MAGMA
Preface iii
In addition, take note of these safety guidelines when appropriate:
♦ To help avoid possible damage to systems boards, wait five
seconds after turning off the computer before removing a
component, removing a system board, or disconnecting a
peripheral device from the computer.
♦ When you disconnect a cable, pull on its connector or on its
strain-relief loop, not on the cable itself. Some cables have a
connector with locking tabs. If you are disconnecting this t ype
of cable, press in on the locking tabs before disconnecting the
cable. As you pull connectors apart, keep them evenly aligned
to avoid bending any connector pins. Also, before connecti ng a
cable, make sure both connectors are correctly oriented and
aligned.
CAUTION
Do not attempt to service the system yourself except as explained in
this manual. Follow installation instructions closely.
Protecting Against Electrostatic Discharge
Electrostatic Discharge (ESD) Warning
Electrostatic Discharge (ESD) is the enemy of semiconductor
devices. You should always take precautions to eliminate any
electrostatic charge from your body and clothing before touching any
semiconductor device or card by using an electrostatic wrist strap
and/or rubber mat.
Static electricity can harm system boards. Perform servic e at an ESD
workstation and follow proper ESD procedure to reduce the risk of
damage to components. Mobility strongly encourages you to follow
proper ESD procedure, which can include wrist straps and smocks,
when servicing equipment.
You can also take the following steps to prevent damage from
electrostatic discharge (ESD):
♦ When unpack ing a static-se nsitive compone nt from its shipping
carton, do not remove the component’s anti-static packaging
material until you are ready to install the component in a
computer. Just before unwrapping the anti-static packaging,
be sure you are at an ESD workstation or grounded.
Page 8

MAGMA
iv Preface
♦ When transporting a sensitive component, first place it in an
anti-static container or packaging.
♦ Handle all sensitive components at an ESD workstation. If
possible, use anti-static floor pads and workbench pads.
♦ Handle components and boards with care. Don’t touch the
components or contacts on a board. Hold a board by its edges
or by its metal mounting bracket.
Page 9

MAGMA
Chapter 1 Introduction 1
Chapter 1 Introduction
General Specifications
The MAGMA 2 Slot CardBus to PCI Expansion System is a generalpurpose bus expansion chassis for the Peripheral Component
Interconnect (PCI) local bus. The expansion chassis is fully compliant
with the PCI Local Bus Specification. This MAGMA expansion system
consists of a CardBus PC Card, a PCI expansion bus cable (a shielded ,
high-speed cable), an expansion chassis containing a 2 slot PCI
backplane, drive bay brackets, a power supply and cooling fans.
Item Description
Backplane: 32-bit or 64-bit / 33MHz
(2) standard PCI slots
(1) non-standard PCI slot
Enclosure: Portable/Aluminum/Steel
Dimensions: 10" W x 2.570" H x 15.144" D
Weight: 5.3lbs or 2.40 kg
Standard Cable Length: 1 meter
PCI Local Bus Specification: Revision 2.2
PCI Bridge Architecture Spec: Revision 1.1
Interconnect Bandwidth: 132 MB/sec (Theoretical Max. of PCI 33/32)
Cooling: (2) 13.2 CFM fans
Disk Drive Bay(s): For (2) 1” disk drives or (1) 1.6” disk drive
Standard Power Supply: 90 Watt AC (non-auto switching)
MTBF: 25,000 hours
Operating Environment:
0º to 50º C Operating Temperature
-20º to 60º C Storage Temperature
5% to 85% Relative Humidity, Noncondensing
Operating Systems: Windows XP/2000
Mac OS X version 10.2.2+
RedHat Linux 9*
Warranty: 1 Year Return to Factory
Available Options: 1.5-meter cable (PN: SUBCBL1.5HF)
DC-ready Power Supply (PN: SUB100WDC)
PCI Host Interface card: required to use
the expansion chassis with a desktop
computer (PN: PCIHIF68)
Pre-Installation Information
Before using the MAGMA expansion chassis you should perform the
following steps:
• Inventory the shipping carton contents for all of the requir ed parts
• Gather all of the necessary tools required for installation
• Read this manual
Page 10

MAGMA
2 Preface
Parts List
The following parts are provided:
Qty Item
1 2 Slot CardBus to PCI Expansion Chassis
1 PCI expansion cable (1-meter or 1.5-meter)
1
1 CardBus PC Card
1 U.S. Standard 115V power cord
4 Rubber feet (to be installed by user)
1 Software CDROM
1 User’s Manual
1
The MAGMA PCI expansion cable uses a 68-pin connector; however, it is NOT
an “off-the-shelf” SCSI cable. The MAGMA PCI expansion cable is a custom
cable designed specifically for PCI Expansion.
Tools Required for Installation
In order to complete the installation of the MAGMA
expansion system you will need a Phillips-head
screwdriver.
Page 11
MAGMA
Chapter 2 Hardware Installation 3
Chapter 2 Hardware Installation
The following steps will guide you in completing the hardware
installation of your MAGMA 2 Slot CardBus to PCI Expansion System.
Electrostatic Discharge (ESD) Warning
All PCI cards are susceptible to electrostatic discharge. When
moving PCI cards, it is best to carry the cards in anti-static
packaging. If you need to set a PCI card down, be sure to place it
inside or on top of an anti-static surface. For more information, see
“Protecting Against Electrostatic Discharge” in the Preface.
WARNING
High voltages are present inside the expansion chassis when the
unit’s power cord is plugged into an electrical outlet. Disconnect the
power cord from its source before removing the enclosure cover.
Turning the system power off at the power on/off switch does not
remove power to components. High voltage is still present.
CAUTION
Before touching anything inside the enclosure, move to an ESD
station and follow proper ESD procedure. Failure to do so may result
in electrostatic discharge damaging the computer or its components.
For more information, see “Protecting Against Electrostatic
Discharge” in the Preface.
STOP
If your MAGMA expansion chassis was not purchased directly from
Mobility Electronics, Inc., you must check to ensure that it doesn’t
contain any pre-installed PCI cards.
Check the rear side of the chassis to see if any PCI cards are visible
in the slots. If you see a PCI card, you should continue installation
using instructions provided by your dealer. If no separate instructions
are available, remove the cover by using instructions in Step 6. Then
remove the card as normal. If no PCI card is visible, then continue
with the cable installation.
Page 12

MAGMA
4 Chapter 2 Hardware Installation
Before you Begin
The 90 Watt AC power supply is NOT auto-s witching. These mea ns that
you MUST be sure the red Voltage Selector Switch on the back of the
chassis shows the correct voltage for your location.
Before you connect any cables to the expansion
chassis, you need to know the voltage of your po wer
source and slide the Voltage Selector Switch from
115V to 220V if required. The factory default setting is
for the North American 115V standard. Ho wever, mos t
non-US locations use a 220V standard.
Remove the orange warning label that is
covering the plug receptacle.
STOP
Using an incorrect power source (wrong voltage for your system)
can result in serious damage to your system. Electronics
components, damaged by incorrect power, may prevent your
system from working properly and can be expensive to replace.
CAUTION
Remember, if you are using a 220V power source, you will need a
power converter (leave your Voltage Selector Switch at 115V), or a
250V power cord adapter (change your Voltage Selector Switch to
230V), to connect to the power source. Double-check that you have
the correct combination of Voltage Selector Switch setting and
Power Converter or Power Cable Adapter to allow your expansion
chassis to operate safely.
Remember, when traveling, to flip the red Voltage Selector switch, if
necessary.
Page 13

MAGMA
Chapter 2 Hardware Installation 5
FEATURE
To allow them to be as portable as your laptop, the 2 slot expansion
chassis is available with a DC power supply option (Part Number
SUB100WDC). This version ships with an internal DC-DC power
supply and an AC power brick. The DC-DC power supply includes
a male 4-pin XLR connector to provide easy connection to user
supplied DC power source. The AC power brick is provided for
times when AC power is available. In addition, the DC version is
auto-switching. Refer to Appendix B for more information.
Attach PCI Expansion and Power Cable
Carefully position the MAGMA expansion chassis so that the supplied
PCI expansion cable will conveniently reach from the con nector of the
CardBus card to the connector on the back of the
chassis.
Attach one end of the PCI expansion cable to the
CardBus card and secure it using the captive
thumbscrews on the cable.
Carefully route the cable to the rear side of the
expansion chassis and attach it to the 68-pin connector, as shown
below:
Secure the cable with the captive thumbscrews. It is important that the
cable be attached securely to the connectors at both ends.
Page 14

MAGMA
6 Chapter 2 Hardware Installation
Before connecting the power cord, check that the expansion chassis
On/Off switch is set to the OFF position. This switch is located on the
right side of the front of the chassis.
NOTE
If at all possible, plug all power cords from the MAGMA expansion
chassis and your host computer into a shared power strip,
preferably one that has surge and noise suppression circuitry built
into it.
Install CardBus PC Card
NOTE
CardBus PC Cards can only be used in systems that support
CardBus. A special keying mechanism prevents insertion in systems
that do not support 32-bit CardBus PC cards.
Begin installation of your CardBus card by first powering down your
laptop computer. Use the procedures for shutting down your operating
system and shutting off power to your system provided in your owner’s
manual or system documentation.
Insert the CardBus card with the MAGMA logo side up, (gold strip up)
into the PC Card slot. Gently push the card until it is s eated firmly. If it
doesn’t seem to fit correctly, try turning the card over, or try the other
PC Card slot – if your laptop has another slot.
For more information on using CardBus PC Cards, please refer to your
computer’s user manual or system documentation.
Recheck the Installation
Check your installation before powering up the MAGMA expansion
chassis for the first time. Although the power supply has an over voltage
protection device built into it, it may not "trip" in time to fully protect a
device that has been improperly connect ed, or whose power cable has
been damaged.
Page 15
MAGMA
Chapter 2 Hardware Installation 7
CAUTION
When using your MAGMA expansion chassis outside of the United
States, make sure that you have correctly identified the voltage of
your power source and that you are connected to it correctly.
Remember, if you are using a 220V power source, you will need a
power converter (leave your Voltage Selector Switch at 115V), or a
250V power cord adapter (change your Voltage Selector Switch to
230V), to connect to the power source. Double-check that you have
the correct combination of Voltage Selector Switch setting and Power
Converter or Power Cable Adapter to allow your expansion chassis
to operate safely.
Applying Power Correctly
Starting Up:
You must apply power to the MAGMA expansion chassis BEFORE you
power up your computer. This will allow the higher numbered PCI buses
in the PCI bus hierarchy to be at a stable s tate when the host system
issues its master power-on bus reset. In systems that perform automatic
PCI bus configuration, this will allow the configuration code to recognize
the PCI bus hierarchy and any attached devices.
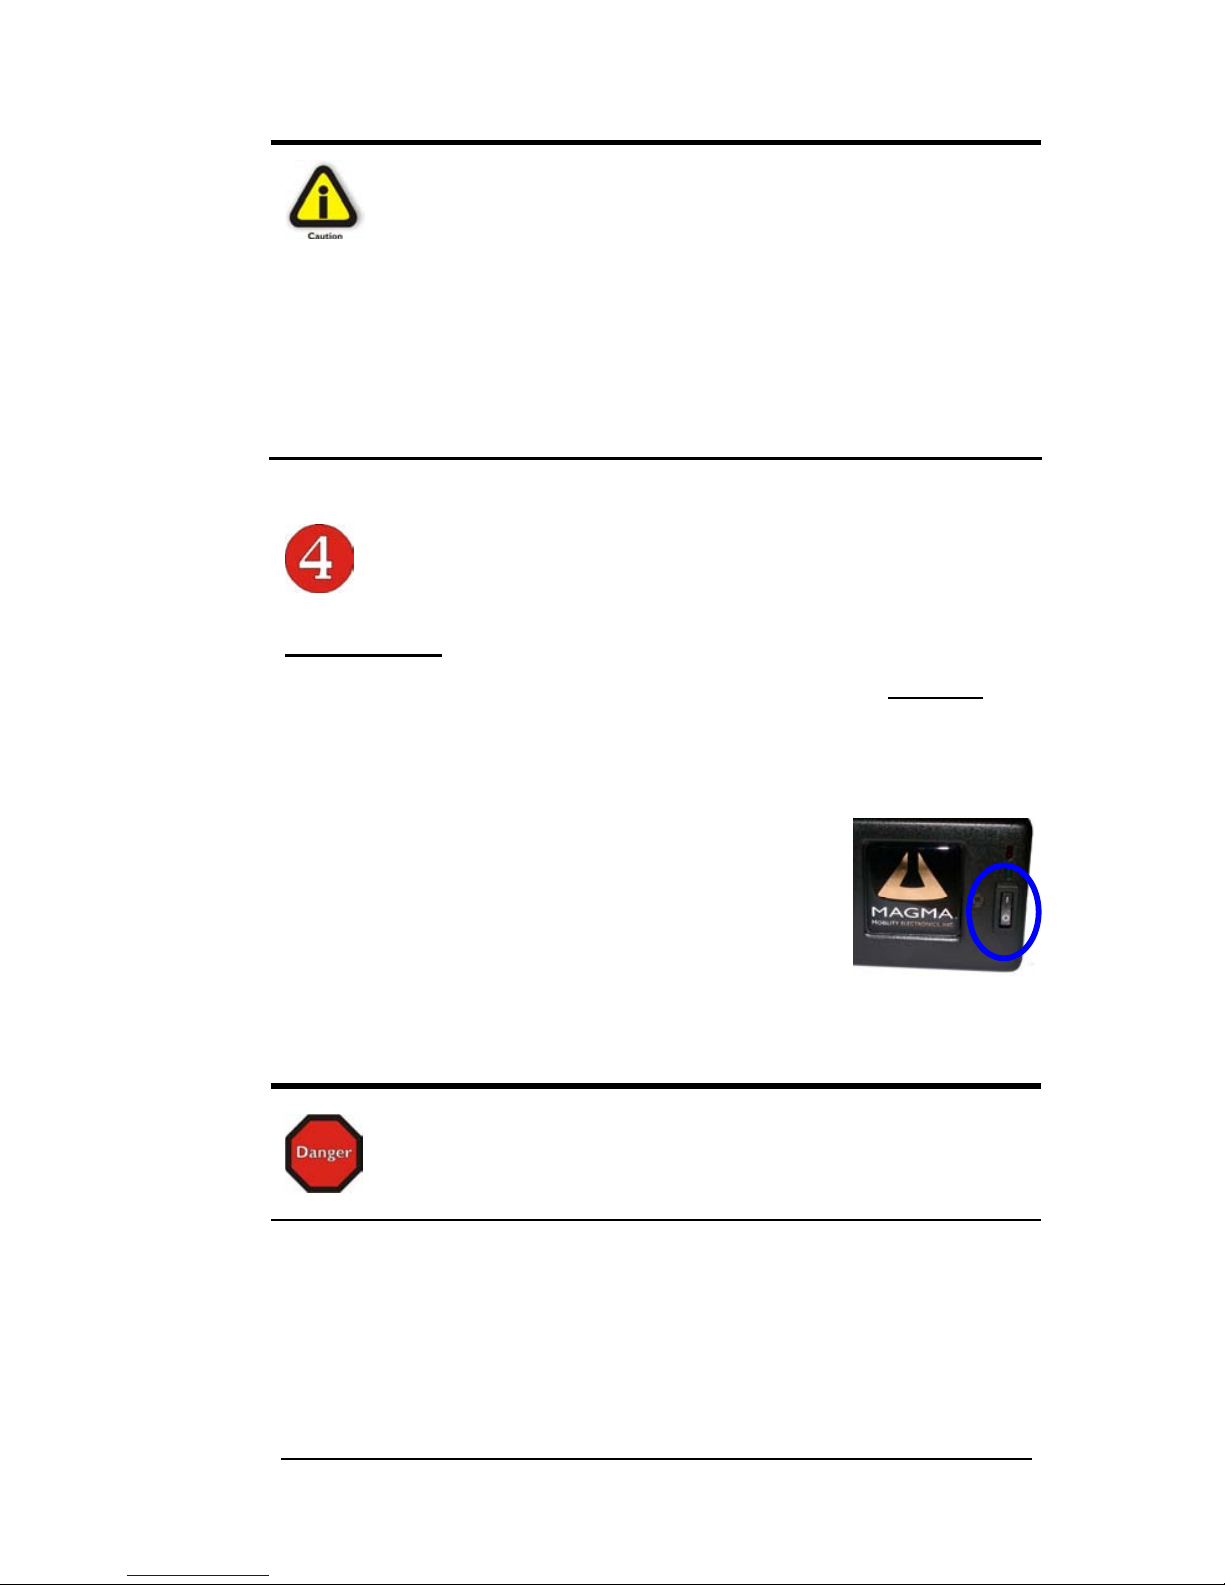
There is an On/Off switch on the front panel, as well
as an LED indicator to indicate power status . Verify
that the green power indicator is ON.
STOP
DO NOT TURN ON THE MAGMA EXPANSION CHASSIS UNTIL
YOU HAVE SHUT DOWN YOUR LAPTOP COMPLETELY! It can
cause a system lockup and loss of any unsaved data.
Page 16
MAGMA
8 Chapter 2 Hardware Installation
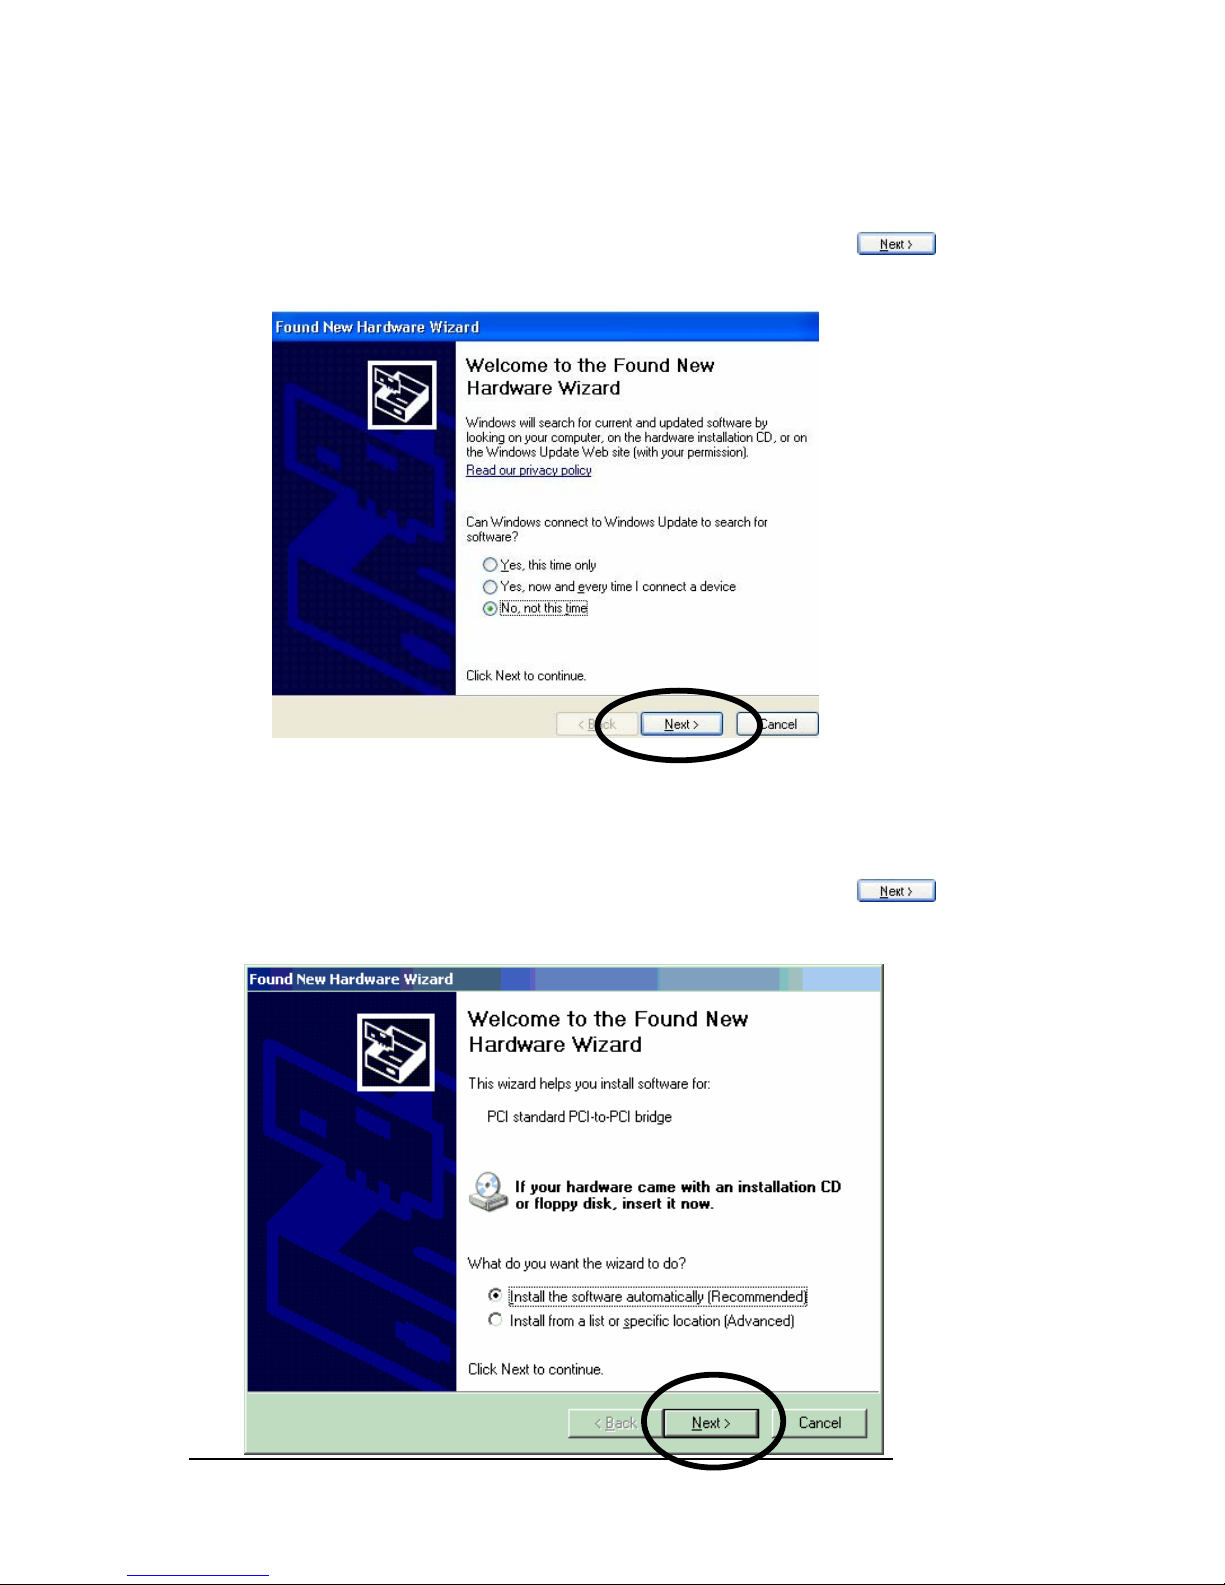
Windows XP and Windows 2000 Start Up
When your Windows operating system first starts up, the following
Wizard appears, select “No, not this time” and click the Next
button.
Windows will then identify the PCI Bridge on the CardBus card and
again ask you for guidance. Select the “Install the software
automatically (Recommended)” option and the click the Next
button.
Page 17

MAGMA
Chapter 2 Hardware Installation 9
NOTE
It is not relevant which type of PCI to PCI Bridge is detected.
Previous MAGMA expansion systems utilized DEC bridges, so you
may see references to other PCI Bridges, not shown in this manual.
After Windows completes installing the software, click the Finish
button to continue.
The laptop must be restarted for these changes to take effect. Click on
the Yes
button to reboot your laptop.
Shutting Down:
When shutting your system down, it is recommended that you first shut
down the computer correctly, and then power down the MAGMA
expansion chassis to avoid ‘computer lock-up’ and potential data loss.
Page 18
MAGMA
10 Chapter 2 Hardware Installation
STOP
DO NOT TURN ON THE MAGMA EXPANSION CHASSIS UNTIL
YOU HAVE SHUT DOWN YOUR LAPTOP COMPLETELY! It can
cause a system lockup and loss of any unsaved data.
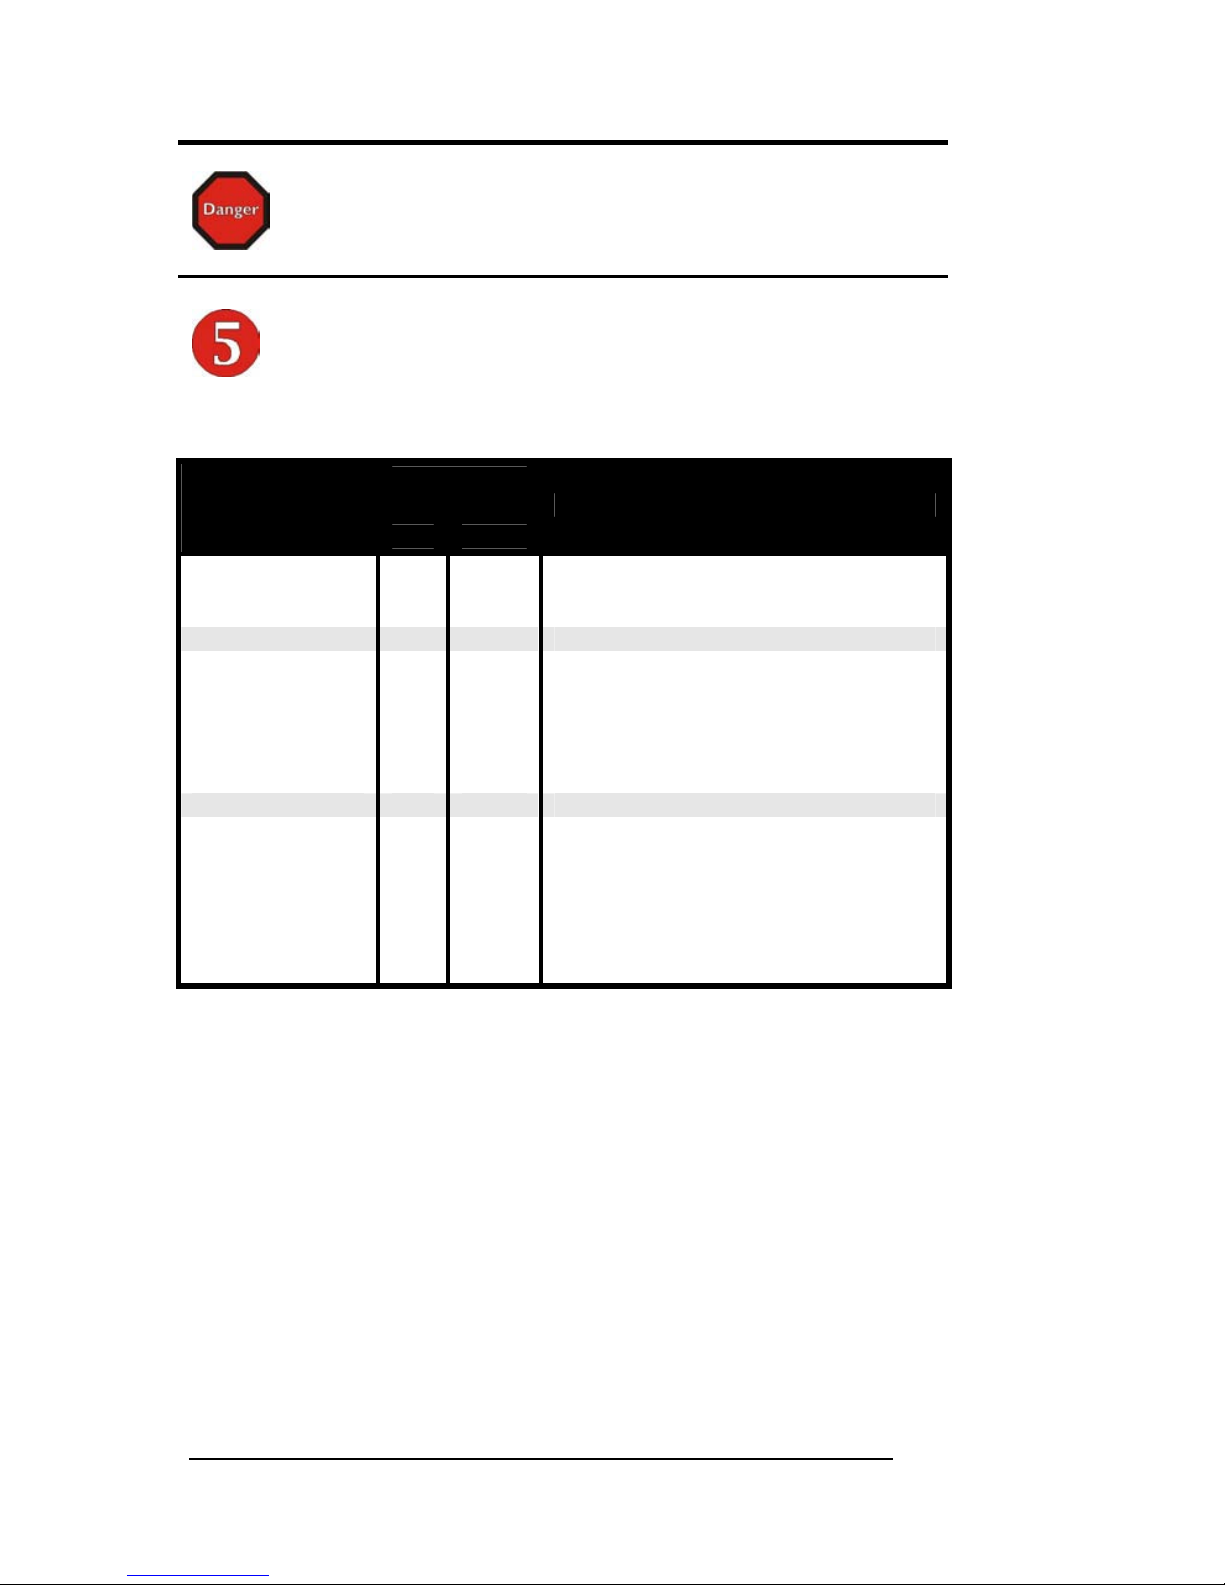
Install Software Drivers
Driver
Required?
Operating
Systems
Yes No
Instructions
Windows XP/2000
D
Proceed to Chapter 3 for Windows Driver
Installation.
Mac OS X
D
The Mac OS operating system should
recognize the MAGMA expansion
chassis on first boot with the expansion
chassis powered up and connected to
the Apple laptop. See Appendix A to
Verify Installation.
RedHat Linux 9
D
Linux does not actually use “drivers” but
does require some “intervention” to
ensure the installed 3
rd
Party PCI cards
work correctly. See the README.TXT
included in the LINUX folder on the
MAGMA CDROM for detailed
information.
Page 19

MAGMA
Chapter 3 Windows Driver Installation 11
Chapter 3 Windows Driver Installation
MAGMA CardBus Expansion Drivers are required for Windows
2000/XP. However, before attempting to ins tall anything on a Windows
XP system, you should ensure that you have set a ne w Restore Point.
Then, you will need to disable the Windows XP restore utility before
continuing. See your Windows XP manual t o learn how to do this. You
should ensure that all data files are closed and that you have a current
backup.
Follow the Step-by-Step Instructions included in Chapter 2 prior to
installing the MAGMA CardBus Expansion Driver. It is important to
apply power to the expansion chassis first, and then apply power to your
computer.
STOP
Before attempting to install the new MAGMA CardBus Expansion
Driver, you must ensure that you have a current system backup of all
of your important data.
Failure to follow these instructions exactly could result in a system
lock-up and potential loss of data.
• Be alert
• Be careful
• Be protected
You must also disable your anti-virus software before continuing.
For best success when installing the MAGMA driver:
Have a current system backup or System Restore Point
Ensure all PCI slots are empty
Reboot and Shut down each time you are prompted
Be logged in as ‘System Administrator’
Disable any anti-virus software
Follow the installation instructions provided in this manual
During the driver installation, you will be prompted to Shut Down and
Reboot your system several times. Please be p atient, each Shut Down
and Reboot serves a specific purpose and is required for correct
installation. If you Shut Down and Reboot when requested, it will help
ensure that everything is installed prop erl y. This will help you get started
correctly, and may save you from having to make a call to Mobility
Technical Support.
Page 20
MAGMA
12 Chapter 3 Windows Driver Installation
WARNING
Prior to installing the MAGMA CardBus Driver, you should ensure
that all PCI slots in the chassis are empty. The MAGMA CardBus
Expansion Driver must be installed, and the MAGMA expansion
chassis installation verified,
BEFORE you attempt to install any 3rd
Party PCI cards.
You must be logged in as ‘System Administrator’ while installing the
MAGMA expansion chassis. You must remain logged in as ‘System
Administrator’ until installation is complete.
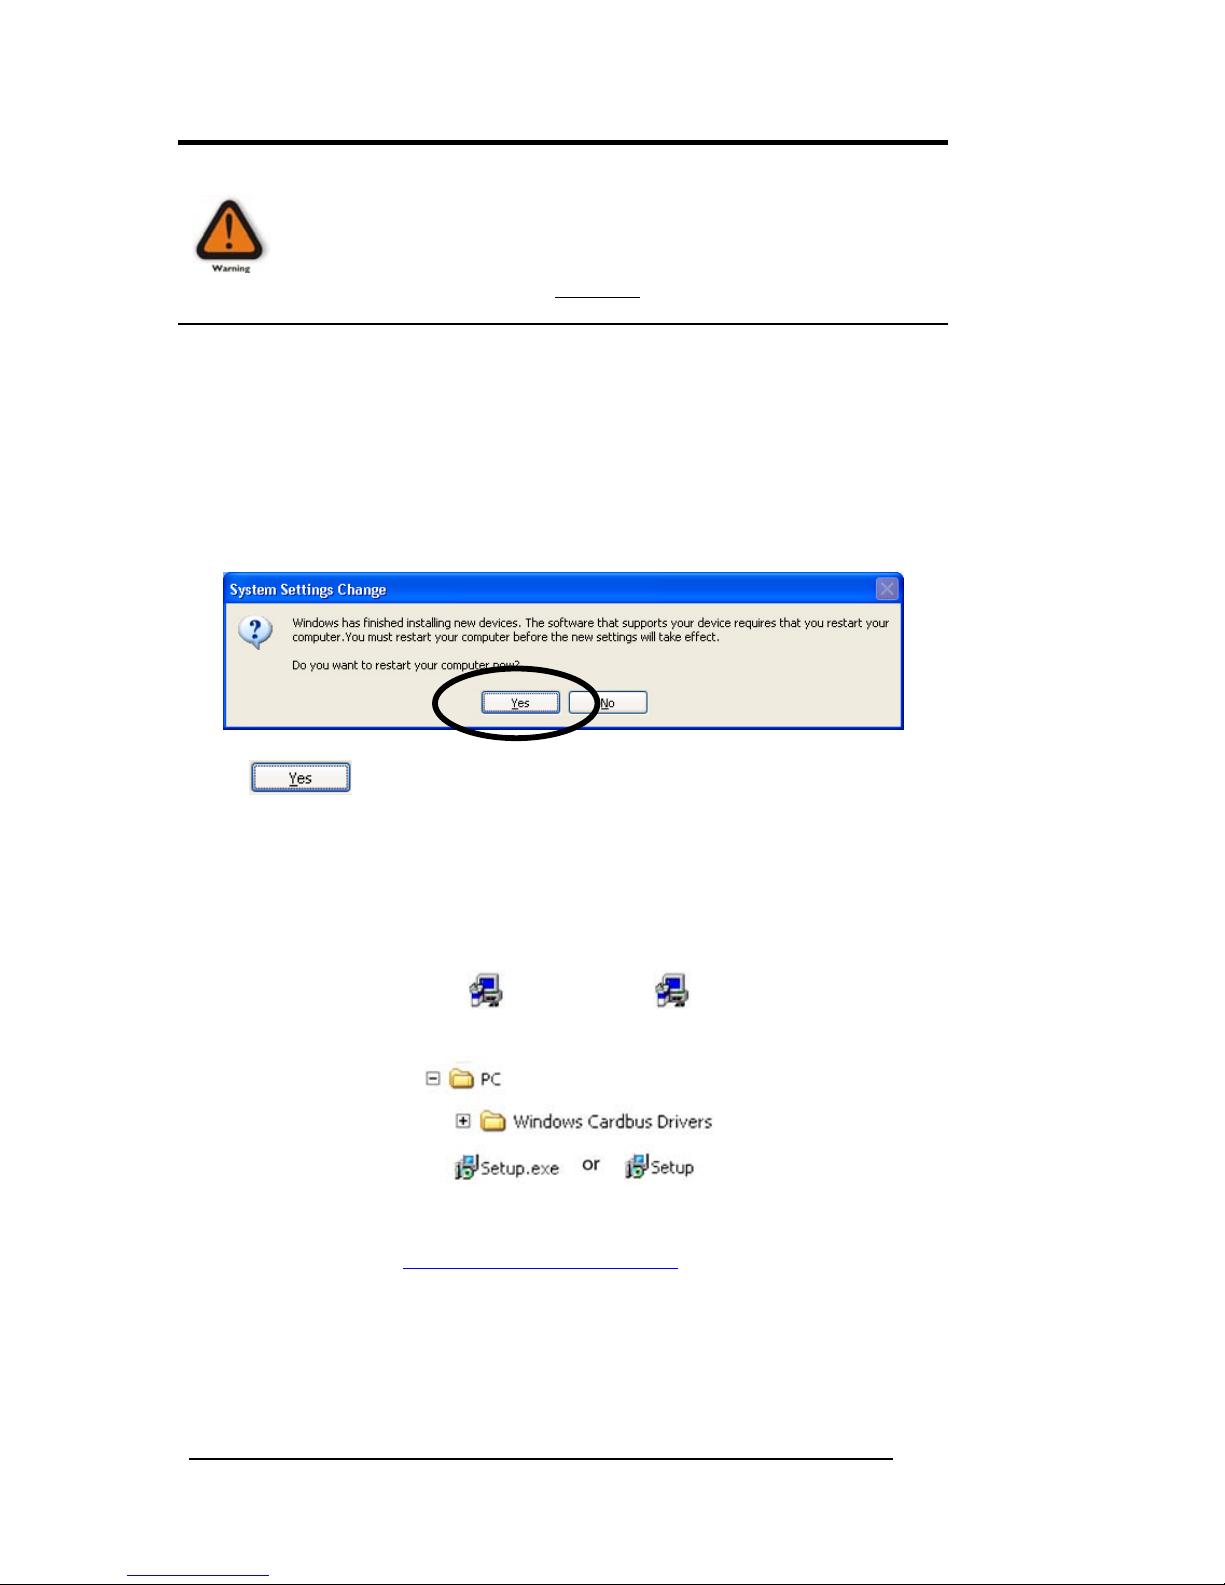
The first time your system boots up, with the expansion chassis
connected, the following System Settings Change Window will appear:
Click
. Your computer will restart. Continue to the next step.
Install the MAGMA CardBus Expansion Driver
After your system comes up, install the MAGMA CardBus Expansion
Driver included on the CDROM:
Double-click the file called
setup.exe (or setup) located on the
CDROM included with your MAGMA expansion systems:
You can also download the latest MAGMA CardBus Expansion Driver
from our web site at
www.magma.com/support/
Page 21
MAGMA
Chapter 3 Windows Driver Installation 13
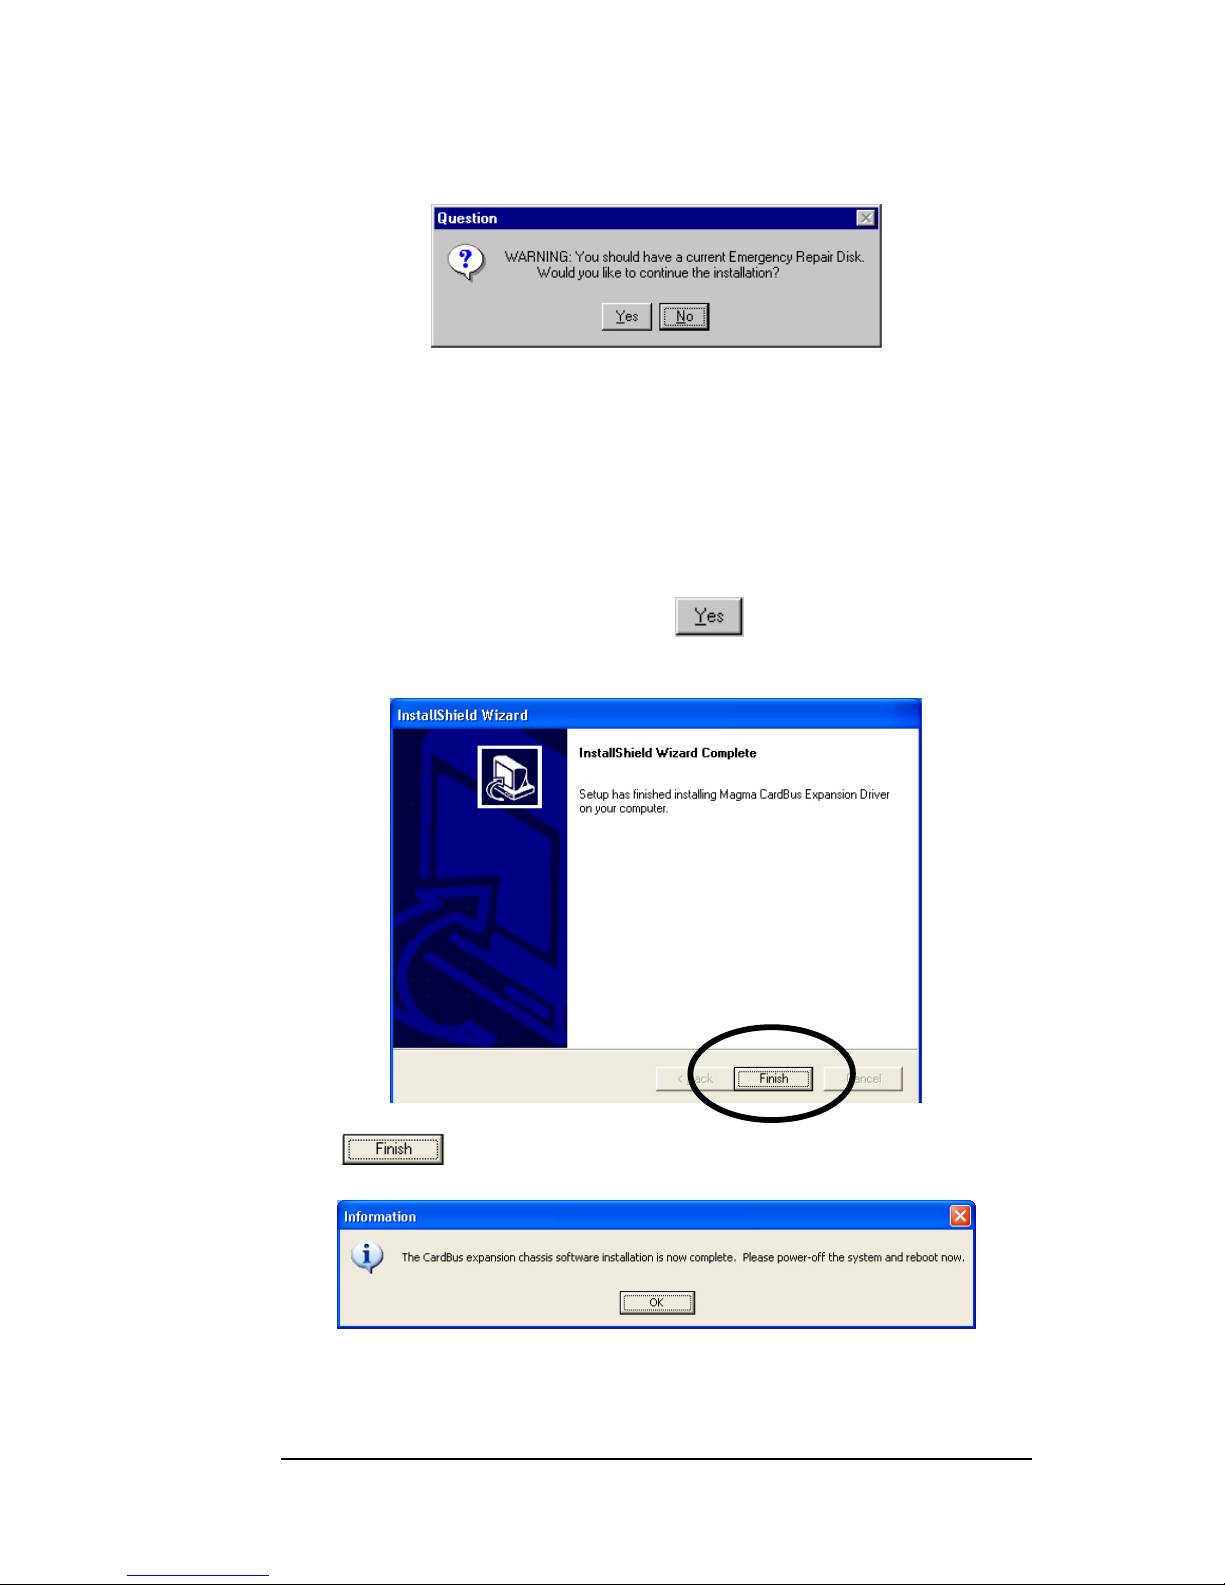
The following Question Window will appear:
If your operating system uses Emergency Repair Disks, such as
Windows 98/ME/NT4.0, make sure that you have a current Emergency
Repair Disk prepared. Windows XP users should set a new System
Restore Point, and then disable the Windows System Restore utility
before continuing. Windows 2000/XP users should also ensure they
have current backups of their System Registry and their System Volume
Information folder.
Once you are sure you are safe, click
and the following
InstallShield Wizard Window will appear:
Click
and a final Information Window will appear:
You should now turn off computer. This means, Shut down your
computer completely.
Page 22

MAGMA
14 Chapter 3 Windows Driver Installation
Windows XP Shut Down Windows 2000 Shut Down
After you have turned off your computer completely, it’s time to
power-up again in order to complete the MAGMA soft ware installation.
The following System Settings Change Window will appear.
Click
. Your computer will reboot.
As your system comes up, if PCI cards are installed in the expansion
chassis, you may be prompted to load or locate drivers. Follow the
instructions you see on the screen and install the drivers just as you
would on a desktop computer. (You should refer to the pr ocedures for
installing drivers that was included with the third-party PCI device(s) you
are installing) If prompted to reboot, do so.
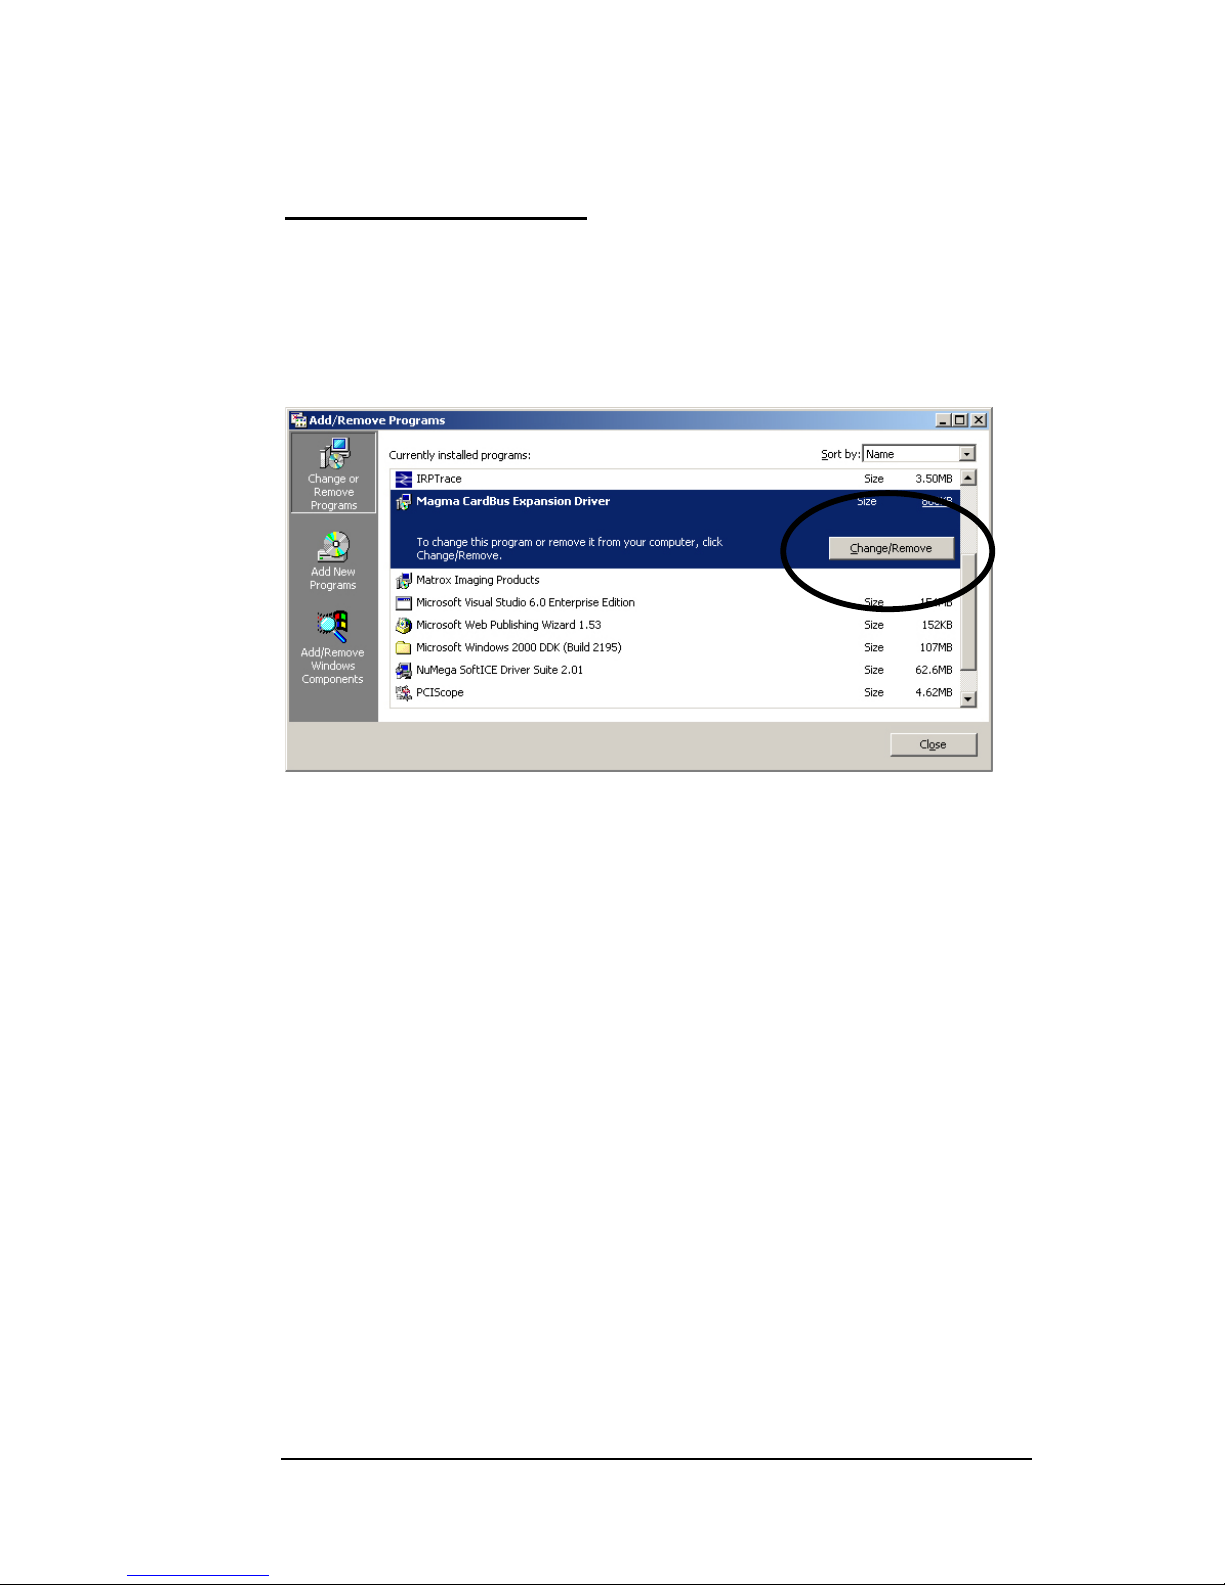
Uninstall the MAGMA Driver
If you need to uninstall, or reinstall, the MAGMA Windo ws drivers, go to
the Windows Control Panel Æ Add/Remove Programs Æ Choos e either
the MAGMA CardBus Expansion Driver (or it may appear as the
Mobility CardBus
Expansion Driver) Æ
then choose
Change/Remove.
Refer to installation
instructions at the start
of this chapter for help
reinstalling the
Windows driver.
Page 23

MAGMA
Chapter 4 Verify Installation 15
Chapter 4 Verify Installation
Windows 2000 and XP
To verify a successful installation on Windows XP or 2000, find the ‘My
Computer’ icon Æ Right-click and select ‘Manage’ Æ H ighlight ‘Device
Manager’ Æ Click on the View Menu and select View Devices by
Connection
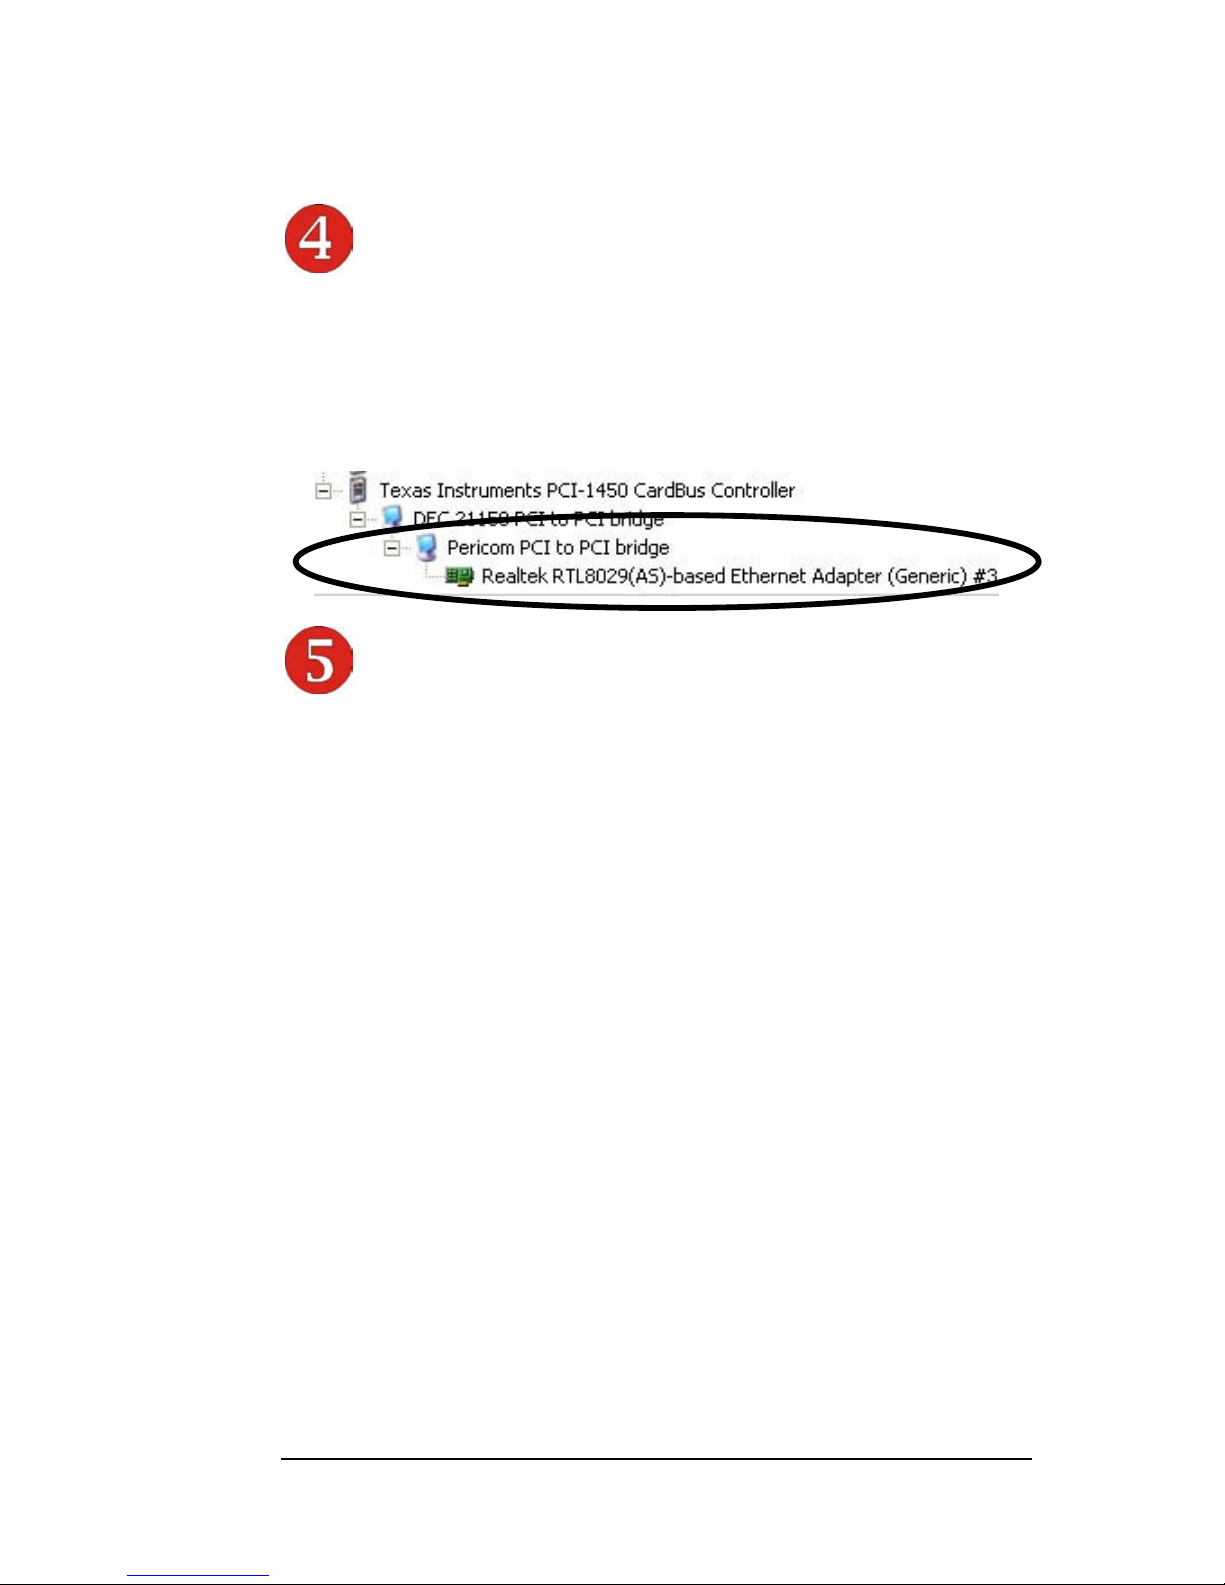
Open ACP (BIOS) Æ Open PCI BusÆ Click the ‘+’ sign several times
until your reach the DEC Bridge PCI to PCI Bridge.
When installed correctly, you will see two “PCI to PCI Bridges” below
your system’s CardBus Controller.
Page 24

MAGMA
16 Chapter 4 Verify Installation
If everything is OK, then the MAGMA CardBus Expansion Driver
installation is complete. You can now proceed to Chapter 5 and Install
3
rd
Party PCI Cards.
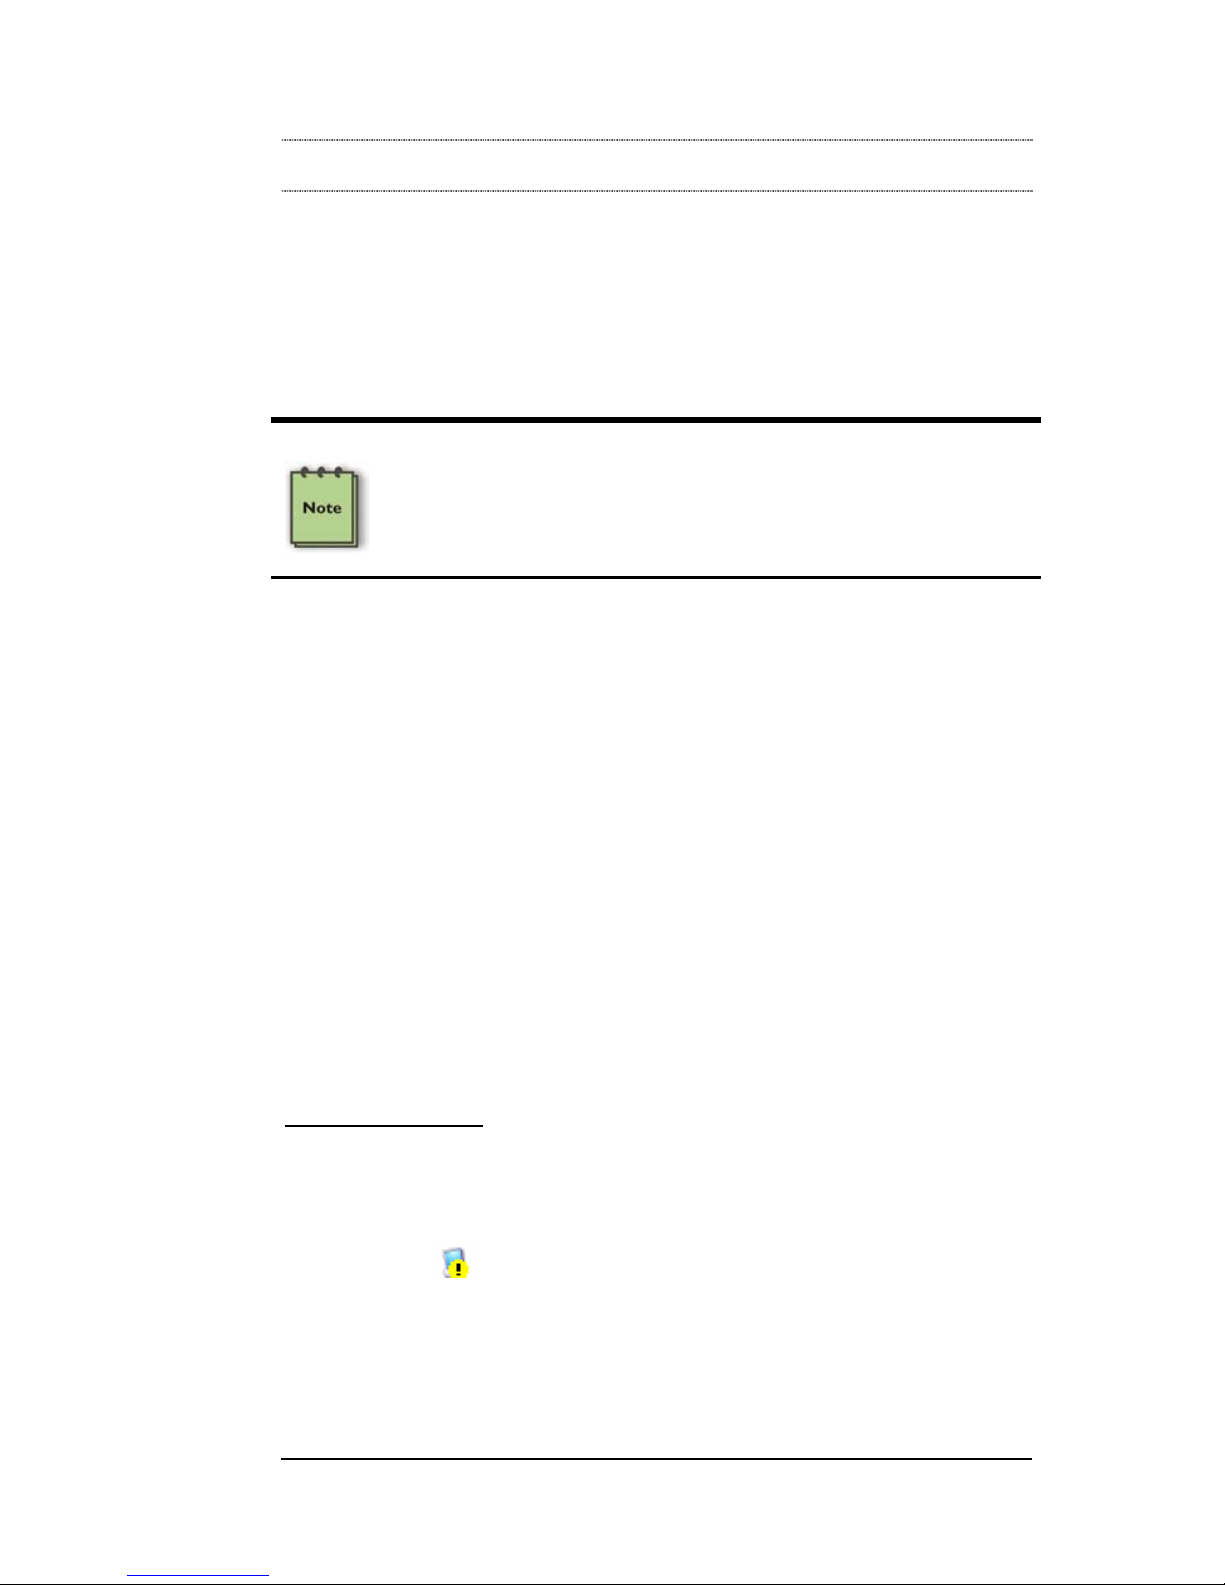
If, however, the installation was unsuccessful, you may not see the PCI
to PCI Bridge, or it will have a small yellow
in front of it.
Proceed to Chapter 6 for Trouble-shooting Windows Installation
problems.
Mac OS X
When using Mac OS X no additional software or driv ers are needed. As
long as you are using Mac OS X Vers ion 10.2.2 or newer, the operati ng
system should automatically recognize the MAGMA expansion chassis.
Select “About This Mac” under the Apple Icon
Page 25

MAGMA
Chapter 4 Verify Installation 17
Then click the “More Info” button Æ click on the Devices tabÆ you
should see a pci-bridge device listed under PCI as shown below:
Any PCI Cards you install in the expansion chassis will appear behi nd
the pci-bridge device.
Mac OS 10.2.x
PCMCIA CardBus Card
pci-bridge
Type: pci
Bus: PCI
Slot: 1x0
Vendor ID: 0x3388
Device ID: 0x0022
Revision ID: 0x0004
Expansion Chassis
pci-bridge
Type: pci
Bus: PCI
Slot: 2x4
Vendor ID: 0x12d8
Device ID: 0x8150
Revision ID: 0x0002
CardBus Controller
TXN,PCIXXX-00
Name: cardbus
Type: cardbus
Bus: PCI
Slot: PCI Card
Vendor ID: 0x104c
Device ID: 0xac56
Revision ID: 0x0000
Mac OS 10.3.x & 10.4.x
If any of these devices are not displayed as shown above, you should
shut down your system (laptop first, then the expansion chassis) and
reconnect the cables and the CardBus card to ensure that you have a
solid connection. Then restart the MAGMA expansion chassis followed
by the laptop. Next, try to verify the installation again, as shown above.
If you are still having problems, contact Mobility Technical Support at
(858) 530-2511.
Page 26

MAGMA
18 Chapter 4 Verify Installation
Page 27

MAGMA
Chapter 5 Install 3rd Party PCI Cards 19
Chapter 5 Install 3rd Party PCI Cards
This chapter provides information on how to install 3rd Party PCI cards
into your MAGMA expansion chassis. More details on th e installation of
individual cards are provided by the card’s m anufactur er. T his chapter i s
provided as a simple guide to help you install your PCI cards in the
chassis.
For the purpose of installation, the MAGMA expansion c hassis functio ns
exactly as a standard desktop computer chassis. Always follow the
manufacturer’s instructions for installing their card on a desktop
computer.
IMPORTANT
We will provide reasonable technical support with 3
rd
Party PCI
cards. However, if you have verified a successful installation of the
MAGMA expansion system (as defined in Chapter 4), but
experience difficulty installing your 3
rd
Party PCI cards, the PCI
card manufacturer should be able to provide the best support.
Be aware that all PCI drivers MUST BE Windows Driver Model
(WDM) compatible to work properly in a laptop+expansion system
environment. If you have a problem with the PCI card driver,
contact the card’s manufacturer for a WDM compatible driver.
Remove PCI Expansion Chassis Cover
Two screws retain the cover on the expansion chassis. They are located
on the rear of the unit, on the top left and top right of the cover' s back
edge. Remove these screws to open the enclosure.
Page 28

MAGMA
20 Chapter 5 Install 3rd Party PCI Cards
Slide the enclosure cover backwards, disengaging
it from the guides at the front of the enclosure, b y
firmly grasping the rear cover lip over the card IO
area and pulling the cover backward about ¼” and
then lifting the cover off.
CAUTION
When replacing the enclosure cover, be sure that the front edge
guides on the cover engage the inner lip of the enclosure.
Install PCI Cards in PCI Expansion Chassis
CAUTION
When installing PCI cards or hard drives, please ensure that the input
current rating specified on the AC input label is not exceeded.
Slot ordering in the 2 Slot
CardBus PCI Expansion
chassis should begin with
the top slot – labeled
SLOT 4.
Generally, when installing 3
rd
Party PCI cards in
the MAGMA expansion
chassis, it should make no difference which PCI slot you place your
cards in, unless specified by the card manufacturer.
Install PCI cards following PCI card manufacturer’s recommendations.
Some PCI card manufacturers recommend that you install their software
driver(s) prior to installing the hardware. If this is th e case, you should
install their driver before you connect and power up the expansion
chassis.
Make sure that all PCI cards are fully seated in their con nectors. When
correctly seated in its connector, you will notice a firm resistance when
you pull up gently on the card. To keep the cards i n place, secure them
in the enclosure with their retaining scre ws (supplied with the MAGMA
expansion chassis).
Page 29
MAGMA
Chapter 5 Install 3rd Party PCI Cards 21
IMPORTANT
The sheer number of PCI cards and device drivers available
makes it impossible for Mobility to fully test and certify all available
PCI cards for use in the MAGMA expansion chassis. Our best
advice to you in this regard is to insist on full PCI Specification
compliance from your card and system vendors. Cards and
systems should be at least PCI Specification Revision 2.0
compliant or better. Compliance in your system motherboard, PCI
cards, and console firmware (or BIOS) is your best assurance that
everything will install and operate smoothly.
Not all PCI cards are as "well-behaved" as they should be.
Sometimes simply moving a PCI card that is having a problem to a
different slot, or reordering your cards in their slots, will alleviate
"behavior" problems.
Install Hard Drive(s)
Your MAGMA 2 slot expansion chassis provides drive brackets for on e
or two hard drives. If you want to install a hard drive to your system, a
PCI hard drive controller card can be insta lled into one of the available
PCI slots or you may connect directly to your host computer’s hard drive
controller ports.
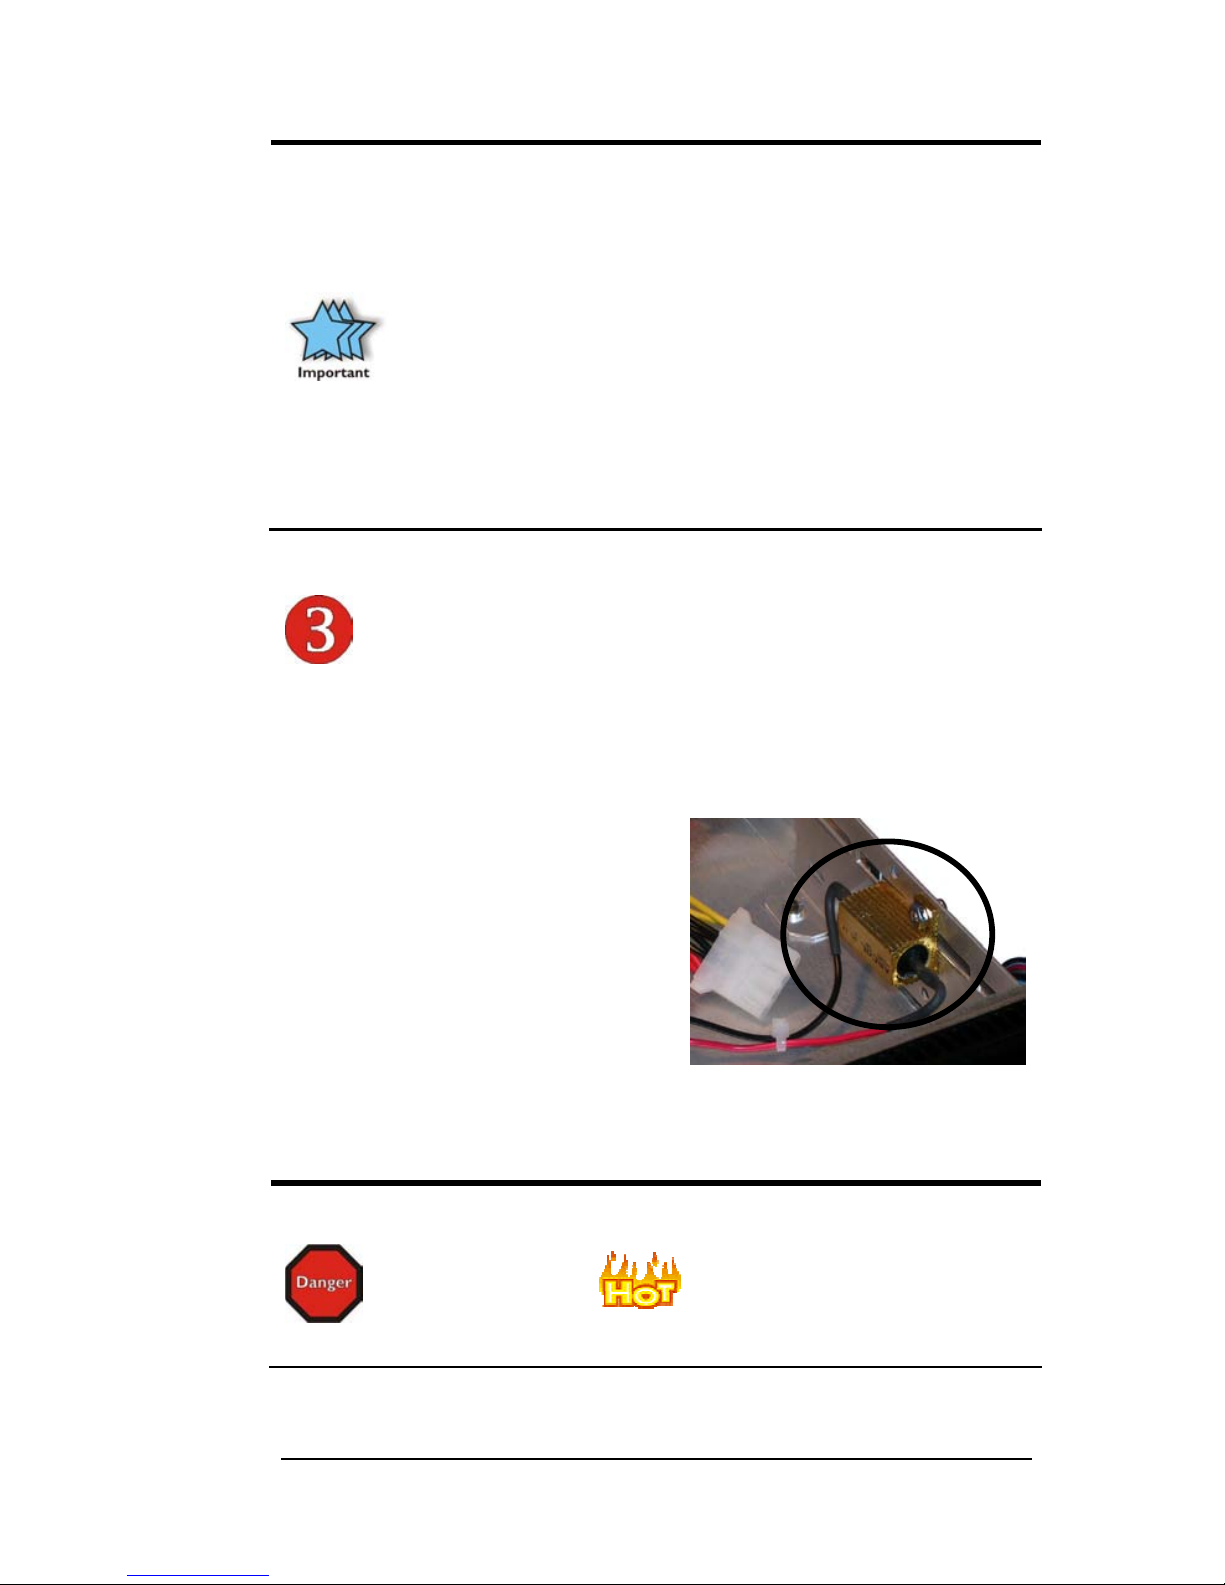
To install a hard drive, you must
remove the 5V Load Resistor that
has been mounted in the hard drive
bay. The Load Resistor is installed to
allow you to use of 3.3V PCI cards
without causing power problems.
If you place a hard drive in your
MAGMA expansion chassis, the hard drive will aut omatical l y provid e the
5V resistance required and the Load R esistor is not required. It can be
removed by removing the screw and disconnecting the power cable.
DANGER
The Load Resistor is
and must NOT BE TOUCHED
unless the system has been shut off for a long period of time. Use
caution when touching the Load Resistor.
Page 30

MAGMA
22 Chapter 5 Install 3rd Party PCI Cards
NOTE
After you remove the 5V Load Resistor, it is a good idea to place it in
an ESD envelope and save it. If you ever decide to remove the hard
drive, you will need to reinstall the 5V Load Resistor to ensure your
Expansion chassis continues to work properly.
After you have removed the 5V Load R esistor, you need to remove the
hard drive bay brackets to allow for an easy hard drive installation.
Simply turn the chassis over, and remove the four scre ws on the bottom
of the enclosure that retain the drive brackets.
Once the hard drive brackets have been removed, mount your hard
drive(s) as specified by the manufacturer.
Next, thread the hard drive ribbon cable under the metal bracket that the
backplane is mounted to as shown below.
Finally, reattach the hard drive brackets to the chassis b y replacing the
screws. Hard drives require power. Make sure to connect one of the
white power supply tabs to the hard drive.
Page 31
MAGMA
Chapter 5 Install 3rd Party PCI Cards 23
System Should Be Up and Running
Apply power to the MAGMA expansion chassis first, then po wer up the
computer.
Use the procedures detailed in Chapter 4 to confirm the card
installation(s) in the Windows Device Manager or Apple System Profiler.
Finishing Touches
After your system is working properly, replace any empty slots with slot
covers, and replace the host computer cover and the expansio n chassis
cover.
Page 32

MAGMA
24 Chapter 5 Install 3rd Party PCI Cards
Page 33
MAGMA
Chapter 6 Troubleshooting 25
Chapter 6 Troubleshooting
Locate the Problem
If you are having trouble with the MAGMA expansion system, verif y that
all PCI cards are seated properly and all cab les are connec ted proper ly.
(Remember to power On and Off correctly.) Recheck the Windows
Device Manager or the Apple System Profiler.
NOTE
Review Chapters 4 and 5 as necessary to verify that you have a valid
installation of the MAGMA expansion system and drivers (if required)
and that you have correctly installed your 3
rd
Party PCI card(s) and
their associated drivers (as required).
If you continue to have problems, there is a quick-check you can
perform to determine if the problem is actually with the 3
rd
Party PCI
Card or a defect with the expansion chassis hardware.
1. Shut down the laptop followed by the MAGMA expansion
chassis
2. Remove the PCI card displaying a problem
3. Replace the “problem card” with a simple PCI card, such as an
Ethernet card that has drivers built into the operating system.
(Using this “type of card” will avoid a ny future questions about
drivers possibly being installed incorrectly.)
4. Turn on the MAGMA expansion chassis, and then turn on the
laptop.
Windows 2000/XP
5. Next, open the Device Manager (View by Connection
selection).
If the
is gone, the problem is with the 3rd Party PCI card or
the card drivers. You should go to the Windows Error Codes
section of this chapter to learn how to troubleshoot using error
codes.
Page 34

MAGMA
26 Chapter 6 Troubleshooting
If the is still visible, the problem may be with the MAGMA
expansion system. Please contact Mobility Technical Support
for further guidance and/or a replacement product.
If an error shows on any of the PCI to PCI Bridge Connections,
call Mobility Technical Support immediately.
MAC
5. Next, open the Apple System Profiler and if the PCI to PCI
Bridge Connections and the 3
rd
Party PCI card(s) are now
correctly visible.
Support for 3rd Party PCI Cards
Mobility will provide reasonable tec hnical support to with 3rd Party PCI
cards. However, if you have verified a successful installation of the
MAGMA PCI Expansion System (as defined in Chapter 4), but
experience difficulty installing your 3
rd
Party PCI cards, the PCI card
manufacturer may be able to provide the best support.
IMPORTANT
The MAGMA PCI Expansion System is designed to function
exactly like your desktop computer. This means that you should
follow the PCI card maker’s instructions for installation on a
Windows or Mac computer as if the expansion chassis WAS the
desktop computer. When correctly installed, there is no difference
to the operating system, removable cards, or most software.
Be aware that all PCI drivers MUST BE Windows Driver Model
(WDM) compatible to work properly in a laptop+expansion system
environment. If you have a problem with the PCI card driver,
contact the card’s manufacturer for a WDM compatible driver.
The PCI to PCI Bridge is Not Found
If the first PCI to PCI Bridge is not visible at all you will need to turn off
your laptop (first) and then the MAGMA expansion chassis (second) and
test all cords and cables to ensure you have everything connected
correctly. Double-check the CardBus card to ensure it is inserted
correctly. If your laptop has two CardBus slots, you should also try the
other slot.
Page 35
MAGMA
Chapter 6 Troubleshooting 27
Windows 2000/XP:
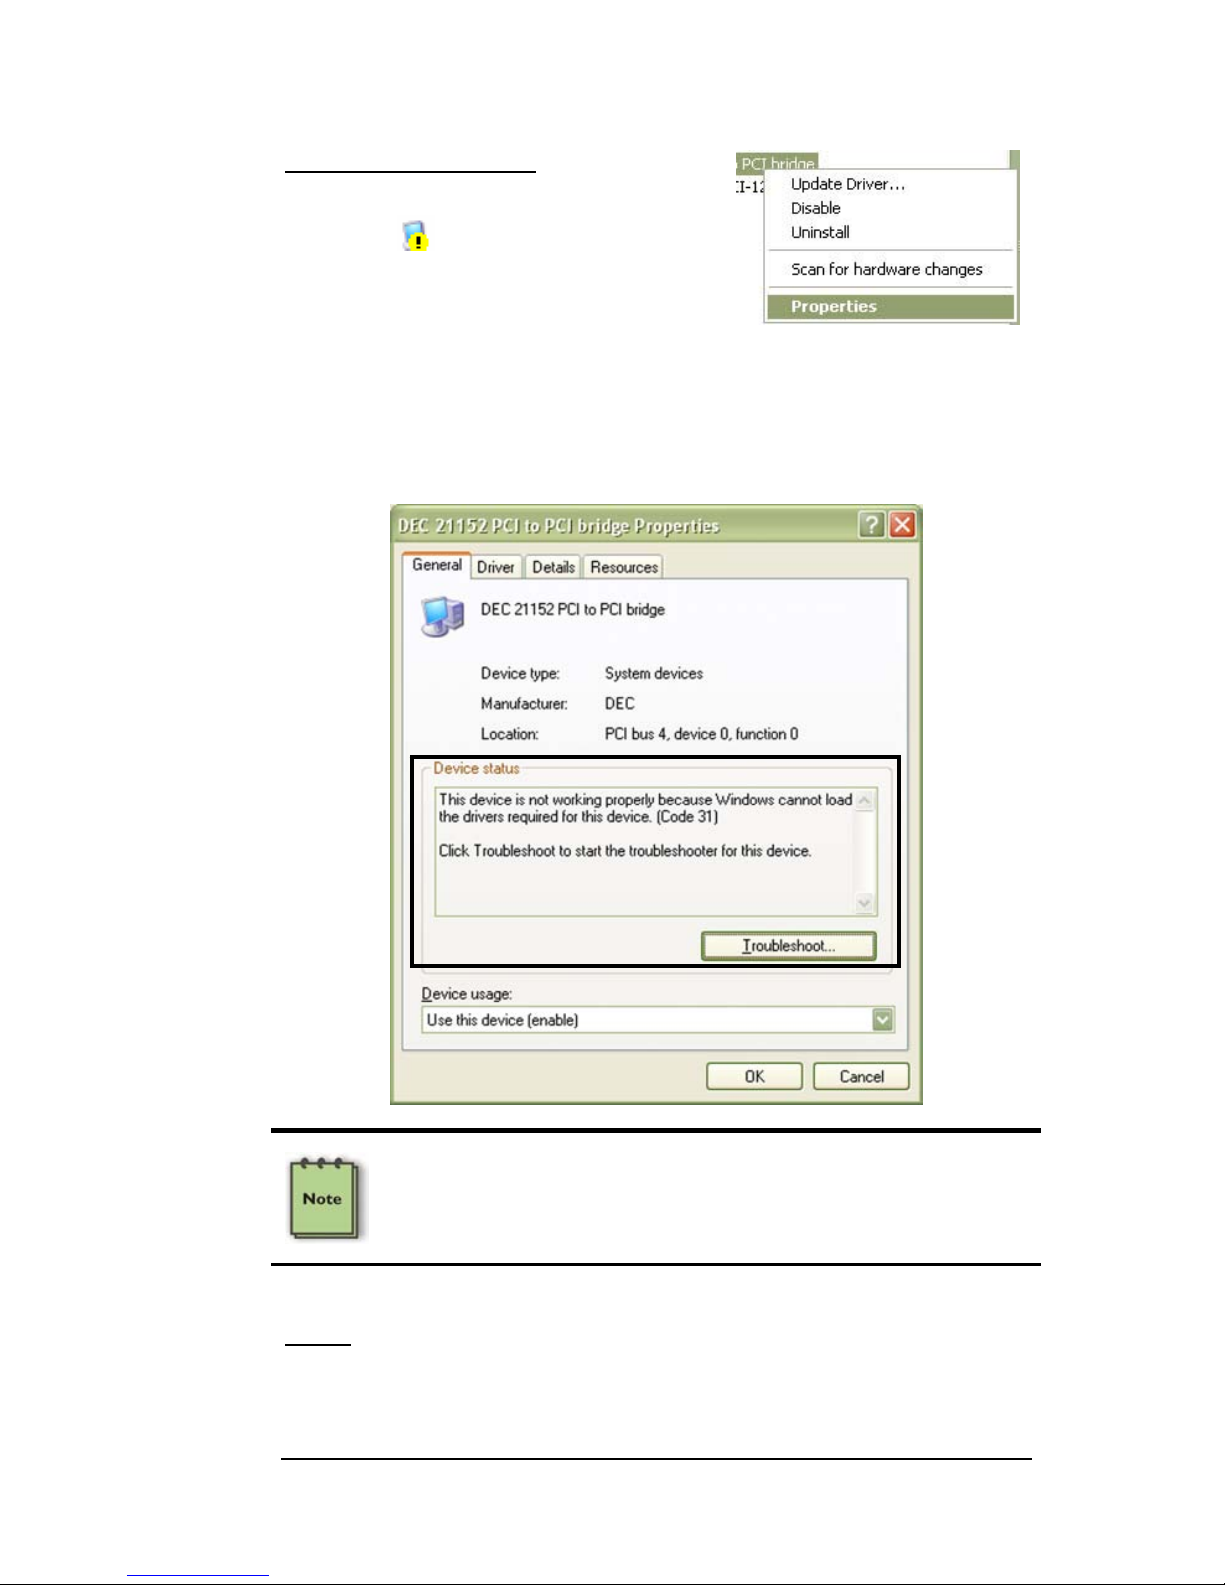
If the PCI to PCI Bridge is visible, but
contains a
in front of it, it has a
problem that must be fixed. To identify
this problem, right-click on the line and
select “Properties” from the pop-up
menu.
Look for the “Error Code” in the box in the center of the Properties
Window and then go to the following Windows Error Code section for
information on how to resolve this issue.
NOTE
Do NOT click on the Driver tab and attempt to reinstall the driver.
This will not help resolve the issue and may even complicate the
problem.
MAC
If you have already reinstalled and reseated everything according to
instructions in Chapter 2, and the PCI to PCI Bridge is still not visible in
the Apple System Profiler, call Mobility Technical Support.
Page 36

MAGMA
28 Chapter 6 Troubleshooting
My Computer Hangs During Power Up
1. Shut off the laptop (first) and then the MAGMA expansion
system and verify that all cards and cables are installed
correctly.
2. If it still hangs, remove all 3
rd
Party PCI cards and try boo ting
up without any cards installed.
a. If it still hangs, remove the MAGMA CardBus card
from the laptop and try booting up without the
MAGMA expansion system attached.
i. If it boots up OK without the MAGMA
expansion system attached, call Mobility
Technical Support.
ii. If it still hangs, the problem is in the laptop
and not with the MAGMA expansion system
or the 3
rd
Party PCI cards. Fix the laptop.
b. If it boots up OK without any 3
rd
Party PCI cards
installed, try adding one card and see if it boots up.
i. If it boots up OK with one card in it, shut it
down (in the proper order, of course) and
swap cards. Repeat this until all cards have
been tested. If they all test OK, then add
them back one at a time until you find the
combination that doesn’t work, or you are
running fine. If you find a bad card, call
Technical Support. If you don’t –
congratulations, you fixed it!
ii. If it still hangs up, try a different card – this
one is probably bad (or has driver problems).
If the second cards works, troubleshoot the
first card. If the second card also fails, call
Technical Support.
Page 37

MAGMA
Chapter 6 Troubleshooting 29
Windows Error Codes
If you are having a problem with one of your devices, and the Device
status box shows a Windows Error Code, refer to the following list of
error codes for guidance:
NOTE
Do NOT click on the Driver tab and attempt to reinstall the driver.
This will not help resolve the issue and may even complicate the
problem.
Page 38

MAGMA
30 Chapter 6 Troubleshooting
Error Code Description/Action
10
(PCI Card)
This code indicates that there is a problem with the PCI
Card driver. Verify if the PCI card driver is in a Windows Driver
Model (WDM) format.
The Magma expansion chassis requires WDM (Windows
Driver Model) PNP (Plug and Play) drivers for Windows XP
and 2000. If necessary, contact the PCI Card’s manufacturer
for updated WDM PNP compatible drivers. If all else fails,
contact Mobility Technical Support for further assistance.
On the Bridge: If you receive error code 12 on the first PCI to
PCI Bridge, this usually means the MAGMA driver is not
installed. Reinstall the driver. If that fails to fix the problem, call
Mobility Technical Support.
12
On the PCI Card
: This usually means the memory, I/O, or
prefetch is more than what we have allocated in the Magma
CardBus Expansion Driver. Call Mobility Technical Support.
28
(PCI Card)
The driver for the PCI Card is not installed on your system.
Reinstall the PCI Card driver following the manufacturer’s
instructions. If that fails to fix the problem, call the card
manufacturer for new drivers.
31
Try using the other CardBus socket. If you don’t have another
socket, call Mobility Technical Support.
Other Codes
For all other error codes, call:
On the PCI to PCI Bridge:
Mobility Technical Support
On the PCI Card:
Card Manufacturer’s Technical Support,
after first verifying that the MAGMA expansion system is
installed properly.
WARNING
After installation of a new Microsoft Service Pak, you should always
reinstall the MAGMA CardBus Expansion Driver.
Page 39
MAGMA
Chapter 6 Troubleshooting 31
Uninstall the MAGMA Driver
For Windows Users Only: If you need to uninstall the MAGMA
CardBus Expansion Driver:
Go to the Windows Control Panel Æ Add/Remove Programs Æ Ch oose
either the MAGMA CardBus Expansion Driver (or it may appear as
the Mobility CardBus Expansion Driver) Æ then choose
Change/Remove.
If you are still having problems, contact Mobility Technical Support for
more help.
Page 40

MAGMA
32 Chapter 6 Troubleshooting
Page 41

MAGMA
Chapter 7 How to Get More Help 33
Chapter 7 How to Get More Help
Frequently Asked Questions (FAQ)
You can visit the MAGMA Technical Suppor t FAQ pages on the Intern et
at:
www.magma.com/support/
Contacting Technical Support
Our support department can be reached by fax at ( 858) 530-2733 or b y
phone at (858) 530-2511. Support is ava ilable Monday through Friday,
8:00 AM to 5:00 PM PT. When contacting MAGMA Technical Support,
please be sure to include the following information:
1) Name
2) Company Name
3) Phone Number
4) Fax Number
5) Email Address
6) Model Number
7) Serial Number
8) Computer Make
9) Computer Model
10) Operating System and Version
11) Make/Model of PCI cards in expansion chassis
12) Detailed description of the problem
You can also visit our web site at:
www.magma.com/support/
For a quick response, use the Technical Support and RMA Request
Form available in the Support Section of the website. Simply complete
the form with all required information. Please make sure that your
problem description is sufficiently detailed to help us understand your
problem.
For example:
Don’t say “Won’t boot up.” Do say “Tried all the
steps in the Troubleshooting Section and it still won’t boot up.”
For faster diagnosis of your problem, please run the two utility programs
described in the following sections and include the diagnostic files they
generate with your email.
Page 42

MAGMA
34 Chapter 7 How to Get More Help
MAGMA Debug Utility
Occasionally, Mobility Technical Support may request Windows users to
produce and email a MAGMA debug log fil e to help them resolve your
problem. This file should be emailed to
support@magma.com. This file
should have a “.log” file extension. To create the *.log file, follow thes e
instructions:
1. Locate a file called dbgview.exe on the MAGMA CDROM.
2. Double-click on the file dbgview.exe
3. While the dbgview screen is open, locate and double-click on
a file called dump.exe on the MAGMA CDROM.
4. Switch back to the dbgview screen, which is now filled with
data.
5. Save this file and email to
support@magma.com upon request.
Include your Name and
the Date the log was
created in the file
name. Then email it to
Technical Support.
Use the “Save As Type” drop-down arrow to select a file type of
(*.LOG).
Page 43

MAGMA
Chapter 7 How to Get More Help 35
PCIScope Software Utility
PCIScope is a powerful tool for Windows users. It was designed by a
Germany company called APSoft. This software utility is a valuable
resource to explore, examine and debug the PCI subsystem of your
computer. It was made to fit the requirements of the most demanding
users, especially engineers, programmers, and system administrators,
and to integrate all advanced functions and tools into one product.
Please visit
www.tssc.de
for more information about the capabilities of
PCIScope and other utilities offered by APSoft.
An evaluation version of PCIScope is available for download at
www.tssc.de
. (You can purchase an inexpensive license from APSoft
for use beyond the evaluation period.)
PCIScope has proven to be extremely useful when verifying and
debugging configurations involving the MAGMA PCI Expansion
Systems under any Windows platform.
PCIScope can provide information to you and our Technical Support
Group such as PCI Bus Numbering, Resource Allocation, and other
information that may prove useful when debugging expansion chassis
or PCI card problems.
If you are experiencing problems setting up your s ystem, yo u should r un
PCIScope before contacting the Mobility Technical Support Group.
With the MAGMA expansion chassis powered up and con nected to yo ur
computer, load and launch the PCIScope application. The PCIScope
Program will be installed on your com puter and a window similar to the
one shown below will appear. (The example was taken from a Compaq
Armada 7400)
Page 44

MAGMA
36 Chapter 7 How to Get More Help
You should save this data as a file on your computer. Please include
your name and date as part of the file name with an extension of “.bpd.”
Then email this file to
support@magma.com if you are experiencing
configuration problems.
Page 45

MAGMA
Chapter 7 How to Get More Help 37
Returning Merchandise to MAGMA
If factory service is required, a Service Representative will give you a
Return Merchandise Authorization (RMA) number. Put this number and
your return address on the shipping label when you return the item(s)
for service. MAGMA will return any product that is not accompanied
by an RMA number. Please note that MAGMA WILL NOT accept COD
packages, so be sure to return the product freight and duties-paid.
Ship the well-packaged product to the address below:
MAGMA RETURNS DEPT.
RMA # ________
9918 Via Pasar
San Diego, CA 92126
USA
It is not required, though highly recommended, that you keep the
packaging from the original shipment of your MAGMA product.
However, if you return a product to MAGMA for warranty repair/
replacement or take advantage of the 30-day money back guarantee,
you will need to package the product in a manner similar to the mann er
in which it was received from our plant. MA GMA cannot be responsibl e
for any physical damage to the product or component pieces of the
product (such as the host or expansion interfaces for PCI expansion
chassis) that are damaged due to inadequate packing. Physical
damage sustained in such a situation will be repaired at the owner’s
expense in accordance with Out of Warranty Procedures. Please,
protect your investment, a bit more paddi ng in a good box will go a long
way to insuring the device is returned to use in the same condition you
shipped it in. Please call for an RMA number first.
Page 46

MAGMA
38 Chapter 7 How to Get More Help
Page 47

MAGMA
Appendix A Bus Hierarchy 39
Appendix A Bus Hierarchy
Bus Hierarchy
The following figure is representative of the PCI Bus hierarchies for the
2 Slot CardBus to PCI Expansion System. This figure pictorially conveys
the overall PCI bus topology of the system.
2 Slot Topology
In general, we do not know what the actual Bus numbers are. We only
know how they increment starting from the CardBus card.
The key point in the figure of the 2 slot topol ogy is that the connecting
cable between the CardBus card and the 2 slot backplane is actuall y a
PCI bus itself. This is represented in the Windows Device Manager as
shown below:
NOTE
All PCI cards installed in the PCI Expansion chassis will appear on
the Third PCI Bus behind the PCI Bus that the CardBus card is
installed on. If you need to know the actual Bus number, right-click
on the Bus and select Properties.
Page 48

MAGMA
40 Appendix A Bus Hierarchy
Page 49

MAGMA
Appendix B DC Power Information 41
Appendix B DC Power Information
SUB100WDC
By purchasing the DC power upgrade (Part Number SUB100WDC),
MAGMA 2 slot chassis users can power their expansion chassis off a
user supplied 12-volt DC power source, such as a battery set, carlighter adapter, etc., (provided they use the proper cabling).
The SUB100WDC provides a 100 Watt DC-DC power supply in place of
the standard 90 Watt AC power supply.
The SUB100WDC includes the following parts:
1. 100 Watt DC-DC converter with male 4-pin XLR receptacle
2. 100 Watt AC-DC power brick
3. U.S. Standard 115V power cord
To use DC power, you must use a cable with a female XLR-4 connector
to connect the MAGMA expansion chassis to your DC power source.
These battery cables and adapter are available from video supply
vendors, like B & H Photo (
www.bhphotovideo.com)
NOTE
The SUB100WDC power supply is designed to accommodate DC
input in the range of 9-16VDC and draw a maximum load of 100
Watts. Please use this information when consulting with your local
audio/video supplier when reviewing battery options, and sizing.
Page 50
MAGMA
42 Appendix B DC Power Information
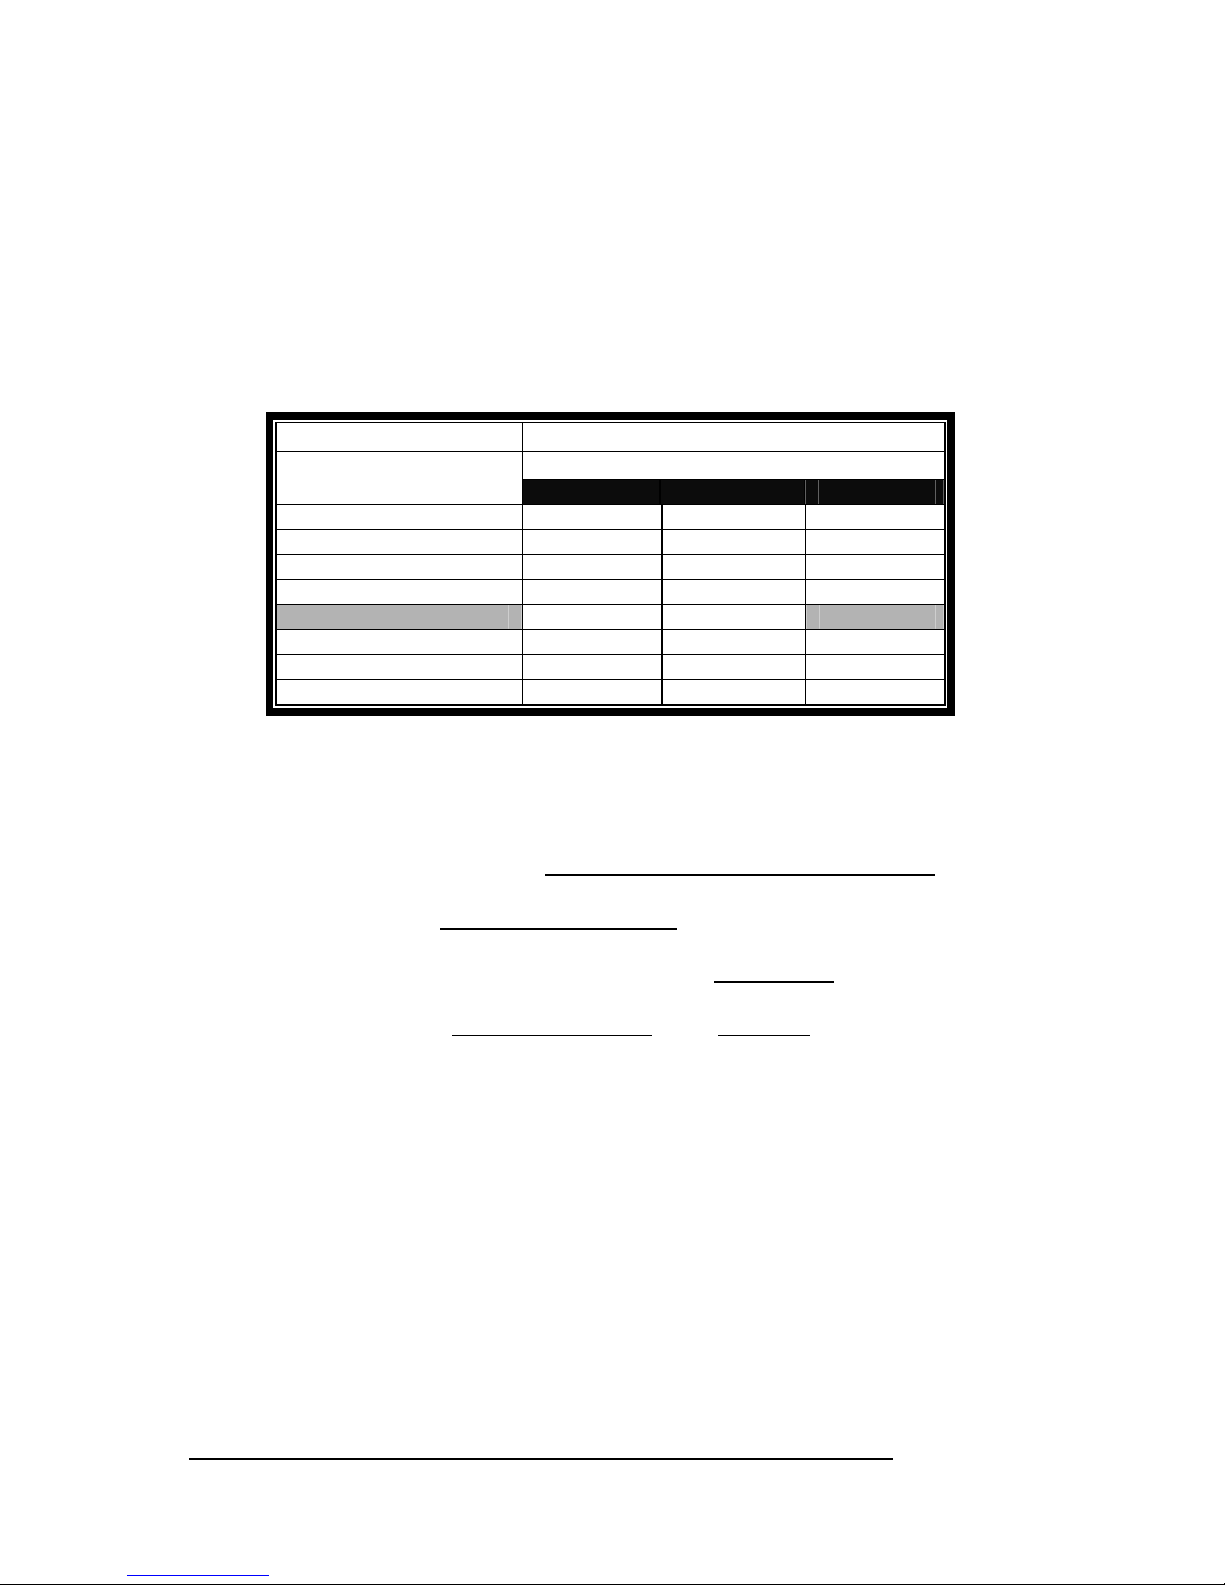
Battery Sizing/Selection:
For Batteries Rated in Amp Hours:
Use the following table for matching desired operating hours to battery
capacity ratings.
SUB100WDC Max Rated Load (Watts): 100 Watts
Margin of Safety for Battery Selection: 10%
Column 1
Column 2-4
Amp Hours
Desired Continuous
Operating Hours
12VDC* 13.2VDC* 14.4VDC*
1 9.2 8.3 7.6
2 18.3 16.7 15.3
3 27.5 25.0 22.9
4 36.7 33.3 30.6
5 45.8 41.7 38.2
6 55.0 50.0 45.8
7 64.2 58.3 53.5
8 73.3 66.7 61.1
*Typical Battery Output Voltage
1. Calculations assume continuous operation at maximum
designed load.
2. Margin of safety used is 10%.
3. Determine the number of Desired Continuous Operating Hours
you would like to operate before recharging. (Column 1)
4. Determine the Battery Output Voltage
of the battery you would
like to use. (Column 2-4)
5. Read the cell value in the table for the Amp Hours
required.
Use this number when choosing a battery (or set of batteries).
6. If you required more than 8 hours
- use multiples of a lesser
number of hours.
Examples:
If you want 5 hours of continuous operation with a 14.4VD C battery set:
Locate row 5 in Column 1 of the table above, read across the row to the
14.4VDC Column, you will find that you will need a battery (or set of
batteries) with a total power rating of about 38 Amp Hours.
If you want 10 hours of conti nuous operation with this same battery set
(at 14.4VDC), would need a total power rating of about 72 Amp Hours
(2 x 38 from the above example).
Page 51

MAGMA
Appendix B DC Power Information 43
For Batteries Rated in Watt Hours:
If the batteries are rated by the vendor in Watt Hours
, then simply
multiply the number of desired hours of use by 100 Watts to get total
Watt Hours
rating requirement.
If you want to run a DC powered 2 slot chassis for up to 4 hours: 4
hours x 100 Watts = 400 Watt Hours is required for the selected batter y
set.
Page 52

MAGMA
44 Appendix B DC Power Information
Page 53

Appendix C Compliance 45
APPENDIX C Compliance
FCC
NOTE: This equipment has been tested and found to comply with the
limits for a Class A digital device, pursuant to part 15 of the FCC Rules.
These limits are designed to provide reasonable protection against
harmful interference when the equipment is operated in a commercial
environment. This equipment generates, uses, and can radiate radio
frequency energy and, if not installed and used in accordance with the
instruction manual, may cause harmful interference to radio
communications. Operation of this equipment in a residential area is
likely to cause harmful interference in which case the user will be
required to correct the interference at his own expense.
This device complies with Part 15 of the FCC Rules. Operation is
subject to the following two conditions: (1) this device may not cause
harmful interference, and (2) this device must accept any interference
received including interference that may cause undesired operation.
Changes or modifications not expressly approved by the party
responsible for compliance could void the us er’s authorit y to operate th e
equipment.
NOTE
The assembler of a personal computer system may be required to
test the system and/or make necessary modifications if a system is
found to cause harmful interferences or to be noncompliant with the
appropriate standards for its intended use.
Industry Canada
This Class A digital apparatus complies with Canadian ICES-003.
Cet appareil numériqué de la classe A est conformé à la norme NMB003 du Canada
CE
The product(s) described in this manual complies with all
applicable European Union (CE) directives. Mobility will not retest or
recertify systems or components that have been reconfigured by
customers.
Page 54

MAGMA
46 Appendix C Compliance
Page 55

Page 56

Manual P/N 09-09940-03-B
Mobility California, Inc.
PCI Expansion Products
9918 Via Pasar, San Diego, CA 92126, USA
Phone (858) 530-2511 • Fax (858) 530-2733
Email: support@magma.com • www.magma.com
 Loading...