

Page 1
2.1 CU. FT. WASHING MACHINE
2.1 CU. FT. WASHING MACHINE
2.1 CU. FT. WASHING MACHINE2.1 CU. FT. WASHING MACHINE
USER MANUAL
USER MANUAL
USER MANUALUSER MANUAL
MODEL MCSTCW21W2
MODEL MCSTCW21W2
MODEL MCSTCW21W2MODEL MCSTCW21W2
Page 2

CONTENTS
CONTENTS
CONTENTSCONTENTS
Important Safeguards
Installation Instructions
Before Washing Preparation
Parts and Features
Washing Cycle Guide
Maintenance and Care / Error Codes
Troubleshooting
Warranty Information
Before using your washing machine, please read this manual carefully and keep it for future
reference.
READ THIS USER MANUAL
Inside this manual, you will find many helpful information on how to properly use and maintain
your washing machine. Just a little preventative care on your part can save you a great deal of
time and money over the life of your washing machine. You will find many answers to common
problems in the troubleshooting tips section. If you review this section first, you may not need to
call for service.
........ 18
........ 3
.......................... 8
............. 10
........ 11
.... 13
....... 17
.... 19
UNPACKING YOUR WASHING MACHINE
1. Inspect and remove all packaging material.
2. Inspect and remove all remaining packing, tape, or printed
materials before powering on your washing machine.
!
!
RISK OF CHILD ENTRAPMENT. CHILD SUPERVISION IS NECESSARY. THIS
APPLIANCE IS TO BE USED ONLY FOR ITS INTENDED PUPROSE AS DESCRIBED
IN THIS MANUAL. READ ALL RECOMMENDED SAFEGUARDS THOROUGHLY.
WARNING
WARNING
2
Page 3

IMPORTANT SAFEGUARDS
IMPORTANT SAFEGUARDS
IMPORTANT SAFEGUARDSIMPORTANT SAFEGUARDS
WARNING
WARNING
!
!
To reduce the risk of fire, electric shock, or personal injury when using your appliance, follow
these basic precautionary guidelines, which includes the following:
1. Read all instructions before using the appliance.
2. Use this appliance only for its intended purpose as described in user manual.
3. Use only detergents or softeners as recommended for use in this manual and keep them out of the
reach of children.
4. This appliance must be properly installed in accordance with the installation instructions before it is
to be used.
5. Never unplug your appliance by pulling on its power cord. Always grasp the plug firmly and pull it
straight out from the outlet.
6. Immediately replace any power cords, loose plugs, and power outlets in poor condition. Consult a
certified electrician when replacing wall outlets.
7. Unplug your appliance before any maintenance and care duties, or before making any repairs to the
appliance.
8. If your old appliance is not being used, we recommend that you remove the door or properly dispose
your old appliance according to local law ordinances.
9. Do not operate your appliance in the presence of explosive fumes.
10. Do not wash or dry articles that have been previously spotted, cleaned in, washed in, or soaked in
food oils, gasoline, dry cleaning solvents, chemicals, and any other flammable or explosive
substance, as they give off vapors that could ignite or explode.
11. Clothes or rags used to clean flammable or explosive substances should not be washed in this
appliance until all traces of this material have been removed.
12. Do not add or mix any flammable or explosive substances to the washer.
13. Do not try to remove clothes while the washer tub is moving. Wait for it to come to a complete stop
before removing clothes.
14. The loading door of the washer must be closed when the tub is spinning.
15. Do not operate your appliance when parts are either missing or broken.
16. Do not use this appliance for commercial purposes. For household use only.
3
Page 4

17. Do not operate this washer unless all enclosure panels are properly installed.
18. Do not tamper with the controls.
19. Do not allow any children to play on or in the appliance. Close supervision of children is necessary
when the appliance is used around them.
20. This appliance must be connected to a proper electrical outlet with the correct amount of electrical
supply, as specified on the rating label.
21. Proper grounding must be ensured to reduce the risk of electric shock and fire. Do not cut or
remove the grounding plug. If you do not have a three-prong electric receptacle wall outlet, have a
certified electrician install the proper receptacle wall outlet. The wall outlet must be properly
grounded.
22. Under certain conditions, hydrogen gas may be produced in a household hot water system that has
not been used for two weeks or more. Hydrogen gas is highly explosive. If the hot water system
has not been used for more than two weeks, turn on all hot water faucets and let the water flow for
several minutes prior to using your compact washer.
23. Do not repair or replace any part of the appliance or attempt any servicing unless specifically
recommended by the user-repair instructions, which you fully understand and have the ability to
carry out.
NOTE: If for any reason this product requires servicing, we strongly recommend that a certified
technician performs the service.
24. To reduce the risk of electric shock or fire, do not use an extension cord or outlet adapters to
connect the unit to an electrical power source. The appliance must be properly grounded using a
three-prong electric receptacle wall outlet.
SAVE THESE INSTRUCTIONS
GROUNDING INSTRUCTIONS
This appliance must be properly grounded. In the event of malfunction or breakdown,
grounding will reduce the risk of electric shock by providing a path of least resistance for
electric current. This appliance is equipped with a power cord with a three-pronged plug for
grounding purposes. This three-pronged plug must be plugged into an appropriate outlet
that is properly installed and grounded in accordance with all local codes and ordinances.
WARNING
WARNING
!
!
Improper connection of the power cord can result in a risk of electric shock. Check with a qualified
electrician or serviceman if you are in doubt as to whether the appliance is properly grounded. Do not
modify the provided plug with the appliance – even if it will not fit into the outlet. Have a qualified
technician install the proper wall outlet for you.
WARNING
WARNING
!
!
To reduce the risk of electric shock, disconnect this appliance from the power supply before
attempting any user maintenance and care. Turning the controls to the OFF position does not
disconnect this appliance from the power source.
4
Page 5
SAFETY AND PRECAUTIONS
SAFETY AND PRECAUTIONS
SAFETY AND PRECAUTIONSSAFETY AND PRECAUTIONS
In order to prevent injury to yourself and others, or property damage, observe the following items:
Observe the following visual guidelines:
Do not disassemble and reassemble
the washer without authorization.
Do not install the washer in moisture
enriched environment in order to avoid
electric shock, fire, or other electrical
accidents.
Do not insert your hand and take out
clothes inside the spinning tub before
it stops.
Do not directly rinse the machine with
water when cleaning.
5
Page 6
Do not let children climb onto the
machine or peer into the spinning tub, in
order to avoid injury.
Prohibit from washing clothes that came
in contact with kerosene, gasoline,
alcohol, or any other flammable chemicals.
Do not damage the power cord or
plug to avoid electric shock, fire, and/or
short-circuiting the appliance.
Pull out the 3-pronged plug from the
socket when the machine is not in use.
Regularly clean the power plug to
remove dust and dirt, in order to prevent
electrical failure.
Properly connect the ends of the power
cord and water hose to avoid any
accidental leakage and electric shock.
Insert the 3-pronged power plug
securely into the electrical outlet.
Do not place any incense, flammable
items, and other heating sources onto
the washing machine.
6
Page 7
Use the correct power source:
3-pronged wall outlet (no adapters).
Do not remove or insert the plug with wet
hands to avoid electric shock.
Ensure that the water inlet pipe is
connected to a water source, and that the
tap is opened prior to washing clothes.
Do not change or alter the power cord or
the 3-pronged plug, in any way.
The water temperature shall not exceed
131oF when washing with hot water.
It is strictly prohibited to place and sit
children or lay weights on top
of the washer.
Remove the power cord from the base
of the 3-pronged plug only.
Do not wash: raincoats, fishing coats,
heavy jackets, and other similar items or
clothes.
7
Page 8
INSTALLATION INSTRUCTIONS
INSTALLATION INSTRUCTIONS
INSTALLATION INSTRUCTIONSINSTALLATION INSTRUCTIONS
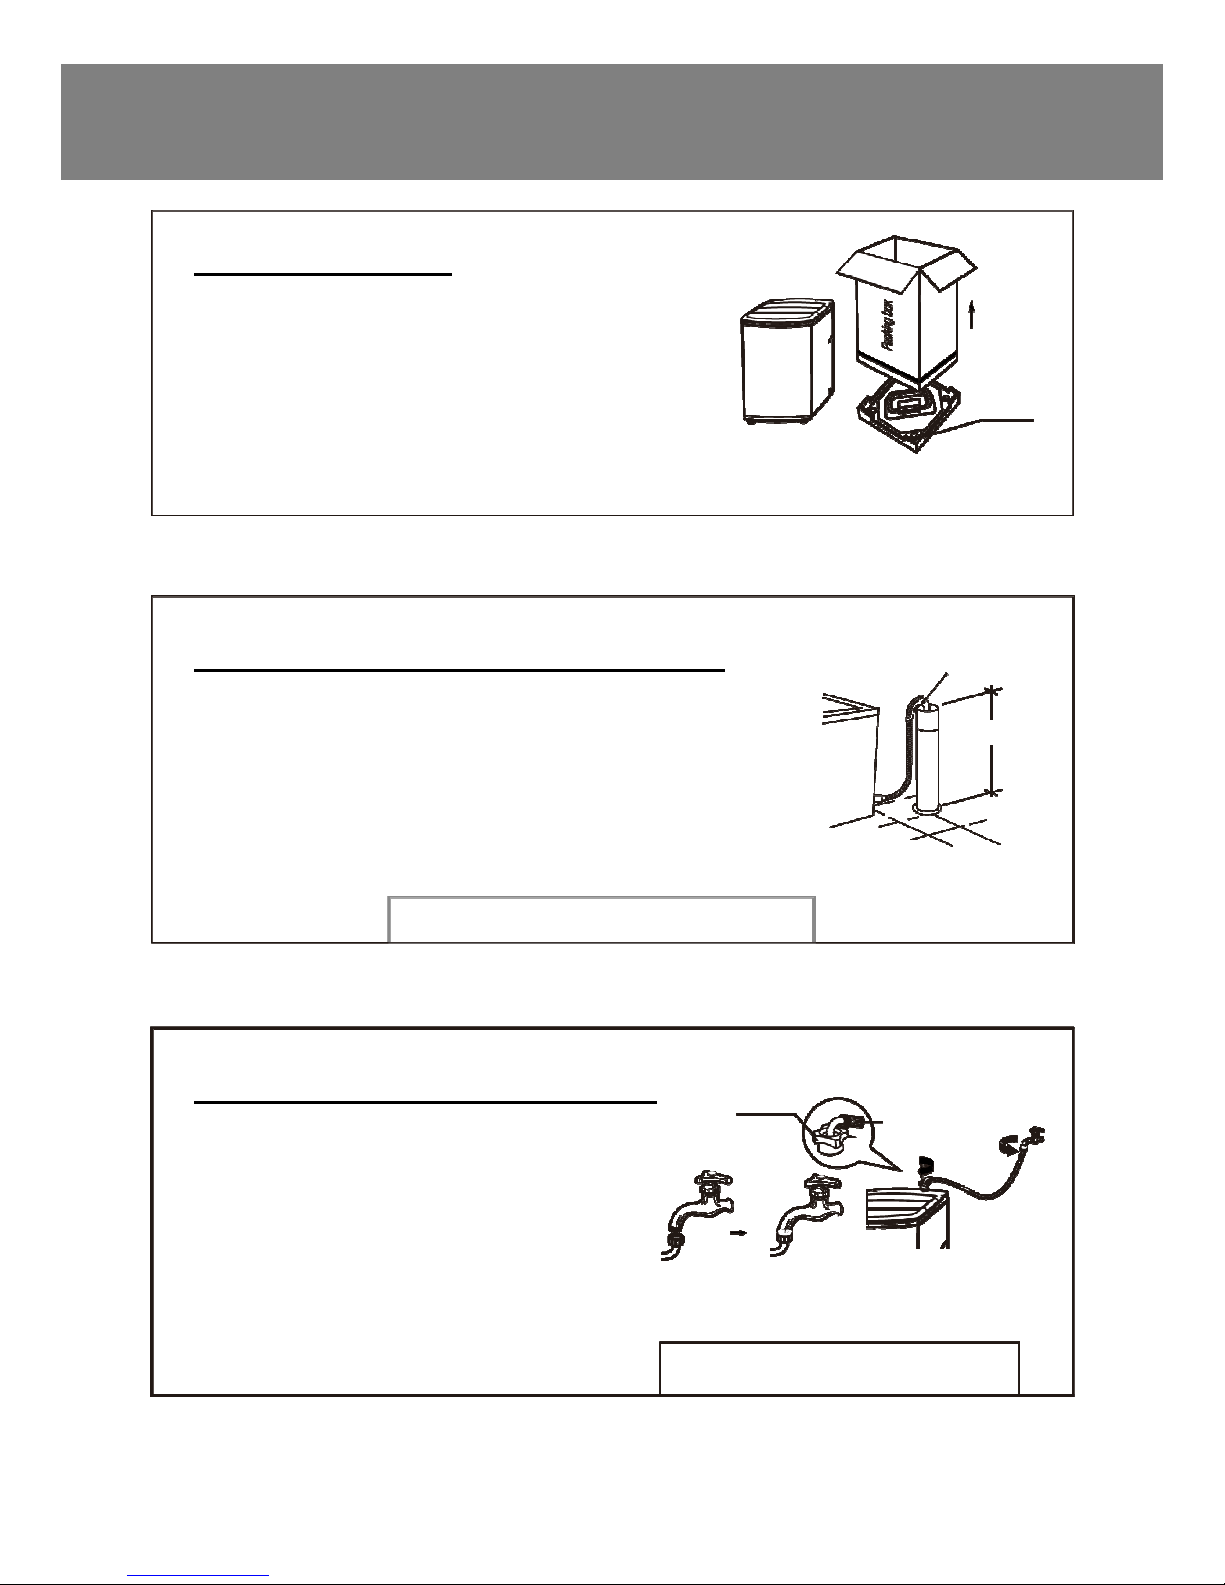
REMOVE PACKAGING
• Remove packaging, foam cushions, and bottom cardboard.
• Open the washer door and take out the accessories.
• Use of washer with the foam cushion is strictly prohibited.
PLACEMENT OF UPPER WATER DRAIN HOSE
The height of the drain hose (A) should be between ~34 to 40”.
Its diameter (B) should not be less than 1.20”, and its flow capacity
should not be less than 40 L/Min.
Before starting the washer, users should properly hang the drain
pipe ~34 to 40” above the floor.
FOR UPPER DRAIN SYSTEM ONLY
Foam
Cushion
Base
A
34 - 40”
B
INSTALLATION OF WATER INLET HOSE
• Place the water inlet hose screw onto the tap.
• Tightly screw the other end of the hose to the water
inlet valve using the rubber seal ring inside.
NOTE:
apply force and avoid twisting the water inlet valve to
prevent breakage of the water inlet valve joint.
When tightening the clamping nut, evenly
Clamping Nut
Water Inlet Hose
ONLY FOR WATER INLET HOSE WITH
DOUBLE THREADED SCREW
8
Page 9

QUICK SINK ADAPTER INSTALLATION
QUICK SINK ADAPTER INSTALLATION
QUICK SINK ADAPTER INSTALLATIONQUICK SINK ADAPTER INSTALLATION
When installing the quick sink adapter to the sink faucet, follow these guidelines:
1. Remove the aerator from your faucet nozzle and determine the size and type of the faucet
(Outside Threaded End or Inside Threaded End).
2. Once you determine the size and type of the faucet, place the proper sized rubber washer into
the silver faucet adapter.
3. Attach the silver faucet adapter to the sink faucet.
4. Attach the faucet adapter to the water inlet hose and ensure that the rubber washer is placed
between the adapter and the water inlet hose.
5. Attach the other end of the water inlet hose to the water inlet on the washer, and ensure that
the rubber washer is placed between the water inlet hose and the washer.
9
Page 10
PREPARATION BEFORE WASHING
PREPARATION BEFORE WASHING
PREPARATION BEFORE WASHINGPREPARATION BEFORE WASHING
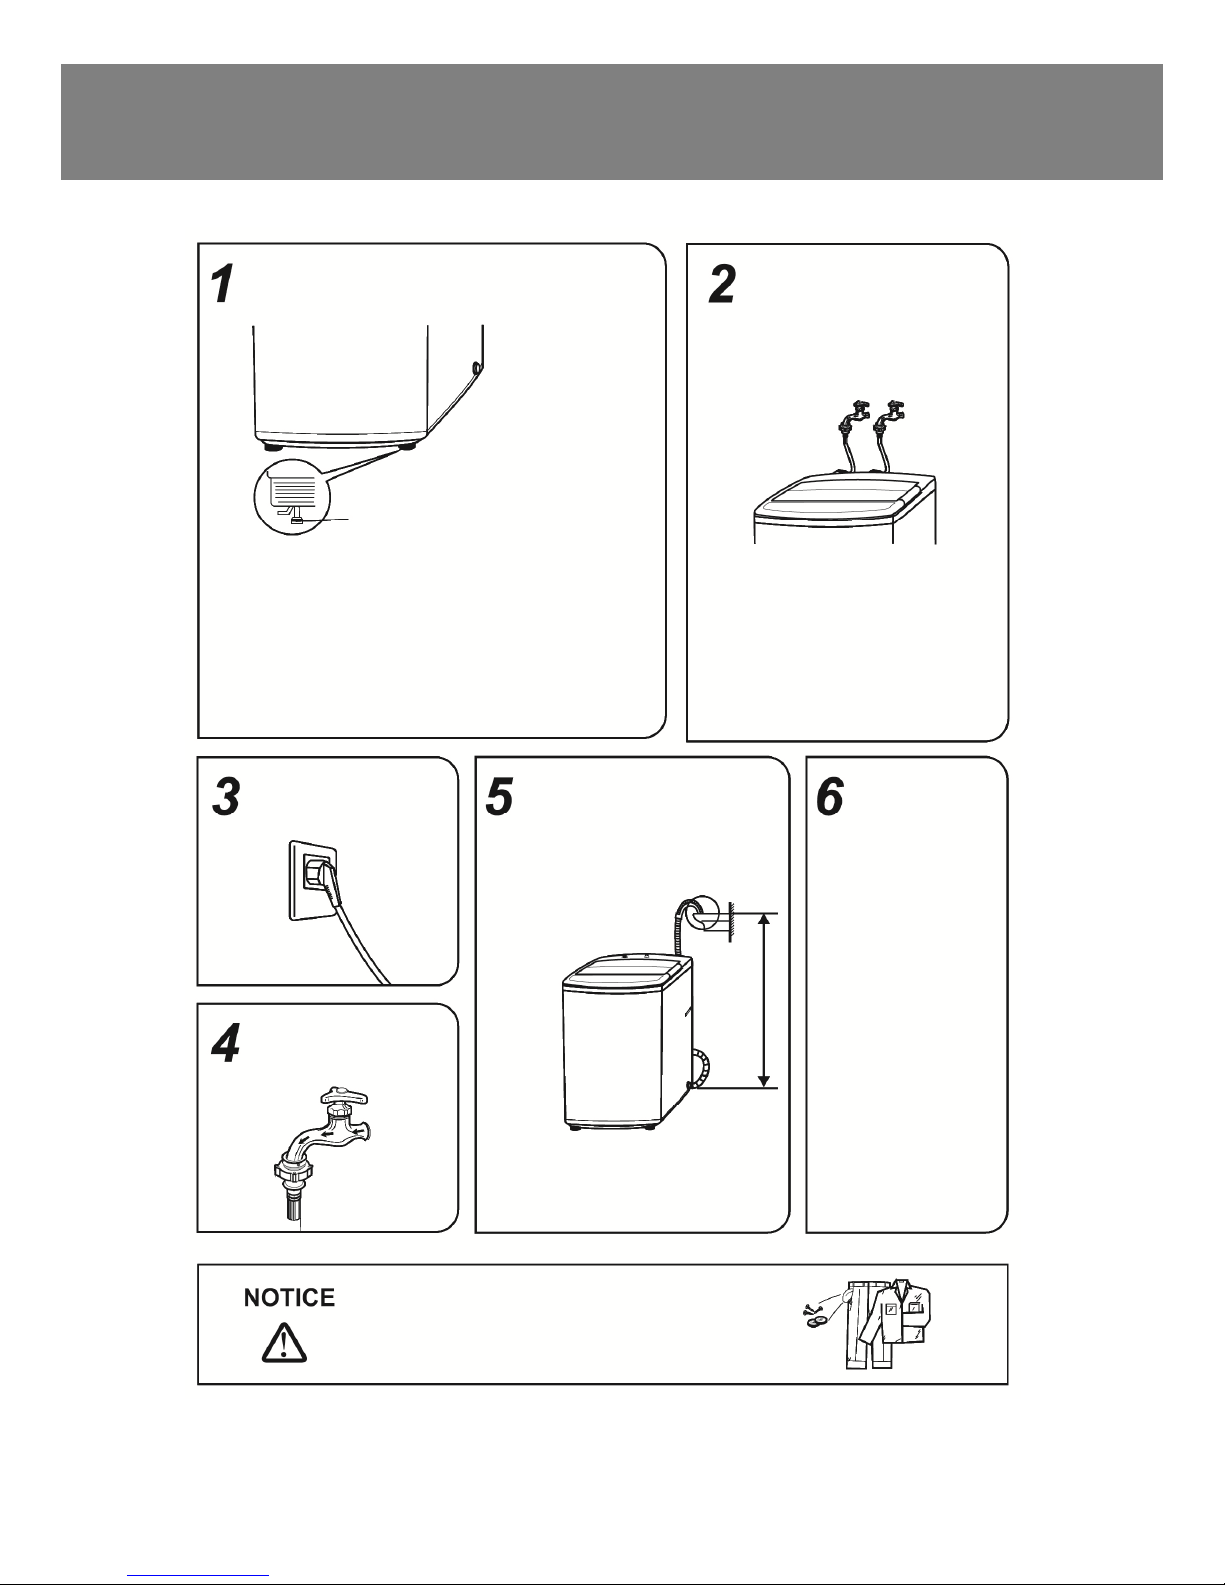
ADJUST THE FOOT TO STABILIZE
THE WASHING MACHINE.
Adjustable foot. Rotating clockwise
will extend the foot, and rotating
counterclockwise will shorten the foot. Slightly incline
the washer first and loosen the adjustable foot knob
prior to rotating. Adjust all four corners of the washer
to ensure an even, stable surface with the ground.
Then tighten the adjustable foot knob and lock it. If
the ground is not flat, make corrections on the ground
surface, otherwise the washer barrel will spin on an
incline and knock into the washer cabinet.
CONNECT TO A
POWER SOURCE.
TURN ON THE
WATER SUPPLY.
ENSURE PROPER
PLACEMENT OF
DRAIN HOSE FOR
WATER DRAINING.
UPPER DRAINAGE
NOTE: The water will overflow when the
height of the drain hose is under 34”.
INSTALL THE WATER
INLET HOSE.
TWO WATER INLET HOSES
PLACE
CLOTHES
INTO THE
WASHER
AND ADD A
SUITABLE
AMOUNT OF
WASHING
~34-40”
POWDER
BASED ON
LAUNDRY
VOLUME,
AND SELECT
WASH
CYCLE
PROGRAM.
Before washing clothes, take out any coins,
keys, and other hard items, while zipping up
zippers to prevent any damage.
10
Page 11
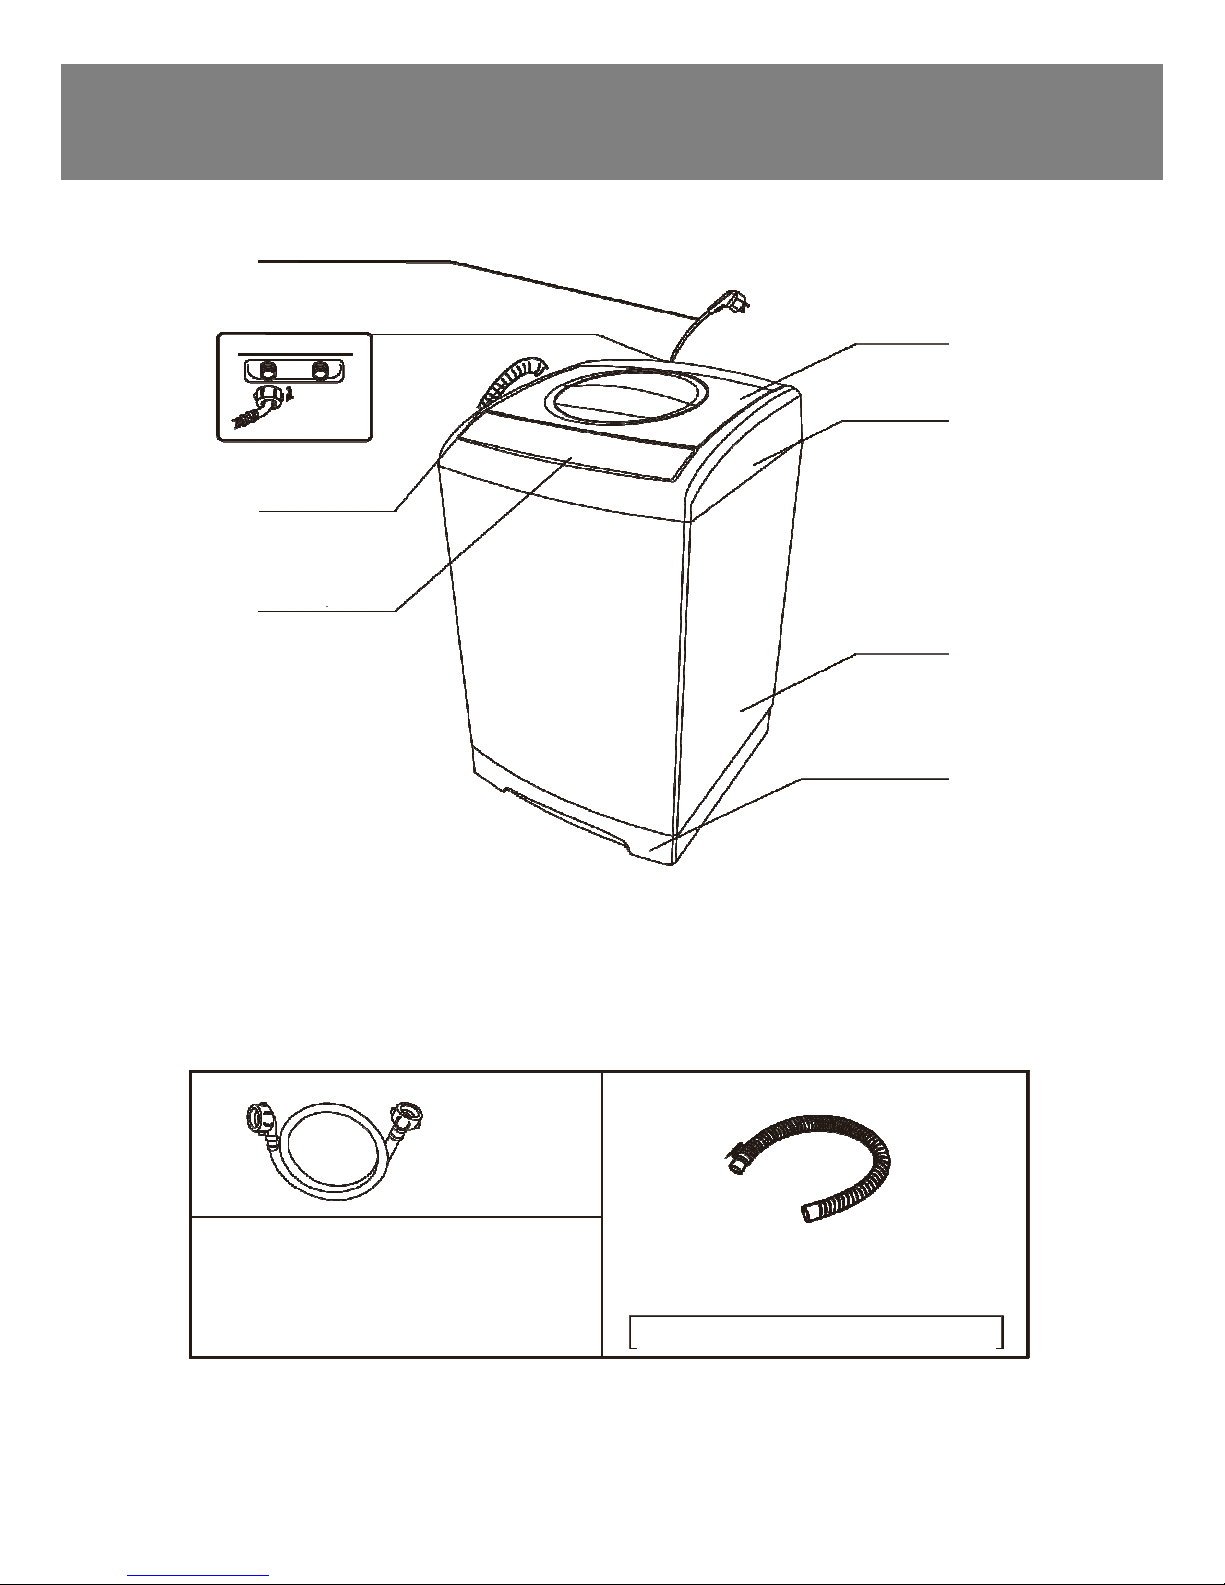
POWER LINE
WATER INLET
DRAIN HOSE
(UPPER DRAIN ONLY)
CONTROL PANEL
PARTS AND FEATURES
PARTS AND FEATURES
PARTS AND FEATURESPARTS AND FEATURES
TOP LID
FRAME
CABINET
WATER
INLET HOSE
INCLUDED WITH WASHING MACHINE
ADJUSTABLE LEG
FOR LOWER DRAIN SYSTEM USE ONLY
11
Page 12

CONTROL PANEL
CONTROL PANEL
CONTROL PANELCONTROL PANEL
WATER LEVEL
Press this button to select water
level. The indicator lights will move
each time the button is depressed.
FUNCTION
• Press this button to select wash time.
• Press this button to select rinse time.
• Press this button to select spin time.
DELAY
Press this button to preset the
delay function. For less than
24 hours, each time the button
is depressed, the time delay is
an hour. For 24+ hours, each
time the button is depressed,
the time delay is 6 hours.
After 48 hours, the preset
indicator will reset.
PROGRAM
Press this button to select fully
automatic programs like:
Normal (Light) Quick (Flash)
Jeans (Light) Anti-Wrinkle (Flash)
Cotton (Light) Air Dry (Flash)
START/PAUSE
Press this button after program
selection to start the washer.
Press this button again to pause
the current program. Press this
button once more to continue
the currently selected program.
POWER
• ON/OFF Power
• Automatic Power
TEMPERATURE
Press this button to set either HOT
or COLD water for the wash cycle.
When the HOT and Cold indicator
lights are both lit, both water inlets
are activated for WARM water.
NOTE: To protect the electrical components and circuits of the control panel, the ON/OFF power
button should not be depressed more than once within 30 seconds.
CHILD LOCK
Press the “Water Level” button
and “Function” buttons at the
same time to engage the lock
feature. Press the “Water Level”
And “Spin” button at the same
Time to disengage the child lock.
12
Page 13

QUICK START GUIDE
QUICK START GUIDE
QUICK START GUIDEQUICK START GUIDE
1. Install the Washing Machine
2. Load the Washer
3. Add Measured
Detergent
9. Press the START/PAUSE Button
8. Select the Desired
Wash Cycle Program
7. Plug-in the Power
Supply
6. Turn on the
4. Close Washer Door
5. Properly Hang
the Drain Pipe
END OF WASH CYCLE
• When the washing machine stops, the buzzer will sound for 6 seconds, and then the washer will
automatically power down.
• Turn off the water tap afterwards.
• Although the washer powers down automatically, the power cord needs to be pulled out for safety
and precautionary measures.
Water Supply
13
Page 14

MAIN WASHING PROCEDURE
MAIN WASHING PROCEDURE
MAIN WASHING PROCEDUREMAIN WASHING PROCEDURE
INSTRUCTIONS FOR NORMAL WASH PROGRAM
• The NORMAL wash cycle program is the easiest, most convenient and common wash cycle
program to use. When the user presses the POWER button and then immediately presses
the START/PAUSE button, the NORMAL wash cycle program is activated.
• When the washing machine begins the program, the digital display will show the remaining time. The
indicator light will flicker to show the remaining time for the wash cycle program.
STEPS IN DETAIL
1. Press the POWER button to turn the washer ON.
2. Determine the laundry load and select the appropriate water level.
3. Press the START/PAUSE button to begin the wash cycle program.
INSTRUCTIONS FOR SINGLE WASH CYCLE PROGRAM
• The user can select any single wash cycle program, or any combination of programs from the WASH,
RINSE, and SPIN options according to laundry load requirements. Deselect any one or two of the
three indicators that are not needed, while the remaining indicator displays the currently activated
wash program selected by the user.
STEPS IN DETAIL FOR SINGLE WASH
1. Press the POWER button to turn the washing machine ON.
2. Turn OFF RINSE and SPIN indicators by pressing their respective buttons.
3. The operation for single RINSE and single SPIN are similar in format.
USING THE MULTI-BATCH WASHING SOLUTION
1. Load the first batch of laundry into the washing machine, add washing powder, and press the
FUNCTION button to set the single WASH to run.
2. Unload the first batch of laundry after hearing the end of wash buzzer.
3. Load the second batch of laundry into the washer, and select WASH, RINSE, or SPIN.
4. Unload the second batch of laundry after hearing the end of wash buzzer.
5. Load the first batch of laundry into the washing machine and press the FUNCTION button to set the
RINSE and SPIN to run.
NOTE:
• Close the lid after loading the washing machine, otherwise it will automatically stop working, and an
abnormal warning indicator is issued.
• The washing machine will not work when the amount of water does not reach the selected water level.
• After pressing the POWER button, if the START/PAUSE button is not pressed, the washing machine
will automatically power down after 10 minutes.
14
Page 15

SPECIAL FUNCTIONS
SPECIAL FUNCTIONS
SPECIAL FUNCTIONSSPECIAL FUNCTIONS
DELAY FUNCTION
The washing machine can be delayed by using this preset feature:
1. Switch the power to ON.
2. Open the water tap and hang the drain hose.
3. Load the laundry and detergent into the washer.
4. Select the appropriate water level according to the
laundry load (quantity of clothing articles).
5. Select the appropriate functions and programs.
6. Press the DELAY button to select the amount of
time to delay the washing cycle.
7. Close the washer lid and press the START/PAUSE
button.
DELAY FUNCTION CONFIRMATION
When the delay function is activated, the
corresponding delay light will flash, and all
other lights will turn off. To check the preset
program and function, press and hold the
DELAY button. Release the DELAY button
to return to the delay status.
CHANGES TO THE DELAY FUNCTION
Press the POWER button to cancel the set delay
function. To change the time on the delay function,
cancel the delay time first, and then press the
DELAY button to reset the program. Follow the
procedures listed above to program a new preset.
DELAY FUNCTION LAYOUT
Press the DELAY button to add ONE
HOUR to the digital delay indicator.
After the number reaches 24, press
the DELAY button to add SIX HOURS
to the delay function. After the number
reaches 48, the digital delay indicator
will turn off and reset to default status.
TIME REMAINING
(MINUTES)
DELAY (HOUR)
DELAY LIGHT
QUICK
Use this function for short washing times. This
function is suitable to wash lightly stained clothes
or clothing made from lightweight materials.
COTTON
Use this function to wash clothes or linens
made from cotton.
JEANS
Use this function to wash heavy or seriously
stained clothes.
ANTI-WRINKLE
Use this function for short washing times.
Using the high water level, this function thoroughly
rinses and washes garments to prevent wrinkling.
AIR DRY
For easily fading, deforming, and non-waterproof
garments, use this function to dry these garments
without regular heating, achieving similar results
when hang-dried.
POWER LOSS MEMORY FUNCTION
The washing machine will automatically resume operation from the previous function prior to power outage.
15
Page 16

FULL AUTOMATIC WASH PROGRAM GUIDE
FULL AUTOMATIC WASH PROGRAM GUIDE
FULL AUTOMATIC WASH PROGRAM GUIDEFULL AUTOMATIC WASH PROGRAM GUIDE
WASHER
FUNCTION
NORMAL 4 1-6 11 MIN 30 SEC 2 MIN 5 MIN
QUICK 3 1-3 2 MIN 00 SEC 1 MIN 1 MIN
COTTON 3 1-3 13 MIN 00 SEC (SOAK)
JEANS 4 1-6 13 MIN 00 SEC (SOAK)
ANTI-WRINKLE 4 1-6 11 MIN 30 SEC 2 MIN 00 MIN
AIR DRY 4 1-6 00 MIN 00 SEC 0 MIN 60 MIN
WATER LEVEL
DEFAULT
SCOPE
WASH TIME RINSE
3 MIN 40 SEC (WASH)
3 MIN 30 SEC (WASH)
SPIN
TIME
TIME
00 SEC
00 SEC
+(SPRAY)
1 MIN 7 MIN
00 SEC
2 MIN 1 MIN
10 SEC
00 SEC
00 SEC
TOTAL
TIME
42 MIN
10 MIN
39 MIN
42 MIN
34 MIN
60 MIN
NOTES
WASH TIME
INCLUDES
SOAK TIME
WASH TIME
INCLUDES
SOAK TIME
WASH TIME
INCLUDES
SOAK TIME
WASH TIME
INCLUDES
SOAK TIME
WASH TIME
INCLUDES
SOAK TIME
WASH TIME
INCLUDES
SOAK TIME
NOTE: The time required may vary depending on water pressure from inlet pipe, garment materials, and
different water draining conditions.
WATER
LEVEL
WATER
VOLUME
LAUNDRY
WEIGHT
CONCENTRATED
WASHING POWDER
COMMON SYNTHETIC
DETERGENT
CONCENTRATED
LIQUID DETERGENT
6 ~60 L < 13.2 lbs 1.21 oz 2.20 oz 1.22 oz
5 ~52 L < 11.0 lbs 1.05 oz 1.89 oz 1.05 oz
4 ~45 L < 8.8 lbs 0.91 oz 1.62 oz 0.91 oz
3 ~37 L < 6.6 lbs 0.74 oz 1.45 oz 0.74 oz
2 ~30 L < 4.4 lbs 0.61 oz 1.18 oz 0.61 oz
1 ~22 L < 2.2 lbs 0.44 oz 0.88 oz 0.44 oz
NOTE:
• It is recommended to use low or mid foaming powder
• The volume of washing powder changes with different volume and weight.
• Water volume will differ because of clothing varieties. If the washer is not running properly, adjust the
clothing volume or water level.
• The water volumes listed above are based on normal clothing volumes.
16
Page 17

MAINTENANCE AND CARE
MAINTENANCE AND CARE / ERROR CODES
MAINTENANCE AND CARE MAINTENANCE AND CARE
ERROR CODES
ERROR CODESERROR CODES
END OF PROGRAM
The washing machine will sound off a buzz at the end of
any program operation to remind the user to take out
the laundry or to operate it again.
After the sound, the washing machine returns to its OFF
state with no display and all indicator lights turned off.
Please shut off the water tap, pull out the power plug
when not in use to avoid water leakage or accidental
fire.
PROBLEM CAUSE OF PROBLEM CODE ALARM
Water
Hose
Alarm
Open Lid
Alarm
Fails to reach preset water
level, after injecting water
for about 16 minutes.
Opening the lid after
starting the delay function.
Opening the lid when the
washing machine is running
a program.
Use gentle wash cloths to wipe off any water and dirt
residues from the surface of the washer after every use.
Detergent, propellants, and other chemicals are
prohibited in order to avoid any possible damage to the
washer and its plastic accessories.
Clean the water inlet hose and drain filter to prevent any
possible draining problems (after every ~10 washes).
Clean any filters to maintain optimal performance (after
every use).
CODE: E1
Other lights are
turned off
CODE: E2
Other lights are
turned off
MAINTENANCE
SOUND
Buzzer
10 Seconds
Every 16
Minutes
Buzzer
10 Seconds
Every 16
Minutes
STOPPING
ALARM
Open lid to fix fault.
Then close lid to
stop the alarm.
Open lid to fix fault.
Then close lid to
stop the alarm.
Imbalance
Alarm
Drain
alarm
Overflow
Alarm
Door Lock
Alarm
Washing machine
imbalance checked three
times.
Draining fails to finish, after
draining for 4 minutes.
Water inlet hose. CODE: E5
Door failed to properly lock
or unlock.
CODE: E3
Other lights are
turned off
CODE: E4
Other lights are
turned off
Other lights are
turned off
CODE: E6
Other lights are
turned off
Buzzer
10 Seconds
Every 16
Minutes
Buzzer
10 Seconds
Every 16
Minutes
Buzzer
10 Seconds
Every 16
Minutes
Buzzer
10 Seconds
Every 16
Minutes
Open lid to fix fault.
Then close lid to
stop the alarm.
Open lid to fix fault.
Then close lid to
stop the alarm.
Open lid to fix fault.
Then close lid to
stop the alarm.
Open lid to fix fault.
Then close lid to
stop the alarm.
NOTE:
1. Overflow alarm: washing machine water drain valve remains opened until manual intervention (shutoff).
2. Once the alarm stops, the washer returns to its previous status prior to the alarm indication.
3. Code E6: Directly unplug the power and lift the door open. If the door is open, press the power button.
17
Page 18

TROUBLESHOOTING
TROUBLESHOOTING
TROUBLESHOOTINGTROUBLESHOOTING
When the washing machine needs servicing, please contact our customer service department, and a
representative will try and diagnose issues regarding your appliance. Please do not dismantle the washing
machine without prior permission. Doing so will void your warranty.
If the washing machine fails to operate properly, or it sounds an alarm, please check the follow guidelines
for possible solutions to common problems or alarm indicators.
LIST OF PROBLEMS AND POSSIBLE SOLUTIONS
PROBLEMS
Water Fails to Flow In - The power is off or the fuse has burned out.
Washing Machine Fails to Run - The power is off or the fuse has burned out.
Abnormal Drainage
Abnormal Spin
MAKE THESE INSPECTIONS
- Water supply is cutoff or low pressure.
- Inlet hose and water tap is connected and open.
- Filter of inlet valve is blocked by dirt buildup.
- Coil of inlet valve is damaged.
- The START/PAUSE button is activated.
- The power supply voltage is too low.
- Water needs to reach required water level.
- The DELAY function is activated.
- The drain hose is placed too high (See Installation Guide).
- The drain hose end is sealed or blocked.
- The internal rubber ring of valve is blocked.
- The door lid is not closed.
- Laundry is improperly or excessively loaded.
- The ground is not flat or its feet are not leveled.
NOTE: During the spin cycle process, if the laundry is loaded onto one side of the washing tub, there will be
an imbalance in the washing tub’s spin trajectory, resulting in it striking the housing of the washing machine.
The washing machine will compensate for this phenomenon by automatically correcting it with more water.
However, if the imbalance is not resolved after three continuous corrections, the auto-correction system will
stop. The user is then required to manually correct the imbalance by evenly distributing the laundry inside
the tub, in order to resolve this problem.
- The washing machine’s motor belt is loose.
18
Page 19

LIMITED WARRANTY
MC Appliance Corporation warrants each new 2.1 CU. FT. Washing Machine to be free from defects in material
and workmanship, and agrees to remedy any such defect or to furnish a new part(s), at the company’s option,
for any part(s) of the unit that has failed during the warranty period. Parts and labor expenses are covered on
this unit for a period of one year from the date of purchase. A copy of the dated sales receipt or invoice is
required to receive warranty service by an authorized service agent.
This warranty covers appliances in use within the continental United States, Puerto Rico, and Hawaii. The
warranty does not cover the following:
Damages due to shipping damage or improper installation.
Damages due to misuse or abuse.
Content losses due to failure of the unit.
Inside components such as filters, etc.
Repairs performed by unauthorized service agents.
Service calls that do not involve defects in material and workmanship such as instructions on proper use
of the product or improper installation.
Replacement or resetting of house fuses or circuit breakers.
Failure of this product if used for other than for its intended purpose.
Disposal costs for any failed unit not returned to our factory.
Any delivery costs incurred as the result of a unit that fails to perform as specified.
Expenses for travel and transportation for product service if your appliance is located in a remote area
where service by an authorized service technician is not available.
The removal and reinstallation of your appliance if it is installed in an inaccessible location or is not
installed in accordance with published installation instructions.
Limitations of Remedies and Exclusions:
Product repair in accordance with the terms herein, is your sole and exclusive remedy under this limited warranty. Any
and all implied warranties including merchantability and fitness for a particular purpose are hereby limited to one year
or the shortest period allowed by law. MC Appliance Corporation is not liable for incidental or consequential damages
and no representative or person is authorized to assume for us any other liability in connection with the sale of this
product. Under no circumstances is the consumer permitted to return this unit to the factory without prior written
consent of MC Appliance Corporation.
Some states prohibit the exclusion or limitation of incidental or consequential damages, or limitations on implied
warranties. This warranty gives you specific legal rights, and you may also have other rights which very from state to
state.
Model Parts Labor Type of Service
MCSTCW21W2 One-Year One-Year Carry In
For Service or Assistance, please call 888-775-0202. Or visit us on the web at www.mcappliance.com to request
warranty service or order parts.
19
Page 20

Lavadora port
Lavadora portáááátil de 2.1 pies c
Lavadora portLavadora port
til de 2.1 pies cúúúúbicos
til de 2.1 pies ctil de 2.1 pies c
bicos
bicosbicos
MANUAL DEL USUARIO
MANUAL DEL USUARIO
MANUAL DEL USUARIOMANUAL DEL USUARIO
MODELO MCSTCW21W2
MODELO MCSTCW21W2
MODELO MCSTCW21W2MODELO MCSTCW21W2
Page 21

ÍÍÍÍNDICE
NDICE
NDICENDICE
Indicaciones de seguridad importantes
Instrucciones de instalación
Preparación antes del lavado
Partes y características
Guía de ciclos de lavado
Cuidado y mantenimiento / Códigos de error
Solución de problemas
Información de la garantía
Antes de usar su lavadora, lea con cuidado este manual y guárdelo para su consulta posterior.
LEA ESTE MANUAL DEL USUARIO
En este manual encontrará mucha información útil para mantener y usar correctamente su
lavadora. Si aplica unos pocos cuidados preventivos puede ahorrar mucho tiempo y dinero a lo
largo de la vida útil de su lavadora. Encontrará muchas respuestas a problemas comunes en la
sección “Solución de problemas”. Si revisa primero esta sección, es posible que no necesite
solicitar servicio.
.......... 36
...................... 27
................. 29
............. 30
....... 32
.... 37
.... 22
......... 35
DESEMBALAJE DE SU LAVADORA
1. Inspeccione y quite todos los materiales de embalaje.
2. Inspeccione y quite el material restante, cinta o materiales impresos antes de encender
la lavadora.
EXISTE EL PELIGRO DE QUE UN NIÑO QUEDE ATRAPADO. ES NECESARIO VIGILAR A
LOS NIÑOS. ESTE APARATO SOLO SE DEBE USAR CON EL PROPÓSITO PARA EL QUE
SE DISEÑÓ TAL COMO SE DESCRIBE EN ESTE MANUAL. LEA COMPLETAMENTE
TODAS LAS INDICACIONES DE SEGURIDAD RECOMENDADAS.
21
Page 22

INDICACIONES DE SEGURIDAD IMPORTANTES
INDICACIONES DE SEGURIDAD IMPORTANTES
INDICACIONES DE SEGURIDAD IMPORTANTESINDICACIONES DE SEGURIDAD IMPORTANTES
Para reducir el riesgo de incendio, choque eléctrico o lesiones personales al usar su
electrodoméstico, siga estas pautas básicas de precaución, que incluyen lo siguiente:
1. Lea todas las instrucciones antes de usar este aparato.
2. Este aparato sólo se debe usar con el propósito para el que se diseñó tal como se describe en este
manual.
3. Use solo detergentes o suavizantes recomendados en este manual y manténgalos lejos del alcance
de los niños.
4. Este aparato se debe instalar de acuerdo con las instrucciones de instalación antes de usarse.
5. Nunca desconecte el aparato jalando el cable de alimentación eléctrica. Siempre tome el enchufe
con firmeza y jale directamente hacia afuera del tomacorriente.
6. Reemplace de inmediato todos los cables eléctricos, enchufes sueltos y tomacorrientes en mal
estado. Consulte a un electricista certificado cuando reemplace los tomacorrientes.
7. Desconecte el aparato antes de realizar tareas de mantenimiento y cuidado, o antes de hacer
cualquier reparación.
8. Si no usa su aparato viejo, recomendamos que desmonte la puerta o que elimine adecuadamente
el aparato de acuerdo con las leyes locales.
9. No utilice el aparato si hay humos explosivos en el aire.
10. No lave ni seque artículos que se hayan manchado, limpiado, lavado o remojado con aceites de
cocina, gasolina, solventes para limpieza en seco, químicos o cualquier otra sustancia explosiva o
inflamable, pues pueden despedir vapores que podrían encenderse o explotar.
11. Las prendas o paños usados para limpiar sustancias inflamables o explosivas no deberán lavarse
en este aparato hasta que todos los residuos de este material se hayan eliminado.
12. No agregue ni mezcle ningún tipo de sustancia inflamable o explosiva en la lavadora.
13. No intente sacar prendas mientras la tina de la lavadora esté en movimiento. Espere a que se
detenga por completo antes de sacarlas.
14. La puerta de carga de la lavadora debe estar cerrada cuando la tina esté girando.
15. No utilice el aparato cuando tenga partes rotas o faltantes.
16. No use este aparato con fines comerciales. Es sólo para uso en el hogar.
17. No utilice esta lavadora a menos que todos los paneles de aislamiento estén bien colocados en su
sitio.
22
Page 23

18. No sabotee los controles.
19. No permita que los niños jueguen dentro o encima del aparato. Mantenga una vigilancia estricta del
aparato cuando se use cerca de niños.
20. Este aparato debe conectarse a un tomacorriente adecuado con la capacidad eléctrica correcta
según se especifica en la etiqueta con el valor nominal.
21. Debe asegurarse una adecuada conexión a tierra para reducir el riesgo de descargas eléctricas e
incendios. No corte ni elimine la conexión a tierra. Si no cuenta con un tomacorriente trifásico,
contrate a un electricista certificado para que lo instale. El tomacorriente debe tener una conexión a
tierra adecuada.
22. En ciertas circunstancias, se puede producir hidrógeno en el sistema de agua caliente de un
aparato que no se haya usado por dos semanas o más. El hidrógeno es un gas muy explosivo.
Si el sistema de agua caliente no se ha usado por más de dos semanas, abra todos los grifos de
agua caliente y permita que el agua salga por varios minutos antes de usar su lavadora.
23. No repare ni reemplace ninguna parte del aparato ni intente darle servicio a menos que así se
recomiende específicamente en las instrucciones de reparación para el usuario, las cuales debe
comprender totalmente y tener la habilidad para efectuarlas.
NOTA: Si por alguna razón este producto requiere servicio, recomendamos que un técnico
certificado realice este servicio.
24. Para reducir el riesgo de descarga eléctrica o incendio, no use un cable de extensión eléctrica ni
adaptadores para tomacorrientes para conectar la unidad a una fuente de energía eléctrica. El
aparato debe tener una conexión a tierra adecuada mediante un tomacorriente trifásico.
GUARDE ESTE INSTRUCTIVO
INSTRUCCIONES DE CONEXIÓN A TIERRA
Este aparato debe tener conexión adecuada a tierra. En el caso de una falla o avería, la conexión a
tierra reducirá el riesgo de una descarga eléctrica al proporcionar una ruta con menor resistencia
para la corriente eléctrica. Este aparato está equipado con un cable de alimentación eléctrica
trifásico con el fin de tener una conexión a tierra. Este enchufe trifásico debe conectarse en un
tomacorriente apropiado que tenga una adecuada conexión a tierra de acuerdo a los reglamentos y
códigos locales.
Una conexión incorrecta del cable de alimentación representa un riesgo de descarga
eléctrica. Pida que un experto en mantenimiento o un electricista calificado revise el sistema
si tiene duda de que el aparato tenga una conexión adecuada a tierra. No modifique el
enchufe que se proporciona con el aparato, aún si no se ajusta al tomacorriente. Procure
que un técnico calificado instale el tomacorriente adecuado.
Para reducir el riesgo de descarga eléctrica, desconecte este aparato de la fuente eléctrica
antes de intentar cualquier trabajo de mantenimiento y servicio. Al colocar los controles en
la posición OFF no se desconecta el aparato de la corriente eléctrica.
23
Page 24

SEGURIDAD Y PRECAUCIONES
SEGURIDAD Y PRECAUCIONES
SEGURIDAD Y PRECAUCIONESSEGURIDAD Y PRECAUCIONES
Con el fin de evitar lesiones a usted y otras personas, o daños materiales, siga estas indicaciones:
Siga estas indicaciones visuales:
No desensamble ni ensamble la
lavadora sin autorización .
No instale la lavadora en un ambiente
muy húmedo para evitar una descarga
eléctrica, incendio u otros accidentes
eléctricos.
No introduzca su mano ni saque
prendas de la tina giratoria antes de
que se detenga .
No enjuague directamente la
máquina con agua cuando la limpie.
24
Page 25

Evite lesiones: no permita que los niños
se suban a la máquina ni se asomen a
la tina giratoria.
No lave prendas que hayan estado en
contacto con keroseno, gasolina, alcohol
ni otros químicos inflamables.
No dañe el cable ni el enchufe eléctrico
para evitar una descarga, incendio o
cortocircuito en el aparato.
Quite el enchufe trifásico del
tomacorriente cuando la máquina no
esté en uso.
Limpie con regularidad el enchufe
eléctrico para eliminar polvo y suciedad
con el fin de evitar una falla eléctrica.
Conecte adecuadamente los extremos
del cable de alimentación eléctrica y la
manguera para el agua con el fin de evitar
una fuga accidental y una descarga
eléctrica.
Inserte bien el enchufe trifásico en el
tomacorriente.
No coloque incienso, artículos inflamables
ni otras fuentes de calor sobre la lavadora.
25
Page 26

Utilice una fuente eléctrica correcta.
Tomacorriente trifásico
(sin adaptadores).
No quite ni inserte el enchufe con las
manos húmedas para evitar descargas
eléctricas.
Asegúrese de que el tubo de entrada de
agua esté conectado a una fuente de
agua y que el grifo esté abierto antes de
lavar la ropa.
No cambie ni altere de ninguna forma el
cable de alimentación eléctrica ni el
enchufe trifásico.
La temperatura del agua no deberá
exceder los 131º F cuando lave con
agua caliente.
Está estrictamente prohibido colocar
o sentar niños o dejar objetos
pesados en la parte
superior de la lavadora.
Quite el cable de alimentación eléctrica
tomando el enchufe
trifásico solo desde
la base.
No lave: Impermeables, ropa de pesca,
chaquetas pesadas ni otras prendas
similares.
26
Page 27

INSTRUCCIONES DE INSTALACI
INSTRUCCIONES DE INSTALACIÓÓÓÓNNNN
INSTRUCCIONES DE INSTALACIINSTRUCCIONES DE INSTALACI
DESEMBALAJE
• Quite el embalaje, los cojines de espuma y el cartón de
la parte inferior.
• Abra la puerta de la lavadora y saque los accesorios.
• Está estrictamente prohibido usar la lavadora con el cojín
de espuma colocado.
Base de
cojín de
espuma
COLOCACIÓN DE MANGUERA DE DRENADO DE
AGUA SUPERIOR
La manguera de drenado (A) deberá estar a una altura de 34 a 40
pulgadas. Su diámetro (B) no deberá ser menos de 1.20” y su
capacidad de flujo no deberá ser menos de 40 litros por minuto.
Antes de encender la lavadora, los usuarios deberán colgar de manera
correcta el tubo de drenado entre 34 a 40” por encima del suelo.
FOR UPPER DRAIN SYSTEM ONLY
INSTALACIÓN DE LA MANGUERA DE ENTRADA DE
AGUA
• Coloque la rosca de la manguera de entrada de agua
en el grifo.
• Atornille bien el otro extremo de la manguera a la
válvula de entrada de agua mediante el anillo con
sello de goma en el interior.
Tuerca fijadora
A
34 - 40”
B
Manguera de entrada
de agua
NOTA:
evite torcer la válvula de entrada de agua para evitar rupturas en la junta de
la válvula de entrada de agua.
Mientras aprieta la tuerca fijadora, aplique una fuerza uniforme y
SOLO PARA LA MANGUERA DE ENTRADA DE
AGUA CON TORNILLO DE ROSCA DOBLE
27
Page 28

INSTALACI
INSTALACIÓÓÓÓN R
INSTALACIINSTALACI
Cuando instale el adaptador para fregadero al grifo del fregadero, siga estos pasos:
1. Quite el aireador de la boquilla del grifo y determine el tamaño y tipo de grifo
(roscado interior o exterior)
2. Cuando determine el tamaño y el tipo del grifo, coloque la arandela de goma del tamaño correcto
en el adaptador para grifo cromado.
3. Coloque el adaptador para grifo cromado en el grifo del fregadero.
4. Coloque el adaptador para grifo en la manguera de entrada de agua y asegúrese de que la arandela
de goma se coloque entre el adaptador y la manguera de entrada de agua.
5. Coloque el otro extremo de la manguera de entrada de agua en la entrada de agua de la
lavadora y asegúrese de que la arandela de goma se coloque entre la manguera de entrada
de agua y la lavadora
N RÁÁÁÁPIDA CON EL ADAPTADOR PARA
N RN R
PIDA CON EL ADAPTADOR PARA
PIDA CON EL ADAPTADOR PARA PIDA CON EL ADAPTADOR PARA
FREGADERO
FREGADERO
FREGADEROFREGADERO
28
Page 29

PREPARACI
PREPARACIÓÓÓÓN ANTES DEL LAVADO
PREPARACIPREPARACI
N ANTES DEL LAVADO
N ANTES DEL LAVADON ANTES DEL LAVADO
AJUSTE LA PATA PARA
ESTABILIZAR LA LAVADORA.
Pata ajustable. Al girar en el sentido
de las manecillas del reloj se
extenderá la longitud de la pata, y en sentido contrario
se reducirá. Incline primero ligeramente la lavadora y
luego afloje la perilla de la pata ajustable antes de
girarla. Ajuste las cuatro esquinas de la lavadora para
asegurarse que tenga una superficie estable y nivelada.
Luego apriete la perilla de la pata ajustable y fíjela. Si
el suelo no es plano, haga correcciones en la
superficie, de lo contrario el barril de la lavadora girará
de manera inclinada y golpeará el gabinete.
CONECTE A UNA FUENTE
DE ALIMENTACIÓN
ELÉCTRICA.
ABRA EL
SUMINISTRO DE
AGUA.
ASEGURE LA
COLOCACIÓN CORRECTA
DE LA MANGUERA DE
DRENADO PARA QUE SE
DRENE BIEN EL AGUA.
DRENADO SUPERIOR
NOTA: El agua se desbordará si la
altura de la manguera de drenado es
menor de 34".
INSTALE LA
MANGUERA DE
ENTRADA DE AGUA.
DOS MANGUERAS DE
ENTRADA DE AGUA
COLOQUE LAS
PRENDAS EN
LA LAVADORA,
AGREGUE LA
CANTIDAD
ADECUADA DE
~34-40”
DETERGENTE
EN POLVO EN
BASE AL
VOLUMEN A
LAVAR Y
SELECCIONE
EL PROGRAMA
DE CICLO DE
LAVADO
AVISO
Antes de lavar las prendas, saque las
monedas, llaves y otros artículos duros,
y suba las cremalleras para evitar daños
29
Page 30

PARTES Y CARACTER
PARTES Y CARACTERÍÍÍÍSTICAS
PARTES Y CARACTERPARTES Y CARACTER
LÍNEA ELÉCTRICA
ENTRADA DE AGUA
MANGUERA DE DRENADO (SOLO
DRENADO SUPERIOR)
PANEL DE CONTROL
STICAS
STICASSTICAS
TAPA SUPERIOR
MARCO
GABINETE
MANGUERA DE
ENTRADA DE AGUA
INCLUIDA CON LA LAVADORA
PATA AJUSTABLE
SOLO PARA EL SISTEMA DE DRENADO
INFERIOR
30
Page 31

PANEL DE CONTROL
PANEL DE CONTROL
PANEL DE CONTROLPANEL DE CONTROL
NIVEL DE AGUA
Presione este botón para
seleccionar el nivel de agua. Las
luces indicadoras se moverán cada
vez que se oprima el botón.
FUNCIÓN
RETARDO
Presione este botón para
preestablecer la función de
retardo. Para menos de 24
horas, cada vez que oprima
el botón, el tiempo de retardo
aumenta una hora. Para más
de 24 horas, cada vez
que oprima el botón, el
tiempo de retardo
aumenta seis horas.
Después de 48
horas, el
indicador
volverá a cero.
INICIO/PAUSA
Presione este botón después de
seleccionar el programa para
iniciar el ciclo de la lavadora.
Presione este botón de nuevo
para pausar el programa actual.
Oprima este botón una vez más
para continuar con el programa
seleccionado vigente.
ENCENDIDO
• ENCIENDE/APAGA
• Encendido automático
• Presione este botón para seleccionar
el tiempo de lavado.
• Presione este botón para seleccionar
el tiempo de enjuagado.
• Presione este botón para seleccionar
el tiempo de centrifugado.
PROGRAMA
Presione este botón para seleccionar
programas completamente automáticos
como:
Normal (Ligero) Rápido (Flash)
Jeans (Ligero) Algodón (Ligero)
Planchado permanente (Flash)
Secado con aire (Flash)
SEGURO CONTRA
NIÑOS
Presione los botones “Water Level”
(Nivel de agua) y “Function” (Función)
al mismo tiempo para activar el seguro.
Presione los botones “Water Level”
(Nivel de agua) y “Spin” (Centrifugar)
al mismo tiempo para desactivar el
seguro contra niños.
TEMPERATURA
Oprima este botón para seleccionar
HOT (CALIENTE) o COLD (FRÍA)
para el ciclo de lavado. Cuando las
luces indicadoras HOT y COLD se
encienden al mismo tiempo, significa
que las dos entradas de agua se
abrieron para conseguir agua TIBIA.
NOTA: Para proteger los componentes eléctricos y circuitos del panel de control, el botón
ON/OFF no deberá oprimirse más de una vez dentro de un lapso de 30 segundos.
31
Page 32

GU
GUÍÍÍÍA DE INICIO R
GUGU
A DE INICIO RÁÁÁÁPIDO
A DE INICIO RA DE INICIO R
PIDO
PIDOPIDO
1. Instale la lavadora
2. Cargue la lavadora
3. Agregue el
detergente
9. Presione el botón START/PAUSE
(INICIO/PAUSA)
8. Seleccione el programa
del ciclo de lavado deseado
7. Conecte la
alimentación eléctrica
4. Cierre la puerta
de la lavadora
5. Cuelgue de manera
correcta el tubo de drenado
FIN DEL CICLO DE LAVADO
•
Cuando se detenga la lavadora, el timbre sonará durante 6 segundos y luego la lavadora
se apagará automáticamente.
•
Después, cierre el grifo.
•
Aunque la lavadora se apaga de manera automática, el cable de alimentación eléctrica
necesita desconectarse por motivos de seguridad y como medida de precaución.
6. Abra el
suministro de agua
32
Page 33

PROCEDIMIENTO DE LAVADO PRINCIPAL
PROCEDIMIENTO DE LAVADO PRINCIPAL
PROCEDIMIENTO DE LAVADO PRINCIPALPROCEDIMIENTO DE LAVADO PRINCIPAL
INSTRUCCIONES PARA UN PROGRAMA DE LAVADO NORMAL
• El programa de ciclo de lavado NORMAL es el más sencillo, cómodo y común de los programas de
ciclo de lavado. Cuando el usuario oprime el botón POWER (Encendido) e inmediatamente presiona
el botón START/PAUSE, se activa el programa de ciclo de lavado NORMAL.
• Cuando la lavadora comienza el programa, la pantalla digital mostrará el tiempo restante. La luz
indicadora parpadeará para mostrar el tiempo restante del programa de ciclo de lavado.
DESCRIPCIÓN DETALLADA DE LOS PASOS
1. Presione el botón POWER para ENCENDER la lavadora.
2. Determine la carga de lavandería y seleccione el nivel de agua apropiado.
3. Presione el botón START/PAUSE para empezar el programa de ciclo de lavado.
INSTRUCCIONES PARA UN PROGRAMA DE CICLO DE LAVADO SENCILLO
• El usuario puede seleccionar cualquier programa de ciclo de lavado sencillo o una combinación de
programas con las opciones WASH (LAVAR), RINSE (ENJUAGAR) y SPIN (CENTRIFUGAR) de
acuerdo con los requisitos de la carga a lavar. Quite la selección en uno o dos de los indicadores que
no sean necesarios al tiempo que el indicador restante muestra el programa de lavado activado
actualmente por el usuario.
DESCRIPCIÓN DETALLADA DE LOS PASOS PARA LAVADO SENCILLO
1. Presione el botón POWER para ENCENDER la lavadora.
2. APAGUE los indicadores RINSE (ENJUAGUE) y SPIN (CENTRIFUGADO) presionando sus respectivos
botones.
3. La operación para RINSE (ENJUAGUE) sencillo y SPIN (CENTRIFUGADO) sencillo son similares en formato.
USO DE LA SOLUCIÓN DE LAVADO POR CARGAS MÚLTIPLES
1. Cargue la primera carga de lavado en la lavadora, agregue detergente en polvo y presione el botón
FUNCTION (FUNCIÓN) para establecer el LAVADO sencillo a ejecutar.
2. Saque la primera carga de lavado después de escuchar el fin del timbre de lavado.
3. Ponga la segunda carga de lavandería en la lavadora y seleccione WASH (LAVAR), RINSE
(ENJUAGAR) o SPIN (CENTRIFUGAR).
4. Saque la segunda carga de lavado después de escuchar el fin del timbre de lavado.
5. Coloque la primera carga de lavandería en la lavadora y oprima el botón FUNCTION (FUNCIÓN) para
establecer el ENJUAGUE y CENTRIFUGADO a ejecutar.
NOTA:
• Cierre la tapa después de cargar la lavadora, de lo contrario se detendrá de manera automática y se
emitirá un indicador de advertencia anormal.
• La lavadora no funcionará hasta que la cantidad de agua alcance el nivel seleccionado.
• Después de presionar el botón POWER, si no se presiona el botón START/PAUSE, la lavadora se
apagará automáticamente después de 10 minutos.
33
Page 34

FUNCIONES ESPECIALES
FUNCIONES ESPECIALES
FUNCIONES ESPECIALESFUNCIONES ESPECIALES
FUNCIÓN DE RETARDO
La lavadora se puede retardar usando esta función preestablecida:
1. ENCIENDA la máquina.
2. Abra el grifo y tienda la manguera de drenado.
3. Cargue la ropa y el detergente en la lavadora.
4. Seleccione el nivel de agua apropiado de acuerdo a la
carga de ropa (cantidad de prendas).
5. Seleccione las funciones y programas apropiados.
6. Oprima el botón DELAY (RETARDO) para seleccionar
la cantidad de tiempo que va a retardar el ciclo
de lavado.
7. Cierre la tapa de la lavadora y presione el botón
START/PAUSE.
CONFIRMACIÓN DE LA FUNCIÓN DE
RETARDO
Cuando se activa la función de retardo, parpadeará
la luz de retardo correspondiente y el resto de las
luces se apagará. Para revisar la función y el
programa preestablecidos, presione y sostenga el
botón DELAY (RETARDO). Suelte el botón DELAY
para regresar al estado de retardo.
CAMBIOS EN LA FUNCIÓN DE RETARDO
Oprima el botón POWER para cancelar la función
de retardo establecida. Para cambiar la hora en la
función de retardo, cancele primero el tiempo de
retardo y luego presione el botón RETARDO para
restablecer el programa. Siga los procedimientos
enlistados arriba para programar una configuración
nueva.
CONFIGURACIÓN DE LA FUNCIÓN DE
RETARDO
Presione el botón DELAY (RETARDO) y
agregue UNA HORA en el indicador digital de
retardo. Después de que el número alcance
24, oprima el botón DELAY y agregue SEIS
HORAS a la función de retardo. Después de
que el número alcance 48, el indicador digital
de retardo se apagará y volverá al estado
preestablecido.
TIEMPO RESTANTE
(MINUTOS)
HORA DE RETARDO
LUZ DE RETARDO
QUICK (RÁPIDO)
Use esta función para tiempos de lavado cortos.
Esta función es adecuada para lavar prendas no
muy sucias o hechas de materiales ligeros.
ANTI-WRINKLE (ANTIARRUGAS)
Use esta función para tiempos de lavado cortos.
Al usar el nivel de agua más alto, esta función
enjuaga y lava completamente las prendas para
evitar arrugas.
COTTON (ALGODÓN)
Use esta función para lavar prendas de algodón.
JEANS
Use esta función para lavar ropa pesada o muy
sucia.
AIR DRY (SECADO CON AIRE)
Para prendas que se decoloran o deforman con
facilidad o que no sean a prueba de agua, use esta
función para secarlas sin el calor regular, con lo que
logrará resultados similares a secarlos al sol.
FUNCIÓN DE PROTECCIÓN DE MEMORIA CONTRA PÉRDIDA DE ENERGÍA
La lavadora volverá a funcionar automáticamente con la función programada antes de la pérdida de energía.
34
Page 35

GU
GUÍÍÍÍA DE PROGRAMAS DE LAVADO AUTOM
GUGU
A DE PROGRAMAS DE LAVADO AUTOMÁÁÁÁTICO
A DE PROGRAMAS DE LAVADO AUTOMA DE PROGRAMAS DE LAVADO AUTOM
COMPLETOS
COMPLETOS
COMPLETOSCOMPLETOS
TICO
TICO TICO
FUNCIÓN DE LA
LAVADORA
NORMAL 4 1-6 11 MIN 30 SEG 2 MIN 5 MIN
QUICK
(RÁPIDO)
COTTON
(ALGODÓN)
JEANS 4 1-6 13 MIN 00 SEG (REMOJO)
ANTI-WRINKLE
(ANTIARRUGAS)
AIR DRY
(SECADO CON
AIRE)
NIVEL DE AGUA TIEMP DE LAVADO TIEMPO DE
PREESTABLECIDO
3 1-3 2 MIN 00 SEG 1 MIN 1 MIN
3 1-3 13 MIN 00 SEG (REMOJO)
4 1-6 11 MIN 30 SEG 2 MIN 00 MIN
4 1-6 00 MIN 00 SEG 0 MIN 60 MIN
OBJECTIVO
3 MIN 40 SEG (LAVAR)
3 MIN 30 SEG (LAVAR)
ENJUAGUE
1 MIN 7 MIN
2 MIN 1 MIN
TIEMPO DE
CENTRIFUGADO
00 SEG
00 SEG
+(CHORRO)
00 SEG
10 SEG
00 SEG
00 SEG
TIEMPO
TOTAL
42 MIN EL TIEMPO DE
10 MIN EL TIEMPO DE
39 MIN EL TIEMPO DE
42 MIN EL TIEMPO DE
34 MIN EL TIEMPO DE
60 MIN EL TIEMPO DE
NOTAS
LAVADO INCLUYE EL
TIEMPO EN REMOJO
LAVADO INCLUYE EL
TIEMPO EN REMOJO
LAVADO INCLUYE EL
TIEMPO EN REMOJO
LAVADO INCLUYE EL
TIEMPO EN REMOJO
LAVADO INCLUYE EL
TIEMPO EN REMOJO
LAVADO INCLUYE EL
TIEMPO EN REMOJO
NOTA: El tiempo requerido puede variar dependiendo de la presión del agua proveniente del tubo de
entrada, los materiales de las prendas y las distintas condiciones de drenado del agua.
NIVEL DE
AGUA
VOLUMEN
DE AGUA
PESO DE
LA CARGA
DETERGENTE
CONCENTRADO EN
POLVO
DETERGENTE
SINTÉTICO COMÚN
DETERGENTE LÍQUIDO
CONCENTRADO
6 ~60 L < 13.2 lbs 1.21 oz 2.20 oz 1.22 oz
5 ~52 L < 11.0 lbs 1.05 oz 1.89 oz 1.05 oz
4 ~45 L < 8.8 lbs 0.91 oz 1.62 oz 0.91 oz
3 ~37 L < 6.6 lbs 0.74 oz 1.45 oz 0.74 oz
2 ~30 L < 4.4 lbs 0.61 oz 1.18 oz 0.61 oz
1 ~22 L < 2.2 lbs 0.44 oz 0.88 oz 0.44 oz
NOTA:
• Se recomienda usar un polvo de baja o media espuma.
• El volumen del detergente en polvo cambia según los pesos y volúmenes diferentes.
• El volumen del agua variará debido a las diferentes prendas. Si la lavadora no funciona de manera
correcta, ajuste el volumen de la carga o el nivel del agua.
• Los volúmenes de agua enlistados arriba se basan en volúmenes de carga normales.
35
Page 36

CUIDADO Y MANTENIMIENTO
CUIDADO Y MANTENIMIENTO / CCCCÓÓÓÓDIGOS DE ERROR
CUIDADO Y MANTENIMIENTO CUIDADO Y MANTENIMIENTO
DIGOS DE ERROR
DIGOS DE ERRORDIGOS DE ERROR
FIN DE PROGRAMA MANTENIMIENTO
La lavadora sonará un timbre al final de cualquier programa para
recordarle al usuario que debe sacar la carga o repetir el ciclo.
Después del sonido, la lavadora regresará al estado APAGADO
con la pantalla y las luces indicadoras apagadas.
Cierre el grifo, desconecte el enchufe cuando no use la lavadora
para evitar fugas de agua o incendios accidentales.
Use paños suaves para limpiar el agua y los residuos de
suciedad de la superficie de la lavadora después de cada uso.
No se permite el uso de detergentes, propelentes ni otros
químicos. Esto con el fin de evitar daños a la lavadora y sus
accesorios de plástico.
Limpie la manguera de entrada de agua y el filtro de drenado
para evitar cualquier problema de drenado posible (cada ~10
lavadas).
Limpie todos los filtros para mantener un desempeño óptimo
(después de cada uso).
PROBLEMA CAUSA DEL PROBLEMA CÓDIGO SONIDO DE LA
ALARMA
Alarma de la
manguera de
agua
Alarma por tapa
abierta
No se alcanzó el nivel de agua
preestablecido después de
inyectar agua por cerca de 16
minutos.
Se abrió la tapa después de
iniciar la función de retardo. Se
abrió la tapa cuando la lavadora
estaba ejecutando un programa.
CÓDIGO: E1
El resto de las luces
están apagadas
CÓDIGO: E2
El resto de las luces
están apagadas
Timbra 10 segundos
cada 16 minutos
Timbra 10 segundos
cada 16 minutos
PARA DETENER LA
ALARMA
Abra la tapa para reparar
la falla. Luego cierre la
tapa para detener la
alarma.
Abra la tapa para reparar
la falla. Luego cierre la
tapa para detener la
alarma.
Alarma por
desequilibrio
Alarma de
drenado
Alarma por
desbordamiento
Alarma de
bloqueo
La lavadora percibió un
desequilibrio tres veces
El drenado no terminó después
de drenar durante 4 minutos.
Manguera de entrada de agua.
Door failed to properly lock or
unlock.
CÓDIGO: E3
El resto de las luces
están apagadas
CÓDIGO: E4
El resto de las luces
están apagadas
CÓDIGO: E5
El resto de las luces
están apagadas
CÓDIGO: E6
El resto de las luces
están apagadas
Timbra 10 segundos
cada 16 minutos
Timbra 10 segundos
cada 16 minutos
Timbra 10 segundos
cada 16 minutos
Timbra 10 segundos
cada 16 minutos
Abra la tapa para reparar
la falla. Luego cierre la
tapa para detener la
alarma.
Abra la tapa para reparar
la falla. Luego cierre la
tapa para detener la
alarma.
Abra la tapa para reparar
la falla. Luego cierre la
tapa para detener la
alarma.
Abra la tapa para reparar
la falla. Luego cierre la
tapa para detener la
alarma.
NOTA:
1. Alarma por desbordamiento: La válvula de drenado de agua de la lavadora permanece abierta hasta que se cierra manualmente.
2. Cuando la alarma se detiene, la lavadora vuelve al estado anterior a la indicación de la alarma.
3. Código E6: Desconecte la alimentación. Abra la tapa para reparar la falla. Luego conecte la alimentación.
36
Page 37

SOLUCI
SOLUCIÓÓÓÓN DE PROBLEMAS
SOLUCISOLUCI
Cuando la lavadora necesite servicio, comuníquese con nuestro departamento de servicio al cliente y un
representante buscará y diagnosticará los problemas que tenga su aparato. No desmonte la lavadora sin
permiso previo. De hacerlo se invalidaría la garantía.
Si la lavadora no funciona adecuadamente o suena una alarma, revise las siguientes indicaciones para
encontrar posibles soluciones a problemas comunes o indicaciones de alarma .
N DE PROBLEMAS
N DE PROBLEMASN DE PROBLEMAS
LISTA DE PROBLEMAS Y SOLUCIONES POSIBLES
PROBLEMAS
El agua no entra en la lavadora - La corriente está apagada o el fusible está fundido.
- No hay suministro de agua o hay baja presión.
- La manguera de entrada y el grifo de agua están conectados y
abiertos.
- El filtro o la válvula de entrada están bloqueadas por la acumulación
de suciedad.
- La bobina de la válvula de entrada está dañada.
- El botón START/PAUSE está activado.
La lavadora no arranca - La corriente está apagada o el fusible está fundido.
- El voltaje de alimentación es desmasiado.
- El agua necesita alcanzar el nivel requerido.
- Ahora está activada la función de RETARDO.
Drenado anormal - La manguera de drenado está colocada en una posición muy alta
(Consulte la Guía de instalación).
- El extremo de la manguera de drenado está sellado o bloqueado.
- El anillo de goma interno de la válvula está bloqueado.
INSPECCIONE LO SIGUIENTE
Centrifugado anormal - La puerta no está cerrada.
NOTA: Durante el proceso de centrifugado, si la carga se apoya más en un lado de la tina de la lavadora,
habrá un desequilibrio en la trayectoria de giro de la tina, lo que provocará que golpee el gabinete de la
lavadora. La lavadora compensará esté fenómeno agregando más agua de forma automática. Sin
embargo, si el desequilibrio no se resuelve después de tres correcciones seguidas, se detendrá el sistema
de autocorrección. Se necesitará que el usuario corrija manualmente este desequilibrio distribuyendo de
manera uniforme las prendas dentro de la tina, con el fin de resolver este problema.
- Hay una sobrecarga o las prendas se cargaron de forma incorrecta.
- El suelo no está plano o las patas no están niveladas.
- La banda del motor de la lavadora está floja.
37
Page 38

GARANTÍA LIMITADA
MC Appliance Corporation garantiza que todas las lavadoras nueves de 2.1 pies cúbicos carecen de defectos
en el material y la mano de obra y acuerda solucionar cualquiera de estos defectos o instalar la(s) parte(s)
nueva(s) (a elección de la compañía) en caso de que la unidad haya fallado durante el periodo de garantía. Las
partes y gastos de reparación están cubiertos en esta unidad por un periodo de un año a partir de la fecha de
compra. Se requiere una copia de la factura o recibo de compra para recibir el servicio de garantía por parte de
un agente de servicio autorizado.
Esta garantía cubre los aparatos que se usen dentro de los Estados Unidos continentales, Puerto Rico y
Hawái. La garantía no cubre lo siguiente:
Daños causados por embarque o por instalación inadecuados.
Daños debido al mal uso o abuso.
Pérdidas de contenido debido a falla de la unidad.
Componentes internos como filtro, etc.
Reparaciones hechas por agentes de servicio no autorizados.
Llamadas a servicio no relacionadas con defectos en el material o mano de obra como uso instalación
inadecuada del producto.
Reemplazo o restablecimiento de fusibles o interruptores de circuito.
Falla de este producto si se usa con fines distintos a los que fue diseñado
Gastos de eliminación por unidades con falla no regresadas a nuestra fábrica.
Cualquier costo de envío en que se incurra como resultado de una unidad que no funcione como se
especificó.
Gastos por transporte para trabajos de servicio del producto si su aparato está ubicado en un área
remota donde no esté disponible el trabajo de servicio de un técnico autorizado.
La desinstalación y reinstalación de su aparato si está instalado en un sitio inaccesible o no está instalado
de acuerdo con las instrucciones publicadas.
Limitaciones de remedios y exclusiones:
La reparación del producto de acuerdo con los términos de este documento, es el único y exclusivo remedio
determinado en esta garantía limitada. Todas y cada una de las garantías implicadas, incluyendo la calidad de
comerciable y capacidad para un propósito particular, se limitan mediante la presente a un año o el periodo más corto
permitido por la ley. MC Appliance Corporation no es responsable por daños incidentales ni resultantes y ningún
representante o persona alguna están autorizados para asumir de parte nuestra ninguna otra responsabilidad en
relación con la venta de este producto. Bajo ninguna circunstancia se le permite al consumidor regresar esta unidad a
la fábrica sin consentimiento previo por escrito de MC Appliance Corporation.
Algunos estados prohíben la exclusión o limitación por daños incidentales o resultantes, o limitaciones en las garantías
implícitas. Esta garantía le otorga a usted derechos legales específicos, y usted puede también tener otros derechos
que varían según la entidad federativa donde se encuentre.
Modelo Partes Manos de Obra Tipo de Servicio
MCSTCW21W2 Un Año Un Año Transporte
Para Servicio o Asistencia, llame por favor al 888-775-0202.
O visítenos en www.mcappliance.com para solicitar el servicio de garantía u ordenar piezas.
38
Page 39

© 2012 CNA International, Inc. doing business as MC Appliance Corporation. All rights reserved.
Distributed by CNA International, Inc. doing business as MC Appliance Corporation.
© 2012 CNA International, Inc. operar bajo el nombre de MC Appliance Corporation.
Todos los derechos reservados. Distribuida por CNA International, Inc. operar bajo el nombre de
777 Mark Street, Wood Dale, IL 60191
U.S. 1-888-775-0202.
Visit us at www.mcappliance.com
MC Appliance Corporation.
777 Mark Street, Wood Dale, IL 60191
Estados Unidos 1-888-775-0202.
Visítenos en www.mcappliance.com
 Loading...