

Magic Chef MCSR-6085W, MCSR-5585W, MCSR-6085B, MCSR-5283W, MCSF-5585BSS Instruction Manual
...Page 1

Please read the following instructions completely before operating this appliance.
INSTRUCTION MANUAL
REFRIGERATOR
MCSR-6085W
MCSR-6085B
MCSR-6085BSS
MCSR-5585W
MCSR-5283W
MCSF-5585BSS
Page 2

2
ATTENTION:
Defrosng—Do not use sharp,pointed objects to remove frost or ice from surfaces of the refrigerator and/or freezer compartment. Doing so could puncture the cooling coil,
causing the unit to lose its ability to maintain cold temperatures and voiding the warranty. See the Care and Cleaning secon for instrucons on defrosng the refrigerator and/or
freezer compartment.
Page 3

3
CONTENTS
Safety instrucon……………………………………………………………………………………………………………………………………………………………………………………………………....…………………………………4
USE OF EXTENSION CORDS………………………………………………………………………………………………………………………………………………………………………………………………………………………………… 4
HOW TO CONNECT ELECTRICITY ………………………………………………………………………………………………………………………………………………………………………………………………………..………4
operaon instrucon ……………………………………………………………………………………………………………………………………………………………………………………………………..…………………………5
Control Sengs…………………………………………………………………………………………………………………………………………………………………………………………………………………………………………… 5
About the refrigerator features…………………………………………………………………………………………………………………………………………………………………….....................................…………… 6
Care and cleaning of the refrigerator ………………………………………………………………………………………………………………………………………………………………………………………………….………6
Care and cleaning of the refrigerator ………………………………………………………………………………………………………………………………………………………………………………………….………………6
Care and cleaning of the refrigerator …………………………………………………………………………………………………………………………………………………………………………………………..........………7
Preparing to install the refrigerator…………………………………………………………………………………………………………………………………………………………………………………………………………… 8
Troubleshoong ps ………………………………………………………………………………………………………………………………………………………………………………………….......………………………………10
Safety precauons……………………………………………………………………………………………………………………………………………………………………………………………………………………………………………12
Page 4

4
geng rid of your old refrigerator, please follow the instrucons below to help prevent
accidents.
Before You Throw Away Your Old Refrigerator or Freezer:
• Take o the doors.
• Leave the shelves in place so
that children may not easily climb inside.
Refrigerants
All refrigeraon products contain refrigerants, which under federal law must be
removed prior to product disposal. If you are geng rid of an old refrigeraon product,
check with the company handling the disposal about what to do.
USE OF EXTENSION CORDS
Because of potenal safety hazards under certain condions, we strongly recommend
against the use of an extension cord.
However, if you must use an extension cord, it is absolutely necessary that it be a CSA
listed, 3-wire grounding type appliance extension cord having a grounding type plug and
outlet and that the electrical rang of the cord be 15 amperes (minimum) and 120 volts.
HOW TO CONNECT ELECTRICITY
Do not, under any circumstances, cut or remove the third
(ground) prong from the power cord. For personal safety,
this appliance must be properly grounded.
• The power cord of this appliance is equipped with a 3-prong (grounding) plug
which mates with a standard 3-prong (grounding) wall outlet to minimize the
possibility of electric shock hazard from this appliance.
• Have the wall outlet and circuit checked by a qualied electrician to make sure the
outlet is properly grounded.
• If you have only a standard 2-prong wall outlet, it is your personal responsibility
and obligaon to have it replaced with a properly grounded 3-prong wall outlet.
• The refrigerator should always be plugged into its own individual electrical outlet
which has a voltage rang that matches the rang plate.
Safety Instrucons
IMPORTANT SAFETY INFORMATION.
READ ALL INSTRUCTIONS BEFORE USING.
Use this appliance only for its intended purpose as described in this Owner’s Manual.
SAFETY PRECAUTIONS
When using electrical appliances, basic safety precauons should be followed, including
the following:
• This refrigerator must be properly
installed and located in accordance with the Installaon Instrucons before it is used.
• Do not allow children to climb,stand or hang on the shelvesin the refrigerator.They
coulddamage the refrigerator andseriously injure themselves.
• Do not store or use gasoline or other ammable vapors and liquids in the vicinity
of this or any other appliance.
• Before replacing a burned-out light bulb, the refrigerator should be unplugged
in order to avoid contact with a live wire lament. (A burned-out light bulb may
break when being replaced.)
• Keep ngers out of the “pinch point” areas; clearances between the doors and
cabinet are necessarily small. Be careful closing doors when children are in the
area.
• Unplug the refrigerator before cleaning and making repairs.
• Turning the temperature control dial to the 0 posion stops cooling but does not
shut o power to the refrigerator.
DANGER! RISK OF CHILD ENTRAPMENT
PROPER DISPOSAL OF THE REFRIGERATOR
Child entrapment and suocaon are not problems of the past. Junked or abandoned
refrigerators are sll dangerous… even if they will sit for “just a few days.” If you are
Page 5
5
Operang Instrucons
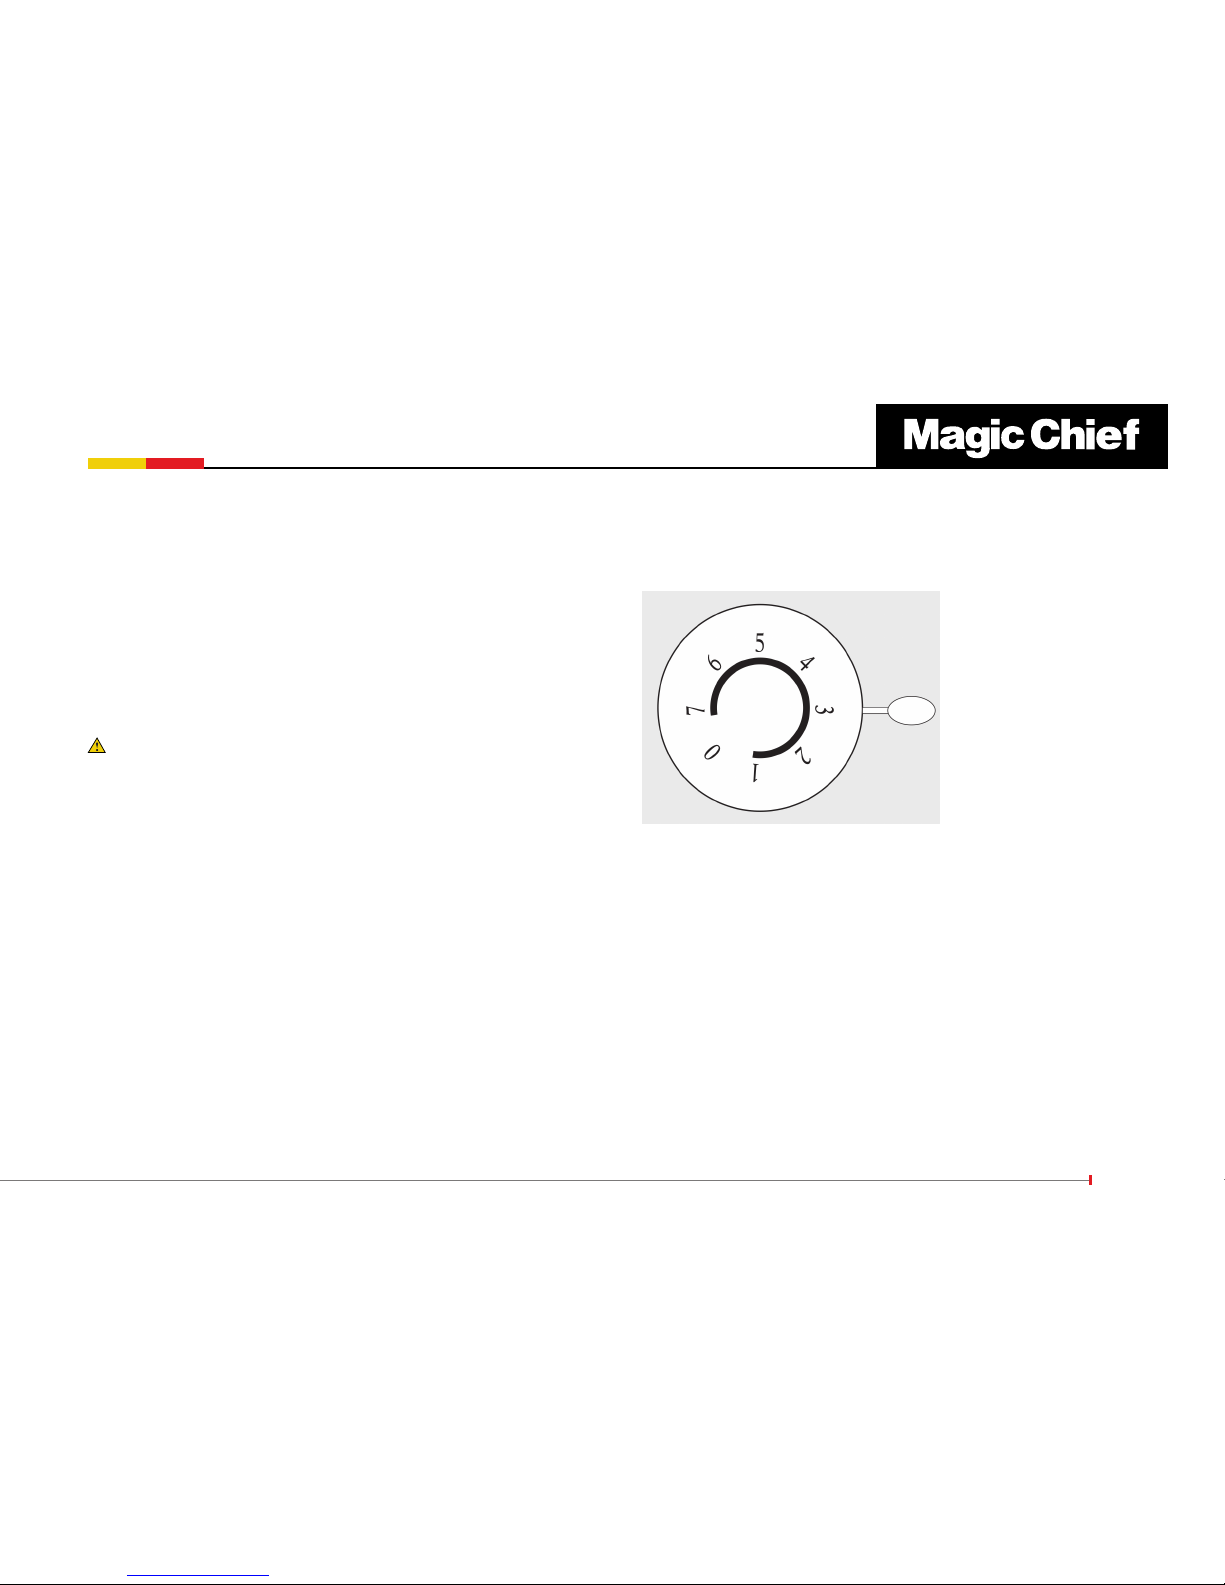
About the control on the refrigerator.
The control will look like the one above.
The arrow indicates the seng selected.
Control Sengs
The temperature control maintains the temperature in the refrigerator. 1 is the warmest
seng; higher numbers are colder sengs with 7 being the coldest seng. The typical
seng is 3.
Allow 24 hours for the refrigerator to reach the desired temperature. If you want a
colder or warmer temperature, move the dial one seng at a me. Moving the control
to O stops cooling but does not turn o the power to the refrigerator. Seng the control
too high may cause freezing in the refrigerator depending on the room temperature.
How To Test Temperatures
Use the milk test. Place a container of milk on a shelf and check it a day later. If the milk is
too warm or too cold, adjust the temperature control. Aer changing the control, allow
• This provides the best performance and also prevents overloading house wiring
circuits which could cause a re hazard from overheated wires.
• Never unplug your refrigerator by pulling on the power cord. Always grip plug
rmly and pull straight out from the outlet.
• Repair or replace immediately all power cords that have become frayed or
otherwise damaged. Do not use a cord that shows cracks or abrasion damage
along its length or at either end.
• When moving the refrigerator away from the wall, be careful not to roll over or
damage the power cord.
IMPORTANT SAFETY INFORMATION.
READ ALL INSTRUCTIONS BEFORE USING.
WARNING!
• USE OF ADAPTER PLUGS
ADAPTER PLUGS ARE NOT LEGAL IN CANADA.
• READ AND FOLLOW THIS SAFETY INFORMATION CAREFULLY.
SAVE THESE INSTRUCTIONS
Page 6
6
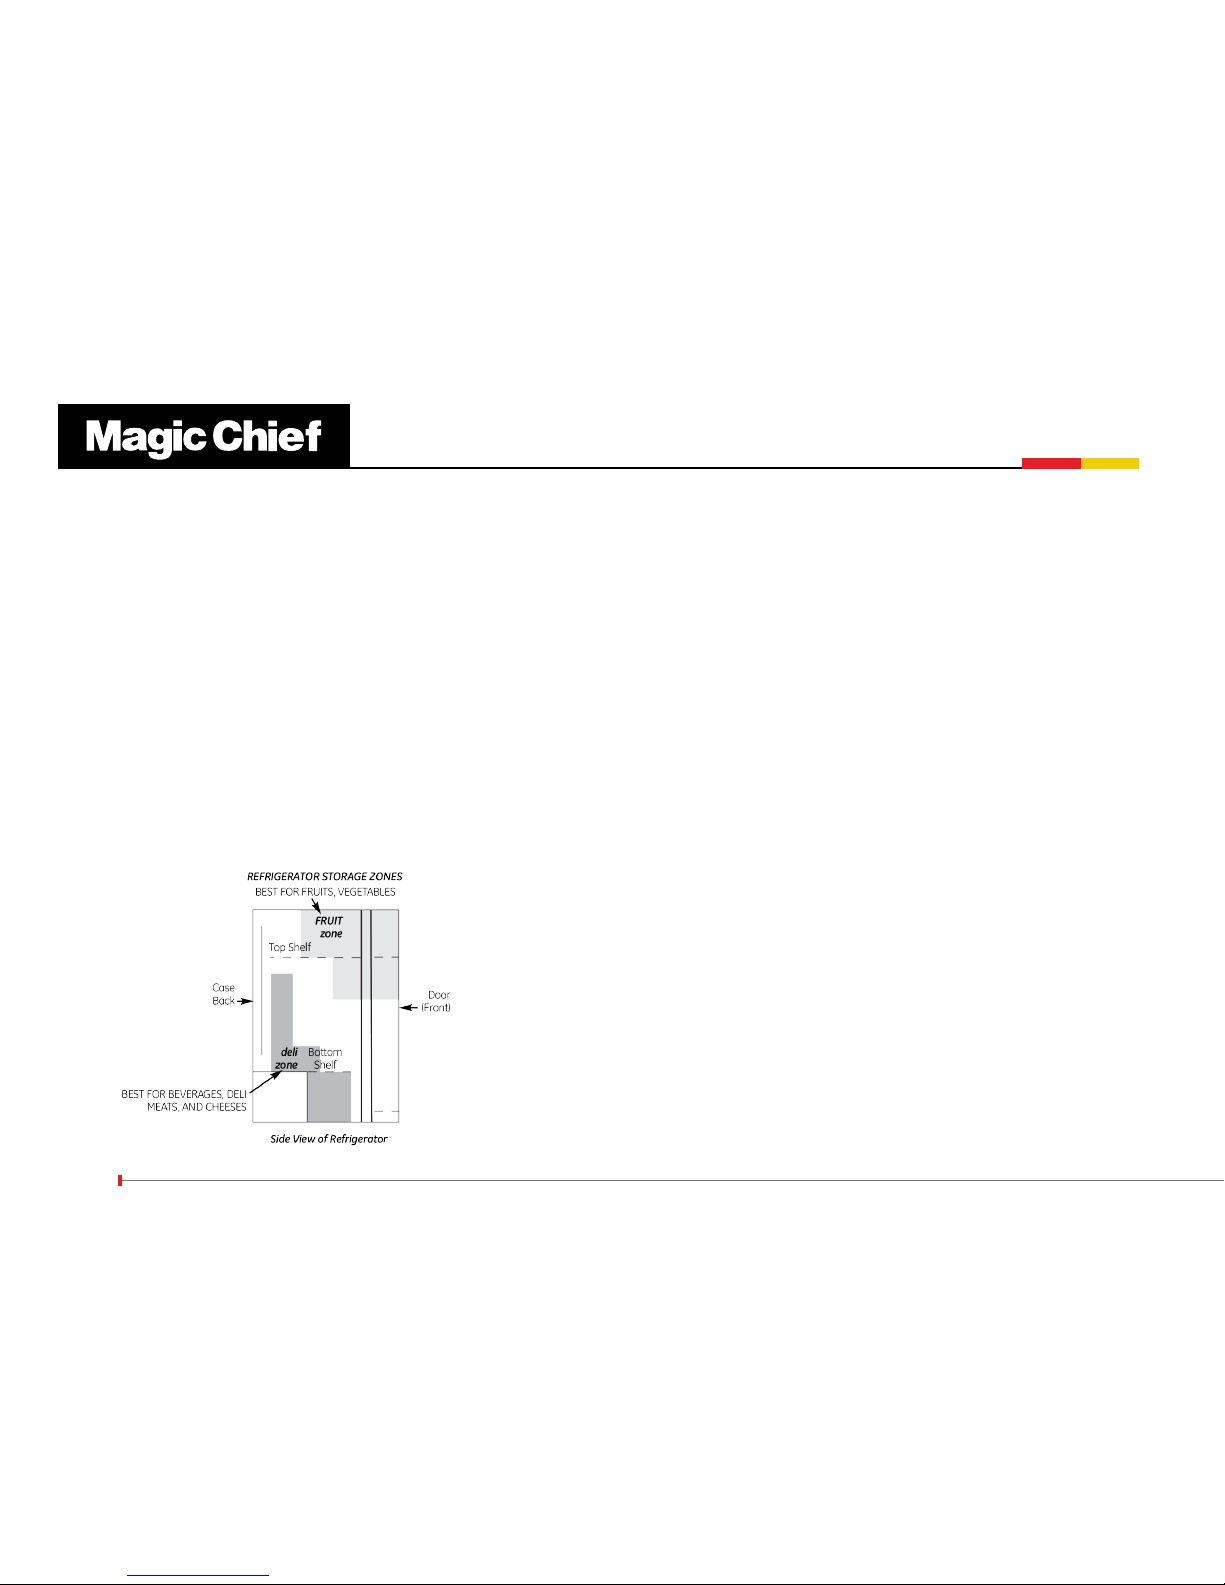
• The top shelf is best
for storing fruits and
vegetables.
• The boom shelf is
best for storing
beverages, deli meats
and cheeses.
Care and cleaning of the refrigerator.
Cleaning the Outside
Keep the outside clean. Wipe with a clean cloth lightly dampened with kitchen appliance
wax or mild liquid dish detergent. Dry and polish with a clean, so cloth. Do not wipe
the refrigerator with a soiled dish cloth or wet towel. These may leave a residue that
can erode the paint. Do not use scouring pads, powdered cleaners, bleach or cleaners
containing bleach because these products can scratch and weaken the paint nish.
Protect the paint nish. The nish on the outside of the refrigerator is a high quality,
baked-on paint nish. With proper care, it willstay new-looking and rust-free for years.
Apply a coat of kitchen/ appliance wax when the refrigerator is new, and then at least
twice a year.
Cleaning the Inside
To help prevent odors, leave an open box of baking soda in the refrigerator. Unplug the
refrigerator before cleaning. If this is not praccal, wring excess moisture out of sponge
or cloth when cleaning around the control. Use warm water and baking soda soluon
–about a tablespoon (15 ml) of baking soda to a quart (1 liter) of water. This both cleans
and neutralizes odors. Rinse and wipe dry. Other parts of the refrigerator–including door
gaskets, fruit and vegetable drawers, and all plasc parts–can be cleaned the same way.
Do not wash any plasc refrigerator parts in the dishwasher.
24 hours for the refrigerator to reach the temperature you have set.
About the refrigerator features.
Shelves
To remove a shelf, li up the back slightly and pull forward.
Freezer Compartment
This compartment is designed for producon of ice cubes and shorerm storage of
some commercially frozen foods.
Door Shelves
Shelves on the door provide convenient storage for frequently used items. The fresh
food doors are capable of storing large boles for your convenience.
Fresh Food Storage Zones
For best results follow
the recommended
storage zones:
Page 7

7
NOTE: If ice buildup is very thick, it may keep the ice tray
compartment door from opening or closing completely. Don’t try to
force it open; aer defrosng, the door will open and close easily.
Care and cleaning of the refrigerator.
Preparing for Vacaon
For long vacaons or absences, remove food and unplug the refrigerator. Move the
control to the 0 posion, and clean the interior with a baking soda soluon of one
tablespoon (15 ml) of baking soda to one quart (1 liter) of water. Leave the door open.
Preparing to Move
Secure all loose items such as shelves and ice trays by taping them securely in place to
prevent damage. Be sure the refrigerator stays in an upright posion during moving.
Replacing the Light Bulb
Unplug the refrigerator before replacing a burned-out bulb. Seng the controls to 0
does not remove power to the light circuit.
The light bulb is located behind the temperature control housing and is visible through
the clear lens. Using a Philips screwdriver, unscrew the lens and pull horizontally unl
the lens is removed. Gently unscrew the light bulb and replace with a bulb of 15 was
or less.
Care and cleaning of the refrigerator.
Defrosng
Defrost whenever frost on the wall of the Freezer compartment becomes 164) “4/
mm) thick. Never use a sharp or metallic instrument to remove frost as it may damage
the cooling coils. (A punctured cooling coil will cause serious problems and void the
warranty.) We recommend using a plasc scraper. Do not use any electrical device in
defrosng your refrigerator.
To defrost:
• Remove foods from the Freezer and Fresh Food compartments.
• Set the temperature control dial to 0.
• Place a towel in the Freezer Compartment to soak up water.
Defrosng usually takes a few hours. To defrost faster, keep the door open. Also using a
hair dryer on the low seng may speed defrosng.
Warning: using excessive heat may damage the plasc liner!
Do not pour water into the Freezer or Fresh Food compartments.
Aer defrosng:
• Empty water from the drip tray. Wash the tray with warm water.
• Wipe the Freezer and Fresh Food compartments with a damp cloth.
• Turn the temperature control to the desired seng and return food
to the refrigerator.
Page 8

8
Preparing to install the refrigerator.
Door Reversal
1. Remove the two screws from under the screw caps located on the top cover.
2. Remove the two screws from the back of the top cover and remove top cover.
3. Remove the top hinge by removing the two screws, as shown.
4. Remove the freezer door by liing o of the middle hinge.
5. Remove the J-shaped hinge support on the boom of the freezer door.
6. Install new J-shaped hinge support on the opposite side of the freezer door boom.
The new J-shaped hinge support and mounng screw are located in a zip lock bag that
is shipped with the refrigerator.
Installaon Instrucons
Preparing to install the refrigerator.
Read these instrucons completely and carefully.
Refrigerator Locaon
• Do not install the refrigerator where the temperature will go below 50°F (10°C)
because it will not run oen enough to maintain proper temperatures.
• Install it on a oor strong enough to support it fully loaded.
• Do not install it closer than 5”(13 cm) next to a range.
• Do not install it in a recessed area.
• Do not build in the refrigerator.
Clearances
Allow the following clearances for ease of installaon and proper
air circulaon.
Sides 113) “2/ mm)
Top 2” (51 mm)
Back 2” (51 mm)*
*From the rear cabinet surface to the wall
Leveling Legs (on some models)
Adjustable legs at the front corners of the refrigerator should be set so the refrigerator
is rmly posioned on the oor and the front is raised just enough that the door
closes easily when opened about halfway. To adjust the leveling legs, turn the legs
counterclockwise to lower the refrigerator, clockwise toraise it.
Page 9

9
7. Remove the two screws from the top cover support. Install top cover support on the
opposite side of refrigerator.
8. Remove the middle hinge. Remove plug buons from the opposite side of refrigerator.
Re-install plug buons in the original hinge mounng holes. Door Reversal (cont.)
9. Remove the fresh food door by liing o the boom hinge.
10. Remove both adjustable legs.
11. Remove the boom hinge and re-install on the opposite side of the refrigerator.
12. Re-install the adjustable legs. Insure that the smaller leg is on the same side as the
boom hinge.
13. Place the fresh food door on the boom hinge.
14. Place the boom peg of the middle hinge in the fresh food door. Re-install middle
hinge. Make sure the fresh food door is aligned with the refrigerator cabinet before
ghtening screws.
15. Place the freezer door on the top peg of the middle hinge. Place the top hinge peg
into the freezer door. Re-install top hinge. Make sure the freezer door is aligned with the
refrigerator cabinet before ghtening screws.
16. Re-install the top cover with four screws.
17. Replace the screw caps.
Page 10
10
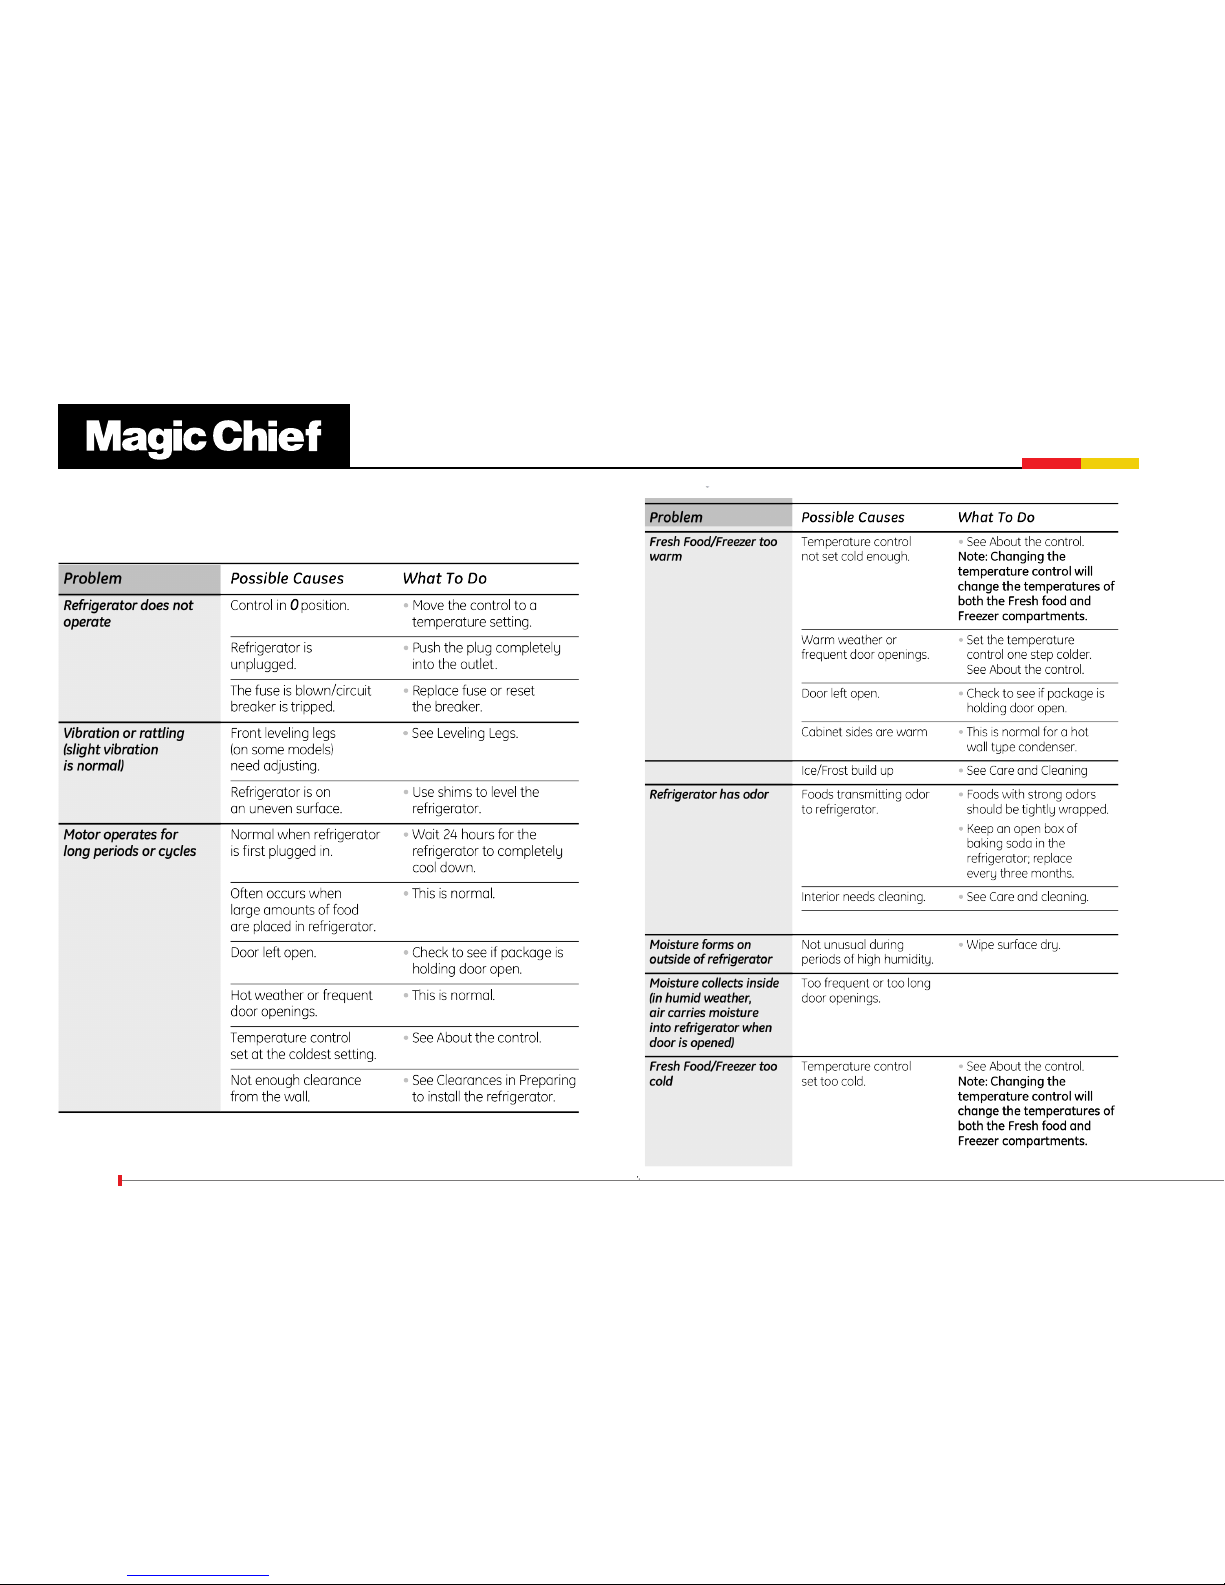
Troubleshoong ps.
Save me and money!
Page 11

Safety precauons
Page 12

12
Safety precauons
Page 13

13
Funcon Schedule
● Energy eciency
● Micro foam technology
● Low noise operaon
● Thick insulaon for energy eciency
System Flow Chart
1. Schemac diagram of System Flow Chart
2 Brief Descripon of System Flow Chart
All models are a direct cooling single-system refrigerator or freezer. When the
refrigerator or freezer is just powered o n, the re f r ig e r a n t o ws in the sequence:
1->2->3->4->5>1
Page 14

14
Maintenance Service and Trouble Shoong
1. No cooling
Circuit Diagram
1 Schemac Circuit Diagram
Brief Descripon of Control Principle
A mechan ic a l t y p e o f a l l th e c o n tr o l is generally adopted..
The thermostat directly controls the start and stop of compressor, and
hence the refrigerator temperature.
Page 15

15
3 Cooling capacity is insucient2 The compressor doesn›t stop
Page 16

16
5 Normal Phenomena—Not Troubles for Refrigerators
In a domesc refrigerator, there is not only a complicated electric controlsystem, but
also a refrigerang system that is dicult to discern whether it is in a good working
condion. Both the systems are related and aect each other. If a certain part of a
refrigerator works abnormally .Its refrigerang eciency will decrease ,operaon
properes will become unstable ,or even it cannot be used normally for those serious
cases. Refrigerators are generally of larger volume ,once troubles appear ,to send
them to a service department is really a tough thing ,if such is the case ,the user will
always be in suspense ,somemes ,normal phenomena will be erroneously regarded as
troubles .Therefore ,before we deal with the topics of frequently occurring troubles of
refrigerators and their remedies, we should rstly give a brief account of some normal
phenomena which are not troubles .In case any one of such phenomena occurs ,there is
no need to worry about it ,and the user can use it at total ease . 1).When the compressor
of a refrigerator has just stopped running ,a rumbling sound can be heard from inside its
evaporator .This is a sound caused by the owing of refrigerant in the evaporator tubing
.Because the pressure dierence is sll greater aer the compressor has just stopped
running ,the refrigerant will ow for a certain me , therefore ,this sound is a normal
phenomenon.
2).A click sound can oen be heard from the refrigerator .This is a
normal sound produced by the pull-in or release of the armature of a current deadweight
start relay when starng the compressor .The compressor motor will produce a slight
and uniform sound while it is running .This sound is not easy to be heard in the dayme
,but of course it can be heard disnctly at night.
3).The compressor consists of an electric motor and a compressing apparatus .During
its normal operao ,the motor›s stator core and windings will rise to a temperature
in the range of 100°C~110°C ,and the temperature of the piston and cylinder of the
compressing mechanism can also reach as above 100°C due to the heat produced when
compressing refrigerant .Most of the heat radiates to the air through the compressor
casing ,therefore ,its casing is generally at a temperature between 85°C ~90°C ,it is very
hot ,parcularly in summer when the ambient temperature is higher .All these are
normal phenomena .
4 The compressor doesn›t work
Page 17

17
Three Essenals for Checkup
1) Look
a) Check the tubing of refrigerang system for cracks and various welding points for
leaks ;if leakage occurs ,an oil stain can be seen denitely .
b) Check the sucon and exhaust pressure values (high pressure and low pressure) of
compressor to see whether they are normal .
c) Check the condions of frost aached to its evaporator and gas return tube .It is
abnormal if frost has formed on part of the evaporator orthere is no frost aached to it .
d) Pay aenon to the speed of temperature drop inside freezer compartment .It is
abnormal if the speed of temperature drop is obviously slower than the corresponding
normal speed .
e) Check the environment to see whether it is suitable for placing a refrigerator .
f)Check refrigerator door seal, case ,table surface and heat insulaon layer .
g) Look at the main control board to ascertain if various indicaon states are normal.
2) Listen
a) Listen to the noises produced when the compressor is runningHums from a fully
enclosed aggregate unit is the sound caused by overload indicang that the motor
cannot be started normally ,meanwhile ,a claering sound can be heard from inside the
start relay ,which is producedbecause the start contacts cannot be released normally
.A whistling sound is caused by the high pressure gas owing out of the crack of the
pressuretube inside the compressor ,and clucks are the sound of striking aer the
suspended spring inside the compressor has broken . During the normal operaon of
compressor, a slight and uniform hum sound due to undulaon of electric current can
be heard generally ,this is a normal phenomenon .However ,if it sounds like «tong ,tong
¼»,i.e., an impact sound inside the compressor ,this means that a large quanty of wet
vapour of refrigerant or refrigerang oil has come into the compressor cylinder ;if it
sounds like «dang ,dang¼», a striking sound of metal parts inside the compressor ,this
means that some moving parts have loosened (note to dierenate this sound from
those formed during starng or stopping the compressor).
4).For the direct cooling refrigerator ,a kind of irregular crack sound can be oen heard
when the compressor is running for a certain period of me or has just stopped its
running .This sound is caused by the stress relief due to expansion and contracon when
temperature changes ,and will not aect the normal applicaon of refrigerator .
6 Common Troubles in Refrigerators and Their Remedies
Causes for troubles occurring in refrigerators are closely related to the quality of
components and workmanship in assembling by manufacturers
as whether refrigerators are properly used and maintained .The parameters generally
used to express the working condions of a refrigerator include
the temperature inside the refrigerator ,operaon rate ,electric power consumpon
,noise level ,and other funconal indexes .If any one of these parameters is beyond its
permissible range ,this indicates that there is a fault or trouble in the refrigerator . During
the whole service life of a refrigerator ,the probability of troubles occurring within a
union me is called its failure rate .Making a comparison between the control circuit
system of a refrigerator and its refrigerang system ,we can nd that the failure rate
of the former is higher ,and that of the thermostat is the highest . In troubleshoong
,the rst thing you must do is to determine where the trouble comes from --- the
control system or the refrigerang system .There is general no trouble indicang
instrument mountedon the dome sc refrigerator ,locaons and natures of troubles
should be determined according to their respecve features ,therefore ,experience in
servicing is very important to troubleshoong. Service technicians with rich experience
can correctly locate them and take reasonable remedy measures based on their
comprehensive analysis of trouble characteriscs as well asoperang condions for
various kinds of refrigerators .
Page 18

18
and dew condensaon may appear for a very short me period when just starng
the machine ,this is a normal phenomenon ). Because a refrigerator is a combinaon
of several components ,they are related and have inuence on each other In case an
abnormal phenomenon has been found through the above-menoned checkups ,you
need not to make a hasty conclusion based on only one abnormal phenomenon .It is
advisable to nd out two or more abnormal phenomenon ,or conduct troubleshoong
comprehensively with the aid of instruments or other ways, because several kinds of
troubles may share a common abnormal phenomenon, and two or more abnormal
phenomena may occur simultaneously due to a certain trouble .With this method ,you
can reject some suspicious troubles and nally make a correct judgment .
7 Analysis of Troubles and Troubleshoong
A. Poor Refrigerang Eect The so-called «poor refrigerang eect « refers to the
fact that the refrigerator can operate and refrigerator normally ,but the temperature
in the refrigerator cannot drop to the prescribed value under the spulated working
condions .In view of there are many causes for this phenomenon ,we are going to
discuss and analyze it in the following 7 aspects :
1) Leakage of refrigerant
Analysis of Trouble The leakage of refrigerant in the system will result in an insucient
refrigerang capacity ,the resulng phenomena are its lower gas sucon pressure and
exhaust pressure as well as higher exhaust gas temperature.The exhaust tube feels
rather hot ,and a connuous gas owing sound louder than usual can be heard at the
outlet of the capillary ,and no frost or a smaller quanty of loose frost appears on the
evaporator .Aer shut down ,the balance pressure in the system is usually lower than
the saturaon pressure corresponding to the same ambient temperature . Remedy In
case there is leakage of refrigerant from the system ,do not hurry to recharge it with
refrigerant ,manage to nd out leak points immediately ,and make a note of from where
it leaks ---welding points and parts .Aer having them repaired ,recharge refrigerant .
There are so surfaces in a refrigerator ,accordingly ,quite a lot potenal leak points do
exist in the system .In troubleshoong ,pay aenon to those parts that are liable to
leak ,check main connecon points for oil seepage and tubing for cracks .If there is no
b) Listen to the sound caused by the owing of gas in the evaporator Open the refrigerator
door while the compressor is in operaon, incline your ear and listen aenvely the gas
ow sound inside the evaporator .If it sounds like gentle whistling accompanied by a
sound similar to water owing ,this is the sound produced by the normal circulaon
of refrigerant within the evaporator .In case only the gas owing sound can be heard
and there is no water owing sound ,this indicates that the refrigerant has already
percolated .If neither the owing sound nor the gas sounds from the evaporator can be
heard ,this means that the lter or capillary has been clogged .
3)Touch and Feel
a) Feel the compressor when running ,its temperature should be generally less than
90°C in the normal state (it may exceed 90°C in case of running for a longer period of
me ).
b) Aer the compressor has operated normally for 5~10 minutes, ouch and feel the
condenser ,the temperature of its upper part should be higher than that of its lower
part (or its right part is hoer than its le part ,depending on the type of condenser coil
),this indicates that the refrigerant is circulang . If the condenser is not hot, this means
the leakage of refrigerant .In case the condenser radiates heat for only several minutes
and then cools down ,this means that the lter and capillary have been clogged .As for
the forced air cooling condenser ,hot air will be blown out of it; this means that the
system is out of order .
c) Feel the lter›s temperature .During the normal operaon of refrigerang system
,the temperature on the lter›s surface should be a lile higher than the ambient
temperature ;if you touch it with your hand ,you will have a sense of slight heat .In case
dew condensaon appears due to the fact that its temperature is obviously lower than
the ambient temperature ,this means that most meshes of its screen has been clogged
,resulng in an obstructed owing of refrigerant ,thus causing a drop in temperature
due to throling .
d) Feel the temperature of exhaust gas from the refrigerang system. the exhaust gas
should be very hot and this is the normal working state. For those refrigerator with
enclosed type of compressor refrigerang system, no frost or dew drop will from on
the gas sucon tube ,otherwise ,there is something wrong in the system (Frosng
Page 19

19
recharge the system with refrigerant .
4) Low eciency of compressor
Analysis of Trouble Low eciency of a refrigerang compressor refers to the actual
reducon of gas discharge capacity ,and hence the corresponding reducon of
refrigerang capacity ,under the condion that the refrigerant in the system is
unchanged .This phenomenon occurs mostly when the compressor has been used for
quite a long me ,its moving parts have worn to a considerable degree ,t clearance
between various parts have increased and sealing property of its gas valve has
deteriorated ,resulng in an decrease in its actual gas discharge capacity . Methods of
Judgment Measure the high and low pressures with pressure gauges to see whether
they are normal .If an abnormal sound comes from the compressor or the temperature
of its causing is too high ,Cut the discharge port open and operate the compressor ,feel
it if there is pressure at the discharge port with your nger (For a normal compressor ,its
discharge port is dicult to be blocked with your nger if you just apply a lile eort).
5) Too thick frost layer formed on evaporator
Analysis of Trouble If a direct cooling refrigerator is to be used for a prolonged period
of me ,be sure to defrost its evaporator regularly ;if you fail to do so ,the frost layer on
the evaporator tubing will become thicker and thicker .Heat conducon will be severely
aected when the whole tubing is wrapped with a transparent ice layer ,and nally the
temperature in the refrigerator cannot drop down to the prescribed range . Remedy
Turn the refrigerator o ,and make preparaons for defrosng ,open the refrigerator
door to let the air come in ,or use a fan to speed up air owing so as to shorten the me
needed for defrosng .Never strike the frost layer with any iron tools or wood sck in
order to avoid damage to the evaporator tubing .
6) Refrigerang oil le in evaporator tubing
Analysis of Trouble During the process of refrigerang cycles ,a lile refrigerang oil
may remain in the evaporator tubing ,and aer a longer me of operaon ,if there is
considerable refrigerang oil le in the evaporator ,the heat conducon eect will be
severer leak point ,charge the system with nitrogen and detect leak points with the
commonly adopted method ,repair them ,evacuate ,charge the system with refrigerant
,and then turn on the refrigerator to make a test run .
2) Too much refrigerant charged into the system
Analysis of Trouble
a) In case the amount of refrigerant charged into the system exceeds its nominal
capacity ,the superuous refrigerant will of course take some space of the evaporator
,thus reducing its heat-dissipaon area and hencethe refrigerang eciency of the
system .The abnormal phenomena caused by this reason are as follows :the gas sucon
and exhaust pressures are generally higher than their respecve normal values ,the
temperature of its condenser is higher and the electric current of the compressor rises
,loose frost forms on the evaporator ,the refrigerator temperature drops slowly ,and
frost appears on the gas return tube .
b) In case excessive refrigerant has been charged ,the liquid refrigerant that cannot
evaporates in the evaporator will return to the compressor ,and thus a phenomenon
of «liquid striking» will occur .The liquid refrigerant evaporates and eervesces as
soon as it ows into the refrigerang oil at the boom of compressor .If the condion
is severe ,foams will ll all over inside the compressor housing and be sucked by the
piston ,causing damage to the components of compressor . Remedy According to the
operang procedures ,it is mandatory to turn the machine o ,and several minutes later
,open the refrigerant charging tube and et the refrigerant escape from it ,replace the dry
lter ,recharge refrigerant aer evacuang ,and then seal the charging port .
3) There is air le in the refrigerang system
Analysis of Trouble Residual air in the refrigerang system will reduce its refrigerang
eciency .The prominent phenomena are the increase in its gas sucon and exhaust
pressures (however ,the gas exhaust pressure will not exceed its rated value ),obvious
increase in temperature in the segment from the compressor outlet to the condenser
inlet .Because there is air in the system ,both the gas exhaust pressure and temperature
will rise ,and moreover ,the gas owing sound is intermient and obviously louder .
Remedy Aer shut down for several minutes ,open the tubing ,evacuate it and then
Page 20

20
1) All refrigerant in the system has leaked out Analysis of Trouble Leak points in the
refrigerang system have not been found and repaired mely ,thus resulng in the
total escape of refrigerant .There are two kinds of leakage :I) slow leakage for instance
,when we want to use a refrigerator that has been put out of quite a long me ,we
nd the leakage of refrigerant ,or in the course of its operaon ,we have found that
the refrigerator is gradually becoming not so cold and nally no refrigerang cab be
achieved ; ii) fast leakage in that case ,all the refrigerant will escape swily due to abrupt
rupture of system tubing . Symptoms of total leakage of refrigerant are mainly asfollows
: the compressor can be started easily (if there is no damage to the compressor parts)
and its operang current becomes low ,its gas sucon pressure is high and discharge
pressure is lower ,the gas discharge tube feels rather cold ,no sound of gas erupon
from the liquid in the evaporator can be heard ,and no will gush out of the process
tube if you cut it open aer shutdown . Remedy Check the whole machine , parcularly
those locaons which are liable to leak .Aer leak points have been found ,repair them
or replace them with new parts according to specic circumstances ,then evacuate the
system and nally charge refrigerant.
2) Refrigerang system has been clogged
a) Clogged with Ice
Analysis of Trouble The dryness treatment for the major parts in the refrigerang system
has been performed improperly, the eect of air purging for the whole system is not
good ,or the water content in the refrigerant is out of standard ,all these will cause the
expansion valve to be clogged with ice .The symptom for this trouble are as follows
:the refrigerator somemes can refrigerate and somemes cannot :the refrigerator
compartment works normally at the beginning ,but aer working for a certain period of
me ,frosng begins at the clogged posion ,evaporaon temperature reaches below
0°C , water will accumulate at the narrow part of the capillary and clog it gradually ,then
frost begins to melt at the evaporator ,no gas owing sound can be heard ,and the gas
sucon pressure assumes a state of vacuum .Note that these phenomena will appear
intermiently ; somemes ,the refrigerator works well ,and somemes not well .In order
to determine whether it is clogged with ice ,heat the suspicious points with hot water to
make ice melt ,and aer a while if a gas owing sound resulng from an abrupt gush is
heard and the gas sucon pressure rises as well ,itcan be conrmed that the trouble is
severely aected ,thus causing a poor refrigerang eect . Remedy It is quite dicult to
determine whether this trouble is caused by the refrigerang oil le in the evaporator
tubing ,because this kind of phenomenon and other several trouble are tends to be
confused .Generally speaking ,you can make a judgment based on the frost formed on
the evaporator .If the frost does not cover the evaporator , and moreover ,it is loosely
formed ,you can make a judgment that the deterioraon of refrigerang eect isdue
to the accumulaon of refrigerang oil le in the evaporator tubing in case no other
troubles have been found . To clear o refrigerang oil le in the evaporator ,dismantle
the evaporator ,purge it thoroughly and then dry it .In case it is dicult to dismantle it
,charge refrigerant from the evaporator inlet to wash it several mes ,then purge and
dry it with nitrogen .
7) Flowing obstructed in refrigerang system
Analysis of Trouble Because the refrigerang system was originally not purged
thoroughly ,some of the lter screen meshes have been clogged by dirt accumulated
in the lter aer using it for a certain me of period ,thus resulng in a decrease in ow
rate ,and hence a poorer refrigerang eect . The abnormal phenomena caused by this
kind of slight clogging in the system are as follows: the gas discharge pressure is lower
,the temperature of discharged gas drops down ,the posion clogged has a temperature
lower than that in normal condions ,and for a severe clogging ,even dew condensaon
as frosng may appear . Remedy Purge the tubing ,and aer replacing the dry lter with
a new one or clearing it thoroughly ,recharge the system with refrigerant and seal the
charging port .
B. No Refrigerang
The phenomenon that the compressor runs normally ,but no frost (or only a lile frost
) appears on the evaporator ,and the refrigerator temperature does not drop down
is called «no refrigerang». There are many causes for this trouble and it is relavely
complicated , too . In servicing ,special aenon to nding direct causes for this
phenomenon .Three main potenal causes for this trouble are analyzed
below :
Page 21

21
sucon valve and discharge valve to suck and discharge the refrigerant. If the valve
block is broken, the refrigerant can not be discharged, and hence no refrigerang can
be achieved. Method for making judgement It is quite dicult to dierenate this
trouble from others because they oen have similar symptoms. In repairing, rstly, hear
aenvely if there is some abnormal sound coming from the compressor (somemes
, the broken pieces of valve block may strike against the cylinder), and feel the
compressor casing with your hand to ascertain whether it is too hot, this is also helpful
to the troubleshoong; secondly, measure the pressures at the high and low pressure
ports of the compressor with pressure gauges, if thegas sucon valve block is broken,
the sucon pressure gauge pointer will swing violently and the sucon pressure is very
high, whereas when the gas discharge valve block is broken , the discharge pressure
gauge pointer will swing drascally and the discharge pressure is very high. In the both
cases, stop the compressor at once, and if technique is available, open the cylinder cover
and check up the valve block, repair it, or replace it with a new one,
C. Sudden stop of Compressor during Its Running The cause of sudden stop of a
compressor during its running is mostly that the gas sucon pressure and/or discharge
pressure exceed their respecve prescribed ranges, thus making a pressure-operated
protecve relay shut o the power to the compressor and stop it. In the following we
discuss mainly the reasons for causing excessively high gas discharge pressure and low
sucon pressure.
1) Stoppage due to excessively high gas discharge pressure
A) Too much refrigerant charged into the system Analysis of Trouble The phenomenon,
such as loose frosng and poor refrigerang eect, may occur if excessive refrigerant
has been charged into the system. Superuous refrigerant will occupy a certain space
of the evaporator, thus reduce its heat dissipang area, and the phenomenon of «liquid
striking» may occur, too. Meanwhile, dew or frost condensaon may occur on the gas
return tube, and the gas discharge pressure will obviously rise, when it reaches the
threshold value, the protecve relay will actuate and shut o the power supply to the
compressor. Remedy Open the tubing, re-evacuate and then charge the system with a
proper quanty of refrigerant.
b) Air le in the system Analysis of Trouble The residual air in the system will circulate
together with the refrigerant in the system. The major symptoms caused by this residual
caused by ice clogging . Remedy If there is too much moisture in the refrigerang system,
it is advisable to release the refrigerant, purge the tubing with nitrogen, and then charge
the system with the ltered refrigerant. However, the commonly adopted method is to
connect a lter with moisture absorbers (such as silica-gel, anhydrous calcium chloride)
to the refrigerang system so as to lter out the moisture from the system, then replace
the lter, evacuate it again and nally charge the system with refrigerant.
b) Clogged with dirt in capillary
Analysis of Trouble The capillary inlet is a place where coarse-grained dirt or refrigerant
oil in the system will tend to sele down and clog it. In case considerable dirt accumulates
there, the whole lter screen may be blocked totally, making the refrigerant unable to
go through. Clogging with dirt exhibits the same symptoms as that with ice, namely,
higher gas sucon pressure, lower temperature of discharged gas, and no gas owing
sound from the evaporator. The dierence between the both is as follows: if the
clogging is caused by dirt , tapping the suspicious clogged point (generally in the capillary
or the connecon joint of the lter) may cause the refrigerant to ow through parally,
resulng in some corresponding change, whereas in that case if you heat it with a
hot towel, no reacon will happen, no owing sound can be heard, moreover, there
is no periodic change. Aer rejecng the possibility of ice clogging, it can be generally
considered as the clogging due to dirt . Remedy Dismantle the system, remove the dry
lter from it, purge the tubing with nitrogen, install a new lter, then evacuate it and
nally charge it with refrigerant.
C) Clogging in lter
Analysis of Trouble Total clogging of a lter is rarely to occur. This trouble is mostly caused
by the paste-like maer formed from the substances lled into the system or other
dust aer the refrigerator has been used for a longer me, or by the dirt accumulated
gradually inside the lter. Somemes, tapping the lter nay cause a passage for owing,
Touching it with your hand, you will feel that it is cooler compared with its temperature
in the normal state. Remedy
The same as described in the capillary clogging with dirt.
3) Troubles of Compressor
a) Breakage of gas sucon and discharge valve blocks
Analysis of Trouble The compressor works by means of the opening and closing of gas
Page 22

22
compressor is generally controlled by a thermostat . When the temperature in the
refrigerator reaches its desired value, the thermostat will shut down the compressor
automacally. Never take this normal operaon as a trouble, care should be taken to
dierenate it from other real troubles in servicing.
D. Compressor won ‹t start In case the compressor cannot be started, you must nd
out the origins of this trouble through checkup step by step, because probably there are
many causes, including those electrical and mechanical.
1) Inspect the power supply to see whether it is connected to the compressor circuit.
Analysis of Trouble
In case the compressor cannot be started, this will generally exhibit in
the power supply circuit, for instance, power failure, poor contact of switch,
and blown fuse. Make a comprehensive analysis of these phenomena, ne
out its real cause and take correct measures to remove this trouble.
Remedy
a) Check the input power circuit to see whether where is voltage of the power supply,
namely, the circuit which is connected to the knife switch. This can be determined with
an avometer or a test pencil. If a blown fuse is found, ascertain and remove its cause,
then replace it with a new one of the same specicaons.
b) Check the compressor accessories, including its thermal protector and relay. In case
the thermal protector is damaged, the compressor cannot be powered on. If the relay
is out of order, the motor will not run and hum sound can be heard from it aer the
compressor is turned on, in that case, shut it down immediately, otherwise, the motor
windings will be burned out in case this condion lasts longer.
c) Check the relay contacts and plugs to see if they are perfect and work reliably. Poor
contact may cause the motor not running or humming.
2) Check the circuit voltage to see whether it is normal. Analysis of trouble If the circuit
voltage is obviously lower than its rated value, it will be dicult to start the motor, and
a hum sound can be heard from it. Remedy Measure the voltage with a voltmeter, if it
is really too low, give direcons to the user for buying a stabilizer so as to step up the
voltage, thus normal operaon can be achieved.
3) Check the thermal relay to see whether its contacts are closed. Analysis of Trouble The
contacts of thermal relay somemes may be open due to the leakage of temperature
air is higher gas discharge pressure, higher discharged gas temperature (the gas discharge
tubing is considerably hot when you feel it with your hand), and poorer refrigerang
eect. Furthermore, the gas discharge pressure will exceed its normal value when the
compressor has run for a period not too long, thus making the protecve relay actuate
and bring to a stoppage. Remedy Check up how the air has been le in the refrigerang
system. Generally, there are two possibilies: one is that the air has been sucked into the
system when repairing due to carelessness, or it has not been purged out totally when
evacuang the system; the other is that there are leak points at the low pressure end
of the refrigerang system. Leak points appear mostly in those low temperature parts
or assemblies, because the evaporaon temperature is lower for such low temperature
devices, especially at the low pressure end, it is easier for the air goes into the system.
Once it has been ascertained that air does exist in the system, you have to open the
tubing, re-evacuate it and then charge it with refrigerant.
2) Stoppage due to electric troubles
a) Thermostat is out of control Analysis of Trouble In case the thermostat does not work
in its good order or its temperature sensor has not been installed properly, frequent
stoppage is also likely to occur. Remedy Try to adjust the temperature sensor›s posion
unl the compressor can be started and stopped normally. If this cannot be achieved,
and the stoppage sll occurs repeatedly, it is most likely that the mechanical parts or
contacts are out of order, disassemble the thermostat, make a thorough checkup and
repair it.
b) Overload of electric motor Analysis of Trouble Probably, too many things have been
put into the refrigerator, and hence the thermal load exceeds its refrigerang capacity ;
or in case the power supply voltage drops considerably, the current owing through the
motor will increase drascally making the thermal protector actuate and the fuse blown
, and hence the motor stops running. If the motor is sll running connuously in such a
case , its windings will be burned out . Remedy Reduce the thermal load, pay aenon
to the variaon in voltage of the power supply.
c) Abnormal thermal protecon
Analysis of Trouble The compressor current is within its normal range, but the thermal
protector actuates repeatedly. Remedy Replace the thermal protector with a new one.
3) Sudden stoppage due to other causes Normal Stoppage Start and stop of the
Page 23

23
and cause the sha to be seized. Copper plang may also result in seizing of sha.
b) Seizing of piston This is caused by too small t clearance between the piston and
cylinder or expansion due to heat. Judgement of seizing sha and piston: Aer the
refrigerator has been powered on, the compressor will not start and run, but a slight
hum sound can be heard, and several seconds later, thermal protecve relay will actuate
and make the contacts open; this process will occur repeatedly, but the compressor
cannot be started.
E. Compressor won›t stop Somemes, the compressor will run connuously(for several
hours or run without end), If the food placed in the refrigerator is not too much, there
may be the following two situaons: i) the refrigerator very low, this means that the
control system is probably out of order; ii) the control system works normally, and there
are troubles in the refrigerang system or other parts.
1) Temperature is set improperly
a) The temperature control knob is set to the «coldest» posion. This posion is to be
used for fast freezing or connuous running, its temperature for power o is too low,
therefore, the compressor won›t stop and the temperature in the refrigerator becomes
lower and lower.
b) Inspecon method: check the temperature control knob to see whether it is set in
the posion «coldest».
2) Thermostat is malfunconing and makes the compressor running connuously
Analysis of Trouble When the thermostat doesn›t work normally, it will make the
compressor run connuously, and hence very low temperature will be achieved in the
refrigerator. The fault is generally due to the fact that the contacts of the thermostat
cannot be released. Remedy Dismantle the thermostat and make a through checkup, if
it is totally out of funconing, replace it with a new one.
3) evaporaon temperature is too high in refrigerang system, resulng in lower
refrigerang capacity and hence connuous running of compressor Analysis of Trouble
Leakage of refrigerant and clogging in a refrigerang system will directly aect its
refrigerang capacity. Due to the reducon in its refrigerang capacity, the refrigerator
temperature cannot reach its rated value, the thermostat won›t work, thus the
compressor runs connuously. When the evaporaon temperature in the system is too
high, the temperature sensing agent in the temperature sensor is also hoer, therefore,
sensing agent from the temperature sensor. Remedy Remove the relay cover to check
up its contacts, if they are open, this means that the original seng is not properly set
or temperature sensing agent has leaked out of the temperature sensor. Try to turn the
adjusng stem of this value in the direcon of the lower temperature graduaon, then
check the contacts to see whether they are closed. If they are sll not closed, dismantle
the temperature sensing disc and then immerse it into warm water to see whether
the contacts actuate, if not, it can be preliminarily determine that temperature sensing
agent has leaked out, and it must be replaced with a new thermostat.
4) Motor troubles and other electric faults
a) Motor windings have been burned or short-circuited between turns Analysis of
Trouble When motor windings have been burned or short-circuited between turns, the
fuse will be blown repeatedly, and the blowout occurs parcularly at the instant when
you close the knife switch. Remedy Check the terminals and the outer casing to see
whether they are short-circuited, and measure the resistance of each phase with an
avometer. If short circuit occurs or the resistance of a certain phase is low, this means
that short circuit does exist in the windings and/or between turns, and insulaon layers
have been burned or deteriorated. A megameter can be used in this inspecon, too. I
f the insulaon resistance is lower than 2 MW, this means that the insulaon layer is
already breakdown. If the motor has been burned, repair it or replaced it with a new
one.
b) Fault of control relay Analysis of Trouble Overheat, burnout or wear of control relay
contacts may occur generally. All these will cause poor contact in electricity. Remedy
Dismantle it to repair, or replace it with a new one.
c) Poor electric contactor in thermostat Analysis of Trouble Burnout of contactor and
leakage of temperature sensing agent may occur generally. Remedy Replace the old
with a new one.
d) Check the terminals for loose connecon and electric circuits for other abnormal
phenomena.
5) Mechanical faults of compressor
a) Seizing of sha This phenomenon is caused mostly by poor lubricaon, such ad
insucient quanty of lubricant, clogging in the lubricant oil line, or intermient
lubricant oil supply. Dirt and other impuries in the lubricant oil will increase its viscosity
Page 24

24
the resistance between the power cord plug and the case body with an avometer ,the
reading will be zero (0W); in the worst case ,the fuse will be blown .Check the 3-prong
outlet to see whether the live wire and the null line are inversely connected ,this makes
the ground protecon lead-out from the power cord plug being connected to the live
wire .Another possibility is that the live wire and null line of the outdoor power supply
circuit have been inversely connected accordingly ,this makes the null line become a
live wire .
G .Stronger vibraon and loader noise
1) Refrigerator placed improperly
a) Uneven ground
Uneven ground will cause there frigerator to be placed unsteadily ,causing stronger
vibraon and noise during its operaon .
b) Leveling screws not properly adjusted If the leveling screws on refrigerator legs have
not been adjusted properly ,vibraon and noise will sll occur even if the refrigerator
has been placed on a level ground .
2) Abnormal noise from compressor Three suspended spring inside the compressor
case are out of balance ,and strike against the case ,moreover ,the wear of compressor
parts may cause noise somemes .
3) Resonance of tubing and loosening of parts Improper and compact laying of tubes or
the loosening of parts may cause vibraon and noise .
4) Inspecon method To nd the sources of noise, press the vibraon spot with your
hand while the refrigerator is in operaon and listen aenvely whether the vibraon
becomes weake or vanishes. If the refrigerator has not been levelly placed ,put a level
meter on its top table and adjust the leveling screws on its legs .In case noise occurs from
the compressor ,strike dierent locaons on the side surface of its case using a rubber
hammer or hand hammer with a wood block in-between so as to determine whether
the suspended springs are out of balance or being seized .
the thermostat is unable to cut o the power supply to the compressor and stop it.
Remedy If it has been found that the refrigerant in the system is insucient in quanty,
recharge it with refrigerant. In case clogging occurs, disassemble the part where it
is blocked. If the evaporaon temperature is too high, sele this problem with an
appropriate quanty of refrigerant.
3) No stoppage of compressor due to damaged heat-insulaon layer inside case body
and/or door seal Analysis of Trouble When the heat-insulaon layer inside the case body
deteriorates or the door seal is not closely touches the door frame, the temperature
in the refrigerator will rise and makes the compressor running connuously. Remedy
Check the heat-insulaon layer for its damaged parts, repair it to improve its heatinsulaon property. If the door has deformed or the door seal is not ghtly sealed
against the case body, repair them, respecvely.
5) Too much food is placed in the refrigerator, or is placed too densely, resulng in poor
venlaon or poor condions for temperature sensing, and hence no stoppage of the
compressor.
6) Too high ambient temperature, poorer venlaon and heat dissipaon make the
compressor running without stop.
F. Electric leakage of refrigerator
1) Slight electric leakage Electric insulaon has deteriorated due to being aected with
damp, thus resulng in slight electric leakage.
2) Serious electric leakage Refrigerator case has become live due to faults occurred in
some electric devices or the erroneous wiring in installing power cord plug or outlet by
the user. This is very dangerous.
3) Electric leakage test
a) Slight electric leakage A ngle sense will be experienced as soon as you touch the
metal parts of the refrigerator with your hand .When you test them with a test pencil
,its neon lamp will come on .In that case ,the rst thing you need to do is to determine
whether the grounding is perfect .If the grounding is no problem ,turn o the refrigerator
immediately ,then check the insulaon of electric circuits with an avometer .
b) Serious electric leakage
Never touch the case body of the refrigerator,its door handle or other metal parts with
your hand .Test the refrigerator with a test pencil ,it will light up intensively ;measure
Page 25

25
......................................................................................................................................................
......................................................................................................................................................
......................................................................................................................................................
....................................................................................................................................................
......................................................................................................................................................
......................................................................................................................................................
......................................................................................................................................................
....................................................................................................................................................
....................................................................................................................................................
....................................................................................................................................................
....................................................................................................................................................
....................................................................................................................................................
....................................................................................................................................................
....................................................................................................................................................
....................................................................................................................................................
....................................................................................................................................................
....................................................................................................................................................
....................................................................................................................................................
....................................................................................................................................................
....................................................................................................................................................
....................................................................................................................................................
....................................................................................................................................................
....................................................................................................................................................
....................................................................................................................................................
....................................................................................................................................................
....................................................................................................................................................
....................................................................................................................................................
....................................................................................................................................................
....................................................................................................................................................
....................................................................................................................................................
....................................................................................................................................................
....................................................................................................................................................
....................................................................................................................................................
....................................................................................................................................................
....................................................................................................................................................
....................................................................................................................................................
....................................................................................................................................................
....................................................................................................................................................
....................................................................................................................................................
Page 26

26
....................................................................................................................................................
....................................................................................................................................................
....................................................................................................................................................
....................................................................................................................................................
....................................................................................................................................................
....................................................................................................................................................
....................................................................................................................................................
....................................................................................................................................................
....................................................................................................................................................
....................................................................................................................................................
....................................................................................................................................................
....................................................................................................................................................
....................................................................................................................................................
....................................................................................................................................................
....................................................................................................................................................
....................................................................................................................................................
....................................................................................................................................................
....................................................................................................................................................
....................................................................................................................................................
....................................................................................................................................................
....................................................................................................................................................
....................................................................................................................................................
....................................................................................................................................................
....................................................................................................................................................
....................................................................................................................................................
....................................................................................................................................................
....................................................................................................................................................
....................................................................................................................................................
....................................................................................................................................................
....................................................................................................................................................
....................................................................................................................................................
....................................................................................................................................................
....................................................................................................................................................
....................................................................................................................................................
....................................................................................................................................................
....................................................................................................................................................
....................................................................................................................................................
....................................................................................................................................................
....................................................................................................................................................
....................................................................................................................................................
....................................................................................................................................................
....................................................................................................................................................
....................................................................................................................................................
....................................................................................................................................................
....................................................................................................................................................
....................................................................................................................................................
....................................................................................................................................................
....................................................................................................................................................
....................................................................................................................................................
....................................................................................................................................................
....................................................................................................................................................
....................................................................................................................................................
....................................................................................................................................................
....................................................................................................................................................
....................................................................................................................................................
....................................................................................................................................................
....................................................................................................................................................
....................................................................................................................................................
....................................................................................................................................................
....................................................................................................................................................
....................................................................................................................................................
....................................................................................................................................................
....................................................................................................................................................
....................................................................................................................................................
Page 27

27
......................................................................................................................................................
......................................................................................................................................................
......................................................................................................................................................
....................................................................................................................................................
......................................................................................................................................................
......................................................................................................................................................
......................................................................................................................................................
......................................................................................................................................................
....................................................................................................................................................
....................................................................................................................................................
....................................................................................................................................................
....................................................................................................................................................
....................................................................................................................................................
....................................................................................................................................................
....................................................................................................................................................
....................................................................................................................................................
....................................................................................................................................................
....................................................................................................................................................
....................................................................................................................................................
....................................................................................................................................................
....................................................................................................................................................
....................................................................................................................................................
....................................................................................................................................................
....................................................................................................................................................
....................................................................................................................................................
....................................................................................................................................................
....................................................................................................................................................
....................................................................................................................................................
....................................................................................................................................................
....................................................................................................................................................
....................................................................................................................................................
....................................................................................................................................................
....................................................................................................................................................
....................................................................................................................................................
....................................................................................................................................................
....................................................................................................................................................
....................................................................................................................................................
....................................................................................................................................................
....................................................................................................................................................
....................................................................................................................................................
Page 28

28
......................................................................................................................................................
......................................................................................................................................................
......................................................................................................................................................
....................................................................................................................................................
......................................................................................................................................................
......................................................................................................................................................
......................................................................................................................................................
......................................................................................................................................................
....................................................................................................................................................
....................................................................................................................................................
....................................................................................................................................................
....................................................................................................................................................
....................................................................................................................................................
....................................................................................................................................................
....................................................................................................................................................
....................................................................................................................................................
....................................................................................................................................................
....................................................................................................................................................
....................................................................................................................................................
....................................................................................................................................................
....................................................................................................................................................
....................................................................................................................................................
....................................................................................................................................................
....................................................................................................................................................
....................................................................................................................................................
....................................................................................................................................................
....................................................................................................................................................
....................................................................................................................................................
....................................................................................................................................................
....................................................................................................................................................
....................................................................................................................................................
....................................................................................................................................................
....................................................................................................................................................
....................................................................................................................................................
....................................................................................................................................................
....................................................................................................................................................
....................................................................................................................................................
....................................................................................................................................................
....................................................................................................................................................
....................................................................................................................................................
Page 29

29
......................................................................................................................................................
......................................................................................................................................................
......................................................................................................................................................
....................................................................................................................................................
......................................................................................................................................................
......................................................................................................................................................
......................................................................................................................................................
......................................................................................................................................................
....................................................................................................................................................
....................................................................................................................................................
....................................................................................................................................................
....................................................................................................................................................
....................................................................................................................................................
....................................................................................................................................................
....................................................................................................................................................
....................................................................................................................................................
....................................................................................................................................................
....................................................................................................................................................
....................................................................................................................................................
....................................................................................................................................................
....................................................................................................................................................
....................................................................................................................................................
....................................................................................................................................................
....................................................................................................................................................
....................................................................................................................................................
....................................................................................................................................................
....................................................................................................................................................
....................................................................................................................................................
....................................................................................................................................................
....................................................................................................................................................
....................................................................................................................................................
....................................................................................................................................................
....................................................................................................................................................
....................................................................................................................................................
....................................................................................................................................................
....................................................................................................................................................
....................................................................................................................................................
....................................................................................................................................................
....................................................................................................................................................
....................................................................................................................................................
Page 30

30
......................................................................................................................................................
......................................................................................................................................................
......................................................................................................................................................
....................................................................................................................................................
......................................................................................................................................................
......................................................................................................................................................
......................................................................................................................................................
......................................................................................................................................................
....................................................................................................................................................
....................................................................................................................................................
....................................................................................................................................................
....................................................................................................................................................
....................................................................................................................................................
....................................................................................................................................................
....................................................................................................................................................
....................................................................................................................................................
....................................................................................................................................................
....................................................................................................................................................
....................................................................................................................................................
....................................................................................................................................................
....................................................................................................................................................
....................................................................................................................................................
....................................................................................................................................................
....................................................................................................................................................
....................................................................................................................................................
....................................................................................................................................................
....................................................................................................................................................
....................................................................................................................................................
....................................................................................................................................................
....................................................................................................................................................
....................................................................................................................................................
....................................................................................................................................................
....................................................................................................................................................
....................................................................................................................................................
....................................................................................................................................................
....................................................................................................................................................
....................................................................................................................................................
....................................................................................................................................................
....................................................................................................................................................
....................................................................................................................................................
Page 31

31
......................................................................................................................................................
......................................................................................................................................................
......................................................................................................................................................
....................................................................................................................................................
......................................................................................................................................................
......................................................................................................................................................
......................................................................................................................................................
......................................................................................................................................................
....................................................................................................................................................
....................................................................................................................................................
....................................................................................................................................................
....................................................................................................................................................
....................................................................................................................................................
....................................................................................................................................................
....................................................................................................................................................
....................................................................................................................................................
....................................................................................................................................................
....................................................................................................................................................
....................................................................................................................................................
....................................................................................................................................................
....................................................................................................................................................
....................................................................................................................................................
....................................................................................................................................................
....................................................................................................................................................
....................................................................................................................................................
....................................................................................................................................................
....................................................................................................................................................
....................................................................................................................................................
....................................................................................................................................................
....................................................................................................................................................
....................................................................................................................................................
....................................................................................................................................................
....................................................................................................................................................
....................................................................................................................................................
....................................................................................................................................................
....................................................................................................................................................
....................................................................................................................................................
....................................................................................................................................................
....................................................................................................................................................
....................................................................................................................................................
Page 32

 Loading...