

Page 1
24” Combo Washer and Dryer
24” Front Load Washer
User’s Manual
Model MCSCWD27W5 / MCSCWD27S5 / MCSFLW27W / MCSFLW27S /
PLEASE READ THIS MANUAL CAREFULLY BEFORE USING YOUR
COMBO WASHER AND DRYER AND KEEP IT FOR FUTURE REFERENCE.
1
MCSCWD27G5
Page 2

PRODUCT REGISTRATION
Thank you for purchasing a Magic Chef® product. The first step to protect your new product is to complete the product
registration on our website: www.mcappliance.com/register. The benefits of registering your product include the following:
1. Registering your product will allow us to contact you regarding a safety notification or product update.
2. Registering your product will allow for more efficient warranty service processing when warranty service is required.
3. Registering your product could act as your proof of purchase in the event of insurance loss.
Once again, thank you for purchasing a Magic Chef product.
2
Page 3

CONTENTS
PRODUCT REGISTRATION . . . . . . . . . . . . . . . . . . . . . . . . . . . . . . . . . . . . . . . . . . . . . . . . . . . . . 2
IMPORTANT SAFETY INSTRUCTIONS . . . . . . . . . . . . . . . . . . . . . . . . . . . . . . . . . . . . . . . . . . . 4
SPECIFICATIONS . . . . . . . . . . . . . . . . . . . . . . . . . . . . . . . . . . . . . . . . . . . . . . . . . . . . . . . . . . . . . . 6
INSTALLATION INSTRUCTIONS . . . . . . . . . . . . . . . . . . . . . . . . . . . . . . . .
BEFORE USE . . . . . . . . . . . . . . . . . . . . . . . . . . . . . . . . . . . . . . . . . . . . . . . . . . . . . . . . . . . . . . . . 10
OPERATION INSTRUCTIONS. . . . . . . . . . . . . . . . . . . . . . . . . . . . . . . . . . . . . . . . . . . . . . . . . . . 11
WASH CYCLE PARAMETERS. . . . . . . . . . . . . . . . . . . . . . . . . . . . . . . . . . . . . . . . . . . . . . . . . . . .1
CARE AND MAINTENANCE . . . . . . . . . . . . . . . . . . . . . . . . . . . . . . . . . . . . . . . . . . . . . . . . . . .
TROUBLESHOOTING . . . . . . . . . . . . . . . . . . . . . . . . . . . . . . . . . . . . . . . . . . . . . . . . . . . . . . . 2
LIMITED WARRANTY . . . . . . . . . . . . . . . . . . . . . . . . . . . . . . . . . . . . . . . . . . . . . . . . . . . . . . . .
. . . . . . . . . . . . . . . . 7
2
3
Page 4

IMPORTANT SAFETY INSTRUCTIONS
This manual contains Safety Instructions, Installation and Operating Instructions, and Troubleshooting Tips. Please
carefully read this manual before using your washing machine for instructions on how to use and maintain the
product properly. Be sure to follow the safety instructions to avoid injury or damage to the product.
Keep this manual. When passing on/selling the device to a third party, the manual must be handed over along
with the device.
Before calling for service, please make sure unit is installed and being used correctly, and read the troubleshooting
section.
WARNING: When using your appliance, follow the precautions listed below.
NOTE: Specifications may change at any time without notice.
State of California Proposition 65 Warnings
WARNING: The California Safe Drinking Water and Toxic Enforcement Act requires the Governor of
California to publish a list of substances known to the State of California to cause cancer, birth defects, or other
reproductive harm, and requires business to warn of potential exposure to such substances. This product contains
a chemical known to the State of California to cause cancer, birth defects, or other reproductive harm. This
appliance can cause low-level exposure to some of the substances listed, including benzene, formaldehyde, and
carbon monoxide.
1. Read all instructions before using this product.
2. This appliance is for household use only. It is not intended for commercial applications.
3. The appliance is intended for indoor use only. DO NOT use outdoors.
4. DO NOT use this appliance for other than its intended purpose.
5. Use only detergents or softeners recommended for use in this manual and keep them out of the reach of
children.
6. This machine is not intended for use by persons (including children) with reduced physical, sensory or
mental capabilities, or lack of experience and knowledge, unless they are given supervision or instruction
concerning the use of the washer by a person responsible for their safety.
7. This appliance must be properly installed in accordance with the installation instructions before it is to be used.
8. DO NOT unplug your appliance by pulling on its power c
straight out from the outlet.
9. Do not operate any appliance that has a damaged cord or plug, if it is damaged or malfunctions in any way,
or if the outlet is not in proper working order. Contact customer service or a service technician.
10. ALWAYS turn off and unplug from outlet before servicing, changing accessories or cleaning the unit. Allow
unit to cool down completely before cleaning, moving or servicing. Turning the unit off does not disconnect
it from the power source.
11. DO NOT put anything flammable or explosive in, on, or near the appliance. DO NOT wash or dry articles
of clothing or any items that have been soaked in flammable or explosive chemicals. To reduce the risk
of fire, clothes, cleaning rags, mop heads and the like which have traces of any flammable substance, such
as cooking oils, petroleum based oils or distillates, waxes, fats, etc., must not be placed in the washing
machine. These items may contain flammable substances which, even after washing, may smoke or catch
fire. DO NOT dry articles containing foam rubber or similarly textured rubber like materials.
12. ALWAYS wait for the washer tub to completely stop moving before reaching in to add or remove any clothes.
13. The loading door must be closed when the tub is spinning.
ord. Always grasp the plug firmly and pull it
4
Page 5

14. DO NOT operate this washer unless all enclosure panels are properly installed.
15. DO NOT tamper with or modify the controls.
WARNING: Risk of child entrapment. DO NOT allow children to play on or in the appliance. Close
16.
supervision of children is necessary when the appliance is used around them.
17. The appliance must be plugged into a properly installed and grounded outlet that meets the voltage
requirements listed on the ratings label.
CAUTION: The power cord is equipped with a 3-prong grounding plug to protect against shock hazards.
18.
ALWAYS plug the cord into a properly installed and grounded 3-prong wall receptacle, and DO NOT remove
the grounding prong.
19. Under certain conditions, hydrogen gas may be produced in a household hot water system that has not
been used for two weeks or more. Hydrogen gas is highly explosive. If the hot water system has not been
used for more than two weeks, turn on all hot water faucets and let the water flow for several minutes
prior to using your compact washer.
20. DO NOT modify or repair the unit by yourself. Contact customer service or a qualified service technician if
service is required.
21. To reduce the risk of electric shock or fire, do not use an extension cord or outlet adapters to connect the
unit to an electrical power source. The appliance must be properly grounded using a three-prong electric
receptacle wall outlet.
22. DO NOT install the washing machine in a moist or wet area, or where it can get wet or exposed to outside
weather conditions. DO NOT spray with water when cleaning.
23. DO NOT put children on top of, or allow children or pets to climb in or on, the washer. ALWAYS check
inside before using.
24. Glass door may be very hot during the operation. Keep children and pets away from the washer while in use.
25. Regularly clean the power plug to remov
26. It is recommended to unplug the unit when it is not in use.
27. ALWAYS be sure to properly and securely connect the power cord to the outlet, and the water hoses to
prevent leakage or electrical shock.
28. DO NOT operate the unit or handle the plug with wet hands.
29. The water temperature to the washing machine should not exceed 131 °F (55 °C).
30. DO NOT wash raincoats, heavy jackets, or similar, heavy items.
31. DO NOT machine wash fiberglass materials (such as curtains and window coverings that use fiberglass
materials.) Small particles may remain in the washing machine and stick to fabrics in subsequent wash loads
causing skin irritation.
32. When removing from service and discarding, be sure to remove the door from the unit and cut the power cord.
33. DO NOT reach into the wash tub when the agitator is moving.
CAUTION: Content may be HOT when washing and/or drying cycle is completed.
34.
e dust and dirt, in order to prevent electrical failure.
READ AND FOLLOW THIS
SAFETY INFORMATION CAREFULLY
SAVE THESE INSTRUCTIONS
5
Page 6
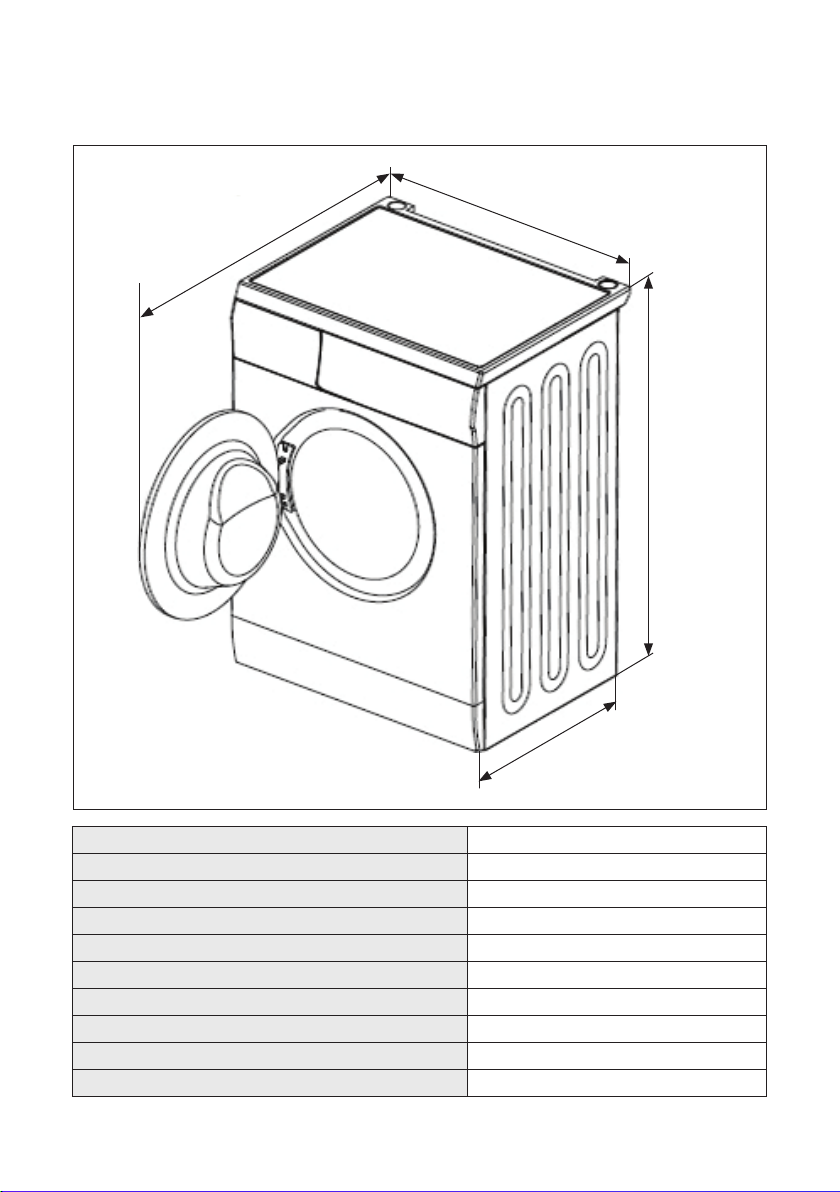
SPECIFICATIONS
42.5” (1080 mm)
Figure 1
23.5” (595 mm)
33.5”
(850 mm)
23.5” (595 mm)
Height 33.5” (850 mm)
Width 23.5” (595 mm)
Depth 23.5” (595 mm)
Depth with Door Opened 42.5” (1080 mm)
Weight 160.9 lbs. (73.0 kg)
Voltage / Frequency AC 120V~60Hz
Rated Current 11.0A
Max. Washing Capacity 26.4 lbs. (12.0 kg)
Max. Dry Capacity
Drum Size 2.7 cu. ft.
(For MCSCWD27W5/MCSCWD27S5/MCSCWD27G5 only) 17.6 lbs. (8.0 kg)
6
Page 7

INSTALLATION INSTRUCTIONS
1. The washing machine must be properly grounded. In the event of a short circuit, grounding can reduce the
danger of electrical shock.
2. Washing machine should be operated in a circuit separate from other electrical appliances.
INCLUDED PARTS
Before starting installation, make sure all included parts are
in the package inside the drum.
INSTALLATION REQUIREMENTS
ELECTRICAL REQUIREMENTS
1. A 120v, 60Hz, AC 15-or 20amp, fused electrical supply
is required. A time-delay fuse or circuit serving only this appliance should be used.
2. This washer is equipped with a power supply cord having a 3 prong grounding plug.
3. To minimize possible shock hazard, the cord must be plugged into a 3 prong outlet, properly grounded in
accordance with local codes and ordinances. If a proper outlet is not available, it is the responsibility of the
customer to have the properly grounded outlet installed by a qualified electrician.
4. If codes permit and a separate ground wire to be used, it is recommended that a qualified electrician
determine the proper ground path.
5. DO NOT ground to a gas pipe.
6. Check with a qualified electrician if you ar
7. DO NOT have a fuse in the neutral or ground circuit.
8. Certain internal parts are intentionally not grounded and may present a risk of electric shock only during
servicing. Service Personnel – Do not contact the following parts while the appliance is energized: Drain
Pump, Door Lock, Drying Heater (Combo), Fan Motor (Combo).
LOCATION REQUIREMENTS
Selecting the proper location for your washer improves performance and minimizes noise and possible washer
“walk.” The washer can be installed under a custom counter or in a basement, laundry room, closet, or recessed area.
You will need:
• A water heater set for 120° F (49° C).
• A grounded electrical outlet located within 6 ft.( 1.8 m) of where the power cord is attached to the back of
the washer.
• Hot and cold water faucets located within 4 ft. (1.2 m) of the hot and cold water fill valves ,and wat
pressure of 20 - 100 psi (137.9 - 689.6 kPa).
• A level floor with a maximum slope of 1” (25 mm) under entire washer. Installing the washer on soft floor
surfaces, such as carpets or surfaces with foam backing.is not recommended.
• A sturdy and solid floor to support the washer with a total weight (water and load) of 200lbs.
• Do not operate your washer in temperatures below 32° F (0° C). Some water can remain in the washer and can
cause damage in low temperatures.
e not sure the washer is properly grounded.
Water Hoses (2) Cable Tie
Figure 2
Transport
Hole Plugs (4)
er
7
Page 8
• The location must be large enough to allow the washer door to be fully opened. The door opens more than
90°, and is not reversible.
• Additional spacing should be considered for ease of installation and servicing.
• Minimum spacing of 1” (25 mm) on all sides of the washer is recommended to reduce noise transfer.
• Additional clearances might be required for wall, door, and floor moldings.
• Spacing for companion appliance should also be considered.
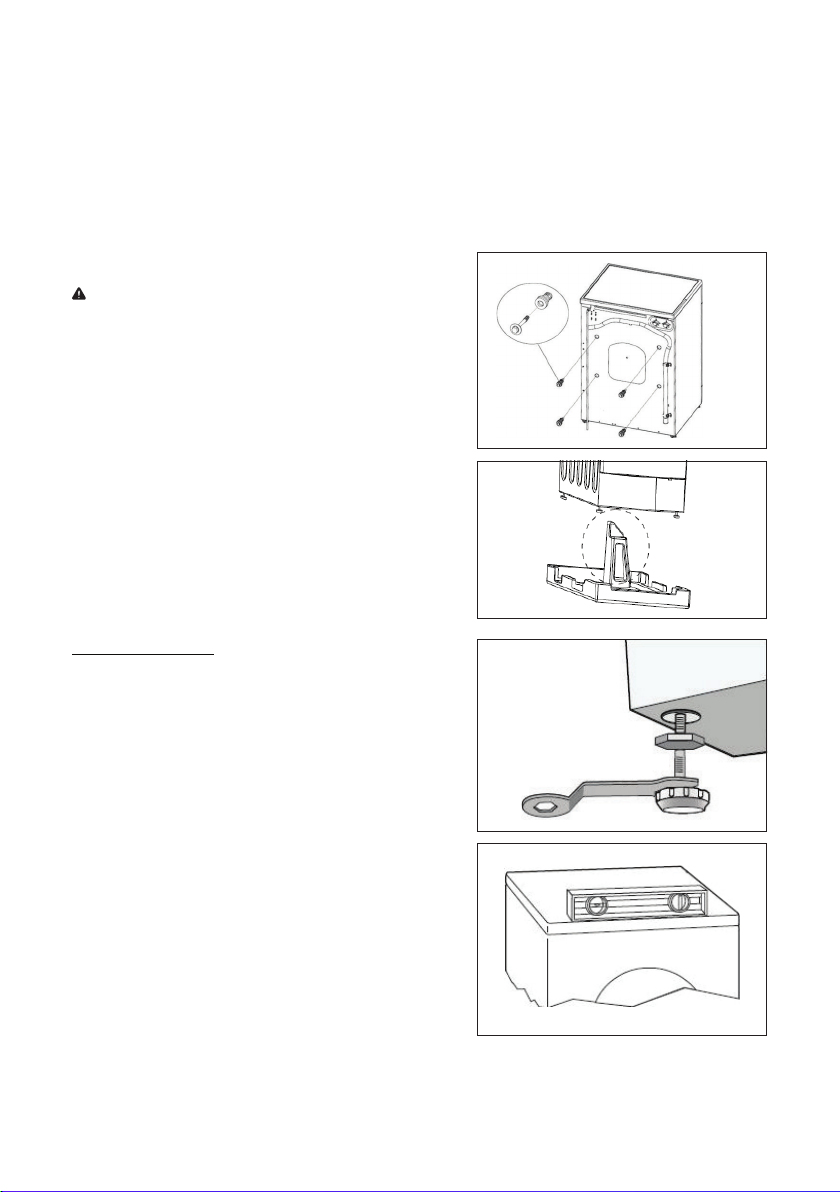
INSTALLATION
CAUTION: Packing materials may be dangerous to children.
Please dispose them properly and DO NOT let children play with
any packing materials.
Before using this washing machine, transport bolts must be
removed from the backside of this machine. Please take the
following steps to remove the bolts:
1. Loosen all bolts and then remove them.
2. Insert the transport hole plugs into the holes.
3. Keep the transport bolts for future use.
Make sure that the small foam triangle is removed with the bottom
foam piece. If not, carefully lay the unit down and remove it.
When you unpack your washing machine, check if there is any
damage or missing pieces. If any items missing, please contact
customer service.
LEVELING THE WASHER
1. When positioning the washing machine, make sure the
legs are screwed in close to the cabinet. If not, turn them
to their original positions by hand or with a wrench and
tighten the nuts with a wrench.
2. After positioning the washing machine, push on all four
corners at the top of washing machine. If the washing
machine has any wobble, or is not stable when being
pressed, adjust the leg to level the machine.
3. To level the unit, loosen the lock nut with a wrench and
turn the leg by hand until it tightly contacts with the floor.
Press the leg with one hand and tighten the locking nut
close to the cabinet with the other hand.
4. Repeat steps 2 and 3 as needed.
5. Use a bubble level to check front to back, side to side, and
corner to opposite corner to ensure the washing machine
is level. Repeat above steps if needed.
Figure 3
Figure 4
Figure 5
Figure 6
8
Page 9

DRAIN SYSTEM
STANDPIPE DRAIN SYSTEM
- WALL OR FLOOR
The standpipe drain requires a
minimum diameter standpipe of 2”
(5 cm). The minimum carry-away
capacity can be no less than 17 gal.
(64 L) per minute. The top of the
standpipe must be at least 24” (60
cm) high and no higher than 39”
(100 cm) from the bottom of the
washer.
LAUNDRY TUB DRAIN SYSTEM
The laundry tub needs a minimum 20 gal. (76 L) capacity.
The top of the laundry tub must be at least 60cm above
the foor.
2” (5 cm)
Figure 9 Figure 10
min. 24”
(61 cm)
max. 39”
(100 cm)
Figure 7 Figure 8
min. 24”
(60 cm)
max. 39”
(100 cm)
FLOOR DRAIN SYSTEM
The floor drain system requires a siphon break that
may be purchased separately. The siphon break must
be a minimum of 28” ( 71 cm) from the bottom of
the washer.
Additional
hoses might
be needed.
min. 28”
(71 cm)
NOTE: Images are for reference only.
INSTALL INLET PIPE
Connect the end of the water inlet hose with the 90°
elbow to the back of the washing machine and turn
clockwise to tighten. Note the position of the Hot and
Cold water inlets.
Connect the other end of the water inlet hose to the
appropriate Hot and Cold water tap. Tighten by turning
clockwise, and turn on the water valve to check for leaks
If any leaks are found, verify all connections are tight and
washers are present, and repeat the procedure.
Connector to water inlet is a 90° bend.
.
9
Hot
Figure 11
Cold
Figure 12
Page 10

BEFORE USE
CHECK LIST AND PREPARATION BEFORE WASHING
Read all instructions carefully to avoid any damage or issues with the washing machine and to clothes. ALWAYS
follow instructions on fabric care labels on clothing articles for proper care.
WARNING: DO NOT leave items to be washed in the washing machine for long periods of time. Items left in the
machine may get moldy and get spots. Clothes may also become discolored if they are not washed according to the
stated washing temperature and instructions.
SELECTING DETERGENT
• Low foaming powdered detergent is recommended for use with the washing machine.
• Some detergents may not completely dissolve if there is too much detergent or if the water temperature is
too low.
• Bleach can damage clothes. Use bleach with caution and follow detergent and clothing article care
instructions.
Washing method is based on weight of clothes, soil level, local water hardness as well as the recommendations
from the detergent manufacturers.
NOTE: DO NOT place or store laundry products, such as detergent, bleach, or liquid fabric softener, on top of
your washer/dryer combo unit. Wipe up any spills immediately. These products can damage the finish and controls.
Keep all laundry products in a safe, dry space out of reach of children.
SEPARATE CLOTHES TO BE WASHED
Classify clothes to be washed into cottons, blended fibers, synthetic fibers, silks, wools, etc. Light and dark clothes
should also be separated.
NOTE: New, colored fabrics should be washed separately.
• Accessories: Loose accessories on some clothes may become damaged and/or damage the washing machine.
Clothes that contain buttons or embroideries should be turned inside-out before being washed.
• Fasteners: Zippers must be closed and buttons or hooks must be firmly affixed. Any loose bands or ribbons
should be tied together before being washed.
• Water-proof materials: It is not recommended to wash water-proof fabrics as they may become damaged
and/or cause damage to the washing machine and other items being washed.
REMOVE ALL LOOSE OBJECTS FROM CLOTHES
Check all pockets/compartments of clothes to be washed and remove any loose items such as coins. Loose items
may damage the washing machine.
BALANCING THE LOAD
Washing large, heavy garments, such as towels, jeans, jackets etc., may cause an unbalanced load. It is suggested to
add one or two more items to balance the load to allow smooth and complete draining.
10
Page 11
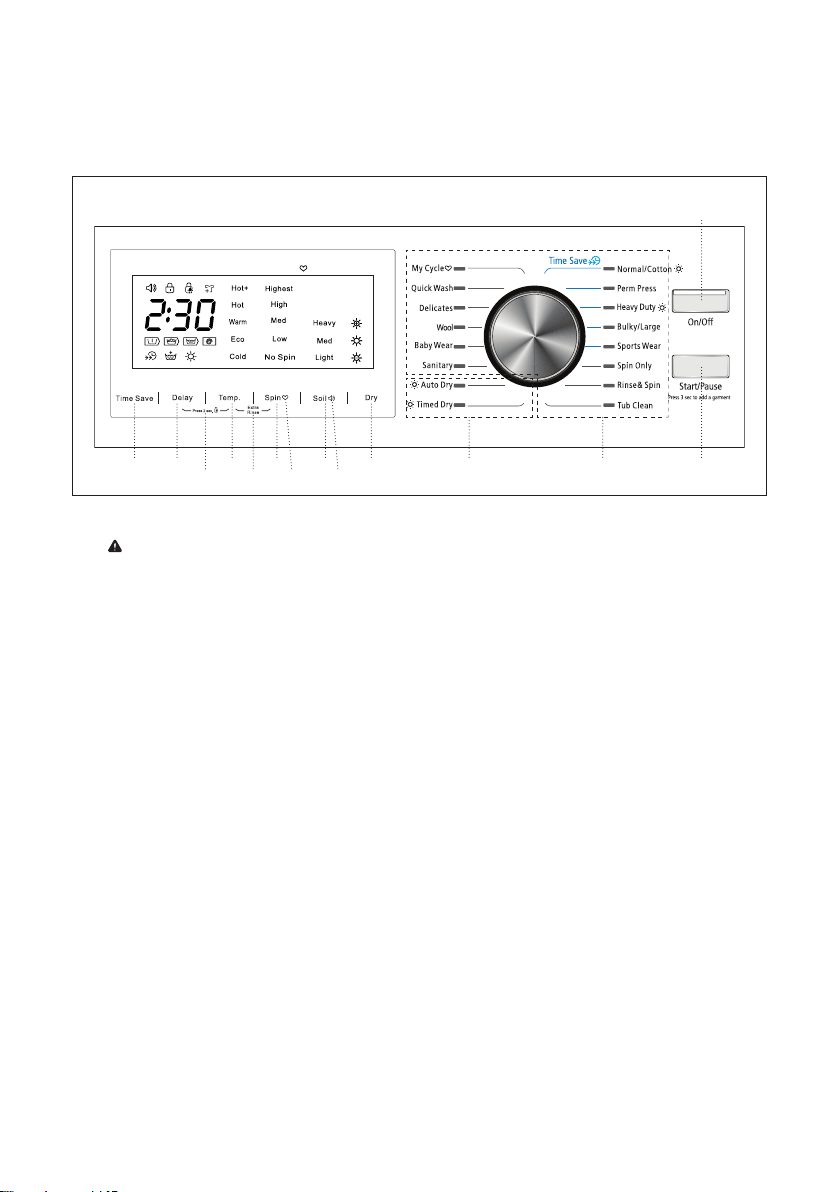
OPERATING INSTRUCTIONS
CONTROL
PANEL (FOR MCSCWD27W5/MCSCWD27S5/MCSCWD27G5 ONLY)
Press 3 sec. to set My Cycle
e f
k
g
h i j d c b
l m n
Figure 13
a
a. On/Off: Press [On/Off] to turn the unit ON. Press the button again to turn the unit OFF.
NOTE: If the washer is programmed for a wash cycle and is not started within 10 minutes, the cycle will be
cancelled and the unit will automatically turn OFF.
b. Start/Pause: Press [Start/Pause] to start a wash cycle. Press [Start/Pause] again to pause the cycle when
the washer is running. Press [Start/Pause] once more to resume. To add a garment after the wash cycle has
started, push this button for 3 seconds before the drum has filled with water. This can only be done in the
beginning of the cycle before the water reached the bottom of the door. Wait for the drum to stop and the
door to unlock, then add item(s). Close door and press [Start/Pause] to continue washing.
c. Wash Cycles
1. My Cycle: Select this option to save a commonly used washing program as a preset.
• To program, select the settings you wish to use, and then press and hold [Spin] for 3 seconds to save.
2. Quick Wash: Select this option to wash small loads of clothing that are not very dirty quickl
y.
3. Delicates: Select this option for delicate fabrics such as dress shirts, nylons, etc.
• Wash cycle operates at a lower temperature.
4. Wool: Only use this option to wash wool clothing articles labeled “Machine Washable”.
• Proper detergent and water temperature must be selected for wool textiles.
• Lower spin speed and less agitation
5. Baby Wear: For washing infant clothing
6. Sanitary: Uses hot water to allow enzymes in detergent to work more efficiently for hard to clean or
heavily soiled items.
7. Normal/Cotton: Select this option for regularly used cottons and fabrics.
• Extended wash cycle with stronger intensity
• Recommended fabrics: cotton, linens, bed sheets, t-shirts, towels, jeans, etc.
• Dry cycle can be added.
11
Page 12
8. Perm Press: Moderate strength wash cycle. Used to reduce wrinkles in clothes from washing.
9. Heavy Duty: Select this option for washing heavy clothing.
• Dry cycle can be added.
10. Bulky/Large: Select this option for bulky/large items.
• Extended wash cycle
11. Sports Wear: Select this option for sportswear.
• Wash cycle cleans heavily soiled clothes.
12. Spin Only: Select this option to spin a load separately from a regular wash cycle.
• Soap water or rinse water must be drained before spinning.
13. Rinse & Spin: Select this option to rinse and spin a load separately from a regular wash cycle.
• This can be helpful in preventing fresh stains from setting in fabrics.
14. Tub Clean: Select this option to clean the wash tub. This program uses high temperatures to sterilize the
tub while removing built up detergent and residues. Add bleach for a better clean. This program should
be used at least once a month with regular use. DO NOT add any clothes or wash items fo
d. Dry Cycles
NOTE: Maximum drying load size is smaller than wash load size. Be sure to note the drying load size when
using.
• Auto Dry: Select this option to have dry cycle automatically set based on the load. Auto Dry program
has a 12 minute spin cycle and 45 minute cool air cycle. It is recommended to dry in multiple, smaller
loads to allow for better for performance.
• Timed Dry: Select this option to set dry cycle time manually. Timed Dry programs include a 12 minute
spin and 25 minute cool period. It is recommended to dry in multiple, smaller loads to allow for better
for performance.
Time in Minutes Capacity
58 1.8 lbs. (0.8 kg)
88 2.2 lbs. (1.0 kg)
199 6.6 lbs. (3.0 kg)
r this program.
NOTE: Important Notes for Dry Cycles
For Wash only, unit can be filled to the Max. Washing Capacity, however, load sizes less than the Max. Wash
Capacity can improve performance and efficiency.
For Wash cycles plus Dry cycles or Dry only cycles, unit should not be filled over the Max. Dry Capacity
to allow the dry function to work effectively. Load sizes less than the maximum capacity will improve the
drying performance of the combo unit.
DO NOT cut off water supply or remove hose attachments during dry cycle. This is a ventless unit that
releases moisture during dry cycles. The dryer is equipped with a door-locking safety feature to ensure safe
temperatures and avoid burns and other safety hazards. The door will remain LOCKED during dry cycle until
the unit reaches a safe temperature. After a safe temperature is reached, the door should open and function
normally.
e. Time Save: Press [Time Save] to decrease the washing time.
• See Wash Cycle Parameters Table for programs that can use Time Save.
f
. Delay: Press [Delay] to set a delay time for the wash to begin.
12
Page 13
• The delay start light will flash to indicate the delay time. You can delay the start time of the cycle from
1 - 24 hours.
• Set Wash program, Press Delay to set the number of hours to delay wash cycle, then push Start/Pause.
• To cancel the delay time, press Delay button until time shows 0H.
g. Temp.: Press [Temp.] to set your desired washing temperature.
• Press button to set desired wash temp (Hot+, Hot, Warm, Eco, Cold)
h. Spin: Press [Spin] to increase spin speed.
• Washer drum spins at a speed up to 1300 RPM which reduces drying time and saves energy.
• Press the button until desired speed is lit (No Spin, Low, Med, High, Highest).
• Some fabrics (i.e. delicates) require a slower spin speed.
• High spin speeds are not available on all cycles.
i. Soil: Press [Soil] to increase time for heavier soiled items.
• There are three (3) soil levels options.
• Each bar increases the base wash time by 15 minutes.
j. Dry Level: Press the Dry button continuously to choose the dry level: Extra Dr
y/Normal Dry/Gentle Dry.
k. Child Lock: Press [Delay] and [Temp] at the same time for 3 seconds to Unlock/Lock the control panel.
• On/Off Button will still function.
l. Extra Rinse: Press the [Temp.] and [Spin] button at the same time to add an extra rinse to the selected cycle.
m. My Cycle: After a wash cycle is modified, hold down [Spin] to save your settings.
• You can quickly choose this cycle for your next wash by turning the dial to My Cycle.
• Override saved settings by holding the [Spin] button down again after a different cycle and options are
selected.
n. Sound: Press the [Soil] button for 3 seconds to turn the sound on or off.
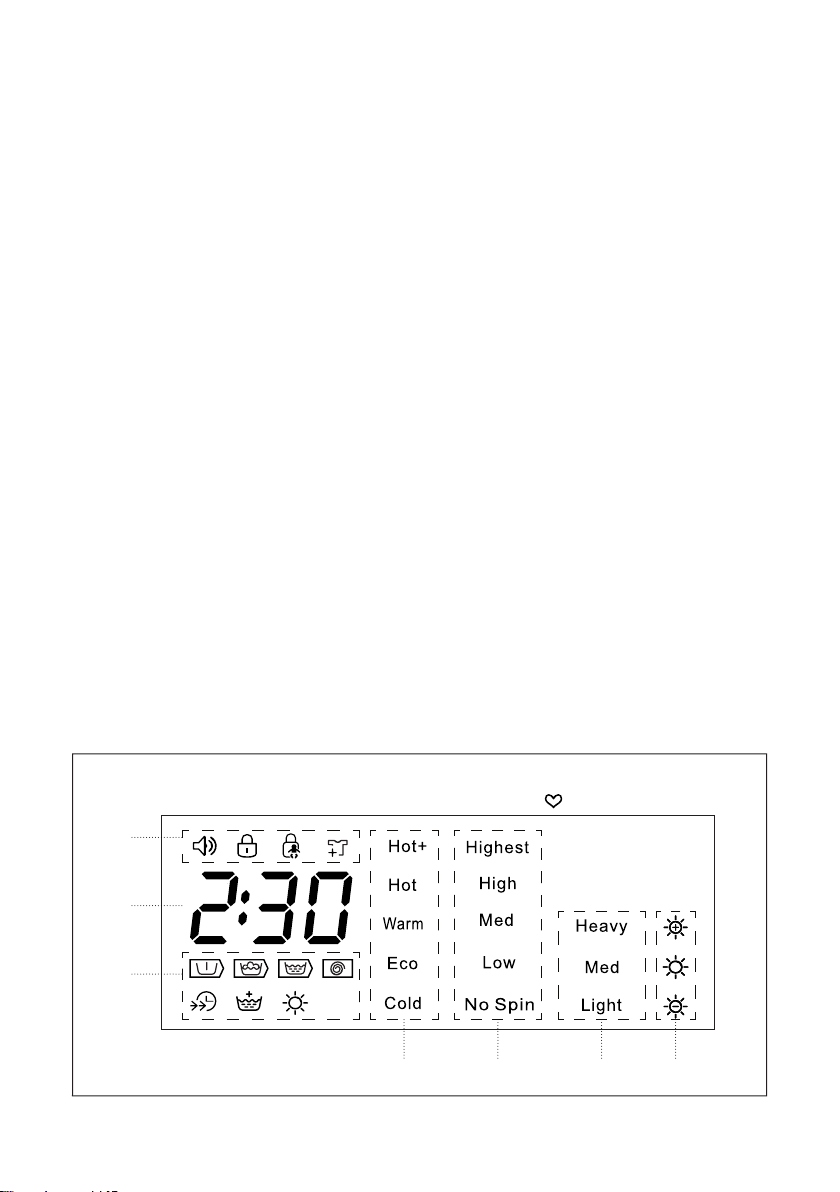
DISPLAY (FOR MCSCWD27W5/MCSCWD27S5/MCSCWD27G5 ONLY)
c
b
a
d e f g
13
Figure 14
ePress 3 sec. to set My Cycl
Page 14

a. Cycle Indicator: Indicates stage of wash/dry cycle.
•
•
: Prewash • : Wash • : Rinse • : Spin
: Time Save • : Extra Rinse • : Dry
b. Clock: Indicates time left until the end of wash/dry cycle.
c. Feature Indicator: Indicates features that are active.
Sound: Indicates that sounds are on. When unlit, unit is muted.
•
•
•
•
Door Lock: Machine is locked for duration of cycle.
Child Lock: Child lock is on.
Add a Garment
d. Water Temperature: Indicates the selected temperature.
e. Spin Speed: Indicates the selected spin speed.
f. Soil Level Indicator: Indicates the selected soil level.
g. Dry Level: Indicated the selected dry level.
•
Extra Dry • Normal Dry • Gentle Dry
NOTE: Maximum drying load size is smaller than wash load size.
CONTROL PANEL (FOR MCSFLW27W/MCSFLW27S ONLY)
Press 3 sec. to set My Cycle
Figure 15
a
d e
f
j
g h i c b
k l
a. On/Off: Press [On/Off] to turn the unit ON. Press the button again to turn the unit OFF.
NOTE: If the washer is programmed for a wash cycle and is not started within 10 minutes, the cycle will be
cancelled and the unit will automatically turn OFF.
b. Start/Pause: Press [Start/Pause] to start a wash cycle. Press [Start/Pause] again to pause the cycle when
the washer is running. Press [Start/Pause] once more to resume. To add a garment after the wash cycle has
started, push this button for 3 seconds before the drum has filled with water. This can only be done in the
beginning of the cycle before the water reached the bottom of the door. Wait for the drum to stop and the
door to unlock, then add item(s). Close door and press [Start/Pause] to continue washing.
c. Wash Cycles
1. My Cycle: Select this option to save a commonly used washing program as a preset.
• To program, select the settings you wish to use, and then press and hold [Spin] for 3 seconds to save.
14
Page 15

2. Quick Wash: Select this option to wash small loads of clothing that are not very dirty quickly.
3. Delicates: Select this option for delicate fabrics such as dress shirts, nylons, etc.
• Wash cycle operates at a lower temperature.
4. Wool: Only use this option to wash wool clothing articles labeled “Machine Washable”.
• Proper detergent and water temperature must be selected for wool textiles.
• Lower spin speed and less agitation
5. Baby Wear: For washing infant clothing
6. Sanitary: Uses hot water to allow enzymes in detergent to work more efficiently for hard to clean or
heavily soiled items.
7. Cold Wash: Only uses cold water.
8. Tub Clean: Select this option to clean the wash tub. This program uses high temperatures to sterilize the tub
while removing built up detergent and residues. Add bleach for a better clean. This program should be
used at least once a month with regular use. DO NOT add any clothes or wash items for this pr
9. Normal/Cotton: Select this option for regularly used cottons and fabrics.
• Extended wash cycle with stronger intensity
• Recommended fabrics: cotton, linens, bed sheets, t-shirts, towels, jeans, etc.
10. Perm Press: Moderate strength wash cycle. Used to reduce wrinkles in clothes from washing.
11. Heavy Duty: Select this option for washing heavy clothing.
12. Bulky/Large: Select this option for bulky/large items.
• Extended wash cycle
13. Sports Wear: Select this option for sportswear.
• Wash cycle cleans heavily soiled clothes.
14. Spin Only: Select this option to spin a load separately from a regular wash cycle.
• Soap water or rinse water must be drained before spinning.
15. Drain Only: Used to drain any water in the unit.
16. Rinse & Spin: Select this option to rinse and spin a load separately from a regular wash cycle.
• This can be helpful in preventing fresh stains from setting in fabrics.
d. Time Save: Press [Time Save
] to decrease the washing time.
• See Wash Cycle Parameters Table for programs that can use Time Save.
e. Delay: Press [Delay] to set a delay time for the wash to begin.
• The delay start light will flash to indicate the delay time. You can delay the start time of the cycle from
1 - 24 hours.
• Set Wash program, Press Delay to set the number of hours to delay wash cycle, then push Start/Pause.
• To cancel the delay time, press Delay button until time shows 0H.
f. Temp.: Press [Temp.] to set your desired washing temperature.
• Press button to set desired wash temp (Hot+, Hot, Warm, Eco, Cold)
g. Spin: Press [Spin] to increase spin speed.
• Washer drum spins at a speed up to 1300 RPM which reduces drying time and saves energy.
• Press the button until desired speed is lit (No Spin, Low, Med, High, Highest).
• Some fabrics (i.e. delicates) require a slower spin speed.
• High spin speeds are not available on all cycles.
ogram.
15
Page 16
h. Soil: Press [Soil] to increase time for heavier soiled items.
• There are three (3) soil levels options.
• Each bar increases the base wash time by 15 minutes.
i. Function: Use to select functions during the wash cycle
j. Child Lock: Press [Delay] and [Temp] at the same time for 3 seconds to Unlock/Lock the control panel.
• On/Off Button will still function.
k. My Cycle: After a wash cycle is modified, hold down [Spin] to save your settings.
• You can quickly choose this cycle for your next wash by turning the dial to My Cycle.
• Override saved settings by holding the [Spin] button down again after a different cycle and options are
selected.
l. Sound: Press the [Soil] button for 3sec. to turn the sound on or off.
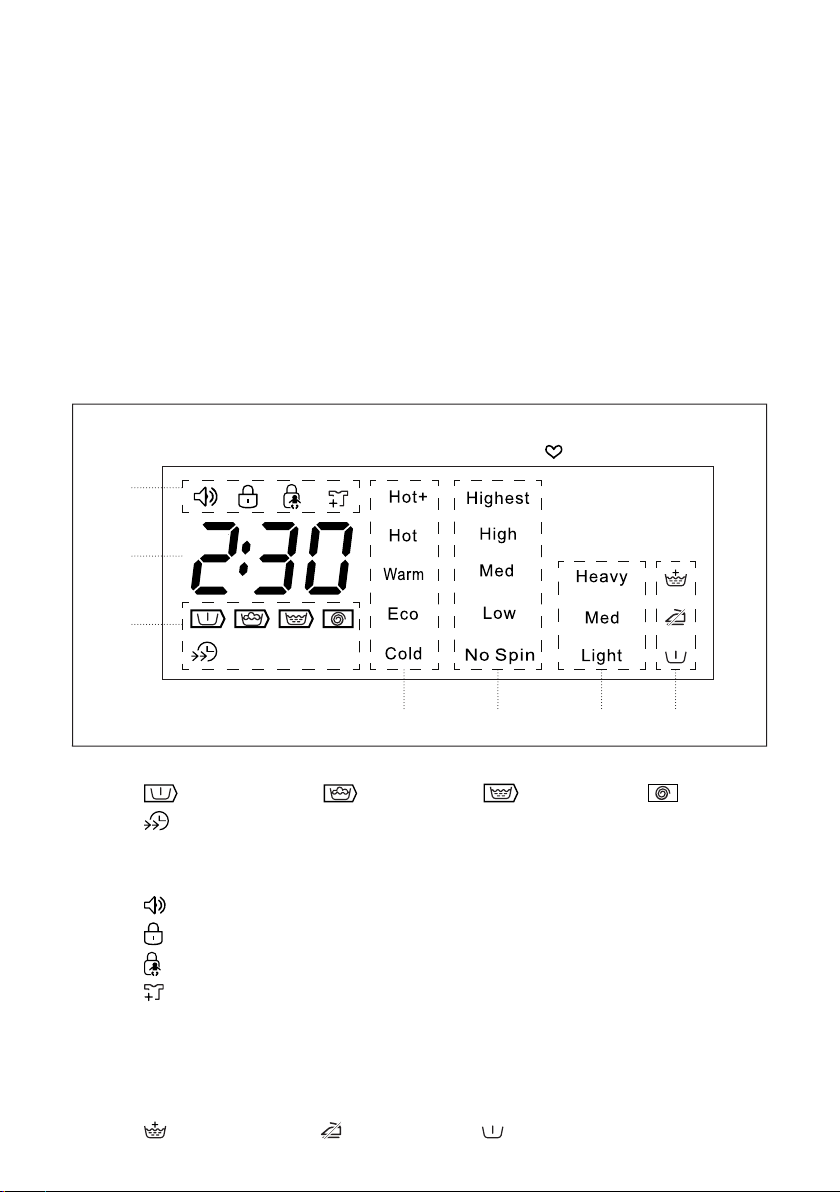
DISPLAY (FOR MCSFLW27W/MCSFLW27S ONLY)
Press 3 sec. to set My Cycle
c
b
a
Figure 16
e
d e f g
a. Cycle Indicator: Indicates stage of wash/dry cycle.
•
•
: Prewash • : Wash • : Rinse • : Spin
: Time Save
b. Clock: Indicates time left until the end of wash/dry cycle.
c. Feature Indicator: Indicates features that are active.
Sound: Indicates that sounds are on. When unlit, unit is muted.
•
•
•
•
Door Lock: Machine is locked for duration of cycle.
Child Lock: Child lock is on.
Add a Garment
d. Water Temperature: Indicates the selected temperature.
e. Spin Speed: Indicates the selected spin speed.
f. Soil Level Indicator: Indicates the selected soil level.
g. Additional Functions: Indicates additional functions selected.
•
Extra Rinse •
Easy Iron •
16
Prewash
Page 17
OPERATION INSTRUCTIONS
WASHING CLOTHES
Before washing clothes for the first time, the washing machine must be run with a small amount of detergent and
without clothes. Follow below instructions.
1. Connect power source and water.
2. Place a small amount of detergent into the detergent dispenser and close.
3. Press [On/Off] button.
4. Turn the cycle to [Normal/Cotton] and press the [Temp.] button until the word Hot is displayed.
5. Press [Start/Pause] button.
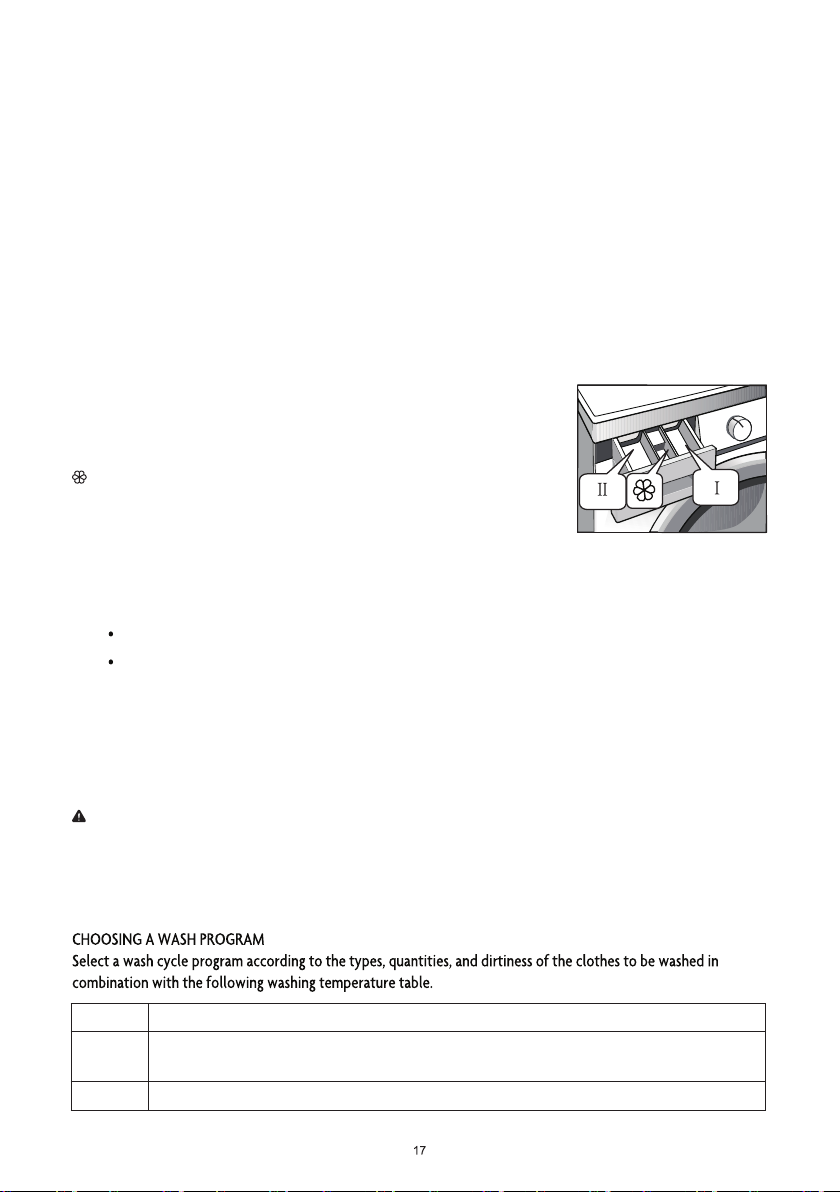
DETERGENT DISPENSER DRAWER
I. Pre-detergent or washing powder
II. Main Detergent
. Softener
Once you have loaded the washer and added laundry products, you are ready to
wash and dry.
Figure 18
START THE WASHING MACHINE
1. Make sure the unit is properly connected to a power source and water lines.
Tap should be turned on (in an open position).
Place your wash load into the drum.
2. Press the [On/Off] button. Control panel will illuminate.
3. Turn the cycle selector knob to the desired cycle based on load. The LCD display panel will reflect the preset
features for that cycle.
4. If you would like to modify any of the preset settings for the desired cycle, press on the individual options
until the display panel reflects the desired settings.
NOTE: If you have a favorite cycle, once you modify all settings, press and hold [Spin] to save as My Cycle.
Depending on the desired cycle, all options may not be available.
5. Press the [Start/Pause] button to begin cycle. Once the cycle begins, the door will automatically lock and
wash cycle will begin. Display panel will change to reflect estimated time and state of wash. At any time, you
can pause the cycle by pressing on the [Start/Pause] button again.
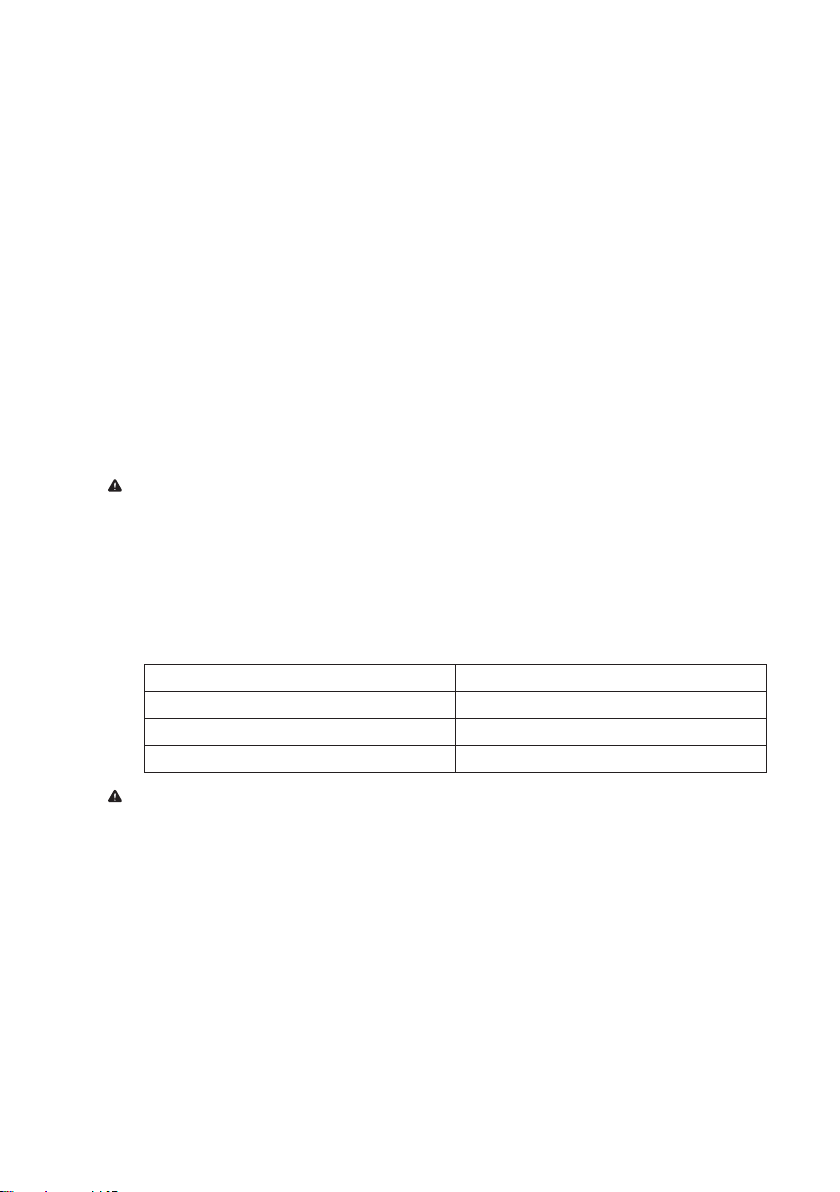
Extra Hot Very dirty, white cotton or linens (examples: table cloths, towels, bed sheets)
Hot Moderately dirty, colored linens, cotton and synthetic articles (examples: shirts, pajamas; Slightly
dirty, white linens (for example: underwear)
Warm Normally dirty articles (including synthetic and wool)
Page 18

WASH CYCLE PARAMETERS
WASH CYCLE PARAMETERS (FOR MCSCWD27W5/MCSCWD27S5/MCSCWD27G5 ONLY)
NOTE: Maximum drying load size is smaller than wash load size.
Program
Normal/Cotton
Perm Press 13.2 (6.0) Warm 1:35
Heavy Duty
Bulky/Large 13.2 (6.0) Warm 2:18
Sports Wear 13.2 (6.0) Warm 2:08
Spin Only 26.4 (12.0) - 0:12 - -
Rinse & Spin 26.4 (12.0) - 0:20 -
Tub Clean - Hot + 1:58 - -
Timed Dry
Auto Dry
Sanitary 13.2 (6.0) Hot 3:09 -
Baby Wear 26.4 (12.0) Eco 1:39 -
Wool 4.4 (2.0) Warm 1:37 -
Delicates 5.5 (2.5) Eco 1:00 -
Quick Wash 4.4 (2.0) Cold 0:20 - -
Max. Washing/Drying
Load in lbs (kgs)
26.4/17.6
(12.0/8.0)
26.4/17.6
(12.0/8.0)
1.1/2.2/5.5
(0.5/1.0/2.5)
17.6 (8.0) - 4:18 - -
Temp
Warm 1:04
Default
Time (H:M)
Hot 2:36
- 1:28 - -
Time
Save
Extra
Delay
Rinse
- - Med
Soil
Level
Light Low
- Med
Light Med
Light Med
- High
- High
- -
- Highest
- Highest
- Med
Light Med
- Low
- Low
- Med
Spin
Speed
NOTE:
is Optional Function.
NOTE: is Dry function.
1
Page 19

WASH CYCLE PARAMETERS (FOR MCSFLW27W/MCSFLW27S ONLY)
Program
Normal/Cotton 26.5 (12.0) Warm 1:04 Med
Perm Press 13.2 (6.0) Warm 1:35 Low -
Heavy Duty 26.5 (12.0) Hot 2:36 Med
Bulky/Large 13.2 (6.0) Warm 2:18 Med
Sport Wear 13.2 (6.0) Warm 2:08 Med
Spin Only 26.5 (12.0) - 0:12 High - - -
Drain Only 26.5 (12.0) - 0:01 - - - - -
Rinse & Spin 26.5 (12.0) - 0:20 High - -
Tub Clean - Hot 1:58 -----
Cold Wash 26.5 (12.0) Cold 1:42 Med
Sanitary 13.2 (6.0) Hot 3:09 Med -
Baby Wear 26.5 (12.0) Eco 1:39 Med
Wool 4.4 (2.0) Warm 1:37 Low - -
Delicates 5.5 (2.5) Eco 1:00 Low ----
Quick Wash 4.4 (2.0) Cold 0:20 Med - - - -
Max. Wash Load
in lbs (kgs)
Temp
Default
Time (H:M)
Spin
Speed
Time
Save
-
Extra
Rinse
-
Easy
Iron
Pre-
wash
-
Delay
NOTE:
is Optional Function.
NOTE: is Required Function.
NOTE: ENERGY TEST PROGRAM - NORMAL/COTTON
“Normal/Cotton” is the standard washing program to which the information in the label and energy guide relates,
and is suitable to clean normally soiled cotton laundry and is the most efficient program in terms of combined
energy and water consumptions for washing that type of laundry. The actual water temperature may differ from
the declared cycle temperature.
NOTE: The parameters in this table are only for user’s reference. The actual parameters maybe vary from the
parameters in above table.
POWER LOSS MEMORY FUNCTION
In the event of the loss of power, the washer will automatically resume operation from previous settings when
power is restored.
1
Page 20

CARE AND MAINTENANCE
Before doing any maintenance, be sure to remove the power plug from the outlet and close the tap.
WARNING:
• DO NOT use solvents to clean the unit. The washing machine can be damaged, or toxic gasses may be
produced.
• NEVER spray water on the washing machine to clean it.
• DO NOT use detergents that contain PCMX to clean the washing machine.
• Certain internal parts are intentionally not grounded and may present a risk of electric shock only during
servicing. Service Personnel – DO NOT contact the following parts while the appliance is energized: Drain
Pump, Door Lock, Drying Heater (Combo), Fan Motor (Combo).
CLEANING AND MAINTENANCE OF WASHING MACHINE CABINET
Proper maintenance on the washing machine can extend its working life. The surface can be cleaned with
diluted non-abrasive neutral detergents when necessary. If there is any water overflow, use a cloth to wipe it off
immediately. DO NOT allow sharp items to strike the cabinet.
NOTE: DO NOT use formic acid and its diluted solvents or equivalent.
CLEANING THE INTERNAL DRUM
Any rust left inside the drum by the metal articles should be cleaned out immediately with chlorine-free detergents.
DO NOT use steel wool.
CLEAN DETERGENT BOX
1. Open Detergent box.
2. Press down the arrow and slide out assembly. (Figure 17-1)
3. Lift the clip and remove softener cover and wash all sections with water. (Figure 17-2)
4. Replace the softener cover and push the drawer back into position. (Figure 17-3)
Figure 17-1 Figure 17-2 Figure 17-3
CLEAN INLET FILTER
Inlet filter maybe need to be cleaned if there is insufficient or no water in when the tap is opened.
To clean the filter:
Figure 17
Page 21

1. Close the tap.
2. Select any procedure except “Wash” or “Drain” procedure.
3. Press the button “Start/Pause” and keep the procedure running for about 40 seconds.
4. Remove the inlet pipe from the tap.
5. Wash the filter with water
6. Reconnect the inlet pipe.
WASHING THE FILTER IN WASHING MACHINE
Figure 18
1. Remove the inlet pipe from the rear of the machine.
2. Pull out the filter with needle nose pliers rinse with water.
3. Put the filter back into place.
4. Reconnect the inlet pipe.
5. Open the tap and make sure there is no water leakage.
6. Close the tap.
REMOVING FOREIGN ITEMS FROM DRAIN PUMP FILTER
The drain pump filter can filter small foreign matters from clothing being washed. Clean the filter periodically to
ensure the normal operation of washing machine.
The pump should be inspected if the machine
Figure 19
does not empty and/or spin, or if it makes unusual
noises during draining due to objects (such as,
coins etc.) blocking the pump.
To access and clean the filter:
1. Open the lower access cover. (Figure 19)
2. Remove the emergency drain hose cap and
let water drain out. It is recommended to
have a vessel ready to catch remaining water.
Figure 21
(Figure 20)
3. Replace emergency drain hose, and open
the filter by turning counter-clockwise.
(Figure 21)
4. Remove any objects in filter and replace,
locking in by turning clockwise. (Figure 22)
WARNING: To avoid burning, it shall be done after the hot water inside the machine cools down.
WARNING: When the appliance is in use and depending on the program selected there may be hot water in the
pump. Never remove the pump cover during a wash cycle, always wait until the appliance has finished the cycle,
and is empty. When replacing the cover, ensure it is securely in place.
Figure 20
Emergency
Drain Hose
Figure 22
THAW A FROZEN WASHING MACHINE
If the temperature drops below zero and your washing machine gets frozen, you may:
1. Disconnect the power supply for the washing machine.
2. Wash the tap connection with warm water to loosen inlet pipe.
2
Page 22

3. Remove the inlet pipe and immerse it in warm water.
4. Pour warm water into washing drum and wait for 10 minutes.
5. Reconnect inlet pipe to the tap and check whether inlet and outlet are working normally.
NOTE: when the washing machine is reused, make sure the ambient temperature is above 32 °F (0 °C).
TO PREVENT FREEZING
If your washing machine is located in the room where it can get frozen easily, please drain the remaining water
inside drain pipe and inlet pipe thoroughly.
Remove the remaining water in inlet pipe:
1. Close the tap.
2. Screw off the inlet pipe from tap and put its end into the
container.
Emergency
Door
Pull Cord
Figure 23
3. Start up any procedure except single Wash or Drain
procedure. Water will be drained out of inlet pipe if any
for about 40 seconds.
4. Reconnect the inlet pipe to tap.
EMERGENCY DOOR RELEASE
In the case of a power failure or other circumstances and door
cannot be opened, if it is necessary to open the door, pull down
on the cord inside the access panel. Be sure to restore the pull
cord after opening the door.
CAUTION: The emergency switch pull cord cannot be used
during washing. If unit is in operation, wait for it to stop and for
the interior to cool to a safe temperature before opening door.
2
Page 23

TROUBLESHOOTING
ALARM CODE DETECTION
Alarm Code Cause of Problem Solution
E30 Door is not properly closed.
E10 Problem with water flow.
E21 Water taking too long to drain. Check if the drain hose is blocked.
E12 Water overflow. Restart the washer.
EXX Other Restart machine to clear. Call customer service if code persists.
NOTE: After trying the solution, restart the washing machine. If code persists, contact customer service.
When the washing machine needs servicing, please contact our customer service department, and a representative
will try to diagnose the issue. Please do not dismantle the washing machine without prior permission. Doing so
will void your warranty.
If the washing machine fails to operate properly, or it sounds an alarm, please check the following guidelines for
possible solutions to common problems or alarm indicators.
LIST OF PROBLEMS AND POSSIBLE SOLUTIONS
Problem Cause Solution
Washing machine
will not start .
Door cannot be opened. Safety lock is engaged. Disconnect the power.
Heating fault
Water leakage
Water overflowing from
the bottom of the
Machine
Indicator or display do
not light.
NTC thermistor is damaged and
heating pipe is worn.
The connection between inlet
pipe or outlet hose and tap or
washing machine is not tight.
Drain pipe is blocked. Clean up outlet hose and drain.
The inlet pipe is not connected
firmly.
Outlet hose has water leakage. Replace the drain hose.
Power is disconnected. Check if plug is connected correctly and power is on.
PC board has problems.
Harness has connection problem.
Check if clothes are stuck in door.
Close door and restart.
Check if the water pressure is too low.
Make sure inlet hose is not bent or blocked.
Check if the inlet valve filter is blocked.
Check if the door is closed tightly.
Check if power plug is properly inserted.
Check if water supply is open.
Check if “On/Off” button is pressed.
Check if “Start/Pause” button is pressed.
Contact customer service.
Check and fasten water pipes.
Fix the inlet pipe.
Contact customer service.
2
Page 24

Detergent residue in the
detergent box
Clothes not clean
enough
Abnormal noises or
vibration
Washing powder is damp and
hardened.
Clean and wipe the box.
Use liquid detergents or the detergents special for hi
efficiency front load washer.
The clothes are too dirty. Select a proper washing program.
Insufficient detergent quantity
Make sure to follow instructions for adding detergent
amount.
Make sure the transport bolts are removed.
Make sure cabinet is installed on solid, level surface.
Check for any foreign items in the unit.
Make sure leveling legs are level.
2
Page 25

LIMITED WARRANTY
MC Appliance Corporation warrants each new Washer and Combo Washer/Dryer to be free from defects in material and workmanship, and agrees to remedy any such defect or to furnish a new part(s), at the company’s option, for any part(s) of the unit
that has failed during the warranty period. Parts and labor expenses are covered on this unit for a period of one year from the
date of purchase. A copy of the dated sales receipt/invoice is required to receive warranty service, replacement or refund.
This warranty covers appliances in use within the contiguous United States, Alaska, Hawaii and Puerto Rico. This warranty does not
cover the following:
• Damages due to shipping damage or improper installation.
• Damages due to misuse or abuse.
• Content losses due to failure of the unit.
• Inside components such as filters, etc.
• Repairs performed by unauthorized service agents.
• Service calls that do not involve defects in material and workmanship such as instructions on proper use of the product
or improper installation.
• Replacement or resetting of house fuses or circuit breakers.
• Failure of this product if used for other purposes than its intended purpose.
• Disposal costs for any failed unit not returned to our factory.
• Any delivery/installation costs incurred as the result of a unit that fails to perform as specified.
• Expenses for travel and transportation for product service if your appliance is located in a remote area where service by
an authorized service technician is not available.
• The removal and reinstallation of your appliance if it is installed in an inaccessible location or is not installed in accordance with published installation instructions. Service may not be available on units installed in nontraditional housing
locations (ie. boats, etc.)
• Refunds for non repairable products are limited to the price paid for the unit per the sales receipt.
• This warranty is non transferable. This warranty applies only to the original purchaser and does not extend to any
subsequent owner(s).
Limitations of Remedies and Exclusions:
Product repair in accordance with the terms herein, is your sole and exclusive remedy under this limited warranty. Any and all
implied warranties including merchantability and fitness for a particular purpose are hereby limited to one year or the shortest
period allowed by law. MC Appliance Corporation is not liable for incidental or consequential damages and no representative or
person is authorized to assume for us any other liability in connection with the sale of this product. Under no circumstances is the
consumer permitted to return this unit to th
Some states prohibit the exclusion or limitation of incidental or consequential damages, or limitations on implied warranties.
This warranty gives you specific legal rights, and you may also have other rights which vary from state to state.
Model Parts Labor Type of Service
MCSCWD27W5/MCSCWD27S5
MCSFLW27W/MCSFLW27S/MCSCWD27G5
For Service or Assistance please call 888-775-0202 or visit us on the web at www.mcappliance.com to request warranty service
or order parts.
e factory without the prior written consent of MC Appliance Corporation.
One Year One Year In Home
2
Page 26

CNA International, Inc. d/b/a MC Appliance Corporation. All rights reserved.
Magic Chef® logo is a registered trademark of CNA International, Inc.
www.mcappliance.com Printed in China
Page 27

Combo de Lavadora y Secadora de 24”
Lavadora de carga frontal de 24”
Manual del usuario
Modelo MCSCWD27W5 / MCSCWD27S5 / MCSFLW27W / MCSFLW27S /
LEA ESTE MANUAL ANTES DE UTILIZAR SU LAVADORA Y SECADORA Y
GUÁRDELO PARA FUTURA REFERENCIA.
26
MCSCWD27G5
Page 28

REGISTRACIÓN DEL PRODUCTO
Gracias por comprar el producto Magic Chef®. El primer paso para proteger su nuevo producto es completar la forma de registración
en nuestra pagina web: www.mcappliance.com/register. Los beneficios de registrar su producto incluyen lo siguiente:
1. Al registrar su producto nos permite contactarle para notificarle de un cambio de seguridad o actualización del
producto.
2. Si llegara a necesitar servicio bajo garantía, registrando su producto nos permite ser más eficiente en procesar el
servicio.
3. En el evento que usted tenga una perdida que esta cubierto por un seguro, registrando su producto puede servir
como prueba de su compra.
Una vez más gracias por comprar un producto marca Magic Chef®.
2
Page 29

ÍNDICE
REGISTRACIÓN DEL PRODUCTO . . . . . . . . . . . . . . . . . . . . . . . . . . . . . . . . . . . . . . . . . . . . . . 27
INSTRUCCIONES DE SEGURIDAD IMPORTANTES ...... ...................... ... . 29
ESPECIFICACIONES . ............................. ...... ...................... 32
INSTRUCCIONES DE INSTALACIÓN ..... ............................ ...... ..... 33
ANTES DE USAR. . . . . . . . . . . . . . . . . . . . . . . . . . . . . . . . . . . . . . . . . . . . . . . . . . . . . . . . . . . . . 36
INSTRUCCIONES DE FUNCIONAMIENTO . . . . . . . . . . . . . . . . . . . . . . . . . . . . . . . . . . . . . . .3
PARÁMETROS DE CICLOS DE LAVADO ....................... ...... ...........
CUIDADO Y MANTENIMIENTO ..... ........................ .... ..............
SOLUCIÓN DE PROBLEMAS . . . . . . . . . . . . . . . . . . . . . . . . . . . . . . . . . . . . . . . . . . . . . . . . . . .
GARANTÍA LIMITADA . . . . . . .............................. ..... ............... 5
2
Page 30

INSTRUCCIONES DE SEGURIDAD IMPORTANTES
Este manual contiene Instrucciones de seguridad, Instrucciones de instalación y operación, y Consejos para
solucionar problemas. Por favor, léalo cuidadosamente antes de utilizar la lavadora para conocer las instrucciones
sobre cómo utilizar y mantener el producto adecuadamente. Asegúrese de seguir las instrucciones de seguridad
para evitar lesiones o daños al producto.
Guarde este manual. Al transferir o vender el aparato a un tercero, el manual debe entregarse junto con el
aparato.
Antes de contactar a servicio técnico, cerciórese de que el equipo haya sido instalado y se esté usando de manera
correcta, y lea la sección de solución de problemas.
ADVERTENCIA: Siga las precauciones que se indican a continuación al utilizar el aparato.
NOTA : Las especificaciones pueden cambiar en cualquier momento sin aviso previo.
Advertencias según la Propuesta 65 del Estado de California
ADVERTENCIA: La Ley de Ejecución sobre Materiales Tóxicos y Agua Potable Segura de California establece
que el gobernador de California deberá publicar una lista de sustancias sobre las que el Estado de California
tenga información de que producen cáncer, defectos congénitos y otros daños reproductivos, y establece que
los comercios deberán advertir sobre las posibles exposiciones a tales sustancias. Este producto contiene una
sustancia química que el Estado de California sabe que produce cáncer, defectos congénitos y otros daños
reproductivos. Este aparato puede ocasionar bajos niveles de exposición a algunas de las sustancias que se
encuentran en la lista, incluidos benceno, formaldehído y monóxido de carbono.
1. Lea todas las instrucciones antes de utilizar este producto.
2. Este aparato es solo para uso doméstico. No está diseñado para aplicaciones comerciales.
3. Este aparato está diseñado solamente para uso en interiores. NO lo utilice al aire libre.
4. NO use este electrodoméstico de una manera que no sea la prevista.
5. Use solo los detergentes o suavizantes recomendados en este manual y manténgalos fuera del alcance de
los niños.
6. Esta máquina no es para ser usada por personas (incluidos los niños) con capacidad física, psíquica o
sensorial reducida o falta de experiencia y conocimiento, a menos que hayan recibido supervisión o
instrucción relativa al uso de la lavadora por parte de una persona responsable por su seguridad.
7. Este aparato debe instalarse correctamente, conforme a las instrucciones de instalación, an
8. NO desenchufe su aparato halando el cable de alimentación. Siempre sujete la clavija firmemente y sáquela
derecha desde el tomacorriente.
9. No utilice ningún aparato que tenga un cable o enchufe dañado, si está dañado o funciona mal de algún
modo o si el tomacorriente no funciona correctamente. Comuníquese con el servicio al cliente o con un
técnico de servicio.
10. SIEMPRE apague y desenchufe el equipo del tomacorriente antes de repararlo, cambiarle accesorios o
limpiarlo. Deje enfriar por completo el equipo antes de limpiarlo, moverlo o hacerle servicio. Apagar el
equipo no lo desconecta de la fuente de poder.
11. NO coloque nada inflamable o explosivo dentro, sobre o cerca del aparato. NO lave prendas de ropa ni
artículos empapados con químicos inflamables o explosivos. Para reducir el riesgo de incendio, no deberán
colocarse en la lavadora ropa, trapos de limpieza, cabezales de mapos o elementos similares que tengan
restos de cualquier sustancia inflamable, por ejemplo aceite de cocina, aceites derivados del petróleo o
destilados, ceras, grasas, etc. Estos artículos pueden contener sustancias inflamables que, incluso después
tes de usarse.
Page 31

del lavado, pueden crear humo o incendiarse. NO seque artículos que contengan goma de espuma o
materiales con textura similar a la goma.
12. SIEMPRE espere que el tambor la lavadora se detenga por completo completamente antes de meter la
mano para colocar o sacar prendas.
13. La puerta de carga debe estar cerrada mientras el tambor esté centrifugando.
14. NO utilice esta lavadora a menos que todos los paneles de cierre estén instalados correctamente.
15. NO manipule ni modifique los controles.
ADVERTENCIA: Existe el riesgo de que un niño quede atrapado. NO permita que los niños jueguen
16.
encima o dentro del aparato. Es necesario vigilar de cerca a los niños cuando se utilice el aparato cerca de
ellos.
17. Este electrodoméstico debe enchufarse en un tomacorriente adecuadamente instalado y conectado a
tierra, que cumpla con los requisitos de voltaje indicados en la etiqueta de especificaciones eléctricas.
PRECAUCIÓN: El cable eléctrico está equipado con un enchufe de 3 puntas conectado a tierra para
18.
protegerlo de peligros de descarga eléctrica. SIEMPRE conecte el cable a un receptor de pared a tierra de
tres espigas instalado correctamente y NO elimine la espiga a tierra.
19. Bajo ciertas circunstancias, se podría producir gas de hidrógeno en un sistema de agua caliente para el hogar
que no se haya usado por dos semanas o más. El gas de hidrógeno es altamente explosivo. Si el sistema de
agua caliente no se ha usado por más de dos semanas, abra todos los grifos de agua caliente y deje que
salga el agua por varios minutos antes de usar la lavadora compacta.
20. NO altere ni repare el equipo usted mismo. De ser necesario, comuníquese con el servicio al cliente o con
un técnico de servicio calificado.
21. Para reducir el riesgo de descarga eléctrica o incendio, no use un prolongador ni un adaptador de
tomacorriente para conectar el equipo a una fuente de energía eléctrica. El aparato debe estar conectado a
tierra correctamente usando un tomacorriente de pared de tres puntas.
22. NO instale la lavadora en un área húmeda o mojada, o donde pueda mojarse o esté expuesta a las
condiciones meteorológicas externas. NO la limpie utilizando atomizadores de agua.
23. NO siente niños en la parte superior ni permita que niños o mascotas se suban a la lavadora. Revise SIEMPRE
el interior antes de usarla.
24. La puerta de vidrio podría estar muy caliente durante la operación. Mantenga a los niños y mascotas
alejados de la lavadora mientras esté en uso
25. Limpie regularmente el enchufe para eliminar polvo y sucio y así evitar fallas eléctricas.
26. Se recomienda desconectar el equipo cuando no esté en uso.
27. SIEMPRE asegúrese de conectar de forma correcta y segura el cable eléctrico al tomacorriente y las
mangueras de agua para evitar fugas o descarga eléctrica.
28. NO opere el equipo, ni manipule el enchufe con las manos húmedas.
29. La temperatura del agua de la lavadora no debería exceder los 131 °F (55 °C).
30. NO lave impermeables, abrigos gruesos ni artículos pesados similares.
31. NO lave a máquina materiales de fibra de vidrio (como cortinas y decoraciones para ventanas que
contengan materiales de fibra de vidrio). Pequeñas partículas podrían permanecer en la lavadora y pegarse a
las telas en las tandas siguientes, lo que puede causar irritación de la piel.
32. Cuando vaya a desechar el aparato o ponerlo fuera de servicio, asegúrese de quitar la puerta de el equipo y
cortar el cable de alimentación.
33. NO introduzca las manos en el tambor de lavado si el agitador se está moviendo.
.
Page 32

34. PRECAUCIÓN: El contenido puede estar CALIENTE cuando el ciclo de lavado y/o secado haya terminado.
LEA ESTA INFORMACIÓN DE SEGURIDAD
Y SÍGALA CUIDADOSAMENTE
GUARDE ESTAS INSTRUCCIONES
3
Page 33

ESPECIFICACIONES
42.5” (1080 mm)
Figura 1
23.5” (595 mm)
33.5”
(850 mm)
23.5” (595 mm)
Altura 33.5” (850 mm)
Anchura 23.5” (595 mm)
Profundidad 23.5” (595 mm)
Profundidad con puerta abierta 42.5” (1080 mm)
Peso 160.9 lbs. (73.0 kg)
Tensión/Frecuencia en c.a. 120V~60Hz
Corriente nominal 11.0A
Máx. capacidad de lavado 26.4 lbs. (12.0 kg)
Máx. capacidad de secado
Tamaño del tambor 2.7 pies cúbicos
(solamente para MCSCWD27W5/MCSCWD27S5/MCSCWD27G5) 17.6 lbs. (8.0 kg)
3
Page 34

INSTRUCCIONES DE INSTALACIÓN
1. La lavadora debe estar adecuadamente conectada a tierra. En el caso de corto circuito, la conexión a tierra
puede reducir el peligro de descarga eléctrica.
2. La lavadora deberá ser operada en un circuito separado de otros aparatos eléctricos.
PIEZAS INCLUIDAS
Antes de iniciar la instalación, corroborar que el paquete que
se encuentra dentro del tambor contiene todas las piezas
incluidas.
REQUISITOS DE INSTALACIÓN
REQUISITOS ELÉCTRICOS
1. Se requiere un suministro eléctrico de 120 v, 60 Hz, c.a. de 15 o 20 amp, con fusible. Se debería usar un fusible
con retardo de tiempo o un circuito que solo sirva a este aparato.
2. Esta lavadora viene con un cable de alimentación con enchufe de conexión a tierra de tres puntas.
3. Para minimizar posibles peligros de descarga, el cable deberá estar enchufado dentro de un tomacorriente de
tres puntas, adecuadamente conectado a tierra y de acuerdo con la codificación y ordenanzas locales. Si no
se dispone de un tomacorriente adecuado, es responsabilidad del cliente hacer que un elec
instale un tomacorriente adecuadamente conectado a tierra.
4. Si los códigos permiten y se utiliza un cable a tierra separado, se recomienda que un electricista calificado
determine si la descarga a tierra es adecuada.
5. NO HACER MASA en una tubería de gas.
6. Verifique con un técnico calificado si usted no está seguro si la lavadora está correctamente conectada a tierra.
7. NO COLOCAR un fusible en el circuito neutro o en el circuito de puesta a tierra.
8. Ciertas partes internas no han sido puestas a tierra intencionalmente y podrían presentar el riesgo de
descarga eléctrica solamente durante el servicio técnico. Personal de servicio técnico: no toque las siguientes
piezas mientras el aparato está energizado: Bomba de desagüe, bloqueo de la puerta, calentador de secado
(combo), motor del ventilador (combo).
REQUISITOS DE UBICACIÓN
El seleccionar la ubicación correcta de la lavadora mejora el rendimiento, reduce el ruido al mínimo y evita su
desplazamiento involuntario. La lavadora puede ser instalada bajo una mesada personalizada, en un sótano,
lavadero, armario empotrado o en área con un hueco.
Usted necesitará:
• Un calentador de agua fijado a 120° F (49° C).
• Un tomacorriente eléctrico con toma a tierra situado a menos de 6 pies (1,8 m) del lugar donde el cable de
alimentación está acoplado a la parte posterior de la lavadora.
• Grifos de agua fría y caliente situados dentro de 4 pies (1,2 m) de las válvulas de llenado de agua caliente y
fría, con una presión de agua de 20 - 100 psi (137,9 - 689,6 kPa).
• Un suelo plano con una pendiente máxima de 1” (25 mm) debajo de la lavadora. No se recomienda la
instalación de la lavadora en superficies de suelo blando, como alfombras ni superficies con refuerzo de
espuma.
3
Mangueras de
agua (2)
Conexión de
cable
Figura 2
Tapones del
orificio de
transporte (4)
tricista calificado
Page 35

• Un piso sólido y resistente para soportar la lavadora, cuyo peso total (agua y tanda) es de 200 lb (90 kg).
• No utilice la lavadora a temperaturas inferiores a 32 °F (0 °C). Podría quedar algo de agua en la lavadora,
ocasionándole daños en bajas temperaturas.
• La ubicación debe ser lo suficientemente grande para permitir que la puerta de la lavadora abra
completamente. La puerta se abre más de 90° y no es reversible.
• Debe considerarse espacio adicional para una mayor facilidad de instalación y mantenimiento.
• Se recomienda espacio mínimo de 1” (25 mm) en todos los lados de la lavadora para reducir la transferencia
de ruido.
• Pueden ser necesarios espacios libres adicionales para pared, puerta y molduras de piso.
• También debe considerarse el espacio para los aparatos acompañantes.
INSTALACIÓN
PRECAUCIÓN: Los materiales de embalaje pueden ser peligrosos
para los niños. Disponga de ellos correctamente y NO DEJE que los
niños jueguen con ninguno de los materiales de embalaje.
Antes de utilizar esta lavadora, deben retirarse los pernos de
transporte de la parte posterior de la máquina. Realice los
siguientes pasos para quitar los pernos:
1. Afloje todos los pernos y, a continuación, quítelos.
2. Inserte los tapones de los orificios de transporte dentro de
los orificios.
3. Conserve los pernos de transporte para uso futuro.
Asegúrese de quitar el pequeño triángulo de espuma junto con la
pieza de espuma en el fondo. En caso contrario, coloque con cuidado
el equipo hacia abajo y quítelo. Al desembalar la lavadora, verifique
que no haya piezas faltantes o dañadas. Si faltara algún elemento,
comuníquese con el servicio al cliente.
LEVELING THE WASHER
1. When positioning the washing machine, make sure the
legs are screwed in close to the cabinet. If not, turn them
to their original positions by hand or with a wrench and
tighten the nuts with a wrench.
2. After positioning the washing machine, push on all four
corners at the top of washing machine. If the washing
machine has any wobble, or is not stable when being
pressed, adjust the leg to level the machine.
3. To level the unit, loosen the lock nut with a wrench and
turn the leg by hand until it tightly contacts with the floor.
Press the leg with one hand and tighten the locking nut
close to the cabinet with the other hand.
4. Repeat steps 2 and 3 as needed.
5. Use a bubble level to check front to back, side to side, and
corner to opposite corner to ensure the washing machine
is level. Repeat above steps if needed.
3
Figura 3
Figura 4
Figura 5
Figura 6
Page 36

SISTEMA DE DESAGÜE
SISTEMA DE DESAGÜE VERTICAL
- PARED O SUELO
El desagüe vertical requiere una
tubería vertical con diámetro mínimo
de 2” (5 mm). La capacidad mínima
de transporte no puede ser menor a
17 galones (64 l) por minuto. La parte
superior de la tubería vertical debe
ser de al menos 24” (60 cm) de altura
y no más de 39” (100 cm) desde la
parte inferior de la lavadora.
SISTEMA DE DESAGÜE DEL TAMBOR DE LAVADO
El tambor de lavado necesita una capacidad mínima de
20 galones (76 l). La parte superior del tambor de lavado
debe estar al menos a 60 cm por encima del suelo.
2” (5 cm)
Figura 9 Figura 10
min. 24”
(61 cm)
max. 39”
(100 cm)
Figura 7 Figura 8
min. 24”
(60 cm)
max. 39”
(100 cm)
SISTEMA DE DESAGÜE DE PISO
El sistema de desagüe de piso requiere un
interruptor de efecto sifón que puede adquirirse
por separado. El interruptor de efecto sifón debe
estar a un
mínimo de
28” (71 mm)
de la parte
inferior de la
lavadora.
Podrían ser
min. 28”
(71 cm)
necesarias
mangueras
adicionales.
NOTA: Las imágenes son solo para referencia
INSTALACIÓN DE MANGUERA DE
ENTRADA DE AGUA INSTALACIÓN DE
MANGUERA DE ENTRADA DE AGUA
Conecte el extremo de la manguera de admisión de agua
con el codo de 90° a la parte posterior de la lavadora y
gire en sentido de las agujas del reloj para ajustar. Note la
posición de las tomas de entrada de agua fría y caliente.
Conecte el otro extremo de la manguera de entrada de
agua al grifo de agua fría o caliente correspondiente.
Ajuste girando en sentido de las agujas del reloj y accione
la válvula de agua para verificar si hay pérdida de agua.
Si encuentra alguna pérdida, verifique que las conexiones estén apretadas y que haya arandelas; repita el
procedimiento.
El conector a la toma de agua es un
codo a 90°.
3
Caliente
Figura 11
Frío
Figura 12
Page 37

ANTES DE USAR
LISTA DE VERIFICACIÓN Y PREPARACIÓN ANTES DE LAVAR
Lea cuidadosamente todas las instrucciones para evitar cualquier daño o problemas con la lavadora y la ropa.
SIEMPRE siga las instrucciones en las etiquetas sobre cuidado de la tela en prendas de ropa para un cuidado adecuado.
ADVERTENCIA: NO deje las piezas lavadas en la lavadora por largos ratos. Las piezas que se dejan en la lavadora
pueden ponerse mohosas y mancharse. La ropa también puede decolorarse si no se lava siguiendo la temperatura
de lavado indicada y las instrucciones.
SELECCIÓN DEL DETERGENTE
• Se recomienda usar detergente en polvo de baja espuma.
• Algunos detergentes podrían no disolverse por completo si hay mucha cantidad o si la temperatura del agua
es muy baja.
• El cloro puede dañar la ropa. Utilice cloro con cuidado y sigas las instrucciones del detergente y cuidado de
la vestimenta.
El método de lavado se basa en el peso de la ropa, nivel de suciedad, dureza del agua y recomendaciones del
fabricante del detergente.
NOTA: NO coloque ni guarde productos de lavandería, tales como detergentes, cloro o suavizante líquido, en la parte
superior de la lavadora/secadora. Limpie cualquier derrame de inmediato. Estos productos pueden dañar el acabado y
los controles. Mantenga los productos de lavandería en un espacio seguro y seco fuera del alcance de los niños.
SEPARE LA ROPA A LAVAR
Clasifique la ropa que va a lavar en algodón, fibra mixta, fibra sintética, seda, lana, etc. La ropa clara y oscura
también debería separarse.
NOTA: La tela nueva de color debe lavarse aparte.
• Accesorios: Los accesorios sueltos de algunas prendas pueden dañarse o dañar la lavadora. La ropa que
contenga botones o bordados debería voltearse antes de lavarla.
• Cierres: Las cremalleras deben cerrarse y los botones o ganchos deben estar firmemente fijados. Cualquier
cinta o lazo suelto debe amarrarse antes de lavarse.
• Materiales a prueba de agua: No se recomienda lavar telas impermeables ya que pueden dañarse o causar
daños a la lavadora y otras piezas que se estén lavando.
QUITAR TODOS LOS OBJETOS SUELTOS DE LA ROPA
Revise todos los bolsillos/compartimientos de la ropa a lavar y retire cualquier artículo suelto como monedas. Los
elementos sueltos podrían dañar la lavadora.
EQUILIBRAR LA CARGA
Lavar una prenda grande y pesada, como toallas, jeans, chaquetas, etc., puede causar una carga desequilibrada. Se
sugiere añadir uno o dos artículos más para equilibrar la carga y permitir un desagüe suave y completo.
3
Page 38

INSTRUCCIONES DE FUNCIONAMIENTO
PANEL DE CONTROL (SOLAMENTE PARA MCSCWD27W5/MCSCWD27S5 /MCSCWD27G5)
Figura 13
a
Press 3 sec. to set My Cycle
e f
k
g
h i j d c b
l m n
a. Encendido/Apagado: Presione [On/Off] para ENCENDER el equipo. Vuelva a presionar ese botón para
APAGAR el equipo.
NOTA: Si la lavadora está programada para un ciclo de lavado y no se la hace arrancar dentro de los 10
minutos, el ciclo se cancelará y el equipo se apagará automáticamente.
b. Inicio/Pausa: Presione [Start/Pause] para iniciar un ciclo de lavado. Presione [Start/Pause] otra vez para hacer
una pausa en el ciclo cuando la lavadora está en marcha. Vuelva a presionar [Start/Pause] para reanudar el
ciclo. Para añadir una prenda una vez comenzado el ciclo de lavado, presione este botón durante 3 segundos
antes de que el tambor se haya llenado de agua. Esto solo se puede hacer al comienzo del ciclo, antes de
que el agua llegue al fondo de la puerta. Espere que el tambor se detenga y la puerta se desbloquee, luego
agregue las prendas. Cierre la puerta y presione [Start/Pause] para seguir lavando.
c. Ciclos de lavado
1. Mi ciclo: Seleccione esta opción para guardar como predeterminado un programa de lavado que utilice
frecuentemente.
• Para programarlo, seleccione las configuraciones que desee utilizar y man
tenga presionado [Spin]
durante 3 segundos para guardarlo.
2. Lavado rápido: Seleccione esta opción para lavar pequeñas cargas de prendas no muy sucias.
3. Ropa delicada Seleccione esta opción para telas delicadas como camisas de vestir, nailon, etc.
• El ciclo de lavado funciona a una temperatura más baja.
4. Lana: Esta opción sólo se utiliza para lavar prendas de lana etiquetadas como “Lavable a máquina”.
• Para los tejidos de lana se deberán seleccionar el detergente y la temperatura del agua
apropiadas.
• Velocidad de centrifugado menor y menos agitación
5. Prendas de bebé: Para lavar ropa de bebé.
6. Sanitario: Utiliza agua caliente para que las enzimas del detergente actúen con más eficacia sobre
piezas difíciles de lavar o muy sucias.
3
Page 39

7. Normal/Algodón: Seleccione esta opción para prendas de algodón y telas que utiliza regularmente.
• Ciclo de lavado extendido con mayor intensidad
• Se recomendada para telas: algodón, ropa de cama, sábanas, camisetas, toallas, pantalones
vaqueros, etc.
• Se puede añadir el ciclo de secado.
8. Planchado permanente: Ciclo de lavado de fuerza moderada. Se usa para reducir las arrugas en la ropa
durante el lavado.
9. Lavado intenso: Seleccione esta opción para prendas grandes y pesadas.
• Se puede añadir el ciclo de secado.
10. Voluminosos/grandes: Seleccione esta opción para artículos voluminosos y grandes.
• Ciclo de lavado extendido
11. Ropa deportiva: Seleccione esta opción para ropa deportiva.
• Este ciclo de lavado limpia las prendas muy sucias.
12. Solo centrifugado: Seleccione esta opción para centrifugar una tanda por separado de un ciclo de
lavado normal.
• El agua con detergente o el agua de enjuague debe ser desagotada antes del centrifugado.
13. Enjuague y centrifugado: Seleccione esta opción para enjuagar y centrifugar una tanda por separado de
un ciclo de lavado normal.
• Esto puede ser útil para prevenir que manchas frescas se imp
regnen a las telas.
14. Limpieza del tambor: Seleccione esta opción para limpiar el tambor de lavado. Este programa utiliza
elevadas temperaturas para esterilizar el tambor a la vez que elimina el detergente y los residuos
acumulados. Agregue cloro para una mejor limpieza. Este programa se debería utilizar por lo menos una
vez al mes con uso regular. NO AÑADIR ninguna prenda ni lavar nada durante este programa.
d. Ciclos de secado
NOTA: La carga de secado máxima es inferior al tamaño de la carga de lavado. Corrobore el tamaño de la
carga a secar cuando se lo utilice.
• Secado automático: Seleccione esta opción para pasar automáticamente al ciclo de secado según la
carga. El programa de Secado automático tiene un ciclo de centrifugado de 12 minutos y un ciclo de
aire de enfriamiento de 45 minutos. Se recomienda secar en varios lotes de menor tamaño para que el
desempeño sea mejor.
• Tiempo de secado: Seleccione esta opción para fijar manualmente la duración del ciclo de secado.
Los programas de Tiempo de secado incluyen un ciclo de centrifugado de 12 minutos y un ciclo de
aire de enfriamiento de 25 minutos. Se recomienda secar en varios lotes de menor tamaño para que el
desempeño sea mejor.
Tiempo en minutos Capacidad
58 1.8 lbs. (0.8 kg)
88 2.2 lbs. (1.0 kg)
199 6.6 lbs. (3.0 kg)
NOTA: Notas importantes para ciclos de secado
Para lavar solamente, es posible llenar el equipo hasta la máxima capacidad de lavado; sin embargo, las cargas
de tamaño inferior a la de la máxima capacidad de lavado pueden mejorar el desempeño y la eficacia.
En los ciclos de lavado más ciclo de secado, o los ciclos de secado solamente, no llenar unidad superando la
3
Page 40

máxima capacidad de secado para permitir que la función de secado funcione de forma eficiente. Las cargas
de tamaño inferior a la capacidad máxima mejorarán el desempeño del equipo combinado.
NO cortar el suministro de agua ni quitar las conexiones de la manguera durante el ciclo de secado. Esta
es una unidad sin salida de aire que libere humedad durante el ciclo de secado. La secadora está equipada
con un bloqueo de seguridad de la puerta para garantizar temperaturas seguras y evitar quemaduras y otros
peligros de seguridad. La puerta quedará BLOQUEADA durante el ciclo de secado hasta que el equipo alcance
una temperatura segura. Una vez la temperatura sea segura, la puerta debe abrir y funcionar normalmente.
e. Ahorro de tiempo: Presione [Time Save] para disminuir el tiempo de lavado.
• Consulte la tabla Parámetros del ciclo de lavado para conocer los programas que pueden usar la
función Ahorro de tiempo.
f. Retraso: Presione [Delay] para fijar el tiempo de retraso en que debe comenzar el lavado.
• La luz del inicio con retraso parpadeará para indicar el tiempo de retraso. El tiempo de inicio del ciclo
puede
ser retrasado entre 1 y 24 horas.
• Fije el programa de lavado, presione el botón Delay para fijar el número de horas que se retrasará el
ciclo de lavado, luego presione Start/Pause.
• Para cancelar el tiempo de retraso, presione el botón Delay hasta que la hora muestre 0H.
g. Temperatura: Presione [Temp.] para fijar la temperatura de lavado deseada.
• Presione el botón para fijar la temperatura de lavado (Caliente+, Caliente, Tibia, Eco, Fría)
h. Centrifugado: Presione [Spin] para aumentar la velocidad del centrifugado.
• El tambor de la lavadora centrifuga a una velocidad de hasta 1.300 rpm, lo que reduce el tiempo de
secado y ahorra energía.
• Presione el botón hasta que se encienda la velocidad deseada (Sin centrifugado, Velocidad baja, media,
alta, máxima).
• Algunos tejidos (por ejemplo, prendas delicadas) requieren una velocidad de centrifugado menor.
• Las velocidades altas de centrifugado no están disponibles en todos los ciclos.
i. Suciedad: Presione [Soil] para aumentar el tiempo para artículos más sucios.
• Hay tres (3) opcion
• Cada barra aumenta el tiempo de lavado base por 15 minutos.
j. Nivel de secado: Presione el botón Secar continuamente para elegir el nivel de secado: Secado Extra/Secado
Normal/Secado Suave.
k. Bloqueo infantil: Presione [Delay] y [Temp.] al mismo tiempo durante 3 segundos para bloquear/desbloquear
el panel de control.
• El botón de encendido/apagado seguirá funcionando.
l. Enjuague adicional: Presione los botones [Temp.] y [Spin] al mismo tiempo para añadir un enjuague adicional
al ciclo seleccionado.
m. Mi ciclo: Después de modificar un ciclo de lavado, mantenga pulsado el botón [Spin] para guardar la
configuración.
• Se puede seleccionar rápidamente este ciclo para el siguiente lavado girando la perilla hacia Mi Ciclo.
• Anule la configuración guardada manteniendo pulsado el botón [Spin] nuevamente después de
seleccionar un ciclo y opciones diferentes.
n. Sonido: Presione el botón [Soil] durante 3 segundos para encender o apagar el sonido.
es de nivel de suciedad.
Page 41

PANTALLA (SOLAMENTE PARA MCSCWD27W5/MCSCWD27S5/MCSCWD27G5)
c
b
a
d e f g
a. Indicador de ciclo: Indica la etapa del ciclo de lavado/secado.
•
•
b. Reloj: Indica el tiempo restante para el final del ciclo de lavado/secado.
c. Indicador de funciones: Indica las funciones que están activas.
•
•
•
•
d. Temperatura del agua: Indica la temperatura seleccionada.
e. Velocidad de centrifugado: Indica la velocidad de centrifugado seleccionada.
f. Indicador de nivel de suciedad: Indica el nivel de suciedad seleccionado.
g. Nivel de suciedad: Indica el nivel de secado seleccionado.
•
: Prelavado • : Lavado • : Enjuague • : Centrifugado
: Ahorro de tiempo • : Enjuague adicional • : Secado
Sonido: Indica que los sonidos están activados. Cuando la luz está apagada, el equipo está con el
sonido en silencio.
Bloqueo de puerta: La máquina se bloquea por la duración del ciclo.
Bloqueo infantil: El bloqueo infantil está activado.
Añadir una prenda
Secado adicional • Secado normal • Secado suave
NOTA: La carga de secado máxima es inferior al tamaño de la carga de lavado.
Figura 14
ePress 3 sec. to set My Cycl
4
Page 42

PANEL DE CONTROL (SOLAMENTE PARA MCSFLW27W/MCSFLW27S)
Press 3 sec. to set My Cycle
Figura 15
a
d e
f
j
g h i c b
k l
a. Encendido/Apagado: Presione [On/Off] para ENCENDER el equipo. Vuelva a presionar ese botón para
APAGAR el equipo.
NOTA: Si la lavadora está programada para un ciclo de lavado y no se la hace arrancar dentro de los 10
minutos, el ciclo se cancelará y el equipo se apagará automáticamente.
b. Inicio/Pausa: Presione [Start/Pause] para iniciar un ciclo de lavado. Presione [Start/Pause] otra vez para hacer
una pausa en el ciclo cuando la lavadora está en marcha. Vuelva a presionar [Start/Pause] para reanudar el
ciclo. Para añadir una prenda una vez comenzado el ciclo de lavado, presione este botón durante 3 segundos
antes de que el tambor se haya llenado de agua. Esto solo se puede hacer al comienzo del ciclo, antes de
que el agua llegue al fondo de la puerta. Espere que el tambor se detenga y la puerta se desbloquee, luego
agregue las prendas. Cierre la puerta y presione [Start/Pause] para seguir lavando.
c. Ciclos de lavado
1. Mi ciclo: Seleccione esta opción para guardar como predeterminado un programa de lavado que utilice
frecuentemente.
• Para programarlo, seleccione las configuraciones que de
see utilizar y mantenga presionado [Spin]
durante 3 segundos para guardarlo.
2. Lavado rápido: Seleccione esta opción para lavar pequeñas cargas de prendas no muy sucias.
3. Ropa delicada Seleccione esta opción para telas delicadas como camisas de vestir, nailon, etc.
• El ciclo de lavado funciona a una temperatura más baja.
4. Lana: Esta opción sólo se utiliza para lavar prendas de lana etiquetadas como “Lavable a máquina”.
• Para los tejidos de lana se deberá seleccionar el detergente y la temperatura del agua apropiadas.
• Velocidad de centrifugado menor y menos agitación
5. Prendas de bebé: Para lavar ropa de bebé.
6. Sanitario: Utiliza agua caliente para que las enzimas del detergente actúen con más eficacia sobre
piezas difíciles de lavar o muy sucias.
7. Lavado en frío: Solamente usa agua fría.
8. Limpieza del tambor: Seleccione esta opción para limpiar el tambor de lavado. Este programa utiliza
elevadas temperaturas para esterilizar el tambor a la vez que elimina el detergente y los residuos
acumulados. Agregue cloro para una mejor limpieza. Este programa se debería utilizar por lo menos una
4
Page 43

vez al mes con uso regular. NO AÑADIR ninguna prenda ni lavar nada durante este programa.
9. Normal/Algodón: Seleccione esta opción para prendas de algodón y telas que utiliza regularmente.
• Ciclo de lavado extendido con mayor intensidad
• Se recomendada para telas: algodón, ropa de cama, sábanas, camisetas, toallas, pantalones
vaqueros, etc.
10. Planchado permanente: Ciclo de lavado de fuerza moderada. Se usa para reducir las arrugas en la ropa
durante el lavado.
11. Lavado intenso: Seleccione esta opción para prendas grandes y pesadas.
12. Voluminosos/grandes: Seleccione esta opción para artículos voluminosos y grandes.
• Ciclo de lavado extendido
13. Ropa deportiva: Seleccione esta opción para ropa deportiva.
• Este ciclo de lavado limpia las prendas muy sucias.
14. Solo centrifugado: Seleccione esta opción para centrifugar una tanda por separado de un ciclo de
lavado normal.
• Antes de centrifugar, desagotar el agua con detergente o el agua de enjuague.
15. Solo desagüe Se usa para el desagüe del agua en el equipo.
16.
Enjuague y centrifugado: Seleccione esta opción para enjuagar y centrifugar una tanda por separado de
un ciclo de lavado normal.
• Esto puede ser útil para prevenir que manchas frescas se impregnen a las telas.
d. Ahorro de tiempo: Presione [Time Save] para disminuir el tiempo de lavado.
• Consulte la tabla Parámetros del ciclo de lavado para conocer los programas que pueden usar la
función Ahorro de tiempo.
e. Demora: Presione [Delay] para fijar el tiempo de retraso en que debe comenzar el lavado.
• La luz del inicio del retraso parpadeará para indicar el tiempo de retraso. El tiempo de inicio del ciclo
puede ser retrasado entre 1 y 24 horas.
• Fije el programa de lavado, presione el botón Delay para fijar el número de horas que se retrasará el
ciclo de lavado, luego presione Start/Pause
• Para cancelar el tiempo de retraso, presione el botón Delay hasta que la hora muestre 0H.
f. Temperatura: Presione [Temp.] para fijar la temperatura de lavado deseada.
• Presione el botón para fijar la temperatura de lavado (Caliente+, Caliente, Tibia, Eco, Fría)
g. Centrifugado: Presione [Spin] par
a aumentar la velocidad del centrifugado.
• El tambor de la lavadora centrifuga a una velocidad de hasta 1.300 rpm, lo que reduce el tiempo de
secado y ahorra energía.
• Presione el botón hasta que se encienda la velocidad deseada (Sin centrifugado, Velocidad baja, media,
alta, máxima).
• Algunos tejidos (por ejemplo, prendas delicadas) requieren una velocidad de centrifugado menor.
• Las velocidades altas de centrifugado no están disponibles en todos los ciclos.
h. Suciedad: Presione [Soil] para aumentar el tiempo para artículos más sucios.
• Hay tres (3) opciones de nivel de suciedad.
• Cada barra aumenta el tiempo de lavado base por 15 minutos.
i. Función: Use para seleccionar las funciones durante el ciclo de lavado.
4
Page 44

j. Bloqueo infantil: Presione [Delay] y [Temp.] al mismo tiempo durante 3 segundos para bloquear/desbloquear
el panel de control.
• El botón de encendido/apagado seguirá funcionando.
k. Mi ciclo: Después de modificar un ciclo de lavado, mantenga pulsado el botón [Spin] para guardar la
configuración.
• Se puede seleccionar rápidamente este ciclo para el siguiente lavado girando la perilla hacia Mi Ciclo.
• Anule la configuración guardada manteniendo pulsado el botón [Spin] nuevamente después de
seleccionar un ciclo y opciones diferentes.
l. Sonido: Presione el botón [Soil] durante 3 segundos para encender o apagar el sonido.
PANTALLA (SOLAMENTE PARA MCSFLW27W/MCSFLW27S)
Figura 16
Press 3 sec. to set My Cycle
c
b
a
d e f g
e
a. Indicador de ciclo: Indica la etapa del ciclo de lavado/secado.
•
•
: Prelavado • : Lavado • : Enjuague
: Centrifugado • : Ahorro de tiempo
b. Reloj: Indica el tiempo restante para el final del ciclo de lavado/secado.
c. Indicador de funciones: Indica las funciones que están activas.
Sonido: Indica que los sonidos están activados. Cuando la luz está apagada, el equipo está con el
•
sonido en silencio.
•
•
•
Bloqueo de puerta: La máquina se bloquea por la duración del ciclo.
Bloqueo infantil: El bloqueo infantil está activado.
Añadir una prenda
d. Temperatura del agua: Indica la temperatura seleccionada.
e. Velocidad de centrifugado: Indica la velocidad de centrifugado seleccionada.
f. Indicador de nivel de suciedad: Indica el nivel de suciedad seleccionado.
g. Funciones adicionales: Indica las funciones adicionales seleccionadas.
•
Enjuague adicional •
Plancha fácil
4
•
Prelavado
Page 45

INSTRUCCIONES DE FUNCIONAMIENTO
LAVADO DE LA ROPA
Antes de lavar ropa por primera vez, la lavadora debe correr con una pequeña cantidad de detergente y sin ropa.
Siga las instrucciones siguientes.
1. Conecte fuente de energía y agua.
2. Coloque una pequeña cantidad de detergente en el dispensador de detergente y cierre.
3. Presione el botón [On/Off] (Encendido/Apagado)
4. Gire el ciclo a [Normal/Algodón] y presione el botón [Temp.] hasta que aparezca la palabra Hot [Caliente].
5. Pulse el botón [Start/Pause].
CAJÓN DISPENSADOR DE DETERGENTE
I. Pre-detergente o jabón en polvo
II. Detergente principal
. Suavizante
Una vez que haya cargado la lavadora y añadido los productos de lavandería,
usted está listo para lavar y secar.
Figura 18
INICIAR LA LAVADORA
1. Asegúrese de que la unidad esté correctamente conectada a una fuente de alimentación y las líneas de agua.
El grifo debe ser abierto (en la posición abierta).
Coloque la tanda de lavado en el tambor.
2. Pulse el botón [On/Off ]. El panel de control se iluminará.
3. Gire el selector de ciclo al ciclo deseado en función de la tanda. El panel de la pantalla LCD reflejará el las
funciones predeterminadas de ese ciclo.
4. Si desea modificar cualquiera de las funciones predeterminadas para el ciclo deseado, pulse sobre las
distintas opciones hasta que el panel de la pantalla refleje la configuración deseada.
NOTA: Si usted tiene un ciclo favorito, una vez que modifique todas las funciones, pulse y mantenga
pulsada la tecla [Spin] para guardarlo como Mi ciclo. Según el ciclo deseado, puede que no estén disponibles
todas las opciones.
5. Presione el botón [Start/Pause] para iniciar el ciclo. Una vez el ciclo comienza, la puerta se bloqueará
automáticamente y ciclo de lavado comenzará. El panel de la pantalla cambiará para reflejar el tiempo
estimado y el estado de lavado. En cualquier momento, puede hacer una pausa en el ciclo presionando el
botón [Start/Pause].
Page 46

PARÁMETROS DE CICLOS DE LAVADO
PARÁMETROS DE CICLOS DE LAVADO (SOLAMENTE PARA MCSCWD27W5/MCSCWD27S5/MCSCWD27G5)
NOTA: La carga de secado máxima es inferior al tamaño de la carga de lavado.
Programa
Normal/Algodón
Planchado
permanente
Lavado intenso
Voluminosos
/grandes
Ropa deportiva 13.2 (6.0) Tibio 2:08
Solo centrifugado 26.4 (12.0) - 0:12 - -
Enjuague y
centrifugado
Limpieza del
tambor
Tiempo de secado
Secado automático
Sanitario 13.2 (6.0) Caliente 3:09 -
Máx. carga de
lavado/secado
en lb (kg)
26.4/17.6
(12.0/8.0)
13.2 (6.0) Tibio 1:35
26.4/17.6
(12.0/8.0)
13.2 (6.0) Tibio 2:18
26.4 (12.0) - 0:20 -
1.1/2.2/5.5
(0.5/1.0/2.5)
17.6 (8.0) - 4:18 - -
Temperatura
Tibio 1:04
Caliente 2:36
- Caliente + 1:58 - -
- 1:28 - -
Tiempo
predeterminado
(H:M)
Ahorro
de
tiempo
Enjuague
adicional
Nivel de
Retraso
suciedad
- - medio
Velocidad
de
centrifugado
Luz Baja
- medio
Luz medio
Luz medio
- alto
- alto
- -
- muy alto
- muy alto
- medio
Prendas de bebé 26.4 (12.0) Eco 1:39 -
Lana 4.4 (2.0) Tibio 1:37 -
Ropa delicada 5.5 (2.5) Eco 1:00 -
Lavado rápido 4.4 (2.0) Frío 0:20 - -
NOTA:
es función Opcional.
NOTA: es función Secado.
4
Luz medio
- Baja
- Baja
- medio
Page 47

PARÁMETROS DE CICLOS DE LAVADO (SOLAMENTE PARA MCSFLW27W/MCSFLW27S)
Programa
Normal
/Algodón
Planchado
permanente
Lavado
intenso
Voluminosos
/grandes
Ropa
deportiva
Solo
centrifugado
Solo
desagüe
Enjuague y
centrifugado
Limpieza
del tambor
Lavado
en frío
Sanitario 13.2 (6.0) Caliente 3:09 Medio -
Prendas
de bebé
Lana 4.4 (2.0) Tibio 1:37 Baja - -
Ropa
delicada
Lavado
rápido
NOTA:
Máx. carga de
lavado/secado
en lb (kg)
26.5 (12.0) Tibio 1:04 Medio
13.2 (6.0) Tibio 1:35 Baja
26.5 (12.0) Caliente 2:36 Medio
13.2 (6.0) Tibio 2:18 Medio
13.2 (6.0) Tibio 2:08 Medio
26.5 (12.0) - 0:12 Alto - -
26.5 (12.0) - 0:01 - - - - -
26.5 (12.0) - 0:20 Alto -
26.5 (12.0) Frío 1:42 Medio
26.5 (12.0) Eco 1:39 Medio
5.5 (2.5) Eco 1:00 Baja - - - -
4.4 (2.0) Frío 0:20 Medio - - - -
es función Opcional.
Temperatura
- Caliente 1:58 - - - - -
Tiempo
predeterminado
(H:M)
Velocidad de
centrifugado
Ahorro
de
tiempo
-
Enjuague
adicional
-
Plancha
fácil
Prelavado Retraso
-
-
-
-
NOTA: es función Obligatoria.
NOTA: PROGRAMA DE PRUEBA DE ENERGÍA - NORMAL/ALGODÓN
El programa “Normal/Algodón” es el programa de lavado estándar al que se refiere la información en la etiqueta y
la guía de energía, y es adecuado para lavar ropa de algodón con suciedad normal y es el programa más eficiente,
en términos de consumo combinado de energía y agua, para lavar ese tipo de ropa. La temperatura real del agua
podría diferir de la temperatura del ciclo declarado.
NOTA: Los parámetros en esta tabla son solo para referencia del usuario. Los parámetros reales podrían variar de
los parámetros indicados en la tabla anterior.
FUNCIÓN DE MEMORIA POR PÉRDIDA DE ENERGÍA
En caso de pérdida de energía, la lavadora reanudará automáticamente el funcionamiento de las configuraciones
previas, cuando se restablezca la energía
4
Page 48

CUIDADO Y MANTENIMIENTO
Antes de cualquier operación de mantenimiento, asegúrese de desenchufar la corriente del tomacorriente y cerrar
la llave.
ADVERTENCIA:
• NO UTILIZAR solventes para limpiar el equipo. La lavadora podría dañarse o podrían generarse gases tóxicos.
• JAMÁS rociar agua sobre la lavadora para limpiarla.
• NO UTILIZAR detergentes que contengan PCMX para limpiar la máquina lavadora.
• Ciertas partes internas no han sido puestas a tierra intencionalmente y podrían presentar el riesgo de
descarga eléctrica solamente durante el servicio técnico. Personal de servicio técnico: NO TOQUE las partes
siguientes mientras el aparato está energizado: Bomba de desagüe, bloqueo de la puerta, calentador de
secado (combo), motor del ventilador (combo).
LIMPIEZA Y MANTENIMIENTO DEL GABINETE DE LA LAVADORA
Un adecuado mantenimiento de la lavadora puede prolongar su vida útil. La superficie puede ser limpiada con
detergentes neutros no abrasivos cuando sea necesario. En caso de desbordamiento de agua, retirar el agua de
inmediato con un paño. NO PERMITIR que objetos filosos golpeen el gabinete.
NOTA: NO USAR ácido fórmico, solventes que lo contengan diluido ni productos equivalentes.
LIMPIEZA DEL TAMBOR INTERNO
Limpie de inmediato cualquier elemento corrosivo dejado por artículos de metal con un detergente sin cloro.
NO USAR lana de acero.
LIMPIEZA DE LA CAJA PARA DETERGENTES
1. Abra la caja para detergentes.
2. Oprima la flecha y saque el conjunto deslizándolo hacia afuera. (Figura 17-1)
3. Levante el sujetador, quite la tapa del suavizante y lave todas las secciones con agua. (Figura 17-2)
4. Vuelva a colocar la tapa del suavizante e introduzca el cajón de nuevo en su lugar. (Figura 17-3)
Figura 17
Figura 17-1 Figura 17-2 Figura 17-3
LIMPIEZA DEL FILTRO DE ENTRADA
Podría ser necesario limpiar el filtro de entrada si no hubiera suficiente agua o no entrara agua cuando se abre el grifo.
Para limpiar el filtro:
4
Page 49

1. Cierre el grifo.
2. Seleccione cualquier función menos “Lavado” o “Desagüe”.
3. Presione el botón` “Start/Pause” y mantenga el ciclo en funcionamiento durante unos 40 segundos.
4. Quite la manguera de entrada de agua del grifo.
5. Lave con agua el filtro.
6. Vuelva a conectar la manguera de entrada de agua.
LAVADO DEL FILTRO EN LA LAVADORA
Figura 18
1. Quite la manguera de entrada de agua de la parte posterior de
la máquina.
2. Saque el filtro con alicates de punta larga y lavar con agua.
3. Vuelva a colocar el filtro en su sitio.
4. Vuelva a conectar la manguera de entrada de agua.
5. Abra el grifo y corrobore que no haya pérdidas de agua.
6. Cierre el grifo.
QUITAR CUALQUIER SUSTANCIA EXTRAÑA DEL FILTRO DE LA BOMBA DE DESAGÜE
El filtro de la bomba de desagüe puede filtrar pequeñas sustancias extrañas de la ropa lavada. Limpie
periódicamente el filtro para asegurar el funcionamiento normal de la lavadora.
Si la máquina no se vacía y/o no centrifuga, o si hace ruidos inusuales durante el drenado durante
inspeccione la bomba en busca de objetos (monedas, por ejemplo) que bloqueen la bomba.
Para acceder y limpiar el filtro:
1. Abra la tapa de acceso inferior. (Figura 19)
Figura 19
2. Quite la tapa de la manguera de desagüe de
emergencia y deje escurrir el agua. Se
recomienda tener un recipiente listo para
atrapar el agua restante. (Figura 20)
3. Vuelva a colocar la manguera de desagüe
de emergencia y abra el filtro haciéndolo
girar en sentido contrario a las agujas del
reloj. (Figura 21)
Figura 21
4. Quite cualquier objeto que se encuentre
en el filtro y vuelva a colocarlo, trabándolo
haciéndolo girar en sentido de las agujas del
reloj. (Figura 22)
ADVERTENCIA: Para no quemarse, esto se
deberá hacer una vez enfriada el agua caliente
dentro de la lavadora.
ADVERTENCIA: Cuando el aparato está en uso y según el programa seleccionado, podría haber agua caliente en
la bomba. Jamás quite la tapa de la bomba durante un ciclo de lavado: espere siempre hasta que el aparato haya
terminado el ciclo y esté vacío. Al volver a colocar la tapa, asegúrese de que quede firmemente en su sitio.
el drenado,
Figura 20
Manguera de
desagüe de
emergencia
Figura 22
4
Page 50

DESCONGELAMIENTO DE UNA LAVADORA
Si la temperatura cae por debajo de cero y su lavadora se congela, usted puede:
1. Desconectar la fuente de alimentación de la lavadora.
2. Lavar la conexión del grifo con agua tibia para aflojar la manguera de entrada de agua.
3. Quitar la manguera de entrada de agua y sumergirla en agua tibia.
4. Verter agua tibia dentro del tambor de lavado y esperar 10 minutos.
5. Volver a conectar la manguera de entrada de agua al grifo y verificar si la entrada y la salida están
funcionando normalmente.
NOTA: Cuando se vuelve a utilizar la lavadora, corroborar que la temperatura ambiente esté por arriba de 32 °F (0 °C).
PARA PREVENIR EL CONGELAMIENTO
Si la lavadora se encuentra en una habitación donde el agua pueda congelarse rápidamente, desagote por completo
el agua remanente en las mangueras de salida y de entrada de agua.
Quite el agua remanente en la manguera de entrada de agua:
1. Cierre el grifo.
2. Desatornille la manguera de entrada de agua del grifo y
coloque su extremo dentro del recipiente.
3. Inicie cualquier ciclo, menos el de Lavado o el de Desagüe.
El agua de la manguera de entrada, si la hubiera, se
desagotará durante unos 40 segundos.
4. Vuelva a conectar la manguera de entrada de agua al grifo.
Cordón de
apertura de
puerta de
emergencia
Figura 23
LIBERACIÓN DE LA PUERTA DE EMERGENCIA
En caso de una falla de electricidad o cualquier otro problema y que no se pueda abrir la puerta, si fuera necesario
hacerlo, hale el cordón dentro del panel de acceso. Asegurarse de volver a guardar el cordón luego de abrir la puerta.
PRECAUCIÓN: El cordón de apertura de emergencia no se puede usar durante el lavado. Si el equipo está en
funcionamiento, espere hasta que se detenga y que el interior se enfríe a una temperatura segura antes de abrir la
puerta.
Page 51

SOLUCIÓN DE PROBLEMAS
DETECCIÓN DE CÓDIGOS DE ALARMA
Código de alarma Causa del problema Solución
E30
E10 Problema con el flujo de agua.
E21
E12 Desbordamiento de agua. Vuelva a poner en marcha la lavadora.
EXX
La puerta no está correctamente
cerrada.
El agua tarda demasiado tiempo
en desagotar.
Otro. Vuelva a poner en marcha la
máquina para que desaparezca.
NOTA: Luego de probar la solución, vuelva a poner en marcha la máquina. Si el código persiste, comuníquese con
el servicio al cliente.
Cuando la lavadora necesite servicio técnico, comuníquese con nuestro departamento de servicio al cliente y un
representante intentará diagnosticar el problema. NO desarme la lavadora sin autorización previa. Hacerlo anularía
su garantía.
Si la lavadora no funciona correctamente, o suena una alarma, revise las siguientes directrices para encontrar
soluciones posibles a problemas comunes o indicadores de alarma.
LISTA DE PROBLEMAS Y POSIBLES SOLUCIONES
Verifique si hay ropa atrapada en la puerta.
Cierre la puerta y vuelva a poner en marcha.
Revise si la presión de agua es demasiado baja.
Corrobore que la manguera de entrada de agua no esté doblada
o bloqueada.
Revise si el filtro de la válvula de entrada está bloqueado.
Revise si la manguera de desagüe está tapada.
Llame al servicio al cliente si el código persiste.
Problema Causa Solución
Revise si la puerta está bien cerrada.
La lavadora no se pone
en marcha.
No es posible abrir la
puerta.
Fallo de calentamiento
Fuga de agua
La traba de seguridad está
activada.
El termistor NTC (sensor de
temperatura) está dañado y
la tubería de calefacción está
desgastada.
La conexión entre la manguera
de entrada o de salida de agua
y el grifo o la lavadora no está
ajustada.
La tubería de desagüe está
tapada.
Revise si el enchufe de energía eléctrica está bien insertado.
Revise si el suministro de agua está abierto.
Revise si el botón “On/Off” está presionado.
Revise el botón “Start/Pause” está presionado.
Desconecte la electricidad.
Comuníquese con servicio al cliente.
Revise y ajuste las mangueras de agua.
Limpie la manguera de salida y desagüe.
Page 52

El agua que desborda de
la base de la máquina.
El indicador o la pantalla
no se encienden.
Hay restos de
detergente
en la bandeja para
detergente
La ropa no se limpia lo
suficiente
Ruidos anormales
o vibraciones
La manguera de entrada de agua
no está conectada firmemente.
La manguera de salida pierde
agua.
La fuente de alimentación está
desconectada.
Arregle la manguera de entrada de agua.
Vuelva a colocar la manguera de desagüe.
Revise si el enchufe está bien conectado y que la
electricidad está encendida.
La tarjeta de PC tiene problemas.
Comuníquese con servicio al
El arnés tiene problemas de conexión.
cliente.
Limpiar y secar la bandeja.
El polvo de lavar está húmedo y
endurecido.
Use detergentes líquidos o un detergente especial para
lavadoras de carga frontal de alta eficiencia.
La ropa está muy sucia. Seleccione un programa de lavado adecuado.
Insuficiente cantidad de
detergente.
Corrobore que ha seguido las instrucciones para agregar la
cantidad de detergente.
Asegúrese de que se hayan quitado los pernos de transporte.
Asegúrese de que el gabinete esté instalado sobre una
superficie firme y a nivel.
Revise que no haya elementos extraños dentro del equipo.
Asegúrese de que las patas niveladoras estén a nivel.
5
Page 53

Garantía limitada
MC Appliance Corporation garantiza que todas las Lavadora y Combo de Lavadora y Secadora sin ventilación carecen de defectos en el material y la
mano de obra y acuerda solucionar cualquiera de estos defectos o instalar la(s) parte(s) nueva(s) (a elección de la compañía) en caso de que la unidad
haya fallado durante el periodo de garantía. Las partes y gastos de reparación están cubiertos en esta unidad por un periodo de un año a partir de la
fecha de compra. Es necesario presentar una copia del recibo o factura de compra con fecha para obtener los servicios de la garantía, el reemplazo o
el reembolso.
Esta garantía cubre los aparatos que se usen dentro de los Estados Unidos contiguos, Alaska, Hawái y Puerto Rico. La garantía no cubre lo siguiente:
• Daños debido al daño del envío o a la instalación incorrecta.
• Daños debido al mal uso o abuso.
• Pérdidas de contenido debido a falla de la unidad.
• Componentes como filro, etc.
• Las reparaciones se realizaron por los agentes desautorizados del servicio.
• Llamadas de servicio que no implican defectos en material y la ejecución tal como instrucción en el uso apropiado del producto o de la
instalación incorrecta.
• Reemplazo o reajuste de los fusibles o de los interruptores de la casa.
• Falla de este producto si se usa con fines distintos a los que fue diseñado.
• Costes de la disposición de unidades falladas no vueltas a nuestra fábrica.
• Todos los gastos de entrega/instalación incurridos como resultado de una unidad que no cumple con lo especificado.
• Gastos de viajes y el transporte de los productos principales de servicio si su aparato está situado en una zona remota donde el servicio
por un técnico de servicio no está disponible.
• La remoción y reinstalación de su gran aparato, si está instalado en un lugar inaccesible o no está instalado de conformidad con las
instrucciones de instalación publicadas.
• Restituciones por productos no reparables se limita al precio pagado por la unidad por el recibo de compra.
• Esta garantía es intransferible. Esta garantía es válida exclusivamente para el comprador original y no se extiende a ningún otro propietario
o propietarios subsiguientes.
Limitaciones de remedios y exclusiones:
La reparación del producto de acuerdo con los términos de este documento, es el único y exclusivo remedio determinado en esta garantía
limitada. Todas y cada una de las garantías implicadas, incluyendo la calidad de comerciable y capacidad para un propósito particular, se limitan
mediante la presente a un año o el periodo más corto permitido por la ley. MC Appliance Corporation no es responsable por daños incidentales ni
resultantes y ningún representante o persona alguna están autorizados para asumir de par te nuestra ninguna otra responsabilidad en relación con
la venta de este producto. Bajo ninguna circunstancia se le permite al consumidor regresar esta unidad a la fábrica sin consentimiento pre
escrito de MC Appliance Corporation.
Algunos estados prohíben la exclusión o limitación por daños incidentales o resultantes, o limitaciones en las garantías implícitas. Esta garantía le
otorga a usted derechos legales específicos, y usted puede también tener otros derechos que varían según la entidad federa!va donde se encuentre.
Modelo
MCSCWD27W5/MCSCWD27S5
MCSFLW27W/MCSFLW27S/MCSCWD27G5
Para servicio o asistencia, llame por favor al 888-775-0202 . O visítenos en www.mcappliance.com para solicitar el servicio de garantía o repuestos.
Piezas Trabajo Tipo de servicio
Uno año Uno año En su casa
vio por
5
Page 54

CNA International, Inc. realiza negocios bajo el nombre de MC Appliance Corporation.
Derechos reservados.
El logotipo Magic Chef® es una marca registrada de CNA International, Inc.
www.mcappliance.com Impreso en China
 Loading...