

Page 1

MapSend™ Series Software Quick Reference Guide
Introduction:
Magellan’s MapSend™ Streets Gold and MapSend™ Topo of the United States
CD-ROM enhances the utility of Magellan map-capable receivers with even
greater mapping detail and useful information management capabilities.
MapSend will upload data to the GPS receiver to view fully detailed street
maps for any region in the United States. MapSend will also locate street
addresses on a map. You can also find any USA city and airport, along with
many parks, lakes, streams, rivers, and dams. MapSend contains a wide assortment of built-in POIs that you can use for route management. You can
upload any category of POIs to your GPS receiver to be used the same as any
waypoint you have in your receiver. The software’s waypoint and route management features allow users to upload, download and customize data for
specific navigation needs. For route planning purposes, MapSend Streets
automatically measures the distance of each leg and the total distance to the
destination. MapSend Topo of the United States also includes topographic
maps and a vertical profile utility. Both versisons of MapSend are designed for
use with Windows 95, 98 or NT.
This Quick Reference Guide is a supplement to the User Manual that is available to you from within the MapSend software. While using MapSend, you
can refer to the User Manual and get detailed answers to your questions about
this software.
Page 2

Connecting the GPS Receiver to Personal Computer
1. Attach the PC cable to the back of the GPS receiver. Using the captive screw
that is attached to the connector, tighten it into the back of the receiver.
2. Disconnect power from your personal computer and connect the other end
of the PC cable with the DIN-9 connector to an available COM port. Remember
which port you are using as you will need this information for a successful
transfer of data to the GPS receiver.
3. Turn on the GPS receiver.
4. Turn on your personal computer.
5. Make sure you have correctly installed the MapSend software.
(Please refer to the back cover for installation instructions.)
6. Start the MapSend program from the Windows start menu or simply insert the
MapSend CD-ROM and click on the “Run” button.
When starting MapSend , please note that it may take some time on slower
computers for the program to bring all the necessary files from the disk into
memory.
7. From the Options menu choose GPS Settings...
8. In the GPS Settings dialog, do the following:
• Click the Autodetect button to let the program find the appropriate COM
port and baud rate.
OR
• Choose the required COM port (i.e. that which your PC is connected to the
GPS receiver). The MapSend program will automatically detect your GPS
receivers baud rate.
• Choose the Test button.
• In the Status box you will see the test results. If the test succeeds, then
the Test button is replaced with the OK button.
Page 3
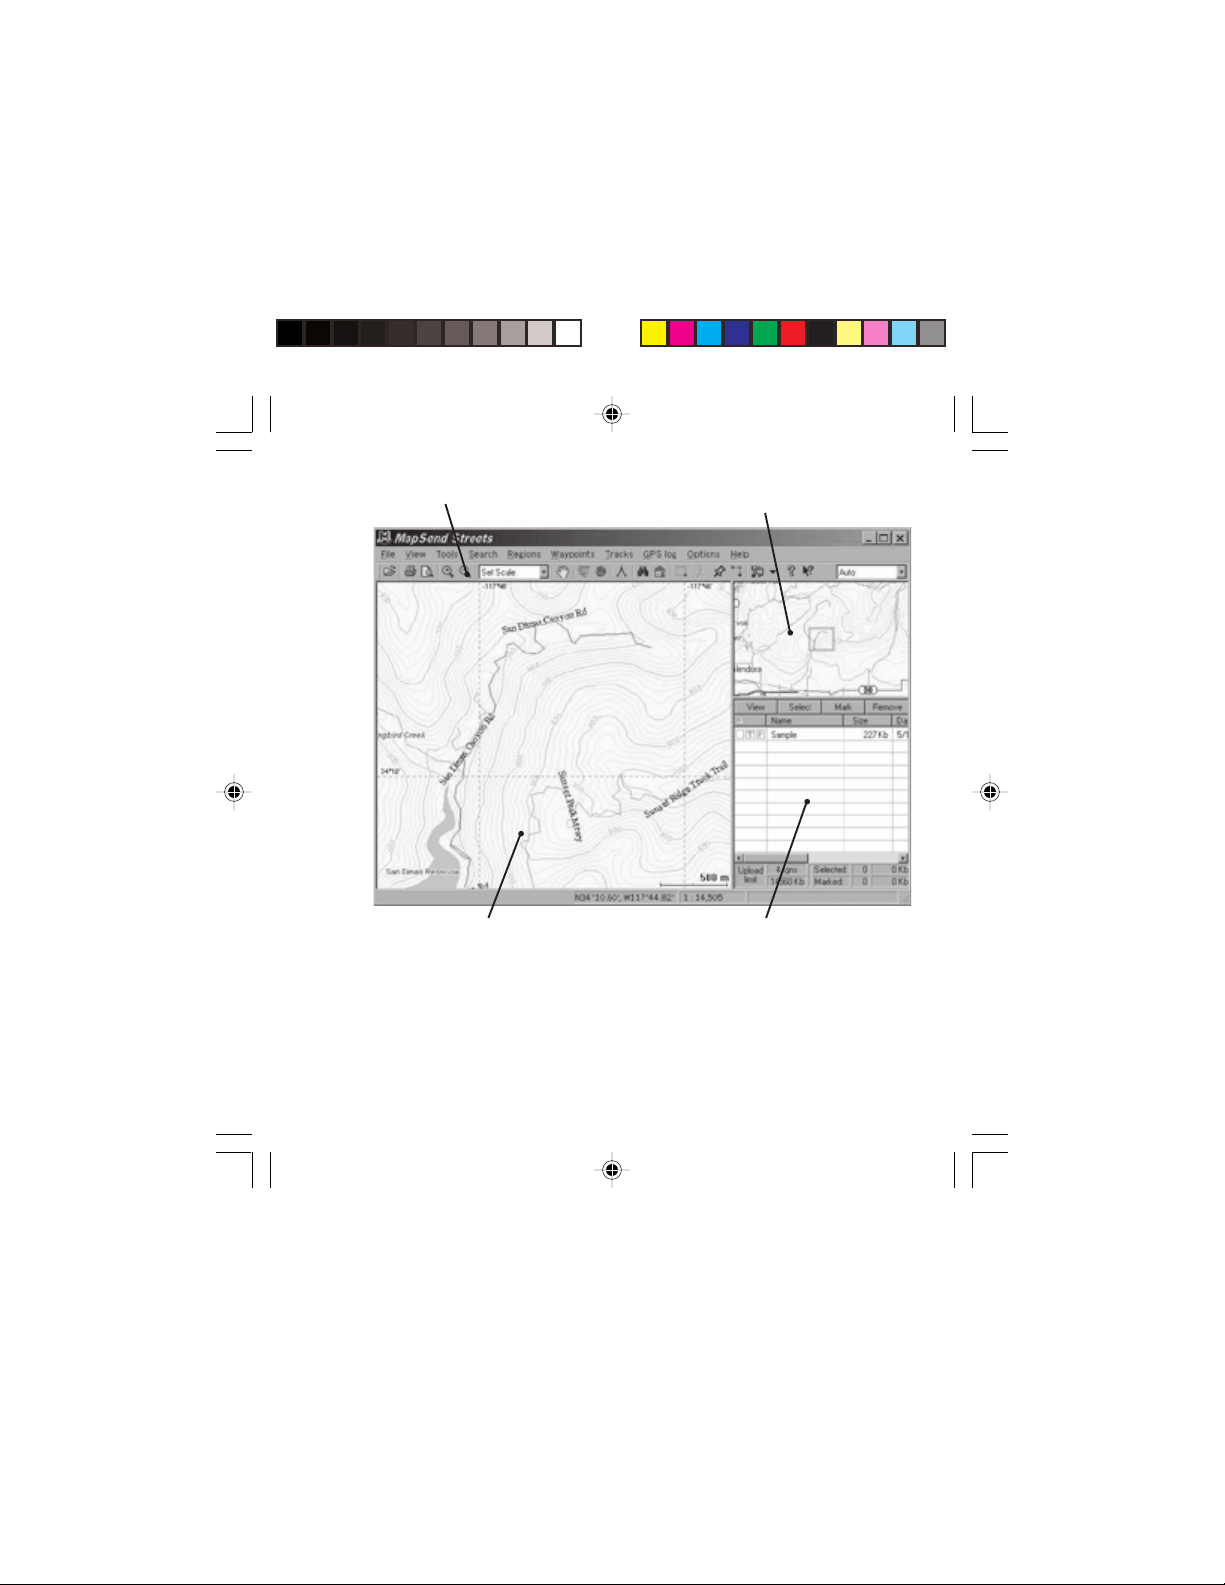
Overview MapToolbar
Map Window
Overview Map: (The smaller map located in the upper right-hand corner frame)
–The Overview Map window is used for a more global view of the map.
– If you left-click on the Overview Map window, the overview frame’s center is
moved to the clicked point, and contents of the Map Window are correspondingly changed.
– Clicking in the Overview Map Window will change the area that is displayed
in the Map Window.
Saved Regions List
Page 4

Map Window:
– The Map Window displays the map itself.
– When navigating the map, make sure the focus is on the Map Window by
Panning Mode:
clicking the left mouse button within the Map Window.
– From the Tools menu choose Pan or click
– The mouse pointer changes to
– Click and hold the left mouse button while dragging the map in the desired
direction. The fingers on the pointer are gripped to a fist while you are
dragging.
– The map will be automatically updated as you continue dragging.
Zooming Mode:
– To enlarge a view scale click
pointer will change to resemble the icon.
– Left-click the place you want to zoom in.
– The view scale becomes 2 times as large and the map is centered to the
place where you have clicked OR click and hold the left mouse button down
and drag a rectangle on the map.
.
on the toolbar. As a result, the mouse
on the toolbar.
– Having released the mouse button, you see the enlarged map sector that
was drawn into the rectangle you dragged.
– To reduce a view scale click
on the toolbar. The mouse pointer will
change to resemble the icon.
– Click the place you want to zoom out and follow the directions from
above for zoom in.
Page 5

Saved Regions List:
– The Saved Regions List is the window where you view the attributes of
regions to be uploaded to the GPS receiver.
– Regions contained in the Saved Regions List are displayed in the Map
Window as rectangles with translucent colored borders.
Drawing and Cutting Rectangular Regions:
– To draw a region and put it in the Saved Regions List, select the Regions
menu, New or click on the toolbar.
– The mouse pointer changes to
– Within the Map Window, click and hold the left mouse button, then drag a
rectangle around the area you wish to define as a region.
– If the region is not to your satisfaction, press <Esc> to undo.
– While you are drawing a region, its estimated size is displayed in the status
bar at the bottom of the screen. The region’s estimated size may differ
from the final one and that can be critical when uploading regions to your
GPS receiver.
– After drawing the rectangular region you need to Cut that region. To do
so, you can select from the Regions menu Cut Region or click
the toolbar.
– In the Naming dialog box, type a name of the drawn region and choose OK.
Now the new region’s name will appear in the Saved Regions List.
Marking Regions:
– Before uploading regions to a GPS receiver, you have to mark them in the
Saved Regions List.
– To mark a region, click the corresponding check-box next to the region’s
name.
– Marked regions are displayed in the Map Window as translucently colored
filled rectangles.
on
Page 6

Selecting Topo and/or POIs from Marked Regions:
– After selecting (marking) a region, you can select whether or not to
upload the POI’s and Topo map (if available).
– Along with the check box for marking the region are the other boxes used
to select Topo and POI’s. (The “T” for Topographic is available
only with the MapSend Topo of the United States software.)
– Clicking on the “T” or “P” will turn the selection on or off. Greyed letters
indicate that option is turned off and will not be uploaded.
Uploading Regions to a GPS Receiver:
– To upload regions from the Saved Regions List to your GPS receiver, you
need to make sure your PC has been properly connected to the GPS
receiver and the required communication options have been set.
– Make sure the regions you want to be uploaded have been marked in the
Saved Regions List and that the total amount of memory used will fit into
the memory restrictions of your receiver.
– From the Regions menu, choose Upload to GPS...
– Follow the instructions in the dialog information box.
– If the estimated total size of the regions you have marked is greater than
available memory on the receiver, a corresponding warning appears. If
so, then try to lessen the size of marked regions by editing the region
rectangles and referring to the table’s status box.
– Estimated size of regions may differ from the final one, so the corre-
sponding warning can appear after the regions have been converted. In
this case, reduce the region size and try again.
– When uploading regions, all current regions stored in your receiver will
be deleted.
– Refer to the User Manual on downloading waypoints, tracks and routes
from the GPS receiver to your PC.
– Be sure to note that the upload or download process may take a certain
amount of time in order to complete the file transfer.
Page 7

Toolbar:
– The toolbar is located under the menu headers at the top of the window.
– The toolbar provides quick mouse access to most tools used in MapSend.
– To hide or display the Toolbar, choose Toolbar from the View menu.
Click To Click To
Add an existing region or regions
group to the Saved Regions List, or
waypoints, routes and tracks to the
current set of waypoints, routes and
tracks.
Zoom in the Map Window.
Open the dialog to find a
location by its name.
Open the dialog to find a
location by its address.
Draw a new rectangular region.
Zoom out the Map Window.
Choose a scale for the
Map either from the list or
user defined.
Move a map in the Map Window.
Set a scale in the Map Window to
view the continental USA.
Set a scale in the Map Window to
view the entire world.
Access the Vertical Profile options.
Measure distances in the Map
Window.
Place the currently edited
region on the Saved Regions
List.
Place waypoints on the map.
Build routes between previously
placed waypoints.
Upload regions marked in
the Saved Regions List to a
GPS receiver. Clicking the
arrow provides the menu
offering uploading/downloading
of additional data.
Display the About dialog box.
Get help on screen elements.
Page 8

 Loading...