

Page 1

Page 2

Copyright Notice
Copyright 1999 Magellan Corporation. All rights reserved.
No part of this publication or the computer programs described within may
be reproduced, translated, stored in a retrieval system, or transmitted in any
form or by any means, electronic, mechanical photocopying, recording, or
otherwise, without prior written permission from Magellan Corporation.
Your rights with regard to this publication and the computer programs
described within are subject to the restrictions and limitations imposed by
the copyright laws of the United States of America (“U.S.A”) and/or the
jurisdiction in which you are located.
For information on translations and distribution outside the U.S.A. please
contact Magellan Corporation.
Trademark Notice
MapSend is a trademark of Magellan Corporation. All other product and
brand names are trademarks or registered trademarks of their respective
holders.
Printed in the United States of America.
Part Number: 630750 A
Page 3

Table of Contents
INTRODUCTION .................................................................................... 1
T
HE MAGELLAN MAPSEND CD ...................................................... 1
M
ARINE CD ............................................................................... 2
L
AND CD ................................................................................... 2
NLOCKING A C-MAP NT COMPACT REGION - QUICK REFERENCE.... 3
U
G
ETTING STARTED............................................................................... 4
M
INIMUM PC REQUIREMENTS ......................................................... 4
NSTALLATION PROCEDURES ............................................................ 4
I
TARTING MAPSEND ...................................................................... 4
S
SING HELP .................................................................................. 5
U
APSEND MENU ........................................................................... 5
M
APSEND OPTIONS ........................................................................ 6
M
HE TOOLBAR .............................................................................. 10
T
HE STATUS WINDOW .................................................................. 10
T
AVIGATING THE MAP ...................................................................11
N
S
ELECTING (OPENING)/REMOVING A C-MAP REGION ...................... 12
P
REVIEW MODE ........................................................................... 12
OMPACT FULL FEATURES DEMO MODE ................................... 12
NT C
ELECTING (OPENING) A REGION ................................................... 12
S
S
ELECTING FROM THE MAP......................................................... 13
S
ELECTING FROM THE LIST ......................................................... 14
R
EMOVING A REGION.................................................................... 15
U
PLOADING REGIONS TO YOUR MAP 410......................................... 16
C
ONNECTING YOUR MAP 410 TO YOUR PC ................................. 16
TARTING UPLOAD ....................................................................... 16
S
NTERRUPT UPLOAD ...................................................................... 17
I
ND UPLOAD ............................................................................... 17
E
Page 4

TYPES OF REGIONS ....................................................................... 18
U
NLOCKED REGIONS .................................................................. 18
L
OCKED REGIONS ...................................................................... 18
I
NFORMATION ON REGIONS ......................................................... 18
C
HART OBJECTS INFORMATION.................................................... 19
NLOCKING CODE ............................................................................. 20
U
NLOCKING CODE REQUEST ....................................................... 20
U
I
NSERT AN UNLOCKING CODE ..................................................... 20
U
NLOCKING CODES BACKUP ...................................................... 21
R
ESTORE UNLOCKING CODES FROM BACKUP ............................... 21
P
RINT UNLOCKING CODE LIST .................................................... 21
OINTS OF INTEREST (POI)............................................................... 22
P
P
OINTS OF INTEREST ..................................................................... 22
OADS ........................................................................................ 23
R
S
ESSIONS ........................................................................................... 24
A
DDING A REGION TO SESSION ...................................................... 24
EMOVING REGIONS FROM SESSION ............................................... 25
R
REVIEW ..................................................................................... 25
P
T
ROUBLESHOOTING ........................................................................... 26
C
ONTACTING C-MAP & MAGELLAN ................................................ 27
C-MAP ...................................................................................... 27
AGELLAN .................................................................................. 28
M
Page 5

INTRODUCTION
Congratulations on your purchase of MapSend™ allowing you to
expand the use of your MAP 410. MapSend is a CD with an application
program that contains C-MAP’s NT CompactTM Marine Electronic
Charts (Marine CD) or enhanced road and Point of Interest detail (Land
CD) which are uploaded to your MAP 410. This CD allows you to
customize your receiver to fit all your boating and outdoor adventures.
You will have the ability to download detailed C-MAP NT Compact
nautical charts, superlakes and an additional 250,000 points of interest
such as marinas, parks, campgrounds, tourist attractions and highway
exit ramp services such as RV campgrounds, restaurants, ATM’s and gas
stations and more.
With MapSend you can now expand the areas you are travelling by
uploading nautical maps, superlakes and points of interest for a more
comprehensive database. Making your way outdoors has never been so
easy as it is with the additional information contained on this CD-ROM.
This guide will aid in the installation of MapSend as well as give you
directions on how to use this program to increase your ability to
navigate new areas of interest. The Getting Started section of this guide
will have you navigating the MapSend database in no time at all and
give you the opportunity to upload those areas of the map that you will
need for your next journey outdoors.
THE MAGELLAN MAPSEND CD
MapSend’s CD-ROMs are a cartographic and information resource for
you to use to aid you while navigating with your Magellan MAP 410
GPS receiver. Available in marine and land versions, these new
databases of marine charts, land maps and Points of Interest (POI’s) can
now be uploaded into your receiver to enhance the cartographic
database contained within. Some items contained within the MapSend
database need to be “unlocked” by calling the nearest C-MAP office
listed in the back of this guide. Using the procedure contained in the
section Unlocking A C-MAP NT Compact Region, you can unlock
regions of interest easily and inexpensively without having to buy
different cartridges for each region and with the preview feature
(available for Marine Charts and SuperLakes) you’ll be able to preview
a region to make sure it’s the right one for you (see “Preview” under
“Selecting (Opening)/Removing A C-MAP Region” for further details).
Magellan MapSend™ User Guide 1
Page 6

MARINE CD
The MapSend Marine CD features C-MAP NT Compact™ charts which
contain coastlines and fixed and floating navigation aids (NAVAIDS),
such as lighthouses, buoys and channel markers as well as spot
soundings, depth contours and hazards to navigation. Superlakes, large,
fresh-water lakes, are also available in the NT Compact™ format.
LAND CD
The MapSend Land CD provides enhanced road detail and over 250,000
POIs. Included are golf courses, campgrounds, parks, airports, hunting
and fishing facilities, tourist attractions, highway exit ramp services as
well as Superlakes.
2 Magellan MapSend™ User Guide
Page 7

UNLOCKING A C-MAP NT COMP ACT
REGION - QUICK REFERENCE
The following procedures apply for unlocking either marine NT
Compact charts or SuperLakes. You can view the available marine
coverage, select your choice and contact a C-MAP Office for the
“unlock” code.
Unlock Process for the First Unlock (Marine CD Only)
Step 1 Connect your MAP 410 to your PC.
Step 2 Ensure the baud rate on the MAP 410 is set to 4800bps
(Use your MAP 410 User Guide to obtain the procedure
for checking your receiver’s baud rate).
Step 3 Open the desired chart region. MapSend will give you
the code for this region in the Status Window.
Step 4 Enter the “Unit” menu and click on “Get MAP 410 ID”.
Step 5 Note the serial number listed on the back of the CD.
Step 6 Call the nearest C-MAP office and tell them you wish to
unlock a MapSend region. (See “Contacting C-MAP &
Magellan” from this guide for available numbers).
Alternatively, you may fax or e-mail your request to CMAP. You must provide them with the following
information:
• MAP 410 Unit ID (Serial #)
• Chart Region #
• CD Serial # for your free, first unlock or credit card
information for additional unlocks.
Step 7 C-MAP will give you the unlock code over the phone, by
fax, or email.
Step 8 Once you have the unlock code from C-MAP, double-
click on the chart region in the Status Window and a
dialog box will open. Type in the 16-digit unlock code in
the space provided and click “Unlock”.
Step 9 You will see the symbol in the Status Window change
from a “lock” to “unlock” icon signifying that you have
successfully unlocked the region.
Step 10 Click the “Transfer” icon or press “F8”. The region will
then be uploaded into the MAP 410 unit. (Note: Don’t
forget to also add Navaids for the region).
Magellan MapSend™ User Guide 3
Page 8

C M Y CM MY CY CMY K
MapSend™
Chart Regions Unlock Instructions
1.) Chart Region Code:
For selecting a C-MAP region code, please refer to pages 12 - 15 of
the user guide. Then write the code number down in the space provided
above for reference.
2.) MAP 410 Unit ID #:
First connect your MAP 410 to your computer, then to obtain the MAP
410 unit ID number, enter the “Unit” menu and click on “Get MAP 410
ID” from the menu. Now write the ID number down in the space provided
above for reference.
3.) CD-ROM Serial #:
Note that the CD-ROM serial number is listed on the back of the jewel
case. Be sure to write it down in the space provided above for reference.
You will not be able to purchase unlock codes with out it, nor will you
be able to obtain your first (1) free marine chart region unlock code.
4.) C-MAP Office Phone #:
Please refer to page 27 of the user guide to locate the nearest C-MAP
office. Then write the phone number down in the space provided above
for reference. Be sure to call C-MAP in order to receive your first (1)
free marine chart region unlock code and for any purchases of other
unlock codes.
5.) Pricing:
The first (1) marine chart region unlock code is free with purchase of the
MapSend™ Marine CD-ROM only. Additional unlock codes will be
charged accordingly:
1 Marine Chart Region FREE MapSend™ Marine
Marine Chart Regions $75.00 MapSend™ Marine
Superlakes Chart Regions $50.00 MapSend™ Land (USA) &
MapSend™ Marine (Americas)
(For More detailed Instructions please refer to page 3 of the user guide.)
PN 203024 A
Page 9
GETTING STARTED
MINIMUM PC REQUIREMENTS
Listed below is what is needed to upload MapSend™ onto your PC:
1. Microsoft® Windows® 95 or 98.
MapSend does not run under Windows NT.
2. 486, 66MHz or faster processor.
3. 16 MB RAM or more.
4. 15 MB hard disk space or higher.
5. Serial COMM port.
6. CD-ROM drive.
7. Mouse.
8. 256 color display.
9. Magellan PC interface cable (p/n: 00-19068-000) or PC interface
cable with cigarette lighter adapter (p/n: 00-19067-000).
INSTALLATION PROCEDURES
Use the following procedures to install MapSend:
1. Start Windows®. Close all active programs.
2. Insert the MapSend CD into your CD-ROM drive.
3. Open the Start menu and click on Run.
4. Type D:\setup and click OK. If your CD-ROM drive is not D,
type the appropriate letter in its place.
5. Follow the on-screen installation instructions.
STARTING MAPSEND
There are two ways to start the MapSend program:
1. Click on the Quick-Start shortcut icon located on your desktop.
or
1. Click on the Start Button.
2. Select the Programs folder.
3. Select MapSend folder.
4 Magellan MapSend™ User Guide
Page 10

4. Click the MapSend application to start and open the MapSend
main window.
USING HELP
MapSend has a Help Menu that you can access by clicking on Help or
by pressing (F1). Use the Help Index in the Help dialog box to get help
on any of the topics listed. You can access any topic by clicking on it. If
you want to return to the Index click on Back. You may print the topic
by clicking on Print.
MAPSEND MENU
The MapSend menus contain MapSend functions and settings. Some of
the functions can also be activated through the buttons on the Toolbar.
The table below lists the menus and the items found within them.
MENU ITEM DESCRIPTION
File
Print Prints the map area as it appears in the active
window (screen).
Print Setup Opens the Print Setup dialog box for printing
options; paper size, paper source, orientation, etc.
Options Opens the Options dialog box to choose and set the
available options; Port&Source, Coverage Borders,
Cities, Roads, POI.
Exit Closes MapSend.
Unit
Send Selected Programs/sends selected regions to
regions your MAP 410 unit.
Restore factory This restores the program defaults that were
data present at time of purchase.
Get MAP 410 ID Provides the MAP 410 Serial Number when the
receiver is connected to the PC.
Select Region
Add Opens the regions allowing you to choose an area
of interest to view. When the desired area is
selected, it is automatically listed in the Status
Window at the bottom of the MapSend main
window.
Magellan MapSend™ User Guide 5
Page 11
MENU ITEM DESCRIPTION
Remove Removes the selected region in the Status
Window at the bottom of the MapSend main
window.
Unlock Codes Add/Remove: Adds or Removes an unlock code;
Make Backup; Restore from Backup.
Info Opens the NT Compact Info dialog box which lists
the selected region chart contents by scale (if
selected) or by name (if selected).
View NT Opens a demo area which contains NT Compact
Compact full data with full features.
features demo
Session
Show session Brings up the Session dialog box and information.
window
Help
Contents Opens the MapSend Help window.
How to Use Help Windows
About MapSend Opens the About MapSend dialog box containing
the version number and copyright information.
MAPSEND OPTIONS
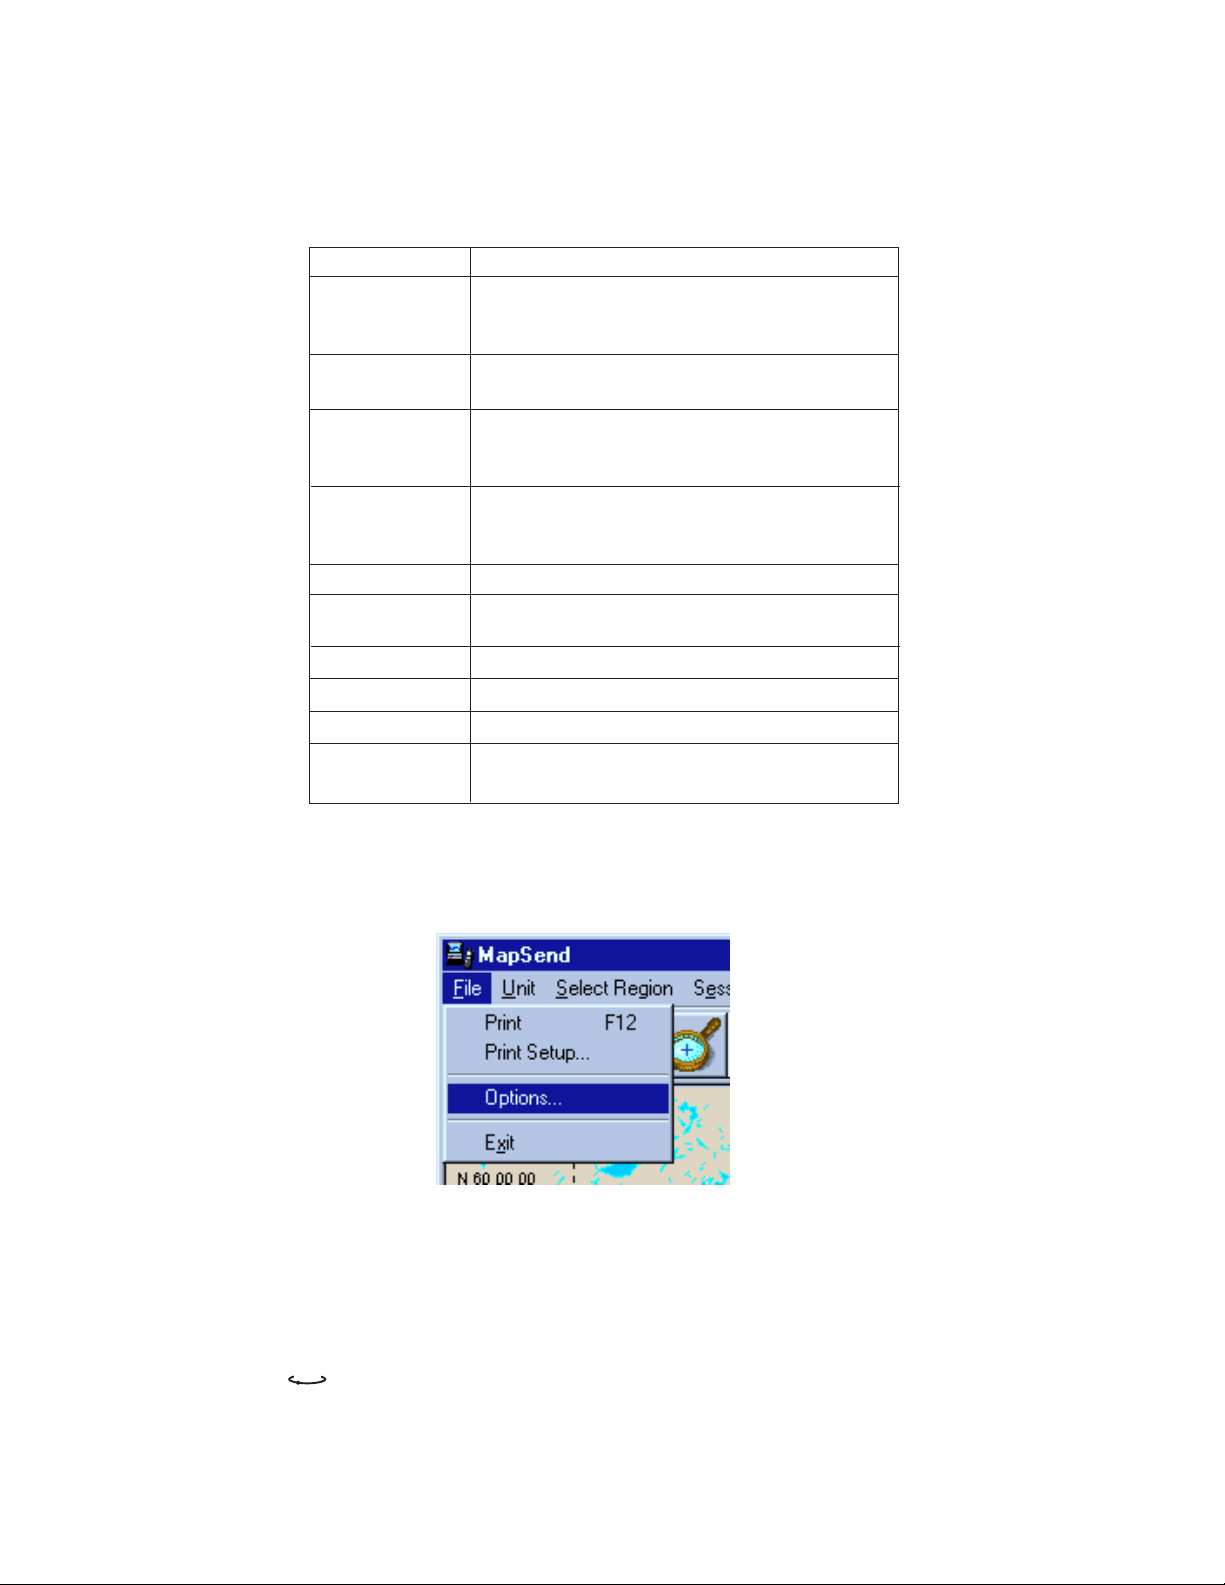
To select the available options in MapSend, select “File/Options” from
the menu bar as shown in the picture below:
6 Magellan MapSend™ User Guide
Page 12

After selecting “Options” from the menu bar, the following dialog box
will appear:
The Connection Port is the COM port where the MAP 410 is connected,
the Source CD-ROM drive represents where the MapSend CD is
inserted, and the electronic cartography colors and the depth units can
be set.
By selecting “Coverage Borders” the following dialog box will appear:
In the “Coverage Borders” area, you can see what the scale level is
currently set to and change it to the desired scale level.
Automatic allows you to set the number of levels which are shown each
time you zoom from the current scale.
Magellan MapSend™ User Guide 7
Page 13

Manual allows you to set which regional borders are shown.
Levels Scales
A >1,500,001:1
B 500,001 to 1,500,000:1
C 150,001 to 500,000:1
D 50,001 to 150,000:1
E 15,001 to 50,000:1
F 5,001 to 15,000:1
G <5,000:1
If Automatic is selected and the levels are less than 4,
the outline of the selected area may not be visible
from the World Map view.
By selecting the “Cities” thumbnail from the previous dialog box, the
following dialog box appears:
Scale levels at which cities can be seen are set from this dialog box.
City Type City Size
Major >500,000 or state capital
Large 100,000 to 500,000
Medium 20,000 to 100,000
Small <20,000
8 Magellan MapSend™ User Guide
Page 14

By selecting the “Roads” thumbnail, the following dialog box will
appear:
The above dialog box shows the scale levels at which the roads and the
type of symbols used can be seen and set.
By selecting the “POI” thumbnail, the following dialog box will appear:
The above dialog box shows the scale levels at which POI’s can be seen
and set.
Magellan MapSend™ User Guide 9
Page 15

THE TOOLBAR
The table below describes each button on the Toolbar.
BUTTON DESCRIPTION
Open NT Compact region*: Opens the NT Compact
regions to choose an area of interest to view. When
the desired area is selected it is automatically listed
in the Status Window at the bottom of the
MapSend main window.
Print: Prints the map area as it appears in the active
window (screen).
World Wide background: Returns to the world map
from any zoom level.
Zoom Out.
Zoom In.
Info: Additional information on charts.
Program/Send data to MAP 410 receiver:
Programs/uploads the selected NT Compact region
to MAP 410 receiver.
THE STATUS WINDOW
The Status Window appears at the bottom of the MapSend main
window. It provides you with the information related to the region(s)
selected:
1. Locked or Unlocked icon.
2. Code of the region.
3. Name of the region.
4. Size (Available memory/Used up memory) in % in MAP 410.
5. Date of the region.
10 Magellan MapSend™ User Guide
Page 16

6. Cursor Position Lat/Lon.
7. Scale of map on main window/map currently viewed.
8. MAP 410 serial number.
NAVIGATING THE MAP
The MapSend main window displays a World-Background Map when
the program is activated. Following are some tips on how to quickly
move around the map:
• To center (PAN) a specific area on the screen, click on the area with
the left mouse button.
• To see more details, press the “I” key or the “Zoom In”
toolbar button.
• To see less detail, press the “O” key or the “Zoom Out”
toolbar button.
• To return to the World-Background Map without
zooming through the intermediate levels, click on the
“Background” toolbar button.
• Pressing the “F1” key accesses MapSend Help.
• Pressing the “F2” key opens up the “Cartridge Info” dialog box
containing information on the currently highlighted region.
• Pressing the “F5” key opens up the “NT Compact Title” dialog box
allowing you to choose a region to add.
• Pressing the “F6” key removes the highlighted region.
• Pressing the “F8” key sends the selected region(s) to your MAP 410.
• Pressing the “F10” key highlights “File” on the Menu Bar.
• Pressing the “F12” key opens up the “HP Doc Wise” dialog box
allowing you to print the current screen.
• Pressing the right mouse button while holding the “CTRL” key opens
up the “Cartographic Info” dialog box allowing you to view details
on the chosen object.
Magellan MapSend™ User Guide 11
Page 17

SELECTING (OPENING)/REMOVING A CMAP REGION
PREVIEW MODE
When you have accessed the Marine MapSend CD and are viewing the
map you are in the Preview mode, allowing you to see an overview of
the region that you are interested in unlocking. With this mode you will
see depth contours, buoys, beacons, fish havens, fog signals, lighthouses
and many more.
NT COMPACT FULL FEATURES DEMO MODE
With the NT Compact full features demo enabled, accessed under the
“Select Region/View NT Compact full features demo” option on the
menu bar, you will see even greater detail than when in Preview mode.
This mode allows you to see a more complete view of what will be seen
when the region is uploaded to your MAP 410. To disable this mode,
click on the Status Window.
SELECTING (OPENING) A REGION
There are two ways to select (open) a region. You can select a region
from the map or from a list. These are discussed in the following two
sections.
NAVAIDS are NOT part of the marine charts and
must be added separately by selecting them from the
“Select Type POI” menu.
12 Magellan MapSend™ User Guide
Page 18

SELECTING FROM THE MAP
To select a region from the map, click the right mouse button on the
region of the map you are interested in. The following dialog box will
appear:
Select the type of region you wish to open, either Marine, Superlake,
POI or Roads. By selecting the code of a region, the coverage related
will appear with a shaded background. The information related to that
region will also appear on the left side of the dialog box.
You can access additional information listing all charts related to that
region by clicking on the “Info” button located at the bottom of the
dialog box (Marine & Superlake only).
Magellan MapSend™ User Guide 13
Page 19

SELECTING FROM THE LIST
You can also select a region using the MapSend menu by selecting
“Select Region” and then select “Add” or press the following toolbar
button:
You will see the following screen:
Select the desired region and click on the “Open” key.
The selected regions are automatically added to the list in the status
window at the bottom of the screen. By clicking the right mouse button
on one of the listed regions, a pop-up menu appears indicating the
available functions on that region.
14 Magellan MapSend™ User Guide
Page 20

The maximum number of regions which can be added
is four.
REMOVING A REGION
Use the following procedure to Remove the listed region(s)from the
Status Window.
1. Select region listed in the Staus Bar and press F6, or;
2. Click region listed in the Status Window with the right-click
on your mouse, select “Remove”. or;
3. Select “Select Region” from the MapSend menu, select
“Remove”.
Magellan MapSend™ User Guide 15
Page 21

UPLOADING REGIONS TO YOUR MAP 410
After connecting your MAP 410 to your PC, click the “Transfer” button
to activate the upload procedure. This will upload the chosen regions to
your receiver.
The maximum number of regions which can be added
is four.
CONNECTING YOUR MAP 410 TO YOUR PC
To connect your PC to your MAP 410, take the PC Interface Cable (p/n:
00-19068-000), or the PC Interface Cable with Cigarette Lighter
Adapter (p/n: 00-19067-000), and connect one end into the COM Port
on the back of your PC and the other end into the back of your receiver,
pulling back the rubber tab to reveal the connector. Make sure the
connections are snug.
STARTING UPLOAD
After having selected the desired region to upload to your MAP 410 and
after having obtained Unlocking Codes, if the region requires one, the
Upload procedure can take place. Select “Unit/Send selected regions”
from the menu or click on the following:
If the selected regions have their Unlocking Code, or are Free, the
Upload window will appear. For more information on the types of
regions available, see the upcoming section “Types of Regions”.
16 Magellan MapSend™ User Guide
Page 22

Make sure your PC and MAP 410 are connected, using the PC Interface
Cable, and click on “Start”. This creates a file which contains all the
selected regions. A progress bar shows the state of progress of the
operation, the MAP 410’s memory is cleared and the Upload process
begins. A second progress bar, related to the approximate time
remaining for Upload completion, is also shown.
INTERRUPT UPLOAD
You can interrupt the Upload procedure at any point during the Upload
process by clicking on the “Cancel” button.
If your MAP 410’s memory is cleared, the World
Background is displayed when the unit is turned ON.
END UPLOAD
If the Upload has been successful, the following message appears at the
end of the Uploading procedure:
Magellan MapSend™ User Guide 17
Page 23

TYPES OF REGIONS
There are two types of regions contained on your MapSend CD. They
are Unlocked Areas (Free), meaning that no Unlocking code is required
to Upload them into your MAP 410, or Locked Areas (Not Free), which
need an unlock code to open.
To obtain an Unlocking Code contact the nearest CMap office listed in the back of this guide.
UNLOCKED REGIONS
All Points of Interest (POI) and Road Areas do not require an
Unlocking Code.
LOCKED REGIONS
All Marine and Superlake regions require an Unlocking Code. Contact
C-MAP for a valid Unlock Code.
INFORMATION ON REGIONS
The list of all the charts contained in a Marine and/or in a
Superlake Area is available by clicking on the “Info”
button shown at right:
After the region has been selected, opened and listed in the window at
the bottom of the main MapSend window,
18 Magellan MapSend™ User Guide
Page 24

the following window will appear:
To change the order of the charts, by name or by scale, select “Choice”
in the dialog box.
CHART OBJECTS INFORMATION
Once a region is selected and opened it is possible to see the
information related to the objects present in the cartography. To select
this function, keep the “CTRL” key pressed and click on the object with
the right mouse button. The following window will appear:
Magellan MapSend™ User Guide 19
Page 25

UNLOCKING CODE
All the Marine and Superlake regions are categorized as Locked Areas
and therefore require an Unlocking Code in order to upload them into
your MAP 410.
UNLOCKING CODE REQUEST
To obtain an Unlocking Code you’ll need to know the serial number of
your MAP 410. This number can be retrieved by selecting: “Unit/Get
MAP 410 ID” from the MapSend menu. Your MAP 410 serial number
will be shown in the window. Contact the nearest C-MAP office, from
the list in this guide, and submit your MapSend CD serial number for
your Marine CD first unlock (free), or your credit card information for
additional unlocks. Also, you will need to submit the serial number of
your MAP 410 and the code number of the region you wish to unlock.
INSERT AN UNLOCKING CODE
The Unlocking Code must be inserted in MapSend in order to upload
the selected region into your MAP 410. Open and select the region from
the list at the bottom of the main MapSend window, select “Select
region/Unlocking codes/Add/Remove”; the following window will
appear:
20 Magellan MapSend™ User Guide
Page 26

Insert the Unlocking Code, received from the C-MAP Office, and click
on “Unlock”. If the code has been correctly entered the Lock icon will
change to unlocked next to the selected region. The region is now
unlocked and can be uploaded to your MAP 410.
UNLOCKING CODES BACKUP
MapSend saves all of the Unlocking Codes on the hard disk, however it
is a good idea to save the Unlocking Codes on a floppy disk as backup.
Select “Select region/Unlocking codes””Make backup” and save the
Unlocking Codes on a floppy disk.
RESTORE UNLOCKING CODES FROM BACKUP
To restore the Unlocking Codes from a backup copy, select “Select
region/Unlocking codes” and then select “Restore from backup”.
PRINT UNLOCKING CODE LIST
The full list of the obtained Unlocking Codes can be printed by
selecting “Select region/Unlocking codes/Print all” from the
menu.Points of Interest (POI) & Roads
Magellan MapSend™ User Guide 21
Page 27

POINTS OF INTEREST (POI)
Below is a list of categories of POI’s available in the MapSend CD:
POINTS OF INTEREST
Aviation & Aerial
Large Airports
Small Airports
Exit Ramp Services
ATM’s
Auto Repair & Services
Gas Stations
Highway Exit Ramps
Hotels & Lodges
Medical Facilities
Parks - Exit Ramps
Restaurants
RV Campgrounds & Services
Truck Services
Marine Activities
Boats & Canoes
Dive & Snorkeling
Marinas & Harbors
NAVAIDS
Fixed NavAids
Floating NavAids - Buoys
Lighthouses
22 Magellan MapSend™ User Guide
Page 28

Wrecks & Obstructions
Wrecks & Obstructions
Campgrounds
Campgrounds
Outdoor Activities
Firearms & Archery
Aerial Activities
Golf Courses
Hunting & Fishing
Tourist & Leisure
Resorts & Casinos
Wineries
Museums & Historical
Gardens
Zoos & Aquariums
Sports Arenas
T ourist Attractions
Sight Seeing
Parks & Recreation
Recreation & Amusement Parks
Parks
ROADS
With your MapSend Land CD-ROM you have access to an enhanced
network of roads as well as more lakes, rivers and streams.
Magellan MapSend™ User Guide 23
Page 29

SESSIONS
The Session Mode allows for the transfer/upload of regions from more
than one CD (e.g. Land and Marine) to your MAP 410. Starting a
session brings up the following dialog box:
In the “Current Selected Region” column all currently opened regions
with an unlocking code or Free are shown. In the “In Session” column
all regions already added to the session are listed.
ADDING A REGION TO SESSION
To add a region to Session, select the region from the “Current Selected
Region” and click on “Add”. The “Add All” adds all the regions listed
in the column to “In Session”.
NAVAIDS are NOT part of the marine charts and
must be added separately by selecting the type from
the “Select Type” menu.
Once you have added all of the regions from the first CD-ROM, close
the MapSend program. Insert the next CD-ROM and restart MapSend.
Add addional regions as necessary and click “Transfer” to add them to
your Session.
24 Magellan MapSend™ User Guide
Page 30

REMOVING REGIONS FROM SESSION
To remove a region from the session, select a region in the “In Session”
column and click on Remove. The “Remove All” removes all the
regions present in Session.
PREVIEW
The “View” button allows you to have a preview of all the regions in
Session. By selecting it, all regions present in Session are shown. In
this mode no Add or Chart Info functions are available. To return to the
previous Session window click on message at the bottom of the screen.
Magellan MapSend™ User Guide 25
Page 31

TROUBLESHOOTING
Following are some questions, and answers, you may have while
working with MapSend.
I have MapSend installed, but it will not work without the CDROM inserted. Why?
• To conserve hard disk space, MapSend only installs the files
necessary to run the program. All of the data files are on the CDROM, and therefore it is necessary to have the CD present to run
MapSend.
I have added a region, but I don’t see where it is?
• Be sure that ‘Border Coverage’ in ‘File/Options’ is set to either
Manual, with All levels selected, (the default setting) or to Auto
with at least 5 levels showing.
I opened a Marine chart region and tried to upload it onto my MAP
410, but I received a message that I need an unlock code. What
does this mean?
• In the front of this manual is a guide for how to obtain an unlock
code. With the purchase of a Marine CD, you will receive one free
unlock region. Subsequent unlocks are also received from the
same source for an additional fee.
I tried to upload region(s) to my MAP 410, but MapSend said that
the unit is not connected. What is the problem?
• Make certain that the connector cable is firmly connected to both
the serial port and the MAP 410 unit.
• Enter the ‘Unit’ menu and ‘Get MAP 410 ID’. If this works, try
the upload again.
• Try changing the COM port in ‘File/Options’. Repeat Step 2.
• Be certain that other programs that utilize the COM port are not
active (such as handheld docking programs) as these programs
tend to “attach” themselves to COM ports.
• If you are still unable to access the MAP 410, contact your
hardware vendor to ensure that the COM ports are properly
registered and accessible.
26 Magellan MapSend™ User Guide
Page 32

CONTACTING C-MAP & MAGELLAN
C-MAP
Contact the following C-MAP offices for NT Compact unlock codes:
C-MAP USA
Off. Hrs are 08:30 AM to 6:00 PM EST Mon/Fri
Phone (800) 424 2627 or (508) 477 8010
Fax (508) 477 6168 E-Mail c-mapinfo@c-map.com
C-MAP Italy
Off. Hrs are 09:00 to 13:00 / 15:00 to 19:00 Mon/Fri
Phone +39 (0585) 772 400 or 772 444
Fax +39 (0585) 631282 E-Mail info@c-map.it
C-MAP UK
Off. Hrs are 09:00 to 17:00 Mon/Fri
Phone +44 (1329) 517 777
Fax +44 (1329) 517 778 E-Mail sales@c-map.co.uk
C-MAP Norway
Off. Hrs are 08:00 to 16:00 Mon/Fri
Phone +47 (51) 464 700
Fax +47 (51) 464 701 E-Mail market@c-map.no
C-MAP Australia
Off. Hrs are 09:00 to 17:00 Australia EST Mon/Fri
Phone +61 (2 ) 987 90277
Fax +61 (2) 987 90322 E-Mail c-mapinfo@c-map.com.au
C-MAP France
Off. Hrs are 08:00 to 12:00 / 13:30 to 18:00 Mon/Fri
Phone +33 (298) 521 215
Fax +33 (298) 521 419 E-Mail c-map.wanadoo.fr
Magellan MapSend™ User Guide 27
Page 33

MAGELLAN
For any operational problem with your MAP 410 please contact
Magellan’s Technical Service at (800) 707-9971 or (909) 394 5000 or
via e-mail at: support@mgln.com. Representatives are available
Monday through Friday from 7 AM to 5 PM Pacific Standard Time.
The Customer Service fax number is (909) 394 7070.
28 Magellan MapSend™ User Guide
Page 34

Page 35

630750 A
960 Overland Court, San Dimas, CA 91773
(909)394-5000
 Loading...