

Page 1

ADOBE® INDESIGN® CS6
GETTING STARTED WITH ADOBE
INDESIGN CS6
PLUG-IN DEVELOPMENT
Page 2

2012 Adobe Systems Incorporated. All rights reserved.
Getting Started with the Adobe® InDesign® CS6 Plug-InDevelopment
If this guide is distributed with software that includes an end user agreement, this guide, as well as the software
described in it, is furnished under license and may be used or copied only in accordance with the terms of such license.
Except as permitted by any such license, no part of this guide may be reproduced, stored in a retrieval system, or
transmitted, in any form or by any means, electronic, mechanical, recording, or otherwise, without the prior written
permission of Adobe Systems Incorporated. Please note that the content in this guide is protected under copyright law
even if it is not distributed with software that includes an end user license agreement.
The content of this guide is furnished for informational use only, is subject to change without notice, and should not be
construed as a commitment by Adobe Systems Incorporated. Adobe Systems Incorporated assumes no responsibility or
liability for any errors or inaccuracies that may appear in the informational content contained in this guide.
Please remember that existing artwork or images that you may want to include in your project may be protected under
copyright law. The unauthorized incorporation of such material into your new work could be a violation of the rights of
the copyright owner. Please be sure to obtain any permission required from the copyright owner.
Any references to company names in sample templates are for demonstration purposes only and are not intended to
refer to any actual organization.
Adobe, the Adobe logo, InCopy, and InDesign are either registered trademarks or trademarks of Adobe Systems
Incorporated in the United States and/or other countries. Windows s either a registered trademark or a trademark of
Microsoft Corporation in the United States and/or other countries. Mac OS is a trademark of Apple Computer,
Incorporated, registered in the United States and other countries. All other trademarks are the property of their
respective owners.
Adobe Systems Incorporated, 345 Park Avenue, San Jose, California 95110, USA. Notice to U.S. Government End Users.
The Software and Documentation are “Commercial Items,” as that term is defined at 48 C.F.R. §2.101, consisting of
“Commercial Computer Software” and “Commercial Computer Software Documentation,” as such terms are used in 48
C.F.R. §12.212 or 48 C.F.R. §227.7202, as applicable. Consistent with 48 C.F.R. §12.212 or 48 C.F.R. §§227.7202-1 through
227.7202-4, as applicable, the Commercial Computer Software and Commercial Computer Software Documentation are
being licensed to U.S. Government end users (a) only as Commercial Items and (b) with only those rights as are granted
to all other end users pursuant to the terms and conditions herein. Unpublished-rights reserved under the copyright
laws of the United States. Adobe Systems Incorporated, 345 Park Avenue, San Jose, CA 95110-2704, USA. For U.S.
Government End Users, Adobe agrees to comply with all applicable equal opportunity laws including, if appropriate, the
provisions of Executive Order 11246, as amended, Section 402 of the Vietnam Era Veterans Readjustment Assistance Act
of 1974 (38 USC 4212), and Section 503 of the Rehabilitation Act of 1973, as amended, and the regulations at 41 CFR
Parts 60-1 through 60-60, 60-250, and 60-741. The affirmative action clause and regulations contained in the preceding
sentence shall be incorporated by reference.
Page 3

Contents
1 Introduction . . . . . . . . . . . . . . . . . . . . . . . . . . . . . . . . . . . . . . . . . . . . . . . . . . . . . . . . . . . . . . 6
About this document . . . . . . . . . . . . . . . . . . . . . . . . . . . . . . . . . . . . . . . . . . . . . . . . . . . . . . . . . . . . . . . . . . . . . . . . . 6
About InDesign plug-ins . . . . . . . . . . . . . . . . . . . . . . . . . . . . . . . . . . . . . . . . . . . . . . . . . . . . . . . . . . . . . . . . . . . . . 6
Plug-in classification . . . . . . . . . . . . . . . . . . . . . . . . . . . . . . . . . . . . . . . . . . . . . . . . . . . . . . . . . . . . . . . . . . . . . . . . . 7
How InDesign plug-ins are developed . . . . . . . . . . . . . . . . . . . . . . . . . . . . . . . . . . . . . . . . . . . . . . . . . . . . . . . . 7
2 Getting Started with the InDesign SDK . . . . . . . . . . . . . . . . . . . . . . . . . . . . . . . . . . . . . 8
SDK Overview . . . . . . . . . . . . . . . . . . . . . . . . . . . . . . . . . . . . . . . . . . . . . . . . . . . . . . . . . . . . . . . . . . . . . . . . . . . . . . . . 8
Development environments . . . . . . . . . . . . . . . . . . . . . . . . . . . . . . . . . . . . . . . . . . . . . . . . . . . . . . . . . . . . . . . . . 11
Anatomy of a plug-in’s project files . . . . . . . . . . . . . . . . . . . . . . . . . . . . . . . . . . . . . . . . . . . . . . . . . . . . . . . . . . 15
Tutorial: Creating a plug-in from scratch . . . . . . . . . . . . . . . . . . . . . . . . . . . . . . . . . . . . . . . . . . . . . . . . . . . . . 16
Step 1: Use DollyXs to generate a dialog-based plug-in project . . . . . . . . . . . . . . . . . . . . . . . . . . . . . . . 17
Files included in the project generated by DollyXs . . . . . . . . . . . . . . . . . . . . . . . . . . . . . . . . . . . . . . . . . . . 21
Create an InDesign SDK Xcode project from the template (Mac OS only) . . . . . . . . . . . . . . . . . . . . . . 25
Step 2: Add a DropDownListWidget to the dialog . . . . . . . . . . . . . . . . . . . . . . . . . . . . . . . . . . . . . . . . . . . . 27
Step 3: Add a TextEditBoxWidget . . . . . . . . . . . . . . . . . . . . . . . . . . . . . . . . . . . . . . . . . . . . . . . . . . . . . . . . . . . . 31
Step 4: Add a StaticTextWidget . . . . . . . . . . . . . . . . . . . . . . . . . . . . . . . . . . . . . . . . . . . . . . . . . . . . . . . . . . . . . . 32
Using resources in plug-ins . . . . . . . . . . . . . . . . . . . . . . . . . . . . . . . . . . . . . . . . . . . . . . . . . . . . . . . . . . . . . . . . . . 34
Step 5: Obtain a value from DropDownListWidget . . . . . . . . . . . . . . . . . . . . . . . . . . . . . . . . . . . . . . . . . . . . 39
Step 6: Get the text in the TextEditBoxWidget . . . . . . . . . . . . . . . . . . . . . . . . . . . . . . . . . . . . . . . . . . . . . . . . 40
Using boss classes in plug-ins . . . . . . . . . . . . . . . . . . . . . . . . . . . . . . . . . . . . . . . . . . . . . . . . . . . . . . . . . . . . . . . . 40
Using interfaces in plug-ins . . . . . . . . . . . . . . . . . . . . . . . . . . . . . . . . . . . . . . . . . . . . . . . . . . . . . . . . . . . . . . . . . . 41
Using databases and objects in plug-ins . . . . . . . . . . . . . . . . . . . . . . . . . . . . . . . . . . . . . . . . . . . . . . . . . . . . . 44
Step 7: Insert a string into a text frame . . . . . . . . . . . . . . . . . . . . . . . . . . . . . . . . . . . . . . . . . . . . . . . . . . . . . . . 44
Using commands in plug-ins . . . . . . . . . . . . . . . . . . . . . . . . . . . . . . . . . . . . . . . . . . . . . . . . . . . . . . . . . . . . . . . . 46
Step 8: Disable the menu with no text selection . . . . . . . . . . . . . . . . . . . . . . . . . . . . . . . . . . . . . . . . . . . . . . 46
Step 9: Initialize dialog widgets . . . . . . . . . . . . . . . . . . . . . . . . . . . . . . . . . . . . . . . . . . . . . . . . . . . . . . . . . . . . . . 47
Conclusion . . . . . . . . . . . . . . . . . . . . . . . . . . . . . . . . . . . . . . . . . . . . . . . . . . . . . . . . . . . . . . . . . . . . . . . . . . . . . . . . . . 49
3 Introduction to ODFRC . . . . . . . . . . . . . . . . . . . . . . . . . . . . . . . . . . . . . . . . . . . . . . . . . . . 50
FR file compilation . . . . . . . . . . . . . . . . . . . . . . . . . . . . . . . . . . . . . . . . . . . . . . . . . . . . . . . . . . . . . . . . . . . . . . . . . . 50
FR file contents . . . . . . . . . . . . . . . . . . . . . . . . . . . . . . . . . . . . . . . . . . . . . . . . . . . . . . . . . . . . . . . . . . . . . . . . . . . . . 50
PluginVersion . . . . . . . . . . . . . . . . . . . . . . . . . . . . . . . . . . . . . . . . . . . . . . . . . . . . . . . . . . . . . . . . . . . . . . . . . . . . . . . 50
PluginDependency . . . . . . . . . . . . . . . . . . . . . . . . . . . . . . . . . . . . . . . . . . . . . . . . . . . . . . . . . . . . . . . . . . . . . . . . . . 52
ExtraPluginInfo . . . . . . . . . . . . . . . . . . . . . . . . . . . . . . . . . . . . . . . . . . . . . . . . . . . . . . . . . . . . . . . . . . . . . . . . . . . . . 52
3
Page 4

4
CriticalTags and IgnoreTags . . . . . . . . . . . . . . . . . . . . . . . . . . . . . . . . . . . . . . . . . . . . . . . . . . . . . . . . . . . . . . . . . 52
SchemaList . . . . . . . . . . . . . . . . . . . . . . . . . . . . . . . . . . . . . . . . . . . . . . . . . . . . . . . . . . . . . . . . . . . . . . . . . . . . . . . . . 53
ImplementationAlias . . . . . . . . . . . . . . . . . . . . . . . . . . . . . . . . . . . . . . . . . . . . . . . . . . . . . . . . . . . . . . . . . . . . . . . . 54
ClassDescriptionTable . . . . . . . . . . . . . . . . . . . . . . . . . . . . . . . . . . . . . . . . . . . . . . . . . . . . . . . . . . . . . . . . . . . . . . . 54
FactoryList . . . . . . . . . . . . . . . . . . . . . . . . . . . . . . . . . . . . . . . . . . . . . . . . . . . . . . . . . . . . . . . . . . . . . . . . . . . . . . . . . . 55
LocaleIndex . . . . . . . . . . . . . . . . . . . . . . . . . . . . . . . . . . . . . . . . . . . . . . . . . . . . . . . . . . . . . . . . . . . . . . . . . . . . . . . . . 55
StringTable . . . . . . . . . . . . . . . . . . . . . . . . . . . . . . . . . . . . . . . . . . . . . . . . . . . . . . . . . . . . . . . . . . . . . . . . . . . . . . . . . 56
UserErrorTable . . . . . . . . . . . . . . . . . . . . . . . . . . . . . . . . . . . . . . . . . . . . . . . . . . . . . . . . . . . . . . . . . . . . . . . . . . . . . . 56
Other resources . . . . . . . . . . . . . . . . . . . . . . . . . . . . . . . . . . . . . . . . . . . . . . . . . . . . . . . . . . . . . . . . . . . . . . . . . . . . . 56
4 Introduction to the InDesign Object Model . . . . . . . . . . . . . . . . . . . . . . . . . . . . . . . . 58
Boss classes . . . . . . . . . . . . . . . . . . . . . . . . . . . . . . . . . . . . . . . . . . . . . . . . . . . . . . . . . . . . . . . . . . . . . . . . . . . . . . . . . 58
Writing your own interface . . . . . . . . . . . . . . . . . . . . . . . . . . . . . . . . . . . . . . . . . . . . . . . . . . . . . . . . . . . . . . . . . . 63
Writing your own implementation . . . . . . . . . . . . . . . . . . . . . . . . . . . . . . . . . . . . . . . . . . . . . . . . . . . . . . . . . . . 64
Constructing a boss instance . . . . . . . . . . . . . . . . . . . . . . . . . . . . . . . . . . . . . . . . . . . . . . . . . . . . . . . . . . . . . . . . 65
Persistence . . . . . . . . . . . . . . . . . . . . . . . . . . . . . . . . . . . . . . . . . . . . . . . . . . . . . . . . . . . . . . . . . . . . . . . . . . . . . . . . . 65
Making a boss persistent . . . . . . . . . . . . . . . . . . . . . . . . . . . . . . . . . . . . . . . . . . . . . . . . . . . . . . . . . . . . . . . . . . . . 65
Writing your own persistent implementation . . . . . . . . . . . . . . . . . . . . . . . . . . . . . . . . . . . . . . . . . . . . . . . . 66
Examples of Persistent Implementations . . . . . . . . . . . . . . . . . . . . . . . . . . . . . . . . . . . . . . . . . . . . . . . . . . . . . 67
Changing persistent data with commands . . . . . . . . . . . . . . . . . . . . . . . . . . . . . . . . . . . . . . . . . . . . . . . . . . . 68
Writing your own command . . . . . . . . . . . . . . . . . . . . . . . . . . . . . . . . . . . . . . . . . . . . . . . . . . . . . . . . . . . . . . . . . 69
Facades . . . . . . . . . . . . . . . . . . . . . . . . . . . . . . . . . . . . . . . . . . . . . . . . . . . . . . . . . . . . . . . . . . . . . . . . . . . . . . . . . . . . . 71
PluginVersion . . . . . . . . . . . . . . . . . . . . . . . . . . . . . . . . . . . . . . . . . . . . . . . . . . . . . . . . . . . . . . . . . . . . . . . . . . . . . . . 72
The lifecycle of a plug-in . . . . . . . . . . . . . . . . . . . . . . . . . . . . . . . . . . . . . . . . . . . . . . . . . . . . . . . . . . . . . . . . . . . . . 73
5 Localization . . . . . . . . . . . . . . . . . . . . . . . . . . . . . . . . . . . . . . . . . . . . . . . . . . . . . . . . . . . . . 74
InDesign locales . . . . . . . . . . . . . . . . . . . . . . . . . . . . . . . . . . . . . . . . . . . . . . . . . . . . . . . . . . . . . . . . . . . . . . . . . . . . . 74
Checking the locale in C++ . . . . . . . . . . . . . . . . . . . . . . . . . . . . . . . . . . . . . . . . . . . . . . . . . . . . . . . . . . . . . . . . . . 74
Controlling plug-in loading . . . . . . . . . . . . . . . . . . . . . . . . . . . . . . . . . . . . . . . . . . . . . . . . . . . . . . . . . . . . . . . . . . 75
PMString . . . . . . . . . . . . . . . . . . . . . . . . . . . . . . . . . . . . . . . . . . . . . . . . . . . . . . . . . . . . . . . . . . . . . . . . . . . . . . . . . . . . 75
String-translation tables . . . . . . . . . . . . . . . . . . . . . . . . . . . . . . . . . . . . . . . . . . . . . . . . . . . . . . . . . . . . . . . . . . . . . 76
Localizing other resources . . . . . . . . . . . . . . . . . . . . . . . . . . . . . . . . . . . . . . . . . . . . . . . . . . . . . . . . . . . . . . . . . . . 77
6 Building Blocks . . . . . . . . . . . . . . . . . . . . . . . . . . . . . . . . . . . . . . . . . . . . . . . . . . . . . . . . . . 79
Boss-object web . . . . . . . . . . . . . . . . . . . . . . . . . . . . . . . . . . . . . . . . . . . . . . . . . . . . . . . . . . . . . . . . . . . . . . . . . . . . 79
Iterating the draw order . . . . . . . . . . . . . . . . . . . . . . . . . . . . . . . . . . . . . . . . . . . . . . . . . . . . . . . . . . . . . . . . . . . . . 80
Service providers . . . . . . . . . . . . . . . . . . . . . . . . . . . . . . . . . . . . . . . . . . . . . . . . . . . . . . . . . . . . . . . . . . . . . . . . . . . . 80
Startup and shutdown services . . . . . . . . . . . . . . . . . . . . . . . . . . . . . . . . . . . . . . . . . . . . . . . . . . . . . . . . . . . . . . 81
Responders . . . . . . . . . . . . . . . . . . . . . . . . . . . . . . . . . . . . . . . . . . . . . . . . . . . . . . . . . . . . . . . . . . . . . . . . . . . . . . . . . 82
Page 5

5
Draw event handlers . . . . . . . . . . . . . . . . . . . . . . . . . . . . . . . . . . . . . . . . . . . . . . . . . . . . . . . . . . . . . . . . . . . . . . . . 82
Page-item adornments . . . . . . . . . . . . . . . . . . . . . . . . . . . . . . . . . . . . . . . . . . . . . . . . . . . . . . . . . . . . . . . . . . . . . . 83
Selection suites . . . . . . . . . . . . . . . . . . . . . . . . . . . . . . . . . . . . . . . . . . . . . . . . . . . . . . . . . . . . . . . . . . . . . . . . . . . . . 83
Scripting . . . . . . . . . . . . . . . . . . . . . . . . . . . . . . . . . . . . . . . . . . . . . . . . . . . . . . . . . . . . . . . . . . . . . . . . . . . . . . . . . . . . 85
List Plug-ins in Extension Manager . . . . . . . . . . . . . . . . . . . . . . . . . . . . . . . . . . . . . . . . . . . . . . . . . . . . . . . . . . . 86
7 InDesign Server Plug-in Techniques . . . . . . . . . . . . . . . . . . . . . . . . . . . . . . . . . . . . . . . 89
Introduction . . . . . . . . . . . . . . . . . . . . . . . . . . . . . . . . . . . . . . . . . . . . . . . . . . . . . . . . . . . . . . . . . . . . . . . . . . . . . . . . 89
Terminology . . . . . . . . . . . . . . . . . . . . . . . . . . . . . . . . . . . . . . . . . . . . . . . . . . . . . . . . . . . . . . . . . . . . . . . . . . . . . . . . 89
Key concepts . . . . . . . . . . . . . . . . . . . . . . . . . . . . . . . . . . . . . . . . . . . . . . . . . . . . . . . . . . . . . . . . . . . . . . . . . . . . . . . . 89
How desktop InDesign and InDesign Server differ . . . . . . . . . . . . . . . . . . . . . . . . . . . . . . . . . . . . . . . . . . . . 90
Minimum requirements for an InDesign Server plug-in . . . . . . . . . . . . . . . . . . . . . . . . . . . . . . . . . . . . . . . 92
Removing calls to APIs that depend on active context or something in “front” . . . . . . . . . . . . . . . . . 94
Using MessageLog or IErrorList in place of custom error/warning dialogs (other than CAlert) . . 95
Adding custom features to InDesign Server . . . . . . . . . . . . . . . . . . . . . . . . . . . . . . . . . . . . . . . . . . . . . . . . . . 97
Performance considerations . . . . . . . . . . . . . . . . . . . . . . . . . . . . . . . . . . . . . . . . . . . . . . . . . . . . . . . . . . . . . . . . . 97
64-bit plug-ins (Windows only) . . . . . . . . . . . . . . . . . . . . . . . . . . . . . . . . . . . . . . . . . . . . . . . . . . . . . . . . . . . . . . 98
Testing techniques . . . . . . . . . . . . . . . . . . . . . . . . . . . . . . . . . . . . . . . . . . . . . . . . . . . . . . . . . . . . . . . . . . . . . . . . . 103
8 Feature Development with Scripting . . . . . . . . . . . . . . . . . . . . . . . . . . . . . . . . . . . . . 110
Scripting . . . . . . . . . . . . . . . . . . . . . . . . . . . . . . . . . . . . . . . . . . . . . . . . . . . . . . . . . . . . . . . . . . . . . . . . . . . . . . . . . . . 110
Scripting versus C++ . . . . . . . . . . . . . . . . . . . . . . . . . . . . . . . . . . . . . . . . . . . . . . . . . . . . . . . . . . . . . . . . . . . . . . . 111
Building blocks for using ExtendScript to implement a feature with scripting . . . . . . . . . . . . . . . . . 111
Tips and hints . . . . . . . . . . . . . . . . . . . . . . . . . . . . . . . . . . . . . . . . . . . . . . . . . . . . . . . . . . . . . . . . . . . . . . . . . . . . . . 121
Building blocks for using ActionScript to implement user interfaces . . . . . . . . . . . . . . . . . . . . . . . . . 124
Frequently asked questions . . . . . . . . . . . . . . . . . . . . . . . . . . . . . . . . . . . . . . . . . . . . . . . . . . . . . . . . . . . . . . . . 128
Resources . . . . . . . . . . . . . . . . . . . . . . . . . . . . . . . . . . . . . . . . . . . . . . . . . . . . . . . . . . . . . . . . . . . . . . . . . . . . . . . . . . 129
Page 6

1
Introduction
This document is for C++ programmers who want to learn how to write Adobe® InDesign® plug-ins. It also
is appropriate reading for experienced InDesign programmers who need a refresher. It is designed to give
an introduction to plug-in development, show how to create some simple plug-ins, and teach the
architecture behind InDesign products—InDesign, Adobe InCopy®, and Adobe InDesign® Server.
About this document
Chapter 2, “Getting Started with the InDesign SDK introduces the files in the SDK, covers development
tools, and provides an initial plug-in development tutorial. If you are new to InDesign development,
completing the tutorial in that chapter will provide you the context necessary to review or try what is
discussed in the rest of this document.
Chapter 3, “Introduction to ODFRC.” InDesign makes heavy use of the OpenDoc Framework Resource
Compiler. This chapter introduces some of the most common resources types that you will encounter
in ODFRC FR files,
Chapter 4, “Introduction to the InDesign Object Model,” discusses boss classes, interfaces, persistence,
commands, facades, and the lifecycle of a plug-in.
Chapter 5, “Localization,” covers the basic mechanisms for localizing strings and other resources used
by your plug-in.
Chapter 6, “Building Blocks,” introduces a set of concepts and patterns that are used in many different
scenarios. These concepts are the building blocks on which you will make things happen with your
plug-in.
Chapter 7, “InDesign Server Plug-in Techniques,” provides technical details to help developers create
new plug-ins or port existing plug-ins to use with InDesign Server.
Chapter 8, “Feature Development with Scripting,”describes how to go beyond automation to
developing new features for InDesign. It describes XHTML Export, whichs is a feature developed with
ExtendScript, and FlexUIStroke, which is a use- interface sample developed with ActionScript and
Creative Suite SDK
After finishing this document, you will be familiar enough with InDesign plug-in development to begin
using the sample code, Adobe InDesign Plug-In Programming Guide, and Adobe InDesign SDK Solutions as
needed.
About InDesign plug-ins
The InDesign Products SDK provides the necessary files to develop plug-ins for InDesign, InCopy, and
InDesign Server. Before getting too far into the technical details, it is important to understand that all
InDesign products are developed from the same code base. A plug-in can be written to load under any
combination of InDesign products. Many Adobe plug-ins are compiled and deployed with all three
applications. Each product application comprises a small executable that loads and initializes plug-ins.
Each executable does very little that is recognizable by an end user; instead, nearly all features are
6
Page 7

CHAPTER 1: Introduction Plug-in classification 7
contributed by plug-ins. This same plug-in architecture used by Adobe Engineering is made available to
third-party developers in the InDesign products SDK.
On Windows, plug-in are DLLs with an “.apln” file extension. On Mac OS, they are Frameworks with an
“.InDesignPlugin” file extension.
Plug-in classification
There are several ways to classify InDesign plug-ins:
By the applications under which they load. For example, you may create an InCopy-only plug-in.
As model or user-interface plug-ins. A model plug-in writes data to an InDesign document. A
user-interface plug-in provides a user interface. An InDesign plug-in must identify whether it supports
model or user-interface operations.
Required or optional plug-ins implement core application features. Third-party plug-ins cannot be
considered required.
How InDesign plug-ins are developed
InDesign is written in C++ and makes heavy use of a resource compiler called ODFRC (OpenDoc
Framework Resource Compiler). ODFRC files end with the “.fr” extension and are used for many things,
including user interfaces, menus, and localization. Chapter 3, “
overview of most of what you can expect to encounter in an ODFRC file.
Perhaps most significantly, ODFRC is used to define and extend classes in the InDesign object model.
These are not C++ classes, but rather an InDesign type of class called a boss. Working with bosses and
instantiated boss objects is at the heart of InDesign plug-in development. Bosses are mentioned in
passing in Chapter 3, “
“Introduction to the InDesign Object Model.”
Introduction to ODFRC,” then are covered more thoroughly in Chapter 4,
Introduction to ODFRC,” gives a high-level
Page 8

2
Getting Started with the InDesign SDK
This chapter describes how to get started with the Adobe® InDesign® CS6 Products SDK. It provides an
overview of the files in the SDK, instructions for working with the sample plug-ins, a tutorial for creating a
basic plug-in, and information about where to go for help.
An InDesign plug-in is an extension library that is loaded dynamically by InDesign. It represents a standard
interface to InDesign. On Windows®, it is a dynamic link library; on Mac OS®, it is a dynamic shared library
packaged in a framework.
SDK Overview
The SDK (denoted in paths by <SDK>) includes several types of files. This section discusses these files and
their respective locations within the SDK.
Documentation
To develop InDesign plug-ins, you must understand many concepts and design patterns implemented in
C++ and OpenDoc Framework Resource Compiler (ODFRC) resource files. This chapter will help you get
started compiling and building simple plug-ins. For a more thorough introduction, read Chapter 3,
“Introduction to ODFRC,” t h r o ug h Chapter 6, “Building Blocks.” After reading those chapters, you should
have enough familiarity with InDesign development to go deeper using the rest of the chapters, the
sample code, and remaining documentation.
PDF versions of all SDK documentation are in the following location:
<SDK>/docs/guides
The SDK API Reference is provided in two files:
<SDK>/docs/references/index.chm
<SDK>/docs/references/sdkdocs.tar.gz
Both files contain reference documentation for all public APIs and SDK sample code.
The index.chm file is a compressed HTML file for use on Windows. To view the contents, double-click the
index.chm file icon.
The sdkdocs.tar.gz archive is for use on Mac OS. To expand this archive, double-click the file. It
decompresses to a folder named sdkdocs. To view the reference, double-click on index.html.
Libraries
InDesign plug-in development requires the use of several libraries supplied by Adobe. On Windows, this
amounts to only a handful of static lib files. Debug and release versions of these libraries are in the
following locations:
<SDK>/build/win/objd
<SDK>/build/win/objr
To support 64-bit InDesign Server plug-ins (Windows only), 64-bit versions are in the following location:
8
Page 9

CHAPTER 2: Getting Started with the InDesign SDK SDK Overview 9
<SDK>/build/win/objdx64
<SDK>/build/win/objrx64
Compiling on the Mac requires many dynamic libraries and Framework files. These files are embedded in a
directory structure that resembles the actual application package:
<SDK>/build/mac/debug/packagefolder/contents/macos
<SDK>/build/mac/release/packagefolder/contents/macos
Several libraries also are available in the <SDK>/external directory. These libraries originated outside the
InDesign engineering team. Windows typically uses these libraries in place; on the Mac, a copy is moved or
a symlink is created into the appropriate package folder.
Source code
The InDesign Products SDK contains several different types of source-code files.
The public API
InDesign-specific public headers are in the following directory:
<SDK>\source\public
External APIs
Several header files are in the external folder:
<SDK>\external
These are not InDesign-specific header files, but they may be used in the InDesign code base. One
example is the header files for the Boost C++ library, a non-Adobe library that is used in the InDesign code
base. Another example is the header files for the Adobe File Library, an Adobe-engineered library that is
not specific to InDesign.
Open folder
The goal of the “open” folder is to provide production InDesign user-interface code to developers, as
examples of complex InDesign user-interface code, and to provide complete plug-ins. At a minimum, an
open plug-in must be able to compile with the Release target. An open plug-in might or might not be able
to compile with the Debug target.
The open folder is not a public API: The code may changed or be removed in the next version. Also, open
plug-ins are not documented in the SDK.
The open folder has three subfolders:
Components — <SDK>/source/open/components/. The source for the plug-ins.
Includes — <SDK>/source/open/includes/. Subfolders that group the actual include files into
functional categories.
Interfaces — <SDK>/source/open/interfaces/. Subfolders that group the actual include interface files
into functional categories.
Page 10

CHAPTER 2: Getting Started with the InDesign SDK SDK Overview 10
Project files for the Open plug-ins are located at: <SDK>/build/mac|win/prj/. The open project files are
named with the following extensions:
.open.xcodeproj on Mac
.open.vcproj on Windows
Sample plug-ins
The SDK contains many sample plug-ins. The project files are in the following directory:
<SDK>/build/mac|win/prj
The source files for the sample projects are in the following directory:
<SDK>/source/sdksamples
Every sample has a design document, which is available in the index.chm or corresponding HTML API
documents. The design document provides details about the functional area each sample illustrates and
the architecture behind the plug-in.
Snippets
The SnippetRunner sample plug-in provides a convenient way to demonstrate and test small snippets of
code.
The SnippetRunner interface has a drop-down list to choose the snippet to execute; control buttons to
start the snippet, clear the log, and so on; areas to enter text; and a read-only log widget. SnippetRunner
offers some services to its client code, such as an API to write to this log widget. The contents of the log can
be saved to a file. The logging function is the same, regardless of whether the SnippetRunner is executing
in the debug or release version.
Snippet Runner source code is supplied with the SDK in the following directory:
<SDK>/source/sdksamples/snippetrunner
And the project file is located in:
<SDK>/build/win│mac/prj/SnippetRunner.vcproj│xcodeproj
All the SDK code snippets included in Snippet Runner are located in the following directory:
<SDK>/source/sdksamples/codesnippets
For more detail about the SnippetRunner plug-in and the snippet framework, see the API documentation
associated with the plug-in.
To facilitate the implementation of a code snippet, a snippet template, SnpTemplate.cpp, is included in the
SnippetRunner project. Open this file in the project, and the comment block for the SnpTemplate class
provides instructions for creating your own code snippet.
Tools
The <SDK>/devtools folder contains the following folders:
Page 11

CHAPTER 2: Getting Started with the InDesign SDK Development environments 11
bin — This contains some tools that are essential to InDesign plug-in development. They primarily are
used to help compile and merge resources with the plug-in executable. A typical SDK sample project
should be set up to use these tools automatically. The projects in different platforms require different
sets of tools, but you need not be concerned about how to use them, as long as your project settings
are similar to the SDK samples.
scripts — There is a PList.py script on Mac OS for packaging a plug-in executable. It is used only by the
SDK’s Xcode project.
sdktools — This folder contains several tools to help facilitate the development of InDesign plug-ins.
DollyXs is a project wizard for generating a project that is ready to build in the SDK with some basic
plug-in functionality, such as hooking up a basic user interface. The later part of this document
discusses how to use DollyXs to generate a project.
sdktools/idmltools — This folder contains some Java-based tools for working with IDML, ICML, and
IDMS files. These tools allow you to validate package and nonpackage files, compress and decompress
IDML packages, and generate and transform IDML files with XSLT. For details, see the readme file in
<SDK>/devtools/sdktools/idmltools/.
statics_reporter — The Static Reporter tool searches InDesign’s object code for global and static
variables, producing a text file for each object file that contains globals or statics.
Development environments
This section describes the required tools and environment for developing plug-ins, how to compile and
execute sample code, and how to start a debugging session.
Requirements
The required environment for developing plug-ins for InDesign CS6 varies by operating system.
All systems
The following table lists the basic component requirements for the InDesign CS6 plug-in development
environment for all systems:
Required component Notes
Applications: InDesign CS6, Adobe InCopy® CS6,
or InDesign Server CS6
OpenDoc Framework Resource Compiler (ODFRC) Included with the InDesign SDK.
We recommend that you have both the debug and
release applications. The debug application is
instrumented to detect bugs and is essential to
successful plug-in development.
1 GB of memory or more (2 GB recommended)
Windows
Developing plug-ins under Windows has the following additional requirements:
Page 12

CHAPTER 2: Getting Started with the InDesign SDK Development environments 12
Required component Notes
Intel® Pentium® 4 or AMD Athlon® 64 processor or better
Windows XP with Service Pack 2 or later
Visual C++ 10 A component of Visual Studio 2010.
Before building on Windows, you need to alter the environment so Visual Studio knows where to find our
custom Adobe build tools, such as ODFRC:
1. Start Visual Studio 2010.
2. Bring up the Visual Studio Options dialog by clicking on the Tools menu and choosing Options.
3. In the widget on the left, expand Projects and Solutions, then click on VC++ Directories.
4. Add the path to your local copy of <SDK>\devtools\bin.
Mac OS
Developing plug-ins under Mac OS has the following additional requirements:
Required component
Intel® processor
Mac OS® X 10.6 or later
Xcode 3.2.5
Compiling and executing sample code
Building a sample plug-in
Start by double-clicking on any SDK sample project.
Windows
1. Use Build > Configuration Manager... to make sure you are building the desired configuration.
2. Choose Build > Clean to remove the previous build artifact.
3. Choose Build > Build to do the build.
Mac OS
1. Use the Active Target drop-down list on the top left corner of the project window to make sure you are
building the desired target.
2. Choose Build > Rebuild ### to do a clean rebuild of the project.
Page 13

CHAPTER 2: Getting Started with the InDesign SDK Development environments 13
Building samples from the command line
There are command-line utilities on both the PC and Mac for building project files. For your convenience,
the SDK contains scripts to build all sample projects.
Windows
The devenv command can be used for command-line compilation of a project file. For example, the
following builds the debug target of the Basic Dialog project. (The Rebuild option is equivalent to a clean
followed by a build.)
devenv BasicDialog.sdk.vcproj /Rebuild Debug
The buildAllSamples.bat file (in <SDK>\build\win\prj) uses devenv to build all Windows sample projects.
This script does not check build results. That is up to you. Before running the script, correct the path in the
DEVENV variable if necessary. To run the script, type the following commands:
1. cd <SDK>\build\win\prj
2. buildAllSamples.bat
Mac OS
The xcodebuild utility is useful for building XCode projects on the command line. For example, the
following builds the release target of the Basic dialog project:
xcodebuild -project BasicDialog.sdk.xcodeproj -target Release build
The buildAllSamples perl script (in <SDK>/build/mac/prj) uses xcodebuild to build all MacOS sample
projects. This script does rudimentary error checking. It dies on the first project failure. To run the script,
type the following commands:
1. cd <SDK>/build/mac/prj
2. buildAllSamples
Launching InDesign with the samples
For your plug-ins to be used in InDesign, InDesign must know about your plug-ins at launch time. You can
do this in one of two ways: Use a special configuration file called PlugInConfig.txt or copy your plug-in to
InDesign’s Plug-ins folder.
Using PlugInConfig.txt
1. If InDesign is running, exit it.
2. Go to the inDesign preference folder in the following directory (where <locale> is a locale-specific
subdirectory; for example, en_US for English):
Windows XP: C:\Documents and Settings\<user>\Application Data\
Adobe\InDesign\Version 8.0\<locale>
Windows Vista: C:\Users\<user>\AppData\Roaming\
Adobe\InDesign\Version 8.0\<locale>
Mac OS: <user-home>/Library/Preferences/
Adobe InDesign/Version 8.0/<locale>
3. Create a text file named “PlugInConfig.txt” in that directory, and enter the following text into it:
Page 14

CHAPTER 2: Getting Started with the InDesign SDK Development environments 14
=Path
4. Edit the sections as desired. For example, the following tells InDesign to load every plug-in in the SDK
folder:
Windows:
=Path
"C:\Adobe InDesign CS6 Products SDK\build\win\debug\sdk"
Mac OS:
=Path
"/Adobe InDesign CS6 Products SDK/build/mac/debug/sdk"
NOTE: You also can use an “=Exclude” tag to exclude a certain plug-in from being loaded. This is useful if
you do not want to load everything in the “=Path” folder.
OTE: This is target specific. You cannot launch the release version of InDesign with debug plug-ins. It is
N
convenient to add both debug and release paths, commenting out the target that is not in use. For
single-line comments, start the comment line with a “;” (semicolon).
5. Save the PlugInConfig.txt file.
6. Restart InDesign.
7. Verify that the set of plug-ins loaded by selecting the About Plug-ins menu.
Moving a plug-in to the Plug-ins folder
By default, all SDK samples are built into the following folder:
<SDK>/build/win│mac/debug│release/sdk
You can move the plug-in(s) that you want to load with InDesign from that path into the following folder:
<InDesign Application Folder>/Plug-ins
Having the project build directly into the Plug-ins folder
You can change the project setting so the plug-in binary is built directly into the InDesign application’s
Plug-ins folder.
On Windows, the project’s output setting is specified in the Visual Studio project’s Properties >
Configuration Properties > Linker > General > Output File.
On Mac OS, the project’s output setting is specified in the Xcode project’s ID_SDK_DIR variable in each
Tar ge t.
Starting a debugging session from your plug-in project
Windows
1. From your project window, choose Debug > Start Debugging.
A dialog pops up to prompt you to select the executable file for the debug session.
2. Under the “Executable file name” drop-down list, select Browse and browse to the InDesign.exe in
your InDesign CS6 folder.
Page 15

CHAPTER 2: Getting Started with the InDesign SDK Anatomy of a plug-in’s project files 15
3. Select the InDesign.exe and click OK to begin the debugging session.
Mac OS
To debug an InDesign plug-in from an Xcode project, you need to define an executable environment.
Because you are building an InDesign plug-in, you need to tell Xcode where to find the host application,
InDesign, when you try to start your plug-in from the Xcode project. To define a new executable:
1. Find the Executable group under the Groups & Files pane of the project window. Right-click on
Executables to bring up its contextual menu.
2. Choose Add > New custom executables. An executables set-up assistant is displayed.
3. Give the executable a name.
4. In Executable Paths, specify the path to InDesign CS6.
5. Select the project to add for the executable. This should be the current project you are trying to
debug.
6. Click Finish. An Executable Info window pops up to summarize the executable environment you just
created.
If you set up only one executable for the project, it becomes the active executable. When you choose Build
> Build And Debug, a debug window appears, and InDesign CS6 starts.
Anatomy of a plug-in’s project files
Typically, an InDesign project contains the following C++, ODFRC, and library files.
C++ files
Declaration of abstract base classes for interfaces.
Definition of implementation classes.
Identification of the implementation ID and name of the InDesign object model.
ODFRC resource files
The PluginVersion resource establishes a plug-in’s name/ID, the plug-in version and InDesign version
required, and the plug-in’s data-format number for conversion.
Boss resources establish relationships among boss IDs for the InDesign object model, the IDs of
interfaces, and the IDs of C++ implementations.
Localization mechanism.
User-interface widget declaration.
Data-conversion schema and plug-in dependency.
Page 16
CHAPTER 2: Getting Started with the InDesign SDK Tutorial: Creating a plug-in from scratch 16
Library files
Public libraries that contains code that you must link against when building your plug-in.
Tutorial: Creating a plug-in from scratch
The rest of this chapter guides you through creating a basic InDesign plug-in and illustrates how to add
functionality to that basic plug-in.
The source code for InDesign plug-ins is largely platform independent. The InDesign plug-in development
process is unique, because it has its own user-interface and object-oriented API. This section focuses on
these two unique aspects, to help you develop plug-ins for both Windows and Mac OS.
Introducing the sample plug-in
The example describes how to build the WriteFishPrice sample plug-in that is available in the InDesign
SDK. This sample allows the user to enter fish names and current prices into a text frame at the text-cursor
position. It incorporates several common user-interface components: menus, dialog boxes, pull-down
menus, text-edit boxes, static-text fields, and buttons.
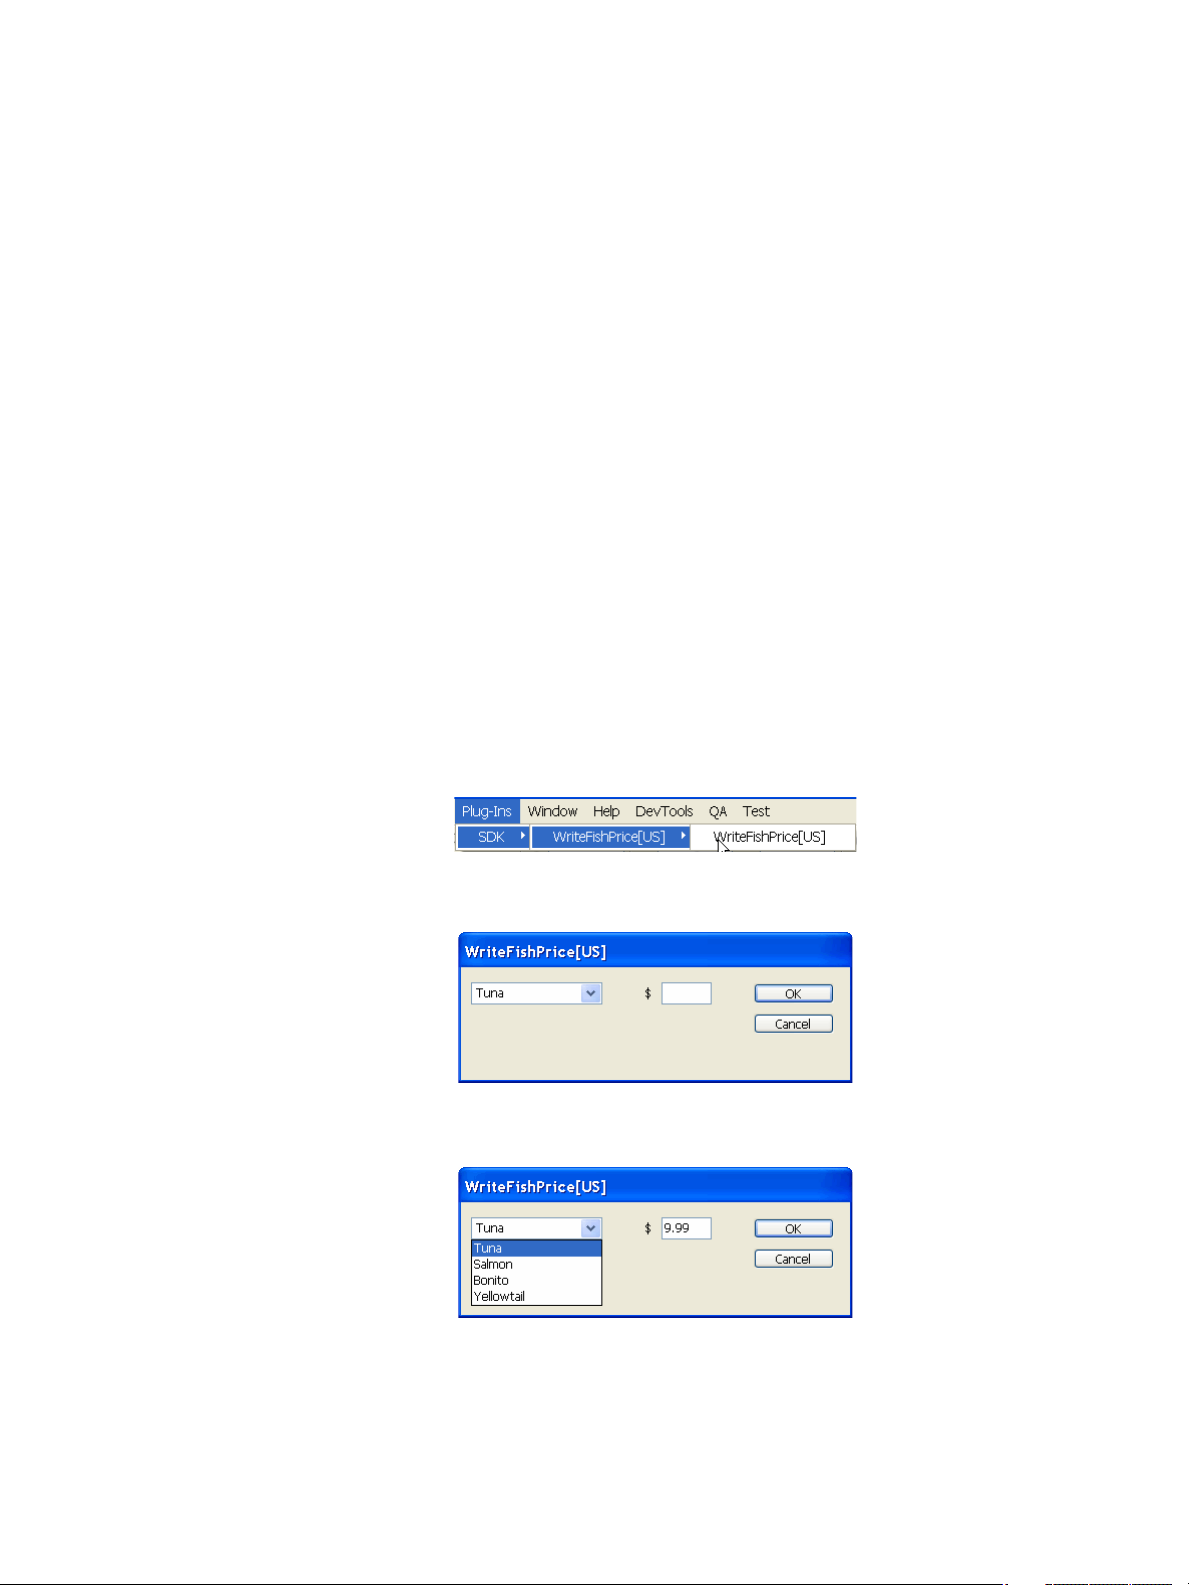
To see the finished plug-in toward which you are working, start InDesign with WriteFishPrice loaded, and
create a document. In the new document, create a text frame and place a text cursor in the frame. From
the main menu, choose Plug-In > SDK > WriteFishPrice(US):
The WriteFishPrice(US) dialog opens:
From the drop-down menu, select a fish name. Enter its price in the text box:
When you click OK, the name of the fish selected from the drop-down menu and the price you entered
appear in the text frame at the insertion point of the text cursor. As you continue making entries in the text
frame, the output appears like that shown here:
Page 17

CHAPTER 2: Getting Started with the InDesign SDK Step 1: Use DollyXs to generate a dialog-based plug-in project 17
This simple plug-in serves as a good starting point, because it incorporates fundamental and common
components. The following sections describe how to create this plug-in. The main steps are as follows:
“Step 1: Use DollyXs to generate a dialog-based plug-in project”
“Step 2: Add a DropDownListWidget to the dialog”
“Step 3: Add a TextEditBoxWidget”
“Step 4: Add a StaticTextWidget”
“Step 5: Obtain a value from DropDownListWidget”
“Step 6: Get the text in the TextEditBoxWidget”
“Step 7: Insert a string into a text frame”
“Step 8: Disable the menu with no text selection”
“Step 9: Initialize dialog widgets”
Step 1: Use DollyXs to generate a dialog-based plug-in project
Before you begin, have a mental picture of the plug-in you want to create—what it should do and what
sort of interface it should present to the user. Then you can use DollyXs to create the basic skeleton for
your plug-in.
DollyXs is a plug-in development tool included in the InDesign SDK. This tool, written in Java™, uses XSL
templates to generate fundamental plug-in projects for Microsoft Visual C++ and Apple® Xcode. See the
DollyXs Readme.txt file for details, including how to obtain the Java Runtime Environment for Windows.
To create a working plug-in that provides a solid starting point for your plug-in development, you can run
DollyXs and fill in the fields in the DollyXs interface. For this example, you will choose a dialog-box user
interface as the foundation for your WriteFishPrice plug-in. In other circumstances, you might choose the
panel-based or script-provider-based user interfaces that DollyXs supplies.
DollyXs is located in the <SDK>/devtools/sdktools/dollyxs directory.
OTE: On Mac OS, as an alternative to using DollyXs to generate a dialog-based plug-in project, you can
N
use the template to generate an empty InDesign SDK project file. See “
Create an InDesign SDK Xcode
project from the template (Mac OS only)” on page 25.
Page 18
CHAPTER 2: Getting Started with the InDesign SDK Step 1: Use DollyXs to generate a dialog-based plug-in project 18
Step 1.1. Start DollyXs
To start, execute DollyXs.bat (on Windows) or the DollyXs.sh shell script (on Mac OS). When DollyXs starts,
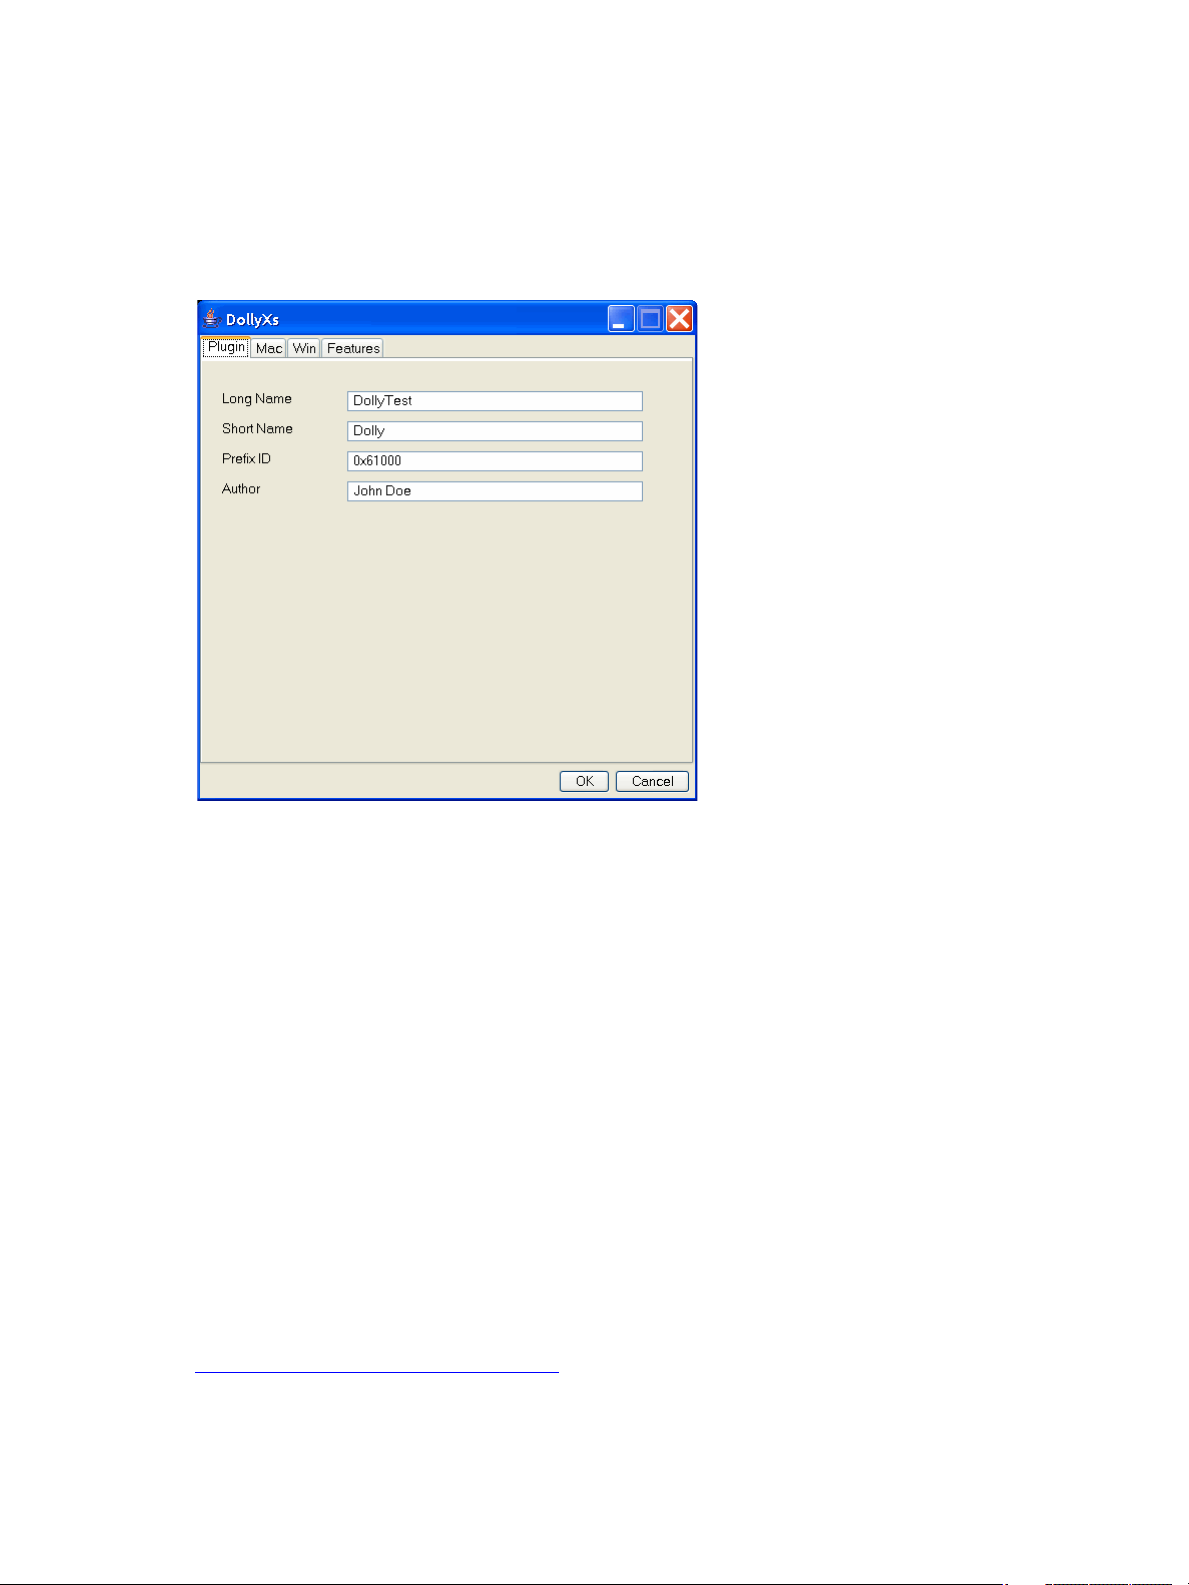
you see this dialog:
Step 1.2: Specify plug-in names
In the Plugin tab, enter the two plug-in names:
Long Name is the name of the plug-in itself. It is used as a string in the Plug-ins menu and in the About
This Plug-in dialog.
Short Name is used as part of the source-code files, class names, and IDs that are generated. We
recommend that Short Name have approximately six characters.
For this exercise, enter WriteFishPrice for Long Name and WFP for Short Name.
For Author, enter your name. This string is used in the About This Plug-in dialog and comments in source
code.
Step 1.3: Specify the prefix ID
A prefix ID is a unique value assigned by Adobe for your plug-in development. For plug-ins that you will
release outside your organization, make sure to use a prefix ID assigned to you by Adobe. Information
about obtaining a plug-in prefix ID is at Adobe’s InDesign Developer Center,
http://www.adobe.com/devnet/indesign/
N
OTE: This is very important, because the prefix ID is used to define the plug-in’s IDs and resources. There
must be no overlap in the prefix IDs used by plug-ins. Plug-ins with the same prefix ID cannot be loaded
simultaneously.
.
Page 19

CHAPTER 2: Getting Started with the InDesign SDK Step 1: Use DollyXs to generate a dialog-based plug-in project 19
For this exercise, specify 0x61000 (the default). This prefix ID was allocated for the purpose of this exercise.
Step 1.4: Specify directory locations
Windows
Click the Win tab, and specify the directory paths that you want to use. For Project Dir, specify the
complete path to the directory where you want your Visual C++ project (.vcproj) file to be generated. If you
installed the SDK in a different directory, edit the default path.
The other directories are relative to Project Dir. For this exercise, you will work in the WriteFishPrice
directory. For Source Dir and Header Dir, specify WriteFishPrice as your subdirectory in sdksamples.
The Shared RSP Files group lets you use existing .rsp file(s). A .rsp file is used in an SDK project to specify
common search paths for the C++ and ODFRC compilers.
Mac OS
Click the Mac tab, and specify the directory paths that you want to use. For Project Dir, specify the
complete path to the directory where you want your Xcode project (.xcodeproj) file to be generated. If you
installed the SDK in a different directory, edit the path.
The other directories are relative to Project Dir. For this exercise, you will work in the WriteFishPrice
directory. For Source Dir and Header Dir, specify WriteFishPrice as your subdirectory in sdksamples.
In the Architectures pop-up menu, the choice corresponds to the Architectures variable in the Xcode’s
project/target setting. Choose the platform that you want to target.
The Shared XCConfig Files group lets you use existing xcconfig files on your computer. The xcconfig file is
used in the Xcode project to provide base settings for project/targets. The file specified in the Main
xcconfig field is used as the xcconfig file for the project-level build setting in the generated project; the file
specified in the Debug xcconfig field is used for the Debug-target build setting; and the file specified in the
Release xcconfig field is used for the Release-target build setting. The SDK comes with a set of xcconfig
files in the projects folder, which you can reuse if you use settings like those in the SDK project.
Step 1.5: Specify template
Click the Features tab, and select Generate Dialog.
Step 1.6: Verify entered information and generate plug-in project
Verify your settings, then click OK.
Verify that DollyXs has generated files in the project and code directories you specified. In the project
directory, you should see WriteFishPrice.vcproj or WriteFishPrice.xcodeproj. In the source directory, you
should see a group of C++ source files that begin with WFP. For details about each file, see “
in the project generated by DollyXs” on page 21.
Files included
Page 20

CHAPTER 2: Getting Started with the InDesign SDK Step 1: Use DollyXs to generate a dialog-based plug-in project 20
Step 1.7: Build the plug-in
Windows
Before building your plug-in, set up your InDesign development environment (IDE) to use the InDesign
ODFRC. To do this, choose Tools > Options, and add the <SDK>\devtools\bin directory under the
Executable Files directory path.
To build your plug- in:
1. Open WFP.vcproj using Microsoft Visual C++.
2. When the project is open, make sure Debug is the active configuration: Choose Project >
WriteFishPrice Properties. The configuration in the Property Pages dialog box should be Active
(Debug).
3. To build the plug-in, choose Build > Build WriteFishPrice.
4. When you are asked to save a Solutions file (.sln), save it to the same directory as the project (.vcproj)
file.
Mac OS
The Xcode project generated by DollyXs is already set up to find the ODFRC compiler from its default SDK
location. Unless you moved the ODFRC.cmd to somewhere other than its default location, you do not
need to do anything to specify the location of the ODFRC compiler.
To build your plug- in:
1. Open the WriteFishPrice.xcodeproj file using Xcode.
2. Choose Debug from the Active Target pop-up menu, on the top left corner of the project window.
3. Choose Build > Build, or click the Build button on the Project Window.
Step 1.8: Load the plug-in
The plug-in you just built has the filename WriteFishPrice.pln (Windows) or WriteFishPrice.InDesignPlugin
(Mac OS) and is in the following directory in your <SDK> directory:
Windows:
Debug: <SDK>\build\win\debug\SDK
Release: <SDK>\build\win\release\SDK
Mac OS:
Debug: <SDK>/build/mac/debug/SDK
Release: <SDK>/build/mac/release/SDK
Copy the WriteFishPrice plug-in file to the Plug-Ins directory in the InDesign CS6 directory; then the
WriteFishPrice plug-in will be loaded when InDesign is launched.
Page 21

CHAPTER 2: Getting Started with the InDesign SDK Files included in the project generated by DollyXs 21
NOTE: Do not install debug plug-ins to the Plug-Ins directory for the release build of InDesign, or vice versa;
if you do, your plug-in will fail to load.
When the plug-in is loaded, InDesign displays a Plug-Ins menu containing a WriteFishPrice menu item.
Step 1.9: Start InDesign through your IDE
If you successfully built and loaded your plug-in, you can start InDesign through your IDE by following the
steps in this section.
On Windows:
1. Using Microsoft Visual C++ and with the project file open, choose Project > WriteFishPrice Properties.
2. In the Debugging panel of Configuration Properties, set the Command field to InDesign.exe. If you
know the path, type it; otherwise, click the Command field, then click the Down button to open a
Browse window that you can use to navigate to where InDesign.exe is located on your computer.
3. Click OK to complete the process.
On Mac OS:
For information on starting an Xcode debugging session, see “Starting a debugging session from your
plug-in project” on page 14.
You are now ready to start the application from your IDE. In Visual C++, choose Debug from the IDE main
menu, and click Start. The process is similar for Xcode.
After you start InDesign, open the dialog from the Plug-Ins menu:
No widgets are placed on your dialog yet, nor is the menu name correct, so you still have some work to do.
Files included in the project generated by DollyXs
This section describes the files that DollyXs generates. Go back to the project in your IDE, and follow along
with this section to examine each file.
Source files
WFPID.h — This header file is a central repository for plug-in IDs. Some IDs are numeric, and some are
string values; some IDs are unique across the application, and some are unique only within the
plug-in. This file is critical for plug-ins and is included by all plug-in project files.
WFPFactoryList.h — This header file contains macros that allow the core InDesign object model to
create and destroy instances of the implementations through factory classes.
Page 22

CHAPTER 2: Getting Started with the InDesign SDK Files included in the project generated by DollyXs 22
WFPNoStrip.cpp — This file prevents the C++ compiler optimizations from dead stripping (eliminating
code that appears to the compiler to be unused). Because most of the code in a plug-in is not used
directly from within the plug-in itself, much of this code can appear to the compiler to be dead.
WFPNoStrip.cpp contains a function, DontDeadStrip, which includes WFPFactoryList.h.
WFPID.cpp — This file allows the IDs defined in WFPID.h to be included as strings in the debug build
symbols.
SDKPlugInEntrypoint.cpp — This file, in the <SDK>/source/sdksamples/common directory, specifies
the plug-in’s entry point. This file is not modified by any DollyXs settings but is simply included in the
project.
TriggerResourceDeps.cpp — This file ensures that the ODFRC resource is relinked when the .fr file is
compiled on Windows.
WFPDialogController.cpp — This source file contains a class used for initializing, validating, and
responding to dialog widgets. The WFPDialogController class specifies what happens when the dialog
is initialized and when OK is clicked.
WFPDialogObserver.cpp — The WFPDialogObserver class in this file dynamically processes changes to
the widgets on the dialog. To observe events pertaining to any other widgets you may place on the
dialog, this is where you add your code.
WFPActionComponent.cpp — The WFPActionComponent class in this source file defines what happens
when the plug-in’s menu item is selected. In this case, the Plug-Ins menu item and About This Plug-In
menu items are handled. The About This Plug-In menu item is displayed in the Help > About Plug-Ins
> SDK menu item (Windows) or the Apple Menu menu item (Mac OS). This class also opens the About
This Plug-In dialog box in the DoAbout method.
Resource files
WFP.fr — This file defines resources unique to InDesign. These cross-platform resource definitions are
compatible with Windows and Mac OS. This file contains resources other than strings.
WFP_enUS.fr — This file contains string resources in a string-table resource used for the US English
locale. These resources are used when the plug-in is used with InDesign in the US English locale. Also,
this file can contain user-interface specifications, especially when they differ by locale.
WFP_jaJP.fr — This file contains string resources in a string-table resource used for the Japanese
locale. These resources are used when the plug-in is used with InDesign in the Japanese locale. Also,
this file can contain user-interface specifications, especially when they differ by locale.
WFP.rc — This file defines resources specific to Windows; in particular, the plug-in file version.
Project files
WFP.vcproj — This is a Visual C++ project file for Windows. By default, it is in <sdk>\build\win\prj.
WFP.xcodeproj — This is an Xcode project file for Mac OS. By default, it is in <sdk>/build/mac/prj.
Detailed descriptions of code generated by DollyXs
This section provides more detail about the source files that you will modify throughout this exercise.
Follow along with this section by using your IDE to open and examine the code of each file.
Page 23
CHAPTER 2: Getting Started with the InDesign SDK Files included in the project generated by DollyXs 23
WFPActionComponent.cpp
WFPActionComponent — This class inherits the CActionComponent class, which implements the
IActionComponent interface. The WFPActionComponent class responds to menu selections in the
DoAction method and distinguishes the selected menu item by means of the corresponding ActionID.
WFPActionComponent::DoAction — This method overrides the DoAction method in its parent class,
(CActionComponent), receives the selected ActionID as a parameter, and compares it with
kWFPAboutActionID and kWFPDialogActionID (defined in WFPID.h). If there is a match, the DoAction
method calls the appropriate DoAbout or DoDialog method.
WFPActionComponent::DoAbout — This method is called from WFPActionComponent::DoAction. It
displays a CAlert::ModalAlert dialog.
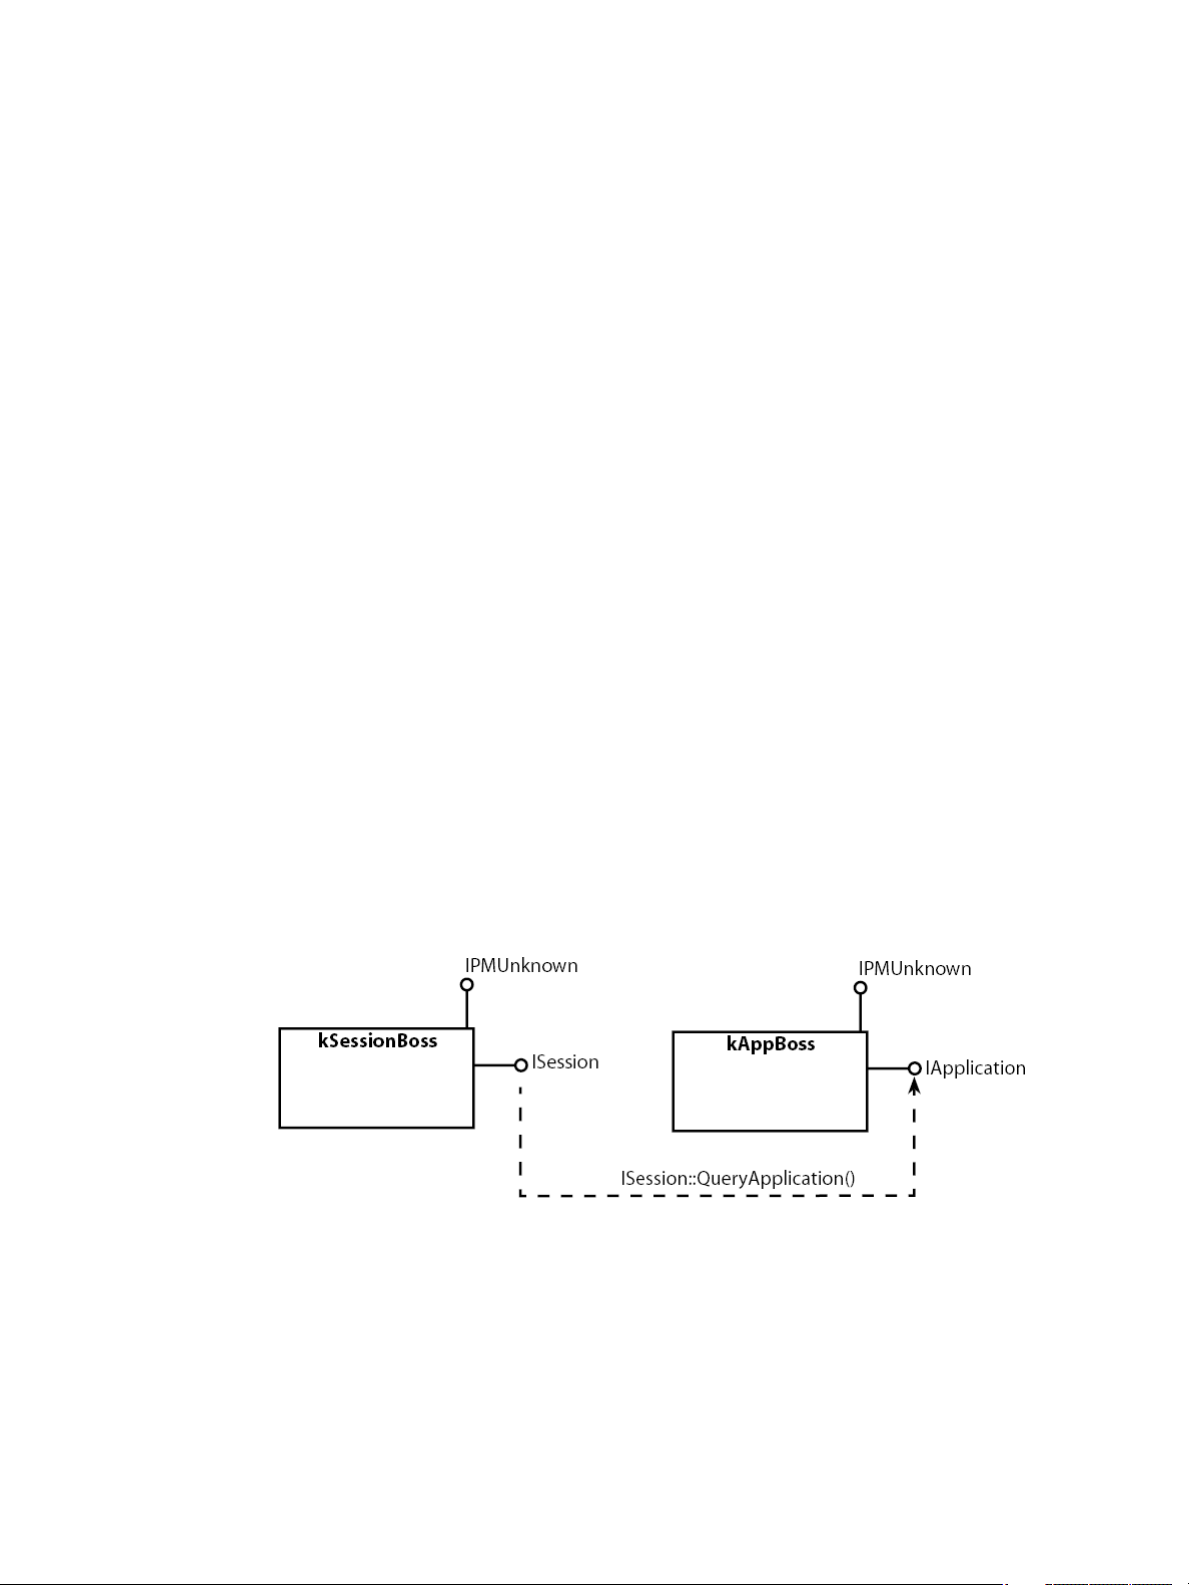
WFPActionComponent::DoDialog — This method first obtains the IApplication interface by means of
GetExecutionContextSession()->QueryApplication(). GetExecutionContextSession() returns a pointer
to the ISession interface aggregated in the kSessionBoss, which is a boss-class object that describes
the current InDesign application session. IApplication is an interface aggregated on kAppBoss, which
is a boss-class object that describes the InDesign application itself. See the following figure. From the
IApplication interface, DoDialog obtains the IDialogMgr interface, which enables you to get to the
InDesign dialog manager’s boss class. Next, DoDialog loads the dialog resources that correspond to
the current user-interface locale during the first instantiation, and DoDialog saves it to the InDesign
database, so it can be loaded efficiently during subsequent instantiations. The current user-interface
locale is obtained by instantiating a RsrcSpec object, dialogSpec, by calling LocaleSetting::GetLocale.
There are several kinds of constructors for the RsrcSpec object, but this method uses the constructor
shown in the code. As shown, once you instantiate a RsrcSpec object, DoDialog calls the
CreateNewDialog method on the IDialogMgr interface. The parameter list contains the dialogSpec
that was just instantiated and a constant that specifies the modality of the dialog (kMovableModal
constant defined in the IDialog interface). CreateNewDialog then creates a movable dialog based on
the dialogSpec and returns a pointer to a dialog (IDialog on kDialogWindowBoss, or a derived boss
class). Finally, the Open method on the IDialog interface is called, and the dialog is opened.
WFPDialogObserver.cpp
WFPDialogObserver — This class inherits the CDialogObserver class, which implements the IObserver
interface. Through this class, you can register to observe dynamic changes to the widgets on the
dialog. The example simply provides some stub code so your code can observe changes to widget
states, such as a custom button. The observer provides a mechanism to listen to changes to specific
objects, known as subjects. By attaching to a subject, observers can be notified when a change occurs,
rather than having to poll for changes.
Page 24

CHAPTER 2: Getting Started with the InDesign SDK Files included in the project generated by DollyXs 24
WFPDialogObserver::AutoAttach — This method is called by the application and enables observers to
attach themselves to a subject. By attaching, an observer can be notified when there is a change to the
subject. In the example, there are no widgets handled. If you need to observe other widgets on this
dialog, you can add them here. Alternately, you can observe each widget in separate observers. To
keep the code simple, however, the example collectively observes all widgets on this dialog. By
default, the OK and Cancel buttons (with widget IDs of kOKButtonWidgetID and
kCancelButton_WidgetID, respectively) are observed by the parent class, CDialogObserver. Consider
how this works. First, the WFPDialogObserver::AutoAttach method calls the
CDialogObserver::AutoAttach method in the parent class. This is so the OK and Cancel buttons can be
handled. Afterward, the IPanelControlData interface (from the same boss object that hosts the current
implementation, WFPDialogObserver) is obtained and, by using the parent class’s
CDialogObserver::AttachToWidget method, it can attach to any other widget on the dialog.
WFPDialogObserver::AutoDetach — This method, which is called by the InDesign application, allows
observers to detach from a subject. Detaching an observer is the reverse of attaching, which means
the detached observer is no longer notified of changes. Again, the OK and Cancel buttons are handled
by default in the parent class, CDialogObserver. Like the AutoAttach method, the
CDialogObserver::AutoDetach method is called to handle the OK and Cancel buttons. Afterward, the
IPanelControlData interface (from the same boss class in which the current class resides) is obtained
and, by using the parent class's CDialogObserver::DetachFromWidget method, an observer can
detach from any other widget on the dialog.
WFPDialogObserver::Update — This method is called by the host when a change occurs to the
observed object. (In the example, there are no widgets other than the OK and Cancel buttons, so there
is not much extra code.) When a widget is changed, the CDialogObserver::Update method is called to
handle the OK and Cancel buttons up front, then the IControlView interface of the widget that caused
the change is obtained from the theSubject parameter. To determine which widget ID caused the
change, the GetWidgetID method is called on the IControlView interface. Suppose you want to add
another button with a specific widget ID, like kWFPIconSuiteWidgetID, to this dialog. For a button
press to be responded to, the widget ID must correspond to the ID for your button, and the message
ID from the theSubject parameter must be something like kTrueStateMessage (indicating the button
is pressed).
WFPDialogController.cpp
WFPDialogController — This class inherits the CDialogController class, which implements the
IDialogController interface. This class handles the dialog initialization, as well as data validation and
the OK button click.
WFPDialogController::InitializeDialogFields — This method initializes the widgets on the dialog. This
method is called by the parent class when the dialog is opened and when the dialog’s Reset button is
clicked, if you did not override the CDialogController::ResetDialogFields method. This method first
needs to call the CDialogController::InitializeDialogFields method in the parent class. (Note: Cancel
becomes Reset when you hold the Alt or Option key.)
WFPDialogController::ValidateDialogFields — This method validates the fields on the dialog. When the
OK button is clicked, this method is called before the ApplyDialogFields method. Again, the
CDialogController::ValidateDialogFields method in the parent class is called first. If there is even one
field with an invalid value, you can return the WidgetID to be selected. If all fields have valid values,
you can return kDefaultWidgetId, which allows the parent class to call the ApplyDialogFields method.
Page 25
CHAPTER 2: Getting Started with the InDesign SDK Create an InDesign SDK Xcode project from the template (Mac OS only)
25
WFPDialogController::ApplyDialogFields — This method retrieves the values from the dialog fields and
acts on them. The widgetId from the parameter list contains the widget ID that caused this method to
be called. By default, this parameter contains kOKButtonWidgetID.
Create an InDesign SDK Xcode project from the template (Mac OS only)
On Mac OS, as an alternative to using DollyXs to generate a plug-in project, you can use the template to
generate an empty InDesign SDK project file. The development environment for the InDesign SDK is
XCode 3.2.5 for Mac OS 10.6.x (also known as Snow Leopard). To create an InDesign template project for
XCode 3.2.5, see the following section.
Add the SDK project template for Xcode
Add the SDK template project folder InDesign Project from <SDK>/devtools/sdktools/xcodetemplates to
<your-start-up-disk-volume>/Developer/Library/Xcode/Project Templates. The template is one of the
methods that you can use to convert or create a new Xcode project for an InDesign plug-in.
Follow these steps:
1. Start Xcode.
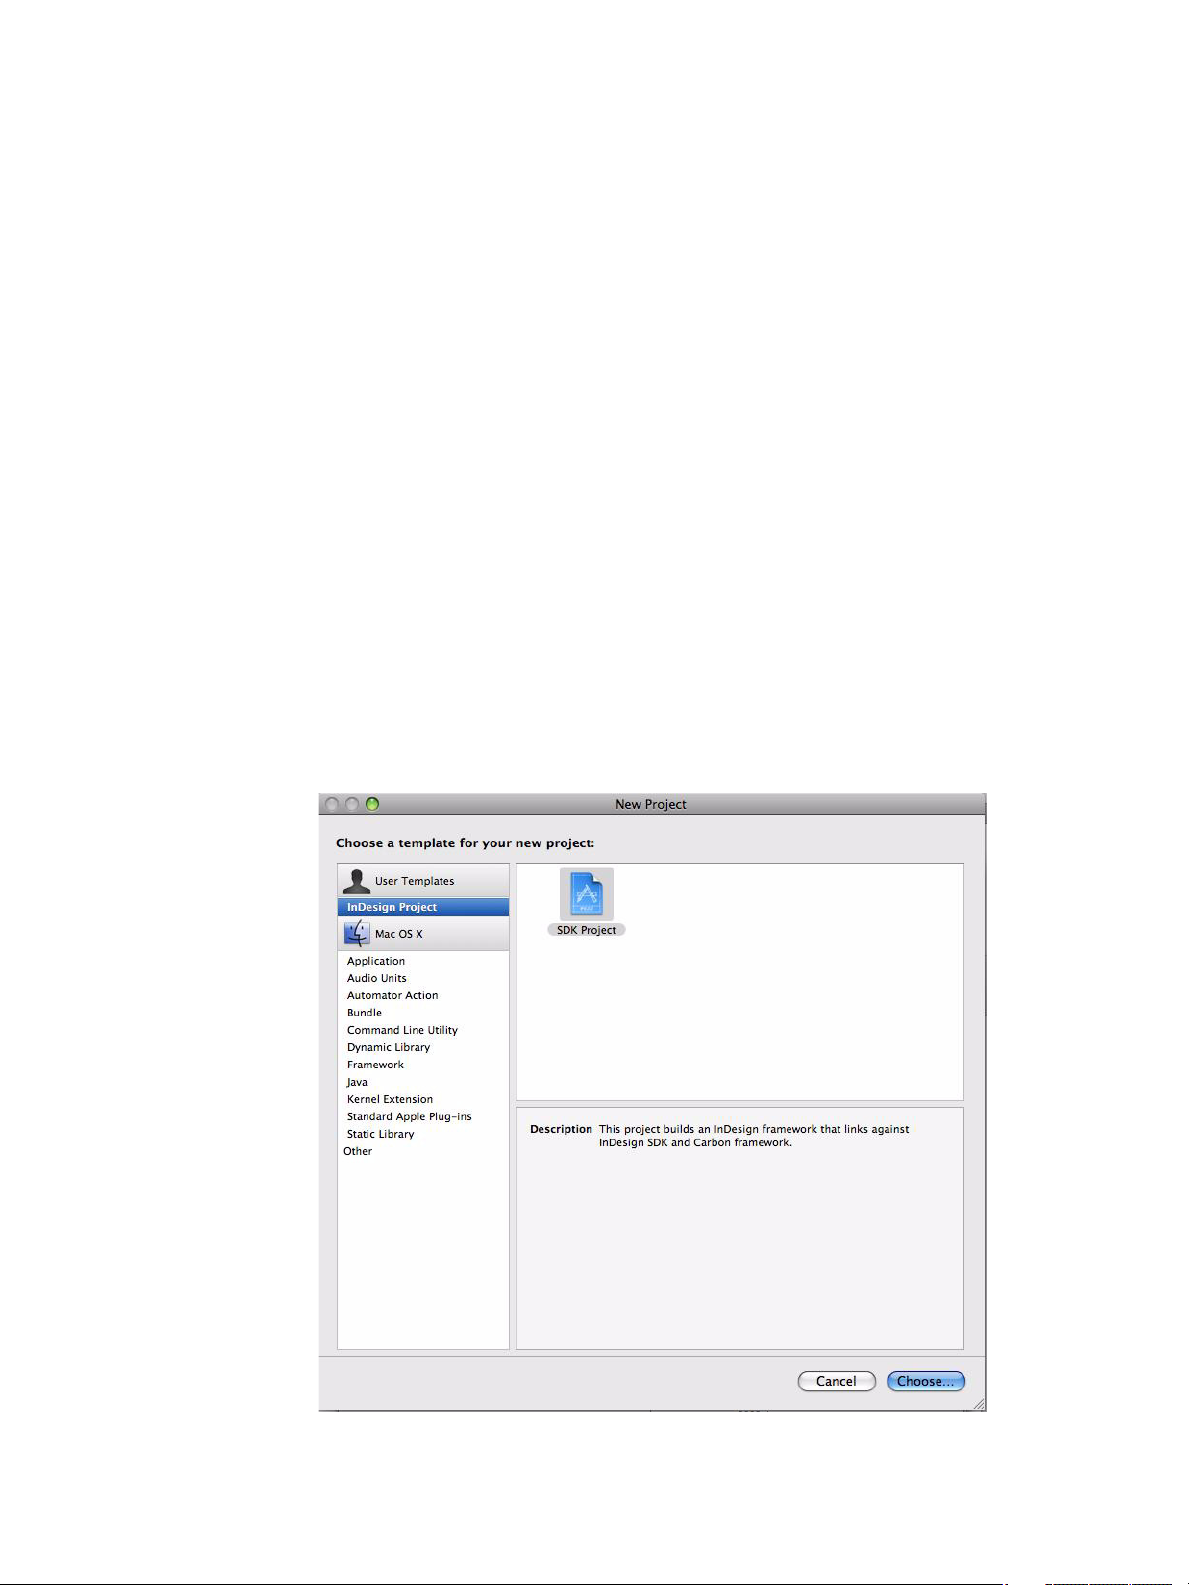
2. From the Xcode menu, choose File > New project to bring up the New Project window:
Page 26

CHAPTER 2: Getting Started with the InDesign SDK Create an InDesign SDK Xcode project from the template (Mac OS only)
26
3. Select the “InDesign Project” group, select “SDK Project”, and click Choose... The Save As dialog
appears:
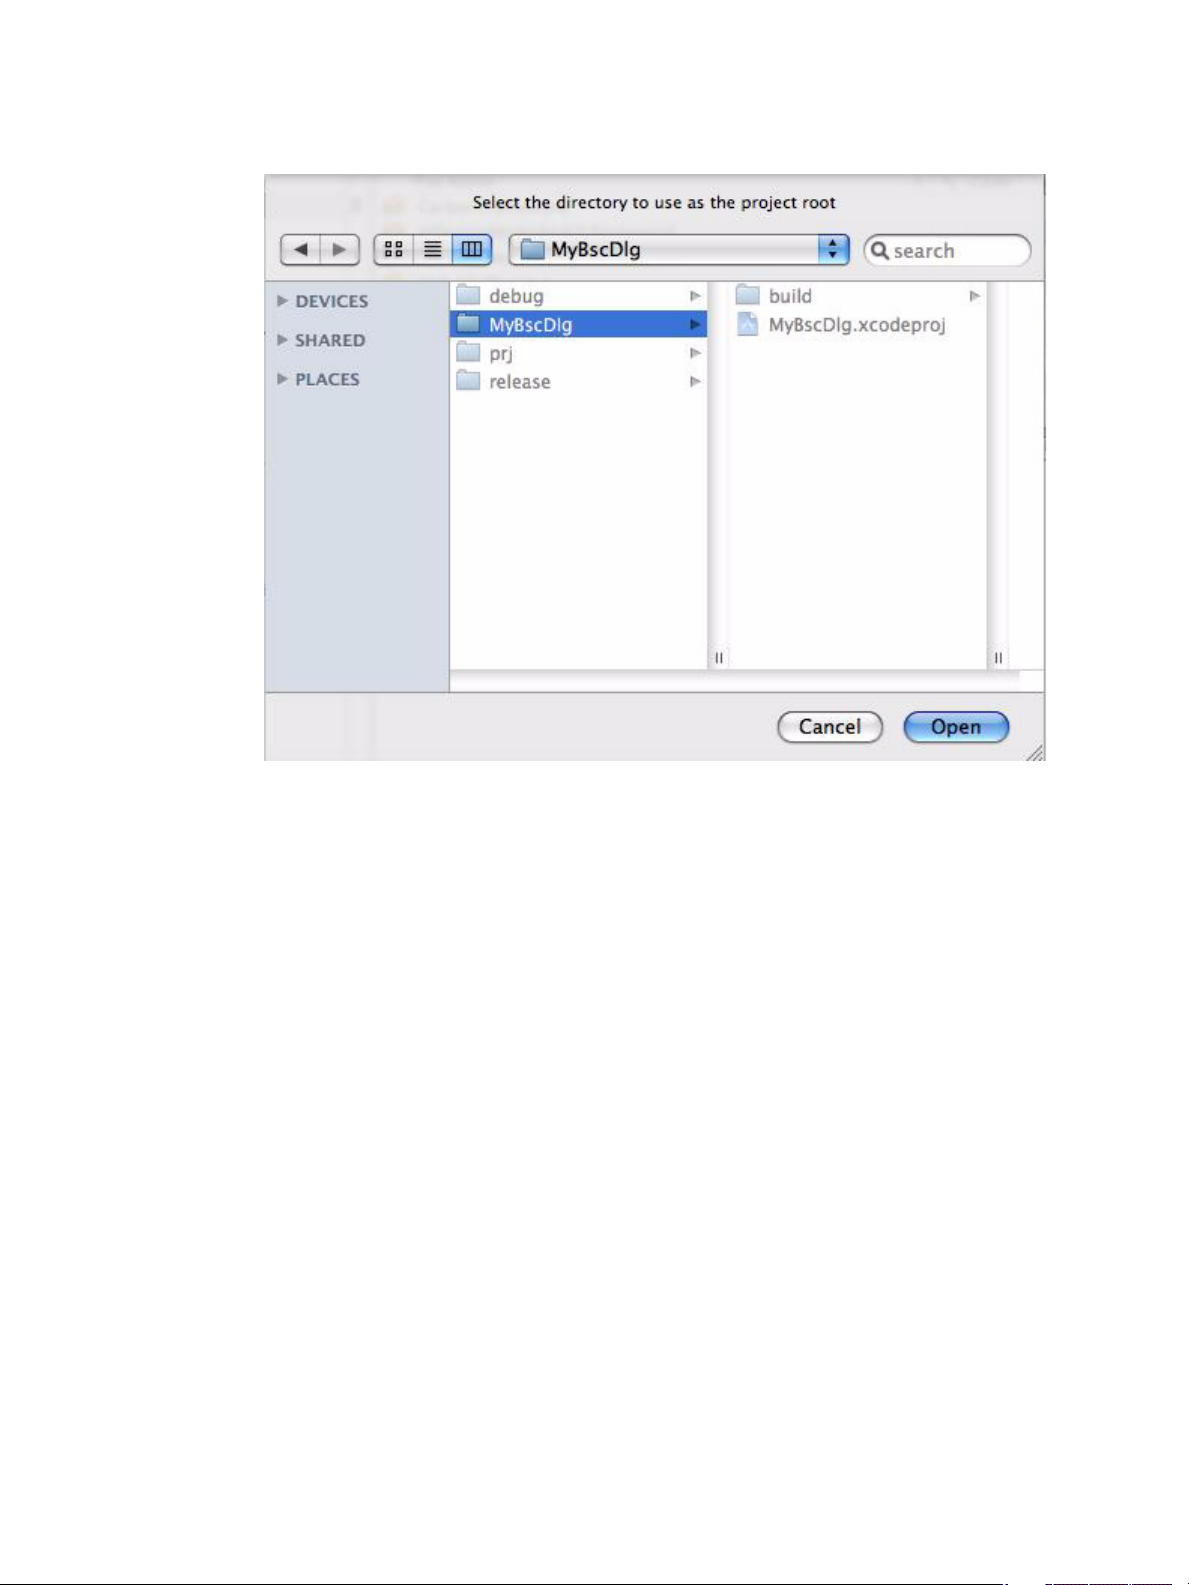
4. Name the project and give it a proper path. The path should be in the same directory as the SDK’s prj
folder. By default, Xcode appends a project folder after you specify the SDK project path. Click Save,
and a windows appears to “Select the directory to use as the project root”:
Page 27
CHAPTER 2: Getting Started with the InDesign SDK Step 2: Add a DropDownListWidget to the dialog 27
5. Select the directory to use as the project root and click Open.
6. Copy the project file from the project folder to the SDK project folder. (If you prefer to create a project
outside the prj folder, consider using DollyXs, as it supports the feature.)
7. If a “Files to be Overwritten” dialog pops up with an invisible .DS.store file shown as the existing file,
click “Overwrite Select Files.” Now a new project with the name you specified above is created in the
prj location. Go to the prj location; you will find the xcodeproj file is created and a folder named
<your-project-name>-#.moved-aside also is created. This folder contains the files that are being
overwritten. If .DS.store file is the only file being overwritten, you can safely discard this <your-project
name>-#moved-aside.
OTE: The template works only when you create the project file in the same directory as the prj folder.
N
N
OTE: The template uses InDesignModel.framework by default. If your plug-in needs UI elements, you
need to replace InDesignModel.framework with InDesignModelAndUI.framework. Otherwise, you will get
many link errors.
OTE: You need to add any necessary header file paths to the project’s Header Search Paths.
N
Step 2: Add a DropDownListWidget to the dialog
You have created the rough foundation for your plug-in. Now it is time to start building your plug-in by
improving its dialog widget.
Step 2.1: Add a widget ID
Open WFPID.h in your IDE and find the widget definitions for the dialog, as shown here:
Page 28

CHAPTER 2: Getting Started with the InDesign SDK Step 2: Add a DropDownListWidget to the dialog 28
// WidgetIDs:
DECLARE_PMID(kWidgetIDSpace, kWFPDialogWidgetID, kWFPPrefix + 1)
On the next line, add the following:
// DropDownList widget ID
DECLARE_PMID(kWidgetIDSpace, kWFPDropDownListWidgetID, kWFPPrefix + 2)
Step 2.2: Define string keys for list items
Next, define string keys for the items in the DropDownList. InDesign has a base type object, PMString, that
is used extensively for user-interface strings; for this type, InDesign has a locale-based, string look-up
mechanism for automatic string translation. The translated strings are defined in a string-table resource; if
a string is specified by its key, InDesign automatically replaces it with the corresponding localized string. If
you look at WFPID.h in the “Other StringKeys” section, you can see several string keys defined there.
To define a string key for the DropDownListWidget items, first find the following in WFPID.h:
// Other StringKeys:
#define kWFPAboutBoxStringKey kWFPStringPrefix "kWFPAboutBoxStringKey"
#define kWFPTargetMenuPath kWFPPluginsMenuPath
Immediately after this, add the following lines:
#define kWFPDropDownItem_1Key kWFPStringPrefix "kWFPDropDownItem_1Key"
#define kWFPDropDownItem_2Key kWFPStringPrefix "kWFPDropDownItem_2Key"
#define kWFPDropDownItem_3Key kWFPStringPrefix "kWFPDropDownItem_3Key"
#define kWFPDropDownItem_4Key kWFPStringPrefix "kWFPDropDownItem_4Key"
If you know what your string key will be—for instance, kWFP_TunaKey—you can define the key using the
string, so you can find it more easily later.
Step 2.3: Define locale-specific strings for list items on DropDownListWidget
Next, define the string-table resource entries that correspond to the string keys you just defined. These
string tables are defined in WFP_enUS.fr and WFP_jaJP.fr, for use in the US English and Japanese locales,
respectively. These two resource files are included by WFP.fr.
Start by defining the US English string-table entries. Open WFP_enUS.fr to see that the string keys and the
English strings are paired up. Add strings for the four string keys you just defined. Look for the following in
WFP_enUS.fr:
resource StringTable (kSDKDefStringsResourceID + index_enUS)
{
// Locale Id
k_enUS,
// Character encoding converter
kEuropeanMacToWinEncodingConverter,
{
// ...omitted
// ----- Panel/dialog strings
kWFPDialogTitleKey, kWFPPluginName "[US]",
Immediately after this, add the following lines:
Page 29

CHAPTER 2: Getting Started with the InDesign SDK Step 2: Add a DropDownListWidget to the dialog 29
// Drop-down list item strings
kWFPDropDownItem_1Key, "Tuna",
kWFPDropDownItem_2Key, "Salmon",
kWFPDropDownItem_3Key, "Bonito",
kWFPDropDownItem_4Key, "Yellowtail",
Similarly, you can add strings to the Japanese string table. Open WFP_jaJP.fr and look for the following:
resource StringTable (kSDKDefStringsResourceID + index_jaJP)
{
k_jaJP,// Locale Id
0, // Character encoding converter
{
//...omitted
// ----- Panel/dialog strings
kWFPDialogTitleKey, kWFPPluginName "[JP]",
Immediately after this, add the following lines:
// Drop-down list item strings
kWFPDropDownItem_1Key, "Tuna [JP]",
kWFPDropDownItem_2Key, "Salmon [JP]",
kWFPDropDownItem_3Key, "Bonito [JP]",
kWFPDropDownItem_4Key, "Yellowtail [JP]",
For this exercise, it is not necessary to enter Japanese characters into the resource string tables. The SDK
sample plug-ins often put a locale-specific suffix on these strings, such as “[JP],” so you know the
appropriate string table is being used. You can choose to do the same.
If you will release your plug-ins commercially, however, there is a chance an InDesign Japanese version will
use your plug-in. In that case, it is advisable to define strings for the Japanese string table. Better yet,
obtain help in translating the strings into Japanese or other locales supported by InDesign.
Step 2.4: Add a DropDownListWidget to your dialog resource
The dialog resource is defined in WFP.fr, toward the end of the file. This resource already contains two
widgets: the default OK button and Cancel button. Look for the following:
resource WFPDialogWidget (kSDKDefDialogResourceID + index_enUS)
{
FILE__, __LINE__,
kWFPDialogWidgetID, // WidgetID
kPMRsrcID_None, // RsrcID
kBindNone, // Binding
0, 0, 388,112, // Frame (l,t,r,b)
kTrue, kTrue, // Visible, Enabled
kWFPDialogTitleKey, // Dialog name
{
...omitted
CancelButtonWidget
(
...omitted
),
Immediately after this, add the following lines:
Page 30

CHAPTER 2: Getting Started with the InDesign SDK Step 2: Add a DropDownListWidget to the dialog 30
// Drop-down list widget resource
DropDownListWidget
(
kWFPDropDownListWidgetID, // WidgetId
kSysDropDownPMRsrcId, // RsrcId
kBindNone, // Frame binding
Frame(10,16,140,36), // Frame (l,t,r,b)
kTrue, kTrue, // Visible, Enabled
{{ // List Items
kWFPDropDownItem_1Key,
kWFPDropDownItem_2Key,
kWFPDropDownItem_3Key,
kWFPDropDownItem_4Key,
}}
),
This drop-down list widget is now added to your dialog.
Step 2.5: Correct the localized menu strings
Earlier, when you first looked at your dialog (“Step 1.9: Start InDesign through your IDE” on page 21), the
menu string in the Plug-Ins > SDK menu was Show Dialog. You want it to be WriteFishPrice[US] or
WriteFishPrice[JP], so you need to change it.
1. Open WFP_enUS.fr, and look for the following:
kWFPDialogMenuItemKey, "Show dialog[US]",
2. Change this line to the following:
kWFPDialogMenuItemKey, kWFPPluginName "[US]",
3. Also do this in your Japanese string table. Open WFP_jaJP.fr, and look for the following:
kWFPDialogMenuItemKey, "Show dialog[JP]",
4. Change this line to the following:
kWFPDialogMenuItemKey, kWFPPluginName "[JP]",
NOTE: kWFPPluginName is defined in WFPID.h.
Step 2.6: Save, build, and test
Save the source files you edited, build the plug-in, move the plug-in to the Plug-Ins directory, start
InDesign, and try using your new drop-down list.
When you first open the dialog, notice there is no default value in the drop-down list. You will set up a
default value for this drop-down list in a later step.
Click the drop-down list widget. The drop-down list widget should show the four strings you just added:
Page 31

CHAPTER 2: Getting Started with the InDesign SDK Step 3: Add a TextEditBoxWidget 31
Step 3: Add a TextEditBoxWidget
Step 3.1: Add a widget ID
1. In preparation for adding a TextEditBoxWidget on your dialog, open WFPID.h again, so you can define
widget IDs.
2. Immediately after the place where you added widget IDs in “Step 2.1: Add a widget ID” on page 27,
add a widget ID for your TextEditBox. Look for the following:
// WidgetIDs:
DECLARE_PMID(kWidgetIDSpace, kWFPDialogWidgetID, kWFPPrefix + 1)
DECLARE_PMID(kWidgetIDSpace, kWFPDropDownListWidgetID, kWFPPrefix + 2)
//DropDownList
3. Immediately after this, add the following line:
DECLARE_PMID(kWidgetIDSpace, kWFPTextEditBoxWidgetID, kWFPPrefix + 3) //TextEditBox
Step 3.2: Add a TextEditBoxWidget resource
Next, you need to add the TextEditBoxWidget resource into your dialog resource definition. Define this
immediately after the place where you added your DropDownListWidget. In WFP.fr, look for the following:
DropDownListWidget
(
// ...omitted
),
Immediately after this, add the following lines:
Page 32

CHAPTER 2: Getting Started with the InDesign SDK Step 4: Add a StaticTextWidget 32
// TextEditBox Widget resource
TextEditBoxWidget
(
kWFPTextEditBoxWidgetID, // WidgetId
kSysEditBoxPMRsrcId, // RsrcId
kBindNone, // Frame binding
Frame(200, 16, 250, 36), // Frame (l,t,r,b)
kTrue, kTrue // Visible, Enabled
0, // Widget id of nudge button (0 so we don't get one)
0, 0,// small, large nudge amount
0, // max num chars(0 = no limit)
kFalse,// is read only
kFalse,// should notify each key stroke
kFalse,// range checking enabled
kFalse,// blank entry allowed
0, // Upper bounds
0, // Lower bounds
"", // Initial text
),
This is all that is necessary to put a text-edit box on a dialog.
Step 3.3: Save, build, and test
Save the source file you edited, build the plug-in, move the plug-in to the Plug-Ins directory, start
InDesign, and try using your new text-edit box:
Try entering some characters or copying text from another application and pasting it into the text-edit box
using shortcut keys. InDesign automatically handles the shortcut keys.
Step 4: Add a StaticTextWidget
So far, you added a drop-down list to select the product and a text-edit box to enter the unit price. In
addition, you should have a currency symbol next to your text-edit box. InDesign can be used in various
locales; this is a good opportunity to use the power of the application’s international capabilities. In this
section, you will modify your dialog to display $ (dollar symbol) or ¥ (yen symbol), based on the locale.
Step 4.1: Add a Widget ID
To add an ID for your StaticTextWidget, open WFPID.h. After the lines you added for the
TextEditBoxWidget, define the ID for your StaticTextWidget. Look for the following:
// widget IDs
DECLARE_PMID(kWidgetIDSpace, kWFPDialogWidgetID, kWFPPrefix + 1)
DECLARE_PMID(kWidgetIDSpace, kWFPDropDownListWidgetID, kWFPPrefix + 2) //DropDownList
DECLARE_PMID(kWidgetIDSpace, kWFPTextEditBoxWidgetID, kWFPPrefix + 3) //TextEditBox
Immediately after this, add the following lines:
Page 33

CHAPTER 2: Getting Started with the InDesign SDK Step 4: Add a StaticTextWidget 33
DECLARE_PMID(kWidgetIDSpace, kWFPStaticTextWidgetID, kWFPPrefix + 4) //StaticText
Step 4.2: Define a string key
Next, define a string key for each currency symbol that will be displayed in the static-text widget:
// StaticText string key (yen or dollar character)
#define kWFPStaticTextKey kWFPStringPrefix "kWFPStaticTextKey"
Step 4.3: Define locale-specific strings for your StaticTextWidget
Define the localized strings that correspond to this string key in the string-table resources in WFP_enUS.fr
and WFP_jaJP.fr.
1. In WFP_enUS.fr, look for this comment:
// Panel/dialog strings
Immediately after this, add the following lines:
// StaticText string key (yen or dollar character)
kWFPStaticTextKey, "$",
2. In WFP_jaJP.fr, look for this comment:
// Panel/dialog strings
Immediately after this, add the following lines:
// StaticText string key. (yen or dollar character)
kWFPStaticTextKey, "¥",
The yen symbol is specified here as a double-byte character (specifically, ShiftJIS code 0x8F81). If you
cannot enter Japanese characters, specify this string as an uppercase Y.
Step 4.4: Add a StaticTextWidget resource to your dialog resource
Add the StaticTextWidget resource immediately after where you added the TextEditBoxWidget. In WFP.fr,
look for the following:
// TextEditBox Widget resource
TextEditBoxWidget
(
// ...omitted
),
Immediately after this, add the following lines:
Page 34

CHAPTER 2: Getting Started with the InDesign SDK Using resources in plug-ins 34
// StaticText widget resource
StaticTextWidget
(
kWFPStaticTextWidgetID, // WidgetId
kSysStaticTextPMRsrcId, // RsrcId
kBindNone, // Frame binding
Frame(150,16,190,36 ), // Frame (l,t,r,b)
kTrue, kTrue, kAlignRight, // Visible, Enabled, Alignment
kDontEllipsize, kTrue, // don't add any ellipses
kWFPStaticTextKey, // Text
// WidgetID for associated shortcut ctrl
kWFPTextEditBoxWidgetID
),
Step 4.5: Save, build, and test
Save the source file you edited, build the plug-in, move the plug-in to the Plug-Ins directory, start
InDesign, and try using your new static-text widget. The following figure shows what you see in the US
English locale:
The following figure shows what you see in the Japanese locale:
As you can see, different strings can be displayed based on the locale. You can do the same with other
user-interface widgets in InDesign.
In this case, the meaning of the data you enter in the text-edit box will change, so you may have to do
extra processing later.
This concludes your design of the dialog. As we demonstrated, you can design your plug-ins starting with
the user interface, before implementing what the plug-in does. In other words, you can develop the
controller in a manner that is decoupled from the rest of the plug-in.
Using resources in plug-ins
This plug-in’s resources are defined in WFP.fr (and the _enUS.fr and _jaJP.fr files that are included). InDesign
uses resource definitions for strings, dialogs, panels, menus, and boss classes that are cross platform
between the Windows and Mac OS development environments. (There are a few resource types not
included in these resource definitions. They are limited to a few types that are not compatible across
platforms: file version, icon, and picture resources.) To share resource definitions across platforms,
InDesign uses the ODFRC.
Page 35

CHAPTER 2: Getting Started with the InDesign SDK Using resources in plug-ins 35
Follow along with this section by using your IDE to take a closer look at various resources defined in WFP.fr.
PluginVersion resource
The PluginVersion resource describes the plug-in version. It is defined in
<SDK>/source/public/includes/objectmodeltypes.fh.
This entry is the build number of InDesign that is the target for the plug-in:
kTargetVersion,
Normally, you specify this using the kTargetVersion macro, which expands depending on whether the
plug-in is being built for the release or debug build.
This entry is an ID unique to this plug-in. It is defined in WFPID.h:
kWFPPluginID,
These entries give the major and minor versions of the plug-in and the major and minor versions of the
host application:
kSDKDefPlugInMajorVersionNumber, kSDKDefPlugInMinorVersionNumber,
kSDKDefHostMajorVersionNumber, kSDKDefHostMinorVersionNumber,
The version numbers are defined in <SDK>/source/sdksamples/common/SDKDef.h for the SDK you are
using.
This entry gives the major and minor version of this plug-in, defined in WFPID.h:
kWFPCurrentMajorFormatNumber, kWFPCurrentMinorFormatNumber,
This entry list specifies which applications (products) you are targeting:
{ kInDesignProduct, kInCopyProduct },
The InDesign SDK can be used to build plug-ins for InDesign, InCopy, and InDesign Server; however, there
may be times when you want to allow your plug-in to be loaded in only one application. In the example
used in this document, you want to be able to use your plug-in in InDesign and InCopy but not InDesign
Server.
This entry is an array that specifies the feature set with which this plug-in works:
{ kWildFS },
A feature set is an abstraction of a set of application features and is different from a user-interface locale.
The feature-set setting allows you to customize not only the user interface but also the behavior of your
plug-in. You can choose from product and language settings. For details, see
<SDK>/source/public/includes/FeatureSets.h. This document’s sample plug-in is specified to work with
any feature set, so it specifies kWildFS.
The last entry is a string that the Adobe Update Manager displays in the plug-in’s About box:
kWFPVersion
It is the plug-in’s version, defined in WFPID.h and based on kSDKDefPluginVersionString, which is defined
in <SDK>/source/sdksamples/SDKDef.h.
Page 36

CHAPTER 2: Getting Started with the InDesign SDK Using resources in plug-ins 36
Boss-class-definition resource
Boss-class definitions specify the InDesign object model. They are somewhat analogous to C++ class
definitions. Boss classes are discussed in detail later, so this section highlights only the resource part.
Each boss-class definition shown in this file begins with the resource keyword Class, which is used to
define a new boss class in the InDesign object model.
You also can start a boss class with the keyword AddIn. This allows you to add interfaces to existing
boss-class definitions. For an example of an AddIn resource, see the SDK sample plug-in FrameLabel.
The next component in the resource definitions for your plug-in, kWFPDialogBoss, is the ID of this boss
class. After that, kDialogBoss indicates the ID of the parent boss class. All the functionality provided by
kDialogBoss (all implementations backing the interfaces aggregated on the boss class) is provided for
kWFPDialogBoss. kWFPDialogBoss can extend this functionality (by adding other interfaces) or adapt it (by
overriding existing interfaces and mapping them onto its own implementation). If you do not want to
specify a parent boss class, specify kInvalidClass in its place.
Next is the interface-to-implementation mapping list for the boss class. In this dialog boss class, you are
overriding the IID_IDIALOGCONTROLLER and IID_IOBSERVER interfaces from kDialogBoss. The actual C++
implementations are referred to indirectly by their implementation IDs, namely kWFPDialogControllerImpl
and kWFPDialogObserverImpl, respectively.
InDesign plug-ins use the CREATE_PMINTERFACE macro to bind a specific implementation ID to a specific
C++ class. This allows InDesign to call the C++ implementation by its implementation ID.
Open the API reference documentation (in <SDK>/docs/references), click the Boss Classes link at the top of
the page, and navigate to the “kDialogBoss Class Reference” page. You can see that kDialogBoss inherits
another boss class, kPrimaryResourcePanelWidgetBoss, and overrides five interfaces. The entire InDesign
object model is built with a collection of these boss classes, and you can build your plug-ins by overriding
and/or extending existing boss classes, just as you did for kWFPDialogBoss.
FactoryList resource
This resource allows you to register the implementation IDs for your C++ implementations in the InDesign
object model. The WFPFactoryList.h header file registers the implementation IDs with the use of the
REGISTER_PMINTERFACE macro, and it also is included in WFPNoStrip.cpp to prevent dead stripping. By
sharing this piece of code, you prevent a situation in which you forget to specify the implementation ID in
one place or the other.
The REGISTER_PMINTERFACE macro in WFPFactoryList.h defines the implementation ID when used in a
resource definition and prevents dead stripping when used in a .cpp file.
MenuDef resource
The first block defines the menu used to show the About This Plug-In dialog. The second block defines the
menu used to show the dialog you just designed for your plug-in.
In each block:
The first line is the action ID issued when the associated menu item is selected.
Page 37

CHAPTER 2: Getting Started with the InDesign SDK Using resources in plug-ins 37
The second line specifies the menu path that corresponds to the action ID specified directly above it.
In the example, kWFPAboutMenuPath is a preprocessor #define statement that expands to
Main:&Help:AboutPlugins:SDK on Windows and Main:AppleMenu:AboutPlugins:SDK on Mac OS.
The third line specifies the position of the menu item relative to other menu items in the same menu
path. kSDKDefAlphabeticPosition is defined in SDKDef.h. If you use this constant (defined as 1.0),
InDesign builds the menu after sorting individual menu items in the same path. In most cases, you can
use this constant.
The fourth line defines the behavior of the menu item. To change the menu each time it is displayed,
set this to kSDKDefIsDynamicMenuFlag; otherwise, set it to kSDKDefIsNotDynamicMenuFlag.
Normally, you specify kSDKDefIsNotDynamicMenuFlag.
ActionDef resource
This resource defines the action invoked from the menu. An action is an abstraction for what happens
when a menu item is selected or a shortcut key is pressed.
In the first line, kWFPActionComponentBoss is a boss class that handles the action IDs.
In the second line, kWFPAboutActionID is an action ID that is to be handled by the boss class specified in
the first line.
In the third line, kWFPAboutMenuKey is the string key that corresponds to the action ID listed in the
second line.
In the fourth line, kOtherActionArea specifies the keyboard shortcut editor (KBSCE) area; in the example,
you are using “other.” KBSCE areas are defined in <SDK>/source/public/includes/ActionDefs.h.
The fifth line specifies the action type. Generally, you specify kNormalAction here.
The sixth line specifies how the menu is enabled or disabled. Again, these enabling types are defined in
ActionDefs.h.
The seventh line specifies the interfaceID for the selection required for the action to be active. If you do not
require any selections for your action to be active, specify kInvalidInterfaceID.
The eighth line specifies whether the shortcut key entry is visible in the KBSCE.
LocaleIndex resource
This resource cross-references the string tables with the InDesign feature set and locale information.
kStringTableRsrcType specifies the type of resource you are cross-referencing. In this case, this resource is
used as a locale-index resource to switch the string tables. kWildFS means this entry applies to all feature
sets (defined in FeatureSets.h). k_enUS specifies that the corresponding locale is US English. So, the first
line in the curly brackets after kStringTableRsrcType means that, for all feature sets and in the US English
locale, use the string table referenced by the resource ID kSDKDefStringsResourceID + index_enUS.
The next line specifies that when the feature set is kInDesignJapaneseFS and the locale is Japanese
(k_jaJP), use the string table referenced by the resource ID kSDKDefStringsResourceID + index_jaJP. In the
example, resource definitions for other locales (like French, German, and UK English) are omitted. It is extra
work to define resources for other languages from the beginning of development, so if you change the
k_enUS to kWild in the first line, your plug-in uses the US English string resources for locales other than
Japanese. This probably is a practical change to make, until you define resources for other locales. For a list
Page 38

CHAPTER 2: Getting Started with the InDesign SDK Using resources in plug-ins 38
of supported locales, see <SDK>/source/public/includes/MLocaleIds.h and
<SDK>/source/public/includes/WLocaleIds.h.
The next LocaleIndex resource defines a no-translation string table, as there may be strings that you do
not want to be translated automatically.
LocaleIndex resource definition for dialogs
This is similar to the LocaleIndex resource for the string tables, except dialogs are defined as
kViewRsrcType resources instead of kStringTableRsrcType. In the example, all feature sets and locales use
the same US English dialog resource. Although the dialog resource comes strictly from the US English
locale index, the strings on the dialog are localized, as you defined above with kStringTableRsrcType.
Custom type definitions
This resource defines a widget type. In the example, WFPDialogWidget belongs to the kViewRsrcType
resource type and inherits the DialogBoss widget. This statement defines the boss class that backs the user
interface of this type:
type WFPDialogWidget(kViewRsrcType) : DialogBoss(ClassID = kWFPDialogBoss)
{
};
The DialogBoss widget type inherits from PrimaryResourcePanelWidget. Both are defined in
<SDK>/source/public/widgets/includes/Widgets.fh.
Dialog (view) resource
This resource defines your plug-in’s dialog box. This dialog is specified for the US English locale; however,
as specified in the LocaleIndex resource, it is used for all feature sets and locales. Since your plug-in does
not require a different dialog definition for each locale (that is, the widget arrangement is the same no
matter what locale is used), the definitions are consolidated into one .fr file.
This resource is complex, so we present the suggested way to navigate through the resource definitions.
First, look at the definition of the parent widget type, DialogBoss. Open
<SDK>/source/public/widgets/includes/Widgets.fh to see this:
type DialogBoss (kViewRsrcType) : PrimaryResourcePanelWidget (ClassID = kDialogBoss)
{
};
Notice that the parent of DialogBoss is PrimaryResourcePanelWidget. Now, examine the definition of
PrimaryResourcePanelWidget, to see that its parent is the root Widget; this is the top of the hierarchy. Look
at PrimaryResourcePanelWidget.
Go deeper and examine CControlView, defined in Widgets.fh:
Page 39

CHAPTER 2: Getting Started with the InDesign SDK Step 5: Obtain a value from DropDownListWidget 39
type CControlView : Interface (IID = IID_ICONTROLVIEW)
{
longint;// fWidgetId
PMRsrcID;// fRsrcId, fRsrcPlugin
integer; // fFrameBinding
Frame; // fFrame
integer; // fVisible
integer; // fEnabled
};
Look at the first line in the type definition. It is a bit different than other widget type definitions you have
seen so far, as it specifies an IID instead of ClassID. This is an interface type. It indicates that CControlView is
a persistent interface in kPrimaryResourcePanelWidgetBoss.
Search for kPrimaryResourcePanelWidgetBoss in the API reference documentation, and see its aggregated
interfaces.
String-table resource
The string-table resource is next. WFP.fr includes two other .fr files, WFP_enUS.fr and WFP_jaJP.fr. They
specify US English and Japanese string table resources, respectively. Because the string-table resources are
separated by locale, they are easier to manage.
WFP_enUS.fr gives the US English string-table resource definition. The first line specifies the locale ID,
k_enUS. The next line specifies the character-encoding converter, which deals with the differences
between high-ASCII characters on Windows and Mac OS. The next line is where the string table is defined.
The string key and corresponding localized strings are comma-separated pairs.
Next, look at the Japanese-locale string table. The first line specifies the locale ID, k_jaJP. Because a
character-encoding converter for Japanese is not needed, the next line contains a zero. The string table is
defined after that, as in the US English string table, with the string key and localized strings in
comma-separated pairs.
Step 5: Obtain a value from DropDownListWidget
In this section, you obtain the string value from a dialog widget and create a string that you can insert into
an InDesign document.
Step 5.1: Get string value of selected item
The first step is to add code to get the fish name from the DropDownListWidget. You want your plug-in to
insert text into the InDesign document when the user clicks OK. Recall that the method that gets called
when OK is clicked is WFPDialogController::ApplyDialogFields. Because the actual handling of the button
click is delegated to CDialogController, the parent class of WFPDialogController, you already have some
basic dialog function in your plug-in.
Look at the code for the WFPDialogController::ApplyDialogFields method using your IDE. This code was
generated by DollyXs from the Dialog template. To obtain the text on the widget, call
CDialogController::GetTextControlData. This method requires a widget ID as a parameter and returns a
PMString object. You will use this method (from the ITextControlData interface in the dialog boss class) to
obtain the text data on the widget. The string returned is not the string you see on your dialog, but the
string key you defined in the string-table resource.
Page 40

CHAPTER 2: Getting Started with the InDesign SDK Step 6: Get the text in the TextEditBoxWidget 40
On the next line, the lookup feature of the PMString object is used to translate the PMString to a string in
the current locale. Add the following code:
//Get selected text of DropDownList.
PMString resultString;
resultString = this->GetTextControlData(kWFPDropDownListWidgetID);
// Look up string and replace.
resultString.Translate();
Step 5.2: Save, build, and test
Save the source file you edited, build the plug-in, move the plug-in to the Plug-Ins directory, start
InDesign, create a text frame, and put the cursor in it.
Select your plug-in from the Plug-Ins menu, select Bonito from the drop-down list, and click OK.
Step 6: Get the text in the TextEditBoxWidget
Step 6.1: Get the string value
As you did in “Step 5.1: Get string value of selected item” on page 39, modify the
WFPDialogController::ApplyDialogFields method. Immediately after the line with resultString, add this
code:
// Get the editbox list widget string.
PMString editBoxString = this->GetTextControlData(kWFPTextEditBoxWidgetID);
Step 6.2: Form a string to insert into the text frame
Concatenate a string to insert into the InDesign document. Append strings in the following order: product
name, tab character, currency symbol, price, and new line.
The following code creates a PMString object, moneySign, that holds the string key for the currency
symbol. The code translates the string based on the current locale. Then, the code concatenates the tab
character, currency symbol, TextEditBoxWidget string that represents the price the user enters, and a
newline character, using the PMString::Append method.
PMString moneySign(kWFPStaticTextKey);
moneySign.Translate(); // Look up string and replace.
resultString.Append('\t'); // Append tab code.
resultString.Append(moneySign);
resultString.Append(editBoxString);
resultString.Append('\r'); // Append return code.
The PMString class has a wide variety of methods and is quite useful.
Using boss classes in plug-ins
A boss class is a class of objects in the InDesign object model. A boss class is like a C++ class; however, boss
classes are declared differently. InDesign consists of boss classes that represent document objects (like
images, text, and layers), as well as widgets (like dialog buttons and input fields). For example, InDesign
pages are represented by this object hierarchy: document, spread, layer, page. This hierarchy is
represented by a boss-class architecture.
Page 41

CHAPTER 2: Getting Started with the InDesign SDK Using interfaces in plug-ins 41
Plug-in developers can access these boss-class objects when developing InDesign plug-ins. To use the
appropriate boss class for the desired task at hand, you must understand the InDesign object model and
its architecture. Also, you need to be aware of which boss class provides what kind of functionality. Like
C++ objects, boss-class objects can be invoked by calling methods (or member functions), but the way
you call boss-class objects differs from how you call methods in C++. For details, see “
plug-ins” on page 41.
As with C++ classes, boss classes can inherit other boss classes. For example, kSplineItemBoss inherits from
kDrawablePageItemBoss, and kDrawablePageItemBoss inherits from kPageItemBoss. Child boss classes
can call methods in parent boss classes, making for a truly abstract, object-oriented programming model.
Boss classes developed by third-party plug-in developers are recognized by InDesign and used just like
boss classes that are part of the core InDesign application. For example, you can make a new boss class (in
this case, a custom page item) that inherits from kDrawablePageItemBoss, instantiate this boss class, and
put it on an InDesign document.
Using interfaces in
Using interfaces in plug-ins
When you call methods in a boss class, you do so in a style that differs from how you normally call a
method on a C++ class. First, you obtain an interface from a boss class, and then you call a method on that
interface. This concept of an interface refers to something unique to the InDesign object model. InDesign
interfaces are analogous to Microsoft Component Object Model (COM) interfaces.
Normally, you group related methods into a set. Interfaces in the InDesign object model comprise sets of
such grouped methods and are denoted as pure abstract C++ classes. By denoting them as pure abstract
C++ classes, you can call all methods within a particular interface in a boss class, even from outside the
interface itself.
For example, kPageItemBoss represents the base class for all page items that can be placed on a
document. This boss class aggregates (contains) the IHierarchy interface. By obtaining this interface and
calling its methods, you can obtain information about the object hierarchy of image and text-frame items
in an InDesign document.
InDesign’s naming convention is that all interface names begin with a capital “I,” so you can distinguish
interfaces at a glance.
IPMUnknown class
The base class of almost all InDesign interfaces is IPMUnknown. For the InDesign object model to function
correctly, interfaces must inherit from IPMUnknown and support the QueryInterface, AddRef, and Release
methods. You can query a boss for an interface pointer of type IPMUnknown and get back a valid interface
pointer.
Querying for interfaces and reference counts
QueryInterface is used to query for an interface on a boss. This function returns a pointer to an interface; it
returns nil if an instance of the interface is not available. QueryInterface automatically calls AddRef, which
increments the reference count on the interface. The object model keeps track of the reference count for
interfaces on bosses. If all interfaces on a boss have a reference count of zero, the boss can be marked for
deletion. If you used QueryInterface to obtain an interface pointer, you must call the Release method
when you are through with the interface, so the reference count for the interface is decremented correctly.
Page 42

CHAPTER 2: Getting Started with the InDesign SDK Using interfaces in plug-ins 42
Forgetting to call Release results in an interface with a positive reference count; this condition (boss leak) is
a memory leak in the InDesign object model.
What is InterfacePtr?
InterfacePtr (<SDK>/source/public/includes/InterfacePtr.h) is a wrapper class that wraps IPMUnknown. In
addition to the AddRef method that is called automatically by QueryInterface, this template-based
wrapper class also calls Release when the interface pointer goes out of scope. This ensures that Release is
called on an interface, preventing boss leaks.
Here is a sample of how you would instantiate an interface pointer to ISpreadList from IDocument, using
InterfacePtr:
InterfacePtr<ISpreadList> iSpreadList(iDocument, UseDefaultIID());
Which variety of InterfacePtr constructor should I use?
There are many InterfacePtr constructors, which may seem overwhelming; however, three major types of
constructors are used commonly.
Type 1a: To get an interface in the same boss class (using default PMIID)
InterfacePtr::InterfacePtr(const IPMUnknown* p, const UseDefaultIID&)
This assumes that you already have an InterfacePtr of some kind or a pointer to an object derived from
IPMUnknown. You use this to obtain an interface aggregated on the same boss class. If the interface
declaration defines an enum kDefaultIID, the UseDefaultIID construct automatically uses the default PMIID
(interface ID). In this case, the new InterfacePtr has its reference count incremented by the
IPMUnknown::AddRef method:
IDocument* doc = Utils<ILayoutUIUtils>()->GetFrontDocument();
InterfacePtr<ISpreadList> iSpreadList(doc, UseDefaultIID());
Type 1b: To get an interface in the same boss class (specifying a PMIID)
InterfacePtr::InterfacePtr(const IPMUnknown* p, PMIID iid);
This assumes that you already have an InterfacePtr of some kind or a pointer to an object derived from
IPMUnknown. You use this to obtain an interface aggregated on the same boss class, but the interface
declaration does not define an enum kDefaultIID. You also use this when there are multiple
implementations of the same interface aggregated on the same boss class. In this case, the new
InterfacePtr has its reference count incremented by the IPMUnknown::AddRef method. There are
situations when you must specify a PMIID, like when you want to obtain an IStyleNameTable on
kWorkspaceBoss or kDocWorkspaceBoss. You also can regard this as a trick to aggregate multiple
implementations of the same interface into your boss class.
// docWorkspace is an IWorkspace aggregated on kDocBoss.
InterfacePtr<IStyleNameTable> iParaStyleTable(docWorkspace, IID_IPARASTYLENAMETABLE);
InterfacePtr<IStyleNameTable> iCharStyleTable(docWorkspace, IID_ICHARSTYLENAMETABLE);
Page 43

CHAPTER 2: Getting Started with the InDesign SDK Using interfaces in plug-ins 43
Type 2: To Get a specific interface, not IPMUnknown*, from a BridgeMethod
explicit InterfacePtr::InterfacePtr(IFace* p);
Generally, Query... methods (commonly known as bridge methods, see “Using databases and objects in
plug-ins” on page 44) return a pointer to an interface derived from IPMUnknown and increment the
reference count; however, you still want to take advantage of the automated cleanup provided by
InterfacePtr. To prevent reference counts from incrementing, as in Type 1a and 1b, use this constructor,
which does not call IPMUnknown::AddRef:
InterfacePtr<IGeometry> iPageGeometry(iSpread->QueryNthPage(0));
The following line of code looks innocent, but if you execute this and quit InDesign, you will get a boss
leak:
InterfacePtr<IGeometry> iPageGeometry(iSpread->QueryNthPage(0), UseDefaultIID());
Look carefully: ISpread->QueryNthPage(0) increments the reference count and, by means of InterfacePtr
constructor Type 1a, the reference count increments again.
The easiest remedy is to remove UseDefaultIID. If you leave it as is and fail to notice that a call to
iPageGeometry->Release is necessary, you will get a boss leak.
Type 3a: To get a persistent object on a database using a UIDRef
InterfacePtr::InterfacePtr(const UIDRef& ref, PMIID iid);
// Usable when kDefaultIID is defined
InterfacePtr::InterfacePtr(const UIDRef& ref, const UseDefaultIID&);
In this case, you use a preexisting UIDRef on a boss class. A UIDRef is a combination of the database that is
the target of persistence and a unique ID (UID) of a boss class object. This constructor is useful after
obtaining a UIDList from a command or a selection target.
The following code processes NewFrameCmd, and then obtains the frame’s IHierarchy:
InterfacePtr<IHierarchy> newPageItemHierarchy((newFrameCmd->
GetItemListReference()).GetRef(0), UseDefaultIID());
The following code obtains the first layer that contains page items:
IDocument* iDocument = Utils<ILayoutUIUtils>()->GetFrontDocument();
UIDRef layerRef(::GetDataBase(iDocument), iSpreadHier->GetChildUID(2));
InterfacePtr<ISpreadLayer> spreadLayer(layerRef, UseDefaultIID());
Type 3b: To get a persistent object on a database using a UID
InterfacePtr::InterfacePtr(IDataBase* db, UID uid, PMIID iid);
// Usable when kDefaultIID is defined
InterfacePtr::InterfacePtr(IDataBase *db, UID uid, const UseDefaultIID&);
This is like Type 3a, but it is useful when you do not need to create another UIDRef; specifically, when you
are getting interfaces on the same database. This is commonly used when you navigate the page item
parent/child relationship.
The following code obtains the first layer (spread-layer index 2) that contains page items:
Page 44

CHAPTER 2: Getting Started with the InDesign SDK Using databases and objects in plug-ins 44
IDocument* iDocument = Utils<ILayoutUIUtils>()->GetFrontDocument();
IDataBase* iDataBase = ::GetDataBase(iDocument);
InterfacePtr<ISpreadLayer> spreadLayer(iDataBase, iSpreadHier->GetChildUID(2),
UseDefaultIID());
The following code navigates up from kFrameItemBoss(ITextFrameColumn), kMultiColumnItemBoss, and
to kSplineItem (see IDataBase, IHierarchy):
InterfacePtr<IHierarchy> frameItemHierarchy(iTextFrameColumn, UseDefaultIID());
InterfacePtr<IHierarchy> mcitemHierarchy
(iDataBase, frameItemHierarchy->GetParentUID(), UseDefaultIID());
InterfacePtr<IHierarchy> splineItemHierarchy
(iDataBase, mcitemHierarchy->GetParentUID(), UseDefaultIID());
Using databases and objects in plug-ins
In InDesign, document files are represented internally as databases. You can make boss-class objects
persistent by storing them in databases. In a C++ programming model, C++ classes generally are declared
with a class keyword and instantiated in memory (for example, a heap). By serializing the data in the
instantiated object, the data can be stored in a complex class structure in a file and retrieved from the file.
To store boss-class objects in a database, a unique identifier (UID) is assigned to each boss-class object. In
the InDesign object model, UIDs (which are stored internally as 32-bit unsigned integers) are handles that
are treated somewhat like pointers. For example, a document boss (kDocBoss) aggregates ISpreadList, an
interface that owns the UIDs of all spreads within a document; within each spread, you can obtain
page-item objects and pages by means of the UIDs obtained from IHierarchy (a bridge interface for the
object tree in a document). Furthermore, these UIDs are persistent across InDesign application sessions, so
even after quitting and restarting InDesign, the UIDs stored in your documents continue to be valid.
To call methods on interfaces aggregated on these boss-class objects in a C++ program, the actual objects
must be instantiated in memory as C++ objects. You can obtain pointers to these interfaces using the
various Get... and Query... methods (bridge methods). The general rule of thumb with bridge methods is
that Get... methods do not increment reference count, but Query... methods do.
Step 7: Insert a string into a text frame
Step 7.1: Insert text into the current text selection
The selection architecture is used to make changes to currently selected items. This architecture is built on
a group of selection-suite interfaces, which usually contain “Suite” in the interface name and have
methods like I<Xxx>Suite::CanDoSomething and I<Xxx>Suite::DoSomething. One good thing about this
approach is that you do not have to worry about what the selected items are, because the branching is
done behind the scenes; you do not have to handle everything in your plug-in code. To learn more about
the selection architecture, see the “Selection” chapter of Adobe InDesign Plug-In Programming Guide.
In this case, you want to edit the text at the current selection. Look in the
<SDK>/source/public/interfaces/text directory, and you will find a few interfaces ending in *Suite.h. One of
them is ITextEditSuite.h. Examine this interface; it contains the methods you need:
virtual bool16 CanEditText() = 0;
virtual ErrorCode InsertText(const WideString& theText) = 0;
The basic idea is to first test to determine whether text on the current selection can be edited (true or false)
and, if so, insert text.
Page 45

CHAPTER 2: Getting Started with the InDesign SDK Step 7: Insert a string into a text frame 45
To query for an instance of this interface, use IActiveContext::GetContextSelection to get to an
ISelectionManager. From ISelectionManager, you can query a suite interface to see whether the queried
suite is available on the current selection. When IActiveContext is not available, you can also use the
ISelectionUtils interface. Because it is aggregated on the kUtilsBoss, you can use the Utils template-based
helper class.
To add code to insert a string into a text frame, open WFPDialogController.cpp and add these #include
statements at the top of the file:
#include "ISelectionManager.h"
#include "ITextEditSuite.h"
Next, add the following code in the WFPDialogController::ApplyDialogFields method, immediately after
where you left off in “
resultString.Append('\r');
Step 6.2: Form a string to insert into the text frame”. Find the following line:
After that line, add the following code, which uses IActiveContext to obtain the current selection and uses
ITextEditSuite to insert text into the current text selection:
InterfacePtr<ITextEditSuite> textEditSuite(
myContext->GetContextSelection(), UseDefaultIID());
if (textEditSuite && textEditSuite->CanEditText())
{
ErrorCode status = textEditSuite->InsertText(WideString(resultString));
ASSERT_MSG(status == kSuccess, "WFPDialogController::ApplyFields: can't insert
text");
}
Inside the implementation for ITextEditSuite, text is inserted by processing a command
(ITextModelCmds::TypeTextCmd) on the text model. Commands are used throughout the InDesign API to
change the model.
Step 7.2: Save, build, and test
After making the changes, save all your edited source files, build the plug-in, move the plug-in to the
Plug-Ins directory, and start InDesign. Then, create a text frame on a new document, make sure the cursor
is blinking, select the Plug-in menu so your dialog shows up, select a fish type, and enter its price. Click OK.
The following figure shows the result:
Page 46

CHAPTER 2: Getting Started with the InDesign SDK Using commands in plug-ins 46
Using commands in plug-ins
InDesign uses commands to modify internal data. This offers the following benefits:
You do not have to modify the internal data (model) directly. The internal data can stay encapsulated.
Commands facilitate actions such as Undo and Redo.
Commands allow your plug-in to be notified about details of changes to the model, through the use of
observers.
You also can create custom commands. If you create custom commands, you can separate the user
interface and core-feature implementation components, making for a more extensible design.
To find out more about processing commands, see the “Commands” chapter of Adobe InDesign Plug-In
Programming Guide.
Step 8: Disable the menu with no text selection
Because you do not want this dialog to be opened when there is no text selection, you will make some
changes so that the menu is disabled when there is no text selection.
Step 8.1: Modify ActionDef
Open the WFP.fr resource file and add the following line toward the top of the file, with all the other
#include statements:
#include "TextID.h"
Go down to the ActionDef resource, to the second block, which begins with kWFPActionComponentBoss.
Change kDisableIfLowMem to kDisableIfSelectionDoesNotSupportIID. On the next line, change
kInvalidInterfaceID to IID_ITEXTEDIT_ISUITE. These constants are defined in ActionDefs.h and TextID.h.
resource ActionDef (kSDKDefActionResourceID)
{
{
... omitted
kWFPActionComponentBoss,
kWFPDialogActionID,
kWFPDialogMenuItemKey,
kOtherActionArea,
kNormalAction,
kDisableIfSelectionDoesNotSupportIID,// Change this!
IID_ITEXTEDIT_ISUITE,// Change this!
kSDKDefVisibleInKBSCEditorFlag,
}
};
Step 8.2: Save, build, and test
After making the changes, save all your edited source files, build the plug-in, move the plug-in to the
Plug-Ins directory, and start InDesign. Now create a new document, put a new text frame on it, and see
whether the menu item for your plug-in is available.
Page 47

CHAPTER 2: Getting Started with the InDesign SDK Step 9: Initialize dialog widgets 47
Step 9: Initialize dialog widgets
As shown in the dialog in the following figure, the drop-down list shows nothing, and the text-edit box is
blank when you open the dialog box.
OTE: There is a hidden feature in this dialog. While the dialog box is active, hold down the Alt key
N
(Windows) or Option key (Mac OS), to change the Cancel button to the Reset button. See the following
figure. Dialogs in InDesign have the capability to reset fields to an initial state.
By adding functionality to the WFPDialogController::InitializeDialogFields method, you can handle the
initialization and resetting of dialog-box fields. In the following sections, you will add functionality to the
InitializeDialogFields method.
Step 9.1: Add code to initialize the DropDownListWidget
Open WFPDialogController.cpp. You will add code to the WFPDialogController::InitializeDialogFields
method. This method first delegates to the same method in the parent class,
CDialogController::InitializeDialogFields. The parent-class method sets a flag that keeps track of whether
this InitializeDialogFields method was called, so make sure you call
CDialogController::InitializeDialogFields:
/* InitializeDialogFields
*/
void WFPDialogController::InitializeDialogFields(IActiveContext* dlgContext)
{
CDialogController::InitializeDialogFields(dlgContext);
// Put code to initialize widget values here.
}
Next, you will add some code to initialize the DropDownListWidget.
By calling the CDialogController::QueryIfNilElseAddRef method, you obtain a pointer to the
IPanelControlData interface. This method takes an IPanelControlData interface pointer as a parameter. If
that pointer is nil, the method returns the IPanelControlData interface of the same boss class. If the pointer
is not nil, the method increments the reference count to that pointer and returns the pointer. Add the
following line at the top of WFPDialogController.cpp:
#include "IPanelControlData.h"
Next, insert the following code immediately after where CDialogController::InitializeDialogFields is called:
Page 48

CHAPTER 2: Getting Started with the InDesign SDK Step 9: Initialize dialog widgets 48
do {
// Get current panel control data.
InterfacePtr<IPanelControlData> pPanelData(QueryIfNilElseAddRef(nil));
if (pPanelData == nil)
{
ASSERT_FAIL("WFPDialogController::InitializeDialogFields: PanelControlData is
nil!");
break;
}
If the pPanelData interface pointer is valid, call IPanelControlData::FindWidget in the IPanelControlData
interface, to obtain an IControlView interface pointer. This method takes a widget ID as a parameter and
returns the corresponding IControlView interface pointer.
OTE: IControlView is the interface for CControlView, which was seen while ascending the hierarchy of
N
widget type definitions.
Insert the following code:
else {
// Find drop-down list menu control view from panel data.
IControlView* pDropDownListControlView =
pPanelData->FindWidget(kWFPDropDownListWidgetID);
if( pDropDownListControlView == nil )
{
// Is the widget on the dialog box?
ASSERT_FAIL("WFPDialogController::InitializeDialogFields: "
"DDListControlView is nil");
break;
}
Using the obtained IControlView interface pointer, obtain the IDropDownListController interface pointer,
which exists in the same boss class, kDropDownListWidgetBoss. The kDropDownListWidgetBoss is
responsible for controlling the DropDownListWidget (as defined in the resource definitions). To use the
IDropDownListController interface, you must add the following include statement at the top of
WFPDialogController.cpp:
#include "IDropDownListController.h"
Then, add the following code immediately after the call to pPanelData->FindWidget:
// Get IDropDownListController interface pointer.
InterfacePtr<IDropDownListController>
pDropDownListController(pDropDownListControlView, UseDefaultIID());
if(pDropDownListController == nil)
{
// Is the controller available?
ASSERT_FAIL("WFPDialogController::InitializeDialogFields: DDListControlView is
nil!");
break;
}
If the pDropDownListController interface pointer is valid, call the IDropDownListController::Select method
to set the initial state of the DropDownListWidget to show the first element. If nothing is selected in the
DropDownListWidget, the IDropDownListController::GetSelected method returns -1, which is an invalid
index. The top of the list has index 0. Add the following code where you left off:
// Select the element at the given position in the list.
pDropDownListController->Select(0);
Page 49

CHAPTER 2: Getting Started with the InDesign SDK Conclusion 49
Step 9.2: Add code to initialize the TextEditBoxWidget
Initialize the text-edit box. Create an initial string using a PMString initialized with an empty (null) string.
Then, set the value of the TextEditBoxWidget to the initial string by calling the SetTextControlData
method. Add the following code:
// Initialize TextEditBox.
PMString InitialString("");
SetTextControlData(kWFPTextEditBoxWidgetID, InitialString);
} while (kFalse);
Step 9.3: Save, build, and test
Save your files, build the plug-in, move it to the Plug-Ins directory, and start InDesign to try your plug-in.
When you open the dialog, you should see the first list element automatically shown in the drop-down list.
Select another entry from the drop-down list, hold down the Alt (Windows) or Option (Mac OS) key, and
click Reset on the dialog. The drop-down list should reset to its initial state.
Conclusion
The goal of this document was to help you become familiar with developing plug-in-based solutions for
InDesign. While this document covers many important, fundamental aspects of InDesign development, it
is only the first step. If you study the code and header files used in our completed plug-in line by line, you
may find more functionality.
The Adobe InDesign and InCopy SDK contains an enormous amount of information to help you develop
plug-in-based solutions for InDesign. At first, you may be overwhelmed, and if you try too much too soon,
you may get discouraged. We recommend that you start by building some of the sample plug-in projects
that are provided and using them with the debug build of InDesign. We hope that you find the sample
plug-ins useful.
Page 50

3
Introduction to ODFRC
This chapter introduces some of the most common resources types you will encounter in ODFRC
(OpenDoc Framework Resource Compiler) files. This is not an ODFRC reference; it is just enough to get you
comfortable with what you will see in a typical FR file. (By convention, ODFRC files have a “.fr” file extension
and are referred to as FR files.)
FR file compilation
Each plug-in project must define certain resources in an FR file. There are resources that describe required
data for a plug-in, and there are many optional resources. One FR file can contain all the resources
necessary for the plug-in, or it can #include other FR files. Regardless of whether everything is in a single
file or resources are spread across multiple files, the main FR file is configured to compile with the ODFRC.
The Windows and Mac OS ODFRC executables are located in the <SDK>/devtools/bin directory. The
Windows version is Odfrc.exe, and the Mac OS version is odfrc-cmd. Adding a search path to this directory
is a necessary step in setting up Visual Studio for InDesign development. This is covered in Chapter 2,
“Getting Started with the InDesign SDK.” The Mac OS project must contain a path to odfrc-cmd.
Visual Studio projects are configured to compile FR files using a custom build tool that calls Odfrc.exe.
Visual Studio custom build tools are not very smart about dependencies on changes to the input file. To
trigger recompiles when the FR file changes and skip them when the file has not changed, the custom
build tool is associated with an object file. This special object file is generated from a C++ file that
#includes the FR file; each plug-in has one such file, usually called TriggerResourceDeps.cpp. When
configured properly, ODFRC is called only when changes occur to the FR file.
The situation is more straightforward on Mac OS, where dependency checking works. InDesign plug-in
projects must contain a build rule for *.fr files. Then, this rule is configured to compile FR files with
odfrc-cmd. For examples of how your plug-in should be configured, see the sample projects or use the
DollyXs plug-in generation tool.
FR file contents
FR files contain three types of content:
#include statements — Two types of files are included, those that provide IDs that are used in
resources, and those that contain additional resource definitions or declarations.
Resource definitions — Some FR files define new types of resources; for example, Widgets.fh, where
various types of user-interface-based resources are defined.
Resource declarations — An FR file contains some actual resource declarations that can be read by the
InDesign architecture
PluginVersion
Each plug-in must declare a PluginVersion resource. This resource is used to provide plug-in-specific
information to the InDesign object model. The name may be a bit misleading, because the resource
50
Page 51

CHAPTER 3: Introduction to ODFRC PluginVersion 51
includes more than version information: It also includes the target (debug or release) for which the plug-in
was compiled, the plug-in’s ID, whether it supports model or user-interface operations, and supported
applications and feature sets.
The following is a typical PluginVersion resource declaration, followed by comments about the fields in the
resource.
resource PluginVersion (kSDKDefPluginVersionResourceID)
{
kTargetVersion, // 1
kFrmLblPluginID, // 2
kSDKDefPlugInMajorVersionNumber, kSDKDefPlugInMinorVersionNumber, //3
kSDKDefHostMajorVersionNumber, kSDKDefHostMinorVersionNumber, //4
kFrmLblLastMajorFormatChange, kFrmLblLastMinorFormatChange, //5
{ kInDesignProduct, kInCopyProduct, kInDesignServerProduct}, //6
{ kWildFS },//7
kModelPlugIn, // 8
kFrmLblVersion // 9
};
1. The target for which this plug-in was built. This is done using kTargetVersion, which is defined
differently for each target (debug or release). This is important because a plug-in’s target must match
the application with which it is trying to launch. For example, a debug plug-in is not compatible with
the release version of the application. The application checks this resource during launch and refuses
to load the plug-in if there is a mismatch.
2. The plug-in’s unique ID. This sometimes is called a prefix ID, because it makes a range of IDs available
to the plug-in. These IDs are used for various constructs in the InDesign architecture. This value is
assigned by Adobe. For more information on acquiring a unique plug-in ID, visit
http://www.adobe.com/devnet/indesign/prefix_reg.html
.
3. The major and minor version numbers for this plug-in. Typically, these are the same as the application
version numbers in the next two fields.
4. The major and minor version of the application that this plug-in supports. Plug-ins must be compiled
for a particular major format number. These fields should be set to “kMajorVersionNumber,
kMinorVersionNumber.” The samples use “kSDKDefPlugInMajorVersionNumber,
kSDKDefPlugInMinorVersionNumber,” which are simply #defines of kMajorVersionNumber and
kMinorVersionNumber.
5. A plug-in can be versioned for conversion purposes. These two fields contain the major and minor
format number for the plug-in. The major version should be set to match the major version of the
application when the plug-in was introduced or its data format changed. The minor version number is
used to mark plug-in data-format changes that occur during a product cycle.
6. A plug-in can target one or all InDesign products (InDesign, InCopy, and/or InDesign Server). This tells
the architecture which product the plug-in supports. There are additional rules for plug-ins that
support InDesign Server: they must not link against WidgetBin or InDesignModelAndUI.framework,
and they must be model-only plug-ins.
7. The InDesign products include several different feature sets. This is related to, but different than,
locales. Some localized InDesign products, like InDesign J, contain additional features; these are called
feature sets. You can target any combination of feature sets in the PluginVersion resource. To target all
feature sets, specify kWileFS.
8. This field declares whether the plug-in supports model (kModelPlugIn) or user-interface (kUIPlugIn)
operations, making model/user-interface separation mandatory. These values come from the
Page 52

CHAPTER 3: Introduction to ODFRC PluginDependency 52
PlugInModel_UIAttributes.h header. This is important in InDesign’s multithreaded environment. Only
model plug-ins are available for operations that occur on background threads.
9. This final field is the plug-in’s four-part version string (for example, 7.0.0.0).
PluginDependency
One plug-in can depend on another plug-in. Consider user-interface and model plug-ins. A user-interface
plug-in is meaningless without a model plug-in present.
resource PluginDependency(1)
{
kWildFS,
{
kWatermarkPluginID, kWatermarkPluginName,
kMajorVersionNumber, kMinorVersionNumber,
}
};
ExtraPluginInfo
InDesign plug-ins can contribute data to a document. It is safe to open such a document if the plug-in is
missing, but the document will not behave as expected. The ExtraPluginInfo allows a plug-in to control the
error message that is presented when the plug-in is determined to be missing.
resource ExtraPluginInfo(1)
{
“Adobe Systems Incorporated”,// Company name
“http://www.adobe.com/devnet/indesign”,// URL
“You may download this plug-in from...”,// Missing plug-in alert text
};
CriticalTags and IgnoreTags
InDesign offers some control over what happens when your plug-in is missing. By default, it warns you
about the missing plug-in. You can suppress these warnings using an IgnoreTags resource, or you can
trigger a more stern warning using CriticalTags. Both resources allow you to specify implementation or
class IDs.
Page 53

CHAPTER 3: Introduction to ODFRC SchemaList 53
resource CriticalTags(1)
{
kImplementationIDSpace,
{
kPstLstDataPersistImpl,
kPstLstUIDListImpl,
}
};
resource CriticalTags(2)
{
kClassIDSpace,
{
kPstLstDataBoss,
}
};
resource IgnoreTags(1)
{
kImplementationIDSpace,
{
kPersistBoolDataImpl,
}
};
SchemaList
InDesign plug-ins can write (or retain) implementation data in document databases. Such plug-ins must
be able to read and write this data when directed by the system. Sometimes, however, an implementation
needs to change what data it writes, while being aware of data from prior versions of the plug-in. Schema
conversion is a convenient way to handle data conversion at the resource level. Typically, you will
encounter or implement something like the following:
resource SchemaList(1)
{{
Schema
{
}
};
This resource captures a data-format change. It records what data kMyDataImpl writes at a particular
revision number; in this case, it is a pair of int32 values along with default values (kMyDataDefaultIndex,
and kMydataDefaultSize) to be used during conversion (if, for example, you opened an older document
without that data present).
This also is important if the implementation needs to be changed. For example, if an extra bool16 is added
to the stream, it could be described using another schema.
kMyDataImpl,
{kRocketMajorFormat, kMyDataChangeChg},
{
{Int32 {1, kMyDataDefaultIndex}},
{Int32 {2, kMyDataDefaultSize}},
Page 54

CHAPTER 3: Introduction to ODFRC ImplementationAlias 54
resource SchemaList(2)
{{
Schema
{
kMyDataImpl,
{kRocketMajorFormat, kMyDataChangeChg2},
{
{Int32 {1, kMyDataDefaultIndex}},
{Int32 {2, kMyDataDefaultSize}},
{Bool16 {3, kMyDataDefaultActive}},
}
};
This is an extremely basic introduction to schemas. For details about schema conversion, see the
“Persistent Data and Data Conversion” chapter in Adobe InDesign Plug-In Programming Guide.
ImplementationAlias
The InDesign object model references C++ implementations by ID. You may find it desirable to add an
implementation to a boss class more than once; however, the InDesign object model does not support
adding duplicate implementation IDs. The ImplementationAlias resource allows you to create a new
implementation ID for an existing implementation.
resource ImplementationAlias(1)
{
{
kSnippetNameDataImpl, kStringDataImpl,
kSnippetCategoriesDataImpl, kStringListDataImpl,
kSnippetDescriptionDataImpl, kStringDataImpl,
kSnippetPreconditionsDataImpl, kStringDataImpl,
}
};
ClassDescriptionTable
As mentioned previously, boss classes are at the heart of the InDesign object model. The
ClassDescriptionTable resource allows you to declare new bosses or to modify existing bosses. You can add
an interface/implementation pair into an existing boss using an AddIn directive. To declare a new boss,
you can use Class directives. Examples of both follow.
Page 55

CHAPTER 3: Introduction to ODFRC FactoryList 55
resource ClassDescriptionTable(1)
{{{
AddIn
{
kWorkspaceBoss,
kInvalidClass,
{
IID_IMYDATA, kMyDataImpl,
}
},
Class
{
kMyDataBoss,
kSomeBaseClassDataBoss, // Base Class
{
IID_IMYDATA, kMyDataImpl,
}
},
}}};
Boss classes support inheritance. This allows a child boss class to inherit all the interface/implementation
pairs from another boss. This is done by specifying a valid ClassID in the second field of the Class directive.
The preceding example inherits the implementations in kSomeBaseClassDataBoss.
FactoryList
InDesign plug-ins must register each implementation. This prevents the linker from looking at them as
dead code. The FactoryList resource typically #includes the implementation registrations from another
header file.
resource FactoryList (1)
{
kImplementationIDSpace,
{
}
};
In effect, this amounts to something like the following:
resource FactoryList (1)
{
kImplementationIDSpace,
{
}
};
LocaleIndex
#include "FrmLblUIFactoryList.h"
REGISTER_PMINTERFACE(FrmLblUIActionComponent, kFrmLblUIActionComponentImpl)
REGISTER_PMINTERFACE(FrmLblUIDialogController, kFrmLblUIDialogControllerImpl)
InDesign plug-ins are fully localizable, including the ability to provide both localized strings and
user-interface layout. The following declares that the plug-in will provide localization strings for the
Japanese feature set, running in the Japanese locale, but use English for everything else.
Page 56

CHAPTER 3: Introduction to ODFRC StringTable 56
resource LocaleIndex ( kSDKDefStringsResourceID)
{
kStringTableRsrcType,
{
kWildFS, k_enUS, kSDKDefStringsResourceID + index_enUS
kInDesignJapaneseFS, k_jaJP, kSDKDefStringsResourceID + index_jaJP
kWildFS, k_Wild, kSDKDefStringsResourceID + index_enUS
}
};
In this example, kStringTableRsrcType tells InDesign that these resources are for strings. A LocaleIndex that
specifies kViewRsrcType is used to localize ODFRC-based user-interface components like dialogs and
panels.
StringTable
The StringTable resource is used to provide a set of string translations for a given locale. It typically looks
something like the following, but with many more strings.
resource StringTable (kSDKDefStringsResourceID + index_enUS)
{
k_enUS,// Locale Id
kEuropeanWinToMacEncodingConverter,// Character encoding converter (irp)
{
// ----- Menu strings
"MyDataOnMenuItem","My Data On",
...
}
};
When kMyDataOnMenuItem is used in a PMString, it is translated to My Data On. This is not very
interesting when dealing with English strings, but it is extremely useful when localizing your plug-in. For
details, see the chapter on “Localization”.
UserErrorTable
Some InDesign APIs return an ErrorCode on failure. An ErrorCode is a value that InDesign or a plug-in
defines within in the kErrorIDSpace using a plug-in prefix, as follows:
DECLARE_PMID(kErrorIDSpace, kMySetDataFailureErrorCode, kMyPluginPrefix + 0)
An ErrorCode can be mapped to a more descriptive string using the UserErrorTable.
resource UserErrorTable(kSDKDefErrorStringResourceID)
{
{
kMySetDataFailureErrorCode, “Failed to Set Data“,
}
};
Other resources
You will encounter several other significant and sometimes complex resource types that, in conjunction
with C++ code, are used to implement user interfaces and scripting. MenuDef and ActionDef resources are
used to define InDesign menus and actions. There are many widget resource types used to describe
Page 57

CHAPTER 3: Introduction to ODFRC Other resources 57
dialogs and panels. The VersionedScriptElementInfo resources describe the objects and properties that a
plug-in contributes to InDesign’s scripting model. Scripting-related resources are covered in more detail in
the “Scriptable Plug-in Fundamentals” chapter of Adobe InDesign Plug-In Programming Guide.
Resource folder
InDesign supports multithreaded resource access. When a plug-in is compiled, ODFRC generates several
new folders containing resource files. On Windows, these folders are in the “(<PluginName> Resources)”
directory, parallel to the plug-in file. (Note that the parentheses are part of the directory name.) On Mac
OS, the folders are in the Resources directory of the plug-in bundle. On Windows and Mac OS, if the folder
name is inconsistent with the plug-in name or a resource file is missing, the plug-in cannot be loaded.
Page 58

4
«boss class»
kBscMnuActionComponentBoss
DoAction ()
UpdateActionStates ()
«interface»
IActionComponent
GetUID( )
GetDataBase()
«interface»
IPMPersist
GetClas s()
GetRef Count()
«interface»
IControllingUnknown
Introduction to the InDesign Object Model
This chapter discusses boss classes, interfaces, persistence, commands, facades, and the lifecycle of a
plug-in.
Boss classes
A boss class defines an aggregate object type comprising one or more C++ classes. Like C++ classes, a
boss class can be instantiated into an instance, and bosses support inheritance. Unlike a C++ class,
however, a boss does not comprise methods and variables. The member type of a boss is a C++ class,
accessible via an interface; this also is known as an interface/implementation pair. And unlike C++ classes,
you can change the definition of existing boss classes by adding additional interface/implementation
pairs. This is demonstrated below.
Interfaces and implementations
Interfaces are purely abstract classes, commonly used in object-oriented systems to provide a common
contract between callers and different underlying types. In C++, they are classes consisting entirely of pure
virtual functions. Interfaces are not instantiated but instead can be implemented, meaning a subclass
inherits the interface and provides definitions for all the pure virtual functions. The subclass is then
instantiated. For example, InDesign includes several implementations of the IShape interface. Each
implementation is unique, but all are accessible via the IShape interface.
The following figure gives you an idea what a boss looks like in memory.
Defining and adding to bosses in ODFRC
Boss definitions and add-ins are defined in a ClassDescriptionTable in your plug-in’s ODFRC resource file.
For example, the following is a ClassDescriptionTable containing one boss definition and one boss add-in:
58
Page 59

CHAPTER 4: Introduction to the InDesign Object Model Boss classes 59
resource ClassDescriptionTable(kMyClassDescriptionTableResourceID) {{{
Class {
kMyNewBoss,
kInvalidClass, {
IID_IMYNEW, kMyNewImpl,
IID_IMYNEWDATA, kMyNewDataImpl,
}}
AddIn {
kUtilsBoss,
kInvalidClass, {
IID_ICJKGRIDUTILS, kCJKGridUtilsImpl,
IID_ICJKGRIDFACADE, kCJKGridFacadeImpl,
}
}
}}};
Usually, a plug-in has one ClassDescriptionTable resource, but it can have more. If it has more, each
resource must be assigned a unique resource ID. This particular resource ID is a simple integer ID, unique
within the plug-in. Since these IDs are not used outside the plug-in, typically they are simple integers (1, 2,
3, ...).
A ClassDescriptionTable contains Class definitions and AddIn directives; the preceding example contains
one of each. Aside from those keywords and the braces, commas, and semicolon, everything is a 32-bit ID.
In the Class block, the first field is an ID for the new boss (kMyNewBoss). The second field is used to specify
a parent boss. Bosses inherit all the interface/implementation pairs of their parent. The example specifies a
parent of kInvalidClass, meaning there is no parent. Finally, a boss definition contains a block of
interface/implementation pairs.
An AddIn adds an interface/implementation pair to an existing boss class. This is useful when you need to
add functionality to existing InDesign objects; for example, the kDocBoss represents an InDesign
document. You may find it useful to create an AddIn for the kDocBoss. The syntax for an AddIn is similar to
a boss definition, but it specifies an existing boss in the first field. The second field, which specifies a parent
in the Class definition, must be set to kInvalidClass. Then the AddIn contains a block of
interface/implementation pairs to add into the existing boss.
Unique prefix-based IDs
Each boss, interface, and implementation has a unique ID that identifies it within the space of all InDesign
bosses, interfaces, or implementations. The boss, interface, and implementation ID spaces are separate
spaces, so your plug-in can safely use the same number for an interface and a boss, but there should be no
overlap within a space; for example, no overlap of bosses with other bosses.
The IDs are 32-bit unsigned integers. To ensure that unique IDs are used in each plug-in, you must request
a 24-bit prefix from InDesign Developer Support. There is a request form at
http://www.adobe.com/devnet/indesign/prefix_reg.html
in your plug-in, giving you a maximum value of 256 values for bosses, interfaces, or any other prefix-based
IDs. Typically, this is more than enough for any plug-in; in fact, sometimes this is enough for a set of
plug-ins.
. The 24-bit prefix you receive is reserved for use
The following table lists the InDesign naming conventions for boss, interface, and implementation
constants.
Page 60

CHAPTER 4: Introduction to the InDesign Object Model Boss classes 60
Constant type Prefix Suffix
Boss k Boss
Interface ID IID_ (none)
Implementation ID k Impl
You can use the same naming conventions for the bosses and interfaces that make up your plug-in. This
will help you quickly differentiate between bosses and interfaces and keep them separate from other
groups of unique IDs. Each plug-in (yours included) has an XXXID.h file (where XXX is the short name of the
plug-in) that defines the prefix ID used and various IDs used by the plug-in. For an example of such a file,
see any of the sample plug-ins.; in particular, see the FrameLabel samples at:
<SDK>/source/sdksamples/framelabel/FrmLblID.h.
IPMUnknown
Interface classes that are used as a component of a boss are either provided by the SDK, such as
ICommand, or written by the plug-in developer to provide some plug-in-specific function. They can
contain any types of methods, but to work as a component of a boss, they must inherit from IPMUnknown.
For example, see the definition of the ICommand interface:
class ICommand : public IPMUnknown
{
...
};
Any interface you write needs to publicly inherit IPMUnknown, which contains three important methods:
AddRef(), Release(), and QueryInterface(). AddRef() and Release() deal with reference counting.
QueryInterface() provides access to the other interfaces on the boss.
Querying for other interfaces on the boss
The QueryInterface (PMIID interface ID) on IPMUnknown allows you to acquire a pointer to other
interfaces on the boss or determine that a boss does not support a particular interface. If the boss contains
an interface for the passed-in ID, it calls AddRef() and returns a pointer to the interface; otherwise, it
returns nil.
IFoo * foo = bar->QueryInterface( IID_IFOO );
Reference counting
Bosses are reference-counted objects. A reference count is maintained for the boss, not for the individual
interfaces. When you call AddRef() or Release() on an interface, the reference count for the entire boss
object is adjusted. Sometime after the reference count reaches zero (this is not guaranteed to happen
right away), the object model deletes the boss from memory.
When your code needs to manage a reference to a boss object, you must call AddRef(). If this is not done,
you run the risk of the boss being deleted while still in use. Likewise, when the reference is no longer
needed, the reference count must be deleted by calling Release(). If this is not done, you will create a boss
leak (which, in turn, creates memory leaks). In essence, you are allocating system resources and never
freeing them.
Page 61

CHAPTER 4: Introduction to the InDesign Object Model Boss classes 61
Reference-counting example
Consider the MyClass::AddBarRef example below. The caller passes an IBar* to AddBarRef(), and MyClass
stores the pointer for later use. Unless AddRef() is called, the code cannot assume that fBar will point to a
valid object when it is used later. In this case, MyClass holds a reference to the boss and needs to call
AddRef().
void MyClass::AddBarRef( IBar* bar)
{
if( bar )
{
fBar = bar;
fBar->AddRef();
}
}
If a MyClass instance holds a valid fBar reference, Release() needs to be called at some point. This could
happen in the destructor:
MyClass::~MyClass()
{
if( fBar )
{
fBar->Release();
fBar = nil;
}
}
NOTE: If the preceding MyClass instance and fBar were part of the same boss class, this code would create a
boss leak. Destructors are not called until after the boss’s reference count reaches zero. In this case, the
reference count would never reach zero, so the destructor would never be called. Do not make this
mistake!
In other cases, it is entirely appropriate to pass an interface pointer to a function without calling AddRef().
For example, consider the following CallBar example. This method does not need to hold a reference to
the boss. It simply performs some operation on the passed-in pointer; it does not save it for later use.
void MyClass2::CallBar( IBar * bar )
{
if( bar )
{
bar->DoSomething();
}
}
InterfacePtr
Typically, you will not need to store a reference to a boss. Most often, your code will acquire a reference to
a boss, use it within a local scope, and eventually need to call Release(). In this case, you should not call
QueryInterface(), AddRef(), and Release() yourself. The SDK includes a templated class called InterfacePtr
that acts much like a smart pointer. The object is created on the stack and initialized with a
reference-counted interface pointer. When the InterfacePtr goes out of scope, it calls Release() in its
destructor.
Page 62

CHAPTER 4: Introduction to the InDesign Object Model Boss classes 62
void MyClass2::CallBar( IPMunknown * obj )
{
InterfacePtr<IBar> bar(obj, UseDefaultIID());
if ( bar )
{
...
if( GetErrorState() )
return;
bar->DoSomething();
}
}
You will find code similar to the preceding throughout the InDesign code base. It is important to
understand what is really happening and the true benefits of using InterfacePtr. In this case, the
InterfacePtr constructor calls QueryInterface on obj (if it is non-nil). It uses a PM_IID (this is the type for an
interface ID that is defined in a plug-in’s ID.h file) that it extracts from an enumeration item called
kDefaultIID within the IBar interface. While we recommend including such an enumeration, it is not
required. If IBar did not include such an enumeration, this code would fail to compile. An alternative is to
construct the InterfacePtr with the ID:
InterfacePtr<IBar> bar(obj, IID_IBAR);
The preceding two InterfacePtr constructions are roughly equivalent to calling QueryInterface directly:
InterfacePtr<IBar> bar(obj->QueryInterface(IID_IBAR));
The one way in which the two constructors differ is that the constructor in the first two examples checks
whether the passed-in pointer is nil. If it is, an InterfacePtr is constructed, but its data member is nil. If the
data member is non-nil, the InterfacePtr destructor calls Release() when the object goes out of scope. The
constructor does nothing if the InterfacePtr’s data member is nil. A similar thing happens with the
indirection operator '->'. It is overloaded, to behave as if you are dealing with a real pointer; however, in the
debug build, it asserts that the actual pointer is non-nil. This provides an opportunity to find crashes right
before they occur.
The final thing to understand about the MyClass2::CallBar is one of the real advantages to using an
InterfacePtr. In this example, the function might need to return abruptly due to an error condition.
Because it uses an InterfacePtr, the code can just return. The InterfacePtr, which is constructed on the
stack, is destructed on return, so Release() is called automatically. Often, InDesign plug-in code queries for
several interfaces. If they are not stored in an InterfacePtr, the code must make sure each code path results
in appropriate calls to Release().
InterfacePtr tips and tricks
Sometimes, you might want to set an InterfacePtr after it is constructed. This is common if the InterfacePtr
can be initialized to different objects. In this case, you can use the reset() method:
InterfacePtr<IBar> bar;
if( someCondition )
bar->reset(document->QueryInterface(IID_IBAR);
else
bar->reset(obj->QueryInterface(IID_IBAR);
The reset() method also calls Release(), if its data points to a non-nil object. There may be circumstances
where you need to remove the data from an InterfacePtr without calling Release(). For this case,
InterfacePtr also supplies a forget() method. The forget() method sets the InterfacePtr data to nil and
returns the original data to the caller; therefore, it can be used to transfer ownership from an InterfacePtr
to a caller. The following code is perfectly safe:
Page 63

CHAPTER 4: Introduction to the InDesign Object Model Writing your own interface 63
InterfacePtr<IBar> bar(obj->QueryInterface(IID_IBAR));
IBar * bar2 = bar->forget();
bar->reset( bar2 );
bar2 = nil;
Writing your own interface
When writing InDesign plug-ins, you often will need to add interface/implementation pairs to a boss.
There are many examples of interfaces in the SDK; see the files in <SDK>/source/public/interfaces. Often,
you can reuse an existing interface. For example, if you need to add integer data to a boss, you can reuse
the SDK’s IIntData interface. Sometimes, however, you will need to write a new interface.
Before writing an implementation, you must add an interface ID (PMIID) to your plug-in’s ID.h file. For
example, the following adds an interface ID (IID_IMYINTDATA) for IMyIntData:
DECLARE_PMID(kInterfaceIDSpace, IID_IMYINTDATA, kLearnIDDevPrefix + 2)
Once you have an interface ID, you are ready to code your interface. Most interfaces will look something
like the following:
#ifndef __IMYDATA
#define __IMYDATA
#include "IPMUnknown.h"
#include "LearnIDDevID.h"
class IMyIntData : public IPMUnknown
{
enum { kDefaultIID = IID_IMYINTDATA };
virtual in32 GetIntData() const = 0;
virtual void SetIntData(int32 i) = 0;
};
#endif
In the preceding example, note the following:
By convention, this class definition should be stored in a file called IMyIntData.h.
All code in the file is wrapped in an #ifndef block, so it can be included many times within the same
compilation.
To be part of a boss, the new class must inherit from IPMUnknown directly or through a subclass of
IPMUknown. Thus, we include IPMUknown.h.
Each interface is identified in the object model by ID. In this case, a new interface ID (IID_IMYINTDATA)
is created in LearnIDDevID.h.
By convention, the interface contains a kDefaultIID enumeration identifying the new interface ID. This
is used by UseDefaultIID() in an InterfacePtr.
The new class includes some pure virtual functions that will be implemented to perform some
operation; in this case, get and set some integer data.
Each interface you write will be similar, but you will provide your own name, ID, and set of pure virtual
functions.
Page 64

CHAPTER 4: Introduction to the InDesign Object Model Writing your own implementation 64
Writing your own implementation
Interfaces and implementations go together. Conceptually, the interface comes first, but it is not unusual
to develop an interface and its implementation together. It also is not unusual to develop an
implementation for an existing, Adobe-supplied interface.
For example, to add a new implementation of the previously defined IMyIntData, called MyIntData, you
must add a new implementation ID to your plug-in’s ID.h file. The following adds an implementation ID
(kMyIntDataImpl) for the MyIntData class:
DECLARE_PMID(kImplementationIDSpace, kMyIntDataImpl, kLearnIDDevPrefix + 6)
Dead-stripping is a compiler optimization that removes code that is not used in a binary. Because of how
InDesign code is referenced, the compiler can be fooled into optimizing it away. To prevent dead stripping,
your plug-in should have a file that references the new C++ class, so it is not dead-stripped. This prevents
the compilers from optimizing your code away because it appears not to be referenced. If you generated
your plug-in project and source code with DollyXs, you will have a file that ends in “FactoryList.h”. Adding
the following line prevents dead-stripping of the MyIntData class:
REGISTER_PMINTERFACE(MyIntData, kMyIntDataImpl)
The following implementation of IMyIntData illustrates the normal steps for implementing an interface:
#include "VCPlugInHeaders.h"
#include "IMyIntData.h"
#include "LearnIDDevID.h"
class MyIntData : public CPMUnknown<IMyIntData>
{
public:
MyIntData(IPMUnknown* boss) : CPMUnknown<IMyIntData>(boss), fMyInt(0) {};
virtual int32 GetIntData() const;
virtual void SetIntData(int32 i);
private:
int32 fMyInt;
};
CREATE_PMINTERFACE(MyIntData, kMyIntDataImpl)
int32 MyIntData::GetIntData() const
{
return fMyInt;
}
void MyIntData::SetIntData(int32 i)
{
fMyInt = i;
}
In the preceding example, note the following:
Implementation files that are built into a plug-in always include VCPlugInHeaders.h.
IMyIntData.h is included, because this class implements the IMyIntData interface.
Rather than inheriting directly from IMyIntData, MyIntData inherits from the templated class
CPMUnknown. This is a convenient way to implement the IPMUnknown methods AddRef(), Release(),
and QueryInterface(). It also adds a helper method, PreDirty(), which is used only for persistent
Page 65

CHAPTER 4: Introduction to the InDesign Object Model Constructing a boss instance 65
interfaces. You may run into implementations that instead inherit directly from an interface and then
add a macro called HELPER_METHODS_INIT below their method declarations; this is an older way of
achieving the same results. The CPMUnknown mechanism is preferred, for its simplicity.
The constructor initializes the base class, CPMUnknown<IMyIntData>. This is required to initialize data
in CPMUnknown.
The CREATE_PMINTERFACE macro binds the implementation to the ID and makes this implementation
usable in the InDesign object model.
The code contains an int32 instance variable called fMyIntData. This variable follows a naming
convention that you see in most InDesign source files. Instance variables always begin with the letter
“f.”
The class contains implementations of the two virtual methods.
Each implementation you write will be somewhat similar. The name, ID, and virtual methods will vary, but
the use of CPMUnknown and CREATE_PMINTERFACE will be the same.
Constructing a boss instance
There are several global functions for constructing (or instantiating) boss objects in the SDK header file
CreateObject.h. There are different functions for creating persistent and nonpersistent boss instances. To
create a nonpersistent instance of a boss, you can call CreateObject as follows:
InterfacePtr<IMyIntData> myIntData((IMyIntData*)::CreateObject(kMyIntBoss,
IID_IMYINTDATA));
In this example, CreateObject returns an IPMUnknown *, which must be cast to the type of the InterfacePtr
data. There is a slightly better way to do this, if the interface supports the kDefaultIID enumeration. You
can avoid both the casting and specification of a PM_IID by using the CreateObject2 template function:
InterfacePtr<IMyIntData> myIntData(::CreateObject2<IMyIntData>(kMyIntBoss));
Regardless of how you create a boss, on success a pointer to the requested interface is returned, and the
reference count is one. A nil pointer is returned if the designated boss cannot be created. This may seem
unlikely, but it is possible for several reasons, most notably a missing plug-in.
Persistence
A persistent boss object can be removed from main memory and later reconstructed, unchanged.
InDesign stores such objects in database files. An InDesign document really is just a database of persistent
boss objects. Each persistent boss instance can be identified by an integer key called a UID (unique
identifier).
The application maintains several different databases for various purposes. The application defaults,
clipboard, and user-interface settings are saved in different databases. Also, as mentioned previously, each
InDesign document is a database file.
Making a boss persistent
To make a boss persistent, add the IID_IPMPERSIST, kPMPersistImpl interface pair:
Page 66

CHAPTER 4: Introduction to the InDesign Object Model Writing your own persistent implementation 66
Class
{
kMyFirstPersistentBoss,
kInvalidClass,
{
IID_IPMPERSIST, kPMPersistImpl,
IID_IMYINTDATA, kMyIntDataImpl,
}
}
This alone does not cause the boss to be written to the database. To do that, the boss must have at least
one persistent implementation.
Writing your own persistent implementation
Persistent and nonpersistent implementations are very similar. The following implementation,
MyPersistIntData, also implements IMyIntData:
#include "VCPlugInHeaders.h"
#include "IMyIntData.h"
#include "IPMStream.h"
#include "LearnIDDevID.h"
class MyPersistIntData : public CPMUnknown<IMyIntData>
{
public:
MyIntData(IPMUnknown* boss) : CPMUnknown<IMyIntData>(boss), fMyInt(0) {};
void ReadWrite(IPMStream* s, ImplementationID prop);
virtual int32 GetIntData() const;
virtual void SetIntData(int32 i);
private:
int32 fMyInt;
};
CREATE_PERSIST_PMINTERFACE(MyPersistIntData, k MyPersistIntDataImpl)
void MyPersistIntData::ReadWrite(IPMStream* s, ImplementationID prop)
{
s->XferInt32(fMyInt);
}
int32 MyPersistIntData::GetIntData() const
{
return fMyInt;
}
void MyPersistIntData::SetIntData(int32 i)
{
if( fMyInt != i )
{
PreDirty();
fMyInt = i;
}
}
MyPersistIntData differs from its nonpersistent counterpart, MyIntData, in the following ways:
MyPersistIntData includes IPMStream.h, which is used to read and write a stream of data.
Page 67

CHAPTER 4: Introduction to the InDesign Object Model Examples of Persistent Implementations 67
MyPersistIntData uses the CREATE_PERSIST_PMINTERFACE macro in place of CREATE_PMINTERFACE.
MyPersistIntData::SetIntData() checks to see whether the passed-in value is different from fMyIntData.
If the values differ, it calls PreDirty() before changing fMyInt. In short, the object model must know
before you change a persistent object. This allows the undo architecture to take snapshots, so changes
can be rolled back if needed.
MyPersistIntData contains a ReadWrite method. This method is responsible for reading and writing
the object's persistent data using the passed-in IPMStream.
Examples of Persistent Implementations
There are many examples of persistent implementations in the SDK sample projects. For a fairly
straightforward example, consider the Frame Label project. See the FrmLblData.cpp file in the Frame Label
sample at:
<SDK>/source/sdksamples/framelabel/FrmLblData.cpp
The Frame Label plug-in adds this implementation to the application and document workspaces and to
each page item. The sample does this by adding the IID_IFRMLBLDATA/kFrmLbldataImpl
interface/implementation pair to the kWorkspaceBoss, kDocWorkspaceBoss, kDrawablePageItemBoss in
its ClassDescriptionTable as follows:
AddIn
{
kWorkspaceBoss,
kInvalidClass,
{
IID_IFRMLBLDATA, kFrmLblDataImpl,
}
},
AddIn
{
kDocWorkspaceBoss,
kInvalidClass,
{
IID_IFRMLBLDATA, kFrmLblDataImpl,
}
},
AddIn
{ kDrawablePageItemBoss,
kInvalidClass,
{
IID_IFRMLBLDATA, kFrmLblDataImpl,
}
}
These bosses already are persistent, so there is no need to add an IPMPersist implementation. There also is
no need to create an instance, because the application already manages these bosses.
This and other persistent implementations always are very similar to the example listed in “Writing your
own persistent implementation” on page 66. Most examples differ from the preceding only in
inconsequential ways. For example, a mutator (SetXXX) method may not check to see that a data member
has really changed before calling PreDirty(); this check is an optimization.
What differs across examples is the data that the implementation manages. Each ReadWrite method is
crafted to match the data to be retained. It is a good idea to look at a handful of examples. You can find
Page 68

CHAPTER 4: Introduction to the InDesign Object Model Changing persistent data with commands 68
these examples by searching for ReadWrite() in the sample files. Notice that a ReadWrite() method
commonly calls methods on IPMStream to stream simple data types. More complex data types have their
own ReadWrite() methods. For example, the first item handled in FrmLblData::ReadWrite() is a WideString.
The FrmLbldata::ReadWrite method calls ReadWrite on the WideString instance, passing along the current
stream and implementation information.
Changing persistent data with commands
Changing a persistent data member requires more than simply calling the member’s mutator (SetXXX)
method. The InDesign object model performs changes in transactions. This allows InDesign to manage the
integrity of a document and supports InDesign’s undo capability. Data changes also require notification, so
dependent user interfaces can be updated.
These requirements are facilitated by InDesign’s use of the Command design pattern. To change existing
persistent data members in InDesign, you must process the appropriate command. Processing amounts to
calling or executing; often, it may be referred to as firing.
If you have written your own persistent implementations, you must write your own new command. Then
this command must be used to change your persistent data.
A command is simply a boss that consists of an ICommand implementation. It almost always contains one
or more data members that are used to specify data for the operation. For example, consider the
command used to alter the Frame Label’s various IFrmLblData implementations:
Class
{
kFrmLblCmdBoss,
kInvalidClass,
{
IID_ICOMMAND, kFrmLblCmdImpl,
IID_IFRMLBLDATA, kFrmLblDataImpl
}
}
To process a command, the caller first creates an instance of the command:
InterfacePtr<ICommand> labelCommand(CmdUtils::CreateCommand(kFrmLblCmdBoss));
The caller must then specify which boss instances are being operated on. This is done through the
ICommand::SetItemList() method:
labelCommand->SetItemList(items);
Typically, the next step is to query the command for any data instances and set them appropriately:
InterfacePtr<IFrmLblData> labelData(labelCommand, UseDefaultIID());
labelData->Set(frmLblInfo);
NOTE: Code that queries for another interface on a boss commonly includes checks to make sure the data
interface is not nil. This is left out for brevity.
The final step is to process the command and check for errors:
Page 69

CHAPTER 4: Introduction to the InDesign Object Model Writing your own command 69
error = CmdUtils::ProcessCommand(labelCommand);
// Check for errors, issue warning if so:
if (error != kSuccess)
{
...
}
Writing your own command
If you introduce a new persistent implementation, you will need to add your own command boss. This will
include a custom implementation of ICommand and some type of data interface. This interface may very
well be the exact interface that is being changed. You can see this in the kFrmLblCmdBoss example. The
IFrmLblData interface that was added into the workspace and page-item bosses exists on the command.
You also can write a custom data interface/implementation pair for your command or reuse existing
interfaces/implementations like IIntData and IBoolData. The last option works fine and is done in the
InDesign code base, but it is not a best practice, because often this option makes it harder to understand
what the data member represents.
Most ICommand implementations extend the Command class. This provides most of the plumbing for
your command and leaves you with a few important methods to implement. These methods are described
below, starting with the most significant.
Do()
A typical command has one more data interface. When writing a Do() method, a typical first step is to
query for the command’s data interfaces. This will look something like the following:
InterfacePtr<IMyCmdData> commandData(this, UseDefaultIID());
Commands operate on one or more boss objects. Typically, these objects are specified as a UIDList saved
within the command. This UIDList is initialized by the caller via SetItemList(). It is available as an instance
variable or by calling IComand::GetItemList(). Some commands operate only on one item; more
commonly, though, a command operates on a list of items. In that case, the command iterates through the
items in the list. For each item, it queries the targeted boss for the interface or interfaces being changed
and copies from the command data to these interfaces. Typically, that will look like this:
for(int32 i = 0; i < fItemList.Length(); i++)
{
InterfacePtr<IMyData> myData(fItemList.GetRef(i),UseDefaultIID());
myData.copyFrom(commandData);
}
The preceding copyFrom() method would have to exist on the IMyData interface. Some interfaces have
such a method; alternately, the command data could have such a method. Other commands may copy
items from their data method by method. In any event, this step amounts to copying data from the
command to the targeted item.
You may see more advanced commands that do some type of filtering. This is to support what is known as
mixed mode. Mixed mode allows you to operate on the common settings in a multiple selection, while
leaving the settings that are not common unchanged. For example, consider the Frame Label sample. If
you create several frames and apply frame-label settings, with some of the settings the same across frames
and others unique for each frame, you can select all the frames and make change to those settings that are
the same without altering those that are unique. This type of support ultimately should be provided by the
underlying command. The Frame Label sample provides such an example in FrmLblCmd.
Page 70

CHAPTER 4: Introduction to the InDesign Object Model Writing your own command 70
DoNotify()
There are dependencies on persistent data. For example, changing persistent data may make a panel out
of date. Because there may be unknown dependencies on persistent data, InDesign does not hard-code
updates; instead, it uses the Subject/Observer design pattern to support the ability to dynamically
subscribe to notifications. A command’s DoNotify method broadcasts on some subject (ISubject) that it
has changed persistent data. Some commands are written to change one instance at a time. For example,
a command that changes some data on the application workspace does not process a list of items. Such
commands typically broadcast on the ISubject interface of the item they have changed. For example, this
code broadcasts on the application workspace:
InterfacePtr<IWorkspace> theWorkSpace
(GetExecutionContextSession()->QueryWorkspace());
InterfacePtr<ISubject> subject(theWorkSpace, IID_ISUBJECT);
if (subject)
{
subject->ModelChange(kSetMydataCmdBoss,
IID_IMYDATA, this);
}
Because notification is dynamic, each plug-in has the opportunity to attach an IObserver instance to an
ISubject. An observer is attached by calling ISubject::AttachObserver(). In addition to taking a pointer to
the IObserver instance, this method takes two PMIIDs. The first PMIID is a ClassID that describes the
change. Usually, this is the ClassID for the command that performed the change. The second PMIID is an
interface ID that narrow the scope. An attached observer is called when a notification with matching
parameters occurs.
Most commands are writen to operate on a list of items. An example of this is any command that operates
on a list of page items. Such commands are necessary to support making changes on a multiple selection
(that is, multiple page items selected). It is not efficient to broadcast on each individual object that is
changed. Such commands broadcast on the document. For example, consider the FrmLblCmd::DoNotify():
Utils<IPageItemUtils>()->NotifyDocumentObservers
(
fItemList.GetDataBase(),
kLocationChangedMessage,
IID_ITRANSFORM_DOCUMENT,
this,
nil /* nil cookie */
);
This command uses a utility that broadcasts on the kDocBoss. This works because the broadcast passes
enough information for the observers to follow. In this case, the command itself (passed as a pointer) gives
access to the item list of what has changed.
It is not always desirable for observers to be updated immediately; for example, the many panels that
watch selection attributes would be updated more than necessary during normal operations. To get
around this, InDesign supports two notification types: regular and lazy notification. Regular notification
happens right away. Lazy notifications are queued for later use. This is thoroughly described in the
“Notification” chapter of Adobe InDesign Plug-In Programming Guide. There are a handful of SDK sample
plug-ins that use lazy notification. Observers often are in user-interface code. For an example of a regular
observer, see <SDK>/source/sdksamples/watermarkui/WatermarkUIDialogObserver.cpp. For an example
of a lazy observer see <SDK>/source/sdksamples/customdatalink/CusDtLnkDocObserver.cpp.
Page 71

CHAPTER 4: Introduction to the InDesign Object Model Facades 71
CreateName()
Each command is given a name. This may appear on the undo stack, depending on how your command is
called. For example, the FrmLblCmd specifies its name as follows:
PMString* FrmLblCmd::CreateName(void)
{
// Core resource for string:
PMString* string = new PMString(kFrmLblCmdStringKey);
return string;
}
The kFrmLblCmdStringKey is simply a macro for a constant string that is defined in FrmLblID.h Because the
command name may appear in the user interface, it must be localized. For information on how to localize
strings, see the “Localization” chapter.
LowMemIsOK()
This method tells the application whether your command can operate in low-memory situations. Most
commands override the default implementation and return kFalse. This means the application checks for
low memory before it runs your command. If it finds itself in a low-memory situation, it purges some of the
undo stack. If your command returns kTrue, this check and possible purging is skipped. Returning kTrue is
rare.
Facades
Processing commands is somewhat tedious. Because a command is the norm for changing persistent data,
the InDesign code base is somewhat of an API of commands. Adobe and plug-in developers often have
duplicated the effort of creating, initializing, and processing commands. For example, a plug-in usually
must call the same command to implement a user interface and scripting.
To get around this, some InDesign engineers recognized that it was advantageous to create utility
methods to create, initialize, and execute commands. There were various attempts at this. Some attempts
simply automated the creation and initialization of the command. Others went as far as to actually process
the command. After some time, we standardized on an approach called facades. A facade essentially is a
procedural wrapper on a command or set of commands. It may provide methods for retrieving data, but
its primary purpose is to provide an API for processing underlying commands. This makes changing
persistent data a matter of locating the facade and calling the appropriate method with the appropriate
data.
Writing facades is a best practice that has developed over time. We wrote facades for some legacy areas
but have not reworked all legacy features. All recent features are written with facades. You should strongly
consider facades when coding your plug-ins.
The facades that are built into the product follow specific guidelines:
Facade interfaces are named IXXXFacade, where XXX is a unique name of the subsystem being
covered; for example, ITransformFacade.
Facades are declared to be part of the Facade namespace.
Facades provide a kDefaultIID enumeration.
Facades must not consider global or static state. You should pass to them everything they need.
Page 72

CHAPTER 4: Introduction to the InDesign Object Model PluginVersion 72
The first parameter to a facade method is the object or objects that are being acted on. Usually, this is
passed by a UIDList.
Facade methods that set data must return ErrorCode.
Facades are added into the kUtilsBoss
To execute a facade method, you typically write code like the following.
Utils<Facade::IMyFacade>()->SetMyData(items, someData);
The Utils<> template class is like InterfacePtr. It queries for the specified facade using its kDefaultIID enum.
Utils contains an operator that allows you to call methods on a pointer data member that it manages. Like
an InterfacePtr, Utils calls Release() on the pointer when the object is destructed.
To enhance your understanding of facades, study the following examples of facade interfaces:
<SDK>/source/public/interfaces/text/IConditionalTextFacade.h
<SDK>/source/public/interfaces/layout/ITransformFacade.h
<SDK>/source/public/interfaces/layout/IGeometryFacade.h
The SDK also provides examples of facade implementations in the sample projects. These facades can be
studied for further understanding:
<SDK>/source/sdksamples/watermark/IWatermarkDataFacade.h
<SDK>/source/sdksamples/framelabel/IFrmLblDataFacade.h
PluginVersion
InDesign requires a plug-in to provide a PluginVersion resource that describes whether the plug-in
supports model operations or user interfaces. Model plug-ins are available on InDesign Server and
background threads. This declaration occurs in the PluginVersion resource. The following example is for a
model plug-in: it uses the kModelPlugIn constant. If it were a user-interface plug-in, it would have used
kUIPlugIn.
//--------------------------------------------------------------// Plugin Version
//--------------------------------------------------------------resource PluginVersion (1)
{
kTargetVersion,
kMyPluginID,
kMajorVersionNumber, kMinorVersionNumber,
kMajorVersionNumber, kMinorVersionNumber,
kMyMajorFormatNumber, kMyInitialMinorFormatNumber,
{ kInDesignProduct, kInCopyProduct, kInDesignServerProduct },
{ kAllProductsJapaneseFS, kInDesignServerRomanFS },
kModelPlugIn,
kMyVersionStr};
Page 73

CHAPTER 4: Introduction to the InDesign Object Model The lifecycle of a plug-in 73
The lifecycle of a plug-in
This section describes the stages that InDesign goes through while starting up. It also discusses what
happens when a boss inside a plug-in is instantiated.
InDesign start-up sequence
The stages a user sees on the application’s start-up screen depend primarily on whether plug-ins were
added, removed, or modified since the last session. The following table shows the start-up stages and
factors that affect each stage.
Stage Description of activity
Initializing... Nonapplication core services and components are initialized.
Scanning for plug-ins... Compares the SavedData file to the plug-ins in the application’s directories.
If plug-ins were added or removed, or they have changed modification
dates, a more complete start-up procedure must take place to reinitialize
the application.
Registering <n> plug-ins Registers every plug-in when it starts for the first time and again when you
add, remove, or modify plug-ins. If no plug-ins changed between sessions,
start-up skips this registration step, and the application is initialized from
the saved state.
Completing object
model...
Saving object model... Creates a new, blank, SavedData file and writes newly revised data to it.
Load plug-ins... Loads plug-ins that must be loaded at start-up. Most plug-ins are loaded
Calling early initializers... Calls Initializer Services for strings and selection extensions.
Starting up service
registry...
Executing start-up
services...
Lazy start-up service
initialization...
Loading tools... Loads tools.
Processes inheritance in the object model. Checks for invalid cases, like two
plug-ins that claim to implement the same boss interface. Some plug-ins
may load, if necessary to complete the object model.
only as needed.
Sets up the mechanism for services.
Performs operations requested by plug-ins that registered as a
kStartupShutdownService.
Installs lazy start-up service registered as a
kAppLazyStartupShutdownService. These services are called via an idle task
after application start-up.
Completing initialization... Initializes the Clipboard, DragandDrop, and Paths. Sets up, but does not run,
IdleTask.
Calling late initializers... Calls Initializer Services for menus, actions, kits, panels, tools, tips, and
scripting resources (such as ScriptInfo).
Loading shortcuts... Reads shortcuts file and loads shortcuts.
Page 74

5
Localization
The InDesign plug-in architecture supports localization. This chapter covers the basic mechanisms for
localizing strings and other resources used by your plug-in.
InDesign locales
An InDesign locale is represented by the PMLocaleId class. You will find this class in the following location:
<SDK>/source/public/includes/PMLocaleId.h
This class represents the following three pieces of an InDesign locale:
Product-feature set — InDesign, InCopy, and InDesign Server are built from the same code base. By
design, it is possible to write a plug-in that will run under all three products. The product-feature set
describes the product or products to which a locale is specific. It is possible to specify a single product
or a combination of products.
Language-feature set — InDesign and InCopy contain some language-specific features; for example,
the Japanese version includes some layout and frame-grid features specific to Japanese users. The
language-feature set describes the language-feature set or sets to which a locale is specific. This
setting does not have to do with the strings on the screen but rather the features that are present.
User-interface language (or language locale) — This describes the language in which the user interface
will be displayed.
The types of feature sets are represented together as a bit field, and the user-interface language is
represented alone. You will find constants representing different feature sets and user-interface locales in
the following files:
<SDK>/source/public/includes/FeatureSets.h
<SDK>/source/public/includes/PMLocaleIds.h
Checking the locale in C++
Your plug-ins may need to know which feature set or language locale they are running under. You can
access an instance of PMLocaleId that describes the current locale by using the LocaleSettings header. The
following demonstrates making a decision based on the three components of a PMLocaleId:
74
Page 75

CHAPTER 5: Localization Controlling plug-in loading 75
#include "LocaleSetting.h"
...
if (LocaleSetting::GetLocale().GetProductFS() != kInCopyProductFS)
{
// Something specific to InCopy
}
if (LocaleSetting::GetLocale().GetLanguageFS() != kJapaneseLanguageFS)
{
// Something specific to the Japanese feature set
}
if( LocaleSetting::GetLocale().GetUserInterfaceId() == k_enUS)
{
// Something specific to the English UI
}
For an example of this, see the following SDK sample file.
<SDK>/source/sdksamples/printmemorystream/PrtMemActionComponent.cpp
Controlling plug-in loading
InDesign gives you the ability to control the feature sets under which your plug-ins will load. This is done in
ODFRC using the PluginVersion resource:
resource PluginVersion (kSDKDefPluginVersionResourceID)
{
};
In the preceding example, the third- and fourth-to-last lines represent the product- and language-feature
sets under which this plug-in will load. In this case, it will load under any language feature set (kWildFS) of
InDesign (kInDesignProduct). Because this resource is set to load only under InDesign, it will not load
under InCopy, even if the plug-in is copied to the plug-ins directory for InCopy.
PMString
InDesign provides the PMString class for those strings that are designed to show up in the user interface.
We already encountered one such string in this document: a command name may show up on the undo
menu. Therefore, a translation should be provided.
kTargetVersion,
kFrmLblUIPluginID,
kSDKDefPlugInMajorVersionNumber, kSDKDefPlugInMinorVersionNumber,
kSDKDefHostMajorVersionNumber, kSDKDefHostMinorVersionNumber,
kFrmLblUICurrentMajorFormatNumber, kFrmLblUICurrentMinorFormatNumber,
{ kInDesignProduct},
{ kWildFS },
kUIPlugIn,
kFrmLblUIVersion
PMString is not a general-purpose string class; WideString is far better for this purpose. What PMString
does well is manage translatable strings that will appear in the user interface. PMStrings interact with
translation tables defined in ODFRC. Each string has a key value, which can be translated into many
languages.
Page 76

CHAPTER 5: Localization String-translation tables 76
A PMString instance eventually is translated; however, you can work with it before it is translated. You can
determine whether it has been translated by calling HasTranslated(). You can force a string to be translated
by calling Translate(). Translate() is called on all PMStrings before they are added to the user interface.
String-translation tables
Providing translations for PMStrings is a fairly straightforward process handled in ODFRC. If you use
DollyXs to generate your plug-in, most of the plumbing is provided. Below, we explain the various
resources that are used.
Each plug-in should provide two LocaleIndex resources that contain a kStringTableRsrcType. One
LocaleIndex is used for translated strings; the other, for strings that will have no translations. These
resources will look something like the following example from Frame Label:
resource LocaleIndex ( kSDKDefStringsResourceID)
{
kStringTableRsrcType,
{
kWildFS, k_enUS, kSDKDefStringsResourceID + index_enUS
kInDesignJapaneseFS, k_jaJP, kSDKDefStringsResourceID + index_jaJP
kWildFS, k_Wild, kSDKDefStringsResourceID + index_enUS
}
};
resource LocaleIndex (kSDKDefStringsNoTransResourceID)
{
kStringTableRsrcType,
{
kWildFS, k_Wild, kSDKDefStringsNoTransResourceID + index_enUS
}
};
Each LocaleIndex resource must have a resource ID that is unique to this plug-in. Because it has to be
unique only within the plug-in, most samples reuse the same resource IDs for translated and
nontranslated LocaleIndex resources (kSDKDefStringsResourceID and kSDKDefStringsNoTransResourceID,
respectively).
Each LocaleIndex also contain a kStringTableRsrcType. This provides one or more references to a
StringTable. Such a reference consists of the feature set (product and language) and language locale that
the StringTable is for and the resource ID of the StringTable. The first LocaleIndex above provides
translations for all versions of all applications. The first entry targets any feature set (kWildFS) and the
English (k_enUS) language. The second entry targets the Japanese feature set and the Japanese (k_jaJP)
language. The third entry specifies that any other feature set and language combination should use
English strings.
Each StringTable resource provides the same set of translations. For example, here is a portion of the Frame
Label sample’s English StringTable:
Page 77

CHAPTER 5: Localization Localizing other resources 77
resource StringTable (kSDKDefStringsResourceID + index_enUS)
{
k_enUS,// Locale Id
kEuropeanWinToMacEncodingConverter,// Character encoding converter (irp)
{
// ----- Menu strings
kFrmLblCompanyKey, FrmLblCompanyValue,
...
}
};
In this example, kFrmLblCompanyKey and kFrmLblCompanyValue are simply macros that represent
strings. This could just as easily have been something like the following.
"CompanyName", "Adobe Systems",
The first string is a key; the second, the English translation. The key is significant in that it must be unique
(across all plug-ins). In this case, “CompanyName” is the key and “Adobe Systems” is the English translation.
The nontranslated LocaleIndex will contain one item that specifies a separate StringTable resource for all
applications and user-interface languages. This additional StringTable holds a set of Strings that have no
translations:
resource StringTable (kSDKDefStringsNoTransResourceID + index_enUS)
{
k_enUS,// Locale Id
kEuropeanMacToWinEncodingConverter,// Character encoding converter
{
// No-Translate strings go here:
}
};
The SDK samples usually provide only Japanese and English translations. To extend this, you must add
more specific translation scenarios to the translated LocaleIndex and provide the new StringTable
resources.
Localizing other resources
Other resources are localized in a similar way. Like strings, an alternate user interface can be given using a
LocaleIndex. The following example uses a different version of kMyDialogRsrcID for Japanese. This is how
ODFRC-based user interfaces handle different user-interface layouts caused by string size.
resource LocaleIndex (kMyDialogRsrcID)
{
kViewRsrcType,
{
kInDesignJapaneseFS, k_Wild, kMyDialogRsrcID + index_jaJP
kWildFS, k_Wild, kMyDialogRsrcID + index_enUS
}
}
Menus, actions, and the other resource types work the same way. For an inventory of resource types, see
source/public/includes/CoreResTypes.h.
Similarly, you can control which feature sets and locales a scripting resource is available on, using the
VersionedScriptElementInfo resource. Here, the last two items in each entry contain feature-set and
language-locale IDs. The following example makes a scripting resource that is available on InDesign and
InDesign Server locales:
Page 78

CHAPTER 5: Localization Localizing other resources 78
resource VersionedScriptElementInfo(1)
{
//Contexts
{
kBasilScriptVersion, kCoreScriptManagerBoss,
kInDesignAllLanguagesFS, k_Wild,
kBasilScriptVersion, kCoreScriptManagerBoss,
kInDesignServerAllLanguagesFS, k_Wild,
}
Page 79

6
Building Blocks
InDesign plug-in development requires you to become familiar with a set of concepts and patterns that
are used in many different scenarios. These concepts are the building blocks on which you will make
things happen with your plug-in. This chapter introduces you to some common building blocks. This is not
an exhaustive list, but this survey of building blocks will help familiarize you with how things are done in
the InDesign architecture.
Boss-object web
It is important to begin by understanding how to navigate the web of InDesign boss objects that exist in
the application. This includes how to access documents and their content. In a running InDesign instance,
each execution context (thread) has one session object represented by the kSessionBoss. You can use a
global function (GetExecutionContextSession) to gain access to the current session. The following
demonstrates how to use the session to query for the IWorkspace interface on the kWorkspaceBoss, and
the IApplication interface on kAppBoss:
InterfacePtr<IWorkspace> sessionWorkspace(
GetExecutionContextSession()->QueryWorkspace());
InterfacePtr<IApplication> application(
GetExecutionContextSession()->QueryApplication());
The kWorkspaceBoss contains interfaces that control the application’s copy of preferences, defaults, styles,
swatches, and so on. The IApplication interface provides access to several interfaces that manage portions
of the application, including IToolMgr, IActionMgr, and IPanelMgr. As their names suggest, these interfaces
allow you to manage tools (like the Text or Direct Select tools), actions, and panels. The IApplication
interface also provides access to the list of documents the application has open. This comes in the form of
an IDocumentList interface on the session’s instance of kDocumentListBoss. The following demonstrates
acquiring the document list:
InterfacePtr<IDocumentList> docList(app->QueryDocumentList());
The IDocumentList provides access to a kDocBoss instance for each document that is open:
for (int32 i = 0; i < docList->GetDocCount(); i++ )
{
IDocument* theDoc = docList->GetNthDoc(i);
...
}
The preceding IDocument interface is saved in a different database from the kAppBoss and
kWorkspaceBoss. Also, note that documents maintain defaults for many of the objects that appear in the
kWorkspaceBoss. Documents store these defaults in kDocWorkspaceBoss, which is available via the
GetDocWorkSpace() method on IDocument.
A kDocBoss has many interfaces; some of the more significant interfaces are IStoryList, ILayerList,
IMasterSpreadList, and ISpreadList. As their names indicate, these interfaces manage the stories, layers,
master spreads, and spreads within an InDesign document.
OTE: Pages have second-class status in the InDesign model. They are merely geometrical in that they
N
designate where the page is. They really do not hold any content. All content belongs to the spread.
79
Page 80

CHAPTER 6: Building Blocks Iterating the draw order 80
The ISpreadList give you access to an ISpread interface on an instance of kSpreadBoss for each spread in
the document. The page items are not children of the spread; instead, between the page items and the
spread is an object called a spread layer (kSpreadLayerBoss). There are spread layers for each layer in the
document and two extra layers for pages and guides. The fact that page items live on spread layers is a
significant detail in the implementation of layers. For our purposes, it is a fact we need to understand when
navigating the document. A navigation from spread to page item demonstrates how the hierarchy works:
InterfacePtr<ISpreadLayer> spreadLayer(spread->QueryLayer(docLayer));
InterfacePtr<IHierarchy> spreadLayerHier(spreadLayer, UseDefaultIID());
for (int32 i = (spreadLayerHier->GetChildCount() - 1); i >= 0; i--)
{
// Get the nth page item
InterfacePtr<IHierarchy> childHier(spreadLayerHier->QueryChild(i));
...
}
Each IHierarchy instance can provide access to zero to many children, and also can provide access back to
its parent. Every object in the hierarchy has a parent except the root, which usually is the kSpreadBoss.
Iterating the draw order
You may need to write code that navigates through all or a subset of the page items in a document. Trying
to write that code by hand using IHierarchy can be tedious and error prone. InDesign provides a way to
iterate through page items in the order in which they draw. Instead of handling the navigation, our code
provides a callback. Your callback is given the opportunity to decide what to do with the particular object.
To iterate the draw order, write an implementation of the ICallback interface. This interface is available at
<SDK>/source/public/interfaces/layout/ICallback.h. Notice that it is not an IPMUnknown but a standard
C++ interface.
To begin iteration, you need to create an instance of the kDrawMgrBoss and your callback. The following
code has “...” in the MyCallBack constructor, because you will provide some context and/or data structures
for the callback to work on. You also choose which point in the hiearchy to begin with. This code starts
with a spread object. You also can set draw flags according to your preferences; these draw flags exist on
the IShape interface.
InterfacePtr<IDrawMgr> drawMgr ((IDrawMgr *)::CreateObject (kDrawMgrBoss,
IID_IDRAWMGR));
MyCallBack callback (...);
const int32 drwMgrFlags = IShape::kSkipHiddenLayers+IShape::kSkipGuideLayers;
drawMgr->IterateDrawOrder( &matrix, ::GetUIDRef(spread), &callback,
drwMgrFlags);
For an example of iterating the draw order, see
<SDK>/source/sdksamples/printselection/PrnSelSuiteCSB.cpp.
Service providers
Service providers are basic building block that are very straightforward and that are used as a component
of many extension points. A service provider is a mechanism by which a plug-in can publish its ability to
provide a particular type of service (or function). Such a plug-in can introduce new types of services or
implement a service of an existing type.
Page 81

CHAPTER 6: Building Blocks Startup and shutdown services 81
Service-provider boss
A service provider is simply a boss that provides an implementation of the IK2ServiceProvider interface:
Class
{
kMyServiceProviderBoss,
kInvalidClass,
{
IID_IK2SERVICEPROVIDER, kMyServiceProviderImpl,
IID_IMYSERVICE, kMyServiceImpl,
}
}
The IK2ServiceProvider interface includes methods that describe details common to all services. Most
notably, the service reports its name and which ServiceID (or IDs) it supports. A ServiceID has the same
form as all other application ID-space values, like ClassID and IID values. It is not unique to the service but
instead identifies the type of service that is provided. All services providers of a particular type return the
same ServiceID.
A service provider contains one or more additional interface/implementation pairs; for example,
“IID_IMYSERVICE, kMyServiceImpl” in the preceding boss. Such additional interfaces provide what is
unique to the service. Each type of service has its own requirements concerning additional interfaces.
Service registry
The application provides an implementation of IK2ServiceRegistry that manages all available service
providers. This interface is available on the session and can be queried for as follows:
InterfacePtr<IK2ServiceRegistry> serviceRegistry(GetExecutionContextSession(),
UseDefaultIID());
During application start-up, the service registry finds all service providers, by iterating through the object
model and registering every boss that has an IK2ServiceProvider interface. A plug-in can query for services
using the session’s IK2ServiceRegistry interface. There are methods for iterating through all the services of
a particular type (ServiceID) and methods that allow you to query for the default service or a service with a
particular ClassID.
Startup and shutdown services
Your plug-in may need to handle some tasks on application startup and shutdown. This can be achieved
by implementing an application startup/shutdown service. InDesign provides two startup and shutdown
service types; their ServiceIDs are kAppStartupShutdownService and kAppLazyStartupShutdownService,
respectively. All service providers that support the kAppStartupShutdownService services are called
during startup. Those that support kAppLazyStartupShutdownService are called on an idle task after
startup is complete. Each startup/shutdown service also needs to provide an implementation of
IStartupShutdownService (IID_IAPPSTARTUPSHUTDOWN).
The application includes reusable implementations that describe the two types of shutdown services. The
implementation IDs for these implementations are kCStartupShutdownProviderImpl and
kLazyStartupShutdownProviderImpl. The following demonstrates examples of the two types of
startup/shutdown services:
Page 82

CHAPTER 6: Building Blocks Responders 82
Class
{
kMyStartupShutdownBoss,
kInvalidClass,
{
IID_IAPPSTARTUPSHUTDOWN, kMyStartupShutdownImpl,
IID_IK2SERVICEPROVIDER, kCStartupShutdownProviderImpl,
}
}...
Class
{
kMyLazyStartupShutdownBoss,
kInvalidClass,
{
IID_IAPPSTARTUPSHUTDOWN, kMyLazyStartupShutdownImpl,
IID_IK2SERVICEPROVIDER, kLazyStartupShutdownProviderImpl,
}
The IStartupShutdownService interface contains simple Startup() and Shutdown() methods.
Responders
In addition to command notification, some changes are broadcast through the signal/responder protocol.
The signal/responder protocol is used for broadcasting certain types of model changes. Signals provide
coarser information than command notifications. Signals signal the responder that a change of a certain
class has occurred. There are signals for various document events, such as new, open, and close; these are
designated by unique ServiceIDs. There are numerous reusable implementations that return the existing
ServiceIDs. For example, the Watermark sample implements a responder. Because it uses the
kAfterNewDocSignalRespServiceImpl, it receives signals after a new document is created:
Class
{
kWatermarkNewDocResponderBoss,
kInvalidClass,
{
IID_IRESPONDER, kWatermarkDefaultResponderImpl,
IID_IK2SERVICEPROVIDER, kAfterNewDocSignalRespServiceImpl,
}
}
The “Notification” chapters of Adobe InDesign Plug-In Programming Guide and Adobe InDesign SDK Solutions
contain more information on implementing responders and the various types of signals that are available.
Draw event handlers
A Draw event handler allows a plug-in to draw within a document at various points (or events). It is a
service provider that supports the kDrawEventService and also implements the IDrwEvtHandler interface.
The IDrwEvthandler interface contains methods to register and unregister draw events. For a list of
available draw events, see the following header:
<SDK>/source/public/interfaces/graphics/DocumentContextID.h
When it comes time to actually draw, the HandleEvent method is called on the IDrwEvthandler instance.
The passed-in eventData contains the context and graphics port necessary for drawing.
Page 83

CHAPTER 6: Building Blocks Page-item adornments 83
The Watermark and BasicDrwEvtHandler samples are good examples of Draw event handlers. The
BasicDrwEvtHandler demonstrates registering to handle many events, and the Watermark sample
demonstrates actually drawing something of interest to a document.
Page-item adornments
Page-item adornments allow plug-ins to do custom drawing on a page items. An adornment is a
nonpersistent boss that provides an implementation of IAdornmentShape. Adornments are referenced by
ClassID. You can add or remove adornments using the AddAdornment and RemoveAdornment methods
on IPageItemAdornmentList. This interface is available on all page-item boss classes. As the page item
draws, it checks the IPageItemAdornmentList and instantiates and calls any adornments that are
registered to draw at particular points in the draw order.
Your implementation of IAdornmentShape::GetDrawOrderBits() provides the points in the draw order that
your adornment will be called on to draw. There are various points defined in the
IAdornmentShape::AdornmentDrawOrder enumeration. Some of the items are relevant only to certain
types of page items. An adornment can specify multiple points by adding different draw order values
together.
When it is time for the adornment to draw, the application calls IAdornmentShape::Draw() on the
adornment:
virtual void Draw(
IShape* iShape, // owning page item
AdornmentDrawOrder drawOrder,
GraphicsData* gd,
int32 flags
) = 0;
While an adornment cannot be persistent, it is passed a pointer to the shape it is drawing on (iShape). This
allows adornments to access data that is specific to the page item. This can include data that your plug-in
adds to the page item. The Draw method also is passed the AdornmentDrawOrder value describing the
current point in the draw order; this provides a way for one Draw method to handle different points in the
draw order. The next parameter passed is a GraphicsData object, which provides the means to actually
draw into the document. The final parameter is a set of flags that describe some attributes of the current
situation; for example, these flags can be used to determine whether the application is printing.
If the adornment draws outside the bounds of the page item, it effectively extends the painted bounds of
the page item. The adornment needs to report this to the application, so the correct screen area can be
invalidated when the item is moved. This is done using the GetPaintedBBox() method.
The Frame Label sample is an excellent example of how to implement a page-item adornment. For more
detail about page-item adornments, see the “Graphics Fundamentals” chapter of the Adobe InDesign
Plug-In Programming Guide.
OTE: There also are handle shape adornments that allow you to adorn page-item handles and participate
N
in hit testing.
Selection suites
This guide does not cover implementing user-interface components like panels, menus, and dialogs. For
that, see Adobe InDesign Plug-In Programming Guide, Adobe InDesign SDK Solutions Guide, or the numerous
samples that demonstrate creating user interfaces.
Page 84

CHAPTER 6: Building Blocks Selection suites 84
If you were to write a user interface, it would need to operate on a selection. This section introduces you to
how InDesign handles selection.
Rather than querying the application for a list of selected objects, iterating through the list, and calling
commands (or facades), an InDesign user interface queries for a particular selection suite and calls
methods on that suite. The user interface is not allowed to be concerned with what is selected. It strictly
calls through the suite. This design facilitates adding selection types without changing large amounts of
client code.
A selection suite is specific to a particular domain. For example, the IGeometrySuite can be used to change
the geometry of the current selection (ResizeSelection) or to find out if that is even possible
(CanChangeSelectionHeight) with the current selection.
To get to a selection suite, you must first access the selection manager. Each user-interface component is
passed or initialized with an IActiveContext pointer. This pointer is the proper way to gain access to the
selection manager:
ISelectionManager* selectionMgr = ac->GetContextSelection();
Some global utilities exist that return an ISelectionManager. These bypass the ActiveContext and make
their decision based on the front document in the user interface. These work as long as the front
document and the IActiveContext are in sync. While there is code in the application that does it that way,
the application is suspicious when dealing with multiple views. Furthermore, this approach is not well
positioned for upcoming InDesign changes. We recommend that you acquire ISelectionManager through
the IActiveContext interface. Once you have an ISelectionManager, you can query for a suite:
InterfacePtr<IFrmLblDataSuite> frmLblDataSuite(dlgContext,
GetContextSelection(),UseDefaultIID());
The preceding is important for code that consumes (or calls) selection suites. If you implement commands
that change data, you will need to implement your own selection suite. Adobe InDesign Plug-In
Programming Guide has an entire chapter dedicated to this. It demonstrates all the types of selections that
can be supported. There also are many samples that implement selection suites. Also, DollyXs can
generate a plug-in with a selection suite.
The following is a high-level view of the process of writing a selection suite, to provide you with some
familiarity with the process:
1. Write commands that change your data.
2. Write a facade that provides a procedural means to call your data.
3. Write an interface for your selection suite. This will be very similar to your facade’s interface, except it
will not have any information about what to target. It also may have some other operations that check
to see whether an operation in the user interface is possible with the current selection.
4. Write one implementation of this interface for each type of selection that your suite will handle.
Examples of types your suite might handle include text, layout (page items), defaults, and table
selections. By convention, these implementations contain “CSB” and the type of selection
(“LayoutCSB) in their class and filenames. CSB stands for “Concrete Selection Boss” and is where the
selection suite actually is located.
5. Also provide another implementation of the suite, which will live on the active selection boss. By
convention, ASB is in the filename of this type of implementation. It provides the template magic that
allows the selection manager to call through to the right CSB or CSBs to handle a request.
6. Add your selection suite into the correct CSB bosses.
Page 85

CHAPTER 6: Building Blocks Scripting 85
Scripting
InDesign supports three higher-level programming languages: JavaScript, VBScript, and AppleScript.
These scripting languages can be used to automate repetitive tasks. JavaScript has even been used to
implement a product feature, Export for Dreamweaver; the source code is available in the InDesign SDK.
Adobe is investing in enhancing the scripting model, so more solutions can be built with scripting. Other
important technologies, such as IDML , are based on scripting. A good plug-in should provide scripting
support for any persistent data that it introduces to a document. This allows the data to be represented in
IDML (InDesign Markup Language).
For example, consider the following script that exercises the Frame Label feature using scripting:
var doc = app.documents[0]
doc.viewPreferences.verticalMeasurementUnits = MeasurementUnits.points;
doc.viewPreferences.horizontalMeasurementUnits = MeasurementUnits.points;
var rect = doc.pages[0].rectangles.add();
rect.geometricBounds = [36,36, 136, 136];
rect.framelabelString = "Hello World";
rect.framelabelPosition = FramelabelPositionEnum.framelabelRight;
rect.framelabelSize = 15;
rect.framelabelFontColor = UIColors.green;
rect.framelabelVisibility = true;
The FrameLabel plug-in adds “framelabel” properties to InDesign page-item types. Here, a rectangle is
decorated with a green “Hello World” frame label. This same frame label is represented in IDML. This can
be seen in the following blurb:
<Spread Self="ubd">
<Rectangle Self="uda" ...
FramelabelString="Hello World"
FramelabelSize="15"
FramelabelVisibility="true"
FramelabelPosition="FramelabelRight">
To make this possible, a plug-in must provide scripting support. In addition to the Frame Label sample,
there are many other examples in the SDK. Similar to the situation with selection suites, DollyXs can
generate a plug-in with stubbed-out scripting support, and Adobe InDesign Plug-In Programming Guide
dedicates an entire chapter (“Scriptable Plug-in Fundamentals”) to the subject. You will need to seek out
those resources when making your plug-in scriptable. The following is a high-level overview:
1. Decide how your data will be represented in scripting. This includes identifying which objects,
properties, enums, and events you will introduce.
2. Each of the items requires a unique name that is mapped to a unique four-character ID. These name/ID
pairs must be registered with Adobe. Typically, these values are made part of an enum and are saved
in a header file for later use.
3. Generate GUIDs for each new scripting object you introduce. This can be done using the Microsoft
GUID Generator (GUIDGEN.exe). This is only for objects and is not required for properties, enums, and
events. These GUIDs are #defined in a header for later use.
4. The scripting objects, events, properties, and enums are described in a VersionedScriptElementInfo
resource in your plug-ins ODFRC file. This requires you to add several new IDs in the
kScriptInfoIDSpace. This also identifies at least one ScriptProvider.
Page 86

CHAPTER 6: Building Blocks List Plug-ins in Extension Manager 86
5. A ScriptProvider is a boss that provides an implementation of IScriptProvider. Your implementation
handles any properties or events specified in the VersionedScriptElementInfo.
Additional points are described in the “Scriptable Plug-in Fundamentals” chapter of Adobe InDesign Plug-In
Programming Guide. When all is said and done, adding scripting support primarily amounts to knowing
how to deal with various ID types, crafting a VersionedScriptElementInfo, and writing some C++ code that
maps IDs and scripting constructs to the InDesign object model.
List Plug-ins in Extension Manager
For your plug-ins to be used in InDesign, InDesign must know about your plug-ins at launch time so that it
can load them. “
In addition, you can add your plug-ins to the Extension Manager. This enables users to view information
about loaded plug-ins while InDesign is running. This is optional; the functionality of your plug-ins is not
affected either way.
The following steps show how to list your plug-ins in the Extension manager.
Step 1: Create the extension installation file
Launching InDesign with the samples” on page 13 explains how to do this.
An InDesign extension installation file is an XML file with the MXI file extension. (MXI stands for
Macromedia Extension Information.) It provides the information required by the Extension Manager about
extensions and about plug-ins, which can be contained in extensions. The installation file consists of the
root element macromedia-extension, its attributes, and its child elements.
Here is an example MXI file for the SDK sample plug-in BasicDalog. You can find it at
<SDK>/source/sdksamples/basicdialog/BasicDialog_win|mac.mxi.
Page 87

CHAPTER 6: Building Blocks List Plug-ins in Extension Manager 87
<?xml version="1.0" encoding="UTF-8"?>
<macromedia-extension
name="BasicDialog"
version="8.0.0.297"
type="object"
locked="false"
pkgtype="zxp"
plugin-manager-type="all-users"
enabled-for-enabled-all="true">
<author name="Adobe Systems Incorporated" />
<products>
<product name="InDesign" version="8.0" primary="true" />
</products>
<description>
<![CDATA[SDK Sample BasicDialog]]>
</description>
<files>
<file source="SDK/BasicDialog.sdk.pln"
destination="$indesign/Plug-Ins/SDK/BasicDialog.sdk.pln"
platform="win" file-type="plugin" />
<file source="SDK/BasicDialog.pdb"
destination="$indesign/Plug-Ins/SDK/BasicDialog.pdb"
platform="win" />
<file source="SDK/(BasicDialog.sdk Resources)"
destination="$indesign/Plug-Ins/SDK"
platform="win" />
</files>
</macromedia-extension>
The root element macromedia-extension has the following attributes:
name — A string with a maximum of 255 characters that represents the plug-in’s name.
version — The plug-in’s version number in the format a{.b{.c}}, where a, b, and c are all positive
integers.
type — Indicates what kind of extension this is. For a plug-in, set this to “object”.
locked — Indicates whether the plug-in is required. If "true’’, the user cannot disable the plug-in using
Extension Manager.
pkgtype — Indicates the plug-in’s package type.
plugin-manager-type — Indicates howthe plug-in is managed. Valid values are "all-users" and
"current-user". The first value sets the management type to enable-for-all, disable-for-one, which
means that only one user needs to enable the plug-in in Extension Manager and then all users can use
it, and each user can disable the plug-in individually without affecting other users. The second value
sets the management type to enable-for-one, disable-for-all, which means that the plug-in is enabled
only for the user who enabled the plug-in in Extension Manager. If this item is a plug-in, you must
specify this attribute.
enabled-for-enabled-all — The value “all” indicates that the plug-in works for every user or the current
user after one user installs this plug-in.
The element macromedia-extension has the following children:
author — A string representing the name of the plug-in’s creator.
products — A container element with a child product element for each supported host.
Page 88

CHAPTER 6: Building Blocks List Plug-ins in Extension Manager 88
description — Text that explains what the plug-in does or is used for.
ui-access — Text that describes how to access the plug-in from the user interface.
files — Indicates what files need to be added to the extension package (see Step 2), and where they
will be installed.
Step 2: Create the extension package
An Extension Manager package is an archive file with file extension ZXP. It is used to install the extension
or plug-in across platforms. To create the package, do either of the following:
Launch Extension Manager, File > Package ZXP Extension.
Copy the MXI file to the folder containing BasicDialog.sdk.pln and BasicDialog.pdb, then double-click
MXI file. A ZXP file is created by Extension Manager.
Step 3: Install the plug-in
To in stal l the plug -in:
1. Open Extension Manager and click Install.
2. Browse to the location where your ZXP file is saved, select it, and click Open to start the installation
process.
3. After the installation is complete, confirm that the plug-in appears in Extension Manager, and that the
plug-in file is copied to the <InDesign>/Plug-Ins/SDK/ folder.
N
OTE: Extension Manager needs to be launched one time by a user with admin rights, so that it can load
and cache the extensions. After that, Extension Manger can also show the list of extensions and plug-ins to
normal users.
To remove a plug-in from Extension Manager:
1. Select the extension from the pop-up menu that lists the installed programs.
2. Choose File > Remove Extension.
N
OTE: The plug-in is not removed from the <InDesign>/Plug-Ins/SDK/ folder.
Page 89

7
InDesign Server Plug-in Techniques
This chapter provides technical details to help developers create new plug-ins or port existing plug-ins to
use with InDesign Server.
Introduction
Developing a plug-in for InDesign Server requires the same fundamental C++ and object oriented
programming and design skills needed to develop plug-ins for the regular version of InDesign, which we
call desktop InDesign. However, because InDesign Server does not have a user interface like its desktop
counterpart, there are many considerations when porting an existing InDesign plug-in for use under the
InDesign Server product.
This chapter compares the object models of desktop InDesign and InDesign Server, identifies the key areas
of InDesign plug-in code that you must review or modify for use with InDesign Server, and suggests
programming techniques to ensure that your plug-ins can run safely under InDesign Server.
The chapter is organized by the different areas of InDesign plug-in code that you must review to
determine its degree of compatibility with InDesign Server, and provides techniques to solve
incompatibility issues. Where necessary, this document includes discussions of techniques to make the
same code run under both desktop InDesign and InDesign Server.
After reading this chaper, you should be able to do the following:
Safely port desktop InDesign plug-ins for use with InDesign Server.
Achieve better plug-in architecture and performance.
Ter mi nol og y
This section defines terms that are used in this chapter.
Desktop InDesign —The regular version of InDesign that runs with a full user interface. You create and
modify layouts using this version of InDesign by interacting with the user interface.
InDesign Server — The server version of InDesign. It has no user interface. To interact with InDesign
Server, you send it commands in the form of SOAP packets.
Key concepts
Model and view (in the MVC paradigm)
InDesign uses the model-view-controller (MVC) architecture from SmallTalk to factor its user interface. The
model manages the behavior and data of the application domain, delivers information about its state to
the view, and makes changes to its state as directed by the controller. The view manages the user interface,
including the onscreen representation of the model. The controller interprets the mouse gestures and
keyboard input from the user, commanding the model and or view to change as appropriate. The
following are mapped onto InDesign:
89
Page 90

CHAPTER 7: InDesign Server Plug-in Techniques How desktop InDesign and InDesign Server differ 90
The model is a document containing publishing assets such as text or images, organized into pages,
spreads, and layers.
The view is a window opened on the document, displaying the contents of the document to the user.
A controller is an object that facilitates communication between the model and the view (for example,
a dialog controller or event handler).
One way of thinking about MVC is that it formalizes the relationships among input, output, and data
processing. If you constructed a view of your model (which could be a window displaying a document),
you could easily have multiple views of the same model. Conversely, if you design your plug-ins according
to this paradigm, you can easily interchange the view of your model or eliminate it altogether.
Active context
In desktop InDesign, the active context refers to an object with which a user is interacting. Object types
include documents, selected items, control views, and workspaces. At any time, there could be one object
of each kind in the active context. The active context is identified by the IActiveContext interface.
Developers can get the active context object by calling one of the Get*** methods in IActiveContext.
In InDesign Server, however, not all types of active context may be available. For instance, there is no view
for InDesign Server.
How desktop InDesign and InDesign Server differ
Although both desktop InDesign and InDesign Server were developed from the same code base, there are
many configuration differences. For instance, desktop InDesign requires a full-featured user interface, but
InDesign Server does not. Also, InDesign Server provides features enabling control by sending SOAP
packets over the network. Most configuration differences are in the set of plug-ins installed and/or loaded
by each application. These configuration differences present a different object model landscape;
therefore, plug-in developers must exercise caution when porting plug-ins for use with InDesign Server.
For instance, user-interface elements in desktop InDesign are not available in InDesign Server.
Assumptions about the existence of certain interfaces, especially ones related to user-interface
components (dialogs/panels, observers attached to such components, and menus/actions), must be
fortified with code that handles such cases properly.
The lists in the following sections present a complete set of configuration differences between desktop
InDesign and InDesign Server, primarily at the plug-in and binary component level (frameworks and
dynamic link libraries).
Windows® plug-ins are DLLs with the extension .apln (application) or .rpln (required). MacOS® plug-ins are
created as framework bundles. The folder that stores a bundle has the extension “.framework”. For brevity,
these extensions are omitted in the following lists.
What InDesign Server has that desktop InDesign does not have
The following plug-ins are unique to InDesign Server (that is, their Product resource contains only
kInDesignServerProduct):
<InDesign CS6 Server>/Plug-Ins/Server/Corba Generator
<InDesign CS6 Server>/Plug-Ins/Server/Corba Utils
Page 91

CHAPTER 7: InDesign Server Plug-in Techniques How desktop InDesign and InDesign Server differ 91
<InDesign CS6 Server>/Plug-Ins/Server/ServerStatistics
<InDesign CS6 Server>/Plug-Ins/Server/SOAPServer
InDesign Server includes the following plug-in, which is installed only with the Japanese version of
InDesign CS6:
<InDesign CS6>/Contents/MacOS/Required/CJKLayout
The following boss classes are published from the Corba Generator, Corba Utils, ServerStatistics, and
SOAPServer plug-ins:
Corba Generator:
kCorbaGeneratorBoss
kCorbaGeneratorScriptProviderBoss
kCorbaHeaderFileGeneratorBoss
kCorbaImplFileGeneratorBoss
kCorbaInterfaceFileGeneratorBoss
kPackagesInitializerBoss
kTemplateInitializerBoss
Corba Utils:
kCorbaAPIScriptMgrBoss
ServerStatistics:
kServerStatisticsScriptProviderBoss
kServerStatisticsStartupShutdownBoss
SOAPServer:
kErrorListScriptObjectBoss
kErrorListScriptProviderBoss
kModelUIScriptProviderBoss (debug only)
kServerDocFileHandlerBoss (NOTE: A different DocFileHandler boss is available in desktop
InDesign)
kServerSettingsScriptProviderBoss
kServerTestScriptProviderBoss
kShutdownRequestIdleTaskBoss
kSoapServerIdleTaskBoss
kSoapServerScriptProviderBoss
kSoapServerStartupShutdownBoss
Page 92

CHAPTER 7: InDesign Server Plug-in Techniques Minimum requirements for an InDesign Server plug-in 92
kXSLEnablerServiceBoss
The following public add-ins are published from the plug-ins:
IID_IDOCUMENTUIACTIONS (boss: kUtilsBoss; interface: IDocumentUIActions. Desktop InDesign also
has an implementation of this interface.)
IID_IERRORLIST (boss: kSessionBoss; interface: IErrorList)
IID_IEVENTDISPATCHER (boss: kAppBoss; interface: IEventDispatcher. Desktop InDesign also has an
implementation of this interface.)
IID_ISERVERSETTINGS (boss: kSessionBoss; interface: IServerSettings)
IID_IPERFORMANCECOUNTERS (boss: kUtilsBoss; interface: IPerformanceCounters))
What desktop InDesign has that InDesign Server does not have
Most of the plug-ins and related components distributed and loaded only in desktop InDesign are related
to the application’s user interface or “view” components. These elements are not necessary for InDesign
Server, because InDesign Server has no user interface.
Minimum requirements for an InDesign Server plug-in
A plug-in for InDesign Server should meet at least the following requirements:
The plug-in should be developed using the InDesign CS6 Product Software Development Kit (SDK).
The ProductIds field in the PluginVersion resource should contain at least kInDesignServerProduct.
Making a plug-in load (or not load) in InDesign Server” on page 92.)
(See “
The threading policy field in PluginVersion should be set to kModelPlugin. Background threads
behave much like InDesign Server, in that user-interface components are not available.
The plug-in must truly be model only. There should be no dependencies on user-interface-related
components available only in desktop InDesign, like the WidgetBin.dll (Windows) or
InDesignModelAndUI.framework (Mac OS). For more information, see the “Model and UI Separation”
chapter in the Adobe InDesign Plug-In Programming Guide.
Making a plug-in load (or not load) in InDesign Server
You can specify whether a plug-in should be loaded, by specifying the ProductIds flags in the
PluginVersion resource. The following example shows a PluginVersion resource for a plug-in that will be
loaded only in InDesign Server:
Page 93

CHAPTER 7: InDesign Server Plug-in Techniques Minimum requirements for an InDesign Server plug-in 93
resource PluginVersion (1)
{
kTargetVersion,
kMyPluginID,
kMajorVersionNumber, kMinorVersionNumber,
kMajorVersionNumber, kMinorVersionNumber,
kMyPluginLastMajorFormat, kMyPluginLastMinorFormat,
{ kInDesignServerProduct }, /* ProductIds field */
{ kWildFS },
kModelPlugIn,
kAUMComponentVersionStr
};
If you omit kInDesignServerProduct from the ProductIds field, the plug-in is not loaded in InDesign Server.
If you specify { kInDesignProduct, kInCopyProduct, kInDesignServerProduct } in the ProductIds field, the
plug-in is loaded in all three products in the InDesign product family: InDesign, InCopy, and InDesign
Server.
A plug-in must specify whether it supports model or user-interface (view) operations. This is called the
plug-in’s threading policy, because it was introduced to support InDesign’s multithreading model, which
makes model operations threadable. As mentioned above, InDesign Server plug-ins must specify
kModelPlugIn in this field.
The SDK contains a set of plug-ins that will load under InDesign Server:
BasicPersistInterface
CandleChart
CHLinguistic
CHMLFilter
CustomConditionalText
ExtendedLink
FrameLabel
HiddenText
Hyphenator
InCopyExport
InCopyImport
INXErrorLogging
PersistentList
PreflightRule
SingleLineComposer
Te xt Im po r tFil te r
TransparencyEffect
Page 94

CHAPTER 7: InDesign Server Plug-in Techniques Removing calls to APIs that depend on active context or something in
“front” 94
Watermark
XDocBookWorkflow
XMLCatalogHandler
XMLDataUpdater
These plug-ins provide services used by application features; therefore, no special script provider
implementations are necessary for them to be driven by a script. For details on how to use a plug-in’s
features though scripting, see the documentation for each sample.
Detecting whether your plug-in is running under InDesign Server
You can distinguish between desktop InDesign and InDesign Server at runtime by getting the product ID
via the LocaleSetting singleton class. The call LocaleSetting::GetLocale().GetProductFS() returns one of the
following values (defined in <SDK>/source/public/includes/FeatureSets.h):
kInCopyProductFS: Plug-in is running under InCopy.
kInDesignProductFS: Plug-in is running under desktop InDesign.
kInDesignServerProductFS: Plug-in is running under InDesign Server.
You also can use the LocaleSetting::GetLocale().IsProductFS(<productId>) method to test for one of the
preceding values. For more information on these methods, see
<SDK>/source/public/includes/PMLocaleTypes.h.
Verifying whether your plug-in is loaded in InDesign Server
There are two ways to verify whether your plug-in is loaded in InDesign Server:
1. Load your plug-in in InDesign Server, start the application, shut it down, and then examine the
QA/Logs/configuration_NNNNN/PluginLoadLog.txt file (where NNNNN is the InDesign Server TCP/IP
port number).
2. Use the QATest script event with a plug-in information related parameter. For information on scripting
features related to testing, see “
Testing techniques” on page 103.
Removing calls to APIs that depend on active context or something in “front”
Several methods in the InDesign C++ API rely on an object that is “front”; for example, a document or
layout that is in front of others. These APIs are not available in InDesign Server, which does not have a user
interface and, consequently, has no concept of an object being in front. For example, instead of using
ILayoutUIUtils::GetFrontDocument, you need to access IDocumentList or store the instance of the
document in a variable when you create it.
Page 95

CHAPTER 7: InDesign Server Plug-in Techniques Using MessageLog or IErrorList in place of custom error/warning
dialogs (other than CAlert) 95
Using MessageLog or IErrorList in place of custom error/warning dialogs (other than CAlert)
In desktop InDesign, plug-ins may invoke custom modal dialogs (other than CAlert) to inform users of an
error or warning. An example of such a dialog is the missing plug-ins dialog, which displays the message,
“The document (name) uses one or more plug-ins which are not currently available…” A user must click on
a button on this dialog for the application to proceed.
In an application without a user interface, such as InDesign Server, showing a modal dialog is equivalent to
the server application hanging. As a result, plug-ins running under InDesign Server must use a different
mechanism to report messages to the user. Instead of displaying a dialog, messages must be written to a
message log.
Third-party plug-ins can use the message log by using one of the following APIs:
MessageLog — To write to the message log. See “Writing messages to the log with MessageLog” on
page 95.
IErrorList — To read from the message log. See “Inspecting the list of logged messages with IErrorList”
on page 96.
Writing messages to the log with MessageLog
The API MessageLog utility (<SDK>/source/public/includes/MessageLog.h) allows plug-in code to add
messages to the message log. If your desktop InDesign plug-in code invokes modal dialogs to inform users
of an error or warning, you must augment your code to instead send the message to the message log
when running under InDesign Server. Ideally, you also would move your desktop InDesign dialog code to a
user-interface-only plug-in so that it will not load under InDesign Server.
OTE: You do not need to replace calls to CAlert methods with MessageLog, because the InDesign Server
N
implementation of CAlert internally logs messages using MessageLog.
There are three runtime global instances of type MessageLog that can be used to log messages at one of
three different levels. For example, to log an information message, use the following:
gInfoLog.Write("Executing Script"); // errorlevel = CAlert::eInformationIcon
To lo g a wa rning, use the following:
gWarnLog.Write("Missing Font"); // errorlevel = CAlert::eWarningIcon
And to log an error, use the following:
gErrorLog.Write("Invalid Path"); // errorlevel = CAlert::eErrorIcon
All these examples use constant value strings. The Write method takes a PMString, so the messages can be
localized and constructed using standard InDesign string mechanisms, such as locale-specific string.fr files
and ReplaceStringParameters.
When you write to the message log in this way, the messages are added to the in-memory error list using
IErrorList (see “
or stderr, depending on the level of the message. Information and warning messages go to stdout; error
messages, to stderr.
Inspecting the list of logged messages with IErrorList” on page 96) and are written to stdout
Page 96

CHAPTER 7: InDesign Server Plug-in Techniques Using MessageLog or IErrorList in place of custom error/warning
dialogs (other than CAlert) 96
Outside of the context of a plug-in (for example, from an application that invokes InDesign Server), you
can redirect the stdout and stderr pipes to capture the log. You can use the standard mechanisms on Unix
and Windows for redirecting stdout and stderr.
Inspecting the list of logged messages with IErrorList
The IErrorList interface, which should be used by third-party plug-ins only to inspect the list of logged
messages, is aggregated on the kSessionBoss only under InDesign Server. (This interface is not available at
runtime when running under desktop InDesign.)
To get the number of logged messages, do the following:
InterfacePtr<IErrorList> errorList(GetExecutionContextSession(), UseDefaultIID());
int16 numMessages = errorList->GetNumErrors();
Then, to inspect the nth logged message (where 0 <= n < numMessages), do the following:
PMString message = errorList->GetErrorMessage(n);
Finally, to inspect the nth logged message’s error level, do the following:
int32 errorLevel = errorList->GetErrorLevel(n);
where the error level value is one of the enums defined in typedef CAlert::eAlertIcon.
For details on the IErrorList interface, see the HTML-based reference documentation.
Scripting clients of InDesign Server can retrieve these messages in a similar way. You can get details about
logged messages, such as the error code, error level as defined in the typedef CAlert::eAlertIcon, message
string, and timestamp, by accessing the ListErrorCode property, ListErrorLevel property, ListErrorMessage
property, and ListErrorTime property, respectively, on a specific ErrorListError collection item.
OTE: With the exception of the MessageLog implementation and error list script provider
N
implementation, do not use the IErrorList interface to write a message to the log. To write a message to the
log from plug-in code, use the MessageLog mechanism (see “
MessageLog” on page 95).
Writing messages to the log with
Writing messages directly to standard error and standard output without writing them to the message log
Even if you do not want your messages written to the log, you can still write messages to the console (from
which you invoked InDesign Server) from within your plug-in code, using cerr or cout:
if (LocaleSetting::GetLocale().GetProductFS() == kInDesignServerProductFS)
std::cout << "(This is some message)" << std::endl;
The key point is that the call to cout is executed only if the runtime check for the InDesign Server feature
set passes. These extra user interface updates may slow down the application; therefore, we recommend
that you use this technique only when needed, for example, when debugging.
The Application script object for InDesign Server also has events that allow a script to write text to the
standard error and standard output streams. They are Consoleerr and Consoleout, respectively. Both
events take a string parameter containing the message to be written.
OTE: If you write messages directly to standard error and standard output, you cannot retrieve them later
N
using IErrorList.
Page 97

CHAPTER 7: InDesign Server Plug-in Techniques Adding custom features to InDesign Server 97
Adding custom features to InDesign Server
With desktop InDesign, you can add user interface components to let users use the custom features
provided by your plug-in. With InDesign Server, however, there is no user interface. The recommended
way to expose your plug-in’s custom features to clients of InDesign Server is to implement script providers
for your custom features, so clients can drive them by scripts. The “Scriptable Plug-in Fundamentals”
chapter of Adobe InDesign Plug-In Programming Guide provides more details on how to add script
providers to your plug-ins.
Before you make your plug-in scriptable, you may need to perform a set of preparatory refactoring tasks to
make the process go smoothly; for example, making sure that the model and user-interface components
are separated. For instance, if you are performing key tasks, such as processing commands, directly from
within an action component or dialog controller, consider moving that code to a utility or facade class that
can be called from multiple components.
Performance considerations
One reason for using InDesign Server is to take advantage of the high-performance publication
generation engine made possible due to the lack of a user interface; however, removing the user-interface
components from your plug-ins goes only so far. There are other plug-in programming techniques that
you can incorporate to improve the performance of your plug-in:
Make sure no unneeded observers are attached (especially those that watch for model changes to
update a user interface).
Make sure there are no unnecessary idle tasks.
Remove unnecessary global recompositions of text stories.
Make sure no unneeded observers are attached
The InDesign change manager calls observers one by one whenever there is a change of interest.
Therefore, processing gets slower as more observers are attached to a subject. If you have any observers
that were attached to model subjects to update a user interface (such as a widget on a panel, dock bar, or
kit), eliminate them (or put them in plug-ins that load only under kInDesignProduct or kInCopyProduct),
because your InDesign Server plug-in will not need them.
OTE: There are precautions to take when moving persistent implementations to a plug-in with a different
N
plug-in ID. For more information, refer to the “Model and UI Separation” chapter of the Adobe InDesign
Plug-In Programming Guide.
Make sure there are no unnecessary idle tasks
As with observers, processing time increases as more idle tasks are installed in the application. If you have
idle tasks monitoring specific operating system events or messages, and they are not part of your InDesign
Server workflow, eliminate them (or put them in plug-ins that load only under kInDesignProduct or
kInCopyProduct).
OTE: There are precautions to take when moving persistent implementations to a plug-in with a different
N
plug-in ID. Refer to the “Model and UI Separation” chapter of the Adobe InDesign Plug-In Programming
Guide.
Page 98

CHAPTER 7: InDesign Server Plug-in Techniques 64-bit plug-ins (Windows only) 98
Remove unnecessary global recompositions of text stories
Many existing scripting providers force text composition when they need to return data that relies on
composition. (It might be useful for script authors to know that the operations they are performing are
forcing composition. They might then be able to combine these operations at the end of the script or even
remove them.) If there is a bottleneck for text composition in your script provider, this can be set as a
simple preference, for instance, where a message is displayed to the console (stdout) every time text
composition is forced, so the script author is notified when this happens. The script author can then
refactor the script to reduce such bottlenecks.
64-bit plug-ins (Windows only)
The InDesign Server Windows code base and project files support 64-bit plug-ins. The Mac OS code base
relies heavily on Carbon, which does not support 64-bit plug-ins.
For your plug-in to load and run under InDesign Server x64, you must convert your plug-in to a 64-bit
version. All SDK sample Visual Studio plug-in project files contain 64-bit targets, even though they do not
all run under InDesign Server (because some have user-interface elements). You can run your 32-bit
plug-in on a 64-bit machine, by running the 32-bit version of InDesign CS6 Server. 32-bit applications can
run on a 64-bit platform in the emulation mode called WOW64 (Win32 On Win64); however, 64-bit
applications cannot run on a 32-bit platform.
This section contains information about setting up Visual Studio and your plug-in project files to build
64-bit targets, and about converting your plug-in code to be 64-bit compatible.
Updating Visual Studio to use 64-bit components
This section explains how to set up your installation of Visual Studio to enable building 64-bit plug-ins. You
can compile and build a 64-bit plug-in on a 32-bit machine, but you can execute it only on a 64-bit
machine.
Install 64-bit components to Visual Studio
If you have not already done so, install the 64-bit components as follows:
1. The original Visual Studio installer, vs_setup.msi, is required for installing the 64-bit components. If you
no longer have the installer on your machine, the update process will let you know and allow you to
insert the CD or point to the installer file at another location.
2. Choose Start > Control Panel > Add/Remove Programs > Change or Remove Programs. Choose
Microsoft Visual Studio 2008.
Choose Add or Remove Features.
Choose Microsoft VS 2008 > Language Tools > Visual C++ > X64 Compilers and Tools.
Click Update. You will see some dialogs with progress bars. If you do not have the installer on the
local machine, you will be asked to locate vs_setup.msi.
3. Install Visual Studio 2008 Service Pack 1.
Page 99

CHAPTER 7: InDesign Server Plug-in Techniques 64-bit plug-ins (Windows only) 99
ODFRC settings in Visual Studio
The following procedure gives Visual C access to ODFRC, the core-resource (*.fr) compiler for InDesign
plug-in development:
1. Launch Visual Studio.
2. Choose Tools > Options > Projects and Solutions > VC++ Directories.
3. Make sure “Show directories for” is set to “Executable files” (look for a drop-down list near the
upper-right corner of the dialog).
4. Set “Platform” to “x64.”
5. Add an entry for <SDK>\devtools\bin (replace <SDK> with a valid path to the InDesign Products SDK).
6. Close the dialog.
7. Choose File > Save All.
8. Quit Visual Studio, then restart to confirm that the setting was accepted. If the setting was not
accepted, you probably will encounter an error when merge_res.cmd is executed while building your
plug-in.
Adding a 64-bit target to a Visual Studio project
This section explains how to add 64-bit targets to an existing InDesign plug-in Visual Studio project file. To
begin, open your project file. It needs to have an established 32-bit target for the following steps to make
sense. Next, open the Properties dialog for the project and make the following changes.
Add a new configuration for the x64 platform
1. Select Configuration: Debug.
2. Select Platform: Win32.
3. Click “Configuration Manager...”
4. In the “Active solution platform:” list, select “new...”.
5. Choose x64.
6. Leave “Copy settings from:” set as Win32.
7. Repeat the previous steps, using Release?Win32 as the base target.
Modify the settings for the new x64 targets using the Properties dialog
Now you have x64 targets based on your Win32 targets. Most settings convert correctly and will not need
to be modified, but you must turn on warnings for 64-bit porting issues and change paths so that they
point to the appropriate object and build folders:
objD -> objDx64
objR -> objRx64
Page 100

CHAPTER 7: InDesign Server Plug-in Techniques 64-bit plug-ins (Windows only) 100
debug -> debugx64
release -> releasex64
The properties that you need to change are listed below. Before editing the properties, be sure you select
the x64 Platform. The paths here assume that you are building your project from within the SDK; if you are
not building from within the SDK, adjust the paths to your own system. Also, where you see
<MyProjectName>, replace it with the actual name of your project.
Configuration Properties > General: Output Directory
Debug: ..\objDx64\<MyProjectName>
Release: ..\objRx64\<MyProjectName>
Configuration Properties > General: Intermediate Directory
Debug: ..\objDx64\<MyProjectName>
Release: ..\objRx64\<MyProjectName>
Configuration Properties > C/C++ > General: Detect 64-bit Portability Issues
All Configurations: Yes (/Wp64)
Configuration Properties > C/C++ > Precompiled Headers: Precompiled Header File
All Configurations: $(IntDir)\<MyProjectName>.pch
Configuration Properties > C/C++ > Output Files
All Configurations: ASM List Location => $(IntDir)\
All Configurations: Object File Name => $(IntDir)\
All Configurations: Program Database File Name => $(IntDir)\
Configuration Properties > Linker > General: Output File
Debug: ..\debugx64\SDK\<MyProjectName>
Release: ..\releasex64\SDK\<MyProjectName>
Configuration Properties > Linker > Input: Additional Dependencies
Debug: Change all paths to point to objDx64 rather than objD
Release: Change all paths to point to objRx64 rather than objR
Configuration Properties > Linker > Debugging: Generate Program Database File
Debug: ..\debugx64\sdk\<MyProjectName>.pdb
Release: ..\releasex64\sdk\<MyProjectName>.pdb
Configuration Properties > Linker > Advanced: Import Library
Debug: ..\objDx64\MyProjectName/<MyProjectName>.lib
Release: ..\objRx64\MyProjectName/<MyProjectName>.lib
 Loading...