

Page 1
Page 2

© 2000 Adobe Systems Incorporated. All rights reserved.
Adobe InDesign 1.5 User Guide Supplement for Windows and Mac OS
This manual, as well as the software described in it, is furnished under license and may be used or copied only in accordance with the terms of such license. The content
of this manual is furnished for informational use only, is subject to change without notice, and should not be construed as a commitment by Adobe Systems Incorporated.
Adobe Systems Incorporated assumes no responsibility or liability for any errors or inaccuracies that may appear in this book.
Except as permitted by such license, no part of this publication may be reproduced, stored in a retrieval system, or transmitted, in any form or by any means, electronic,
mechanical, recording, or otherwise, without the prior written permission of Adobe Systems Incorporated.
Please remember that existing artwork or images that you may want to include in your project may be protected under copyright law. The unauthorized incorporation of
such material into your new work could be a violation of the rights of the copyright owner. Please be sure to obtain any permission required from the copyright owner.
Any references to company names in sample templates are for demonstration purposes only and are not intended to refer to any actual organization.
Adobe, the Adobe logo, Acrobat, Acrobat Reader, Adobe Garamond, Classroom in a Book, Illustrator, InDesign, PageMaker, Photoshop, PostScript, and PostScript 3 are
trademarks of Adobe Systems Incorporated.
Apple, Mac, Macintosh, QuickTime, Power Macintosh, and TrueType are trademarks of Apple Computer, Inc. registered in the U.S. and other countries. Focoltone is a
registered trademark of Gordon Phillips Limited. Pentium is a registered trademark of Intel Corporation. Microsoft, Windows, and Windows NT are trademarks of Microsoft Corporation registered in the U.S and/or other countries. Kodak is a registered trademark and Photo CD is a trademark of Eastman Kodak Company. PANTONE®,
PANTONE MATCHING SYSTEM®, PANTONE Process Color System®, and Hexachrome™ are trademarks of Pantone, Inc. TRUMATCH is a registered trademark of
Trumatch, Inc. All other trademarks are the property of their respective owners.
QuickHelp™ is licensed from Altura Software, Inc. End-User is prohibited from taking any action to derive a source code equivalent of QuickHelp, including reverse assembly or reverse compilation. Color-database derived from Sample Books © Dainippon Ink and Chemicals, Inc., licensed to Adobe Systems Incorporated. Portions ©
Eastman Kodak Company, 1999 and used under license. All rights reserved. Portions © The Focoltone Colour Systems, and used under license. Portions © TRUMATCH,
and used under license. PANTONE® Computer Video simulations displayed may not match PANTONE-identified solid color standards. Use current PANTONE® Color
Referencing Manuals for accurate color. All trademarks noted herein are either the property of Adobe Systems Incorporated, Pantone, Inc. or their respective companies.
“PANTONE® Open Color Environment™ (POCE™)” © Pantone, Inc. 1994, 1996. Pantone, Inc. is the copyright owner of “PANTONE® Open Color Environment™
(POCE™)” and Software which are licensed to Adobe Systems Incorporated to distribute for use only in combination with Adobe InDesign. “PANTONE® Open Color
Environment™ (POCE™)” and Software shall not be copied onto another diskette or into memory unless as part of the execution of Adobe InDesign. The Spelling portion
of this product is based on Proximity Linguistic Technology. The Proximity Hyphenation System ©1989 All Rights Reserved. Proximity Technology Inc. The Proximity/Franklin Database ©1994 Franklin Electronic Publishers, Inc. Legal Supplement ©1990/1994 Merriam-Webster Inc./Franklin Electronic Publishers, Inc. Medical Supplement ©1990/1994 Merriam-Webster Inc. /Franklin Electronic Publishers, Inc. ©1994 All Rights Reserved. Proximity Technology, Inc. The Proximity/Collins Databases
©1990 William Collins Sons & Co. Ltd., ©1990 All Rights Reserved. Proximity Technology Inc. The Proximity/Maura Database ©1991 Dr. Lluis de Yzaguirre i Maura,
©1991 All Rights Reserved. Proximity Technology Inc. The Proximity/Munksgaard Database ©1990 Munksgaard International Publishers Ltd., ©1990 All Rights Reserved.
Proximity Technology Inc. The Proximity/Van Dale Database ©1995 Van Dale Lexicografie bv., ©1996 All Rights Reserved. Proximity Technology Inc. The Proximity/IDE
Databases ©1990 IDE a.s., ©1990 All Rights Reserved. Proximity Technology Inc. The Proximity/Hachette Database ©1992 Hachette, ©1992 All Rights Reserved. Proximity Technology Inc. The Proximity/Bertelsmann Databases ©1997 Bertelsmann Lexikon Verlag, ©1997 All Rights Reserved. Proximity Technology Inc.
Adobe Systems Incorporated, 345 Park Avenue, San Jose, California 95110-2704, USA
Notice to U.S. government end users. The software and documentation are “commercial items,” as that term is defined at 48 C.F.R. §2.101, consisting of “commercial
computer software” and “commercial computer software documentation,” as such terms are used in 48 C.F.R. §12.212 or 48 C.F.R. §227.7202, as applicable. Consistent
with 48 C.F.R. §12.212 or 48 C.F.R. §§227.7202-1 through 227.7202-4, as applicable, the commercial computer software and commercial computer software documentation are being licensed to U.S. government end users (A) only as commercial items and (B) with only those rights as are granted to all other end users pursuant to the
terms and conditions set forth in the Adobe standard commercial agreement for this software. Unpublished rights reserved under the copyright laws of the United States.
Part Number: 90019853 (2/2000)
Page 3

Contents
iii
Getting Started
Using Work Area and
Layout Enhancements
Working with Text and
Type
What’s new in InDesign 1.5 . . . . . . . . . . . . . . . . . . . . . . . . . . . . 1
The Adobe InDesign 1.5 package contents . . . . . . . . . . . . . . . . . 3
Installing Adobe InDesign . . . . . . . . . . . . . . . . . . . . . . . . . . . . . . 3
Starting Adobe InDesign . . . . . . . . . . . . . . . . . . . . . . . . . . . . . . . 3
Registering Adobe InDesign . . . . . . . . . . . . . . . . . . . . . . . . . . . . 3
Learning Adobe InDesign . . . . . . . . . . . . . . . . . . . . . . . . . . . . . . 4
Using Adobe Online . . . . . . . . . . . . . . . . . . . . . . . . . . . . . . . . . . 6
Chapter 1
Using new palette and tool tip options . . . . . . . . . . . . . . . . . . . . 9
Viewing pages . . . . . . . . . . . . . . . . . . . . . . . . . . . . . . . . . . . . . 11
About moved commands . . . . . . . . . . . . . . . . . . . . . . . . . . . . . 11
About moved tools . . . . . . . . . . . . . . . . . . . . . . . . . . . . . . . . . . 11
About the enhanced direct-selection tool . . . . . . . . . . . . . . . . . 11
Using new grid and ruler options . . . . . . . . . . . . . . . . . . . . . . . 11
Using the enhanced Pages palette . . . . . . . . . . . . . . . . . . . . . . 12
Configuring plug-ins . . . . . . . . . . . . . . . . . . . . . . . . . . . . . . . . 15
About converting InDesign 1.0 documents . . . . . . . . . . . . . . . . 16
About converting QuarkXPress and PageMaker documents . . . . 16
Chapter 2
Using general text enhancements . . . . . . . . . . . . . . . . . . . . . . . 19
Finding and changing fonts . . . . . . . . . . . . . . . . . . . . . . . . . . . 24
Creating type along a path . . . . . . . . . . . . . . . . . . . . . . . . . . . . 25
Using new paragraph and character options . . . . . . . . . . . . . . . 30
Using new indent and tab options . . . . . . . . . . . . . . . . . . . . . . 37
Page 4

iv
CONTENTS
Drawing and
Transforming Objects
Using New Color and
Trapping Features
Importing Files and
Creating Output
Chapter 3
Using new drawing tools and features . . . . . . . . . . . . . . . . . . . 39
Working with segments and multiple points on a path . . . . . . . 41
Controlling image display quality and performance . . . . . . . . . . 43
Copying attributes between objects . . . . . . . . . . . . . . . . . . . . . 44
Using new clipping path options . . . . . . . . . . . . . . . . . . . . . . . 45
Distributing or inserting a spacing value between objects . . . . . 47
Using new transformation options . . . . . . . . . . . . . . . . . . . . . . 48
Chapter 4
Using new Swatches palette features . . . . . . . . . . . . . . . . . . . . 53
Applying colors by dragging and dropping . . . . . . . . . . . . . . . . 54
Using colors from imported graphics . . . . . . . . . . . . . . . . . . . . . 54
Using other new color features . . . . . . . . . . . . . . . . . . . . . . . . . 55
Automatic trapping . . . . . . . . . . . . . . . . . . . . . . . . . . . . . . . . . 56
Comparing Adobe In-RIP Trapping and built-in trapping . . . . . . 56
Trapping a document . . . . . . . . . . . . . . . . . . . . . . . . . . . . . . . . 60
Chapter 5
Easier file relinking . . . . . . . . . . . . . . . . . . . . . . . . . . . . . . . . . . 69
Replacing files from the Place dialog box . . . . . . . . . . . . . . . . . 69
Checking fonts in imported graphics . . . . . . . . . . . . . . . . . . . . . 70
Using styles for printing and PDF export . . . . . . . . . . . . . . . . . . 70
Printing with trapping styles
and reader’s spreads . . . . . . . . . . . . . . . . . . . . . . . . . . . . . . . . 71
Printing on Windows 2000 . . . . . . . . . . . . . . . . . . . . . . . . . . . . 72
Index
. . . . . . . . . . . . . . . . . . . . . . . . . . . . . . . . . . . . . . . . . . . 73
Page 5

Getting Started
1
elcome to Adobe®InDesignTM 1.5—the
future of professional publishing, and
your solution for creating graphicsintensive documents. Whether you are a designer
who requires complete control over layout and
typography, or a production artist who maintains
precise graphics standards, InDesign provides you
with the industrial-strength support you need.
What’s new in InDesign 1.5
InDesign 1.5 includes many color, drawing, type,
and workflow enhancements, and is better
integrated with other Adobe professional graphic
arts products. New features and enhancements
include the following:
New operating system support
with Windows™ 2000 and Mac™ OS 9, now added
to the list of supported operating systems.
Path type (text on a path)
you draw, and customize it with various options
and effects.
Built-in trapping
wider range of Adobe PostScript™ imagesetters,
using a high-quality trapping engine built into
InDesign.
Vertical justification
along the vertical dimension of a text frame.
Drag-and-drop color
by dragging colors from the Swatches or Color
palette.
Trap your documents on a much
Distribute lines of text evenly
Apply color to objects simply
Enjoy compatibility
Flow text along any path
Styles for printing and PDF output
PDF output settings for easy and consistent
output. This is especially useful in high-volume,
high-precision environments.
Enhanced Pages palette
binding spine, and change page icon sizes and
other view options.
New ways to create clipping paths
clipping paths for imported graphics from any
alpha channel or path stored with the graphic.
Configure Plug-ins command
of InDesign and save RAM by disabling plug-ins
you don’t use every day. You can enable plug-ins
for your next InDesign session, and create sets of
enabled plug-ins.
Find Font command
document and in imported EPS or PDF graphics,
and replace fonts in your document. Make font
changes when you open a document or package a
document for output.
Free transform tool
tions by dragging the free transform tool, which is
also found in Adobe Photoshop® and Adobe
Illustrator®.
New transformation tool options
transformation, such as rotation, by entering
values in a dialog box for that tool.
New options for master pages
override masters with additional options.
View the document’s
Identify and list fonts in your
Apply multiple transforma-
Save printing or
Generate
Streamline your copy
Precisely specify a
Use, display, and
Page 6

2
Getting Started
Eyedropper tool
Copy your choice of fill, stroke,
and type attributes between objects using the
eyedropper tool, which is also found in Illustrator
and Photoshop. You can even sample a color from
an imported graphic.
New default CMYK swatches
Quickly apply color
using a basic set of default color swatches.
More control over stories
Control column and
page breaks, automatically label jump lines, and
insert placeholder text.
New location for Preferences and Color Settings com-
Change your preferences from the Edit
mands
menu. The Preferences and Color Settings
commands were moved from the File menu to the
Edit menu to be more consistent with similar
commands in many other programs.
Pencil tool
Smooth tool
Draw freeform paths even more easily.
Simplify hand-drawn or other paths
that have too many points on them.
Erase tool
Enhanced shape drawing
Remove parts of paths easily.
Draw shapes out from the
center, and reposition shapes as you draw them.
New path editing options
Select more than one
point on one or more paths, and select subpaths
on compound paths.
Enhanced palettes
Configure the toolbox as a
single horizontal or vertical row, or as double
vertical rows as in InDesign 1.0. Dock palettes to
each other, as you can in Illustrator. Use the Small
Palette Rows command to make list palettes take
up less space. In the toolbox, the scissors tool is
now grouped with the pen tool.
Enhanced grids and rulers
Specify a different ruler
origin for each page. You can set separate horizontal
and vertical spacing values for the document grid,
and position it in front of or behind page objects.
New tab and indent options
Set a right-aligned tab
and type text for a hanging indent more easily. Also,
you can set an indent that’s tied to the position of a
special character.
Portable hyphenation
Store the hyphenation
dictionary inside the document, or on your system
as in InDesign 1.0. Storing a hyphenation dictionary
in your document helps maintain type composition
when you take the document to a service provider.
Paragraph formatting enhancements
Apply tints to
paragraph rules, and import paragraph styles from
Microsoft Word with an enhanced import filter.
New object distribution options
Distribute objects
by specifying a precise amount of space between
each object.
Improved default color names
Identify a color
swatch more easily. When you create a color swatch,
InDesign automatically names the swatch using
the color values that define it. You can still rename
the colors.
New options for graphics display
Control the onscreen resolution of imported graphics to balance
display quality with screen redraw time, and
specify on-screen resolution for each imported
graphic independently.
Page 7

The Adobe InDesign 1.5 package contents
The Adobe InDesign software package includes
the following software and documentation:
The Adobe InDesign 1.5 CD.
•
Adobe InDesign User Guide
•
Adobe InDesign 1.5 User Guide Supplement
•
Adobe InDesign Quick Reference Card
•
.
, updated
for InDesign 1.5.
Registration card.
•
The Adobe InDesign 1.5 CD contains everything
you need to install and run the InDesign application
such as the InDesign installer and PostScript printer
driver installers. For a complete listing of all CD
contents, see the
Install_ReadMe
or
Install_ReadMe.doc
(Mac OS) file on the CD.
(Windows) file
For information about the software and hardware
you need to use InDesign, see the ReadMe file.
Installing Adobe InDesign
You must install the application from the Adobe
InDesign 1.5 CD onto your hard disk; you cannot
run the program from the CD. Installation instructions are available in the
(Windows) or
Install_ReadMe
Install_ReadMe.doc
(Mac OS) file that is
included on the CD.
Make sure your serial number is accessible before
installing the application:
ADOBE INDESIGN 1.5
User Guide Supplement
If you are upgrading from InDesign 1.0, use your
•
InDesign 1.0 serial number.
Note:
Many of InDesign’s plug-ins and other
components were updated for InDesign 1.5. If you’re
upgrading from InDesign 1.0, for best results keep
each version in its own folder.
Starting Adobe InDesign
You start InDesign just as you would any software
application.
To start Adobe InDesign in Windows:
Choose Start > Programs > Adobe InDesign 1.5.
To start Adobe InDesign in Mac OS:
Open the Adobe InDesign 1.5 folder, and doubleclick the Adobe InDesign 1.5 program icon. (If you
installed the program in a folder other than one
named Adobe InDesign 1.5, open that folder.)
The Adobe InDesign 1.5 program window appears.
You can now open a document or create a new one
and start working.
Registering Adobe InDesign
Registering your software helps Adobe offer
technical support and inform you about new
software developments. Please register your copy
by filling out and returning the warranty registration card included with your software package.
3
•
If you purchased a new copy of InDesign 1.5, you
can find the serial number on the registration card
or CD sleeve.
Page 8

4
Getting Started
You can register quickly by using the registration
software that appears when you first start InDesign.
This registration requires that you be connected to
the Internet, as it opens the Adobe’s registration
Web page. If you do not register when you first
start the program, InDesign will remind you at
intermittent intervals of your choice. In addition,
you can choose to register at any time by choosing
Help > Online Registration. If you are registering
from a location other than the U.S., go to
www.adobe.com and click Adobe Worldwide to
see the Adobe page for your region.
Learning Adobe InDesign
Adobe provides a variety of options for you to learn
InDesign, including printed guides and tutorials,
online Help, tool tips, and easy access to Adobe’s
home page on the World Wide Web, where you can
find service, products, and regularly updated tips
for using InDesign.
Reader software, included on the
Adobe Acrobat
InDesign CD, lets you view PDF files. Adobe
Acrobat 4.0 or Acrobat Reader 4.0 is required to
view many of the technical and training documents
included on the InDesign CD.
Included reference guides
This
Adobe InDesign 1.5 User Guide Supplement
contains detailed information about new features
and changes in InDesign 1.5. Wherever a topic or
procedure appears in both the
Guide
and in this supplement, use the information
in this supplement.
®
Adobe InDesign User
Adobe InDesign User Guide
The
contains detailed
information about InDesign tools and commands.
It is designed to be used as a reference tool in your
everyday work. The cross-platform user guide
provides instructions for using InDesign on both
the Windows and Mac
OS platforms. The text notes
any differences in procedures and commands
between platforms.
The user guide and this supplement assume you
have a working knowledge of your computer and its
operating conventions, including how to use a
mouse and standard menus and commands. It also
assumes you know how to open, save, and close
files. For help with any of these techniques, please
see your Windows or Mac OS documentation.
Adobe InDesign Quick Reference Card
The
contains
basic information about the Adobe InDesign tools
and palettes, and shortcuts for using them.
Adobe InDesign Script Guide
The
explains how to
create scripts using Visual Basic (Windows) and
AppleScript (Mac OS) for use with InDesign.
Virtually every task you can perform by manipulating InDesign’s tools, menus, palettes, and dialog
boxes can be performed by a script. Scripts execute
quickly and are capable of getting information and
making decisions and calculations based on the
information they receive. Scripting is useful for
automating repetitive tasks and for creating your
own new InDesign features. The
Script Guide
(Scripting.pdf) is included on the
Adobe InDesign
InDesign CD in the Scripting folder in the Adobe
Technical Info folder.
Page 9

The
Adobe InDesign Tagged Text
document lists
each InDesign tag and offers procedures and guidelines for using tags efficiently. Tags let you import
and export both character- and paragraph-level
attributes with text-only files. This document
(Tagged Text.pdf) is included on the InDesign CD
in the Tagged Text folder in the Adobe Technical
Info folder.
Using online Help
Adobe InDesign includes complete documentation
in online Help, including all of the information in
this user guide supplement, plus keyboard shortcuts,
and more. In addition, online Help includes full
color illustrations, and more detailed information
about some procedures. Also included are tool tips,
which help you identify a tool or control in the work
area.
When you click the Contents tab in online Help,
you’ll see two Help files: One for InDesign 1.0, and
another for InDesign 1.5. However, the Index and
Find tabs combine the two files automatically.
To start online Help:
Choose Help > Help Topics, or press F1 (Windows
only).
To identify a tool or control:
Position the pointer over a tool or control and
pause. A tool tip appears showing the name and
keyboard shortcut (if any) for the item.
ADOBE INDESIGN 1.5
User Guide Supplement
If tool tips don’t appear, the preference for
displaying them may be turned off.
To get more descriptive information, look
up the item’s name in the online Help index.
To adjust tool tips:
1
Choose Edit > Preferences > General.
2
Choose one of the following from the Tool Tips
menu in the General Options section, and then
click OK:
To turn off tool tips completely, choose None.
•
To specify a short delay, choose Normal. This is
•
the default setting. With this setting, tool tips don’t
appear unless you hold the mouse over a tool for a
few moments.
To specify a quick response, choose Fast. This
•
can be useful when you are unfamiliar with tool
names or keyboard shortcuts.
Note:
Tool tips are not available in most dialog boxes.
Other resources
Other printed guides that are not included with
your InDesign application, as well as Adobe certification opportunities, are also available.
Classroom in a Book
series for Adobe graphics and publishing software.
This book is developed by experts at Adobe and
published by Adobe Press. For information on
purchasing
Adobe InDesign Classroom in a Book
visit the Adobe Web site at www.adobe.com, or
contact your local book distributor.
Serves as the official training
,
5
Page 10

6
Getting Started
Adobe Print Publishing Guide
Provides in-depth
information on successful print production,
including topics such as color management,
commercial printing, constructing a publication,
imaging and proofing, and project management
guidelines. For information on purchasing
Print Publishing Guide
, visit the Adobe Web site at
Adobe
www.adobe.com.
The Adobe Certification program
Offers users,
instructors, and training centers the opportunity
to demonstrate their product proficiency and
promote their software skills as Adobe Certified
Experts, Adobe Certified Instructors, or Adobe
Authorized Learning Providers. Certification is
available for several different geographical regions.
Visit the Partnering with Adobe Web site at
http://partners.adobe.com to learn how you can
become certified.
Using Adobe Online
If you have an Internet connection and a Web
browser installed on your system, you can use the
Adobe Online feature to reach the Adobe Systems
home page on the World Wide Web.
When you set up Adobe Online to connect to your
Web browser, Adobe can either notify you whenever new information is available or automatically
download that information to your hard disk. If
you choose not to use Adobe’s automatic download
feature, you can still view and download new files
whenever they are available by using the Downloadables command in the Help menu. Adobe
Online uses your current Web browser settings to
view downloaded Web or PDF pages.
To see Adobe’s home page for your region:
1
Open Adobe’s U.S. home page at
www.adobe.com.
2
From the Adobe World Wide menu, choose
your geographical region. Adobe’s home page is
customized for 25 different geographical regions.
To use Adobe Online:
1
In InDesign, choose Help > Adobe Online, or
click the icon at the top of the toolbox.
Adobe Online provides up-to-the-minute information about services, products, and tips for using
InDesign and other Adobe products. You can also
download and view the current version of the
InDesign Top Issues document containing the latest
InDesign technical support solutions. Bookmarks
are also included to take you quickly to noteworthy
Adobe- and InDesign-related sites. Refreshing
Adobe Online updates bookmarks and buttons so
you can quickly access the most current information
available.
Note:
You must have an Internet connection and an
Internet browser installed. Adobe Online will launch
your browser using your default Internet configuration.
2
Do any of the following:
•
To make sure you have the latest version of the
Adobe Online window and its buttons, as well as
the latest bookmarks, click Refresh.
Page 11

ADOBE INDESIGN 1.5
User Guide Supplement
7
•
To specify connection options, click Preferences.
General preferences affect how Adobe Online
interacts with all Adobe products installed on your
system, and Application preferences affect how
Adobe Online interacts with InDesign. To see an
explanation of each preference option, click Setup
and follow the prompts.
Note:
You can also set Adobe Online preferences by
choosing Edit > Preferences > Online Settings.
To see more information about featured online
•
information and services related to Adobe InDesign,
click a button in the Adobe InDesign section of the
Adobe Online window. Any button in the Adobe
InDesign section will open a page using your default
Web browser settings.
To view Adobe-suggested Web sites related to
•
InDesign and Adobe, click the bookmark button
and choose an option from the menu that appears.
These bookmarks are automatically updated as
new Web sites become available.
To return to InDesign, click Close.
•
Accessing Adobe Online through the
Help menu
The Help menu includes options to view and
download information from Adobe’s Web site. You
can view regularly updated troubleshooting
documents, corporate news articles, and Web links
to helpful sites for both Adobe’s Web site and other
companies.
To view and download information from Adobe’s Web
site using the Help menu:
1 In InDesign, choose Help > Downloadables.
2 Select a View Option:
• To view only the files that are new since the last
time you viewed downloadable files or were
notified of them, select Show Only New Files.
• To view all the files on Adobe’s Web site that are
currently available for download, select Show All
Available Files.
3 Select Download Options:
• To let Adobe Online start the component’s
installer (if available) as soon as the download is
complete, select Auto Install Downloaded
Components. You can then follow the on-screen
directions to install the files.
• To continue working in InDesign and other
applications while the file downloads, select
Download in Background.
• To have Adobe Online display a message when
the files have been transferred to your computer,
select Notify When Download Complete.
4 To view a list of downloadable files, open any
category that appears in the list, if available.
5 To see a description of a file, position the mouse
cursor over a filename and view its description in
the Item Description section.
Page 12

8
Getting Started
6 To see the location where a file will be installed
if downloaded, select a file and view its location in
the Download Location section. To change the
location, click the Folder button ( ).
7 To download files, select one or more files and
click Download.
8 Click Close.
To view the InDesign Top Issues document:
Choose Help > Top Issues. The first time you choose
Top Issues, you will be prompted to download the
Top Issues document using Adobe Online.
The next time you choose Top Issues, Adobe
Acrobat Reader opens and displays the file.
Note: If Acrobat 4.0 or Acrobat Reader 4.0 is not
installed on your system, you can install Acrobat
Reader 4.0 from the InDesign CD.
To view Adobe corporate news articles:
1 Choose Help > Adobe Corporate News.
Note: Corporate news articles only appear in this
location if you set Adobe Online to automatically
download new files or if you’ve manually downloaded
news articles using either Adobe Online or the
Downloadables command.
2 Select an article and click View.
3 Click Delete if you want to remove the link from
the Adobe Corporate News list.
4 Click Done.
To view Web links related to Adobe or InDesign:
Do one of the following:
• Choose Help > Adobe Links and select a Web
address from the list.
• Choose Help > InDesign Links and select a Web
address from the list.
Page 13

Chapter 1: Using Work Area and
Layout Enhancements
Adobe InDesign 1.5 includes new features that
enhance the work area and make it easier for you
to set up documents and work with pages.
Using new palette and tool tip options
InDesign 1.5 gives you additional flexibility in
arranging your work area. You can now dock
palettes together, change the layout of the toolbox,
and make list palette rows more compact.
SELECTING NEW TOOLS InDesign 1.5 adds
several new drawing tools also found in
Adobe Photoshop and Adobe Illustrator. For
more information about changes to tools and
keyboard shortcuts, see the Adobe InDesign
1.5 Quick Reference Card.
9
When you open a new document, the document
window now opens between the toolbox and the
default palette positions along the right edge of the
screen. In InDesign 1.0, a document window
opened as large as the entire screen by default,
which sometimes resulted in objects being
obscured by palettes.
Changing the toolbox layout
You can change the overall layout of the toolbox to
fit your preferred window and palette layout. By
default, the toolbox appears as two vertical columns
of tools. You can also set it up as a single vertical
column or as one horizontal row. However, you
can’t rearrange the positions of individual tools in
the toolbox.
(N) Pencil
Free transform (E)
(I) Eyedropper
Smooth (N)
Erase (N)
Path type (T)
Page 14
CHAPTER 1
10
Using Work Area and Layout Enhancements
To change the toolbox layout:
1 Choose Edit > Preferences > General.
2 Choose one of the following from the Tools
Palette menu in the General Options section, and
then click OK:
• To display the toolbox as one narrow vertical
column, choose Single Column.
• To display the toolbox as two columns with a large
fill box and stroke box, choose Double Column.
This is the default setting and matches InDesign 1.0.
• To display the toolbox as one narrow horizontal
row, choose Single Row.
You can quickly cycle through toolbox display
options by double-clicking the title bar (Windows)
or clicking the zoom box (Mac OS) on the toolbox.
About tool tip enhancements
You can now adjust the amount of time before a
tool tip displays to an interval appropriate for your
level of experience. For more information about
using tool tips, see “Using online Help” on page 5.
You can dock a single palette to one other palette
or to a group of palettes. However, you can’t dock
a group of palettes unless you dock each of them
individually, because docking involves dragging an
individual palette’s tab and not the title bar.
To dock palettes:
Drag a palette’s tab to the bottom edge of another
palette. When the bottom edge of the other palette
is highlighted, release the mouse.
To move a set of docked palettes:
Drag its title bar.
Compacting list palettes
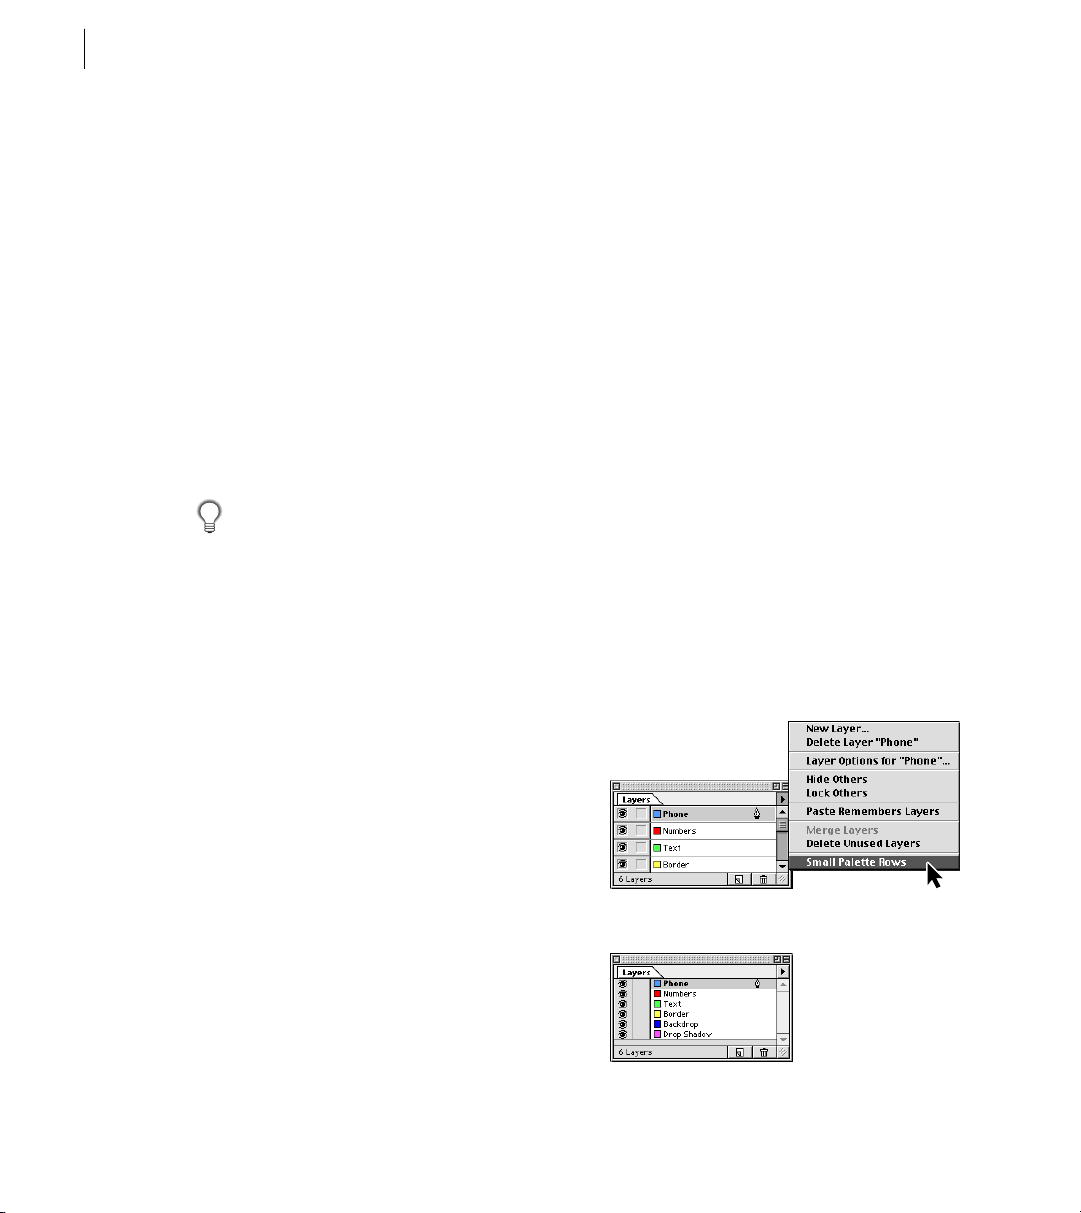
You can save space by compacting rows in palettes
that display lists, such as the Layers and Swatches
palettes.
To compact a list palette:
Choose Small Palette Rows from the palette menu.
Also, the tool tips for the toolbox are now more
precise for tool families hidden under tools that
show a small triangle in the bottom right corner.
When you hold down the mouse button over such a
tool and drag it over a tool on its menu, the tool tip
now indicates that you must press Shift plus the
single-key shortcut to cycle through to that tool.
Docking palettes
Docking palettes connects the bottom edge of one
palette to the top edge of another palette, so that
both palettes move together and are shown and
hidden together. When you dock palettes, both
palettes remain fully visible. In contrast, when you
group palettes, only the frontmost palette is visible.
Small Palette Rows off
Small Palette Rows on
Page 15

ADOBE INDESIGN 1.5
User Guide Supplement
11
Viewing pages
InDesign 1.5 includes a new pop-up menu that
makes it easier to go to a specific page.
To go to a page using the page menu:
Click the downward facing arrow to the right of
the page box, and then choose a page.
About moved commands
The Preferences, Edit Shortcuts, and Color Settings
commands, formerly located on the File menu in
InDesign 1.0, are now located at the bottom of the
Edit menu in InDesign 1.5. Keep the new locations
in mind as you refer to the Adobe InDesign User
Guide for information about these commands.
About moved tools
InDesign 1.5 adds several new tools (see “Selecting
new tools” on page 9). To make the best use of the
space in the toolbox, existing tools have been
moved or grouped with other tools in the toolbox.
For a complete description of the current toolbox,
see the Adobe InDesign 1.5 Quick Reference Card.
About the enhanced directselection tool
The direct-selection tool ( ) is enhanced in
InDesign 1.5. You can now select segments and
multiple points on a path, as in Illustrator and
Photoshop. Because of these changes, remember to
use the selection tool ( ) as your primary tool for
selecting, moving, and copying whole objects. Use
the direct-selection tool only when you want to
work with a part of a path or with a path nested
inside a frame. For more information, see “Working
with segments and multiple points on a path” on
page 41.
Using new grid and ruler options
You can specify different values for horizontal and
vertical grid spacing, and you can position the
document and baseline grids in front of or behind
page objects. InDesign 1.5 also lets you set the
horizontal ruler origin (zero point) in relation to
each spread, each page, or each spread at its spine.
Note: If you set the ruler origin at each spread’s
binding spine, the origin becomes locked at the spine.
You won’t be able to reposition the ruler origin by
dragging it from the intersection of the rulers unless
you choose another origin option.
To set enhanced document grid features:
1 Choose Edit > Preferences > Grids.
2 To set horizontal grid spacing, in the Horizontal
section of the document Grid section specify a
value for Gridline Every, and then specify a value
for Subdivisions between each grid line.
Page 16
CHAPTER 1
12
Using Work Area and Layout Enhancements
3 To set vertical grid spacing, in the Vertical
section of the document Grid section specify a
value for Gridline Every, and then specify a value
for Subdivisions between each grid line.
4 Do one of the following and then click OK:
• To put the document and baseline grid behind all
other objects, make sure Grids in Back is selected.
This is the default setting, and matches InDesign 1.0.
• To put the document and baseline grid in front
of all other objects, deselect Grids in Back.
You can also choose Guides in Front or Guides
in Back from the context menu that appears
when you right-click (Windows) or Control-click
(Mac OS) an empty area of the document window.
To set the scope of the horizontal ruler origin:
1 Choose Edit > Preferences > Units & Increments.
2 In the Ruler Units section, choose one of the
following from the Origin menu:
• To set the ruler origin at the top left corner of
each spread, choose Spread. This is the default
setting for InDesign 1.0 and 1.5.
• To set the ruler origin at the top left corner of
each page in each spread, choose Page.
• To set the ruler origin at the binding spine of
each spread, choose Spine.
Using the enhanced Pages palette
The Pages palette includes improvements such as
displaying the binding spine for each spread, icon
size options, and many more customizable display
options.
Binding spine
Changing the Pages palette display
Customize the Pages palette to display page and
master icons to match the way you work.
To change the page and spread display:
1 Choose Palette Options from the Pages palette
menu.
You can also change horizontal ruler origin
settings using the context menu that appears
when you right-click (Windows) or Control-click
(Mac OS) the horizontal ruler.
2 To set the icon size for page icons, choose an
option from the Icon Size menu in the Pages section.
Page 17
ADOBE INDESIGN 1.5
User Guide Supplement
13
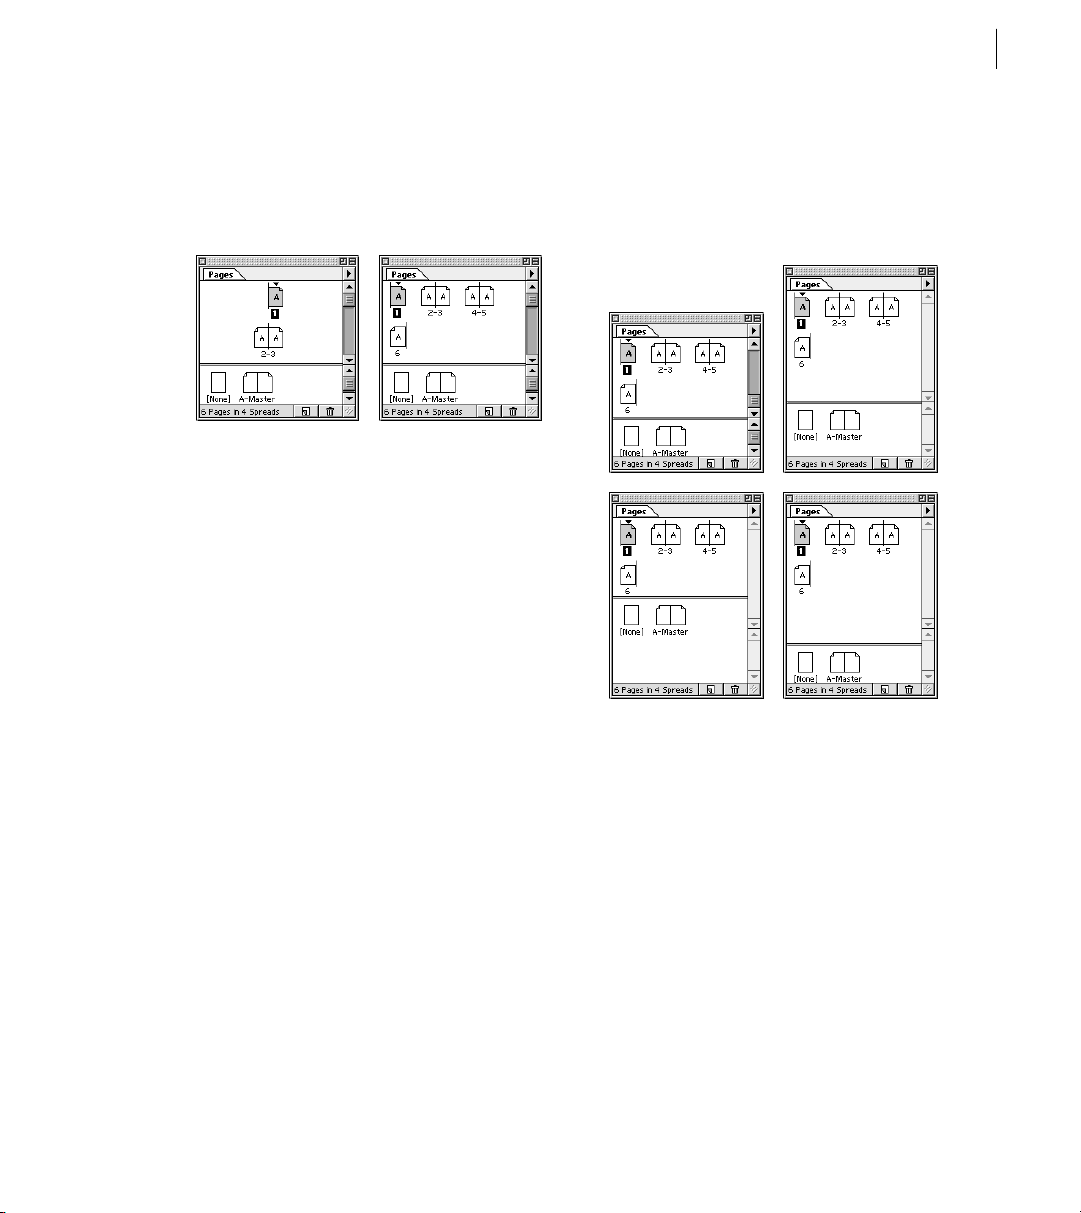
3 To display page icons in one vertical column, make
sure Show Vertically is selected in the Pages section.
To display page icons as a series of horizontal rows
(the same as InDesign 1.0), deselect Show Vertically.
Vertical page icon display (left) and horizontal
display (right)
4 To set the icon size for master icons, choose an
option from the Icon Size menu in the Master
section.
5 To display master icons in one vertical column,
make sure Show Vertically is selected in the Master
section. To display master icons as a series of
horizontal rows (the same as InDesign 1.0),
deselect Show Vertically.
6 In the Palette Layout section, do one of the
following:
• To display the page icon section above the master
icon section, select Pages On Top.
• To display the master icon section above the page
icon section, select Masters On Top.
7 To control how Pages palette sections grow
when you resize the palette, choose one of the
following from the Resize menu in the Palette
section, and then click OK:
• To resize both the pages and masters sections of
the palette, choose Proportional.
• To maintain the size of the pages section and let
the masters section grow, choose Pages Fixed.
• To maintain the size of the masters section and
let the pages section grow, choose Masters Fixed.
Original size (top left), Proportional resize (top right),
Pages Fixed (bottom left), and Masters Fixed
(bottom right)
About the Keep Spread Together command
The Set as Island Spread command in InDesign 1.0
has been renamed Keep Spread Together in
InDesign 1.5. The command’s function is
unchanged, but the new name is easier to understand. Keep this in mind when reading about the
Set as Island Spread command in the Adobe
InDesign User Guide.
Page 18

CHAPTER 1
14
Using Work Area and Layout Enhancements
Controlling spread pagination
You can easily create spreads of more than two
pages. However, most documents use two-page
spreads exclusively. You can prevent unexpected
pagination by making sure your document
contains only two-page spreads. The Allow Pages
to Shuffle command specifies how pages and
spreads are redistributed when you add, remove,
or arrange pages.
To specify how the document’s pages are distributed
when you add, remove, or arrange pages:
In the Pages palette, do one of the following:
• To preserve all two-page spreads and prevent the
creation of spreads with more than two pages,
make sure Allow Pages to Shuffle is selected on the
Pages palette menu. This is the default setting.
• To allow the creation of spreads of more than
two pages and preserve them when you add,
remove, or arrange pages, deselect Allow Pages to
Shuffle on the Pages palette menu. InDesign will
preserve spreads of more than two pages while
letting two-page spreads repaginate normally.
Using new master options
Masters are enhanced in InDesign 1.5. You can:
• Specify a master prefix containing up to four
characters.
• Use new options for viewing master icons in the
Pages palette. For more information, see
“Changing the Pages palette display” on page 12.
• Completely detach any master object from its
master. When you change attributes of a master
object from a document page, InDesign tracks
your changes as local overrides of the master, but
any attributes you don’t change continue to update
with the master. When you detach the object from
the master, none of the object’s attributes update
with the master.
For more information about masters, see the
Adobe InDesign User Guide.
To detach a master object from its original master:
1 With the selection tool ( ), go to the spread
containing the item (but not to a master page).
2 Hold down Shift+Ctrl (Windows) or
Shift+Command (Mac OS) as you click the master
object you want to detach.
Pressing Shift+Ctrl/Command lets you select a
master object on a document page.
3 Choose Detach Selection From Master from the
Pages palette menu.
To detach all master objects on the current spread:
1 Go to the spread that contains the master objects
you want to detach from their master (don’t go to
the master page).
2 Select Detach All Objects from Master from the
Pages palette menu.
Page 19

ADOBE INDESIGN 1.5
User Guide Supplement
15
Configuring plug-ins
InDesign’s standard feature set is actually a collection
of plug-ins, or modular software components,
connected to a small core application. This modular
architecture makes it easy to add or remove features.
Use the Configure Plug-ins command to inspect and
customize the set of installed plug-ins. For example,
you can:
• Create custom plug-in sets for different tasks or
workgroups.
• Get detailed information about installed plug-ins.
• Isolate plug-ins when troubleshooting
problems.
• Decrease InDesign’s use of system resources by
turning off plug-ins you don’t use every day.
• Organize plug-ins from third-party manufac-
turers (manufacturers other than Adobe).
In the Configure Plug-ins dialog box, icons identify
different kinds of plug-ins:
• Enabled plug-ins ( ) were loaded when you
started the current InDesign session, and will stay
loaded until you exit InDesign.
• Adobe ( ) plug-ins are provided by Adobe.
• Required ( ) plug-ins must be present for
InDesign to start.
Note: You can’t edit, rename, or delete the All Plugins, Adobe Plug-ins, or Required Plug-ins sets. To
change any of those sets, duplicate it, and then edit
the duplicate.
To configure plug-ins:
1 Choose Help > Configure Plug-ins (Windows)
or choose Configure Plug-ins from the Apple
menu (Mac OS).
2 Do any of the following, and then click OK:
• To change the active set of plug-ins, choose one
from the Set menu.
• To disable or enable a plug-in, make sure a
custom set is active, and then click to hide or show
the check mark at the far left of the plug-in listing.
Note: When you enable or disable plug-ins or choose
a different plug-in set, the change doesn’t take effect
until you exit InDesign and then start InDesign again.
• To change the plug-ins displayed in the list,
select or deselect any option in the Display section.
Changing options in this section affects the list
display only, not the actual status of plug-ins.
• To create a new plug-in set from a duplicate of
the active set, click Duplicate, name the set, and
then click OK. The set you create becomes the
active set.
• To rename the active set of plug-ins, click
Rename, name the set, and then click OK.
• To permanently remove the active set, click
Delete, and then click OK when an alert appears.
• To import a file of plug-in sets, click Import,
locate and select the file containing the sets you
want to import, and then click OK. If the file you
import contains any sets that have the same name
as an existing set, the imported set will be renamed
as a copy. The first set in the file you import
becomes the active set.
Page 20

CHAPTER 1
16
Using Work Area and Layout Enhancements
Note: (Windows only) When importing plug-in sets,
if you select Plug-in Manager Import Files from the
Files of Type menu in the Open a File dialog box,
plug-in set files will appear only if the files are named
with a filename extension of .pset.
• To export all custom plug-in sets to one file, click
Export, go to the folder where you want to store
the file, select Export All Sets, and then click Save.
On Windows, plug-in sets are exported with a
filename extension of .pset.
• To see detailed information about a plug-in,
select the plug-in and click Show Info. In addition
to viewing information such as a plug-in’s version,
you can find out if a plug-in depends on other
plug-ins. When you’re finished, click OK to close
the Plug-in Information dialog box.
You can also view plug-in details by double-
clicking a plug-in in the list.
About converting InDesign 1.0 documents
Use the Open command to convert InDesign 1.0
documents. Keep the following in mind:
• For best results, save the InDesign 1.5 document
under a different name than the InDesign 1.0
version.
• If you used third-party plug-ins to create an
InDesign 1.0 document, check with the manufacturer to make sure they are installed correctly for
and compatible with InDesign 1.5 before you
convert the InDesign 1.0 document.
• InDesign 1.0 can’t open InDesign 1.5
documents.
• InDesign 1.5 can’t save documents in InDesign
1.0 format.
About converting QuarkXPress and PageMaker documents
InDesign 1.5’s enhanced feature set supports the
conversion of more features from converted
QuarkXPress 3.x, 4.x, and PageMaker 6.5x
documents. However, because InDesign may
implement some features differently, some
features will convert more precisely than others.
This section describes conversion issues relevant
to the new features in InDesign 1.5; for information about other conversion issues see the
Adobe InDesign User Guide, and check the support
documents at the Adobe Web site
(www.adobe.com).
Vertical alignment and justification
InDesign converts top, center, and bottom vertical
text alignment from QuarkXPress and PageMaker
6.5. In addition, InDesign converts justified text
alignment from QuarkXPress. Keep the following
in mind as you convert documents containing text
boxes or frames that use vertical alignment options:
• InDesign converts QuarkXPress vertical
alignment from rectangular text areas only.
Vertical alignment won’t be converted from nonrectangular text areas, such as a Bezier text box or
a rectangular text box using a corner style that
creates a non-rectangular text area.
Page 21

ADOBE INDESIGN 1.5
User Guide Supplement
17
• Combining a drop cap with a vertically justified
text block in QuarkXPress makes the drop cap
appear too small both in QuarkXPress and when
opened in InDesign. QuarkXPress drop caps work
correctly with top, center, or bottom alignment,
and convert correctly when opened in InDesign.
• The Inter ¶ Max value in QuarkXPress is
converted to the Paragraph Spacing Limit value in
InDesign.
For more information about vertical alignment in
InDesign, see “Aligning and justifying text vertically” on page 30.
Line styles and paragraph rules
Line styles in PageMaker 6.5x and QuarkXPress
(such as Thick-Thin-Thick) convert directly to
equivalent line styles in InDesign. However, the
Triple line and custom line styles (dashes and dots)
from QuarkXPress are converted to solid lines in
InDesign.
Shades in paragraph rules from QuarkXPress are
converted to paragraph rule tints in InDesign.
QuarkXPress InDesign
Next Box Page Number Next Page Number
Right Margin Tab Right Indent Tab
Indent Here Indent to Here
Path type (text on a path)
InDesign converts QuarkXPress text paths to
InDesign path type objects. InDesign converts
kerning, tracking, alignment, and indents applied
to QuarkXPress text paths. Keep in mind that in
QuarkXPress, text path options are in the Modify
dialog box for a selected text path; in InDesign,
path type options are in the Path Type Options
dialog box.
Most InDesign path type options are similarly
named to their QuarkXPress equivalents.
QuarkXPress text path orientation options are
converted to corresponding options in InDesign,
as described in the following table.The buttons
listed are those in the Text Orientation section of
the Text Path tab in the Modify dialog box for a
selected text path in QuarkXPress.
Special characters
Special characters converted from QuarkXPress
are replaced with their equivalents in InDesign, as
described in the following table.
QuarkXPress InDesign
Next Column Column Break
Next Box Frame Break
Page Number Place Holder Auto Page Number
Previous Box Page Number Previous Page Number
QuarkXPress InDesign
Top left button Rainbow
Top right button Skew
Bottom left button 3D Ribbon
Bottom right button Stair Step
For more information about InDesign path type
options, see “Creating type along a path” on
page 25.
Page 22

Page 23
Chapter 2: Working with Text and Type
19
Using general text enhancements
Adobe InDesign 1.5 includes many new text
features that will help you speed document
production.
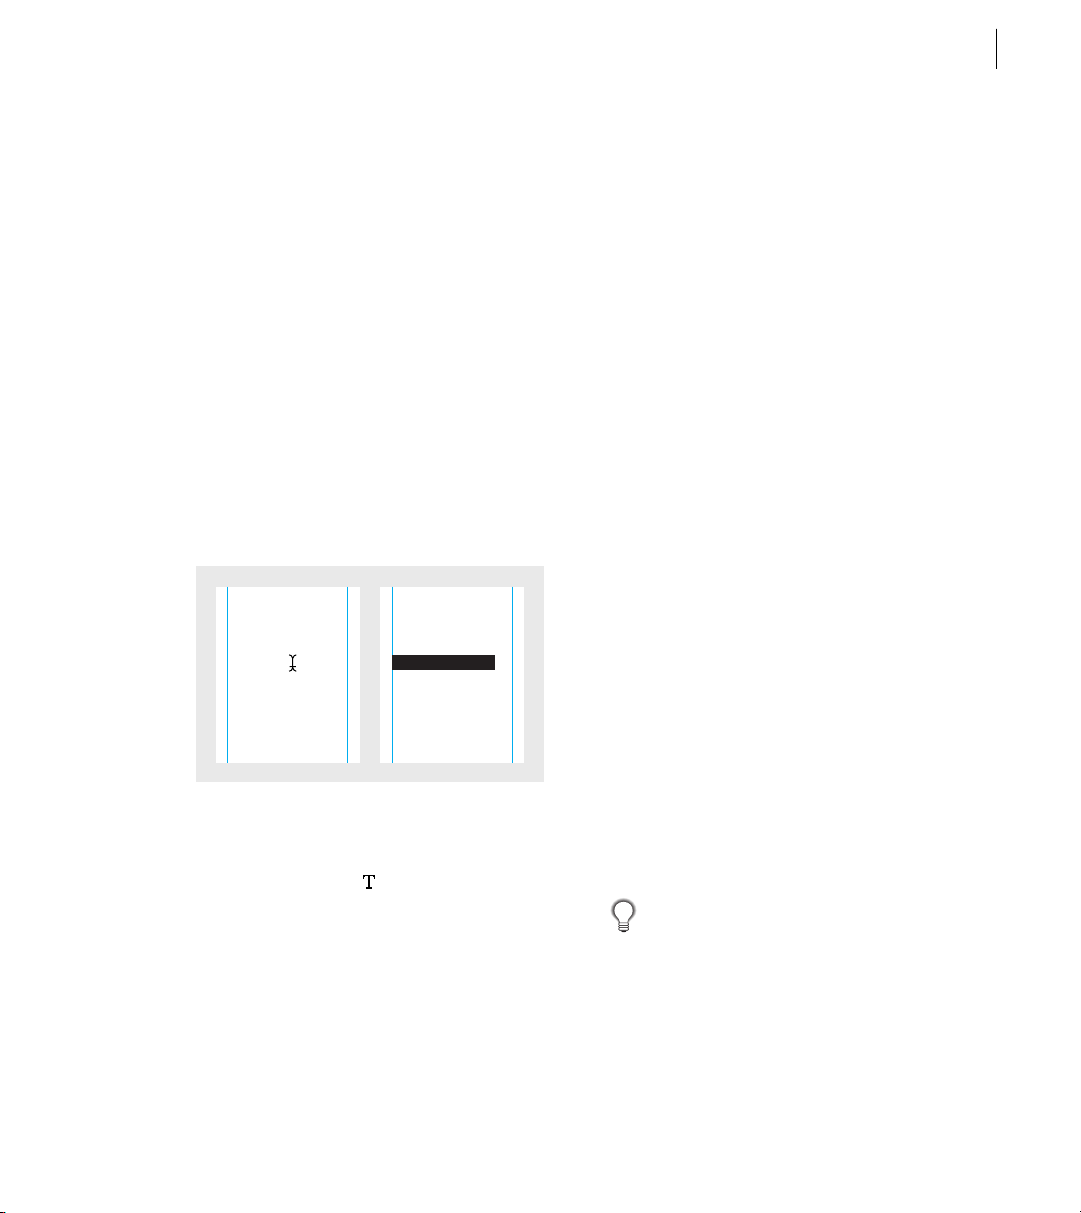
Selecting a single line of text
You can select one line of text by using a keyboard
shortcut. This is helpful when you are copyfitting,
fixing local spacing problems, or adjusting leading.
This technique selects a single line between the sides
of a column; it doesn’t select a sentence.
It was a particularly dark
night and all the stars and
planets were beginning to
appear. Soon a glittering
tapestry of light emerged
from the darkness.
“ “
Where did all the stars
come from?” Saturn always
wondered. They were truly
amazing, a wonder to
behold.
Single line of text selected using a keyboard shortcut
To select a single line of text:
1 With the type tool ( ), click an insertion point
in the line you want to select.
2 Press Ctrl+Shift+\ (Windows) or
Command+Shift+\ (Mac OS).
It was a particularly dark
night and all the stars and
planets were beginning to
appear. Soon a glittering
tapestry of light emerged
from the darkness.
Where did all the stars
come from?” Saturn always
wondered. They were truly
amazing, a wonder to
behold.
Inserting placeholder text
While you can lay out and thread text frames
without any text in them, adding placeholder text
can give you a more complete sense of your publication’s design. InDesign 1.5 can add placeholder
text that you can easily replace with actual text later.
If you add placeholder text to a frame that’s
threaded to other frames, the placeholder text is
added starting at the first text frame (if all frames
are empty) or at the end of the existing text (if text
already exists in the threaded frames).
Note: The placeholder text doesn’t represent any
particular language. Before you adjust settings that
depend on the rules of a specific language, such as
hyphenation, replace the placeholder text with
actual text in your document’s final language.
To add placeholder text to a text frame:
1 Do one of the following:
• With the selection tool, select one or more text
frames.
• With the type tool, click a text insertion point in
a text frame or in path type.
2 Choose Type > Fill With Placeholder Text.
You can also choose Type > Fill with Placeholder
Text from the context menu that appears when
you right-click (Windows) or Control-click (Mac OS)
a selected empty text frame or a text frame with a text
insertion point active.
Page 24

CHAPTER 2
20
Working with Text and Type
Adding column, frame, and page breaks
InDesign 1.5 significantly improves the control
you have over how text flows among threaded text
frames. You can control column, frame, or page
breaks by inserting a special break character
anywhere in the text. The special characters are
visible when you choose Type > Show Hidden
Characters. The new break options are also
available in the Keep Options dialog box so that
you can make them part of a paragraph style. The
following break options are available:
Column break ( ) Flows the text to the next
column in the current text frame. If the frame has
only one column, the text goes to the next
threaded frame.
Frame break ( ) Flows the text to the next
threaded text frame regardless of the current text
frame’s column setup.
Page break ( ) Flows the text to the next page
containing a text frame threaded to the current
text frame.
Odd page break ( ) Flows the text to the next odd-
numbered page containing a text frame threaded
to the current text frame.
Even page break ( ) Flows the text to the next
even-numbered page containing a text frame
threaded to the current text frame.
To create a column, frame, or page break:
1 With the type tool, click an insertion point
where you want the break.
2 Right-click (Windows) or Control-click (Mac
OS) the text frame, and on the context menu that
appears, choose a break character from the Insert
Break Character submenu.
You can also create breaks using the Enter key
on the numeric keypad. For a column break
press Enter, for a frame break press Shift+Enter, and
for a page break press Ctrl+Enter (Windows) or
Command+Enter (Mac OS).
Adding automatic page numbers for
story jumps
You can easily maintain the jump lines of stories
that continue from or to other pages, such as a line
that says “Continued on page 42.” Use a jump line
page number to automatically update the number
of the page containing a story’s next or previous
threaded text frame, so that the number automatically updates as you move or reflow the story’s
threaded text frames.
In general, you’ll want the jump line page number
to be in a separate text frame from the story it
tracks. That way the jump line page number
remains in position even if the story’s text reflows.
Note: If you create a break by changing paragraph
settings (such as the Keep options), the break occurs
before the paragraph that contains the setting. If you
create a break using a special character, the break
occurs immediately after the special character.
Page 25
ADOBE INDESIGN 1.5
User Guide Supplement
21
Note: If you enter an automatic page number special
character into the Find/Change dialog box, jump line
page numbers will also be found and subject to change.
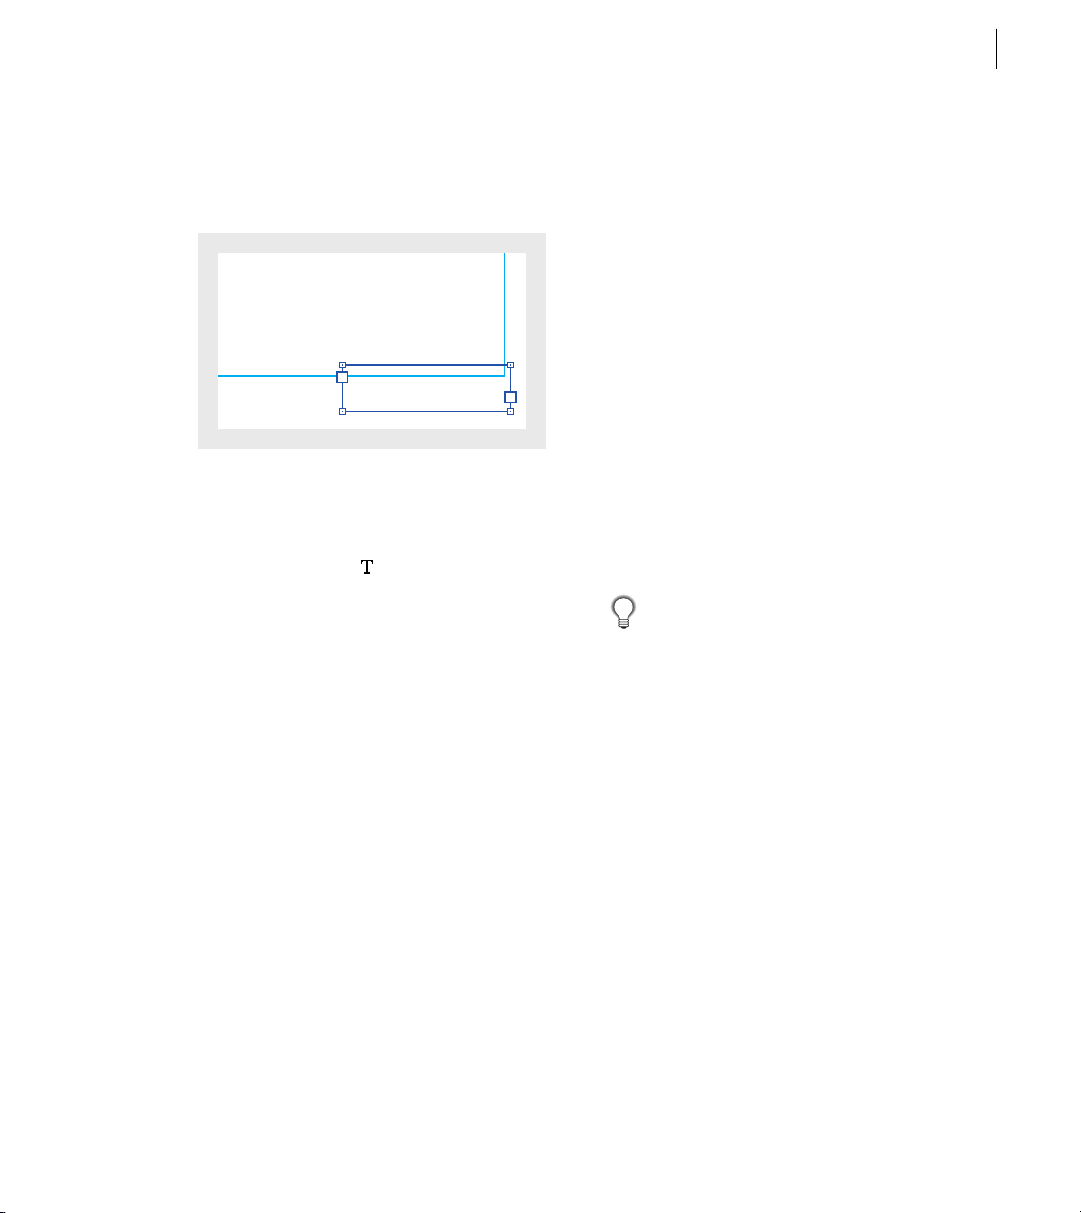
he large island of Niphon and wooded
region, fifty leagues from Yokohama,
lies hidden the ancient city of the
dead— the necropolis of Japanese
continued on page 42
Make sure a jump line page number’s text frame overlaps
the text frame that contains the story you want it to track.
To add an automatic jump line page number:
1 With the type tool ( ), drag to create a new text
frame above or below an existing text frame that
contains the story you want to track.
2 With the selection tool, position the new text
frame so that it overlaps the frame containing the
story you want to track.
3 With a text insertion point active in the new text
frame, type text such as “Continued from ” or
“Continued on ” as necessary, and then do one of
the following:
• To add a “continued from” page number, right-
click (Windows) or Control-click (Mac OS) the text
frame, and in the context menu that appears, choose
Insert Special Character > Previous Page Number.
• To add a “continued to” page number, right-click
(Windows) or Control-click (Mac OS) the text
frame, and in the context menu that appears, choose
Insert Special Character > Next Page Number.
Note: If the jump line page number is the same as the
current page number, make sure you overlap the text
frames of the jump line and the story, and make sure
the story is threaded to a text frame on a different
page.
4 With the selection tool, hold down Shift as you
select the frames containing the story and its jump
line page number.
5 Choose Object > Group. This keeps the story
and its jump line together if you move them.
6 If necessary, repeat this procedure to add more
jump lines.
To insert the previous page number using a
keyboard shortcut, press Alt+Shift+Ctrl+[
(Windows) or Option+Shift+Command+[ (Mac OS).
To insert the next page number, press Alt+Shift+Ctrl+]
(Windows) or Option+Shift+Command+] (Mac OS).
Page 26
CHAPTER 2
22
Working with Text and Type
Identifying the end of a story
When the Show Hidden Characters command is
selected, a special character (#) marks the end of a
story. It indicates that the text in a frame is not
threaded to any subsequent text frames. This
special character is visible only in a document
window; it won’t output or print, and you can’t use
the Find/Change command to locate it. This
character appears automatically in every story;
you can’t add or remove it.
ing. There are no
ortcuts to producing
sh, passionate
rdens.#
If you want to mark the end of a story with a
visible, printable symbol (also known as a
dingbat), at the end of each story add an inline
graphic or a character from a graphics font.
Working with enhanced text wrap around imported graphics
InDesign 1.5 includes several enhancements for
wrapping text around graphics. Automatic text
wrap now works with all imported bitmap and
vector graphics. (InDesign 1.0 generated automatic
text wrap boundaries for bitmap images only.)
By default, InDesign 1.5 first looks in the graphic for
an embedded path (such as a clipping path) to use
as a wrap boundary. If it can’t find an embedded
path in the graphic, it looks for an alpha channel. If
neither exists, InDesign uses automatic edge
detection. Automatic edge detection looks for a
high-contrast edge, so the graphic doesn’t have to
be on a pure white background.
You can specify the method you want to use to
generate the text wrap boundary. When an image
contains more than one embedded path or alpha
channel, you can specify which one to use.
Regardless of the text wrap method you use, you
can always manually adjust the resulting text wrap
boundary. For more information about manual
adjustment and about other text wrap features, see
the Adobe InDesign User Guide.
To wrap text around an imported graphic:
1 If necessary, choose Object > Text Wrap to
display the Text Wrap palette. If the Contour
Options aren’t visible, choose Show Options from
the Text Wrap palette menu.
2 Using the direct-selection tool ( ), select an
imported graphic.
3 In the Text Wrap palette, click the Wrap Text
Around Object Shape option, and specify wrap
offset values as necessary.
4 To specify contour options, choose one of the
following from the Type menu on the Text Wrap
palette:
• To wrap text to the rectangle formed by the
graphic’s height and width, choose Bounding Box.
Page 27

ADOBE INDESIGN 1.5
User Guide Supplement
23
• To generate the text wrap boundary using
InDesign’s automatic edge detection, choose
Detect Edges.
• To generate the text wrap boundary from an
alpha channel saved with the image, choose Alpha
Channel, and then choose the channel you want to
use from the Alpha Channel menu on the Text
Wrap palette. If the Alpha Channel option isn’t
available, no alpha channels were saved with the
image. InDesign automatically recognizes
Photoshop’s default transparency (the checkerboard pattern) as an alpha channel; otherwise you
must use Photoshop to delete the background or
create and save one or more alpha channels with
the image.
• To generate the text wrap boundary from a path
saved with the image, choose Photoshop Path, and
then choose the path you want to use from the
Path menu on the Text Wrap palette. If the
Photoshop Path option isn’t available, no named
paths were saved with the image.
5 To let text appear inside “holes” in an imported
graphic, such as a photo of a tire, select Include
Inside Edges on the Text Wrap palette.
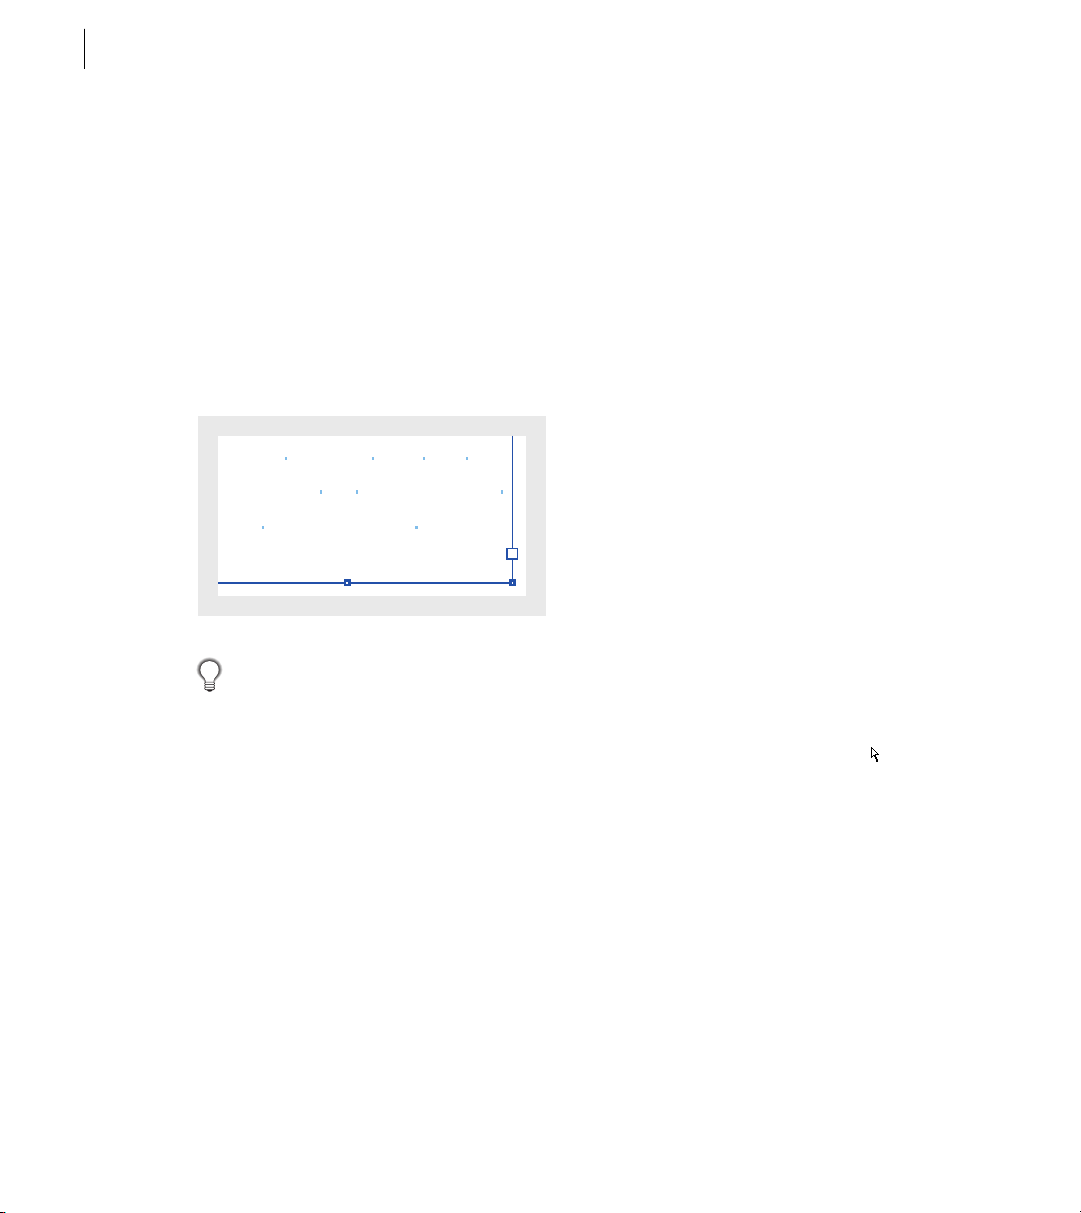
How many things can you name that are round?
a circle • an orange • the sun • a baseball • the rim of
a glass • the end of a pipe • a button • a bubble • dots
marbles • peas • a basketball • the moon • wedding
rings • o’s
oooh bicycle wheels
one of Saturn’s rings
a a ping-pong
the bottom of a can
search- lights
a camera’s lens • the earth • some
snowflakes • a bowling ball • cherries • a roll of tape
headlights • the equator• a golf ball • cantalope • the
head of a pin • a period
mouth when it goes
•
paddle • the
little black
dots in the
middle of
your eye
a tire • the
very end of a
garden hose
spectacles
•
How many things can you name that are round?
a circle • an orange • the sun • a baseball • the rim of
a glass • the end of a pipe • a button • a bubble • dots
marbles • peas • a basketball • the moon • wedding
rings • o’s
oooh bicycle wheels
•
one of Saturn’s rings
a a ping-pong
•
a camera’s lens
•
the earth
snow- flakes • a bowling
ball • cher- ries • a roll of tape
headlights • the equator• a golf ball • cantalope • the
•
head of a pin • a period
•
little black
middle of your
the very end of a
hose • the bot-
can • search
mouth when it goes
paddle • the
dots in the
eye • a tire
garden
tom of a
lights
spectacles
some
•
•
•
•
•
•
Include Inside Edges off (left) and on (right)
Page 28
CHAPTER 2
24
Working with Text and Type
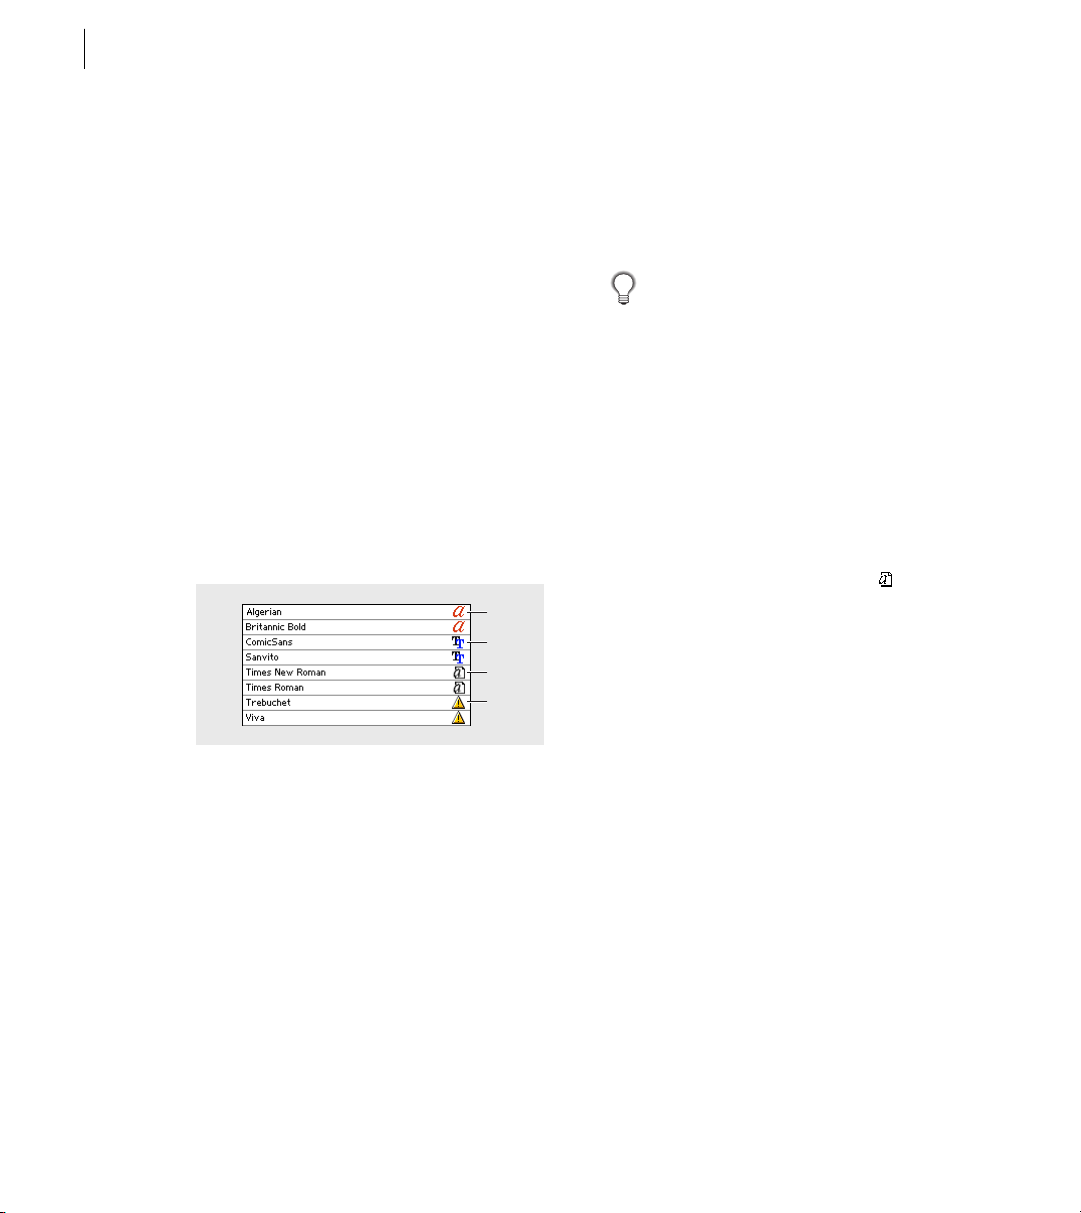
Finding and changing fonts
Use the Find Font command to search for and list
fonts used throughout your document. You can
then replace any font (except fonts in imported
graphics) with any other font available on your
system.
A font name is listed once for all of its instances in
the layout and listed again for each additional
instance in imported graphics. For example, if you
use the same font three times on the layout and
also in three imported graphics, it will be listed in
the Find Font dialog box four times—once for all
layout instances, and then three more times for
each imported graphic. Icons identify the font type
and the instances when the font is used in
imported graphics.
A
B
C
D
A. PostScript font in document B. TrueType font in
document C. PostScript font in imported graphic
D. Missing font (either not installed or inactive)
Note: Use the Type > Find Font command to help
ensure consistent output by analyzing font usage on
pages and in imported graphics. To find and change
specific text attributes, characters, or styles, use the
Edit > Find/Change command instead.
To find and replace fonts in your file:
1 Choose Type > Find Font.
2 Select one or more font names from the Fonts in
Document list.
You can also select fonts in the Fonts in
Document list by clicking in the list and using
the arrow keys.
3 Do one of the following:
• To find the first layout instance of the font
selected in the list, click Find First. The text that
uses the font moves into view. The Find First
button won’t be available if the selected instance of
a font is used in an imported graphic or if you
selected multiple fonts in the list.
• To select the imported graphic that uses a font
marked in the list by a graphic icon ( ), click Find
Graphic. The graphic also moves into view. The
Find Graphic button isn’t available if the selected
instance of the font is used on the layout or if you
selected multiple fonts in the list.
4 To see details about a selected font, click More
Info. To hide the details, click Less Info. The Info area
will be blank if you selected multiple fonts in the list.
Note: The font type may be listed as Unknown if the
file format of selected graphic doesn’t supply information about the font type. Fonts in bitmap graphics
(such as TIFF images) won’t appear in the list at all
because they are bitmaps, not characters.
Page 29

ADOBE INDESIGN 1.5
User Guide Supplement
25
5 To replace the font, select the new font you want
to use from the Replace With list, and do one of the
following:
• Click Change to change just that instance of the
selected font.
• Click Change/Find to change that instance and
then find the next instance.
• Click Change All to change all instances of the
fonts selected in the list.
When there are no more instances of a font in your
file, that font name is removed from the Fonts in
Document list.
Note: To change fonts in imported graphics, use the
program that originally exported the graphic, and
then replace the graphic.
6 If you clicked Change, click Find Next to locate
the next instance of the font.
7 Click Done.
You can open the Find Font dialog box while
preflighting a document. In the Preflight dialog
box, switch to the Fonts tab and click Find Font.
Creating type along a path
You can create path type that flows along the edge of
an open or a closed path of any shape. You can apply
options and effects to path type, such as sliding it
along the path, flipping it over to the other side of
the path, or using the shape of the path to distort the
characters. Path type has an in port and an out port
just like other text frames, so you can thread text to
and from it.
A
B
A
t
t
h
e
D
o
o
r
o
f
t
h
e
C
A. Start bracket B. In port C. Center bracket D. End
bracket E. Out port indicating overset text
Keep the following points in mind as you create
path type:
P
a
l
a
c
D
e
E
To delete type from a path:
1 With the selection tool ( ) or direct-selection
tool ( ), select one or more path type objects.
2 Choose Object > Path Type > Delete.
• The alignment setting from the Paragraph
palette affects the alignment of path type.
• You can display only one line of type on a path,
so any type that won’t fit on the path will be
overset (hidden) unless you’ve threaded it to
another path or text frame.
• You can apply any character and paragraph
options to path type. However, paragraph rules
and paragraph spacing options have no effect on
path type.
Page 30

CHAPTER 2
26
Working with Text and Type
• You can’t create path type using compound
paths, such as those that result from using the
Create Outlines command.
To create path type:
1 Select the path type tool ( ).
2 Position the pointer on the path until a small
plus sign appears next to the pointer ( ), and
then do one of the following:
• To type using default settings, click the path. An
insertion point appears. By default, the insertion
point appears at the start of the path. If the current
default paragraph settings specify an indent, or an
alignment other than left, the insertion point may
appear at a position other than the start of the path.
• To confine the text to a specific portion of the
path, drag along the path.
A
t
t
h
e
D
o
o
r
3 Enter the type you want. If you clicked the
insertion point, type will appear along the entire
length of the path. If you dragged, type will appear
only along the length you dragged.
A
t
t
h
e
D
o
o
r
o
f
t
h
e
P
a
l
a
c
e
Set the insertion point. Then enter type.
Note: If the path was originally visible, it remains
visible after you add path type to it. To hide the path,
select it using the selection or direct-selection tool,
and then apply a stroke and fill of None.
To edit path type characters:
1 With the path type tool, do one of the following:
• To add an insertion point, click between any two
characters in the path type.
• To select characters, drag through the path type.
2 Edit the text as needed.
Note: If neither clicking nor dragging seems to work,
make sure the small plus sign appears next to the
path type tool pointer when you click or drag along
the path.
If the text is threaded, it moves to the next
threaded text frame or path type object. If the text
isn’t threaded, it is deleted. The path remains, but
loses any path type attributes—all brackets, in and
out ports, and threading are removed.
Page 31

ADOBE INDESIGN 1.5
User Guide Supplement
27
Note: If the path’s fill and stroke was set to None, the
path is invisible after you delete the type. To make
the path visible, press the D key immediately after
you choose Object > Path Type > Delete. This applies
the default fill and stroke to the selected path.
To change the start or end position of path type:
1 With the selection tool ( ), select the path type.
2 Position the pointer over the path type’s start or
end bracket until a small icon appears next to the
pointer ( ). Do not position it over the bracket’s
in port or out port.
3 Drag the start or end bracket along the path.
A
t
t
h
e
D
o
o
r
o
f
t
h
e
P
a
l
a
c
e
A
t
t
h
e
D
o
o
r
o
A
f
t
t
t
h
h
e
e
P
D
a
o
l
a
o
c
r
e
o
f
Position pointer on the start or end bracket. Then drag
to reposition the boundary of the path type.
Note: The start and end brackets don’t represent the
left and right indent values (on the Paragraph
palette). If you apply a paragraph indent value, it’s
measured from the start and end brackets.
To slide path type along a path:
1 With the selection tool ( ), select the path type.
2 Position the pointer over the path type’s center
bracket until a center bracket icon appears next to
the pointer ( ).
3 Drag the center bracket along the path.
A
t
t
h
e
D
o
o
r
o
f
t
h
e
P
a
l
a
c
e
A
t
t
h
e
D
o
o
A
r
t
o
t
f
h
e
t
h
D
e
o
P
o
a
r
l
a
o
c
f
e
t
h
e
P
a
l
a
c
e
Note: The text won’t move if both the start and end
brackets are at the ends of the path. To create some
space for dragging text, drag the start or end bracket
away from the ends of the path.
To control vertical alignment of path type:
1 With the selection tool or the type tool, select
the path type.
2 Choose Object > Path Type > Options.
3 Choose one of the following from the Align
menu to specify how to align all characters to the
path, relative to a font’s total height:
• To align by the font’s top edge, choose Ascender.
• To align by the font’s bottom edge, choose
Descender.
• To align by the point halfway between the font’s
ascender and descender, choose Center.
• To align by their baselines, choose Baseline. This
is the default setting.
Page 32

CHAPTER 2
28
Working with Text and Type
Note: Characters without an ascender or descender
(such as a letter e) or baseline (such as an apostrophe)
are vertically aligned as if they had an ascender,
descender, and baseline. These font dimensions are
permanently specified by the font designer.
4 Choose one of the following from the To Path
menu to specify where to align the path to all
characters, relative to the path’s stroke weight
when drawn left to right:
• To align the path at the top edge of its stroke,
choose Top.
• To align the path at the bottom edge of its stroke,
choose Bottom.
• To align the path to the stroke’s center, choose
Center. This is the default setting.
For more control over vertical alignment, use
the Baseline Shift option in the Character
palette. For example, enter a negative value in the
Baseline Shift text box to lower the type.
A
t
t
h
e
D
o
o
r
o
f
t
h
e
P
a
l
a
c
e
A
t
t
h
e
D
o
o
r
o
f
t
h
e
P
a
l
a
c
e
To flip path type by dragging:
1 Select the selection tool ( ).
2 Position the pointer over the path type’s center
bracket until a center bracket icon appears next to
the pointer ( ).
3 Drag the center bracket across the path.
A
t
t
h
e
D
o
o
r
o
f
t
h
e
P
a
l
a
c
e
A
t
e
t
c
h
a
e
l
a
D
P
o
e
o
h
r
t
o
f
f
o
t
h
r
e
o
o
P
D
a
l
e
a
h
c
t
e
t
A
Position pointer on center bracket. Then drag across
path to flip type.
Ty pe flows along a path in the order that points
were added to the path. If you want your text to
flow from left to right without having to flip the path,
select the path and choose Object > Reverse Path.
To flip path type using a dialog box:
1 With the selection tool or the type tool, select
the path type.
Type on a path (left) and with its baseline shift value
reduced (right)
2 Choose Object > Path Type > Options.
3 Select the Flip option, and then click OK.
Page 33

ADOBE INDESIGN 1.5
User Guide Supplement
29
To apply a path type effect:
1 With the selection tool or the type tool, select
the path type.
2 Choose Object > Path Type > Options.
3 Choose one of the following from the Effect
menu, and then click OK:
• To keep the center of each character’s baseline
parallel to the path’s tangent, choose Rainbow.
This is the default setting because it looks natural.
Rainbow effect
• To keep characters’ vertical edges perfectly
vertical regardless of the path shape, while letting
characters’ horizontal edges skew to follow the
path, choose Skew. The resulting horizontal
distortion is useful for text that follows waves or
goes around a cylinder, such as a beverage can.
To keep characters’ horizontal edges perfectly
•
horizontal regardless of the path shape, while
keeping each character’s vertical edge perpendicular to the path, choose 3D Ribbon.
3D Ribbon effect
To keep the left edge of each character’s baseline
•
on the path without rotating any characters, choose
Stair Step.
Stair Step effect
• To keep the center of each character’s baseline on
the path while keeping each vertical edge in line
with the path’s center point, choose Gravity. You
can control this option’s perspective effect by
adjusting the arc of the text’s path.
Skew effect
Gravity effect
Page 34

CHAPTER 2
30
Working with Text and Type
To tighten character spacing around sharp turns and
acute angles:
1 With the selection tool or the type tool, select
the path type.
2 Choose Object > Path Type > Options.
3 For Spacing, enter a value in points. Higher
values remove more space from between
characters along sharp curves or angles.
D
N
I
E
N
C
G
S
E
D
E
H
T
E
D
G
E
Path type before (left) and after (right) applying a spacing
adjustment
D
N
I
E
N
C
G
S
E
E
D
E
H
T
D
G
E
Note: The Spacing value compensates for the way
characters fan out around a curve or sharp angle.
It has no effect on characters along straight segments.
To change spacing for characters anywhere along the
path, select them and then apply kerning or tracking.
Aligning and justifying text vertically
You can align or distribute lines of text in a frame
along its vertical axis to help keep type vertically
consistent among frames and their columns. You
can align text to the top, center, or bottom of the
frame using each paragraph’s leading and
paragraph spacing values. You can also justify text
vertically, which evenly spaces lines regardless of
their leading and paragraph spacing values.
Good garden design
begins with vision,
planning and a lot of
doing. There are no
shortcuts to producing
lush, passionate
gardens.
Good garden design
begins with vision,
planning and a lot of
doing. There are no
shortcuts to producing
lush, passionate
gardens.
Good garden design
begins with vision,
planning and a lot of
doing. There are no
shortcuts to producing
lush, passionate
gardens.
Good garden design
begins with vision,
planning and a lot of
doing. There are no
shortcuts to producing
lush, passionate
gardens.
Using new paragraph and character options
Paragraph and character formatting improvements give you better control over formatting text.
Top alignment (upper left), Center alignment (upper right),
Bottom alignment (lower left), and Justify option
(lower right).
Vertical text alignment and justification is calculated from the baseline positions of each line of
text in the frame. Keep the following in mind as
you adjust vertical alignment:
Page 35

ADOBE INDESIGN 1.5
User Guide Supplement
31
• The top of the frame is defined as the baseline of
the first line of top-aligned text. The First Baseline
Offset option in the Text Frame Options dialog box
affects this value; for more information about the
First Baseline Offset option see the Adobe InDesign
User Guide.
• The bottom is defined as the baseline of the last
line of bottom-aligned text.
• When the Align to Baseline Grid option is
applied to paragraphs with Top, Center, or Bottom
alignment, all lines will be aligned to the baseline
grid. With the Justified option, only the first and
last lines will be aligned to the baseline grid.
• If you adjust a text frame’s Top or Bottom Inset
values in the Text Frame Options dialog box, you
change the location of the first or last baseline,
respectively.
• Vertical justification isn’t applied to text that takes
on a non-rectangular shape due to influences such as
text frame shape, text wrap, or corner effects. In these
cases, top alignment is applied. When a corner effect
is applied, vertical justification is possible if you
make the text area rectangular by increasing the Inset
value in the Text Frame Options dialog box relative
to the Size value in the Corner Effects dialog box.
To align or justify text vertically within a text frame:
1 Do one of the following:
• With the selection tool, select a text frame.
• With the type tool, click an insertion point in a
text frame.
2 Choose Object > Text Frame Options.
The Text Frame Options command is also available
on the context menu that appears when you right-
click (Windows) or Control-click (Mac OS) a text frame.
3 In the Vertical Justification section of the Text
Frame Options dialog box, choose one of the
following options from the Align menu:
• To vertically align text down from the top of the
frame, choose Top. This is the default setting, and
was the only option in InDesign 1.0.
• To center lines of text in the frame, choose Center.
• To vertically align lines of text up from the
bottom of the frame, choose Bottom.
• To evenly distribute lines of text vertically between
the top and bottom of the frame, choose Justify.
4 If you chose Justify and you want to prevent the
leading value from becoming disproportionately
larger than the paragraph spacing value, specify a
Paragraph Spacing Limit value. The space between
paragraphs is expanded up to the value you specify;
if the text still doesn’t fill the frame, the space
between lines is adjusted until the frame is filled.
The paragraph spacing limit value is applied in
addition to Space Before or Space After Values
entered on the Paragraph palette.
Yokohama: In the heart of the
large island of Niphon and
wooded region, fifty leagues
from Yokohama, lies hidden
the ancient city of the dead—
the necropolis of Japanese
Emperors.
Nikko: Resting on the descending
edge of the Holy Mountain
Nikko, below the shelter of dense
forest, in the early dawn, many
go to seek renewal.
Paragraph spacing limit set to zero (left) and 1 pica (right)
5 Click OK.
Yokohama: In the heart of the
large island of Niphon and
wooded region, fifty leagues
from Yokohama, lies hidden
the ancient city of the dead—
the necropolis of Japanese
Emperors.
Nikko: Resting on the descending
edge of the Holy Mountain
Nikko, below the shelter of dense
forest, in the early dawn, many
go to seek renewal.
Page 36

CHAPTER 2
32
Working with Text and Type
An easy way to adjust the Paragraph Spacing
Limit value is to select Preview and then click
the up or down arrow next to the Paragraph Spacing
Limit value until paragraph spacing appears to be
balanced with leading.
Creating tinted paragraph rules
In InDesign 1.5, you can use the Paragraph Rules
dialog box to both create and apply a tint to a
paragraph rule. (In InDesign 1.0, you had to create
the tint in advance.) This topic only covers creating
and applying the tint; for information about other
paragraph rule options, see the Adobe InDesign
User Guide.
To apply a tint to a paragraph rule:
1 With the type tool, click an insertion point in a
paragraph or select text in a paragraph.
2 Choose Paragraph Rules from the Paragraph
palette menu.
3 If necessary, choose Rule Above or Rule Below
from the popup menu, and then select Rule On.
4 Choose a swatch from the Color menu. Note
that you can’t create tints of the built-in colors
None, Paper, Registration, or Text Color.
5 For Tint, specify a tint value, and then click OK.
Controlling where hyphenation exception lists are stored
By default, hyphenation exceptions are located only
in user dictionary files stored outside the document
(with filenames ending with the extensions .udc
and .not), on the computer where InDesign was
installed. However, you can also store hyphenation
exceptions inside any open document. In addition,
you can specify that the text composition engine
composes text using either the hyphenation list
stored in the external user dictionary or the list
stored in the current document.
Storing hyphenation exceptions inside a document
makes it easier to maintain text composition when
you move that document to other computers. For
example, it helps ensure that the hyphenation won’t
change when the document is opened at your
prepress service provider. For this reason, you can
also control the location of hyphenation exceptions
from the Create Package Folder dialog box. In
contrast, storing a hyphenation exception list
outside the document makes it easier to have
multiple documents use the same list of hyphenation exceptions.
This section covers only features new to InDesign
1.5. For more information about hyphenation
options not covered here, or about other factors
that affect text composition, see the Adobe
InDesign User Guide.
To specify hyphenation preferences:
1 Choose Edit > Preferences > Dictionary.
2 From the Compose Using menu in the Hyphen-
ation Exceptions menu, choose one of the following:
• To compose text using the hyphenation excep-
tions list stored in the external user dictionary,
choose User Dictionary.
• To compose text using the hyphenation exceptions
list stored inside the document, choose Document.
• To compose text using both lists, choose User
Dictionary and Document. This is the default setting.
Page 37

ADOBE INDESIGN 1.5
User Guide Supplement
33
3 To add the exceptions list stored in the external
user dictionary to the exceptions list stored within
the document, select Merge User Dictionary Into
Document. To compose from both exceptions lists
in the future make sure User Dictionary and
Document is selected in step 2.
Note: You may want to deselect the Merge User
Dictionary Into Document option if you work with
many partners or clients; for example, if you’re a
service provider, you probably don’t want your user
dictionary merged with every customer’s file.
4 To recompose all stories when certain settings are
changed, select Recompose All Stories When
Modified. Selecting this option recomposes stories
when you change the Compose Using option (from
step 2) or when you use the Edit Dictionary
command to add or remove words. This option is
off by default, because recomposing all stories may
take time, depending on the amount of text in the
document.
5 Click OK.
To add an hyphenation exception to an external or
document exceptions list:
1 Do one of the following:
• If, during a spell check, InDesign displays an
unfamiliar word in the Check Spelling dialog box,
click Add to open the Edit Dictionary dialog box
with the word in it.
• Choose Edit > Edit Dictionary. If a word is
selected on the layout, the word appears in the
Word box. Otherwise, in the Word box type the
word you want to add.
2 From the Target menu in the Hyphenation
Exceptions menu, choose where you want to store
the word. The Target menu lets you choose from
the external user dictionary or any open InDesign
document.
3 Specify other hyphenation options as needed,
and then click Add. For more information about
the other hyphenation options, see the Adobe
InDesign User Guide.
To control hyphenation settings when packaging a
document for a service provider:
1 Choose File > Package, and continue through
the dialog boxes until the Create Package Folder
dialog box appears.
Note: This procedure covers only the hyphenation
feature of the Package command; for more information about the Package command, see the Adobe
InDesign User Guide.
2 Do one of the following:
• To prevent the document from composing with
the external user dictionary and to prevent the
document’s hyphenation exceptions list from
merging with the external user dictionary, select
Use Document Hyphenation Exceptions Only.
You may want to select this option when
packaging a document to be printed by someone
outside your workgroup, such as when you take
the document to a service provider.
Page 38

CHAPTER 2
34
Working with Text and Type
• To allow the external user dictionary (on the
computer the file is opened on) to merge with the
document’s hyphenation exceptions list, and to
allow the document to compose using the exceptions
lists stored in both the external user dictionary and
inside the current document, leave Use Document
Hyphenation Exceptions Only unselected.
3 Click Package to continue packaging.
Applying paragraph styles while preserving formatting overrides
InDesign 1.5 simplifies working with text where the
paragraph or character styles have been overridden
for some words. When you apply a paragraph style
using InDesign 1.5, any existing character styles and
character formatting that override the paragraph
style are preserved. You can use modifier keys to clear
either the character formatting overrides or both the
character styles and character formatting overrides.
To apply a paragraph style and preserve character
styles but remove character format overrides:
In the Paragraph Styles palette, hold down Alt
(Windows) or Option (Mac OS) as you click the
name of the style.
To apply a paragraph style and remove both
character styles and character format overrides:
In the Paragraph Styles palette, hold down Alt+Shift
(Windows) or Option+Shift (Mac OS) as you click
the name of the style.
About defining colors for character and
paragraph styles
When you define colors for character and
paragraph styles, you can create a new color by
double-clicking the fill or stroke box. Also, the list
of swatches now includes gradient swatches.
Changes to applying bold and italic
When you apply the bold or italic styles to type,
InDesign 1.5 applies the face specified by the font.
This makes a difference only where a font specifies
a bold or italic variation that isn’t exactly labeled
bold or italic respectively. For example, some font
designs specify that when you apply bold to that
font, the semibold variation is to be used.
In InDesign 1.0, applying bold always applied the
variation of the font named bold, even when the
font specified the use of another variation.
Page 39

ADOBE INDESIGN 1.5
User Guide Supplement
35
About viewing the size of scaled text
The Size option in the Character palette indicates the
font size applied using the Character palette, without
adjusting for whether the text frame itself was scaled
by dragging or by using the Scale tool. InDesign 1.5
clarifies the meaning of the value in the Size option
by adding the apparent size of type in parentheses
after the type size. InDesign calculates the apparent
size by multiplying the size applied in the Character
palette by any other scaling done to the text frame.
Good garden
design begins with
vision, planning
Good garden
design begins with
vision, planning
and a lot of
doing.
and a lot of
doing.
Note: In some cases, the Font Size option in the
Character palette may not be wide enough to display
the entire scaled font value. If this happens, click an
insertion point in the Font Size option, and then press
the left and right arrow keys to scroll the Font Size value.
Copying type attributes with the eyedropper tool
You can use the eyedropper tool to copy the
character, paragraph, fill, and stroke attributes
between different instances of type in your
document. By default, the eyedropper tool copies
all attributes of a type selection.
To customize the attributes you want to copy with
the eyedropper tool, use the Eyedropper Options
dialog box. For more information about using the
eyedropper tool and the Eyedropper Options
dialog box, see “Copying attributes between
objects” on page 44.
To copy type attributes to unselected text:
1 With the eyedropper tool ( ), click the text
from which you want to copy text attributes. (The
text can be in another open InDesign document.)
The eyedropper tool reverses direction and
appears full ( ), to indicate that it’s loaded with
the attributes you copied. When you position the
eyedropper over text, a text I-beam appears next to
the loaded eyedropper ( ).
2 With the eyedropper tool, drag to select the text
you want to change. The selected text takes on the
type attributes loaded in the eyedropper. As long
as the eyedropper tool is loaded, you can drag
other text characters and apply the loaded
formatting to them.
Yokohama:
the large islan
and wooded re
Nikko: Resting
scending edge
Mountain Nik
shelter of dens
Type attributes copied to unselected text
Yokohama:
the large islan
and wooded re
Nikko Resting
scending edge
Mountain Nik
shelter of dens
Yokohama:
the large islan
and wooded re
Nikko: Restin
scending edge
Mountain Nik
shelter of dens
Page 40

CHAPTER 2
36
Working with Text and Type
Note: If you use the eyedropper tool to copy a
paragraph style from text in one document to text in
another, and the paragraph style has the same name
but different sets of attributes, any style differences
will appear as local overrides to the destination style.
To copy type attributes to text you select:
1 With the type tool ( ) or path type tool ( ),
select the text you want to copy attributes to. The
text you want to copy formatting from must be in
the same InDesign document as the text you want
to change.
2 Select the eyedropper tool ( ), and click the
text you want to copy attributes from. The
eyedropper tool reverses direction and appears full
( ), to indicate that it’s loaded with the attributes
you clicked on. The attributes are applied to the
text you selected in the previous step.
Yokohama: In the heart of
the large island of Niphon
and wooded region, fifty
leagues from Yokohama, lies
hidden the ancient city of
the dead— the necropolis of
Japanese Emperors.
Nikko: Resting on the de-
scending edge of the Holy
Mountain Nikko, below the
shelter of dense forest, in the
Type attributes copied to selected text
To pick up new attributes when the eyedropper tool
is loaded:
1 Press Alt (Windows) or Option (Mac OS) while
Yokohama: In the heart of
the large island of Niphon
and wooded region, fifty
leagues from Yokohama, lies
hidden the ancient city of
the dead— the necropolis of
Japanese Emperors.
Nikko: Resting on the descending edge of the Holy
Mountain Nikko, below the
shelter of dense forest, in the
the eyedropper tool is loaded. The eyedropper tool
reverses direction and appears empty ( ), to
indicate that it’s ready to pick up new attributes.
2 Without releasing Alt/Option, click an object
containing the attributes you want to pick up, and
then release Alt/Option so that you can drop the
new attributes on another object.
To change the text attributes affected by the
eyedropper tool:
1 In the toolbox, double-click the eyedropper
tool.
2 Choose Character Settings or Paragraph
Settings from the menu at the top of the
Eyedropper Options dialog box.
3 Select the attributes you want to copy with the
eyedropper tool, and then click OK.
To copy or apply only paragraph attributes
without having to change settings in the
Eyedropper Options dialog box, hold down Shift as
you click text with the eyedropper tool.
Changing capitalization
The Change Case command lets you change the
case setting of selected text. The Change Case
command only works with 1-byte Roman text.
CJK Roman (double-byte) text is not affected. The
Change Case command is different than the All
Caps or Small Caps options in the Character
Palette because the Change Case command doesn’t
require a special font for capital letters.
The Change Case command is also available on
the context menu that appears when you rightclick (Windows) or Control-click (Mac OS) selected
text.
To change the capitalization of text:
1 Select a type tool, and then select the text to be
changed.
Page 41

ADOBE INDESIGN 1.5
User Guide Supplement
37
2 Choose one of the following from the Type >
Change Case submenu:
• To change all characters to lowercase, choose
Lowercase.
• To capitalize the first letter of each word, choose
Title Case.
• To capitalize the first letter of each sentence,
choose Sentence Case.
Note: The Sentence Case command assumes that the
period (.), exclamation point (!), and question mark
(?) characters mark the end of a sentence. Applying
Sentence Case may cause unexpected case changes
when these characters are used in other ways, such as
in abbreviations, filenames, or Internet URLs.
• To change all characters to uppercase, choose
UPPERCASE.
Kerning between words
You can directly adjust the kerning between words
by using keyboard shortcuts. Word kerning isn’t the
same as the Word Spacing option in the Justification
dialog box; word kerning changes the kerning value
only between a word’s first character and the space
before that character.
The amount of the kerning adjustment is the same as
the Kerning value in the Units & Increments Preferences dialog box. When you press the shortcut and
the Shift key, the kerning amount is the Kerning
preferences value multiplied by five.
To adjust word kerning using the keyboard:
With the type tool ( ), select a range of text and
do one of the following:
• To add space between selected words, press
Alt+Ctrl+\ (Windows) or Option+Command+\
(Mac OS).
• To remove space between selected words, press
Alt+Ctrl+Backspace (Windows) or
Option+Command+Delete (Mac OS).
• To multiply the kerning adjustment by 5, press
Shift as you press the keyboard shortcut.
Using new indent and tab options
New options for indents and tabs give you more
ways to format text or tabular content.
Setting a right indent tab
In one step, you can add a right-aligned tab at the
right indent, making it easier to prepare tabular text
that spans an entire column. Right indent tabs are
slightly different from regular tabs. A right indent tab:
• Aligns all subsequent text to the right edge of the
text frame. If the same paragraph includes any tabs
after the right indent tab, those tabs and their text
are pushed to the next line.
• Is a special character located in the text, not in
the Tabs palette. You add a right indent tab using a
context menu, not the Tabs palette. As a result, a
right indent tab can’t be part of a paragraph style.
• Is different than the Right Paragraph Indent value
in the Paragraph palette. The Right Paragraph Indent
value keeps the entire right edge of the paragraph
away from the right edge of the text frame.
Page 42

CHAPTER 2
38
Working with Text and Type
• Can’t be used with a tab leader. To create a right-
aligned tab with a tab leader, use the Tabs palette.
1870
4000
2500
1870
4000
2500
Tabbed text (top), last tab replaced by right indent
tab (bottom)
To set a right indent tab:
1 With the type tool ( ), click an insertion point on
350
225
135
350
225
135
16
35
28
16
35
28
$85,000
$1220,000
$135,000
$85,000
$1220,000
$135,000
the line where you want to add the right indent tab.
2 Right-click (Windows) or Control-click (Mac
OS) the text, and then choose Insert Special
Character > Right Indent Tab.
You can also insert a right indent tab by pressing
Shift+Tab when an insertion point is active.
Faster formatting of hanging indents
If you format a paragraph with a negative first line
left indent and press the Tab key, the insertion
point automatically moves to the left indent. This
makes it unnecessary to add a tab at the left indent.
Controlling left indents with a special character
You can use the Indent to Here special character to
indent lines in a paragraph independently of a
paragraph’s left indent value. The Indent to Here
special character is different from the paragraph’s
left indent in the following ways:
• Indent to Here is part of the text flow, as if it was
a visible character. If text reflows, the indent moves
with it.
• Indent to Here affects all lines after the line
where you add its special character, so you can
indent just some of the lines in a paragraph.
• When you choose Type > Show Hidden
Characters, the Indent to Here character is visible ( ).
It was a particularly dark
night and the stars and planets
were beginning to appear.
Soon a glittering tapestry of
light emerged from the dark-
ness. “Where did all the stars
come from?” Saturn always
wondered. They were truly
amazing, a wonder to behold.
Indented using paragraph’s left indent (left) and indented
using Indent to Here special character (right)
To mark a location in the text as a left indent:
1 With the type tool ( ), click an insertion point
It was a particularly dark
night and the stars and planets
were beginning to appear.
Soon a glittering tapestry
of light emerged from the
darkness. “Where did all the
stars come from?” Saturn
always wondered. They
were truly amazing, a
wonder to behold.
after the character where you want the rest of the
paragraph’s lines to be indented.
2 Right-click (Windows) or Control-click (Mac OS)
the text, and then choose Insert Special Character >
Indent to Here.
Note: If you insert more than one Indent to Here
special character on a line, InDesign uses the one
furthest to the right.
Page 43

Chapter 3: Drawing and Transforming
Objects
39
Using new drawing tools and features
Adobe InDesign 1.5 adds new drawing tools, such
as the pencil, smooth, and erase tools, and adds
features to existing drawing and transformation
tools. You gain flexibility and more consistency
with Adobe Illustrator and Adobe Photoshop.
Using the centers of objects
When you draw an object, a center point appears.
You can use this point to drag the object or to align
the object with other elements in your artwork. The
center point is always visible, and can’t be hidden or
deleted.
Drawing from the corner (left) and drawing from the
center (right)
2 Position the pointer where you want the center
of the shape to be, and then drag diagonally to any
corner or edge until the shape is the desired size.
Shift-drag to constrain the shape to a uniform
height and width or to multiples of 45 degrees,
depending on the tool you’re using.
Drawing with the pencil tool
The pencil tool lets you draw open and closed paths
as if you were drawing with a pencil on paper. It is
most useful for fast sketching or creating a handdrawn look.
To draw a freeform path with the pencil tool:
1 Select the pencil tool ( ).
2 Position the pointer where you want the path to
begin, and drag to draw a path.
As you drag, a dotted line follows the tool. When
you are finished drawing, anchor points appear at
both ends of the path and at various points along it.
The path takes on the current fill and stroke
attributes, and it remains selected by default.
To create a rectangle, ellipse, or line by dragging
from the center:
1 Press Alt (Windows) or Option (Mac OS) with
the rectangle tool ( ), polygon tool ( ), ellipse
tool ( ), or line tool ( ) selected.
Drag to draw
Page 44

CHAPTER 3
40
Drawing and Transforming Objects
To draw a closed path with the pencil tool:
1 Select the pencil tool.
2 Position the pointer where you want the path to
begin, and then start dragging to draw a path.
3 As you drag, hold down Alt (Windows) or
Option (Mac OS). The pencil tool displays a small
loop and a solid eraser ( ) to indicate drawing a
closed path.
4 When the path is the size and shape you want,
release the mouse button (but not the Alt or
Option key). After the path closes, release the Alt
or Option key.
Smoothing a path with the smooth tool
Use the smooth tool to remove unwanted bumps
from an existing path or section of a path. The
smooth tool retains the original shape of the path
as much as possible. Smoothed paths generally
have fewer points, which can make them easier to
edit, display, and print.
To use the smooth tool:
1 If the path you want to smooth is not selected,
select it with the selection tool ( ). Or Ctrl-click
(Windows) or Command-click (Mac OS) the path
to select it.
2 Select the smooth tool ( ).
3 Drag the tool along the length of the path
segment you want to smooth. The modified stroke
or path usually has fewer anchor points than the
original.
4 Continue smoothing until the stroke or path is
the desired smoothness.
Erasing a path with the erase tool
The erase tool lets you remove a portion of an
existing path or stroke. You can use the erase tool
on paths but not on text.
Path before and after using the smooth tool
Strokes before (left) and after (right) using the erase tool
Page 45

ADOBE INDESIGN 1.5
User Guide Supplement
41
To use the erase tool:
1 Select the erase tool ( ).
2 Drag the tool along the length of the path
segment you want to erase (not across the path). For
best results, use a single, smooth, dragging motion.
Anchor points are added to the ends of the
resulting paths.
Setting preferences for the pencil and smooth tools
You can set preferences for the pencil tool and
smooth tool. The preferences include tolerances
that control how sensitive the pencil and smooth
tools are to the movement of your mouse or
graphics-tablet stylus, and whether you want the
path to remain selected after you draw it.
The tolerance is calculated in pixels. The larger the
number of pixels you specify, the less complex are
the paths.
To set preferences for the pencil tool and smooth
tool:
1 Double-click the pencil tool ( ) or smooth
tool ( ).
2 Use the Fidelity and Smoothness sliders or enter
values:
• Fidelity controls the distance (in pixels) within
which the final curves can stray from the
smoothed mouse or tablet data. Lower fidelity
values result in a path that less closely matches the
line you drew; higher values result in a path that
more tightly matches the line you drew but may
result in more anchor points.
• Smoothness controls the amount of smoothing
(by percentage) applied when you use the tool.
Lower smoothness values usually result in more
anchor points and preserve more of a line’s irregu-
larities; higher values result in fewer anchor points
and remove more of a line’s irregularities.
3 To keep the path selected after you draw it, select
Keep Selected. This option is selected by default.
4 Click OK.
Paths with low fidelity and smoothness (left), and high
fidelity and smoothness (right)
Working with segments and multiple points on a path
You can use the direct-selection tool to select
multiple points or path segments on one or more
paths. You can also select subpaths on a compound
path. This is useful for quickly altering a portion of
a path defined by several points, rather than
moving each point individually.
Page 46

CHAPTER 3
42
Drawing and Transforming Objects
Note: Fill and stroke attributes apply to entire paths
regardless of how many points are selected.
Dragging to select multiple points
Select a compound path’s subpath to reposition it
without disturbing the rest of the compound path
To select multiple points on a path:
1 Select the direct-selection tool ( ).
2 Do one of the following:
• Drag around the points you want to select.
• Hold down Shift as you click the points you want
to select.
To select all points on a path at once:
Using the direct-selection tool, press Alt (Windows)
or Option (Mac OS) as you click a path.
Alt/Option-clicking a path with the direct-
selection tool is useful for moving a whole path
that’s nested inside a frame, or for moving a frame
without moving its contents.
To select a path segment:
1 Make sure no points on the path are selected;
deselect the path if necessary.
2 Select the direct-selection tool, and then click
the path segment you want to select.
Note: Selecting a segment doesn’t select any points,
but will display any direction handles facing the
segment. If you want to keep track of which segments
are selected, select segments by selecting the points
that define them.
To select multiple path segments:
Select the direct-selection tool, and then hold
down Shift as you click the path segments you
want to select.
To move a straight path segment:
With the direct-selection tool, drag any of the path
segments.
Note: If the entire path moves, choose Edit > Undo,
and then make sure you click only the path itself—do
not click the fill. All points should be hollow, not
solid. You can move a curved segment only by Shiftselecting and then dragging the points that define it.
Page 47
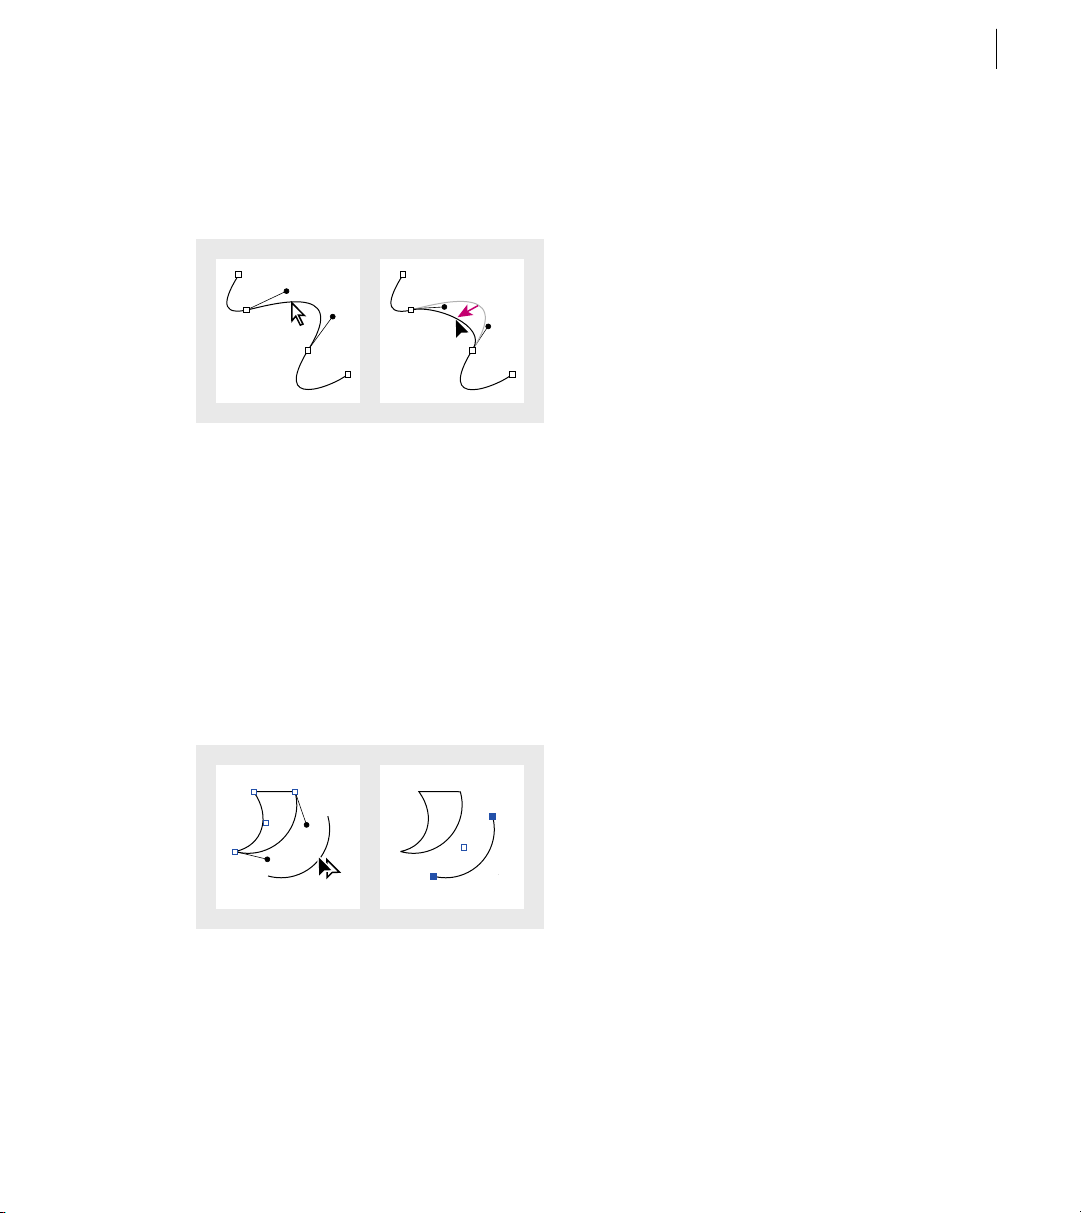
ADOBE INDESIGN 1.5
User Guide Supplement
43
To reshape a curved path segment:
With the direct-selection tool, click to select a
curved path segment, and then drag the curve.
To copy a selected path segment by dragging:
1 Hold down the mouse button over a segment,
and then without moving or releasing the mouse
button, press Alt (Windows) or Option (Mac OS).
2 Keep both the Alt/Option key and the mouse
button pressed as you drag the selected segment.
3 When you’ve dragged the segment to the desired
position, release the mouse button. The selected
segment is copied, and the rest of the path is left
behind.
Controlling image display quality and performance
Use image display options to balance display speed
and quality. You can specify an image display
setting for all images and vector graphics in the
document, and you can also specify image display
options separately for each image or vector
graphic (overriding the document-wide setting).
The following display options are available:
Full Resolution Displays an image at the resolution
at which the image was saved. If the amount of
RAM available to InDesign is too low to display
images instantly, the image will be displayed as a
progressive series of strips. Vector graphics are
displayed at full resolution. This option provides
the highest quality but the slowest performance.
Optimized Resolution Downsamples a high-
resolution image to a resolution appropriate for
high-quality display on your monitor. Vector
graphics are displayed at full resolution. This
option uses RAM more efficiently and displays
images faster than the Full Resolution setting.
Proxy Creates a low-resolution proxy image
appropriate for identifying and positioning an
image or vector graphic, and stores the proxy in
the document. If available RAM is low, the
resolution of the proxy may be reduced further.
Proxy is the default option, and is the fastest way to
display an identifiable image.
Page 48

CHAPTER 3
44
Drawing and Transforming Objects
Gray Out Draws images and vector graphics as
gray rectangles. This is the fastest option but it
previews image sizes only.
A
C
A. Full Resolution B. Optimized Resolution
C. Proxy D. Gray Out
B
D
Note: Image display options don’t affect output
resolution on PostScript output devices. InDesign
always prints images at full resolution on PostScript
output devices. When creating HTML or PDF files,
final image resolution depends on the output options
you choose for downsampling images.
To control display quality for all images and vector
graphics:
1 Choose Edit > Preferences > General.
2 Choose a display quality setting from the
Display menu.
The Display menu for document-wide image
display options is also available as a submenu
on the context menu that appears when you rightclick (Windows) or Control-click (Mac OS) a spread
and nothing is selected.
To control display quality for one graphic:
1 With the selection tool ( ) or direct-selection
tool ( ), select an imported graphic.
2 Right-click (Windows) or Control-click (Mac
OS) the image. From the Display submenu on the
context menu that appears, choose a display
quality setting. If you choose Set to Default, the
graphic uses the display quality specified in the
General Preferences dialog box.
To cycle through the display settings for the
document, press Ctrl+Shift+F5 (Windows) or
Command+Shift+F5 (Mac OS). To cycle through
settings for one graphic, select the graphic before
pressing the shortcut.
Copying attributes between objects
Use the eyedropper tool to copy fill and stroke
attributes, such as color, from any object in an
InDesign file, including imported graphics. By
default, the eyedropper tool loads all available fill
and stroke attributes of an object and sets the
default fill and stroke attributes of any new objects
you draw. You can use the Eyedropper Options
dialog box to change the attributes that the
eyedropper tool copies. You can also use the
eyedropper tool to copy type attributes; see
“Copying type attributes with the eyedropper
tool” on page 35.
Page 49

ADOBE INDESIGN 1.5
User Guide Supplement
45
Note: If an attribute is not listed in the Eyedropper
Options dialog box, it can’t be copied with the
eyedropper tool. The only exception is the corner
effect for strokes, which is copied even though it isn’t
listed in the Eyedropper Options dialog box.
To copy fill and stroke attributes using the
eyedropper tool:
1 Select one or more objects that have fill and
stroke attributes you want to change.
2 Select the eyedropper tool ( ).
3 Click the object that has the fill and stroke
attributes you want to sample. The eyedropper
appears loaded ( ), and the selected objects are
automatically updated with the fill and stroke
attributes of the object you clicked.
4 To change other objects to the same attributes,
click the objects with the loaded eyedropper. If an
object is stroked and not filled, be sure to click the
object’s outline.
To pick up new attributes when the eyedropper tool
is loaded:
1 Press Alt (Windows) or Option (Mac OS) while
the eyedropper tool is loaded. The eyedropper tool
reverses direction and appears empty ( ), to
indicate that it’s ready to pick up new attributes.
2 Without releasing Alt/Option, click an object
containing the attributes you want to pick up, and
then release Alt/Option so that you can drop the
new attributes on another object.
To change the fill and stroke attributes affected by
the eyedropper tool:
1 In the toolbox, double-click the eyedropper tool.
2 Choose Fill and Stroke Settings from the menu
at the top of the Eyedropper Options dialog box.
3 Select the fill and stroke attributes you want to
copy with the eyedropper tool, and then click OK.
To copy or apply only the fill and stroke color of
an object, hold down Shift as you click an object
with the eyedropper tool.
Using new clipping path options
You can create a clipping path from imported
graphics containing alpha channels or multiple
embedded paths. This gives you maximum flexibility when creating transparent backgrounds for
imported graphics. When a graphic contains
multiple alpha channels or paths, you can choose
which one to use as a clipping path.
Page 50

CHAPTER 3
46
Drawing and Transforming Objects
An alpha channel is an invisible channel that defines
transparent areas of an image. It’s stored inside an
image along with the image’s RGB or CMYK
channels. Alpha channels are commonly used in
video effects applications and are easily created in
Photoshop.
ABC
DEF
A. Original image B. Alpha channel C. Placed image
D. Original image E. Image with embedded path
F. Placed image
Note: This section describes only the features new to
InDesign 1.5. For information about other options in
the Clipping Path dialog box, see the Adobe
InDesign User Guide.
To create or reset a clipping path for an imported
graphic:
1 Select an imported graphic and choose Object >
Clipping Path.
2 Choose one of the following commands from
the Type menu:
• To reset a clipping path to the default rectangular
frame, choose None.
• To create a clipping path based on the lightest
areas of a graphic, choose Detect Edges. This is the
method used by InDesign 1.0.
• To create a clipping path from an alpha channel
saved with the graphic, choose Alpha Channel,
and then choose the channel you want to use from
the Alpha menu. If the Alpha menu is not
available, no alpha channels were saved with the
image. InDesign automatically recognizes
Photoshop’s default transparency (the checker-
board background) as an alpha channel; if the
image has an opaque background you must use
Photoshop to remove the background or create
and save one or more alpha channels with the
image.
• To create a clipping path from a path saved with
the image, choose Photoshop Path, and then
choose the path you want to use from the Path
menu. If the Photoshop Path option isn’t available,
no named paths were saved with the image.
3 If you want to create a clipping path that stops
at the visible edge of the image, select Restrict to
Frame. This can result in a simpler path when you
use the image’s frame to crop the image.
4 Click OK.
Note: The Tolerance and Threshold settings are not
available for the None or Photoshop Path options.
For more information about Clipping Path dialog
box options other than the ones in the Type menu, see
the Adobe InDesign User Guide.
Page 51

Distributing or inserting a spacing value between objects
In InDesign 1.0, the Align palette lets you:
• Align objects by their centers or by the same edge
(left, right, top, or bottom) of each selected object.
• Distribute objects within the boundaries of the
selection, measuring from the same edge of each
object.
InDesign 1.5 adds the following distribution
options:
• Distribute objects using a value you specify, by
inserting a spacing value between the facing edges
of all selected objects.
ADOBE INDESIGN 1.5
User Guide Supplement
•
Distribute objects using a value you specify, by
inserting a spacing value between the center point
or same edge of each selected object.
ABC
A. Original placement B. Distributing within selection;
equal spacing between top edges C. Distributing by
specifying value between top edges
These expanded options help you get exactly the
result you want when the selection includes
objects of different widths and heights.
47
ABC
A. Original placement B. Distributing within selection;
equal spacing between facing edges C. Distributing by
specifying value between facing edges
This topic covers only the distribution features
new to InDesign 1.5. For information about the
other options in the Align palette, see the Adobe
InDesign User Guide.
When you distribute using spacing, specifying a
negative value moves objects left along the
horizontal axis or up along the vertical axis.
Positive values move objects right along the
horizontal axis or down along the vertical axis.
Specifying a positive value adds space between
objects, and specifying a negative value removes
space between objects.
To display the Align palette:
1 Choose Window > Align.
Page 52

CHAPTER 3
48
Drawing and Transforming Objects
To distribute objects within the selection boundary
with equal space between facing edges:
1 If the Distribute Spacing section of the Align
palette isn’t visible, choose Show Options from the
Align palette menu.
2 In the Distribute Spacing section of the Align
palette, make sure Use Spacing is deselected.
3 In the Distribute Spacing section of the Align
palette, click the button to distribute along the
horizontal or vertical axis.
To insert a specific amount of space between the
centers or edges of objects:
1 In the Align palette, select Use Spacing in the
Distribute Objects section of the palette, and then
enter the amount of space you want to apply in the
document’s unit of measure.
2 Click a button to distribute selected objects
along their horizontal or vertical axis.
To insert a specific amount of space between the
facing edges of objects:
1 If the Distribute Spacing section of the Align
palette isn’t visible, choose Show Options from the
Align palette menu.
2 In the Distribute Spacing section of the Align
palette, make sure Use Spacing is selected, and
then enter the amount of space you want to apply
in the document’s unit of measure.
3 Click a button to distribute selected objects
along their horizontal or vertical axis.
Note: To distribute objects evenly within the bounds
of the selection (as in InDesign 1.0 and Illustrator
8.0), leave the Use Spacing checkboxes deselected,
and click any Distribute button in the palette.
Using new transformation options
InDesign 1.5 extends its transformation tools with
new and enhanced options. These improvements
give you additional flexibility and increase
InDesign’s consistency with Photoshop and Illus-
trator.
About transforming objects with the direct-selection tool
The direct-selection tool in InDesign 1.5 can select
segments or multiple points on a path, making it
possible to transform portions of a path. The
results of a transformation can be significantly
different depending on whether you use the
selection tool or direct-selection tool, so make sure
you’re using the right tool.
Use the selection tool ( ) to move or copy an
entire path and any contents, and use the directselection tool ( ) to move or copy just a part of a
path without any contents. For more information,
see “Working with segments and multiple points
on a path” on page 41.
Drag-copying a segment with selection tool (left) and
direct-selection tool (right)
Page 53

ADOBE INDESIGN 1.5
User Guide Supplement
49
Nudging object dimensions using the keyboard
InDesign 1.5 includes a new keyboard shortcut
that lets you scale objects in one percent or five
percent increments, similar to the way you can
nudge an object’s position with the arrow keys.
When you use this method to change the dimensions of a path, the Transform palette reports the
path’s new height and width as 100%. When you
use this method to change the dimensions of an
image, the Transform palette reports the image’s
new height and width as a percentage of its original
dimension. This lets you easily reset an image to
100% at any time, by typing 100% into the image’s
dimensions in the Transform palette. To track the
percentage change of path dimensions, use the
Scale tool or dialog box instead; see “Transforming
objects using dialog boxes” on page 50.
To change object dimensions using the keyboard:
Select an object and do one of the following:
• To enlarge by one percent, press Ctrl+.
(Windows) or Command+. (Mac OS).
• To reduce by one percent, press Ctrl+,
(Windows) or Command+, (Mac OS).
• To enlarge or reduce by five percent, use either of
the preceding shortcuts while also pressing Alt
(Windows) or Option (Mac OS).
It’s easy to remember these shortcuts because
they correspond to the keys that use the greaterthan (>) symbol and the less-than symbol (<). The
shortcuts aren’t listed with these symbols because the
shortcuts don’t use the Shift key.
Using the free transform tool
The free transform tool works as it does in
Photoshop and Illustrator, providing a way to
perform any transformation with just one tool.
You can combine transformations, such as
rotating and scaling, while the free transform tool
is active.
You can use keyboard shortcuts to instantly
switch among the transform tool (press E), the
selection tool (V), and the direct-selection tool (A).
To move with the free transform tool:
1 Select the object or objects to move.
2 Select the free transform tool ( ).
3 Click anywhere within the bounding box and
then drag.
To scale with the free transform tool:
1 Select the object or objects to scale.
2 Select the free transform tool ( ).
3 Do one of the following:
• Drag any bounding box handle until the object
is the desired size.
• Shift-drag the handle to preserve the selection’s
proportions.
• Alt-drag (Windows) or Option-drag (Mac OS)
to scale from the center of the bounding box
(instead of from the opposite handle).
To rotate with the free transform tool:
1 Select the object or objects to rotate.
2 Select the free transform tool ( ).
Page 54

CHAPTER 3
50
Drawing and Transforming Objects
3 Position the pointer anywhere outside the
bounding box. The pointer changes to ( ).
4 Drag until the selection is at the desired angle of
rotation.
To reflect with the free transform tool:
1 Select the object or objects to reflect.
2 Select the free transform tool ( ).
3 Drag a handle of the bounding box past the
opposite edge or handle until the object is at the
desired level of reflection.
To shear with the free transform tool:
1 Select the object or objects to shear.
2 Select the free transform tool ( ).
3 Start dragging a handle on the side of the
bounding box (not a corner) and then hold down
Ctrl+Alt (Windows) or Option+Command
(Mac OS) as you drag until the object is at the
desired perspective. Shift-drag to constrain the tool.
Note: If the object scales instead of skews, make sure
you start dragging a side handle before you press the
Ctrl/Command key. If you press the key first, the
object scales.
Transforming objects using dialog boxes
You can transform objects precisely using new
transformation dialog boxes similar to those in
Illustrator.
To move an object using dialog box options:
1 Select one or more objects, and then choose
Object > Transform > Move or double-click the
selection tool ( ).
2 Do one of the following:
• Enter the horizontal and vertical distances that
you want the object to move. Positive values move
the object down and to the right of the x axis;
negative values move the object up and to the left.
• Enter the distance and angle for the move. The
angle you enter is calculated in degrees from the x
axis. Positive angles specify a counterclockwise
move; negative angles specify a clockwise move.
You can also enter values between 180 and 360
degrees; these values are converted to their corresponding negative values (for example, a value of
270 degrees is converted to –90 degrees).
3 If the selected object is a frame with content and
you want the content to move with the frame,
make sure Move Content is selected. This option is
selected by default.
4 Do one of the following:
• To preview the effect before you apply it, select
Preview.
• To move the object, click OK.
• To move a copy of the object, click Copy.
To rotate an object using dialog box options:
1 Select one or more objects, and then do one of
the following:
• Choose Object > Transform > Rotate.
• Double-click the rotate tool ( ).
• To change the point of origin and specify a
rotation angle in the Rotate dialog box, select the
rotate tool, and Alt-click (Windows) or Optionclick (Mac OS) the new point of origin.
Page 55

ADOBE INDESIGN 1.5
User Guide Supplement
51
2 Enter the rotation angle, in degrees, in the Angle
option. Enter a negative angle to rotate the object
clockwise; enter a positive angle to rotate the
object counterclockwise.
3 If the selected object is a frame with content and
you want the content to rotate with the frame,
make sure Move Content is selected. This option is
selected by default.
4 Do one of the following:
• To preview the effect before you apply it, select
Preview.
• To rotate the object, click OK.
• To rotate a copy of the object, click Copy.
Set point of origin. Then use the Copy option in the
Rotate dialog box to rotate a duplicate.
To scale an object using dialog box options:
1 Select one or more objects.
2 Do one of the following:
• Choose Object > Transform > Scale.
• Double-click the scale tool ( ).
• To change the point of origin and specify a
scaling percentage in the Scale dialog box, select
the scale tool, and Alt-click (Windows) or Optionclick (Mac OS) the new point of origin.
3 In the Scale dialog box, do one of the following:
• Select Uniform, and then enter a percentage in
the Scale option to preserve the relative height and
width of the object.
• Select Non-Uniform, and then enter the
horizontal and vertical scale factors as percentages
to scale the height and width separately. The scale
factors are relative to the specified point of origin
and can be negative numbers.
4 If the selected object is a frame with content and
you want the content to scale with the frame, make
sure Scale Content is selected. This option is
selected by default.
5 Do one of the following:
• To preview the effect before you apply it, select
Preview.
• To scale the object, click OK.
• To scale a copy of the object, click Copy.
To shear an object using dialog box options:
1 With the selection tool, select the object or
objects to shear.
• Choose Object > Transform > Shear.
• Double-click the shear tool ( ).
• To change the point of origin and specify a
shearing angle and axis in the Shear dialog box,
select the shear tool, and Alt-click (Windows) or
Option-click (Mac OS) the new point of origin.
2 In the Shear dialog box, enter the new shear
angle. The shear angle is the amount of slant to be
applied to the object, relative to a line perpendicular to the shear axis. (Shear angle is calculated
clockwise from the current axis.)
Page 56

CHAPTER 3
52
Drawing and Transforming Objects
3 Specify the axis along which the object is to be
sheared. You can shear an object along a
horizontal, a vertical, or an angled axis.
If you choose an angled axis, enter the angle of the
axis that you want, in degrees, relative to the x axis.
Point of origin placed at left corner (left), and shear angle
entered into Shear dialog box (right)
4 If the selected object is a frame with content and
you want the content to move with the frame, make
sure Shear content is selected. This option is
selected by default.
5 Do one of the following:
• To preview the effect before you apply it, select
Preview.
• To shear the object, click OK.
• To shear a copy of the object, click Copy.
Pasting a copy at the same position as the original
You can use the Paste in Place command to paste a
frame or imported graphic at the same position as
the object you originally copied. This is helpful
when you want to keep the copy aligned with the
original, or when you want to paste the copy at the
same position on another page.
Note: If you want an object to appear in the same
position on many pages, consider creating a master
with the object on it. For more information, see the
Adobe InDesign User Guide.
To paste a copy at the same position as the original:
1 Select an object and then choose Edit > Copy.
2 Choose Edit > Paste in Place.
To paste in place using a keyboard shortcut,
press Alt+Shift+Ctrl+V (Windows) or
Option+Shift+Command+V (Mac OS).
Page 57

Chapter 4: Using New Color and
Trapping Features
53
Adobe InDesign 1.5 enhances the way you work
with color. If you use Adobe Illustrator, you’ll
already be familiar with many of the changes.
Using new Swatches palette features
The Swatches palette is now easier to use and is
more closely aligned with the Swatches palette in
Illustrator.
Default colors in the Swatches palette
Six CMYK-defined colors appear in the default
Swatches palette (cyan, magenta, yellow, red,
green, and blue).
To change the swatches that appear in new
documents by default, edit the Swatches palette
when no documents are open.
Naming process colors after their values
In InDesign 1.5, the default name of a process
color swatch is derived from the values of the
color’s components. For example, if you create a
red color using 10 percent cyan, 75 percent
magenta, 100 percent yellow, and 0 percent black,
its swatch will be named C=10 M=75 Y=100 K=0
by default. This change makes it easier to identify
the composition of new process colors.
As with any color you define, you can change the
name of a process color swatch at any time. By
default, a process color swatch’s name automati-
cally updates to represent its current CMYK
definition; you can switch this option off or on as
needed.
To switch automatic process swatch naming on or off:
1 Double-click a process color in the Swatches
palette.
2 Do one of the following, and then click OK:
• To let InDesign rename the swatch when you
adjust its CMYK percentages, make sure the Name
with Color Value option is selected.
• To preserve the current swatch name when you
adjust its CMYK values, make sure the Name with
Color Value option is deselected.
Defining spot color swatches directly
You can define a new color swatch as a spot color
without having to select Spot Color in the New
Color dialog boxes.
To define a spot color using the New Color button:
In the Swatches palette, press Ctrl (Windows) or
Command (Mac OS) as you click the New Color
button.
Page 58

CHAPTER 4
54
Using New Color and Trapping Features
To d efine a spot color using the New Color button and
also open the New Color dialog box:
In the Swatches palette, press Alt+Ctrl (Windows)
or Option+Command (Mac OS) as you click the
New Color button.
Note: If the New Color button isn’t available, select a
swatch first.
Changing the swatch size
You can change the size of the swatches in the
Swatches palette. Making the swatches smaller
saves space on your monitor.
To modify the swatch display:
In the Swatches palette, choose one of the
following display options from the palette menu:
• Name displays a small swatch next to the name of
the swatch. The icons to the right of the name show
the color model (CMYK, RGB, and so on), and
whether the color is a spot color, process color,
registration color, or none.
• Small Swatch or Large Swatch displays only the
swatch. A triangle with a dot in the corner of the
swatch indicates that the color is a spot color.
A triangle without a dot indicates a process color.
• The fill or stroke boxes in the toolbox or in a
palette.
• The gradient box in the Gradient palette.
• Swatches from the Swatches palette or any
swatch library palette.
• An out-of-gamut icon ( ) in a palette.
You can drop colors or gradients on the following
objects and palettes:
• The fill or stroke of a path. To drop color on a fill
or stroke, as you drag a color position the center of
the drag icon precisely over the path’s fill or stroke,
and then release the mouse button.
• The Swatches palette.
If you drag one or more Swatches palette swatches
or an out-of-gamut icon, you can also drop them
in another InDesign document window, which
adds the swatches to that document’s Swatches
palette.
Using colors from imported graphics
InDesign 1.5 makes it easier to use colors from
graphics you import into your document.
Applying colors by dragging and dropping
An easy way to apply colors or gradients is to drag
them from a color source to an object or palette.
Dragging and dropping lets you apply colors or
gradients to objects without first selecting the
objects. You can drag the following:
Using the eyedropper tool to sample colors from imported graphics
You can use the eyedropper tool to add colors from
imported graphics to your document or apply
them to objects in your document. This is useful
for coordinating layout colors with images. For
more information about the eyedropper tool, see
“Copying attributes between objects” on page 44.
Page 59

ADOBE INDESIGN1.5
User Guide Supplement
55
For best results with color separations, you may
want to make sure that color names, types (such as
spot and process), and models (such as RGB and
CMYK) of the colors sampled in InDesign are
consistent with the color definitions in the
imported graphics. If you’re not sure about the
best settings to use, consult your prepress service
provider.
Redefining imported spot colors as
process colors
When you import an EPS or PDF graphic
containing a spot color, InDesign adds the spot
color name and definition to the Swatches palette.
You can change an imported spot color swatch to
a process color swatch. This provides flexibility to
adapt colors–even those in imported graphics–to
changing output requirements.
To change an imported spot color to process:
1 In the Swatches palette, double-click the swatch
you want to edit.
2 In the Swatch Options dialog box, choose
Process from the Color Type menu.
Note: This changes the color type in the InDesign
document only. To permanently change the color
type of colors within a graphic, open the graphic in
the program used to create it, and then edit the color
in that program.
Swap Fill/Stroke button
You can use the toolbox’s Swap Fill/Stroke button
( ) with selected type. In InDesign 1.0, this
button did not apply to type.
Cycling through color modes using a shortcut
You can use a shortcut to cycle through the CMYK,
RGB, and LAB color modes in many places where
a color bar or color box is present, instead of
choosing a color mode from a palette or dialog box
menu.
To cycle through color modes:
Do one of the following:
• In the Color palette, Shift-click the color bar at
the bottom of the palette.
• In the New Color Swatch or Swatch Options
dialog box, Shift-click the color box.
• In the New Gradient or Gradient Options dialog
box, select a gradient stop, make sure RGB, LAB,
or CMYK is selected in the Stop Color menu, and
then Shift-click the color box.
Reversing a gradient
The Gradient palette now includes a Reverse button
so that you can instantly reverse a gradient’s color
progression.
Using other new color features
InDesign 1.5 provides shortcuts for defining color
modes and gradients.
To reverse a gradient:
1 Activate a gradient.
2 In the Gradient palette, click the
Reverse button ( ).
Page 60

CHAPTER 4
56
Using New Color and Trapping Features
Automatic trapping
InDesign can automatically trap color documents
using a built-in trapping engine, and can also take
advantage of the similar but more powerful Adobe
In-RIP Trapping engine available on Adobe
PostScript output devices that support Adobe InRIP Trapping.
Both trapping engines can precisely calculate and
apply any necessary adjustments to the edges of both
type and graphics throughout your document. They
can apply effective trapping techniques to different
parts of a single object, even if text or an InDesign
object overlaps several different background colors.
Trapping adjustments are made automatically, and
you can define trapping styles that address the
trapping requirements of specific page ranges. The
effects of trapping appear only on color separations
generated by a trapping engine; you cannot see the
results on-screen within InDesign.
The trapping engine decides where to trap by
detecting contrasting color edges, and then creates
traps based on the neutral densities (lightness or
darkness) of abutting colors, in most cases spreading
lighter colors into adjacent darker colors. The
trapping settings you specify in the Print dialog
box modify the trapping engine’s results.
Comparing Adobe In-RIP Trapping and built-in trapping
While built-in trapping and Adobe In-RIP
Trapping are quite similar, the differences between
them can make a significant difference in the
output you get from the same document. For best
results, read the following sections and understand
the differences between the two trapping engines.
Software requirements for automatic trapping
To trap documents using either the built-in or
Adobe In-RIP Trapping engines, you need the
following print drivers:
• For Windows 2000, use Adobe PostScript driver
version 5.0 or later.
• For Windows NT 4, use Adobe PostScript driver
version 5.1.1 or later.
• For Windows 98, use Adobe PostScript driver
version 4.3.2 or later.
• For Mac OS, use the Adobe PostScript driver
version 8.6 or later.
For more information about installing Windows
printer drivers, see the Install_ReadMe.doc file.
Note: Automatic trapping isn’t always necessary for
color documents. For information about design
strategies that avoid having to trap, or about
simulating traps by overprinting manually, see the
Adobe InDesign User Guide.
Note: If you’re using Windows 2000 and printing
through a Windows NT print server, we recommend
that you install Adobe PostScript driver 5.1.1 on
your print server and print using that driver.
For Adobe In-RIP Trapping, you also need the
following software and hardware:
Page 61

ADOBE INDESIGN1.5
User Guide Supplement
57
• A PPD (PostScript Printer Description) file that
supports Adobe In-RIP Trapping. You must select
this PPD using the Adobe PS print driver. For
more information about installing a PostScript
driver and selecting a PPD, see the Adobe InDesign
User Guide.
• An Adobe PostScript Level 2 or later output
device that uses a RIP that supports Adobe In-RIP
Trapping. To find out if a PostScript output device
supports Adobe In-RIP Trapping, contact the
manufacturer or your prepress service provider.
General differences between built-in and Adobe In-RIP Trapping
The following are some of the features that are not
available through built-in trapping, but are
available through Adobe In-RIP Trapping:
• Trapping gradients created in InDesign.
• Sliding traps.
• Composite color workflow. With built-in
trapping, you can separate a document using
InDesign or using in-RIP separations. To use
Adobe In-RIP Trapping, you must use in-RIP
separations.
• Trap widths. Built-in trapping limits trap widths
to 1 point regardless of the amount you enter. For
larger trap widths, use Adobe in-RIP Trapping.
About trapping imported images
Built-in trapping traps images, such as photographs, to text and InDesign graphics. However,
the images must be saved using a truly pixel-based
file format that supports the color requirements of
commercial printing. Built-in trapping will trap
images saved in the BMP, GIF, JPEG, PCX, PICT,
PNG, PSD (Photoshop), TIFF, and WMF file
formats. Of these, JPEG, PSD, and TIFF are the
most appropriate formats for commercial printing
jobs; before using other formats consult your
prepress service provider.
In file formats that are not purely pixel-based, the
non-pixel data will prevent the image from
working properly with built-in trapping. Built-in
trapping cannot trap graphics saved in the AI
(Adobe Illustrator), DCS, EPS, PDF or PostScript
file formats; if you want to trap these graphics file
formats use Adobe In-RIP Trapping. It’s easy to
use one of these formats by accident; the following
are examples of scenarios when you might be
including these formats unintentionally:
• While EPS and PDF images may appear to
consist only of pixels, the pixels are actually
contained inside a layer of PostScript code.
• The Desktop Color Separation (DCS) format is
based on EPS, so images saved using DCS can’t be
trapped by built-in trapping.
Additional differences between built-in and Adobe
In-RIP Trapping are described in the following
sections.
Page 62

CHAPTER 4
58
Using New Color and Trapping Features
• If you’re using an Open Prepress Interface (OPI)
server, verify that it creates for-position-only
(FPO) images using TIFF format, not EPS. If the
images are TIFF, it may be possible to use built-in
trapping as long as you don’t select any Omit
options at output time. Omit image options are
located in the Graphics panel of the Print dialog
box when a PostScript printer is targeted.
Built-in trapping doesn’t support the Trap Images
Internal option that traps colors within a single
image. However, 1-bit images will trap to other
images if they’re saved as TIFF or another
supported pixel-based format.
Note: The behavior and precision of trapping within
an OPI workflow depends on many factors, such as
the downsampling method the OPI server uses to
generate FPO images. For best results, consult your
OPI vendor for information about integrating Adobe
trapping solutions with their OPI server.
About trapping imported vector graphics
Both Adobe In-RIP Trapping and built-in trapping
can trap text and graphics created using the tools
in InDesign. However, built-in trapping doesn’t
trap gradients created using InDesign, nor placed
vector graphics such as EPS or PDF files. You can
use built-in trapping with documents containing
vector graphics in the following cases:
• If you want to trap art from Adobe Illustrator,
consider copying and pasting objects (or dragging
and dropping them) from the Illustrator file into
your InDesign document. This will convert them
to InDesign paths which can be trapped. However,
these methods won’t preserve Illustrator features
that aren’t supported by InDesign, and the objects
can’t be updated automatically if you edit the
original Illustrator document.
• Another way to trap Illustrator art is to save the
Illustrator file as a TIFF image and place that into
InDesign. Make sure you specify TIFF resolution
and color options that are appropriate for your
print job; see your prepress service provider if
you’re unsure of the best settings.
• Text, paths, and frames you create in InDesign
won’t trap properly if they overlap a frame
containing a placed graphic that built-in trapping
won’t trap, such as placed Illustrator art. If the
placed vector graphic isn’t rectangular, try
reshaping the placed graphic’s frame closer to the
graphic itself, and away from other objects. For
example, you might use the Object > Clipping
Path command to fit the graphics frame more
tightly around the graphic.
InDesign text and graphics that overlap placed graphics (left)
won’t trap properly. To allow proper trapping in this example,
reshape the frame to avoid touching other objects (right).
Page 63

ADOBE INDESIGN1.5
User Guide Supplement
59
About trapping text
Both the Adobe In-RIP and built-in trapping
engines can trap text characters to other text and
graphics (as long as they exist directly on the layout
and aren’t contained in imported graphics). A text
character overlapping different background colors
traps accurately to all colors it overlaps.
For best results with built-in trapping, use
PostScript fonts only; using TrueType fonts may
result in inconsistent traps. Neither trapping
engine traps bitmap fonts. If your document must
use TrueType fonts and you want to use built-in
trapping, consider converting all TrueType text to
outlines by selecting the text and choosing Type >
Create Outlines. The text will become InDesign
objects that do trap reliably. Remember that text
can’t be edited after you convert it to outlines.
Maximizing trapping performance
Whether you use Adobe In-RIP trapping or built-in
trapping, you can save time by not processing
pages that don’t need trapping, such as pages
containing black text only. You can use trapping
page ranges to enable trapping only for the page
ranges that require it; for more information see
“Using trapping page ranges” on page 61.
The speed of built-in trapping depends on the
speed of your computer system. If you’re trapping
every page of a long document, use the fastest
computer system you have. Built-in trapping also
makes extensive use of your computer’s hard disk,
so a fast hard disk and data bus will benefit builtin trapping. To maximize the amount of time your
computers are available for other tasks, consider
using Adobe In-RIP Trapping, which processes all
traps at the imagesetter instead of at your
computer.
Setting aside disk space for built-in trapping
To trap the edges of every color that requires
trapping, the trapping engine creates a large number
of paths which are used only by the output device
(not stored in your document). While Adobe In-RIP
Trapping processes and stores these additional paths
at the RIP, built-in trapping uses your computer’s
hard disk as a temporary storage area for these trap
paths. Before you use built-in trapping, make as
much space as possible available on your hard disk.
The amount of disk space you need depends on a
wide range of factors, so it isn’t possible to
precisely predict the amount of disk space a
particular trapping job will require. However, disk
space requirements for trapping are most likely to
increase when you increase one or more of the
following characteristics of your document:
• Number of pages included in trapping page
ranges
• Number of overlapping colored objects
• Number of images that need to be trapped
Page 64

CHAPTER 4
60
Using New Color and Trapping Features
• Amount of text that needs to be trapped
• Resolution of final output
If a print job that uses built-in trapping is interrupted or runs out of disk space, trapping data
may be left behind on your hard disk. When
necessary, you can exit InDesign and find and
delete temporary InDesign data in the C:\Temp
folder (Windows) or the Cleanup At Startup folder
(Mac OS).
Note: The Cleanup At Startup folder is an invisible
folder at the top level of a Mac OS computer. Use a
disk utility to see it, or to locate it using the Mac OS
Find command, press Option as you click the left
search criterion menu to choose the Visibility option,
and then choose Invisible from the right criterion
menu.
Trapping a document
Trapping is a complex process that depends on
the interaction of various color, ink, and printing
factors; the correct settings vary depending on
specific printing conditions. Do not change the
default trapping settings unless you’ve consulted
with your prepress service provider, and read the
trapping topics referred to in the following
procedure to make sure you understand how
trapping options work in the context of your
document and printing conditions.
To open the Trapping panel:
1 Choose File > Print.
2 Click the Trapping tab (Windows) or choose
Trapping from the printer options menu (Mac OS).
To trap a document:
1 Open the Trapping panel as described above,
and then from the Trapping menu, choose one of
the following:
• To use no automatic trapping, choose Off.
• To trap the document using the trapping engine
included with InDesign, choose Application Built-in.
• To trap the document using Adobe In-RIP
Trapping, choose Adobe In-RIP. This option
works only when you target an output device that
supports Adobe In-RIP Trapping.
Note: If you set options for Adobe In-RIP trapping
and then switch to Application Built-in trapping,
options not supported by built-in trapping will
become unavailable. They may appear selected, but
won’t be applied until you switch back to Adobe In-
RIP trapping.
2 Click Inks. As necessary, select an ink, specify
the following options, and then click OK:
• For Type, choose an ink type that describes the
selected ink only if your prepress service provider
recommends changing this setting. See “Working
with specialty inks or varnishes” on page 64.
• For Neutral Density, type a value that describes
the neutral density of the selected ink only if your
prepress service provider recommends changing
this setting. See “Adjusting ink neutral density
values” on page 63.
• For Ink Sequence, type a value to set the order in
which inks are printed only if your prepress service
provider recommends changing this setting. See
“Specifying ink sequence” on page 64.
Page 65

ADOBE INDESIGN1.5
User Guide Supplement
61
3 In the Trapping section, as necessary do either
of the following:
• To create a new trapping page range, click New.
• To view or change a trapping page range, select a
trapping page range and click Edit.
4 Specify options, and then click OK. See “Using
trapping page ranges” on page 61.
5 In the Trapping section, click the Enabled
column to turn trapping on or off for any listed
page ranges.
6 Click Styles to define named sets of options for
trapping, and then click OK. See “Using trapping
styles” on page 62.
7 Click a different tab (Windows) or choose
another panel from the popup menu (Mac OS) to
continue specifying other print options.
8 Click OK (Windows) or Print (Mac OS) to print
the document.
Using trapping page ranges
The trapping engine lets you specify different
trapping options for different ranges of pages. For
example, pages with no abutting colors will print
faster if you disable trapping on those pages. You
can define a range of pages as a trapping page
range, and associate that range with a trapping
style you’ve defined. See “Using trapping styles”
on page 62.
Note: You can’t edit the default trapping page range.
If you want to change any of the default trapping
page range options, create and apply a new trapping
page range.
To set up trapping page ranges:
1 Open the Trapping panel.
2 In the Trapping list, if necessary either click New
to make a new trapping page range, or change an
existing trapping page range by selecting it and
clicking Edit.
3 Select a Trapping Style to apply to the page
range. To set up styles, see “Using trapping styles”
on page 62.
4 Specify a page range by selecting All Pages,
selecting Range and typing a range, or by selecting
By Section and selecting one or more sections in
the list. If you selected By Section, you can select
Section Numbering to change the page
numbering method in this dialog box only. If you
specify a page range, type one or more ranges in
ascending sequence using a hyphen for each range,
and separating pages and ranges using commas.
For example, 2-4, 6, 9-10, 12- is a valid range.
Note: If a page appears in multiple page ranges, that
page will be trapped with the style assigned to the
page range that appears later in the list.
5 Click OK. If necessary, repeat steps 2-6 to create
or modify other page ranges.
6 Make sure Enabled is selected for the page range
you created or edited.
To disable a trapping page range:
In the Trapping list in the Trapping panel, make
sure Enabled is deselected for the page range you
want to disable.
Page 66

CHAPTER 4
62
Using New Color and Trapping Features
To delete a trapping page range:
In the Trapping list, select a trapping page range
and click Delete.
Using trapping styles
A trapping style is a named set of trapping specifications. Use trapping styles so that you don’t have to
remember trapping settings for different presses or
page ranges. If you don’t apply a trapping style to a
trapping page range, that page range will use the
Default trapping style. The way individual
trapping options are used varies depending on the
situation. For more information, see the other
trapping topics in this chapter.
Note: You can’t edit the default trapping style. If you
want to change any of the default trapping style
options, create and apply a new trapping style.
To set up trapping styles:
1 Open the Trapping panel.
2 Click Styles. If necessary, create a new style by
clicking New, or change an existing style by
selecting it and clicking Edit. Specify the following
options, and then click OK.
• For Name, type a name for the style.
• For the Trap Width section, type values to
specify the amount of overlap for inks. See “Setting
trap widths” on page 65.
• For the Trapping Threshold section, type values
to specify the conditions under which trapping
occurs. Many variables affect the values you enter
here. For more information, consult your prepress
service provider and see the other trapping topics.
• For Trap Color Reduction, type a value to specify
the degree to which the trapping engine uses
components from abutting colors to reduce the trap
color. This is useful for preventing certain abutting
colors (such as pastels) from making an unsightly
trap that is darker than either color. Specifying a
Trap Color Reduction smaller than 100% begins to
lighten the color of the trap; a Trap Color Reduction
value of 0% makes a trap whose neutral density is
equal to the neutral density of the darker color.
• For the Image Settings section, specify settings
that determine how to trap imported bitmap
images. See “Trapping imported graphics” on
page 67.
To create a new style based on an existing style,
select an existing style before clicking New.
To apply a trapping style:
1 In the Trapping list in the Trapping panel, select
the page range to which you want to apply a
trapping style, and then click Edit.
2 For Trapping Style, select the style you want to
apply, and then click OK.
To delete a style:
1 In the Trapping Options dialog box, click Styles.
2 Select a style, click Delete, and then click OK.
Note: Use caution when you use trapping styles in a
document and print with the Reader’s Spreads
option turned on. For more information, see
“Printing with trapping styles and reader’s spreads”
on page 71.
Page 67

ADOBE INDESIGN1.5
User Guide Supplement
63
Adjusting ink neutral density values
You can adjust the ink neutral density (ND) values
that the selected trapping engine uses to determine
the precise placement of traps. The default ND
values for process inks are based on the neutral
density readings of process ink swatches that
conform to industry standards in different parts of
the world. The language version of InDesign determines which standard it adheres to. For example,
the ND values for the U.S. English and Canadian
versions of InDesign conform to the Specifications
for Web Offset Publications (SWOP) solid ink
density values published by the Graphic Arts
Technical Foundation of North America. InDesign
lets you adjust process ink neutral densities to
match printing industry standards in a different
part of the world.
The trapping engine derives the ND values for a
spot color from its CMYK equivalent. For most spot
colors, the ND values of their CMYK equivalents
are accurate enough for proper trap creation. Spot
inks that are not easily simulated using process inks,
however, may need their ND values adjusted so that
the trapping engine traps them correctly. By typing
new values, you can ensure that an ink that is
observed as darker or lighter is perceived that way in
InDesign; the appropriate trap placement is then
applied automatically.
You can get the appropriate neutral density value
for a given ink by asking your commercial printer.
The most accurate method of determining an ink’s
ND is to use a commercial densitometer to measure
a swatch of the ink color. Read the “V” or visual
density of the ink (do not use process filters). If the
value differs from the default setting, type the new
value in the ND text box, and then click Set. You
can restore the default for a selected ink by
clicking Default.
Note: Changing the neutral density for a spot color
only affects how that color will trap. It does not change
the appearance of that color in your document.
Use the following guidelines for adjusting ND
values:
Metallic and opaque inks Metallic inks are usually
darker than their CMYK equivalents, while opaque
inks obscure any ink beneath them. In general, you
should set the ND values for both metallic and
opaque spot colors much higher than their default
values to ensure that these spot colors won’t spread.
It’s also a good idea to set the metallic ND to a
higher value than the ND of Black so that Black
does not spread into the metallic spot color.
Note: Setting an ink to Opaque or OpaqueIgnore in
the Edit Trapping Inks dialog box will prevent an
opaque ink from spreading into other colors, unless
another opaque ink has a higher ND value.
Page 68

CHAPTER 4
64
Using New Color and Trapping Features
Pastel inks These inks are normally lighter than
their process equivalents. You may want to set the
ND value for these inks lower than their default
values to ensure that they spread into adjacent
darker colors.
Other spot inks Some spot colors, such as turquoise
or neon orange, are significantly darker or lighter
than their CMYK equivalents. You can determine
whether this is the case by comparing printed
swatches of the actual spot inks to printed swatches
of their CMYK equivalents. You can adjust the spot
ink’s ND value as higher or lower as necessary.
Working with specialty inks or varnishes
Certain inks require special trapping considerations.
For example, if you are using a varnish on your
document, you don’t want the varnish to affect
trapping. However, if you are overprinting certain
areas with a completely opaque ink, there is no need
to create traps for items underneath. Ink options are
available for these situations. It’s usually best to
leave the default settings unless your prepress
service provider recommends changing them.
For a color illustration of working with specialty
inks or varnishes, see the Adobe InDesign User
Guide.
To customize trapping with specialty inks:
1 Open the Trapping panel.
2 Click Inks, and then select an ink that requires
special treatment.
3 For Type, choose one of the following options,
and then click OK:
• Choose Normal for traditional process inks and
most spot inks.
• Choose Transparent for clear inks to ensure that
underlying items trap. Use this option for
varnishes and die line inks.
• Choose Opaque for heavy, non-transparent inks
to prevent trapping of underlying colors but allow
trapping along the ink’s edges. Use this option for
metallic inks.
• Choose OpaqueIgnore for heavy non-trans-
parent inks to prevent trapping of underlying colors
and to prevent trapping along the ink’s edges. Use
this option for inks that have undesirable interactions with other inks.
Specifying ink sequence
You can adjust the ink sequence (also called the
trapping order), which corresponds to the printing
press inking order. This is particularly useful when
printing with multiple opaque colors, such as
metallic inks. Opaque inks with lower sequence
numbers are spread under opaque inks with
higher sequence numbers. This prevents the last
applied ink from being spread, and still creates
seamless traps. Not all output devices support ink
sequence control. To learn whether your output
device has this feature, contact the manufacturer
or your prepress service provider.
Note: Do not alter the default ink sequence without
first consulting with your prepress service provider.
Page 69

ADOBE INDESIGN1.5
User Guide Supplement
65
To adjust the printing press inking order:
1 Open the Trapping panel.
2 Click Inks. The list of inks displays the current
ink sequence.
3 Select an ink and type a value for Ink Sequence.
The value you type is switched with the ink that
formerly used that value.
4 Repeat the previous step for as many inks as
necessary, and then click OK.
Setting trap widths
Differences in paper characteristics, screen rulings,
and printing press conditions require different
amounts of trap. To determine the appropriate trap
widths for each job, consult with your commercial
printer. Trapping styles provide two different settings
for trap width (the amount of overlap for each trap):
Default Specifies the trap width for trapping all
colors except those involving solid black.
Black Width Specifies both the distance that inks
spread into black, and the holdback amount for
trapping rich blacks. The default value is 0.5
points. This value is often set to be 1.5 to 2 times
the value of the default trap width. If you are
trapping black (not rich black), the holdback
amount isn’t necessary and doesn’t apply.
The value you set for Black Color Limit determines
what InDesign considers a solid black or a rich black
(a process color consisting of solid black with one or
more layers of C, M, or Y inks). For details, see
“Trapping with blacks and rich blacks” on page 67.
Note: If you choose Application Built-in trapping
and you specify a Default trap width or Black Width
larger than one point, the resulting trap width is
limited to one point. However, the option continues
to display the value you specified, because if you
switch to Adobe In-RIP Trapping, traps larger than
one point are applied as you specified.
Setting trapping thresholds
You can adjust trapping thresholds as recommended
by your prepress service provider to correspond to
your printing conditions. Trapping thresholds are
available for the following color conditions:
Step Limit Indicates the degree to which compo-
nents (such as CMYK values) of abutting colors
must vary before the trapping engine creates a trap.
Type a value from 0% to 100%, or use the default of
10%. For best results, use a value from 8% to 20%.
Lower percentages increase sensitivity to color differences and result in more traps. This option is not
available if you choose Application Built-in trapping.
Black Color Limit Indicates the minimum amount
of black ink required before the Black Width setting
is applied. Type a value from 0% to 100%, or use
the default of 100%. For best results, use a value no
lower than 70%. See “Trapping with blacks and
rich blacks” on page 67.
Black Density Limit Indicates the neutral density
value at or above which the trapping engine
considers an ink to be black. For example, if you
want a dark spot ink to use the Black Width setting,
ensure that the value here is no greater than its
neutral density. Use any value from 0 to 10, but
this value is typically set near the default of 1.6.
Page 70

CHAPTER 4
66
Using New Color and Trapping Features
Sliding Trap Limit Indicates the percent difference
between the neutral densities of abutting colors at
which the trap is moved from the darker side of a
color edge toward the centerline for a more elegant
trap. Type a value from 0% to 100%, or use the
default of 70%. See “Using sliding traps” on
page 66. Sliding Trap Limit is not available if you
choose Application Built-in trapping.
Adjusting trapping tolerance
Some jobs need only the most extreme color
changes trapped, while others require traps for
more subtle color changes. The Step Limit value
specifies the threshold at which the trapping
engine decides to create a trap.
To change how much the component inks in
abutting colors can vary before causing those colors
to trap, increase or decrease the value for Step Limit
in the Trapping panel in the Print dialog box. The
lower the Step Limit percentage, the more often
traps are created between colors.
Using sliding traps
When you use Adobe In-RIP Trapping, you can
use a sliding trap to prevent abrupt shifts in trap
placement along a gradient edge. When trapping,
the trapping engine adjusts (slides) the trap
position from spreading the lighter color into the
darker one to straddling the centerline between
them.
In the Trapping Style dialog box, the Sliding Trap
Limit value determines when the trapping engine
starts to straddle the centerline of the color
boundary. The value refers to the proportion of
the lighter color’s neutral density value to a
darker, abutting color’s neutral density value. For
example, setting the Sliding Trap Limit value to
70% moves the placement of the trap to begin to
straddle the centerline when the lighter color
exceeds 70% of the darker color in neutral
density (lighter color’s neutral density divided by
darker color’s neutral density > 0.70). Colors of
identical neutral density will always have their
traps placed exactly about the centerline unless
the Sliding Trap Limit is set to 100%.
Note: The Sliding Trap Limit option is available only
with Adobe In-RIP trapping.
To set the percentage difference at which a trap
slides:
1 Open the Trapping Style dialog box for a new or
existing style. See “Using trapping styles” on
page 62.
2 For Sliding Trap Limit, enter a percentage from
0 to 100. At 0%, all traps default to centerline; at
100%, sliding traps are turned off, forcing one
color to be spread fully into another regardless of
the neutral density relationship of the abutting
colors.
For a color illustration of sliding traps, see the Adobe
InDesign User Guide.
Page 71

ADOBE INDESIGN1.5
User Guide Supplement
67
Trapping imported graphics
You can use the Trapping panel to control traps
within images as well as traps between bitmap
images, such as photographs, and vector objects,
such as those from a drawing program. If you’re
using built-in trapping instead of Adobe In-RIP
Trapping, be sure to understand the differences in
the way each trapping engine handles imported
graphics; see “About trapping imported images” on
page 57.
The Trapping panel in the Print dialog box includes
the following options:
Image Trap Placement Provides options for deter-
mining where the trap falls when trapping vector
objects (including objects drawn in InDesign) to
bitmap images. All options except Neutral Density
create a visually consistent edge. Center creates a
trap that straddles the edge between objects and
images. Choke causes objects to overlap the abutting
image. Neutral Density applies the same trapping
rules as used elsewhere in the document. Trapping
an object to a photograph with the Neutral Density
setting can result in noticeably uneven edges as the
trap moves from one side of the edge to another.
Spread causes the bitmap image to overlap the
abutting object.
Trap Objects to Images Ensures that vector objects
(such as frames used as keylines) trap to images,
using the Image Trap Placement settings. If vector
objects do not overlap images in a trapping page
range, consider turning this option off to speed
trapping of that page range.
Trap Images Internal Turns on trapping among
colors within each individual bitmap image (not
just where they touch vector artwork and text). In
most cases, leave this option deselected. Use it for
page ranges containing high-contrast images only,
such as screen shots or cartoons. Trapping is faster
when this option is deselected. This option is not
available if you chose Application Built-in
trapping.
Trap 1-Bit Images Ensures that 1-bit images trap to
abutting objects. This option does not use the Image
Trap Placement settings because 1-bit images use
only one color. In most cases, leave this option
selected. In some cases, such as a 1-bit images where
pixels are widely spaced, selecting this option may
darken the image and slow trapping.
Trapping with blacks and rich blacks
The value you type for Black Color Limit in the
Trapping Style dialog box determines what is
considered a solid black and a rich black. A rich
black is any black color that uses a support screen—
adding percentages of one or more process inks to
strengthen the black.
The Black Color Limit setting is useful when you
must compensate for extreme dot gain (as when
using low-grade paper stock). These situations
cause black percentages lower than 100% to print as
solid areas. By screening back (using tints of solid
black) blacks or rich blacks and decreasing the Black
Color Limit setting from its default of 100%, you
can compensate for dot gain and ensure that the
trapping engine will apply the proper trap width
and placement to black objects.
Page 72

CHAPTER 4
68
Using New Color and Trapping Features
When a color reaches the Black Color Limit value,
the Black Width value is applied to all colors next
to it, and keepaway traps are applied to rich black
areas using the Black Width value.
Note: Don’t worry that the Black Width setting will
be too wide for trapping thin elements, such as black
keylines around graphics. In those cases, the trapping
engine automatically overrides the Black Width setting
and limits the trap to half the width of the thin element.
If support screens extend all the way to the edge of a
black area, any misregistration will cause the edges
of support screens to become visible, creating an
unwanted halo or distorting the edges of objects.
The trapping engine uses a keepaway, or a holdback,
placement for rich blacks to keep support screens a
specified distance away from edges of reversed-out
or light elements in the foreground, so that the light
elements retain their sharpness. You control the
distance of support screens from the edges of black
area by specifying the Black Width value.
For a color illustration of using Black Width to trap
support screens, see the Adobe InDesign User Guide.
To set the trap width for colors next to black:
1 Open the Trapping Style dialog box for a new
or existing style. See “Using trapping styles” on
page 62.
2 For Black Width, enter a distance (in points)
you want other colors spread into black or the
distance you want support screens choked back
under black. Typically, the Black Width is set 1.5
to 2 times the value of the Default trap width.
3 For Black Color Limit and Black Density, set
values. See “Setting trapping thresholds” on
page 65.
Note: To apply black trapping features, a colored area
must use an ink having a neutral density greater than
or equal to the Black Density Limit and occur in
percentages equal to or greater than the Black Color
Limit.
4 Click OK as necessary to close dialog boxes.
Page 73

Chapter 5: Importing Files and
Creating Output
69
Easier file relinking
When you open an InDesign file and a link is
missing or out of date, InDesign opens an alert
dialog box and provides a Fix Links button so that
you can resolve the link immediately.
In addition, when you select a link in the Links
palette and choose Link Information from the
Links palette menu, the Link Information dialog
box includes Relink and Update buttons, which
perform the same functions as the Relink and
Update Link buttons, respectively, in the Links
palette. This allows you to resolve a link without
having to leave the Link Information dialog box.
For more information about managing links and
the Links palette, see the Adobe InDesign User Guide.
Replacing files from the Place
dialog box
You can replace an imported text or graphics file
using the Place dialog box, so that you don’t have
to replace files from the Links palette. You can
replace text with a graphic, or vice versa.
To replace an imported file using the Place dialog box:
1 With the selection tool ( ), select an imported
file.
2 Choose File > Place.
3 Locate and select the new file you want to use.
4 Make sure Replace Selected Item is selected, and
then click Open (Windows) or Choose (Mac OS).
If necessary, you can make the frame fit the new
graphic. With the frame selected, choose Object
> Fitting > Fit Frame to Content.
To replace an imported graphic using the Place dialog
box and scale the new graphic to the existing frame:
1 With the direct-selection tool ( ), select an
imported graphic (don’t select the frame).
2 Choose File > Place.
3 Locate and select the new file you want to use.
Page 74

CHAPTER 5
70
Importing Files and Creating Output
4 Make sure Replace Selected Item is selected, and
then click Open (Windows) or Choose (Mac OS).
Note: This procedure doesn’t preserve the original
proportions of the graphic.
Checking fonts in imported graphics
You can identify the fonts used in imported
graphics, such as EPS and PDF files, by using the
Find Font command. For more information, see
“Finding and changing fonts” on page 24.
Using styles for printing and
PDF export
You can easily automate printed and PDF output
jobs by saving all output settings as either a printer
or PDF export style. Using output styles is a fast,
reliable way to apply settings consistently to jobs
that require accurate settings for many options in
the Print or Export PDF dialog boxes.
You can export and import output styles, making
it easy to back them up or to make them available
to your service providers, clients, or others in your
workgroup.
To create or edit a PDF export style:
1 Choose File > Define PDF Style.
2 Do one of the following, and then click OK:
• To create a new style, click New, and then specify
a Name.
• To change an existing style, select a style in the
list and then click Edit.
3 Specify export settings as necessary in any of the
panels listed in the menu under the name, and then
click OK. The options available in the panels are the
same as those in the Export PDF dialog box except
for the Security options; for more information see
the Adobe InDesign User Guide.
To export a PDF using a PDF export style:
1 Choose File > Export.
2 Specify a location and name for the file, choose
Adobe PDF from the Formats menu, and then
click Save (Windows) or Export (Mac OS).
3 Choose a style from the Style menu, and then
click Export.
To create or edit a printer style:
1 Choose File > Printer Styles > Define.
2 Do one of the following, and then click OK:
• To create a new style, click New, specify a Name,
and then click OK.
• To change an existing style, select a style in the
list and then click Edit.
3 In the Print dialog box that follows (on Mac OS,
the Page Setup dialog box also appears), specify the
print settings you want, and then click OK. For
more information about printing options, see the
Adobe InDesign User Guide and the documentation
for your printer driver. For more information about
Application Built-in trapping options, see
“Automatic trapping” on page 56.
Page 75

ADOBE INDESIGN 1.5
User Guide Supplement
71
To print using a printer style:
1 Choose a printer style from the File > Printer
Styles menu. If you want, confirm the printer
settings in the dialog box that appears.
2 Click OK (Windows) and Print (Mac OS).
To rename or delete printer or PDF styles:
1 Do one of the following:
• To rename or delete PDF styles, choose File >
Define PDF Style.
• To rename or delete printer styles, choose File >
Printer Styles > Define.
2 Do one of the following:
• To rename an existing style, select a style in the
list, click Rename, type a new name, and then
click OK.
• To delete styles, select one or more styles in the
list, click Delete, and then click OK to confirm the
deletion.
3 Click OK.
To export printer or PDF styles:
1 Do one of the following:
• To export PDF styles, choose File > Define PDF
Style.
• To export printer styles, choose File > Printer
Styles > Define.
2 In the list, select one or more styles to export.
3 Click Export. Specify a name and location, and
then click Save.
Printing with trapping styles and reader’s spreads
You can apply one trapping style to one sheet of
output, such as one page. Normally this is not a
concern, but if you print more than one page on
the same sheet of output (such as by using the
Reader’s Spreads option) and each page has a
different trapping style, only one trapping style
can be applied to the sheet. InDesign resolves this
in the following ways:
To import printer or PDF styles:
1 Do one of the following:
• To import PDF styles, choose File > Define PDF
Style.
• To import printer styles, choose File > Printer
Styles > Define.
2 Click Import.
3 Locate and double-click the file containing the
styles you want to import, and then click OK.
• If one of the two resulting pages uses a trapping
style, InDesign applies it to both pages.
• If each page uses a trapping style, InDesign
applies the trapping style that appears later in the
Trapping Styles list.
For more information about trapping styles, see
“Using trapping styles” on page 62.
Page 76

CHAPTER 5
72
Importing Files and Creating Output
Printing on Windows 2000
For best results when printing to a PostScript
output device on Windows 2000, print using
either the Windows 2000 or AdobePS 5.1.1
PostScript driver. If an alert message appears in the
Print dialog box, check the version of the printer
driver in use, and if necessary, install one of the
printer driver versions mentioned above.
To get information about the driver version you’re
using:
1 Open the Printers folder.
2 In the Printers window, choose File > Server
Properties.
3 Click the Drivers tab, and then click the printer
you’re using. While it may display a version, this
information isn’t sufficient, so you’ll check the
driver properties in the next step.
4 Click Properties and look for one of the
following:
• If the the Driver File is PSCRIPT5.DLL and the
Config File is PS5UI.DLL, you’re using the
Windows 2000 driver.
• If the Driver File is AdobePS5.dll and the Config
File is Adobe PSU.dll, you’re using the AdobePS
5.1.1 driver.
• If the Driver File and Config File names don’t
match either of the two drivers listed above,
upgrade your printer driver software.
If you’re connected to a local area network, it’s
possible to be running Windows 2000 but printing
through the Windows NT printer driver. This is
because Windows uses the printer driver from the
print server, and your system administrator may
be running Windows NT on the print server. If you
experience problems printing with this configu-
ration, contact your system administrator to see if
any of the following options are practical:
• Continue using the Windows NT print server,
but upgrade the server’s printer driver to AdobePS
version 5.1.1.
• Upgrade the print server to Windows 2000.
• Target a printer instance served from a Novell
server, if such a network is already installed.
• Install a Windows 2000 printer instance locally
and print directly, without using the network.
• Install a Windows 2000 printer instance locally
and change the port to the printer you want to use.
This requires administrative privileges and the
exact path or IP address of the printer.
If none of the above are practical for your printing
environment, you can still print from InDesign
because the alert message won’t prevent printing.
However, if you aren’t printing with the Windows
2000 or Adobe 5.1.1 printer driver, it will be more
difficult to diagnose unexpected printing results.
Page 77

Index
ADOBE INDESIGN 1.5
User Guide Supplement
73
A
Acrobat. See Adobe Acrobat
Adobe Acrobat Reader
Adobe Certification program 6
Adobe Illustrator 48, 57, 58
Adobe InDesign
converting from 1.0 16
installing 3
online Help 5
starting 3
updating 7
Adobe InDesign Script Guide 4
Adobe In-RIP Trapping
compared to built-in trapping
56
described
turning on
Adobe news articles 8
Adobe Online 6, 7
Adobe PageMaker, converting
Adobe Photoshop 46, 57
Adobe PostScript drivers 72
Adobe Print Publishing Guide
Adobe Web site 6
AdobePS. See Adobe PostScript
Align palette
56
from 16
drivers
47
4
60
aligning text vertically 30
aligning type to a path 27
Allow Pages to Shuffle command
14
alpha channels
46
defined
masking with 45
text wrap using 23
Ascender option (path type) 27
B
baseline grid
Baseline path type alignment
binding spine 12
Black Color Limit option
definition of black
dot gain and
trapping thresholds and 65
Black Density Limit option 65, 68
Black Width option 65, 68
defined 65
effect of 68
6
threshold for 65
black, trapping next to 67
BMP files, trapping 57
bold type style, applying 34
11, 31
command
27
67
68
Bottom path type alignment
command 28
built-in trapping
compared to Adobe In-RIP
56
Trapping
disk space requirements 59
turning on
C
capitalization, changing 36
CD-ROM contents 3
Center (image trap) option 67
Center path type alignment
center point of objects, using 39
Change Case command 36
Character palette, scaled type size
character styles, preserving format
characters, special. See special
Choke option 67
Classroom in a Book 5
Clipping Path command 46
clipping paths 45
closed paths, drawing with pencil
CMYK values and step limit 65
60
command 27, 28
and 35
overrides 34
characters
40
tool
Page 78

74
INDEX
codes for text formatting 5
color modes, cycling through 55
color separations
adjusting ink density values 63
dot gain control 67
colors
character styles and 34
cycling through modes 55
dragging and dropping 54
naming after values 53
paragraph styles and
redefining imported spot to
process
55
sampling from imported
graphics 54
column break 20
composite color workflow 57
Configure Plug-ins command 15
contents of InDesign package 3
continued lines 20
converting
Adobe InDesign 1.0 16
Adobe PageMaker 16
QuarkXPress 16
copying 35, 48
curves, smoothing 41
D
DCS files 57
defaults
Swatches palette 53
34
trap width option 65
window layout 9
Define (printer styles) command
70
Define PDF Style command
Descender option (path type) 27
Detach All Objects from Master
command 14
Detach Selection From Master
command 14
Detected Edge option 23
Dictionary command 32
direct-selection tool
moving and copying 48
new features of 11
distortion effects, path type 29
distributing objects 47
distributing type vertically 30
document grids 11
documentation overview
dot gain, compensating for
Downloadables command 7
dragging and dropping colors 54
drawing
ellipses 39
erase tool and 40
paths 39
pencil tool and 39
rectangles 39
70
4
67
smooth tool and 40
duplicating
direct-selection tool and 48
fill and stroke attributes 44
type attributes 35
E
Edit Style button 62
ellipses, drawing centered 39
end of story marker 22
EPS files, trapping 57
erase tool 9, 40, 41
even page break 20
eyedropper tool
colors and 54
fill and stroke attributes and 44
location in toolbox 9
type attributes and 35
using 45
F
fills
copying 44
Find Font command 24, 70
fonts
checking graphics for 70
copying attributes 44
finding and changing 24
formatting codes 5
frame break 20
Page 79

ADOBE INDESIGN 1.5
User Guide Supplement
75
free transform tool 49
moving objects 49
reflecting objects
rotating objects 49
scaling objects 49
shearing objects
toolbox location 9
freeform paths
See also pencil tool
freehand tool. See pencil tool
Full Resolution option 43
G
General preferences
GIF files, trapping 57
gradients
Adobe In-Rip Trapping and
built-in trapping and 57
reversing color progression 55
Graphic Arts Technical
Foundation of North America
63
Gray Out option
Grids in Back option 12
grids, spacing 11
H
hanging indents 38
Help Topics command 5
holdback 65, 68
hyphenation exceptions 32
50
50
5
44
I
Image Trap Placement option 67
images. See imported graphics
imported files
linking to different 69
imported graphics
display performance 43
finding fonts in 24
linking 69
sampling colors from 54
trapping 57, 67
Include Inside Edges option 23
Indent to Here special character 38
indents, new features 37
InDesign Top Issues document 8
ink sequence (trapping order) 64
66
inks
opaque 63
pastels 64
trapping metallic 63
Inks button 60
installing Adobe InDesign 3
island spreads 13
italic type style, applying 34
J
JPEG files, trapping
jump lines 20
justification, vertical 30
57
K
Keep Spread Together command
13
keepaway traps
kerning, word 37
keyboard shortcuts. See the Quick
Reference Card or online
Help
L
lessons 4
line styles from QuarkXPress 17
lines, pencil tool and 39
Link Information dialog box 69
links, restoring broken 69
lowercase and uppercase type,
changing 36
M
Mac OS 1, 56
masks. See clipping paths
masters, new options
metallic inks, trapping
Microsoft Windows 72
Move command 50
moving objects
dialog box options and 50
direct-selection tool and 48
free transform tool and 49
Move command and 50
N
ND. See neutral density
68
14
63
Page 80

76
INDEX
neutral density 66
adjusting 63
Black Density and
measuring 63
values 63
Neutral Density option
new features 1
New Style button 62
new tools 9
Next Page Number command 21
Non-Uniform Scaling option 51
Normal option (ink type) 64
O
odd page break
online Help 5
online registration 4
Online Settings preference 7
Opaque Ignore option 64
opaque inks, trapping
Opaque option (ink type) 64
OPI images, trapping and 58
Optimized Resolution option 43
origin point for transformations
50, 51
origin, ruler 12
P
page breaks 20
page menu 11
65
67
20
63
page numbers 20
Page origin option 12
PageMaker. See Adobe PageMaker
pages
going to other 11
page breaks 20
rulers and 11
viewing 12
Pages palette, new features 12
palettes, compacting lists in 10
palettes, docking
paragraph rules 17, 32
paragraph styles 34
paragraph styles, preserving
overrides
Paste in Place command 52
pastel inks, trapping 64
pasting at original position 52
path type
converted from QuarkXPress 17
creating 26
deleting 25
described 25
distortion effects 29
flipping 28
spacing 30
start and end boundaries 27
vertical alignment 27
path type tool 9, 26
paths
10
34
drawing with pencil tool 39, 40
erasing 41
selecting segments and points
41
smoothing
PCX files, trapping 57
PDF files
styles for exporting 70
trapping and 57
pencil tool
See also freeform paths
defined 39
preferences 41
toolbox location 9
using 39
performance
image display
trapping 59
Photoshop Path option 23, 46
PICT files, trapping 57
Place command
placeholder text 19
plug-ins, configuring 15
PNG files, trapping 57
PostScript files, trapping and 57
PostScript Printer Description file.
PPD files 57
preferences
Adobe Online 7
general 5
40
43
69
See PPD files
Page 81

ADOBE INDESIGN 1.5
User Guide Supplement
77
grids 11
hyphenation 32
image display
kerning 37
location of command 11
pencil tool
ruler origin 12
smooth tool 41
toolbox layout 10
Preferences command 5, 11
Previous Page Number command
21
print servers, Windows 2000 and
72
printing
styles for
Windows 2000 and 72
process colors, naming 53
Proxy option 43
Q
QuarkXPress, converting from 16
Quick Reference Card 4
R
Reader, Adobe Acrobat. See Adobe
Acrobat Reader
reader’s spreads, trapping and
rectangles, drawing from center 39
reference card 4
reflecting, free transform tool and
50
43
41
70
71
registration online
rich blacks 67, 68
right indent tab
Rotate command 50
rotating objects 49, 50
rulers, setting horizontal origin
S
Scale command 51
scaling
dialog box options and 51
free transform tool and 49
keyboard shortcuts for 49
Scale command and 51
type size and 35
scripting InDesign 4
selecting
multiple points 41
one line of text 19
segments of paths 41
Set as Island Spread command 13
Shear command 51
shearing
free transform tool and 50
Shear command and 51
skewing. See shearing
Sliding Trap Limit option
sliding traps 57, 66
Small Palette Rows command 10
4
37
66
smooth tool
smoothing paths or strokes 40
spacing
between objects 47
between words 37
path type characters 30
12
special characters
column break 20
end of story 22
even page break 20
frame break
indent to here 38
jump line page numbers 20
odd page break 20
page break 20
from QuarkXPress 17
right indent tab 37
Specifications for Web Offset
Spine origin option 12
spot colors, trapping 63
Spread option 67
Spread origin option 12
starting InDesign 3
Step Limit option 65, 66
story jumps
story, end marker 22
strokes
erasing
smoothing 40
styles
9, 41
20
Publications
20
40
63
Page 82

78
INDEX
bold 34
italic 34
paragraph
PDF export 70
printing 70
trapping
support screens 67
Swap Fill/Stroke button 55
swatches
defining as spot 53
displaying name 54
size of 54
Swatches palette 53
SWOP standards 63
T
tabs 37
tagged text 5
Tagged Text document 5
technical support, top issues 8
text
aligning and justifying vertically
changing case
new features 19
placeholder 19
preserving format overrides 34
scaling and reported size 35
selecting a single line 19
tagged text 5
text wrap 22
34
62
30
36
trapping 59
Text Frame Options command 31
text on a path. See path type
text wrap 22
tints, paragraph rules and 32
tolerance, pencil tool 41
5, 10
tool tips
toolbox 9, 10, 11
Top Issues document 8
Top path type alignment
command 28
training 4
transforming objects 48
dialog box, using 50
free transform tool 49
transparency 45
Transparent option 64
Trap 1-Bit Images option 67
Trap Images Internal option 67
Trap Objects To Images option
Trap Width options 65
trap widths 65
trapping
Adobe In-RIP Trapping 60
automatic 56
67
black
built-in 60
gradients 66
graphics 67
holdback amount 65
imported images 57
67
keylines to images
maximizing performance 59
metallic inks
order 64
page ranges 61
pastel inks
reader’s spreads and 71
sliding traps 66
specialty inks 64
Step Limit option 66
styles 62
Trap Width options 65
Trapping Thresholds options 65
varnishes 64
trapping order 64
trapping page ranges 61
Trapping print option 60
trapping styles 62, 71
Trapping Thresholds options 65
TrueType fonts, trapping and 59
tutorials 4
type
along a path 25
attributes, copying with
eyedropper tool 35
capitalization, changing 36
duplicating attributes 35
fonts, finding and replacing 24
type on a path. See path type
67
63
64
Page 83

U
updating InDesign
uppercase type, changing
user dictionaries, hyphenation and
32
V
64
varnishes
Vertical alignment and
justification
vertical alignment, path type
vertical alignment, text 16, 30
vertical justification 16, 30
W
Web links related to Adobe or
InDesign 8
Web page, registration 4
Web site for Adobe 7
window layout default 9
Windows
Windows 2000
compatibility with
printing on 72
trapping on 56
Windows 98 56
Windows NT 4 56
word spacing (kerning) 37
7
36
30
27
56
1
ADOBE INDESIGN 1.5
User Guide Supplement
79
Page 84

 Loading...