

Page 1
U
B
1
A
U
U
B
1
A
A
N
H
T
2
T
2
3 T
T
•
C
•
2 L
3 T
dob e G oLiv e CS H elp
sing H elp | C on t en ts | Inde x
ack
sing H elp
U sing Help
bout Help
dobe Systems Incorporated provides complete documentation in an Adobe PDF-based
help system. This help system includes information on all tools, commands, and features
of an application. It is designed for easy on-screen navigation and can also be printed and
used as a desktop reference. Additionally, it supports third-party screen-reader applica
tions that run in a Windows environment.
avigating in Help
elp opens in an Adobe Acrobat window with the Bookmarks pane open. (If the
Bookmarks pane is not open, click the Bookmarks tab at the left edge of the window.)
At the top and bottom of each page is a navigation bar containing links to this page (Using
Help), the table of contents (Contents), and the index (Index).
-
To move through pages sequentially, you can click the Next Page and the Previous
Page arrows; click the navigation arrows at the bottom of the page; or click Back to
return to the last page you viewed.
You can navigate Help topics by using bookmarks, the table of contents, the index, or the
Search (Acrobat 6) or Find (Acrobat 5) command.
o find a topic using bookmarks:
1
I
n the B ookmarks pane, click the plus sign (+) (Windows) or the right-facing arrow
(Mac OS) next to a bookmark topic to view its subtopics.
C
lick the b ookmark to go to that topic.
o find a topic using the table of contents:
1
C
lick C ontents in the navigation bar.
On the C ontents page, click a topic to go to that topic.
o view a list of subtopics, click the plus sign (+) (Windows) or the right-facing arrow
(Mac OS) next to the topic name in the Bookmarks pane.
o find a topic using the index:
1
D
o one of the f ollowing:
lick Index in the navigation bar, and then click a letter at the top of the page.
Ι
n the B ookmarks pane, expand the Index bookmark to view the letter subtopics;
then click a letter.
ocate the entry you want to view, and click the page number to go to that topic.
o view other entries for the same topic, click Back to return to the same place in the
index, and then click another page number.
sing H elp | C on t en ts | Inde x
ack
Page 2

U
B
2
A
U
U
B
2 T
2 T
T
2 T
3 T
P
A
T
C
dob e G oLiv e CS H elp
sing H elp | C on t en ts | Inde x
o find a topic using the Search command (Acrobat 6):
1 C hoose Edit > Search.
ype a word or phrase in the text box and click Search. Acrobat searches the document
and displays every occurrence of the word or phrase in the Results area of the Search PDF
pane.
o find a topic using the Find command (Acrobat 5):
1 C hoose Edit > Find.
ype a word or phrase in the text box and click Find. Acrobat searches the document,
starting from the current page, and displays the first occurrence.
o find the next occurrence, choose Edit > Find Again.
ack
sing H elp
rinting Help
lthough Help is optimized for on-screen viewing, you can print selected pages or the
entire file.
o print Help:
hoose File > Print, or click the Print icon in the Acrobat toolbar.
sing H elp | C on t en ts | Inde x
ack
Page 3
U
B
3
A
C on t en ts
U
B
3
C
L
dob e G oLiv e CS H elp
sing H elp | C on t en ts | Inde x
ontents
earning about Adobe GoLive CS 4
What’s New in GoLive CS 8
Tutorials 11
Looking at the Work Area 28
Setting up Sites and Pages 46
Creating Site Diagrams 72
Managing and Viewing Web Sites 91
Laying Out Pages 134
Working with Tables 165
ack
Formatting Text 185
Using Cascading Style Sheets 212
Adding Images and Multimedia 235
Adding Content from Adobe Applications 261
Creating Forms 294
Working with Site Assets 304
Transferring Files and Publishing Web Sites 323
Creating and Maintaining Co-Author Sections 339
Working with PDF Documents 346
Authoring Wireless Web Sites 354
Working with Source Code 375
Using Actions 414
Using Web Settings 448
GoLive Extensibility 462
Keyboard Shortcuts 463
Legal Notices 470
sing H elp | C on t en ts | Inde x
ack
Page 4
U
B
4
A
L
U
dob e G oLiv e CS H elp
sing H elp | C on t en ts | Inde x
ear ning ab out A dob e G oLiv e CS
ack
Learning about Adobe GoLive CS
Getting help
There are a number of ways to get the help you need in GoLive CS. The following three
tables can help you find specific resources related to GoLive features, training resources,
and support.
Finding Help for GoLive features
If you . . . Try this . . .
Want information about
installing GoLive
• Insert the Adobe GoLive CD into your CD drive, and follow the
on-screen installation instructions (you cannot run the GoLive
application from the CD).
• See the HowToInstall file on the Adobe GoLive CD.
Are new to GoLive and want
an overview of tools and
features
Are upgrading from a
previous version of GoLive
Are looking for detailed
information about a feature
Want information about
authoring QuickTime or SMIL
files.
Want a complete list of
keyboard shortcuts
• Browse through the information in “Working with Adobe GoLive”
on page 6 for information on specific tasks.
• Choose Help > GoLive Help. Then select “Looking at the Work Area”
from the links on the Contents tab.
• Move the pointer over a tool or button to display the tool or button
name.
• Try the beginning tutorials in GoLive Help.
Go to the “What’s New in GoLive CS” chapter to get an overview of
new features, or see the NewFeatures.pdf file in the GoLive application folder for more detailed information.
In GoLive Help, use the index, or search for the feature.
See the Adobe GoLive CS Multimedia Authoring Guide (English only)
in the GoLive section of Adobe Studio at www.studio.adobe.com.
Look at the “Keyboard Shortcuts” on page 463.
sing H elp | C on t en ts | Inde x Back 4
Page 5

Adobe GoLive CS Help Learning about Adobe GoLive CS
Using Help | Contents | Index Back 5
Finding GoLive training resources
If you . . . Try this . . .
Want to obtain in-depth
GoLive training
Are looking for background
information on Web design
Want information about
using third-party products
provided with GoLive
Want information about
extending the functionality
of GoLive
Want to access the Developer Knowledgebase or software developer kits (SDKs)
Want information about
becoming an Adobe Certified Expert
• See the tutorials on the Adobe Studio Web site
at www.studio.adobe.com.
• Browse the Adobe Press materials at www.adobepress.com
(English only), and the available training resources at
www.adobe.com/support/training.
• For step-by-step lessons, consider the Adobe Classroom in a
Book series.
• For in-depth reference information, consider the RealWorld series.
See the Adobe Press section of the Adobe Web site at
www.adobe.com/misc/books.html.
Look in the Partners folder on the Adobe GoLive CD.
Look at “GoLive Extensibility” on page 462.
See the Adobe Solutions Network (ASN) section of the Adobe Web
site at http://partners.adobe.com/asn/golive/ (English only).
Visit the Partnering with Adobe Web site at www.partners.adobe.com. Certification is available for several different geographical regions.
Want training from an Adobe
Certified Training Provider
See the Training page of the Adobe Web site
at www.adobe.com/misc/training.html
Finding support for GoLive
If you . . . Try this . . .
Want customer or
technical support
• Refer to the technical support card provided with your software.
• Register GoLive and receive technical support for up to 90 days
from the date of your first call (terms may vary depending on country of residence).
• See the Adobe GoLive support page
at www.adobe.com/support/products/golive.
• Read the ReadMe file installed with GoLive for information that
became available after this guide went to press.
Want answers to common
troubleshooting questions
Search the Adobe Support Knowledgebase and GoLive Top Issues
at www.adobe.com/support/products/golive.
Using Help | Contents | Index Back 5
Page 6
Adobe GoLive CS Help Learning about Adobe GoLive CS
Using Help | Contents | Index Back 6
Finding support for GoLive
If you . . . Try this . . .
Want to register your copy of
GoLive
Want access to a multitude of
GoLive specific information,
such as downloads, updates,
patches, plug-ins, and links
to user forums
• When you first start GoLive, you’re prompted to register online. Fill
out the form, and then submit it directly or fax a printed copy.
• Fill out and return the registration card included with your soft-
ware package.
• Access the online registration form at any time by choosing
Help > Registration.
Visit the GoLive pages on Adobe Studio at www.studio.adobe.com.
Working with Adobe GoLive
You can work with GoLive in many different ways. In the related topics, you’ll find directions to specific information to help you accomplish some common GoLive tasks.
If you want consistent design throughout a site
• Apply page templates to present a uniform look and feel.
(“Using page templates” on page 305.)
• Create components to automatically update navigation bars and other design
elements that appear on multiple pages. (See
• Use Cascading Style Sheets (CSS) to apply identical text styles throughout a site.
(See “About cascading style sheets” on page 212.)
• Create co-author sections, which let editors and writers update content by using a
simple form-like interface. (See
“Creating co-author sections” on page 339.)
“Using components” on page 311.)
If you want to increase productivity
• Add pre-built snippets of commonly used HTML and JavaScript code.
(See “Using snippets” on page 313.)
• Group files in collections to speed up common file management tasks.
(See “Using collections” on page 319.)
• Use enhanced source code features to automatically compare, find, and complete code.
(See
“Using the GoLive source code editors” on page 375.)
• Update links site-wide with the In & Out Links palette.
(See “Using the In & Out Links palette to view links” on page 124.)
If you want to work with other Adobe tools
• Use Smart Objects to import and optimize native Adobe Photoshop
trator®, and Adobe Acrobat® files. (See “Working with Smart Objects” on page 262.)
• Import and edit Adobe ImageReady
®
rollovers. (See “Importing rollovers from
ImageReady” on page 244.)
Using Help | Contents | Index Back 6
®
, Adobe Illus-
Page 7

Adobe GoLive CS Help Learning about Adobe GoLive CS
Using Help | Contents | Index Back 7
• Fully integrate Adobe PDF documents into Web sites.
(See “About working with PDF documents” on page 346.)
• Import GoLive packages from Adobe InDesign
designs. (See
• Manage projects with Adobe Version Cue
version-control features. (See
“Adding InDesign content” on page 286.)
“Working with Adobe Version Cue managed projects” on
®
to quickly match related print and Web
TM
to provide workgroups with powerful
page 45.)
If you want to import content from non-Adobe applications
• Add GIF, JPEG, PNG, and WBMP images to Web pages. (See “Adding pre-optimized
images” on page 235.)
• Open exported HTML files by using the File > Open command.
• Create a new site from a folder of HTML files by using the Site Wizard's Import from
Folder feature. (See
• Import tab-delimited text from a spreadsheet or database into a GoLive table.
(See “Adding text to tables” on page 182.)
“Creating a single user site” on page 47.)
Using Help | Contents | Index Back 7
Page 8
Adobe GoLive CS Help What’s New in GoLive CS
Using Help | Contents | Index Back 8
What’s New in GoLive CS
Work with industry-leading Adobe technology
GoLive CS offers unparalleled integration with Adobe products like Adobe Acrobat, Adobe
Photoshop, Adobe InDesign, and Adobe Version Cue.
Adobe PDF Adobe Portable Document Format (PDF) is a worldwide standard for secure
and reliable transmission of electronic documents over the Web. GoLive CS offers more
comprehensive PDF support than any other Web-publishing application. You can preview
Web pages in PDF and export them with all formatting, links, and graphics intact. You can
also open existing PDF documents to create and edit PDF links and bookmarks. (See
“About working with PDF documents” on page 346.)
Smart Objects With Smart Objects, you can work with native Photoshop, Illustrator, and
Acrobat files directly in GoLive. When you modify a Smart Object, GoLive automatically
reoptimizes it for the Web, helping you work more efficiently. New Smart Object features
include cropping, site-wide updating of Smart Objects edited outside of GoLive, and full
support for ImageReady-generated JavaScript code. (See
on page 262.)
Adobe InDesign You can quickly match related print and Web designs by using
InDesign’s Package for GoLive feature. These packages let you easily transfer text, graphics,
and multimedia assets from InDesign to GoLive. If a print design changes in the future,
simply re-create the package in InDesign to update related assets throughout a GoLive
site. (See
Adobe Version Cue Use Adobe Version Cue features in Adobe GoLive CS to increase your
productivity when you work alone or collaborate with others. You can integrate GoLive
design management into your existing workflows within and across the Adobe Creative
Suite applications. The Version Cue features in GoLive CS are compatible only with the
Adobe Version Cue Workspace, available only as part of the Adobe Creative Suite. (See
“Working with Adobe Version Cue managed projects” on page 45.)
Adobe color engine GoLive CS shares the color engine used by Photoshop, Illustrator,
InDesign, and Acrobat. This shared color engine lets you use one set of controls to achieve
consistent color across Adobe applications and a variety of output devices. (See
“Managing color in images” on page 248.)
“Adding InDesign content” on page 286.)
“Working with Smart Objects”
Enhance your productivity
With a familiar Adobe interface and many other productivity enhancements, GoLive CS
streamlines common Web workflows.
Adobe interface GoLive CS includes a familiar interface from Adobe products like
Photoshop and Illustrator. You can zoom in to refine page layouts with pixel-level
precision, use a vertical Objects palette, and collapse palettes to free up screen space for
large, detailed Web designs.
Using Help | Contents | Index Back 8
Page 9
Adobe GoLive CS Help What’s New in GoLive CS
Using Help | Contents | Index Back 9
Streamlined color workflow With the Color and Swatches palettes, you can apply color
with a single click, store commonly used colors, and search for colors by name or
hexadecimal value. (See
Pre-built design elements To help you quickly complete common Web design tasks,
GoLive CS includes a large number of professionally-made design elements in a new
Library palette. Choose from pre-built Web pages, Section 508-compliant designs, CSS
styles, and JavaScript snippets for cookies, event handlers, and more.
Co-author sections In GoLive sites, Web professionals can now create special co-author
sections, which let editors and writers update content by using a simple form-like
interface. These template-driven sections ensure a consistent look and feel throughout a
site, while letting co-authors with little knowledge of Web design create sophisticated
Web content. (See
Queries Expanded search functionality lets you build and save complex queries. You can
search for items ranging from HTML elements to site assets and errors. To perform
complex searches, define nested queries; for simple searches, use predefined queries. (See
“Generating queries” on page 129.)
Collections To speed up common file management tasks, you can create site-specific
collections, which let you quickly select groups of related files. You can attach queries to
collections, ensuring that they include all files that meet specific search criteria. (See
“Using collections” on page 319.)
“Using color” on page 67.)
“Creating co-author sections” on page 339.)
Use powerful tools that support industry standards
GoLive CS ensures that your sites meet the latest Web standards.
Enhanced CSS workflow In the new CSS editor, you can visually preview styles as you
change style properties, drag and re-sort style elements, and view related CSS code. You
can also quickly apply styles in the Layout Editor by using new CSS commands in the Type
menu. (See
JavaScript rollovers The new Rollovers & Actions palette lets you create sophisticated
rollovers with ease. You can combine self and remote rollovers and specify trigger objects
ranging from images to text and table cells. GoLive CS also fully supports ImageReady
JavaScript code. (See
Revised source code editor GoLive CS includes a completely revised source code editor,
which lets you easily select entire HTML elements, complete code automatically, and
optimize hand-coded HTML. Customizable syntax coloring helps you easily identify
different code types. And new code compare and query features ensure consistent HTML
throughout a site. (See
Publish servers With publish servers, you can maintain a site in one, central location, but
publish to multiple servers using different transfer protocols such as WebDAV or FTP. The
streamlined publish server interface lets you quickly configure and access servers, so you
can focus more energy on Web design. (See
page 325.)
“About the GoLive CSS workflow” on page 213.)
“Creating rollovers” on page 240.)
“Using the GoLive source code editors” on page 375.)
“About GoLive publish server clients” on
Using Help | Contents | Index Back 9
Page 10

Adobe GoLive CS Help What’s New in GoLive CS
Using Help | Contents | Index Back 10
Updated QuickTime and SMIL features Among Web design applications, only GoLive
CS provides a full authoring environment for QuickTime movies. You can create interactive
content with wired actions and integrate movies with XML databases. If you own
QuickTime Pro, you can also produce 3GPP-compatible files for wireless devices. GoLive CS
provides similarly extensive support for SMIL, letting you design RealOnePlayer and MMS
documents with an intuitive, visual interface. For more information, see the
CS Multimedia Authoring Guide
, available on the Adobe Web site.
Adobe GoLive
Using Help | Contents | Index Back 10
Page 11
Adobe GoLive CS Help Tutorials
Using Help | Contents | Index Back 11
Tutorials
About these tutorials
The following tutorials provide a quick tour of the basic Adobe GoLive CS features. Before
you get started, be sure you are familiar with the basic concepts of GoLive. (See
basics” on page 28.)
As you work through these tutorials, you may have new ideas and questions. To assist you
with learning GoLive, Adobe provides a variety of resources. For more information, see
“Getting help” on page 4.
For more advanced GoLive tutorials, visit the Adobe Web site at www.adobe.com/
products/tips/golive.html.
“GoLive
Create and structure a site
Adobe GoLive CS makes it easy to create complex, multipage Web sites using the site
wizard and the site diagram feature. The site wizard walks you through the process of
setting up a new Web site, and the site diagram feature lets you quickly prototype the site,
and then convert the prototype to actual pages.
In the steps that follow, you’ll use the site wizard, diagramming tools, and the site window
to create a new Web site with multiple pages and folders.
1. Create a new blank site.
Start GoLive and click the New Site button to open the Site Wizard. Select the Single User
option, and click Next. In the next screen, select Blank Site, and then click Next. Enter a
name for your site in the Site Name text box, click Next, and then specify a location on your
hard drive to store the site files and folders. Click Finish to create the new site. That’s all
there is to creating a new site.
Using Help | Contents | Index Back 11
Page 12
Adobe GoLive CS Help Tutorials
Using Help | Contents | Index Back 12
GoLive creates a project folder on your hard drive. This folder contains the site’s project
file, a web-content folder, which contains an index.html file, a web-data folder, and a websettings folder, which GoLive uses to manage the site and its assets.
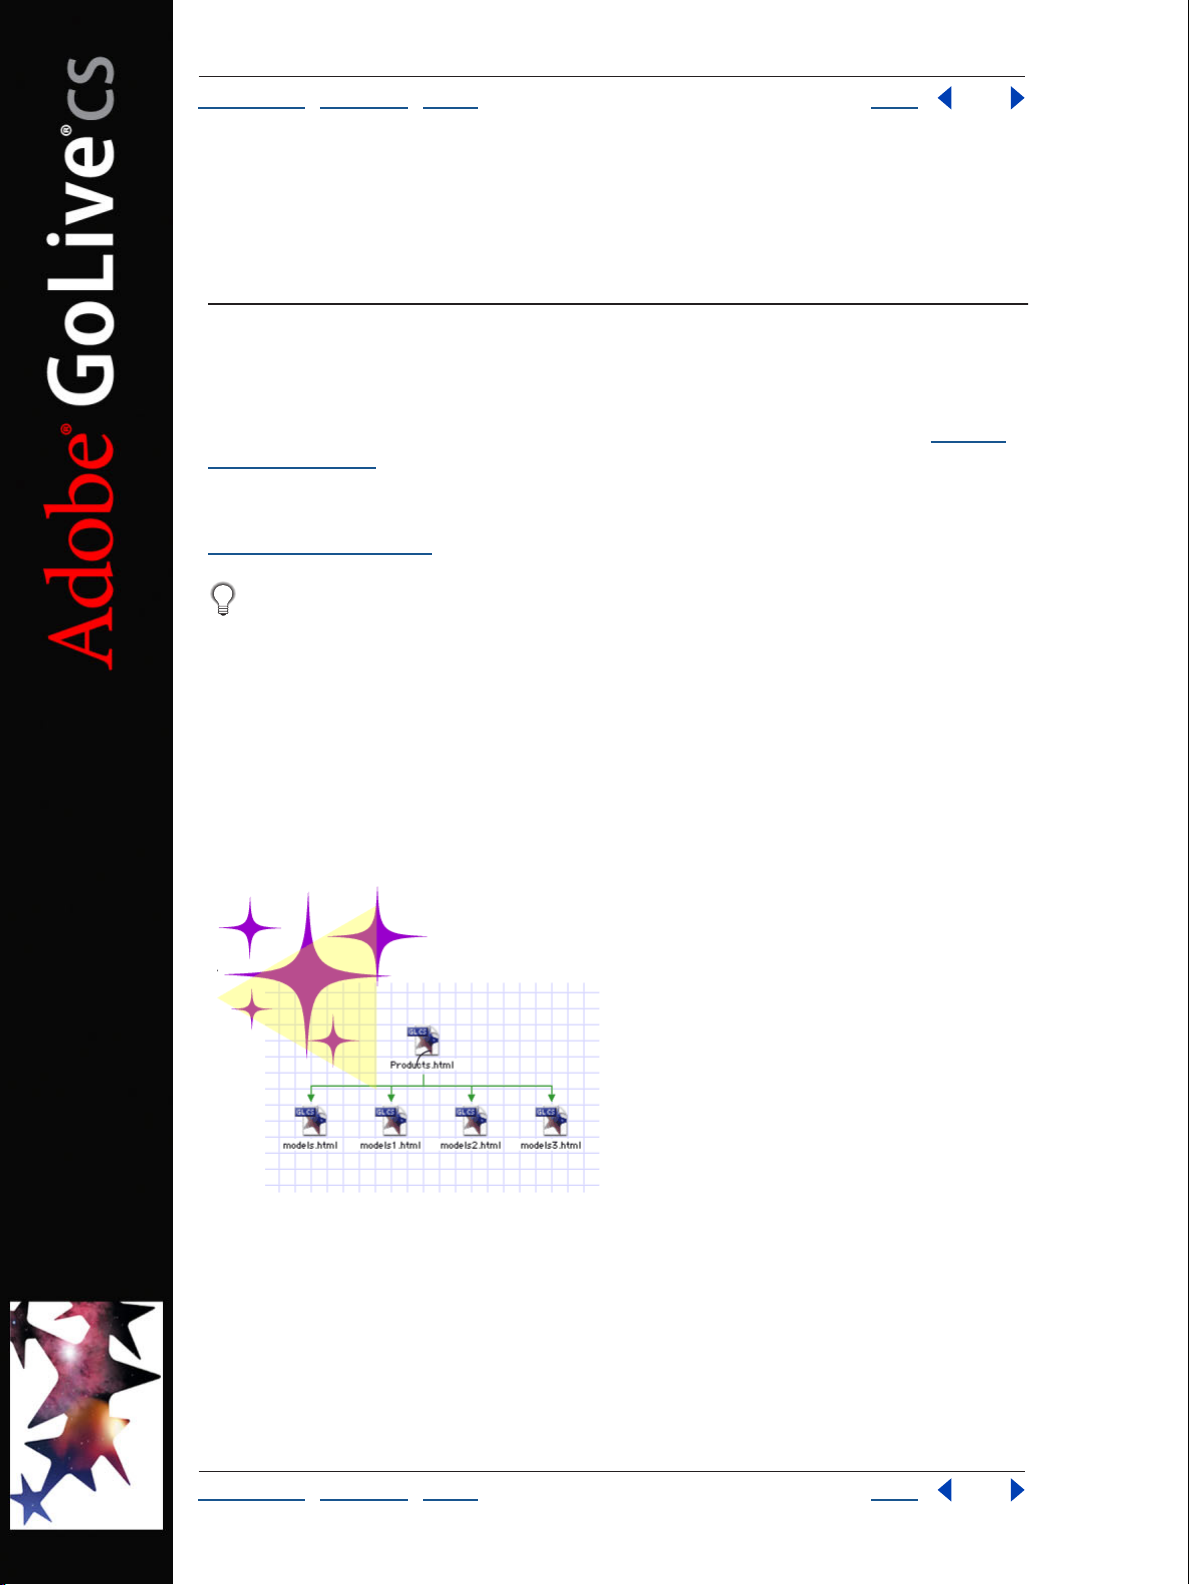
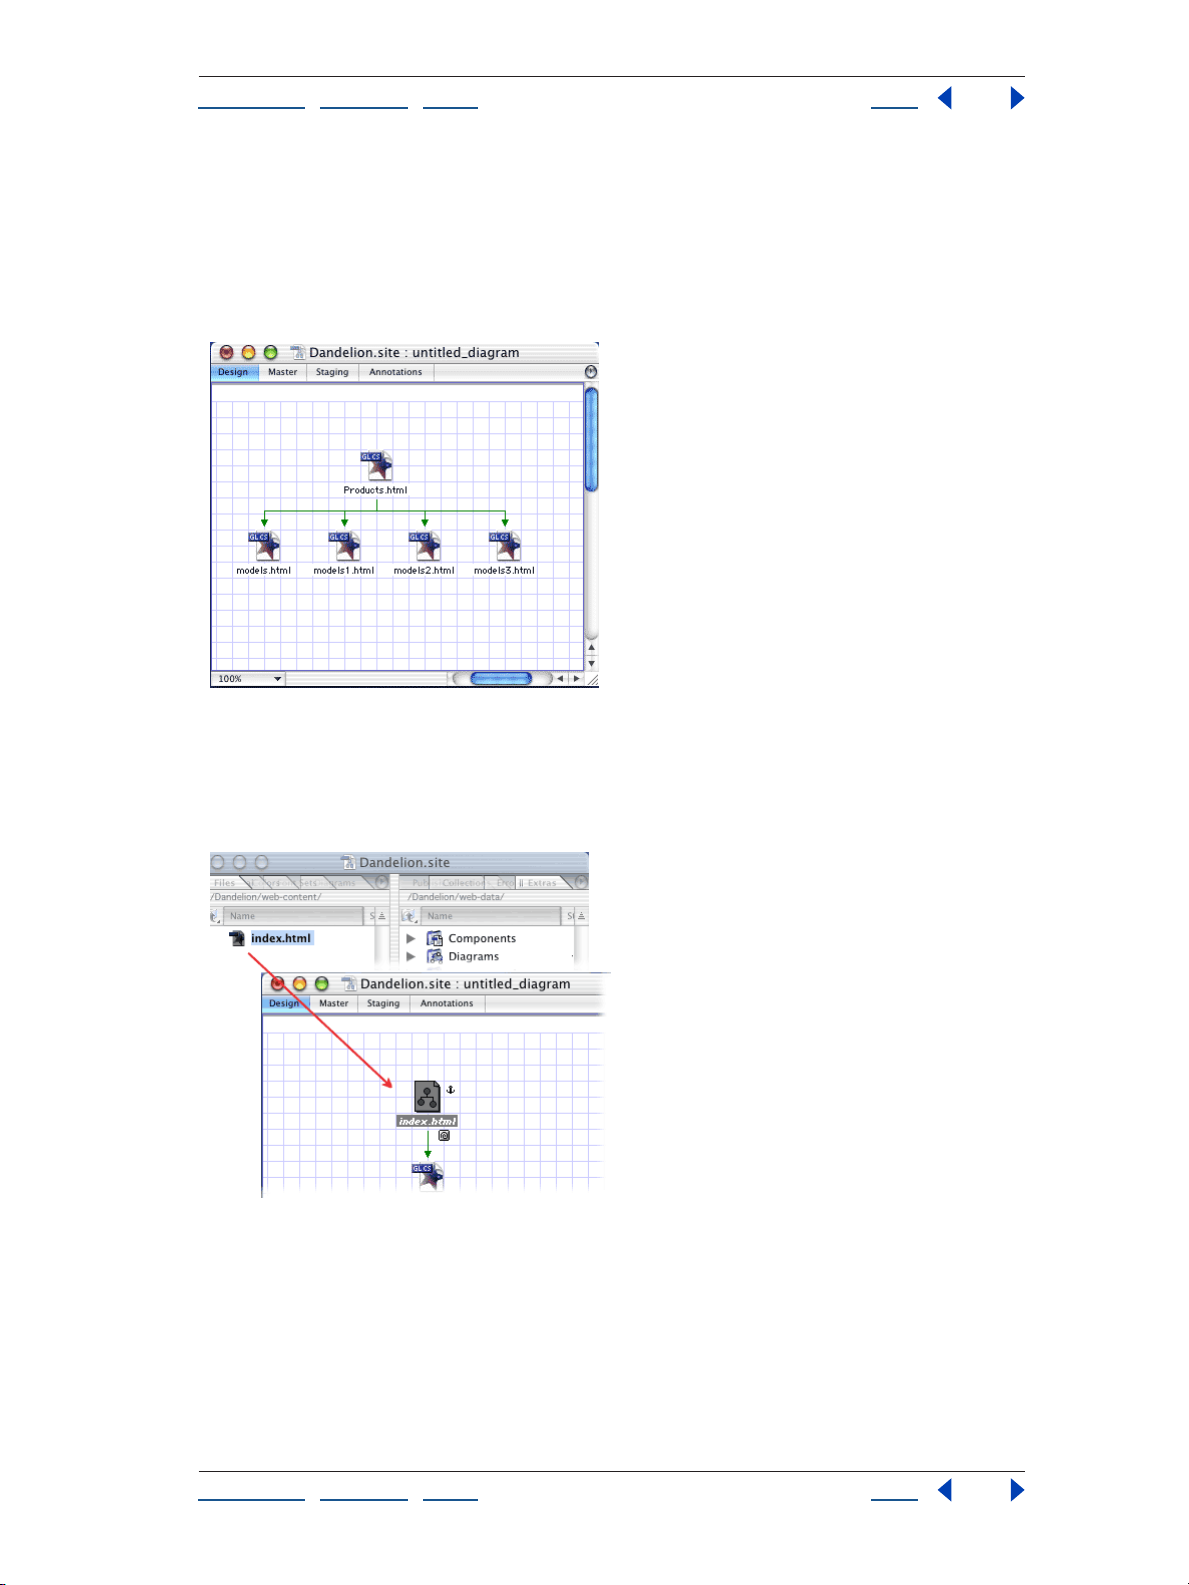
2. Create a diagram and add a page.
With the site window active, choose Diagram > New Diagram to create a new diagram.
Drag a Page icon from the Diagram set of the Objects palette to the design view to add a
new page named
untitled.html. Click the page’s name, and then enter a new name, such as
Products.html.
Using Help | Contents | Index Back 12
Page 13
Adobe GoLive CS Help Tutorials
Using Help | Contents | Index Back 13
3. Add new child pages.
With the page in the design view selected, choose Diagram > New Pages. In the New
Pages dialog box, enter the number of new child pages to create a base filename for the
new pages. For example, enter
Filenames text box to add pages named
4 to create four pages, and then enter Models in the
Models.html, Models1.html, Models2.html, and
Models3.html. Click Create.
4. Anchor the diagram to a page in the site.
Drag the index.html page from the Files tab of the site window to the design view.
Index.html becomes an anchor page in the diagram and is indicated by an anchor symbol.
Anchoring the diagram specifies the diagram’s location in the site’s hierarchy.
Using Help | Contents | Index Back 13
Page 14
Adobe GoLive CS Help Tutorials
Using Help | Contents | Index Back 14
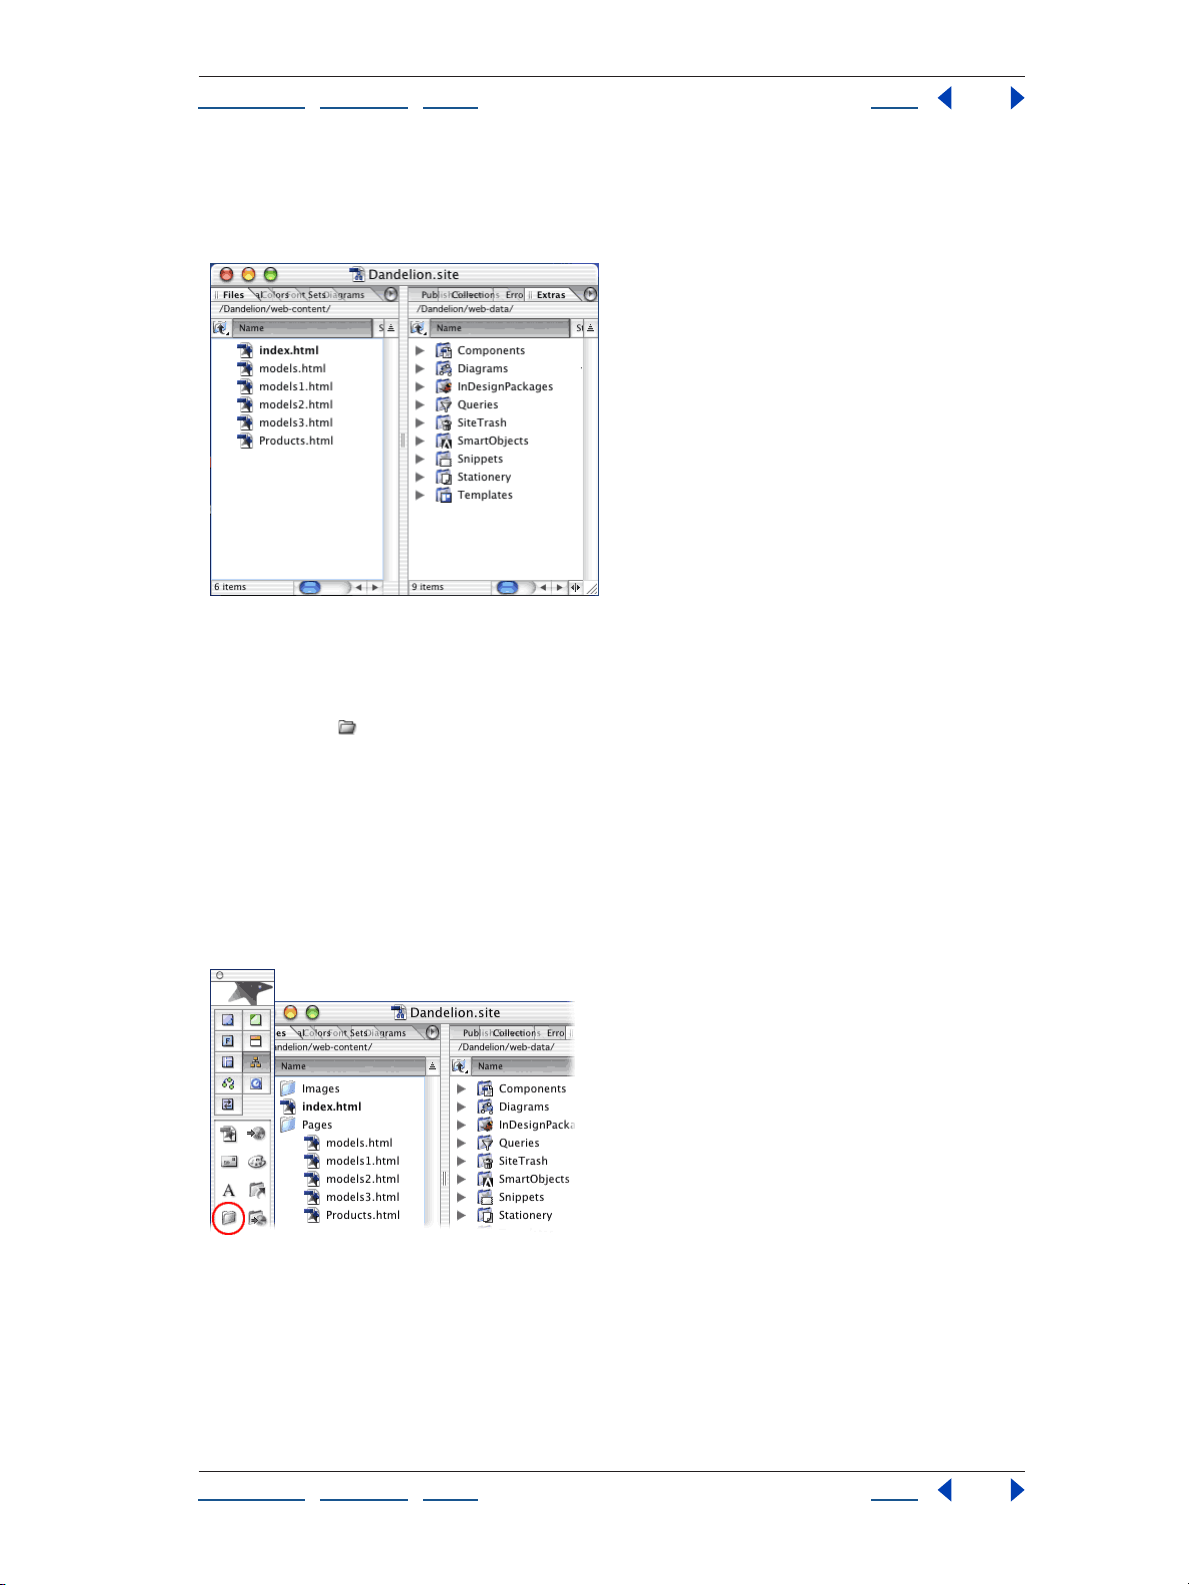
5. Submit the diagram to the site.
Choose Diagram > Staging > Submit All. GoLive converts the diagram’s pages to HTML
pages in the site. In the Files tab of the site window, you can see the new pages in the site.
6. Structure the site.
Organize your pages and images in separate folders so that you can keep track of files and
update them easily. With the Files tab of the site window active, click the Create New
Folder button
in the toolbar. Rename the new untitled folder Pages. You’ll place all your
HTML pages in this folder. Click in an empty area of the Files tab and click the Create New
Folder button. Rename the new folder Images. You’ll place all your images in this folder.
Select Products.html and its child pages (models.html, models1.html, etc.), and drag them
into the Pages folder (Shift-click to select multiple files).
If your site is very complex, you may want to create subfolders within these folders to
easily organize your files. Whenever you move, rename, or add pages, or create a new
folder in the Files tab, GoLive automatically makes the change in the site’s web-content
folder.
Using Help | Contents | Index Back 14
Page 15
Adobe GoLive CS Help Tutorials
Using Help | Contents | Index Back 15
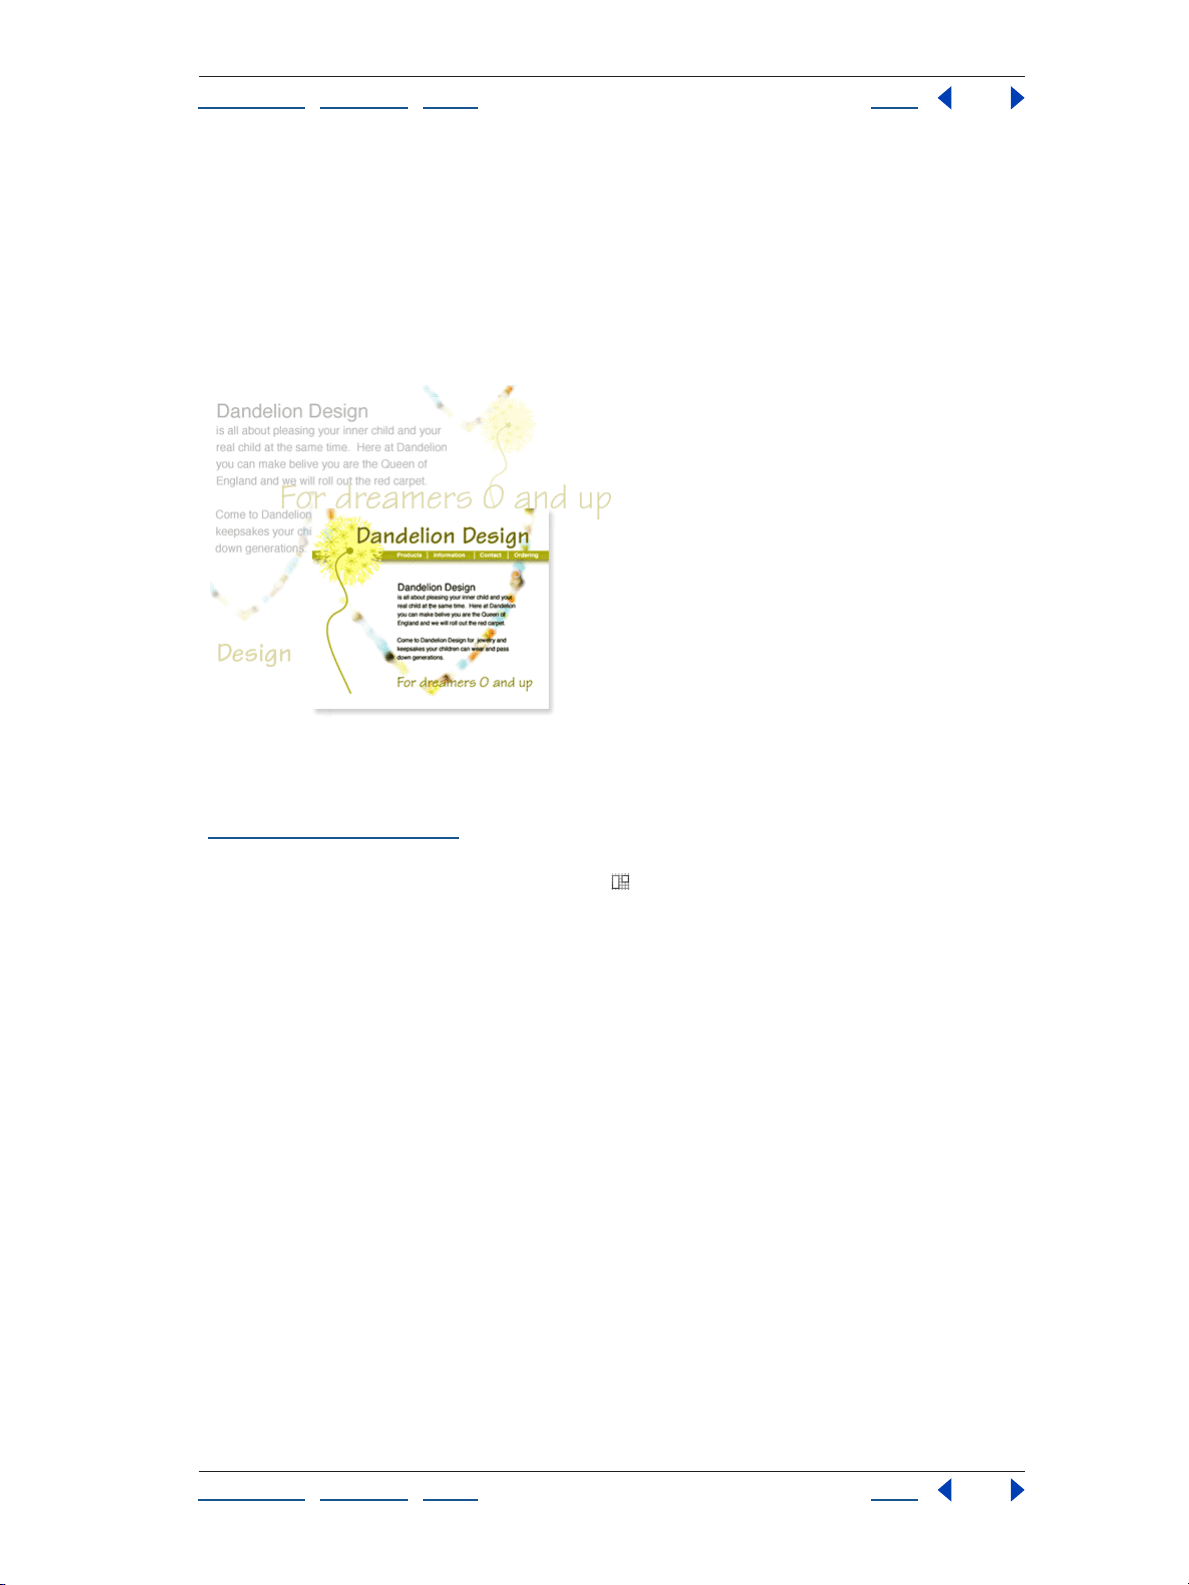
Design and lay out a Web page
Adobe GoLive makes it easy to design and lay out visually compelling Web pages. You can
create simple or complex professional-quality Web pages without writing any code.
Once you’ve designed your page, you can save it as a page template. New pages created
from a page template remain linked to the template—when you change the template,
GoLive automatically updates the pages without affecting any content that has been
added to them.
1. Set page dimensions and add a layout grid.
Open a site, and choose File > New Page. (For information about creating a site, see
“Creating a site” on page 46.) Choose 720 from the menu at the bottom right of the
document window to display the current page at 720 pixels wide, the standard width for
17-inch monitors. Drag the Layout Grid icon
the page. Type 720 in the Width text box in the Layout Grid Inspector to match the layout
grid to the width of the page.
from the Basic set of the Objects palette to
Using Help | Contents | Index Back 15
Page 16
Adobe GoLive CS Help Tutorials
Using Help | Contents | Index Back 16
Setting a default page size helps prevent you from adding objects, such as large graphic
banners, that are too wide to display on a standard page. Layout grids let you create tablebased designs without having to deal with rows, cells, and columns. Layout grids automat
ically lengthen to accommodate the objects you place on them.
-
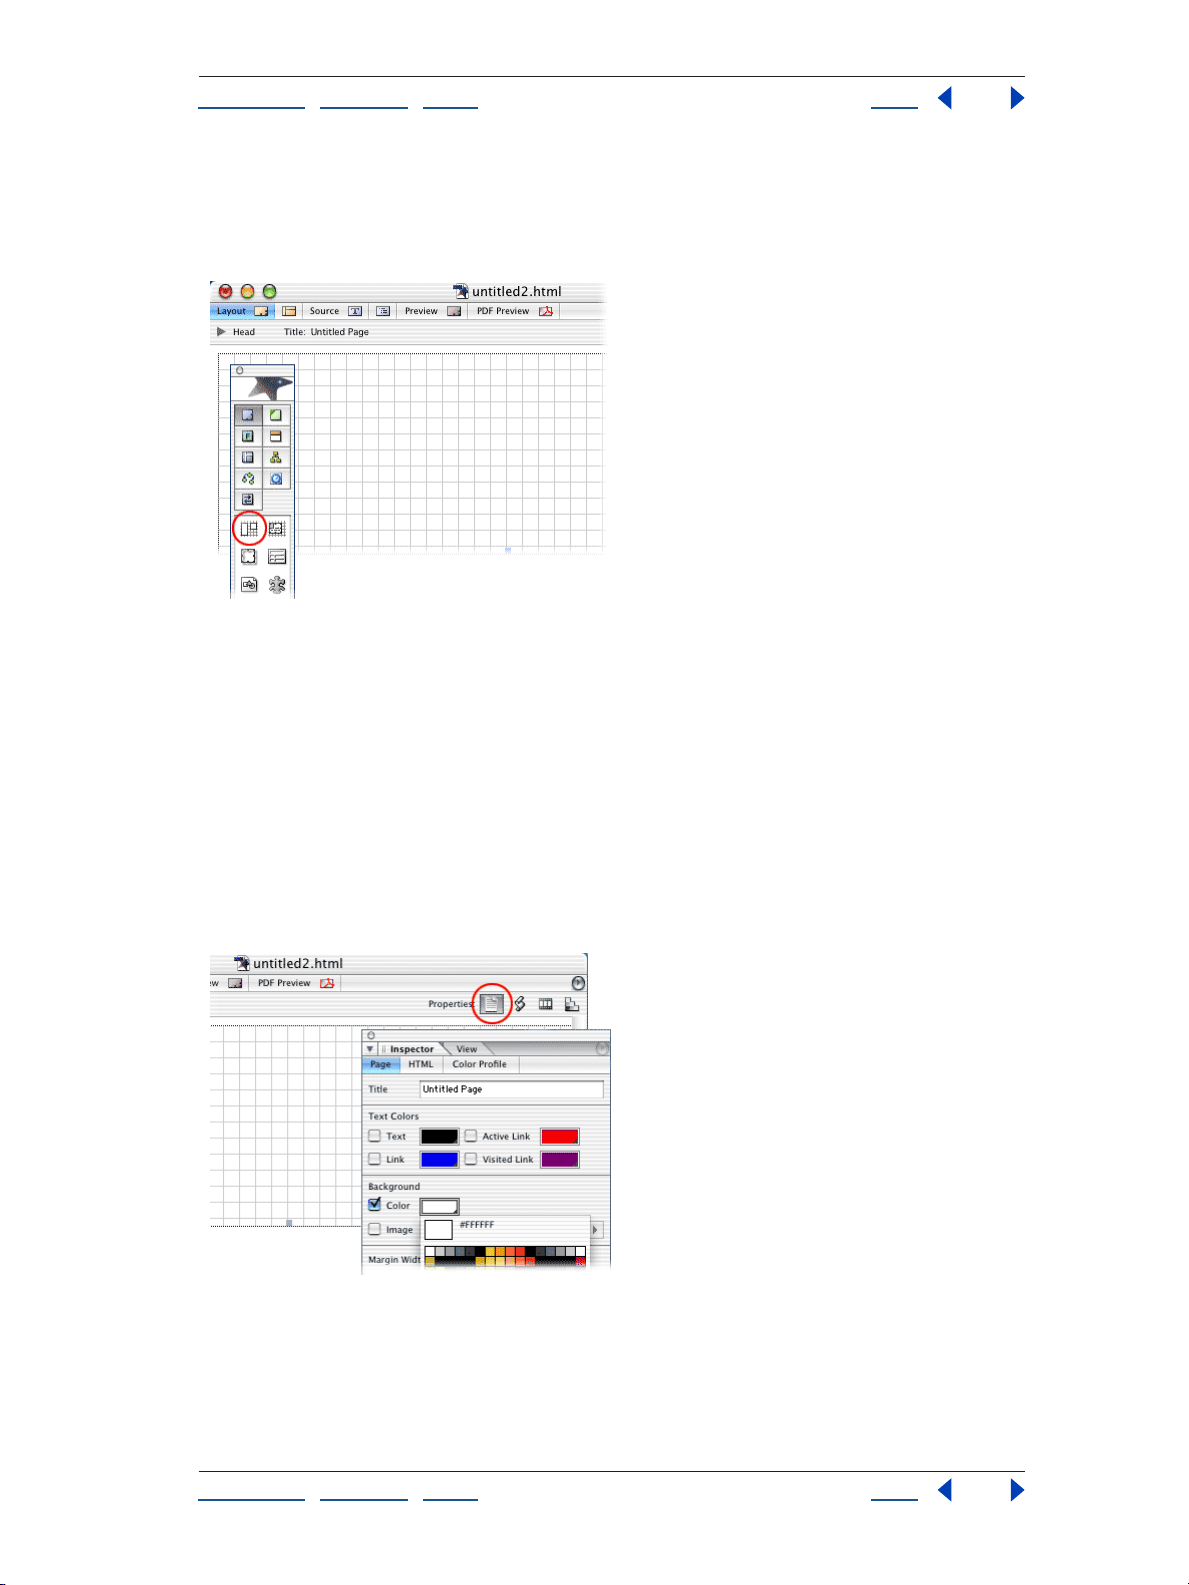
2. Add a background color to the page.
Click the Show Page Properties icon in the upper right corner of the document window. In
the Page tab of the Page Inspector, select Background Color and click the lower right
corner of the color field. Choose a background color for your page from the list of
swatches that appear.
You can apply a color or an image to the background of your page to visually enhance it.
Although colors that you choose for page backgrounds override the default colors used
by most Web browsers, viewers can change browser preferences to override your page
background colors. You can also select an image for the page background, but keep in
mind that Web browsers treat the image as a tile and repeat it to cover the entire page.
Using Help | Contents | Index Back 16
Page 17
Adobe GoLive CS Help Tutorials
Using Help | Contents | Index Back 17
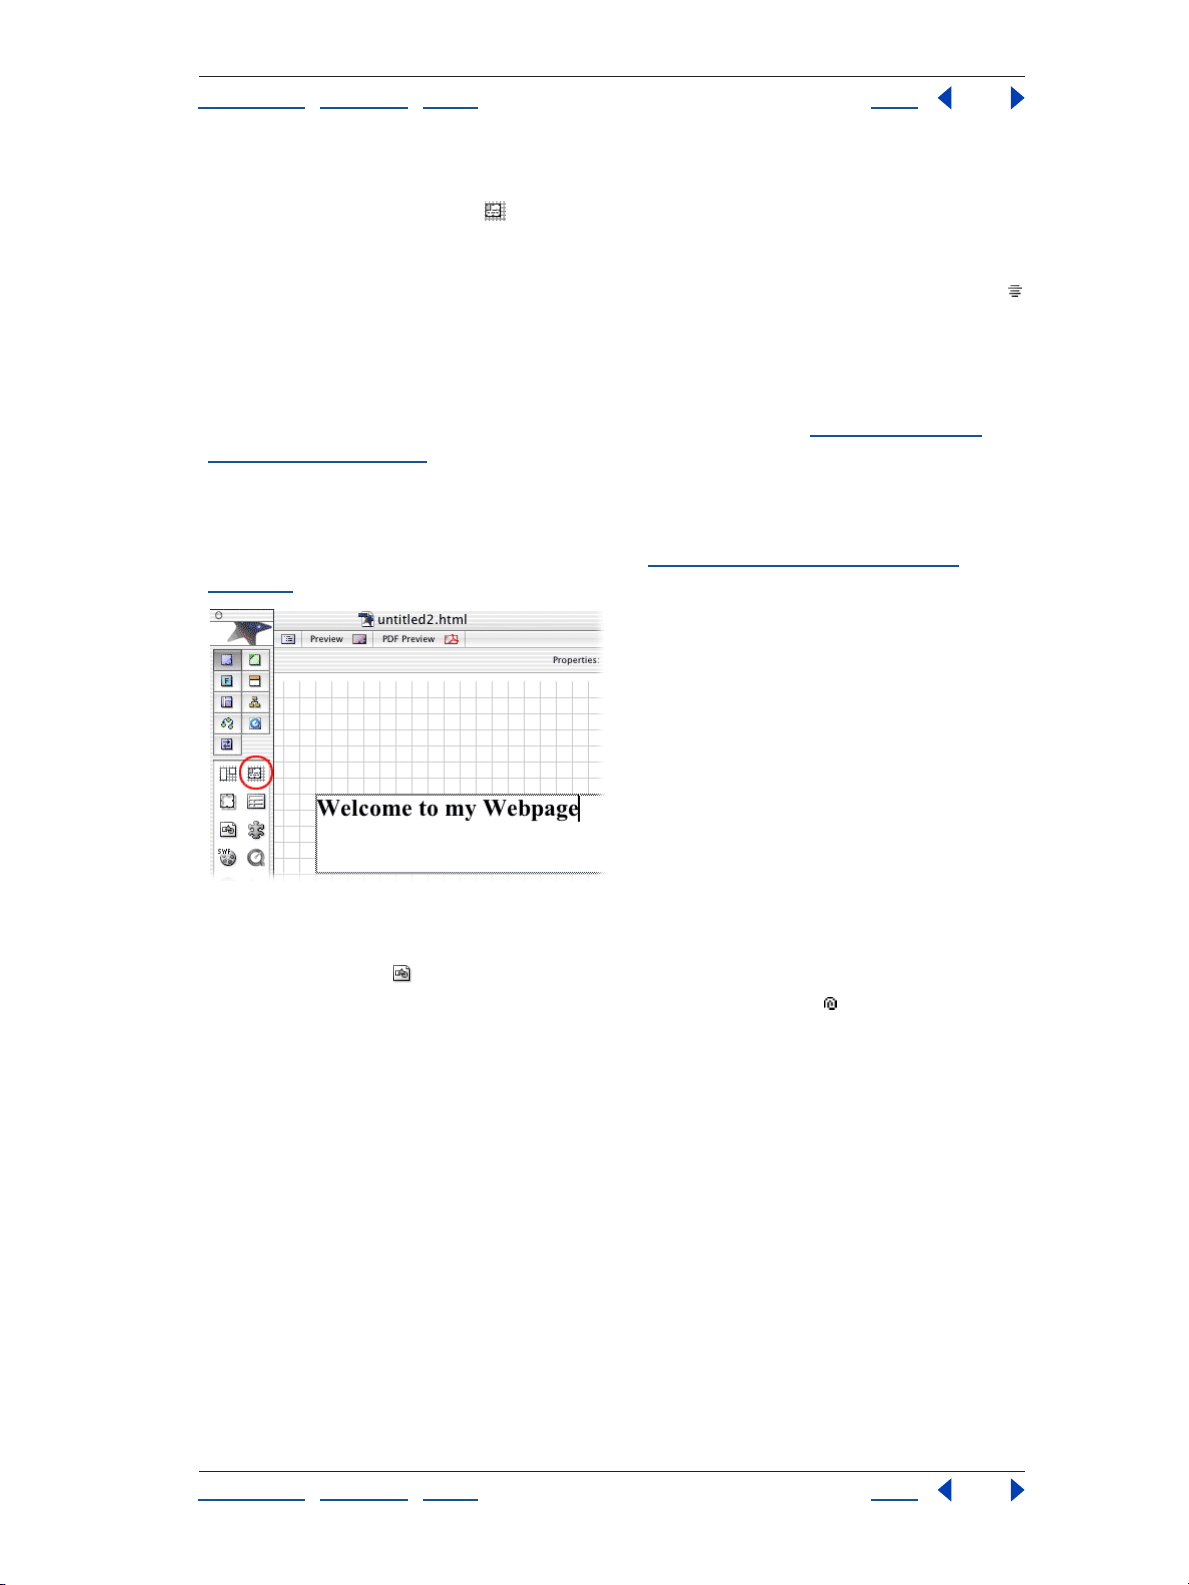
3. Add a text box and format the text.
Drag the Layout Text Box icon from the Basic set of the Objects palette to the layout
grid. Move the pointer over the edge of the text box until it changes into a double arrow,
and then drag until the box is the size you want. Click inside the layout text box to create
an insertion point and type some placeholder text. On the toolbar, click the Align Center
button, and then choose Header2 from the Set Paragraph Format menu.
In GoLive, you can format text in a variety of ways: use paragraph styles, such as Header 1
and Header 2, to format paragraphs; use physical styles, such as Bold and Italic, to
emphasize text; and use structural styles, such as Emphasis and Strong, to both emphasize
and classify text. (For more information about formatting text, see
“About formatting
HTML text” on page 185.) You can also apply fonts, type sizes, and color to text using CSS
(cascading style sheets), which contain a set of stylistic rules that describe how HTML
documents should appear to viewers. If you need to update a CSS style, you simply edit
the style rule and all content that hosts the style will automatically reflect the new
properties. For more information about CSS, see
“About cascading style sheets” on
page 212.
4. Add a pre-optimized image.
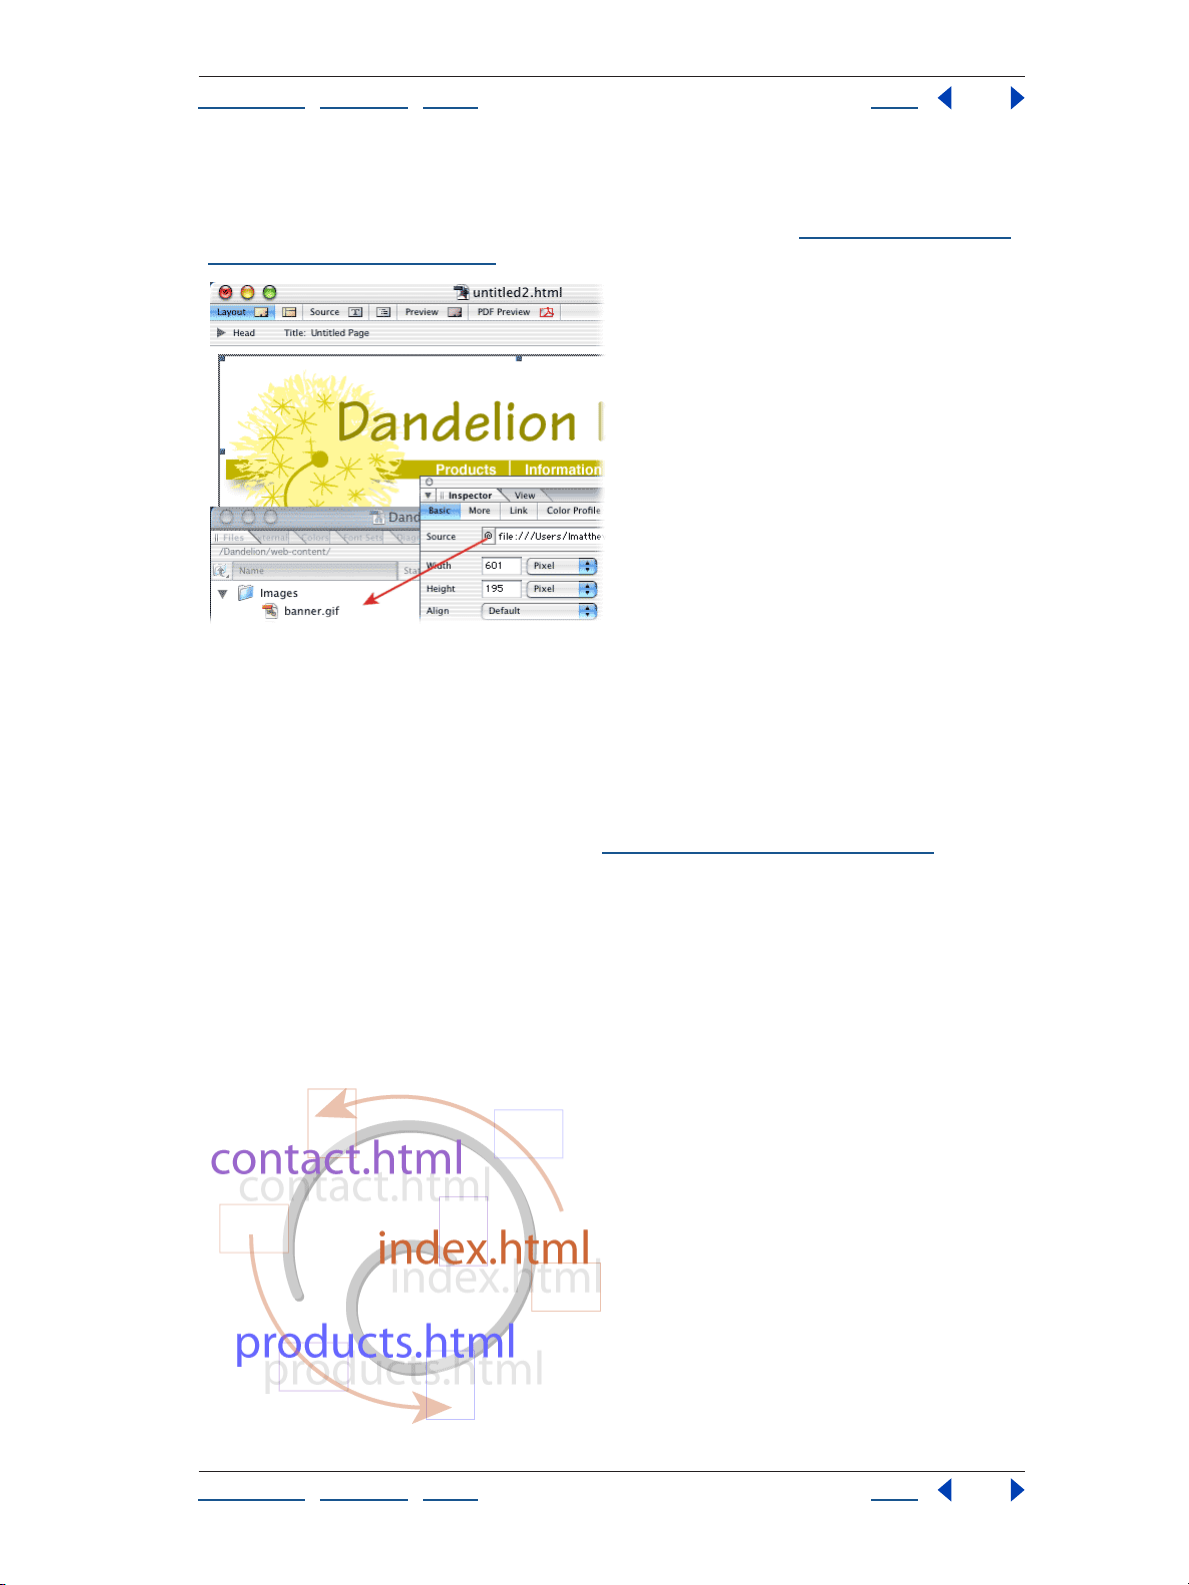
Drag an Image icon from the Basic set of the Objects palette to the layout grid. Select
the image object in the document window, and drag the pick whip in the Basic tab of
the Image Inspector to a GIF or JPEG file in the site window. You’ve successfully made the
connection when the line from the pick whip connects with and highlights the filename in
the site window. Don’t worry if you don’t have a GIF or JPEG file in your site: you can link an
image file to the image object in the document window at any time.
Using Help | Contents | Index Back 17
Page 18
Adobe GoLive CS Help Tutorials
Using Help | Contents | Index Back 18
The standard image formats for the Web are GIF and JPEG. GIF images are typically used
for line art, and JPEGs are typically used for photographs and other images with more than
256 colors. For information about choosing an image format, see
optimized images” on page 237,
“Choosing a format for
5. Save the file as a page template.
Choose Save As > Save As Template from the document window menu in the upper right
corner of the document window. Type a name for the template in the Save As dialog box,
and click Save.
Page templates are predesigned page layouts that you can use as the basis for new pages.
When you update a template, you automatically update all pages based on that template.
For more information about templates, see
“Using page templates” on page 305.
Create and manage links
In this tutorial you’ll create navigational links from which viewers can jump to other pages
in your site (internal links) or to other sites on the Web (external links).
Adobe GoLive’s powerful site management features make it easy to maintain links
between pages, and because GoLive collects and updates URLs in the External tab of the
site window, you can quickly create links across the Web.
Using Help | Contents | Index Back 18
Page 19
Adobe GoLive CS Help Tutorials
Using Help | Contents | Index Back 19
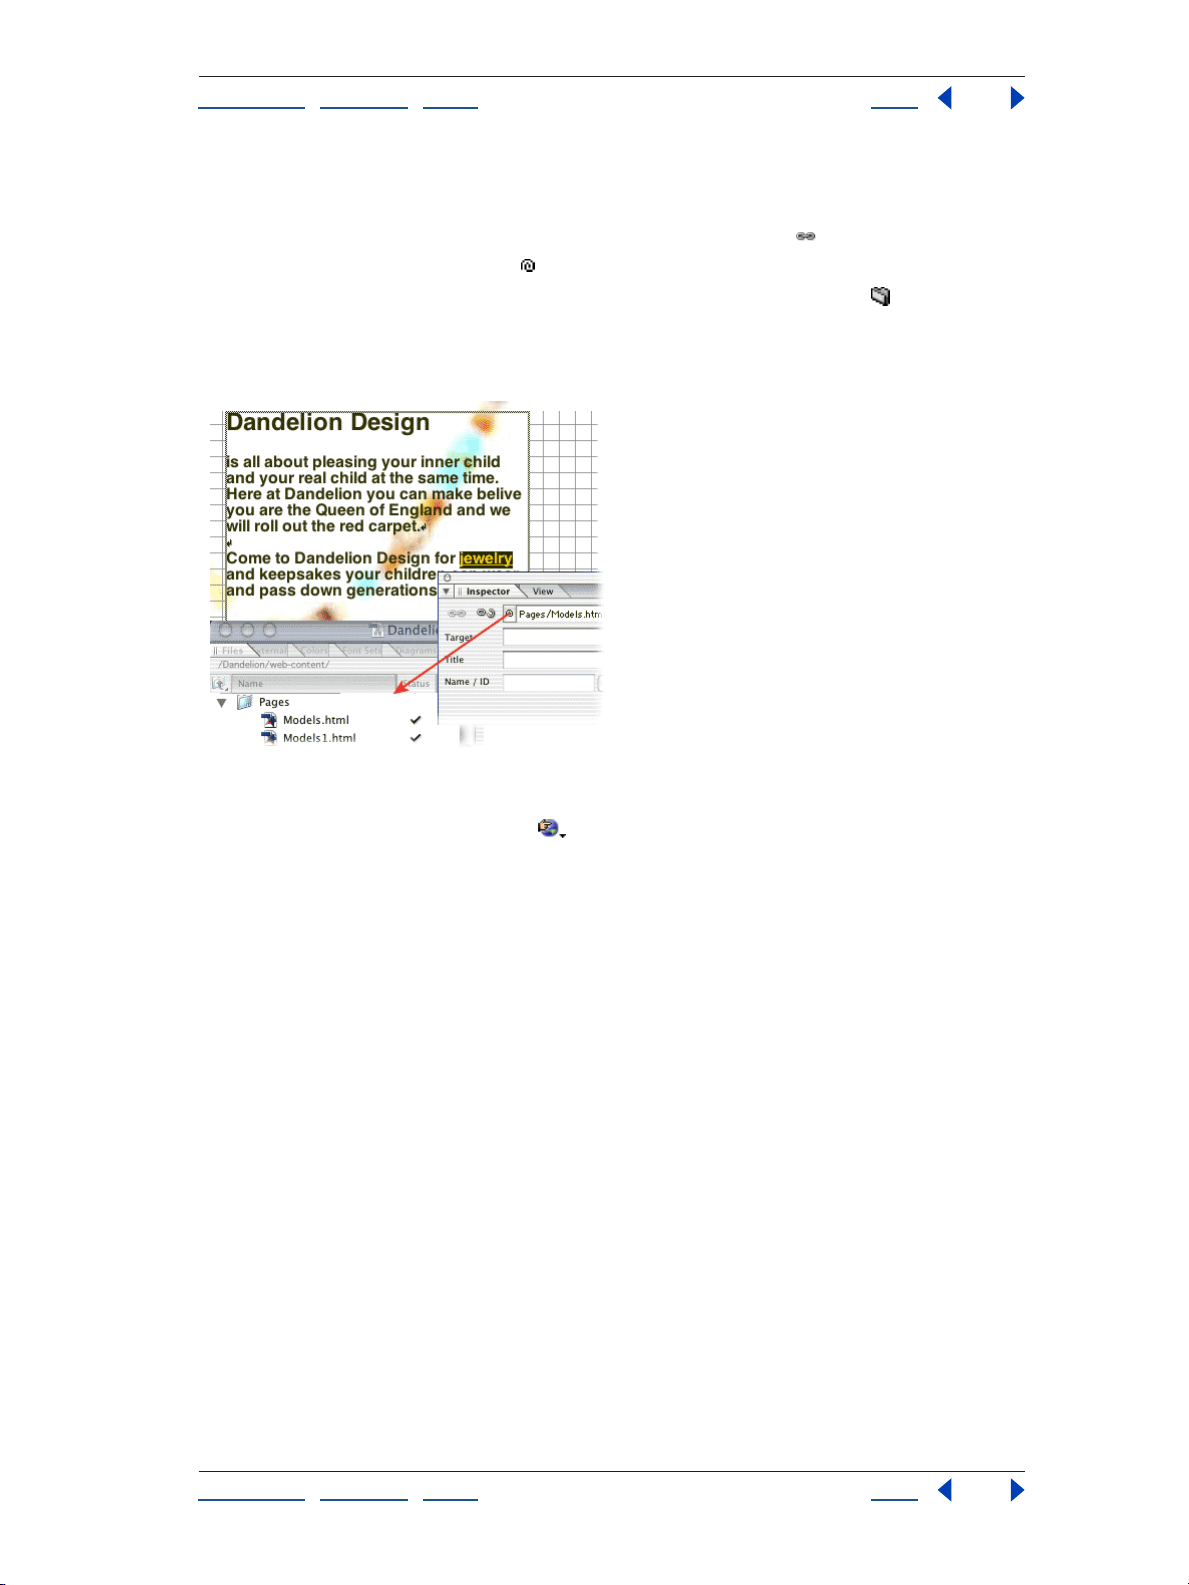
1. Create an internal link.
Open a GoLive site, and then open the page that you want to serve as the source of the
link. Select a short block of text and click the Create Link button
in the toolbar. In the
Text Inspector, drag the pick whip to the destination page in the site window.
You can also create internal links by using the Inspector’s Browse button to locate a
page, or by typing the relative path to the page in the Inspector’s URL text box. It’s best,
however, to use the pick whip when creating links to avoid mistakenly linking to pages
outside of the site’s web-content folder.
2. Test the link.
Click the Preview in Browser button in the toolbar to preview the page containing the
link in your Web browser. Click the link and make sure that the destination page appears in
the browser window.
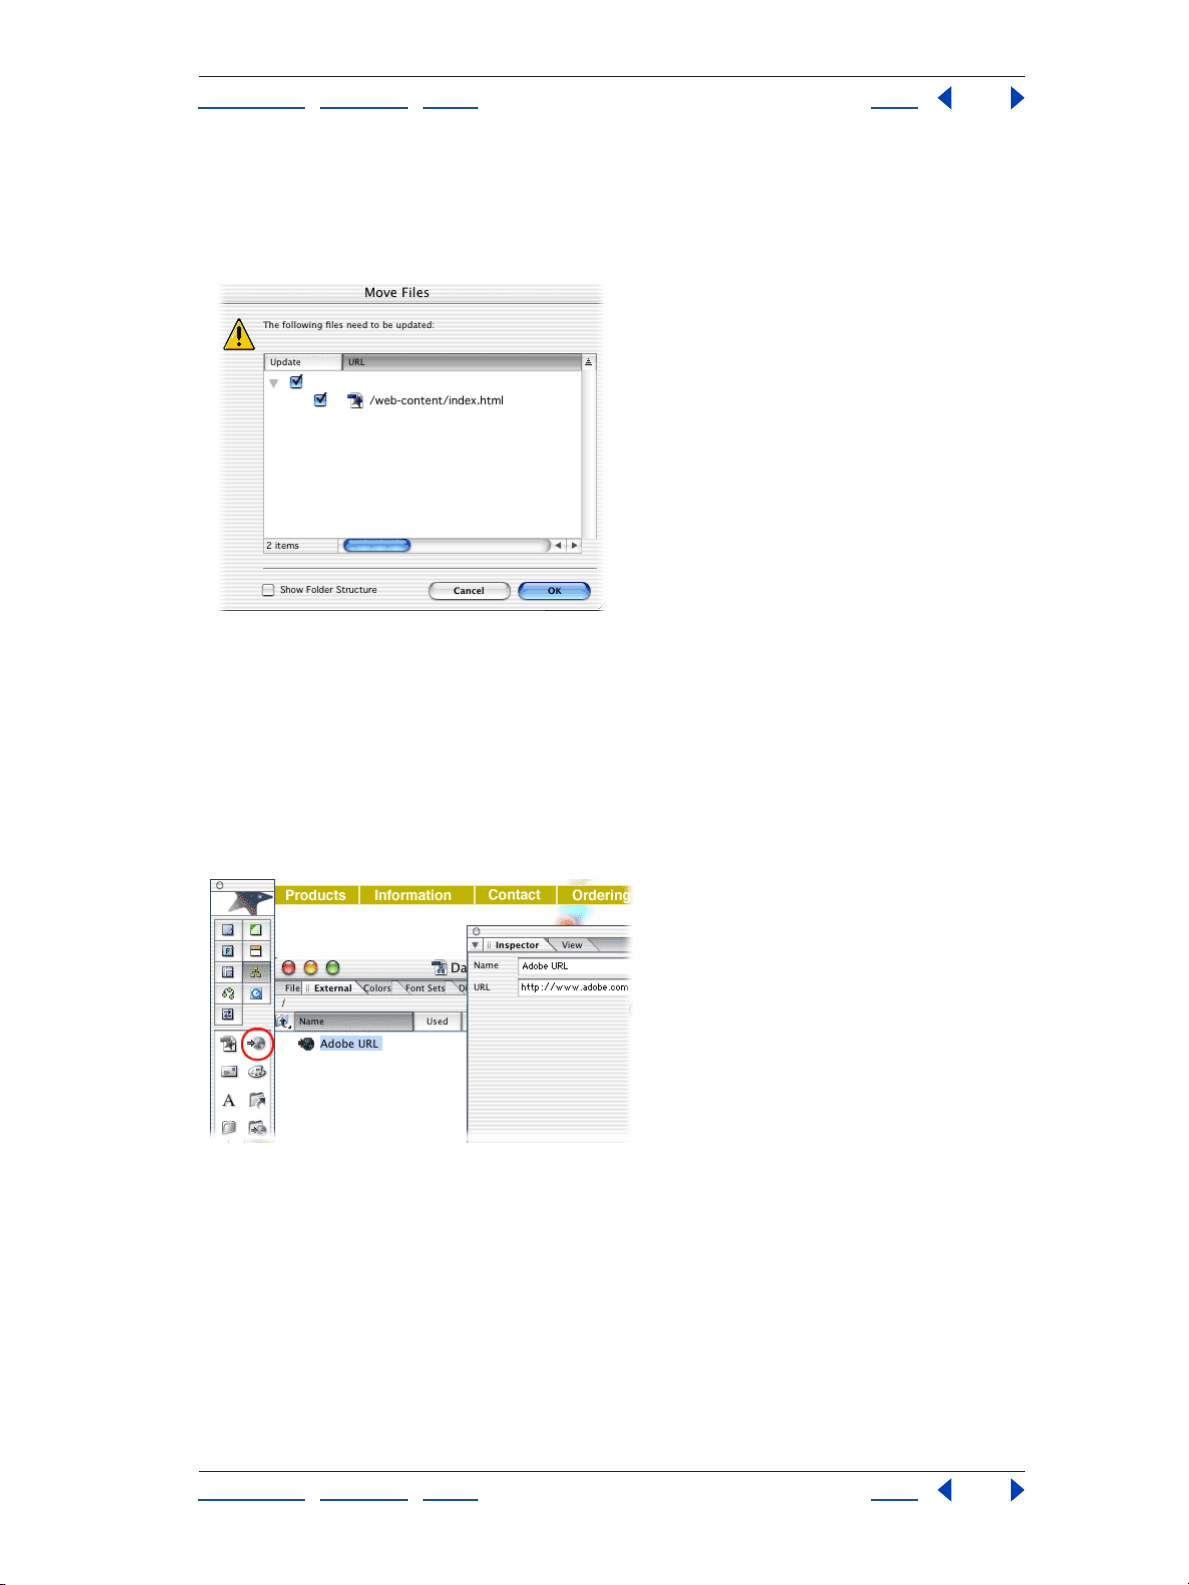
3. Update the internal link.
With the Files tab of the site window active, click the Create New Folder button in the
toolbar. Drag the link’s destination page into the new folder. GoLive displays the Move
Files dialog box, which lists the page that serves as the source of the link, and prompts you
to update the file. Click OK.
Using Help | Contents | Index Back 19
Page 20
Adobe GoLive CS Help Tutorials
Using Help | Contents | Index Back 20
GoLive updates links in your site when you move or rename files in the site window. To
avoid broken links in your site, perform all such site management tasks in the GoLive site
window, not directly in your site’s web-content folder in Windows Explorer or the Mac OS
Finder.
4. Add a URL to the External tab of the site window.
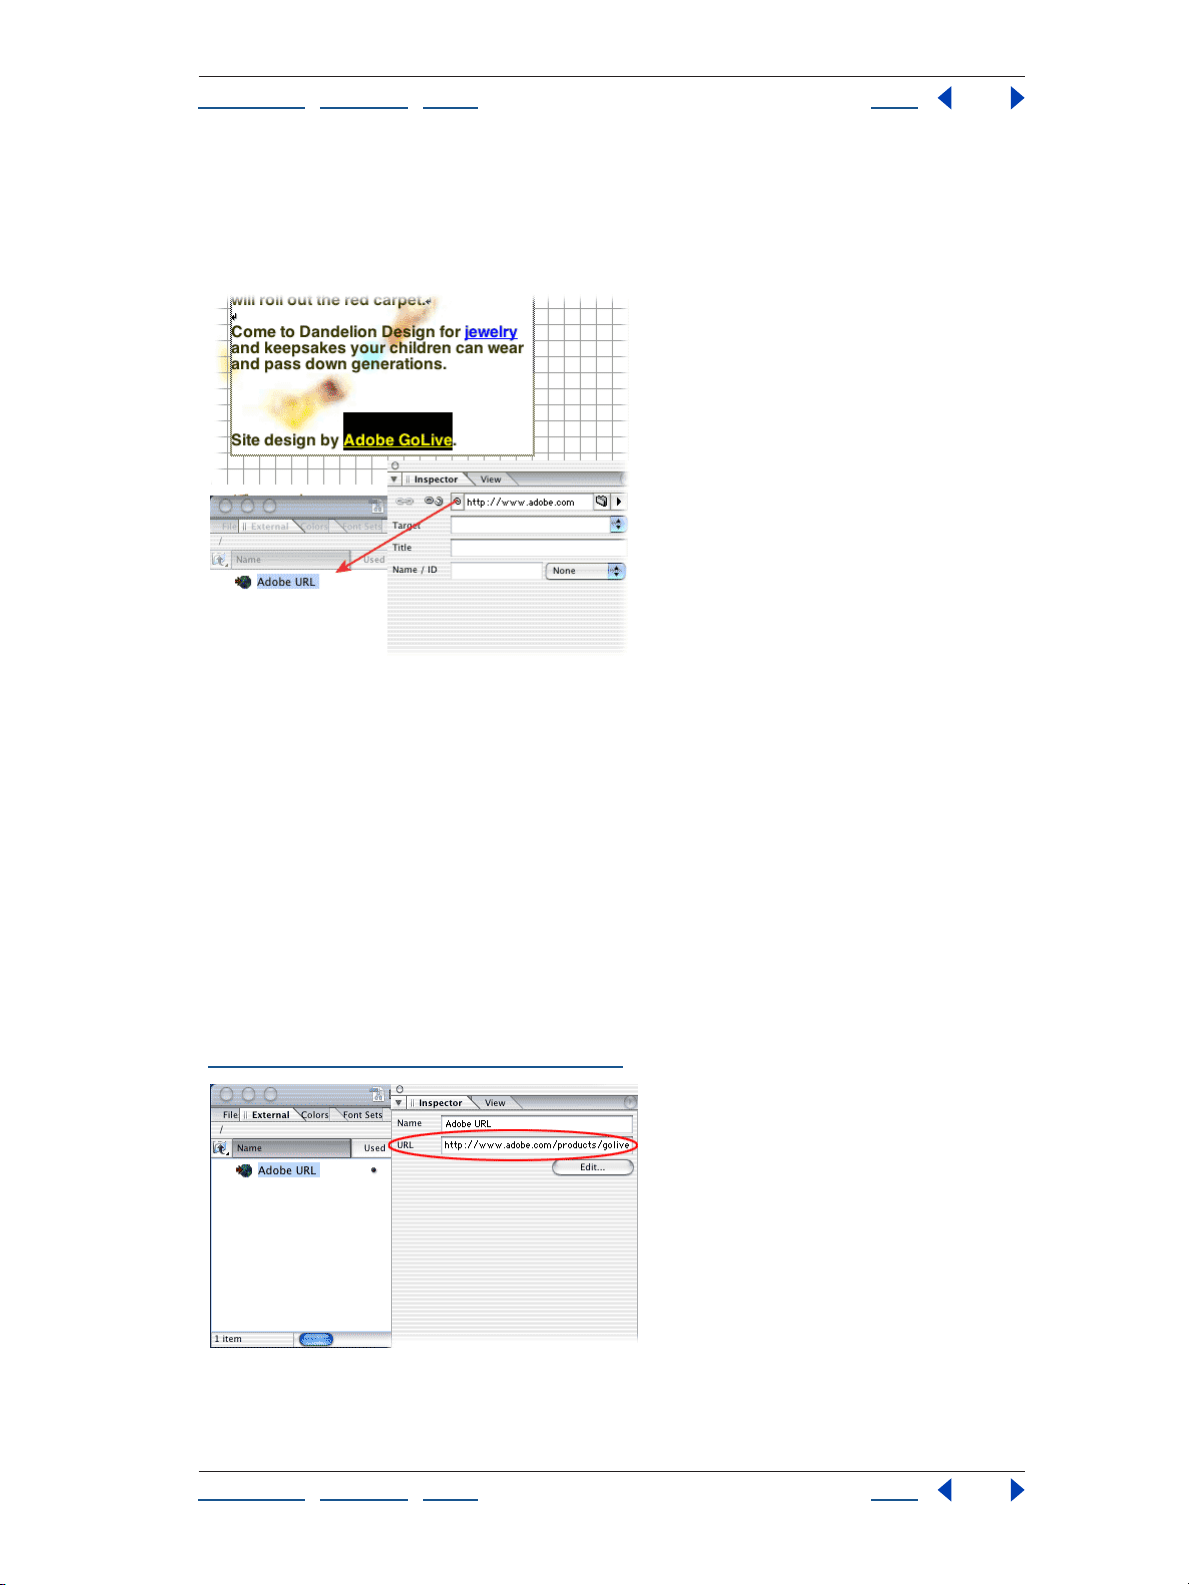
Drag the URL icon from the Site set of the Objects palette to the External tab of the site
window. Rename the untitled URL
Adobe URL. Type http://www.adobe.com in the URL
text box of the Reference Inspector.
The External tab of the site window contains URLs and e-mail addresses. Storing a URL in
the External tab is useful when you want to use the URL on more than one page in your
site. If you later need to update a URL in the External tab, GoLive automatically updates it
wherever it appears in the site.
Using Help | Contents | Index Back 20
Page 21
Adobe GoLive CS Help Tutorials
Using Help | Contents | Index Back 21
5. Create an external link.
Open the page that you want to serve as the source of the link. Select a short block of text,
and click the Create Link button in the toolbar. In the Text Inspector, drag from the pick
whip to the Adobe URL in the External tab of the site window.
6. Test the link.
Click the Preview in Browser button in the toolbar to preview the page containing the link
in your Web browser. Click the link and make sure that the Adobe Web site appears in the
browser window.
7. Update the external link.
Select the Adobe URL in the External tab of the site window. Type http://
www.adobe.com/products/golive/ main.html
in the URL text box of the Reference
Inspector, and then press Enter (Windows) or Return (Mac OS). GoLive displays the Change
Reference dialog box, which lists the page that serves as the source of the link, and
prompts you to update the file. Click OK to update the reference.
GoLive provides other tools for updating internal and external links. For example, to edit
links sitewide, use the In & Out Links palette or the Change References dialog box (see
“Editing links and URLs sitewide” on page 124).
Using Help | Contents | Index Back 21
Page 22
Adobe GoLive CS Help Tutorials
Using Help | Contents | Index Back 22
Create a print-friendly PDF version of a Web page
With GoLive’s PDF features, you can quickly view, edit, and export PDF files. This powerful
functionality lets you easily create interactive PDF forms, archive Web pages, and more.
In this tutorial, you’ll create a print-friendly version of a Web page, while retaining features
such as links and tables.
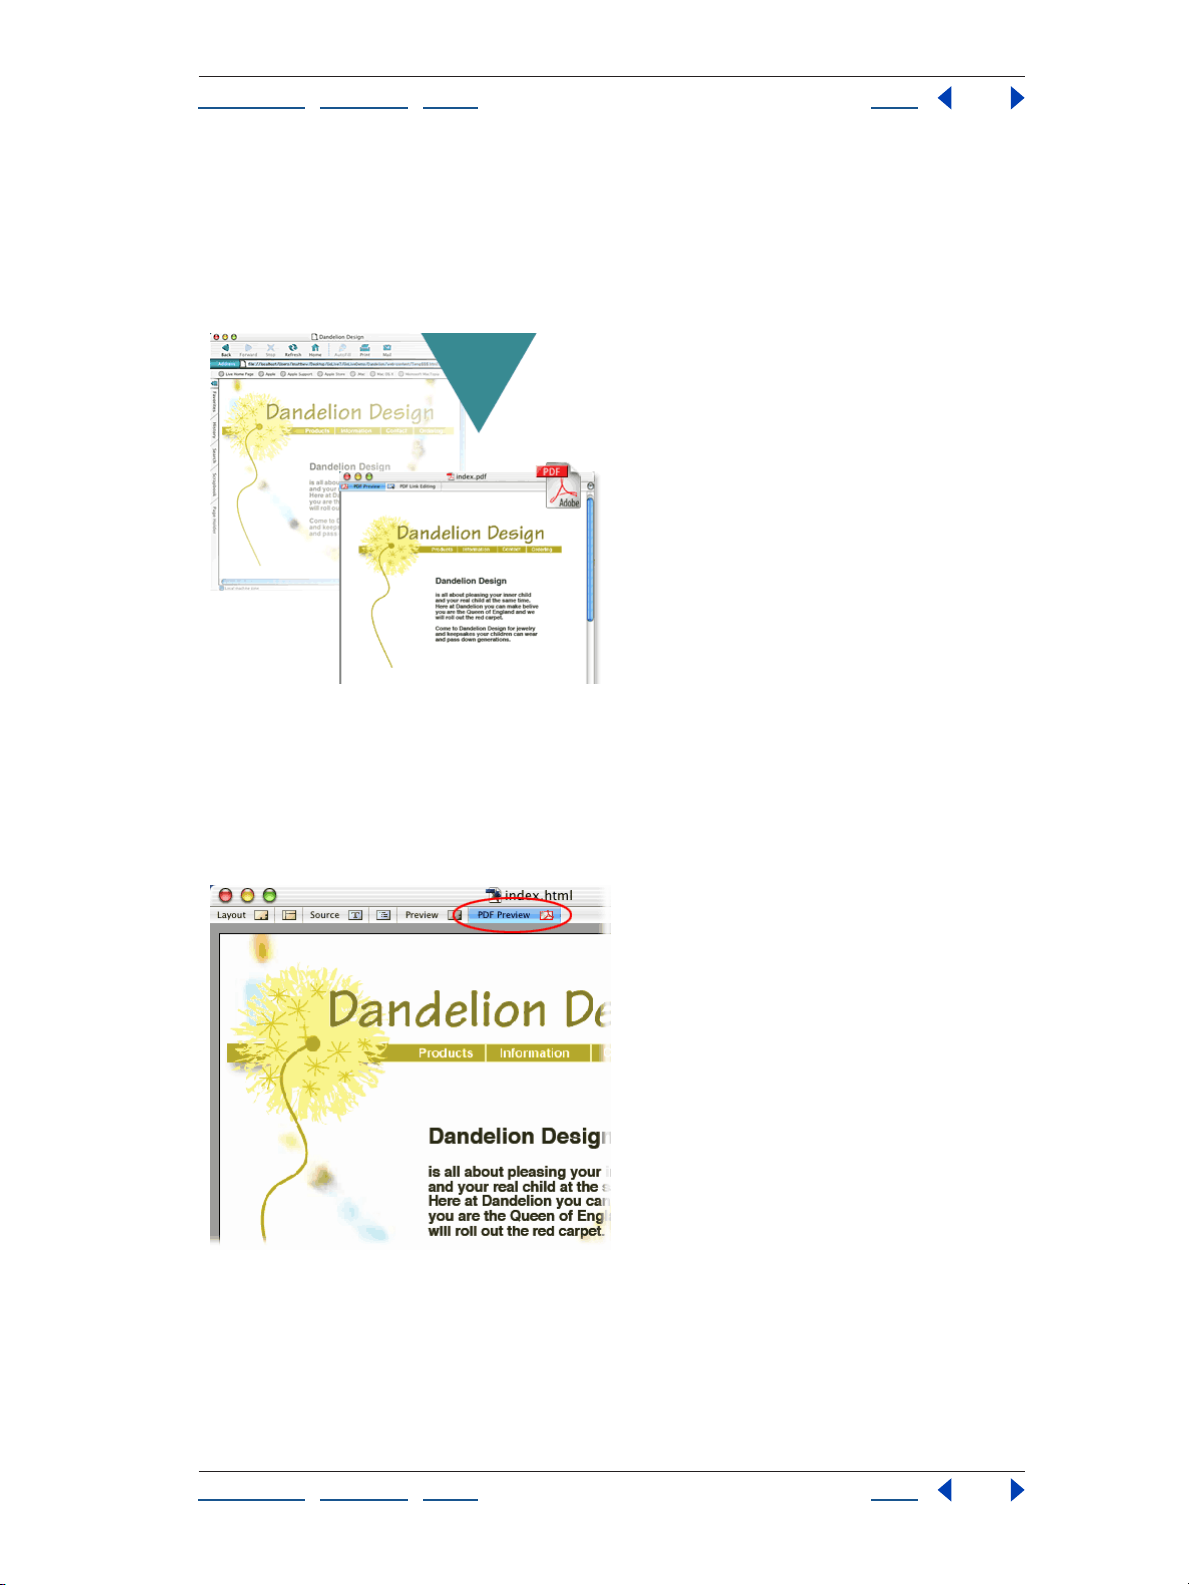
1. Preview as PDF.
In GoLive, open the Web page that you want to export to PDF, and then click the PDF
Preview tab in the document window. If you need to optimize the appearance of items
such as type or tables, click the Layout tab, make the necessary changes, and then return
to the PDF preview to see the results.
Using Help | Contents | Index Back 22
Page 23
Adobe GoLive CS Help Tutorials
Using Help | Contents | Index Back 23
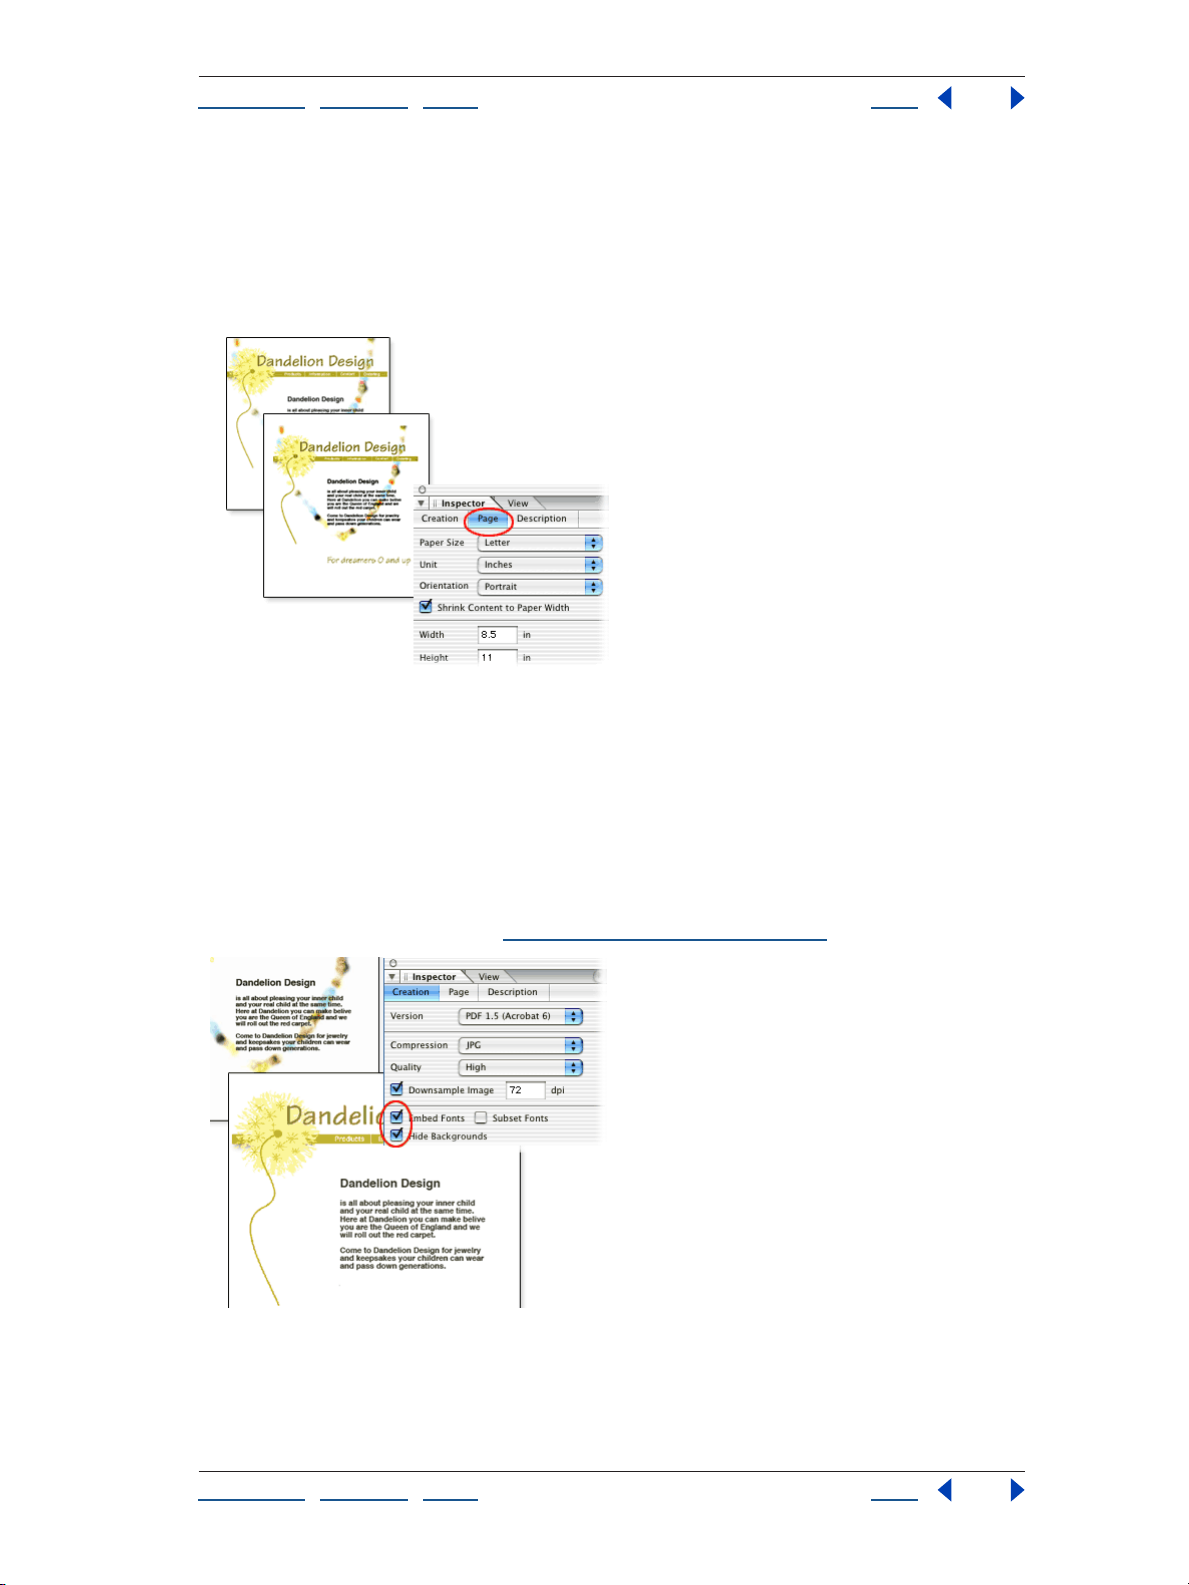
2. Format the pages.
In the PDF Creation Inspector, click the Page tab, and set the paper size, margins, and
orientation. Then select Shrink Content to Paper Width, and click re-create PDF to see the
results.
Shrink Content to Paper Width reduces Web content so it fits on the selected paper size.
3. Optimize for printing.
To ensure that the exported PDF file works well when printed, click the Creation tab and
select Embed Fonts and Hide Backgrounds. Click re-create PDF again to see the results.
Embed Fonts includes fonts in the exported file, ensuring that text always looks as
expected. Hide Backgrounds replaces Web page backgrounds with a white background,
which adds clarity to black-and-white prints. The PDF Creation Inspector contains many
additional options, which you can use to embed multimedia files, optimize file size, and
more. For more information, see
“PDF creation options” on page 351.
Using Help | Contents | Index Back 23
Page 24

Adobe GoLive CS Help Tutorials
Using Help | Contents | Index Back 24
4. Smooth text, line art, and images.
To smooth jagged edges in text, line art, and images, select the appropriate Smooth
options in the View palette.
Smoothing affects only on-screen appearance in Acrobat applications and is especially
effective for large type.
5. Export the PDF file.
Click the Export button in the toolbar, and save the PDF file in your site folder.
If you plan to incorporate PDF files into a site, always save them in the site folder. In that
location, you can manage PDF links with the same site management tools used for HTML
links. For more information, see
“Editing links and URLs sitewide” on page 124.
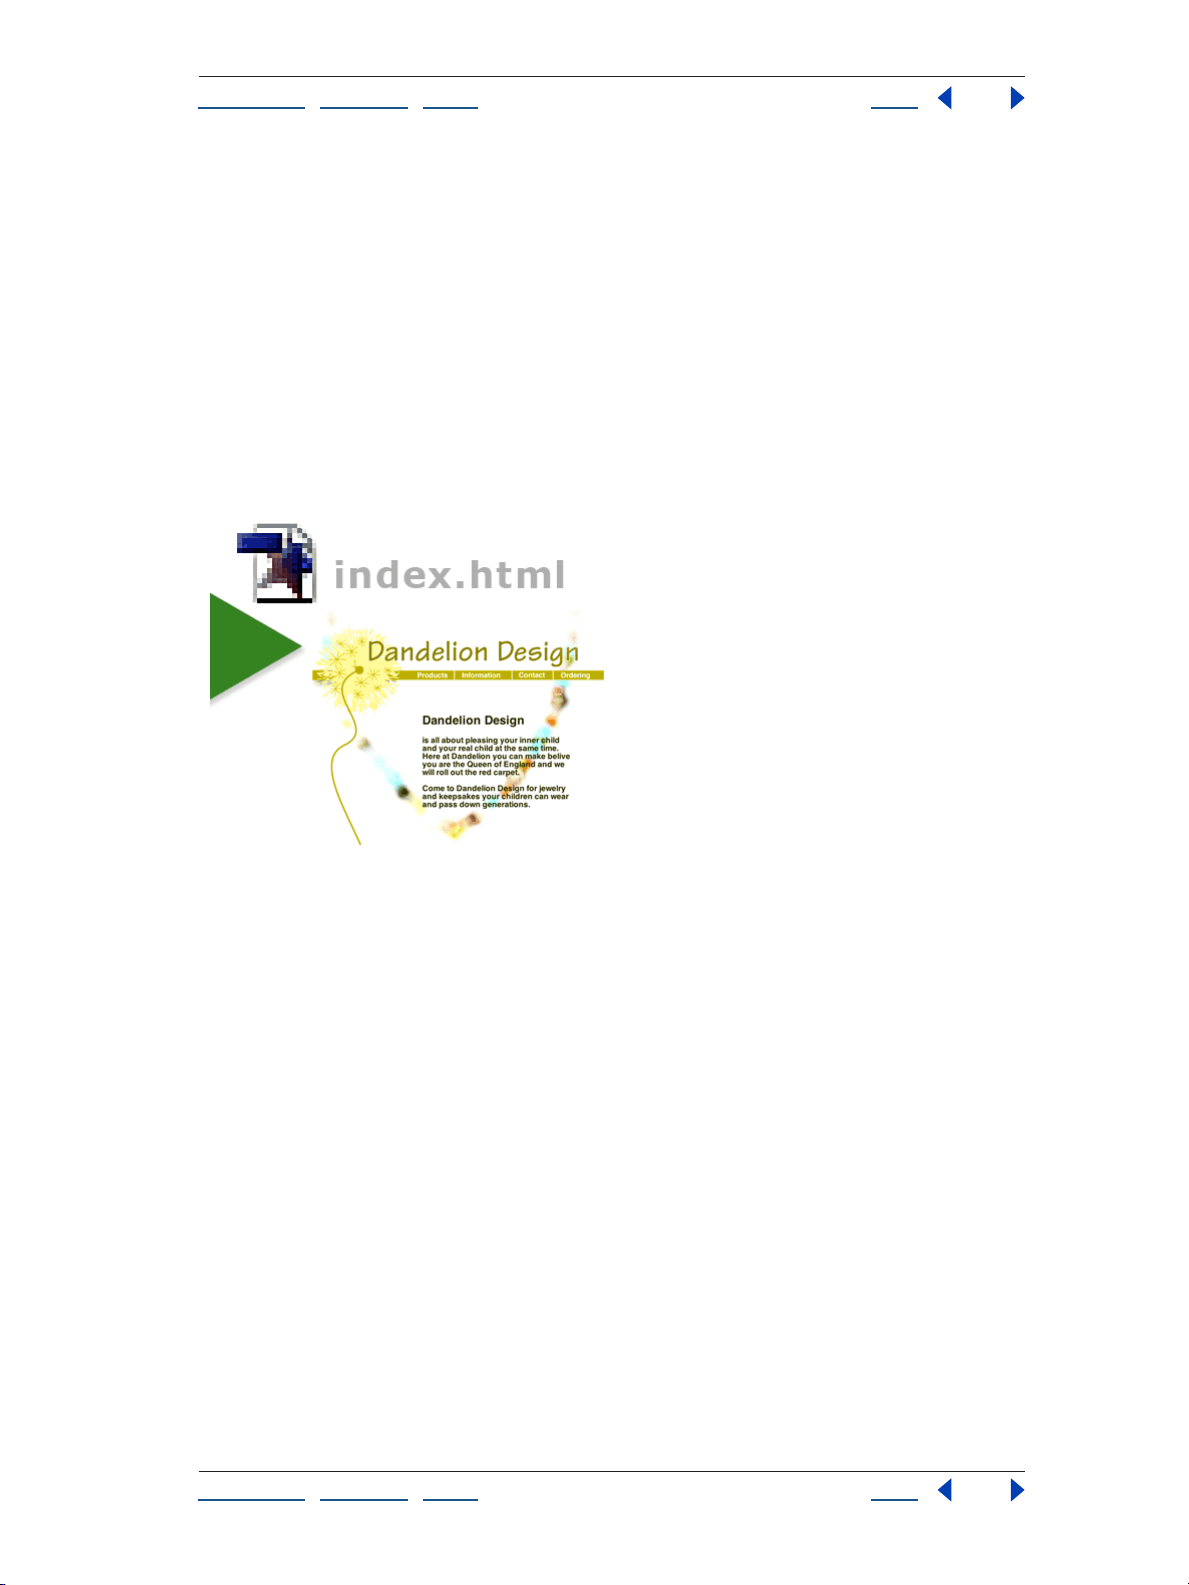
6. Link to the PDF file from the Web page.
Click the Layout tab to edit the Web page, and add the text Print-friendly version in an
appropriate location. Select the text, and link it to the PDF file by using the Text Inspector.
Then save the Web page.
You’ve successfully incorporated a print-friendly PDF into your site. In the future, you can
link from a Web page to specific PDF bookmarks or pages (see
“Linking files” on page 61).
You can also link from PDF files to destinations in your site and elsewhere on the Web (see
“Editing PDF link regions” on page 351).
Using Help | Contents | Index Back 24
Page 25
Adobe GoLive CS Help Tutorials
Using Help | Contents | Index Back 25
Publish a site
Before visitors can view your Web site, you need to transfer it to a publish server (a server
that hosts your site files, such as an FTP server). This tutorial demonstrates how to use
GoLive to transfer your site files to a publish server for the first time. Before you start this
tutorial, contact your Internet service provider (ISP) to determine the settings you’ll need
to access the publish server, including the publish server address, the server’s protocol,
the location of your directory on the publish server, and your user name and password.
GoLive makes it easy to transfer your site to a publish server with the Publish Server tab in
the site window. Once you’ve transferred a site, updating it is easy using modified-item
uploads and synchronized uploads. GoLive takes the guesswork out of determining which
files need updating by comparing the modification dates of local files with those on the
server.
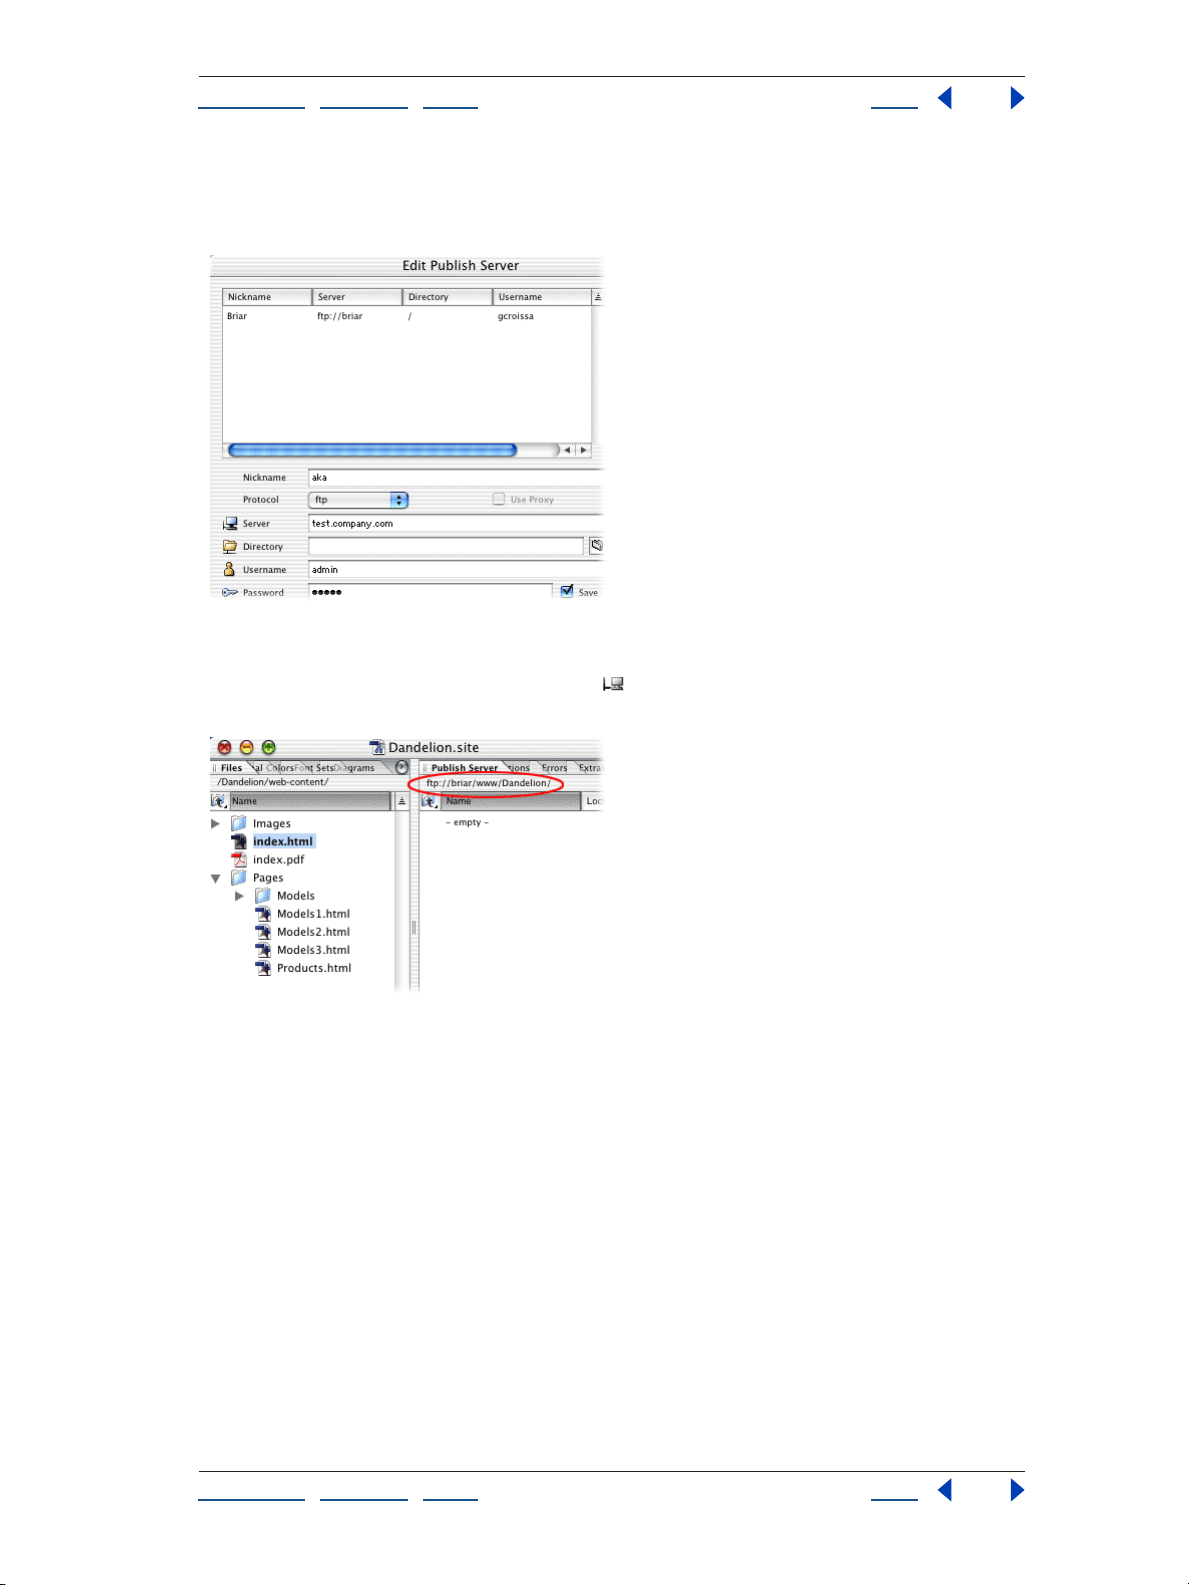
1. Configure a publish server.
Open a site and choose Edit > Server (Windows) or GoLive > Server (Mac OS). Click New in
the Edit Publish Server dialog box and type an easily recognizable nickname for your
server in the Nickname text box (this prevents confusion if you add more than one server
to the list). Choose a protocol from the Protocol menu and fill in the Server, Directory,
Username, and Password text boxes based on the publish server information you
obtained from your ISP; then click OK. Click the Site Settings button on the toolbar, and
choose Publish Server. Click Add and select the server you just configured. Click OK, and
then click OK again to add the server to the site settings.
Using Help | Contents | Index Back 25
Page 26
Adobe GoLive CS Help Tutorials
Using Help | Contents | Index Back 26
Once you’ve configured a publish server in GoLive, you can use it for any site. If you
change information about the publish server in the Edit Publish Server dialog box, GoLive
updates all sites that use that server.
2. Connect to the publish server.
Click the Connect to Publish Server button in the toolbar. GoLive brings the Publish
Server tab in the site window to the front.
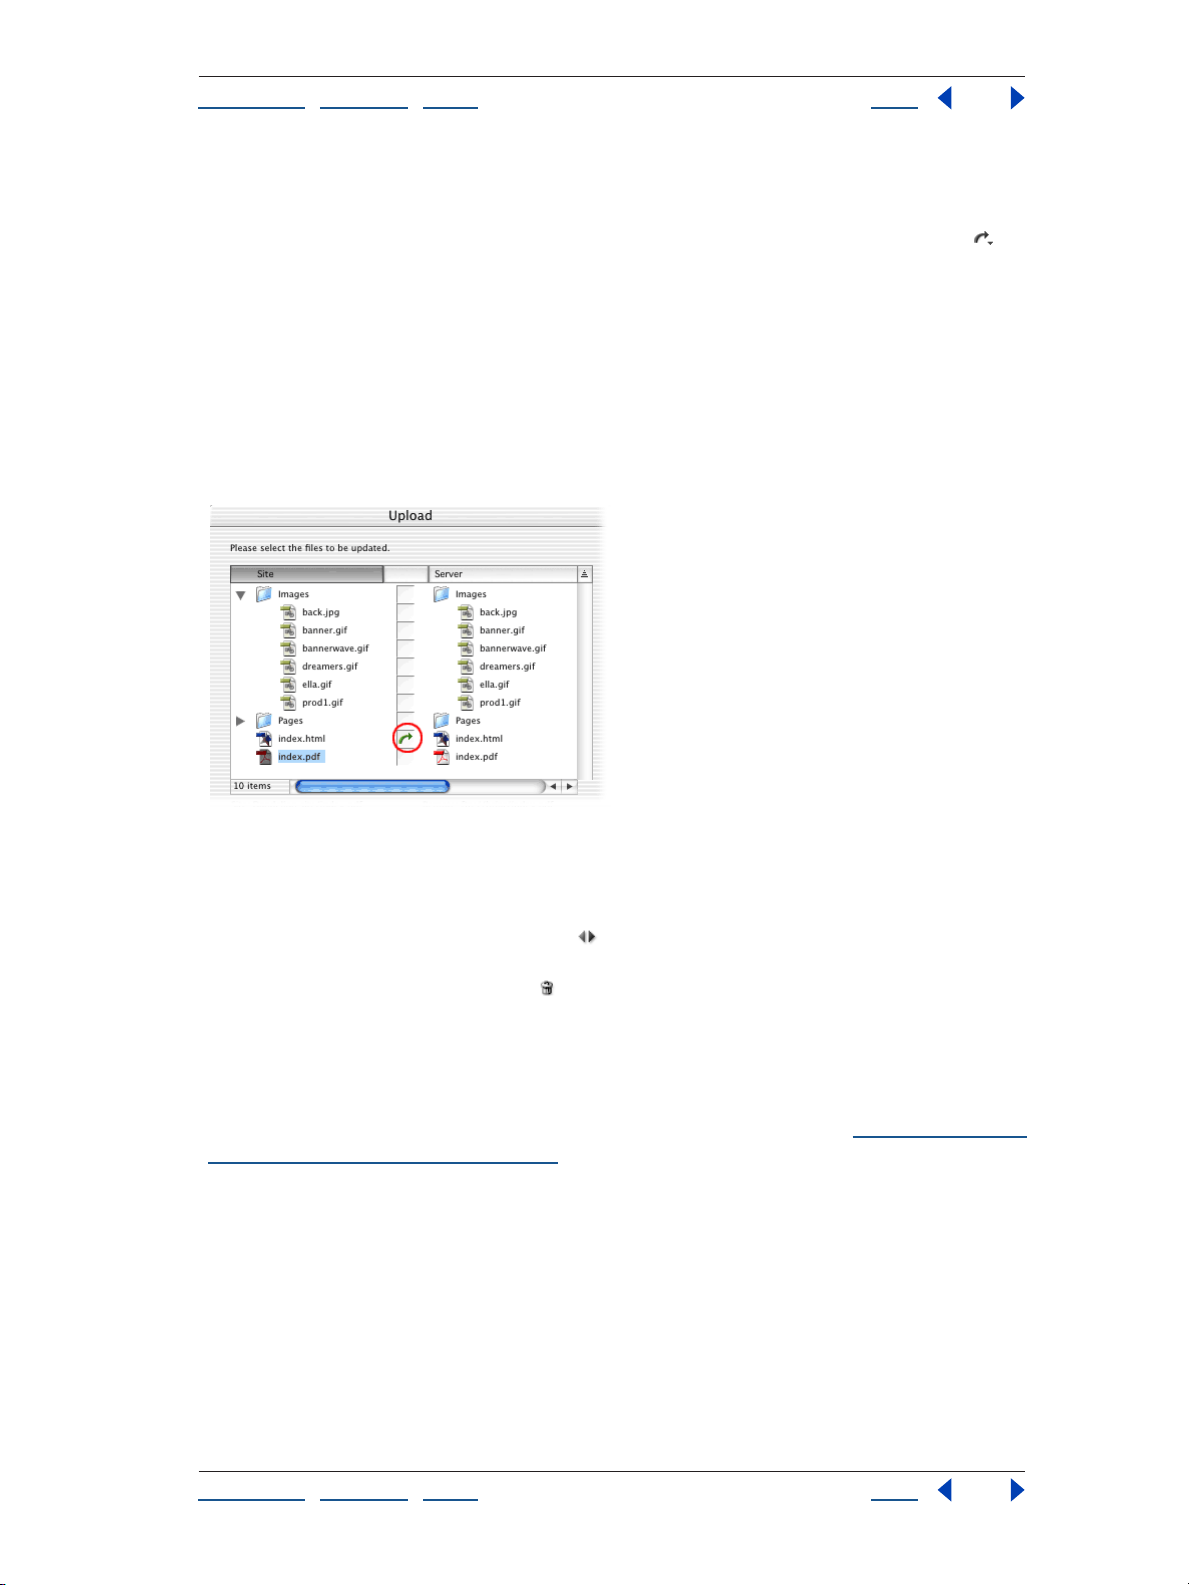
3. Upload a new file.
In the Files tab of the site window, select the file you want to upload and choose Site >
Publish Server > Upload Selection (don’t select the home page of the site—you’ll delete
this file later in the tutorial). GoLive uploads the file and displays it in the Publish
Server tab.
You can use the Publish Server command to upload selected files, all files in your site, or
only new files and files that have been modified locally since the last upload.
Using Help | Contents | Index Back 26
Page 27
Adobe GoLive CS Help Tutorials
Using Help | Contents | Index Back 27
4. Upload a modified file.
In the Files tab of the site window, select and open the file you uploaded in step 3. Make a
change to the file, and then save and close it. Click the Upload Modified Files button
on
the toolbar (if the button tool tip reads Upload All or Upload Selection, click the triangle at
the lower right of the button and choose Upload Modified Command from the Change
Button To menu). In the Upload dialog box, note that the file you’ve just modified is
marked with a green arrow, meaning GoLive will upload it to the publish server. Click OK
to perform the modified-item upload.
When GoLive uploads files, it saves the modification time for the local site files and the files
on the server. When you perform a modified-item upload, GoLive compares the modifi
cation times and transfers only new files and files that have been modified locally since the
last upload.
5. Synchronize all files in the site.
In the Files tab of the site window, select the file you uploaded in step 3, and then click the
Delete Selected Item button in the toolbar. Click Yes to confirm the deletion. Click the
Synchronize with Publish Server button
on the toolbar. The Synchronize dialog box
appears and displays files on the local site and on the publish server. The file you deleted
locally is marked with a Delete icon
. Click OK to delete the file from the publish server
and synchronize the site.
Synchronizing a site ensures that the local site and the site on the server match. When you
synchronize a site, you can upload files to the publish server, download them from the
server to the local site, skip files completely, or delete them. You can exclude files from
upload by setting their publish state to Never in the File Inspector (see
“Assigning publish
states to files and folders” on page 133).
Using Help | Contents | Index Back 27
Page 28
Adobe GoLive CS Help Looking at the Work Area
Using Help | Contents | Index Back 28
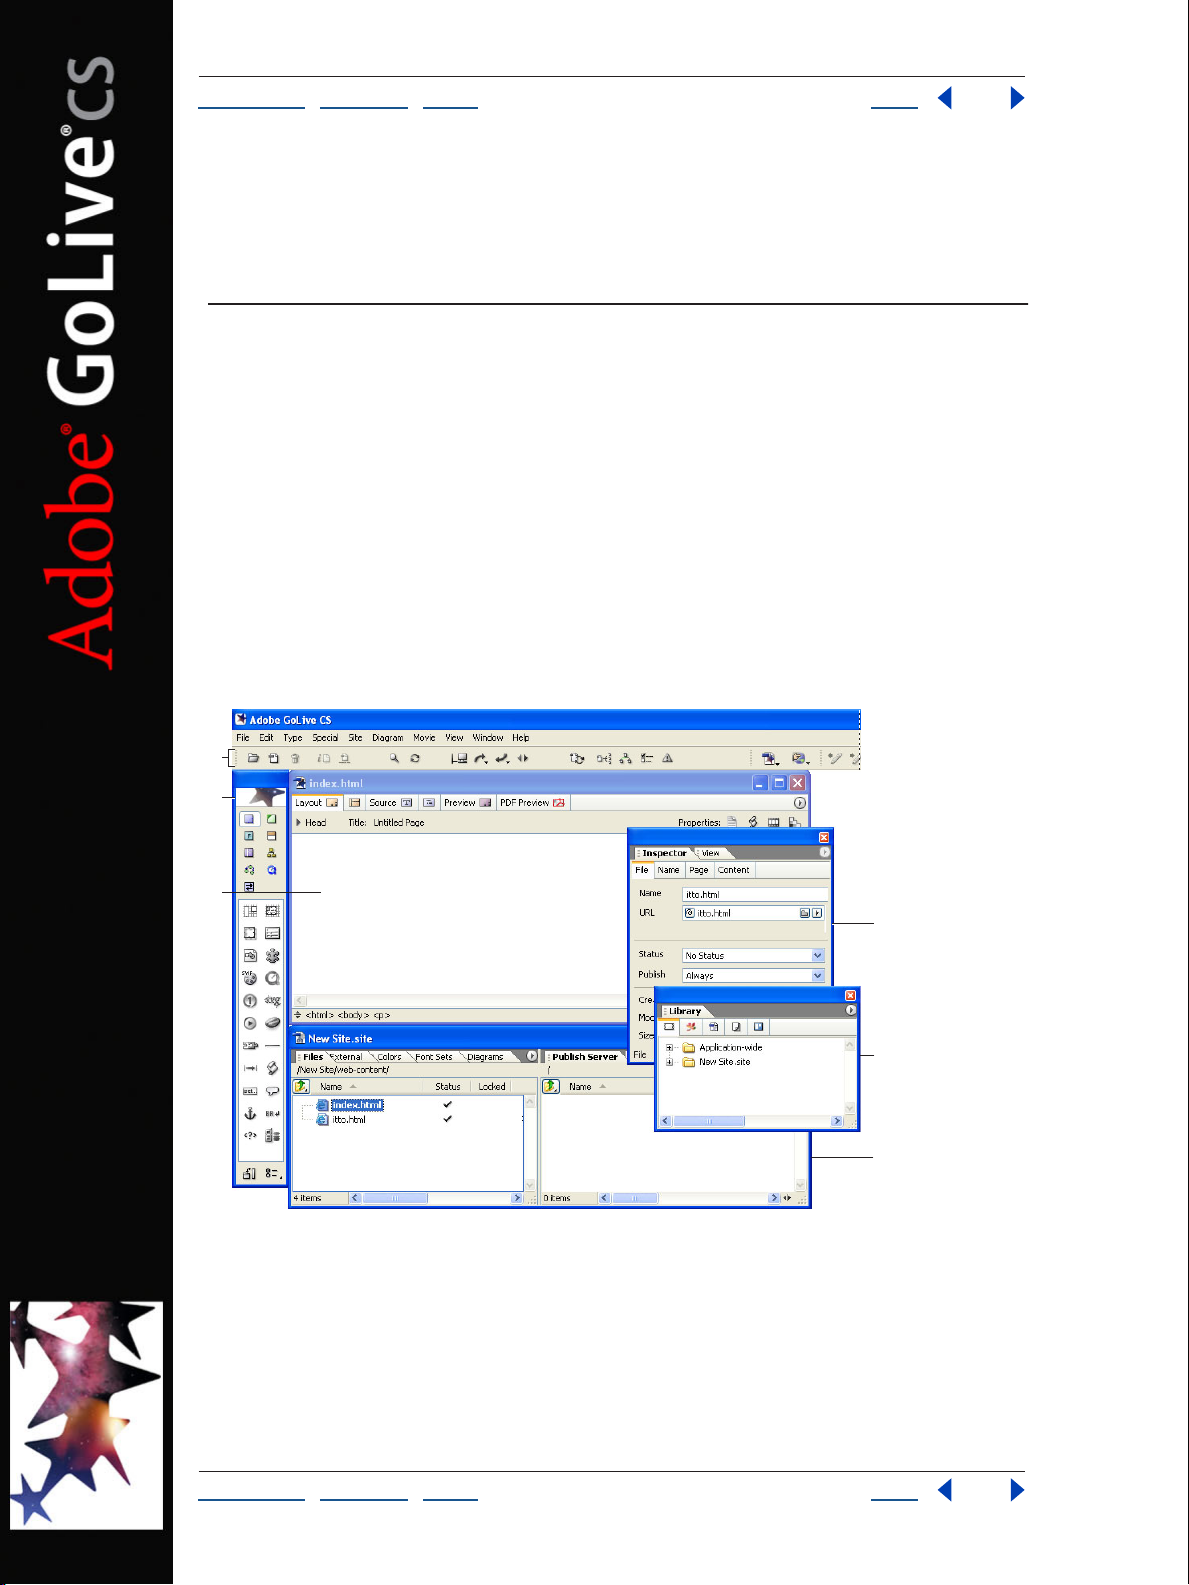
Looking at the Work Area
GoLive basics
The GoLive work area includes the site window (one for every site project), document
windows for each open Web page, and a variety of editors, toolbars, and palettes for
working with everything in your site. Windows can be stacked or tiled on your screen, and
palettes can be grouped, ungrouped, rearranged on the screen, and saved as custom
workspaces.
Dragging and dropping You can drag files around in the site window just like you drag
files
on your desktop—but by dragging in the site window, GoLive continually tracks the
files and updates file references in the site accordingly. You can drag files from the site
window into an open Web page to add images, Smart Objects, site assets, or hypertext
links to the page. You can drag text and objects from one page to another, and from one
site to another.
A
B
C
D
E
F
GoLive work area
A. Toolbar B. Objects palette C. Document window D. Inspector E. Library palette F. Site window
Using the Objects palette, you can drag objects representing HTML elements to an open
page. You can drag text and objects from the page into the Snippets tab of the Library
palette for storage with the site or application.
Using Help | Contents | Index Back 28
Page 29

Adobe GoLive CS Help Looking at the Work Area
Using Help | Contents | Index Back 29
Using the point-and-shoot feature, you can create resource links (between object placeholders on the page and their source files) or navigational links (between the page and
other pages or URLs) by dragging from the page or the Inspector to destinations in the site
window or another open page. (See
page 61.)
If a window is hidden behind other windows, you can drag to the Select Window
button
to a tab on a window, GoLive brings the tab to the front of the window.
Starting the application When the GoLive application starts, an Intro screen appears by
default that contains options to create a new page or a new site, open a file, or close the
Intro screen. You can deselect the option to show the screen at startup and later reselect
the option in the Preferences dialog box. (See
page 42.)
on the toolbar to bring the window to the front. When you drag a file or object
“Creating resource and navigational links” on
“Setting preferences for opening pages” on
Working with windows, palettes, and menus
When you first start GoLive, several palettes are displayed by default in groups. You can
move palettes between groups or to their own windows, collapse them into tabs on the
side of the screen, arrange them so that multiple palettes share a single title bar, and resize
them to make better use of your work area. You can save the way palettes are displayed as
custom workspaces.
Tabs in the site window and graphical site views behave the same way as palettes; that is,
you can rearrange and organize them into new groups.
The site window (with both panes open), the Objects palette, the toolbar, and the
Inspector should always be open for building, revising, and uploading a site.
Displaying the site and document windows
You can display multiple site and document windows at a time—GoLive keeps track of the
pages with their corresponding sites—so you can easily copy things from page to page
and
site to site.
To display the document window:
Open an XHTML or HTML page, or create a new page.
To display the site window:
Open the site project file (.site).
To collapse the site window to a single pane:
Click the double-arrow button at the bottom of the window. (To expand the site
window to two panes, click the button again.)
To display the head section pane in the document window:
With the Layout tab selected, click the Toggle Head Section icon in the upper left corner
of the document window (next to the Header label).
Using Help | Contents | Index Back 29
Page 30

Adobe GoLive CS Help Looking at the Work Area
Using Help | Contents | Index Back 30
To display the source code pane in the Layout Editor:
With the Layout tab selected in the document window, click the Show/Hide Split Source
icon
in the lower left corner of the window.
Note: You can also display the source code pane in the Frame Editor and Outline Editor.
To display the source code pane on the sides, top, or bottom of the Layout Editor:
Alt-click (Windows) or Option-click (Mac OS) the Show/Hide Split Source icon—each time
you click, the pane moves to a new vertical or horizontal position in the window.
To display an editor or preview:
Click a tab at the top of the document window:
• Click the Layout Editor tab to add content to a document.
• Click the Frame Editor tab to create a frameset and lay out frames that display individual
Web pages.
• Click the Source Code Editor tab to work directly with your document’s source code.
• Click the Outline Editor tab to view source code in a hierarchical, structured view.
• Click the Preview tab to preview your document and test links in GoLive.
• Click the PDF Preview tab to export a Web page to PDF.
Displaying toolbars and rulers
The main toolbar appears below the command menus at the top of your screen. It
contains buttons and pop-up menus that change depending on what you have selected
in the work area. In addition to the main toolbar, the Source Code toolbar is available
when you work with source code in the document window.
Note: The Version Cue toolbar to the right of the main toolbar has buttons that are
available when you use Adobe Version Cue with GoLive. For more information, see
“Working with Adobe Version Cue managed projects” on page 45.
You can display horizontal and vertical rulers in the Layout Editor to help you place and
resize objects on a page with precision. When you place an object, white areas on the
rulers indicate the current position and size of the selected object. When you move the
pointer in the document window, lines in the rulers move along to indicate the current
position of the pointer.
To show or hide the layout rulers:
Choose View > Show Rulers or View > Hide Rulers.
To show or hide the main toolbar:
Choose Window > Main Toolbar. (A check mark next to Main Toolbar in the Window menu
indicates that it is showing.)
To move the main toolbar:
Drag the lower left corner. In Windows, drag the toolbar by its title bar once it’s moved
from its default position below the command menus at the top of your screen.
Using Help | Contents | Index Back 30
Page 31

Adobe GoLive CS Help Looking at the Work Area
Using Help | Contents | Index Back 31
To show or hide the Source Code toolbar:
Right-click (Windows) or Control-click (Mac OS) the source code in the document window
and choose View > Toolbar from the context menu.
Using context menus
GoLive contains a number of context-sensitive menus that display commands relating to
the active window or selection. You can use these context menus as a quick way to choose
commonly used commands.
To use a context menu:
1 Position the pointer over the active window or selection.
2 Do one of the following:
• In Windows, click with the right mouse button.
• In Mac OS, hold down the Control key and click.
Context menu for selected file
Displaying palettes
GoLive palettes are listed in the Window menu. A check mark next to the palette’s name
indicates that the palette is showing at the front of its group.
To show a palette and any palettes in its group:
Choose the palette’s name from the Window menu. (To hide the palette and its group,
choose the name again from the Window menu.)
To bring a palette to the front of its group:
Do one of the following:
• Click the palette’s name in the group.
• Choose the palette’s name from the Window menu.
To hide all palettes:
Choose Window > Workspace > Hide Palettes.
Using Help | Contents | Index Back 31
Page 32

Adobe GoLive CS Help Looking at the Work Area
Using Help | Contents | Index Back 32
To return palettes to their default sizes and positions:
Choose Window > Workspace > Default Workspace.
Note: The Default Workspace command restores only the default palettes (the Inspector
and the Objects, Color, Swatches, CSS, Layers, Table, Library, and View palettes). GoLive
will close any other open palettes.
To display the Objects palette horizontally:
In the Objects palette, click the Toggle Orientation button . Click the button again to
return the palette to vertical orientation.
Note: When the Objects palette is displayed vertically, its palette menu is in the lower right
corner, next to the Toggle Orientation button.
Rearranging palettes or tabs
All palettes can be moved from one group to another, rearranged within their group, or
separated into windows of their own. In addition, you can move and separate the tabs in
the site window, navigation view, and links view.
You can dock palettes so that multiple palettes share a single title bar. You can collapse
and expand docked palettes.
A
B
C
GoLive palettes
A. Grouped palettes B. Docked palettes C. Collapsed palettes
To move a palette or tab between groups:
Do one of the following:
• Drag the palette’s name in a group to another group.
• Drag the tab’s name from one pane to another in the site window or from the site
window to a graphical site view window (navigation or links view).
Using Help | Contents | Index Back 32
Page 33

Adobe GoLive CS Help Looking at the Work Area
Using Help | Contents | Index Back 33
• Drag the Navigation tab or the Links tab to a pane in the site window.
Note: You can move the Objects palette into another group only when it is displayed
horizontally.
To move a group of palettes or tabs:
Drag the title bar of the group window.
To dock palettes:
Drag the palette’s tab to the bottom of another palette until the bottom of the target
palette is highlighted.
Note: You can dock the Objects palette only when it is displayed horizontally.
To move a docked group of palettes:
Drag the group’s title bar.
To move a palette or tab so that it appears in its own window:
Drag the palette’s name or tab’s name away from the group or site window.
To bring a tab to the front of its group in the site window:
Do one of the following:
• Click the tab.
• Choose the tab from the site window’s menu.
• Drag an appropriate item to the tab, pause while the body of the tab comes to the front,
and then continue dragging into the body itself. (For example, drag formatted text to
the Fonts tab, pause, and continue dragging into the body of the tab.)
Pausing with the pointer on the Font Sets tab brings the body of the tab to the front.
Using Help | Contents | Index Back 33
Page 34

Adobe GoLive CS Help Looking at the Work Area
Using Help | Contents | Index Back 34
To rearrange palettes and tabs within a group:
Drag the palette or tab name to a new position. (For example, drag a palette to the right of
another palette in its group, or drag a tab in the site window to the left of another tab in its
group.)
Collapsing palettes into side tabs
You can collapse palettes into tabs on the side of the screen to optimize desktop space,
and then quickly slide them open by clicking the tabs. Clicking the tab again collapses the
palette.
Note: You can collapse the Objects palette into a side tab only when it is displayed
horizontally.
To collapse a palette into side tabs:
Select the palette’s name and drag it to the left or right side of your computer screen.
Note: In Mac OS, you cannot drag the palette to the side of the screen that contains
the Dock.
To slide open or close the collapsed palette:
Click the side tab.
To separate the collapsed palette from the screen edge:
Drag the tab out to the center of your screen or into a palette group.
To collapse multiple palettes into a side tab:
Collapse a palette, and then drag another palette’s tab over the tab of the collapsed
palette on the edge of the screen.
To adjust the size of a collapsed palette:
Drag the bottom of the palette up or down.
Using palette and window menus
GoLive palettes and windows include a menu in the upper right corner that displays
options specific to the palette or window. For example, the Color palette menu contains
options that correspond to the color set buttons across the top of the palette. (See
the Color palette” on page 67.)
To use a palette or window menu:
Click the triangle in the upper right corner of the palette or window, and choose an
option from the menu that appears.
“Using
Arranging windows and editors
You can arrange document windows, site windows, graphical site view windows, and
editors horizontally, vertically, or in cascading order. GoLive fits the windows and editors
side by side on the screen (starting new rows or columns as necessary) or stacks them on
top of each other with just their edges showing.
To tile or stack all open windows or editors on the screen:
Choose Tile Horizontally, Tile Vertically, or Cascade from the Window > Cascade and
Tile menu.
Using Help | Contents | Index Back 34
Page 35

Adobe GoLive CS Help Looking at the Work Area
Using Help | Contents | Index Back 35
Switching between windows or editors
GoLive provides several methods to switch between multiple document windows, site
windows, site design windows, and editors open on your desktop.
To switch to an open window or editor:
Do one of the following:
• Click the desired window or editor to select it.
• Choose the desired window or editor from the bottom of the Window menu.
• Click the Select Window button on the toolbar to toggle between the foremost
window or editor and the site window.
• Choose the desired window or editor from the Select Window button’s pop-up menu
on the toolbar.
AB
C
Different states of the Select Window button
A. Click to return to document window.
B. Click to return to site window.
C. Press and hold to display a list of open windows or editors.
• When you’re creating a reference link, drag the pick whip to the Select Window
button on the toolbar to open the pop-up menu and bring a window to the front, and
then continue to drag to the destination in the window. (See
“Specifying the desti-
nation URL for a link” on page 62.)
If a window or editor is off-screen and not visible (for example, if you changed your
monitor’s resolution or dragged the window or editor off the screen edge), choose
Window > Cascade to return the window or editor to view.
Saving custom workspaces
You can save the current sizes and positions of palettes on the screen as custom
workspaces. This is useful for working on different types of pages, such as regular Web
pages or pages with Cascading Style Sheets, which require different palettes to be visible.
The names of workspaces appear in a Workspace submenu of the Window menu. You can
edit the list of names by adding, renaming, or deleting a workspace.
To save a custom workspace:
1 Open, close, resize, and arrange the palettes as desired on the screen.
2 Choose Window > Workspace > Save Workspace.
3 Do one of the following:
• Type a name for a new workspace in the text box.
• Choose the name of an existing workspace to replace from the pop-up menu.
4 Click OK.
Using Help | Contents | Index Back 35
Page 36

Adobe GoLive CS Help Looking at the Work Area
Using Help | Contents | Index Back 36
To use your custom workspace:
Choose it from the Window > Workspace submenu.
To edit the list of custom workspaces:
1 Choose Window > Workspace > Manage Workspaces.
2 Select a name in the list of workspaces and do any of the following:
• Click the New Workspace button to add a new workspace.
• Type a new name in the text box and press Enter or Return.
• Click the Remove Selected Workspaces button to remove the selected name.
3 Click OK.
Reverting and restoring changes to pages
When designing your Web page, you can use the History palette or menu commands to
revert to a previous state of a page or site. The History palette records the changes that
you make to a page in the Layout Editor or Source Code Editor and changes you make to
files in the site window. Each time that you make a change, the new state of the page or
site is added to the History palette. You can revert to a previous state of the page or site by
selecting any state in the History palette. Once you’ve reverted to a previous state, you can
restore changes that you made to that state by choosing a newer state in the History
palette.
Using the History palette
You can set the maximum number of states that the History palette displays for a page or
site (20 states by default). When you switch between open documents or site windows,
the contents of the History palette adjust accordingly. However, the content is cleared and
you lose the information when you click a different tab in the document window.
To use the History palette:
1 Choose Window > History.
The History palette lists the previous states of the document, with the oldest state at the
top of the list and the newest state at the bottom.
2 In the History palette, click the state of the document to which you want to revert.
3 To restore the changes that you made to that document state, choose a newer state in
the History palette. (The newer states of the document are dimmed.)
In Mac OS, press Shift+Command+Z to restore the changes that you made to a
document state incrementally.
To set the maximum number of states listed in the History palette:
In the History palette, choose History Options from the palette menu, enter a number
between 1 and 1600 in the Maximum History States text box, and click OK.
To clear the History palette of all states:
In the History palette, choose Clear History from the palette menu.
Using Help | Contents | Index Back 36
Page 37

Adobe GoLive CS Help Looking at the Work Area
Using Help | Contents | Index Back 37
Using the Undo, Redo, and Revert to Saved commands
As an alternative to using the History palette, you can undo or redo a change that you’ve
made to a page using the Undo and Redo commands. Some palette menus contain the
Undo and Redo commands, such as the HTML Styles palette menu. You can also undo all
changes by reverting to the state of your page when you last saved it.
To use the Undo, Redo, and Revert to Saved commands:
1 To undo an action, do one of the following:
• Choose Edit > Undo. The menu command describes the last action you performed. Each
time you choose the command from the menu and undo the action, the description
changes to match what has now become the last action you performed. When no
actions remain, the menu command is dimmed.
• Choose Undo from the palette menu.
2 To redo the action, do one of the following:
• Choose Edit > Redo. The menu command describes the last action that you can redo.
Each time you choose the command from the menu and redo the action, the
description changes to match what has now become the last action you can redo.
When all of the actions are redone, the menu command is dimmed.
• Choose Redo from the palette menu.
3 To revert to the way the page was when you last saved it, choose File > Revert to Saved.
Previewing files
You can preview your Web pages and test your links directly in GoLive. You can also
preview QuickTime movies, animated GIFs, or any other plug-in media items that GoLive
supports. Using the Live Rendering window, you can preview changes you make in the
Layout Editor on the fly. Layout preview approximates what your page looks like when it’s
finally published on the Web.
You can also preview PDF files you create or open in GoLive. (See “Exporting Web
pages to PDF” on page 349.)
In addition to previewing your page in GoLive, you should always preview it using a
variety of browsers, browser versions, and platforms. You’ll need to use browsers to
determine potential browser differences and to preview JavaScript, DHTML, or other items
for which GoLive doesn’t provide native support. If desired, you can start a browser such as
Safari, Opera, Netscape Navigator, or Microsoft Internet Explorer, from within GoLive by
first adding it to the Preview in Browser menu in the toolbar.
You can also view a browser simulation of your page in the Layout Editor by choosing
the profile of a specific Web browser in the View palette. (See “Setting view options for
page layout” on page 55.)
To preview your page in Layout Preview:
1 Make sure that Preview Mode is activated in the Modules Preferences: Choose Edit >
Preferences (Windows) or GoLive > Preferences (Mac OS), select Modules in the left pane
of the Preferences dialog box, select Preview Module in the right pane, and click OK.)
2 Click the Preview tab in the document window.
Using Help | Contents | Index Back 37
Page 38

Adobe GoLive CS Help Looking at the Work Area
Using Help | Contents | Index Back 38
3 To check your page layout, scroll the document window. To test your links, click all of
the hot spots on your page. GoLive opens each referenced page in either the Preview
pane or in its own window.
Note: To use Layout Preview in Adobe GoLive for Windows, you need Microsoft Internet
Explorer installed on your computer.
To preview your page in Live Rendering:
1 Do one of the following:
• Open the page you want to preview and choose File > Preview In > Live Rendering.
• Choose File > Preview In > Live Rendering, and use the pick whip or click the Browse
button to open a page.
• Choose File > Preview In > Live Rendering, choose Load from the Live Rendering
window menu, and then select a page in the Choose File to Render dialog box.
Changes you make in the Layout Editor are reflected in the Live Rendering window after
you click in the Live Rendering window. If you have multiple document windows open,
the Live Rendering window previews the currently selected document.
To set Live Rendering window options:
Choose one of the following from the Live Rendering window menu:
• Choose Load to open a file from the Choose File to Render dialog box.
• Choose Reload to reflect changes you’ve made in the Layout Editor (use this option if
you’ve deselected Auto Update).
• Choose Auto Update to ensure that the Live Rendering window displays changes you
make in the Layout Editor when you click in the Live Rendering window (this option is
selected by default). If Auto Update isn’t selected, you’ll need to choose Reload after
you make a change in the Layout Editor.
• Choose Bound to bind the Live Rendering window to a specific document: select the
open document you want to preview, and then choose Bound from the Live Rendering
window menu.
To set up preferences for previewing in browsers:
1 Make sure that each browser is installed on your hard disk and that all plug-ins you
need for previewing are placed in the browser’s Plug-ins folder (or any other location your
browser uses for multimedia extensions).
2 Choose Edit > Preferences (Windows) or GoLive > Preferences (Mac OS), and click the
Browsers icon in the left pane of the Preferences dialog box.
3 Do one of the following:
• To add all browsers on your hard disk to the browser list, click Find All.
• To add a single browser, click Add. Then select the browser, and click Open (Windows),
or click Add and then click Done (Mac OS).
Using Help | Contents | Index Back 38
Page 39

Adobe GoLive CS Help Looking at the Work Area
Using Help | Contents | Index Back 39
4 Select one or more browsers in the scrolling window that you want to be started when
you click the Preview in Browser button
Default Browser.
Note: Most browsers only allow you to open one version at a time. For example, you can
open Netscape Navigator and Microsoft Internet Explorer at the same time, but not
Netscape Navigator 4.0 and 7.0.
When two or more types of browsers are selected in the Browsers preferences, such as
Navigator and Internet Explorer, a generic browser icon appears on the toolbar. When
only a single type of browser is selected, such as Navigator 4.0, the program icon of that
browser appears on the toolbar.
5 To delete a browser from the scrolling window, select it and click Remove.
6 Click OK.
To preview your page in a browser:
Do one of the following:
• To preview the page in the browser or browsers that you have selected in the Browsers
preferences, click the Preview in Browser button
Preview In > Default Browser.
• To preview the page in a single browser that you’ve set up in the Browsers preferences,
choose the browser from the Preview in Browser menu on the toolbar. Or, choose a
browser from the File > Preview In submenu.
on the toolbar or choose File > Preview In >
on the toolbar, or choose File >
Preview in Browser button and pop-up menu
Getting information about documents
The Document Statistics dialog box displays information about Web pages, while the File
Info command provides metadata about a file—when, how, and by whom it was created.
The File Info command works only on non-HTML files, such as files in PDF and JPEG
formats.
Using Help | Contents | Index Back 39
Page 40

Adobe GoLive CS Help Looking at the Work Area
Using Help | Contents | Index Back 40
Using the Document Statistics dialog box
You can use the Document Statistics dialog box to view general information about your
Web page, including its byte size, word count, character count, and the approximate time
it takes to download. Note that the byte sizes listed don’t include media, such as
QuickTime or sound (because they may be set to start playing before they are fully
downloaded). In addition, the download times listed are only rough estimates based on a
well-defined set of circumstances. External conditions, such as heavy traffic on the
network and Web server overload, may substantially change the real time it takes to
download the
page.
You can create a query for more detailed information, such as the download time for
everything that makes up the page (images, QuickTime movies, and so on.). (See
“Generating queries” on page 129.)
To view information for the current page:
Choose Special > Document Statistics. When you have finished viewing the document
information, click OK.
Adding metadata to documents
File information—also called metadata—is increasingly important in all types of
publishing. Metadata preserves information about the contents, copyright status, origin,
and history of documents, and can be used to search for files.
You can add file information to any site file, except HTML files. The information you add is
embedded in the file using XMP (eXtensible Metadata Platform). XMP facilitates the
exchange of metadata between Adobe applications and across publishing workflows. For
example, you can save metadata from one file as a template, and then import the
metadata into other files.
Companies can use the XMP Software Development Kit to customize the creation,
processing, and interchange of metadata. For example, the XMP SDK can be used to
add fields to the File Info dialog box. More information on XMP and the XMP SDK is
available on the Adobe Solutions Network.
To add metadata to a document:
1 Choose File > File Info.
2 Select a category from the list on the left side of the dialog box, enter the desired infor-
mation, and click OK.
• Description to specify information about the document, such as title, author,
description, and keywords that can be used to search for the document. To specify
copyright information, select Copyrighted from the Copyright Status menu. Then enter
the copyright notice string and the URL of the person or company who owns the
copyright.
• Origin to provide information on the history of the artwork. To enter the current date in
a short text format, click Today. For Credit, enter the information needed in the credit
line for a copyrighted image. Transmission Reference provides the Associated Press
with information on the original transmission location of the artwork. For Urgency,
specify the editorial urgency of the file—not its handling priority.
Using Help | Contents | Index Back 40
Page 41

Adobe GoLive CS Help Looking at the Work Area
Using Help | Contents | Index Back 41
• Advanced to view the XMP data for the file in a structured format.
• Raw Data to view the raw XMP data for the file.
To save metadata as a template:
1 Click the triangle icon at the top of the File Info dialog box, and choose Save
Metadata Template.
2 Enter a template name, and click Save.
To save metadata to an XMP file:
1 In the Advanced section of the File Info dialog box, click Save.
2 Type a filename, choose a location for the file, and click Save.
To import metadata into a document:
Do one of the following:
• Click the triangle icon at the top of the File Info dialog box, and choose a template name
from the top section of the pop-up menu. The metadata from the template will replace
the current metadata. To append the current metadata instead, hold down Ctrl
(Windows) or Command (Mac OS) when you choose the template name.
Note: You must save a metadata template before you can import metadata
from a template.
• In the Advanced section of the File Info dialog box, click Replace to replace the current
information with information stored in an XMP file. Locate the XMP file containing the
metadata you want to import, and click Open.
• In the Advanced section of the File Info dialog box, click Append to add information
stored in an XMP file to the current file information. For each File Info field, if the field
does not contain information then it will be updated with contents from the file.
Keywords will always be appended with the information from the file.
To delete a metadata template:
1 Click the triangle icon at the top of the File Info dialog box, and choose Delete
Metadata Template.
2 Select the name of the template you want to delete, and click Delete.
To show the location of metadata templates:
Click the triangle icon at the top of the File Info dialog box, and choose Show Templates.
Magnifying and reducing a document
You can magnify the contents of the document window to precisely place and align page
elements. Likewise, you can reduce magnification to view the overall layout of a page.
To magnify or reduce a document:
Do one of the following:
• Click the Zoom In button or the Zoom Out button at the bottom of the document
window, or choose View > Zoom In or View > Zoom Out.
Using Help | Contents | Index Back 41
Page 42

Adobe GoLive CS Help Looking at the Work Area
Using Help | Contents | Index Back 42
• Choose a magnification value from the Zoom Values menu at the bottom of the
document window, or choose a value from the View > Zoom To menu.
• Choose Edit from the Zoom Values menu at the bottom of the document window, enter
a zoom value percentage in the Zoom To dialog box, and then click OK.
Referencing files
GoLive provides several methods for referencing, or specifying, files in the Inspector, the
CSS Editor, and various palettes. You can use any of these methods to reference items such
as link destinations, external style sheets, or source files for image placeholders.
To reference a file:
In the Inspector, CSS Editor, or palette, do one of the following:
• Enter the path to the file in the text box.
• Drag the pick whip to a file in a site.
• Click the Browse button , and then locate and select the file.
• Choose a recently referenced file, an HTML file, an image, a URL, or an anchor from the
pop-up menu to the right of the Browse button.
Setting preferences
Numerous program settings are stored in the GoLive preference file, located in the Application Data/Adobe/Adobe GoLive folder (Windows) and the Mac OS X/Users/[username]/
Library/Preferences folder (Mac OS). You can change most of the program settings using
the Preferences dialog box, giving you control over the way GoLive looks and behaves. For
example, you can set display options, options for importing images, options for activating
modules, options for selecting default Web browsers that you start from GoLive, and
spelling checker options.
Some application preferences that you set in the Preferences dialog box also appear in the
Site Settings dialog box (such as URL Handling options) and can be overridden by settings
you make for a specific site. (See
page 91.)
To set options in the Preferences dialog box:
1 Choose Edit > Preferences (Windows) or GoLive > Preferences (Mac OS).
2 Select an icon or name in the left pane of the Preferences dialog box. If needed, click the
triangle or + symbol next to the icon to display a list of names below the icon.
3 Select options in the right pane of the Preferences dialog box. To find an explanation of
a particular preferences option or set of options, refer to the index.
4 Click OK. The new settings take affect the next time you start GoLive.
“Specifying preferences and settings for Web sites” on
Setting preferences for opening pages
You can set General preferences for automatically opening a new page when the GoLive
application starts, and you can set which tab in the document window (such as the Source
tab) is selected when the page opens.
Using Help | Contents | Index Back 42
Page 43

Adobe GoLive CS Help Looking at the Work Area
Using Help | Contents | Index Back 43
You can also set a preference to base new pages on an existing page or template. This is
useful when you’re setting up pages for your site. For example, you can set up a page with
the page title, margins, and background that you want for all the pages, and set a
preference to use this page whenever GoLive creates a new page. (See
“Setting up pages”
on page 53.) To store the page with your site, save it as stationery. (See “Using stationery”
on page 312.)
To set General preferences for opening pages when GoLive starts or creates a
new page:
1 Choose Edit > Preferences (Windows) or GoLive > Preferences (Mac OS).
2 Select General in the left pane of the Preferences dialog box.
3 In the right pane of the Preferences dialog box, choose one of the following options
from the At Launch menu to customize the behavior of GoLive when it starts:
• Create New Page to create and open a new untitled document.
• Show Welcome Screen to prompt you to create a new page or site, or to open an
existing file.
• Do Nothing to start GoLive without creating a new document or displaying the
Intro screen.
4 To specify the document window tab in which a page opens, choose it from the Default
Mode pop-up menu.
5 To use an existing file as the basis for new pages that you create in GoLive, select New
Page Template, click the Select button, and select the file. If you also choose Create New
Page from the At Launch menu, GoLive creates a new document based on this file when
you start the application.
6 To add the meta information “<meta name="generator" content="Adobe GoLive ">” to
each file that you create or save, select Write “Generator Adobe GoLive.”
7 Click OK.
Setting user interface preferences
You can set preferences to customize the color of highlighted items, such as text that has
been formatted with a CSS style, and the size and thickness of selection borders and
handles. You can also enable GoLive to start other applications for editing the source files
of media embedded on a page. General User Interface preferences are applied to every
page that you open until you change them.
To set General preferences for the GoLive user interface:
1 Choose Edit > Preferences (Windows) or GoLive > Preferences (Mac OS).
2 Click the symbol next to General to expand the list, and select User Interface.
3 Select Launch Other Applications to Edit Media Files to enable GoLive to start a specific
editing application when you double-click an image or object on your page that’s linked
to an image or media source file, or when you open a source file in the Files tab of the
site window.
Using Help | Contents | Index Back 43
Page 44

Adobe GoLive CS Help Looking at the Work Area
Using Help | Contents | Index Back 44
For example, GoLive maps the filename extension .psd to the Adobe Photoshop application and starts Photoshop when you double-click an image file with that extension. The
file mappings to the editing applications are listed in the Web Settings dialog box. (See
“Using the File Mappings tab” on page 460.)
4 To modify the appearance of resize handles on selection lines, do one of the following:
• Select 3D to add a beveled edge or 2D to add a flat edge to the selection handles.
• To change the color of the handles, click the lower right corner of the color field and
select a color from the swatches that appear, and then click OK.
• To change the size of the handles, choose Large, Medium, or Small from the
pop-up menu.
5 Click OK.
Setting preferences for program modules
The Modules Preferences dialog box lets you disable or enable selected modules and
extend scripts on an as-needed basis— improving the GoLive application’s launch time,
responsiveness, and overall memory requirements. By disabling unused modules, you can
reduce the program’s memory requirements to the minimum recommended 24 MB.
To activate or deactivate program modules:
1 Choose Edit > Preferences (Windows) or GoLive > Preferences (Mac OS).
2 Click the Modules icon in the left pane of the Preferences dialog box.
3 To read a description of a module, select it in the right pane and click the triangle next
to Show Item Information.
4 Click the check boxes to select or deselect modules to activate or deactivate them.
Program modules that are currently installed are checked by default.
5 Click OK.
6 Restart GoLive.
Customizing keyboard shortcuts
You can customize the GoLive set of keyboard shortcuts or a set called My Settings that is
based on the GoLive set. You can also create additional sets of keyboard shortcuts by
copying an existing set and modifying the new set.
For example, you can modify a set to include keyboard shortcuts for the Window >
Workspace
then use the shortcuts to switch between workspaces. (See
on page 35.)
Note: My Settings is an editable version of the GoLive set and can be deleted. The GoLive
set cannot be deleted.
> Default Workspace menu command and your other custom workspaces, and
“Saving custom workspaces”
To customize a set of keyboard shortcuts:
1 Choose Edit > Keyboard Shortcuts.
2 Do one of the following:
• To modify an existing set of keyboard shortcuts, choose it from the Selected Set menu.
Using Help | Contents | Index Back 44
Page 45

Adobe GoLive CS Help Looking at the Work Area
Using Help | Contents | Index Back 45
• To create a new set of keyboard shortcuts, click New Set. In the New Set dialog box,
enter a name for the new set, choose an existing set that you want to use as the basis
for your new set, and click OK.
3 To change a keyboard shortcut in an editable set, select the name of a menu command
and enter a new keyboard shortcut in the Press New Shortcut text box. (If the keyboard
shortcut that you entered is currently assigned to another command, the name of the
command appears below.) Then click Assign or Replace to assign the keyboard shortcut to
the selected command.
4 Click OK.
Working with Adobe Version Cue managed projects
Adobe Version CueTM is an innovative set of features designed to increase your productivity
when you work alone or collaborate with others. Version Cue integrates design
management into your existing workflows within and across the Adobe Creative Suite
applications, including Adobe GoLive CS, Adobe Illustrator CS, Adobe InDesign CS, and
Adobe Photoshop CS.
Note: The Version Cue features are compatible only with the Adobe Version Cue
Workspace, which is available only as part of the Adobe Creative Suite.
Version Cue streamlines the following tasks while you work in the Creative Suite:
• Creating file versions
• Maintaining file security
• Organizing files into private or shared projects
• Browsing with file thumbnails, and searching file information and version comments
• Reviewing file information, comments, and file statuses in private and shared projects
while you browse
In addition, you can use the Version Cue Workspace Administration for more
advanced tasks:
• Duplicate, export, backup and restore projects
• View information about projects in the workspace
• Import files to the workspace using FTP or WebDAV
• Delete file versions and remove file locks
• Create project users and define their project privileges
• Restrict access to a specific project
To view the complete Version Cue documentation, see Adobe Version Cue Help. You can
also view the Adobe Version Cue documentation as a PDF or print it by opening the
VersionCueHelp.pdf file located on the Adobe Creative Suite CD and the Adobe GoLive CD.
Using Help | Contents | Index Back 45
Page 46

Adobe GoLive CS Help Setting up Sites and Pages
Using Help | Contents | Index Back 46
Setting up Sites and Pages
Creating a site
You use the GoLive site wizard to create blank sites, sites based on templates, and sites
based on imported files from other folders or Web sites. To work with sites that were
created in older versions of GoLive (4.0 or earlier) or other Web authoring applications, you
can import them into a new GoLive CS site.
You can use the site wizard to create a single user site (a site on your local computer) or a
Version Cue project site (a workgroup site managed by the Adobe Version Cue Workspace).
For information about Version Cue projects, see
managed projects” on page 45.
“Working with Adobe Version Cue
About GoLive sites
When you use the site wizard to create a single user Web site, GoLive creates a site project
file (with the .site filename extension) to manage and control the site contents. GoLive also
creates three folders to hold the Web pages, media files, and other resource files needed
for building and maintaining the site. When you create a blank site, GoLive creates a blank
index.html page and a project folder that contains everything, including the three site
folders and the site project file.
If you name the new site Mysite, the site project file is named Mysite.site. T he project folder
is named
• The web-content folder contains Web pages, image files, external cascading style sheets,
and other source files on the server.
• The web-data folder contains reusable GoLive site assets, such as components and page
template files.
• The web-settings folder stores settings you make in the site window and the Site
Settings dialog box. (See
page 91.)
Mysite and contains the site project file and three folders:
“Specifying preferences and settings for Web sites” on
Using Help | Contents | Index Back 46
Page 47

Adobe GoLive CS Help Setting up Sites and Pages
Using Help | Contents | Index Back 47
The site project file and contents of the web-data and web-settings folders are not
uploaded when you upload the site to the Web server.
A
B
C
D
E
GoLive site named “Mysite”
A. Project folder B. Site project file C. Web-content folder
D. Web-data folder E. Web-settings folder
Whether you create the site in Windows or Mac OS, the site project file you create can be
opened and used on both platforms.
Creating a single user site
To create a site on your local computer using the site wizard, you create a single user site.
Based on the name you specify for the new site, GoLive creates the site project file, a site
project folder, and folders for the site’s web-content, web-data, and web-settings files.
To create a single user site:
1 Choose File > New Site to open the site wizard.
2 Select Single User and click Next.
3 Do one of the following:
• Select Blank Site to create a project folder, a site project file, a web-content folder
containing a blank home page named index.html, a web-data folder containing empty
subfolders for resource files, and a web-settings folder.
• Select Import from Folder to create a new site based on a folder of existing files on your
computer. GoLive uses the folder of existing files as the basis for the new site’s webcontent folder, and adds new folders for the site’s web-data and web-settings files. You
are given the opportunity to specify a location for the site project file, name it (which
should always have the .site filename extension), and create a folder to put it in.
Note: Because GoLive uses the folder of existing files as the basis for the new site, you may
want to make a copy to import rather than use the original folder and its contents.
Using Help | Contents | Index Back 47
Page 48

Adobe GoLive CS Help Setting up Sites and Pages
Using Help | Contents | Index Back 48
• Select Import from Server to create a new site based on a copy of a site downloaded
from an FTP or HTTP server. (See
• Select Copy from Template to create a new site based on a site template that you
created. (See
4 Click Next and follow the instructions in the site wizard.
“Using site templates” on page 321.)
“Importing sites from remote servers” on page 48.)
Using sites from previous versions of GoLive
If you used Adobe GoLive 5.0 or 6.0 to create a site, you can open and save the site as a
GoLive CS site. If you used Adobe GoLive 4.0 to create a site, you can import it, and then
save it as a new GoLive CS site.
To open a GoLive 5.0 or 6.0 site:
Open the site in GoLive CS. GoLive automatically updates it to a GoLive CS site, creating a
CS site project file, and backs up the site file.
Note: If you want to archive the entire previous site, not just its site project file, copy it,
archive the copy, and then open the site project file of the original.
To open a GoLive 4.0 site:
1 Choose File > New Site to open the site wizard.
2 Select Single User and click Next.
3 Select Import from Folder.
4 Click Next and follow the instructions in the site wizard.
Importing sites from remote servers
Using the site wizard, you can create GoLive sites based on other sites imported from FTP
or HTTP servers. To import sites from a remote server, you must create a single user site
and download the files to your local hard disk. Once you’ve imported a remote site, you
can create a site locator file that contains the login and character encoding information
necessary to create the site.
Accessing login information
To create sites based on files imported from an FTP server, you need valid account information to log on to the server—this includes the name of the server, and your FTP user
name and password. The site wizard gives you the opportunity to change the port
number and to use passive mode if the site is protected by a firewall. To create sites by
importing sites from HTTP servers, you only need access set up to the Internet and a
valid home page URL. See your Internet service provider or system administrator for
login information.
Using advanced URL handling options
If you know the type of character encoding that a site uses for its URLs, you can specify it in
the site wizard before the site is imported. Unicode’s UTF16 and UTF8 encodings cover all
major languages and platforms. % HH Escaping uses hexadecimal encoding notations for
character escaping in URLs (for example, %20 is used to escape spaces, which are not
allowed in URLs). You can also check for case sensitivity in URLs.
Using Help | Contents | Index Back 48
Page 49

Adobe GoLive CS Help Setting up Sites and Pages
Using Help | Contents | Index Back 49
These advanced URL handling options remain in effect for the new site. After you create
the site, you can change the URL character encoding (but not the URL case sensitive
checking) for the new site in the Site Settings dialog box. To comply with W3C standards,
you should select both URL encoding options. (See
for Web sites” on page 91.)
“Specifying preferences and settings
Importing a site from an HTTP server
Using the site wizard, you can import an entire Web site into GoLive including every linked
page that branches out to multiple HTTP servers and every source file (such as images)
referenced by the pages. Because large sites can take a long time to download, you can
restrict the number of page levels in the page-link hierarchy to import.
In addition to the number of page levels, you can select Only Get Pages Under Same Path
to download only the pages that are located in the same folder (or a subfolder) that
contains the home page URL, and Stay on Same Server to download only those pages that
are on the same server as the home page URL. However, whether you select Stay on Same
Server or not, GoLive downloads from other servers any source files referenced by the
pages it downloads.
GoLive imports only the pages on the levels you specify and the source files for images
and other objects on those pages. GoLive converts any remaining page links that go to
other levels into external URLs and lists them in the External tab of the site window. After
you create the site, you can individually download the pages from these external URLs by
choosing Download from a URL’s context menu.
Downloading pages from external links
You can download a page and its source files from an external link. GoLive downloads the
page and the referenced source files (such as images) to the Files tab in the site window.
For information on other ways to download files from a server, see
page” on page 333.
To download a page from an external link:
Right-click (Windows) or Control-click (Mac OS) the external link in the External tab in the
site window or in the In & Out Links palette and choose Download from the context menu.
“Downloading a Web
Importing a site from a site locator file
A site locator file describes the location of a site on a remote server and enables you to
quickly import remote sites. It contains all the login and character encoding information
necessary to create the site.
To export a site locator file:
1 Open the site you want to copy.
2 Choose File > Export > Site Locator.
3 Choose a name and location for the site locator file in the Save Site Locator File dialog
box, and then click Save.
To create a site by importing a site locator file:
1 Connect to the Internet.
2 Choose File > Import > New Site from Site Locator.
Using Help | Contents | Index Back 49
Page 50

Adobe GoLive CS Help Setting up Sites and Pages
Using Help | Contents | Index Back 50
3 Select the site locator file in the Load Site Locator File dialog box, and then click Open.
4 Specify a destination folder for the site files in the Browse for Folder dialog box, and
then click OK.
5 Select files to be downloaded from the server in the Download dialog box, and click OK.
Adding files to a site
You can add Web pages, image files, and other media or resource files to your site and
GoLive keeps track of them in the site window. By dragging existing files from the desktop
(such as Windows Explorer or the Mac
of the files to the site without moving the original files. Using the site window to add files
to your site is important so GoLive can maintain all the links to pages, resource files, and
site assets.
Creating a new page as part of a site
You can choose File > New Page to create a new Web page that is not related to your site
until you save it in your site. When the site window is open, you can use a variety of
methods to create a new page that is automatically a part of your site.
OS Finder) into the site window, you can add copies
When you create a new page, GoLive creates an untitled.html file and displays it in the
Layout Editor of the document window.
You can set a GoLive preference to automatically create a new page when the application is started and display it in the editor or preview mode of your choice. (See
“Setting preferences for opening pages” on page 42.)
To create a new page as part of a site:
Do one of the following:
• Select the Files tab or Extras tab in the site window and if desired, select a folder listed in
the tab. Then choose Site > New > Page. The new page is added to the bottom of the
list in the tab or in the folder you selected. You can also select a page in the Files tab in
the site window and choose Edit > Duplicate to create a copy of the existing page.
Using Help | Contents | Index Back 50
Page 51

Adobe GoLive CS Help Setting up Sites and Pages
Using Help | Contents | Index Back 51
• With the site window open, choose File > New Page, and then choose File > Save As. In
the Save As dialog box, name the page, choose Root from the Site Folder menu, and
click Save. The new page is added to the contents of the site’s root folder, which appears
in the Files tab of the site window.
Saving a page in the site’s root folder
Note: The site window must be open, but not necessarily selected, before the Site Folder
menu will appear in the Save As dialog box.
• Drag a generic page icon from the Site set in the Objects palette into the Files tab or
Extras tab of the site window or next to another page in navigation view.
Creating special documents
Using GoLive, you can create documents in a variety of special formats, including XHTML,
QuickTime, Real, and SMIL. You can create a new HTML document based on a page
template or stationery that you’ve set up for the site, or create a text document, cascading
style sheet, or JavaScript file. For information about creating QuickTime, Real, and SMIL
documents, see the
Note: When you create a special HTML document, XHTML document, MMS document,
WML Deck, or SMIL document, GoLive automatically adds a doctype declaration to the
source code with a reference to the appropriate Document Type Definition (DTD). (See
“Setting the doctype of a document” on page 383.)
To create a document in a special format:
Choose a format from the File > New Special menu. A special document window or dialog
box opens depending on the format you choose. Consult the index for more information
about special document formats.
Adobe GoLive CS Multimedia Authoring Guide on the Adobe Web site.
Using Help | Contents | Index Back 51
Page 52

Adobe GoLive CS Help Setting up Sites and Pages
Using Help | Contents | Index Back 52
Adding existing files
To add files from other locations to your site, you can manually move the files into the site
folder on the desktop and update the site window, or you can import or drag the files into
the Files tab in the site window to have GoLive make a copy of them in the site folder and
leave the original files untouched.
Note: When you create a new page, GoLive automatically adds a meta element that
defines the character encoding for text to the head section of the page. If a page does not
contain the element, GoLive displays a dialog box when you open the page so that you
can temporarily use a default encoding or set the character encoding for the page.
To add an existing file to a site:
Do one of the following:
• Drag the file from your desktop into the Files tab in the site window.
• Move the file into the site’s root folder on your desktop. Then select the site window and
click the Refresh View button
• Select the Files tab in the site window. Then choose File > Import > Files to Site. In the
dialog box, locate and select the desired file, click Add, and click Done. If prompted,
click OK to copy the file and update the site.
in the toolbar.
For information on importing files as a new GoLive site, see “Creating a site” on page 46.
Unlocking locally locked files
You can use GoLive to unlock files that were locked in the Mac OS Finder or given a Read
Only attribute in the Windows Properties dialog box. If you import a site with locally
locked files, you’ll need to unlock them before you can edit them. If the files are hidden in
Windows Explorer, you need to show them before you can edit them.
Local file locking applies only to the platform where it is applied. For example, if you create
a site in Mac
site to a UNIX or Windows server.
Local file locking does not apply to files on a WebDAV server.
To unlock a locked or read-only file:
1 Select the file in the site window.
Note: You can unlock a file with this method only if it shows a padlock in the Locked
column of the Files tab. The padlock indicates that it has been locked in Mac OS or made
read-only in Windows.
2 Click the Show Information in Explorer (Windows) or Show Information in Finder
(Mac
OS) button on the toolbar.
3 Do one of the following:
• In Windows, deselect Read-only and click OK.
• In Mac OS, deselect Lock and close the Get Info window.
4 Click the Refresh View button on the toolbar.
OS and lock its HTML files, the files will not be locked when you upload the
Using Help | Contents | Index Back 52
Page 53

Adobe GoLive CS Help Setting up Sites and Pages
Using Help | Contents | Index Back 53
Setting up pages
Before or after you lay out text and objects on your Web pages, you can set up titles,
margins, and backgrounds for pages, and a window size that you want your page layouts
to fit within. You can add hidden instructions for Web browsers about each document by
dragging elements and scripts into the head sections (for example, keywords that are
used by search engines to find your page).
As you work in the document window, you can set options in the View palette to show or
hide certain screen elements that are hidden on pages in the browser, such as line break
symbols and comments. You can also use the View palette to set up a profile for
previewing a browser simulation of the page layout on a different platform.
Once your page is set up, you can use it as the starting point for other new pages by saving
it as stationery or a page template. (See
Changing the page title
When you create a new blank page (a new HTML or XHTML document), it is automatically
given a title—“Untitled Page.” Web browsers display page titles in their title bar and use
the titles to label a viewer’s bookmarks or favorites. Web browsers and Internet search
engines use these titles, along with keywords, to identify content in your pages. (For infor
mation on adding keywords to a page, see “About head section elements” on page 56.)
You can set a preference to display a reminder for changing the page title whenever you
save a page.
“About site assets” on page 304.)
-
When you’re looking at your pages in navigation view or links view, you can select an
option in the Display tab in the View palette to view them either by page title or by
filename. (See
To change the page title:
Do one of the following:
• Select the default page title Untitled Page in the Title section of the document window,
and type your new title.
• Click the Show Page Properties icon in the upper right corner of the document window
and enter the new title in the Page tab of the Page Inspector.
• Select the page in the Files tab of the site window, navigation view, or links view, and
enter the new title in the Page tab of the File Inspector.
You can create a custom page title on a blank page and set a preference to use that
page for creating new pages. (See “Setting preferences for opening pages” on
page 42.)
To add a reminder to change the title for new pages:
Choose Edit > Preferences (Windows) or GoLive > Preferences (Mac OS), select Modules on
the left side of the Preferences dialog box, scroll down to Extend Scripts on the right side,
select SetTitle, and click OK. Then restart the GoLive application. When you save a page,
GoLive automatically displays the Set Title dialog box if the page title is blank or contains
the words “Welcome to Adobe GoLive,” “Welcome to GoLive CyberStudio,” or “untitled.”
“Changing the display of the view” on page 117.)
Using Help | Contents | Index Back 53
Page 54

Adobe GoLive CS Help Setting up Sites and Pages
Using Help | Contents | Index Back 54
Choosing a document window size
You can choose a size for the document window to use as a guide when you’re designing
your page layout. You can choose a size for the document window in the Layout Editor or
the View as PDF Editor. For example, although many monitors have a visible display area
greater than 640 pixels, you may want to set the size of your page layout to 580 pixels or
less to accommodate viewers with 14-inch monitors, or viewers that don’t like the browser
to fill the entire screen.
The document window size is only a tool for designing the page layout—the size you
choose does not affect the size of the browser window that displays the page.
To choose a size for document windows:
Do one of the following:
• For the open document window, choose a size from the pop-up menu in the lower right
corner of the document window.
• To set a default size for all document windows, first set the open document window to
the size you want all document windows to be by default, and then choose Settings
from the pop-up menu in the lower right corner of the document window. Select
Markup Document Windows, and click OK.
• To add a size to the pop-up menu in the lower right corner of the document window,
choose Options from the pop-up menu and click the Create New Window Configu
ration button. Enter a width, height, and annotation in the text boxes in the Window
Size Configuration dialog box, and then click OK. To remove a size from the pop-up
menu, select it in the Window Size Configuration dialog box, click the Remove Selected
Window Configurations button, and then click OK.
Specifying page margins
You can control how the contents of a Web page are offset in browser windows by specifying page margins. Using the Page Inspector, you can specify the margin width (the space
between the page’s content and the left edge of the Web browser window) and the
margin height (the space between the page’s content and the top edge of the browser
window).
You can also remove the automatic margin offset that pages have in browser windows by
specifying zero for margins.
To specify page margins:
1 Choose Special > Page Properties to open the Page Inspector.
2 In the Page Inspector, click the Page tab and enter values in pixels in the Margin Width
and Margin Height text boxes.
To set the page margin offset to zero:
Right-click (Windows) or Control-click (Mac OS) in the page and choose Document > Set
Page Margins To Zero from the context menu. (See
“Using context menus” on page 31.)
Using Help | Contents | Index Back 54
Page 55

Adobe GoLive CS Help Setting up Sites and Pages
Using Help | Contents | Index Back 55
Setting view options for page layout
Using the View palette, you can set options that control the display of images, colors,
fonts, and certain screen elements on your page (such as table borders, layer markers, line
break symbols, and the lines in layout grids). You can choose a profile for a specific Web
browser (for example, choose Opera 7 Mac if you plan to display your pages in Opera for
Mac OS), and GoLive makes the appropriate adjustments to the page layout as it would
appear in that browser. You can also select style sheets to apply to the page. The options
that you select are only applied to the open page.
To set view options for the page in the View palette:
1 Select the Layout tab in the document window.
2 In the View palette, do any of the following:
• Choose an option from the Basic Profile menu to view a simulated preview of your page
in a Web browser for Windows or Mac OS. Profiles you’ve used recently appear beneath
the GoLive profiles at the top of the menu.
• Choose options from the User Profiles menu to set a default screen size or to show or
hide color, fonts and text, or images. Choose a user style sheet to apply it to the page, or
choose a target media option to display the page as it would appear in that media.
• Choose a style sheet from the Alternate CSS menu to apply it to the page.
• Select Negative Margins to preview how elements with negative margin values
grow in to adjacent elements.
• Select Hidden Elements to display or hide elements that are set by the CSS
display property.
• Choose Show All Items, Default Set, or a custom set from the Visibility menu to display
all or some items that don’t show in the browser window. The option or set that you
choose determines which items are displayed or hidden in GoLive when you choose
View >
Hide Invisible Items or View > Show Invisible Items. (See “Creating custom sets
of visible screen elements” on page 59.)
• Choose Visited Links, Active, Hover, or Focus to preview the colors that have been
chosen for each link state. (See
“Setting the default color for text or links in a page” on
page 70 and “Creating HTML element styles” on page 220.)
Opening site pages in a particular view
You can use a variety of methods to open pages from your site and specify whether they
display in the Layout Editor or a different tab in the document window.
You can set an application preference to automatically open all pages in another tab.
(See “Setting preferences for opening pages” on page 42.)
To open a page from the site in the Layout Editor:
Do one of the following:
• Double-click the page in the site window, navigation view, or links view.
• Select the page in the site window and choose Site > Explorer > Launch File (Windows)
or Site > Finder
> Launch File (Mac OS).
Using Help | Contents | Index Back 55
Page 56

Adobe GoLive CS Help Setting up Sites and Pages
Using Help | Contents | Index Back 56
To open a page in the document window with a particular tab showing:
1 Select the file in the site window, navigation view, or links view.
2 Right-click (Windows) or Control-click (Mac OS) the file to display its context menu.
3 Choose an item from the Open in Mode submenu. The submenu lists all the tabs in the
document window.
Adding elements or scripts to the head section
An HTML page consists of two major sections: a head and a body. The Layout Editor in
GoLive mirrors this structure by providing a head section pane as part of the document
window. You can use the head section pane to store page information that’s used by Web
browsers, including the page title and keywords. The head section of each page already
contains a Title element for the page title that appears at the top of the document
window.
You use the Head set of icons in the Objects palette to add empty tags to the head section
of your Web page, and then you use the Inspector to specify the attributes for the element
or script.
To add an element to the head section of a page:
1 Drag the desired icon from the Head set in the Objects palette to the body of the
page. GoLive automatically moves it to the head section pane and opens the pane. (You
can also click the Toggle Head Section icon
in the upper left corner of the document
window to open the head section pane.)
A
You can reposition head elements in the pane by
dragging them.
A. Closed head section pane B. Opened head section pane
B
You can bypass using the Objects palette to add head elements to the head section by
Right-clicking (Windows) or Control-clicking (Mac OS) in the head section pane and
choosing the object from the Insert Object > Head context menu.
2 In the Inspector, choose various options and specify attributes for the selected element
or script.
About head section elements
The options and attributes in the Inspector vary depending on the type of element that is
selected in the head section pane.
You can add any of the following elements to a page:
Using Help | Contents | Index Back 56
Page 57

Adobe GoLive CS Help Setting up Sites and Pages
Using Help | Contents | Index Back 57
The Keywords element You use the Keywords meta element to specify keywords for
your Web page. Internet search engines use the information in the Keywords element
when constructing their indexes. The Keywords Inspector lets you add, update, delete, and
rearrange selected keywords in a list for the element. You can also add a keyword to the
first Keywords element in the head section by selecting text in the page and choosing
Special
> Add to Keywords. If no Keywords element exists in the head section, GoLive adds
it automatically. The new keyword appears in the list in the Keywords Inspector.
Internet search engines rely both on keywords and page titles to find your pages. (See
“Changing the page title” on page 53.)
Comments (head section) You use the Comment icon to add hidden comments to your
Web page, such as publishing information for future reference. To view the comments, you
need to use GoLive or another source code viewer.
Note: You can also add comments to the body of the page and refer to them as you build
the page in the Layout Editor. (See
“Adding comments” on page 161.)
The Meta element You use the generic meta element to include information about the
Web page, such as a description of the page content. For each new page, GoLive automat
ically includes the following information using meta elements: file format (for example,
text/HTML), character set used (for example, ISO-8859-1), and file creator (for example,
Adobe GoLive). The Meta Inspector lets you choose an HTTP-Equivalent option to simulate
header information that accompanies the page when it’s sent by an HTTP server to a
browser or the Name option to define a non-HTTP meta element.
-
Note: To prevent GoLive from writing the file creator meta element, choose Edit > Preferences (Windows) or GoLive > Preferences (Mac OS), select General, deselect Write
“Generator Adobe GoLive,” and click OK. To change the character set for a new page, select
the Encode tag in the head section of the page and select another character set in the
Encoding Inspector. To change the character set for all new pages, choose Edit
> Preferences (Windows) or GoLive > Preferences (Mac OS), select Encodings, choose a new set,
and click OK. To change the encoding for selected files in a site, select files in the Files tab of
the site window, choose Edit > Document Content > Change Encoding, select a new
encoding, and click OK.
The Script element You use the Script element to add JavaScript to the head section of
your Web page. A script in the head section is executed while the visible body section of
the page is still being loaded. You use the Head Script Inspector to enter a name for the
script, choose the language or JavaScript dialect for a browser, specify the script file, and
open the JavaScript Editor to edit the script file. (See
“Using JavaScript” on page 406.)
The Refresh element You use the Refresh meta element to instruct Web browsers to
refresh the contents of your Web page or replace your page with another page after a
specified interval. You may want to use this element if your page contains live material or if
it’s part of a sequential series of pages you are presenting to viewers. The Refresh
Inspector lets you enter a Delay value in seconds to specify an interval before the page is
refreshed or replaced with another page. You choose either the Target This Document
option to refresh the current page or the Target URL option to replace the page with
another page.
You can easily create a slide show by adding a Refresh element to each page that’s part of
the slide show. For example, you can add a Refresh element to the first page of the slide
show that replaces the first page with the second page, and so on.
Using Help | Contents | Index Back 57
Page 58

Adobe GoLive CS Help Setting up Sites and Pages
Using Help | Contents | Index Back 58
<no edit> elements You use the Element icon to add <no edit> elements to the head
section of your Web page. These are useful for adding code that has unusual syntax or that
GoLive can’t read, and for adding new unknown elements and ensuring compatibility with
future versions of HTML and the Web browsers that support these versions. You use the
Element Inspector to edit the start and end tags, add the names and values of new
attributes, and delete attributes from the list.
Text character encoding You use the Encode icon to add a meta element that defines
the character encoding for text in a document. By default, all new pages created in GoLive
use the meta encoding element in the head section with the ISO-8859-1 character set
attribute. You can change the character encoding by selecting the Encode object in the
head section and selecting an encoding option in the Encoding Inspector. You can also
change the character set for a document by choosing a different set from the File
Document Encoding submenu, or change the character set for selected files in a site by
choosing Edit > Document Content > Change Encoding and selecting a new encoding in
the Change Encoding dialog box. (See
page 209.)
The Link element You use the Link element to define relationships between your current
Web page and other pages in your Web site, or on the Internet. (If you manage the pages
in your site using the GoLive site window, you don’t need to use the Link element.) You can
use the information in the Link element to keep track of links between pages in a large
site.The Link Inspector lets you specify the title, link name, and anchor name for the refer
enced page, the relationship and reverse relationship between the current page and the
source or destination URL, a list of HTTP methods supported by the referenced page, and a
Uniform Resource Number (URN) for the page.
“Working with nonroman character sets” on
>
-
Note: Most Web browsers don’t use or support URNs or the Methods attribute.
The IsIndex element You use the IsIndex element both to inform Web browsers that your
Web page can be examined using a keyword search and to instruct the browsers to
display a search text box for keywords when displaying your page. The Prompt text box in
the IsIndex Inspector lets you enter the string that you want browsers to display with the
search dialog box.
Note: The IsIndex element is obsolete.
The Base element You use the Base element to specify the original location of your Web
page, also known as the base URL. The base URL is used by Web browsers to locate relative
links on your page. In the event that your page is moved away from its original location,
the browsers can correctly locate the page’s relative links using the base URL.
Adding browser-switch scripts
You can add a browser-switch script to the head section of your Web page that detects the
Web browser loading the page and automatically redirects viewers to an alternate page
based on their browser. For example, you can use this feature to have version 3.0 browsers
switch to another page if the current page contains features (such as actions, animations,
and cascading style sheets) that can only be interpreted by version 4.0 browsers and later.
Note: The browser-switch script is ignored by version 2.0 browsers and Microsoft Internet
Explorer 3.01 for Mac OS.
Using Help | Contents | Index Back 58
Page 59

Adobe GoLive CS Help Setting up Sites and Pages
Using Help | Contents | Index Back 59
Since an older browser can’t read the browser-switch script, you should make sure that the
page you’re placing the script on is built for the oldest of browsers and assumes no
redirect is possible. You can also use the browser-switch script to separate Netscape from
Internet Explorer browsers based on browser-specific markup support.
To add a browser-switch script:
1 Drag the Browser Switch icon from the Smart set in the Objects palette to the body
of the page. GoLive automatically moves it to the head section and opens the head
section pane.
2 In the Browser Switch Inspector, select the browsers that support the features on
your page:
• Select Auto to have GoLive determine browser compatibility. For example, if your page
contains features that can only be interpreted by version 4.0 browsers and later, GoLive
configures the script to reroute requests from version 3.0 browsers.
• If the same browsers are supported in Windows and Mac OS, deselect Auto, choose All
from the Supported Platform menu, and select the supported browsers.
• If different browsers are supported in Windows and Mac OS, choose Windows from the
Supported Platform menu and select the supported browsers for Windows. Then
choose Mac OS from the Supported Platform menu, and select the supported browsers
for Mac OS.
Note: In the Browser Switch Inspector, you can select the infinity symbol for Netscape or
Explorer to indicate that the supported browser versions are those later than version 6.0.
3 Specify the URL to an alternate page in the Alternate Link text box. (See “Specifying the
destination URL for a link” on page 62.)
When you have finished, try viewing your page with an incompatible browser and check
whether the request is correctly rerouted.
Adding or changing a doctype declaration
You can use the document window menu to add or change a doctype declaration in your
Web page that references a W3C Document Type Definition (DTD) for a specific type of
HTML or XHTML, such as cHTML (i-mode) for wireless devices. (GoLive automatically adds
the doctype for the HTML 4.01 Transitional DTD to new HTML pages.) You can also
configure the icon sets in the Objects palette to match the doctype. (See
“Setting the
doctype of a document” on page 383.)
Creating custom sets of visible screen elements
The Visibility menu in the View palette contains a default set of items that are normally
hidden on your screen, such as line break symbols. You can modify this set to show some
of the items and hide others, and you can create additional sets based on the default set.
To create custom sets of visible items for the Visibility menu:
1 Do one of the following:
• Choose Edit Set from the Visibility menu in the View palette.
• Choose Edit > Preferences (Windows) or GoLive > Preferences (Mac OS), expand the list
of General preferences in the left pane, and select Invisible Elements in the list.
Using Help | Contents | Index Back 59
Page 60

Adobe GoLive CS Help Setting up Sites and Pages
Using Help | Contents | Index Back 60
2 Select a set in the middle pane and then select check boxes in the right pane next
to items that you want hidden in the set. The default set can be edited, but not deleted
or renamed.
3 To add a set to the list, click the Create New Set button at the bottom of the
middle pane.
4 To rename a set, select it and then type a new name in the text box.
5 To delete a set, select it and click the Remove Selected Sets button .
6 Click OK.
Saving pages
You can save your Web pages directly to the site’s root folder that stores the pages and
media for your Web site. You can also save your pages as components, stationery, or page
templates for the site. For information on stationery, components, and templates,
see
“About site assets” on page 304.
You can set a preference to display or hide the Set Title dialog box, which lets you change
the page titles when you save your pages. (See
“Changing the page title” on page 53.)
To save a page as part of the site:
1 Open the site project file.
2 Do one of the following:
• Select the document window, and choose File > Save or choose File > Save As.
• In the document window, choose Save As from the window menu, and then choose
Save As Stationery, Save As Component, or Save As Template.
3 In the Save As dialog box, name the file, using the appropriate file-naming conventions.
(For example, it’s a good idea to use all lowercase letters and no spaces.) Make sure that
you include the appropriate suffix (.htm or .html) for the name to ensure that GoLive and
Web browsers recognize the format of the file. (See
“Providing names and paths for files”
on page 101.)
4 Choose a site folder (Root, Stationery, Components, or Templates) from the Site Folder
menu in the Save As dialog box. (This step is not necessary if you chose an option from the
Save As submenu of the document window menu.)
Saving a page in the root folder of a site.
5 Click Save.
Using Help | Contents | Index Back 60
Page 61

Adobe GoLive CS Help Setting up Sites and Pages
Using Help | Contents | Index Back 61
6 If the Set Title dialog box appears, enter a name for the page title in the text box or
select Set Title To Document Name to automatically enter the filename as the title. To
prevent the Set Title dialog box from appearing again, select Don’t Remind Me Again.
Then click Set.
Linking files
After you create your site and add all your resources to the site window, you can start
linking images or objects on the page to their source files, create a navigational system
between the pages in your site, and add navigational links to other sites or external URLs.
You can use GoLive’s Edit PDF Anchor feature to create links to bookmarks in PDF files.
GoLive automatically updates the site with each new link you create and continually
verifies the integrity of links as you build your site. If you move or rename a file in the site
window, GoLive updates the links to the new paths.
You can view a graphical representation of all the links in your site and the navigational
hierarchy between pages. (See
If a link is broken because the destination file was moved or renamed outside of the site
window, GoLive displays the orphaned or missing file in the Errors tab of the site window.
(See
“Fixing site errors” on page 126.)
For information on creating links that originate from parts of an image, see “Creating
image maps” on page 245.
“About graphical site views” on page 104.)
Creating resource and navigational links
When you add images and other types of media to a page, you create resource links from
the placeholders on the page to the source files. You can also create
from images or text on a page that users click to go to other pages in the site, other
anchored locations on the same page, or external URLs or e-mail addresses.
You can set up text or images as empty reference links and specify the destination files for
them later or attach actions to them. (See
page 62 and “Setting up actions” on page 414.)
To create a resource link:
Do one of the following:
• Drag the source file (such as a GIF image, a SWF file, or a Photoshop PSD file) from the
Files tab of the site window to the page. GoLive automatically creates a resource link
between the image on the page and the source file.
• Select the placeholder object (such as an image or a Smart Object) on the page, and
specify the source file in the URL text box in the Inspector. (See
nation URL for a link” on page 62.)
“Specifying the destination URL for a link” on
navigational links
“Specifying the desti-
Using Help | Contents | Index Back 61
Page 62

Adobe GoLive CS Help Setting up Sites and Pages
Using Help | Contents | Index Back 62
To create a navigational link:
1 Select text, or an image or object on the page.
2 In the Inspector, do one of the following:
• For selected text, specify the destination file for the navigational link in the URL text
box. If you type a URL or e-mail address in the text box, include “http://” or “mailto:” at
the beginning, respectively.
• For selected images or objects, click the Link tab (if applicable), and then click the
Create Link button
and specify the destination file for the link in the URL text box.
You can also drag the destination file for a navigational link from the Files tab of the
site window onto the selection in the page. (If you drag the file to a page without
a selection in it, GoLive creates a hypertext link and uses the name of the file for the
text label.)
3 If you want the link destination to appear in a frame or a new Web browser window,
choose an option from the Target menu in the Inspector. (See
“Setting up target frames”
on page 159.)
4 Enter a descriptive title for the link in the Inspector. This title appears in some browsers
when you hold the pointer over the link.
5 In the Inspector, choose an option from the Name/ID menu (choose Name & ID for
maximum browser compatibility), and then type a unique link name in the Name/ID text
box.
To create an empty reference link:
Select the text or object in the page, and click the Create Link button on the toolbar.
GoLive displays a bug icon in the site window next to pages that contain empty
reference links.
You can specify the destination file for multiple links at once by using the In & Out
Links palette. (See “Editing links and URLs sitewide” on page 124.)
To remove a link:
Select the text or object in the page, and click the Remove Link button on the toolbar.
Specifying the destination URL for a link
You use the Inspector to specify the destination file or URL for resource and navigational
links. You can type the path to the link’s destination file directly in the Inspector’s URL text
box or use any of a variety of methods to specify it, including dragging files, using the pick
whip, browsing, and reusing recently linked files. No matter which method you use, the
path to the destination file appears in the Inspector.
Note: The pick whip is also conveniently located in other windows and palettes (such as
the In & Out Links palette) when you need to link something to a file in the site. (See
“Editing links and URLs sitewide” on page 124.)
Using Help | Contents | Index Back 62
Page 63

Adobe GoLive CS Help Setting up Sites and Pages
Using Help | Contents | Index Back 63
The Inspector palette menu and context menus for selected text and objects contain lists
of recently linked files you can use to specify the destination for a link. The lists are
organized by categories, including HTML, Images, Misc. URLs, Anchors, and the last five
files that have already been used as the destination for links. The Misc. URLs category
includes links made to PDF files, favorite URLs, or e-mail addresses collected in the External
tab of the site window.
To specify the link’s URL by dragging the destination file:
Do one of the following:
• For resource links, drag an image file or other media file from the Files tab in the site
window to the page. The URL to the source file appears in the Inspector.
• For navigational links, drag an HTML file from the Files tab in the site window to a
selected link or text on the page. The destination URL of the page appears in the
Inspector. (If you drag the HTML file to the page without a selection in it, GoLive creates
a hypertext link and uses the filename for the text label.)
You can also drag external URLs, e-mail addresses, and snippets from the site window
or Library palette to the page. (See “About site assets” on page 304.)
To specify the links’s destination using the pick whip:
1 Select the text, object, placeholder icon, or existing link on the page.
2 Do one of the following to specify the destination file:
• Drag a line from pick whip to the destination in the site window, which can be a file or
an anchor listed under the file in the Files tab, or a URL or an e-mail address in the
External tab. You can also drag to the Show Page Properties icon
or an anchor in an
open page. (See “Using anchors for links” on page 66 and see “Using site URLs and e-
mail addresses” on page 317.)
• Alt-drag (Windows) or Command-drag (Mac OS) a line from a selection in the page to
the destination file in the site window or to a destination on the page or another open
page (creating an anchor).
If the line recoils, you have released the mouse button too soon or the link can’t
be created.
Using Help | Contents | Index Back 63
Page 64

Adobe GoLive CS Help Setting up Sites and Pages
Using Help | Contents | Index Back 64
As you drag, you can hold the pointer over the Select Window button on the toolbar to
bring a window to the front or hold the pointer over a page in Files tab in the site window
to display a list of anchors under the page.
Drag the pick whip in the Inspector to a file in the site window.
To specify the link’s destination by browsing:
1 Select the text, object, placeholder icon, or existing link on the page.
2 In the Inspector, click the Browse button .
3 In the Open dialog box, select the destination file, and click Open.
If the destination file is not located in the site window, you can use the Browse button
to locate it, and link it to the selected text or object. Then you can drag the orphan file
from the Errors tab in the site window to the Files tab and click OK to copy the file and
update the site. Or, you can use the Clean Up Site command to move a copy of the file into
the site. (See
To specify the link destination using a recently linked file, e-mail address, or URL:
1 Select the text, object, placeholder icon, or existing link in the page.
2 In the Inspector, choose a recently linked file, HTML file, image, miscellaneous URL, or
anchor from the URL menu.
“Cleaning up a site” on page 100.)
Editing URLs in links
You can use the Edit URL dialog box to edit the path to a link’s destination, make the path
relative or absolute, and add query parameters to the URL for Common Gateway Interface
(CGI) requests and other types of server requests.
Query parameters are used to query servers for information such as data from databases
or loading server scripts, such as Perl Script, to process forms (see
page 294).
When you add query parameters to the URL, GoLive inserts a question mark (?) for the
query, equal signs (=) between each parameter name and value, and ampersands (&)
between each parameter. GoLive displays the complete URL including the CGI or other
server request at the bottom of the Edit URL dialog box.
“About forms” on
Using Help | Contents | Index Back 64
Page 65

Adobe GoLive CS Help Setting up Sites and Pages
Using Help | Contents | Index Back 65
By default, GoLive uses relative URLs for the destinations of links. You can use the Edit URL
dialog box to change an individual URL to an absolute path. You can also make URLs
absolute for a specific site, or set a preference to make all URLs absolute for all sites. (See
“Setting up absolute link paths” on page 104.)
To edit a URL:
1 In the Inspector, choose Edit from the URL menu.
2 In the Edit URL dialog box, do any of the following:
• Modify or type a new URL in the Path text box.
• Click Browse to locate and select a new destination page.
• Click Make Absolute or Make Relative to use an absolute or relative path for the URL.
• Type parameter names and values in the text boxes and click Add Parameter to add
them to the list of Query Parameters.
• To remove a parameter from the list, select it and click Delete Parameter.
• To change the name or value of a parameter, select the parameter in the list, edit the
name or value in the text boxes below the list, and click Update.
The complete URL, including the parameters, appears in the Result box at the bottom of
the Edit URL dialog box.
3 Click OK.
Creating anchor links to PDF bookmarks
A PDF bookmark links to a specific location in a PDF file. You can use GoLive’s Edit PDF
Anchor feature to link from an HTML page to a PDF bookmark.
Note: Anchor links to PDF bookmarks don’t work with Acrobat 6.0 in Mac OS X.
To create an anchor link to a PDF bookmark:
1 Create a link to the PDF file (see “Creating resource and navigational links” on page 61
and “Specifying the destination URL for a link” on page 62).
2 In the Inspector, click Edit PDF Anchor.
3 In the PDF Anchor Editing dialog box, do one of the following:
• Select a bookmark in the Settings pane to open the PDF file to that bookmark.
• Select Use Page Number and enter a page number in the Use Page Number text box to
open the PDF file to a specific page.
4 Select Use Page Mode and choose bookmarks, thumbs, or none to open the PDF file
with the bookmarks pane, the thumbnail pane, or no pane visible, respectively.
5 Click OK.
Note: You can’t preview links to PDF bookmarks in GoLive for Windows. To preview the
link, upload your site to a Web server.
Using Help | Contents | Index Back 65
Page 66

Adobe GoLive CS Help Setting up Sites and Pages
Using Help | Contents | Index Back 66
Using anchors for links
An anchor is a specified location on a Web page that serves as the destination of a link.
Here are some guidelines to follow when creating anchors:
• You shouldn’t place anchors directly on a layout grid. Instead, place anchors in the flow
of HTML text, a layout text box, or a table cell. When you add an anchor to a layout text
box or table cell, make sure that the box or cell has other contents. Otherwise, the
anchor will not be recognized by Netscape Navigator. To work around this problem, you
can add a nonbreaking space to the empty box or cell. To add a nonbreaking space,
click inside the box or cell, and press Shift+spacebar (Windows) or Option+spacebar
(Mac OS).
• You should place anchors near the left margin of the page, so that the anchors work
more consistently across browsers.
• You won’t be able to preview certain link and anchor combinations in Layout Preview.
• You should test links to anchors extensively in browsers before publishing your Web
site. Anchors don’t always work the same way in all browsers.
To create an anchor:
Do one of the following:
• Drag the Anchor icon from the Basic set of icons in the Objects palette to the desti-
nation on the page where you want the anchor.
• Select a link on the page, drag the pick whip in the Inspector to a location on the
page or another open page where you want to place the anchor, and release the mouse
button.
Note: You must save the destination page before you can create an anchor using the
pick whip.
To give an anchor a unique name:
1 Select the anchor marker in the page.
2 In the Anchor Inspector, choose an option from the Name/ID menu (choose Name & ID
for maximum browser compatibility), and then type a unique anchor name in the Name/
ID text box.
You can see a list of all the anchors on a page by clicking the triangle next to the page
in the Files tab in the site window.
Using Help | Contents | Index Back 66
Page 67

Adobe GoLive CS Help Setting up Sites and Pages
Using Help | Contents | Index Back 67
Using color
Use the Color and Swatches palettes to apply color to page backgrounds, text, and objects
on a page. Use the Color palette to mix and edit colors. Use the Swatches palette to select
colors by color swatch, name, or hexadecimal value.
Use the Eyedropper tool in the Swatches or Colors palette to extract colors from an image
or screen element.
For information on applying color to text, see “Applying fonts, type sizes, and color to text”
on page 194.
Note: When you use the Color or Swatches palette to apply color to text or objects, GoLive
inserts the color attribute inside the font element. Because the font element is deprecated
and can cause problems with Web browsers, you may want to apply color to text and
objects using CSS styles instead of the Color or Swatches palette. (See
page 233.)
Using the Color palette
The Color palette contains color models based on CMYK, RGB, HSV, HSB (for video
hardware), and Grayscale. The Color palette displays the color of the current selection in
the preview pane, as well as recently used colors in the Recent Colors List. The Hex value
text box displays the hexadecimal value of colors you’ve chosen.
“Applying styles” on
Use the Color palette to edit and mix colors. When you’re done, add them to the
Swatches palette.
To display the Color palette:
Choose Window > Color.
Note: You can also open the Color palette by clicking a color field (for example, in the
Inspector or toolbar).
A
B
C
Clicking a color field automatically opens the Color palette.
A. A color field B. The preview pane C. Recently used colors
To change the color model:
Choose a color model from the Color palette menu, or click a color model button, located
at the top of the Color palette. (Choose Only Web Colors to display only web-safe colors.)
Using Help | Contents | Index Back 67
Page 68

Adobe GoLive CS Help Setting up Sites and Pages
Using Help | Contents | Index Back 68
To display color values in percentages:
Choose Percent Values from the Color palette menu. Choose Percent Values again to
display colors in the 256 numerical scale.
To show or hide the color model buttons:
Choose Show Buttons from the palette menu.
To show or hide the Recent Color list:
Choose Show Recent Colors from the palette menu.
To manually add a color to the Recent Color list:
1 Do one of the following:
• Select a colored element on a page, such as colored text.
• Select a color from the Color or Swatches palette.
2 Click the Add Color to Recent Colors List button .
Using the Swatches palette
The Swatches palette contains predefined sets of colors, site colors (colors you’ve used in a
site), and recent colors (colors you’ve used recently or added to the Recent Colors list in
the Color palette). You can add or remove custom swatches. The Show Search Fields
option lets you search for colors by name or hexadecimal value.
If you click the lower right corner of a color field, GoLive displays the current swatch set
chosen in the Swatches palette, as well as any custom colors you’ve added to the Swatches
palette.
To display the Swatches palette:
Choose Window > Swatches.
A
B
The Swatches palette
A. Search fields B. Current swatch set
To change the swatch set:
Choose a swatch set from the Swatches palette menu.
To change how swatches appear:
Choose a display option from the Swatches palette menu:
• Small List to display the hexadecimal value and thumbnail of each swatch.
Note: If Web Named Colors is selected from the Swatches palette menu, GoLive also
displays the name of the swatch.
• Small Thumbnail to display a thumbnail of each swatch.
Using Help | Contents | Index Back 68
Page 69

Adobe GoLive CS Help Setting up Sites and Pages
Using Help | Contents | Index Back 69
To search for a color in the Swatches palette:
1 Choose Show Search Fields from the Swatches palette menu.
2 Do one of the following, and then press Enter (Windows) or Return (Mac OS):
• Type a hexadecimal value in the Value text box.
• Type a color name in the Name text box.
Note: If the color you’re searching for doesn’t exist in the current swatches, GoLive displays
the nearest color.
To show named colors in the Swatches palette:
Choose Web Named Colors from the Swatches palette menu.
To view recently used colors:
Choose Recent Colors from the Swatches palette menu.
To view a list of site colors:
Choose Site Colors from the Swatches palette menu.
To add a custom swatch to the Swatches palette:
1 Choose a color from the Color palette.
2 Click the Create New Swatch button in the Swatches palette.
To remove a custom swatch from the Swatches palette:
Select the swatch and click the Delete Swatch button .
Applying color to objects
Use the Colors or Swatches palette to apply color to page backgrounds, text, and objects
on a page. For information on applying color to text or page backgrounds, see
fonts, type sizes, and color to text” on page 194 and “Applying images or color to the page
background” on page 70.
To apply color to an object:
1 Select the object you want to color (for example, a table cell).
2 In the Inspector, click the lower right corner of the color field and choose a color from
the swatches that appear, or click the color field and do one of the following:
• Select a color from the Color palette. To use only Web safe colors, choose Only Web
Colors from the Color palette menu, and then select a color. The sliders snap to Websafe colors when you drag them.
Note: Web-safe colors are the 216 colors that are used by browsers, regardless of platform.
Browsers change all colors in the image to these colors when displaying the image on an
8-bit screen. By working with Web-safe colors, you can ensure that the colors in your Web
pages will not dither on a system using a 256 color display.
“Applying
• Choose a color from the Swatches palette. An alert cube next to the color rectangle
indicates a Web-safe color.
Note: Alert cubes appear only if you’re viewing Swatches using the Small List display
option.
Using Help | Contents | Index Back 69
Page 70

Adobe GoLive CS Help Setting up Sites and Pages
Using Help | Contents | Index Back 70
To remove color from a selection:
1 Select the colored object.
2 Deselect Color in the Inspector.
To extract a color using the eyedropper:
Do one of the following:
• Open the Color palette and click the Eyedropper tool , then drag the eyedropper to
the color that you want to extract.
• In the Swatches palette, move the pointer over a swatch until it changes to an
eyedropper
, and then click and drag the eyedropper to the color that you want
to extract.
Note: Notice that the color changes in the Color palette as you drag.
Applying images or color to the page background
You can apply an image or color to the background of your page to visually enhance the
page. When selecting an image for the background, keep in mind that GoLive and Web
browsers treat the image as a tile that is repeated to cover the page. Although colors that
you choose for page backgrounds override the default colors used by most Web browsers,
other browser preference colors can override your page background colors.
To apply an image or color to the page background:
1 Click the Show Page Properties icon in the upper right corner of the
document window.
2 In the Page Inspector, click the Page tab.
3 Under Background, do one of the following:
• Select Image and specify the image file. (See “Referencing files” on page 42.)
• Select Color and click inside the color field. Then select a color from the Color palette or
the Swatches palette. The color you select is automatically applied to the page and to
the color field in the Page Inspector.
• Select Color and click the lower right corner of the color field. Then select a color from
the swatches that appear. The color you select is automatically applied to the page and
to the color field in the Page Inspector.
Setting the default color for text or links in a page
You use the Page Inspector to set default colors for text that you type on a page and three
stages of links: normal (the normal appearance of a link in the Web browser), active (when
the mouse button is held down on a link in the browser), and visited (after a link has been
clicked in the browser).
To set default colors for text or links on the page:
1 Click the Show Page Properties icon in the upper right corner of the
document window.
2 In the Page Inspector, click the Page tab and do one of the following:
Using Help | Contents | Index Back 70
Page 71

Adobe GoLive CS Help Setting up Sites and Pages
Using Help | Contents | Index Back 71
• To color all text on the page, select Text, click the color field, and select a color from the
Color or Swatches palette. Or, click the lower right corner of the color field and choose a
color from the swatches that appear.
• To color the various stages of hypertext links on the page, select Link, Active Link, or
Visited Link. Then click the color field for each type of link and select a color from the
Color or Swatches palette. Or, click the lower right corner of the color field and choose a
color from the swatches that appear.
Using Help | Contents | Index Back 71
Page 72

Adobe GoLive CS Help Creating Site Diagrams
Using Help | Contents | Index Back 72
Creating Site Diagrams
About diagrams
The diagram features of Adobe GoLive are powerful presentation and Web site creation
tools. A diagram shows the hierarchy of HTML pages within a site and the links between
pages, assets, and other files. It may also contain annotations, level indicators, custom
objects, and boxes that hold text or images.
A diagram lets you lay out the structure of a site before you create real pages, and helps
you manage the site creation process. You can use multiple prototype diagrams as you
build and revise a site, creating and testing designs as you need them. You can present
diagrams in print or online in Adobe PDF or SVG format. When you are ready to work with
live pages, you submit a diagram, converting its pages to actual pages in the site.
A
B
C
D
E
FG H
Diagram
A. Anchored section page B. Parent-child link
C. Annotation D. Page E. Hyperlink F. Level object
G. Group H. Box
Setting up a diagram When you create a diagram, a diagram window opens, displaying
an empty design view. You use the View palette to set page, grid, and canvas options for
the design view, and to specify the appearance and labels of objects in the diagram. (See
“Creating diagrams” on page 73.)
Using Help | Contents | Index Back 72
Page 73

Adobe GoLive CS Help Creating Site Diagrams
Using Help | Contents | Index Back 73
Creating the structure of the diagram You add objects to the design view by dragging
them from the Diagram set
commands. You can add objects that represent pages or sections (subtrees of pages), and
link them in a hierarchy to other pages or sections. You can also add and link custom
objects that represent assets, programs, and other features used in the site.
By dragging objects in the design view, you can change their location on the canvas, their
place in the site hierarchy, or both. You can group objects to manipulate them together,
and use pick whip
page in the site so that its pages will be visible in a navigation view after you submit the
diagram. (See
Preparing the diagram for presentation To make objects appear on each page of a
multipage diagram, you drag them to the Master tab of the diagram window. Items on this
tab (the master view) are not part of the site design and can’t be submitted.
In the design view, you can add annotation objects to provide text commentary, or add
level objects to display brackets indicating levels of the site. You can also add box objects
that contain text or graphics. When you have finished adding objects, you can use the
Align palette to align and distribute them. You can adjust the curvature of link lines by
dragging or by using the Link Inspector. To present the diagram to reviewers, you can print
it to paper or export it to Adobe PDF or SVG format. (See
tation” on page 84.)
Submitting the diagram You can submit an entire diagram or selected items.
Submitting converts pages in the diagram to real pages in the site, and creates scratch files
for custom objects. To reverse a submission, you recall the diagram or items. You can
submit and recall diagrams and items as often as necessary as you develop a site. (See
“Submitting diagrams” on page 88.)
to add diagram links. You should anchor the diagram to an existing
“Developing diagrams” on page 74.)
of the Objects palette, or by using buttons or menu
“Preparing diagrams for presen-
Creating diagrams
When you create a diagram, a new diagram window opens to the Design tab. This tab, also
called the
other items in the site you are designing. The View palette and the Inspector provide
controls for changing the look of the diagram and the appearance and behavior of objects
within it.
When a site window is open, you can create one or more diagrams for the site.
To create a new diagram:
1 Open a new or existing site.
2 Choose Diagram > New Diagram. The diagram window opens to the design view.
3 If you want to rename the diagram, click the Diagrams tab of the site window, select the
diagram name, and enter a new name.
To open an existing diagram:
Do one of the following:
• With the site window open, choose Diagram > Diagrams > diagram name.
• In the Diagrams tab of the site window, double-click the diagram.
design view, is the canvas on which you add objects representing pages and
Using Help | Contents | Index Back 73
Page 74

Adobe GoLive CS Help Creating Site Diagrams
Using Help | Contents | Index Back 74
Developing diagrams
You develop a diagram by adding to the design view objects that represent pages,
sections (hierarchies of pages), and other items that can be added or linked to the site.
After adding objects, you can create new links or redefine links, group and rearrange the
objects, and anchor the diagram to an existing page in the site. You can change how
design views display using the View palette and the Layout tab of the Inspector
(see
“Changing the display of design views” on page 82 and “Changing the layout of
objects in a hierarchy” on page 83).
If you expect the diagram to occupy several pages, and you want certain text or graphics
to appear on each page, you may want to set up these items in the master view before you
develop the diagram in the design view. (See
Adding pages
You can add a single page to a diagram as a separate object, or add the page in any family
relationship—parent, child, previous sibling, or next sibling—to another page or to a
section. (See
pages to a page or section. While adding the new child pages, you can make the child
pages and their parent a section (or a subsection, if the parent page is within a section).
“Adding and defining sections” on page 75.) You can also add sets of child
“Adding master items” on page 84.)
You can add content to pages while you are working on a diagram, or add the content
after you have submitted the pages, and they exist as live pages in the site.
Adding pages to a diagram affects its appearance and navigational logic, sometimes
changing the position of other pages and the direction of lines that connect those
pages. Before arranging a diagram for a presentation, add all pages and other objects, and
establish their hierarchical positions.
To add a page outside a hierarchy:
Drag the Page icon from the Diagram set of the Objects palette to an empty area of the
design view. After creating the page, you can define it in the Page Inspector. You can also
add other pages to the new page, creating family links, or create new hyperlinks.
To add a single page to another page or section:
Do one of the following:
• Select the page or section to which you want to add the page, and choose Next Page,
Child Page, Previous Page, or Parent Page from the toolbar or the Diagram > New
menu.
• Drag the Page icon from the Diagram set of the Objects palette to the page or section.
As you drag, a black bar appears next to the existing page or section, indicating a family
relationship to the new page. Drag the Page icon above the page or section to add a
parent, to either side of it to add a sibling, or below it to add a child.
To add a set of child pages to another page or section:
1 Select the page or section to which you want to add the child pages.
2 Choose Diagram > New Pages.
3 Specify the number of pages to create, their filenames, the stationary or template (if
any) to use in creating the pages, and the types of links to generate. (See
pages and pending links to a hierarchy” on page 119.)
Using Help | Contents | Index Back 74
“Adding empty
Page 75

Adobe GoLive CS Help Creating Site Diagrams
Using Help | Contents | Index Back 75
4 If you want the selected page and the child pages you are creating to be a new section
or subsection, select Make Parent a Section. (See
“Adding and defining sections” on
page 75.)
5 Click Create. The child pages are created. If you selected Make Parent a Section, the
parent page becomes a section page for the new section or subsection.
To define a page in the Page Inspector:
In the Page tab of the Page Inspector, do any of the following:
• Enter a design name for the page in the Name text box. This name appears in the design
view as the label for the page only if Design Name is selected in the Display tab of the
View palette. Otherwise the label is its filename or page title. (See
“Changing the
display of design views” on page 82.)
• Change the default page title.
• Specify a template, stationery, or sample file for the page.
To add content to a page in a diagram:
In the design view, double-click the page. The page opens in a document window. You can
edit the page using the same techniques used to edit pages added directly to a site.
Adding and defining sections
A section is a hierarchy of diagram pages, usually a subtree, that is part of a larger
hierarchy. The section and its children are descendents of some other object. You treat a
section as a unit to simplify file management. The pages in a section have the same base
filename, and you can put them in the same folder and create them using the same
template or stationery. Sections can contain other sections (subsections) as well as pages.
The parent page for a section or subsection is called its section page. The filename for a
newly created section page is index.html, unless you have changed the home page
filename in the site preferences. Section pages are displayed with boldface labels and the
Section icon (if diagram objects appear as icons).
To add and define a section:
1 Drag the Section icon from the Diagram set of the Object palette to the design view.
This creates a section page.
2 If necessary, do one or both of the following in the Page tab of the Section Inspector:
• Enter a design name for the page in the Name text box. This name appears in the design
view as the label for the page only if Design Name is selected in the Display tab of the
View palette. Otherwise the label is its filename or page title. (See
display of design views” on page 82.)
• Change the default page title.
Note: For a section page, don’t use the Target Dir option on the Page tab. You set the folder
for the page and its children in the Section tab. Also, you probably don’t need to change
the default filename for the section page. Even if the home page for the site has the same
filename, the two files have different paths because the section has its own folder.
“Changing the
3 In the Section tab of the Section Inspector, do any of the following:
• Enter a base filename for the child pages you will place in the section and their descen-
dents. The page filenames will be provided automatically. For example, if you enter the
Using Help | Contents | Index Back 75
Page 76

Adobe GoLive CS Help Creating Site Diagrams
Using Help | Contents | Index Back 76
base filename Hiking, the page filenames will be Hiking.html, Hiking1.html, Hiking
2.html, and so on.
• Specify a target folder for the section page, the child pages in the section, and their
descendents. When you submit the diagram, the pages will be placed in this folder. The
target folder should be a subfolder of the root folder, either an existing subfolder or a
new one that will be created when you submit the diagram. For example, you might
specify the folder Recreation/Hiking for the pages in the hiking section of a recreation
site. If you don’t specify a target folder, the folder used is either the root folder or the
folder for generated items specified in Site preferences.
• Specify a template or stationery for the pages.
4 If you want to add child pages to the section page at this time, do both of the following:
• Choose the types of parent and sibling links to generate between the section page and
its children. (See
• In the Count text box, enter the number of child pages to add to the section page.
“Adding empty pages and pending links to a hierarchy” on page 119.)
5 Click Create New Pages.
Adding and editing pending links
You can add pending links between pages, sections, and custom objects, and change links
from one type to another. Tour links connect a series of objects, not necessarily adjacent
siblings in a sequence. In the site settings, you can change the colors of links and add new
link types.
To add a pending link of the type Hyperlink from one object to another:
1 In the design view, select the source object. The pick whip appears.
2 Drag from the pick whip to the target object. A new link appears with the link type
Hyperlink.
Using Help | Contents | Index Back 76
Page 77

Adobe GoLive CS Help Creating Site Diagrams
Using Help | Contents | Index Back 77
To add pending links between already linked objects:
1 In the design view, do one of the following:
• Select two objects linked to each other.
• Select two or more objects linked in sequence, starting with the first object in the
sequence.
To select any object or link after the first object or link selected, Ctrl-click (Windows) or
Shift-click (Mac OS). Repeat to deselect the object or link.
2 Right-click (Windows) or Control-click (Mac OS) and choose a link type from the Add
Design Line submenu. Ordinarily, you add a type that complements the current link type.
For example, you would add a Child link (parent-to-child) to a Parent link (child-to-parent).
To change a link type:
1 In the design view, select a link. A small rectangle appears on the link, and the source
and target objects are highlighted.
2 If necessary, select other links. If multiple links are selected, their source and target
objects are not highlighted.
3 Choose a new link type in the Link Inspector. Normally you would choose only
Hyperlink, Tour, or a user-defined link type because the family link types (Parent, Child,
Next, and Previous) are more easily changed by dragging one of the linked objects onto
the other one. (See
“Moving and copying objects” on page 79.)
Important: If you create a new family link between two objects by dragging one of them
onto the other, the link is always valid. However, if you use the Link Inspector to create it,
you may create an invalid family hierarchy—for example, a child with two parents.
To edit link types:
1 With a site view open, choose Site > Settings > Diagram Link Types.
2 Select Site Specific Settings.
3 Do one or both of the following:
• To change the color of a link type, select the type, click the lower right corner of the
color field, and then specify a new color from the swatches that appear.
• To add a link type, click the New button , type a name, and then click the lower right
corner of the color field to specify a color from the swatches that appear.
Edits to link types apply to all diagrams associated with the current site.
Adding custom objects
You can create custom objects that represent items that you might add or link to a site,
and add these objects to the Diagram set of the Objects palette. The Diagrams set of the
Objects palette contains a number of predefined custom objects representing items such
as forms, elements, databases, applets, and scripts. You can edit or delete these objects
as needed.
Using Help | Contents | Index Back 77
Page 78

Adobe GoLive CS Help Creating Site Diagrams
Using Help | Contents | Index Back 78
Custom objects are images in GIF format, located in the Modules/Diagram Objects folder
in the GoLive application folder. When you add a custom object to a diagram, you can
specify whether to create a file for the object when it is submitted, and the type of file to
be created. You must create the file from a template, stationery, or sample file. For
example, you can add a movie to a site by creating a custom object that uses the movie file
as a sample file. When the diagram is submitted, a new movie file is created from the
sample file. All non-HTML files created from custom objects become scratch items.
To create a new custom object and add it to the Diagram set of the Objects palette:
1 Save an image using the following filename convention: myfilename-myextension.gif,
where
myfilename is the name that appears in the Objects palette tool tip and
myextension is the default extension that is used in the filenames of the created objects. (If
you do not include a default extension and the preceding hyphen, .html is used.)
2 Place the image file in this folder:
Adobe GoLive /Modules/Diagram Objects.
3 Restart GoLive. To be available from the Objects palette, the custom object must be in
the Diagram Objects folder when GoLive starts.
To specify a sample file for a custom object:
1 Create a default sample file in the Adobe GoLive /Settings7/DocumentStore/examples
folder. The default sample file is used to create a file when you submit the object, unless
you specify another file in the Object Inspector.
2 Open the defaults.agldex file in the DocumentStore folder and copy an existing
<example></example> specification in this file. Example specifications have this format:
<example ident="myfilename" mime="mime type" ext="myextension"
group="group name">
<display name="myfilename” context="no" menu="no" sort="2020"/>
</example>
where ident is the filename you specified for the custom object (without the hyphen and
extension),
object,
misc), display name is the filename you specified (to be used in the user interface if the
next three items are set to
site context menu,
menu,
mime is the appropriate mime type, ext is the extension you specified for the
group is the appropriate group in the defaults.agldex file (markup, css, media, or
yes), context is no unless you want the file to be listed in the
menu is no unless you want the file to be listed in the File > New Special
sort specifies the sort order for the display name in menus, and file url is the
name of your sample file (dialog is not used at this time).
3 Edit the copy of the specification and place it in the appropriate group in the
defaults.agldex file.
<file url="examples/mysample.myextension"/>
4 Restart GoLive. To be available as a sample file, the file must be in the examples folder
and defined in the defaults.agldex file when GoLive starts.
Using Help | Contents | Index Back 78
Page 79

Adobe GoLive CS Help Creating Site Diagrams
Using Help | Contents | Index Back 79
To add a custom object to a diagram:
1 Drag the object from the Diagram set of the Objects palette to the design view. You can
add a custom object to an empty area of the design view, or drag it over an existing page,
section, or other custom object to add it as a parent, sibling, or child of the existing object.
2 In the Object tab of the Object Inspector, do any of the following:
• Enter a design name for the object in the Name text box. This name appears in the
design view as the label for the object only if Design Name is selected in the Display tab
of the View palette. Otherwise the label is its filename or page title.
• Select Create From to specify that a file will be created when the object is submitted,
and then select Stationery, Template, or Sample. You must specify a stationery,
template, or sample file in order to create a file for the custom object. To use a
stationary or template file, choose the file from a menu. To use a sample file other than
the default file in the DocumentStore folder, drag from the pick whip to the sample file.
The sample file must be located on your computer.
• Specify a filename and target folder for the file to be created when the object
is submitted.
To edit a custom object:
Do any of the following:
• Change settings for the object in the Object tab of the Object Inspector.
• Change the sample file in the Adobe GoLive /Settings7/DocumentStore/examples
folder.
• Edit the specification for the object in the Adobe GoLive/Settings7/DocumentStore/
defaults.agldex file.
• Delete the object by removing its GIF file from the Adobe GoLive/Modules/Diagram
Objects folder.
Moving and copying objects
You can treat any item in a diagram simply as an object in a drawing program, and drag it
as you would in such a program. You can also drag a page, section, or custom object onto
another page, section, or custom object to create a new family link in the logical hierarchy.
You can select a number of objects and drag them all at once. However, a better method is
to group the objects and then drag the group. (See
You can also copy objects in a diagram, and duplicate them along with their links.
To move an object without changing its position in the logical hierarchy:
In the design view, drag the object to a new location. If Collision Avoidance is selected, and
you drag the object near or partially over another object, the other object will move (to
avoid a collision) when the drag is completed.
“Grouping objects” on page 80.)
Note: If you drag an object over another object and a line appears to the top, bottom, left,
or right of the other object, you have dragged too far into the center of the other object.
Decrease the overlap until the line disappears.
Any link lines connected to an object move when you drag the object. However, the
object’s descendents do not move with it as they would if you were moving the object to a
new hierarchical position.
Using Help | Contents | Index Back 79
Page 80

Adobe GoLive CS Help Creating Site Diagrams
Using Help | Contents | Index Back 80
To move a page, section, or custom object into a new position in the logical
hierarchy:
1 In the design view, drag the object onto the page, section, or custom object you want it
linked to. Depending on the position of the object you are dragging, a line appears above
or below the target object or to its left or right.
2 Drop the object above, below, to the left, or to the right of the target object, depending
on the family relationship you want the two objects to have. (See
“Rearranging the parts
of a hierarchy” on page 121.)
To move a copy of an object to a new location:
In the design view, Ctrl-drag (Windows) or Option-drag (Mac OS) the object to another
location. A copy of the object is created at that location. If the original object is annotated
or linked, the annotations or link lines are not copied.
To duplicate objects:
1 In the design view, select the objects you want to duplicate.
2 Choose Edit > Duplicate. The objects and their connectors and links are copied. If you
only select one object, it is duplicated along with its links.
Grouping objects
A group is a rectangle that encloses a number of objects in a diagram and lets you treat the
objects as a unit. You can move, copy, or delete the objects in a group by moving, copying,
or deleting the group. You can also close a group to temporarily unclutter the diagram.
The objects in a group must be located within the group rectangle, but they don’t have to
be in any logical relation to one another.
To group selected objects:
1 In the design view, select the objects.
2 Choose Edit > Group, or click the Layout Group button in the Transform palette.
A group rectangle encloses the selected objects. If Collision Avoidance is selected, any
unselected objects that would be enclosed by the rectangle move out of the way
automatically.
To create an empty group in a particular location:
1 Drag the Group icon from the Diagram set of the Objects palette to the design view.
If Collision Avoidance is selected, any objects at or near the icon’s position move out of the
way automatically.
2 Do one or both of the following as needed:
• Resize the group by dragging one of its corner handles.
• Reposition the group by dragging its title bar or border.
To set group options:
1 Select the group by clicking its title bar or border.
2 In the Group Inspector, do any of the following:
• Enter a name. It appears in the title bar if the title bar is displayed. You can also enter the
name directly in the title bar.
Using Help | Contents | Index Back 80
Page 81

Adobe GoLive CS Help Creating Site Diagrams
Using Help | Contents | Index Back 81
• Click an Align button to left-align, center-align, or right-align the group name.
• Select or deselect Display Title Bar.
• Select or deselect Auto Resize. With Auto Resize selected, the group rectangle is only as
large as it needs to be to hold its contents, growing or shrinking as needed.
To add objects to a group:
Drag the objects into the group rectangle. If the rectangle is too small to hold the objects
and you have selected Auto Resize in the Group Inspector, the rectangle enlarges
automatically.
To ungroup grouped objects:
1 Select the group.
2 Choose Edit > Ungroup, or click the Layout Ungroup button in the Transform
palette.
To work with a group:
Do any of the following:
• To collapse or expand a group, click the Collapse/Expand button in the group’s
title bar.
• To move a group and its contents, drag its title bar or border.
• To delete a group and its contents, select it and press the Delete key.
Anchoring a diagram
When you submit a diagram, its pages become live pages in the site. To see these pages in
the site’s navigation view after you submit the diagram, you have to anchor its new pages
to an existing page in the site.
To anchor a diagram to an existing page in a site:
1 Display the page that will anchor the diagram in a navigation view, in a links view, or in
the Files tab of the site window. A navigation view gives you the best picture of how the
diagram will be anchored.
2 Open the diagram window for the diagram and display a design view.
3 Make sure that both windows are accessible, moving one or both if necessary.
4 Drag the page that will anchor the diagram from its window to the design view. The
page appears in the design view with the Anchor icon
Pages group in the Staging tab of the diagram window.
If you drag the anchor page onto a page in the diagram, establishing a family link,
make the anchor page a sibling of the page it is linked to. Parent-child links can
produce unexpected results.
. It is also listed in the Anchor
Using Help | Contents | Index Back 81
Page 82

Adobe GoLive CS Help Creating Site Diagrams
Using Help | Contents | Index Back 82
Changing the display of design views
The View palette works with design views in the same way it works with navigation and
links views. The Design tab of the palette has controls for viewing collections, for orien
tation, and for the display of peripheral panes. The Display tab has controls for how
objects appear in the diagram. The Grid tab has controls for the grid, collision avoidance,
and the canvas.
Note: Collections are custom sets of page files, which can be visually identified by
spotlighting. (See
“Creating and using collections in navigation or links view” on page 114
and “Using collections” on page 319.)
To specify how objects appear in a diagram:
In the Display tab of the View palette, do any of the following:
• Specify whether to display master items, which appear on each canvas page, and
whether to display breaks between pages.
• Specify whether to display staging icons next to pages. The Anchor Page icon
identifies the page used to anchor a diagram to a site. The Generic Page icon
indicates that a file for the page has been created but not edited or submitted. The Real
Page icon
indicates that the page file has been created and edited, but not
submitted. The Live Page icon indicates that the page has been submitted, and that
the page file has moved to its target folder in the site.
• Specify whether to show pages, sections, and custom objects as icons, thumbnails,
frames, ovals, or icon frames. Ovals are oval if the frame size is set to Wide. Otherwise,
they are circles.
-
• Specify how to label pages in the diagram. You can use as labels the page titles entered
in the Page Title text box of the Page Inspector, the filenames of the pages, or design
names entered in the Name text box in the Page Inspector.
• Select Multi Line Text to allow long labels to wrap to multiple lines, or Overhang Text to
allow the labels to grow horizontally. If you select neither option, long labels are
truncated.
• Choose a frame size to set the amount of space around objects displayed as icons, or to
set the size of objects displayed as thumbnails, frames, ovals, or icon frames. If you are
using icon frames, the best choice for frame size is Wide.
• Click the Item Color box to select a custom color from the Color palette.
Note: You can also specify the background color of the design view of the Diagram
window. (See
“Customizing view colors” on page 118.)
To set options for the grid or for collision avoidance:
1 In the Grid tab of the View palette, do any of the following:
• Select Visible to display horizontal or vertical grid lines, or both. You can also show or
hide the grid by choosing View > Show Grid or View > Hide Grid.
• Select Snap to snap objects in the diagram to the horizontal or vertical grid lines, or to
both.
• Select Collision Avoidance to have other objects move out of the way when you move
or insert an object in a diagram.
Using Help | Contents | Index Back 82
Page 83

Adobe GoLive CS Help Creating Site Diagrams
Using Help | Contents | Index Back 83
2 If you selected the grid or collision avoidance, enter values in the Horizontal and
Vertical text boxes to specify the spacing between grid lines or the avoidance area.
If you are using both the grid and collision avoidance, make the collision avoidance
values multiples of the grid values.
To set canvas options:
In the Grid tab of the View palette, do any of the following:
• Select Canvas Is Single Page to prevent the design view canvas from expanding beyond
one page. This option deselects the other options.
• Select the Auto options to allow the canvas to expand as necessary to contain objects
added to the diagram. The canvas expands or shrinks in increments of pages.
• Enter values for Page Rows and Columns to constrain the canvas to the specified
number of rows and columns in the grid.
To expand a view of a diagram:
1 Choose Panorama Pane from the diagram window menu, or select Panorama in the
Design tab of the View palette. The panorama pane opens, showing the current design
view and any parts of the diagram that extend beyond it. (See
“Using the peripheral panes
of the site views” on page 109.)
2 Move the view box in the panorama pane to view different parts of the diagram.
You can also expand a view by zooming out.
Changing the layout of objects in a hierarchy
The Layout tab of the Inspector is available when you add and select objects that can be
linked to other objects in a hierarchy—pages, sections, or custom objects. You can specify
how links appear, the alignment of parents and children, the effects of page breaks and
the grid, and the arrowhead style for links.
To specify the layout of objects in a hierarchy:
1 In the design view, select a page, section, or custom object.
2 In the Layout tab of the Inspector, do any of the following:
• Choose a Draw Links As option to specify the display of links. By default, connectors
appear as single green lines with arrowheads, lines appear as two green lines with
arrowheads, and outlines appear as single straight lines with no arrowheads.You can
change the arrowhead style for connectors and outlines.
• With a parent object selected, click a button that specifies the alignment of all child
objects with their parents.
• With a parent object selected, select Stagger to alternate offsets for each child (when
links are drawn as connectors), or to display outlines on the right in a vertical layout
(when links are drawn as outlines).
• With a parent object selected, select Auto Position to space child objects, as they are
added or removed, by using the spacing used for the parent object.
Note: When links are drawn as outlines, all child objects are automatically positioned.
Using Help | Contents | Index Back 83
Page 84

Adobe GoLive CS Help Creating Site Diagrams
Using Help | Contents | Index Back 84
• With a parent object selected, select Align Children to align the first child with the
parent, or Center Children to center all children relative to the parent.
• Select Honor Page Breaks to prevent objects from straddling a page break.
• Select Honor Grid to use settings in Grid tab of the View palette when distributing
parent, child, and sibling objects.
• Enter values for the horizontal or vertical spacing between parent, child, and sibling
objects, or for both horizontal and vertical spacing. Zero specifies the default spacing.
Choose an arrowhead style for connectors and outlines.
Preparing diagrams for presentation
After creating a diagram that represents a site, you can add boxes, annotations, and level
objects to provide more information to reviewers or clients. Boxes are rectangular
containers for text and graphics. Annotations are text comments that can be displayed
along with an icon. Level objects are brackets, with optional labels, that can be used to
indicate levels in a site. If you want objects created for presentation purposes to appear on
each page of a diagram, you can add them as master items on the Master tab of the
diagram window.
You can enhance the appearance of a diagram by aligning and distributing objects and
adjusting the curvature of link lines. To publish the diagram, you print it to paper or export
it to Adobe PDF or SVG format for an online presentation.
Adding master items
The Master tab of the diagram window provides a master view with the same grid and
canvas settings as the design view. Objects added to the master view (master items)
appear on each page of a diagram, but can’t be submitted. You might use master items, for
example, to display a logo and title on each page of a diagram.
The master view shows only master items, but the design view shows both master items
and objects added to the design view. You can add master items at any time, but it may be
most convenient to set them up before beginning work in the design view. That way, you
can see the master items while you lay out the diagram in the design view.
To add master items to a diagram:
Display the Master tab of the diagram window, and drag objects from the Diagram set of
the Objects palette to the master view.
Adding boxes
Boxes are graphical containers that can hold objects, including text, graphics, and other
boxes. All contents within a box are clipped to the box boundaries, and move with the
box. You can format text within a box, and use it to present captions, titles, and other infor
mation.
-
When you drag an image to the design view, a box is automatically created to contain
the image. You can display the image at its actual size by selecting Size to Image in the
Box Inspector.
To add a box to a diagram:
1 Drag the Box icon from the Diagram set of the Objects palette to the design view.
Using Help | Contents | Index Back 84
Page 85

Adobe GoLive CS Help Creating Site Diagrams
Using Help | Contents | Index Back 85
2 In the Box tab of the Box Inspector, do any of the following:
• Enter text in the Text box. In the design view, you can also enter text directly in the box
by clicking in the box and typing the text.
• Select Single Line to constrain the text to a single line.
• Select Resize with Text to resize the box to fit
the text.
• Click an Align button to align the text.
• Enter width and height values for the margins within the box.
• Select font options for text: Bold, Italic, or both.
• Specify the location of any image you want to appear in the box, and select Size to
Image to size the box to fit the image.
3 In the Graphics tab of the Box Inspector, do any of the following:
• Specify the color and line width of the border of the design box.
• Specify the fill color of the design box.
• Specify the color and font size of the text.
4 Specify how to apply the settings:
• Click Default Settings to use the current settings for all subsequent boxes.
• Click Apply to All to apply the current settings to all existing boxes.
Adding, viewing, and editing annotations
You use annotations to comment on a diagram or on items in a diagram, or to provide
captions. Annotations consist of text with an optional subject line. Each annotation
appears as an annotation icon
along with the icon. You can place an annotation on an object or link line, or anywhere in
the design view. Annotations added to objects stay with the objects when they are
moved. Annotations added to link lines stay with the lines when they are moved or
deflected.
The Annotations tab in the diagram window shows the subject lines and text of all annotations to a diagram. You can edit annotations in the Annotations tab or in the Design tab.
To add an annotation to a diagram:
1 Drag the Annotation icon from the Diagram set of the Object palette to an object in
the design view or a blank area of the canvas.
2 Enter the subject and text by doing one of the following:
• In the design view, double-click the annotation, select the subject or text, and enter a
new subject or text.
• In the Annotation Inspector, enter the subject and annotation text.
3 In the Annotation tab of the Annotation Inspector, do any of the following:
• To display the subject line in the diagram, select Display Subject.
• To specify the alignment of the subject line, click an Align button.
• To display the text in the diagram, select Display Text. (If you select both Display Subject
and Display Text, the text appears under the subject.)
in the diagram, and you can display the subject or text
Using Help | Contents | Index Back 85
Page 86

Adobe GoLive CS Help Creating Site Diagrams
Using Help | Contents | Index Back 86
• Choose a position option to specify whether the subject and text appear to the right or
left of the icon, or centered above or below the icon.
4 In the Graphics tab of the Annotation Inspector, do any of the following:
• Specify the color and line width of the annotation’s border.
• Specify the fill and header color of the annotation.
• Specify the color and font size of the text.
5 Specify how to apply the settings:
• Click Default Settings to use the current settings for all subsequent annotations.
• Click Apply to All to apply the current settings to all existing annotations.
To view the subject and text of an annotation:
Do one of the following:
• Double-click the annotation to open it.
• Click the Annotations tab of the diagram window and view it there.
• Select the annotation and view it in the Annotation Inspector.
To edit the subject or text of an annotation:
1 In the Design or Annotations tab of the diagram window, select the annotation.
2 Do one of the following:
• In the Annotation Inspector, enter a new subject or text.
• In the Design tab, display the subject or text if necessary and then select and edit the
subject or text.
• In the Annotations tab, select and edit the subject.
To delete an annotation:
In the Design or Annotations tab of the diagram window, select the annotation and
press Delete.
Adding level objects
Level objects are brackets, with optional text labels, that you can use to indicate the
hierarchy of objects in a diagram. You can place a bracket anywhere in the design view,
and resize the bracket to include all the objects at a particular level.
To add a level object to a diagram:
1 Drag the Level icon from the Diagram set of the Objects palette to the design view.
2 Position the bracket by dragging it.
3 Resize the bracket by dragging any of its handles.
4 In the Level tab of the Level Inspector, do any of the following:
• Label the level by entering text in the Text box. You can also label the level in the design
view by clicking to the left of the bracket and entering text in the text box that opens.
• Click a vertical alignment button to position your label.
• Click a text alignment button to justify the text within the brackets.
• Select Single Line to constrain the label to remain on one line.
Using Help | Contents | Index Back 86
Page 87

Adobe GoLive CS Help Creating Site Diagrams
Using Help | Contents | Index Back 87
• Select Center Bracket to center the bracket within its handles.
• Enter width and height values for the label margins.
• Select font options for the label text: Bold, Italic, or both.
5 In the Graphics tab of the Level Inspector, do any of the following:
• Specify the color and line width of the bracket.
• Specify the color and font size of the text.
6 Specify how to apply the settings:
• Click Default Settings to use the current settings for all subsequent level objects.
• Click Apply to All to apply the current settings to all existing level objects.
Aligning and distributing objects in a diagram
You can use the Align palette to control the spatial relationship of objects in a diagram.
Note: When you align an object with its parent, the parent is a geometrical dominant, not
a logical parent within a hierarchy of family relationships. The geometrical parent is the
entire canvas page, or it is the group if the objects you are aligning are in a group.
To align an object with its geometrical parent:
1 Select the object.
2 In the Align palette, click one of the Align to Parent buttons.
To align objects with each other:
1 Select two or more objects.
2 In the Align palette, click one of the Align Objects buttons.
To distribute objects or spacing:
1 Select three or more objects.
2 In the Align palette, do one of the following:
• Click one of the Distribute Objects buttons.
• Click one of the Distribute Spacing buttons.
• In the Distribute Objects or Distribute Spacing section of the palette, select Use Spacing
and enter a numeric value for the spacing offset.
Changing the deflection (curve) of link lines
You can make link lines straight or deflect them from a straight line (curve them) to any
degree and in either direction. You can do this by dragging the lines or specifying a
deflection percentage.
To change the deflection of a link line:
1 Select the line.
2 Do one of the following:
• Drag the line’s selection rectangle in the direction you want its deflection to increase
or decrease.
• In the Link Inspector, choose a percentage from the Deflection menu. Positive
percentages increase the deflection to the right, negative percentages to the left.
Using Help | Contents | Index Back 87
Page 88

Adobe GoLive CS Help Creating Site Diagrams
Using Help | Contents | Index Back 88
(Right and left are from the perspective of the source page—the page that the link
arrow points away from.) A deflection of zero produces a straight line.
Note: When two pages are linked by two lines, giving the lines a zero deflection merges the
lines. This effect is likely to obscure the design.
Printing and exporting diagrams
You can print a diagram for a paper presentation, or export the diagram to Adobe PDF or
SVG format for an online presentation. The exported diagram can contain live links and
annotations.
To print a diagram:
1 Open the design view for the diagram, and choose File > Print.
2 Select print options and click OK.
To export a diagram:
1 Choose File > Export > Diagram, or choose Export Diagram from the diagram
window menu.
2 Choose SVG or PDF.
3 Select Preserve Background Color to give the exported image the background color of
the design view. Otherwise, the image is exported with a white background.
4 Select Make Diagram Objects into Links and specify the root URL if you want the links to
open the files.
5 Select an annotation option:
• Static exports annotations in their current states—with their contents displayed or
closed to icons.
• Live lets you open annotations by clicking them.
Submitting diagrams
When you submit a diagram, GoLive converts its pages and sections to real, editable HTML
pages. The pages move to the Files tab, indicating that they exist as files within the site.
Files for custom objects are created if possible. When you recall a submitted diagram, you
reverse these changes. You can submit and recall a diagram repeatedly while you develop
a site. You can also submit and recall selected objects within the diagram.
Before submitting a diagram, you should check its staging and correct any errors that are
detected.
Checking the staging of diagrams
When you check the staging of a diagram, you determine whether all its pages are
connected by links to an anchor page and whether there will be folder or filename
problems when the diagram is submitted. You can then make corrections as needed.
Note: Diagrams with staging errors cannot be submitted, and a few error conditions can
be detected only when you attempt a submission. If you check a diagram, detect no errors,
but are unable to submit the diagram, check it again.
Using Help | Contents | Index Back 88
Page 89

Adobe GoLive CS Help Creating Site Diagrams
Using Help | Contents | Index Back 89
To check the staging of a diagram:
1 In the diagram window, click the Staging tab. If you haven’t submitted the diagram, its
pages are listed as Design Pages, and custom objects are listed as Design Objects. If you
have submitted the diagram, the pages are listed as Live Pages.
2 Click the Check Staging button on the toolbar, or choose Diagram > Staging > Check
Staging. A check mark in the Check column opposite a page or object means that no
errors were detected. Other icons in the column indicate problems or potential problems.
To correct staging errors:
If an error icon or warning icon appears opposite a page or object in the Check column,
use the following information to correct the problem:
• The File In Use icon indicates that a page is open in a document window. Close all
pages in a diagram before submitting or recalling the diagram.
• The Target Folder icon indicates that the target folder for a page could not be created
when you tried to submit the diagram. Change the Folder setting in the Section
Inspector for the page’s section, or change the Target Dir setting in the Page Inspector if
the page doesn’t belong to a section. For custom objects, change the Target Dir setting
in the Object tab of the Object Inspector.
• The Section Name icon indicates that a section page could not be named index.html
(or another name assigned to the home page in Site preferences) because a file with
that name already exists in the target folder. Rename the page or specify another folder
for the page by changing the Folder setting in the Section Inspector.
• The Stage in Scratch icon indicates that a page is not linked directly or indirectly to an
anchor page. Unless you want the page to be treated as a scratch page when the
diagram is submitted, drag an anchor page from the navigation view to a page in the
design view or link the page to an anchored page in the diagram to create a family link.
(See
“Anchoring a diagram” on page 81.)
Note: All custom objects are treated as scratch items. A custom object must have a sample
file, stationery, or template specified in the Object Inspector before the object can become
a file in the site.
• The File Rename icon indicates that the page will be renamed automatically when
the diagram is submitted. Normally this is an acceptable result.
Submitting all diagram items
You can submit a diagram for the first or only time, submit a diagram you have recalled, or
submit a nonrecalled diagram to update a previous submission.When you submit a
diagram, the following changes take place:
• In the Staging tab of the diagram window, the pages move from the Design Pages
group to the Live Pages group. (They also appear with the Live Page Staging icon
the Design tab.) Custom objects move from the Design Objects group to the Live
Objects group.
in
• In the site window, the pages appear in the Files tab. The pages move from the diagram
staging folder in the site data folder to the target folder in the root folder.
• In the navigation view, pages that are directly or indirectly linked to an anchor page
appear in the central pane in the same hierarchy that they form in the design view.
Unanchored pages and custom objects appear in the scratch pane.
Using Help | Contents | Index Back 89
Page 90

Adobe GoLive CS Help Creating Site Diagrams
Using Help | Contents | Index Back 90
• Pending links between pages are updated. The Pending Links palette can be used to
resolve any problems with the links.
To submit all diagram items:
1 Open the diagram in a design view.
2 Click the Submit All button on the toolbar, choose Diagram > Staging > Submit All,
or choose Submit All from the diagram window menu.
Recalling and updating all diagram items
Recalling a diagram reverses the changes that occurred when the diagram was submitted.
Recalls are often an expected part of the design process. For example, you might submit a
diagram in progress to examine it in a live context, and then recall it for further design
work. Or you might submit one of two alternative diagrams and recall it so that you can
submit the other and then choose between them.
In fact, you don’t need to recall a diagram to work on it further. You can submit an unfinished diagram, leave it live, and continue to work on it in the design view. Submitting the
diagram again updates the site.
Updates involving substantial design changes can produce unexpected results. If this
happens, try recalling the updated diagram, checking and fixing it, and resubmitting
the diagram.
To recall all diagram items:
1 Open the diagram in a design view.
2 Click the Recall All button on the toolbar, choose Diagram > Staging > Recall All, or
choose Recall All from the diagram window menu.
Submitting and recalling selected items
You can perform selective submissions and recalls of items in a diagram. For example, you
might submit selected items if you are abandoning a diagram as a whole but want to
salvage parts of it. Or you might submit a complete diagram, discover that part of it needs
further design work, and recall only that part for retooling.
To submit selected items:
1 In the Design or Staging tab of the diagram window, select the items.
2 Do one of the following:
• Choose Submit Items from the Diagram > Staging menu or the diagram window menu.
• Choose Submit Items to Scratch from the Diagram > Staging menu or the diagram
window menu.
To recall selected items:
1 In the Design or Staging tab of the diagram window, select the items.
2 Choose Recall Items from the Diagram > Staging menu or the diagram window menu.
Using Help | Contents | Index Back 90
Page 91

Adobe GoLive CS Help Managing and Viewing Web Sites
Using Help | Contents | Index Back 91
Managing and Viewing Web Sites
Managing a site
A Web site is built from a collection of linked files. These files can contain objects such as
HTML, images and media, and scripts. Maintaining properly linked files and organizing the
files into a logical hierarchy are important for managing a site. GoLive offers several tools
for managing and viewing sites.
Site window For viewing and manipulating files and folders within your site, GoLive has a
site window that gives you access to all of the site files and assets. (See
site window” on page 92 and see “About site assets” on page 304.) It’s good practice to
maintain all your source files, data, HTML files, scripts, and media in the site window. The
site window not only helps you avoid breaking links and creating orphan files, it also gives
you easy access for fixing site file errors.
“Working with the
Graphical views GoLive also has graphical site views that let you look at the hierarchy of
your site with different representations. (See
Graphical site views are useful for examining the navigation of your site, reviewing files, or
establishing or correcting links.
In & Out Links palette The In & Out Links palette is a powerful link management tool
that you can use to change links and file references. For example, if you use an application
other than GoLive to change the name of an image file, you can use the In & Out Links
palette to change all references in your site to the new filename. (See
URLs sitewide” on page 124.)
For information about creating a site, see “Creating a site” on page 46.
“About graphical site views” on page 104.)
“Editing links and
Specifying preferences and settings for Web sites
When you manage a Web site, it’s important to specify several application-wide Site
preferences and site-specific settings that affect the site.
The Site preferences establish the way you manage all sites and include settings for
general file and folder management, Filename Constraints, Status, Clean Up Site, Upload/
Export, Diagram Colors, and Diagram Link Types. Two other categories of application-wide
preferences that also affect the management of all sites are the Script Library preferences
and Internet preferences. The Script Library preferences include settings for how GoLive
handles JavaScripts, and the Internet preferences include settings for connectivity and
network status.
In addition to the Site preferences, you can also specify site-specific settings for Publish
Servers, URL Handling, URL Mappings, Diagram Colors, Script Library, and others. The sitespecific settings override the Site preferences.
To set preferences that affect all sites:
1 Choose Edit > Preferences (Windows) or GoLive > Preferences (Mac OS).
Using Help | Contents | Index Back 91
Page 92

Adobe GoLive CS Help Managing and Viewing Web Sites
Using Help | Contents | Index Back 92
2 In the left pane of the Preferences dialog box, do one of the following:
• Click or expand the Site preferences icon and then select a Site category.
• Click the Script Library preferences icon .
• Click the Internet preferences icon .
3 In the right pane, set the preferences you want to apply to all sites.
4 Click OK.
To specify site-specific settings:
1 Open a site.
2 Click the Site Settings button on the toolbar or choose Site > Settings.
3 In the Site Settings dialog box, click a category in the left pane and then select options
in the right pane.
4 If the Site Specific Settings option is available for a category, select it to have the sitespecific settings override the Site preferences.
5 Click OK.
Working with the site window
The site window is your indispensable tool for building and managing a Web site, and
should contain all of the linked files used in the site.
p
BA
Files tab and Extras tab in the site window
A. Current status of files B. Show/Hide right pane button.
To open a site project file (.site) in the site window:
Do one of the following:
• Choose File > Open, browse to the site project file (.site), select it, and then click Open.
• Double-click the site project file on your system desktop.
Note: Opening a site project file automatically creates a backup of the file. GoLive deletes
the backup when you save and close the site project file. You can turn this feature off for all
sites in Site preferences.
If you need to reopen a site that was open during a computer crash, open the regular
site file, not the backup site file. If it is necessary to use the backup, GoLive will
inform you.
Using Help | Contents | Index Back 92
Page 93

Adobe GoLive CS Help Managing and Viewing Web Sites
Using Help | Contents | Index Back 93
To show or hide the right pane of the site window:
Click the Toggle Split View icon in the scroll bar at the bottom of the window.
To display the contents of a tab in the site window:
Do one of the following:
• Click the tab to bring it to the front.
• Choose the tab from the site window menu.
To restore the original configuration of the site window:
Choose Default Configuration from the site window menu for either pane of the window.
To customize the display of the site window tabs:
Do any of the following:
• To change the sort order of the column the tab is currently being sorted by, click the
column’s head. In Mac OS, you can also click the Sort Order icon
• To sort the tab by another column, click the column head.
• To show and hide columns, choose the column names from the Show Columns menu in
above the scroll bar.
the View palette.
• To resize a column in a tab, drag the right border of the column head to the left or right.
• To change the position of a column in the tab, drag (Windows) or Command-drag (Mac
OS) the column head to the left or right. (You can’t change the position of the left-most
column in any tab.)
• To go up one level in the folder or group whose contents are listed in the tab, click the
Upwards button
(Windows) or (Mac OS) at the top of the tab.
Note: Once you’ve reached the topmost level of the folder hierarchy reflected in the site
window, GoLive opens the Local File Browser to let you navigate through the file system.
• To show or hide the anchors in a page, click the icon to the left of the page to expand or
collapse the page.
• To change the view of items in a tab, choose an option from the Site > View menu.
For more information about arranging site window tabs, see “Rearranging palettes or
tabs” on page 32.
About the site window
GoLive organizes a site into nine tabs to handle different aspects of site management:
Files Contains HTML, XHTML, XML, media, and other files, as well as folders that you can
use to organize the files.
External Displays external URLs and e-mail addresses referenced by the site files.
Diagrams Contains diagrams with a graphical view of possible site implementations.
(See
“About diagrams” on page 72.)
Colors Contains a collection of colors used in your site.
Font Sets Contains a collection of font sets used in your site. The font sets are lists of alter-
native fonts that you use to override the browser’s default display font settings.
Using Help | Contents | Index Back 93
Page 94

Adobe GoLive CS Help Managing and Viewing Web Sites
Using Help | Contents | Index Back 94
You can also show and hide the right pane of the site window that contains these
additional tabs:
Extras Contains all of the files and folders in the site’s web-content folder and web-data
folder. The web-data folder contains four types of reusable objects: components,
stationery pages, snippets, and page templates. The Extras tab also contains diagrams,
Smart Objects, InDesign packages, queries, and files moved to the Site Trash. (See
“About
site assets” on page 304.)
Note: You can choose to not show the web-content folder in the Extras tab by doing the
following: choose Edit > Preferences (Windows) or GoLive > Preferences (Mac OS) and
select Site in the left pane; then deselect Show Web-content Folder in Extras Tab.
Errors Contains missing files, orphan files, Smart Object warnings, and files that have a
name that doesn’t meet your filename constraints. An orphan file is referenced in a link
but GoLive can’t find the file, or the file is outside the web-content folder. If you manage
files in the site window, you can avoid creating orphan files. Click a file in the Errors tab to
open the Error Inspector. For information on finding and fixing links to missing files, see
“Checking the site for missing or orphan files” on page 127.
Publish Server Displays the site on a remote server while GoLive is connected to a
publish server (an FTP, WebDAV, or local file server).
Collections Displays custom sets of one or more files that you select manually or define
as a result of a query, syntax check, or find operation.
The status column in the site window contains icons that show you each file’s status. The
checkmark icon
indicates that the file is error-free—that all files referenced in it have
been found. For information on the meaning of the other status icons, see “Fixing site
errors” on page 126.
You can also display a third view of the site window that contains two graphical views:
Navigation and Links view (see
“About graphical site views” on page 104).
About site files and folders
In GoLive, a site is a collection of files that are used as resources for developing and
maintaining a Web site on a Web server. Viewers of the Web site only see files that you
upload to the Web server. (See
home page (usually named index.html), pages linked directly or indirectly to the home
page, and media files referenced by any of these pages.
Viewers don’t see the rest of the files that are usually placed in the web-data and websettings folders, and normally the contents of these folders are not uploaded to the server.
The files comprising a GoLive site include the site project file and the contents of three
folders: the web-content folder, the site web-data folder, and the site web-settings folder.
• Files and file information that are managed by the site project file are displayed in the
various tabs of the site window.
“Uploading a site” on page 328.) These files include the
• The contents of the site web-content folder are listed in the Files and Extras tabs of the
site window.
• The contents of the site web-data folder are listed in the Extras tab of the site window.
• The site web-settings folder contains XML files of site-specific settings, and settings for
the Colors tab, External tab, and Font Sets tab.
Using Help | Contents | Index Back 94
Page 95

Adobe GoLive CS Help Managing and Viewing Web Sites
Using Help | Contents | Index Back 95
Inspecting file properties
The File Inspector for any selected file has a File tab with basic file information, a Name tab
with information on whether the filename matches or violates a filename constraint (see
“Naming files and folders” on page 102), and a Content tab with a thumbnail of the file. For
HTML and XHTML files, the File Inspector includes an additional Page tab with the page
title and encoding information. (See
Inspector includes basic folder information and a Name tab with filename status.
You can also use the File Inspector and Folder Inspector to rename files and folders, or
change their publish state and their status label. (See
page 133.)
To inspect a file or folder:
1 Display the Inspector.
2 Select the file or folder in the site window.
3 If you selected a file, click the File, Name, Page, or Content tab in the File Inspector as
necessary. If you selected a folder, click the Folder or Name tab in the Folder Inspector as
necessary.
“Changing the page title” on page 53.) The Folder
“Providing file status information” on
To show file information in Explorer (Windows) or Finder (Mac OS):
Click the Show Information in Explorer button (Windows) or the Show Information in
Finder button (Mac OS) on the toolbar.
Working with files and folders
In the site window, arrange files in folders to keep them in order. For example, create
separate folders for storing pages, images, and animations in the Files tab in the site
window.
Important: When using GoLive, you can reference files in any folder on your system.
However, if you use a system tool such as Explorer (Windows) or Finder (Mac OS) to move,
rename, or delete site files, GoLive doesn’t update link and reference information. This is
why it’s highly recommended that you work in the site window when moving, renaming,
or deleting files. If you do move, rename, or delete files with a system tool, be sure to
refresh the view of files in the site window. (See “Refreshing the site window” on page 98.)
Similarly, use the site window to arrange non-file items in groups. (GoLive treats and
displays a group in the site window as a type of folder, but all groups are stored within the
Settings folder rather than within other regular folders on your hard disk.) Items in the
Files and Extras tabs are stored in regular folders. All non-file items in the External,
Colors, and Font Sets tabs are stored in groups. Items in the Collections tab are stored in
collections.
To create a folder (group, regular folder, or collection):
1 Click the tab where you want to create the folder.
2 If you want the folder you are creating to be subordinate to an existing folder in the tab,
select the existing folder.
3 Do one of the following:
• Click the Create New Folder button on the toolbar.
Using Help | Contents | Index Back 95
Page 96

Adobe GoLive CS Help Managing and Viewing Web Sites
Using Help | Contents | Index Back 96
• To add a folder to the Files or Extras tab, drag the Folder icon from the Site set of the
Objects palette to the site window.
• To add a group to the External tab, drag the URL Group icon or the Address Group
icon from the Site set of the Objects palette to the site window.
• To add a group to the Colors tab, drag the Color Group icon from the Site set of the
Objects palette to the site window.
• To add a group to the Font Sets tab, drag the Font Set Group icon from the Site set of
the Objects palette to the site window.
• To add a collection to the Collections tab, drag the Collection icon from the Site set of
the Objects palette to the site window.
GoLive assigns a generic name of “untitled folder” for a new folder in the File tab; “untitled
collection” for a new collection in the Collections tab; and “untitled group” for a new group
in the Colors, External, or Font Sets tabs.
4 Enter a new name for the folder or group.
5 Move items into the folder as necessary.
You can also import files and other items into a site. (See “Adding existing files” on
page 52.)
To move a file or object to a folder (group or regular folder):
1 Do one of the following:
• Drag the file or object from a folder in the Explorer (Windows) or Finder (Mac OS) into a
folder or tab in the site window.
• Drag an object into a group.
Dragging a file from a desktop folder to a folder in the
site window
If you want the target folder to open so that you can see its contents, position the
pointer over its icon before releasing the mouse button. If you want to target a folder
one level up from the folder displayed in the tab you are dragging into, drag the file or
object to the Upwards button
(Windows) or (Mac OS) at the top of the tab.
Using Help | Contents | Index Back 96
Page 97

Adobe GoLive CS Help Managing and Viewing Web Sites
Using Help | Contents | Index Back 97
2 If you are moving a file containing links or file references, click OK in the Move Files
dialog box to update them.
Important: If you exclude any file from updating, broken links and invalid file references
might result.
To open the desktop folder containing a file or folder in the site window:
1 Select the file or folder in the site window. You can select only regular folders and files,
not groups or objects in groups.
2 Click the Reveal in Explorer (Windows) or Reveal in Finder (Mac OS) button on
the toolbar.
Tracking work on site files
The Workflow palette lets you keep track of what state your site files are in, and is useful
whether you’re working alone or in a workgroup. When you select a file in the site window,
the Workflow palette lets you indicate who is editing a file and how complete the file is.
This information is displayed in two additional columns in the Files tab of the site window
for easy reference—in the To Be Edited By column and the Completed column.
Note: You can also add metadata to a file in a site to preserve information about the
contents, copyright status, origin, and history of the file (see
documents” on page 40).
To show the state of a file or folder:
1 Choose Window > Workflow to display the Workflow palette.
Note: If Workflow does not appear in the Window menu, choose Edit > Preferences
(Windows) or GoLive > Preferences (Mac OS), and then click Modules. Make sure the
Workflow option, which is at the bottom of the list under Extend Scripts, is selected in the
right pane, and then restart GoLive.
2 Select a file or folder in the site window.
3 In the Workflow palette, enter a name in the To Be Edited By text box and then choose a
percentage from the Completed menu.
“Adding metadata to
Deleting files
When you delete a file or folder from the site, you send it to a Site Trash folder or to the
system Recycle Bin or Trash. The default destination is Site Trash, but you can select the
Recycle Bin or Trash as the destination in the Site preferences. You can recover files from
the Site Trash, or you can move them to the system Recycle Bin or Trash. Deleting objects
and groups from the system Recycle Bin or Trash removes them entirely from the system.
For many purposes, updating the Files or Extras tab or removing unused objects from the
External, Colors, or Font Sets tab is preferable to deleting the file or object. (See
“Refreshing the site window” on page 98.)
To delete a file, regular folder, object, or group:
1 Select the item.
2 Click the Delete Selected Item button on the toolbar.
3 If necessary, confirm the deletion by clicking Yes.
Using Help | Contents | Index Back 97
Page 98

Adobe GoLive CS Help Managing and Viewing Web Sites
Using Help | Contents | Index Back 98
To recover a file from the Site Trash:
1 If necessary, click the Toggle Split View icon in the scroll bar at the bottom of the site
window to show the right pane.
2 Click the Extras tab.
3 Open the Site Trash folder and then select the file you want to recover.
4 Do one of the following:
• If you haven’t performed any other actions since you deleted the file, choose
Edit
> Undo Move to Trash.
• Drag the file to its previous location (or another location) in the Files tab.
To move files to the system Recycle Bin or Trash:
In the Extras tab, do one of the following:
• To move all files from the Site Trash to the system Recycle Bin or Trash, select the Site
Trash icon and then choose Empty Trash from the context menu.
• To move an individual file from the Site Trash to the system Recycle Bin or Trash, select
the file and then press Delete (Windows) or Command-Delete (Mac OS).
To change the destination of file and folder deletions:
1 Choose Edit > Preferences (Windows) or GoLive > Preferences (Mac OS), and then
click Site.
2 Select a trash option and then click OK.
Refreshing the site window
You can refresh the list of items in the Files, Diagrams, Collections, and Extras tabs in the
site window so that you are viewing the actual site—that is, the contents of the site’s webcontent folder (Files tab), web-data folder (Extras and Diagrams tabs), or web-settings
folder (Collections tab). You can also refresh the contents of the current directory on the
publish server if you connect to the publish server and refresh the Publish Server tab.
Refreshing the site window may result in files being added to the site window, files being
removed, or both, depending on changes you’ve made to files both in and outside GoLive.
Refresh the site window if you have been working with files outside GoLive—for example,
using the Explorer (Windows) or Finder (Mac OS) instead of GoLive to move, rename, or
delete, files in the site window.
To refresh the Files, Diagrams, Collections, or Extras tabs:
1 Do one of the following:
• Click the tab.
• Click the Files tab and then open the desired folder.
2 Click the Refresh View button on the toolbar or choose Site > Refresh View.
Note: If your site contains a password-protected PDF file, GoLive will prompt you for the
password when you refresh the site.
Using Help | Contents | Index Back 98
Page 99

Adobe GoLive CS Help Managing and Viewing Web Sites
Using Help | Contents | Index Back 99
To refresh the Publish Server tab:
1 Connect to a publish server.
2 Open the server directory you want to refresh.
3 Click the Refresh View button on the toolbar or choose Site > Refresh View.
Adding items in use and removing unused items from the site window
GoLive can scan all pages in your site for non-file items that are used on a page but are not
listed on the External, Colors, or Font Sets tabs. Once found, GoLive adds these items to
the appropriate tabs in the site window. For example, GoLive adds a color to the Colors tab
if the color is being used on a page but isn’t listed in the Colors tab.
If GoLive finds new references or addresses that need to be listed in the External tab,
GoLive creates a Scanned URLs or Scanned Addresses group for them in the tab. Similarly,
Scanned Colors or Scanned Font Sets groups are created in the Colors or Font Sets tabs if
new colors or font sets are found.
You can remove references, colors, or font sets that are not being used in your site from
the External, Colors, and Font Sets tabs.
To add items in use and remove unused items from the site window:
1 Click the External, Colors, or Font Sets tab.
2 Click the Get Used/Remove Unused button on the toolbar.
Note: By default, the Get Used/Remove Unused button adds items in use and removes
unused items. To perform a single action only, such as removing unused items, click the
triangle to the right of the Get Used/Remove Unused button and choose an option.
3 Click OK to confirm the removal of unused items, if necessary.
Updating site files that are dependent on library files
When you update site files, GoLive checks the content of the Components, Templates,
Smart Objects, and InDesignPackages folders in the site’s web-data folder for updates to
that content made outside of GoLive.
For information about components or templates, see “About site assets” on page 304. For
information about Smart Objects or InDesign packages, see “Working with Smart Objects”
on page 262 and “Adding InDesign content” on page 286.
To update site files that are dependent on library files:
1 Open a site.
2 Do one of the following:
• To check all components, templates, Smart Objects, or InDesign packages for updates,
choose Site > Update Files Dependent On > Library or click the Update Files Dependent
on Library button on the toolbar.
• To check specific components, templates, or Smart Objects for updates, select
templates, components, or Smart Objects in the Extras tab of the site window (Controlclick to select multiple files), and then choose Site > Update Files Dependent On >
Selection.
3 If necessary, select files to update in the Update Dependent Files dialog box.
Using Help | Contents | Index Back 99
Page 100

Adobe GoLive CS Help Managing and Viewing Web Sites
Using Help | Contents | Index Back 100
Cleaning up a site
The Clean Up Site command is essential for maintaining your site and preparing it for
publication (uploading to a Web server for viewing by the public). Cleaning up a site gets
rid of unused links, colors, e-mail addresses, and font sets that can clutter the working
version of your locally stored site. You can also use this command to copy any files or
objects into the web-content folder that are referenced in your site, but actually located
outside the web-content folder.
When cleaning up a site, you can choose to do any combination of the following:
• Refresh the view of items listed in the site window.
• Copy files that are used in your site into the web-content folder. Used means “referenced
on some page in the web-content folder.”
• Remove unused files. Unused means “not referenced on any page in the web-content
folder.” (See
• Add references, colors, and font sets that are used in your site but are not listed in the
External, Colors, or Font Sets tabs. (See
items from the site window” on page 99.)
• Remove unused references, colors, and font sets.
“Refreshing the site window” on page 98.)
“Adding items in use and removing unused
To specify options for cleaning up a site:
1 Do one of the following:
• To specify options for cleaning up the active site only, click the Site Settings button
on the toolbar or choose Site > Settings. Then click Clean Up Site in the left pane, and
then select Site Specific Settings.
• To specify options for cleaning up all sites, choose Edit > Preferences (Windows) or
GoLive > Preferences (Mac OS), and then expand Site in the left pane. Then click Clean
Up Site.
2 Select options as follows:
• To refresh the view of items listed in the site window, select Refresh View.
• To copy files that are used in your site into the web-content folder if they are stored
outside the web-content folder, select Add Used Files. If you want to display a dialog
box that lets you select the files to be copied, select the Show List of Files to Copy
option.
• To add non-file items that are used in your site but are not listed in the External, Colors,
or Font Sets tabs in the site window, select Add Used External References, Add Used
Colors, or Add Used Font Sets.
• To move files not being used in your site to the Site Trash, select Remove Files Not
Linked. If you want to display a dialog box that lets you select the files to be removed,
select the Show List of Files to Remove option.
• To remove non-file items that are not being used in your site but are listed in the
External, Colors, or Font Sets tabs in the site window, select Remove Unused External
References, Remove Unused Colors, or Remove Unused Font Sets.
Using Help | Contents | Index Back 100
 Loading...