

Page 1

Using
®
ADOBE
FRAMEMAKER® XML AUTHOR
2015 release
Page 2

Legal notices
Legal notices
For legal notices, see http://help.adobe.com/en_US/legalnotices/index.html.
Last updated 8/18/2015
Page 3

Contents
Chapter 1: Getting Started
Activation, registration, and System requirements . . . . . . . . . . . . . . . . . . . . . . . . . . . . . . . . . . . . . . . . . . . . . . . . . . . . . . . . . . . . . . . . . . . . . . 1
Help and support . . . . . . . . . . . . . . . . . . . . . . . . . . . . . . . . . . . . . . . . . . . . . . . . . . . . . . . . . . . . . . . . . . . . . . . . . . . . . . . . . . . . . . . . . . . . . . . . . . . . . . 2
Services, downloads, and extras . . . . . . . . . . . . . . . . . . . . . . . . . . . . . . . . . . . . . . . . . . . . . . . . . . . . . . . . . . . . . . . . . . . . . . . . . . . . . . . . . . . . . . . . 4
What’s new in FrameMaker XML Author . . . . . . . . . . . . . . . . . . . . . . . . . . . . . . . . . . . . . . . . . . . . . . . . . . . . . . . . . . . . . . . . . . . . . . . . . . . . . . . . 5
Chapter 2: About FrameMaker XML Author
Author . . . . . . . . . . . . . . . . . . . . . . . . . . . . . . . . . . . . . . . . . . . . . . . . . . . . . . . . . . . . . . . . . . . . . . . . . . . . . . . . . . . . . . . . . . . . . . . . . . . . . . . . . . . . . . . . 9
Collaborate . . . . . . . . . . . . . . . . . . . . . . . . . . . . . . . . . . . . . . . . . . . . . . . . . . . . . . . . . . . . . . . . . . . . . . . . . . . . . . . . . . . . . . . . . . . . . . . . . . . . . . . . . . . 9
Review . . . . . . . . . . . . . . . . . . . . . . . . . . . . . . . . . . . . . . . . . . . . . . . . . . . . . . . . . . . . . . . . . . . . . . . . . . . . . . . . . . . . . . . . . . . . . . . . . . . . . . . . . . . . . . . 10
Feature Overview . . . . . . . . . . . . . . . . . . . . . . . . . . . . . . . . . . . . . . . . . . . . . . . . . . . . . . . . . . . . . . . . . . . . . . . . . . . . . . . . . . . . . . . . . . . . . . . . . . . . 10
Chapter 3: FrameMaker XML Author Basics
User interface . . . . . . . . . . . . . . . . . . . . . . . . . . . . . . . . . . . . . . . . . . . . . . . . . . . . . . . . . . . . . . . . . . . . . . . . . . . . . . . . . . . . . . . . . . . . . . . . . . . . . . . . 13
Accessibility features in FrameMaker XML Author . . . . . . . . . . . . . . . . . . . . . . . . . . . . . . . . . . . . . . . . . . . . . . . . . . . . . . . . . . . . . . . . . . . . . 43
Opening, saving, and closing documents . . . . . . . . . . . . . . . . . . . . . . . . . . . . . . . . . . . . . . . . . . . . . . . . . . . . . . . . . . . . . . . . . . . . . . . . . . . . . . 43
Restore last session . . . . . . . . . . . . . . . . . . . . . . . . . . . . . . . . . . . . . . . . . . . . . . . . . . . . . . . . . . . . . . . . . . . . . . . . . . . . . . . . . . . . . . . . . . . . . . . . . . . 49
Document direction . . . . . . . . . . . . . . . . . . . . . . . . . . . . . . . . . . . . . . . . . . . . . . . . . . . . . . . . . . . . . . . . . . . . . . . . . . . . . . . . . . . . . . . . . . . . . . . . . . 50
iii
Chapter 4: Variables, line numbers, and document creation
Variables . . . . . . . . . . . . . . . . . . . . . . . . . . . . . . . . . . . . . . . . . . . . . . . . . . . . . . . . . . . . . . . . . . . . . . . . . . . . . . . . . . . . . . . . . . . . . . . . . . . . . . . . . . . . . 51
Line numbers . . . . . . . . . . . . . . . . . . . . . . . . . . . . . . . . . . . . . . . . . . . . . . . . . . . . . . . . . . . . . . . . . . . . . . . . . . . . . . . . . . . . . . . . . . . . . . . . . . . . . . . . 59
Create documents . . . . . . . . . . . . . . . . . . . . . . . . . . . . . . . . . . . . . . . . . . . . . . . . . . . . . . . . . . . . . . . . . . . . . . . . . . . . . . . . . . . . . . . . . . . . . . . . . . . . 60
Chapter 5: Text
Adding and editing text . . . . . . . . . . . . . . . . . . . . . . . . . . . . . . . . . . . . . . . . . . . . . . . . . . . . . . . . . . . . . . . . . . . . . . . . . . . . . . . . . . . . . . . . . . . . . . 62
Working with elements in structured documents . . . . . . . . . . . . . . . . . . . . . . . . . . . . . . . . . . . . . . . . . . . . . . . . . . . . . . . . . . . . . . . . . . . . . . 63
Search for items . . . . . . . . . . . . . . . . . . . . . . . . . . . . . . . . . . . . . . . . . . . . . . . . . . . . . . . . . . . . . . . . . . . . . . . . . . . . . . . . . . . . . . . . . . . . . . . . . . . . . . 81
Check spelling . . . . . . . . . . . . . . . . . . . . . . . . . . . . . . . . . . . . . . . . . . . . . . . . . . . . . . . . . . . . . . . . . . . . . . . . . . . . . . . . . . . . . . . . . . . . . . . . . . . . . . . . 86
Use the Thesaurus . . . . . . . . . . . . . . . . . . . . . . . . . . . . . . . . . . . . . . . . . . . . . . . . . . . . . . . . . . . . . . . . . . . . . . . . . . . . . . . . . . . . . . . . . . . . . . . . . . . . 92
Multiple Undo/Redo . . . . . . . . . . . . . . . . . . . . . . . . . . . . . . . . . . . . . . . . . . . . . . . . . . . . . . . . . . . . . . . . . . . . . . . . . . . . . . . . . . . . . . . . . . . . . . . . . . 93
Equations . . . . . . . . . . . . . . . . . . . . . . . . . . . . . . . . . . . . . . . . . . . . . . . . . . . . . . . . . . . . . . . . . . . . . . . . . . . . . . . . . . . . . . . . . . . . . . . . . . . . . . . . . . . . 96
Working with multiple languages . . . . . . . . . . . . . . . . . . . . . . . . . . . . . . . . . . . . . . . . . . . . . . . . . . . . . . . . . . . . . . . . . . . . . . . . . . . . . . . . . . . . 132
Chapter 6: Tables
About tables . . . . . . . . . . . . . . . . . . . . . . . . . . . . . . . . . . . . . . . . . . . . . . . . . . . . . . . . . . . . . . . . . . . . . . . . . . . . . . . . . . . . . . . . . . . . . . . . . . . . . . . . 137
Insert, move, or remove a table . . . . . . . . . . . . . . . . . . . . . . . . . . . . . . . . . . . . . . . . . . . . . . . . . . . . . . . . . . . . . . . . . . . . . . . . . . . . . . . . . . . . . . 138
Text and graphics in tables . . . . . . . . . . . . . . . . . . . . . . . . . . . . . . . . . . . . . . . . . . . . . . . . . . . . . . . . . . . . . . . . . . . . . . . . . . . . . . . . . . . . . . . . . . 143
Chapter 7: Graphics
Graphics and objects . . . . . . . . . . . . . . . . . . . . . . . . . . . . . . . . . . . . . . . . . . . . . . . . . . . . . . . . . . . . . . . . . . . . . . . . . . . . . . . . . . . . . . . . . . . . . . . . 150
Using color in text and objects . . . . . . . . . . . . . . . . . . . . . . . . . . . . . . . . . . . . . . . . . . . . . . . . . . . . . . . . . . . . . . . . . . . . . . . . . . . . . . . . . . . . . . . 169
Anchored frames . . . . . . . . . . . . . . . . . . . . . . . . . . . . . . . . . . . . . . . . . . . . . . . . . . . . . . . . . . . . . . . . . . . . . . . . . . . . . . . . . . . . . . . . . . . . . . . . . . . . 173
Hotspots . . . . . . . . . . . . . . . . . . . . . . . . . . . . . . . . . . . . . . . . . . . . . . . . . . . . . . . . . . . . . . . . . . . . . . . . . . . . . . . . . . . . . . . . . . . . . . . . . . . . . . . . . . . . 185
Last updated 8/18/2015
Page 4

USING FRAMEMAKER XML AUTHOR (2015 RELEASE)
Contents
Object Styles . . . . . . . . . . . . . . . . . . . . . . . . . . . . . . . . . . . . . . . . . . . . . . . . . . . . . . . . . . . . . . . . . . . . . . . . . . . . . . . . . . . . . . . . . . . . . . . . . . . . . . . . 187
Using RoboScreenCapture . . . . . . . . . . . . . . . . . . . . . . . . . . . . . . . . . . . . . . . . . . . . . . . . . . . . . . . . . . . . . . . . . . . . . . . . . . . . . . . . . . . . . . . . . . . 188
Chapter 8: Dynamic Documents
Markers . . . . . . . . . . . . . . . . . . . . . . . . . . . . . . . . . . . . . . . . . . . . . . . . . . . . . . . . . . . . . . . . . . . . . . . . . . . . . . . . . . . . . . . . . . . . . . . . . . . . . . . . . . . . . 191
Create hypertext links . . . . . . . . . . . . . . . . . . . . . . . . . . . . . . . . . . . . . . . . . . . . . . . . . . . . . . . . . . . . . . . . . . . . . . . . . . . . . . . . . . . . . . . . . . . . . . . 192
Create ways to start, open, and close applications . . . . . . . . . . . . . . . . . . . . . . . . . . . . . . . . . . . . . . . . . . . . . . . . . . . . . . . . . . . . . . . . . . . . 194
Test and troubleshoot hypertext documents . . . . . . . . . . . . . . . . . . . . . . . . . . . . . . . . . . . . . . . . . . . . . . . . . . . . . . . . . . . . . . . . . . . . . . . . . 196
Cross-references . . . . . . . . . . . . . . . . . . . . . . . . . . . . . . . . . . . . . . . . . . . . . . . . . . . . . . . . . . . . . . . . . . . . . . . . . . . . . . . . . . . . . . . . . . . . . . . . . . . . 197
Chapter 9: Books and Long Documents
About books . . . . . . . . . . . . . . . . . . . . . . . . . . . . . . . . . . . . . . . . . . . . . . . . . . . . . . . . . . . . . . . . . . . . . . . . . . . . . . . . . . . . . . . . . . . . . . . . . . . . . . . . 209
Create books . . . . . . . . . . . . . . . . . . . . . . . . . . . . . . . . . . . . . . . . . . . . . . . . . . . . . . . . . . . . . . . . . . . . . . . . . . . . . . . . . . . . . . . . . . . . . . . . . . . . . . . . 211
Managing books . . . . . . . . . . . . . . . . . . . . . . . . . . . . . . . . . . . . . . . . . . . . . . . . . . . . . . . . . . . . . . . . . . . . . . . . . . . . . . . . . . . . . . . . . . . . . . . . . . . . 214
Footnotes and endnotes . . . . . . . . . . . . . . . . . . . . . . . . . . . . . . . . . . . . . . . . . . . . . . . . . . . . . . . . . . . . . . . . . . . . . . . . . . . . . . . . . . . . . . . . . . . . . 217
Conditional documents . . . . . . . . . . . . . . . . . . . . . . . . . . . . . . . . . . . . . . . . . . . . . . . . . . . . . . . . . . . . . . . . . . . . . . . . . . . . . . . . . . . . . . . . . . . . . . 221
Troubleshooting books . . . . . . . . . . . . . . . . . . . . . . . . . . . . . . . . . . . . . . . . . . . . . . . . . . . . . . . . . . . . . . . . . . . . . . . . . . . . . . . . . . . . . . . . . . . . . . 232
Chapter 10: Working with Documents
Importing and linking files . . . . . . . . . . . . . . . . . . . . . . . . . . . . . . . . . . . . . . . . . . . . . . . . . . . . . . . . . . . . . . . . . . . . . . . . . . . . . . . . . . . . . . . . . . . 233
Embedding objects . . . . . . . . . . . . . . . . . . . . . . . . . . . . . . . . . . . . . . . . . . . . . . . . . . . . . . . . . . . . . . . . . . . . . . . . . . . . . . . . . . . . . . . . . . . . . . . . . . 251
3D object part links . . . . . . . . . . . . . . . . . . . . . . . . . . . . . . . . . . . . . . . . . . . . . . . . . . . . . . . . . . . . . . . . . . . . . . . . . . . . . . . . . . . . . . . . . . . . . . . . . . 255
Interactive Links for 3D/Multimedia Objects . . . . . . . . . . . . . . . . . . . . . . . . . . . . . . . . . . . . . . . . . . . . . . . . . . . . . . . . . . . . . . . . . . . . . . . . . . 257
Export text and graphics . . . . . . . . . . . . . . . . . . . . . . . . . . . . . . . . . . . . . . . . . . . . . . . . . . . . . . . . . . . . . . . . . . . . . . . . . . . . . . . . . . . . . . . . . . . . . 260
Smart paste hypertext and MS® Word contents as structured content . . . . . . . . . . . . . . . . . . . . . . . . . . . . . . . . . . . . . . . . . . . . . . . . . 262
Managing files using WebDAV . . . . . . . . . . . . . . . . . . . . . . . . . . . . . . . . . . . . . . . . . . . . . . . . . . . . . . . . . . . . . . . . . . . . . . . . . . . . . . . . . . . . . . . 264
Package related files into a zip file . . . . . . . . . . . . . . . . . . . . . . . . . . . . . . . . . . . . . . . . . . . . . . . . . . . . . . . . . . . . . . . . . . . . . . . . . . . . . . . . . . . . 267
iv
Chapter 11: Editing Content
Identify changes by tracking edited text . . . . . . . . . . . . . . . . . . . . . . . . . . . . . . . . . . . . . . . . . . . . . . . . . . . . . . . . . . . . . . . . . . . . . . . . . . . . . . 269
Track changes at book or map level . . . . . . . . . . . . . . . . . . . . . . . . . . . . . . . . . . . . . . . . . . . . . . . . . . . . . . . . . . . . . . . . . . . . . . . . . . . . . . . . . . 271
Using Dropbox for review and collaborative writing . . . . . . . . . . . . . . . . . . . . . . . . . . . . . . . . . . . . . . . . . . . . . . . . . . . . . . . . . . . . . . . . . . 272
Compare versions to view changes . . . . . . . . . . . . . . . . . . . . . . . . . . . . . . . . . . . . . . . . . . . . . . . . . . . . . . . . . . . . . . . . . . . . . . . . . . . . . . . . . . 274
Determine word and character count . . . . . . . . . . . . . . . . . . . . . . . . . . . . . . . . . . . . . . . . . . . . . . . . . . . . . . . . . . . . . . . . . . . . . . . . . . . . . . . . 276
Import PDF comments . . . . . . . . . . . . . . . . . . . . . . . . . . . . . . . . . . . . . . . . . . . . . . . . . . . . . . . . . . . . . . . . . . . . . . . . . . . . . . . . . . . . . . . . . . . . . . 276
Roundtripping tables, equations, and anchored frames . . . . . . . . . . . . . . . . . . . . . . . . . . . . . . . . . . . . . . . . . . . . . . . . . . . . . . . . . . . . . . . 279
Direct OLE support in XML . . . . . . . . . . . . . . . . . . . . . . . . . . . . . . . . . . . . . . . . . . . . . . . . . . . . . . . . . . . . . . . . . . . . . . . . . . . . . . . . . . . . . . . . . . . 281
Chapter 12: Structured Authoring
Introduction to structured authoring . . . . . . . . . . . . . . . . . . . . . . . . . . . . . . . . . . . . . . . . . . . . . . . . . . . . . . . . . . . . . . . . . . . . . . . . . . . . . . . . . 282
XML with FrameMaker XML Author . . . . . . . . . . . . . . . . . . . . . . . . . . . . . . . . . . . . . . . . . . . . . . . . . . . . . . . . . . . . . . . . . . . . . . . . . . . . . . . . . . 287
Error console . . . . . . . . . . . . . . . . . . . . . . . . . . . . . . . . . . . . . . . . . . . . . . . . . . . . . . . . . . . . . . . . . . . . . . . . . . . . . . . . . . . . . . . . . . . . . . . . . . . . . . . . 293
Filter By Attribute . . . . . . . . . . . . . . . . . . . . . . . . . . . . . . . . . . . . . . . . . . . . . . . . . . . . . . . . . . . . . . . . . . . . . . . . . . . . . . . . . . . . . . . . . . . . . . . . . . . 294
Banner text . . . . . . . . . . . . . . . . . . . . . . . . . . . . . . . . . . . . . . . . . . . . . . . . . . . . . . . . . . . . . . . . . . . . . . . . . . . . . . . . . . . . . . . . . . . . . . . . . . . . . . . . . 302
Regular Expression . . . . . . . . . . . . . . . . . . . . . . . . . . . . . . . . . . . . . . . . . . . . . . . . . . . . . . . . . . . . . . . . . . . . . . . . . . . . . . . . . . . . . . . . . . . . . . . . . . 304
XPath . . . . . . . . . . . . . . . . . . . . . . . . . . . . . . . . . . . . . . . . . . . . . . . . . . . . . . . . . . . . . . . . . . . . . . . . . . . . . . . . . . . . . . . . . . . . . . . . . . . . . . . . . . . . . . . 304
Simplified XML . . . . . . . . . . . . . . . . . . . . . . . . . . . . . . . . . . . . . . . . . . . . . . . . . . . . . . . . . . . . . . . . . . . . . . . . . . . . . . . . . . . . . . . . . . . . . . . . . . . . . . 306
Last updated 8/18/2015
Page 5

USING FRAMEMAKER XML AUTHOR (2015 RELEASE)
Contents
Chapter 13: Structured Authoring Using DITA
Why DITA . . . . . . . . . . . . . . . . . . . . . . . . . . . . . . . . . . . . . . . . . . . . . . . . . . . . . . . . . . . . . . . . . . . . . . . . . . . . . . . . . . . . . . . . . . . . . . . . . . . . . . . . . . . 314
DITA support in FrameMaker XML Author . . . . . . . . . . . . . . . . . . . . . . . . . . . . . . . . . . . . . . . . . . . . . . . . . . . . . . . . . . . . . . . . . . . . . . . . . . . . 315
DITA options . . . . . . . . . . . . . . . . . . . . . . . . . . . . . . . . . . . . . . . . . . . . . . . . . . . . . . . . . . . . . . . . . . . . . . . . . . . . . . . . . . . . . . . . . . . . . . . . . . . . . . . . 317
DITA topics . . . . . . . . . . . . . . . . . . . . . . . . . . . . . . . . . . . . . . . . . . . . . . . . . . . . . . . . . . . . . . . . . . . . . . . . . . . . . . . . . . . . . . . . . . . . . . . . . . . . . . . . . . 320
DITA maps and bookmaps . . . . . . . . . . . . . . . . . . . . . . . . . . . . . . . . . . . . . . . . . . . . . . . . . . . . . . . . . . . . . . . . . . . . . . . . . . . . . . . . . . . . . . . . . . . 323
DITA content references (conrefs) . . . . . . . . . . . . . . . . . . . . . . . . . . . . . . . . . . . . . . . . . . . . . . . . . . . . . . . . . . . . . . . . . . . . . . . . . . . . . . . . . . . . 333
DITA cross-references and links . . . . . . . . . . . . . . . . . . . . . . . . . . . . . . . . . . . . . . . . . . . . . . . . . . . . . . . . . . . . . . . . . . . . . . . . . . . . . . . . . . . . . . 337
Find References . . . . . . . . . . . . . . . . . . . . . . . . . . . . . . . . . . . . . . . . . . . . . . . . . . . . . . . . . . . . . . . . . . . . . . . . . . . . . . . . . . . . . . . . . . . . . . . . . . . . . 342
Assign IDs to elements . . . . . . . . . . . . . . . . . . . . . . . . . . . . . . . . . . . . . . . . . . . . . . . . . . . . . . . . . . . . . . . . . . . . . . . . . . . . . . . . . . . . . . . . . . . . . . 342
Conditional processing . . . . . . . . . . . . . . . . . . . . . . . . . . . . . . . . . . . . . . . . . . . . . . . . . . . . . . . . . . . . . . . . . . . . . . . . . . . . . . . . . . . . . . . . . . . . . . 343
Using DITA Open Toolkit to Publish DITA content . . . . . . . . . . . . . . . . . . . . . . . . . . . . . . . . . . . . . . . . . . . . . . . . . . . . . . . . . . . . . . . . . . . . 345
Chapter 14: Working with Content Management Systems
Adobe Experience Manager (AEM) . . . . . . . . . . . . . . . . . . . . . . . . . . . . . . . . . . . . . . . . . . . . . . . . . . . . . . . . . . . . . . . . . . . . . . . . . . . . . . . . . . . 348
Documentum, SharePoint, DITAExchange . . . . . . . . . . . . . . . . . . . . . . . . . . . . . . . . . . . . . . . . . . . . . . . . . . . . . . . . . . . . . . . . . . . . . . . . . . . . 355
Chapter 15: Scripting in FrameMaker XML Author
What is scripting? . . . . . . . . . . . . . . . . . . . . . . . . . . . . . . . . . . . . . . . . . . . . . . . . . . . . . . . . . . . . . . . . . . . . . . . . . . . . . . . . . . . . . . . . . . . . . . . . . . . 369
Why use scripting? . . . . . . . . . . . . . . . . . . . . . . . . . . . . . . . . . . . . . . . . . . . . . . . . . . . . . . . . . . . . . . . . . . . . . . . . . . . . . . . . . . . . . . . . . . . . . . . . . . 369
Getting started with scripting . . . . . . . . . . . . . . . . . . . . . . . . . . . . . . . . . . . . . . . . . . . . . . . . . . . . . . . . . . . . . . . . . . . . . . . . . . . . . . . . . . . . . . . . 369
v
Chapter 16: Keyboard Shortcuts
About keyboard shortcuts . . . . . . . . . . . . . . . . . . . . . . . . . . . . . . . . . . . . . . . . . . . . . . . . . . . . . . . . . . . . . . . . . . . . . . . . . . . . . . . . . . . . . . . . . . . 373
Navigating through documents . . . . . . . . . . . . . . . . . . . . . . . . . . . . . . . . . . . . . . . . . . . . . . . . . . . . . . . . . . . . . . . . . . . . . . . . . . . . . . . . . . . . . . 375
Keys for screen modes . . . . . . . . . . . . . . . . . . . . . . . . . . . . . . . . . . . . . . . . . . . . . . . . . . . . . . . . . . . . . . . . . . . . . . . . . . . . . . . . . . . . . . . . . . . . . . . 375
Keys for views . . . . . . . . . . . . . . . . . . . . . . . . . . . . . . . . . . . . . . . . . . . . . . . . . . . . . . . . . . . . . . . . . . . . . . . . . . . . . . . . . . . . . . . . . . . . . . . . . . . . . . . 376
Dialog boxes . . . . . . . . . . . . . . . . . . . . . . . . . . . . . . . . . . . . . . . . . . . . . . . . . . . . . . . . . . . . . . . . . . . . . . . . . . . . . . . . . . . . . . . . . . . . . . . . . . . . . . . . 376
Keys for selection . . . . . . . . . . . . . . . . . . . . . . . . . . . . . . . . . . . . . . . . . . . . . . . . . . . . . . . . . . . . . . . . . . . . . . . . . . . . . . . . . . . . . . . . . . . . . . . . . . . . 379
Menu commands . . . . . . . . . . . . . . . . . . . . . . . . . . . . . . . . . . . . . . . . . . . . . . . . . . . . . . . . . . . . . . . . . . . . . . . . . . . . . . . . . . . . . . . . . . . . . . . . . . . . 379
Tables . . . . . . . . . . . . . . . . . . . . . . . . . . . . . . . . . . . . . . . . . . . . . . . . . . . . . . . . . . . . . . . . . . . . . . . . . . . . . . . . . . . . . . . . . . . . . . . . . . . . . . . . . . . . . . . 387
Book commands . . . . . . . . . . . . . . . . . . . . . . . . . . . . . . . . . . . . . . . . . . . . . . . . . . . . . . . . . . . . . . . . . . . . . . . . . . . . . . . . . . . . . . . . . . . . . . . . . . . . 389
Keys for finding and changing . . . . . . . . . . . . . . . . . . . . . . . . . . . . . . . . . . . . . . . . . . . . . . . . . . . . . . . . . . . . . . . . . . . . . . . . . . . . . . . . . . . . . . . 390
Documents . . . . . . . . . . . . . . . . . . . . . . . . . . . . . . . . . . . . . . . . . . . . . . . . . . . . . . . . . . . . . . . . . . . . . . . . . . . . . . . . . . . . . . . . . . . . . . . . . . . . . . . . . 391
Document utilities . . . . . . . . . . . . . . . . . . . . . . . . . . . . . . . . . . . . . . . . . . . . . . . . . . . . . . . . . . . . . . . . . . . . . . . . . . . . . . . . . . . . . . . . . . . . . . . . . . . 393
Text . . . . . . . . . . . . . . . . . . . . . . . . . . . . . . . . . . . . . . . . . . . . . . . . . . . . . . . . . . . . . . . . . . . . . . . . . . . . . . . . . . . . . . . . . . . . . . . . . . . . . . . . . . . . . . . . . 394
Track Text Edit . . . . . . . . . . . . . . . . . . . . . . . . . . . . . . . . . . . . . . . . . . . . . . . . . . . . . . . . . . . . . . . . . . . . . . . . . . . . . . . . . . . . . . . . . . . . . . . . . . . . . . 397
Editing text . . . . . . . . . . . . . . . . . . . . . . . . . . . . . . . . . . . . . . . . . . . . . . . . . . . . . . . . . . . . . . . . . . . . . . . . . . . . . . . . . . . . . . . . . . . . . . . . . . . . . . . . . 398
Entering special characters . . . . . . . . . . . . . . . . . . . . . . . . . . . . . . . . . . . . . . . . . . . . . . . . . . . . . . . . . . . . . . . . . . . . . . . . . . . . . . . . . . . . . . . . . . 399
Function keys . . . . . . . . . . . . . . . . . . . . . . . . . . . . . . . . . . . . . . . . . . . . . . . . . . . . . . . . . . . . . . . . . . . . . . . . . . . . . . . . . . . . . . . . . . . . . . . . . . . . . . . 400
Keys for drawing . . . . . . . . . . . . . . . . . . . . . . . . . . . . . . . . . . . . . . . . . . . . . . . . . . . . . . . . . . . . . . . . . . . . . . . . . . . . . . . . . . . . . . . . . . . . . . . . . . . . 401
Keys for editing objects . . . . . . . . . . . . . . . . . . . . . . . . . . . . . . . . . . . . . . . . . . . . . . . . . . . . . . . . . . . . . . . . . . . . . . . . . . . . . . . . . . . . . . . . . . . . . . 403
Keys for adding color . . . . . . . . . . . . . . . . . . . . . . . . . . . . . . . . . . . . . . . . . . . . . . . . . . . . . . . . . . . . . . . . . . . . . . . . . . . . . . . . . . . . . . . . . . . . . . . . 405
Keys for equations . . . . . . . . . . . . . . . . . . . . . . . . . . . . . . . . . . . . . . . . . . . . . . . . . . . . . . . . . . . . . . . . . . . . . . . . . . . . . . . . . . . . . . . . . . . . . . . . . . . 405
Filter By Attribute . . . . . . . . . . . . . . . . . . . . . . . . . . . . . . . . . . . . . . . . . . . . . . . . . . . . . . . . . . . . . . . . . . . . . . . . . . . . . . . . . . . . . . . . . . . . . . . . . . . 419
Hierarchical element insert . . . . . . . . . . . . . . . . . . . . . . . . . . . . . . . . . . . . . . . . . . . . . . . . . . . . . . . . . . . . . . . . . . . . . . . . . . . . . . . . . . . . . . . . . . 419
Markers and variables . . . . . . . . . . . . . . . . . . . . . . . . . . . . . . . . . . . . . . . . . . . . . . . . . . . . . . . . . . . . . . . . . . . . . . . . . . . . . . . . . . . . . . . . . . . . . . . 420
Last updated 8/18/2015
Page 6

USING FRAMEMAKER XML AUTHOR (2015 RELEASE)
Contents
Working with structure . . . . . . . . . . . . . . . . . . . . . . . . . . . . . . . . . . . . . . . . . . . . . . . . . . . . . . . . . . . . . . . . . . . . . . . . . . . . . . . . . . . . . . . . . . . . . . 420
Element menu . . . . . . . . . . . . . . . . . . . . . . . . . . . . . . . . . . . . . . . . . . . . . . . . . . . . . . . . . . . . . . . . . . . . . . . . . . . . . . . . . . . . . . . . . . . . . . . . . . . . . . 421
Other useful shortcuts . . . . . . . . . . . . . . . . . . . . . . . . . . . . . . . . . . . . . . . . . . . . . . . . . . . . . . . . . . . . . . . . . . . . . . . . . . . . . . . . . . . . . . . . . . . . . . . 422
vi
Last updated 8/18/2015
Page 7

Chapter 1: Getting Started
Before you begin working with your software, take a few moments to read an overview of activation and the many
resources available to you. You have access to instructional videos, plug-ins, templates, user communities, seminars,
tutorials, RSS feeds, and much more.
Resources
Before you begin working with FrameMaker XML Author, take a few moments to read an overview of activation and
the many resources available to you. In addition to the links below, you have access to instructional videos, plug-ins,
templates, user communities, seminars, tutorials, RSS feeds, and much more online.
• Activation and registration
• Adobe TV instructional videos for FrameMaker XML Author
• Adobe FrameMaker discussion forum
• Framers -- An email list for FrameMaker discussions
1
Activation, registration, and System requirements
To review complete system requirements and Adobe Recommendations for your Adobe® FrameMaker XML Author®
12 software, see the product page at
System requirements
Before installing FrameMaker XML Author, make sure that you have the required hardware and software:
• Intel Pentium 4 or faster processor
• Microsoft Windows 7, or 8.1
• 1GB of RAM (2GB recommended)
• 3GB of available hard-disk space for installation; additional free space required during installation (cannot install
on a volume that uses a case-sensitive file system or on removable flash storage devices)
• DVD-ROM drive
• 1024x768 screen resolution (1280x800 recommended) with 16-bit video card
• This software does not operate without activation. A broadband Internet connection and registration are required
for software activation, validation of subscriptions, and access to Online Services.
Note: Phone activation is not available.
Install the software
1 Close any Adobe applications open on your computer.
2 Insert the installation disc into your disk drive, and follow the onscreen instructions.
www.adobe.com/products/framemaker.
Last updated 8/18/2015
Page 8

USING FRAMEMAKER XML AUTHOR (2015 RELEASE)
Getting Started
Help with installation
For help with installation issues, see the Installation Support Center at www.adobe.com/go/learn_fm_install_en.
License activation
During the installation process, your Adobe software contacts an Adobe server to complete the license activation
process. No personal data is transmitted. For more information on product activation, visit the Adobe website at
www.adobe.com/go/activation.
Register
Register your product to receive complimentary installation support, notifications of updates, and other services.
❖ To register, follow the onscreen instructions in the Registration dialog box, which appears when you first start the
software.
If you postpone registration, you can register at any time by choosing Help > Registration.
2
Help and support
Visit the Adobe Support website at www.adobe.com/support/framemaker to access documentation, along with
tutorials and troubleshooting information. You can also access customer support information from this page.
Online Help also includes a link to the complete, updated PDF version of Help.
Adobe Community Help
Adobe Community Help is an integrated environment on Adobe.com that gives you access to community-generated
content moderated by Adobe and industry experts. Think of Community Help as collections of related items rather
than books. Adobe continually curates and adds to these collections.
Bookmark the FrameMaker Help hub page to find the best content on the web about FrameMaker XML Author,
including these resources:
• Videos, tutorials, tips and techniques, blogs, articles, and examples for designers and developers.
• Complete online Help, which is updated regularly.
• All other content on Adobe.com, including knowledgebase articles, downloads and updates, Adobe Developer
Connection, and more.
Accessing FrameMaker XML Author help
Accessing help using a web browser
FrameMaker XML Author help is available on-line at the following location FrameMaker Help. You can view the help
using a web browser (Internet Explorer, Safari, Chrome, Firefox, etc.) independent of the product. This means, you do
not need to open FrameMaker XML Author to access the online help using a web browser.
The online help includes a search functionality that you use to search for help in the FrameMaker XML Author
documentation or across adobe.com.
The online help also includes a PDF that you can download and view when you are offline.
Last updated 8/18/2015
Page 9

USING FRAMEMAKER XML AUTHOR (2015 RELEASE)
Getting Started
For more information on the offline Help, see Offline Help.
Accessing help from within FrameMaker XML Author
When you are working in FrameMaker XML Author, press F1 to launch the help in a context-sensitive Help viewer.
• If you are online and you launch help from within FrameMaker XML Author, the product launches the online help
within the Help viewer. This viewer launches as an independent window. If you are working in a multi-screen
environment, you can keep FrameMaker XML Author on one screen and drag the viewer to the other screen.
Since the viewer is context-sensitive, you can go to a help topic corresponding to your context in the application.
For example, if you are in the multi-channel publishing pod, press F1 to go to the corresponding help content for
this feature.
Note: You can use the search functionality in the Help viewer to search for topics within FrameMaker XML Author
help. To search for help within FrameMaker XML Author and across adobe.com, go to the
browser.
online help using a web
• If you are offline, the context-sensitive Help launches a Microsoft Help (CHM) viewer. The offline viewer provides
you the same in-product, context-sensitive functionality that you experience using the online Help viewer.
Important: The offline Help CHM file is delivered with each new patch that Adobe provides. If FrameMaker XML
Author Help is updated between patches, follow the instructions in this
the updated Help file.
knowledge base article to download and install
3
Services, downloads, and extras
You can enhance your product by integrating various services, plug-ins, and extensions in your product. You can also
download samples and other assets and see various resources to get your work done.
Adobe Exchange
Visit the Adobe Exchange at www.adobe.com/go/exchange to download samples as well as plug-ins and extensions
from Adobe and third-party developers. The plug-ins and extensions can help you automate tasks, customize
workflows, create specialized professional effects, and more.
Adobe downloads
Visit www.adobe.com/go/downloads to find free updates, trials, and other useful software.
Adobe Labs
Adobe Labs at www.adobe.com/go/labs gives you the opportunity to experience and evaluate new and emerging
technologies and products from Adobe. At Adobe Labs, you have access to resources such as these:
• Prerelease software and technologies
• Code samples and best practices to accelerate your learning
• Early versions of product and technical documentation
• Forums, wiki-based content, and other collaborative resources to help you interact with like-minded users
Adobe Labs fosters a collaborative software development process. In this environment, customers quickly become
productive with new products and technologies. Adobe Labs is also a forum for early feedback. The Adobe
development teams use this feedback to create software that meets the needs and expectations of the community.
Last updated 8/18/2015
Page 10

USING FRAMEMAKER XML AUTHOR (2015 RELEASE)
Getting Started
Adobe forums
To reach out to experts in the Adobe RoboHelp community, visit http://forums.adobe.com/community/framemaker.
If you comment on a Help page, the comment is automatically posted on the forum. The experts and other users can
respond to your comment.
Adobe TV
Visit Adobe TV at http://tv.adobe.com to view instructional and inspirational videos. The Technical Communications
channel features videos relevant for technical communicators. The videos on the FrameMaker XML Author channel
help you get started.
FrameMaker Developer Center
Visit FrameMaker Developer Center for articles written by internal and external RoboHelp users on various userrequested topics.
Other resources
Online Help also includes a link to the complete, updated PDF version of Help.
Visit the Adobe Support website at www.adobe.com/support to learn about free and paid technical support options.
4
Visit the following resources to interact with the FrameMaker community.
• Adobe Forums: http://forums.adobe.com/community/framemaker
• Adobe Blogs: http://blogs.adobe.com/
• Adobe TV: http://tv.adobe.com/product/framemaker/
Services, downloads, and extras
You can enhance your product by integrating various services, plug-ins, and extensions in your product. You can also
download samples and other assets to Help you get your work done.
Adobe downloads
Visit www.adobe.com/go/downloads to find free updates, trials, and other useful software.
Adobe Labs
Adobe Labs at www.adobe.com/go/labs gives you the opportunity to experience and evaluate new and emerging
technologies and products from Adobe. At Adobe Labs, you have access to resources such as these:
• Prerelease software and technologies
• Code samples and best practices to accelerate your learning
• Early versions of product and technical documentation
• Forums, wiki-based content, and other collaborative resources to Help you interact with like-minded users
Adobe Labs fosters a collaborative software development process. In this environment, customers quickly become
productive with new products and technologies. Adobe Labs is also a forum for early feedback. The Adobe
development teams use this feedback to create software that meets the needs and expectations of the community.
Last updated 8/18/2015
Page 11

USING FRAMEMAKER XML AUTHOR (2015 RELEASE)
Getting Started
Adobe TV
Visit the technical communications channel on Adobe TV at http://tv.adobe.com/channel/technical-communication
for instructional videos on authoring.
What’s new in FrameMaker XML Author
Adobe FrameMaker 2015 ships with a number of enhancements.
Structured authoring and XML Enhancements
Simplified XMLAuthor:
FrameMaker now makes it easier for the subject matter experts and casual authors to create valid XML documents
without the need to know the underlying XML structure. DITA 1.2 structured application has been enhanced to
support the new Simplified XML authoring environment. The new simplified authoring interface provides a form-like
easy-to-fill authoring environment.
While authoring, you can also use the Quick Elements Toolbar to easily insert the most commonly used objects, such
as numbered list, image, or a section in your document.
5
Out-of-the-box FrameMaker supports DITA 1.2 topics, however, you can also design your own structured
applications to use the Simplified XML authoring environment. You can also customize the appearance of the form
fields by updating the associated template.
For more information, see Simplified XML.
DITA 1.3 support
FrameMaker now provides support for DITA 1.3. This means that now you can create troubleshooting DITA topics.
For more information, see Customization.
Structure view enhancements
Working with the Structure View is now more intuitive. Enhancements to the way elements are accessed and displayed
makes navigating through your document much easier.
In addition to the triangle insertion point displayed in the Structure View, the element bubble containing the insertion
point in your document is now highlighted. If your insertion point is inside an element whose parent is collapsed in
the Structure View, the parent element is highlighted to indicate the top level location of your insertion point.
The right-click context menu includes the option to locate your current location in the Structure View. You can also
use the Ctrl+Shift+L keystroke to locate your element in the Structure View.
When dragging and dropping elements across the Structure View, the destination pointer changes color based on
whether the destination is structurally valid or not. You can, however, still choose to place an element at a location that
is structurally invalid. If the target location element is collapsed, hover the mouse over the element to expand the target
element.
You can choose to expand and collapse all sibling elements or all child elements in the Structure View. The right-click
menu for an element includes an item for expanding and collapsing elements.
Last updated 8/18/2015
Page 12

USING FRAMEMAKER XML AUTHOR (2015 RELEASE)
Getting Started
When scrolling through your document using the mouse or the scroll bars, FrameMaker also scrolls through the
contents in the Structure View. The document view and the Structure View are therefore always synchronized. This
synchronization is also maintained when you scroll through the Structure View. This feature is turned off by default.
You can choose to activate the synchronization from the FrameMaker Preferences dialog.
For more information, see Working with the Structure View.
MathML object enhancements
Saving PDF documents with MathML equations
When saving files as PDF documents, MathML objects are now saved with the EPS facet instead of PNG. In addition
to making the object text searchable, the EPS facet enhances the clarity of the MathML object.
MathML object styles
You can now apply any of the object styles available in your template, to a MathML object. The compose DPI property
is not supported for MathML objects. When you open previous versions of FrameMaker files the compose DPI
property is not honored.
Support for inline MathML equations
By default, when you insert a MathML equation in a document, the equation is placed on the next line after the current
insertion point. You can use the inline property to place the MathML equation inline with the paragraph text.
6
The Ambient property allows you to specify that the following MathML styles will be inherited from the styles of the
enclosing text:
• Font color, size, and family
• Background color
You can update the inline and ambient properties of a MathML equation that is included from within the object
properties dialog. Alternatively, you edit or create an object style with these properties are already set and then apply
this object style to an MathML equation.
For more information, see Format a MathML equation.
Ditaval support in DITA-OT publishing
When generating output using the DITA Open Tool kit, you can specify conditional filtering of content using
attribute-value pairs in a ditaval file. While the location of the ditaval file could be specified in ditafm.ini, you can now
select your ditaval file from the Generate DITA-OT Output dialog
For more information, see Generate output using DITA OT.
Preview child map in DITA maps
If a DITA map includes references to child maps, the Show and Hide options in the DITA map will show or hide the
topics referenced in the child maps.
For more information, see Display DITA map content.
Last updated 8/18/2015
Page 13

USING FRAMEMAKER XML AUTHOR (2015 RELEASE)
Getting Started
Right-to-left language support
FrameMaker now supports right-to-left (RTL) language scripts such as Hebrew and Arabic. You can author the entire
document in the RTL script of your choice or you can author a document in both RTL and LTR scripts simultaneously.
For example, in an LTR document, you can include selected paragraphs or tables that are authored in an RTL script.
You can also author a document containing both RTL and LTR content.
Bi-directional content authoring
FrameMaker provides out-of-the-box document direction support for both unstructured documents (see Set the
direction of a document) and DITA topics (see Change text direction). However, for structured documents based on
other structured applications, the application developer will need to define the dir property in the EDD. For details,
see the Structured applications reference guide.
You can also choose to author multi-directional documents. This means that you can author a document in a specific
direction that includes parts authored in the other direction.
You can import Word documents into FrameMaker that contain content that is either LTR or RTL (see Import
Microsoft Word files). You can also copy and paste such text to and from FrameMaker documents.
You can also flip objects, such as images, in a document.
Bi-directional content translation
You can also flip objects, such as images, in a document.
7
See the video, Bidirectional content flipping.
Authoring and productivity enhancements
Table Enhancements
Conditionalize table columns
Apply conditional tags to individual columns in any of your tables. The column reflects the formatting specified in the
conditional tag. The columns are either displayed or hidden based on the settings you save from the Show/Hide
Conditional Text dialog. The conditional tag state for a column overrides any conditional tags that are applied to the
text in the individual cells in the column.
For more information, see Conditional text.
Table usability enhancements
Use one of the multiple table formats available to you when creating a new table. You can choose to use the new
formats for existing tables, from the Table Designer or the Table Catalog. Use the Table Designer to modify a table
design as required.
For more information, see Insert a table.
Navigate through the cells of a table using either the Tab key or the arrow keys on your keyboard. Pressing Tab when
you are in the last cell of the table, creates a new row at the end of the table.
For more information, see Rows and columns.
You may need to reorder the rows and columns in your table. Select the row or column you want to move and hold
the Shift key down before you drop the row or column to the desired location. You can select multiple rows and
columns for reordering.
Last updated 8/18/2015
Page 14

USING FRAMEMAKER XML AUTHOR (2015 RELEASE)
Getting Started
For more information, see Copy, move, or reorder rows or columns.
Auto insert table continuation variables
Add continuation variables to a table using the Add Variables option from the right-click menu. Apply the variables
you created to the current table, to all tables, or to all tables of a certain format.
For more information, see Insert a table.
Table cell shading with solid fill
In previous releases, the color tint property of a table, would cause the color to be displayed as a granular pattern. The
functionality now changes the color to a shade based on the percentage of the tint.
User interface enhancements
Location of modal pods FrameMaker now remembers the location of the modal pods in the application.
Activate opened pods If a modeless pod is currently opened and a user opens the pod again (using the menu or
shortcut keys), the pod is highlighted as an indicator to the user.
Resizable dialogs The following modal and client dialogs can be resized:
• Set Up Table of Contents (Special > Table of Contents > Standalone TOC)
• Set Up Mini Table of Contents (Special > Table of Contents > Create Mini TOC).
• Set Up Standard Index dialog (Special > Standard Index).
• Set Up Author Index dialog (Special > Index Of > Authors).
• Set Up Subject Index dialog (Special > Index Of > Subjects).
• Set Up Index Of Markers dialog (Special > Index Of > Markers).
• Set Up Index Of References dialog (Special > Index Of > References).
• DITA Conref dialog (DITA > Insert Conref)
• DITA Cross-Reference dialog (Special > Cross-Reference)
• DITA Link dialog
The following modeless dialogs can be resized:
8
• Show / Hide Conditional Text dialog
• Cross-Reference dialog
Redesigned pods The following pods have been redesigned to improved usability:
Pods do not gray out on resize If pods are docked at the bottom of the screen and a user reduces the size of the
FrameMaker window, the pods are grayed out only if the size of the window is reduced to an extent that prevents
functioning of the pod.
Drag and drop to open files You can now drag-and-drop files from the Windows Explorer to empty UI areas, toolbars,
menu bars, pods, or document window to open them.
Conditional tag pod State button Now when you apply a condition to text in a document, the State checkbox operates
as a toggle. This implies that if you apply a condition to text, you need to check the State checkbox. To remove a
condition from text, you need to uncheck the State checkbox.
The intermediate state is read-only. This implies that if you select text where the current condition is partially applied,
the checkbox displays with the intermediate state.
Last updated 8/18/2015
Page 15

Chapter 2: About FrameMaker XML Author
FrameMaker XML Author (FMXA) is an XML authoring solution. It is a fully standards-compliant XML editor. In
FMXA, you can create XML content based on a standard such as DITA or any custom structure with the easy-touse
and familiar FrameMaker interface.
FMXA is provided for content creators who are authoring entirely in XML. FMXA ships with the WYSIWYG view for
writers who prefer not to work in the XML environment, However, for content createors comfortable with raw XML
authoring, FMXA also includes the XML and code views. FMXA excludes the FrameMaker functionality that is not
specific to XML authoring. For this reason, XML authors will work with a lightweight user interface but with all the
FrameMaker tools required for XML authoring.
Author
9
FMXA is targeted at XML authors - content creators who have the need to author in an XML environment but do not
require features such as publishing, template creation, and structure app development. Content creators are provided
with the full capability to author in any of the FrameMaker views: WYSIWYG, XML or Code view (
view, and WYSIWYG view” on page 37). You can also add equations to your documents “Using the FrameMaker XML
Author Equation Pod” on page 96 or “Using the MathFlow editor from Design Science” on page 128.
For a complete list of features, see the FMXA “Feature List” on page 11.
“XML view, Author
Collaborate
Since the features in FMXA are a subset of the complete FrameMaker feature set, users of both these products can work
in a collaborative environment.
An XML document created either in FrameMaker or FMXA will work seamlessly in the other environment. This
means that the decision to choose one environment over the other depends completely on the needs of the user. If the
content creator and subject matter experts in a team do not require full FrameMaker capability, they can choose FMXA
and still exchange XML documents with the FrameMaker users. FrameMaker users on the team can be tasked with
publishing (such as Multi-channel publishing), creating the structured apps, and managing templates.
FMXA allows for integration with a variety of industry-standard CMS:
1 Ships with a native connector to “Adobe Experience Manager (AEM)” on page 348
2 rovides connectors to: “Documentum, SharePoint, DITAExchange” on page 355
FMXA also allows you to share and maintain topics and related files using Dropbox. For details, see “Using Dropbox
for review and collaborative writing” on page 272.
For a complete list of features, see the FMXA “Feature List” on page 11.
Last updated 8/18/2015
Page 16
USING FRAMEMAKER XML AUTHOR (2015 RELEASE)
About FrameMaker XML Author
Review
FMXA is targeted at reviewers working in an XML environment. XML authors can create their content in this
environment. The content can then be sent to subject matter experts. While PDF is often used as a means for document
review, FMXA provides reviewers with the tool to review, comment, and use track changes. to enhance the review
process. PDF review, on the other hand can be used for a larger review audience. After completing a PDF review, you
can also use the FMXA
For a complete list of features, see the FMXA “Feature List” on page 11.
“Import PDF comments” on page 276 feature.
Feature Overview
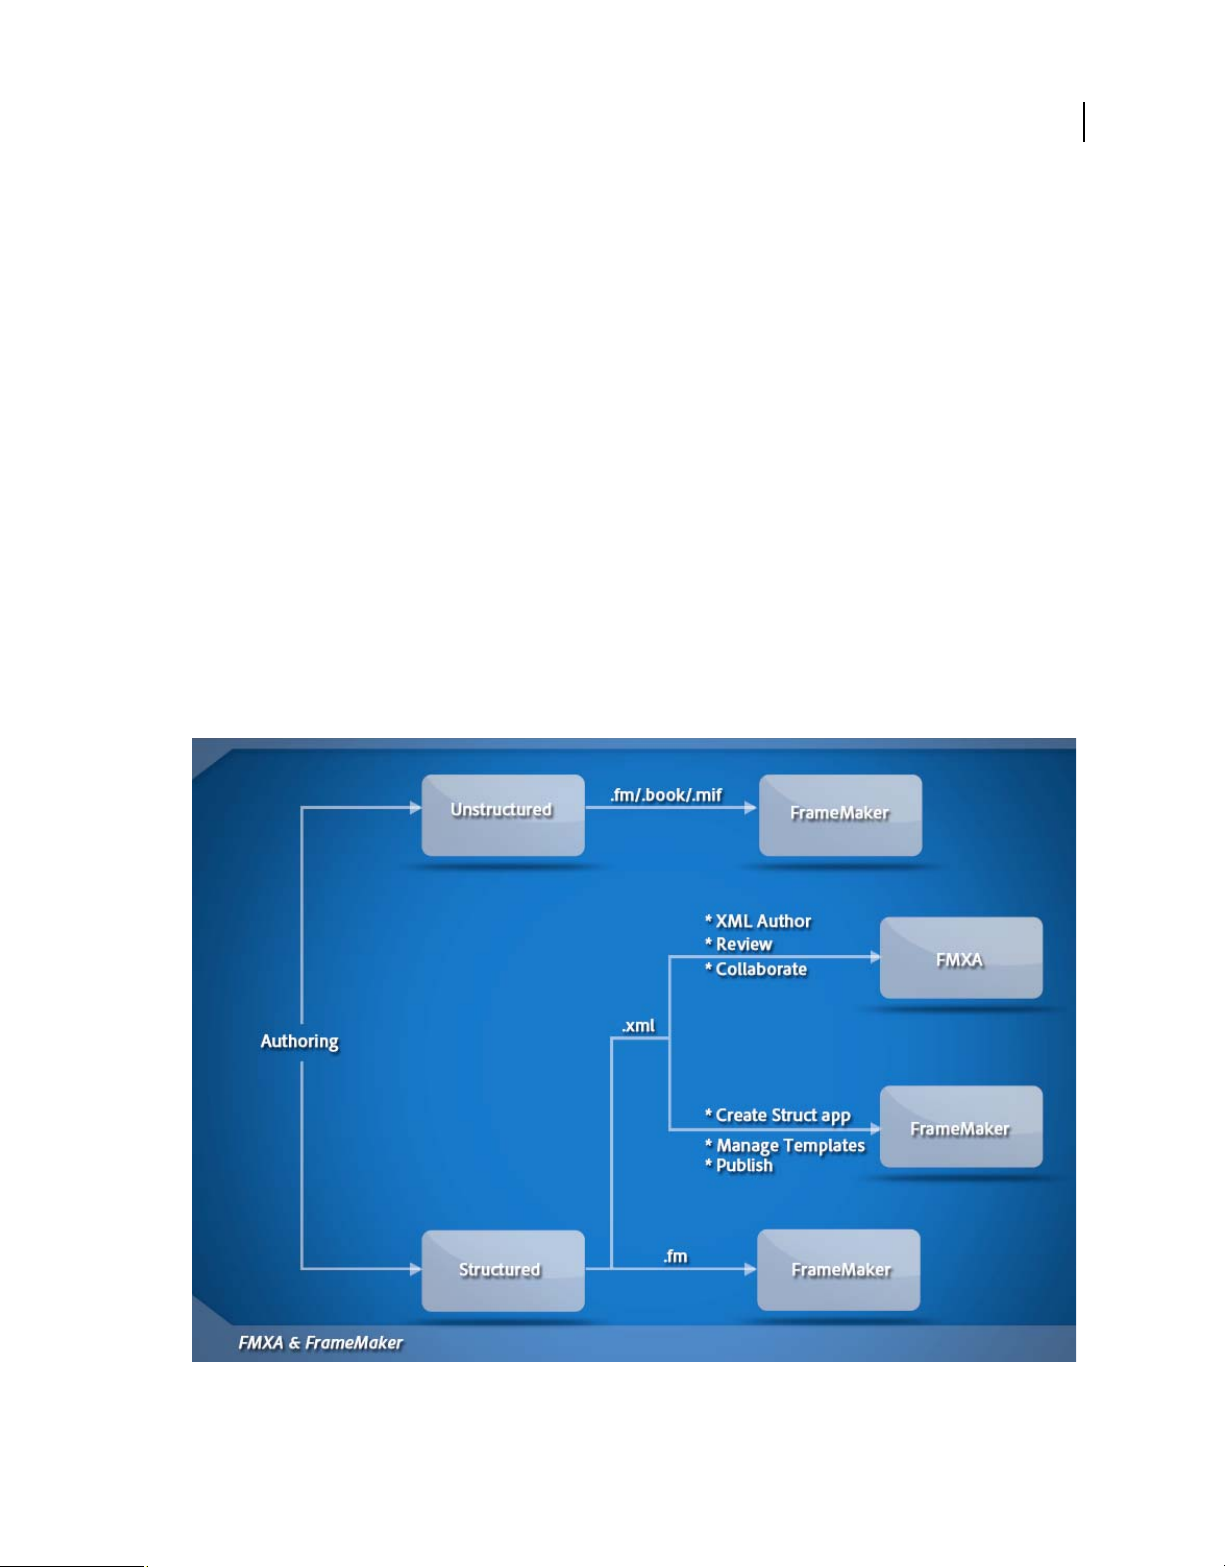
From the complete FrameMaker feature set, FMXA takes a large set of features to enable XML authoring. In this
regard, it excludes features that are not required by an XML author. For example, FMXA does not include the
functionality to create and work with unstructured FrameMaker documents. However, it does include WYSIWYG,
Author, and XMLCode views. This allows content creators to perform a large majority of the tasks that they are used
to performing in FrameMaker.
While FMXA and FrameMaker are provided as solutions for XML authoring, FrameMaker also supports the FM and
MIF formats.
10
FMXA & FrameMaker
Last updated 8/18/2015
Page 17

USING FRAMEMAKER XML AUTHOR (2015 RELEASE)
About FrameMaker XML Author
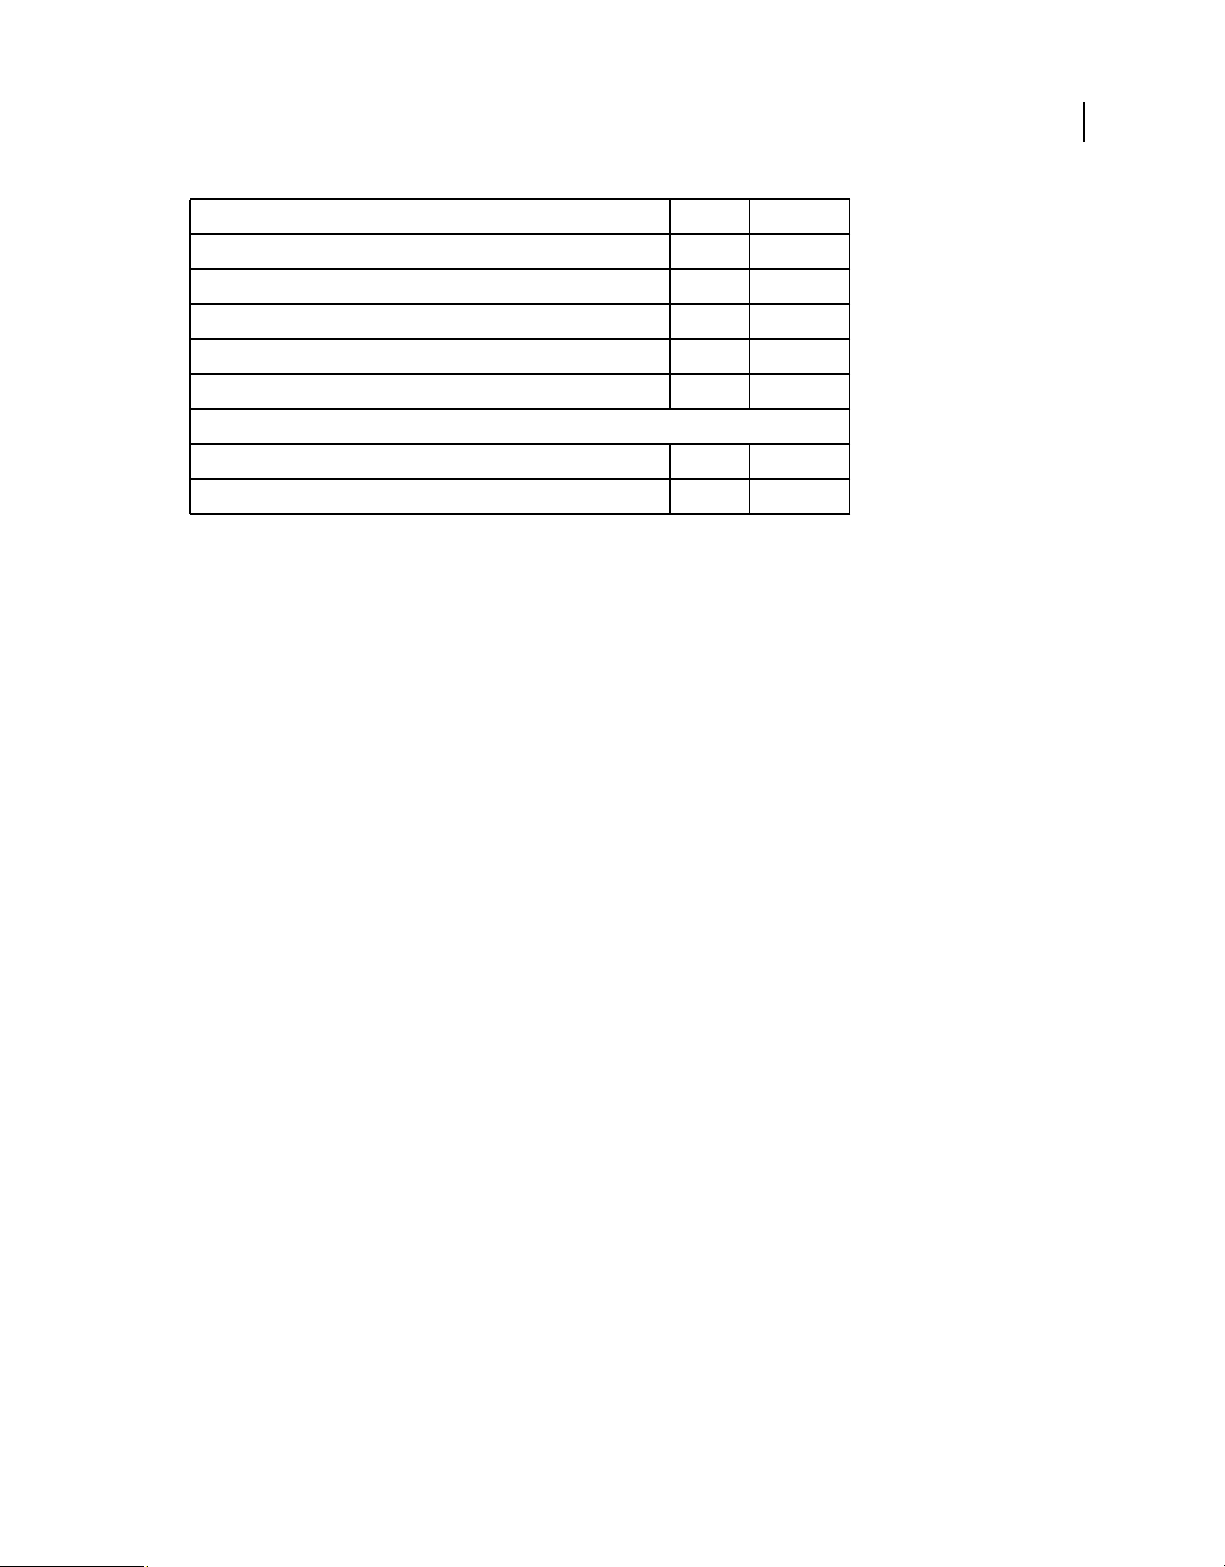
Feature List
Feature FMXA FrameMaker
Authoring
Open, edit, save FM and MIF files NO YES
Create, edit, save XML files YES YES
Enter and modify attributes YES YES
Validate XML content YES YES
WYSIWYG, Author, and XML Code Views YES YES
XPath and XSLT support YES YES
MathML support YES YES
FrameMaker book files with XML components YES YES
Read structured applications YES YES
Filter content based on attributes and conditional tags YES YES
DITA support
11
DITA 1.2, and 1.1 support YES YES
Filter contents based on DITAVal YES YES
Create and assemble DITA map YES YES
Create composite document from DITA map NO YES
S1000D support YES YES
DocBook support NO YES
xDocBook support YES YES
Design and format
Design FrameMaker templates NO YES
Prepublish setup: page numbering, book update, adding TOC, index etc. NO YES
Create templates and conditional tags NO YES
Create or edit Master Page NO YES
Create structured applications and edit structapps.fm NO YES
Create TOC, indexes, and list of references NO YES
Designers and catalogs: paragraph, character, table, object NO YES
Publishing
Format menu: fonts, characters, paragraphs, page layouts NO YES
Publish to PDF YES YES
Mutlichannel publishing (HTML5, EPUB 3, MOBI, KF8, etc.) NO YES
Review and collaboration
Integration with Microsoft Sharepoint YES YES
Last updated 8/18/2015
Page 18
USING FRAMEMAKER XML AUTHOR (2015 RELEASE)
About FrameMaker XML Author
Feature FMXA FrameMaker
Integration with EMC Documentum YES YES
Integration with Adobe Experience Manager YES YES
Integration with Dropbox YES YES
Integration APIs for other CMS YES YES
PDF based reviews YES YES
Miscellaneous
Attribute config file maker NO YES
Conversion tables NO YES
12
Last updated 8/18/2015
Page 19
Chapter 3: FrameMaker XML Author Basics
User interface
Basics
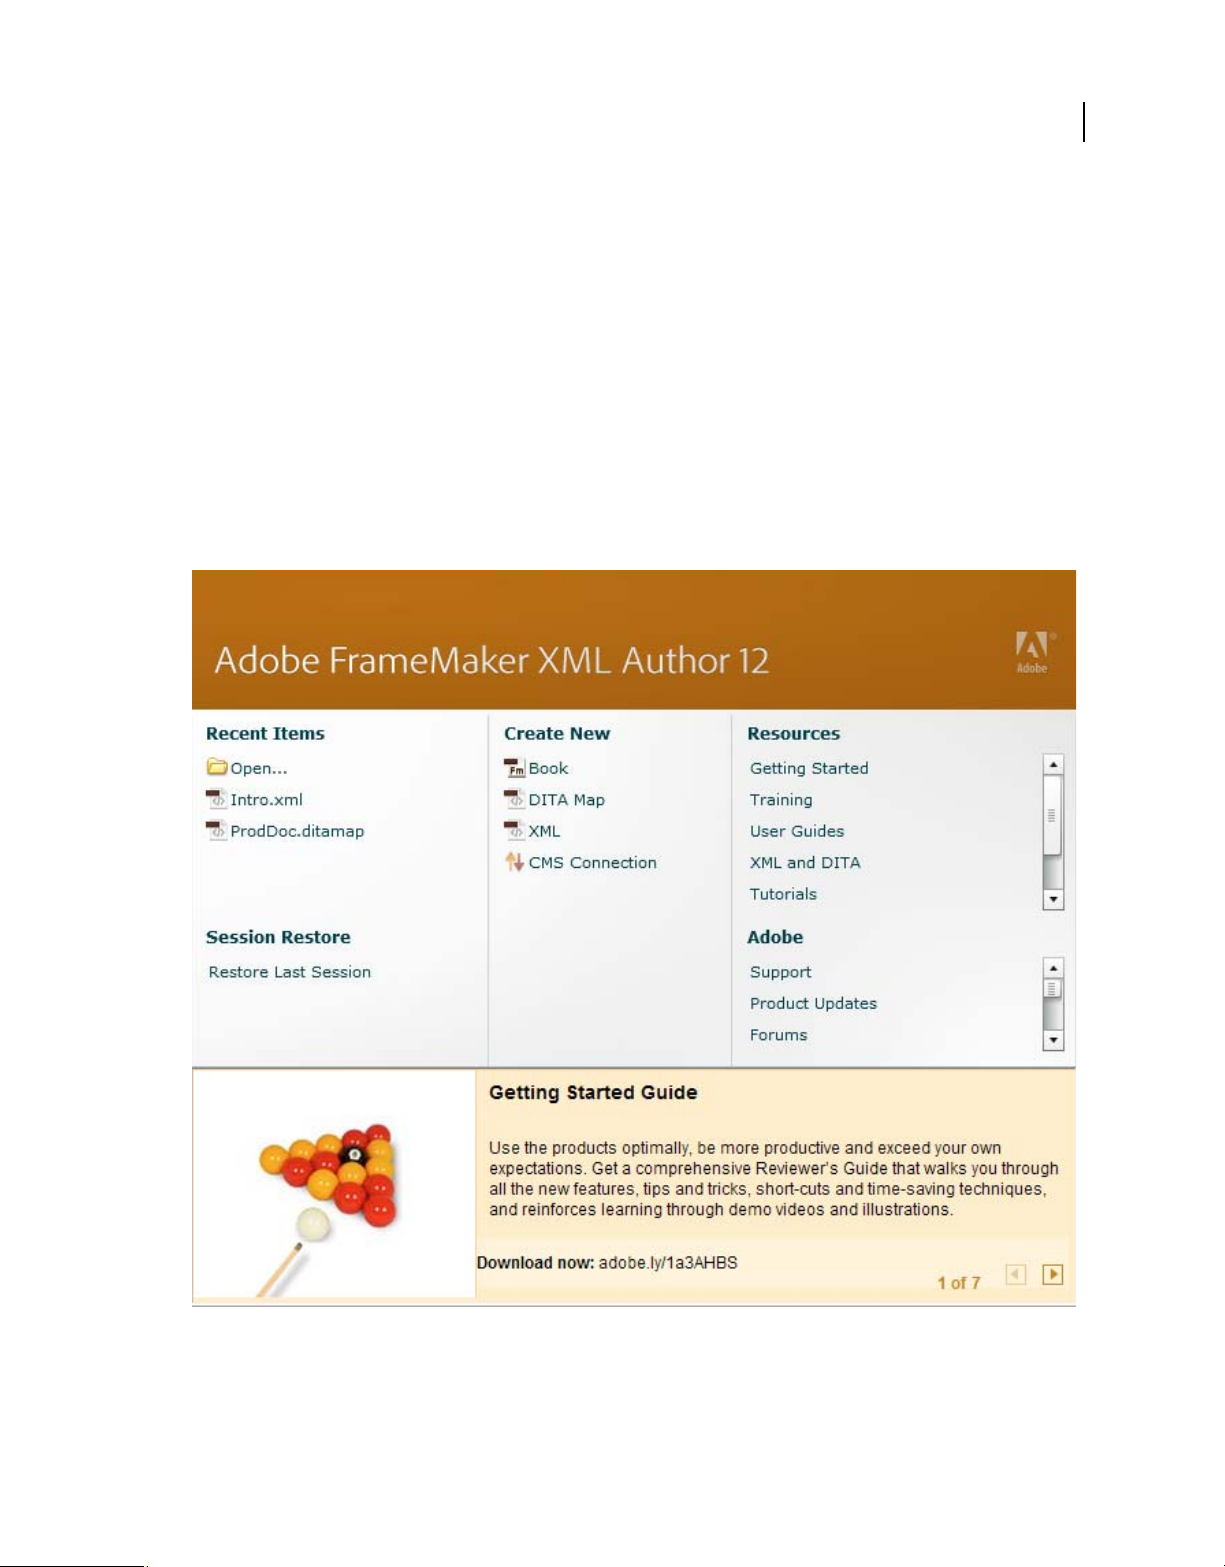
The Welcome screen
A Welcome screen is displayd each time you open FMXA:
13
XML Author Welcome screen
From the Welcome screen, you can perform the following tasks:
• Open recent documents
Last updated 8/18/2015
Page 20
USING FRAMEMAKER XML AUTHOR (2015 RELEASE)
FrameMaker XML Author Basics
•
Creating new FrameMaker XML Author documents, books, CMS connections, DITA maps, DITA files, and XML files
• Access FrameMaker XML Author learning resources
• Access support, product updates, and forums
• Restore last session
Workspace overview
A particular arrangement of elements, such as pods that you use frequently while working on documents, is called a
workspace. You can dock, stack, minimize, or make these elements free-floating in your workspace. You can select
from several preset workspaces or create one of your own. Once you have arranged the panels and pods, you can save
the workspace settings for use later.
The FrameMaker XML Author interface has the following components.
• The Application bar across the top contains a workspace switcher, menus, and other application controls.
• The document window displays the file you’re working on. Document windows can be tabbed and, in certain cases,
grouped and docked.
• Pods help you monitor and modify your work. Examples include marker, variables, cross-references pods. You can
minimize, group, stack, or dock pods.
• The status bar shows text formatting and pagination information for the current document.
14
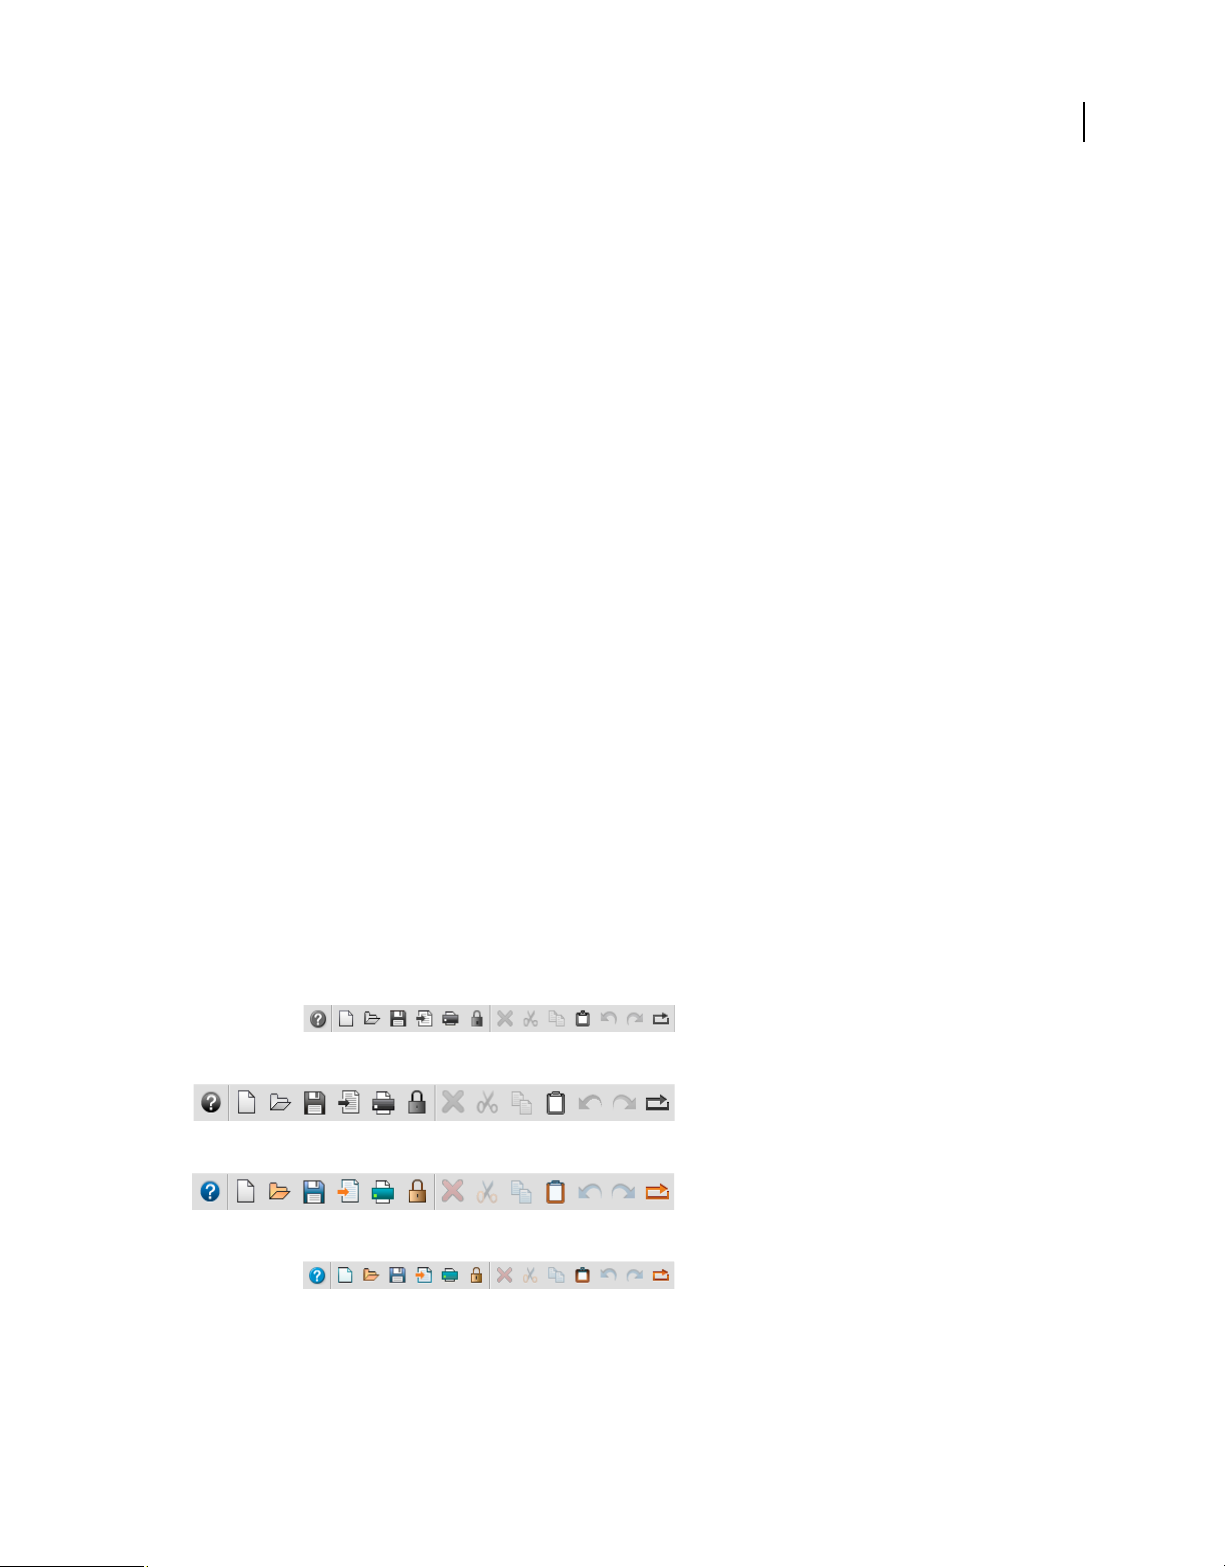
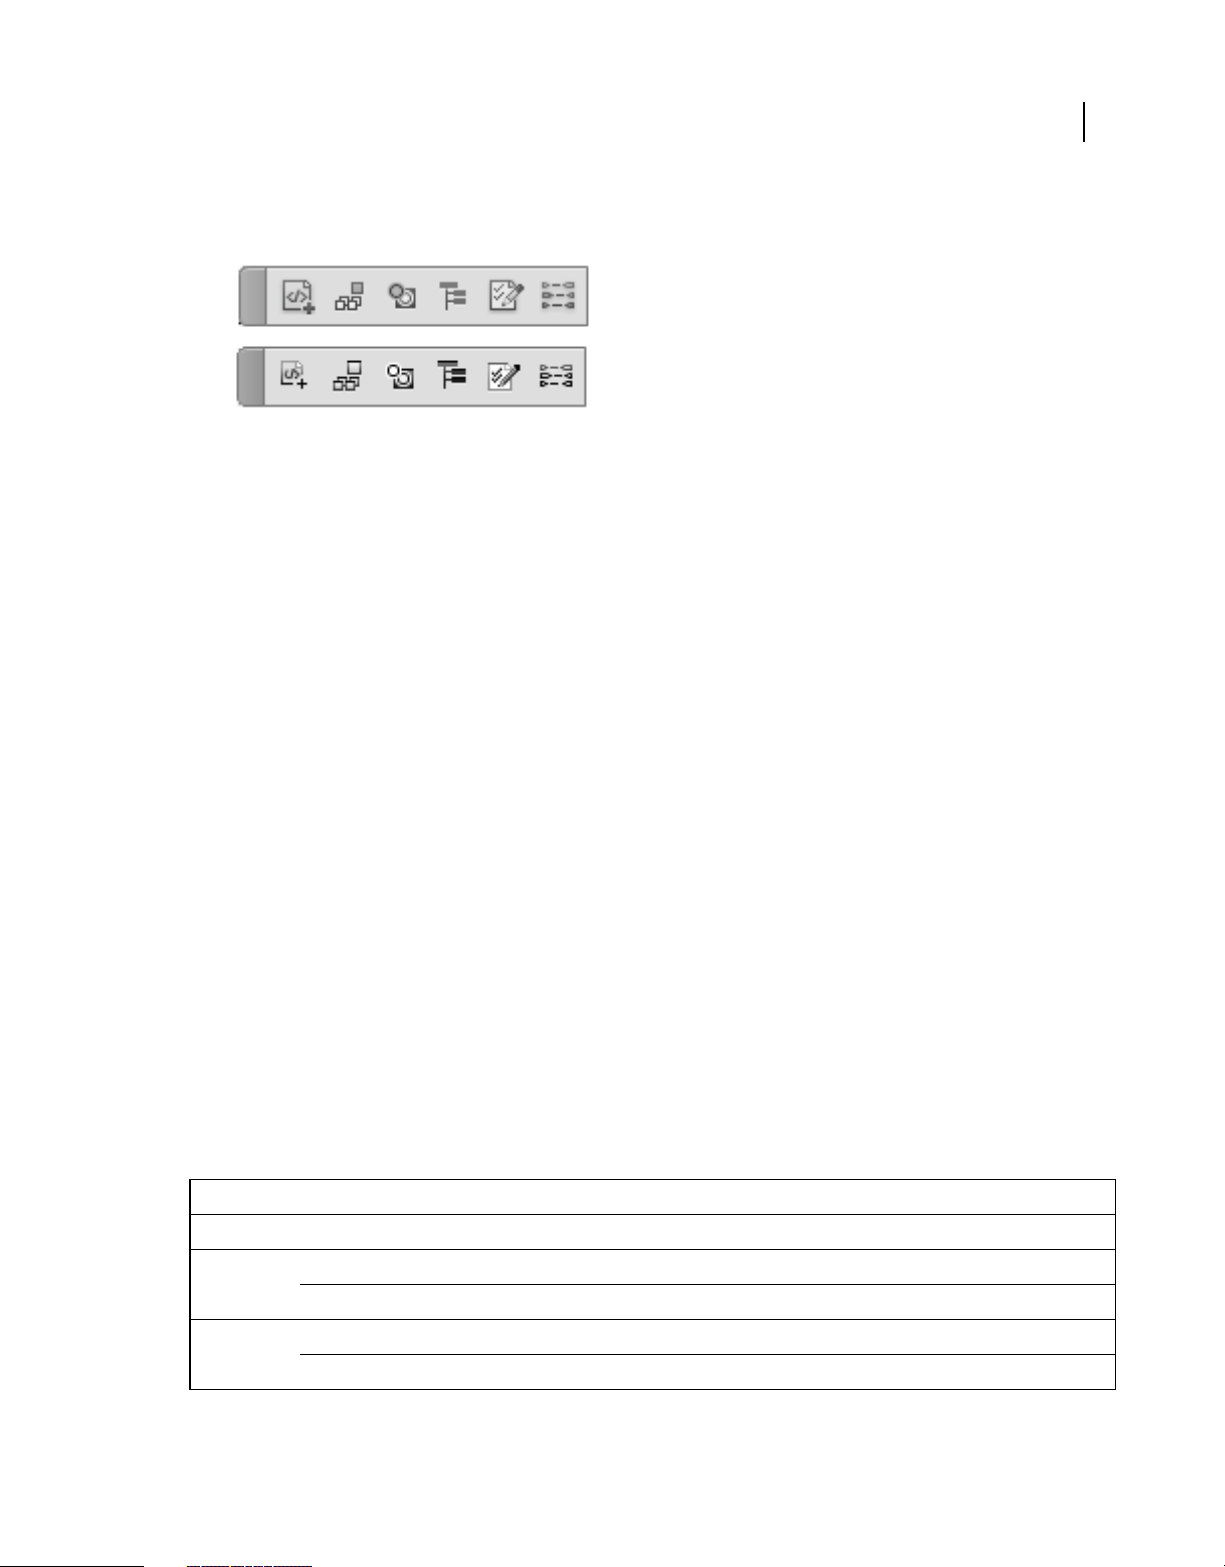
Icons
FrameMaker XML Author gives you choice of size and color for the icons. Using preferences, you can set up to use any
of the following icons for FrameMaker XML Author interface:
• Large colored icons
• Large grayscale icons
• Regular colored icons
• Regular grayscale icons
Note: Large icons’s size is 26x26pixels and regular icons’ size is 18x18pixels.
Icons according to various Interface settings in the Preferences dialog
Last updated 8/18/2015
Page 21
USING FRAMEMAKER XML AUTHOR (2015 RELEASE)
FrameMaker XML Author Basics
FrameMaker XML Author 12 icons
Change FrameMaker XML Author icons
You can change FrameMaker XML Author icons between colored\greyscale and large\small.
1 Select Edit > Preferences.
2 In the Preferences dialog, select Interface and choose the preferences for icons.
3 Restart FrameMaker XML Author for the icon preferences to take effect.
15
Use your own icons
You can also add your own custom icons in FrameMaker XML Author.
1 Locate the toolbar.xml file relevant to your view and mode and open it.
2 Create and place all the icon files in AppData\Roaming\Adobe\FrameMakerXMLAuthor\12\.
3 Locate the Action element relevant to the icon you want to customize. The Action element code looks like the
following:
<ACTION command="CenterPara">
<images base="P_TextAlignCenter_Md"/>
4 Add the base name of the icon in the base attribute of images element.
5 Create at least 2 icon images for normal and rollover state of the icon.
For example if the icon name is xyz the image names will be xyz_C_S.png and xyz_R_C_S.png. (Here, C= color,
S=regular, and R=rollover.) If, however, your icon preferences are set to have large or greyscale icons instead of
regular and color, you will use M and L in the icon names.
You can have 8 image files for the following possible combinations of preferences with the base name as xyz:
Preferences Icon names
Size Color Normal Rollover
Large (L) Colored (C) xyz_C_L.png xyz_R_C_L.png
Grayscale (M) xyz_M_L.png xyz_R_M_L.png
Regular (S) Colored (C) xyz_C_S.png xyz_R_C_S.png
Grayscale (M) xyz_M_S.png xyz_R_M_S.png
Last updated 8/18/2015
Page 22

USING FRAMEMAKER XML AUTHOR (2015 RELEASE)
FrameMaker XML Author Basics
6 You can further add more icon files for icon states, such as dark_normal and dark_rollover by specifying attributes
with data in the relevant element. For example:
<ACTION command="CenterPara">
<images base="P_TextAlignCenter_Md"
dark_normal="<icon_name>.png" <!-- for regular
sized icons-->
dark_rollover="<icon_name>.png"
dark_normal_l="<icon_name>.png"<!-- "_l" suffix
for large sized icons-->
dark_rollover_l="<icon_name>.png"
/>
Preferences dialog
The preferences dialog (Edit > Preferences) has the following settings:
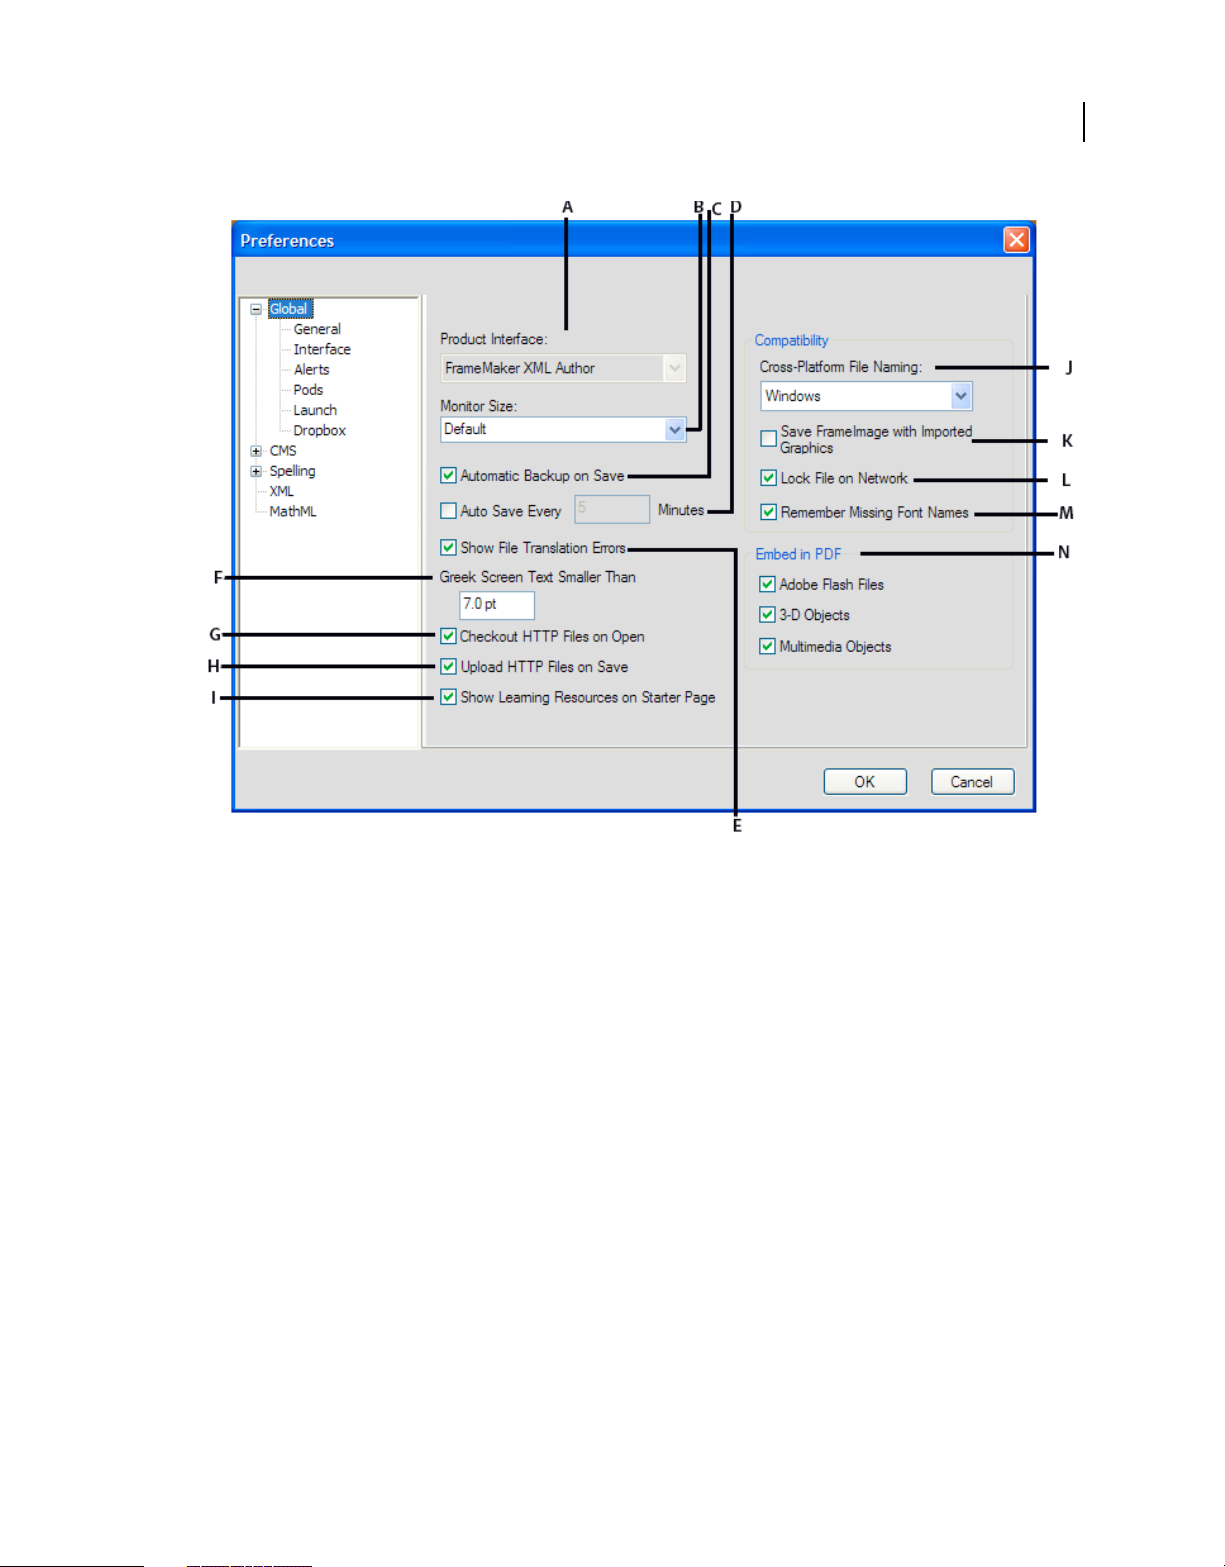
General preferences
Use these preferences to specify settings, such as:
• Product interface
• File saving, naming, and backup
• Handling of embedded objects
16
Last updated 8/18/2015
Page 23
USING FRAMEMAKER XML AUTHOR (2015 RELEASE)
FrameMaker XML Author Basics
17
General preferences
A. FrameMaker XMLAuthor interface B. Specify the diagonal size of your monitor C. Select to create a backup file when you save a file for
the first-time D. Specify the number of minutes after which FrameMaker XML Author automatically saves the open file E. Select to display
errors, if any, when you open a file in FrameMaker XML Author F. Text size smaller than the one specified in this field is displayed as XXXX
G. Select to automatically lock and check-out a file when you download it H. Select to check in a file every time you save it I. Select to display
learning resource links on the bottom of the starter page J. Select the type of cross-platform file naming for FrameMaker XML Author to follow
K. Select to add a FrameImage facet to bitmap graphics imported by copying L. Select to prevent multiple people from opening the same file
M. Select to remember missing font names N. Select the file types to be embedded in the PDF
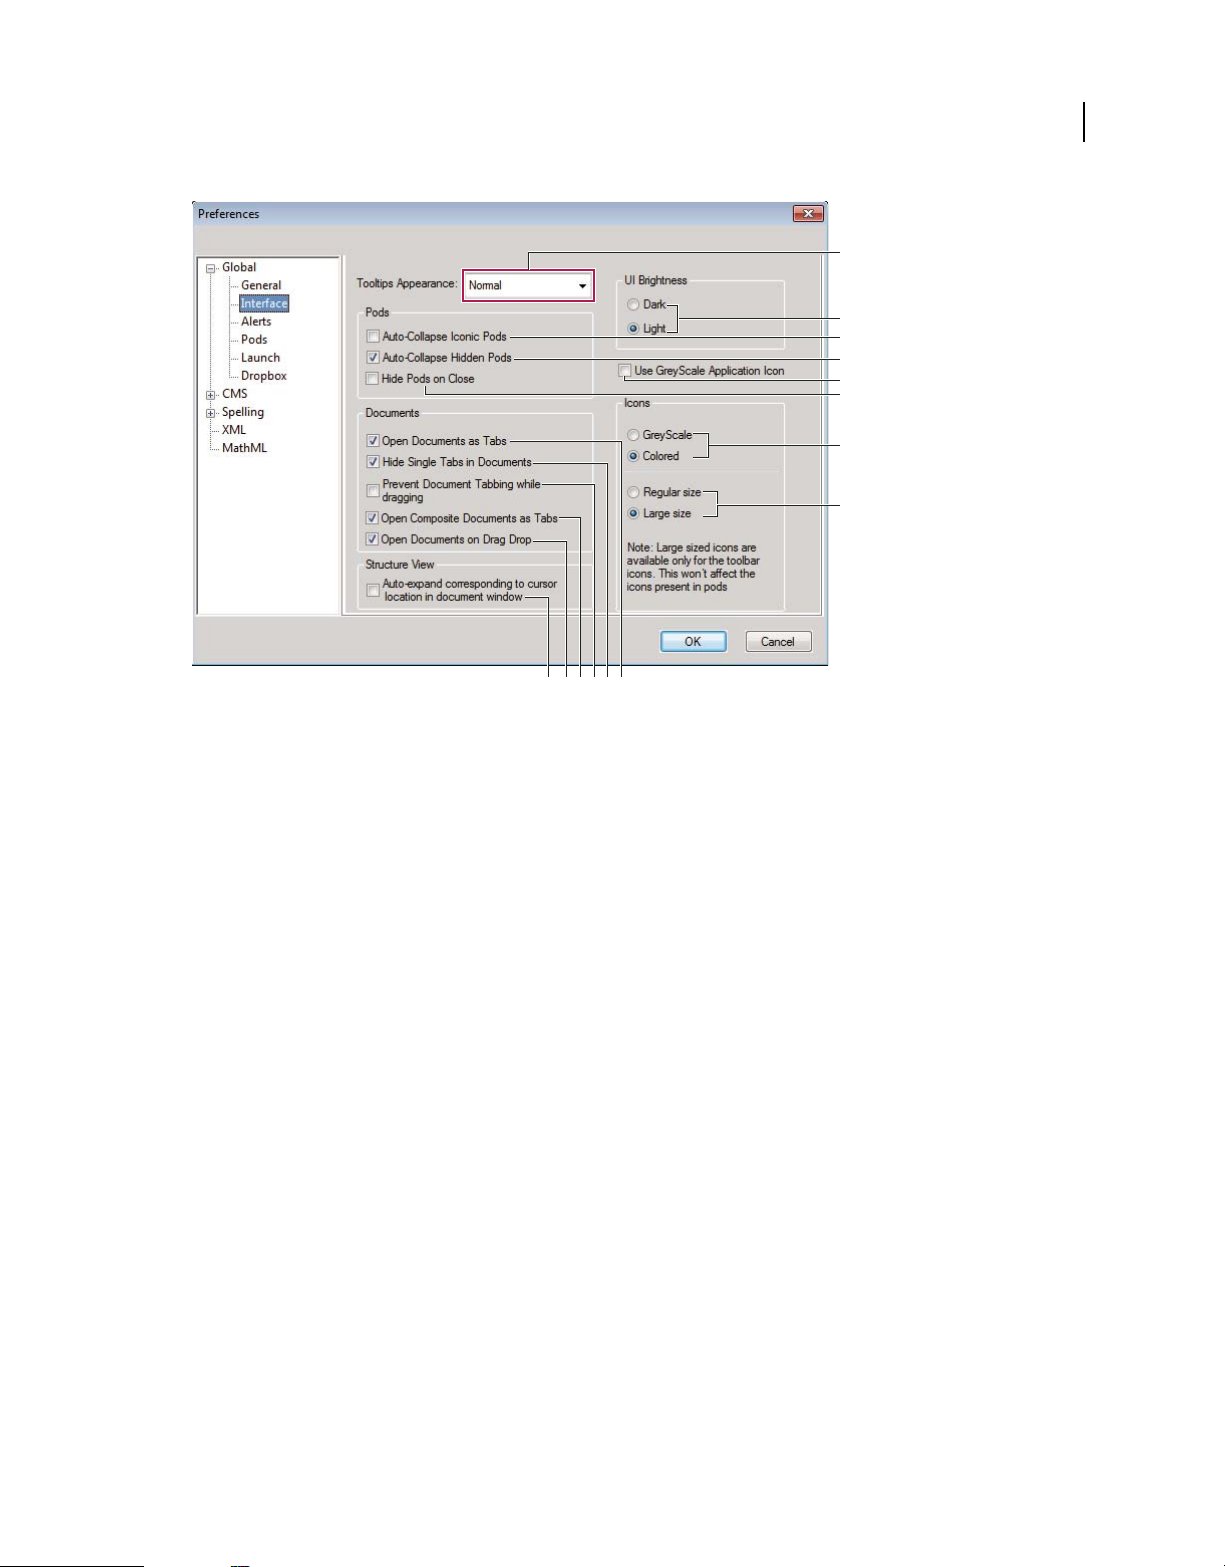
Interface preferences
Use this dialog box to specify whether FrameMaker XML Author should auto-collapse panels to icons or always open
documents as tabs.
Last updated 8/18/2015
Page 24
USING FRAMEMAKER XML AUTHOR (2015 RELEASE)
FrameMaker XML Author Basics
A
B
C
D
E
F
G
H
IJKLMN
Default interface properties
A. Select tool tip appearance type: Normal, Fast, or Hidden B. Switch between dark or light levels of UI brightness C. When disabled, you must
click on the panel tab/panel icon to collapse it. When enabled, just click on another panel or in the document to collapse a panel. D. Select to
hide all docked panels permanently E. Select to make FrameMaker XML Author application icon grayscale F. When you close panels they are
hidden but are still active in memory. Deselect this option to remove panels when you close them. To display them again, choose them from
FrameMaker XML Author menus. G. Select grayscale or colored icons for the interface H. Select large or small sized icons for the interface
I. Opens composite documents as tabbed documents. Deselect to open composite document windows as floating windows. J. When you drag
document windows and place them together, they tend to form tabs in a single document window. Select this option to prevent document
tabbing. K. Floating document windows display the document name only in the title bar. Deselect to display document name in title bar and
tab bar. L. Select to open all documents as tabbed documents. Deselect to open document windows as floating windows.
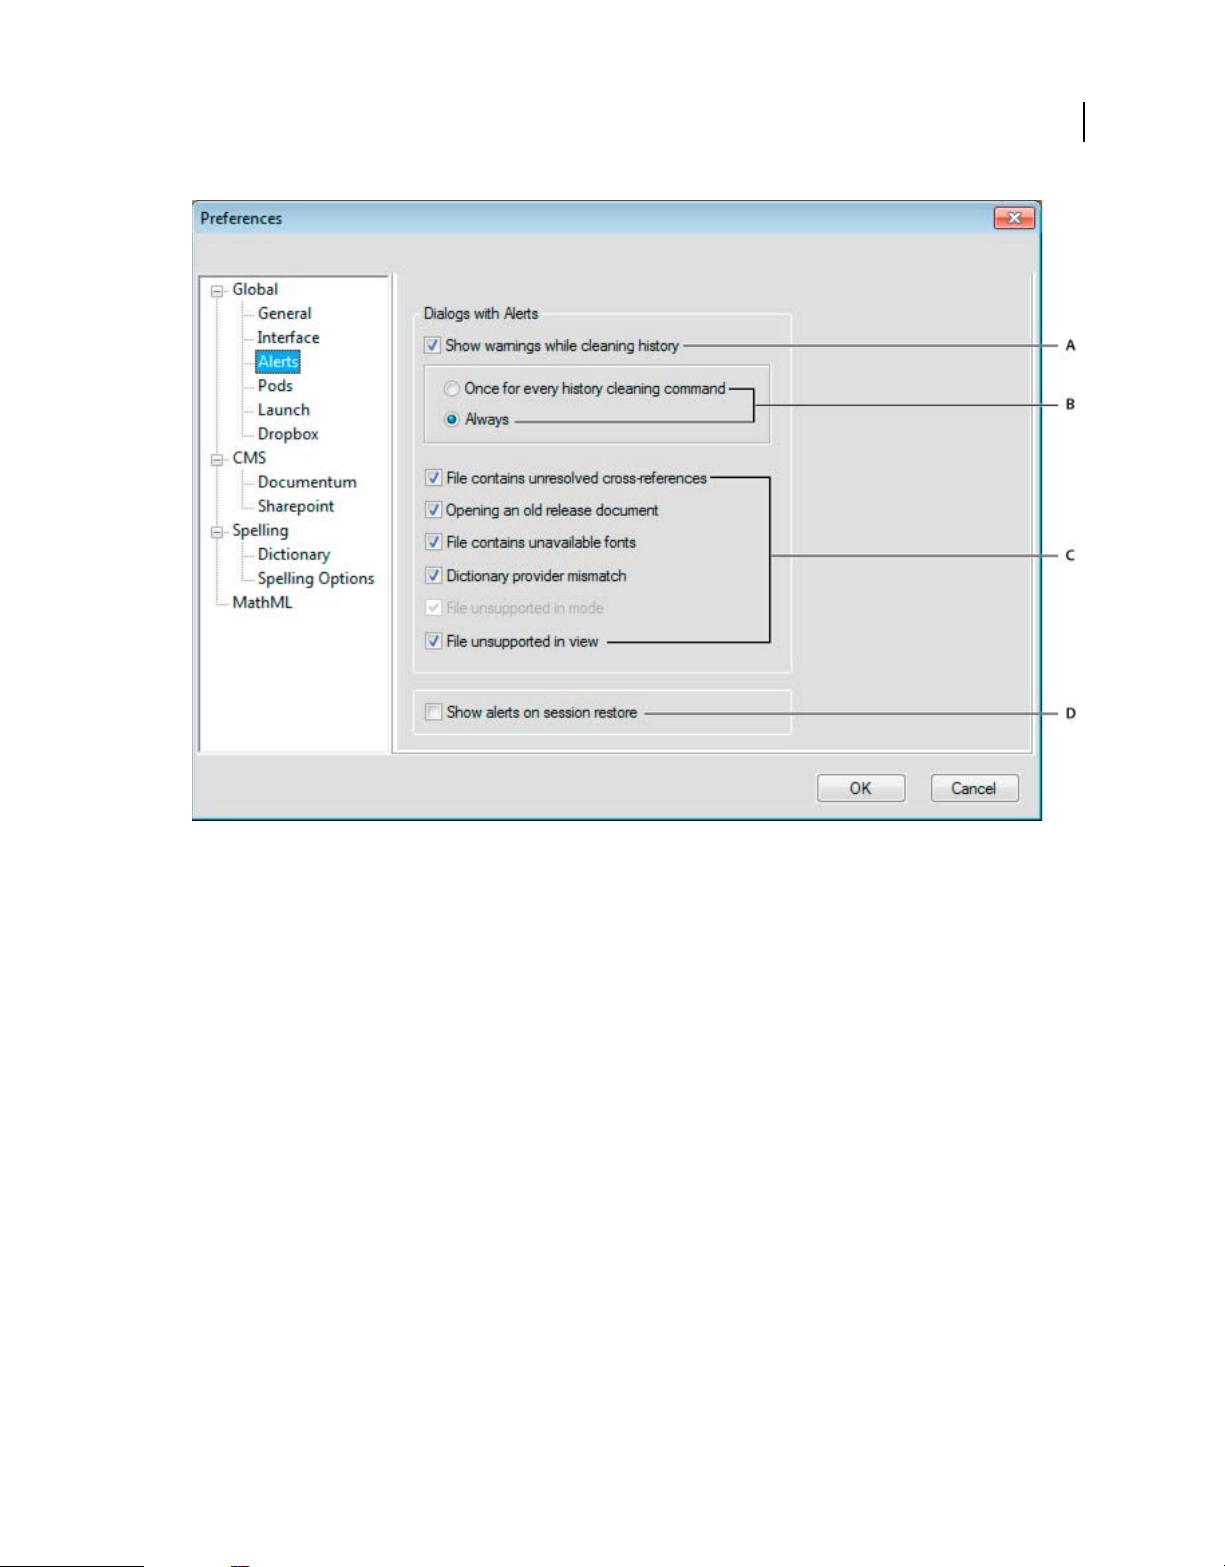
18
Alerts
These settings control the display of warnings.
Last updated 8/18/2015
Page 25
USING FRAMEMAKER XML AUTHOR (2015 RELEASE)
FrameMaker XML Author Basics
19
Alerts
A. Select to show warnings on actions that clear the history B. Specify if you want the warning to appear once for a history clearing command
or every time you run that command C. Select when you want FrameMaker XML Author to display dialogs with alerts D. Select to display
non-input alerts, such as missing fonts, on session restore
See also
“Restore last session” on page 49
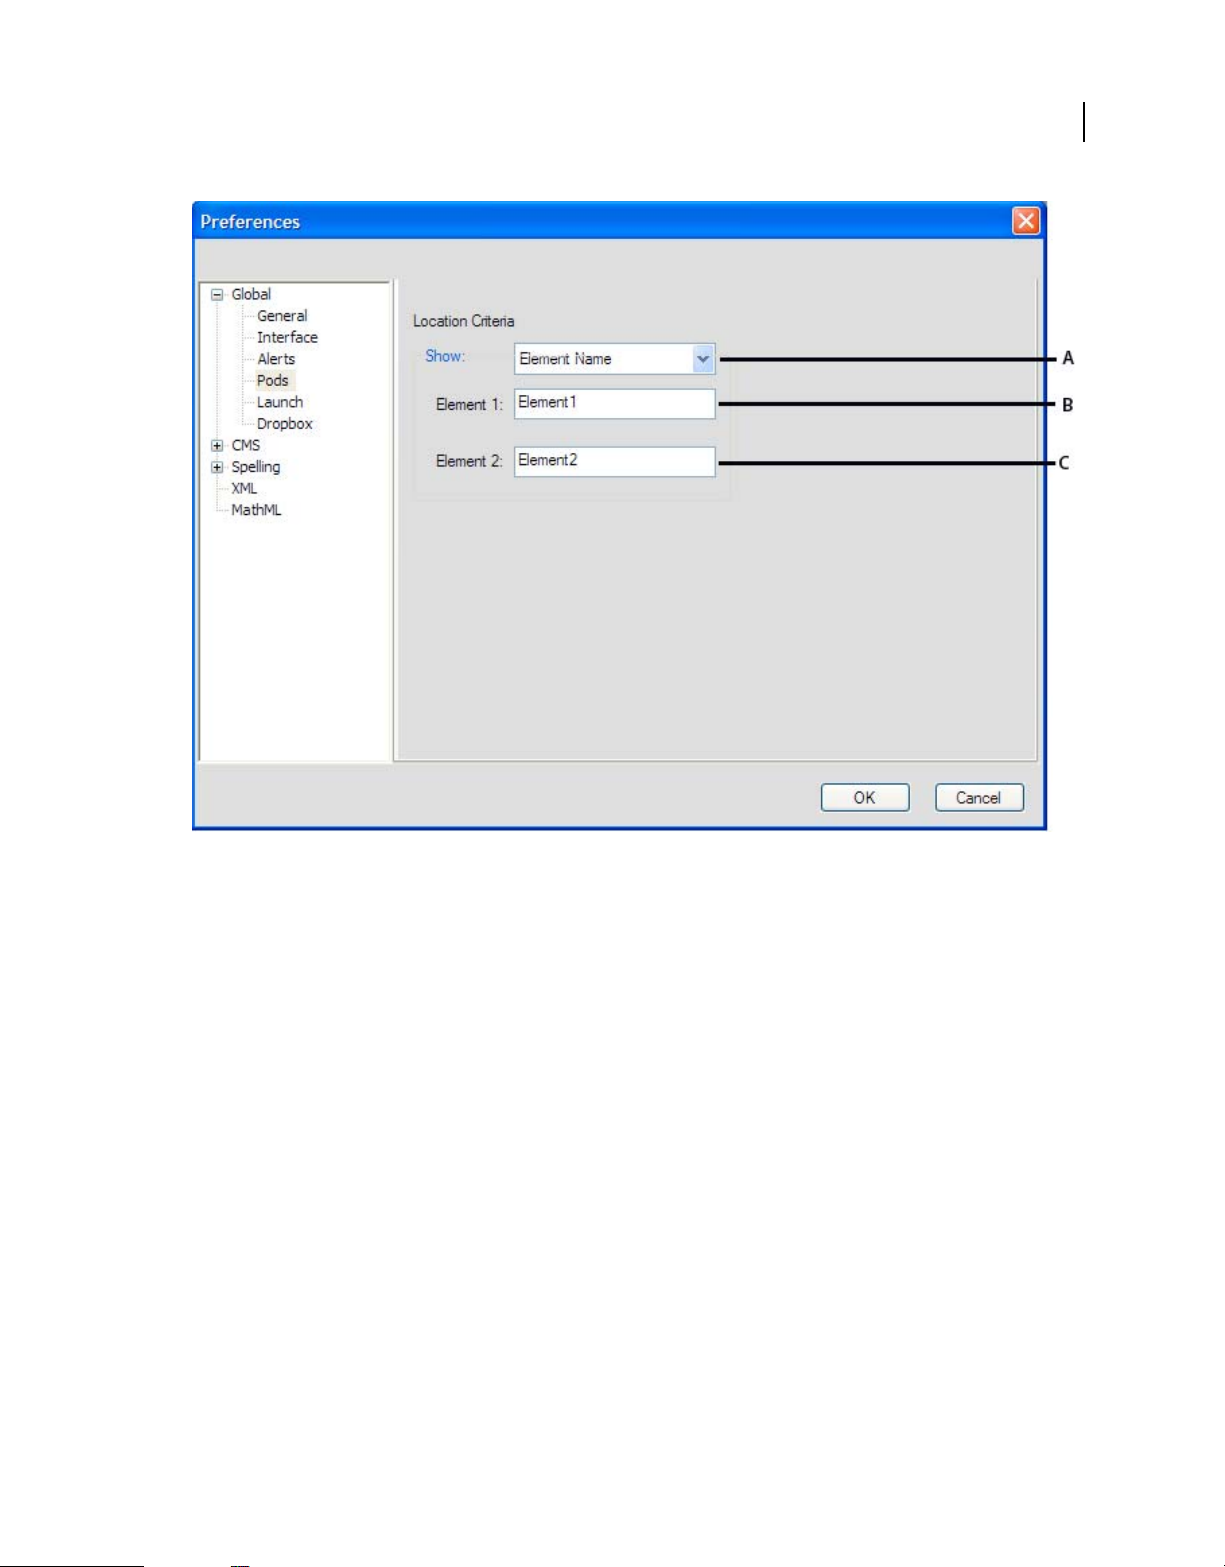
Pods
The pod location criteria determine what should be displayed in the pod list area for an instance by way of identifying
its location in the document.
Last updated 8/18/2015
Page 26
USING FRAMEMAKER XML AUTHOR (2015 RELEASE)
FrameMaker XML Author Basics
20
Pods
A. Specify the element names. In FMXA, you can only specify elements styles. B. Specify the first element style C. Specify the second element style
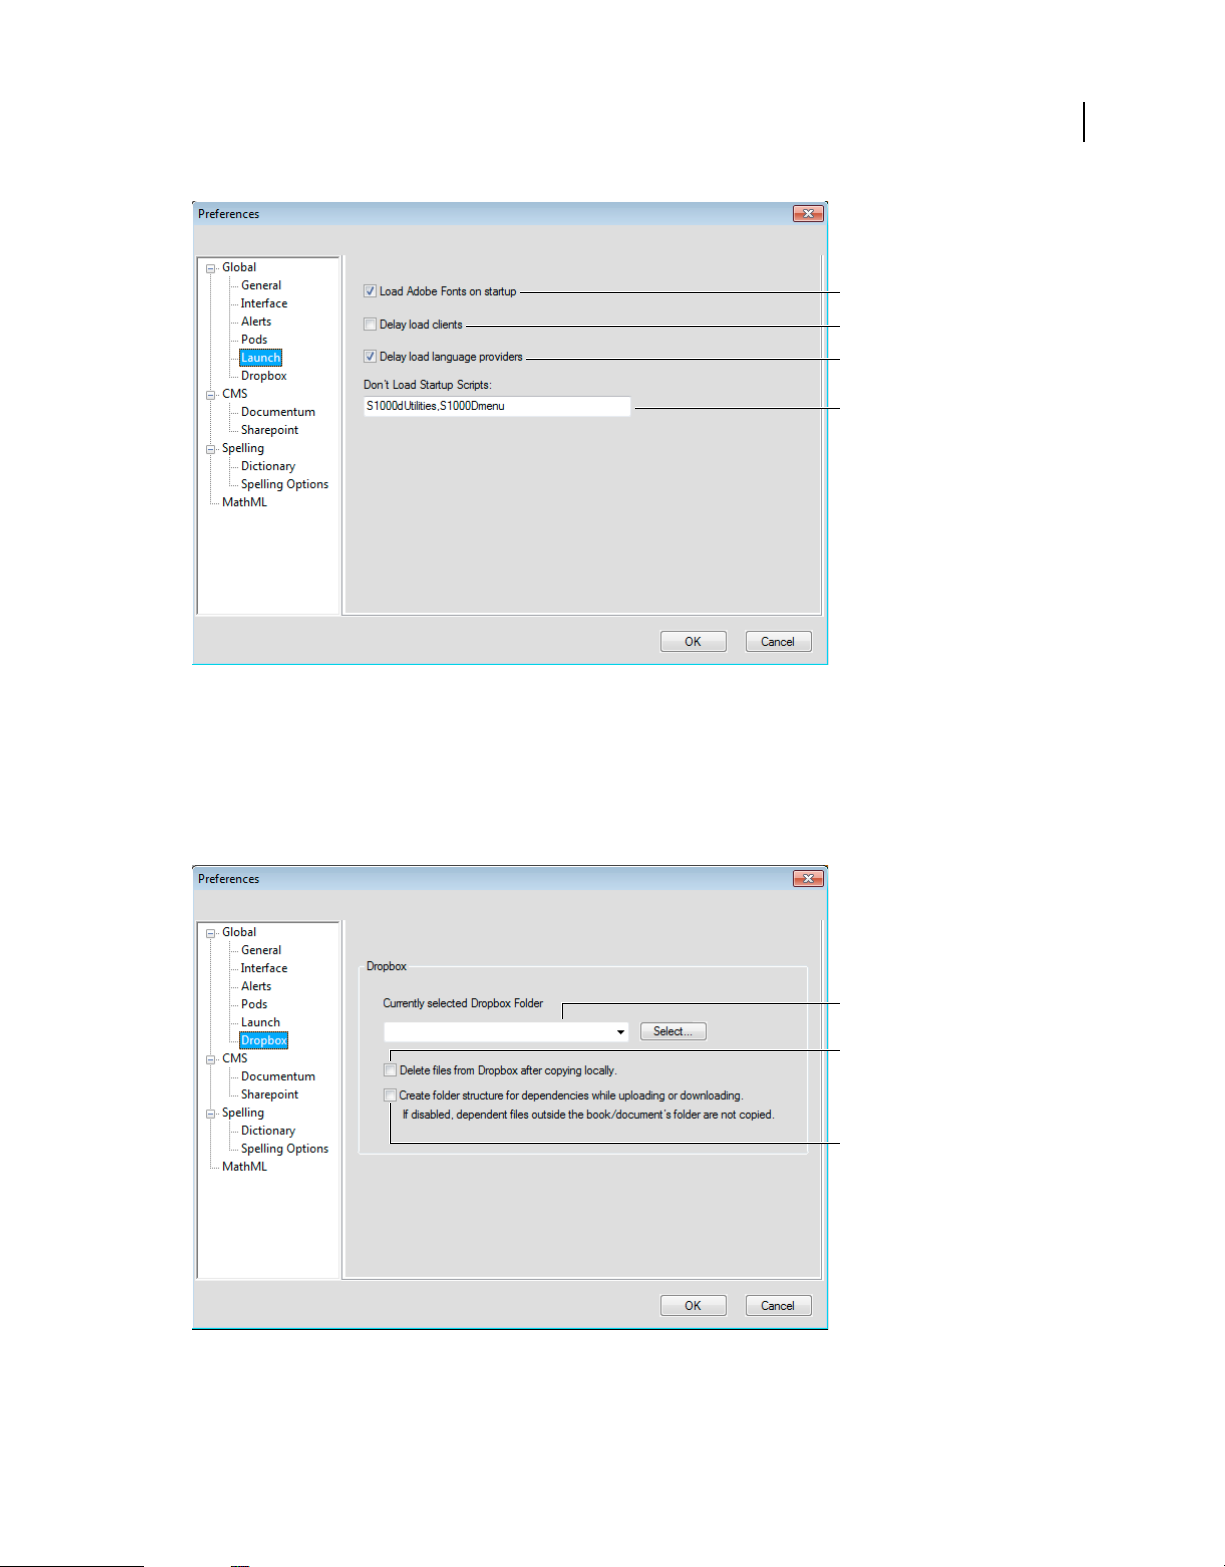
Launch
The Launch preferences help you optimize the startup time of FrameMaker XML Author. Using the Launch
preferences, you can optimize the loading of the clients, fonts, language providers, and startup scripts according to
your requirement.
Last updated 8/18/2015
Page 27
USING FRAMEMAKER XML AUTHOR (2015 RELEASE)
FrameMaker XML Author Basics
A
B
C
D
Launch preferences
A. Load Adobe Fonts On Startup: Deselect this if you do not require Adobe fonts in a session. B. Delay Load Clients: When you select this option,
none of the clients such MathFlow and PDF import comments are loaded on startup. C. Delay Load Language Provider: When you select this
option, only the English language is loaded on startup. D. Don't Load Startup Scripts: Specify the startup script names in this field that you do
not want FrameMaker XML Author to load on startup. Use commas to delimit.
21
Dropbox
The Dropbox preferences, help you set up the Dropbox app to work with FrameMaker XML Author.
A
B
C
The Dropbox preferences
A. Dropbox Folder path: Once you have installed Dropbox, the default path is automatically there as an option in the drop-down. B. Delete
files from Dropbox after copying locally: When selected, when you select (File > Dropbox > ) Save Locally or Save Locally With Dependencies,
the files are deleted from the Dropbox folder on your machine. C. Create folder structure for dependencies while uploading or downloading:
FrameMaker XML Author creates a folder structure in the Dropbox folder for dependencies similar to the one being uploaded, but not when .
When this option is selected, FrameMaker XML Author creates a folder structure similar to the
Last updated 8/18/2015
Page 28
USING FRAMEMAKER XML AUTHOR (2015 RELEASE)
FrameMaker XML Author Basics
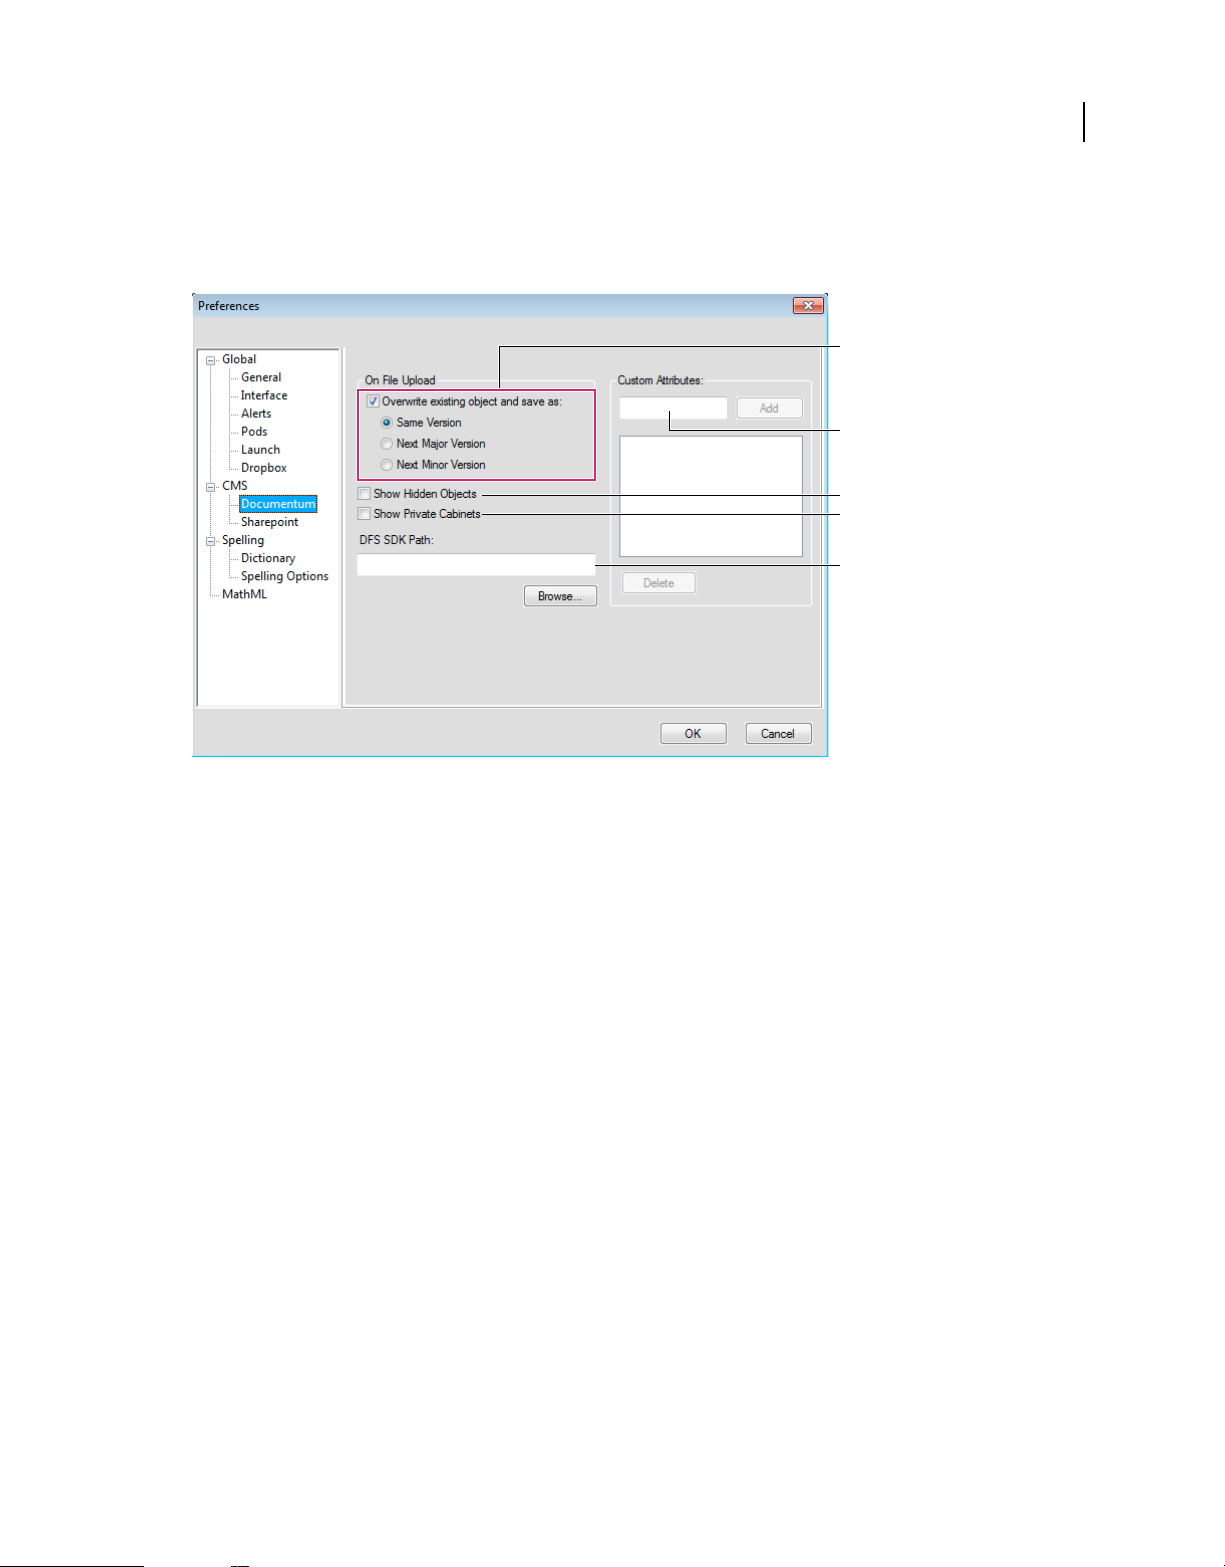
Documentum®
Use these preferences to set up Documentum® file versioning, specify DFS SDK path, and add custom CMS properties
to FrameMaker XML Author for Documentum®.
A
B
C
D
E
22
Documentum® CMS preferences
A. Specify how existing objects are overwritten and saved B. Enter the name of a custom attribute to add C. Select to show hidden objects
D. Select to show private cabinets E. Specify the path to DFS SDK
Sharepoint
Use these preferences to set up Sharepoint file versioning and add custom CMS properties to FrameMaker XML
Author for Sharepoint.
Last updated 8/18/2015
Page 29
USING FRAMEMAKER XML AUTHOR (2015 RELEASE)
FrameMaker XML Author Basics
A
B
Sharepoint preferences
A. Specify how existing objects are overwritten and saved B. Enter the name and type of a custom attribute to add
23
Dictionary
Use these preferences to specify Proximity or Hunspell dictionaries for Spelling, Hyphenation, and Thesaurus for
various languages.
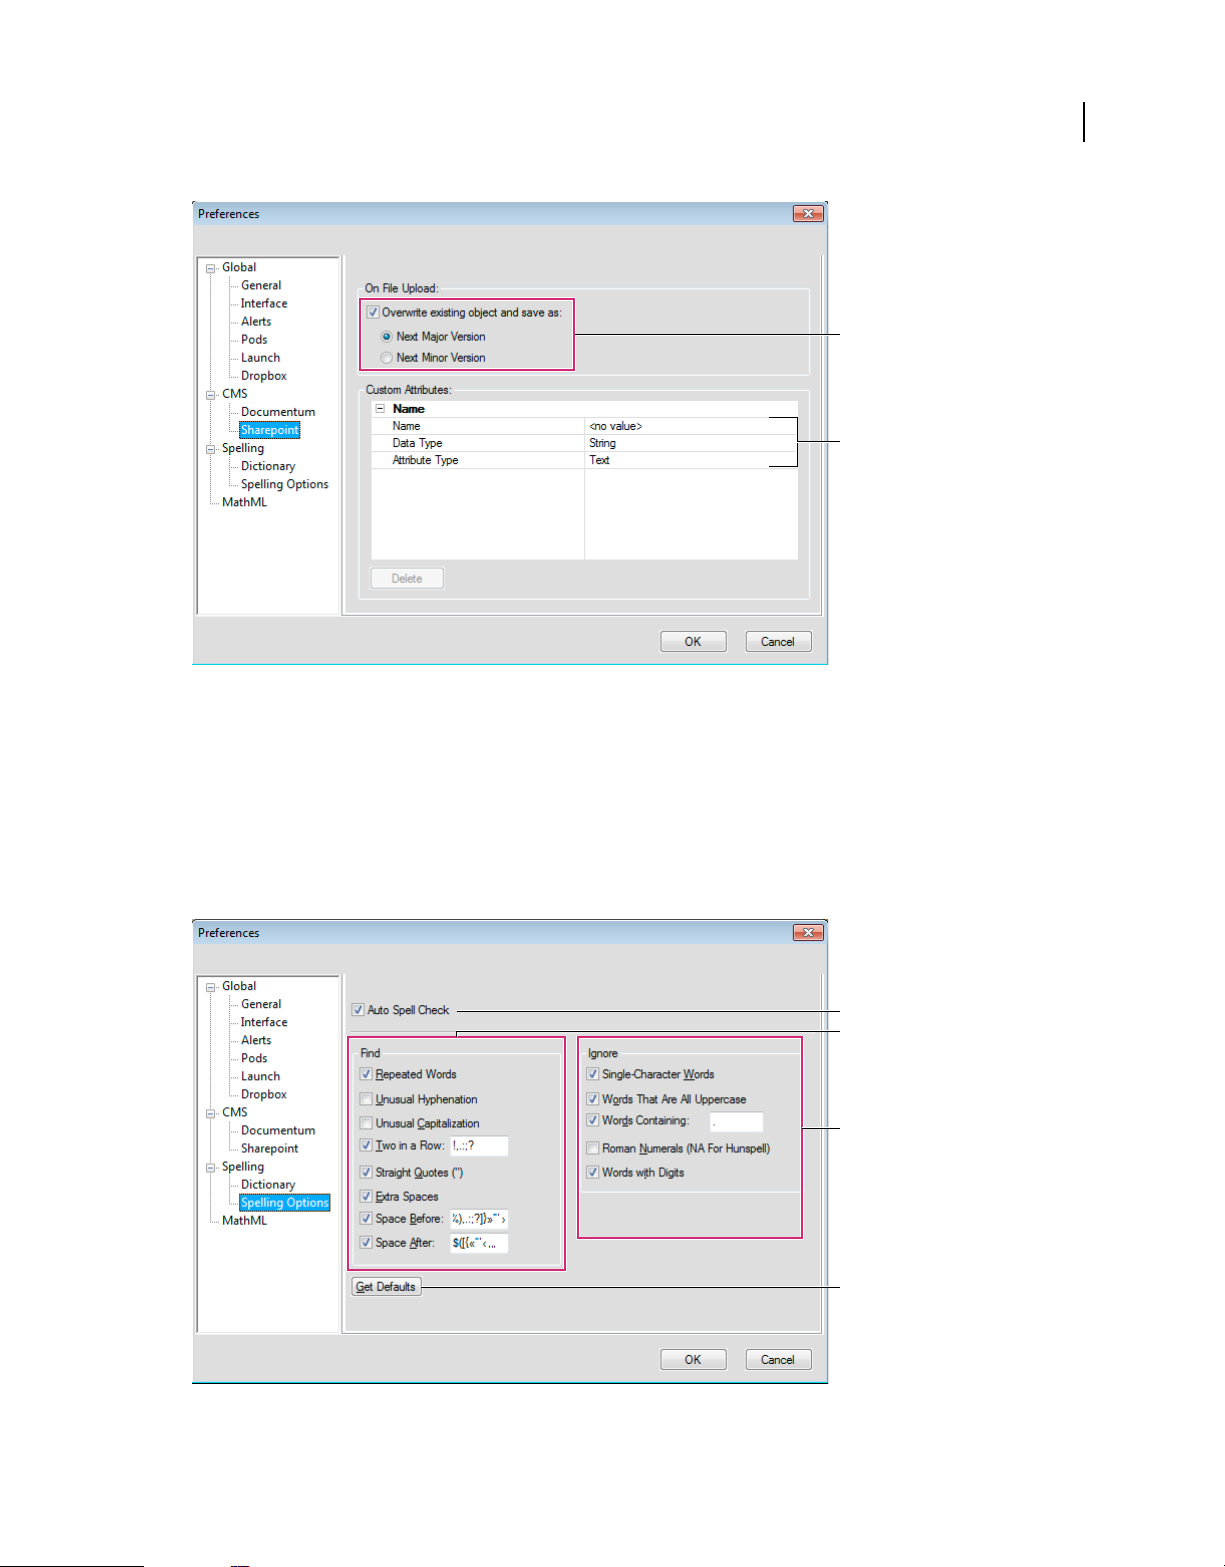
Spelling options
Use these preferences to set up Spelling Checker.
A
B
C
D
Spelling Options
A. Auto Spell check B. Select all that you want spell checker to find C. Select all that you want spell checker to ignore D. Click to get default
spelling options
Last updated 8/18/2015
Page 30
USING FRAMEMAKER XML AUTHOR (2015 RELEASE)
FrameMaker XML Author Basics
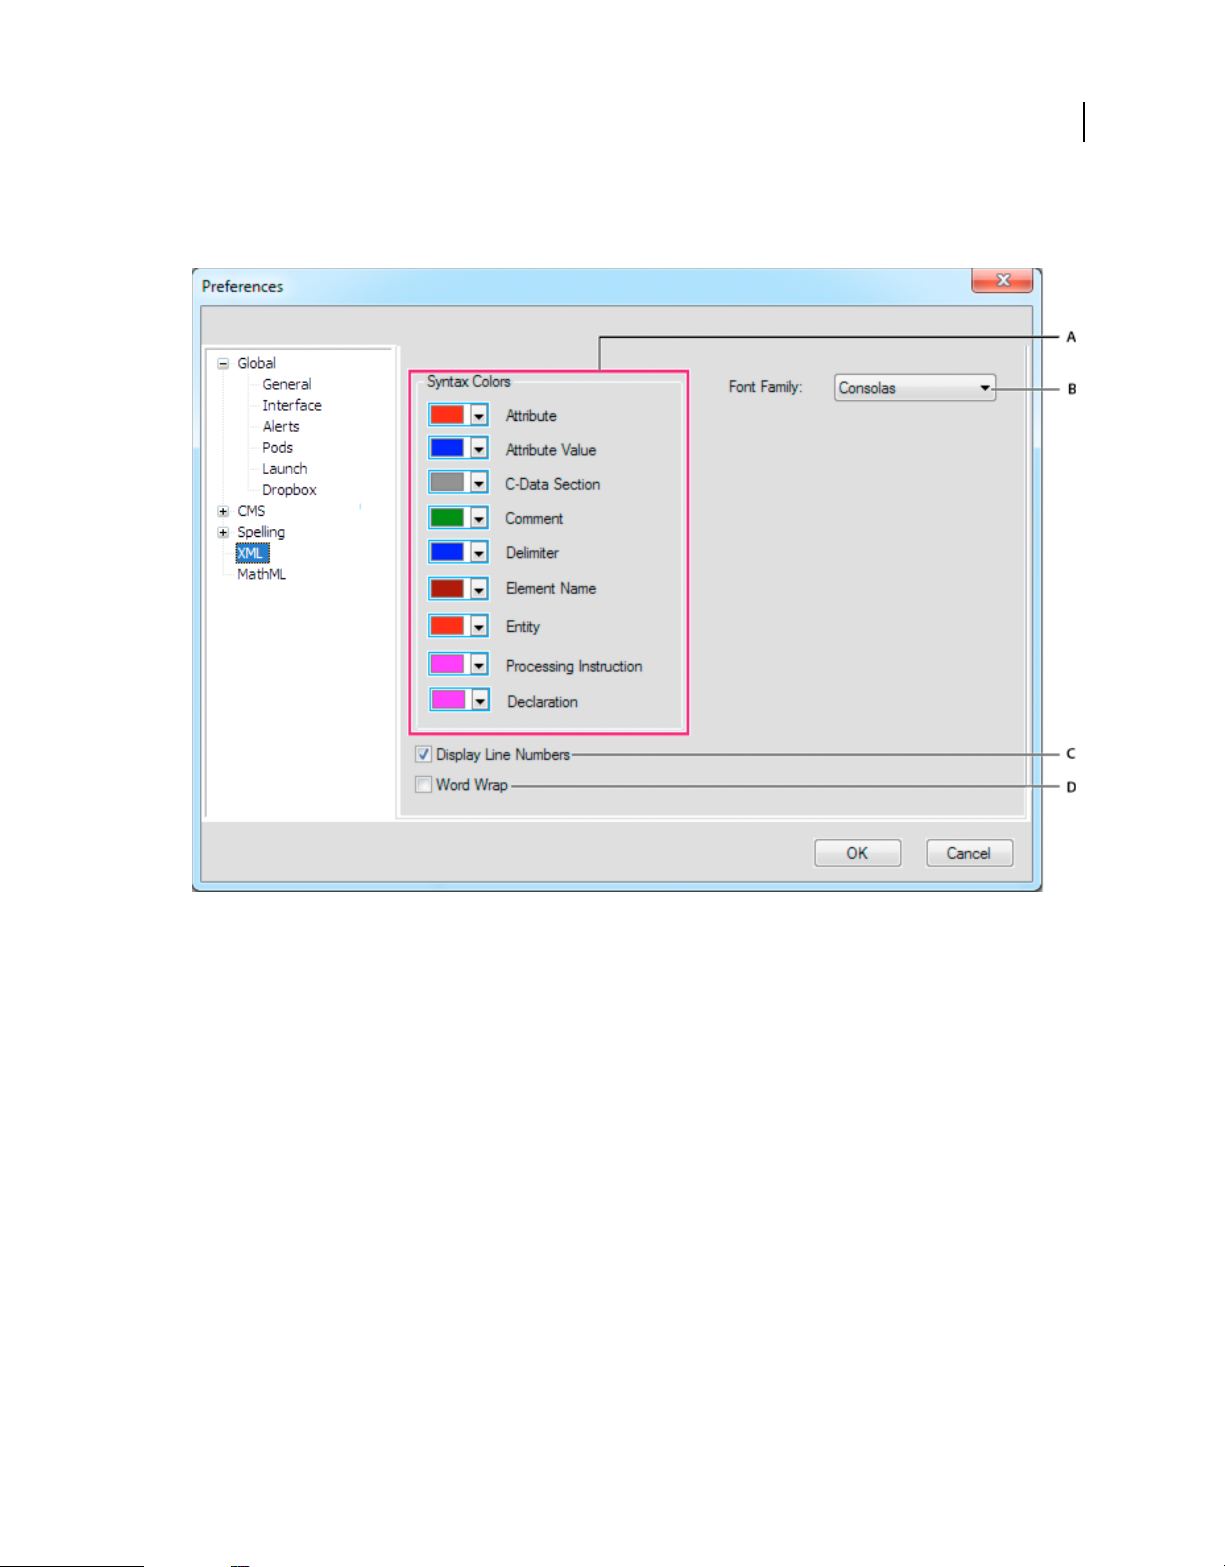
XML
Use these preferences to set up syntax colors and other display options for XML content in FrameMaker XML Author.
24
XML preferences
A. Select the color preferences for various parts of XML syntax B. Select the font family for displaying the xml tags and content C. Select to
display line numbers in the document D. Select to word wrap
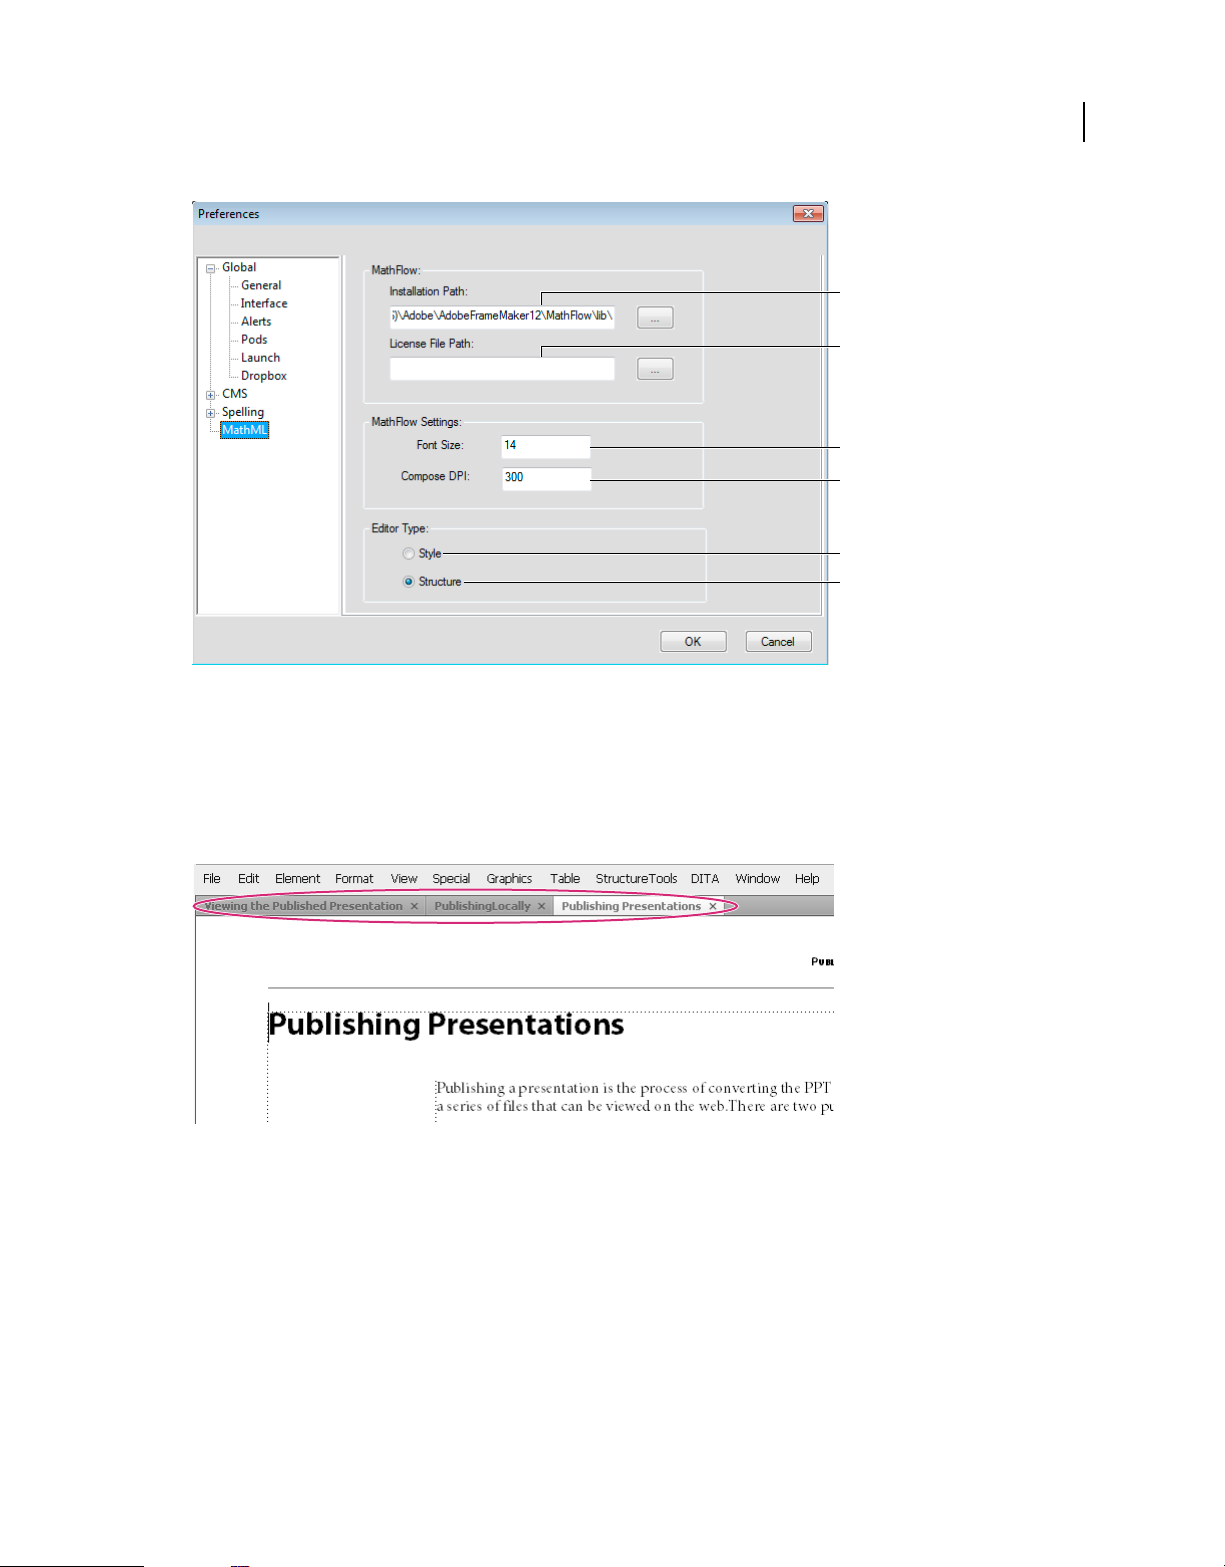
MathML
Use these preferences to set up the MathFlow Editor install path and specify the licence file path. You can also select
the Style or Structure editor from this dialog.
Last updated 8/18/2015
Page 31
USING FRAMEMAKER XML AUTHOR (2015 RELEASE)
FrameMaker XML Author Basics
A
B
C
D
E
F
MathML preferences
A. Specify the MathFlow editor installation path B. Specify the license file C. Specify the font size of the equations D. Specify the DPI of the
image of the equation E & F. Select from the Style or Structure editors
25
Tabbed documents
When you open more than one file, the document windows are tabbed. You can open documents as floating windows
by clearing the Open Documents As Tabs option in the Interface Preferences dialog box.
Documents appear as tabs in the document view.
However, when you add a generated file, such as a Table Of Content, the generated file appears minimized in the lower
left corner of your workspace. There are multiple ways in which you can organize floating and tabbed document
windows.
• To dock a document window in a group of document windows, drag the window into the group.
• To rearrange the order of tabbed document windows, drag a window’s tab to a new location in the group.
• To undock a document window from a group of windows, drag the window’s tab out of the group.
Note: When you minimize a floating document window, it covers a part of the FrameMaker XML Author status bar.
You cannot move the minimized window to a new location.
Last updated 8/18/2015
Page 32

USING FRAMEMAKER XML AUTHOR (2015 RELEASE)
FrameMaker XML Author Basics
Tips on working with the new interface
Adjust the UI brightness Adjust the UI brightness by using the UI Brightness slider under > Interface.
Combine document windows To consolidate all document windows, floating, minimized, or docked, right-click the
tab bar of the docked document window and select Consolidate All To Here from the menu.
Float document windows Click Arrange Documents icon on the top Application bar and select Float All In Windows.
This arranges all the document windows as cascaded floating panels.
Tile documents Use the Arrange Documents icon to tile document windows vertically or horizontally. This is specially
useful for manually comparing documents and layering them side by side.
Bring hidden pods to the front Sometimes while working with floating document windows or when switching
workspaces, the pods may seem difficult to bring to the front.
• Undock the pods by dragging them out using the pod title bar.
• Dock all floating document windows. Right-click the docked tab bar and select Consolidate All To Here or drag
and dock the floating document windows.
Minimize pods to icons Right-click on the pods tab bar and select Collapse To Icons from the menu. This option is
available only if the pods are floating and not docked. To collapse docked pods, click anywhere in the tab bar.
Reopen the pods Choose View > Pods and click any pod name. The entire group of pods open at the bottom of the
workspace.
26
Reopen a panel Choose Windows and select Panels and select the panel you want to reopen.
Collapse all open panel groups to icons Right-click the tab bar of the panel group and select Collapse To Icons.
Exit the full screen mode Right-click outside the text frame in the document window and select Toggle Screen Mode.
More Help topics
“Keys for screen modes” on page 375
Using Smart catalogs
You can use the Smart catalog as a convenient shortcut to the catalogs available in FrameMaker XML Author. For
example, to add a list in a document, use the Smart catalog to quickly search for and select the type of list (dl, li, ol).
To use the Smart catalog
1 Place the cursor at the required location in the document.
For elements and attributes, place the pointer at the element insertion location in the structure view.
2 Press the Smart catalog shortcut key. See, the “Smart catalog shortcut keys” on page 27 defined below.
The Smart catalog dialog displays. The focus of the pointer is now within the text box at the top of the dialog.
3 To search for an item in the current catalog, start typing either the name of the item or the description. As you type,
the list in the dialog is narrowed down.
For example, if you want to insert a list element in a structured document, you can type the name of the list element:
ul, ol, or dl. You can, however, also type the description of the element, list, and the dialog list is narrowed down to
all the available list items in element catalog.
Note: The list of displayed items in the dialog is limited to 10. If the list exceeds 10, you can use the scrollbar to navigate
up and down the list.
Last updated 8/18/2015
Page 33

USING FRAMEMAKER XML AUTHOR (2015 RELEASE)
FrameMaker XML Author Basics
Smart catalog shortcut keys
Shortcut Smart Catalog
Ctrl + 1 Element catalog
Ctrl + 2 Wrap element
Ctrl + 3 Change element
Ctrl + 4 Apply condition
Ctrl + 5 Remove condition
Ctrl + 7 Attributes catalog
To use the Hierarchical Element insert
Make the following configuration changes:
1 Open the maker.ini file location at:
%appdata%\Adobe\FrameMakerXMLAuthor\12
2 Set the following flag to ON:
EnableOldSmartInsert
27
Customize and manage workspaces
Workspaces in FMXA allow you to set up a custom view of the application with the toolbars, pods, and catalogs
displayed and positioned as you want them. For example, you can choose to place the Structure View pod on the right
side of the application window and the Elements catalog on the left side. You can choose to only hide all toolbars.
FMXA ships with the Authoring workspace. This is the default workspace for FMXA. However, you can create and
manage custom workspaces for your specific requirements.
Save a custom workspace
1 Configure the workspace the way you want it and choose Save Workspace from the workspace switcher on the
Application bar.
2 Type a name for the workspace and click OK.
FrameMaker XML Author remembers the last used workspace across sessions. If you were working in the Review
workspace and you close and relaunch FrameMaker XML Author, it loads the custom workspace.
Switch workspaces
❖ Select a workspace from the workspace switcher in the Application bar.
Last updated 8/18/2015
Page 34

USING FRAMEMAKER XML AUTHOR (2015 RELEASE)
FrameMaker XML Author Basics
Use the workspace switcher to switch between workspaces designed for your workflow.
Reset a workspace
By saving the current configuration of panels as a named workspace, you can restore that workspace even if you move
or close a panel. The names of saved workspaces appear in the workspace switcher in the Application bar.
❖ Select the Reset Workspace option from the workspace switcher in the Application bar.
28
Rename a custom workspace
1 Select Manage Workspace from the workspace switcher in the Application bar.
2 Select the workspace and click Rename.
3 Type a new name and click OK twice.
Delete a custom workspace
❖ Select Manage Workspace from the workspace switcher in the Application bar, select the workspace, and then click
Delete.
Interface view options
Display pages more quickly
❖ Do the following:
• Open the document by bypassing the update of imported graphics, cross-references, and text insets. (Opening
a document without updating references makes a document open faster but can slow down the display of
individual pages.)
• Turn off the display of graphics by choosing View > Options, deselecting the Graphics option, and clicking Set.
Important: If you deselect the Graphics option and generate a PDF, the graphics do not appear in the PDF.
• Display small text as gray bars by choosing File > Preferences > General, entering a point size in the Greek Screen
Text Smaller box, and clicking Set. Whenever text in your document is in a point size smaller than the size you
specified, it appears on the screen as a gray bar.
Last updated 8/18/2015
Page 35

USING FRAMEMAKER XML AUTHOR (2015 RELEASE)
FrameMaker XML Author Basics
Change the preset display units
Some text boxes in dialog boxes require a unit of measurement (such as points or inches) for the value you enter. You
can specify the default units for font size and line spacing (font size units) and for other measurements (display units).
The default units of measurement appear after the values in the text boxes. If you enter a value without a unit of
measurement, FrameMaker XML Author uses the default unit.
• To change the preset units, make the appropriate window is active. Select View > Options. Select the values for
Display Units and Font Units, and then click Set.
• To enter different units in a box, make the appropriate window active. Enter an abbreviation for the unit along with
the numeric value. Use cm for centimeters, mm for millimeters, " or in for inches, pc, pi, or pica for picas, pt or
point for points, dd for didots, cc or cicero for ciceros, Q for Q units (refers to font size and line spacing for the
Japanese language only).
FrameMaker XML Author converts the entry to the preset display units when you click a command button in the
dialog box. For example, if your document display units are picas and you want to set a paragraph indent of 1 inch,
enter 1" in the First Indent box. When you click Apply, the measurement changes to the number of picas that
corresponds to 1 inch.
Change the spacing of ruler or grid intervals
1 Make the appropriate document window or book window active. If a book window is active, select the documents
you want to affect.
2 Select View > Options. Select a new setting from the Rulers menu or the Grid menu, and click Set.
29
Show or hide visual guides
You can show several of these visual guides in a document window:
• Borders around text frames, graphic frames, and imported objects
• Markers, paragraph returns, and other symbols in running text
• Rulers along the top and left side of the window
You can also show a grid of horizontal and vertical lines for drawing, resizing, and aligning graphics. All visual guides
are nonprinting, so you do not need to hide them when you print.
1 Make the appropriate document window or book window active. If a book window is active, select the documents
you want to affect.
2 Do the following:
• To show or hide borders, select View > Borders.
• To show or hide the text symbols, select View > Text Symbols.
• To show or hide the rulers, select View > Rulers.
• To show or hide grid lines, select View > Grid Lines.
• To show the element boundaries, select View > Element Boundaries or Element Boundaries (As Tags) in
Structured FrameMaker XML Author. FrameMaker XML Author automatically toggles these two options.
Last updated 8/18/2015
Page 36

USING FRAMEMAKER XML AUTHOR (2015 RELEASE)
FrameMaker XML Author Basics
Text symbols
Text symbol Meaning
End of paragraph
End of flow and end of table cell
Tab
Anchored frame and table anchor
Marker
Forced return
Manual equation alignment point
Nonbreaking space
Discretionary hyphen
Suppress hyphenation
30
Display a subset of menu commands
You can display a subset of menu commands called quick menus. The quick menus do not have commands for
formatting text, editing some aspects of graphics, and inserting some objects such as markers and variables.
If you do not see the full set of menu commands, the quick menus is probably displayed.
Note: If you’re using a structured document, your application developer can change the commands available in the
complete menus.
• To display quick menus, select View > Menus > Quick.
• To restore the complete menu, select View > Menus > Complete.
• To customize menus, add, move, or remove menus and commands as described in the online manual Customizing
FrameMaker on the Adobe website
www.adobe.com/go/lr_FrameMaker_support_en.
Display a high-contrast workspace
FrameMaker XML Author uses system colors to draw window backgrounds, text, and other graphics. Users who have
trouble discerning colors or variations in contrast, or who have low visual acuity, can set high-contrast color schemes
and custom text and background colors. This setting makes the information in the user interface easier to view.
1 Open the Windows Control Panel, double-click Accessibility Options, and select the Display tab.
2 Change contrast globally or change the color theme, as follows:
• To change the appearance of all operating system windows at once, select the Use High Contrast option.
• To change the color theme, click Settings and select one of the High Contrast Appearance Scheme options.
Note: FrameMaker XML Author does not adjust colors of all items. Some of these include the background color, and the
fill color of graphic objects.
Last updated 8/18/2015
Page 37

USING FRAMEMAKER XML AUTHOR (2015 RELEASE)
FrameMaker XML Author Basics
Use status bar controls
The FrameMaker XML Author status bar provides all the navigational controls, pagination information, and zoom
controls.
A C DB E F G H
Navigational controls on the status bar
A. First page B. Previous C. Go to page number D. Next E. Last page F. Go to line number G. Go to insertion point H. Zoom controls
Zoom in and out
• To magnify or decrease magnification, text, and objects, click the + (Increase Zoom) or - (Decrease Zoom) buttons
on the status bar. FrameMaker XML Author zooms in or out on the area of the page containing the insertion point
or selection. If the document doesn’t contain an insertion point or a selection, FrameMaker XML Author zooms in
on the center of the page.
• To display text and objects at a particular magnification, select a percentage from the Zoom pop-up menu.
• To display the entire page in the current window, select Fit Page In Window from the Zoom pop-up menu.
• To fit the page or text frame to the window, select Fit Window To Page or Fit Window To Text Frame from the
Zoom pop-up menu. If the view options are set to display facing pages, the window is resized to accommodate two
pages side by side.
• To change the available zoom settings, click Set from the Zoom pop-up menu, select the percentage you want to
change and enter the new percentage. Enter any percentage from 25% to 1600%. Click Set. To return to the default
percentages, click Get Defaults.
• To make 100% zoom match the page size, select File > Preferences > General. For Monitor Size, specify the diagonal
size of your monitor, and then click OK. If screen-to-paper fidelity is not critical, leave Monitor Size set to Default,
which ensures cross-application compatibility.
Note: You can customize the default zoom settings. For information, see the online manual Customizing FrameMaker
on the Adobe website
www.adobe.com/go/lr_FrameMaker_support_en.
31
Turn pages and set scrolling
You can page through a document window using controls in the status bar.
You can also define how FrameMaker XML Author displays pages when you scroll up and down, left and right, or two
pages at a time.
If the document you are paging through is part of an open book, FrameMaker XML Author sometimes displays an
alert message prompting you to choose to open the next or previous document in the book. For example, if you click
Previous Page on the first page of a document, clicking Yes in the alert message box opens the previous document in
the book. The last page of that document appears.
1 Make the appropriate document window or book window active. If a book window is active, select the documents
you want to affect.
2 Choose View > Options.
3 Choose one of the following options from the Page Scrolling pop-up menu:
• To display pages from top to bottom (for example, page 2 below page 1), choose Vertical.
• To display pages from left to right (for example, page 2 to the right of page 1), choose Horizontal.
• To display pages two at a time, side by side, choose Facing Pages.
Last updated 8/18/2015
Page 38

USING FRAMEMAKER XML AUTHOR (2015 RELEASE)
FrameMaker XML Author Basics
• To display as many pages as will fit in the window from left to right, choose Variable.
4 Click Set.
Go to another page
❖ Do one of the following:
• To go to the next page, click the Next Page button.
• To go to the previous page, click the Previous Page button.
• To go to the first page in the document, click the First Page button.
• To go to the last page in the document, click the Last Page button.
• To go to a specific page, click in the Page Number area and specify the page number you want to display.
• To go to a specific line number, click in the Line Number area and specify the line number you want to display.
• To go to the page containing the insertion point, click the Insertion Point button.
• To move quickly through the pages, scroll vertically.
In case of structured documents, click or select in the Structure View to display the corresponding page in the
document window. This is often the quickest way to go to the page you want.
32
Using toolbar shortcuts
You can access all commonly used commands from the following toolbars. You can display a toolbar from the View >
Toolbars menu.
Graphics Toolbar Provides shortcuts for graphic creation and edits.
Quick Access Bar Provides commands for opening and saving documents, editing text, graphics, and tables.
Object Alignment Provides commands to change sequence, alignment, and orientation of objects.
Object Properties Provides commands to group objects, change layer order, reshape, scale, and snap objects.
Track Text Edits Provides commands for tracking, accepting, and rejecting text edits.
Quick Element Provides commands inserting and wrapping common structured document elements.
You also have keyboard shortcuts for all commands accessible through the toolbars and menus. For a list of all the
keyboard shortcuts see
“Keyboard Shortcuts” on page 373.
More Help topics
“Keyboard Shortcuts” on page 373
Using pods
About pods
These frequently used dialog boxes have an interface designed to simplify your work:
• Conditional Tags pod
• Cross-references pod
• Marker pod
• Insets pod
Last updated 8/18/2015
Page 39

USING FRAMEMAKER XML AUTHOR (2015 RELEASE)
FrameMaker XML Author Basics
• Variables pod
• Reference pods
• Hotspots pod
• Currently Opened Files pod
A C
D
E
Explaining the pod interface
A. Select document B. Pod-specific toolbar buttons C. Search pod entries - as you type, FrameMaker XML Author searches through all the
columns for matches and keeps displaying them D. Arrow on column headers indicates sort order E. Pod list area. F. Details of each instance
include location. You can customize the location using Pods Location Criteria dialog box.
B
F
33
Close pods and tab groups
Pods have a button on the right side of the title bar you can click to close a pod or a tab group (group of pods).
Close pods and tab groups
• Close: Closes just the pod in focus (Marker).
• Close Tab Group: Closes all the pods in the tab group.
Also, by double-clicking in the title of a pod, you can minimize or maximize that pod as well as the whole tab group it
is a part of.
Last updated 8/18/2015
Page 40

USING FRAMEMAKER XML AUTHOR (2015 RELEASE)
FrameMaker XML Author Basics
About the pod list area
The Select pop-up displays a list of all open documents and DITA maps. If you select All Open Docs, the pod list area
displays all the variables from all the open documents. If you select a specific open document, the pod list area displays
variables from the selected document even when you switch to other open documents. The pod list area continues to
display the list of instances from the selected document.
If you select the Current option, the pod list area displays the list of instances from the selected document. The list area
refreshes when you switch between open documents. However, when you switch between pods, you may need to click
the Refresh button.
If you select an open document
• Single-click an instance in the pod to display the corresponding instance in the document. For example, if you select
an image instance from the Insets pod, the corresponding image is also selected in the document view.
• Double-click an instance to do the following for each pod:
Conditional Tags pod Displays the Add/Edit Condition Tag panel for the selected condition.
Cross-references pod Displays the Cross-Reference panel for editing the selected cross-reference.
Markers pod Displays the Marker panel so that you can edit the selected marker definition.
Fonts pod Displays the Replace Font panel for selecting a replacement font.
34
Insets pod Displays the Object Properties panel for the selected inset.
Variables pod Adds the selected variable at the insertion point in the current document.
Reference pod Displays the results of the search for locations where a particular element is referenced. This pod is
only relevant for DITA documents.
• Click a column name to sort the data in the list area in ascending or descending order.
Setting pod location criteria
The pod location criteria determine what should be displayed in the pod list area for an instance by way of identifying
its location in the document.
A
B
C
Pod location criteria
A. In structured interface, you can specify either the paragraph styles or the element names. B. Specify the first paragraph style. C. Specify the
second paragraph style.
1 Choose .
Last updated 8/18/2015
Page 41

USING FRAMEMAKER XML AUTHOR (2015 RELEASE)
FrameMaker XML Author Basics
2 Select Panels and Pods.
3 Select Element Name if you want the pod to display the element names in which the instance is located.
4 Specify valid element names and click OK.
B
35
B
The Markers pod displays the setting for marker location
A. Marker is selected in the document view B. Paragraph styles that you specify in Pod Location Criteria C. Markers pod displays the first
head3 title and head2 title in which the marker occurs.
Document window overview
The first time that you launch FrameMaker XML Author, it prompts you to select the product interface. Subsequently,
it opens with the last used interface.
Last updated 8/18/2015
Page 42
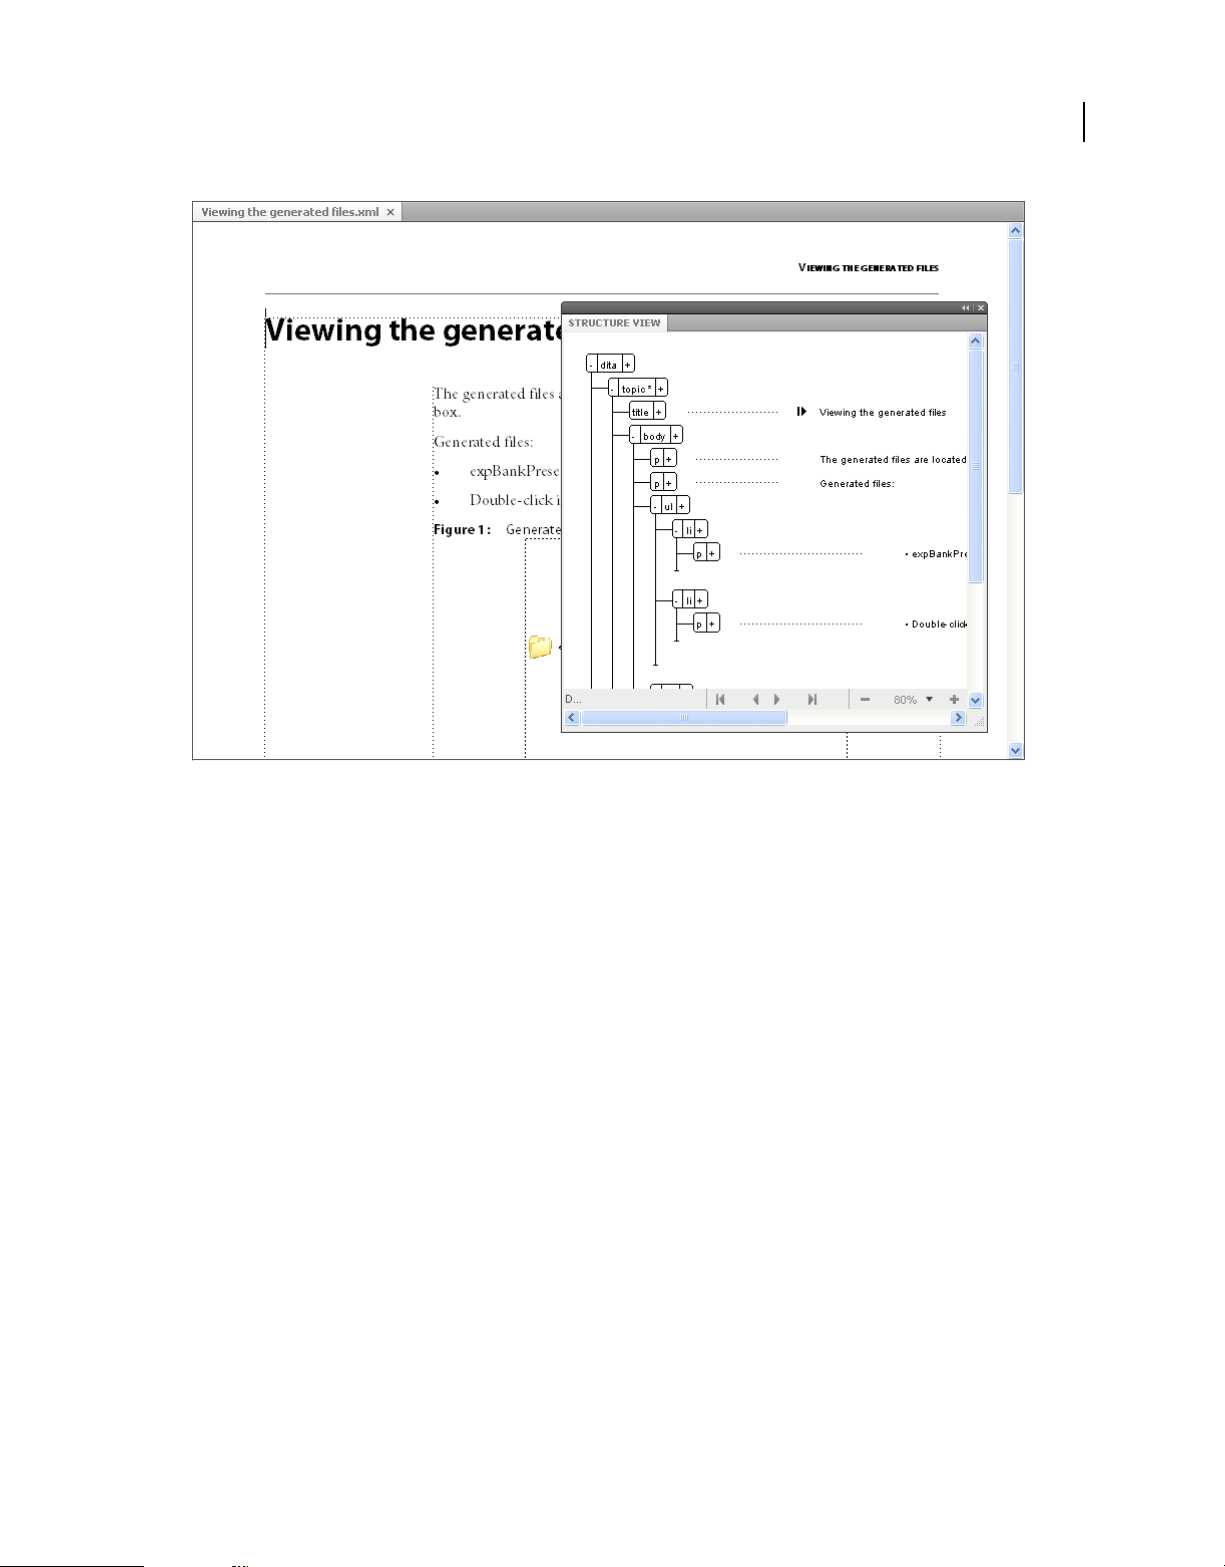
USING FRAMEMAKER XML AUTHOR (2015 RELEASE)
FrameMaker XML Author Basics
36
Contents and structure information
More Help topics
“About elements” on page 63
Document window
A document window appears when you open an XML document. The window shows the document text formatted,
with graphics and other items in place, and everything laid out in a page design. If more than one document is open,
a document window appears for each one.
Structure View window
The Structure View window displays the underlying XML structure. The view uses bubbles to represent elements and
their relationship to one another. It also identifies errors in the document structure. In Structure View, you can insert,
select, expand, collapse, move, merge, or split elements. When you work with structured documents, you’ll use the
document window and the Structure View together. These windows help you organize elements in a valid structure.
Both windows are editable, and anything you do in one is mirrored in the other. You can have the two views open side
by side, to keep track of both contents and structure. If you click or select in one view, an insertion point or selection
appears at the equivalent place in the other view. Any editing you do in one is reflected in the other. It’s easier to make
your changes in Structure View, where you can drag-and-drop bubbles to rearrange elements or select bubbles to edit
them in other ways.
❖ To display, choose Structure Tools > Structure View.
Last updated 8/18/2015
Page 43

USING FRAMEMAKER XML AUTHOR (2015 RELEASE)
FrameMaker XML Author Basics
Elements catalog
The Elements catalog lists the elements you can use at the current location and provides commands for adding and
editing elements. It also displays other information about the current location, such as whether you can type text there.
The information in the Elements catalog comes from content rules in the definition for the current element.
The catalog is preset to show only the elements that are valid at the current location, though you can have it display
more elements if you want greater flexibility. The catalog is empty if the document has no element definitions or if no
more elements are required at the current location.
❖ To display, click the Element Catalog button at the upper-right corner in the document window.
The Element Catalog uses the following symbols to identify whether an element is valid:
Heavy check mark The element is valid at the current location. If you insert the element, the current (parent) element
will be correct and complete up to this location.
Plus sign (+) The element is an inclusion (SGML only) in the current element and is valid at the current location. The
plus sign always appears next to a heavy check mark. Inclusions are valid only in SGML documents, so this sign does
not appear in XML documents.
Although inclusions are as valid as elements identified with just a heavy check mark, you might find it helpful to list
inclusions separately. If a document has many inclusions, it can be difficult to find other valid elements in the catalog.
Question mark (?) The element is a possible replacement for the element right after the insertion point or for the
selected elements. It is valid at the current location, but will make child elements after it invalid. If you insert an
element with a question mark, the current (parent) element will be complete and correct up to this location, but you’ll
have to correct errors after the new element.
37
Light check mark The element is valid later in the current element. If you insert one of these elements, the current
(parent) element will be correct but incomplete up to this location. You’ll have to go back and fill in missing child
elements.
No symbol If an element in the catalog has no symbol, it is not valid at the current location or later in the current
element. It may be valid earlier in the current element or outside the element.
The Element Catalog may also include the following indicators to provide other information about the current
location:
<TEXT> You can type text at this point.
<UNDEFINED> The current element does not have a definition in the document. The element was probably pasted
from a document with different element definitions. (This does not appear when the catalog is set to display all
elements.)
<INVALID> The contents of the current element are invalid. (This does not appear when the catalog is set to display
all elements.)
You can use buttons in the Element Catalog to insert an empty element, wrap an element around contents, and change
the type of an existing element.
XML view, Author view, and WYSIWYG view
FrameMaker XML Author has three views that help you author your content:
• XML view allows you to work with the plain XML code of your structured FrameMaker XML Author XML files.
• Author view simplifies structured authoring by keeping out features not relevant for XML authors, such as page
numbers.
Last updated 8/18/2015
Page 44

USING FRAMEMAKER XML AUTHOR (2015 RELEASE)
FrameMaker XML Author Basics
XML view
The XML view allows you to work with the plain XML code of your structured XML files. In the XML view, you can
expand /collapse elements.
A
38
C
B
XML View
A. Collapsed elements in the XML view B. Errors console C. Tree view
FrameMaker XML Author indents the child elements by one tab space compared to their parent elements. Word wrap
keeps the content of the elements visible in the width of the window. The XML view supports Unicode. You can edit
multilingual content in the XML view. You can also copy/paste content from clipboard.
When you edit/change references such as conrefs, links, and cross references in XML Code View, FrameMaker XML
Author updates them in the WSIWYG View also. XML view automatically validates the XML content with the DTD
and helps you ensure that the content is well formed at all times. While you are working in the XML view, FrameMaker
XML Author automatically inserts attribute values and close tags for the tags you insert in the file.
A Find/Change dialog in the XML view helps you search through the XML code. You can also use regular expressions
such as with ampersand and pipeline to search through text. XML code view also has support for XPath. You can build
and use XPath expressions to locate XML content. For more information on XPath, see XPath.
The following features can be accessed using the Code view only:
• “XPath” on page 304
Errors console
The Errors console in the XML view describes the errors, if any, in the open XML files. The error console also displays
the filename of the error. To go to the file and location of the error, click an error row.
Last updated 8/18/2015
Page 45

USING FRAMEMAKER XML AUTHOR (2015 RELEASE)
FrameMaker XML Author Basics
Display error pod
• To display the Error Pod, select View > Pod > Errors.
Tree view
XML View provides a tree-like outline that allows you to navigate and view the structure of your XML document. The
Up and Down arrow keys let you move up and down in the tree view. Left and Right arrow keys respectively allow you
to collapse and expand the elements.
Display tree view
• To display the tree view, select View > Outline.
Author view
The Author view provides a WYSIWYM (What You See Is What You Mean) view of your XML documents.
The Author view includes the visual tools for structured authoring, such as the element tags, Structure View, Element
Catalog, Attributes editor.
Using XML Author View, you can concentrate on the structure and content of the document rather than the
appearance.
39
WYSIWYG view
WYSIWYG is the classic FrameMaker XML Author view, which supports structured authoring. The WYSIWYG view
has all the features of FrameMaker XML Author.
Last updated 8/18/2015
Page 46
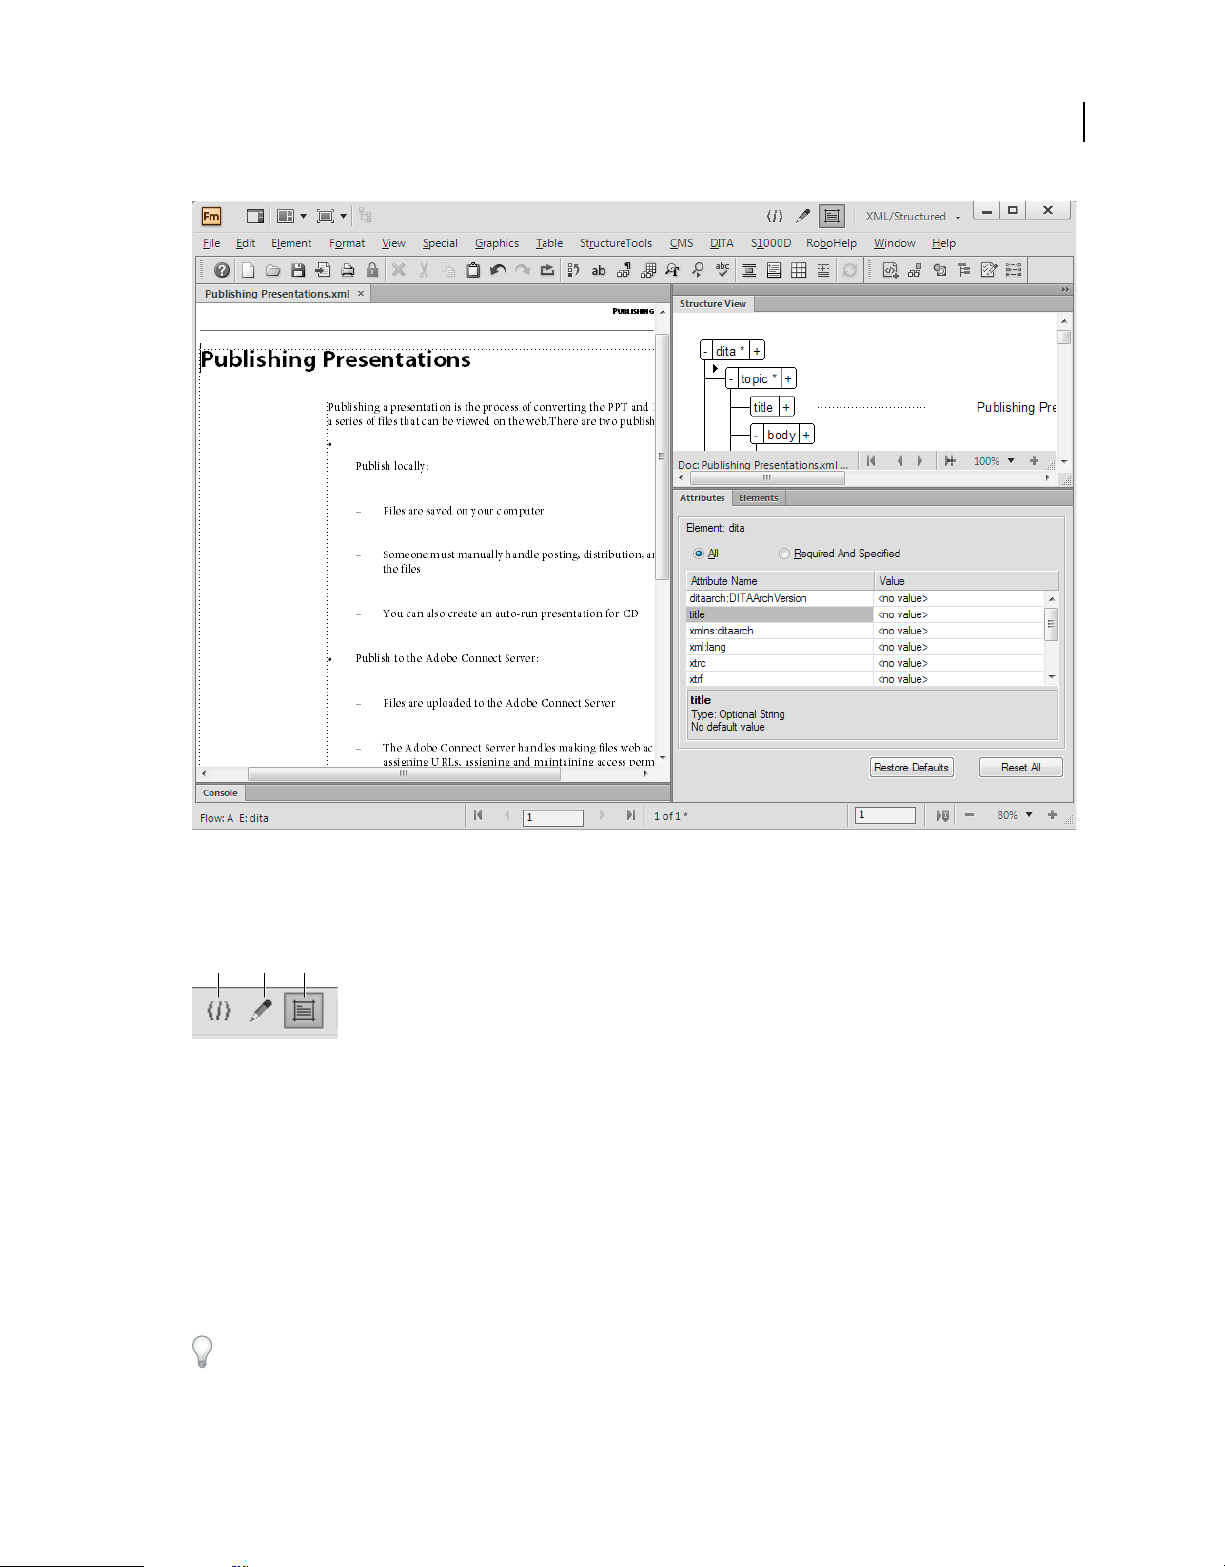
USING FRAMEMAKER XML AUTHOR (2015 RELEASE)
FrameMaker XML Author Basics
40
WYSIWYG view
Switch between the views
You can switch between the three views by clicking the relevant icon in the Application bar.
ABC
Icons of the three views in the Application bar
A. XML view B. Author view C. WYSIWYG view
Working with the Structure View
Expand or collapse structure
In the Structure View, you can expand or collapse elements, showing or hiding a detailed outline of your document.
(When elements are expanded or collapsed in Structure View, text in the document window does not change.)
An element is sometimes defined to have attributes, which provide supplemental information about the element. You
can also expand and collapse the attributes associated with an element.
Collapse elements to get a higher-level look at the document structure. Collapsed elements are also easier to move
around. It’s especially helpful to collapse long lists of items and procedures with many steps.
• To expand or collapse elements, click the plus (+) or minus (-) symbol on the left side of element bubbles.
Last updated 8/18/2015
Page 47

USING FRAMEMAKER XML AUTHOR (2015 RELEASE)
FrameMaker XML Author Basics
• To expand or collapse attributes, click the plus (+) or minus (-) symbol on the right side of element bubbles.
• To expand or collapse all child elements or attributes, hold down Shift while you click a plus or minus sign.
View element boundaries in the document window
Element boundaries shown in the document window mark the beginning and end of each element. Working with
visible boundaries helps you see how the document content is divided into elements. Viewing the boundaries also
makes it easier to place an insertion point properly or to make the right selection.
For most elements, the boundaries appear as opening and closing brackets ( [ ] ) or as two boxes with an element tag.
For some elements (graphics, footnotes, markers, tables, and equations), the element location is marked only by one
box with a tag.
When elements are inside other elements, their brackets or tags nest to show the hierarchy.
• To surround each element with brackets, choose View > Element Boundaries.
• To surround each element with a text label, choose View > Element Boundaries (As Tags).
• If the book window is active, select View > Show Element Boundaries or View > Hide Element Boundaries.
• To hide element boundaries, choose View > Hide Element Boundaries or Element Boundaries (As Tags)
Note: The brackets and tags that mark element boundaries are characters that both print and occupy document space.
Hide them before printing to suppress them in print output. Also hide them to see the document layout unaltered by
element boundaries.
41
Expand and collapse elements in document window
If you are viewing element boundaries as tags in the document window, you can perform the following operations:
• Collapse all elements, even in the document view.
• Collapse a parent element to hide the child elements, without collapsing them.
• Collapse child elements, when collapsing the parent element.
• Collapse all elements to the same level, when collapsing an element.
• Select the element, by clicking the element tag.
• Toggle the collapsed state of an element, by double-clicking the element tag.
• View expanded element structure, when any operation (for example, Find/Change) results in a selection, within a
collapsed element structure.
• Have the document view and structure view synchronized with respect to the collapsed state of the elements.
Show and hide attributes for new elements
You can show or hide attributes for new elements in Structure View. The view can display all the attributes in the flow,
none of the attributes, or only required attributes or attributes that have a value. This setting applies to new elements
as you enter them.
1 Make the appropriate document window or book window active. If a book window is active, select the documents
you want to affect.
2 Select View > Attribute Display Options, choose the display option you want, and click Set.
Last updated 8/18/2015
Page 48

USING FRAMEMAKER XML AUTHOR (2015 RELEASE)
FrameMaker XML Author Basics
Change the scope of elements available in a structured document
When adding elements to a structured document, insert only elements that are valid at the current location. (Valid
elements have heavy check marks, heavy check marks and a plus sign, and question marks in the Element Catalog.) If
you add elements this way, you can work from the beginning of a document to the end and be sure that its structure
is valid at every point along the way.
Sometimes you want to work more loosely, and in these cases you can make more elements available. For example,
some draft documents must adhere strictly to a predefined structure but follow the structure only as a guideline. Or,
you can plan your document to conform to a structure without having all the information to complete it from start to
finish.
When more elements are available, the additional elements appear in the Element Catalog and are available if you
insert elements from the keyboard. You can also list inclusions after other valid elements in the catalog.
1 Make the appropriate document window or book window active. If a book window is active, select the documents
you want to affect.
2 Select Element > Set Available Elements. You can also click Options in the Element Catalog.
3 Select one of the following options in the Show Tags For area:
• To show only elements that are valid for the current location, select Valid Elements For Working Start To Finish.
Use this option if you plan to go through a document from start to finish and fill in the elements in their correct
order and hierarchy.
• To show elements that are valid for the current location or later in the current element, select Valid Elements
For Working In Any Order. Use this setting if you plan to build a valid document but not necessarily by working
from start to finish. This is helpful if you don’t have all the information you need.
• To show elements allowed anywhere in the current element, select Elements Allowed Anywhere In Parent. Use
this setting if you want more flexibility for filling in elements. You can insert elements that are invalid and
correct the errors later.
• To show all elements defined for the document, select All Elements. Use this setting if you’re not building a valid
document, if you want flexibility and will correct errors later, if you’re wrapping elements around contents, or
if you want to see what’s available elsewhere in the document.
• To show a set of elements that you specify, select Customized List. Use this setting to work with a subset of the
elements, to display elements in a fixed order, or to work with a list that is static instead of context sensitive.
4 If you selected Customized List, click Edit and create or change a list of elements.
To move element tags between the Show and Don’t Show lists, use the arrow buttons or double-click the element
tags. Transfer all of the elements from one list to another by holding down Shift as you click an arrow button. Click
the Move Up and Move Down buttons to arrange the elements in the Show list in the order you want them to appear
in the Element Catalog. Click Set when the list is the way you want it.
42
Note: A customized list of tags is always the same regardless of the location of the insertion point, so be careful to
include all the tags you need. The only indication of validity is a check mark next to a tag.
5 To list inclusions separately in the Element Catalog, turn on List After Other Valid Elements.
This groups the inclusions right after the other valid elements. Use this setting if you have a large number of
inclusions that you rarely need.
6 Click Set.
Last updated 8/18/2015
Page 49

USING FRAMEMAKER XML AUTHOR (2015 RELEASE)
FrameMaker XML Author Basics
Accessibility features in FrameMaker XML Author
The FrameMaker XML Author software provides a number of features that improve access for visually impaired users.
In particular, it:
• Provides support for high-contrast viewing for users with low visual acuity.
• Supports assistive technology, such as screen reader software for the Windows® platform.
Screen readers let visually impaired users interact with the computer by interpreting what is happening on the screen
and sending that information to speech-synthesis devices. The screen reader will follow the logical structure of the
document. Screen readers can read FrameMaker XML Author documents viewed in FrameMaker XML Author, or
tagged PDF documents viewed in Adobe Acrobat® or Adobe Reader®. Refer to your screen reader documentation for
information on installation and use with documents viewed in FrameMaker XML Author or Acrobat.
For more information on accessibility in Adobe Acrobat and Adobe PDF documents, see the Acrobat online Help and
the Adobe website.
Launch the soft keyboard
1 From the Start menu, select Programs > Accessories > Accessibility > On-Screen Keyboard.
2 Click OK. You can then start using the onscreen keyboard.
43
More Help topics
“Display a high-contrast workspace” on page 30
Opening, saving, and closing documents
Open a document
In FMXA, you can open XML and text files.
Open a file
1 Select File > Open.
2 Locate the document and click Open.
Opening a document usually updates graphics imported by reference, text insets, cross-references, and system
variables (if any exist). Recently opened files are listed at the bottom of the File menu.
Messages alerting you to possible issues with the file sometimes appear. You can click OK and resolve the problems
later.
Open a text file
Text-only files do not contain graphics or formatting information. When you open a text-only file, you are asked to
confirm that it is a text file.
1 Select File > Open, and open a .txt file. The Unknown File Type dialog box appears.
2 Select the Text option.
3 Click Convert.
Last updated 8/18/2015
Page 50

USING FRAMEMAKER XML AUTHOR (2015 RELEASE)
FrameMaker XML Author Basics
4 Select one of the following options:
• To break the text into paragraphs only at blank lines, select Merge Lines Into Paragraphs. Use this option for a
paragraph-oriented text file, such as a file containing document text.
• To break the text into paragraphs at the end of each line, select Treat Each Line As A Paragraph. Use this option
for a line-oriented text file, such as a file containing computer code.
• To convert the text into a table, select the Convert Text To Table. Use this option if the content of your source
file is tabulated.
Select additional options in the Convert To Table dialog box, such as number of columns, cell separators, and
heading rows, to obtain the data in the appropriate tabular form.
5 Select the desired Encoding scheme. By default, the ANSI (Windows) encoding scheme is selected.
6 Click Read. The text appears in a document that is created from a special template. You can customize the template
so that documents created from text files are formatted differently.
Open a document without updating references
A document opens more slowly if it contains many cross-references to other files, large imported graphics, or many
text insets. You can open a document faster by bypassing the update of imported graphics, cross-references, and text
insets. However, if you use this method to open documents, keep in mind that FrameMaker XML Author does not
warn you about missing items or unresolved cross-references. For this reason, it is best to occasionally open a
document in the usual way.
44
1 Choose File > Open, and select the file you want to open.
2 Control-click Open.
After the file is open, FrameMaker XML Author imports and displays graphics as needed on a page-by-page basis. You
can manually update cross-references and text insets by using Edit > Update References. If the page display is too slow,
reopen the document in the usual way.
In the case of .xml files, control-clicking the Open button opens them as text files. You are prompted to specify the text
reading options in the Reading Text File dialog box. Opening these files as text lets you view or edit the markup.
Markup in an SGML file
Troubleshooting unavailable fonts
You sometimes get an alert message that indicates the document you are opening uses unavailable fonts. Fonts can
become unavailable for a few reasons:
• The document was edited on a different system using fonts that are not installed on your system.
• A font is removed or has become damaged.
• The default printer for your system has changed.
Last updated 8/18/2015
Page 51

USING FRAMEMAKER XML AUTHOR (2015 RELEASE)
FrameMaker XML Author Basics
If the Remember Missing Font Names option in the Preferences dialog box is selected, FrameMaker XML Author
preserves the names of unavailable fonts. Selecting this option causes the original fonts to reappear when you open the
document on a computer that has the fonts installed, even if you save the document with substitute fonts.
To fix the problem of missing fonts, consider the following options:
Check for damaged fonts Determine whether the fonts that are unavailable in FrameMaker XML Author are installed
on your system and available in another application. If another application can use fonts that FrameMaker XML
Author cannot use, the fonts may be damaged. Reinstall them using the original media. For more information on
troubleshooting font problems, isolating damaged fonts or a damaged fonts folder, or reinstalling PostScript fonts, see
the Adobe website.
Remap unavailable fonts If you cannot install or reinstall the unavailable fonts, you may want to permanently remap
the unavailable fonts to available fonts, so that the alert message does not appear when you open the document. You
do this by deselecting the Remember Missing Font Names option in the Preferences dialog box before you open the
file. However, be aware that doing this causes you to lose the original font information referenced in the document.
Obtain and install the missing fonts For example, if you and a co-worker are editing the same documents, and you
would like to use the same fonts as your co-worker, consider purchasing and installing copies of the fonts.
Add metadata to a document
FrameMaker XML Author includes built-in support for Extensible Metadata Platform (XMP). Metadata, or file
information, is descriptive information that can be searched and processed by a computer. Use it to provide
information about the contents of a document, and to preserve information about a document that will be opened in
other Adobe applications. If you export the file to PDF, much of this metadata will appear in Acrobat.
45
Metadata tags travel with the document and describe its content. By embedding them in your documents, you make
the documents easier to track, manage, and retrieve.
Note: Metadata in a book file sometimes overrides metadata in a document file. If your document is part of a book file,
open the book file and select the document before you add metadata.
1 Make the appropriate document window or book window active. If a book window is active, select the documents
you want to affect.
2 Choose File > File Info.
3 Enter the desired information in the box next to any or all categories.
4 For Marked, choose Yes if the document is copyrighted, or No if the document is explicitly in the public domain.
Choose Unknown if you’re not sure.
5 Click Set.
Save documents
You can save a document using its current name and location, or save a copy of the document using a different name
or location. You can save a document in several formats, including Extensible Markup Language (XML), and Portable
Document Format (PDF).
When a document or a book has unsaved changes, an asterisk (*) appears in the Page Status area of the status bar.
An asterisk indicates unsaved changes.
Last updated 8/18/2015
Page 52

USING FRAMEMAKER XML AUTHOR (2015 RELEASE)
FrameMaker XML Author Basics
Save a document
1 Do one of the following:
• To save changes in the current file, choose File > Save.
• To save the file in a different folder or with a different filename, choose File > Save As.
2 If you choose the Save As command, or if the file has never been saved, specify the new filename and location. If
you want to save the file in a different format, choose the format from the pop-up menu.
3 Click Save. If you choose Text Only format, specify how to treat the text and tables in the document.
Save a book
1 Do one of the following:
• To overwrite the current version on the disk, choose File > Save Book.
• To save the file in a different folder or using a different name, choose File > Save Book As.
2 If you choose the Save Book As command, or if the file has never been saved, specify the new filename and location.
Save all open documents
❖ Hold down Shift and choose File > Save All Open Files.
46
Return to the saved version of your document
❖ Choose File > Revert To Saved and click OK.
File formats you can save in
You can use the Save As command to save a file in the following formats:
PDF Creates a Portable Document Format (PDF) file that can be viewed in Adobe Acrobat® and other applications that
support PDF files.
XML Creates an XML document that can be used for data exchange and viewed on the World Wide Web.
Filename extensions for saved files
When you save a file for the first time in Windows, FrameMaker XML Author automatically adds these extensions:
..xml for documents and books. With these extensions, the files are recognized as FrameMaker XML Author files by
the Windows operating system.
If you don’t want these special extensions added to the filenames you assign, enclose the filenames in double quotation
marks. Windows doesn’t recognize a file without one of these extensions as a FrameMaker XML Author file, but you
can still open the file in FrameMaker XML Author.
If you assign an extension that’s registered by another application, such as .doc, the extension is not replaced by the
FrameMaker XML Author extension and you can still open the file in FrameMaker XML Author.
Back up and save automatically
FrameMaker XML Author can back up and save your work automatically.
1 Choose .
Last updated 8/18/2015
Page 53

USING FRAMEMAKER XML AUTHOR (2015 RELEASE)
FrameMaker XML Author Basics
2 In General preferences, do the following:
• To create a backup file every time you save, select Automatic Backup On Save. This option creates a copy of the
file before your latest changes are saved. If a backup file exists, the new backup file overwrites it. (The filenames
of backup files contain .backup.)
• To create an autosave file at regular intervals, select Automatic Save and enter an interval (in minutes) in the
box. This causes a copy of the file to be saved periodically without your having to choose File > Save. (The
filenames of autosave files contain .auto.) When you save manually or revert to the last saved version with the
Revert To Saved command, the autosave file is deleted.
3 Click OK.
Currently opened files pod
FrameMaker XML Author prompts you to review and save the open files when you try to exit FrameMaker XML
Author. When you try to exit FrameMaker XML Author, FrameMaker XML Author displays the Currently Opened
Files pod using which you can:
1 Review and save files with unsaved changes
2 Search for a file with a specific name or files saved in a particular folder
3 Navigate across different files
4 Review the path of the various open files
5 Close specific files after saving or without saving
47
ABCD E
G
H
The Currently Opened Files pod
A. B. Refresh C. Search - As you type, the pod matches the search criteria with entries in all the columns D. Clear search criteria E. The
checkbox to select all the currently opened files F. The checkboxes to select the currently opened files G. Click to save files and keep them open
H. Click to save the selected files and close them I. Click to close the selected files - if there are unsaved changes in the files you are trying to close,
the Save Files dialog appears
F
Even while working on FrameMaker XML Author, you can display a list of currently opened files, review the unsaved
files, and save the ones you want to.
Last updated 8/18/2015
Page 54

USING FRAMEMAKER XML AUTHOR (2015 RELEASE)
FrameMaker XML Author Basics
Save files on exit or while closing files
FrameMaker XML Author displays the Save Files dialog when you attempt any of the following:
• Exit FrameMaker XML Author by
• Clicking the Close button
• Selecting File > Exit
• Right clicking in the Status Bar and selecting Close all windows
• Using Alt+F4 on the keyboard
• Select Shift+File and select one of the following options
• Close All Open Files
• Close All Files in Book
• Close All Files in Ditamap
• Try to close files without saving in the Currently Opened Files pod
The Save Files dialog
In the Save Files dialog, you can review and save unsaved changes files. You can also discard the changes by deselecting
the files and clicking OK.
48
Save and close currently opened files
You can see a list of currently open documents in the Currently Opened Files pod. Using the Currently Opened Files
pod, you can select the files and changes to save and discard.
Save
1 Do one of the following:
• Select File > Currently Opened Files.
• Select View > Pods > Currently Opened Files.
FrameMaker XML Author displays the Currently Opened Files pod. Unsaved files and files with unsaved changes
are indicated with asterisk (*). To locate files in a long list, type in the Search box. FrameMaker XML Author
matches the text in the name of the file as well as the path.
2 Select the files to be saved and do one of the following:
• Click Save.
FrameMaker XML Author saves the selected files. FrameMaker XML Author prompts you to specify the name
and path of the files that are not saved to the disk yet.
• Click Save and Close.
FrameMaker XML Author saves and closes the selected files.
• Close Files.
FrameMaker XML Author closes the selected files. If you choose to close any files with unsaved changes, the List
Of All Open Files dialog appears.
Last updated 8/18/2015
Page 55

USING FRAMEMAKER XML AUTHOR (2015 RELEASE)
FrameMaker XML Author Basics
Restore last session
FrameMaker XML Author allows you to restore the last session you were working on when you last exited
FrameMaker XML Author or it crashed. In case of a crash, when you launch FrameMaker XML Author again,
FrameMaker XML Author displays an alert where you can choose whether or not to restore the last session. By
restoring the last session, you can reinstate the following as you were working on them in the last session:
• View: XML Code, WYSIWYG, or Author
• Workspace
• The document in focus
• The files open in the last session (Except the files open through the CMS connector in the last session)
• Page numbers in focus for different documents
• The scrollspace for the master, body and reference pages
• Tab order of the documents
• Palettes (such as Equation, Templates, and Thesaurus browser)
• stuctapps.fm file: The last read structapps.fm file (On restore, the last read structapps.fm file is read again)
49
Conditions to restore last session
If all the following conditions are met, you can restore FrameMaker XML Author’s last session:
1 There were files open when you exited FrameMaker XML Author or it crashed. In other words, there is something
to restore in the last session. If you exit files FrameMaker XML Author after manually closing the files, there is
nothing to restore.
2 There are no open files when you try to restore the last session
To restore the last session
To restore FrameMaker XML Author’s last session, launch FrameMaker XML Author and do one of the following:
• Click Restore Last Session on the starter screen.
OR
• Select File > Restore Last Session.
OR
• Use the keyboard shortcut Esc r s.
• In case FrameMaker XML Author crashes, when you relaunch FrameMaker XML Author, FrameMaker XML
Author displays an alert message where you can click Yes to restore the last session.
FrameMaker XML Author restores the last session. If there are some files that could not be restored, FrameMaker
XML Author displays an error message and lists the files in the in the console.
Preferences for alerts on restore
In the preferences dialog, you can select whether or not to display the alerts, such as missing fonts and unresolved cross
references, on session restore. The alerts that require user action, such as missing graphics, appear even when you have
disabled the alerts.
Last updated 8/18/2015
Page 56

USING FRAMEMAKER XML AUTHOR (2015 RELEASE)
FrameMaker XML Author Basics
Document direction
FrameMaker allows you to author documents in both left-to-right (LTR) as well as right-to-left (RTL) scripts such as
Arabic and Hebrew.
FrameMaker provides out-of-the-box document direction support for DITA topics (see Change text direction).
However, for structured documents based on other structured applications, the application developer will need to
define the
You can also choose to author multi-directional documents. This means that you can author a document in a specific
direction that includes elements authored in the other direction.
You can change the orientation (flip) of the images in a document based on the direction of the document.
Inheritance design
The direction authoring support in FrameMaker is based on an inheritance design. By default, the element in a
document inherit the direction of the document. For example, direction of the elements inserted into a RTL document
will be RTL. FrameMaker uses this inheritance design to allow you to author multi-direction documents.
Caret location and movement
By default, the cursor in an RTL enabled document moves right to left as your type. FrameMaker now has system of a
strong (primary) caret and a weak (secondary) caret. The strong caret indicates where an inserted character will be
displayed when that character's direction is the same as the base direction of the text. The weak caret shows where an
inserted character will be displayed when the character's direction is the opposite to the base direction.
dir property in the EDD. For details, see the Structured applications reference guide.
50
To change the movement behavior of the caret:
1 Open the Preferences dialog (Choose Edit > Preferences).
2 In the Caret Movement group, choose Logical to ensure that the key movement remains the same as the logical
order of inserted characters.
Choose Visual to ensure that the cursor movement is in the direction of the keys. For example, the left key moves
the cursor in the left direction.
Last updated 8/18/2015
Page 57

Chapter 4: Variables, line numbers, and document creation
Variables
About variables
You can include text that frequently changes and appears often in your document as variables. Variables are also useful
for providing information that is updated automatically, such as the current date. In FMXA, you have system variables
and user variables. System variables are maintained by FMXA, such as current date or filename. User variables are
variables that you define in FMXA, such as company name or product name.
System variables
Each system variable has a name and a definition. Although you cannot rename system variables, you can edit their
definitions. A system variable definition can contain the following items:
51
• Building blocks for system information, such as the month, day, year, and filename
• Text characters, such as the comma and the spaces that appear in the date May 1, 2012
• Building blocks for character format changes
For example, the Table Sheet variable that appears in a table title as (Sheet 3 of 5) has the following definition.
A
B
A. Text you type B. Building blocks
You can change the definition—the way the information is displayed—by adding, removing, or rearranging building
blocks and by editing the text in the definition. For example, you can change the format used to display the current
date.
If you place a system variable on a body, the value is updated only when you open or print the file.
You can also manually update the value of the variable when the file is open. Access the Variables pod and click
Update.
Note: Variables and variable names support the Unicode text encoding standard.
Last updated 8/18/2015
Page 58

USING FRAMEMAKER XML AUTHOR (2015 RELEASE)
Variables, line numbers, and document creation
Default values for system variables
System variable Default definition (US English version) Example of display
Current Page # <$curpagenum> 3
Page Count <$lastpagenum> 18
Current Date (Long) <$monthname> <$daynum>, <$year> October 11, 2012
Current Date (Short) <$monthnum>/<$daynum>/<$shortyear> 10/11/12
52
Modification Date (Long) <$monthname> <$daynum>, <$year>,
<$hour>:<$minute00> <$ampm>
Modification Date (Short) <$monthnum>/<$daynum>/<$shortyear> 9/24/11
Creation Date (Long) <$monthname> <$daynum>, <$year> July 1, 2012
Creation Date (Short) <$monthnum>/<$daynum>/<$shortyear> 7/1/12
Filename (Long) <$fullfilename> c:\Memos\Staffing.fm
Filename (Short) <$filename> Staffing.fm
Table Continuation (Continued) (Continued)
Table Sheet (Sheet <$tblsheetnum> of <$tblsheetcount>) (Sheet 1 of 2)
Volume Number <$volnum> 3
Chapter Number <$chapnum> 3
Section Number <$sectionnum> 3
Sub Section Number <$subsectionnum> 3
September 24, 2011, 10:48 am
You can use the <$chaptertitlename> variable to propagate the folder name in the template associated with the folder.
More Help topics
“Add a folder” on page 211
User variables
Each user variable has a name and a definition. A definition includes text and optional building blocks for the character
format of the text. For example, suppose you define a variable as follows:
<BookTitleFormat>The Earth Sciences
If the BookTitleFormat character format is defined as italics, this variable appears on the page as The Earth Sciences.
You can change the definition of any user variable, for example, when the book title changes. When you change the
definition, all occurrences of the variable in your document are updated to use the new definition.
The standard templates don’t provide any user variables. If you’re using one of these templates, create your own user
variables. If you’re using a template created at your site, perhaps it already includes some user variables.
Valid variables in structured documents
You can add a system variable to a structured flow, with or without a special variable element. You do not use special
variable elements for user variables but insert them directly in elements defined for text.
Variables in FMXA are exported as entities, and usually the entity name is the same as the variable name. However, if
you create a variable whose name is not a valid XML or SGML name, the entity name is not the same as the variable name.
Last updated 8/18/2015
Page 59

USING FRAMEMAKER XML AUTHOR (2015 RELEASE)
Variables, line numbers, and document creation
Here are some examples of invalid names:
• A name with multibyte (Asian-language) characters.
• A name that includes anything other than alphanumeric characters, hyphens, or periods.
• A name containing more characters than the number specified by the value of NAMELEN in the XML or SGML
declarations for the particular application.
Working with variables
Variables pod
You can use the Variables pod to insert, edit, or delete system and user variables.
A B C D E F G H I
53
J
K
L M
Variables pod
A. Select the file B. Insert a variable in your document C. Create a new user variable D. Edit a variable definition E. Delete a user variable
F. Convert a variable to text G. Update all system variables H. Refresh the pod data I. Search for a variable J. System variables K. User
variables L. Variable format M. Document in which the variable exists
More Help topics
“Using pods” on page 32
Insert a variable
You can insert most system variables on a body, reference, or master page.
1 Access the Variables pod from View > Pods > Variables.
2 Click to place the insertion point where you want the variable to appear in the document.
3 Double-click a variable from the Variables pod to insert it in your document. Alternatively, click the Insert icon on
the pod toolbar.
The Variables pod contains the variables allowed at the insertion point in the document. For example, if the
insertion point is in a text frame on a body page, the scroll list doesn’t contain the Current Page # variable. If the
insertion point is in a text frame on a master page, then more variables are displayed in the Variables pod.
Last updated 8/18/2015
Page 60

USING FRAMEMAKER XML AUTHOR (2015 RELEASE)
Variables, line numbers, and document creation
Insert variable elements in structured documents
You can use an element to insert a variable in a structured flow. You can also insert a variable directly in text, without
using a special variable element. For example, you can include the Chapter Title Name as part of a body element.
FMXA comes with a set of system variables. The format rules of a variable element determine which variable to use
with it. You cannot change a system variable element to use a different variable.
The values of system variables you insert are updated when you open or print the document. You can also update
system variables manually. (System variables in headers or footers are updated when the page is redisplayed.)
1 Click where you want to insert the variable.
2 Select a system variable element in the Element Catalog and click Insert.
3 If the Attributes for the New Element dialog box appears, enter attribute values for the element and click Insert
Element.
The current value of the variable appears at the insertion point. A bubble for the variable appears in the Structure
View, with a text snippet that shows the beginning of the variable text.
4 To update all variables in the current document, click Update on the pod toolbar. To update variables in all open
documents, first select All Open Docs and then click Update on the pod toolbar.
If your application has user variables already defined, you can insert variable elements in your document. You can
insert a user variable directly in text, without using a variable element. Perhaps your application has user variables
already defined. You can define and maintain other user variables as needed. If the value of a user variable changes, it
is updated automatically wherever it occurs.
54
Edit or delete a variable occurrence
If you edit a variable definition, then all occurrences of the variable in the document are updated.
Alternatively, you can convert a variable to editable text and then edit the text in the document. If you convert the
variable to text, however, the text is no longer updated when the variable definition changes.
You can delete variable occurrences from a body page. Also, backspacing the insertion point over a variable in the
document doesn’t delete the variable. You can remove or edit a variable in the following ways:
• To delete one occurrence of a variable:
1 Select the variable name from the Variables pod and click Edit.
2 From the Add/Edit Variables panel or the Edit System Variables panel, select the instance from the Location list
and click Delete.
• To copy or move a variable, select it and choose Edit > Copy, Edit > Cut, or Edit > Paste.
• To replace a variable, select the variable in the Document view, and then double-click a different variable in the
Variables pod.
• To delete a variable in a text inset, delete the variable in the source document.
Note: Deleting a variable definition converts all occurrences of the variable in your document to editable text.
Convert a variable to text
1 Select the variable, click Convert To Text from the Variables pod.
2 Do one of the following:
• To convert a single occurrence of a variable, click Selected Variable.
Last updated 8/18/2015
Page 61
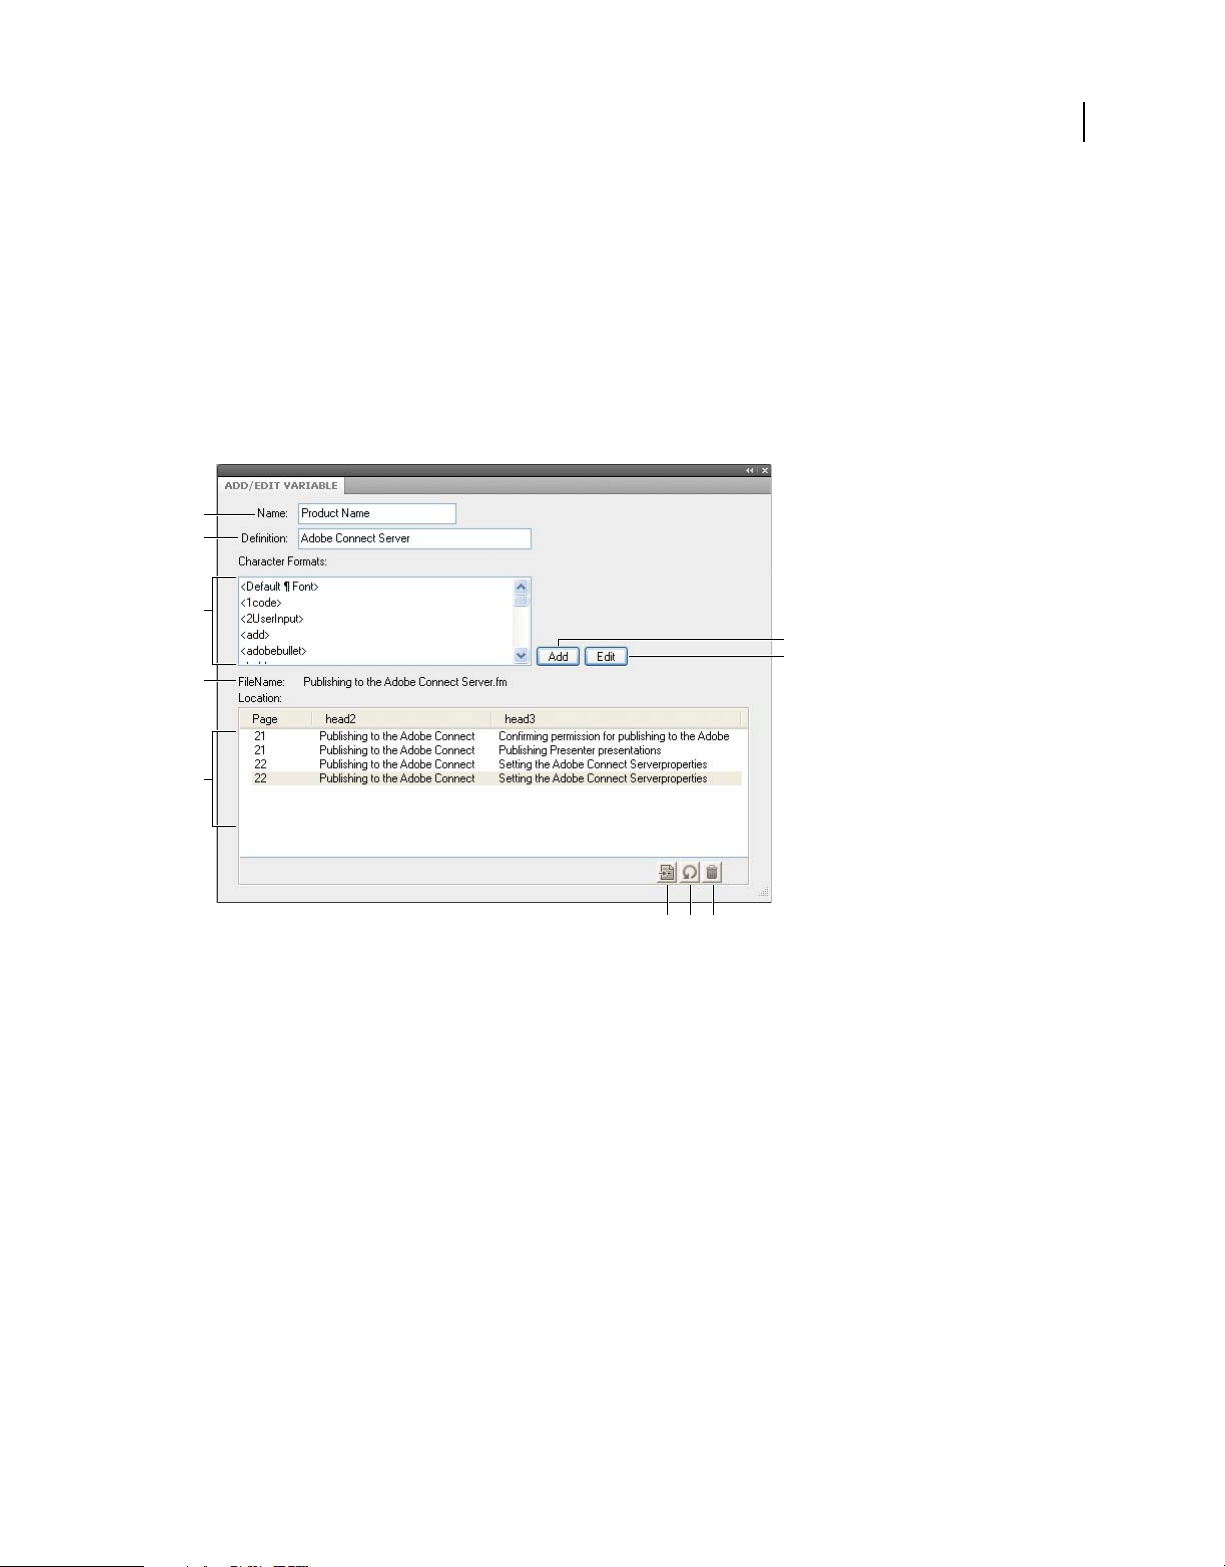
USING FRAMEMAKER XML AUTHOR (2015 RELEASE)
Variables, line numbers, and document creation
• To convert all occurrences of a particular variable, select the variable in the Variables Named scroll list. For
structured documents, you can also choose the variable element tag from the Variables With Element Tag popup menu.
• To convert all variables in the document, click All Variables.
3 Click Convert.
Create a user variable
A user variable is useful for a product name that can change or for a long manual name that is difficult to type each
time. You can add a new variable and edit its definition from the Add/Edit Variable panel.
A
B
C
F
G
D
55
E
I JH
Add or edit existing user variable definitions from the Add/Edit Variable panel
A. Name of the new variable or variable selected in the Variables pod B. Specify or edit the format definition for the variable C. Select from the
list of building blocks to define the variable format D. Name of the file that contains the selected variable instance in the Variables pod
E. Location list displays the location of the selected variable in the document. It displays the page number and the headings under which it
appears F. Add a new user variable G. Edit the definition of a variable H. Highlights the selected variable in the Document view. Select an
instance from the Location list and click this button. I. Refreshes the data in the Location list J. Deletes the selected variable instance selected
in the Location list from the document.
If you don’t specify a character format in the variable definition, the variable uses the format at the insertion point. If
you change the character format for the variable, the change applies only to the variable, not to the text that follows.
1 Click Create New User Variable from the Variables pod.
2 Enter the name and definition of the variable. Use these guidelines:
• Variable names are case-sensitive.
• The complete definition, including typed text and character formats, can be up to 255 characters long.
• You cannot use system variable building blocks for user variables.
• To include an angle bracket in a variable definition as text, precede it with a backslash (\).
• Enter a sequence of characters beginning with a backslash (\).
• To create a multiline variable such as multiline address, append \r for each line. Do not press Enter to insert a
line break.
Last updated 8/18/2015
Page 62

USING FRAMEMAKER XML AUTHOR (2015 RELEASE)
Variables, line numbers, and document creation
3 To change the character format within the variable definition, do the following:
• To use a character format stored in the Character Catalog, place the insertion point in the Definition box where
you want to change the character format. Then click the character format in the Character Formats scroll list.
The scroll list includes all the formats in the Character Catalog of the current document.
Important: Don’t use a character format whose tag includes angle brackets.
• To return the character format to the paragraph default font at the end of the variable, place the insertion point
in the Definition box where you want to change the character format. Then click <Default Font> in the
Character Formats scroll list.
4 Click Add.
5 To add more user variables, repeat steps 3 through 5.
Edit a variable definition
You can edit both system variables and user variables. For a system variable, you can edit its format by changing its
building blocks in the Edit System Variable panel. To do so, select the system variable in the pod and click the Edit
button.
56
A
B
C
F
D
E
H IG
Edit system variable definitions from the Edit System Variable panel
A. Name of the variable selected in the Variables pod B. Displays the format definition for the variable C. Select from the list of building blocks
to define the variable format D. Displays the name of the file that contains the selected variable instance in the Variables pod E. Location list
displays the location of the selected variable in the document. It displays the page number and the headings under which it appears F. Edits the
definition of the selected variable G. Highlights the selected variable in the document. Select an instance from the Location list and click this
button. H. Refreshes the data in the Location list I. Deletes the selected variable instance selected in the Location list from the document.
For user variables, you can change the variable name and the variable format from the Add/Edit Variable panel.
Last updated 8/18/2015
Page 63
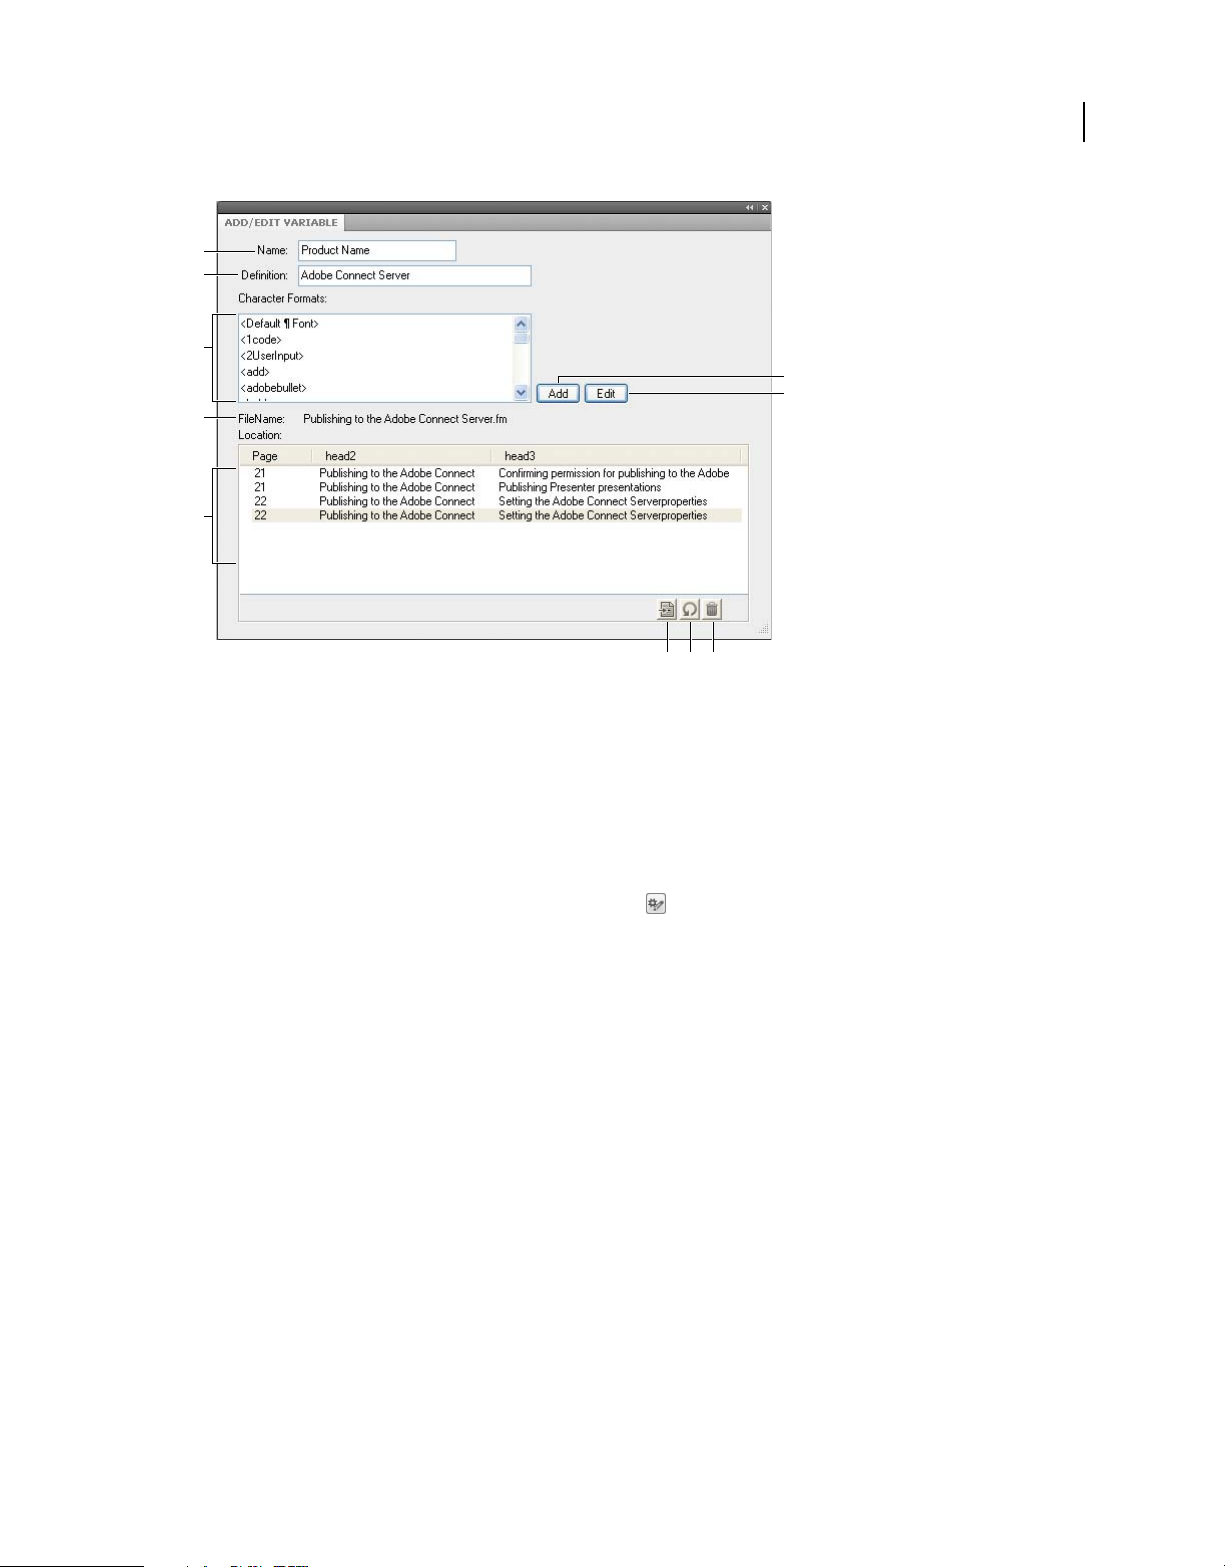
USING FRAMEMAKER XML AUTHOR (2015 RELEASE)
Variables, line numbers, and document creation
A
B
C
F
G
D
E
I JH
Add or edit existing user variable definitions from the Add/Edit Variable panel
A. Name of the new variable or variable selected in the Variables pod B. Specify or edit the format definition for the variable C. Select from the
list of building blocks to define the variable format D. Name of the file that contains the selected variable instance in the Variables pod
E. Location list displays the location of the selected variable in the document. It displays the page number and the headings under which it
appears F. Add a new user variable G. Edit the definition of a variable H. Highlights the selected variable in the Document view. Select an
instance from the Location list and click this button. I. Refreshes the data in the Location list J. Deletes the selected variable instance selected
in the Location list from the document.
57
Note: If a variable is in a text inset that uses the source document formats, change the variable definition in the source
document.
1 Select the variable from the Variables pod and click Edit .
2 Do one of the following:
• For user variables, edit the variable name or change its definition in the Add/Edit Variable panel and click Edit.
• For system variables, edit the definition and click Edit.
Insert a building block for system-supplied information or for a character format at the insertion point. Click
the building block in the Building Blocks scroll list. Only the building blocks appropriate for the variable appear
in the scroll list. For example, <$fullfilename> and <$filename> appear for the filename variables. All the
character formats in the Character Catalog appear at the bottom of the scroll list.
All instances of the variable in the document are updated with the new format.
Changing definitions of date and time variables
FMXA includes both long and short versions of variables for the current date, the date the document was last modified,
and the document creation date. FMXA provides the following building blocks for date and time variables.
Last updated 8/18/2015
Page 64

USING FRAMEMAKER XML AUTHOR (2015 RELEASE)
Variables, line numbers, and document creation
Building block What it displays Example
58
<$second>
<$second00>
<$minute>
<$minute00>
<$hour>
<$hour01>
<$hour24>
<$ampm>
<$AMPM>
<$daynum>
<$daynum01>
<$dayname>
<$shortdayname>
<$monthnum>
<$monthnum01>
<$monthname>
<$shortmonthname>
<$year>
<$shortyear>
Seconds 8 or 32
08 or 32
Minutes 8 or 32
08 or 32
Hours 8 or 12
08 or 12
08 or 22
Morning or evening designation am or pm
A.M. or P.M.
Number of the day 8 or 28
08 or 28
Name of the day Monday
Mon
Number of the month 8 or 12
08 or 12
Name of the month August
Aug
Year 1997
97
FMXA uses the language of the current paragraph to determine the language used in date and time variables. For
example, the current day name variable sometimes appears as Wednesday in an English paragraph but as Miercoles in
a Spanish paragraph. If you change the language of a paragraph, the system variables in the paragraph are updated to
use the new language.
If your system supports the typing of Japanese text in documents and dialog boxes, the following additional building
blocks are available for Japanese dates.
Building block Example
<$daynumkanjikazu>
<$daynumkanjinumeric>
<$monthnumkanjikazu>
<$monthnumkanjinumeric>
<$imperialyear> 1 or 10
<$imperialyear01> 01 or 10
<$imperialyearspecialkanjikazu>
or
or
or
or
or
Last updated 8/18/2015
Page 65

USING FRAMEMAKER XML AUTHOR (2015 RELEASE)
Variables, line numbers, and document creation
Building block Example
59
<$imperialyearspecialkanjinumeric>
<$imperialyearkanjikazu>
<$imperialyearkanjinumeric>
<$imperialera>
or
or
or
Japanese dates appear in a variable when the variable uses a Japanese font family and the Language property is set to
Nihongo.
Line numbers
Line numbers in FMXA files help you identify particular lines of content. For XML files, line number properties are
derived from their respective template documents.
While using line numbers and change bars, ensure that they do not overlap.
Line numbers and change bars displayed in a FMXA file
Insert line numbers
To insert line numbers, complete the following steps:
Note: You can also use the View > Line Numbers to display/hide line numbers.
1 Select Format > Document > Line Numbers.
2 In the line number properties dialog, select Show line numbers and specify the following:
a Width: Distance of line numbers from the column. The distance is relative to the columns that contain text.
Last updated 8/18/2015
Page 66

USING FRAMEMAKER XML AUTHOR (2015 RELEASE)
Variables, line numbers, and document creation
b Font: Font of the line numbers
c Size: Size of the line numbers
d Color: Color of the line numbers
e Restart at Each Page: Selecting this option restarts line numbers for each page
Some highlights of line numbers
1 Support for multicolumn and multiflow formats: For files with multicolumn formats, line numbers appear for text
in each of the columns. For multi-flow documents, the line numbers are calculated according to the text flows and
continue accordingly.
2 Recalculation: When you insert text within a paragraph with line numbers are enabled, the line numbers are
recalculated to accommodate the new text.
3 Document level property: Line numbers are a document level property. Line numbers can be set at a document level
to continue from previous page or restart at each page.
4 Text flows: For multi-flow documents, the line numbers follow the text flows and continue according to the text
flows.
5 XML documents: Line numbers do not persist in XML documents. However, you can enable line numbers in the
application template.
6 Printing: Line numbers are visible in the print and PDF created using Save As PDF.
60
Create documents
In FrameMaker XML Author, you create structured (.xml) documents.
Create a document based on a structured application
If you want to create a structured document, make sure that you have an EDD and a structure application available.
You can use the EDD file and sample structure application included with FrameMaker XML Author in the Structure
folder, or you can create your own. For information on creating a structured application and EDD, see the online
manual, Developing Structured Applications with Adobe FrameMaker 9 on the Adobe website,
www.adobe.com/go/lr_FrameMaker_support_en.
1 Choose File > New > XML.
2 In the New XML dialog, choose one of the following:
• Structured Applications: Choose from DITA, S1000D, or any other structured applications set up on
FrameMaker XML Author on your computer.
• DITA: Choose to create a DITA topic, such as Task, Concept, or Reference.
• S1000D: Choose to create an S1000D module, such as Crew or IPD.
3 Save the document in the desired format.
Last updated 8/18/2015
Page 67

USING FRAMEMAKER XML AUTHOR (2015 RELEASE)
Variables, line numbers, and document creation
Create an XML document based on a DTD
You can create a structured document based on the DTD. For the formatting of the document, you need to create an
EDD and do further work. For XML roundtripping, you need to create an XML application based on the DTD. For
information on creating a structured application and EDD, see the online manual, Developing Structured Applications
with Adobe FrameMaker 9 on the Adobe website,
1 Select File > New > XML.
2 In the New XML dialog, select other XML.
3 Select DTD Based XML and click OK.
4 Specify the following:
a Root Element: Specify the name of the root element.
b Public ID: Enter a public ID. A public ID in an XML document makes it portable to other computers.
c System ID: Specify the path to the relevant DTD. The System ID is the URL of the DTD relevant to an XML file.
5 Click OK.
FrameMaker XML Author makes the elements in the specified DTD available in the document. .
www.adobe.com/go/lr_FrameMaker_support_en.
61
Create a blank XML document
You can create a blank XML document without a structured application or a DTD. An XML document without a DTD
allows you to create markup tags without having to define them first. XML aware programs can parse a well-formed
XML document even when it does not have an associated DTD.
1 Select File > New > XML.
2 In the New XML dialog, select Other XML.
3 Click Empty XML.
4 Click OK.
Last updated 8/18/2015
Page 68

Chapter 5: Text
Adding and editing text
Add text and special characters
The insertion point marks where you enter or edit text.
You can also insert special text items, such as cross-references, footnotes, variables, and markers from the Special
menu. When you click a special text item, such as a cross-reference, variable, or text inset, you select the entire item.
If you can’t place the insertion point in or next to text, consider these possible reasons:
• The text is background text that was typed on a master page.
• The text was automatically generated, as with paragraph autonumbers, cross-references, or headers and footers.
More Help topics
“Search for items” on page 81
62
Special characters
In addition to standard characters, you can type bullets, dashes, fixed-width spaces, mathematical symbols,
international characters, and other special characters.
Note: In FrameMaker XML Author, character (ALT) sequences are not implemented for Dingbats and Symbol fonts
because Unicode equivalents of codepage 1252 for these fonts are provided by default. The character (ALT) sequences are
implemented for the MakerRoman font family only.
For a list of characters in the Symbol and Zapf Dingbats fonts, a list of accented characters in the standard character
set, and information on inserting the Euro currency symbol, see the online manual FrameMaker XML Author
Character Sets.
Some special characters are entered or displayed differently in dialog boxes. In Windows, you enter a sequence of
characters beginning with a backslash (\), these sequences are listed in
Tabs
Each time you press Tab, a tab symbol is embedded in the text. The symbol does not appear in the printed document,
but it is visible onscreen when text symbols are visible.
If the current paragraph has tab stops set, FrameMaker XML Author moves the insertion point and text one tab stop
each time you press Tab. If tab stops are not set, pressing Tab doesn’t move the insertion point and text. If you press
Tab more times than you have tab stops, the Tab symbols overlap. If you later add tab stops to the paragraph,
FrameMaker XML Author positions the text correctly at the tab stops.
FrameMaker XML Author uses tab stops that are absolute rather than relative. With relative tab stops, each time you
press Tab, the insertion point moves to the next available tab stop. With absolute tab stops, the nth tab on a line moves
the insertion point to the nth stop. If that tab stop is to the left of the insertion point, the insertion point does not move.
“Dialog boxes” on page 376.
Last updated 8/18/2015
Page 69

USING FRAMEMAKER XML AUTHOR (2015 RELEASE)
Text
Copy, move, and delete text
Pasted text retains its character format properties. If the pasted text contains paragraph symbols , the paragraph
format associated with each paragraph is also pasted. Otherwise, the pasted text takes the paragraph format of the
paragraph in which it is pasted.
You copy text more quickly if you bypass the clipboard, which is possible only if the original text and the new location
are visible and exist in the same document. You must use the clipboard to copy and paste text from one document to
another.
❖ To copy text without using the clipboard, place the insertion point where you want to insert the copied text, hold
down Alt, and select the text you want to copy.
Drag and drop text
FrameMaker XML Author allows you to drag and drop text. You can drag and drop text across various FrameMaker
XML Author documents and across other applications that support the drag and drop feature.
In addition, FrameMaker XML Author allows you to drag and drop elements.
• To copy an element, hold the CTRL key while dropping the element in its new location.
• If you drop an element in an invalid location, the cursor changes to a ‘?’ to indicate that the location is invalid.
You can also drag and drop rows and columns of a table.
63
• In a table, to move a whole row or column, select the column or row, and hold the ALT key while dropping it to the
new location.
• In a table, to copy a whole row or column, select the column or row, and hold the CTRL and ALT keys together
while dropping it to the new location.
Note: If you do not hold the ALT key while dragging columns or rows, only the contents of the columns and rows are
copied.
Working with elements in structured documents
About elements
The basic unit of information in structured documents is called an element. Elements hold other elements, text,
graphics, tables, cross-references, and markers.
You can add elements to a document to build its structure, and you can edit existing elements in many ways.
If you create a FrameMaker XML Author document by opening a structured file, you do not need to add elements to
it. The document already contains elements. You can edit the document’s elements, and add more elements.
To build a document’s structure, you can either add elements to the document and then fill in the contents, or select
existing contents and wrap them in elements.
A structured document has element definitions stored in its Element Catalog. These definitions describe the allowable
contents for each type of element the document can have. They sometimes specify attributes and formatting for the
elements. If all the elements in a document have contents and attributes that meet these specifications, the document
is valid.
Last updated 8/18/2015
Page 70

USING FRAMEMAKER XML AUTHOR (2015 RELEASE)
Text
Valid contents for elements
An element’s definition has content rules that determine what the element can contain. For example, perhaps the
definition of a Section element specifies that a Section must begin with a Head element, then must have a Para element,
and then can have any combination of Para, Figure, and other Section elements. A Para element sometimes allows text
and CrossRef elements, in any order.
The Element Catalog indicates valid elements for the current location with a heavy check mark. It shows that text is
allowed with the <TEXT> tag.
Two classes of elements
Elements fall into two basic classes determined by their allowable contents:
• A container element can hold text, other elements, or both. Container elements, such as heads and paragraphs, build
the document’s structure.
• An object element is a single object—a marker, cross-reference, system variable, equation, or anchored frame. You
cannot type in these elements or add child elements to them.
Section
Head
Para
CrossRef
A
B
64
A. Containers have round-cornered bubbles. B. Object elements have square-cornered bubbles.
A container element can be defined to remain empty. For example, perhaps a table cell is empty as part of a table’s
design. If an element contains only spaces or nonprintable characters such as tabs, its text snippet in the Structure View
is <WHITESPACE>.
Attributes for elements
An element can have attributes, which provide information about the element that is not part of the element’s contents.
Your document uses attributes for several purposes:
• To control the formatting of an element. For example, perhaps a Type attribute in a List element has two possible
values—Bulleted and Numbered.
List
Type = Numbered
ListItem
ListItem
9.2.2.1 When to Install Door Panels
Install door panels under the following conditions:
1. when a door panel has been removed to be repaired or unjammed
2. when a damaged door panel is being replaced with a new one
Attributes can provide formatting information.
1. when a door panel has been
2. when a damaged door panel
• To record descriptive information about an element, such as level of classification. An attribute value can even
trigger a custom routine that hides the element when the document is displayed.
Last updated 8/18/2015
Page 71

USING FRAMEMAKER XML AUTHOR (2015 RELEASE)
Text
• To store source and destination information for elements, typically for cross-referencing. A Section element
sometimes has an ID attribute that stores a unique value. A cross-reference element that points to the Section stores
the same value in a Reference attribute, to maintain the connection between the elements.
You typically enter and edit the values for attributes, unless the attributes are defined to be read-only. Crossreference IDs are often read-only and are generated by FrameMaker XML Author.
Insert elements
To add an element to a document, you either insert an empty element and enter contents, or wrap an element around
existing contents. Before you can begin, your document must have element definitions in its Element Catalog.
If you haven’t yet fully planned your document, consider inserting just the high-level elements, such as Section and
Head elements, and then use this structure as an outline for developing the document.
You can also enter all the elements in their correct order and hierarchy as you go, or concentrate on contents rather
than on structure, and then validate later to correct errors.
The Element Catalog shows the elements that are available at the current location. You can change the scope of
elements available—for example, to show elements that are not valid at the current location. Ask your application
developer for a summary of what each element can contain.
If you have turned on element boundaries, then once you insert or wrap an element, a pair of element boundaries
appears in the document window, and a new bubble appears in the Structure View.
65
9.1.1 [[Chapter Ove
9.1.1.1 [[Procedu
[This chapter descr
AstroLiner T440B
[ ]]
Empty element boundaries (left) and bubble for the new element (right)
Section
Head
Para
Para
Insert an element using the Element Catalog
1 Click where you want to insert the element. If you’re inserting it between other elements, work in the Structure
View rather than the document window.
2 Select an element tag in the Element Catalog, and click Insert. If only one element appears in the catalog, you can
click Insert without selecting it.
You can also double-click an element tag to insert the element.
Note: The Element Catalog always displays only those elements that are valid at the insertion point.
3 If the Attributes For New Element dialog box appears, enter attribute values for the element and click Insert
Element.
This dialog box appears only if the element has attributes and if an option is set in the New Element Options dialog
box to prompt for attribute values when you insert new elements.
4 If you insert a table, a marker, a graphic, or a cross-reference, provide more information about the element in the
dialog box that appears.
5 Add content to the elements. You can add content as you insert elements, or after you build the structure of your
document.
Last updated 8/18/2015
Page 72

USING FRAMEMAKER XML AUTHOR (2015 RELEASE)
Text
Press Return to insert elements
In many cases, pressing Return inserts an element automatically. Whenever you press Return, FrameMaker XML
Author checks the current element’s definition for the following conditions—in the following order—and sometimes
inserts a child element:
One valid element If only one child element is valid at the current location, pressing Return adds that element. For
example, after you add a Section, perhaps a Head is the only element permitted next. You can also use this technique
to create repeating elements, such as body paragraphs and list items.
More than one valid element If more than one child element is valid, pressing Return highlights the Tag area to
prompt you for an element tag. Type until the tag you want appears, and then press Return to insert the element.
End of an element If the insertion point is at the end of an element and no more child elements are valid, pressing
Return looks for valid elements in ancestors after this location. If a valid element is found, the insertion point moves
to the ancestor and the element is inserted (if only one is valid) or the Tag area is highlighted (if more than one element
is valid).
Other conditions If none of the preceding conditions are true, pressing Return causes a beep and no element is
inserted.
Set options for inserting new elements
1 Make the appropriate document window or book window active. If a book window is active, select the documents
you want to affect.
2 Choose Element > New Element Options.
3 Specify how you want to be prompted for attribute values when you add new elements:
• To enter all possible attribute values as you add elements, select Always Prompt For Attribute Values.
• To enter only required attribute values as you add elements, select Prompt For Required Attribute Values.
• To enter attribute values after adding elements, select Do Not Prompt For Attribute Values.
4 To allow FrameMaker XML Author to insert child elements automatically for new elements, select Allow
Automatic Insertion Of Children.
5 Click Set.
To speed up the process of adding new elements, select the Do Not Prompt For Attribute Values and Allow Automatic
Insertion Of Children options.
66
Add text in a structured document
Place the insertion point anywhere inside a text frame in a document window. An insertion point also appears at the
corresponding place in the Structure View. To place the insertion point in the middle of text, use the document
window rather than the Structure View. When placing the insertion point at the beginning or end of an element, or
between elements, click in the Structure View.
The Element Catalog describes what the current element can contain. You can enter text whenever <TEXT> appears
in the catalog.
1 Place the insertion point:
• To place at the beginning or end of text, click to the left or right in the first or second half of the text snippet.
After you click, a line on the left or right side of the triangle insertion point indicates that the point is at the
beginning or end of text.
Last updated 8/18/2015
Page 73

USING FRAMEMAKER XML AUTHOR (2015 RELEASE)
Text
• To place between two elements, click to the right of the vertical line connecting the elements, between the two
bubbles.
Section
Head
Para
Insertion point between two elements
9.1.1.1 Procedures in Th...
This chapter describes m...
2 Begin typing. Don’t press Return unless you want to insert a new element.
Edit elements
You can edit a document’s structure in many ways—including changing an element to a different type, rearranging
elements, and splitting and merging elements.
After editing one part of a document, sometimes you edit the document further to correct content errors. For example,
if you split a Section element in two, you sometimes need to add a Head element for the new second Section. Use the
Structure View as a guide for finding errors as you work, or validate the document when you’re finished.
Change elements
You can change an existing element to another element of the same type. For example, you sometimes want to convert
a Para element into a Note element, or a series of Para elements into ListItem elements that you can include within a
List element.
67
However, not all elements can be converted to other elements. For example, if you change a Para element containing
text to a Marker element containing the same text, the name of the element changes, but the text is not converted to
marker text.
Note: If you want to change contents to a table, use Table > Convert To Table to convert text rather than changing an
element.
Changing elements to another type
1 Select the element. You can select more than one element, even if the elements do not have the same tag. All the
elements are changed to the new type of element. However, the elements’ children are not changed, but they
sometimes become invalid because the parent changed.
2 Select an element tag in the Element Catalog and click Change. Sometimes attributes in the element become invalid
and need to be corrected.
Merge elements
You can merge two or more elements into a single element. Merging places the contents of the second element
(including any child elements) at the end of the first element.
Section
Head
Para
Section
Head
Section
Head
Para
Head
Para
List
Merging two Sections, before and after
Last updated 8/18/2015
Page 74

USING FRAMEMAKER XML AUTHOR (2015 RELEASE)
Text
You sometimes must edit the document after merging elements.
1 Select the elements you want to merge. The elements can be of different types, but they must be siblings and next
to each other in their parent element.
2 Choose Element > Merge.
Merging retains the attributes for the first element only.
Split an element
You can split an element into two elements that have the same tag and are at the same level. For example, perhaps you
split a Section element in two.
68
Section
Para
Para
List
Splitting a Section, before and after
Section
HeadHead
Para
Section
Para
List
You sometimes must edit the document after splitting an element. In the example above, after splitting you would add
a Head for the new second Section.
Note: You cannot split an element that is a table part (such as a row or cell).
1 Click where you want to split the element. The contents after the insertion point go in the new second element.
2 Choose Element > Split.
Splitting sometimes results in two elements with identical attributes. However, if the original attribute had a Unique
ID attribute, the second element loses its ID value.
Wrap elements around existing content
You can add structure to content already in a document by wrapping a new element around the content. The content
can be any part of a document, including other elements. The element’s content is formatted as specified in the
element’s format rules.
Note: You cannot wrap content in elements that are for parts of tables (such as rows or cells), but you can wrap text or
other elements that are within a cell or a table title element. If you want to convert text and elements to a table, use Table
> Convert To Table rather than wrapping.
After wrapping an element, you sometimes must edit the document to correct structure errors. For example, if you
wrap Para elements in a Section element that requires a Head element, you’ll need to insert the Head element.
Wrap an element using the Element Catalog
1 Select the contents you want to wrap in an element. If you’re selecting text, use the document window. If you’re
selecting entire elements, use the Structure View.
2 Select an element tag in the Element Catalog, and click Wrap.
3 If the Attributes For New Element dialog box appears, enter attribute values for the element and click Insert
Element.
Last updated 8/18/2015
Page 75

USING FRAMEMAKER XML AUTHOR (2015 RELEASE)
Text
This dialog box appears only if the element has attributes and if an option is set in the New Element Options dialog
box to prompt for attribute values when you insert elements.
Wrap elements throughout a document
1 In the document window, wrap text ranges, system variables, and other items that are inside paragraphs. Don’t
worry about errors you see in the Structure View. You’ll correct many of these errors when you wrap the lowest
levels in parent elements. You can correct the other errors when you’re finished.
2 Wrap paragraphs, headings, and other paragraph-level items in their elements.
3 In the Structure View, wrap the elements you have so far in parent elements, such as Section and List.
When you wrap the first element in the document, the Structure View immediately changes to show a default invalid
structure, as follows:
• A highest-level element is added with the tag NoName, unless you begin by wrapping the contents in a valid
highest-level element. NoName is a placeholder for your valid highest-level element.
• All tables become structured and are given default element tags, such as TABLE and ROW.
• Objects become elements with default tags such as CROSSREF, GRAPHIC, and EQUATION.
• Footnotes become FOOTNOTE.
• Rubi text becomes RUBI and RUBIGRP elements.
Note: Variables and markers do not become structured object elements.
69
You can correct the structure of the document when you’re finished wrapping elements.
If your application developer has set up a conversion table for the document, you can apply the table to wrap elements
throughout the document all at one time. This is much faster than wrapping text manually.
Unwrapping the contents of elements
Unwrapping deletes an element but leaves its contents in the same place in the document. You usually unwrap
elements as part of a larger editing process. For example, if you plan to convert ListItem elements into Para elements,
sometimes you must unwrap the parent List element first. Then use Edit > Find/Change to convert the ListItem
elements to Para elements.
Para
List
ListItem
ListItem
ListItem
ListItem
Unwrapping ListItems, before and after
You sometimes must edit the document after unwrapping an element. For this example, you would change the
ListItem elements to valid elements or rewrap them.
Note: You cannot unwrap an element that is a table part (such as a row or cell).
Para
ListItem
ListItem
ListItem
ListItem
1 Select the element with the contents you want to unwrap.
2 Choose Element > Unwrap.
Last updated 8/18/2015
Page 76
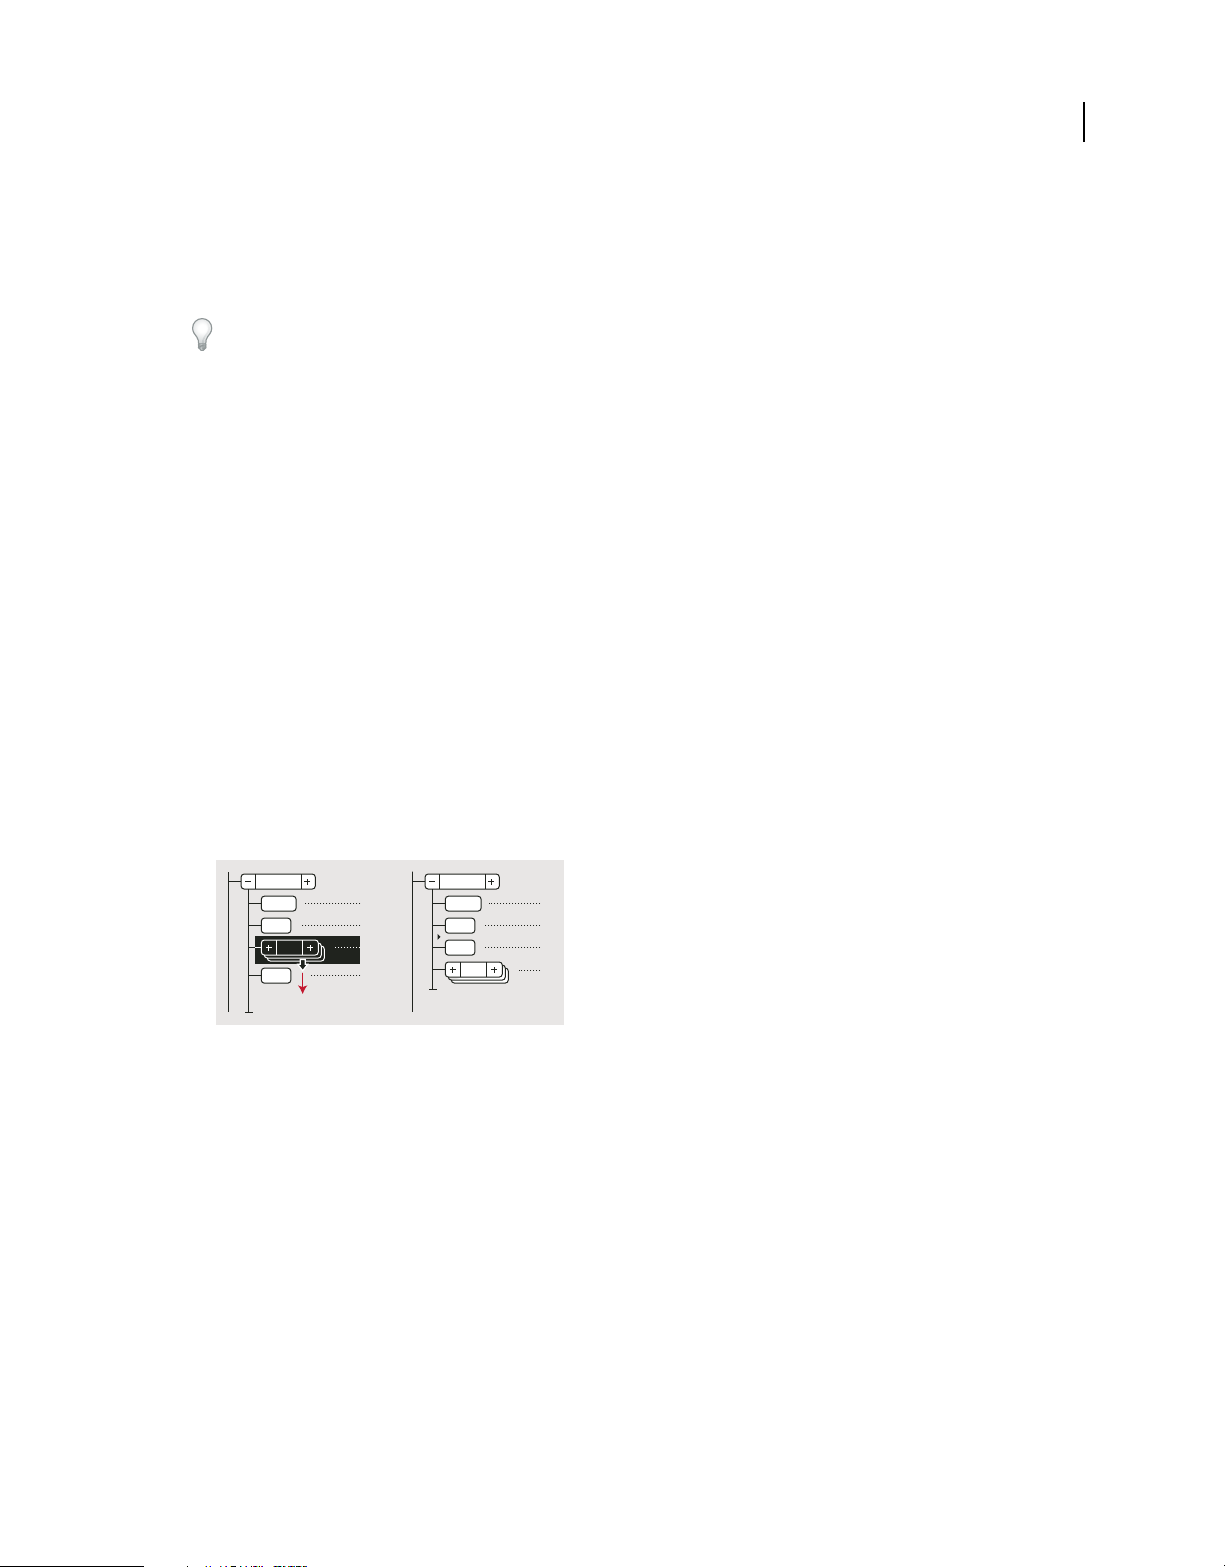
USING FRAMEMAKER XML AUTHOR (2015 RELEASE)
Text
Move or copy elements
You can move an element to another location in a document by dragging its bubble in the Structure View. When you
move or copy an element, its contents, including descendants, all move along with it. This does not affect the contents
of the clipboard.
If you’re moving an element that has many descendants, collapse the element first.
You can also move or copy an element by cutting or copying it to the clipboard and pasting, even across documents.
If you paste an element from another document, sometimes the element is not defined in your document. If you don’t
plan to add a definition for the element, change the element to a valid one. You cannot cut and paste elements in a
book file.
❖ Do one of the following:
• To move an element, drag the bubble to the location you want.
• To copy an element, hold down Alt and drag the bubble to the location.
As you drag the bubble to copy, the pointer changes to a hollow, stacked up-and-down arrowhead, and a horizontal
arrow moves to indicate where the copy goes if you release the mouse button.
As you drag the bubble to move, the pointer changes to a solid up-and-down arrowhead, and an arrow moves to
indicate where the bubble goes if you release the mouse button.
70
If the element is valid in the location where the arrow points, a check mark or question mark appears in the bubble.
Nudge an element one place
❖ Drag the element’s bubble slightly to one side or up or down. As you drag a small distance, the pointer changes to
a single arrow. (If you drag too far, the arrow changes to an up-and-down arrowhead.)
Section
Head
Para
List
Para
Nudging a List one place, before and after
Section
Head
Para
Para
List
When you release, the element moves one place in the indicated direction, as follows:
• Moving an element up places it right above the sibling right before it. Moving an element down places it below
the sibling after it.
• Moving an element to the left makes it a sibling of its parent. Moving an element to the right makes it a child of
the sibling before it.
Hierarchical element insert
Using the Elements quick catalog, you can select and insert multiple levels of elements. When you select an element in
the quick catalog, FrameMaker XML Author displays the elements available within the selected element.
Hit Enter and use the pointer or the arrow keys (or the pointer) to select a hierarchy of elements that you want to insert.
When you hit Enter, if there is only one valid element at the pointer’s position, FrameMaker XML Author inserts the
element.
Last updated 8/18/2015
Page 77
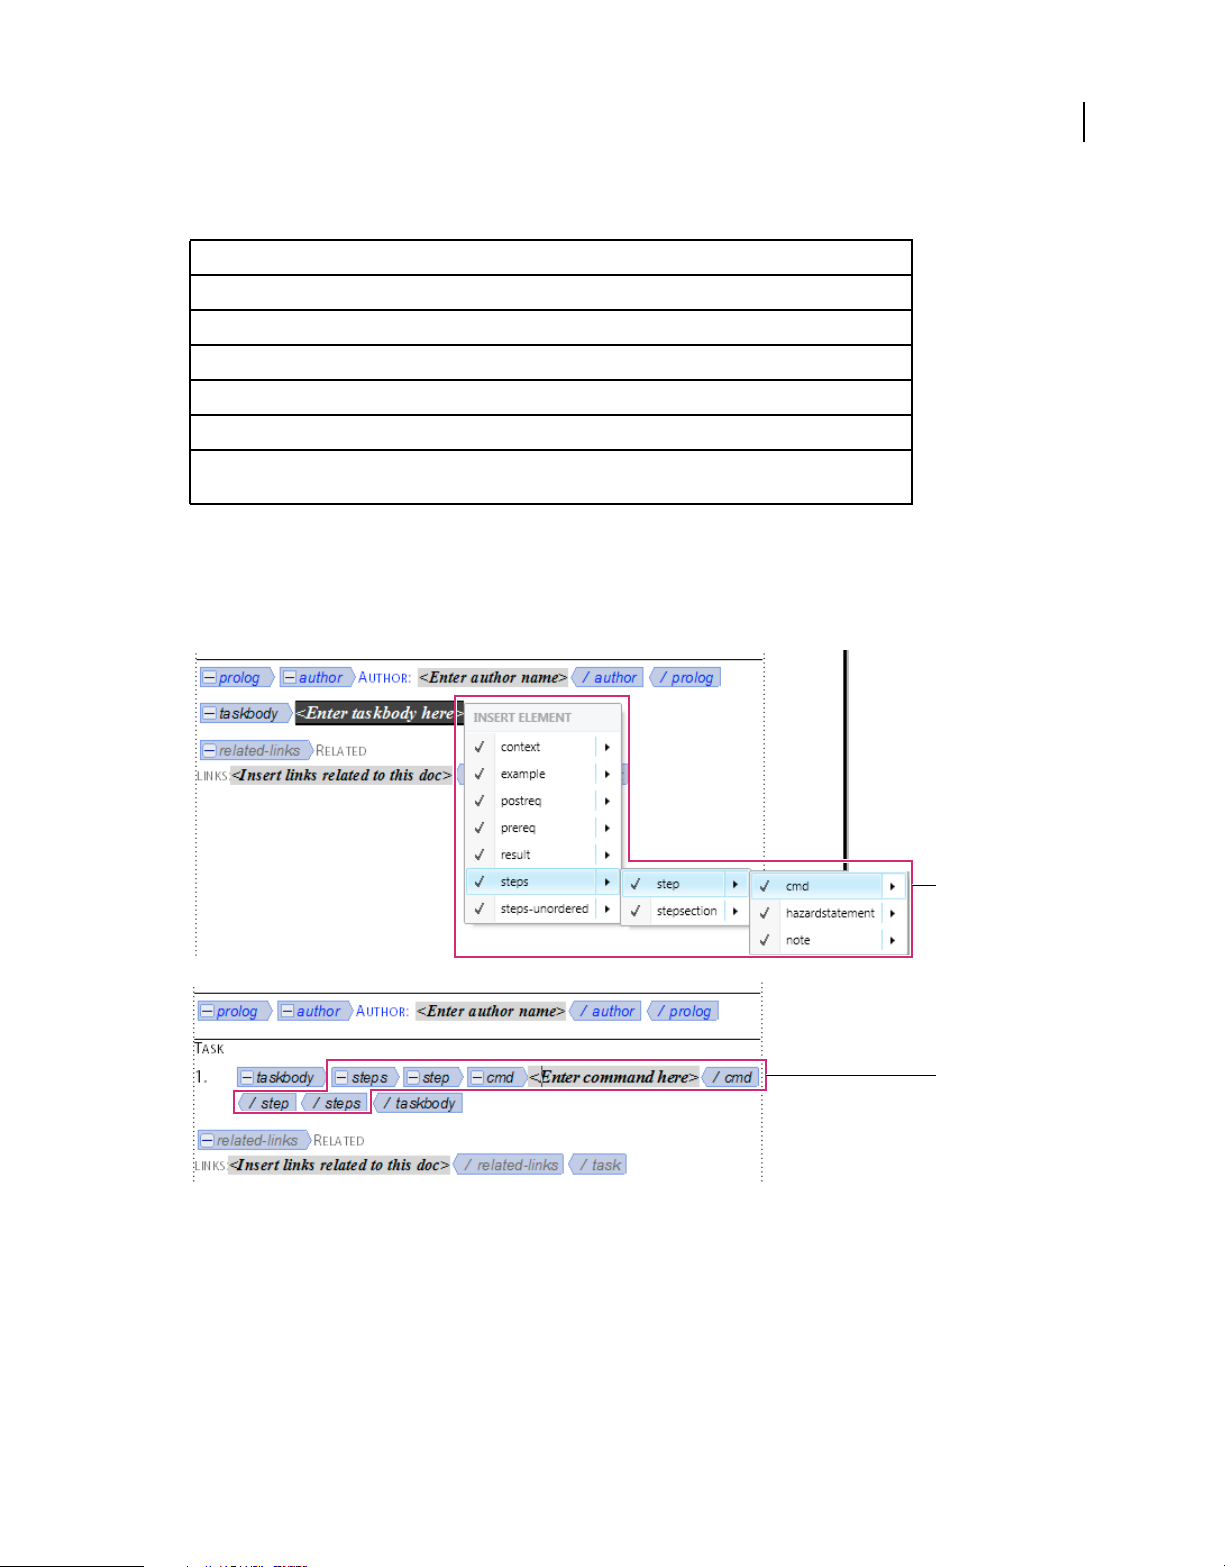
USING FRAMEMAKER XML AUTHOR (2015 RELEASE)
Text
Use the following keys to navigate through the hierarchy of elements in quick catalogs:
Key\Key action Type of navigation\action
Place cursor in an element and hit Enter Display the quick catalog
Right arrow Display the elements available within the selected element
Left arrow Hide one level hierarchy of elements
tab scroll down
shift+tab scroll up
71
Alphabets\combination of alphabets Type an alphabet or combination of alphabets to select an element. For
example, press B to select Body and Type T,O to go to Topic.
The list of elements in the quick catalog appears according to the settings in the Set Available Elements dialog. If Show
Element Descriptive Tags is selected, the element tool tips in the catalog display the element descriptions.
Hierarchical element insert takes care of auto insertions for the last selected element in the hierarchy, as specified in
the EDD. If there are auto insertion rules in place for elements apart from the last element, they are ignored.
A
Hierarchical element insert
A. Select a hierarchy of elements B. Elements get inserted as a group
Select and edit text
Select text in flow
❖ To select all the text in a flow, click in the flow and choose Edit > Select All In Flow.
Last updated 8/18/2015
B
Page 78

USING FRAMEMAKER XML AUTHOR (2015 RELEASE)
Text
Select text in structured document window
You can select entire elements and any part of the document contents in a document window. A corresponding
selection also appears in the Structure View.
If an element has contents, you can select all or part of the contents without selecting the element itself. If an element
consists of a single object, such as a graphic or a cross-reference, select the entire element.
When you select an entire element, its contents are selected along with it.
Work with element boundaries showing, so that you can see the beginning and end of each element. After selecting,
check the status bar for the correct tag name of the selection parent element. The tag name appears following the “E:”
text.
❖ To select text in an element, do one of the following:
• To select text without selecting the whole element, drag through the range of text. Be careful not to drag across
an element boundary. If you do, you select the entire element.
• To select one element, drag from anywhere inside the element to outside one of its element boundaries.
• To select more than one elements, drag through the elements. FrameMaker XML Author selects each element
as you drag across one of its boundaries.
72
Select element content in Structure View
You can select entire elements or the element contents in the Structure View. A corresponding selection also appears
in the document window.
If an element has contents, you can select all of the contents without selecting the element itself. If an element is a single
object, such as a graphic or a cross-reference, you select the entire element. (Elements that are allowed contents have
round-cornered bubbles; elements that are a single object have square-cornered bubbles.)
When you select an entire element, its contents are selected along with it.
❖ To select element content, do one of the following
• To select an element, click the middle of its bubble.
• To select more than one element, click the first bubble and then Shift-click the other bubbles. You can also drag
to the right of the vertical line connecting the elements. Start above the first element you want to select, and drag
down to the last element you want to select.
• To select contents of an element without descendants but not select the entire element, double-click the text
snippet.
• To select the contents of an element with descendants but not select the entire element, double-click to the right
of the vertical line connecting the first level of descendants.
Remove elements
You can remove any element, with or without its contents. For example, you sometimes want to delete a Section
element and its contents, or delete the Section but leave the contents in place, so you can place them in a different
element.
For elements that are defined to contain text or other elements, you can also delete the contents and leave the empty
element in the document. For elements that are single objects without contents, you must delete the entire element.
• To remove an element and its contents, select the element and press Delete.
Last updated 8/18/2015
Page 79

USING FRAMEMAKER XML AUTHOR (2015 RELEASE)
Text
• To remove an element but not its content, select the element and choose Element > Unwrap. FrameMaker XML
Author reformats the contents based on the new context, if necessary.
• To remove the contents of an element but not the element itself, select the contents and press Delete.
• To remove an element and its contents and replace it with another element, select the element. Then select the
replacement element in the Element Catalog, and click Insert. A new empty element replaces the selected element
and its contents.
• To remove all elements from a document to base it on paragraph and character formats, choose Special > Remove
Structure From Flow. If the document has additional structured flows, repeat this command for each flow.
FrameMaker XML Author removes all elements from the current text flow. If the formatting was created or
modified by format change lists in the element catalog, the removed elements become format overrides in the
document.
Note: To create named formats for each removed element variation and save them in the catalog, use the Create And
Apply Formats command.
Assign attribute values
Attributes store supplementary information about an element that does not appear with the contents of the document.
You can see attributes and their values in the Structure View.
73
Chapter
ID = <no value>
DraftVersion = Alpha Draft
XRefLabel = <no value>
Title
ChapNumber
ChapName
Attributes in the Structure View
An attribute’s definition specifies the type of values that are acceptable (such as text or numeric) and sometimes
includes a list of possible values or a numeric range.
The definition also determines whether the value is optional, required, or read only. It sometimes provides a default
value. You can assign values to an attribute if the attribute is not read only.
If an attribute’s current value does not conform to the specifications in its definition, the attribute is invalid.
Note: FrameMaker XML Author can provide the values for ID and ID Reference attributes used in cross-referencing.
(These attributes are often defined to be read only.)
Enter attribute values as you insert elements
You enter some attribute values as you insert elements, particularly for required attributes and attributes that affect
formatting. Optional attributes can perhaps wait for a later pass.
Some font property values used in an element definition document (EDD) require that you use specific units. For
example, if the Offset Horizontal value is set as a percentage of an em space, typing 5pt creates an offset of 5 em spaces
instead of 5 points.
Do not use multibyte (Asian-language) characters when entering attribute values. Sometimes these characters are not
exported to SGML correctly because multibyte characters are not supported in the SGML workflow.
Last updated 8/18/2015
Page 80

USING FRAMEMAKER XML AUTHOR (2015 RELEASE)
Text
Note: Attribute names support the Unicode text-encoding standard.
1 Make sure you are prompted for attribute values when you insert elements.
2 Insert the element. If attributes are defined for the element, the Attributes For New Element dialog box appears,
listing all the attributes (except read-only ones) defined for the element.
3 For each attribute value to provide, select the attribute in the Attribute Name scroll list, enter the value in the
Attribute Value box, and click Set Value. If an attribute is required, you must enter a value for the element to be
valid.
If an attribute has a set of predefined values, choose from the Attribute Value pop-up menu rather than entering a
value.
The value you can enter, such as text or a number, is determined by the attribute’s type.
A description of the selected attribute (its type, whether a value is required, and so on) appears in the dialog box
below the Attribute Value area.
4 Click Insert Element.
Enter or edit attribute values for elements already in a document
To change an attribute name rather than a value, use Edit > Find/Change. Sometimes this is necessary if you imported
element definitions that use different attribute names with identical meanings, such as Security instead of
SecurityLevel. The new attribute name must be defined for the element.
74
1 Select the element with the attribute value you want to change.
You can select more than one element of the same type, and apply the change to all. The elements must be
contiguous. For example, if several Para elements in a row have a Security attribute, you can change the value of
that attribute for all the Para elements at one time.
2 Double-click an attribute name or value in the Structure View to display the Attributes dialog box.
Alternatively, access the Attributes modal panel from Elements > Edit Attributes.
3 For each attribute value to enter or edit, select the attribute in the Attribute Name scroll list, enter the value in the
Attribute Value box, and click Set Value.
If an attribute has a set of predefined values, choose from the Attribute Value pop-up menu rather than entering a
value.
4 Click Done.
Types of attributes
An attribute’s type determines the kind of values that are allowed in the attribute. For example, the value version 1 is
not valid for an attribute defined as an integer, but the value 1 is valid. Numeric types (such as integer or real number)
can also be limited to a predefined range by their attribute definition.
Choice An attribute with a list of predefined values.
ID Reference An attribute with a value that is a Unique ID value from another element. It is typically used for element-
based cross-references.
ID References An attribute with a value of one or more Unique ID values from another element. (Sometimes the
developer specifies this attribute if you’re exporting to a structured application that uses multiple values for source
information.)
Last updated 8/18/2015
Page 81

USING FRAMEMAKER XML AUTHOR (2015 RELEASE)
Text
Integer An attribute with a whole number value (no decimal parts). Examples of valid integers are 22, -22, and +322.
An integer can be defined to fall within a range.
75
Integers
Real An attribute with a real number value, with or without a decimal part (the value can also be expressed in scientific
An attribute with a value of one or more integers. Enter each number on a separate line in the Attribute Value box.
notation). Examples of valid real numbers are 2, 22.4, -0.22, and 2.3e-1. A real number can be defined to fall within a
range.
Reals An attribute with a value of one or more real numbers. Enter each number on a separate line in the Attribute
Value box.
String An attribute with a value of a series of characters (text).
Strings An attribute with a value of one or more strings. Enter each string on a separate line in the Attribute Value box.
Unique ID An attribute with a value of a unique text string. An element can have only one ID attribute (which can be
of type Unique ID or Unique IDs). All ID values must be unique in the document or book. An element with a
ID attribute can be the source for an element-based cross-reference.
Unique
Unique IDs An attribute with a value of one or more unique text strings. Enter each string on a separate line in the
Attribute Value box. (Sometimes the developer specifies this attribute if you’re exporting to a structured application
that uses multiple values for source information.)
Copy attribute values
You can use the clipboard to copy and paste attribute values from one element to another. If you paste values to an
element that does not have corresponding attributes defined, the attributes are invalid. To preserve element-based
cross-references, an ID attribute value is not pasted.
If you copy an attribute from another document, the attribute sometimes is not defined in the current document.
1 Select the element with the attribute values you want to copy, and choose Edit > Copy Special > Attribute Values.
All attribute values associated with the element are copied to the clipboard.
2 Select a different element and choose Edit > Paste.
3 (Optional) To delete an undefined attribute copied from another document, select the element with the undefined
attribute, open the Attributes dialog box, select the attribute, and click Delete Attribute. In the next dialog box that
appears, remove the attribute for the current element or for all elements that have the attribute.
Find and edit elements and attributes
You search for elements and attributes in a structured document to keep track of them or to make changes to them
quickly. Searching is especially useful when you want to apply the same change to more than one occurrence of an
element or attribute.
You can also search for many other items in FrameMaker XML Author, including strings of text, specific formatting,
unresolved cross-references, and objects (such as anchored frames) that are not elements.
Note: The Find/Change feature supports the Unicode text-encoding standard.
More Help topics
“Regular Expression” on page 304
Last updated 8/18/2015
Page 82

USING FRAMEMAKER XML AUTHOR (2015 RELEASE)
Text
Search for element tags, attribute names, or attribute values
You can search for an element tag, attribute name, and attribute value either separately or in combination. For
example, you can search for an element tagged List to find each List element, or perhaps you limit the search to find
only List elements that have a Security attribute set to Classified.
1 Choose Edit > Find/Change.
2 Choose Element from the Find pop-up menu.
3 Select the options you want in the Find Element dialog box.
The settings can be used in many combinations. These are a few examples:
• To find any element, leave all three boxes empty.
• To find a specific element, type an element tag but leave the Attribute Name and Attribute Value boxes empty.
• To find any element with a specific attribute, type an attribute name but leave the Element Tag and Attribute
Value boxes empty.
• To find any element with a specific attribute value, type an attribute value but leave the Element Tag and
Attribute Name boxes empty.
• To find a specific combination of element and attribute, type an element tag and choose an attribute name.
• To find a specific combination of element and attribute value, type an element tag and choose an attribute name
and an attribute value. (If the attribute type is Choice, type the value.)
• To find a specific element with an attribute that has no value, type an element tag, choose an attribute name, and
choose <No Value> from the Attribute Value pop-up menu.
Leave a box empty if you do not want to restrict the search. An empty box has the same effect as searching for any
element, or choosing either <Any Attribute> or <Any Value>.
76
4 Click Set.
5 In the Find/Change dialog box, select Consider Case, Whole Word, Use Wildcards, or Find Backward.
6 Click Find.
Note: After searching the main flow, FrameMaker XML Author looks at other text frames and text lines. Because a search
is flow by flow, it sometimes appears to jump around the document.
More Help topics
“Regular Expression” on page 304
Change elements or attributes you find
After you find an element, attribute, or attribute value, you can change it to another element, attribute, or value. For
example, you can quickly and globally change the value of a SecurityLevel attribute from Declassified to Top Secret.
When changing items in a document, you can change each occurrence of the item as it is found or have FrameMaker
XML Author automatically make the change throughout the document.
After pasting material from another document or importing new element definitions, use the Find/Change command
to clean up your document. You can use Find/Change to change CELL elements, for example, to TableCell elements.
1 Choose Edit > Find/Change.
2 In the Find/Change dialog box, choose Element from the Find pop-up menu.
Last updated 8/18/2015
Page 83

USING FRAMEMAKER XML AUTHOR (2015 RELEASE)
Text
3 Select the options you want in the Find Element dialog box, and click Set. Then choose an option from the Change
pop-up menu in the Find/Change dialog box, and type the replacement tag or value.
The Find Element dialog box and the Change pop-up menu work together. These are a few examples of
combinations you can use:
• To change one element to another, type an element tag in the Find Element dialog box but leave Attribute Name
and Attribute Value empty. Then choose Element Tag To in the Change pop-up menu and type an element tag.
• To change one attribute to another, type an attribute name but leave Element Tag and Attribute Value empty.
Then choose Attribute Name To and type an attribute name that is defined for this element.
• To change one attribute value to another, type an attribute value but leave Attribute Name and Attribute Value
empty. Then choose Attribute Value To and type a value.
• To change an attribute with a specific name to a certain value, type an attribute name but leave Element Tag and
Attribute Value empty. Then choose Attribute Value To and type a value.
• To change a specific element with a specific attribute value to another element, type an element tag and choose
an attribute name and attribute value. Then choose Element Tag To in the Change pop-up menu and type an
element tag.
• To remove an attribute value, type an attribute value but leave Element Tag and Attribute Name empty. Then
choose Attribute Value To and leave the Choose box empty.
If you try to make a change that is not allowed—for example, if you try to remove an element tag—an alert message
appears explaining the problem.
77
4 Click Find.
5 When FrameMaker XML Author finds the element or attribute, do one of the following:
• To make the change but not continue searching for other occurrences of the item, click Change.
• To make the change and continue searching for other occurrences, click Change & Find.
• To change all occurrences of the item, specify all occurrences in the document or only occurrences in the current
selection and click Change All.
Find and correct errors in document structure
An error in a structured flow can be a structure problem, such as an element in an invalid location, or an invalid
attribute, such as an attribute with a missing required value. In Structure View, when a collapsed element has invalid
content in its structure, the plus sign on the left of the element name is red.
You can also validate a document to find errors. After you know where the errors are located, use the Element Catalog
and the Structure View as guides to help you correct them.
If you’ve made any formatting changes to text in elements, the elements perhaps do not conform to their format rules.
Use the Structure View to find errors
When an element doesn’t conform to content rules and attribute descriptions in the document’s element definitions,
the Structure View identifies the error for you.
Missing elements If an element is missing one or more child elements required by the element definitions, a small red
hole appears on the vertical line where the child element should be.
Last updated 8/18/2015
Page 84

USING FRAMEMAKER XML AUTHOR (2015 RELEASE)
Text
Section
Para
At least one required child element is missing.
Elements at an invalid location If an element is at a location not allowed by the content rules, the vertical line next to
it is broken from the position of that element to the end of the parent element.
ListItem
Para
ListItem
The Para element is invalid at this location.
Undefined elements If an element is not defined for the document, its bubble is red. This sometimes happens if you
have pasted the element from another document.
Invalid attributes If an attribute has an invalid value or is not defined for the document, it appears with a red x to the
left of the attribute name and its value is red.
Chapter
x DraftVersion = Alpha Draft
XRefLabel = <no value>
78
The DraftVersion attribute is invalid.
Attributes missing a required value If an attribute does not have a value, <no value> appears to the right of the
attribute name. If the attribute requires a value, <no value> is red and a red hole appears to the left of it.
Chapter
DraftVersion = Alpha Draft
XRefLabel = <no value>
The XRefLabel attribute is missing a required value.
Validate a document
When FrameMaker XML Author validates a document, it searches for elements that do not conform to content and
attribute rules in the document’s element definitions. If FrameMaker XML Author finds an error, it selects the element
and describes the error.
You can validate an entire document, the current flow, or the current element. If you validate the current element,
FrameMaker XML Author does not check the descendants of the element’s child elements. For example, if you validate
the Section element below, FrameMaker XML Author makes sure that the Head element, the two Para elements, and
the List element are valid, but does not check the List Item elements in List.
Last updated 8/18/2015
Page 85

USING FRAMEMAKER XML AUTHOR (2015 RELEASE)
Text
Section
Head
Para
Para
List
ListItem
ListItem
Only the section’s child elements are validated.
When a door
When a oor
If the document has conditional text, only the versions that are showing are validated.
You can also validate an entire book including all its files, only the book file, or only the current element in the book file.
1 Choose Element > Validate.
2 Select Entire Document, Entire Book, Current Flow, or Current Element to specify the scope of the validation.
3 To exclude missing elements or attribute values from the search, select Ignore Missing Elements or Ignore Missing
Attribute Values.
If these settings are selected, FrameMaker XML Author does not look for places where a required child element or
a required attribute value is missing. Consider selecting these if you are not trying to build a complete document yet.
79
4 Click Start Validating.
FrameMaker XML Author starts checking at the beginning of the current element. If you’re validating only the
current element, it checks the element with the insertion point or the selected element. If more than one element is
selected, it checks the first element in the selection.
5 If FrameMaker XML Author finds an error, click Start Validating again when you’re ready to continue validating.
The top of the Element Validation dialog box shows the tag of the element and a brief message about the problem.
You can correct the error, ignore it, or click Allow As Special Case. If you mark it as a special case, FrameMaker
XML Author won’t identify the error the next time you validate the document.
6 Repeat step 5 until FrameMaker XML Author does not find any more errors.
When FrameMaker XML Author reaches the end of the document, it returns to the beginning and continues
validating. When FrameMaker XML Author reaches the end of a flow, it continues to the next one.
Note: When validating a book, FrameMaker XML Author tells you if a file in the book has invalid content, but for a more
detailed evaluation, you must open and validate the file.
Validation of the elements in an EDD includes attributes in if-then clauses. For example, suppose that the possible
values of an attribute are A or B or C, and a context rule says
If [attrval = "D"]. This is flagged as an error and
reported as an invalid structure when the element definitions are imported.
Similarly, if an element’s text formatting rules or prefix/suffix rules use attribute names in the context specifications,
the attribute name and case must match the attribute definition in the element’s definition.
If an attribute’s value is changed to the same value it previously had, the action is not flagged as a change. This enhances
performance by eliminating unnecessary value checking.
Clear all special cases
1 Choose Element > Validate.
Last updated 8/18/2015
Page 86

USING FRAMEMAKER XML AUTHOR (2015 RELEASE)
Text
2 Click Clear Special Cases. FrameMaker XML Author clears the special cases in the document, the flow, or the
element—whichever scope is selected in the dialog box.
Validation error messages
The following error messages can appear at the top of the Element Validation dialog box. (In the descriptions, tag
represents an element tag, name represents an attribute name, and value represents an attribute value.)
Element is undefined The element is not defined in the document. You perhaps copied this element from another
document.
Missing element before tag At least one required element is missing before the specified element.
More contents required at end At least one more child element is required at the end of the current element.
No current element There is no insertion point or selection. (This message appears when the scope is set to Current
Element.)
No current flow There is no insertion point or selection. (This message appears when the scope is set to Current Flow.)
Not highest-level element The element is not permitted at the highest level in the document.
<TEXT> not permitted in this element The element contains text, but text is not allowed.
<TEXT> not valid at this position The element is allowed to have text but not at this location.
80
The name attribute refers to an undefined ID value The attribute is an ID Reference and refers to a Unique ID value
that doesn’t exist in the document (or in the book, if you’re validating a book).
The name attribute is undefined for this element The definition of this element does not include a name attribute.
This element should be a type The element is the wrong type, where type can be graphic, marker, cross-reference,
equation, or system variable. For example, a cross-reference element sometimes consists of text instead of a crossreference.
Value must be a type for name attribute The attribute value is the wrong type for the attribute.
Value for name attribute must be in the range from n to n The attribute’s numeric value is out of the specified range.
Value for name attribute is not one of the allowed choices The attribute’s value must match a value from the pop-up
menu of valid choices.
Value for name attribute must be unique A Unique ID value must be unique for all elements in the document or book.
Value required for name attribute The attribute does not have a required value.
tag excluded in this element The tag element is not allowed because of an exclusion rule for the parent or one of its
ancestors.
tag not permitted in this element The tag element is not allowed anywhere in the parent element.
tag not valid at this position The tag element is allowed in the parent element but not at the current location.
Correct errors in elements
After you have identified errors in elements and attributes, use the Element Catalog and Structure View as guides for
correcting them:
• To correct an element in an invalid location, move the element to a valid location, or change it to an element that
is valid for its current location.
You can select an invalid element, or if you’re validating, FrameMaker XML Author selects the element for you.
When the element is selected, the Element Catalog shows which elements are valid at that location.
Last updated 8/18/2015
Page 87

USING FRAMEMAKER XML AUTHOR (2015 RELEASE)
Text
li or ListItem is valid at this location.
• To correct an element with invalid contents (with the text snippet <INVALID CONTENT>), change it to an
element that allows those contents.
• To correct a structure with a missing child element, insert the required element.
You can click where an element is missing, or if you’re validating, FrameMaker XML Author places the insertion
point there for you. When the insertion point is at the location of the missing element, the Element Catalog shows
which elements are valid at that location.
81
Title is required at this location.
• To correct an invalid attribute value, change the value to one that is valid for the attribute.
• To remove an undefined attribute, select the element with the undefined attribute, open the Attributes dialog box,
select the attribute, and click Delete Attribute. In the next dialog box that appears, remove the attribute for the
current element or for all elements that have the attribute.
• To resolve a cross-reference with an invalid ID, select the cross-reference, choose Special > Cross-Reference, and
change to a source that has a valid ID.
Search for items
Searching documents and books
If you are searching in a document (Edit > Find/Change), FrameMaker XML Author begins searching at the insertion
point and continues through the document. It searches only pages of the type the insertion point is on—for example,
only body, master, or reference pages. When FrameMaker XML Author reaches the end of the document, it continues
the search at the beginning. After searching the main text flow, it searches other text in the document. Because
FrameMaker XML Author searches flow by flow rather than page by page, it sometimes appears to jump around within
the document while searching.
Last updated 8/18/2015
Page 88

USING FRAMEMAKER XML AUTHOR (2015 RELEASE)
Text
If you are searching throughout a book, FrameMaker XML Author begins searching from the active document, or
from the first document of the book if the book window is active, and continues searching until all documents in the
book have been searched. If a document cannot be opened, the document is skipped and a message appears in the Book
Error Log.
Note: When you are searching through a book, bookmap, or DITA map, you cannot search the master or reference pages.
In addition to text, you can search for any of the following items in a selection, in a document, or throughout an entire
book. You can also search in a map from the Resource Manager view.
Text formats and tags Character format properties, or specific paragraph or character tags. In structured FrameMaker
XML Author, Element appears right after text, so you can search for element tag, attribute name, attribute value, or
simultaneously for all three.
82
Markers
Cross-references Any cross-references, regardless of their formats, cross-references that use a specific format, or
Any markers, regardless of their marker types, markers of a specific type, or markers that contain specified text.
unresolved cross-references—cross-references that FrameMaker XML Author is unable to update. When an
unresolved cross-reference is found, the marker text of the cross-reference appears in the Find box.
Text insets Any text imported by reference. You can also search for unresolved text insets—insets that cannot be
updated from their sources. However, you can’t search for graphics subscribers or OLE linked objects. (To list OLE
links, choose Edit > Links.)
Variables Any variables, regardless of their variable names, or specific variables.
Rubi Any rubi text, when Japanese fonts are installed on your system.
Anchored frames Frame that contains graphics and helps you locate them. Graphics placed in non-anchored frames
are not found.
Footnotes Any text or table footnotes.
Tables Any tables regardless of their table format tags, or tables with a specific tag.
Conditional text Any conditional text, regardless of its condition tags, text with specific condition tags, or
unconditional text. FrameMaker XML Author cannot find conditional table rows or hidden conditional text.
Automatic hyphen Words that are hyphenated automatically.
Text and character format on the clipboard Text that matches the clipboard text, capitalization, and character
formatting.
More Help topics
“Regular Expression” on page 304
Searching for Unicode text
FrameMaker XML Author uses the UTF-8 encoding format. Therefore, every character in a .fm or XML document
containing Unicode-encoded text uses multiple bytes. As a result, only the string entered in the Find field is used to
perform the search operation.
Searching in a range is applicable only to Unicode characters, and users can search for any character that belongs to
the Basic Multilingual Plane (BMP). Unicode code points can also be used for performing search and replace
operations. For example, you can provide \uXXXX as the input to locate a character that has code point XXXX. Thus,
to search for letter “A” whose code point is u+0041, you can specify \u0041 in the Find/Change dialog box.
Last updated 8/18/2015
Page 89

USING FRAMEMAKER XML AUTHOR (2015 RELEASE)
Text
A code point is any value in the Unicode codespace, which is a range of integers from 0 to 10FFFF16. This particular
range is defined for the codespace in the Unicode standard only. Other character-encoding standards sometimes use
other codespaces.
You can also use wildcard characters while searching for Unicode text.
Note: In Asian documents with multibyte characters, the bracket characters [ ] do not work as wildcards.
More Help topics
“Regular Expression” on page 304
Replacing items
When changing items, keep the following in mind:
• If you choose Change or Change & Find when no text is selected in the document, FrameMaker XML Author
inserts or applies the replacement item at the insertion point.
• The Clone Case option in the Find/Change dialog box maintains the capitalization in the source text. For example,
if you select Clone Case and type tea in the Find box and coffee in the Change box, FrameMaker XML Author
replaces tea with coffee and Tea with Coffee.
• You can type any text, including special characters not found on the keyboard—for example, em spaces and
paragraph symbols.
• You can’t change marker text by using the Find/Change dialog box. If FrameMaker XML Author finds the marker
text you specify, and if you type different text in the Change box and click Change, FrameMaker XML Author
replaces the marker—not the marker text—with the text in the Change box. To change marker text, use the Special
> Marker command.
83
Search for backslashes and wildcard characters
You can enter any characters in the Find/Change box. However, the following characters require special treatment:
• For backslashes, specify two backslashes (\\) in the box. A single backslash usually indicates a special character.
• For wildcard characters used as ordinary characters, when the Use Wildcards option is selected, precede the
wildcard character with a backslash in the box.
More Help topics
“Typing in dialog boxes” on page 376
“Regular Expression” on page 304
Search for character format properties
1 Copy the text with the character format you want to find. FrameMaker XML Author uses only the first 126
characters copied into the clipboard.
2 Select Edit > Find/Change. In the Find/Change dialog box, choose Text & Character Formats In Clipboard from
the Find pop-up menu. Don’t type the text you want to find in the Find box.
3 Click Find.
To prevent FrameMaker XML Author from applying a property to found text, set the property to As Is.
Last updated 8/18/2015
Page 90

USING FRAMEMAKER XML AUTHOR (2015 RELEASE)
Text
After making some changes in the Change To Character Format dialog box, you can reset the dialog box to match the
format of the current text by pressing Ctrl+Shift+F9.
Search for special characters and nonprinting symbols
You can search for any text, including single characters, phrases, and special characters that aren’t on your keyboard.
You’ll need to type the backslash sequence.
For example, you could find empty paragraphs by searching for \P\p (beginning of paragraph followed by end of
paragraph).
You can use most of these sequences for both searching and replacing—for example, replacing a forced return symbol
with an end-of-paragraph symbol. However, you cannot replace with the end-of-flow, start-of-paragraph, start-ofword, or end-of-word sequence.
More Help topics
“Typing in dialog boxes” on page 376
Search for markers
FrameMaker XML Author uses markers for cross-references, indexes, and other purposes. It can find any type of
marker or just the marker type you specify. When text symbols are visible, a symbol
indicates a marker.
84
FrameMaker XML Author can also find markers with specific marker text.
1 In the Find/Change dialog box, do one of the following:
• To find any marker in the document, choose Any Marker from the Find pop-up menu, and leave the Find box
blank.
• To find a specific type of marker, choose Marker Of Type from the Find pop-up menu, and enter the marker
type in the Find box.
• To find a marker with specific text, choose Marker Text from the Find pop-up menu, and enter the marker text
in the Find box.
2 Click Find. If the Marker dialog box is open (Special > Marker), the marker text for the found marker appears there.
Important: If you want to replace the text in a found marker, use the Marker dialog box to edit the marker text. If you
use the Find/Change dialog box, you’ll replace the marker rather than the marker text.
Search for conditional text
You can search for visible text that has specific condition tags. When FrameMaker XML Author finds visible
conditional text, it selects all adjacent text that uses these condition tags.
FrameMaker XML Author cannot find conditional table rows.
1 Make sure that the text with the condition tags you want to find is visible.
2 In the Find/Change dialog box, choose Conditional Text from the Find pop-up menu.
3 Do the following:
• To find text with a particular condition tag, move the condition tag to the In list.
• To find text that doesn’t have a particular condition tag, move the tag to the Not In scroll list.
• If you don’t care whether found text has a particular tag, move the tag to the As Is scroll list.
Last updated 8/18/2015
Page 91

USING FRAMEMAKER XML AUTHOR (2015 RELEASE)
Text
• To find all conditional text, move all tags to the As Is scroll list.
• To find unconditional text, select Unconditional.
Note: To move a condition tag between scroll lists, select the tag and click an arrow, or double-click the tag. To move
all tags from one scroll list to another, select a tag in the list and Shift-click an arrow.
4 Click Set, and then click Find.
Regular expression search and replace
You can use regular expressions in the WYSIWYG view of structured to search for and replace (substitute) text-based
items in a document. This means that you can use regular expressions to search for text, marker text, or paragraph tag.
However, this search and replace option is disabled for items such as markers and cross references.
To perform a regular expression search
Use a regular expression to search for dates with the dd-mm-yyyy format in a document.
1 Open the Find / Change dialog.
2 Enter the following regular expression in the Find box:
[\d]{2}-[\d]{2}-[\d]{4}
85
3 Choose the Regular Expressions find option and click Find.
To perform a regular expression search and replace
Use a regular expression to search for dates with the dd-mm-yyyy format in a document and replace (substitute) dates
found in this format to mm-dd-yyyy
1 Open the Find / Change dialog.
2 Enter the following regular expression in the Find box:
([\d]{2})-([\d]{2})-([\d]{4})
Note: The date, month, year parts of the regular expression are enclosed in parenthesis. This ensures that the regular
expression engine remembers these values for each search result.
3 Choose the Regular Expressions find option.
Next, you need to use the regular expression substitution syntax to replace only the parts that you enclosed in
parenthesis.
4 In the Change box, enter the following substitution:
$2-$1-$3
$2 is the second (month) enclosed part. $1 is the first (date) enclosed part. So when using the substitution syntax,
you interchange the $1 and $2 results from the search.
Configuring the regular expression engine in FrameMaker XML Author
FrameMaker XML Author uses the boost engine for Regex. For more information on Boost, see boost.org.
You can write the regular expressions using the following syntax:
• Perl (default)
• Grep
• Ergrep
Last updated 8/18/2015
Page 92

USING FRAMEMAKER XML AUTHOR (2015 RELEASE)
Text
By default, you use the Perl regular expression syntax to write regular expressions in FrameMaker XML Author.
However, to use either the Grep or Ergrep regular expression syntax, you need to update the RegularExpressionSyntax
flag in the maker.ini
Troubleshoot a search
If you don’t find the item even though you’re sure it is there, check the Find/Change dialog box for the following
possible problems:
• Text spelling.
• Number and type of spaces.
• Search options.
• Hidden conditional text.
• Insertion point on master page when searching a master page.
• Selection of Book option when searching entire book.
Check spelling
86
FrameMaker XML Author dictionaries
FrameMaker XML Author automatically creates a personal dictionary for you and a document dictionary for each of
your documents. You can use either the Spelling Checker or Auto Spell Check options, to add or delete words in these
dictionaries, or you can manage the dictionaries directly. When you work with a dictionary directly, you can examine
and edit its contents or merge it with another dictionary. You can create multiple personal dictionaries and then use
them one at a time.
If you make changes either to a personal or to a document dictionary, mark all paragraphs for rechecking before you
spell-check the document again.
You perform many of the following tasks in the Dictionary Functions dialog box.
About FrameMaker XML Author dictionaries
The FrameMaker XML Author Spelling Checker uses several dictionaries to check text for spelling errors. When you
spell-check a document, FrameMaker XML Author compares each word in it with the words in the following
dictionaries:
• The main dictionary contains words found in a standard dictionary. You can’t add words to or delete words from
this dictionary.
• The default site dictionary contains some technical terms. You can add words common to your site or workgroup—
for example, the company name and product names. The site dictionary is normally in the site.dict file in the
FrameMaker XML Author dict folder.
• Your personal dictionary contains words you use often. Because FrameMaker XML Author uses this dictionary
whenever you spell-check any document, use this dictionary for words that are neither document-specific nor sitespecific (for example, your name). You can add or delete words. You can also create several personal dictionaries
and switch between them.
Last updated 8/18/2015
Page 93

USING FRAMEMAKER XML AUTHOR (2015 RELEASE)
Text
• The document dictionary contains words that are acceptable in a particular document. FrameMaker XML Author
uses this dictionary regardless of who is editing the document. You can add words to or delete words from it. Unlike
the other dictionaries, the document dictionary is part of the document rather than a separate file.
You have editorial control over your document, personal, and site dictionaries. You can choose different dictionaries,
merge one dictionary into another, and edit and delete dictionaries.
Dictionaries for other languages
In FrameMaker XML Author, the dictionaries, hyphenation, and Thesaurus are Unicode enabled.
FrameMaker XML Author provides dictionary and hyphenation support for the following languages: Bulgarian,
Catalan, Croatian, Czech, Danish, Dutch, Estonian, Finnish, Greek, Hungarian, Italian, Latvian, Lithuanian,
Norwegian, Nynorsk, Polish, Portuguese, Romanian, Russian, Slovak, Slovenian, Spanish, Swedish, and Turkish.
Note: By default, dictionaries of all languages supported in FrameMaker XML Author are installed.
FrameMaker XML Author provides full authoring support (without dictionaries and hyphenation) for Japanese,
Korean, Traditional Chinese, and Simplified Chinese.
In addition, full authoring support (including language rules, dictionary, hyphenation, and thesaurus) is extended for
US English, French, Danish, Dutch, German, Italian, Norwegian, Swedish, Swiss German, Canadian French, and
British English.
87
Choose Dictionary Functions dialog box
1 Make the appropriate document window or book window active.
2 Choose Edit > Spelling Checker.
3 Click Dictionaries.
Delete the contents of the document dictionary
❖ Choose Clear from the Document Dictionary pop-up menu and click OK.
Locate a personal dictionary
❖ To find the name of the personal dictionary, choose Edit > Spelling Checker, and then click Dictionaries.
Import dictionary entries
1 Select Edit > Spelling Checker and click Dictionaries.
2 Select Import Dictionary from the Personal Dictionary pop-up menu and click OK.
3 Locate or specify the name of the file that contains the personal dictionary you want to use and click Use.
Check the spelling of a document without using the personal dictionary
❖ Choose Set To None from the Personal Dictionary pop-up menu and click OK.
Copy the contents of a dictionary to a file
1 Choose Write To File from the Personal Dictionary or Document Dictionary pop-up menu and click OK.
2 Specify the file to which you want to copy the dictionary contents. You can edit this file and then use it as a new
dictionary.
If a book window is active when you choose this command, the document dictionaries are copied to a single file.
Last updated 8/18/2015
Page 94

USING FRAMEMAKER XML AUTHOR (2015 RELEASE)
Text
Merge the contents of a dictionary with the current personal or document dictionary
1 Choose Merge From File from the Personal Dictionary or Document Dictionary pop-up menu and click OK.
2 Specify the file you want to merge with the current dictionary.
You can use the Merge From File command to merge a single dictionary into multiple book files so that all the files in
your book share the same dictionary.
Create another personal dictionary
1 Place words, with a hyphen at each hyphenation point, in a document. Type as the first line in the document:
<MakerDictionary 3.0>
2
When you save the file, choose Text Only format and click Save. Then click Only Between Paragraphs and click Save.
Change site dictionaries
You can specify a different site dictionary for each of several projects. You can also edit your site dictionary directly.
If FrameMaker XML Author is used across a network at your site, a system administrator probably manages the site
dictionary.
❖ Specify the dictionary in the maker.ini file.
Note: Use caution when editing an ini file.
88
Edit dictionary files
1 If you’re editing a personal or document dictionary, use FrameMaker XML Author to write the dictionary contents
to a file.
2 Edit the file. If you use FrameMaker XML Author to edit a dictionary, be sure to do the following:
•
When you open the file, select Treat Each Line As A Paragraph in the Reading Text File dialog box and click Read.
• When you save the file, choose Text Only format and click Save. Then click Only Between Paragraphs and click Save.
3 Merge the dictionary file with another dictionary. If you removed words from the dictionary, delete the original
dictionary before merging the file. Otherwise, the deleted words remain in the dictionary.
Add unknown words to a dictionary
If your document contains many correctly spelled words that FrameMaker XML Author questions, expedite spellchecking by adding the words to a dictionary in a separate operation before you begin to spell-check.
1 Make the appropriate document window or book window active.
2 Choose Edit > Spelling Checker.
3 Click Dictionaries.
4 Click Write All Unknown Words To File and click OK.
5 Specify a filename for the dictionary file, and click OK or Save. The resulting dictionary file doesn’t include typing
errors such as repeated words, capitalization errors, or extra spaces.
6 Edit the dictionary file with a text editor or with FrameMaker XML Author. Delete any words you don’t want to
add to your dictionary, such as misspelled words.
7 In the Spelling Checker dialog box, click Dictionaries.
Last updated 8/18/2015
Page 95

USING FRAMEMAKER XML AUTHOR (2015 RELEASE)
Text
8 Choose Merge From File from the Personal Dictionary or Document Dictionary pop-up menu, and click OK. If
you expect the words to appear in several documents, merge the words with a personal dictionary, or merge them
into all the files in a book.
9 Name and save the dictionary file.
Note: To add a few words to a dictionary, you can select Learn Word from right click menu. Above method is help if you
have many words highlighted by red squiggly line.
Add hyphenated compound words to personal dictionary
A document sometimes contains hyphenated compound words. By default, FrameMaker XML Author spell-checks
each word in a hyphenated compound word rather than checking the hyphenated compound word as a whole. For
example, when spell-checking the word heavy-duty, FrameMaker XML Author checks heavy and then checks duty. By
changing the default settings, you can spell-check hyphenated compound words as single words, and you can add
hyphenated compound words to your personal dictionary.
1 Choose Edit > Spelling Checker and click Options.
2 Select Unusual Hyphenation and click Set.
3 In the Word box in the Spelling Checker dialog box, enter the hyphenated compound word you want to add to your
personal dictionary. Include a hyphen at the beginning of the compound word, and type a backslash (\) before each
hyphen that connects words.
For example, to add the word heavy-duty, type -heavy\-duty.
89
4 Click Learn.
Spelling and typing errors
When correcting errors, keep in mind the following:
• If FrameMaker XML Author questions something that you don’t consider to be a typing error, you can turn off the
option to find that type of potential error. For example, you can stop FrameMaker XML Author from questioning
the use of straight quotation marks.
• If FrameMaker XML Author adds a word that contains uppercase letters to a personal or document dictionary,
when Unusual Capitalization is selected in the Spelling Checker Options dialog box, it considers any other
capitalization of the word a spelling mistake. For example, if FrameMaker XML Author learns Trinidad, it
questions the spelling oftrinidad. However, if it learns trinidad, in all lowercase letters, it does not question any type
of capitalization of the word.
• FrameMaker XML Author does not spell-check superscript and subscript text or manually micropositioned text,
such as text with a manual baseline shift).
• To correct a typing error (for example, repeated words such as and and), make sure that the correctly typed text is
in the Correction box and click Correct. FrameMaker XML Author lists only one suggestion for mistyped text. If
the suggestion is not correct, you can enter the correct text in the Correction box, or type it directly in the document
window.
Spell-check a document, book, or map
The Spelling Checker checks for repeated words, unusual hyphenation or capitalization, punctuation errors, straight
quotation marks (when curved must be used), and extra spaces. You can spell-check the current page, the open
document, the entire book, bookmap or DITA map, or selected files within the book. However, the spell check only
checks on pages of the type you are viewing, for example, master pages or body pages.
Last updated 8/18/2015
Page 96

USING FRAMEMAKER XML AUTHOR (2015 RELEASE)
Text
FrameMaker XML Author begins spell-checking from the active document or from the first document of the book if
the book window is active. It continues spell-checking until all documents in the book have been checked. If a
document cannot be opened, the document is skipped and a message appears in the Book Error Log. When spellchecking throughout a book, you cannot spell-check master or reference pages.
An alert message prompts you to save the document before continuing with the next document. When the last
document in the book has been checked, a Spelling OK or Finished checking spelling message appears.
To check the spelling in specific documents of a book or map, you can select them in the resource manager view, and
then choose Selection to spell-check only those files, books, or maps if you decide to spell-check the entire book or map.
FrameMaker XML Author draws a red squiggly line under words, to indicate spelling mistakes—words not present in
the dictionary. A green squiggly line under the word indicates a punctuation mistake. To correct, right click on a
highlighted word and select the desired option.
Note: For the words highlighted in green, the options to add to dictionary are not applicable, and hence are not available.
In FrameMaker XML Author, Auto Spell Check feature is enabled by default. If for some reason you disabled it, you can
enable it again by going to File > Preferences > General. This option spell checks the open file as soon as it is turned on.
When you spell-check throughout a book or map, words added to your personal dictionary are applied to all
documents. Words added to the document dictionary are used only in the current document, not in any other
document in the book. When the Spelling Checker finds a questionable word, it suggests the most likely correction
along with some other possibilities.
90
❖ In the document, choose Edit > Spelling Checker and click Start Checking.
Note: Auto spell check is session specific and not document specific. If the same document is opened on a different
machine, settings for Auto spell checker might differ.
Correct spelling errors automatically
You can have FrameMaker XML Author automatically correct future occurrences of a misspelled word or typing error.
FrameMaker XML Author keeps track of the errors to correct automatically until you exit or until you instruct
FrameMaker XML Author to stop making the corrections.
Before changing a particular misspelling or typing error automatically, verify the changes to make. If you use the
Automatic Correction option when correcting a repeated word, FrameMaker XML Author corrects every repeated
word even though some are correct (such as had had). Similarly, if thst is a misspelling of both test and that, you don’t
want to change it automatically to either word.
1 Choose Edit > Spelling Checker and click Start Checking.
2 When FrameMaker XML Author questions a word or typing error, select and click Correct.
Spell-check text insets
❖ Open the inset source file and check the spelling there.
Change Spelling Checker options
When you spell-check a document, FrameMaker XML Author also checks for errors that don’t involve spelling—for
example, repeated words, extra or misplaced spaces, or unusual capitalization. You can specify the kinds of typing
errors to check.
Last updated 8/18/2015
Page 97

USING FRAMEMAKER XML AUTHOR (2015 RELEASE)
Text
You can also limit the spell-check so that FrameMaker XML Author overlooks certain types of words. For example,
perhaps you want to overlook words that contain numbers.
1 Choose Edit > Spelling Checker and click Options.
2 Do the following:
• In the Find area, specify the kinds of typing errors you want to find. For example, select Unusual Capitalization
if you want to find words with uppercase letters in inappropriate locations (for example, GReen).
• In the Ignore area, specify the kinds of words you want to overlook. For example, select Words With Digits if
you want to ignore words that contain numbers.
Keep in mind that the more words FrameMaker XML Author overlooks, the greater the possibility that your
document contains mistakes. For example, if you choose to ignore words containing a period, you also skip over
a sentence that begins without a space after the preceding period.
• If you change the Spelling Checker options and then want to reset the default options, click Get Defaults. If you
exit FrameMaker XML Author without resetting the default options, your current settings become the default
options.
3 Click Set.
91
Recheck after changing Spelling Checker options
FrameMaker XML Author ordinarily rechecks only paragraphs that have been edited since the prior check. If you
change options after spell-checking a document, consider running the Spelling Checker again after instructing
FrameMaker XML Author to mark all paragraphs for rechecking.
Assign text to be ignored by Spelling Checker
To ignore certain text, change its Language property to None. For example, perhaps you don’t want to spell-check
paragraphs of computer code.
When you set the language of text to None, FrameMaker XML Author no longer provides hyphenation for it.
Check spelling in different languages
All text is assigned a language. When you spell-check, FrameMaker XML Author uses the main dictionary of the
language assigned to the text. You can change the language used to spell-check text by changing the language assigned
to the text. You can also add Unicode (UTF-8)-encoded words to user and personal dictionaries in FrameMaker XML
Author.
The FrameMaker XML Author CD contains dictionaries for all supported languages. However, the default installation
contains only one dictionary in a single language.
❖ To change the language of text in a document, use the Language property in the Default Font properties of the
Paragraph Designer to change the language of one of the following:
• A single paragraph, or all the paragraphs in a document.
• A range of text within a paragraph, or the language of a text line.
Note the following about Asian-language documents:
• In an Asian-language document, some special characters are not displayed in the Spelling Checker as they are in a
Western-language document. For example, a backslash is displayed as a yen symbol, and a nonbreaking hyphen is
displayed as a blank.
Last updated 8/18/2015
Page 98

USING FRAMEMAKER XML AUTHOR (2015 RELEASE)
Text
• In an Asian-language document that contains Roman text, make sure that you turn off the Straight Quotes option
in the Spelling Checker dialog box so that the Spelling Checker does not stop on properly spelled words.
Control hyphenation
When you add a word to a personal dictionary, FrameMaker XML Author suggests hyphenation points. You can
change them before adding the word. You can also specify that a word is always or never hyphenated. For example,
you can hyphenate heavy duty wherever it appears but never hyphenate your company name.
After making hyphenation changes, rehyphenate the document.
For strict control over hyphenation (for example, before printing the final draft of a book), consider searching your
document for all hyphens that FrameMaker XML Author has inserted automatically. Choose Automatic Hyphen
from the Find pop-up menu in the Find/Change dialog box.
Change word hyphenation
1 Show the hyphenation points of the word.
2 Adjust the hyphenation and click Learn. You can add and delete hyphens as necessary.
Prevent FrameMaker XML Author from hyphenating a word
1 Enter the word in the Correction box.
2 Click Show Hyphenation.
3 Remove all hyphens from the word.
4 Insert a hyphen at the beginning of the word.
5 Click Learn.
92
Rehyphenate an entire document
1 Make the appropriate document window or book window active.
2 Choose Edit > Spelling Checker.
3 Click Dictionaries.
4 Select Rehyphenate Document and click OK. This option works for an open document.
In case of a book file, select Rehyphenate All Files In Book and then click OK.
Use the Thesaurus
Look up words in the Thesaurus
Use the Thesaurus to look up synonyms, related words, and antonyms for words you specify. The Thesaurus lets you
improve on a word already in a document or search for the right word to insert.
You can look up any one of the words from the first pass and display its synonyms, related words, and antonyms.
FrameMaker XML Author keeps a history of the last 10 words you looked up.
If more information is available than fits, you can use the arrow buttons at the bottom of the dialog box to view the
additional information. FrameMaker XML Author displays the synonyms, antonyms, and related words with
capitalization that matches the capitalization of the word you looked up.
Last updated 8/18/2015
Page 99

USING FRAMEMAKER XML AUTHOR (2015 RELEASE)
Text
You can look up words in the following ways:
• To look up a word visible in the document window, select the word and choose Edit > Thesaurus.
• To look up a word not visible in the document window, make sure that no text is selected, then choose Edit >
Thesaurus. Enter the word and click Look Up.
• To look up a phrase, make sure that no text is selected and choose Edit > Thesaurus. Enter the phrase, including
any hyphens, in the Thesaurus Look Up dialog box, and click Look Up
Note: If you try to specify a phrase by selecting it in the document window, FrameMaker XML Author looks up only
the first selected word.
• To look up a synonym, a related word, or an antonym displayed in the Thesaurus dialog box, click the word.
Synonyms, related words, and antonyms are shown in bold.
• To look up a word again, choose the word from the Word pop-up menu in the Thesaurus dialog box.
Choose a language for the Thesaurus
FrameMaker XML Author uses the language of the current text. If a word isn’t selected or the insertion point isn’t in
a paragraph, FrameMaker XML Author uses the language of the interface you chose when you installed FrameMaker
XML Author. You can override the default language in new documents by creating your own template for custom new
documents.
93
The Thesaurus for a language is installed along with the dictionary for that language.
Specify a different language when looking up a word
1 Click Look Up in the Thesaurus dialog box.
2 Enter the word you want to look up, choose a language, and click Look Up.
Insert a word from the Thesaurus into the document
1 Do one of the following:
• To add the word, place an insertion point in the document.
• To replace a word in the document, select the word.
2 Control-click the word in the Thesaurus dialog box and click Replace.
More Help topics
“Check spelling” on page 86
Multiple Undo/Redo
You can undo or redo multiple actions in FrameMaker XML Author. However some actions cannot be undone and
you are prompted to confirm the action.
Undo and Redo commands
A Redo icon appears in the toolbar, next to the Undo icon . Click this button to redo the most recently undone
action in the current document.
Last updated 8/18/2015
Page 100

USING FRAMEMAKER XML AUTHOR (2015 RELEASE)
Text
A Redo command also appears in the Edit menu and in context menus, under the Undo command, showing the most
recent redoable command in the current document.
The Edit menu displays the last command as well as the last command that has been undone.
94
If no action is available for Undo or Redo in the current document, the corresponding menu options and toolbar
buttons are unavailable (dimmed).
The History command opens the command History panel, which allows you to undo or redo an action other than the
most recent one, along with all of the subsequent actions.
Document-level command history
FrameMaker XML Author maintains a history of undoable commands, so that you can select one or more recent
commands to undo or redo.
The command history is available through the Edit menu and context menus. The command history is kept separately
for each document, so undoing or redoing an operation in one document does not change the undo capability of
another open document.
Cursor movement and object selection actions are not undoable, but when a previous state is restored, it includes the
original cursor location and object selection state.
Commands that affect an external file (such as Spelling Checker commands that update the user dictionary) cannot be
undone.
Repeat Last Operation
FrameMaker XML Author features a powerful Repeat Last Operation feature that makes it easy for you to repeat the
previous operation, when working on a FrameMaker XML Author document.
Repeat Last Operation can be performed on a document at the following locations:
• The current insertion point
• The current text selection
• The current object selection
To perform the Repeat operation, select Edit > Repeat [operation/object name] from the FrameMaker XML Author menu.
Last updated 8/18/2015
 Loading...