

Page 1

™
®
Using Flash
macromedia
Page 2

Trademarks
Afterburner, AppletAce, Attain, Attain Enterprise Learning System, Attain Essentials, Attain Objects for Dreamweaver,
Authorware, Authorware Attain, Authorware Interactive Studio, Authorware Star, Authorware Synergy, Backstage, Backstage
Designer, Backstage Desktop Studio, Backstage Enterprise Studio, Backstage Internet Studio, Design in Motion, Director,
Director Multimedia Studio, Doc Around the Clock, Dreamweaver, Dreamweaver Attain, Drumbeat, Drumbeat 2000, Extreme
3D, Fireworks, Flash, Fontographer, FreeHand, FreeHand Graphics Studio, Generator, Generator Developer’s Studio, Generator
Dynamic Graphics Server, Knowledge Objects, Knowledge Stream, Knowledge Track, Lingo, Live Effects, Macromedia,
Macromedia M Logo & Design, Macromedia Flash, Macromedia Xres, Macromind, Macromind Action, MAGIC, Mediamaker,
Object Authoring, Power Applets, Priority Access, Roundtrip HTML, Scriptlets, SoundEdit, ShockRave, Shockmachine,
Shockwave, Shockwave Remote, Shockwave Internet Studio, Showcase, Tools to Power Your Ideas, Universal Media, Virtuoso,
Web Design 101, Whirlwind and Xtra are trademarks of Macromedia, Inc. and may be registered in the United States or in other
jurisdictions including internationally. Other product names, logos, designs, titles, words or phrases mentioned within this
publication may be trademarks, servicemarks, or tradenames of Macromedia, Inc. or other entities and may be registered in
certain jurisdictions including internationally.
Third-Party Information
Speech compression and decompression technology licensed from Nellymoser, Inc. (www.nellymoser.com).
Sorenson™ Spark™ video compression and decompression technology licensed from
Sorenson Media, Inc.
This guide contains links to third-party Web sites that are not under the control of Macromedia, and Macromedia is not
responsible for the content on any linked site. If you access a third-party Web site mentioned in this guide, then you do so at your
own risk. Macromedia provides these links only as a convenience, and the inclusion of the link does not imply that Macromedia
endorses or accepts any responsibility for the content on those third-party sites.
Apple Disclaimer
APPLE COMPUTER, INC. MAKES NO WARRANTIES, EITHER EXPRESS OR IMPLIED, REGARDING THE
ENCLOSED COMPUTER SOFTWARE PACKAGE, ITS MERCHANTABILITY OR ITS FITNESS FOR ANY PARTICULAR PURPOSE. THE EXCLUSION OF IMPLIED WARRANTIES IS NOT PERMITTED BY SOME STATES. THE
ABOVE EXCLUSION MAY NOT APPLY TO YOU. THIS WARRANTY PROVIDES YOU WITH SPECIFIC LEGAL
RIGHTS. THERE MAY BE OTHER RIGHTS THAT YOU MAY HAVE WHICH VARY FROM STATE TO STATE.
Copyright © 2002 Macromedia, Inc. All rights reserved. This manual may not be copied, photocopied, reproduced,
translated, or converted to any electronic or machine-readable form in whole or in part without prior written approval of
Macromedia, Inc.
Acknowledgments
Director: Erick Vera
Producer: Wayne Wieseler
Writing: Jody Bleyle, JuLee Burdekin, Mary Burger, Dale Crawford, Marcelle Taylor
Instructional Design: Stephanie Gowin, Barbara Nelson
Editing: Rosana Francescato, Lisa Stanziano, Anne Szabla
Multimedia Design and Production: Aaron Begley, Benjamin Salles, Noah Zilberberg
Print Design and Production: Chris Basmajian, Caroline Branch
First Edition: February 2002
Macromedia, Inc.
600 Townsend St.
San Francisco, CA 94103
Page 3

CONTENTS
INTRODUCTION
Getting Started
. . . . . . . . . . . . . . . . . . . . . . . . . . . . . . . . . . . . . . . . . . . . . . . . . . . . . 9
System requirements for Flash authoring . . . . . . . . . . . . . . . . . . . . . . . . . . . . . . . . . . . . . 9
System requirements for the Flash Player. . . . . . . . . . . . . . . . . . . . . . . . . . . . . . . . . . . . . 9
Installing Flash . . . . . . . . . . . . . . . . . . . . . . . . . . . . . . . . . . . . . . . . . . . . . . . . . . . . . . . 10
What’s new in Flash MX . . . . . . . . . . . . . . . . . . . . . . . . . . . . . . . . . . . . . . . . . . . . . . . . 10
Guide to instructional media. . . . . . . . . . . . . . . . . . . . . . . . . . . . . . . . . . . . . . . . . . . . . 13
Launching Flash on a network. . . . . . . . . . . . . . . . . . . . . . . . . . . . . . . . . . . . . . . . . . . . 15
CHAPTER 1
Working in Flash
. . . . . . . . . . . . . . . . . . . . . . . . . . . . . . . . . . . . . . . . . . . . . . . . . . . 17
Artwork in Flash . . . . . . . . . . . . . . . . . . . . . . . . . . . . . . . . . . . . . . . . . . . . . . . . . . . . . . 17
Animation in Flash . . . . . . . . . . . . . . . . . . . . . . . . . . . . . . . . . . . . . . . . . . . . . . . . . . . . 17
Interactive movies in Flash . . . . . . . . . . . . . . . . . . . . . . . . . . . . . . . . . . . . . . . . . . . . . . 18
Application development in Flash . . . . . . . . . . . . . . . . . . . . . . . . . . . . . . . . . . . . . . . . . 18
The Stage and workspace. . . . . . . . . . . . . . . . . . . . . . . . . . . . . . . . . . . . . . . . . . . . . . . . 18
Creating a new document . . . . . . . . . . . . . . . . . . . . . . . . . . . . . . . . . . . . . . . . . . . . . . . 21
Setting preferences in Flash . . . . . . . . . . . . . . . . . . . . . . . . . . . . . . . . . . . . . . . . . . . . . . 22
Using the Property inspector to change document attributes. . . . . . . . . . . . . . . . . . . . . 24
Customizing keyboard shortcuts . . . . . . . . . . . . . . . . . . . . . . . . . . . . . . . . . . . . . . . . . . 25
Using scenes and the Scene panel . . . . . . . . . . . . . . . . . . . . . . . . . . . . . . . . . . . . . . . . . 27
Using the Timeline . . . . . . . . . . . . . . . . . . . . . . . . . . . . . . . . . . . . . . . . . . . . . . . . . . . . 28
Using frames and keyframes . . . . . . . . . . . . . . . . . . . . . . . . . . . . . . . . . . . . . . . . . . . . . 31
Using layers . . . . . . . . . . . . . . . . . . . . . . . . . . . . . . . . . . . . . . . . . . . . . . . . . . . . . . . . . . 33
Previewing and testing movies. . . . . . . . . . . . . . . . . . . . . . . . . . . . . . . . . . . . . . . . . . . . 39
Using the Movie Explorer . . . . . . . . . . . . . . . . . . . . . . . . . . . . . . . . . . . . . . . . . . . . . . . 40
Speeding up movie display . . . . . . . . . . . . . . . . . . . . . . . . . . . . . . . . . . . . . . . . . . . . . . 42
Saving Flash documents . . . . . . . . . . . . . . . . . . . . . . . . . . . . . . . . . . . . . . . . . . . . . . . . 43
Configuring a server for the Flash Player. . . . . . . . . . . . . . . . . . . . . . . . . . . . . . . . . . . . 44
Printing Flash documents as you edit . . . . . . . . . . . . . . . . . . . . . . . . . . . . . . . . . . . . . . 45
CHAPTER 2
Working with Flash assets
. . . . . . . . . . . . . . . . . . . . . . . . . . . . . . . . . . . . . . . . . . 47
Assets and asset management. . . . . . . . . . . . . . . . . . . . . . . . . . . . . . . . . . . . . . . . . . . . . 47
Panels and the Property inspector . . . . . . . . . . . . . . . . . . . . . . . . . . . . . . . . . . . . . . . . . 48
Using the toolbox . . . . . . . . . . . . . . . . . . . . . . . . . . . . . . . . . . . . . . . . . . . . . . . . . . . . . 52
Using context menus. . . . . . . . . . . . . . . . . . . . . . . . . . . . . . . . . . . . . . . . . . . . . . . . . . . 54
Using the library . . . . . . . . . . . . . . . . . . . . . . . . . . . . . . . . . . . . . . . . . . . . . . . . . . . . . . 54
About components . . . . . . . . . . . . . . . . . . . . . . . . . . . . . . . . . . . . . . . . . . . . . . . . . . . . 58
3
Page 4

CHAPTER 3
Drawing
. . . . . . . . . . . . . . . . . . . . . . . . . . . . . . . . . . . . . . . . . . . . . . . . . . . . . . . . . . . 59
About vector and bitmap graphics . . . . . . . . . . . . . . . . . . . . . . . . . . . . . . . . . . . . . . . . 59
Flash drawing and painting tools. . . . . . . . . . . . . . . . . . . . . . . . . . . . . . . . . . . . . . . . . . 61
About overlapping shapes in Flash. . . . . . . . . . . . . . . . . . . . . . . . . . . . . . . . . . . . . . . . . 62
Drawing with the Pencil tool. . . . . . . . . . . . . . . . . . . . . . . . . . . . . . . . . . . . . . . . . . . . . 63
Drawing straight lines, ovals, and rectangles . . . . . . . . . . . . . . . . . . . . . . . . . . . . . . . . . 63
Using the Pen tool. . . . . . . . . . . . . . . . . . . . . . . . . . . . . . . . . . . . . . . . . . . . . . . . . . . . . 64
Painting with the Brush tool . . . . . . . . . . . . . . . . . . . . . . . . . . . . . . . . . . . . . . . . . . . . . 69
Reshaping lines and shape outlines . . . . . . . . . . . . . . . . . . . . . . . . . . . . . . . . . . . . . . . . 70
Erasing . . . . . . . . . . . . . . . . . . . . . . . . . . . . . . . . . . . . . . . . . . . . . . . . . . . . . . . . . . . . . 72
Modifying shapes . . . . . . . . . . . . . . . . . . . . . . . . . . . . . . . . . . . . . . . . . . . . . . . . . . . . . 73
Snapping. . . . . . . . . . . . . . . . . . . . . . . . . . . . . . . . . . . . . . . . . . . . . . . . . . . . . . . . . . . . 74
Choosing drawing settings. . . . . . . . . . . . . . . . . . . . . . . . . . . . . . . . . . . . . . . . . . . . . . . 75
CHAPTER 4
Working with Color
. . . . . . . . . . . . . . . . . . . . . . . . . . . . . . . . . . . . . . . . . . . . . . . . . 77
Using the Stroke Color and Fill Color controls in the toolbox. . . . . . . . . . . . . . . . . . . . 77
Using the Stroke Color and Fill Color controls in the
Property inspector . . . . . . . . . . . . . . . . . . . . . . . . . . . . . . . . . . . . . . . . . . . . . . . . . . 79
Working with solid colors and gradient fills in the Color Mixer. . . . . . . . . . . . . . . . . . . 80
Modifying strokes with the Ink Bottle tool . . . . . . . . . . . . . . . . . . . . . . . . . . . . . . . . . . 82
Applying solid, gradient, and bitmap fills with the Paint Bucket tool. . . . . . . . . . . . . . . 83
Transforming gradient and bitmap fills . . . . . . . . . . . . . . . . . . . . . . . . . . . . . . . . . . . . . 84
Copying strokes and fills with the Eyedropper tool . . . . . . . . . . . . . . . . . . . . . . . . . . . . 86
Locking a gradient or bitmap to fill the Stage . . . . . . . . . . . . . . . . . . . . . . . . . . . . . . . . 86
Modifying color palettes . . . . . . . . . . . . . . . . . . . . . . . . . . . . . . . . . . . . . . . . . . . . . . . . 87
CHAPTER 5
Using Imported Artwork and Video
. . . . . . . . . . . . . . . . . . . . . . . . . . . . . . . . . . 89
Placing artwork into Flash. . . . . . . . . . . . . . . . . . . . . . . . . . . . . . . . . . . . . . . . . . . . . . . 89
Working with imported bitmaps . . . . . . . . . . . . . . . . . . . . . . . . . . . . . . . . . . . . . . . . . . 96
Importing video . . . . . . . . . . . . . . . . . . . . . . . . . . . . . . . . . . . . . . . . . . . . . . . . . . . . . 100
CHAPTER 6
Adding Sound
. . . . . . . . . . . . . . . . . . . . . . . . . . . . . . . . . . . . . . . . . . . . . . . . . . . . 109
Importing sounds . . . . . . . . . . . . . . . . . . . . . . . . . . . . . . . . . . . . . . . . . . . . . . . . . . . . 109
Adding sounds to a movie . . . . . . . . . . . . . . . . . . . . . . . . . . . . . . . . . . . . . . . . . . . . . . 110
Adding sounds to buttons . . . . . . . . . . . . . . . . . . . . . . . . . . . . . . . . . . . . . . . . . . . . . . 112
Using sounds with Sound objects . . . . . . . . . . . . . . . . . . . . . . . . . . . . . . . . . . . . . . . . 112
Using the sound-editing controls. . . . . . . . . . . . . . . . . . . . . . . . . . . . . . . . . . . . . . . . . 113
Starting and stopping sounds at keyframes . . . . . . . . . . . . . . . . . . . . . . . . . . . . . . . . . 114
About the onSoundComplete event. . . . . . . . . . . . . . . . . . . . . . . . . . . . . . . . . . . . . . . 114
Compressing sounds for export . . . . . . . . . . . . . . . . . . . . . . . . . . . . . . . . . . . . . . . . . . 115
CHAPTER 7
Working with Graphic Objects
. . . . . . . . . . . . . . . . . . . . . . . . . . . . . . . . . . . . . 119
Selecting objects . . . . . . . . . . . . . . . . . . . . . . . . . . . . . . . . . . . . . . . . . . . . . . . . . . . . . 119
Grouping objects. . . . . . . . . . . . . . . . . . . . . . . . . . . . . . . . . . . . . . . . . . . . . . . . . . . . . 122
Moving, copying, and deleting objects. . . . . . . . . . . . . . . . . . . . . . . . . . . . . . . . . . . . . 123
Contents4
Page 5

Stacking objects. . . . . . . . . . . . . . . . . . . . . . . . . . . . . . . . . . . . . . . . . . . . . . . . . . . . . . 125
Transforming objects . . . . . . . . . . . . . . . . . . . . . . . . . . . . . . . . . . . . . . . . . . . . . . . . . . 126
Flipping objects. . . . . . . . . . . . . . . . . . . . . . . . . . . . . . . . . . . . . . . . . . . . . . . . . . . . . . 131
Restoring transformed objects . . . . . . . . . . . . . . . . . . . . . . . . . . . . . . . . . . . . . . . . . . . 131
Aligning objects. . . . . . . . . . . . . . . . . . . . . . . . . . . . . . . . . . . . . . . . . . . . . . . . . . . . . . 131
Breaking apart groups and objects . . . . . . . . . . . . . . . . . . . . . . . . . . . . . . . . . . . . . . . . 133
CHAPTER 8
Working with Text
. . . . . . . . . . . . . . . . . . . . . . . . . . . . . . . . . . . . . . . . . . . . . . . . . 135
About embedded fonts and device fonts . . . . . . . . . . . . . . . . . . . . . . . . . . . . . . . . . . . 136
Creating text . . . . . . . . . . . . . . . . . . . . . . . . . . . . . . . . . . . . . . . . . . . . . . . . . . . . . . . . 136
Setting text attributes . . . . . . . . . . . . . . . . . . . . . . . . . . . . . . . . . . . . . . . . . . . . . . . . . 139
Creating font symbols . . . . . . . . . . . . . . . . . . . . . . . . . . . . . . . . . . . . . . . . . . . . . . . . . 143
Editing text . . . . . . . . . . . . . . . . . . . . . . . . . . . . . . . . . . . . . . . . . . . . . . . . . . . . . . . . . 144
About transforming text . . . . . . . . . . . . . . . . . . . . . . . . . . . . . . . . . . . . . . . . . . . . . . . 144
Breaking text apart . . . . . . . . . . . . . . . . . . . . . . . . . . . . . . . . . . . . . . . . . . . . . . . . . . . 144
Linking text to a URL (horizontal text only). . . . . . . . . . . . . . . . . . . . . . . . . . . . . . . . 145
Substituting missing fonts . . . . . . . . . . . . . . . . . . . . . . . . . . . . . . . . . . . . . . . . . . . . . . 145
CHAPTER 9
Using Symbols, Instances, and Library Assets
. . . . . . . . . . . . . . . . . . . . . . . 149
Types of symbol behavior . . . . . . . . . . . . . . . . . . . . . . . . . . . . . . . . . . . . . . . . . . . . . . 150
Creating symbols. . . . . . . . . . . . . . . . . . . . . . . . . . . . . . . . . . . . . . . . . . . . . . . . . . . . . 151
Creating instances . . . . . . . . . . . . . . . . . . . . . . . . . . . . . . . . . . . . . . . . . . . . . . . . . . . 154
Creating buttons . . . . . . . . . . . . . . . . . . . . . . . . . . . . . . . . . . . . . . . . . . . . . . . . . . . . 154
Enabling, editing, and testing buttons. . . . . . . . . . . . . . . . . . . . . . . . . . . . . . . . . . . . . 157
Editing symbols. . . . . . . . . . . . . . . . . . . . . . . . . . . . . . . . . . . . . . . . . . . . . . . . . . . . . . 157
Changing instance properties . . . . . . . . . . . . . . . . . . . . . . . . . . . . . . . . . . . . . . . . . . . 159
Breaking apart instances . . . . . . . . . . . . . . . . . . . . . . . . . . . . . . . . . . . . . . . . . . . . . . . 163
Getting information about instances on the Stage . . . . . . . . . . . . . . . . . . . . . . . . . . . 163
Copying library assets between movies . . . . . . . . . . . . . . . . . . . . . . . . . . . . . . . . . . . . 165
Using shared library assets . . . . . . . . . . . . . . . . . . . . . . . . . . . . . . . . . . . . . . . . . . . . . . 165
Resolving conflicts between library assets. . . . . . . . . . . . . . . . . . . . . . . . . . . . . . . . . . . 168
CHAPTER 10
Creating Animation
. . . . . . . . . . . . . . . . . . . . . . . . . . . . . . . . . . . . . . . . . . . . . . . . 169
About tweened animation . . . . . . . . . . . . . . . . . . . . . . . . . . . . . . . . . . . . . . . . . . . . . . 169
About frame-by-frame animation . . . . . . . . . . . . . . . . . . . . . . . . . . . . . . . . . . . . . . . . 170
About layers in animation . . . . . . . . . . . . . . . . . . . . . . . . . . . . . . . . . . . . . . . . . . . . . . 170
Creating keyframes . . . . . . . . . . . . . . . . . . . . . . . . . . . . . . . . . . . . . . . . . . . . . . . . . . . 170
Representations of animations in the Timeline . . . . . . . . . . . . . . . . . . . . . . . . . . . . . . 171
About frame rates . . . . . . . . . . . . . . . . . . . . . . . . . . . . . . . . . . . . . . . . . . . . . . . . . . . . 171
Extending still images . . . . . . . . . . . . . . . . . . . . . . . . . . . . . . . . . . . . . . . . . . . . . . . . . 172
Distributing objects to layers for tweened animation . . . . . . . . . . . . . . . . . . . . . . . . . . 172
Tweening instances, groups, and type . . . . . . . . . . . . . . . . . . . . . . . . . . . . . . . . . . . . . 173
Tweening motion along a path . . . . . . . . . . . . . . . . . . . . . . . . . . . . . . . . . . . . . . . . . . 176
Tweening shapes . . . . . . . . . . . . . . . . . . . . . . . . . . . . . . . . . . . . . . . . . . . . . . . . . . . . . 178
Using shape hints . . . . . . . . . . . . . . . . . . . . . . . . . . . . . . . . . . . . . . . . . . . . . . . . . . . . 179
Creating frame-by-frame animations . . . . . . . . . . . . . . . . . . . . . . . . . . . . . . . . . . . . . . 180
Editing animation. . . . . . . . . . . . . . . . . . . . . . . . . . . . . . . . . . . . . . . . . . . . . . . . . . . . 181
Using mask layers . . . . . . . . . . . . . . . . . . . . . . . . . . . . . . . . . . . . . . . . . . . . . . . . . . . . 183
Contents 5
Page 6

CHAPTER 11
Writing Scripts with ActionScript
. . . . . . . . . . . . . . . . . . . . . . . . . . . . . . . . . . . 187
Using the Actions panel. . . . . . . . . . . . . . . . . . . . . . . . . . . . . . . . . . . . . . . . . . . . . . . . 187
Using an external text editor . . . . . . . . . . . . . . . . . . . . . . . . . . . . . . . . . . . . . . . . . . . . 195
About syntax highlighting . . . . . . . . . . . . . . . . . . . . . . . . . . . . . . . . . . . . . . . . . . . . . . 196
Setting Actions panel preferences. . . . . . . . . . . . . . . . . . . . . . . . . . . . . . . . . . . . . . . . . 196
Using code hints . . . . . . . . . . . . . . . . . . . . . . . . . . . . . . . . . . . . . . . . . . . . . . . . . . . . . 197
Assigning actions to a frame . . . . . . . . . . . . . . . . . . . . . . . . . . . . . . . . . . . . . . . . . . . . 199
Assigning actions to a button. . . . . . . . . . . . . . . . . . . . . . . . . . . . . . . . . . . . . . . . . . . . 200
Assigning actions to a movie clip . . . . . . . . . . . . . . . . . . . . . . . . . . . . . . . . . . . . . . . . . 201
CHAPTER 12
Understanding the ActionScript Language
. . . . . . . . . . . . . . . . . . . . . . . . . . 203
Differences between ActionScript and JavaScript . . . . . . . . . . . . . . . . . . . . . . . . . . . . 203
About scripting in ActionScript. . . . . . . . . . . . . . . . . . . . . . . . . . . . . . . . . . . . . . . . . . 204
ActionScript terminology . . . . . . . . . . . . . . . . . . . . . . . . . . . . . . . . . . . . . . . . . . . . . . 209
Deconstructing a sample script . . . . . . . . . . . . . . . . . . . . . . . . . . . . . . . . . . . . . . . . . . 212
Using ActionScript syntax . . . . . . . . . . . . . . . . . . . . . . . . . . . . . . . . . . . . . . . . . . . . . . 213
About data types . . . . . . . . . . . . . . . . . . . . . . . . . . . . . . . . . . . . . . . . . . . . . . . . . . . . . 216
About variables . . . . . . . . . . . . . . . . . . . . . . . . . . . . . . . . . . . . . . . . . . . . . . . . . . . . . . 219
Using operators to manipulate values in expressions . . . . . . . . . . . . . . . . . . . . . . . . . . 223
Using actions. . . . . . . . . . . . . . . . . . . . . . . . . . . . . . . . . . . . . . . . . . . . . . . . . . . . . . . . 229
Writing a target path . . . . . . . . . . . . . . . . . . . . . . . . . . . . . . . . . . . . . . . . . . . . . . . . . . 230
Controlling flow in scripts. . . . . . . . . . . . . . . . . . . . . . . . . . . . . . . . . . . . . . . . . . . . . . 230
Using built-in functions . . . . . . . . . . . . . . . . . . . . . . . . . . . . . . . . . . . . . . . . . . . . . . . 232
Creating functions. . . . . . . . . . . . . . . . . . . . . . . . . . . . . . . . . . . . . . . . . . . . . . . . . . . . 233
About built-in objects . . . . . . . . . . . . . . . . . . . . . . . . . . . . . . . . . . . . . . . . . . . . . . . . . 236
About custom objects . . . . . . . . . . . . . . . . . . . . . . . . . . . . . . . . . . . . . . . . . . . . . . . . . 239
Using Flash MX ActionScript with older versions of Flash. . . . . . . . . . . . . . . . . . . . . . 242
CHAPTER 13
Working with Movie Clips and Buttons
. . . . . . . . . . . . . . . . . . . . . . . . . . . . . . 245
About multiple Timelines . . . . . . . . . . . . . . . . . . . . . . . . . . . . . . . . . . . . . . . . . . . . . . 246
Using actions and methods to control movie clips . . . . . . . . . . . . . . . . . . . . . . . . . . . . 254
Handling events with ActionScript . . . . . . . . . . . . . . . . . . . . . . . . . . . . . . . . . . . . . . . 260
Manipulating buttons with ActionScript. . . . . . . . . . . . . . . . . . . . . . . . . . . . . . . . . . . 265
CHAPTER 14
Creating Interaction with ActionScript
. . . . . . . . . . . . . . . . . . . . . . . . . . . . . . 267
Controlling movie playback. . . . . . . . . . . . . . . . . . . . . . . . . . . . . . . . . . . . . . . . . . . . . 267
Creating complex interactivity. . . . . . . . . . . . . . . . . . . . . . . . . . . . . . . . . . . . . . . . . . . 271
CHAPTER 15
Using Components
. . . . . . . . . . . . . . . . . . . . . . . . . . . . . . . . . . . . . . . . . . . . . . . . 289
Working with components in Flash MX . . . . . . . . . . . . . . . . . . . . . . . . . . . . . . . . . . . 290
Adding components to Flash documents. . . . . . . . . . . . . . . . . . . . . . . . . . . . . . . . . . . 293
Deleting components from Flash documents. . . . . . . . . . . . . . . . . . . . . . . . . . . . . . . . 295
About component label size and component width and height . . . . . . . . . . . . . . . . . . 296
The CheckBox component . . . . . . . . . . . . . . . . . . . . . . . . . . . . . . . . . . . . . . . . . . . . . 296
The ComboBox component . . . . . . . . . . . . . . . . . . . . . . . . . . . . . . . . . . . . . . . . . . . . 297
Contents6
Page 7

The ListBox component . . . . . . . . . . . . . . . . . . . . . . . . . . . . . . . . . . . . . . . . . . . . . . . 298
The PushButton component . . . . . . . . . . . . . . . . . . . . . . . . . . . . . . . . . . . . . . . . . . . . 299
The RadioButton component . . . . . . . . . . . . . . . . . . . . . . . . . . . . . . . . . . . . . . . . . . . 300
The ScrollBar component . . . . . . . . . . . . . . . . . . . . . . . . . . . . . . . . . . . . . . . . . . . . . . 301
The ScrollPane component . . . . . . . . . . . . . . . . . . . . . . . . . . . . . . . . . . . . . . . . . . . . . 303
Writing change handler functions for components . . . . . . . . . . . . . . . . . . . . . . . . . . . 304
Customizing component colors and text . . . . . . . . . . . . . . . . . . . . . . . . . . . . . . . . . . . 305
Customizing component skins . . . . . . . . . . . . . . . . . . . . . . . . . . . . . . . . . . . . . . . . . . 309
Creating forms using components . . . . . . . . . . . . . . . . . . . . . . . . . . . . . . . . . . . . . . . . 312
CHAPTER 16
Connecting with External Sources
. . . . . . . . . . . . . . . . . . . . . . . . . . . . . . . . . . 319
Sending and loading variables to and from a remote source . . . . . . . . . . . . . . . . . . . . 319
Sending messages to and from the Flash Player . . . . . . . . . . . . . . . . . . . . . . . . . . . . . . 329
CHAPTER 17
Creating Printable Movies
. . . . . . . . . . . . . . . . . . . . . . . . . . . . . . . . . . . . . . . . . 333
Printing from the Flash Player. . . . . . . . . . . . . . . . . . . . . . . . . . . . . . . . . . . . . . . . . . . 333
Adding a Print action . . . . . . . . . . . . . . . . . . . . . . . . . . . . . . . . . . . . . . . . . . . . . . . . . 336
Printing from the Flash Player context menu. . . . . . . . . . . . . . . . . . . . . . . . . . . . . . . . 339
About publishing a movie with printable frames . . . . . . . . . . . . . . . . . . . . . . . . . . . . . 340
CHAPTER 18
Creating Accessible Content
. . . . . . . . . . . . . . . . . . . . . . . . . . . . . . . . . . . . . . . 341
About the Macromedia Flash Accessibility Web page. . . . . . . . . . . . . . . . . . . . . . . . . . 341
About screen reader technology. . . . . . . . . . . . . . . . . . . . . . . . . . . . . . . . . . . . . . . . . . 341
About accessible objects in Flash movies . . . . . . . . . . . . . . . . . . . . . . . . . . . . . . . . . . . 342
Supported configurations . . . . . . . . . . . . . . . . . . . . . . . . . . . . . . . . . . . . . . . . . . . . . . 343
Specifying basic accessibility . . . . . . . . . . . . . . . . . . . . . . . . . . . . . . . . . . . . . . . . . . . . 343
Specifying advanced accessibility options. . . . . . . . . . . . . . . . . . . . . . . . . . . . . . . . . . . 344
Suggestions for creating effective accessibility . . . . . . . . . . . . . . . . . . . . . . . . . . . . . . . 347
Testing accessible content . . . . . . . . . . . . . . . . . . . . . . . . . . . . . . . . . . . . . . . . . . . . . . 348
CHAPTER 19
Testing a movie
. . . . . . . . . . . . . . . . . . . . . . . . . . . . . . . . . . . . . . . . . . . . . . . . . . . 349
Optimizing movies . . . . . . . . . . . . . . . . . . . . . . . . . . . . . . . . . . . . . . . . . . . . . . . . . . . 349
Testing movie download performance . . . . . . . . . . . . . . . . . . . . . . . . . . . . . . . . . . . . 350
Authoring and scripting guidelines . . . . . . . . . . . . . . . . . . . . . . . . . . . . . . . . . . . . . . . 352
Using the Debugger . . . . . . . . . . . . . . . . . . . . . . . . . . . . . . . . . . . . . . . . . . . . . . . . . . 353
Using the Output window. . . . . . . . . . . . . . . . . . . . . . . . . . . . . . . . . . . . . . . . . . . . . . 362
CHAPTER 20
Publishing
. . . . . . . . . . . . . . . . . . . . . . . . . . . . . . . . . . . . . . . . . . . . . . . . . . . . . . . . 365
Playing your Flash movies . . . . . . . . . . . . . . . . . . . . . . . . . . . . . . . . . . . . . . . . . . . . . . 365
Unicode text encoding in Flash movies . . . . . . . . . . . . . . . . . . . . . . . . . . . . . . . . . . . . 366
Publishing Flash documents . . . . . . . . . . . . . . . . . . . . . . . . . . . . . . . . . . . . . . . . . . . . 367
About HTML publishing templates . . . . . . . . . . . . . . . . . . . . . . . . . . . . . . . . . . . . . . 382
Customizing HTML publishing templates . . . . . . . . . . . . . . . . . . . . . . . . . . . . . . . . . 383
Editing Flash HTML settings . . . . . . . . . . . . . . . . . . . . . . . . . . . . . . . . . . . . . . . . . . . 386
Previewing the publishing format and settings. . . . . . . . . . . . . . . . . . . . . . . . . . . . . . . 393
Contents 7
Page 8

Using the stand-alone player . . . . . . . . . . . . . . . . . . . . . . . . . . . . . . . . . . . . . . . . . . . . 393
Configuring a Web server for Flash . . . . . . . . . . . . . . . . . . . . . . . . . . . . . . . . . . . . . . . 394
Screening traffic to your Web site . . . . . . . . . . . . . . . . . . . . . . . . . . . . . . . . . . . . . . . . 394
CHAPTER 21
Exporting
. . . . . . . . . . . . . . . . . . . . . . . . . . . . . . . . . . . . . . . . . . . . . . . . . . . . . . . . . 395
Exporting movies and images . . . . . . . . . . . . . . . . . . . . . . . . . . . . . . . . . . . . . . . . . . . 395
About export file formats. . . . . . . . . . . . . . . . . . . . . . . . . . . . . . . . . . . . . . . . . . . . . . . 396
Updating Flash movies for Dreamweaver UltraDev . . . . . . . . . . . . . . . . . . . . . . . . . . . 401
APPENDIX A
Keyboard shortcuts
. . . . . . . . . . . . . . . . . . . . . . . . . . . . . . . . . . . . . . . . . . . . . . . 403
Navigation keys . . . . . . . . . . . . . . . . . . . . . . . . . . . . . . . . . . . . . . . . . . . . . . . . . . . . . . 403
Action keys . . . . . . . . . . . . . . . . . . . . . . . . . . . . . . . . . . . . . . . . . . . . . . . . . . . . . . . . . 404
Mouse actions . . . . . . . . . . . . . . . . . . . . . . . . . . . . . . . . . . . . . . . . . . . . . . . . . . . . . . . 404
Menu items. . . . . . . . . . . . . . . . . . . . . . . . . . . . . . . . . . . . . . . . . . . . . . . . . . . . . . . . . 404
APPENDIX B
Operator Precedence and Associativity
APPENDIX C
Keyboard Keys and Key Code Values
. . . . . . . . . . . . . . . . . . . . . . . . . . . . . 405
. . . . . . . . . . . . . . . . . . . . . . . . . . . . . . 407
Letters A to Z and standard numbers 0 to 9 . . . . . . . . . . . . . . . . . . . . . . . . . . . . . . . . 407
Keys on the numeric keypad . . . . . . . . . . . . . . . . . . . . . . . . . . . . . . . . . . . . . . . . . . . . 408
Function keys . . . . . . . . . . . . . . . . . . . . . . . . . . . . . . . . . . . . . . . . . . . . . . . . . . . . . . . 409
Other keys. . . . . . . . . . . . . . . . . . . . . . . . . . . . . . . . . . . . . . . . . . . . . . . . . . . . . . . . . . 410
APPENDIX D
Error Messages
INDEX . . . . . . . . . . . . . . . . . . . . . . . . . . . . . . . . . . . . . . . . . . . . . . . . . . . . . . . . . . . . . 415
. . . . . . . . . . . . . . . . . . . . . . . . . . . . . . . . . . . . . . . . . . . . . . . . . . . 411
Contents8
Page 9

INTRODUCTION
Getting Started
Macromedia Flash MX is the professional standard authoring tool for producing high-impact
Web experiences. Whether you are creating animated logos, Web site navigation controls,
long-form animations, entire Flash Web sites, or Web applications, you’ll find the power and
flexibility of Flash ideal for your own creativity.
System requirements for Flash authoring
The following hardware and software are required to author Flash movies:
• For Microsoft
Windows 98 SE, Windows ME, Windows NT 4.0, Windows 2000, or Windows XP;
64 MB of RAM (128 MB recommended); 85 MB of available disk space; a 16-bit color
monitor capable of 1024 x 768 resolution; and a CD-ROM drive.
• For the Macintosh: A Power Macintosh running Mac OS 9.1 (or later) or Mac OS X version
10.1 (or later); 64 MB RAM free application memory (128 MB recommended), plus 85 MB
of available disk space; a color monitor capable of displaying 16-bit (thousands of colors) at
1024 x 768 resolution; and a CD-ROM drive.
System requirements for the Flash Player
The following hardware and software are required to play Flash movies in a browser:
• Microsoft Windows 95, Windows 98, Windows ME, Windows NT 4.0, Windows 2000,
or Windows XP or later; or a Macintosh PowerPC with System 8.6 or later (including
OS X 10.1 or later).
• Netscape plug-in that works with Netscape 4 (or later) in Windows, or works with
Netscape 4.5 (or later) or Internet Explorer 5.0 (or later) on the Mac OS.
• To run ActiveX controls, Microsoft
Windows Me, Windows NT4, Windows 2000, Windows XP, or later).
• AOL 7 on Windows, AOL 5 on the Mac OS
• Opera 6 on Windows, Opera 5 on the Mac OS
®
Windows: An Intel Pentium 200 MHz or equivalent processor running
®
Internet Explorer 4 or later (Windows 95, Windows 98,
9
Page 10

Installing Flash
Follow these steps to install Flash on either a Windows or a Macintosh computer.
To install Flash on a Windows or a Macintosh computer:
1 Insert the Flash CD into the computer’s CD-ROM drive.
2 Do one of the following:
• In Windows, choose Start > Run. Click Browse and choose the Flash MX Installer.exe file on
the Flash MX CD. Click OK in the Run dialog box to begin the installation.
• On the Macintosh, double-click the Flash MX Installer icon.
3 Follow the onscreen instructions.
4 If prompted, restart your computer.
What’s new in Flash MX
New features in Flash MX enhance the approachability, creativity, and power of Flash. Designers
who require a higher level of control and integration with industry-standard design tools now
have an unparalleled creative application for creating media-rich content.
Powerful new features build on this creativity, giving application developers access to new
capabilities that make Flash MX a robust and exciting application development environment.
Developers can work with advanced scripting and debugging tools, built-in code reference, and
predefined components to rapidly deploy rich Web applications.
For all Flash users
The ability to save Flash MX documents in Flash 5 format lets you upgrade now and still collaborate
with designers who are working on Flash 5 projects. See “Saving Flash documents” on page 43.
Accessible content that can be seen and heard by persons with disabilities is now easy to develop,
expanding the audience for Flash movies and applications. See “About accessible objects in Flash
movies” under Help > Using Flash.
Korean and Chinese language support reaches audiences in more of the world. Features like
vertical text fields and Unicode support make it easy to create Asian-language content. See
“Creating text” on page 136.
For the designer
Flash MX enhances creativity by providing designers with a higher level of control and expanded
integration capabilities with a rich set of design tools. New features help designers quickly create a
broad range of content. Instead of focusing on how Flash works, they can give more attention to
their designs.
Timeline enhancements such as folders for organizing layers, improved pointer feedback, and the
ability to resize, cut, and paste multiple frames make it easier to use the Timeline, helping you
work faster and with less effort. See “Using the Timeline” on page 28.
Enhanced editing of symbols in place makes document creation easier by letting designers work
on symbols in the context of their movies. New controls above the Stage make it easier than ever
to edit symbols in place. See “Editing symbols” on page 157.
Introduction10
Page 11

Library improvements
eliminate production bottlenecks by simplifying the creation and
manipulation of library symbols. Moving symbols or folders between Flash documents or creating
new library symbols is now as easy as dragging and dropping. See “Work i ng with com m on
libraries” on page 58. The new Resolve Library Conflict dialog box simplifies adding library
symbols to a document that has an existing library symbol with the same name. See “Resolving
conflicts between library assets” on page 168.
Shared library assets improve Flash movie authoring by letting you share library assets with other
Flash documents, either while authoring, or when a movie is played with the Flash Player. Shared
runtime libraries help you create smaller files and easily make updates to multiple documents
simultaneously by letting your document show library symbols and shared objects that are stored
on an intranet or the Internet. Shared author-time libraries improve your work pace by letting
you track, update, and swap symbols in any Flash document available on your computer or
network. See “Using shared library assets” on page 165.
Workspace enhancements make the Flash MX workspace more manageable and easier to
understand for new and veteran designers. The most commonly used features now appear in one
context-sensitive Property inspector, eliminating the need to access many other windows, panels,
and dialog boxes. See “Panels and the Property inspector” on page 48. Other frequently used
features now appear in easily collapsible panels that dock and undock as necessary to conserve
screen space. Designers can even save custom panel layouts to personalize their Flash workspace.
See “Using panels” on page 48.
New starter templates included with Flash MX simplify the creation of new documents by
eliminating many of the common tasks required to start a new document. See “Creating a new
document” on page 21. You can also create your own templates from documents. See “Saving
Flash documents” on page 43.
Color Mixer improvements make creating, editing, and using colors and gradients easier than ever.
See “Working with solid colors and gradient fills in the Color Mixer” on page 80.
Complete lessons that address the new features in Flash MX make it easy to become familiar with
its powerful tools and features. To get started with the lessons, choose Help > Lessons > Getting
Started with Flash.
Video support expands the creative possibilities for Flash movies by letting you import video clips
in a variety of formats. See “Importing video” under Help > Using Flash.
The Free Transform tool opens new possibilities for your creative expression by letting you
combine the effects of multiple object transformations at once. See “Transforming objects freely”
on page 126.
The Envelope modifier lets you easily create otherwise-difficult graphic objects by letting you warp
and distort the shape of the bounding box that surrounds them. See “Modifying shapes with the
Envelope modifier” on page 128.
Pixel-level editing adds precision and polish to your work by letting you align objects with
pixel-level precision in your Flash documents. Precisely place objects or points of objects where
you want them to appear in your final movie. See “Pixel snapping” on page 74.
The Break Apart feature makes it easy to make creative edits to individual text characters without
having to convert the text to symbols, simplifying the creation of complex designs and animation.
See “About transforming text” on page 144.
The Distribute to Layers command quickly and automatically distributes any number of selected
objects to their own layers. See “Distributing objects to layers for tweened animation” on page 172.
Getting Started 11
Page 12

Movie clip mask layers
let you create animated masks by placing a movie clip on a mask layer. See
“Using mask layers” on page 183. You can also use ActionScript to create an animated mask with
a movie clip. See “Using movie clips as masks” under Help > Using Flash.
Enhanced sound controls enhance the production quality of your movies by letting you
synchronize movie events with the start or end of sound clips. See “About the onSoundComplete
event” under Help > Using Flash.
For the developer
The powerful Flash MX environment includes enhanced scripting and debugging tools, built-in
code reference, and predefined components you can use to rapidly develop rich Web applications.
Enhanced ActionScript gives you the ability to dynamically load JPEG and MP3 sound files at
runtime, and lets you update your files at any time without having to republish your movie.See
“Placing artwork into Flash” and “Importing sounds” under Help > Using Flash.See “Placing
artwork into Flash” and “Importing sounds” under Help > Using Flash.
Anchor points enhance navigation in Flash movies by letting users use the Forward and Back
buttons in their browsers to jump from anchor to anchor. See “Using named anchors” on page 33.
The improved ActionScript editor makes it easier for new and veteran authors to access the full
potential of ActionScript. See “About scripting in ActionScript” on page 204.
Code hints speed content development of ActionScript by automatically detecting what
command the user is typing and offering hints to reveal the exact syntax of the command. See
“Using code hints” under Help > Using Flash.
Flash components accelerate Web application development by providing reusable drag-and-drop
interface elements for Flash content, such as list boxes, radio buttons, and scroll bars. See Chapter
15, “Using Components,” on page 289.
The improved debugger combines the debugging capabilities already in existence with an
ActionScript debugger by allowing you to set breakpoints and single-step through the code as it
executes. See “Tes t i n g a m o vi e” under Help > Using Flash.
The object model integrates movie clips, buttons, and text fields into the ActionScript
object-oriented scripting language. See “Working with Movie Clips and Buttons” and
“Controlling text with ActionScript” under Help > Using Flash.
The event model makes ActionScript event handling more powerful and easier to understand.
The event model now allows for more sophisticated control over user events, such as mouse
movement and keyboard input. See “Controlling when ActionScript runs” on page 207.
The Live Preview feature for components makes it possible to actively view changes in user
interface components within the authoring environment. See “Working with components in Live
Preview” on page 293.
Enhanced text support allows for detailed control using ActionScript over every property of a text
object, including its formatting, size, and layout. See Chapter 8, “Wo rkin g wit h Tex t, ” on page 135.
The new drawing API enhances the object-oriented programming power of ActionScript by offering
a set of shape-drawing capabilities through the MovieClip object, allowing for programmatic
control over the Flash rendering engine. See “About the MovieClip object” on page 206.
Strict equality and switch statements allow for concise definition of flow control statements such
as if, then, and else, further increasing ActionScript support for ECMA-262. See the entries for
these statements in the online ActionScript Dictionary in the Help menu.
Introduction12
Page 13

SetInterval and clearInterval
functions allow designers to set up a generic routine that will be
called at periodic intervals throughout the lifetime of a movie. See the entries for these functions
in the online ActionScript Dictionary in the Help menu.
Conversion of String, Array, and XML objects to native objects increases performance by
optimizing the Number, Boolean, Object, String, Array, and XML ActionScript objects.
Performance in the Flash Player is increased as much as 100 times. See the entries for these objects
in the online ActionScript Dictionary in the Help menu.
SWF compression uses existing Z-lib compression code to improve download times for complex
Flash content. See Chapter 20, “Publishing,” on page 365.
Guide to instructional media
The Flash package contains a variety of media to help you learn the program quickly and become
proficient in creating your own Flash movies. These media include a printed manual, an
expanded electronic version of the manual, online help that appears in your Web browser, a
built-in ActionScript Reference panel, interactive lessons, and a regularly updated Web site. In
addition, there are many third-party resources available to Flash designers and developers.
About the printed and electronic manuals
Information that appears in the printed version of Using Flash is primarily intended for users who
are in their first three to six months of learning Flash. Online lessons and tutorials supplement
this information.
The electronic version of Using Flash contains all of the information in the printed version, as well
as additional chapters with instructions and information for using Flash tools and commands. It
also includes chapters on ActionScript, which explain how to write and create interactions with
the Flash scripting language.
Using Flash Help
Flash Help contains two main sections: Using Flash and the ActionScript Dictionary. For the best
experience with Flash Help, Macromedia strongly recommends that you use a browser with Java
player support, such as Internet Explorer 4.5 or later. Flash Help also supports Netscape
Navigator 6.1 or later on Windows and Macintosh. Running Flash and Flash Help
simultaneously on a Macintosh may require up to 32 MB of memory, depending on your
browser’s memory needs.
Note: The first time you access Flash Help when running Windows XP, you may be prompted to install the Java
player. Follow the onscreen instructions to install the Java player.
To use Flash Help:
1 Choose one of the help systems from the Help menu.
2 Navigate the help topics using any of these features:
• Contents organizes information by subject. Click top-level entries to view subtopics.
• Index organizes information like a traditional printed index. Click a term to jump to a
related topic.
Getting Started 13
Page 14
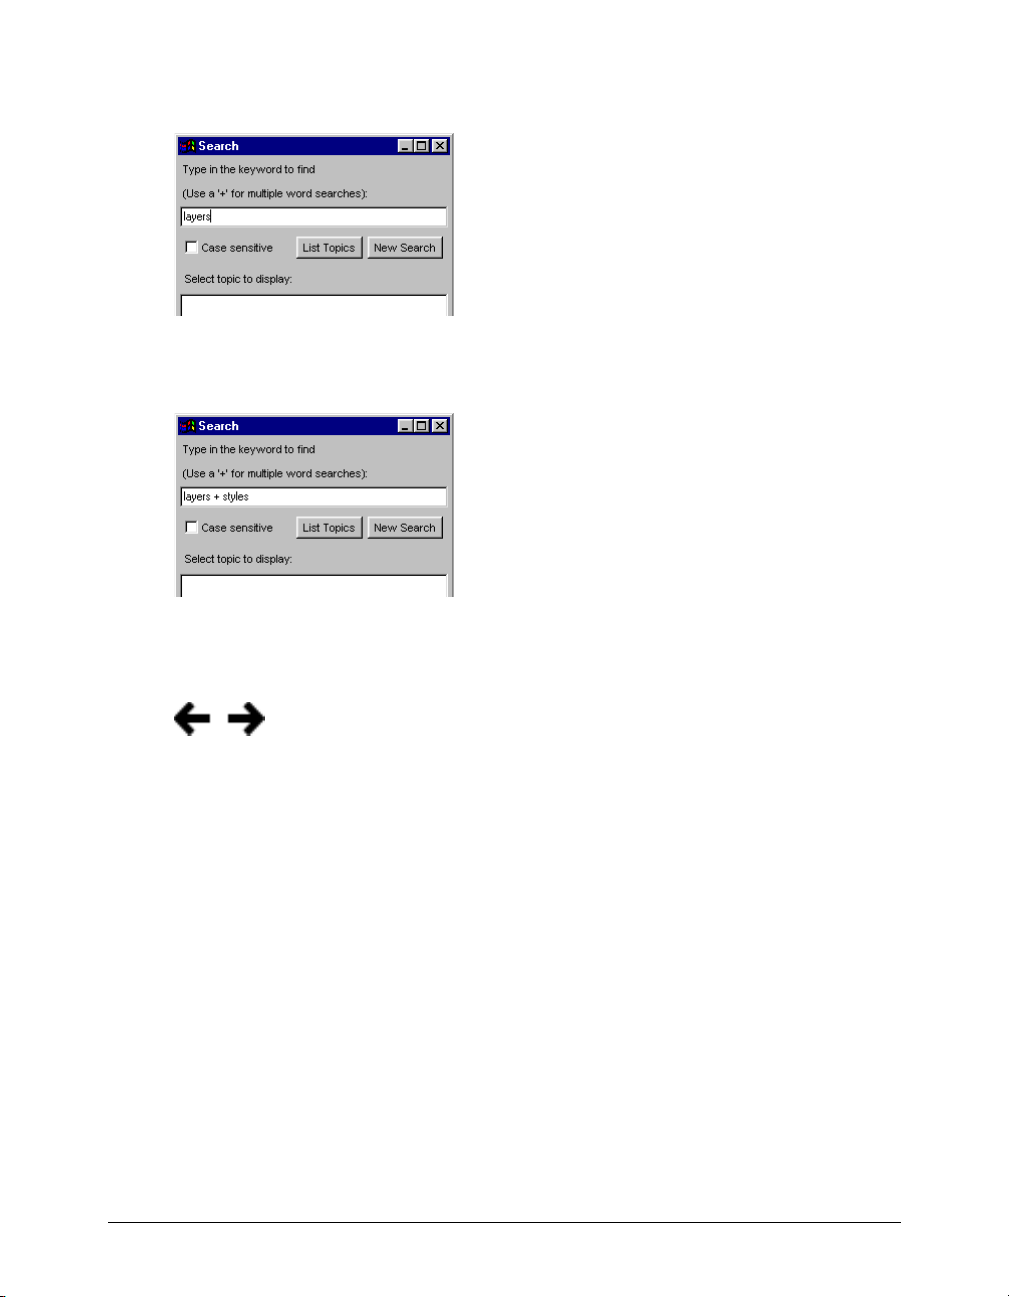
• Search finds any character string in all topic text. Search requires a 6.1 or later browser with
Java enabled. To search for a phrase, type it into the text entry box.
To search for files that contain two keywords (for example, layers and style), separate the words
with a plus (+) sign.
To search for files that contain a complete phrase, separate the words with a space.
• Previous and Next buttons let you move through the topics within a section.
• The Flash icon links you to the Flash Support Center Web site.
Using Flash lessons and tutorials
Flash lessons provide quick interactive instruction that introduces you to the main features of
Flash, letting you practice on isolated examples. If you are new to Flash, or if you have used only
a limited set of its features, start with the lessons.
Flash tutorials provide in-depth interactive instruction that helps you familiarize yourself with
Flash and provides detailed instruction on some powerful Flash features.
The Introduction to Flash MX Tutorial introduces the workflow in Flash by showing you how to
create a basic movie. The tutorial assumes an understanding of the topics covered in the lessons.
The Introduction to ActionScript Tutorial teaches you the basic principles of ActionScript, the
object-oriented language Flash uses to add interactivity to movies.
The Introduction to Components Tutorial is designed to introduce components to beginner and
intermediate Flash users and show how they can be used to quickly create a simple application.
Before taking this tutorial, you should complete the Flash lessons, the Introduction to Flash MX
tutorial, and the Introduction to ActionScript tutorial or be familiar with ActionScript.
Introduction14
Page 15

To start the lessons:
Choose Help > Lessons > Getting Started with Flash.
To start a tutorial, do one of the following:
• Choose Help > Tutorials > Introduction to Flash MX.
• Choose Help > Tutorials > Introduction to ActionScript.
• Choose Help > Tutorials > Introduction to Components.
Using additional Macromedia resources
The Flash Support Center Web site is updated regularly with the latest information on Flash, plus
advice from expert users, advanced topics, examples, tips, and other updates. Check the Web site
often for the latest news on Flash and how to get the most out of the program at
www.macromedia.com/support/flash. Check the Web site often for the latest news on Flash and
how to get the most out of the program at www.macromedia.com/support/flash.
The ActionScript Reference panel provides detailed information on ActionScript syntax and
usage. The hierarchical structure of the information lets you easily scroll down to the specific
information you need.
To display the ActionScript Reference panel:
Choose Window > Reference.
Third-party resources
Macromedia recommends several Web sites with links to third-party resources on Flash.
Macromedia Flash community sites:
www.macromedia.com/support/flash/ts/documents/flash_websites.htm
www.macromedia.com/support/flash/ts/documents/tn4148-flashmaillists.html
Macromedia Flash books:
www.macromedia.com/software/flash/productinfo/books/
Object-oriented programming concepts:
http://java.sun.com/docs/books/tutorial/java/concepts
Launching Flash on a network
If you encounter a license infringement warning message when launching Flash, you may have
exceeded the number of licensed copies for that serial number.
Flash detects unauthorized copies of itself (under the same serial number) on a local area network.
By enumerating currently running copies of Flash through network communication, Flash
detects if the number of copies currently running exceeds a license count for the serial number.
To prevent license infringement warnings, do one of the following:
• Purchase additional licensed copies of Flash from Macromedia.
• Uninstall Flash from one or more computers on your local area network, then launch Flash
again on your computer.
Getting Started 15
Page 16

Introduction16
Page 17

CHAPTER 1
Working in Flash
Macromedia Flash MX movies are graphics, text, animation, and applications for Web sites. They
consist primarily of vector graphics, but they can also contain imported video, bitmap graphics,
and sounds. Flash movies can incorporate interactivity to permit input from viewers, and you can
create nonlinear movies that can interact with other Web applications. Web designers use Flash to
create navigation controls, animated logos, long-form animations with synchronized sound, and
even complete, sensory-rich Web sites. Flash movies use compact vector graphics, so they
download rapidly and scale to the viewer’s screen size.
You’ve probably watched and interacted with Flash movies on many Web sites. Millions of Web
users have received the Flash Player with their computers, browsers, or system software; others
have downloaded it from the Macromedia Web site. The Flash Player resides on the local
computer, where it plays back movies in browsers or as stand-alone applications. Viewing a Flash
movie on the Flash Player is similar to viewing a DVD on a DVD player—the Flash Player is the
device used to display the movies you create in the Flash authoring application.
Flash documents, which have the .fla filename extension, contain all the information required to
develop, design, and test interactive content. Flash documents are not the movies the Flash Player
displays. Instead, you publish your FLA documents as Flash movies, which have the .swf filename
extension and contain only the information needed to display the movie.
For an interactive introduction to Flash, choose Help > Lessons > Getting Started with Flash.
Artwork in Flash
Flash provides a variety of methods for creating original artwork and importing artwork from
other applications. You can create objects with the drawing and painting tools, as well as modify
the attributes of existing objects. See Chapter 3, “Drawing,” on page 59 and Chapter 4, “Wor ki ng
with Color,” on page 77.
You can also import vector graphics, bitmap graphics, and video from other applications and
modify the imported graphics in Flash.See “Using Imported Artwork and Video” under Help >
Using Flash.
Note: You can also import sound files, as described in “Importing sounds” under Help > Using Flash.
Animation in Flash
Using Flash, you can animate objects to make them appear to move across the Stage and/or
change their shape, size, color, opacity, rotation, and other properties. You can create
frame-by-frame animation, in which you create a separate image for each frame. You can also
create tweened animation, in which you create the first and last frames of an animation and direct
Flash to create the frames in between. See Chapter 10, “Creating Animation,” on page 169.
17
Page 18
You can also use ActionScript, an object-oriented programming language, to create animation in
Flash. See Chapter 12, “Understanding the ActionScript Language,” on page 203.
Interactive movies in Flash
Flash lets you create interactive movies, in which your audience can use the keyboard or the
mouse to jump to different parts of a movie, move objects, enter information in forms, and
perform many other operations.
You create interactive movies by scripting actions using ActionScript. For more information, see
Chapter 14, “Creating Interaction with ActionScript,” on page 267. For complete information on
using ActionScript to create advanced interactivity, see the online ActionScript Dictionary in the
Help menu.
Application development in Flash
Flash provides movie clips with defined parameters, called components, to aid in developing rich
user experiences in Flash movies. Each built-in Flash component has its own unique set of
ActionScript methods that allow you to set and change the authoring parameters and additional
options at runtime. By combining the easy drop-in capabilities of the predefined components
with the powerful capabilities of ActionScript, you can create fully functional applications on the
Web. For more information on components, see Chapter 15, “Using Components,” on page 289.
For an interactive introduction to components, choose Help > Tutorials > Introduction to
Components.
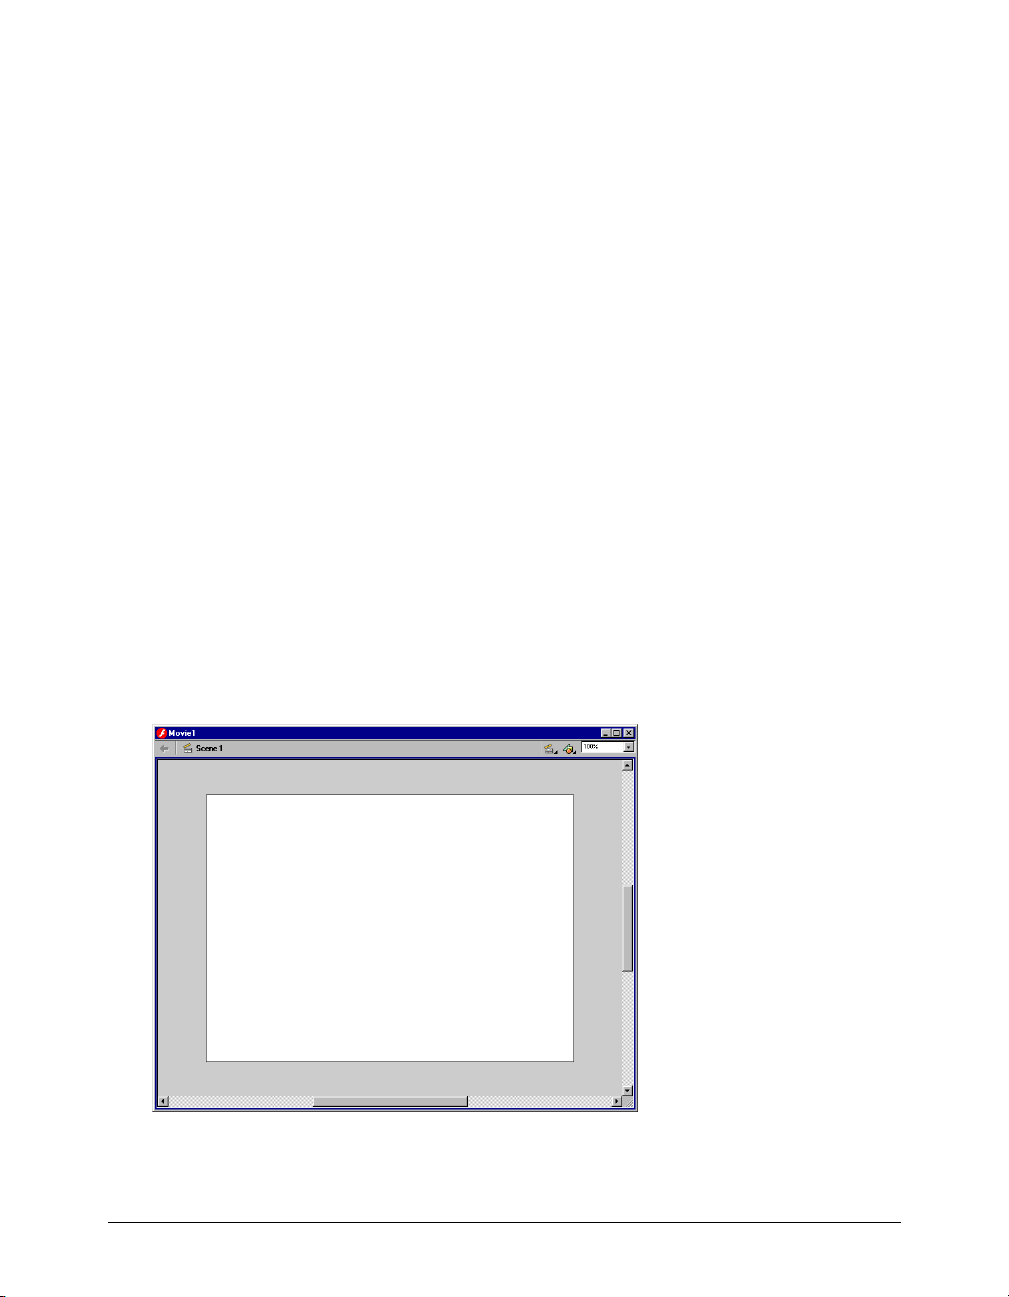
The Stage and workspace
Like films, Flash movies divide lengths of time into frames. The Stage is where you compose the
content for individual frames in the movie, drawing artwork on it directly or arranging imported
artwork on it. For more information on frames, see “Using frames and keyframes” on page 31.
The Stage is where you compose individual frames in a movie.
Chapter 118
Page 19
Viewing the Stage
You can change your view of the Stage by changing the magnification level or moving the
Stage within the Flash work environment. You can also adjust your view of the Stage using
the View commands.
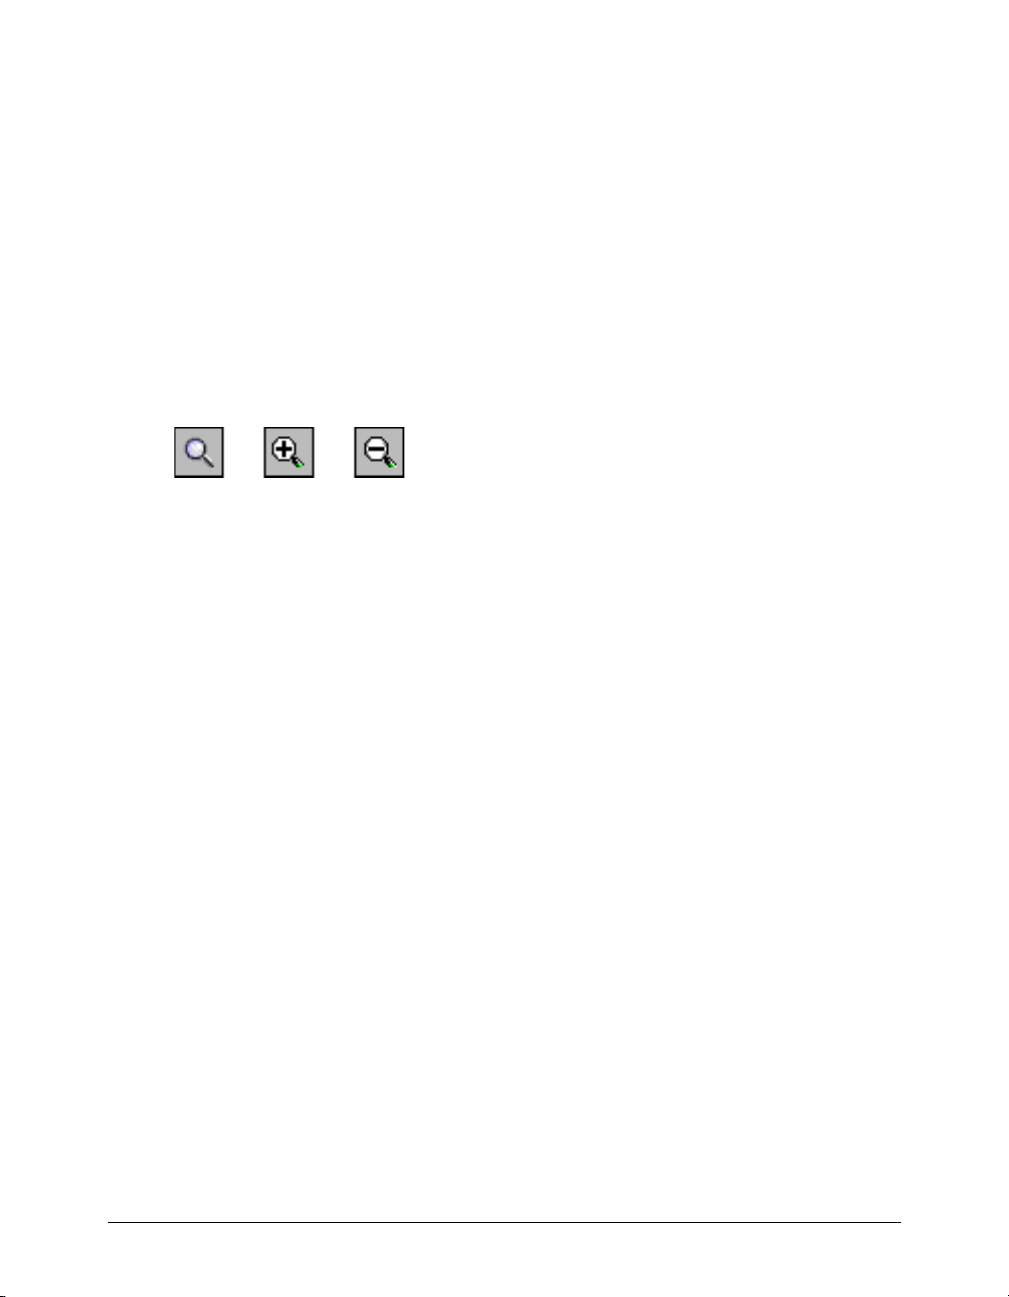
Zooming
To view the entire Stage on the screen, or to view just a particular area of your drawing at high
magnification, you can change the magnification level. The maximum magnification depends on
the resolution of your monitor and the document size.
To magnify or reduce your view of the Stage, do one of the following:
• To zoom in on a certain element, select the Zoom tool and click the element. To switch the
Zoom tool between zooming in or out, use the Enlarge or Reduce modifiers or Alt-click
(Windows) or Option-click (Macintosh).
• To zoom in on a specific area of your drawing, drag a rectangular selection marquee with the
Zoom tool. Flash sets the magnification level so that the specified rectangle fills the window.
• To zoom in on or out of the entire Stage, choose View > Zoom In or View > Zoom Out.
• To zoom in or out by a specified percentage, choose View > Magnification and select a
percentage from the submenu, or select a percentage from the Zoom control at the lower left
corner of the application window.
• To display the contents of the current frame, choose View > Magnification > Show All, or
choose Show All from the Zoom control at the lower left corner of the application window. If
the scene is empty, the entire Stage is displayed.
• To display the entire Stage, choose View > Magnification > Show Frame or choose Show Frame
from the Zoom control at the lower left corner of the application window.
• To display the work area surrounding the Stage, choose View > Work Area. The work area is
shown in light gray. Use the Work Area command to view elements in a scene that are partly or
completely outside of the Stage. For example, to have a bird fly into a frame, you would
initially position the bird outside of the Stage in the work area.
Moving the view of the Stage
When the Stage is magnified, you may not be able to see all of it. The Hand tool lets you move
the Stage to change the view without having to change the magnification.
To move the Stage view:
1 In the toolbox, select the Hand tool. To temporarily switch between another tool and the
Hand tool, hold down the Spacebar and click the tool in the toolbox.
2 Drag the Stage.
Working in Flash 19
Page 20

Using the grid, guides, and rulers
Flash comes with rulers and guides that help you draw and lay out objects precisely. You can place
guides in a document and snap objects to those guides, or turn on the grid and snap objects to it.
Using the grid
When the grid is displayed in a document, it appears as a set of lines behind the artwork in all
scenes. You can snap objects to the grid, and you can modify the grid size and grid line color.
To display or hide the drawing grid:
Choose View > Grid > Show Grid.
To turn snapping to grid lines on or off:
Choose View > Grid > Snap to Grid.
To set grid preferences:
1 Choose View > Grid > Edit Grid.
2 For Color, click the triangle in the color box and select a grid line color from the palette.
The default grid line color is gray.
3 Select or deselect Show Grid to display or hide the grid.
4 Select or deselect Snap to Grid to turn snapping to grid lines on or off.
5 For grid spacing, enter values in the text boxes to the right of the horizontal and vertical arrows.
6 For Snap Accuracy, select an option from the pop-up menu.
7 If you want to save the current settings as the default, click Save Default.
Using guides
You can drag horizontal and vertical guides from the rulers onto the Stage when the rulers are
displayed. You can move guides, lock guides, hide guides, and remove guides. You can also snap
objects to guides, and change guide color and snap tolerance (how close objects must be to snap
to a guide). Draggable guides appear only in the Timeline in which they were created.
To create custom guides or irregular guides, you use guide layers. See “Using guide layers” on page 38.
To display or hide the drawing guides:
Choose View > Guides > Show Guides.
Note: If the grid is visible and Snap to Grid is turned on when you create guides, guides will snap to the grid.
To turn snapping to guides on or off:
Choose View > Guides > Snap to Guides.
Note: Snapping to guides takes precedence over snapping to the grid in places where guides fall between grid lines.
To move a guide:
Use the Arrow tool to drag the guide.
Chapter 120
Page 21

To remove a guide:
With guides unlocked, use the Arrow tool to drag the guide to the horizontal or vertical ruler. For
information on locking and unlocking guides, see the following procedure.
To set guide preferences:
1 Choose View > Guides > Edit Guides.
2 For Color, click the triangle in the color box and select a guide line color from the palette.
The default guide color is green.
3 Select or deselect Show Guides to display or hide guides.
4 Select or deselect Snap to Guides to turn snapping to guides on or off.
5 Select or deselect Lock Guides to lock or unlock guides.
6 For Snap Accuracy, select an option from the pop-up menu.
7 If you want to remove all guides, click Clear All.
Note: Clear All removes all guides from the current scene.
8 If you want to save the current settings as the default, click Save Default.
Using rulers
When rulers are displayed, they appear along the top and left sides of the document. You can
change the unit of measure used in the rulers from the default of pixels. When you move an
element on the Stage with the rulers displayed, lines indicating the element’s dimensions appear
on the rulers.
To display or hide rulers:
Choose View > Rulers.
To specify the rulers’ unit of measure for a document:
Choose Modify > Document, and then select an option from the pop-up menu at the upper right.
Creating a new document
Each time you open Flash, the application creates a new file with the FLA extension. You can
create additional new Flash documents as you work. To set the size, frame rate, background color,
and other properties of a new document, you use the Document Properties dialog box.
You can also open a template as a new document. You can choose from standard templates that
ship with Flash, or open a template you have saved previously. For information on saving a
document file as a template, see “Saving Flash documents” on page 43.
To create a new document and set its properties:
1 Choose File > New.
2 Choose Modify > Document.
The Document Properties dialog box appears.
Working in Flash 21
Page 22

3 For Frame Rate, enter the number of animation frames to be displayed every second. For
most computer-displayed animations, especially those playing from a Web site, 8 fps (frames
per second) to 12 fps is sufficient. (12 fps is the default frame rate.)
4 For Dimensions, do one of the following:
• To specify the Stage size in pixels, enter values in the Width and Height text boxes.
The default movie size is 550 x 400 pixels. The minimum size is 1 x 1 pixels; the maximum is
2880 x 2880 pixels.
• To set the Stage size so that there is equal space around the content on all sides, click the
Contents button to the right of Match. To minimize movie size, align all elements to the upper
left corner of the Stage, and then click Contents.
• To set the Stage size to the maximum available print area, click Printer. This area is determined
by the paper size minus the current margin selected in the Margins area of the Page Setup
dialog box (Windows) or the Print Margins dialog box (Macintosh).
• To set the Stage size to the default size, click Default.
5 To set the background color of your movie, click the triangle in the Background Color box and
select a color from the palette.
6 To specify the unit of measure for rulers that you can display along the top and side of the
application window, select an option from the pop-up menu in the upper right. See “Using
rulers” on page 21. (This setting also determines the units used in the Info panel.)
7 Do one of the following:
• To make the new settings the default properties for your new document only, click OK.
• To make these settings the default properties for all new documents, click Make Default.
To open a template as a new document:
1 Choose File > New from Template.
2 In the New Document dialog box, select a category from the Category list, and select a
document from the Category Items list.
3 Click OK.
Setting preferences in Flash
Flash lets you set preferences for general application operations, editing operations, and
Clipboard operations. See also “Choosing drawing settings” on page 75.
To set preferences:
1 Choose Edit > Preferences.
2 Click the General, Editing, Clipboard, Warning, or ActionScript Editor tab, and choose from the
respective options as described in the procedures that follow. For more information on
ActionScript Editor preferences, see “Setting Actions panel preferences” under Help > Using
Flash.
Chapter 122
Page 23

To set general preferences, choose from the following options:
• For Undo Levels, enter a value from 0 to 200 to set the number of undo/redo levels. Undo
levels require memory; the more undo levels you use, the more system memory is taken up.
The default is 100.
• For Printing Options (Windows only), select Disable PostScript to disable PostScript
output when printing to a PostScript printer. By default, this option is deselected. Select this
option if you have problems printing to a PostScript printer, but keep in mind that this will
slow down printing.
• For Selection Options, select or deselect Shift Select to control how Flash handles selection of
multiple elements. When Shift Select is off, clicking additional elements adds them to the
current selection. When Shift Select is on, clicking additional elements deselects other
elements unless you hold down the Shift key.
• Select Show Tooltips to display tooltips when the pointer pauses over a control. Deselect this
option if you don’t want to see the tooltips.
• For Timeline Options, select Disable Timeline Docking to keep the Timeline from attaching
itself to the application window once it has been separated into its own window. For more
information, see “Using the Timeline” on page 28.
• Select Span Based Selection to use span-based selection in the Timeline, rather than the default
frame-based selection (Flash 5 used span-based selection). For more information on span-based
and frame-based selection, see “Working with frames in the Timeline” on page 31.
• Select Named Anchor on Scenes to have Flash make the first frame of each scene in a movie a
named anchor. Named anchors let you use the Forward and Back buttons in a browser to jump
from scene to scene in a movie. For more information, see “Using named anchors” on page 33.
• For Highlight Color, select Use This Color and select a color from the palette, or select Use
Layer Color to use the current layer’s outline color.
• For Font Mapping Default, select a font to use when substituting missing fonts in movies you
open in Flash. See “Substituting missing fonts” on page 145.
To set editing preferences, choose from the following options:
• For Pen Tool options, see “Setting Pen tool preferences” on page 64.
• For Vertical Text options, select Default Text Orientation to make the default orientation of
text vertical, which is useful for some Asian language fonts. By default, this option is
deselected.
• Select Right to Left Text Flow to reverse the default text display direction. This option is
deselected by default.
• Select No Kerning to turn off kerning for vertical text. This option is deselected by default, but
is useful to improve spacing for some fonts that use kerning tables.
• For Drawing Settings, see “Choosing drawing settings” on page 75.
Working in Flash 23
Page 24

To set Clipboard preferences, choose from the following options:
• For Bitmaps (Windows only), select options for Color Depth and Resolution to specify these
parameters for bitmaps copied to the Clipboard. Select Smooth to apply anti-aliasing. Enter a
value in the Size Limit text box to specify the amount of RAM that is used when placing a
bitmap image on the Clipboard. Increase this value when working with large or
high-resolution bitmap images. If your computer has limited memory, choose None.
• For Gradients (Windows only), choose an option to specify the quality of gradient fills placed
in the Windows Metafile. Choosing a higher quality increases the time required to copy
artwork. Use this setting to specify gradient quality when pasting items to a location outside of
Flash. When you are pasting within Flash, the full gradient quality of the copied data is
preserved regardless of the Gradients on Clipboard setting.
• For PICT Settings (Macintosh only), for Type, select Objects to preserve data copied to the
Clipboard as vector artwork, or select one of the bitmap formats to convert the copied artwork
to a bitmap. Enter a value for Resolution. Select Include PostScript to include PostScript data.
For Gradients, choose an option to specify gradient quality in the PICT. Choosing a higher
quality increases the time required to copy artwork. Use the Gradients setting to specify
gradient quality when pasting items to a location outside of Flash. When you are pasting within
Flash, the full gradient quality of the copied data is preserved regardless of the Gradient setting.
• For Fr eeH and Text, selec t Mai ntain Text as Bl ocks t o keep tex t editabl e in a paste d Fr eeH and fil e.
To set warning preferences, choose one of the following options:
• Select Warn on Save for Macromedia Flash 5 Compatibility to have Flash warn you when you
try to save documents with Flash MX–specific content to a Flash 5 file. This option is selected
by default.
• Select Warn on Missing Fonts to have Flash warn you when you open a Flash document that
uses fonts that are not installed on your computer. This option is selected by default.
• Select Warn on Loss of Expert Mode Formatting to have Flash warn you of any expert mode
formatting that will be lost when you switch to normal mode in the Actions panel. This option
is selected by default.
• Select Warn on Reading Generator Content to have Flash display a red “X” over any Generator
objects, as a reminder that Generator objects are not supported in Flash MX.
• Select Warn on Inserting Frames when Importing Content to have Flash alert you when it
inserts frames in your document to accommodate audio or video files that you import.
Using the Property inspector to change document attributes
The Property inspector makes it easy to access and change the most commonly used attributes of
a document. You can make changes to document attributes in the Property inspector without
accessing the menus or panels that contain these features. For more information on the Property
inspector, see “Panels and the Property inspector” on page 48.
To change document properties with the Property inspector:
1 Deselect all assets, then select the Pointer tool.
2 If the Property inspector is not visible, choose Window > Properties.
Chapter 124
Page 25
3 Click the Size control to display the Document Properties dialog box and access its settings.
For more information on the Document Properties dialog box, see “Creating a new document”
on page 21.
4 To choose a background color, click the triangle in the Background color box and select a color
from the palette.
5 For Frame Rate, enter the number of animation frames to be displayed every second.
6 Click the Publish control to display the Publish Settings dialog box with the Flash tab selected.
For more information on the Publish Settings dialog box, see “Publishing Flash documents”
on page 367.
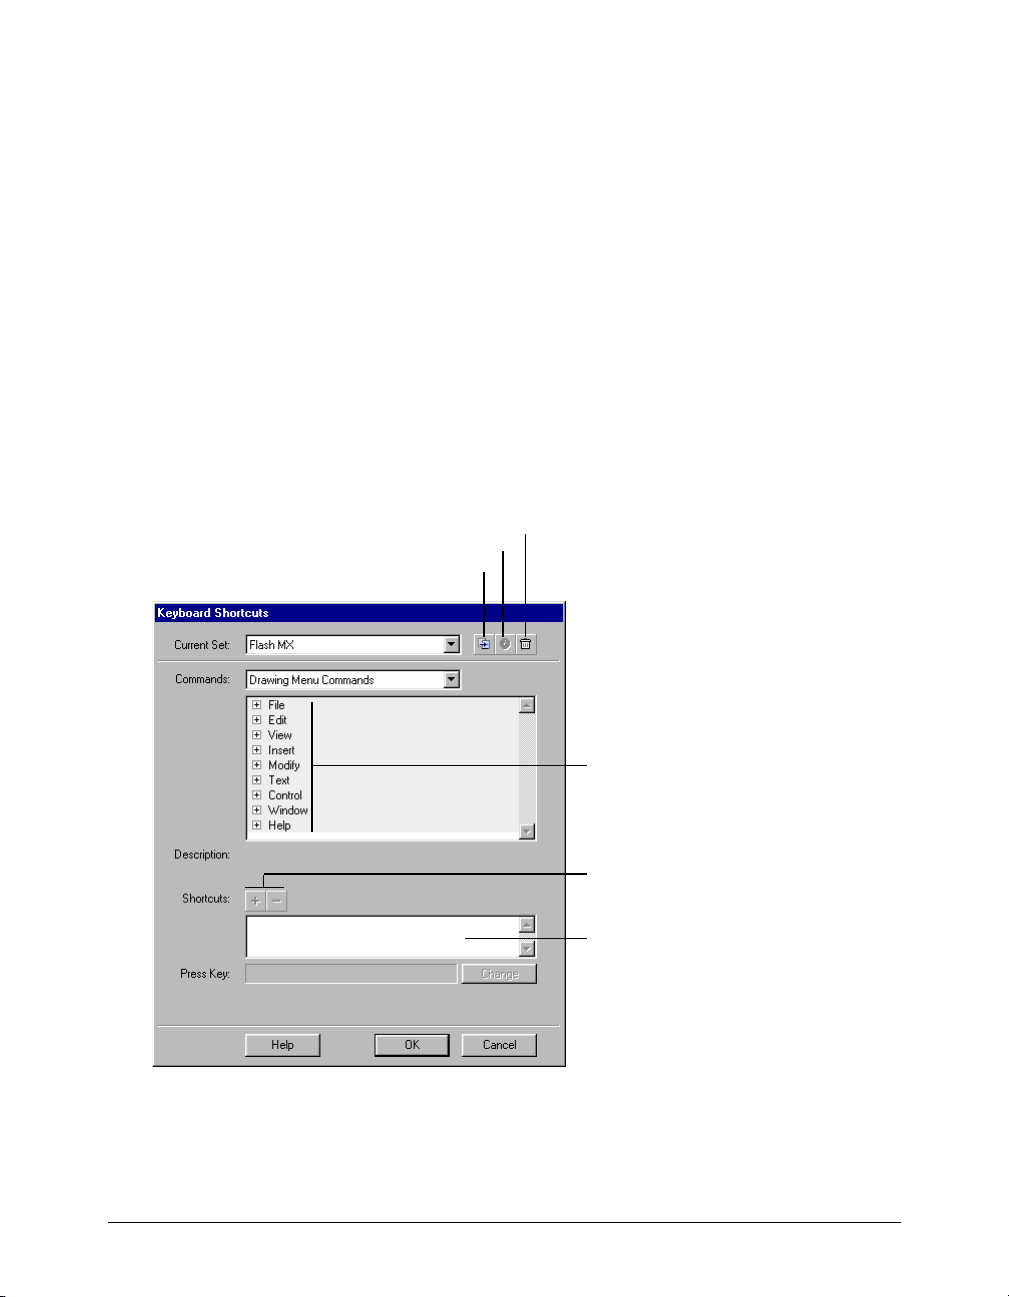
Customizing keyboard shortcuts
You can choose keyboard shortcuts in Flash to match the shortcuts you use in other applications,
or to streamline your Flash workflow. By default, Flash uses built-in keyboard shortcuts designed
for the Flash application. You can also select a built-in keyboard shortcut set from one of several
popular graphics applications, including Fireworks, Adobe Illustrator, and Adobe Photoshop.
To create a custom keyboard shortcut set, you duplicate an existing set, and then add or remove
shortcuts from the new set. You can delete custom shortcut sets.
Delete Set button
Rename Set button
Duplicate Set button
Commands list
Add/Delete
Shortcut buttons
Shortcuts list
Working in Flash 25
Page 26

To select a keyboard shortcut set:
1 Choose Edit > Keyboard Shortcuts.
2 In the Keyboard Shortcuts dialog box, choose a shortcut set from the Current Set pop-up menu.
To create a new keyboard shortcut set:
1 Select a keyboard shortcut set as described above.
2 Click the Duplicate Set button.
3 Enter a name for the new shortcut set and click OK.
To rename a custom keyboard shortcut set:
1 In the Keyboard Shortcuts dialog box, choose a shortcut set from the Current Set pop-up menu.
2 Click the Rename Set button.
3 In the Rename dialog box, enter a new name and click OK.
To add or remove a keyboard shortcut:
1 Choose Edit > Keyboard Shortcuts and select the set that you want to modify.
2 From the Commands pop-up menu, select Drawing Menu Commands, Drawing Tools, or
Test Movie Menu Commands to view shortcuts for the selected category.
3 In the Commands list, select the command for which you want to add or remove a shortcut.
An explanation of the selected command appears in the Description area in the dialog box.
4 Do one of the following:
• To add a shortcut, click the Add Shortcut (+) button.
• To remove a shortcut, click the Remove Shortcut (-) button and proceed to step 6.
5 If you are adding a shortcut, enter the new shortcut key combination in the Press Key text box.
Note: To enter the key combination, simply press the keys on the keyboard. You do not need to spell out key
names, such as Control, Option, and so on.
6 Click Change.
7 Repeat this procedure to add or remove additional shortcuts.
8 Click OK.
To delete a keyboard shortcut set:
1 Choose Edit > Keyboard Shortcuts. In the Keyboard Shortcuts dialog box, click the
Delete Set button.
2 In the Delete Set dialog box, choose a shortcut set and click Delete.
Note: You cannot delete the built-in keyboard shortcut sets that ship with Flash.
Chapter 126
Page 27
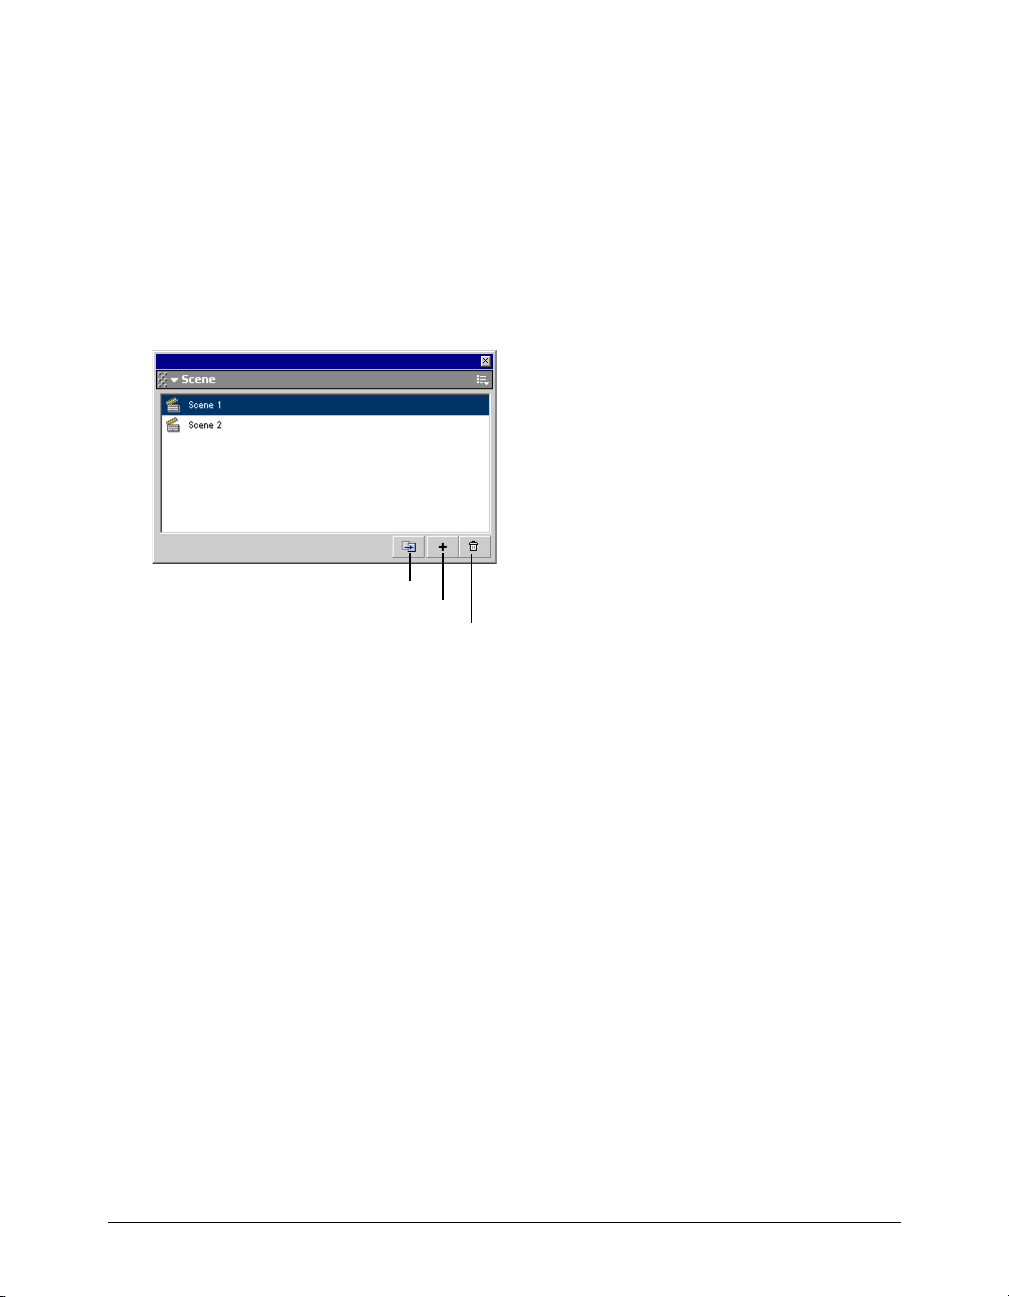
Using scenes and the Scene panel
To organize a movie thematically, you can use scenes. For example, you might use separate scenes
for an introduction, a loading message, and credits.
When you publish a Flash movie that contains more than one scene, the scenes in the movie play
back in the order they are listed in the Scene panel in the Flash document. Frames in the movie
are numbered consecutively through scenes. For example, if a movie contains two scenes with ten
frames each, the frames in Scene 2 are numbered 11–20.
You can add, delete, duplicate, rename, and change the order of scenes.
To stop or pause a movie after each scene, or to let users navigate the movie in a nonlinear
fashion, you use actions. See Chapter 14, “Creating Interaction with ActionScript,” on page 267.
Duplicate Scene button
Add Scene button
Remove Scene button
Scene panel
To display the Scene panel:
Choose Window > Scene.
To view a particular scene:
Choose View > Go To and then choose the name of the scene from the submenu.
To add a scene, do one of the following:
• Click the Add Scene button in the Scene panel.
• Choose Insert > Scene.
To delete a scene, do one of the following:
• Click the Delete Scene button in the Scene panel.
• Open the scene you want to delete and choose Insert > Remove Scene.
To change the name of a scene:
Double-click the scene name in the Scene panel and enter the new name.
Working in Flash 27
Page 28
To duplicate a scene:
Click the Duplicate Scene button in the Scene panel.
To change the order of a scene in the movie:
Drag the scene name to a different location in the Scene panel.
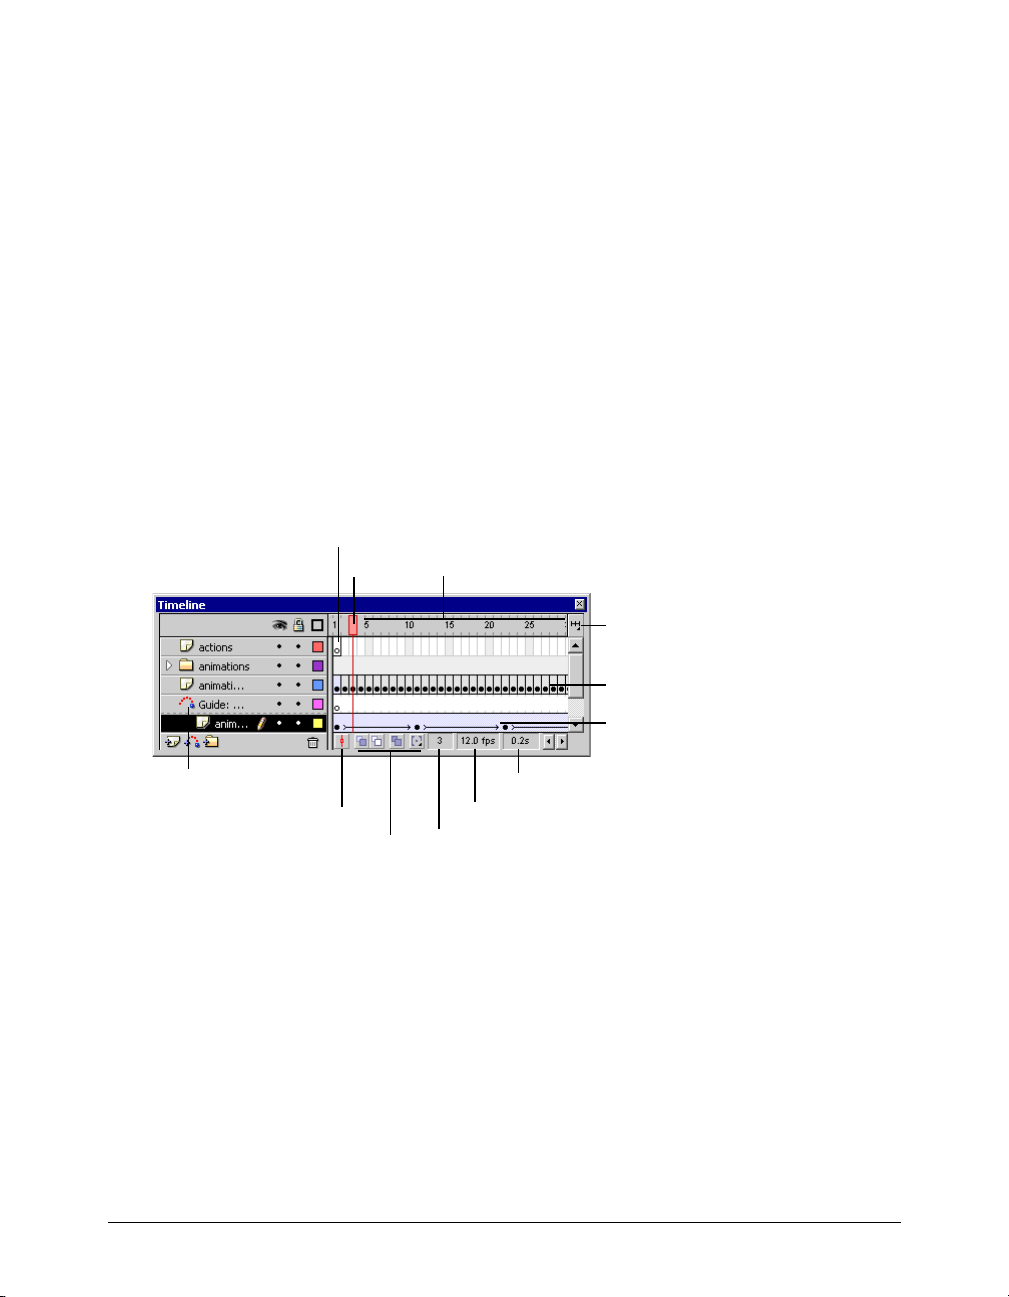
Using the Timeline
The Timeline organizes and controls a movie’s content over time in layers and frames. Like films,
Flash movies divide lengths of time into frames. Layers are like multiple film strips stacked on top
of each other, each containing a different image that appears on the Stage. The major components
of the Timeline are layers, frames, and the playhead.
Layers in a document are listed in a column on the left side of the Timeline. Frames contained in
each layer appear in a row to the right of the layer name. The Timeline header at the top of the
Timeline indicates frame numbers. The playhead indicates the current frame displayed on the Stage.
The Timeline status display at the bottom of the Timeline indicates the selected frame number,
the current frame rate, and the elapsed time to the current frame.
Note: When an animation is played, the actual frame rate is displayed; this may differ from the movie frame rate if the
computer can’t display the animation quickly enough.
Empty keyframe
Playhead
Timeline header
Frame View
pop-up menu
Frame-by-frame
animation
Tweened
animation
Guide layer icon
Center Frame button
Onion-skinning buttons
Current Frame indicator
Elapsed Time indicator
Frame Rate indicator
You can change the way frames are displayed, as well as display thumbnails of frame content in
the Timeline. The Timeline shows where there is animation in a movie, including frame-by-frame
animation, tweened animation, and motion paths. For more information on animation, see
Chapter 10, “Creating Animation,” on page 169.
Controls in the layers section of the Timeline let you hide or show, lock, or unlock layers, as well
as display layer contents as outlines. See “Editing layers and layer folders” on page 36.
You can insert, delete, select, and move frames in the Timeline. You can also drag frames to a
new location on the same layer or to a different layer. See “Working with frames in the Timeline”
on page 31.
Chapter 128
Page 29
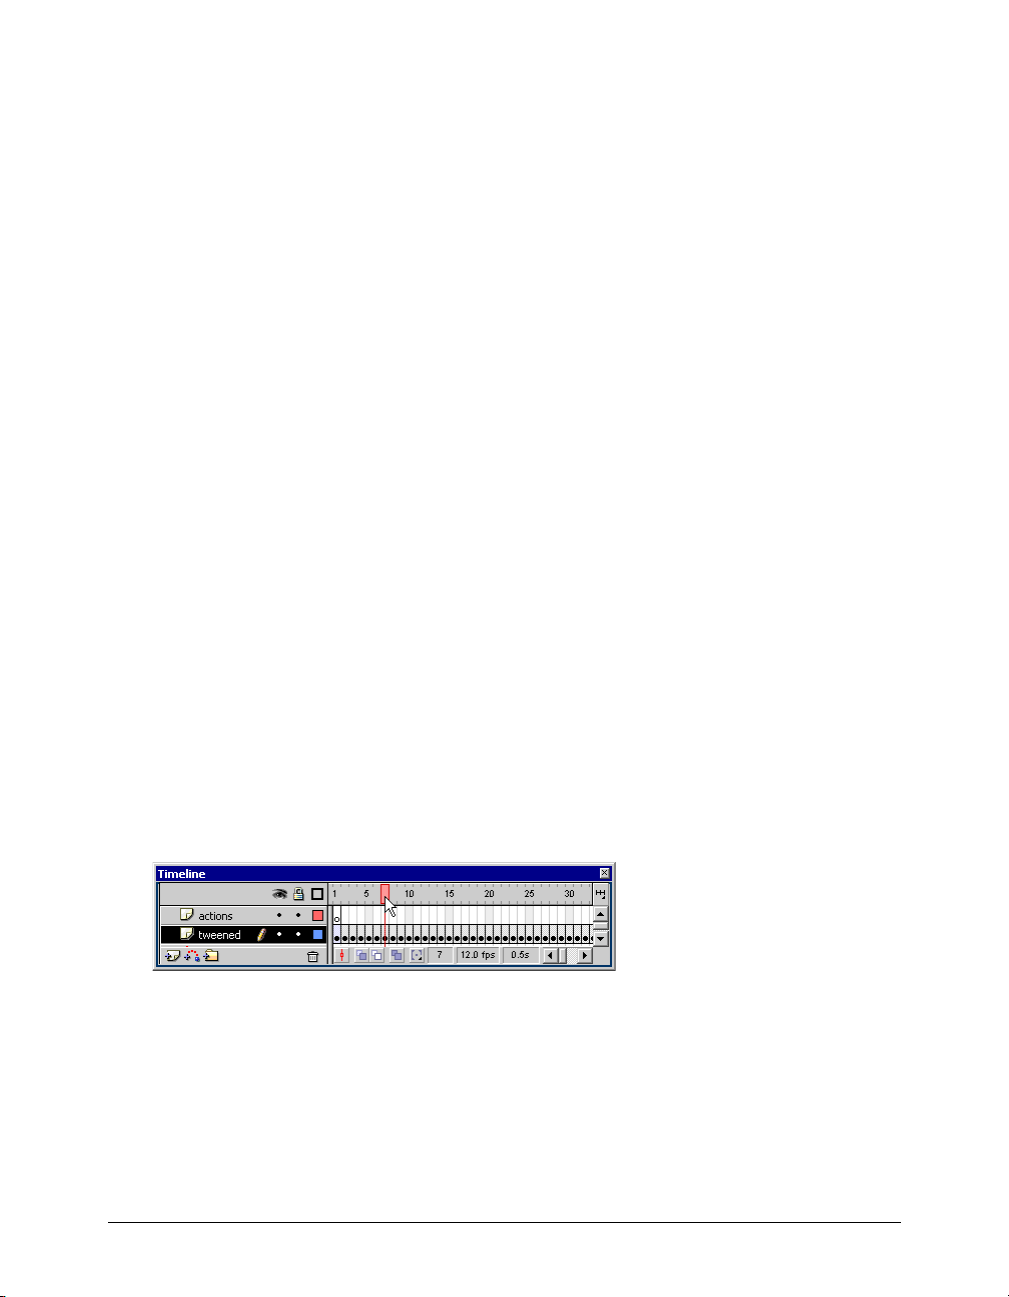
Changing the appearance of the Timeline
By default, the Timeline appears at the top of the main application window, above the Stage.
To change its position, you can dock the Timeline to the bottom or either side of the main
application window, or display the Timeline as its own window. You can also hide the Timeline.
You can resize the Timeline to change the number of layers and frames that are visible. When
there are more layers than can be displayed in the Timeline, you can view additional layers by
using the scroll bars on the right side of the Timeline.
To move the Timeline:
Drag from the area above the Timeline header.
Drag the Timeline to the edge of the application window to dock it. Control-drag to prevent the
Timeline from docking.
To lengthen or shorten layer name fields:
Drag the bar separating the layer names and the frames portion of the Timeline.
To resize the Timeline, do one of the following:
• If the Timeline is docked to the main application window, drag the bar separating the Timeline
from the application window.
• If the Timeline is not docked to the main application window, drag the lower right corner
(Windows) or the Size box in the lower right corner (Macintosh).
Moving the playhead
The playhead moves through the Timeline to indicate the current frame displayed on the Stage.
The Timeline header shows the frame numbers of the animation. To display a frame on the Stage,
you move the playhead to the frame in the Timeline.
When you’re working with a large number of frames that can’t all appear in the Timeline at once,
you can move the playhead along the Timeline to easily locate the current frame.
To go to a frame:
Click the frame’s location in the Timeline header, or drag the playhead to the desired position.
To center the Timeline on the current frame:
Click the Center Frame button at the bottom of the Timeline.
Working in Flash 29
Page 30
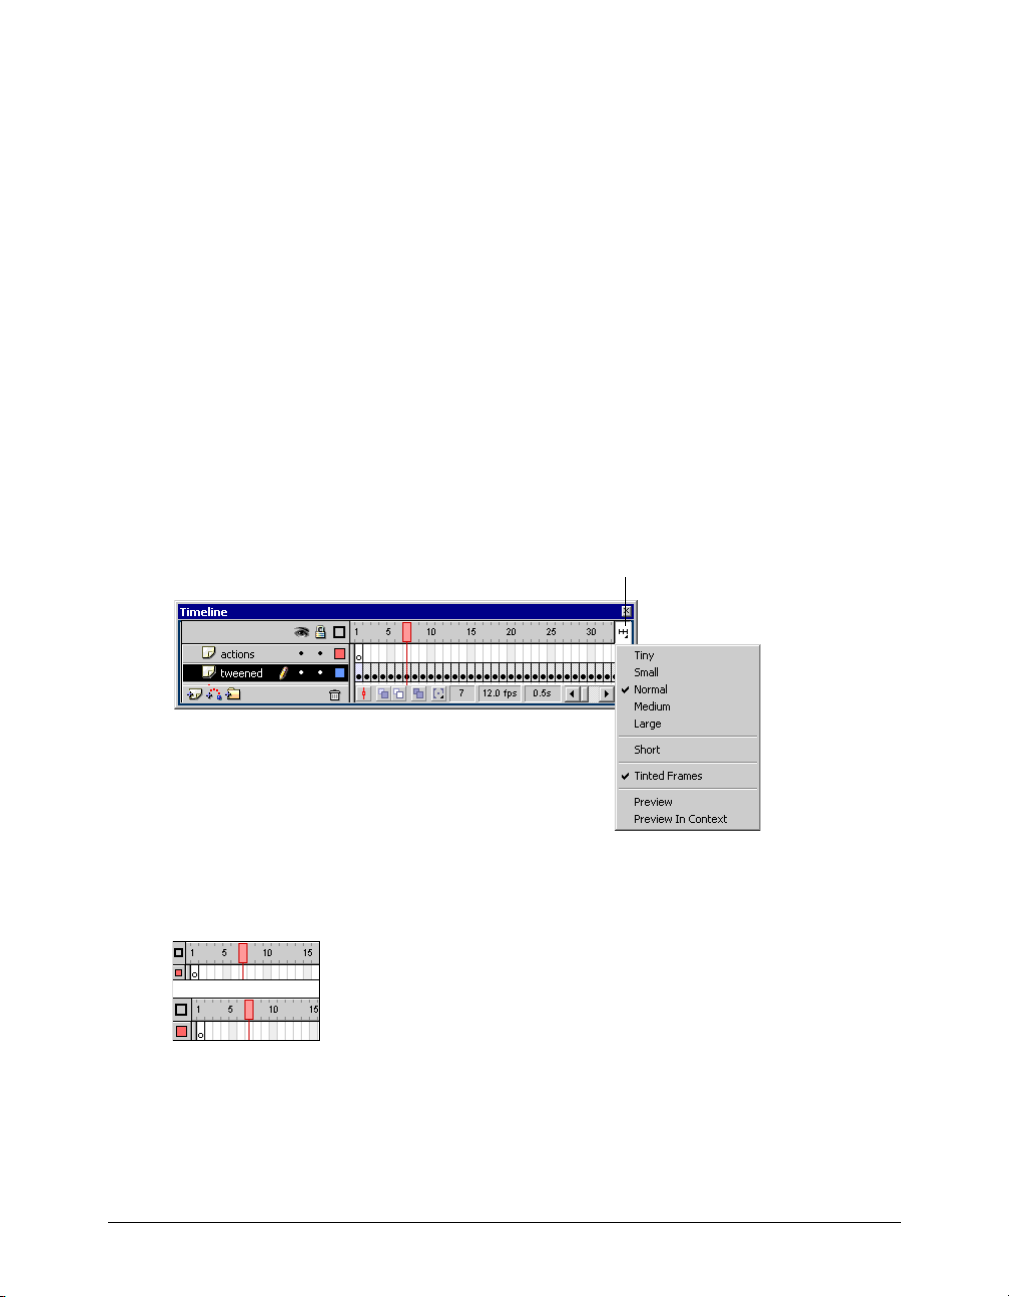
Changing the display of frames in the Timeline
You can change the size of frames in the Timeline, and display sequences of frames with tinted
cells. You can also include thumbnail previews of frame content in the Timeline. These
thumbnails are useful as an overview of the animation, but they require extra screen space.
To change the display of frames in the Timeline:
1 Click the Frame View button in the upper right corner of the Timeline to display the Frame
View pop-up menu.
2 Choose from the following options:
• To change the width of frame cells, choose Tiny, Small, Normal, Medium, or Large. (The
Large frame-width setting is useful for viewing the details of sound waveforms.)
• To decrease the height of frame cell rows, choose Short.
• To turn tinting of frame sequences on or off, choose Tinted Frames.
• To display thumbnails of the content of each frame scaled to fit the Timeline frames, choose
Preview. This can cause the apparent content size to vary.
• To display thumbnails of each full frame (including empty space), choose Preview in Context.
This is useful for viewing the way elements move within their frames over the course of the
animation, but previews are generally smaller than with the Preview option.
Frame View button
Frame View pop-up menu
Short and Normal frame view options
Chapter 130
Page 31

Using frames and keyframes
A keyframe is a frame in which you define a change in an animation or include frame actions to
modify a movie. Flash can tween, or fill in, the frames between keyframes to produce fluid
animations. Because keyframes let you produce animation without drawing each frame, they
make creating movies easier. You can change the length of a tweened animation by dragging a
keyframe in the Timeline.
The order in which frames and keyframes appear in the Timeline determines the order in which
they are displayed in a movie. You can arrange keyframes in the Timeline to edit the sequence of
events in a movie.
Working with frames in the Timeline
In the Timeline, you work with frames and keyframes, placing them in the order you want the
objects in the frames to appear. You can change the length of a tweened animation by dragging a
keyframe in the Timeline.
You can perform the following modifications on frames or keyframes:
• Insert, select, delete, and move frames or keyframes
• Drag frames and keyframes to a new location on the same layer or on a different layer
• Copy and paste frames and keyframes
• Convert keyframes to frames
• Drag an item from the Library panel onto the Stage to add the item to the current keyframe
The Timeline provides a view of tweened frames in an animation. For information on editing
tweened frames, see Chapter 10, “Creating Animation,” on page 169.
Flash offers two different methods for selecting frames in the Timeline. In frame-based selection
(the default) you select individual frames in the Timeline. In span-based selection, the entire frame
sequence, from one keyframe to the next, is selected when you click any frame in the sequence. For
information on using span-based selection, see “Setting preferences in Flash” on page 22.
To insert frames in the Timeline, do one of the following:
• To insert a new frame, choose Insert > Frame.
• To create a new keyframe, choose Insert > Keyframe, or right-click (Windows) or Control-click
(Macintosh) the frame where you want to place a keyframe, and choose Insert Keyframe from
the context menu.
• To create a new blank keyframe, choose Insert > Blank Keyframe, or right-click (Windows) or
Control-click (Macintosh) the frame where you want to place the keyframe, and choose Insert
Blank Keyframe from the context menu.
To delete or modify a frame or keyframe, do one of the following:
• To delete a frame, keyframe, or frame sequence, select the frame, keyframe, or sequence and
choose Insert > Remove Frame, or right-click (Windows) or Control-click (Macintosh) the
frame, keyframe, or sequence and choose Remove Frame from the context menu. Surrounding
frames remain unchanged.
• To move a keyframe or frame sequence and its contents, drag the keyframe or sequence to the
desired location.
Working in Flash 31
Page 32

• To extend the duration of a keyframe, Alt-drag (Windows) or Option-drag (Macintosh) the
keyframe to the final frame of the new sequence duration.
• To copy a keyframe or frame sequence by dragging, Alt-click (Windows) or Option-click
(Macintosh) and drag the keyframe to the new location.
• To copy and paste a frame or frame sequence, select the frame or sequence and choose
Edit > Copy Frames. Select a frame or sequence that you want to replace, and choose
Edit > Paste Frames.
• To convert a keyframe to a frame, select the keyframe and choose Insert > Clear Keyframe, or
right-click (Windows) or Control-click (Macintosh) the keyframe and choose Clear Keyframe
from the context menu. The cleared keyframe and all frames up to the subsequent keyframe
are replaced with the contents of the frame preceding the cleared keyframe.
• To change the length of a tweened sequence, drag the beginning or ending keyframe left or
right. To change the length of a frame-by-frame sequence, see “Creating frame-by-frame
animations” on page 180.
• To add an item from the library to the current keyframe, drag the item from the Library panel
onto the Stage.
Using the Property inspector to set frame attributes
The Property inspector simplifies document creation by making it easy to edit frame attributes.
The contents of the Property inspector change to reflect the contents of the frame, letting you edit
a frame without accessing the menus or panels that contain these features.
In addition to changing the name of a frame and making a keyframe a named anchor, you can use
the Property inspector to set animation and sound attributes. To edit animation settings, you use
the Tween, Scale, Ease, Rotate, Orient to Path, Sync, and Snap options in the Property inspector.
For more information, see “Tweening instances, groups, and type” on page 173. You use the
Sound, Effect, Edit, Sync, and Loop options to edit sound settings. See “Adding sounds to a
movie” under Help > Using Flash.
To edit the name of a frame:
1 If the Property inspector is not visible, choose Window > Properties.
2 Type a new name for the frame in the Frame text box in the Property inspector.
Creating frame labels and comments
Frame labels are useful for identifying keyframes in the Timeline and should be used instead of
frame numbers when targeting frames in actions such as Go To. If you add or remove frames, the
label moves with the frame it was originally attached to, whereas frame numbers can change.
Frame labels are included when you publish a document as a Flash movie, so avoid long names to
minimize file size.
Frame comments are useful for making notes to yourself and others working on the same
document. Frame comments are not exported when you publish a document as a Flash movie, so
you can make them as long as you want.
Chapter 132
Page 33

To create a frame label or comment:
1 Select a frame.
2 If the Property inspector is not visible, choose Window > Properties.
3 In the Property inspector, enter the frame label or comment in the Frame Label text box. To
make the text a comment, enter two slashes (//) at the beginning of each line of the text.
Using named anchors
Named anchors simplify navigation in Flash movies by letting viewers use the Forward and Back
buttons in a browser to jump from frame to frame or scene to scene. Named anchor keyframes are
indicated in the Timeline by an anchor icon. If you prefer to have Flash automatically make the
first keyframe of each scene a named anchor, see “Setting preferences in Flash” on page 22.
A named anchor keyframe in Scene 1
To take advantage of named anchor keyframes in your final Flash movie, select the Flash w/
Named Anchors option in the Template pop-up menu on the HTML tab of the Publish Settings
dialog box. For more information on the Publish Settings dialog box, see “Choosing publish
settings Flash movie format” on page 370.
To use Flash movies with named anchors, you must be running Flash Player 6 on your browser.
Note: If you save a document with named anchor keyframes as a Flash 5 document, the named anchor keyframes
are converted to regular labeled frames.
To make a selected keyframe a named anchor:
1 If the Property inspector is not visible, choose Window > Properties.
2 Type a name for the keyframe in the text box in the Property inspector.
3 Select the Named Anchor option.
To make a named anchor keyframe to a regular keyframe:
1 Select the named anchor keyframe in the Timeline.
2 Deselect the Named Anchor option in the Property inspector.
Using layers
Layers are like transparent sheets of acetate stacked on top of each other. Layers help you organize
the artwork in your document. You can draw and edit objects on one layer without affecting objects
on another layer. Where there is nothing on a layer, you can see through it to the layers below.
To draw, paint, or otherwise modify a layer or folder, you select the layer to make it active. A
pencil icon next to a layer or folder name indicates that the layer or folder is active. Only one layer
can be active at a time (although more than one layer can be selected at a time).
Working in Flash 33
Page 34

When you create a new Flash document, it contains one layer. You can add more layers to
organize the artwork, animation, and other elements in your document. The number of layers
you can create is limited only by your computer’s memory, and layers do not increase the file size
of your published movie. You can hide, lock, or rearrange layers.
You can also organize and manage layers by creating layer folders and placing layers in them. You
can expand or collapse layers in the Timeline without affecting what you see on the Stage. It’s a
good idea to use separate layers or folders for sound files, actions, frame labels, and frame
comments. This helps you find these items quickly when you need to edit them.
In addition, you can use special guide layers to make drawing and editing easier, and mask layers
to help you create sophisticated effects.
For an interactive introduction to layers, choose Help > Lessons > Understanding Layers.
Creating layers and layer folders
When you create a new layer or folder, it appears above the selected layer. A newly added layer
becomes the active layer.
To create a layer, do one of the following:
• Click the Add Layer button at the bottom of the Timeline.
• Choose Insert > Layer.
• Right-click (Windows) or Control-click (Macintosh) a layer name in the Timeline and choose
Insert Layer from the context menu.
To create a layer folder, do one of the following:
• Select a layer or folder in the Timeline, then choose Insert > Layer Folder.
• Right-click (Windows) or Control-click (Macintosh) a layer name in the Timeline, then
choose Insert Folder from the context menu.
The new folder appears above the layer or folder you selected.
Viewing layers and layer folders
As you work, you may want to show or hide layers or folders. A red X next to a the name of layer or
folder name indicates that it is hidden. Hidden layers are not preserved when a movie is published.
To help you distinguish which layer objects belong to, you can display all objects on a layer as
colored outlines. You can change the outline color used by each layer.
You can change the height of layers in the Timeline in order to display more information
(such as sound waveforms) in the Timeline. You can also change the number of layers displayed
in the Timeline.
To show or hide a layer or folder, do one of the following:
• Click in the Eye column to the right of the layer or folder name in the Timeline to hide that
layer or folder. Click in it again to show the layer or folder.
• Click the eye icon to hide all the layers and folders. Click it again to show all layers and folders.
• Drag through the Eye column to show or hide multiple layers or folders.
Chapter 134
Page 35

• Alt-click (Windows) or Option-click (Macintosh) in the Eye column to the right of a layer or
folder name to hide all other layers and folders. Alt-click or Option-click it again to show all
layers and folders.
Hidden layer
Active layer
Objects on layer displayed as outlines
Locked layer
To view the contents of a layer as outlines, do one of the following:
• Click in the Outline column to the right of the layer’s name to display all objects on that layer
as outlines. Click in it again to turn off outline display.
• Click the outline icon to display objects on all layers as outlines. Click it again to turn off
outline display on all layers.
• Alt-click (Windows) or Option-click (Macintosh) in the Outline column to the right of a
layer’s name to display objects on all other layers as outlines. Alt-click or Option-click in it
again to turn off outline display for all layers.
To change a layer’s outline color:
1 Do one of the following:
• Double-click the layer’s icon (the icon to the left of the layer name) in the Timeline.
• Right-click (Windows) or Control-click (Macintosh) the layer name and choose Properties
from the context menu.
• Select the layer in the Timeline and choose Modify > Layer.
2 In the Layer Properties dialog box, click the Outline Color box and select a new color, enter
the hexadecimal value for a color, or click the Color Picker button and choose a color.
3 Click OK.
To change layer height in the Timeline:
1 Do one of the following:
• Double-click the layer’s icon (the icon to the left of the layer name) in the Timeline.
• Right-click (Windows) or Control-click (Macintosh) the layer name and choose Properties
from the context menu.
• Select the layer in the Timeline and choose Modify > Layer.
2 In the Layer Properties dialog box, choose an option for Layer Height and click OK.
Working in Flash 35
Page 36

To change the number of layers displayed in the Timeline:
Drag the bar that separates the Timeline from the Stage.
Editing layers and layer folders
You can rename, copy, and delete layers and folders. You can also lock layers and folders to
prevent them from being edited.
By default, new layers are named by the order in which they are created: Layer 1, Layer 2, and so
on. You can rename layers to better reflect their contents.
To select a layer or folder, do one of the following:
• Click the name of a layer or folder in the Timeline.
• Click a frame in the Timeline of the layer you want to select.
• Select an object on the Stage that is located on the layer you want to select.
To select two or more layers or folders, do one of the following:
• To select contiguous layers or folders, Shift-click their names in the Timeline.
• To select discontiguous layers or folders, Control-click (Windows) or Command-click
(Macintosh) their names in the Timeline.
To rename a layer or folder, do one of the following:
• Double-click the name of a layer or folder and enter a new name.
• Right-click (Windows) or Control-click (Macintosh) the name of a layer or folder and choose
Properties from the context menu. Enter the new name in the Name text box and click OK.
• Select the layer or folder in the Timeline and choose Modify > Layer. In the Layer Properties
dialog box, enter the new name in the Name text box and click OK.
Chapter 136
Page 37

To lock or unlock one or more layers or folders, do one of the following:
• Click in the Lock column to the right of the name of a layer or folder to lock it. Click in the
Lock column again to unlock the layer or folder.
• Click the padlock icon to lock all layers and folders. Click it again to unlock all layers and folders.
• Drag through the Lock column to lock or unlock multiple layers or folders.
• Alt-click (Windows) or Option-click (Macintosh) in the Lock column to the right of a layer or
folder name to lock all other layers or folders. Alt-click or Option-click in the Lock column
again to unlock all layers or folders.
To copy a layer:
1 Click the layer name to select the entire layer.
2 Choose Edit > Copy Frames.
3 Click the Add Layer button to create a new layer.
4 Click the new layer and choose Edit > Paste Frames.
To copy the contents of a layer folder:
1 Click the triangle to the left of the folder name to collapse it, if necessary.
2 Click the folder name to select the entire folder.
3 Choose Edit > Copy Frames.
4 Choose Insert > Layer Folder to create a new folder.
5 Click the new folder and choose Edit > Paste Frames.
To delete a layer or folder:
1 Select the layer or folder.
2 Do one of the following:
• Click the Delete Layer button in the Timeline.
• Drag the layer or folder to the Delete Layer button.
• Right-click (Windows) or Control-click (Macintosh) the layer or folder name and choose
Delete Layer from the context menu.
Note: When you delete a layer folder, all the enclosed layers and all their contents are also deleted.
Organizing layers and layer folders
You can rearrange layers and folders in the Timeline to organize your document.
Layer folders help organize your workflow by letting you place layers in a tree structure. You can
expand or collapse a folder to see the layers it contains without affecting which layers are visible
on the Stage. Folders can contain both layers and other folders, allowing you to organize layers in
much the same way you organize files on your computer.
Working in Flash 37
Page 38

The layer controls in the Timeline affect all layers within a folder. For example, locking a layer
folder locks all layers within that folder.
To move a layer or layer folder into a layer folder:
Drag the layer or layer folder name to the destination layer folder name.
The layer or layer folder appears inside the destination layer folder in the Timeline.
To change the order of layers or folders:
Drag one or more layers or folders in the Timeline to the desired position.
To expand or collapse a folder:
Click the triangle to the left of the folder name.
To expand or collapse all folders:
Right-click (Windows) or Control-click (Macintosh) and choose Expand All Folders or Collapse
All Folders from the context menu.
Using guide layers
For help in aligning objects when drawing, you can create guide layers. You can then align objects
on other layers to the objects you create on the guide layers. Guide layers do not appear in a
published Flash movie. You can make any layer a guide layer. Guide layers are indicated by a guide
icon to the left of the layer name.
Guide layer
You can also create a motion guide layer to control the movement of objects in a motion tweened
animation. See “Tweening motion along a path” on page 176.
Note: Dragging a normal layer onto a guide layer converts the guide layer to a motion guide layer. To prevent
accidentally converting a guide layer, place all guide layers at the bottom of the layer order.
To designate a layer as a guide layer:
Select the layer and right-click (Windows) or Control-click (Macintosh) and select Guide from
the context menu. Select Guide again to change the layer back to a normal layer.
Chapter 138
Page 39

Previewing and testing movies
As you create a movie, you’ll need to play it back to preview animation and test interactive
controls. You can preview and test movies within the Flash authoring environment, in a separate
test window in Flash, or in a Web browser.
Previewing movies in the authoring environment
To preview movies, you use commands in the Control menu, buttons on the Controller, or
keyboard commands.
To preview the current scene, do one of the following:
• Choose Control > Play.
• Choose Window > Toolbars > Controller (Windows) or Window > Controller (Macintosh)
and click Play.
• Press Enter (Windows) or Return (Macintosh). The animation sequence plays at the frame rate
you specified for the document.
• To step through the frames of the animation, use the Step Forward and Step Backward buttons
on the Controller, or choose those commands from the Control menu. You can also press the <
and > keys on the keyboard.
• To jump to the first or last frame in a movie using the Controller, use the First Frame or Last
Frame button.
Note: You can also drag the playhead to view frames in a document. See “Moving the playhead” on page 29.
You can modify movie playback using commands in the Control menu. When using the
following commands, you must also choose Control > Play to preview the movie.
To play the movie in a continuous loop:
Choose Control > Loop Playback.
To play all the scenes in a movie:
Choose Control > Play All Scenes.
To play a movie without sound:
Choose Control > Mute Sounds.
To enable frame actions or button actions:
Choose Control > Enable Simple Frame Actions or Enable Simple Buttons.
Previewing movies with the Test Movie command
Although Flash can play movies in the authoring environment, many animation and interactive
functions cannot work unless the document is exported to its final Flash movie format. Using
commands in the Control menu, you can export the current document as a Flash movie and
immediately play it using the Test Movie command. The exported movie uses the options set in
the Publish Settings dialog box. You can also use the Test Movie command to test downloading
performance. See “Testing movie download performance” under Help > Using Flash.
Working in Flash 39
Page 40

In addition, you can test actions in a movie using the Debugger. See “Using the Debugger” under
Help > Using Flash.
To test all interactive functions and animation:
Choose Control > Test Movie or Control > Test Scene.
Flash creates a Flash movie (a SWF file), opens it in a separate window, and plays it with the Flash
Player. The SWF file is placed in the same folder as the FLA file.
Previewing movies in a Web browser
For the most accurate representation of a Flash movie, you should preview it in your default
Web browser.
To test the movie in a Web browser:
Choose File > Publish Preview > HTML.
Flash creates a Flash movie (a SWF file), opens it in your default Web browser, and plays it with
the Flash Player. The SWF file is placed in the same folder as the FLA file. For more information,
see “About HTML publishing templates” on page 382.
Using the Movie Explorer
The Movie Explorer provides an easy way for you to view and organize the contents of a
document and select elements in the document for modification. It contains a display list of
currently used elements, arranged in a navigable hierarchical tree. You can filter which categories
of items in the document are displayed in the Movie Explorer, choosing from text, graphics,
buttons, movie clips, actions, and imported files. You can display the selected categories as movie
elements (scenes), symbol definitions, or both. You can expand and collapse the navigation tree.
The Movie Explorer offers many features to streamline the workflow for creating movies. For
example, you can use the Movie Explorer to do the following:
• Search for an element in a document by name
• Familiarize yourself with the structure of a Flash document created by another developer
• Find all the instances of a particular symbol or action
• Replace all occurrences of a font in a document with another font
• Copy all text to the Clipboard to paste into an external text editor for spell checking
• Print the navigable display list currently displayed in the Movie Explorer
Chapter 140
Page 41

The Movie Explorer has an options menu as well as a context menu with options for performing
operations on selected items or modifying the Movie Explorer display. The options menu is
indicated by a check mark with a triangle below it in the title bar of the Movie Explorer.
Options menu
Filtering buttons
Find text box
Display list
Path for selected item
To view the Movie Explorer:
Choose Window > Movie Explorer.
To filter the categories of items displayed in the Movie Explorer:
• To show text, symbols, ActionScript, imported files, or frames and layers, click one or more of
the filtering buttons to the right of the Show option. To customize which items to show, click
the Customize button. Select options in the Show area of the Movie Explorer Settings dialog
box to view those elements.
• From the options menu in Movie Explorer, choose Show Movie Elements to display items in
scenes, and choose Show Symbol Definitions to display information about symbols. (Both
options can be active at the same time.)
To search for an item using the Find text box:
In the Find text box, enter the item name, font name, ActionScript string, or frame number. The
Find feature searches all items currently displayed in the Movie Explorer.
To select an item in the Movie Explorer:
Click the item in the navigation tree. Shift-click to select more than one item.
The full path for the selected item appears at the bottom of the Movie Explorer. Selecting a scene in
the Movie Explorer displays the first frame of that scene on the Stage. Selecting an element in the
Movie Explorer selects that element on the Stage if the layer containing the element is not locked.
Working in Flash 41
Page 42

To use the Movie Explorer options menu or context menu commands:
1 Do one of the following:
• To view the options menu, click the options menu control in the Movie Explorer’s title bar.
• To view the context menu, right-click (Windows) or Control-click (Macintosh) an item in the
Movie Explorer navigation tree.
2 Select an option from the menu:
• Go to Location jumps to the selected layer, scene, or frame in the document.
• Go to Symbol Definition jumps to the symbol definition for a symbol that is selected in the
Movie Elements area of the Movie Explorer. The symbol definition lists all the files associated
with the symbol. (The Show Symbol Definitions option must be selected. See option
definition below.)
• Select Symbol Instances jumps to the scene containing instances of a symbol that is selected in
the Symbol Definitions area of the Movie Explorer. (The Show Movie Elements option must
be selected.)
• Find in Library highlights the selected symbol in the document’s library (Flash opens the
Library panel if it is not already visible).
• Rename lets you enter a new name for a selected element.
• Edit in Place lets you edit a selected symbol on the Stage.
• Edit in New Window lets you edit a selected symbol in a new window.
• Show Movie Elements displays the elements in your movie, organized into scenes.
• Show Symbol Definitions displays all the elements associated with a symbol.
• Copy All Text to Clipboard copies selected text to the Clipboard. You can paste the text into an
external text editor for spell checking or other editing.
• Cut, Copy, Paste, and Clear perform these common functions on a selected element.
Modifying an item in the display list modifies the corresponding element in the movie.
• Expand Branch expands the navigation tree at the selected element.
• Collapse Branch collapses the navigation tree at the selected element.
• Collapse Others collapses the branches in the navigation tree not containing the
selected element.
• Print prints the hierarchical display list currently displayed in the Movie Explorer.
Speeding up movie display
To speed up the movie display, you can use commands in the View menu to turn off
rendering-quality features that require extra computing and slow down movies.
None of these commands have any effect on how Flash exports a movie. To specify the display
quality of Flash movies in a Web browser, you use the
command can do this for you automatically. For more information, see “Publishing Flash
documents” on page 367.
Chapter 142
OBJECT and EMBED parameters. The Publish
Page 43

To change the movie display speed:
Choose View and select from the following options:
• Outlines displays only the outlines of the shapes in your scene and causes all lines to appear
as thin lines. This makes it easier to reshape your graphic elements and to display complex
scenes faster.
• Fast turns off anti-aliasing and displays all the colors and line styles of your drawing.
• Antialias turns on anti-aliasing for lines, shapes, and bitmaps. It displays shapes and lines so
that their edges appear smoother on the screen. This option draws more slowly than the Fast
option. Anti-aliasing works best on video cards that provide thousands (16-bit) or millions
(24-bit) of colors. In 16- or 256-color mode, black lines are smoothed, but colors might look
better in fast mode.
• Antialias Text smooths the edges of any text. This command works best with large font sizes
and can be slow with large amounts of text. This is the most common mode in which to work.
Saving Flash documents
You can save a Flash FLA document using its current name and location, or save the document
using a different name or location. You can revert to the last saved version of a document. You can
also save Flash MX content as a Flash 5 document.
You can save a document as a template, in order to use the document as the starting point for a
new Flash document (this is similar to how you would use templates in word-processing or Web
page–editing applications). For information on using templates to create new documents, see
“Creating a new document” on page 21.
When you save a document using the Save command, Flash performs a quick save, which
appends new information to the existing file. When you save using the Save As command, Flash
arranges the new information into the file, creating a smaller file on disk.
To save a Flash document:
1 Do one of the following:
• To overwrite the current version on the disk, choose File > Save.
• To save the document in a different location and/or with a different name, or to compress the
document, choose File > Save As.
2 If you chose the Save As command, or if the document has never been saved before, enter the
file name and location.
3 To save the document in Flash MX format, choose Flash MX Document from the Format
pop-up menu. If an alert message indicates that content will be deleted if you save in Flash MX
format, click Save As Flash MX if you wish to continue.
4 Click Save.
To revert to the last saved version of a document:
Choose File > Revert.
Working in Flash 43
Page 44

To save a document as a template:
1 Choose File > Save As Template.
2 In the Save As Template dialog box, enter a name for the template in the Name text box.
3 Choose a category from the Category pop-up menu, or enter a name to create a new category.
4 Enter a description of the template in the Description text box (up to 255 characters). The
description will be displayed when the template is selected in the New Document dialog box
(see “Previewing and testing movies” on page 39).
5 Click OK.
To save as a Flash 5 document:
1 Choose File > Save As.
2 Enter the file name and location.
3 Choose Flash 5 Document from the Format pop-up menu. If an alert message indicates that
content will be deleted if you save in Flash 5 format, click Save As Flash 5 to continue.
4 Click Save.
Configuring a server for the Flash Player
For a user to view your Flash movie on the Web, the Web server must be properly configured to
recognize the SWF file as a Flash movie.
Your server may already be configured properly. If your server is not properly configured, follow
the procedure below to configure it.
Configuring a server establishes the appropriate Multipart Internet Mail Extension (MIME) types
for the server to identify files with the SWF suffix as Shockwave Flash files.
A browser that receives the correct MIME type can load the appropriate plug-in, control, or
helper application to process and properly display the incoming data. If the MIME type is
missing or not properly delivered by the server, the browser might display an error message or a
blank window with a puzzle piece icon.
Note: When you publish a Flash movie, you must configure the movie for the Flash Player in order for users to view
the movie. See Chapter 20, “Publishing,” on page 365.
To configure a server for the Flash Player, do one of the following:
• If your site is established through an Internet service provider, contact them and request that
the MIME type application/x-shockwave-flash with the SWF suffix be added to the server.
• If you are administering your own server, consult the documentation for your Web server
software for instructions on adding or configuring MIME types.
Chapter 144
Page 45

Printing Flash documents as you edit
You can print frames from Flash documents as you work, to preview and edit your movies.
You can also specify frames to be printable from the Flash Player by a viewer displaying the Flash
movie. See “Creating Printable Movies” under Help > Using Flash.
When printing frames from a Flash document, you use the Print dialog box to specify the range
of scenes or frames you want to print, as well as the number of copies. In Windows, the Page
Setup dialog box specifies paper size, orientation, and various print options—including margin
settings and whether all frames are to be printed for each page. On the Macintosh, these options
are divided between the Page Setup and the Print Margins dialog boxes.
The Print and Page Setup dialog boxes are standard within either operating system, and their
appearance depends on the printer driver selected.
To set printing options:
1 Choose File > Page Setup (Windows) or File > Print Margins (Macintosh).
2 Set page margins. Select both Center options to print the frame in the center of the page.
3 In the Frames pop-up menu, choose to print all frames in the movie or only the first frame
of each scene.
4 In the Layout pop-up menu, choose from the following options:
• Actual Size prints the frame at full size. Enter a value for Scale to reduce or enlarge the
printed frame.
• Fit on One Page reduces or enlarges each frame so it fills the print area of the page.
• Storyboard options print several thumbnails on one page. Enter the number of thumbnails per
page in the Frames text box. Set the space between the thumbnails in the Story Margin text
box. Select Label to print the frame label as a thumbnail.
To preview how your scene is arranged on the printer paper:
Choose File > Print Preview.
To print frames:
Choose File > Print.
Working in Flash 45
Page 46

Chapter 146
Page 47

CHAPTER 2
Working with Flash assets
Macromedia Flash MX assets are the various elements you use to create a movie. Assets include
objects on the Stage, symbols and symbol instances, sound clips, and other imported files. Flash
provides tools to help you organize and optimize assets. These tools improve your workflow by
keeping the most frequently used features of Flash easily accessible.
Assets and asset management
Most Flash assets are objects on the Stage or symbols stored in the document’s library. Other
assets include files on local or remote computers. The library makes organization easier and helps
optimize file size. The toolbox, inspectors, panels, and library work help you work efficiently with
the assets of any document, whether simple or complex.
Symbols and instances
Symbols are reusable elements that you use with a document. Symbols can include graphics,
buttons, video clips, sound files, or fonts. When you create a symbol, the symbol is stored in the
file’s library. When you place a symbol on the Stage, you create an instance of that symbol.
Symbols reduce file size because, regardless of how many instances of a symbol you create, Flash
stores the symbol in the file only once. It is a good idea to use symbols, animated or otherwise, for
every element that appears more than once in a document. You can modify the properties of an
instance without affecting the master symbol, and you can edit the master symbol to change all
instances.
You can edit symbols in several ways: in place on the Stage, in a new window, or in
symbol-editing mode. When you edit a symbol, the Timeline window displays only the
Timeline of the symbol you are editing. For more information on editing symbols, see “Editing
symbols” on page 157.
You can locate and open a symbol in the library from within the Movie Explorer, using the Find
in Library command. See “Using the Movie Explorer” on page 40.
47
Page 48

For more information on symbols and instances, see the Symbols lesson, located under Help >
Lessons > Creating and Editing Symbols, and Chapter 9, “Using Symbols, Instances, and Library
Assets,” on page 149.
Editing a symbol in its context in the document (left) and editing a symbol in isolation (right)
Symbols and interactive movies
Symbols are an integral part of creating interactive movies; you can use instances of symbols to
create interactivity in a movie. For example, you can create a button symbol that changes in
response to mouse actions and place an instance of the symbol on the Stage. You use another type
of symbol, called a movie clip, to create sophisticated interactive movies. See “Working with
Movie Clips and Buttons” under Help > Using Flash.
Panels and the Property inspector
Flash offers many ways to customize the workspace to your needs. Using panels and the Property
inspector, you can view, organize, and change assets and their attributes. You can show, hide, and
resize panels. You can also group panels and save custom panel sets to make managing your
workspace easier. The Property inspector changes to reflect the tool or asset you are working with,
giving you quick access to frequently used features.
Using panels
Panels in Flash help you view, organize, and change elements in a document. The options
available on panels control the characteristics of symbols, instances, colors, type, frames, and
other elements. You can use panels to customize the Flash interface, by displaying the panels you
need for a specific task and hiding other panels.
Panels let you work with objects, colors, text, instances, frames, scenes, and entire documents. For
example, you use the Color Mixer to create colors, and the Align panel to align objects to each
other or the Stage. To view the complete list of panels available in Flash, see the Window menu.
Chapter 248
Page 49

Most panels include a pop-up menu with additional options. The options menu is indicated by a
control in the panel’s title bar. (If no options menu control appears, there is no options menu for
that panel.)
Options menu controlCollapse arrow
To open a panel:
Select the desired panel from the Window menu.
To close a panel, do one of the following:
• Select the desired panel from the Window menu.
• Right-click (Windows) or Control-click (Macintosh) the panel’s title bar and choose Close
Panel from the context menu.
To use a panel’s options menu:
1 Click the control in the panel’s title bar to view the options menu.
2 Click an item in the menu.
To resize a panel:
Drag the panel’s border (Windows) or drag the size box at the panel’s lower right corner
(Macintosh).
To expand or collapse a panel to its title bar:
Click the collapse arrow in the title bar. Click the collapse arrow again to expand the panel to its
previous size.
To show or hide all panels:
Press Tab.
To close all panels:
Choose Window > Close All Panels.
Working with Flash assets 49
Page 50

Arranging panels
You can rearrange the order in which panels appear within panel groups. You can also create new
panel groups and dock panels to existing panel groups.
To move a panel:
Drag the panel by its title bar.
To add a panel to an existing panel group:
Drag the panel by its title bar onto another panel.
To create a new panel group:
Drag the panel by its title bar, away from other panel groups.
Using panel sets
You can create panel sets in custom arrangements, and you can save these custom panel layouts.
You can reset panel display to the default layout (displaying the Color Swatches, Actions, and
Components panels and the Color Mixer to the right of the application window) or to a custom
layout that you have saved previously.
To save a custom panel set:
1 Choose Window > Save Panel Layout.
2 Enter a name for the layout and click OK.
To select a panel layout:
1 Choose Window > Panel Sets.
2 From the submenu, choose Default Layout to reset panels to the default layout, or choose a
custom layout that you have saved previously.
To delete custom layouts:
Open the Panel Sets folder inside the Flash MX application folder on your hard drive and delete
the Panel Sets file.
Chapter 250
Page 51

Working with the Library panel
The Library panel is where you store and organize symbols created in Flash, as well as imported
files, including bitmap graphics, sound files, and video clips. The Library panel lets you organize
library items in folders, see how often an item is used in a document, and sort items by type. See
“Using the library” on page 54.
To display or hide the Library panel:
Choose Window > Library.
Working with the Actions panel
The Actions panel lets you create and edit actions for an object or frame. Selecting a frame,
button, or movie clip instance makes the Actions panel active. The Actions panel title changes to
Button Actions, Movie Clip Actions, or Frame Actions, depending on what is selected.
For information on using the Actions panel, including switching between editing modes, see
“Using the Actions panel” under Help > Using Flash.
To display or hide the Actions panel:
Choose Window > Actions.
Working with Flash assets 51
Page 52

Using the Property inspector
The Property inspector simplifies document creation by making it easy to access the most
commonly used attributes of the current selection, either on the Stage or in the Timeline. You can
make changes to the object or document attributes in the Property inspector without accessing
the menus or panels that contain these features.
Depending on what is currently selected, the Property inspector displays information and settings
for the current document, text, symbol, shape, bitmap, video, group, frame, or tool. When two or
more different types of objects are selected, the Property inspector displays the total number of
objects selected.
The Property inspector displaying text options
To display or hide the Property inspector:
Choose Window > Properties.
Using the toolbox
The tools in the toolbox let you draw, paint, select, and modify artwork, as well as change the
view of the Stage. The toolbox is divided into four sections:
• The Tools section contains drawing, painting, and selection tools.
• The View section contains tools for zooming and panning in the application window.
• The Colors section contains modifiers for stroke and fill colors.
• The Options section displays modifiers for the selected tool, which affect the tool’s painting or
editing operations.
Chapter 252
Page 53

For information on using the drawing and painting tools, see “Flash drawing and painting tools”
on page 61. For information on using the selection tools, see “Selecting objects” on page 119. For
information on using the view modification tools, see “Viewing the Stage” on page 19.
Selecting a tool in the toolbox ...
displays the modifiers for that tool here
To show or hide the toolbox:
Choose Window > Tools.
To select a tool, do one of the following:
• Click the tool you want to use. Depending on the tool you select, a set of modifiers may be
displayed in the Options area at the bottom of the toolbox.
• Press the tool’s keyboard shortcut.
Working with Flash assets 53
Page 54

Using context menus
Context menus contain commands relevant to the current selection. For example, when you
select a frame in the Timeline window, the context menu contains commands for creating,
deleting, and modifying frames and keyframes. Context menus exist for many items and controls
in many locations, including on the Stage, in the Timeline, in the Library panel, and in the
Actions panel.
Context menu for a selected frame
To open a context menu:
Right-click (Windows) or Control-click (Macintosh) an item.
Using the library
The library in a Flash document stores symbols created in Flash, plus imported files such as video
clips, sound clips, bitmaps, and imported vector artwork. The Library panel displays a scroll list
with the names of all items in the library, allowing you to view and organize these elements as you
work. An icon next to an item’s name in the Library panel indicates the item’s file type.
You can open the library of any Flash document while you are working in Flash, to make the
library items from that file available for the current document.
You can create permanent libraries in your Flash application that will be available whenever you
launch Flash. Flash also includes several sample libraries containing buttons, graphics, movie
clips, and sounds that you can add to your own Flash documents. The sample Flash libraries and
permanent libraries that you create are listed in the Window > Common Libraries submenu. See
“Working with common libraries” on page 58.
Chapter 254
Page 55

You can export library assets as a SWF file to a URL to create a runtime-shared library. This
allows you to link to the library assets from Flash movies that import symbols using runtime
sharing. See “Using shared library assets” on page 165.
Options menu
Item preview
Sort Order button
Wide State button
Narrow State button
Trash can icon
Properties icon
New Folder button
New Symbol button
To display the Library panel:
Choose Window > Library.
To open the library from another Flash file:
1 Choose File > Open as Library.
2 Navigate to the Flash file whose library you want to open, and click Open.
The selected file’s library opens in the current document, with the file’s name at the top of the
Library panel. To use items from the selected file’s library in the current document, drag the items
to the current document’s Library panel or to the Stage.
To resize the Library panel, do one of the following:
• Drag the lower right corner.
• Click the Wide State button to enlarge the Library panel so that it displays all the columns.
• Click the Narrow State button to reduce the width of the Library panel.
To change the width of columns:
Position the pointer between column headers and drag to resize.
You cannot change the order of columns.
Working with Flash assets 55
Page 56

To use the Library options menu:
1 Click the control in the Library panel’s title bar to view the options menu.
2 Click an item in the menu.
Working with library items
When you select an item in the Library panel, a thumbnail preview of the item appears at the top
of the Library panel. If the selected item is animated or is a sound file, you can use the Play
button in the Library preview window or the Controller to preview the item.
To use a library item in the current document:
Drag the item from the Library panel onto the Stage.
The item is added to the current layer.
To convert an object to a symbol in the library:
Drag the item from the Stage onto the current Library panel.
To use a library item from the current document in another document:
Drag the item from the library or Stage into the library or Stage for another document.
To move an item between folders:
Drag the item from one folder to another. If an item with the same name exists in the new
location, Flash prompts you to replace the item you are moving.
To replace a symbol on the Stage with another symbol:
1 Select the symbol you want to replace.
2 Choose Modify > Swap Symbol.
3 Select a new symbol from the Swap Symbol dialog box, then click OK.
Working with folders in the Library panel
You can organize items in the Library panel using folders, much like in the Windows Explorer or
the Macintosh Finder. When you create a new symbol, it is stored in the selected folder. If no
folder is selected, the symbol is stored at the root of the library.
The Library panel columns list the name of an item, its type, the number of times it’s used in the
file, its linkage status and identifier (if the item is associated with a shared library or is exported
for ActionScript), and the date on which it was last modified. You can sort items in the Library
panel by any column. The Library panel also contains an options pop-up menu with options for
modifying library items.
To create a new folder:
Click the New Folder button at the bottom of the Library panel.
To open or close a folder, do one of the following:
• Double-click the folder.
• Select the folder and choose Expand Folder or Collapse Folder from the Library options menu.
Chapter 256
Page 57

To open or close all folders:
Choose Expand All Folders or Collapse All Folders from the Library options menu.
Sorting items in the Library panel
You can sort items in the Library panel alphanumerically by any column. Sorting items lets you
view related items together. Items are sorted within folders.
To sort items in the Library panel:
Click the column header to sort by that column. Click the triangle button to the right of the
column headers to reverse the sort order.
Editing items in the library
To edit library items, including imported files, you choose options from the Library options
menu. You can update imported files after editing them in an external editor, using the Update
option in the Library options menu.
To edit a library item:
1 Select the item in the Library panel.
2 Choose one of the following from the Library options menu:
• Choose Edit to edit an item in Flash.
• Choose Edit With and select an application to edit the item in an external editor.
Note: When launching a supported external editor, Flash opens the original imported document.
Renaming library items
You can rename items in the library. Changing the library item name of an imported file does not
change the file name.
To rename a library item, do one of the following:
• Double-click the item’s name and enter the new name in the text field.
• Select the item and click the properties icon at the bottom of the Library panel. Enter the new
name in the Symbol Properties dialog box and click OK.
• Select the item and choose Rename from the Library options menu, and then enter the new
name in the text field.
• Right-click (Windows) or Control-click (Macintosh) the item and choose Rename from the
context menu, and then enter the new name in the text field.
Deleting library items
When you delete an item from the library, all instances or occurrences of that item in the
document are also deleted by default. The Use Count column in the Library panel indicates
whether an item is in use.
Working with Flash assets 57
Page 58

To delete a library item:
1 Select the item and click the trash can icon at the bottom of the Library panel.
2 In the warning box that appears, select Delete Symbol Instances (the default) to delete the
library item and all instances of it. Deselect the option to delete only the symbol, leaving the
instances on the Stage.
3 Click Delete.
Finding unused library items
To make organizing a document easier, you can locate unused library items and delete them.
Note: It is not necessary to delete unused library items to reduce a Flash movie’s file size, because unused library
items are not included in the SWF file.
To find unused library items, do one of the following:
• Choose Select Unused Items from the Library options menu.
• Sort library items by the Use Count column. See “Sorting items in the Library panel” on page 57.
Updating imported files in the Library panel
If you use an external editor to modify files that you have imported into Flash, such as bitmaps or
sound files, you can update the files in Flash without reimporting them. You can also update
symbols that you have imported from external Flash documents. Updating an imported file
replaces its contents with the contents of the external file.
To update an imported file:
Select the imported file in the Library panel and choose Update from the Library options menu.
Working with common libraries
You can use the sample libraries included with Flash to add symbols, buttons, or sounds to your
documents. You can also create your own sample libraries, which you can then use with any
documents that you create.
To create a sample library for your Flash application:
1 Create a Flash file with a library containing the symbols that you want to include in the
permanent library.
2 Place the Flash file in the Libraries folder located in the Flash application folder on your hard drive.
To use an item from a common library in a document:
1 Choose Window > Common Libraries, and select a library from the submenu.
2 Drag an item from the common library into the library for the current document.
About components
Flash components are movie clips with defined parameters, each with its own unique set of
ActionScript methods that allow you to set and change the authoring parameters and additional
options at runtime. See Chapter 15, “Using Components,” on page 289.
Chapter 258
Page 59

CHAPTER 3
Drawing
The drawing tools in Macromedia Flash MX let you create and modify shapes for the artwork
in your movies. For an interactive introduction to drawing in Flash, choose Help > Lessons >
Illustrating in Flash.
Before you draw and paint in Flash, it is important to understand how Flash creates artwork, how
drawing tools work, and how drawing, painting, and modifying shapes can affect other shapes on
the same layer.
About vector and bitmap graphics
Computers display graphics in either vector or bitmap format. Understanding the difference
between the two formats can help you work more efficiently. Using Flash, you can create and
animate compact vector graphics. Flash also lets you import and manipulate vector and bitmap
graphics that have been created in other applications.
59
Page 60

Vector graphics
Vector graphics describe images using lines and curves, called vectors, that also include color and
position properties. For example, the image of a leaf is described by points through which lines
pass, creating the shape of the leaf’s outline. The color of the leaf is determined by the color of the
outline and the color of the area enclosed by the outline.
When you edit a vector graphic, you modify the properties of the lines and curves that describe its
shape. You can move, resize, reshape, and change the color of a vector graphic without changing
the quality of its appearance. Vector graphics are resolution-independent, meaning they can be
displayed on output devices of varying resolutions without losing any quality.
Bitmap graphics
Bitmap graphics describe images using colored dots, called pixels, arranged within a grid. For
example, the image of a leaf is described by the specific location and color value of each pixel in
the grid, creating an image in much the same manner as a mosaic.
When you edit a bitmap graphic, you modify pixels, rather than lines and curves. Bitmap
graphics are resolution-dependent, because the data describing the image is fixed to a grid of a
particular size. Editing a bitmap graphic can change the quality of its appearance. In particular,
resizing a bitmap graphic can make the edges of the image ragged as pixels are redistributed
within the grid. Displaying a bitmap graphic on an output device that has a lower resolution than
the image itself also degrades the quality of its appearance.
Chapter 360
Page 61

Flash drawing and painting tools
Flash provides various tools for drawing freeform or precise lines, shapes, and paths, and for
painting filled objects.
Arrow
Line
Pen
Oval
Pe nc il
Fr ee Tra n sf o rm
Ink Bottle
Eyedropper
Hand
Subselection
Lasso
Text
Rectangle
Brush
Fill Transform
Paint Bucket
Eraser
Zoom
Stroke color
Fill color
Tool modifiers
• To draw freeform lines and shapes as if drawing with a real pencil, you use the Pencil tool. See
“Drawing with the Pencil tool” on page 63.
• To draw precise paths as straight or curved lines, you use the Pen tool. See “Using the Pen tool”
on page 64.
• To draw basic geometric shapes, you use the Line, Oval, and Rectangle tools. See “Drawing
straight lines, ovals, and rectangles” on page 63.
• To create brushlike strokes as if painting with a brush, you use the Brush tool. See “Painting
with the Brush tool” on page 69.
When you use most Flash tools, the Property inspector changes to present the settings associated
with that tool. For example, if you choose the Text tool, the Property inspector displays text
properties, making it easy to select the text attributes you want. For more information on the
Property inspector, see “Panels and the Property inspector” on page 48.
When you use a drawing or painting tool to create an object, the tool applies the current stroke
and fill attributes to the object. To change the stroke and fill attributes of existing objects, you can
use the Paint Bucket and Ink Bottle tools in the toolbox or the Property inspector. See “Using the
Stroke Color and Fill Color controls in the toolbox” on page 77 or “Using the Stroke Color and
Fill Color controls in the Property inspector” on page 79.
Drawing 61
Page 62

You can reshape lines and shape outlines in a variety of ways after you create them. Fills and
strokes are treated as separate objects. You can select fills and strokes separately to move or modify
them. See “Reshaping lines and shape outlines” on page 70.
You can use snapping to automatically align elements with each other and with the drawing grid
or guides. See “Snapping” on page 74 and “Using the grid, guides, and rulers” on page 20.
About overlapping shapes in Flash
When you use the Pencil, Line, Oval, Rectangle, or Brush tool to draw a line across another line
or painted shape, the overlapping lines are divided into segments at the intersection points. You
can use the Arrow tool to select, move, and reshape each segment individually.
Note: Overlapping lines that you create with the Pen tool do not divide into individual segments at intersection
points, but remain connected. See “Using the Pen tool” on page 64.
A fill; the fill with a line drawn through it; and the two fills and three line segments created
by segmentation
When you paint on top of shapes and lines, the portion underneath is replaced by whatever is on
top. Paint of the same color merges together. Paint of different colors remains distinct. You can
use these features to create masks, cutouts, and other negative images. For example, the cutout
below was made by moving the ungrouped kite image onto the green shape, deselecting the kite,
and then moving the filled portions of the kite away from the green shape.
To avoid inadvertently altering shapes and lines by overlapping them, you can group the shapes or
use layers to separate them. See “Grouping objects” on page 122 and “Using layers” on page 33.
Chapter 362
Page 63

Drawing with the Pencil tool
To draw lines and shapes, you use the Pencil tool, in much the same way that you would use a real
pencil to draw. To apply smoothing or straightening to the lines and shapes as you draw, you can
select a drawing mode for the Pencil tool.
To draw with the Pencil tool:
1 Select the Pencil tool.
2 Select Window > Properties and select a stroke color, line weight, and style in the Property
inspector. See “Using the Stroke Color and Fill Color controls in the Property inspector” on
page 79.
3 Choose a drawing mode under Options in the toolbox:
• Choose Straighten to draw straight lines and convert approximations of triangles, ovals, circles,
rectangles, and squares into these common geometric shapes.
• Choose Smooth to draw smooth curved lines.
• Choose Ink to draw freehand lines with no modification applied.
Lines drawn with Straighten, Smooth, and Ink mode, respectively
4 Drag on the Stage to draw with the Pencil tool. Shift-drag to constrain lines to vertical or
horizontal directions.
Drawing straight lines, ovals, and rectangles
You can use the Line, Oval, and Rectangle tools to easily create these basic geometric shapes. The
Oval and Rectangle tools create stroked and filled shapes. The Rectangle tool lets you create
rectangles with square or rounded corners.
To draw a straight line, oval, or rectangle:
1 Select the Line, Oval, or Rectangle tool.
2 Select Window > Properties and select stroke and fill attributes in the Property inspector. See
“Using the Stroke Color and Fill Color controls in the Property inspector” on page 79.
Note: You cannot set fill attributes for the Line tool.
3 For the Rectangle tool, specify rounded corners by clicking the Round Rectangle modifier and
entering a corner radius value. A value of zero creates square corners.
Drawing 63
Page 64

4 Drag on the Stage. If you are using the Rectangle tool, press the Up and Down Arrow keys
while dragging to adjust the radius of rounded corners.
For the Oval and Rectangle tools, Shift-drag to constrain the shapes to circles and squares.
For the Line tool, Shift-drag to constrain lines to multiples of 45°.
Using the Pen tool
To draw precise paths as straight lines or smooth, flowing curves, you can use the Pen tool. You
can create straight or curved line segments and adjust the angle and length of straight segments
and the slope of curved segments.
When you draw with the Pen tool, you click to create points on straight line segments, and click
and drag to create points on curved line segments. You can adjust straight and curved line
segments by adjusting points on the line. You can convert curves to straight lines and the reverse.
You can also display points on lines that you create with other Flash drawing tools, such as the
Pencil, Brush, Line, Oval, or Rectangle tools, to adjust those lines. See “Reshaping lines and shape
outlines” on page 70.
Setting Pen tool preferences
You can specify preferences for the appearance of the Pen tool pointer, for previewing line segments
as you draw, or for the appearance of selected anchor points. Selected line segments and anchor
points are displayed using the outline color of the layer on which the lines and points appear.
To set Pen tool preferences:
1 Choose Edit > Preferences and click the Editing tab.
2 Under Pen Tool, set the following options:
• Select Show Pen Preview to preview line segments as you draw. Flash displays a preview of the
line segment as you move the pointer around the Stage, before you click to create the end point
of the segment. If this option is not selected, Flash does not display a line segment until you
create the end point of the segment.
• Select Show Solid Points to specify that unselected anchor points appear as solid points and
selected anchor points appear as hollow points (this option is selected by default). Deselect
this option to display unselected anchor points as hollow points and selected anchor points as
solid points.
• Select Show Precise Cursors to specify that the Pen tool pointer appear as a cross-hair pointer,
rather than the default Pen tool icon, for more precise placement of lines. Deselect the option
to display the default Pen tool icon with the Pen tool.
Note: Press the Caps Lock key while working to toggle between the cross-hair pointer and the default
Pen tool icon.
3 Click OK.
Chapter 364
Page 65

Drawing straight lines with the Pen tool
To draw straight line segments with the Pen tool, you create anchor points—points on the line
that determine the length of individual line segments.
To draw straight lines with the Pen tool:
1 Select the Pen tool.
2 Select Window > Properties and select stroke and fill attributes in the Property inspector. See
“Using the Stroke Color and Fill Color controls in the Property inspector” on page 79.
3 Position the pointer on the Stage where you want the straight line to begin, and click to define
the first anchor point.
4 Click again where you want the first segment of the straight line to end. Shift-click to constrain
lines to multiples of 45°.
5 Continue clicking to create additional straight segments.
6 To complete the path as an open or closed shape, do one of the following:
• To complete an open path, double-click the last point, click the Pen tool in the toolbox, or
Control-click (Windows) or Command-click (Macintosh) anywhere away from the path.
• To close a path, position the Pen tool over the first anchor point. A small circle appears next to
the pen tip when it is positioned correctly. Click or drag to close the path.
• To complete the shape as is, choose Edit > Deselect All or select a different tool in the toolbox.
Drawing 65
Page 66

Drawing curved paths with the Pen tool
You create curves by dragging the Pen tool in the direction you want the curve to go to create the
first anchor point, and then dragging the Pen tool in the opposite direction to create the second
anchor point.
When you use the Pen tool to create a curved segment, the anchor points of the line segment
display tangent handles. The slope and length of each tangent handle determine the slope and the
height, or depth, of the curve. Moving the tangent handles reshapes the curves of the path. See
“Adjusting segments” on page 68.
To draw a curved path:
1 Select the Pen tool.
2 Position the Pen tool on the Stage where you want the curve to begin, and hold down the
mouse button.
The first anchor point appears, and the pen tip changes to an arrowhead.
3 Drag in the direction you want the curve segment to be drawn. Shift-drag to constrain the tool
to multiples of 45°.
As you drag, the tangent handles of the curve appear.
4 Release the mouse button.
The length and slope of the tangent handles determine the shape of the curve segment. You
can move the tangent handles later to adjust the curve.
5 Position the pointer where you want the curve segment to end, hold down the mouse button,
and drag in the opposite direction to complete the segment. Shift-drag to constrain the
segment to multiples of 45°.
6 To draw the next segment of a curve, position the pointer where you want the next segment to
end, and drag away from the curve.
Chapter 366
Page 67

Adjusting anchor points on paths
When you draw a curve with the Pen tool, you create curve points—anchor points on a
continuous, curved path. When you draw a straight line segment, or a straight line connected to a
curved segment, you create corner points—anchor points on a straight path or at the juncture of
a straight and a curved path.
By default, selected curve points appear as hollow circles, and selected corner points appear as
hollow squares.
To convert segments in a line from straight segments to curve segments or the reverse, you
convert corner points to curve points or the reverse.
You can also move, add, or delete anchor points on a path. You move anchor points using the
Subselection tool to adjust the length or angle of straight segments or the slope of curved
segments. You can nudge selected anchor points to make small adjustments.
Deleting unneeded anchor points on a curved path optimizes the curve and reduces the file size.
To move an anchor point:
Drag the point with the Subselection tool.
To nudge an anchor point or points:
Select the point or points with the Subselection tool and use the arrow keys to move the
point or points.
To convert an anchor point, do one of the following:
• To convert a corner point to a curve point, use the Subselection tool to select the point, then
Alt-drag (Windows) or Option-drag (Macintosh) the point to place the tangent handles.
• To convert a curve point to a corner point, click the point with the Pen tool.
Drawing 67
Page 68

To add an anchor point:
Click a line segment with the Pen tool.
To delete an anchor point, do one of the following:
To delete a corner point, click the point once with the Pen tool.
• To delete a curve point, click the point twice with the Pen tool. (Click once to convert the
point to a corner point, and once more to delete the point.)
• Select the point with the Subselection tool and press Delete.
Adjusting segments
You can adjust straight segments to change the angle or length of the segment, or adjust curved
segments to change the slope or direction of the curve.
When you move a tangent handle on a curve point, the curves on both sides of the point adjust.
When you move a tangent handle on a corner point, only the curve on the same side of the point
as the tangent handle adjusts.
To adjust a straight segment:
1 Select the Subselection tool, and select a straight segment.
2 Use the Subselection tool to drag an anchor point on the segment to a new position.
To adjust a curve segment:
Select the Subselection tool and drag the segment.
Note: When you click the path, anchor points are revealed. Adjusting a segment with the Subselection tool may add
points to the path.
To adjust points or tangent handles on a curve:
1 Select the Subselection tool, and select an anchor point on a curved segment.
A tangent handle appears for the point you selected.
2 To adjust the shape of the curve on either side of the anchor point, drag the anchor point, or
drag the tangent handle. Shift-drag to constrain the curve to multiples of 45°. Alt-drag
(Windows) or Option-drag (Macintosh) to drag tangent handles individually.
Chapter 368
Page 69

Painting with the Brush tool
The Brush tool draws brushlike strokes, as if you were painting. It lets you create special effects,
including calligraphic effects. You can choose a brush size and shape using the Brush tool
modifiers. On most pressure-sensitive tablets, you can vary the width of the brush stroke by
varying pressure on the stylus.
Brush size for new strokes remains constant even when you change the magnification level for the
Stage, so the same brush size appears larger when the Stage magnification is lower. For example,
suppose you set the Stage magnification to 100% and paint with the Brush tool using the smallest
brush size. Then, you change the magnification to 50% and paint again using the smallest brush
size. The new stroke that you paint appears 50% thicker than the earlier stroke. (Changing the
magnification of the Stage does not change the size of existing brush strokes.)
You can use an imported bitmap as a fill when painting with the Brush tool. See “Breaking apart
groups and objects” on page 133.
A variable-width brush stroke drawn with a stylus
To paint with the Brush tool:
1 Select the Brush tool.
2 Select Window > Properties and select a fill color in the Property inspector. See “Using the
Stroke Color and Fill Color controls in the Property inspector” on page 79.
3 Click the Brush Mode modifier and choose a painting mode:
• Paint Normal paints over lines and fills on the same layer.
• Paint Fills paints fills and empty areas, leaving lines unaffected.
• Paint Behind paints in blank areas of the Stage on the same layer, leaving lines and fills unaffected.
• Paint Selection applies a new fill to the selection when you select a fill in the Fill modifier or
the Fill box of the Property inspector. (This option is the same as simply selecting a filled area
and applying a new fill.)
• Paint Inside paints the fill in which you start a brush stroke and never paints lines. This works
much like a smart coloring book that never allows you to paint outside the lines. If you start
painting in an empty area, the fill doesn’t affect any existing filled areas.
Original image, Paint Normal, Paint Behind, Paint Selection, Paint Fills, and Paint Inside
4 Choose a brush size and brush shape from the Brush tool modifiers.
Drawing 69
Page 70

5 If a pressure-sensitive tablet is attached to your computer, you can select the Pressure modifier
to vary the width of your brush strokes by varying the pressure on your stylus.
6 Drag on the Stage. Shift-drag to constrain brush strokes to horizontal and vertical directions.
Reshaping lines and shape outlines
You can reshape lines and shape outlines created with the Pencil, Brush, Line, Oval, or Rectangle
tools by dragging with the Arrow tool, or by optimizing their curves.
You can also use the Subselection tool to display points on lines and shape outlines and modify
the lines and outlines by adjusting the points. For information on adjusting anchor points, see
“Using the Pen tool” on page 64.
To display anchor points on a line or shape outline created with the Pencil, Brush, Line, Oval,
or Rectangle tools:
1 Select the Subselection tool.
2 Click the line or shape outline.
Reshaping using the Arrow tool
To reshape a line or shape outline, you can drag on any point on a line using the Arrow tool.
The pointer changes to indicate what type of reshaping it can perform on the line or fill.
Flash adjusts the curve of the line segment to accommodate the new position of the moved
point. If the repositioned point is an end point, you can lengthen or shorten the line. If the
repositioned point is a corner, the line segments forming the corner remain straight as they
become longer or shorter.
When a corner appears next to the pointer, you can change an end point. When a curve appears next to
the pointer, you can adjust a curve.
Some brush stroke areas are easier to reshape if you view them as outlines.
If you are having trouble reshaping a complex line, you can smooth it to remove some of its
details, making reshaping easier. Increasing the magnification can also make reshaping easier and
more accurate; see “Optimizing curves” on page 72 or “Viewing the Stage” on page 19.
To reshape a line or shape outline using the Arrow tool:
1 Select the Arrow tool.
2 Do one of the following:
• Drag from any point on the segment to reshape it.
• Control-drag (Windows) or Option-drag (Macintosh) a line to create a new corner point.
Chapter 370
Page 71

Straightening and smoothing lines
You can reshape lines and shape outlines by straightening or smoothing them.
Note: You can adjust the degree of automatic smoothing and straightening by choosing preferences for drawing
settings. See “Choosing drawing settings” on page 75.
Straightening makes small straightening adjustments to lines and curves you have already drawn.
It has no effect on already straight segments.
You can also use the straightening technique to make Flash recognize shapes. If you draw any
oval, rectangular, or triangular shapes with the Recognize Shapes option turned off, you can use
the Straightening option to make the shapes geometrically perfect. (For information on the
Recognize Shapes option, see “Choosing drawing settings” on page 75.) Shapes that are touching,
and thus connected to other elements, are not recognized.
Shape recognition turns the top shapes into the bottom shapes.
Smoothing softens curves and reduces bumps or other variations in a curve’s overall direction. It
also reduces the number of segments in a curve. Smoothing is relative, however, and has no effect
on straight segments. It is particularly useful when you are having trouble reshaping a number of
very short curved line segments. Selecting all the segments and smoothing them reduces the
number of segments, producing a gentler curve that is easier to reshape.
Repeated application of smoothing or straightening makes each segment smoother or straighter,
depending on how curved or straight each segment was originally.
To smooth the curve of each selected fill outline or curved line:
Select the Arrow tool and click the Smooth modifier in the Options section of the toolbox, or
choose Modify > Smooth.
To make small straightening adjustments on each selected fill outline or curved line:
Select the Arrow tool and click the Straighten modifier in the Options section of the toolbox, or
choose Modify > Straighten.
To use shape recognition:
Select the Arrow tool and click the Straighten modifier, or choose Modify > Straighten.
Drawing 71
Page 72

Optimizing curves
Another way to smooth curves is to optimize them. This refines curved lines and fill outlines by
reducing the number of curves used to define these elements. Optimizing curves also reduces the
size of the Flash document (FLA file) and the exported Flash movie (SWF file). As with the
Smooth or Straighten modifiers or commands, you can apply optimization to the same elements
multiple times.
To optimize curves:
1 Select the drawn elements to be optimized and choose Modify > Optimize.
2 In the Optimize Curves dialog box, drag the Smoothing slider to specify the degree
of smoothing.
The exact results depend on the curves selected. Generally, optimizing produces fewer curves,
with less resemblance to the original outline.
3 Set the additional options:
• Select Use Multiple Passes to repeat the smoothing process until no further optimization can be
accomplished; this is the same as repeatedly choosing Optimize with the same elements selected.
• Select Show Totals Message to display an alert box that indicates the extent of the optimization
when smoothing is complete.
4 Click OK.
Erasing
Erasing with the Eraser tool removes strokes and fills. You can quickly erase everything on the
Stage, erase individual stroke segments or filled areas, or erase by dragging.
You can customize the Eraser tool to erase only strokes, only filled areas, or only a single filled
area. The Eraser tool can be either round or square, and it can have one of five sizes.
To quickly delete everything on the Stage:
Double-click the Eraser tool.
To remove stroke segments or filled areas:
1 Select the Eraser tool and then click the Faucet modifier.
2 Click the stroke segment or filled area that you want to delete.
To erase by dragging:
1 Select the Eraser tool.
2 Click the Eraser Mode modifier and choose an erasing mode:
• Erase Normal erases strokes and fills on the same layer.
• Erase Fills erases only fills; strokes are not affected.
• Erase Lines erases only strokes; fills are not affected.
• Erase Selected Fills erases only the currently selected fills and does not affect strokes, selected or
not. (Select the fills you want to erase before using the Eraser tool in this mode.)
Chapter 372
Page 73

• Erase Inside erases only the fill on which you begin the eraser stroke. If you begin erasing from
an empty point, nothing will be erased. Strokes are unaffected by the eraser in this mode.
3 Click the Eraser Shape modifier and choose an eraser shape and size. Make sure that the Faucet
modifier is not selected.
4 Drag on the Stage.
Modifying shapes
You can modify shapes by converting lines to fills, expanding the shape of a filled object, or
softening the edges of a filled shape by modifying the curves of the shape.
The Convert Lines to Fills feature changes lines to fills, which allows you to fill lines with
gradients or to erase a portion of a line. The Expand Shape and Soften Edges features allow you to
expand filled shapes and blur the edges of shapes.
The Expand Fill and Soften Fill Edges features work best on small shapes that do not contain
many small details. Applying Soften Edges to shapes with extensive detail can increase the file size
of a Flash document and the resulting SWF file.
To convert lines to fills:
1 Select a line or multiple lines.
2 Choose Modify > Shape > Convert Lines to Fills.
Selected lines are converted to filled shapes. Converting lines to fills can make file sizes larger,
but it can also speed up drawing for some animations.
To expand the shape of a filled object:
1 Select a filled shape. This command works best on a single filled color shape with no stroke.
2 Choose Modify > Shape > Expand Fill.
3 In the Expand Path dialog box, enter a value in pixels for Distance and select Expand or Inset
for Direction. Expand enlarges the shape, and Inset reduces it.
To soften the edges of an object:
1 Select a filled shape.
Note: This feature works best on a single filled shape that has no stroke.
2 Choose Modify > Shape > Soften Fill Edges.
3 Set the following options:
• Distance is the width in pixels of the soft edge.
• Number of Steps controls how many curves will be used for the soft edge effect. More steps
will provide a smoother effect but will also create larger files and be slower to draw.
• Expand or Inset controls whether the shape will be enlarged or reduced to soften the edges.
Drawing 73
Page 74

Snapping
To automatically align elements with one another, you can use snapping. Flash lets you align
objects by snapping to other objects or by snapping to individual pixels.
Note: You can also snap to the grid or to guides. For more information, see “Using the grid, guides, and rulers” on
page 20.
Object snapping
Object snapping can be turned on using the Snap modifier for the Arrow tool, or the Snap to
Objects command in the View menu.
If the Snap modifier for the Arrow tool is on, a small black ring appears under the pointer when
you drag an element. The small ring changes to a larger ring when the object is within snapping
distance of another object.
To turn object snapping on or off:
Choose View > Snap to Objects. A check mark is displayed next to the command when it is on.
When you move or reshape an object, the position of the Arrow tool on the object provides the
reference point for the snap ring. For example, if you move a filled shape by dragging near its
center, the center point snaps to other objects. This is particularly useful for snapping shapes to
motion paths for animating.
Note: For better control of object placement when snapping, begin dragging from a corner or center point.
To adjust object snapping tolerances:
1 Choose Edit > Preferences and click the Editing tab.
2 Under Drawing Settings, adjust the Connect Lines setting. See “Choosing drawing settings” on
page 75.
Pixel snapping
You can turn on pixel snapping using the Snap to Pixels command in the View menu. If Snap to
Pixels is on, a pixel grid appears when the view magnification is set to 400% or higher. The pixel
grid represents the individual pixels that will appear in your movie. When you create or move an
object, it is constrained to the pixel grid.
To turn pixel snapping on or off:
Choose View > Snap to Pixels.
If magnification is set to 400% or higher, a pixel grid is displayed. A check mark is displayed next
to the command when it is on.
To turn pixel snapping on or off temporarily:
Press the C key. When you release the C key, pixel snapping returns to the state you selected with
View > Snap to Pixels.
To temporarily hide the pixel grid:
Press the X key. When you release the X key, the pixel grid reappears.
Chapter 374
Page 75

Choosing drawing settings
You can set drawing settings to specify snapping, smoothing, and straightening behaviors when
you use Flash drawing tools. You can change the Tolerance setting for each option, and turn each
option off or on. Tolerance settings are relative, depending on the resolution of your computer
screen and the current magnification of the scene. By default, each option is turned on and set to
Normal tolerance.
To set drawing settings:
1 Choose Edit > Preferences and click the Editing tab.
2 Under Drawing Settings, choose from the following options:
• Connect Lines determines how close the end of a line being drawn must be to an existing line
segment before the end point snaps to the nearest point on the other line. The available
options are Must Be Close, Normal, and Can Be Distant. This setting also controls horizontal
and vertical line recognition—that is, how nearly horizontal or vertical a line must be drawn
before Flash makes it exactly horizontal or vertical. When Snap to Objects is turned on, this
setting controls how close objects must be to snap to one another.
• Smooth Curves specifies the amount of smoothing applied to curved lines drawn with the
Pencil tool when the drawing mode is set to Straighten or Smooth. (Smoother curves are easier
to reshape, while rougher curves match more closely the original line strokes.) The selections
are Off, Rough, Normal, and Smooth.
Note: You can further smooth existing curved segments using Modify > Smooth and Modify > Optimize.
• Recognize Lines defines how nearly straight a line segment drawn with the Pencil tool must be
before Flash recognizes it and makes it perfectly straight. The selections are Off, Strict,
Normal, and Tolerant. If Recognize Lines is off while you draw, you can straighten lines later
by selecting one or more line segments and choosing Modify > Straighten.
• Recognize Shapes controls how precisely you must draw circles, ovals, squares, rectangles, and
90° and 180° arcs for them to be recognized as geometric shapes and redrawn accurately. The
options are Off, Strict, Normal, and Tolerant. If Recognize Shapes is off while you draw, you
can straighten lines later by selecting one or more shapes (for example, connected line
segments) and choosing Modify > Straighten.
• Click Accuracy specifies how close to an item the pointer must be before Flash recognizes the
item. The options are Strict, Normal, and Tolerant.
Drawing 75
Page 76

Chapter 376
Page 77

CHAPTER 4
Working with Color
Macromedia Flash MX provides a variety of ways to apply, create, and modify colors. Using the
default palette or a palette you create, you can choose colors to apply to the stroke or fill of an
object you are about to create, or one already on the Stage. Applying a stroke color to a shape
paints the outline of the shape with that color. Applying a fill color to a shape paints the interior
space of the shape with that color.
When applying a stroke color to a shape, you can select any solid color, and you can select the
style and weight of the stroke. For a shape’s fill, you can apply a solid color, gradient, or bitmap.
To apply a bitmap fill to a shape, you must import a bitmap into the current file. You can also
create an outlined shape with no fill by using None as a fill, or a filled shape with no outline by
using None as an outline. And you can apply a solid color fill to text. See “Setting text attributes”
on page 139.
You can modify stroke and fill attributes in a variety of ways using the Paint Bucket, Ink
Bottle, Eyedropper, and Fill Transform tools, and the Lock Fill modifier for the Brush or
Paint Bucket tools.
With the Color Mixer you can easily create and edit solid colors and gradient fills in RGB and
HSB modes. You can import, export, delete, and otherwise modify the color palette for a file
using the Color Swatches panel. You can select colors in Hexadecimal mode in the mixer, as well
as in the Stroke and Fill pop-up windows in the toolbox or Property inspector.
Using the Stroke Color and Fill Color controls in the toolbox
The Stroke Color and Fill Color controls in the toolbox let you select a solid stroke color or a
solid or gradient fill color, switch the stroke and fill colors, or select the default stroke and fill
colors (black stroke and white fill). Oval and rectangle objects (shapes) can have both stroke and
fill colors. Text objects and brush strokes can have only fill colors. Lines drawn with the Line, Pen,
and Pencil tools can have only stroke colors.
77
Page 78

The toolbox Stroke Color and Fill Color controls set the painting attributes of new objects you
create with the drawing and painting tools. To use these controls to change the painting attributes
of existing objects, you must first select the objects on the Stage.
Stroke Color
Fill Color
Swap Stroke and Fill button
None button
Default Stroke and Fill button
Hex Edit text box
Color Picker button
Solid color swatches
Gradient swatches
Note: Gradient swatches appear only in the Fill Color control.
To apply stroke and fill colors using the toolbox controls, do one of the following:
• Click the triangle next to the Stroke or Fill color box and choose a color swatch from the
pop-up window. Gradients can be selected for the fill color only.
• Click the Color Picker button in the color pop-up window and choose a color from the
Color Picker.
• Typ e a c olo r’s hexadecimal value in the text box in the color pop-up window.
• Click the Default Fill and Stroke button in the toolbox to return to the default color settings
(white fill and black stroke).
• Click the None button in the color pop-up window to remove any stroke or fill.
Note: The None button appears only when you are creating a new oval or rectangle. You can create a new object
without a stroke or fill, but you cannot use the None button with an existing object. Instead, select the existing
stroke or fill and delete it.
• Click the Swap Fill and Stroke button in the toolbox to swap colors between the fill and the stroke.
Chapter 478
Page 79

Using the Stroke Color and Fill Color controls in the Property inspector
To change the stroke color, style, and weight for a selected object, you can use the Stroke Color
controls in the Property inspector. For stroke style, you can choose from styles that are preloaded
with Flash, or you can create a custom style.
To select a solid color fill, you can use the Fill Color control in the Property inspector.
Stroke color control
Fill color control
To select a stroke color, style, and weight using the Property inspector:
1 Select an object or objects on the Stage.
2 If the Property inspector is not visible, choose Window > Properties.
3 To select a color, click the triangle next to the Stroke color box and do one of the following:
Stroke weight
Stroke style
• Choose a color swatch from the palette.
• Typ e a c olo r’s hexadecimal value in the text box.
4 To select a stroke style, click the triangle next to the Style pop-up menu and choose an option
from the menu. To create a custom style, choose Custom from the Property inspector, then
choose options in the Stroke Style dialog box and click OK.
Note: Choosing a stroke style other than Solid can increase file size.
5 To select a stroke weight, click the triangle next to the Weight pop-up menu and set the slider
at the desired weight.
To apply a solid color fill using the Property inspector:
1 Select an object or objects on the Stage.
2 Choose Window >Properties.
3 To select a color, click the triangle next to the Fill color box and do one of the following:
• Choose a color swatch from the palette.
• Typ e a c olo r’s hexadecimal value in the text box.
Wo rk in g w i th Co lo r 79
Page 80

Working with solid colors and gradient fills in the Color Mixer
To create and edit solid colors and gradient fills, you can use the Color Mixer. If an object is
selected on the Stage, the color modifications you make in the Color Mixer are applied to
the selection.
You can create any color using the Color Mixer. You can choose colors in RGB, HSB, or expand
the panel to use hexadecimal mode. You can also specify an alpha value to define the degree of
transparency for a color. In addition, you can select a color from the existing color palette.
You can expand the Color Mixer to display a larger color space in place of the color bar, a split
color swatch showing the current and previous colors, and a Brightness control to modify color
brightness in all color modes.
Stroke Color control
Fill Color control
Fill Type
Color values
Alpha value
Default Stroke and Fill button
None button
Swap Stroke and Fill button
Color space
Brightness control
Hex Edit text box
Color sample
To create or edit a solid color with the Color Mixer:
1 To apply the color to existing artwork, select an object or objects on the Stage.
2 Choose Window > Color Mixer.
3 To select a color mode display, choose RGB (the default setting) or HSB from the pop-up
menu in the upper right corner of the Color Mixer.
4 Click the Stroke or Fill icon to specify which attribute is to be modified.
Note: Be sure to click the icon, not the color box, or the color pop-up window will open.
5 If you selected the Fill icon in step 4, verify that Solid is selected in the Fill Type pop-up menu
in the center of the Mixer.
6 Click the arrow in the lower right corner to expand the Color Mixer.
Chapter 480
Page 81

7 Do one of the following:
• Click in the color space in the Color Mixer to select a color. Drag the Brightness control to
adjust the brightness of the color.
Note: To create colors other than black or white, make sure the Brightness control is not set to either extreme.
• Enter values in the color value boxes: Red, Green, and Blue values for RGB display; Hue,
Saturation, and Brightness values for HSB display; or hexadecimal values for hexadecimal
display. Enter an Alpha value to specify the degree of transparency, from 0 for complete
transparency to 100 for complete opacity.
• Click the Default Stroke and Fill button to return to the default color settings (white fill and
black stroke).
• Click the Swap Stroke and Fill button to swap colors between the fill and the stroke.
• Click the None button to apply no color to the fill or stroke.
Note: You cannot apply a stroke or fill of None to an existing object. Instead, select the existing stroke or fill
and delete it.
• Click the Stroke or Fill color box and choose a color from the pop-up window.
8 To add the color defined in step 5 to the color swatch list for the current document, choose
Add Swatch from the pop-up menu in the upper right corner of the Color Mixer.
To create or edit a gradient fill with the Color Mixer:
1 To apply a gradient fill to existing artwork, select an object or objects on the Stage.
2 If the Color Mixer is not visible, choose Window > Color Mixer.
3 To select a color mode display, choose RGB (the default setting) or HSB.
4 Select a gradient type from the Fill Type pop-up menu in the center of the Color Mixer:
• Linear Gradient creates a gradient that shades from the starting point to the end point in a
straight line.
• Radial Gradient creates a gradient that shades from the starting point to the end point in a
circular pattern.
Wo rk in g w i th Co lo r 81
Page 82

The gradient definition bar appears in place of the color bar in the Color Mixer, with pointers
below the bar indicating each color in the gradient.
Current color
Fill type
Color values
Alpha value
Gradient definition bar
Color space
Brightness control
Gradient pointers
Hex Edit text box
Gradient sample
5 Click the arrow in the lower right corner to expand the Color Mixer.
6 To change a color in the gradient, click one of the pointers below the gradient definition bar
and click in the color space that appears directly below the gradient bar in the expanded Color
Mixer. Drag the Brightness control to adjust the lightness of the color.
7 To add a pointer to the gradient, click on or below the gradient definition bar. Select a color for
the new pointer as described in step 6.
8 To reposition a pointer on the gradient, drag the pointer along the gradient definition bar.
Drag a pointer down and off of the gradient definition bar to remove it.
9 To save the gradient, click the triangle in the upper right corner of the Color Mixer and choose
Add Swatch from the pop-up menu. The gradient is added to the Color Swatches panel for the
current document.
Modifying strokes with the Ink Bottle tool
To change the stroke color, width, and style of lines or shape outlines, you can use the Ink Bottle
tool. You can apply only solid colors, not gradients or bitmaps, to lines or shape outlines.
Using the Ink Bottle tool, rather than selecting individual lines, makes it easier to change the
stroke attributes of multiple objects at one time.
Chapter 482
Page 83

To use the Ink Bottle tool:
1 Select the Ink Bottle tool from the toolbox.
2 Choose a stroke color as described in “Using the Stroke Color and Fill Color controls in the
toolbox” on page 77.
3 Choose a stroke style and stroke width from the Property inspector. See “Using the Stroke
Color and Fill Color controls in the Property inspector” on page 79.
4 Click an object on the Stage to apply the stroke modifications.
Applying solid, gradient, and bitmap fills with the
Paint Bucket tool
The Paint Bucket tool fills enclosed areas with color. It can both fill empty areas and change the
color of already painted areas. You can paint with solid colors, gradient fills, and bitmap fills. You
can use the Paint Bucket tool to fill areas that are not entirely enclosed, and you can specify that
Flash close gaps in shape outlines when you use the Paint Bucket tool. For information on
applying a bitmap fill, see “Working with imported bitmaps” under Help > Using Flash.
The shape on the left is not fully enclosed but can still be filled. The star shape consists of individual
lines that enclose an area that can be filled.
To use the Paint Bucket tool to fill an area:
1 Select the Paint Bucket tool from the toolbox.
2 Choose a fill color and style, as described in “Using the Stroke Color and Fill Color controls in
the Property inspector” on page 79.
3 Click the Gap Size modifier and choose a gap size option:
• Choose Don’t Close Gaps if you want to close gaps manually before filling the shape. Closing
gaps manually can be faster for complex drawings.
• Choose a Close option to have Flash fill a shape that has gaps.
Note: If gaps are too large, you might have to close them manually.
4 Click the shape or enclosed area that you want to fill.
Wo rk in g w i th Co lo r 83
Page 84

Transforming gradient and bitmap fills
You can transform a gradient or bitmap fill by adjusting the size, direction, or center of the fill. To
transform a gradient or bitmap fill, you use the Fill Transform tool.
To adjust a gradient or bitmap fill with the Fill Transform tool:
1 Select the Fill Transform tool.
2 Click an area filled with a gradient or bitmap fill.
When you select a gradient or bitmap fill for editing, its center point appears, and its bounding
box is displayed with editing handles. When the pointer is over any one of these handles, it
changes to indicate the function of the handle.
Press Shift to constrain the direction of a linear gradient fill to multiples of 45°.
3 Reshape the gradient or fill in any of the following ways:
• To reposition the center point of the gradient or bitmap fill, drag the center point.
• To change the width of the gradient or bitmap fill, drag the square handle on the side of the
bounding box. (This option resizes only the fill, not the object containing the fill.)
• To change the height of the gradient or bitmap fill, drag the square handle at the bottom of the
bounding box.
Chapter 484
Page 85

• To rotate the gradient or bitmap fill, drag the circular rotation handle at the corner. You can
also drag the lowest handle on the bounding circle of a circular gradient or fill.
• To scale a linear gradient or a fill, drag the square handle at the center of the bounding box.
• To change the radius of a circular gradient, drag the middle circular handle on the bounding circle.
• To skew or slant a fill within a shape, drag one of the circular handles on the top or right side of
the bounding box.
• To tile a bitmap inside a shape, scale the fill.
Note: To see all of the handles when working with large fills or fills close to the edge of the Stage, choose
View > Work Area .
Wo rk in g w i th Co lo r 85
Page 86

Copying strokes and fills with the Eyedropper tool
You can use the Eyedropper tool to copy fill and stroke attributes from one object and
immediately apply them to another object. The Eyedropper tool also lets you sample the image
in a bitmap to use as a fill. See “Breaking apart groups and objects” on page 133.
To use the Eyedropper tool to copy and apply stroke or fill attributes:
1 Select the Eyedropper tool and click the stroke or filled area whose attributes you want to apply
to another stroke or filled area.
When you click a stroke, the tool automatically changes to the Ink Bottle tool. When you click
a filled area, the tool automatically changes to the Paint Bucket tool and the Lock Fill modifier
is turned on. See “Locking a gradient or bitmap to fill the Stage” on page 86.
2 Click another stroke or filled area to apply the new attributes.
Locking a gradient or bitmap to fill the Stage
You can lock a gradient or bitmap fill to make it appear that the fill extends over the entire Stage
and that the objects painted with the fill are masks revealing the underlying gradient or bitmap.
For information on applying a bitmap fill, see “Working with imported bitmaps” under Help >
Using Flash.
When you select the Lock Fill modifier with the Brush or Paint Bucket tool and paint with the
tool, the bitmap or gradient fill extends across the objects you paint on the Stage.
Using the Lock Fill modifier creates the appearance of a single gradient or bitmap fill being applied to
separate objects on the Stage.
To use a locked gradient fill:
1 Select the Brush or Paint Bucket tool and choose a gradient or bitmap as a fill.
2 Select a Linear Gradient or Radial Gradient from the Fill Type pop-up menu in the center of
the Color Mixer before selecting the Brush or Paint Bucket tool.
3 Click the Lock Fill modifier.
4 First paint the areas where you want to place the center of the fill, and then move to other areas.
To use a locked bitmap fill:
1 Select the bitmap you want to use.
2 Select Bitmap from the Fill Type pop-up menu in the center of the Color Mixer before
selecting the Brush or Paint Bucket tool.
3 Select the Brush or Paint Bucket tool.
4 Click the Lock Fill modifier.
5 First paint the areas where you want to place the center of the fill, and then move to other areas.
Chapter 486
Page 87

Modifying color palettes
Each Flash file contains its own color palette, stored in the Flash document. Flash displays a file’s
palette as swatches in the Fill Color and Stroke Color controls and in the Color Swatches panel.
The default color palette is the Web-safe palette of 216 colors. You can add colors to the current
color palette using the Color Mixer. See “Working with solid colors and gradient fills in the Color
Mixer” on page 80.
To import, export, and modify a file’s color palette, you use the Color Swatches panel. You can
duplicate colors, remove colors from the palette, change the default palette, reload the Web-safe
palette if you have replaced it, or sort the palette according to hue.
You can import and export both solid and gradient color palettes between Flash files, as well as
between Flash and other applications, such as Macromedia Fireworks and Adobe Photoshop.
Duplicating and removing colors
You can duplicate colors in the palette, delete individual colors, or clear all colors from the palette.
To duplicate a color or delete a color:
1 If the Color Swatches panel is not visible, choose Window > Color Swatches.
2 Click the color that you want to duplicate or delete.
3 Choose Duplicate Swatch or Delete Swatch from the pop-up menu in the upper right corner.
To clear all colors from the color palette:
In the Color Swatches panel, choose Clear Colors from the pop-up menu in the upper right
corner. All colors are removed from the palette except black and white.
Using the default palette and the Web-safe palette
You can save the current palette as the default palette, replace the current palette with the default
palette defined for the file, or load the Web-safe palette to replace the current palette.
To load or save the default palette:
In the Color Swatches panel, choose one of the following commands from the pop-up menu in
the upper right corner:
• Load Default Colors replaces the current palette with the default palette.
• Save as Default saves the current color palette as the default palette. The new default palette is
used when you create new files.
To load the Web-safe 216-color palette:
In the Color Swatches panel, choose Web 216 from the pop-up menu in the upper right corner.
Wo rk in g w i th Co lo r 87
Page 88

Sorting the palette
To make it easier to locate a color, you can sort colors in the palette by hue.
To sort colors in the palette:
1 In the Color Swatches panel, choose Sort by Color from the pop-up menu in the upper
right corner.
Importing and exporting color palettes
To import and export both RGB colors and gradients between Flash files, you use Flash Color
Set files (CLR files). You can import and export RGB color palettes using Color Table files
(ACT files) that can be used with Macromedia Fireworks and Adobe Photoshop. You can also
import color palettes, but not gradients, from GIF files. You cannot import or export gradients
from ACT files.
To import a color palette:
1 In the Color Swatches panel, choose one of the following commands from the pop-up menu in
the upper right corner:
• To append the imported colors to the current palette, choose Add Colors.
• To replace the current palette with the imported colors, choose Replace Colors.
2 Navigate to the desired file and select it.
3 Click OK.
To export a color palette:
1 In the Color Swatches panel, choose Save Colors from the pop-up menu in the upper right corner.
2 In the dialog box that appears, enter a name for the color palette.
3 For Save As Type (Windows) or Format (Macintosh), choose Flash Color Set or Color Table.
Click Save.
Chapter 488
Page 89

CHAPTER 5
Using Imported Artwork and Video
Macromedia Flash MX can use artwork created in other applications. You can import vector
graphics and bitmaps in a variety of file formats. If you have QuickTime 4 or later installed on
your system, you can import additional vector or bitmap file formats. For more information, see
“Import file formats for vector or bitmap files” on page 91. You can import FreeHand files
(version 10 or earlier) and Fireworks PNG files directly into Flash, preserving attributes from
those formats.
When you import a bitmap, you can apply compression and anti-aliasing, place the bitmap
directly in a Flash document, use the bitmap as a fill, edit the bitmap in an external editor, break
the bitmap apart into pixels and edit it in Flash, or convert the bitmap to vector artwork. See
“Working with imported bitmaps” on page 96.
You can also import video into Flash. You can import files in Macromedia Flash Video format
(FLV files) directly into Flash. For information on the FLV file format, see Chapter 21,
“Exporting,” on page 395.
If you have QuickTime 4 or later (Windows or Macintosh) or DirectX 7 or later (Windows only)
installed on your system, you can import video in MOV, AVI, or MPEG format. Additional
formats may be supported for import, depending on your system. Video clips can be imported as
linked or embedded files. You can publish movies with imported video as SWF files or
QuickTime movies. See “Importing video” on page 100.
For information on importing sound files in WAV (Windows), AIFF (Macintosh), and MP3
(both platforms) formats, see “Importing sounds” on page 109.
Placing artwork into Flash
Flash recognizes a variety of vector and bitmap formats. You can place artwork into Flash by
importing it onto the Stage in the current Flash document or into the library for the current
document. You can also import bitmaps by pasting them on the Stage in the current document.
All bitmaps that you import directly into a Flash document are automatically added to the
document’s library.
Graphic files that you import into Flash must be at least 2 pixels by 2 pixels in size.
You can load JPEG files into a movie during runtime using the
detailed information, see
loadMovie in the online ActionScript Dictionary in the Help menu.
loadMovie action or method. For
89
Page 90

Flash imports vector graphics, bitmaps, and sequences of images as follows:
• When you import vector images into Flash from FreeHand, you can choose options for
preserving FreeHand layers, pages, and text blocks. See “Importing FreeHand files” on page 93.
• When you import PNG images from Fireworks, you can import files as editable objects that
you can modify in Flash, or as flattened files that you can edit and update in Fireworks.
• You can choose options for preserving images, text, and guides. See “Importing Fireworks
PNG files” on page 92.
Note: If you import a PNG file from Fireworks by cutting and pasting, the file is converted to a bitmap.
• When you import vector images into Flash from Adobe Illustrator, you can choose options for
preserving Illustrator layers. See “Importing Adobe Illustrator files” on page 95.
• Vector images from SWF and Windows Metafile Format (WMF) files that you import directly
into a Flash document (instead of into a library) are imported as a group in the current layer.
See “Import file formats for vector or bitmap files” on page 91 and “Importing Adobe
Illustrator files” on page 95.
• Bitmaps (scanned photographs, BMP files) that you import directly into a Flash document are
imported as single objects in the current layer. Flash preserves the transparency settings of
imported bitmaps. Because importing a bitmap can increase the file size of a Flash movie (SWF
file), you may want to compress imported bitmaps. See “Setting bitmap properties” on page 97.
Note: Bitmap transparency may not be preserved when bitmaps are imported by dragging and dropping. To
preserve transparency, use the File > Import command for importing.
• Any sequence of images (for example, a PICT and BMP sequence) that you import directly
into a Flash document is imported as successive keyframes of the current layer.
For information on specific file formats, see “Import file formats for vector or bitmap files” on
page 91.
To import a file into Flash:
1 Do one of the following:
• To import a file directly into the current Flash document, choose File > Import.
• To import a file into the library for the current Flash document, choose File > Import to
Library. (To use a library item in a document, drag it onto the Stage. See Chapter 9, “Using
Symbols, Instances, and Library Assets,” on page 149.
2 In the Import dialog box, choose a file format from the Files of Type (Windows) or Show
(Macintosh) pop-up menu.
3 Navigate to the desired file and select it.
If an imported file has multiple layers, Flash may create new layers (depending on the import
file type). Any new layers will be displayed in the Timeline.
Note: If you are importing a Fireworks PNG file, see “Importing Fireworks PNG files” on page 92. If you are
importing a FreeHand file, see “Importing FreeHand files” on page 93. If you are importing an Adobe Illustrator
file, see “Importing Adobe Illustrator files” on page 95.
Chapter 590
Page 91

4 Do one of the following:
• In Windows or Macintosh OS 10 or later, click Open.
• In Macintosh OS 9.X or earlier, click Add to add the selected file to the Import list, and click
Import to import the file or files in the Import list.
5 If the name of the file you are importing ends with a number, and there are additional
sequentially numbered files in the same folder, choose whether to import the sequence of files.
• Click Yes to import all of the sequential files.
• Click No to import only the specified file.
The following are examples of filenames that can be used as a sequence:
Frame001.gif, Frame002.gif, Frame003.gif
Bird 1, Bird 2, Bird 3
Walk-001.ai, Walk-002.ai, Walk-003.ai
To paste a bitmap from another application directly into the current Flash document:
1 Copy the image in the other application.
2 In Flash, choose Edit > Paste.
Import file formats for vector or bitmap files
Flash MX can import different vector or bitmap file formats depending on whether QuickTime 4
or later is installed on your system. Using Flash with QuickTime 4 installed is especially useful for
collaborative projects in which authors work on both Windows and Macintosh platforms.
QuickTime 4 extends support for certain file formats (including Adobe Photoshop, PICT,
QuickTime Movie, and others) to both platforms.
The tables in this section list import file formats supported for vector or bitmap files. For
information on import file formats supported for video clips, see “Importing video” on page 100.
The following vector or bitmap file formats can be imported into Flash MX, regardless of whether
QuickTime 4 is installed:
File type Extension Windows Macintosh
Adobe Illustrator (version 8 or earlier; see
“Importing Adobe Illustrator files” on page 95)
AutoCAD DXF (see “AutoCAD DXF files” on
page 95)
Bitmap .bmp ✔✔
Enhanced Windows Metafile .emf ✔
FreeHand .fh7, .fh7, .fh8,
FutureSplash Player .spl ✔✔
GIF and animated GIF .gif ✔✔
JPEG .jpg ✔✔
.eps, .ai ✔✔
.dxf ✔✔
(Using QuickTime)
✔✔
.fh8, .fh9, .fh9,
.fh10
Using Imported Artwork and Video 91
Page 92

File type Extension Windows Macintosh
PICT .pct, .pic ✔
PNG .png ✔✔
Flash Player 6 .swf ✔✔
Windows Metafile .wmf ✔
The following vector or bitmap file formats can be imported into Flash MX only if QuickTime 4
or later is installed:
File type Extension Windows Macintosh
MacPaint .pntg ✔✔
Photoshop .psd ✔✔
PICT .pct, .pic ✔
QuickTime Image .qtif ✔✔
Silicon Graphics Image .sgi ✔✔
TGA .tga ✔✔
TIFF .tif ✔✔
(As bitmap)
Importing Fireworks PNG files
You can import Fireworks PNG files into Flash as flattened images or as editable objects. When
you import a PNG file as a flattened image, the entire file (including any vector artwork) is
rasterized, or converted to a bitmap image. When you import a PNG file as editable objects,
vector artwork in the file is preserved in vector format. You can choose to preserve placed bitmaps,
text, and guides in the PNG file when you import it as editable objects.
If you import the PNG file as a flattened image, you can launch Fireworks from within Flash and
edit the original PNG file (with vector data). See “Editing bitmaps in an external editor” on page 98.
When you import multiple PNG files in a batch, you choose import settings one time. Flash MX
uses the same settings for all files in the batch.
Note: You can edit bitmap images in Flash by converting the bitmap images to vector artwork or by breaking apart
the bitmap images. See “Converting bitmaps to vector graphics” on page 99 and “Breaking apart a bitmap” on
page 98.
To import a Fireworks PNG file:
1 Choose File > Import.
2 In the Import dialog box, choose PNG Image from the Files of Type (Windows) or Show
(Macintosh) pop-up menu.
3 Navigate to a Fireworks PNG image and select it.
4 Do one of the following:
• In Windows or Macintosh OS 10 or later, click Open.
• In Macintosh OS 9.X or earlier, click Add to add the selected file to the Import list, and click
Import to import the file or files in the Import list.
Chapter 592
Page 93

5 In the Fireworks PNG Import Settings dialog box, select one of the following for File
Structure:
• Select Import as Movie Clip and Retain Layers to import the PNG file as a movie clip, with all
of its frames and layers intact inside the movie clip symbol.
• Select Import into New Layer in Current Scene to import the PNG file into the current Flash
document in a single new layer at the top of the stacking order. The Fireworks layers are
flattened into the single layer. The Fireworks frames are contained in the new layer.
6 For Objects, select one of the following:
• Select Rasterize if Necessary to Maintain Appearance to preserve Fireworks fills, strokes, and
effects in Flash.
• Select Keep All Paths Editable to keep all objects as editable vector paths. Some Fireworks fills,
strokes, and effects will be lost on import.
7 For Text, select one of the following:
• Select Rasterize if Necessary to Maintain Appearance to preserve Fireworks fills, strokes, and
effects in text imported into Flash.
• Select Keep All Paths Editable to keep all text editable. Some Fireworks fills, strokes, and effects
will be lost on import.
8 Select Import as a Single Flattened Image to flatten the PNG file into a single bitmap image.
When this option is selected, all other options are dimmed.
9 Click OK.
Importing FreeHand files
You can import FreeHand files (version 10 or earlier) directly into Flash. FreeHand is the best
choice for creating vector graphics for import into Flash, because you can preserve FreeHand
layers, text blocks, library symbols, and pages, and choose a page range to import. If the imported
FreeHand file is in CMYK color mode, Flash converts the file to RGB.
Keep the following guidelines in mind when importing FreeHand files:
• When importing a file with overlapping objects that you want to preserve as separate objects,
place the objects on separate layers in FreeHand, and choose Layers in the FreeHand Import
dialog box in Flash when importing the file. (If overlapping objects on a single layer are
imported into Flash, the overlapping shapes will be divided at intersection points, just as with
overlapping objects that you create in Flash.)
• When you import files with gradient fills, Flash can support up to eight colors in a gradient fill.
If a FreeHand file contains a gradient fill with more than eight colors, Flash creates clipping
paths to simulate the appearance of a gradient fill. Clipping paths can increase file size. To
minimize file size, use gradient fills with eight colors or fewer in FreeHand.
• When you import files with blends, Flash imports each step in a blend as a separate path. Thus,
the more steps a blend has in a FreeHand file, the larger the imported file size will be in Flash.
• When you import files with strokes that have square caps, Flash converts the caps to round caps.
• When you import files with placed grayscale images, Flash converts the grayscale images to
RGB images. This conversion can increase the imported file’s size.
Using Imported Artwork and Video 93
Page 94

• When importing files with placed EPS images, you must select the Convert Editable EPS
when Imported option in FreeHand Import Preferences before you place the EPS into
FreeHand. If you do not select this option, the EPS image will not be viewable when imported
into Flash. In addition, Flash does not display information for an imported EPS image
(regardless of the Preferences settings used in FreeHand).
To import a FreeHand file:
1 Choose File > Import.
2 In the Import dialog box, choose FreeHand from the Files of Type (Windows) or Show
(Macintosh) pop-up menu.
3 Navigate to a FreeHand file and select it.
4 Do one of the following:
• In Windows or Macintosh OS 10 or later, click Open.
• In Macintosh OS 9.X or earlier, click Add to add the selected file to the Import list, and click
Import to import the file or files in the Import list.
5 In the FreeHand Import Settings dialog box, for Mapping Pages, choose a setting:
• Scenes converts each page in the FreeHand document to a scene in the Flash document.
• Keyframes converts each page in the FreeHand document to a keyframe in the Flash document.
6 For Mapping Layers, select one of the following:
• Layers converts each layer in the FreeHand document to a layer in the Flash document.
• Keyframes converts each layer in the FreeHand document to a keyframe in the Flash
document.
• Flatten converts all layers in the FreeHand document to a single flattened layer in the
Flash document.
7 For Pages, do one of the following:
• Choose All to import all pages from the FreeHand document.
• Enter page numbers for From and To to import a page range from the FreeHand document.
8 For Options, choose any of the following options:
• Include Invisible Layers imports all layers (visible and hidden) from the FreeHand document.
• Include Background Layer imports the background layer with the FreeHand document.
• Maintain Text Blocks preserves text in the FreeHand document as editable text in the
Flash document.
9 Click OK.
Chapter 594
Page 95

Importing Adobe Illustrator files
Flash can import and export Adobe Illustrator files in version 8.0 format or earlier. (For
information on exporting Illustrator files, see “Adobe Illustrator” on page 397.) When you import
an Illustrator file into Flash, you must ungroup all the Illustrator objects on all layers. Once all the
objects are ungrouped, they can be manipulated like any other Flash object.
To import an Adobe Illustrator file:
1 Choose File > Import.
2 In the Import dialog box, choose Adobe Illustrator from the Files of Type (Windows) or Show
(Macintosh) pop-up menu.
3 Navigate to an Illustrator file and select it.
4 Do one of the following:
• In Windows or Macintosh OS 10 or later, click Open.
• In Macintosh OS 9.X or earlier, click Add to add the selected file to the Import list, then click
Import to import the file in the Import list.
The Illustrator Import Settings dialog box appears.
5 For Convert Layers, select one of the following:
• Layers converts each layer in the Illustrator document to a layer in the Flash document.
• Keyframes converts each layer in the Illustrator document to a keyframe in the Flash document.
• Flatten converts all layers in the Illustrator document to a single flattened layer in the Flash
document.
6 Choose Include Invisible Layers to import all layers (visible and hidden) from the
Illustrator document.
7 Click OK.
AutoCAD DXF files
Flash supports the AutoCAD DXF format in the release 10 version.
DXF files do not support the standard system fonts. Flash tries to map fonts appropriately, but
the results can be unpredictable, particularly for the alignment of text.
Since the DXF format does not support solid fills, filled areas are exported as outlines only. For
this reason, the DXF format is most appropriate for line drawings, such as floor plans and maps.
You can import two-dimensional DXF files into Flash. Flash does not support three-dimensional
DXF files.
Although Flash doesn’t support scaling in a DXF file, all imported DXF files produce 12-inch x
12-inch movies that you can scale using the Modify > Transform > Scale command. Also, Flash
supports only ASCII DXF files. If your DXF files are binary, you must convert them to ASCII
before importing them into Flash.
Using Imported Artwork and Video 95
Page 96

Working with imported bitmaps
When you import a bitmap into Flash, you can modify that bitmap and use it in your Flash
movie in a variety of ways. You can apply compression and anti-aliasing to imported bitmaps to
control the size and appearance of bitmaps in movies. See “Setting bitmap properties” on page 97.
You can apply an imported bitmap as a fill to an object. See “Applying a bitmap fill” on page 97.
Flash lets you break apart a bitmap into editable pixels. The bitmap retains its original detail but
is broken into discrete areas of color. When you break a bitmap apart, you can select and modify
areas of the bitmap with the Flash drawing and painting tools. Breaking apart a bitmap also lets
you sample the bitmap with the Eyedropper tool to use it as a fill. See “Breaking apart a bitmap”
on page 98.
You can edit an imported bitmap in Fireworks or another external image editor by launching the
editing application from within Flash. See“Editing bitmaps in an external editor” on page 98. To
convert a bitmap’s image to a vector graphic, you can trace the bitmap. Performing this
conversion enables you to modify the graphic as you do other vector artwork in Flash. See
“Converting bitmaps to vector graphics” on page 99.
If a Flash movie displays an imported bitmap at a larger size than the original, the image may be
distorted. Preview imported bitmaps to be sure that images are displayed properly.
Using the Property inspector to work with bitmaps
When you select a bitmap on the Stage, the Property inspector displays the bitmap’s symbol name
and its pixel dimensions and position on the Stage. Using the Property inspector, you can assign a
new name to the bitmap, and you can swap an instance of a bitmap—that is, replace the instance
with an instance of another bitmap in the current document.
To display the Property inspector:
1 Select an instance of a bitmap on the Stage.
2 Choose Window > Properties.
To assign a new name to a bitmap:
1 Select the bitmap in the Library panel.
2 Choose Window > Properties if the Property inspector is not visible. Select an instance of the
bitmap on the Stage to view the bitmap properties.
3 In the Property inspector, enter a new name in the Name text box.
4 Click OK.
To replace an instance of a bitmap with an instance of another bitmap:
1 Select a bitmap instance on the Stage.
2 Choose Window > Properties if the Property inspector is not visible.
3 In the Property inspector, click Swap.
4 In the Swap Bitmap dialog box, select a bitmap to replace the one currently assigned to the instance.
Chapter 596
Page 97

Setting bitmap properties
You can apply anti-aliasing to an imported bitmap to smooth the edges in the image. You can also
sele ct a compre ssion opti on to redu ce the bitmap f ile size and format the fil e for display o n the Web.
To select bitmap properties, you use the Bitmap Properties dialog box.
To set bitmap properties:
1 Select a bitmap in the Library panel.
2 Do one of the following:
• Click the properties icon at the bottom of the Library panel.
• Right-click (Windows) or Control-click (Macintosh) the bitmap’s icon and choose Properties
from the context menu.
• Choose Properties from the options menu in the upper right corner of the Library panel.
3 In the Bitmap Properties dialog box, select Allow Smoothing to smooth the edges of the
bitmap with anti-aliasing.
4 For Compression, choose one of the following options:
• Choose Photo (JPEG) to compress the image in JPEG format. To use the default compression
quality specified for the imported image, select Use Document Default Quality. To specify a
new quality compression setting, deselect Use Document Default Quality and enter a value
between 1 and 100 in the Quality text box. (A higher setting preserves greater image integrity
but yields a larger file size.)
• Choose Lossless (PNG/GIF) to compress the image with lossless compression, in which no
data is discarded from the image.
Note: Use Photo compression for images with complex color or tonal variations, such as photographs or images
with gradient fills. Use Lossless compression for images with simple shapes and relatively few colors.
5 Click Test to determine the results of the file compression. Compare the original file size to the
compressed file size to determine if the selected compression setting is acceptable.
6 Click OK.
Note: JPE G Quality setti ng s that you selec t in the Publis h Setting s dialo g box do not spec ify a quali ty setting for
im po rted JP EG file s. You mu st s pec if y a quality s ettin g for impor ted JPE G files in th e Bitma p Prop ertie s dialo g bo x.
Applying a bitmap fill
You can apply a bitmap as a fill to a graphic object using the Color Mixer. Applying a bitmap as a
fill tiles the bitmap to fill the object. The Fill Transform tool allows you to scale, rotate, or skew
an image and its bitmap fill. See “Transforming gradient and bitmap fills” on page 84.
To apply a bitmap as a fill using the Color Mixer:
1 To apply the fill to existing artwork, select a graphic object or objects on the Stage.
2 Choose Window > Color Mixer.
3 In the Color Mixer, choose Bitmap from the pop-up menu in the center of the panel.
Using Imported Artwork and Video 97
Page 98

4 If you need a larger preview window to display more bitmaps in the current document, click
the arrow in the lower right corner to expand the Color Mixer.
5 Click a bitmap to select it.
The bitmap becomes the current fill color. If you selected artwork in step 1, the bitmap is
applied as a fill to the artwork.
Editing bitmaps in an external editor
If you have Fireworks 3 or later or another image-editing application installed on your system,
you can launch the application from within Flash to edit an imported bitmap.
If you are editing a Fireworks PNG file imported as a flattened image, you can choose to edit the
PNG source file for the bitmap, when available.
Note: You cannot edit bitmaps from Fireworks PNG files imported as editable objects in an external image editor.
To edit a bitmap with Fireworks 3 or later:
1 In the Library panel, right-click (Windows) or Control-click (Macintosh) the bitmap’s icon.
2 In the bitmap’s context menu, select Edit with Fireworks 3.
3 In the Edit Image dialog box, specify whether the PNG source file or the bitmap file is
to be opened.
4 Perform the desired modifications to the file in Fireworks.
5 Choose File > Update.
The file is automatically updated in Flash.
To edit a bitmap with another external editing application:
1 In the Library panel, right-click (Windows) or Control-click (Macintosh) the bitmap’s icon.
2 In the bitmap’s context menu, select Edit With.
3 Choose an image-editing application to open the bitmap file, and click OK.
4 Perform the desired modifications to the file in the image-editing application.
5 Save the file in the image-editing application.
The file is automatically updated in Flash.
6 Return to Flash to continue editing the document.
Breaking apart a bitmap
Breaking apart a bitmap separates the pixels in the image into discrete areas that can be selected
and modified separately. When you break apart a bitmap, you can modify the bitmap with the
Flash drawing and painting tools. Using the Lasso tool with the Magic Wand modifier, you can
select areas of a bitmap that has been broken apart.
You can paint with a broken-apart bitmap by selecting the bitmap with the Eyedropper tool and
applying the bitmap as a fill with the Paint Bucket tool or another drawing tool.
Chapter 598
Page 99

To break apart a bitmap:
1 Select a bitmap in the current scene.
2 Choose Modify > Break Apart.
To change the fill of selected areas of a broken-apart bitmap:
1 Select the Lasso tool and click the Magic Wand modifier.
2 Click the Magic Wand Settings modifier and set the following options:
• For Threshold, enter a value between 1 and 200 to define how closely the color of adjacent
pixels must match to be included in the selection. A higher number includes a broader range of
colors. If you enter 0, only pixels of the exact same color as the first pixel you click are selected.
• For Smoothing, select an option from the pop-up menu to define how much the edges of the
selection will be smoothed.
3 Click the bitmap to select an area. Continue clicking to add to the selection.
4 Select the fill that you want to use to fill the selected areas in the bitmap. See “Using the Stroke
Color and Fill Color controls in the toolbox” on page 77.
5 Select the Paint Bucket tool and click anywhere in the selected area to apply the new fill.
To apply a broken-apart bitmap as a fill using the Eyedropper tool:
1 Select the Eyedropper tool and click the broken-apart bitmap on the Stage.
The Eyedropper tool sets the bitmap to be the current fill and changes the active tool to the
Paint Bucket.
2 Do one of the following:
• Click an existing graphic object with the Paint Bucket tool to apply the bitmap as a fill.
• Select the Oval, Rectangle, or Pen tool and draw a new object. The object is filled with the
broken-apart bitmap.
You can use the Paint Bucket tool to scale, rotate, or skew the bitmap fill.
Converting bitmaps to vector graphics
The Trace Bitmap command converts a bitmap into a vector graphic with editable, discrete areas
of color. This command lets you manipulate the image as a vector graphic; it is also useful if you
wish to reduce file size.
When you convert a bitmap to a vector graphic, the vector graphic is no longer linked to the
bitmap symbol in the Library panel.
Note: If the imported bitmap contains complex shapes and many colors, the converted vector graphic may have a
larger file size than the original bitmap. Try a variety of settings in the Trace Bitmap dialog box to find a balance
between file size and image quality.
You can also break apart a bitmap in order to modify the image using Flash drawing and painting
tools. See “Breaking apart a bitmap” on page 98.
Using Imported Artwork and Video 99
Page 100

To convert a bitmap to a vector graphic:
1 Select a bitmap in the current scene.
2 Choose Modify > Trace Bitmap.
3 Enter a Color Threshold value between 1 and 500.
When two pixels are compared, if the difference in the RGB color values is less than the color
threshold, the two pixels are considered the same color. As you increase the threshold value,
you decrease the number of colors.
4 For Minimum Area, enter a value between 1 and 1000 to set the number of surrounding pixels
to consider when assigning a color to a pixel.
5 For Curve Fit, select an option from the pop-up menu to determine how smoothly outlines are
drawn.
6 For Corner Threshold, select an option from the pop-up menu to determine whether sharp
edges are retained or smoothed out.
To create a vector graphic that looks most like the original bitmap, enter the following values:
• Color Threshold: 10
• Minimum Area: 1 pixel
• Curve Fit: Pixels
• Corner Threshold: Many Corners
The results of using the Trace Bitmap command, with low settings (more like the original image)
and higher settings (more distorted)
Importing video
You can import video clips into Flash. Depending on the video format and the import method
you choose, you can publish the movie with video as a Flash movie (SWF file) or a QuickTime
movie (MOV file).
If you have QuickTime 4 or later (Windows or Macintosh) or DirectX 7 or later (Windows only)
installed on your system, you can import video clips in a variety of file formats, including MOV
(QuickTime movie), AVI (Audio Video Interleaved file), and MPG/MPEG (Motion Picture
Experts Group file). For information on supported file formats, see “Video import file formats”
on page 101.
You can import video clips as embedded files or linked files. See “Importing video clips as
embedded files” on page 103 and “Importing QuickTime video clips as linked files” on page 105.
Chapter 5100
 Loading...