

Page 1

macromedia
FIREWORKS®2
Using Fireworks
®
macromedia
™
Page 2

Licenses and Trademarks
Fireworks was created by Macromedia, Inc. © 1999. All rights reserved. Apple, the Apple Logo, Macintosh, Power Macintosh, Mac OS, and LaserWriter
are registered trademarks of Apple Computer, Inc. Java and all Java-based trademarks and logos are trademarks or registered trademarks of Sun
Microsystems, Inc. in the U.S. and other countries. GIF-LZW licensed under U.S. Patent No. 4,558,302 and foreign counterparts. This software is based in
part on the work of the Independent JPEG Group. The Graphics Interchange Format is Copyright © CompuServe Incorporated. GIF is a Service Mark
and the property of CompuServe Incorporated. Portions Copyright © 1988–1992 Sam Leffler. Portions Copyright © 1991, 1992 Silicon Graphics.
Photographs used in “Optimizing JPEGs” and “Creating Slices” tutorials are Copyright © 1994 PhotoDisc, Inc.
Fireworks and Microsoft Windows
FIREWORKS OPERATES IN A GRAPHICS ENVIRONMENT CALLED MICROSOFT WINDOWS, CREATED BY MICROSOFT
CORPORATION. AN EXTENSION OF THE MS-DOS OPERATING SYSTEM, MICROSOFT WINDOWS GIVES A STANDARD
LOOK AND FEEL TO FIREWORKS AND ALL OTHER WINDOWS APPLICATIONS. TO RUN FIREWORKS UNDER
MICROSOFT WINDOWS, YOU NEED TO LICENSE AND INSTALL MICROSOFT WINDOWS.
Fireworks and the Apple Macintosh
SYSTEM UTILITIES AND TOOLS ARE COPYRIGHTED PROGRAMS OF APPLE COMPUTER, INC., LICENSED TO
MACROMEDIA, INC. TO DISTRIBUTE FOR USE ONLY IN COMBINATION WITH FIREWORKS. APPLE SOFTWARE SHALL
NOT BE COPIED ONTO ANOTHER DISK (EXCEPT FOR ARCHIVAL PURPOSES) OR INTO MEMORY UNLESS AS PART OF
THE EXECUTION OF FIREWORKS. WHEN FIREWORKS HAS COMPLETED EXECUTION, APPLE SOFTWARE SHALL NOT
BE USED BY ANY OTHER PROGRAM. APPLE COMPUTER, INC., MAKES NO WARRANTIES, EITHER EXPRESS OR IMPLIED,
REGARDING THE ENCLOSED COMPUTER SOFTWARE PACKAGE, ITS MERCHANTABILITY, OR ITS FITNESS FOR ANY
PARTICULAR PURPOSE. THE EXCLUSION OF IMPLIED WARRANTIES IS NOT PERMITTED BY SOME STATES. THE ABOVE
EXCLUSION MAY NOT APPLY TO YOU. THIS WARRANTY PROVIDES YOU WITH SPECIFIC LEGAL RIGHTS. THERE MAY
BE OTHER RIGHTS THAT YOU HAVE WHICH VARY FROM STATE TO STATE.
U.S. Patents 5,353,396, 5,361,333, 5,434,959, 5,467,443, 5,500,927, 5,594,855 and 5,623,593. Other patents pending.
Macromedia, the Macromedia logo, Authorware, Director, Dreamweaver, Fireworks, Flash, Fontographer, FreeHand, FreeHand Graphics Studio,
Macromedia xRes, Shockwave, and Xtra are trademarks or registered trademarks of Macromedia, Inc. Other product names mentioned within this
publication may be trademarks of Macromedia, Inc. or other entities.
Copyright © 1999 Macromedia, Inc. All rights reserved. This manual may not be copied, photocopied, reproduced, translated, or converted to any electronic
or machine-readable form in whole or in part without prior written approval of Macromedia, Inc.
Macromedia, Inc.
600 Townsend St.
San Francisco, CA 94103
Acknowledgments
Written by Randy Varnell and Rocky Angelucci.
Edited by Monte Williams and Stuart Manning.
Project management by Monte Williams.
Production by Stuart Manning and Rocky Angelucci.
Special thanks to Doug Benson, Dennis Griffin, David Morris, and Mark Haynes.
2
Page 3

CONTENTS
CHAPTER 1
Getting Your Bearings. . . . . . . . . . . . . . . . . . . . . . . . . . . 9
What’s in this package. . . . . . . . . . . . . . . . . . . . . . . . . . . . . . . . . . . . . . . . . . . . . . . . . . . . . . . . . . .10
System requirements . . . . . . . . . . . . . . . . . . . . . . . . . . . . . . . . . . . . . . . . . . . . . . . . . . . . . . . . . . . . 10
Windows: . . . . . . . . . . . . . . . . . . . . . . . . . . . . . . . . . . . . . . . . . . . . . . . . . . . . . . . . . . . . . . . . . 10
Macintosh:. . . . . . . . . . . . . . . . . . . . . . . . . . . . . . . . . . . . . . . . . . . . . . . . . . . . . . . . . . . . . . . . .10
Installing and starting Fireworks . . . . . . . . . . . . . . . . . . . . . . . . . . . . . . . . . . . . . . . . . . . . . . . . 11
Uninstalling Fireworks. . . . . . . . . . . . . . . . . . . . . . . . . . . . . . . . . . . . . . . . . . . . . . . . . . . . . . . . . . 12
Resources for learning Fireworks . . . . . . . . . . . . . . . . . . . . . . . . . . . . . . . . . . . . . . . . . . . . . . . .12
What’s unique about Fireworks? . . . . . . . . . . . . . . . . . . . . . . . . . . . . . . . . . . . . . . . . . . . . . . . . 13
Welcome to Fireworks . . . . . . . . . . . . . . . . . . . . . . . . . . . . . . . . . . . . . . . . . . . . . . . . . . . . . . . . . .14
What is Fireworks? . . . . . . . . . . . . . . . . . . . . . . . . . . . . . . . . . . . . . . . . . . . . . . . . . . . . . . . .14
Using the document window. . . . . . . . . . . . . . . . . . . . . . . . . . . . . . . . . . . . . . . . . . . . . . . . . . . .15
View Controls toolbar . . . . . . . . . . . . . . . . . . . . . . . . . . . . . . . . . . . . . . . . . . . . . . . . . . . . .21
Using the toolbars. . . . . . . . . . . . . . . . . . . . . . . . . . . . . . . . . . . . . . . . . . . . . . . . . . . . . . . . . . 21
Navigating and viewing the document . . . . . . . . . . . . . . . . . . . . . . . . . . . . . . . . . . . . . . . . . .32
Setting document magnification . . . . . . . . . . . . . . . . . . . . . . . . . . . . . . . . . . . . . . . . . . .32
Shortcut menus. . . . . . . . . . . . . . . . . . . . . . . . . . . . . . . . . . . . . . . . . . . . . . . . . . . . . . . . . . . .33
Multiple document views. . . . . . . . . . . . . . . . . . . . . . . . . . . . . . . . . . . . . . . . . . . . . . . . . .33
Optimizing document redraw. . . . . . . . . . . . . . . . . . . . . . . . . . . . . . . . . . . . . . . . . . . . . .34
A Case Study: With and Without Fireworks . . . . . . . . . . . . . . . . . . . . . . . . . . . . . . . . . . .34
The Fireworks way. . . . . . . . . . . . . . . . . . . . . . . . . . . . . . . . . . . . . . . . . . . . . . . . . . . . . . . . .35
Setting up your document. . . . . . . . . . . . . . . . . . . . . . . . . . . . . . . . . . . . . . . . . . . . . . . . . . . . . . .37
Importing and Exporting. . . . . . . . . . . . . . . . . . . . . . . . . . . . . . . . . . . . . . . . . . . . . . . . . . . . . . . 40
Importing bitmap images . . . . . . . . . . . . . . . . . . . . . . . . . . . . . . . . . . . . . . . . . . . . . . . . . 40
Importing vector art. . . . . . . . . . . . . . . . . . . . . . . . . . . . . . . . . . . . . . . . . . . . . . . . . . . . . . . 40
Exporting . . . . . . . . . . . . . . . . . . . . . . . . . . . . . . . . . . . . . . . . . . . . . . . . . . . . . . . . . . . . . . . . . .41
Contents
3
Page 4

CHAPTER 2
Creating and Editing a Graphic . . . . . . . . . . . . . . . . . .43
Object mode and image edit mode. . . . . . . . . . . . . . . . . . . . . . . . . . . . . . . . . . . . . . . . . . . . . . 44
Fireworks drawing and editing tools. . . . . . . . . . . . . . . . . . . . . . . . . . . . . . . . . . . . . . . 44
Editing path objects . . . . . . . . . . . . . . . . . . . . . . . . . . . . . . . . . . . . . . . . . . . . . . . . . . . . . . . . . . . . .45
Using path operations to reshape paths . . . . . . . . . . . . . . . . . . . . . . . . . . . . . . . . . . . . 48
Drawing in object mode . . . . . . . . . . . . . . . . . . . . . . . . . . . . . . . . . . . . . . . . . . . . . . . . . . 48
Editing in object mode . . . . . . . . . . . . . . . . . . . . . . . . . . . . . . . . . . . . . . . . . . . . . . . . . . . . .50
Image edit mode basics . . . . . . . . . . . . . . . . . . . . . . . . . . . . . . . . . . . . . . . . . . . . . . . . . . . . . . . . . .52
Switching to image edit mode. . . . . . . . . . . . . . . . . . . . . . . . . . . . . . . . . . . . . . . . . . . . . .52
Converting an object to an image. . . . . . . . . . . . . . . . . . . . . . . . . . . . . . . . . . . . . . . . . . .54
Using Xtras . . . . . . . . . . . . . . . . . . . . . . . . . . . . . . . . . . . . . . . . . . . . . . . . . . . . . . . . . . . . . . . .54
Transforming and distorting objects . . . . . . . . . . . . . . . . . . . . . . . . . . . . . . . . . . . . . . . .54
Using color. . . . . . . . . . . . . . . . . . . . . . . . . . . . . . . . . . . . . . . . . . . . . . . . . . . . . . . . . . . . . . . . . . . . . .55
Using the Color Mixer . . . . . . . . . . . . . . . . . . . . . . . . . . . . . . . . . . . . . . . . . . . . . . . . . . . . 56
Using the Swatches panel . . . . . . . . . . . . . . . . . . . . . . . . . . . . . . . . . . . . . . . . . . . . . . . . . .57
System color pickers. . . . . . . . . . . . . . . . . . . . . . . . . . . . . . . . . . . . . . . . . . . . . . . . . . . . . . . .58
Using color wells. . . . . . . . . . . . . . . . . . . . . . . . . . . . . . . . . . . . . . . . . . . . . . . . . . . . . . . . . . .58
Applying strokes and fills. . . . . . . . . . . . . . . . . . . . . . . . . . . . . . . . . . . . . . . . . . . . . . . . . . . . . . . .59
The Stroke panel. . . . . . . . . . . . . . . . . . . . . . . . . . . . . . . . . . . . . . . . . . . . . . . . . . . . . . . . . . 60
The Fill panel. . . . . . . . . . . . . . . . . . . . . . . . . . . . . . . . . . . . . . . . . . . . . . . . . . . . . . . . . . . . . .61
Using styles . . . . . . . . . . . . . . . . . . . . . . . . . . . . . . . . . . . . . . . . . . . . . . . . . . . . . . . . . . . . . . . .63
Adding texture. . . . . . . . . . . . . . . . . . . . . . . . . . . . . . . . . . . . . . . . . . . . . . . . . . . . . . . . . . . . 64
Applying effects to objects . . . . . . . . . . . . . . . . . . . . . . . . . . . . . . . . . . . . . . . . . . . . . . . . . . . . . . .65
Live Effects . . . . . . . . . . . . . . . . . . . . . . . . . . . . . . . . . . . . . . . . . . . . . . . . . . . . . . . . . . . . . . . .65
Using Xtras . . . . . . . . . . . . . . . . . . . . . . . . . . . . . . . . . . . . . . . . . . . . . . . . . . . . . . . . . . . . . . . 67
Using text . . . . . . . . . . . . . . . . . . . . . . . . . . . . . . . . . . . . . . . . . . . . . . . . . . . . . . . . . . . . . . . . . . . . . . 67
Using the Text Editor . . . . . . . . . . . . . . . . . . . . . . . . . . . . . . . . . . . . . . . . . . . . . . . . . . . . . 68
Attaching text to a path . . . . . . . . . . . . . . . . . . . . . . . . . . . . . . . . . . . . . . . . . . . . . . . . . . . 69
Controlling document size and resolution . . . . . . . . . . . . . . . . . . . . . . . . . . . . . . . . . .70
Resampling . . . . . . . . . . . . . . . . . . . . . . . . . . . . . . . . . . . . . . . . . . . . . . . . . . . . . . . . . . . . . . . .70
Organizing your document. . . . . . . . . . . . . . . . . . . . . . . . . . . . . . . . . . . . . . . . . . . . . . . . . . . . . . 71
Grouping objects. . . . . . . . . . . . . . . . . . . . . . . . . . . . . . . . . . . . . . . . . . . . . . . . . . . . . . . . . . . 71
Arranging objects on a layer . . . . . . . . . . . . . . . . . . . . . . . . . . . . . . . . . . . . . . . . . . . . . . . .72
Using layers. . . . . . . . . . . . . . . . . . . . . . . . . . . . . . . . . . . . . . . . . . . . . . . . . . . . . . . . . . . . . . . .72
Using frames. . . . . . . . . . . . . . . . . . . . . . . . . . . . . . . . . . . . . . . . . . . . . . . . . . . . . . . . . . . . . . . 74
4
Contents
Page 5

Find and Replace. . . . . . . . . . . . . . . . . . . . . . . . . . . . . . . . . . . . . . . . . . . . . . . . . . . . . . . . . . . . . . . . 74
Finding and replacing text. . . . . . . . . . . . . . . . . . . . . . . . . . . . . . . . . . . . . . . . . . . . . . . . . .76
Finding and replacing fonts . . . . . . . . . . . . . . . . . . . . . . . . . . . . . . . . . . . . . . . . . . . . . . . .77
Finding and Replacing colors. . . . . . . . . . . . . . . . . . . . . . . . . . . . . . . . . . . . . . . . . . . . . . .77
Finding and Replacing URLs. . . . . . . . . . . . . . . . . . . . . . . . . . . . . . . . . . . . . . . . . . . . . .78
Symbols and instances. . . . . . . . . . . . . . . . . . . . . . . . . . . . . . . . . . . . . . . . . . . . . . . . . . . . . . . . . . .78
Creating a symbol. . . . . . . . . . . . . . . . . . . . . . . . . . . . . . . . . . . . . . . . . . . . . . . . . . . . . . . . . .78
Creating an instance . . . . . . . . . . . . . . . . . . . . . . . . . . . . . . . . . . . . . . . . . . . . . . . . . . . . . . .79
Modifying a symbol. . . . . . . . . . . . . . . . . . . . . . . . . . . . . . . . . . . . . . . . . . . . . . . . . . . . . . . .79
Modifying an instance . . . . . . . . . . . . . . . . . . . . . . . . . . . . . . . . . . . . . . . . . . . . . . . . . . . . .79
Working with symbols and instances . . . . . . . . . . . . . . . . . . . . . . . . . . . . . . . . . . . . . .79
Tweening . . . . . . . . . . . . . . . . . . . . . . . . . . . . . . . . . . . . . . . . . . . . . . . . . . . . . . . . . . . . . . . . . .80
Compositing . . . . . . . . . . . . . . . . . . . . . . . . . . . . . . . . . . . . . . . . . . . . . . . . . . . . . . . . . . . . . . . . . . . . 81
Using the Object inspector . . . . . . . . . . . . . . . . . . . . . . . . . . . . . . . . . . . . . . . . . . . . . . . . .81
Using blending modes . . . . . . . . . . . . . . . . . . . . . . . . . . . . . . . . . . . . . . . . . . . . . . . . . . . . . 81
Masking . . . . . . . . . . . . . . . . . . . . . . . . . . . . . . . . . . . . . . . . . . . . . . . . . . . . . . . . . . . . . . . . . . .83
CHAPTER 3
Importing and Exporting . . . . . . . . . . . . . . . . . . . . . . . . 85
Fireworks in the workflow . . . . . . . . . . . . . . . . . . . . . . . . . . . . . . . . . . . . . . . . . . . . . . . . . . . . . 86
Importing . . . . . . . . . . . . . . . . . . . . . . . . . . . . . . . . . . . . . . . . . . . . . . . . . . . . . . . . . . . . . . . . . . . . . . 86
Import File dialog box. . . . . . . . . . . . . . . . . . . . . . . . . . . . . . . . . . . . . . . . . . . . . . . . . . . . . 86
Drag and drop . . . . . . . . . . . . . . . . . . . . . . . . . . . . . . . . . . . . . . . . . . . . . . . . . . . . . . . . . . . . .87
Copy and paste. . . . . . . . . . . . . . . . . . . . . . . . . . . . . . . . . . . . . . . . . . . . . . . . . . . . . . . . . . . . .87
Importing text . . . . . . . . . . . . . . . . . . . . . . . . . . . . . . . . . . . . . . . . . . . . . . . . . . . . . . . . . . . . .88
Importing Fireworks files . . . . . . . . . . . . . . . . . . . . . . . . . . . . . . . . . . . . . . . . . . . . . . . . . .88
Importing FreeHand, Illustrator, or CorelDRAW files . . . . . . . . . . . . . . . . . . . . 89
Importing animated GIFs. . . . . . . . . . . . . . . . . . . . . . . . . . . . . . . . . . . . . . . . . . . . . . . . . 90
Importing from a scanner or digital camera. . . . . . . . . . . . . . . . . . . . . . . . . . . . . . . . 90
Exporting . . . . . . . . . . . . . . . . . . . . . . . . . . . . . . . . . . . . . . . . . . . . . . . . . . . . . . . . . . . . . . . . . . . . . . . 91
Using Export Preview. . . . . . . . . . . . . . . . . . . . . . . . . . . . . . . . . . . . . . . . . . . . . . . . . . . . . . . . . . .93
Preview area . . . . . . . . . . . . . . . . . . . . . . . . . . . . . . . . . . . . . . . . . . . . . . . . . . . . . . . . . . . . . . 94
Options panel. . . . . . . . . . . . . . . . . . . . . . . . . . . . . . . . . . . . . . . . . . . . . . . . . . . . . . . . . . . . . .95
Contents
5
Page 6

Working with color palettes . . . . . . . . . . . . . . . . . . . . . . . . . . . . . . . . . . . . . . . . . . . . . . . . . . . . 96
Using palettes for drawing and creating. . . . . . . . . . . . . . . . . . . . . . . . . . . . . . . . . . . . 96
Using palettes for exporting . . . . . . . . . . . . . . . . . . . . . . . . . . . . . . . . . . . . . . . . . . . . . . . .97
Setting the number of colors in the palette. . . . . . . . . . . . . . . . . . . . . . . . . . . . . . . . . .97
Editing colors in a palette . . . . . . . . . . . . . . . . . . . . . . . . . . . . . . . . . . . . . . . . . . . . . . . . . 98
Saving a palette. . . . . . . . . . . . . . . . . . . . . . . . . . . . . . . . . . . . . . . . . . . . . . . . . . . . . . . . . . . .100
Using Dithering . . . . . . . . . . . . . . . . . . . . . . . . . . . . . . . . . . . . . . . . . . . . . . . . . . . . . . . . . .100
Adjusting transparency . . . . . . . . . . . . . . . . . . . . . . . . . . . . . . . . . . . . . . . . . . . . . . . . . . . 101
Optimize . . . . . . . . . . . . . . . . . . . . . . . . . . . . . . . . . . . . . . . . . . . . . . . . . . . . . . . . . . . . . . . . .102
Interlacing . . . . . . . . . . . . . . . . . . . . . . . . . . . . . . . . . . . . . . . . . . . . . . . . . . . . . . . . . . . . . . . .102
File panel . . . . . . . . . . . . . . . . . . . . . . . . . . . . . . . . . . . . . . . . . . . . . . . . . . . . . . . . . . . . . . . . .102
Animation panel. . . . . . . . . . . . . . . . . . . . . . . . . . . . . . . . . . . . . . . . . . . . . . . . . . . . . . . . . .102
Export Area. . . . . . . . . . . . . . . . . . . . . . . . . . . . . . . . . . . . . . . . . . . . . . . . . . . . . . . . . . . . . . . . . . . .103
Web export formats . . . . . . . . . . . . . . . . . . . . . . . . . . . . . . . . . . . . . . . . . . . . . . . . . . . . . . . . . . . .103
GIF. . . . . . . . . . . . . . . . . . . . . . . . . . . . . . . . . . . . . . . . . . . . . . . . . . . . . . . . . . . . . . . . . . . . . . .103
JPEG . . . . . . . . . . . . . . . . . . . . . . . . . . . . . . . . . . . . . . . . . . . . . . . . . . . . . . . . . . . . . . . . . . . . 104
PNG . . . . . . . . . . . . . . . . . . . . . . . . . . . . . . . . . . . . . . . . . . . . . . . . . . . . . . . . . . . . . . . . . . . . .105
Web format comparison . . . . . . . . . . . . . . . . . . . . . . . . . . . . . . . . . . . . . . . . . . . . . . . . . .105
Other export formats . . . . . . . . . . . . . . . . . . . . . . . . . . . . . . . . . . . . . . . . . . . . . . . . . . . . . . . . . . 106
TIFF . . . . . . . . . . . . . . . . . . . . . . . . . . . . . . . . . . . . . . . . . . . . . . . . . . . . . . . . . . . . . . . . . . . . 106
PICT . . . . . . . . . . . . . . . . . . . . . . . . . . . . . . . . . . . . . . . . . . . . . . . . . . . . . . . . . . . . . . . . . . . . 106
BMP . . . . . . . . . . . . . . . . . . . . . . . . . . . . . . . . . . . . . . . . . . . . . . . . . . . . . . . . . . . . . . . . . . . . 106
xRes LRG. . . . . . . . . . . . . . . . . . . . . . . . . . . . . . . . . . . . . . . . . . . . . . . . . . . . . . . . . . . . . . . . 106
Batch processing . . . . . . . . . . . . . . . . . . . . . . . . . . . . . . . . . . . . . . . . . . . . . . . . . . . . . . . . . . . . . . 106
Finding and Replacing during a batch process. . . . . . . . . . . . . . . . . . . . . . . . . . . . .107
Changing file settings with a batch process . . . . . . . . . . . . . . . . . . . . . . . . . . . . . . . .107
Backing up batch processed files. . . . . . . . . . . . . . . . . . . . . . . . . . . . . . . . . . . . . . . . . . 109
Using batch Scriptlets . . . . . . . . . . . . . . . . . . . . . . . . . . . . . . . . . . . . . . . . . . . . . . . . . . . . 109
Using the Project Log. . . . . . . . . . . . . . . . . . . . . . . . . . . . . . . . . . . . . . . . . . . . . . . . . . . . 109
Working with Dreamweaver . . . . . . . . . . . . . . . . . . . . . . . . . . . . . . . . . . . . . . . . . . . . . . . . . . .110
Fireworks images in Dreamweaver . . . . . . . . . . . . . . . . . . . . . . . . . . . . . . . . . . . . . . . .110
Editing Fireworks images in other image editors. . . . . . . . . . . . . . . . . . . . . . . . . . . 112
6
Contents
Page 7

CHAPTER 4
Web Design Features . . . . . . . . . . . . . . . . . . . . . . . . . .113
Producing web components . . . . . . . . . . . . . . . . . . . . . . . . . . . . . . . . . . . . . . . . . . . . . . . . . . . .114
Features for web production. . . . . . . . . . . . . . . . . . . . . . . . . . . . . . . . . . . . . . . . . . . . . . . 114
Web objects: The basics of web production . . . . . . . . . . . . . . . . . . . . . . . . . . . . . . . . . . . . . 114
Creating web objects . . . . . . . . . . . . . . . . . . . . . . . . . . . . . . . . . . . . . . . . . . . . . . . . . . . . . . 115
Setting web object properties . . . . . . . . . . . . . . . . . . . . . . . . . . . . . . . . . . . . . . . . . . . . . . 115
Creating an image map. . . . . . . . . . . . . . . . . . . . . . . . . . . . . . . . . . . . . . . . . . . . . . . . . . . . . . . . .116
Choosing an image map source graphic . . . . . . . . . . . . . . . . . . . . . . . . . . . . . . . . . . .116
Creating a hotspot . . . . . . . . . . . . . . . . . . . . . . . . . . . . . . . . . . . . . . . . . . . . . . . . . . . . . . . .116
Setting image map options . . . . . . . . . . . . . . . . . . . . . . . . . . . . . . . . . . . . . . . . . . . . . . . .116
Exporting image maps . . . . . . . . . . . . . . . . . . . . . . . . . . . . . . . . . . . . . . . . . . . . . . . . . . . . 117
Slicing images when exporting. . . . . . . . . . . . . . . . . . . . . . . . . . . . . . . . . . . . . . . . . . . . . . . . . . 117
Slice objects as event areas . . . . . . . . . . . . . . . . . . . . . . . . . . . . . . . . . . . . . . . . . . . . . . . . . 117
Creating a sliced image . . . . . . . . . . . . . . . . . . . . . . . . . . . . . . . . . . . . . . . . . . . . . . . . . . . .117
Exporting an image in multiple slices. . . . . . . . . . . . . . . . . . . . . . . . . . . . . . . . . . . . . . 118
Specifying export settings for slice objects. . . . . . . . . . . . . . . . . . . . . . . . . . . . . . . . . .119
Naming slices. . . . . . . . . . . . . . . . . . . . . . . . . . . . . . . . . . . . . . . . . . . . . . . . . . . . . . . . . . . . .119
JavaScript rollovers . . . . . . . . . . . . . . . . . . . . . . . . . . . . . . . . . . . . . . . . . . . . . . . . . . . . . . . . . . . . .120
Button rollovers . . . . . . . . . . . . . . . . . . . . . . . . . . . . . . . . . . . . . . . . . . . . . . . . . . . . . . . . . . .120
The Down state. . . . . . . . . . . . . . . . . . . . . . . . . . . . . . . . . . . . . . . . . . . . . . . . . . . . . . . . . . . 121
Swapping parts of the image. . . . . . . . . . . . . . . . . . . . . . . . . . . . . . . . . . . . . . . . . . . . . . . 121
Using irregularly shaped rollovers. . . . . . . . . . . . . . . . . . . . . . . . . . . . . . . . . . . . . . . . . .122
Creating toggle group rollovers . . . . . . . . . . . . . . . . . . . . . . . . . . . . . . . . . . . . . . . . . . . .123
Exported JavaScript code . . . . . . . . . . . . . . . . . . . . . . . . . . . . . . . . . . . . . . . . . . . . . . . . . .123
Creating animation. . . . . . . . . . . . . . . . . . . . . . . . . . . . . . . . . . . . . . . . . . . . . . . . . . . . . . . . . . . . .124
Fireworks animation features . . . . . . . . . . . . . . . . . . . . . . . . . . . . . . . . . . . . . . . . . . . . .124
Opening an animation . . . . . . . . . . . . . . . . . . . . . . . . . . . . . . . . . . . . . . . . . . . . . . . . . . . .124
Drawing an animation. . . . . . . . . . . . . . . . . . . . . . . . . . . . . . . . . . . . . . . . . . . . . . . . . . . .125
Optimizing and controlling the animation . . . . . . . . . . . . . . . . . . . . . . . . . . . . . . . .127
Previewing an animation. . . . . . . . . . . . . . . . . . . . . . . . . . . . . . . . . . . . . . . . . . . . . . . . . .128
Exporting an animation. . . . . . . . . . . . . . . . . . . . . . . . . . . . . . . . . . . . . . . . . . . . . . . . . . .129
Contents
7
Page 8

Transparency . . . . . . . . . . . . . . . . . . . . . . . . . . . . . . . . . . . . . . . . . . . . . . . . . . . . . . . . . . . . . . . . . . .129
GIF transparency. . . . . . . . . . . . . . . . . . . . . . . . . . . . . . . . . . . . . . . . . . . . . . . . . . . . . . . . .129
PNG alpha transparency . . . . . . . . . . . . . . . . . . . . . . . . . . . . . . . . . . . . . . . . . . . . . . . . .129
Using Fireworks HTML . . . . . . . . . . . . . . . . . . . . . . . . . . . . . . . . . . . . . . . . . . . . . . . . . . . . . .130
Exporting HTML with a Fireworks file . . . . . . . . . . . . . . . . . . . . . . . . . . . . . . . . . .130
Some HTML basics . . . . . . . . . . . . . . . . . . . . . . . . . . . . . . . . . . . . . . . . . . . . . . . . . . . . . .132
Common HTML tags . . . . . . . . . . . . . . . . . . . . . . . . . . . . . . . . . . . . . . . . . . . . . . . . . . .132
Copying and pasting from a Fireworks HTML file . . . . . . . . . . . . . . . . . . . . . . .133
JavaScript . . . . . . . . . . . . . . . . . . . . . . . . . . . . . . . . . . . . . . . . . . . . . . . . . . . . . . . . . . . . . . . . .133
Client-side image maps. . . . . . . . . . . . . . . . . . . . . . . . . . . . . . . . . . . . . . . . . . . . . . . . . . . .133
Sliced images. . . . . . . . . . . . . . . . . . . . . . . . . . . . . . . . . . . . . . . . . . . . . . . . . . . . . . . . . . . . . .133
8
Contents
Page 9

CHAPTER 1
Getting Your Bearings
................................................................................................................
1
9
Page 10

What’s in this package
System requirements
The Fireworks package contains:
A CD-ROM containing the Fireworks installer
◆
and the sample artwork.
◆
Using Fireworks
, the manual you are now reading.
Fireworks runs on either the Windows or Macintosh
operating systems. Before you install Fireworks, you
need the following equipment:
Windows:
Windows 95, Windows 98, or Windows NT 4
◆
(with Service Pack 3) or later
◆
Intel Pentium 120 MHz processor required
(Pentium II recommended) 32 MB of system
RAM on Windows 95 or Windows 98 (40 MB or
more recommended for Windows NT)
60 MB of available hard disk space (100 MB or
◆
more recommended)
◆
CD-ROM drive
◆
Mouse or digitizing tablet
◆
640x480 resolution, 256-color monitor required
(1024x768 resolution, millions of colors
recommended)
Macintosh:
◆
System 7.5.5 or higher
◆
Adobe Type Manager 4 or higher to use Type 1
fonts
Power Macintosh processor required (G3
◆
recommended)
◆
24MB of application RAM with virtual memory
on (32 MB or more with virtual memory off
recommended)
◆
60 MB of available hard disk space (100 MB or
more recommended)
◆
CD-ROM drive
Mouse or digitizing tablet
◆
640x480 resolution, 256-color monitor required
◆
(1024x768 resolution, millions of colors
recommended)
10
Chapter 1
Page 11

Installing and starting Fireworks
Before installing Fireworks, make sure your computer
meets the system requirements listed in “System
requirements” on page 10. Read the ReadMe document
on the Fireworks CD-ROM for late-breaking
information.
To install and start Fireworks on Windows NT 4 or
Windows 95 or 98:
Insert the Fireworks CD-ROM in your CD-ROM
1
drive.
2
Follow the instructions that appear on screen.
The installer application prompts you to enter
required information.
When Fireworks is installed, launch Fireworks
3
from the Start menu.
Windows NT 4 and Windows 95 or 98 have four
alternative ways to install Fireworks:
◆
Double-click the installation application Setup.exe.
◆
Click the Install button in the Add/Remove
Programs module in the Control Panel and
navigate to the Setup.exe application in the
Fireworks folder.
◆
Use the Run command in the Start menu and
navigate to the Setup.exe application in the
Fireworks folder.
◆
Select the CD-ROM icon in the Windows
Explorer or My Computer, right-click to display the
menu, and choose AutoPlay.
To install and start Fireworks on a Macintosh:
Disable virus-protection extensions and restart
1
your computer.
2
Insert the Fireworks CD-ROM in your CDROM drive.
Double-click to launch the Fireworks Installer.
3
Follow the instructions that appear on screen.
4
Double-click the Fireworks icon to launch
5
Fireworks from the Finder.
Note:
To disable AutoPlay, hold down the Shift key
while inserting the Fireworks CD-ROM.
Getting Your Bearings
11
Page 12

Uninstalling Fireworks
Use the uninstaller to ensure that all Fireworks files are
removed from the computer.
To uninstall Fireworks on Windows NT 4,
Windows 95, or Windows 98:
Choose Start > Settings > Control Panel.
1
Double-click Add/Remove Programs.
2
3
Select Macromedia Fireworks 2 in the list box.
Click the Add/Remove button.
Follow the instructions that appear on screen.
4
The uninstaller removes all Fireworks 2 program
files from your system.
On Windows, manual uninstallation may fail to
remove several DLLs and registry database entries.
To uninstall Fireworks on the Macintosh:
Run the Fireworks 2 installer and choose Remove
1
from the Options pop-up.
2
Follow the instructions that appear on screen.
The uninstaller removes all Fireworks application
files from your computer.
On the Macintosh, manually removing Fireworks can
fail to remove several preference files in the System
folder.
If you used Custom installation to install Fireworks in a
different folder than the default location, you must
specify the same location when uninstalling.
Resources for learning Fireworks
Fireworks Tutorials
◆
Fireworks tutorials, available from the Help menu
whenever the Fireworks application is active,
contain step-by-step lessons for the most common
Fireworks tasks, such as optimizing GIFs and
JPEGs, and creating animations, image maps, and
rollovers.
Fireworks Application
◆
The Fireworks application contains many dialog
boxes and ToolTips designed to assist you in using
the program. ToolTips appear when your cursor
pauses over a user interface element. Instructional
dialog boxes appear when you attempt to use certain
tools incorrectly.
Using Fireworks
◆
The
Using Fireworks
manual
manual includes information
about basic and advanced Fireworks features.
www.macromedia.com
◆
Macromedia’s award-winning web site contains
Fireworks tutorials, sample art, and updates.
◆
TechNotes
Navigate to http://www.macromedia.com/support/
Fireworks/ to search for frequently updated
technical information on Fireworks.
◆
Fireworks Discussion Group
For discussion on Fireworks topics with Fireworks
users, technical support representatives, and the
Fireworks development team, use a news group
reader to go to news://forums.macromedia.com/
macromedia.fireworks.
Use these resources to learn Fireworks quickly:
Fireworks Help
◆
Fireworks Help, available whenever the Fireworks
application is active, includes information on every
Fireworks tool, panel, dialog box, and preference.
Chapter 1
12
Page 13

What’s unique about Fireworks?
The premier production tool for creating web graphics,
Fireworks has features that can save hours by
simplifying the web-graphic creation workflow.
Fireworks was created from the ground up specifically
for the web.
Live effects—
embosses that are fully editable. Watch them update
automatically!
Vector tool flexibility with an organic bitmap
look—
strokes and textured fills. Apply customizable Live
Effects to objects.
Total text control—
an illustration tool in an image-editing application.
Control kerning, leading, text effects, alignment, and
more. Apply Live Effects to text. Text is always editable,
all the time. Change text after applying a Live Effect and
watch the effect update automatically.
Export Preview—
adjustment of export settings without switching to your
web browser. Compare up to four alternative files
simultaneously to choose the best mix of quality and
file-size reduction.
Export optimization—
settings, dithering, and more to optimize your web
graphics. Or, use the Export Wizard to optimize
automatically.
Batch processing—
and replace graphics and text when batch processing
custom groups of images or an entire site.
Image maps—
an overlay above the image. Enter a URL link and
browser status bar message for each hotspot.
JavaScript rollovers—
interactive rollovers and other graphics.
Slice images—
generate HTML table code to reassemble images and
add links.
Create drop shadows, bevels, glows, and
Bézier paths and shapes have bitmap brush
Retain the precise text control of
Directly view the graphic after each
Simplify file format, palette
Choose export settings, and find
Create editable, color-coded hotspots on
Automatically generate code for
Slice images on export. Automatically
Compatibility with Macromedia Dreamweaver—
Export JavaScript rollovers that can be edited and
changed in Dreamweaver. Or, export complex
graphics as Dreamweaver library objects, easily
placing and reusing navigation bars and complex
rollovers. With Dreamweaver 2, launch Fireworks
from within Dreamweaver to easily and quickly make
changes to a graphic.
Getting Your Bearings
13
Page 14

Welcome to Fireworks
What is Fireworks?
Fireworks creates the smallest, highest-quality JPEG
and GIF graphics in the fewest number of steps. It is a
total solution for creating and producing web graphics.
Fireworks simplifies and streamlines the process of
making web and screen graphics, while providing the
ultimate in flexibility and editability.
Fireworks also makes it easy to minimize file size
without sacrificing quality, which results in faster web
sites and higher satisfaction among web site visitors.
Without Fireworks, for example, a web designer creates
an image in a vector-based drawing program such as
FreeHand, then imports the vector art into a bitmap
graphics program to rasterize and apply filters.
Continuing the creative process, the designer exports the
graphic for import into a color palette-conversion utility
and then optimizes the palette and image format for
either web- or screen-based delivery. The designer might
also use an animation tool or image map utility to create
a dynamic image.
To test the graphic, the designer must view it in a web
browser application. Revising the graphic at this point
may force the designer to start from the beginning and
repeat every step.
With Fireworks, the designer’s creativity is no longer
complicated by switching from tool to tool, and
valuable time is saved by avoiding repetitive procedures.
Fireworks is a single tool that handles all the
necessary steps.
By creating editable paths with bitmap attributes,
Fireworks ensures that your work is fully editable
throughout every stage of the design process. Fireworks’
powerful export preview capabilities integrated with
color palette and graphic formatting offer the designer
control over exporting.
Fireworks is a solution to the challenges faced by web
designers. Accordingly, Fireworks is not optimal for
creating or modifying images intended for traditional
commercial printing. The Fireworks environment is
based on the RGB color model, ideally suited for images
rendered at screen, rather than print, resolutions.
The advantages to using Fireworks over other tools
include efficiency, convenience, and adaptability. With
Fireworks, the designer is free to focus on design and
creation without the distraction of switching from tool
to tool.
This efficient workflow is even more convenient with
Fireworks’ incredible power over color palettes and file
formats. Advanced preview capabilities allow the
designer to see the effect of palette and color depth
changes without the time-consuming step of viewing
graphics in a browser.
Amazingly, both text and objects in a Fireworks graphic
are fully editable at any time. This means that graphics
can be easily modified without recreating them.
14
Chapter 1
Page 15
Using the document window
Fireworks is both a vector graphics and a bitmap
graphics application. Vector objects are composed of
paths, and bitmap objects are composed of individual
pixels. Fireworks combines the organic look of bitmap
objects with the flexibility, control, and editability of
Bézier paths.
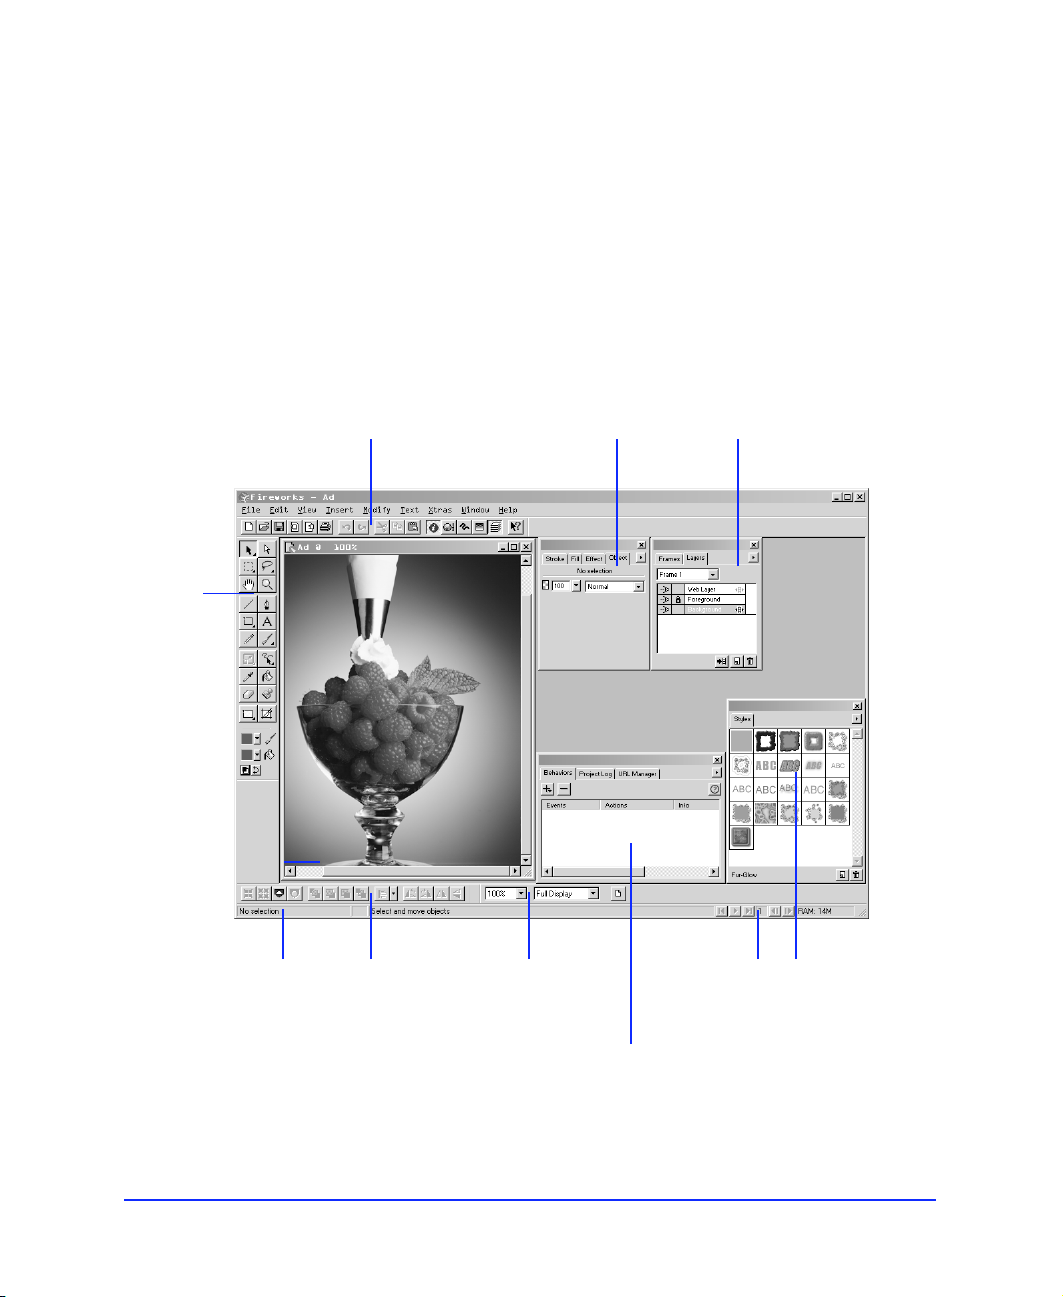
Launching Fireworks displays the document window,
your interface to the illustration. A Fireworks canvas
can be up to 6000 pixels wide by 6000 pixels tall. Move,
resize, or hide the panels, Toolbox, and toolbars to
customize your environment.
Toolbox
(Windows only)
Status bar
Main toolbar (Windows only)
Modify toolbar
(Windows only)
View Controls
toolbar
(Windows only)
Object inspector Layers panel
VCR Animation
Controls
Styles panel
Fireworks on Windows
Behaviors inspector
Getting Your Bearings
15
Page 16
Toolbox
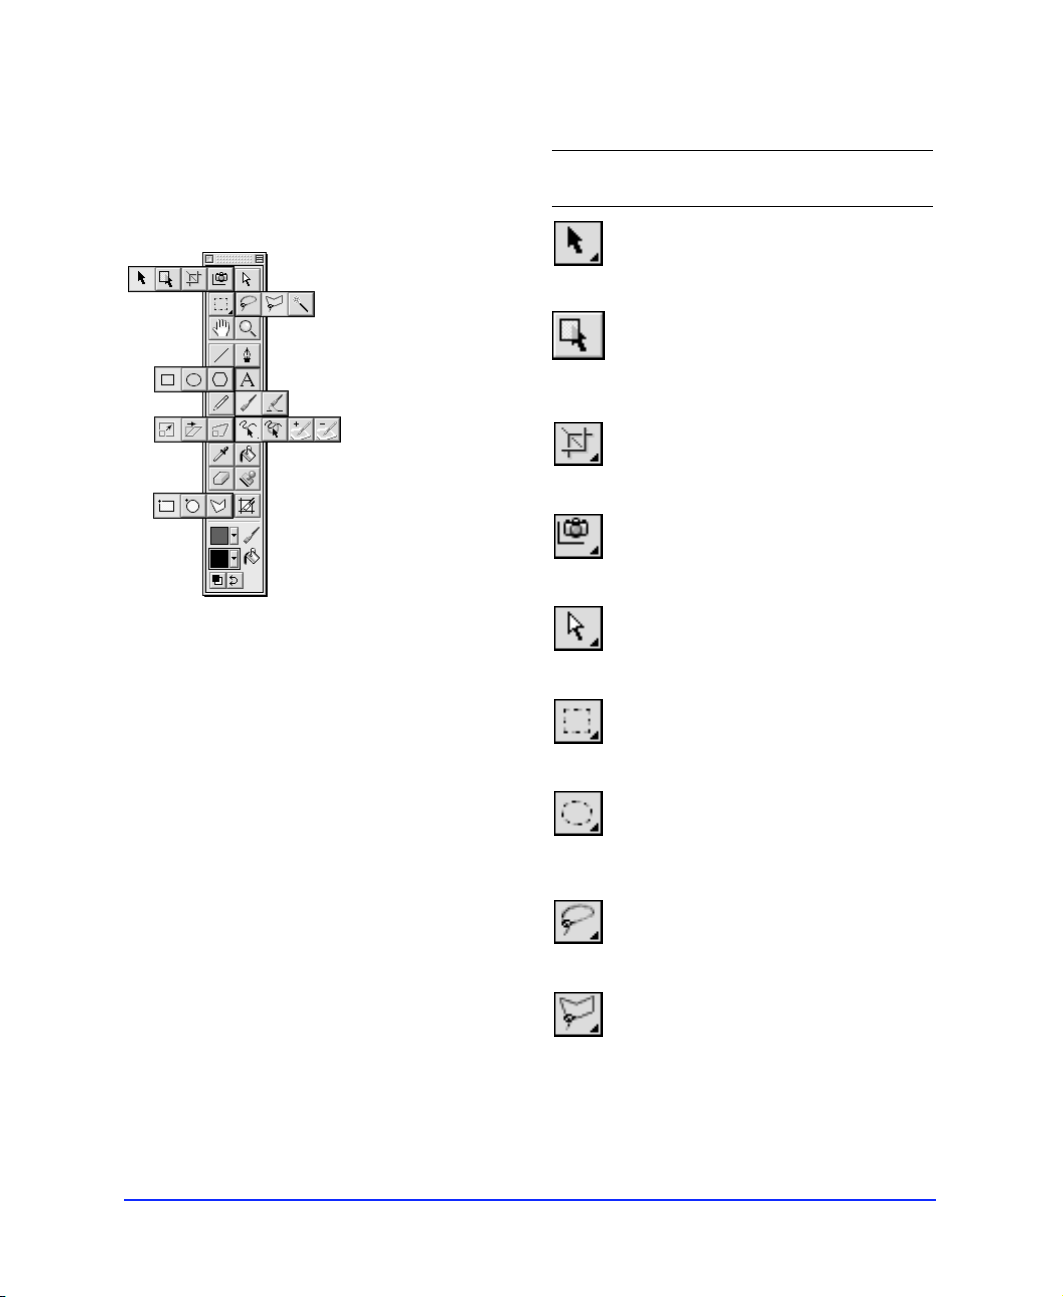
The Toolbox contains 35 tools, some of which are
contained in tool groups, as shown. To display a tool
group, click and hold any tool with a triangle in the
lower-right corner.
Press and hold a tool to reveal tool groups.
Click an alternate tool to choose it from the tool group.
Pressing letter keys switches quickly between tools.
Press the letter key shown in the following chart to
choose a tool.
Fireworks documents contain four types of objects–
vector objects, which are path based; image objects,
which are pixel-based; text; and web objects, which are
special objects used to define areas of interactivity or
image slicing.
Use this tool To Activate by
pressing
Select and drag
objects.
Pointer
Select objects behind
other objects.
Select
Behind
Discard or add canvas
area.
Crop
Export a portion of a
document.
Export Area
Select an object within
a group or points on a
path.
Subselect
Select a rectangular
pixel area in image edit
mode.
Marquee
Select an elliptical pixel
area in image edit
mode.
Ellipse
Marquee
Select a freeform pixel
area in image edit
mode.
Lasso
v
or
0 (zero)
v
or
0 (zero)
c
j
a or 1
m
m
l
16
Chapter 1
Polygon
Lasso
Select a polygonal pixel
area in image edit
mode.
l
Page 17
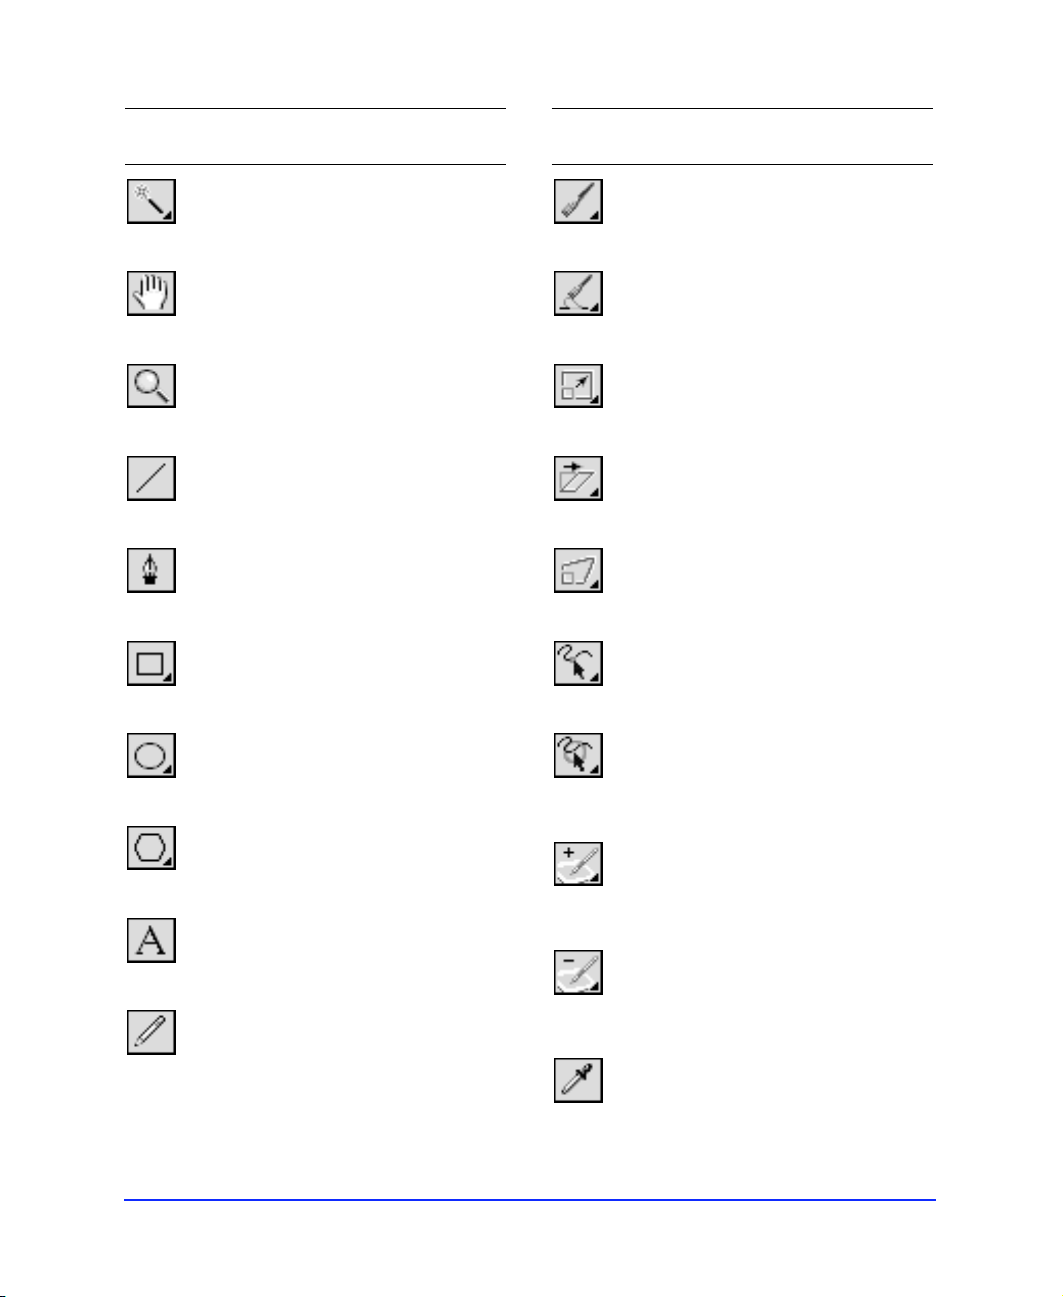
Use this tool To Activate by
pressing
Use this tool To Activate by
pressing
Magic Wand
Hand
Magnify
Line
Pen
Rectangle
Ellipse
Polygon
Text
Pencil
Select pixel areas of
similar color in image
edit mode.
Pan the view of the
document.
Change view
magnification (zoom in
or zoom out).
Draw straight lines.
Draw paths by
anchoring points.
Draw rectangles,
rounded rectangles,
and squares.
Draw ellipses and
circles.
Draw polygons and
stars.
Create text blocks.
Draw one-pixel pencil
strokes.
w
spacebar
or
h
z
n
p
r
r
g
t
y
Brush
Redraw Path
Scale
Skew
Distort
Freeform
Reshape
Area
Path
Scrubber (+)
Path
Scrubber (–)
Eyedropper
Draw brush strokes
using Stroke panel
settings.
Redraw portions of a
selected path.
Resize and rotate
objects.
Slant and rotate
objects, and change
perspective.
Distort and rotate
objects.
Pull a path segment or
push a path segment
using a resizable
cursor.
Reshape a selected
path within the area of
the resizable cursor.
Increase stroke
characteristics
controlled by pressure
or speed.
Decrease stroke
characteristics
controlled by pressure
or speed.
Sample a color and
apply it to the active
color well.
b
b
q
q
q
f
f
u
u
I
Getting Your Bearings
17
Page 18
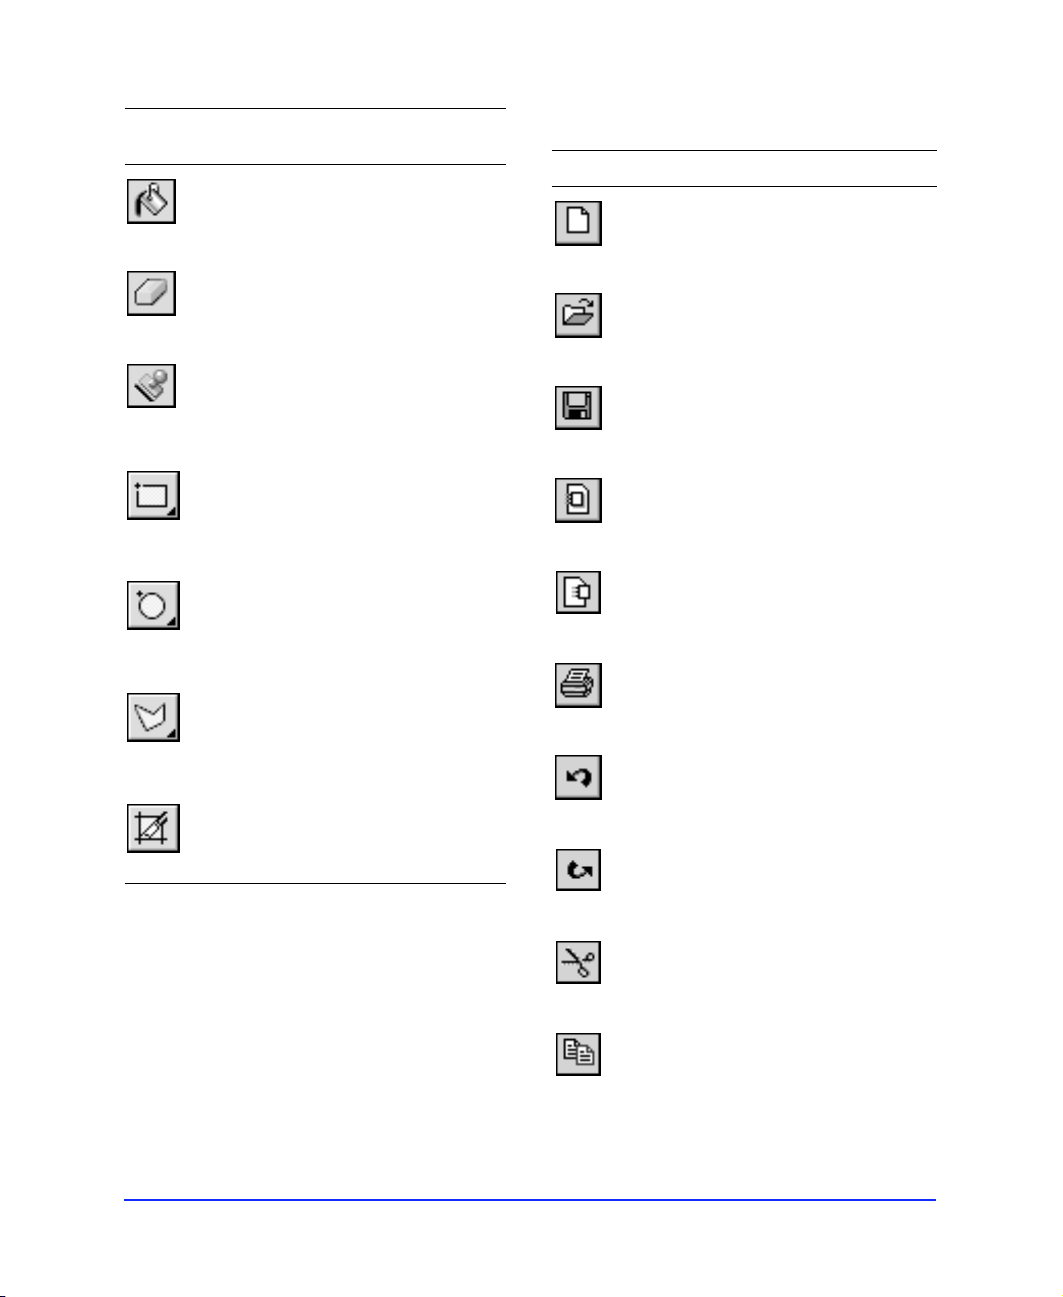
Use this tool To Activate by
pressing
k
e
s
Paint Bucket
Eraser
Rubber
Stamp
Rectangle
Hotspot
Circle
Hotspot
Polygon
Hotspot
Fill objects with color,
gradients, or patterns
and adjust fills with
Paint Bucket handles.
Remove or replace
portions of image
objects and cut paths.
Clone portions of an
image object.
Draw URL hotspots in
the shape of rectangles
or squares.
Draw URL hotspots in
the shape of circles.
Draw URL hotspots in
the shape of irregular
polygons.
Main toolbar (Windows only)
Use To
Create a new document.
New
Open an existing document.
Open
Save the active document.
Save
Import a file.
Import
Export a file.
Export
Print the active document.
Print
Undo the last action.
Slice
18
Create rectangular slice
objects.
Chapter 1
Undo
Redo the last action.
Redo
Cut selected objects to the Clipboard.
Cut
Copy selected objects to the
Clipboard.
Copy
Page 19
Use To
Paste
Object
Inspector
Paste the Clipboard’s contents into
the active document.
Open the Object inspector to view
properties for the selected object.
Open the Color Mixer.
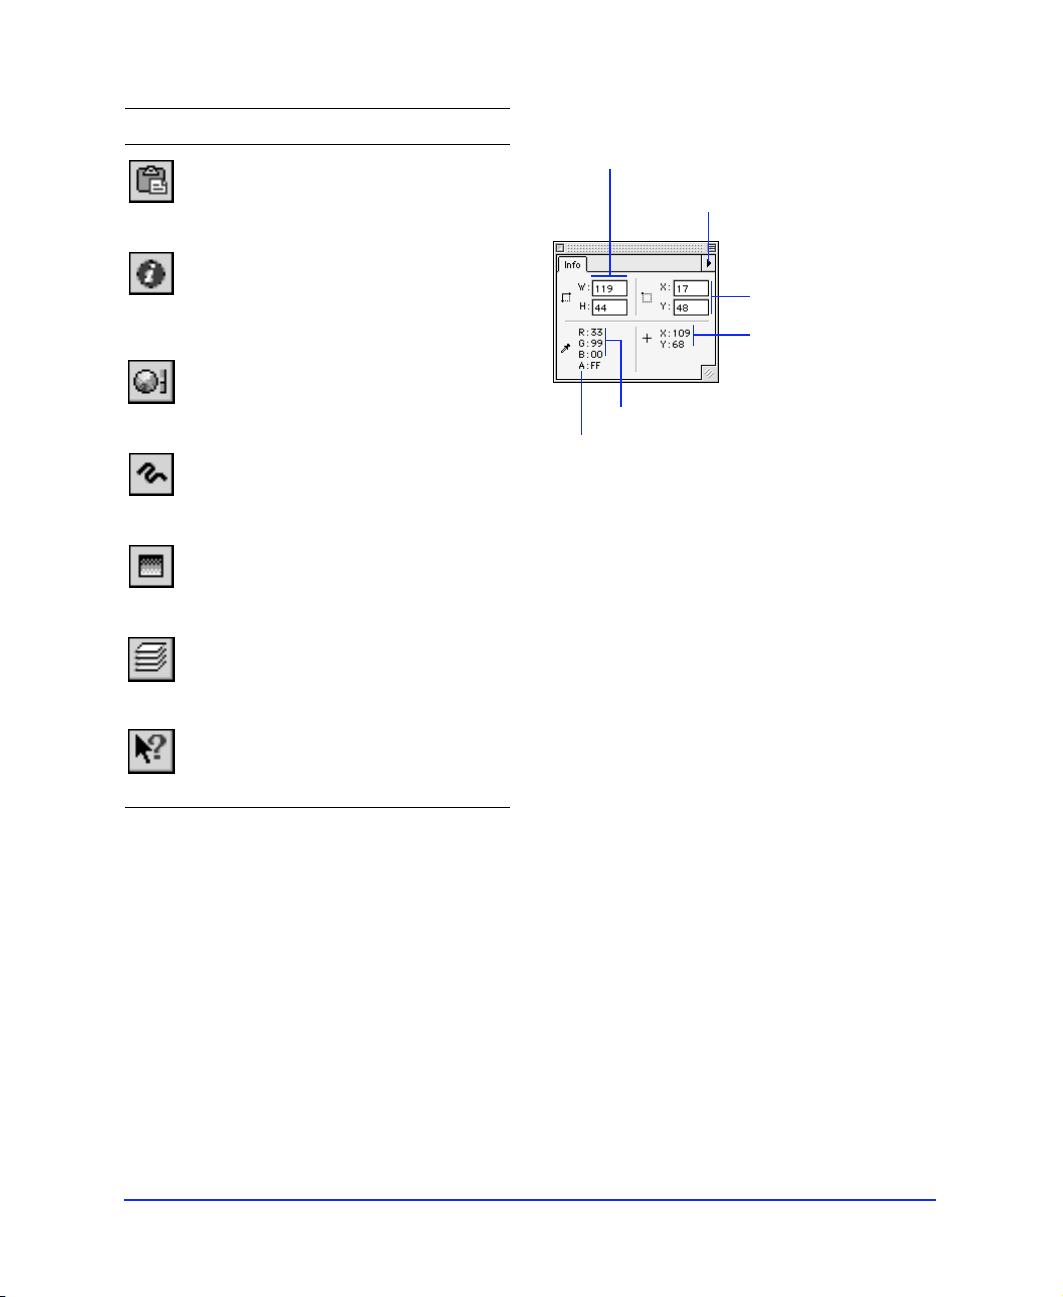
Info panel
Dimensions of selected object
Options for choosing a color model
and document unit of measurement
Position of
bounding box’s
upper-left corner
point
Cursor position
Color Mixer
Open the Stroke panel.
Stroke
Open the Fill panel.
Fill
Open the Layers panel.
Layers
Access Fireworks Help.
Help
ToolTips name or describe each button's function as
well as other user-interface features throughout
Fireworks. Pause the cursor over a button on a toolbar to
display a small label, which disappears when you move
the cursor away from the item.
Color of pixel beneath cursor
Alpha opacity measured in
increments from 0 to 255
The Info panel provides feedback for selected objects,
depending on object type and current action. Feedback
includes the color of the pixel beneath the cursor in the
current color model values, the position of the cursor,
the location of the selected object's bounding box, and
the selected object's dimensions. Choose Window > Info
to show or hide the Info panel.
The Info panel's Options pop-up contains settings for
your document's color model and unit of measurement.
Getting Your Bearings
19
Page 20
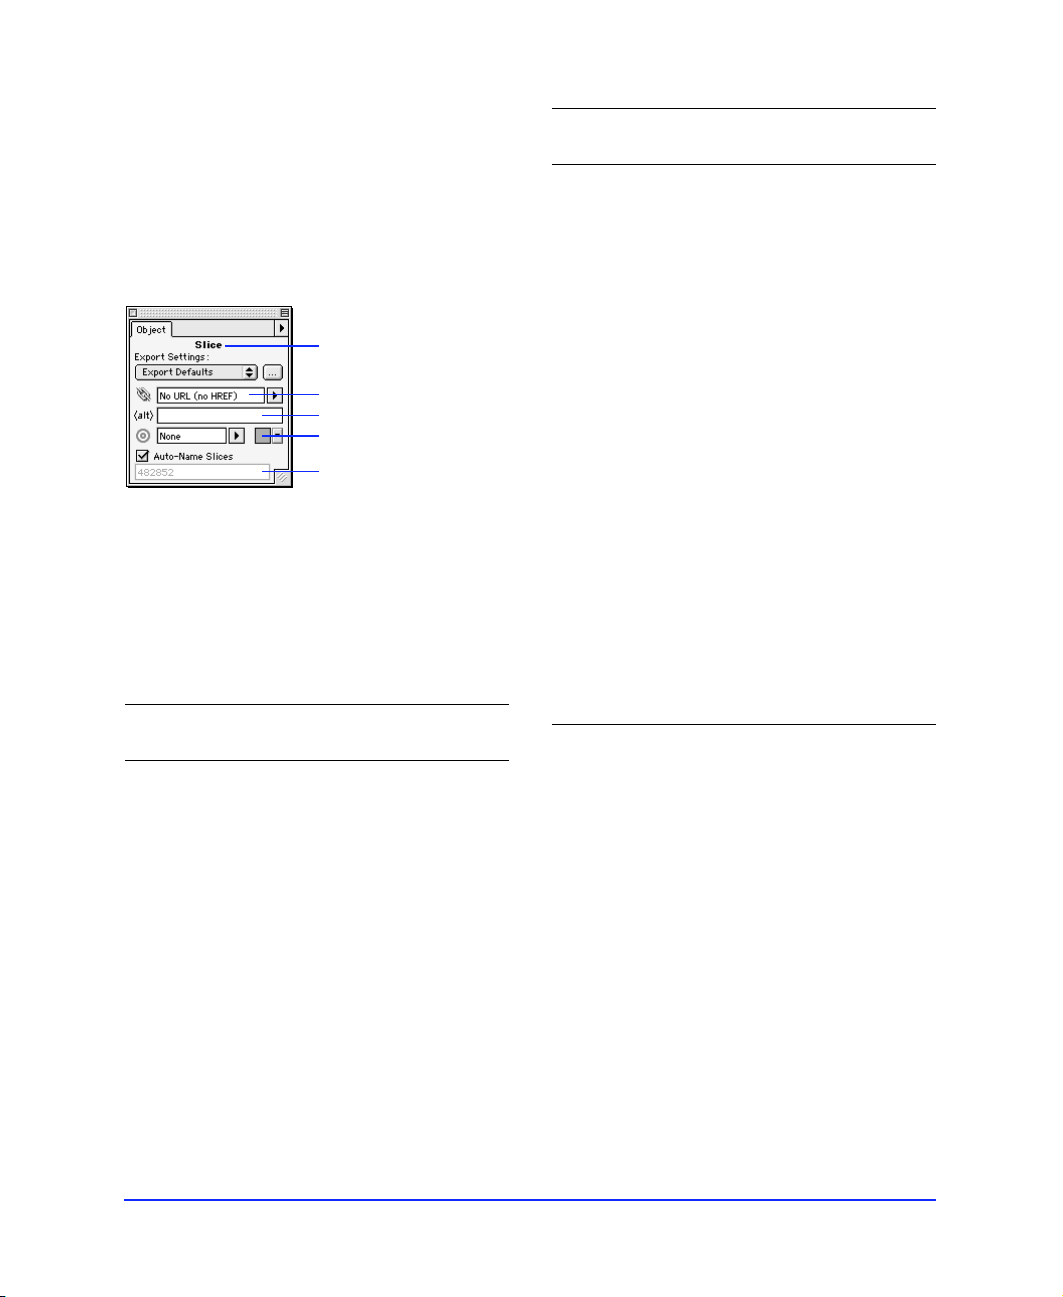
Object inspector
Use the Object inspector to set characteristics such as
opacity, blending mode, and placement of the brush
stroke in relation to a path. The Object inspector
contains status information for selected objects. The
Object inspector operates in one of eight different
modes, depending on the object type selected.
Use To When
selecting
Clipping path
setting
Export Settings Assign export
Define how the
mask group
appears
presets to exported
slice objects
A mask
group.
Slice objects.
Object type
Link to URL
Alt tag
Color well
Slice name
Components of the Object inspector
The different iterations of the Object inspector share
common elements, as shown in the table below. These
elements will become familiar as you work with various
object types.
Use To When
selecting
Object Opacity Set the opacity of a
single object
Blending Mode Set an object's
blending mode
Anything
except
hotspot or
slice objects.
Anything
except
hotspot or
slice objects.
Link to URL Assign URLs Slice objects
Alt tag Assign alternative
tag to be used
when the image is
unavailable
Link target Specify the
window or frame
in which the link is
displayed
Color well Set color Slice objects
Hotspot shape Choose to change
the shape of a
hotspot object
Auto-name Choose default or
custom slice names
and hotspot
objects.
Slice objects
and hotspot
objects.
Slice objects
and hotspot
objects.
and hotspot
objects.
Hotspot
objects.
Slice objects.
Stroke Settings Control the
Transformation
Method
Group Type Define object
Chapter 1
20
interaction of an
object's stroke and
fill
Transform text as
pixels or as paths
group as mask or
traditional group
Any text or
path object.
Text.
Grouped
objects.
Page 21

Opacity and blending mode in detail
Use the Object inspector to set opacity and blending
mode. Opacity and blending modes are important in
the process of compositing. Compositing is the process
of varying the transparency of two or more overlapping
objects to create a variety of graphic elements. An
opacity setting of 100 renders an object completely
opaque. Conversely, an opacity setting of 0 renders an
object completely transparent.
To Do this
Set the opacity of a
single object
Apply the same
opacity changes to
multiple objects
Return individual
objects to the
previous opacity
before grouping
Set the blending
mode of a single
object
Apply the same
blending mode to
multiple objects
Set the value using the opacity
slider.
Group the objects and alter
the group's opacity using the
opacity slider.
Ungroup the objects.
Choose from the blending
mode pop-up.
Group the objects and alter
the group's blending mode
using the blending mode popup.
Note: On the Macintosh, the View controls are located
at the lower-left corner of the document window.
Using the toolbars
Fireworks on Windows has several toolbars:
◆ Toolbox
◆ Main toolbar
◆ Modify toolbar
◆ View Controls toolbar
Each toolbar is moveable and dockable. This section
describes the default location and configuration of the
toolbars.
To show or hide the Toolbox, choose Window > Toolbox.
On Macintosh, use the menu to duplicate functions
found on the Windows Main toolbar and Modify
toolbar.
On Windows, choose Window > Toolbars and choose a
toolbar to show or hide individual toolbars.
Tool Options panel
Return individual
objects to the
previous blending
mode before
grouping
Ungroup the objects.
View Controls toolbar
Use the View Controls toolbar to change document
magnification and display mode. Click the Preview
Page button to view document dimensions and pixel
resolution.
Options related to the active tool
appear on the Tool Options panel.
Options related to the active tool appear on the Tool
Options panel.
The Tool Options panel contains settings for all
Fireworks tools. For example, the Pointer tool options,
shown above, include Mouse Highlight and Preview
Drag. Double-click a tool in the Toolbox to open and
close the Tool Options panel.
Getting Your Bearings 21
Page 22
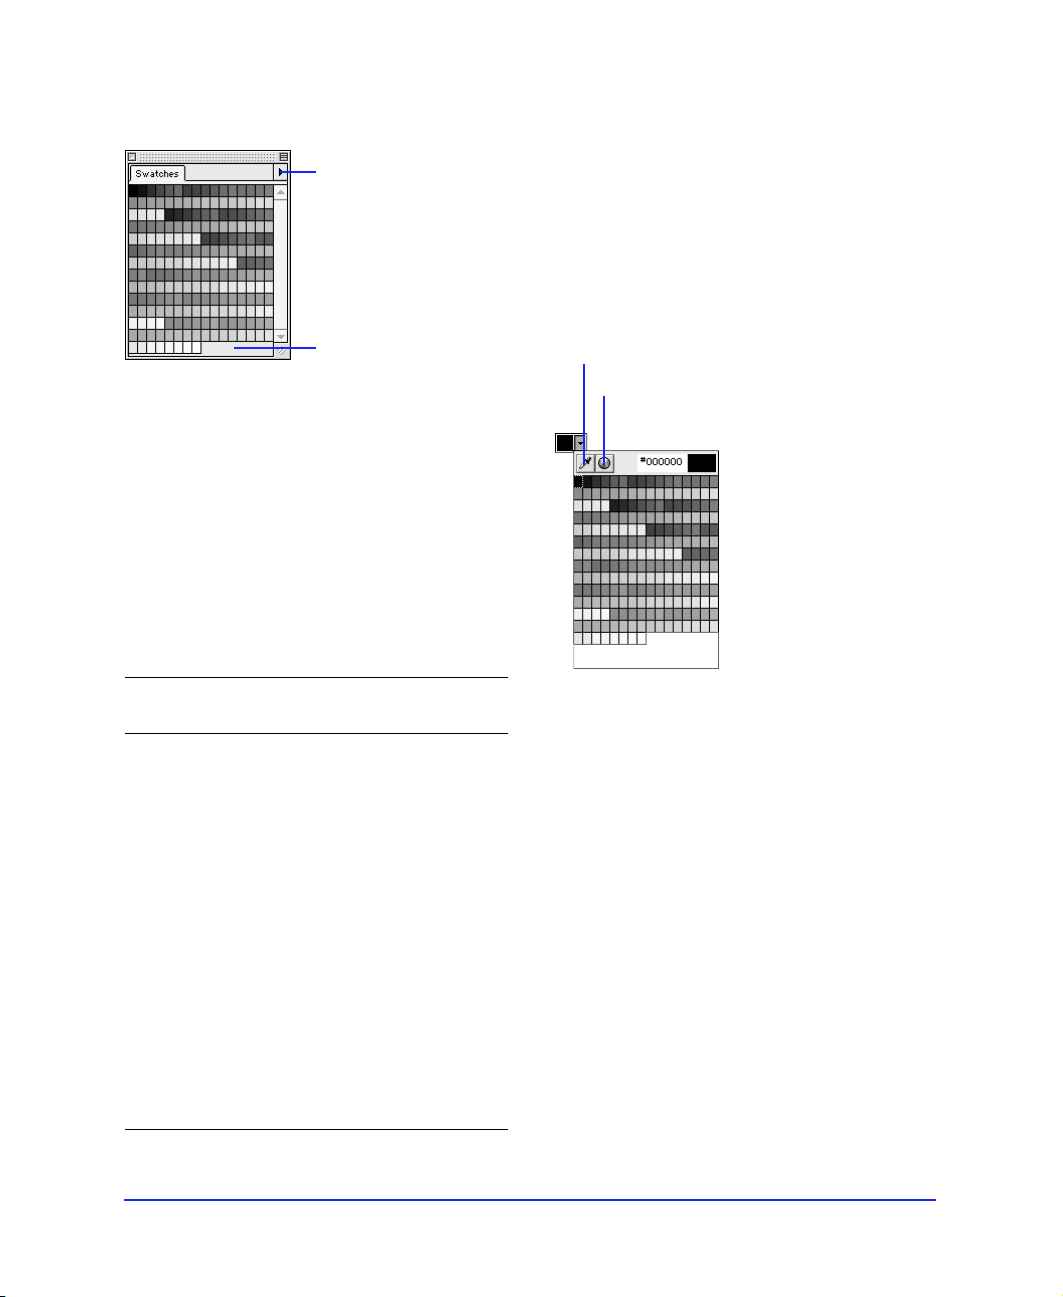
Swatches panel
Use the Options
pop-up to add,
replace, delete,
save, and sort
swatches, and
choose a color
palette.
When moving the cursor over the Swatches panel, the
cursor becomes an Eyedropper tool. Click a color to
apply it automatically to selected objects and color wells.
To choose a color, you need not access the Swatches
panel or Color Mixer. Just click any color well in
Fireworks, such as in the Toolbox, Fill panel, or Color
Mixer, to access all the swatches in the current color
palette. Then click to pick a color from the pop-up set of
color swatches.
Add a color to the
palette by clicking
in an empty area.
The Swatches panel shows Fireworks’ current color
palette. Choose from this palette when designing
graphics. Select a preset palette or import a palette using
the Options pop-up. Use the Save Swatches command
to save custom palettes for later import. Extract the color
table from a GIF image using the Add Swatches
command.
To Choose this from the
Options pop-up
Add swatches to the
panel
Replace all swatches with
an external set
Save swatches to an
external set
Delete all swatches from
the panel
Add Swatches.
Replace Swatches.
Save Swatches.
Clear Swatches.
Eyedropper tool
Color picker tool
Pop-up color swatches
Change to Macintosh,
Windows, Web 216, or
Grayscale palette
Sort the swatches by
color
Use the custom color
palette from the Export
Preview
Chapter 122
A palette.
Sort by Color.
Current Export Palette.
Page 23
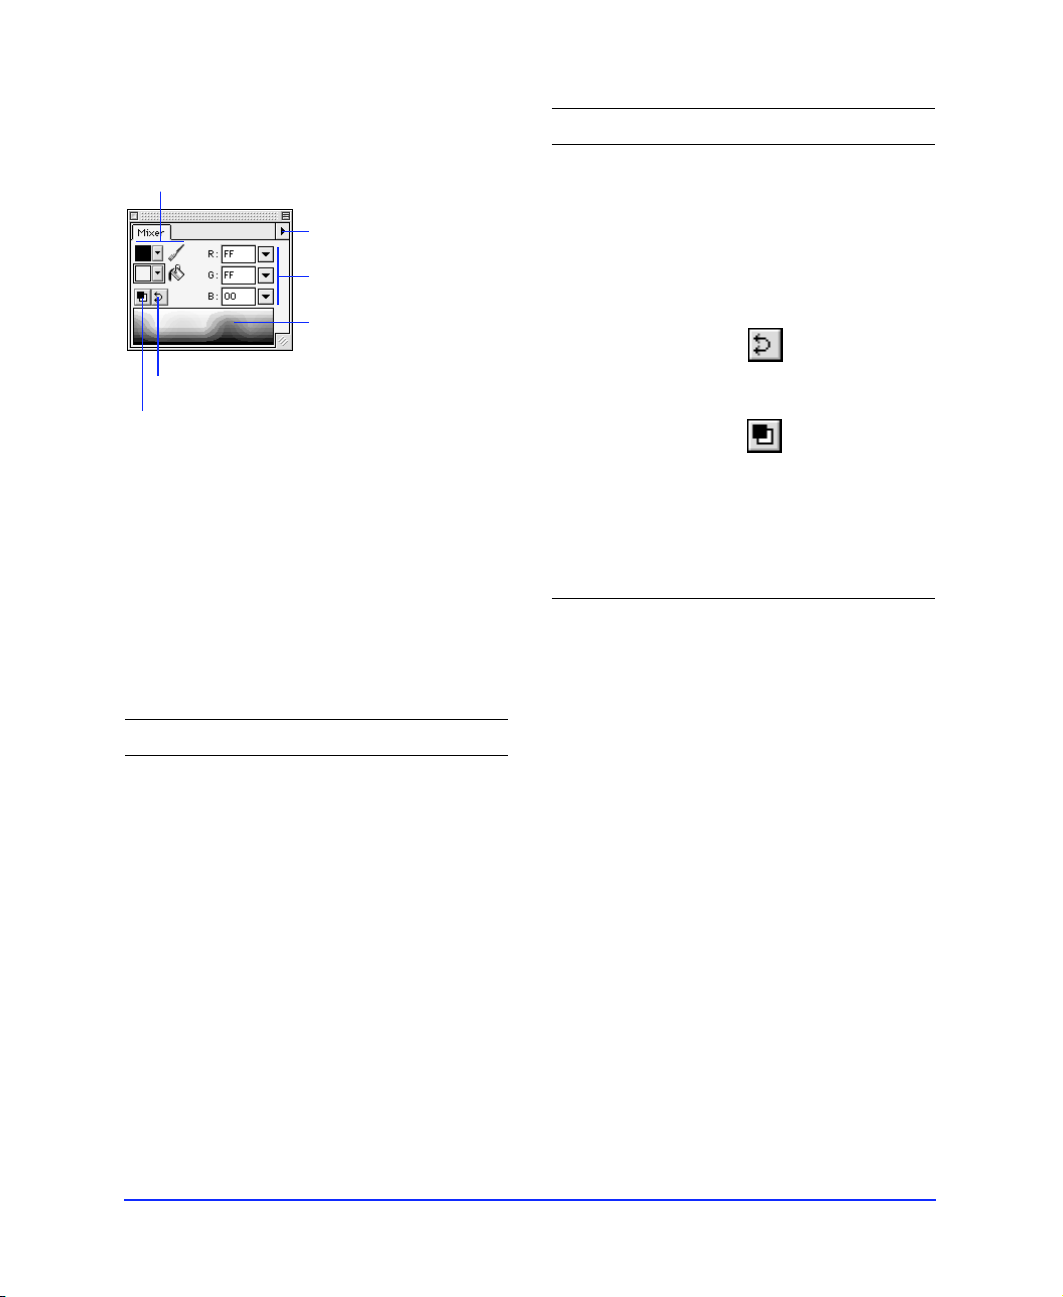
Color Mixer
To Do this
Select stroke
or Fill color.
Swap stroke and fill colors.
Use default colors.
Choose a color mode
from the Options popup.
Pick a color from the
color bar.
Set color values.
Create colors using the Color Mixer, then apply colors
to strokes, fills, effects, and text. Use the Options pop-up
to select a color mode: RGB, Hexadecimal, CMY, HSB,
or grayscale. The Color Mixer automatically responds to
the type of object selected. For example, select an object
with a fill and no stroke and the Color Mixer
automatically selects the Fill color well. Conversely,
select an object with a stroke and no fill and the Color
Mixer automatically selects the Stroke color well.
To Do this
Apply color to selected
text
Switch color modes Choose the desired color
Switch brush and fill color Click the Swap Colors
Revert to default colors Click the Default Colors
Define colors using the
system color picker
Change color models in
the color bar only
Choose a new color. The
Fill color well is selected
automatically.
mode from the Color
Mixer Options pop-up.
button.
button.
Double-click color well.
Point to the color bar
and use Shift-click
(Windows) or Optionclick (Macintosh).
Apply color changes to
the selected object’s
brush stroke
Apply color changes to
the selected object’s fill
Apply color changes to an
object having only a
brush stroke
Apply color changes to an
object having only a fill
Apply color changes to
the selected object’s
effect
Click the Stroke color
well before choosing a
new color.
Click the Fill color well
before choosing a new
color.
Choose a new color. The
Stroke color well is
selected automatically.
Choose a new color. The
Fill color well is selected
automatically.
Click the Effect color well
in the Effect panel
before choosing a new
color.
Getting Your Bearings 23
Page 24
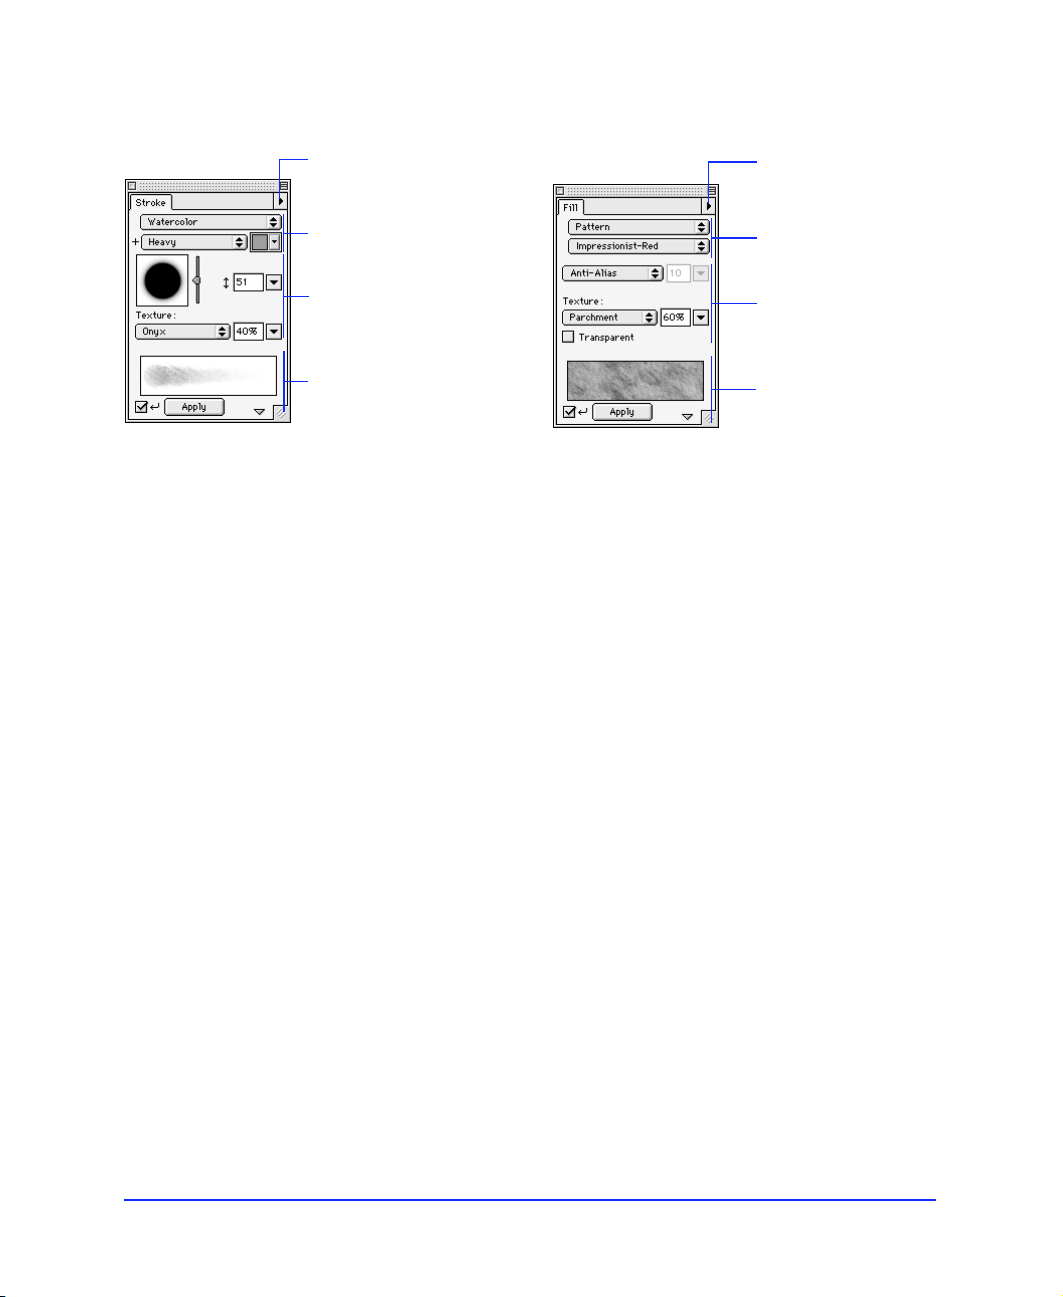
Stroke panel
Fill panel
Save, edit, name, and
delete strokes using the
Options pop-up.
Choose a brush stroke.
Choose stroke-specific
settings.
Preview and apply
the brush stroke.
Use the Stroke panel to design and modify strokes, as
well as alter the appearance of paths that have already
been drawn. Changing stroke settings affects selected
paths and paths drawn after the settings are changed.
To choose a color in the Stroke panel, you need not
access the Swatches panel. Just click the pop-up to the
right of the color well to access all the swatches in the
current color palette. Then click to pick a color from the
pop-up set of color swatches.
Choose Edit Stroke from the Options pop-up to open
the Edit Stroke dialog box. The Options, Shape, and
Sensitivity panels within the Edit Stroke dialog box
control current stroke attributes. Save, delete, and
rename custom strokes using the Options pop-up.
Click the show/hide triangle at the bottom of the Stroke
panel to show and hide the Stroke preview.
Checking Auto-Apply automatically updates selected
path and text objects as you change stroke settings. If
the preview is hidden, Auto-Apply is automatically
turned on. If the preview is visible and Auto-Apply is
turned off, click Apply to manually apply changes to
selected paths.
Save, edit, name, and
delete gradients using
the Options pop-up.
Choose a fill.
Choose fill-specific
settings.
Preview and apply
a fill.
Use the Fill panel to control how objects are filled.
Choose from the available fill categories, and then choose
one of the many fill types from within each category.
To choose a color in the Fill panel, you need not access
the Swatches panel. Just click the pop-up to the right of
the color well to access all the swatches in the current
color palette. Then click to pick a color from the pop-up
set of color swatches.
Modify any fill by choosing a texture and intensity, fill
color, anti-aliasing, feather, or hard edge. Check
Transparent for a transparent fill texture and enter a
texture amount greater than zero. Use the Fill Options
pop-up to save, name, and delete Gradient fills.
Click the show/hide triangle at the bottom of the Fill
panel to show and hide the Fill preview.
Check Auto-Apply to automatically update the fill of
selected objects as you change fill settings. If the preview
is hidden, Auto-Apply is automatically turned on. If the
preview is visible and Auto-Apply is turned off, click
Apply to manually apply fill changes to selected objects.
Chapter 124
Page 25
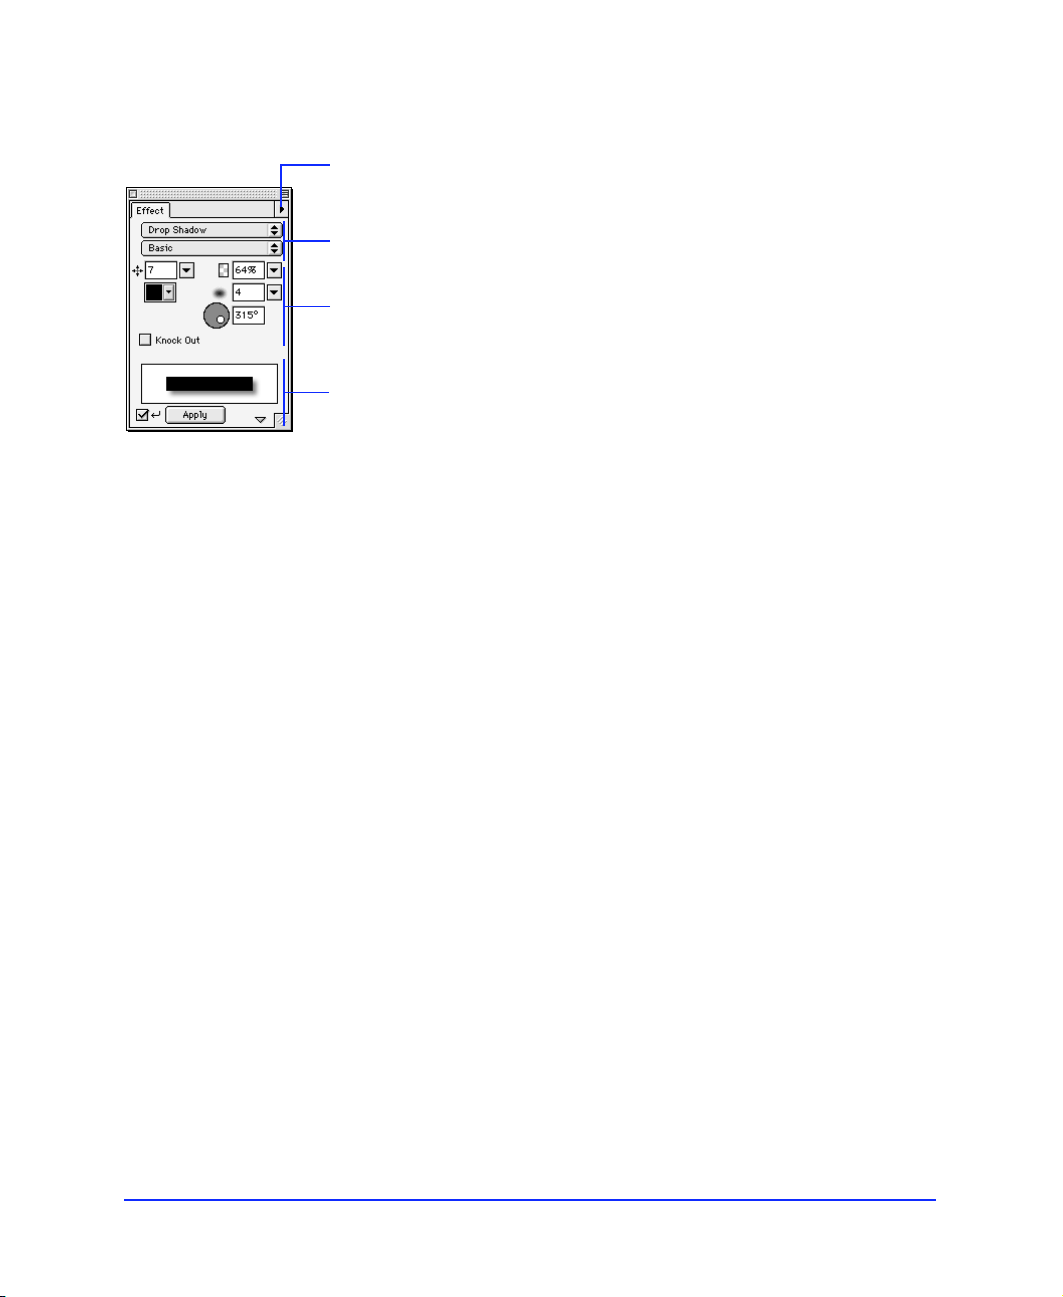
Effect panel
Save, edit, name, and
delete effects using
the Options pop-up.
Choose an effect.
Choose effectspecific settings.
Preview and apply
an effect.
Use the Effect panel to apply and modify Live Effects in
your document. Effects applied using the Effect panel
are maintained and updated when the affected object is
altered. For example, if you apply an edge bevel to a
rectangular object and then make the object circular, the
beveled edge adjusts accordingly. Modify effects after
applying them to an object by changing settings in the
Effect panel. Effects that can be altered in this way are
known as Live Effects.
To choose a color in the Effect panel, you need not access
the Swatches panel. Just click the pop-up to the right of
the color well to access all the swatches in the current
color palette. Then click to pick a color from the pop-up
set of color swatches.
Like the Stroke and Fill panels, the Effect panel has
controls for selecting effect type and name. Use the
Options pop-up to save, name, and delete custom
effect settings.
Choose a single effect from the Effect Category pop-up,
or choose Multiple to apply more than one effect.
Click the show/hide triangle at the bottom of the Effect
panel to show and hide the Effect preview.
Check Auto-Apply to automatically update the effect of
selected objects as you change effect settings. If the
preview is hidden, Auto-Apply is automatically turned
on. If the preview is visible and Auto-Apply is turned
off, click Apply to manually apply effect changes to
selected objects.
Getting Your Bearings 25
Page 26
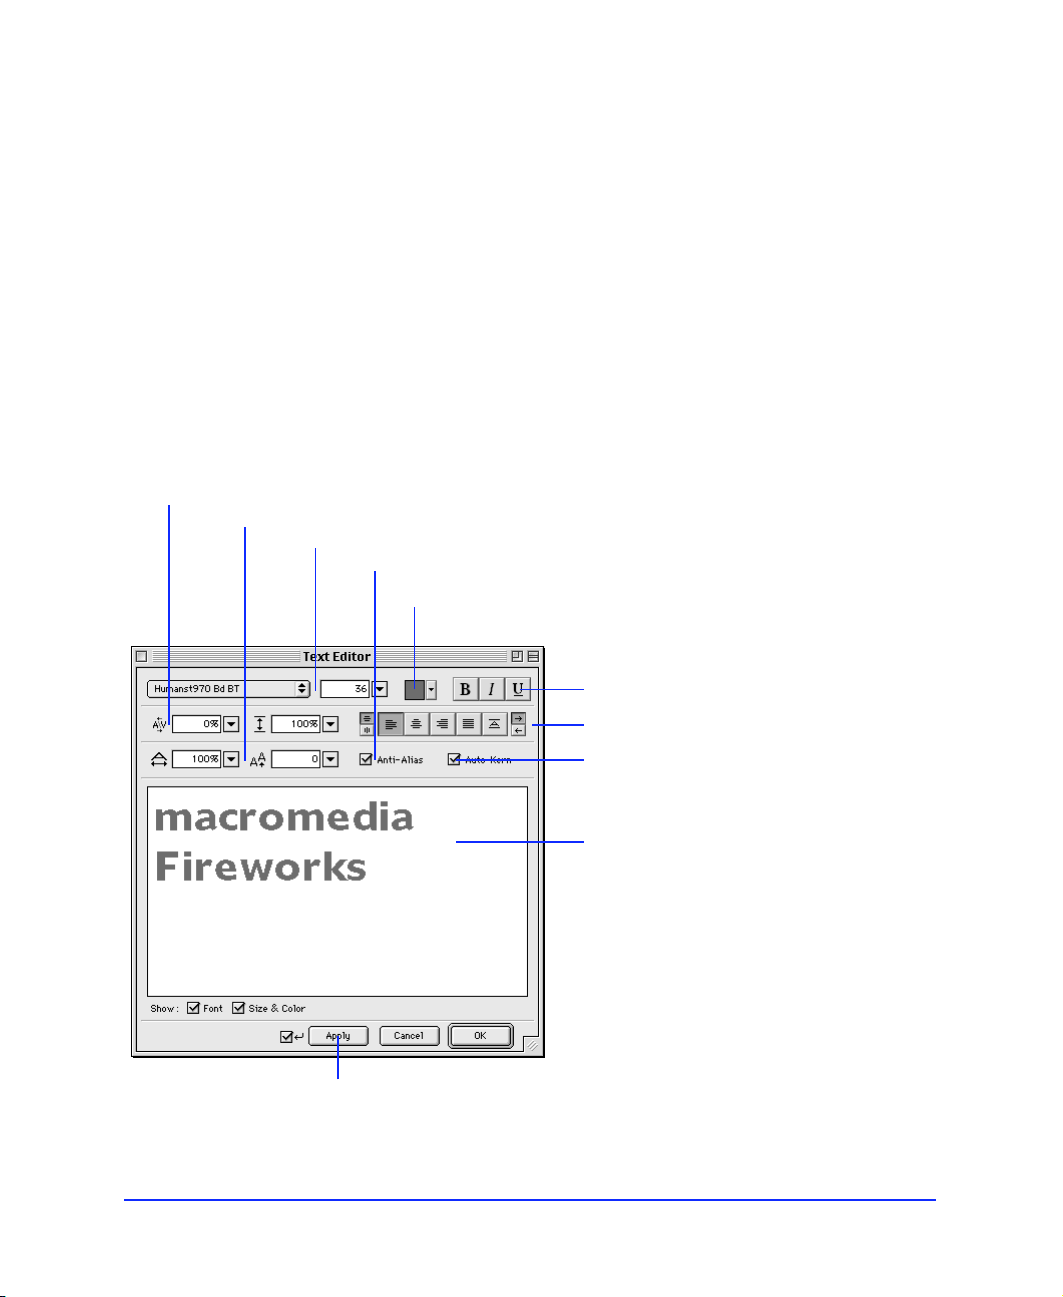
Text Editor
Use the Text Editor to create and edit text. Unlike text in
many other applications, Fireworks text is always
editable all the time. Edit text quickly and easily after
custom effects have been applied.
To choose a color in the Text Editor, you need not access
the Swatches panel. Just click the pop-up to the right of
the color well to access all the swatches in the current
color palette. Then click to pick a color from the pop-up
set of color swatches.
Set horizontal scaling and baseline shift.
Adjust kerning and leading.
Set font, size, and style.
Check to anti-alias text.
Add color to text.
Open the Text Editor by clicking on a document with
the Text tool, drawing a rectangular text block with the
Text tool, double-clicking a text container, or selecting a
text block and choosing Text > Editor.
After closing the Text Editor, resize the text block by
pulling or pushing handles. Move selected text blocks
with the Pointer tool.
Apply an underline to text.
Set orientation, alignment, and flow.
Check to automatically kern text.
Type or edit text.
Apply changes to the document
without closing the text editor.
Chapter 126
Page 27
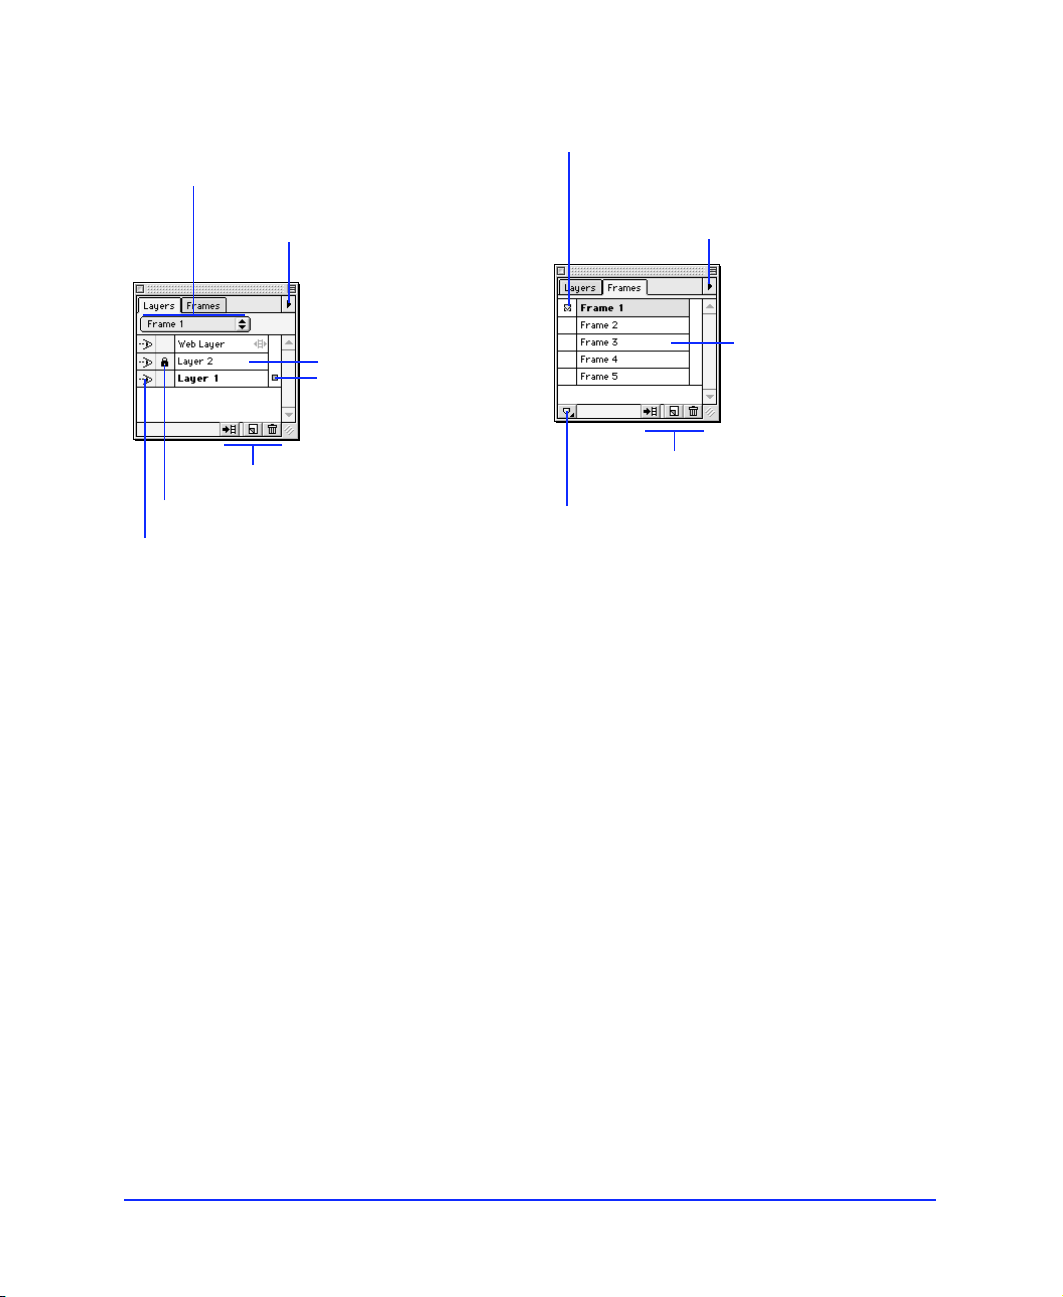
Layers panel and Frames panel
Navigate quickly to
a specific frame.
Change global view and lock
settings; create, delete, and rename
layers using the Options pop-up.
Drag to rearrange
layers. Double-click
to rename a layer.
Drag to assign selected
objects to another layer.
Share objects across frames.
Create, delete, and duplicate frames.
Distribute items across frames. Copy
selected items to specific frames.
Drag to rearrange
frames.
See “Icon buttons”
on page 28.
Lock and unlock individual layers.
Show or hide individual layers.
Use the Layers and Frames panels to organize and
animate your illustration. Layers divide an
illustration into discrete planes, as though the
components of the illustration were drawn on
separate tracing paper overlays.
See “Icon buttons”
on page 28.
Activate and
control onion
skinning.
Use the Layers panel to manage multilayered
documents. The Options pop-up includes commands
for creating, deleting, and renaming layers and
commands for viewing and locking all layers. Choose
Share Layer to share the selected layer across all frames
in the document. Choose Single-Layer Editing to
prevent accidental changes to layers other than the
selected layer.
The Web Layer, reserved for web objects such as
hotspots and slices, and cannot be renamed or deleted.
To show or hide individual layers, click the Show/Hide
icon at the left of the layer name. When the icon is
visible, the layer is also visible. Similarly, clicking the
Lock/Unlock icon locks and unlocks individual layers.
When a layer is locked, items on that layer may not be
moved or deleted.
To move a selected object to another layer, drag the
“Selected Objects” icon.
Use the Frame pop-up to quickly choose a different
frame in your document without switching to the
Frames panel.
Getting Your Bearings 27
Page 28
The Frames panel is the key to Fireworks animation
and rollovers. Use the Frames panel and the Animation
panel in the Export Preview to create animated GIFs.
The Frames panel lists each frame of an animation and
has controls for adding and deleting frames. Use the
Options pop-up to add, delete, duplicate, and copy
objects to specific frames.
Icon buttons
Use the buttons at the bottom right of the Layers and
Frames panels as shortcuts to create, distribute,
duplicate, or delete layers or frames. Select a frame or
layer and then click a button, or drag and drop a frame
or layer onto a button.
Delete
New/Duplicate
Distribute to Frames
To Do this
To Do this
Duplicate selected
objects onto a new
layer or frame
Delete a current
layer or frame
Delete currently
selected objects
Drag the square “Selected
Objects” icon from the right
column of the Layers or
Frames panel to the New/
Duplicate button.
Click the Delete icon
or
Drag the current layer or
frame name to the Delete
button.
Drag the square “Selected
Objects” icon from the right
column of the Layers or
Frames panel to the Delete
button.
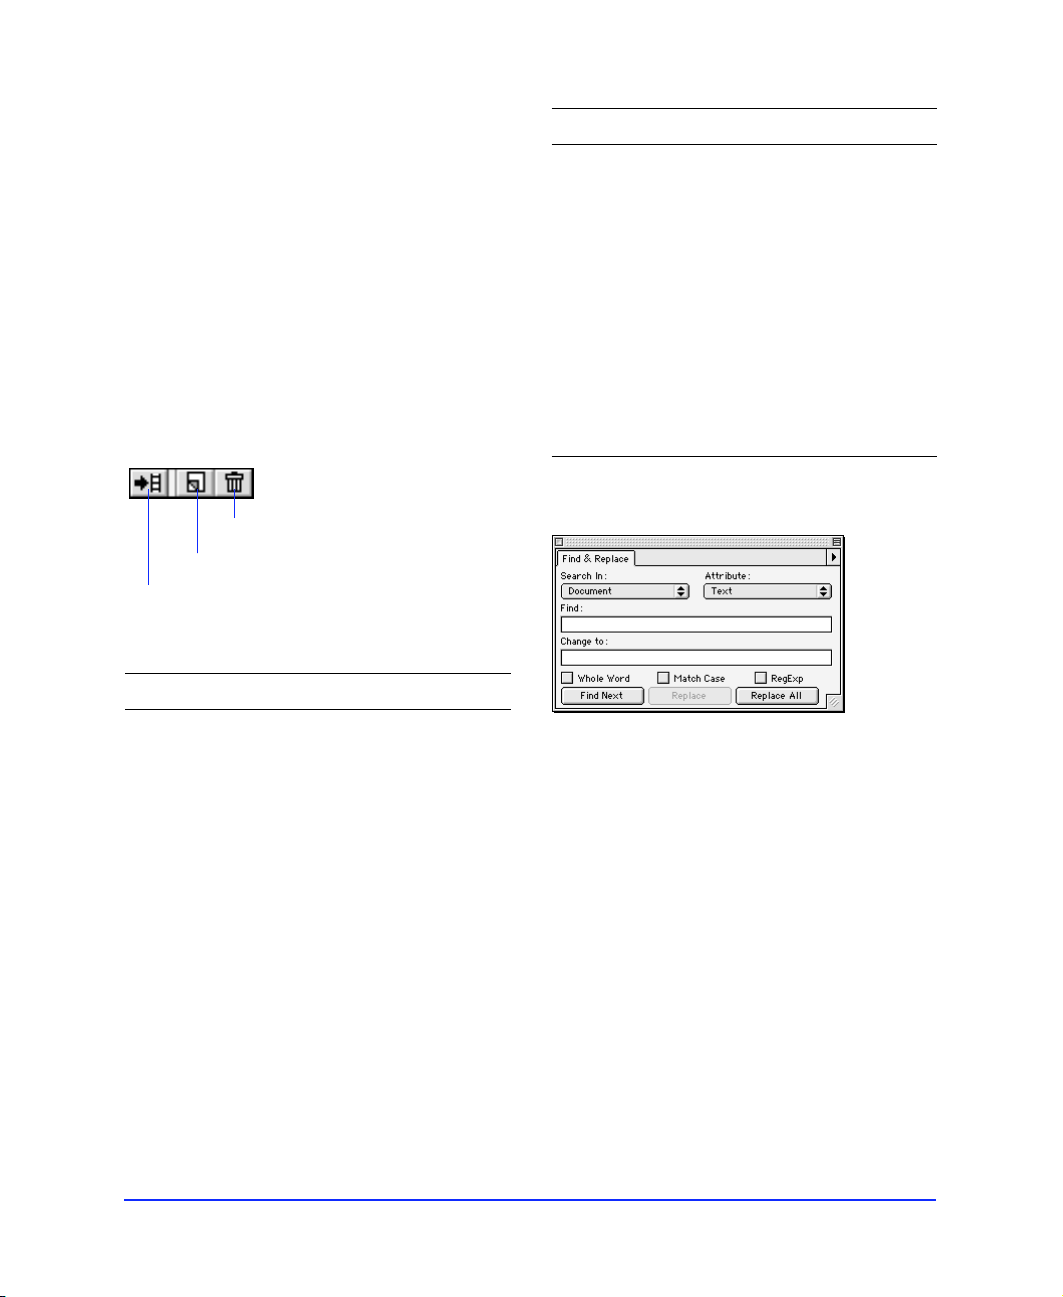
Find & Replace panel
Distribute a selected
group of objects
across frames
Distribute an entire
layer's objects to
specific frames
Create a new blank
layer or frame
Duplicate a current
layer or frame
Chapter 128
Click the Distribute button
after selecting objects
or
Drag the square “Selected
Objects” icon from the right
column of the Layers or
Frames panel to the Distribute
button.
Drag a layer name to the
Distribute button.
Click the New/Duplicate
button.
Drag the current layer or
frame name to the New/
Duplicate button.
Use Find & Replace to search for and replace various
elements of a document, such as text, URLs, fonts, and
colors. Find & Replace can search the current document
or multiple files. Also, Fireworks can track changes
made during a Find & Replace operation and store a log
of the changes in the Project Log panel.
Page 29
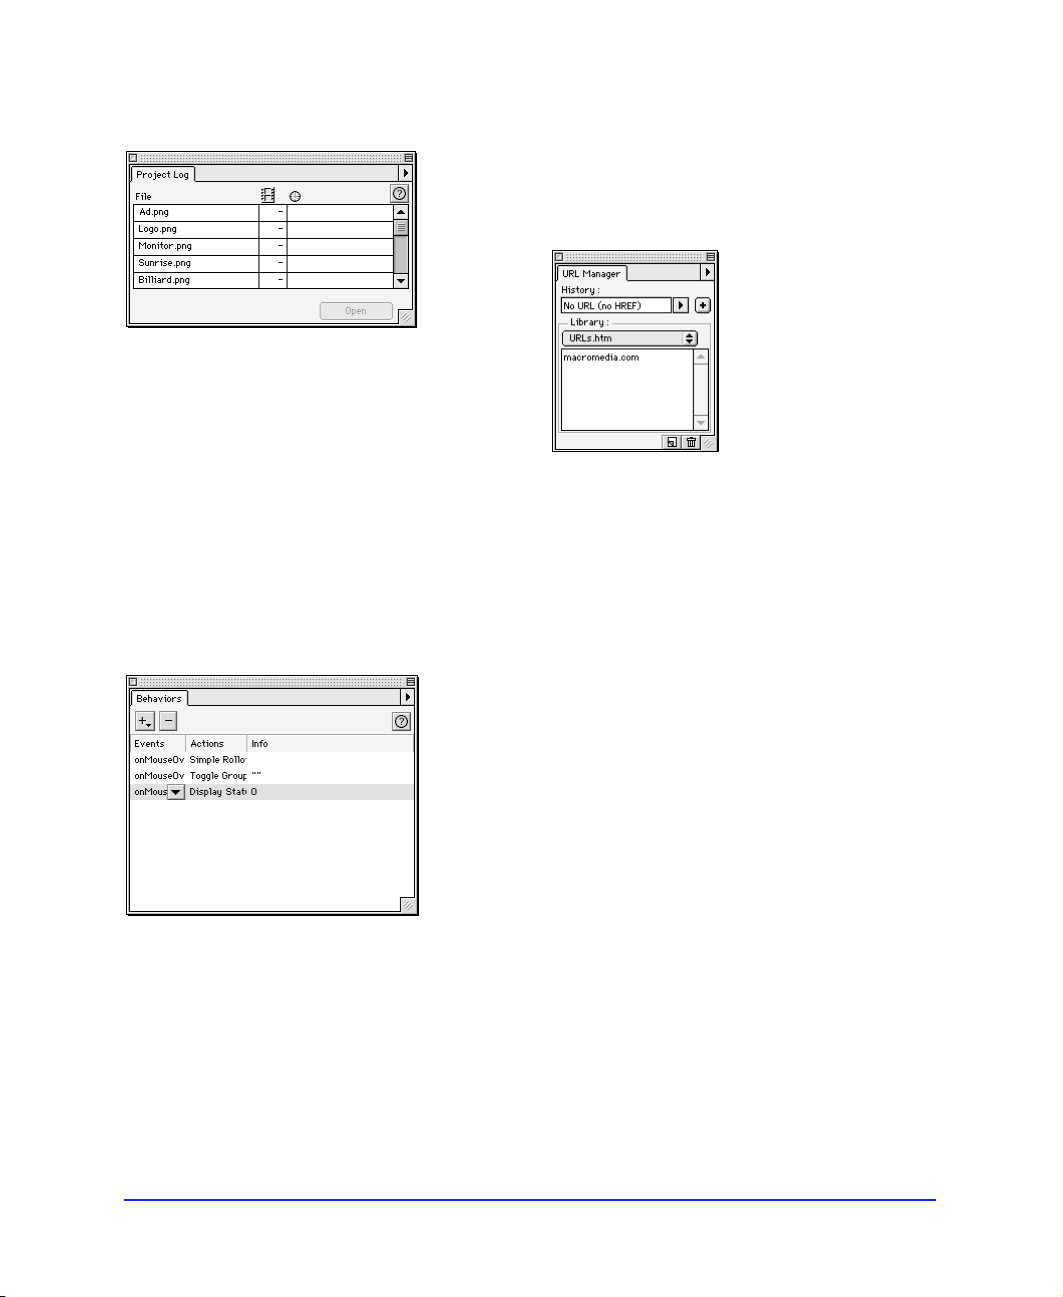
Project Log panel
The Project Log panel stores a log of changes made
during Find & Replace operations when searching
multiple files.
Any documents changed during a Find & Replace are
automatically recorded in the Project Log. Use the
Project Log to navigate through selected files, export
selected files using their last export settings, or select files
to be batch processed. Add files to the Project Log to
search them during a batch process or find and replace.
Behaviors inspector
The Behaviors inspector lists all behaviors assigned to
the currently selected web object. Use the Behaviors
inspector to edit or remove existing behaviors.
URL Manager
Add, load, and save URLs using the URL Manager.
URL stands for Uniform Resource Locator, which is an
address of a specific page or file on the Internet.
Fireworks can import URLs from any HTML file.
Fireworks can read bookmark files saved with Netscape
Navigator (typically stored in a file named
Bookmarks.htm) or favorites files saved with Microsoft
Internet Explorer.
When a document is first opened, Fireworks adds all
URLs in the document to the URL Manager's History
pop-up. Assign URLs to selected objects using the
History pop-up or by clicking a URL in the Library
window. URLs in the History pop-up are not retained
when the application is closed. To save the active
History URL into the URL Library, click the Add to
Library Button next to the History pop-up.
Use the Behaviors inspector to add actions to specific
user events, which are called behaviors. Behaviors are
assigned to web objects, either hotspots or slices. A
typical behavior is a pop-up status message assigned to
a hotspot region so that the message is displayed
(action) when the user points to it with the mouse
cursor (event).
Getting Your Bearings 29
Page 30
Working with the URL Manager
To Do this
To Do this
Add a Fireworks
file's URLs to the
URL Manager
Determine what URL
is assigned to an
object
Assign a URL to an
object
Add a URL to the
URL Library
Edit URL in the URL
Library
Open the file. All URLs are
automatically added to the
History pop-up.
Select the object and note the
URL’s name in the History
field.
Select the object and choose a
URL from the History pop-up
or
Select the object and click a
URL in the Library window.
1.Enter or select the URL in
the History pop-up.
2.Click the Add to Library
button (+) to the right of
the History pop-up
or
1.Choose Add URL from the
Options pop-up
2.Enter a URL in the New URL
dialog box
or
Choose Add History to Library
from the Options pop-up
1.Select the URL in the URL
Library.
2.Choose Edit URL from the
Options pop-up.
Import a URL Library 1. Choose Import URLs from
Create a new URL
Library
the Options pop-up.
2.Select desired library, HTML,
or bookmark file.
1.Choose New URL Library
from the Options pop-up.
2.Name the new URL Library
in the New URL Library
dialog box.
or
Place an HTML bookmark file
in the Fireworks 2/Settings/
URL Libraries folder.
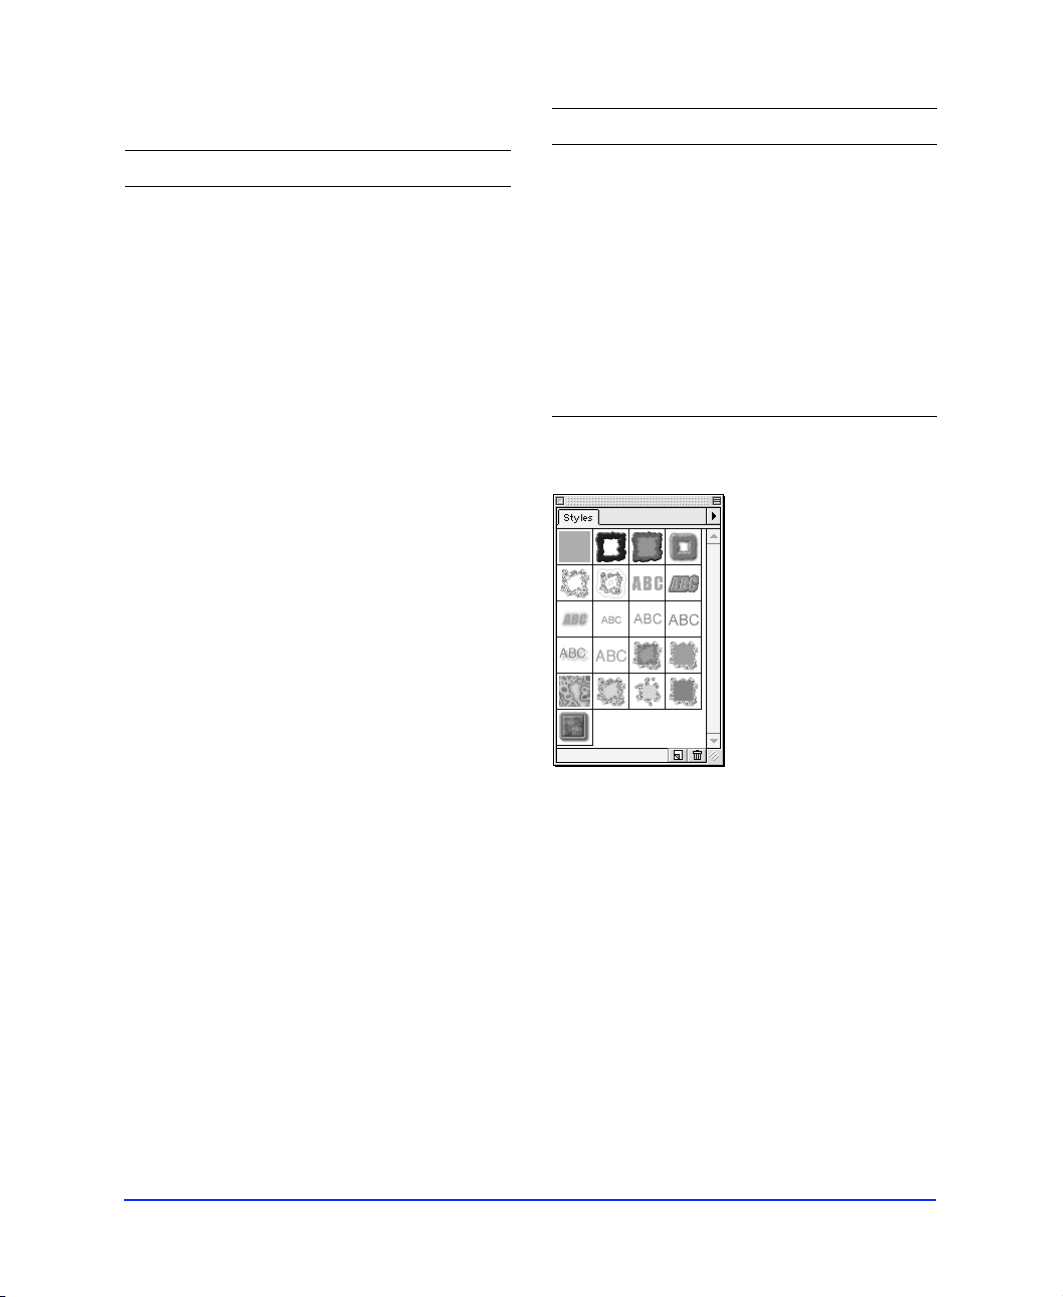
Styles panel
Delete a URL in the
URL Library
Export current URL
Library
Chapter 130
1.Select the URL in the URL
Library.
2.Choose Delete URL from the
Options pop-up.
1.Choose Export URLs from
the Options pop-up.
2.Name the exported library
and choose a destination.
The Styles panel provides a library of built-in styles for
text and graphics, which are viewed as large or small
graphical icons. A style can include any attribute such as
font, point size, color, fill, stroke, or effect. More than one
style can be applied to any individual object.
Use the Styles panel to create new styles, or edit or delete
existing styles. Style libraries are stored in Fireworks
Styles files. Import or export styles to or from a
Fireworks document.
Page 31

Using panels
Fireworks panels float above the document. Place them
anywhere on your screen. Click a tab to display a
particular panel. View and hide all panels as described
below. These tabbed panels can be moved, separated, or
grouped by dragging their tabs. Use the Window menu
to show and hide panels individually.
Fireworks includes the following tabbed panels:
◆ Tool Options panel
◆ Swatches panel
◆ Color Mixer
◆ Stroke panel
◆ Fill panel
◆ Effect panel
◆ Layers panel
◆ Frames panel
◆ Info panel
◆ Object inspector
◆ Find & Replace panel
◆ Project Log panel
◆ Behaviors inspector
◆ URL Manager
◆ Styles panel
To group a panel with another panel:
To remove a panel:
To hide all panels:
Choose View > Hide Panels or press the Tab key. All
currently open panels will be hidden.
To view hidden panels:
Choose View > Hide Panels to uncheck the Hide Panels
option or press the Tab key. All hidden panels appear.
Panels that were closed when the Hide Panels option
was activated will remain hidden when Hide Panels is
unchecked.
Getting Your Bearings 31
Page 32

To return the panels to their default positions and reset
application-level preferences, quit Fireworks, delete the
preferences file named Fireworks Preferences located in
the Fireworks folder, and relaunch Fireworks.
Close any of these panels using the standard close box.
Open or close them by choosing the appropriate
command from the Window menu.
Navigating and viewing the document
Setting document magnification
Fireworks magnification ranges from 6 percent to
6400 percent.
Choose a magnification
setting from the pop-up.
To Do this
Enlarge a document
view level
Reduce a document
view level
Chapter 132
Choose the Magnify tool and
click inside a document
window
or
Choose an increment from the
Magnification pop-up
or
Choose View > Magnification
and choose a magnification
level.
Choose the Magnify tool, hold
down Alt (Windows) or Option
(Macintosh) and click in a
document
or
Choose an increment from the
Magnification pop-up
or
Choose View > Magnification
and choose a magnification
level.
Page 33

To Do this
Magnification shortcuts
Zoom to the highest
magnification
Zoom to the lowest
magnification
Zoom in to view a
specific area
Zoom out Choose the Magnify tool and
Choose 6400% from the
Magnification pop-up
or
Choose View >
Magnification > 6400%
or
Press Control-6 (Windows) or
Command-6 (Macintosh).
Choose 6% from the
Magnification pop-up
or
Choose View >
Magnification > 6%.
Choose the Magnify tool and
drag a selection area.
hold down Alt (Windows) or
Option (Macintosh) and drag a
selection area.
To Press
Set view to 50% Control-5 (Windows) or
Command-5 (Macintosh).
Set view to 100% Control-1 (Windows) or
Command-1 (Macintosh).
Set view to 200% Control-2 (Windows) or
Command-2 (Macintosh).
Set view to 400% Control-4 (Windows) or
Command-4 (Macintosh).
Set view to 800% Control-8 (Windows) or
Command-8 (Macintosh).
Set view to 3200% Control-3 (Windows) or
Command-3 (Macintosh).
Set view to 6400% Control-6 (Windows) or
Command-6 (Macintosh).
Zoom in Control-Spacebar (Windows)
or Command-Spacebar
(Macintosh)
or
Control-+ (Windows) or
Command-+ (Macintosh).
Zoom out Control-[minus] (Windows) or
Command-[minus]
(Macintosh).
Shortcut menus
Click the right mouse button (Windows) or Controlclick (Macintosh) to display a shortcut menu
containing a variety of commands. These menus vary
according to which tool is chosen or which objects are
selected. For example, one shortcut menu is available
when selecting objects, while another shortcut menu is
available when in image edit mode. Experiment with
shortcut menus to speed your work.
Multiple document views
Use multiple views to see one document at two different
view modes or magnifications simultaneously.
Getting Your Bearings 33
Page 34

To open a second document view:
1 Choose Window > New Window.
2 Change the view and magnification of the new
document window.
To close a document view window, click the window’s
close box.
Optimizing document redraw
Choose one of two view modes from the View menu:
Full Display or Draft Display. View modes affect a
document’s on-screen representation, not its object data
or output quality.
When in Draft Display, switch to Full Display by
choosing View > Full Display or by using the Display
Mode pop-up on the View Controls toolbar
(Windows) or in the lower-left corner of the document
window (Macintosh).
Display controls
(Windows)
Choosing a display mode
Choose To
Full Display Display the document in all
available colors with full
detail.
Draft Display Display paths as one pixel
wide with no fill. Each image
object appears as an X-box.
A Case Study: With and Without Fireworks
Before Fireworks, creating graphics for the web involved
several applications, with each contributing to a portion
of the task. Imagine that a web designer named Diana is
asked by a client to create an artist’s palette to serve as a
navigation graphic on a web page. The graphic will be
used to link to other places on the client’s web site and
must contain rich textures and effects to capture the
viewer’s attention. Accordingly, the graphic must
contain web-safe colors, text, textures, Live Effects, and
hotspot links.
How Diana approaches this task without
Fireworks:
1 Create a line drawing of an artist’s palette using
an application, such as Macromedia FreeHand.
2 Import the vector graphic into an image-editing
application, such as Adobe Photoshop, to
rasterize the graphic (convert the vectors to
pixels).
3 Apply third-party filter effects, such as bevels and
drop shadows.
4 Use a utility, such as Equilibrium DeBabelizer, to
convert the image to a web-safe color palette in
the proper graphics file format with an
optimized size.
5 Painstakingly add hotspot objects or animation
using yet another application.
6 Manually attach hyperlinks to the hotspots that
link to the client’s web pages.
7 View the results of this process in a web browser.
Unfortunately, if the graphic has the slightest flaw,
Diana must often begin again and redo every step to
reproduce the graphic. In adjusting file-size
optimization, Diana may need to retrace all or some of
these steps. Even if the result is acceptable to the
designer, client-driven changes such as text edits may
result in repeating these steps many times until the final
product is complete.
Note: For easier editing, objects selected while in Draft
Display mode display in full detail.
Chapter 134
Page 35

The Fireworks way
With Fireworks, Diana doesn’t need those other
programs. She needs only Fireworks to produce this
graphic from start to finish. Even better, modifications
are easy, even after the graphic has been loaded onto the
web site.
How Diana uses Fireworks to make this job easy:
1 Open a new Fireworks document or import an
existing document.
In our example, the vector framework is created in
Fireworks using the intuitive vector tools.
Fireworks imports all major web design file formats.
Alternatively, Diana can create this vector art in
FreeHand and open it directly in Fireworks.
Create vector art in Fireworks or open FreeHand
documents directly.
2 Apply strokes, fills, and effects.
Apply realistic strokes, fills, and effects using the
Stroke, Fill, and Effect panels. Use the Effect panel to
bevel the edge of the palette. In this example, Diana
uses the vector tools to alter the number and
location of the paint wells on the artist’s palette. She
then applies a wood pattern fill and bevel effect to
produce this image.
3 Reshape the object.
Alter the shape of the artist’s palette using the
Reshape Area tool.
Getting Your Bearings 35
Page 36

4 Add text.
Use Fireworks’ Text Editor to create and
modify text.
5 Add a drop shadow to the text.
Apply a live drop shadow effect to the text using the
Effect panel. Even though a drop shadow effect has
been added, the text can still be modified.
6 Create the image map.
Use the hotspot tools in the Toolbox to add hotspot
objects to the paint wells. These hotspots can link to
any URL. Use the Object inspector to define map
type, background URL, and alternate image
descriptions. In our example, Diana selects the three
labeled paint wells and chooses Insert > Hotspot.
This command creates a hotspot object the same
size, shape, and location as the original path. With
each path selected, Diana defines the linked hotspot
using the Object inspector.
Chapter 136
Page 37

7 Optimize the graphic upon export.
Exporting from Fireworks is a dynamic experience
offering live feedback and total control over color
depth, file format, palette selections, and animation.
View up to four simultaneous live previews as you
compare output options and see the results on
screen before exporting.
Setting up your document
Consider your document’s design and final output
requirements. Decide in advance which settings are best.
Canvas size
Set the canvas size in the New Document dialog box to
define the size of your document. Set canvas dimensions
using pixels, inches, or centimeters. Alter the canvas size
by choosing Modify > Document > Canvas Size or by
using the Crop tool to crop the image.
Resolution
Resolution is defined in the New Document dialog box
as either pixels per inch or pixels per centimeter.
Consider the intended delivery medium when assigning
resolution. For example, web graphics are usually saved
at 72 pixels per inch.
8 Revise.
Diana's client loves the graphic but requests two
changes. The client wants a different color on the
Feedback paint well and wants the text’s drop
shadow to be changed to an inner bevel. No
problem! Diana opens the file in Fireworks, changes
the color of the Feedback paint well, changes the
drop shadow to an inner bevel, and exports again
using the previous export settings.
Objects created in Fireworks are always editable, all
the time.
Canvas color
The canvas is at the bottom layer of the document.
Choose a white canvas, a transparent canvas, or a color
canvas in the New Document dialog box. Change
canvas color later by choosing Modify > Document >
Canvas Color. To choose a color in the Canvas Color
dialog box, click the pop-up to the right of the color
well to access all the swatches in the current color
palette. Then click to pick a color from the pop-up set
of color swatches.
Getting Your Bearings 37
Page 38

Number of undo steps
Grid
Choose File > Undo to reverse an action. Enter a value of
up to 100 in the General > “Undo Steps” preference field.
RAM requirements increase as the number of undo
steps increases.
Note: Changes to the Undo preference do not take
effect until Fireworks is restarted.
Unit of measurement
Define canvas size using pixels, inches, or centimeters in
the New Document dialog box. The unit you choose
appears in the Info panel. Change the unit using the
Info panel's Options pop-up.
Note: Regardless of the document’s unit of
measurement, rulers always display in pixels.
Rulers
To show or hide rulers, choose View > Rulers. To set the
ruler’s zero point, click and drag the zero-point marker
from the upper-left corner of the document window to a
new location. The zero point represents the intersection
of the horizontal and vertical rulers. Double-click the
zero point marker to reset the zero point to its
default position.
The grid is a non-exporting background of horizontal
and vertical lines. Choose View > Grid to display the
grid. With View > Snap to Grid checked, dragging an
object near a grid line causes that object to snap to
the grid.
Set grid color.
Set horizontal
grid spacing.
Set vertical
grid spacing.
Chapter 138
Page 39

Guides
Working with the grid and guides
Use guides, which are non-exporting guidelines, to
precisely align and place objects. Choose View > Guides
to show or hide guides.
To add a guide with the page rulers active, drag from
either the horizontal or the vertical ruler.
With View > Snap to Guides checked, objects snap
when dragged near guides.
Editing guides
Choose View > Edit Guides to open the Guides
dialog box.
To Do this
Show or hide
the grid
Snap objects to
the grid
Modify the grid Choose View > Grid Options
Show or hide rulers Choose View > Rulers.
Show or hide ruler
guides
Show or hide slice
guides
Snap objects to
guides
Edit guides Choose View > Guide
Choose View > Grid
or
Check Show Grid in the Grid
dialog box.
Choose View > Snap to Grid
or
Check Snap to Grid in the
Edit Grid dialog box.
> Edit Grid.
Choose View > Guides.
Choose View > Slice Guides.
Choose View > Guide
Options > Snap to Guides
or
Check Snap to Guides in the
Edit Guides dialog box.
Options > Edit Guides.
Use To
Color Change the guides’ color.
Show Guides Show or hide guides.
Snap to
Guides
Lock Guides Prevent guides from moving.
Clear All Remove all ruler guides, not slice
Slice Color Change the color of slice guides.
Show Slice
Guides
Easily align objects to guides.
guides.
Show or hide slice guides.
Lock guides Choose View > Guide
Options > Lock Guides.
Getting Your Bearings 39
Page 40

Importing and Exporting
Fireworks can import a wide variety of vector and
bitmap graphic formats and can export many bitmap
graphic formats. Discussed in “Using Export Preview,”
one of Fireworks’ greatest strengths is the ability to
export many formats with extensive export preview
capabilities.
Export Preview provides immediate and dynamic
feedback on the appearance and technical specifications
of your graphics before exporting them. Use the Export
Preview to experiment with export formats, color depth,
and palette assignments and immediately see the results.
Importing bitmap images
Fireworks imports BMP, GIF, JPEG, PICT
(Macintosh), PNG, TIFF, xRes LRG, Targa, and
Photoshop files. When imported, these files are fully
editable using Fireworks bitmap editing tools and many
Photoshop third-party plug-ins while in image edit
mode. In addition to file name and location, the Import
File dialog box shows file size, format, and a thumbnail
preview, if available.
To import a bitmap graphic:
1 Choose File > Import or use Command-R
(Macintosh) or Control-R (Windows).
2 Choose the file to import.
3 Position the import cursor where the upper-left
corner of the graphic is to appear.
4 Click the mouse button to place the graphic at its
default size, or click and drag the import cursor
to resize the image while importing.
Importing vector art
Fireworks imports vector graphics from Macromedia
FreeHand 7 and 8, Adobe Illustrator 7 and 8, and
uncompressed CorelDRAW 7 and 8. Imported paths
are fully editable as if they were created in Fireworks.
Fireworks offers several choices for importing multilayer
documents, including layer-to-layer and layer-to-frame
interpretations. See “Importing FreeHand, Illustrator, or
CorelDRAW files” on page 89 for more information on
importing vector graphics.
Chapter 140
Page 41
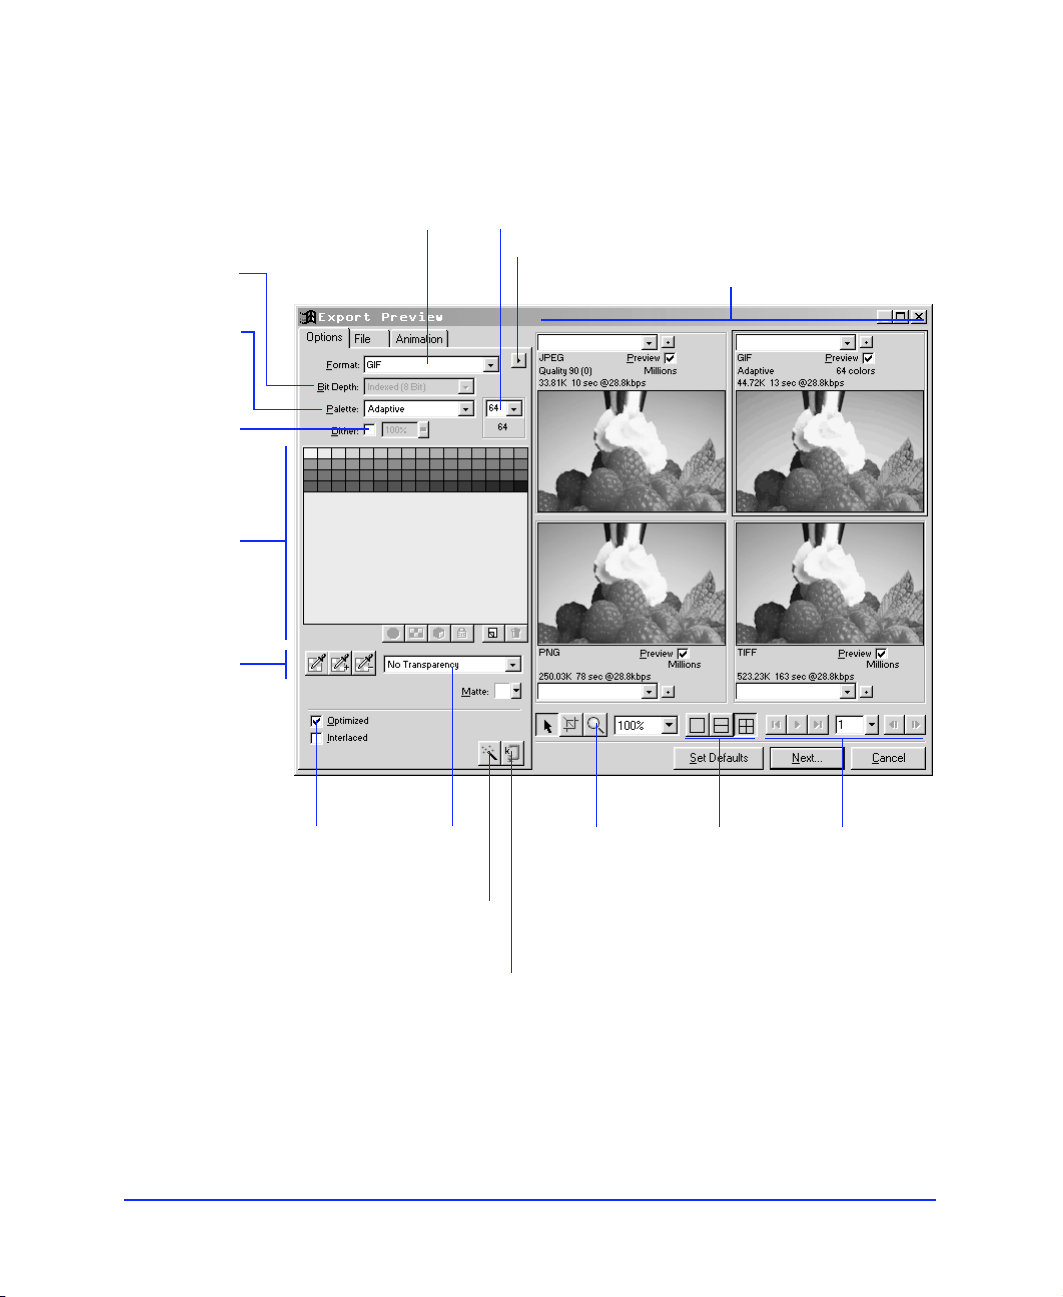
Exporting
Choose a color
depth.
Choose a color
palette.
Check to dither
the image.
Preview and
edit the colors
in the image’s
palette.
Add to or
remove colors
from the
transparency.
Choose a format.
Enter a maximum number of colors for the exported file.
Click to edit, save, or load a palette.
Preview up to four previews.
Check to optimize
the exported graphic.
Choose the
type of
transparency.
Click to launch the
Export Wizard.
Click to launch the
Export to Size
Wizard.
Use the Magnification
tool to magnify the
preview area.
Choose the
number of
views shown
in the preview
area.
Getting Your Bearings 41
Use frame
controls to
preview
frames or play
an animated
GIF.
Page 42

To export a graphic:
1 Choose File > Export or use Control-Shift-R
(Windows) or Command-Shift-R (Macintosh) to
open the Export Preview.
2 Choose settings on the Options, File, and
Animation panels.
3 View the effect of your settings in the preview
area. The preview area can display up to four
views simultaneously.
4 Click Next when you are ready to export the file
with the current settings.
Export Wizard
Activate the Fireworks Export Wizard by choosing
File > Export Wizard or by clicking the Export Wizard
button in the Export Preview. The Export Wizard asks
questions regarding your exported file’s intended use and
suggests appropriate graphic formats.
Export dialog box
Use the Export dialog box to choose the location and
name of your exported files. Use the Export dialog box
pop-ups to set slicing and HTML style options.
Document Properties
The Document Properties dialog box contains
document-specific export settings. Change these settings
to control slicing and image map options. Save your
defaults using the Set Defaults button.
Select the Shim type for
HTML tables: none,
Transparent Image, or
Shims from Image.
Set Slice
variables.
Set Image Map
characteristics.
Chapter 142
Page 43

CHAPTER 2
Creating and Editing a Graphic
................................................................................................................
2
43
Page 44

Object mode and image edit mode
Computer graphics are one of two types: vector
drawings created in an application such as Macromedia
FreeHand, or bitmap images created in an application
such as Adobe Photoshop.
Paths are the basic elements of vector graphics.
Generated mathematically, a path has at least two points.
Each point joins path segments and point handles
control the shape and length of adjacent segments.
Pixels, the basic elements of bitmap graphics, are tiny
squares that combine like the tiles of a mosaic to create
an image. A bitmap image becomes more granulated as
magnification reveals the individual pixels.
Fireworks blurs the distinction between vector graphics
and bitmap image graphics. The path of a Fireworks
object is an editable vector path. Yet it may also have a
wide, textured stroke, an image fill, and an effect such as
a drop shadow, bevel, or glow.
Magnifying any Fireworks object reveals pixels. Yet the
object's pixels redraw in response to vector editing. Even
effects—previously reserved for bitmap image
applications—redraw after an object is edited.
Fireworks can edit both types of objects—vector objects
and image objects. Some tools behave in different ways
when editing either type of object.
Object mode is the default mode, where vector graphic
creation and some image manipulation occurs. Image
edit mode is where pixel editing occurs within an image
object. A blue and black striped border outlines the
current document, signifying that Fireworks is in image
edit mode.
Fireworks has up to 100 undo steps, which are available
in both image edit mode and object mode. The default
number of Undo Steps in File > Preferences is 8.
Fireworks drawing and editing tools
The table below describes each tool's basic function on
each type of object. Some tools work only on one type of
object, while others work on both. The characteristics of
some tools change according to the type of object being
edited.
Fireworks drawing and editing tools use smart cursors
which show what tool is being used by the shape of the
cursor. For example, the paintbrush tool cursor is a small
paintbrush and the pencil tool cursor is a small pencil.
To replace these smart cursors with more precise
crosshair cursors, check the File > Preferences > Editing >
“Precise Cursors” preference. Press the Caps Lock
button to temporarily enable precise cursors without
using this preference.
Tools that behave exactly the same on both types of
objects are not in this table.
This tool In object mode In image edit mode
Pointer Selects and moves
Select
Behind
Crop Discards portions of
Subselection
Marquee
or Ellipse
Marquee
paths on the
screen.
Selects an object
behind the selected
object.
a document.
Selects and moves
paths on screen,
selects an object
within a group or
symbol, displays
points on a path,
and selects points.
Activates image
edit mode and
selects or moves a
rectangular or
elliptical area of
pixels.
Moves the image or
moves pixels bound
by a marquee.
Double-click an
image to edit its
pixels.
Moves the image or
moves pixels bound
by a marquee.
Discards portions of
a floating image
document.
Moves the image or
moves pixels bound
by a marquee.
Selects or moves a
rectangular or
elliptical area of
pixels.
Chapter 244
Page 45

This tool In object mode In image edit mode
Editing path objects
Lasso or
Polygon
Lasso
Magic
Wand
Line and
Basic
Shapes
Pen Draws objects as
Text Creates and edits
Pencil Draws one-pixel
Brush Draws brush
Freeform Pulls or pushes a
Reshape
Area
Activates image
edit mode and
selects or moves a
freeform area of
pixels.
Activates image
edit mode and
selects or moves a
area of similarly
colored pixels.
Draws objects as
editable paths.
editable paths.
text blocks and
opens the Text
Editor.
pencil strokes as
freeform paths.
strokes as paths.
selected path to
reshape it.
Reshapes the parts
of a selected path
that lie within the
Reshape Area
cursor area.
Selects or moves a
freeform area of
pixels.
Selects an area of
similarly colored
pixels.
Paints pixel brush
strokes on an image
object.
Leaves image edit
mode and draws
objects as editable
paths.
Leaves image edit
mode, creates text
blocks, and opens
the Text Editor.
Draws one-pixel
pencil strokes as
pixels.
Paints brush strokes
as pixels.
Leaves image edit
mode.
Leaves image edit
mode.
In object mode, paths and points are the basic elements
of graphic design. Upon magnification, Fireworks path
objects appear pixelated, as if painted in an image-editing
application. However, at the root, path objects remain
editable. Fireworks combines the editability of Bézier
curves with the organic look of bitmap images.
Activities in object mode include:
◆ Drawing paths by dragging a basic shape tool or the
Line tool, placing points with the Pen tool, or
drawing paths with a pixel-wide stroke with the
Pencil tool.
◆ Drawing paths with a wide variety of brush strokes,
including textures and patterns with the Brush tool.
◆ Editing paths with the Freeform, Reshape Area,
Eraser, Redraw Path, Path Scrubber, and other tools.
◆ Editing paths by moving points and adjusting
Bézier handles.
◆ Editing paths by using a path operation, such as
Union, Intersect, Punch, Crop, Simplify, Expand
Stroke, and Inset Path.
◆ Typing and editing text.
◆ Importing, positioning, and applying effects to
bitmap images.
◆ Importing and editing documents with vector
graphics created in applications such as FreeHand.
Path
Scrubber
Eraser
(Knife)
Rubber
Stamp
Alters a path’s
pressure and speed
characteristics
without changing
its shape.
Cuts a selected
path into separate
paths.
Activates image
edit mode and
clones portions of
an image object.
Leaves image edit
mode.
Erases pixels from an
image.
Clones portions of
an image object.
A vector object with an
editable path and points.
A bitmap image with a
rectangular image
bounding box.
Creating and Editing a Graphic 45
Page 46

Brush strokes created in image edit mode may appear
A
the same as those drawn in object mode, but they are
strictly bitmap images. Conventional vector-editing
techniques cannot edit these images. Working in image
edit mode is similar to other image-editing applications.
Open and closed paths
Open—An open path has a beginning point and an
ending point that do not connect.
Closed—A closed path has a beginning point and an
ending point that connect.
To close a path with any drawing tool, return the cursor
to the starting point of the path and click when a black
square appears next to the cursor.
When this square appears,
release the mouse button to
close the path.
Drawing paths
Use the Pen tool to draw paths by plotting points, as in
FreeHand, or use the Brush tool to paint paths, as in
Photoshop. Either way, a brush stroke with a path and
points is created when in object mode.
Open path Closed path
A single path can overlap itself to create a loop that
appears to enclose an area, but that is not a closed path.
Only joined endpoints create a closed path. Either type
of path can have a fill. Paths drawn with basic shape
tools are closed paths.
To resume drawing an existing open path, use the Pen
tool or the Redraw Path tool to click the ending point
and continue the path.
Completing open and closed paths
To end an open path when using the Pen tool, doubleclick the Pen tool at the ending point when a small
arrow appears next to the cursor. To end an open
path when using other drawing tools, release the
mouse button.
Pen tool
Displaying and selecting paths
Brush tool
All path objects in object mode are editable. The active
tool and the status of the Hide Edges command
determine which path and point information is
displayed.
Displayed path and hidden points—Use the Pointer
tool to drag a selection area around any part of one or
more paths or click a path to select it.
n object selected with the Pointer tool displays the path of the
object without points.
Chapter 246
Page 47

Displayed path and points—Choose the
A
S
S
D
a
Subselection tool to automatically display the points on
all selected paths. Use the Subselection tool to drag a
selection area around one or more paths, displaying the
path and points of all selected objects, or click a path to
select it.
An object selected with the Subselection tool displays the path of
the object with points.
Hidden path and points—Choose View >
Hide Edges to hide the paths and points of
selected objects.
selected object displays no path when Hide Edges is checked.
With Hide Edges checked, choosing the Subselection
tool shows the points of selected objects without the
path.
Note: With Hide Edges checked, look at the Status bar
(Windows) or Object inspector to identify the currently
selected object. Hide Edges also hides marquees in
image edit mode.
Editing points to reshape paths
Points are the framework for a vector path. The position
and length of each point handle determine the shape
and position of adjacent path segments.
ubselection tool
To select an individual point, use the Subselection tool.
Either click individual points or drag a selection area
around one or more points. To move a point, drag it with
the Subselection tool.
Fireworks has two point types:
Curve—Adjacent segments are curved. Clicking a curve
point with the Pen tool converts it to a corner point,
retracting the handles and straightening the adjacent
segments.
Corner—One or both adjacent segments are straight
lines. Clicking a corner point and dragging away from it
with the Pen tool converts it to a curve point, extending
the handles and curving the adjacent segments.
To change the shape of an adjacent path segment, drag a
point handle. The path preview shows the result of
moving the handles.
Point handle
Subselection cursor
Path preview
Path
To add more objects to a current selection, hold down
Selected point
Shift and select the additional objects. To select a path
behind another path, use the Select Behind tool.
rag a point handle with the Subselection tool to edit
djacent path segments.
If handles are not visible, hold down Alt (Windows) or
elect Behind tool
Options (Macintosh) and drag from a point using the
Subselection tool so that the point handles appear.
Creating and Editing a Graphic 47
Page 48

To bend only one adjacent segment, leaving the other
segment unedited, hold down Alt (Windows) or
Option (Macintosh) and drag a point handle from the
point with the Subselection tool.
Using path operations to reshape paths
A powerful way to create complex paths is to use path
operations to combine or alter paths.
Drawing in object mode
Draw paths in any of three ways:
◆ Use the Brush tool or Pencil tool to draw freeform
paths.
◆ Use the Line, Rectangle, Ellipse, or Polygon tool to
draw paths by dragging.
◆ Use the Pen tool to draw paths by plotting points.
Use To
Union Combine two or more closed paths
Intersect Create a path enclosing the area
Punch Remove portions of selected, closed
Crop Remove portions of selected, closed
Simplify Remove points from a path while
Expand
Stroke
Inset Path Expand or contract one or more closed
into a single path enclosing the entire
area of the original paths. Stroke and
fill attributes of the back object are
applied to the resulting path.
common to all selected, closed paths.
Stroke and fill attributes of the back
object are applied to the resulting
path.
paths below the frontmost, closed
path. Stroke and fill attributes remain
unchanged.
paths outside the area of the
frontmost, closed path. Stroke and fill
attributes remain unchanged.
maintaining the same overall shape.
Convert the perimeter of the stroke of
the selected path into a closed path.
paths by a specified amount.
To apply a path operation, first select objects. Then,
choose one of the path operation commands from the
Modify > Combine or Modify > Alter Path submenus.
Applying Union, Intersect, Punch, or Crop to objects
may yield a composite path, which consists of individual
paths joined together.
Drawing by dragging
Line tool
Basic shape tools
To draw using the Line tool or a basic shape tool, hold
down the mouse button to start a path, drag to draw,
and release the mouse button to complete the path.
Use Shift with the To constrain shapes to
Rectangle tool Squares.
Ellipse tool Circles.
Polygon tool Polygons oriented at
Line tool Lines at increments of 45
Pencil tool Horizontal or vertical lines.
Brush tool Horizontal or vertical lines.
increments of 45 degrees.
degrees.
Note: Using a path operation removes all pressure and
speed information from the affected paths.
Chapter 248
Page 49

To draw a basic shape from a specific centerpoint, hold
down Alt (Windows) or Option (Macintosh) and
drag a drawing tool. The Polygon tool always draws
from a centerpoint.
To both constrain a shape and draw from the
centerpoint, hold down Shift-Alt (Windows) or ShiftOption (Macintosh) while using a drawing tool.
The corner rounding percentage setting on the
Rectangle Tool Options panel determines the
curvature of the corners of rectangles drawn using the
Rectangle tool. To assign a rounding percentage value
to the corners of a rectangle, enter a value or use the
slider on the Rectangle Tool Options panel before
drawing the rectangle.
Use the Polygon tool to draw stars and other polygons.
Use the Polygon Tool Options panel to set the number
of sides, choose stars or shapes, and set angle acuteness.
Drawing by plotting points
To draw using the Pen tool:
1 Choose the Pen tool.
2 Click to plot corner points.
Press and hold the mouse button on a point, then
drag to draw curves.
3 End the path.
◆ To create an open path, double-click the last
point.
◆ To create a closed path, click the starting point
when a solid square appears next to the cursor.
Point handle
Path preview
Pen cursor
Draw paths with the Pen tool by plotting point by point.
A five-point star
with Angle =
Automatic
A five-side
polygon
An eight-point star
with Angle = 10
Note: Hold Shift while drawing with the Pencil tool or
Brush tool to plot a path point by point.
Creating and Editing a Graphic 49
Page 50

Reorienting the brush stroke
An object’s brush stroke is centered on the path by
default, but options for placing the brush stroke
completely inside or outside the path are available.
Centered stroke
Stroke inside
To move the brush stroke of one or more objects
inside or outside the path:
1 Select one or more objects.
2 Choose Window > Object.
3 Choose a stroke placement button.
Normally, the stroke appears over the fill. To draw the fill
on top of the stroke, check Draw Fill over Stroke in the
Object inspector.
Checking Draw Fill over Stroke in the Object inspector
fills selected objects all the way to the paths. With this
option checked, opaque fills may obscure the brush
strokes inside paths. Fills with a degree of transparency
may tint or blend with brush strokes inside paths.
Editing in object mode
In addition to dragging point handles, several Fireworks
tools edit paths in object mode.
Stroke outside
Chapter 250
The Freeform, Reshape Area, Path Scrubber, Redraw Path,
and Eraser (Knife) tools are the object mode editing tools.
Page 51

This cursor Indicates
p
The Freeform tool or the Reshape Area
tool is in use. Move onto a selected
path to activate the pull cursor. Click
and hold away from a selected path to
activate the push cursor or reshape
cursor.
Specified length
The Freeform tool is in use. The pull
cursor is in position to pull the
selected path. Click and hold the
mouse and drag to reshape the path.
The Freeform tool is in use. The pull
cursor is pulling the selected path.
Release to redraw the path.
The Freeform tool is in use. The push
cursor is active. Push the selected path
with the adjustable circle to reshape
the path.
The Reshape Area tool is in use and the
cursor is active. Drag the area of the
selected path under the cursor. The
area from the inner circle to the outer
circle represents reduced strength.
The Redraw Path tool is in use. The
redraw path cursor is on a selected
path to be redrawn.
The Path Scrubber tool is in use. The
path scrubber plus cursor is active.
Trace a path to change the path’s
pressure- or speed-sensitive data.
The Path Scrubber tool is in use. The
path scrubber minus cursor is active.
Trace a path to change the path’s
pressure- or speed-sensitive data.
The knife cursor is active. Drag the
knife line across the selected path to
cut it into two or more paths.
The Freeform tool pulls a path segment.
The Freeform tool
ushes a path segment.
Reshape Area tool—Pull the area of a selected path
The path redraws to
reflect the push.
within the outer circle of the Reshape Area cursor. On
the Tool Options panel, enter a value in the Size field or
use the pop-up slider to set the size of the reshape area
cursor. Enter a value in the Strength field or use the popup slider to set the size of the inner circle of the reshape
area cursor. The inner circle is the boundary of the tool
at full strength. The area between the inner and outer
circle reshapes paths at less than full strength.
Path Redraw tool—Redraw a segment of a selected
path, retaining the brush, fill, and effect characteristics of
the path.
Freeform tool—
path. Fireworks automatically adds, moves, or deletes
points along the path as you edit it. On the Tool
Options panel, enter a value in the Size field or use the
pop-up slider to set the size of the push cursor and the
length of the path segment the pull cursor affects.
Push or pull any part of a selected
The Path Redraw tool redraws a path segment.
Knife tool—Drag the knife cursor across a selected path
to slice it into two or more paths.
See Fireworks Help for more information about
these tools.
Creating and Editing a Graphic 51
Page 52

Image edit mode basics
A
Switch to image edit mode to directly edit pixels in an
image. Activities in image edit mode include:
◆ Editing imported images, such as GIFs, JPEGs, and
PNGs.
◆ Editing pixels with the Pencil tool.
◆ Painting in color with the Brush tool.
◆ Erasing to transparency or to another color.
◆ Applying Xtra filters to pixel selections.
◆ Replicating image elements with the Rubber Stamp
tool.
◆ Compositing images.
Switching to image edit mode
Although graphics created in object mode may have
bitmap image characteristics, Fireworks also has a mode
specifically for editing bitmap images pixel by pixel. In
image edit mode, each pixel of a selected image object is
editable.
Note: An image imported in object mode remains an
image. A vector object can be converted to an image by
choosing Modify > Merge Images.
To Do this
Edit an image
object
Create a new
image object
Select the object, and then
choose Modify > Image Object
or
Double-click the object using
the Pointer tool
or
Use any of these tools on the
image object: Marquee, Ellipse
Marquee, Lasso, Polygon Lasso,
Magic Wand, Paint Bucket,
Eraser, or Rubber Stamp.
Choose Insert > Empty Image.
When you enter image edit mode, a striped border
appears around the entire document. You can draw or
edit pixels anywhere within the document. When you
leave image mode, the excess empty space is trimmed off
of the edges of the image object you were editing.
To prevent the editable area of an image from expanding
to fill the screen when the image is edited, choose File >
Preferences > Editing and uncheck “Expand to Fill
Document.”
To temporarily hide the striped border, choose View >
Hide Edges. Once you leave image edit mode, Hide
Edges is turned off. To force edges to remain visible until
Hide Edges is chosen again, choose File > Preferences >
Editing and uncheck Turn off “Hide Edges.”
striped border outlines the canvas in image edit mode.
Leaving image edit mode
Return to object mode from image edit mode in any of
five ways:
◆ Double-click an empty area of the document with
any selection tool
Stop buttonStop cursor
◆ Click the Stop button on the Status bar.
◆ Choose Modify > Exit Image Edit.
◆ Press Control-Shift-D (Windows) or Command-
Shift-D (Macintosh).
◆ Press the Esc key.
Chapter 252
Page 53
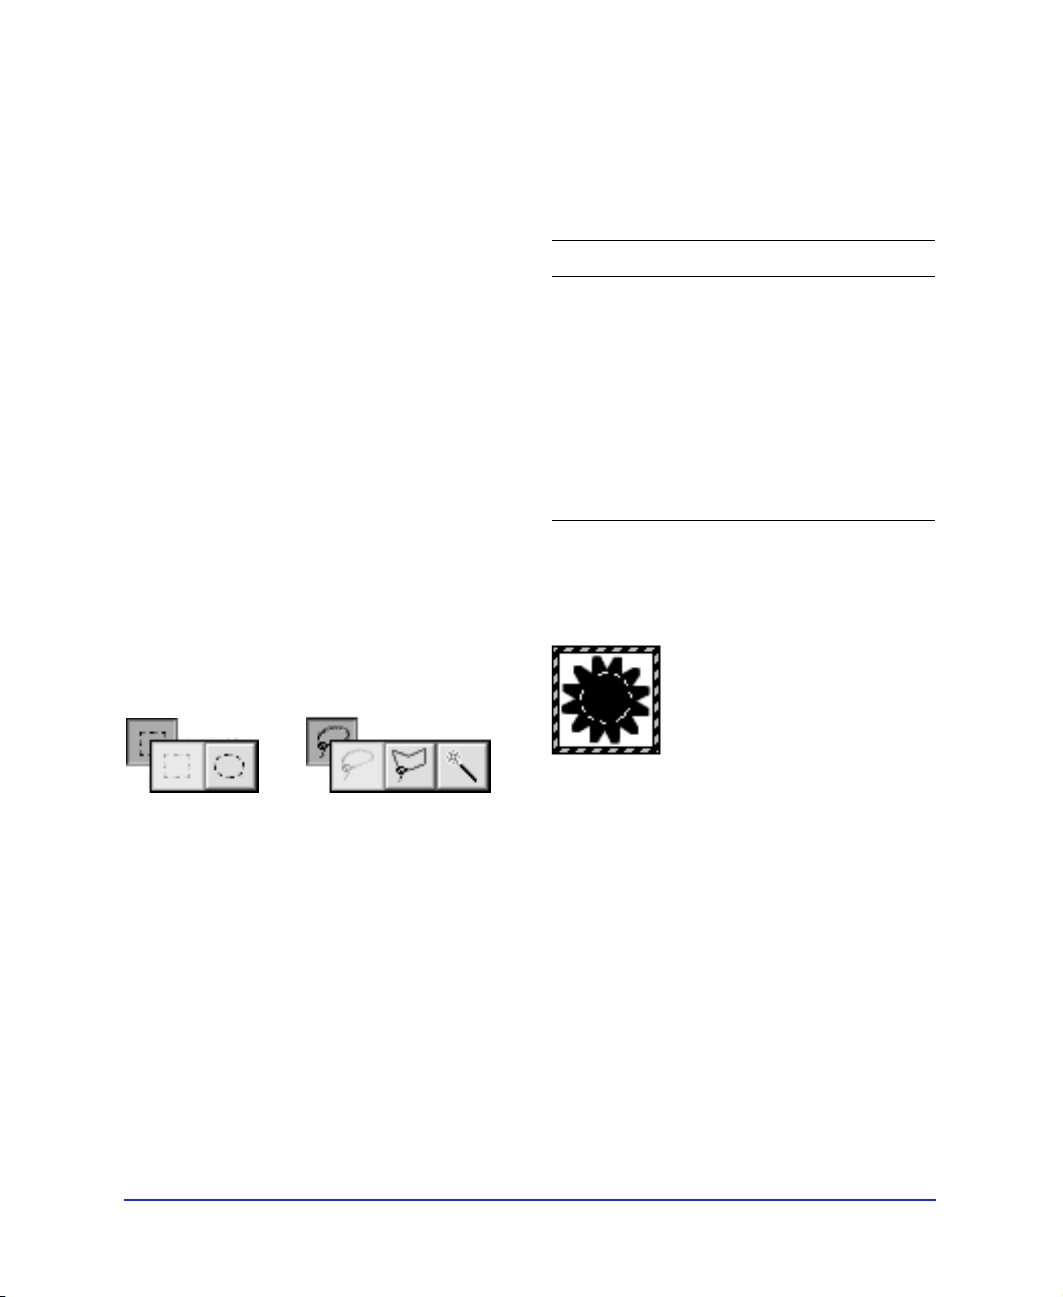
Selecting an image object
M
A
Each bitmap image in Fireworks has a rectangular
bounding box. This box is highlighted when an image is
selected in object mode with View > Hide Edges
unchecked. To switch to image edit mode, double-click a
visible part of the image.
Use these tools to highlight an area of pixels to edit,
move, cut, or copy. Each draws a marquee that becomes
a flickering dotted shape when complete. To remove a
marquee, draw another one, choose Edit > Deselect, or
exit image edit mode.
Use this tool To
Fireworks 1 Background layer image
In Fireworks 1, the background layer is a permanent
image stretching across the entire canvas under which
no objects or layers can be placed. Fireworks 2 does not
have a permanent background layer.
When opening Fireworks 1 documents in Fireworks 2,
the Background layer from Fireworks 1 is converted into
an image object and is placed as a shared layer on the
bottom of the document.
For more information about layers, see “Using layers” on
page 72.
Using marquees
In image edit mode, the primary selection tools are the
Marquee and Ellipse Marquee tools, the Lasso and
Polygon Lasso tools, and the Magic Wand tool.
arquee tools
Lasso tools
Marquee Highlight a rectangular area of
Elliptical
Marquee
Lasso Highlight a freeform area of pixels.
Polygon Lasso Highlight an area of pixels bound
Magic Wand Highlight an area of pixels of
Note: Hold down Shift to draw square or circular
marquees or to constrain lasso lines to 45-degree
increments. Hold down Control (Windows) or Option
(Macintosh) to draw from the centerpoint.
pixels.
Highlight an elliptical area of
pixels.
by a polygon.
similar color.
n object in image edit mode with a circle marquee
For more information about the Marquee and Lasso
tools, see Fireworks Help.
Creating and Editing a Graphic 53
Page 54

Trimming the canvas
Once an image is edited in image edit mode, its size is
automatically trimmed to a rectangular shape in the size
of the used pixels, removing transparent space around
the image. Use Modify > Document > Trim Canvas to
remove excess pixels from around the edge of the
document.
◆ The canvas is cropped to the outermost edge of all
pixels in the document.
◆ If multiple frames exist in the document, Trim
Canvas crops to include all objects in all frames, not
just the current frame.
Transform tools
Choosing any Transform tool or menu item displays the
transform handles. The handles frame the entirety of
selected objects. In image edit mode, the transform
handles frame the pixel selection.
Converting an object to an image
Choose Modify > Merge Images, which converts selected
objects into a single image object. A path-to-image
conversion is irreversible, except when choosing Edit >
Undo is still an option.
Using Xtras
The Xtras menu has effects that are not reversible. Once
these effects are applied to a vector object, the object is no
longer editable as paths and becomes a floating image
object. Fireworks Xtras include Blur, Invert, and
Sharpen.
Photoshop plug-ins also work in Fireworks. Copy
Photoshop plug-ins into the Fireworks Xtras folder to
add them to the Xtras menu. Alternatively, use the
Preferences dialog box to target an additional plug-in
folder.
For more information about Xtras, see Fireworks Help.
Transforming and distorting objects
Use the Transform tools or menu items to scale, rotate,
distort, or skew an object, a group of objects, or a pixel
selection area.
Transformation handles
Center point
Original object
Scaled
Rotated
Skewed Distorted
Drag any transform handle to edit the selected objects
interactively. The cursor changes to indicate the available
activity.
When dragging a transform handle in transform mode
hold down Alt (Windows) or Option (Macintosh)to
scale objects bi-directionally.
Chapter 254
Page 55

When moving the cursor beyond the handles in
C
transform mode to rotate selected objects interactively:
◆ Hold down Shift to constrain rotation.
◆ Drag the round centerpoint away from the center of
the handles to relocate the axis of rotation.
When dragging a transform handle in distort mode:
◆ Hold down Shift to constrain handle movement to
45-degree angles.
◆ Hold down Control (Windows) or Command
(Macintosh) to achieve the illusion of perspective
(corner handles only).
◆ Hold down Alt (Windows) or Option
(Macintosh) to distort the object symmetrically.
When moving the cursor beyond the handles in distort
mode to skew the object, hold down Alt (Windows) or
Option (Macintosh) to skew the object relative to the
centerpoint.
To move the centerpoint back to the center of the
transform handles, double-click the centerpoint.
Numeric transformations
To scale or rotate selected objects, images, and pixel
selections by specific measurements, choose Modify >
Transform > Numeric Transform to open the Numeric
Transform dialog box. Select the type of transformation
to perform on the current selection from the pop-up,
and input numeric values to transform the selection.
Check Constrain Proportions when scaling or resizing
to keep the horizontal and vertical size of the selection
proportional when transforming.
Check Scale Attributes to transform the fill, stroke, and
effect of the object along with the object. If Scale
Attributes is unchecked, the stroke, fill, and effect on the
object do not increase in size; only the path is scaled.
Using color
Use the Color Mixer and the Swatches panel to create or
choose colors for brush strokes, fills, and effects.
Click to apply a color to the brush color well.
Click to apply a color to the fill color well.
Choose a color model.
Create a color.
Pick a color.
Click to switch brush and fill colors.
Click to restore default brush and fill colors.
olor Mixer
Add, replace, save, clear,
or sort swatches, or
choose a palette.
Choose a swatch.
Click to add the active
swatch to the palette.
Swatches panel
Creating and Editing a Graphic 55
Page 56

Using the Color Mixer
c
By default, the Color Mixer identifies colors as
Hexadecimal RGB, displaying a color’s values of red (R),
green (G), and blue (B) color components. RGB values
are calculated based on a range from 00 to FF.
To create a color in the Color Mixer:
1 Choose Window > Color Mixer, if necessary, to
display the Color Mixer.
2 Click either the stroke color well or fill color well,
or display the Stroke, Fill, or Effect panel, to
choose the destination for the new color.
3 Choose a color model from the Color Mixer
Options pop-up, if necessary.
4 Enter values in the color component fields,
use the pop-up sliders, or pick a color from the
color bar.
The cursor becomes the eyedropper cursor when it
moves over the color bar. Click to pick a color. Deselect
all objects before mixing a color to prevent unwanted
object editing as you mix colors.
Choose alternative color models from the Color Mixer
Options pop-up. The current color’s component values
and the color bar change with each new color model.
Choose To express color components as
CMY Values of Cyan, Magenta, and
Yellow, where each component
has a value from 0 to 255, where
0-0-0 is white and 255-255-255 is
black.
Grayscale A percentage of black. The single
Black (K) component has a value of
0 to 100 percent, where 0 is white
and 100 is black, and in between
are shades of gray.
Clicking the color bar while holding down Shift toggles
the color bar through the RGB, Hexadecimal, and
Grayscale color models. The fields on the Color Mixer
do not change.
Note: When the Hexadecimal color bar is displayed,
color choices are restricted to the Web 216 palette.
To take a color from the document and put it into
the Color Mixer, click the color using the Eyedropper
tool from the Toolbox. The highlighted color well
displays the color and the Color Mixer displays the
component values.
Viewing color information
Choose To express color components as
RGB Values of Red, Green, and Blue,
where each component has a
value from 0 to 255, where 0-0-0 is
black and 255-255-255 is white.
Hexadecimal Values of Red, Green, and Blue,
where each component has a
hexadecimal value of 00 to FF,
where 00-00-00 is black and
FF-FF-FF is white.
HSB Values of Hue, Saturation, and
Brightness, where Hue has a value
from 0 to 360 degrees, and
Saturation and Brightness have a
value from 0 to 100 percent.
The Info panel displays the component values of the
color at the current cursor location. Choose an
alternate Info panel color model in the Info panel
Options pop-up.
View the color values of the color under the cursor.
The Info panel displays information about the color at the
urrent cursor location.
Chapter 256
Page 57

Using the Swatches panel
Choose Window > Swatches to display the Swatches
panel, which contains a group of colors. Click a color
swatch to choose a stroke, fill, or effect color for selected
objects and objects to be drawn later.
Note: The Swatches panel displays the current
Fireworks palette, not the current document’s palette.
When the cursor points to a swatch, it becomes one of
three Eyedropper tool icons. Clicking a swatch
automatically assigns that color to the active color well
and applies the color to the stroke, fill, or effect of all
selected objects.
This eyedropper Applies a color to
The stroke color well and the
stroke of each selected object.
The fill color well and the fill of
each selected object.
The effect color well and the
effect of each selected object.
By default, the Swatches panel contains the Web 216
color palette. Choose alternative color palettes or
customize a palette using the Swatches panel Options
pop-up.
Customizing palettes
To add the active color to the current palette:
1 Move the cursor to the open space after the last
swatch on the Swatches panel.
The cursor becomes the paint bucket cursor.
2 Click to add the swatch.
Choosing Edit > Undo does not undo swatch
additions or deletions.
To replace a swatch with the active color:
1 Hold down Shift and point to a swatch.
The cursor becomes the paint bucket cursor.
2 Click the swatch.
The active color replaces the original swatch.
To delete a swatch from the palette:
1 Hold down Control (Windows) or Command
(Macintosh) and point to a swatch.
The cursor becomes the scissors cursor.
2 Click the swatch to delete it.
To clear the entire Swatches panel, choose Clear
Swatches from the Swatches panel Options pop-up.
To append a palette to the current palette:
1 Choose Add Swatches from the Options pop-up.
A File dialog box opens.
2 Choose a palette file.
Fireworks adds swatches from either of two types of
files: Photoshop ACO palette files and GIFs. The
new swatches are appended to the end of the
current swatches.
To Do this
Revert a color
palette to its
original swatches
Save a custom
palette
Use the current
custom color palette
from the Export
Preview dialog box
Note: Except when displaying Current Export Palette,
the Swatches panel is unrelated to the Export Preview
swatch display. For more information about swatches in
the Export Preview, as well as optimizing color palettes,
see “Options panel” on page 95.
Reselect the color palette from
the Options pop-up.
Choose Save Palette from the
Swatches panel Options popup, and then either name the
new palette or leave the
previous name to replace the
original palette.
Choose Current Export Palette
from the Swatches panel
Options pop-up.
Creating and Editing a Graphic 57
Page 58
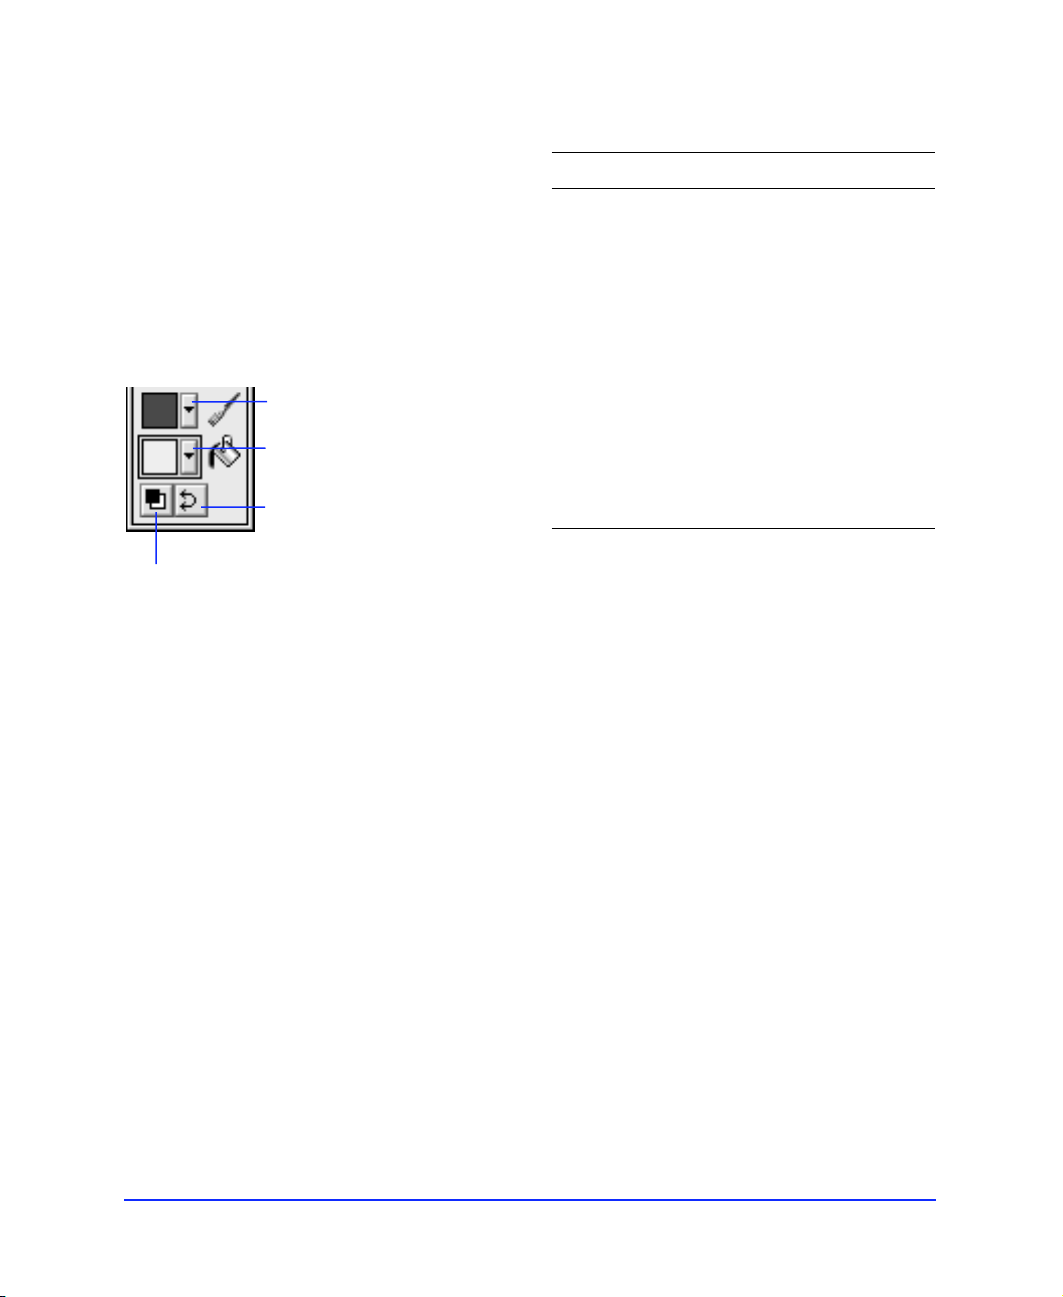
System color pickers
Double-clicking any color well displays the Windows
Color dialog box (Windows) or the Apple Color Picker
(Macintosh). Colors created using either of these
methods bypass the Color Mixer and Swatches panel.
Using color wells
The current stroke and fill colors are displayed in the
stroke and fill color wells on the Color Mixer. Duplicate
color wells appear in the Toolbox.
Click to activate the
stroke color well.
Click to activate the Fill
color well. The Fill color
well is shown as active.
Click to switch the colors
in the stroke and fill color
wells.
Click to reset to the default stroke and
fill colors specified in the Preferences.
The stroke and fill color wells and the color well buttons
appear in both the Color Mixer and the Toolbox.
In addition, a duplicate stroke color well appears on the
Stroke panel and a duplicate fill color well appears on
the Fill panel. An Effect color well appears on the Effect
panel when color is an element of the effect.
To activate the Do this
Stroke color
well
Fill color well Click the color well with the paint
Effect color well Click the color well in the Effect
Click the color well with the brush
next to it in the Toolbox or in the
Color Mixer
or
Click the color well in the Stroke
panel.
bucket next to it in the Toolbox or
in the Color Mixer
or
Click the color well in the Fill panel.
panel. Neither the Toolbox nor the
Color Mixer has an Effect
color well. Some effects do not
use color.
To swap colors so that the stroke color becomes the fill
color and the fill color becomes the stroke color, click
the Swap Colors button in the Color Mixer or in
the Toolbox.
To reset to the default colors, click the Default Colors
button. Specify default colors using the General > “Color
Defaults” preference.
Chapter 258
Page 59
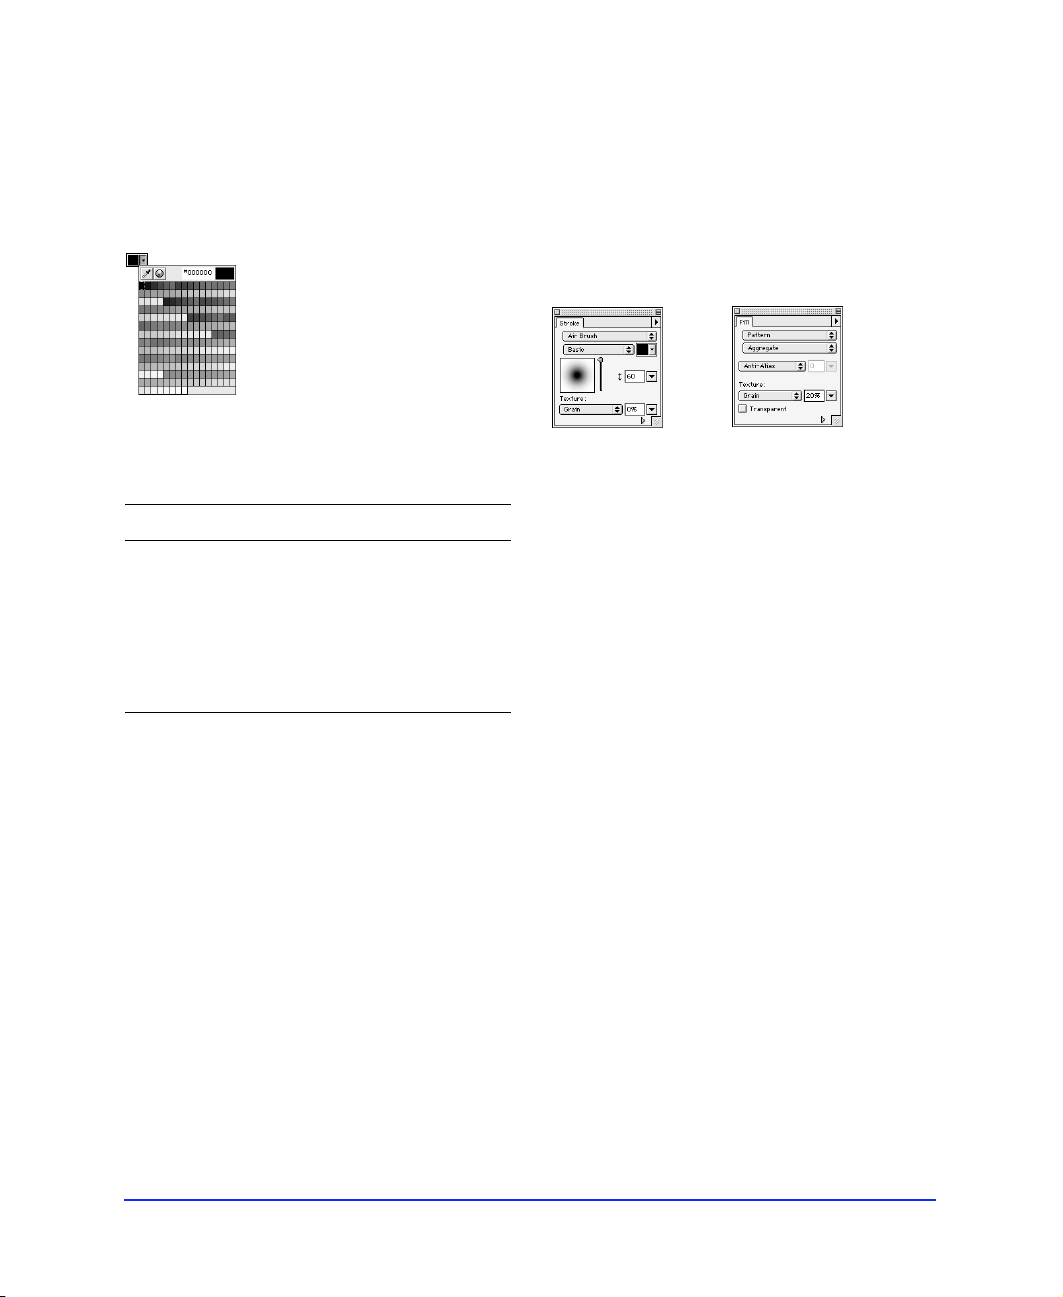
Using color well pop-up swatches
Click the box next to any color well to display pop-up
swatches and choose a color to apply to that color well
and any selected objects. The color well pop-up contains
the swatches currently in Fireworks Swatches panel.
Color Well Pop-up swatches
To Do this
Get a color from
anywhere on the
screen
Get a color from the
system color picker
Apply transparency. Click the transparency button.
Applying color to the canvas
Click the eyedropper button,
and then click anywhere on
the screen.
Click the color picker button,
and then choose a color from
the system color picker.
The canvas is the bottom surface of the Fireworks
document. Specify a canvas color in either of two ways:
◆ When opening a new document, choose White,
Transparent, or Custom in the New Document
dialog box. To choose a canvas color using the
system color picker, click the Custom color well.
◆ With an existing document, choose Modify >
Document > Canvas Color, and then choose White,
Transparent, or Custom.
Applying strokes and fills
Use the Stroke panel to choose a brush stroke and to
apply a brush stroke to selected objects. Use the Fill
panel to fill selected objects and subsequently drawn
objects. Use the Stroke panel Options pop-up and Fill
panel Options pop-up to adjust stroke and fill settings
and to create and save custom brushes and fills.
Stroke panel
The Stroke panel and Fill panel combine to form the
control center for creating brush strokes and fills. Save
your favorite stroke and fill settings to use again.
Saving a stroke or fill only saves it for use within the
current document. To reuse a saved stroke or fill in
another document, copy and paste an object with the
saved stroke or fill into the document. The saved stroke
is added to the Stroke panel for use within the
document.
Alternatively, use the Styles panel to save a stroke or fill
and reuse it later.
Fill panel
Creating and Editing a Graphic 59
Page 60
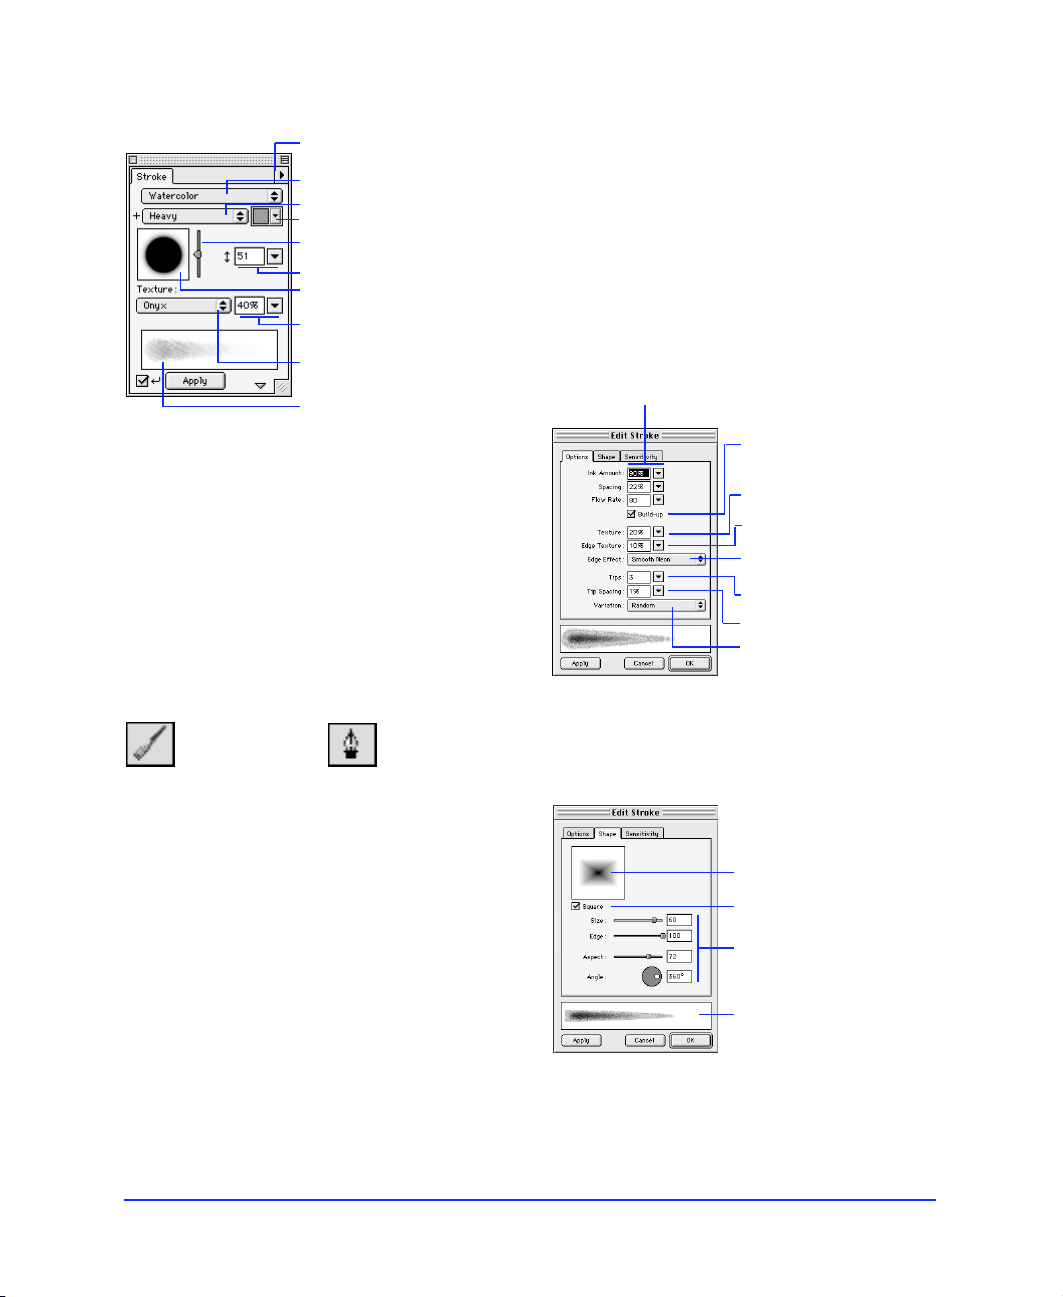
The Stroke panel
B
E
E
Save, edit, rename, and
delete strokes.
Choose a stroke category.
Choose a specific stroke.
Alter stroke color.
Alter stroke size.
Alter stroke edge.
Show current stroke shape.
Change intensity of the
brush stroke texture.
Choose a stroke texture.
Preview stroke.
Using the Edit Stroke panels
Choose Edit Stroke from the Stroke panel Options
pop-up to display the Edit Stroke panels: Options,
Shape, and Sensitivity.
The stroke preview at the bottom of any Stroke panel
shows the current brush with the current settings. A
stroke in the preview that tapers or fades or otherwise
changes from left to right illustrates the current pressureand speed-sensitivity settings.
Set ink amount, spacing, and flow rate.
Stroke panel
The Brush tool is the primary freeform drawing tool in
Fireworks. The Pen tool is the primary Bézier
curve drawing tool. Use either to create paths with a
wide range of possible characteristics in both object
mode and image edit mode, from thin, pencil-like
paths to wide swaths resembling spray paint or
splattered oil. A variety of stroke textures add to the
range of creative possibilities.
rush tool
Pen tool
Stroke editing features offer full control of every brush
nuance, including ink amount, tip size and shape, edge
effect, and aspect. Also, sensitivity settings control how a
pressure-sensitive pen affects strokes.
A newly created brush stroke assumes the current color
displayed in the brush color well, whether in object
mode or image edit mode.
Overlap brush stamps for
dense strokes.
Set brush texture amount.
Set texture on the edges.
Choose an edge effect.
Set the number of tips.
Set spacing of multiple tips.
Choose the color variation
between multiple tips.
dit Stroke Options panel
Preview the brush tip shape.
Check for a square brush tip.
Set the brush tip size, edge
softness, tip aspect, and tip
angle.
Preview the brush stroke.
dit Stroke Shape panel
Chapter 260
Page 61

The Fill panel
Assign the stroke
property for sensitivity
data to control.
Set the degree to which
sensitivity data affects the
current stroke property.
Preview the stroke.
Edit Stroke Sensitivity panel
Saving stroke settings
Any change to stroke settings is saveable. Use the Stroke
panel Options pop-up to save strokes, change stroke
characteristics, rename the current stroke, or delete the
current stroke.
Saving a stroke only saves it for use within the current
document. To reuse a saved stroke in another document,
copy and paste an object with the saved brush stroke
into the document. The saved stroke is added to the
Stroke panel for use within the document.
Use the Styles panel to store a stroke and its settings.
Select an object then click a stroke in the Styles panel to
apply the stored stroke to the object. Stroke styles in the
Styles panel may be exported and then imported into
other Fireworks documents.
Fireworks fill categories are None, Solid, Pattern, Web
Dither and various gradient shapes. Combine fill types
with textures to quickly create complex artwork.
Save, edit, name, and
delete gradients.
Choose a fill category.
Choose Anti-Alias, Hard
Edge, or Feathered edge.
Control edge feathering.
Choose a fill texture and
intensity and control
transparency.
Preview fill.
Fill panel
A newly created closed path drawn with the Pen tool or
a basic shape tool assumes the current fill displayed in
the Fill panel. Paths drawn with other drawing tools
have a default fill of None.
Saving and reusing fills
Saved fills are stored within the current document. To
reuse a saved fill in another document, copy and paste an
object with the saved fill into the other document. The
saved fill is added to the Fill panel.
Use the Styles panel to store a fill and its settings. Select
an object then click a fill in the Styles panel to apply the
stored fill to the object. Fill styles in the Styles panel may
be exported and then imported into other Fireworks
documents.
Editing and saving a gradient color ramp
All fill categories other than None, Solid, Pattern, and
Web Dither are Gradient fills. Use the Fill panel
Options pop-up to edit, save, rename, or delete the
current Gradient.
Creating and Editing a Graphic 61
Page 62

Choosing Edit Gradient opens the Edit Gradient dialog
box. Choose a preset Gradient from the Preset Options
pop-up. Click an area under the color ramp to add a
color well. Click and drag any color well below the color
ramp to change the transition between colors in the fill.
Double-click any color well to pick a color from the
color palette pop-up menu. Add as many colors to the
color ramp as you want.
Edit Gradient dialog box
Editing a fill with the Paint Bucket tool
Choose the Paint Bucket tool to quickly edit a selected
object’s fill.
Paint Bucket tool
Filling areas of similar color
On image objects, use the Paint Bucket tool to fill areas
of similar color. With the Paint Bucket tool selected, set
the tolerance on the Tool Options panel to determine
the range of similar colors to be filled.
A tolerance setting of 0 (zero) causes the Paint Bucket
tool to fill a solid area of a single color. Higher tolerance
settings will cause the Paint Bucket tool to fill adjoining
areas near in color to the color that was clicked.
To fill the entire image or selection, rather than similar
colors, check Fill Selection Only on the Tool Options
panel when the Paint Bucket tool is selected.
Adjusting a fill interactively
To change or distort a selected object’s Pattern or
Gradient fill, choose the Paint Bucket tool. An L-shaped
or linear set of handles appears on or near the object. Use
these handles to adjust the object’s fill.
Drag to
adjust fill
width and
skew.
Drag to
place a fill’s
center or
first color.
Drag to
adjust fill
angle.
◆ When the Fill panel has a fill of None, Solid, or
Web Dither, clicking inside the object with the
Paint Bucket tool adds the color in the fill color well
as a Solid or Web Dither fill.
◆ When the Fill panel has a Pattern or Gradient fill,
clicking the Paint Bucket tool places the round
paint bucket handle, which represents the center or
starting point of the fill.
◆ When choosing a new Pattern or Gradient fill type
in the Fill panel, clicking inside a selected object
applies the new fill type to the object.
Chapter 262
Use the Paint Bucket tool handles to interactively adjust a
Pattern or Gradient fill.
Page 63

The round starting handle specifies the starting point of
the fill. Drag the starting handle to move the fill within
the object without changing the size, width, skew, or
angle of the fill.
The ending handle represents the ending point of the fill.
The distance between the ending handle and the width
handle sets the fill angle. Dragging the ending handle
does not move the other handles. The width handle
represents both aspect (or width) and skew.
Note: To create the illusion of a true transparent fill in a
web browser, apply a Web Dither fill to an object and
check Transparent on the Fill panel. Then, export the
object as a GIF or PNG with Index Transparency or
Alpha Channel Transparency set. When viewed in a web
browser, the web page's background will show through
every other pixel of the transparent Web Dither fill,
creating the effect of transparency.
Using styles
The Web Dither fill
When exporting using a web-safe palette, colors in the
image that are not web-safe are shifted to a web-safe
color or dithered. Use Web Dither fill to create the
appearance of a color outside the web-safe palette that
will neither shift nor dither when exported with a websafe palette. Use a Web Dither to fill an object with a
dither pattern based on two web-safe colors.
Choose two web-safe colors
to create a dither pattern.
Web Dither Fill panel
When a color is selected in the Web Dither Fill panel, a
dither pattern is created from the two web-safe colors
that are closest in value to the color that is to be
approximated.
Note: Setting a Soft Edge or a Feathered Edge for a
Web Dither fill will result in colors that are not web-safe.
Use styles to maintain visual consistency and to
simplify formatting. Use the Styles panel to store and
apply stroke, fill, effect, and text styles to objects or text.
Styles panel
Styles in Fireworks behave like an artist's palette, not like
styles in a word processor. When a style is applied to an
object, that object takes on the style's characteristics.
However, Fireworks does not keep track of which style
was applied to the object, and the object does not update
if the style is edited.
To apply a style to an object, select an object or text, and
then click a style in the Styles panel.
To add a new style:
1 Create an object or text block with the stroke, fill,
and text settings you want.
2 With the object selected, choose New Style from
the Styles panel Options pop-up, or click the New
Style button at the bottom of the Styles panel.
Creating and Editing a Graphic 63
Page 64

3 Enter a name for the style and check the
properties you want to apply with the style.
Properties left unchecked will not be applied to an
object with the style.
4 Click OK.
An icon for the style appears on the Styles panel
showing a quick preview of the style.
Editing and deleting styles
To Do this
Edit a style Double-click a style or click a
style in the Styles panel and
then choose Edit Style from
the Options pop-up.
In the Edit Style dialog box,
check or uncheck components
of the style that will be
applied.
Specific style characteristics,
such as fill or stroke type,
cannot be changed by using
Edit Style. To change fill,
stroke, or effect settings for a
style, create a new style.
Importing and exporting styles
Styles can be exported and shared with other Fireworks
users.
To Do this
Import styles Choose Import Styles from the
Options pop-up, and then
choose a saved styles
document to import.
All styles in the selected styles
document are imported and
placed directly after the
currently selected style on the
Styles panel.
Export styles Select styles on the Styles
panel. Hold down the Shift as
you select to select multiple
styles.
Choose Export Styles from the
Options pop-up.
Enter a name and a location
for the saved styles document,
and then click Save.
Adding texture
Delete a style Click a style in the Styles panel,
Reset the Styles
panel to the default
styles
make the style
preview icons larger
Chapter 264
and then choose Delete Style
from the Options pop-up or
click the Delete Style button at
the bottom of the Styles
panel.
Hold down the Shift key while
clicking styles to select
multiple styles for deleting.
Choose Reset Styles from the
Options pop-up.
Choose Large Icons from the
Options pop-up. Choose Large
Icons again to switch back to
the small previews.
Both the Stroke panel and the Fill panel have an option
for adding a texture to the brush stroke or fill.
Preview a texture.
Adjust texture and
transparency.
The Texture name pop-up displays a preview of the
highlighted texture.
The Amount of texture field next to the Texture name
pop-up controls the depth of the texture from 0 to 100
percent. Lower percentages result in lighter texture and
higher percentages result in heavier texture.
On the Fill panel, check Transparent to make the light
parts of the texture transparent.
Page 65

Applying effects to objects
Use the Effect panel and Xtras menu commands to
enhance graphics with many Live Effects and filters.
Easily achieve common web effects such as Bevel, Glow,
Drop Shadow, and Emboss, or apply combinations of
any of those effects. Alter images with Xtra filter effects
such as Blur, Unsharp Mask, and Invert.
For example, create a button by applying an Outer Bevel
effect on the button itself and apply Drop Shadow to the
text on the button. The button shape and the text on the
button all remain fully editable.
Live Effects
Live Effects are pixel-based effects that apply to path,
image, and text objects and redraw to reflect subsequent
editing. Applying a Live Effect does not permanently
change the original object.
◆ The object to which the effect is applied remains
editable.
◆ The effect itself remains editable and removable.
Inner Bevel effect
Outer Bevel effect
Drop Shadow effect
Emboss effect
Glow effect
Creating and Editing a Graphic 65
Page 66

Save, edit, name, and
M
delete effects.
Applying multiple effects
Choose Multiple from the category pop-up of the Effect
panel to apply multiple effects.
Choose an effect category.
Choose a specific effect.
Set effect-specific
options such as width,
contrast, and softness.
Choose bevel appearance.
Effect panel
To apply an effect to an object:
1 Select the object.
2 Choose the effect from the Effect panel.
To edit an effect:
1 Select the object.
2 Adjust effect characteristics in the Effect panel.
Use the Effect panel Options pop-up to save custom
effect settings, rename an effect, and delete an effect.
Saved effects are stored only within the current
document. To reuse a saved effect in another document,
copy and paste an object with the saved effect into
the other document. The saved effect is added to the
Effect panel.
Choose Multiple to apply
more than one effect to
selected objects.
Click to open the Effect
panel for the checked effect.
Check to apply the effect
and open the Effect panel.
ultiple Effect panel
To apply multiple effects to an object:
1 Select the object.
2 Choose Multiple from the Effect panel category
pop-up.
3 Check the box next to each effect you wish to
apply.
Each time you check an effect, make specific
settings for that particular effect in the dialog box
that opens.
To edit an effect that is part of a multiple effect:
1 Select the object.
2 Click the edit button next to the effect you want
to edit.
3 Change settings in the dialog box that appears,
and then click OK.
Note: When opening Fireworks 2 documents in
Fireworks 1, objects that contain multiple effects will
retain only the first effect.
Chapter 266
Page 67

Saving, renaming, or deleting multiple effect settings
Once a multiple effect is set, you can save that setting so
that it can be quickly applied at a later time.
To Do this
Using text
Add text using the Text tool and the Text Editor. Apply
brush strokes, fills, and effects to text. Edit text and its
stroke, fill, and effect attributes redraw accordingly.
Save a multiple
effect setting
Rename a multiple
effect setting
Delete a multiple
effect setting
Using Subselect or Superselect with effects
Choose Save Effect As from
the Effect panel Options popup, enter a name for the
effect, then click OK. The
effect will appear in the
Multiple Effect presets pop-up
on the Effect panel.
Select the effect you want to
rename from the Multiple
Effect presets pop-up, choose
Rename Effect from the Effect
panel Options pop-up, enter a
new name, then click OK.
Select the effect you want to
delete from the Multiple Effect
presets pop-up, then choose
Delete Effect from the Effect
panel Options pop-up.
When applying various effects to a group, masking
group, or Symbol:
◆ Choose Select > Subselect to select all objects within
a selected group, masking group, or Symbol.
◆ Choose Select > Superselect to select the group,
masking group, or Symbol that contains the
selected object.
Using Xtras
The Xtras menu has effects that are not reversible. Once
these effects are applied to an object, the object is no
longer editable and becomes a floating image object.
Fireworks Xtras include Blur, Invert, and Sharpen.
Photoshop plug-ins also work in Fireworks. Copy
Photoshop plug-ins into the Fireworks Xtras folder to
add them to the Xtras menu. Alternatively, target an
additional plug-in folder in the Preferences dialog box.
Text tool
In Fireworks, text is neither a path nor an image. Text
initially has no stroke and a solid fill. A stroke can be
added using the Stroke panel. Check Anti-Alias in the
Text Editor to give text an anti-aliased edge. Also, text
edges can be changed using the Fill panel. A text block
is a moveable and resizable object.
Drag any text block handle to
resize a text block.
Text block
Text is convertible to an image or to paths; however,
converting text renders it uneditable as text.
To enter text:
1 Choose the Text tool and click the canvas.
The Text Editor opens.
2 Choose font, size, spacing, and other text
characteristics.
3 Type the text.
To see changes in the document as you edit the text
in the Text Editor, check the auto-apply checkbox in
the Text Editor.
To change text characteristics in the Text Editor,
select the text in the Text Editor, then apply changes.
4 Click OK or press Enter.
The text appears in a text block in the Fireworks
document.
Creating and Editing a Graphic 67
Page 68

5 Resize and move the text block with the Pointer
tool.
6 Add a stroke or effect, or change the fill.
To edit text, double-click a text block. Within a single
block of text, you can vary all aspects of text, including
size, font, spacing, leading, baseline shift, and more. To
resize a text block, pull any text block selection handle.
To use Type 1 fonts on the Macintosh, Fireworks
requires Adobe Type Manager 4 or higher.
Choose fonts from the Font pop-up.
Using the Text Editor
The Text Editor is where you enter and edit text and
change text attributes. Select all or part of the text in the
Text Editor preview area and apply changes.
To view the results of changes in the document, move
the Text Editor so that the selected text block is visible,
then click Apply to see the changes without closing the
Text Editor.
Orient text horizontally or vertically.
Adjust point size.
Apply color to text.
Apply a Bold, Italic, or
Underline style.
Adjust leading.
Adjust kerning or
range kerning.
Adjust horizontal scale.
Adjust baseline shift.
Type and edit text.
Check to show actual
fonts and sizes in the
Text Editor.
Set the direction of text
flow as left to right or
right to left.
Set text block alignment to
Left, Center, Right, Justified,
or Stretched.
Resize the Text Editor.
Chapter 268
Page 69

Attaching text to a path
To place text on a path:
1 Select a text block and a path.
2 Choose Text > Attach to Path.
3 Optionally, choose Text > Orientation, then
choose an orientation option.
Choose any of four orientation options for text on a
path: Rotate around Path, Vertical, Skew Vertical, or
Skew Horizontal.
To edit text attached to a path, double-click the text-andpath object to open the Text Editor.
To edit the shape of the path, choose Text > Detach from
Path to detach the text from the path and edit the path.
After editing the path, select it and the text block and
choose Attach to Path.
r
e
i
w
F
o
r
k
s
If text attached to an open path exceeds the length of the
path, the remaining text returns and repeats the shape of
the path.
Text on a path returns and repeats the path shape.
To move the starting point of text attached to a
path:
1 Select the text-and-path object.
2 Choose Modify > Object to display the Object
inspector.
3 Enter a value in the Text Offset field.
A negative offset value is valid when text is attached to a
closed path or when text is center aligned. The attached
text’s alignment and flow—set in the Text Editor—affects
the outcome of Text Offset.
Converting text to paths and images
Horizontal text on a path
A path to which text is attached temporarily loses its
stroke, fill, and effect attributes. Subsequently applied
stroke, fill, and effect attributes are applied to the text, not
the path. A path regains its stroke, fill, and effect
attributes when text is detached from it.
Vertical text on a path with
Vertical Orientation
After text is converted into an image object or to paths, it
is no longer editable as text. The conversion is
irreversible, except when Edit > Undo is available.
To convert text to paths:
1 Select the text.
2 Choose Text > Convert to Paths.
Text converted to paths retains all of its properties and is
now editable only as paths.
To convert text to an image object:
1 Select the text.
2 Choose Modify > Merge Images.
Text converted to an image object retains its current
appearance.
Creating and Editing a Graphic 69
Page 70

Controlling document size and resolution
Choose Modify > Document > Image Size to open the
Image Size dialog box and change the document's
dimensions, print size, and resolution.
Image Size dialog box
To resize an image in Fireworks:
1 Choose Modify > Document > Image Size.
The Image Size dialog box opens.
2 Enter numbers in the Pixel Dimensions fields to
set the new horizontal and vertical dimensions
for the image.
By default, the document's current dimensions are
displayed in the Pixel Dimensions fields. If
Resample Image is unchecked, Pixel Dimensions
cannot be changed–only the resolution or Print
Size may be changed.
3 Enter numbers in the Print Size fields to set the
new horizontal and vertical dimensions of the
image when it is printed.
4 Enter a number in the Resolution field to change
the resolution of the image.
If Resample Image is checked, changing the
Resolution also changes the Pixel Dimensions.
5 To maintain the same ratio between the
document's horizontal and vertical dimensions,
check Constrain Proportions.
Uncheck Constrain Proportions to resize the width
and height independently from one another.
6 Check Resample Image to add or remove pixels
when resizing the image to approximate the
same appearance at a different size.
7 Click OK.
Resampling
Resizing bitmap images always presents a unique
problem–do you add or remove pixels to resize the
image, or do you change the number of pixels per inch or
centimeter?
One way to adjust the size of a pixelated image is to
adjust the resolution, which changes the size of the pixels
in the image so that more or fewer pixels fit in a given
space. Another way to adjust the image's size is to
resample the image.
When an image is resampled, pixels must be added or
removed to make the bitmap larger or smaller. Either
way, the image is altered, which can result in some
quality loss at the target resolution.
◆ Downsampling, or removing pixels to make the
image smaller, always causes quality loss because
pixels are discarded to resize the image.
◆ Resampling up, or adding pixels to make the image
larger, may result in quality loss because some pixels
are being added to make the image larger, and the
pixels that are added do not always correspond pixelfor-pixel to the original image.
Resampling in Fireworks differs from most image
editing applications; Fireworks contains pixel-based
bitmap image objects and vector-based path objects.
When an image object is resampled, pixels are added to
or removed from the image object to make it larger or
smaller. When a path object is resampled, little quality
loss occurs because the path is redrawn mathematically
at a larger or smaller size.
However, since path objects in Fireworks are composed
of pixels, some strokes or fills may appear slightly
different after resampling because the pixels that
compose the stroke or fill must be redrawn.
Note: When you resize an image, guides, hotspot
objects, and slice objects are resized with the image.
Chapter 270
Page 71

Organizing your document
Fireworks has several features that help organize a
document as it grows more complex.
◆ Group and ungroup individual objects.
◆ Arrange objects behind or in front of other objects.
◆ Arrange, lock or unlock, and show or hide layers.
◆ Organize layers and frames within a document.
◆ Arrange frames.
◆ Hide individual objects.
Grouping objects
Grouping two or more selected objects freezes their
positions and stacking order relative to one another, so
you can manipulate them as a single object. Objects
within a group retain their individual characteristics,
unless you modify the entire group.
Group selected objects as a single object.
To group two or more selected objects, choose
Modify > Group. To ungroup, select the group and
choose Modify > Ungroup.
To work with individual objects within a group, either
ungroup the objects or use the Subselection tool to
subselect only the objects you want to modify.
Modifying attributes of a subselected object changes
only the subselected object and not the entire group.
Moving a subselected object to another layer will
remove the object from its original group.
Subselect an object within a group.
When editing a group, masking group, or symbol:
◆ Choose Edit > Subselect to select all objects within a
selected group, masking group, or symbol.
◆ Choose Edit > Superselect to select the group,
masking group, or symbol that contains the
selected object.
Creating and Editing a Graphic 71
Page 72

Arranging objects on a layer
Using layers
Arranging objects on the same layer
To Do this
Move an object
forward on the
same layer
Move an object
to the front of
a layer
Move an object
backward on
the same layer
Move an object
to the back of
a layer
Select the object and choose
Modify > Arrange > Bring
Forward.
Select the object and choose
Modify > Arrange > Bring to
Front.
Select the object and choose
Modify > Arrange > Send
Backward.
Select the object and choose
Modify > Arrange > Send to
Back.
Layers divide a Fireworks document into discrete
planes, as though the graphic components were drawn
on separate tracing paper overlays. Each object in a
graphic resides on a layer. Create all layers before you
draw, or add layers as needed.
Only objects on visible, unlocked layers are editable. The
canvas is below all other layers, but it is not actually a
layer. Change the canvas color by choosing Modify >
Document > Canvas Color and then selecting a different
canvas color.
The name of the active layer is highlighted. Drawn,
imported, or pasted objects initially reside on the active
layer.
Choose a different frame.
Add, duplicate, rename,
and delete layers. Hide
and show layers. Lock
and unlock layers.
Use the Arrange commands to change the stacking
order of objects. However, you may not see the change in
the stacking order if the objects are not overlapping.
Chapter 272
View and rearrange the
stacking order of layers.
Lock or unlock a layer.
Show or hide a layer.
Layers panel
Page 73

To show or hide the Layers panel choose Window >
Layers. The Layers panel displays the current state of all
layers in the current frame of a document.
To Do this
Add a layer Choose New Layer from the
Options pop-up on the Layers
panel
or
Click the New Layer button
or
Choose Insert > Layer.
Delete a layer Drag a layer to the Delete
Layer button, select a layer
and click the Delete Layer
button
or
Select a layer and choose
Delete Layer from the Options
pop-up on the Layers panel.
Move a layer Drag a layer name up or down
on the Layers panel.
Use the Options pop-up to add, duplicate, rename,
remove, hide or show, lock or unlock, and share layers.
Check Single Layer Editing to restrict editing to the
current layer.
Use the Current Frame pop-up to navigate among
frames. Alternatively, use the frame controls on the
bottom of the document window to navigate among
frames.
Hiding a layer hides all objects on that layer, but does
not remove them from the document. A hidden layer
cannot be an active layer. Showing a layer shows all
objects on that layer.
Hiding selected objects from view
To hide all selected objects, select them and then choose
View > Hide Selection. Hide Selection does not hide
guides. Hidden objects remain hidden when the
document is closed and reopened.
To show all hidden objects, choose View > Show All.
Show or hide a layer Click the square in the first
Lock a layer Click the square in the second
Duplicate a layer Drag a layer to the New Layer
Move selected
objects to another
layer
column to the left of a layer
name.
A show/hide icon indicates
that a layer is visible.
column to the left of a layer
name.
A padlock indicates that a
layer is locked. Objects on a
locked layer are not editable
until the layer is unlocked.
button, select a layer and click
the New Layer button
or
Select a layer and choose
Duplicate Layer from the
Options pop-up on the Layers
panel.
Drag the square selection icon
to the desired layer.
The Web Layer
The Web Layer is a special layer that appears at the top
of every new document. The Web Layer contains web
objects used for assigning interactivity to exported
Fireworks documents.
The Web Layer may be moved in the Layers panel, but
it may not be deleted. Moving a path object to the Web
Layer creates a hotspot in the shape of that object. The
Web Layer is always shared across all frames.
Sharing a layer across frames
Set a layer so that it is shared across all the frames in the
document in either of two ways:
◆ Double-click a layer, and then in the Layer Options
dialog box check Share Across Frames.
◆ Select a layer you want to share, then check Share
Layer on the Options pop-up of the Layers panel.
Creating and Editing a Graphic 73
Page 74
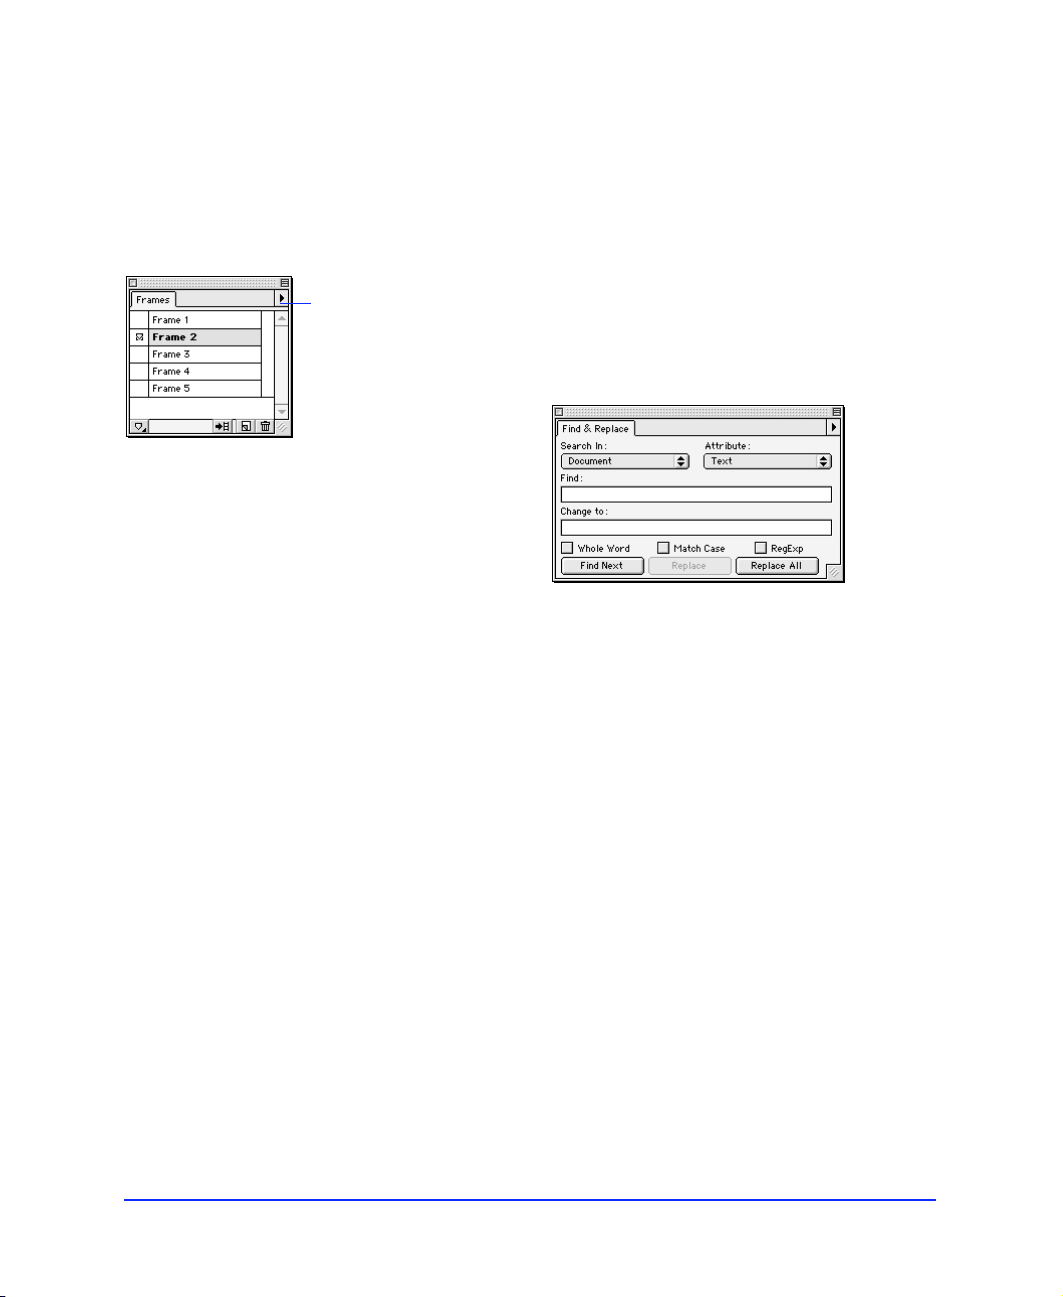
Using frames
Frames comprise the structure for an animated
Fireworks document, or contain the alternate states for
behaviors. Each frame within a document is the same
size and has the same layers in the same order as the
other frames.
Add, duplicate, and
delete frames; copy to
frames; or distribute
the selection.
Frames panel
To show or hide the Frames panel choose Window >
Frames. Frames are automatically named in numerical
order, beginning with Frame 1.
Add, duplicate, or delete frames using the Frames panel
Options pop-up. Use Copy to Frames to copy the
current selection and paste it into the frame specified in
the Copy to Frames dialog box. Use Distribute to
Frames to distribute all selected objects across frames
according to the stacking order from bottom to top.
For more information about using frames for animation,
see “Creating animation” on page 124. For more
information on using frames for rollovers see “JavaScript
rollovers” on page 120.
Find and Replace
Use Find & Replace to search for and replace different
elements in a document, such as text, URLs, fonts, and
colors. When you use Find & Replace, Fireworks can
search the current document or multiple files.
Also, Fireworks can track changes made during a Find
& Replace operation and store a log of the changes in the
Project Log panel. Find and Replace only works on
Fireworks PNG files, or on files containing vector
objects, such as Macromedia FreeHand files,
CorelDRAW files, or Adobe Illustrator files.
Find & Replace panel
To find and replace elements of a document:
1 Choose Edit > Find & Replace to open the Find &
Replace panel.
2 Choose an attribute to search for from the
Attributes pop-up.
3 Set the Find and Change to fields to define
attributes to find and replace.
4 Click one of the three buttons at the bottom of
the Find & Replace panel:
◆ Choose Find Next to find the next instance of
the element in the Find field. Found elements
appear selected in the document.
◆ Choose Replace to replace a found element
with the contents of the Change to field.
◆ Choose Replace All to find and replace every
instance of a found element throughout the
search range.
Chapter 274
Page 75

Selecting the source for the search
Fireworks can perform a find and replace in any of five
locations. Choose an option from the Search In field to
select the range of content you want to find and replace:
Selection—Find and replace elements only among the
currently selected objects and text.
Frame—Find and replace elements only within the
current frame.
Document—Find and replace elements in the active
document.
Project log—Find and replace elements in files listed in
the Project Log.
Files—Find and replace elements across multiple files.
When you choose Files from the Search In pop-up, the
Open Multiple Files dialog box opens. Navigate to a file
you want to search, and then click Add to add that file
to the find and replace list. Click Add All to add all files
in the current folder to the find and replace list.
Managing multiple file searches
When finding and replacing among multiple files, select
Replace Options from the Options pop-up to set how
multiple opened files are backed up after the file has been
searched.
Check Save and Close Files to save and close all files in a
multiple file find and replace. Each file is saved and
closed after the find and replace is performed. Only the
original active documents remain open.
Choose an option from the Backups pop-up to make
backups of changed files from a find and replace.
◆ Choose No Backups to make no backups. The
changed files replace the original files.
◆ Choose Overwrite Existing Backups to create only
one backup of each original file. If additional find
and replace operations are performed, the previous
original file always replaces the backup copy. The
backup copies are stored in subfolders called
Original Files, which are created in the folders of
each file that was replaced during a find and replace.
If an Original Files folder already exists, it is used
instead of a new folder.
Choose Incremental Backups to save every instance of a
changed file. The original files are moved to an Original
Files subfolder of their current folder, and an
incremental number is appended to each file name.
If additional find and replace operations are performed,
the original file is copied to the Original Files folder and
the next higher number is added to its file name.
For example, for a file named Drawing.png, the first
time a find and replace is executed, the backup file is
named Drawing-1.png. The second time a find and
replace is run, the backup file is named Drawing-2.png,
and so on.
Managing searches with the Project Log
The Project Log helps track and control changes made
in multiple files when using Find and Replace or when
batch processing. Any documents changed during a
Find & Replace are recorded in the Project Log.
Project Log panel
Use the Project Log to navigate through selected files,
export selected files using their last export settings, or
select files to be batch processed.
Creating and Editing a Graphic 75
Page 76

The Project Log records each changed document and
F
displays which frame of the document contained the
change, as well as the date and time of the change.
To Do this
Finding and replacing text
Manually add files
to the Project Log
Open or display files
listed in the Project
Log
Remove an entry
from the Project Log
Remove all entries
from the Project Log
Export a file listed in
the Project Log
using its last export
settings
Choose Add Files from the
Project Log Options pop-up
and navigate to the file you
want to add.
Select a file listed in the
Project Log and click Open, or
double-click a file listed in the
Project Log.
Select one or more entries and
choose Clear Selection from
the Project Log Options popup.
Choose Clear All from the
Project Log Options pop-up.
Select a file or files in the
Project Log and choose Export
Again from the Project Log
Options pop-up.
Viewing and printing the Project Log
The latest version of the Project Log is stored as an
HTML file in the Fireworks 2 \ Settings folder. Open
the Project_Log.htm file in a browser to view or print
the Project Log.
ind & Replace Text panel
Choose Text from the Attributes pop-up of the Find
and Replace panel to search for and replace words,
phrases, or text strings in Fireworks documents. Enter
the text to search for in the Find field. Enter the
replacement text in the Change to field.
◆ Check Whole Word to find the text in the same
form as it appears in the Find field, and not as part
of any other word.
◆ Check Match Case to distinguish between
uppercase and lowercase letters when searching text.
◆ Check RegExp to use regular expressions when
searching. Use regular expressions to match parts of
words or numbers conditionally during a search.
For more information on using regular expressions,
see http://developer.netscape.com/docs/manuals/
communicator/jsguide/regexp.htm.
Chapter 276
Page 77

Finding and replacing fonts
Finding and Replacing colors
Find & Replace Fonts panel
Choose Font from the Attributes pop-up of the Find
and Replace panel to search for and replace fonts in a
Fireworks document or documents. Specify the font or
font characteristics to find in the Find area. Specify the
font or font characteristics used to replace found fonts in
the Change to area.
◆ In the Min field, enter the minimum point size to
find of the selected font.
◆ In the Max field, enter the maximum point size to
find of the selected font.
◆ In the Size field, enter a point size to apply to
found fonts.
Find & Replace Colors panel
Choose Color from the Attributes pop-up to search for
and replace colors in Fireworks documents. Choose the
color to be replaced from the Find color well pop-up.
Choose the replacement color from the Change to color
well pop-up.
Choose an item from the Apply to pop-up to determine
how the colors found in the find and replace are applied:
Fills—Find and replace a fill color, except for a Pattern
fill that is based on a bitmap image.
Strokes—Find and replace stroke colors only.
Fills and Strokes—Find and replace both fill and
stroke colors.
Effects—Find and replace effect colors only.
Everything—Find and replace fill, stroke, and
effect colors.
Creating and Editing a Graphic 77
Page 78

Finding and Replacing URLs
Find & Replace URLs panel
Choose URL from the Attributes pop-up of the Find
and Replace panel to search for and replace URLs
assigned to web objects in Fireworks documents.
Enter or choose the URL to be replaced in the Find
field. Enter or choose the replacement URL in the
Change to field. The Find and Change to pop-ups
display all URLs present in the active document.
Symbols and instances
Use symbols and instances to simplify Fireworks
animations and improve editability. Instances are
representations of an original Fireworks object, which is
designated as the symbol. When the symbol object (the
original) is edited, the instances (copies) automatically
change to reflect the modifications to the symbol.
Use symbols and instances to:
◆ Simplify modifications to existing animations by
changing only the symbol object and having the
instance objects update automatically.
◆ Easily modify complex illustrations containing
multiple copies of objects.
◆ Share components across rollover states.
Creating a symbol
Create a symbol from any object, text, or group. Choose
Insert > Symbol to turn one or more selected objects into
a symbol. To add objects to an existing symbol, select the
symbol and the objects and choose Insert > Symbol
Options > Add to Symbol. Symbols cannot include
instances and other symbols.
A plus icon represents a
symbol object.
Chapter 278
Page 79

Creating an instance
Working with symbols and instances
Create an instance using any of these methods:
◆ Copy and paste a symbol.
◆ Duplicate a symbol.
◆ Clone a symbol.
◆ Choose a symbol and select Copy to Frames from
the Frames panel.
◆ Press Alt (Windows) or Option (Macintosh) after
you begin dragging a symbol.
An arrow icon represents
an instance object.
Modifying a symbol
Modify a symbol to automatically modify all associated
instances. Symbols behave as groups when modified or
transformed. For example, apply different opacities to
components within a symbol by subselecting objects
and using the Object inspector. For more information
on modifying opacity within grouped objects, see
“Object inspector” on page 20 and “Using the Object
inspector” on page 81.
To Do this
Create a symbol Select an object or group of
Add items to an
existing symbol
Create an instance Copy and paste, duplicate, or
Delete all instances
while retaining a
symbol
Delete a symbol and
all associated
instances
Break the link
between a symbol
and its instances
Find a symbol for a
particular Instance
Move a symbol and
its instances
simultaneously
objects and choose Insert >
Symbol.
Select the symbol and the
items and choose Insert >
Symbol Options > Add to
Symbol.
clone a symbol or instance
or
Select a symbol and choose
Copy to Frames from the
Frames panel
or
Press Alt (Windows) or Option
(Macintosh) after you begin
dragging a symbol.
Select the symbol and choose
Insert > Symbol Options >
Delete Instances.
Delete the symbol and confirm
in the resulting dialog box to
delete all Instances.
Select the symbol, choose
Insert > Symbol Options >
Break Link, and then click
Group from the resulting
dialog box. The Instances are
retained as unlinked groups.
Select an instance and choose
Insert > Symbol Options >
Find Symbol.
Select the symbol, choose
Edit > Subselect, and move
the contents of the symbol.
Modifying an instance
Instance object modifications are limited to
transformations, opacity, blending modes, and Live
Effects. When applied to an instance, transformations
and Live Effects do not affect an instance’s symbol
object. Changes to an instance are automatically
reapplied when its symbol is modified.
Note: Symbol and instance functions are available only
in object mode.
Creating and Editing a Graphic 79
Page 80

Tweening
Choose Insert > Tween Instances to blend a symbol and
one or more of its instances, creating interim instance
objects with transitional attributes. This is known as
tweening. Alternatively, tween two or more instances
without using a symbol.
Instance objects created by tweening derive attributes
from the symbol or instance objects used. For
example, tween a vertical symbol with a horizontal
instance to produce instance objects that rotate
progressively to form a blend from the vertical object to
the horizontal object.
Tweening can apply to these object characteristics:
Transformations—Tween between objects with
different rotation, scaling, or skew transformations.
Opacity—Tween between opacity settings of the same
opacity type.
Live Effects—Tween between settings of the same Live
Effects.
Tweened from 100% opacity to 25% opacity.
To tween:
1 Select objects to be tweened.
Select a symbol and one or more of its instances
or select two or more instances of the same
symbol object.
2 Choose Insert > Tween Instances.
3 Enter the number of tween steps in the Tween
Instances dialog box and click OK.
Check Distribute to frames to distribute the
tweened objects to separate animation frames.
Chapter 280
Page 81

Compositing
S
Compositing is the process of varying the transparency
or color interaction of two or more overlapping objects
to create a variety of graphic elements.
Using the Object inspector
Choose a blending mode.
Adjust opacity.
et opacity and choose a blending mode in the Object inspector.
Use the Object inspector to adjust the opacity of selected
objects and to apply blending modes. A setting of 100
renders an object completely opaque. A setting of 0
(zero) renders an object completely transparent.
Using blending modes
Blending modes manipulate the color values of
overlapping objects to create effects. They also add a
dimension of control to the opacity effect.
Choosing a blending mode applies it to the entire
appearance of selected objects. Objects within a single
document or a single layer can have blending modes that
differ from other objects within the document or layer.
To set a default blending mode for newly drawn objects,
choose Edit > Deselect, then choose a blending mode.
When objects with different blending modes are
grouped, the group’s blending mode overrides individual
blending modes. Ungrouping the objects restores the
objects’ individual blending modes.
A blending mode has four elements:
Blend color—The color or colors of the object to which
the blending mode is applied.
Opacity—The opacity of the object to which the
blending mode is applied.
Base color—The color of pixels underneath the blend
color.
Result color—The result of the blending mode’s effect
on the base color or colors.
Creating and Editing a Graphic 81
Page 82

Blending mode behavior
Choose To
Normal Apply no blending mode.
Multiply Multiply the base color by the blend
color, resulting in darker colors.
Screen Multiply the inverse of the blend color
by the base color, resulting in a
bleaching effect.
Darken Select the darker of the blend color and
base color to use as the result color.
This color replaces only pixels that are
lighter than the blend color.
Lighten Select the lighter of the blend color and
base color to use as the result color.
This color replaces only pixels that are
darker than the blend color.
Difference Subtract the blend color from the base
color or the base color from the blend
color. The color with less brightness is
subtracted from the color with more
brightness.
Hue Combine the hue value of the blend
color with the luminance and
saturation of the base color to create
the result color.
Saturation Combine the saturation of the blend
color with the luminance and hue of
the base color to create the result
color.
◆ In object mode, a blending mode affects the
selected object.
◆ In image edit mode, a blending mode affects the
floating selection of pixels.
◆ In image edit mode without a floating selection, a
blending mode affects the brushes and fills of
subsequently drawn objects.
◆ The effect of a blending mode in image edit mode
describes how new pixels blend against other pixels
in the same image.
For more information on blending modes, including
examples, see Fireworks Help.
Color Combine the hue and saturation of the
Luminosity Combine the luminance of the blend
Invert Invert the base color to create the
Tint Add gray to the base color to create
Erase Remove all base color pixels, including
blend color with the luminance of the
base color to create the result color,
preserving the gray levels for coloring
monochrome images and tinting color
images.
color with the hue and saturation of
the base color to create the result
color.
result color.
the result color.
those in the background image, to
reveal the canvas color.
Chapter 282
Page 83
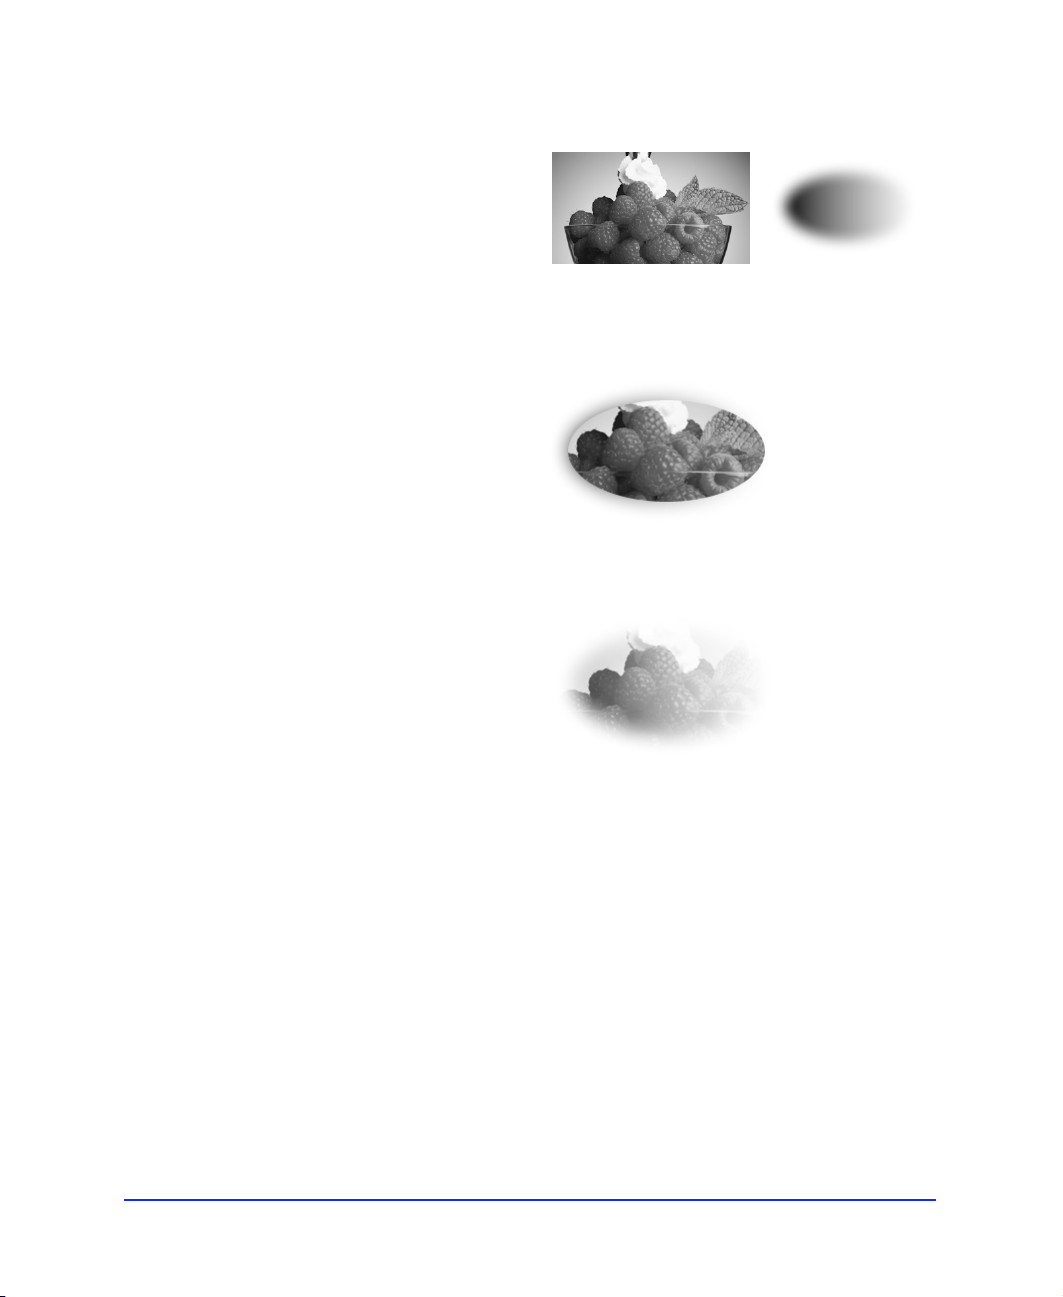
Masking
P
In Fireworks, masks are created by grouping two objects
together as a mask group. The top object acts as the
mask, while the bottom object is the image to be masked.
Create masks from any element in Fireworks, including
images, path objects, or text. A mask group has two
primary uses:
◆ Pasting an object inside another object, so that the
top object continues to be visible. This is known as a
paste inside or clipping path in FreeHand. It crops
an image to its shape.
◆ Pasting an object inside another object, so that the
top object is not visible and the alpha of each pixel in
the top object becomes part of the mask or filter of
the bottom object. This is known as a layer mask in
Photoshop. A typical application of a mask is to use
the top image to define gradient transparency for
the bottom object.
Image and clipping path
aste inside
Mask group
Creating and Editing a Graphic 83
Page 84

To create a clipping path mask:
1 Position the object to be pasted in front of the
destination path.
2 Cut the object to the Clipboard.
3 Select a path inside which the object on the
Clipboard is to be pasted.
4 Choose Edit > Paste Inside.
The object on the Clipboard is pasted inside the
selected object in the same position from which it
was cut. The Object inspector identifies this
element as a clip group.
To create a mask similar to a layer mask:
1 Position two or more objects, one on top of the
other, so that the top object is the object to be
used as the mask and the bottom object is the
object to be masked.
2 Select the objects.
3 Choose Modify > Mask Group.
The top object is converted to an alpha object whose
grayscale values are used to mask the bottom object.
Note: The top object need not be a path for this type of
masking. It can be an image.
Editing objects within a mask group
Subselect objects within a mask group to edit or
move them. Use the Subselection tool or double-click
the mask group handle to select the contents of the
mask group.
◆ To convert a paste inside into a mask group, select
the paste inside, choose Window > Object, and then
choose Clip to Top Object’s Image.
◆ To convert a mask group into a paste inside, select
the mask group, choose Window > Object, and then
choose Clip to Top Object’s Path.
Chapter 284
Page 85

CHAPTER 3
Importing and Exporting
................................................................................................................
3
85
Page 86

Fireworks in the workflow
Importing
Although Fireworks greatly reduces the need for other
applications within the graphic creation workflow, it is
highly compatible with other applications associated
with producing web graphics.
◆ Import graphics created in applications such as
FreeHand or Photoshop, and edit them using
familiar tools and similar document-organization
features such as layers and frames.
◆ Export optimized graphics, HTML, and JavaScript
for use in Dreamweaver or in a web browser.
◆ Import and export a wide variety of file formats.
◆ Use Export Preview to quickly determine the best
balance of size and quality for exported graphics
without switching to and from a browser.
◆ Batch process all files within a folder and name and
save export presets.
Import graphics or text in any of four ways:
◆ Import
◆ Open
◆ Drag and drop
◆ Copy and paste
Import File dialog box
To import a graphic using the Import File dialog
box:
1 Choose File > Import.
2 Select a file and click Open.
When available, a preview of the selected file is
shown along with file information such as file type
and file size.
3 Position the import cursor where you want the
upper-left corner of the object to appear.
4 Click the mouse button to place the object at its
default size. Click and drag to scale the object.
Imported bitmap images are placed as image objects.
For more information about image objects, see
“Image edit mode basics” on page 52.
Fireworks can import these formats:
◆ PNG
◆ GIF
◆ JPEG
◆ BMP
◆ TIFF
◆ xRes LRG
◆ ASCII
◆ RTF
Chapter 386
Page 87

◆ Adobe Photoshop 3, 4, 5
◆ Adobe Illustrator 7
◆ Macromedia FreeHand 7, 8
◆ CorelDRAW 7
◆ Ta r g a
Drag and drop
Drag and drop objects, images, or text into Fireworks
from any application that supports OLE Drag and
Drop (Windows) or Macintosh Drag and Drop
(Macintosh), such as:
◆ Macromedia FreeHand 7, 8
◆ Macromedia Flash 3
◆ Adobe Photoshop 4, 5
◆ Adobe Illustrator 7, 8
◆ Microsoft Office 97, 98
◆ Microsoft Internet Explorer 3, 4
◆ Netscape Navigator 3, 4
◆ CorelDRAW 7, 8
To drag and drop into Fireworks:
1 Select a graphic in another application and drag
it over an open Fireworks document.
2 Position the cursor where you want to drop the
selection and release the mouse button.
Copy and paste
Objects that are pasted into Fireworks from another
application are centered in the active document. When
using copy and paste, Fireworks accepts these formats
from the Clipboard:
◆ FreeHand 7, 8
◆ Illustrator
◆ PNG
◆ PICT (Macintosh)
◆ DIB (Windows)
◆ BMP (Windows)
◆ ASCII text
Resampling
Resampling adds pixels to or subtracts pixels from a
resized image to match the appearance of the original
image as closely as possible. Resampling an image to a
higher resolution typically causes little data or quality
loss. Resampling to a lower resolution always causes data
loss and a drop in quality.
When pasting an image with a resolution that differs
from the destination Fireworks document, Fireworks
displays a dialog box asking if the image is to be
resampled:
◆ Click Resample to maintain the pasted data’s
original width and height, adding or subtracting
pixels as necessary.
◆ Click Don’t Resample to keep all the original pixels,
which may make the relative size of the pasted
image larger or smaller than expected.
Importing and Exporting 87
Page 88

Pasting
ASCII
Each edit mode handles pasted data differently:
◆ In object mode, pasting a pixel selection yields a
rectangular image object, which uses alpha
transparency to maintain the appearance of the
selection.
◆ In image edit mode, pasting a vector graphic or
image object pastes a pixel selection that remains
floating until it is deselected. When deselected, the
selection becomes part of the current image.
Importing text
Import text into Fireworks using the same methods for
importing graphics. Fireworks imports two text formats:
RTF (Rich Text Format) and ASCII (plain text).
RTF
Choose File > Open or File > Import to import RTF text.
When RTF text is imported, Fireworks maintains these
attributes:
◆ Fon t
◆ Size
◆ Style (bold, italic)
◆ Alignment (left, right, center, justified)
◆ Leading
◆ Baseline shift
◆ Range kerning
◆ Horizontal scale
◆ First character's color
All other RTF information is ignored.
Import ASCII text using any of the four import
methods. Imported ASCII text is set to the default font,
12 pixels high, and uses the current fill color.
Importing Fireworks files
Import saved Fireworks files into the current drawing
layer of an active Fireworks document. When
importing a Fireworks file:
◆ Hotspot objects and slice objects are placed on the
Web Layer of the Layers panel. For more
information about URLs, see “Creating an image
map” on page 116.
◆ Layers within the imported file are merged.
◆ In files with multiple frames, only the first frame is
imported.
Imported objects from a Fireworks file are selected when
they are first imported so they may be easily grouped,
moved, or distributed immediately after import.
Note: Fireworks cannot import RTF text using copy and
paste or drag and drop.
Chapter 388
Page 89

Importing FreeHand, Illustrator, or CorelDRAW files
Import objects or files from Macromedia FreeHand,
Adobe Illustrator, or CorelDRAW using any four of
the import methods. When opening or importing a
vector-based file, use the Vector File Options dialog box
to define specific settings. Vector File Options do not
apply when pasting or dragging.
◆ Remember layers—Maintain the layer structure
of the imported file.
◆ Convert layers to frames—Place each layer of
the imported document onto a separate frame in
Fireworks.
Include Invisible Layers—Import objects on layers
that have been turned off. Otherwise, invisible layers
are ignored.
Include Background Layers—Import objects from
the document’s background layer. Otherwise, the
background layer is ignored.
Render as images—Rasterize complex groups, blends,
or Tiled fills and place them as a single image object in a
Fireworks document. Enter a number in the field to
determine how many objects a group, blend, or Tiled fill
can contain before it is rasterized during import.
Anti-Aliased—Anti-alias imported objects.
Note: Use Modify > Edge after importing to change
selected objects to Anti-Alias or Hard Edge.
Importing Illustrator files
These vector file import options are not available when
importing Illustrator files:
◆ File Conversion > Page options.
◆ File Conversion > Include Background layers.
◆ Render as images > Blends over <number> steps.
Scale—Specify the scale percentage for the imported file.
Width and Height—Specify in pixels the width and
height of the imported file.
Resolution—Specify the resolution of the imported file.
File Conversion—Specify how multipage documents
are handled when imported.
◆ Open a page—Import only the specified page.
◆ Open pages as frames—Import all the pages
from the document, and place each on a separate
frame in Fireworks.
Importing CorelDRAW files
Fireworks can import uncompressed CDR files that
have been created with CorelDRAW 7 or 8 for
Windows. These vector file import options are not
available when importing CDR files:
◆ File Conversion > Include Background layers.
◆ Render as images > Blends over <number> steps.
◆ Render as images > Tiled Fills over <number> objects.
Note: Fireworks cannot open or import CMX files or
compressed CDR files.
Importing and Exporting 89
Page 90

Because CorelDRAW supports a different set of
features than Fireworks, the following changes occur
when importing CDR files:
Master pages—The contents of the master pages are
repeated on each Fireworks frame.
Blends—Fireworks only imports the two end objects of
the CorelDRAW blend. The objects are grouped
after import.
Dimensions—Converted to vector objects.
Text—Only basic text is imported. Most character and
paragraph parameters are unsupported.
Colors—Colors are generally converted to RGB colors if
possible.
Importing animated GIFs
Choose File > Open to import animated GIFs. When
opening an animated GIF, Fireworks places each frame
of the animated GIF on a separate frame in the
Fireworks document. Also, Fireworks creates a
Background layer based on the common pixels found in
all the imported frames.
Importing from a scanner or digital camera
Import images from scanners or digital cameras directly
into Fireworks using TWAIN modules or Photoshop
Acquire plug-ins (Macintosh). Images imported into
Fireworks from a scanner or digital camera are opened
as a new document.
To import an image from a scanner or digital
camera:
1 Connect the scanner or camera to your
computer.
Follow the connection instructions included with
the camera or scanner to ensure correct installation.
2 Install the software that accompanies the
scanner or camera.
Fireworks cannot scan images unless the
appropriate software drivers, modules, and
plug-ins have been installed. Again, consult the
documentation for the scanner or camera for
specific instructions on correct installation
and setup.
3 In Fireworks, choose File > Scan and select a
TWAIN module or Photoshop Acquire plug-in
that corresponds to the device from which you
are importing an image.
For most TWAIN modules or acquire plug-ins,
additional dialog boxes will ask you to set options
for the module or plug-in.
4 Follow instructions and make settings as needed.
For more specific instructions about settings and
options, consult the documentation for the
TWAIN module or acquisition plug-in that you
are using.
The imported image is opened as a new Fireworks
document.
Using Photoshop Acquire plug-ins (Macintosh)
To use Photoshop Acquire plug-ins in Fireworks, one of
two things must be done during or after installation:
◆ Install the Photoshop Acquire plug-in in the
Fireworks 2\Settings\Xtras folder.
◆ Install the Photoshop Acquire plug-in in the
Photoshop Plug-ins folder or in another folder.
Then, in Fireworks, choose File > Preferences, click
the Folders tab, check Photoshop Plug-Ins and
browse to the folder containing the Acquire plug-in.
Chapter 390
Page 91

Exporting
Finding a good balance between quality and speed
when exporting a graphic for the web can be a daunting
task. Fireworks offers several methods to help develop
top-quality graphics with the lowest possible file size.
Fireworks exports graphics through these methods:
◆ Drag and drop
◆ Copy and paste
◆ Export
◆ Export Area tool
◆ Export as Files
◆ Export as CSS Layers
◆ Export Again
◆ Export Wizard
To export a graphic:
1 Choose File > Export to display the Export
Preview.
2 Choose settings.
3 Click Next.
4 In the Export dialog box, type a name for the file,
select slicing options and HTML style, select the
destination, and click Save (Windows) or Export
(Macintosh).
Choose File > Export Again to quickly export a file using
its previous export settings. Export Again bypasses the
Export Preview.
Export dialog box
Click Next in the Export Preview to open the Export
dialog box.
Use the Export dialog box to:
◆ Select a location for exported files.
◆ Provide a base name for automatically named
exported files (for example, slice objects).
◆ Choose slicing options.
◆ Choose HTML style.
◆ Select a location for associated HTML.
◆ Access the Document Properties dialog box using
the Setup button.
Importing and Exporting 91
Page 92

Export Wizard
Use the Export Wizard (File > Export Wizard) to help
optimize your exported files. Answer questions about
the file's destination and intended use, and the Export
Wizard suggests file type and optimization settings. In
addition, the Export Wizard attempts to optimize an
exported file to fit within the size constraint you set in
the Target export file size field.
Constrain file size from the Export Preview using the
Export to Size Wizard. Click the Export to Size button
to open the Export to Size Wizard and enter a file size.
Slicing options available:
◆ None: Use no slice options when exporting.
◆ Use Slice Objects: Export slice objects as defined
using the Slice tool.
◆ Slice Along Guides: Slice exported objects along
existing guides.
Default HTML styles available:
◆ None
◆ Dreamweaver Library.lbi
◆ Dreamweaver 2
◆ Fire works
◆ FrontPage
◆ Generic
For more information about using HTML styles, see
“Exporting HTML with a Fireworks file” on page 130.
Export Commands
To Do this
Export to Size button
The Export to Size Wizard attempts to match the
requested file size using the following methods:
◆ Adjusting JPEG quality.
◆ Modifying JPEG smoothing.
◆ Altering the number of colors in 8-bit images.
◆ Changing dither settings in 8-bit images.
◆ Enabling or disabling Optimization.
Chapter 392
Export Open the Export Preview and
Export Special >
Export As Files
Export as CSS Layers Export document as Dynamic
Export Again Export the current document
Export Wizard Launch the Export Wizard to
Export Area tool Export a specific portion of an
choose export settings.
Export images contained on
multiple frames, layers, or
slices of a document as
individual images.
HTML.
using the previous export
settings.
help select optimal export
settings.
image.
Page 93

Using Export Preview
Use the Export Preview to try different settings for the
chosen file format, compare the effects of different color
palettes and transparencies, customize palettes and
animation settings, and preview the file pixel-for-pixel as
it will be exported.
Choose a color
depth.
Choose a color
palette.
Check to dither
the image.
Preview and
edit the colors
in the image’s
palette.
Add to or
remove colors
from the
transparency.
Choose a format.
Enter a maximum number of colors for the exported file.
Click to edit, save, or load a palette.
Preview up to four previews.
Check to optimize
the exported graphic.
Choose the
type of
transparency.
Click to launch the
Export Wizard.
Click to launch the
Export to Size
Wizard.
Use the Magnification
tool to magnify the
preview area.
Importing and Exporting 93
Choose the
number of
views shown
in the preview
area.
Use frame
controls to
preview
frames or play
an animated
GIF.
Page 94

Preview area
The preview area displays the graphic exactly as it will be
exported and estimates file size and download time with
the current export settings.
Because each preview accurately reflects the exported
graphic, you can use split views to compare different
settings and create the smallest file size while
maintaining an acceptable level of quality.
Choose a saved set of options for
the selected export preview.
Check to preview the results
of the chosen export settings.
View and
compare
file size
and
download
time
estimates
for the
related
preview.
Click to save
the export
settings
used in the
active view.
Preview area of the Export Preview dialog box
When exporting animated GIFs or JavaScript rollovers,
the estimated file size is a total of all frames.
Note: To speed redraw of the Export Preview, uncheck
Preview. To stop the redraw of the preview area when
changing settings, press Esc.
Split view
Click a button to divide the preview area into one,
two, or four previews. Each preview window can
display a preview of the exported graphic with different
export settings.
Split View buttons on the Export Preview
Magnification and pan control
Choose the Magnify tool, and then click to magnify the
preview. Use Alt-click (Windows) or Option-click
(Macintosh) to zoom out.
Choose the Pointer tool and drag in a preview to pan.
When multiple views are open, all previews are
magnified to the same level and all previews pan
simultaneously to display the same portion of the image.
Saving export presets
Save Export Preview settings for future exports or batch
processing. Settings within the Options panel are
included in the saved export settings. In addition, the
Animation settings are saved when the export file
format is animated GIF. When applying export presets
to animated GIFs, ensure that the imported presets
contain an equal or greater number of frames; otherwise,
remaining frames in the animation will be set to the
Fireworks default settings, which are unspecified
disposal, 20/100 delay.
Applying preset export settings does not override
custom cropping and scaling previously applied within
the Export Preview.
To save export presets:
1 Click the + in the preview area of the Export
Preview.
2 Type a name for the export preset and click OK.
The preset is saved in the
Fireworks 2\Settings\ Export Settings folder.
To apply saved export presets to a preview, choose a
preset from the Export Presets pop-up in any
preview area. To delete an export preset, remove or
delete its file from the Fireworks 2\Settings\Export
Settings folder.
Chapter 394
Page 95

Options panel
Use the Options panel to choose file format and formatspecific settings for exporting. Although some settings
are common to many formats, other settings are unique
to a single format.
Color depth
Color depth is the number of colors used in the exported
graphic. Although most web images are exported in 8bit color (256 colors), Fireworks exports some formats
with 24-bit and 32-bit depths.
Format
Select the file format for the exported image. Fireworks
exports these formats:
◆ GIF
◆ JPEG
◆ PNG
◆ TIFF
◆ PICT (Macintosh)
◆ xRes LRG
◆ BMP
Bit depth Maximum number of
colors
1-bit 2 colors GIF, PNG, PICT,
8-bit 256 colors GIF, PNG, PICT,
24-bit 16.7 million colors
(millions)
32-bit 16.7 million colors
and an 8-bit alpha
channel
Fireworks export
formats supporting
this bit depth
TIFF, LRG
BMP, TIFF, LRG
JPEG, PNG, PICT,
BMP, LRG, TIFF
PNG, LRG, TIFF
Higher color depths create larger exported files, and are
typically not ideal for web graphics. Use JPEG with 24or 32-bit color depths when exporting photographic
images with continuous tones or complex gradient
blends of colors.
Importing and Exporting 95
Page 96

Working with color palettes
Color palettes are groups of colors, 8-bit or less, which
are stored within an image file or as a separate palette file.
◆ Use palettes when creating graphics to control
which colors are available. For example, if you have a
group of five corporate colors, you can create a
palette with only those colors so that they may be
quickly and precisely selected when drawing.
◆ Use palettes when exporting a graphic to limit the
colors included in the exported file.
Using palettes for drawing and creating
When creating an image that will be exported with a
palette, draw or create an image using colors from the
palette you will use during export. Since the Fireworks
document window always displays the image in millions
of colors (24-bit), using a palette when creating an image
can help minimize color shifting or dithering when you
force the image to 8-bit color or less during export.
If you are not sure which color palette will be used for
the exported image, use the default palette for the
Swatches panel, which is the Web 216 palette.
To add colors from a palette to the Swatches
panel:
1 In the Swatches panel Options pop-up, choose
Add Swatches.
2 Browse to the saved color palette or GIF image
file that contains colors you want to add, and
click OK.
Colors from the saved palette or GIF image file are
added to the colors in the Swatches panel.
Note: Adding or removing colors from the Swatches
panel does not alter colors already appearing in the
document.
Fireworks does not restrict itself to colors in the
Swatches panel when drawing. When creating glows,
feathered edges, anti-aliased edges, gradients, or other
transparent effects, colors other than those that appear in
the Swatches panel are used. This may cause dithering or
color shifting when exporting with some palettes. To
prevent dithering or color shifting, limit use of gradients,
export using an adaptive palette, or export in a file
format that supports higher than 8-bit color.
For more information about the Swatches panel, see
“Using the Swatches panel” on page 57.
To replace all the colors in the Swatches panel
with colors from a palette:
1 In the Swatches panel Options pop-up, choose
Replace Swatches.
2 Browse to a saved color palette or GIF image
file that contains colors you want to add, and
click OK.
Colors from the saved palette or GIF image file
appear in the Swatches panel.
Chapter 396
Page 97

Using palettes for exporting
N
Optimize or customize palettes during export using the
Options panel of the Export Preview. When exporting
an image with a color depth of 8-bits or less, palette
options appear in the Export Preview. Choose a palette
from the Palette pop-up, and then optimize it as desired.
These palettes are available by default:
Adaptive—A custom palette derived from the actual
colors in the document. Adaptive palettes most often
produce the highest quality image with the smallest
possible file size.
WebSnap Adaptive—An adaptive palette in which
colors that are near in value to web-safe colors are
converted to the closest web-safe color.
Web 216—A palette of the 216 colors common to both
Windows and Macintosh computers. This palette is
often called a web-safe or browser-safe palette, because it
produces fairly consistent results on different platforms
and with different browsers.
Exact—A palette containing the exact colors used in the
image. Only images created with 256 colors or less may
use the Exact palette. If the image contains more than
256 colors, the palette reverts to Adaptive.
System (Windows) and System (Macintosh)—Each
palette contains the 256 colors as defined by the
Windows or Macintosh platform standards.
Grayscale—A palette of 256 or fewer shades of gray.
Using this palette will effectively convert the exported
image to grayscale.
Black and White—A two-color palette that converts
the image to black and white.
Uniform—A mathematical palette based on RGB pixel
values.
Custom—A palette that has been modified or loaded
from an external palette or a GIF file. Choose Load
Palette from the Export Preview Options pop-up to
load a palette.
Setting the number of colors in the palette
Enter a number in the Number of Colors pop-up to set
the maximum number of colors desired in the exported
image. The number below the entry field displays the
actual number of colors used in the image. Create
smaller files by reducing the number of colors.
Setting the number of colors to a number lower than the
actual number of colors in an image forces some colors
to be lost, beginning with the least used colors. Pixels
containing lost colors will be converted to the closest
color remaining in the palette.
umber of Colors pop-up
Importing and Exporting 97
Page 98

Editing colors in a palette
The palette view displays colors used in the current
preview of the image when working in 8-bit color or less.
Use the palette view to preview or modify the palette for
an image. The preview window updates to reflect
changes made in the palette view.
Locking colors
Individual colors may be locked so that they are not
removed or changed when changing palettes or reducing
the number of colors in a palette.
To Do this
This symbol Indicates
The color has been edited.
Note: This does not change the color
in the document, only for export.
The color is locked.
The color is transparent.
The color is web-safe.
The color has multiple attributes. In
this case, the color is web-safe,
locked, and it has been edited.
Lock a selected color Click the Lock button on the
bottom of the Palette view or
choose Lock Color from the
Options pop-up.
Unlock a color Select a color and then click
the Lock button on the
bottom of the Palette view or
choose Lock Color from the
Options pop-up.
Unlock all colors Choose Unlock All Colors from
the Options pop-up.
Locked colors are indicated by a small square in the
lower-right corner of the swatch, as shown here:
Select a color by clicking it on the palette or in the
preview area. To select multiple colors, hold down
Control (Windows) or Command (Macintosh) as you
click colors. Hold Shift and then click a second color to
select a range of colors.
Chapter 398
Page 99

If you switch to another palette after colors have been
locked, locked colors are added to the new palette
according to the following table:
When switching to Locked colors are
To edit a color, select the color, and then click the Edit
button below the Preview area or choose Edit from the
Options pop-up. Change the color using the system
color picker. The new color replaces every instance of the
replaced color in the preview area.
Adaptive or
WebSnap Adaptive
Web 216 or Uniform Added to the palette if not
Exact Added until the total number
Black/White,
Macintosh,
Windows, or
Grayscale
Custom Added until the total number
Forced into the new palette.
already present. Only the first
40 locked colors from the
previous palette are added.
Additional locked colors are
discarded.
of colors in the palette equals
256. If the addition of locked
colors causes the total number
of colors in the palette to
exceed 256, the palette
switches to WebSnap
Adaptive and locked colors are
included accordingly.
Discarded.
of colors in the palette equals
256. Additional locked colors
are discarded.
Editing colors
Change a color in the palette by editing it in the Export
Preview. Editing a color replaces all instances of that
color in the exported image. Editing does not replace the
color in the original image; however, edited colors are
retained the next time the Export Preview is accessed.
Click to open the System color picker.
Edited colors are indicated on the Palette view with a
small square in the lower-left of the swatch, as shown
here:
Note: Use shortcut menus to edit colors. Right-click
(Windows) or Control-click (Macintosh) a color in the
palette to display a shortcut menu of edit options for
the color.
Importing and Exporting 99
Page 100

Removing edits to colors
Remove any edit made to a color by selecting the color
and choosing Remove Edit from the Options pop-up.
Also, individual edits may be removed by selecting a
color and then deselecting the button of the edit you
wish to remove.
Saving a palette
Custom palettes may be saved as Photoshop palette
files. Saved palettes may be used with other Fireworks
documents, or in other applications that support
Photoshop palettes, such as Adobe Photoshop,
Macromedia FreeHand, or Macromedia Director.
Setting web-safe colors
Web-safe colors are colors that are common to both
Macintosh and Windows platforms. These colors are
not dithered when viewed in a web browser on a
computer display set to 256 colors.
Web-safe colors are indicated on the Palette view with
a small diamond in the center of the swatch, as
shown here:
Fireworks has several methods of applying and using
web-safe colors.
◆ Choose the Web 216 palette to force all colors to
web-safe colors.
◆ Choose the WebSnap Adaptive palette to create an
adaptive palette in which colors that are near in
value to web-safe colors are converted to the closest
web-safe color.
◆ Select a color and click the Web-Safe button, or
choose Snap to Web-Safe from the Options pop-up
to force that color to its closest web-safe equivalent.
To save a custom color palette:
1 Choose Save Palette from the pop-up next to
the Format pop-up.
2 Type a name for the palette and choose a
destination folder.
3 Click Save.
The saved palette file can be loaded into the
Swatches panel or used when exporting other
documents.
Using Dithering
Use dithering to approximate colors not in the current
palette. Dithering is especially effective when exporting
images with complex blends or gradients or when
exporting photographic images to an indexed image
format, such as GIF.
Note: Dithering can greatly increase file size, especially
the size of a GIF.
To dither the exported image, check Dither in the
Export Preview, then enter a percentage value in the
Dither Amount field. Higher numbers increase
dithering and file size.
Web-safe button
Changing colors to web-safe in the Export Preview does
not effect the actual image, only the exported version of
the image. However, all colors set to web-safe are
retained each time Export Preview is used.
Chapter 3100
 Loading...