

Page 1

Adobe® Dreamweaver® CC Help
Page 2

Legal notices
Legal notices
For legal notices, see http://help.adobe.com/en_US/legalnotices/index.html.
Last updated 6/3/2015
Page 3

Contents
Chapter 1: What's new
New features summary . . . . . . . . . . . . . . . . . . . . . . . . . . . . . . . . . . . . . . . . . . . . . . . . . . . . . . . . . . . . . . . . . . . . . . . . . . . . . . . . . . . . . . . . . . . . . . . . .1
Chapter 2: Workspace and workflow
Dreamweaver workflow and workspace . . . . . . . . . . . . . . . . . . . . . . . . . . . . . . . . . . . . . . . . . . . . . . . . . . . . . . . . . . . . . . . . . . . . . . . . . . . . . . . 15
Customizing the Dreamweaver workspace . . . . . . . . . . . . . . . . . . . . . . . . . . . . . . . . . . . . . . . . . . . . . . . . . . . . . . . . . . . . . . . . . . . . . . . . . . . . 25
Working in the Document window . . . . . . . . . . . . . . . . . . . . . . . . . . . . . . . . . . . . . . . . . . . . . . . . . . . . . . . . . . . . . . . . . . . . . . . . . . . . . . . . . . . . 35
Using toolbars, inspectors, and context menus . . . . . . . . . . . . . . . . . . . . . . . . . . . . . . . . . . . . . . . . . . . . . . . . . . . . . . . . . . . . . . . . . . . . . . . . 38
Use the Insert panel . . . . . . . . . . . . . . . . . . . . . . . . . . . . . . . . . . . . . . . . . . . . . . . . . . . . . . . . . . . . . . . . . . . . . . . . . . . . . . . . . . . . . . . . . . . . . . . . . . 40
CSS Designer panel . . . . . . . . . . . . . . . . . . . . . . . . . . . . . . . . . . . . . . . . . . . . . . . . . . . . . . . . . . . . . . . . . . . . . . . . . . . . . . . . . . . . . . . . . . . . . . . . . . . 44
DOM panel . . . . . . . . . . . . . . . . . . . . . . . . . . . . . . . . . . . . . . . . . . . . . . . . . . . . . . . . . . . . . . . . . . . . . . . . . . . . . . . . . . . . . . . . . . . . . . . . . . . . . . . . . . . 53
Search files based on filename or content | Mac OS . . . . . . . . . . . . . . . . . . . . . . . . . . . . . . . . . . . . . . . . . . . . . . . . . . . . . . . . . . . . . . . . . . . . 56
Zoom in and out . . . . . . . . . . . . . . . . . . . . . . . . . . . . . . . . . . . . . . . . . . . . . . . . . . . . . . . . . . . . . . . . . . . . . . . . . . . . . . . . . . . . . . . . . . . . . . . . . . . . . 57
Keyboard shortcuts . . . . . . . . . . . . . . . . . . . . . . . . . . . . . . . . . . . . . . . . . . . . . . . . . . . . . . . . . . . . . . . . . . . . . . . . . . . . . . . . . . . . . . . . . . . . . . . . . . . 58
Optimizing the workspace for visual development . . . . . . . . . . . . . . . . . . . . . . . . . . . . . . . . . . . . . . . . . . . . . . . . . . . . . . . . . . . . . . . . . . . . 60
CEF integration . . . . . . . . . . . . . . . . . . . . . . . . . . . . . . . . . . . . . . . . . . . . . . . . . . . . . . . . . . . . . . . . . . . . . . . . . . . . . . . . . . . . . . . . . . . . . . . . . . . . . . . 63
iii
Chapter 3: Site management
About Dreamweaver sites . . . . . . . . . . . . . . . . . . . . . . . . . . . . . . . . . . . . . . . . . . . . . . . . . . . . . . . . . . . . . . . . . . . . . . . . . . . . . . . . . . . . . . . . . . . . 68
About dynamic sites . . . . . . . . . . . . . . . . . . . . . . . . . . . . . . . . . . . . . . . . . . . . . . . . . . . . . . . . . . . . . . . . . . . . . . . . . . . . . . . . . . . . . . . . . . . . . . . . . . 69
Set up a local version of your site . . . . . . . . . . . . . . . . . . . . . . . . . . . . . . . . . . . . . . . . . . . . . . . . . . . . . . . . . . . . . . . . . . . . . . . . . . . . . . . . . . . . . . 70
Connect to a remote server . . . . . . . . . . . . . . . . . . . . . . . . . . . . . . . . . . . . . . . . . . . . . . . . . . . . . . . . . . . . . . . . . . . . . . . . . . . . . . . . . . . . . . . . . . . 70
Manage Sites dialog box options . . . . . . . . . . . . . . . . . . . . . . . . . . . . . . . . . . . . . . . . . . . . . . . . . . . . . . . . . . . . . . . . . . . . . . . . . . . . . . . . . . . . . . 80
Set up a testing server . . . . . . . . . . . . . . . . . . . . . . . . . . . . . . . . . . . . . . . . . . . . . . . . . . . . . . . . . . . . . . . . . . . . . . . . . . . . . . . . . . . . . . . . . . . . . . . . 81
Version Control and Advanced settings . . . . . . . . . . . . . . . . . . . . . . . . . . . . . . . . . . . . . . . . . . . . . . . . . . . . . . . . . . . . . . . . . . . . . . . . . . . . . . . 84
Import and export Dreamweaver site settings . . . . . . . . . . . . . . . . . . . . . . . . . . . . . . . . . . . . . . . . . . . . . . . . . . . . . . . . . . . . . . . . . . . . . . . . . 85
Edit an existing remote website . . . . . . . . . . . . . . . . . . . . . . . . . . . . . . . . . . . . . . . . . . . . . . . . . . . . . . . . . . . . . . . . . . . . . . . . . . . . . . . . . . . . . . . 87
Set site preferences for transferring files . . . . . . . . . . . . . . . . . . . . . . . . . . . . . . . . . . . . . . . . . . . . . . . . . . . . . . . . . . . . . . . . . . . . . . . . . . . . . . . 87
Chapter 4: File management
Creating and opening documents . . . . . . . . . . . . . . . . . . . . . . . . . . . . . . . . . . . . . . . . . . . . . . . . . . . . . . . . . . . . . . . . . . . . . . . . . . . . . . . . . . . . 89
Managing files and folders . . . . . . . . . . . . . . . . . . . . . . . . . . . . . . . . . . . . . . . . . . . . . . . . . . . . . . . . . . . . . . . . . . . . . . . . . . . . . . . . . . . . . . . . . . . 101
Getting and putting files to and from your server . . . . . . . . . . . . . . . . . . . . . . . . . . . . . . . . . . . . . . . . . . . . . . . . . . . . . . . . . . . . . . . . . . . . . 109
Checking in and checking out files . . . . . . . . . . . . . . . . . . . . . . . . . . . . . . . . . . . . . . . . . . . . . . . . . . . . . . . . . . . . . . . . . . . . . . . . . . . . . . . . . . . 113
Synchronizing files . . . . . . . . . . . . . . . . . . . . . . . . . . . . . . . . . . . . . . . . . . . . . . . . . . . . . . . . . . . . . . . . . . . . . . . . . . . . . . . . . . . . . . . . . . . . . . . . . . 121
Comparing files for differences . . . . . . . . . . . . . . . . . . . . . . . . . . . . . . . . . . . . . . . . . . . . . . . . . . . . . . . . . . . . . . . . . . . . . . . . . . . . . . . . . . . . . . . 123
Cloaking files and folders in your Dreamweaver site . . . . . . . . . . . . . . . . . . . . . . . . . . . . . . . . . . . . . . . . . . . . . . . . . . . . . . . . . . . . . . . . . . 125
Storing file information in Design Notes . . . . . . . . . . . . . . . . . . . . . . . . . . . . . . . . . . . . . . . . . . . . . . . . . . . . . . . . . . . . . . . . . . . . . . . . . . . . . . 128
Testing your Dreamweaver site . . . . . . . . . . . . . . . . . . . . . . . . . . . . . . . . . . . . . . . . . . . . . . . . . . . . . . . . . . . . . . . . . . . . . . . . . . . . . . . . . . . . . . 130
Chapter 5: Layout and design
Using visual aids for layout . . . . . . . . . . . . . . . . . . . . . . . . . . . . . . . . . . . . . . . . . . . . . . . . . . . . . . . . . . . . . . . . . . . . . . . . . . . . . . . . . . . . . . . . . . . 134
Using Frames . . . . . . . . . . . . . . . . . . . . . . . . . . . . . . . . . . . . . . . . . . . . . . . . . . . . . . . . . . . . . . . . . . . . . . . . . . . . . . . . . . . . . . . . . . . . . . . . . . . . . . . . 137
Laying out pages with CSS . . . . . . . . . . . . . . . . . . . . . . . . . . . . . . . . . . . . . . . . . . . . . . . . . . . . . . . . . . . . . . . . . . . . . . . . . . . . . . . . . . . . . . . . . . . 149
Last updated 6/3/2015
Page 4

DREAMWEAVER
Content s
Working with Bootstrap files . . . . . . . . . . . . . . . . . . . . . . . . . . . . . . . . . . . . . . . . . . . . . . . . . . . . . . . . . . . . . . . . . . . . . . . . . . . . . . . . . . . . . . . . . 155
Visual Media Queries . . . . . . . . . . . . . . . . . . . . . . . . . . . . . . . . . . . . . . . . . . . . . . . . . . . . . . . . . . . . . . . . . . . . . . . . . . . . . . . . . . . . . . . . . . . . . . . . 161
Responsive design using fluid grid layouts . . . . . . . . . . . . . . . . . . . . . . . . . . . . . . . . . . . . . . . . . . . . . . . . . . . . . . . . . . . . . . . . . . . . . . . . . . . 164
Presenting content with tables . . . . . . . . . . . . . . . . . . . . . . . . . . . . . . . . . . . . . . . . . . . . . . . . . . . . . . . . . . . . . . . . . . . . . . . . . . . . . . . . . . . . . . . 167
Using jQuery UI widgets in Dreamweaver . . . . . . . . . . . . . . . . . . . . . . . . . . . . . . . . . . . . . . . . . . . . . . . . . . . . . . . . . . . . . . . . . . . . . . . . . . . . 181
Using jQuery effects in Dreamweaver . . . . . . . . . . . . . . . . . . . . . . . . . . . . . . . . . . . . . . . . . . . . . . . . . . . . . . . . . . . . . . . . . . . . . . . . . . . . . . . . 182
Colors . . . . . . . . . . . . . . . . . . . . . . . . . . . . . . . . . . . . . . . . . . . . . . . . . . . . . . . . . . . . . . . . . . . . . . . . . . . . . . . . . . . . . . . . . . . . . . . . . . . . . . . . . . . . . . . 184
Chapter 6: CSS
Understanding Cascading Style Sheets . . . . . . . . . . . . . . . . . . . . . . . . . . . . . . . . . . . . . . . . . . . . . . . . . . . . . . . . . . . . . . . . . . . . . . . . . . . . . . . 186
CSS Designer panel . . . . . . . . . . . . . . . . . . . . . . . . . . . . . . . . . . . . . . . . . . . . . . . . . . . . . . . . . . . . . . . . . . . . . . . . . . . . . . . . . . . . . . . . . . . . . . . . . . 190
Set CSS Styles preferences . . . . . . . . . . . . . . . . . . . . . . . . . . . . . . . . . . . . . . . . . . . . . . . . . . . . . . . . . . . . . . . . . . . . . . . . . . . . . . . . . . . . . . . . . . . 200
Create a CSS rule . . . . . . . . . . . . . . . . . . . . . . . . . . . . . . . . . . . . . . . . . . . . . . . . . . . . . . . . . . . . . . . . . . . . . . . . . . . . . . . . . . . . . . . . . . . . . . . . . . . . 200
Set CSS properties . . . . . . . . . . . . . . . . . . . . . . . . . . . . . . . . . . . . . . . . . . . . . . . . . . . . . . . . . . . . . . . . . . . . . . . . . . . . . . . . . . . . . . . . . . . . . . . . . . . 201
Edit a CSS rule . . . . . . . . . . . . . . . . . . . . . . . . . . . . . . . . . . . . . . . . . . . . . . . . . . . . . . . . . . . . . . . . . . . . . . . . . . . . . . . . . . . . . . . . . . . . . . . . . . . . . . . 207
Add a property to a CSS rule . . . . . . . . . . . . . . . . . . . . . . . . . . . . . . . . . . . . . . . . . . . . . . . . . . . . . . . . . . . . . . . . . . . . . . . . . . . . . . . . . . . . . . . . . 208
Apply, remove, or rename CSS class styles . . . . . . . . . . . . . . . . . . . . . . . . . . . . . . . . . . . . . . . . . . . . . . . . . . . . . . . . . . . . . . . . . . . . . . . . . . . . 208
Move/export CSS rules . . . . . . . . . . . . . . . . . . . . . . . . . . . . . . . . . . . . . . . . . . . . . . . . . . . . . . . . . . . . . . . . . . . . . . . . . . . . . . . . . . . . . . . . . . . . . . 209
Convert inline CSS to a CSS rule . . . . . . . . . . . . . . . . . . . . . . . . . . . . . . . . . . . . . . . . . . . . . . . . . . . . . . . . . . . . . . . . . . . . . . . . . . . . . . . . . . . . . . 211
Link to an external CSS style sheet . . . . . . . . . . . . . . . . . . . . . . . . . . . . . . . . . . . . . . . . . . . . . . . . . . . . . . . . . . . . . . . . . . . . . . . . . . . . . . . . . . . 211
Edit a CSS style sheet . . . . . . . . . . . . . . . . . . . . . . . . . . . . . . . . . . . . . . . . . . . . . . . . . . . . . . . . . . . . . . . . . . . . . . . . . . . . . . . . . . . . . . . . . . . . . . . . 212
Format CSS code . . . . . . . . . . . . . . . . . . . . . . . . . . . . . . . . . . . . . . . . . . . . . . . . . . . . . . . . . . . . . . . . . . . . . . . . . . . . . . . . . . . . . . . . . . . . . . . . . . . . 212
Disable/Enable CSS . . . . . . . . . . . . . . . . . . . . . . . . . . . . . . . . . . . . . . . . . . . . . . . . . . . . . . . . . . . . . . . . . . . . . . . . . . . . . . . . . . . . . . . . . . . . . . . . . . 213
Inspect CSS in Live view . . . . . . . . . . . . . . . . . . . . . . . . . . . . . . . . . . . . . . . . . . . . . . . . . . . . . . . . . . . . . . . . . . . . . . . . . . . . . . . . . . . . . . . . . . . . . 214
Check for cross-browser CSS rendering issues . . . . . . . . . . . . . . . . . . . . . . . . . . . . . . . . . . . . . . . . . . . . . . . . . . . . . . . . . . . . . . . . . . . . . . . . 215
Use Design-Time style sheets . . . . . . . . . . . . . . . . . . . . . . . . . . . . . . . . . . . . . . . . . . . . . . . . . . . . . . . . . . . . . . . . . . . . . . . . . . . . . . . . . . . . . . . . 217
Working with div tags . . . . . . . . . . . . . . . . . . . . . . . . . . . . . . . . . . . . . . . . . . . . . . . . . . . . . . . . . . . . . . . . . . . . . . . . . . . . . . . . . . . . . . . . . . . . . . . 217
Apply gradients to background . . . . . . . . . . . . . . . . . . . . . . . . . . . . . . . . . . . . . . . . . . . . . . . . . . . . . . . . . . . . . . . . . . . . . . . . . . . . . . . . . . . . . . 231
CSS3 transition effects . . . . . . . . . . . . . . . . . . . . . . . . . . . . . . . . . . . . . . . . . . . . . . . . . . . . . . . . . . . . . . . . . . . . . . . . . . . . . . . . . . . . . . . . . . . . . . . 234
Use Dreamweaver sample style sheets . . . . . . . . . . . . . . . . . . . . . . . . . . . . . . . . . . . . . . . . . . . . . . . . . . . . . . . . . . . . . . . . . . . . . . . . . . . . . . . 235
The CSS Styles panel . . . . . . . . . . . . . . . . . . . . . . . . . . . . . . . . . . . . . . . . . . . . . . . . . . . . . . . . . . . . . . . . . . . . . . . . . . . . . . . . . . . . . . . . . . . . . . . . . 235
iv
Chapter 7: Page content and assets
Set page properties . . . . . . . . . . . . . . . . . . . . . . . . . . . . . . . . . . . . . . . . . . . . . . . . . . . . . . . . . . . . . . . . . . . . . . . . . . . . . . . . . . . . . . . . . . . . . . . . . 240
Set CSS link properties for an entire page . . . . . . . . . . . . . . . . . . . . . . . . . . . . . . . . . . . . . . . . . . . . . . . . . . . . . . . . . . . . . . . . . . . . . . . . . . . . . 241
Set CSS heading properties for an entire page . . . . . . . . . . . . . . . . . . . . . . . . . . . . . . . . . . . . . . . . . . . . . . . . . . . . . . . . . . . . . . . . . . . . . . . . 242
Set title and encoding properties for a page . . . . . . . . . . . . . . . . . . . . . . . . . . . . . . . . . . . . . . . . . . . . . . . . . . . . . . . . . . . . . . . . . . . . . . . . . . 242
Use a tracing image to design apage . . . . . . . . . . . . . . . . . . . . . . . . . . . . . . . . . . . . . . . . . . . . . . . . . . . . . . . . . . . . . . . . . . . . . . . . . . . . . . . . . 243
Understanding document encoding . . . . . . . . . . . . . . . . . . . . . . . . . . . . . . . . . . . . . . . . . . . . . . . . . . . . . . . . . . . . . . . . . . . . . . . . . . . . . . . . . 243
Select and view elements in the Document window . . . . . . . . . . . . . . . . . . . . . . . . . . . . . . . . . . . . . . . . . . . . . . . . . . . . . . . . . . . . . . . . . . 244
Zoom in and out . . . . . . . . . . . . . . . . . . . . . . . . . . . . . . . . . . . . . . . . . . . . . . . . . . . . . . . . . . . . . . . . . . . . . . . . . . . . . . . . . . . . . . . . . . . . . . . . . . . . 246
Set download time and size preferences . . . . . . . . . . . . . . . . . . . . . . . . . . . . . . . . . . . . . . . . . . . . . . . . . . . . . . . . . . . . . . . . . . . . . . . . . . . . . 247
Working with text . . . . . . . . . . . . . . . . . . . . . . . . . . . . . . . . . . . . . . . . . . . . . . . . . . . . . . . . . . . . . . . . . . . . . . . . . . . . . . . . . . . . . . . . . . . . . . . . . . . 247
Arabic and Hebrew text . . . . . . . . . . . . . . . . . . . . . . . . . . . . . . . . . . . . . . . . . . . . . . . . . . . . . . . . . . . . . . . . . . . . . . . . . . . . . . . . . . . . . . . . . . . . . . 255
Edit in Live View . . . . . . . . . . . . . . . . . . . . . . . . . . . . . . . . . . . . . . . . . . . . . . . . . . . . . . . . . . . . . . . . . . . . . . . . . . . . . . . . . . . . . . . . . . . . . . . . . . . . . 256
DOM panel . . . . . . . . . . . . . . . . . . . . . . . . . . . . . . . . . . . . . . . . . . . . . . . . . . . . . . . . . . . . . . . . . . . . . . . . . . . . . . . . . . . . . . . . . . . . . . . . . . . . . . . . . . 266
Set text properties in the Property inspector . . . . . . . . . . . . . . . . . . . . . . . . . . . . . . . . . . . . . . . . . . . . . . . . . . . . . . . . . . . . . . . . . . . . . . . . . 269
Last updated 6/3/2015
Page 5

DREAMWEAVER
Content s
Spell check a web page . . . . . . . . . . . . . . . . . . . . . . . . . . . . . . . . . . . . . . . . . . . . . . . . . . . . . . . . . . . . . . . . . . . . . . . . . . . . . . . . . . . . . . . . . . . . . . 272
Import tabular data . . . . . . . . . . . . . . . . . . . . . . . . . . . . . . . . . . . . . . . . . . . . . . . . . . . . . . . . . . . . . . . . . . . . . . . . . . . . . . . . . . . . . . . . . . . . . . . . . . 273
Import Microsoft Office documents (Windows only) . . . . . . . . . . . . . . . . . . . . . . . . . . . . . . . . . . . . . . . . . . . . . . . . . . . . . . . . . . . . . . . . . . 273
Create a link to a Word or Excel document . . . . . . . . . . . . . . . . . . . . . . . . . . . . . . . . . . . . . . . . . . . . . . . . . . . . . . . . . . . . . . . . . . . . . . . . . . . . 274
Use HTML Formatting . . . . . . . . . . . . . . . . . . . . . . . . . . . . . . . . . . . . . . . . . . . . . . . . . . . . . . . . . . . . . . . . . . . . . . . . . . . . . . . . . . . . . . . . . . . . . . . 274
Use horizontal rules . . . . . . . . . . . . . . . . . . . . . . . . . . . . . . . . . . . . . . . . . . . . . . . . . . . . . . . . . . . . . . . . . . . . . . . . . . . . . . . . . . . . . . . . . . . . . . . . . 276
Modify font combinations . . . . . . . . . . . . . . . . . . . . . . . . . . . . . . . . . . . . . . . . . . . . . . . . . . . . . . . . . . . . . . . . . . . . . . . . . . . . . . . . . . . . . . . . . . . 277
Add Edge Web Fonts to the Font list . . . . . . . . . . . . . . . . . . . . . . . . . . . . . . . . . . . . . . . . . . . . . . . . . . . . . . . . . . . . . . . . . . . . . . . . . . . . . . . . . . 278
Insert dates . . . . . . . . . . . . . . . . . . . . . . . . . . . . . . . . . . . . . . . . . . . . . . . . . . . . . . . . . . . . . . . . . . . . . . . . . . . . . . . . . . . . . . . . . . . . . . . . . . . . . . . . . 279
Working with assets . . . . . . . . . . . . . . . . . . . . . . . . . . . . . . . . . . . . . . . . . . . . . . . . . . . . . . . . . . . . . . . . . . . . . . . . . . . . . . . . . . . . . . . . . . . . . . . . . 280
Creating and managing a list of favorite assets . . . . . . . . . . . . . . . . . . . . . . . . . . . . . . . . . . . . . . . . . . . . . . . . . . . . . . . . . . . . . . . . . . . . . . . 285
Insert and edit images . . . . . . . . . . . . . . . . . . . . . . . . . . . . . . . . . . . . . . . . . . . . . . . . . . . . . . . . . . . . . . . . . . . . . . . . . . . . . . . . . . . . . . . . . . . . . . . 287
Adding media objects . . . . . . . . . . . . . . . . . . . . . . . . . . . . . . . . . . . . . . . . . . . . . . . . . . . . . . . . . . . . . . . . . . . . . . . . . . . . . . . . . . . . . . . . . . . . . . . 297
Adding video . . . . . . . . . . . . . . . . . . . . . . . . . . . . . . . . . . . . . . . . . . . . . . . . . . . . . . . . . . . . . . . . . . . . . . . . . . . . . . . . . . . . . . . . . . . . . . . . . . . . . . . . 304
Insert HTML5 video . . . . . . . . . . . . . . . . . . . . . . . . . . . . . . . . . . . . . . . . . . . . . . . . . . . . . . . . . . . . . . . . . . . . . . . . . . . . . . . . . . . . . . . . . . . . . . . . . . 309
Inserting SWF files . . . . . . . . . . . . . . . . . . . . . . . . . . . . . . . . . . . . . . . . . . . . . . . . . . . . . . . . . . . . . . . . . . . . . . . . . . . . . . . . . . . . . . . . . . . . . . . . . . . 311
Adding web widgets . . . . . . . . . . . . . . . . . . . . . . . . . . . . . . . . . . . . . . . . . . . . . . . . . . . . . . . . . . . . . . . . . . . . . . . . . . . . . . . . . . . . . . . . . . . . . . . . 314
Adding Sound . . . . . . . . . . . . . . . . . . . . . . . . . . . . . . . . . . . . . . . . . . . . . . . . . . . . . . . . . . . . . . . . . . . . . . . . . . . . . . . . . . . . . . . . . . . . . . . . . . . . . . . 314
Insert HTML5 audio . . . . . . . . . . . . . . . . . . . . . . . . . . . . . . . . . . . . . . . . . . . . . . . . . . . . . . . . . . . . . . . . . . . . . . . . . . . . . . . . . . . . . . . . . . . . . . . . . . 316
Automating tasks . . . . . . . . . . . . . . . . . . . . . . . . . . . . . . . . . . . . . . . . . . . . . . . . . . . . . . . . . . . . . . . . . . . . . . . . . . . . . . . . . . . . . . . . . . . . . . . . . . . . 317
About assets and libraries . . . . . . . . . . . . . . . . . . . . . . . . . . . . . . . . . . . . . . . . . . . . . . . . . . . . . . . . . . . . . . . . . . . . . . . . . . . . . . . . . . . . . . . . . . . . 322
Working with library items . . . . . . . . . . . . . . . . . . . . . . . . . . . . . . . . . . . . . . . . . . . . . . . . . . . . . . . . . . . . . . . . . . . . . . . . . . . . . . . . . . . . . . . . . . . 324
Working with Photoshop and Dreamweaver . . . . . . . . . . . . . . . . . . . . . . . . . . . . . . . . . . . . . . . . . . . . . . . . . . . . . . . . . . . . . . . . . . . . . . . . . . 327
v
Chapter 8: Linking and navigation
About linking and navigation . . . . . . . . . . . . . . . . . . . . . . . . . . . . . . . . . . . . . . . . . . . . . . . . . . . . . . . . . . . . . . . . . . . . . . . . . . . . . . . . . . . . . . . . 334
Linking . . . . . . . . . . . . . . . . . . . . . . . . . . . . . . . . . . . . . . . . . . . . . . . . . . . . . . . . . . . . . . . . . . . . . . . . . . . . . . . . . . . . . . . . . . . . . . . . . . . . . . . . . . . . . . 336
Jump menus . . . . . . . . . . . . . . . . . . . . . . . . . . . . . . . . . . . . . . . . . . . . . . . . . . . . . . . . . . . . . . . . . . . . . . . . . . . . . . . . . . . . . . . . . . . . . . . . . . . . . . . . 343
Navigation bars . . . . . . . . . . . . . . . . . . . . . . . . . . . . . . . . . . . . . . . . . . . . . . . . . . . . . . . . . . . . . . . . . . . . . . . . . . . . . . . . . . . . . . . . . . . . . . . . . . . . . 344
Image maps . . . . . . . . . . . . . . . . . . . . . . . . . . . . . . . . . . . . . . . . . . . . . . . . . . . . . . . . . . . . . . . . . . . . . . . . . . . . . . . . . . . . . . . . . . . . . . . . . . . . . . . . . 345
Troubleshooting links . . . . . . . . . . . . . . . . . . . . . . . . . . . . . . . . . . . . . . . . . . . . . . . . . . . . . . . . . . . . . . . . . . . . . . . . . . . . . . . . . . . . . . . . . . . . . . . 346
Chapter 9: Previewing
Preview and inspect web pages on multiple devices . . . . . . . . . . . . . . . . . . . . . . . . . . . . . . . . . . . . . . . . . . . . . . . . . . . . . . . . . . . . . . . . . . 349
Previewing pages . . . . . . . . . . . . . . . . . . . . . . . . . . . . . . . . . . . . . . . . . . . . . . . . . . . . . . . . . . . . . . . . . . . . . . . . . . . . . . . . . . . . . . . . . . . . . . . . . . . 352
Chapter 10: Coding
General information about coding in Dreamweaver . . . . . . . . . . . . . . . . . . . . . . . . . . . . . . . . . . . . . . . . . . . . . . . . . . . . . . . . . . . . . . . . . . 357
Setting up your coding environment . . . . . . . . . . . . . . . . . . . . . . . . . . . . . . . . . . . . . . . . . . . . . . . . . . . . . . . . . . . . . . . . . . . . . . . . . . . . . . . . . 361
Setting coding preferences . . . . . . . . . . . . . . . . . . . . . . . . . . . . . . . . . . . . . . . . . . . . . . . . . . . . . . . . . . . . . . . . . . . . . . . . . . . . . . . . . . . . . . . . . . 363
Writing and editing code . . . . . . . . . . . . . . . . . . . . . . . . . . . . . . . . . . . . . . . . . . . . . . . . . . . . . . . . . . . . . . . . . . . . . . . . . . . . . . . . . . . . . . . . . . . . 370
Collapsing code . . . . . . . . . . . . . . . . . . . . . . . . . . . . . . . . . . . . . . . . . . . . . . . . . . . . . . . . . . . . . . . . . . . . . . . . . . . . . . . . . . . . . . . . . . . . . . . . . . . . . 387
Lint code . . . . . . . . . . . . . . . . . . . . . . . . . . . . . . . . . . . . . . . . . . . . . . . . . . . . . . . . . . . . . . . . . . . . . . . . . . . . . . . . . . . . . . . . . . . . . . . . . . . . . . . . . . . . 389
Optimize code . . . . . . . . . . . . . . . . . . . . . . . . . . . . . . . . . . . . . . . . . . . . . . . . . . . . . . . . . . . . . . . . . . . . . . . . . . . . . . . . . . . . . . . . . . . . . . . . . . . . . . 391
Editing code in Design view . . . . . . . . . . . . . . . . . . . . . . . . . . . . . . . . . . . . . . . . . . . . . . . . . . . . . . . . . . . . . . . . . . . . . . . . . . . . . . . . . . . . . . . . . 395
Working with head content for pages . . . . . . . . . . . . . . . . . . . . . . . . . . . . . . . . . . . . . . . . . . . . . . . . . . . . . . . . . . . . . . . . . . . . . . . . . . . . . . . . 401
Working with server-side includes . . . . . . . . . . . . . . . . . . . . . . . . . . . . . . . . . . . . . . . . . . . . . . . . . . . . . . . . . . . . . . . . . . . . . . . . . . . . . . . . . . . 405
Last updated 6/3/2015
Page 6

DREAMWEAVER
Content s
Managing tag libraries . . . . . . . . . . . . . . . . . . . . . . . . . . . . . . . . . . . . . . . . . . . . . . . . . . . . . . . . . . . . . . . . . . . . . . . . . . . . . . . . . . . . . . . . . . . . . . . 407
Importing custom tags into Dreamweaver . . . . . . . . . . . . . . . . . . . . . . . . . . . . . . . . . . . . . . . . . . . . . . . . . . . . . . . . . . . . . . . . . . . . . . . . . . . 410
Chapter 11: Javascript
Using JavaScript behaviors (general instructions) . . . . . . . . . . . . . . . . . . . . . . . . . . . . . . . . . . . . . . . . . . . . . . . . . . . . . . . . . . . . . . . . . . . . . 412
Applying built-in JavaScript behaviors . . . . . . . . . . . . . . . . . . . . . . . . . . . . . . . . . . . . . . . . . . . . . . . . . . . . . . . . . . . . . . . . . . . . . . . . . . . . . . . 415
Chapter 12: Cross-product
Add-Ons . . . . . . . . . . . . . . . . . . . . . . . . . . . . . . . . . . . . . . . . . . . . . . . . . . . . . . . . . . . . . . . . . . . . . . . . . . . . . . . . . . . . . . . . . . . . . . . . . . . . . . . . . . . . 426
Cross-application integration . . . . . . . . . . . . . . . . . . . . . . . . . . . . . . . . . . . . . . . . . . . . . . . . . . . . . . . . . . . . . . . . . . . . . . . . . . . . . . . . . . . . . . . . 429
Working with Fireworks and Dreamweaver . . . . . . . . . . . . . . . . . . . . . . . . . . . . . . . . . . . . . . . . . . . . . . . . . . . . . . . . . . . . . . . . . . . . . . . . . . . 430
Working with Flash and Dreamweaver . . . . . . . . . . . . . . . . . . . . . . . . . . . . . . . . . . . . . . . . . . . . . . . . . . . . . . . . . . . . . . . . . . . . . . . . . . . . . . . 435
Working with Adobe Bridgeand Dreamweaver . . . . . . . . . . . . . . . . . . . . . . . . . . . . . . . . . . . . . . . . . . . . . . . . . . . . . . . . . . . . . . . . . . . . . . . 436
Working with Device Central and Dreamweaver . . . . . . . . . . . . . . . . . . . . . . . . . . . . . . . . . . . . . . . . . . . . . . . . . . . . . . . . . . . . . . . . . . . . . . 438
Working with ConnectNow and Dreamweaver . . . . . . . . . . . . . . . . . . . . . . . . . . . . . . . . . . . . . . . . . . . . . . . . . . . . . . . . . . . . . . . . . . . . . . . 439
AIR Extension for Dreamweaver . . . . . . . . . . . . . . . . . . . . . . . . . . . . . . . . . . . . . . . . . . . . . . . . . . . . . . . . . . . . . . . . . . . . . . . . . . . . . . . . . . . . . 440
Using Dreamweaver with Adobe Online services . . . . . . . . . . . . . . . . . . . . . . . . . . . . . . . . . . . . . . . . . . . . . . . . . . . . . . . . . . . . . . . . . . . . . 444
Extract in Dreamweaver CC . . . . . . . . . . . . . . . . . . . . . . . . . . . . . . . . . . . . . . . . . . . . . . . . . . . . . . . . . . . . . . . . . . . . . . . . . . . . . . . . . . . . . . . . . . 451
Dreamweaver-Business Catalyst integration . . . . . . . . . . . . . . . . . . . . . . . . . . . . . . . . . . . . . . . . . . . . . . . . . . . . . . . . . . . . . . . . . . . . . . . . . . 463
Import Microsoft Office documents (Windows only) . . . . . . . . . . . . . . . . . . . . . . . . . . . . . . . . . . . . . . . . . . . . . . . . . . . . . . . . . . . . . . . . . . 465
vi
Chapter 13: Templates
About Dreamweaver templates . . . . . . . . . . . . . . . . . . . . . . . . . . . . . . . . . . . . . . . . . . . . . . . . . . . . . . . . . . . . . . . . . . . . . . . . . . . . . . . . . . . . . . 467
Recognizing templates and template-based documents . . . . . . . . . . . . . . . . . . . . . . . . . . . . . . . . . . . . . . . . . . . . . . . . . . . . . . . . . . . . . . 471
Creating a Dreamweaver template . . . . . . . . . . . . . . . . . . . . . . . . . . . . . . . . . . . . . . . . . . . . . . . . . . . . . . . . . . . . . . . . . . . . . . . . . . . . . . . . . . . 474
Creating editable regions in templates . . . . . . . . . . . . . . . . . . . . . . . . . . . . . . . . . . . . . . . . . . . . . . . . . . . . . . . . . . . . . . . . . . . . . . . . . . . . . . . 477
Creating repeating regions in templates . . . . . . . . . . . . . . . . . . . . . . . . . . . . . . . . . . . . . . . . . . . . . . . . . . . . . . . . . . . . . . . . . . . . . . . . . . . . . . 478
Using optional regions in templates . . . . . . . . . . . . . . . . . . . . . . . . . . . . . . . . . . . . . . . . . . . . . . . . . . . . . . . . . . . . . . . . . . . . . . . . . . . . . . . . . . 481
Defining editable tag attributes in templates . . . . . . . . . . . . . . . . . . . . . . . . . . . . . . . . . . . . . . . . . . . . . . . . . . . . . . . . . . . . . . . . . . . . . . . . . 483
Creating a nested template . . . . . . . . . . . . . . . . . . . . . . . . . . . . . . . . . . . . . . . . . . . . . . . . . . . . . . . . . . . . . . . . . . . . . . . . . . . . . . . . . . . . . . . . . . 484
Editing, updating, and deleting templates . . . . . . . . . . . . . . . . . . . . . . . . . . . . . . . . . . . . . . . . . . . . . . . . . . . . . . . . . . . . . . . . . . . . . . . . . . . . 487
Exporting and importing template content . . . . . . . . . . . . . . . . . . . . . . . . . . . . . . . . . . . . . . . . . . . . . . . . . . . . . . . . . . . . . . . . . . . . . . . . . . 491
Applying or removing a template from an existing document . . . . . . . . . . . . . . . . . . . . . . . . . . . . . . . . . . . . . . . . . . . . . . . . . . . . . . . . . 492
Editing content in a template-based document . . . . . . . . . . . . . . . . . . . . . . . . . . . . . . . . . . . . . . . . . . . . . . . . . . . . . . . . . . . . . . . . . . . . . . 493
Tem plate sy ntax . . . . . . . . . . . . . . . . . . . . . . . . . . . . . . . . . . . . . . . . . . . . . . . . . . . . . . . . . . . . . . . . . . . . . . . . . . . . . . . . . . . . . . . . . . . . . . . . . . . . . 496
Setting authoring preferences for templates . . . . . . . . . . . . . . . . . . . . . . . . . . . . . . . . . . . . . . . . . . . . . . . . . . . . . . . . . . . . . . . . . . . . . . . . . 497
Chapter 14: Mobile and multiscreen
Creating media queries . . . . . . . . . . . . . . . . . . . . . . . . . . . . . . . . . . . . . . . . . . . . . . . . . . . . . . . . . . . . . . . . . . . . . . . . . . . . . . . . . . . . . . . . . . . . . . 499
Change page orientation for mobile devices . . . . . . . . . . . . . . . . . . . . . . . . . . . . . . . . . . . . . . . . . . . . . . . . . . . . . . . . . . . . . . . . . . . . . . . . . 501
Creating web applications for mobile devices . . . . . . . . . . . . . . . . . . . . . . . . . . . . . . . . . . . . . . . . . . . . . . . . . . . . . . . . . . . . . . . . . . . . . . . . 501
Chapter 15: XML
About XML and XSLT . . . . . . . . . . . . . . . . . . . . . . . . . . . . . . . . . . . . . . . . . . . . . . . . . . . . . . . . . . . . . . . . . . . . . . . . . . . . . . . . . . . . . . . . . . . . . . . . 505
Performing XSL transformationson the server . . . . . . . . . . . . . . . . . . . . . . . . . . . . . . . . . . . . . . . . . . . . . . . . . . . . . . . . . . . . . . . . . . . . . . . . 511
Performing XSL transformationson the client . . . . . . . . . . . . . . . . . . . . . . . . . . . . . . . . . . . . . . . . . . . . . . . . . . . . . . . . . . . . . . . . . . . . . . . . . 528
Missing character entities for XSLT . . . . . . . . . . . . . . . . . . . . . . . . . . . . . . . . . . . . . . . . . . . . . . . . . . . . . . . . . . . . . . . . . . . . . . . . . . . . . . . . . . . 529
Last updated 6/3/2015
Page 7

DREAMWEAVER
Content s
Chapter 16: Dynamic sites, pages and web forms
Understanding web applications . . . . . . . . . . . . . . . . . . . . . . . . . . . . . . . . . . . . . . . . . . . . . . . . . . . . . . . . . . . . . . . . . . . . . . . . . . . . . . . . . . . . . 532
Set up your computer for application development . . . . . . . . . . . . . . . . . . . . . . . . . . . . . . . . . . . . . . . . . . . . . . . . . . . . . . . . . . . . . . . . . . 539
Database connections for ColdFusion developers . . . . . . . . . . . . . . . . . . . . . . . . . . . . . . . . . . . . . . . . . . . . . . . . . . . . . . . . . . . . . . . . . . . . 544
Database connections for ASP developers . . . . . . . . . . . . . . . . . . . . . . . . . . . . . . . . . . . . . . . . . . . . . . . . . . . . . . . . . . . . . . . . . . . . . . . . . . . . 545
Database connections for PHP developers . . . . . . . . . . . . . . . . . . . . . . . . . . . . . . . . . . . . . . . . . . . . . . . . . . . . . . . . . . . . . . . . . . . . . . . . . . . 552
Troubleshooting database connections . . . . . . . . . . . . . . . . . . . . . . . . . . . . . . . . . . . . . . . . . . . . . . . . . . . . . . . . . . . . . . . . . . . . . . . . . . . . . . 554
Removing connection scripts . . . . . . . . . . . . . . . . . . . . . . . . . . . . . . . . . . . . . . . . . . . . . . . . . . . . . . . . . . . . . . . . . . . . . . . . . . . . . . . . . . . . . . . . 558
Designing dynamic pages . . . . . . . . . . . . . . . . . . . . . . . . . . . . . . . . . . . . . . . . . . . . . . . . . . . . . . . . . . . . . . . . . . . . . . . . . . . . . . . . . . . . . . . . . . . 559
Dynamic content sources overview . . . . . . . . . . . . . . . . . . . . . . . . . . . . . . . . . . . . . . . . . . . . . . . . . . . . . . . . . . . . . . . . . . . . . . . . . . . . . . . . . . 561
Defining sources of dynamic content . . . . . . . . . . . . . . . . . . . . . . . . . . . . . . . . . . . . . . . . . . . . . . . . . . . . . . . . . . . . . . . . . . . . . . . . . . . . . . . . 565
Adding dynamic content to pages . . . . . . . . . . . . . . . . . . . . . . . . . . . . . . . . . . . . . . . . . . . . . . . . . . . . . . . . . . . . . . . . . . . . . . . . . . . . . . . . . . . 579
Changing dynamic content . . . . . . . . . . . . . . . . . . . . . . . . . . . . . . . . . . . . . . . . . . . . . . . . . . . . . . . . . . . . . . . . . . . . . . . . . . . . . . . . . . . . . . . . . . 583
Displaying database records . . . . . . . . . . . . . . . . . . . . . . . . . . . . . . . . . . . . . . . . . . . . . . . . . . . . . . . . . . . . . . . . . . . . . . . . . . . . . . . . . . . . . . . . . 584
Viewing live data . . . . . . . . . . . . . . . . . . . . . . . . . . . . . . . . . . . . . . . . . . . . . . . . . . . . . . . . . . . . . . . . . . . . . . . . . . . . . . . . . . . . . . . . . . . . . . . . . . . . 593
Adding custom server behaviors . . . . . . . . . . . . . . . . . . . . . . . . . . . . . . . . . . . . . . . . . . . . . . . . . . . . . . . . . . . . . . . . . . . . . . . . . . . . . . . . . . . . . 594
About building forms . . . . . . . . . . . . . . . . . . . . . . . . . . . . . . . . . . . . . . . . . . . . . . . . . . . . . . . . . . . . . . . . . . . . . . . . . . . . . . . . . . . . . . . . . . . . . . . . 604
Using forms to collect information from users . . . . . . . . . . . . . . . . . . . . . . . . . . . . . . . . . . . . . . . . . . . . . . . . . . . . . . . . . . . . . . . . . . . . . . . . 604
Building ColdFusion forms . . . . . . . . . . . . . . . . . . . . . . . . . . . . . . . . . . . . . . . . . . . . . . . . . . . . . . . . . . . . . . . . . . . . . . . . . . . . . . . . . . . . . . . . . . . 608
Creating web forms . . . . . . . . . . . . . . . . . . . . . . . . . . . . . . . . . . . . . . . . . . . . . . . . . . . . . . . . . . . . . . . . . . . . . . . . . . . . . . . . . . . . . . . . . . . . . . . . . 619
Enhanced HTML5 support for form elements . . . . . . . . . . . . . . . . . . . . . . . . . . . . . . . . . . . . . . . . . . . . . . . . . . . . . . . . . . . . . . . . . . . . . . . . . 632
vii
Chapter 17: Building applications visually
Building master and detail pages . . . . . . . . . . . . . . . . . . . . . . . . . . . . . . . . . . . . . . . . . . . . . . . . . . . . . . . . . . . . . . . . . . . . . . . . . . . . . . . . . . . . 635
Building search and results pages . . . . . . . . . . . . . . . . . . . . . . . . . . . . . . . . . . . . . . . . . . . . . . . . . . . . . . . . . . . . . . . . . . . . . . . . . . . . . . . . . . . . 642
Building a record insert page . . . . . . . . . . . . . . . . . . . . . . . . . . . . . . . . . . . . . . . . . . . . . . . . . . . . . . . . . . . . . . . . . . . . . . . . . . . . . . . . . . . . . . . . 647
Building an update record page . . . . . . . . . . . . . . . . . . . . . . . . . . . . . . . . . . . . . . . . . . . . . . . . . . . . . . . . . . . . . . . . . . . . . . . . . . . . . . . . . . . . . . 650
Building a delete record page . . . . . . . . . . . . . . . . . . . . . . . . . . . . . . . . . . . . . . . . . . . . . . . . . . . . . . . . . . . . . . . . . . . . . . . . . . . . . . . . . . . . . . . . 655
Building pages with advanced data manipulation objects (ColdFusion, ASP) . . . . . . . . . . . . . . . . . . . . . . . . . . . . . . . . . . . . . . . . . . . 662
Building a registration page . . . . . . . . . . . . . . . . . . . . . . . . . . . . . . . . . . . . . . . . . . . . . . . . . . . . . . . . . . . . . . . . . . . . . . . . . . . . . . . . . . . . . . . . . 666
Building a login page . . . . . . . . . . . . . . . . . . . . . . . . . . . . . . . . . . . . . . . . . . . . . . . . . . . . . . . . . . . . . . . . . . . . . . . . . . . . . . . . . . . . . . . . . . . . . . . . 668
Building a page that only authorized users can access . . . . . . . . . . . . . . . . . . . . . . . . . . . . . . . . . . . . . . . . . . . . . . . . . . . . . . . . . . . . . . . . 670
Securing a folder in your application (ColdFusion) . . . . . . . . . . . . . . . . . . . . . . . . . . . . . . . . . . . . . . . . . . . . . . . . . . . . . . . . . . . . . . . . . . . . 673
Using ColdFusion components . . . . . . . . . . . . . . . . . . . . . . . . . . . . . . . . . . . . . . . . . . . . . . . . . . . . . . . . . . . . . . . . . . . . . . . . . . . . . . . . . . . . . . . 674
Chapter 18: Accessibility
Dreamweaver and accessibility . . . . . . . . . . . . . . . . . . . . . . . . . . . . . . . . . . . . . . . . . . . . . . . . . . . . . . . . . . . . . . . . . . . . . . . . . . . . . . . . . . . . . . 680
Chapter 19: Dreamweaver and Creative Cloud
Synchronizing Dreamweaver settings with Creative Cloud . . . . . . . . . . . . . . . . . . . . . . . . . . . . . . . . . . . . . . . . . . . . . . . . . . . . . . . . . . . . 684
Chapter 20: System Requirements
System requirements for Dreamweaver . . . . . . . . . . . . . . . . . . . . . . . . . . . . . . . . . . . . . . . . . . . . . . . . . . . . . . . . . . . . . . . . . . . . . . . . . . . . . . 693
Last updated 6/3/2015
Page 8
Chapter 1: What's new
New features summary
1
The 2015 release of Dreamweaver CC focuses on responsive design, improvements to code editing features, preview of
web pages on devices, and batch extract of web-optimized images with multiple resolutions from Photoshop comps.
Integration with the Bootstrap framework helps you build mobile-first, responsive websites. Visual Media Queries
further complement the responsive web designing experience by enabling you to visualize and modify your design at
various breakpoints.
This release also includes several enhancements to editing features in Live view and CSS Designer. This article
introduces these new features and enhancements, and provides links to resources for more help and learning.
What's new
Last updated 6/3/2015
Page 9

What's new
What's changed
• Device preview
• Visual Me d i a Q u er ies
• Linting support
• Emmet support
• Preview in Code View
• New code snippets
• Bootstrap integration
• New menus in Live view
• Support for Tables in Live View
• Support for jQuery UI elements in Live View
• DOM panel
• SVG code hints in HTML documents
• Technology previews
• Code folding
2
• Extract improvements
• Enhancements to Live view editing
• Coding toolbar changes
• CSS Designer improvements
• Testing server - workflow improvements
• Changes to Business Catalyst workflow
• Other changes
Device preview
Dreamweaver now lets you test your production-ready web pages simultaneously on multiple devices. You can see how
your web page reflows in various form factors and also test interactive features on your pages. All these without having
to install any mobile app or having to physically connect the devices to your desktop! Simply scan the auto generated
QR code with your devices and preview your web pages on the devices.
Live inspect, when triggered on desktop, reflects on all connected devices and helps you inspect various elements and
tweak the design as required.
For detailed information, see Preview and inspect web pages on multiple devices .
Visual Media Queries
Visual Media Query bars are a visual representation of the media queries present in a page. These bars help you visualize
your web page at different breakpoints and how different components of your web page reflow in different viewports.
While you view your page in different viewports, you can make design changes that are specific to a viewport without
affecting the page design in other viewports.
Last updated 6/3/2015
Page 10
What's new
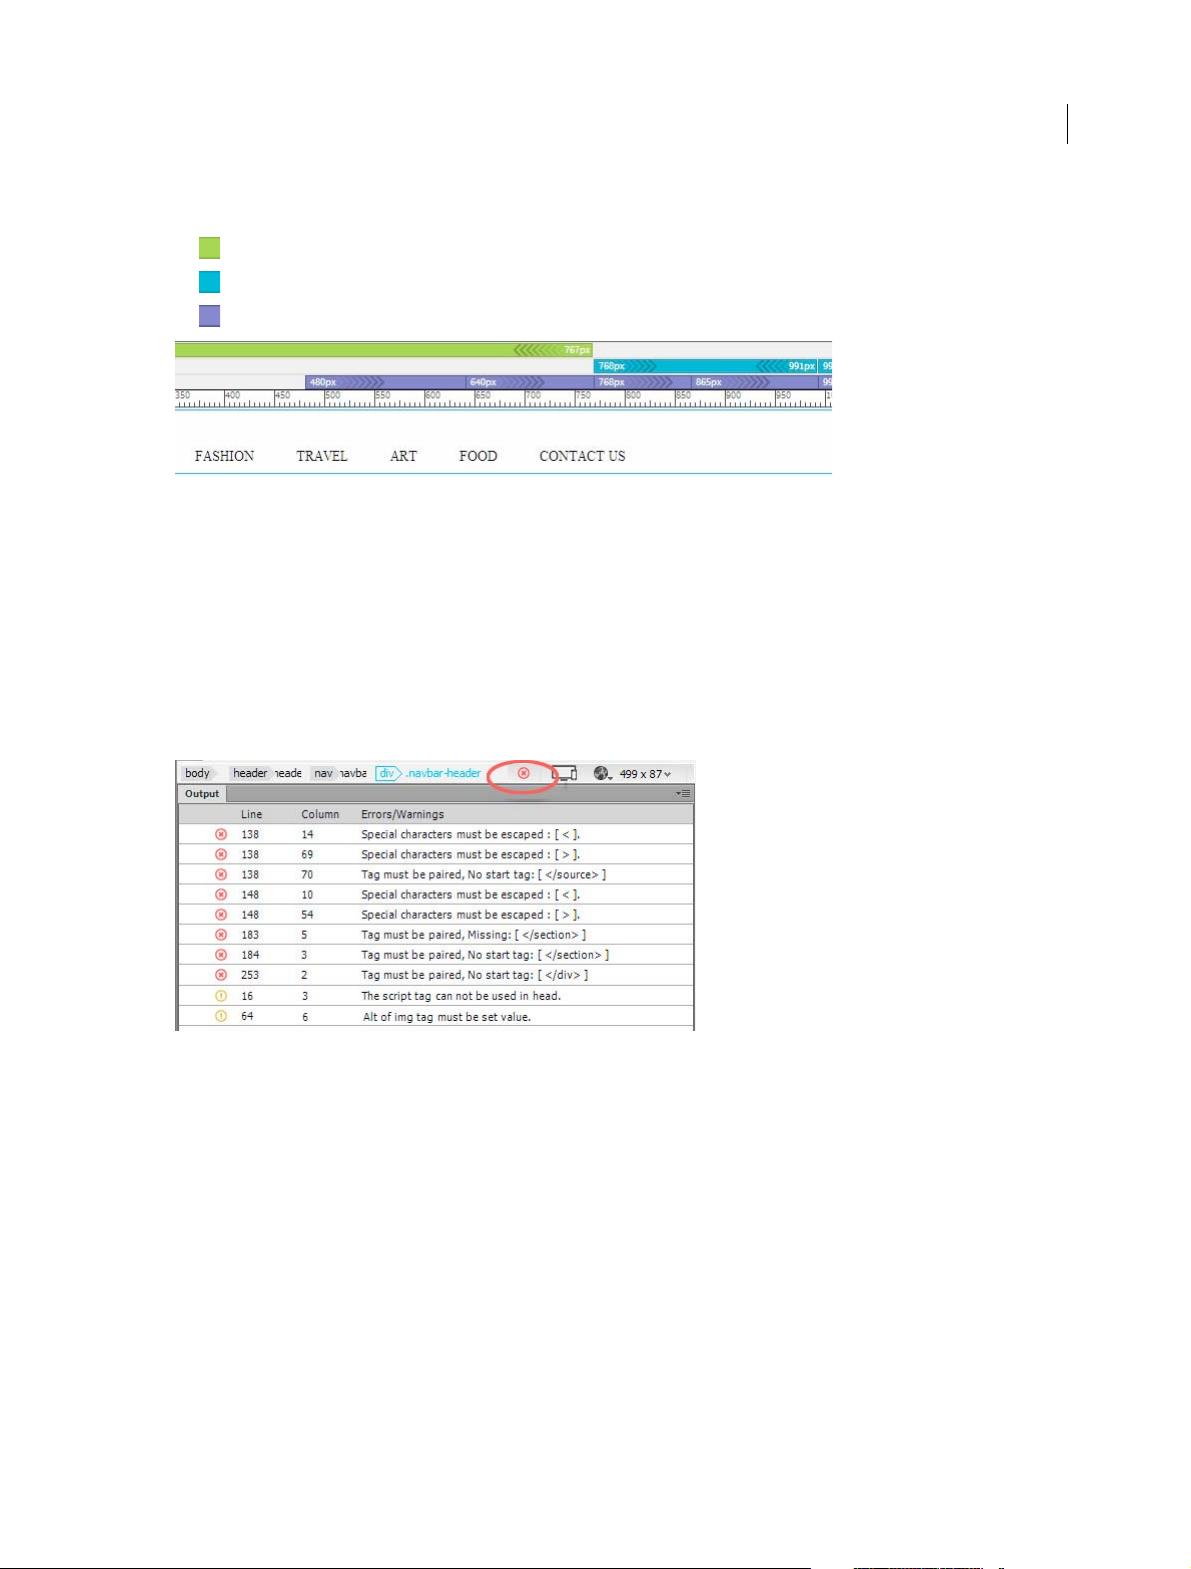
Visual Media Query consists of three bars as horizontal rows, each representing a category of media query:
• Green: Media queries with max-width conditions
• Blue : Media queries with both min-width and max-width conditions
• Purple : Media queries with min-width conditions
For more information, see Visual Media Q u e r i e s .
Support for linting code
With this new version of Dreamweaver, you can now debug your code for common errors using linting. Linting is the
process of analyzing code to flag potential errors or suspicious usage of code. Dreamweaver can lint HTML, CSS, and
JavaScript files when they are loaded, saved, or edited. The errors and warnings are then listed in the new Output panel.
3
For more information, see Lint code .
Support for Emmet
Are you an avid developer who types several lines of code in Dreamweaver? Save your time by using Emmet
abbreviations to code. Easy to remember and type, these abbeviations expand into full-fledged code in Code View when
you press the Tab key.
For detailed information, see Insert code using Emmet .
Last updated 6/3/2015
Page 11
What's new
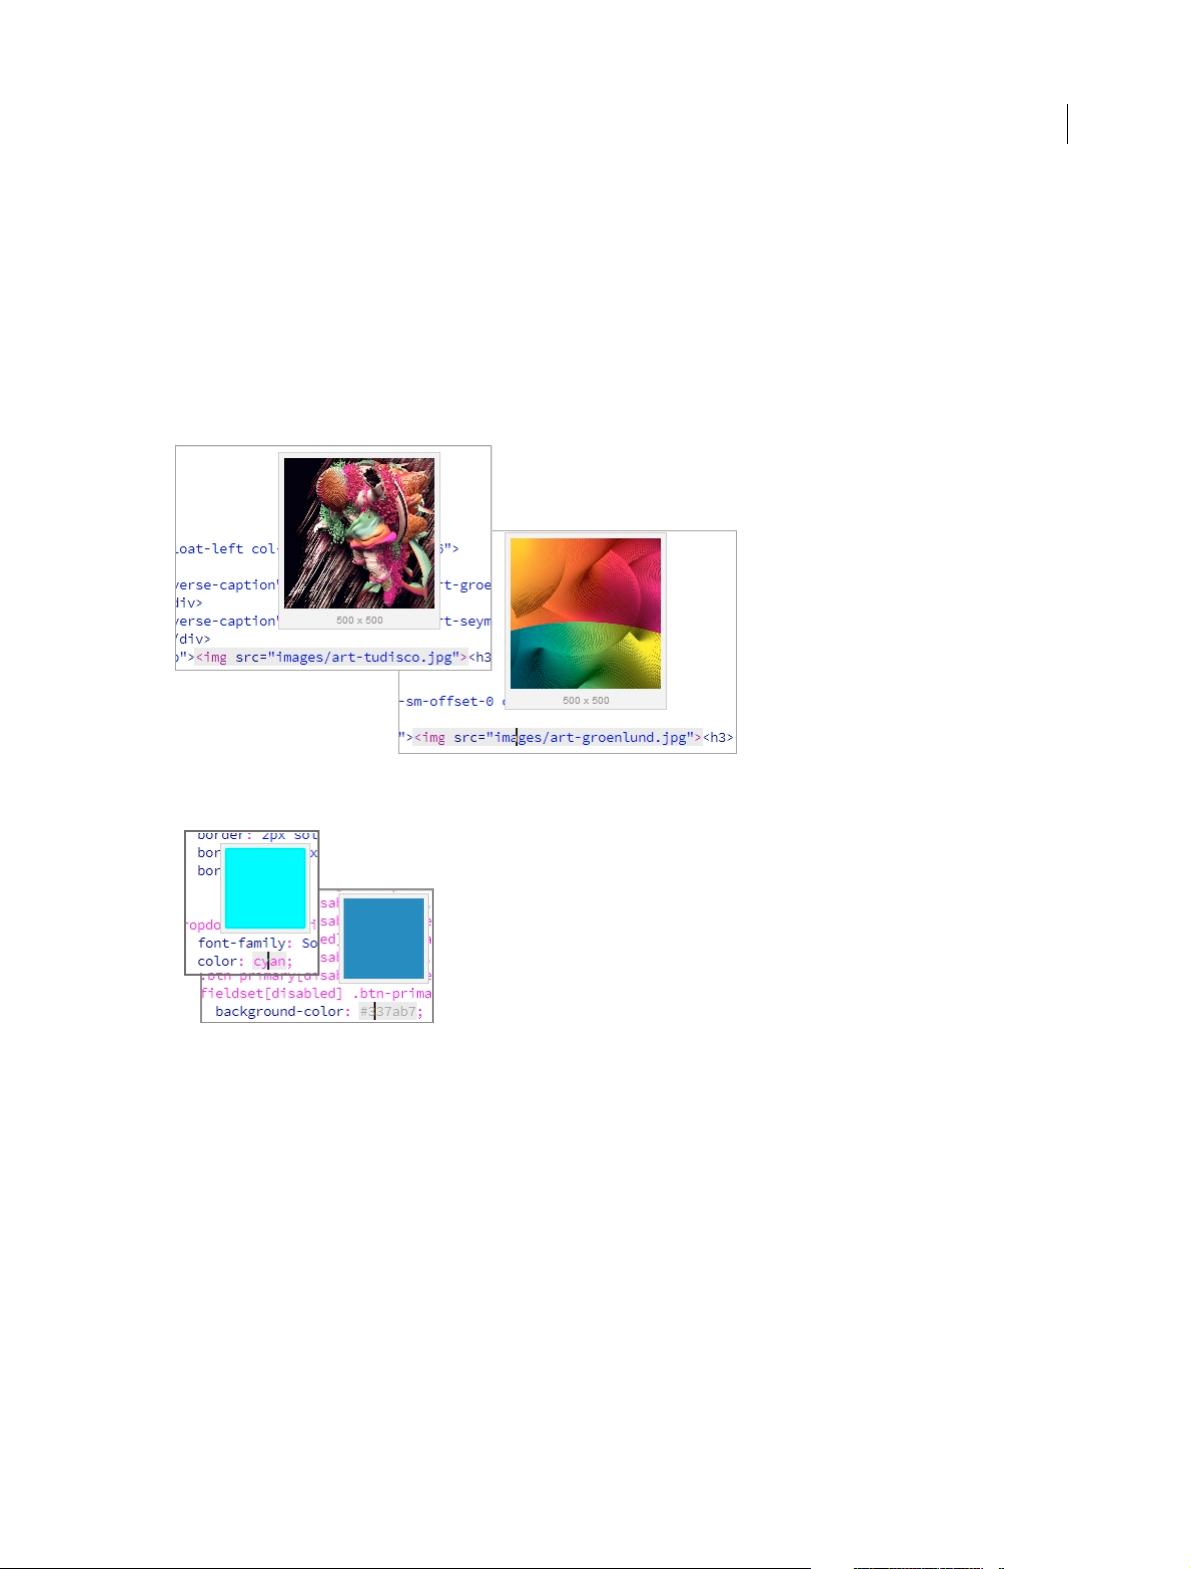
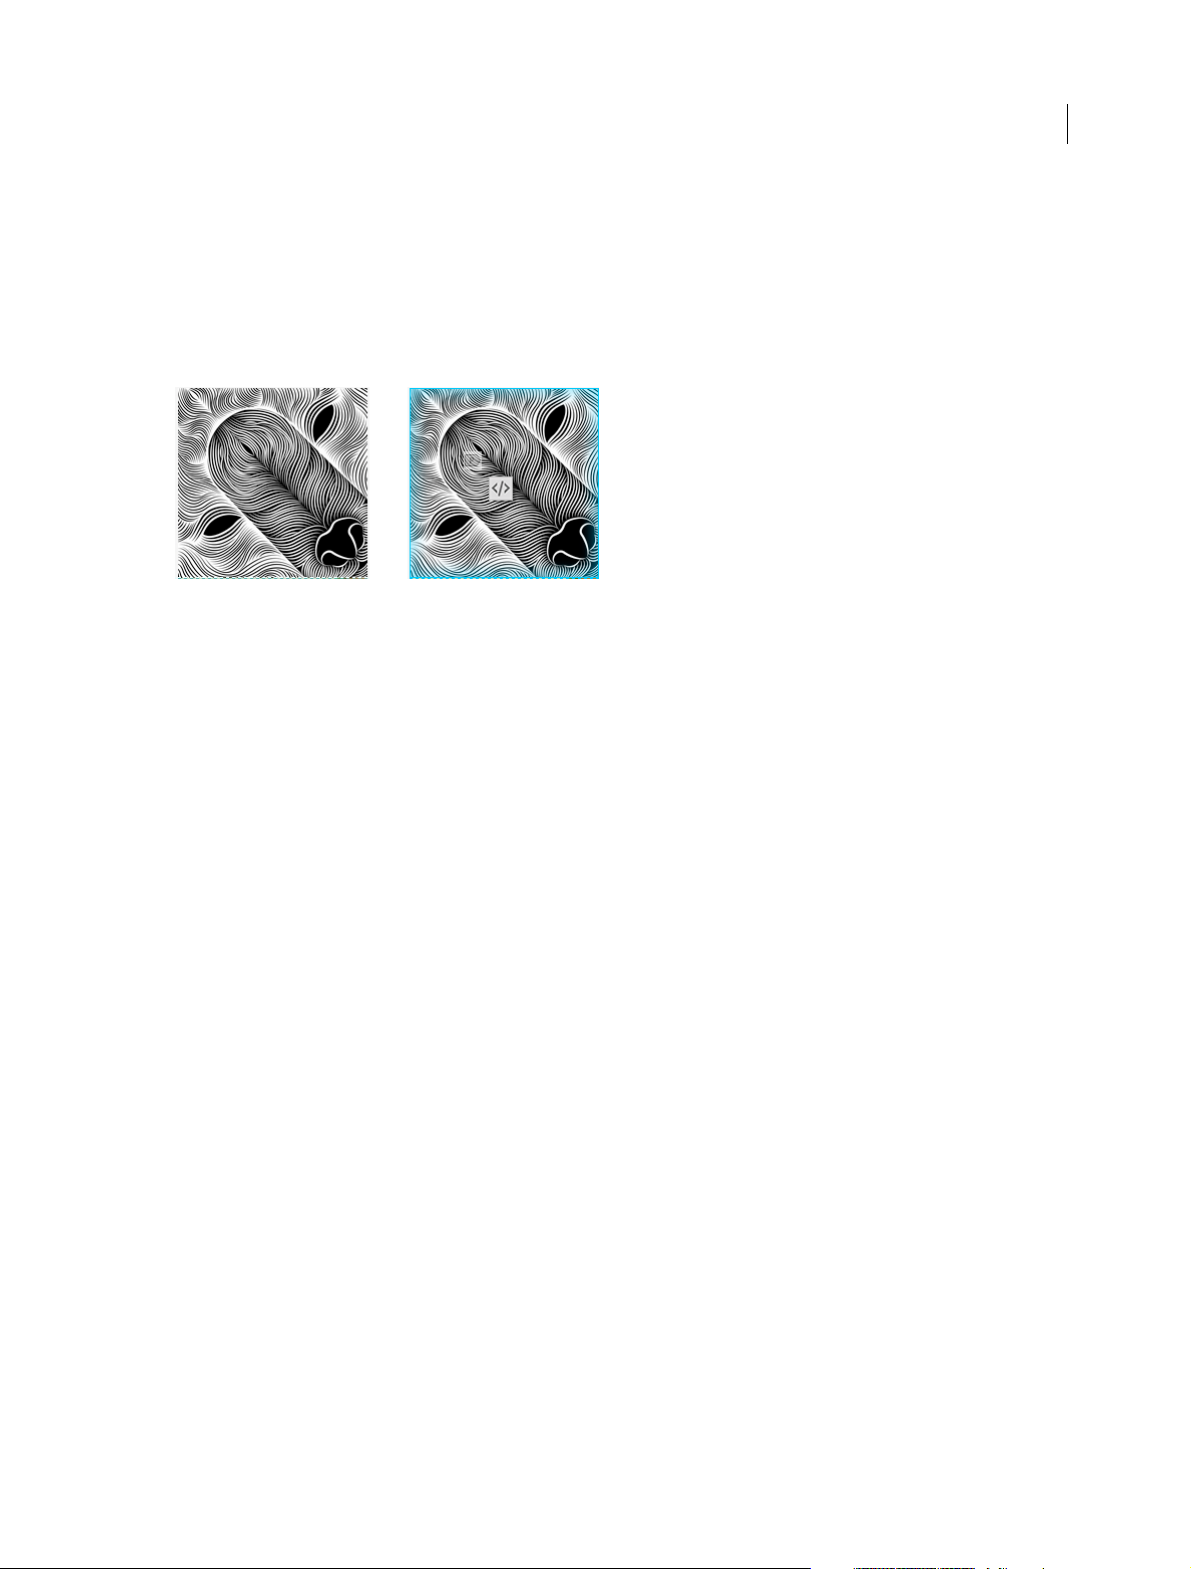
Preview in Code view
If you are working in Split view, you can see any changes to images or colors instantly in Live or Design view. But, when
you prefer to work only in Code view, images are just filenames, which tend to be unintuitive most often. Colors (unless
predefined colors are used), too, are only a set of obscure set of numbers. With this version of Dreamweaver, you can
quickly preview images and colors right within Code view. This feature helps you make a visual connection between
the image filenames and the color formats with the actual image or color they represent. As a result, you can take design
decisions faster and cut down the development time significantly.
For more information, see Preview images and colors in Code view .
4
The Code view also displays an error preview. The line number of the erroneous code is highlighted in red. When you
hover your mouse over the number, a brief description of the error is displayed.
Note: Only the first error in the line is displayed. If the line contains only a warning, the description of the warning is
displayed. If the line contains a warning and an error, only the error description is displayed.
New code snippets
Snippets are portions of code that you can reuse repeatedly in your projects. This release of Dreamweaver provides new
and updated code snippets:
• Boostrap_Snippets
• CSS_Animation_And_Transitions
• CSS_Effects
• CSS_Snippets
Last updated 6/3/2015
Page 12

What's new
• HTML_Snippets
• JavaScript Snippets (updated)
• PHP_Snippets
• Preprocessor_Snippets
• Responsive_Design_Snippets
For information on using code snippets, see Work with c o de s n i p p et s .
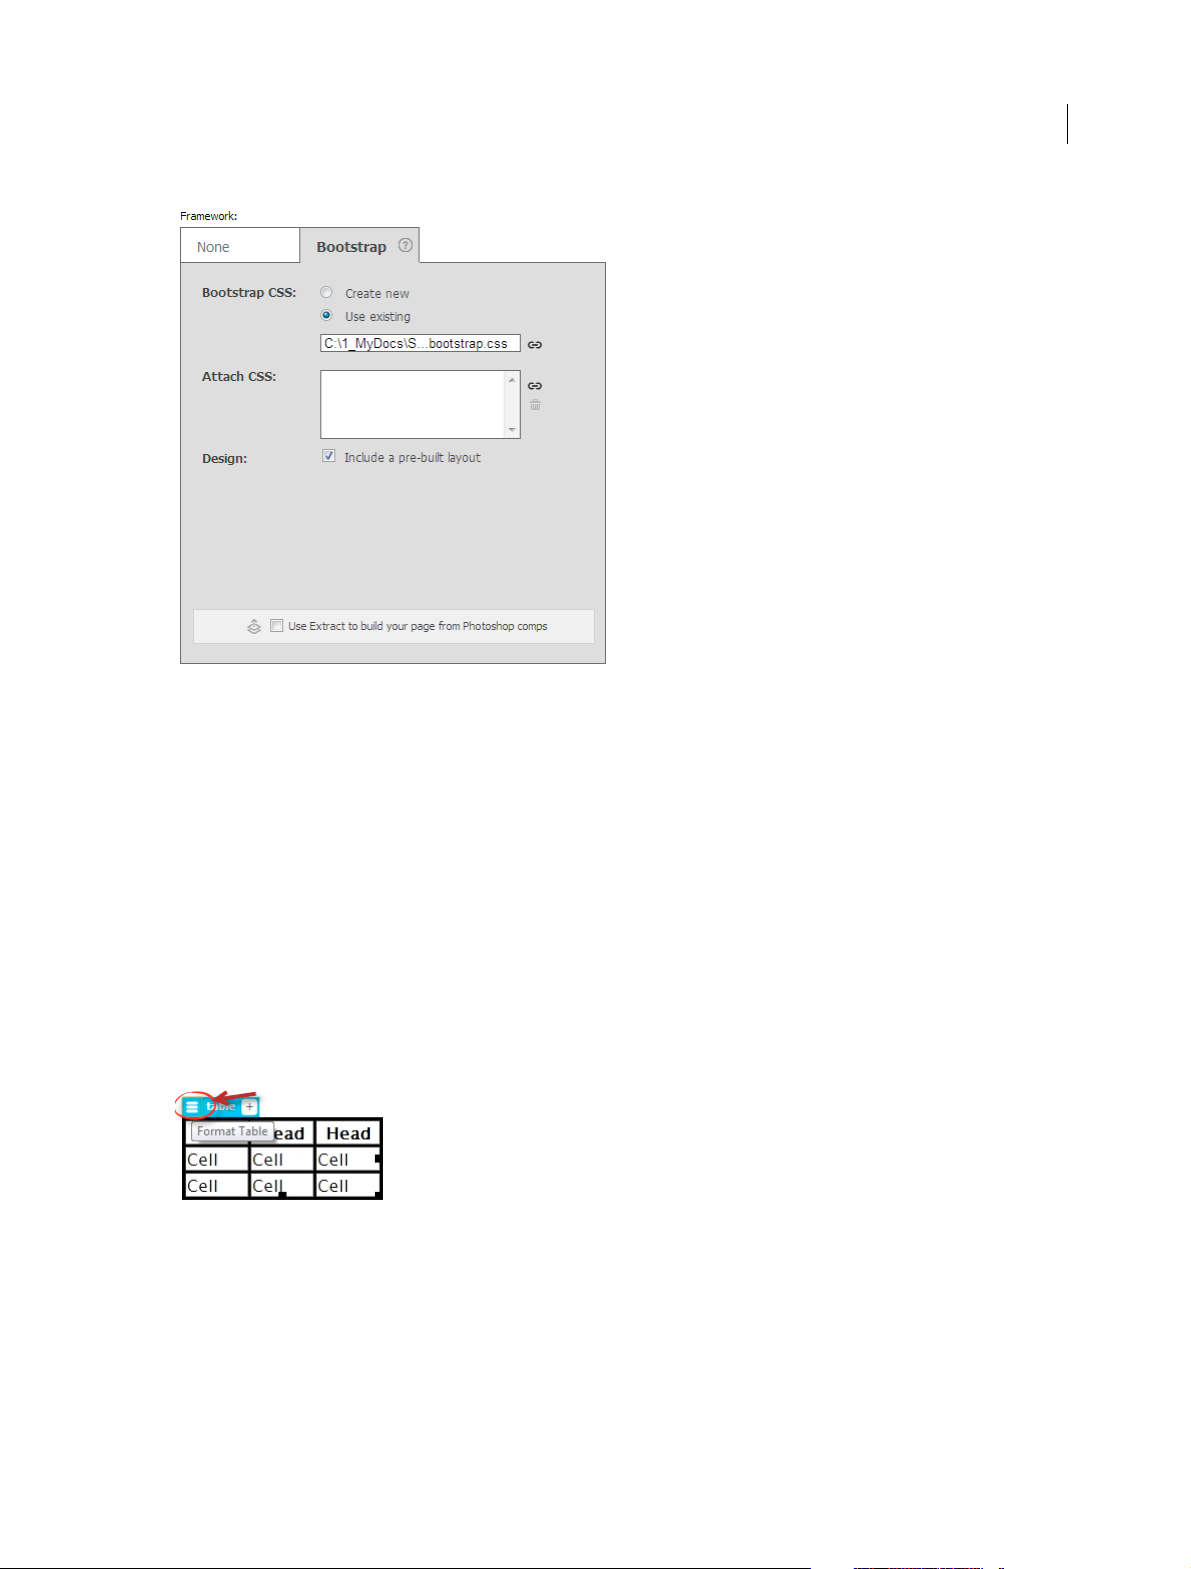
Bootstrap integration
Bootstrap is the most popular, free, HTML, CSS, and JavaScript framework for developing responsive, mobile-first
websites. The framework includes responsive CSS and HTML templates for buttons, tables, navigation, image
carousels, and other elements that you can use on your web page. A few optional JavaScript plug-ins too are available,
which enable developers with even basic coding knowledge to develop great responsive websites.
Dreamweaver lets you create Bootstrap documents and also edit existing web pages created using Bootstrap. You can
begin designing your Bootstrap website using one of the Bootstrap starter templates that you can choose from the New
Doc u m ent d i a lo g b ox ( St a r te r Te m p l a t e s > B oo t s t rap Te m p l a t e s ).
• Bootstrap-Agency
• Bootstrap-eCommerce
5
• Bootstrap-Portfolio
• Bootstrap-Product
• Bootstrap-Real Estate
• Bootstrap-Resume
You can also create a custom Bootstrap document from the New Document dialog box (New Document > Bootstrap).
Then, build the website brick-by-brick using Bootstrap components such as accordions and carousels using the Insert
panel in Dreamweaver. Or, if you have Photoshop comps, use Extract to bring in images, fonts, styles, text, and more
into your Bootstrap document.
Last updated 6/3/2015
Page 13
What's new
6
Whether it is a fully designed Bootstrap file or a work-in-progress design, you can edit them in Dreamweaver to not
only edit code, but also use visu al editing features such as Live View editing, visual CSS designer, Visual Media Q ueries ,
and Extract to make design changes.
Note: You can open websites created using only Bootstrap framework version 3 and later in Dreamweaver.
For detailed information, see Working with Bootstrap files .
Support for editing tables in Live view
You can edit tables in Live view easily and quickly using one or a combination of the following options:
• Formatting options in Element Display
• Modify > Table menu
Note: Modify menu is now enabled in Live view.
For more information, see Resize a tableand Format tables and cells.
New menus in Live view
The editing capabilites in Live view have now become better with the following menus available in Live view:
• Modify
Last updated 6/3/2015
Page 14

What's new
• Format
• Commands
• Site
• 'Paste Special' option in Edit and context menu
Support for jQuery UI elements in Live view
Using the Insert panel, you can now directly insert jQuery widgets in Live view. Drag the required element from the
Insert panel on to Live view and hold your mouse to use one of the following features to insert:
• Live Guides: These guides appear as you hover over the elements in Live view after dragging the required element
from the Insert panel. Using Live Guides, you can insert elements at the top or bottom, or to the left or right of an
element in focus.
• DOM icon: The DOM icon appears when you pause for a brief while when the Live Guides appear. Click the icon
to view the DOM structure in a pop-up and drop the element at a precise location in the document structure.
• Position Assist: Position Assist helps you position the element before, after, or nest within the element in focus (in
Live view).
Note: The features above are displayed based on the element you choose to insert.
7
For more information, see Insert elements directly in Live view .
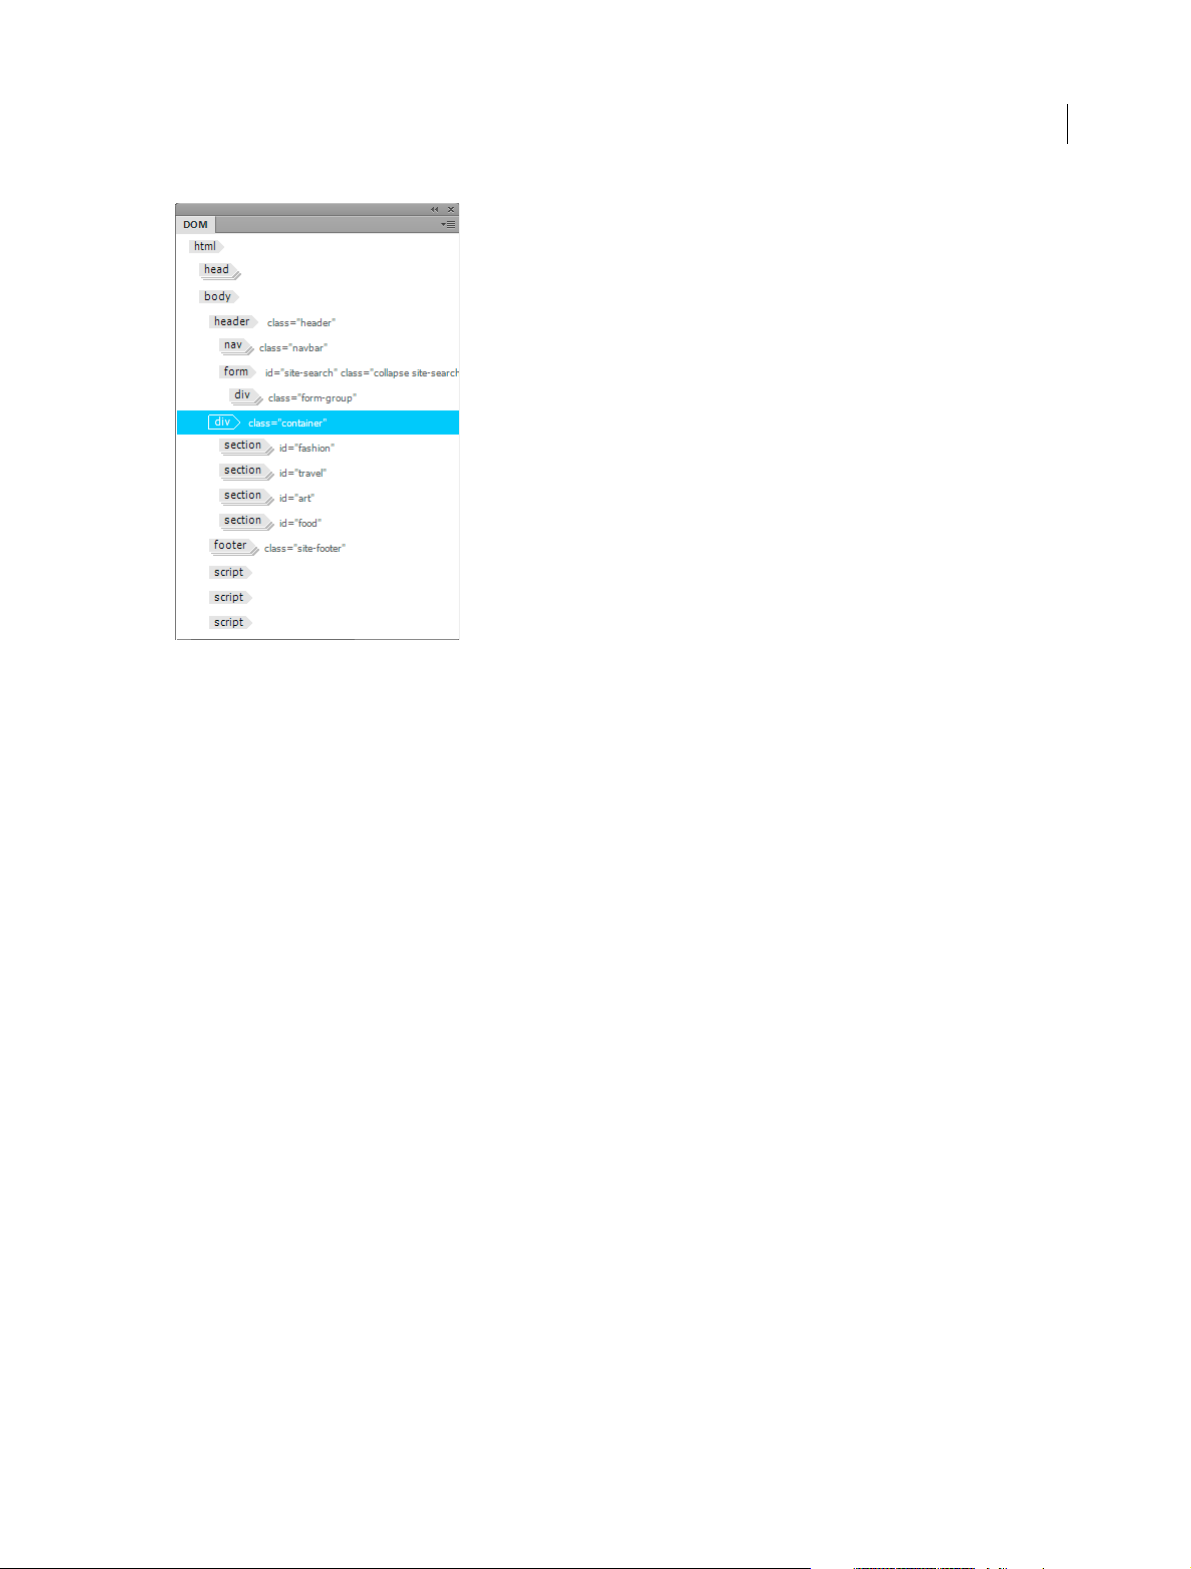
DOM panel
Element Quick View is now replaced with the DOM panel (Windows > DOM). The DOM panel provides all the
functionalities that Element Quick View provided and more. This panel is available in all workspaces and is persistent,
which means, you can open two documents, open, and access their DOM panels simultaneously.
Using the DOM panel, you can:
• Drag elements from the Insert panel to insert them precisely in the document structure.
• Copy, paste, duplicate, move, or delete structural elements in the document.
• View any element on the page in context with the document structure - the element in focus is highlighted in the
DOM panel.
For detailed information on using the DOM panel and editing the HTML structure using the panel, see DOM panel.
Last updated 6/3/2015
Page 15
What's new
8
SVG code hints in HTML documents
Code hints for all SVG elements and attributes are now supported in HTML documents. Using these code hints, you
can now add SVG elements in Code view of HTML documents just like you add in an SVG document.
Technology Previews
Starting with this release, the Dreamweaver team provides previews of certain features to gather customer feedback.
Based on the feedback, these features will be improved upon further and included as core features of Dreamweaver. You
can access such features from the Technology Previews category of the Preferences dialog box.
The preview feature in this release is Code Highlighting. This feature highlights all occurences of any selected text in
Code view.
To use this feature, perform the following steps:
1 Go to Preferences > Technology Previews.
2 Enable Code Highlighting. Then, click Apply and Close to close the Preferences dialog box.
3 Open the document in which you want to use code highlighting. You can use code highlighting in any type of
document, such as, HTML, JS, CSS, and LESS.
4 In Code view, double-click the text - tag, word, or phrase - that needs to be highlighted.
All occurences of the selected text are highlighted in Code view.
You can navigate between the highlighted text using the following keyboard shortcuts:
• Move forward: F3 (Win); Cmd+G (Mac)
• Move backward: Shift+F3 (Win); Cmd+Shift+G (Mac)
Last updated 6/3/2015
Page 16

What's new
Custom preview in Code view using showPreview API
With this release of Dreamweaver, you can generate a custom preview popup that gets displayed when you hover your
mouse over the code in Code view. To implement customized previews, you can use the new API, showPreview, along
with the existing mm:browsercontrol API. For example, you can use these APIs to display a preview of all the
parameters of a JavaScript function when you hover your mouse over the name of the function.
Code folding
In previous versions of Dreamweaver, you had to select code blocks in Code view and then collapse them. In this
version and later, you can collapse code blocks by simply hovering over the line numbers and clicking the triangle that
appears.
Code folding (collapsing) is available in HTML, CSS, LESS, Sass, SCSS, JS, PHP, XML, and SVG files and is based on
tag blocks.
The Copy, Cut, Paste, and drag-and-drop actions retain the code folding state. For example, when you copy a code block
that is collapsed, the Paste action pastes the copied text as a collapsed block.
In HTML files, unlike the earlier code collapse functionality, the collapsed content now contains the closing tag and is
rendered differently. Also, the number of characters displayed in a collapsed code block is now increased. This helps
you to preview the initial attributes, if any.
9
For detailed information, see Collapsing code.
Extract enhancements
• Extract for devices
• Support for % units
Extract for devices
Devices not only vary in sizes, but also in resolutions. Your plan for a responsive web design must account for multiple
resolution versions of images that are rendered appropriately on devices. However, it can be a daunting task to create
so many different resolution versions for all the images in your project.
Extract in Dreamweaver eases up this task to a large extent. While extracting an image from your Photoshop comp in
the 2015 release of Dreamweaver, you can choose to extract different resolution versions of that image too. The image
in Photoshop is automatically scaled in different, predefined resolutions during extraction.
You can then call these images in JavaScript or media queries to display them based on the device they are viewed upon.
For example, for high density retina display, you can use the 2X version of the image.
For more information, see Extract images from PSD files .
Last updated 6/3/2015
Page 17
What's new
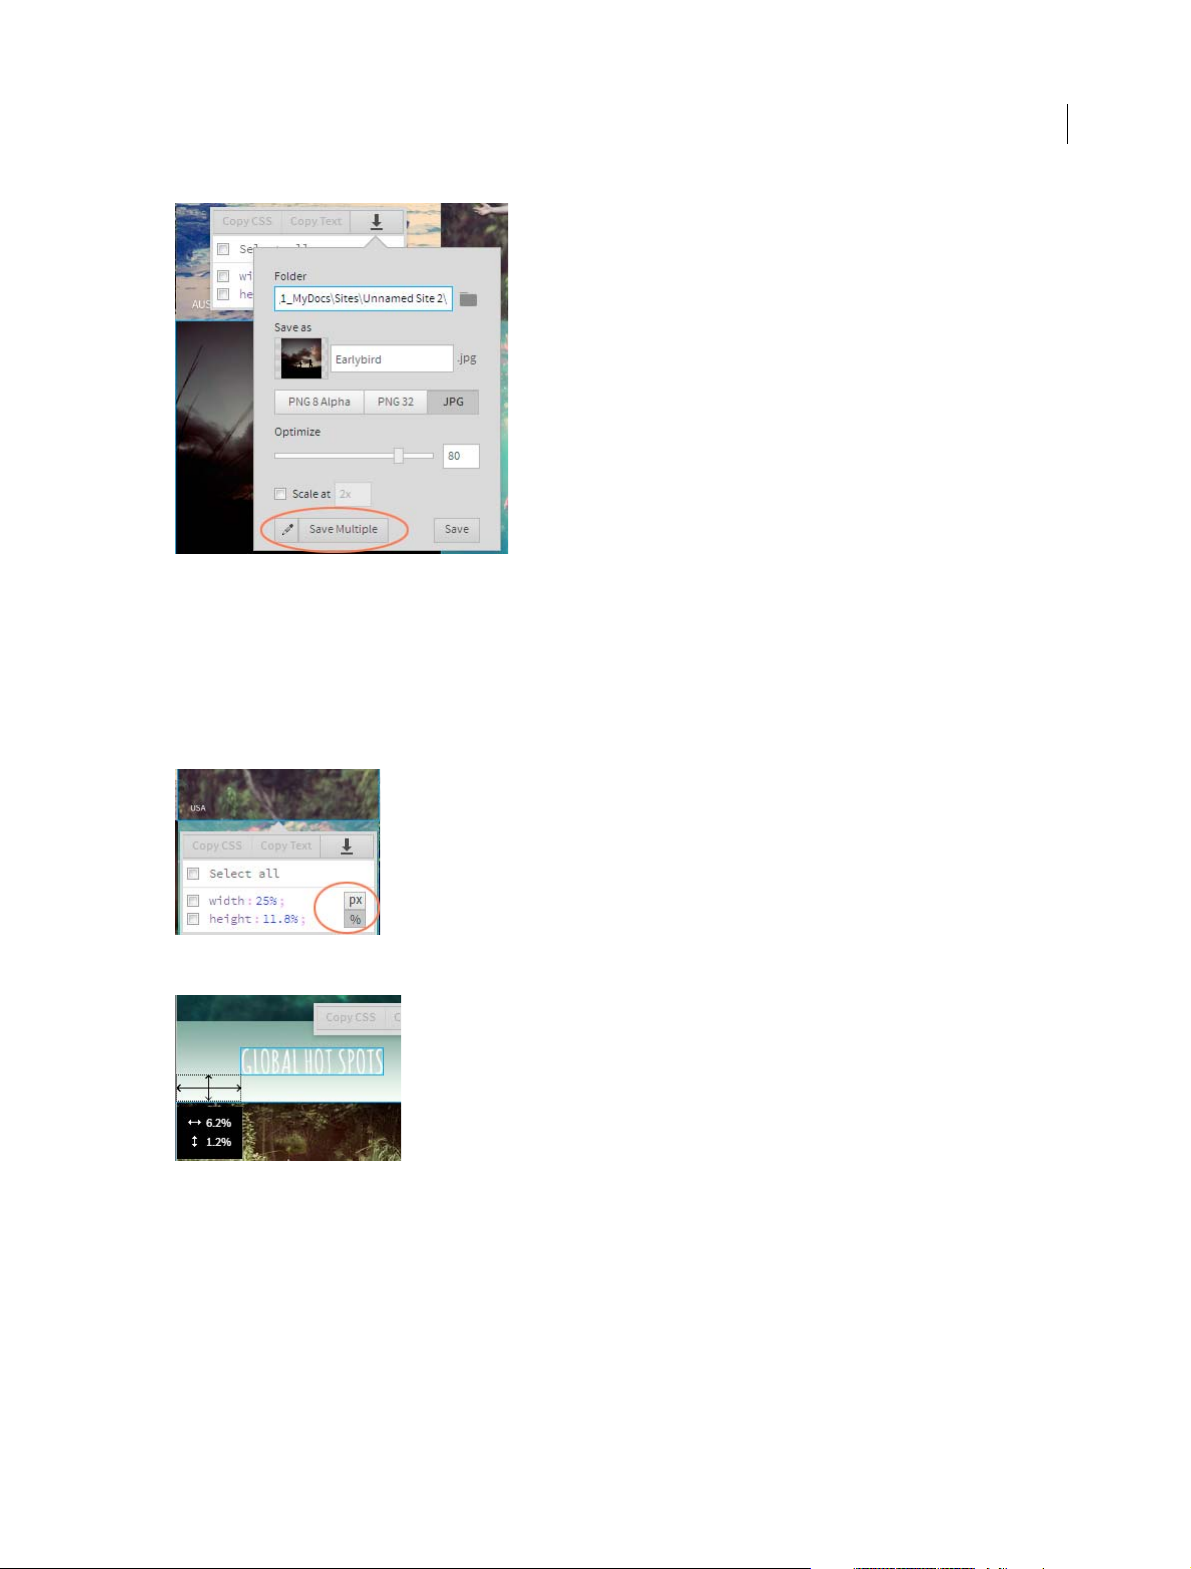
Support for % units
In the Extract panel, you can now view the width and height of images in % values in addition to pixels. You can also
view the measurements in %.
10
When you click an asset in the Extract panel, the pop-up that appears provides you an option to switch between pixels
and %. The unit you select in this pop-up is retained when you view measurements between assets.
Enhancements to Live view editing
Last updated 6/3/2015
Page 18
What's new
Nested Insert in Live View
Now, you can insert elements within other elements in Live view. When you drag elements from the Insert panel, Asset
panel, or within Live view, and hover over different elements on the page, you will notice the visual feedback for nesting
elements (along with before and after guides).
• Before/After guides: When you hover over top and bottom 30% of the element.
• Nesting visual feedback: When you hover over the middle 40% of the element.
Editing Selectors directly in Element Display
You can now simply click the name of the Selector in Element Display to edit it. You can commit the changes by clicking
anywhere on the page.
11
Coding toolbar changes
The following options in the Coding toolbar related to collapsing code have been removed:
• Collapse Full Tag
• Collapse Selection
Note: These options have been removed from the right-click context menu and the Edit menu as well. You can now
Collapsing codeby hovering your mouse over the line number and clicking the triangle that appears. Also, the following
options are now not available for HTML, CSS, and JS files.
• Highlight Invalid Code
• Syntax Error Alerts in Info Bar
You can now use linting to find errors in the code and the Output panel displays the linting results.
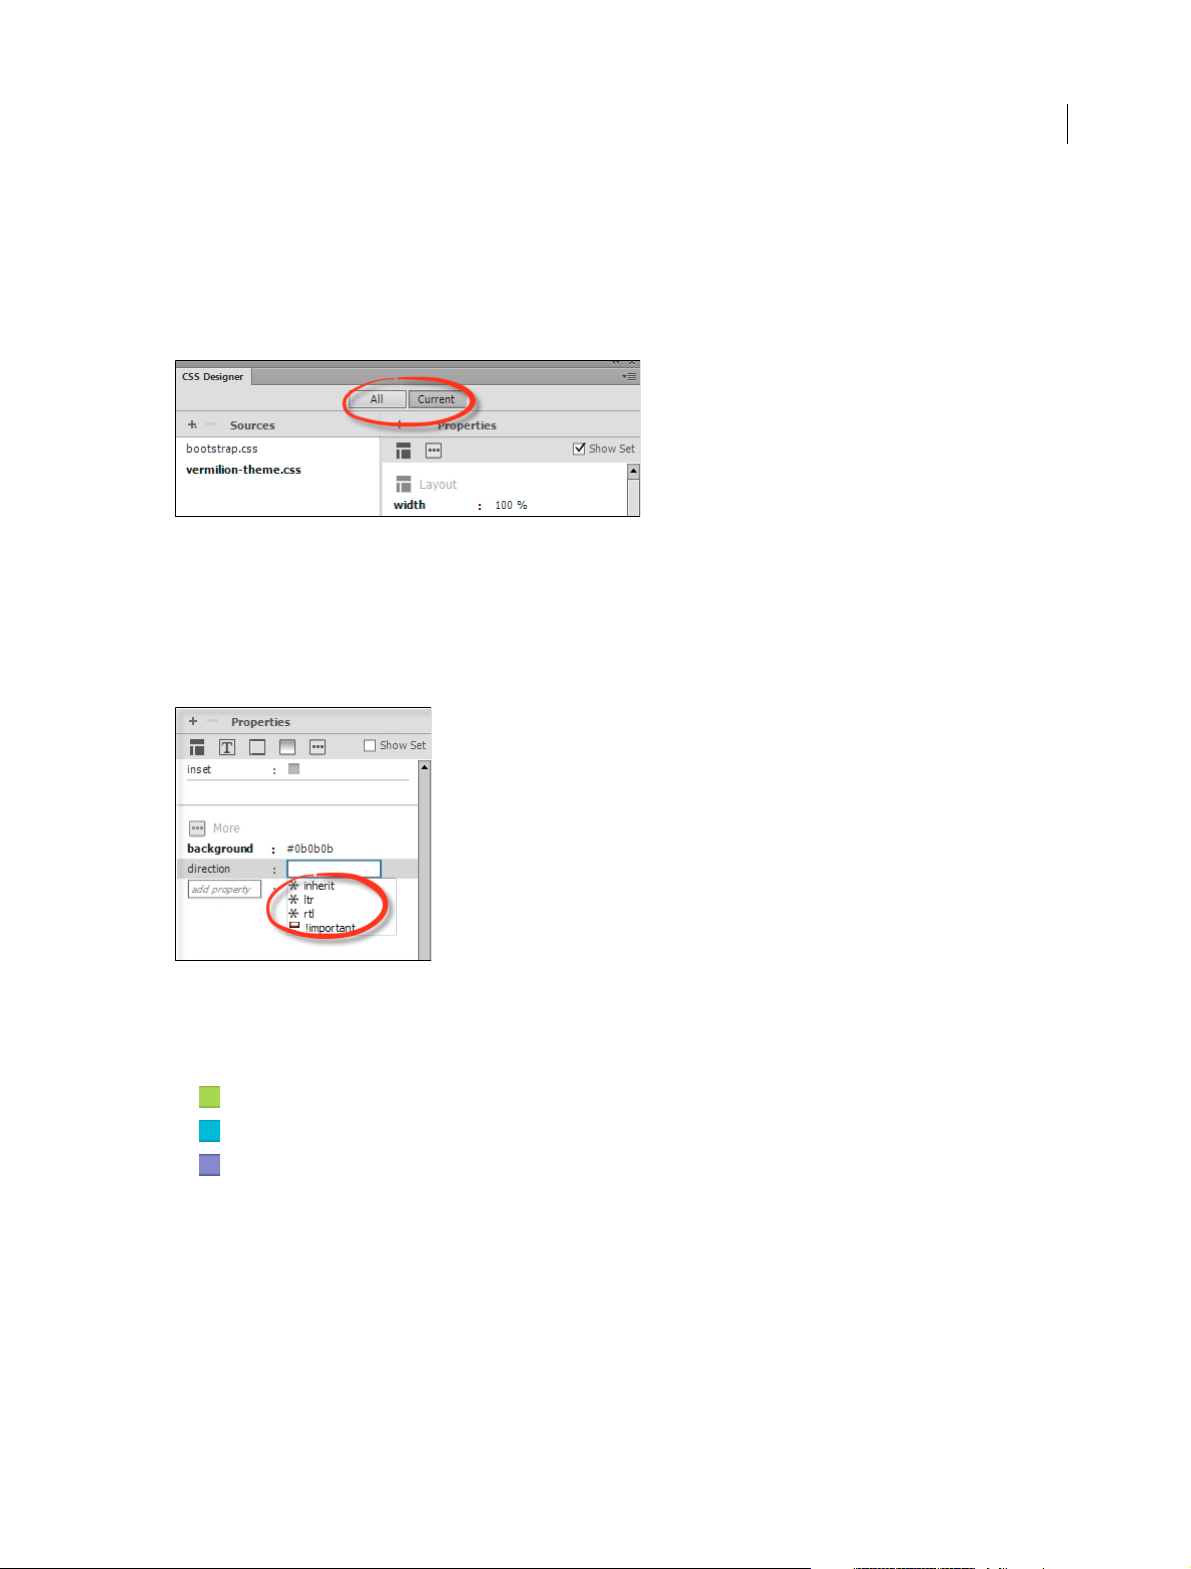
CSS Designer improvements
• All and Current modes
• Code hints
• Color coding for media queries
• Other changes
All and Current modes
CSS Designer now provides two different modes of viewing and editing CSS properties:
• All: All the CSS, media queries, and selectors in the current document are listed in this mode. This mode is not
sensitive to the selection in Design or Live view.
Last updated 6/3/2015
Page 19
What's new
This mode is optimal if you want to create CSS, media queries, or selectors.
• Current: Computed styles for any element selected in Design or Live view are listed in this mode. In a CSS file, if
the focus is on a selector, this mode displays the properties of that selector.
This mode is optimal if you want to edit the properties of selectors associated with the element selected in the
document.
Code hints
Dreamweaver now displays code hints in CSS Designer, similar to Code view, for setting new properties.
Note: Options that have further action associated with them, such as manage fonts, color picker, and browse, are not
available in CSS Designer.
12
Color coding for media queries
Media queries in the CSS Designer panel are now color coded to match Visu a l Media Queries .
• Green: Media queries with max-width conditions
• Blue : Media queries with both min-width and max-width conditions
• Purple : Media queries with min-width conditions
Last updated 6/3/2015
Page 20

What's new
Other changes
• Show Set option: The Show Set check box in the Properties section is now selected by default when you first launch
Dreamweaver. Any change to this option (select or unselect) is persistent in all the subsequent Dreamweaver
sessions.
• The panel scrolls to display Add Property at the center: When you click + in the Properties section, the section
scrolls so that the Add Property row is displayed at the center of the panel. If Properties section is too small, add
property row is displayed at the bottom of the panel.
13
• Background highlighting while adding new property: When the focus is on the Add New Property text box, the
row is highlighted in grey background.
• Change in the position of + and - buttons: + and - buttons that appear in each pane in the CSS Designer panel are
moved from extreme right to extereme left to make them more visible.
• Custom category is renamed: The category name for Custom properties is changed More.
Testing server workflow changes
The testing server workflow improvements in this release aim to make editing of documents with server-side code in
Live view easy and seamless.
Changes in server setup
Unlike the previous versions of Dreamweaver, you can now designate a specific server as either a testing server or a
remote server, and not both. Check boxes in the user interface of server setup are replaced with radio buttons to enforce
the specification of servers.
If you import a site into Dreamweaver CC 2015, which has a single server specified as both testing and remote server,
a duplicate entry of the server is created. Then, one is marked as remote and the other is marked as testing server.
Automatic pushing of dynamic files
Dreamweaver now automatically syncs dynamic documents to your testing server when you open, create, or save
changes made to dynamic documents. Dreamweaver no longer displays "Update Testing Server" or "Push Dependent
Files" dialog boxes for testing server workflows.
For more information, see Set up a testing server .
Last updated 6/3/2015
Page 21

What's new
Changes to Business Catalyst workflow
Business Catalyst extension is retired and will not be available for use with Dreamweaver CC 2015 release and later.
Dreamweaver CC 2014.1.1 is the last release that is compatible with the Business Catalyst extension.
To use Business Catalyst with Dreamweaver CC 2015 release and later, use the SFTP connection option in
Dreamweaver. For more information see the
Here's the official announcement on this change on the Business Catalyst website.
Business Catalyst documentation.
Other changes
• Insert panel is reorganized to group all options in Common, Layout ,and Media categories into a more logical
category - HTML.
• Mini tour videos and the link to launch them from Help menu are removed. This option is not available for non-
English locales too.
• The options present in the document bar drop-down at the bottom of a page are cleaned up - only Orientation, Full
Size, and Edit Sizes options are available now.
14
Last updated 6/3/2015
Page 22

Chapter 2: Workspace and workflow
Dreamweaver workflow and workspace
Dreamweaver workflow overview
You can use several approaches to create a website. This is one approach:
Plan and set up your site
Determine where the files will go and examine site requirements, audience profiles, and site goals. Additionally,
consider technical requirements such as user access, as well as browser, plug-in, and download restrictions. After you’ve
organized your information and determined a structure, you can begin creating your site. (See
sites.)
About Dreamweaver
15
Organize and manage your site files
In the Files panel you can easily add, delete, and rename files and folders to change the organization as needed. The
Files panel also has many tools for managing your site, transferring files to and from a remote server, setting up a Check
In/Check Out process to prevent files from being overwritten, and synchronizing the files on your local and remote
sites. From the Assets panel, you can easily organize the assets in a site; you can then drag most assets directly from the
Assets panel into a Dreamweaver document. You can also use Dreamweaver to manage aspects of your
®
Contribute® sites. (See Managing files and foldersand Managing assets and libraries.)
Adobe
Lay out your web pages
Choose the layout technique that works for you, or use the Dreamweaver layout options in conjunction with one
another to create your site’s look. You can use Dreamweaver Fluid Grid layouts or default templates to get started. You
can create new pages based on a Dreamweaver template, then update the layout of those pages automatically when the
template changes. If you want to display multiple elements at once in a browser, you can use frames to lay out your
documents. (See
Add content to pages
Add assets and design elements such as text, images, rollover images, image maps, colors, movies, sound, HTML links,
jump menus, and more. You can use built-in page-creation features for such elements as titles and backgrounds, type
di rect ly in the p age, or i mpor t co nte nt f rom o the r docu ment s. D reamwe ave r als o provi des t ools for maxi mizi ng w ebsi te
performance and for testing pages to ensure compatibility with different web browsers. (See
Create pages by hand coding
Coding web pages by hand is another approach to creating pages. Dreamweaver provides easy-to-use visual editing
tools, but it also provides a sophisticated coding environment; you can use either approach, or both, to create and edit
your pages. (See
Creating pages with CSS and Laying out pages with CSS.)
Adding content to pages.)
Working with page co d e .)
Set up a web application for dynamic content
Last updated 6/3/2015
Page 23
Workspace and workflow
Many websites contain dynamic pages that allow visitors to view information stored in databases, and usually allow
some visitors to add new information and edit information in the databases. To create such pages, you must first set up
a web server and application server, create or modify a Dreamweaver site, and connect to a database. (See
Preparing to
build dynamic sites.)
Create dynamic pages
In Dreamweaver, you can define a variety of sources of dynamic content, including recordsets extracted from databases,
form parameters, and JavaBeans components. To add the dynamic content to a page, simply drag it on to the page.
You can set your page to display one record or many records at a time, display more than one page of records, add
special links to move from one page of records to the next (and back), and create record counters to help users keep
track of the records. (See
Making pages dynamic.)
Test a n d p ub l is h
Testing your pages is an ongoing process that happens throughout the development cycle. At the end of the cycle, you
pu blish the site on a s erver. Many d eve lop ers also s che dul e pe riod ic m aintena nce to ens ure th at t he s ite rema ins cur rent
and functional. (See
Getting and putting files to and from your server.)
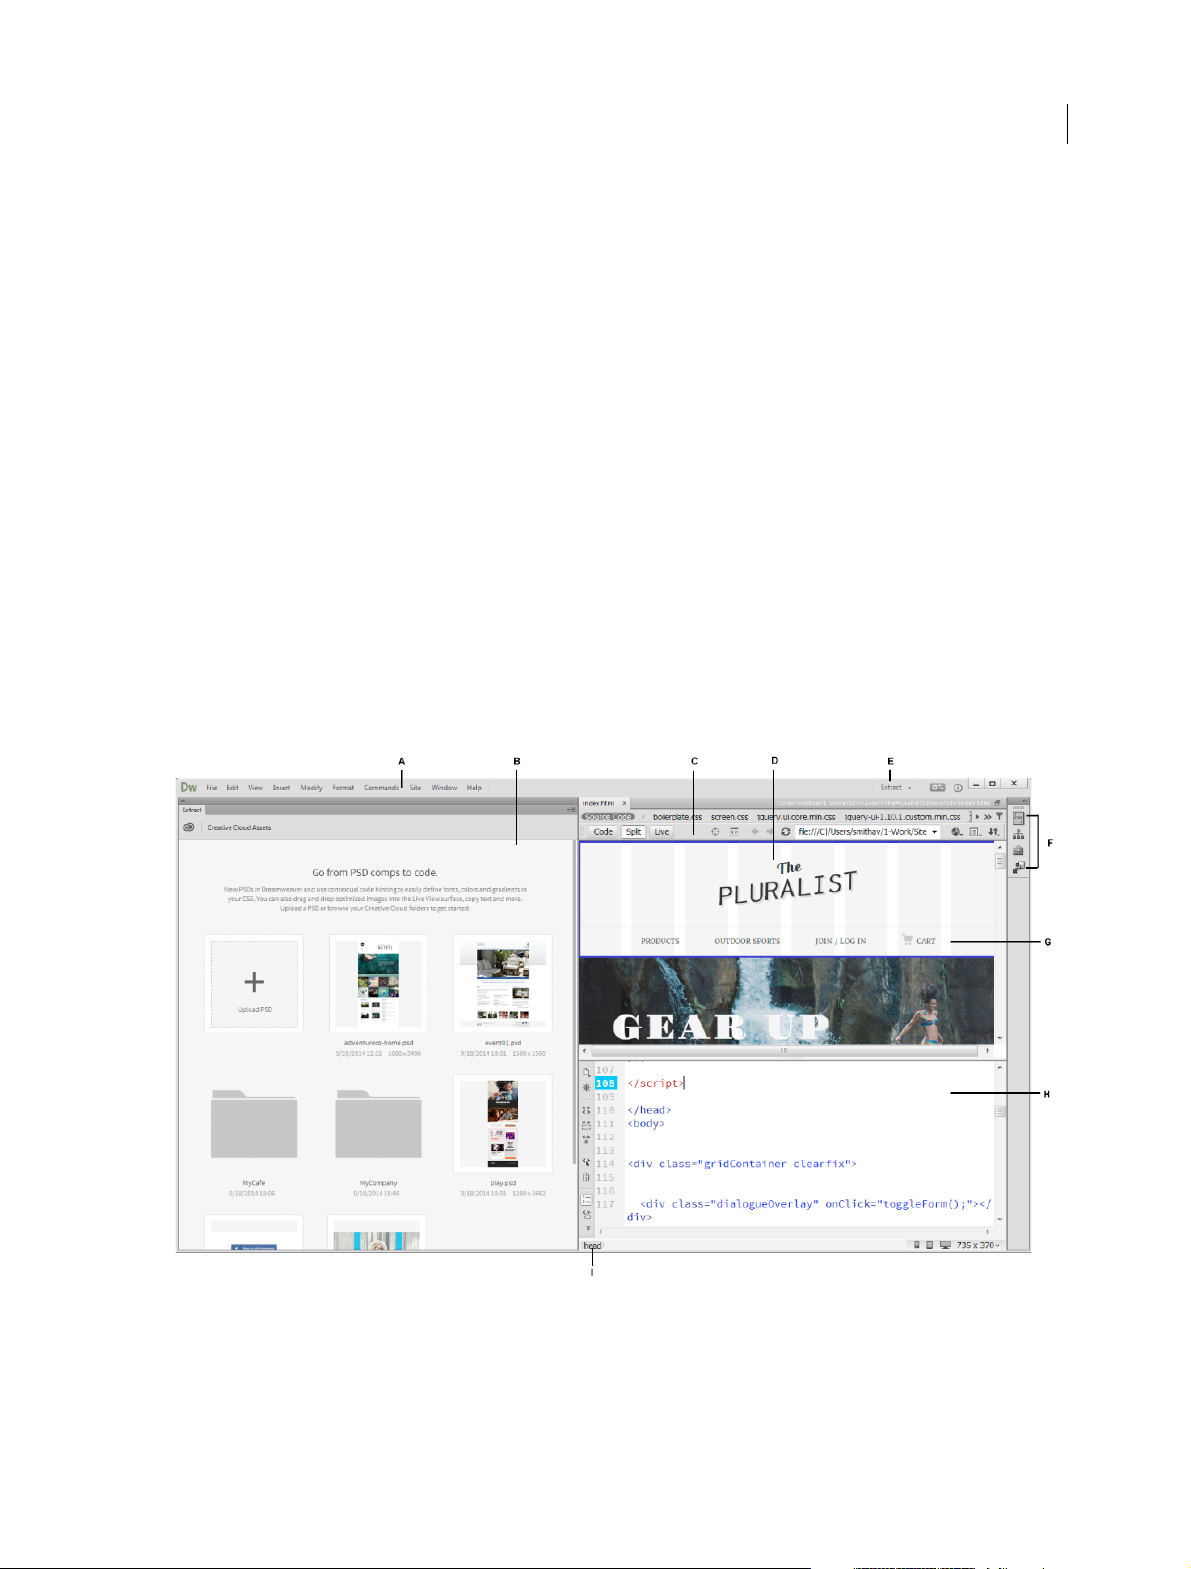
Workspace layout overview
The Dreamweaver workspace lets you view documents and object properties. The workspace also places many of the
most common operations in toolbars so that you can quickly make changes to your documents.
16
A Application bar B Extract panel C Document toolbar D Document window E Workspace switcher F Panel groups G Live View H Code View
I
Tag selec tor
Workspace elements overview
The workspace includes the following elements:
Last updated 6/3/2015
Page 24

Workspace and workflow
Note: Dreamweaver provides many other panels, inspectors, and windows. To open the panels, inspectors, and windows,
use the Window menu.
The Welcome screen Lets you open a recent document or create a new document. From the Welcome screen, you can
also learn more about Dreamweaver by taking a product tour or accessing learn and help content for users with varying
skill levels and read about the new features in the current and past releases. Welcome Screen lets you create a new Starter
Template too.
The Application bar Is across the top of the application window and contains a workspace switcher, menus (Windows
only), and other application controls.
The Document toolbar Contains buttons that provide options for different views of the Document window (such as
Design view, Live view, and Code view), various viewing options, and some common operations such as previewing in
a browser.
The Standard toolbar To display the Standard toolbar, select View > Toolbars > Standard. The toolbar contains buttons
for common operations from the File and Edit menus: New, Open, Browse in Bridge, Save, Save All, Print Code, Cut,
Copy, Paste, Undo, and Redo.
The Coding toolbar (Displayed in Code view only.) Contains buttons that let you perform many standard coding
operations.
The Document window Displays the current document as you create and edit it.
17
The Property inspector Lets you view and change a variety of properties for the selected object or text. Each object has
different properties.
The Tag selector Located in the Status bar at the bottom of the Document window. Shows the hierarchy of tags
surrounding the current selection. Click any tag in the hierarchy to select that tag and all its contents.
Panels Help you monitor and modify your work. Examples include the Insert panel, the CSS Designer panel, and the
Files panel. To expand a panel, double-click its tab.
The Extract panel Lets you upload and view your PSD files on Creative Cloud. Using this panel, you can extract CSS,
text, images, fonts, colors, gradients, and measurements from your PSD comps into your document.
The Insert panel Contains buttons for inserting various types of objects, such as images, tables, and media elements,
into a document. Each object is a piece of HTML code that lets you set various attributes as you insert it. For example,
you can insert a table by clicking the Table button in the Insert panel. If you prefer, you can insert objects using the
Insert menu instead of the Insert panel.
The Files panel Lets you manage your files and folders, whether they are part of a Dreamweaver site or on a remote
server. The Files panel also lets you access all the files on your local disk.
Document window overview
The Document window shows the current document. To switch to a document, click its tab.
You can select any of the following views:
Live view (View > Live View) Live view displays a more realistic representation of what your document will look like
in a browser, and lets you interact with the document exactly as you would in a browser. You can edit HTML elements
directly in Live View and instantly preview your changes in the same view as well. For more information on editing in
Live View, see
Edit in Live View.
Design view (View > Design) A design environment for visual page layout, visual editing, and rapid application
development. In this view, Dreamweaver displays a fully editable, visual representation of the document, similar to what
you would see when viewing the page in a browser.
Last updated 6/3/2015
Page 25
Workspace and workflow
Code view (View > Code) A hand-coding environment for writing and editing HTML, JavaScript, and any other kind
of code.
Split Code view (View > Split Code) A split version of Code view that lets you scroll to work on different sections of
the document at the same time.
Code and Design view (View > Code And Design) Lets you see both Code view and Design view for the same
document in a single window.
Live Code view (View > Live Code) Only available when viewing a document in Live view. Live Code view displays the
actual code that a browser uses to execute the page, and can dynamically change as you interact with the page in Live
view. Live Code view is not editable.
When a Document window is maximized (the default), tabs appear at the top of the Document window showing the
filenames of all open documents. Dreamweaver displays an asterisk after the filename if you have made changes that
you haven’t saved yet.
Dreamweaver also displays the Related Files toolbar below the document’s tab (or below the document’s title bar if you
are viewing documents in separate windows). Related documents are documents associated with the current file, such
as CSS files or JavaScript files. To open one of these related files in the Document window, click its filename in the
Related Files toolbar.
18
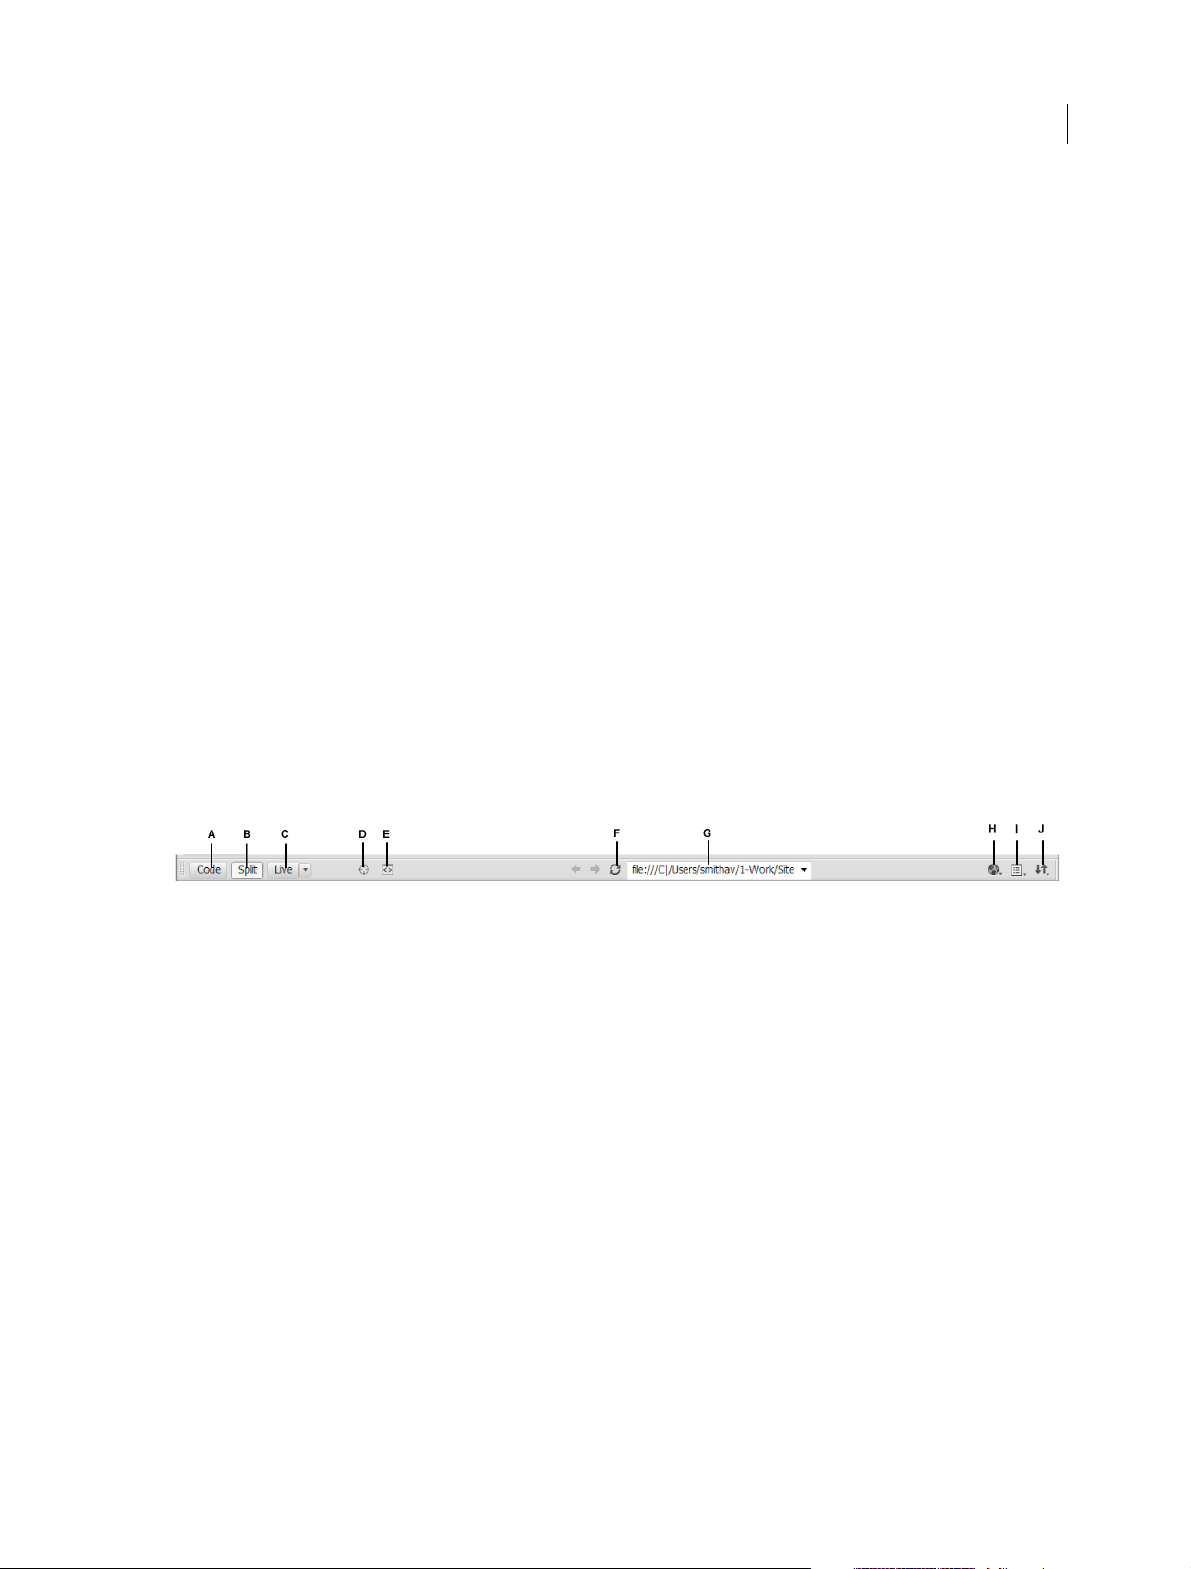
Document toolbar overview
The Document toolbar contains buttons that let you toggle between different views of your document quickly. The
toolbar also contains some common commands and options related to viewing the document and transferring it
between the local and remote sites.
A Code view B Show Live and Code view C Live view D Go to Inspect mode E Show Live view source in Code view F Refresh G File path and
name H
Preview/Debug in browser I Live view options J File management
The following options appear in the Document toolbar:
Code View Displays only the Code view in the Document window.
Show Live and Code Views Splits the Document window between the Code and the Live/Design views. Design view
option is not available for fluid grid documents.
Live View Displays an interactive, browser-based view of the document. You can also edit HTML elements in Live
View. The drop-down list adjacent to the Live options lets you switch between Live and Design views. This drop-down
list is not available in fluid grid documents.
Preview/Debug in Browser Allows you to preview or debug your document in a browser. Select a browser from the
pop-up menu.
File Management Displays the File Management pop-up menu.
Standard toolbar overview
The Standard toolbar contains buttons for common operations from the File and Edit menus: New, Open, Browse in
Bridge, Save, Save All, Print Code, Cut, Copy, Paste, Undo, and Redo. Use these buttons just as you would use the
equivalent menu commands.
Last updated 6/3/2015
Page 26
Workspace and workflow
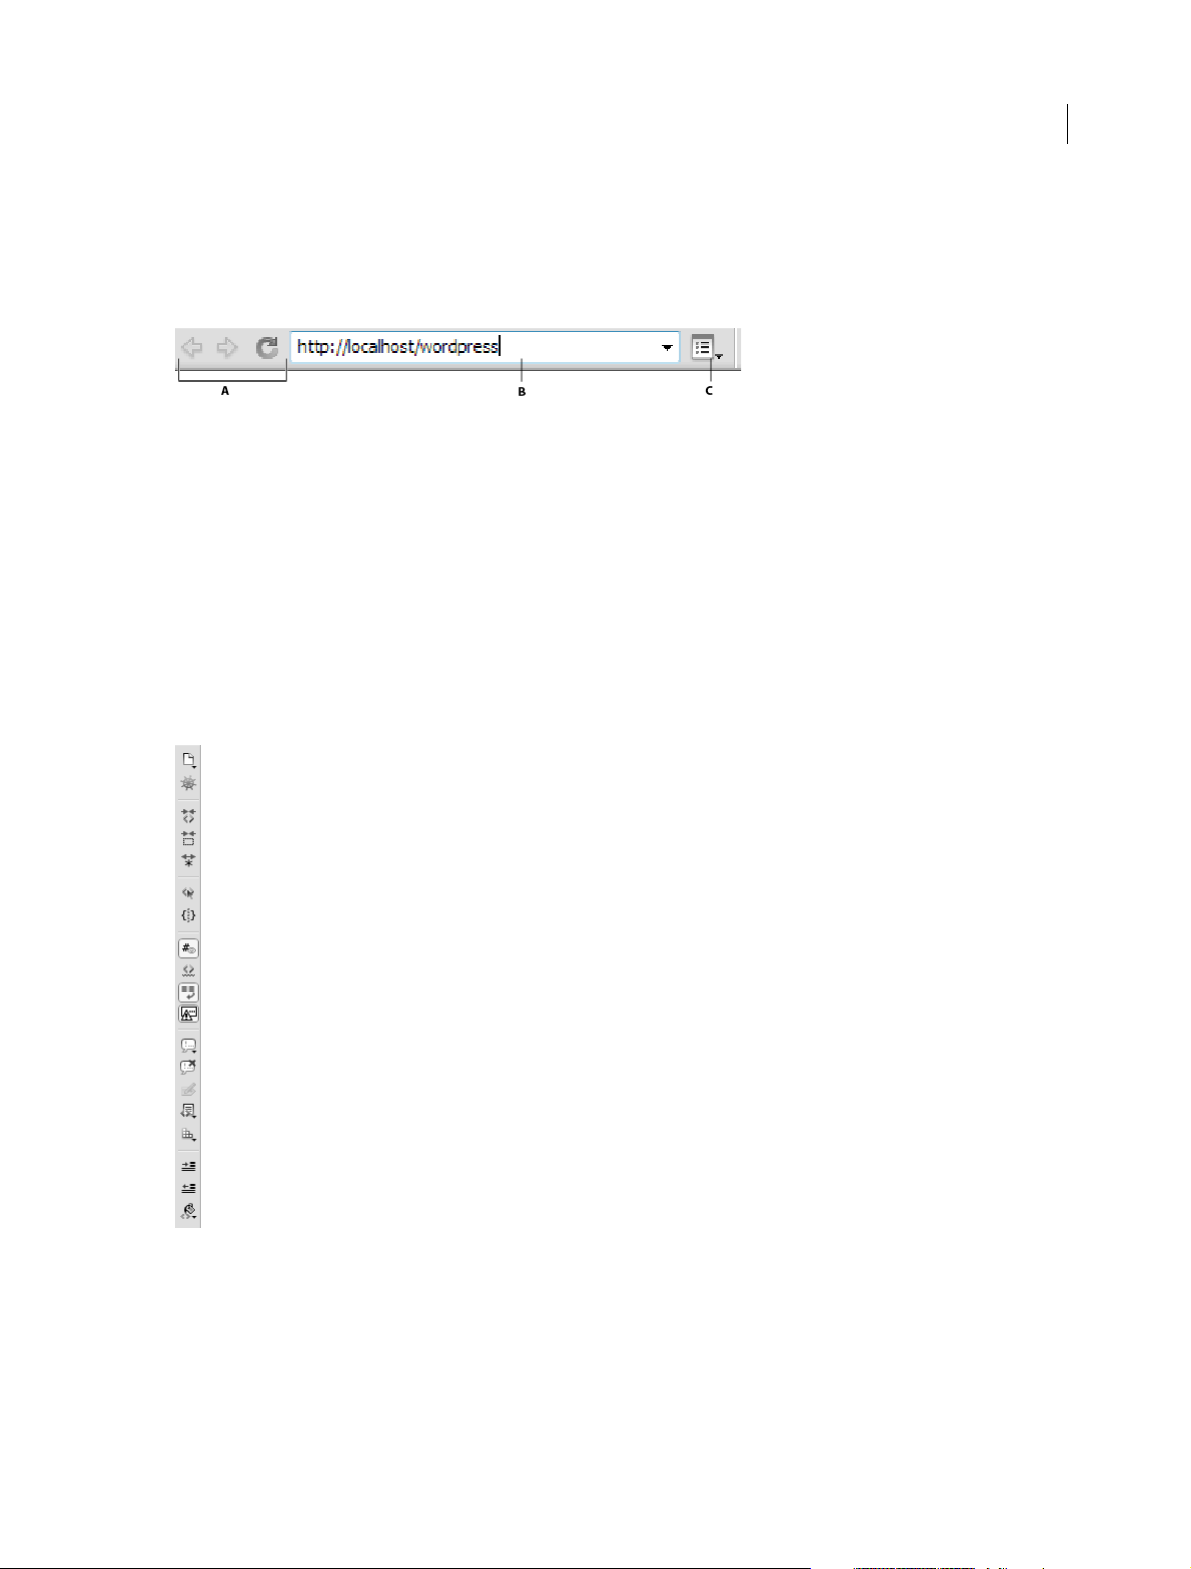
Browser Navigation toolbar overview
The Browser Navigation toolbar becomes active in Live view, and shows you the address of the page you’re looking at
in the Document window. Live view acts like a regular browser, so even if you browse to a site outside of your local site
(for example, http://www.adobe.com), Dreamweaver will load the page in the Document window.
A Browser controls B Address box C Live View options
By default, links are not active in Live view. Having links non-active lets you select or click link text in the Document
window without being taken to another page. To test links in Live view, you can enable one-time clicking or continuous
cl ick ing by sel ect ing Follo w Li nks or Fol low Li nks Con tinuo usly f rom the View o pti ons me nu to t he r igh t of th e ad dre ss
box.
Coding toolbar overview
The Coding toolbar contains buttons that let you perform many standard coding operations, such as collapsing and
expanding code selections, highlighting invalid code, applying, and removing comments, indenting code, and inserting
re cent ly u sed co de sn ipp ets. The C od ing t ool bar a ppe ars v erti cally on t he le ft si de of the D oc ume nt wi ndow, an d is o nly
visible when Code view is displayed.
19
You cannot undock or move the Coding toolbar, but you can hide it (View > Toolbars > Coding). For information on
the different options available in the toolbar, see
You can also edit the Coding toolbar to display more buttons (such as Show Hidden Characters, and Auto Indent), or
hide buttons that you don’t want to use. To do so, however, you must edit the XML file that generates the toolbar. For
more information, see Extending Dreamweaver.
Insert code using the Coding toolbar.
Last updated 6/3/2015
Page 27
Workspace and workflow
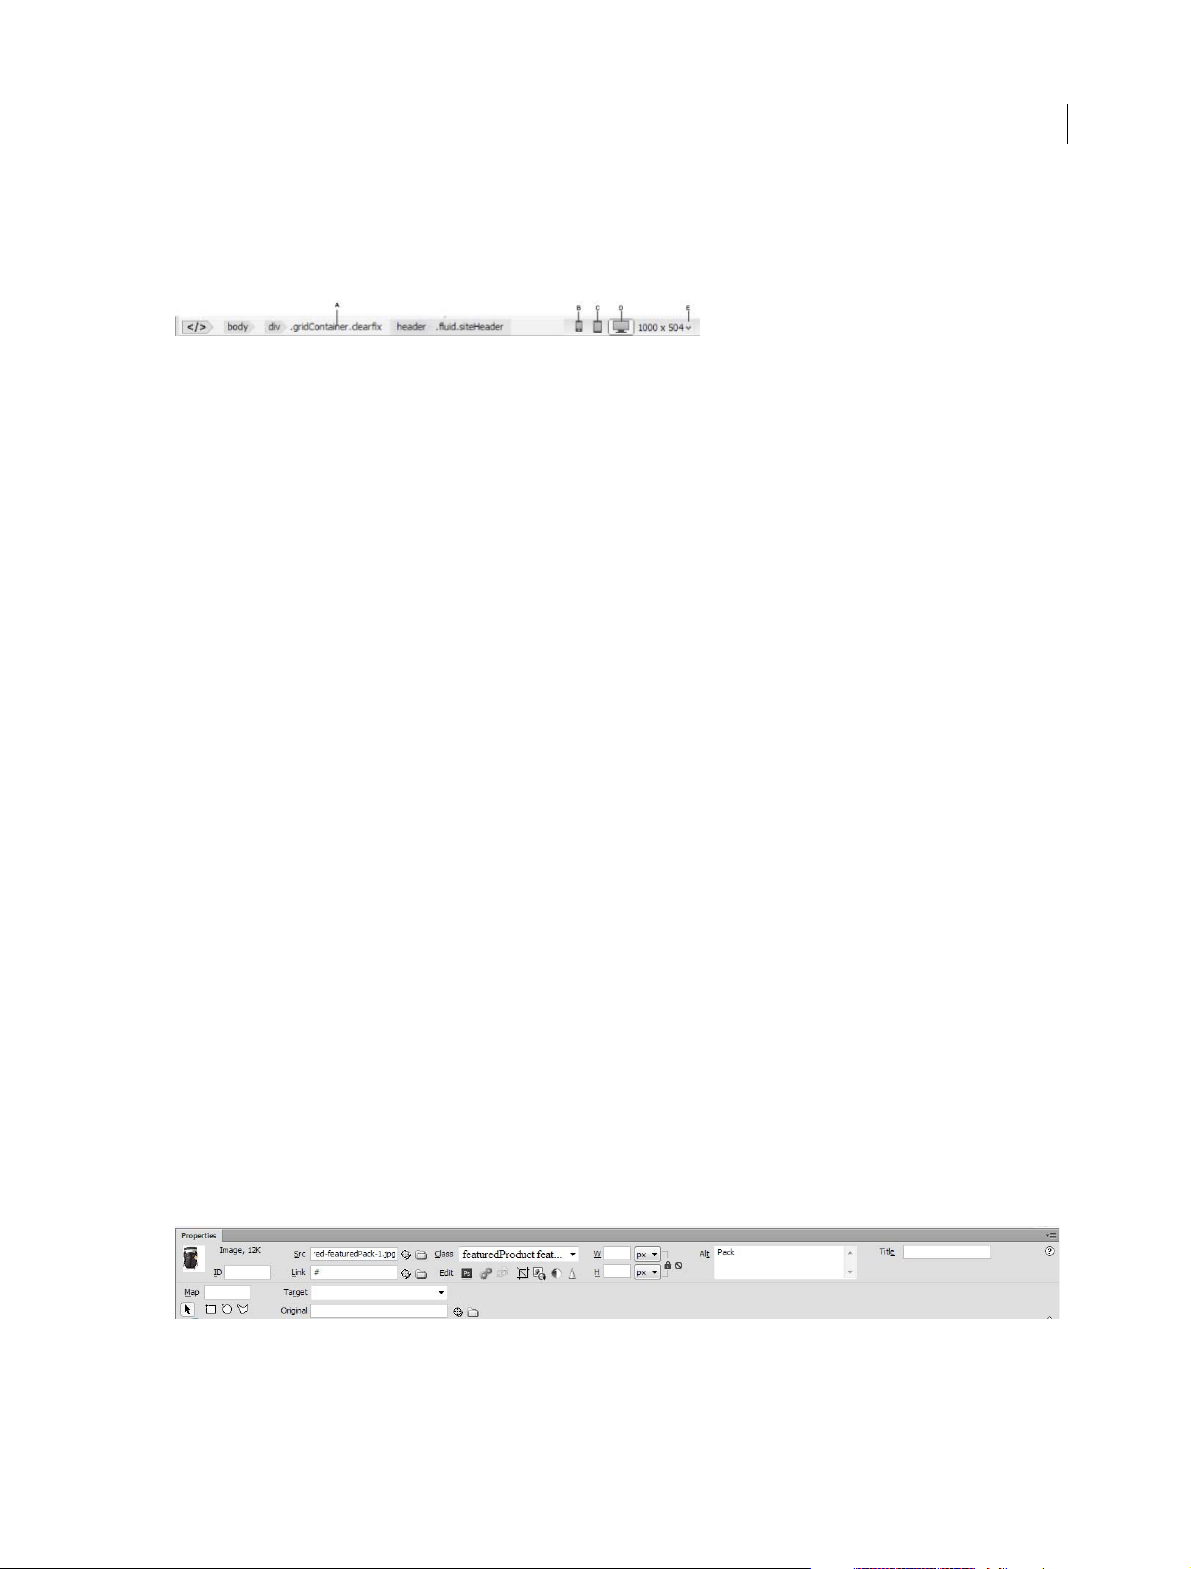
Status bar overview
The Status bar at the bottom of the Document window provides additional information about the document you are
creating.
A Tag s el e ctor B Mobile size C Tab let si ze D Desktop size E Window si ze
Tag sel e c tor
Shows the hierarchy of tags surrounding the current selection. Click any tag in the hierarchy to select that tag and all
its contents. Click <body> to select the entire body of the document. To set the class or ID attributes for a tag in the tag
selector, right-click (Windows) or Control-click (Macintosh) the tag and select a class or ID from the context menu.
Mobile size
Shows a preview of the document in mobile size - 480 X 800 by default. To change the default size, click Window Size
pop-up menu > Edit Sizes.
Tablet siz e
Shows a preview of the document in tablet size - 768 X 1024 by default. To change the default size, click Window Size
pop-up menu > Edit Sizes.
20
Desktop size
Shows a preview of the document in desktop size - 1000 px width by default. To change the default size, click Window
Size pop-up menu > Edit Sizes.
Window size pop-up menu
(Not available in Code view.) Lets you resize the Document window to predetermined or custom dimensions. When
you change the view size of a page in design or live view only the dimensions of the view size change. The document
size is unaltered.
In addition to predetermined and custom sizes, Dreamweaver also lists sizes specified in a media query. When you
select a size corresponding to a media query, Dreamweaver uses the media query to display the page. You can also
change the page orientation to preview the page for mobile devices where the page layout changes based on how the
device is held.
Property inspector overview
The Property Inspector lets you examine and edit the most common properties for the currently selected page element,
such as text or an inserted object. The contents of the Property Inspector vary depending on the element selected. For
example, if you select an image on your page, the Property Inspector changes to show properties for the image (such as
the file path to the image, the width and height of the image, the border around the image, if any, and so on).
The Property Inspector is at the lower edge of the workspace by default, but you can undock it and make it a floating
panel in the workspace.
Last updated 6/3/2015
Page 28
Workspace and workflow
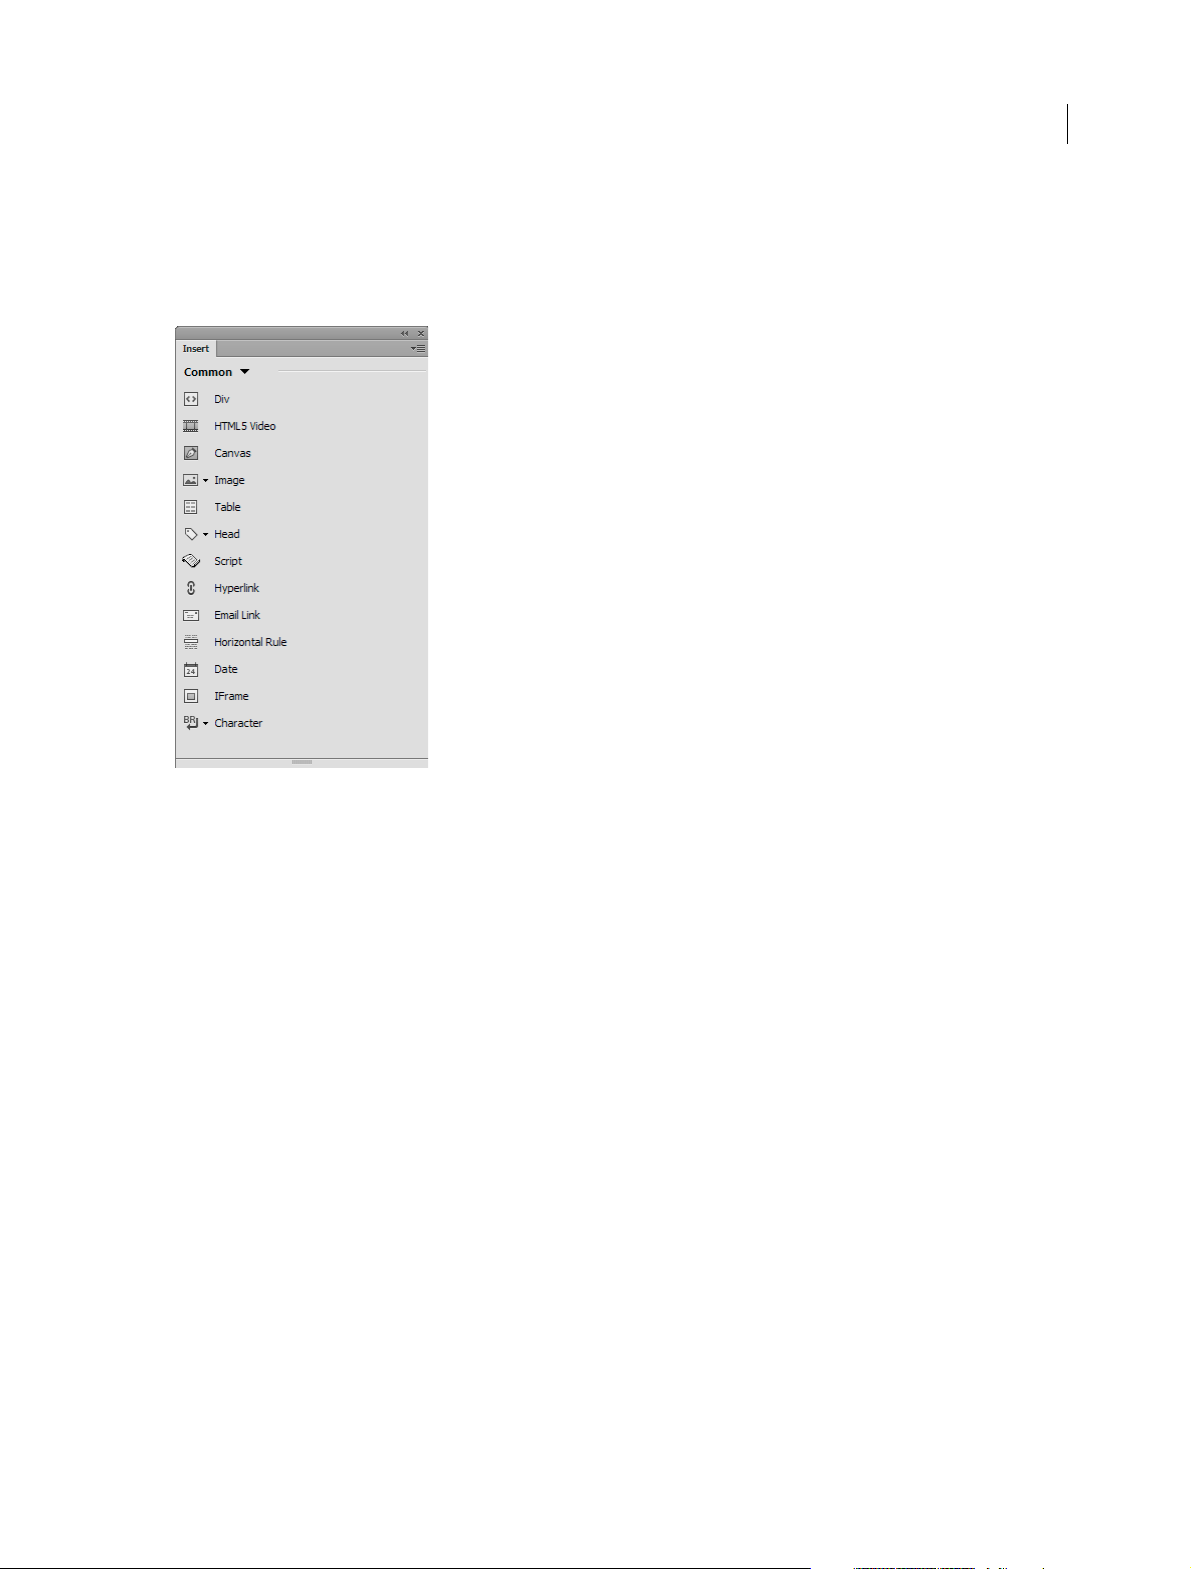
Insert panel overview
The Insert panel contains buttons for creating and inserting objects such as tables, images, and links. The buttons are
organized into several categories, which you can switch by selecting the desired category from the drop-down list at the
top.
21
Some categories have buttons with pop-up menus. When you select an option from a pop-up menu, it becomes the
default action for the button. For example, if you select Image Placeholder from the Image button’s pop-up menu, the
next time you click the Image button, Dreamweaver inserts an image placeholder. Anytime you select a new option
from the pop-up menu, the default action for the button changes.
The Insert panel is organized in the following categories:
Common Lets you create and insert the most commonly used elements such as div tags and objects, such as images,
and tables.
Structure Lets you insert structural elements such as div tags, headings, lists, paragraphs, headers, and footers.
Media Lets you insert media elements such as Edge Animate composition, HTML5 audio and video, and Flash audio
and video.
Form Contains buttons for creating forms and inserting form elements, such as search, month, and password.
jQuery Mobile Contains buttons for building sites that use jQuery Mobile.
jQuery UI Lets you insert jQuery UI elements such as accordion, sliders, and buttons.
Te mp l at es Lets you save the document as a template and mark specific regiions as editable, optional, repeating, or
editable optional regions.
Favo rites Lets you group and organize the Insert panel buttons you use the most in one common place.
Files panel overview
Use the Files panel to view and manage the files on your Dreamweaver site.
Last updated 6/3/2015
Page 29
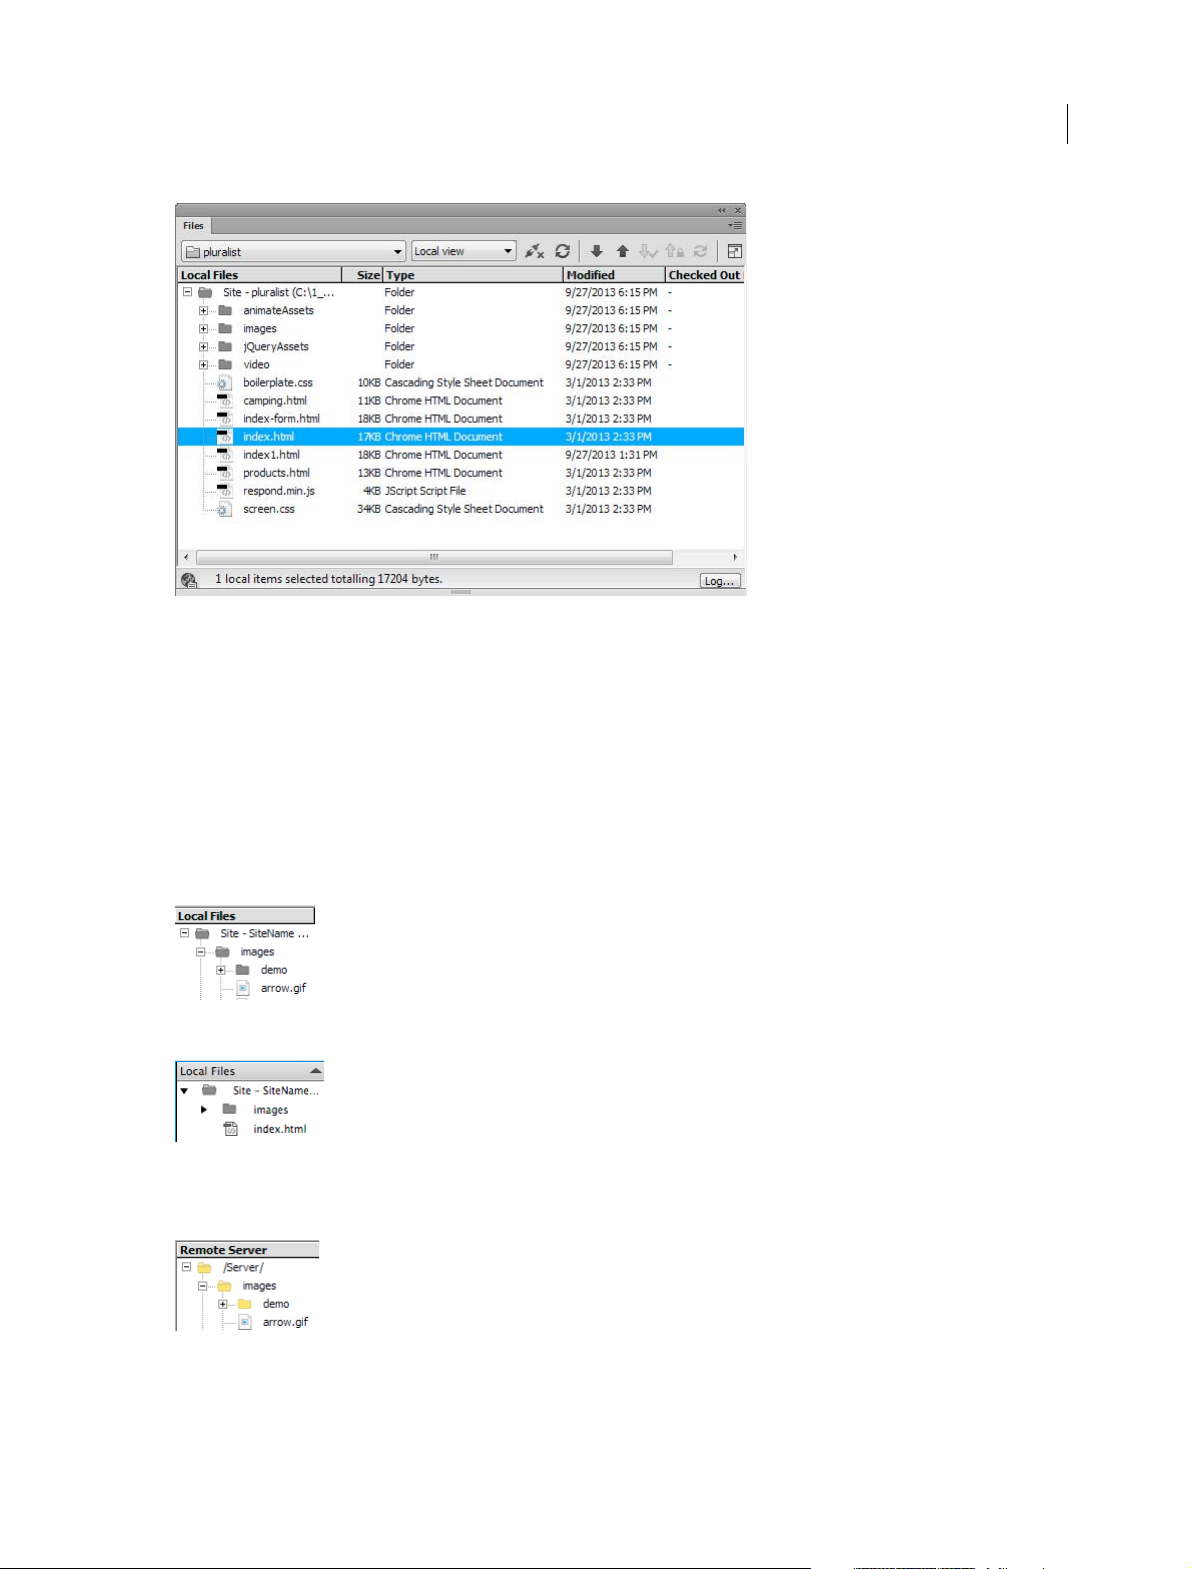
Workspace and workflow
When you view sites, files, or folders in the Files panel, you can change the size of the viewing area, and expand or
collapse the Files panel. When the Files panel is collapsed, it displays the contents of the local site, the remote site, the
testing server, or the SVN repository as a list of files. When expanded, it displays the local site and either the remote
site, the testing server, or the SVN repository.
22
For Dreamweaver sites, you can also customize the Files panel by changing the view—either your local or remote site—
that appears by default in the collapsed panel.
The folders in the Files panel are displayed in different colors based on the view - Local, Remote, or Testing.
Local view
Remote Server view
Last updated 6/3/2015
Page 30
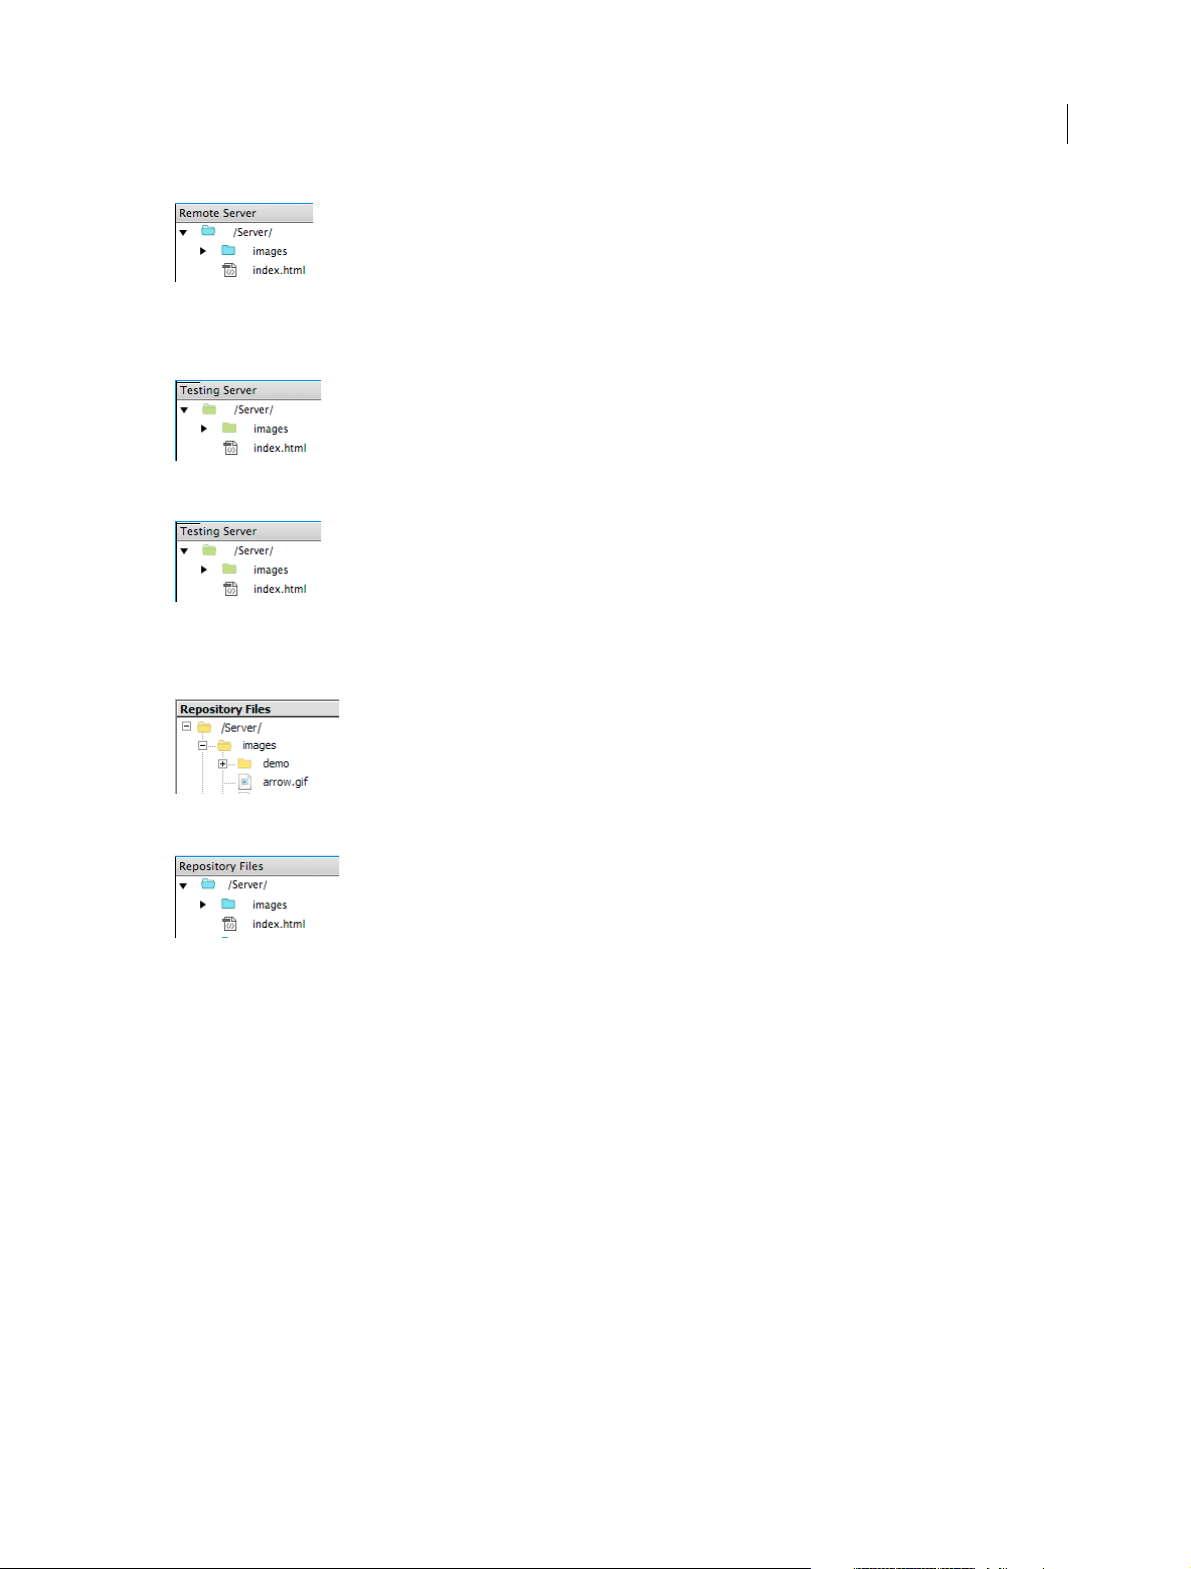
Workspace and workflow
Test i n g S er ve r v ie w
Repository view
23
The Files panel interacts with the server at regular intervals to update its content. An error message is displayed when
you try to perform an action in the Files panel when it is running these auto-updates. To disable auto-updates, open
the Files panel options menu, and deselect Auto-Update in the View menu.
To update the contents of the panel manually, use the Refresh button in the panel. The current check-out status of files,
however, is updated only when auto-updates are enabled.
CSS Designer
CSS Designer panel (Windows > CSS Designer) is a CSS Property Inspector that lets you 'visually' create CSS styles,
files, and set properties, along with media queries.
Last updated 6/3/2015
Page 31

Workspace and workflow
24
The CSS Designer panel consists of the following panes:
Sources Lists all the CSS style sheets associated with the document. Using this pane, you can create and attach a CSS
to the document, or define styles within the document.
@Media Lists all the media queries in the source selected in the Sources pane. If you do not select a specific CSS, this
pane displays all the media queries associated with the document.
Selectors Lists all the selectors in the source selected in the Sources pane. If you also select a media query, this pane
narrows down the list of selectors for that media query. If no CSS or media queries are selected, this pane displays all
the selectors in the document.
When you select Global in the @Media pane, all the selectors that are not included in a media query of the selected
source are displayed.
Properties Displays properties that you can set for the specified selector. For more information, see Set properties .
CSS Designer is context-sensitive. This means, for any given context or selected page element, you can view the
associated selectors and properties. Further, when you select a selector in CSS Designer, the associated source and
media queries are highlighted in the respective panes.
For more information, see CSS Designer panel.
Last updated 6/3/2015
Page 32

Workspace and workflow
Visual guides overview
Dreamweaver provides several kinds of visual guides to help you design documents and predict approximately how
they appear in browsers. You can do any of the following:
• Instantly snap the Document window to a desired window size to see how the elements fit on the page.
• Use a tracing image as the page background to help you duplicate a design created in an illustration or image-editing
application such as Adobe® Photoshop® or Adobe® Fireworks®.
• Use rulers and guides to provide a visual cue for precise positioning and resizing of page elements.
• Use the grid for precise positioning and resizing of absolutely positioned elements (AP elements).
Grid marks on the page help you align AP elements, and when snapping is enabled, AP element s automatically snap
to
the closest grid point when moved or resized. (Other objects, such as images and paragraphs, do not snap to th
rid.) Snapping works regardless of whether the grid is visible.
g
More Help topics
Working i n t he D o cu m e nt wi n d o w
About Live view
Open Related Files
25
e
General information about coding in Dreamweaver
Preview pages in Live view
Setting coding preferences
View and edit head content
Using visual aids for layout
Previewing pages in Dreamweaver
Insert code with the Coding toolbar
Set window size and connection speed
Zoom in and out
Resize the Document window
Set download time and size preferences
Manage windows and panels
Use the Property inspector
Use the Insert panel
Work with files in the Files panel
Using visual aids for layout
Customizing the Dreamweaver workspace
Note: The user interface has been simplified in Dreamweaver CC and later. As a result, you may not find some of the
options described in this article in Dreamweaver CC and later. For more information, see this article.
Last updated 6/3/2015
Page 33

Workspace and workflow
Manage windows and panels
You can create a custom workspace by moving and manipulating Document windows and panels. You can also save
workspaces and switch among them. For Fireworks, renaming custom workspaces can lead to unexpected behavior.
Note: The following examples use Photoshop for demonstration purposes. The workspace behaves the same in all the
products.
Rearrange, dock, or float document windows
When you open more than one file, the Document windows are tabbed.
• To rearrange the order of tabbed Document windows, drag a window’s tab to a new location in the group.
• To undock (float or untab) a Document window from a group of windows, drag the window’s tab out of the group.
Note: In Photoshop you can also choose Window > Arrange > Float in Window to float a single Document window, or
Window > Arrange > Float All In Windows to float all of the Document windows at once. See tech note
information.
Note: Dreamweaver does not support docking and undocking Document windows. Use the Document window’s Minimize
button to create floating windows (Windows), or choose Window > Tile Vertically to create side-by-side Document
windows. Search “Tile Vertically” in Dreamweaver Help for more information on this topic. The workflow is slightly
different for Macintosh users.
kb405298 for more
26
• To dock a Document window to a separate group of Document windows, drag the window into the group.
• To create groups of stacked or tiled documents, drag the window to one of the drop zones along the top, bottom, or
sides of another window. You can also select a layout for the group by using the Layout button on the Application bar.
Note: Some products do not support this functionality. However, your product may have Cascade and Tile commands in
the Window menu to help you lay out your documents.
• To switch to another document in a tabbed group w hen dragging a selection, drag the s elec tion over the document’s
tab for a moment.
Note: Some products do not support this functionality.
Dock and undock panels
A dock is a collection of panels or panel groups displayed together, generally in a vertical orientation. You dock and
undock panels by moving them into and out of a dock.
• To dock a panel, drag it by its tab into the dock, at the top, bottom, or in between other panels.
• To dock a panel group, drag it by its title bar (the solid empty bar above the tabs) into the dock.
• To remove a panel or panel group, drag it out of the dock by its tab or title bar. You can drag it into another dock or
make it free-floating.
Last updated 6/3/2015
Page 34

Workspace and workflow
27
You can prevent panels from filling all the space in a dock. Drag the bottom edge of the dock up so it no longer meets
the edge of the workspace.
Move panels
As you move panels, you see blue highlighted drop zones, areas where you can move the panel. For example, you can
move a panel up or down in a dock by dragging it to the narrow blue drop zone above or below another panel. If you
drag to an area that is not a drop zone, the panel floats freely in the workspace.
Note: The position of the mouse (rather than the position of the panel), activates the drop zone, so if you can’t see the drop
zone, try dragging the mouse to the place where the drop zone should be.
• To move a panel, drag it by its tab.
• To move a panel group, drag the title bar.
A Title bar B Tab C Drop zone
Last updated 6/3/2015
Page 35

Workspace and workflow
Press Ctrl (Windows) or Command (Mac OS) while moving a panel to prevent it from docking. Press Esc while moving
the panel to cancel the operation.
Add and remove panels
If you remove all panels from a dock, the dock disappears. You can create a dock by moving panels to the right edge of
the workspace until a drop zone appears.
• To remove a panel, right-click (Windows) or Control-click (Mac) its tab and then select Close, or deselect it from
the Window menu.
• To add a panel, select it from the Window menu and dock it wherever you want.
Manipulate panel groups
• To move a panel into a group, drag the panel’s tab to the highlighted drop zone in the group.
28
• To rearrange panels in a group, drag a panel’s tab to a new location in the group.
• To remove a panel from a group so that it floats freely, drag the panel by its tab outside the group.
• To move a group, drag the title bar (the area above the tabs).
Stack floating panels
When you drag a panel out of its dock but not into a drop zone, the panel floats freely. The floating panel allows you to
position it anywhere in the workspace. You can stack floating panels or panel groups so that they move as a unit when
you drag the topmost title bar.
• To stack floating panels, drag a panel by its tab to the drop zone at the bottom of another panel.
• To change the stacking order, drag a panel up or down by its tab.
Note: Be sure to release the tab over the narrow drop zone between panels, rather than the broad drop zone in a title bar.
• To remove a panel or panel group from the stack, so that it floats by itself, drag it out by its tab or title bar.
Resize panels
• To minimize or maximize a panel, panel group, or stack of panels, double-click a tab. You can also double-click the
tab area (the empty space next to the tabs).
• To resize a panel, drag any side of the panel. Some panels, such as the Color panel in Photoshop, cannot be resized
by dragging.
Last updated 6/3/2015
Page 36

Workspace and workflow
Collapse and expand panel icons
You can collapse panels to icons to reduce clutter on the workspace. In some cases, panels are collapsed to icons in the
default workspace.
29
• To collapse or expand all panel icons in a column, click the double arrow at the top of the dock.
• To expand a single panel icon, click it.
• To resize panel icons so that you see only the icons (and not the labels), adjust the width of the dock until the text
disappears. To display the icon text again, make the dock wider.
• To collapse an expanded panel back to its icon, click its tab, its icon, or the double arrow in the panel’s title bar.
In some products, if you select Auto-Collapse Icon Panels from the Interface or User Interface Options preferences, an
expanded panel icon collapses automatically when you click away from it.
• To add a floating panel or panel group to an icon dock, drag it in by its tab or title bar. (Panels are automatically
collapsed to icons when added to an icon dock.)
• To move a panel icon (or panel icon group), drag the icon. You can drag panel icons up and down in the dock, into
other docks (where they appear in the panel style of that dock), or outside the dock (where they appear as floating
icons).
Save and switch workspaces
By saving the current size and position of panels as a named workspace, you can restore that workspace even if you
move or close a panel. The names of saved workspaces appear in the workspace switcher in the Application bar.
Last updated 6/3/2015
Page 37

Workspace and workflow
Save a custom workspace
1 With the workspace in the configuration you want to save, do one of the following:
• (Illustrator) Choose Window > Workspace > Save Workspace.
• (Photoshop, InDesign, InCopy) Choose Window > Workspace > New Workspace.
• (Dreamweaver) Choose Window > Workspace Layout > New Workspace.
• (Flash) Choose New Workspace from the workspace switcher in the Application bar.
• (Fireworks) Choose Save Current from the workspace switcher in the Application bar.
2 Type a name for the workspace.
3 (Photoshop, InDesign) Under Capture, select one or more options:
Panel Locations Saves the current panel locations (InDesign only).
Keyboard shortcuts Saves the current set of keyboard shortcuts (Photoshop only).
Menus or Menu Customization Saves the current set of menus.
Display or switch workspaces
❖ Select a workspace from the workspace switcher in the Application bar.
30
In Photoshop, you can assign keyboard shortcuts to each workspace to navigate among them quickly.
Delete a custom workspace
• Select Manage Workspaces from the workspace switcher in the Application bar, select the workspace, and then click
Delete. (The option is not available in Fireworks.)
• (Photoshop, InDesign, InCopy) Select Delete Workspace from the workspace switcher.
• (Illustrator) Choose Window > Workspace > Manage Workspaces, select the workspace, and then click the Delete
icon.
• (Photoshop, InDesign) Choose Window > Workspace >Delete Workspace, select the workspace, and then click
Delete.
Restore the default workspace
1 Select the Default or Essentials workspace from the workspace switcher in the application bar. For Fireworks, see
the article
Note: In Dreamweaver, Designer is the default workspace.
2 For Fireworks (Windows), delete these folders:Wi n do w s
Vista\\Users\<username>\AppData\Roaming\Adobe\Fireworks CS4\ Windows XP\\Documents and
Settings\<username>\Application Data\Adobe\Fireworks CS4
3 (Photoshop, InDesign, InCopy) Select Window > Workspace > Reset [Workspace Name].
http://www.adobe.com/devnet/fireworks/articles/workspace_manager_panel.html.
(Photoshop) Restore a saved workspace arrangement
In Photoshop, workspaces automatically appear as you last arranged them, but you can restore the original, saved
arrangement of panels.
• To restore an individual workspace, choose Window > Workspace > Reset Wo r k s p a ce Nam e .
Last updated 6/3/2015
Page 38

Workspace and workflow
• To restore all the workspaces installed with Photoshop, click Restore Default Workspaces in the Interface
preferences.
To rearrange the order of workspaces in the application bar, drag them.
Display tabbed documents (Dreamweaver Macintosh)
You can view multiple documents in a single Document window by using tabs to identify each document. You can also
display them as part of a floating workspace, in which each document appears in its own window.
Open a tabbed document in a separate window
❖ Control-click the tab and select Move To New Window from the context menu.
Combine separate documents into tabbed windows
❖ Select Window > Combine As Tabs.
Change the default tabbed document setting
1 Select Dreamweaver > Preferences, and then select the General category.
31
2 Select or deselect Open Documents in Tabs, and click OK.
Dreamweaver does not alter the display of documents that are currently open when you change preferences.
Documents opened after you select a new preference, however, display according to the preference you selected.
Turn on color icons
By default, Dreamweaver CS4 and later uses black and white icons that turn into colored icons when you hover over
them. You can turn color icons on permanently so that no hovering is required.
❖ Do one of the following:
• Choose View > Color Icons.
• Switch to the Classic or Coder workspace.
To turn color icons off again, deselect Color Icons in the View menu, or switch to a different workspace.
Hide and display the Dreamweaver Welcome screen
The Welcome screen appears when you start Dreamweaver and anytime that you do not have any documents open. You
can choose to hide the Welcome screen, and then later display it again. When the Welcome screen is hidden and no
documents are open, the Document window is blank.
Hide the Welcome screen
❖ Select the Don’t Show Again option on the Welcome screen.
Display the Welcome screen
1 Select Edit > Preferences (Windows) or Dreamweaver > Preferences (Macintosh).
2 In the General category, select the Show Welcome Screen option.
Last updated 6/3/2015
Page 39

Workspace and workflow
About customizing Dreamweaver in multiuser systems
You can customize Dreamweaver to suit your needs even in a multiuser operating system such as Windows XP or Mac
OS X.
Dreamweaver prevents any user’s customized configuration from affecting any other user’s customized configuration.
To accomplish this goal, the first time you run Dreamweaver in one of the multiuser operating systems that it
recognizes, the application creates copies of a variety of configuration files. These user configuration files are stored in
a folder that belongs to you.
For example, in Windows XP, they’re stored in C:\Documents and Settings\username\Application
Data\Adobe\Dreamweaver\en_US\Configuration, which is hidden by default. To show hidden files and folders, select
Tools > Folder Options in Windows Explorer, click the View tab, and select the Show Hidden Files and Folders option.
In Windows Vista, they’re stored in C:\Users\username\AppData\Roaming\Adobe\Dreamweaver
\en_US\Configuration, which is hidden by default. To show hidden files and folders, select Tools > Folder Options in
Windows Explorer, click the View tab, and select the Show Hidden Files and Folders option.
In Mac OS X, they’re stored inside your Home folder; specifically, in Users/username/Library/Application
Support/Adobe/Dreamweaver/Configuration.
If you reinstall or upgrade Dreamweaver, Dreamweaver automatically makes backup copies of existing user
configuration files, so if you customized those files by hand, you still have access to the changes you made.
32
Set General preferences for Dreamweaver
1 Select Edit > Preferences (Windows) or Dreamweaver > Preferences (Macintosh).
2 Set any of the following options:
Open Documents In Tabs Opens all documents in a single window with tabs that let you switch between documents
(Macintosh only).
Show Welcome Screen Displays the Dreamweaver Welcome screen when you start Dreamweaver or when you don’t
have any documents open.
Reopen Documents on Startup Opens any documents that were open when you closed Dreamweaver. If this option
is not selected, Dreamweaver displays the Welcome screen or a blank screen when you start (depending on your
Show Welcome Screen setting).
Warn When Opening Read-Only Files Alerts you when you open a read-only (locked) file. Choose to unlock/check
out the file, view the file, or cancel.
Enable Related Files Lets you see which files are connected to the current document (for example, CSS or JavaScript
files). Dreamweaver displays a button for each related file at the top of the document, and opens the file if you click
the button.
Discover Dynamically-Related Files Lets you select whether Dynamically-Related Files appear in the Related Files
toolbar automatically, or after manual interaction. You can also choose to disable the discovery of DynamicallyRelated Files.
Update Links When Moving Files Determines what happens when you move, rename, or delete a document within
your site. Set this preference to always update links automatically, never update links, or prompt you to perform an
update. (See
Update links automatically.)
Show Dialog When Inserting Objects Determines whether Dreamweaver prompts you to enter additional
information when inserting images, tables, Shockwave movies, and certain other objects by using the Insert panel
or the Insert menu. If this option is off, the dialog box does not appear and you must use the Property inspector to
Last updated 6/3/2015
Page 40

Workspace and workflow
specify the source file for images, the number of rows in a table, and so on. For roll over images and Fireworks
HTML, a dialog box always appears when you insert the object, regardless of this option setting. (To temporarily
override this setting, Control-click (Windows) or Command-click (Macintosh) when creating and inserting
objects.)
Enable Double-Byte Inline Input Lets you enter double-byte text directly into the Document window if you are
using a development environment or language kit that facilitates double-byte text (such as Japanese characters).
When this option is deselected, a text input window appears for entering and converting double-byte text; the text
appears in the Document window after it is accepted.
Switch To Plain Paragraph After Heading Specifies that pressing Enter (Windows) or Return (Macintosh) at the end
of a heading paragraph in Design or Live view creates a new paragraph tagged with a p tag. (A heading paragraph
is one that’s tagged with a heading tag such as h1 or h2.) When the option is disabled, pressing Enter or Return at
the end of a heading paragraph creates a new paragraph tagged with the same heading tag (allowing you to type
multiple headings in a row and then go back and fill in details).
Allow Multiple Consecutive Spaces Specifies that typing two or more spaces in Design or Live view creates
nonbreaking spaces that appear in a browser as multiple spaces. (For example, you can type two spaces between
sentences, as you would on a typewriter.) This option is designed mostly for people who are used to typing in word
processors. When the option is disabled, multiple spaces are treated as a single space (because browsers treat
multiple spaces as single spaces).
33
Use <strong> and <em> in Place of <b> and <i> Specifies that Dreamweaver applies the strong tag whenever you
perform an action that would normally apply the b tag, and applies the em tag whenever you perform an action that
would normally apply the i tag. Such actions include clicking the Bold or Italic buttons in the text Property inspector
in HTML mode and choosing Format > Style > Bold or Format > Style > Italic. To use the b and i tags in your
documents, deselect this option.
Note: The World Wide Web Consortium discourages use of the b and i tags; the strong and em tags provide more
semantic information than the b and i tags do.
Warn when placing editable regions within <p> or <h1> - <h6> tags Specifies whether a warning message is
di splayed w henever y ou s ave a D reamwea ver te mplate t hat has an edi table reg ion within a p ara graph or h ead ing tag .
The message tells you that users will not be able to create more paragraphs in the region. It is enabled by default.
Centering Specifies whether you want to center elements using divalign="center" or the center tag when you click
the Align Center button in the Property inspector.
Note: Both of these approaches to centering have been officially deprecated as of the HTML 4.01 specification; you
should use CSS styles to center text. Both of these approaches are still technically valid as of the XHTML 1.0 Transitional
specification, but they’re no longer valid in the XHTML 1.0 Strict specification.
Maximum Number of History Steps Determines the number of steps that the History panel retains and shows. (The
default value should be sufficient for most users.) If you exceed the given number of steps in the History panel, the
oldest steps are discarded.
For more information, see Task automat ion.
Spelling Dictionary lists the available spelling dictionaries. If a dictionary contains multiple dialects or spelling
conventions (such as American English and British English), the dialects are listed separately in the Dictionary
pop-up menu.
Last updated 6/3/2015
Page 41

Workspace and workflow
Set Fonts preferences for documents in Dreamweaver
A document’s encoding determines how the document appears in a browser. Dreamweaver font preferences let you
view a given encoding in the font and size you prefer. The fonts you select in the Fonts Preferences dialog, however,
only affect the way fonts appear in Dreamweaver; they do not affect the way the document appears in a visitor’s browser.
To change the way fonts appear in a browser, you need to change the text by using the Property inspector or by applying
a CSS rule.
For information on setting a default encoding for new documents, see Creating and opening documents.
1 Select Edit > Preferences (Windows) or Dreamweaver > Preferences (Macintosh).
2 Select Fonts from the Category list on the left.
3 Select an encoding type (such as Western European or Japanese) from the Font Settings list.
Note: To display an Asian language, you must be using an operating system that supports double-byte fonts.
4 Select a font and size to use for each category of the selected encoding.
Note: To appear in the font pop-up menus, a font must be installed on your computer. For example, to see Japanese text
you must have a Japanese font installed.
Proportional Font The font that Dreamweaver uses to display normal text (for example, text in paragraphs,
headings, and tables). The default depends on your system’s installed fonts. For most U.S. systems, the default is
Times New Roman 12 pt. (Medium) on Windows and Times 12 pt. on Mac OS.
34
Fixed Font The font Dreamweaver uses to display text within pre, code, and tt tags. The default depends on your
system’s installed fonts. For most U.S. systems, the default is Courier New 10 pt. (Small) on Windows and Monaco
12 pt. on Mac OS.
Code View The font used for all text that appears in the Code view and Code inspector. The default depends on your
system’s installed fonts.
Customize Dreamweaver highlighting colors
Use the Highlighting preferences to customize the colors that identify template regions, library items, third-party tags,
layout elements, and code in Dreamweaver.
Change a highlighting color
1 Select Edit > Preferences and select the Highlighting category.
2 Beside the object you want to change the highlighting color for, click the color box, and then use the color picker to
select a new color, or enter a hexadecimal value.
Activate or deactivate highlighting for an object
1 Select Edit > Preferences and select the Highlighting category.
2 Beside the object you want to activate or deactivate highlighting color for, select or deselect the Show option.
Restore default preferences
For procedures on restoring default Dreamweaver preferences, see Tech Note 83912.
Last updated 6/3/2015
Page 42

Workspace and workflow
More Help topics
Workspace layout overview
Update links automatically
Understanding document encoding
Use the color picker
Change the highlight color of div tags
Working in the Document window
Note: The user interface has been simplified in Dreamweaver CC and later. As a result, you may not find some of the
options described in this article in Dreamweaver CC and later. For more information, see
Switch between views in the Document window
You can view a document in the Document window in Code view, Split Code view, Design view, Code and Design views
(Split view), or Live view. You also have the option of viewing Split Code view or Code and Design views horizontally
or vertically. (Horizontal display is the default.)
this article.
35
Note: Design view option is not available for fluid grid documents.
Switch to Code view
❖ Do one of the following:
• Select View > Code.
• In the Document toolbar, click the Code button.
Switch to Split Code view
Split Code view splits your document in two so that you can work on two sections of the code at once.
❖ Select View > Split Code.
Switch to Design view
In the Document toolbar, click the drop-down list adjacent to Live option and click Design. To switch to full Design
view, click the Design button.
Show both Code and Design views
In the Document toolbar, click the Split button. Then, click the drop-down list adjacent to Live option and click Design.
Split views vertically or horizontally
1 Make sure that you are in the Split view (Split Code or split Design/Live view).
Last updated 6/3/2015
Page 43

Workspace and workflow
2 To split the view vertically, select View > Split Vertically. To split the view horizontally, deselect View > Split
Ve r ti c a ll y.
Cascade or tile Document windows
If you have many documents open at once, you can cascade or tile them.
Cascade Document windows
❖ Select Window > Cascade.
Tile Document windows
• (Windows) Select Window > Tile Horizontally or Window > Tile Vertically.
• (Macintosh) Select Window > Tile.
Resize the Document window
The Status bar displays the Document window’s current dimensions (in pixels). To design a page that looks its best at
a specific size, you can adjust the Document window to any of the predetermined sizes, edit those predetermined sizes,
or create sizes.
36
When you change the view size of a page in design or live view only the dimensions of the view size change. The
document size is unaltered.
In addition to predetermined and custom sizes, Dreamweaver also lists sizes specified in a media query. When you
select a size corresponding to a media query, Dreamweaver uses the media query to display the page. You can also
change the page orientation to preview the page for mobile devices where the page layout changes based on how the
device is held.
Resize the Document window to a predetermined size
❖ Select one of the sizes from the Window Size pop-up menu at the bottom of the Document window. Dreamweaver
CS5.5 and later offers an extended list of choices, including choices for common mobile devices (as pictured below).
The window size shown reflects the inside dimensions of the browser window, without borders; the monitor size or
mobile device is listed to the right.
Last updated 6/3/2015
Page 44

Workspace and workflow
For less precise resizing, use your operating system’s standard methods of resizing windows, such as dragging the
lower-right corner of a window.
Note: (Windows only) Documents within the Document window are maximized by default, and you can't resize a
document when it's maximized. To de-maximize the document, click the de-maximize button
in the upper right
corner of the document.
Change the values listed in the Window Size pop-up menu
1 Select Edit Sizes from the Window Size pop-up menu.
2 Click any of the width or height values in the Window Sizes list, and type a new value.
To make the Document window adjust only to a sp ecific width (leaving the height unchanged), select a height value
and delete it.
3 Click the Description box to enter descriptive text about a specific size.
Add a new size to the Window Size pop-up menu
1 Select Edit Sizes from the Window Size pop-up menu.
2 Click the blank space below the last value in the Width column.
3 Enter values for Width and Height.
37
To set the Width or Height only, simply leave one field empty.
4 Click the Description field to enter descriptive text about the size you added.
For example, you might type SVGA or average PC next to the entry for an 800 x 600 pixel monitor, and 17-in. Mac
next to the entry for an 832 x 624 pixel monitor. Most monitors can be adjusted to a variety of pixel dimensions.
Set window size and connection speed
1 Select Edit > Preferences (Windows) or Dreamweaver > Preferences (Macintosh).
2 Select Window Sizes from the Category list on the left.
3 Customize the Window Sizes as required.
Reports in Dreamweaver
You can run reports in Dreamweaver to find content, troubleshoot, or test content. You can generate the following types
of reports:
Search Lets you search for tags, attributes, and specific text within tags.
Reference Lets you search for helpful reference information.
Val idat ion Lets you check for code or syntax errors.
Browser Compatibility Lets you test the HTML in your documents to see if any tags or attributes are unsupported by
your target browsers.
Link Checker Lets you find and fix broken, external, and orphaned links.
Site Reports Ena ble you to im prove wor kflo w an d tes t HTM L at trib ute s in your sit e. Work fl ow r epo rt s in clu de ch eck ed
out by, recently modified, and design notes; HTML reports include combinable nested font tags, accessibility, missing
Alt text, redundant nested tags, removable empty tags, and untitled documents.
FTP Log Enables you to view all FTP file-transfer activity.
Last updated 6/3/2015
Page 45

Workspace and workflow
Server Debug Lets you view information to debug an Adobe® ColdFusion® application.
Note: Support for ColdFusion is removed in Dreamweaver CC and later.
More Help topics
Document window overview
Preview pages in Live view
Manage windows and panels
Display tabbed documents (Dreamweaver Macintosh)
Status bar overview
Using toolbars, inspectors, and context menus
Note: The user interface has been simplified in Dreamweaver CC and later. As a result, you may not find some of the
options described in this article in Dreamweaver CC and later. For more information, see
this article.
38
Display toolbars
Use the Document and Standard toolbars to perform document-related and standard editing operations; the Coding
toolbar to insert code quickly; and the Style Rendering toolbar to display your page as it would appear in different
media types. You can choose to display or hide the toolbars as necessary.
• Select View > Toolbars, and then select the toolbar.
• Right-click (Windows) or Control-click (Macintosh) any of the toolbars and select the toolbar from the context
menu.
Note: To display or hide the Coding toolbar in the Code inspector (Window > Code Inspector), select Coding Toolbar from
the View Options pop-up menu at the top of the inspector.
Use the Property inspector
The Property inspector lets you examine and edit the most common properties for the currently selected page element,
such as text or an inserted object. The contents of the Property inspector vary depending on the element(s) selected.
To access help for a particular Property inspector, click the help button in the upper right corner of the Property
inspector, or select Help from a Property inspector’s Options menu.
Note: Use the Tag inspector to view and edit every attribute associated with a given tag’s properties.
Show or hide the Property inspector
❖ Select Window > Properties.
Expand or collapse the Property inspector
❖ Click the expander arrow in the lower-right corner of the Property inspector.
Last updated 6/3/2015
Page 46

Workspace and workflow
View and change properties for a page element
1 Select the page element in the Document window.
You might have to expand the Property inspector to view all the properties for the selected element.
2 Change any of the properties in the Property inspector.
Note: For information on specific properties, select an element in the Document window, and then click the Help icon
in the upper-right corner of the Property inspector.
3 If your changes are not immediately applied in the Document window, apply the changes in one of these ways:
• Click outside the property-editing text fields.
• Press Enter (Windows) or Return (Macintosh).
• Press Tab to switch to another property.
Use context menus
Context menus provide convenient access to the most useful commands and properties related to the object or window
you’re working with. Context menus list only those commands that pertain to the current selection.
1 Right-click (Windows) or Control-click (Macintosh) the object or window.
39
2 Select a command from the context menu.
Last updated 6/3/2015
Page 47

Workspace and workflow
More Help topics
Document toolbar overview
Standard toolbar overview
Coding toolbar overview
Style Rendering toolbar overview
Property inspector overview
Set text properties in the Property inspector
Dock and undock panels
Change attributes with the Tag inspector
Use the Insert panel
The Insert panel contains buttons for creating and inserting objects such as tables and images. The buttons are
organized into categories.
40
Note: The user interface has been simplified in Dreamweaver CC and later. As a result, you may not find some of the
options described in this article in Dreamweaver CC and later. For more information, see
this article.
Hide or show the Insert panel
❖ Select Window > Insert.
Note: If you are working with certain types of files, such as XML, JavaScript, Java, and CSS, the Insert panel and the
Design view option are dimmed because you cannot insert items into these code files.
Show the buttons in a particular category
❖ Select the category name from the Category pop-up menu. For example, to show buttons for the Layout category,
select Layout.
Display the pop-up menu for a button
❖ Click the down arrow beside the button’s icon.
Last updated 6/3/2015
Page 48

Workspace and workflow
41
Insert an object
1 Select the appropriate category from the Category pop-up menu of the Insert panel.
2 Do one of the following:
• Click an object button or drag the button’s icon into the Document window (into Design, Live, or Code View).
• Click the arrow on a button, then select an option from the menu.
Last updated 6/3/2015
Page 49

Workspace and workflow
Depending on the object, a corresponding object-insertion dialog box may appear, prompting you to browse to
a file or specify parameters for an object. Or, Dreamweaver may insert code into the document, or open a tag
editor or a panel for you to specify information before the code is inserted.
For some objects, no dialog box appears if you insert the object in Design view, but a tag editor appears if you
insert the object in Code view. For a few objects, inserting the object in Design view causes Dreamweaver to
switch to Code view before inserting the object.
Note: Some objects, such as named anchors, are not visible when the page is viewed in a browser window. You can
display icons in Design view that mark the locations of such invisible objects.
More Help topics
Insert elements directly in Live View
Bypass the object-insertion dialog box and insert an empty placeholder object
❖ Control-click (Windows) or Option-click (Macintosh) the button for the object.
For example, to insert a placeholder for an image without specifying an image file, Control-click or Option-click the
Image button.
42
Note: This procedure does not bypass all object-insertion dialog boxes. Many objects, including AP elements and
framesets, do not insert placeholders or default-valued objects.
Modify preferences for the Insert panel
1 Select Edit > Preferences (Windows) or Dreamweaver > Preferences (Macintosh).
2 In the General category of the Preferences dialog box, deselect Show Dialog When Inserting Objects to suppress
dialog boxes when you insert objects such as images, tables, scripts, and head elements or by holding down the
Control key (Windows) or the Option key (Macintosh) while creating the object.
When you insert an object with this option off, the object is given default attribute values. Use the Property inspector
to change object properties after inserting the object.
Add, delete, or manage items in the Favorites category of the Insert panel
1 Select any category in the Insert panel.
2 Right-click (Windows) or Control-click (Macintosh) in the area where the buttons appear, and then select
Customize Favorites.
3 In the Cutomize Favorite Objects dialog box, make changes as necessary, and click OK.
• To add an object, select an object in the Available Objects pane on the left, and then click the arrow between the
two panes or double-click the object in the Available Objects pane.
Note: You can add one object at a time. You cannot select a category name, such as Common, to add an entire category
to your favorites list.
• To delete an object or separator, select an object in the Favorite Objects pane on the right, and then click the
Remove Selected Object in Favorite Objects List button above the pane.
• To move an object, select an object in the Favorite Objects pane on the right, and then click the Up or Down
arrow button above the pane.
Last updated 6/3/2015
Page 50

Workspace and workflow
• To add a separator below an object, select an object in the Favorite Objects pane on the right, and then click the
Add Separator button below the pane.
4 If you’re not in the Favorites category of the Insert panel, select that category to see your changes.
Insert objects using buttons in the Favorites category
❖ Select the Favorites category from the Category pop-up menu of the Insert panel, and then click the button for any
Favorites object that you added.
Display the Insert panel as a horizontal Insert bar
Unlike other panels in Dreamweaver, you can drag the Insert panel out of its default dock position and drop it into a
horizontal position at the top of the Document window. When you do so, it changes from a panel to a toolbar (though
you cannot hide and display it in the same way as other toolbars).
1 Click the Insert panel’s tab and drag it to the top of the Document window.
43
2 When you see a horizontal blue line across the top of the Document window, drop the Insert panel into position.
Note: The horizontal Insert bar is also a default part of the Classic workspace. To switch to the Classic workspace, select
Classic from the workspace switcher in the Application bar.
Return the horizontal Insert bar to a panel group
1 Click the horizontal Insert bar’s gripper (on the left side of the Insert bar) and drag the bar to the place where your
panels are docked.
Last updated 6/3/2015
Page 51

Workspace and workflow
2 Position the Insert panel and drop it. A blue line indicates where you can drop the panel.
Show horizontal Insert bar categories as tabs
❖ Click the arrow beside the category name on the left end of the horizontal Insert bar, and then select Show as Tabs.
Show horizontal Insert bar categories as a menu
❖ Right-click (Windows) or Control-click (Macintosh) a category tab in the horizontal Insert bar, and then select
Show as Menus.
More Help topics
Insert panel overview
Edit tags with Tag editors
Select and view elements in the Document window
CSS Designer panel
44
CSS Designer panel (Windows > CSS Designer) is a CSS Property Inspector that lets you 'visually' create CSS styles,
files, and set properties, along with media queries.
Watch vid e o
Use the visual CSS editor in Dreamweaver (8 min)
Last updated 6/3/2015
Page 52

Workspace and workflow
Note: You can use Ctrl/Cmd+ Z to undo or Ctrl/Cmd + Y to redo all actions you perform in CSS Designer. The changes
are automatically reflected in Live View and the relevant CSS file is also refreshed. To let you know that the related file has
changed, the affected file’s tab is highlighted for a while (around 8 seconds).
The CSS Designer panel consists of the following panes and options:
All Lists all the CSS, media queries, and selectors in the current document. This mode is not sensitive to the selection.
This means, when you select an element on the page, the associated selector, media query, or CSS are not highlighted
in CSS Designer.
Use this option to begin with creating your selectors or media queries.
Current Lists all the computed styles for any selected element in Design or Live view of the current document. When
you use this mode for a CSS file in Code view, all the properties for the selector in focus are displayed.
Use this option to edit the properties of selectors associated with selected elements in the document.
Sources Lists all the CSS style sheets associated with the document. Using this pane, you can create and attach a CSS
to the document, or define styles within the document.
@Media Lists all the media queries in the source selected in the Sources pane. If you do not select a specific CSS, this
pane displays all the media queries associated with the document.
Selectors Lists all the selectors in the source selected in the Sources pane. If you also select a media query, this pane
narrows down the list of selectors for that media query. If no CSS or media queries are selected, this pane displays all
the selectors in the document.
45
When you select Global in the @Media pane, all the selectors that are not included in a media query of the selected
source are displayed.
Properties Displays properties that you can set for the specified selector. For more information, see Set properties .
CSS Designer is context-sensitive. This means, for any given context or selected page element, you can view the
associated selectors and properties. Further, when you select a selector in CSS Designer, the associated source and
media queries are highlighted in the respective panes.
Note: When you select a page element, 'Computed' is selected in the Selectors pane. Click a selector to view the associated
source, media query, or properties.
To view all the selectors, you can choose All Sources in the Sources pane. To view selectors that do not belong to any
media query in the selected source, click Global in the @Media pane.
More Help topics
Laying out pages with CSS
CSS3 transition effects
More Help topics
Add style to web pages with the CSS Designer panel
More Help topics
Using the CSS Designer panel
Last updated 6/3/2015
Page 53

Workspace and workflow
Create and attach style sheets
1 In the Sources pane of the CSS Designer panel, click , and then click one of the following options:
• Create a New CSS File: To create and attach a new CSS file to the document
• Attach Existing CSS File: To attach an existing CSS file to the document
• Define in Page: To define a CSS within the document
Based on the option you choose, Create A New CSS File or Attach Existing CSS File dialog boxes appear.
2 Click Browse to specify the name of the CSS file and, if you are creating a CSS, the location to save the new file.
3 Do one of the following:
• Click Link to link the Dreamweaver document with the CSS file
• Click Import to import the CSS file into the document.
4 (Optional) Click Conditional Usage and specify the media query that you want to associate with the CSS file.
Define media queries
1 In the CSS Designer panel, click a CSS Source in the Sources pane.
2 Click in the @Media pane to add a new media query.
46
The Define Media Query dialog box appears and lists all the media query conditions supported by Dreamweaver.
3 Select the Conditions as per your requirements. For detailed information on the media queries, see this article.
Ensure that you specify valid values for all the conditions you select. Else, corresponding media queries do not get
created successfully.
Note: Only 'And' operation is supported currently for multiple conditions.
If you add media query conditions through code, only the supported conditions are populated in the Define Media
Query dialog box. The Code text box in the dialog box, however, displays the code completely (including unsupported
conditions).
If you click on a media query in the Design/Live view, the viewport switches to match the selected media query. To view
the full size viewport, click Global in the @Media pane.
Define CSS Selectors
1 In the CSS Designer, select a CSS source in the Sources pane or a media query in the @Media pane.
2 In the Selectors pane, click . Based on the element selected in the document, CSS Designer smartly identifies and
prompts you with the relevant selector (upto three rules).
You can do one or more of the following:
• Use the up or down arrow keys to make the suggested selector more specific or less specific.
• Delete the suggested rule and type the required selector. Ensure that you type the name of the selector along with
the denotion for the Selector Type. For example, if you are specifying an ID, prefix the name of the selector with
a '#'.
• To search for a specific selector, use the search box at the top of the pane.
• To rename a selector, click the selector, and type the required name.
• To reorganize the selectors, drag the selectors to the required position.
Last updated 6/3/2015
Page 54

Workspace and workflow
• To move a selector from one source to another, drag the selector to the required source in the Source pane.
• To duplicate a selector in the selected source, right-click the selector, and click Duplicate.
• To duplicate a selector and add it into a media query, right-click the selector, hover the mouse over Duplicate Into
Media Query, and then choose the media query.
Note: The Duplicate Into Media Query option is available only when the source of the selected Selector contains
media queries. You cannot duplicate a Selector from one source into a media query of another source.
Copy-paste styles
You can now copy styles from one selector and paste into another. You can copy all styles or copy only specific category
of styles such as Layout, Text, and Border.
Right-click a selector and choose from the available options:
47
• If a selector has no styles, Copy and Copy All Styles are disabled.
• Paste Styles is disabled for remote sites that cannot be edited. But Copy and Copy All styles is available.
• Pasting Styles that already exist partially on a selector (Overlapping) works. Union of all the selectors is pasted.
• Copy-paste Styles also works for different linkages of CSS files – Import, Link, Inline Styles.
Set CSS properties
The properties are grouped into the following categories and are represented by different icons at the top of the
Properties pane:
• Layout
• Te x t
• Border
• Background
• Others (list of 'text only' properties and not properties with visual controls)
Note: Before editing the properties of a CSS Selector, identify the elements associated with the CSS Selector using Reverse
Inspect. By doing so, you can evaluate if all the elements highlighted during Reverse Inspect actually require the changes.
See link for more information on Reverse Inspect.
Last updated 6/3/2015
Page 55

Workspace and workflow
Select the Show Set check box to view only the set properties. To view all the properties that you can specify for a
selector, deselect the Show Set check box.
To set a property, such as, width or border-collapse, click the required options displayed adjacent to the property in the
Properties pane. For information on setting gradient background or box controls such as margins, padding, and
position, see the following links:
Overridden properties are indicated using a strikethrough format.
More Help topics
Set margins, padding, and position
Apply gradients to background
Use Flexible Box layouts
Set margins, padding, and position
Using the box controls in CSS Designer's Properties pane, you can quickly set the margins, padding, and position
properties. If you prefer code, you can specify shorthand code for margin and padding in the quick edit boxes.
48
Click the values and type the required value. If you want all the four values to be the same and changed simultaneously,
click the link icon (
)at the center.
At any point in time, you can disable ( ) or delete ( ) specific values, for example, left margin value while retaining
the right, top, and bottom values.
Last updated 6/3/2015
Page 56

Workspace and workflow
Set border properties
Border Control properties are organized into logical tabs to help you quickly view or modify the properties.
If you prefer code, you can specify shorthand code for borders and border radius in the quick edit text box.
49
To specify the Border Control properties, first set the properties in the 'All Sides' tab. The other tabs are then enabled
and the properties set in the 'All Sides' tab are reflected for individual borders.
When you change a property in the individual border tabs, the value of the corresponding property in the 'All Sides'
tab changes to 'undefined' (default value).
In the example below, the border color was set to black and then changed to red for the Top border.
Last updated 6/3/2015
Page 57

Workspace and workflow
Border color set to black for all sides
50
Last updated 6/3/2015
Page 58

Workspace and workflow
The code that is inserted is based on the preference setting for shorthand or longhand.
Delete and disable controls are available for individual properties as before Dreamweaver CC 2014. Now, you can use
the delete and disable controls at the Border Control group level to apply these actions to all the properties.
51
During Inspect, the tabs are focused based on the priority of the "set" tabs. The highest priority is for "All sides" tab
followed by "Top", "Right", "Bottom" and "Left". For example, if only the top value for a border is set, the computed mode
takes the focus to the "Top" tab ignoring the "All sides" tab because "All sides" tab is not set.
Disable or delete properties
The CSS Designer panel lets you disable or delete each property. The following screenshot shows the disable ( ) and
delete ( ) icons for the width property. These icons are visible when you hover your mouse on the property.
Keyboard shortcuts
You can add or delete CSS selectors and properties using keyboard shortcuts. You can also navigate between the
property groups in the Properties pane.
Shortcut Work flow
CTRL + Alt +[Shift =] Adds Selector (If control is in the selector section)
CTRL + Alt+ S Add Selector (If control is anywhere in the application)
CTRL + Alt +[Shift =] Adds Property (If control is in the property section)
Last updated 6/3/2015
Page 59

Workspace and workflow
CTRL + Alt+ P Adds Property (If control is anywhere in the application)
Select + Delete Deletes selector, if selector is selected
CTRL + Alt + (PgUp/PgDn) Jump between sections while in the properties subpanel
Identify page elements associated with a CSS Selector (13.1)
Most often, a single CSS Selector is associated with multiple page elements. For example, text in the main content of a
page, header, and footer text can all be associated with the same CSS Selector. When you edit the properties of the CSS
Selector, all the elements associated with the Selector are affected, including the ones that you do not intend to change.
Live Highlight helps you identify all the elements associated with a CSS Selector. If you want to change only one elment
or some of the elements, you can create a new CSS Selector for those elements, and then edit the properties.
To identify the page elements associated with a CSS Selector, hover your mouse over the Selector in Live View (with
Live Code 'off '). Dreamweaver highlights the associated elements with dotted lines.
52
To lock-in the highlight for the elements, click the Selector. The elements now are highlighted with a blue border.
Last updated 6/3/2015
Page 60

Workspace and workflow
To remove the blue highlight around the elements, the Selector again.
Note: The following table summarizes the scenarios where Live Highlight is not available.
Mode Live Code Live Highlight displayed?
Code NA NA
Design NA NA
Live ON (button is pressed) No
OFF Ye s
Disable Live Highlight
Live Highlight is enabled by default. To disable Live Highlight, click Live View options in Document Toolbar and click
Disable Live Highlight.
DOM panel
The DOM panel renders an interactive HTML tree for static and dynamic content. This view helps you visually map
elements in Live View with their HTML markup and the applied selectors in CSS Designer. You can also make edits to
the HTML structure in the DOM panel and see the changes take effect instantly in Live View.
53
Step-by-step tutorial
How to visualize and visually modify your HTML structure in Dreamweaver (30 min)
To open the DOM panel, select Window > DOM. You can also use the keyboard keys - Ctrl + / (Win); Cmd + / (Mac)
- to open the DOM panel.
When you drag elments to directly insert them in Live View, the </> icon appears before you drop the element. You can
click this icon to open the DOM panel and insert the element at the appropriate position in the document structure.
For more information, see
Inserting elements directly in Live View .
The DOM panel displays only static elements in Code or Design view, and both static and dynamic elements in Live
view.
In fluid grid documents, the DOM panel only lets you visualize the HTML DOM structure and does not let you edit
the HTML structure.
Note: You can edit only the static content in the DOM panel. Read-only or dynamic elements are shown in a darker shade
of grey.
Last updated 6/3/2015
Page 61

Workspace and workflow
54
You can move around the DOM panel and place it at any convenient location on the user interface. You can also dock
the panel along with other panels.
How to use the DOM panel
1 Open the required document and then open the DOM panel by selecting Window > DOM.
2 Switch to Live view and click the element that you want to inspect or edit.
• The HTML markup of the selected element is highlighted in the DOM panel.
• The applied selector is highlighted in CSS Designer.
• The relevant code is highlighted in the Code view.
• The relevant tag is highlighted (in blue) in Tag Selector.
Alternatively, you can select an HTML element in the DOM panel. When you click any element in the DOM panel:
• Live View scrolls to the corresponding element.
• If Code View is open, the Code View scrolls to the code corresponding to the element.
• CSS Designer (Selectors pane) scrolls to the closest corresponding selector (similar to you clicking the element
in Live View).
• The tag is highlighted in the Tag Selector.
This syncing between different views and CSS Designer lets you visualize the HTML markup and styling associated
with the selected element at a glance.
3 Proceed to edit the element as required (HTML or CSS editing). For information on using the DOM panel to edit
the HTML markup, see
Designer panel.
Edit HTML structure using the DOM panel . For information on CSS Designer, see CSS
Last updated 6/3/2015
Page 62

Workspace and workflow
Edit HTML structure using the DOM panel
The current selected element on the page is highlighted in the DOM panel. You can navigate to any node or element
using the arrow keys.
• To select an element or a node, click the element or node. To expand or collapse an element or a node, click the
HTML tag or double-click the selector adjacent to the tag.
• To duplicate an element or a node, right-click the element or the node, and click Duplicate. When you duplicate an
element with an ID associated with it, the ID is incremented for the new (duplicate) element.
• To copy an element or a node, right-click the element or the node, and click Copy. If you have copied an element
with children, the child elements are also copied.
• To paste an element or a node, click the element or the node under which you want to nest the copied elements.
Then, right-click the element or the node and click Paste.
• To paste the copied element as a child of a specific element or node, right-click the element or node (parent), and
then click Paste As Child.
• To move or rearrange elements, drag the element to the required location within the DOM panel.
A green line appears to indicate where the dragged element will be positioned. If you drop the element over the element
highlighted in gray (reference element), then the dropped element is positioned as the first child of the reference
element.
55
• To delete an element or a node, right-click the element or the node, and click Delete.
You can undo (Ctrl/Cmd + Z) or redo (Ctrl/Cmd + Y) the operations that you perform in the DOM panel.
Keyboard shortcuts:
• Duplicate - Ctrl + D (Win)/ Cmd + D (Mac)
• Delete - Del or Backspace
• Copy - Ctrl + C (Win)/Cmd + C (Mac)
• Paste - Ctrl + V (Win)/Cmd + V (Mac)
• Undo - Ctrl + Z (Win)/Cmd + Z (Mac)
• Redo - Ctrl + Y (Win)/Cmd + Y (Mac)
Note: Typically, when a page is edited, the Refresh button in the Document toolbar changes to Stop button indicating that
the page is reloading. After the page is reloaded, the Refresh button appears again to indicate that the page has completely
loaded. When you make changes in the DOM panel, the page may take a while to reload even after the Refresh button
appears back again after changing to Stop button.
Last updated 6/3/2015
Page 63

Workspace and workflow
56
A Location where the dragged element is placed B Reference element C Element being moved
Important: If your page contains JavaScript, the right-click menu in the DOM panel gets displayed for a while and then
becomes unavailable. To use the right-click menu, hide the Live View displays (Live View options > Hide Live View
Displays), and then disable JavaScript (Live View options > Disable JavaScript).
Search files based on filename or content | Mac OS
This feature is available only for Mac OS.
Last updated 6/3/2015
Page 64

Workspace and workflow
Use Live Search to locate files based on filename or text present in files. The site selected in the Files panel is used for
search. If there is no site selected in the panel, the search option does not appear.
Live Search uses the Spotlight API in Mac OS. Any customization that you apply to Spotlight preferences is also used
for Live Search. Spotlight displays all files on your computer that match your search query. Live Search searches files in
the local root folder of the site currently selected in the Files panel.
1 Select Edit > Live Search. Alternatively, use CMD+SHIFT+F. The focus is set to the Live Search text box in Files
Panel.
2 Enter the word or phrase in the text box. The results are displayed as you enter text in the text box.
Matching files Displays a maximum of 10 filenames that match your search criteria. The message More Than 10
Results Found is displayed if there are more than 10 matching files. Refine your search criteria if you do not find
your desired file in the options displayed.
Matching Text In Displays a maximum of 10 files that contain text matching the word or phrase you entered. For
more options, click Find All. The results are displayed in the Search panel.
3 When you move the mouse cursor over a search result, a tool tip with the root-relative path of the file is displayed.
Press Enter, or click the item to open the file.
For files containing matching text, the first instance of the text is highlighted. Use Cmd+G to navigate to other
instances.
57
Note: To close the Live Search results panel, click outside the panel, or press Escape / Esc
Zoom in and out
Note: The user interface has been simplified in Dreamweaver CC and later. As a result, you may not find some of the
options described in this article in Dreamweaver CC and later. For more information, see
Dreamweaver lets you increase the magnification (zoom in) in the Document window so that you can check the pixel
accuracy of graphics, select small items more easily, design pages with small text, design large pages, and so on.
Note: The zooming tools are only available in Design view.
Zoom in or out on a page
1 Click the Zoom tool (the magnifying glass icon) in the lower-right corner of the Document window.
2 Do one of the following:
• Click the spot on the page you want to magnify until you’ve achieved the desired magnification.
• Drag a box over the area on the page that you want to zoom in on and release the mouse button.
• Select a preset magnification level from the Zoom pop-up menu.
• Type a magnification level in the Zoom text box.
You can also zoom in without using the Zoom tool by pressing Control+= (Windows) or Command+= (Macintosh).
this article.
3To zoom out (reduce magnification), select the Zoom tool, press Alt (Windows) or Option (Macintosh) and
click on the page.
You can also zoom out without using the Zoom tool by pressing Control+- (Windows) or Command+- (Macintosh).
Last updated 6/3/2015
Page 65

Workspace and workflow
Edit a page after zooming
❖ Click the Select tool (the pointer icon) in the lower-right corner of the Document window, and click inside the page.
Pan a page after zooming
1 Click the Hand tool (the hand icon) in the lower-right corner of the Document window.
2 Drag the page.
Fill the Document window with a selection
1 Select an element on the page.
2 Select View > Fit Selection.
Fill the Document window with an entire page
❖ Select View > Fit All.
Fill the Document window with the entire width of a page
❖ Select View > Fit Width.
58
More Help topics
Status bar overview
Keyboard shortcuts
Note: The user interface has been simplified in Dreamweaver CC and later. As a result, you may not find some of the
options described in this article in Dreamweaver CC and later. For more information, see
Create a reference sheet for the current shortcut set
A reference sheet is a record of the current shortcut set. The information is stored in HTML table format. You can view
the reference sheet in a web browser or print it.
1 Select Edit > Keyboard Shortcuts (Windows) or Dreamweaver > Keyboard Shortcuts (Macintosh).
2 Click the Export Set As HTML button, which is the third button in the set of four at the top of the dialog box.
3 In the Save dialog box that appears, enter the name for the reference sheet, and select the appropriate location for
saving the file.
Customize keyboard shortcuts
Use the Keyboard Shortcut Editor to create your own shortcut keys, including keyboard shortcuts for code snippets.
You can also remove shortcuts, edit existing shortcuts, and select a predetermined set of shortcuts in the Keyboard
Shortcut Editor.
this article.
Last updated 6/3/2015
Page 66

Workspace and workflow
Create a keyboard shortcut
Create your own shortcut keys, edit existing shortcuts, or select a predetermined set of shortcuts.
1 Select Edit > Keyboard Shortcuts (Windows) or Dreamweaver > Keyboard Shortcuts (Macintosh).
2 Set any of the following options and click OK:
Current Set Allows you to choose a set of predetermined shortcuts included with Dreamweaver, or any custom set
you’ve defined. The predetermined sets are listed at the top of the menu. For example, if you are familiar with the
shortcuts found in HomeSite or BBEdit, you can use those shortcuts by choosing the corresponding predetermined
set.
Commands Allows you to select a category of commands to edit. For example, you can edit menu commands, such
as the Open command, or code editing commands, such as Balance Braces.
59
To add or edit a keyboard shortcut for a code snippet, select Snippet from the Commands pop-up menu.
The command list Displays the commands associated with the category you selected from the Commands pop-up
menu, along with the assigned shortcuts. The Menu Commands category displays this list as a tree view that
replicates the structure of the menus. The other categories list the commands by name (such as Quit Application),
in a flat list.
Shortcuts Displays all shortcuts assigned to the selected command.
Add Item (+) Adds a new shortcut to the current command. Click this button to add a new blank line to the
Shortcuts. Enter a new key combination and click Change to add a new keyboard shortcut for this command. You
can assign two different keyboard shortcuts for each command; if there are already two shortcuts assigned to a
command, the Add Item button does nothing.
Remove Item (-) Removes the selected shortcut from the list of shortcuts.
Press Key Displays the key combination you enter when you’re adding or changing a shortcut.
Change Adds the key combination shown in the Press Key to the list of shortcuts, or changes the selected shortcut
to the specified key combination.
Duplicate Set Duplicates the current set. Give the new set a name; the default name is the current set’s name with
the word copy appended.
Rename Set Renames the current set.
Export as HTML File Saves the current set in an HTML table format for easy viewing and printing. You can open the
HTML file in your browser and print the shortcuts for easy reference.
Delete Set Deletes a set. (You cannot delete the active set.)
Remove a shortcut from a command
1 Select Edit > Keyboard Shortcuts (Windows) or Dreamweaver > Keyboard Shortcuts (Macintosh).
2 From the Commands pop-up menu, select a command category.
3 In the Commands list, select a command and then select a shortcut.
4 Click the Remove Item (-) button.
Add a shortcut to a command
1 Select Edit > Keyboard Shortcuts (Windows) or Dreamweaver > Keyboard Shortcuts (Macintosh).
2 From the Commands pop-up menu, select a command category.
Last updated 6/3/2015
Page 67

Workspace and workflow
3 In the Commands list, select a command.
To add a keyboard shortcut for a code snippet, select Snippet from the Commands pop-up menu.
The shortcuts assigned to the command appear in the Shortcuts.
4 Prepare to add a shortcut by doing one of the following:
• If there are fewer than two shortcuts already assigned to the command, click the Add Item (+) button. A new
blank line appears in the Shortcuts and the insertion point moves to the Press Key.
• If there are already two shortcuts assigned to the command, select one of them (that one will be replaced by the
new shortcut). Then click in the Press Key.
5 Press a key combination. The key combination appears in the Press Key.
Note: If there is a problem with the key combination (for example, if the key combination is already assigned to another
command), an explanatory message appears just below the Shortcuts and you may be unable to add or edit the shortcut.
6 Click Change. The new key combination is assigned to the command.
Edit an existing shortcut
1 Select Edit > Keyboard Shortcuts (Windows) or Dreamweaver > Keyboard Shortcuts (Macintosh).
60
2 From the Commands pop-up menu, select a command category.
3 In the Commands list, select a command and then select a shortcut to change.
4 Click in the Press Key and enter a new key combination.
5 Click the Change button to change the shortcut.
Note: If there is a problem with the key combination (for example, if the key combination is already assigned to another
command), an explanatory message appears just below the Shortcuts field and you may be unable to add or edit the
shortcut.
About keyboard shortcuts and non-U.S. keyboards
The default Dreamweaver keyboard shortcuts work primarily on U.S.-standardized keyboards. Keyboards from other
countries (including those produced in the United Kingdom), may not provide the functionality necessary for utilizing
these shortcuts. If your keyboard does not support certain Dreamweaver-enabled shortcuts, Dreamweaver disables
their functionality.
To customize keyboard shortcuts that work with non-U.S.-standardized keyboards, see “Changing keyboard shortcut
mappings” in Extending Dreamweaver.
More Help topics
Work with code snippets
Optimizing the workspace for visual development
Note: The user interface has been simplified in Dreamweaver CC and later. As a result, you may not find some of the
options described in this article in Dreamweaver CC and later. For more information, see
Last updated 6/3/2015
this article.
Page 68

Workspace and workflow
Displaying web-application development panels
Select the Data category from the Category pop-up menu of the Insert panel to display a set of buttons that let you add
dynamic content and server behaviors to your page.
The number and type of buttons that appear vary depending upon the document type opened in the Document
window. Move your mouse over an icon to display a tooltip that describes what that button does.
The Insert panel includes buttons to add the following items to the page:
• Recordsets
• Dynamic text or tables
• Record navigation bars
If you switch to Code view (View > Code), additional panels might appear in their own Insert panel category,
allowing you to insert code in the page. For example, if you view a ColdFusion page in Code view, a CFML panel
becomes available in the CFML category of the Insert panel.
Several panels provide ways for you to create dynamic pages:
• Select the Bindings panel (Window > Bindings) to define sources of dynamic content for your page and add the
content to the page.
61
• Select the Server Behaviors panel (Window > Server Behaviors) to add server-side logic to your dynamic pages.
• Select the Databases panel (Window >Databases) to explore databases or create database connections.
• Select the Components panel (Window > Components) to inspect, add, or modify code for ColdFusion
components.
Note: The Components panel is enabled only if you open a ColdFusion page.
A server behavior is the set of instructions inserted in a dynamic page at design time and executed on the server at run
time.
For a tutorial on setting up the development workspace, see www.adobe.com/go/vid0144.
View your database within Dreamweaver
After connecting to your database, you can view its structure and data within Dreamweaver.
1 Open the Databases panel (Window > Databases).
The Databases panel displays all the databases for which you created connections. If you’re developing a ColdFusion
site, the panel displays all the databases that have data sources defined in the ColdFusion Administrator.
Note: Dreamweaver looks at the ColdFusion server you defined for the current site.
If no database appears in the panel, you must create a database connection.
2 To display the tables, stored procedures, and views in the database, click the Plus (+) sign beside a connection in the
list.
3 To display the columns in the table, click a table name.
The column icons reflect the data type and indicate the primary key of the table.
4 To view the data in a table, right-click (Windows) or Control-click (Macintosh) the table name in the list, and select
View Data from the pop-up menu.
Last updated 6/3/2015
Page 69

Workspace and workflow
Previewing dynamic pages in a browser
Web application developers often debug their pages by checking them often in a web browser. You can quickly view
dynamic pages in a browser without first manually uploading them to a server (press F12).
To preview dynamic pages, you must complete the Testing Server category of the Site Definition dialog box.
You can specify that Dreamweaver use temporary files instead of the original files. With this option, Dreamweaver runs
a temporary copy of the page on a web server before displaying it in your browser. (Dreamweaver then deletes the
temporary file from the server.) To set this option, select Edit > Preferences > Preview In Browser.
The Preview In Browser option does not upload related pages such as a results or a detail page, dependent files such as
image files, or server-side includes. To upload a missing file, select Window > Site to open the Site panel, select the file
under Local Folder, and click the blue up arrow in the toolbar to copy the file to the web server folder.
Restrict database information displayed in Dreamweaver
Advanced users of large database systems like Oracle should restrict the number of database items retrieved and
displayed by Dreamweaver at design time. An Oracle database may contain items that Dreamweaver cannot process at
design time. You can create a schema in Oracle and use it in Dreamweaver to filter out unnecessary items at design time.
Note: You cannot create a schema or catalog in Microsoft Access.
62
Other users may benefit from restricting the amount of information Dreamweaver retrieves at design time. Some
databases contain dozens or even hundreds of tables, and you might prefer not to list them all while you work. A schema
or catalog can restrict the number of database items that are retrieved at design time.
You must create a schema or catalog in your database system before you can apply it in Dreamweaver. Consult your
database system documentation or your system administrator.
Note: You cannot apply a schema or catalog in Dreamweaver if you’re developing a ColdFusion application, or using
Microsoft Access.
1 Open a dynamic page in Dreamweaver; then open the Databases panel (Window > Databases).
• If the database connection exists, right-click (Windows) or Control-click (Macintosh) the connection in the list,
and select Edit Connection from the pop-up menu.
• If the connection does not exist, click the Plus (+) button at the top of the panel and create it.
2 In the dialog box for the connection, click Advanced.
3 Specify your schema or catalog, and click OK.
Set the Property inspector for ColdFusion stored procedures and ASP commands
Modify the selected stored procedure. The available options vary depending on the server technology.
❖ Edit any of the options. When you select a new option in the inspector, Dreamweaver updates the page.
Input Name options
This Property inspector appears when Dreamweaver encounters an unrecognized input type. Typically this occurs
because of a typing or other data entry error.
Last updated 6/3/2015
Page 70

Workspace and workflow
63
If you change
correct the spelling error—the Property inspector updates to show the properties for the recognized type. Set any of the
following options in the Property inspector:
Input Name Assigns a name to the field. This box is required, and the name must be unique.
Typ e Sets the input type of the field. The contents of this box reflect the input type value that currently appears in your
HTML source code.
Val ue Sets the value of the field.
Parameters Opens the Parameters dialog box so you can view the current attributes of the field, as well as add or
remove attributes.
the field type in the Property inspector to a value that Dreamweaver recognizes—for example, if you
More Help topics
Development workspace tutorial
Set up a testing server
CEF integration
Dreamweaver is now integrated with the Chromium Embedded Framework (CEF), an open source framework
based on the Google Chromium project. This integration enables Dreamweaver to control resource loading,
navigation, context menus, printing and more, while taking advantage of the same performance and HTML5
technologies available in the Google Chrome Web browser.
Dreamweaver is integrated with CEF3 version, which is a multi-process implementation using asynchronous
messaging to communicate between Dreamweaver and one or more rendering processes (Webkit + V8 engine).
CEF3 uses Chromium’s official Chromium content API and thus provides performance similar to Google Chrome.
For more information on CEF, see this article.
Here are the Dreamweaver features that are affected by the CEF integration:
• Enhanced user experience
• Rendering enhancements
• Inspect
• Codec
• Pop-up menus
Last updated 6/3/2015
Page 71

Workspace and workflow
• Error messages
• Zoom/Scroll
• Fluid Grid pages
• Architectural changes
• Code Navigator
• Navigation
• SSL Certificate
• Live Code/Code View
• External CSS
• Dynamically Related Files
• Live View options
• Vi ew p or t
Enhanced user experience
64
Rendering enhancements
With CEF integration, many enhancements have been done to the way Dreamweaver renders objects and other UI
elements.
The following illustrations show how a div with border radius and gradient repeat is rendered in the old Apollo Webkit
and after CEF integration.
Inspect
The new inspect mode is the same as Google Chrome’s inspect. The “Margin” is marked in yellow and the “Padding”
in purple. A set of horizontal and vertical rulers appear when you hover your mouse over the elements. The rulers
appear at top/bottom and left/right, based on the position of the element. The rulers show the value of the margin,
padding, width, and border properties applied to the element.
In addition, a tool tip with the following information also appears:
• The name of the element (for example, div)
• CSS class or ID, if defined.
• The dimension of the element. The number shown is the sum of the width, padding, and the border applied to that
element.
Last updated 6/3/2015
Page 72

Workspace and workflow
Codec
Video Audio
Theora mp3
h264 wav
ogg Vorbis
ogv pcm-u8
mp4 pcm_s16le
mov pcm_s24le
Pop-up support
With CEF integration, Dreamweaver can now render HTML5 form elements such as month, date, and time. When you
click these controls, Dreamweaver now displays pop-up menus that you can use to select the required parameter.
65
Fluid Grid pages
When the FG Layout guides are turned OFF, Live view uses CEF Webkit for rendering. Fluid Grid pages in Live view
with FG Layout guides ON continues to use the old Apollo Webkit for rendering. Live view features such as Navigation
(address bar), Inspect Mode, and Live Code are available only in the CEF mode.
Error strings
The appearance of error strings in Dreamweaver now is the same as those in Google Chrome.
Last updated 6/3/2015
Page 73

Workspace and workflow
Zoom/Scroll
UI for scroll bars are different in Live view and Design view.
Zoom behavior in Dreamweaver is changed with CEF integration. Earlier, the Zoom was per tab and now in CEF live
view, Zoom is per page.
Scenario 1: Suppose that you Zoom a page to 300% in Live view. You then open the same page from a different tab
(follow links and reach this page). Then:
• In CEF, the page retains the 300% zoom
• In Apollo (older version), the page is rendered in the default 100% zoom
66
Scenario 2: Suppose that you zoom a page to 50% in a tab (Live view). You then navigate to another page in the same
tab. Then:
• In CEF, other pages are opened in the default 100% zoom
• In Apollo, all pages navigated to from this tab retain 50% zoom
Architectural changes
Code navigator
Code Navigator parses the document and lists all the styles applicable to the called element. It uses Browser control to
render the contents. When you hover your mouse; on any of the selectors, all the associated CSS properties are shown
as tool tip. When you click a selector, the insertion point is taken to the corresponding code.
SSL certificate
When you try to navigate to a secure (https) site, whose certificate is not recognized, then SSL certificate confirmation
dialog appears.
Last updated 6/3/2015
Page 74

Workspace and workflow
Others
The following features are impacted due to CEF integration:
• Dynamically Related Files
• External CSS
• Live View and Live Code sync
• Navigation
• Live View opt ions ( “Foll ow lin ks”, “Foll ow Lin ks C ont inuousl y’, “Us e Testi ng S erve r For Docu ment S our ce”, "D isa ble
javascript", "Freeze javascript")
• Vi ew p or t
• Target attribute for links
• Context menu (The Follow Link and Disable Plugins options are removed from the right-click menu of a link)
Note: Due to CEF integration, the way you use <mm:browsercontrol> while developing extensions requires a change.
this article for detailed information.
See
67
Last updated 6/3/2015
Page 75

Chapter 3: Site management
About Dreamweaver sites
A Adobe Dreamweaver site is a collection of all of the files and assets in your website. You can create web pages on your
computer, upload them to a web server, and maintain the site by transferring updated files whenever you save them.
You can also edit and maintain websites that were created without Dreamweaver.
What is a Dreamweaver “site”?
In Dreamweaver the term “site” refers to a local or remote storage location for the documents that belong to a website.
A D reamwe ave r sit e pr ovi des a way to or gan ize a nd m ana ge al l of y our web d ocum ents , up load you r sit e to a web serve r,
track and maintain your links, and manage and share files. You should define a site to take full advantage of
Dreamweaver features.
68
Note: To define a Dreamweaver site, you only need to set up a local folder. To transfer files to a web server or to develop
web applications, you must also add information for a remote site and testing server.
A Dreamweaver site consists of as many as three parts, or folders, depending on your development environment and
the type of website you are developing:
Local root folder Stores the files you’re working on. Dreamweaver refers to this folder as your “local site.” This folder is
typically on your local computer, but it can also be on a network server.
Remote folder Stores your files for testing, production, collaboration, and so on. Dreamweaver refers to this folder as
your “re mote site” in th e Files panel. Typica lly, your rem ote folder is on the computer where your web server is running.
The remote folder holds the files that users access on the Internet.
Together, the local and remote folders enable you to transfer files between your local hard disk and web server, making
it easy to manage files in your Dreamweaver sites. You work on files in the local folder, and then publish them to the
remote folder when you want other people to view them.
Testing server folder The folder where Dreamweaver processes dynamic pages.
For a tutorial on defining a Dreamweaver site, see www.adobe.com/go/learn_dw_comm08_en.
Understanding local and remote folder structure
When you want to use Dreamweaver to connect to a remote folder, you specify the remote folder in the Servers category
of the Site Setup dialog box. The remote folder that you specify (also referred to as the “host directory”) should
correspond to the local root folder of your Dreamweaver site. (The local root folder is the top-level folder of your
Dreamweaver site.) Remote folders, like local folders, can have any title, but commonly, Internet Service Providers
(ISPs) name the top-level remote folders for individual user accounts public_html, pub_html, or something similar. If
you are in charge of your own remote server, and can name the remote folder anything you want, it is a good idea for
your local root folder and remote folder to have the same name.
Last updated 6/3/2015
Page 76

Site management
The following example shows a sample local root folder on the left and a sample remote folder on the right. The local
root folder on the local machine maps directly to the remote folder on the web server, rather than to any of the remote
folder’s sub folders, or folders that exist above the remote folder in the directory structure.
Note: The above example illustrates one local root folder on the local machine, and one top-level remote folder on the
remote web server. If, however, you are maintaining a number of Dreamweaver sites on your local machine, you would need
an equal number of remote folders on the remote server. In such a case the above example would not apply, and you would
instead create different remote folders within the public_html folder, and then map them to their corresponding local root
folders on your local machine.
69
When you first establish a remote connection, the remote folder on the web server is usually empty. Then, when you
use Dreamweaver to upload all of the files in your local root folder, the remote folder populates with all of your web
files. The directory structure of the remote folder and the local root folder should always be the same. (That is, there
should always be a one-to-one correspondence between the files and folders in your local root folder, and the files and
folders in your remote folder.) If the structure of the remote folder doesn’t match the structure of the local root folder,
Dreamweaver uploads files to the wrong place, where they might not be visible to site visitors. Additionally, image and
link paths can easily break when folder and file structures are not in synch.
The remote folder must exist before Dreamweaver can connect to it. If you don’t have a designated folder that acts as
your remote folder on the web server, create one or ask your ISP’s server administrator to create one for you.
About dynamic sites
Before you begin building dynamic web pages, there are a few preparations that must be done, including setting up a
web application server and connecting to a database for Coldfusion, ASP, and PHP applications. Adobe Dreamweaver
handles database connections differently depending on your server technology.
Note: The user interface has been simplified in Dreamweaver CC and later. As a result, you may not find some of the
options described in this article in Dreamweaver CC and later. For more information, see
this article.
Last updated 6/3/2015
Page 77

Site management
Set up a local version of your site
To set up a local version of your site, all you need to do is specify the local folder where you’ll store all of your site files.
The local folder can be on your local computer or on a network server. You can use the Manage Sites dialog box in
Dreamweaver to set up multiple sites and manage them.
1 Identify or create the folder on your computer where you want to store the local version of your site files. (The folder
can be anywhere on your computer.) You’ll specify this folder as your local site in Dreamweaver.
2 In Dreamweaver, choose Site > New Site.
3 In the Site Setup dialog box, make sure the Site category is selected. (It should be selected by default.)
4 In the Site Name text box, enter a name for your site. This name appears in the Files panel and in the Manage Sites
dialog box; it does not appear in the browser.
5 In the Local Site Folder text box, specify the folder you identified in step one—the folder on your computer where
you want to store the local version of your site files. You can click the folder icon to the right of the text box to browse
to the folder.
6 Click Save to close the Site Setup dialog box. You can now begin working on your local site files in Dreamweaver.
When you’re ready, you can fill out the other categories in the Site Setup dialog box, including the Servers category,
where you can specify a remote folder on your remote server.
70
For a video tutorial on setting up a new Dreamweaver site, click here.
Connect to a remote server
A remote server (often referred to as the web server) is where you publish your site files so that people can view them
online. The remote server is simply another computer like your local computer with a collection of files and folders on
it. For example, an FTP server or a WebDav server.
You’ll specify a folder for your site on the remote server, just as you specified a folder for your local site on your local
computer. Dreamweaver refers to the specified remote folder as your remote site.
When you set up a remote folder, you must select a connection method for Dreamweaver to upload and download files
to and from your web server. The most typical connection method is FTP, but Dreamweaver also supports
local/network, FTPS, SFTP, WebDav, and RDS connection methods. If you don’t know which connection method to
use, ask your ISP or your server administrator.
Note: Dreamweaver also supports connections to IPv6-enabled servers. Supported connection types include FTP, SFTP,
WebDav, and RDS. For more information, see
More Help topics
Video tutorial: Setup server login details
Setting up a testing server
www.ipv6.org/
Getting and putting files to and from your server
Checking in and checking out files
Last updated 6/3/2015
Page 78

Site management
Specify a connection method
FTP connections
Use this setting if you connect to your web server using FTP.
Note: Business Catalyst supports only SFTP. If you are using Business Catalyst, see the section on SFTP connections on
this page.
1 Select Site > Manage Sites.
2 Click New to set up a new site, or select an existing Dreamweaver site and click the edit icon.
3 In the Site Setup dialog box, select the Servers category and do one of the following:
• Click the Add New Server button to add a new server
• Select an existing server and click the Edit Existing Server button
The following illustration shows the Basic screen of the Server category with the text fields already populated.
71
4 In the Server Name text box, specify a name for the new server. You can choose any name that you require.
5 Select FTP from the Connect Using pop-up menu.
6 In the FTP Address text box, enter the address of the FTP server to which you upload files for your website.
Your FTP address is the full Internet name of a compute r system, such as ftp.mindspring.com. Enter the full address
without any additional text. In particular, don’t add a protocol name in front of the address.
If you do not know your FTP address, contact your web hosting company.
Note: Port 21 is the default port for receiving FTP connections. You can change the default port number by editing the
text box to the right. The result when you save your settings is a colon and the new port number appended to your FTP
address (for example, ftp.mindspring.com:29).
Last updated 6/3/2015
Page 79

Site management
7 In the Username and Password text boxes, enter the username and password that you use to connect to the FTP
server.
8 Click Test to test your FTP address, username, and password.
Note: You must obtain the FTP address, username and password information from the system administrator for the
company hosting your site. No one else has access to this information. Enter the information exactly as your system
administrator gives it to you.
9 Dreamweaver saves your password by default. Deselect the Save option if you prefer that Dreamweaver prompt you
for a password each time you connect to the remote server.
10 In the Root Directory text box, enter the directory (folder) on the remote server where you store documents that are
visible to the public.
If you’re uncertain about what to enter as the root directory, contact the server’s administrator or leave the text box
blank. On some servers, your root directory is the same as the directory you first connect to with FTP. To find out,
connect to the server. If a folder with a name like public_html, or www, or your user name, appears in the Remote
File view in your Files panel, that’s probably the directory you should enter in the Root Directory text box.
11 In the Web URL text box enter the URL of your website (for example, http://www.mysite.com). Dreamweaver uses
the Web URL to create site root-relative links, and to verify links when you use the link checker.
For a more extensive explanation of this option, see Advanced Settings category.
72
12 Expand the More Options section if you still need to set more options.
13 Select Use Passive FTP if your firewall configuration requires use of passive FTP.
Passive FTP enables your local software to set up the FTP connection rather than requesting the remote server to
set it up. If you’re not sure whether you use passive FTP, check with your system administrator, or try both checking
and unchecking the Use Passive FTP option.
For more information, see TechNote 15220 on the Adobe website at www.adobe.com/go/tn_15220.
14 Select Use IPv6 Transfer Mode if you are using an IPv6-enabled FTP server.
Wit h th e dep loy ment of v ers ion 6 of t he Inte rnet Pro toc ol (I Pv 6), EPRT an d EP SV ha ve r epl aced the F TP co mman ds
PORT and PASV, respectively. Thus, if you are trying to connect to an IPv6-enabled FTP server, you must use the
extended passive (EPSV) and the extended active (EPRT) commands for your data connection.
For more information, see www.ipv6.org/.
15 Select Use Proxy if you want to specify a proxy host or proxy port.
For more information, click the link to go to the Preferences dialog box, and then click the Help button in the Site
category of the Preferences dialog.
16 Click Save to close the Basic screen. Then in the Servers category, specify whether the server you just added or edited
is a remote server, a testing server, or both.
For help with troubleshooting FTP connectivity problems, see TechNote kb405912 on the Adobe website at
www.adobe.com/go/kb405912.
SFTP connections
Use Secure FTP (SFTP) if your server/firewall configuration requires the use of secure FTP. SFTP uses encryption and
identity keys to secure a connection to your remote/testing server.
Note: Your server must be running an SFTP service for you to select this option. If you don’t know whether your server is
running SFTP, check with your server administrator.
Last updated 6/3/2015
Page 80

Site management
You can now authenticate connections to an SFTP server based on an ‘Identity Key’ (with or without a passphrase).
Dreamweaver supports only OpenSSH key files.
1 Select Site > Manage Sites.
2 Click New to set up a new site, or select an existing Dreamweaver site and click Edit.
3 In the Site Setup dialog box, select the Servers category and do one of the following:
• Click the Add New Server button to add a new server
• Select an existing server and click the Edit Existing Server button
4 In the Server Name text box, specify a name for the new server. The name can be anything of your choosing.
5 Select SFTP from the Connect Using pop-up menu.
6 Specify the other options in the dialog box based on one of the applicable scenarios below:
• Scenario 1: No key, but have user name and password
• Scenario 2: Have a key that does not require a passphrase
• Scenario 3: Have a key that requires a passphrase
Scenario 1
You do not have a key and want to establish an SFTP connection using only the credentials - combination of user name
and password. In this case, use the “Username and Password” authentication method.
73
1 Enter a friendly name for the server.
2 From the Connect list, click SFTP, and enter a valid SFTP address and port.
3 For the authentication method, click Username and Password, and then provide the user name and password.
To verify the connection, click Test.
Last updated 6/3/2015
Page 81

Site management
4 Enter a valid Root Directory.
5 Enter a valid Web URL.
6 Click Save.
Scenario 2
You have a key that does not require a passphrase. And, you want to establish an SFTP connection using the
combination of user name and Identity File. In this case, use the “Private Key File” authentication method.
74
1 Enter a friendly name for the server.
2 From the Connect list, click SFTP, and enter a valid SFTP address and port.
3 For the authentication method, click Private Key File, and then provide the following:
• User name
• A valid Identity File
• Leave the Passphrase blank and select Save Passphrase
Note: Dreamweaver supports only OpenSSH key files.
To verify the connection, click Test.
4 Enter a valid Root Directory.
5 Enter a valid Web URL.
6 Click Save.
Scenario 3
You h av e a ke y t h at requires a passphrase. And, you want to establish an SFTP connection using the combination of
user name, Identity File, and the Passphrase for the key. In this case, use the “Private Key File” authentication method.
Last updated 6/3/2015
Page 82

Site management
75
1 Enter a friendly name for the server.
2 From the Connect list, click SFTP, and enter a valid SFTP address and port.
3 For the authentication method, click Private Key File, and then provide the following:
• User name
• A valid Identity File
• Passphrase for the Identity File
Note: Dreamweaver supports only OpenSSH key files.
To verify the connection, click Test.
4 Enter a valid Root Directory.
5 Enter a valid Web URL.
6 Click Save.
Note: Port 22 is the default port for receiving SFTP connections.
The rest of the options are the same as the options for FTP connections. See the above section for more information.
FTPS connections
FTPS (FTP over SSL) provides both encryption and authentication support as compared to SFTP that offers only
encryption support.
When using FTPS for data transfer, you can choose to encrypt your credentials, and also the data being transmitted to
the server. In addition, you can choose to authenticate the server's credentials and connections. The credentials of a
server are validated against the current set of trusted CA server certificates in the Dreamweaver database. Certificate
Authorities (CAs), which include companies like VeriSign, Thawte, and so on, issue digitally signed server certificates
Last updated 6/3/2015
Page 83

Site management
Note: This procedure describes options specific to FTPS. For information on regular FTP options, see the previous section.
1 Select Site > Manage Sites.
2 Click New to set up a new site, or select an existing Dreamweaver site and click Edit.
3 In the Site Setup dialog box, select the Servers category and do one of the following:
• Click the “+” (Add New Server) button to add a new server.
• Select an existing server and click the Edit Existing Server button.
4 In Server Name, specify a name for the new server.
5 In Connect Using, select one of the following based on your requirement.
FTP over SSL/TLS (Implicit Encryption) The server terminates the connection if the security request is not received.
FTP over SSL/TLS (Explicit Encryption) If the client does not request security, the server can choose to proceed with
an insecure transaction, or refuse/limit the connection.
6 In Authentication, choose one of the following options:
None The server’s credentials, signed or self-signed, are displayed. If you accept the server’s credentials, the
certificate is added to a certificate store, trustedSites.db, in Dreamweaver. When you connect to the same server the
next time, Dreamweaver directly connects to the server.
76
Note: If the credentials of a self-signed certificate have changed on the server, you are prompted to accept the new
credentials.
Tru ste d The presented certificate is validated with the current set of trusted CA server certificates in the
Dreamweaver database. The list of trusted servers is stored in the cacerts.pem file.
Note: An error message is displayed if you select Trusted Server, and connect to a server with a self-signed certificate.
7 Expand the More Options section to set more options.
Encrypt Only Command Channel Select this option if you want to encrypt only the commands that are being
transmitted. Use this option when the data being transmitted is already encrypted, or does not contain sensitive
information.
Encrypt Only User Name and Password Select this option if you want to encr ypt only your user name and password.
8 Click Save to close the Basic screen. Then in the Servers category, specify whether the server you added or edited is
a remote server, a testing server, or both.
For help with troubleshooting FTP connectivity problems, see TechNote kb405912 on the Adobe website at
www.adobe.com/go/kb405912.
Local or network connections
Use this setting to connect to a network folder, or if you are storing files or running your testing server on your local
computer.
1 Select Site > Manage Sites.
2 Click New to set up a new site, or select an existing Dreamweaver site and click Edit.
3 In the Site Setup dialog box, select the Servers category and do one of the following:
• Click the Add New Server button to add a new server
• Select an existing server and click the Edit Existing Server button
4 In the Server Name text box, specify a name for the new server. The name can be anything of your choosing.
Last updated 6/3/2015
Page 84

Site management
5 Select Local/Network from the Connect Using pop-up menu.
6 Click the folder icon beside the Server Folder text box to browse to and select the folder where you store your site
files.
7 In the Web URL text box enter the URL of your website (for example, http://www.mysite.com). Dreamweaver uses
the Web URL to create site root-relative links, and to verify links when you use the link checker.
For a more extensive explanation of this option, see Advanced Settings category.
8 Click Save to close the Basic screen. Then in the Servers category, specify whether the server you just added or edited
is a remote server, a testing server, or both.
WebDAV connections
Use this setting if you connect to your web server using the Web-based Distributed Authoring and Versioning
(WebDAV) protocol.
For t his conne ction m eth od, you mu st have a serv er t hat su pports this p rotoc ol, such a s Mi crosoft I ntern et Inf ormat ion
Server (IIS) 5.0 or an appropriately configured installation of Apache web server.
Note: If you select WebDAV as your connection method, and you are using Dreamweaver in a multiuser environment, you
should also make sure that all of your users select WebDAV as the connection method. If some users select WebDAV, and
other users select other connection methods (FTP, for example), Dreamweaver’s check-in/check-out feature will not work
as expected, since WebDAV uses its own locking system.
77
1 Select Site > Manage Sites.
2 Click New to set up a new site, or select an existing Dreamweaver site and click Edit.
3 In the Site Setup dialog box, select the Servers category and do one of the following:
• Click the Add New Server button to add a new server
• Select an existing server and click the Edit Existing Server button
4 In the Server Name text box, specify a name for the new server. The name can be anything of your choosing.
5 Select WebDAV from the Connect Using pop-up menu.
6 For the URL, enter the complete URL to the directory on the WebDAV server you want to connect to.
This URL includes the protocol, port, and directory (if not the root directory). For example,
http://webdav.mydomain.net/mysite.
7 Enter your username and password.
This information is for server authentication and is not related to Dreamweaver. If you are not sure of your username
and password, check with your system administrator or webmaster.
8 Click Test to test your connection settings.
9 Select the Save option if you want Dreamweaver to remember your password each time you start a new session.
10 In the Web URL text box enter the URL of your website (for example, http://www.mysite.com). Dreamweaver uses
the Web URL to create site root-relative links, and to verify links when you use the link checker.
For a more extensive explanation of this option, see Advanced Settings category.
11 Click Save to close the Basic screen. Then in the Servers category, specify whether the server you just added or edited
is a remote server, a testing server, or both.
Last updated 6/3/2015
Page 85

Site management
RDS connections
Use this setting if you connect to your web server using Remote Development Services (RDS). For this connection
method, your remote server must be on a computer running Adobe® ColdFusion®
1 Select Site > Manage Sites.
2 Click New to set up a new site, or select an existing Dreamweaver site and click Edit.
3 In the Site Setup dialog box, select the Servers category and do one of the following:
• Click the Add New Server button to add a new server
• Select an existing server and click the Edit Existing Server button
4 In the Server Name text box, specify a name for the new server. The name can be anything of your choosing.
5 Select RDS from the Connect Using pop-up menu.
6 Click the Settings button and provide the following information in the Configure RDS Server dialog box:
• Enter the name of the host computer where your web server is installed.
• The host name is probably an IP address or a URL. If you are unsure, ask your administrator.
• Enter the port number that you connect to.
• Enter your root remote folder as the host directory.
• For example, c:\inetpub\wwwroot\myHostDir\.
78
• Enter your RDS username and password.
Note: These options might not appear if you set your username and password in the ColdFusion Administrator security
settings.
• Select the Save option if you want Dreamweaver to remember your settings.
7 Click OK to close the Configure RDS Server dialog box.
8 In the Web URL text box enter the URL of your website (for example, http://www.mysite.com). Dreamweaver uses
the Web URL to create site root-relative links, and to verify links when you use the link checker.
For a more extensive explanation of this option, see Advanced Settings category.
9 Click Save to close the Basic screen. Then in the Servers category, specify whether the server you just added or edited
is a remote server, a testing server, or both.
Microsoft Visual SourceSafe connections
Support for Microsoft Visual SourceSafe has been deprecated as of Dreamweaver CS5.
Set Advanced server options
1 Select Site > Manage Sites.
2 Click New to set up a new site, or select an existing Dreamweaver site and click Edit.
3 In the Site Setup dialog box, select the Servers category and do one of the following:
• Click the Add New Server button to add a new server
• Select an existing server and click the Edit Existing Server button
4 Specify Basic options as necessary, and then click the Advanced button.
5 Select Maintain Synchronization Information if you want to automatically synchronize your local and remote files.
(This option is selected by default.)
Last updated 6/3/2015
Page 86

Site management
6 S elect Automatica lly Uploa d Files to S erver on Save if y ou want Dreamweave r to upload your file t o you r remote site
when you save the file.
7 Select Enable File Check Out if you want to activate the Check In/Out system.
8 If you are using a Testing server, select a server model from the Server Model pop-up menu. For more information,
.
see
Connect to or disconnect from a remote folder with network access
❖ You don’t need to connect to the remote folder; you’re always connected. Click the Refresh button to see your remote
files.
Connect to or disconnect from a remote folder with FTP access
❖ In the Files panel:
• To connect, click Connects to Remote Host in the toolbar.
• To disconnect, click Disconnect in the toolbar.
Troubleshoot the remote folder setup
The following list provides information on common problems you may encounter in setting up a remote folder, and
how to resolve them.
79
There is also an extensive tech note that specifically provides FTP troubleshooting information on the Adobe website
www.adobe.com/go/kb405912.
at
• The Dreamweaver FTP implementation might not work properly with certain proxy servers, multilevel firewalls,
and other forms of indirect server access. If you encounter problems with FTP access, ask your local system
administrator for help.
• For a Dreamweaver FTP implementation, you must connect to the remote system’s root folder. Be sure to indicate
the remote system’s root folder as the host directory. If you’ve specified the host directory using a single slash (/),
you might need to specify a relative path from the directory you are connecting to and the remote root folder. For
example, if the remote root folder is a higher level directory, you may need to specify a ../../ for the host directory.
• Use underscores in place of spaces, and avoid special characters in file and folder names wherever possible. Colons,
slashes, periods, and apostrophes in file or folder names can sometimes cause problems.
• If you encounter problems with long filenames, rename them with shorter names. On the Mac OS, filenames cannot
be more than 31 characters long.
• Many servers use symbolic links (UNIX), shortcuts (Windows), or aliases (Macintosh) to connect a folder on one
part of the server’s disk with another folder elsewhere. Such aliases usually have no effect on your ability to connect
to the appropriate folder or directory; however, if you can connect to one part of the server but not another, there
might be an alias discrepancy.
• If you encounter an error message such as “cannot put file,” your remote folder may be out of space. For more
detailed information, look at the FTP log.
Note: In general, when you encounter a problem with an FTP transfer, examine the FTP log by selecting Window >
Results (Windows) or Site > FTP Log (Macintosh), then clicking the FTP Log tag.
Last updated 6/3/2015
Page 87

Site management
Manage Sites dialog box options
The Manage Sites dialog box is your gateway into various Dreamweaver site functions. From this dialog box, you can
initiate the process for creating a new site, editing an existing site, duplicating a site, removing a site, or importing or
exporting a site’s settings.
Note: The Manage Sites dialog box does not let you connect to or publish files to a remote server. For instructions on
connecting to a remote server, see
an existing remote website .
Manage Sites dialog box options (CS6 and later)
1 Select Site > Manage Sites.
A site list appears. If you haven't created any sites yet, the site list will be blank.
2 Do one of the following:
Create a new site Click the New Site button to create a new Dreamweaver site. Then specify the name and location
for your new site in the Site Setup dialog box. For more information, see
Import a site Click the Import Site button to import a site. For more information, see Import and export
Dreamweaver site settings.
Connect to a remote server . If you are trying to connect to an existing website, see Edit
Set up a local version of your site.
80
Note: The import feature only imports site settings that have previously been exported from Dreamweaver. It does
not import site files to create a new Dreamweaver site. For information on creating a new site in Dreamweaver, see
Set up a local version of your site.
Create a new Business Catalyst site Click the New Business Catalyst Site button to create a new Business Catalyst
Site. For more information, see
Import a Business Catalyst site Click the Import Business Catalyst Site button to import an existing Business
Catalyst site. For more information, see
3 For existing sites, the following options are also available:
Delete Deletes the selected site and all of its setup information from your list of Dreamweaver sites; it does not
delete the actual site files. (If you want to remove the site files from your computer, you need to do that manually.)
To delete a site from Dreamweaver, select the site in the site list and then click the Delete button. You cannot undo
this action.
Edit Enables you to edit information such as username, password, and server information for an existing
Dreamweaver site. Select the existing site in the site list and click the Edit button to edit the existing site. (The Site
Setup dialog box opens once you click the Edit button for a selected site.) For more information on editing existing
site options, click the Help button in the various screens of the Site Setup dialog box.
Duplicate Creates a copy of an existing site. To duplicate a site, select the site in the site list and click the
Duplicate button. The duplicated site appears in the site list with the word “copy” appended to the name of the site.
To change the name of the duplicated site, leave the site selected and click the Edit button.
Export En ables you to e xport t he s ele cte d si te’s setti ngs as an XM L fi le ( *.s te). For more i nformati on, see Import
and export site settings .
Create a temporary Business Catalyst site.
Import a Business Catalyst site.
Manage Sites dialog box options (CS5 and CS5.5)
1 Select Site > Manage Sites and select a site from the list on the left.
Last updated 6/3/2015
Page 88

Site management
2 Click a button to select one of the options, make any changes you need to make, and click Done.
New Enables you to create a new site. When you click the New button the Site Setup dialog box opens, letting you
name and specify the location for your new site. For more information, see
Edit Enables you to edit information such as username, password, and server information for an existing
Dreamweaver site. Select the existing site in the site list on the left and click the Edit button to edit the existing site.
For more information on editing existing site options, see
Duplicate Creates a copy of an existing site. To duplicate a site, select the site in the site list on the left and click the
Duplicate button. The duplicated site appears in the site list with the word “copy” appended to the name of the site.
To change the name of the duplicated site, leave the site selected and click the Edit button.
Remove Deletes the selected site and all of its setup information from your list of Dreamweaver sites; it does not
delete the actual site files. (If you want to remove the site files from your computer, you need to do that manually.)
To delete a site from Dreamweaver, select the site in the site list and then click the Remove button. You cannot undo
this action.
Export/Import Enables you to either export the selected site’s settings as an XML file (*.ste), or import a site’s
settings. For more information, see
Note: The import feature only imports site settings that have previously been exported. It does not import site files to
create a new Dreamweaver site. For information on creating a new site in Dreamweaver, see
your site .
Import and export site settings .
Connect to a remote server .
Set up a local version of your site .
Set up a local version of
81
More Help topics
About Dreamweaver sites
Edit an existing remote website in Dreamweaver
Set up a testing server
If you plan to develop dynamic pages, Dreamweaver needs the services of a testing server to generate and display
dynamic content while you work. The testing server can be your local computer, a development server, a staging server,
or a production server.
Dreamweaver automatically syncs dynamic documents to your testing server when you open, create, or save changes
made to dynamic documents. For more information, see
Set up a testing server
1 Select Site > Manage Sites.
2 Click New to set up a new site, or select an existing Dreamweaver site and click the edit icon.
3 In the Site Setup dialog box, select the Servers category and do one of the following:
• Click the Add New Server button to add a new server
• Select an existing server and click the Edit Existing Server button
4 Specify Basic options as necessary, and then click the Advanced button.
Note: You must specify a Web URL in the Basic screen when specifying a testing server. For more information, see the
next section.
5 Under Testing Server, select the server model you want to use for your web application.
Last updated 6/3/2015
Page 89

Site management
Note: As of Dreamweaver CS5, Dreamweaver no longer installs ASP.NET, ASP JavaScript, or JSP server behaviors. (You
can manually
re-enable the deprecated server behaviors if you wish, but keep in mind that Dreamweaver no longer
officially supports them.) If you’re working on ASP.NET, ASP JavaScript, or JSP pages, however, Dreamweaver will still
support Live view, code coloring, and code hinting for those pages. You do not need to select ASP.NET, ASP JavaScript
or JSP in the Site Definition dialog box for any of these features to work.
6 Click Save to close the Advanced screen. Then in the Servers category, specify the server you just added or edited as
a testing server.
About the Web URL for the testing server
You must specify a Web URL so Dreamweaver can use the services of a testing server to display data and to connect to
databases while you work. Dreamweaver uses the design-time connection to provide you with useful information about
the database, such as the names of the tables in your database and the names of the columns in your tables.
A Web URL for a testing server comprises the domain name and any of your website’s home directory’s subdirectories
or virtual directories.
Note: The terminology used in Microsoft IIS may vary from server to server, but the same concepts apply to most web
servers.
The home directory The folder on the server mapped to your site’s domain name. Suppose the folder you want to use
to process dynamic pages is c:\sites\company\, and this folder is your home directory (that is, this folder is mapped to
your site’s domain name—for example, www.mystartup.com). In that case, the URL prefix is
http://www.mystartup.com/.
82
If the folder you want to use to process dynamic pages is a subfolder of your home directory, simply add the subfolder
to the URL . If yo ur h ome di rec tor y is c:\ sites \co mpany\, your s ite’s d omain nam e is www.my sta rtup.co m, and the fol der
you want to use to process dynamic pages is c:\sites\company\inventory. Enter the following Web URL:
http://www.mystartup.com/inventory/
If the folder you want to use to process dynamic pages is not your home directory or any of its subdirectories, you must
create a virtual directory.
A virtual directory A folder that is not physically contained in the home directory of the server even though it appears
to be in the URL. To create a virtual directory, specify an alias for the folder’s path in the URL. Suppose your home
directory is c:\sites\company, your processing folder is d:\apps\inventory, and you define an alias for this folder called
warehouse. Enter the following Web URL:
http://www.mystartup.com/warehouse/
Localhost R efe rs t o th e home dir ect ory in your URL s wh en t he c lie nt (us ual ly a brows er, b ut in t his cas e Dreamwe aver)
ru ns on the same system as your web ser ver. Suppo se Dreamweaver is running on the s ame Windows s ystem as the web
server, your home directory is c:\sites\company, and you defined a virtual directory called warehouse to refer to the
folder you want to use to process dynamic pages. The following are the Web URLs you would enter for selected web
servers:
Web server Web U RL
ColdFusion MX 7 http://localhost:8500/warehouse/
IIS http://localhost/warehouse/
Apache (Windows) http://localhost:80/warehouse/
Jakarta Tomcat (Windows) http://localhost:8080/warehouse/
Last updated 6/3/2015
Page 90

Site management
Note: By default the ColdFusion MX 7 web server runs on port 8500, the Apache web server runs on port 80, and the
Jakarta Tomcat web server runs on port 8080.
For Macintosh users running the Apache web server, your personal home directory is Users/MyUserName/Sites, where
MyUserName is your Macintosh user name. An alias called ~MyUserName is automatically defined for this folder
when you install Mac OS 10.1 or higher. Therefore, your default Web URL in Dreamweaver is as follows:
http://localhost/~MyUserName/
If the folder you want to use to process dynamic pages is Users:MyUserName:Sites:inventory, then the Web URL is as
follows:
http://localhost/~MyUserName/inventory/
More Help topics
Automatic pushing of dynamic files
Wh en you make e dit s to the sou rce co de e ith er i n Co de vi ew or L ive vie w, and s ave a dyna mic doc ume nt, Dr eamwe aver
automatically pushes the file to the testing server. If the dependent files are not present on the testing server,
Dreamweaver automatically pushes the dependent files as well. If the dependent files are already present on the server,
these files are not pushed and only the server-side document is pushed to the testing server.
83
Consider the following scenarios:
Scenario 1: You make changes to the source code and dependent files. The focus is in thesource code when you click
Save.
In this case, the following dialog box that lists all the affected, dependent files appears:
You can then choose the files that you want to push to the testing server.
Note: You can select Always Auto Save the Dependent Files to not see the prompt for subsequent operations. To revert
this preference at any point in time, go to the settings of the testing server (Site Setup), and in the Advanced tab,
uncheck Always Auto Save Dependent Files.
Scenario 2: You make changes to the source code and dependent files. The focus is on one of the dependent files when
you click Save.
Last updated 6/3/2015
Page 91

Site management
In this case, only the dependent file is saved and pushed to the testing server.
84
Version Control and Advanced settings
Access the Version Control and Advanced settings categories in the Site Setup dialog box by choosing Site > Manage
Sites, selecting the site you want to edit, and clicking Edit.
Version Control category
You can get and check in files using Subversion. For more information, see Use Subversion (SVN) to get and check in
files.
Advanced Settings category
Local Info
Default Images Folder The folder in which you want to store images for your site. Enter the path to the folder, or click
the folder icon to browse to the folder. Dreamweaver uses the path to the folder when you add images to documents.
Links Relative To Specifies the kind of links Dreamweaver creates when you create links to other assets or pages in your
site. Dreamweaver can create two kinds of links: document-relative and site root-relative. For more information on the
differences between the two, see
By default, Dreamweaver creates document-relative links. If you change the default setting and select the Site Root
option, make sure the correct Web URL for the site is entered in the Web URL text box (see below). Changing this
setting does not convert the path of existing links; the setting will only apply to new links you create visually with
Dreamweaver.
Absolute, document-relative, and site root-relative paths.
Last updated 6/3/2015
Page 92

Site management
Note: Content linked by site-root relative links does not appear when you preview documents in a local browser unless you
specify a testing server, or select the Preview Using Temporary File option in Edit > Preferences > Preview In Browser. This
is because browsers don’t recognize site roots—servers do.
Web URL The URL of your website. Dreamweaver uses the Web URL to create site root-relative links, and to verify links
when you use the link checker.
Site root-relative links are useful if you are uncertain about the final location in the directory structure of the page you’re
working on, or if you think you might later relocate or reorganize files that contain links. Site root-relative links are
links whose paths to other site assets are relative to the site root, not the document, so if you move the document at
some point, the path to the assets remains correct.
For example, let’s say that you’ve specified http://www.mysite.com/mycoolsite (the remote server’s site root directory)
as the Web URL, and that you also have an images folder in the mycoolsite directory on the remote server
(http://www.mysite.com/mycoolsite/images). Let’s also say that your index.html file is in the mycoolsite directory.
When you create a site root-relative link from the index.html file to an image in the images directory, the link looks as
follows:
<img src="/mycoolsite/images/image1.jpg" />
This is different from a document-relative link, which would simply be:
<img src="images/image1.jpg" />
85
The appendage of /mycoolsite/ to the image source links the image relative to the site root, not the document. Assuming
the image stays in the image directory, the file path to the image (/mycoolsite/images/image1.jpg), will always be
correct, even if you move the index.html file to another directory.
For more information, see Absolute, document-relative, and site root-relative paths.
With regard to link verification, the Web URL is necessary for determining whether a link is internal or external to the
site. For example, if your web URL is http://www.mysite.com/mycoolsite, and the link checker finds a link with a URL
of http://www.yoursite.com on your page, the checker determines that the latter link is an external link and reports it
as such. Similarly, the link checker uses the Web URL to determine if links are internal to the site, and then checks to
see if those internal links are broken.
Case-sensitive Links Checking Checks that the case of the links matches the case of the filenames when Dreamweaver
checks links. This option is useful on UNIX systems where filenames are case-sensitive.
Enable Cache Indicates whether to create a local cache to improve the speed of link and site management tasks. If you
do not select this option, Dreamweaver asks you if you want to create a cache again before it creates the site. It is a good
idea to select this option because the Assets panel (in the Files panel group) only works if a cache is created.
Cloaking and other categories
For more information on the Cloaking, Design Notes, File View Columns, Contribute, Templates, or Spry categories,
click the Help button in the dialog box.
Import and export Dreamweaver site settings
You can export your site settings as an XML file that you can later import into Dreamweaver. Exporting/importing sites
enables you to transfer site settings to other machines and product versions, share site settings with other users, and
back up site settings.
Last updated 6/3/2015
Page 93

Site management
The import/export feature does not import or export site files. It only imports/exports site settings to save you the time
of recreating sites in Dreamweaver. For information on creating a new site in Dreamweaver, see
of your site .
Set up a local version
86
Export your site settings regularly so that you have a backup copy if anything happens to the site.
Export your site settings
1 Select Site > Manage sites.
2 Select one or more sites whose settings you want to export and click Export (CS5/CS5.5) or the Export button
(CS6 and later):
• To select more than one site, Control-click (Windows) or Command-click (Macintosh) each site.
• To select a range of sites, Shift-click the first and last site in the range.
3 If you want to back up your site settings for yourself, select the first option in the Exporting Site dialog box and click
OK. Dreamweaver saves remote server login information, such as the user name and password, as well as local path
information.
4 If you want to share your settings with other users, select the second option in the Exporting Site dialog box and
click OK. (Dreamweaver does not save information that would not work for other users, such as your remote ser ver
login information and local paths.)
5 For each site whose settings you want to export, browse to a location where you want to save the site file and click
Save. (Dreamweaver saves each site’s settings as an XML file, with an .ste file extension.)
6 Click Done.
Note: Save the *.ste file to your site root folder or to your desktop to make it easy to find. If you cannot remember where
you put it, do a file search on your computer for files with the *.ste extension to locate it.
Import site settings
1 Select Site > Manage sites.
2 Click Import (CS5/CS5.5) or the Import Site button (CS6 and later).
3 Browse to and select one or more sites—defined in files with an .ste file extension—whose settings you want to
import.
To select more than one site, Control-click (Windows) or Command-click (Macintosh) each .ste file. To select a
range of sites, Shift-click the first and last file in the range.
4 Click Open and then click Done.
After Dreamweaver imports the site settings, the site names appear in the Manage Sites dialog box.
More Help topics
About Dreamweaver sites
Backing up and restoring site definitions
Last updated 6/3/2015
Page 94

Site management
Edit an existing remote website
You can use Dreamweaver to copy an existing remote site (or any branch of a remote site) to your local disk and edit it
there, even if you didn’t use Dreamweaver to create the original site. You must have the correct connection information,
and connect to the site’s remote server, before you can edit the site.
1 Create a local folder to contain the existing site and set up the folder as the local folder for the site. (See Set up a local
version of your site .)
Note: You must locally duplicate the entire structure of the relevant branch of the existing remote site.
2 Set up a remote folder, using the remote access information about the existing site. You must connect to the remote
site to download the files to your computer before you can edit them. (See
Make sure to choose the correct root folder for the remote site.
3 In the Files panel (Window > Files), click the Connects To Remote Host button (for FTP access) or the Refresh
button (for network access) in the toolbar to view the remote site.
4 Edit the site:
• If you want to work with the entire site, select the root folder of the remote site in the Files panel, and click Get
File(s) in the toolbar to download the entire site to your local disk.
• If you want to work with just one of the files or folders of the site, locate the file or folder in the Remote view of
the Files panel, and click Get File(s) in the toolbar to download that file to your local disk.
Dreamweaver automatically duplicates as much of the remote site’s structure as is necessary to place the downloaded
file in the correct part of the site hierarchy. When editing only one part of a site, you should generally include dependent
files, such as image files.
Connect to a remote server .)
87
More Help topics
About Dreamweaver sites
Editing an existing website (Dreamweaverblog)
Set site preferences for transferring files
You select preferences to control file transfer features that appear in the Files panel.
1 Select Edit > Preferences (Windows) or Dreamweaver > Preferences (Macintosh).
2 In the Preferences dialog box, select Site from the category list on the left.
3 Set the options and click OK.
Always Show Specifies which site (remote or local) is always shown, and in which Files panel pane (left or r ight) the
local and remote files appear.
By default, the local site always appears on the right. Whichever pane is not chosen (the left one by default) is the
changeable pane: this pane can display the files in the other site (the remote site by default).
Dependent Files Displays a prompt for transferring dependent files (such as images, external style sheets, and other
files referenced in the HTML file) that the browser loads when it loads the HTML file. By default, both Prompt on
Get/Check Out and Prompt on Put/Check In are selected.
Last updated 6/3/2015
Page 95

Site management
It’s usually a good idea to download dependent files when checking out a new file, but if the latest versions of the
dependent files are already on the local disk, there’s no need to download them again. This is also true for uploading
and checking in files: no need if up-to-date copies are already at the destination.
If you deselect these options, your dependent files are not transferred. Therefore, to force the Dependent Files dialog
box to appear even when these options are deselected, hold down Alt (Windows) or Option (Macintosh) while
choosing the Get, Put, Check In, or Check Out commands.
FTP Connection Determines whether the connection to the remote site is terminated after the specified number of
minutes have passed with no activity.
FTP Time Out Specifies the number of seconds in which Dreamweaver attempts to make a connection with the
remote server.
If there is no response after the specified amount of time, Dreamweaver displays a warning dialog box alerting you
to this fact.
FTP Transfer options Determines whether Dreamweaver selects the default option, after a specified number of
seconds, when a dialog box appears during a file transfer and there is no user response.
Proxy Host Specifies the address of the proxy server through which you connect to outside servers if you are behind
a firewall.
If you are not behind a firewall, leave this space blank. If you are behind a firewall, select the Use Proxy option in
the Site Definition dialog box (Servers > Edit Existing Server (pencil icon) > More Options).
88
Proxy Port Specifies the port in your proxy or firewall through which you pass to connect to the remote server. If
you connect through a port other than 21 (the default for FTP), enter the number here.
Put Options: Save Files Before Putting Indicates that unsaved files are saved automatically before being put onto the
remote site.
Move Options: Prompt Before Moving Files on Server Alerts you when you attempt to move files on the remote site.
Manage Sites Opens the Manage Sites dialog box, where you can edit an existing site or create a new one.
You can define whether the types of files that you transfer are transferred as ASCII (text) or binary, by customizing
the FTPExtensionMap.txt file in the Dreamweaver/Configuration folder (on the Macintosh,
FTPExtensionMapMac.txt). For more information see, Extending Dreamweaver.
Last updated 6/3/2015
Page 96

Chapter 4: File management
Creating and opening documents
The user interface in Dreamweaver CC and later has been simplified. As a result, you may not find some of the options
described in this article in Dreamweaver CC and later. For more information, see this article.
About creating Dreamweaver documents
Dreamweaver offers a flexible environment for working with a variety of web documents. In addition to HTML
documents, you can create and open a variety of text-based documents, including ColdFusion Markup Language
(CFML), ASP, JavaScript, and Cascading Style Sheets (CSS). Source code files, such as Visual Basic, .NET, C#, and Java,
are also supported.
Dreamweaver provides several options for creating a new document. You can create any of the following:
89
• A new blank document or template
• A document based on one of the predesigned page layouts that comes with Dreamweaver, including over 30 CSS-
based page layouts
• A document based on one of your existing templates
You can also set document preferences. For example, if you typically work with one type of document, you can set
it as the default document type for new pages you create.
You can easily define document properties, such as meta tags, document title, and background colors, and several
other page properties in either Design view or Code view.
Dreamweaver file types
You can work with a variety of file types in Dreamweaver. The primary kind of file you will work with is the HTML file.
HTML files—or Hypertext Markup Language files—contain the tag-based language responsible for displaying a web
page in a browser. You can save HTML files with either the .html or .htm extension. Dreamweaver saves files using the
.html extension by default.
Dreamweaver lets you create and edit HTML5-based web pages. Starter layouts are also available for building HTML5
pages from scratch.
Following are some of the other common file types you might use when working in Dreamweaver:
CSS Cascading Style Sheet files have a .css extension. They are used to format HTML content and control the
positioning of various page elements.
GIF Graphics Interchange Format files have a .gif extension. GIF format is a popular web graphic format for cartoons,
logos, graphics with transparent areas, and animations. GIFs contain a maximum of 256 colors.
JPEG Joint Photographic Experts Group files (named after the organization that created the format) have a .jpg
extension, and are usually photographs or high-color images. The JPEG format is best for digital or scanned
Last updated 6/3/2015
Page 97

File management
photographs, images using textures, images with gradient color transitions, and any images that require more than 256
colors.
XML Extensible Markup Language files have a .xml extension. They contain data in a raw form that can be formatted
using XSL (Extensible Stylesheet Language).
XSL Extensible Stylesheet Language files have a .xsl or .xslt extension. They are used to style XML data that you want
to display on a web page.
Create a layout using a blank page
You can create a page that contains a predesigned CSS layout, or create a completely blank page and then create a layout
of your own.
1 Select File > New.
2 In the Blank Page category of the New Document dialog box, select the kind of page you want to create from the
Page Type column. For example, select HTML to create a plain HTML page.
3 If you want your new page to contain a CSS layout, select a predesigned CSS layout from the Layout column;
otherwise, select None. Based on your selection, a preview and description of the selected layout appears on the right
side of the dialog box.
The predesigned CSS layouts provide the following types of columns:
90
Fixed Column width is specified in pixels. The column does not resize based on the size of the browser or the site
visitor’s text settings.
Liquid Column width is specified as a percentage of the site visitor’s browser width. The design adapts if the site
visitor makes the browser wider or narrower, but does not change based on the site visitor’s text settings.
Dreamweaver also offers two HTML5 CSS layouts: two- and three-column fixed.
Note: In Dreamweaver CC and later, only HTML5 CSS layouts are available.
4 Select a document type from the DocType pop-up menu. In most cases, you can use the default selection, XHTML
1.0 Transitional or HTML5 (Dreamweaver CC).
Selecting one of the XHTML document type definitions from the DocType (DTD) menu makes your page XHTMLcompliant. For example, you can make an HTML document XHTML-compliant by selecting XHTML 1.0
Transitional or XHTML 1.0 Strict from the menu. XHTML (Extensible Hypertext Markup Language) is a
reformulation of HTML as an XML application. Generally, using XHTML gives you the benefits of XML, while
ensuring the backward and future compatibility of your web documents.
Note: For more information about XHTML, see the World Wide Web Consortium (W3C) website, which contains the
specification for XHTML 1.1 - Module-Based XHTML (
www.w3.org/TR/xhtml11/) and XHTML 1.0
(www.w3c.org/TR/xhtml1/), as well as XHTML validator sites for web-based files (http://validator.w3.org/) and local
files (http://validator.w3.org/file-upload.html).
5 If you selected a CSS layout in the Layout column, select a location for the layout’s CSS from the Layout CSS pop-
up menu.
Add To Head Adds CSS for the layout to the head of the page you’re creating.
Create New File Adds CSS for the layout to a new external CSS file and attaches the new style sheet to the page you’re
creating.
Link To Existing File Lets you specify an existing CSS file that already contains the CSS rules needed for the layout.
To do this, click the Attach Style Sheet icon above the Attach CSS file pane and select an existing CSS style sheet.
Last updated 6/3/2015
Page 98

File management
This option is particularly useful when you want to use the same CSS layout (the CSS rules for which are contained
in a single file) across multiple documents.
6 (Optional) You can also attach CSS style sheets to your new page (unrelated to the CSS layout) when you create the
page. To do this, click the Attach Style Sheet icon
above the Attach CSS File pane and select a CSS style sheet.
For a detailed walk-through of this process, see David Powers’s article, Automatically attaching a style sheet to new
documents.
7 S elect Enable InContext E diting if you want to create a page that becomes InContext Editing-enabled as soon as you
save it.
An InContext Editing-enabled page must have at least one div tag that can be specified as an editable region. For
example, if you’ve selected the HTML page type, you must select one of the CSS layouts for your new page, since
these layouts already contain pre-defined div tags. The InContext Editing editable region is automatically placed on
the div tag with the content ID. You can later add more editable regions to the page if you like.
Note: InContext Editing is removed in Dreamweaver CC and later.
8 Click Preferences if you want to set default document preferences, such as a document type, encoding, and a file
extension.
9 Click Get More Content if you want to open Dreamweaver Exchange where you can download more page design
content.
10 Click the Create button.
91
11 Save the new document (File > Save).
12 In the dialog box that appears, navigate to the folder where you want to save the file.
It’s a good idea to save your file in a Dreamweaver site.
13 In the File Name box, type a name for the file.
Avoid using spaces and special characters in file and folder names, and do not begin a filename with a numeral. In
particular, do not use special characters (such as é, ç, or ¥) or punctuation marks (such as colons, slashes, or periods)
in the names of files you intend to put on a remote server; many servers change these characters during upload,
which will cause any links to the files to break.
Create a blank template
You can use the New Document dialog box to create Dreamweaver templates. By default, templates are saved in the
Templates folder of your site.
1 Select File > New.
2 In the New Document dialog box, select the Blank Template category.
3 Select the kind of page you want to create from the Template Type column. For example, select HTML template to
create a plain HTML template, select ColdFusion template to create a ColdFusion template, and so on.
4 If you want your new page to contain a CSS layout, select a predesigned CSS layout from the Layout column;
otherwise, select None. Based on your selection, a preview and description of the selected layout appears on the right
side of the dialog box.
The predesigned CSS layouts provide the following types of columns:
Fixed Column width is specified in pixels. The column does not resize based on the size of the browser or the site
visitor’s text settings.
Last updated 6/3/2015
Page 99

File management
Liquid Column width is specified as a percentage of the site visitor’s browser width. The design adapts if the site
visitor makes the browser wider or narrower, but does not change based on the site visitor’s text settings.
5 Select a document type from the DocType pop-up menu. In most cases, you will want to leave this selected to the
default selection, XHTML 1.0 Transitional.
Selecting one of the XHTML document type definitions from the DocType (DTD) menu makes your page XHTMLcompliant. For example, you can make an HTML document XHTML-compliant by selecting XHTML 1.0
Transitional or XHTML 1.0 Strict from the menu. XHTML (Extensible Hypertext Markup Language) is a
reformulation of HTML as an XML application. Generally, using XHTML gives you the benefits of XML, while
ensuring the backward and future compatibility of your web documents.
Note: For more information about XHTML, see the World Wide Web Consortium (W3C) website, which contains the
specification for XHTML 1.1 - Module-Based XHTML (
www.w3.org/TR/xhtml11/) and XHTML 1.0
(www.w3c.org/TR/xhtml1/), as well as XHTML validator sites for web-based files (http://validator.w3.org/) and local
files (http://validator.w3.org/file-upload.html).
6 If you selected a CSS layout in the Layout column, select a location for the layout’s CSS from the Layout CSS pop-
up menu.
Add to Head Adds CSS for the layout to the head of the page you’re creating.
Create New File Adds CSS for the layout to a new external CSS styles sheet and attaches the new style sheet to the
page you’re creating.
92
Link To Existing File Lets you specify an existing CSS file that already contains the CSS rules needed for the layout.
To do this, click the Attach Style Sheet icon
above the Attach CSS file pane and select an existing CSS style sheet.
This option is particularly useful when you want to use the same CSS layout (the CSS rules for which are contained
in a single file) across multiple documents.
7 (Optional) You can also attach CSS style sheets to your new page (unrelated to the CSS layout) when you create the
page. To do this, click the Attach Style Sheet icon
8 S elect Enable InContext E diting if you want to create a page that becomes InContext Editing-enabled as soon as you
above the Attach CSS file pane and select a CSS style sheet.
save it.
An InContext Editing-enabled page must have at least one div tag that can be specified as an editable region. For
example, if you’ve selected the HTML page type, you must select one of the CSS layouts for your new page, since
these layouts already contain pre-defined div tags. The InContext Editing editable region is automatically placed on
the div tag with the content ID. You can later add more editable regions to the page if you like.
9 Click Preferences if you want to set default document preferences, such as a document type, encoding, and a file
extension.
10 Click Get More Content if you want to open Dreamweaver Exchange where you can download more page design
content.
11 Click the Create button.
12 Save the new document (File > Save). If you haven’t added editable regions to the template yet, a dialog box appears
telling you that there are no editable regions in the document. Click OK to close the dialog box.
13 In the Save As dialog box, select a site in which to save the template.
14 In the File Name box, type a name for the new template. You do not need to append a file extension to the name of
the template. When you click Save, the .dwt extension is appended to the new template, which is saved in the
Templates folder of your site.
Last updated 6/3/2015
Page 100

File management
Avoid using spaces and special characters in file and folder names and do not begin a filename with a numeral. In
particular, do not use special characters (such as é, ç, or ¥) or punctuation (such as colons, slashes, or periods) in the
names of files you intend to put on a remote server; many servers change these characters during upload, which will
cause any links to the files to break.
Create a page based on an existing template
You can select, preview, and create a new document from an existing template. You can either use the New Document
dialog box to select a template from any of your Dreamweaver-defined sites or use the Assets panel to create a new
document from an existing template.
Create a document based on a template
1 Select File > New.
2 In the New Document dialog box, select the Page From Template category.
3 In the Site column, select the Dreamweaver site that contains the template you want use, and then select a template
from the list on the right.
4 Deselect Update Page When Template Changes if you don’t want to update this page each time you make changes
to the template on which this page is based.
5 Click Preferences if you want to set default document preferences, such as a document type, encoding, and a file
extension.
6 Click Get More Content if you want to open Dreamweaver Exchange where you can download more page design
content.
93
7 Click Create and save the document (File > Save).
Create a document from a template in the Assets panel
1 Open the Assets panel (Window > Assets), if it is not already open.
2 In the Assets panel, click the Templates icon on the left to view the list of templates in your current site.
If you just created the template you want to apply, you might need to click the Refresh button to see it.
3 Right-click (Windows) or Control-click (Macintosh) the template you want to apply, then select New From
Te mp l at e .
The document opens in the Document window.
4 Save the document.
Create a page based on a Dreamweaver sample file
Dreamweaver comes with several professionally developed CSS design files and starter pages for mobile applications.
You c an use t hes e sample files as starting points for designing pages in your sites. When you create a document based
on a sample file, Dreamweaver creates a copy of the file.
You can preview a sample file and read a brief description of a document’s design elements in the New Document dialog
box. In the case of CSS style sheets, you can copy a predesigned style sheet and apply it to your documents.
1 Select File > New.
2 In the New Document dialog box, select the Page From Sample category.
Last updated 6/3/2015
 Loading...