

Page 1

Using
ADOBE® DIRECTOR
®
11.5
Page 2

Copyright
© 2009 Adobe Systems Incorporated. All rights reserved.
Using Adobe® Director® 11.5 for Windows® and Mac OS
If this guide is distributed with software that includes an end user agreement, this guide, as well as the software described in it, is furnished under license and
may be used or copied only in accordance with the terms of such license. Except as permitted by any such license, no part of this guide may be reproduced, stored
in a retrieval system, or transmitted, in any form or by any means, electronic, mechanical, recording, or otherwise, without the prior written permission of Adobe
Systems Incorporated. Please note that the content in this guide is protected under copyright law even if it is not distributed with software that includes an end
user license agreement.
The content of this guide is furnished for informational use only, is subject to change without notice, and should not be construed as a commitment by Adobe
Systems Incorporated. Adobe Systems Incorporated assumes no responsibility or liability for any errors or inaccuracies that may appear in the informational
content contained in this guide.
Please remember that existing artwork or images that you may want to include in your project may be protected under copyright law. The unauthorized
incorporation of such material into your new work could be a violation of the rights of the copyright owner. Please be sure to obtain any permission required
from the copyright owner.
Any references to company names in sample templates are for demonstration purposes only and are not intended to refer to any actual organization.
This work is licensed under the Creative Commons Attribution Non-Commercial 3.0 License. To view a copy of this license, visit
http://creativecommons.org/licenses/by-nc-sa/3.0/us/
Adobe, the Adobe logo, Director, and Shockwave, are either registered trademarks or trademarks of Adobe Systems Incorporated in the United States and/or
other countries.
Mac OS is a trademark of Apple Inc., registered in the United States and other countries. Windows is either a registered trademark or a trademark of Microsoft
Corporation in the United States and/or other countries. All other trademarks are the property of their respective owners.
Bitstream is a trademark or a registered trademark of Bitstream Inc.
This product contains either BSAFE and/or TIPEM software by RSA Security, Inc.
This product includes software developed by the Apache Software Foundation (http://www.apache.org).
Adobe Flash 9 video compression and decompression is powered by On2 TrueMotion video technology. © 1992-2005 On2 Technologies, Inc. All Rights
http://www.on2.com.
Reserved.
Portions of this product contain code that is licensed from Gilles Vollant.
Portions of this product contain code that is licensed from Nellymoser, Inc. (www.nellymoser.com)
Sorenson Spark™ video compression and decompression technology licensed from Sorenson Media, Inc.
Copyright © 1995-2002 Opera Software ASA and its supplier. All rights reserved.
MPEG Layer-3 audio coding technology licensed from Fraunhofer IIS and Thomson. mp3 Surround audio coding technology licensed from Fraunhofer IIS,
Agere Systems and Thomson. mp3PRO audio coding technologies licensed from Coding Technologies, Fraunhofer IIS and Thomson Multimedia.
PhysX is a trademark or registered trademark of NVIDIA Corporation in the United States and/or other countries.
Adobe Systems Incorporated, 345 Park Avenue, San Jose, California 95110, USA.
Notice to U.S. Government End Users. The Software and Documentation are “Commercial Items,” as that term is defined at 48 C.F.R. §2.101, consisting of
“Commercial Computer Software” and “Commercial Computer Software Documentation,” as such terms are used in 48 C.F.R. §12.212 or 48 C.F.R. §227.7202,
as applicable. Consistent with 48 C.F.R. §12.212 or 48 C.F.R. §§227.7202-1 through 227.7202-4, as applicable, the Commercial Computer Software and
Commercial Computer Software Documentation are being licensed to U.S. Government end users (a) only as Commercial Items and (b) with only those rights
as are granted to all other end users pursuant to the terms and conditions herein. Unpublished-rights reserved under the copyright laws of the United States.
Adobe Systems Incorporated, 345 Park Avenue, San Jose, CA 95110-2704, USA. For U.S. Government End Users, Adobe agrees to comply with all applicable
equal opportunity laws including, if appropriate, the provisions of Executive Order 11246, as amended, Section 402 of the Vietnam Era Veterans Readjustment
Assistance Act of 1974 (38 USC 4212), and Section 503 of the Rehabilitation Act of 1973, as amended, and the regulations at 41 CFR Parts 60-1 through 60-60,
60-250, and 60-741. The affirmative action clause and regulations contained in the preceding sentence shall be incorporated by reference.
Last updated 9/28/2011
Page 3

Contents
Chapter 1: Getting started
Installation . . . . . . . . . . . . . . . . . . . . . . . . . . . . . . . . . . . . . . . . . . . . . . . . . . . . . . . . . . . . . . . . . . . . . . . . . . . . . . . . . . . . . . . . . . . . . . . . . . . . . . . . . . . . 1
Adobe Help . . . . . . . . . . . . . . . . . . . . . . . . . . . . . . . . . . . . . . . . . . . . . . . . . . . . . . . . . . . . . . . . . . . . . . . . . . . . . . . . . . . . . . . . . . . . . . . . . . . . . . . . . . . 2
Resources . . . . . . . . . . . . . . . . . . . . . . . . . . . . . . . . . . . . . . . . . . . . . . . . . . . . . . . . . . . . . . . . . . . . . . . . . . . . . . . . . . . . . . . . . . . . . . . . . . . . . . . . . . . . . 2
What's new . . . . . . . . . . . . . . . . . . . . . . . . . . . . . . . . . . . . . . . . . . . . . . . . . . . . . . . . . . . . . . . . . . . . . . . . . . . . . . . . . . . . . . . . . . . . . . . . . . . . . . . . . . . 5
Chapter 2: Workspace
Introduction . . . . . . . . . . . . . . . . . . . . . . . . . . . . . . . . . . . . . . . . . . . . . . . . . . . . . . . . . . . . . . . . . . . . . . . . . . . . . . . . . . . . . . . . . . . . . . . . . . . . . . . . . . 8
User Interface enhancements . . . . . . . . . . . . . . . . . . . . . . . . . . . . . . . . . . . . . . . . . . . . . . . . . . . . . . . . . . . . . . . . . . . . . . . . . . . . . . . . . . . . . . . . . . 8
Undo multiple actions . . . . . . . . . . . . . . . . . . . . . . . . . . . . . . . . . . . . . . . . . . . . . . . . . . . . . . . . . . . . . . . . . . . . . . . . . . . . . . . . . . . . . . . . . . . . . . . . . 9
Understanding the Director metaphor . . . . . . . . . . . . . . . . . . . . . . . . . . . . . . . . . . . . . . . . . . . . . . . . . . . . . . . . . . . . . . . . . . . . . . . . . . . . . . . . 10
Navigating the Director workspace . . . . . . . . . . . . . . . . . . . . . . . . . . . . . . . . . . . . . . . . . . . . . . . . . . . . . . . . . . . . . . . . . . . . . . . . . . . . . . . . . . . 11
Getting to know the workspace . . . . . . . . . . . . . . . . . . . . . . . . . . . . . . . . . . . . . . . . . . . . . . . . . . . . . . . . . . . . . . . . . . . . . . . . . . . . . . . . . . . . . . . 11
Getting to know window types . . . . . . . . . . . . . . . . . . . . . . . . . . . . . . . . . . . . . . . . . . . . . . . . . . . . . . . . . . . . . . . . . . . . . . . . . . . . . . . . . . . . . . . 12
Using the Stage . . . . . . . . . . . . . . . . . . . . . . . . . . . . . . . . . . . . . . . . . . . . . . . . . . . . . . . . . . . . . . . . . . . . . . . . . . . . . . . . . . . . . . . . . . . . . . . . . . . . . . 13
Using the Score . . . . . . . . . . . . . . . . . . . . . . . . . . . . . . . . . . . . . . . . . . . . . . . . . . . . . . . . . . . . . . . . . . . . . . . . . . . . . . . . . . . . . . . . . . . . . . . . . . . . . . 14
Using the Control panel . . . . . . . . . . . . . . . . . . . . . . . . . . . . . . . . . . . . . . . . . . . . . . . . . . . . . . . . . . . . . . . . . . . . . . . . . . . . . . . . . . . . . . . . . . . . . . 17
Using the Cast window . . . . . . . . . . . . . . . . . . . . . . . . . . . . . . . . . . . . . . . . . . . . . . . . . . . . . . . . . . . . . . . . . . . . . . . . . . . . . . . . . . . . . . . . . . . . . . . 18
Using the Property inspector . . . . . . . . . . . . . . . . . . . . . . . . . . . . . . . . . . . . . . . . . . . . . . . . . . . . . . . . . . . . . . . . . . . . . . . . . . . . . . . . . . . . . . . . . 20
Using the Script window . . . . . . . . . . . . . . . . . . . . . . . . . . . . . . . . . . . . . . . . . . . . . . . . . . . . . . . . . . . . . . . . . . . . . . . . . . . . . . . . . . . . . . . . . . . . . . 22
Using the Message window . . . . . . . . . . . . . . . . . . . . . . . . . . . . . . . . . . . . . . . . . . . . . . . . . . . . . . . . . . . . . . . . . . . . . . . . . . . . . . . . . . . . . . . . . . . 23
Customizing your workspace . . . . . . . . . . . . . . . . . . . . . . . . . . . . . . . . . . . . . . . . . . . . . . . . . . . . . . . . . . . . . . . . . . . . . . . . . . . . . . . . . . . . . . . . . 24
Working with Xtra extensions . . . . . . . . . . . . . . . . . . . . . . . . . . . . . . . . . . . . . . . . . . . . . . . . . . . . . . . . . . . . . . . . . . . . . . . . . . . . . . . . . . . . . . . . . 28
Connecting to the Internet . . . . . . . . . . . . . . . . . . . . . . . . . . . . . . . . . . . . . . . . . . . . . . . . . . . . . . . . . . . . . . . . . . . . . . . . . . . . . . . . . . . . . . . . . . . 30
iii
Chapter 3: Score, Stage, and Cast
Using the Tool palette with the Stage . . . . . . . . . . . . . . . . . . . . . . . . . . . . . . . . . . . . . . . . . . . . . . . . . . . . . . . . . . . . . . . . . . . . . . . . . . . . . . . . . 32
Setting Stage properties . . . . . . . . . . . . . . . . . . . . . . . . . . . . . . . . . . . . . . . . . . . . . . . . . . . . . . . . . . . . . . . . . . . . . . . . . . . . . . . . . . . . . . . . . . . . . . 33
Using multiple Score windows . . . . . . . . . . . . . . . . . . . . . . . . . . . . . . . . . . . . . . . . . . . . . . . . . . . . . . . . . . . . . . . . . . . . . . . . . . . . . . . . . . . . . . . . 34
Changing Score settings . . . . . . . . . . . . . . . . . . . . . . . . . . . . . . . . . . . . . . . . . . . . . . . . . . . . . . . . . . . . . . . . . . . . . . . . . . . . . . . . . . . . . . . . . . . . . . 34
Selecting, editing, and adding frames in the Score . . . . . . . . . . . . . . . . . . . . . . . . . . . . . . . . . . . . . . . . . . . . . . . . . . . . . . . . . . . . . . . . . . . . . 34
About cast members . . . . . . . . . . . . . . . . . . . . . . . . . . . . . . . . . . . . . . . . . . . . . . . . . . . . . . . . . . . . . . . . . . . . . . . . . . . . . . . . . . . . . . . . . . . . . . . . . 35
Using the Cast window . . . . . . . . . . . . . . . . . . . . . . . . . . . . . . . . . . . . . . . . . . . . . . . . . . . . . . . . . . . . . . . . . . . . . . . . . . . . . . . . . . . . . . . . . . . . . . . 47
Using Cast List view . . . . . . . . . . . . . . . . . . . . . . . . . . . . . . . . . . . . . . . . . . . . . . . . . . . . . . . . . . . . . . . . . . . . . . . . . . . . . . . . . . . . . . . . . . . . . . . . . . 53
Using Cast Thumbnail view . . . . . . . . . . . . . . . . . . . . . . . . . . . . . . . . . . . . . . . . . . . . . . . . . . . . . . . . . . . . . . . . . . . . . . . . . . . . . . . . . . . . . . . . . . . 55
Launching external editors . . . . . . . . . . . . . . . . . . . . . . . . . . . . . . . . . . . . . . . . . . . . . . . . . . . . . . . . . . . . . . . . . . . . . . . . . . . . . . . . . . . . . . . . . . . 56
Managing external casts . . . . . . . . . . . . . . . . . . . . . . . . . . . . . . . . . . . . . . . . . . . . . . . . . . . . . . . . . . . . . . . . . . . . . . . . . . . . . . . . . . . . . . . . . . . . . . 57
Creating libraries . . . . . . . . . . . . . . . . . . . . . . . . . . . . . . . . . . . . . . . . . . . . . . . . . . . . . . . . . . . . . . . . . . . . . . . . . . . . . . . . . . . . . . . . . . . . . . . . . . . . . 58
Setting cast member properties by using Lingo or JavaScript syntax . . . . . . . . . . . . . . . . . . . . . . . . . . . . . . . . . . . . . . . . . . . . . . . . . . . 59
Setting Xtra cast member properties . . . . . . . . . . . . . . . . . . . . . . . . . . . . . . . . . . . . . . . . . . . . . . . . . . . . . . . . . . . . . . . . . . . . . . . . . . . . . . . . . . 60
Last updated 9/28/2011
Page 4

USING DIRECTOR 11.5
Contents
Chapter 4: Sprites
About sprites . . . . . . . . . . . . . . . . . . . . . . . . . . . . . . . . . . . . . . . . . . . . . . . . . . . . . . . . . . . . . . . . . . . . . . . . . . . . . . . . . . . . . . . . . . . . . . . . . . . . . . . . . 61
Creating sprites . . . . . . . . . . . . . . . . . . . . . . . . . . . . . . . . . . . . . . . . . . . . . . . . . . . . . . . . . . . . . . . . . . . . . . . . . . . . . . . . . . . . . . . . . . . . . . . . . . . . . . 61
Setting sprite general preferences . . . . . . . . . . . . . . . . . . . . . . . . . . . . . . . . . . . . . . . . . . . . . . . . . . . . . . . . . . . . . . . . . . . . . . . . . . . . . . . . . . . . 62
Selecting sprites . . . . . . . . . . . . . . . . . . . . . . . . . . . . . . . . . . . . . . . . . . . . . . . . . . . . . . . . . . . . . . . . . . . . . . . . . . . . . . . . . . . . . . . . . . . . . . . . . . . . . . 62
Naming sprites . . . . . . . . . . . . . . . . . . . . . . . . . . . . . . . . . . . . . . . . . . . . . . . . . . . . . . . . . . . . . . . . . . . . . . . . . . . . . . . . . . . . . . . . . . . . . . . . . . . . . . . 65
Finding sprites . . . . . . . . . . . . . . . . . . . . . . . . . . . . . . . . . . . . . . . . . . . . . . . . . . . . . . . . . . . . . . . . . . . . . . . . . . . . . . . . . . . . . . . . . . . . . . . . . . . . . . . 66
Creating sprite channel names . . . . . . . . . . . . . . . . . . . . . . . . . . . . . . . . . . . . . . . . . . . . . . . . . . . . . . . . . . . . . . . . . . . . . . . . . . . . . . . . . . . . . . . . 66
Layering sprites . . . . . . . . . . . . . . . . . . . . . . . . . . . . . . . . . . . . . . . . . . . . . . . . . . . . . . . . . . . . . . . . . . . . . . . . . . . . . . . . . . . . . . . . . . . . . . . . . . . . . . 67
Displaying and editing sprite properties . . . . . . . . . . . . . . . . . . . . . . . . . . . . . . . . . . . . . . . . . . . . . . . . . . . . . . . . . . . . . . . . . . . . . . . . . . . . . . . 67
Locking and unlocking sprites . . . . . . . . . . . . . . . . . . . . . . . . . . . . . . . . . . . . . . . . . . . . . . . . . . . . . . . . . . . . . . . . . . . . . . . . . . . . . . . . . . . . . . . . 72
Positioning sprites . . . . . . . . . . . . . . . . . . . . . . . . . . . . . . . . . . . . . . . . . . . . . . . . . . . . . . . . . . . . . . . . . . . . . . . . . . . . . . . . . . . . . . . . . . . . . . . . . . . . 73
Controlling the entrance of a sprite on the stage . . . . . . . . . . . . . . . . . . . . . . . . . . . . . . . . . . . . . . . . . . . . . . . . . . . . . . . . . . . . . . . . . . . . . . 77
Controlling the duration of a sprite on the stage . . . . . . . . . . . . . . . . . . . . . . . . . . . . . . . . . . . . . . . . . . . . . . . . . . . . . . . . . . . . . . . . . . . . . . . 78
Splitting and joining sprites . . . . . . . . . . . . . . . . . . . . . . . . . . . . . . . . . . . . . . . . . . . . . . . . . . . . . . . . . . . . . . . . . . . . . . . . . . . . . . . . . . . . . . . . . . . 79
Changing the appearance of sprites . . . . . . . . . . . . . . . . . . . . . . . . . . . . . . . . . . . . . . . . . . . . . . . . . . . . . . . . . . . . . . . . . . . . . . . . . . . . . . . . . . . 79
Using sprite inks . . . . . . . . . . . . . . . . . . . . . . . . . . . . . . . . . . . . . . . . . . . . . . . . . . . . . . . . . . . . . . . . . . . . . . . . . . . . . . . . . . . . . . . . . . . . . . . . . . . . . . 85
Assigning a cast member to a sprite with Lingo or JavaScript syntax . . . . . . . . . . . . . . . . . . . . . . . . . . . . . . . . . . . . . . . . . . . . . . . . . . . 88
Exchanging cast members . . . . . . . . . . . . . . . . . . . . . . . . . . . . . . . . . . . . . . . . . . . . . . . . . . . . . . . . . . . . . . . . . . . . . . . . . . . . . . . . . . . . . . . . . . . . 89
iv
Chapter 5: Animation
About animation . . . . . . . . . . . . . . . . . . . . . . . . . . . . . . . . . . . . . . . . . . . . . . . . . . . . . . . . . . . . . . . . . . . . . . . . . . . . . . . . . . . . . . . . . . . . . . . . . . . . . 90
About tweening in Director . . . . . . . . . . . . . . . . . . . . . . . . . . . . . . . . . . . . . . . . . . . . . . . . . . . . . . . . . . . . . . . . . . . . . . . . . . . . . . . . . . . . . . . . . . . 90
Tweening the path of a sprite . . . . . . . . . . . . . . . . . . . . . . . . . . . . . . . . . . . . . . . . . . . . . . . . . . . . . . . . . . . . . . . . . . . . . . . . . . . . . . . . . . . . . . . . . 91
Accelerating and decelerating sprites . . . . . . . . . . . . . . . . . . . . . . . . . . . . . . . . . . . . . . . . . . . . . . . . . . . . . . . . . . . . . . . . . . . . . . . . . . . . . . . . . 92
Tweening other sprite properties . . . . . . . . . . . . . . . . . . . . . . . . . . . . . . . . . . . . . . . . . . . . . . . . . . . . . . . . . . . . . . . . . . . . . . . . . . . . . . . . . . . . . 93
Suggestions and shortcuts for tweening . . . . . . . . . . . . . . . . . . . . . . . . . . . . . . . . . . . . . . . . . . . . . . . . . . . . . . . . . . . . . . . . . . . . . . . . . . . . . . 93
Changing tweening settings . . . . . . . . . . . . . . . . . . . . . . . . . . . . . . . . . . . . . . . . . . . . . . . . . . . . . . . . . . . . . . . . . . . . . . . . . . . . . . . . . . . . . . . . . . 94
Switching a sprite’s cast members . . . . . . . . . . . . . . . . . . . . . . . . . . . . . . . . . . . . . . . . . . . . . . . . . . . . . . . . . . . . . . . . . . . . . . . . . . . . . . . . . . . . 95
Editing sprite frames . . . . . . . . . . . . . . . . . . . . . . . . . . . . . . . . . . . . . . . . . . . . . . . . . . . . . . . . . . . . . . . . . . . . . . . . . . . . . . . . . . . . . . . . . . . . . . . . . 95
Frame-by-frame animation . . . . . . . . . . . . . . . . . . . . . . . . . . . . . . . . . . . . . . . . . . . . . . . . . . . . . . . . . . . . . . . . . . . . . . . . . . . . . . . . . . . . . . . . . . . 96
Shortcuts for animating with multiple cast members . . . . . . . . . . . . . . . . . . . . . . . . . . . . . . . . . . . . . . . . . . . . . . . . . . . . . . . . . . . . . . . . . . 97
Using film loops . . . . . . . . . . . . . . . . . . . . . . . . . . . . . . . . . . . . . . . . . . . . . . . . . . . . . . . . . . . . . . . . . . . . . . . . . . . . . . . . . . . . . . . . . . . . . . . . . . . . . . 99
Setting film loop properties . . . . . . . . . . . . . . . . . . . . . . . . . . . . . . . . . . . . . . . . . . . . . . . . . . . . . . . . . . . . . . . . . . . . . . . . . . . . . . . . . . . . . . . . . 100
Step-recording animation . . . . . . . . . . . . . . . . . . . . . . . . . . . . . . . . . . . . . . . . . . . . . . . . . . . . . . . . . . . . . . . . . . . . . . . . . . . . . . . . . . . . . . . . . . . 101
Real-time recording animation . . . . . . . . . . . . . . . . . . . . . . . . . . . . . . . . . . . . . . . . . . . . . . . . . . . . . . . . . . . . . . . . . . . . . . . . . . . . . . . . . . . . . . . 102
Linking a sequence with Paste Relative . . . . . . . . . . . . . . . . . . . . . . . . . . . . . . . . . . . . . . . . . . . . . . . . . . . . . . . . . . . . . . . . . . . . . . . . . . . . . . 102
Animating sprites with Lingo or JavaScript syntax . . . . . . . . . . . . . . . . . . . . . . . . . . . . . . . . . . . . . . . . . . . . . . . . . . . . . . . . . . . . . . . . . . . . 103
Chapter 6: Bitmaps
Introduction . . . . . . . . . . . . . . . . . . . . . . . . . . . . . . . . . . . . . . . . . . . . . . . . . . . . . . . . . . . . . . . . . . . . . . . . . . . . . . . . . . . . . . . . . . . . . . . . . . . . . . . . 104
About importing bitmaps . . . . . . . . . . . . . . . . . . . . . . . . . . . . . . . . . . . . . . . . . . . . . . . . . . . . . . . . . . . . . . . . . . . . . . . . . . . . . . . . . . . . . . . . . . . . 104
Using animated GIFs . . . . . . . . . . . . . . . . . . . . . . . . . . . . . . . . . . . . . . . . . . . . . . . . . . . . . . . . . . . . . . . . . . . . . . . . . . . . . . . . . . . . . . . . . . . . . . . . . 105
Using the Paint window . . . . . . . . . . . . . . . . . . . . . . . . . . . . . . . . . . . . . . . . . . . . . . . . . . . . . . . . . . . . . . . . . . . . . . . . . . . . . . . . . . . . . . . . . . . . . 106
Changing selected areas of a bitmap . . . . . . . . . . . . . . . . . . . . . . . . . . . . . . . . . . . . . . . . . . . . . . . . . . . . . . . . . . . . . . . . . . . . . . . . . . . . . . . . . 114
Flipping, rotating, and applying effects to bitmaps . . . . . . . . . . . . . . . . . . . . . . . . . . . . . . . . . . . . . . . . . . . . . . . . . . . . . . . . . . . . . . . . . . . 114
Using Auto Distort . . . . . . . . . . . . . . . . . . . . . . . . . . . . . . . . . . . . . . . . . . . . . . . . . . . . . . . . . . . . . . . . . . . . . . . . . . . . . . . . . . . . . . . . . . . . . . . . . . . 115
Last updated 9/28/2011
Page 5

USING DIRECTOR 11.5
Contents
Changing registration points . . . . . . . . . . . . . . . . . . . . . . . . . . . . . . . . . . . . . . . . . . . . . . . . . . . . . . . . . . . . . . . . . . . . . . . . . . . . . . . . . . . . . . . . 116
Changing size, color depth, and color palette for bitmaps . . . . . . . . . . . . . . . . . . . . . . . . . . . . . . . . . . . . . . . . . . . . . . . . . . . . . . . . . . . . . 117
Controlling bitmap images with Lingo or JavaScript syntax . . . . . . . . . . . . . . . . . . . . . . . . . . . . . . . . . . . . . . . . . . . . . . . . . . . . . . . . . . . 118
Using gradients . . . . . . . . . . . . . . . . . . . . . . . . . . . . . . . . . . . . . . . . . . . . . . . . . . . . . . . . . . . . . . . . . . . . . . . . . . . . . . . . . . . . . . . . . . . . . . . . . . . . . 121
Using patterns . . . . . . . . . . . . . . . . . . . . . . . . . . . . . . . . . . . . . . . . . . . . . . . . . . . . . . . . . . . . . . . . . . . . . . . . . . . . . . . . . . . . . . . . . . . . . . . . . . . . . . 123
Creating a custom tile . . . . . . . . . . . . . . . . . . . . . . . . . . . . . . . . . . . . . . . . . . . . . . . . . . . . . . . . . . . . . . . . . . . . . . . . . . . . . . . . . . . . . . . . . . . . . . . 124
Using Paint window inks . . . . . . . . . . . . . . . . . . . . . . . . . . . . . . . . . . . . . . . . . . . . . . . . . . . . . . . . . . . . . . . . . . . . . . . . . . . . . . . . . . . . . . . . . . . . . 125
Using onion skinning . . . . . . . . . . . . . . . . . . . . . . . . . . . . . . . . . . . . . . . . . . . . . . . . . . . . . . . . . . . . . . . . . . . . . . . . . . . . . . . . . . . . . . . . . . . . . . . . 127
About the Paste As PICT option . . . . . . . . . . . . . . . . . . . . . . . . . . . . . . . . . . . . . . . . . . . . . . . . . . . . . . . . . . . . . . . . . . . . . . . . . . . . . . . . . . . . . . 129
Setting and changing bitmap cast member properties . . . . . . . . . . . . . . . . . . . . . . . . . . . . . . . . . . . . . . . . . . . . . . . . . . . . . . . . . . . . . . . . 129
Setting and changing PICT cast member properties . . . . . . . . . . . . . . . . . . . . . . . . . . . . . . . . . . . . . . . . . . . . . . . . . . . . . . . . . . . . . . . . . . 130
Setting Paint window preferences . . . . . . . . . . . . . . . . . . . . . . . . . . . . . . . . . . . . . . . . . . . . . . . . . . . . . . . . . . . . . . . . . . . . . . . . . . . . . . . . . . . 130
Compressing bitmaps . . . . . . . . . . . . . . . . . . . . . . . . . . . . . . . . . . . . . . . . . . . . . . . . . . . . . . . . . . . . . . . . . . . . . . . . . . . . . . . . . . . . . . . . . . . . . . . 131
Working with Adobe Fireworks . . . . . . . . . . . . . . . . . . . . . . . . . . . . . . . . . . . . . . . . . . . . . . . . . . . . . . . . . . . . . . . . . . . . . . . . . . . . . . . . . . . . . . 132
Bitmap filters . . . . . . . . . . . . . . . . . . . . . . . . . . . . . . . . . . . . . . . . . . . . . . . . . . . . . . . . . . . . . . . . . . . . . . . . . . . . . . . . . . . . . . . . . . . . . . . . . . . . . . . . 135
Chapter 7: Vector Shapes
About vector shapes . . . . . . . . . . . . . . . . . . . . . . . . . . . . . . . . . . . . . . . . . . . . . . . . . . . . . . . . . . . . . . . . . . . . . . . . . . . . . . . . . . . . . . . . . . . . . . . . 150
Drawing vector shapes . . . . . . . . . . . . . . . . . . . . . . . . . . . . . . . . . . . . . . . . . . . . . . . . . . . . . . . . . . . . . . . . . . . . . . . . . . . . . . . . . . . . . . . . . . . . . . 150
Editing vector shapes . . . . . . . . . . . . . . . . . . . . . . . . . . . . . . . . . . . . . . . . . . . . . . . . . . . . . . . . . . . . . . . . . . . . . . . . . . . . . . . . . . . . . . . . . . . . . . . . 154
Defining gradients for vector shapes . . . . . . . . . . . . . . . . . . . . . . . . . . . . . . . . . . . . . . . . . . . . . . . . . . . . . . . . . . . . . . . . . . . . . . . . . . . . . . . . . 156
Controlling vector shapes with Lingo or JavaScript syntax . . . . . . . . . . . . . . . . . . . . . . . . . . . . . . . . . . . . . . . . . . . . . . . . . . . . . . . . . . . . 157
Setting vector shape properties . . . . . . . . . . . . . . . . . . . . . . . . . . . . . . . . . . . . . . . . . . . . . . . . . . . . . . . . . . . . . . . . . . . . . . . . . . . . . . . . . . . . . . 157
Using shapes . . . . . . . . . . . . . . . . . . . . . . . . . . . . . . . . . . . . . . . . . . . . . . . . . . . . . . . . . . . . . . . . . . . . . . . . . . . . . . . . . . . . . . . . . . . . . . . . . . . . . . . . 158
Setting shape cast member properties . . . . . . . . . . . . . . . . . . . . . . . . . . . . . . . . . . . . . . . . . . . . . . . . . . . . . . . . . . . . . . . . . . . . . . . . . . . . . . . 158
v
Chapter 8: Color, Tempo, and Transitions
Introduction . . . . . . . . . . . . . . . . . . . . . . . . . . . . . . . . . . . . . . . . . . . . . . . . . . . . . . . . . . . . . . . . . . . . . . . . . . . . . . . . . . . . . . . . . . . . . . . . . . . . . . . . 160
Controlling color . . . . . . . . . . . . . . . . . . . . . . . . . . . . . . . . . . . . . . . . . . . . . . . . . . . . . . . . . . . . . . . . . . . . . . . . . . . . . . . . . . . . . . . . . . . . . . . . . . . . 160
Setting palette cast member properties . . . . . . . . . . . . . . . . . . . . . . . . . . . . . . . . . . . . . . . . . . . . . . . . . . . . . . . . . . . . . . . . . . . . . . . . . . . . . . 168
About tempo . . . . . . . . . . . . . . . . . . . . . . . . . . . . . . . . . . . . . . . . . . . . . . . . . . . . . . . . . . . . . . . . . . . . . . . . . . . . . . . . . . . . . . . . . . . . . . . . . . . . . . . 170
Using transitions . . . . . . . . . . . . . . . . . . . . . . . . . . . . . . . . . . . . . . . . . . . . . . . . . . . . . . . . . . . . . . . . . . . . . . . . . . . . . . . . . . . . . . . . . . . . . . . . . . . . 172
Chapter 9: Text
About text . . . . . . . . . . . . . . . . . . . . . . . . . . . . . . . . . . . . . . . . . . . . . . . . . . . . . . . . . . . . . . . . . . . . . . . . . . . . . . . . . . . . . . . . . . . . . . . . . . . . . . . . . . 175
Embedding fonts in movies . . . . . . . . . . . . . . . . . . . . . . . . . . . . . . . . . . . . . . . . . . . . . . . . . . . . . . . . . . . . . . . . . . . . . . . . . . . . . . . . . . . . . . . . . . 175
Creating text cast members . . . . . . . . . . . . . . . . . . . . . . . . . . . . . . . . . . . . . . . . . . . . . . . . . . . . . . . . . . . . . . . . . . . . . . . . . . . . . . . . . . . . . . . . . 176
Editing and formatting text . . . . . . . . . . . . . . . . . . . . . . . . . . . . . . . . . . . . . . . . . . . . . . . . . . . . . . . . . . . . . . . . . . . . . . . . . . . . . . . . . . . . . . . . . 178
Creating a hypertext link . . . . . . . . . . . . . . . . . . . . . . . . . . . . . . . . . . . . . . . . . . . . . . . . . . . . . . . . . . . . . . . . . . . . . . . . . . . . . . . . . . . . . . . . . . . . . 182
Working with fields . . . . . . . . . . . . . . . . . . . . . . . . . . . . . . . . . . . . . . . . . . . . . . . . . . . . . . . . . . . . . . . . . . . . . . . . . . . . . . . . . . . . . . . . . . . . . . . . . . 182
Using editable text . . . . . . . . . . . . . . . . . . . . . . . . . . . . . . . . . . . . . . . . . . . . . . . . . . . . . . . . . . . . . . . . . . . . . . . . . . . . . . . . . . . . . . . . . . . . . . . . . . 183
Converting text to a bitmap . . . . . . . . . . . . . . . . . . . . . . . . . . . . . . . . . . . . . . . . . . . . . . . . . . . . . . . . . . . . . . . . . . . . . . . . . . . . . . . . . . . . . . . . . 184
Mapping fonts between platforms for field cast members . . . . . . . . . . . . . . . . . . . . . . . . . . . . . . . . . . . . . . . . . . . . . . . . . . . . . . . . . . . . 184
Setting text or field cast member properties . . . . . . . . . . . . . . . . . . . . . . . . . . . . . . . . . . . . . . . . . . . . . . . . . . . . . . . . . . . . . . . . . . . . . . . . . . 185
Formatting chunks of text with Lingo or JavaScript syntax . . . . . . . . . . . . . . . . . . . . . . . . . . . . . . . . . . . . . . . . . . . . . . . . . . . . . . . . . . . . 187
Formatting text or field cast members with Lingo or JavaScript syntax . . . . . . . . . . . . . . . . . . . . . . . . . . . . . . . . . . . . . . . . . . . . . . . . 188
Controlling scrolling text with Lingo or JavaScript syntax . . . . . . . . . . . . . . . . . . . . . . . . . . . . . . . . . . . . . . . . . . . . . . . . . . . . . . . . . . . . . 189
Last updated 9/28/2011
Page 6

USING DIRECTOR 11.5
Contents
Checking for specific text with Lingo or JavaScript syntax . . . . . . . . . . . . . . . . . . . . . . . . . . . . . . . . . . . . . . . . . . . . . . . . . . . . . . . . . . . . . 190
Modifying strings with Lingo or JavaScript syntax . . . . . . . . . . . . . . . . . . . . . . . . . . . . . . . . . . . . . . . . . . . . . . . . . . . . . . . . . . . . . . . . . . . . 190
Unicode support in Director . . . . . . . . . . . . . . . . . . . . . . . . . . . . . . . . . . . . . . . . . . . . . . . . . . . . . . . . . . . . . . . . . . . . . . . . . . . . . . . . . . . . . . . . . 190
Chapter 10: Using Flash, Flash Components, and Other Interactive Media Types
Introduction . . . . . . . . . . . . . . . . . . . . . . . . . . . . . . . . . . . . . . . . . . . . . . . . . . . . . . . . . . . . . . . . . . . . . . . . . . . . . . . . . . . . . . . . . . . . . . . . . . . . . . . . 194
Using Flash Content . . . . . . . . . . . . . . . . . . . . . . . . . . . . . . . . . . . . . . . . . . . . . . . . . . . . . . . . . . . . . . . . . . . . . . . . . . . . . . . . . . . . . . . . . . . . . . . . . 194
Adding a Flash content cast member . . . . . . . . . . . . . . . . . . . . . . . . . . . . . . . . . . . . . . . . . . . . . . . . . . . . . . . . . . . . . . . . . . . . . . . . . . . . . . . . 195
Editing a Flash cast member . . . . . . . . . . . . . . . . . . . . . . . . . . . . . . . . . . . . . . . . . . . . . . . . . . . . . . . . . . . . . . . . . . . . . . . . . . . . . . . . . . . . . . . . . 197
Controlling Flash content with Lingo or JavaScript syntax . . . . . . . . . . . . . . . . . . . . . . . . . . . . . . . . . . . . . . . . . . . . . . . . . . . . . . . . . . . . . 198
Controlling Flash content appearance with Lingo or JavaScript syntax . . . . . . . . . . . . . . . . . . . . . . . . . . . . . . . . . . . . . . . . . . . . . . . . 198
Streaming Flash content with Lingo or JavaScript syntax . . . . . . . . . . . . . . . . . . . . . . . . . . . . . . . . . . . . . . . . . . . . . . . . . . . . . . . . . . . . . 200
Playback Flash content with Lingo or JavaScript syntax . . . . . . . . . . . . . . . . . . . . . . . . . . . . . . . . . . . . . . . . . . . . . . . . . . . . . . . . . . . . . . . 200
Using Lingo or JavaScript syntax with Flash variables . . . . . . . . . . . . . . . . . . . . . . . . . . . . . . . . . . . . . . . . . . . . . . . . . . . . . . . . . . . . . . . . . 201
Sending messages from Flash content using getURL . . . . . . . . . . . . . . . . . . . . . . . . . . . . . . . . . . . . . . . . . . . . . . . . . . . . . . . . . . . . . . . . . 203
Sending XML Data from Flash to Director . . . . . . . . . . . . . . . . . . . . . . . . . . . . . . . . . . . . . . . . . . . . . . . . . . . . . . . . . . . . . . . . . . . . . . . . . . . . 205
Using Flash objects in script . . . . . . . . . . . . . . . . . . . . . . . . . . . . . . . . . . . . . . . . . . . . . . . . . . . . . . . . . . . . . . . . . . . . . . . . . . . . . . . . . . . . . . . . . 205
Using the Flash local connection object . . . . . . . . . . . . . . . . . . . . . . . . . . . . . . . . . . . . . . . . . . . . . . . . . . . . . . . . . . . . . . . . . . . . . . . . . . . . . . 207
Using Flash Media Server . . . . . . . . . . . . . . . . . . . . . . . . . . . . . . . . . . . . . . . . . . . . . . . . . . . . . . . . . . . . . . . . . . . . . . . . . . . . . . . . . . . . . . . . . . . . 210
Using the Flash Settings panel . . . . . . . . . . . . . . . . . . . . . . . . . . . . . . . . . . . . . . . . . . . . . . . . . . . . . . . . . . . . . . . . . . . . . . . . . . . . . . . . . . . . . . . 212
Playback performance tips for Flash content . . . . . . . . . . . . . . . . . . . . . . . . . . . . . . . . . . . . . . . . . . . . . . . . . . . . . . . . . . . . . . . . . . . . . . . . . 213
Using Director movies within Director movies . . . . . . . . . . . . . . . . . . . . . . . . . . . . . . . . . . . . . . . . . . . . . . . . . . . . . . . . . . . . . . . . . . . . . . . . 214
Setting linked Director movie properties . . . . . . . . . . . . . . . . . . . . . . . . . . . . . . . . . . . . . . . . . . . . . . . . . . . . . . . . . . . . . . . . . . . . . . . . . . . . . 215
Using ActiveX controls . . . . . . . . . . . . . . . . . . . . . . . . . . . . . . . . . . . . . . . . . . . . . . . . . . . . . . . . . . . . . . . . . . . . . . . . . . . . . . . . . . . . . . . . . . . . . . . 216
Using Flash components . . . . . . . . . . . . . . . . . . . . . . . . . . . . . . . . . . . . . . . . . . . . . . . . . . . . . . . . . . . . . . . . . . . . . . . . . . . . . . . . . . . . . . . . . . . . 218
Button component . . . . . . . . . . . . . . . . . . . . . . . . . . . . . . . . . . . . . . . . . . . . . . . . . . . . . . . . . . . . . . . . . . . . . . . . . . . . . . . . . . . . . . . . . . . . . . . . . . 221
CheckBox component . . . . . . . . . . . . . . . . . . . . . . . . . . . . . . . . . . . . . . . . . . . . . . . . . . . . . . . . . . . . . . . . . . . . . . . . . . . . . . . . . . . . . . . . . . . . . . . 222
DateChooser component . . . . . . . . . . . . . . . . . . . . . . . . . . . . . . . . . . . . . . . . . . . . . . . . . . . . . . . . . . . . . . . . . . . . . . . . . . . . . . . . . . . . . . . . . . . . 223
Label component . . . . . . . . . . . . . . . . . . . . . . . . . . . . . . . . . . . . . . . . . . . . . . . . . . . . . . . . . . . . . . . . . . . . . . . . . . . . . . . . . . . . . . . . . . . . . . . . . . . 225
List component . . . . . . . . . . . . . . . . . . . . . . . . . . . . . . . . . . . . . . . . . . . . . . . . . . . . . . . . . . . . . . . . . . . . . . . . . . . . . . . . . . . . . . . . . . . . . . . . . . . . . 226
NumericStepper component . . . . . . . . . . . . . . . . . . . . . . . . . . . . . . . . . . . . . . . . . . . . . . . . . . . . . . . . . . . . . . . . . . . . . . . . . . . . . . . . . . . . . . . . 228
RadioButton component . . . . . . . . . . . . . . . . . . . . . . . . . . . . . . . . . . . . . . . . . . . . . . . . . . . . . . . . . . . . . . . . . . . . . . . . . . . . . . . . . . . . . . . . . . . . 230
ScrollPane component . . . . . . . . . . . . . . . . . . . . . . . . . . . . . . . . . . . . . . . . . . . . . . . . . . . . . . . . . . . . . . . . . . . . . . . . . . . . . . . . . . . . . . . . . . . . . . 231
TextArea component . . . . . . . . . . . . . . . . . . . . . . . . . . . . . . . . . . . . . . . . . . . . . . . . . . . . . . . . . . . . . . . . . . . . . . . . . . . . . . . . . . . . . . . . . . . . . . . . 233
TextInput component . . . . . . . . . . . . . . . . . . . . . . . . . . . . . . . . . . . . . . . . . . . . . . . . . . . . . . . . . . . . . . . . . . . . . . . . . . . . . . . . . . . . . . . . . . . . . . . 235
Tree component . . . . . . . . . . . . . . . . . . . . . . . . . . . . . . . . . . . . . . . . . . . . . . . . . . . . . . . . . . . . . . . . . . . . . . . . . . . . . . . . . . . . . . . . . . . . . . . . . . . . 236
vi
Chapter 11: Sound and Synchronization
About sound and synchronization . . . . . . . . . . . . . . . . . . . . . . . . . . . . . . . . . . . . . . . . . . . . . . . . . . . . . . . . . . . . . . . . . . . . . . . . . . . . . . . . . . . 240
Importing internal and linked sounds . . . . . . . . . . . . . . . . . . . . . . . . . . . . . . . . . . . . . . . . . . . . . . . . . . . . . . . . . . . . . . . . . . . . . . . . . . . . . . . . 240
Audio mixers and sound objects . . . . . . . . . . . . . . . . . . . . . . . . . . . . . . . . . . . . . . . . . . . . . . . . . . . . . . . . . . . . . . . . . . . . . . . . . . . . . . . . . . . . . 241
Setting sound cast member properties . . . . . . . . . . . . . . . . . . . . . . . . . . . . . . . . . . . . . . . . . . . . . . . . . . . . . . . . . . . . . . . . . . . . . . . . . . . . . . . 244
Controlling sound in the Score . . . . . . . . . . . . . . . . . . . . . . . . . . . . . . . . . . . . . . . . . . . . . . . . . . . . . . . . . . . . . . . . . . . . . . . . . . . . . . . . . . . . . . 244
Looping a sound . . . . . . . . . . . . . . . . . . . . . . . . . . . . . . . . . . . . . . . . . . . . . . . . . . . . . . . . . . . . . . . . . . . . . . . . . . . . . . . . . . . . . . . . . . . . . . . . . . . . 245
Using sound in Windows . . . . . . . . . . . . . . . . . . . . . . . . . . . . . . . . . . . . . . . . . . . . . . . . . . . . . . . . . . . . . . . . . . . . . . . . . . . . . . . . . . . . . . . . . . . . 246
Playing sounds with Lingo or JavaScript syntax . . . . . . . . . . . . . . . . . . . . . . . . . . . . . . . . . . . . . . . . . . . . . . . . . . . . . . . . . . . . . . . . . . . . . . . 246
About Shockwave Audio . . . . . . . . . . . . . . . . . . . . . . . . . . . . . . . . . . . . . . . . . . . . . . . . . . . . . . . . . . . . . . . . . . . . . . . . . . . . . . . . . . . . . . . . . . . . 248
Last updated 9/28/2011
Page 7

USING DIRECTOR 11.5
Contents
Compressing internal sounds with Shockwave Audio . . . . . . . . . . . . . . . . . . . . . . . . . . . . . . . . . . . . . . . . . . . . . . . . . . . . . . . . . . . . . . . . . 248
Streaming linked Shockwave Audio and MP3 audio files . . . . . . . . . . . . . . . . . . . . . . . . . . . . . . . . . . . . . . . . . . . . . . . . . . . . . . . . . . . . . . 249
Playing audio with Lingo or JavaScript syntax . . . . . . . . . . . . . . . . . . . . . . . . . . . . . . . . . . . . . . . . . . . . . . . . . . . . . . . . . . . . . . . . . . . . . . . . 250
Synchronizing media . . . . . . . . . . . . . . . . . . . . . . . . . . . . . . . . . . . . . . . . . . . . . . . . . . . . . . . . . . . . . . . . . . . . . . . . . . . . . . . . . . . . . . . . . . . . . . . . 251
Synchronizing sound with Lingo or JavaScript syntax . . . . . . . . . . . . . . . . . . . . . . . . . . . . . . . . . . . . . . . . . . . . . . . . . . . . . . . . . . . . . . . . . 252
Accessibility . . . . . . . . . . . . . . . . . . . . . . . . . . . . . . . . . . . . . . . . . . . . . . . . . . . . . . . . . . . . . . . . . . . . . . . . . . . . . . . . . . . . . . . . . . . . . . . . . . . . . . . . . 252
Chapter 12: Using Digital Video
About digital video . . . . . . . . . . . . . . . . . . . . . . . . . . . . . . . . . . . . . . . . . . . . . . . . . . . . . . . . . . . . . . . . . . . . . . . . . . . . . . . . . . . . . . . . . . . . . . . . . . 253
Importing digital video formats . . . . . . . . . . . . . . . . . . . . . . . . . . . . . . . . . . . . . . . . . . . . . . . . . . . . . . . . . . . . . . . . . . . . . . . . . . . . . . . . . . . . . . 253
Adding an MP4Media member to a movie . . . . . . . . . . . . . . . . . . . . . . . . . . . . . . . . . . . . . . . . . . . . . . . . . . . . . . . . . . . . . . . . . . . . . . . . . . . . 254
Using the video windows . . . . . . . . . . . . . . . . . . . . . . . . . . . . . . . . . . . . . . . . . . . . . . . . . . . . . . . . . . . . . . . . . . . . . . . . . . . . . . . . . . . . . . . . . . . . 255
Playing digital video Direct To Stage . . . . . . . . . . . . . . . . . . . . . . . . . . . . . . . . . . . . . . . . . . . . . . . . . . . . . . . . . . . . . . . . . . . . . . . . . . . . . . . . . 255
Controlling digital video in the Score . . . . . . . . . . . . . . . . . . . . . . . . . . . . . . . . . . . . . . . . . . . . . . . . . . . . . . . . . . . . . . . . . . . . . . . . . . . . . . . . . 256
Playing digital video with Lingo or JavaScript syntax . . . . . . . . . . . . . . . . . . . . . . . . . . . . . . . . . . . . . . . . . . . . . . . . . . . . . . . . . . . . . . . . . . 256
Setting QuickTime digital video cast member properties . . . . . . . . . . . . . . . . . . . . . . . . . . . . . . . . . . . . . . . . . . . . . . . . . . . . . . . . . . . . . . 258
Controlling QuickTime with Lingo or JavaScript syntax . . . . . . . . . . . . . . . . . . . . . . . . . . . . . . . . . . . . . . . . . . . . . . . . . . . . . . . . . . . . . . . 259
Using Windows Media files in Director . . . . . . . . . . . . . . . . . . . . . . . . . . . . . . . . . . . . . . . . . . . . . . . . . . . . . . . . . . . . . . . . . . . . . . . . . . . . . . . 261
Using DVD media content in Director . . . . . . . . . . . . . . . . . . . . . . . . . . . . . . . . . . . . . . . . . . . . . . . . . . . . . . . . . . . . . . . . . . . . . . . . . . . . . . . . 263
Cropping digital video . . . . . . . . . . . . . . . . . . . . . . . . . . . . . . . . . . . . . . . . . . . . . . . . . . . . . . . . . . . . . . . . . . . . . . . . . . . . . . . . . . . . . . . . . . . . . . . 265
Using digital video on the Internet . . . . . . . . . . . . . . . . . . . . . . . . . . . . . . . . . . . . . . . . . . . . . . . . . . . . . . . . . . . . . . . . . . . . . . . . . . . . . . . . . . . 266
Synchronizing video and animation . . . . . . . . . . . . . . . . . . . . . . . . . . . . . . . . . . . . . . . . . . . . . . . . . . . . . . . . . . . . . . . . . . . . . . . . . . . . . . . . . . 267
Using RealMedia content in Director . . . . . . . . . . . . . . . . . . . . . . . . . . . . . . . . . . . . . . . . . . . . . . . . . . . . . . . . . . . . . . . . . . . . . . . . . . . . . . . . . 267
Using Lingo or JavaScript syntax sound elements with RealMedia . . . . . . . . . . . . . . . . . . . . . . . . . . . . . . . . . . . . . . . . . . . . . . . . . . . . . 277
vii
Chapter 13: Behaviors
About behaviors . . . . . . . . . . . . . . . . . . . . . . . . . . . . . . . . . . . . . . . . . . . . . . . . . . . . . . . . . . . . . . . . . . . . . . . . . . . . . . . . . . . . . . . . . . . . . . . . . . . . 279
Attaching behaviors . . . . . . . . . . . . . . . . . . . . . . . . . . . . . . . . . . . . . . . . . . . . . . . . . . . . . . . . . . . . . . . . . . . . . . . . . . . . . . . . . . . . . . . . . . . . . . . . . 279
Changing the order of attached behaviors . . . . . . . . . . . . . . . . . . . . . . . . . . . . . . . . . . . . . . . . . . . . . . . . . . . . . . . . . . . . . . . . . . . . . . . . . . . 281
Getting information about behaviors . . . . . . . . . . . . . . . . . . . . . . . . . . . . . . . . . . . . . . . . . . . . . . . . . . . . . . . . . . . . . . . . . . . . . . . . . . . . . . . . 281
Creating and modifying behaviors . . . . . . . . . . . . . . . . . . . . . . . . . . . . . . . . . . . . . . . . . . . . . . . . . . . . . . . . . . . . . . . . . . . . . . . . . . . . . . . . . . . 282
Writing behaviors with Lingo or JavaScript syntax . . . . . . . . . . . . . . . . . . . . . . . . . . . . . . . . . . . . . . . . . . . . . . . . . . . . . . . . . . . . . . . . . . . . 285
Setting up a Parameters dialog box . . . . . . . . . . . . . . . . . . . . . . . . . . . . . . . . . . . . . . . . . . . . . . . . . . . . . . . . . . . . . . . . . . . . . . . . . . . . . . . . . . 285
Setting behavior properties with script . . . . . . . . . . . . . . . . . . . . . . . . . . . . . . . . . . . . . . . . . . . . . . . . . . . . . . . . . . . . . . . . . . . . . . . . . . . . . . . 286
Customizing a behavior’s property . . . . . . . . . . . . . . . . . . . . . . . . . . . . . . . . . . . . . . . . . . . . . . . . . . . . . . . . . . . . . . . . . . . . . . . . . . . . . . . . . . . 286
Creating an on getPropertyDescriptionList handler . . . . . . . . . . . . . . . . . . . . . . . . . . . . . . . . . . . . . . . . . . . . . . . . . . . . . . . . . . . . . . . . . . . 287
Including a description for the Behavior inspector . . . . . . . . . . . . . . . . . . . . . . . . . . . . . . . . . . . . . . . . . . . . . . . . . . . . . . . . . . . . . . . . . . . . 288
Example of a complete behavior . . . . . . . . . . . . . . . . . . . . . . . . . . . . . . . . . . . . . . . . . . . . . . . . . . . . . . . . . . . . . . . . . . . . . . . . . . . . . . . . . . . . . 288
Sending messages to behaviors attached to sprites . . . . . . . . . . . . . . . . . . . . . . . . . . . . . . . . . . . . . . . . . . . . . . . . . . . . . . . . . . . . . . . . . . . 290
Using inheritance in behaviors . . . . . . . . . . . . . . . . . . . . . . . . . . . . . . . . . . . . . . . . . . . . . . . . . . . . . . . . . . . . . . . . . . . . . . . . . . . . . . . . . . . . . . . 292
Chapter 14: Navigation and User Interaction
About navigation and user interaction . . . . . . . . . . . . . . . . . . . . . . . . . . . . . . . . . . . . . . . . . . . . . . . . . . . . . . . . . . . . . . . . . . . . . . . . . . . . . . . 293
Creating basic navigation controls with behaviors . . . . . . . . . . . . . . . . . . . . . . . . . . . . . . . . . . . . . . . . . . . . . . . . . . . . . . . . . . . . . . . . . . . . 293
Adding push buttons, radio buttons, and check boxes . . . . . . . . . . . . . . . . . . . . . . . . . . . . . . . . . . . . . . . . . . . . . . . . . . . . . . . . . . . . . . . . 294
Jumping to locations with Lingo or JavaScript syntax . . . . . . . . . . . . . . . . . . . . . . . . . . . . . . . . . . . . . . . . . . . . . . . . . . . . . . . . . . . . . . . . . 294
Detecting mouse clicks with Lingo or JavaScript syntax . . . . . . . . . . . . . . . . . . . . . . . . . . . . . . . . . . . . . . . . . . . . . . . . . . . . . . . . . . . . . . . 296
Last updated 9/28/2011
Page 8

USING DIRECTOR 11.5
Contents
Making sprites editable and draggable . . . . . . . . . . . . . . . . . . . . . . . . . . . . . . . . . . . . . . . . . . . . . . . . . . . . . . . . . . . . . . . . . . . . . . . . . . . . . . . 297
Making sprites editable or moveable with Lingo or JavaScript syntax . . . . . . . . . . . . . . . . . . . . . . . . . . . . . . . . . . . . . . . . . . . . . . . . . . 297
Checking which text is under the pointer with Lingo or JavaScript syntax . . . . . . . . . . . . . . . . . . . . . . . . . . . . . . . . . . . . . . . . . . . . . 298
Responding to rollovers with Lingo or JavaScript syntax . . . . . . . . . . . . . . . . . . . . . . . . . . . . . . . . . . . . . . . . . . . . . . . . . . . . . . . . . . . . . . 298
Finding mouse pointer locations with Lingo or JavaScript syntax . . . . . . . . . . . . . . . . . . . . . . . . . . . . . . . . . . . . . . . . . . . . . . . . . . . . . . 299
Checking keys with Lingo or JavaScript syntax . . . . . . . . . . . . . . . . . . . . . . . . . . . . . . . . . . . . . . . . . . . . . . . . . . . . . . . . . . . . . . . . . . . . . . . . 299
Equivalent cross-platform keys . . . . . . . . . . . . . . . . . . . . . . . . . . . . . . . . . . . . . . . . . . . . . . . . . . . . . . . . . . . . . . . . . . . . . . . . . . . . . . . . . . . . . . . 299
Identifying keys on different keyboards . . . . . . . . . . . . . . . . . . . . . . . . . . . . . . . . . . . . . . . . . . . . . . . . . . . . . . . . . . . . . . . . . . . . . . . . . . . . . . 300
About animated color cursors . . . . . . . . . . . . . . . . . . . . . . . . . . . . . . . . . . . . . . . . . . . . . . . . . . . . . . . . . . . . . . . . . . . . . . . . . . . . . . . . . . . . . . . 300
Creating an animated color cursor cast member . . . . . . . . . . . . . . . . . . . . . . . . . . . . . . . . . . . . . . . . . . . . . . . . . . . . . . . . . . . . . . . . . . . . . . 301
Using an animated color cursor in a movie . . . . . . . . . . . . . . . . . . . . . . . . . . . . . . . . . . . . . . . . . . . . . . . . . . . . . . . . . . . . . . . . . . . . . . . . . . . 302
Chapter 15: 3D Basics
Introduction . . . . . . . . . . . . . . . . . . . . . . . . . . . . . . . . . . . . . . . . . . . . . . . . . . . . . . . . . . . . . . . . . . . . . . . . . . . . . . . . . . . . . . . . . . . . . . . . . . . . . . . . 304
What you need to know . . . . . . . . . . . . . . . . . . . . . . . . . . . . . . . . . . . . . . . . . . . . . . . . . . . . . . . . . . . . . . . . . . . . . . . . . . . . . . . . . . . . . . . . . . . . . 304
About 3D in Director . . . . . . . . . . . . . . . . . . . . . . . . . . . . . . . . . . . . . . . . . . . . . . . . . . . . . . . . . . . . . . . . . . . . . . . . . . . . . . . . . . . . . . . . . . . . . . . . 304
The 3D Xtra extension . . . . . . . . . . . . . . . . . . . . . . . . . . . . . . . . . . . . . . . . . . . . . . . . . . . . . . . . . . . . . . . . . . . . . . . . . . . . . . . . . . . . . . . . . . . . . . . 305
Using the Shockwave 3D window . . . . . . . . . . . . . . . . . . . . . . . . . . . . . . . . . . . . . . . . . . . . . . . . . . . . . . . . . . . . . . . . . . . . . . . . . . . . . . . . . . . . 306
Using the Property inspector for 3D . . . . . . . . . . . . . . . . . . . . . . . . . . . . . . . . . . . . . . . . . . . . . . . . . . . . . . . . . . . . . . . . . . . . . . . . . . . . . . . . . . 307
Using rendering methods . . . . . . . . . . . . . . . . . . . . . . . . . . . . . . . . . . . . . . . . . . . . . . . . . . . . . . . . . . . . . . . . . . . . . . . . . . . . . . . . . . . . . . . . . . . 309
Using 3D anti-aliasing . . . . . . . . . . . . . . . . . . . . . . . . . . . . . . . . . . . . . . . . . . . . . . . . . . . . . . . . . . . . . . . . . . . . . . . . . . . . . . . . . . . . . . . . . . . . . . . 310
3D behaviors . . . . . . . . . . . . . . . . . . . . . . . . . . . . . . . . . . . . . . . . . . . . . . . . . . . . . . . . . . . . . . . . . . . . . . . . . . . . . . . . . . . . . . . . . . . . . . . . . . . . . . . . 311
3D text . . . . . . . . . . . . . . . . . . . . . . . . . . . . . . . . . . . . . . . . . . . . . . . . . . . . . . . . . . . . . . . . . . . . . . . . . . . . . . . . . . . . . . . . . . . . . . . . . . . . . . . . . . . . . . 312
The 3D world . . . . . . . . . . . . . . . . . . . . . . . . . . . . . . . . . . . . . . . . . . . . . . . . . . . . . . . . . . . . . . . . . . . . . . . . . . . . . . . . . . . . . . . . . . . . . . . . . . . . . . . . 312
viii
Chapter 16: The 3D Cast Member, 3D Text, and 3D Behaviors
Introduction . . . . . . . . . . . . . . . . . . . . . . . . . . . . . . . . . . . . . . . . . . . . . . . . . . . . . . . . . . . . . . . . . . . . . . . . . . . . . . . . . . . . . . . . . . . . . . . . . . . . . . . . 315
3D cast members . . . . . . . . . . . . . . . . . . . . . . . . . . . . . . . . . . . . . . . . . . . . . . . . . . . . . . . . . . . . . . . . . . . . . . . . . . . . . . . . . . . . . . . . . . . . . . . . . . . . 315
Model resources . . . . . . . . . . . . . . . . . . . . . . . . . . . . . . . . . . . . . . . . . . . . . . . . . . . . . . . . . . . . . . . . . . . . . . . . . . . . . . . . . . . . . . . . . . . . . . . . . . . . . 316
Models . . . . . . . . . . . . . . . . . . . . . . . . . . . . . . . . . . . . . . . . . . . . . . . . . . . . . . . . . . . . . . . . . . . . . . . . . . . . . . . . . . . . . . . . . . . . . . . . . . . . . . . . . . . . . . 317
Shaders . . . . . . . . . . . . . . . . . . . . . . . . . . . . . . . . . . . . . . . . . . . . . . . . . . . . . . . . . . . . . . . . . . . . . . . . . . . . . . . . . . . . . . . . . . . . . . . . . . . . . . . . . . . . . 318
Textures . . . . . . . . . . . . . . . . . . . . . . . . . . . . . . . . . . . . . . . . . . . . . . . . . . . . . . . . . . . . . . . . . . . . . . . . . . . . . . . . . . . . . . . . . . . . . . . . . . . . . . . . . . . . 319
Motions . . . . . . . . . . . . . . . . . . . . . . . . . . . . . . . . . . . . . . . . . . . . . . . . . . . . . . . . . . . . . . . . . . . . . . . . . . . . . . . . . . . . . . . . . . . . . . . . . . . . . . . . . . . . . 320
Lights . . . . . . . . . . . . . . . . . . . . . . . . . . . . . . . . . . . . . . . . . . . . . . . . . . . . . . . . . . . . . . . . . . . . . . . . . . . . . . . . . . . . . . . . . . . . . . . . . . . . . . . . . . . . . . . 320
Cameras . . . . . . . . . . . . . . . . . . . . . . . . . . . . . . . . . . . . . . . . . . . . . . . . . . . . . . . . . . . . . . . . . . . . . . . . . . . . . . . . . . . . . . . . . . . . . . . . . . . . . . . . . . . . 321
Groups . . . . . . . . . . . . . . . . . . . . . . . . . . . . . . . . . . . . . . . . . . . . . . . . . . . . . . . . . . . . . . . . . . . . . . . . . . . . . . . . . . . . . . . . . . . . . . . . . . . . . . . . . . . . . . 322
Creating 3D text . . . . . . . . . . . . . . . . . . . . . . . . . . . . . . . . . . . . . . . . . . . . . . . . . . . . . . . . . . . . . . . . . . . . . . . . . . . . . . . . . . . . . . . . . . . . . . . . . . . . . 322
Modifying 3D text . . . . . . . . . . . . . . . . . . . . . . . . . . . . . . . . . . . . . . . . . . . . . . . . . . . . . . . . . . . . . . . . . . . . . . . . . . . . . . . . . . . . . . . . . . . . . . . . . . . 323
Script and 3D text . . . . . . . . . . . . . . . . . . . . . . . . . . . . . . . . . . . . . . . . . . . . . . . . . . . . . . . . . . . . . . . . . . . . . . . . . . . . . . . . . . . . . . . . . . . . . . . . . . . 324
Using 3D behaviors . . . . . . . . . . . . . . . . . . . . . . . . . . . . . . . . . . . . . . . . . . . . . . . . . . . . . . . . . . . . . . . . . . . . . . . . . . . . . . . . . . . . . . . . . . . . . . . . . . 326
Chapter 17: Working with Models and Model Resources
Introduction . . . . . . . . . . . . . . . . . . . . . . . . . . . . . . . . . . . . . . . . . . . . . . . . . . . . . . . . . . . . . . . . . . . . . . . . . . . . . . . . . . . . . . . . . . . . . . . . . . . . . . . . 331
About models and model resources . . . . . . . . . . . . . . . . . . . . . . . . . . . . . . . . . . . . . . . . . . . . . . . . . . . . . . . . . . . . . . . . . . . . . . . . . . . . . . . . . . 331
Model resources . . . . . . . . . . . . . . . . . . . . . . . . . . . . . . . . . . . . . . . . . . . . . . . . . . . . . . . . . . . . . . . . . . . . . . . . . . . . . . . . . . . . . . . . . . . . . . . . . . . . . 331
Primitives . . . . . . . . . . . . . . . . . . . . . . . . . . . . . . . . . . . . . . . . . . . . . . . . . . . . . . . . . . . . . . . . . . . . . . . . . . . . . . . . . . . . . . . . . . . . . . . . . . . . . . . . . . . 332
Cast member methods . . . . . . . . . . . . . . . . . . . . . . . . . . . . . . . . . . . . . . . . . . . . . . . . . . . . . . . . . . . . . . . . . . . . . . . . . . . . . . . . . . . . . . . . . . . . . . 338
Last updated 9/28/2011
Page 9

USING DIRECTOR 11.5
Contents
Models . . . . . . . . . . . . . . . . . . . . . . . . . . . . . . . . . . . . . . . . . . . . . . . . . . . . . . . . . . . . . . . . . . . . . . . . . . . . . . . . . . . . . . . . . . . . . . . . . . . . . . . . . . . . . . 339
Shaders . . . . . . . . . . . . . . . . . . . . . . . . . . . . . . . . . . . . . . . . . . . . . . . . . . . . . . . . . . . . . . . . . . . . . . . . . . . . . . . . . . . . . . . . . . . . . . . . . . . . . . . . . . . . . 344
Textures . . . . . . . . . . . . . . . . . . . . . . . . . . . . . . . . . . . . . . . . . . . . . . . . . . . . . . . . . . . . . . . . . . . . . . . . . . . . . . . . . . . . . . . . . . . . . . . . . . . . . . . . . . . . 351
Groups . . . . . . . . . . . . . . . . . . . . . . . . . . . . . . . . . . . . . . . . . . . . . . . . . . . . . . . . . . . . . . . . . . . . . . . . . . . . . . . . . . . . . . . . . . . . . . . . . . . . . . . . . . . . . . 353
Modifiers . . . . . . . . . . . . . . . . . . . . . . . . . . . . . . . . . . . . . . . . . . . . . . . . . . . . . . . . . . . . . . . . . . . . . . . . . . . . . . . . . . . . . . . . . . . . . . . . . . . . . . . . . . . . 356
Animation modifiers . . . . . . . . . . . . . . . . . . . . . . . . . . . . . . . . . . . . . . . . . . . . . . . . . . . . . . . . . . . . . . . . . . . . . . . . . . . . . . . . . . . . . . . . . . . . . . . . . 361
Motions . . . . . . . . . . . . . . . . . . . . . . . . . . . . . . . . . . . . . . . . . . . . . . . . . . . . . . . . . . . . . . . . . . . . . . . . . . . . . . . . . . . . . . . . . . . . . . . . . . . . . . . . . . . . . 368
About lights and cameras . . . . . . . . . . . . . . . . . . . . . . . . . . . . . . . . . . . . . . . . . . . . . . . . . . . . . . . . . . . . . . . . . . . . . . . . . . . . . . . . . . . . . . . . . . . . 369
Light properties . . . . . . . . . . . . . . . . . . . . . . . . . . . . . . . . . . . . . . . . . . . . . . . . . . . . . . . . . . . . . . . . . . . . . . . . . . . . . . . . . . . . . . . . . . . . . . . . . . . . . 369
Light methods . . . . . . . . . . . . . . . . . . . . . . . . . . . . . . . . . . . . . . . . . . . . . . . . . . . . . . . . . . . . . . . . . . . . . . . . . . . . . . . . . . . . . . . . . . . . . . . . . . . . . . 371
Cameras . . . . . . . . . . . . . . . . . . . . . . . . . . . . . . . . . . . . . . . . . . . . . . . . . . . . . . . . . . . . . . . . . . . . . . . . . . . . . . . . . . . . . . . . . . . . . . . . . . . . . . . . . . . . 372
Collada models . . . . . . . . . . . . . . . . . . . . . . . . . . . . . . . . . . . . . . . . . . . . . . . . . . . . . . . . . . . . . . . . . . . . . . . . . . . . . . . . . . . . . . . . . . . . . . . . . . . . . . 376
Google SketchUp models . . . . . . . . . . . . . . . . . . . . . . . . . . . . . . . . . . . . . . . . . . . . . . . . . . . . . . . . . . . . . . . . . . . . . . . . . . . . . . . . . . . . . . . . . . . . 377
Chapter 18: Controlling the 3D World
Introduction . . . . . . . . . . . . . . . . . . . . . . . . . . . . . . . . . . . . . . . . . . . . . . . . . . . . . . . . . . . . . . . . . . . . . . . . . . . . . . . . . . . . . . . . . . . . . . . . . . . . . . . . 380
3D Lingo or JavaScript syntax events . . . . . . . . . . . . . . . . . . . . . . . . . . . . . . . . . . . . . . . . . . . . . . . . . . . . . . . . . . . . . . . . . . . . . . . . . . . . . . . . . 380
Collisions . . . . . . . . . . . . . . . . . . . . . . . . . . . . . . . . . . . . . . . . . . . . . . . . . . . . . . . . . . . . . . . . . . . . . . . . . . . . . . . . . . . . . . . . . . . . . . . . . . . . . . . . . . . 381
Vector math . . . . . . . . . . . . . . . . . . . . . . . . . . . . . . . . . . . . . . . . . . . . . . . . . . . . . . . . . . . . . . . . . . . . . . . . . . . . . . . . . . . . . . . . . . . . . . . . . . . . . . . . . 383
Transforms . . . . . . . . . . . . . . . . . . . . . . . . . . . . . . . . . . . . . . . . . . . . . . . . . . . . . . . . . . . . . . . . . . . . . . . . . . . . . . . . . . . . . . . . . . . . . . . . . . . . . . . . . . 384
Rendering functionality . . . . . . . . . . . . . . . . . . . . . . . . . . . . . . . . . . . . . . . . . . . . . . . . . . . . . . . . . . . . . . . . . . . . . . . . . . . . . . . . . . . . . . . . . . . . . . 388
ix
Chapter 19: Movies in a Window
Introduction . . . . . . . . . . . . . . . . . . . . . . . . . . . . . . . . . . . . . . . . . . . . . . . . . . . . . . . . . . . . . . . . . . . . . . . . . . . . . . . . . . . . . . . . . . . . . . . . . . . . . . . . 394
About MIAWs . . . . . . . . . . . . . . . . . . . . . . . . . . . . . . . . . . . . . . . . . . . . . . . . . . . . . . . . . . . . . . . . . . . . . . . . . . . . . . . . . . . . . . . . . . . . . . . . . . . . . . . 394
Creating or declaring a MIAW . . . . . . . . . . . . . . . . . . . . . . . . . . . . . . . . . . . . . . . . . . . . . . . . . . . . . . . . . . . . . . . . . . . . . . . . . . . . . . . . . . . . . . . . 395
Opening and closing a MIAW . . . . . . . . . . . . . . . . . . . . . . . . . . . . . . . . . . . . . . . . . . . . . . . . . . . . . . . . . . . . . . . . . . . . . . . . . . . . . . . . . . . . . . . . 395
Setting the window size and location for a MIAW . . . . . . . . . . . . . . . . . . . . . . . . . . . . . . . . . . . . . . . . . . . . . . . . . . . . . . . . . . . . . . . . . . . . . 396
Controlling the appearance of a MIAW . . . . . . . . . . . . . . . . . . . . . . . . . . . . . . . . . . . . . . . . . . . . . . . . . . . . . . . . . . . . . . . . . . . . . . . . . . . . . . 397
Controlling MIAW layering . . . . . . . . . . . . . . . . . . . . . . . . . . . . . . . . . . . . . . . . . . . . . . . . . . . . . . . . . . . . . . . . . . . . . . . . . . . . . . . . . . . . . . . . . . . 400
MIAW events . . . . . . . . . . . . . . . . . . . . . . . . . . . . . . . . . . . . . . . . . . . . . . . . . . . . . . . . . . . . . . . . . . . . . . . . . . . . . . . . . . . . . . . . . . . . . . . . . . . . . . . . 400
Listing the current MIAWs . . . . . . . . . . . . . . . . . . . . . . . . . . . . . . . . . . . . . . . . . . . . . . . . . . . . . . . . . . . . . . . . . . . . . . . . . . . . . . . . . . . . . . . . . . . 401
Controlling interaction between MIAWs . . . . . . . . . . . . . . . . . . . . . . . . . . . . . . . . . . . . . . . . . . . . . . . . . . . . . . . . . . . . . . . . . . . . . . . . . . . . . . 401
Chapter 20: Using Xtras
Using the XML Parser Xtra . . . . . . . . . . . . . . . . . . . . . . . . . . . . . . . . . . . . . . . . . . . . . . . . . . . . . . . . . . . . . . . . . . . . . . . . . . . . . . . . . . . . . . . . . . . 403
Using the MUI Xtra . . . . . . . . . . . . . . . . . . . . . . . . . . . . . . . . . . . . . . . . . . . . . . . . . . . . . . . . . . . . . . . . . . . . . . . . . . . . . . . . . . . . . . . . . . . . . . . . . . 409
Using the Physics (Dynamiks) Xtra . . . . . . . . . . . . . . . . . . . . . . . . . . . . . . . . . . . . . . . . . . . . . . . . . . . . . . . . . . . . . . . . . . . . . . . . . . . . . . . . . . . 419
Chapter 21: Making Director Movies Accessible
Introduction . . . . . . . . . . . . . . . . . . . . . . . . . . . . . . . . . . . . . . . . . . . . . . . . . . . . . . . . . . . . . . . . . . . . . . . . . . . . . . . . . . . . . . . . . . . . . . . . . . . . . . . . 425
Using the Accessibility Behavior library . . . . . . . . . . . . . . . . . . . . . . . . . . . . . . . . . . . . . . . . . . . . . . . . . . . . . . . . . . . . . . . . . . . . . . . . . . . . . . . 425
Accessibility scripting with Lingo or JavaScript syntax . . . . . . . . . . . . . . . . . . . . . . . . . . . . . . . . . . . . . . . . . . . . . . . . . . . . . . . . . . . . . . . . 430
Deploying accessible movies . . . . . . . . . . . . . . . . . . . . . . . . . . . . . . . . . . . . . . . . . . . . . . . . . . . . . . . . . . . . . . . . . . . . . . . . . . . . . . . . . . . . . . . . 432
Chapter 22: Managing Memory
About managing memory . . . . . . . . . . . . . . . . . . . . . . . . . . . . . . . . . . . . . . . . . . . . . . . . . . . . . . . . . . . . . . . . . . . . . . . . . . . . . . . . . . . . . . . . . . . 434
How Director unloads items from memory . . . . . . . . . . . . . . . . . . . . . . . . . . . . . . . . . . . . . . . . . . . . . . . . . . . . . . . . . . . . . . . . . . . . . . . . . . . 434
Last updated 9/28/2011
Page 10

USING DIRECTOR 11.5
Contents
Loading and unloading individual cast members . . . . . . . . . . . . . . . . . . . . . . . . . . . . . . . . . . . . . . . . . . . . . . . . . . . . . . . . . . . . . . . . . . . . . 435
Preloading digital video . . . . . . . . . . . . . . . . . . . . . . . . . . . . . . . . . . . . . . . . . . . . . . . . . . . . . . . . . . . . . . . . . . . . . . . . . . . . . . . . . . . . . . . . . . . . . 436
Chapter 23: Managing and Testing Director Projects
Managing Director projects . . . . . . . . . . . . . . . . . . . . . . . . . . . . . . . . . . . . . . . . . . . . . . . . . . . . . . . . . . . . . . . . . . . . . . . . . . . . . . . . . . . . . . . . . 437
About testing movies to avoid problems . . . . . . . . . . . . . . . . . . . . . . . . . . . . . . . . . . . . . . . . . . . . . . . . . . . . . . . . . . . . . . . . . . . . . . . . . . . . . 438
Printing movies . . . . . . . . . . . . . . . . . . . . . . . . . . . . . . . . . . . . . . . . . . . . . . . . . . . . . . . . . . . . . . . . . . . . . . . . . . . . . . . . . . . . . . . . . . . . . . . . . . . . . 439
Resources . . . . . . . . . . . . . . . . . . . . . . . . . . . . . . . . . . . . . . . . . . . . . . . . . . . . . . . . . . . . . . . . . . . . . . . . . . . . . . . . . . . . . . . . . . . . . . . . . . . . . . . . . . . 440
Chapter 24: Packaging Movies for Distribution
Introduction . . . . . . . . . . . . . . . . . . . . . . . . . . . . . . . . . . . . . . . . . . . . . . . . . . . . . . . . . . . . . . . . . . . . . . . . . . . . . . . . . . . . . . . . . . . . . . . . . . . . . . . . 441
About distributing movies . . . . . . . . . . . . . . . . . . . . . . . . . . . . . . . . . . . . . . . . . . . . . . . . . . . . . . . . . . . . . . . . . . . . . . . . . . . . . . . . . . . . . . . . . . . 441
Shockwave player browser compatibility . . . . . . . . . . . . . . . . . . . . . . . . . . . . . . . . . . . . . . . . . . . . . . . . . . . . . . . . . . . . . . . . . . . . . . . . . . . . . 442
Using the lingo.ini file to run startup scripts . . . . . . . . . . . . . . . . . . . . . . . . . . . . . . . . . . . . . . . . . . . . . . . . . . . . . . . . . . . . . . . . . . . . . . . . . . 442
Previewing a movie in a browser . . . . . . . . . . . . . . . . . . . . . . . . . . . . . . . . . . . . . . . . . . . . . . . . . . . . . . . . . . . . . . . . . . . . . . . . . . . . . . . . . . . . . 442
About Xtra extensions . . . . . . . . . . . . . . . . . . . . . . . . . . . . . . . . . . . . . . . . . . . . . . . . . . . . . . . . . . . . . . . . . . . . . . . . . . . . . . . . . . . . . . . . . . . . . . . 443
Managing Xtra extensions for distributed movies . . . . . . . . . . . . . . . . . . . . . . . . . . . . . . . . . . . . . . . . . . . . . . . . . . . . . . . . . . . . . . . . . . . . . 444
About Distribution formats . . . . . . . . . . . . . . . . . . . . . . . . . . . . . . . . . . . . . . . . . . . . . . . . . . . . . . . . . . . . . . . . . . . . . . . . . . . . . . . . . . . . . . . . . . 445
Creating Shockwave content . . . . . . . . . . . . . . . . . . . . . . . . . . . . . . . . . . . . . . . . . . . . . . . . . . . . . . . . . . . . . . . . . . . . . . . . . . . . . . . . . . . . . . . . 446
Using default Publish settings . . . . . . . . . . . . . . . . . . . . . . . . . . . . . . . . . . . . . . . . . . . . . . . . . . . . . . . . . . . . . . . . . . . . . . . . . . . . . . . . . . . . . . . 446
Changing Publish settings . . . . . . . . . . . . . . . . . . . . . . . . . . . . . . . . . . . . . . . . . . . . . . . . . . . . . . . . . . . . . . . . . . . . . . . . . . . . . . . . . . . . . . . . . . . 447
Using dswmedia folders and the support folder to publish Shockwave content . . . . . . . . . . . . . . . . . . . . . . . . . . . . . . . . . . . . . . . . 454
Using linked media when testing Shockwave content . . . . . . . . . . . . . . . . . . . . . . . . . . . . . . . . . . . . . . . . . . . . . . . . . . . . . . . . . . . . . . . . 455
Converting movies created in previous versions of Director . . . . . . . . . . . . . . . . . . . . . . . . . . . . . . . . . . . . . . . . . . . . . . . . . . . . . . . . . . . 455
About projectors . . . . . . . . . . . . . . . . . . . . . . . . . . . . . . . . . . . . . . . . . . . . . . . . . . . . . . . . . . . . . . . . . . . . . . . . . . . . . . . . . . . . . . . . . . . . . . . . . . . . 458
Creating projectors . . . . . . . . . . . . . . . . . . . . . . . . . . . . . . . . . . . . . . . . . . . . . . . . . . . . . . . . . . . . . . . . . . . . . . . . . . . . . . . . . . . . . . . . . . . . . . . . . . 458
About cross-platform projectors . . . . . . . . . . . . . . . . . . . . . . . . . . . . . . . . . . . . . . . . . . . . . . . . . . . . . . . . . . . . . . . . . . . . . . . . . . . . . . . . . . . . . 460
Processing movies with Update Movies . . . . . . . . . . . . . . . . . . . . . . . . . . . . . . . . . . . . . . . . . . . . . . . . . . . . . . . . . . . . . . . . . . . . . . . . . . . . . . 461
Exporting digital video and frame-by-frame bitmaps . . . . . . . . . . . . . . . . . . . . . . . . . . . . . . . . . . . . . . . . . . . . . . . . . . . . . . . . . . . . . . . . . 462
Setting QuickTime export options . . . . . . . . . . . . . . . . . . . . . . . . . . . . . . . . . . . . . . . . . . . . . . . . . . . . . . . . . . . . . . . . . . . . . . . . . . . . . . . . . . . 463
About organizing movie files . . . . . . . . . . . . . . . . . . . . . . . . . . . . . . . . . . . . . . . . . . . . . . . . . . . . . . . . . . . . . . . . . . . . . . . . . . . . . . . . . . . . . . . . 464
x
Chapter 25: Using Shockwave Player
About Shockwave Player . . . . . . . . . . . . . . . . . . . . . . . . . . . . . . . . . . . . . . . . . . . . . . . . . . . . . . . . . . . . . . . . . . . . . . . . . . . . . . . . . . . . . . . . . . . . 466
Streaming movies . . . . . . . . . . . . . . . . . . . . . . . . . . . . . . . . . . . . . . . . . . . . . . . . . . . . . . . . . . . . . . . . . . . . . . . . . . . . . . . . . . . . . . . . . . . . . . . . . . . 466
About network operations . . . . . . . . . . . . . . . . . . . . . . . . . . . . . . . . . . . . . . . . . . . . . . . . . . . . . . . . . . . . . . . . . . . . . . . . . . . . . . . . . . . . . . . . . . . 467
Setting movie playback options . . . . . . . . . . . . . . . . . . . . . . . . . . . . . . . . . . . . . . . . . . . . . . . . . . . . . . . . . . . . . . . . . . . . . . . . . . . . . . . . . . . . . . 467
Setting Shockwave playback options . . . . . . . . . . . . . . . . . . . . . . . . . . . . . . . . . . . . . . . . . . . . . . . . . . . . . . . . . . . . . . . . . . . . . . . . . . . . . . . . . 468
About creating multiuser applications . . . . . . . . . . . . . . . . . . . . . . . . . . . . . . . . . . . . . . . . . . . . . . . . . . . . . . . . . . . . . . . . . . . . . . . . . . . . . . . 469
About streaming with the Score and behaviors . . . . . . . . . . . . . . . . . . . . . . . . . . . . . . . . . . . . . . . . . . . . . . . . . . . . . . . . . . . . . . . . . . . . . . . 469
Checking whether media elements are loaded with Lingo or Java Script syntax . . . . . . . . . . . . . . . . . . . . . . . . . . . . . . . . . . . . . . . . 470
Downloading files from the Internet with Lingo or JavaScript syntax . . . . . . . . . . . . . . . . . . . . . . . . . . . . . . . . . . . . . . . . . . . . . . . . . . 470
Retrieving network operation results with Lingo or JavaScript syntax . . . . . . . . . . . . . . . . . . . . . . . . . . . . . . . . . . . . . . . . . . . . . . . . . 473
Using Lingo or JavaScript syntax in different Internet environments . . . . . . . . . . . . . . . . . . . . . . . . . . . . . . . . . . . . . . . . . . . . . . . . . . . 473
Testing your movie . . . . . . . . . . . . . . . . . . . . . . . . . . . . . . . . . . . . . . . . . . . . . . . . . . . . . . . . . . . . . . . . . . . . . . . . . . . . . . . . . . . . . . . . . . . . . . . . . . 476
Last updated 9/28/2011
Page 11

USING DIRECTOR 11.5
Contents
Cross-domain policy . . . . . . . . . . . . . . . . . . . . . . . . . . . . . . . . . . . . . . . . . . . . . . . . . . . . . . . . . . . . . . . . . . . . . . . . . . . . . . . . . . . . . . . . . . . . . . . . . 476
About downloading speed . . . . . . . . . . . . . . . . . . . . . . . . . . . . . . . . . . . . . . . . . . . . . . . . . . . . . . . . . . . . . . . . . . . . . . . . . . . . . . . . . . . . . . . . . . 478
Index ...............................................................................................................479
xi
Last updated 9/28/2011
Page 12

Chapter 1: Getting started
If you haven’t installed your new software, begin by reading some information on installation and other preliminaries.
Before you begin working with your software, take a few moments to read an overview of Adobe® Help and of the many
resources available to users. You have access to instructional videos, plug-ins, templates, user communities, seminars,
tutorials, RSS feeds, and much more.
Installation
Requirements
❖ To review complete system requirements and recommendations for your Adobe® software, see the Read Me file on
the installation disc.
Install the software
1 Close any other Adobe applications open on your computer.
2 Insert the installation disc into your disc drive, and follow the onscreen instructions.
Note: For more information, see the Read Me file on the installation disc.
1
Activate the software
If you have a single-user retail license for your Adobe software, you will be asked to activate your software; this is a
simple, anonymous process that you must complete within 30 days of starting the software.
For more information on product activation, see the Read Me file on your installation CD, or visit the Adobe website
www.adobe.com/go/activation.
at
1 If the Activation dialog box isn't already open, choose Help > Activate.
2 Follow the onscreen instructions.
Note: If you want to install the software on a different computer, you must first deactivate it on your computer. Choose
Help > Deactivate.
Register
Register your product to receive complimentary installation support, notifications of updates, and other services.
❖ To register, follow the onscreen instructions in the Registration dialog box, which appears after you install and
activate the software.
If you postpone registration, you can register at any time by choosing Help > Registration.
Last updated 9/28/2011
Page 13

USING DIRECTOR 11.5
Getting started
Read Me
The installation disc contains the Read Me file for your software. (This file is also copied to the application folder
during product installation.) Open the file to read important information about topics such as the following:
• System requirements
• Installation (including uninstalling the software)
• Activation and registration
• Font installation
• Troubleshooting
• Customer support
• Legal notices
Adobe Help
Adobe Help resources
Documentation for your Adobe software is available in a variety of formats.
2
In-product and Web Help
In-product Help provides access to all documentation and instructional content available at the time the software
ships. It is available through the Help menu in your Adobe software.
Web Help includes all the content from in-product Help, plus updates and links to additional instructional content
available on the web. Find Web Help for your product in the Adobe Help Resource Center, at
www.adobe.com/go/documentation.
Think of Help, both in the product and on the web, as a hub for accessing additional content and communities of users.
The most complete and up-to-date version of Help is always on the web.
Adobe PDF documentation
The in-product Help is also available as an Adobe PDF that is optimized for printing. Other documents, such as
installation guides and white papers, may also be provided as PDFs.
All PDF documentation is available through the Adobe Help Resource Center at www.adobe.com/go/documentation.
To see the PDF documentation included with your software, look in the Documents folder on the installation or
content DVD.
Resources
Extras
You have access to a wide variety of resources that will help you make the most of your Adobe software. Some of these
resources are installed on your computer during the setup process; additional helpful samples and documents are
included on the installation or content disc. Unique extras are also offered online by the Adobe Exchange community
www.adobe.com/go/exchange.
at
Last updated 9/28/2011
Page 14

USING DIRECTOR 11.5
Getting started
Installed resources
During software installation, a number of resources are placed in your application folder. To view those files, navigate
to the application folder on your computer.
• Windows®: [startup drive]\Program Files\Adobe\[Adobe application]
• Mac OS®: [startup drive]/Applications/[Adobe application]
Samples Sample files include more complicated designs and are a great way to see new features in action. These files
demonstrate the range of creative possibilities available to you.
DVD content
The installation or content DVD included with your product contains additional resources for use with your software.
Adobe Exchange
For more free content, visit www.adobe.com/go/exchange, an online community where users download and share
thousands of free actions, extensions, plug-ins, and other content for use with Adobe products.
Adobe Design Center
Adobe Design Center offers articles, inspiration, and instruction from industry experts, top designers, and Adobe
publishing partners. New content is added monthly.
3
You can find hundreds of tutorials for design products and learn tips and techniques through videos, HTML tutorials,
and sample book chapters.
New ideas are the heart of Think Tank, Dialog Box, and Gallery:
• Think Tank articles consider how today’s designers engage with technology and what their experiences mean for
design, design tools, and society.
• In Dialog Box, experts share new ideas in motion graphics and digital design.
• The Gallery showcases how artists communicate design in motion.
Visit Adobe Design Center at www.adobe.com/designcenter.
Adobe Developer Center
Adobe Developer Center provides samples, tutorials, articles, and community resources for developers who build rich
Internet applications, websites, mobile content, and other projects using Adobe products. The Developer Center also
contains resources for developers who develop plug-ins for Adobe products.
In addition to sample code and tutorials, you'll find RSS feeds, online seminars, SDKs, scripting guides, and other
technical resources.
Visit Adobe Developer Center at www.adobe.com/go/developer.
Customer support
Visit the Adobe Support website (www.adobe.com/go/support) to find troubleshooting information for your product
and to learn about free and paid technical support options. Follow the Training link for access to Adobe Press books,
a variety of training resources, Adobe software certification programs, and more.
Last updated 9/28/2011
Page 15

USING DIRECTOR 11.5
Getting started
Downloads
Visit www.adobe.com/go/downloads to find free updates, tryouts, and other useful software. In addition, the
Adobe Store (www.adobe.com/go/store) provides access to thousands of plug-ins from third-party developers,
helping you to automate tasks, customize workflows, create specialized professional effects, and more.
Samples
Samples (.dir Files) that demonstrate various features in Director are included as part of the product DVD under the
Goodies section. The following samples are also installed in the Director installation directory under /Adobe Director
11/Configuration/Tutorials/
• The 3dSave_w3dTextureEditor.dir file demonstrates 3D textures. Load any w3d file, modify the texture properties,
and save it using the
• The Rigid Body Proxy Shapes.dir file demonstrates 3D Physics. The various rigid body shapes that can be created
are demonstrated in this sample.
createRigidBody() Creates #dynamic and #static rigid bodies.
createProxyTemplate() Creates a proxy template ( a pre-computed proxy that can be saved and used later ) based
on the model resource.
addProxyTemplate() Adds the created proxy to a specified 3d world that you can use later.
savew3d(filename) method .
4
loadProxyTemplate() Loads the proxy that was saved earlier in the 3d world; returns a handler for the proxy loaded
from the 3d world.
createRigidbodyFromProxy() Creates #dynamic and #static concave rigid bodies from the proxy templates.
The movie also demonstrates visualizing the created proxy using rb.properties of the rigid body.
• The resources that you require for the following tutorials are available in the Proudct Resources section at
http://www.adobe.com/support/documentation/en/director.
This tutorial requires the following movies:
• Magic_start.dir
• Magic_finished.dir
• Basic_Finished.dir
• Basic_Start.dir
Adobe Labs
Adobe Labs gives you the opportunity to experience and evaluate new and emerging technologies and products from
Adobe.
At Adobe Labs, you have access to resources such as these:
• Prerelease software and technologies
• Code samples and best practices to accelerate your learning
• Early versions of product and technical documentation
• Forums, wiki-based content, and other collaborative resources to help you interact with like-minded developers
Last updated 9/28/2011
Page 16

USING DIRECTOR 11.5
Getting started
Adobe Labs fosters a collaborative software development process. In this environment, customers quickly become
productive with new products and technologies. Adobe Labs is also a forum for early feedback, which the Adobe
development teams use to create software that meets the needs and expectations of the community.
Visit Adobe Labs at www.adobe.com/go/labs.
User communities
User communities feature forums, blogs, and other avenues for users to share technologies, tools, and information.
Users can ask questions and find out how others are getting the most out of their software. User-to-user forums are
available in English, French, German, and Japanese; blogs are posted in a wide range of languages.
To participate in forums or blogs, visit www.adobe.com/communities.
What's new
Adobe® Director® 11.5.8 software and Adobe Shockwave® Player help you create and publish compelling interactive
experiences for the Internet, Mac OS® and Windows® platforms, DVDs, and CDs.
5
Top new features of Adobe Director 11.5.9
Parallax mapping Parallax mapping is an enhancement of Normal/Bump Mapping technique. This technique
provides more apparent depth and greater realism with less impact on the performance. For more information, see
Parallax Mapping.
Cube mapping Cube mapping is a method of using a six-sided cube as the shape of the map. The model is projected
onto the six faces of a cube and stored as six square textures, or unfolded into six regions of a single texture. For more
information, see Cube Mapping.
Normal mapping Normal mapping is a technique used for showing finer details like lighting of bumps and dents
without using additional polygons. For more information, see Normal Mapping.
Render to texture Render Textures are textures that are created and updated at runtime. For more information, see
Render Texture.
Importing Collada models Adobe Director now provides support for importing Collada-based models. For more
information, see
Collada models.
Top new features of Adobe Director 11.5.8
Character Controller capabilities Make your games with a finer control of characters and rigid bodies and make all of
them interact with each other. For more information, see Character Controller methods.
Cloth simulation capabilities Start using the cloth simulation techniques to incorporate flags and banners in your
game. For more information, see Cloth methods.
Cross domain policy enhancements Cross-domain policy changes have been made in Adobe Director to support
media-based cross-domain checks for the Flash cast members.
A new flash cast member property cdpCheckMode has been made available, which can be set to either
#useMediaPolicy (to use the Flash player's cross-domain checks) or #useSWPolicy (to use the Shockwave player's
cross-domain checks).
Last updated 9/28/2011
Page 17

USING DIRECTOR 11.5
Getting started
For more information, see Cross-domain policy.
3D Hardware Anti-aliasing In Adobe Director, for hardware anti-aliasing support in Shockwave 3D asset,
antiAliasingMode property can be set for anti-aliasing the 3D Sprites. For more information, see antiAliasingMode.
Improvements in audio compression Audio compression properties have been added in the Publish dialog settings.
The supported format for audio compression is:
• Wav files 8-bit, 16-bit with (22050, 44100, or 48000) Hz frequency-mono or stereo.
Support for Flash Player 10/ActionScript 3 movies You can import all your Flash ActionScript 3 swf files into Adobe
Director as cast members. The following new APIs have been introduced:
• newProxyCallback()
• stage (Flash Sprite property)
Support for Flex/FlashBuilder The swf files produced from Flex Builder 3 and Flash Builder 4 can be imported into
Adobe Director as cast members.
Mac 64-bit support for Shockwave Players Safari 4.x is available as a universal binary application, which has support
for x86_64. Snow Leopard (10.6.x) has native support for 64-bit applications. Hence, when you launch an application,
the application is launched in an x86_64 mode if the application has support for that mode. Adobe Director now
supports running the Shockwave player in a 64-bit Safari browser.
6
Top new features of Adobe Director 11.5
Enriched audio capabilities Make your games sound as real as they look with 5.1-channel surround sound, real-time
mixing, audio effects, and DSP filters. For more information, see
Enhanced video capabilities Enhance your user’s multimedia experience using H.264-video integration that provides
full-screen, high-definition video in multimedia applications and games. For more information, see
Video” on page 253.
New 3D importer for SketchUp Rapidly create rich 3D environments using the many ready-made 3D models available
through Google SketchUp. For more information, see
Streaming support Stream audio and video over the Internet using RTMP support. For more information, see
“Google SketchUp models” on page 377.
“Streaming members” on page 254.
New data type Access and manipulate binary data using the ByteArray data type. For more information, see the
What’s New With Director Scripting section of the Scripting Dictionary.
Enhanced physics engine Support for dynamic concave rigid bodies. For more information, see “Dynamic concave
rigid bodies” on page 421.
Enhanced productivity Support for multiple undo/redo operations. For more information, see “Undo multiple
actions” on page 9.
Cross domain policy For more information, see “Cross-domain policy” on page 476.
Enhancements to the text engine
• Open Type Font (OTF) embedding support on Macintosh OS.
• Class-based kerning support.
• Hinting support at a member level. For more information, see “Font hinting” on page 181.
“Audio mixers and sound objects” on page 241.
“Using Digital
Last updated 9/28/2011
Page 18

USING DIRECTOR 11.5
Getting started
Enhancements to platform and browser support
• Macintosh OSX 10.5 (authoring and runtime) support.
• Firefox 3.0 support.
For more information, see the Read Me file.
7
Last updated 9/28/2011
Page 19

Chapter 2: Workspace
Introduction
The Adobe® Director® workspace is designed to make the most efficient use of the space on your screen. Windows, also
called panels, can be organized into tabbed panel groups, and panel groups can be docked together. To make the most
of the features in Director, you should take a few minutes to understand how to navigate and customize your
workspace.
As you get to know the workspace, you will also learn about the features that Director has to offer. For example,
learning about the Script window and the Message window can help those who are new to scripting in Director. If you
have not scripted in Director before and would like to start, be sure to read about the Script window and the Message
window.
Before you begin working in Director for the first time, you should also understand the movie metaphor that Director
is based on. By understanding this metaphor, you can more easily recognize components of your workspace, such as
the Stage and Cast window.
8
User Interface enhancements
The following enhancements have been made to the user interface in Director 11.
• Tabbed layout in the center docking channel. Document windows appear as separate tabs in the center docking
channel. Stage, Score, and all media editors are the default document windows. The Stage and Score windows can
be docked together by pressing Ctrl and then dropping the Score window over the Stage window.
• Floating and unfloating windows. The Float and Unfloat options in the Options menu enable you to float or
unfloat a tool window.
Floating windows are tool windows that can be grouped with other tool windows but cannot be grouped with any
document windows.
Unfloated tool windows are document windows that layer with, and can be docked with other unfloated tool
windows.
• Message and Cast Windows as tool windows. By default, the Message and Cast windows appear as tool windows.
As floating windows, they can be also be docked in the docking channels. You can convert them to document
windows by using the Unfloat option.
• The Stage and Score panels can be docked together. The location of the Score in relation to the Stage can now be
customized. The splitter bar can be used to resize the Stage and Score. The Score can also be undocked from the
Stage and placed in separate windows (when not in maximized tab view mode) or tabs (in maximized tab view
mode). To place them in separate tabs, exit the maximized tabbed view, undock the Stage and Score, and return to
the maximized tabbed view.
• Media editors are no longer grouped. New media editors appear as separate tabs in the maximized tabbed view.
Windows users can add new tabs for a media editor by clicking the Plus button.
Last updated 9/28/2011
Page 20

USING DIRECTOR 11.5
Workspace
• Exiting and re-entering the tabbed view. Windows®’ users can exit the tabbed document mode by clicking the
Restore button. Mac® users can use the Break Apart Tabbed Documents option in the Window menu to enter into
the untabbed mode, where all the tabs from the tabbed document window are split up into separate windows. To
re-enter the tabbed mode, Windows users click the maximize box on any document window, and Mac users use
the Tab Documents Together option in the Window menu. If the Score and Stage are docked together in the
maximized tabbed view, they will continue to be docked even after you exit that mode.
• The debugger is now a separate window from the script window. When you open the debugger window and click
the Stage in the maximized tabbed view, the debugger window is relocated to the back of the Stage. It can be brought
to front by using the shortcut Ctrl+F11 or Cmd+F11.
• Collapsing a panel. To collapse a panel, you have to click the title of the panel, unlike in previous versions where
clicking on any portion of the title bar collapsed the panel.
• MIAWs are not present in tabs and remain as separate document windows like the debugger. Only MIAWS created
as tool MIAWS can be docked in the docking channels.
• MIAWS behind the Stage can be brought to front using the open() lingo function for MIAWS.
Undo multiple actions
9
Director lets you undo multiple actions in the following windows:
• Script window
• Field window
• Text window
• Paint window
For all other windows, only one level of undo is supported.
Undo actions
Do one of the following:
• Click Edit > Undo Text. Repeat this step as many times as necessary.
• (Windows) Use the Ctrl+Z keyboard shortcut as many times as necessary.
(Mac) Use the Command+Z keyboard shortcut.
Redo undid actions
To reverse the undo operation on one or more actions, do the following:
• Click Edit > Redo Text. Repeat this step as many times as necessary.
• (Windows) Use the Ctrl+Y keyboard shortcut as many times as necessary.
(Mac) Use the Command+Shift+Z keyboard shortcut.
Last updated 9/28/2011
Page 21

USING DIRECTOR 11.5
Workspace
Set undo preferences
Optionally, specify the number of recent actions that you want to be available for the undo operation. The default value
is 25. Do the following:
1 Click Edit > Preferences > General.
2 In the General Preferences dialog box, enter a number in Levels Of Undo.
3 Click OK.
Understanding the Director metaphor
The Director user interface is designed around a movie metaphor. Each project you create can be thought of as a movie,
with a cast of characters, a Score, a Stage where the action takes place, and a director (you, the author). Each media
element that appears in your movie (sound, video, images, text, buttons, and so on) can be thought of as a member of
the movie’s cast. In Director, the Cast window is where you view the list of media elements that appear in your movie.
As with a real movie, each Director movie has a Score. However, the Score of a Director movie contains more than just
music. The Score window in Director contains information about when and where each of the cast members appears
on the Stage. The Score describes the action that happens in the movie.
10
The action in a Director movie takes place in a window called the Stage. To create a Director movie, you add cast
members (media elements) to the Cast window by creating them in Director or importing them. Next, you place them
on the Stage as sprites. A sprite is simply a copy of a cast member that appears on the Stage. Then you refine the actions
of the sprites by editing them on the Stage or in the Score.
Last updated 9/28/2011
Page 22
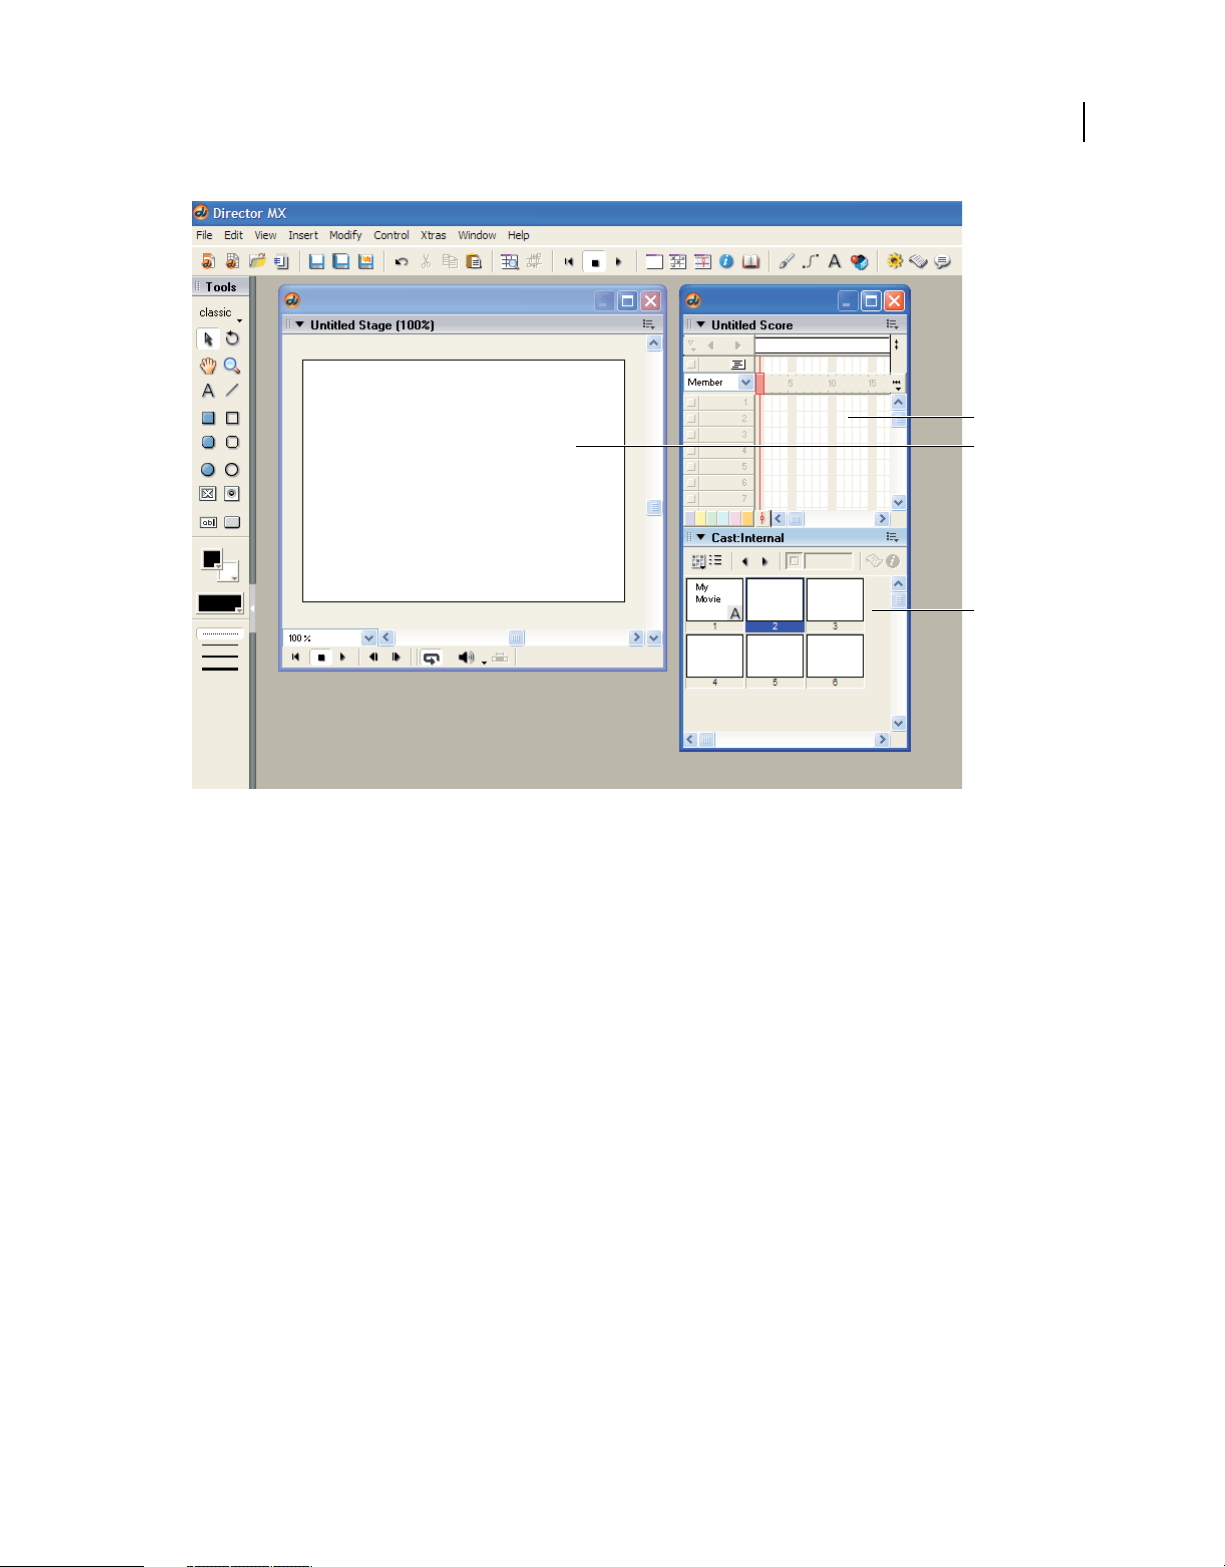
USING DIRECTOR 11.5
Workspace
11
A
B
C
The Cast window, the Stage, and the Score in Director
A. Score B. Stage C. Cast
Navigating the Director workspace
When you first start Director, several windows open in the default workspace. The Tool palette and the Stage are standalone windows. Other windows are docked together. For example, the Score and the Cast window are docked together
by default. In the right docking channel, you can find the Property inspector, along with a group of windows called
Design and another group of windows called Code.
Getting to know the workspace
When creating and editing a basic movie, you typically work in four of the windows that appear in the default
workspace: the Stage, the Score, the Cast window, and the Property inspector. From the Cast window, you import,
create, and edit the cast members (media elements) of your movie. In the Property inspector, you control the
properties of the cast members. With the Score and the Stage, you control how, where, when, and for how long those
media elements appear in your movie.
Last updated 9/28/2011
Page 23
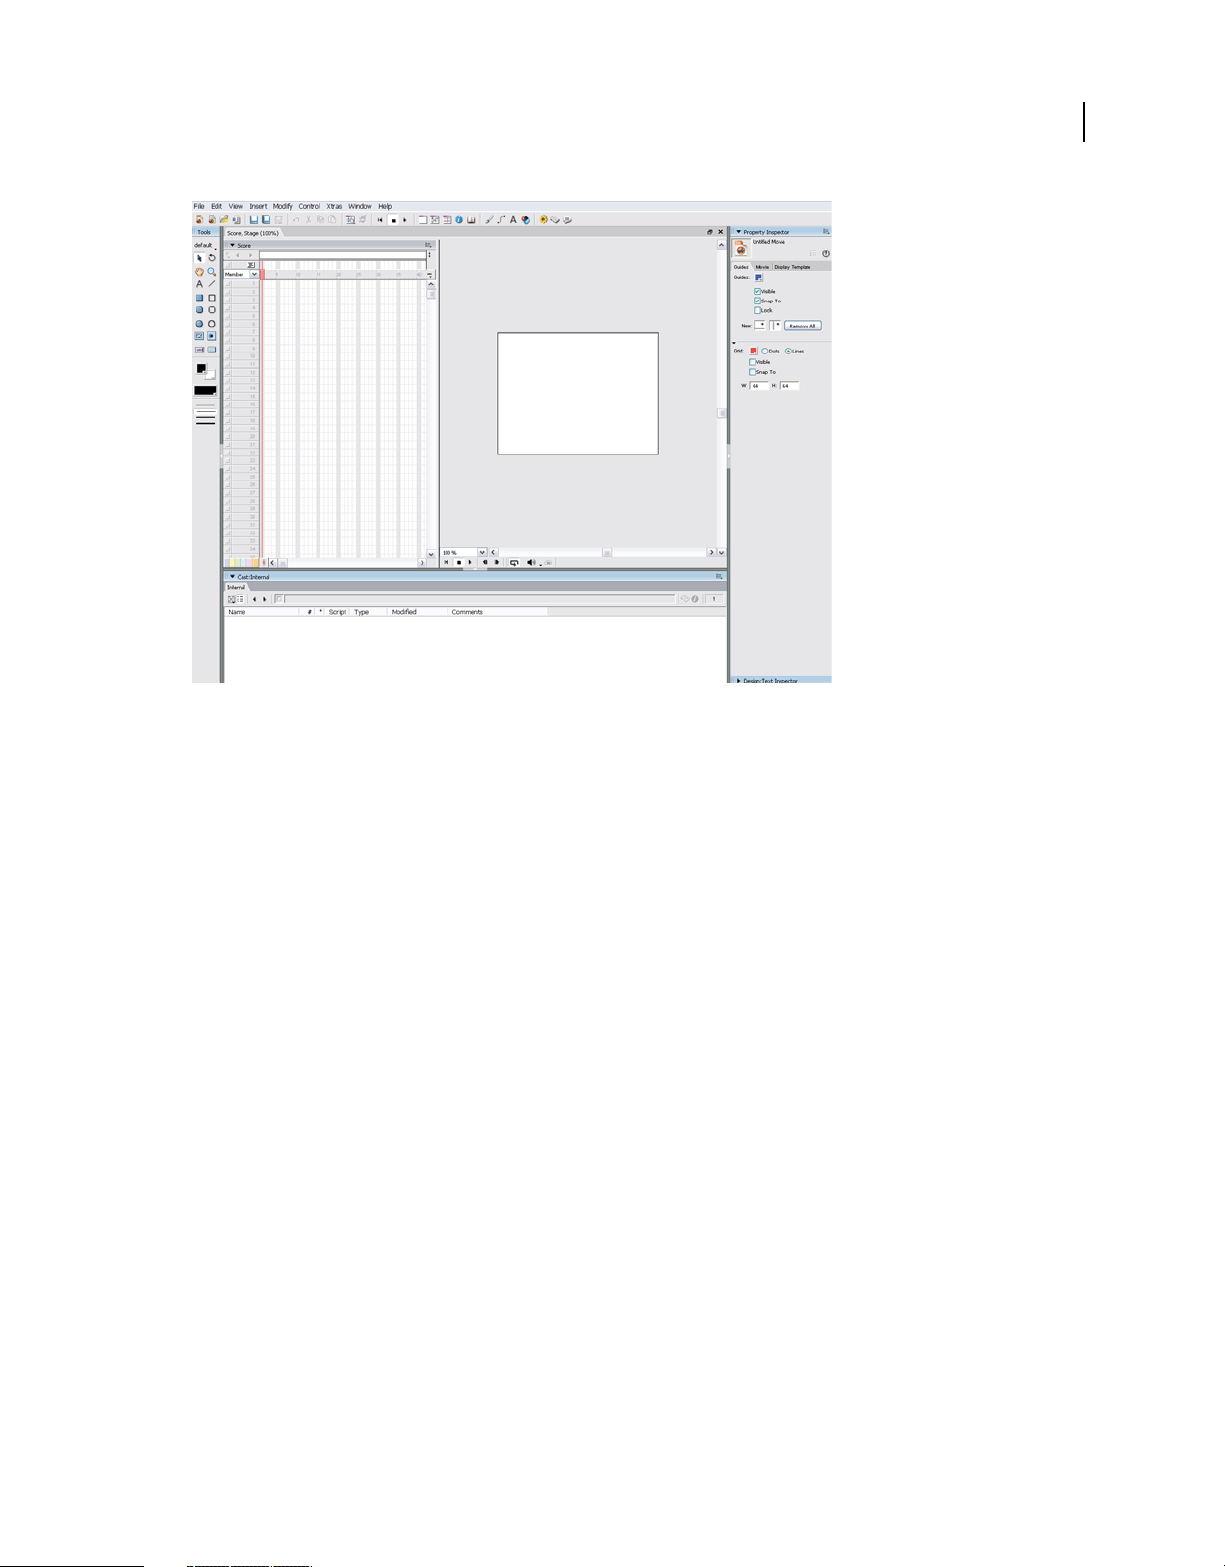
USING DIRECTOR 11.5
Workspace
12
The default Director workspace (Windows platform)
Manipulating the default workspace
The default workspace is designed for most people who are new to using Director. You can manipulate the default
workspace to suit your needs. For example, you can display additional windows as you need them or hide windows to
keep your workspace clean and easy to work with. You can also control how windows display their contents by
changing window preferences.
Display or hide a window
1 Open the Window menu.
2 Select one of the window names. A check mark or bullet mark next to a window name indicates that the window is
currently displayed.
For information on customizing your workspace further, see “Customizing your workspace” on page 24.
Change window preferences
1 Select Edit > Preferences.
2 Select one of the following commands: General, Score, Sprite, Cast, Paint, Editors, or Script.
These commands all open dialog boxes that allow you to modify the behavior of windows. The General command
controls windows in general. Other commands control a specific window or set of windows. (The Network
command is also available, but it does not control window preferences. Rather, it controls Internet connection
settings.)
Getting to know window types
There are two types of windows in Director: document windows and tool windows. You typically use document
windows to create or edit content; you use tool windows to view or modify properties of that content.
Last updated 9/28/2011
Page 24

USING DIRECTOR 11.5
Workspace
For example, the Paint window is a document window that allows you to create and edit images. In contrast, the
Property inspector is a tool window that allows you to change the properties of an image that you created in the Paint
window, and to change properties of other content.
Both types of windows are available from the Window menu.
Document windows include the following:
• Stage
• Score
• Cast
• Various media editors (for example, Text, QuickTime®, and DVD)
Tool windows include the following:
• Property inspector
• Tool palette
• Text inspector
• Control panel
13
Using the Stage
The Stage is the part of a movie that your users will see. You use the Stage to determine where media elements (cast
members) should appear onscreen. When you determine where you want the cast member to appear, you place a copy
of that cast member, called a sprite, on the Stage.
During authoring, you can define the properties of the Stage, such as its size and color. For example, as you work on
your movie, you can make the Stage either larger or smaller than its original size. You can also scale the coordinates
for the sprites on the Stage, so that they continue to fill the entire screen. Guides, grids, and Align and Tweak windows
are available to align sprites on the Stage.
Moving around on the Stage
A large-sized Stage sometimes does not fit in your workspace. If you can see only part of your Stage at one time, you
can move to a different part of the Stage whenever you need to.
1 If the Stage is not already displayed, select Window > Stage.
2 Do one of the following:
• From the Tool palette, select the Hand tool.
• Press and hold the Spacebar.
3 Place the hand on the Stage, and click and drag to move the Stage.
Increasing or decreasing your view of the Stage
You can author in Director on a zoomed Stage—one that is either larger or smaller than the normal size of the movie.
The Stage’s title bar indicates the Stage size, expressed as a percentage of the normal Stage size.
When you change the size of the Stage, any guides or grids used to assist with alignment also scale to the zoomed size,
and you can manipulate sprites in the same way that you would on a Stage that is not zoomed.
Last updated 9/28/2011
Page 25
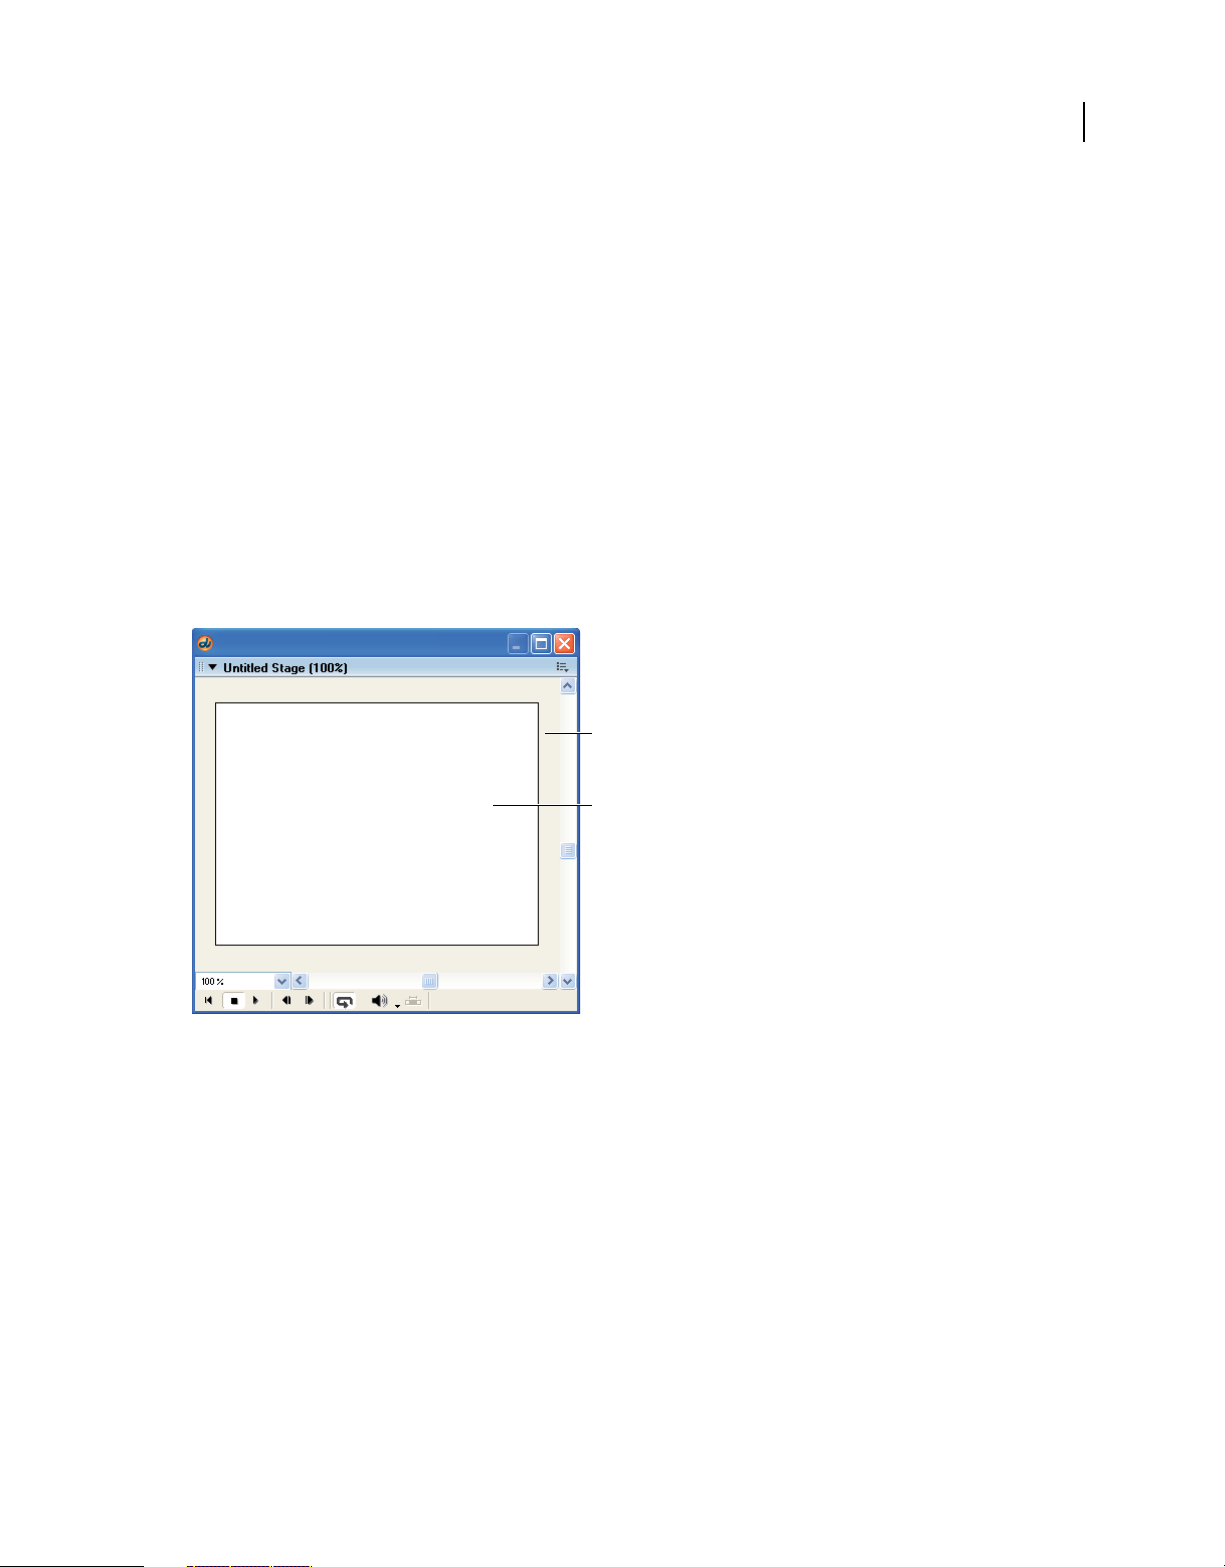
USING DIRECTOR 11.5
Workspace
Zoom in on the Stage
1 From the Tool palette, select the Magnifying Glass tool.
2 Click the Stage until it reaches the desired size.
Zoom out from the Stage
1 From the Tool palette, select the Magnifying Glass tool.
2
Press and hold the Alt key (Windows) or the Option key (Mac), and then click the Stage until it reaches the desired size.
Using the offstage canvas
The Stage includes an offstage canvas area within the Stage window but outside of the active movie area. This canvas
area is useful for assembling your sprites, either before or after they appear on the Stage.
The offstage canvas is also useful as a way to preload content. For example, you can place sprites on the offstage canvas.
There, they are loaded into memory and are ready to play immediately when needed in a subsequent frame of the
movie.
14
A
B
The offstage canvas and the onstage canvas
A. Offstage canvas B. Onstage canvas
Using the Score
Like the Stage, the Score provides a view of your movie. The Stage provides a graphical view. The Score provides a view
of the movie’s timeline. The Stage displays the point in time that is selected within the Score.
The Score organizes and controls a movie’s content over time in rows called channels. The Score includes many Sprite
channels for the movie’s sprites. Sprite channels are numbered and control when sprites appear in the movie.
Additionally, the Score includes effects channels that control the movie’s tempo, sound, color palettes, transitions, and
scripted behaviors.
The Score displays channels in the order shown in the following figure. Only the Sprite channels are displayed by
default.
Last updated 9/28/2011
Page 26
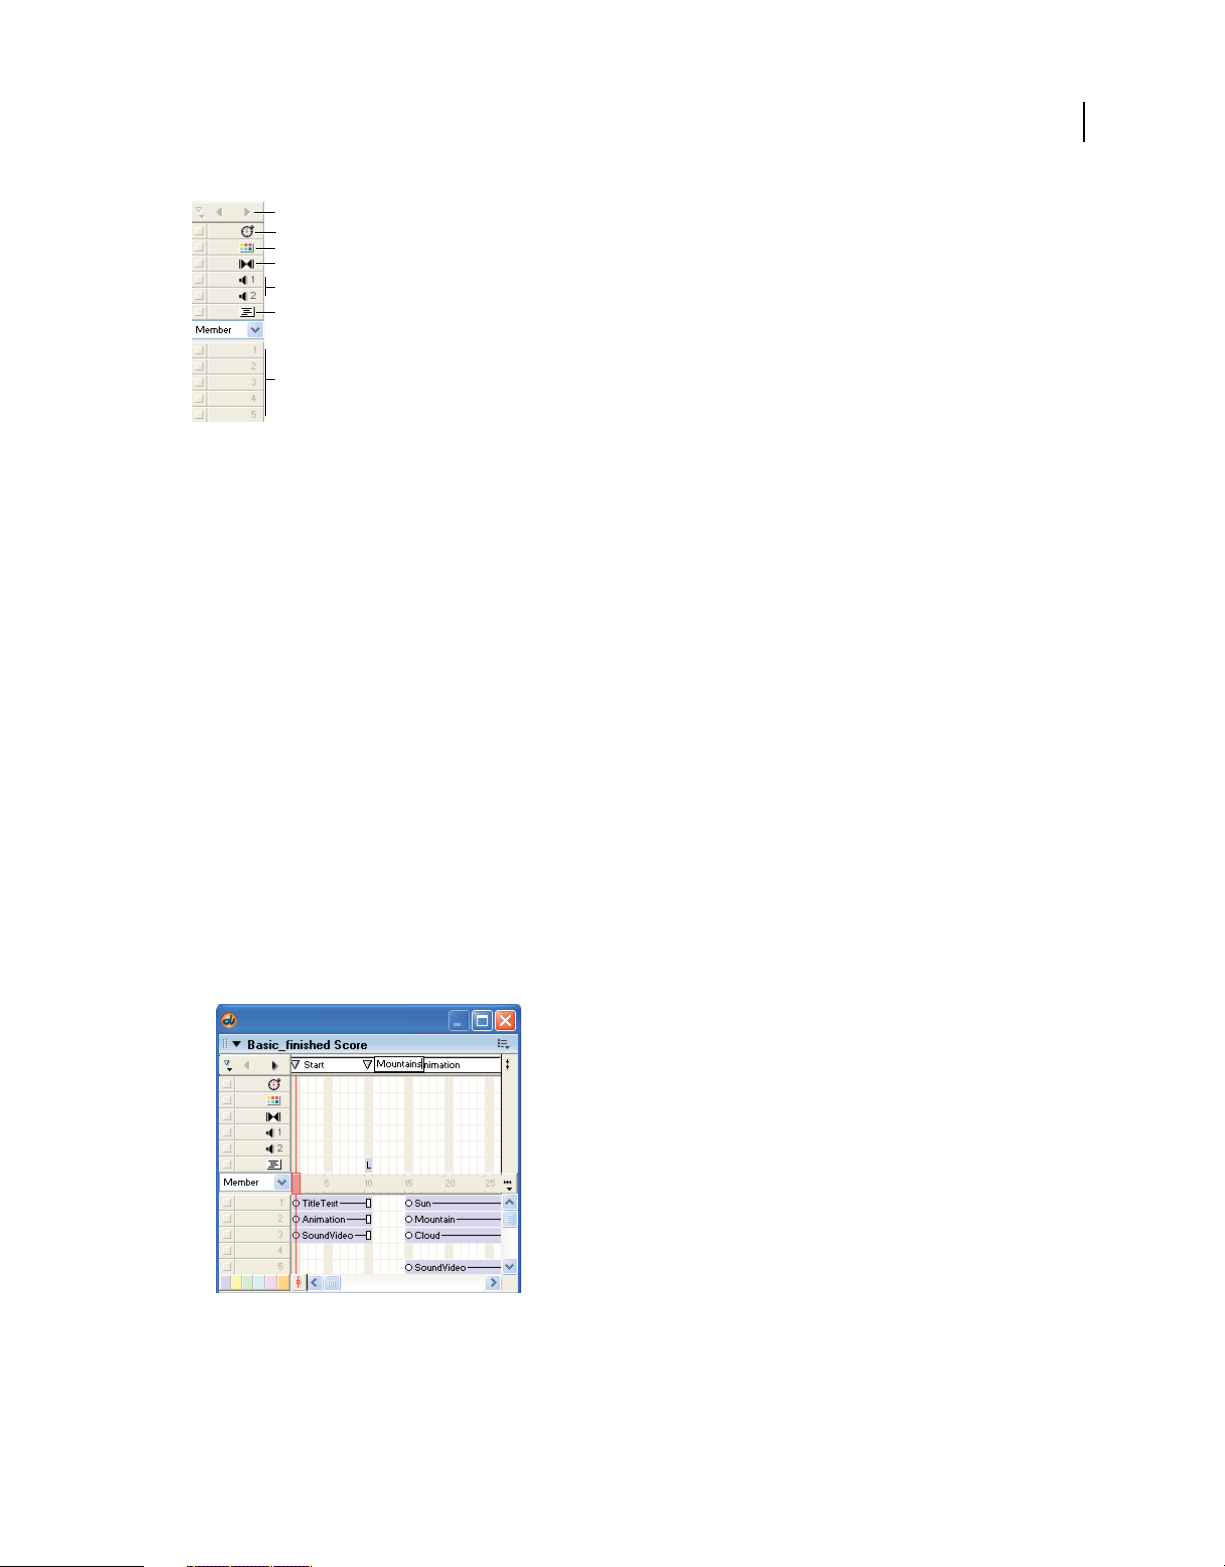
USING DIRECTOR 11.5
Workspace
A
B
C
D
E
F
G
Effects and sprite channels in the Score
A. Markers channel B. Tempo channel C. Palette channel D. Transition channel E. Sound channels F. Behavior channel G. Sprite channels
The rows of the Score contain channels. The columns of the Score contain frames. A frame in a movie represents a
single point in time, which is similar in theory to a frame in a celluloid film. Frame numbers are listed above the
columns in the Score.
A red vertical line, called the playhead, moves across the frames in the Score to indicate which point in time is currently
displayed on the Stage. You can also click any frame in the Score to move the playhead to that frame, and you can drag
the playhead backward or forward through frames.
15
Navigating the Score
The first channel in the Score is the marker channel. It contains markers that identify important points in time, such
as the beginning of a new scene. Markers help you make quick jumps to specific frames in a movie. If you need to jump
to a frame that is not marked with a marker, you can also move the playhead.
Create a new marker
1 If the Score is not already displayed, select Window > Score.
2 Display the frame that you want to mark with a marker.
3 Directly above the frame that you want to mark, click the white bar in the Marker channel.
4 Select the New Marker text, and type a new name for the marker.
A new marker on a frame in the Score
Jump to a marker in the Score
1 On the Marker channel, open the Markers menu.
Last updated 9/28/2011
Page 27
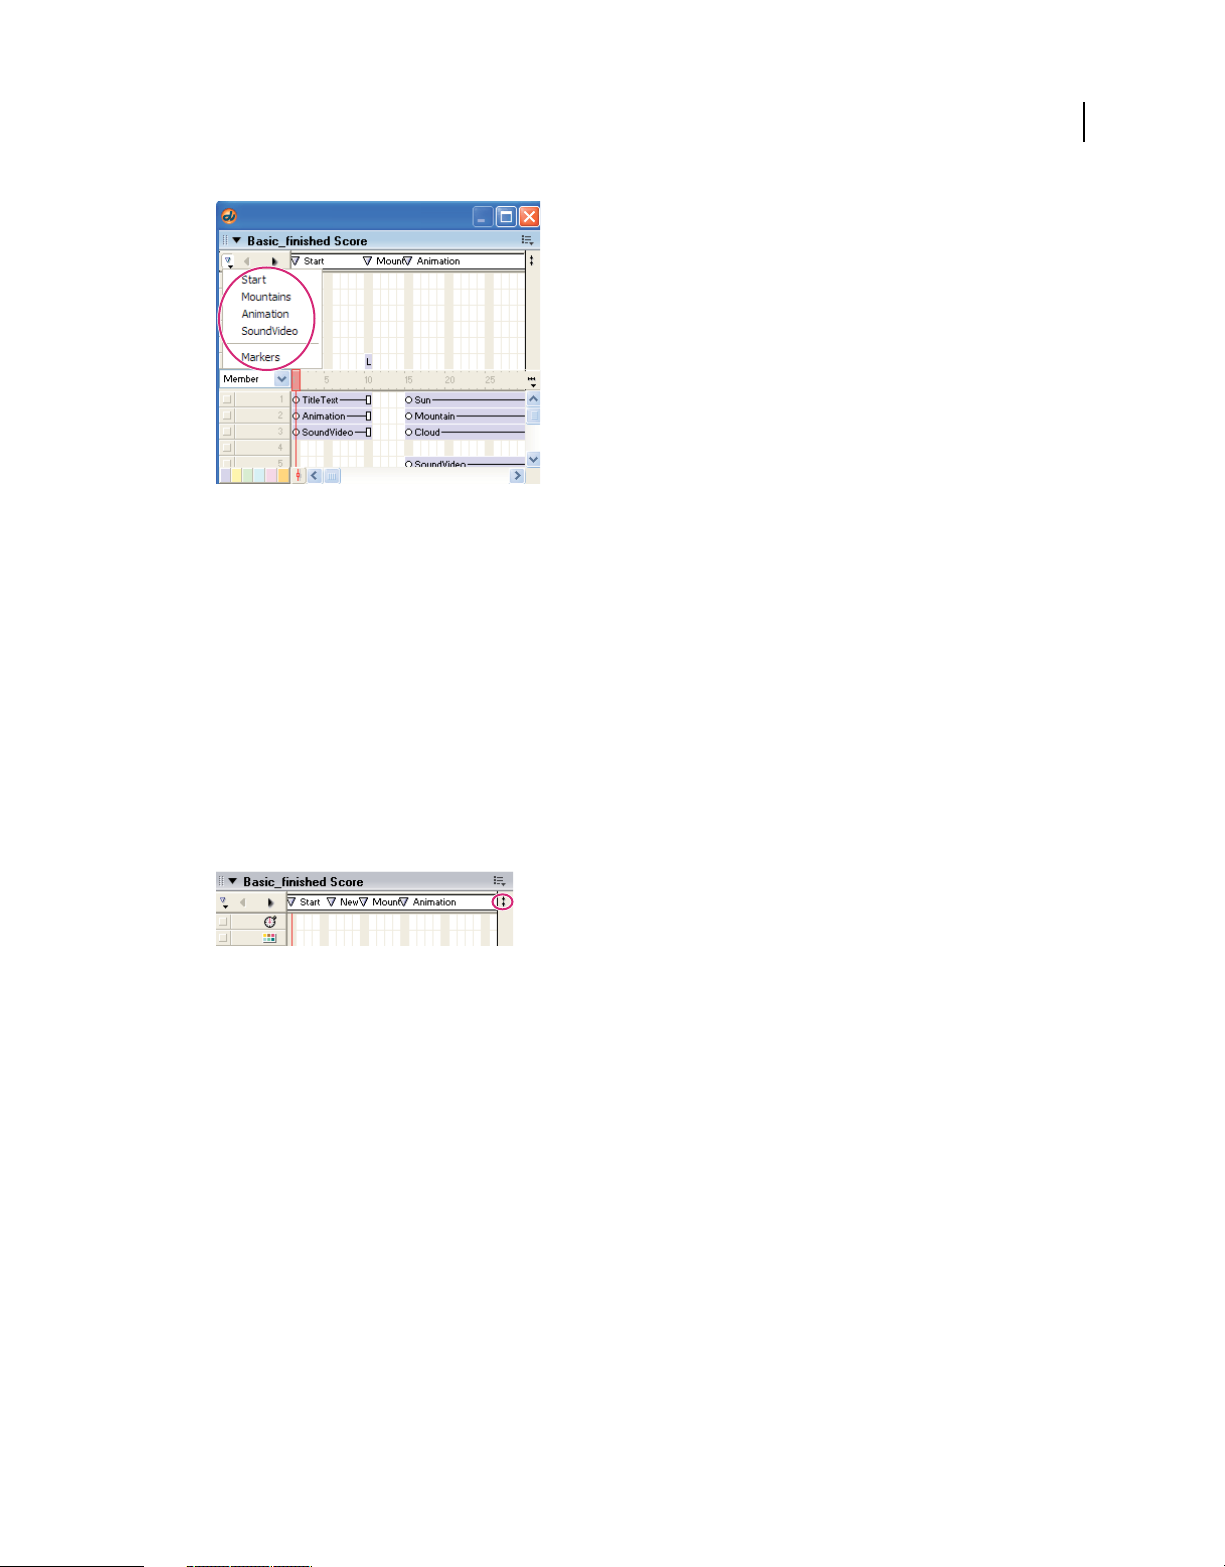
USING DIRECTOR 11.5
Workspace
Markers menu
2 Select the name of the marker that you want to jump to.
Jump to a frame in the Score
❖ Click the frame that you want to jump to.
16
Showing and hiding the effects channels
The effects channels—like tempo, transition, and sound—can be either displayed or hidden. When you begin working
with Director, you may want to have the effects channels shown at all times. As you become comfortable with Director,
you can hide the effects channels until you need to use them. Settings on the effects channels remain in place even when
the channels are hidden from view.
❖ Click the Hide/Show Effects Channels button in the upper-right corner of the Score to change the display.
Hide/Show Effects Channels button
Setting the number of sprite channels
Although the Score can include as many as 1000 sprite channels, most movies use as few as possible to improve
performance in the authoring environment and during playback. Sprites in higher channels appear on the Stage in
front of sprites in lower channels. You use the Property inspector’s Movie tab to control the number of channels in the
Score for the current movie.
1 Make sure that the Score is the active window.
2 In the Property inspector, select the Movie tab.
3 On the Movie tab, in the Channels text box, enter a number from 1 to 1000.
The numbered sprite channels in the Score increase or decrease, according to the number in the Channels text box.
Turning channels on and off
To hide the contents of any channel on the Stage, or to disable the contents if they are not visible sprites, use the button
to the left of the channel. When you turn off an effects channel, the channel’s data has no effect on the movie. You
should turn off Score channels when testing performance or working on complex overlapping animations.
Last updated 9/28/2011
Page 28
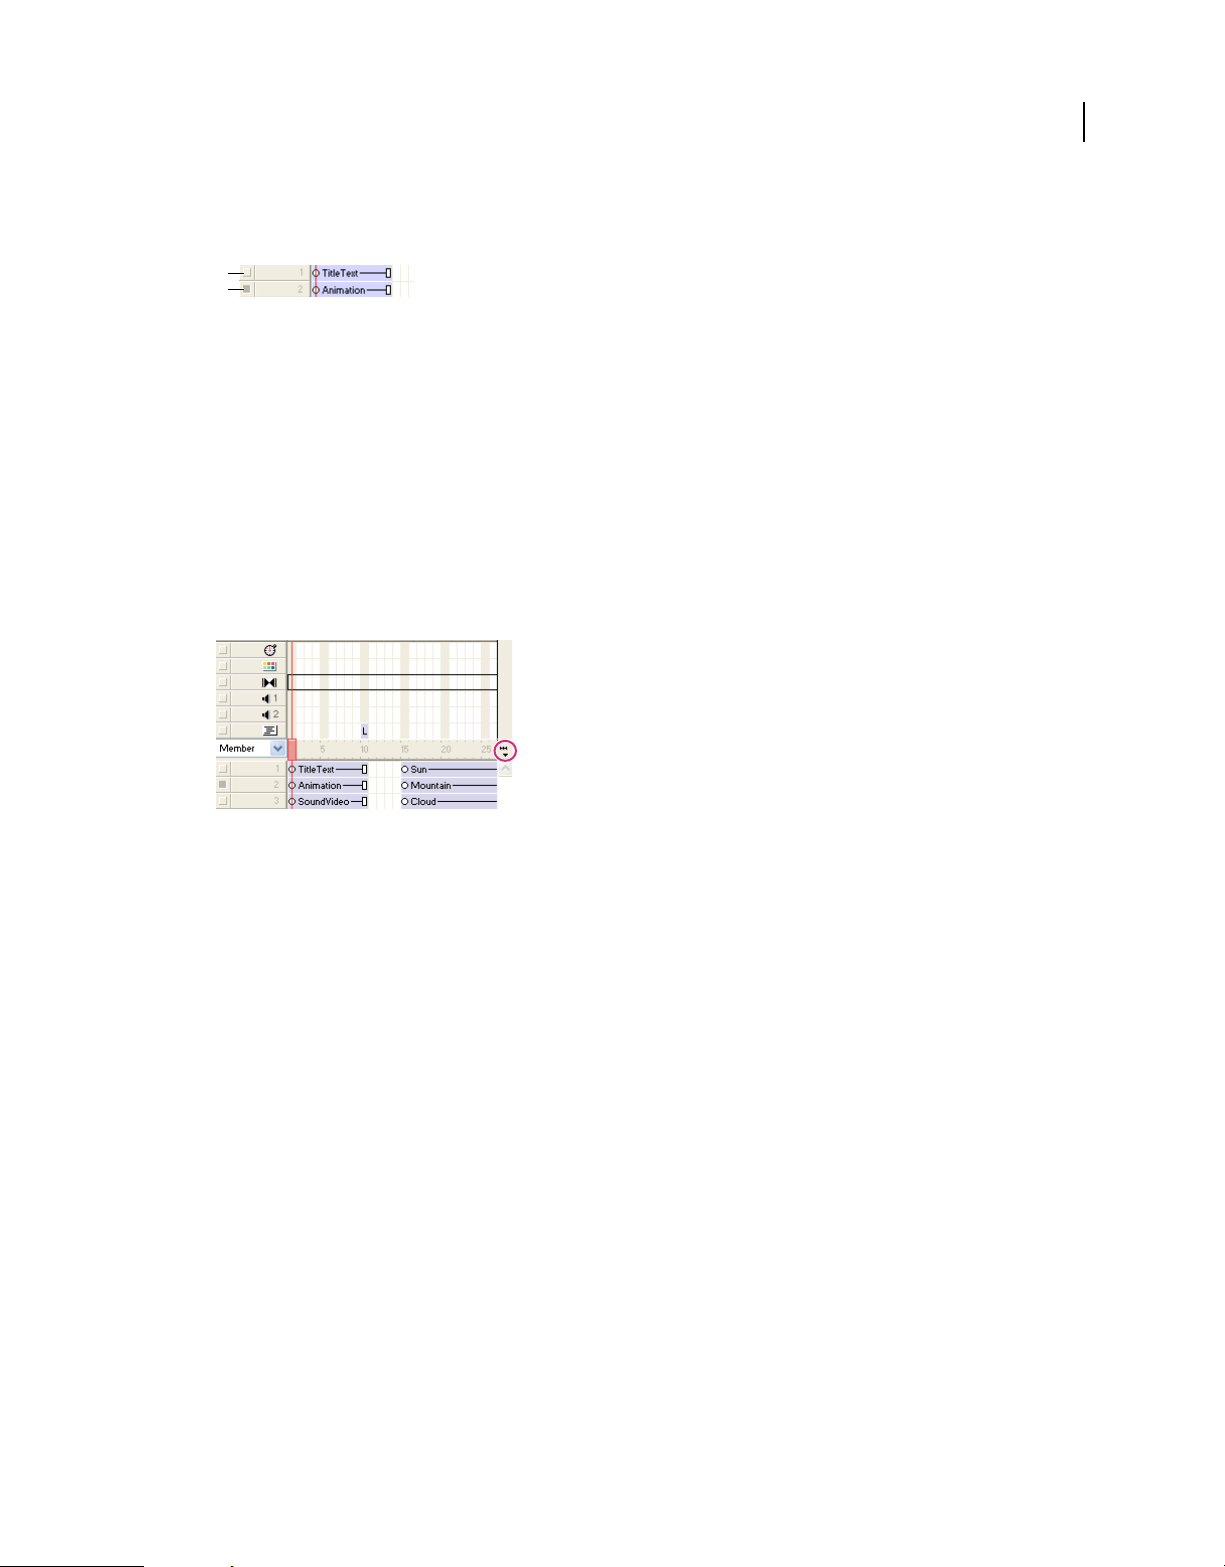
USING DIRECTOR 11.5
Workspace
Turn off a Score channel
❖ Click the gray button to the left of the channel. A darkened button indicates that the channel is off.
A
B
A. This channel is on B. This channel is off
Turn multiple Score channels off and on
1 Press and hold the Alt key (Windows) or the Option key (Mac).
2
Click a channel that is on to turn all of the other channels off, or click a channel that is off to turn the other channels on.
Changing your view of the Score
To narrow or widen the Score, you change the zoom percentage. Zooming in widens each frame, which lets you see
more data in a frame. Zooming out shows more frames in less space and is useful when moving large blocks of Score
data.
1 On the right side of the Score, click the Zoom Menu button.
17
Zoom Menu button
2 Select a size from the Zoom menu. Sizes are displayed as a percentage of full size.
Using the Control panel
The Control panel governs how movies play back in the authoring environment. You can jump to specific frames
within the movie, control how many frames per second play on the Stage, and change the volume at which sounds play.
You can also use the Control panel to start, stop, and rewind movies on the Stage.
Displaying the Control panel
Part of the Control panel, called the Control toolbar, is docked to the bottom of the Stage for easy access. To use all of
the buttons on the Control panel, you can also display the full Control panel as a floating window.
Display or hide the Control panel
❖ Select Window > Control Panel.
Display or hide the Control toolbar
❖ Select View > Control Toolbar.
Last updated 9/28/2011
Page 29
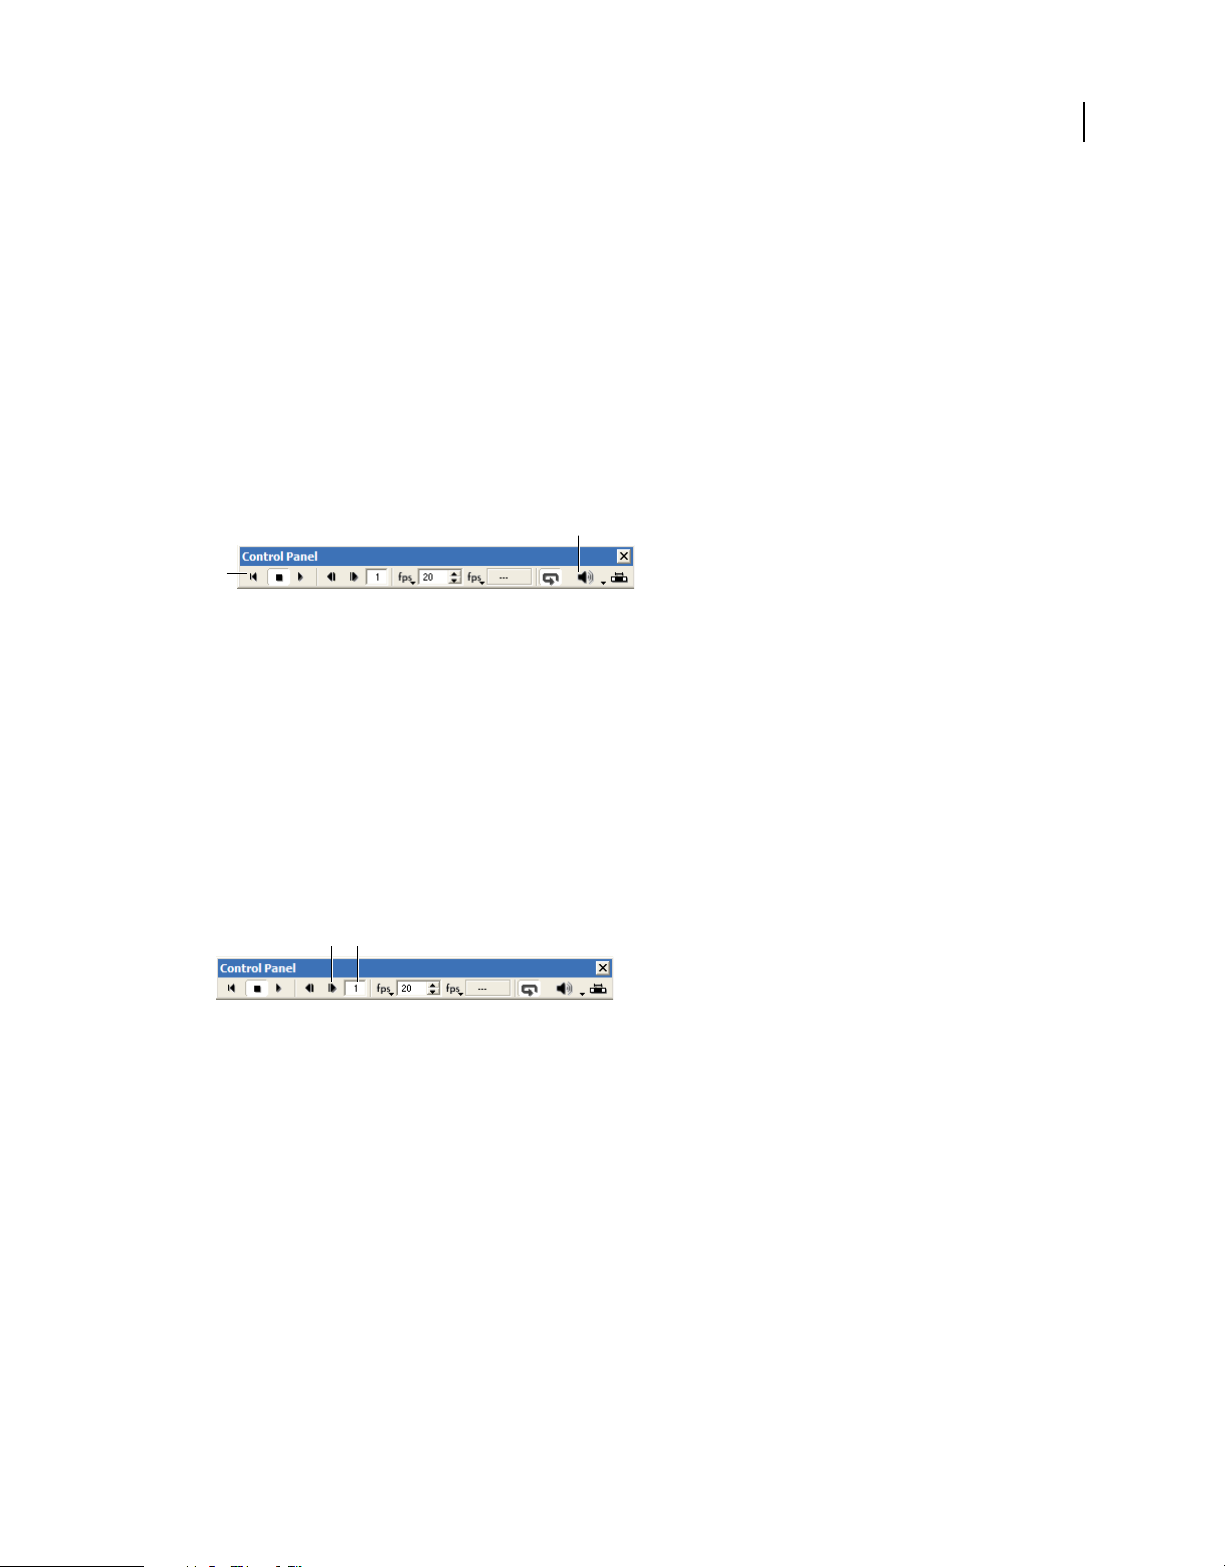
USING DIRECTOR 11.5
Workspace
Controlling movie playback
As you build a movie, you may want to check your progress periodically by watching the movie on the Stage. You can
use the Control panel for this purpose.
Start, stop, or rewind a movie
1 If the Control panel is not already displayed, select Window > Control Panel.
2 On the Control panel, click the Rewind, Stop, or Play button. These three buttons appear on the far left side of the
Control panel.
Change the volume at which sounds play
❖ On the Control panel, click the Volume button, and then select a volume level from the menu.
A
B
Movie playback options in the floating Control panel
A. Volume button B. Rewind, Stop, and Play buttons
Navigating frames in a movie
As you build a movie, you sometimes need to check individual frames or examine transitions from one frame to the
next. The Control panel allows you to check these details.
18
Step through a movie one frame at a time
❖ On the Control panel, click the Step Forward button.
Go to a specific frame in a movie
❖ Enter a frame number in the frame counter, and press Enter (Windows) or Return (Mac).
BA
Frame navigation options in the floating Control panel
A. Step Forward button B. Frame counter
Using the Cast window
The Cast window contains the cast members of your movie. You can use the Cast window to create or import new cast
members, to view existing cast members, and to control the properties of each cast member.
As you work in Director, expect to use two types of cast members:
• Cast members can be the media elements of your movie, such as sounds, text, graphics, animation, and video. These
cast members are placed on the Stage as sprites.
• Some cast members may appear in the Score but not on the Stage. These cast members include scripts, palettes,
fonts, and transitions, which you can use in the effects channels on the Score.
Last updated 9/28/2011
Page 30
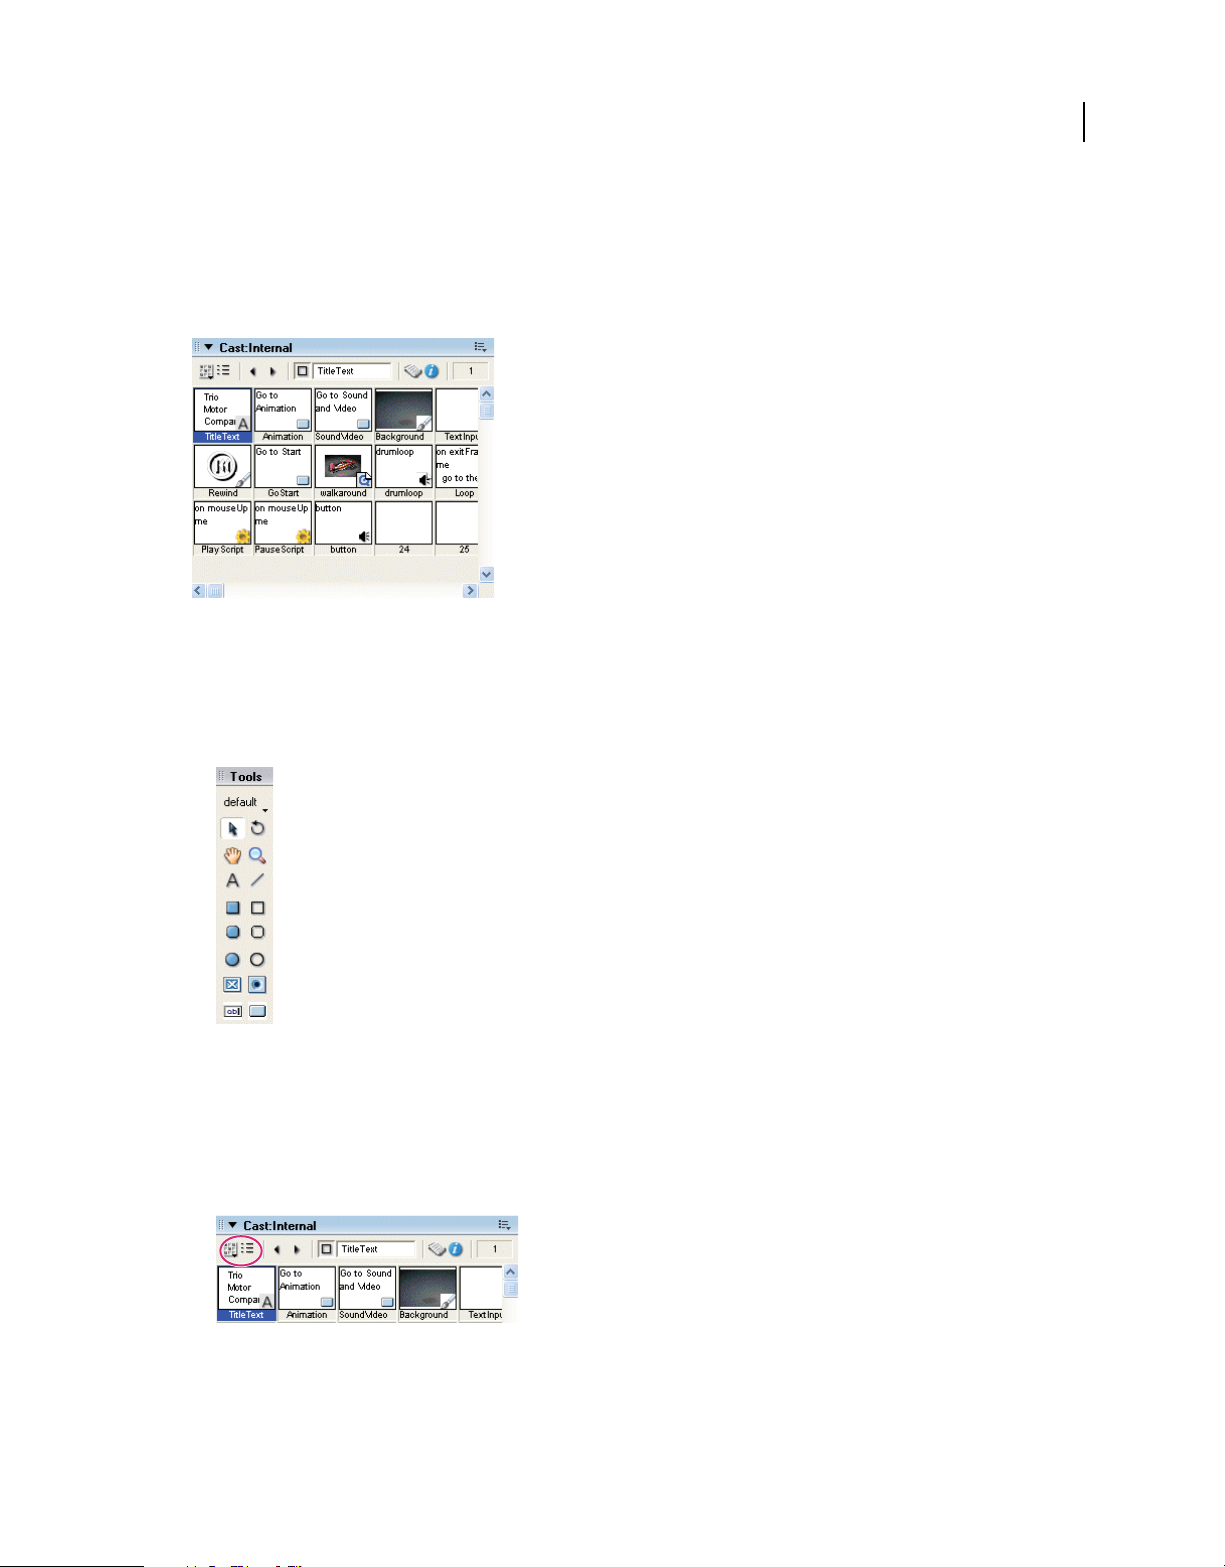
USING DIRECTOR 11.5
Workspace
In the Cast window, you can create or import new cast members to appear as sprites on the Stage. Creating a Director
movie consists largely of defining sprites’ properties, where they appear, when they appear in the movie, and how they
behave. Different sprites can be created from a single cast member. Each sprite can have its own values for different
properties, and most changes to these properties do not affect the cast member. Most changes to a cast member,
however, will change the sprites created from that cast member.
The Cast window filled with cast members
Create a new cast member
1 If the Cast window is not already displayed, select Window > Cast.
2 On the Tool palette, select a text, drawing, or control button.
19
Text, drawing, and control buttons
3 Click the Stage to place the new cast member in the Cast window.
Import a cast member from an existing media file
1 If the Cast window is not already in thumbnail view, click the Cast View Style button.
Cast View Style button
2 In thumbnail view in the Cast window, right-click an empty cast member, and select Import.
3 Navigate to a media file, select the file, and click the Import button.
Last updated 9/28/2011
Page 31

USING DIRECTOR 11.5
Workspace
Using the Property inspector
Every cast member and sprite in a movie has properties. You can view and change these properties by using the
Property inspector. In addition to cast members and sprites, the entire movie also has a set of properties. The Property
inspector displays a Movie tab, where you can view and change these properties.
Controlling your view of the Property inspector
Like other windows in Director, the Property inspector allows you to control its appearance. You can choose between
a list view and a graphical view. You can also save space by showing only the most frequently used options in the
Property inspector, or you can show the full set of options.
Switch between a list view and a graphical view
1 If the Property inspector is not already displayed, select Window > Property Inspector.
2 Near the top of the Property inspector, click the List View Mode button.
20
List View Mode button
Show more or less information in the Property inspector
❖ Click the expander arrow in the Property inspector.
Expander arrow
Last updated 9/28/2011
Page 32

USING DIRECTOR 11.5
Workspace
Setting cast member and sprite properties
Each time you select a sprite, cast member, or multiple sprites and cast members, your view of the Property inspector
changes. New options and tabs appear, depending on what you have selected. If you select multiple sprites and cast
members, the Property inspector displays only the properties that apply to all the selected items.
1 Do one of the following:
• On the Stage or in the Score, select a sprite.
• In the Cast window, select a cast member.
2 In the Property inspector, change one of the properties.
3 Click the Stage to enter your selection. Then look on the Stage to see the effect of the new property.
Setting movie properties
On the Movie tab, you can control how colors are defined, the size and location of the Stage, the number of channels
in the Score, copyright information, and font mapping. The Movie tab is available whenever an item on the Stage or
in the Score is selected. You do not have access to the Movie tab when a cast member is selected.
21
The Movie tab in the Property inspector
1 Make sure that the Property inspector is in graphical view, and select the Movie tab.
2 In the Stage Size row, select a preset value or enter values in the Width and Height text boxes to set the size of the
Stage.
3 In the Channels text box, specify the number of channels in the Score.
4 In the Color text box, enter an RGB value for the color of the Stage, or double-click the color icon and select a color.
5 In the Palette box, select a color palette for the movie. This palette remains selected until Director encounters a
different palette setting in the Palette channel.
6 To determine how the movie assigns colors, select either RGB or Index.
RGB Makes the movie assign all color values as absolute RGB values.
Index Makes the movie assign color according to its position in the current palette.
Enable Editing Shortcuts Enables or disables the ability to use standard editing shortcuts for cut, copy and paste
operations with editable text and field members on the Stage
7 In the Preferred 3D Renderer box, select a default renderer used to draw 3D sprites within the movie, if that
renderer is available on the client computer.
OpenGL Specifies the openGL drivers for hardware acceleration that work with Mac and Windows platforms.
Last updated 9/28/2011
Page 33

USING DIRECTOR 11.5
Workspace
#DirectX9.0 Specifies the DirectX® 9 drivers for hardware acceleration that work only with Windows platforms.
#auto sets the renderer to DirectX 9. In MacTel, only #OpenGL renderer is available.
DirectX 7.0 Specifies the DirectX 7 drivers for hardware acceleration that work only with Windows platforms.
DirectX 5.2 Specifies the DirectX 5.2 drivers for hardware acceleration that work only with Windows platforms.
Software Specifies the Director built-in software renderer that works with Mac and Windows platforms.
Auto Specifies that the most suitable renderer should be selected. This option is the default value for this property.
Note: If the preferred renderer is not available on the client computer, the movie selects the most suitable available
renderer.
8 In the About and Copyright boxes, enter copyright and other information about the movie.
This information is important if your movie will be downloaded from the Internet and saved on a user’s system.
9 To save the current font map settings in a text file named Fontmap.txt, click Save. To load the font mapping
assignments specified in the selected font map file, click Load.
Note: More advanced movie properties are available on the Display Template tab, next to the Movie tab in the Property
inspector. For example, you can control the location of the Stage on a user’s screen by using the Display Template tab in
the Property inspector.
22
Using the Script window
The Script window in Director allows you to add advanced, scripting-based interactivity to movies. In the Script
window, you can code in either Lingo or JavaScript™ syntax. Lingo is the traditional scripting language of Director. Java
Script syntax was recently introduced to support multimedia developers who prefer working with Java Script.
By scripting in the Script window, you can accomplish many of the same tasks that you can in the graphical interface
of Director—such as moving sprites on the Stage or playing sounds. But much of the usefulness of scripting is in the
flexibility that it brings to a movie. Instead of playing a series of frames exactly as the Score dictates, a movie can have
scripts that control frame play in response to specific conditions and events.
The Script window
Here are a few examples of what you can do with scripts:
• Control the movement of a sprite based on whether the user clicks a specific button.
• Control when a sound plays, based on how much of the sound has already streamed from the Internet.
Last updated 9/28/2011
Page 34

USING DIRECTOR 11.5
Workspace
• Create animation, stream movies from the web, perform navigation, format text, and respond to user actions with
the keyboard and mouse.
• Create and manage data arrays, perform mathematical operations, and combine strings of text.
For more complete information on scripting in Director, see the Scripting Reference topics in the Director Help Panel.
Note: In addition to the Script window, where you can create your own scripts, Director includes a set of prepackaged
instructions, called behaviors, that you can simply drag to sprites and frames. Behaviors let you add script-based
interactivity without writing scripts. For more information on behaviors, see
“Behaviors” on page 279.
Opening and closing multiple script windows
Multiple scripts can be opened as different tabs in the script window. Because the Script window can accommodate
only a fixed number of tabs, some of the tabs get hidden when the number of tabs exceed the space limit. You can
navigate to the hidden tabs using the > and < Browse Script tab icons.
When you open multiple Script windows, only the first instance of the Script window contains the Explorer panel. To
display the Explorer panel in the other windows, double-click the Arrow icon in the splitter bar between the script
editor and the Explorer panel.
Open multiple Script windows
Do one of the following:
23
• From the Script window select Windows > New script window.
• Press Alt+w+n.
You can use the Alt+w+n shortcut key to open additional instances of any active window.
Close a Script tab
1 Click the tab of the script window that you want to close.
2 Do one of the following:
• Click the X button corresponding to the tab.
• Right-click the tab area, and select Close <script type:script name>.
Using the Message window
The Message window supports testing and debugging in Director. These features are especially important as you add
script-based interactivity to your movies. Like the Script window, the Message window offers both Lingo and Java
Script syntax. The Message window offers two modes—a standard mode and a trace mode.
• In standard mode, you can enter script into the Input pane to test the result before you add it to the movie. In this
mode, the Message window helps you test scripting results immediately, instead of having to play the whole movie
to check the results.
• In trace mode, you can play a movie and watch the Output pane to see script as it runs in the movie. In this mode,
the Message window helps you find the source of bugs in your movie by showing you what script is running when
an error occurs.
Last updated 9/28/2011
Page 35

USING DIRECTOR 11.5
Workspace
Switch between standard and trace modes
1 If the Message window is not already displayed, select Window > Message.
2 In the Message window, click the Trace button.
Trace button
When the Trace button is indented, the Message window is in trace mode.
For more information on how to use the Message window for testing and debugging, see the Scripting Reference topics
in the Director Help Panel.
24
Customizing your workspace
In Director, some windows (panels) can be grouped together into a tabbed set of panels called a panel group. Director
comes preconfigured with several default panel groups, but you can customize panel groups to maximize your
productivity. Whether you use the defaults or create customized panel groups, you can display or hide panel groups,
just as you do with standard windows.
To make the most efficient use of your workspace, Director also supports default and customized docking of panel
groups. You can dock panel groups to each other or to one of the docking channels. (Docking channels are available
only in Windows.) After you customize the panel groups, you can save the workspace layout as a panel set. With panel
sets, you can switch between different layouts to suit different types of work.
Most panels or panel groups have a header bar that displays the name and includes the following features: an expander
arrow to collapse and expand the panel or panel group, a gripper to dock and undock the panel or panel group, and an
Options menu for managing the panel or panel group.
Last updated 9/28/2011
Page 36

USING DIRECTOR 11.5
Workspace
25
AB
Features in the header bar
A. Gripper to dock and undock panels or panel groups B. Expander arrow to collapse and expand panels or panel groups C. Options menu
button
C
Customizing panel groups
Director comes preconfigured with several default panel groups. Some of these panel groups contain multiple panels
on tabs. For example, the Design panel group has three tabs—Text Inspector, Align, and Tweak. Other panel groups,
such as the Property inspector, contain only one panel.
You can use the default panel groups or customize panel groups to fit your preferences. To customize, you can move
a tab from one panel group to another, or you can separate a tab and create a new stand-alone panel.
Panels that you can combine in a tabbed panel group are restricted by window type and functionality. The following
combinations are allowed:
• Casts with other casts
• Media editor windows with other media editors (for example, Vector Shape with Shockwave® 3D)
• Script windows with media editors (for example, Script with Paint)
• Tool windows with other tool windows (for example, Text inspector with Memory inspector windows)
You cannot place the Property inspector, Tool palette, Stage, Score, or Message window in a tabbed panel group. They
must remain stand-alone panels.
Move a panel to a different panel group
1 Select a stand-alone panel or a panel within a panel group.
2 From the Options menu, select Group [panel name] With, where [panel name] is the name of the panel that you
selected.
Last updated 9/28/2011
Page 37

USING DIRECTOR 11.5
Workspace
Select Group [panel name]
Note: If Group [panel name] With is not available on the Options menu, then the panel cannot be moved to a new
panel group.
3 From the Group [panel name] With menu, do one of the following:
• To move the panel to an existing tabbed panel group, select a panel group name.
• To move the panel to a new standalone panel, select New Panel Group.
Note: The New Panel Group option is dimmed if the panel is already a stand-alone panel.
26
Rename a panel group
1 From a panel group’s Options menu, select Rename Panel Group.
2 In the Rename Panel Group dialog box, enter a new name for the panel group, and click OK.
Rearrange the order of tabs within a panel group
1 Select a tab within a panel group.
2 From the panel group’s Options menu, select Group [panel name] With, where [panel name] is the name of the tab
that is selected.
3 From the Group [panel name] With menu, select the same panel group that already contains the tab.
The tab is moved to the last (rightmost) position in the panel group.
When you customize your panel groups, it is a good idea to save your new layout for later use. See “Docking panel
groups” on page 26.
Docking panel groups
You can dock stand-alone panels and panel groups in two ways: to each other and to the docking channels. (Docking
channels are available only in Windows and cannot be used for docking document windows.) In Windows, the
docking channels run along the left and right sides of the application window. The area between these docking
channels is called the View Port.
Docking is restricted by window type. In both Mac and Windows versions of Director, document windows can be
docked together (for example, the Stage with the Cast window), and tool windows can be docked together (for
example, the Property inspector with the Behavior inspector). A document window cannot be docked with a tool
window.
Last updated 9/28/2011
Page 38

USING DIRECTOR 11.5
Workspace
Dockable panels and panel groups have a header bar just below their title bar, as shown in the following illustration.
Panels and panel groups that do not have this header bar are not dockable.
A header bar with a gripper, indicating that the panel is dockable
Dock a panel or panel group
❖ On the header bar below the title bar, click and drag the gripper to another dockable panel group or to one of the
docking channels. When you see a thick black line where you want to place the panel or panel group, release the
gripper.
Note: The Tool palette cannot be docked with other windows. It can be docked only to a docking channel in Windows.
Undock a panel or panel group
❖ On the header bar below the title bar, click and drag the gripper until the panel or panel group is separated from its
docking location, and release the gripper.
27
Saving panel sets
You can save your current workspace layout as a panel set. Later, you can open that panel set to return to the workspace
layout. You can manage your workspace by saving multiple panel sets, removing panel sets that you no longer use, and
restoring the default panel set.
Save a panel set
1 Select Window > Panel Sets > Save Panel Layout.
2 Name the panel layout, and click OK.
Open a saved panel set
Do one of the following:
• To switch to a customized layout, select Window > Panel Sets, and select one of the saved panel sets.
• To return to the default layout, select Window > Panel Sets > Default.
Remove a panel set
1 Select Window > Panel Sets > Remove Panel Set.
2 From the Panel Set list, select the panel set that you want to remove.
3 Click Remove.
Opening, closing, and collapsing panel groups
Panels groups can be open, closed, or collapsed. Open panel groups can float on the workspace or (only in Windows)
be docked to one of the docking channels. Collapsed panel groups are still available on the workspace with only the
header bar displayed. Closed panel groups are removed entirely from the workspace.
Last updated 9/28/2011
Page 39

USING DIRECTOR 11.5
Workspace
Close a panel group
❖ From the Options menu, select Close Panel Group.
Open a panel group
❖ From the Window menu, select one of the panels in the panel group.
When you display one of the panels in a panel group, the entire panel group is displayed.
28
Collapse or expand a panel group
❖ Click the expander arrow or the panel group’s title in the header bar.
Click to expand or collapse a panel
Close or collapse a docked collection of panel groups
• If the panel groups are docked to each other, click the Close button in the title bar.
• If the panel groups are docked to the docking channel (Windows only), click the arrow in the center of the docking
channel’s separator bar.
Close all tool panels and docking channels
❖ Select Window > Hide Panels.
Working with Xtra extensions
Xtra extensions are software components that extend Director functionality. Some Xtra extensions are installed with
Director and others are available separately for download and installation. If you know the C programming language,
you can create custom Xtra extensions. For information on creating custom Xtra extensions, see the Adobe Xtras
Developers Support page in the Director Support Center at
www.adobe.com/support/xtras/.
Last updated 9/28/2011
Page 40

USING DIRECTOR 11.5
Workspace
Xtra extensions provide several types of additional functionality. After they are installed, they are available for your
use whenever you open Director. Xtra extensions can bring the following elements into Director:
Media Introduce additional media types as cast members into your movie.
Scripting Access additional Lingo or JavaScript™ syntax if you script in Director.
Transitions Choose from additional transitions between movie scenes.
Tools Use additional tools to make the authoring process easier.
Adding media
Xtra extensions can import media as cast members into Director. Some of these media Xtra extensions are built into
Director, such as Adobe Flash®, Vector Shape, and Animated GIF. Other media Xtra extensions come from third-party
developers. These include databases, 3D graphics processors, special types of graphics, and so on.
Display the media Xtra extensions that are available for your movie
❖ Select Insert > Media Element.
The Media Element submenu displays all of the built-in media Xtra extensions. If a media element appears in this
list, then you can import files of this type as cast members.
29
Note: Third-party media Xtra extensions might not appear here and might require implementation through scripting.
Adding script
Scripting Xtra extensions make additional objects, methods, and properties available in Director. The built-in
NetLingo scripting Xtra extension, for example, allows you to control Internet functions.
Display the scripting Xtra extensions that are available for your movie
1 If the Script window is not already open, select Window > Script.
2 Click the Scripting Xtras button.The Scripting Xtras menu displays all of the installed scripting Xtra extensions.
The Script window with the Scripting Xtras menu
3 Click one of the scripting Xtra extensions to see all of the methods and properties that are included with that Xtra
extension.
For more information on the objects, methods, and properties in standard Director scripting Xtra extensions, see the
Scripting Reference topics in the Director Help Panel.
Deleting scripts
You can delete scripts using the Explorer panel.
Last updated 9/28/2011
Page 41

USING DIRECTOR 11.5
Workspace
Do one of the following:
• In the script browser, right-click a script entry and select Delete.
• In the list view of the Script Explorer, select a script and press Delete.
Note: When you delete a script that is open, the tab corresponding to the script is also removed from the Script window.
If the open script you deleted was the only script in your movie, the Script window is disabled, and the tab in which the
script appeared displays the text "Script". To enable the text editor, click the Plus sign in the script editor panel.
Adding transitions
Transition Xtra extensions provide additional transitions beyond the predefined transitions that are available in
Director. You can access these additional transitions in the same place that you access the standard transitions.
Display transition Xtra extensions that are available for your movie
1 Select a frame in the Score.
2 Select Modify > Frame > Transition.
The Frame Properties: Transition dialog box shows all of the transitions that you can use in your movie, including
the transition Xtra extensions.
30
Distributing Xtra extensions
When you distribute a movie, you must package your media Xtra extensions, scripting Xtra extensions, and transition
Xtra extensions along with the movie. If you do not package the Xtra extensions with the movie, your users will not be
able to view all of the movie’s content or use all of its features. Xtra extensions can be packaged with projectors, or your
user can download your required Xtra extensions from the Internet.
If your user is missing an Xtra extension that Director requires, an alert appears when the movie opens. For missing
transition Xtra extensions, the movie performs a simple cut transition instead. For missing media Xtra extensions,
Director displays a red X as a placeholder for the cast member.
For more information on distributing Xtra extensions with your movie, see “Packaging Movies for Distribution” on
page 441.
Connecting to the Internet
Director can connect to the Internet to import media files and retrieve data. If you plan to access files remotely while
using Director, follow the steps here before you try to connect to the Internet. Use the settings in the Network
Preferences dialog box to control how the connection works and to define a preferred browser.
1 Select Edit > Preferences > Network.
Note: On Mac OS X operating systems, select Director > Preferences > Network instead.
2 In the Preferred Browser text box, type the file path to your preferred web browser, or click the Browse button and
navigate to the correct file path.
By specifying this file path, you select which web browser should open on your system when you play a movie that
is programmed to open a web browser.
3 Select or clear Launch When Needed. When this option is selected, web browser launching is enabled.
Last updated 9/28/2011
Page 42

USING DIRECTOR 11.5
Workspace
4 In the Disk Cache Size text box, type the maximum number of kilobytes that you want Director to use to cache data
from the Internet on your hard disk.
To immediately empty the cache, click Clear.
5 To specify how often cached data is compared with the same data on the server, select one of the following Check
Documents options:
Once Per Session Checks for data revisions only once from the time you start to the time you quit Director. This
option improves performance but might not always display the most current version of a page.
Every Time Checks for changes whenever you request a page. This option slows performance but ensures that you
are always viewing the most current version of a page.
6 To specify the configuration of your system’s proxy server, select one of the following Proxies options:
No Proxies Specifies that you have a direct connection to the Internet.
Manual Configuration Allows you to customize proxy settings for your system. Enter the HTTP or FTP location
and port number of your proxy server.
Browsers usually do not require proxy servers to interact with the network services of external sources. However,
in some network configurations where a firewall blocks the connection between the browser software and a remote
server, interaction with a proxy might be required.
31
A firewall protects information in internal computer networks from external access, and in doing so, it can limit
the ability to exchange information. To overcome this limitation, browser software can interact with proxy
software. A proxy server interacts with the firewall and acts as a conduit, providing a specific connection for each
network service protocol. If you are running browser software on an internal network from behind a firewall, you
need the name and associated port number for the server running proxy software for each network service.
Last updated 9/28/2011
Page 43

Chapter 3: Score, Stage, and Cast
This chapter describes how to use three of the most important windows in Adobe® Director®: the Score, the Stage, and
the Cast windows.
Using the Tool palette with the Stage
The Tool palette contains useful tools for creating and manipulating sprites on the Stage. It also contains drawing tools
and elements that you can place directly on the Stage.
Three views are available for the Tool palette: Default, Classic, and Flash® component. Each view contains some of the
same tools, including arrow, hand, and magnifying glass tools.
• The Flashcomponent view primarily contains Flash components.
• The Default view combines some Flash components and some Classic items.
32
Default view
1 If the Tool palette is not available, select Window > Tool Palette.
2 Click on the Tool palette View menu and select a view.
3 (Windows® only) To dock the Tool palette, drag the palette, using the palette gripper, over a docking channel. A
placement preview line or rectangle appears when the palette can be docked.
Last updated 9/28/2011
Page 44

USING DIRECTOR 11.5
Score, Stage, and Cast
Setting Stage properties
When active, the Stage has three tabs in the Property inspector that are available at all times: Display Template, Movie,
and Guides.
• The Display Template tab lets you set properties for Movies in a Window. For more information, see “Movies in a
Window” on page 394.
• The Movie tab lets you set the properties of the movie on the Stage. These properties include color definitions, size
and location of the Stage while the movie plays, and channels in the movie’s Score.
• The Guides tab lets you control the guides and grid that appear on the Stage to assist with movie authoring. The
bottom half of the Guides tab contains grid settings.
Setting guides and grid properties
Guides are horizontal or vertical lines that you can either drag around the Stage or lock in place to assist with sprite
placement. The Guides tab also lets you activate the grid. The grid contains cell rows and columns of a specified height
and width that you use to assist in visually placing sprites on the Stage. Moving a sprite with the Snap To Grid or Snap
To Guides feature selected lets you snap the sprite’s edges and registration point to the nearest grid or guide line. (For
more information about sprites, see
“Sprites” on page 61.)
33
You must create guides before they become available. To do so, use the Guides tab on the Property inspector. The grid
is always available. Guides and the grid are visible only during authoring. When you are not using the guides or the
grid, you can hide them.
1 With the Property inspector open, click the Guides tab.
2 To create and set guide properties, click the Guide Color box to select a different color.
3 Select the options you prefer. You can make the guides visible, lock them, or make the sprites snap to the guides.
4 To add a guide, move the pointer over the new horizontal or vertical guide, and then drag the guide to the Stage.
Numbers in the guide tooltip indicate the distance, in pixels, that the guide is located from the top or left edge of
the Stage.
5 Make selections from the following:
• To reposition a guide, move the pointer over the guide. When the sizing handle appears, drag the guide to its
new position.
• To remove a guide, drag it off the Stage.
• To remove all guides, click Remove All on the Guides tab in the Property inspector.
6 To set grid properties, with the Property inspector open, click the Guides tab.
• To change the grid color, click the Grid Color box and select a different color.
• Select to make the grid visible and to make the sprites snap to the grid.
• Enter values in the W and H text boxes to change the width and height of the grid.
• Select to display the grid as dots or lines.
Last updated 9/28/2011
Page 45

USING DIRECTOR 11.5
Score, Stage, and Cast
Using multiple Score windows
You can view and work in different parts of a movie at the same time by opening additional Score windows. If your
sprite spans many frames in the Score, for example, you can open a second Score window to work on another place in
the movie without scrolling. You can also drag sprites from one Score window to another.
1 Activate the current Score window.
2 Select Window > New Score Window.
You can scroll in this window to a different location in the Score.
Changing Score settings
Set preferences for the Score to control the appearance of the Score and the information that appears in numbered
sprite channels. By doing so, you can display a script preview and cast member information.
1 Select Edit > Preferences > Score (Windows) or Director > Preferences > Score (Mac®).
2 The Extended display option lets you display information about sprites in the Score. For more information, see
“Displaying sprite labels in the Score” on page 71. To specify what information appears in the numbered sprite
channels when Extended display is on, select from the following options:
Name Displays sprites by name, if they have names assigned to them.
34
Cast Member Displays the cast member number, name, or both.
Behaviors Displays the behaviors attached to the sprite.
Ink Mode Displays the type of ink applied to the sprite.
Blend Displays the blend percentage applied to the sprite.
Location Shows the sprite’s x and y screen coordinates.
Change in Location Shows the change in x and y coordinates relative to the previous cast member in that channel.
3 To display the first few lines of the selected script in a box at the top of the Score, select Script Preview.
4 To display the cast member’s name and number when the pointer is held over a sprite for a few seconds, select Show
Data Tips.
To change when a sprite span starts in the score, use Edit > Preferences > Sprite (Windows) or Director > Preferences
> Sprite (Mac®). For more information, see
“Sprites” on page 61.
Selecting, editing, and adding frames in the Score
You can select a range of frames in the Score and then copy, delete, or paste all the contents of the selected frames.
1 Double-click in the frame channel to select frames.
Last updated 9/28/2011
Page 46

USING DIRECTOR 11.5
Score, Stage, and Cast
Double-click here to select all sprites in a frame, including markers, special effects, and sounds. Double-click and drag to select a range of
frames.
2 Do one or more of the following:
• To move or copy frames, select Edit > Cut Frames or Edit > Copy Frames.
• To delete frames, select Edit > Clear Frames, or press the Delete key on your keyboard.
If you cut, clear, or delete the selected frames, Director removes the frames and closes up the empty space.
Note: To delete a single frame, select Insert > Remove Frame.
3 To paste frames that you have cut or copied, select any frame or sprite, and select Edit > Paste Sprites.
If there aren’t enough empty frames available for the entire sprite to be pasted, the Paste Options dialog box
appears. Choose how to paste the sprites.
35
Overwrite Existing Sprites Copies the entire sprite over the frames of any existing sprites
Truncate Sprites Being Pasted
Insert Blank Frames To Make Room Inserts frames into the Score so the entire sprite can fit without being truncated
Pastes the sprite into the number of available empty frames by shortening its frame span.
or overwriting other sprites.
4 To add frames, select a frame in the Score.
5 Select Insert > Frames and enter the number of frames to insert.
The new frames appear to the right of the selected frame. Sprites in the frames you select are extended (tweened).
For more information about tweening, see
“Animation” on page 90.
About cast members
Cast members are the media and other assets in your movie. They can be bitmaps, vector shapes, text, scripts, sounds,
Adobe Flash content or components, DVD content, QuickTime® movies, Windows Media video or audio, Shockwave®
Player 3D content, rich text, sounds of various formats, and more. When you place a cast member on the Stage or in
the Score, you create a sprite. For more information about sprites, see
Use windows called Cast windows to group and organize your cast members. To populate casts, import and create cast
members. You can create and use multiple casts in a movie, and you can group multiple Cast windows together in a
tabbed panel layout.
“Sprites” on page 61.
Last updated 9/28/2011
Page 47

USING DIRECTOR 11.5
Score, Stage, and Cast
Cast window with tabs in Thumbnail view
You can create and edit cast members in Director by using basic tools and media editors such as the Paint and Text
windows, or you can edit cast members by using external editors. In addition, you can import cast members from
almost every popular media format into a movie file. For some media types, you can link cast members as external files
located on a disk or the Internet. Linked cast members can be updated dynamically.
The Property inspector contains asset management fields for cast members on the Member tab. These fields let you
name cast members, add comments about them, and view information such as creation and modification dates and
file size.
Casts can be internal (stored inside the movie file and exclusive to that movie) or external (stored outside the movie
file and available for sharing with other movies). When you create a new movie, an empty internal cast is created
automatically. When you open the Cast window, the cast is in the default List view. For more information about Cast
window views, see
“Switching from one Cast window view to another” on page 51.
36
Cast window in List view
External casts are also useful for creating groups of commonly used cast members. Use external casts to switch large
groups of cast members in a single step. For example, to switch the text cast members in your movie from English to
French, switch the cast that the movie uses, rather than changing each individual cast member.
Using external casts can keep the movie size small for downloading. This is because an external cast can be downloaded
separately from the movie file if or when it is needed.
Creating new casts
Before assembling a large number of cast members, it’s good practice to create the casts that are necessary to keep them
organized. Sort casts by type, edit cast properties, and use external casts for storing and sharing common media
elements.
Create as many casts as necessary. The number of casts does not affect the size of a movie for downloading.
Last updated 9/28/2011
Page 48

USING DIRECTOR 11.5
Score, Stage, and Cast
You can include as many as 32,000 cast members in a single cast, but it’s usually best to group media such as text,
buttons, and images logically in a few different casts for each movie.
1 Do one of the following:
• Select File > New > Cast.
• Select Modify > Movie > Casts to open the Movie Casts dialog box, and click the New button.
• In the Cast window, click the Cast button and select New Cast from the menu. (See “Using Cast window
controls” on page 52.)
Cast button
2 In the New Cast dialog box, type a name for the new cast.
3 Specify how to store the cast:
Internal Stores the cast within the movie file. This option makes the cast available only to the current movie.
37
External Stores the cast in a separate file outside the movie file. This option makes the cast available for sharing
with other movies. For information about internal and external casts, see
4 If you chose External and you don’t want to use the cast in the current movie, deselect the Use In Current Movie
“Managing external casts” on page 57.
option.
Note: You can link the external cast to your movie later. See “Managing external casts” on page 57.
5 Click Create.
The cast is created and appears as a tabbed panel in the Cast window.
Note: Creating a new cast by selecting Modify > Movie > Casts doesn’t automatically display a tabbed panel. To
display the tabbed panel, click the Cast button and select the cast you created from the menu.
6 If you created an external cast, select File > Save while its Cast window is active, and then save the cast.
Creating cast members
You can create several types of cast members in Director. Director includes editors to create and edit common media
such as video, text, shapes, and bitmaps. You can also define external editors to launch from Director when you
double-click a cast member, and you can edit almost any type of supported media. For more information, see
“Launching external editors” on page 56.
You can also import cast members. For more information, see “Importing cast members” on page 42.
Create a new cast member from the Insert menu
1 Open the Cast window for the cast member you are creating.
To place a cast member in a specific position in the Cast window, select the position in Thumbnail view. For more
information, see
first empty position or after the current selection in the Cast window.
“Using Cast Thumbnail view” on page 55. Otherwise, Director places the new cast member in the
Last updated 9/28/2011
Page 49

USING DIRECTOR 11.5
Score, Stage, and Cast
2 Select Insert > Media Element, and then select the type of cast member to create.
For more information about each choice, see the following:
• “Using the Paint window” on page 106
• “Using the Color Palettes window” on page 164
• “Streaming linked Shockwave Audio and MP3 audio files” on page 249
• “Creating text cast members” on page 176
• “Embedding fonts in movies” on page 175
• “Creating an animated color cursor cast member” on page 301
• “Drawing vector shapes” on page 150
• “Using Flash Content” on page 194
• “Using Windows Media files in Director” on page 261
• “Using DVD media content in Director” on page 263
• “Importing digital video formats” on page 253
• “Using animated GIFs” on page 105
3 To create a control or button, do one of the following:
• Select Insert > Control > Push Button, Radio Button, or Check Box to create a button cast member and a sprite
on the Stage. For more information, see
“Using shapes” on page 158.
• Select Insert > Control > Field to create a field cast member. Creating a field cast member also creates a sprite
on the Stage. For more information, see
“Working with fields” on page 182.
• (Windows only) Select Insert > Control >ActiveX to create an ActiveX cast member. For more information, see
“Using ActiveX controls” on page 216.
Note: You can also use Flash components to create controls and buttons. See “Selecting Flash components” on
page 218.
38
Create a cast member in a media editing window
1 Open a media editing window by selecting Window and then selecting the type of cast member you want to create
(Paint, Vector Shape, Text, Windows Media, DVD, and so on).
2 Click the New Cast Member button to create a cast member of the corresponding type. The cast member is added
to the most recently active Cast window.
New Cast Member button
Create a cast member using the Script window
1 Select Window > Script.
2 Click the New Cast Member button to create a script cast member.
Create a cast member on the Stage
1 Open the Tool palette, if it is not already open, by selecting Window > Tool Palette.
2 Using the tools in the Tool palette, create content directly on the Stage. Each object you create automatically
becomes a cast member.
Last updated 9/28/2011
Page 50

USING DIRECTOR 11.5
Score, Stage, and Cast
Note: Cast members created on the Stage are automatically placed in the Score.
Changing Cast properties
Use the Property inspector to change the name of a Cast and to define how its cast members are loaded into memory.
1 With the Cast window as the active window, open the Property inspector and click the Cast tab.
39
The Cast tab in the Property inspector
2 To change the name of the current cast, enter the new name in the Name text box.
3 Select a Preload option to define how cast members are loaded into memory when the movie runs:
When Needed Loads each cast member into memory when it is required by the movie. This setting can slow down
the movie while it plays, but it causes the movie to begin playing sooner. This setting is the best choice when
controlling cast members that load with Lingo or JavaScript™ syntax.
After Frame One Loads all cast members (except those required for frame 1) when the movie exits frame 1. This
setting can ensure that the first frame appears as quickly as possible, and it might be the best choice if the first frame
of the movie is designed to remain onscreen for a number of seconds.
Before Frame One Loads all cast members before the movie plays frame 1. This setting causes the movie to take
longer to start playing, but it provides the best playback performance if there is enough memory to hold all cast
members.
Viewing and setting cast member properties
You can display and set properties for individual cast members, or for multiple cast members at once, even if the cast
members are different types. In both cases, use the Property inspector.
You can also set cast member properties by using Lingo or JavaScript syntax (see “Setting cast member properties by
using Lingo or JavaScript syntax” on page 59).
1 Select one or more cast members.
Last updated 9/28/2011
Page 51

USING DIRECTOR 11.5
Score, Stage, and Cast
2 Do one of the following:
• If the Property inspector is open, click the Member tab.
• If the Property inspector is not open, select Window > Property Inspector, and click the Member tab.
40
The Member tab in the Property inspector
If you’ve selected multiple cast members, the information that is common to all the selected cast members appears.
Any changes you make apply to all the selected cast members.
3 Display the Graphical view on the Member tab. The Member tab displays the following items:
• Editable fields to view or change the cast member’s name (the Name text box), a Comments text box to enter
text that appears in the Comments column of the Cast List window, and an Unload menu that lets you select
how to remove a cast member from memory. For more information about using the Unload menu, see
“Controlling cast member unloading” on page 46.
• View-only fields that indicate the cast member’s size, when the cast member was created and modified, and the
name of the person who modified the cast member.
For an Xtra cast member, the information in the Property inspector is determined by the developer of the Xtra.
Some Xtra extensions have options in addition to those listed here. For non-Adobe Xtra extensions, see the
documentation supplied by the developer.
More Help topics
“Using animated GIFs” on page 105
“Embedding fonts in movies” on page 175
“Using Flash Content” on page 194
“Setting and changing bitmap cast member properties” on page 129
“Setting vector shape properties” on page 157
“Synchronizing media” on page 251
“Setting film loop properties” on page 100
Last updated 9/28/2011
Page 52

USING DIRECTOR 11.5
Score, Stage, and Cast
“Setting palette cast member properties” on page 168
“Setting and changing PICT cast member properties” on page 130
“Specify a shape’s fill in Lingo or JavaScript syntax” on page 159
“Setting sound cast member properties” on page 244
“Setting text or field cast member properties” on page 185
“Setting transition cast member properties” on page 174
“Setting Xtra cast member properties” on page 60
“Creating an animated color cursor cast member” on page 301
“Streaming linked Shockwave Audio and MP3 audio files” on page 249
“Setting Flash component parameters” on page 220
“Setting Windows Media properties” on page 261
“Setting QuickTime digital video cast member properties” on page 258
Launching cast member editors
You can open any cast member in the appropriate editor directly from the Cast window. You can use the Director
internal media editors, such as the Text, Paint, or Vector Shape window, or you can specify external editors for certain
types of cast members. For more information, see
“Launching external editors” on page 56.
41
Do one of the following:
• Double-click a cast member in the Cast window.
• Double-click a sprite that contains the cast member in the Score or on the Stage. See “Sprites” on page 61.
Finding cast members
You can search for cast members by name, type, and color palette. You can search for selected cast members used in
the Score, such as when you are preparing a movie for distribution. You can also search for cast members not used in
the Score, for example to clean up a movie and reduce the space and memory required to save and run the movie.
Before releasing a movie, it’s a good idea to remove unused cast members to make the movie as small as possible for
downloading.
1 Select Edit > Find > Cast Member.
2 In the Find Cast Member dialog box, select a Cast window to search from the Cast pop-up menu. To search every
cast in the movie, select All Casts.
3 Select a search option:
• Select Name, and enter search text in the text box. For example, to search for a group of related cast members
that share a common element in their names, you might enter the word Bird to search for cast members named
Bird 1, Bird 2, and Bird 3.
• Select Type, and select an option from the menu to search for cast members by media type.
• Select Palette, and select an option from the menu. You can use this option to search for and resolve palette
conflicts.
Last updated 9/28/2011
Page 53

USING DIRECTOR 11.5
Score, Stage, and Cast
• Select Usage to locate all cast members that aren’t used in the Score. Cast members that you find with this option
might be used in the movie by a script.
4 When Director displays the specified cast member, do one of the following:
• Select a cast member on the list, click Select to close the dialog box, and select the cast member in the Cast
window.
• Click Select All to close the dialog box and select all listed cast members in the Cast window.
Find a cast member in the Score
1 Select a cast member to search for in the cast or the Score. If you select a sprite that includes multiple cast members,
Director searches for the first cast member in the sprite. To select a cast member other than the first, open the sprite
to select the cast member. (For information about selecting sprites, see
2 Select Edit > Find > Selection, or press Control+Shift+F (Windows) or Command+Shift+F (Mac).
Director searches the Score and highlights the first Score cell it finds.
3 Select Edit > Find Again to find the next occurrence of the cast member in the Score.
“Selecting sprites” on page 62.)
Importing cast members
Importing lets you create cast members from external media. You can either import data into a Director movie file or
create a link to the external file and re-import the file each time the movie opens. Linked files let you display dynamic
media from the Internet, such as sports scores, sounds, and weather pictures. Linking makes downloading movies
faster. For more information about linked files, see
“About linking to files” on page 45.
42
Director can import cast members from almost every popular media file format. See “About import file formats” on
page 44.
You can import files by using the Import dialog box, by dragging files from the desktop to a Cast window, or by using
Lingo or JavaScript syntax.
1 In Thumbnail view, select an empty position in a cast.
If no cast position is selected, Director places the new cast member in the first available position in the current cast
in Thumbnail view. In List view, Director places the new cast member at the end of the list.
2 Select File > Import.
Last updated 9/28/2011
Page 54

USING DIRECTOR 11.5
Score, Stage, and Cast
43
Importing cast members
3 Do one of the following:
• To import a file from the Internet, click Internet and enter a URL in the Find URL text box.
•
To import local files, select the type of media to import from the Files of Type (Windows) or the Show (Mac) menu.
4 To select files to import, do one of the following:
• Double-click a file.
• Select one or more files, and click Add.
• Click Add All.
You can switch folders and import files from different folders at the same time.
Note: You can import a text file as a text or a script. To add the same text file as text and as a script, you must repeat
the procedure to add the text file in the other format. Unlike previous versions of Director, you will not be able to add
the text file twice to the import dialog box, and import each instance in a different format.
5 From the Media menu at the bottom of the dialog box, specify how to treat imported media:
Standard Import Imports all selected files, storing them inside the movie file but not updating them when changes
are made to the source material. If you select the option to import from the Internet in step 3 and an Internet
connection is available, Director retrieves the file immediately.
Note: All digital video files, such as DVD, Windows Media, QuickTime, RealMedia®, and so on, are linked
automatically to the original external file (see the next option, Link to External File), even if you select Standard
Import.
Link To External File Creates a link to the selected files and imports the data each time the movie runs. If you choose
to import from a URL through the Internet, the media is dynamically updated. For more information, see
“About
linking to files” on page 45.
Note: Text and RTF files are always imported and stored inside the movie file (see the Standard Import option), even
if you select Link To External File.
Last updated 9/28/2011
Page 55

USING DIRECTOR 11.5
Score, Stage, and Cast
Include Original Data For Editing Preserves the original data in the movie file for use with an external editor.
When this option is selected, Director keeps a copy of the original cast member data and sends the original to the
external editor when you edit the cast member. This option preserves all the editor’s capabilities. For example, if
you specify Photoshop to edit PICT images, Director maintains all the Photoshop object data. For more
information, see
Import PICT File As PICT Prevents PICT files from being converted to bitmaps.
6 When you finish selecting the files, click Import.
“Launching external editors” on page 56.
If you’ve imported a bitmap with a color depth or color palette that differs from the current movie, the Image
Options dialog box appears for entering additional information. See
“Choosing import image options” on page 45.
More Help topics
“About importing bitmaps” on page 104
“Importing internal and linked sounds” on page 240
“Using Director movies within Director movies” on page 214
“Importing internal and linked sounds” on page 240
“Importing text” on page 177
44
“Using animated GIFs” on page 105
“Using Flash Content” on page 194
“Importing Windows Media” on page 261
“Using DVD media content in Director” on page 263
“Using Flash components” on page 218
Import files by dragging
1 In the Explorer (Windows) or on the system desktop (Mac), select files to import.
2 Drag the files from the desktop to the desired position in the Cast window Thumbnail view or to the Cast window
List view.
If you drag the files to List view, the imported files are added at the bottom of the list.
Import files with Lingo or JavaScript syntax
❖ Use the importFileInto method to import a file. Set the fileName Cast Member property to assign a new file to
a linked cast member. For more information about this property, see the Scripting Reference topics in the Director
Help Panel.
About import file formats
Director can import files in all the formats listed in the following table. For information about additional file formats
Director might support, see the Director Support Center website at
www.adobe.com/support/director.
German: http://www.adobe.com/de/support/
French: http://www.adobe.com/fr/support/
Japanese: http://www.adobe.com/jp/support/
Last updated 9/28/2011
Page 56

USING DIRECTOR 11.5
Score, Stage, and Cast
Type of file Supported formats
45
Animation and multimedia
Image BMP, GIF, JPEG, LRG (xRes), Photoshop 3.0 (or later), MacPaint, PNG, TIFF, PICT, Targa
Multiple-image file Windows only: FLC, FLI
Sound
Digital Video
Text RTF, HTML, ASCII (often called Text Only), Lingo, or JavaScript syntax
Palette
Flash movies, animated GIF, PowerPoint® presentations, Director movies, Director external cast files
Mac only: PICS, Scrapbook
AIFF, WAV, MP3 audio, Shockwave Audio, Sun™ AU, uncompressed and IMA compressed
DVD, Windows Media (WMV), QuickTime, AVI, RealMedia®
PAL, Photoshop® CLUT
About linking to files
When Link To External File is selected in the Import dialog box, Director re-imports media every time a movie runs.
(To open the Import dialog box, select File > Import). Linking makes it easy to use bulky media such as long sounds
and is especially useful for showing media that changes frequently from the Internet. Linking also makes downloading
movies faster because users can choose to view linked files, so the files do not download unless they’re needed.
When you link to an external file, Director creates a cast member that stores the name and location of the file. Saving
a movie saves only the link to the linked cast member. Keep linked files in a folder that’s close to the original movie
file. Paths are restricted to 4096 characters by the system. URLs can be as many as 260 characters. If you store a file that
is too many folders away from the movie or you use a very long URL, it might not link correctly.
When distributing movies with linked media, use the following guidelines:
• If you distribute a movie, you also must include all linked cast member files, and they must be in their expected
locations.The Copy Linked And Dependent Files option in the Publish Settings dialog box ensures that the linked
media are automatically placed in the relative location during publishing. If you have disabled the Copy Linked And
Dependent Files option, copy the linked files to the same folder as the projector or in a folder inside the Projector
folder. The behavior is the same as in Director MX 2004 if this option is disabled. In addition, the Xtra extensions
that are used to import the media must be present when the movie runs (either on the user’s computer or included
in your movie). For more information, see
“Setting Xtra cast member properties” on page 60.
• When you link to media on the Internet, the media must be present at the specified URL when the movie runs.
Provide for link failure because you can’t guarantee that an Internet transaction will be successful.
• To retrieve media from the Internet during playback, Director requires that the projector include certain Xtra
extensions. To include these Xtra extensions automatically, click Add Network in the Movie Xtras dialog box.
Movies playing in web browsers do not require these Xtra extensions.
Note: Select Edit > Preferences > Network to define standard network settings for the Director authoring environment.
If you are using a Mac OS® X operating system, select the Director menu, instead of the Edit menu, to access
Preferences.
Choosing import image options
If you import a bitmap cast member with a color depth or color palette that is different from that of the Stage (the
current movie), Director lets you select the image’s color depth and color palette. You can choose to import the bitmap
at its original color depth or at the Stage color depth. (The Stage color depth is the same as the system color depth.)
You can also choose to import the image’s color palette or remap the image’s colors to a palette in the movie.
Last updated 9/28/2011
Page 57

USING DIRECTOR 11.5
Score, Stage, and Cast
In many cases, it’s easiest to change the image’s color depth to the depth of the movie and remap the image to the color
palette that is used in the rest of the movie. For more information about controlling color in Director, see
“Color,
Tempo, and Transitions” on page 160.
If you change 16-, 24-, or 32-bit cast members to 8 or fewer bits, you must remap the cast members to an existing color
palette.
Select bitmap image options for importing
1 Import a bitmap image by selecting File > Import. (See “Importing cast members” on page 42.)
2 If the Image Options dialog box appears while you are importing a bitmap image using File > Import, select one of
the following Color Depth options:
Image Specifies the color depth and palette of the image.
Stage Specifies the color depth of the current Stage.
3 Select a Palette option to change palette settings for 2-, 4- or 8-bit images:
Import Imports the image with its color palette. The palette appears as a new cast member immediately following
the bitmap cast member.
Remap To Replaces the image’s colors with the most similar solid colors in the palette you select from the menu.
46
4 Select Image options:
Trim White Space Removes any white pixels from the edges of the image. Deselect this option to preserve the white
canvas around an image.
Dither Blends the colors in the new palette in the Palette section to approximate the original colors in the graphic.
5 To apply the current settings to all the remaining files that you selected for importing, select Same Settings For
Remaining Images.
Controlling cast member unloading
When Director runs low on memory, it removes cast members from memory. Use the Property inspector to specify
the priority with which a cast member is removed from memory. When a cast member is available in memory, it
appears almost instantly. When the cast member needs to be loaded from disk, the loading can cause a delay. Set your
cast members so that frequently used cast members remain in memory as long as possible.
These settings are the same for all types of cast members.
1 Select the cast members in the Cast window.
2
On the Property inspector Member tab, display the Graphical view, and then select an option from the Unload menu:
3—Normal Sets the selected cast members to be removed from memory after any priority 2 cast members are
removed.
2—Next Sets the selected cast members to be among the first removed from memory.
1—Last Sets the selected cast members to be the last removed from memory.
0—Never Sets the selected cast members to be retained in memory. These cast members are never unloaded.
Last updated 9/28/2011
Page 58

USING DIRECTOR 11.5
Score, Stage, and Cast
Using the Cast window
In the Cast window, you can view the cast in either the default List view or the Thumbnail view. (To change the default
so that the Cast window opens in Thumbnail view, see
You can do the following in the Cast window:
• Organize and display all media in a movie.
• Move groups of cast members.
• Start editors for cast members.
• Launch the Property inspector to view, add, and change comments about your cast members and to view and
modify cast member properties.
• Group multiple casts in a tabbed view using panel groups (see “Working with Cast panel groups” on page 51).
To view the Cast window, select Window > Cast or press Control+3 (Windows) or Command+3 (Mac). If there is
more than one cast in the movie, specify which Cast window to open by selecting a cast name from the Cast submenu.
Setting Cast window preferences
Use the Cast window preferences settings to control the appearance of the current Cast window or, if desired, all Cast
windows. You can set different preferences for each Cast window. The title bar of the dialog box displays the name of
the Cast window preferences you are changing.
“Setting Cast window preferences” on page 47.)
47
1 Select a Cast window to change, or a click a tab within a Cast panel group.
2 Select Edit > Preferences > Cast.
Note: If you are using a Mac OS X operating system, select the Director menu, instead of the Edit menu, to access
Preferences.
Cast window preferences
3 To set the Cast window to appear in either List or Thumbnail view, select the appropriate Cast View option.
4 If you want your preferences to apply to all Cast windows, select Apply To All Casts.
Last updated 9/28/2011
Page 59

USING DIRECTOR 11.5
Score, Stage, and Cast
5 To select the columns that appear in Cast List view, select List Columns options. See “Using Cast List view” on
page 53.
6 To specify the maximum number of cast members to appear in the Cast window, select a value from the
Thumbnails Visible menu.
This option doesn’t limit the number of cast members that can exist in the cast. If you have a small number of cast
members, you can hide the remaining unused cast positions to make better use of the vertical scroll bar. The default
is 1000.
7 To specify the number of thumbnails in each row of the Cast window, select an option from the Row Width menu.
The options for 8 Thumbnails, 10 Thumbnails, and 20 Thumbnails specify fixed-row widths that are independent
of the window size. If the Cast window is smaller horizontally than the width of the cast row, you must use the
horizontal scroll bar to reveal the rest of the cast. The Fit To Window option automatically adjusts the number of
cast members per row to fit in the current width of the Cast window. In this mode, the horizontal scroll bar is
disabled because the entire width of the cast is always in view. The default is Fit To Window.
8 To set the size of each cast thumbnail image that appears in the Cast window, select one of the following options
from the Thumbnail Size menu:
Small 44 x 33 pixels
Medium 56 x 42 pixels (default)
48
Large 80 x 60 pixels
Thumbnails always maintain the standard 4:3 aspect ratio.
If the thumbnails appear fuzzy, they are probably appearing in larger than their original size. To correct this, change
the Cast window preferences thumbnail setting to a smaller size. Click OK when prompted about regenerating
thumbnails.
9 To select the display format of the cast member ID that appears below each cast thumbnail image in the Cast
window, select one of the following options from the Label menu:
Number Displays the cast number.
Name Displays the cast name, if one exists; otherwise, this option displays the cast number in decimal format.
Number:Name Displays the cast number in decimal format and the cast name, separated by a colon (:) (for
example, 340:Dancing Potato). If no name exists, this setting displays the cast number in decimal format.
The selected format is also used in other windows, including the Score, whenever a cast ID appears.
10 To specify whether Director displays an icon that indicates the cast member’s type, select one of the following from
the Media Type Icons menu: All Types, All But Text and Bitmap, or None. Icons appear in the lower-right corner
of each cast member
11 To display a script indicator icon in the lower-left corner of each cast member that has a script attached, select
Script.
12 To make your preference settings the default settings, click Save As Default.
Naming cast members
To avoid problems in Lingo or JavaScript syntax when referring to cast members, name them and then refer to them
by name. Naming cast members doesn’t affect Director performance. The name stays the same even if the cast member
number changes.
Last updated 9/28/2011
Page 60

USING DIRECTOR 11.5
Score, Stage, and Cast
Avoid duplicating cast member names. If more than one cast member has the same name, Lingo or JavaScript syntax
uses the cast member with the lowest number in the cast.
1 Select the cast member in either the List or the Thumbnail view of the Cast window.
2 Do one of the following:
• Enter a name in the Cast Member Name text box at the top of the Cast window or in any of the editing windows.
• Enter a name in the Name text box on the Cast or Member tab in the Property inspector.
To name a cast member by using Lingo or JavaScript syntax, set the name Cast Member property. For more
information about this property, see the Scripting Reference topics in the Director Help Panel.
Selecting cast members in the Cast window
Before changing, sorting, or moving cast members, you must select them in the Cast window.
Select a single cast member
Do one of the following:
• In List view, click the name or icon (Windows) or click any part of the text or icon (Mac).
• In Thumbnail view, click the thumbnail image.
49
Select multiple adjacent cast members
Do one of the following:
• In List view, Shift-click the cast members.
• In Thumbnail view, click the first cast member in the range and then Shift-click the last cast member in the range.
Select multiple nonadjacent cast members
❖ In either List or Thumbnail view, Control-click (Windows) or Command-click (Mac) each cast member that you
want to select.
Copying cast members
You can create multiple versions of a cast member in a single cast. You can also copy cast members from one Cast
window to another.
1 In either List or Thumbnail view, select the cast members that you want to copy.
2 Alt-click (Windows) or Option-click (Mac), and drag the cast member to a new location (Thumbnail view) or to
the bottom of the list (List view).
You can drag the cast member to a location in the same Cast window or to a different Cast window. Director creates
a cast member with a new number. All of its other information is identical to the original.
3 If you copied the cast member into the same Cast window, change the name of the copied cast member so that you
(and scripts) can distinguish it from the original. For more information, see
“Naming cast members” on page 48.
Moving cast members within the Cast window
When moving a cast member to a new position or a different cast within the Cast window, use Thumbnail view to see
the representation of the cast member’s position.
Last updated 9/28/2011
Page 61

USING DIRECTOR 11.5
Score, Stage, and Cast
Note: When you move a cast member to a new position, Director assigns it a new number and updates all references to
the cast member in the Score. However, Director doesn’t automatically update references to cast member numbers in
Lingo or JavaScript syntax. The best practice is to always name cast members and refer to them by name in scripts that
refer to them.
❖ Using Thumbnail view, drag the cast member to a new position in any open Cast window.
In Thumbnail view, a highlight bar indicates where the cast member will be placed. If you drag the cast member
over a position that already contains a cast member, Director places your selected cast member in that position and
moves the existing cast member one position to the right.
In List view, the cast member is added to the bottom of the list.
Cut, copy, and paste cast members to a new position or a different cast
1 Select one or more cast members, and then select Cut or Copy from the Edit menu.
2 Do one of the following:
• In Thumbnail view, select an empty position in any open Cast window, and then select Edit > Paste.
• In List view, deselect all cast members by clicking anywhere in the window except on a cast member name. Then
select Edit > Paste.
Note: In either Thumbnail or List view, if you paste cast members while other cast members are selected, you will
overwrite the selected cast members.
50
Move a cast member to a position that is not currently visible in Thumbnail view
1 Select the cast member you want to move.
2 Scroll the Cast window to display the destination position.
3 Drag the Drag Cast Member button to the destination position.
Organizing cast members within the Cast window
The Sort command in the Modify menu helps clean up and organize the Cast window. Use Sort to sort cast members
by their media type, name, size, or usage in the Score. You can also use Sort to remove empty positions in a Cast
window.
When you use the Sort command to organize a Cast window, Director can move cast members to new positions, with
new cast member numbers.
Note: If you’ve written scripts that refer to cast members by number, these scripts can’t find moved cast members. To
avoid this problem, always name your cast members and refer to them by name in your scripts.
If you want to view the cast members in a different sort order without changing cast member numbers, click a column
title in Cast List view. See
1 With the Cast window active, select the cast members to sort or select Edit > Select All.
2 Select Modify > Sort.
3 In the Sort Cast Members dialog box, select one of the following sorting methods:
Usage In Score Places selected cast members that are used in the Score at the beginning of the selection.
“Sorting Cast List view columns” on page 54.
Media Type Groups all cast members according to their media type.
Name Groups the selection alphabetically by cast member name.
Last updated 9/28/2011
Page 62

USING DIRECTOR 11.5
Score, Stage, and Cast
Size Arranges the selection with the largest files appearing first.
Empty At End Places all empty cast positions in the selection at the end.
4 Click Sort.
Director reorders the cast members according to the sorting method you selected. The Score automatically adjusts
to the new cast member numbers.
Switching from one Cast window view to another
Do one of the following to toggle between List and Thumbnail views of the Cast window:
• Click the Cast View Style button on the Cast window to toggle between the two views.
Cast View Style
• With the Cast window active, select View > Cast, and select either List or Thumbnail.
• Right-click (Windows) or Control-click (Mac) the Cast window, and select either List or Thumbnail.
Working with Cast panel groups
Each Cast panel and panel group has an Options menu located in its upper-right corner. The Options menu contains
items for grouping, closing, and renaming panels.
51
Use a Cast panel Options menu
❖ Click the Options menu control in the upper right of the panel, and select a menu item.
Help Launches the page in the Help system that is relevant to the current panel.
Group [Panel name] With Lets you group the currently selected tab in a panel group with another Cast panel or
panel group.
Rename Panel Group Opens the Rename Panel Group dialog box.
Maximize Panel Group Maximizes the panel group to occupy the entire height of the docking channel.
Close Panel Group Closes the panel group.
Group a Cast panel with another Cast panel or Cast panel group
1 Select a Cast panel or a tab within a Cast panel group.
2 From the panel’s Options menu, select Group [Panel Name] With, and then select a panel or panel group name
from the submenu that appears.
Remove a panel (tab) from a Cast panel group
1 Select a tab within a Cast panel group.
2 From the panel group’s Options menu, select Group [Panel Name] With, and then select New Panel Group from
the submenu that appears.
The selected panel opens in its own floating panel. The new panel assumes the name previously assigned to it.
Note: The New Panel Group submenu option is dimmed if the panel group contains only a single panel.
Last updated 9/28/2011
Page 63

USING DIRECTOR 11.5
Score, Stage, and Cast
Rename a Cast panel group
❖ Select Rename Panel Group from the panel’s Options menu, and then type a new name for the panel group in the
Rename Panel Group dialog box.
Rearrange the order of tabs within a Cast panel group
1 Select a tab within the Cast panel group.
2 Select Group [Panel Name] With from the panel group’s Options menu, and then choose the name of the Cast
panel group that contains the selected panel.
The tab is moved to the last (rightmost) position in the panel group.
Note: Save your panel layout if you want to restore your Cast panel configuration the next time you open your file. Select
Window > Panel Sets > Save Panel Layout.
Managing casts
When casts are grouped with other casts, they appear as tabs in the Cast panel group, as shown.
52
Cast panel group
To save the configuration of your Cast panel tabs, you must save the panel layout before closing your file. When you
open the file again, restore the tab configuration by opening the panel layout you created.
Managing casts in older Director movies
When you open a multicast movie created in a previous version of Director, only the first cast appears in the Cast
window. You can display the remaining casts as tabs in a panel group or in a new Cast window.
• To open the cast as a tabbed panel, in the Cast window, click the Cast button and select the cast.
• To open a cast in a new window, Alt-click (Windows) or Option-click (Mac) the Cast button and select a cast.
Using Cast window controls
The controls at the top of the Cast window are the same in both the List and Thumbnail views. Use the controls to
change the cast that appears in the Cast window, the cast member selection, or the name of a cast member. You can
also use them to move cast members and to open a cast member’s Script window or the Property inspector.
A
BC
Cast window controls
A. Cast B. Cast View Style C. Previous/Next Cast Member D. Drag Cast Member E. Cast Member Name F. Cast Member Script G. Cast
Member Properties H. Cast Member Number
D
EFGH
Last updated 9/28/2011
Page 64

USING DIRECTOR 11.5
Score, Stage, and Cast
Change the cast displayed in the current Cast window
Do one of the following:
• Click the Cast button and select a cast from the menu.
• Click a tabbed panel to make it active.
• Press Control+Alt (Windows) or Command+Option (Mac) followed by the Right Arrow key or Left Arrow key to
move from tab to tab.
Open a cast in a new Cast window
❖ Click the Cast button and select a cast from the context menu.
Select the previous or next cast member
❖ Click the Previous Cast Member or Next Cast Member button.
Move a selected cast member to a new position in the Cast window (Thumbnail view) or to the Stage
❖ Drag the Drag Cast Member button to the desired position in the Cast window or to the Stage.
This procedure is useful when the selected cast member has scrolled out of view.
53
Enter a cast member name
❖ Select a cast member and enter the name in the Cast Member Name text box.
Edit a cast member script
❖ Select a cast member and click the Cast Member Script button.
View cast member properties
1 Select a cast member.
2 Do one of the following:
• Click the Cast Member Properties button.
• Right-click (Windows) or Control-click (Mac), and select Cast Member Properties from the context menu.
• Select Window > Property Inspector. The Property inspector displays only those properties associated with the
selected cast member.
For more information, see “Viewing and setting cast member properties” on page 39.
View the cast member number
❖ See the Cast Member Number field in the upper-right corner of the Cast window.
Using Cast List view
By default, the Cast List view (the default view in which the Cast window opens) provides seven columns of
information.
Last updated 9/28/2011
Page 65

USING DIRECTOR 11.5
Score, Stage, and Cast
Column Title Column Information
54
Name The name of the cast member and an icon that describes the cast member type. For information about
what the icons represent, see
# The number that is assigned to the cast member. This number represents the order in which this cast
member appears in Thumbnail view.
* An asterisk (*) in this column indicates the cast member has changed, but you have not yet saved those
changes.
Script The word Member in this column means the cast member contains a script.
The word Movie in this column means the cast member is a movie script.
The word Behavior in this column means the cast member is a Behavior.
You can use the Script icon to view the script or behavior.
Type The cast member type.
Modified The date and time the cast member was changed.
Comments Displays text entered in the Comments text box on the Property inspector Member tab.
“Using Cast Thumbnail view” on page 55.
Four additional columns are available in the Cast Window Preferences dialog box. For more information, see “Setting
Cast window preferences” on page 47.
Column Title Column Information
Size The size in bytes, kilobytes, or megabytes.
Created The date and time the cast member was created.
Modified By Who modified the cast member. This value comes from the user login name (Windows) or the Sharing
Filename The full path to the cast member if it is a linked asset.
setup name (Mac).
Resizing columns in Cast List view
1 Hold the pointer over the column boundary to activate the Resizing tool.
2 Drag the column to the desired size.
Sorting Cast List view columns
You can sort the Cast List view columns in ascending and descending order by clicking the column title. When you
sort the Cast List window by clicking the column title, you’re changing the way in which the information appears but
not changing any cast member attributes.
About cast member order in Cast List view
In List view, the cast member order doesn’t always correspond to the member’s physical location in the cast.
When you work in List view, keep the following in mind:
• In List view, Director places new cast members at the end of the list, and the cast member number becomes the first
available number after the current selection.
• You can use Thumbnail view to reorder (and renumber) cast members by dragging them to different locations in
the window. You can’t reorder cast members by dragging in List view.
Last updated 9/28/2011
Page 66

USING DIRECTOR 11.5
Score, Stage, and Cast
Using Cast Thumbnail view
Cast Thumbnail view shows a very small version of the cast member, along with an icon that represents the cast
member media type, as shown in the following table:
Icon Cast member type Icon Cast member type
Animated GIF Behavior
Bitmap Button
Check box Custom cursor
Digital video DVD
Field Film loop
Flash component Flash movie
55
Font Linked bitmap (all linked cast member icons are changed in the
Movie script OLE
Palette Parent script
PICT QuickTime video
Radio button RealMedia
Shape Shockwave 3D
Shockwave Audio Sound
Text Transition
Vector shape Windows Media
Xtra
same way)
Turn off or on the display of cast member icons in Thumbnail view and change the Cast window display
❖ Select Edit > Preferences > Cast (Windows) or Director > Preferences (Mac). For more information, see “Setting
Cast window preferences” on page 47.
Last updated 9/28/2011
Page 67

USING DIRECTOR 11.5
Score, Stage, and Cast
Creating a custom cast member thumbnail
Note: For most cast members, Director displays a scaled version as the thumbnail unless you define a custom thumbnail.
Creating a custom thumbnail is useful for behaviors that you want to identify in the Library palette, because behaviors
have no identifying image.
1 Select a bitmap image and copy it to your system’s Clipboard.
You can copy the image from any bitmap editor, including the Paint window. The image can be of any size, but
smaller images look better because they require less scaling.
2 Select any cast member in the Cast window and open the Property inspector.
3 Right-click (Windows) or Control-click (Mac) the Thumbnail window.
56
Paste a thumbnail
4 From the context menu, select Paste Thumbnail.
The image from the Clipboard replaces the current cast member thumbnail, creating a custom thumbnail.
Note: You can also use text as a thumbnail. Create and copy text instead of an image from any bitmap editor and follow
the same steps.
Launching external editors
You can specify external applications to edit many types of media. The Editors Preferences dialog box lists all the types
of media for which you can define an external editor. After you set up an external editor for a particular media type,
Director starts the application when you edit a cast member of that type. When you finish editing a cast member in an
external editor and then save and close the file, Director re-imports the cast member media.
You can easily edit Flash cast members by using the launch-and-edit feature in Director. For more information, see
“Editing a Flash cast member” on page 197.
To use an external editor for an imported cast member, select Include Original Data For External Editing during
import. For more information, see
“Importing cast members” on page 42.
Last updated 9/28/2011
Page 68

USING DIRECTOR 11.5
Score, Stage, and Cast
You can’t define an external editor for any cast member created by an Xtra, such as text, vector shapes, and custom
pointers.
Define an external editor
1 Select Edit > Preferences > Editors.
Note: If you are using a Mac OS X operating system, select the Director menu, instead of the Edit menu, to access
Preferences.
2 Select a type of media for which you want to define an external editor.
3 Click Edit.
4 Click Browse or Scan to locate the application. You can specify any application capable of editing the selected type
of media.
5 To determine which editor appears when you double-click a cast member, do one of the following:
• If you prefer to make changes inside Director and only occasionally want to use the external editor, select Use
Internal Editor.
• If you prefer to use the external editor to make changes to the cast member, select Use External Editor.
57
Launch an external editor
1 Select a cast member of a media type for which you have defined an external editor, and do one of the following:
• If you specified Use External Editor when you defined the external editor for this media type, double-click the
cast member.
• Select Edit > Launch External Editor.
• While the cast member is selected and the Cast window is active, right-click (Windows) or Control-click (Mac)
and select Launch External Editor from the context menu.
Director launches or switches to the application that created the cast member, sending the original data to the
external editor.
Note: If you specified an external editor and you want to edit a cast member with the Director internal editors, select
the cast member and select Edit > Edit Cast Member.
2 Edit the cast member.
If you change an image in the Paint window and then edit the image with an external editor, all changes that were
made in the Paint window (except registration points) are lost.
3 Save and close the file. Director re-imports the cast member.
Managing external casts
An external cast is a separate file that must be explicitly linked to a movie for the movie to use its cast members.
If you link an external cast to a movie, Director opens the cast every time it opens the movie. If you don’t link an
external cast to a movie, you must open and save the file separately. You can use unlinked external casts as libraries to
store commonly used elements for authoring, such as scripts, buttons, and so on. For more information, see
libraries” on page 58.
“Creating
Last updated 9/28/2011
Page 69

USING DIRECTOR 11.5
Score, Stage, and Cast
When you distribute a movie that uses an external cast, you must include the external cast file. The Copy Linked And
Dependent Files option in the Publish Settings dialog box ensures that the linked media are automatically placed in
the relative location during Publishing. If you have disabled the Copy Linked And Dependent Files option, copy the
linked files to the same folder as the projector or in a folder inside the Projector folder. For disk-based movies, the cast
must be in the same relative path in your files as it was when the movie was created. For Shockwave Player movies on
the web, the cast must be at the specified URL.
Create an external cast
1 Select File > New > Cast.
2 Type a name for the new cast.
3 Specify that the cast be stored as an external cast.
If you don’t want to use the cast in the current movie, deselect the Use In Current Movie option.
4 Click Create.
The cast is created, and a Cast window for the cast appears in List view. For more information, see “Using the Cast
window” on page 47.
5 Select File > Save while the Cast window is active, and save the cast in the desired directory.
58
Link an external cast to a movie
1 Select Modify > Movie > Casts.
2 In the Movie Casts dialog box, click Link.
3 Locate and select the external cast you want, and click Open.
You can link to casts on your local disk or to casts that are stored at any URL. Click Internet and enter a URL (in
the Find URL text box) for a linked external cast.
Unlink a cast from a movie
1 Select Modify > Movie > Casts.
2 In the Movie Casts dialog box, select the external cast.
3 Click Remove.
Save a movie and all linked or unlinked open casts
❖ Select File > Save All.
Note: To use a cast member from an external cast without creating a link to the external cast, first copy the cast
member to an internal cast or to a different linked external cast.
Creating libraries
A library is a special type of unlinked external cast that appears in the Library palette. When you drag a cast member
from an external cast library to the Stage or Score, Director automatically copies the cast member to one of the movie’s
internal casts. Libraries are useful for storing any type of commonly used cast members, especially behaviors. A library
cannot be linked to a movie. For more information, see
“Attaching behaviors” on page 279.
Last updated 9/28/2011
Page 70

USING DIRECTOR 11.5
Score, Stage, and Cast
When you create a library, it appears in the Library List menu in the Library palette.
1 Create an external cast file, using the procedure under “Creating new casts” on page 36. Do not select Use In
Current Movie.
2 With the Cast window for the external cast active, select File > Save, and place the external cast in the Libs folder in
the Director application folder.
3 Restart Director. The cast that you just created appears in the Library palette.
Setting cast member properties by using Lingo or JavaScript syntax
Lingo or JavaScript syntax lets you control and edit cast members by setting their properties. Some properties are
available for every type of cast member, and other properties are available only for specific cast member types. For
more information about these properties, see the Scripting Reference topics in the Director Help Panel.
Specify the cast member’s content
❖ Set the media Cast Member property.
59
Specify the cast member’s name
❖ Set the name Cast Member property.
Set the contents of the cast member’s comments field
❖ Set the comments Cast Member property. You can store any text information that you find useful, and access it at
runtime by getting the
comments property.
Specify the cast member’s purge priority
❖ Set the purgePriority Cast Member property.
Specify the content of the script that is attached to the cast member
❖ Set the scriptText Cast Member property.
Specify the file that is assigned to a linked cast member
❖ Set the fileName Cast Member property.
For additional cast member properties that you can test and set by using Lingo or JavaScript syntax, see the
properties in the Scripting Reference topics in the Director Help Panel.
Last updated 9/28/2011
Page 71

USING DIRECTOR 11.5
Score, Stage, and Cast
Setting Xtra cast member properties
Xtra cast members have the same Name and Unload properties as other cast members, and they also contain an extra
panel of options that is accessible from the Property inspector. To set cast member properties, use the Member tab and
the custom tab for the type of cast member you are working with. The Member tab contains an Edit button and might
contain a More Options button, depending on the type of Xtra. Use the Edit button to edit the cast member with its
default editor. Use the More Options button to display the Cast Member Properties dialog box for the current cast
member.
The custom tab for the type of cast member you are working with might also contain a More Options button. This
button displays the Cast Member Properties dialog box for the current cast member.
The Xtra developer determines the content of the Properties dialog box. For non-Adobe Xtra extensions, refer to the
developer’s documentation that the developer supplies.
1 Select an Xtra cast member.
2 Open the Property inspector and click the Member tab.
The Member tab displays the following information about the member:
• The cast member name
• The name of the cast that contains the cast member
• The size in kilobytes
• The creation date
• The date the cast member was last modified
• The name of the user who last modified the cast member
3 Use the Name field to view or edit the cast member name.
4 To specify how Director removes cast members from memory if memory is low, select options from the Unload
menu. For information about these options, see
5 To set special options for the current Xtra cast member, click the custom tab for the cast member you are working
with. Some types of Xtra cast members also have a More Options button on this tab. Use this button to set any
properties of the cast member that are not displayed on the tab.
“Controlling cast member unloading” on page 46.
60
Last updated 9/28/2011
Page 72

Chapter 4: Sprites
About sprites
A sprite is an object that controls when, where, and how cast members appear in an Adobe® Director® movie. Multiple
sprites can use the same cast member. You can also switch cast members assigned to a sprite as the movie plays. Use
the Stage to control where a sprite appears, and use the Score to control when it appears in your movie.
Sprites appear on the Stage layered according to the channel in which they are assigned in the Score. Sprites in highernumbered channels appear in front of sprites in lower-numbered channels. A movie can include as many as 1000 sprite
channels. Use the Movie tab of the Property inspector to control the number of channels.
Sprite properties include the sprite’s size and location, the cast member assigned to the sprite, the sprite’s name, and
the frames in which the sprite occurs. Different properties can alter the appearance of a sprite. You can rotate, skew,
flip, and change the color of sprites without affecting cast members. You can change sprite properties with the Property
inspector or Lingo or JavaScript syntax.
The Filters property of a sprite enables you to apply effects to any non-Direct To Score sprite, using the Filters tab in
the Property inspector. For more information about filters, see
“Bitmap filters” on page 135.
61
You can also give each sprite a unique name. You can assign a name by using the Property inspector, and then view the
sprite by name in the Score and on the Stage. Assigning a name lets you refer to the sprite by that name in Lingo or
JavaScript™ syntax and not just by the channel number that it occupies. You can move a sprite to a different channel and
not worry about changing scripts. Editing scores and code scripts is much easier when you refer to a sprite by its name.
In Lingo or JavaScript syntax, some properties are available only for certain types of sprites. Such properties typically
are characteristics that are related to the specific sprite type. For example, Lingo or JavaScript syntax has several digital
video properties that determine the contents of tracks in digital video sprites.
Creating sprites
Create a sprite by dragging a cast member to either the Stage or the Score; the sprite appears in both places. New sprites,
by default, span 30 frames.
1 Click to select the frame in the Score where you want the sprite to begin.
2 From the Cast window, in either List or Thumbnail view, do one of the following:
• Drag a cast member to the position on the Stage where you want to place the sprite.
• Drag a cast member to the Score. Director places the new sprite in the center of the Stage.
• To create a sprite one frame long, press Alt (Windows®) or Option (Mac®) and drag a cast member to the Stage
or Score.
Last updated 9/28/2011
Page 73

USING DIRECTOR 11.5
Sprites
Setting sprite general preferences
Use the Sprite Preferences dialog box to control the way sprites behave and appear in the Score window and on the
Stage.
1 Select Edit > Preferences > Sprite.
Note: If you are using a Mac OS® X operating system, select the Director menu, instead of the Edit menu, to access
Preferences.
2 To set the effect of selecting a sprite on the Stage, choose a Stage Selection option:
Entire Sprite Selects the sprite in all frames that it occupies.
Current Frame Only Selects only the current frame of the sprite.
3 To determine the appearance and behavior of sprites yet to be created, select the following Span Defaults
options.These options don’t change settings for existing sprites.
Display Sprite Frames Turns on Edit Sprite Frames for all new sprites. See “Editing sprite frames” on page 95.
Tweening Turns on tweening for all properties that can be tweened. This option is on by default. With this option
off, sprites must be manually tweened when new frames or keyframes are added to the sprite. For additional
information about tweening, see
“Animation” on page 90.
62
4 To determine the length of sprites measured in frames, select a Span Duration option from the following:
Frames Defines the default number of frames for sprites.
Width Of Score Window Sets the sprite span to the visible width of the Score window.
Terminate At Markers Makes new sprites end at the first marker.
5 To specify the frame used as the beginning of a sprite span when you create or edit new sprites on the Stage, select
a Span Starts option:
Previous Marker Sets the sprite span to begin at the sprite’s previous marker.
Current Frame Sets the sprite span to begin at the current frame.
First Frame In Score Window Sets the sprite span to begin at the first frame in the current Score window.
Selecting sprites
To edit or move a sprite, you must select it. You can select sprites, frames within sprites, and groups of sprites in several
ways.
Use the Arrow tool on the Tool palette to select sprites before most operations. You can also select sprites with the
Rotate and Skew tool to enable rotation and skewing. See
When selecting sprites, you often want to select a certain frame or range of frames within the sprite instead of the entire
sprite. When you make certain changes to a frame within a sprite, it becomes a selectable object called a keyframe. See
“Editing sprite frames” on page 95.
“Rotating and skewing sprites” on page 81.
A selected sprite appears on the Stage with a double border. When you select a single frame within a sprite, the sprite
appears on the Stage with a single border.
Last updated 9/28/2011
Page 74

USING DIRECTOR 11.5
Sprites
Entire sprite selected
Single frame within sprite selected
Select sprites
Do one of the following:
Note: The following techniques select an entire sprite only if Edit Sprite Frames is not enabled for the sprites you select.
• On the Stage, click a sprite to select the entire sprite span.
You can change sprite preferences so that selecting a sprite on the Stage selects only the current frame instead of
the entire sprite. See
• In the Score, click the horizontal line within a sprite bar. Don’t click the keyframes, the start frame, or the end frame.
“Setting sprite general preferences” on page 62.
63
Horizontal line within a sprite bar
• To select a contiguous range of sprites either on the Stage or in the Score, select a sprite at one end of the range and
then Shift-click a sprite at the other end of the range. You can also drag to select all the sprites in an area.
Contiguous range of sprites selected
• To select sprites that are not contiguous, Control-click (Windows) or Command-click (Mac) the discontiguous
sprites.
Non-contiguous sprites selected
Last updated 9/28/2011
Page 75

USING DIRECTOR 11.5
Sprites
Select a keyframe
Do one of the following:
• To select only a keyframe, click the keyframe indicator.
Keyframe selected
• To select a keyframe and sprites at the same time, Control-click (Windows) or Command-click (Mac) the keyframe
and the sprites.
Keyframe and sprites selected
64
Select a frame within a sprite that is not a keyframe
Do one of the following:
• In the Score, Alt-click (Windows) or Option-click (Mac) the frame within the sprite.
Frame within a sprite selected
• On the Stage, Alt-click (Windows) or Option-click (Mac) to select only the current frame of the sprite. The sprite
appears on the Stage with a single border.
Select all the sprites in a channel
❖ Click the channel number at the left side of the Score.
Last updated 9/28/2011
Page 76

USING DIRECTOR 11.5
Sprites
Naming sprites
Assign a name to a sprite by using the Property inspector and then view the sprite by name in the Score and on the
Stage. Assigning a name lets you refer to the sprite by that name in Lingo or JavaScript syntax and not just by the
channel number that it occupies. You can move a sprite to a different channel and not worry about changing scripts
that once referred to the sprite by its channel number. The sprite name is different from a cast member name because
a sprite is an instance of that cast member. If you want the sprite name to be displayed in the Score and Stage, select
Edit > Preferences > Score > Name. (If you are using a Mac OS X operating system, select the Director menu, instead
of the Edit menu, to access Preferences.) For more information, see
Name a sprite by using the Property inspector
1 Select a sprite in the Score or on the Stage.
2 Select Window > Property Inspector, and select the Sprite tab.
3 Enter a name for the selected sprite in the Name text box.
Consider naming the sprite with an easily recognizable name that will be easy to script.
“Changing Score settings” on page 34.
65
View a sprite in the Score by its name
1 In the Score, select the Sprite labels menu.
2 Select Name. All the sprites in the Score appear with their sprite name listed.
Sprites listed with their names
View a sprite on the Stage by its name
❖ Select a sprite on the Stage. The sprite name appears on the second line of the sprite overlay.
Edit the name of a sprite
1 Select the sprite and open the Property inspector.
2 Enter a name in the Name text box.
Last updated 9/28/2011
Page 77

USING DIRECTOR 11.5
Sprites
Setting the Sprite name property in Lingo or JavaScript syntax
The new sprite name property is accessible as a standard sprite property. The name property can be read at all times,
but names can be assigned only by script when in Score recording mode.
The syntax is as follows:
put sprite(1).name -- this displays the name in the message window.
You can also refer to the sprite by using its given name when evoking script commands on the sprite. For example:
sendSprite ("pete", #handlername) -- call the "handlername" method in sprite("pete")
put sprite("somename").rect -- display the sprite's rect
To find out which sprite is targeted for a particular name, you can use the following expression:
sprite("myName").spriteNum
To create a name for a sprite, the assignment must be made in Score recording mode. Note that you don’t have to use
the updateFrame command, but the record frame must be a frame where the sprite exists in the Score, as follows:
beginrecording
sprite(2).name = "tubular"
endrecording
For more information about this property, see the Scripting Reference topics in the Director Help Panel.
66
Finding sprites
You can search for and find sprites by name. When you have many sprites in a movie, searching for a sprite by name
is easier and more efficient than searching by channel name or number.
1 Select Edit > Find > Find Sprite. The Find Sprite dialog box opens with a list of the named sprites in the current cast.
Note: Only the sprites that you have already named appear in the list.
2 In the Name text box, type the name of the sprite that you want to find.
You can type only the first letters to limit the list to sprites that start with those letters.
3 Select Name if you want to sort the sprites by name; select Number to sort the sprites by channel number.
4 Select the sprite that you want to find and click Select. The Score opens at the location of the selected sprite.
Creating sprite channel names
You can also name sprite channels. When authoring sprites in Lingo or JavaScript syntax, you often must work in a
particular channel or manage several different channels. Naming a sprite channel can expedite your work when
authoring and managing many composite layers.
1 Double-click a channel in the Score sprite channel column.
2 Type a name for the channel and press Enter.
Last updated 9/28/2011
Page 78

USING DIRECTOR 11.5
Sprites
Naming channels
Layering sprites
A sprite appears in front of other sprites on the Stage according to its channel. Sprites in higher-numbered channels
appear in front of sprites in lower-numbered channels.
67
The rocket in channel 2 appears in front of the planet in channel 1.
1 In the Score, select the sprite. To select the contents of an entire channel, click the channel number at the left side
of the Score.
2 Do one of the following:
• Select Modify > Arrange, and select a command from the submenu to change the order of sprites.
• Drag the sprite in the Score from one channel to another.
• If you selected a channel, drag its contents to another channel.
Note: If you give each sprite a unique name, you don’t need to update any scripts you have written when you move a
sprite to a new channel. For more information, see
“Naming sprites” on page 65.
Displaying and editing sprite properties
As you work with sprites in your movie, be sure to monitor and possibly modify sprite properties. Use one or more of
the following methods:
• The Property inspector
• The Sprite toolbar, which includes a subset of Sprite text boxes found in the Property inspector
• The Sprite Overlay, which appears directly on the Stage the most commonly used properties for selected sprites
Last updated 9/28/2011
Page 79

USING DIRECTOR 11.5
Sprites
• Sprite labels, which appear within the sprite bars in the Score and let you view important sprite properties
• Script in Lingo or JavaScript syntax
Displaying and editing sprite properties in the Property inspector
Depending on your preference, you can use either the Sprite toolbar or the Property inspector to perform many of the
same procedures.
1 Select one or more sprites on either the Stage or the Score.
2 If the Property inspector is not open, select Window > Property Inspector.
The Property inspector opens with focus on the Sprite tab. The Graphical view is the default view. You can toggle to
the List view by clicking the List View Mode icon.
The Property inspector displays settings for the current sprite. If you select more than one sprite, the Property
inspector displays only their common settings.
A B
68
Editing sprites in the Property inspector
A. Thumbnail B. List View Mode icon
A thumbnail image of the sprite’s cast member appears in the upper-left corner of the Property inspector.
Note: To open a window for editing the sprite’s cast member, double-click the thumbnail image.
❖ Edit any of the following sprite settings in the Property inspector:
Lock Changes the sprite to a locked sprite so it can’t be changed. See “Locking and unlocking sprites” on
page 72.
Editable Applies only to text sprites and lets you edit the selected text sprite on the Stage during playback. See
“Selecting and editing text on the Stage” on page 178.
Moveable Lets you position the selected sprite on the Stage during playback. For more information, see
“Visually positioning sprites on the Stage” on page 74.
Trails Makes the selected sprite remain on the Stage, leaving a trail of images along its path as the movie plays.
If Trails is not selected, the selected sprite is erased from previous frames as the movie plays.
Last updated 9/28/2011
Page 80

USING DIRECTOR 11.5
Sprites
Flip Horizontal and Flip Vertical Reverse the sprite horizontally or vertically to form an inverted image. See
“Flipping sprites” on page 83.
The Name text box Lets you enter a name for the sprite. For more information, see “Naming sprites” on page 65.
Reg Point Horizontal (X) and Vertical (Y) Display the location of the registration point in pixels from the upper-left
corner of the Stage. See
Left (L), Top (T), Right (R), and Bottom (B) Show the location of the edges of the sprite’s bounding rectangle.
Width (W) and Height (H) Show the size of the sprite’s bounding rectangle in pixels.
Ink menu Displays the ink of the current sprite and lets you select a new ink color. See “Using sprite inks” on
“Editing sprite properties with Lingo or JavaScript syntax” on page 72.
page 85.
Blend Determines the blend percentage of the selected sprites. See “Setting blends” on page 84.
Start Frame and End Frame Display the start and end frame numbers of the sprite. Enter new values to adjust how
long the sprite plays. See
Rotation Rotates the sprite by the number of degrees you enter. See “Rotating and skewing sprites” on page 81.
Skew Slants the sprite by the number of degrees you enter. See “Rotating and skewing sprites” on page 81.
Forecolor and Backcolor color boxes Determine the colors of the selected sprite. See “Changing the color of a
“Controlling the duration of a sprite on the stage” on page 78.
sprite” on page 83.
69
Restore All Reverts the height and width to that of the cast member.
Scale Opens the Scale Sprite dialog box, where you can resize the selected sprite. See “Resizing and scaling sprites”
on page 80.
Displaying sprite properties in the Sprite toolbar
The Sprite toolbar displays a subset of the same information and text boxes found on the Sprite tab in the Property
inspector. Use either the Sprite toolbar or the Property inspector.
Show or hide the Sprite toolbar in the Score
❖ While the Score is active, select View > Sprite Toolbar.
Using the Sprite Overlay
The Sprite Overlay displays important sprite properties directly on the Stage. You can open editors, inspectors, and
dialog boxes to change sprite properties by clicking the corresponding icons in the Sprite Overlay.
Display the Sprite Overlay when a sprite is selected
❖ Select View > Sprite Overlay > Show Info.
Last updated 9/28/2011
Page 81

USING DIRECTOR 11.5
Sprites
70
A
B
C
Sprite Overlay
A. Name, cast, and media type of sprite’s cast member B. Channel number; left, top, right, and bottom coordinates; ink; and blend settings
C. Attached behavior(s) D. Sprite Overlay E. Overlay opacity control
D
E
Change how the overlay appears
1 Click the sprite on the Stage to select it.
2 In the Sprite Overlay, click the icon that represents the data you want to edit:
• To edit the Sprite’s cast member, click this icon to open the tab in the Property inspector that applies to this
type of sprite. For example, clicking this icon displays the Vector tab for a vector sprite, the Text tab for a text
sprite, and so on.
• To open the Sprite tab in the Property inspector, click this icon .
• To open the Behavior tab in the Property inspector, click this icon . See “Behaviors” on page 279.
Change the Sprite Overlay’s appearance to suit your preference
1 Select View > Sprite Overlay > Settings.
2 Select a Display option to determine when sprite properties are visible and active:
Roll Over Displays sprite properties only when the pointer is over a single sprite.
Selection Displays sprite properties when you select a sprite.
All Sprites Displays sprite properties for all sprites on the Stage.
3 Use the Text Color box to select the color for text that appears in the Sprite Overlay.
If the Stage has a dark background, changing the color of the text to a light color lets you read the sprite information
in the overlay.
Change the opacity of the Sprite Overlay
❖ Drag up or down the small thin line that appears on the right edge of the Sprite Overlay.
Adjust opacity of the Sprite Overlay
Last updated 9/28/2011
Page 82

USING DIRECTOR 11.5
Sprites
Displaying sprite labels in the Score
Sprite labels appear in the Score’s sprite bars and display key information about the sprite in relation to the movie. For
example, if you detect a strange blip caused by an ink effect, you can select Ink from the Sprite Label menu and quickly
locate the problem in those sprites that have Ink properties by sorting the Ink label. You can select the way information
appears in channels by selecting from the available sprite labels. For example, you can use the Extended display option
to display the precise location of a sprite in every frame.
Display sprite labels
1 With the Score as the active window, do one of the following:
• Select View > Sprite Labels.
• Right-click (Windows) or Control-click (Mac) on any Score channel, and select Sprite Labels.
2 Select from the following options:
• Keyframes
• Changes Only (shown at 800%)
71
• Every frame (shown at 800%)
• First frame
• None
Many options are useful only when the Score is zoomed to 400% or 800%.
Change sprite label options
❖ Select a display option from the Display menu in the Score or from the View > Display menu.
Name Displays the name of the sprite.
Cast Member Displays the name and number of the sprite’s cast member.
Behavior Displays the behavior that is assigned to the sprite.
Location Displays the x and y coordinates of the sprite’s registration point.
Ink Displays the ink effect that is applied to each sprite.
Last updated 9/28/2011
Page 83

USING DIRECTOR 11.5
Sprites
Blend Displays the blend percentage.
Extended Displays any combination of display options. Select options by selecting Edit > Preferences > Score. (If
you are using a Mac OS X operating system, select the Director menu, instead of the Edit menu, to access
Preferences.)
Editing sprite properties with Lingo or JavaScript syntax
You can use Lingo or JavaScript syntax to check and edit sprite properties with scripts as the movie plays.
Note: Sprite properties changed with Lingo are not saved in the Score unless you’re using Score recording.
Check a property value
❖ Use the put method or check in the Watcher window. For more information, see the Scripting Reference topics in
the Director Help Panel.
72
Edit a property
❖ Use the equals (=) operator or the set command to assign a new value to the property. For more information, see
the Scripting Reference topics in the Director Help Panel.
Locking and unlocking sprites
During authoring, you can lock sprites to avoid inadvertent changes to the sprite. When you lock a sprite, you can no
longer change its settings, although you still see it represented on the Stage and in the Score. While preserving the
settings of your locked sprites, you can continue to create and edit unlocked sprites.
Locking sprites is not supported during playback.
Note: If you try to perform an operation on a group of locked and unlocked sprites, a message appears that indicates the
operation will affect only the unlocked sprites.
Lock a sprite
In the Stage or the Score, select one or more sprites to lock, and do one of the following:
• Select Modify > Lock Sprite.
• On the Sprite tab of the Property inspector, click the padlock icon.
• Right-click (Windows) or Option-click (Mac), and select Lock Sprite from the context menu.
In the Score, a locked sprite appears with a padlock in front of its name. On the Stage, a locked sprite appears with a
padlock in its upper-right corner.
Last updated 9/28/2011
Page 84

USING DIRECTOR 11.5
Sprites
Select a locked sprite on the Stage
❖ Hold down the L key while selecting the sprite.
Unlock a sprite
1 In the Score or on the Stage, select one or more sprites to unlock.
2 Do one of the following:
• Select Modify > Unlock Sprite.
• On the Sprite tab in the Property inspector, click the padlock icon.
• Right-click (Windows) or Option-click (Mac), and select Unlock Sprite from the context menu.
Positioning sprites
The easiest way to position a sprite is to simply drag the sprite into place on the Stage. To position a sprite more
precisely, do any of the following:
• Set a sprite’s position on the Stage by entering coordinates in the Property inspector.
• Use the Tweak window.
• Use guides or the grid.
• Use the Align window.
• Use the arrow keys to manually move a selected sprite.
• Set the sprite’s coordinates in Lingo or JavaScript syntax.
The following diagram shows all the sprite coordinates you can specify:
73
F
G
C
Sprite coordinates
A. Top B. Bottom C. Right D. Left E. Width F. 0,0 Upper-left corner of the Stage G. Bounding rectangle H. Height I. Registration point
(X,Y)
I
A
D
B
E
H
Last updated 9/28/2011
Page 85

USING DIRECTOR 11.5
Sprites
Director places the image of a cast member on the Stage by specifying the location of its registration point. For many
cast members, such as bitmap or vector shapes, the registration point is in the center of the bounding rectangle by
default. For other types of cast members, the registration point is at the upper-left corner. (For instructions on
changing the location of the registration point of bitmap cast members, see
page 116. For instructions on changing a vector shape cast member’s registration point, see “Editing vector shapes” on
page 154.)
“Changing registration points” on
Visually positioning sprites on the Stage
Position sprites on the Stage by dragging them or by using the arrow keys.
Visually position a sprite on the Stage
1 Select Window > Stage to display the Stage.
2 Do one of the following on the Stage:
• Drag a sprite to a new position. Hold down Shift to limit the movement to horizontal or vertical straight lines.
• Select a sprite and use the arrow keys to move the selected sprite 1 pixel at a time. Hold down Shift as you press
an arrow key to move the selection 10 pixels at a time.
74
Visually position a sprite on the Stage during playback
1 Select a sprite that you want to position during playback.
2 On the Sprite tab in the Property inspector, click Moveable. See “Displaying and editing sprite properties in the
Property inspector” on page 68.
3 Begin playing back the movie.
4 On the Stage, drag the sprite to the new position.
Positioning sprites with the Property inspector
Use the Property inspector to specify the exact coordinates of a sprite.
1 With the Property inspector open and in Graphical view, select a sprite to re-position.
2 On the Sprite tab in the Property inspector, specify the sprite coordinates in pixels, with 0,0 at the upper-left corner
of the Stage, as follows:
• Specify attributes in the X and Y text boxes to change the horizontal and vertical coordinates of the registration
point.
• Specify coordinates in the W and H text boxes to change the width and height of the sprite.
• Specify values in the L, T, R, and B text boxes to change the left, top, right, and bottom edges of the sprite’s
bounding rectangle, respectively.
To move the sprite without resizing it, adjust only the x and y coordinates.
Positioning sprites with the Tweak window
Use the Tweak window when you want to move sprites by a certain number of pixels.
1 Select Modify > Tweak.
2 Select the sprite or sprites you want to move, as described in “Selecting sprites” on page 62.
Last updated 9/28/2011
Page 86

USING DIRECTOR 11.5
Sprites
3 In the Tweak window, drag the point on the left side of the window or enter the number of pixels in the text boxes
for horizontal and vertical change, and then click Tweak.
4 If you want to repeat the move, click Tweak again.
Positioning sprites by using guides, the grid, or the Align window
On the Stage, you can align sprites by using guides, the grid, or the Align window.
The grid consists of cell rows and columns of a specified height and width that you use to assist in visually placing
sprites on the Stage. The grid is always available.
Guides are horizontal or vertical lines you can either drag around the Stage or lock in place to assist you with sprite
placement. You must create guides before they become available.
Moving a sprite with the Snap To Grid or Snap To Guides feature selected lets you snap the sprite’s edges and
registration point to the nearest grid or guide line. When you’re not using the guides or the grid, you can hide them.
Guides and the grid are visible only during authoring.
You can create and modify the guides and the grid from the Property inspector or by using menu commands.
Add and configure guides
1 With the Property inspector open, click the Guides tab.
The top half of the tab contains settings for Guides.
75
2 To change the guide color, click the Guide Color box and select a different color.
3 Select the desired options to make the guides visible, to lock them, and to make the sprites snap to the guides.
4 To add a guide, move the cursor over the new horizontal or vertical guide, and then drag the guide to the Stage.
Numbers in the guide tooltip indicate the distance, in pixels, where the guide is located from the top or left edge of
the Stage.
5 To reposition a guide, move the pointer over the guide. When the sizing handle appears, drag the guide to its new
position.
6 To remove a guide, drag it off the Stage.
7 To remove all guides, click Remove All on the Guides tab in the Property inspector.
Display guides and align sprites
1 If guides don’t appear on the Stage, select View > Guides and Grid > Show Guides.
2 If Snap To Guides is not selected, select View > Guides and Grid > Snap To Guides.
3 Move a sprite on the Stage near a guide line to make the sprite snap to that exact location.
Display a grid and align sprites
1 If grid lines don’t appear on the Stage, select View > Guides and Grid > Show Grid.
Last updated 9/28/2011
Page 87

USING DIRECTOR 11.5
Sprites
Grid displayed
2 If Snap To Grid is not selected, select View > Guides and Grid > Snap To Grid.
3 Move a sprite on the Stage near a grid line to make the sprite snap to that exact location.
Note: Press the G key while moving or resizing a sprite to temporarily turn Snap To Grid off or on.
Configure the grid
1 With the Property inspector open, click the Guides tab.
The bottom half of the Guides tab contains Grid settings.
2 To change the grid color, click the Grid Color box and select a different color.
3 Select options to make the grid visible and to make the sprites snap to the grid.
4 To change the width and height of the grid, enter values in the W and H text boxes.
5 Select the desired options to display the grid as dots or lines.
76
Align sprites using the Align window
1 On the Stage or in the Score, select the sprites to align.
Select entire sprites, keyframes, or frames within sprites in as many different frames or channels as you need. All of
the elements align to the last sprite or frame selected.
2 Select alignment buttons to modify the selected objects:
• For Align, select Align Left Edge, Align Horizontal Center, Align Right Edge, Align Horizontal RegPoint, Align
Top Edge, Align Vertical Center, Align Bottom Edge, or Align Vertical RegPoint.
• For Distribute, select Distribute Left Edge, Distribute Horizontal Center, Distribute Right Edge, Distribute
Horizontal RegPoint, Distribute Width, Distribute Horizontally Across Stage, Distribute Top Edge, Distribute
Vertical Center, Distribute Bottom Edge, Distribute Vertical RegPoint, Distribute Height, or Distribute
Vertically Across Stage.
Positioning sprites with Lingo or JavaScript syntax
Script lets you control a sprite’s position by setting the sprite’s coordinates on the Stage. You can also test a sprite’s
coordinates to determine a sprite’s current position and whether two sprites overlap.
Check the location of a sprite’s registration point or bounding rectangle on the Stage
❖ Test the bottom, left, loc, locH, locV, right, or top sprite property.
The bottom, left, right, and top sprite properties determine the location of the sprite’s individual edges. For
more information about these properties, see the Scripting Reference topics in the Director Help Panel.
Last updated 9/28/2011
Page 88

USING DIRECTOR 11.5
Sprites
Place a sprite at a specific location
❖ Set one of the following properties. For more information about these properties, see the Scripting Reference topics
in the Director Help Panel.
The loc sprite property Sets the horizontal and vertical distance from the upper-left corner of the Stage to the
sprite’s registration point. The value is given as a point.
The locV sprite property Sets the number of pixels from the top of the Stage to a sprite’s registration point.
The locH sprite property Sets the number of pixels from the left of the Stage to a sprite’s registration point.
The rect sprite property Sets the location of the sprite’s bounding rectangle on the Stage.
The quad sprite property Sets the location of the sprite’s bounding rectangle on the Stage. You can specify any four
points. The points don’t have to form a rectangle. The
quad sprite property can set the sprite’s coordinates as precise
floating-point numbers.
Determine whether two sprites overlap
❖ Use the sprite...intersects operator to determine whether a sprite’s bounding rectangle touches the bounding
rectangle of a second sprite. Use the
second sprite. For more information about these operators, see the Scripting Reference topics in the Director Help
Panel.
sprite...within operator to determine whether a sprite is entirely within a
77
Controlling the entrance of a sprite on the stage
A sprite controls where and when media appear on the Stage. You change when a sprite appears on the Stage by
moving the sprite to different frames in the Score and by changing the number of frames the sprite spans. You can
either drag sprites to new frames or copy and paste them. Copying and pasting is easier when moving sprites more
than one screen width in the Score. You can also copy and paste to move sprites from one movie to another.
Note: When you copy a sprite from one movie to another, save the source movie first.
Moving a sprite in the Score
Change when a sprite appears on the Stage
1 Select Window > Score to display the Score.
2 Select a sprite or sprites, as described in “Selecting sprites” on page 62.
3 Drag the sprite to a different frame.
To move a sprite without spreading it over additional frames, hold down the Spacebar and drag. This technique is also
useful for moving any sprite that consists mostly (or entirely) of keyframes.
Copy or move sprites between frames
1 Select a sprite or sprites, as described in “Selecting sprites” on page 62.
2 Select Edit > Cut Sprites or Edit > Copy Sprites.
3 Position the pointer where you want to paste the sprite, and select Edit > Paste Sprites.
Last updated 9/28/2011
Page 89

USING DIRECTOR 11.5
Sprites
If the pasting will overwrite existing sprites, select one of the following Paste options in the Paste Options dialog box:
Overwrite Existing Sprites Replaces the sprites with the content of the Clipboard.
Truncate Sprites Being Pasted Pastes the Clipboard contents in the space available without replacing existing sprites.
Insert Blank Frames To Make Room Adds new frames for the contents of the Clipboard.
Note: Copies of locked sprites are unlocked when they are copied.
Controlling the duration of a sprite on the stage
By default, Director assigns each new sprite a duration of 30 frames. You can change the duration of a sprite—that is,
the amount of time the sprite appears in a movie—by adjusting its length, changing the number of frames in which it
appears, or by using the Extend command.
Director maintains the spacing proportions of keyframes when a sprite is lengthened. For a description of keyframes,
“Animation” on page 90.
see
78
Extend or shorten a sprite
1 Select Window > Score to display the Score.
2 Do one of the following:
• Drag the start or end frames.To extend a one-frame sprite, Alt-drag (Windows) or Option-drag (Mac).
• To extend a sprite and leave the last keyframe in place, Alt-drag (Windows) or Option-drag (Mac) a keyframe
at the end of the sprite.
• To extend a sprite and leave all keyframes in place, Control-drag (Windows) or Command-drag (Mac) the end
frame.
• Enter new values in the Start and End text boxes on the Sprite tab in the Property inspector to change the start
and end frames.
Extend a sprite to the current location of the playhead
1 Select the sprite or sprites to extend.
2 Click the frame channel to move the playhead:
• To extend the sprite, move the playhead past the right edge of the sprite.
Frame channel
• To shorten the sprite, move the playhead to the left of the sprite’s right edge, inside the sprite.
• To move the sprite’s start frame, place the playhead to the left of the sprite.
Last updated 9/28/2011
Page 90

USING DIRECTOR 11.5
Sprites
3 Select Modify > Extend Sprite.
Splitting and joining sprites
You might need to split an existing sprite into two separate sprites or join separate sprites. If, for example, you created
a complex animation as separate sprites and now want to move the entire sequence in the Score, you would join the
sprites. Splitting and joining also lets you update movies created with older versions of Director that might have several
fragmented sprites.
Split an existing sprite
1 In the Score, click the frame within a sprite where you want the split to occur.
The playhead moves to the selected frame.
Playhead at the selected frame
79
2 Select Modify > Split Sprite.
Director splits the sprite into two new ones.
Sprite split into two
Join separate sprites into a single sprite
1 Select the sprites you want to join, as described in “Selecting sprites” on page 62.
Director fills the gaps between the selected sprites. You can also select sprites in several channels. Director joins
selected sprites in each individual channel.
2 Select Modify > Join Sprites.
Changing the appearance of sprites
You can change the appearance of sprites on the Stage without affecting the cast member assigned to the sprite. You
can resize, rotate, skew, flip, and apply new foreground and background colors to sprites. Applying these changes
allows you to reuse the same cast member to create several different versions of an image. For example, you can create
a flipped and rotated sprite with a new color. Because each cast member adds to downloading time, reusing cast
members in this way reduces the number of cast members in your movie and causes it to download faster. Reusing the
same cast member for multiple sprites also reduces the amount of memory required.
Last updated 9/28/2011
Page 91

USING DIRECTOR 11.5
Sprites
Resizing and scaling sprites
You can resize sprites directly on the Stage by dragging their handles. To resize the sprite precisely, enter coordinates
or scale sprites by a specified percentage on the Sprite tab in the Property inspector. You can also set the sprite’s size
with Lingo or JavaScript syntax.
Changing a sprite’s size on the Stage does not change the size of the cast member that is assigned to the sprite. The size
of the sprite is not affected if you resize its cast member.
In some cases, resizing bitmap sprites can cause noticeable delays. If a bitmap sprite must be of a particular size,
properly size the cast members that appear in the sprite. You can do this with Modify > Transform Bitmap or in any
image-editing program. Scaling and resizing sprites works best with vector shapes.
Note: The procedure for resizing a rotated or skewed sprite is different from the following procedures. For more
information, see
Resize a sprite by dragging its handles
1 Select the sprite.
2 On the Stage, drag any of the sprite’s resize handles. To maintain the sprite’s proportions, hold down Shift while
dragging.
“Rotating and skewing sprites” on page 81.
80
Scale a sprite by pixels or by an exact percentage
1 Select the sprite you want to scale and click the Sprite tab of the Property inspector (Graphical view).
2 Click the Scale button.
3 In the dialog box, enter new values to scale the sprite by doing one of the following:
• Specify a pixel size in the Width or Height text boxes. If Maintain Proportions is selected, all text boxes that can
be updated adjust to reflect the new scaled size. If Maintain Proportions is not selected, you can specify new
proportions in the Width and Height text boxes.
• Enter a percentage in the Scale text box.
4 Click OK.
The sprite is scaled relative to its current size, not to the size of its parent cast member.
Sprite scaled
Restore a sprite to its original dimensions
Do one of the following:
• On the Sprite tab in the Property inspector (Graphical view), click Restore All.
• Select Modify > Transform > Reset Width and Height or Reset All.
Last updated 9/28/2011
Page 92

USING DIRECTOR 11.5
Sprites
Resize a sprite’s bounding rectangle with script
❖ Set the sprite’s quad or rect sprite property. For more information about these properties, see the Scripting
Reference topics in the Director Help Panel.
The rect sprite property determines the coordinates of a sprite’s bounding rectangle. The coordinates are given as
rect value, which is a list of the left, top, right, and bottom coordinates.
a
Change a sprite’s height or width with script
❖ Set the height or width sprite property. For more information about these properties, see the Scripting Reference
topics in the Director Help Panel.
Rotating and skewing sprites
You can rotate and skew sprites to turn and distort images and to create dramatic animated effects. You rotate and
skew sprites on the Stage by dragging. To rotate and skew sprites more precisely, use Lingo or JavaScript syntax or the
Property inspector to enter degrees of rotation or skew. The Property inspector is also useful for rotating and skewing
several sprites at once by the same angle.
Director can rotate and skew bitmaps, text, vector shapes, Flash® content, QuickTime® videos, and animated GIFs.
Director rotates a sprite around its registration point, which is a marker that appears on a sprite when you select it with
your mouse. By default, Director assigns a registration point in the center of all bitmaps. You can change the location
of the registration point by using the Paint window. For more information, see
page 116.
“Changing registration points” on
81
Rotation changes the angle of the sprite. Skewing changes the corner angles of the sprite’s rectangle.
Rotated sprite
Skewed sprite
After a sprite is rotated or skewed, you can still resize it.
Director can automatically change rotation and skew from frame to frame to create animation. See “Tweening other
sprite properties” on page 93.
Rotate or skew a sprite on the Stage
1 Select a sprite on the Stage.
2 Select Window > Tool Palette to display the Tool palette.
3 Click the Rotate And Skew tool in the Tool palette.
You can also press Tab while the Stage window is active to select the Rotate tool.
Last updated 9/28/2011
Page 93

USING DIRECTOR 11.5
Sprites
The handles around the sprite change to indicate the new mode.
4 Do either of the following:
• To rotate the sprite, move the pointer inside the sprite and drag in the direction you want to rotate.
Pointer
• To skew the sprite, move the pointer to the edge of the sprite until it changes to the skew pointer, and then drag
in the direction you want to skew.
Pointer
82
Rotate or skew a sprite with the Property inspector
1 Select the sprite you want to rotate or skew and click the Sprite tab in the Property inspector (List view).
2 To rotate the selected sprite, display the Rotation menu and enter the number of degrees in the Rotation text box.
3 To skew the selected sprite, display the Skew menu and enter the number of degrees in the Skew text box.
A
B
Rotating or skewing a sprite in the Property inspector
A. Rotate B. Skew
Resize a rotated or skewed sprite
Do one of the following:
• Click the Rotate And Skew tool and drag any of the sprite’s handles. Use Alt-drag (Windows) or Option-drag (Mac)
to maintain the sprite’s proportions as you resize.
Last updated 9/28/2011
Page 94

USING DIRECTOR 11.5
Sprites
• Enter new values on the Sprite tab in the Property inspector.
Director resizes the sprite at the current skew or rotation angle.
Restore a skewed or rotated sprite to its original orientation
❖ Select Modify > Transform > Reset Rotation And Skew or Reset All.
Skew a sprite with script
❖ Set the skew sprite property. For more information about this property, see the Scripting Reference topics in the
Director Help Panel.
Flipping sprites
Flipping a sprite creates a horizontally or vertically inverted image of the original sprite.
1 Select a sprite.
2 Do any of the following:
• Click the Flip Vertical or Flip Horizontal button on the Sprite tab in the Property inspector to flip the
sprite without moving the registration point or changing the current skew or rotation angles.
• Select Modify > Transform > Flip Horizontal In Place or Flip Vertical In Place to flip the sprite so that its
bounding rectangle stays in place and the registration point is moved, if necessary.
• Select Modify > Transform > Mirror Horizontal or Mirror Vertical to flip the sprite without moving the
registration point but inverting the skew and rotation angles.
83
Changing the color of a sprite
You can tint or color sprites by selecting new foreground and background colors from the Property inspector or by
using Lingo or JavaScript syntax. Selecting a new foreground color changes black pixels within the sprite to the selected
color and blends dark colors with the new color. Selecting a new background color changes white pixels within the
sprite to the selected color and blends light colors with the new color.
Director can animate foreground and background color changes in sprites, shifting gradually between the colors you
specify in the start and end frames of a sprite. See
To reverse the colors of an image, change the foreground color to white and the background color to black.
Change the color of a sprite
1 Select a sprite.
2 Do one of the following:
• Select colors from the Forecolor and Backcolor boxes on the Sprite tab in the Property inspector.
Selecting colors
• Enter RGB values (hexadecimal) or palette index values (0-255) for the foreground and background colors on
the Sprite tab in the Property inspector.
“Tweening other sprite properties” on page 93.
Last updated 9/28/2011
Page 95

USING DIRECTOR 11.5
Sprites
Change the color of a sprite with Lingo or JavaScript syntax
Set the appropriate sprite property:
• The color sprite property sets the sprite’s foreground color. The value is an RGB value. For more information
about this property, see the Scripting Reference topics in the Director Help Panel.
• The bgColor sprite property sets the sprite’s background color. The value is an RGB value. For more information
about this property, see the Scripting Reference topics in the Director Help Panel.
Setting blends
You can use blending to make sprites transparent. To change a sprite’s blend setting, use the Sprite tab in the Property
inspector.
AB
A. Blend setting of 100% B. Blend setting of 30%
Director can gradually change blend settings to make sprites fade in or out. See “Tweening other sprite properties” on
page 93.
84
The Blend percentage value affects only Copy, Background Transparent, Matte, Mask, and Blend inks.
Set blending for a sprite
1 Select the sprite.
2 Select a percentage from the Blend menu in the Property inspector, or enter a blend percentage between 0 and 100.
Specifying blend percentage
Set blending with Lingo or JavaScript syntax
❖ Set the blend sprite property. For more information about this property, see the Scripting Reference topics in the
Director Help Panel.
Last updated 9/28/2011
Page 96

USING DIRECTOR 11.5
Sprites
Using sprite inks
You can change a sprite’s appearance on the Stage by applying inks. Sprite inks change the display of a sprite’s colors.
Inks are most useful for hiding white bounding rectangles around images, but they can also create many compelling
and useful color effects. Inks can reverse and alter colors, make sprites change colors depending on the background,
and create masks that obscure or reveal portions of a background.
Change the ink for a sprite in the Property inspector or with Lingo or JavaScript syntax.
85
A
Changing sprite inks
A. Sprite with Copy ink B. Sprite with Matte ink
To achieve the fastest animation rendering on the screen, use Copy ink; other ink types might have a slight effect on
performance.
B
Change a sprite’s ink with the Property inspector
1 Select the sprite.
2 Select the desired type of ink from the Ink menu on the Sprite tab in the Property inspector.
Change a sprite’s ink with script
❖ Set the sprite’s ink sprite property. For more information about this property, see the Scripting Reference topics in
the Director Help Panel.
Note: If Background Transparent and Matte inks don’t seem to work, the background of the image might not be true
white. Also, if the edges of the image have been blended or are fuzzy, applying these inks might create a halo effect. Use
the Paint window or an image-editing program to change the background to true white and harden the edges. You
can also re-create the image with an alpha channel (transparency) and re-import the image.
Using Mask ink to create transparency effects
To reveal or tint certain parts of a sprite, use Mask ink. Mask ink lets you define a mask cast member, which controls
the degree of transparency for parts of a sprite.
Last updated 9/28/2011
Page 97

USING DIRECTOR 11.5
Sprites
The original cast member, its mask, and the sprite with Mask ink applied.
Black areas of a mask cast member make the sprite completely opaque in those areas, and white areas make it
completely transparent (invisible). Colors between black and white are more or less transparent. Darker colors are
more opaque.
When creating a bitmap mask for a sprite, use a grayscale palette if the mask cast member is an 8-bit (or less) image.
An 8-bit mask affects only the transparency of the sprite and does not affect the color. Director ignores the palette of
mask cast members that are less than 32-bit images, so using a grayscale palette lets you view the mask in a meaningful
way. If your mask cast member is a 32-bit image, the colors of the mask tint the sprite’s colors.
86
If you don’t need variable levels of opacity, use a 1-bit mask cast member to conserve memory and disk space.
There are many ways to use Mask ink. The following procedure explains the most basic method.
1 Decide which cast member you want to mask.
The cast member can be a bitmap of any depth.
2 In the next position in the same cast, create a duplicate of the cast member to serve as the mask.
The mask cast member can actually be any image, but a duplicate of the original is usually the most useful.
3 Edit the mask cast member in the Paint window or any image editor.
Black areas of the mask make the sprite completely opaque in those areas, and white areas make it completely
transparent (invisible).
4 Drag the original cast member to the Stage or Score to create a sprite.
5 Make sure the new sprite is selected, and select Mask Ink from the Ink menu on the Sprite tab in the Property
inspector.
Only the parts of the sprite that are revealed by the mask are visible on the Stage.
About Darken and Lighten inks
Darken and Lighten inks provide a great control over a sprite’s RGB properties. Use them to create color effects in
sprites varying from subtle to surreal.
Darken and lighten inks
Last updated 9/28/2011
Page 98

USING DIRECTOR 11.5
Sprites
Darken and Lighten each change how Director applies the foreground and background color properties of a sprite.
Darken makes the background color equivalent to a color filter through which the sprite is viewed on the Stage.
Lighten tints the colors in a sprite lighter as the background color gets darker. For both inks, the foreground color is
added to the image to the degree allowed by the other color control. Neither ink has any effect on a sprite until you
change the foreground or background color from the default settings of black and white.
Darken and Lighten are especially useful for animating unusual color effects. Because the foreground and background
color properties of the sprite control the effects, you can animate color shifts to create dazzling effects without having
to manually edit colors in a cast member. See
“Tweening other sprite properties” on page 93.
Ink definitions
The following definitions describe all available ink types:
Copy Displays all the original colors in a sprite. All colors, including white, are opaque unless the image contains alpha
channel effects (transparency). Copy is the default ink and is useful for backgrounds or for sprites that don’t appear in
front of other artwork. If the cast member is not rectangular, a white box appears around the sprite when it passes in
front of another sprite or appears on a nonwhite background. Sprites with the Copy ink animate faster than sprites
with any other ink.
Matte Removes the white bounding rectangle around a sprite. Artwork within the boundaries is opaque. Matte
functions much like the Lasso tool in the Paint window in that the artwork is outlined rather than enclosed in a
rectangle. Matte, like Mask, uses more RAM than the other inks, and sprites with this ink animate more slowly than
other sprites.
87
Background Transparent Makes all the pixels in the background color of the selected sprite appear transparent and
permits the background to be seen.
Transparent Makes all light colors transparent so you can see lighter objects beneath the sprite.
Note: When you apply transparent ink to a vector-shape sprite filled with gradient colors and then add a filter, the sprite
becomes subtly colored.
Reverse Reverses overlapping colors. When applied to the foreground sprite, where colors overlap, the upper color
changes to the chromatic opposite (based on the color palette currently in use) of the color beneath it. Pixels that were
originally white become transparent and let the background show through unchanged. Reverse is good for creating
custom masks.
Ghost Like Reverse, Ghost reverses overlapping colors, except nonoverlapping colors are transparent. The sprite is not
visible unless it is overlapping another sprite.
Not Copy Reverses all the colors in an image to create a chromatic negative of the original.
Not Transparent, Not Reverse, Not Ghost These types are all variations of other effects. The foreground image is first
reversed, and then the Copy, Transparent, Reverse, or Ghost ink is applied. These inks are good for creating odd
effects.
Mask Determines the exact transparent or opaque parts of a sprite. For Mask ink to work, you must place a mask cast
member in the Cast window position immediately following the cast member to be masked. The black areas of the
mask make the sprite opaque, and white areas are transparent. Colors between black and white are more or less
transparent; darker colors are more opaque. See
Blend Ensures that the sprite uses the color blend percentage that is specified on the Sprite tab in the Property
inspector. See
“Setting blends” on page 84.
“Using Mask ink to create transparency effects” on page 85.
Darkest Compares RGB pixel colors in the foreground and background and uses the darkest pixel color.
Lightest Compares RGB pixel colors in the foreground and background and uses the lightest pixel color.
Last updated 9/28/2011
Page 99

USING DIRECTOR 11.5
Sprites
Add Creates a new color that is the result of adding the RGB color value of the foreground sprite to the color value of
the background sprite. If the value of the two colors exceeds the maximum RGB color value (255), Director subtracts
256 from the remaining value so the result is between 0 and 255.
Add Pin Similar to Add. The foreground sprite’s RGB color value is added to the background sprite’s RGB color value,
but the color value is not allowed to exceed 255. If the value of the new color exceeds 255, the value is reduced to 255.
Subtract Subtracts the RGB color value of the foreground sprite’s color from the RGB value of the background sprite’s
color to determine the new color. If the color value of the new color is less than 0, Director adds 256 so the remaining
value is between 0 and 255.
Subtract Pin Subtracts the RGB color value of pixels in the foreground sprite from the value of the background sprite.
The value of the new color is not allowed to be less than 0. If the value of the new color is negative, the value is set to 0.
Darken Changes the effect of the foreground and background color properties of a sprite to create dramatic color
effects that generally darken and tint a sprite. Darken ink makes the background color equivalent to a color filter
through which the sprite is viewed on the Stage. White provides no filtering. Black darkens all color to pure black. The
foreground color is then added to the filtered image, which creates an effect that is similar to shining a light of that
color onto the image. Selecting Darken ink has no effect on a sprite until you select non-default foreground and
background colors. See
Lighten Changes the effect of the foreground and background color properties of a sprite so that it is easy to create
dramatic color effects that generally lighten an image. Lighten ink makes the colors in a sprite lighter as the
background color gets darker. The foreground color tints the image to the degree allowed by the lightening. See
Darken and Lighten inks” on page 86.
“About Darken and Lighten inks” on page 86.
“About
88
Note: Mask and Matte use more memory than other inks because Director must duplicate the mask of the artwork.
Assigning a cast member to a sprite with Lingo or JavaScript syntax
Several script properties specify the cast member that is assigned to a sprite. You can use these properties to determine
a sprite’s cast member and switch the sprite’s cast members as the movie plays.
Specify the cast member, including its cast
❖ Set the member sprite property. For more information about this property, see the Scripting Reference topics in the
Director Help Panel.
Setting this property is the most reliable way to specify a sprite’s cast member. You can also set the memberNum sprite
property, but this is reliable only when the new cast member is in the same cast as the current cast member.
Determine which cast contains the cast member assigned to a sprite
❖ Test the castLibNum sprite property. For more information about this property, see the Scripting Reference topics
in the Director Help Panel.
This procedure is useful for updating movies that serve as templates.
Last updated 9/28/2011
Page 100

USING DIRECTOR 11.5
Sprites
Exchanging cast members
The Exchange Cast Members command changes the cast member associated with a particular sprite to the currently
selected cast member. In other words, it replaces the member reference for the selected sprite with the member
reference of the selected cast member.
This command modifies the selected sprites in the Score; it doesn’t modify cast members. The command is enabled
only when both a sprite and a cast member are selected.
If multiple cast members are selected, the command associates only the first selected cast member with the sprite.
You can execute this command while the movie is playing.
1 Select a sprite in the Score.
2 Select a cast member in the Cast window. Be sure it is not the cast member that is already associated with the sprite.
3 Select Edit > Exchange Cast Members.
The selected cast member is associated with the sprite.
89
Last updated 9/28/2011
 Loading...