

Page 1

4
™
Contribute
®
Adobe
Deploying Contribute and Contribute Publishing Server
Page 2

© 2006 Adobe Systems Incorporated. All rights reserved.
Contribute™ 4 Deploying Contribute and Contribute Publishing Server
If this guide is distributed with software that includes an end-user agreement, this guide, as well as the software described in it, is
furnished under license and may be used or copied only in accordance with the terms of such license. Except as permitted by any
such license, no part of this guide may be reproduced, stored in a retrieval system, or transmitted, in any form or by any means,
electronic, mechanical, recording, or otherwise, without the prior written permission of Adobe Systems Incorporated. Please note
that the content in this guide is protected under copyright law even if it is not distributed with software that includes an end-user
license agreement.
The content of this guide is furnished for informational use only, is subject to change without notice, and should not be
construed as a commitment by Adobe Systems Incorporated. Adobe Systems Incorporated assumes no responsibility or liability
for any errors or inaccuracies that may appear in the informational content contained in this guide.
Please remember that existing artwork or images that you may want to include in your project may be protected under copyright
law. The unauthorized incorporation of such material into your new work could be a violation of the rights of the copyright
owner. Please be sure to obtain any permission required from the copyright owner.
Any references to company names in sample templates are for demonstration purposes only and are not intended to refer to any
actual organization.
Adobe, the Adobe logo, Breeze, Contribute, Dreamweaver, Flash, Flash Player, JRun, and Reader are trademarks of Adobe
Systems Incorporated. Mac OS is a trademark of Apple Computer, Inc., registered in the United States and other countries.
Solaris is a trademark or registered trademark of Sun Microsystems, Inc. in the United States and other countries. Windows is
either a registered trademark or trademark of Microsoft Corporation in the United States and/or other countries. All other
trademarks are the property of their respective owners.
Opera ® browser Copyright © 1995-2002 Opera Software ASA and its suppliers. All rights reserved. - Patents for product and
any other Adobe products on CD, including tryout versions
Adobe Systems Incorporated, 345 Park Avenue, San Jose, California 95110, USA
Notice to U.S. government end users. The software and documentation are “Commercial Items,” as that term is defined at 48
C.F.R. §2.101, consisting of “Commercial Computer Software” and “Commercial Computer Software Documentation,” as such
terms are used in 48 C.F.R. §12.212 or 48 C.F.R. §227.7202, as applicable. Consistent with 48 C.F.R.. §12.212 or 48 C.F.R.
§§227.7202-1 through 227.7202-4, as applicable, the Commercial Computer Software and Commercial Computer Software
Documentation are being licensed to U.S. Government end users (a) only as Commercial items and (b) with only those rights as
are granted to all other end users pursuant to the terms and conditions herein. Unpublished-rights reserved under the copyright
laws of the United States. Adobe Systems Incorporated, 345 Park Avenue, San Jose, CA 95110-2704, USA. For U.S.
Government End Users, Adobe agrees to comply with all applicable equal opportunity laws including, if appropriate, the
provisions of Executive Order 11246, as amended, Section 402 of the Vietnam Era Veterans Readjustment Assistance Act of
1974 (38 USC 4212), and Section 503 of the Rehabilitation Act of 1973, as amended, and the regulations at 41 CFR Parts 60-1
through 60-60, 60-250 ,and 60-741. The affirmative action clause and regulations contained in the preceding sentence shall be
incorporated by reference.
Page 3

Contents
Chapter 1: Overview . . . . . . . . . . . . . . . . . . . . . . . . . . . . . . . . . . . . . . 5
Understanding Contribute user management models . . . . . . . . . . . . . . .5
Common website configurations . . . . . . . . . . . . . . . . . . . . . . . . . . . . . . . . .9
Deployment roles and responsibilities . . . . . . . . . . . . . . . . . . . . . . . . . . . . 14
Deployment tasks checklist . . . . . . . . . . . . . . . . . . . . . . . . . . . . . . . . . . . . . 15
Chapter 2: Preparing Your Network and Installing
Contribute . . . . . . . . . . . . . . . . . . . . . . . . . . . . . . . . . . . . . . . . . . . . . . 17
Preparing your web server before you deploy . . . . . . . . . . . . . . . . . . . . . 17
Planning your Contribute site structure and connection path. . . . . . . 22
Installing Contribute and creating an administrative connection . . . . 30
Installing Contribute Publishing Server (Optional) . . . . . . . . . . . . . . . . 32
Chapter 3: Configuring Contribute and Contribute Publishing
Server to work with your website. . . . . . . . . . . . . . . . . . . . . . . . . . . 41
Configuring Contribute . . . . . . . . . . . . . . . . . . . . . . . . . . . . . . . . . . . . . . . . . 41
Configuring Contribute Publishing Server (CPS only) . . . . . . . . . . . . . 48
Enabling Contribute websites to work with CPS (CPS only) . . . . . . . 55
Adding users to your website (CPS only) . . . . . . . . . . . . . . . . . . . . . . . . .57
Deploying Contribute and website connections . . . . . . . . . . . . . . . . . . 59
Deploying Contribute across an organization . . . . . . . . . . . . . . . . . . . . 63
Index . . . . . . . . . . . . . . . . . . . . . . . . . . . . . . . . . . . . . . . . . . . . . . . . . 69
3
Page 4

4Contents
Page 5

CHAPTER 1
Overview
Adobe® Contribute™ is a website editor that lets people connect to departmental and other
websites so that they can update web page content. Administrative assistants, product managers,
human resource managers, and other people in an organization can use Contribute to update
their team website without having to contact a web team or other departmental resources.
For larger organizations, you can optionally use Adobe® Contribute™ Publishing Server (CPS)
with Contribute. CPS is a user management and publishing solution that lets Contribute
administrators manage large groups of Contribute users and monitor what those users do on the
website.
This chapter, intended for website administrators and IT professionals, gives you valuable
information you need before you deploy Contribute, and optionally CPS, in an organization. It
explains the Contribute user management models for using Contribute alone or with CPS, shows
scenarios for setting up Contribute in a variety of IT environments, and lists the people and the
various tasks involved in successfully deploying Contribute.
This chapter contains the following sections:
• “Understanding Contribute user management models” on page 5
• “Common website configurations” on page 9
• “Deployment roles and responsibilities” on page 14
• “Deployment tasks checklist” on page 15
Understanding Contribute user management models
User management lets you add and remove user access to websites and create user roles that
restrict editing privileges in a site. User management also provides a mechanism that lets users
easily connect to a website.
Contribute has two user management models: manual site connections using Contribute only
and managed site connections using Contribute plus the CPS User Directory service.
Manual connections let you communicate connection information to users, who then create
their own connections, either by entering connection information in the Connection Wizard or
by importing a connection-key file that you give them.
5
Page 6

This user model works best for smaller workgroups and organizations. It allows you to quickly set
up Contribute, create a connection to your website, define the necessary user roles, generate
connection information for the website connection and user role, and send the information to
users in the form of a connection-key file.
Managed connections lets you use CPS to integrate Contribute with your organization’s LDAP
or Active Directory services, letting you add and remove user access to a website and modify user
roles without having to resend connection-key files to users. You can also create a file-based
database, using an XML file to manually enter user names and passwords.
CPS is intended for larger organizations that have several Contribute users to manage. CPS lets
you add and remove users from websites and roles without having to resend connection
information. When you create a connection to a website that uses CPS, you add users to a list that
grants access to a given website and user role. When users access the website, CPS prompts them
for a user name and password. After they enter their user name and password, they are granted
access to the website and the role you’ve assigned to them.
To use CPS, you must have a J2EE application server such as Adobe® JRun™ 4.5 installed. To
learn about other CPS functionality, see “Using Contribute Publishing Server with Contribute”
on page 6. For more information about getting CPS for your organization, see the CPS website at
www.adobe.com/products/contribute/server/.
Using Contribute Publishing Server with Contribute
Using Contribute Publishing Server (CPS) with Contribute creates a powerful solution for
managing and maintaining your website.
CPS is a J2EE-based server application that lets you centrally manage large groups of Contribute
users. CPS includes the following services:
User Directory service is a user management solution that lets you integrate Contribute with
your organization’s user directory to easily manage and authenticate users.
E-mail Notification service lets you automatically notify users about changes to web pages in
the draft review process.
Log service lets you monitor website activity so that you can easily troubleshoot problems.
CPS also has two other services that you can extend to meet your needs or use as they are:
Simple File Deployment service enables you to easily move files from a staging or testing
server to a live server.
RSS Activity Feed service produces a syndication feed that lists changes that occur in any
folder on your website.
The biggest advantage to using CPS is the ability to integrate your organization’s user directory
services (such as LDAP or Active Directory) with Contribute. This gives you individual control
over which user is granted access to a particular website and the role to which they are assigned.
6Overview
Page 7

Consider a large organization with several decentralized websites. In addition to a public-facing
site that provides information about the organization, several internal sites are in use by individual
departments and workgroups. The organization uses LDAP as both a directory service that lets
users look up other employees as well as an authentication service through which administrators
set permissions that limit users’ access to file-sharing servers and other network resources.
Unlike sites that don’t use CPS to manage users, when a user logs in to a CPS website, the User
Directory service retrieves the connection information associated with that user, and provides
access to the sites that the administrator assigned. By maintaining site connection information in
the User Directory, administrators can add or remove access to websites without having to resend
connection information.
This example provides a partial listing of employees from an organization’s user directory. The
employees, their workgroup affiliations, and the sites they can access are listed in the following
table:
User Workgroup Websites
John Lydon Product Management Sales, Production, Marketing
Malcolm McClaren Product Management Sales, Production, Marketing
Martin Atkins Marketing Marketing
Keith Levine Sales Sales
John Savage Production Production
Laura Logic Web Design Sales, Production, Marketing
Jah Wobble Contribute Administrator Sales, Production, Marketing
Although this user list is oversimplified, it demonstrates one possible scenario for the way that
users within an organization might be assigned access to websites. This scenario divides users
according to their role within the organization, and assumes that they have full editing and
publishing privileges in their respective sites. Certain users have access to all the sites. For
example, the product managers, John Lydon and Malcolm McClaren, work with all the teams in
developing and launching products, and need to contribute to all the sites.
Likewise, web designer Laura Logic and Contribute administrator Jah Wobble have access to all
sites. As the web designer, Laura provides templates that are easy to add content to and that fit the
needs of users collaborating internally. The templates she maintains include those for taking
meeting minutes, for scheduling, and for providing product specifications, marketing launch
plans, and sales projections, to name a few. Laura also collaborates with Jah Wobble, the
Contribute administrator, to help determine the editing and publishing privileges for individual
users and roles.
Understanding Contribute user management models 7
Page 8
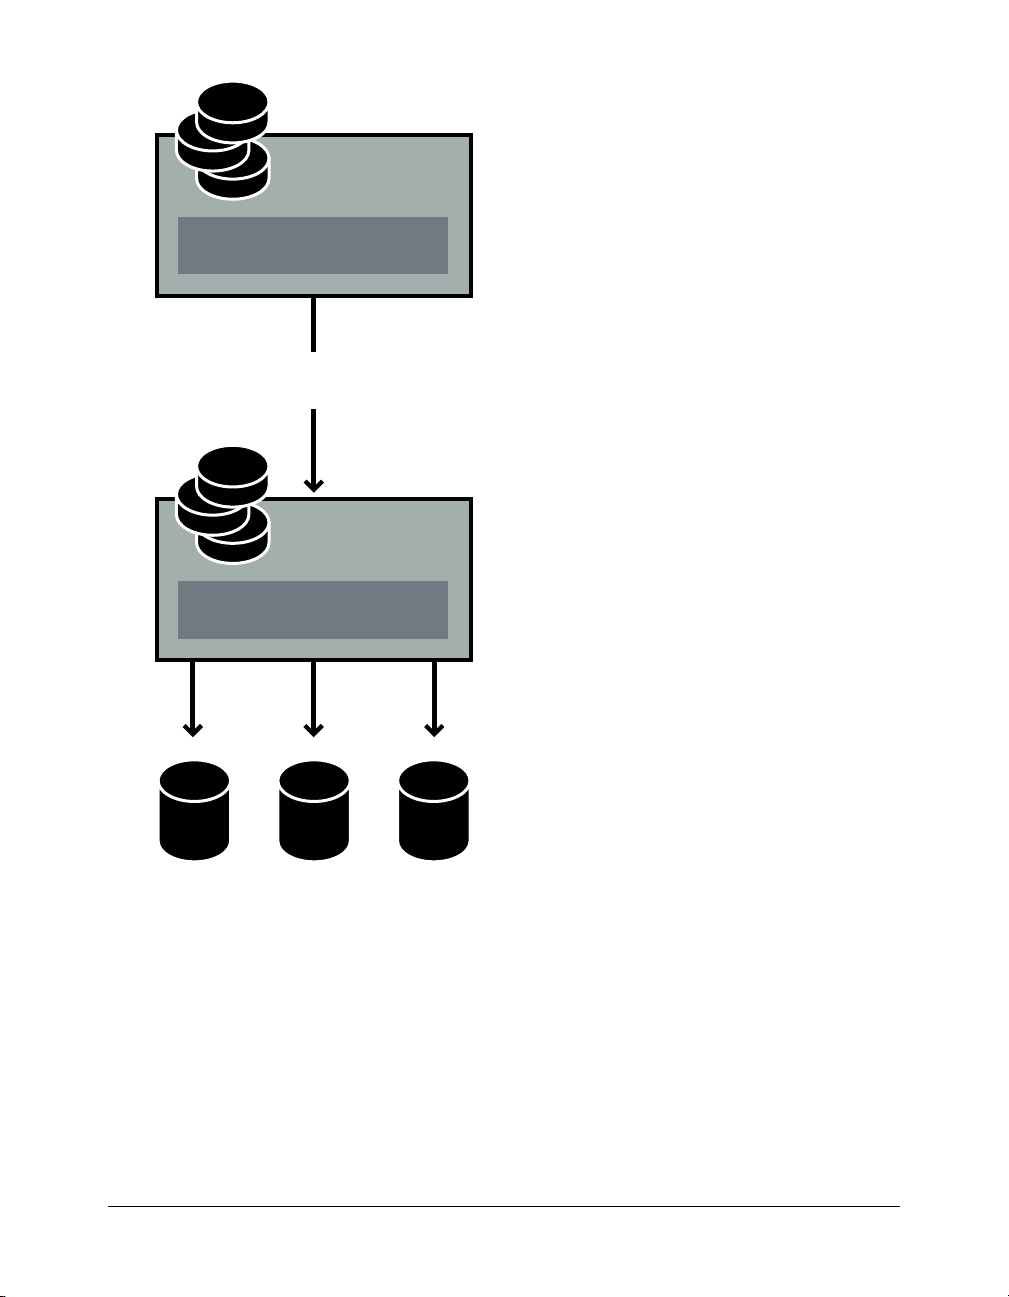
DIRECTORY SERVICE
Users... John Lydon, Martin
Atkins, Keith Levine, Laura...
User list input from directory
service (LDAP, Active Directory)
PUBLISHING SERVICE
SERVER
User Directory manages users
and their connections
Sales
Marketing Manufacturing
CPS integrates with the organization’s LDAP service, which authenticates user access to various
network resources. In this case, the LDAP authentication is the first step in granting access to
websites hosted on various servers within the organization. The Contribute roles further define
user privileges in a website, determining the degree to which users can modify pages in the site.
Common website configurations
Before you deploy Contribute, consider various scenarios for setting up Contribute for large or
multi-team organizations.
8Overview
Page 9

This section describes three primary configurations for you to consider as you set up a Contribute
site.
Single website on one webserver Typically, this is a website where users have read access to
the root of the site and read/write access to specific folders in the site as controlled by the file
server or network permissions. There is a single root folder and all users access the site by using
the same Contribute connection. If this applies to your site, see “Deploying Contribute for a
single website with one webserver” on page 9.
Multiple websites on one webserver This structure has a single root folder. The root folder
contains folders for each section or organizational function in the website. Contribute roles are
used to control user access to particular folders on the site and to assign a subset of the
common templates used on the site. Although not required, file server permissions are usually
used in addition to Contribute roles to restrict user access to sections of a site. If this applies to
your site, see “Deploying Contribute for multiple websites on one webserver” on page 11.
Website on a staging server and a live server Many websites use a staging web server with
their production web server. Staging servers let you create and test web content without
making it live on your public-facing website. Only when content has been approved are web
pages and their associated files copied from the staging to the production web server. When
used with Contribute, a staging server adds an extra measure of security because you can
configure your staging server so that Contribute specific files (such as administrative folders,
rollback files, and interim drafts) are not copied to the publicly accessible website outside your
network firewall. For more information, see “Deploying Contribute to a staging server and a
live server” on page 12.
Depending on how your website is structured, use separate strategies to successfully set up
Contribute for multiple users and groups. Specifically, consider where to store the Contribute
shared settings file, how to prevent overlapping connection paths, and how you’ll send
connections to users.
Deploying Contribute for a single website with one webserver
In this example, Contribute is deployed to a simple intranet consisting of a single web server
hosting a departmental website. The website has a single, common root folder with subfolders for
individual departments. The site uses Dreamweaver templates and CSS styles to enforce the look
and feel of the website and SSIs to maintain page elements such as navigation menus, headers,
and footers.
The key to this arrangement is that all users have the same Contribute site connection. In other
words, a single connection point for all users controls the behavior of Contribute when editing
the website. To restrict users to editing content in their workgroup’s folder, you would need to
create a role that limits access to a specific folder.
An advantage to this type of Contribute deployment is that users in all departments can
collaborate by sending pages for review to one another. If separate connections had been created
for each department (as in the example “Deploying Contribute for multiple websites on one
webserver” on page 11), then only the users with access to that folder could receive and edit drafts
sent to them for review.
Common website configurations 9
Page 10
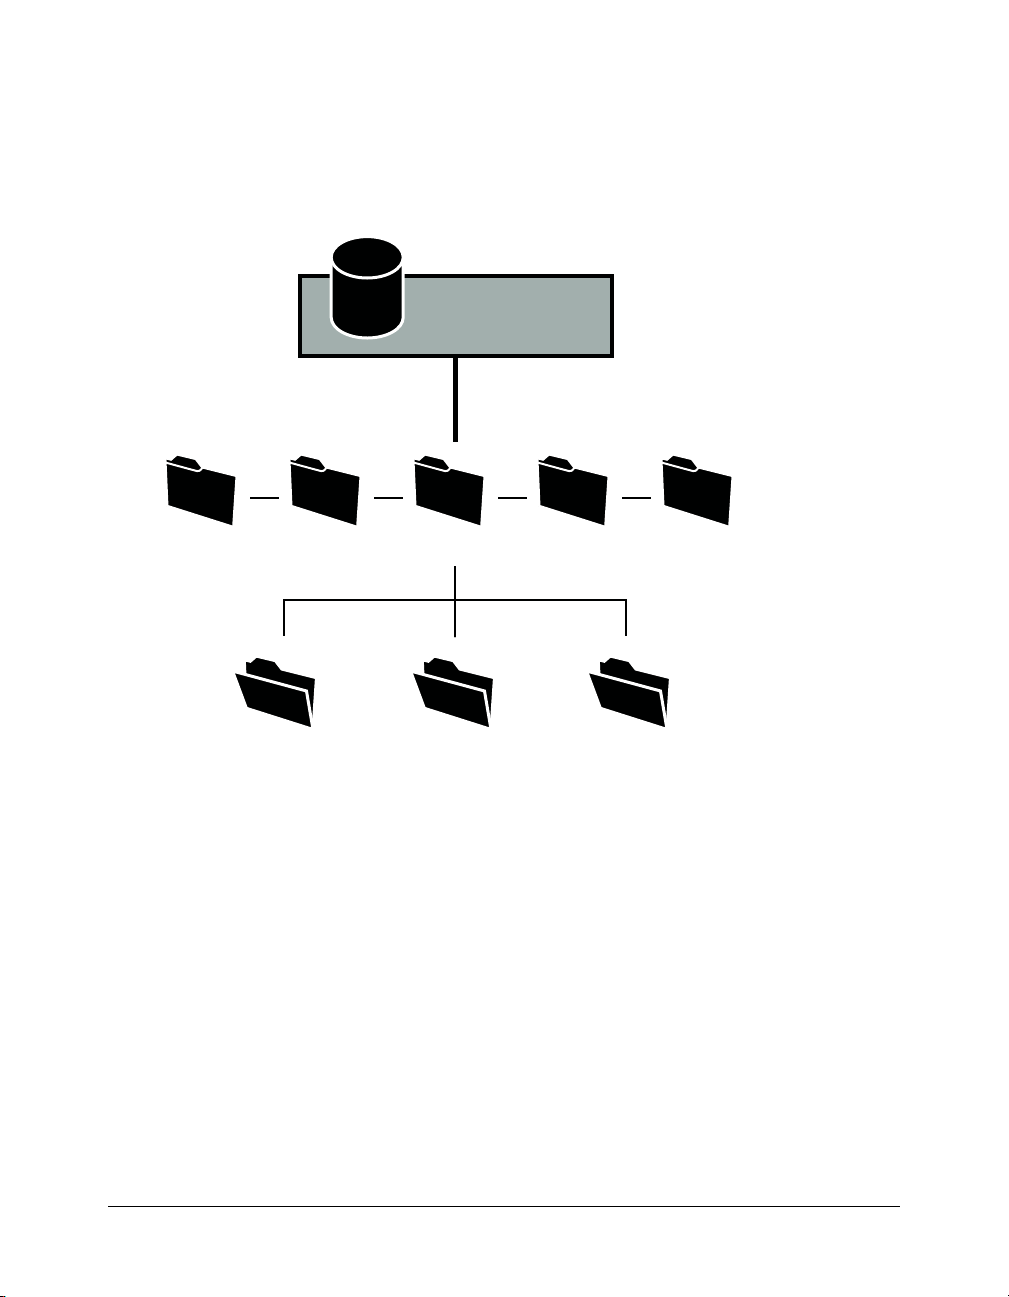
It is important that the Templates folder, which is located at the same level as the Contribute
shared settings folder (_mm), is accessible by all users, and the site’s CSS (CSS folder), and server
side includes (SSI folder) are protected by role settings that restrict access to those folders. Web
pages and associated files stored in these folders cannot be edited using Contribute, preventing
them from being inadvertently modified or damaged. To restrict users to editing content in their
workgroup’s folder, create a role that limits access to a specific folder.
WEB SERVER HOSTING
INTERNAL SITES
Team Sites _mm(Shared settings) TemplatesSSICSS
Sales Manufacturing Marketing
Deploying Contribute for multiple websites on one webserver
This scenario has several departmental intranet sites, each of which needs access restricted to
members of the given department. To accomplish this, the administrator creates a separate
Contribute connection for each department’s folder in the website (to essentially create subsites).
In addition, each department has its own set of Dreamweaver templates on which to base new
pages.
When connecting users to their respective sites, the administrator creates and distributes a
connection key for each website connection.
In this scenario, three administrator connections are created. The site administrators create a
connection to their department’s section of the website (for example, /myIntranet/sales).
Additional roles can be created to define any restrictions for users in the site (for example, to
specific subfolders in the Sales folder or to set editing options).
10 Overview
Page 11
Users can browse the entire site but are restricted to editing in their department’s folder. By
restricting user’s editing privileges to their department’s web pages, each group can maintain
control over their web content and can act more independently with the content they make
available to the entire organization. A potential drawback to this arrangement is that users in
different departments cannot collaborate on pages. Each department must work independently.
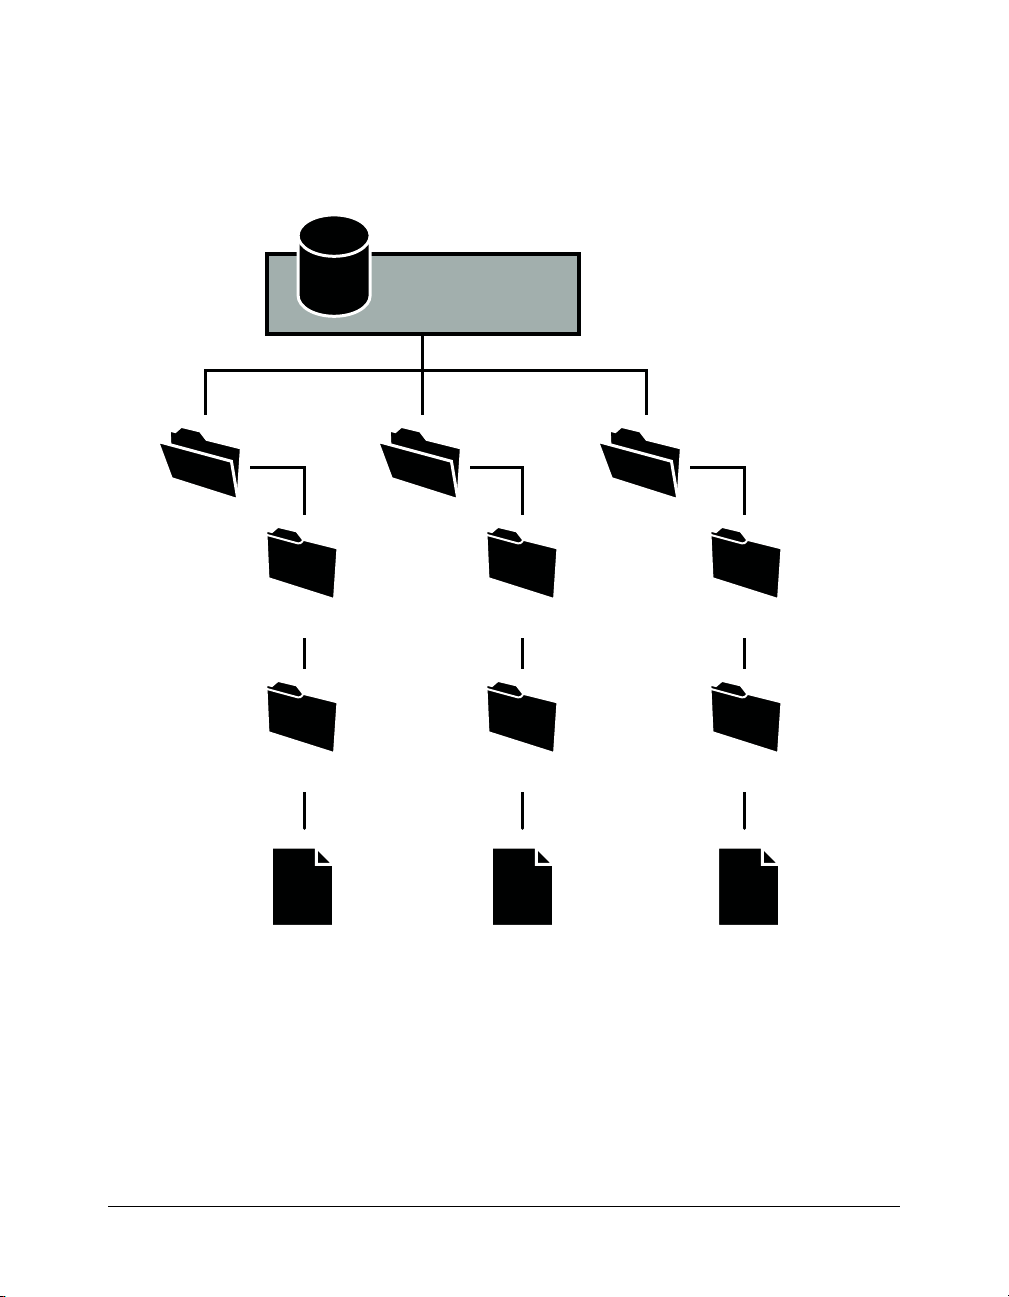
WEB SERVER HOSTING
INTERNAL SITES
Manufacturing MarketingSales
_mm_mm (Shared settings) _mm
TemplatesTemplates Templates
index.htmlindex.htmlindex.html
Deploying Contribute to a staging server and a live server
Many organizations use a staging web server with their production web server. A staging server
lets you create websites on a non-production web server, so you can generate and test content
without making it live on your organization’s public website. The use of a staging server also lets
you maintain an automatic backup copy of all your website content.
Common website configurations 11
Page 12
In regard to Contribute, the use of a staging server lets you copy only folders and files that you
specify as necessary for your website. This enables you to use Contribute to update web content
on the staging server, but only publish the necessary web pages to your production web server for
public access.
By configuring Contribute to work with content on your staging server, you can provide an extra
measure of security by not copying Contribute’s administrative files and folders to your
production server. This also lets you eliminate the presence of unnecessary files from a server with
public access.
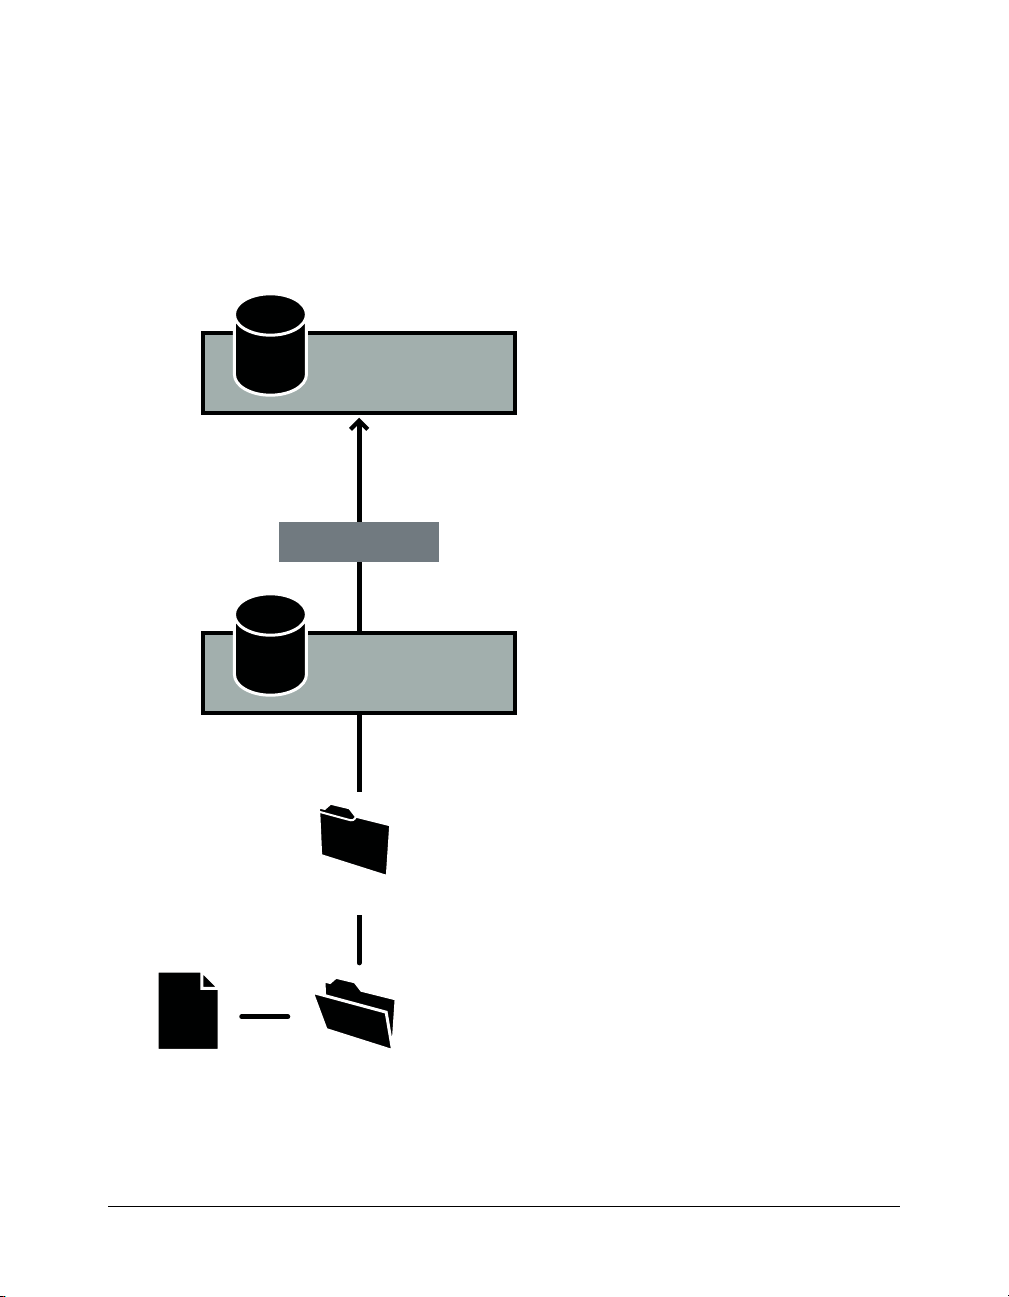
PRODUCTION SERVER
outside firewall
New and updated web content is
copied from the staging server
to the production server
Firewall
index.html
12 Overview
STAGING SERVER
inside firewall
_mm (Shared settings)
Contribute users create
and update content on
the staging server
Page 13

To use Contribute with a staging server, you create a connection to the staging server’s website.
Users can update content on the staging server. Any temporary drafts that are created during the
review process, or drafts of files that are in the process of being updated, but not yet published to
the website, remain on the staging server, protected by your network’s firewall.
When using a staging server, configure the software you use to copy web pages and related files
from the staging to the production server to not copy the following folders and the files they
contain:
_mm contains Contribute administrative files and the messaging folders used to notify users
when they have a draft that requires their attention.
_baks archives rollback copies of files.
_notes contains design notes. These files record information about who last published a given
page, and other information
MMWIP contains drafts of pages that have been sent for review but have not yet been
published to the site.
Keeping these folders, and the files that Contribute stores inside them, off your production
website provides an additional level of security. Although every effort has been made to make
these folders and their files secure, the best security measure is to keep them on a server protected
by your network’s firewall. In addition, consider using access control lists (ACLs) to secure these
folders further by restricting access to network addresses in your organization’s network.
Deployment roles and responsibilities
After you understand how Contribute fits into your organization, it’s important to understand
the various roles involved in deploying Contribute.
As a system or website administrator, you play a large part in deploying Contribute. The
deployment responsibilities include the following tasks (for a complete list, see “Deployment tasks
checklist” on page 15):
• Installing the Contribute software.
• Creating connections to websites that users of Contribute can access.
• Defining roles (a collection of privileges that you assign to specific users).
• Installing Contribute on individual computers throughout your organization.
• (Optional) Integrating Contribute with Contribute Publishing Server (CPS).
The size of your organization and the job roles associated with your organization’s websites
determine who assumes responsibility for deployment. A single system administrator may be
responsible for all deployment, or other members of the organization’s web team or IT staff may
be involved.
If you are a system administrator, this might be your first time to work with web pages and web
content. Your role as a system administrator may intersect with the role of web designer.
Deployment roles and responsibilities 13
Page 14

The following table describes the function of each role that relates to Contribute:
Role Function
Contribute administrator Responsible for installing Contribute, setting up user roles and privileges,
and determining the degree to which users can access and update
websites.
Contribute administrators are often members of an organization’s IT staff,
responsible for maintaining server and network infrastructure, managing
user and file permissions across an organization’s network.
System administrator Maintains web servers and web server access. This role often overlaps
with that of the Contribute administrator and may be handled by the same
person in smaller organizations.
Web designer Designs websites, determining their look and feel, and creates and
maintains the site’s content.
Web developer Develops web-based applications, such as for absence reporting and
financial reporting, distributed to users over the web.
Contribute user Contribute users range widely in their job tasks and computer experience.
What they have is common is the need to update web page content
quickly and easily. Using Contribute, they can easily connect to a website
and safely update its content without inadvertently introducing
malfunctions.
These roles vary from organization to organization. In smaller organizations and workgroups, a
single person may handle the job of administering Contribute and determining the design of the
website. Larger workgroups and departments may have a team of people involved in maintaining
their website.
Deployment tasks checklist
The following table describes the tasks you need to perform to successfully deploy Contribute.
Task Description
Configure network and
server permissions
Plan your site structure
and connection path
Install Contribute and
create an administrative
website connection
14 Overview
Ensure that the network and server permissions allow read, write, and
modify access so that Contribute users can connect to the site and
update pages.
For more information, see “Preparing your web server before you deploy”
on page 17.
Plan your site structure, including considerations for subsites or multiple
connections, and determine your connection path.
For more information, see “Planning your Contribute site structure and
connection path” on page 22.
Install Contribute on the computer from which you’ll administer the site,
create a connection to the website by using Contribute, and establish
yourself as the Contribute administrator for the site.
To learn more about creating an administrative connection, see “Installing
Contribute and creating an administrative connection” on page 30.
Page 15

Task Description
Install Contribute
Publishing Server (CPS)
(optional)
Configure Contribute
settings and roles
Configure CPS user
directory service
(optional)
Configure the Log and
E-mail services
(optional)
Enable your website to
work with CPS (optional)
Add users to the website In Contribute, add users to the website.
Deploy Contribute to
your user base
CPS is a suite of Java server applications that lets you integrate
Contribute with Lightweight Directory Access Protocol (LDAP) or Active
Directory services, and implement e-mail notifications to keep Contribute
users informed about the status of their drafts in progress.
To use CPS, you must install and configure the server on a Java
application server.
For more information, see “Installing Contribute Publishing Server
(Optional)” on page 32
Configure the administrative settings so that Contribute works more
efficiently with your website and create Contribute roles based on the
privileges and restrictions you want to place on a user’s ability to access
and edit pages in the site.
For more information, see “Configuring Contribute” on page 41.
If you use CPS, configure the User Directory service: you must specify the
user directory type, and either configure CPS to access your LDAP or
Active Directory server, or enter user information into a file-based
database. You can also configure other CPS services now, or you can do
it later.
For more information, see “Configuring Contribute Publishing Server
(CPS only)” on page 48.
Configure the log file and e-mail settings that CPS should use. You can
configure these CPS services now, or you can do it later.
For more information, see “Configuring Contribute Publishing Server
(CPS only)” on page 48.
If you use CPS, you must enable your website to work with the server.
For more information, see “Enabling Contribute websites to work with
CPS (CPS only)” on page 55.
For more information, see “Adding users to your website (CPS only)”
on page 57.
Deploy Contribute to your users, and send them website connection
information so they can access the website.
To learn more about distributing website connections, see “Deploying
Contribute and website connections” on page 59.
In addition to the basic tasks described in the preceding table, you can further enhance your
website by designing it to be more easily maintainable or by adding additional functionality by
using CPS.
Deployment tasks checklist 15
Page 16

16 Overview
Page 17

CHAPTER 2
Preparing Your Network and Installing Contribute
After you have given some consideration to what is involved in deploying Adobe® Contribute™
and Contribute Publishing Server (CPS), you are ready to begin. First you need to prepare your
network, then you can install the software.
This chapter contains the following sections:
• “Preparing your web server before you deploy” on page 17
• “Planning your Contribute site structure and connection path” on page 22
• “Installing Contribute and creating an administrative connection” on page 30
• “Installing Contribute Publishing Server (Optional)” on page 32
Preparing your web server before you deploy
Before you actually install Contribute and roll it out, consider how Contribute will affect your
network and prepare for it by setting permissions, access, and securing special files and folders on
your web server.
This section covers the following topics:
• “Understanding network and server permissions” on page 18
• “Understanding server access for connecting to CPS-managed websites” on page 18
• “Restricting access to administrative folders and special file types” on page 19
• “Special files created by the draft review process” on page 20
17
Page 18

Understanding network and server permissions
Contribute is unique in that it allows editing of web pages directly on the server hosting your
website. This level of server access makes network permissions and access control especially
important.
There are at least three levels of permissions for every Contribute site:
• Permissions defined by the network operating system (for instance, Windows or UNIX® server
software)
• Permissions defined by the web server software
• Roles you define in Contribute
Network permissions can be set in several ways through a variety of systems. Contribute always
adheres to the network permissions for read and write access to folders. It also obeys permissions
set through LDAP and similar systems. Contribute can never overwrite any server- or networklevel permissions.
Note: The server’s network and operating system permissions, and the web server software’s
permissions, always take precedence over Contribute permissions.
Whenever you provide access to a web server, take precautions to ensure that the operating system
of the server hosting the site, as well as the web server software itself (and the FTP server, if you
are using FTP), are secure. For the best practices related to securing your website from accidental
and malicious tampering, see the documentation provided with your server’s operating system,
FTP, and web server software.
Note: You can set folder permissions to allow a user or group of users to modify a folder and later
define more restrictive folder- or file-editing options when you define the Contribute user roles.
Understanding server access for connecting to CPS-managed websites
As an administrator, you should require that users enter their own account username and
password to log in when they use FTP, SFTP, or WebDAV to connect to a website managed by
CPS. This is a best practice and the default option. The alternative is to use a shared FTP, SFTP,
or WebDAV account for a website connection managed by CPS.
Requiring users to log in with their own account username and password provides an extra layer
of security. When you share a website connection that uses a shared account, the username and
password for the shared account are stored on the machine where CPS is installed. The password
is stored as a hash of the password in a non-browsable folder, and you can restrict access to this
folder. However, the password could be at risk if it is not a strong password. Therefore, it is
recommended that you not use shared account information for any CPS website connection, but
that you require users to log in with their own account information.
If you require users to log in with their own account information, CPS prompts them for a
username and password. You can improve the user experience by creating FTP, SFTP, or
WedDAV accounts tied to your user directory service so that users do not have to know or
remember another password. If the CPS login is also tied to your user directory service, CPS can
automatically reuse the user’s CPS login information to open the connection and does not
prompt for a second password for connection information. The user also can have Contribute
remember the account username and password for future use.
18 Preparing Your Network and Installing Contribute
Page 19

As an administrator for a website managed by CPS, you can view or modify FTP, SFTP, and
WebDAV settings by editing the connection.
For more information about editing website connections, see in Contribute Help.
Restricting access to administrative folders and special file types
When you create a site connection, Contribute creates special files that are stored in folders whose
names begin with an underscore (such as _mm, _baks, and _notes). These folders may contain
files with user names, e-mail addresses, previous versions of web pages, and other types of meta
information used by Contribute. The underscore allows Macromedia Dreamweaver from Adobe
and Contribute to distinguish between those folders and the other folders in your site.
Contribute and Dreamweaver use this naming convention to filter these special files and prevent
them from appearing in the Dreamweaver Site panel and in the Contribute Remote File Browser.
These hidden folders can’t be browsed, overwritten, or inadvertently altered by users.
Additionally, some search engines and automated programs are designed not to return pages
found in folders whose names begin with an underscore.
To ensure that these folders and files remain protected, review the configuration of your web
server software and make certain that you block HTTP access to folders whose names begin with
an underscore (_mm, _baks, and _notes), the MMWIP folder, and files identified by the file
extensions .lck, .mno, .bak, .lbi, .csi, and .dwt.
In particular, you might want to block HTTP access to the MMWIP folder. The MMWIP folder
contains interim drafts of files (works in progress) that you might want to protect. Adobe
recommends that you restrict access to the MMWIP folder so that only members of your
organization can browse files in that folder.
Note: In addition to using the computer’s operating system and web server software configuration
settings, you might consider using a third-party URL scanner to block HTTP access to secure these
files and folders.
Apache web servers
If your website uses Apache, you can explicitly disable browsing folders and files that begin with
an underscore. If you know how to modify the Apache web server’s httpd.conf file and have
permission to do so, you can use the DirectoryMatch directive to prevent visitors from viewing
any file in a folder beginning with an underscore.
If you’re not sure how to edit the Apache httpd.conf file or don’t have permission to do so, ask
your system administrator or Internet service provider (ISP) to do it for you. To learn more about
limiting access to files and folders, and other security issues relevant to the Apache web server, see
the documentation supplied with your Apache distribution.
Preparing your web server before you deploy 19
Page 20

Microsoft IIS web servers
To prevent unauthorized users from accessing Contribute administrative folders under Microsoft
IIS, use access control lists (ACLs) to prevent read access by unauthenticated users of the
operating system as well as by clients connecting to IIS. When you use ACLs to restrict access,
only properly authenticated users can view the contents of the Contribute administrative folder.
Anonymous web clients, or other users with access to the server, cannot view the administrative
folder and its contents.
Note: When setting permissions for Contribute administrative folders, ensure that Contribute has
read/write access to the administrative folders and the files they contain. Contribute uses the settings
in these files to enforce role settings of users connecting to the site.
In addition to securing the administrative folders using the operating system’s permissions and
access control lists, consider using UrlScan to further secure IIS web servers. UrlScan is a security
tool provided by Microsoft that screens incoming requests to the server by filtering the requests
based on rules that you create. Filtering requests helps secure the server by ensuring that only valid
requests are processed.
To learn more about the UrlScan utility, see the Microsoft website at www.microsoft.com.
Other web servers
If you are using another vendor’s web server, refer to the documentation supplied with your web
server software to learn how to prevent users from accessing specific folders and files.
Special files created by the draft review process
The draft review process enables you to send drafts to users for final approval before publishing
pages to your site. When you enable the draft review process, Contribute creates a series of folders
and files used in tracking pages as they make their way through the collaborative approval
workflow. Although there are no site maintenance or planning tasks involved in enabling
approvals for your website, be aware of the additional files and folders that Contribute creates to
manage the workflow.
20 Preparing Your Network and Installing Contribute
Page 21
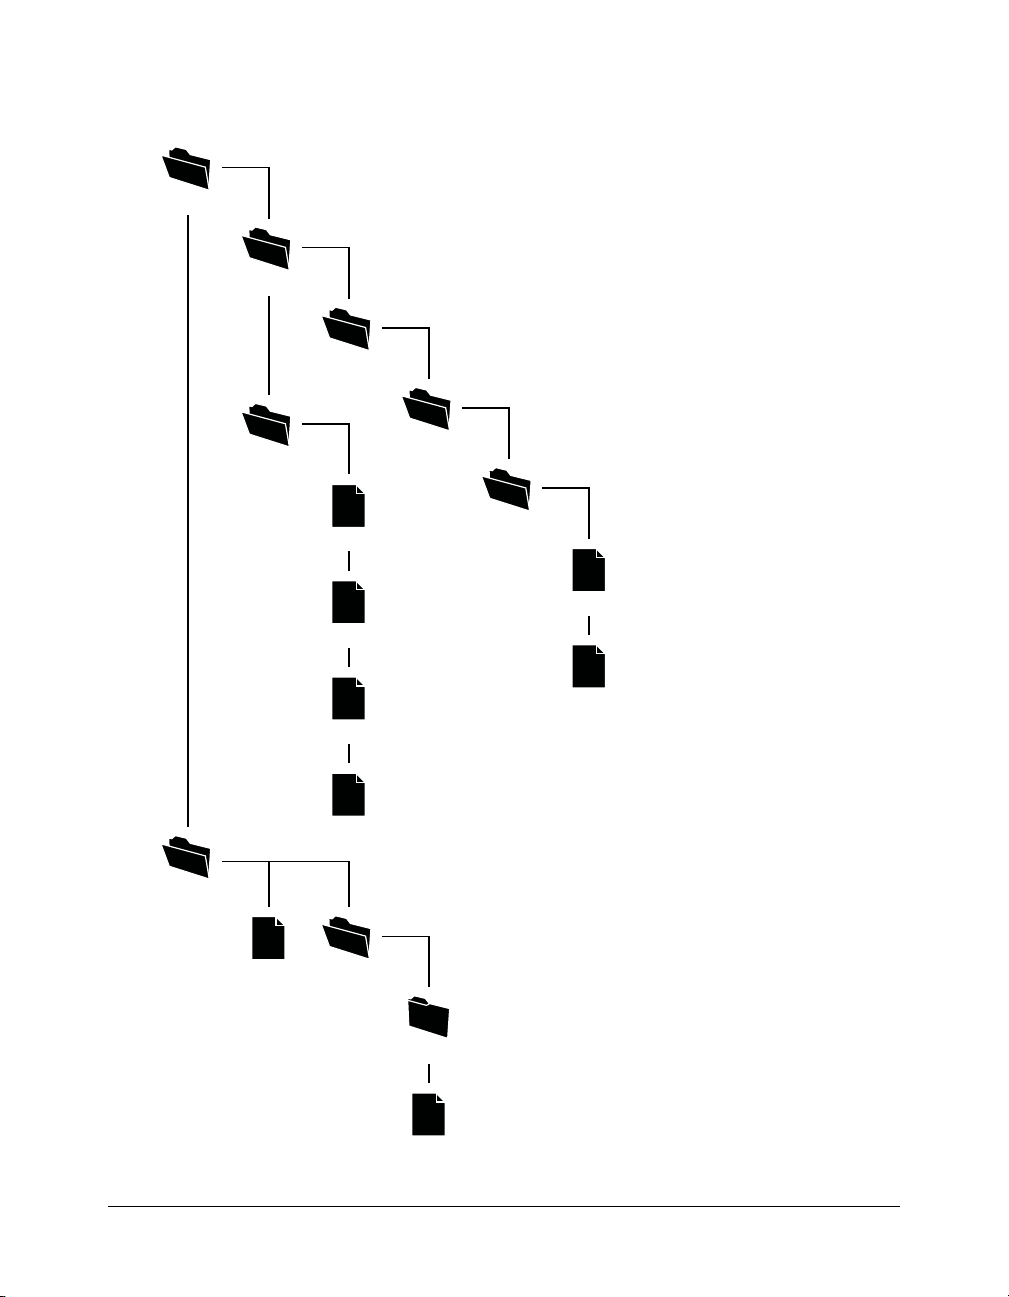
The following figure shows an example of a file sent for review, and the files and folders that are
created when you send a user of your website a page for review.
_mm
ct3
messaging
MMWIP
WIPMetaData
wipMeta.mje1d0lzk4vxc.fre
wipMeta.mje1d0lzk4vxc.csi.chk
wipMetamje1d0lzk4vxc.csi
index.html
index.html
users
users
jlydon@acme.com
index.html
notifyWIP.jr615v2v4p.csi
_notes
3629c837.htm.mno
Preparing your web server before you deploy 21
Page 22

This figure shows the main folders and files that are created when you enable the draft review
process for a given site and a user sends a page for review. The following folders are created:
_mm/ct2004/messaging/users contains a folder for each user for whom the draft review
process is enabled. Each user folder is populated with a series of XML files that identify what
drafts the user has in the system. In the previous example, the file notifyWIP.jr615v2v4p.csi
indicates that notification has been sent to one or more users that there is a page that needs
review.
WIPMetaData contains a series of files that maintain the draft history and the current state and
location of the draft in the draft review process. The files contained in this folder include an XML
file (wipMeta.mje1d0lzk4vxc.csi in this example) that serves as a pointer to files in the draft
review process and also include contact information for the sender and recipient of the draft. A
corresponding file with the extension .fre indicates that the file is free (available for review).
MMWIP stores drafts in progress. For each file in the draft review process, a random folder name
and filename are generated. In the preceding example, the actual filename is myPage.htm.
Contribute generates the folder name 8eba150d and the filename 3629c837.htm.mno to
represent the file as it progresses through the draft review process.
When the recipient of the page requiring review chooses to view it, Contribute creates a LCK
(lock) file for the page in the website, and a CHK (checkout) file in the WIPMetaData folder.
These files indicate that the file is in use by the recipient and tracks changes made to the file.
The filename extensions (.mno and .csi) used by the draft review process help to prevent interim
drafts of web pages and their associated XML messaging files from being served by your web
server. This helps to prevent users from inadvertently sending a link to a draft of a file or from
using a web browser to view files in the draft review process. In addition, Contribute places a
guard page in each of the folders used to store files for review. The guard page (labeled index.html
in the previous example) redirects users to the website’s home page.
Planning your Contribute site structure and connection path
The connection you create to a website with Contribute determines the network protocol to use
when accessing the site, the web address (URL) of the site, and the degree to which the site’s
structure is accessible to content contributors. Before creating a connection to a website, carefully
consider how users will access the site and what areas of the site they must access.
This section covers the following topics:
• “Understanding Contribute connection paths” on page 22
• “Understanding subsites and overlapping website connections” on page 23
• “Understanding Contribute network connection types” on page 26
• “Network paths and web addresses (URLs)” on page 30
Understanding Contribute connection paths
A Contribute website is defined when you create an administrative connection and select the
website folder to connect to. All folders from the folder you connect to and below make up the
the Contribute site.
22 Preparing Your Network and Installing Contribute
Page 23

As the administrator, you can establish a connection to the root folder in a website if you need
access to all the folders in that site. Or, you can establish a connection to a lower-level folder,
depending on the access you and your users require.
Tip: Adobe recommends that you create a connection at the root of your website (www.mysite.com/
intranet/, for example), and use the Contribute Permissions settings to limit user access to specific
folders in the site.
As an alternative to creating one website connection for all your users, you can create separate
connections for different parts of the website. For example:
connection1: www.mysite.com/intranet/marketing
connection2: www.mysite.com/intranet/finance
It is also possible to create overlapping connection paths. This occurs when you create a website
connection to a folder, and then create another website connection at a lower level, to a folder that
is contained in the first website connection. For example:
connection1: www.mysite.com/intranet/
connection2: www.mysite.com/intranet/marketing
In this case, the connection paths overlap, and the second connection is a child website of the first
connection, which is the parent website.
Tip: Adobe recommends that, if you create child sites, you make any users who are connected to a
parent site, also connect to any child sites.
When you create website connections to different parts of your website, it is important to
remember that each website connection represents a Contribute website. So your entire website
can consist of multiple websites (as many websites as connections you create). Users who connect
to each website are limited to editing pages and sending drafts for review in their website.
This is a valid way to set up connections in Contribute. It just requires careful consideration. For
more information, see “Understanding subsites and overlapping website connections” on page 23.
Understanding subsites and overlapping website connections
An overlapping website connection occurs when you create a website connection to a folder in
your website and then create another website connection to a folder that is contained in the
original website connection. For example:
connection1: www.mysite.com/intranet/
connection2: www.mysite.com/intranet/marketing
The first connection, at the higher level, is the parent website, and the second connection, at the
lower level, is the child website.
Child websites do not inherit from the parent website. This includes administrative settings, roles,
templates, and other assets. Each website connection is its own distinct website and is not related
to any other website connections you create.
Planning your Contribute site structure and connection path 23
Page 24

When you have website connections that overlap, the most nested website that contains the page
a user is editing or viewing takes priority for administrative settings and roles, the draft review
process, and templates and other assets.
For example, consider the marketing website (www.mysite.com/intranet/marketing), which is a
child of the intranet website (www.mysite.com/intranet/). When a user edits a page in the
marketing website, the settings and roles for that connection apply, the user can send only a draft
for review to other users who are connected to that website, and the user has access to template
and shared assets for that website only.
Tip: Adobe recommends that, if you create overlapping website connections, you make any users
who are connected to a parent site, also connect to any child sites.
This section covers the following topics:
• “Understanding Administrative settings and roles in overlapping websites” on page 24
• “Understanding the draft for review process in overlapping websites” on page 25
• “Understanding templates, shared assets, and images in overlapping websites” on page 26
Understanding Administrative settings and roles in overlapping websites
Contribute creates a special administrative folder (labeled _mm) that contains a shared settings
file in each website you create a connection to. The shared settings file contains information
about each role you define, including the administrator role and any site-wide permissions you
define.
When you establish overlapping website connections, you might have users who have multiple
connections to different parts of your entire website. When those users edit a page, the settings
file for the most nested website connection applies for the page and the user.
For example, consider a user with the following connections:
connection1: www.mysite.com/intranet/
connection2: www.mysite.com/intranet/marketing
A page in the marketing folder, marketinganalysis.htm for example, is technically part of both
websites that user is connected to. But because these are two separate connections—and therefore
two separate websites—there are two different administrative folders. When the user edits the
marketinganalysis.htm file, the roles and settings for the most nested website connection applies;
in this example, www.mysite.com/intranet/marketing.
Now suppose the same user edits a file in the intranet/marketing/contacts folder, and the user
does not have a website connection to that folder. The user can still edit pages in that folder
because it is part of the marketing website, but the user does not have a separate connection to
that folder, so it is not a separate website. Again, the settings for www.mysite.com/intranet/
marketing apply because that is the deepest website connection in the path to the page the user is
editing.
24 Preparing Your Network and Installing Contribute
Page 25

Understanding the draft for review process in overlapping websites
When you send drafts for review, your list of possible reviewers are users who are connected to
your website. And the draft you send for review is temporarily placed in the root of your website
(that is, the root of your Contribute website connection).
Tip: To avoid potential problems with the draft review process, users who are connected to websites
that have child websites, should also connect to all the child websites.
When you have overlapping sites, depending on your website connections, the draft review
process might not work as you expect:
• You might not be able to send to users you expect to send to.
For example, consider the following website connections:
User 1’s connection: www.mysite.com/intranet/
User 2’s connection: www.mysite.com/intranet/marketing
If User 1 edits a page in the marketing folder and then clicks Send for review, the list of
possible reviewers is users connected to the same website as User 1 (www.mysite.com/intranet/
). In this case, User 1 could not send to User 2, who belongs to the marketing website.
Now suppose that User 1 has website connections to both websites (www.mysite.com/intranet/
and www.mysite.com/intranet/marketing) and User 2 has a connection to the marketing
website only (www.mysite.com/intranet/marketing). If User 1 edits a page in the marketing
folder, and then clicks Send for review, the list of possible reviewers is users connected to the
User 1’s most nested website, www.mysite.com/intranet/marketing. In this case, User 1 could
send the draft to User 2.
• Reviewers might not receive drafts.
Consider the same website connections from the previous example:
User 1’s connection: www.mysite.com/intranet/
User 2’s connection: www.mysite.com/intranet/marketing
If User 1 edits a page in the marketing folder and then clicks Send for review, the list of
possible reviewers is users connected to the same website as User 1 (www.mysite.com/intranet/
).
If both websites have a group with the same name, Writer, then User 1 might send to the
Writer group for www.mysite.com/intranet/ but think that he’s sending the draft to the Writer
group for the marketing website. In this case, the marketing Writer group would not receive
the draft from User 1.
• Reviewers might not be able to take action on a draft.
Now, consider the following website connections:
User 1’s connection: www.mysite.com/intranet/
User 2’s connections: www.mysite.com/intranet/ and www.mysite.com/intranet/marketing
Planning your Contribute site structure and connection path 25
Page 26

Suppose User 1 edits a page in the marketing folder and sends it to User 2 for review. The draft
for review is temporarily placed on the website at the root of User 1’s website connection
(www.mysite.com/intranet/). (Remember, User 1 does not have a website connection to the
marketing website.) When User 2 receives the draft, there is a conflict because User 2 has
website connections to the site where the draft for review was placed and also to the website
that contains the original page.
In this case, Contribute has a conflict on how to handle the draft for review, because it expects
the draft for review to be in the same folder as the original page. Because of this conflict, User
2 can send the draft for review or delete the draft only. User 2 cannot edit or publish the draft
for review.
Understanding templates, shared assets, and images in overlapping websites
Templates in Contribute reside in a folder named Templates in the root folder of each website
connection (for example, /Templates/contactPage.dwt). Shared assets and images are also stored
separately for each website and are available to users depending on the role the website
administrator assigned to them for that website.
When you have overlapping website connections in your website, you might have users who have
multiple connections to different parts of your website. When those users edit a page, they have
access to the templates and shared assets for the most nested website connection for the page and
the user.
You must carefully consider where you place your templates, shared assets, and images. For
example, if you place the company logo in the root of the intranet website (www.mysite.com/
intranet/), users who have connections to the marketing website only (www.mysite.com/intranet/
marketing) won’t have access to the logo.
Understanding Contribute network connection types
Contribute lets you connect to websites using one of several network connection types. The
connection type you choose depends upon the infrastructure of your website. For example, if you
are deploying Contribute to update a workgroup’s intranet site, you can, in most instances, use a
local area network connection. However, if the site is hosted through an ISP or other external
resource, you might need to use either an FTP, SFTP, or WebDAV connection.
This section covers the following topics:
• “Local area networks” on page 27
• “File transfer protocol (FTP)” on page 27
• “Secure FTP” on page 28
• “FTP and SFTP file permissions” on page 28
• “WebDAV” on page 29
26 Preparing Your Network and Installing Contribute
Page 27

Local area networks
When Contribute is used to connect to a web server through a local network, the web server must
be visible to the local network. Contribute can also be used with virtual private network (VPN)
servers to ensure that all file transmissions occur behind your firewall. If the web server is not
visible to the local network, you can create an FTP connection with Contribute to work with the
website (if the server you’re creating a connection to has an FTP server installed).
To ensure that you are entering the correct network path, click Browse in the Connection wizard
to locate and select the network folder. If the path to the folder is correct, but Contribute still
cannot create a connection, verify that the folder has proper read/write permissions.
Tip: Depending on how the server you are connecting to is configured, you might not be able to see
the complete path to the website folder. If you cannot connect to the server, make certain you are
using a fully qualified path.
To learn how to check your server’s network and folder permissions, see the documentation
supplied with your server operating system.
File transfer protocol (FTP)
If users access the website by using FTP, ensure that the folder has delete, overwrite, and rename
privileges enabled. When anonymous FTP is used, these options are typically disabled by default
so that users cannot update pages or add new pages to the website.
Tip: If you will use FTP to connect to a website, Adobe recommends that you use SFTP. In addition
to providing a secure connection when you transfer files to and from Contribute and your website,
SFTP is a more reliable connection protocol. To learn more about SFTP, and the benefits it provides,
see “Secure FTP” on page 28.
When you create an FTP connection, Contribute attempts to auto-detect the FTP path, checking
that the FTP folder is the same folder that contains your website files. If the folder paths don’t
match, Contribute can’t write to the page displayed by your browser and prompts you to enter the
correct path.
To ensure that you are entering the correct FTP path, click Browse in the Connection wizard to
locate and select the FTP folder. If the path to the folder is correct but Contribute still can’t create
a connection, verify that the folder has proper read, write, and modify permissions for the user. If
you are creating an anonymous FTP account, the server must be configured to support delete,
rename, and overwrite permissions for the anonymous user. In some cases, file permissions on
UNIX servers may be configured in a way that prevents Contribute from operating, especially if
the server doubles as a file server. For more information, see “Setting up a site connection in
Contribute” on the Contribute Support Center.
To test whether FTP is set up correctly for an end user, you can transfer a test web page to the
server. Then, using the login settings you provide to the user, attempt to view the page in a
browser.
Planning your Contribute site structure and connection path 27
Page 28

Secure FTP
SFTP is a secure version of the FTP protocol. Like SSH, SFTP prevents unauthorized users from
gaining access to password and user information that is sent without encryption over the Internet.
Standard FTP sends the user ID and password as clear (that is, unencrypted) text, allowing
anyone monitoring your FTP data to see your user ID and password, as well the data being
transmitted. With SFTP, everything you transmit is encrypted, protecting it from monitoring by
intruders.
In addition to increased security, Adobe recommends that you use SFTP because it’s a more
robust protocol that provides more reliable performance. The following reasons describe why
SFTP is a better protocol:
• A more strict protocol than FTP
• Supports functionality that FTP does not
• Is more efficient than FTP
• Does not conflict with firewalls, proxy servers, or routers
• Provides a secure connection over which to transfer files
To use SFTP with Contribute, you must have an SFTP server installed. You cannot use a standard
FTP server and select SFTP from the connection type choice in Contribute; the connection fails.
You must also have Secure Shell 2 (SSH2) enabled on the server. Contribute provides SFTP only
over SSH2-protected network connections.
To learn more about SFTP, see the documentation supplied with your server’s operating system
and SFTP server. To learn more about SSH2, see the SSH Communications Security website at
www.ssh.com.
Note: Contribute supports only password-based authentication. Other authentication methods, such
as certificate-based authentication, public key, and Kerberos, are not supported.
FTP and SFTP file permissions
Typically, FTP servers are configured so that when they create (or write) a new file, the
permissions created for the file give the person uploading the file read/write permission and give
members in the permission group read-only access.
In the case of Contribute, this process can cause a problem when another user tries to edit a page.
Contribute can read the file, but when it attempts to copy the updated file back to the web server,
the FTP server’s file permissions prevent Contribute from writing the new file.
When configuring your FTP server to work with Contribute, be certain to configure the file
permissions that the FTP server creates for new files so that members of the permission group can
read and write the file. This issue typically occurs on UNIX servers. Set the permissions for files to
umask 664, which provides read and write access to the file owner (the person who created the
file) and to the permissions group (which would include any users needing to connect to the
website to update the file).
28 Preparing Your Network and Installing Contribute
Page 29

WebDAV
Web-based Distributed Authoring and Versioning (WebDAV) is a series of extensions to the
HTTP protocol that lets users collaboratively update and manage files on a website. A key feature
of the WebDAV protocol is file locking. Users connecting to a WebDAV-enabled site lock files
when they open the file for editing. This prevents a user of the same website from overwriting
another user’s changes.
To use Contribute with a WebDAV-enabled site, you must use a WebDAV server that supports
exclusive write locks. Exclusive write locks guarantee that only the lock owner (the person who
opened the file for editing) can overwrite the file.
Note: Some WebDAV servers support shared write locks, which allow two or more users to
collaborate concurrently on a web page. Contribute does not support shared write locks. If a user
opens a page using Contribute on a WebDAV-enabled site that uses shared locks, Contribute opens
the file only if it can create an exclusive lock. If another user is editing the file, Contribute informs the
user that the file is not available for editing.
When creating a connection to a WebDAV-enabled site, you must provide a WebDAV-specific
URL. This might consist of a specific port number used by the WebDAV site.
For example, suppose that this is the URL of your site:
www.mysite.com/
This might be the WebDAV URL:
www.mysite.com:81/
Appending the port number 81 to the site’s domain name specifies the network address used by
WebDAV.
WebDAV-enabled sites often have their own user name and password requirements. You can
create these on an individual basis, or you can create a group user name and password.
When creating a connection to a WebDAV site, you must not mix connection types (such as FTP
with WebDAV or local area network with WebDAV). You must use only the WebDAV
connection type. When you create a connection to a website using local area network, FTP, or
SFTP connections, Contribute uses its own file-locking mechanism to prevent users from
overwriting each other’s files. Contribute connections using these connection types cannot detect
files locked with WebDAV locks and could inadvertently open a file being edited by a WebDAVenabled connection.
To prevent users from setting up different connection types to a WebDAV-enabled site, do
one of the following:
• Tell users creating connections that they should use only the WebDAV connection type with
WebDAV-enabled sites.
• Send a connection key that allows only users connecting to the site to use WebDAV.
• Restrict local area network, FTP, and SFTP access to the server hosting the WebDAV-enabled
site.
For more information on WebDAV, see the WebDav Resources website at www.webdav.org.
Planning your Contribute site structure and connection path 29
Page 30

Network paths and web addresses (URLs)
When creating a connection to the website, Contribute prompts you to provide the web address
(URL) of the website, and the network connection information of the server and folder storing
the website. Both the web address and network path must point to the same folder in the website.
For example, suppose your website is located at the directory path:
\\MyServer\wwwroot\sites\MySite
And the corresponding web address for this site is:
www.MyServer.com/sites/MySite
When creating the connection, you must enter these values correctly, so they point to the same
folder.
To ensure that the website and network folder (or in the case of FTP and SFTP, the FTP folder)
are the same, Contribute uploads a temporary file using the path information you provide.
Contribute then attempts to read the temporary file through HTTP, using the web address you
provide. If Contribute succeeds in locating the temporary file, the paths match, and Contribute
creates the connection. If the paths don’t match, Contribute prompts you again for the correct
path.
Note: If your users will use FTP to connect to a website folder in the FTP Host folder, you must
provide an absolute path to the folder.
Installing Contribute and creating an administrative connection
After you plan your website infrastructure and configure the network and server permissions for
appropriate read, write, and modify permissions, you must install a copy of Contribute and create
a Contribute administrator connection to the website.
Note: You can create as many administrative connections as necessary, depending on how many
sites and subsites you need to establish.
Go ahead and install Contribute, and then gather the information you need for connecting (see
“Preparing to connect to a website” on page 30) and establish your administrative connection (see
“Creating a Contribute website connection” on page 31).
Preparing to connect to a website
Before you begin, gather the following information:
• Your user name and e-mail address
The user name and e-mail address identify users and the web pages they are working on.
Contribute prevents multiple users from simultaneously editing the same web page.
(Contribute uses a system much like the Dreamweaver check in/check out system to avoid
editing conflicts.)
Tip: If you have multiple copies of Contribute, use a different user name for each copy. For
example, Chris(laptop), and Chris(Mac). Using the same user name can cause problems because
you can override checkouts you make on the other computer.
30 Preparing Your Network and Installing Contribute
Page 31

• Web address (URL) of the website
A website’s Uniform Resource Locator (URL) is its address either on the Internet or on an
organization’s intranet. Website URLs usually have the following form:
http://www.mysite.com/
• Network path to the website (for connecting to local networks)
The network path is the location of the website in your organization’s local network. The
network path includes the name of the server on which the website is stored and the directory
path of the website’s files on that server. For example, your network path might be
\\mycomputer\wwwroot\ (Windows) or afp://server:volume: (Macintosh).
Note: If you are a Mac OS X® user, to create a LAN connection, make sure to mount the network
volume of the server you are creating a connection to on your computer desktop before you create
your connection. In the Finder, select Go > Connect to Server to mount the network to which you
want to connect.
• FTP or SFTP connection information
FTP provides a secure way to transfer files to your local or remote web server. If you will
connect to your website from a remote location (for example, telecommuting from home or
another office) you may need to connect to the website using FTP, to transfer files from a
remote location across the Internet to your website (for example, if you don’t have a local
network connection to the website).
If you or your users will connect to your website by using FTP or SFTP, you must know the
address of the FTP server as well as the user name and password to connect to the FTP server.
For example, your FTP server’s address might be ftp.mysite.com.
Note: For websites that are managed by Contribute Publishing Server (CPS), require users to use
their own FTP or SFTP account information to connect to the website. For more information, see
“Understanding server access for connecting to CPS-managed websites” on page 18.
Creating a Contribute website connection
The Contribute Connection Wizard (Windows) or Connection Assistant (Macintosh) guides you
through the steps of creating a connection to a website, prompting you for the information
needed to establish a website connection.
Note: If you are a Macintosh user and have a .Mac account, you can easily create a connection to
your .Mac account. In the Connection Assistant, select the .Mac check box. For information about
selecting a folder to connect to in your .Mac website, see Contribute Help.
To create a website connection:
1.
Start Contribute.
2.
Select Edit > My Connections (Windows) or Contribute > My Connections (Macintosh).
The My Connections dialog box appears. The options in this dialog box let you create and
manage your Contribute connections.
Installing Contribute and creating an administrative connection 31
Page 32

3.
Click Create.
The Connection Wizard (Windows) or Connection Assistant (Macintosh) appears.
This wizard or assistant guides you through setting up a new website connection. As you
complete each screen in the wizard or assistant, click Next (Windows) or Continue
(Macintosh) to go to the next screen.
Tip: Click Back or Go Back to return to a previous screen, if necessary. If you need more
information about how to complete a screen, click the Help button.
4.
On the Summary screen, review the connection settings to verify that they’re correct and click
Done (Windows) or Finish (Macintosh) to complete the connection.
Contribute creates a connection to the website.
After Contribute has successfully created a connection to the website, the Connection Wizard
or Assistant closes, and the main page of the website appears in the Contribute browser.
Related topics
• “Configuring Contribute” on page 41
Installing Contribute Publishing Server (Optional)
The Contribute Publishing Server (CPS) installers give you two options for installing CPS,
depending on your server environment:
• Simple Installation is for systems that do not already have a Java application server installed.
This installation includes a Java Runtime Environment (JRE) and JRun 4 server for use with
CPS.
For more information, see “Installing Contribute Publishing Server by using the Simple
Installation” on page 33.
• WAR File Installation is for systems that have a Java application server already installed.
For more information, see “Installing Contribute Publishing Server by using the WAR File
Installation” on page 35.
If your platform does not have an installer, you can download a WAR file and associated data files,
and then follow the WAR File Installation process to install CPS.
Note: If your platform does not have an installer, and you need to perform the WAR file installation
but do not have a Java application server, you can download a trial version of the JRun 4 server with
limited licensing capabilities. For more information, see the Adobe website at www.adobe.com.
Software requirements
Contribute Publishing Server (CPS) is a J2EE web application that you can install as a Web
Application Archive (WAR) file onto any supported Java Application Server.
You can install CPS as an integrated Java application server that includes Adobe® JRun™ 4.0, or as
a WAR file that you deploy onto an existing Java application server.
32 Preparing Your Network and Installing Contribute
Page 33

Install CPS on its own server in a firewall-protected network. When using the User Directory
service, CPS stores information to authenticate user access to web servers in your IT
environment. For this reason, follow security procedures appropriate to any other application
server you might install in your infrastructure.
For a list of the minimum hardware and software configurations required to successfully operate
CPS, see http://www.adobe.com/products/contribute/productinfo/systemreqs/.
Installing Contribute Publishing Server by using the Simple Installation
The Simple Installation for CPS enables you to install a preconfigured Java application server that
includes CPS. This installation is recommended if you don’t have an existing Java application
server.
To install CPS by using the Simple Installation (Windows):
1.
Download the installation file.
2.
Double-click the file to start the installer.
3.
Read and accept the license agreement to continue with the installation.
4.
In the Installation Method screen, select the Simple Installation option.
5.
Accept the default installation location or click Choose to select another location.
The default location is: C:/Program Files/Macromedia/Contribute Publishing Server
6.
When prompted, enter an administrative password to restrict access to the CPS Console.
Tip: This is not the same password used to protect the Contribute administrator role, so you might
want to make a note of it.
7.
Review the Summary screen, and then click Install when you are ready to begin the installation.
The installer writes folders and files to the installation folder. CPS installs as a Windows
Service and automatically starts.
Note: The Contribute Publishing Server/jrun4 directory contains the JRun 4 application server
and a deployed version of CPS.
8.
In the Installation Complete screen, click Done to close the installer window.
The CPS Console launches in a browser. The browser probably displays a security warming,
because the CPS installer created a self-signed certificate for the server. The certificate is used
to create a secure connection, and self-signed certificates are not verified by a third-party so you
always need to accept them.
Note: The CPS Console requires that you have Flash Player 7 installed on your computer.
9.
Accept the certificate.
Tip: You might want to permanently accept the certificate, if you can. Otherwise, you might be
prompted to accept the certificate each time you launch the CPS Console.
The CPS Console Login dialog box appears.
Installing Contribute Publishing Server (Optional) 33
Page 34

10.
Enter the password you created during the installation process.
The CPS Console appears for you to configure CPS. For information, see “Configuring
Contribute Publishing Server (CPS only)” on page 48.
Tip: In the future, you can access the CPS Console by selecting Start > Programs > Adobe
Contribute Publishing Server > Administer Macromedia Contribute Publishing Server.
To install CPS by using the Simple Installation (UNIX):
1.
Download the installation file.
2.
At a command prompt, enter the following command to set execute permissions for the JRun
installation shell script:
chmod +x pubserver-linux.bin
Note: If you are installing on the Solaris™ platform, substitute solaris for linux in the command.
3.
Enter the following command to run the JRun installation script:
sh ./pubserver-linux.bin
Note: If you are installing on the Solaris platform, substitute solaris for linux in the command.
The installer extracts the installation files, and then runs the install script.
4.
View each screen of the license agreement, and then accept the agreement to continue with the
installation.
5.
In the Installation Method screen, select the Simple Installation option.
6.
In the Installation Folder screen accept the default installation location or enter another
location.
7.
In the Administrator Password screen, enter an administrative password to restrict access to the
CPS Console.
Tip: This is not the same password used to protect the Contribute administrator role, so you might
want to make a note of it.
8.
Review the Summary screen, and then press Enter when you are ready to begin the installation.
When the installer finishes, the Installation Complete screen displays a list of scripts that you
can use to start and stop CPS.
9.
Press Enter to exit the installer, and then change to the installation folder.
10.
Enter the following command to start CPS:
sh ./bin/startCPS.sh
When you see the message Server contribute-wps ready, the server has started.
11.
Now you are ready to log in to the CPS Console and configure CPS.
For information, see “Configuring Contribute Publishing Server (CPS only)” on page 48.
34 Preparing Your Network and Installing Contribute
Page 35

Installing Contribute Publishing Server by using the WAR File Installation
Use the WAR File Installation for CPS if your computer is already running a J2EE application
server or if there is not a Simple Installation installer for your platform.
Note: If your platform doesn’t have an installer, and you need to perform the WAR File Installation but
do not have a Java application server, you can download a trial version of the JRun 4 server with
limited licensing capabilities. For more information, see the Adobe website at www.adobe.com.
The WAR File installation process involves the following steps:
1.
Generate the WAR file.
In this step you’ll use an installer to generate the WAR file and configure CPS file locations (see
“Generating the WAR file using an installer” on page 35).
Note: If there is not an installer for your platform, you might be able to download the zip file
containing the WAR file and associated data files. In this case, you can skip the step for generating
the WAR file, and proceed to the next step for deploying the WAR file.
2.
Deploy the WAR file.
After you have the WAR file, you are ready to deploy it (see “Deploying the WAR file”
on page 36).
Generating the WAR file using an installer
The first step in the WAR File Installation for CPS is using an installer to generate a WAR file and
associated data files in a directory structure. The installer also configures the WAR files to
reference the installed data files.
Note: If you want to change the location of these data files you can do so later, after you generate and
deploy the WAR file. For more information, see “Configuring the CPS file locations” on page 39.
To use the CPS installer to generate a WAR file (Windows):
1.
Download the installer.
2.
Double-click the file to start the installer.
3.
Read and accept the license agreement to continue with the installation.
4.
In the Installation Method window, select the WAR fil e option.
5.
Accept the default installation location or click Choose to select another location.
The default location is: C:/Program Files/Macromedia/Contribute Publishing Server
6.
When prompted, enter an administrative password to restrict access to the CPS Console.
Tip: This is not the same password used to protect the Contribute administrator role, so you might
want to make a note of it.
7.
Click Close when you finish viewing the Summary screen.
The installer creates a directory structure that includes a WAR file and associated data files.
8.
Now you are ready to deploy the WAR file.
For information, see “Deploying the WAR file” on page 36.
Installing Contribute Publishing Server (Optional) 35
Page 36

To use the CPS installer to generate a WAR file (UNIX):
1.
Download the installation file.
2.
At a command prompt, enter the following command to set execute permissions for the JRun
installation shell script:
chmod +x pubserver-linux.bin
Note: If you installing on the Solaris platform, substitute solaris for linux in the command.
3.
Enter the following command to run the JRun installation script:
sh ./pubserver-linux.bin
Note: If you installing on the Solaris platform, substitute solaris for linux in the command.
The installer extracts the installation files, and then runs the install script.
4.
View each screen of the license agreement, and then accept the agreement to continue with the
installation.
5.
In the Installation Method screen, select the WAR fi l e option.
6.
In the Installation Folder screen accept the default installation location or enter another
location.
7.
In the Administrator Password screen, enter an administrative password to restrict access to the
CPS Console.
Tip: This is not the same password used to protect the Contribute administrator role, so you might
want to make a note of it.
8.
Review the Summary screen, and then press Enter when you are ready to begin the installation.
The installer creates a directory structure that includes a WAR file and associated data files.
9.
Now you are ready to deploy the WAR file.
For information, see “Deploying the WAR file” on page 36.
Deploying the WAR file
After you have the WAR file, you are ready to deploy it to your J2EE application server.
Note: CPS requires that your J2EE application server be running version 1.4 or later of the JVM (Java
Virtual Machine).
The CPS application must run from an expanded directory structure. J2EE application servers
vary in how you deploy the WAR file and create the expanded directory structure. Typically, there
are two methods:
• Deploy the compressed WAR file to a working directory.
On some J2EE application servers (such as IBM WebSphere), the deployment process expands
the WAR file into a working directory, and from that point forward, the expanded directory is
considered to be the application. For these application servers, you deploy the compressed
WAR file and work in the resulting directory structure.
36 Preparing Your Network and Installing Contribute
Page 37

• Expand the WAR file and deploy the expanded structure as the working directory.
On other application servers (such as JRun 4, BEA WebLogic, and JBoss), you expand the
WAR file manually and then deploy the expanded directory structure, which becomes your
working directory.
Note: The reason that you must expand the WAR file and then deploy the expanded structure into
a working directory on certain Java application servers is to prevent the server from extracting the
compressed WAR file to a temporary directory each time the server is started. If this happens, the
application data stored in the ckm.xml file is written over each time the server extracts the
compressed WAR file to a temporary directory.
The deployment method you use depends on your application server; see your Java application
server documentation for information on deploying a WAR file. The following procedure
demonstrates deploying CPS on a JRun 4 server.
Note: The following procedure assumes that you have a preexisting version of JRun 4 installed.
To deploy the WAR file on a JRun 4 server:
1.
Manually expand the pubserver.war file in the installation folder.
a
At a command prompt, change to the CPS installation folder.
2.
Create your working directory, using the following command:
mkdir pubserver-war (UNIX)
or
md pubserver-war (Windows)
a
Change to your working directory, using the following command:
cd pubserver-war
b
Expand the WAR file in your working directory, using the following command:
java_home/bin/jar -xvf ../pubserver.war
where java_home is the root directory of your Java Runtime Environment (JRE).
3.
Start the JRun server if it is not already running.
4.
Open a web browser, and enter the URL for the JRun Administration Console.
Using the default installation location, the URL is: http://localhost:8000.
The JRun Administration Console appears in your web browser.
5.
Enter the JRun administrator’s user name and password.
6.
Expand the Default server icon in the left pane, and then click the J2EE Components icon.
7.
Click Add on the Web Applications panel.
8.
Navigate to the working directory you created (pubserver-war) by clicking Browse, or by
entering the path in the Source File Path text field.
Installing Contribute Publishing Server (Optional) 37
Page 38

9.
Click Deploy.
The working directory is deployed in JRun, and the J2EE Components Summary screen
appears.
Note: In the General Settings section, confirm that the Context Path is set to /contribute.
10.
Click the Logging icon in the left pane.
The Log Viewer appears. Review the log to make sure that the server started correctly.
11.
If you didn’t use an installer to generate the WAR file and configure CPS file locations, proceed
to “Configuring the CPS file locations” on page 39; if you used an installer, you can skip this
step, unless you want to change the location where CPS data is stored.
12.
Now you are ready to log in to the CPS Console and configure CPS.
For information, see “Configuring Contribute Publishing Server (CPS only)” on page 48.
Deploying CPS on JBoss (Macintosh) application servers
JBoss is an open source, Java-based application server commonly deployed on Macintosh OS X
servers. Adobe recommends that you manually expand the pubserver.war file in the installation
folder, and copy the expanded WAR file to the folder: <JBoss_home>/server/default/deploy.
To deploy CPS on the JBoss application server:
1.
Stop the JBoss application server by opening a terminal window, and executing the
shutdown.sh script.
% <JBoss_home>/server/bin/shutdown.sh
2.
Manually expand the pubserver.war file, and copy the expanded WAR file to the
<JBoss_home>/server/default/deploy
3.
Create a folder for the database.xml file.
folder.
This is where you will store user and connection information. Copy the database.xml file to
this folder. If you will be using a file-based user directory, copy the user_directory.xml file to
the folder as well.
4.
At a command prompt, change to the WEB-INF/config folder in your CPS working directory.
5.
Open the ckm.xml file in a text editor.
38 Preparing Your Network and Installing Contribute
Page 39

6.
Change the path value for <home_directory> to indicate the folder created in step 3to store
user and connection information.
The following example changes the database folder path to: <Macintosh HD>/Contribute
Publishing Server/database.
Note: If you already added user and connection information in CPS, move that information from
the current location to the new location you set.
For example:
<plugin_fileDatabase>
<home_directory><Macintosh HD>/Contribute Publishing Server/database
</home_directory>
</plugin_fileDatabase>
7.
Change the path value for <logger_settings> to indicate where you want to store CPS error
and output logs.
For example:
<out>
<file><Macintosh HD>/Contribute Publishing Server/logs/out.log</file>
</out>
<err>
<file><Macintosh HD>/Contribute Publishing Server/err.log</file>
</err>
8.
Save and close ckm.xml, and then restart your JBoss application server.
To restart JBoss, execute the
% <JBoss_home>/server/bin/run.sh
9.
Now you are ready to log in to the CPS Console and configure CPS.
run.sh script in a terminal window.
Using a web browser, browse to the following URL: https://<server>/8080/cps/
<context_root>/admin.
Replace the
<server> and <context_root> variables with the domain name (or IP address) of
your server, and the CPS context root name (the name of the WAR file).
For information, see “Configuring Contribute Publishing Server (CPS only)” on page 48.
Configuring the CPS file locations
CPS stores user and connection information, along with logs, to your local file system, and
indicate where those files are stored.
To configure the WAR file:
1.
At a command prompt, change to the WEB-INF\config folder in your CPS working directory.
2.
Open the ckm.xml file in a text editor.
3.
Change the path value for <home_directory> to indicate where you want to store user and
connection information.
Note: If you already added user and connection information in CPS, move that information from
the current location to the new location you set.
Installing Contribute Publishing Server (Optional) 39
Page 40

4.
Change the path value for <logger_settings> to indicate where you want to store CPS error
and output logs.
For example:
<out>
<file>C:\Contribute Publishing Server\logs\out.log</file>
</out>
<err>
<file>C:\Contribute Publishing Server\err.log</file>
</err>
5.
Save and close ckm.xml, and then restart your J2EE server.
6.
Now you are ready to log in to the CPS Console and configure CPS.
For information, see “Configuring Contribute Publishing Server (CPS only)” on page 48.
40 Preparing Your Network and Installing Contribute
Page 41

CHAPTER 3
Configuring Contribute and Contribute Publishing
Server to work with your website
After you install Adobe® Contribute™ and connect to your website (see Chapter 2, “Preparing
Your Network and Installing Contribute”), you are ready to configure Contribute and Contribute
Publishing Server (CPS) to meet your needs.
If you are using CPS, you need to enable your website to work with the server and add users to
the server. Finally, you can deploy Contribute to your user and give them website connection
information.
This chapter contains the following sections:
• “Configuring Contribute” on page 41
• “Configuring Contribute Publishing Server (CPS only)” on page 48
• “Enabling Contribute websites to work with CPS (CPS only)” on page 55
• “Adding users to your website (CPS only)” on page 57
• “Deploying Contribute and website connections” on page 59
• “Deploying Contribute across an organization” on page 63
Configuring Contribute
After you install Contribute and connect to your website, you are ready to adjust the
administrative settings for the website, and to create roles with different levels of access for
different users.
This section covers the following topics:
• “About Contribute administrative settings” on page 42
• “Configuring Contribute administrative settings” on page 42
• “About Contribute user roles and settings” on page 43
• “Creating Contribute roles” on page 46
41
Page 42

About Contribute administrative settings
Contribute administrative settings are a collection of settings that apply to all users of your
website. These settings let you fine-tune Contribute to provide a better user experience. The
Contribute administrative settings are as follows:
Users and Roles lets you add users to the site, and create, edit, and delete roles.
Administration lets you specify a primary administrator for the site, set an administrator
password, and remove administration.
Tip: Contribute does not require that you set an administrator password; however, you should create
a password to protect access to the administrative functions. If you fail to assign an administrator or
an administrative password, anyone with a Contribute connection to the site can make themselves an
administrator of that site.
Publishing Server
lets you enable your website connection to use CPS—a suite of applications
running on a server that lets you extend the capabilities of Contribute, as well as provide
additional functionary for users.
Note: If you will be using the CPS User Directory service, you should enable CPS and the User
Directory service before adding users to the site. When you start the User Directory service, any users
who have connected to the site are removed, and any connection keys you might have sent to users
become disabled. To learn more about CPS, see “Understanding Contribute user management
models” on page 5.
Web Server
lets you configure Contribute to work with your website’s specific web server
configuration. Because all websites vary somewhat in how they are set up, the configuration
options in the Web Server dialog box let you specify settings specific to your website, which
Contribute might not be able to determine automatically.
To learn more about the web server configuration settings you can specify, see the web server
index pages section and the alternate website addresses section Contribute Help.
Rollbacks lets you enable rollback files and specify the number of rollback files to maintain on
the server.
To learn more about rollbacks, see Contribute Help.
New pages lets you specify the encoding used for characters in web pages and the default page
extension (.htm, .html, and so on) to use when you create pages.
By default, the character encoding for new pages is set to Western, which applies to all English
and Western European languages. The default encoding is set from your computer operating
system’s default encoding. Additional options include Central European, Cyrillic, Greek,
Icelandic, Japanese, Traditional Chinese, Simplified Chinese, and Korean. If you want to create
pages that display characters for multiple languages, select UTF-8.
To learn more about setting new pages preferences, see in Contribute Help.
Configuring Contribute administrative settings
The Administer Website dialog box lets you configure a variety of settings that specify how
Contribute interacts with your website as well as letting you manage users.
42 Configuring Contribute and Contribute Publishing Server to work with your website
Page 43

You can set settings that affect the whole website, such as the administrator’s contact or password
information, the number of rollback versions of pages to save, and filename conventions for
website default home pages.
For more information about Contribute administrative settings, see “About Contribute
administrative settings” on page 42.
To open the Administer Website dialog box:
1.
Select Edit > Administer Websites (Windows) or Contribute > Administer Websites
(Macintosh), and select the website you want to set options for.
2.
If prompted, enter the Administrator password, and then click OK.
Assigning an administrator to a site and assigning a password for the administrative account are
optional. For more information about becoming an administrator, see Contribute Help.
The Administer Websites dialog box appears.
3.
Select the administrative settings category you want to modify from the list on the left side of
the dialog box.
Click the Help button in the dialog or see Using and Administering Contribute for information
about options in this dialog box:
About Contribute user roles and settings
Contribute lets you control access to your website by creating roles. Roles are collections of
settings that you create, each of which may be assigned privileges by the administrator of the site.
The roles you create reflect different levels of access to page creation, editing and deletion of
content, page design, and approval.
Configuring Contribute 43
Page 44

You can define any number of Contribute roles and specify various options for each role you
create. Contribute roles are not based on system or network user groups. You can create the same
role for members of various workgroups and send them a connection. As long as the recipients
have appropriate access to the network and server, they can edit the website.
This section covers the following topics:
• “Contribute default roles” on page 44
• “Settings for user roles” on page 44
• “Example role assignments” on page 45
Contribute default roles
Contribute has three default roles: Administrator, Publisher, and Writer
Administrator identifies the administrator of the site, who can create roles and modify existing
ones, add users to the site, and send connections to new users so that they can access the site. A
site can have more than one person assigned to the administrative role.
Publisher identifies users who can create and edit pages as well as publish pages to the website.
Writer identifies users who can create and edit pages, but cannot publish pages to the website. A
user in the Writer role must send their pages for review to a user in a Publisher or Administrator
role who can publish the page to the site or send it back to the Writer for additional editing.
Depending on your website publishing needs, and the number of people adding content to your
site, you might only need to use the Administrator and Publisher roles. If you deploy Contribute
in an organization where website content must be approved before it’s published, you should use
the Administrator, Publisher, and Writer roles.
In general, you shouldn’t need to create too many roles for a website. If you are deploying
Contribute in a large organization that uses many internal websites to communicate information,
consider creating connections to Contribute from the individual websites and sending
appropriate roles to the users who are responsible for each site’s content.
Settings for user roles
Contribute lets you define the following categories of permissions and website settings in the Edit
Role Name Settings dialog box:
General lets you select a starting (home) page that users in the selected role see when they enter
the website. For more information general role settings, see Contribute Help.
Folder/File Access limits a role’s access to the selected folder (or folders) and any subfolders they
contain. For more information about folder and file access settings, see Contribute Help.
Editing lets you specify what content users can modify and determine how Contribute processes
paragraphs, line spacing, and accessibility options. For more information about page-editing and
paragraph settings, see Contribute Help.
Styles and Fonts specifies which font sets users have access to, and which users can apply style
and formatting to text. For more information about style and font settings, see Contribute Help.
44 Configuring Contribute and Contribute Publishing Server to work with your website
Page 45

New Pages specifies whether Contribute users can create blank pages, and which (if any)
Dreamweaver MX templates they can use to create pages. You can also specify which pages, if any,
the user can copy. The options in this category determine what options users see in the New Page
dialog box. For more information settting new web page preferences, see Contribute Help.
File Placement lets you specify folder locations for files based on the file extension used to
identify the file type. You can also specify that Contribute not allow files of a certain size to be
uploaded to the web server. For more information about setting options for file placement,
Contribute Help.
Shared Assets lets you create a library of assets (such as images, Adobe® Flash® Player 9 content,
or Macromedia Dreamweaver from Adobe library items) that users can add to web pages. You can
restrict access to shared assets to specific users or let any Contribute user accessing the website add
the assets to their pages. For more information about setting options for shared assets, Contribute
Help.
New Images lets you specify a maximum file size, width, and height for images. You can also
restrict users so that they can use images only from a shared asset library that you create, or you
can allow them to add any image to a web page. For more information about setting options for
new images, see Contribute Help.
Example role assignments
As an example of roles you might create, consider an online magazine. The job functions
associated with producing a magazine include a publisher, managing editor, copy editor, writer,
and web designer. In addition, Contribute adds an administrator to maintain the magazine’s
website. Each role reflects separate access to article creation, approval, editing and deletion, page
design, and site maintenance.
The following table describes the roles and privileges related to Contribute.
Job Title Contribute Role Privileges
System
administrator
Publisher Publish Gives final approval to all articles on the website and can
Managing editor Publish Monitors drafts as they go from writers to copy editors and
Copy editor Writer Can edit any unlocked text on a page. The copy editor cannot
Administrator Installs Contribute, creates connections to the website, and
defines Contribute roles appropriate to the magazine’s job
functions.
The system administrator consults the designer on how to set
up role sett ings so that ot her members of the magazine’s staff
have appropriate editing privileges in their area.
publish final drafts of pages or send them back for additional
editing or writing.
keeps track of who is working on what article. The managing
editor approves articles before sending them to the publisher
for final approval and publication to the website.
publish pages to the site; they send the edited articles to the
managing editor for approval.
Configuring Contribute 45
Page 46

Job Title Contribute Role Privileges
Writer Writer Can edit any unlocked text on a page, insert images, and
Web designer Administrator The designer creates new CSS styles and web page
apply pre-defined styles to text.
templates to accommodate changing site designs, inserts
images and Flash content into pages, and adds assets to the
shared asset library for writers to insert into pages.
Creating Contribute roles
You can create roles for users to determine their level of access in a website.
For more information about Contribute default user roles and settings, see “About Contribute
user roles and settings” on page 43.
When Contribute users connect to a website, they are prompted to indicate which role they
belong to (this is not true for CPS-managed sites). For example, a Contribute user might choose
or be assigned to the Writer role. Thereafter, while connected to that website, that user has
whatever permissions you have configured for the Writer role.
To create a role:
1.
Select Edit > Administer Websites (Windows) or Contribute > Administer Websites
(Macintosh), and then select the website you want to administer from the submenu.
If the website has no administrator, click Ye s when a dialog box asks whether you want to
become the website administrator. Then enter and confirm an administrator password for the
website, and click OK.
The Administer Website dialog box appears.
46 Configuring Contribute and Contribute Publishing Server to work with your website
Page 47

2.
Select Users and Roles.
By default, Contribute creates three roles: Administrator, Publisher, and Writer.
3.
Click Create New Role.
The Create New Role dialog box appears.
4.
Select an existing role from the Create new role from copy of list box.
Selecting an existing role as a base for a new role lets you reuse the selected role’s settings. You
can modify the new role’s settings as needed.
5.
Enter a name for the role you want to create, and then click OK.
The new role appears in the list of role names in the User and Roles panel of the Administer
Website dialog box.
Configuring Contribute 47
Page 48

6.
Select the role name, and then click Edit Role Settings.
The Edit Role dialog box appears. The Edit Role dialog box lets you modify the user settings
associated with each role.
7.
Modify the settings for the role.
For more information about the settings, see “Settings for user roles” on page 44
8.
When you finish defining the role, click OK to save your changes.
The Role dialog box closes, returning you to the Administer Website dialog box.
9.
To create additional roles, repeat steps 4 through 7 for each role you want to add.
10.
Select another administrative category to modify, or click Close to apply your changes and exit
the Administer Website dialog box.
Note: You can modify a role’s settings at any time, even after you have distributed a connection
key. Connection information and website permissions are maintained separately.
11.
To modify the roles you have created, select the role whose settings you want to modify and
click Edit Role Settings. The Role dialog box appears.
12.
Click Close to close the Define Roles dialog box, and then click Close to close the Administer
Website dialog box.
Next, you will configure CPS. If you are not using CPS to manage your website, then you are
ready for user to install Contribute and connect to the website. For more information, see
“Deploying Contribute and website connections” on page 59.
Configuring Contribute Publishing Server (CPS only)
If you are using Contribute Publishing Server (CPS) with Contribute, it’s important to configure
the User Directory service when you deploy. User Directory service is a user management solution
that lets you integrate Contribute with your organization’s user directory to easily manage and
authenticate users.
You can also configure the E-mail Notification and Log services at the same time, or you can wait
until later. At a later time you will probably also want to set up Simple File Deployment service
and RSS Feed service. For more information, see Contribute Publishing Server Help.
Before you configure the User Directory service, you should understand the two authentication
models available, and how Contribute works with LDAP and what the LDAP authentication
workflow is.
This section covers the following topics:
• “Understanding Contribute user authentication models” on page 49
• “About Contribute and LDAP or Active Directory” on page 49
• “Authentication workflow” on page 51
• “Configuring CPS User Directory and other services” on page 52
48 Configuring Contribute and Contribute Publishing Server to work with your website
Page 49

Understanding Contribute user authentication models
Contribute provides two user authentication models that you can use:
File-based authentication lets you use either a password stored in an XML file, or Windows
domain authentication.
When using the Contribute file-based authentication system, CPS looks up the user’s credentials
in an XML file located on the server.
When using Windows domain authentication, CPS validates the user’s identity against the
Windows domain in which CPS operates.
Note: Windows domain authentication uses the winNT.dll library for authentication. You must ensure
that this file’s path (usually c:\windows\system32) is placed in the java.library.path environment
variable.
User directory service-based authentication
lets you integrate Contribute with user directory
services such as Lightweight Directory Access Protocol (LDAP) or Active Directory.
About Contribute and LDAP or Active Directory
Lightweight Directory Access Protocol (LDAP) is a protocol for accessing information directories.
Microsoft Active Directory and LDAP are types of directory services. In the case of directory
services, a directory is like a telephone book and not like a directory (folder) on your computer.
You can integrate the User Directory service of CPS with your directory service. The User
Directory is an application service that enables you to centrally manage users.
When you integrate with your LDAP directory, you control who can access your website and how
they are authenticated.
LDAP branches Using the User Directory service, you can add your entire LDAP user directory
for your website, or you can indicate specific branches to search.
You have the following options:
• Add the root node of your LDAP tree to the user directory, and enable search for users or
groups in any of the branches.
• Add specific branches to the user directory and determine the scope of the search—whether
you want to search only the branch or the branch and any subbranches. This way, you can
exclude certain branches of your LDAP tree from the search.
For each branch you add, you can define a user search only or you can define a user and a group
search.
For example, suppose your LDAP directory has three branches: East, Central, and West. You
want to integrate with the LDAP directory your entire company, so in the following example, you
add one branch for a user search to the user directory:
User branch with baseDN:o=MyCompany, Search Scope:SUBTREE_LEVEL,
filter:(objectClass=organizationalPerson)
Configuring Contribute Publishing Server (CPS only) 49
Page 50

Now, suppose you want to include only the Central and West branches and you want to define
user and group searches. You add the following four branches to the user directory:
User branch with baseDN:ou=Central,o=MyCompany, Search Scope:SUBTREE_LEVEL,
filter:(objectClass=organizationalPerson)
User branch with baseDN:ou=West,o=MyCompany, Search Scope:SUBTREE_LEVEL,
filter:(objectClass=organizationalPerson)
Group branch with baseDN:ou=Central,o=MyCompany, Search Scope:SUBTREE_LEVEL,
filter:(objectClass=groupOfNames)
Group branch with baseDN:ou=West,o=MyCompany, Search Scope:SUBTREE_LEVEL,
filter:(objectClass=groupOfNames)
LDAP permissions and Contribute permissions
Integrating your company LDAP directory
with CPS adds another layer of permissions. When connecting to an LDAP or Active Directory
server, CPS respects any file/folder permissions set by the LDAP or Active Directory service.
Contribute permissions are layered on top of the directory service or the network/server
permissions and are applied globally.
Contribute permissions, which are settings stored in an XML file at the root of your website, are
specific controls for the Contribute editing environment. These permissions are not assigned on a
per-user basis; they are groups of settings that Contribute reads when first connecting to a
website. Contribute then conforms to these settings during the editing process. Contribute
administrators can specify access to certain folders for different user roles.
LDAP authentication types CPS authenticates users against the LDAP directory. For CPS to
authenticate a user, the LDAP server must verify the user’s display name. This is usually a unique
name in the LDAP tree that is associated with the user. CPS receives only a user name, so it must
retrieve the user’s display name, based on the user name, to authenticate the user.
In your User Directory service configuration, you can select one of four types of LDAP
authentication:
• LDAP bind authenticates users by pre-pending a specified prefix and appending a specified
suffix to the user ID. With this method, you can specify only a single prefix and a single suffix.
Use this method if all the DNs in your LDAP directory are stored as
suffix
prefix + <username> +
If all DNs are not stored according to this pattern, then this method does not enable you to
construct a path to all the users in your system.
• LDAP bind (auto-find user DN) authenticates users in a two-step process: CPS looks up the
user ID of the user who’s trying to log in to determine that user’s DN, and then uses the DN to
authenticate the user.
Use this method if all your DNs are not stored according to the same
suffix
pattern. For example, if you have set up CPS to search multiple branches (OUs) of
your LDAP tree, and those branches store DNs in different ways, then you should use this
authentication method.
Although this method requires and extra LDAP search (compared to the LDAP bind method),
it gives you more flexibility.
prefix + <username> +
50 Configuring Contribute and Contribute Publishing Server to work with your website
Page 51

• Password in file authenticates users using passwords that you specify when you add users to the
file-based User Directory.
Note: If you use the file-based authentication with an LDAP Directory, you must have a file entry
for each user in your LDAP directory.
• Windows domain uses your organization’s Microsoft Windows® authentication solution.
If you use this method, the User IDs in your LDAP directory must match your Windows
user IDs.
Authentication workflow
When a user attempts to connect to a CPS-managed website through Contribute, the process
through which CPS communicates with your organization’s LDAP or other user directory service
is as follows:
1.
Contribute prompts the user for their user directory authentication credentials.
2.
Contribute generates a Simple Object Access Protocol (SOAP) user authentication message,
and sends the request to CPS over an SSL-encrypted network connection.
Note: When sending SOAP requests to CPS, Contribute sends the request over an SSL
encrypted network connection, and uses port 8900 by default. The message timeout is
20 seconds.
3.
CPS requests authentication from the LDAP server by using the credentials specified in the
SOAP user authentication message.
Note: When sending requests to the user directory server, CPS sends the request over an LDAP
or LDAPS network connection, and uses ports 389 and 636 by default. The message timeout is
60 seconds.
4.
The LDAP server attempts to validate the credentials and sends the resulting confirmation or
rejection to CPS.
5.
If the authentication was successful, CPS sends a connection key to the Contribute client for
each website that the user has access to.
6.
For each connection that CPS does not return, Contribute prompts the user for FTP
authentication for the corresponding website.
Configuring Contribute Publishing Server (CPS only) 51
Page 52

7.
If the user successfully authenticates access to a website, they can edit the website by using
Contribute.
Configuring CPS User Directory and other services
You should configure CPS User Directory services when you deploy CPS. You can also configure
the E-mail Notification and Log services at the same time, or you can wait until later.
Note: For more information about configuring the other CPS services, see Contribute Publishing
Server Help.
After you configure the User Directory service, you can enable your website to use CPS.
52 Configuring Contribute and Contribute Publishing Server to work with your website
Page 53

To configure Contribute Publishing Server:
1.
In a web browser, enter the URL for the CPS Console.
Note: The CPS Console requires that you have Flash Player 7 installed on your computer.
The URL is https://hostname:port/contribute/admin/server.cfm, and uses the following
variables:
hostname is the server computer’s DNS name or IP address.
port is the network port number that CPS uses. If you used the Simple Installation, the port
number is 8900. If you deployed CPS as a WAR file in an existing Java application server,
the port number varies with your application server’s configuration. The following table lists
the port numbers that CPS uses on some of the more popular Java application servers:
Java Application Server Port number
BEA Weblogic 7001
IBM Websphere 9080
Adobe JRUN 8900
JBoss 8080
Tip: If you select the Simple Installation for installing CPS (see “Installing Contribute Publishing
Server by using the Simple Installation” on page 33), the URL for the CPS Console is https://
localhost:8900/contribute/admin/server.cfm/.
The CPS Console launches in a browser.
If this is the first time you’re launching the console, the browser probably displays a security
warning, because the CPS installer created a self-signed certificate for the server. The certificate
is used to create a secure connection, and self-signed certificates are not verified by a thirdparty so you always need to accept them.
2.
If your browser displays a security warning, accept the certificate.
Tip: You might want to permanently accept the certificate, if you can. Otherwise, you might be
prompted to accept the certificate each time you launch the CPS Console.
Configuring Contribute Publishing Server (CPS only) 53
Page 54

3.
Enter the CPS administrator password you created during the installation process, and then
click Login to log in to the CPS Console.
The CPS Console appears. Make a note of the CPS Console web address that appears at the
top of the Overview panel; you’ll need this address later when you enable CPS in Contribute.
4.
Select User Directory from the Services Settings list on the left.
At this point, you should configure the User Directory. You can also configure the E-mail, and
Log services now, or you can do it later.
Note: The Website Settings category shows the website-specific settings for websites you’ve
enabled CPS for. You’ll enable CPS for your website next, and then configure Website Settings.
5.
Enter all the settings to configure the User Directory service.
For more information about any of the settings, click the Help link to show online help.
6.
Click Save Settings to save your settings.
Tip: If you want to use secure LDAP, see “Configuring the User Directory service to use secure
LDAP” on page 54 after you configure the User Directory service.
7.
(Optional) Select another service from the Services Settings list on the left if you want to
configure the other services now.
Now you are ready to start Contribute, and enable your website to use CPS. To do so, see
“Enabling Contribute websites to work with CPS (CPS only)” on page 55.
Configuring the User Directory service to use secure LDAP
The default configuration of the User Directory service does not encrypt communications to the
LDAP server. You can configure the service to use secure LDAP (LDAPS) to encrypt information
to and from your LDAP server.
54 Configuring Contribute and Contribute Publishing Server to work with your website
Page 55

Note: Before you set up LDAPS, you should have already configured the User Directory service to
integrate with your LDAP/Active Directory server. If you have not done so, see “Configuring CPS
User Directory and other services” on page 52 before you complete the LDAPS procedure in this
section.
This section describes one method for configuring the User Directory service to use LDAPS. This
method uses the Java keytool to import your LDAP server SSL certificate into the trust store of
the CPS J2EE server JVM.
Note: The following procedure is for the CPS Simple Installation—if you did not already have a Java
application server when you installed CPS. If you used the CPS WAR File Installation—because you
already had a Java application server—then you should consult your Java server documentation for
information about importing an SSL certificate.
To import your LDAP SSL certificate into CPS trust store to use LDAPS:
1.
In a command prompt, change to the CPS installation directory in the following default
location:
C:/Program Files/Macromedia/Contribute Publishing Server/jre/bin
2.
Enter the following command:
keytool
Depending on your configuration, you might need to include more information. The
complete command is:
keytool -import -alias serverca -file <certificate filename and path> -
keystore {jrun.rootdir}/lib/trustStore -storepass changeit
In this command, certificate filename and path is the name and location of your LDAP
SSL certificate.
3.
Restart the server running CPS.
Now you are ready to start Contribute, and enable your website to use CPS.
Enabling Contribute websites to work with CPS (CPS only)
After you install (see “Installing Contribute Publishing Server (Optional)” on page 32) and
configure (see “Configuring CPS User Directory and other services” on page 52) Contribute
Publishing Server (CPS), you can enable any website to which you’ve created a connection to
access CPS.
Note: If you haven’t created a connection to your website, do so before you proceed with these
instructions. For information, see “Creating a Contribute website connection” on page 31.
To enable CPS:
1.
Start Contribute.
2.
Select Edit > Administer Websites > We b si t e Na m e.
The Administer Website dialog box appears.
3.
Select Publishing Server from the list of administrative categories on the left.
Enabling Contribute websites to work with CPS (CPS only) 55
Page 56

4.
Click Enable Publishing Server.
The Enable Publishing Server dialog box appears.
5.
Enter the Publishing Server web address in the address field and deselect the Enable User
Directory check box if you will not use the User Directory service to manage users.
Note: If you plan to use the User Directory service to manage users, see “Adding users to your
website (CPS only)” on page 57 to learn how to add users to your website.
For information about options in this dialog box, click Help to show online help.
6.
Click OK.
Contribute establishes a connection to CPS.
7.
In the Administer Website dialog box, click the Publishing Server Console link.
The CPS Login dialog box appears.
8.
Enter the CPS administrator password, and then click Login to log in to the CPS Console.
The CPS Console opens to the Website Settings panel.
56 Configuring Contribute and Contribute Publishing Server to work with your website
Page 57

9.
Verify that you want the Log and E-mail Notification services enabled.
By default, the Log and E-mail Notification services are enabled. To disable one or more of
these services, deselect the appropriate check box, and click Save Settings.
Now Contribute is enabled to use Contribute Publishing Server and you are ready to add users
to your website.
Adding users to your website (CPS only)
When you enable Contribute to work with CPS (see “Enabling Contribute websites to work with
CPS (CPS only)” on page 55), you must add users to the website from your LDAP, Active
Directory, or file-based user database.
Note: Any users previously connected to the website are removed.
Users cannot connect to a CPS-managed website unless you have added them as users. This
differs from using Contribute without CPS, where anyone with a connection key and connection
information can connect.
1.
In Contribute, select Edit > Administer Websites > We b sit e Nam e .
The Administer Website dialog box appears.
2.
Select Users and Roles from the list of administrative categories on the left.
Adding users to your website (CPS only) 57
Page 58

3.
Click Add Users.
The Add Users dialog box appears.
4.
Select a role to assign users from the Role for the new users pop-up menu.
The role you assign determines the users’ editing permissions for modifying the site’s pages.
5.
Add users to the role you selected. The Search Results panel lets you locate users in your
organization’s user directory and add them to the list of users for the role you’ve selected.
Do the following to find and add user names to a role:
a
Enter a name in the Search text box, and then click Search. Contribute shows the closest
matches it finds in the Search Results list.
b
Select the name of the user you want to add to the role, and click Add to move that user to
the list of Users to add.
If you inadvertently add a user to a role, you can remove that user by selecting their name in
the Users to add list and clicking Remove.
6.
(Optional) Select Send connection key e-mail to users to send an e-mail to the users you’ve
added to the role.
Contribute creates a single e-mail message with a connection link that you can send to the
users. The e-mail lets the user know that they’ve been given access to the website, and the
connection link lets them easily import connection information into their copy of Contribute.
58 Configuring Contribute and Contribute Publishing Server to work with your website
Page 59

7.
Click OK to close the Add Users dialog box.
The Users and Roles panel of the Administer Website dialog box shows the new users who are
assigned to a specific role.
8.
To add additional users, repeat steps 4 through 8.
Tip: For more information on creating user roles, see “About Contribute user roles and settings”
on page 43.
Now you are ready for user to install Contribute and connect to the website.
Deploying Contribute and website connections
To set up Contribute users, you need to make sure that every user has Contribute installed on
their machine. Then, you need to provide them with the basic site connection information for the
web server. You do this by sending them a connection key.
Contribute lets you share website connection information by embedding website information in a
connection-key file. Because the connection key is encrypted with a password, any network or File
Transfer Protocol (FTP) login information you send in the file remains secure and can be accessed
only through Contribute. You can either e-mail the file to users, or save it to your computer for
users to download and import.
Note: FTP and Secure FTP (SFTP) connection keys can be used across platforms; LAN connection
keys are platform specific.
Deploying Contribute and website connections 59
Page 60

After receiving a connection key, a user double-clicks it to start the connection process. Because
the file is encrypted, the user must know the password that the administrator defined for the key.
Connection keys also specify what role settings to apply. When the user supplies the correct
password, Contribute automatically makes a connection to the site and allows page edits as
defined for the associated Contribute role.
If you are using CPS to manage users, you must add users to your website before they can connect
and begin using Contribute to edit the website (see “Adding users to your website (CPS only)”
on page 57). After you have added users to the website, you can send them a connection key to
connect.
Tip: You can also have users type connect:server domain name (where server domain name is the
name of the server where CPS is installed) in the Contribute browser address bar to connect to the
website.
The procedure for sending a connection key varies depending on whether you are using CPS to
manage your website or not. If you’re not using CPS, see “Sending connection keys for websites”
on page 60. If you are using CPS to manage users, see “Sending connections for CPS managed
sites” on page 62.
Sending connection keys for websites
Using the Export Connection Wizard (Windows) or Export Connection Assistant (Macintosh),
you can easily set up connections to websites for other users by sending them a connection key.
Note: To send a website connection key to other users, you must create one or more Contribute
website connections to share. If you need to create a Contribute website connection, see “Installing
Contribute and creating an administrative connection” on page 30.
If your website is managed by CPS, see “Sending connections for CPS managed sites” on page 62
for information about sending connection keys.
60 Configuring Contribute and Contribute Publishing Server to work with your website
Page 61

To create a website connection key to share with users:
1.
Select Edit > Administer Websites (Windows) or Contribute > Administer Websites
(Macintosh), and select the website you want to administer from the submenu.
2.
Do one of the following:
If the website has no administrator, click Ye s when a dialog box asks whether you want to
become the website administrator. Then enter and confirm an administrator password for the
website, and click OK.
The Administer Website dialog box appears.
3.
Select the Users and Roles category on the left side of the dialog box.
The Users and Roles dialog box appears.
Deploying Contribute and website connections 61
Page 62

4.
You can send a connection-key file to a new user, or you can send a connection key to a user
who has already connected to the site, and assign them a new role.
■ To send a connection key to a new user, click Send Connection Key.
■ To send a connection key to an existing user, assigning them a new role, select the user’s
name from the list of connected users, and click Send Connection Key.
The Send Connection Key Wizard (Windows) or Export Connection Key Assistant
(Macintosh) appears.
5.
Follow the instructions in the wizard or assistant, and click Next (Windows) or Continue
(Macintosh) to proceed to the next screen.
6.
After completing the wizard or assistant, a new connection-key file is created for the user,
assigning them to a new role.
You can e-mail the connection-key file to the user or save the file to your computer.
7.
Select another category to modify, or click Close to exit the Administer Website dialog box and
save your changes.
Related topics
• “Deploying Contribute and website connections” on page 59
62 Configuring Contribute and Contribute Publishing Server to work with your website
Page 63

Sending connections for CPS managed sites
If you’re using Contribute Publishing Server (CPS) to manage your website, you send users a
connection key that connects them to the server.
Tip: You can also have users type connect:server domain name (where server domain name is the
name of the server where CPS is installed) in the Contribute browser address bar to connect to the
website.
Note: Before users can use a connection key or type connect: to connect to a CPS managed
website, you must add users to the website. If you haven’t already done so, see “Adding users to your
website (CPS only)” on page 57.
If you’re not using CPS to manage your website, see “Sending connection keys for websites”
on page 60 for information about sending connection keys.
To send a CPS connection key:
1.
Select Edit > Administer Websites (Windows) or Contribute > Administer Websites
(Macintosh), and select the website you want to administer from the submenu.
If the website has no administrator, click Ye s when a dialog box asks whether you want to
become the website administrator. Then enter and confirm an administrator password for the
website, and click OK.
The Administer Website dialog box appears.
2.
Click Send Connection Key.
The Send Connection Key dialog box appears.
3.
You can select to e-mail the connection link to the user, or save the file to your local computer.
4.
Select another category to modify, or click Close to exit the Administer Website dialog box and
save your changes.
Related topics
• “Deploying Contribute and website connections” on page 59
• “Adding users to your website (CPS only)” on page 57
Deploying Contribute across an organization
Adobe uses an extensible installation application called the Microsoft Windows Installer (MSI)
that lets you install Contribute to multiple Windows computers in your organization. The
Contribute MSI installer can interface with Microsoft Active Directory that lets multiple users in
your organization use the application based on the organization’s group policies.
Deploying Contribute 4.0 by using Microsoft Systems Management Server
You can also deploy Contribute on multiple computers across the organization by using the
Microsoft Systems Management Server (SMS). SMS allows you to effectively manage large
groups of Microsoft-based computer systems in your organization with services such as remote
control, patch management, and software distribution.
Deploying Contribute across an organization 63
Page 64

To deploy Contribute by using SMS, you must first create a package and add an optional
advertisement, which then initiates the deployment process. The package is automatically sent to
all the client computers in the organization. The SMS client on each client computer receives the
package and then runs it to install the Contribute application. The installation process does not
require any user intervention.
To deploy Contribute using SMS, do the following:
1.
Uninstall previous versions of Contribute.
2.
Set up the server.
3.
Create the SMS package.
4.
Create an advertisement.
Uninstalling previous versions
It is recommended that you first uninstall any existing versions of Contribute. You can uninstall
Contribute by using either the Add/Remove Programs feature in the Windows Control Panel or a
separate SMS package.
Note: If the uninstall process prompts you to restart the computer, do so.
Setting up the server
SMS 2003 offers greater control and flexibility than previous versions. With SMS 2003, you can
force a package to run by using a specified account with administrative rights on the target
computer. This lets you distribute the package to client computers who are not logged into the
network or to a user who does not have administrator rights.
To specify an administrative account for SMS to use:
1.
From the Windows Start menu, select Start > Programs > Systems Management Server, and
then double-click SMS Administrator Console.
The Microsoft Management Console (MMC) appears.
2.
In the left pane of the MMC, expand Site Database Tree, and then expand the Site Hierarchy
node.
3.
Select the site by right-clicking the site, and then select Properties.
The Properties dialog box appears.
4.
On the Accounts tab in the Properties dialog box, click the Set button next to SMS Client
Remote Installation Account.
Also specify the account to use to perform the software installation. The account must have
domain Administrator rights as well as local Administrator rights on the workstations. The
Remote Client Installation component primarily uses the account, but software distribution
also uses the account to run packages on computers that are not logged into the network.
64 Configuring Contribute and Contribute Publishing Server to work with your website
Page 65

Creating the SMS package
If you are creating a package from the SMS Installer, the installer creates an executable file that
has all the information and the commands necessary for deployment.
To create the package that SMS uses for distribution:
1.
Open the Systems Management Server console, right-click Packages, and then select New/
Package.
The Package Properties dialog box appears.
2.
On the General tab, enter the name of the package (up to 50 characters), and then enter
optional information for any of the following:
■ Version number of the software package, up to 32 characters
■ Name of the software publisher, up to 32 characters
■ Language version, up to 32 characters
■ Description of the package, up to 127 characters
3.
On the Data Source tab, select This Package Contains Source files.
4.
For Source Directory, select the type of connection for the source files and click Apply.
5.
On the Distribution Settings tab, select Medium from the Sending Priority pop-up menu.
6.
Click OK.
The package appears under the Package node of the Site Database tree in the SMS console.
7.
Go to the Packages node in the SMS console, right-click Programs, and then select New/
Program.
The Program Properties dialog box appears.
8.
To enter the command line in the Command Line text box, click Browse and navigate to locate
the installation folder.
9.
Click OK.
10.
Type one of the following commands to run the installer:
■ To run the installer by using the msiexec program (Typical Install), enter the following
command:
MSIEXEC /I "<PATH>Adobe Contribute 4.msi" /passive /norestart /log <Path
for the Log file and log file name>.log
Note: Use the Typical Install option only if all the client computers have the MSI 2.0 engine
installed.
■ To run the installer by using the msiexec program (Custom Install), refer to the following
table for the commands you can use:
Deploying Contribute across an organization 65
Page 66

Note: Command-line parameters are also available with the Contribute MSI file.
Command Notes
MSIEXEC/I "<PATH>Adobe Contribute
4.msi"CREATEDESKTOPSHORTCUT="0"/passive
/norestart/log <Path for the log file
and log file name>.log
MSIEXEC/I "<PATH>Adobe Contribute
4.msi"CREATEQUICKLAUNCHSHORTCUT="0"/
passive /norestart/log <Path for the
log file and log file name>.log
MSIEXEC/I "<PATH>Adobe Contribute
4.msi"INSTALLFIREFOXPLUGIN="0"/passive
/norestart/log <Path for the log file
and log file name>.log
MSIEXEC /I "<PATH>Adobe Contribute
4.msi"INSTALLIEPLUGIN ="0"/passive /
norestart/log <Path for the log file
and log file name>.log
MSIEXEC /I "<PATH>Adobe Contribute
4.msi"INSTALLOFFICEPLUGIN ="0"/passive
/norestart/log <Path for the log file
and log file name>.log
Note: All values are set to 1 by default in a typical installation.
This command does not install the desktop
shortcut.
This command does not install the quick
launch shortcut.
This command does not install the Firefox
extension.
This command does not install the Microsoft
Internet Explorer toolbar.
This command does not install the Microsoft
Office toolbar.
You can also customize these commands based on your preferences. For example, if you do
not want the Contribute desktop shortcut and the Internet Explorer plug-in to be installed,
you can use the following command:
MSIEXEC /I "<PATH>Adobe Contribute 4.msi" CREATEDESKTOPSHORTCUT=”0”
INSTALLIEPLUGIN ="0" /passive /norestart /log <Path for the log file and
log file name>.log
11.
On the Environment tab, clear the User Input Required option, and then click Run with
administrative rights.
12.
Click OK.
The SMS package appears under the Packages node in the SMS console.
13.
Go to the SMS console and do the following:
a
Under the Packages node, expand the SMS package you created.
b
Right-click the package and select Distribution Points.
The New Distribution Points Wizard dialog box appears.
14.
In the New Distribution Points Wizard dialog box, select the servers to designate as the
distribution points, and click Finish.
Creating an advertisement
The final step in the deployment process is to create an advertisement that pushes the SMS
package to the client computers.
66 Configuring Contribute and Contribute Publishing Server to work with your website
Page 67

To create an advertisement:
1.
Expand Collections on the Site Database tree, and then right-click the collection to receive the
package.
The Distribute Software wizard starts.
2.
Click Next.
3.
Select Select an Existing Package on the Package screen, and click Next.
4.
On the Distribution Points screen, select the distribution point to copy the package to, and click
Next.
5.
Click Yes on the Advertise A Program screen, and then click Next.
6.
On the Advertisement Target screen, do the following:
a
Select Advertise The Program To An Existing Collection.
b
Click Browse to locate the collection if it isn’t visible.
c
Click Next.
7.
Verify that the correct package and collection names appear on the Advertisement Name screen,
and then click Next.
8.
Specify any sub-collections that should also receive the advertisement on the Advertise To
Subcollections screen, and then click Next.
9.
On the Advertisement Schedule screen, do the following:
a
Confirm or change the time for the advertisement to be pushed to the client computers.
b
Specify if the advertisement should expire and the date and time (if it should expire).
c
Click Next.
10.
Click Yes to assign the program on the Assign Program screen, and then click Next.
11.
Verify the settings you selected on the Completing the Distribute Software Wizard screen, and
then click Finish.
Uninstalling Contribute 4.0
To use SMS to remove Contribute, follow the installation steps for preparing the package for
deployment. Instead of preparing a package, use the following command on the General tab of
the Program Properties dialog box:
msiexec /x " Adobe Contribute 4.msi " [DELETEUSERCONFIG ="1"|"0"] /passive /log
d:\uninstall.log
Note: DELETEUSERCONFIG ="1" also deletes the user preferences.
Deploying Contribute across an organization 67
Page 68

68 Configuring Contribute and Contribute Publishing Server to work with your website
Page 69

Index
A
about CPS 6
Add Users dialog box 58
Administer Website dialog box 55, 57
administration
settings, about 42
sitewide settings 43
administrator, responsibilities 14
C
child website 23
compressed WAR archive 36
connecting to a website that CPS manages 60, 62
connection key, sending 59
Connection Wizard 30
connections
about 26
child websites 23
creating a website 30
network path 31
overlapping 23
SFTP 27
URL 31
WebDAV 29
Contribute 58
Administer Website dialog box 55, 57
Enable Publishing Server dialog box 56
Log service 6
Publishing Server, enabling 55
User Directory, enabling 56
Contribute Publishing Server
about 6
case study 6
Simple Installation 32, 33
using secure LDAP with User Directory 54
WAR File Installation 32, 34
CPS
about 6
Simple Installation 32, 33
using secure LDAP with User Directory 54
WAR File Installation 32, 34
D
deploying
responsibilities 14
tasks 15
E
E-mail Notification, about 6
Enable Publishing Server dialog box 56
expanded WAR archive 36
F
FTP, connection information 31
I
installing
Contribute Publishing Server, Simple Installation
32, 33
Contribute Publishing Server, WAR File Installation
32, 34
69
Page 70

L
LDAP, using secure LDAP with User Directory 54
Log service, about 6
N
network
about 18
connection types, about 26
path and web addresses 30
O
overlapping, website connections 23
P
parent website 23
permissions, about 18
Publishing Server
enabling with Contribute 55
Publishing Server Console 52
Simple Installation 32, 33
system requirements 32
using secure LDAP with User Directory 54
WAR File Installation 32, 34
web address 56
S
secure LDAP, using with User Directory 54
server permissions 18
services
E-mail Notification 6
Log 6
User Directory 6
SFTP connection information 27, 31
Simple Installation, Contribute Publishing Server 32,
33
Sitewide Settings dialog box 43
staging servers, case study 12
system requirements 32
U
User Directory
about 6
enable 56
User Directory service, using secure LDAP (LDAPS)
54
user management
about 5
Contribute Publishing Server 5
manual connections 5
users, connecting to a website that CPS manages 60,
62
R
roles
about 43
Administrator 44
default 43
example of 45
Publisher 44
Writ er 4 4
70 Index
W
WAR
compressed archive 36
expanded archive 36
WAR File Installation, Contribute Publishing Server
32, 34
Web Application Archive, see WAR.
WebDAV connection information 29
website connections
child websites 23
creating 30, 31
overlapping 23
website, address (URL) 31
wizards, Connection Wizard 30
 Loading...