

Page 1
E
n
g
l
i
s
h
ALDINET S.P.A.
VIALE C.COLOMBO, 8
20090 T
REZZANO S/N (MI)
ITALY
Page 2
Precautions
Identification of controls
When using remote control
Quick Guide
Turning the power on and off
Stopping playback
Fast-forwarding/ fast-reversing
Finding the beginning of chapters or tracks
Changing the default settings(setup)
Others
1- 3
4-6
7- 10
9
10
7
8
12-13
17-18
Source
Remote control
Front panel
Playing a disc
Tuning the sound on and off
Playing from the desired location
Chapter/track/title repeat playback
Displaying the disc status
Convenient Functions
11
Installation and connections
14-16
In case of difficulty
Specifications
17
18
Loadi ng and unloa di ng a disc
Setting volume level
Page 3

This digital versatile disc (DVD) video player uses 12V DC.
+20%
-10%
For future refe rence, record the model and serial number
(located on the case of the DVD player) in the space provided.
CAUTION:
This DVD VIDEO PL AYER IS A CLASS 1 LASER PRODUCT.
USE OF CONTROLS OR ADJUSTMENTS OR PERFORMANCE OF PROCEDURES OTHER
THAN THOSE SPECIFIED HEREIN MAY RESULT IN HAZARDOUS RADIATION EXPOSURE.
AS THE LASER BEAM USED IN THIS DVD VIDEO PLAYER IS HARMFUL TO THE EYES.
DO NOT ATTEMPT TO DISASSEMBLE THE CABINET.
REFER SERVICING TO QUALIFIED PERSONNEL ONLY.
WARNING : class 1 laser product - avoid long term viewing of direct laser radiation.
WARNING OF DEW FOR MATION
Dew may form on the p ickup lens in the following conditions.
- Immediately a fter a heater has been turned on.
- In a steamy or very humid room.
When the unit is suddenly moved form a cold environment to a warm one.
If dew forms inside this unit ,it may not operate properly.
In this case, tur n on the power and wait about 2 or 3 hours for the dew to evaporate.
When the unit is used under low temperatures.
The pick up lens might warm up very fast and dew will form.
In this case ,tur n on the power and wait a while for the dew to evaporate.
Page 4
Page 5

Direct sun and heat
High humidity and water
Excessive dust Excessive vibrations
Make sure the unit will not be installed in a location subjected to:
sure safety, always c ontact the dealer where you purchased this product to have the work done
Caution
This symbol mea ns important instructions.
Failure to heed them can result in injury or property damage.
Be sure the temperature inside the vehicle is between +55 C (+13 1 F) and -5 C(+23 F)
before turning your unit on.
3
Page 6
SRC
POWER / SO URCE STOP SKIP SKIP PAUSE
PLAY
EJECT
PLAYER
AUX MONITOR
SRC
POWE R / SOURC E STOP SKIP SKIP PAUSE
PLAY
EJEC T
PLAYER
AUX MONITOR
Disc solt/
open, close indicator
SRC
POWER /SOURCE
button
STOP
button
SKIPbutton
PLAYER/AUX
button
SKIP+
button
PLAY/PAUSE
button
EJECT
button
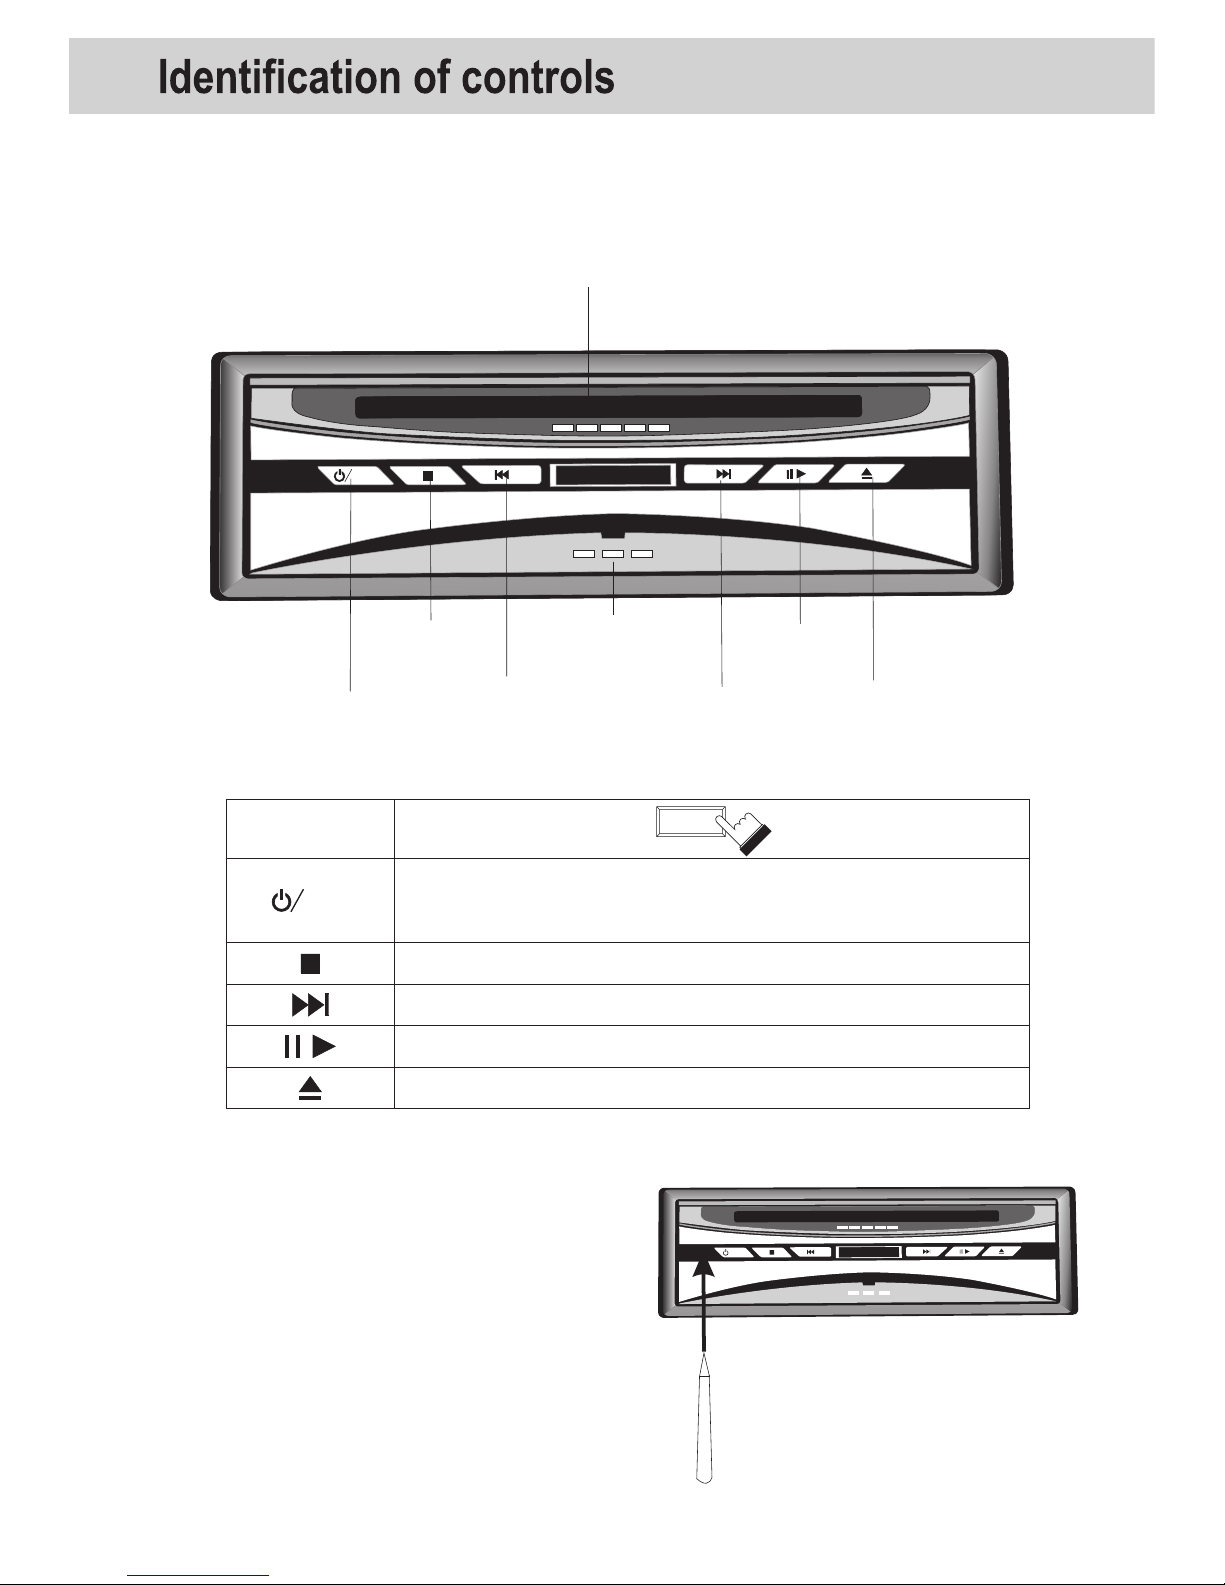
Front panel
The button
Short press is POWER function to power on/off ,
long press is SOURCE function to select different
source ( player or AUX )
To stop playback
To locate previous/next chapter or track
Play/ pause
To eject a disc
Resetting the unit
Press the RESET button with a pointed object,
such as a ballpoint pen, as shown.
Unit will turn off momentary after the
RESET button is pressed.
Note: pressing the RESET button
will erase some s tored contents.
RESET button
4
Page 7

GOTO button to location
power on/off button
by entering its corresponding track
number,chapter number or time
Long press is CLEAR function
to clear the wrong number you entered.
REPEAT.button
AUDIO button-toselect DVD audio
or VCD audio stereo
SETUP button
To change the default settings
DISPLAY button to display the disc staus
MENU button
to locate a specific DVD root MENU
Long press is TITLE function
to locate a specific title chapter or track
or VCD PBC on/off.
VOL button
mute button
playing with no sound
GOTO
AUDIO
CLEA R
ANGL E
5
SUB.
DIS PLAY
SOURCE button
to select different sources
(DVD or AUX)
to select the DVD disc subtitle
Long press is SUBTITLE function
button to eject the disc
Page 8

Page 9

SRC
POWER / SOUR CE STOP SKIP SKIP PAUSE
PLAY
EJECT
PLAYER
AUX USB
SRC
POWER / SOUR CE STOP SKIP SKIP PAUSE
PLAY
EJECT
PLAYER
AUX USB
Loading and un loading a disc
Turn on the power before loading and unloading discs .
1
Insert the disc w ith the side containing
words diagram s facing upwards.
Once the disc is partially inserted, it is
drawn in automatically. Playback starts.
2
Unloading disc
Press EJECT button, the disc is
automatically ejected.
Notes:
If wrong disc, up side-down discs or dirty discs
have been inserted, “NO DISC” is displayed.
Remove the disc.
Do not put any objects other than discs into the
disc slot. doing so may cause the player to
malfunction.
This owner’s manual explains the basic instructions of this DVD player, some DVD
disc are produced in a manner that allows specific or limited op eration during playback.
As such, the DVD pl ayer may not respond to all operating commands. This is no t a
defect in the DVD player. Refer to the instruction notes of discs.
“ “may appear on the screen during operation.
A “ “ means that the operation is not permitted by the DVD player or the disc.
These indicat e the disc for which the functio n can be used.
7
Page 10

Press the button of
the remote cont rol, the power turns off.
To turn the power on, press the button
again.
1
2 SOURCE
Select DVD player or AUX input
by pressing the SOURCE button.
Connect
Using AUDIO and VIDEO IN,
connect the DVD video player
to a VTR, TV/VTR combination
or video selector.
AUX
SOURCE
During playback pree ,no sound
is played.Press to resume normal
playback with sound.
3 Setting volume level
First press VOL button on the remote
,
then press the button to
increase or decrease voloume level
4
During playba ck,
press DISPLAY buttonto
appear the playback status ;
press DISPLAY button again to turn off
the playback status.
5
SUB.
8
Page 11

Page 12

10
Page 13

AUDI O
AUDI O
AUDI O
pressing button
AUDI O
pressing button
SUB.
SUB.
SUB.
pressing button
During playba ck, press GOTO.
Playing form
the desired location
Locating a specific location by entering
the track number, the chapter number
or the time
2
3
Input the chapter the title or the time
from which you want to start playback
using the joystick and the number
keys(0~9).
Press ENTER
Playback starts from the selected chapter,
track or the time .
5
GOT O
GOT O
Notes:
Input the hours first, followed by the
minutes, then t he seconds.
Press CLEAR to delete all digits you
input.
AUDIO
AUDI O
SUB.
GOTO
RPT.
RPT.
RPT.
11
Page 14

TV Syst em : Multi
Langu age
Video
1 Language setup
2 Video setup
12
Page 15

Digit al output :P CM
Night M ode :Off
3 Audio setup
4 Rating setup
5 Others setup
13
Page 16

1,2,3
14
Page 17

3A
SRC
POWER / SOUR CE STOP SKIP SKIP PAUSE
PLAY
EJECT
PLAYER
AUX USB
WARNI NG:
MOVE THE S CREWS B EFORE F IXING !
!
Note:
The are 2 mounting screws on the case of
DVD player to protect unit during shipping.
Be sure to remove these screws before
installing the unit. Cover the holes with
the dustproof paster.
Two black sticking papers
Mounting brac ket
(half sleeve)
Removable tri m rin g
equipped on the unit
Rear strap
(brace)
Mounti ng screw M5
X1
Key
x2
x2
15
Page 18

3A
Rear of product
REAR VIDEO OUT
FRONT VIDEO OUT
MONITO R VID EO IN
EXTERIOR VIDEO IN
AUDIO OUT (LEFT)
AUDIO OUT (RIGHT)
AUDIO IN (LEFT)
AUDIO IN (RIGHT)
To monit or with r ear-v iem camera input
RCA input for rear-view camera
To headr est or ce iling m ount mo nitors
RCA input for video games
AUDIO output (RCA)
AUDIO input (RCA)
GREEN - PARKING BRAKE
RED - +12V ACC
YELLOW - +12V BATT
BLUE - STANDBY OUT
BROWN - REVERSE INPUT
BLACK - POWER GROUND
USB jack(optional)
remote control sens or ja ck
BLACK: (-) neg . ground input. To vehicle chassis
BROWN: (+) pos. reverse wire inp ut (for r ear vie w camer a option)
BLUE: (+) 300mA max. standby output
YELLOW: (+) po s. 12 vol t constant input
RED: (+) pos. 12 volt accessory in put
GREEN: Used to d ete ct the On/Off status o f the p arking brake ,This lead m ust b e connected
to the power s upp ly side of the parking b rak e switch.
YELLOW
Left(WHITE)
Right(RED)
16
Note
1.We adv ise to c onnect th e EX-VIDE O-CON lea d.
And so the fr ont displ ay only wil l be on wh ile d etec ting the
parkin g brake ON.
Or if the
EX-VID EO-CON an d MONI TOR VIDEO I N are used,
the fron t display w ill be on whi le bac kin g the ca r.
2. Th is pr oduc t’s RE AR VI DEO OU T is for conn ections o f display s
to enabl e passeng ers in the re ar sea ts to w atch t he DVD
or Vi deo C D.
Warning
NEVER in stall the d ispl ay in a l ocat ion t hat en ables the d river
to watch t he DVD or Video CD wh ile drivi ng.
This pro ducts whe ther your c ar’s park ing brake i s engaged o r not,
and prev ents you fr om watchi ng a DVD o r Video CD on t he dis pla y
connec ted to FRON T VIDE O OUT wh ile drivi ng.
Exampl e: When you a ttempt to w atch a D VD, t he scr een is blac k.
When you p arking yo ur car in a saf e plac e and a pply t he parkin g
brake, t he pictur e appears o n the sc ree n.
Page 19

17
Page 20

Power requirement: 12
Power consumption: less than 20 W
V DC
Dimensions(approx.): 178x50x183mm
(w/h/d) incl. Projecting parts
Weight: 1.4Kg
Design and specifications are subject to change without notice.
Power
General
Audio output : 1.9 0.2V 100k (analog)
Video output: 1 0.2V
Resolution: more than 500 line
Audio
Video
+20%
-10%
Normal operating temperature range: -5°C(+23°F) TO+55° C(+131° F)
The illustrations in this manual may appear different from the
actual product due to printing conditions.
75
18
 Loading...