

Page 1
1
1
Page 2

Contents
Contents
Safety precautions..........................................1
Notices......................................................2
Main features................................................3
Device connection and Installation
Parking brake connection.......................................4
Reverse connection...........................................4
Electrical Connections Overall Diagram........................... 4
Notes of installation........................................... 5
Installation procedure......................................... 5
Before using
Front panel..................................................7
Remote Controller.............................................8
Remote Controller for Front Zone..............................8
Remote Controller for Rear Zone...............................9
Notes of remote controller using...............................10
Uninstall Battery...........................................10
Install Battery.............................................10
Basic operations
Reset the unit............................................... 11
Power on / off............................................... 11
Volume Adjustment...........................................11
Mute...................................................... 11
Playing sources switching..................................... 11
Open / Close the Monitor.......................................12
Adjust the monitor angle.......................................12
Display modes switching.......................................12
Image setting................................................12
Audio setting................................................13
Advance functions
TFT monitor auto open........................................ 14
Auto brightness control....................................... 14
Line mute...................................................14
When parking brake applied....................................14
When Reverse Driving........................................ 14
Mechanism overloaded protection...............................14
Radio mode
Mode selecting..............................................15
User Interface (UI) of Radio mode............................... 15
Page 3

Contents
Contents
Radio band selection.......................................... 16
Automatic tuning............................................. 16
Manual tuning................................................16
Auto memory store (AMS) function............................... 17
Scan preset stations...........................................17
Local radio station seeking (LOC)................................17
RDS operations
Brief introduction of RDS....................................... 18
Search the PTY...............................................18
PTY alarm...................................................19
TA function...................................................19
AF (Alternative Frequency lists) function...........................20
Region......................................................20
CT (Clock Ti me)...............................................20
RT (Radio Te xt)...............................................20
PI
search....................................................20
Setup of RDS................................................ 20
DVD mode
Loading a disc................................................21
Play/ Pause..................................................21
Stop playback................................................21
Fast Forward (FF) / Fast Reverse (FR).............................21
Slow Forward (SF) / Slow Reverse (SR)............................21
Playback the previous / next file..................................21
Repeat Playback..............................................22
Repeat A-B function (for DVD/
VCD/CD)...........................22
Random Playback.............................................22
Intro playback................................................22
GOTO Search function (for DVD/VCD)............................ 22
Direct track selection (for CD/VCD)...............................23
Audio channel selection........................................23
Alter between 2-ch and 6-ch.....................................24
Disc Menu (for DVD only).......................................24
PBC (Playback Control) function (for VCD only)
.....................24
Subtitle language selection (for DVD only)......................... 25
View angle selection.......................................... 25
Zoom...................................................... 25
Playback information..........................................25
Mp3 / WMA file playback........................................27
Page 4

Contents
Contents
SD card mode
Mode selecting...............................................28
User Interface (UI) of SD card mode .............................. 28
Play/ Pause................................................. 28
Stop playback................................................28
Playback the previous / next file..................................29
Repeat Playback..............................................29
Random Playback.............................................29
Direct track selection (for CD/VCD)...............................29
Audio channel selection........................................29
Alter between 2-ch and 6-ch.....................................29
Change page.................................................2 9
Change direction............................................. 29
System setup
................................30
ASP CONFIG................................................ 30
GENERAL SETUP............................................ 31
SCREEN CAL................................................31
DVD setup
LANGUAGE................................................. 32
VIDEO......................................................32
AUDIO..................................................... 32
SPK CONFIG................................................33
PRO LOGIC Ⅱ............................................... 34
RATING.....................................................34
Load Factory.................................................35
TV mode
Mode selecting...............................................36
Automatic tuning..............................................36
Manual tuning................................................36
Auto memory store (AMS) function................................36
Scan preset channels..........................................36
Change TV channel............................................36
Display TV channel number..................................... 36
Other modes
AUX IN mode.................................................37
Rearview camera mode.........................................37
Navigation mode..............................................37
Rear Zone................................................... 37
Parameter adjustment procedures
Page 5

Troubleshooting
Meanings of familiar characters..................................38
General problems.............................................39
TFT monitor................................................. 40
FM / AM radio................................................ 40
DVD player..................................................41
MP3/WMA playback...........................................41
Basic knowledge
Basic knowledge of disc........................................42
Disc icons.................................................42
Disc symbols..............................................42
Caution of disc using........................................43
Basic knowledge of DVD/VCD/CD/MP3............................44
AV contents structure of DVD.................................44
AV contents structure of VCD................................ 44
Glossaries of DVD/ VCD/ CD................................. 44
Dolby Digital 5.1 Surround Sound............................ 47
About MP3 files............................................48
Specifications..............................................51
Contents
Contents
Page 6
1
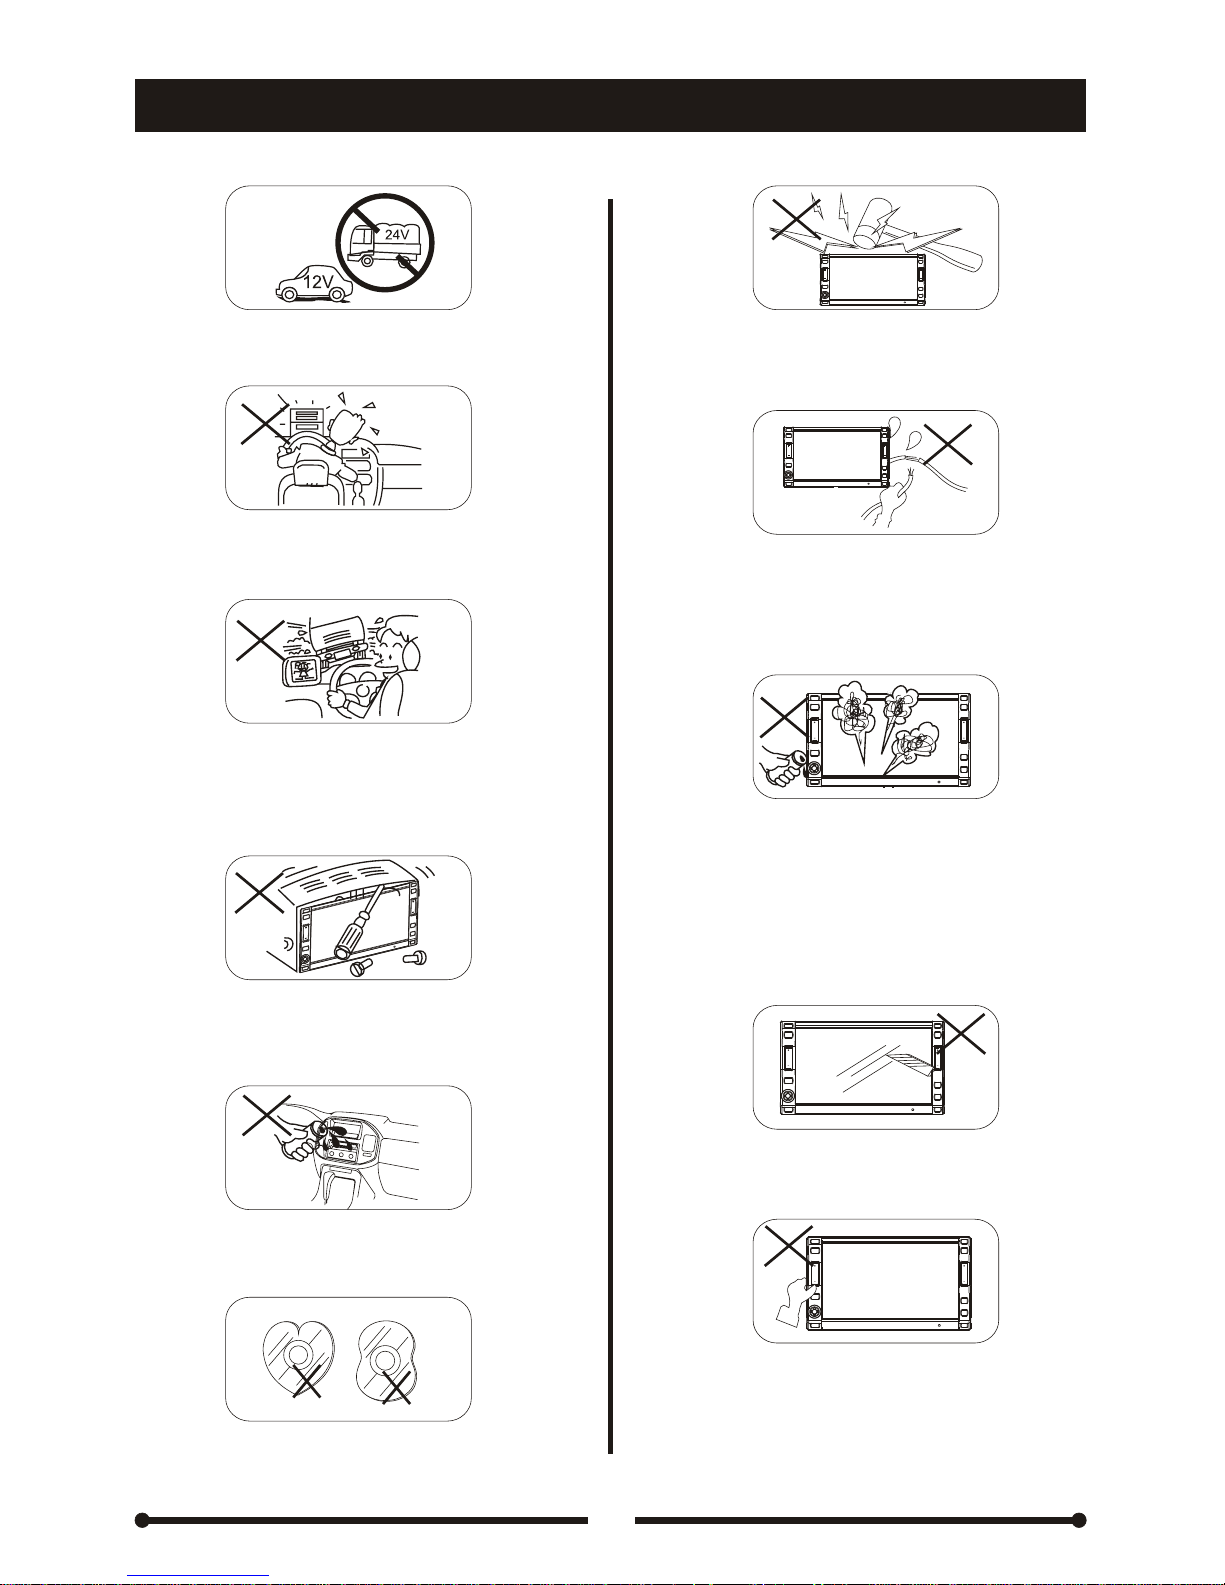
Safety precautions
Safety precautions
1. Only connect the unit to a 12-volt power
supply with negative grounding.
2. Never install this unit where the operation &
condition for safety driving is restrained.
3. Never use the video
display function in the
front when driving to prevent the violation of
laws & regulations and also to reduce the
risk of traffic accident except using for rear
view video camera.
4.
Never disassemble or adjust the unit with out any professional operation.For details,
please consult any professional car shop /
dealer for inquiry.
5. Never expose th
e unit, amplifier, and
speakers to moisture or water for preventing
electronic sparks or fires.
6.Never use irregular discs.
7. No fierce impact to the LCD monitor when it
is in open position
for preventing the damage
to any mechanisms inside.
8. please don't change the fuse on the power
cord without professional guidance, using
improper fuse may cause damage to this
unit or even cause fire.
9. Please power off this unit at once and send it
back to the after-sales service center or the
dealer / distributor you purchased from if one
of the
following symptoms is found:
(a). No audio output; (b). No image display;
(c). Water or other obstacle enters the unit;
(d). Smoking; (e). Peculiar smell
10. To prevent the damage to the screen,aviod
touching it with sharp hard objects.
11. The monitor employs auto motorizing
mechanism, please don't push, pull, or
swivel the monitor manually to prevent
damage to the core mechanism.
Page 7

2
Notices
1. If the front panel or the monitor is 6. Clean up the laser pickup more
squalid, please use a cleansilicone often than the home used
cloth and neutral detergent to wipe counterpart due to the worse
off the spot. Using a rough cloth
environment to the unit in car.
and non-neutral detergent such as
alcohol for cleaning may result in
scratching or decoloration
.
7. To provide a clear demonstration
and an alternative for easy
understanding of the operation of
2. If any abnormal behavior of the
this unit, graphic illustration is
unit is found, please refer to
used. However, this illustration is
troubleshooting guide of this
not necessary printed as the
manual. If
no relevant information
actual image you may find on the
is found, please press the
unit.
[RESET] key on the front panel to
resume factory default.
8. During operation the unit, “ ” is
displayed if the particular
3. If you have parked the car in hot
operation is not
available or
or cold weather for a long time,
illegal.
please wait until the temperature
in the car becomes normal before
operating the unit.
9. Operate the unit correctly
according to the manual
4. Using in-car heater in low
instruction to prevent unnecessary
temperature environment may
problem. The guarantee
won't be
cause beads coagulate inside the
valid if the problem is caused by
unit, don't use the unit in this
inappropriate operation.
situation, eject the disc and wipe
off the bead on the disc. If the unit
still doesn't work after a few hours,
please contact with after-sales
service center.
This unit is manufactured under
license from Dolby Laboratories.
'Dolby', 'ProLogic', 'ProLogic Ⅱ'
5. To ensure safe driving, please
and the double-D symbol are
adjust the volume to a safe &
trademarks of Dolby
comfort level in case of emergency
Laboratories.
situations.
Page 8

3
Main features
Main features
DVD Player
Compatible disc formats: DVD±R, DVD±RW
CD-R, CD-RW, CD, SVCD, VCD
Compatible file formats: MP3, WMA, MPEG1,
MPEG2, MPEG4 and JPEG
Dual optional display ratios (4:3 and 16:9)
Dolby Digital and Dolby ProLogic Ⅱ decoder
Break point memory function
Multi-subtitle, Multi-language and Multi-angle
playback, Children lock
Forward / reverse fast playback ;
Forward / reverse slow playback
Pause playback, Repeat playback,
Scan playback, Stop playback; GOTO
search function, ZOOM function, PBC
function, Playback information display
Multi-channel and stereo audio output
Electrical Shock Protection (ESP) for DVD
Playback
MP3/WMA
ID3 tag display
Pause playback, Stop playback,
Reverse skip / Forward skip
Searching for a particular file by number
buttons
Electronic Shock Protection(ESP) for MP3
and WMA Playback
AM/FM TUNER
30 preset radio stations (18FM+12 AM)
Tuning and presetting radio stations
automatically or manually
Radio stations scan playing
Distance / Local radio stations tuning
mode
DVD Player
MP3/WMA
AM/FM TUNER
TV TUNER
Full frequency range searching
98 TV channels in total
Auxiliary functions
Support 1GB SD card
External navigation interface
Display Screen
6.5 inches wide TFT touch screen
Full automatic motorized TFT LCD
16-step TFT LCD tilting adjustment
Auto protection for unknown moving path
General Features
2 DIN size
Standard ISO interface
Front & Rear area independent playback
Rear view video camera signal input
Auxiliary AV RCA input
Rear AV RCA output
Internal power amplifier outputs
Multi-channel RCA audio line out
EQ selection
Dual video system: PAL & NTSC
5-way joystick menu navigation
IR remote
controller
Mechanical anti-vibration system and ESP
High & low voltage protection
Clock display on the screen
TV TUNER
Auxiliary functions
Display Screen
General Features
Page 9

4
1、Parking Brake
2. Rear View Video Camera
3.Electrical Connections Overal Diagram
1、Parking Brake
2. Rear View Video Camera
3.Electrical Connections Overal Diagram
2A
Parking Brake Lead
Green Wire
Brake Light
Car Frame
Battery
Note : For Safety purpose,professional installation for the following connections is
recommended.
Note : For Safety purpose,professional installation for the following connections is
recommended.
P
R
N
D
2
L
P
R
N
D
2
L
Reverse Driving Light
Car Frame
Battery
Pink Wire
Gearbox
Car Frame
Rear View Video Camera Lead
Parking Brake Switch Parking Brake Switch
Device connection and Installation
Device connection and Installation
Page 10
5
Notes of installation
1) Before installation, please make sure proper connections are conducted and
the unit operates normally. Please refer to <Electrical Connections overall
diagram> and improper connection may result in damage to the unit.
2) Use only accessories designed and manufactured for this unit and other
unauthorized accessories may result in damage to the unit.
3) Before installation, please fasten all power cables.
4) DO NOT install the unit in the place where close to hot area to prevent damage
to electrical components such as the laser head.
5) Install
the unit horizontally. Install the unit more than 30 degree vertically may
result in worse performance.
6) To prevent electric spark, connect the positive pole first and then the negative pole.
7) DO NOT block the cooling fan exit to ensure sufficient heating dissipation of
this unit, or it may result in damage to this unit.
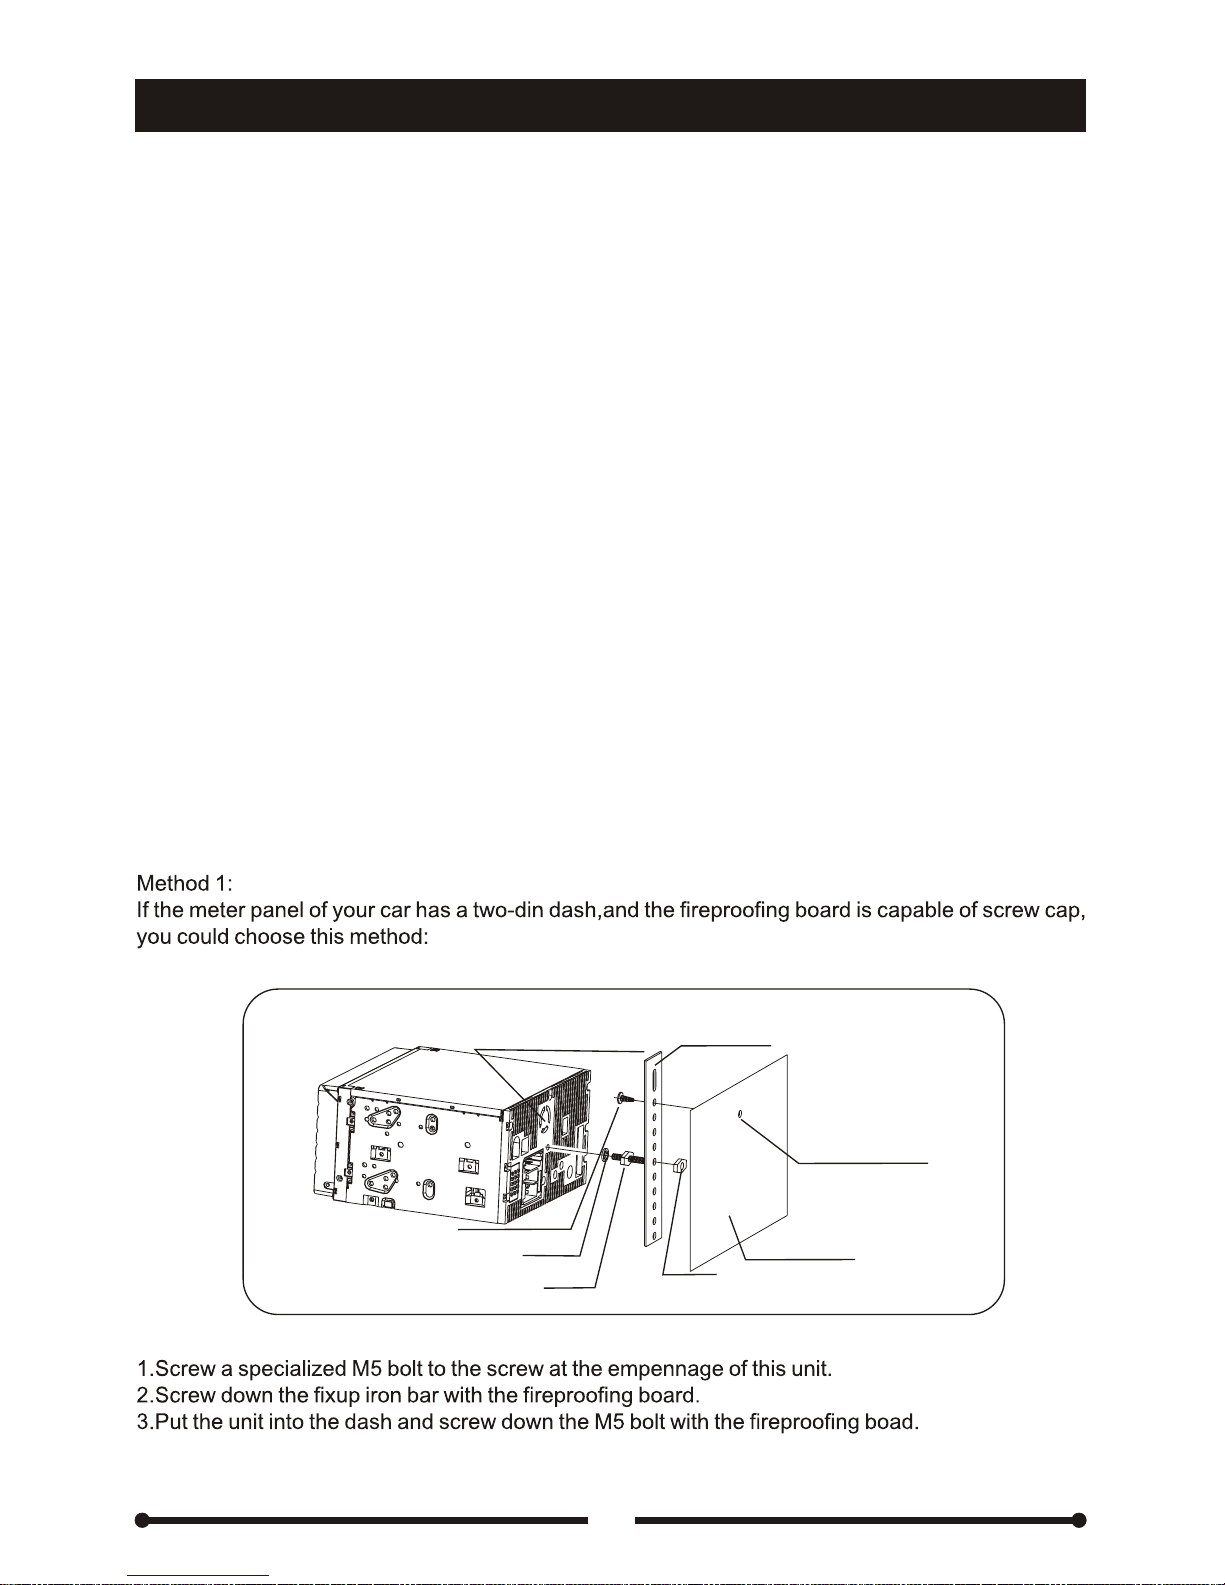
Notes of installation
Installation procedure
Installation procedure
Device connection and Installation
Device connection and Installation
Fan Cover
Do not Cover with installation
Gasket
M5.0Bolt
Nut
Fire proofing screw
Fire proofing board
Fixup iron bar
PT5x19
Page 11
Device connection and Installation
Device connection and Installation
6
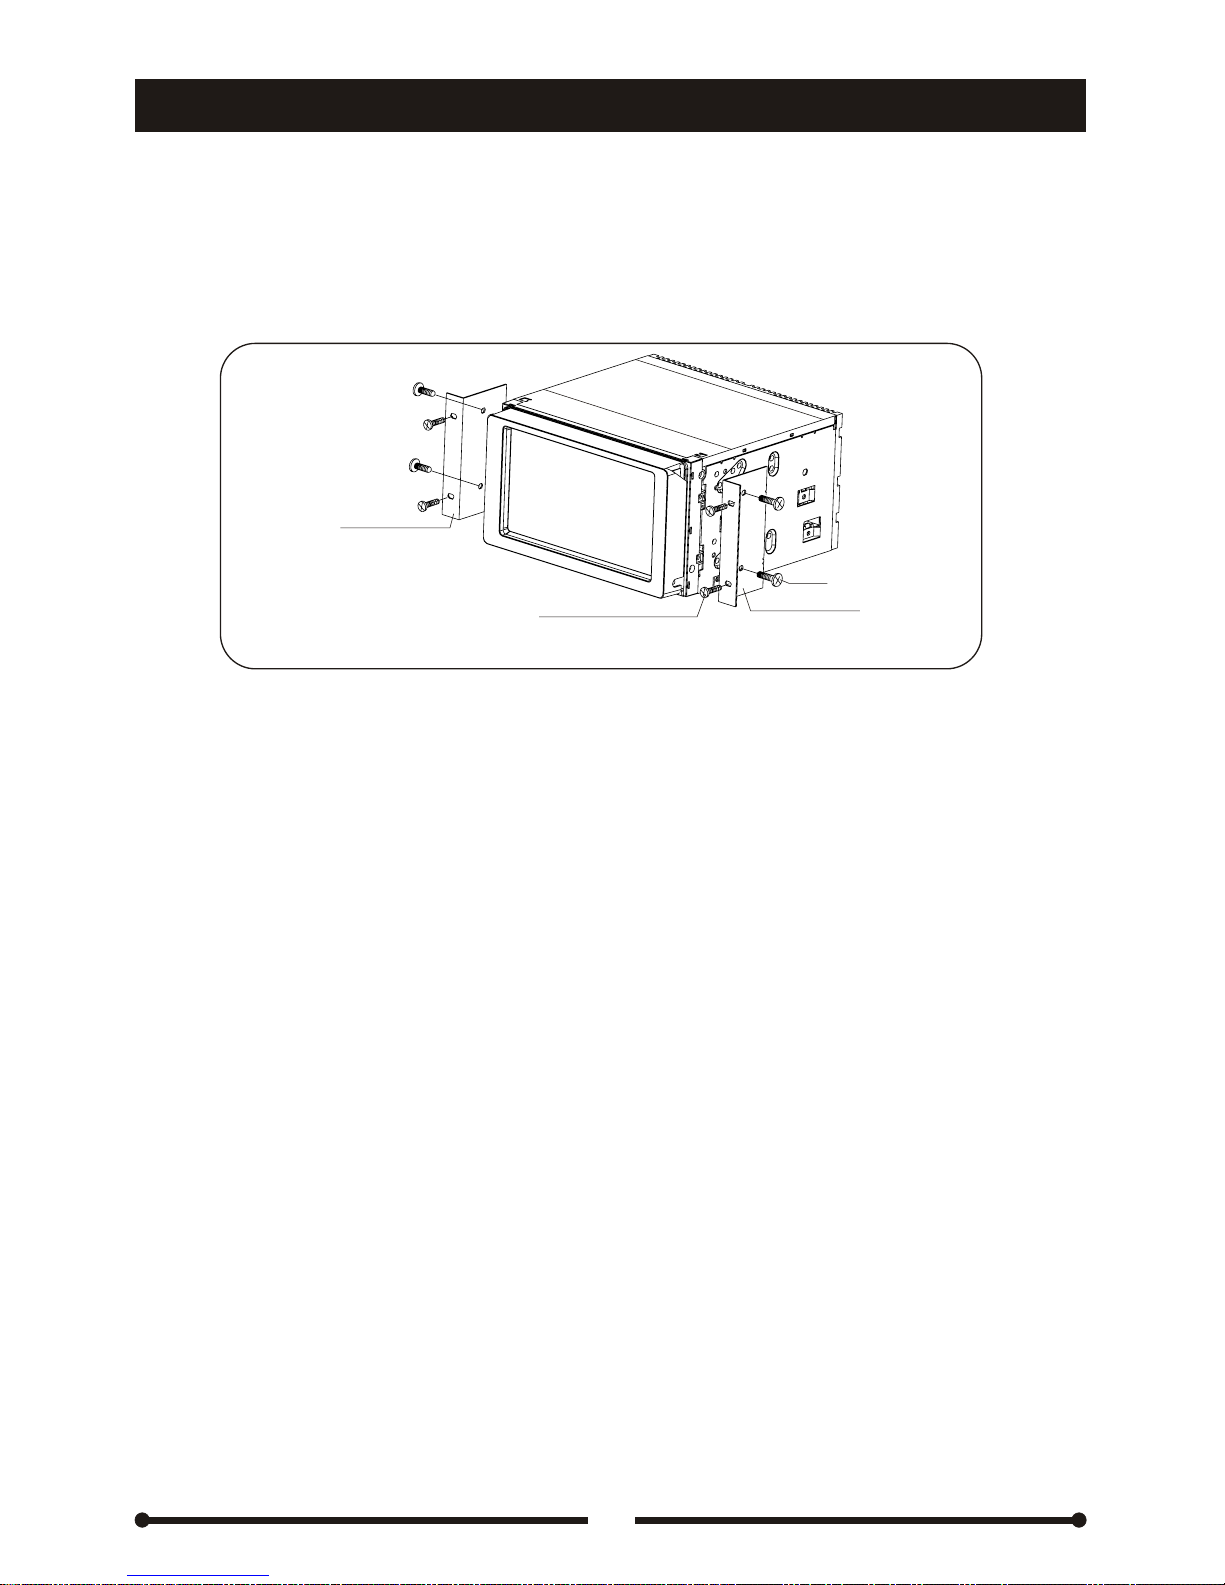
Method 2:
Different car matches to different bracket, please buy a suitable
bracket to your car accordingly.
1.Choose a perfect position according to the depth of the dash; install two brackets
(for Left and Right side respectively.) to the unit, using 4pcs of M5X6 screw to
screw down the
bracket with the unit.
2.Put the unit into the dash and screw down the bracket to the meter panel with
suitable screw.
Left bracket
(Additional buy)
M5×6
Right bracket
(Additional buy)
Screw Additional buy
according to your car type.
Page 12

Before using
Before using
Front panel
Front panel
Main functions of each key are listed as follows:
Main functions of each key are listed as follows:
7
1.[ /MUTE] Key
2.[SEL/■LOC/DX] Key
3. [VOL +] Key
4. [VOL-] Key
5.[TUNER] Key
/AF function
6. [ ] Key
- Power / Mute
- Audio Control /
Local / Distance Search
- Volume up
- Volume down
-
Radio source/
Radio bands switch
- Next / Auto searching /
Move cursor right
7.[ ] Key
/PTY function
8.[ ] Key
- Fast forward/ Fast
reverse/Move cursor up
- Previous / Auto
searching/Move cursor left
9. [■AME∕ENTER∕SCAN] Key
-
Play/ Pause/ Scan playing/ Enter
10. [ ] Key
/TA function
11. [MENU/SRC] Key
12. [NAVI] Key Enter navigation mode
13. [DISP]Key
- Slow forward/ Slow
reverse/Move cursor down
- Enter the sources menu
-
- Information display
14. [CH+] Key
15. [CH-] Key
16. [SD] Key
17. [DVD/■2-6CH]Key
- Increase the monitor angle
-Decrease the monitor angle
- SD card mode
- DVD mode
18. [OPEN]Key
- Open/Close the monitor
19. [ ] Key- Eject the disc inside
20.Disc Slot
21.Disc Indicator
22.SD Card Slot
Remote control receiving area
11
12
13
14
15
16
17
1
8
2
3
4
5
6
9
10
7
18
RESET Key
19
20
21
22
■AF
■PTY
■TA
NAVI
Page 13
Before using
Before using
8
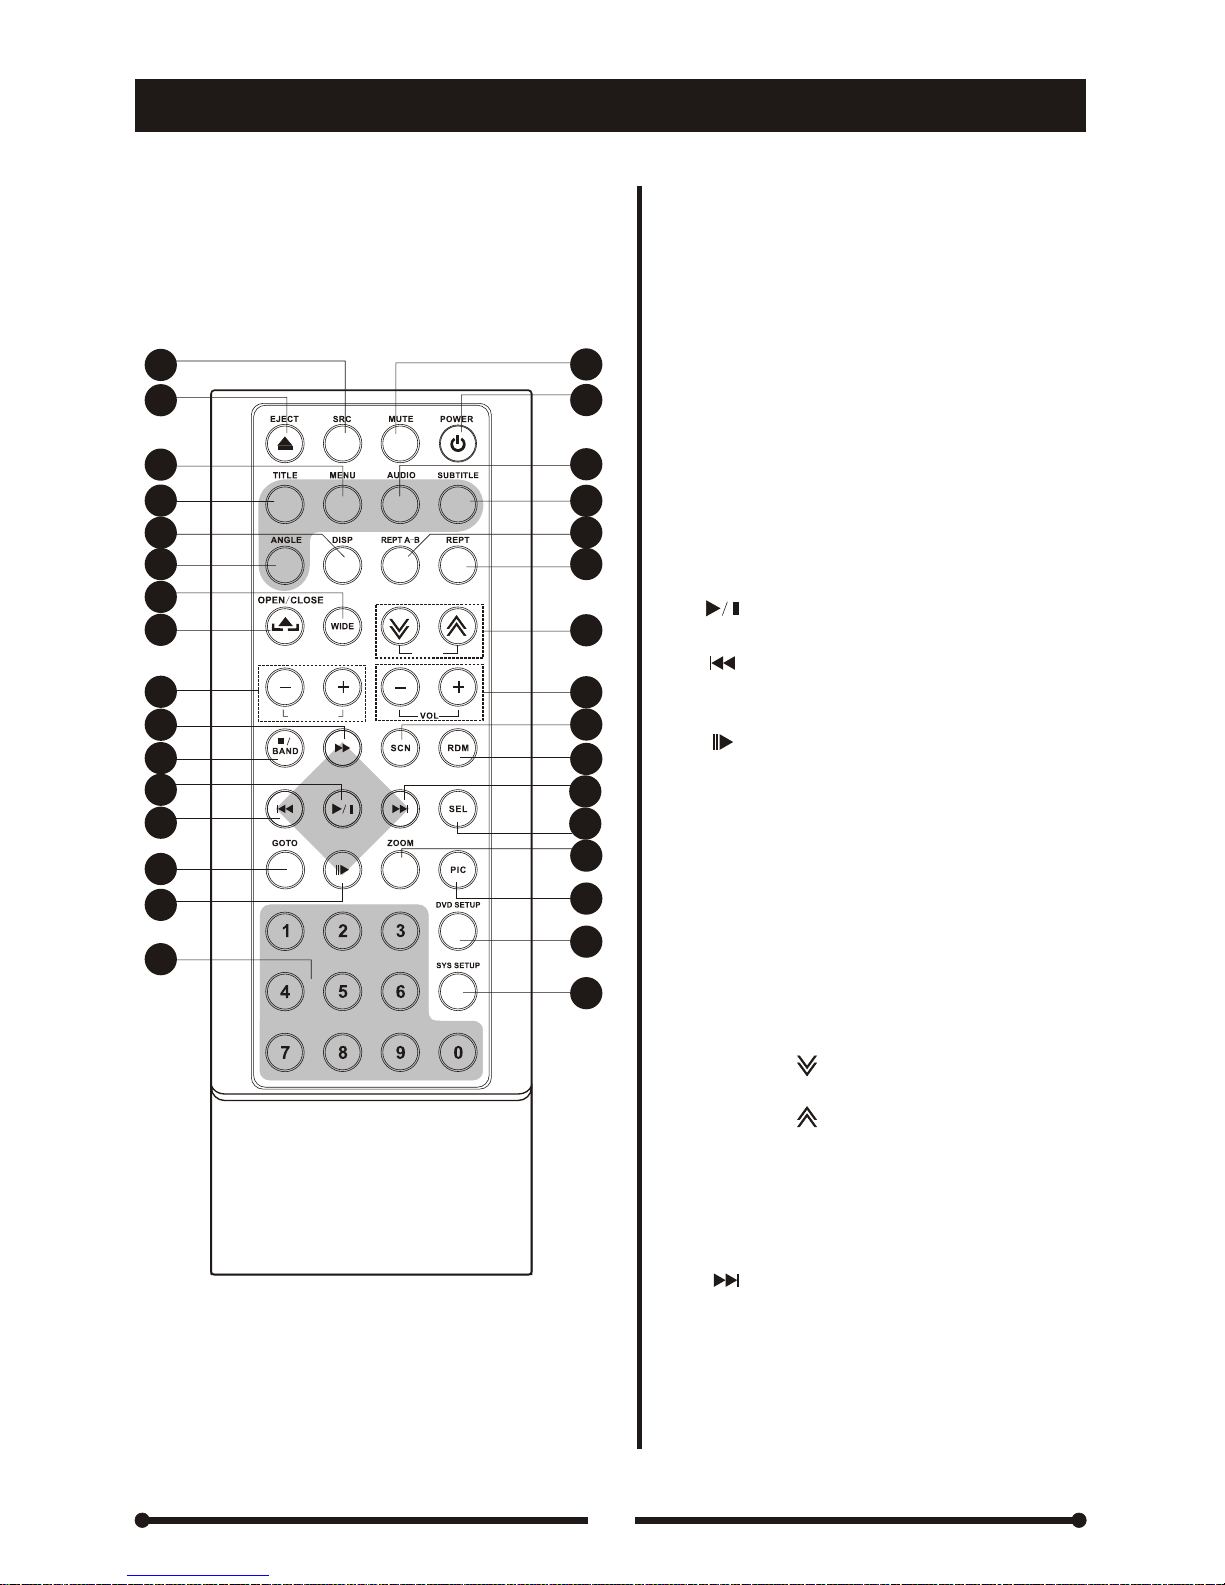
1.[SRC] key- Front source select
2.[EJECT] key- Disc in /out
3.[MENU] key- DVD menu / VCD PBC
4.[TITLE] key- DVD title
5.[DISP] key- Display Information
6.[ANGLE] key- Vie w angles switch
7.[WIDE] key- Display modes switch
8.[OPEN/CLOSE] key- Open/
Close the monitor
9.[NAVI ZOOM+/-] key- Navigation map
zoom in/out
10.[►►] key- Fast forward/ Fast reverse/
Move cursor up
11.[■/BAND] key- Stop playback /
Radio bands switch
12.[ ] key- Play/ Pause/
Scan playing/ Enter
13.[ ] key- Previous/ Auto searching/
Move cursor left
14.[GOTO] key- GOTO search
15.[ ] key-
Slow forward/ Slow reverse/
Move cursor down
16.[0~9] key- Numeric Keys
17.[MUTE] key- Audio mute
18.[POWER]key- Power on/ off
19.[AUDIO] key- DVD dialogue
languages switch
20.[SUBTITLE] key- DVD subtitle
languages switch
21.[REPT A-B] key- A-B segment
repeat mode
22.[REPT] key- Repeat modes switch
23.[ANGLE/
] key- Decrease the
monitor angle
[ANGLE/ ] key- Increase the
monitor angle
24.[VOL/+] key- Volume up
[VOL/-] key- Volume down
25.[SCN] key- Scan playback
26.[RDM] key- Random playback
27.[ ] key- Next / Auto searching/
Move cursor right
28.[SEL] key-
Audio control
29.[ZOOM] key- Image zoom in
30.[PIC] key- Image setting
31.[DVD SETUP] key- Enter DVD setup
32.[SYS SETUP] key- Enter system setup
■Remote Controller for Front Zone
Remote Controller for Front Zone
Remote Controller
Remote Controller
1
2
3
4
5
6
7
8
9
10
11
12
13
14
15
16
17
18
19
20
21
22
23
24
25
26
27
28
29
30
31
32
ANGLE
NAVI ZOOM
Page 14
Before using
Before using
9
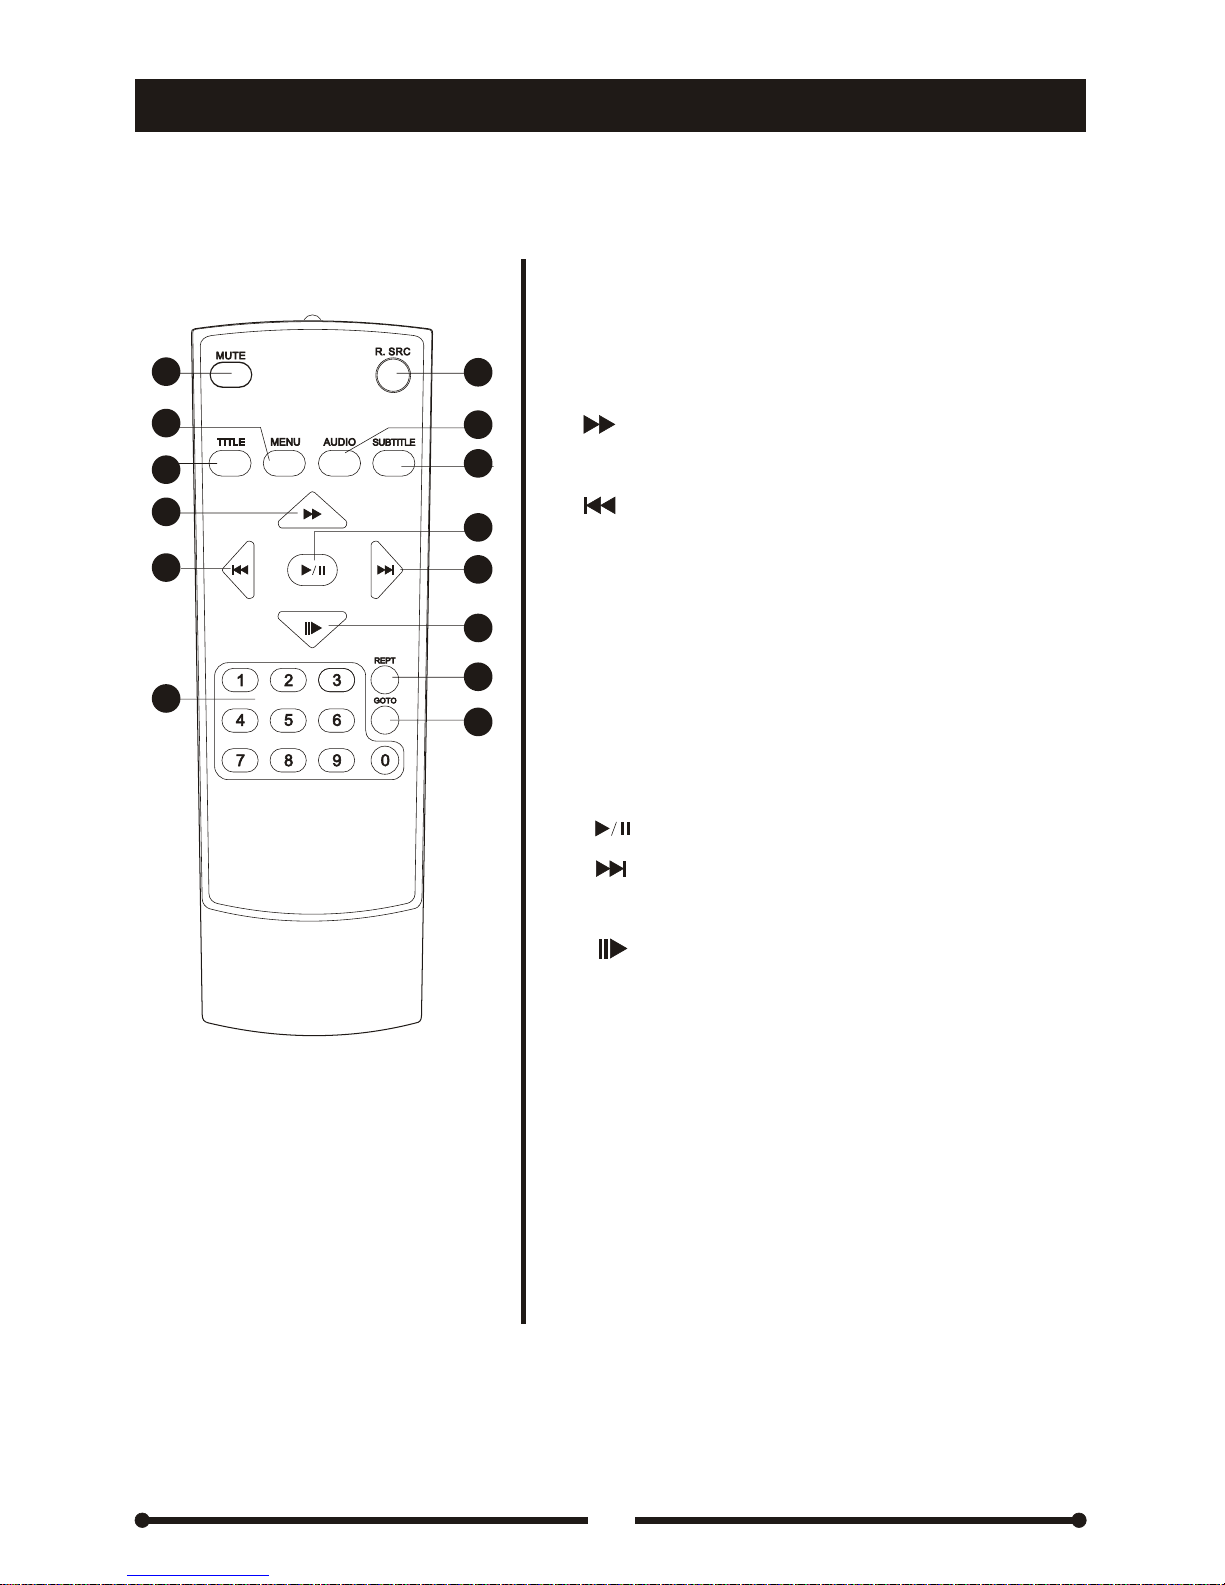
1
2
3
4
5
6
14
13
12
11
10
9
8
7
1.[MUTE] key- Audio mute
2.[MENU] key- DVD menu / VCD PBC
3.[TITLE] key- DVD title
4.[ ] key- Fast forward/ Fast reverse/
Move cursor up
5.[ ] key- Previous/ Auto searching/
Move cursor left
6.[0~9] key- Numeric Keys
7.[R.SRC] key- Rear playing sources switch
8.[AUDIO] key- DVD
dialogue
languages switch
9.[SUBTITLE] key- DVD subtitle
languages switch
10.[ ] key- Play/ Pause/ Scan playing/ Enter
11.[ ] key- Next / Auto searching/
Move cursor right
12.[ ] key- Slow forward/ Slow reverse/
Move cursor down
13.[REPT] key- Repeat modes switch
14.[GOTO] key- GOTO search
■Remote Controller for Rear Zone
Remote Controller for Rear Zone
Page 15
Before using
Before using
10
■ Notes of remote control using
Aim the remote controller directly at he remote sensor on the unit.
Remove the battery from the remote control or insert a battery insulator
if the battery has not been used for a month or longer.
Do not store the remote control under direct sunlight or in high
temperature environment, the controller may not function properly.
The battery can work for 6 months under normal condition. If the remote
controller can't work, please change the battery.
Use“button shaped” lithium battery“CR2025”(3V) only.
Do not recharge, disassemble, heat or expose the battery in fire.
Insert the battery in proper direction according to the (+) and (-) poles.
Store the battery in a place where children cannot reach to avoid risk of
accident.
Notes of remote control using
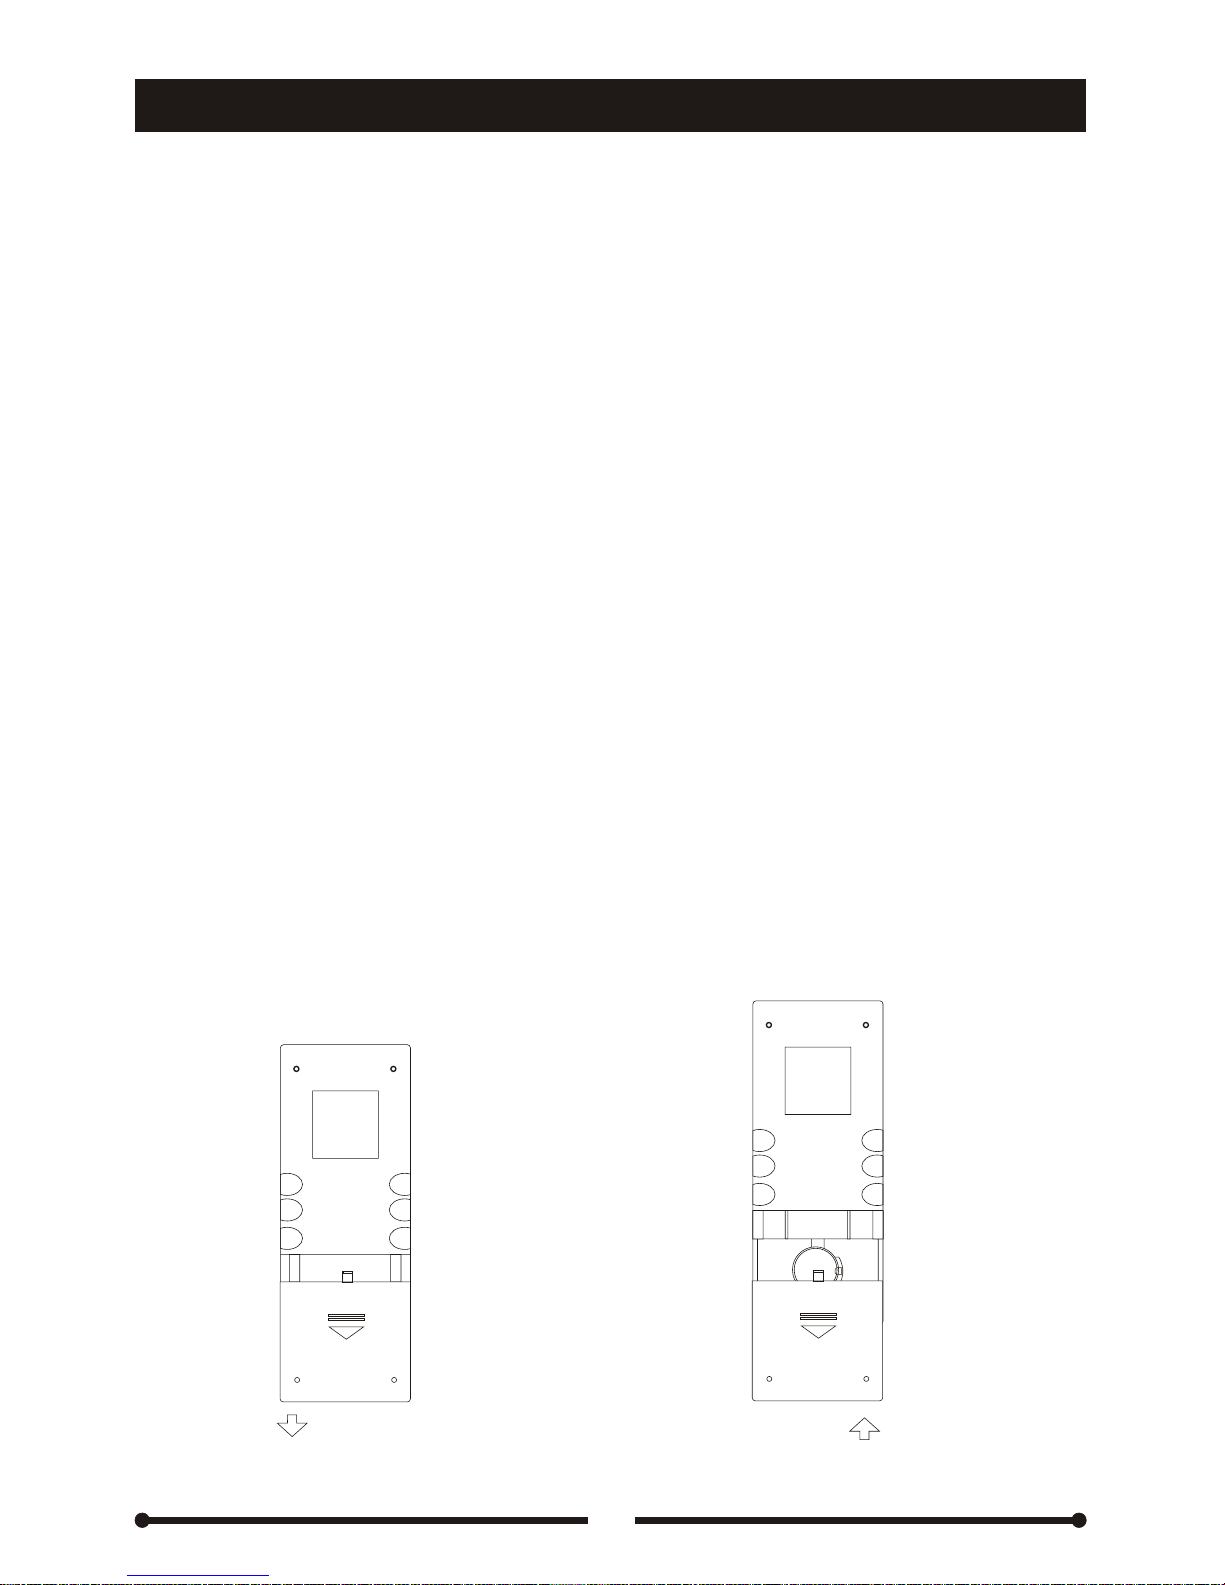
■ Uninstall Battery ■Install Battery
Slide out the battery Use only “button shaped” lithium
compartment tray at the bottom on battery “CR2025 (3V)”, insert the
the back of the remote control. battery to the battery tray in
proper direction according to the
(+) and (-)poles.
Uninstall Battery Install Battery
PULL OUT PUSH IN
+
Page 16
Basic operations
Basic operations
11
Reset the unit
Operating the unit for the first time or after replacing the car battery or
the unit working abnormally, you should reset the unit.
Press the [RESET] key on the front panel to restore the unit to the
original factory settings.
Power on / off
Power on
Press the [ / MUTE] key on the front panel or the [ /POWER] key on
the remote controller.
Power off
Press and hold the [ / MUTE] key on the front panel or press the
[ /POWER] key on the remote controller briefly.
Reset the unit
Power on / off
Power on
Power off
Note:
After the unit is off, the volume level and radio current settings will be
memorized, and when the unit is on, it will resume the stored status you have set.
Volume Adjustment
Press the [VOL/+] or [VOL/-] key on the remote controller or the front panel.
Mute
When the unit is on, press the [ / MUTE] key on front panel or [MUTE] key on the
remote controller to close audio outputs. Press it again or adjust volume to resume
the volume.
Playing sources switching
Method 1:
Press the [SRC] key repeatedly on the remote controller to switch to the source
you desired.
Method 2:
Enter the sources menu by pressing the [MENU] key on the front panel or touching
the left top corner of the screen, and then touch the proper icon.
Volume Adjustment
Mute
Playing sources switching
Page 17
12
Basic operations
Basic operations
Open / Close the Monitor
Press the [OPEN] key on the front panel or the [ ] key on the remote controller.
Adjust the monitor angle
Press and hold the [CH+] / [CH-] key on front panel or press the [ANGLE ] /
[ANGLE ] key on the remote controller.
Display modes switching
Press the [WIDE] key on the remote controller to switch the display modes between
CINEMA, NORMAL and STANDBY.
Open / Close the Monitor
Adjust the monitor angle
Display modes switching
Image setting
Video format
The video output format for each source is listed as below:
Image setting
Video format
Source
Source
Video format
Video format
TUNER
DVD
NAVI
SD
AUX IN
CAMERA
TV
RGB mode
CVBS mode
Adjustable Parameters
In RGB mode, only BRIGHT is adjustable.
In CVBS mode, PICTURE, COLOR, CONTRAST, BRIGHT and TINT are adjustable.
Adjustable Parameters
Page 18
Parameter adjustment procedure
①Enter image setting mode
Press the [PIC] key on the remote controller.
②Select one setting item
Press the [ ]/ [ ] key on the front panel or the [ ]/ [ ] key on the remote controller.
③Adjust the value
Press the [ ]/ [ ] key on the front panel or the [ ]/ [ ] key on the remote controller.
④Exit image setting mode
Repeat the operation of the first step or stop operating for some seconds.
Audio setting
Audio control allows you to easily adjust the audio system to meet the in-car
acoustic characteristics that vary depending on the type of car and its measurement.
Parameter adjustment procedure
①Enter audio setting mode
Press and hold the [SEL/LOC/DX] key on the front panel or press the [SEL] key
on the remote controller.
②Select one setting item
Press the [ ]/ [ ] key on the front panel or
the [ ]/ [ ] key on the remote
controller.
③Adjust the value
Press the [ ]/ [ ] key on the front panel or the [ ]/ [ ] key on the remote
controller.
④Exit audio setting mode
Repeat the operation of the first step or stop operating for some seconds.
Parameter adjustment procedure
Parameter adjustment procedure
Audio setting
Basic operations
Basic operations
13
①EQ modes: User →Flat →Jazz →Pop →Classic →Rock→Vocal→User.
②Different EQ reflects in different Bass level and Treble level, the Bass and
Treble level could be adjusted only in User mode.
③ If turning off the ACC power, all settings will become as that they have
set
in the plant.
Note:
Page 19

14
Advance functions
Advance functions
TFT monitor auto open
①If 'TFT Auto Open' is set to 'On', the monitor will go to its last position after the unit is power on.
②If 'TFT Auto Open' is 'Off', the monitor will be unfurled by pressing the [OPEN] key on the
front panel or the [ ]
key on the remote controller after the unit is power on.
TFT monitor auto open
Auto brightness control
To avoid the display being too bright at night time, if the cable for headlight is
connected to ILLUMI (for more details, please refer to < Electrical Connections
Overall Diagram >), turning on the headlight dim the backlight of TFT and vice versa.
Line mute
If the MUTE is connected, other audio outputs are closed when a call is received
by the car phone (for more details, please refer to < Electrical Connections Overall
Diagram >).
When parking brake applied
①If 'PRK SW' cable is connected to hand brake switch, the video display of the
TFT monitor will be controlled by driving status, system setup and input video
sources.
②When 'Parking' is set to 'Off' or the car is parking or the input video source is
CAMERA, the video display of the TFT monitor will be normal.
③When 'Parking' is set to 'On' and the car is moving ahead, the following warning
screen will be displayed to prevent the driver watching images. The passengers
at the rear seats can watch normally.
When Reverse Driving
If the rear view video camera is connected, the unit automatically switches to
CAMERA source during reverse driving. The unit returns to the original work mode
after the reverse driving is done.
Mechanism overloaded protection
During the TFT movement, once the monitor is overloaded by blocking or unclear
moving path, the unit will automatically protect the mechanism.
Auto brightness control
Line mute
When parking brake applied
When Reverse Driving
Mechanism overloaded protection
Note:
Please refer to the 'TFT Auto Open' option of the General Setup.
ATTENTION:
DO NOT USE THIS FUNCTION
WHILE DRIVING!
Page 20

15
Radio mode
Radio mode
Mode selecting
Press the [TUNER] key on the front panel to switch to RADIO mode directly, or
press the [SRC] key on the remote controller repeatedly to switch to RADIO mode,
or touch the left top corner of the screen to open the sources menu and then touch
the [RADIO] button.
User Interface (UI) of Radio mode
When the unit switches to the RADIO mode, the following user interface will be
displayed:
① Source name, touch to open main source menu
② Band name
③ Preset radio station NO.
④ Current radio frequency
⑤ Clock
⑥ Radio function indicators
⑦ Rear Zone, touch to enter rear zone source menu
⑧ Preset
radio stations
⑨ Radio function keys
Mode selecting
User Interface (UI) of Radio mode
○○ ○○○○
Multi-Zone
TUNER
FM-3 P3 88.8MHz
08:08
ST
LOC AF TA TP PTY
P1
87.5MHz
P4
89.9MHz
P2
88.6MHz
P5
96.9MHz
P3
88.8MHz
P6
99.9MHz
BAND
AS
①②③④ ⑤
⑥
⑦
⑧
⑨
FM-3 88.8MHz
○○
ST LOC
P1
87.5MHz
P4
89.9MHz
P2
88.6MHz
P5
96.9MHz
P3
88.8MHz
P6
99.9MHz
②④
⑥
⑧
When multi-zone is on and the source of the rear zone is DVD mode or SD
mode, the radio UI will be shown as the right picture.
Note:
Page 21

Radio mode
Radio mode
16
Radio band selection
Press the [TUNER] key on the front panel or the [■/BAND] key on the remote
controller, or touch the [BAND] key on the UI to switch the radio band among
FM1, FM2, FM3, AM1, AM2.
Radio band selection
Note:
The frequency ranges of FM and AM are different according to the radio
systems. As the unit provides different radio systems, you can choose proper
one accordingly. For more detail, please refer to 'Radio' option of the General
Setup.
Automatic tuning
Press and hold the [ ]/ [ ] key on the front panel or the [ ]/ [ ] key on the remote
controller, or touch the [ ]/ [ ] key on the UI, the automatic tuning will start.
When one
radio station with strong signal has been received, the unit will stop
tuning and play the station. Press and hold the 1~6 preset buttons to store the
station found.
Automatic tuning
To stop automatic tuning, press it again or any radio-function key.
Note:
Manual tuning
Press the [ ]/ [ ] key on the front panel or the [ ]/ [ ] key on the remote
controller repeatedly, or touch the [ ]/ [ ] key repeatedly on the UI to tune in one
station upward or
downward step by step. Press and hold the 1~6 preset buttons
to store the station found.
Manual tuning
Page 22

Radio mode
Radio mode
17
Auto memory store (AMS) function
Auto search these radio stations with strongest radio signal in the whole radio
band and auto store those stations to the 1~6 preset stations.
Press and hold the [ENTER] key on the front panel or the [ ] key on the remote
controller, or touch the [AS] key on
the UI to start AMS function.
Press the 1~6 numeric keys on the front panel or touch the 1~6 preset stations on
the UI to recall the preset radio stations.
Auto memory store (AMS) function
①To stop AMS, press any radio-function key.
②Auto store one radio station to the preset station will overwrite the previous
preset radio station.
Note:
Scan preset stations
Press the [ENTER] key on the front panel or the [ ] on the remote controller to
scan all preset stations in the memory of the current band and play each station
for 10 seconds.
To stop scanning, press any radio-function key.
Scan preset stations
Local radio station seeking (LOC)
When LOCAL seeking is on, only the station with strong signal can be received
and played.
Press and hold the [SEL/■LOC/DX] key on the front panel or touch the [LOC] key
on the UI to turn the LOCAL function on.
To exit LOCAL mode, do the above operation again.
Local radio station seeking (LOC)
Note:
Page 23

Brief introduction of RDS
The unit provides basic functions of RDS, including PI (Program Identification),
station name displaying, RT (Radio Text), CT (Clock Time), AF (Alternative
Frequency), TA (Traffic Announcement) and PTY (Program Type) Selection.
Brief introduction of RDS
① RDS service is not available in AM broadcasting.
② RDS service depends on the FM broadcasting provider.
Note:
Search the PTY
PTY is the abbreviation for Program Type which is a code defining the type of
program being broadcast (eg News or Rock).
① Activate PTY search mode
Press and hold the [
▲] key on the front panel to activate PTY function.
② Select a PTY
Press the [
▲]/ [▼] key on the front panel or the [ ]/ [ ] key on the remote
controller repeatedly to select one PTY you desired.
③ Search for a PTY
Auto search a PTY
When a PTY is select (eg NEWS), auto search for next available
PTY by increasing
tuning frequency until the PTY of the next station matches the current. If no
matched PTY has been found, the tuner will return to the original radio station
and 'NONE' is displayed.
Search by category
Supposed the searching category for PTY
were 'SPEECH' and 'MUSIC', the
searching stops and starts to playback while either has been met.
PTY light
During PTY search, 'PTY' indicator is lits up and blinked.
④ Store a PTY
When you want to store the current PTY, you should press and hold the numeric
keys of 1~6 on the remote controller.
⑤ Searching the PTY quickly
When PTY is on, press the numeric keys of 1~6 on the remote controller to play
one preset station, then choose other station as needed.
■
■
■
Search the PTY
After the searching, no matter whether a PTY has been found, the unit will exit
the searching mode and PTY will be OFF if no operation in 5 seconds.
Note:
RDS operations
RDS operations
18
Page 24

⑥ Deactivate PTY function
To cancel this function, do the operation above again.
PTY alarm
PTY alarm function activates automatically during emergency announcement
broadcasting such as natural disaster announcement no matter what media source
you are playing.
If the unit receivers a radio alarm code, 'ALARM' will display and the unit switches
to receive the emergency announcement.
PTY alarm
RDS operations
RDS operations
Note:
① The unit returns to the original source after the emergency announcement
has been received.
②There is no button operation can stop the reception of emergency announcement.
TA function
The TA (Traffic Announcement flag) function lets you receive traffic announcements
automatically no matter what media source you are playing back. The TA function
can be activated for a TP station broadcasting traffic information.
① Activate TA function
Press and hold the [▼] key on the front panel to activate
TA function.
② Search traffic announcements under radio mode
Press the [◄]/ [►] key on the front panel or the [ ]/ [ ] key on the remote controller.
③ Receive traffic announcements under other modes
When TA is activated and a traffic announcement is received, the
current playing
source will be overridden by the traffic announcement if the current radio band
is FM and the 'TA' indicator lights up, indicating that the unit is waiting for traffic
announcements.
The unit returns to the original source after the traffic announcement
has been received.
④Cancel traffic announcements reception
Repeat the operation of step ①.
TA function
Note:
The unit will attempt to seek a TP station all the time when the current source is
not radio if 'TA' has been activated. Under this condition, if you switch the playing
source to radio, you will find the radio frequency may be different from the
frequency before the tuner was switched off.
19
Page 25

AF (Alternative Frequency lists) function
Lists of Alternative Frequencies are used for the same program service and used
in conjunction with the PI code (Program Identification code) to assist automatic
tuning. Using this information, a radio can automatically search out another station
that is playing the same material. This is useful when the station you are
listening
to is fading out.
To activate this function, press and hold the [TUNER/■AF] key on the front panel.
Region
When AF is activated and Region is set to 'On', auto tuning to those stations within
the region assigned.
When AF is activated and Region is set to 'Off', auto tuning to those stations without
any region boundary.
CT (Clock Time)
Some stations broadcast the time and date within the encoded RDS signal.
The clock time is automatically adjusted when 'CT' is set to 'On'.
RT (Radio Text)
When this function is activated, the unit will display short message data transmitted
from the provider, such as station information, the name of the current broadcasting
song and the artist name.
PI search
When RDS signal is lost for a long time, the unit will search a frequency matching
with the current station PI per 2 minutes automatically to switch to a station playing
the same program.
Setup of RDS
Touch the left top corner of the screen or press the [MENU/SRC] key on the front
panel to open the main MENU. Press the [SETUP] and then press [SYSTEM SETUP]
on the UI or press the [SYS SETUP] on the remote controller to open the SYSTEM
SETUP menu and then press
[RDS SETUP] option.
AF (Alternative Frequency lists) function
Region
CT (Clock Time)
RT (Radio Text)
PI search
Setup of RDS
RDS operations
RDS operations
20
Option
Selectable values
Selectable values
Function
Function
RDS
CT
Region
On/Off
On/Off
On/Off
Switching RDS function on or off.
Switching Region function on
or off.
Switching Clock Ti me function on
or off.
Page 26

DVD mode
DVD mode
21
Loading a disc
Turn the power on and insert the disc into the slot with the printed side facing
upward. The unit will enter DVD mode automatically.
Press the [ ] key on the front panel or the remote controller to eject the disc and
the unit will switch to radio mode
automatically.
Play/ Pause
It will take some seconds to load the disc. When the playback starts, press the
[ENTER] key on the front panel or the [ ] key on the remote controller to stop the
playback temporarily. To resume the playback, do the operation again.
Stop playback
During playback, press the [■/BAND] key on the remote controller, the playback
will stop and the current playback point will be memorized. To resume the playback,
press the [ENTER] key on the front panel or the [ ] key on the remote controller.
Press the [■/BAND] key
again to stop playback fully. If you start playback now,
the playback will start from the very beginning.
Fast Forward (FF) / Fast Reverse (FR)
Press the [ ] key on the front panel or the [ ] key on the remote controller
repeatedly to select the speed of FF or FR among X2, X4, X8 and X20. To resume
normal playback, press the [ENTER] key on the front panel or the
[ ] key on the
remote controller.
Slow Forward (SF) / Slow Reverse (SR)
Press the [ ] key on the front panel or the [ ] key on the remote controller
repeatedly to select the speed of SF or SR among X1/2, X1/4, X1/6 and X1/7. To
resume normal playback, press the [ENTER] key on the front panel or the
[ ] key
on the remote controller.
Loading a disc
Play/ Pause
Stop playback
Fast Forward (FF) / Fast Reverse (FR)
Slow Forward (SF) / Slow Reverse (SR)
Touch function under DVD mode
Touch function under DVD mode
A
B
C
D
E
F
A -Open front sources menu
B -Display playback information
C -Open rear sources menu
D -Play previous file
E -Play next file
F -Recall the following keys:
[ ][■] [ ] [ ] [ ] [ ]
Page 27

DVD mode
DVD mode
22
Playback the previous / next file
Press the [ ] / [ ] key on the front panel or the [ ] / [ ] key on the
remote controller to play the previous / next file.
Repeat playback
Press the [REPT] key on the remote controller repeatedly to select one repeat mode.
For DVD: Repeat Titl e→ Repeat Chapter→ Repeat Off
For VCD(PBC Off)/CD: Repeat Single → Repeat Off
For MP3: Repeat Single→ Repeat Folder→ Repeat Off
Repeat A-B function (for DVD/ VCD/CD)
During playback, the playback between point A and B is repeated when this
function is on.
Press the [REPT A-B] key on the remote controller to set the start point (A) and do
the operation again to set the end point (B) of the section you want to repeat.
Press the [REPT
A-B] key for the third time to cancel the A-B repeat function and
normal playback is resumed.
Random playback
During playback, press the [RDM] key on the remote controller to start random
playback.
To cancel this function, do the operation again.
Playback the previous / next file
Repeat playback
Repeat A B function (for DVD/ VCD/CD)
Random playback
-
PBC will be closed automatically when random playback is on.
Note:
Intro playback
You can play the first 10 seconds of each file .
Press the [SCN] key on the remote controller to start random playback.
To cancel this function, do the operation again.
GOTO search function (for DVD/VCD)
The unit can go to the track/ chapter or the time point you desired.
①Enter GOTO search mode
Press the [GOTO] key on the remote controller and the search menu will be displayed
on the screen. For VCD, press the [GOTO] key repeatedly to select the Track
Search or the Disc
Search.
Intro playback
GOTO search function (for DVD/VCD)
Search
Time --:--:-Title/Chapter ---/---
For DVD
For DVD
Track Search
Time --:--:-Title/Chapter ---/---
For VCD
For VCD
Disc Search
Time --:--:-Track ---/---
Page 28

DVD mode
DVD mode
23
②Select one type of search
Press the [ ] / [ ] key on the front panel or the [ ]/[ ] key on the remote
controller to select one search option among Time/ Tit le Chapter/ Tra ck.
③Execute the search
For time search
Press the numeric keys to enter the time you want to start playback from
(hh:mm:ss). For example, to enter time 01:28:53, press 0→1→2→8→5→3.
Press the [ENTER] key on the front panel or the [ ] key on the remote controller
to start
playback.
For Title/Chapter search
Press the numeric keys and the [ ] on the front panel or the [ ] key on the remote
controller to enter the title and chapter number you desired. For example, to search
th th
the 8 chapter of the 20 title, press 2→0→ / →8. Press the [ENTER] key on the
front panel or the [ ] key on the remote controller to start playback.
For Track search
th
Press the numeric keys to enter the track number. For example, to enter the 13
track, press 1→3. Press the [ENTER] key on the front panel or the [ ] key on the
remote controller to start playback.
④Exit GOTO search mode
To exit GOTO search
mode, press the [GOTO] key repeatedly until the search
menu disappeared.
Direct track selection (for CD/VCD)
During playback, press the numeric keys on the remote controller to go to the track
th
desired. For example, if you want to play the 15 track, press 1 and then 5.
Audio channel selection
For DVD
Press the [AUDIO] key repeatedly on the remote controller to change the dialogue
language.
For VCD/ CD
Press the [AUDIO] key repeatedly on the remote controller to select one audio
channel output mode among Left Channel, Right Channel and Stereo.
For time search
For Title/Chapter search
For Track search
For DVD
For VCD/ CD
Direct track selection (for CD/VCD)
Audio channel selection
Page 29

DVD mode
DVD mode
24
Alter between 2-ch and 6-ch
Press and hold the [DVD/■2-6CH] key on the remote controller to change audio
output mode between multi-channel and stereo.
Disc Menu (for DVD only)
Disc menu
①Press the [Menu] key on the remote controller to enter the disc menu.
②Press the [ ]/ [ ]/ [ ]/ [ ] key on the front panel or the [ ]/ [ ]/ [ ]/ [
] key
on the remote controller.
③Press the [ENTER] key on the front panel or the [ ] key on the remote controller
to start playback.
Title menu
①Press the [TITLE] key on the remote controller to enter the disc menu.
②Press the [ ]/ [ ]/ [ ]/ [ ] key on the front panel or the [ ]/ [ ]/ [ ]/ [
] key
on the remote controller.
③Press the [ENTER] key on the front panel or the [ ] key on the remote controller
to start playback.
PBC (Playback Control) function (for VCD only)
If you insert a VCD disc with PBC function, playback starts from the first
track automatically.
①Press the [MENU] key on the remote controller to activate PBC menu.
②If the menu consist a list of tracks, you can select a desired one by pressing the
numeric keys on the remote
controller or the [ ]/ [ ]/ [ ]/ [ ] key on the front
panel or the [ ]/ [ ]/ [ ]/ [ ] key on the remote controller and then pressing the
[ENTER]
key on the front panel or the [ ] key on the remote controller to start
playback.
③Press the [■/BAND] key on the remote controller to return to the menu.
④To deactivate PBC function, press the [MENU] key again.
Alter between 2-ch and 6-ch
Disc Menu (for DVD only)
PBC (Playback Control) function (for VCD only)
Disc menu
Title menu
Note:
①When PBC function is activated, fast playback, slow playback, and previous
/ next track are available. Repeat playback and direct track selection are invalid.
②When PBC function is activated, if random playback or intro playback is
executed, PBC function is deactivated automatically.
Page 30

DVD mode
DVD mode
25
Subtitle language selection (for DVD only)
Press the [SUBTITLE] key on the remote controller to change the subtitle language
among the languages supported by the DVD disc.
View angle selection
Press the [ANGLE] key repeatedly on the remote controller to play back images in
different camera angles. If the disc does not support multi-angle playback, this
function will not work.
Zoom
During playback, press the [ZOOM] key on the remote controller to zoom in images.
Images will be enlarged accordingly: X1→ X2→ X3→ X4(DVD only)→off.
Playback information
During playback, press the [DISP] key on the front panel or the remote controller,
the playback information will be displayed on the screen.
For DVD disc
Playback information
Subtitle language selection (for DVD only)
View angle selection
Zoom
Playback information
For DVD disc
① Disc format
th
② This DVD has 8 titles and the title playing back now is the 5 title.
③ The current title has 16 chapters and the chapter playing back now is the
second chapter.
④ Elapsed time
⑤The subtitle of this DVD has been recorded in 6 languages and the language
displayed now is the second, which is English.
Playback status
①Front source is DVD mode
②Rear source is AUX IN
③Decode method
④No Pro Logic is being used
1
2 3 4
DVD T: 5/8 C: 2/16 00:41:28 .... 2/6 Eng
5
1
2 3 4
Front:DVD Rear: AUX IN Dolby Digital By Pass
Page 31

DVD mode
DVD mode
26
For VCD disc
Playback information
For VCD disc
①Disc format
th
②This VCD has 18 tracks and the track playing back now is the 6 title
③Elapsed time
Playback status under 6-channel mode
①Front source is DVD mode
②Rear source is AUX IN
③Decode method
④Surround mode is Pro Logic II Music
Playback status under 2-channel mode
①Front source is DVD mode
②
Rear source is AUX IN mode
③The current EQ is FLAT
④The current LOUD level is 1.
1
2 3
VCD2.0 T:6/ 18 00: 08:18
1
2 3 4
Front:DVD Rear:AUX IN MPEG PLⅡ Music
1
2
3 4
Front:DVD Rear:AUX IN EQ:FLAT LOUD: Level 1
Page 32

DVD mode
DVD mode
27
MP3 / WMA file playback
When playing back an MP3 or WMA disc, the unit plays back a file according to the
sequence as follows: Root directory → Folder → File.
Search a file
If the current playing file is ♫ (Random and Repeat Single are closed)……
⑵
MP3 / WMA file playback
Search a file
Operation
Key
Key
Key
[6]
Result:♫⑵
♫⑵→ ♫⑴
♫⑴→ ♫⑵
♫⑵→ ♫⑹
Select one play mode
Press the [RDM] and [REPT] keys on the remote controller to select one play
mode according to the following table.
Select one play mode
Normal
Pausing after playing back all files in the disc
Repeat Single
Play back a file repeatedly
Folder Repeat
Play back all files in the current folder repeatedly
Play back all files in the current folder randomly
Playing Modes
Results
Random
Select other folders or files to play back
①Press [ ]/ [ ] key on the remote controller to change the folder.
②Press [ ]/ [ ] key on the remote controller or numeric keys to select the file you
want. You can
play back a file by pressing numeric keys of the remote controller
or touching the file directly also.
Select other folders or files to play back
For more details about MP3, please refer to 'About Mp3 files'.
Note:
Page 33

28
SD card mode
SD card mode
Mode selecting
Press the [SD] key on the front panel to switch to SD card mode directly, or press
the [SRC] key on the remote controller repeatedly to switch to SD card mode, or
touch the left top corner of the screen to open the sources menu and then touch
the [SD] button.
User Interface (UI) of SD card mode
Mode selecting
User Interface (UI) of SD card mode
① Source name, touch to open main source menu
②
③
E
④
⑤
⑥
⑦
⑧ . '
⑨
⑩
⑪
Current file / total files
lapsed time
Clock
File folder name
File format
Repeat mode key. It’s a touch key
Random mode key It s a touch key
File list
ID3 tag information
Play control keys
During playback, press the [ENTER] key on the front panel or the [
] key on the
remote controller to stop the playback temporarily. To resume the playback, do the
operation again.
Play/ Pause
Play/ Pause
SD
18/88 00:08:08
Favorite
Repeat Random
18 Endless horizon
20 From now on
21 Moon River
22 Close to you
♫
♫
♫
♫
19 ♫ With an orchid
18 ♫ Endless horizon
19 ♫ With an orchid
20 ♫ From now on
21 ♫ Moon River
22 ♫ Close to you
Artist:YAN I
PAGE-
PAG E+
DIR- DIR+
08:08
MP3
23 Love is all around
24 My heart will go on
25 Night and day
26 Moon River
27 Right here waiting
♫
♫
♫
♫
♫
①
②③④
⑤
⑥
⑦
⑧
⑨
⑩
⑪
Page 34

SD card mode
SD card mode
29
Stop playback
During playback, press the [■/BAND] key on the remote controller, the playback
will stop and the current playback point will be memorized. To resume the playback,
press the [ENTER] key on the front panel or the [ ] key on the remote controller.
Press the [■/BAND] key
again to stop playback fully. If you start playback now, the
playback will start from the very beginning.
Playback the previous / next file
Press the [ ] / [ ] key on the front panel or the [ ] / [ ] key on the remote
controller to play the previous / next file.
Repeat Playback
Press the [REPT] key repeatedly on the remote controller or touch the [Repeat]
key on the UI repeatedly to change repeat mode among Repeat single, Folder
repeat, Repeat Off.
Random Playback
During playback, press the [RDM] key on the remote controller or touch the
[Random] key on the UI to start random playback.
To cancel this function, do the operation again.
Direct track selection (for CD/VCD)
During playback, press the numeric keys on the remote controller to go to the file
th
desired. For example, if you want to play the 15 file, press 1 and then 5.
You can play back one file by pressing the file in the list directly.
Audio channel selection
Press the [AUDIO] key repeatedly on the remote controller to select one audio
channel output mode among Left Channel, Right Channel and Stereo.
Alter between 2-ch and 6-ch
Press and hold the [DVD/■2-6ch] key on the remote controller to alter audio
output between 2-channel and 6-channel.
Change page
Press the [PAGE+]/ [PAGE-]key on the UI to switch to the previous/next page.
Change direction
Press the [DIR+]/ [DIR-] key on the UI to change direction.
Stop playback
Playback the previous / next file
Repeat Playback
Random Playback
Direct track selection (for CD/VCD)
Audio channel selection
Alter between 2-ch and 6-ch
Change page
Change direction
Page 35

30
System setup
System setup
In any mode, touch the left top corner of the screen or press the [MENU/SRC] key
on the front panel to open the main MENU. Press the [SETUP] and then press
[SYSTEM SETUP] on the UI or press the [SYS SETUP] on the remote controller
to open the SYSTEM SETUP menu.
SYSTEM
SETUP includes ASP CONFIG, GENERAL SETUP and SCREEN CAL.
Parameter adjustment procedures
①Select one option
Press the [◁]/ [▷] key on the front panel or the [ ]/ [ ] key on the remote
controller and then press the [ENTER] key on the front panel or the [ ]key on
the remote controller to confirm or touch the desired option.
②Adjust the value
Press the [ ]/ [ ] key on the front panel or the [ ]/ [ ] key on the
remote controller.
③Save the change
Press
the [ENTER] key on the front panel or the [ ] key on the remote controller
to confirm.
ASP CONFIG
Parameter adjustment procedures
ASP CONFIG
Option
Selectable values
Selectable values
Function
Function
Bass Center
Frequency
Treble Center
Frequency
SUB.W Filter
SUB.W Phase
Bass Q-Factor
60Hz/ 80Hz/ 100Hz/
130Hz/ 150Hz/ 200 Hz
10KHz/12.5KHz/
15KHz/ 17KHz
80Hz/120Hz/160Hz
0D/ 180D
1.0/ 1.25/ 1.5/ 2.0
According to audio source discs,
select the Bass center frequency
to get the best Bass effect.
Set a cut-off frequency of the
subwoofer's L.P.F (low pass filter).
Set
an output phase of the
subwoofer's L.P.F (low pass filter).
Change the sharpness of the
Bass output.
The larger the Q-Factor,
the sharper the Bass.
According to audio source discs,
select the Treble center frequency
to get the best Treble effect.
Note:
Note:
All adjustments can be done by touch screen function also.
All adjustments can be done by touch screen function also.
Page 36

System setup
System setup
31
GENERAL SETUP
GENERAL SETUP
Set the clock.
Option
Selectable values
Selectable values
Function
Function
Radio
Clock Mode
Clock Mode
Parking
TV System
TV System
TFT Auto Open
TFT Auto Open
OSD
Clock
USA/S-Amer1/Arabia/China/
S-Amer2/Europe/Korea
12Hr/24Hr
On/ Off
Auto/PAL/NTSC
On/Off
English
Select one radio system according
to your country.
Select one clock mode to display
the clock.
On: Image is played only when the
car has been parked.
Off: Image is displayed all the time.
Auto: The color system of the monitor
is switched automatically according
to the input video format.
PAL: The color system of the monitor
is set to PAL system.
NTSC: The color system of the
monitor is set to NTSC system.
Set the monitor working mode when
the unit is on and off.
On:
when the unit is off the monitor
draws back into the unit and when it's
on the monitor unfurls automatically.
Off: when the unit is off the monitor
draws back into the unit automatically,
but it will not unfurl when the unit is on.
Select the menu language.
Note:
Method 1: Touch the 'Hour' or 'Min' and then touch the [+]/ [-] key on the UI to
adjust the clock.
Method 2: Press the [ ]/ [ ] key on the front panel or [ ]/ [ ] key on the
remote controller to
move the cursor to 'Hour' or 'Min', and then press the
[◁]/ [▷] key on the front panel or the [ ]/ [ ] key on the remote controller to
adjust the value.
SCREEN CAL
Use the SCREEN CAL function when the touch screen is not sensitive or valid.
Calibrate the touch screen following the clew displayed on the screen after
entering the SCREEN CAL mode.
SCREEN CAL
Page 37

32
DVD setup
DVD setup
LANGUAGE
LANGUAGE
Option
Option
Selectable values
Selectable values
Subtitle
Audio
DVD Menu
English/Auto/off
English
English
Set subtitle language during DVD playback.
Set dialogue language during DVD playback.
Set MENU/TITLE display language during
DVD playback.
Function
Function
VIDEO
Option
Option
Selectable values
Selectable values
TV Shape
Angle Mark
View Mode
4:3/ 16:9
On/ Off
Fill/ Original/ H fit/ W fit/
Fit to scrn/ Pan & scan
Set the aspect ratio of the image displayed.
Set whether the angle mark is shown
on the monitor.
Set the image display mode.
Function
Function
AUDIO
Option
Option
Selectable values
Selectable values
Pink Noise
DRC
CNTR CTRL
Off/ Left/Center/ Right/
Left Surr/ Rear Surr/
Subwoofer
On/ Off
0~6ms
Use the built-in pink noise to adjust each channel
output volume, or verify if audio output quality is
normal.
Set the dynamic range of Dolby digital DVDs.
Set the time delay between the center Speaker
and the front Speakers. Proper delay will produce
a more excellent audio effect for listening to.
Function
Function
REAR CTRL
Down Sampling
On/ Off
0~6ms
Set the time delay between the center Speaker
and the rear Speakers. Proper delay will produce
a better surround effect for listening to.
No matter what the sampling frequency is, if the
above selection is on, all the signal output is
48kHz.
You can enter DVD SETUP under DVD mode, SD mode.
Touch the left top corner of the screen or press the [MENU/SRC] key on the front
panel to open the main menu, press the [SETUP] and then press [DVD SETUP]
on the UI or press the [DVD SETUP] key on the
remote controller to open the DVD
SETUP menu.
DVD SETUP includes LANGUAGE, VIDEO, AUDIO, SPEAKER, ProLogicⅡ and
RATING.
Page 38

DVD setup
DVD setup
Surround setup
The UI of Surround setup is shown as following:
Surround setup
Large
Small
Large
Small
None
Large
None
Large
Small
None
Setup for the speakers with deficient bass response.
Setup for the speakers with excellent bass response.
Setup for the speakers with deficient bass response.
Outputs of the rear speakers are closed.
Output of the subwoofer is open.
Output of the subwoofer is closed.
Setup for the speakers with excellent bass response.
Setup for
the speakers with deficient bass response.
Outputs of the center speakers are closed.
Option
Selectable
values
Selectable
values
Function
Function
FL/FR
RL/RR
SUB
CTR
Setup for the speakers with excellent bass response.
33
SPK CONFIG
SPK CONFIG
Full 6CH
DownMix
SUB.W
Small
Large
Large
Center
Small
Page 39

DVD setup
DVD setup
34
PRO LOGIC Ⅱ
PRO LOGIC Ⅱ
Option
Option
Selectable
values
Selectable
values
Function
Function
Surround Mode
Surround Mode
Off
Surround I
Surround Matrix
Surround Movie
Surround Music
On/Off
0~6
Panorama
Dimension Ctrl
Dimension Ctrl
Center Width Ctrl
Center Width Ctrl
No sound effect is applied
Dolby Pro Logic decoder
Get surround effect from mono-sound
Enhanced movie surround effect
Surround music effect
Extend the sound from the front to the rear,
getting a better audio surround effect.
Panorama is available only when
‘surround mode' is set to 'Surround music'.
Adjust the balance between the front
and
rear audio output to get better balanced
sound field.
'Dimension Ctrl' is available only when
‘surround mode' is set to 'Surround music'.
Adjusting the center width, the driver and
the passenger of the front seat can enjoy
such sound effect as the stage.
0~6
RATING
Some DVD discs have built-in parental lock which prevents the unauthorized
persons to watch restricted contents and prevents the children to watch some
scenes as force or eroticism especially.
Change password
Press the [ ]/ [ ] key on the remote controller or the [ ]/ [ ] key on the front
panel, moving the cursor to 'Password' option. And then press the numeric keys
to input the old password and confirm. After doing
these operations, the parental
lock is opened and then you can input your new password (4 digits). The new
password is set successfully after confirming by pressing the [ENTER] key on the
front panel or the [ ] on the remote controller and the parental lock is closed.
The original password of parental lock is null. Please set your password when
you use this function for the first time.
RATING
Change password
Note:
Page 40

DVD setup
DVD setup
35
Change watch level
①The parental lock is opened after you enter the correct password and the
password you entered is cleared by the unit automatically. To make the
change become effective, you must enter a password again.
② The rating of the
disc is marked on disc, disc packing or documentation.
The parental lock is invalid if the rating of parental lock is not available in
the disc.
③ Even through some discs have parental lock, but the restricted contents
are skipped partially instead of entirely. For more
details, please refer to
the disc description.
Load Factory
After reset the DVD settings, the parental lock password and the watch
level will not changed.
② 'Load Factory' is different from pressing the [RESET] key on the front
panel. 'Load Factory' just reset the DVD settings but other settings are not
changed. You should press
the [RESET] key on the front panel when the
unit can not work normally.
①Input password to open the parental lock.
②Change watch level
Select an appropriate watch level from the levels list.
③Input password to close the parental lock
Input a new password and
confirm to close the parental lock.
Press the [ ]/ [] key on the remote controller or the [ ]/ [ ] key on the front
panel, moving the cursor to 'Load Factory' option and confirm by pressing the
[ENTER] key on the front panel or the [
] on the remote controller. All DVD
settings are initialized to the original settings.
①
Change watch level
Load Factory
Note:
Note:
Page 41

36
TV mode
TV mode
Mode selecting
Press the [SRC] key on the remote controller repeatedly to switch to TV mode, or
touch the left top corner of the screen to open the sources menu and then touch
the [TV] button.
Automatic tuning
Press and hold the [ ]/ [ ] key on the remote controller or the [ ]/ [ ] key on
the front panel, the automatic tuning will start. When a TV channel has been
received, the unit will stop tuning and play the channel.
Manual tuning
Press the [ ]/ [ ] key on the remote controller or the [ ]/ [ ] key on the front
panel repeatedly to tune in one station upward or downward step by step.
Auto memory store (AMS) function
Auto search available TV channels in the whole frequency band and auto store
those channels.
Press and hold the [ENTER] key on the front panel or the [ ] on the remote
controller to start AMS function.
Scan preset channels
Press the [ENTER] key on the front panel or the [ ] on the remote controller to
scan all preset channels and play each channel for 10 seconds.
To stop scanning, do the operation again.
Change TV channel
Press the [ ]/ [ ] key on the remote controller or the [ ]/ [ ] key or the
[CH+]/[CH-] key on the front panel to select the previous/next stored TV channel.
Display TV channel number
Press the [DISP] key on the front panel or the remote controller to display current
TV channel number.
Mode selecting
Automatic tuning
Manual tuning
Auto memory store (AMS) function
Scan preset channels
Change TV channel
Display TV channel number
Page 42

37
Other modes
Other modes
AUX IN mode
External AV devices can be connected with the unit through AUX IN function. For
more details, please refer to <Electrical Connections Overall Diagram>.
Press the [SRC] key on the remote controller repeatedly to switch to AUX IN mode,
or touch the left top corner of the screen to open the sources
menu and then touch
the [AUX IN] button.
Rearview camera mode
The rearview camera can be connected to the unit. For more details, please refer
to <Electrical Connections Overall Diagram>.
Press the [SRC] key on the remote controller repeatedly to switch to CAMERA
mode, or touch the left top corner of the screen to open the sources menu and
then touch the
[CAMERA] button.
The front source will change to CAMERA mode automatically when you
reverse the car.
Navigation mode
The appointed navigation devices can be connected to the unit. For more details,
please refer to <Electrical Connections Overall Diagram>.
Press the [NAVI] key on the front panel or the [SRC] key on the remote controller
repeatedly to switch to NAVI mode, or touch the left top corner of the
screen to open
the sources menu and then touch the [NAVI] button.
Rear Zone
If a monitor is installed in the rear seat and connected with the rear zone AV
output of the unit, passengers at the backseats are able to enjoy a live
entertainment and do multifarious playing control operations using the remote
controller for rear zone.
Press the [R.SRC] key on the REAR
remote controller repeatedly to select one
playing mode, or touch the left top corner of the screen to open the sources menu
and then touch the [Multi-zone] button to enter sources menu for the rear zone and
select one desired mode.
If you select STANDBY, the rear zone will
be closed.
AUX IN mode
Rearview camera mode
Navigation mode
Rear Zone
Note:
Note:
Page 43

38
What appears to be trouble is not always serious. Please check the following
points before calling a service center.
■ Familiar characters and their meanings
■
Characters Causes
Remedies
No Disc
Disc is too dirty.
Clean the disc or change the disc.
Disc is inserted upside down.
Insert the disc correctly.
No disc in the unit.
Insert a disc.
Bad Disc
Disc is extreme dirty.
Disc is inserted upside down.
Insert the disc correctly.
Unkown Disc
The disc is not
compatible with the unit.
Region Error
The disc's region code is
not the same as the unit's.
Clean the disc or change the disc.
Change the disc.
Change the disc.
Troubleshooting
Troubleshooting
Page 44

Troubleshooting
Troubleshooting
39
■ General problems
ACC and BATT are connected in corre ctly.
Corre ct the connections according to
“Electri c al Connections Overall Diagram”
Tel-MUTE malfunction
Check the connection.
User preset information
is lost when ACC is off.
Corre ct the connection according to
“Electri c al Connections Overall Diagram”
Check the speakers.
Symptoms
Causes
Remedies
The unit cannot
be powered on.
The fuse of the unit has been broken.
Insta ll a new fuse with corre ct rating.
False operations and etc.
Reset the unit.
Remote contro ller
does not work.
Batte ry has been exhausted.
Change the batte ry.
Batte ry is not installed corre ctly.
Insta ll the batte ry correctly.
Audio output
connection is not corre ct.
Corre ct the connection according to
“Electri c al Connections Overall Diagram”
The volume level is set
to th e minimum level.
Adjust the volume to th e optimum level.
MUTE connection is not corre ct.
The speakers have been damaged.
The audio channel outp uts
are not balanced.
The speaker cord is
conta cted
with the bodywork.
Piratic disc is used.
Adjust the balance of audio channel
outputs. Please refer to “Audio contro l”.
Poor sound quality
or sound disto rti on.
The speakers power rati ng does not
fit into the unit output power.
Use original copy disc.
The speakers are connected incorrectly.
Change the speakers.
The speaker cord is contacted
with the bodywork.
Corre ct the connections according to
“Electri c al Connections Overall Diagram”
MUTE is grounded.
Use insulating cord for connection.
The fuse of car batte ry has been broken.
Insta ll a new fuse with corre ct rating.
No sound comes out
or it's hard to hear.
Use insulating cord for connection.
Page 45

Troubleshooting
Troubleshooting
40
■
TFT Monitor
■
■
Radio Tuner
It's hard to
receive stations.
Auto antenna is not
extended completely.
Correct the connections according to
“Electrical Connections Overall Diagram”.
Auto antenna is not connected
with the unit firmly.
Correct the connections according
to “Electrical Connections Overall Diagram”.
LOCAL function is on.
Close the LOCAL function.
Symptoms
Causes
Remed
ies
Monitor cannot
open automatically
“TFT Auto Open” is set to “off ”.
Set
“ TFT Auto Open” to “ on ”.
No image appears
on the monitor and
warning information
is shown at all times.
“PRK SW” is connected incorrectly.
Correct the connection according
to “Electrical Connections Overall
Diagram”.
Abnormal display
like as pulsatile
stripes on the image
and so on.
The color system of DVD disc is
not suited with the monitor.
Adjust the
color system of the
DVD disc or the monitor.
The actual color system is not the
same as the marked color system
on the label for some piratic discs.
Use original copy disc.
The video cord is broken.
Characters
are abnormal.
The video cord is not
connected correctly.
Change the video cord.
Turn off
the power and then turn on
the power again, or change to other
playing source and then go back.
Symptoms
Causes
Remedies
False operations.
Connect the video cord correctly.
Page 46

Troubleshooting
Troubleshooting
41
■ ■ DVD player
MP3 playback
Disc cannot
be inserted.
There is a disc in the unit already.
Eject the disc and then insert another on e.
Disc cannot be
played back.
Disc is scratched.
Change the disc.
Disc is too di rty or wet.
Clean the disc.
The pickup is dirty.
Clean the pickup wit h cleaning disc.
Disc is not compatible wit h the unit.
Change the disc.
Parental lock class is too hi gh.
Change the parental lock class.
Disc is inserted upside down.
Insert the disc correctly.
The disc's region cod e is
not the
same as the unit' s.
Change the disc.
Subtitle cannot
be shown.
There is no subtitle file in the disc.
Change another disc
containing subtitle files.
Audio language /
subtitle cannot be
changed.
There is only one au di o
language / subtitle in the disc.
Change another disc containing
multi-language audio or subtitle.
View angle cannot
be changed.
There is just one view
angle in the dis c.
Change anothe r dis c containing multi-angle.
Multi-angle view is not available
for the segment playing ba ck now.
Select another segment to pl ay back.
Image distortion.
The disc is protected by the copyright.
The unit is compatible with copy syste m;
hence some discs contained the
information of co pying prohibited cannot
be played back.
PBC is invalid whe n
playing back VCD.
The disc does not support PBC.
Change another disc wit h PBC function.
Repeat playback or
GOTO search is
invalid when
playi ng
back VCD.
PBC is on.
Close PBC function.
Symptoms
Causes
Remedies
Disc cannot be
played back.
Disc is scratched.
Interruption occurred
during playback.
Disc is too dirty or wet.
The pickup is dirty.
Disc is inserted upside down.
MP3's name cannot
be displayed
correctly.
Symptoms
Causes
Remedies
Disc is scratched.
Disc is too dirty or wet.
Some contents are damaged.
Disc is not recorded correctly.
The name of MP3 is not regular.
Change the disc.
Clean the disc.
Clean the pickup with cleaning disc.
Insert the disc correctly.
Change the disc.
Clean the disc.
Change the disc.
Record the disc again.
Use the regular characters.
Page 47

Basic knowledge
Basic knowledge
42
Disc icons
Maximum Playback Time
12cm
Single Side Single Layer (DVD-5)
Single Side Double Layer(DVD-9)
12cm
Double Side Single Layer(DVD-10)
Double Side Double Layer(DVD-18)
VCD Disc
12cm
Single Side Single Layer(VCD)
(MPEG 1 method)
74 minute
CD Disc
12cm
Single Side Single Layer
74 minute
DIGITAL AUDIO
TEXT
Disc Physical Properties
(MPEG 2 Method)
133 minute
242 minute
266 minute
484 minute
Basic knowledge of disc
■
■
Disc icons
Disc symbols Disc Symbols
Basic knowledge of disc
■
Disc icons
Disc symbols Disc Symbols
Meanings
The numbers of audio languages rec orde d in the disc.
This disc has 8 audio languages.
The numbers of subtitle languages rec orde d in the disc.
This disc has 32 subtitle languages.
The numbers of view angles rec orde d in the disc.
This disc has 9 view angles.
Aspect rati os can be selected.
"LB" stands for
Letter Box and "P S" stands for Pan / Scan.
Region code of DVD disc.
9
16:9
16:9
LB
8
32
Disc Symbols
Page 48

■ Caution of disc using
1) DO NOT use irregular shaped disc
2) Disc Cleaning
Use a dry, soft cloth to wipe the disc from center to edge, only neutral detergent
can be used.
3) When playing a new disc
New disc may have some rough spots around the inner and outer edges.
If such
a disc is used, remove these rough spots with a pencil or ball-point pen, etc.
2
1
3
Rough Edges
Rough Edges
Basic knowledge
Basic knowledge
43
Page 49

Basic knowledge of DVD/VCD/CD/MP3
■ AV contents structure of DVD
DVD has different titles and the title subdivides into different chapters.
For AV program, a single work (such as the filming information, the movie
theme) is a single title. For Karaoke disc, a single song is a single chapter. But
some of the discs are
not recognized as this method, you should notice the
difference when using search function.
■ AV contents structure of VCD
For VCD, CD, MP3 discs, the discs are divided into tracks and each track
carries a song. Index numbers may be used for each track to distinguish each
other in some certain discs.
■ Glossaries of DVD / VCD /CD
1)Dolby AC-3 (Dolby Digital)
A true surround audio system that offers up to 6 discrete channels: 2 front (left
& right), 2 rear (surround left & surround right), 1 center, and 1 subwoofer.
These Channels are often specified as 5.1 channels because subwoofer only
counts as “0.1 " channel. The channels are compressed using
lossy audio
compression algorithm and then packed into a bitstream.
Basic knowledge of DVD/VCD/CD/MP3
Basic knowledge
Basic knowledge
44
Page 50

2) Line PCM(LPCM)
Line PCM (Pulse Code Modulation) is an uncompressed audio format which is
similar with CD audio, but with higher sampling frequency and quantization.
LPCM offers up to 8 channels of 48 kHz or 96kHz sampling frequency and 16,
20 or 24 bits per sample but not all at the same time.
LPCM provides better
audio quality comparing to CD audio using 44.1 kHz and 16 bits. LPCM offers
high quality (similar with DVD-Audio) but its high data rate leaves little
bandwidth for video on a DVD video disc. The audio signal is converted to
digital data and recorded in two channels
without compression. Due to the
larger capacity of DVD, more data with better accuracy could be stored implies
better quality audio DVD may have over CD's.
3) HDCD
High Definition Compatible Digital (HDCD) is a patented encode / decode
process for delivering the full richness and detail of the original microphone
feed on Compact Discs and DVD - Audio. HDCD-encoded CDs sound better
because they are encoded with 20 bits of real musical information while other
CDs are encoded with 16 bits. HDCD overcomes the limitation of the 16-bit CD
format by using a sophisticated system to encode the additional 4 bits
onto the
CD while remaining completely compatible with the existing CD format. HDCD
provides more dynamic range, a more focused 3-D soundstage, and
extremely natural vocal and musical timbre. With HDCD, you get the body,
depth, and emotion of the original performance not a flat, digital imitation.
Basic knowledge
Basic knowledge
45
Page 51

4) Pro Logic II
Pro Logic II is dramatically improved matrixes surround system based on the
original Dolby Pro Logic system, In the case of Pro Logic, there are four
channels, that is, front left, center, and front right, plus a mono surround
channel that is usually split between two rear
Speakers. Compared to Pro
Logic, Pro Logic II offers two full-range stereo surround channels, more
sophisticated steering logic, high channel separation and an exceptionally
stable sound field. DPL II uses a simple servo circuits used to derive the five
channels. And, unlike the synthetic, Jazz club, Hall and Stadium modes
found
on many A/V receivers, DPL II introduces no phony delay-induced echoes,
reverb, or tonal coloration.
5) Multi Angle Playback
DVD may contain scenes which have been shot simultaneously from different
angles; a scene then could be selected for viewing from different angles during
its playback.
6) Region Code
Region 1: USA, Canada, East Pacific Ocean Islands;
Region 2: Japan, West Europe, North Europe, Egypt, South Africa, Middle
East;
Region
3: Taiwan of China, Hong Kong of China, South Korea, Thailand,
Indonesia, South East Asia;
Region 4: Australia, New Zealand, Mid & south America, South Pacific Ocean
Islands/Oceania;
Region 5: Russia, Mongolia, India, Middle Asia, East Europe, North Korea,
North Africa, North West Asia;
Region 6: Chinese Mainland.
Basic knowledge
Basic knowledge
46
Page 52

■
Dolby Digital 5.1 is a surround audio system which keeps the multiple
channels fully separated throughout the AV encoding and decoding
processes. In addition to Left, Centre, Right, Left Surround, and Right
Surround channels, Dolby Digital 5.1 carry a “0.1 channel” which boosts the
audio output with very low
frequency for theater sound effect.
To optimize the output effect of Dolby Digital 5.1 surround sound, the following
Speakers location is recommended.
Dolby Digital 5.1 Surround Sound
Front Right Speaker
Rear Right Speaker
Center Speaker
Front Left Speaker
Rear Left Speaker
Subwoofer
Basic knowledge
Basic knowledge
47
Page 53

■ About MP3 files
There are some notices you should pay attention to when you want to record
or play back one MP3 disc.
1) Media Compatibility
The unit can play back MP3 files with the file extension code <.mp3> or
<.wma> (regardless of the letter case upper / lower) recorded in CD-R
/ CDRW, DVD±R / DVD±RW. For CD - RW discs please format them fully not
quickly to prevent illegal disc operation.
2) MP3 Format Compatibility
① All the file naming formats listed below are compatible, file and folder naming
format is listed below in the bracket
ISO 9660 Level
1(file name : up to 12 characters; file extension : 3
characters)
ISO 9660 Level 2(file name : up to 31 characters; file extension : 3
characters)
Joliet(up to 64 characters)
② If file name or folder name does not conform to ISO 9660 file
system, it may
not be displayed correctly nor be normally played back.
3) Settings for MP3 Encoder and CD / DVD recorder
① Do the following settings when compressing audio data in Mp3
Transferring Bit Rate : 8-320kbps;
Sampling Frequency:16kHz, 22.05kHz, 24kHz, 32kHz, 44.1kHz, 48kHz
② When recording
MP3 up to maximum disc capacity using CD writer, disable
additional writing. For recording on an empty disc up to maximum disc
capacity, use "Disc at once" setting.
Basic knowledge
Basic knowledge
48
Page 54

4) Read MP3 files from media
① To o many folders or files other than MP3 recorded on a disc consume more
time to start the playback of MP3 file. Files or folders searching may not be
accessible.
② Besides, it may take much time to search for the next
MP3 file and sometimes
file or folder searching may be inaccessible.
5) Note on playing back an MP3 disc
① Never try to rename a non-MP3 file into a file with MP3 extension code.
Otherwise, the unit plays back the non-MP3 abnormally.
② Never play back non-MP3 files.
6) Other notes
① During playback or file searching, playback accords to the disc recording
sequence. Sometimes, the actual playback sequence is not like as the
desired.
② Playing list function is not supported. Record files and folders in the order you
desired.
③ File & folder hierarchy and file searching.
For example, a medium with the following folder / file hierarchy is subject to
File searching shown as follows:
Basic knowledge
Basic knowledge
49
Page 55

()
0
1
2
♪①
♪②
5
♪⑧
♪⑦
6
7
♪⑨
♪③
3
4
♪④
♪⑤
♪⑥
Layer1 Layer 2 Layer 3 Layer 4 Layer5
○ Root Folder
Folder
♪ File
Searching for another MP3 file when
playing ♪④……
Operations
Results
Key
Key
The beginning of a file
Basic knowledge
Basic knowledge
50
Page 56

Specifications
Specifications
51
General
Operation voltage...........................................................................12V(DC)
Operation voltage range.................................................... 10.8V~16.0V(DC)
Max. Operation current..........................................................................10A
Grounding system.................................................. Car battery negative pole
Installation dimension(W×H×D)....................................178×100×(162+18)mm
Installation angle
oo
Vertically......................................................................................0 ~+30
o
Horizontally.......................................................................................±15
FM
Signal noise ratio.................................................................................55dB
Limit noise sensitivity(S/N=30dB)......................................................... 20dB
Frequency response(±3dB).......................................................50Hz~12KHz
Station seeking level.................................................................. 20~30dBuV
Distortion............................................................................................ 1.0%
Stereo seperation(1KHz)......................................................................25dB
Antenna impedence...............................................................................75Ω
AM
Limit noise sensitivity(S/N=20dB)......................................................... 20dB
Amplitude(±9KHz)............................................................................... 18dB
DVD player
S/N ratio............................................................................................ 80dB
Dynamic range.................................................................................... 80dB
Frequency range(±3dB)............................................................20Hz~20KHz
Max. output power............................................................................. 5×45W
Load impedence..................................................................................... 4Ω
AUX IN
Distortion................................................................................................ 0.5%
Frequency range(±3dB)................................................................20Hz~20KHz
Audio input level................................................................................40mVrms
Audio
Audio output impedence........................................................................600Ω
Audio output level......................................................................... ≥2.2Vrms*
* Under normal audio input level at maximum output volume.
General
FM
AM
DVD player
AUX IN
Audio
Page 57

Specifications
Specifications
Video
Normal video input level(CVBS).......................................................1.0±0.2V
Normal video input level(RGB)...............................................................0.7V
Video input impedence..........................................................................75Ω
Video output impedence........................................................................75Ω
Video output level.........................................................................1.0±0.2V*
*Under normal video input level
TFT monitor
Screen size..................................................................................6.5 inches
Usable display area(H×V)...........................................................143.4×79.32
Resolution(H×V)............................................................................1200×234
2
Brightness....................................................................................400cd/m *
*The brightness of center area measured after powering on for 30 minutes
Contrast......................................................................................60(minimum)
Response time(rise).............................................................................15ms
Response time(fall)..............................................................................25ms
Viewing angle
o
Top.....................................................................................................40
o
Bottom................................................................................................55
o
Horizontally....................................................................................... ±60
LCD life cycle.......................................................................20000h(at 25℃)
Environment
Operation temperature...............................................................-20℃~+70℃
Storing temperature...................................................................-30℃~+80℃
Operating humidity...................................................................45%~80%RH
Storing humidity.......................................................................30%~90%RH
※ This product is subject to be updated without notice.
Video
TFT monitor
Environment
52
 Loading...