

Page 1
Page 2

1
Contents
Safety information..................................................................................……2
DVD player features………........................................................................…4
DVD Video Features..................................................................................5
Disc playback............................................................................................5
Controls..........................................................................................................6
Moni
Monitor Open View
Remote Control
tor Stowed View
.....................................................................
..........................................................................
.................................................................
……….....6
……….....7
……….....8
Operations....................................................................................................10
Open the monitor
Stow the monitor
Handing disc
.
..............................................................................
.......................................................................
........................................................................
……….....10
……….....10
…..….......10
Turn the player on......................................................................................11
Turn the player off......................................................................................11
Chang the image aspect ration..................................................................11
Adjust the display.......................................................................................11
Car
e and Maintenance...................................................................
............12
Use the remote control..............................................................................12
Replace the battery in t he remote control…..............................................13
Play...............................................................................................................14
Pla
y DVD disc
............................................................................
Play Audio CD disc
.....................................................................
……….....14
……….....16
Play MP3 dis c
.............................................................................
Play USB s torage..............................
Play SD/MMC card
....................................................................
........................................
……….....16
……….....17
……….....18
Installation and Wiring................................................................................19
What's in the box
Before you begin
........................................................................
........................................................................
Mounting and Wiring Precautions
Installation proc edure
Wiring diagram
System Setup
Troubleshooting
Specifications
...........................................................................
...............................................................................
...........................................................................
...............................................................................
.........................
..............................................
........................................
……….....19
……….....19
……….....20
……….....21
……….....22
…........….23
....……….25
…........….26
Page 3

2
SafetyInformation
ThankyouforbuyingtheRoofMountLCDMonitorwithDVDplayer.
v
Pleasereadthismanualcarefullybeforeusingtheplayerinordertoget
themostoutofallthefeaturesandfunctions.Keepthismanualinasafe
place,asitcanbeavaluabletoolinhelpingyoutounderstandallthe
featuresandfunctions.
Donotoperatetheunitinanywayotherthandescribedwithinthismanual.
v
Failuretofollowtheinstructionswithinthemanualwillinvalidateyour
warranty.
SAFETYFIRST!Donotinstallthedisplaywhereitmay(i)obstructthe
v
driver’svision,(ii)impairtheperformanceofanyofthevehicle’soperating
systemsorsafetyfeatures,includingairbags,or(iii)impairthedriver’s
abilitytosafelyoperatethevehicle.
Whenusingthesystem,makesureyouarefirmlysecuredbyyourseat
v
belttoensureyoudonotaccidentallyhityourheadonthescreenduring
suddenbrakingorotherincidents.Ifyouareeverinanaccident,injuries
canbemoresevereiftheseatbeltisnotproperlybuckled.
v Donotattempttoinstallorserviceyourdisplaybyyourself.Installationor
servicingofthedisplaybypersonswithouttrainingandexperiencein
electronicequipmentandautomotiveaccessoriesmaybedangerousand
couldexposeyoutotheriskofelectricshockorotherhazards.
Becarefulnottodrainthecarbatterywhileusingtheunitwiththecar
v
enginestopped.Toavoiddrainingthebattery,itissuggestedthatthe
vehicleenginealwaysisrunningwhileusingtheunit.
Donotdisassembleoraltertheunitinanyway.Failuretodosocancause
v
damagetotheunitandinvalidthewarranty.
v Nevercleanthesurfaceofthescreenwithchemicalsolventorcorrosive
detergent,whichmaycausepermanentdamagetotheTFTLCDscreen.
Avoidinstallingtheunitwhereverisunderdirectsunlightornearhotair
v
vent.Pleasenotethatthenormalworkingtemperatureoftheunitis
between-5℃ to+50℃.Iftheinternaltemperatureofthevehicleis
extremelyhigh,ashortcoolingdownperiodisnecessarybeforeoperating
theunit.
Ifthetemperatureinsidethecarisverylowandthemonitorisusedsoon
v
afterswitchingontheheater,moisturemayformonthepaneloftheunit.
Turnofftheunitimmediately!Failuretodosomaycausetheinternal
componentstoshort.Allowtheunittorestforaboutonehourtoallowthe
condensationtodisappearbeforecontinueoperation.
v Inextremelycoldtemperatures,themovementofthepicturemaybeslow
andthepicturemaybedark.Itisnotamalfunction.Theunitwillwork
normallyonceitreachesitsoperatingtemperature.
v DonotdroporhittheLCDpanelwithahardobject,asitmaycause
Page 4

3
permanentdamagetotheLCDpanel.ShouldLCDpanelbreak,avoid
touchingglassandfluid.Ifdo,pleasecleanitwithplentyofwaterandask
formedicalattentionimmediately.
v Duetodifferentcarspecifications,pleasekindlyensuethatthedisplay
monitorisproperlylocatedandnotobstructingtheair-conditioningvent.
AvoidinsertinganyforeignobjectsintotheslotofthediscPlayer.Failure
v
toobservethismaycausemalfunctionduetotheprecisemechanismof
thisunit.
Protectyourdisc.Whenyouleavethecar,besuretoejectthediscfrom
v
thisunitandstoreitseparatelyawayfromdirectsunlight.
v Heatandhumiditymaydamagethediscandyoumaynotbeabletoplayit
again.
v UsethesuppliedscrewstofixthemonitorMetalMountingPlate.
Page 5

4
DVD Player Features
This player is a Roof Mount 10.2" TFT-LCD Color Display with DVD player
that can be used as a stand-alone display, or can be integrated into a mobile
multimedia system. This player has the following features:
10.2" TFT-LCD color minitor(16:9)
Roof Mounting Application
Pixel(dots):800RGB(W)x480(H)
Wide Viewing angle(up/down/left/right):45/55/65/65
NTSC and PAL Compatible
Adjustable Contrast / Brightness / Color / Tint / Volume
Manual Viewing Angle Adjustment
Vertical Angle Adjustable: up/down<120
White LED Dome Light
Automotive Startup Protection
Built-in IR Transmitter
IR Remote Control
On Screen Display
2xAV Input
1xAV Output
Slot-in DVD mechanism
Support SD/MMC card and USB
Capability to read: DVD Format / DVD±R / DVD±RW / CD-DA / CD±RW /
MP3 / VCD / SVCD
Note:
0
Multi-session CDs and 320kbps WMA files can not be played on this
player.
Page 6
5
DVD Video Features
Thisunitprovidesthefollowingfunctionsinadditiontohighimagequalityand
soundqualityofDVDvideo:
Multi-soundFunction
DVDaudiocanstoreupto8languagesforonefilm.Thisallowsforthe
selectionoflanguageofonespreference.
Multi-angleFunction
ADVDvideothatisfilmedfrommultipleanglewhichallowsyouchoosingto
viewfromdifferentperspectives.
SubtitleFunction
ADVDvideocanrecordsubtitlesforupto32languagestochoosefrom.
Disc Playback
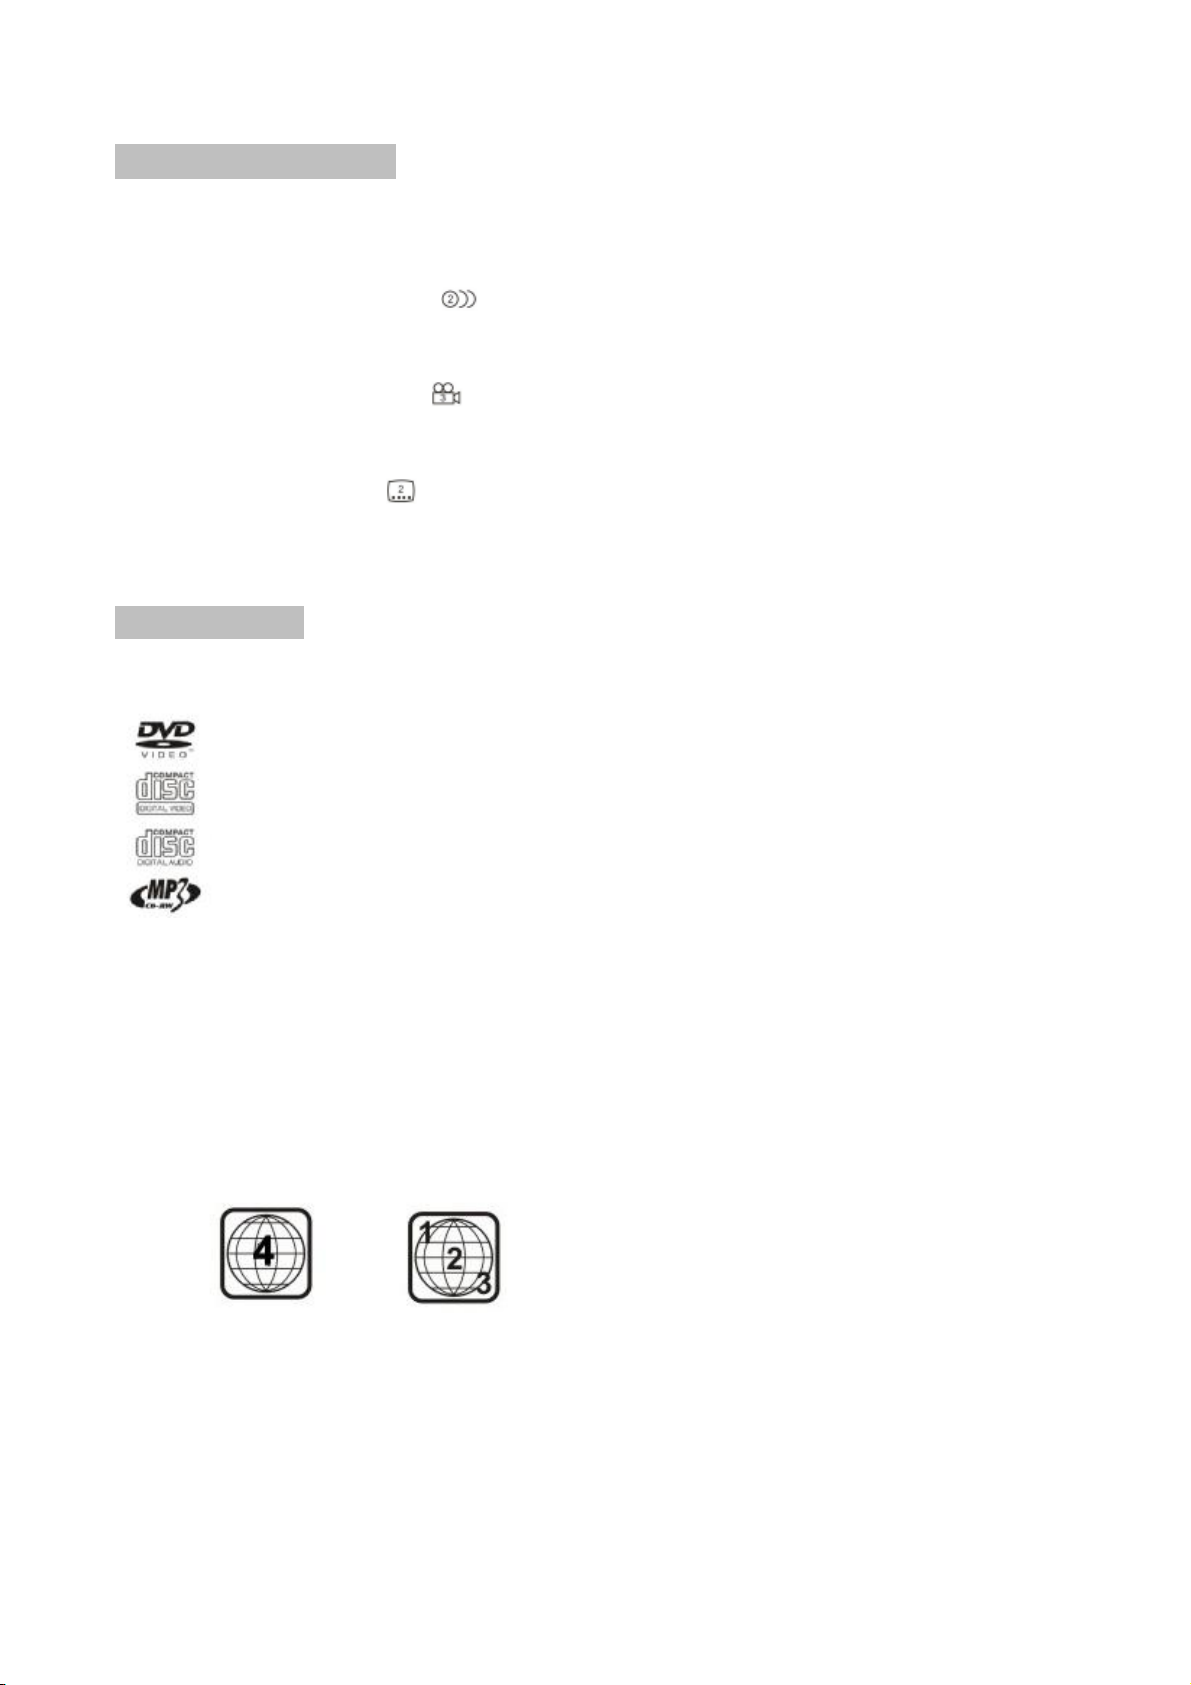
ThisDVDplayercanplaythefollowingformats.
DV D
CD V ideo
CD A udio
CD M P3
l PlaybackofCDswithtworecordedsessions(oneaudioandonedata)
l Multi-sound:DVDaudiothatsupportsuptoeightlanguagesperfilm
l Subtitles:supportupto32languages
l TheplaybackofMP3musicfilesstoredonaCD-R/CD-RWdisc
l Regionnumberassignedbasedonthesalesarea;regionnumberis
12 cm
12 cm
12 cm
12 cm
indicatedontheboxasfollows.Australiaisregion4.
Ex.Australiaisregion4.
Page 7
6
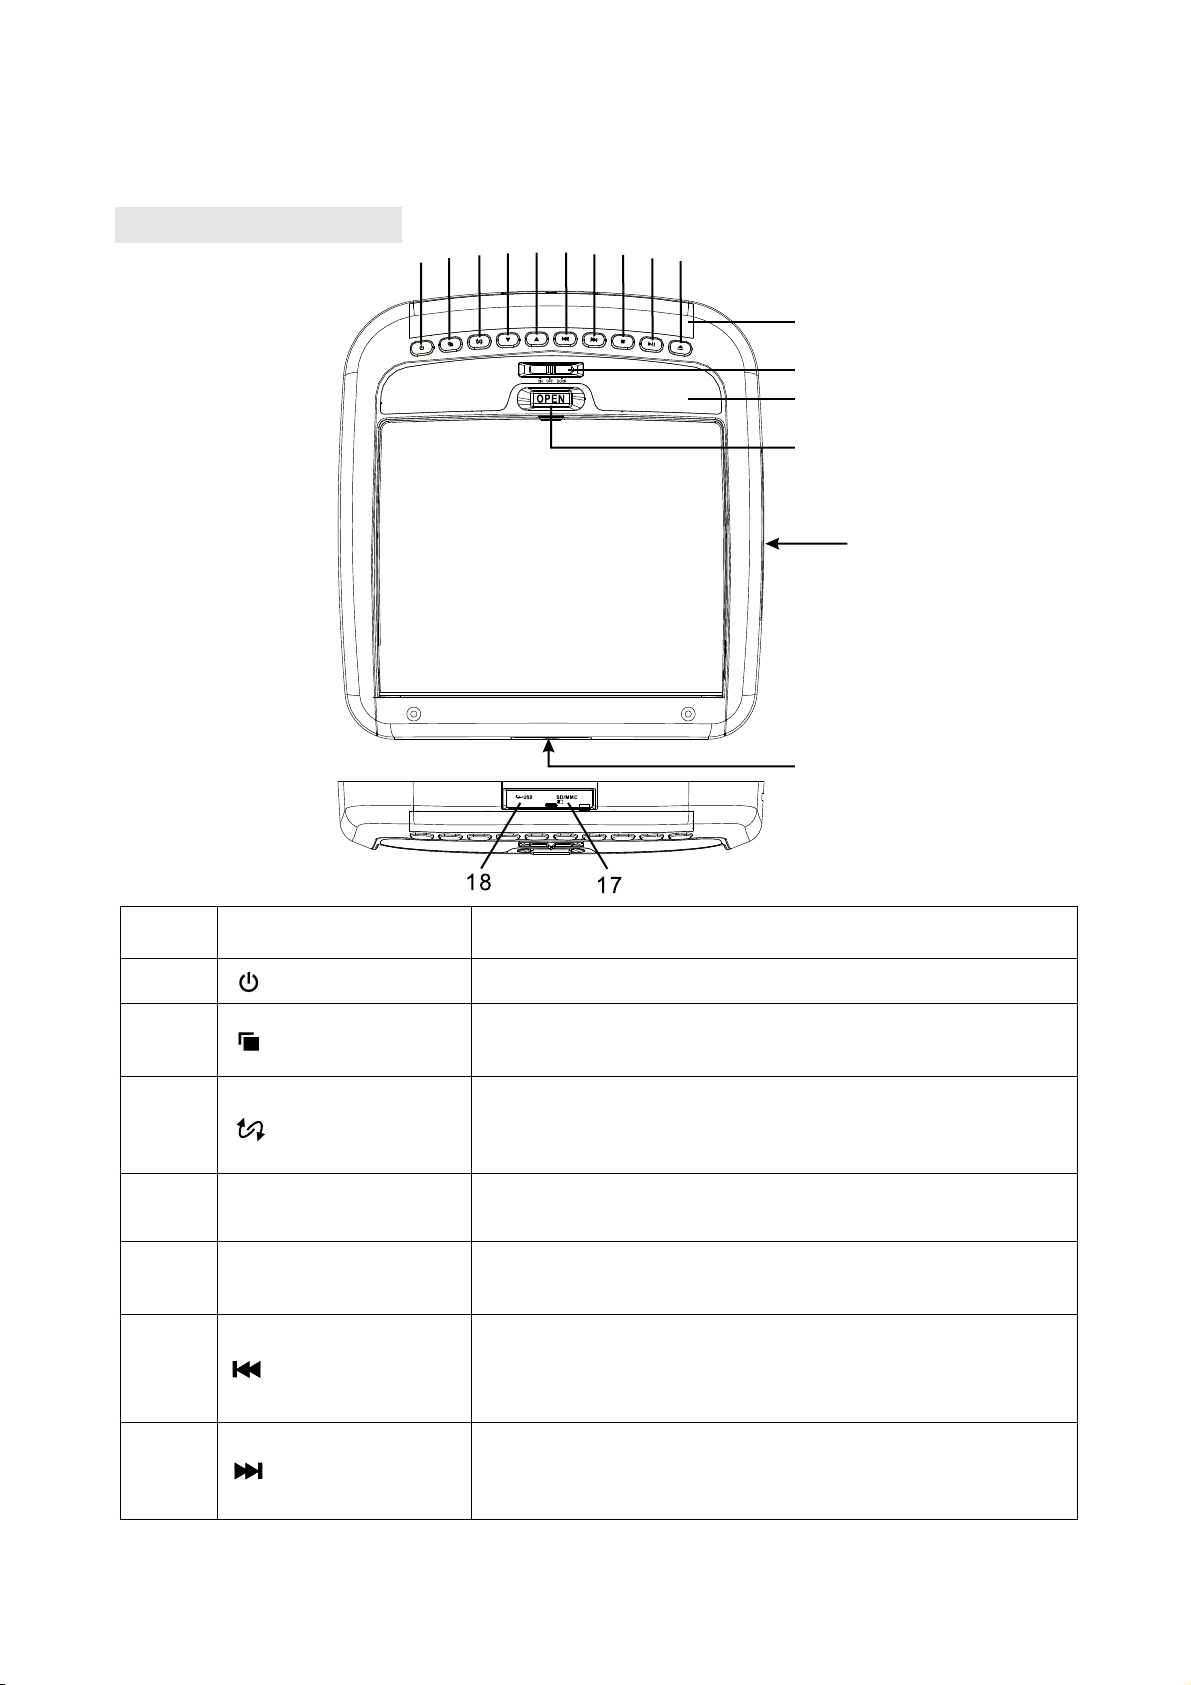
Controls
Monitor Stowed View
5
4
3
2
1
7
6
8
9
10
11
12
13
14
15
16
Item Name FunctionorControl
1 Power Presstoturnonorturnofftheplayer
OpenstheDisplaymenu.Pressagainto
2 Menu
sequentiallyselecteachmenuitem.
Selectsthevideoinputsource:AVIN1,AVIN2
3 Source
orDVDIN;InDVDmode,pressandholdto
switchthemodebetweenSD/MMCandUSB.
Decreasevolumeduringplayback;Inthe
4
▼ Decrease
OSDmenu,presstoreducesavalue.
Increasevolumeduringplayback;IntheOSD
5
▲ Increase
menumode,presstoreducesavalue.
SkipstothepreviouschapteronaDVDor
6 Fastreverse
trackonaCD;Pressandholdtofastreverse
at2x,4x,8x,16x,32xandnormalspeeds.
SkipstothenextchapteronaDVDortrackon
7 Fastforward
aCD;Pressandholdtofastforwardat
2x,4x,8x,16x,32xandnormalspeeds.
Page 8
7
Pressoncetostopplayback.Press button
8 ■ STOP
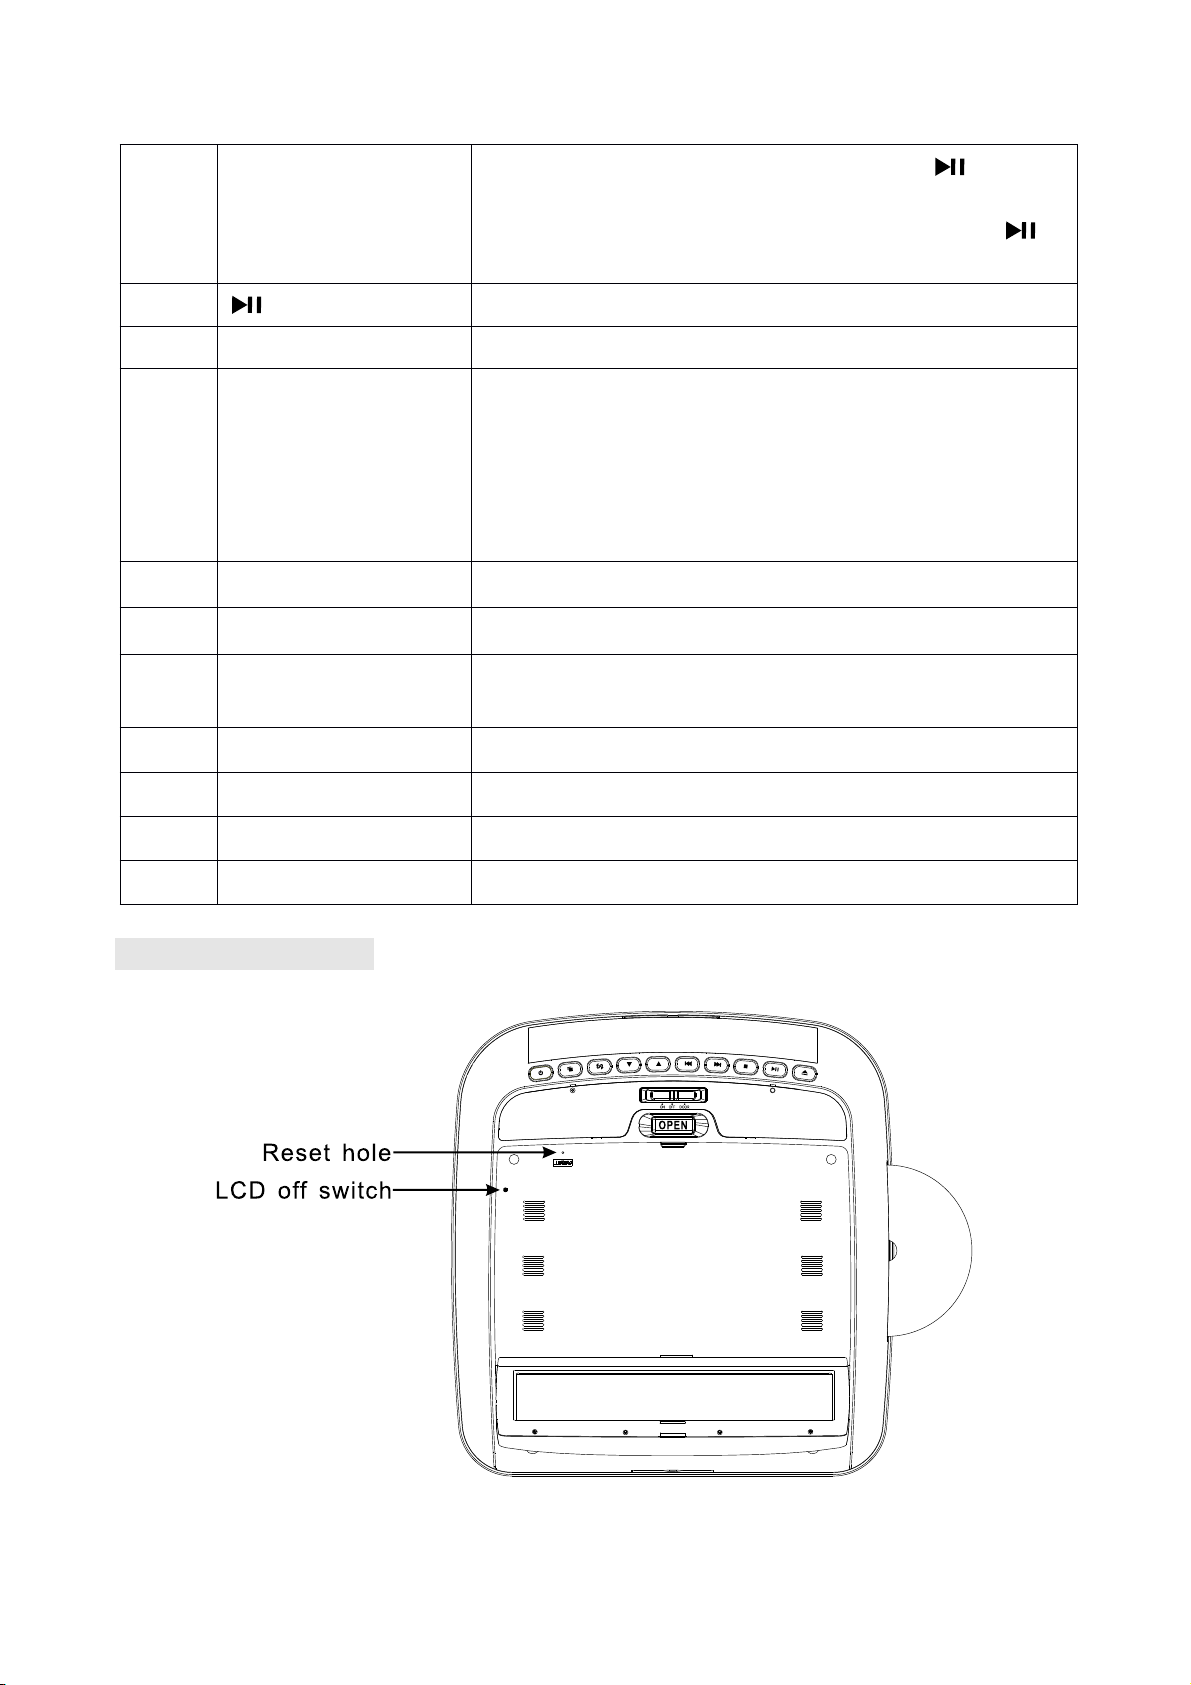
9 PlayorPause Playsorpausesthedisc.
10 Eject Presstoejectthedisc.
11 Domelightswitch
12 Domelight Toilluminateinthecar.
13 OPEN button Presstolowertheoverheadmonitorscreen.
tostartplayingatthelastposition;Pressthis
buttontwicetofullystopplayback.Press
buttontostartplayingatthebeginningofdisc.
Configuresthedomelight:ON,OFFordoor
activated.Tomanuallyturnthelightonoroff,
movethisswitchtotheONorOFFposition.In
thedoor-activatedposition,thedomelight
turnsonandoffwhenyouopenandclosethe
cardoor.
14 IRWindow
15 Discslot
16 AV1INsocket Externalequipmentaudio/videoinsocket.
17 SD/MMCcardslot InserttheSDcardorMMCcard.
18 USBsocket ConnectUSBdevice.
Monitor Open View
ReceivesIRsignalsfromtheremotecontrolor
sendsIRsignalstoIRwirelessheadphone.
Insertthedisc.
Page 9
8
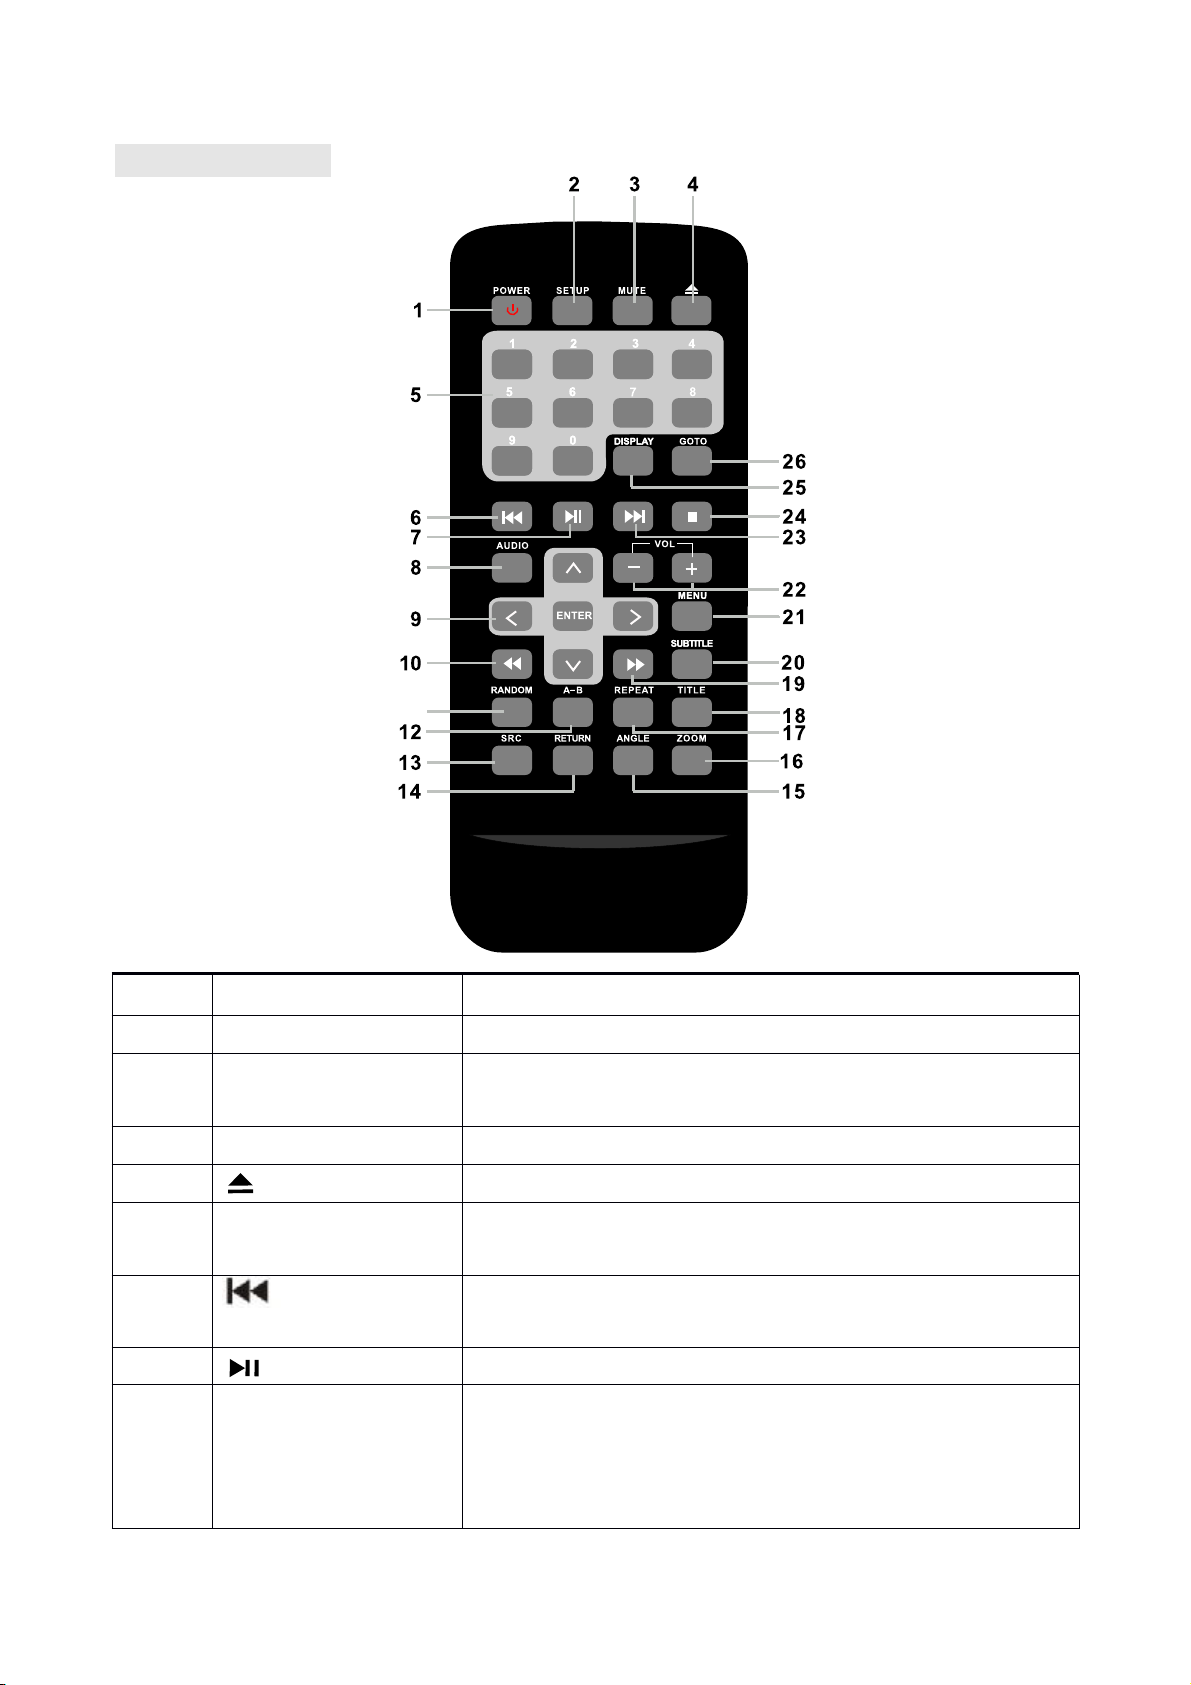
Remote Control
Item
Name
Function
or
control
11
1
POWER
Presstoturnonorturnofftheplayer.
Presstoaccessthesetupmenutomodifythe
2
SETUP
DVDplayersettings.
3
4
MUTE
Presstoturnthesoundonoroff.
Presstoejectthedisc.
Presstoenternumbersdirectly,suchasfor
5
0-9Numberkey
settingsortracknumbers.
6
Previous
PresstogotothepreviouschapteronDVDor
trackonCD.
7
PresstoplayorpausetheCDorDVD.
DVD: Presstochangetheaudiolanguage
duringDVDplayback. VCD/CD: Pressto
8
AUDIO
changetheaudiochannel(Left,Rightand
stereo)duringVCDandCDplayback.
Page 10

9
9
.
ARROWAND
ENTER
Presstonavigateinamenuandchangesetting
values.
10
11
12
13
14
15
16
17
18
19
20
21
Fastreverse
RANDOM
A-B
SRC
RETURN
ANGLE
ZOOM
REPEAT
TITLE
Fastforward
SUBTITLE
MENU
Presstofastreverseplaybackat2x,4x,8x,16x
and32xspeeds.
Presstoplaychaptersortracksinrandomorder
PresstorepeatplaybackfrompointAtopointB.
Selectsthevideoinputsource:AVIN1,AVIN2
orDVDIN;InDVDmode,pressandholdto
switchthemodebetweenSD/MMCandUSB.
Presstoreturnthemainmenu,pressagainto
returnthelastpositionofplayback.
Presstoselectadifferentfilmingangle.This
featureonlyworksiftheDVDisrecordedwith
multipleangles.
Presstosetthezoomformovieviewing.
Presstorepeatsthetrackortheentiredisc.
PresstoviewtheDVDdisc’stitlemenu.
Presstofastforwardplaybackat2x,4x,8x,16x
and32xspeeds.
Presstoselectandturnonsubtitlesduring
playback.
PresstoviewtheDVDmainmenu.
PressandholdtodisplaytheDisplayMenu.
22
23
24
25
26
VOL-/+
Next
■ Stopbutton
DISPLAY
GOTO
Presstodecrease/increasethevolume.
PresstogotothenextchapteronDVDortrack
onCD.
Presstostopplayback,press or[ENTER]
buttontostartplayingatthelastposition;
Press ■ buttontwicetofullystopplayback,
press or[ENTER]buttontostartplayingat
thebeginningofDVD.
Presstodisplaytheplaybackinformation(such
astitle,chapter,trackandtime).
Presstostartplaybackataselectedchapter,
trackortime.
Page 11

10
Operation
Open
the
monitor
1.
Stow
the
monitor
Handing
disc
Pressthemonitorreleasebuttontolowertheoverheadmonitorscreen.
2.GentlyswingtheLCDdownandadjusttheangleforviewing.
120°
Caution
TheLCDopenstoamaximumangleof120° degrees.
Donotattempttoopenitfurther.
Gentlypushthebacksideofthedisplaypaneluntilitclicksintotheoverhead
housing.Themonitorturnsoffautomaticallywhenyoureturnittotheclosed
position.
Note:
Whenclosingthedisplaypanel,donotletcordsorotheritemsget
caughtbetweenthedisplayandtheoverheadhousing.Doingso
canseriouslydamagethescreen.
Foryoursafety,closetheLCDpanelwhenyouarenotusingit.
Tokeepadiscclean,donottouchtheplayside
l
(non-labelside).
Donotattachstickynotestoorputtapeonadisc.
l
Keepdiscsawayfromdirectsunlightandheat.
l
Storediscsinaprotectivedisccase.
l
Tocleanthedisc,wipethediscoutwards
l
fromthecenterwithacleancloth.
Page 12

11
Turn the player on
MENU
Bright
ness
Color
Tint
TurntheignitiontoeitherACCorON.
1.
2.Pressthepowerbuttonontheplayerortheremotecontrol.Ifnodiscisin
thedrive,itdisplays “NODISC”.
Tochangeinputsource,pressSRCandalternateamongA/Vinputsource:
3.
DVD-IN,AVIN1(firstadditionalaudio-videosource)andAVIN2(second
audio-videosource).AdditionalAVsourcemustbeconnected.
Note:
YoucannotinsertaDVDintotheslotifyouhaveselected
analternateaudio-videosource(AVIN1orAVIN2).
Turn the player off
Toturnthepoweroff,pressthepowerbutton.
Ifadiscisplayingwhenyouturnthepoweroffandbackonagain,theplayer
continuesplaybackfromwhereyoustopped.
Note:
Oncetheplayeristurnedoff,youcannotejectadiscintheplayer.
Chang the image aspect ration
Acommondisplaysettingtochangeisscreenmode,whichcontrolsthe
aspectratiousedtodisplayimages.
Adjust the display
1.Pressthe buttononthepanelorpressandholdthe MENU buttonon
theremotecontroltodisplayadjustmenu(OSD).
2.IntheOSDMENU,pressthe
buttonagaintosequentiallyselect
eachmenuitem.
Contrast Adjuststhedifferencesbetweenthelightanddarkareasof
theimage
Makesthewholeimagelighterordarker
Adjustscolorbasedonthecolorspectrum
AdjuststheintensityofthecolorwheninNTSCmode(toplay
Page 13

12
Wide
Screen
Selects the aspect ratio of the image wide ,normal .
R
eset
Returns all menu values to their default settings.
3. Press the left (<) or right (>) arrows on the remote control or press
▼ or
▲ button on the panel to change the values of selected options.
Care and Maintenance
Cleaning the monitor
Use a clean, soft, dry cloth to gently wipe dust and dirt from the screen.
Do not use benzene, thinner, car cleaner, or other cleaners. These
substances may damage the monitor system or cause the paint to peel.
The surface of the LCD can be easily scratched. Do not rub it with
anything abrasive.
Servicing the monitor
In the event that trouble arises, never open the monitor case, disassemble the
player or attempt to repair it yourself. The internal parts are not serviceable by
user. Opening any components will void the warranty.
CAUTION:
Changes or modificati
ons to this product not approved by the
manufacturer may void the warranty.
Cleaning the remote control
Use only a clean, soft, damp cloth to clean the remote control. Do not use
lighter fluid, methyl alcohol or other solvents.
Cleaning discs
Before playing a disc, wipe it out wards from the center with a clean, soft cloth.
Use the remote control
Use the remote control only inside the vehicle.
Use the remote control no further than five feet (three meters) from the
sensor.
Direct sunlight (or a very bright light) reduces s ensitivity to remote signals.
Do not use the player in direct sunlight.
Any object than comes between the infrared sensor and the remote
control may disrupt reception.
Page 14

13
Replace the battery in the remote control
N
ote:
Thebatteryneedschangingwhenthebuttonsontheremotestopworkingor
whenyouhavetomoveclosetoplayerfortheremotetowork.
Precautions
l Disposeofusedbatteriesproperty.
Donotdisposeofusedbatteriesthrowingthemintofire.Ifyoudoso,they
l
mayexplode.
l Donotshortthepositive(+)andnegative(-)terminals.
Keepthebatteryanditsholderawayfromyoungchildren.Theymay
l
chokeonthebatterywhileattemptingtoswalloworchewonit.
Procedure
ThebatterytypemustbeCR2025.Donotreplacewith
anyotherbatterytype.
1.Turntheremoteup-side-down.
Simultaneouslyslidethebatterylatchinthedirectionofthearrowandpull
2.
thebatteryholderoutoftheslot.
Removingthebatteryholder Batterywiththeplussideup
3.Removetheoldbattery.
4.Placethenewbatteryintheslotwiththeplus(+)sideup.
5.Pushthebatteryholderbackintotheslotuntilitlocksinplace.
Insertingtheholderwiththebatteryintotheremotecontrol
Page 15

14
Play
OnDVDmode,insertadiscintothediscslotwhenthescreendisplay"NO
RETURN
TITLE
DISPLAY
Note:
AUDIO
1.
DISC".Whenthediscwasinserted,“LOADING” displayed,thesystem
willreadandplaythediscautomatically.
Pressthe buttonontheremotecontroloronthepaneltoejectthedisc.
2.
3.Ifthedischavenotbeentakeawayin10seconds,thesystemwillslotitin
automaticallyandplayagain.
Play DVD disc
Accesstherootmenu
ADVDisdividedintotitlesandchapters.Therootmenushowsthecontents
ofthedisc.SomeDVDdisconlyallowyoutoselectdiscplaybackoptions
fromtheDVDrootmenu.
ToaccesstherootmenuoftheDVD,pressthe
or
buttonon
theremotecontrolduringplayback.
Statusinformation
Toviewstatusinformationaboutthecurrentviewingsession,pressthe
buttoncontinuouslytocyclethroughthefollowinginformation.
TITLE ELAPSED
TT 02/06 CH 15/18 1:20:10
TITLE REMAIN
TT 02/06 CH 15/18 0:13:50
CHAPTER ELAPSED
TT 02/06 CH 15/18 0:02:20
CHAPTER REMAIN
TT 02/06 CH 15/18 0:01:10
Changlanguages
Allaudiblelanguagesmustbepre-recordedontheDVD.SomeDVDdisc
onlyallowlanguageaccessthroughtheDVDmenu.
l Tochangetheaudiblelanguage,presstheAUDIO buttonontheremote
control.Theplayerdisplaysthecurrentlanguagenumberandname,and
thetotalnumberoflanguagesavailable.
l Tocyclethroughallavailablelanguages,continuepressingthe
buttonontheremotecontrol.Theaudioinformationwilldisappears
automaticallyafterthreeseconds.
Page 16

15
Usesubtitles
SUBTITLE
SUBTITLE
REPEAT
•
•
Languagesubtitlesarenormallyoff.
Note:
SubtitlesmustbeontheDVD.SomeDVDsonlyallowsubtitle
accessthroughtheDVDmenu.
l Toturnsubtitleson,presstheSUBTITLEbutton.Theplayerdisplaysthe
currentlanguagenumberandname,andthetotalnumberoflanguagesfor
whichsubtitlesareavailable.
l IftheDVDprovidessubtitlesinmultiplelanguages,continuepressingthe
buttontochangethesubtitlelanguage.
Toturnsubtitlesoff,pressthe
l
buttonuntilthescreendisplays
"subtitleoff",Thedisplayofthesubtitleoptionsdisappearsautomaticallyif
youwaitforthreeseconds.
RepeatDVDchaptersandtitles
Torepeatachapterortitle,duringplaybackcontinuepressing
to
alternateamongoptions.
• Chapter---Repeatsthecurrentchapter.
• Title---Repeatsthecurrenttitle.
• ALL---Cyclesplayallchaptersandtitles
• Repeatoff---Resumesnormalplayback.
Repeatfavoritesections
Torepeatafavoritesectionyoumustfirstmarkwhereitbeginsandends.
1.PlaybacktheDVD.
2.Toidentifythebeginningofyourfavoritesection(pointA),presstheA-B
buttonwhenthesectionstartsplayingback.
3.Toidentifytheendofyourfavoritesection(pointB),presstheA-Bbutton
againwhenplaybackreachestheendofthesection.
Tocanceltherepeatplaybackandresumenormalplayback,presstheA-B
buttonagain.
Changviewingangle
Note:
Multipleanglesmustbepre-recordedontheDVD.
Lookforthemultipleanglesicon( )onthejacketoftheDVD.
• Tocyclethroughtheavailableviewingangles,presstheANGLEbuttonon
the remotewhileplayingbacktheDVD.Theplayerdisplaysthecurrent
anglenumberandthetotalnumberofanglesavailable.
Tochangetheangle,presstheANGLEbuttonagain.
Toreturntonormalviewing,presstheANGLEbuttonagain.
Page 17

16
Zoominandout
•
•
DISPLAY
REPEAT
REPEAT
Tozoomin(enlarge)theimagewhenwatchingaDVD,pressZOOMduring
playback.
AsyoupressZOOMontheremote,theplayeralternatesamongthe
availablezoomsettings(2x,3x,4x,1/2,1/3,1/4).
Tozoominwhenviewingphotographs(JPEG/JPGimages)storedona
disc,pressZOOMontheremote,theplayeralternatesamongthe
availablezoomsettings:ZOOM100%,ZOOM125%,ZOOM150%,ZOOM
200%,ZOOM75%,ZOOM50%.
Play Audio CD disc
DisplayCDinformation
Todisplaytheplayinginformation,press DISPLAY buttonontheremote
controlduringCDpalyback.Continuepressing
SINGLEELAPSED,SINGLEREMAIN,TOTALELAPSED,TOTALREMAIN,
DISPLAYOFF.
RepeatCDtracks
buttontoview
TorepeatatrackortheentireCD,press
playback.
Tocyclethroughtheavailableoptions,continuepressing
• Track---Repeatplaythecurrentmusic
• All---Cyclesplayallmusic
• Repeatoff---Resumenormalplayback
Repeatfavoritesections
Torepeatafavoritesectionyoumustfirstmarkwhereitbeginsandends.
1.PlaybacktheCD.
2.Toidentifythebeginningofyourfavoritesection(pointA),presstheA-B
buttonontheremotewhenthesectionstartsplayingback.
3.Toidentifytheendofyourfavouritesection(pointB),presstheA-Bbutton
againwhenplaybackreachestheendofthesection.
Tocanceltherepeatplaybackandresumenormalplayback,presstheA-B
buttonagain.
Play MP3 disc
buttonontheremoteduring
.
MP3isaformatforstoringdigitalaudio,compresseseachaudiotrackwith
littlelossofaudioquality.Theresulttakesupmuchlessdiscspacethanthe
trackwouldwithoutMP3compression.
MP3icons
Page 18

17
This icon in front of an item identifies a f older.
ENTER
Λ/V
ENTER
Λ/V
ENTER
SRC
This icon in front of an item identifies t he item as an MP3 file.
Procedure
1. Insert a CD that contains MP3 files into the player .The player display the
MP3 menu .
2. To select the folders and tracks to play, press the
button on the
remote control . The player displays the folder structure.
3. To choose a folder from the list, press the
button on the remote
control.
4. Press the
button on the remote control . The player displays the
contents of the selected folder.
5. To select the MP3 file, press the
6. To play the file, press the
arrow button on the remote c ontrol.
button on the remote control.
MP3 controls
To play back to the next MP3 file, press the next button ( ).
To play back the previous MP3 file, press the previous button ( ).
Repeat MP3
To repeat a single MP3 file, press the REPEAT button on the remote. To cycle
through all the following settings , continue to press REPEAT.
Repeat one---repeats the current file.
Repeat folder---repeats the current the folder.
Repeat all---cycles play all current of the disc.
Repeat off---turns off repeat and resumes normal playback.
Play USB storage and SD/MMC card
Play USB storage
1. Inserting the USB storage into the USB socket of the main unit.
2. In DVD mode, press button on the panel or press
button on the
remote control for more than 2 seconds to switch the USB mode . The
main unit will read the contents of USB storage automatically .
Page 19

18
Play SD/MMC card
SRC
1. Inserting the SD card or MMC card into the SD/MMC slot of the main unit.
2. In DVD mode, press button on the panel or press
remote control for more than 2 seconds to switch the card mode . The main
unit will read the contents of card automatically .
button on the
Page 20

19
Installation
and
Wiring
Donotattempttoinstallorserviceyourplayerbyyourself.Installationand
servicinginelectronicequipmentandautomotiveaccessories.Ifyoudonot
haveknowledgeorexperiencethisinstallationmaybedangerousandcould
exposeyoutotheriskofelectricshockorotherhazards.
Readtheseinstructionsandprecautionscarefully.Improperinstallationcan
damagethemonitorandthevehicle.
What's in the box
Inadditiontothismanual,theboxcontains:
Nameofparts Quantity
Player 1
IRremotecontrolwithbattery 1
Powercable 1
AVINcable 1
ST4.2x16screw 6
CM4x8screw 4
Metalmountingplate 1
Usermanual
Rubbergasket 1
Note:
Useonlythecontentsofthispackagetoinstallandusethesystem.
Usingaccessoriesnotprovidedwiththisplayermaydamagetheplayer.
Before you begin
Verifythatthevehicleelectricalcomponentsfunction,includingpower
1.
windows,powerdoorlocks,airconditioning,lights,etc.
2. Identifythepolarityofthedomelightcircuitandsettheswitchonthe
bottomoftheoverheadmonitorhousing.
1
3. Testfitthelocationoftheoverheadmonitorsystemtoensureitwillnot
interferewiththeoperationofthevehicle.
Ifapplicable,verifythatthemonitor,whenmounted,willnotinterferewith
4.
Page 21

20
theoperationofthesunroof.
5. Carefullymarkthelocationwithmaskingtape.
6. Lowerthevehicle’sheadlinerdowntoseeifaroofsupportbeamis
availabletoscrewthemountingbracketto.
Ifasupportbeamisnotavailable,usea3/4-inchpieceofplywoodcutto
theappropriatesize.Attachtheplywoodtotheroofofthevehicleusing
silicone.Allowforadequatedryingtime.
Determinethelocationofanyadditionalaudio/videosources.
7.
Disconnectthenegativebatteryterminalbeforemakinganywiring
8.
connections.
Caution:
Donotopenthecase.Therearenoserviceablepartsinside.Ifyou
dropanythingintotheunitduringinstallation,consultwithyourOZON
DealeroranauthorizedOZONservicecenter.
Mounting and Wiring precautions
l Thisunitisexclusivelyforvehicleswithanegativeground,12Vpower
supply.
l Thisunitmaybeinstalledwithadditionalmobileaudiocomponents,such
asadigitalcamera.
Alwaysusegreatcarewhenattachinganythingtoavehicle.Check
l
clearancesonbothsidesoftheplannedinstallationbeforedrillingany
holesorinstallinganyscrews.
l Agoodchassisgroundconnectioniscriticaltominimizeresistanceand
avoidnoiseproblems.Usetheshortestwirepossibleandsecurely
connectittothecarchassis.
l WhenroutingRCAcables,keepthemawayfromthepowercablesand
outputspeakerwires,engine,exhaustsystem,ect.Heatmaydamage
wires.
l Ifthefuseshouldblow,makesurethatallconnectionsarecorrect,the
cableshavenotcausedashortcircuit,andnowiresaredamaged.Then
replacethefusewithanewfuseofthesameamperagevalueasthe
originalfuse.Whenreplacingafuse,neverletthepowercabletouchany
metalpartorotherwire.
l Neverletdisconnectedcablesorterminalstouchmetalonthecarorany
otherconductingmaterial.
l Topreventshortcircuit,donotremovethecapsfromunusedterminalsor
fromtheendsofunconnectedcables.
l Insulateunconnectedwireswithvinyltapeorothersimilarmaterial.
Page 22

21
Warning!
vehicle
’
s
negative
battery
lead
before
making
any
power
connections.
Topreventshortcircuitsduringinstallation,disconnectthe
Installation procedure
1.Disconnectandremovetheoriginaldomelight
2.Screwthemetalmountingplatetothebeamorplywoodusingthesix
ST4.2x16screws.
Metalmountingplateshowingscrewpositions
Note: Donotcovertheoriginaldomelightopening.
3.Pullouttheoriginaldomelight’spowerwireandsignal/powercable
throughtheoriginaldomelightopening.
4.Placetherubbergasketontheplayer.
5.Identifythedomelightwiresinthevehicleandconnectthemtothe
correspondingdomelightwireontheoverheadmonitorsystem
6.Pluginanyaudio/videosourcecables.Pluginthepowerharnessintothe
overheadmonitorsysyeminthefollowingorder:groundwire,batterywire,
ACCwireanddoorwire.
Note:
notconnectthiswire,thebatterychangemaydrainoffprematurely.
7.Carefullyholdtheoverheadmonitoruptothemetalmountingplate.
ScrewinthefourCM4x8screwsmakingsurethewiresarenotintheway.
8.
DonotforgettoconnecttheredACCwiretotheignitionswitch.Ifyoudo
Page 23

22
9.Reconnectthebattery
Checkthecar’sbrakelights,blinkers,wiper,etc.toensuretheyare
10.
workingproperty.
Wiring diagram
Note:Slidethepolarityswitchto"-"ifyourvehicle'spowersupplysystemis
negative;Slidethepolarityswitchto"+"ifyourvehicle'spowersupply
systemispositive.
Page 24

23
System
Setup
Press SETUP ontheremotecontroltoaccessthesetupmenu.
Λ
/
V
</>
Λ
/
V
ENTER
<toreturn
the
previous
grade
menu
.
Press
SETUP
TV
DISPLAY:
ANGLE
MARK:
OSD
LANG:
CAPTIONS:
SCREEN
SAVER:
LOGO
TYPE:
DOWNMIX:
DUAL
MONO:
DYNAMIC:
TV
TYPE:
AUDIO:
SUBTITLE:
1.
2.Press
3.Press
Press
4.
5.Press
6.Press
7.
Menu Description
buttonontheremotecontroltoselectamongmenuitems.
buttononremotecontroltoalternatesetitems.
buttontoselecttheoptionyouwishtochange.
toconfirmyourselection.
toexitthesetupmenu.
modifiesthedisplayifitdoesnotmatch
thewidthtoheightratiotheDVDuses.
·NORMAL/PS ·NORMAL/LB ·WIDE
Selectsadifferentangleifthebackof
theDVDjacketcontainsamultipleanglesicon.
·ON ·OFF
GENERALSETUP
PAGE
SPEAKERSETUP
PAGE
PREFERENCE
PAGE
SelectsalanguageforDVDplaymenu.
·ENGLISH ·FRENCH ·SPANISH ·ITALIAN
SelectsthecaptionforDVDplay.
·ON ·OFF
Protectsthescreenifitpausedabout
5minutes.
·ON ·OFF
SelectsdifferentstartLOGOpicture.
·DEFAULT ·CAPTURED
AppliestoDolbydigitalsound.
·LT/RT ·STEREO
Selectsthedifferentchannelsofsound.
·STEREO ·L-MONO ·L-MONO ·MIX-MONO
SelectsthedifferentratinglevelofdB.
·FULL ·3/4 ·1/2 ·1/4 ·OFF
SelectstheTVsystem.
·PAL ·AUTO ·NTSC
Selectstheaudiotracklanguage.
· ENGLISH · FRENCH · SPANISH · GERMAN
·CHINESE ·RUSSIAN ·ITALIAN
Selects the language of the subtitles
displayedonthescreen.
· ENGLISH · FRENCH · SPANISH · GERMAN
·CHINESE ·RUSSIAN ·ITALIAN ·OFF
Page 25

24
Note:
DISC
MENU:
Selectsthelanguageofthecurrentdisc.
PARENTAL:
PASSWORD:
DEFAULT
:
· ENGLISH · FRENCH · SPANISH · GERMAN
·CHINESE ·RUSSIAN ·ITALIAN
Restrictstheviewingofmoviestochildren
ofappropriateagelevelsonly.Youcanselect1to8.
1KIDSAF (safeforchildren)
2G(generalaudience)
3PG (parentalguidancesuggested)
4PG13 (somematerialunsuitableforchildrenunder13)
5PGR (somematerialunsuitableforchildrenunder17)
6R(somematerialunsuitableforunder17)
7NC17 (notrecommendedviewingforchildrenunder17)
8ADULT (Onlyforadultsduetographiccontent.Thisisthe
defaultsetting.)
Afteryouselecttheparentalsetting,pressENTER,then
enterthe4-digitpassword(defaultis3308).PressENTER
againtoconfirm.
Letsyouchangethe4-digitpassword
usingthenumberkeysontheremotecontrol.The
defaultpasswordis3308,butnolongerworksafteryou
changethepassword.
Resetsallsettingstothefactorydefaults.
AfteryouinputsomepicturestotheplayerasLOGOpicture,select
CapturedinLOGOTYPEmenu,thenyoucanuseSUBTITLEkeyonthe
remotecontroltochangethestartLOGOpictureonebyone.SelectDefaultin
LOGOTYPEmenutorecoverthedefaultstartLOGOpicture.
Page 26

25
Troubleshooting
Problem
Cause
Solution
.
2.
Ifoperationfreezes,thescreengoesblackortheunitshouldotherwisenot
functionproperly,tryturningtheunitonandoff.Iftheunitdoesnotrespond,
presstheresetswitchontheFrontPanel.
Playerdoesnot
playdisc
Theplayer
suddenlystoppedworkingor
thescreenwent
black
Playerdoesn’t
turnon
Playeroperates
erratically
PictureSkips
Occasions
Discinsertedincorrectly
Discformatisnot
supported
Discisdirtyorscratched Cleanorreplacethedisc.
Playererror
Thecarignition(or
ACC/Accessory)isoff
Condensationintheplayer
Batteryneedsreplacing Replacethebattery.
DirtyIRwindowonthe
Playerorremotecontrol
Looseconnections
Discisdirtyorscratched Cleanorreplacethedisc.
Reinsertthediscwiththelabel
sideup(facingtheceiling).
Checkthediscformat.
Tryturningtheplayeroffandon
Iftheplayerstilldoesn’t
respond,presstheresetbutton.
Insertthekeyintotheignition
andturnittoACC/Accessory.
Waitforaboutonehouroruntil
condensationevaporates.
Cleantheplayer’sandthe
remotecontrol’sIRwindows.
Checkandtightenall
connections.
Blurpictureon
thescreen.
Thepictureon
thescreenis
dark.
Interferedbyshortdistancedstrong
interference.
(E.g.highvoltagewire,
transformationstationor
aircraftetc…)
Theequipmentlocates
1.
atalowtemperature
area.
Brightnessissettoo
low.
Movethevehicleawayfrom
theinterference.
1.Thisisthecharacteristicsof
LCDdisplayinlowtemperature,
itwillrestoretonormal
brightnessafterstartingthe
displayforfewminutes.
2.Adjustthebrightnesssetting.
Page 27

26
Specifications
Specificationsanddesignaresubjecttochangewithoutnotice.
PowerSource Vehiclebattery(DC+10V~+16V)
OperatingVoltage DC+14V
Mechanism ManualOpen/Close
DisplayAngle VerticalAdjustable:Up/Down<120°
Pixel 800RGB(W)x480(H)
Viewingangle(up/down/left/right) 45/55/65/65
Operatingcurrent <2000mA(TypicalVDD=14V)
DomeLight <2W
OperationTemperature -5℃ to+50℃
StorageTemperature -20°Cto+70°C
Page 28

 Loading...