

Page 1

USER MANUAL
M-DSPA.401
DSP
POWER
AMPLIFIER
Page 2

www.macrom.it
Page 3

- 3 -
Contents
Warranty ....................................................... 4
Safety information ........................................ 4
Features ....................................................... 4
Specifications ............................................... 4
Product overview .......................................... 5
Front panel ............................................... 5
Speaker connectro pins layout ................ 5
How to install and connect the APP ............ 6
APP installation ........................................ 6
APP overview ............................................ 6
APP overview ................................................ 7
Main .......................................................... 7
Equalizer ................................................... 8
Crossover filter ......................................... 9
Setting channels ..................................... 10
Time alignment ...................................... 11
Selector gain level .................................. 12
Selector frequency cuts ......................... 12
Slope selector ......................................... 12
Connections ................................................ 13
Plug & Play ............................................. 13
Universal ................................................. 13
(1) System extension .............................. 14
(2) System extension .............................. 14
Declaration of Conformity .......................... 15
Page 4
- 4 -
Features
• DSP Bluetooth setting control via APP for Android and iPhone smart phones.
• 3 way active crossover, selectable from By-pass, Low-pass, Hi-pass and Band-pass.
• Time alignment in“cm” for 4 channel output selectatble from 0 to 230 cm.
• 7-Band parametric equalizer
• Input setting controller, easy to set Gain, Mute, changing Phase of each channel
• SRS 3D surround sound
• Dynamic Bass setting
• 5 memory preset sound in the amplifier
• Unlimited sound setting save in the mobile phone
Warranty
Thank you for purchasing this Macrom product. Should your product need warranty service, please return
it to the shop where you buy it or to the Macrom distributor in your country. The warranty does not cover
damage due to improper use and or installation, incorrect connections to power supply and audio sources,
exposure to excessive humidity, unauthorized repair attempts or modifications.
Safety information
Before beginning with installation, disconnect the wire from the battery ground terminal to prevent any
short during installation.
This subwoofer must properly installed by Macrom authorized installer. Impropers installation may
damege the unit and /or the vehicle. Verify all electrical and drivability of the vehicle before the installation.
Specifications
M-DSPA.401 play a music from a RCA line input or from a High level input.
• Output rated power 150 Watt by 4 channel (76W RMS).
• The operating frequency range is from 20Hz to 20KHz.
• Signal to noise ratio > 120dB.
• Dynamic range > 100dB.
• THD: 1KHz < 0.001%.
• Standby current < 0.1mA
• Max current consumption 20A.
• Operation voltage from 9Volts to 15.5Volts.
• Dimensions: 195mm 130mm 38mm
Page 5
- 5 -
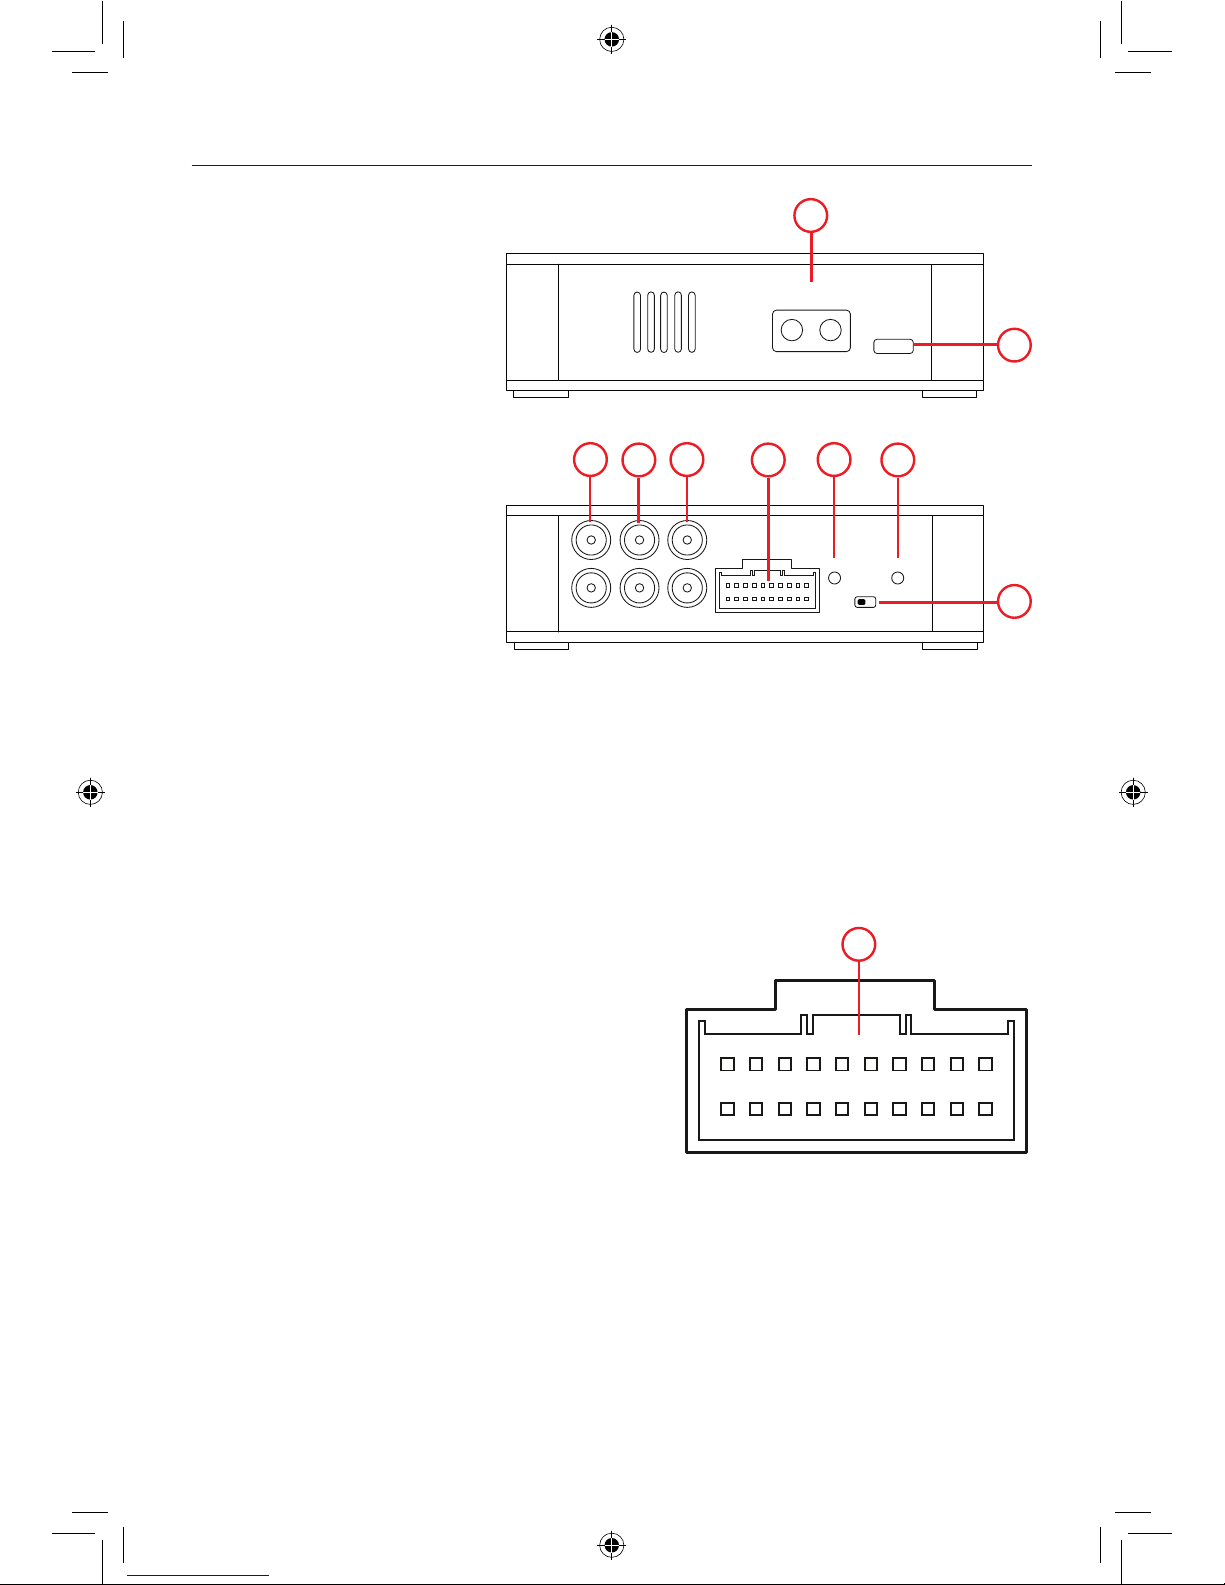
Front Panel
1. Power DC connector
2. Fuse [20A]
3. Subwoofer output
4. Front output
5. Rear Output
6. Speakers connector
7. LED power indicator
8. LED effect indicator
9. ON/OFF effect swict
Product overview
Notice:
The graphic in this manual is for reference only, and may be different from the actual unit.
1. Front/Right + input
2. Front/Right - input
3. Front/Left + input
4. Front/Left - input
5. Rear/Left + input
6. Rear/Left - input
7. Rear/Right + input
8. Rear/Right - input
9. Remote output (+12V/Max 500mA)
10. Acc input
11. Rear/Right - output
12. Rear/Right + output
13. Rear/Left - output
14. Rear/Left + output
15. Front/Right - output
16. Front/Right + output
17. Front/Left - output
18. Front/Left + output
19. + Batt (12volts)
20. GND (Ground)
Speaker connector pins layout
SUB W
FRONT REAR
OUT
PUT
POWER EFFECT
SPEAKER
OFF/ON
R
L
1
10
20 11
POWER IN
GND BATT
FUSE
(20A)
M-DSPA.401
1
2
3
4
5
6
7
8
9
1
2345
6
7
89
19 18 17
16 15 14 13
12 11
6
Page 6

- 6 -
APP Installation
1. Download the APP of M-DSPA.401 in the Google Play or Apple store by search "M-DSPA.401"
2. Install the APP to your Android or iPhone smart mobile.
3. Turn ON Bluethooth on your mobile and search "M-DSPA.401", then PAIR it. If requiredt the
pairing code is :1234.
4. Open the APP "M-DSPA.401" and click [ Connect ], then you will connect to the amplifier and
you can set your own sound by the APP.
5. When you finish the setting, please click [ EXIT ] to exit from the APP.
APP overview
How to install and connect the APP
Main
Parametric equalizer
Crossover Filter
Setting channels
Time alignment
Gain level selector
Frequency cuts selector
Slop selector
Page 7

- 7 -
APP overview
1. Parametric Equalizer; click on it to obtain the EQ functions.
2. Time Alignment; click on it to obtain the TA functions.
3. Setting; click on it to obtain the setting functions.
4. Favorite preset; you can load the 5 favorite setting saved in the amplifier.
5. Save to Amplifier; after you finish the setting, you can save to amplifier your own setting in the
favorite five preset.
6. Exit; after finisc the sound setting please click (EXIT) to exit the APP.
7. Connect; click (Connect), then you will connect the amplifier and you can set your own sound by
the APP.
8. Load preset; click to load the presets stored on your PC.
9. Save to phone; after you finish the setting, you can create the name of your sound setting and
when you click (OK) the sound setting will be saved in your phone memory.
10. Filter: click on it to obtain the crossover functions.
Main
3
4
7
5
6
8
10
9
1 2
Page 8

- 8 -
APP overview
1. 7 Bands equalizer adjustable from +15dB to -15dB.
2. Frequencies setting adjustable from 20Hz to 20.000Hz
3. Q factor variable from 0.3 to 9.9
4. SRS 3D surrond sound
5. Rear, setting equalizer rear section
6. Front, setting equalizer front section
7. Setting; click on it to get the setup functions.
8. Main menu; click on it to get the main menu.
9. Time Alignment; click on it to get the time alignment functions.
10. Filter; click on it to get the filter crossover functions.
11. All, setting of equalization parameters for both sections (front and rear)
12. Reset
13. Setting Dynamic Bass
Equalizer
1
2
11
3
13
12
5
4
7
89
6
10
Page 9

- 9 -
APP overview
1. Front graphic view
2. Front low pass frequencies setting, adjustable from 20Hz to 20.000Hz
3. Front low pass slope, selecatble from 6-12-18-24/dB or Bypass
4. Rear graphic view
5. Rear low pass frequencies setting, adjustable from 20Hz to 20.000Hz
6. Rear low pass slope, selecatble from 6-12-18-24/dB or Bypass
7. Subwoofer graphic view
8. Subwoofer low pass frequencies setting, adjustable from 20Hz to 20.000Hz
9. Subwoofer low pass slope, selecatble from 6-12-18-24/dB or Bypass
10. Main menu; click on it to obtain the mani menu.
11. Parametric Equalizer; click on it to get the equalization functions.
12. Setting; click on it to obtain the setting functions.
13. Time Alignment; click on it to obtain the time alignment functions.
14. Subwoofer high pass frequencies setting, adjustable from 20Hz to 20.000Hz
15. Subwoofer high pass slope, selecatble from 6-12-18-24/dB or Bypass
16. Rear high pass frequencies setting, adjustable from 20Hz to 20.000Hz
17. Rear high pass slope, selecatble from 6-12-18-24/dB or Bypass
18. Front high pass frequencies setting, adjustable from 20Hz to 20.000Hz
19. Front low pass slope, selecatble from 6-12-18-24/dB or Bypass
Crossover filter
19
17
15
8
9
5
6
2
3
7
4
10
18
16
14
13
12
1
11
Page 10

- 10 -
APP overview
1. FR-Gain adjustable from -90 to +5
2. FR-Phase switch from 0° to 180°
3. RR-Gain adjustable from -90 to +5
4. RR-Phase switch from 0° to 180°
5. SW - Selector phase adjustable from 0 ° to 180 °.
6. Slider for adjusting gain levels
7. MUTE switches for individual channels
8. Main menu; click on it to get the main menu.
9. Parametric Equalizer; click on it to get the equalization functions.
10. Time Alignment; click on it to get the time alignment functions.
11. Filter; click on it to get the crossover functions.
12. SW - Gain regolabite -90 to +5
13. RL - Selector phase adjustable from 0 ° to 180 °.
14. RL - Gain regolabite -90 to +5.
15. FL - Selector phase adjustable from 0 ° to 180 °.
16. FL - Gain regolabite -90 to +5.
Setting channels
16
15
2
1
4
3
5
14
13
6
11
10
9
8
12
7
Page 11

- 11 -
APP overview
Time alignment
1. Increase (+) front right speaker delay.
2. Decrease (-) front right speaker delay.
3. FR - adjustable delay Viewer from 0 cm to 230 cm.
4. Increase (+) Right rear speaker delay.
5. Decrease (-) late stage right rear speaker.
6. RR - adjustable delay Viewer from 0 cm to 230 cm.
7. Decrease (-) subwoofer delay.
8. Main menu; click on it to get the main menu.
9. Parametric Equalizer; click on it to get the equalization functions.
10. Setting; click on it to get the setup functions.
11. Filter; click on it to get the crossover functions.
12. Reset the parameter
13. Increase (+) subwoofer delay.
14. RL - viewer adjustable delay from 0 cm to 230 cm.
15. Decrease (-) left rear speaker delay.
16. Increase (+) left rear speaker delay.
17. FL - Viewer of the adjustable delay from 0 cm to 230 cm.
18. Decrease (-) front left speaker delay
19. Increase (+) front left speaker delay
18
17
19
3
2
1
6
5
4
15
14
16
13
7
8
12
11
10
9
Page 12

- 12 -
APP overview
Selector gain level
1. Cancel, selection cancel.
2. Type the value for the level between -90 to + 5dB.
3. Cursor to change the value of the level.
4. OK, press to confirm the selection.
Selector frequency cuts
1. Cancel, selection cancel
2. Type the value of the selected cutoff frequency between 20Hz to 20,000Hz.
3. OK, press to confirm the selection.
1
2
Slope selector
1. Cancel, selection cancel
2. Slope selector of 6 dB / octava
3. Slope selector of 12dB / octava
4. Slope selector 18 dB / octava
5. Slope selector 24 dB / octava
6. Bypass Switch (band pass)
NOTE: no cutting or gradient applied to the selected section.
2
3
4
5
6
1
3
1
2
4
3
Page 13

- 13 -
Connections
Plug & Play
1. Plug & Play.
Interpose the Plug & Play wiring between the Car Stereo and the connector coming from the
vehicle and connect the ends to ‘M-DSPA.401 amplifier.
Note: check the available wiring on www. macrom.it
2. OPTIONAL: For more power and sound quality you can proceed with a power upgrade as shown
in the diagram.
POWER IN
GND BATT
FUSE
(20A)
SUB W
FRONT REAR
OUT
PUT
POWER EFFECT
SPEAKER
OFF/ON
R
L
M-DSPA.401
1
10
20 11
Ground
(Chassis)
Battery
-+
Ground
(Chassis)
Car Stereo
RRRLFL FR
Speaker
Input
Speaker
Output
Remote Output
(+12V )
BATT +12V
Ground (Chassis)
POWER IN
GND BATT
FUSE
(20A)
SUB W
FRONT REAR
OUT
PUT
POWER EFFECT
SPEAKER
OFF/ON
R
L
M-DSPA.401
1
10
20 11
Ground
(Telaio)
Battery
-+
Ground
(Telaio)
Car Stereo
Remote output
(+12V )
1
2
Universal
Follow the instructions on page 5, paragraph 6.
2
Page 14

Connections
1 System Extension
Thanks to the pre-amplified outputs on the product you can expand the system by adding a powered
subwoofer.
SUB W
FRONT REAR
OUT
PUT
POWER EFFECT
SPEAKER
OFF/ON
R
L
1
10
20 11
Car Stereo
Uscita remota
(+12V )
Subwoofer
BATT +12V
Ground (Telaio)
SUB W
FRONT REAR
OUT
PUT
POWER EFFECT
SPEAKER
OFF/ON
R
L
1
10
20 11
Car Stereo
RRRLFL FR
Speakers
Input
Speakers
output
Remote output
(+12V )
BATT +12V
Ground (Chassis)
Power
amplifier
BATT +12V
Ground (Chassis)
SUB
DO NOT USE
2 System Extension
Thanks to the pre-amplified outputs on the product you can expand the system by adding a
multi-channel amplifier (4 + 1) to enhance the sound system.
- 14 -
Page 15

www.macrom.it
Declaration of Conformity
M-DSPA.401 DSP POWER AMPLIFIER
- 15 -
Hereby, Aldinet S.p.A, declares that this type of M-DSPA.401, Brand Macrom is in compliance with the
essential requirements and other relevant provisions of Directive R&TTE 1999/5/EC.
The Declaration of Conformity is available at:
Aldinet S.p.A.
Viale Colombo, 8 - 20090 Trezzano S/N (MI) Italy
and available at www.macrom.it
Made in China by
Aldinet S.p.A.
Page 16

ALDINET S.p.A
Viale C. Colombo, 8 - 20090 Trezzano s/N (MI) - Itlaly
Tel. +39 02 484781
www.macrom.it
 Loading...