

Page 1
HDR Pro™
User’s Guide
HDR24/96 Software Upgrade and FireWire® Drive Bay
Page 2
HDR Pro
CAUTION AVIS
RISK OF ELECTRIC
DO NOT OPEN
RISQUE DE
NE PAS OUVRIR
CAUTION: TO REDUCE THE RISK OF ELECTRIC SHOCK
DO NOT REMOVE COVER (OR BACK)
NO USER-SERVICEABLE PARTS INSIDE
REFER SERVICING TO QUALIFIED PERSONNEL
ATTENTION: POUR EVITER LES RISQUES DE CHOC
ELECTRIQUE, NE PAS ENLEVER LE COUVERCLE. AUCUN
ENTRETIEN DE PIECES INTERIEURES PAR L’USAGER. CONFIER
L’ENTRETIEN AU PERSONNEL QUALIFIE.
AVIS: POUR EVITER LES RISQUES D’INCENDIE OU
D’ELECTROCUTION, N’EXPOSEZ PAS CET ARTICLE
A LA PLUIE OU A L’HUMIDITE
The lightning flash with arrowhead symbol within an equilateral
triangle is intended to alert the user to the presence of uninsulated
"dangerous voltage" within the product’s enclosure, that may be
of sufficient magnitude to constitute a risk of electric shock to persons.
Le symbole clair avec point de fl che l’int rieur d’un triangle
quilat ral est utilis pour alerter l’utilisateur de la pr sence
l’int rieur du coffret de "voltage dangereux" non isol d’ampleur
suffisante pour constituer un risque d’ l ctrocution.
The exclamation point within an equilateral triangle is intended to
alert the user of the presence of important operating and maintenance
(servicing) instructions in the literature accompanying the appliance.
Le point d’exclamation l’int rieur d’un triangle quilat ral est
employ pour alerter les utilisateurs de la pr sence d’instructions
importantes pour le fonctionnement et l’entretien (service) dans le
livret d’instruction accompagnant l’appareil.
CHOC
SHOCK
ELECTRIQUE
Important Safety Instructions
1. Read instructions — Read, understand and follow all safety and
operating instructions before using this Mackie product.
2. Retain Instructions — Keep these safety and operating
instructions for future reference.
3. Heed Warnings — Follow all warnings on this Mackie product
and in these operating instructions.
4. Water and Moisture — Do not use this Mackie product near
water – for example, near a bathtub, kitchen sink, garden hose,
incontinent poodle, sweaty drummer, etc. – or when condensation has formed on the unit.
5. Cleaning — Clean only with a dry cloth.
6. Heat and Ventilation — Locate this Mackie product away from
heat sources such as radiators, campfires, compost pits, heliarc
welders, magma flows, etc. Do not block the ventilation
openings or install in spaces that prevent adequate air circulation
to the unit.
7. Power Sources — Connect this Mackie product only to a power
source of the type described in these operating instructions or as
marked on the product.
8. Power Cord Protection — Route power supply cords so that they
are not likely to be walked upon, tripped over, or abraded by
items placed upon or against them. Pay particular attention to
cords at plugs, convenience receptacles, and the point where
they exit the product.
9. Object and Liquid Entry — Do not drop objects or spill liquids
into this Mackie product. Clean only with a damp cloth; do not
clean with liquid or aerosol cleaners.
10. Attachments — Use this Mackie product with only the
accessories specified in this manual.
11. Damage Requiring Service — This Mackie product should be
serviced only by qualified service personnel when:
A. The power supply cord or the plug has been damaged; or
B. Objects have fallen onto, or liquid has spilled into the unit; or
C. The unit has been exposed to rain or water; or
D. The unit does not appear to operate normally or exhibits a
marked change in performance; or
E. The unit has been dropped, or its chassis damaged.
12. Servicing — Do not attempt to service this Mackie product. All
servicing should be referred to the Mackie Service Department.
13. Lightning — Unplug the product during lightning storms or
when unused for long periods of time. Note that this Mackie
product is not completely disconnected from the AC mains
service when the power switch is in the OFF position.
14. Grounding and Polarization — To prevent electric shock, do not
use the polarized plug with an extension cord, receptacle or
other outlet unless the blades can be fully inserted to prevent
blade exposure. Do not defeat the grounding by plugging into an
ungrounded receptacle or ground lift adapter.
This apparatus does not exceed the Class A/Class B (whichever is
applicable) limits for radio noise emissions from digital apparatus as
set out in the radio interference regulations of the Canadian
Department of Communications.
ATTENTION — Le présent appareil numérique n’émet pas de bruits
radioélectriques dépassant las limites applicables aux appareils
numériques de class A/de class B (selon le cas) prescrites dans le
réglement sur le brouillage radioélectrique édicté par les ministere
des communications du Canada.
FCC Information
NOTE: This equipment has been tested and found to comply
with the limits for Class B digital devices, pursuant to Part 15 of
the FCC Rules. These limits are designed to provide reasonable
protection against harmful interference when the equipment is
operated in a commercial installation. This equipment generates,
uses, and can radiate radio frequency energy and, if not installed
and used in accordance with the instruction manual, may cause
harmful interference to radio communications. Operation of this
equipment in a residential area is likely to cause harmful
interference in which case the user will be required to correct
the interference at his own expense.
WARNING — To reduce the risk of fire or electric shock, do
not expose this appliance to rain or moisture.
Part No. 0001124 Rev. A1 11/02
©2002 Mackie Designs Inc. All rights reserved.
Printed in the U.S.A.
2
HDR Pro
Page 3
Introduction
Thank you for choosing Mackie Designs for
your hard disk recording solution. HDR Pro™ is a
major step in our continued support of the
HDR24/96 Hard Disk Recorder/Editor. HDR Pro
is not a required upgrade, but adds a new dynamic
to the already rich feature set of the HDR24/96.
HDR Pro includes the HDR Pro software for
your HDR24/96, and the FireWire
HDR Pro software allows you to save your
HDR Project file as a Mac-based Pro Tools
Session file (versions 3.x, 4.x, or 5.x), and allows
Pro Tools Session files to be imported directly into
an HDR Project. You can save the files directly to
the internal drive for FTP transfer, or to a
removable drive in the HDR’s drive bay (Mackie
Media M90). The removable drive can then be
transferred to the HDR Pro FireWire drive bay,
and accessed from the Macintosh desktop through
the FireWire connection. Copy the newly created
Pro Tools Session to your Pro Tools drive and
you’re ready to wield your Pro Tools magic on
your HDR24/96 recorded digital audio tracks.
The first step in using HDR Pro is installing the
software in the HDR24/96.
®
drive bay.
®
Installing the Software
1) With the HDR24/96 powered off, insert
installation Disk 1 into the HDR24/96
floppy drive, and power the HDR24/96 up.
2) The HDR24/96 will boot into the installer
program automatically. Follow the prompts
on the LCD screen.
3) Insert Disk 2 into the floppy drive when
prompted, and select “Continue.”
4) When the HDR24/96 has completed reading
both installer disks, it will ask you if you
want to install HDR Pro 1.4. Click “OK” to
finish the installation, or “Cancel” to cancel
without writing any files to disk.
5) When the installation is complete, remove
Disk 2 from the floppy drive, turn the
HDR24/96 off, and then turn it back on
again to begin using the new software.
User’s Guide
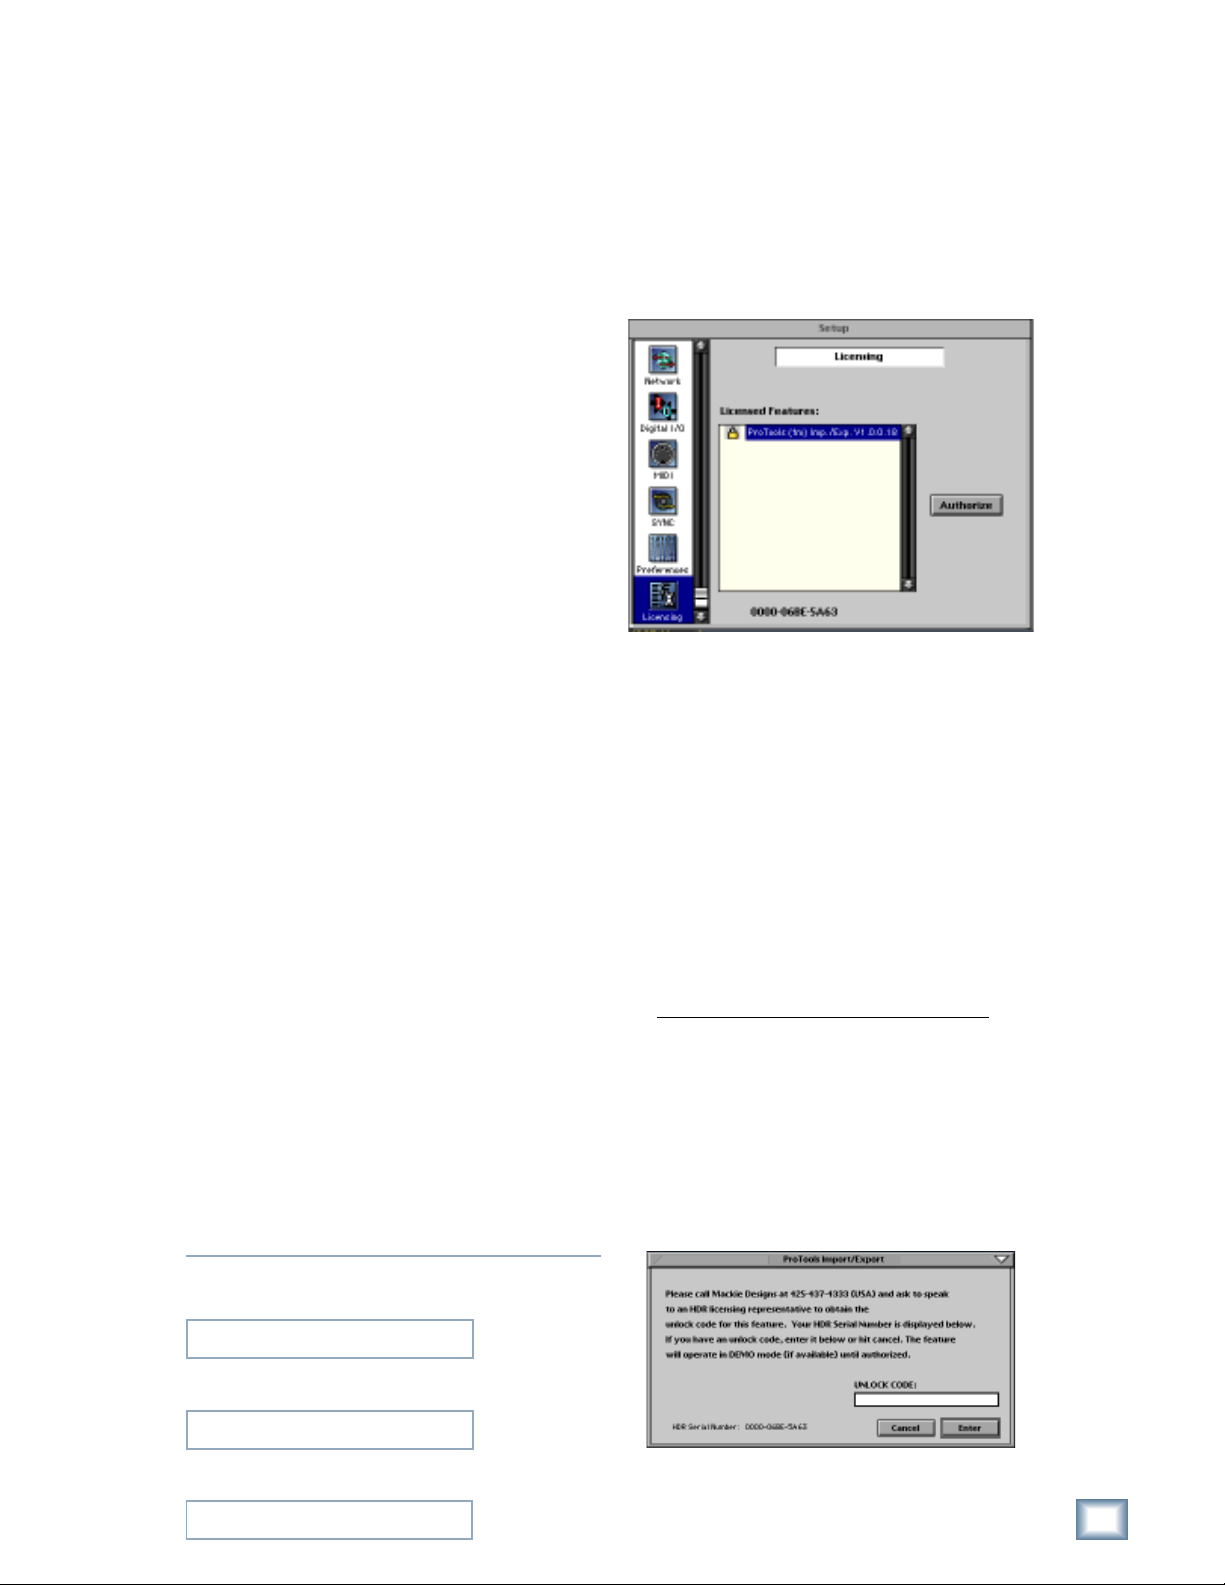
Licensing
It is necessary to authorize the software in
order to use the “Import/Export Pro Tools”
feature.
To authorize the software:
• Click the Licensing icon in the Setup
window.
Unlock procedure
1. Locate the HDR’s Electronic Serial Number
(ESN). This is displayed at the bottom of the
Licensing window. The 12 digit ESN is
made from numbers 0-9 and letters A-F.
2. Locate the HDR software upgrade serial
number, which is printed on the floppy disk
label.
3. To obtain the unlock code, have the ESN
and software upgrade serial number ready.
Then you have two options:
• Log on to the Mackie authorization web
page at:
http://www.mackie.com/HDRauthorize,
or
• Phone Mackie Tech Support at:
800-258-6883 (425-487-4333 outside the U.S.)
4. When you have obtained an unlock code,
click Authorize in the Licensing window
and enter your unlock code in the UNLOCK
CODE box. Click Enter, reboot the HDR, and
enjoy your newly expanded software.
Please write your serial number here for future
reference:
Purchased at:
Date Of Purchase:
User’s Guide
3
Page 4

HDR Pro
Exporting HDR Projects in Pro
Tools Session Format
To export an HDR Project as a Pro Tools Session
from the GUI:
1. Select Export ProTools... from the File
menu.
4. Click the box under Audio Files to select
the file format for the audio files. Pro Tools
v3.x and 4.x use SD-II only, while Pro Tools
v5.x can use SD-II, Wave, and AIFF files.
5. Click New to save the new Pro Tools
Session. The more audio files there are in
the Project, the longer it takes to export.
6. When the export process is complete, an
alert message informs you that the Session
files are saved to the “Pro Tools Export”
folder.
2. In the Export ProTools Session dialog box,
you can enter a name for the Session. Click
the box under Drive Select to choose which
drive the Pro Tools Session files are to be
exported to, internal or external.
3. Click the box under Session Type to select
the Pro Tools version you are using (3.x,
4.x, or 5.x).
7. Click Continue to finish.
Importing Pro Tools Session Files
To import a Pro Tools Session from the GUI:
1. Select Import ProTools... from the File
menu.
4
HDR Pro
Page 5

2. In the Import ProTools Project dialog box,
select the Pro Tools Session file you want to
import as an HDR Project file. You can
navigate to the drive and folder where the
file is located in the Location and Drive
Select boxes at the top of the window.
User’s Guide
Connecting the HDR Pro FireWire
Drive to a Macintosh
1. Plug the linecord into the IEC socket on the
back of the FireWire drive. Plug the other
end into an AC socket properly configured
for your particular model.
2. Connect the supplied FireWire patch cable
between one of the FireWire ports on the
back of the FireWire drive and the FireWire
port on the Macintosh. It doesn’t matter
which port you use.
3. That’s all there is to it!
Note: Macintosh computers require Mac OS 9.1 or
higher. PC computers require Windows 2000 or
Windows XP.
1. The Linecord goes here 2. The FireWire goes here (Port 1 or 2)
3. Click Open to save the new Pro Tools
Session. The Confirm Import dialog box
opens.
4. Click OK to save the Pro Tools Session as
an HDR Project file, or click Cancel to exit.
5. The New Project dialog box opens. Enter a
name for the Project, select whether to save
it on the external or internal drive, and
select whether it should be 44.1/48 kHz or
88.2/96 kHz.
AC INPUT
1 2
Macintosh Setup
On a Macintosh, you should do the following:
1. Go to the Apple drop down menu and select
Control Panels – File Exchange.
2. Select the PC Exchange tab and add the
following entries:
Ext: Application File Type
pt3 Pro Tools x.x PSes
pt4 Pro Tools x.x PT4S
pt5 Pro Tools x.x PT5S
sd2 Pro Tools x.x
or QuickTime Player SD2F
where x.x is the version of Pro Tools
installed on your system (e.g., 5.1)
Installing or Removing a Mackie
Media Tray
AUDIO
L
R
6. Click New to finish.
To install or remove a Mackie Media tray:
1. Make sure the power is off on the FireWire
Drive.
2. To install a new M•90 drive, first remove
the blank plate by inserting the key and
turning it a quarter-turn counterclockwise.
Pull out from the edge of the plate closest
to the key to remove it. Slide the media tray
User’s Guide
5
Page 6

HDR Pro
into the front panel drive bay. Press it firmly
into place, and latch it by pressing the bail
handle downward until it’s fully seated.
3. Insert the key into the lock and turn it a
quarter-turn clockwise. The key locks the
drive into place and powers the tray.
4. Push in the Power switch on the FireWire
drive to turn it on. The M90 drive will
appear on the Macintosh desktop.
Power Switch
5. To remove a drive, first drag the M90 drive
icon to the trash and turn the power off on
the FireWire drive. Unlock the drive by
inserting the key and turning it a quarterturn counterclockwise. Two keys are
packed with the FireWire drive, and one
with each M•90 drive.
6. Lift the handle to release the drive, and pull
it out of the drive bay.
Note: Mackie Media are hard drives, and as we all
know, hard drives involve some pretty intricate
technology. So don’t shake the little darling, and if
a tray has just come in from a freezing car or
airplane cargo hold, do not install it until it has
reached room temperature.
Service
Service for the FireWire drive bay bought and
residing in the United States is available only at
Mackie Designs. HDR Pro owners outside the U.S.
should consult their local Mackie dealer or
distributor for service.
1. Please verify that the problem does indeed
lie with the FireWire drive bay, and not the
result of a connection or computer problem.
Assuming you’ve done so...
2. Have your FireWire drive bay serial number
ready — hopefully you copied it down in the
front of this manual (page 3).
3. Call Mackie Tech Support at 800-258-6883
(8 AM to 5 PM, Pacific Time) to explain the
problem. If it can’t be solved over the phone,
you will be issued an RA (Return Authorization)
number. You must have an RA number before
you can obtain service from the factory.
4. Pack the FireWire drive bay in the original
box, with the original foam innards or other
packing materials. You DID save that stuff,
didn’t you? If you didn’t, you’ll need to
purchase a new box and packing materials
from Mackie. Mackie is not responsible for
any damage resulting from shipments of
product in “non-original” packaging.
5. Include a legible note stating your name,
return shipping address (no P.O. boxes of
course), daytime phone number, the RA
number, and a detailed description of the
problem, including how we can duplicate it.
6. Write the RA number in
top of the box.
7. Ship the FireWire drive bay to Mackie. We
recommend you get insurance on the
package. Send it to this address:
Mackie Designs Inc.
Service Department
16140 Wood-Red Rd. NE, Ste. 5
Woodinville, WA 98072
8. We’ll try to fix the FireWire drive bay
within five business days. Ask Tech
Support for current turnaround times when
you call for your RA number. We normally
send everything back prepaid using threeday shipping. However, if you rush your
FireWire drive bay to us via next-day air,
we’ll do the same for the return trip. This
does not necessarily apply to non-warranty
service.
HUGE letters on
6
HDR Pro
Page 7

Specifications
User’s Guide
Power Requirements
Power Supply: U.S. version: 120 Vac, 50-60 Hz
International version: 240 Vac, 50-60 Hz
Physical
2 Firewire Ports: IEEE1394
Height: 2.5 in (64 mm)
Width: 7.75 in (197 mm)
Depth: 9.75 in (248 mm)
Please read the included warranty information,
then complete and return the Warranty Registration
card. You can also register online at www.mackie.com.
“Mackie,” the “Running Man” figure, and “HDR Pro”
are trademarks or registered trademarks of Mackie
Designs Inc. All other brand names mentioned are
trademarks or registered trademarks of their
respective holders, and are hereby acknowledged.
Weight (no drive): 3.4 lbs (1.5 kg)
© 2002 Mackie Designs Inc.
All Rights Reserved.
Printed in the U.S.A.
HDR Pro Supported Features
HDR Pro Export Chart (Version 1.4 Build 419)
Audio File Types .SD2 .SD2 .SD2, .AIF, Broadcast.WAV
Pro Tools 3.xFeatures
Supported Bit Depth 16 bit 16 bit 16 bit and 24 bit
Region Definitions Yes Yes Yes
Track Names PT tracks named "Audio Track 001—Audio Track 024"
Region Names Based on HDR Pro region names and edit order
Region List Yes Yes Yes
Fade Ins No No No
Fade Outs No No No
Crossfades No, the first region is extended to cover the fade region
Looped Regions Yes, exported as separate regions
Locked Regions Yes Yes Yes
Sample Rate Yes Yes Yes
Bit Depth Yes, but bit depth for 3.x or 4.x PT sessions Yes, but since PT 5.x supports 16 bit and 24 bit
is limited to 16 bit only — HDR project sessions, the HDR audio files used in a
should be set to 16 bit when recording Project and the global HDR Bit Depth setting
must match when exporting
Virtual Tracks Active track is exported — virtual tracks to the Pro Tools region bin
Original Time Stamp Yes Yes Yes
Pro Tools 4.x Pro Tools 5.x
HDR Pro Import Chart (Version 1.4 Build 419)
Audio File Types .SD2 .SD2 .SD2 .SD2, .AIF, Broadcast.WAV
Pro Tools 3.xFeatures
Supported Bit Depth 16 bit 16 bit and 24 bit 16 bit and 24 bit 16 bit and 24 bit
Region Definitions Yes Yes Yes Yes
Track Names Yes Yes Yes No
Region Names Yes Yes Yes Yes
Region List Yes Yes Yes Yes
Fade Ins Yes, as regions Yes, as regions Yes, as regions Yes, as regions
Fade Outs Yes, as regions Yes, as regions Yes, as regions Yes, as regions
Crossfades Yes, as regions Yes, as regions Yes, as regions Yes, as regions
Locked Regions Yes Yes Yes Yes
Sample Rate No, HDR does not change to sample rate and bit depth of PT session
Bit Depth No, HDR does not change to sample rate and bit depth of PT session
Playlists Active playlist is used — track name also reflects this
other playlist audio are in region bin
Track Numbers > 24 Tracks discarded but audio is imported into region list
Muted Regions Yes, as normal (unmuted) regions
Inactive Track No No No Yes, as normal tracks
Hidden Tracks Yes, as normal tracks and regions
THE FOLLOWING FEATURES ARE NOT INCLUDED IN THE FOLLOWING PRO TOOLS FEATURES ARE
THE IMPORT/EXPORT FUNCTION OF HDR PRO v1.4: NOT APPLICABLE FOR THE HDR:
Volume Envelopes MIDI Tracks
Cue Points and Names Stereo or Multi-channel (Surround) Tracks
Record Enabled Tracks Master/Group Tracks
Tempo and MIDI Maps Send/Plug-ins/Inserts
I/O Settings All Pro Tools Mixer Settings
Muted/Soloed Tracks
History List
Templates
Pro Tools 4.x Pro Tools 5.0 Pro Tools 5.1
First playlist is used on track
containing multiple playlists
and regions
User’s Guide
7
Page 8

16220 Wood-Red Rd. NE • Woodinville, WA 98072 • USA
Europe, Asia, Central & South America: 425/487-4333
US & Canada: 800/898-3211
Middle East & Africa: 31-20-654-4000
Fax: 425/487-4337 • www.mackie.com
E-mail: sales@mackie.com
 Loading...