

Page 1

ADAPTIVE DIGITAL MIXER FOR PODCASTING AND STREAMING,
FEATURING MIX AGENT™ TECHNOLOGY
OWNER’S MANUAL
www.mackie.com
Page 2
DLZ CREATOR ADAPTIVE DIGITAL MIXER FOR PODCASTING AND STREAMING, FEATURING MIX AGENT™ TECHNOLOGY
Important Safety Instructions
1. Read these instructions.
2. Keep these instructions.
3. Heed all warnings.
4. Follow all instructions.
5. Do not use this apparatus near water.
6. Clean only with a dry cloth.
7. Do not block any ventilation openings.
Install in accordance with the manufacturer’s instructions.
8. Minimum distance (5 cm) around the apparatus for sucient ventilation.
The ventilation should not be impeded by covering the ventilation openings
with items, such as newspapers, table-cloths, curtains, etc.
9. Do not install near any heat sources such as radiators, heat registers,
stoves, or other apparatus (including amplifiers) that produce heat.
10. No naked flame sources, such as lighted candles, should be placed
on the apparatus.
11. Only use attachments/accessories specified by the manufacturer.
12. Use only with a cart, stand, tripod, bracket, or table specified by the manufacturer,
or sold with the apparatus. When a cart is used, use caution when moving the cart/
apparatus combination to avoid injury from tip-over.
13. Unplug this apparatus during lightning storms or when unused
for long periods of time.
14. Refer all servicing to qualified service personnel. Servicing is required when
the apparatus has been damaged in any way, such as power-supply cord or plug
is damaged, liquid has been spilled or objects have fallen into the apparatus,
the apparatus has been exposed to rain or moisture, does not operate normally,
or has been dropped.
15. This apparatus shall not be exposed to dripping or splashing, and no object filled
with liquids, such as vases or beer glasses, shall be placed on the apparatus.
16. Operating Temperature: 0˚–40˚ C // 32–104˚ F
17. RF Power: ≤20dBm (EIRP)
Bluetooth: V5.0
Bluetooth frequency range: 2400MHz-2483.5MHz
18. NOTE: This device complies with Part 15 of the FCC Rules [and contains
license-exempt transmitter(s)/receiver(s) that comply with Innovation,
Science and Economic Development Canada’s license-exempt RSS(s)].
Operation is subject to the following two conditions:
(1) This device may not cause harmful interference, and
(2) This device must accept any interference received, including interference
that may cause undesired operation of the device.
L’émetteur/récepteur exempt de licence contenu dans le présent appareil
est conforme aux CNR d’Innovation, Sciences et Développement économique
Canada applicables aux appareils radio exempts de licence. L’exploitation
est autorisée aux deux conditions suivantes:
(1) L’appareil ne doit pas produire de brouillage, et
(2) L’appareil doit accepter tout brouillage radioélectrique subi, même
si le brouillage est susceptible d’en compromettre le fonctionnement.
WARNING — To reduce the risk of fire or electric shock,
do not expose this apparatus to rain or moisture.
19. This apparatus does not exceed the Class B limits for radio noise emissions
from digital apparatus as set out in the radio interference regulations
of the Canadian Department of Communications.
Canada ICES-003(B)/NMB-003(B)
ATTENTION
— Le présent appareil numérique n’émet pas de bruits
radioélectriques dépassant las limites applicables aux appareils
numériques de class B prescrites dans le réglement sur le brouillage
radioélectrique édicté par les ministere des communications du Canada.
20. NOTE: This equipment has been tested and found to comply with the limits
for a Class B digital device, pursuant to part 15 of the FCC Rules. These limits
are designed to provide reasonable protection against harmful interference
in a residential installation. This equipment generates, uses, and can radiate
radio frequency energy and, if not installed and used in accordance with
the instructions, may cause harmful interference to radio communications.
However, there is no guarantee that interference will not occur in a particular
installation. If this equipment does cause harmful interference to radio
or television reception, which can be determined by turning the equipment
o and on, the user is encouraged to try to correct the interference by one
or more of the following measures:
• Reorient or relocate the receiving antenna.
• Increase the separation between the equipment and the receiver.
• Connect the equipment into an outlet on a circuit dierent
from that to which the receiver is connected.
• Consult the dealer or an experienced radio/TV technician for help.
CAUTION: Changes or modifications to this device not expressly approved
by LOUD Audio, LLC. could void the user’s authority to operate the equipment
under FCC rules.
21. This equipment complies with FCC and ISED radiation exposure limits set forth
for an uncontrolled environment. This device should be installed and operated
with minimum distance 20cm between the radiator & your body.
22. Exposure to extremely high noise levels may cause permanent hearing loss.
Individuals vary considerably in susceptibility to noise-induced hearing loss,
but nearly everyone will lose some hearing if exposed to suciently intense
noise for a period of time. The U.S. Government’s Occupational Safety
and Health Administration (OSHA) has specified the permissible noise
level exposures shown in the following chart.
According to OSHA, any exposure in excess of these permissible limits could
result in some hearing loss. To ensure against potentially dangerous exposure
to high sound pressure levels, it is recommended that all persons exposed
to equipment capable of producing high sound pressure levels use hearing
protectors while the equipment is in operation. Ear plugs or protectors
in the ear canals or over the ears must be worn when operating the equipment
in order to prevent permanent hearing loss if exposure is in excess of the limits
set forth here:
Duration, per
day in hours
8 90 Duo in small club
6 92
4 95 Subway Train
3 97
2 100 Very loud classical music
1.5 102
1 105 Chaz screaming at Troy about deadlines
0.5 110
0.25 or less 115 Loudest parts at a rock concert
Sound Level dBA,
Slow Response
Typical Example
Correct disposal of this product: This symbol indicates that this product should not be disposed of with your household waste, according to the WEEE directive (2012/19/EU)
and your national law. This product should be handed over to an authorized collection site for recycling waste electrical and electronic equipment (EEE). Improper handling of
this type of waste could have a possible negative impact on the environment and human health due to potentially hazardous substances that are generally associated with EEE.
At the same time, your cooperation in the correct disposal of this product will contribute to the eective usage of natural resources. For more information about where you can
drop o your waste equipment for recycling, please contact your local city oce, waste authority, or your household waste disposal service.
2
Page 3
DLZ CREATOR ADAPTIVE DIGITAL MIXER FOR PODCASTING AND STREAMING, FEATURING MIX AGENT™ TECHNOLOGY
Table of Contents
Important Safety Instructions ................................................................................................................................................................2
Table of Contents ......................................................................................................................................................................................3
Chapter : Welcome ..................................................................................................................................................................................8
Introduction ................................................................................................................................................................................................8
About This Guide .......................................................................................................................................................................................8
Chapter 2 : DLZ Creator Rear Panel Features ......................................................................................................................................9
Introduction ................................................................................................................................................................................................9
Power Connector .......................................................................................................................................................................................9
Power Switch............................................................................................................................................................................................10
XLR and 1/4" Combo Inputs ................................................................................................................................................................... 10
1/4" Line Input Jacks (5/6) .................................................................................................................................................................... 11
1/4" LR Main Output Jacks ..................................................................................................................................................................... 11
1/4" Headphone Output Jacks ...............................................................................................................................................................11
1/8" Stereo Line Input Jack (7/8) ......................................................................................................................................................... 11
USB-C Computer Jack ............................................................................................................................................................................12
Ethernet Port – NDI ................................................................................................................................................................................ 12
USB-A Jack ............................................................................................................................................................................................... 16
SD Recording and Playback ...................................................................................................................................................................17
Chapter 3 : DLZ Creator Top Panel Features ......................................................................................................................................8
Introduction ..............................................................................................................................................................................................9
Input Channels ......................................................................................................................................................................................... 19
Solo Button ..........................................................................................................................................................................19
Mute Button ........................................................................................................................................................................ 19
Channel Faders and Input Meters..................................................................................................................................20
Sampler Channel .................................................................................................................................................................................... 20
Solo Button .........................................................................................................................................................................20
Sampler Channel Fader ....................................................................................................................................................20
Six Sample Pads ................................................................................................................................................................20
Main Output Channel .............................................................................................................................................................................. 21
Mute Button ........................................................................................................................................................................ 21
Main Output Fader and Meters .......................................................................................................................................21
Home • Rec • AutoMix .............................................................................................................................................................................21
Home Button ....................................................................................................................................................................... 21
Rec Button ...........................................................................................................................................................................21
AutoMix Button ................................................................................................................................................................. 22
Quick Control Knobs .............................................................................................................................................................................. 23
DLZ Creator Display ............................................................................................................................................................................... 24
3
Page 4
DLZ CREATOR ADAPTIVE DIGITAL MIXER FOR PODCASTING AND STREAMING, FEATURING MIX AGENT™ TECHNOLOGY
Chapter 4 : Getting Started .................................................................................................................................................................. 25
Introduction ............................................................................................................................................................................................. 25
Tapping and Dragging ............................................................................................................................................................................ 25
Welcome Screen ..................................................................................................................................................................................... 25
Control Modes .........................................................................................................................................................................................26
Chapter 5 : Overview Tab ...................................................................................................................................................................... 30
Introduction .............................................................................................................................................................................................30
Headphone Mix Mode ............................................................................................................................................................................. 31
Chapter 6 : Channel Tab ........................................................................................................................................................................ 34
Introduction ............................................................................................................................................................................................. 34
Channel ID Button [Easy • Enhanced • Pro] ................................................................................................................. 34
Presets [Easy • Enhanced • Pro] .................................................................................................................................... 34
Channel Icon / Color [Easy • Enhanced • Pro] ............................................................................................................. 34
Channel Name [Easy • Enhanced • Pro] ........................................................................................................................ 35
Bypass All Processing [Easy • Enhanced • Pro] .......................................................................................................... 35
Microphone / Channel Setup... [Easy] .......................................................................................................................... 35
Channel Setup [Enhanced] ............................................................................................................................................. 36
Channel Setup > Advanced Controls [Enhanced] .......................................................................................................38
Channel Setup [Pro] .........................................................................................................................................................39
Channel Setup > EQ Introduction [Pro]........................................................................................................................42
Channel Setup > EQ On /O [Pro] ................................................................................................................................. 42
Channel Setup > EQ Presets [Pro] ................................................................................................................................ 42
Channel Setup > EQ HPF On / O and Frequency [Pro] ............................................................................................ 43
Channel Setup > EQ Gain, Frequency and Q [Bandwidth] [Pro] .............................................................................. 43
Channel Setup > Low EQ [Pro] ....................................................................................................................................... 43
Channel Setup > Mid EQ [Pro] ....................................................................................................................................... 44
Channel Setup > High EQ [Pro] ......................................................................................................................................44
Channel Setup > EQ at a Glance [Pro] .......................................................................................................................... 45
Channel Setup > Gate Introduction [Pro] .................................................................................................................... 46
Channel Setup > Gate On / O [Pro] .............................................................................................................................46
Channel Setup > Gate Presets [Pro] .............................................................................................................................46
Channel Setup > Gate Display and Settings [Pro] ..................................................................................................... 47
Channel Setup > Gate Meters [Pro] ............................................................................................................................. 47
Channel Setup > Gate at a Glance [Pro].......................................................................................................................48
Channel Setup > Compressor Introduction [Pro] ......................................................................................................48
Channel Setup > Compressor On / O [Pro] ............................................................................................................... 48
Channel Setup > Compressor Presets [Pro] ............................................................................................................... 48
Channel Setup > Compressor Display and Settings [Pro] ........................................................................................49
Channel Setup > Compressor Meters [Pro] ................................................................................................................ 49
Channel Setup > Compressor at a Glance [Pro] ......................................................................................................... 50
4
Page 5

DLZ CREATOR ADAPTIVE DIGITAL MIXER FOR PODCASTING AND STREAMING, FEATURING MIX AGENT™ TECHNOLOGY
Channel Setup > De-Esser Introduction [Pro] ............................................................................................................ 50
Channel Setup > De-Esser On / O [Pro] .....................................................................................................................50
Channel Setup > De-Esser Presets [Pro].....................................................................................................................50
Channel Setup > De-Esser Display and Settings [Pro] .............................................................................................. 51
Channel Setup > De-Esser Meters [Pro] ...................................................................................................................... 51
Channel Setup > De-Esser at a Glance [Pro] ...............................................................................................................51
Chapter 7 : FX Tab [Enhanced and Pro].............................................................................................................................................. 52
FX Setup > Introduction .................................................................................................................................................. 52
FX Setup > FX Mute On / O [Enhanced] ..................................................................................................................... 52
FX Setup > FX Presets [Enhanced] ............................................................................................................................... 52
FX Setup > FX Volume Knobs [Enhanced] ................................................................................................................... 52
FX Setup > Eect On / O [Pro] .................................................................................................................................... 53
FX Setup > FX Presets [Pro] .......................................................................................................................................... 53
FX Setup > Atomizer Reverb Settings [Pro] ................................................................................................................54
FX Setup > Atomizer Reverb at a Glance [Pro] ...........................................................................................................54
FX Setup > ChronoTronic Delay Settings [Pro] .......................................................................................................... 54
FX Setup > ChronoTronic Delay at a Glance [Pro] .....................................................................................................54
Chapter 8 : Media Tab ............................................................................................................................................................................55
Media Setup > Introduction ............................................................................................................................................ 55
Media Setup > Arrow Pointing Upwards Icon [Previous Screen] ........................................................................... 56
Media Setup > Index Finger Icon [Select Item] .......................................................................................................... 56
Media Setup > A-Z / Hourglass Icon [Arranges Media Files] .................................................................................. 56
Media Setup > Pencil and Eraser Icon [Edit / Rename] ............................................................................................ 56
Media Setup > Trash Can Icon [Delete] ....................................................................................................................... 56
Media Setup > Playback .................................................................................................................................................. 57
Chapter 9 : Snapshots Tab .................................................................................................................................................................... 58
Snapshots Setup > Introduction ....................................................................................................................................58
Creating Snapshots .......................................................................................................................................................... 59
Naming Snapshots ............................................................................................................................................................ 59
Recalling Snapshots .........................................................................................................................................................60
Editing Snapshots ............................................................................................................................................................. 62
Deleting Snapshots .......................................................................................................................................................... 62
Chapter 10 : Pads Tab ............................................................................................................................................................................. 63
Samples Setup > Introduction ....................................................................................................................................... 63
Bank Selection ................................................................................................................................................................... 63
Record New Sample .......................................................................................................................................................... 64
Load Sample From Disk ...................................................................................................................................................65
Rename Pad .......................................................................................................................................................................66
Color .................................................................................................................................................................................... 67
Pad Mode ............................................................................................................................................................................ 67
Play Style ............................................................................................................................................................................ 67
Edit Sample ........................................................................................................................................................................ 68
5
Page 6

DLZ CREATOR ADAPTIVE DIGITAL MIXER FOR PODCASTING AND STREAMING, FEATURING MIX AGENT™ TECHNOLOGY
Control Mode ..................................................................................................................................................................... 69
Pad Behavior ............................................................................................................................................................. 69
Censor ........................................................................................................................................................................ 69
Mute Group ................................................................................................................................................................ 70
Locals Only ................................................................................................................................................................ 70
Intercom ......................................................................................................................................................................71
Fade ............................................................................................................................................................................. 72
Ducking ...................................................................................................................................................................... 72
FX Mode .............................................................................................................................................................................. 73
Pad Behavior ............................................................................................................................................................. 73
Channel Assign ......................................................................................................................................................... 73
Atomizer Reverb ....................................................................................................................................................... 73
Chronotronic Delay ...................................................................................................................................................74
Telephone ....................................................................................................................................................................74
StreamFX Voice Changer ........................................................................................................................................75
Chapter 11 : Settings Tab ....................................................................................................................................................................... 77
Settings > Introduction and System ............................................................................................................................. 77
Settings > System > Language ...................................................................................................................................... 77
Settings > System > System Lock ................................................................................................................................. 78
Settings > System > Brightness .................................................................................................................................... 79
Settings > Bluetooth / Disk ............................................................................................................................................. 79
Settings > Bluetooth / Disk > Bluetooth ...................................................................................................................... 79
Settings > Bluetooth / Disk > SD Card ......................................................................................................................... 80
Settings > Bluetooth / Disk > USB Drive ......................................................................................................................82
Settings > Recording / Routing ......................................................................................................................................84
Settings > Recording / Routing > Disk Recording ......................................................................................................84
Settings > Recording / Routing > Disk Destination ................................................................................................... 85
Settings > Recording / Routing > Bypass Processing ............................................................................................... 85
Settings > Recording / Routing > Post-Fader ............................................................................................................. 85
Settings > Recording / Routing > One-Tap Record.....................................................................................................85
Settings > Recording / Routing > Computer (USB) ................................................................................................... 85
Settings > Recording / Routing > NDI Output Mode ..................................................................................................86
Settings > Recording / Routing > NDI Output Name .................................................................................................86
Settings > Recording / Routing > NDI Audio Source ................................................................................................. 87
Settings > About ............................................................................................................................................................... 88
Settings > About > Factory Reset ..................................................................................................................................78
Chapter 12 : Presets ............................................................................................................................................................................... 90
Presets > Introduction .....................................................................................................................................................90
Factory Presets vs User Presets ....................................................................................................................................90
Load Preset ................................................................................................................................................................91
Save Preset .................................................................................................................................................................91
Rename Preset ...........................................................................................................................................................91
Delete Preset .............................................................................................................................................................91
Channel Presets vs DSP Presets ................................................................................................................................... 92
6
Page 7
DLZ CREATOR ADAPTIVE DIGITAL MIXER FOR PODCASTING AND STREAMING, FEATURING MIX AGENT™ TECHNOLOGY
Chapter 13 : Recording .......................................................................................................................................................................... 94
Recording > Introduction ................................................................................................................................................ 94
Connections ....................................................................................................................................................................... 94
Formatting .......................................................................................................................................................................... 94
Recording ........................................................................................................................................................................... 95
Chapter 14 : Routing Simplified ........................................................................................................................................................... 98
Routing Simplified > Introduction .................................................................................................................................98
Routing Simplified > Source Selection ........................................................................................................................98
Routing Simplified > USB Routing ................................................................................................................................ 99
Routing Simplified > Examples ......................................................................................................................................99
Routing Simplified > Windows Setup ........................................................................................................................... 99
Routing Simplified > Mac Setup .................................................................................................................................. 100
Hookup Diagrams .................................................................................................................................................................................. 101
Hookup Diagrams > Podcast ......................................................................................................................................... 101
Hookup Diagrams > Streaming Broadcast .................................................................................................................102
Appendix A : Service Information .......................................................................................................................................................103
Appendix B : Technical Information ...................................................................................................................................................105
Specifications...................................................................................................................................................................105
DLZ Creator Dimensions ................................................................................................................................................107
Warranty Statement ............................................................................................................................................................................ 108
Open Source Code ................................................................................................................................................................................ 108
Fin ..........................................................................................................................................................................................109
7
Page 8
DLZ CREATOR ADAPTIVE DIGITAL MIXER FOR PODCASTING AND STREAMING, FEATURING MIX AGENT™ TECHNOLOGY
Chapter : Welcome
Introduction
Hello everyone! This is the DLZ Creator Owner’s Manual... we hope you like it!
This document contains detailed information about the hardware and firmware.
The hardware should remain relatively unchanged throughout the life of your product. The firmware, though, is another story.
Additional features are always being added, tweaked, updated and more... even right now this very minute! This means updates
to this Owner’s Manual, firmware and more.
With frequent changes, some screenshots may look slightly dierent than what you see within these pages and there could
be some functional dierences, as well.
Do not fret if a feature listed in this document is not available. It will be shortly. Our goal is to make the DLZ
Creator firmware the best it can possibly be before releasing it to the public. All of these features (and more)
will be available shortly, if not now. Thank you for your patience and understanding. It is much appreciated!
So there you have it. Again, we hope you like it. If you have any questions or comments about this Owner’s Manual
(or other Mackie documentation), please don’t hesitate to contact us:
• -800-898-32 (Monday through Friday, normal business hours, Pacific Time)
• www.mackie.com/support-contact
About This Guide
This guide is designed to be accessible, with subsections as complete as practical to minimize having to electronically leaf
back and forth looking for the whole story. The entire guide does not need to be read to figure out how to use this console.
As the saying goes, “a picture tells a 000 words”. With that thought in mind, we added quite a few illustrations, screenshots
and other images throughout to accompany the text.
This icon marks information that is critically important or unique! For your own good, read and remember
them.
There’s an illustration of a microscope, so, of course, you’re going to get more detailed information
when you see this little guy. There are explanations of features and practical tips listed here.
It’s a good idea to pay attention to text displayed next to a note icon, as this icon draws attention
to certain features and functions relating to the usage of DLZ Creator.
8
Page 9
DLZ CREATOR ADAPTIVE DIGITAL MIXER FOR PODCASTING AND STREAMING, FEATURING MIX AGENT™ TECHNOLOGY
Chapter 2 : DLZ Creator Rear Panel Features
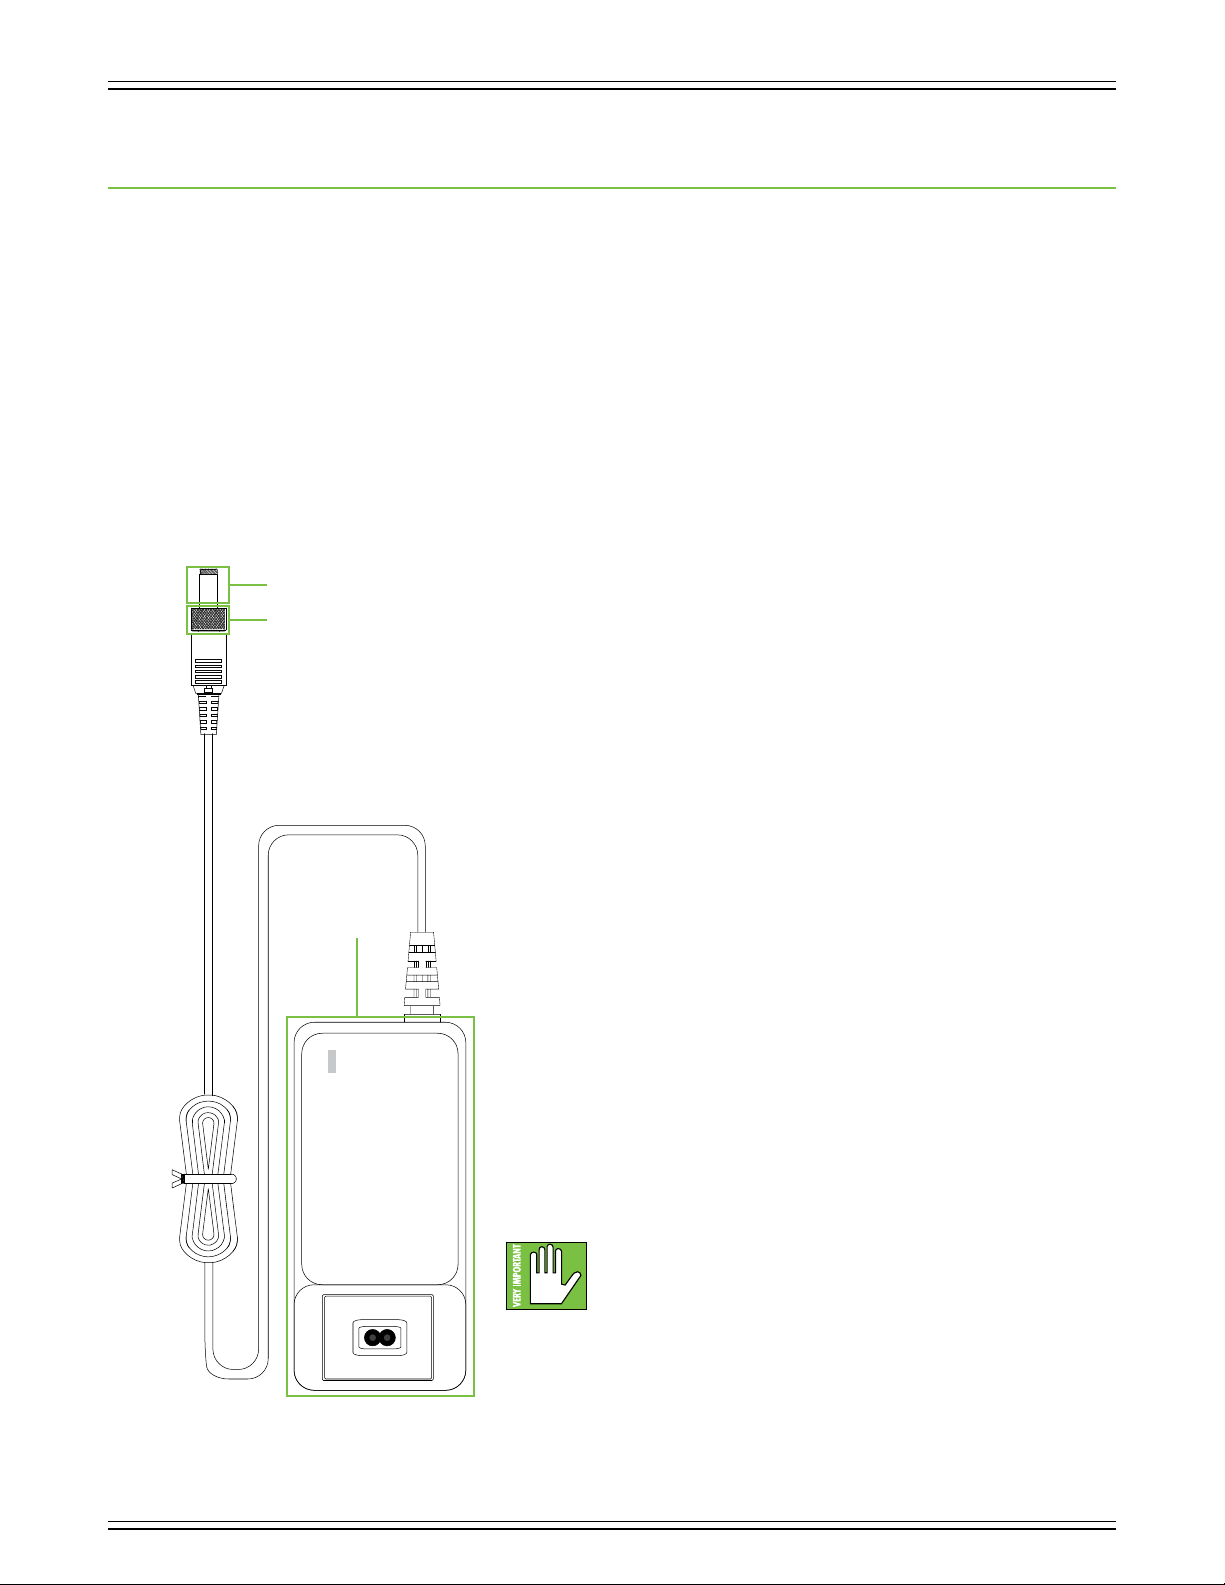
Barrel Connector
Locking Outer Ring
The
Power
Block
Introduction
From lef to right, the rear panel of each DLZ Creator is oufitted with a power
connector and power switch, a microSD card slot, a multi-purpose USB-A jack,
a network connector, a USB-C port for connecting to a computer, an /8" stereo
input jack, four /4" headphone jacks, /4" L/R output jacks, /4" L/R stereo input
jacks and last but not least... four combo input jacks. Let’s take a look at each
of these features, starting on the lef with the power connector and power switch,
followed by a look at the inputs, outputs and the rest.
Power Connector
The DLZ Creator has a universal external power supply that accepts any AC voltage
ranging from 00 VAC to 240 VAC. No need for voltage select switches. It will work
virtually anywhere in the world. That’s why we call it a “Planet Earth” power supply!
It is less susceptible to voltage sags or spikes compared to conventional power
supplies, and provides greater electromagnetic isolation and better protection
against AC line noise.
An external 8V DC power supply [aka The Power Block] and a line cord are included
with the DLZ Creator. A locking barrel connector resides at the end of the cord attached
to The Power Block. Attach it to the power connector on the DLZ Creator and rotate the
outer ring clockwise to lock. Do not over-tighten! Screw until there is resistance, then
stop. Connect the female end of the line cord to The Power Block and plug the male end
into a live grounded outlet. An LED on The Power Block will illuminate blue to indicate
success (whether the DLZ Creator is powered on or not).
Warning: Disconnecting the plug’s ground pin is dangerous. Don’t do it!
In fact, it’s a bad idea to remove anything from (or add anything to)
The Power Block or line cord. Again, don’t do it!
9
Page 10
DLZ CREATOR ADAPTIVE DIGITAL MIXER FOR PODCASTING AND STREAMING, FEATURING MIX AGENT™ TECHNOLOGY
2
Power Switch
Located just above the power connector is the power switch. Press the top of this rocker switch in to turn the DLZ Creator
on and press the bottom of this switch in to turn it o.
XLR and /4" Combo Inputs
As a general guide, the DLZ Creator should be turned on first, followed by external power amplifiers or powered
speakers. As such, the DLZ Creator should also be turned o last. This will reduce the possibility of any turn-on
or turn-o thumps in the PA.
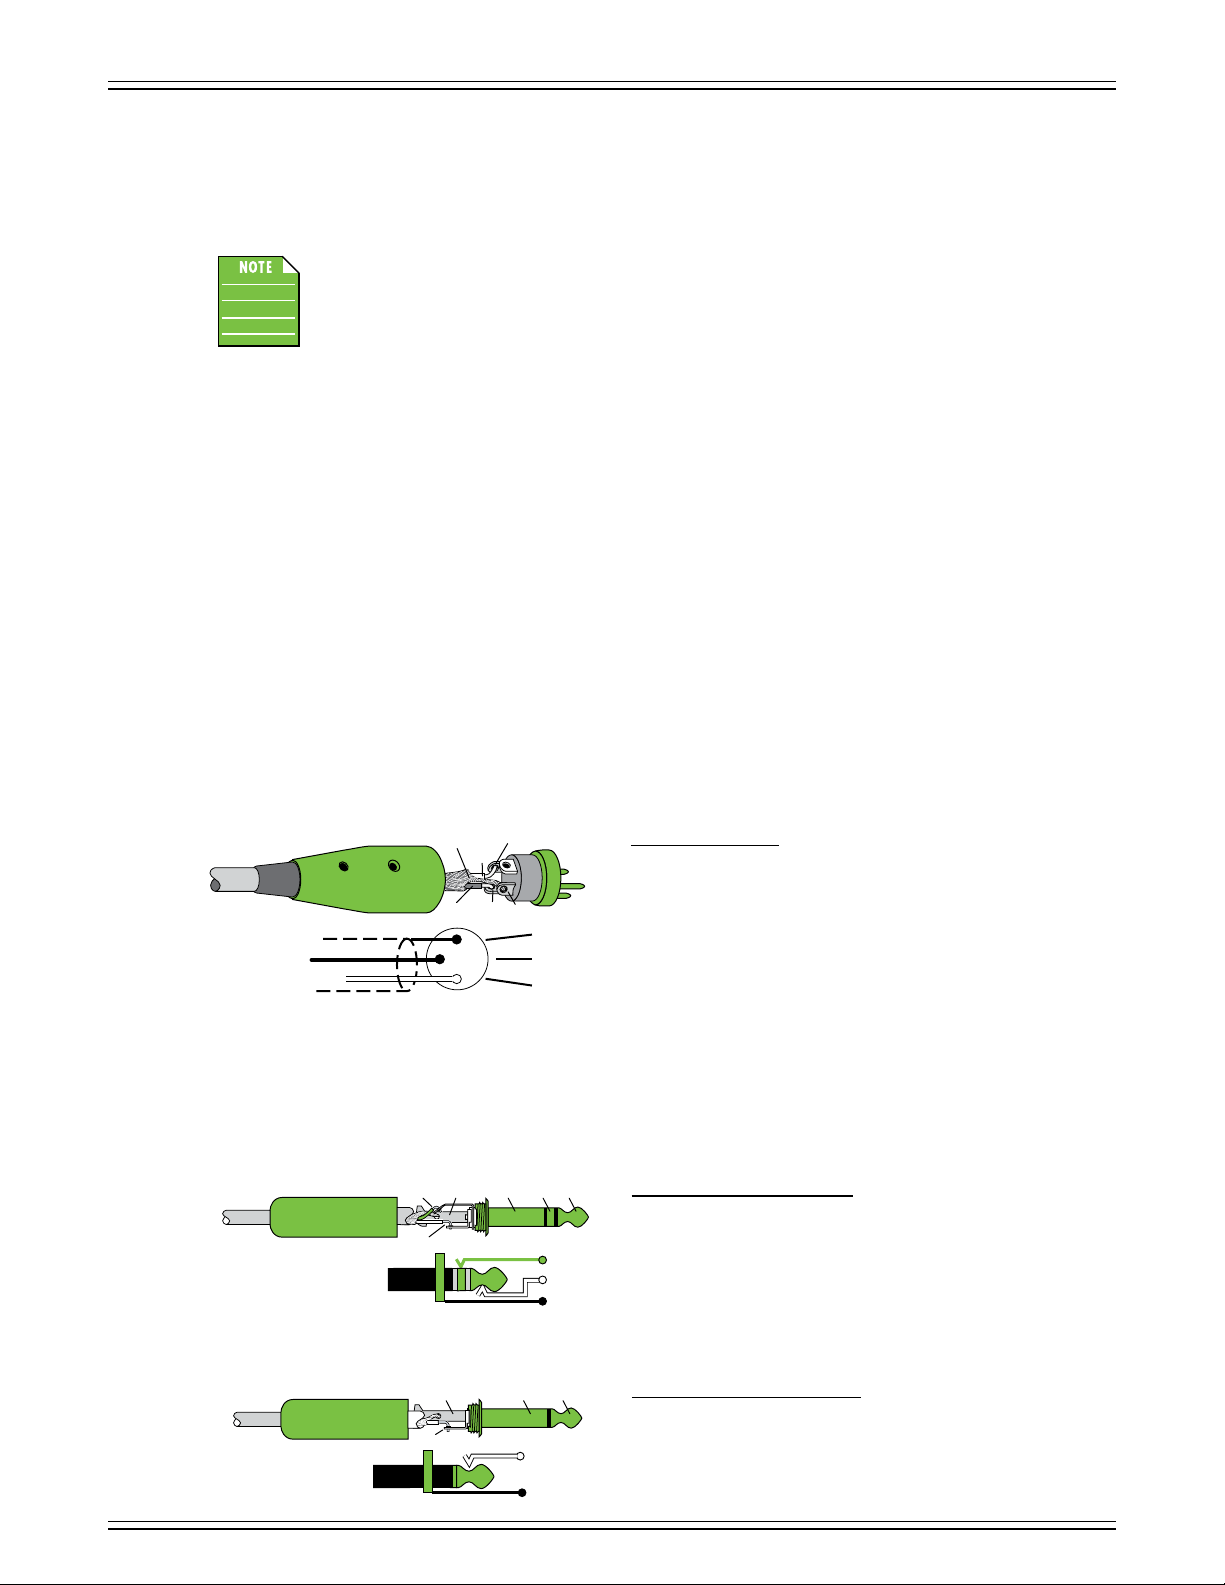
The first four input channels may accept a balanced mic or line-level signal using an XLR connector. They are wired as follows,
according to standards specified by the AES (Audio Engineering Society).
SHIELD
HOT
XLR Balanced Wiring:
Pin = Shield (ground)
COLD
3
1
3
1
2
SHIELD
COLD
HOT
Pin 2 = Positive (+ or hot)
Pin 3 = Negative (– or cold)
In addition to accepting balanced mic or line-level signals using an XLR connector, these inputs may also accept /4" line-level
signals driven by balanced or unbalanced sources.
To connect balanced lines to these inputs, use a /4" Tip-Ring-Sleeve (TRS) plug. “TRS” stands for Tip-Ring-Sleeve, the three
connection points available on a stereo /4" or balanced phone jack or plug. TRS jacks and plugs are used for balanced signals
and stereo headphones and are wired as follows:
TIPSLEEVE
SLEEVERING
TIP
RING
RING
TIP
SLEEVE
/4" TRS Balanced Mono Wiring:
Sleeve = Shield
Tip = Hot (+)
Ring = Cold (–)
To connect unbalanced lines to these inputs, use a /4" mono (TS) phone plug, wired as follows:
SLEEVE
TIP
TIPSLEEVE
TIP
SLEEVE
/4" TS Unbalanced Mono Wiring:
Sleeve = Shield
Tip = Hot (+)
0
Page 11
DLZ CREATOR ADAPTIVE DIGITAL MIXER FOR PODCASTING AND STREAMING, FEATURING MIX AGENT™ TECHNOLOGY
/4" Line Input Jacks (5/6)
The stereo line inputs are designed for /4" jacks. They may accept (nearly) any line-level instrument, eects device,
CD player, etc. If you are connecting a mono source, use the lef (mono) input, and the mono signals will appear
on both sides of the main mix. Adding the right input separates to stereo. The wiring diagrams are presented
on the previous page.
/4" L/R Main Output Jacks
The main outputs provide a line-level signal that represents the end of the mixer chain, where the fully mixed stereo signal enters
the real world. Connect these to the lef and right inputs of your main power amplifiers or directly into powered speakers.
The main outputs accept /4" connectors driven by balanced or unbalanced sources. Wiring diagrams for both connectors are
presented on the previous page.
/4" Headphone Output Jacks
These /4" TRS connectors supply the output to stereo headphones. The volume is controlled via the quick control knobs.
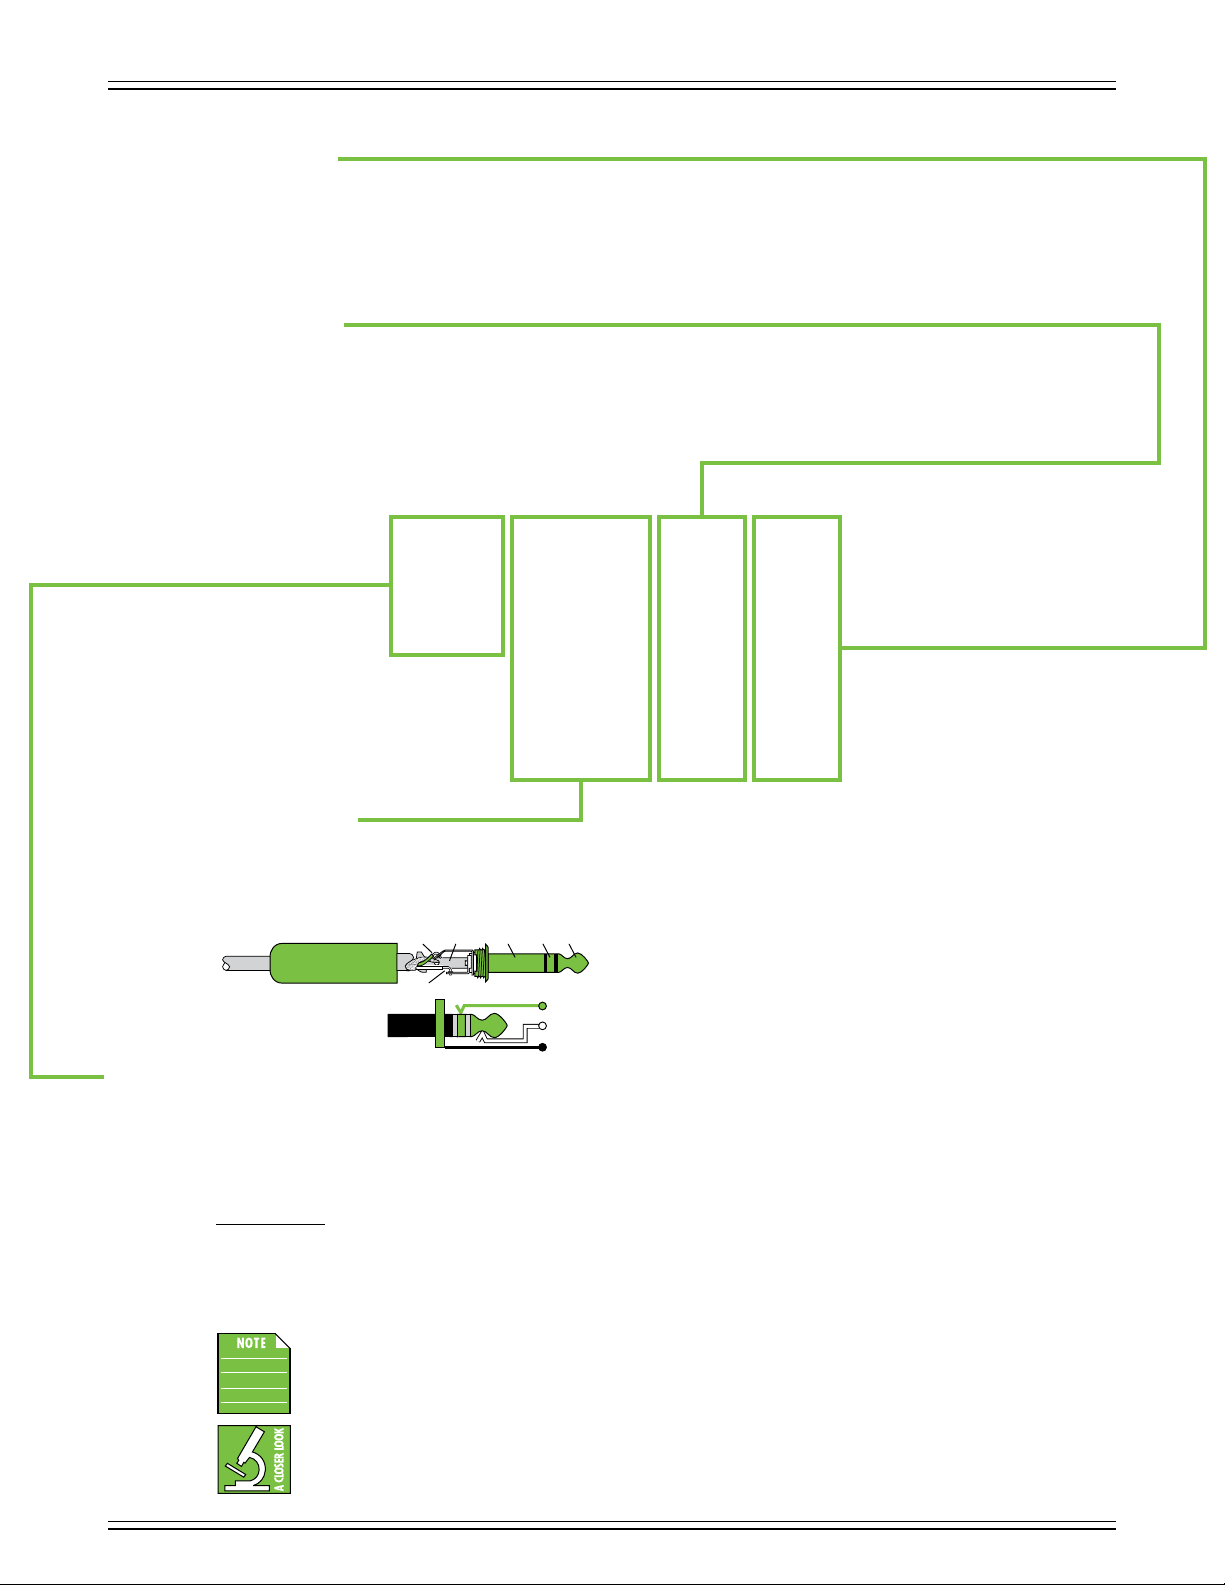
The phones output follows standard conventions:
/8" Stereo Line Input Jack (7/8)
This /8" stereo input may accept a stereo or mono line-level signal from a smartphone, tablet, MP3 player,
CD player or other signal source.
It is wired as follows, according to standards specified by the AES (Audio Engineering Society):
Stereo /8" TRS
Sleeve = Shield (Ground)
Tip = Lef Channel
Ring = Right Channel
While the volume may be raised and lowered via DLZ Creator, the volume of the device also needs to be up.
TIPSLEEVE
SLEEVERING
RING
Tip = Lef channel
Ring = Right channel
TIP
RING
TIP
SLEEVE
Sleeve = Ground
This jack does NOT accept a TRRS connector that sends audio back to the phone or tablet.
Page 12
DLZ CREATOR ADAPTIVE DIGITAL MIXER FOR PODCASTING AND STREAMING, FEATURING MIX AGENT™ TECHNOLOGY
USB-C Computer Jack
This is an interface that allows audio to stream to the DLZ Creator via computer.
Connect the USB-C side of a USB cable to the DLZ Creator and the USB-A side to the computer’s USB port.
USB Audio IN – This connector allows the ability to transmit STEREO AUDIO TO DLZ Creator channel 5/6 or 7/8
(depending on source selection) via computer or phone. DLZ Creator will send multitrack audio to the computer
via the master audio bus.
USB Audio OUT – This connector allows the ability to transmit STEREO OR MULTITRACK AUDIO FROM the DLZ Creator
via computer.
Don’t forget to change the input and output to ‘DLZ Creator’ via Settings on your computer.
DLZ Creator’s USB connection is audio only. It is not a source of power.
Ethernet Port – NDI
We suggest reviewing the remainder of this document first then coming back here for NDI when good and ready!
If you are ready, simply turn the page!
The Ethernet port on DLZ Creator is for connecting an Ethernet cable so that
the Network Device Interface (NDI) will allow audio to communicate via computer
network. The Ethernet port is 0/00, so it will work with CAT5, CAT5e, and CAT6
cables. That said, it will run at the slower 0/00 speed when connected to a CAT5e
or CAT6 cable.
Plug one end of the Ethernet cable into the DLZ Creator’s Ethernet port
and the other end of the Ethernet cable to a router (not included). The router
“connects” devices together in order to be able to “share” information with each other.
2
Page 13
DLZ CREATOR ADAPTIVE DIGITAL MIXER FOR PODCASTING AND STREAMING, FEATURING MIX AGENT™ TECHNOLOGY
REC
2H11M
00:01:23
STOP
PAUSE
Router
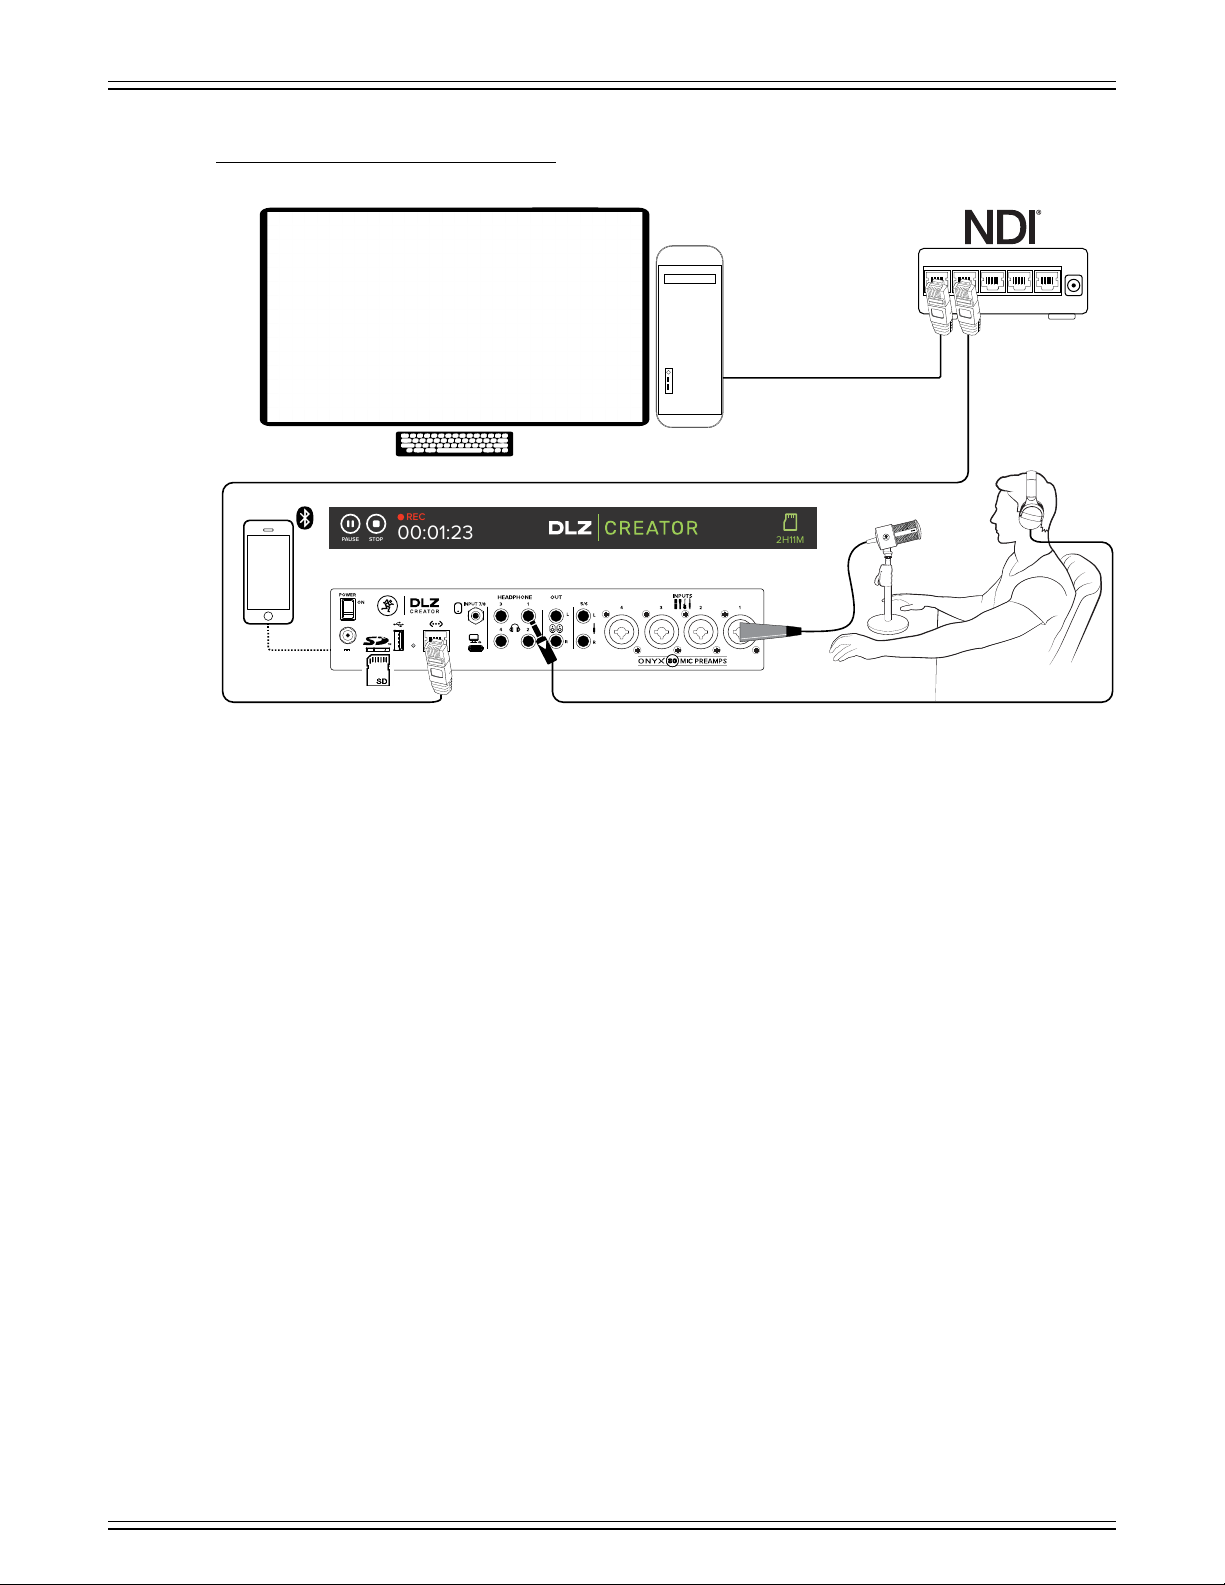
Hookup Diagram Number One – NDI to NDI Plugin
18V 1.5A
In this first hookup diagram, an Ethernet cable connects the DLZ Creator to the router, which, in turn, is also connected
to the computer. Here, the audio input is routed to the computer over Ethernet via NDI, be it NDI Bridge, NDI Plugin, or other,
in your DAW of choice (with many of the NDI Tools displayed on the huge monitor above).
Also of note is the phone connected via Bluetooth in order for the host to accept calls. Lastly, a microSD card is connected
for recording in tandem.
3
Page 14
DLZ CREATOR ADAPTIVE DIGITAL MIXER FOR PODCASTING AND STREAMING, FEATURING MIX AGENT™ TECHNOLOGY
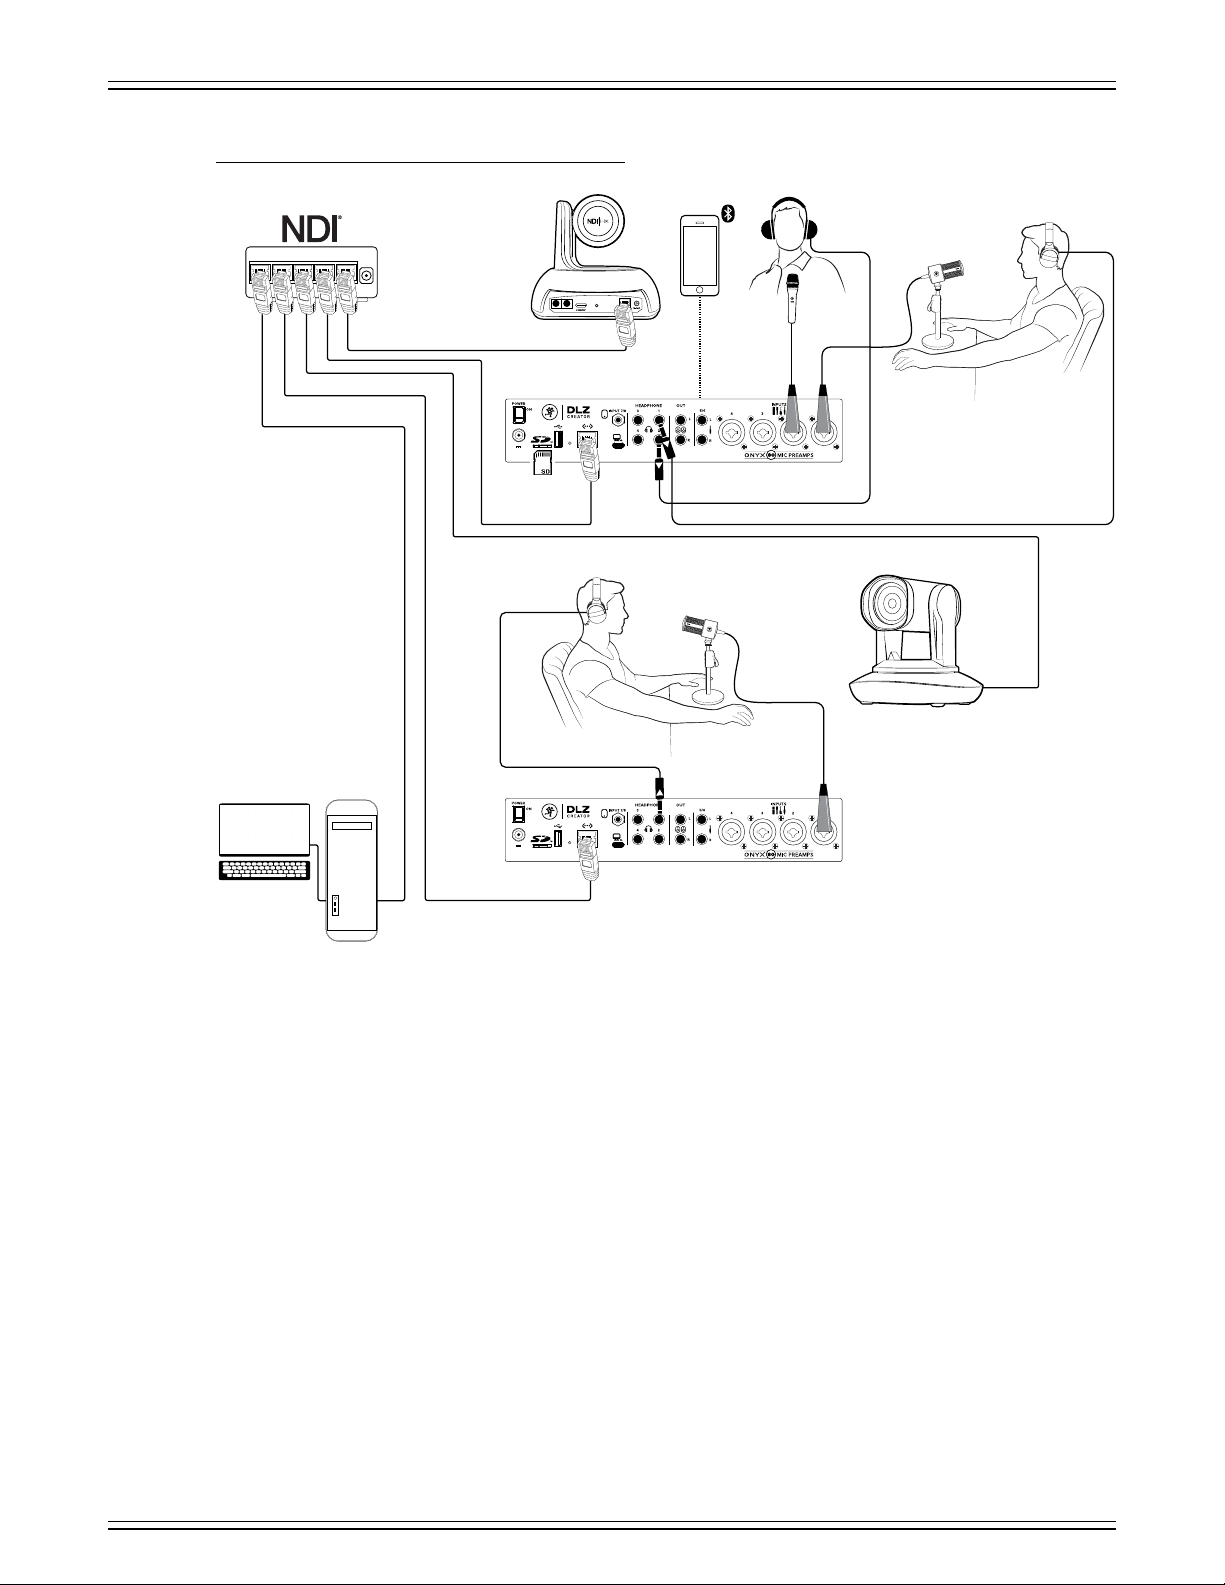
Hookup Diagram Number Two – DLZ Creator to DLZ Creator
Router
DC12VLine InIN—RS232—OUT
Webcam
18V 1.5A
Webcam
18V 1.5A
Did you know that multiple DLZ Creator mixers may be connected to each other? Not just right next to each other, either...
there could be a DLZ Creator in one room of a building and another mixer in a completely separate room! This hookup diagram
showcases the multiple DLZ Creators example.
Here, Ethernet cables connect each DLZ Creator to the router, which, in turn, is also connected to the computer.
Like the previous example, the audio input is routed to the computer over Ethernet via NDI, be it NDI Bridge, NDI Plugin,
or other, in your DAW of choice (with many of the NDI Tools displayed on the monitor).
These podcasters/live streamers DO have a face for radio, and are therefore able to have webcams pointed at their mugs
for video streaming. Connect an Ethernet cable from each webcam to the router. Finally, a phone is connected via Bluetooth
in order for the host to accept calls.
The audio input from the first DLZ Creator is sent over Ethernet to a second DLZ Creator with other audio sources, mixed,
and then streamed or recorded to a PC via Ethernet. A microSD card is also connected for recording in tandem, if so desired.
4
Page 15
DLZ CREATOR ADAPTIVE DIGITAL MIXER FOR PODCASTING AND STREAMING, FEATURING MIX AGENT™ TECHNOLOGY
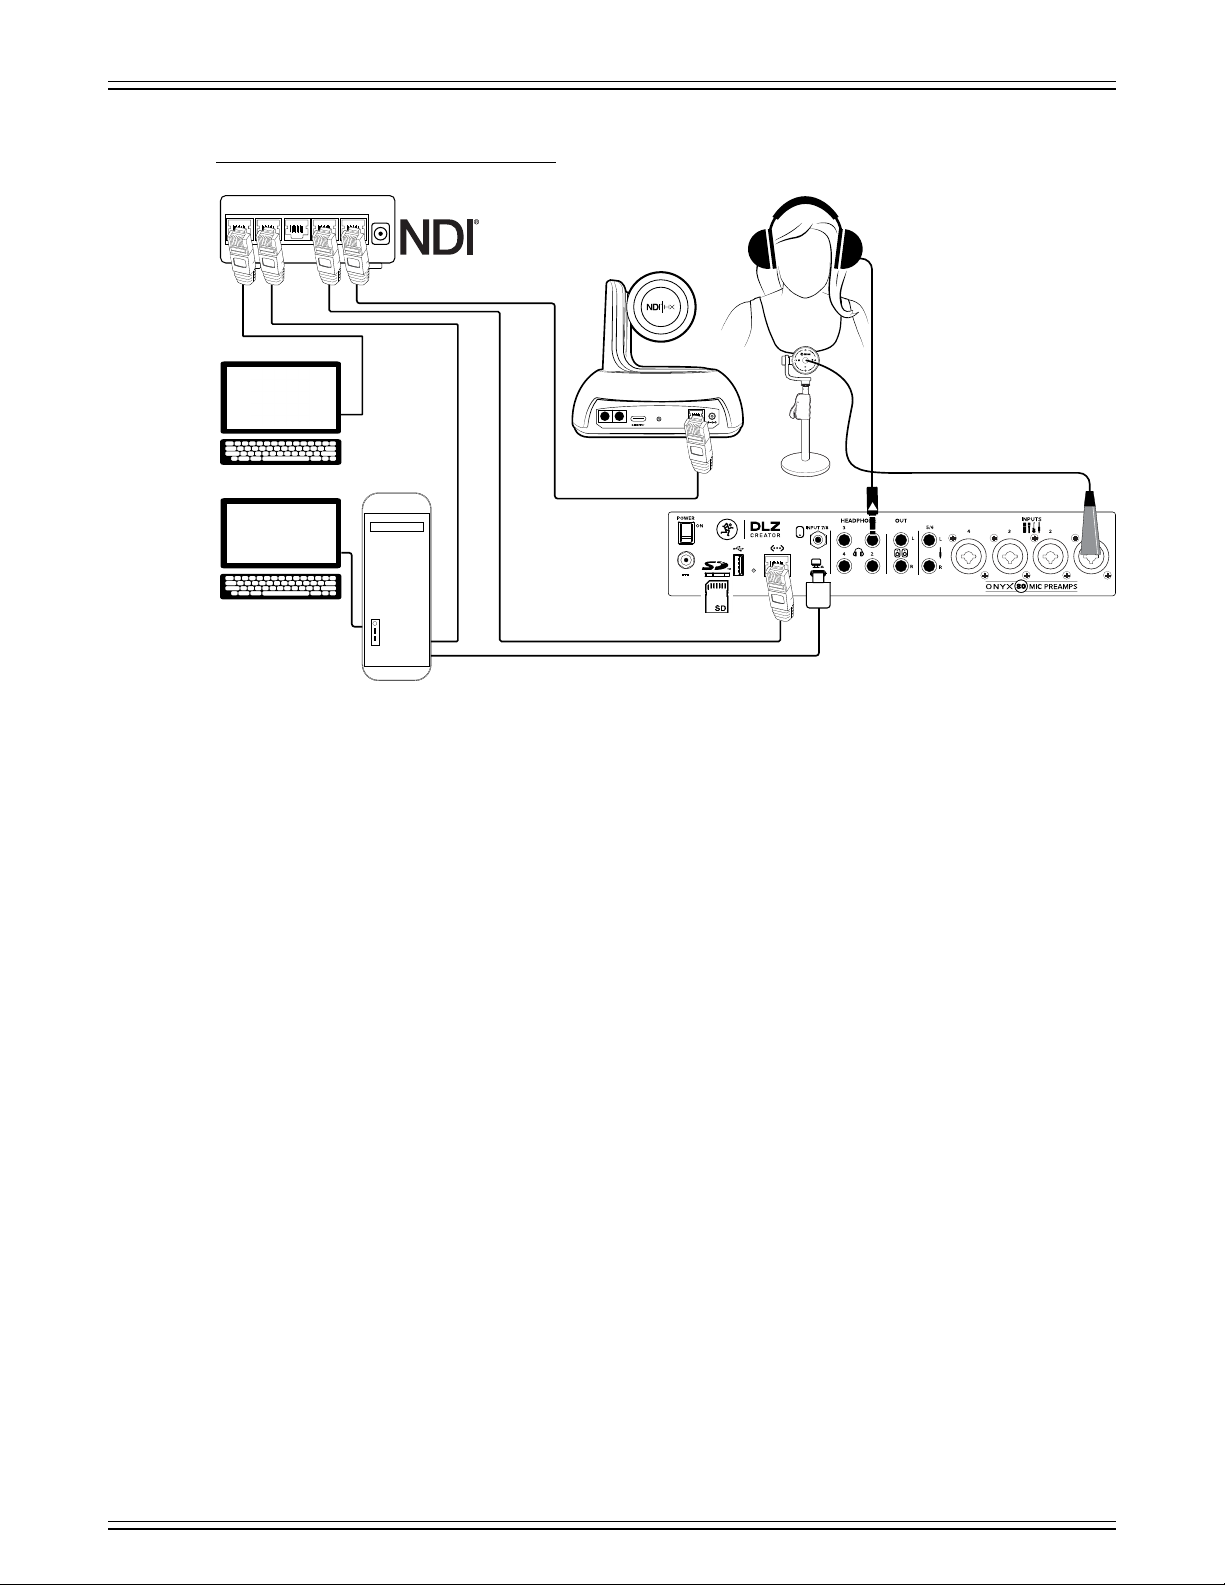
Hookup Diagram Number Three – Dual-Box Setup
Router
DC12VLine InIN—RS232—OUT
Webcam
18V 1.5A
And finally, NDI hookup diagram number three, the dual-box setup, otherwise known as ONE DLZ Creator connected
to TWO computers!
As you can see above, the DLZ Creator and webcam are both hooked up to the router via Ethernet cables. From there,
the router connects to both computers: () the tower PC that has massive processing power and handles all of the “heavy
lifing”, and (2) the laptop located above it – the computer with the OBS logo on it – which handles all of the audio/video
using OBS for video recording or streaming. The router sends the NDI out to a streaming laptop via Ethernet.
Note that the DLZ Creator is also connected directly to the tower PC via USB AND a microSD card is inserted, as well,
allowing multiple recording options.
These setups – and more! – need to be dialed in via Settings > Recording / Routing. More information on pages 84-87.
5
Page 16
DLZ CREATOR ADAPTIVE DIGITAL MIXER FOR PODCASTING AND STREAMING, FEATURING MIX AGENT™ TECHNOLOGY
USB-A Jack
This USB-A jack serves as a multi-purpose feature, allowing for a variety of options. Connect a flash drive and record direct,
for example. Have a dying phone? Charge it here!
While that last example is totally doable, we assume that this jack will almost exclusively be used for recording.
Please use a flash drive only! Do NOT use an SSD (Solid State Drive) or HDD (Hard Drive Disk),
portable or otherwise, as these will not be recognized by DLZ Creator. There is not enough power
in DLZ Creator to drive an SSD or HDD.
Formatting – We know you’re an eager beaver, all psyched to start recording, but let’s take care of something very important
first: formatting the USB drive. First, get a USB drive; this could be a brand new one or one you’ve had for awhile so long
as it’s Class 0 or better.
The USB drive need to be Class 0 or better to ensure reliable operation. If using an older USB drive, it’s a high
possibility that some samples will be dropped because it is too slow. We are not in the business of suggesting
what USB drive to go with, but choosing one with an instantly recognizable, quality, trustworthy name doesn’t hurt.
Some examples we’ve heard of:
• Seagate
• SanDisk
• LaCie
• Adata
• WD (Western Digital)
Even if the USB drive has already been formatted via a dierent source, we highly suggest formatting
via the DLZ Creator. In fact, never mind the “highly suggest.” DO IT!
Just follow the steps listed below:
This probably goes without saying, but we’re going to say it, anyway. In order for the USB drive to be formatted
via the DLZ Creator, the USB drive needs to be connected to the DLZ Creator’s USB-A slot. You have been using
USB-A slots for years now. It only fits one way. Due to Murphy’s Law, you will, of course, try one way and it
won’t work. You will flip it around and find out that that way does not work, either. And, of course, flipping back
to the original way WILL work this time. Those darned USB-A slots!
Granted, you might have a dicult time trying to format the USB drive if that first condition isn’t yet met. For one, it doesn’t
easily fit in any other way – which you have already found out – and for another, DLZ Creator will remain with the “USB drive
not present” statement.
Now that the USB drive is inserted properly and DLZ Creator is fired up, it’s time to format the USB drive.
Head to Settings > Bluetooth / Disk (on pages 79-84) for more information.
We’re still looking at the DLZ Creator hardware and that part is sofware related!
6
Page 17
DLZ CREATOR ADAPTIVE DIGITAL MIXER FOR PODCASTING AND STREAMING, FEATURING MIX AGENT™ TECHNOLOGY
SD Recording and Playback
Last – but certainly not least! – is the microSD slot, nestled in-between the power connector and USB-A jack.
Not only is the DLZ Creator a great mixer with some pretty amazing features, but here you can also record
podcasts, interviews, in-studio gigs and more to a microSD card!
Formatting – We know you’re an eager beaver, all psyched to start recording, but let’s take care of something very important
first: formatting the microSD Card. First, get a microSD Card; this could be a brand new one or one you’ve had for awhile
so long as it’s Class 0 or better.
microSD Cards need to be Class 0 or better to ensure reliable operation. If using an older microSD Card, it’s a high
possibility that some samples will be dropped because the card is too slow. We are not in the business of suggesting
what microSD Card to go with, but choosing one with an instantly recognizable, quality, trustworthy name doesn’t
hurt.
Some examples we’ve heard of:
• SanDisk
• PNY
• Lexar
• Samsung
• Kingston
Even if the microSD Card has already been formatted via a dierent source, we highly suggest formatting
via the DLZ Creator. In fact, never mind the “highly suggest.” DO IT!
Just follow the steps listed below:
These probably goes without saying, but we’re going to say them, anyway. In order for the microSD card to be formatted
via the DLZ Creator, () the microSD card needs to be connected to the DLZ Creator’s microSD card slot with the card’s
electrical contacts facing down; the top of the microSD card (with the brand name, disc size, etc.) faces up towards
the “SD™” logo (as seen below)...
Electrical Contacts microSD card OUT microSD card IN
...and (2) head to Settings > Bluetooth / Disk > SD Card (on pages 79-84) for more information.
We’re still looking at the DLZ Creator hardware and that part is sofware related! Up next is the front panel...
Before then, though, a couple of quick SD Card notes (which will also be addressed in more detail later):
Stereo playback from a microSD card may be routed into stereo input channel 9/0, processed, and then sent
to the main LR.
Or instead... this slot also supports multitrack recording – 4 Channels – four mono (channels -4),
three stereo (channels 5/6, 7/8, 9/0), the stereo sample pad (channels /2), plus the LR mix (3/4)!
7
Page 18

DLZ CREATOR ADAPTIVE DIGITAL MIXER FOR PODCASTING AND STREAMING, FEATURING MIX AGENT™ TECHNOLOGY
Chapter 3 : DLZ Creator Top Panel Features
8
Page 19
DLZ CREATOR ADAPTIVE DIGITAL MIXER FOR PODCASTING AND STREAMING, FEATURING MIX AGENT™ TECHNOLOGY
Introduction
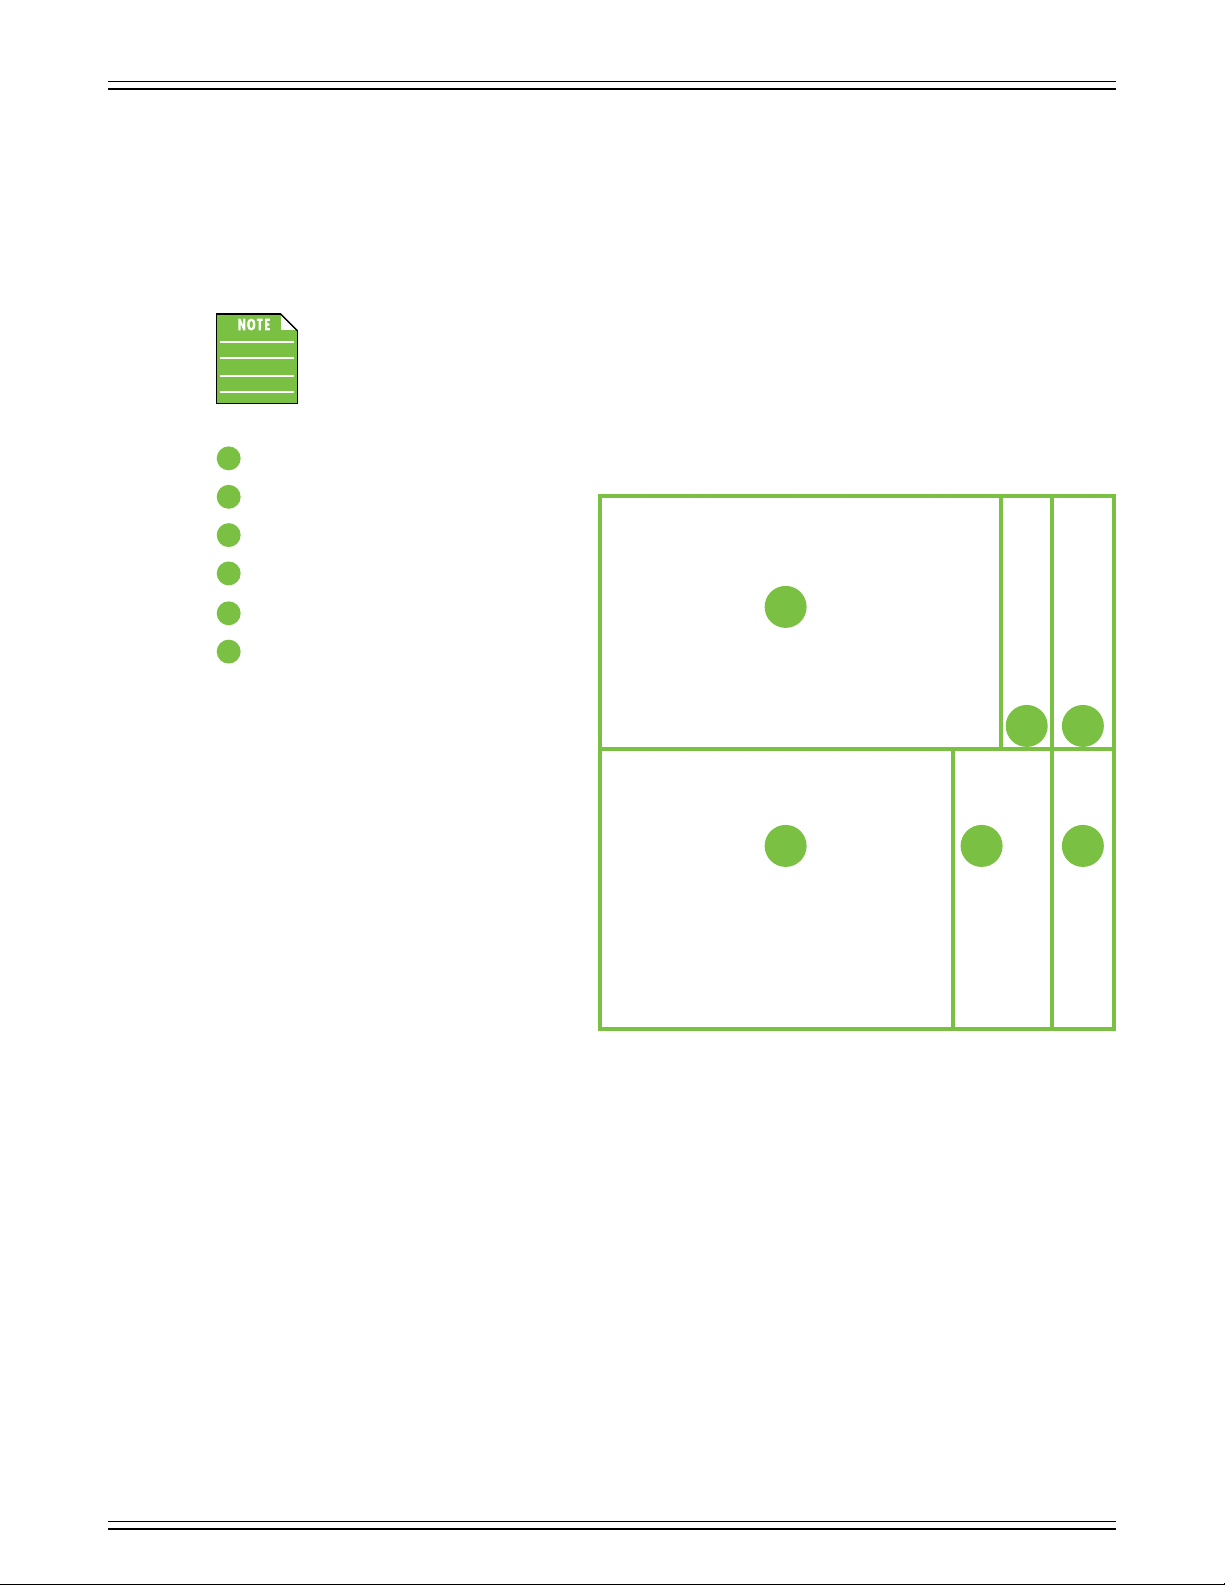
From top to bottom and lef to right, the top panel of each DLZ Creator is oufitted with a bunch of knobs, buttons, faders,
screens, encoders and more. So much more, in fact, that we will call out and describe each one... but not here...
Rather, what you see below is an outline and order each section will be described. Refer to the pages listed for in-depth
commentary and illustrative close-ups of each section.
As a reminder, the information detailed on the following pages is still regarding the hardware side of things.
We will dig into the DSP (Digital Signal Processing) aferwards.
Input Channels – pages 9-20
Sampler Channel – page 20
2
Main Output Channel – page 2
3
Home • Rec • Automix – pages 2-23
4
Quick Control Knobs – page 23
5
DLZ Creator Display – page 24
6
564
2 3
Input Channels
DLZ Creator has a total seven input channel strips (four mono, three stereo), one stereo sampler channel strip,
and one stereo master channel strip. Each input channel strip contains the following:
SOLO Button
Solo oers the opportunity to audition channel(s) [input channel strips] before they are added to the mix.
Whenever a channel’s solo button is engaged, only the soloed channel(s) may be heard in headphone
output one. Solo buttons illuminate amber when engaged. A small, amber “S” will appear on that channel’s ID.
More about Channel IDs shortly.
MUTE Button
Mute buttons mute – turn o – the signal on the selected input(s) and/or output(s).
Mute buttons illuminate red when engaged. A small, red “M” will appear on that channel’s ID.
More about Channel IDs shortly.
9
Page 20

DLZ CREATOR ADAPTIVE DIGITAL MIXER FOR PODCASTING AND STREAMING, FEATURING MIX AGENT™ TECHNOLOGY
Channel Faders and Input Meters
The channel faders adjust the level of each channel going to the selected output(s).
The volume levels range from o (silent) to max (full volume).
The input meters display the relative level of each input channel. They should remain green
with the occasional bump into the yellow zone. Turn down the gain if the input meter remains
consistently yellow. If the input is too high [overloading], a clip indicator at the top of the
meter will illuminate red. If clipping occurs, reduce the gain.
Input channels -4 have mono meters (one strip) versus input channels 5-0,
the sampler channel (/2) and main out L/R which are all stereo meters (two strips).
Mono Stereo
Sampler / FX / Control Channel
This channel strip contains the following:
SOLO Button
Solo oers the opportunity to audition this channel before it is added to the mix.
Whenever a channel’s solo button is engaged, only the soloed channel(s) may be heard
in the monitor bus. Solo buttons illuminate orange when engaged.
Sampler / FX / Control Channel Fader
This channel fader adjusts the level of the samples / FX / Control going to the selected output(s).
The volume level ranges from o (silent) to max (full volume). It is a global control, aecting
the level of all six pads.
Six Pads
Pressing one (or more) of these six full-color, sof-touch silicone momentary buttons results
in playback of the saved sample, FX, and/or control. When pressed, it will play. Additionally, the button
will illuminate brightly for the duration of the playback. When not playing, the pads will still illuminate,
but dimly. If nothing is assigned to a pad, it will remain unlit.
The samples, playback mode, colors and more may be changed and updated via the pads tab.
More on this later.
20
Page 21

DLZ CREATOR ADAPTIVE DIGITAL MIXER FOR PODCASTING AND STREAMING, FEATURING MIX AGENT™ TECHNOLOGY
Main Output Channel
Like the input channel strips, the master channel strip also contains a mute button and fader.
However, unlike the input channel strips, the master channel strip is linked to the L/R outputs, not the inputs.
MUTE Button
Mute buttons mute – turn o – the signal on the selected input(s) and/or output(s). Mute buttons illuminate red
when engaged. The master channel mute button works exactly like a channel mute, except it mutes the output.
Use it as a bathroom break switch, for example. Note that it only mutes the main out L/R, by default. The mute button
illuminates red when engaged.
Main Output Fader and Meters
The main fader adjusts the level of the output, while the output meter displays the output signal level, presented in stereo L/R.
The meters should remain green with the occasional bump into the yellow zone. If there is too much yellow (or any red
clipping), lower the main fader until it’s gone and check the input channels, as well.
Input channels -4 have mono meters (one strip) versus input channels 5-0, the sampler channel (/2)
and main out L/R which are all stereo meters (two strips).
Home • Rec • AutoMix
These three full-color, sof-touch silicone buttons () allow for immediate access to the overview tab, (2) reveals the recording
banner and (3) reveals the MixAgent™ AutoMix banner. See below for more information.
HOME Button
This button’s single function in life is to return you to the main overview screen when pressed. We totally get it... sometimes
afer a long day at the oce, we could use a button like this to return home immediately, too. This momentary button will
illuminate green when engaged (and held).
REC Button
Once this button is pressed, the display presents the recording setup banner. One-tap recording either () enables hard
start/stop on-board recording (quick press-and-release) or (2) pauses the current recording (2-second hold-and-release).
While paused, recording may be resumed by a quick press of the recording button. This latching button will illuminate – and
pulse – red when engaged to indicate that recording has begun.
Much more information about the DLZ Creator recording process may be found in Chapter 3 (pages 94-97).
2
Page 22
DLZ CREATOR ADAPTIVE DIGITAL MIXER FOR PODCASTING AND STREAMING, FEATURING MIX AGENT™ TECHNOLOGY
AUTOMIX Button
AutoMix allows quick access to the AutoMix banner, as seen below. Press the AutoMix button so the banner opens.
The first thing you may notice are that the input meters for channels -4 are gone. Do not fret! The meters are still there;
they are just “hidden” by the AutoMix banner.
Note that AutoMix is only visible when the ‘Overview’ tab is open. We will discuss ‘Overview’ and the other tabs
in the upcoming chapters.
AutoMix OFF
AutoMix ON
While pressing the AutoMix button opens the AutoMix banner, AutoMix still needs to be turned on in order to function.
Simply tap the Automix on/o switch in the upper-right corner of the banner.
As it says at the top of the banner, “Select which microphone channels should be included using the toggles below.
Gain will be shared between the channels based on the selected priority value.”
In order to accomplish that feat, tap each channel’s ‘assign’ switch that you want to assign a ‘weight’ to.
Once turned on – switch to the right – assign the ‘weight’ that you would like assigned to each mic input: High, medium or low.
While all four channels have been assigned a weight in the example above, that doesn’t have to always be the case.
Channels -2 could be on while channels 3-4 remain o, for example. In order to assign a weight, however, the assign
button has to be turned on first.
22
Page 23

DLZ CREATOR ADAPTIVE DIGITAL MIXER FOR PODCASTING AND STREAMING, FEATURING MIX AGENT™ TECHNOLOGY
Pressing the AutoMix button again results in a few things. First, the AutoMix Banner disappears and the meters magically
reappear! Also, so long as the AutoMix banner toggle switch is engaged, the AutoMix button will illuminate teal when
engaged to indicate that Automix is currently active. Lastly, a tiny teal “A” is added to the Main L/R Channel ID.
So, when should AutoMix be used? When (and why) should mics be assigned weights? It could be anything from, say,
a podcast, where the host’s mic could be assigned a high weight and guests medium or low. Same thing with a broadcast.
There’s the play-by-play announcer and the color commentator. They would be given higher weights than special guests
in the booth or on the field. Radio stations could use AutoMix for the main host and their guests, as well.
Quick Control Knobs
Located between the main display and the Home, Rec and AutoMix buttons are the quick control knobs.
Main L/R Channel IDAutoMix Button
Quick Control Knobs
These five quick control knobs control context-dependent parameters as viewed on the display to the lef of them.
While the knobs are not assignable or user-customizable, pre-assigned parameters may be accessed then edited
via the quick control knobs.
The color of the base of each knob changes depending on what parameter is available at the time.
All of this will make much more sense when we get to the sofware side of things!
23
Page 24

DLZ CREATOR ADAPTIVE DIGITAL MIXER FOR PODCASTING AND STREAMING, FEATURING MIX AGENT™ TECHNOLOGY
DLZ Creator Display
The reason we’re all here today... the DLZ Creator display!
The DLZ Creator display is a mammoth 0" touch screen with a resolution spanning 024x600 pixels.
Here is where you may view, access and update parameters via the following tabs:
• Overview [aka Home] – The DLZ Creator Overview.
• Channel setup – including channel naming, icons and colors, gain, 48V, pan, send levels, dynamics, FX levels and more.
• FX setup – including reverb and delay settings [Enhanced and Pro Modes].
• Media – this is where recordings are stored to USB and/or SD. It is also the place to access (and play back)
these audio files that have been stored on disk.
• Snapshots – this is where snapshots may be recalled, saved, stored, edited or deleted.
• Pads – including name, pad color, three pad modes, multiple play styles, a variety of control modes, FX, and more.
• Settings – including the work mode, screen and button brightness levels, factory reset,
Bluetooth pairing, recording and much, much more.
In addition to the tabs laid out horizontally along the navigation bar, several other things may be tapped, double-tapped,
poked and prodded, swiped and dragged. Those will be discussed in detail when we get to them.
24
Page 25
DLZ CREATOR ADAPTIVE DIGITAL MIXER FOR PODCASTING AND STREAMING, FEATURING MIX AGENT™ TECHNOLOGY
Chapter 4 : Getting Started
Introduction
Before powering the DLZ Creator on, let’s take a few minutes to get acquainted with the wording that will be used throughout
this Owner’s Manual. Doing so will minimize confusion and increase productivity, a great combination!
Tapping and Dragging
The tap-and-drag sounds like it could be a brand-new dance, but alas, ’tis not. Instead they are the functions you will be using:
Gesture Action Examples
Single-Tap To press or touch a control or item
Double-Tap To press or touch a control or item twice quickly
Drag To press down and slowly drag the feature to the desired
spot (that is, move side-to-side and up and down)
(analogous to a single mouse click)
(analogous to a double mouse click)
Select tabs, channels, presets, etc.
Center pans/balance,
reset EQ to 0 dB gain, etc.
Adjust pans, EQ, gate/comp, FX, etc.
There are a multitude of things to tap: tabs (and sub tabs) along the navigation bar, channel IDs, preset pull-downs,
on/o switches and many more. The DLZ Creator works in similar fashion. In most cases, it is tap to engage, tap again
to disengage.
Some things may be double-tapped to reset to their default settings. For example, pans will be centered,
EQ will be set to 0 dB gain, etc. Also, a double-tap on a channel ID will quickly navigate to that channel’s parameters.
Dragging is how to adjust pans, EQ, gate, compressor and FX settings to name just a few. Keep a finger on the parameter
and drag the selected item to the desired destination. You will become a master dragger in no time!
Welcome Screen
Are you ready to fire it up? Of course you are... let’s go! Turn the power switch on and let the little gerbils hanging out
under the hood wake up. Afer their slumber, you will be welcomed with the following screen:
25
Page 26
DLZ CREATOR ADAPTIVE DIGITAL MIXER FOR PODCASTING AND STREAMING, FEATURING MIX AGENT™ TECHNOLOGY
Control Modes
As you can see, DLZ Creator oers multi-language support. Therefore, the first thing that needs to occur is selecting
a language that you feel most comfortable with. Tap the chosen language so it is highlighted green followed by tapping
the arrow; the default language is English.
The translations have been made for simplicity and understanding versus exact translation.
The language may be changed via Settings > System and selecting the ‘Language’ drop down.
More information on page 77.
Once a language has been chosen, you will be asked to choose a Control Mode...
You will hear all about modes throughout this entire manual, as there are visible and functional dierences between them.
No need to fret, though, as we will pick them all apart, answering any questions you may have. DLZ Creator has three modes
to choose from. Additionally, all three modes feature an intuitive wizard, should you ever get stuck!
• Easy Mode – Easy mode is for the beginner. The feature set may be reduced in easy mode,
but once you have a better grip, simply jump to enhanced or pro mode! We highly suggest
starting with easy mode.
• Enhanced Mode – Enhanced mode is easy mode, but with additional features and flexibility.
This mode is perfect for entry-level broadcasters, podcasters, Stratocasters® and Telecasters®.
• Pro Mode – You know it all, don’t cha?! If so, then dive right in to pro mode where the features
and flexibility are at their most advanced.
26
Page 27

DLZ CREATOR ADAPTIVE DIGITAL MIXER FOR PODCASTING AND STREAMING, FEATURING MIX AGENT™ TECHNOLOGY
As you can see in the image on the previous page, easy mode is already selected and the setup assistant toggle switch
is to the right [on]. Tap the ‘Next’ button. Follow the steps as they appear on the screens being sure not to skip any...
no shortcuts! However, if you missed a step – tsk tsk! – you can always tap the ‘Back’ button. You will be greeted
with screens, but in short, these are the steps (regardless of the chosen mode):
• Channel Faders – Raise all channel faders to unity level. This includes the sample level fader.
• Headphones, Part I – Connect -4 headphones to the headphone output jack(s).
• Headphones, Part II – Put the headphones on and rotate the quick control knob(s) associated
with each headphone until you hear audio clearly. If you need additional assistance, tap
the ‘Headphone Help’ button.
27
Page 28

DLZ CREATOR ADAPTIVE DIGITAL MIXER FOR PODCASTING AND STREAMING, FEATURING MIX AGENT™ TECHNOLOGY
• Combo Input Jacks -4 – Plug a microphone and/or line/instrument signal into input channel .
Multiple input suggestions are at your disposal. More information about these inputs and correct
cables may be seen on page 0.
• Setting Input Levels – Add phantom power (if necessary) and adjust the slider until the meter reaches
the highlighted target. If you need additional assistance, tap the ‘Microphone Help’ or ‘Listen and Set
for Me’ button. More inputs? Follow this and the previous step for input channels 2-4.
• Input Jacks 5-0 – Select what will be connected to these stereo channels.
Channel 5/6 – None, Line, USB Audio
Channel 7/8 – None, Aux (phone, tablet), USB Audio
Channel 9/0 – None, Bluetooth, USB / SD
As you can see, multiple input possibilities are at your disposal. More information about these inputs
and correct cables may be seen on page .
28
Page 29
DLZ CREATOR ADAPTIVE DIGITAL MIXER FOR PODCASTING AND STREAMING, FEATURING MIX AGENT™ TECHNOLOGY
• Pads – These pads may be pressed to play a sample or sound clip for a podcast, presentation, and more.
Additionally, the pads may be configured to control aspects of the mixer, as well as FX on/o pads.
It is 8x6, meaning eight separate banks with six sample / sound clip possibilities within each bank. Heavy duty!
More information about the pads and how they work may be found on page 63.
• L/R Outputs – If you are using speakers in addition to headphones, they may be connected to the /4" L/R
outputs. More information about these outputs and correct cables may be seen on page .
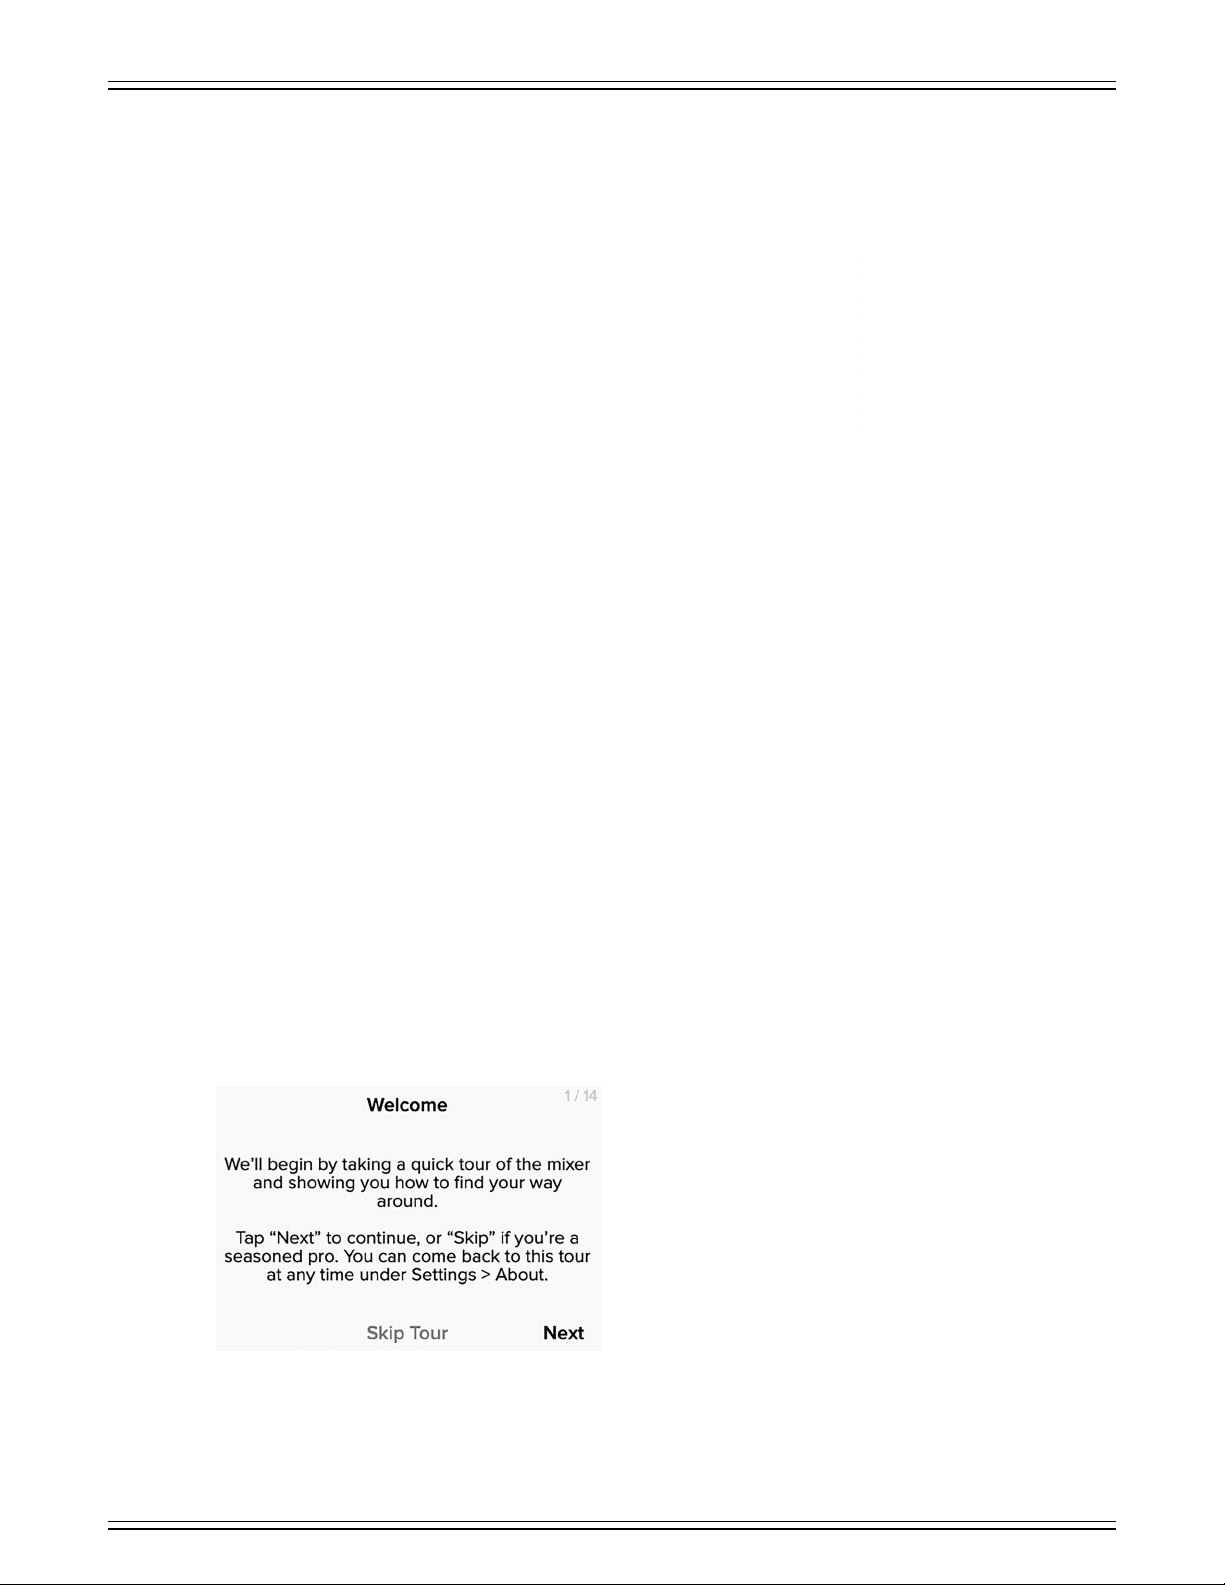
At this point, the setup is complete and you’ll be asked if you would like to take a tour of the mixer. While it is completely
up to you, we believe that you should strongly consider it. Tap ‘Next’.
Everything in the tour will be expanded upon in the following pages... but we’re glad you’ll experience it, anyway!
Once finished, you will land back on the Overview tab.
29
Page 30
DLZ CREATOR ADAPTIVE DIGITAL MIXER FOR PODCASTING AND STREAMING, FEATURING MIX AGENT™ TECHNOLOGY
Chapter 5 : Overview Tab
Introduction
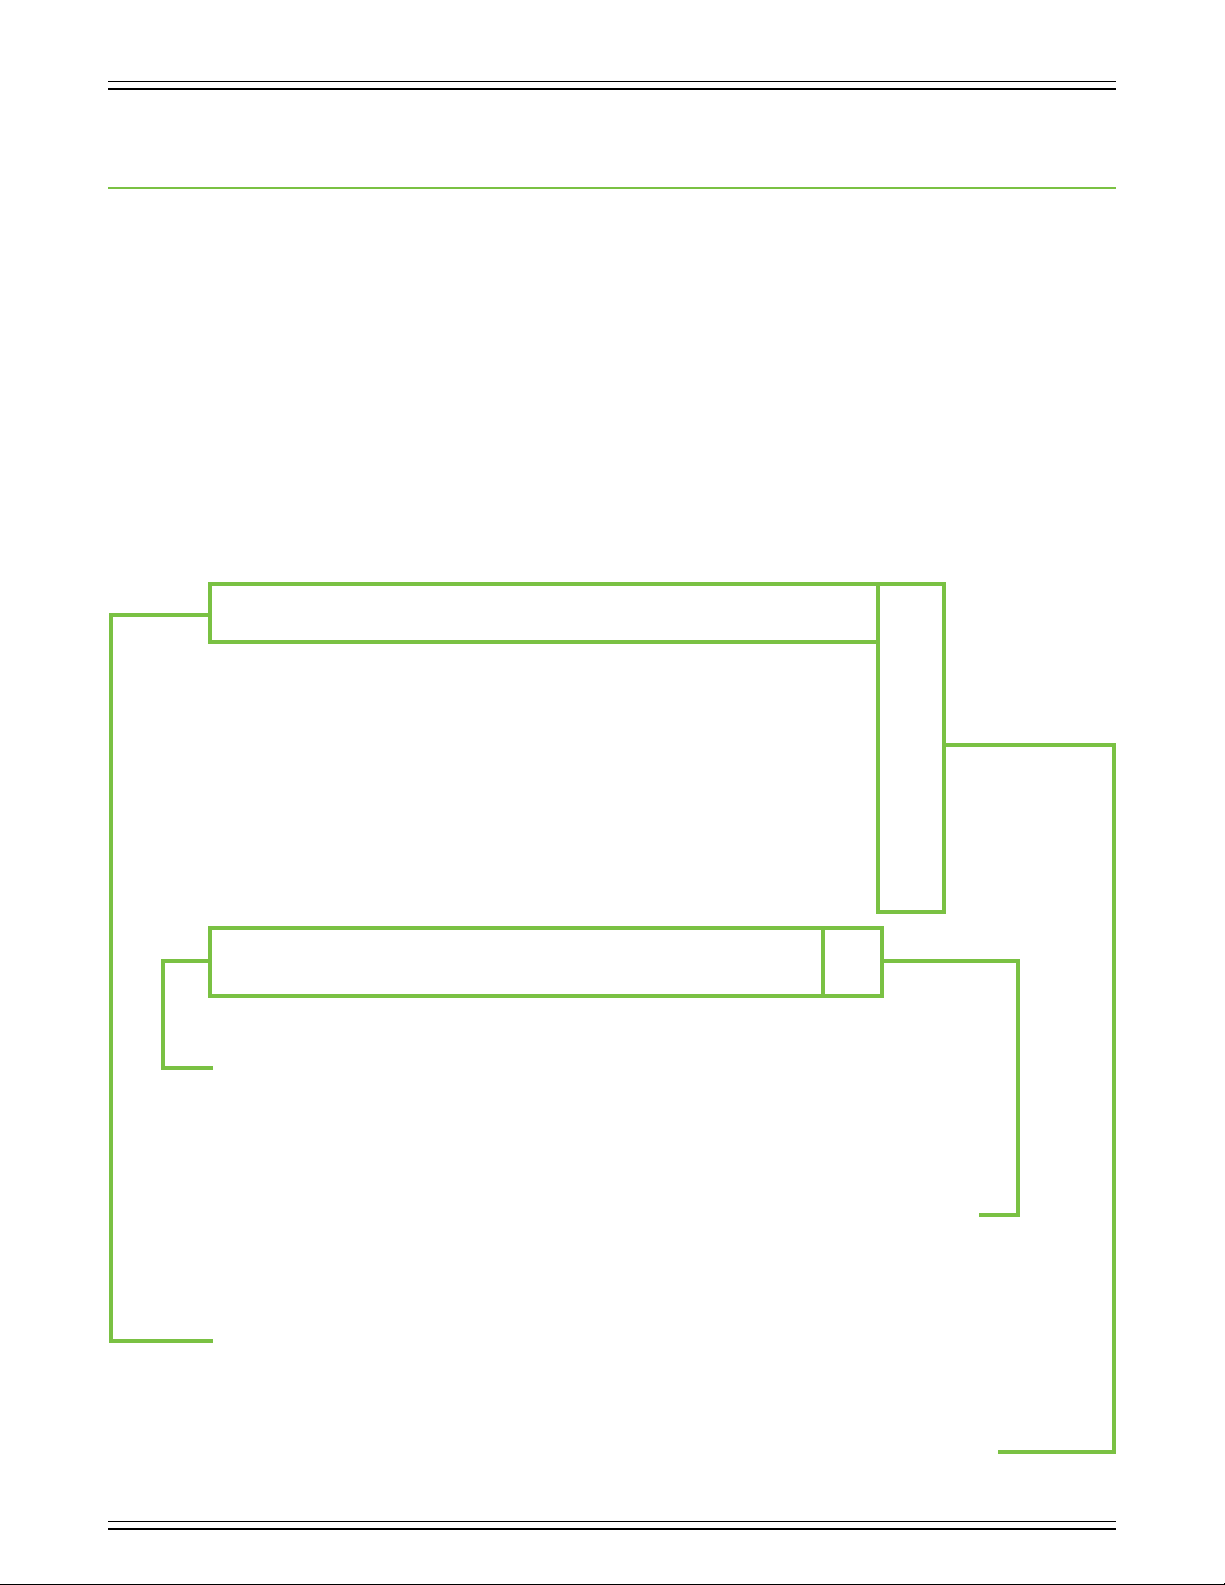
Located in the upper lef-hand corner of the DLZ Creator display is the first tab: Overview. This is the main view, and where
you will (most likely) spend most of the time. Afer touring the DLZ Creator, this is the default landing screen. It is also called
the home screen and is easily accessed by tapping the big home button regardless of what view is displayed!
While parameters are not updated here, it does allow access to the channel selection bar that lies horizontally across
the bottom of the display. Channel meters are viewed here, as well. Additionally, in the upper-right corner of the display
are several small icons. These will illuminate white to show connectivity and are grayed out if not.
Also displayed on the home screen is the current play status and color of each sample pad (which match the sample
pad colors on the hardware). To the right of the sample pad play status and colors are the currently assigned mix levels
(which may be raised and lowered via the quick control knobs, also on the hardware). On easy mode, it’s the headphone
levels. Headphone levels and multiple other features are available in enhanced or pro mode, such as channel gain level,
panning, EQ, FX send levels and much more!
As stated above, parameters are not updated here. However, there are three things that may be tapped:
() any of the square channel ID buttons on the aforementioned channel selection bar lying horizontally across
the bottom of the display. The currently selected channel will illuminate to indicate that it is the selected channel.
Channel as seen above. When parameters are updated, it’s on the channel that has been selected.
Go ahead and tap some of the other channel IDs to get a feel for it, then return back to channel selected...
or double-tap a channel ID to go directly to that channel’s parameters!
(2) any of the eight sample banks (A-H). There are six samples available per bank for a total of 48 samples!
Again, we suggest tapping between the eight banks, returning to “A” when complete. Notice that the other seven banks
are completely blank, awaiting your samples. Additionally, notice that the sample pads themselves are no longer illuminated
in the other seven banks, either.
(3) any of the tabs on the navigation bar lying horizontally across the top of the display. This includes the overview, channel,
FX, media, snapshots, pads and settings tabs. Ok, one more time! Tap around between the tabs to get a feel for it, returning
to the ‘Overview’ tab when play time is over.
Tapping any of the four headphone volume tabs laid out vertically on the far-right of the display will take you directly
to that headphone’s mix mode and other settings. Note: this only works in Pro Mode. More on this feature later.
And by later we mean the next page...
30
Page 31

DLZ CREATOR ADAPTIVE DIGITAL MIXER FOR PODCASTING AND STREAMING, FEATURING MIX AGENT™ TECHNOLOGY
As mentioned on the previous page, tapping any of the four headphone volume tabs laid out vertically on the far-right
of the display will take you directly to that headphone’s mix mode and other settings. Let’s start with the headphone output.
Tap it so the mix mode appears. It opens with standard mix selected, the default. Standard mix oers a copy of the main LR
pre-fader with output volume control using the quick control knob associated with it.
For the next example, we tapped the headphone 2 output and selected the next mix mode on the list: custom. The overall
channel input levels are already set, but here each person with a set of headphones on can set the channel input levels
to their desire... and even mute channels they don’t want in their mix! Simply tap-and-drag a “fader ball” up and down
until that channel’s level is where you want it. The custom mix oers a completely independent mix of each input channel
with headphone output volume control using the quick control knob associated with it.
3
Page 32
DLZ CREATOR ADAPTIVE DIGITAL MIXER FOR PODCASTING AND STREAMING, FEATURING MIX AGENT™ TECHNOLOGY
The third and final mix mode is quick mix! We tapped the headphone 3 output for this example. Tapping quick mix mode sets
the “fader balls” at center position where they may be raised (boosted) or lowered (attenuated) based upon the fader position
and relative level of the DLZ Creator. Simply tap-and-drag a “fader ball” up and down until that channel’s level is where you
want it. Like the custom mix, the quick mix also oers a completely independent mix of each input channel with headphone
output volume control using the quick control knob associated with it. Also like the custom mix, people may mute channels
that they don’t want to hear in their mix.
There is no fourth mix mode. However, there is a toggle switch option to ‘Send to USB 3-4’
(which has been an option on the three previous examples, as well). This routes THIS mix
to USB 3/4 for streaming (the USB 3/4 SEND). Here is what this means: DLZ Creator is a 4x4
USB interface (4 channels to the computer and four channels returned from the computer –
USB /2 and USB 3/4 (the USB /2 and USB 3/4 RETURNS)).
When this switch is engaged (switch right, illuminates green), it sends this headphone
mix out USB sends 3-4 on DLZ Creator going to the computer.
This is a great way to capture a “backup” to the DAW while streaming the main to OBS
[Open Broadcaster Sofware], for one example. Or perhaps you prefer to send dierent mixes
to two dierent streaming plaforms (audio only)? This is the way!
The switch is gray when disengaged (switch lef).
Once one output mix has been routed to USB 3/4 this option will be grayed
out and unavailable for selection on the other output mixes.
The Send to USB 3-4 toggle switch is only available in:
Settings > Recording / Routing > Computer (USB) > Stereo LR -2.
It will disappear when Multitrack + LR 3-4 is selected.
32
Page 33

DLZ CREATOR ADAPTIVE DIGITAL MIXER FOR PODCASTING AND STREAMING, FEATURING MIX AGENT™ TECHNOLOGY
Below the ‘Send to USB 3-4’ toggle switch is another toggle switch: ‘Send to NDI’. This is the same as ‘Send to USB 3-4’, but
instead of sending the headphone mix to USB 3-4, it sends it to NDI. It is a stereo mix that goes out over NDI, so with this switch
engaged, it will replace the default NDI output which is the main mix. This one is independent of record mode. NDI output is only
ever main L/R mix (Default) or the headphone mix (‘Send to NDI’). When this switch is engaged (switch right) it illuminates – in
Chris Martin’s voice – “Yellow”.
Regardless of the headphone output or mix mode selected, each headphone output may be color-coordinated to go with today’s
oufit. When the headphone output is tapped and mix mode appears, a default color is presented. If you would prefer a dierent
color, tap the swatch to unveil a color palette laid out horizontally. Simply tap the color you would like for the selected headphone
output and the quick control knob and headphones/mix level display will change to represent the chosen color.
Coming back to the ‘Overview’ tab for one last thing... notice the sample “circles” laid out vertically between the settings
tab and the sample banks switcher in the screenshot to the lef; a quick DOUBLE-tap takes you directly to that sample’s
page so changes may be made on-the-fly! Check out more information about samples in Chapter 0, pages 63-76.
33
Page 34
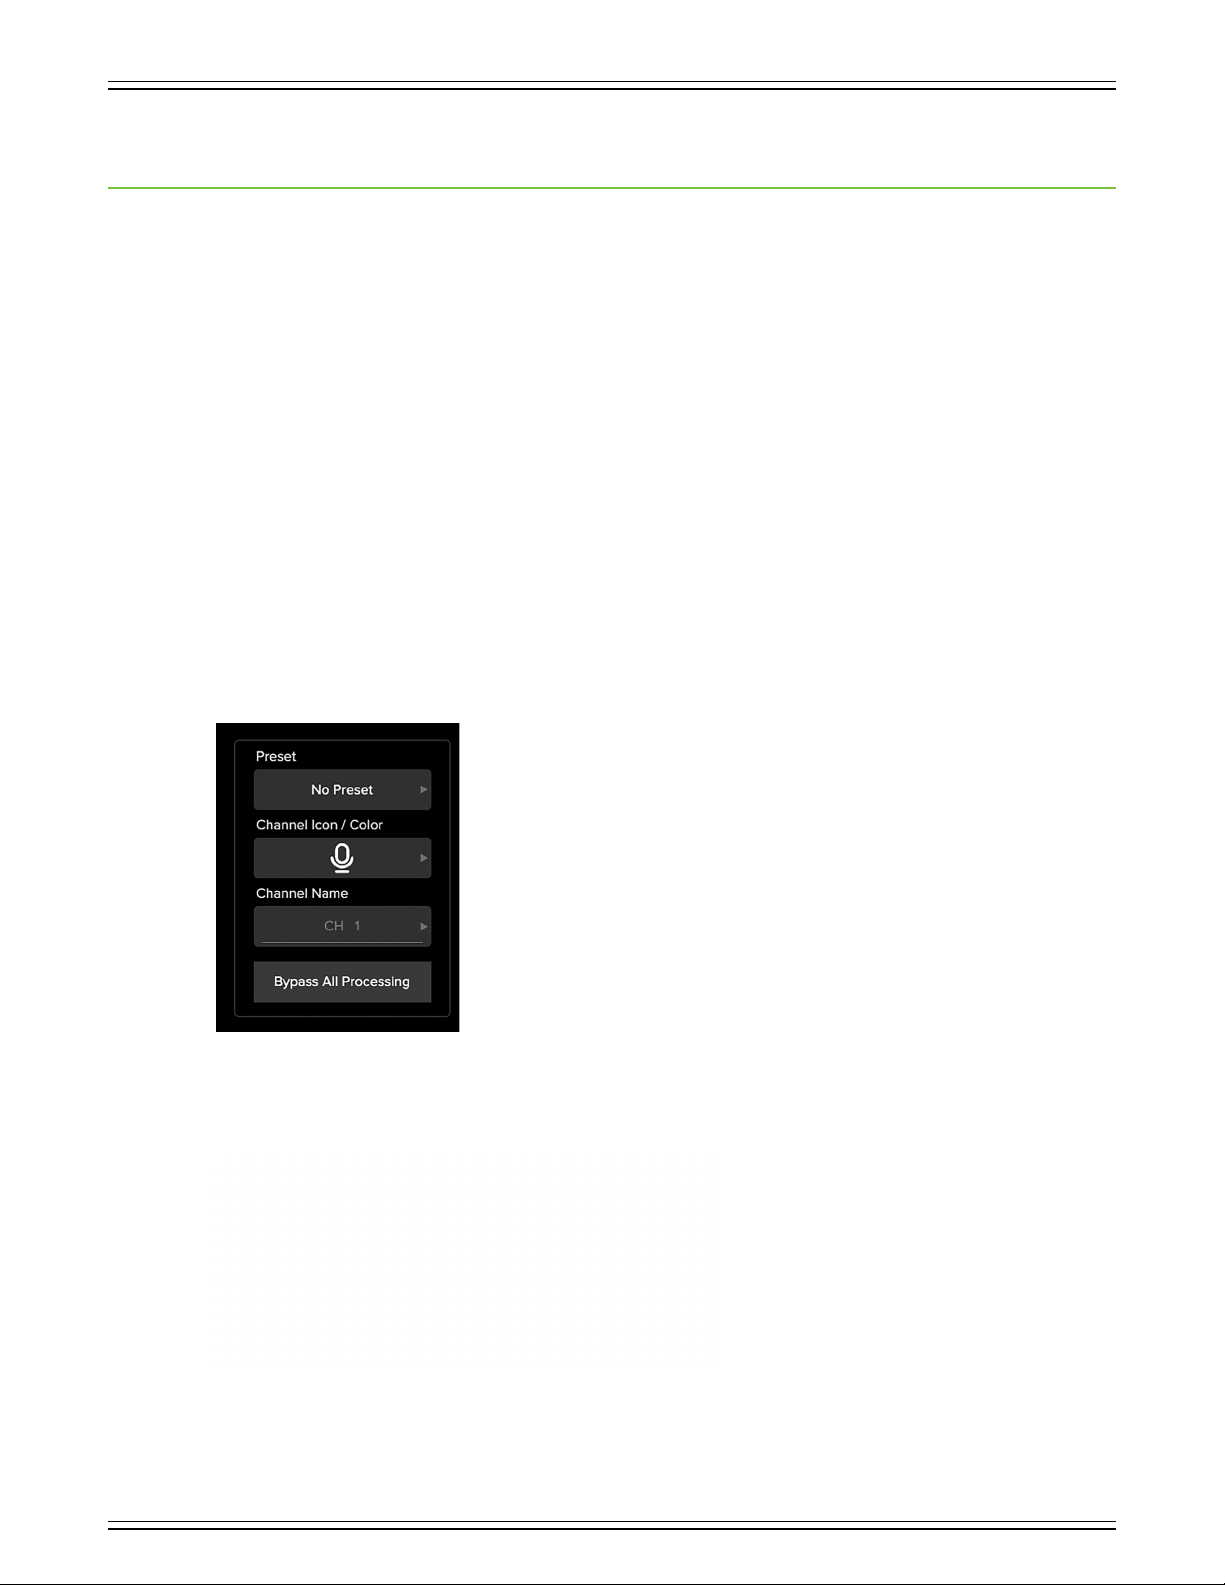
DLZ CREATOR ADAPTIVE DIGITAL MIXER FOR PODCASTING AND STREAMING, FEATURING MIX AGENT™ TECHNOLOGY
Chapter 6 : Channel Tab
Introduction
Channel is the next tab listed. Tap it so it opens up. Here you are able to name the channel, give it some color and add an icon,
too! Additionally, this is where to re-run the Microphone/Channel Setup wizard – if the setup assistant was bypassed – and add
presets.
If you are working in enhanced or pro mode, though, a whole slew of other things are oered, including advanced setup,
EQ, gate, compressor, de-esser and more.
• Channel Tab EASY Mode – pages 34-35
• Channel Tab ENHANCED Mode – pages 34-39
• Channel Tab PRO Mode – pages 34-35, 39-5
Some of the channel tab setup features look and work similarly between all three modes. Those will only be explained once.
In fact, the first view displayed below may be seen in all three modes.
Channel ID Button [Easy • Enhanced • Pro]
Each channel ID button name, image, color and preset is user-editable. The channel tab is already open, so just tap a channel
button to get started. We will start with channel .
Presets [Easy • Enhanced • Pro]
Presets save parameters and may be recalled as needed. DLZ Creator comes with a library
of factory presets.
There are also user presets. These may be created for each preset type.
An entire chapter is dedicated to presets. This includes detailed instructions and multiple
screenshots every step of the way. Please check it out on pages 90-93.
Channel Icon / Color [Easy • Enhanced • Pro]
Let’s spice up the channel with an icon and color! Tap “Channel Icon / Color” to reveal a new popover as seen below.
Look at the multitude of built-in icons and colors
at your disposal!
From here, tap the icon and color you would like
for each channel. Here we chose a general “person”
icon who is the host of the show. His favorite color
is purple, so I chose it for this example.
34
Afer making the selections, the channel is updated
immediately, but there is one more thing we can add
to the channel... a name!
Page 35
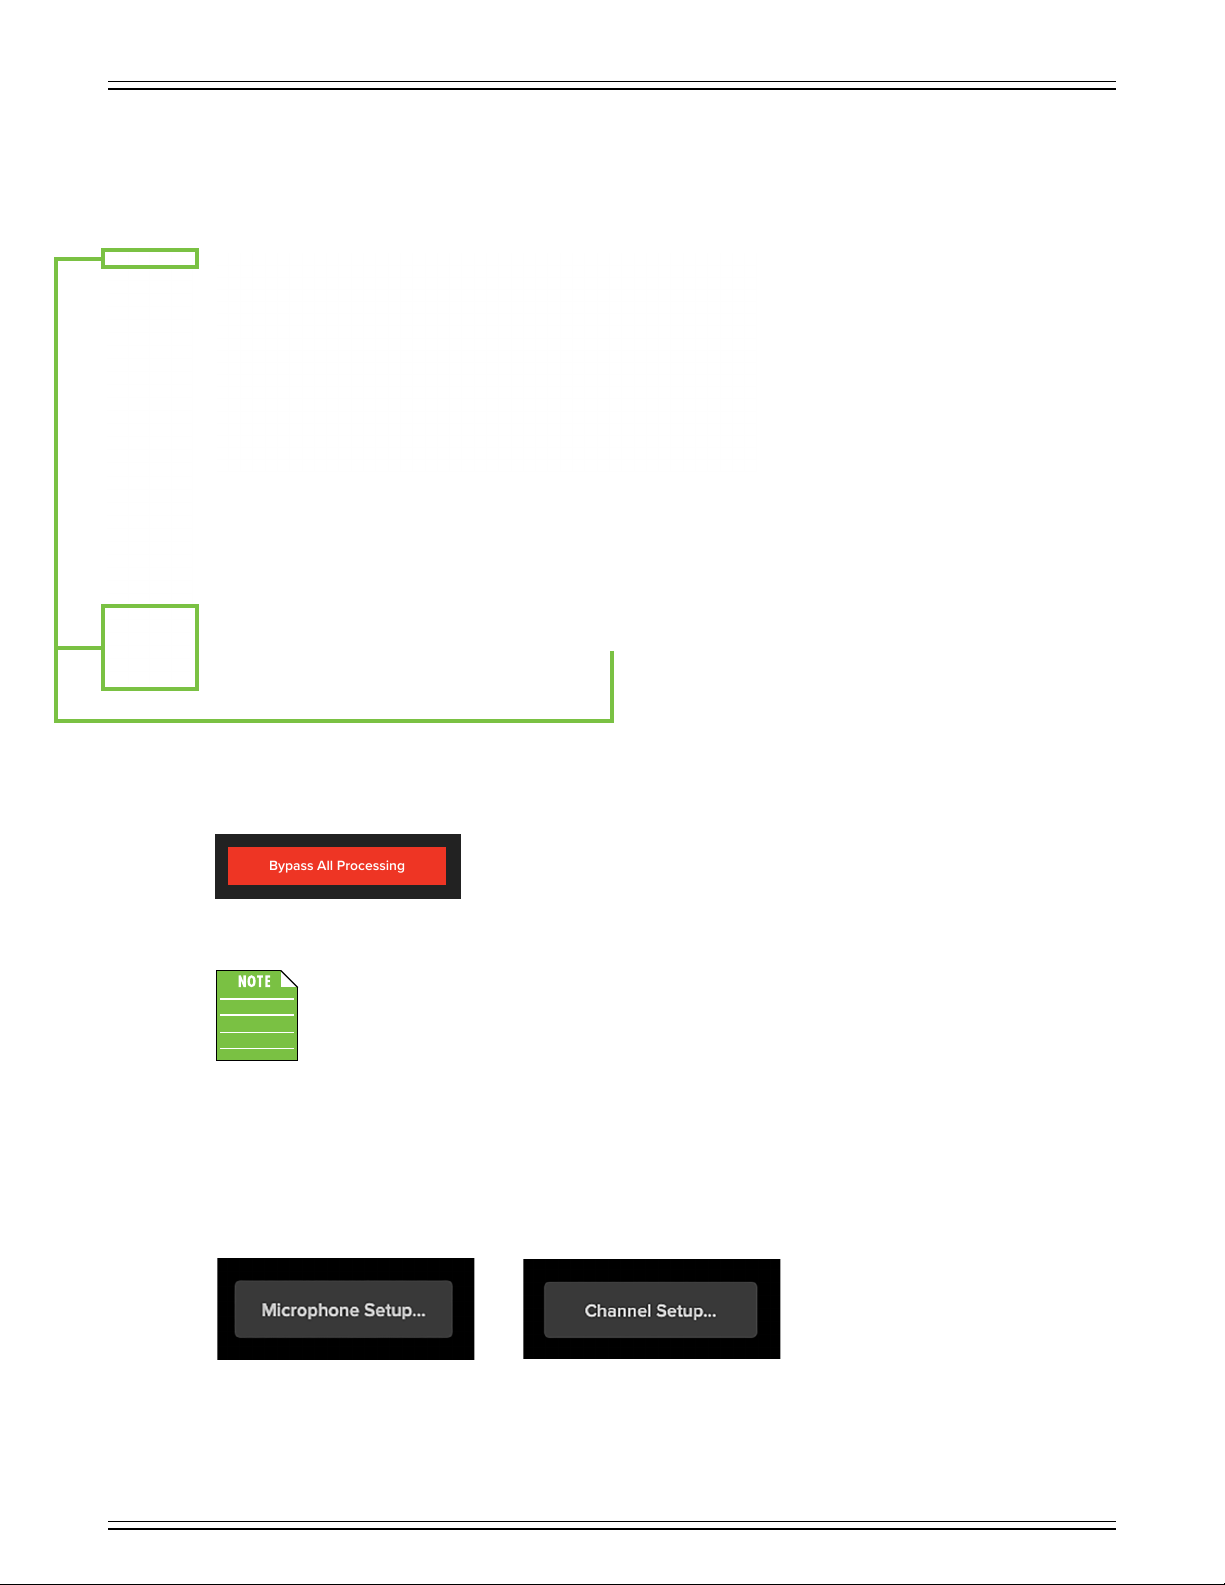
DLZ CREATOR ADAPTIVE DIGITAL MIXER FOR PODCASTING AND STREAMING, FEATURING MIX AGENT™ TECHNOLOGY
Bypass All Processing
Channel Name [Easy • Enhanced • Pro]
Ready to add a name? Tap in the name box to bring up the keyboard (as seen in the image below). Type in the name
you want for that channel followed by tapping “Enter”. Our host’s name is Johnny. The name is limited to 36 characters.
Notice the Channel ID... the name and icon are there! Also notice that both the top and bottom of the channel strip becomes
the selected color. The preset that you loaded is there, as well, but presets aren’t “displayed”.
As seen in all of these images, a small number resides in the upper-lef corner regardless of name, icon and/or color. This
number represents each channel and it cannot be changed or removed. Trust us, it’s for the best, as it is for easy identification.
You may set up the remaining input and output channels the same way as listed above.
Bypass All Processing [Easy • Enhanced • Pro]
This is a true hardware bypass of all processing circuitry to ensure that there
is no coloration of the signal if processing is not needed. When this is engaged
[red with white text, as seen to the lef], any eects that are added or changed
will have no eect on the signal. This switch is to make an A/B comparison between the processed signal and the signal
without any processing.
And you may tell yourself, “This is not my beautiful house.” And you may tell yourself, “This is not my beautiful
wife.” And you may tell yourself, “There are no FX, gates/comps, EQ, etc. in Easy Mode.” Well, if that’s true, then
what exactly does ‘Bypass All Processing’ do when in Easy Mode? Presets, of course! Presets can – and do! –
shape the sound just as much as individually changing the parameters when in Enhanced or Pro Mode.
Microphone / Channel Setup... [Easy]
If you are still having issues with setup, there is a setup assistance for the inputs. This includes microphone (and instrument)
setup on channels -4 and channel setup on channels 5-0. Simply tap the button. This will send you to the microphone
(and instrument) or channel setup section of the setup assistant.
Mic and Channel Setup Buttons in EASY mode
35
Page 36
DLZ CREATOR ADAPTIVE DIGITAL MIXER FOR PODCASTING AND STREAMING, FEATURING MIX AGENT™ TECHNOLOGY
Channel Setup [Enhanced]
Check out what the channel setup tab looks like in enhanced mode.
Channel Setup in ENHANCED mode
1 2 3
There are a few things to notice here:
First and foremost, listed underneath the Channel’s main tab are not one, but TWO sub tabs:
‘Setup’ (which we will discuss below) and ‘Advanced Controls’ (which we will discuss next)!
Within the ‘Setup’ sub tab, there are three separate “boxes” as outlined above.
• # – Notice that the first “box” displayed is the Channel ID setup: preset, channel icon / color, channel name and bypass
all processing. These look and work exactly the same as in easy mode and were discussed on the previous two pages.
• #2 – The middle “box” is about setting levels (channels -4) and selecting the channel source (channels 5-0).
• If setting levels, first tap whether the connected microphone is dynamic or condenser. As indicated
by the lightning bolt icon, condenser mics require 48V phantom power. It will automatically be applied
to that channel and a little lightning bolt icon will be added to the middle-right side of that channel ID.
Most modern professional condenser mics require 48V phantom power, which lets the DLZ Creator send
low-current DC voltage to the mic’s electronics through the same wires that carry audio. (Semi-pro condenser
mics ofen have batteries to accomplish the same thing.) “Phantom” owes its name to an ability to be “unseen”
by dynamic mics (Mackie EM-89D and Shure SM57/SM58, for instance), which don’t need external power
and aren’t aected by it anyway.
Never plug single-ended (unbalanced) micro phones, or ribbon mics into the mic input jacks
if phantom power is applied to that channel. Do not plug instrument outputs into the mic XLR
input jacks with phantom power on unless you know for certain it is safe to do so. Be sure
the main mix fader and headphone levels are turned down when connecting microphones to the mic inputs
when phantom power is turned on to prevent pops from getting through to the speakers and headphones.
The next step is to tap ‘Set Level Automatically’. The button will illuminate green and the text will change
to ‘Listening...’. Simultaneously speak into the mic at normal volume and continue speaking until the button
changes back to ‘Set Level Automatically’. [Note that it will state ‘Level Set!’ prior to ‘Set Level Automatically’,
but it’s pretty fast!]. Once it is set, you might notice that the horizontal meter will remain on the far-left when
the mic is not in use and in the money-zone when spoken directly into.
36
Page 37
DLZ CREATOR ADAPTIVE DIGITAL MIXER FOR PODCASTING AND STREAMING, FEATURING MIX AGENT™ TECHNOLOGY
Keep in mind that we have only looked at this setup view when on channels -4. But what opportunities arise
when another channel is selected? The first box remains the same as it always was: presets, icons, colors,
naming and the ability to bypass all processing. However, since mic/XLR inputs are only on the first four
channels, a channel source is requested when viewing non-mic/XLR inputs, as seen below.
Channels 9/10Channels 5/6 and 7/8
The source for channels 5/6 is either line in 5/6, USB /2 or USB 3/4. [Channels 7/8 are exactly the same
as channels 5/6, except the source is either line in 7/8, USB /2 or USB 3/4]. Channels 9/0 are a little bit
different in that its channel source is either Bluetooth or SD/USB. Simply tap the source you want for each
channel. An entire chapter is dedicated to routing. This includes detailed instructions and multiple screenshots
every step of the way. Please check it out in Chapter 4, pages 98-00.
• #3 – The third and last “box” is about...
• Turning the reverb and/or delay on (switch right) and o (switch lef). When on, the reverb
switch will be purple and the delay switch is blue. They are grayed out when turned o.
Something else to notice is that channels with reverb and/or delay switched on, it will
also show up on that channel’s ID as seen below (along with the 48V phantom power
lightning bolt icon, when engaged).
Reverb
Delay
The reverb and delay switches work exactly as described above. However, of note is the addition of a Mix-Minus
switch on channels 5/6, 7/8 and 9/0. When on – switch to the right – the mix-minus switch will be green.
As seen above, it is grayed out when turned o.
48V Phantom Power
What mix-minus accomplishes is that DLZ Creator will send the sources a copy of the main mix minus
themselves. This helps prevent feedback and/or stereo return echoes. Additionally, as a Bluetooth source,
channels 9/0 work similarly in that it could be a caller from the outside for a podcast interview, for example.
It removes the caller’s voice from the call, yet allows them to hear the remaining channels (including
the samples).
37
Page 38
DLZ CREATOR ADAPTIVE DIGITAL MIXER FOR PODCASTING AND STREAMING, FEATURING MIX AGENT™ TECHNOLOGY
Channel Setup > Advanced Controls [Enhanced]
We saw the Enhanced Mode Channel Setup screen on the previous two pages, but there is another tab just to the right of it:
Advanced Controls.
Tap it to reveal a screen similar to what is displayed below.
Advanced Controls in ENHANCED mode
1 2 3
Just like with the setup screen, there are also three separate “boxes” in advanced controls, as well (outlined above).
• # – The first “box” contains the input level slider (which ranges from 0 to +80 dB) and corresponding meter level,
as well as a high-pass filter (HPF) on/o switch. Now, the input level should be fine – or at least very close – since
we “set the level” automatically a couple of pages back. This is simply your chance to fine-tune the input level. The input
level may be changed by either () rotating the quick control knob associated with it or (2) tapping-and-dragging the slider
lef and right until the desired level has been achieved.
Located underneath the input level slider and corresponding meter level lies the HPF on/o switch. High-pass
filters are utilized to cut out low frequencies. The high-pass filter control adjusts the cut-o frequency for the filter.
While the pro mode expands on the HPF – we’ll get there soon – the enhanced mode simply adds this option as on
(switch right) or o (switch lef). It will illuminate hot pink when engaged and is gray when disengaged.
• #2 – The middle “box” contains the EQ section. The EQ may be engaged (switch right) or disengaged (switch lef).
It is a 3-band EQ with bass, mid and treble. The gain may be changed by either () rotating the quick control knob
associated with it or (2) tapping-and-dragging these sliders up and down until the desired sound has been achieved.
Moving a slider vertically changes that frequency’s gain by up to ±5 dB. Tapping an EQ ball twice quickly will set it at 0 dB.
It will illuminate blue when engaged and is gray when disengaged.
You can really upset things with too much EQ. Each EQ band has a lot of boost and cut because
that is needed on occasion. But if the EQ is maxed on every channel, the mix turns to mush.
Equalize subtly, using cut as well as boost. If you find yourself repeatedly using a lot of boost or cut,
consider altering the sound source such as placing a mic dierently, trying a dierent kind of mic,
a dierent broadcaster, gargling, or all of the above.
The default frequency for each band is as follows:
Bass: 200 Hz
Mid: kHz
Treble: 5 kHz
However, while these may be the default settings, the EQ may have been changed in pro mode
and/or a preset may have been loaded, which will also alter the EQ settings.
38
Page 39
DLZ CREATOR ADAPTIVE DIGITAL MIXER FOR PODCASTING AND STREAMING, FEATURING MIX AGENT™ TECHNOLOGY
• #3 – The third and last “box” contains the noise gate, compressor and de-esser. Gates are typically used to reduce leakage
from open microphones. Signals below the threshold level are muted, while signals above the threshold get to pass through.
The range control changes the rule slightly. Signals below the threshold are attenuated by the amount of the range setting,
while signals above the threshold get to pass through.
Compressors are used to reduce or limit transient peaks in a signal. If the signal is too hot, turn down that channel’s
gain, otherwise leave it alone. As the input level to the compressor increases, the output level increases linearly until
the threshold point is reached. Afer that point, the output level no longer increases linearly. Instead, it increases
at a reduced rate determined by the ratio setting. The compressor percentage may be changed by either () rotating
the quick control knob associated with it or (2) tapping-and-dragging this slider lef and right until the desired sound
has been achieved.
De-essers are specialized compressors that focus on and reduce or remove high frequencies and sibilance,
especially “harsh” sounds such as “ess”, “z”, “ch”, “j”, “sh” and “ts”. There are always exception to the rule,
of course, but for the most part, sibilance is typically in the 3-6 kHz (male) and 6-8 kHz (female) range.
While the pro mode expands on all of these items – with separate tabs even; we’ll get there soon – the enhanced
mode simply adds these options as on (switch right) or o (switch lef), with the ability to choose the amount
of compression from 0-00%.
Channel Setup [Pro]
Now check out what the channel setup tab looks like in pro mode.
Channel Setup in PRO mode
There are a few things to notice here:
First and foremost, listed underneath the Channel’s main tab are not one, not two, but a whopping FIVE sub tabs:
‘Setup’ (which we will discuss below), ‘EQ’ (which we will discuss next), followed by ‘Gate’, ‘Compressor’ and ‘De-Esser’!
1 2 3
Within the ‘Setup’ sub tab, there are three separate “boxes” as outlined above.
• # – Notice that the first “box” displayed is the Channel ID setup: preset, channel icon / color, channel name and bypass
all processing. These look and work exactly the same as in easy and enhanced mode and were discussed on pages 34-35.
• #2 – The middle “box” is about adding (or removing) 48V phantom power from the channel and setting levels
(channels -4) and selecting the channel source, adding trim and toggling the mix-minus function on/o (channels 5-0).
• If setting levels, does the connected microphone require 48V phantom power? (Condenser mics
require 48V phantom power.) If so, make sure that the 48V phantom power switch is to the right.
It will illuminate orange to confirm that phantom power is engaged for that channel and is gray
when disengaged. It will automatically be applied to that channel and a little lightning bolt icon
will be added to the middle-right side of that channel ID.
39
Page 40
DLZ CREATOR ADAPTIVE DIGITAL MIXER FOR PODCASTING AND STREAMING, FEATURING MIX AGENT™ TECHNOLOGY
Most modern professional condenser mics require 48V phantom power, which lets the DLZ Creator send
low-current DC voltage to the mic’s electronics through the same wires that carry audio. (Semi-pro condenser
mics ofen have batteries to accomplish the same thing.) “Phantom” owes its name to an ability to be “unseen”
by dynamic mics (Mackie EM-89D and Shure SM57/SM58, for instance), which don’t need external power
and aren’t aected by it anyway.
Never plug single-ended (unbalanced) micro phones, or ribbon mics into the mic input jacks
if phantom power is applied to that channel. Do not plug instrument outputs into the mic XLR
input jacks with phantom power on unless you know for certain it is safe to do so. Be sure
the main mix fader and headphone levels are turned down when connecting microphones to the mic inputs
when phantom power is turned on to prevent pops from getting through to the speakers and headphones.
The next step is to tap ‘Set Level Automatically’. The button will illuminate green and the text will change
to ‘Listening...’. Simultaneously speak into the mic at normal volume and continue speaking until the button
changes back to ‘Set Level Automatically’. [Note that it will state ‘Level Set!’ prior to ‘Set Level Automatically’,
but it’s pretty fast!]. Once it is set, you might notice that the horizontal meter will remain on the far-left when
the mic is not in use and in the money-zone when spoken directly into.
Keep in mind that we have only looked at this setup view when on channels -4. But what opportunities arise
when another channel is selected? The first box remains the same as it always was: presets, icons, colors,
naming and the ability to bypass all processing. However, since mic/XLR inputs are only on the first four
channels, a channel source is requested when viewing non-mic/XLR inputs, as seen below.
Channels 9/10Channels 5/6 and 7/8
The source for channels 5/6 is either line in 5/6, USB /2 or USB 3/4. [Channels 7/8 are exactly the same
as channels 5/6, except the source is either line in 7/8, USB /2 or USB 3/4]. Channels 9/0 are a little bit
different in that its channel source is either Bluetooth or SD/USB. Simply tap the source you want for each
channel. An entire chapter is dedicated to routing. This includes detailed instructions and multiple screenshots
every step of the way. Please check it out in Chapter 4, pages 98-00.
Underneath the channel source selection is a trim slider. Trim is a digital level control at the top of the channel’s
processing. It aects all input sources to the channel whether analog or digital. It ranges from –20 dB to +40 dB
with a default of –0 dB. It’s used for adding level to a channel before any of the channel processing.
So what is the dierence between gain and trim? When would you use gain and when would you
use trim? In short, gain is analog, while trim is digital (right afer the A/D conversion but before
everything else). So if the source is analog, you would use gain. If the source is digital, you would
use trim since it doesn’t have gain. In most cases, you will adjust (analog) gain, not (digital) trim.
If you want to lower a channel level, you can adjust the channel’s trim (assuming it isn’t clipping). The analog
line inputs on stereo channels 5-0 do not have gain. However, digital trim is adjustable for these line inputs.
Trim does not help curb clipping or distortion.
40
Page 41
DLZ CREATOR ADAPTIVE DIGITAL MIXER FOR PODCASTING AND STREAMING, FEATURING MIX AGENT™ TECHNOLOGY
The trim may be changed by either () rotating the quick control knob associated with it or (2) tapping-and-
dragging the slider lef and right until the desired trim level has been achieved. The horizontal meter underneath
the slider will assist; simply continue to add signal to this channel while raising or lowering the trim. The dual
green horizontal lines mark the spot you’re aiming for. Tapping the trim slider ball twice quickly will set it back
to its default of –0 dB. The slider will illuminate blue when any trim is added.
Also of note is the addition of a Mix-Minus switch. When on – switch to the right – the mix-minus switch
will be blue (and is grayed out when turned o). What mix-minus accomplishes is that DLZ Creator will send
the sources a copy of the main mix minus themselves. This helps prevent feedback and/or stereo return echoes.
Additionally, as a Bluetooth source, channels 9/0 work similarly in that it could be a caller from the outside
for a podcast interview, for example. It removes the caller’s voice from the call, yet allows them to hear
the remaining channels (including the samples).
• #3 – The third and last “box” is about two things...
• () Setting the L/R pan (channels -4) and balance (channels 5-2 + main L/R) levels
and (2) setting the reverb and delay send levels (all input channels).
Pan allows you to adjust how much of the channel is sent to the lef versus the right outputs.
The pan control employs a design called “Constant Loudness.” If a channel is panned hard lef
(or right) and then panned to the center, the signal is attenuated 3 dB to maintain the same apparent
loudness. Otherwise, the sound would appear much louder when panned center.
Reverb
Delay
Like pan, balance also allows you to adjust how much of the channel is sent to the lef versus the right
outputs. The only dierence is that channels -4 are mono (and are therefore panned), while channels
5/6, 7/8, 9/0 and /2 are all stereo (and are therefore panned via the balance slider).
The pan and balance sliders may be changed by either () rotating the quick control knob associated
with it or (2) tapping-and-dragging the slider lef and right until the desired pan or balance level
has been achieved. Tapping the pan or balance slider ball twice quickly will set it back to its center
[the default]. The slider will illuminate yellow when the pan or balance is not at center.
• Whereas there is no reverb or delay in easy mode, and a simple on/o switch in enhanced mode,
pro mode unleashes reverb and send levels ranging from –inf (o) to a max of +0 dB. The reverb
and delay send sliders may be changed by either () rotating the quick control knob associated
with it or (2) tapping-and-dragging the slider lef and right until the desired reverb or delay send
level has been achieved. The sliders will illuminate purple (reverb) and blue (delay) when above -inf.
Something else to notice is that channels with reverb and/or delay added, it will also show up on that channel’s
ID as seen below (along with the 48V phantom power lightning bolt icon, when engaged).
48V Phantom Power
4
Page 42
DLZ CREATOR ADAPTIVE DIGITAL MIXER FOR PODCASTING AND STREAMING, FEATURING MIX AGENT™ TECHNOLOGY
Channel Setup > EQ Introduction [Pro]
The equalizer area accesses all EQ-related parameters such as 3-band EQ for the selected channel
(including gain, frequency and Q) and a high-pass filter (HPF).
You can really upset things with too much EQ. Each EQ band has a lot of boost and cut because that is needed
on occasion. But if the EQ is maxed on every channel, the mix turns to mush. Equalize subtly, using cut as well
as boost. If you find yourself repeatedly using a lot of boost or cut, consider altering the sound source such
as placing a mic dierently, trying a dierent kind of mic, a dierent broadcaster, gargling, or all of the above.
Channel Setup > EQ On / O [Pro]
The EQ button – near the upper-lef corner of the screen – allows for true bypass of the EQ circuitry to ensure that there
is no coloration of the signal if the EQ is not needed. When this button is disengaged, the EQ controls have no eect
on the signal. You may use this button to make an A/B comparison between the EQ’d signal and the signal without EQ.
Tap this button to turn EQ on or o. It will illuminate cyan when engaged and is gray when disengaged.
Channel Setup > EQ Presets [Pro]
Presets save parameters and may be recalled as needed. DLZ Creator comes with a library of factory presets.
There are also user presets. These may be created for each preset type.
An entire chapter is dedicated to presets. This includes detailed instructions and multiple screenshots every step of the way.
Please check it out on pages 90-93.
42
Page 43
DLZ CREATOR ADAPTIVE DIGITAL MIXER FOR PODCASTING AND STREAMING, FEATURING MIX AGENT™ TECHNOLOGY
Channel Setup > EQ HPF On / O and Frequency [Pro]
Located underneath the EQ on/o button and preset buttons lies the HPF on/o button. High-pass filters are utilized to cut out
low frequencies. The high-pass filter control adjusts the cut-o frequency for the filter. Frequencies below the cut-o frequency
are attenuated at a rate of 8 dB/octave. The slope for the HPF is adjustable by either () rotating the quick control knob
associated with it or (2) tapping-and-dragging the HPF ball lef and right until the desired sound has been achieved.
Simply tap the HPF button to engage the high-pass filter. It will illuminate hot pink when engaged and is gray when
disengaged. The HPF ranges from 20 Hz – 700 Hz.
Gain (+)
Frequency (–)
Gain (–)
High-Pass
Filter
Cut-O
Point
Frequency (+)
Frequency (–)
Channel Setup > EQ Gain, Frequency and Q [Bandwidth] [Pro]
All three bands have adjustable gain, frequency and Q (bandwidth). The gain and frequency may be changed by either
() rotating the quick control knobs associated with it or (2) tapping-and-dragging any of the three numbered balls
(representing each band) until the desired sound has been achieved. Moving a ball vertically changes the gain by up
to ±5 dB. Moving a ball horizontally changes the frequency, ranging from 20 Hz to 20 kHz. Q [bandwidth] – which may
only be changed via the quick control knob – ranges from 0. – 5. Double-tap an EQ ball to reset it to its default setting.
Take a look at the quick control knobs and notice how the top and bottom ones remain the same regardless of
which EQ band is selected. Rotate the top quick control knob to raise/lower the HPF and rotate the bottom quick
control knob to quickly rotate between bands. EQ bands, that is. Not rock ’n roll bands. The three quick control
knobs in-between are associated with the selected channel’s EQ (frequency, gain and Q). The base of the quick
control knobs match the color of each band’s EQ ball.
Gain (+)
Frequency (+)
High-Pass
Filter
Cut-O
Point
Gain (–)
High-Pass Filter DisengagedHigh-Pass Filter Engaged
Channel Setup > Low EQ [Pro]
The low EQ provides up to 5 dB of boost or cut from 20 Hz to 20 kHz. The screenshots displayed below contain EQ Band
at 200 Hz at ±0 dB with the EQ on and o. The Q is set at 0.. Notice the similarities and dierences between them.
EQ OFF – Low Band (1) – 200 Hz at ±10 dBEQ ON – Low Band (1) – 200 Hz at ±10 dB
43
Page 44
DLZ CREATOR ADAPTIVE DIGITAL MIXER FOR PODCASTING AND STREAMING, FEATURING MIX AGENT™ TECHNOLOGY
Channel Setup > Mid EQ [Pro]
The mid EQ provides up to 5 dB of boost or cut from 20 Hz to 20 kHz. The screenshots displayed below contain EQ Band 2
at kHz at ±0 dB with the EQ on and o. The Q is set at 0.. Notice the similarities and dierences between them.
Channel Setup > High EQ [Pro]
EQ OFF – Mid Band (2) – 1 kHz at ±10 dBEQ ON – Mid Band (2) – 1 kHz at ±10 dB
The high EQ provides up to 5 dB of boost or cut from 20 Hz to 20 kHz. The screenshots displayed below contain EQ Band 3
at 5 kHz at ±0 dB with the EQ on and o. The Q is set at 0.. Notice the similarities and dierences between them.
EQ OFF – High Band (3) – 5 kHz at ±10 dBEQ ON – High Band (3) – 5 kHz at ±10 dB
Although the Q control does adjust the bandwidth of a filter, the Q value itself is dimensionless; it has no unit
of measurement. Some equalizers use the fractional bandwidth of the filter, measured in octaves, to express
this parameter. The two parameters are inversely related; a high Q value corresponds to a small fractional
bandwidth. The following table lists some equivalent Q and fractional bandwidth values.
Q BW (oct) Q BW (oct)
0.7 2 2.87 /2
.44 4.38 /3
2.45 2/3 5 /0
44
Page 45
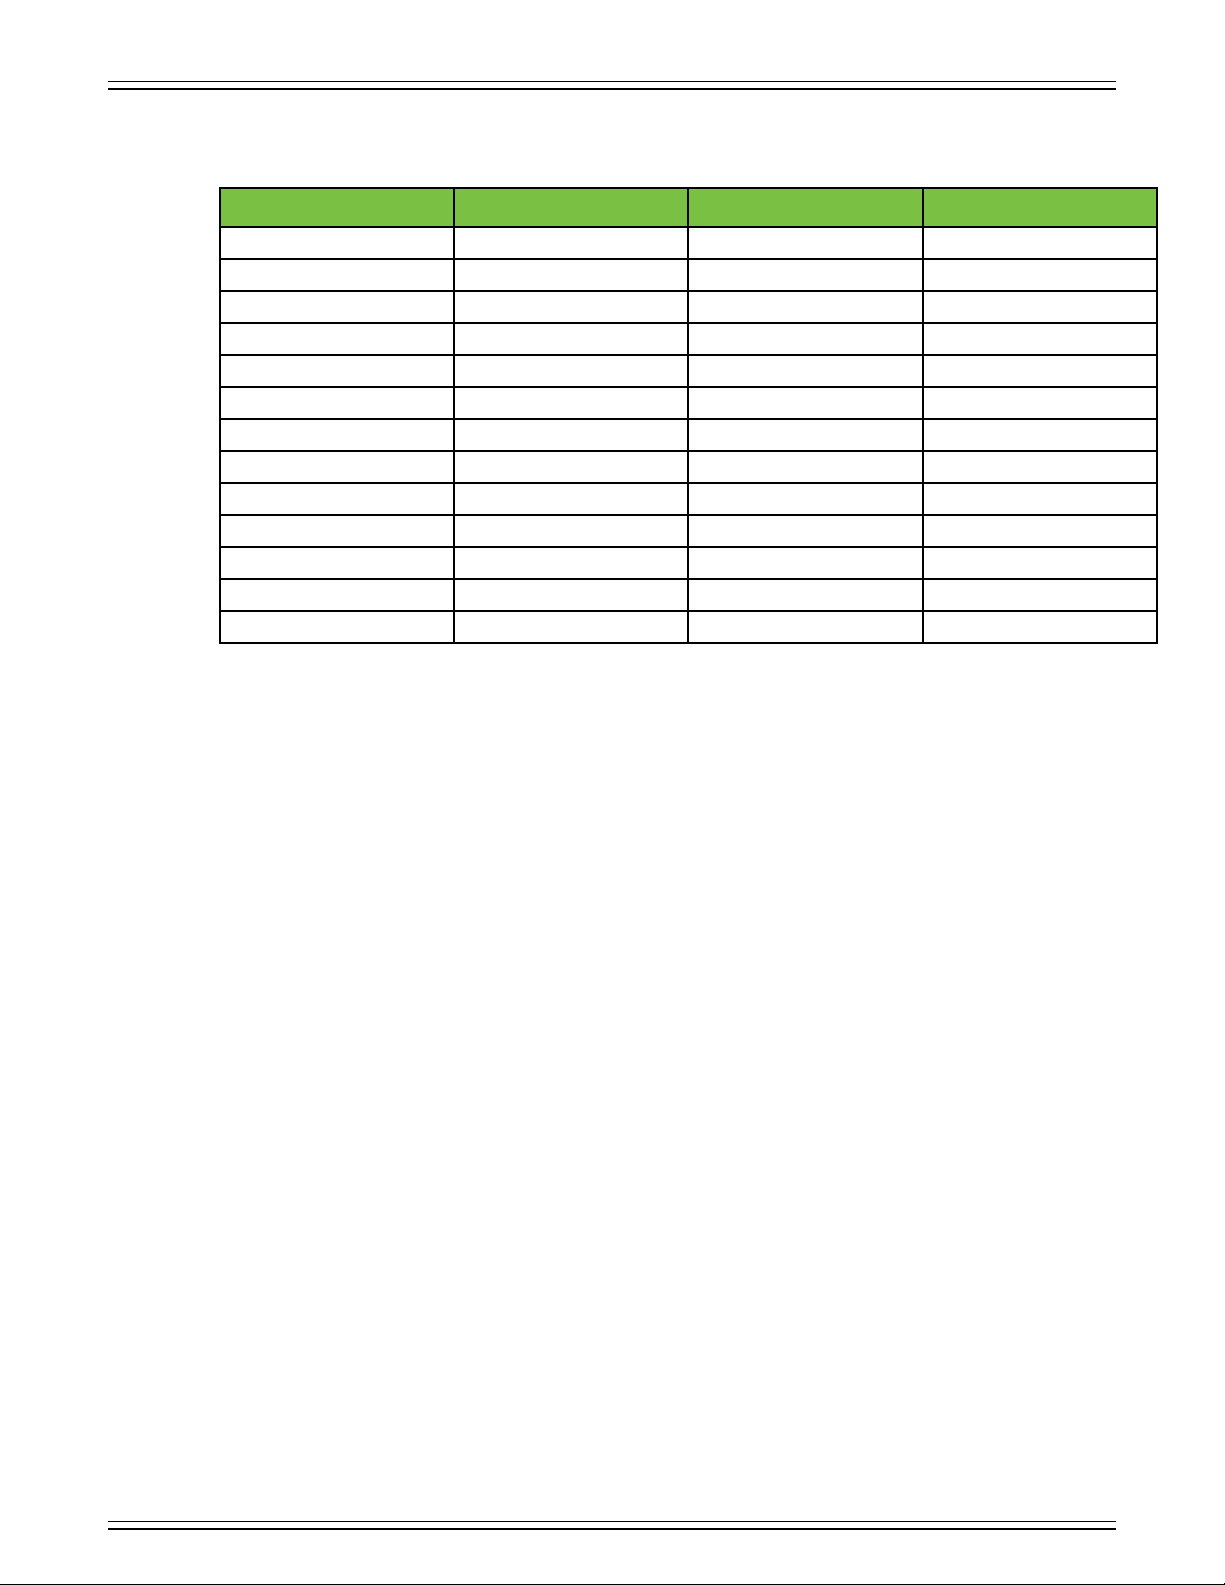
DLZ CREATOR ADAPTIVE DIGITAL MIXER FOR PODCASTING AND STREAMING, FEATURING MIX AGENT™ TECHNOLOGY
Channel Setup > EQ at a Glance [Pro]
Parameter Low Value Limit High Value Limit Default
HPF Enable O On O
HPF Frequency 20 Hz 700 Hz 70 Hz
HPF Slope – – 8 dB/octave
EQ Enable O On On
Low Gain –5 dB +5 dB 0 dB
Low Freq 20 Hz 20 kHz 200 Hz
Low Q 0. 5 .89
Mid Gain –5 dB +5 dB 0 dB
Mid Freq 20 Hz 20 kHz kHz
Mid Q 0. 5 .89
High Gain –5 dB +5 dB 0 dB
High Freq 20 Hz 20 kHz 5 kHz
High Q 0. 5 .89
45
Page 46
DLZ CREATOR ADAPTIVE DIGITAL MIXER FOR PODCASTING AND STREAMING, FEATURING MIX AGENT™ TECHNOLOGY
Channel Setup > Gate Introduction [Pro]
Gates are typically used to reduce leakage from open microphones. Signals below the threshold level are muted, while signals
above the threshold get to pass through. The range control changes the rule slightly. Signals below the threshold are attenuated
by the amount of the range setting, while signals above the threshold get to pass through.
The operation of the gate is further modified by the attack, hold, and release controls. In order to open the gate, the input signal
must exceed the threshold for at least the duration of the attack time. This is useful for helping the gate discriminate between
something that is short duration and long duration.
Once the gate has opened, the hold time begins. The hold timer resets any time the input signal crosses the threshold
again, as long as it remains above the threshold for longer than the attack setting. Afer the hold time passes, the gain falls
at a rate determined by the release setting. The range control allows the gate to remain partly open, even if the input is below
the threshold.
Channel Setup > Gate On / O [Pro]
Tap the Gate button to turn the gate on or o. It will illuminate cyan when engaged and is gray when disengaged.
Channel Setup > Gate Presets [Pro]
Presets save parameters and may be recalled as needed. DLZ Creator comes with a library of factory presets.
There are also user presets. These may be created for each preset type.
An entire chapter is dedicated to presets. This includes detailed instructions and multiple screenshots every step of the way.
Please check it out on pages 90-93.
46
Page 47
DLZ CREATOR ADAPTIVE DIGITAL MIXER FOR PODCASTING AND STREAMING, FEATURING MIX AGENT™ TECHNOLOGY
Channel Setup > Gate Display and Settings [Pro]
The gate for each channel may be adjusted by () rotating any of the five quick control knobs associated
with it (noticing how the base of the quick control knobs match the color of the gate) or (2) moving the threshold
and range balls via tap-and-drag. The gate may be adjusted whether the gate is on or o.
Threshold — Threshold determines the level at which the gate acts on the incoming signal. The range of the threshold
setting varies from –60 dB to 0 dB.
Range — Range determines how far the gain drops once the signal is below threshold. Setting the range control
to something in the -20 to -30 dB range allows some amount of signal leakage when the gate is closed, which
may make its action more subtle (less abrupt) and therefore less noticeable. The range of the gated signal varies
from –80 dB to 0 dB.
Attack — Attack determines how quickly the gate opens once the signal is above threshold. Short attack times allow
triggering on short transients, while longer attack times cause these transients to be ignored. The range of the attack
time varies from 0.5 ms to 500 ms.
Release — Release determines how long it takes for the gain to fall to the setting of the range control once the signal falls
below threshold and the hold time elapses. The range of the release speed varies from 0 ms to 2 seconds.
Hold — Hold sets a fixed time that the gate remains open once the signal drops below the threshold setting.
During the hold time, the gain is held constant, whereas during the release time, the gain is falling at the release
rate. The range of the hold time varies from 0 ms to 500 ms.
Channel Setup > Gate Meters [Pro]
These three meters show the input level, amount of gain reduction and output level.
47
Page 48
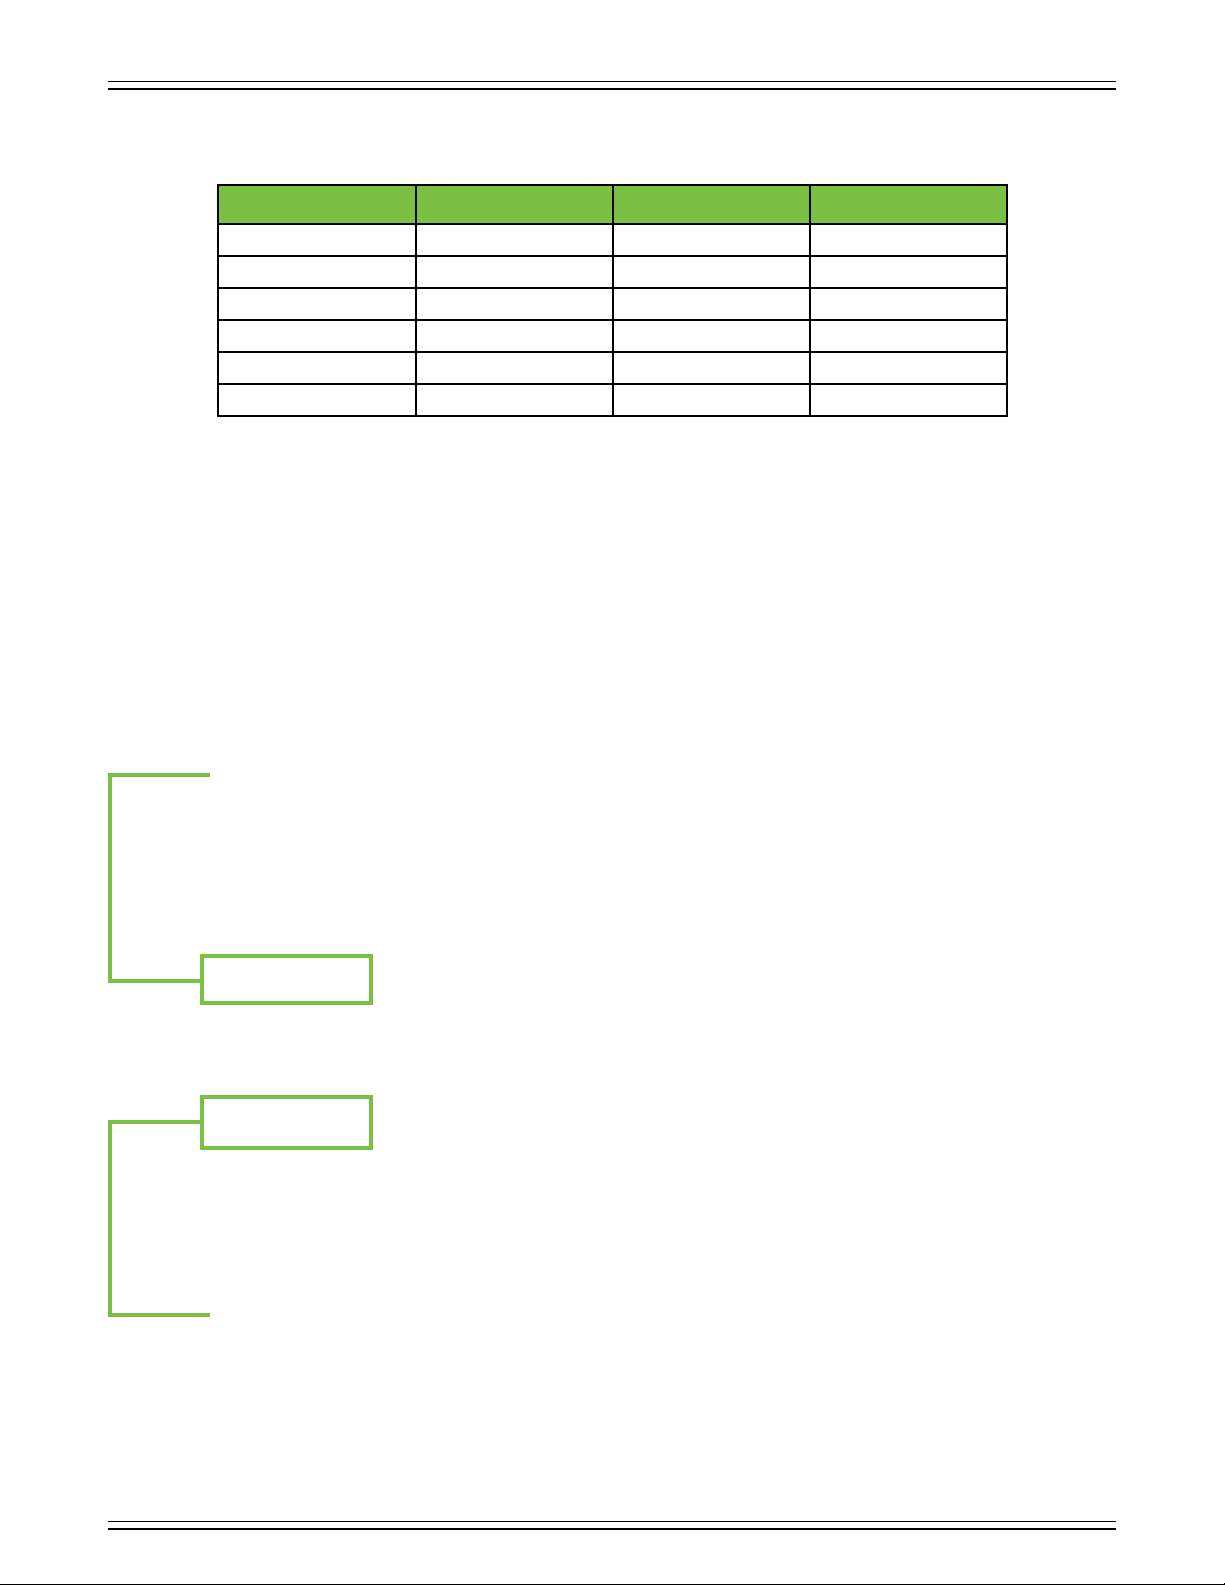
DLZ CREATOR ADAPTIVE DIGITAL MIXER FOR PODCASTING AND STREAMING, FEATURING MIX AGENT™ TECHNOLOGY
Channel Setup > Gate at a Glance [Pro]
Parameter Low Value High Value Default
Gate Enable O On On
Threshold –60 dB 0 dB –45 dB
Range –80 dB 0 dB –9 dB
Attack 0.5 ms 500 ms 9 ms
Release 0 ms 2 s 92 ms
Hold 0 ms 500 ms 50 ms
Channel Setup > Compressor Introduction [Pro]
Compressors are used to reduce or limit transient peaks in a signal. If the signal is too hot, turn down that channel’s gain,
otherwise leave it alone. As the input level to the compressor increases, the output level increases linearly until the threshold
point is reached. Afer that point, the output level no longer increases linearly. Instead, it increases at a reduced rate determined
by the ratio setting.
The attack and release controls aect the rate of the gain change; attack aects the rate of the onset of gain reduction
and release aects the recovery rate once the transient has passed.
Channel Setup > Compressor On / O [Pro]
Tap the Compressor button to turn the comp on or o. It will illuminate purple when engaged and is gray when disengaged.
Channel Setup > Compressor Presets [Pro]
Presets save parameters and may be recalled as needed. DLZ Creator comes with a library of factory presets.
There are also user presets. These may be created for each preset type.
An entire chapter is dedicated to presets. This includes detailed instructions and multiple screenshots every step of the way.
Please check it out on pages 90-93.
48
Page 49
DLZ CREATOR ADAPTIVE DIGITAL MIXER FOR PODCASTING AND STREAMING, FEATURING MIX AGENT™ TECHNOLOGY
Channel Setup > Compressor Display and Settings [Pro]
The compressor for each channel may be adjusted by () rotating any of the five quick control knobs associated with it
(noticing how the base of the quick control knobs match the color of the comp) or (2) moving the gain, threshold and ratio
balls via tap-and-drag. The compressor may be adjusted whether the comp is on or o.
Threshold — Threshold sets the threshold of the compressor in dB below 0 dBFS.
The range of the threshold setting varies from –60 dB to 0 dB.
Ratio — Ratio sets the amount of gain reduction applied as the signal exceeds the threshold level.
The range of the ratio of the compressor varies from : to 20:.
Gain — Gain adds make-up gain to the output of the compressor. This is useful to make the apparent volume of the signal
the same with the compressor in and out of the signal chain. The range of the make-up gain varies from 0 dB to 24 dB.
Attack — Attack determines how quickly the compressor reacts once the signal is above threshold. Short attack times allow
compressing on short transients, while longer attack times cause these transients to be ignored. The range of the attack
time varies from 0.5 ms to 500 ms.
Release — Release determines how long it takes for the compressor to end gain reduction once the signal drops back below
the threshold. The range of the release speed varies from 0 ms to 2 seconds.
Sof Knee / Hard Knee Compression — This determines the shape of the gain reduction curve at the threshold level.
When set to hard [lef], the gain reduction curve changes abruptly at the threshold level. When set to sof
[right, default], the gain reduction curve changes gently as it transitions to the final ratio amount.
Channel Setup > Compressor Meters [Pro]
These three meters show the input level, amount of gain reduction and output level.
49
Page 50
DLZ CREATOR ADAPTIVE DIGITAL MIXER FOR PODCASTING AND STREAMING, FEATURING MIX AGENT™ TECHNOLOGY
Channel Setup > Compressor at a Glance [Pro]
Parameter Low Value High Value Default
Comp Enable O On On
Threshold –60 dB 0 dB –30 dB
Ratio : 20 : 2 :
Gain 0 dB 24 dB dB
Attack 0.5 ms 500 ms 42 ms
Release 0 ms 2 s 500 ms
Knee Sof Hard Sof
Channel Setup > De-Esser Introduction [Pro]
De-essers are specialized compressors that focus on and reduce or remove high frequencies and sibilance, especially “harsh”
sounds such as “ess”, “z”, “ch”, “j”, “sh” and “ts”. There are always exception to the rule, of course, but for the most part,
sibilance is typically in the 3-8 kHz range.
“De-essing is a dynamic audio editing process, only working when the level of the signal in the sibilant range (the ess sound)
exceeds a set threshold. De-essing temporarily reduces the level of high-frequency content in the signal when a sibilant
ess sound is present. De-essing diers from equalization, which is a static change in level among many frequencies.
However, equalization of the ess frequencies alone can be manipulated to reduce the level of sibilance... Over de-essing
can result in the over-manipulation of transients, resulting in the sofening or hardening of certain consonants, yielding
undesirable eects.”
Channel Setup > De-Esser On / O [Pro]
Tap the De-Esser button to turn it on or o. It will illuminate a blood orange when engaged and is gray when disengaged.
Channel Setup > De-Esser Presets [Pro]
Presets save parameters and may be recalled as needed. DLZ Creator comes with a library of factory presets.
There are also user presets. These may be created for each preset type.
An entire chapter is dedicated to presets. This includes detailed instructions and multiple screenshots every step of the way.
Please check it out on pages 90-93.
De-essing
50
Page 51
DLZ CREATOR ADAPTIVE DIGITAL MIXER FOR PODCASTING AND STREAMING, FEATURING MIX AGENT™ TECHNOLOGY
Channel Setup > De-Esser Display and Settings [Pro]
The de-esser for each channel may be adjusted by () rotating any of the four quick control knobs associated with it
(noticing how the base of the quick control knobs match the color of the de-esser) or (2) moving the frequency / threshold
ball via tap-and-drag. The de-esser may be adjusted whether it is turned on or o.
Frequency — The frequency of sibilance typically runs between 2 kHz and 0 kHz. Here we give you the full 20 to 20
spectrum. The range of the frequency setting varies from 20 Hz to 20 kHz.
Threshold — This parameter should be lowered until the ‘esses’ are eliminated.
The range of the threshold setting varies from –96 dB to 0 dB.
Lowering it too much, however, will result in a mued sound (aka too much attenuation, or TMA on-the-fly).
Range — This number determines the amount of de-essing, ranging from –5 dB to 0 dB.
Width — This number determines the width between end points; the smaller the number, the wider the end points
are from each other. The range of the width setting varies from 0. Q to 5 Q.
Channel Setup > De-Esser Meters [Pro]
These three meters show the input level, amount of attenuation and output level.
Channel Setup > De-Esser at a Glance [Pro]
Parameter Low Value High Value Default
De-Esser Enable O On On
Frequency 20 Hz 20 kHz 6.4 kHz
Threshold –96 dB 0 dB –47.8 dB
Range –5 dB 0 dB –.4 dB
Width 0. Q 5 Q 3.47 Q
5
Page 52
DLZ CREATOR ADAPTIVE DIGITAL MIXER FOR PODCASTING AND STREAMING, FEATURING MIX AGENT™ TECHNOLOGY
Chapter 7 : FX Tab [Enhanced and Pro]
FX Setup > Introduction
FX is the next tab listed. Tap to open it, revealing a screen that looks somewhat like what is displayed below.
The DLZ Creator has two FX available: reverb and delay. Reverb simulates the eect of room variations,
while delay allows adjustment of the delay eect.
FX are not available when easy mode is selected.
• FX Tab EASY Mode – not available
• FX Tab ENHANCED Mode – page 52
• FX Tab PRO Mode – pages 53-54
FX Setup > FX Mute On / O [Enhanced]
Located below the volume knobs are the FX mute switches. Tap the mute switch(es) to turn the reverb and/or delay on or o.
It will illuminate orange when engaged [switch to the right] and is grey when disengaged [switch to the lef].
FX Setup > FX Presets [Enhanced]
Presets save parameters and may be recalled as needed. DLZ Creator comes with a library of factory presets.
There are also user presets. These may be created for each preset type.
An entire chapter is dedicated to presets. This includes detailed instructions and multiple screenshots every step of the way.
Please check it out on pages 90-93.
FX in Enhanced Mode
FX Setup > FX Volume Knobs [Enhanced]
The FX may be adjusted by () rotating one of the two quick control knobs associated with it (noticing how the base
of the quick control knobs match the color of each eect) or (2) moving the volume knob via tap-and-rotate.
The FX volume may be adjusted whether the mutes are on or o.
Volume — The big volume knobs set the FX send level for the currently selected channel.
The volume range for both FX settings ranges from –inf to +0 dB.
52
Page 53
DLZ CREATOR ADAPTIVE DIGITAL MIXER FOR PODCASTING AND STREAMING, FEATURING MIX AGENT™ TECHNOLOGY
FX Setup > Eect On / O [Pro]
Located above the level knobs are the FX on/o switches. Tap the mute switch(es) to turn the reverb and/or delay
on or o for that channel. It will illuminate purple [reverb] or cyan [delay] when engaged and is grey when disengaged.
FX Setup > FX Presets [Pro]
Presets save parameters and may be recalled as needed. DLZ Creator comes with a library of factory presets.
There are also user presets. These may be created for each preset type.
An entire chapter is dedicated to presets. This includes detailed instructions and multiple screenshots every step of the way.
Please check it out on pages 90-93.
Reverb in Pro Mode
Delay in Pro Mode
Below the FX preset pull-down and eect on/o switch are a total of eight rotatable knobs – four on the Atomizer Reverb
and four on the ChronoTronic Delay. Flip the page and let’s take a look at what these do!
53
Page 54
DLZ CREATOR ADAPTIVE DIGITAL MIXER FOR PODCASTING AND STREAMING, FEATURING MIX AGENT™ TECHNOLOGY
FX Setup > Atomizer Reverb Settings [Pro]
The reverb may be adjusted by () rotating one of the four quick control knobs associated with it
(noticing how the base of the quick control knobs match the color of each eect) or (2) moving the knobs
via tap-and-rotate. The FX may be adjusted whether the eects are on or o.
Pre-Delay — When listening to a live performance, direct sounds are reached first, followed by reverberation caused
by room reflections. The pre-delay is the amount of time between when the direct sounds arrive and when the reflections
arrive. The range is 0 ms to 50 ms.
The speed of sound is approximately 340 meters per second (00 feet per second). This means that in one millisecond,
it travels 0.34 meters (. feet). As a rough idea, think of ms as the time it takes for sound to travel one foot.
Decay — This represents the decay time of the reverb. The range is 200 ms to 8 seconds.
Low Pass — This applies a low-pass filter to the reverbed signal and rolls o the higher frequencies.
It ranges from 400 Hz to 20 kHz.
Reverb Level — This sets the reverb FX send level for the currently selected channel. The range is –inf (o) to +0 dB.
FX Setup > Atomizer Reverb at a Glance [Pro]
Parameter Low Value High Value Default
Atomizer Reverb Enable O On On
Pre-Delay 0.0 ms 50.0 ms 0.0 ms
Decay 200.0 ms 8.0 sec 200.0 ms
Low Pass 400 Hz 20 kHz 20 kHz
Reverb Level –inf +0 dB –inf
FX Setup > ChronoTronic Delay Settings [Pro]
The delay may be adjusted by () rotating one of the four quick control knobs associated with it
(noticing how the base of the quick control knobs match the color of each eect) or (2) moving the knobs
via tap-and-rotate. The FX may be adjusted whether the eects are on or o.
Delay Time (Decay) — This knob sets the current delay time, ranging from 00 ms to 2.0 seconds.
Feedback — This controls how much of the delayed signal is routed back to the input of the delay section to create
multiple echoes. Each time the signal is fed back, the delayed signal becomes quieter (so the echo won’t go on forever
unless set at 00%). It ranges from 0% to 00%.
Low Pass — This applies a low-pass filter to the delayed signal and rolls o the higher frequencies.
It ranges from 20 Hz to 20 kHz.
Delay Level — This sets the delay FX send level for the currently selected channel. The range is –inf (o) to +0 dB.
FX Setup > ChronoTronic Delay at a Glance [Pro]
Parameter Low Value High Value Default
ChronoTronic Delay Enable O On On
Delay Time (Decay) 00 ms 2.0 sec 500 ms
Feedback 0% 00% 50%
Low Pass 20 Hz 20 kHz 8 kHz
Delay Level –inf +0 dB –inf
54
Page 55
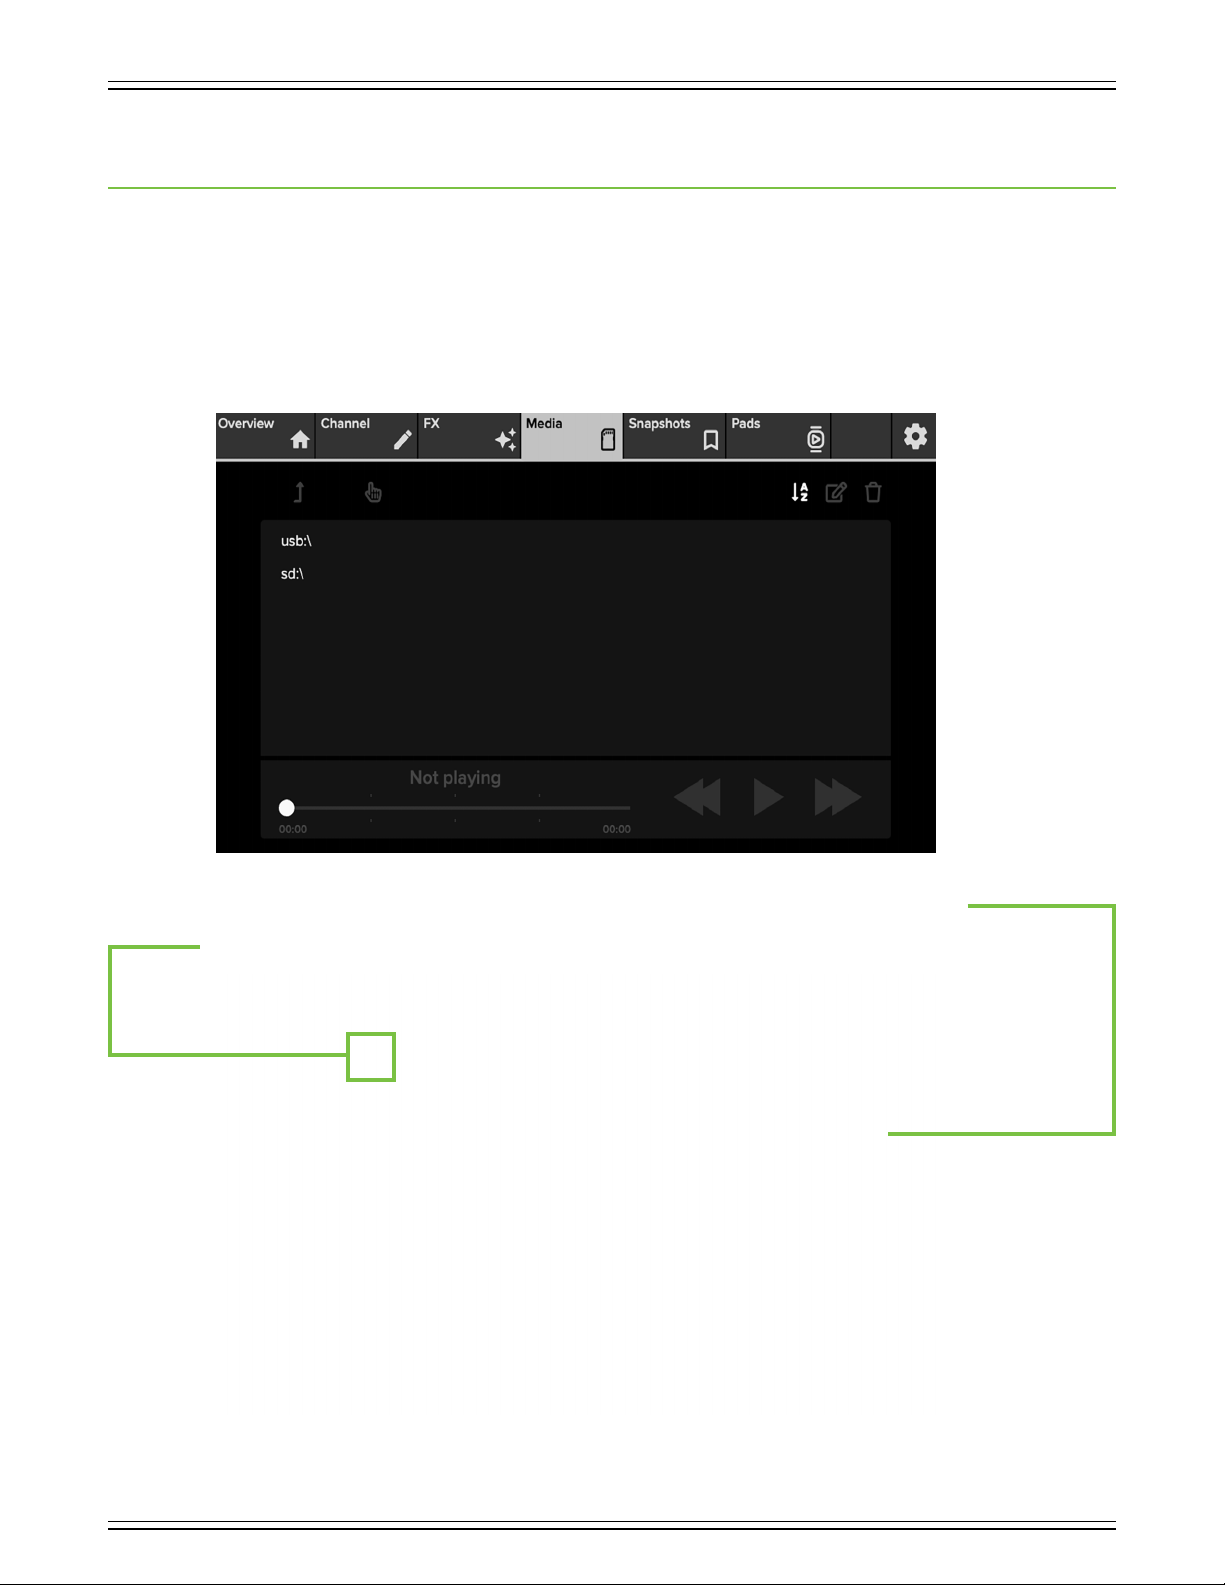
DLZ CREATOR ADAPTIVE DIGITAL MIXER FOR PODCASTING AND STREAMING, FEATURING MIX AGENT™ TECHNOLOGY
Chapter 8 : Media Tab
Media Setup > Introduction
Media is the next tab listed. Tap to open it, revealing a screen that looks somewhat like what is displayed below.
This allows direct access to compatible media files on an inserted microSD card or USB flash drive. Additionally, recordings
that were made are stored here within the ‘DLZ_Creator_Recordings\’ folder and are available for playback.
The media tab looks and functions exactly the same for all three modes. Let’s go through the media tab, checking out
all the things we can tap, select, play, edit, delete and more.
Right out of the gate, there is only one thing to do: select where you will be getting the media files. Are the files
you desire on the flash drive... or are they located on the microSD card? Tap usb:\ or sd:\ so it is highlighted.
In addition to the media file being highlighted, notice how the ‘index finger’ icon also turns from grey to white.
55
Page 56
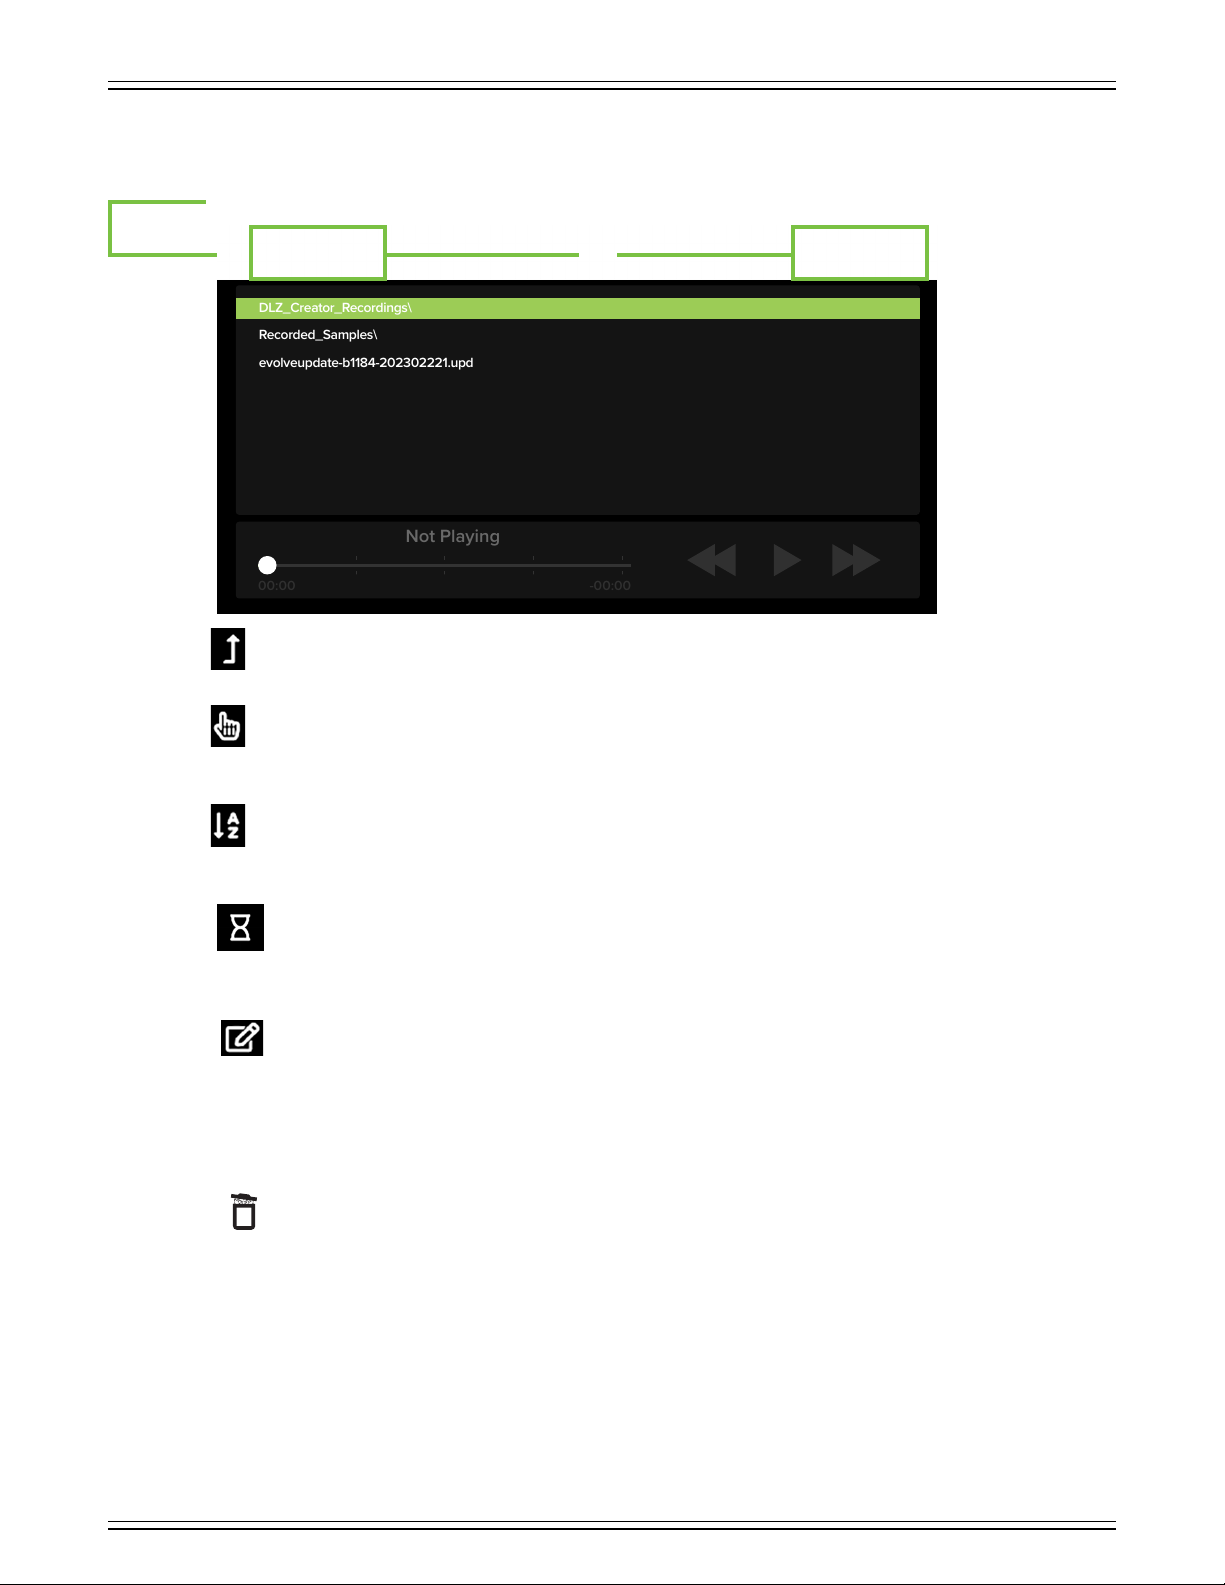
DLZ CREATOR ADAPTIVE DIGITAL MIXER FOR PODCASTING AND STREAMING, FEATURING MIX AGENT™ TECHNOLOGY
Not Playing
-00:00
00:00
DLZ_Creator_Recordings\
Recorded_Samples\
evolveupdate-b1184-202302221.upd
Press the ‘index finger’ icon in order to see what files are on the selected drive followed by tapping the desired file
so it is highlighted. All icons on the top row are no longer greyed out and are now available for selection... and action!
We will describe each icon from lef to right.
• First up is the arrow pointing upwards. Simply put, tapping this icon returns you to the previous screen.
• Next up is the ‘index finger’ icon. We have already tapped it on the previous page. Afer a drive, file or folder
is highlighted, tapping this icon selects (or opens) it.
• Now we’re swinging over to the upper-right side – or Upper East Side for our friends in New York! – of the media tab.
When the A-Z icon is visible, all files will be presented in alphabetical order.
When tapped, this icon turns into an hourglass... (or a timer if you’re playing a board game... hurry!). If the hourglass
icon is present, then the files are arranged in order of creation with the oldest file (i.e. the oldest recording) at the top.
Most importantly, never forget: “Like sands through the hourglass, so are the Days of Our Lives.”
• A pen is forever, but mistakes and updates can be made with a pencil and eraser!
That is why we went with the pencil and eraser icon... to make edits!
Tapping this icon brings up the keyboard. Type in the name you would rather have for the selected file/recording
followed by tapping “Enter”. The name is limited to 36 characters.
• The final icon on the top row of the media tab is an image of a trash can. If you thought that tapping this icon would
result in Oscar the Grouch® from Sesame Street® popping his head out, you’d be correct! Oh, how I wish... how cool
would that be?! In reality, tapping this icon results in deleting the selected file/recording. This is a permanent deletion
with no undo, so a confirmation dialog helps prevent accidents.
The fourth sentence on the previous page states, “Additionally, recordings that were made are stored here within
the ‘DLZ_Creator_Recordings\’ folder and are available for playback.” Flip the page to find out how!
56
Page 57
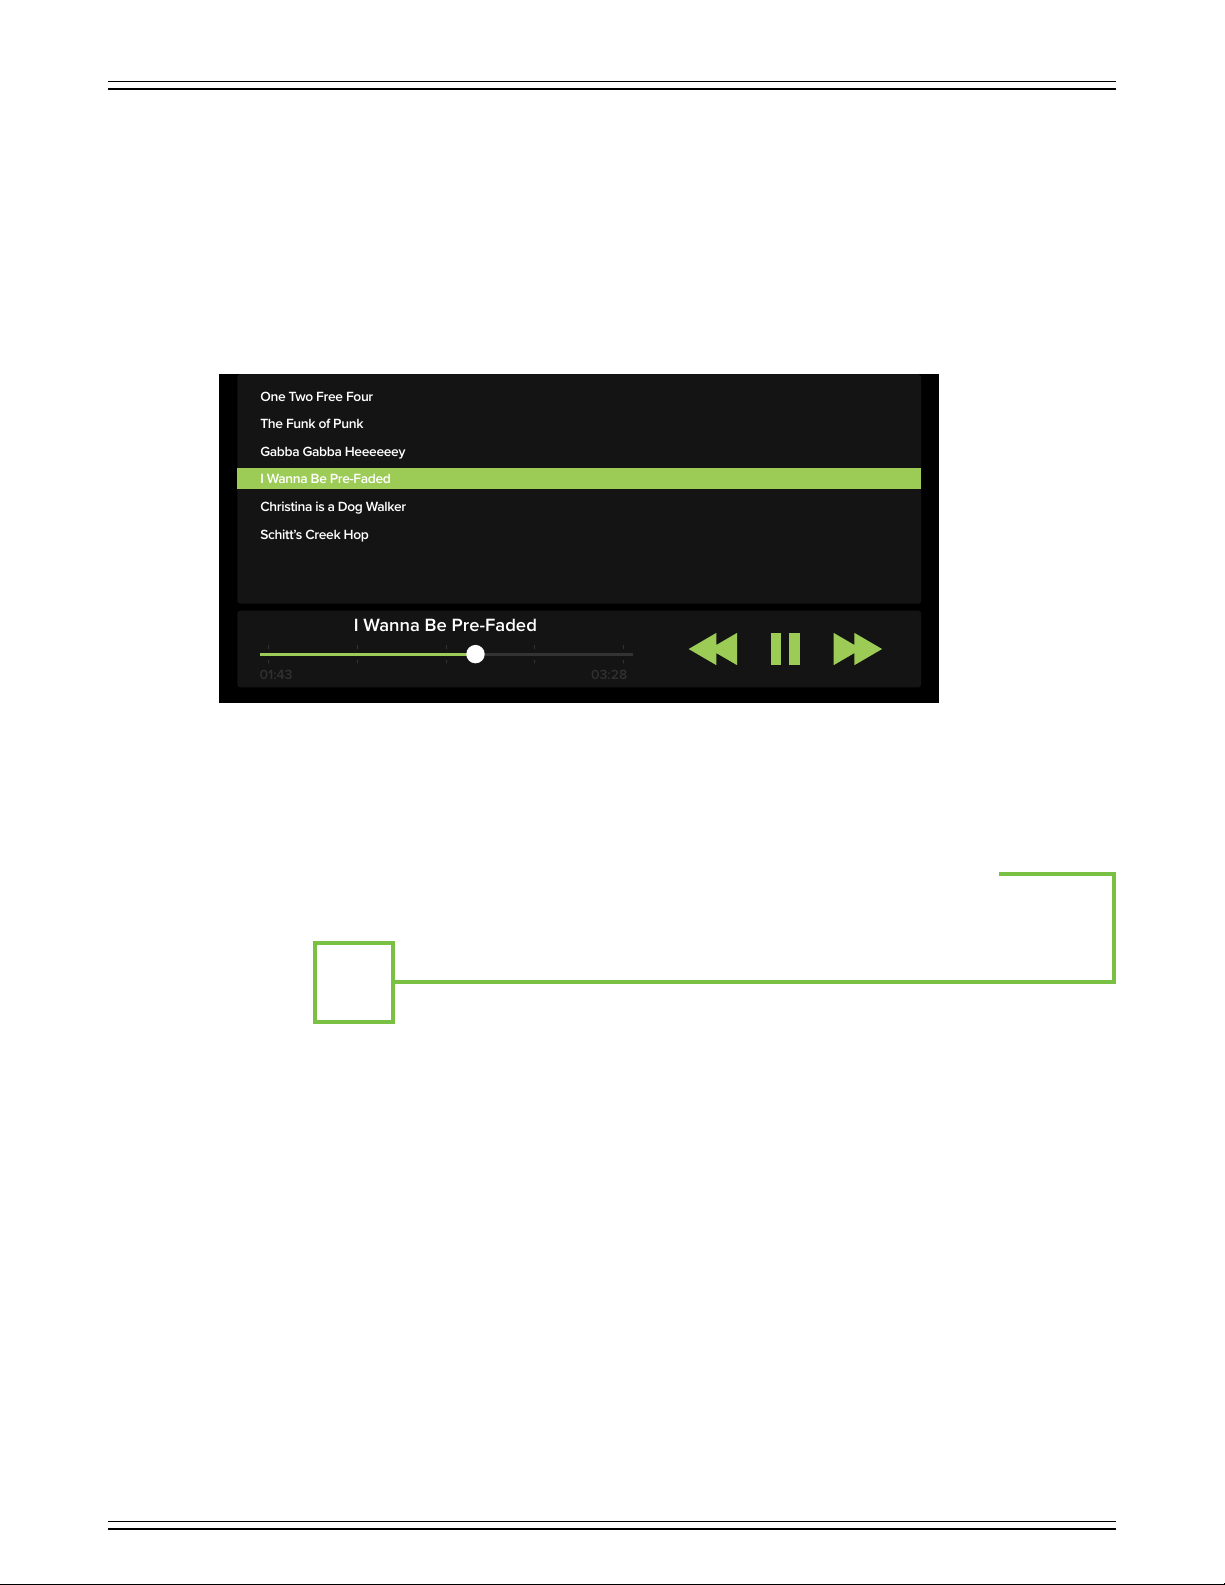
DLZ CREATOR ADAPTIVE DIGITAL MIXER FOR PODCASTING AND STREAMING, FEATURING MIX AGENT™ TECHNOLOGY
I Wanna Be Pre-Faded
03:28
01:43
One Two Free Four
The Funk of Punk
Gabba Gabba Heeeeeey
I Wanna Be Pre-Faded
Christina is a Dog Walker
Schitt’s Creek Hop
These are the steps in order to get playback from one of the recordings:
• Select the recording you want for playback by tapping it; this can be from either the usb:\ or sd:\ drive.
The chosen file will illuminate green.
• The recording is only selected at this point, but it needs to be loaded, too. Tap the ‘index finger’ icon to load the file.
• The file will immediately start playback, as seen below.
You may recall way, way, way back in an early chapter that we named the Channel ID “Johnny”. That would
be in tribute to Johnny Ramone, guitarist of seminal punk band, the Ramones. The next three Channel IDs
were named afer the remaining members of the classic lineup: Joey, Dee Dee and Tommy. While the band
is no longer – or the band members for that matter – this is a podcast where the group discusses all things Ramones.
• Now we just need to make sure the source and levels are set correctly (if not already). Return to the channel tab
and tap the channel 9/0 channel ID button. Confirm that the channel 9/0 channel source is set to SD/USB.
• Raise the channel 9/0 fader up to unity and make sure the headphone (and/or main L/R output) levels are above –inf.
• Repeat the steps above to play back other recordings!
57
Page 58
DLZ CREATOR ADAPTIVE DIGITAL MIXER FOR PODCASTING AND STREAMING, FEATURING MIX AGENT™ TECHNOLOGY
Restore Default Settings
Chapter 9 : Snapshots Tab
Snapshots Setup > Introduction
Not to be confused with Snapchat®, the snapshots tab reveals the snapshots. This (along with the addition of the current state)
makes up the DLZ Creator’s file system. Before diving directly in, let’s do a quick overview of the file system.
Snapshots save every parameter associated with its operation with the exception of the hardware: power switch, quick control
knobs, fader levels, and solo and mute. The current state of all parameters is constantly stored so the console powers on in
the same state as when it was turned o, just like an analog console. Please note that it will default to the overview tab when
powered back up, even if turned o with a dierent tab open.
The file system consists of the following:
() Current State — When DLZ Creator is turned on, it wakes in the state that it was in when it was powered o,
but on the overview tab.
(2) Snapshots — A snapshot is just that: a “photograph” of the current state of the DLZ Creator.
As just mentioned, a snapshot is just that: a “photograph” of the current state of the DLZ Creator. So why would you create
snapshots? For one example, the previously mentioned Ramones fanatics who run their own podcast may have dierent
snapshots depending on if it’s all talk or if they’re also playing Ramones tunes back to the listening enthusiasts. So snapshots
may be created for in-between song banter. Or snapshots could be created with and without FX. The possibilities are un
The following is a list of features that are stored in a snapshot:
• Input channel settings
• FX channel settings
• Main LR channel settings
• Channel ID
The following is a list of features that may not be snapshot:
• Solo
• Mute
• Board (Fader) Settings
• Recording / Playback
Ok, that’s what they are, but how do you create them?
58
limited!
Page 59
DLZ CREATOR ADAPTIVE DIGITAL MIXER FOR PODCASTING AND STREAMING, FEATURING MIX AGENT™ TECHNOLOGY
Restore Default Settings
Step — Creating snapshots: Creating snapshots is easy. Simply set gains, pans, DSP (EQ, dynamics, FX, etc.)
for each snapshot that you are going to want to recall at a later time.
As user-friendly as creating snapshots may be with DLZ Creator, if this is your first time creating them,
it might be best to start o simple until you get the hang of it. Go ahead and name some channel inputs
and load up a couple of colors and icons, as well. If feeling brave, set some EQs, gate and compressor
levels, too.
Now return to the snapshots tab by tapping it. It may be mostly barren now, but will fill up soon.
Tapping the disk icon will store the current state of the console – the EQs, gates and compressors, etc.
that you just set – into a new snapshot. Doing this is similar to pressing a “Store” button on other consoles.
Step 2 — Naming snapshots: You created a snapshot, but how do you know what it represents? By naming it, of course!
Once the disk icon is tapped [save], the keyboard appears awaiting for the snapshot to be named. Name the currently
selected snapshot as you so desire followed by tapping the “Enter” key when satisfied.
Snapshots are limited to 36 characters. This includes letters, numbers and special characters. The text
will remain green until the limit is reached, in which the text will turn red indicating that you have hit the limit.
Once the snapshot(s) have been named, they will be placed in alphanumerical order on the snapshots list.
59
Page 60
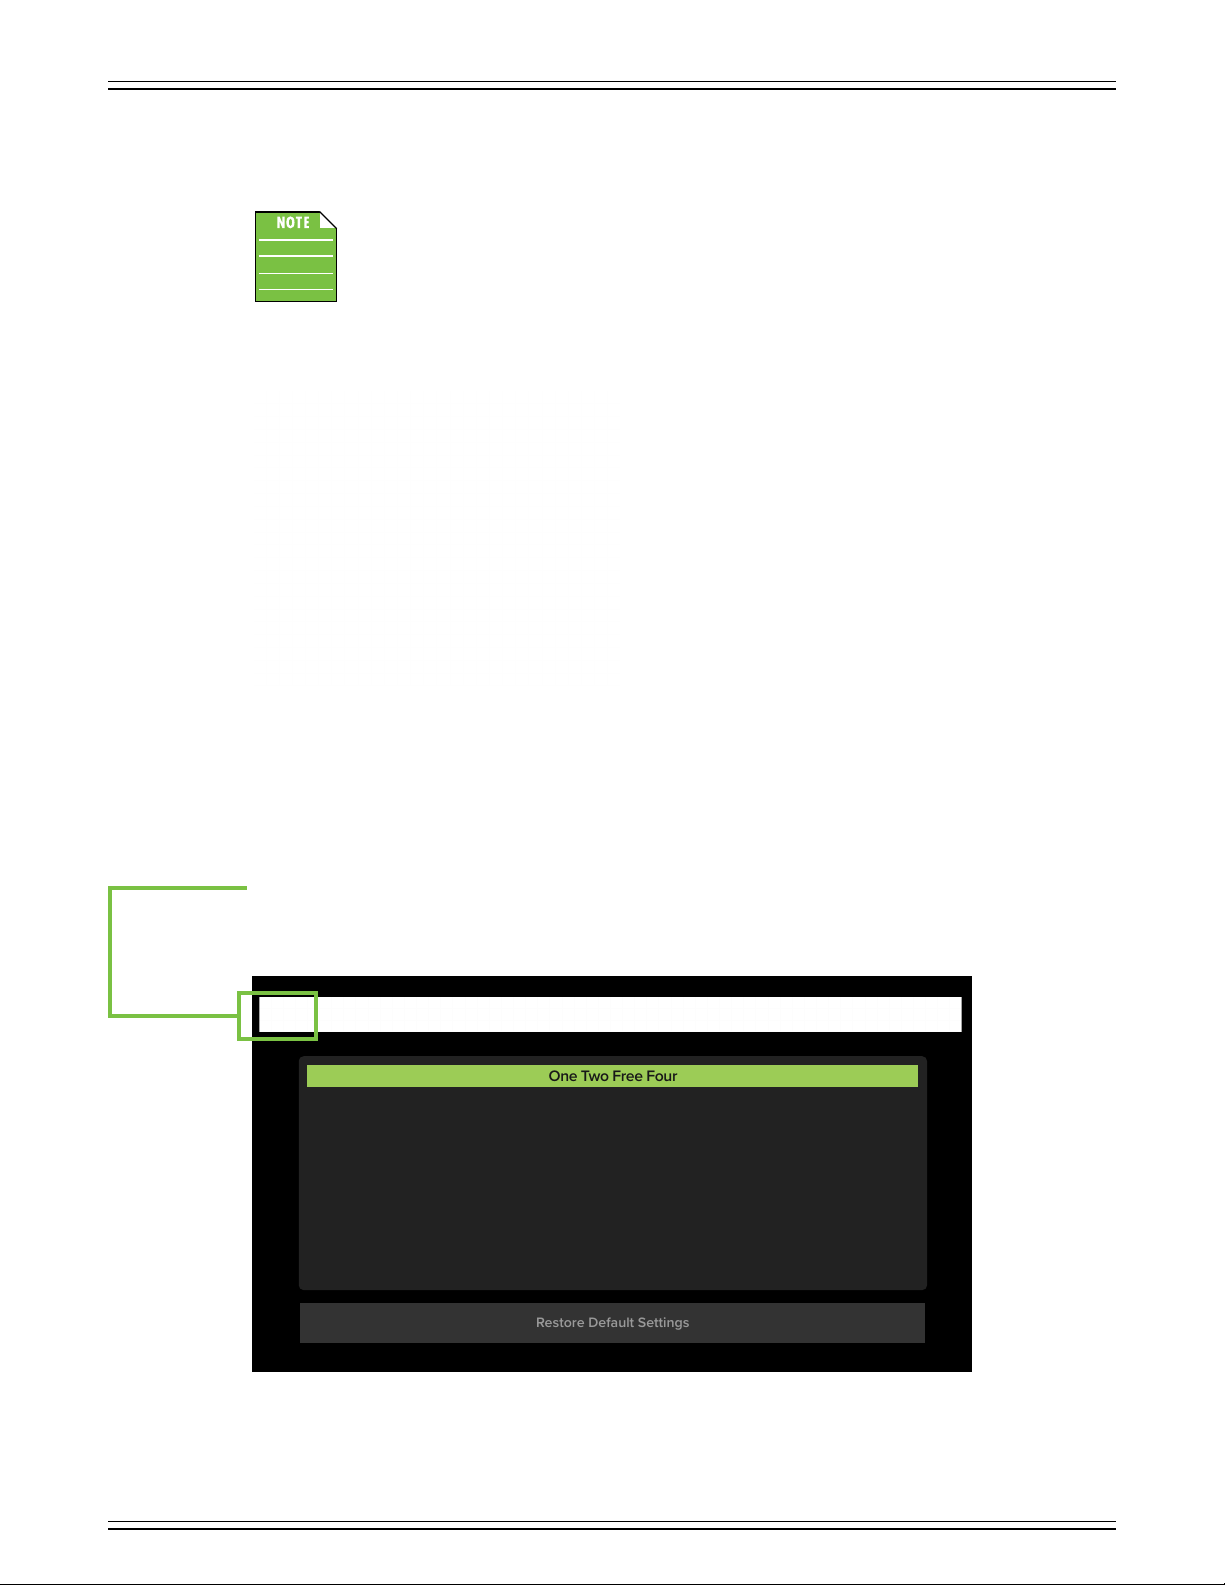
DLZ CREATOR ADAPTIVE DIGITAL MIXER FOR PODCASTING AND STREAMING, FEATURING MIX AGENT™ TECHNOLOGY
Restore Default Settings
One Two Free Four
Step 3 — Recalling snapshots: Now that you’ve created and named the snapshots, it’s time to recall them!
On recall, all appropriate console parameters change to match the stored snapshot.
Tapping ‘Restore Default Settings’ will set the DLZ Creator to its default (which – for all intents
and purposes – is a zeroed out board). ‘Restore Default Settings’ is always listed on the bottom
and cannot be renamed, replaced or deleted; only recalled. In fact...
Go ahead and start by tapping ‘Restore Default Settings’ so it is highlighted. You will immediately be greeted
with the following confirmation dialog:
As stated, this clears all current settings... but it will keep all snapshots, of course! Tap ‘Clear Settings and Restart’
if ready to wipe the board or ‘Go Back’ if you need to save a snapshot first. Lucky for us, we DID save a snapshot
already. We will recall it shortly. Afer tapping ‘Clear Settings and Restart’, DLZ Creator will reset all settings
and return to the overview display.
Now return to the snapshots tab. Notice that the snapshot(s) you created are still there! Tap the snapshot you want
to recall so it is highlighted:
The next thing to do is to tap the open folder icon: RECALL. On recall, all appropriate console parameters change
to match the saved snapshot.
A confirmation dialog will appear. As stated, all unsaved data will be lost... but it will keep all snapshots, of course!
60
Page 61
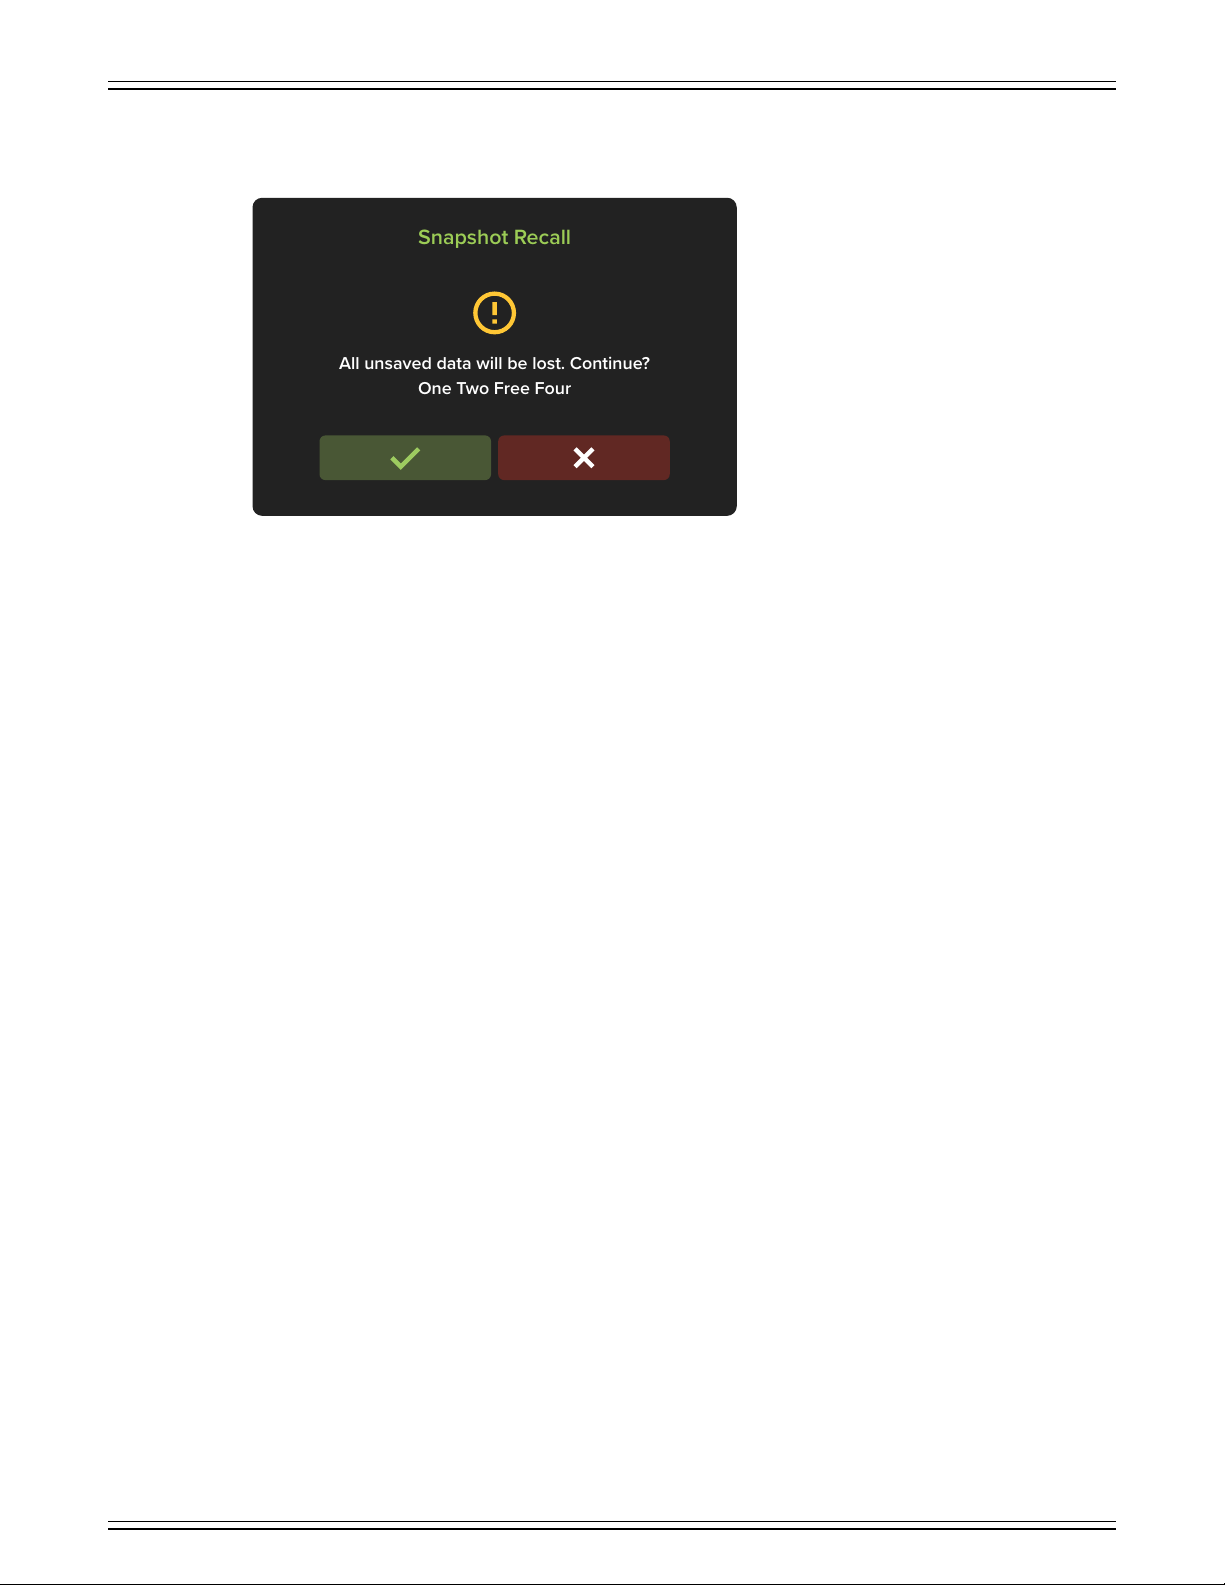
DLZ CREATOR ADAPTIVE DIGITAL MIXER FOR PODCASTING AND STREAMING, FEATURING MIX AGENT™ TECHNOLOGY
Snapshot Recall
All unsaved data will be lost. Continue?
One Two Free Four
Tap the green checkmark if ready to continue or the red “X” if you need to save a snapshot first. Afer tapping the green
checkmark, DLZ Creator will recall all settings of the snapshot and return to the overview display.
Let’s take a look at some of the other features on the snapshots display! Located underneath the samples
and settings tabs are two additional snapshot features: edit and delete. Now that you have created and recalled
a snapshot, we will first edit it...
...followed by deleting it. Say it ain’t so?!
6
Page 62
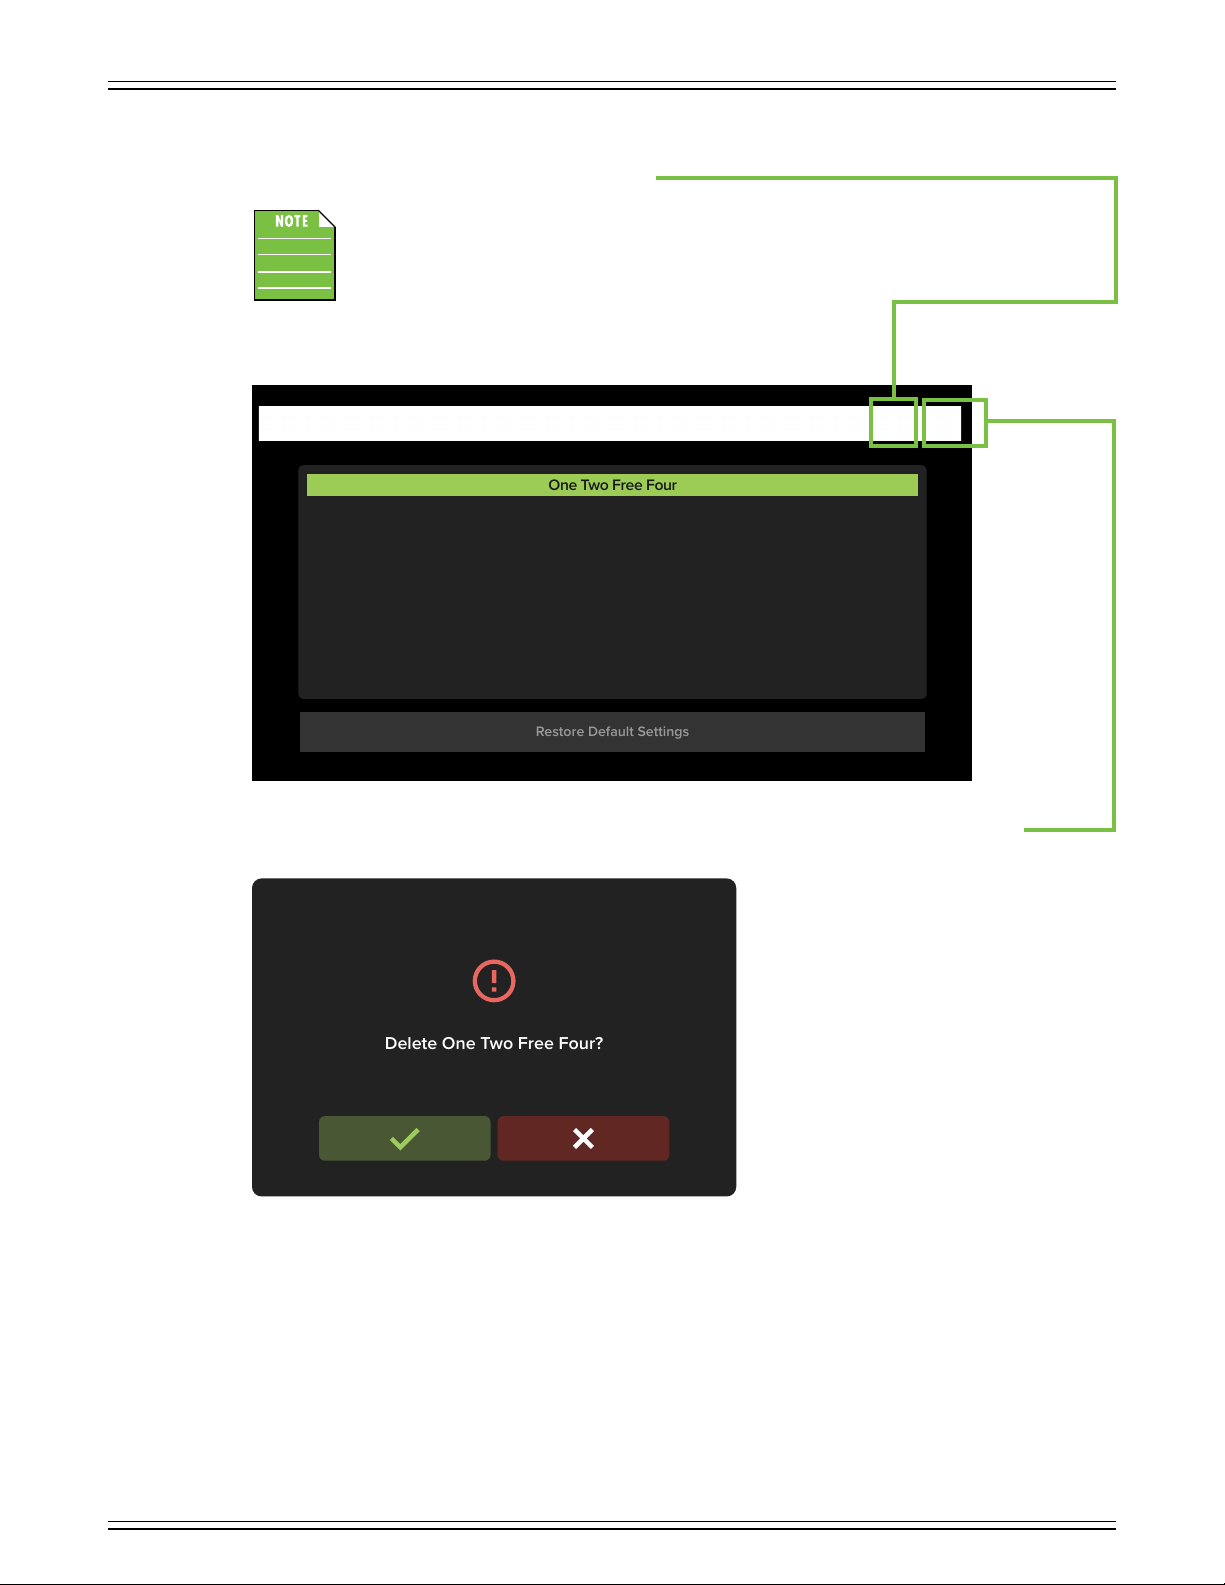
DLZ CREATOR ADAPTIVE DIGITAL MIXER FOR PODCASTING AND STREAMING, FEATURING MIX AGENT™ TECHNOLOGY
Restore Default Settings
One Two Free Four
Delete One Two Free Four?
Step 4 — Editing snapshots: The *only* thing that editing snapshots does is return you to the keyboard to rename
the snapshot as seen in step two a couple of pages back.
No settings are changed, only the name. However, if you want to change the settings, then simply change
them to what you want and save it as a new snapshot or save over the current snapshot (understanding
that the previous settings will be replaced by the new ones).
Step 5 — Deleting snapshots: Tapping delete – the garbage can icon – deletes the currently selected snapshot.
This is a permanent deletion with no undo, so a confirmation dialog helps prevent accidents.
62
Page 63
DLZ CREATOR ADAPTIVE DIGITAL MIXER FOR PODCASTING AND STREAMING, FEATURING MIX AGENT™ TECHNOLOGY
Chapter 0 : Pads Tab
Pads Setup > Introduction
The second to last tab listed on the navigation bar is ‘Pads’. Tap to open it, revealing a screen that looks somewhat like what
is shown below. In short, this screen displays a summary of all the pads, including the name and playback length, pad color,
opportunity to edit, etc.
There are a total of 48 samples that may be created and saved: six separate samples in eight dierent banks (A-A6, B-B6,
C-C6, D-D6, E-E6, F-F6, G-G6, and H-H6, with Bank A opened below). The six samples displayed below come pre-loaded
with DLZ Creator.
These samples may be edited to your heart’s content. However, they will be re-installed if the DLZ Creator is factory reset.
As mentioned above, each bank has its own sub tab. These other banks may be accessed simply by tapping them.
The selected bank will be highlighted green.
Notice also that the headphone levels may still be raised and lowered via the quick control knobs
(located on the hardware to the right of the levels).
As seen in the image above (as well as upcoming images), the bank and bank number resides in the middle
of each sample pad display regardless of the name, color and/or playback mode. These represent each bank
and sample and cannot be changed or removed. Trust us, it’s for the best, as it is for easy identification,
even afer you rename it something goofy.
63
Page 64
DLZ CREATOR ADAPTIVE DIGITAL MIXER FOR PODCASTING AND STREAMING, FEATURING MIX AGENT™ TECHNOLOGY
Since we are banking – yes, pun very much intended – on you keeping the six pre-loaded samples, let’s go ahead
and tap ‘Bank B’ so it opens.
While six samples have been baked into ‘Bank A’, by no means are you forced to keep them.
Feel free to keep, change, delete, whatever... it’s your DLZ Creator mixer!
All six samples displayed below are gray and white, indicating that no samples have been assigned to them yet.
This is also true of the remaining banks.
If we tap anywhere in one of the sample boxes, it opens up the editing features of that sample.
The first thing that has to be done is either a microSD card and/or USB flash drive has to be connected to DLZ Creator.
Afer that,...:
() a sample has to be recorded, or...
(2) a sample has to be loaded from disk, be it microSD or USB.
Record New Sample – If you want to record a sample, the very first step is to make sure that you have the correct bank
and sample pad selected. For this example, we will use Bank B, Sample . As such, B is displayed in the upper-lef
corner of both views near the top of the following page.
64
Page 65
DLZ CREATOR ADAPTIVE DIGITAL MIXER FOR PODCASTING AND STREAMING, FEATURING MIX AGENT™ TECHNOLOGY
Next, tap ‘Record New Sample’ followed by tapping ‘Start Recording’. This begins recording from the main L/R track.
Once tapped, the ‘Start Recording’ button turns to ‘Stop Recording’, the record time is displayed and the universal
image for recording – the red circle • – also appear.
Once the sample has been recorded, it is time to tap ‘Stop Recording’. This writes the file to disk and assigns
it to the assigned pad. Additionally, this will return you to the previous display – the sample settings page – where
the sample pad may be (re)named, a color may be assigned to the pad, the pad’s playback mode chosen, and more.
Now, if ‘Record New Sample’ was an accidental tap, simply tap ‘Cancel’ or the ‘X’ in the upper-right corner of the display to return
to the previous view. You can only stop a recording after it has started; it cannot be cancelled.
Load Sample From Disk – The other choice is to load a sample that was pre-recorded and saved to disk.
Out of the gate, there are really only two things you can do here and that is to either () load a sample or (2) exit.
If ‘Load Sample from Disk’ was an accidental tap, simply tap ‘Cancel’ or the ‘X’ in the upper-right corner of the display
to return to the previous view.
Since it was NOT an accidental tap, go ahead and FIRST tap the source of the sample so it is selected and highlighted.
This will either be the usb:\ drive or sd:\ drive. I have placed some samples on a USB drive, so that is what I selected.
65
Page 66
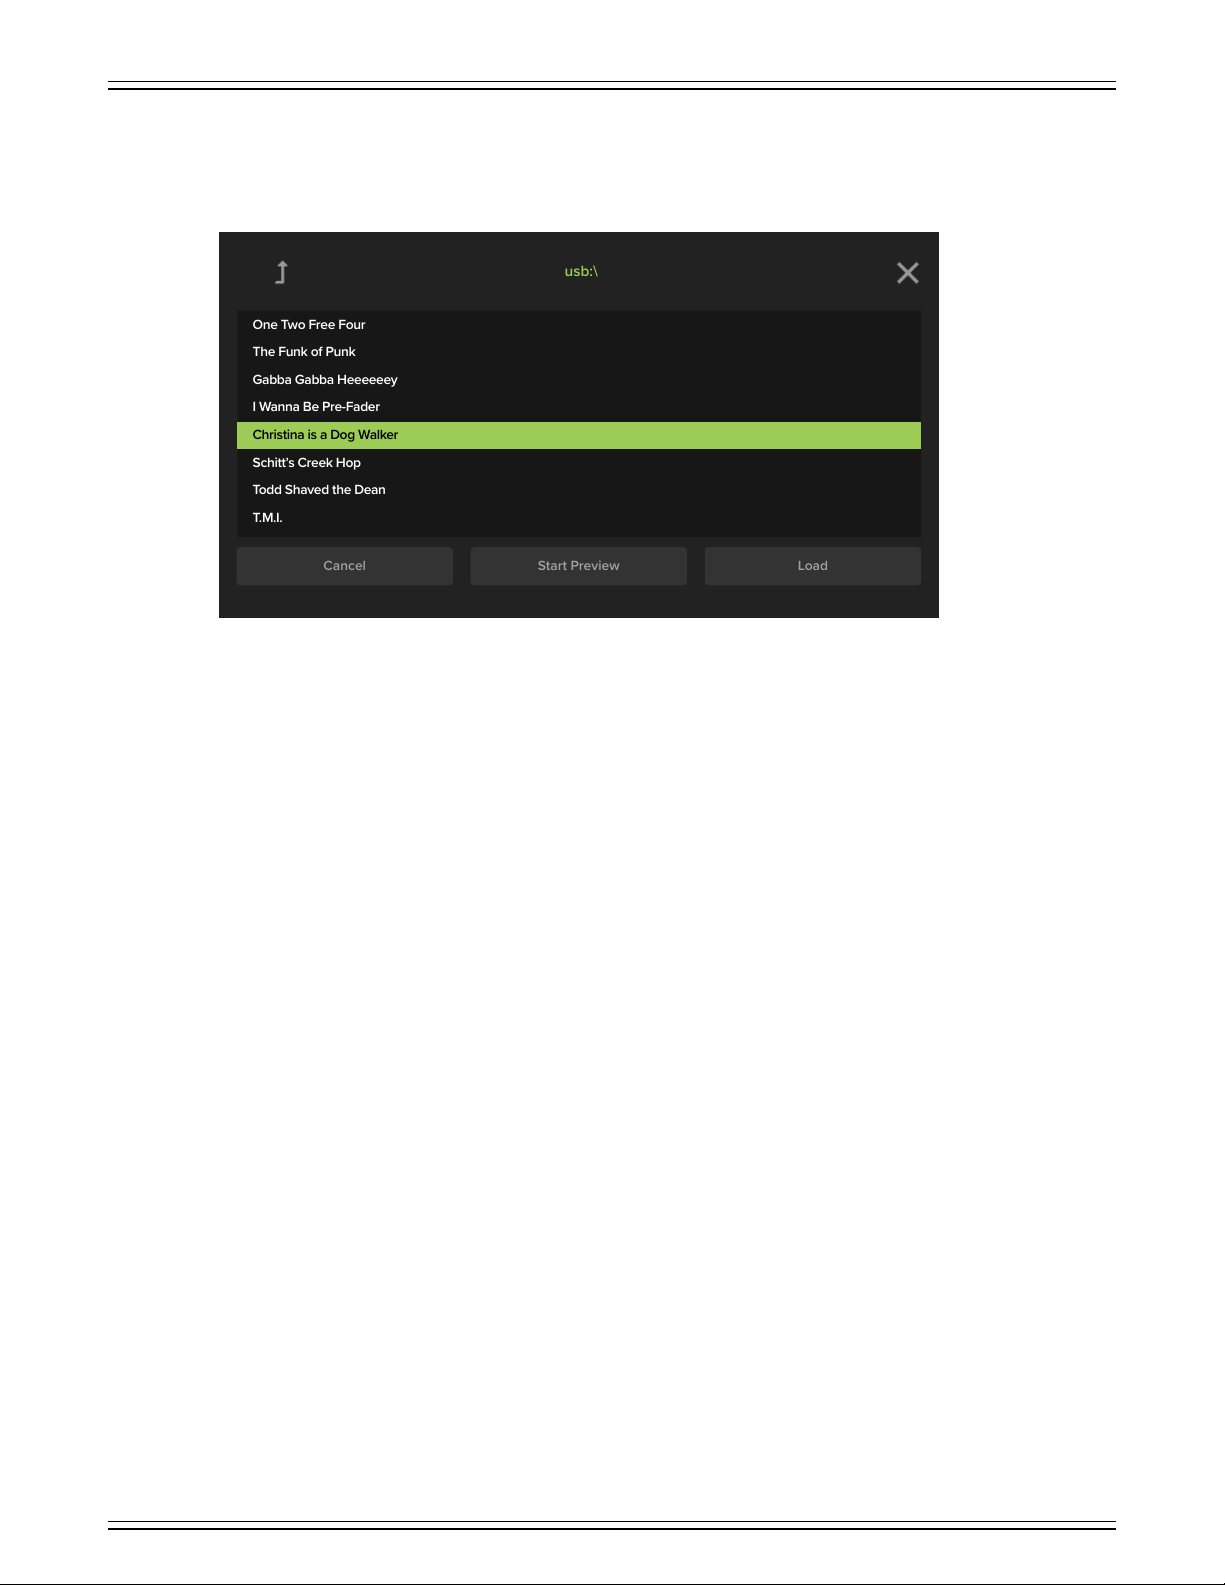
DLZ CREATOR ADAPTIVE DIGITAL MIXER FOR PODCASTING AND STREAMING, FEATURING MIX AGENT™ TECHNOLOGY
usb:\
Load
Start Preview
Cancel
One Two Free Four
The Funk of Punk
Gabba Gabba Heeeeeey
I Wanna Be Pre-Fader
Schitt’s Creek Hop
Todd Shaved the Dean
T.M.I.
Christina is a Dog Walker
Now tap ‘Load’ in order to view all of the files on the drive. Notice all of the samples on the USB drive below!
Simply tap-and-drag the display up and down to view other samples that may be hidden below, then highlight
the sample you would like to load. ‘Christina is a Dog Walker’ in the example below.
From here, there are a few choices to make. You could return to the previous view by () tapping the up arrow in the upper-left
corner of the display, (2) tapping the “X” in the upper-right corner of the display or (3) tapping ‘Cancel’ in the lower-left
of the display.
However, we’re here to LOAD a sample, not back out to the previous view! So, the choices, then, are to () ‘Start Preview’
which only PLAYS the selected sample; it does not load it to the assigned pad, or (2) ‘Load’ which LOADS the selected
sample and assigns it to the selected pad.
The display will looks similar to what is displayed below afer tapping ‘Load’. And now that a sample has been recorded
(or loaded) and assigned to a sample pad, it is time to give it some flavor! We will start at the top-lef and work our way down.
• Green Lef Arrow – Tapping this returns you to the main header page of the currently selected bank.
• Red X – This is your basic “delete” function. Do you not like the sample? Ready to make an update, a change
or something else? Tap the red x to “unassign” the file from the sample pad and return it to an unassigned state.
This is a permanent deletion with no undo, so a confirmation dialog helps prevent accidents.
• Pad Name – The sample is initially named as it was on the disk that it was loaded from... but it may be renamed.
Tapping the pad name reveals an on-screen keyboard so that the pad nickname may be edited.
66
Page 67
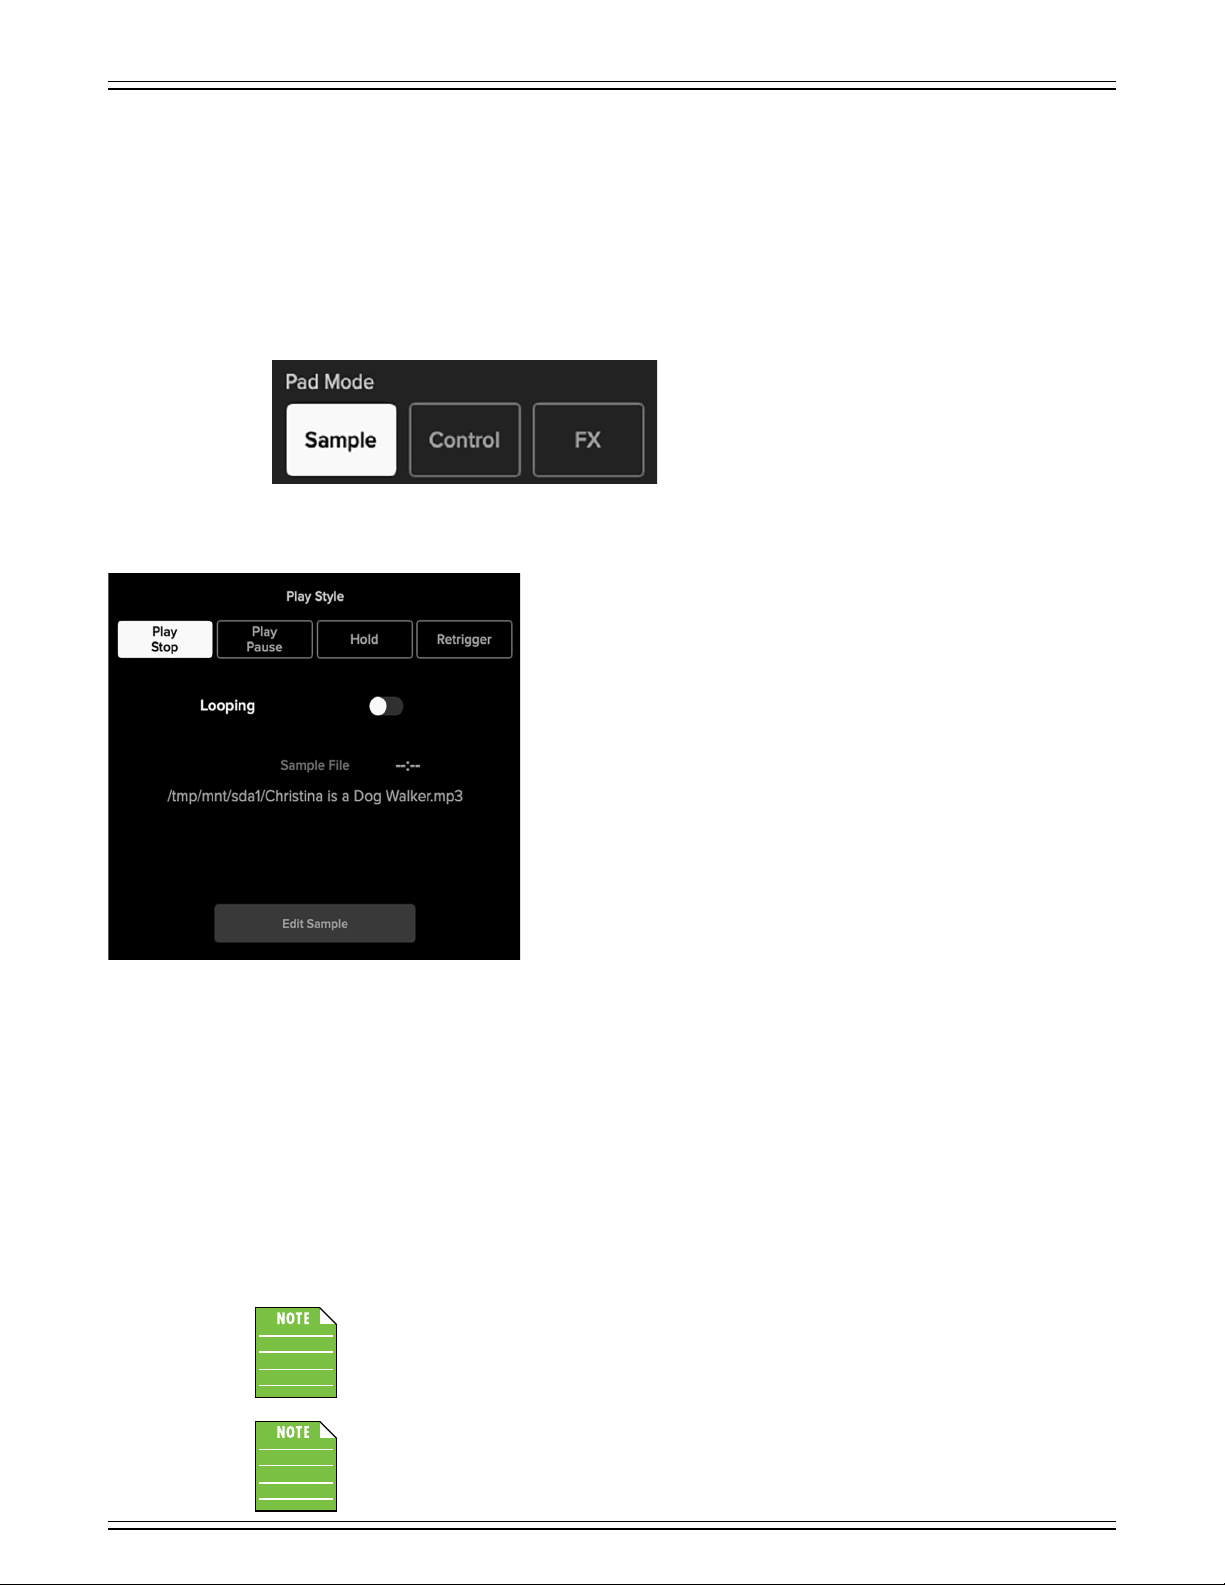
DLZ CREATOR ADAPTIVE DIGITAL MIXER FOR PODCASTING AND STREAMING, FEATURING MIX AGENT™ TECHNOLOGY
• Color – The sample is initially colored hot pink [the default color]... but it may be changed. Tap the color to reveal a new
popover showcasing all available colors. Tapping on another color will select that color for that pad. The selected color
will have a white outline, as well as a white check mark in the middle, indicating that it has been chosen.
Additionally, the sample color will change in the upper-lef corner of the display and the actual sample pad
on the hardware will also update to the chosen color.
• Pad Mode – There are three dierent pad modes to choose from, with ‘Sample’ as the default... but it may be changed.
Simply tap the pad mode you desire. The tapped pad mode will illuminate white, like ‘Sample’ is below. We are currently
working in the samples section and will check out control and FX next:
• Play Style – There are four dierent play styles to choose from with ‘Play / Stop’ as the default... but it may be changed.
Listed below are the four play style modes and their playback behaviors:
• Play / Stop – Play / Stop plays the sample from start to finish.
The sample may be stopped early by pressing the sample pad again.
If pressed again, though, it will restart the sample from the beginning.
• Play / Pause – Play / Pause also plays the sample from start to finish.
However, the sample may be paused by pressing the sample pad again.
If the sample pad is pressed a third time, the sample will continue to play
from the paused point. The sample may be played and paused until the end
of the sample is reached.
• Hold – If Hold is the selected play style, the sample pad acts as a momentary
switch, only playing the sample when the button is tapped and held down.
The sample will stop playback once the button has been released. If the sample
plays to the end, it will “loop back” to the beginning and play the sample again
repeatedly until the sample pad is released.
• Retrigger – Retrigger is similar to Play / Stop as it also plays the sample
from start to finish. In fact, it will do so if you allow it. However, you didn’t
set this up as a Play / Stop. It’s a Retrigger!
With Retrigger, you’re supposed to tap the sample pad again. This ends the currently playing sample and starts
the sample playback from the beginning.
• Looping – If this switch is to the right (illuminates green), looping has been engaged. This means that once
the sample has finished playing, it will “loop back” to the beginning and play the sample again repeatedly until
the sample pad is pressed again. Looping is available on all play styles except Retrigger.
As you might expect, only one play style may be selected per sample pad (although it would be quite odd to have more
than one!).
Regardless of the play style(s) chosen:
The sample pads will illuminate brighter – in their selected colors – during playback.
All six sample pads are on their own chain. What this means is that multiple samples may be played
simultaneously.
67
Page 68
DLZ CREATOR ADAPTIVE DIGITAL MIXER FOR PODCASTING AND STREAMING, FEATURING MIX AGENT™ TECHNOLOGY
• Edit Sample – Let’s have some fun with the sample now! Tap ‘Edit Sample’ to reveal something similar
to what is displayed below:
As you can see, we are able to edit each sample’s start and end time, as well as their fade in and out time and trim level.
Samples may be edited by () rotating one of the five quick control knobs associated with it (noticing how the base
of the quick control knobs match the color of each parameter) or (2) tapping-and-dragging the sliders lef and right.
• Edit Start – This parameter adjusts the point to where the sample should start playing. It is measured
in milliseconds from the beginning of the file. It ranges from 0 ms [the default] up to a max of 3000 ms.
• Edit End – This parameter adjusts the point to where the sample should stop playing. It is measured
in milliseconds from the end of the file. It ranges from 0 ms [the default] up to a max of 3000 ms.
• Fade In – This parameter sets the duration for the sample to fade in. It is measured in milliseconds
from the start point of the sample. It ranges from ms up to a max of 000 ms (with 0 ms as the default).
• Fade Out – This parameter sets the duration for the sample to fade out. It is measured in milliseconds
from the end point of the sample. It ranges from ms up to a max of 000 ms (with 0 ms as the default).
• Trim – This final parameter sets the trim of the recorded sample. It is measured in dB ranging from –40 dB
up to a max of 0 dB [the default].
The settings listed above are non-destructive. What that means is that the entire sample is still there,
still available. Editing simply “edits” the sample to your liking. If you don’t like it and want the entire sample,
just reset the sliders to their default positions.
Tapping any of these slider’s balls twice quickly will set them to their default.
The edits are saved simply by tapping the “X” in the upper-right corner. It will return you to the previous view.
Now that you know how to switch between banks, record and/or load samples, name them, add color, assign them a play style,
edit the samples, and more, it is time to follow the previous steps for the other unassigned sample pads.
68
Page 69
DLZ CREATOR ADAPTIVE DIGITAL MIXER FOR PODCASTING AND STREAMING, FEATURING MIX AGENT™ TECHNOLOGY
• Control Mode – The pad mode listed next afer ‘Sample’ is ‘Control’. Here you are able to set the pads to play
(or aect) something other than samples (and FX). This includes six separate control modes to choose from:
Censor, mute group, locals only, intercom, fade, and ducking. Read below to learn about these features and how
they work.
Before looking at the control modes, we’ll start o on the lef-side of the display with pad behavior.
• Pad Behavior – There are two choices with pad behavior: Toggle and Hold. With toggle engaged,
the pad simply just needs to be tapped and the selected control mode is on.
If hold is the selected pad behavior, the pad acts as a momentary switch, only activating the selected
control mode when the button is tapped and held down. The selected control mode will stop once
the button has been released.
This is dierent from rad behavior. Rad behavior may be selected for any, well, rad
guests on the podcast. Unfortunately, unruly guests show up occasionally, too.
If so, then you will want to select bad behavior.
• Censor – Whether we mean to do it or not, it happens. People swear. Pressing the pad when
in censor control mode releases a kHz tone [by default], a high-pitched beep. Everyone with
headphones will hear the salty language, but the audience will just get the beep.
As mentioned above, the tone is simply the default, but you can make the censor sound be whatever
you want. Just tap the ‘Sample’ button. Out of thin air – and below the censor sound – are two
additional buttons: ‘Record New Sample’ and ‘Load Sample from Disk’. We just went over these
a few pages ago, so will not reiterate here. Simply go back to page 64 and start there.
Using a personal sample for the censor could be fun when interviewing a “rock star”, for example,
and the sample could be a selection o their latest single. An interview with an author could have
a book excerpt being read as the censor. The possibilities are endless!
69
Page 70
DLZ CREATOR ADAPTIVE DIGITAL MIXER FOR PODCASTING AND STREAMING, FEATURING MIX AGENT™ TECHNOLOGY
• Mute Group – Mute groups allow you to quickly mute (and unmute) multiple channels using the pad.
There are a multitude of possibilities in which to assign and enable mute groups, especially for muting
all inputs while the host intros/outros a show, for example. This very example is shown below with all
channels muted except channel one. Pressing the pad will mute and un-mute the selected inputs
(depending on the pad behavior).
Two things to notice. First, when engaged the display will darken. Your eyes do not
deceive you, nor is the mixer broken. This is to let you know that mutes are engaged.
Feel free to move around in the other tabs and such, but when returning to the pads
tab, it will remain darkened until the pad is tapped again (channels un-muted).
Additionally, when mute groups are engaged, the mute switches on the selected
channels will illuminate red.
• Locals Only – When ‘Locals Only’ is selected and the pad is engaged, the audio sent to the mix-minus
channels over Bluetooth, USB, and NDI will be muted. This allows podcaster(s) to discuss things
on-the-fly without having to interrupt the caller’s incoming audio and (more importantly) without
the caller hearing what you are saying. It’s for locals only!
When a ‘Locals Only’ pad is engaged, the icon in the upper-right corner of the display
will illuminate red, indicating that it has been applied.
70
Page 71
DLZ CREATOR ADAPTIVE DIGITAL MIXER FOR PODCASTING AND STREAMING, FEATURING MIX AGENT™ TECHNOLOGY
• Intercom – As you can see below, when intercom mode is selected, it creates a virtual mix that allows
communication between sources without being recorded.
When engaged, channels that are selected will be able to hear each other, but muted in the main mix.
So when would one use this feature? For example, it could be a radio station that’s live broadcasting
their morning show. Before patching callers through, the engineer will likely screen calls to make sure
they are “radio friendly”. In a case like this, you would select the Bluetooth channel as seen below.
When an ‘Intercom’ pad is engaged, the icon in the upper-right corner of the display
will illuminate red, indicating that it has been applied.
7
Page 72
DLZ CREATOR ADAPTIVE DIGITAL MIXER FOR PODCASTING AND STREAMING, FEATURING MIX AGENT™ TECHNOLOGY
• Fade – The fade control mode allows all channels to fade out when the pad is engaged. The levels
will return to their original levels when the pad is disengaged. Near the bottom right of the display
is an option to “Exclude Channel ”. This is a great option to choose when, say, a podcast has wrapped
up, the host may continue talking at a normal level, while all other channels fade out. Exclude channel
is engaged when the switch is to the right; it will illuminate green to confirm the selection and is gray
when o.
When a ‘Fade’ pad is engaged, the icon in the upper-right corner of the display
will illuminate red, indicating that it has been applied.
• Ducking – Have you been to an event where music was playing, then when someone spoke into
the mic, that the music volume decreased greatly (but was still there)? That’s called “ducking”!
It also works when multiple mics and other inputs are being used... like with DLZ Creator!
When ducking is engaged, the volume of all channels (other than channel ) are reduced by 5 dB,
so long as a mic signal above –50 dB is present on channel . There is a gradual fade in/out; it is not
immediate.
The multi-track outputs are not aected by ducking. However, the stereo outputs and stereo
recordings are and they are heard via headphones and the main LR output.
When a ‘Ducking’ pad is engaged, the icon in the upper-right corner of the display
will illuminate white, indicating that it has been applied.
72
Page 73

DLZ CREATOR ADAPTIVE DIGITAL MIXER FOR PODCASTING AND STREAMING, FEATURING MIX AGENT™ TECHNOLOGY
• FX – The FX control mode allows you to add voice-altering eects to the selected mic input. The tapped pad
mode will illuminate white, like ‘FX’ is below. Before looking at the eects choices, we’ll start o on the lef-side
of the display with pad behavior and channel assign.
• Pad Behavior – There are two choices with pad behavior: Toggle and Hold. With toggle engaged,
the pad simply just needs to be tapped and the selected FX mode is on.
If hold is the selected pad behavior, the pad acts as a momentary switch, only activating the selected
FX mode when the button is tapped and held down. The selected FX mode will stop once the button
has been released.
• Channel Assign – Select which mic channel – or 2 – the FX pad should be assigned to.
• Atomizer Reverb – The reverb may be adjusted by moving the knobs via tap-and-rotate.
The FX may be adjusted whether the eects are on or o.
Preset — Presets save parameters and may be recalled as needed. DLZ Creator comes
with a library of factory presets. There are also user presets. These may be created
for each preset type.
An entire chapter is dedicated to presets. This includes detailed instructions and multiple
screenshots every step of the way. Please check it out on pages 90-93.
Pre-Delay — When listening to a live performance, direct sounds are reached first, followed
by reverberation caused by room reflections. The pre-delay is the amount of time between
when the direct sounds arrive and when the reflections arrive.
The speed of sound is approximately 340 meters per second (00 feet per second).
This means that in one millisecond, it travels 0.34 meters (. feet). As a rough idea,
think of ms as the time it takes for sound to travel one foot.
Decay — This represents the decay time of the reverb.
Low Pass — This applies a low-pass filter to the reverbed signal and rolls o the higher
frequencies.
Reverb Level — This sets the reverb FX send level for the currently selected channel ( or 2).
73
Page 74

DLZ CREATOR ADAPTIVE DIGITAL MIXER FOR PODCASTING AND STREAMING, FEATURING MIX AGENT™ TECHNOLOGY
• Chronotronic Delay – The delay may be adjusted by moving the knobs via tap-and-rotate.
The FX may be adjusted whether the eects are on or o.
Preset — Presets save parameters and may be recalled as needed. DLZ Creator comes
with a library of factory presets. There are also user presets. These may be created for each
preset type.
An entire chapter is dedicated to presets. This includes detailed instructions and multiple
screenshots every step of the way. Please check it out on pages 90-93.
Delay Time (Decay) — This knob sets the current delay time.
Feedback — This controls how much of the delayed signal is routed back to the input
of the delay section to create multiple echoes. Each time the signal is fed back,
the delayed signal becomes quieter (so the echo won’t go on forever unless set at 00%).
Low Pass — This applies a low-pass filter to the delayed signal and rolls o the higher
frequencies.
Delay Level — This sets the delay FX send level for the currently selected channel ( or 2).
• Telephone – The intensity may be adjusted by moving the knob via tap-and-rotate.
The FX may be adjusted whether the eects are on or o.
Intensity — This eect simulates the sound of someone talking on the phone.
It essentially limits the frequency response, resulting in a “thinner”, more lo-fi sound.
This knob sets the intensity of the telephone eect.
74
Page 75
DLZ CREATOR ADAPTIVE DIGITAL MIXER FOR PODCASTING AND STREAMING, FEATURING MIX AGENT™ TECHNOLOGY
• StreamFX Voice Changer – The voice changer contains three dierent options to choose from:
Pitch shif, disguise, and robot. Let’s say we check them out, shall we...?
Pitch Shif — This knob sets the pitch of the voice. When the pitch shif knob
is tapped-and-dragged to the lef, it deepens the voice, and anything to the right
of the middle increases the pitch. Double-tap the pitch shif ball to re-center it.
Disguise Intensity — The middle StreamFX Voice Changer selection is “Disguise”.
Use it to – <ahem> – disguise your voice.
When the disguise intensity knob is tapped-and-dragged to the lef, it lowers the intensity
of the disguise and the further right it is, the more intense the disguise eect is. Double-tap
the disguise intensity ball to re-center it. When the ball is to the far-lef, there is little-to-no
disguise. It has to be up at least a little bit for it to take eect.
This is the kind of voice that’s heard when watching TV, for example, and the person’s face
is pixelated and the voice is altered. They do not want to be known. This can be selected
if a guest of the podcast wants their true voice to be altered, as an example.
Robot — The third and final StreamFX Voice Changer selection is “Robot”. When selected –
and engaged – the voice alters, sounding eerily like a robot from the future. There are three
robot voice selections to choose from: Small, medium, and large.
Note that any number of StreamFX Voice Changer eects may be on simultaneously.
It will likely sound like a mess if all of them are engaged, but it IS a possibility.
Only channel or 2 may be selected per time. In other words, you cannot have channel with reverb
and channel 2 with delay, for example.
75
Page 76
DLZ CREATOR ADAPTIVE DIGITAL MIXER FOR PODCASTING AND STREAMING, FEATURING MIX AGENT™ TECHNOLOGY
We have (almost) made it through the entire pads chapter, but would like to add a few final notes.
At the top of the chapter, we mentioned and displayed the six factory default samples. Guess what? You don’t
have to keep them! Go ahead and make ’em your own! Did you do that and now want the factory default samples
back? Guess what? They’re stored on local memory, so all you need to do is a factory reset.
Here’s something cool that we discussed way back in the day, as well, but it’s worth bringing up again.
You do not need to manually navigate to the pads tab to edit individual samples! Wait, what?! But how...?
Yo, check it! From the Overview screen, you can easily switch between banks by tapping the bank that
you want to access. When the bank letter is tapped – “A” on the screenshot to the far-lef, for example,
the sample pads list is replaced with the list of banks (as seen on the right side screenshot). Tap the bank
that has the samples you prefer. The bank’s letter will illuminate, confirming the selected bank. You could
also tap the arrow buttons to switch between banks.
The samples will then be whatever you added to that particular bank and the pads will also change color
to what you assigned to them.
But that’s not all! Displayed above the bank “box” are the six samples from that bank. They are laid
out vertically on the display, just like they are on the hardware. Double-tapping one of these will take
you to that pad’s page.
When the day is over and you need to unwind, simply load up DLZ Creator’s version of ‘Simon™’, available within the pad
tab [Pad > DLZimon™]. Like its circular tabletop counterpart, this works similarly in that DLZ Creator will simultaneously
emit a quick sound and flash a brightly colored light (i.e. sample pad). You will then have to repeat the sequence back
to DLZ Creator... in the same order. The game ends when you incorrectly guess the order.
Don’t forget that there are three levels of game play. Be sure to set it up in Settings >System:
[Easy, Enhanced or Pro].
76
Page 77
DLZ CREATOR ADAPTIVE DIGITAL MIXER FOR PODCASTING AND STREAMING, FEATURING MIX AGENT™ TECHNOLOGY
Chapter : Settings Tab
Settings > Introduction and System
Settings is the final tab listed. But make no mistake... it is every bit as valuable as the previous tabs!
Tap to open it, revealing a screen that looks somewhat like what is displayed below.
The first thing to notice here is the chosen mode: Pro. However, the display looks exactly* the same for all modes,
regardless of the mode chosen.
*Ok, fine, it’s not
by easy or enhanced (displayed below along with pro). The amount of gear icons that are displayed relates to the number
of additional features that are available for the chosen mode. More gear icons means more features. Of course this only
relates to
exactly
the same for all modes. No. In fact, the dierence is the following. Pro (outlined above) is replaced
some
of the tabs and sub tabs as discussed in previous chapters.
Settings > System > Language
Way way way way back in the stone age – aka near the beginning of the owner’s manual – you were asked to choose
the language of your choice. If you chose wrong or would like to work create in a dierent language, this is the place!
Tap the button to reveal the options and select the language.
77
Page 78
DLZ CREATOR ADAPTIVE DIGITAL MIXER FOR PODCASTING AND STREAMING, FEATURING MIX AGENT™ TECHNOLOGY
Settings > System > System Lock
Setting a four numbers passcode will “lock the system” to the overview screen.
Tap ‘System Lock’ to begin. At this time, you will be prompted to enter and lock a four number passcode.
The tabs on the navigation bar will now be hidden, preventing any unwarranted changes.
To re-introduce the tabs to the navigation bar, tap the key icon and enter the four character passcode.
Be sure to remember the passcode! If you forget, you will not be able to access these
controls ever again! Read that sentence again... Ok, fine, you got us, there is a secret
squirrel workaround. Press and hold the Home and AutoMix buttons down until
the mixer unlocks (which is roughly ~0 seconds).
Settings > System > Brightness
The brightness levels of (almost) all LEDs may be adjusted by () rotating one of the three quick control knobs associated
with it (noticing how the base of the quick control knobs match the color of each brightness level slider) or (2) moving
the sliders lef and right via tap-and-drag. The brightness of all buttons and the display may be changed. However,
the Home, Rec and AutoMix buttons will always remain at 00% brightness.
Screen Brightness — This sets the overall brightness level of the main display, ranging from 0% to 00% [default 00%].
Lit Button Brightness — This sets the overall brightness level of the lit buttons, ranging from 0% to 00% [default 80%].
The lit buttons are the six sample pads.
Dim Button Brightness — This sets the overall brightness level of the dim buttons, ranging from 0% to 00% [default 25%].
The dim buttons include the mute and solo buttons.
Did you set any – or all? – of the button brightness settings to 0% and still see something?
We haven’t released the braille version of DLZ Creator yet, so we still need “some” light
to get through. Thanks for understanding!
78
Page 79
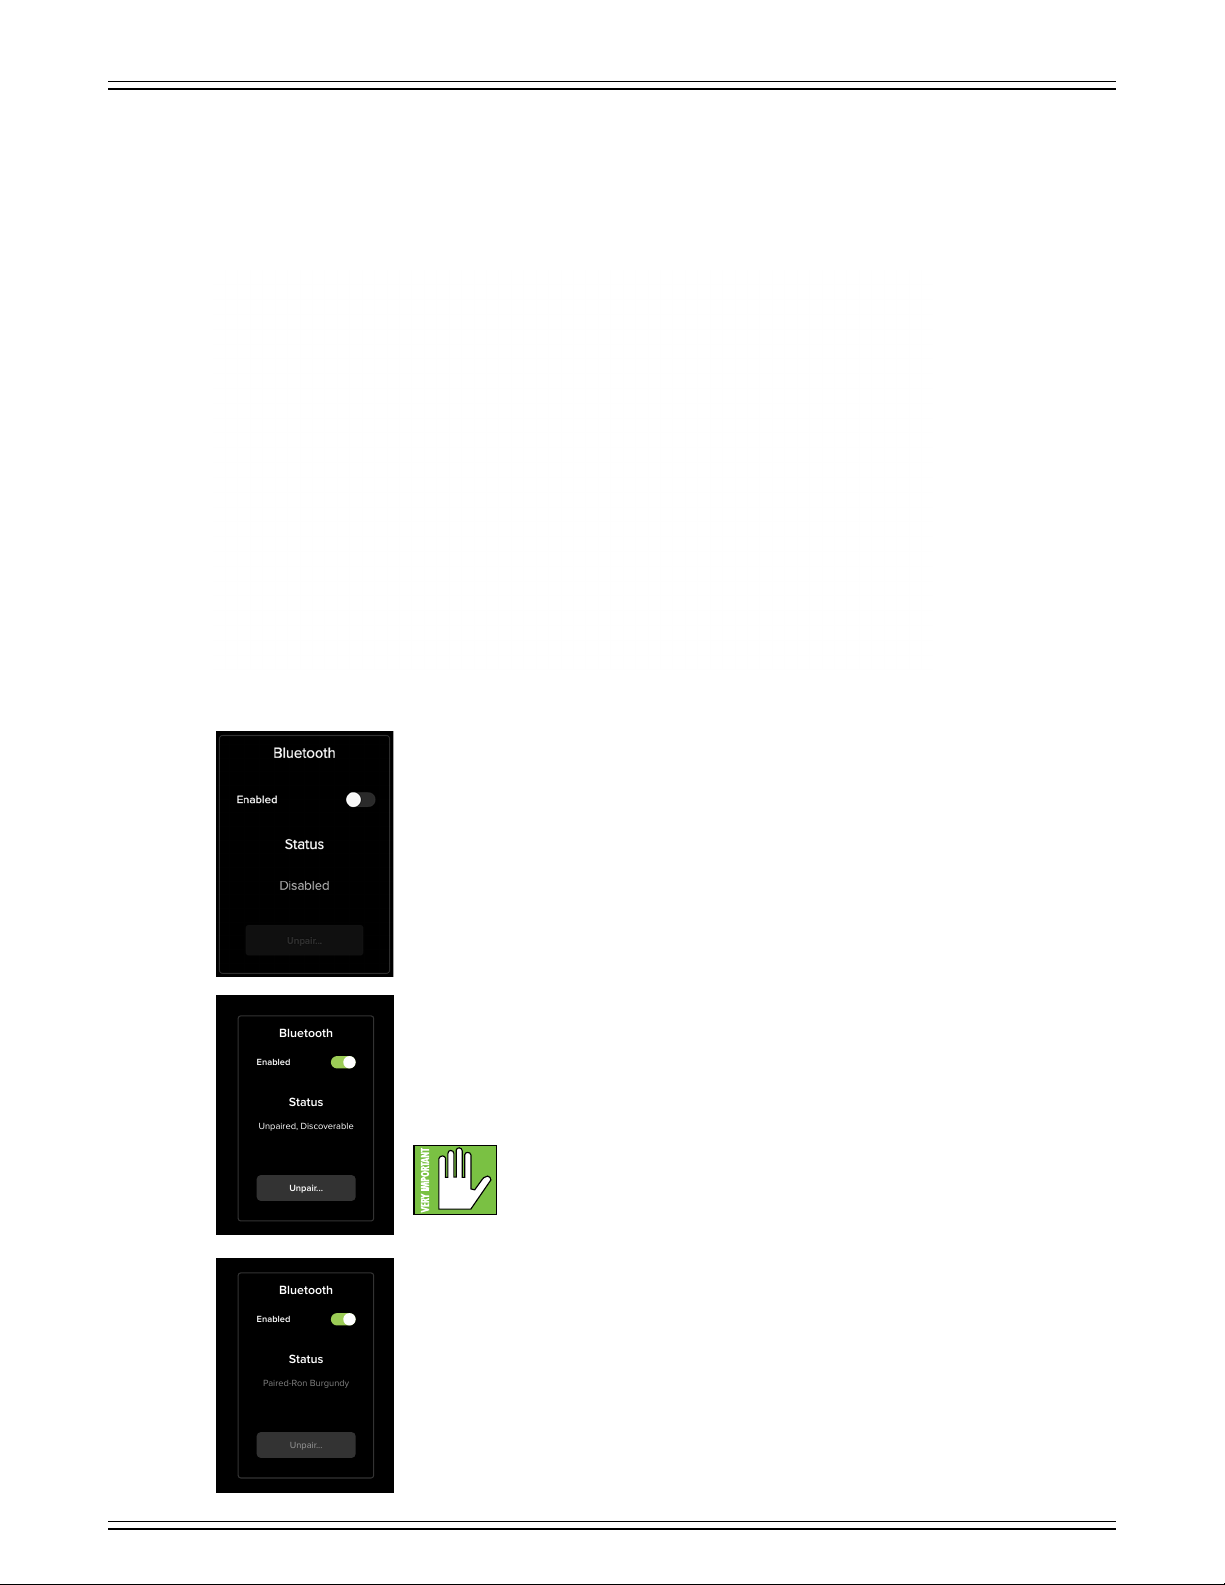
DLZ CREATOR ADAPTIVE DIGITAL MIXER FOR PODCASTING AND STREAMING, FEATURING MIX AGENT™ TECHNOLOGY
Bluetooth
Status
Unpaired, Discoverable
Enabled
Unpair...
Bluetooth
Status
Paired-Ron Burgundy
Enabled
Unpair...
Settings > Bluetooth / Disk
The next sub tab over from settings > system is bluetooth / disk. Here is another tab that looks and works exactly the same
regardless of the chosen mode. Tap bluetooth / disk to open it, revealing a screen that looks somewhat like what is displayed
below. We will go through each of these three sections separately: () Bluetooth, (2) SD Card and (3) USB Drive.
Settings > Bluetooth / Disk > Bluetooth
Mixers can only accept one input per channel and the DLZ Creator is no dierent.
As indicated earlier, the last input channel (9/0) may accept a Bluetooth connection.
Or, if not using Bluetooth, this channel strip could be used for SD/USB instead of Bluetooth
(via Channel > Setup > Channel Source). Regardless, a channel source must be chosen!
Pairing and Connecting – Tap the Bluetooth’s ‘Enabled’ switch so it is to the right (on, enabled).
This switch will engage the channel’s pairing mode, allowing the DLZ Creator to be seen by other
Bluetooth devices such as a phone or tablet. The switch will illuminate solid green when engaged.
This is to indicate that the DLZ Creator and device are in pairing mode.
While the DLZ Creator is in pairing mode, simultaneously scan for Bluetooth devices on the phone
or tablet. You should see DLZ Creator appear in the “available devices” list. Select it. From there,
the device should indicate that it is successfully connected.
A previously paired device will auto reconnect if both the device and mixer are powered on
and in range.
The Bluetooth may disconnect when aected by Electrostatic Discharge [ESD].
Manually reconnect the Bluetooth connection.
Bluetooth Calls – Once paired and connected, making and taking calls from guests is easy!
While this may be true, we strongly suggest a trial run to confirm that everything works as it should.
. Make sure the channel 9/0 fader is at unity.
2. Make sure the channel 9/0 source is set to Bluetooth.
3. Make sure Mix-Minus is turned on.
4. Make sure the (Bluetooth) volume is turned up on the phone.
5. Have someone call the number of the phone connected via Bluetooth. Ron Burgundy’s phone
in the example to the lef.
6. Make sure the output destination on the phone is set to DLZ Creator.
7. Adjust the levels until you hear each other clearly!
79
Page 80
DLZ CREATOR ADAPTIVE DIGITAL MIXER FOR PODCASTING AND STREAMING, FEATURING MIX AGENT™ TECHNOLOGY
Settings > Bluetooth / Disk > SD Card
This first part below was mentioned way, way back in the hardware section – albeit briefly – but it
is worth repeating. Whether or not it is worthy of a second read, however, is entirely up to you!
The microSD slot is nestled in-between the power connector and USB-A jack on the rear panel.
Not only is the DLZ Creator a great mixer with some pretty amazing features, but here you can also record podcasts,
interviews, in-studio gigs and more to a microSD card!
Formatting – We know you’re an eager beaver, all psyched to start recording, but let’s take care of something very important
first: formatting the microSD Card. First, get a microSD Card; this could be a brand new one or one you’ve had for awhile
so long as it’s Class 0 or better.
microSD Cards need to be Class 0 or better to ensure reliable operation. If using an older microSD Card, it’s a high
possibility that some samples will be dropped because the card is too slow. We are not in the business of suggesting
what microSD Card to go with, but choosing one with an instantly recognizable, quality, trustworthy name doesn’t
hurt.
Some examples we’ve heard of:
• SanDisk
• PNY
• Lexar
• Samsung
• Kingston
Even if the microSD Card has already been formatted via a dierent source, we highly suggest formatting
via the DLZ Creator. In fact, never mind the “highly suggest.” DO IT!
Just follow the steps listed below:
These probably goes without saying, but we’re going to say them, anyway. In order for the microSD card to be formatted
via the DLZ Creator, () the microSD card needs to be connected to the DLZ Creator’s microSD card slot with the card’s
electrical contacts facing down; the top of the microSD card (with the brand name, disc size, etc.) faces up towards
the “SD™” logo (as seen below).
Electrical Contacts microSD card OUT microSD card IN
Granted, you might have a dicult time trying to format the microSD Card if these conditions aren’t yet met.
For one, it doesn't easily fit in any other way, and for another, DLZ Creator will remain with the “SD card not present”
statement as seen on the previous page.
80
Page 81
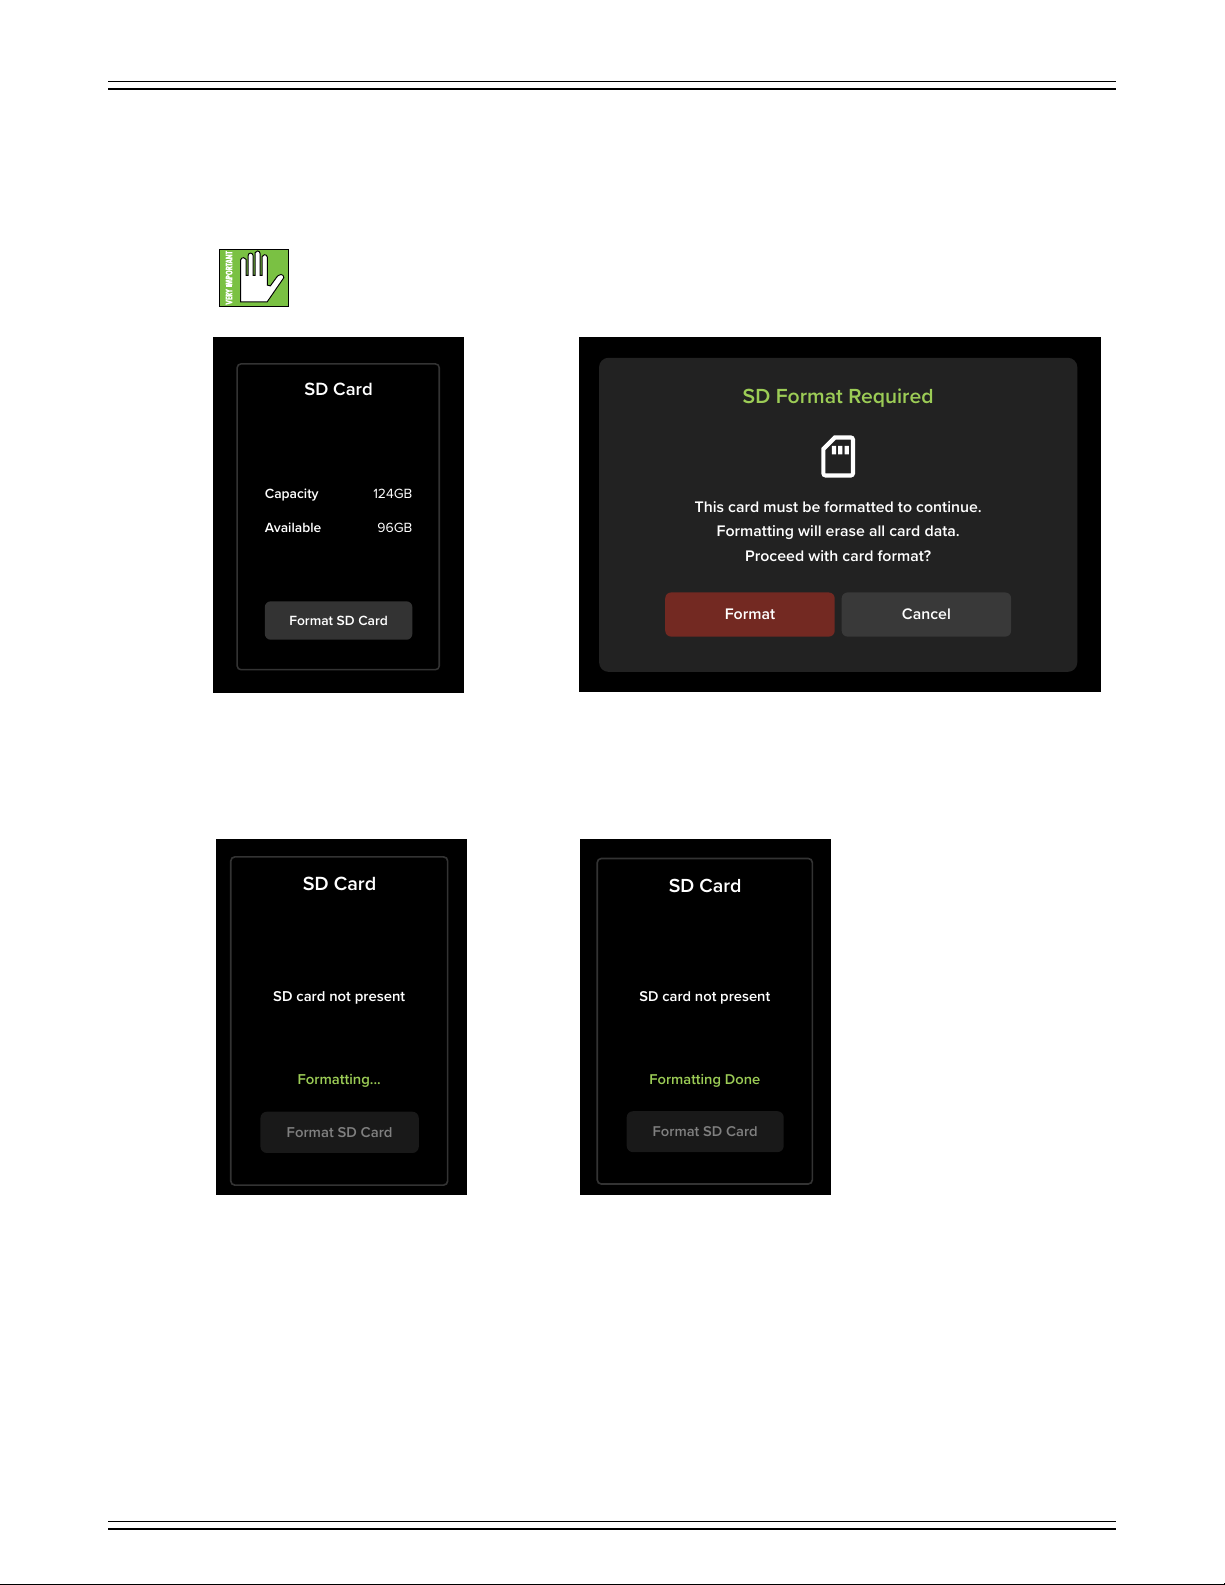
DLZ CREATOR ADAPTIVE DIGITAL MIXER FOR PODCASTING AND STREAMING, FEATURING MIX AGENT™ TECHNOLOGY
SD Card
Capacity
124GB
Available
96GB
Format SD Card
SD Format Required
This card must be formatted to continue.
Formatting will erase all card data.
Proceed with card format?
Cancel
Format
SD Card
SD card not present
Formatting...
Format SD Card
SD Card
SD card not present
Formatting Done
Format SD Card
Now that the microSD card is inserted properly and DLZ Creator is fired up, it’s time to format the microSD card.
Head to Settings > Bluetooth / Disk. The display will look something like this (Image A). Tap ‘Format SD Card’.
This is a permanent deletion with no undo, so a confirmation dialog helps prevent accidents.
Formatting will completely erase the SD Card, so please back up any files before formatting!
Tap ‘Format’ (to continue with the formatting) or ‘Cancel’ (if it was an accidental tap) (Image B).
Image BImage A
As seen in Image C, the microSD card is formatting. DO NOT DO ANYTHING UNTIL FORMATTING IS COMPLETE (Image D)!
Image C Image D
8
Page 82
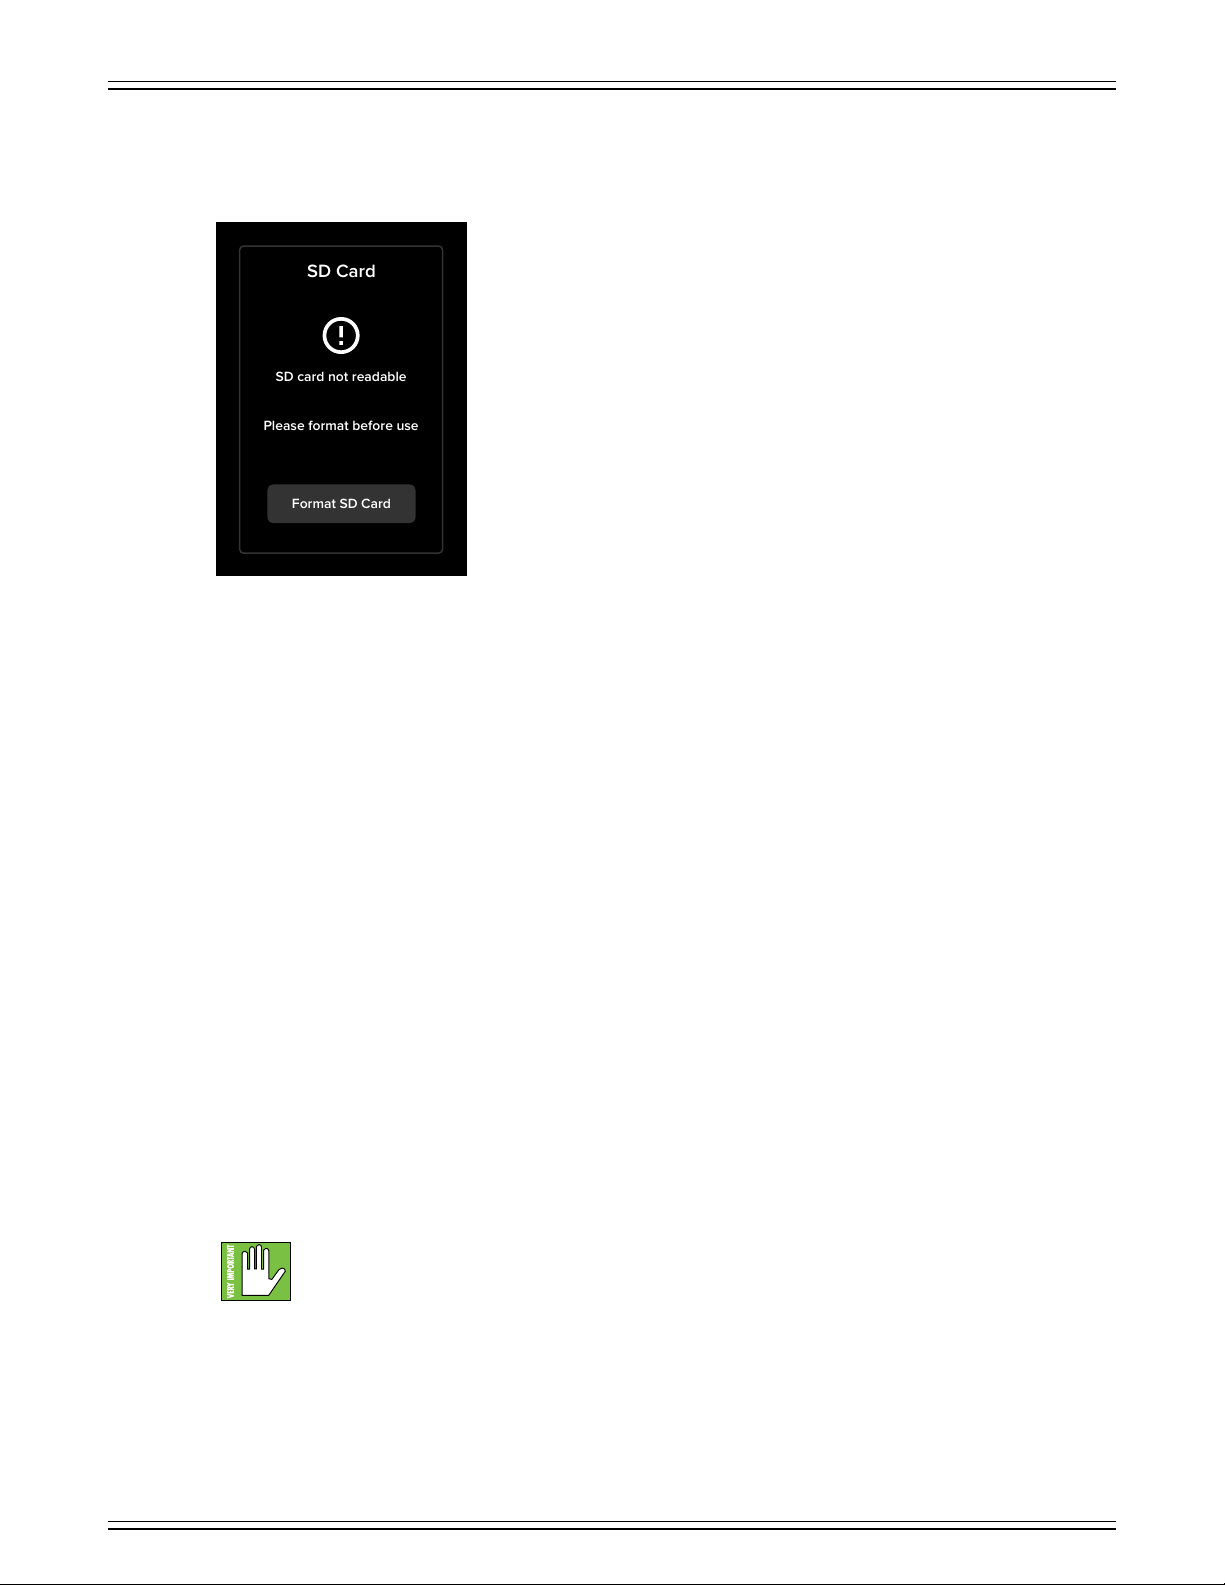
DLZ CREATOR ADAPTIVE DIGITAL MIXER FOR PODCASTING AND STREAMING, FEATURING MIX AGENT™ TECHNOLOGY
SD Card
SD card not readable
Please format before use
Format SD Card
While the majority of microSD cards are readable, some are not. If you see a display similar to Image E below, you might
have a corrupt microSD card as DLZ Creator thinks the card is not formatted to FAT32 (the only supported format).
That said, it is absolutely worth a shot to try and format the card via computer (or at least see if it even shows up).
Image E
Settings > Bluetooth / Disk > USB Drive
This first part below was mentioned way, way back in the hardware section – albeit briefly – but it is worth repeating.
Whether or not it is worthy of a second read, however, is entirely up to you!
This USB-A jack serves as a multi-purpose feature, allowing for a variety of options. Connect a flash drive and record direct,
for example. Have a dying phone? Charge it here!
Not only is the DLZ Creator a great mixer with some pretty amazing features, but here you can also record podcasts, interviews,
in-studio gigs and more direct to USB!
Formatting – We know you’re an eager beaver, all psyched to start recording, but let’s take care of something very important
first: formatting the USB drive. First, get a USB drive; this could be a brand new one or one you’ve had for awhile.
We are not in the business of suggesting what USB drive to go with, but choosing one with an instantly recognizable, quality,
trustworthy name doesn’t hurt.
Some examples we’ve heard of:
• Seagate
• SanDisk
• LaCie
• Adata
• WD (Western Digital)
Even if the USB drive has already been formatted via a dierent source, we highly suggest formatting
via the DLZ Creator. In fact, never mind the “highly suggest.” DO IT!
82
Page 83
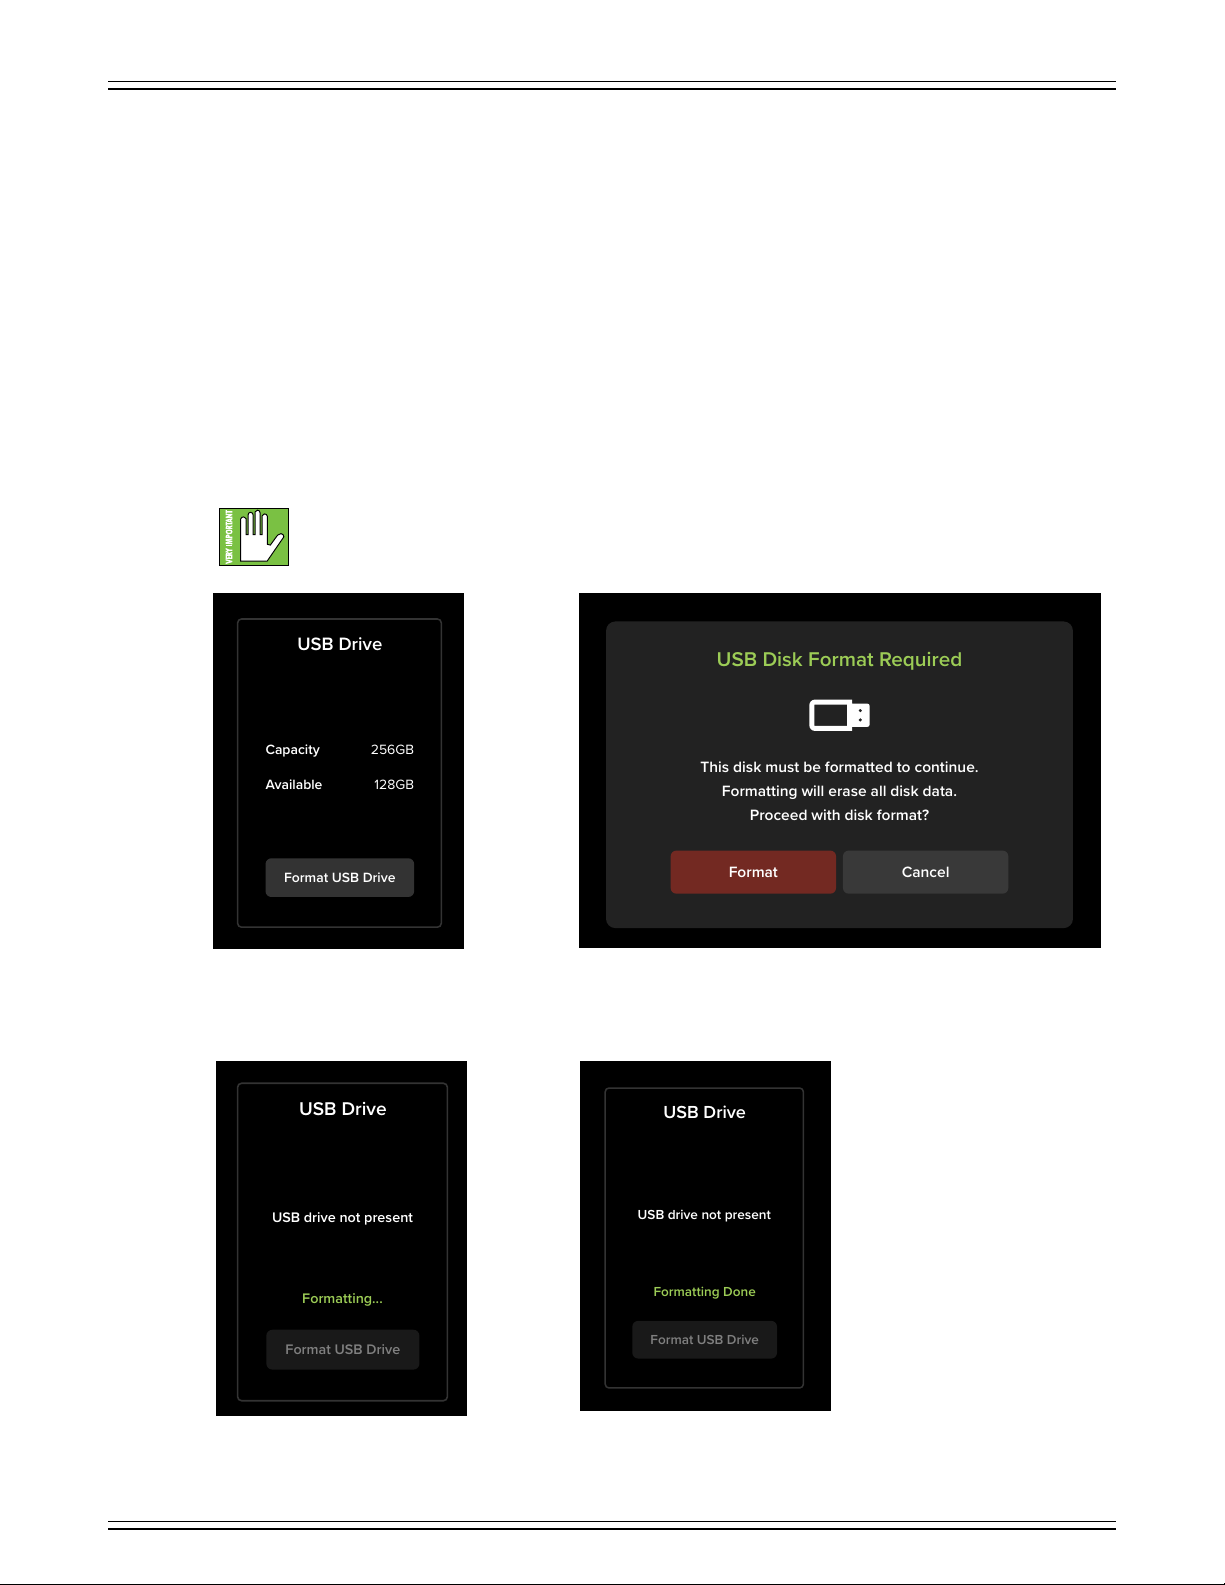
DLZ CREATOR ADAPTIVE DIGITAL MIXER FOR PODCASTING AND STREAMING, FEATURING MIX AGENT™ TECHNOLOGY
USB Drive
Capacity
128GB
Capacity
Available
72GB
Available
256GB
128GB
Format USB Drive
USB Disk Format Required
This disk must be formatted to continue.
Formatting will erase all disk data.
Proceed with disk format?
Cancel
Format
USB Drive
Capacity
128GB
USB drive not present
Formatting...
Format USB Drive
USB Drive
Capacity
128GB
USB drive not present
Formatting Done
Format USB Drive
Just follow the steps listed below:
This probably goes without saying, but we’re going to say it, anyway. In order for the USB drive to be formatted
via the DLZ Creator, the USB drive needs to be connected to the DLZ Creator’s USB-A slot. You have been using
USB-A slots for years now. It only fits one way. Due to Murphy’s Law, you will, of course, try one way and it
won’t work. You will flip it around and find out that that way does not work, either. And, of course, flipping back
to the original way WILL work this time. Those darned USB-A slots!
Granted, you might have a dicult time trying to format the USB drive if that first condition isn’t yet met. For one, it doesn’t
easily fit in any other way – which you have already found out – and for another, DLZ Creator will remain with the “USB drive
not present” statement as seen four pages back.
Now that the USB drive is inserted properly and DLZ Creator is fired up, it’s time to format the USB drive.
Head to Settings > Bluetooth / Disk. The display will look something like this (Image A). Tap ‘Format USB Drive’.
This is a permanent deletion with no undo, so a confirmation dialog helps prevent accidents.
Formatting will completely erase the USB drive, so please back up any files before formatting!
Tap ‘Format’ (to continue with the formatting) or ‘Cancel’ (if it was an accidental tap) (Image B).
As seen in Image C, the USB Drive is formatting. DO NOT DO ANYTHING UNTIL FORMATTING IS COMPLETE (Image D)!
Image BImage A
Image C Image D
83
Page 84
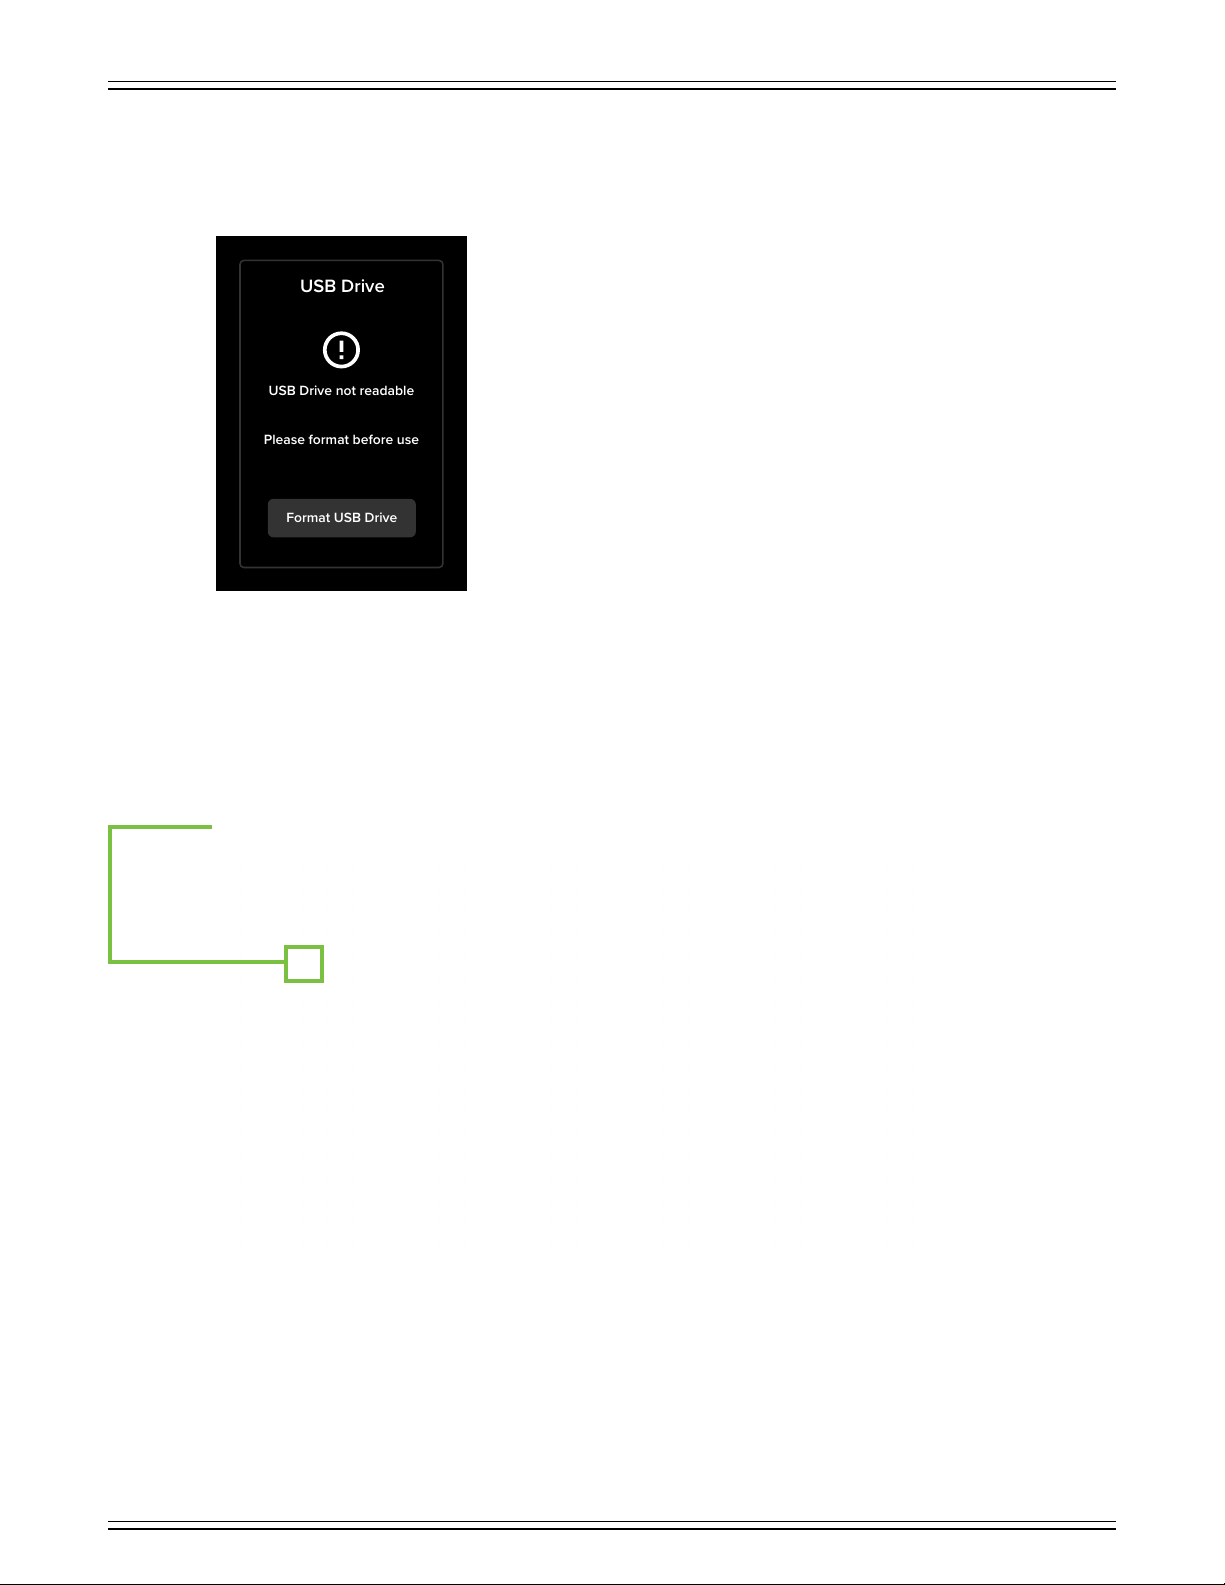
DLZ CREATOR ADAPTIVE DIGITAL MIXER FOR PODCASTING AND STREAMING, FEATURING MIX AGENT™ TECHNOLOGY
USB Drive
USB Drive not readable
Please format before use
Format USB Drive
While the majority of USB drives are readable, some are not. If you see a display similar to Image E below, you might
have a corrupt USB drive, as DLZ Creator thinks the drive is not formatted to FAT32 (the only supported format).
That said, it is absolutely worth a shot to try and format the drive via computer (or at least see if it even shows up).
Image E
Settings > Recording / Routing
The next sub tab over from bluetooth / disk is recording / routing. Tap recording / routing to open it, revealing a screen
that looks somewhat like what is displayed below.
Near the upper-lef corner is a semicircle-arrow. Tap it to reset everything within the recording / routing sub tab to its default.
Settings > Recording / Routing > Disk Recording
Not only does DLZ Creator support multitrack and stereo recording via USB, but it does so via disk, as well, be it microSD
or USB flash drive. Audio is recorded directly to one or the other (disk destination is mentioned next) with similar options
as computer (USB) recording: stereo or multitrack + stereo. The tapped selection will be a white box with black text.
84
Page 85

DLZ CREATOR ADAPTIVE DIGITAL MIXER FOR PODCASTING AND STREAMING, FEATURING MIX AGENT™ TECHNOLOGY
Settings > Recording / Routing > Disk Destination
This is simply the place to choose if you want the recording to go to the MicroSD card or USB Flash Drive.
The tapped selection will be a white box with black text.
Settings > Recording / Routing > Bypass Processing
This is a true hardware bypass of all processing circuitry to ensure that there is no coloration of the signal if processing
is not needed. When this is engaged [switch to the right, illuminated green], any eects that are added or changed will
have no eect on the signal. This switch simply tells the DLZ Creator to either record or bypass all processing in its recordings.
Settings > Recording / Routing > Post-Fader
By default, DLZ Creator recordings are made pre-fader. This means that it routes a copy of the track BEFORE the channel
fader (hence “PRE-fader”) whereas a post-fader send will do this AFTER the channel fader (hence “POST-fader”).
Pre-fader is handy for quick spot-checks of channels, especially ones that have their faders turned down. Utilizing a pre-fader
send is considered advantageous because the signal and channel fader are independent of each other. Raise and lower
the channel fader(s) to heart’s content without changing the level being recorded. It will be recorded at unity gain.
That said, post-fader recordings have their place, too! Also called “Afer-Fader Listen”, post-fader allows you to hear
the channel levels based upon the fader settings on DLZ Creator. In other words, the audio is recorded at the fader level.
There is no right or wrong setting here. In short, it really comes down to Pre-Fader Listen which means that the channels
are recorded at unity gain regardless of the fader levels versus Post-Fader Listen which means that the channels are recorded
at the fader levels. Pre-fader is ofen thought of as “the more useful way to mix” (which is why it’s the default), but post-fader
has its place within our family, friends and colleagues. Here, YOU get to choose!
Settings > Recording / Routing > One-Tap Record
By default, recording is a two-step process. Pressing the ‘Record’ button on the hardware “arms” the recording (i.e. “gets
it ready for recording”), but then ‘rec’ (on the display) needs to be tapped to start the recording. However, if one-tap record
is engaged (switch to the right), simply tapping the ‘Record’ button on the hardware will begin recording immediately.
Settings > Recording / Routing > Computer (USB)
If not interested in multitrack recording, a simple L/R main mix stereo recording is available [Stereo LR -2].
However, DLZ Creator also supports multitrack recording – 2 Channels + Main Mix – via USB to a Mac/PC
where each input may be routed independently to a DAW or other recording sofware [Multitrack LR 3-4].
The tapped selection will be a white box with black text.
85
Page 86
DLZ CREATOR ADAPTIVE DIGITAL MIXER FOR PODCASTING AND STREAMING, FEATURING MIX AGENT™ TECHNOLOGY
Settings > Recording / Routing > NDI Output Mode
The DLZ Creator Ethernet port and NDI were discussed at length on pages 2-5. Additionally, several hookup diagrams
are included as examples of NDI.
Here we would like to discuss what the NDI options are and what they mean, starting with the NDI output mode.
The NDI output mode allows you to send the main mix out via NDI. As seen below, there are three choices:
• O – No NDI output mode is selected; it is o.
• Mono – The main mix is sent out via NDI in mono.
• Stereo – The main mix is sent out via NDI in stereo.
Settings > Recording / Routing > NDI Output Name
DLZ Creator is the default NDI output name simply because it is the DLZ Creator that is connected to the router.
By all means feel free to change the name to whatever you would like for DLZ Creator. Hey, people name their cars,
guitars, boats, and many more things, so why not the DLZ Creator, too...?
Once NDI output name is tapped, the keyboard appears awaiting for it to be (re)named. Name it as you so desire followed
by tapping the “Enter” key when satisfied.
Text is limited to 36 characters. This includes letters, numbers and special characters. The text will remain
green until the limit is reached, in which the text will turn red indicating that you have hit the limit.
86
Page 87
DLZ CREATOR ADAPTIVE DIGITAL MIXER FOR PODCASTING AND STREAMING, FEATURING MIX AGENT™ TECHNOLOGY
Settings > Recording / Routing > NDI Audio Source
When NDI audio source is first tapped, the display will look something like this:
The first thing to do is connect the DLZ Creator to the router (if not already connected).
Note: The DLZ Creator’s Ethernet port may NOT be connected directly to the computer’s Ethernet port.
There needs to be a router in between.
There is a five-page document that is geared specifically towards OBS and NDI users, with multiple downloads,
screenshots, and much more! We highly suggest checking it out if you plan on using DLZ Creator with NDI
(and/or OBS).
Simply go to the Mackie DLZ Creator website > Downloads & Resources > Quick Start Guide (English) OBS-NDI.
87
Page 88
DLZ CREATOR ADAPTIVE DIGITAL MIXER FOR PODCASTING AND STREAMING, FEATURING MIX AGENT™ TECHNOLOGY
Settings > About
The fourth and final setting sub tab is the About screen. Tap About to open it, revealing a screen that looks somewhat
like what is displayed below.
On the lef side of the display is a QR code. Scanning it with the camera app on your smartphone will take you directly
to the Mackie technical support home page. Or you could go to www.mackie.com/support-contact.
On the right side of the display are three options.
() Place DLZ Creator in ‘Demo Mode’:
Would you like to see DLZ Creator in demo mode? Simply tap the ‘Demo Mode’ switch so it is to the right (on, green) and o you
go! Demo mode adds two things: () meters (regardless of input(s) and/or fader position(s)), and (2) a green ALL-CAPS ‘DEMO
MODE’ at the top-center of the display regardless of what tab is open.
(2) Retake the tour:
Tapping this button does exactly what it sounds like... it takes you on a(nother?) tour of the DLZ Creator.
(3) Reset DLZ Creator to its factory default:
Settings > System > Factory Reset
It may be necessary to reset the DLZ Creator to its factory settings.
Please keep in mind that this erases all settings, including any levels, EQs, FX, presets, etc. that may have been set.
Be sure to power down any amps and/or powered speakers before factory resetting DLZ Creator and save a snapshot
so nothing is lost!
88
Page 89
DLZ CREATOR ADAPTIVE DIGITAL MIXER FOR PODCASTING AND STREAMING, FEATURING MIX AGENT™ TECHNOLOGY
Simply tap the ‘Factory Reset’ button to reset the DLZ Creator to its factory settings. This is a permanent reset – everything
zeroed out – so a confirmation dialog helps prevent accidents.
In addition to all of the settings being erased, you are also wiping the DLZ Creator’s memory of previously
paired devices. To remedy this, on your phone, tablet or other Bluetooth device, you will need to ‘forget device’
in the Bluetooth settings, then re-pair in order to regain communication and functionality.
There may be one other reason to visit the ‘About’ section. If you are calling Technical Support, it might behoove
you to jot down the information at the bottom of the display (before calling): Device IP address and firmware
version (including the build number).
89
Page 90

DLZ CREATOR ADAPTIVE DIGITAL MIXER FOR PODCASTING AND STREAMING, FEATURING MIX AGENT™ TECHNOLOGY
Chapter 2 : Presets
Presets > Introduction
Presets save parameters on individual input or output channels and on particular DSP blocks such as EQ, dynamics,
FX, etc. For example, a favorite microphone EQ setting may be saved as a preset and recalled as needed.
DLZ Creator comes with a library of factory presets. A maximum number of factory presets will be displayed at one time.
Just scroll up and down to view the other factory presets, if available. There are also user presets. These may be created
for each preset type. The number of user presets available is limited only by the available space on the DLZ Creator.
Presets are generally set ahead of time, not as an event is taking place. Presets are stored on the DLZ Creator.
The following preset types are available:
• Input channel
• Output channel
• EQ
• Gate
• Compressor
• FX
The first thing we will do is take a look at factory presets vs user presets. From there, channel presets and DSP presets
may be selected [factory] or created [user].
Factory Presets vs User Presets
There are factory presets and user presets on all channel and DSP settings that may be set ahead of time. Feel free
to start with a factory preset, manipulate to your liking, then save as a user preset. We will start with what each one
looks like and how they work. The next section will discuss the dierences between channel presets and DSP presets.
While we do hope you keep the factory presets as-is, they may be replaced, renamed, deleted... or loaded. If it is loaded,
it remains a factory preset. Anything else is considered a user preset.
As you may see, a wide variety of factory presets are available to choose from. These are graced with a name of said
factory preset. Simply tap the preferred preset and load. This will update the current selection. For example, selecting
“Broadcast” from the list will update the EQ, gate, compressor and de-esser settings to standard broadcast mic settings.
It’s certainly easier to make updates from a factory preset versus updating parameters from a zeroed out board!
Factory and user preset names are user-editable. At the bottom of the preset list is a button labeled “Save”.
Tapping this button reveals a keyboard. Simply type in a name you would like to call this preset followed
by tapping the ‘Enter’ key. This saves the new preset. This is similar to a “Store” button on other consoles.
Turn the page to reveal what the other three choices are and how they work.
90
Page 91
DLZ CREATOR ADAPTIVE DIGITAL MIXER FOR PODCASTING AND STREAMING, FEATURING MIX AGENT™ TECHNOLOGY
Simply tap “Preset” to reveal a popover (with a channel input preset seen below). The popover displays a list of factory
presets to choose from, as well as the opportunity to...
• load the preset
• save the preset
• rename the preset and/or
• delete the preset
Tap a preset so it is highlighted or... if you do not see it listed, scroll the presets up and down to view the other choices.
Let’s take a look at each of the choices from lef to right, starting with ‘Load’.
Load — Pressing the load button recalls presets. Upon load, all appropriate console parameters change to match
the stored preset. Afer tapping the load button, you’ll hear the changes immediately and may notice the changes
to the Channel ID and DSP settings, as well.
Save — The save preset button stores the current state of the processing into a new user preset OR... it will
save over the currently selected preset if one has been selected. Be careful NOT to do this... or do it only if so intended.
Afer tapping ‘Save’ you will be asked to name the preset.
The name of the preset is the name of the preset, not the channel input, master output, etc.
Rename — When the rename button is pressed, use the onscreen keyboard to name (or rename) the currently selected
item. Simply type a name in the box and tap the “enter” key when finished. Preset names are limited to 36 characters.
This includes letters, numbers and special characters. The text will remain green until the limit is reached, in which
case the text will quick-flash red indicating that you have hit the limit.
Delete — The delete button deletes the currently selected preset. This is a permanent deletion with no undo,
so a confirmation dialog helps prevent accidents.
9
Page 92

DLZ CREATOR ADAPTIVE DIGITAL MIXER FOR PODCASTING AND STREAMING, FEATURING MIX AGENT™ TECHNOLOGY
Channel Presets vs DSP Presets
There are channel presets and DSP presets. Also, there are factory presets for both or you may create your own user
presets for each. So many options! Let’s take a look at each:
Input and Output Channel Presets — Channel presets change virtually all controls on the channel. There are both input
and output channel presets. Input channel presets do NOT change the pan, mute, fader or solo. Output channel presets
do NOT change the balance or level. This allows you to easily audition presets on a channel one afer another.
DSP Presets — DSP presets change only a portion of an input or output channel. This includes EQ and HPF, gate
and compressor, de-esser and FX. However, DSP presets do NOT change the on / o state. This allows a user
to audition presets with the processor on or o, as desired.
Displayed below are the input channel presets. Don’t forget to scroll up and/or down to access more factory presets,
if going that route.
CHANNEL
PRESETS
92
Page 93
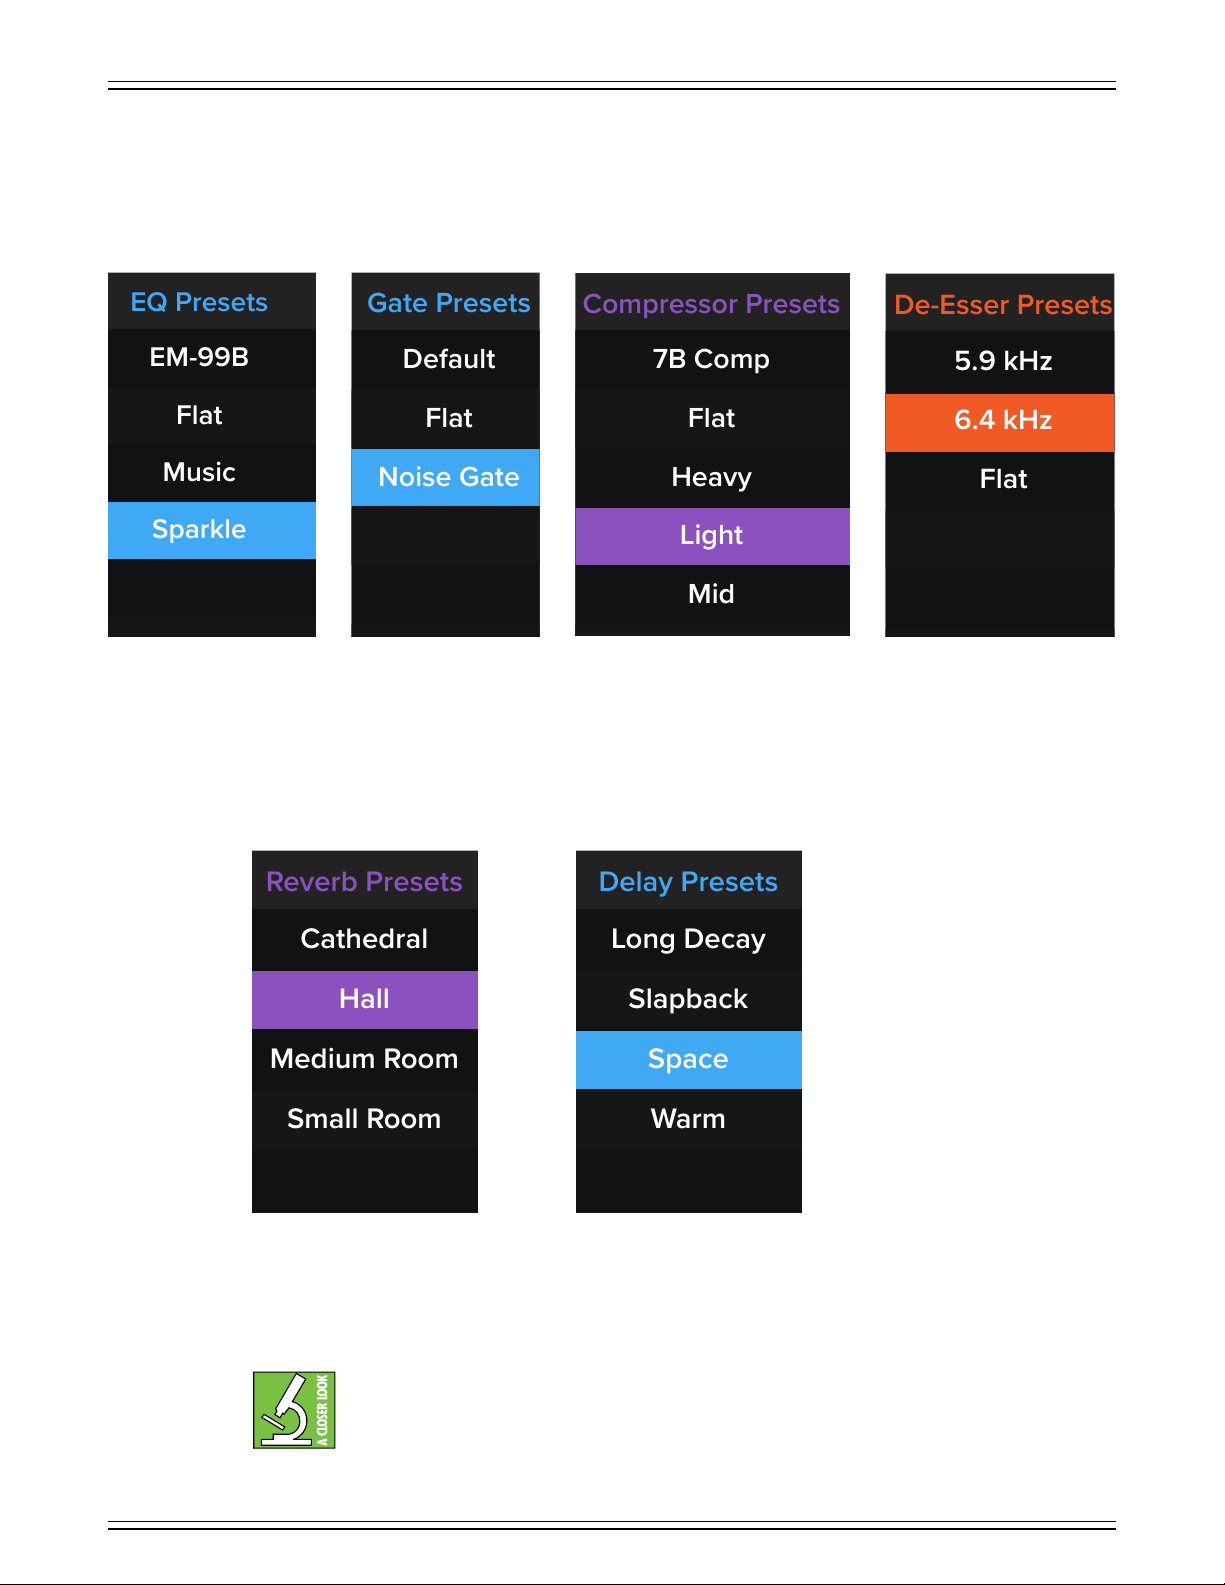
DLZ CREATOR ADAPTIVE DIGITAL MIXER FOR PODCASTING AND STREAMING, FEATURING MIX AGENT™ TECHNOLOGY
Gate Presets
Default
Flat
Noise Gate
Compressor Presets
7B Comp
Flat
Heavy
Mid
Light
De-Esser Presets
5.9 kHz
Flat
6.4 kHz
EQ Presets
EM-99B
Flat
Music
Sparkle
Reverb Presets
Cathedral
Medium Room
Small Room
Hall
Delay Presets
Long Decay
Slapback
Space
Warm
From the EQ channel view you are able to set a preset for the channel’s EQ. Don’t forget to scroll up and/or down
to access more factory presets, if going that route. EQ presets do NOT recall either the HPF on/o or the EQ on/o.
From the gate, compressor and de-esser channel view you are able to set a preset for the dynamics.
Don’t forget to scroll up and/or down to access more factory presets, if going that route.
EQ
PRESETS
From the FX channel view you are able to set a preset for the FX. Don’t forget to scroll up and/or down to access more
factory presets, if going that route.
REVERB
PRESETS
GATE
PRESETS
COMPRESSOR
PRESETS
DELAY
PRESETS
DE-ESSER
PRESETS
IMPORTANT – DO NOT FORGET! Presets are also available on the OUTPUT! This includes the same presets
as previously found in the channel setup, EQ, compressor, reverb and delay windows.
93
Page 94
DLZ CREATOR ADAPTIVE DIGITAL MIXER FOR PODCASTING AND STREAMING, FEATURING MIX AGENT™ TECHNOLOGY
Chapter 3 : Recording
Recording > Introduction
Not only are these great mixers with some pretty amazing features, but here you can also record the podcast, broadcast,
music recordings and more! This includes multitracking and stereo recording at 48 kHz and 24-bits. We discussed
the recording button very briefly in the hardware chapter, but will go into much more detail here.
Connections
As discussed previously, on the rear panel of the DLZ Creator are three connectors ready to accept recordings:
microSD connector – microSD card
USB-A connector – flash drive
USB-C connector – computer (i.e. DAW)
A Mac should work automatically with no additional drivers.
However, Windows drivers will require separate installation. Simply download it for free from our website.
Formatting
We know you’re an eager beaver, all psyched to start recording, but let’s take care of something very important first:
formatting! We won’t go into details here, as this was all outlined in the Settings > Bluetooth / Disk > Format section
of the manual. Check it out again on pages 79-84.
While the USB-A (flash drive), USB-C and microSD connectors may all be connected simultaneously, they may
NOT be used simultaneously for recording. That said, nothing “takes priority” over the other. YOU choose!
You will want to format via DLZ Creator any time...:
() ...a brand new (just out-of-box) microSD card and/or flash drive is connected.
(2) ...you want to use an existing microSD card and/or flash drive exclusively for recording and playback
with a DLZ Creator.
94
Page 95
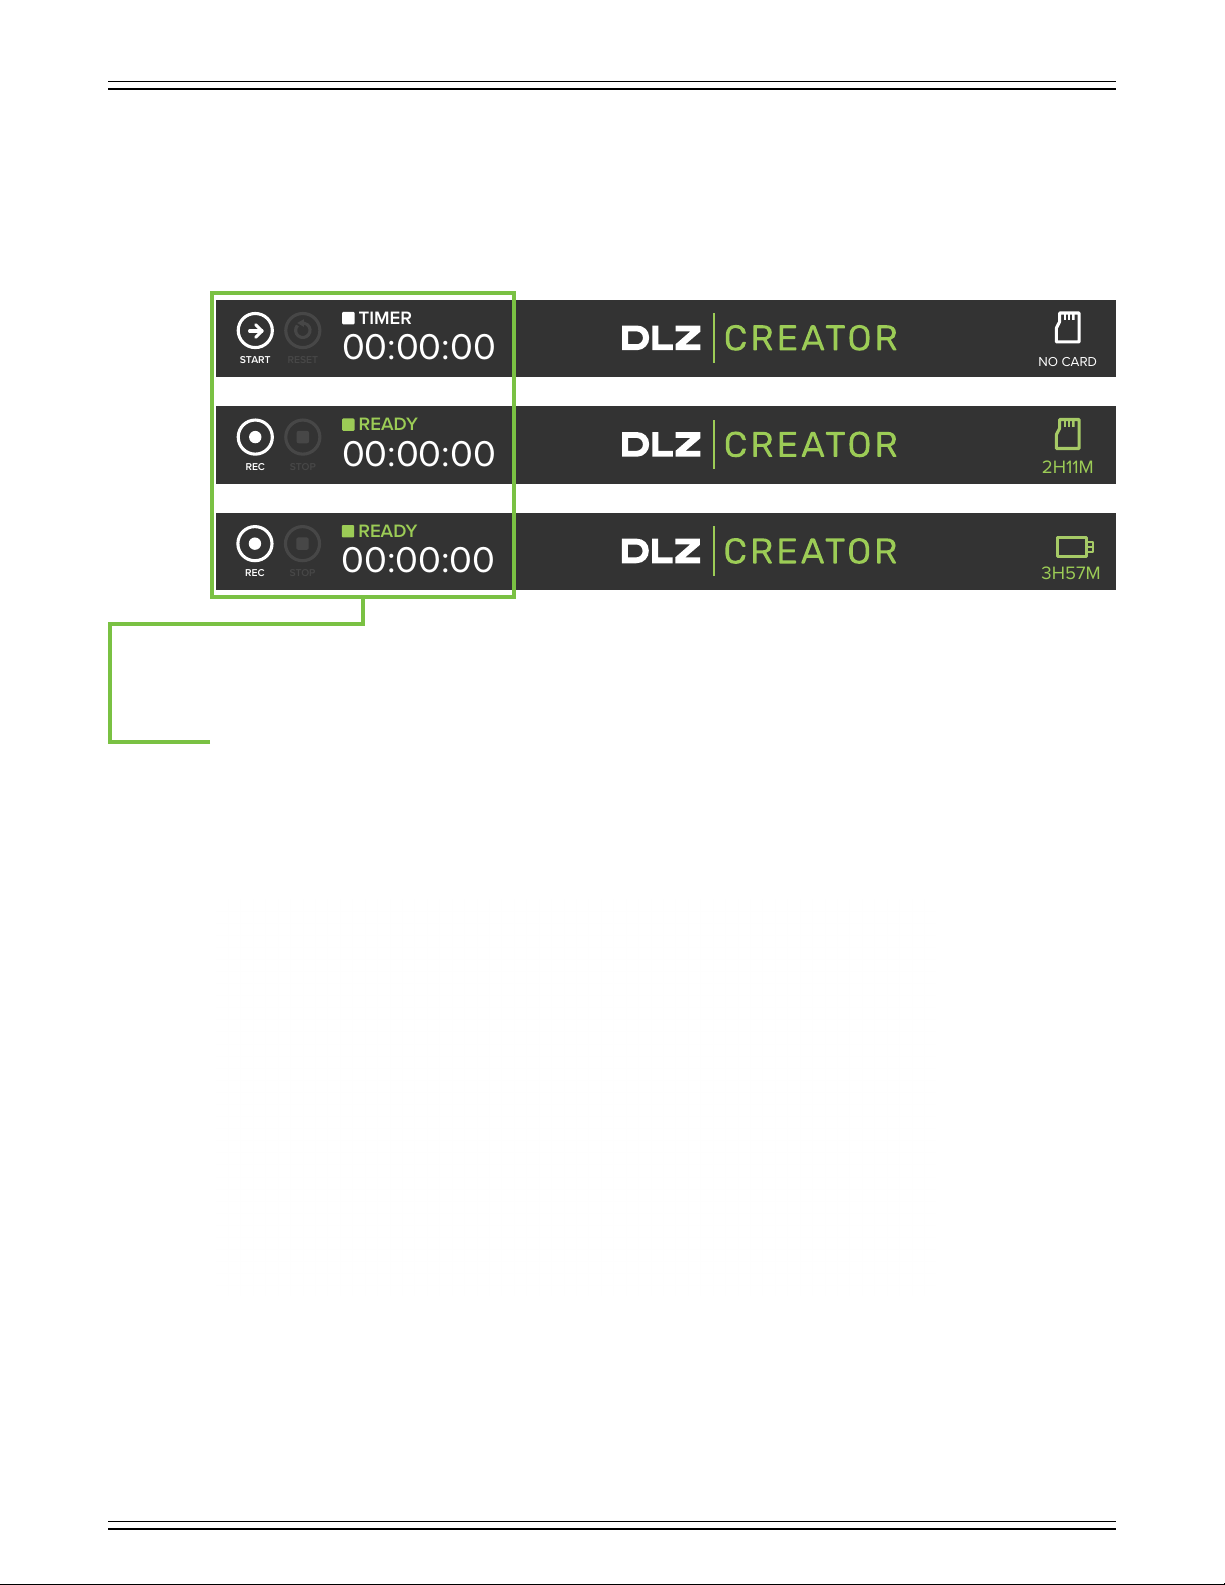
DLZ CREATOR ADAPTIVE DIGITAL MIXER FOR PODCASTING AND STREAMING, FEATURING MIX AGENT™ TECHNOLOGY
NO CARD
00:00:00
TIMER
RESET
STARTXREC
READY
2H11M
STOP
REC
READY
3H57M
00:00:00
STOP
Recording
Let’s get started with recording already... right?! To reveal the recording banner, just tap the recording button located
near the upper-right corner of the DLZ Creator tucked in-between the Home and Automix buttons... this button will NOT
illuminate red yet (unless One-Tap Record is enabled). The recording banner will appear horizontally at the top of the display
just below the tabs and will look somewhat like what may be seen below.
Computer
microSD
USB
All three banners displayed above will not appear simultaneously. In order from top to bottom, when no card is inserted,
the banner will serve either as a timer for streaming or external (computer) recording, the middle banner is for recording
to the microSD Card and the bottom banner is for recording to the USB flash drive.
Also of note – other than an icon displayed on the far right of the recording banner, nothing else matters over there.
All of the goodies are on the lef side of the banner, lef of “DLZ | CREATOR”.
The Settings > Recording display is shown below and the recording banner is all dependent on how it is set up as described
on pages 84-87.
95
Page 96
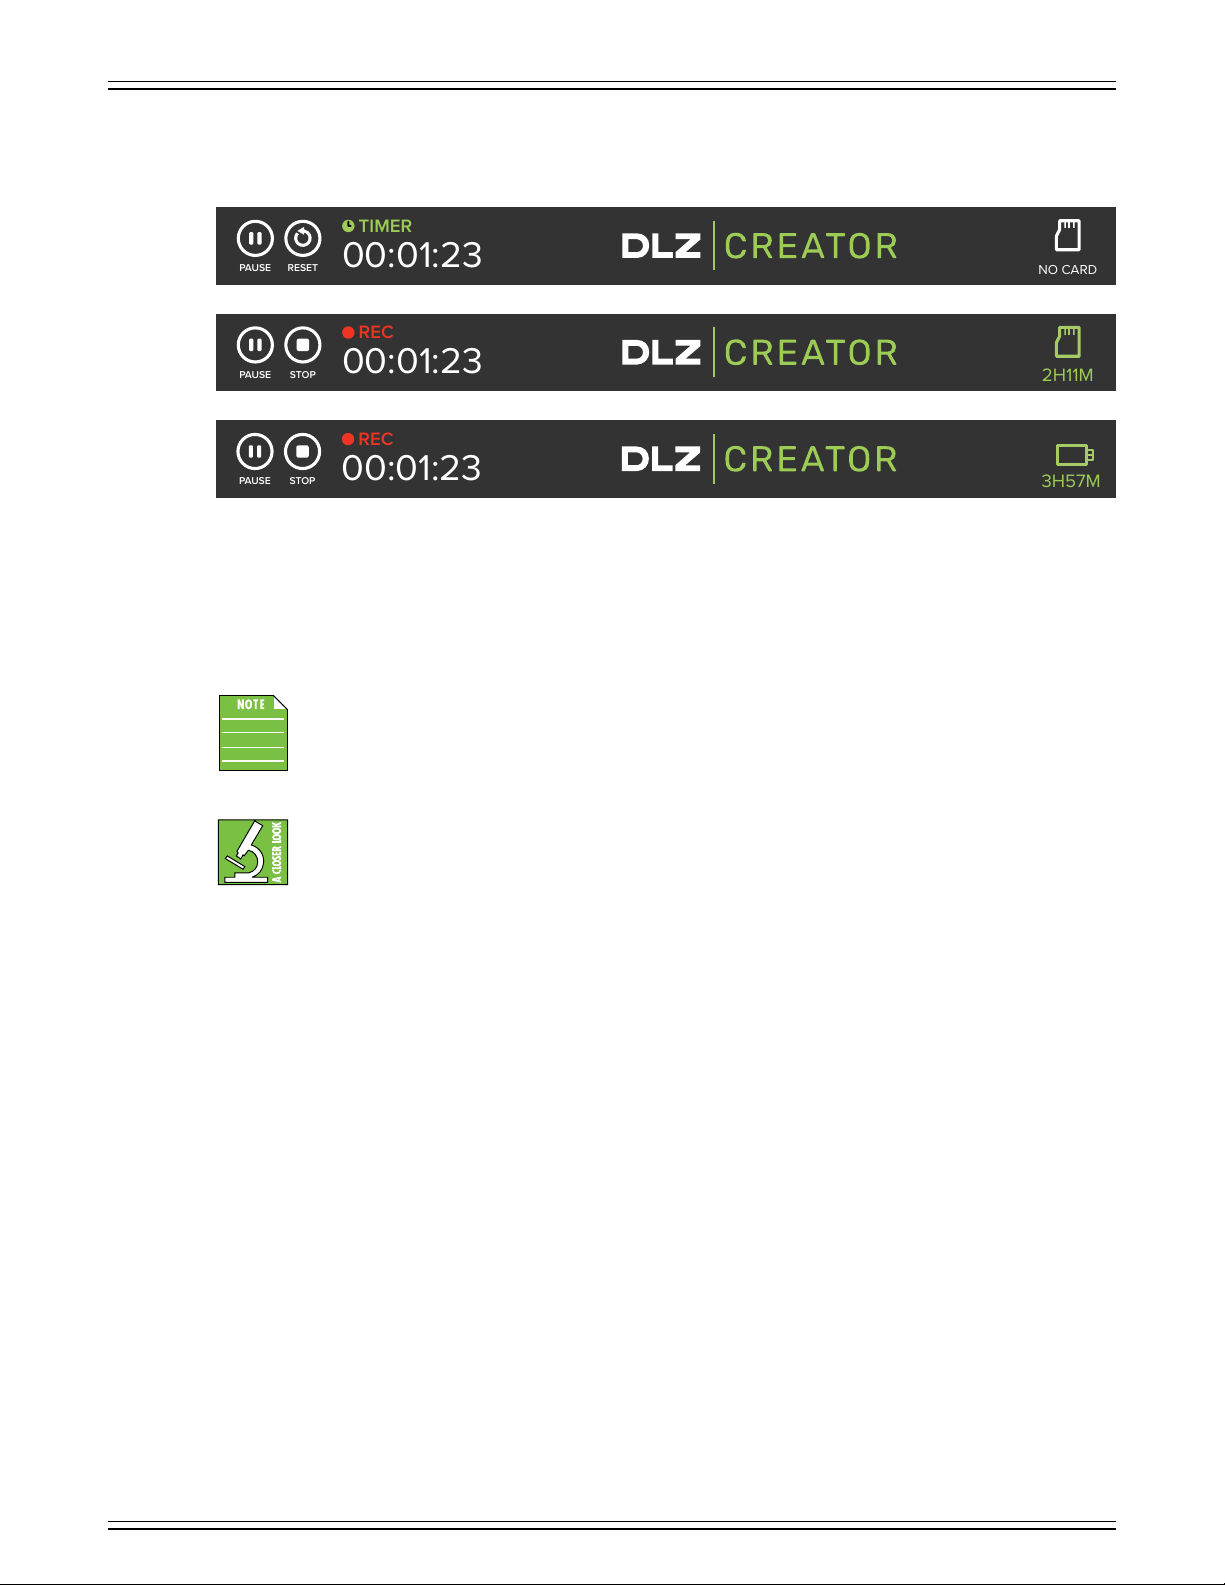
DLZ CREATOR ADAPTIVE DIGITAL MIXER FOR PODCASTING AND STREAMING, FEATURING MIX AGENT™ TECHNOLOGY
00:01:23
TIMER
RESET
PAUSE
NO CARD
REC
2H11M
00:01:23
STOP
PAUSE
REC
3H57M
00:01:23
STOP
PAUSE
At this point, recording is simply “enabled”, but no recording has begun. In order to start recording (or the timer), tap the button
on the far lef, be it ‘START’ or ‘REC’.
Computer
microSD
USB
X
There are now several more things to notice: () ‘START’ or ‘REC’ now becomes ‘PAUSE’, (2) next to ‘PAUSE’ is ‘RESET’
(timer/computer) or ‘STOP’ (microSD or USB), (3) the recording time appears, and (4) the international symbol for a recording
in progress is a red dot (•). One will appear above the recording time to the lef of a red ‘REC’. Orrrrrrr... if using as a timer,
it turns into a green ‘TIMER’ with a green clock icon to the left of it. Most importantly, (5) the ‘REC’ button (on the hardware)
now flashes red to indicate that a recording is in progress.
DLZ Creator supports background recording. This means that you may tap any of the tabs and sub-tabs,
the Overview/Home, AutoMix, and even the Rec buttons, etc. while the DLZ Creator continues to record.
Recording will continue until you stop (or pause) it, the power goes out, or the disc / drive runs out of space.
As we are all well aware, there are always exceptions to the rule. So what’s the exception, you ask?
When a recording is in progress – whether paused or not – all features listed in the Settings > Recording
tab are grayed out and unavailable for selection. Additionally, a red “Recording in progress*” is added next
to the semicircle-arrow (reset).
96
Page 97
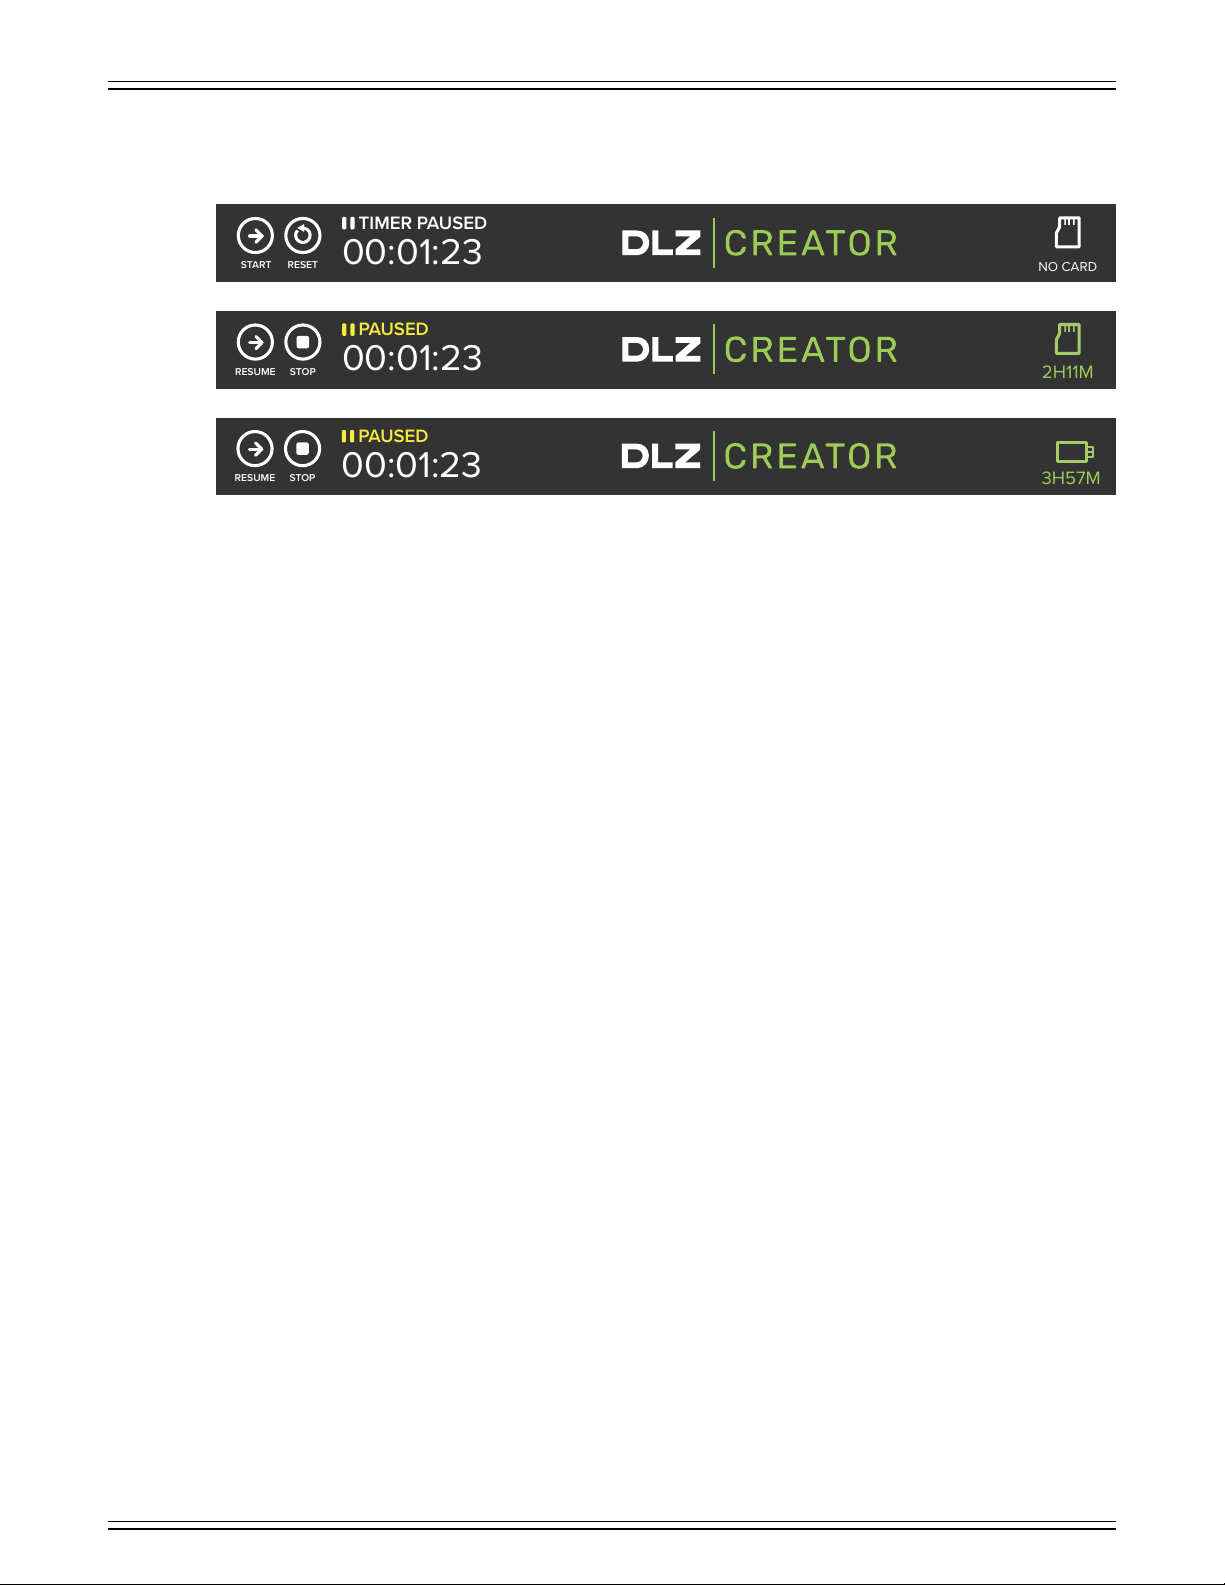
DLZ CREATOR ADAPTIVE DIGITAL MIXER FOR PODCASTING AND STREAMING, FEATURING MIX AGENT™ TECHNOLOGY
00:01:23
TIMER PAUSED
RESET
START
NO CARD
2H11M
00:01:23
PAUSED
RESUME
STOP
3H57M
00:01:23
PAUSED
RESUME
STOP
We are not ready to stop the recording yet, so we will just pause for the moment. Once pause is tapped, the recording banner
will look something like this...
Computer
microSD
USB
X
From here, you may notice that: () ‘PAUSE’ now becomes ‘START’ or ‘RESUME’, (2) next to ‘START’ or ‘RESUME’ is ‘RESET’
(timer/computer) or ‘STOP’ (microSD or USB) – this remains the same as the previous (currently recording) banners,
(3) the recording time is paused, and (4) the international symbol for a PAUSED recording in progress are two vertical bars
side-by-side (| |). The timer pause will be white, while microSD and USB are colored yellow. Additionally, (5) the ‘REC’ button
(on the hardware) will STOP flashing red and become solid white again to indicate that a recording is stopped or paused.
Once you are finished recording, tap reset (to stop the timer) or stop (to stop the recording). The files may then be accessed
and played via the computer (DAW) or media tab (microSD or USB flash drive; detailed in length in chapter 8, pages 55-57).
97
Page 98
DLZ CREATOR ADAPTIVE DIGITAL MIXER FOR PODCASTING AND STREAMING, FEATURING MIX AGENT™ TECHNOLOGY
Chapter 4 : Routing Simplified
Routing Simplified > Introduction
DLZ Creator routing was discussed briefly throughout the manual, but we would like to break it down even moreso.
While channel faders -4, /2 and the Main LR fader are dedicated inputs and outputs (with the faders only controlling
the level of whatever is connected to them), stereo channel faders 5-0 operate slightly dierently. In fact, these channel
faders actually control multiple inputs / sources! That said, only one input / source may be selected at a time. A good way
to think about it is to compare channel faders 5-0 to that of a Swiss Army® knife. There are a lot of tools, but only one
may be used at a time.
Routing Simplified > Source Selection
Here is a recap of those channels, their respective faders and source selection. We will place them in order
of degree of diculty. That said, we hope you don’t find it too dicult since it’s really not!
None: We’re not sure why you would select “none” as the source, but the result is the same for all three channels.
There is nothing connected to these input channels, nor a computer (USB-C) connection to route audio from
the computer to DLZ Creator... or phone for Bluetooth or flash drive / microSD card for recording on channel 9/0.
This is as basic as it gets. No routing going on ’round these parts!
The only chance to select “none” as a source is upon the very first power-up (or afer a factory reset
(and going through the ‘Setup Assistant’)).
Line, Aux (phone, tablet), Bluetooth: The next “easiest” setup is simply using these as channel inputs, raising and lowering
the levels of whatever is connected to these inputs.
Line = Channel 5/6 line inputs = /4" L/R jacks on the rear panel of DLZ Creator
Aux (phone, tablet) = Channel 7/8 line input = single /8" stereo jack, also on the rear panel
These inputs were explained in much greater detail in Chapter 2, page .
Bluetooth = Channel 9/0 = Bluetooth is for connecting a phone to this channel for call-in guests.
This input was explained in much greater detail in Chapter , page 79.
USB Audio, Disk, NDI®: The “easiest” of these input options is channel 9/0, so we’ll start there, then return to stereo
channels 5/6-7/8.
Disk = Channel 9/0 = this fader will raise and lower the volume of the playback, whether recorded to a USB
flash drive or microSD card. While the source is set up via the channel 9/0 tab, the playback is part of the media
tab and it was explained in much greater detail in Chapter 8, pages 55-57.
NDI® Network = Channel 9/0 = this fader will raise and lower the volume of audio playback coming into the mixer
via the NDI network as a channel input source. While the Channel 9/0 NDI source may be selected in the channel
view, the actual NDI device will need to be selected in the Settings > Recording / Routing view. The NDI playback
and source slection is part of the NDI setup and it was explained in much greater detail on pages 84-87.
Now things are getting fun! DLZ Creator utilizes a digital / analog hybrid channel type that allows audio to be sent FROM
the computer TO the DLZ Creator via the USB /2 and/or USB 3/4 channels. These are routed to channel faders 5/6 and 7/8.
This allows you to record all input channels to the computer via USB and/or return two independent audio streams of stereo
playback from a computer.
USB Audio = Channel 5/6 = this fader will raise and lower the volume of USB /2 OR USB 3/4 RETURN,
depending on the source selection.
USB Audio = Channel 7/8 = this fader will raise and lower the volume of USB /2 OR USB 3/4 RETURN,
depending on the source selection.
98
Page 99
DLZ CREATOR ADAPTIVE DIGITAL MIXER FOR PODCASTING AND STREAMING, FEATURING MIX AGENT™ TECHNOLOGY
Routing Simplified > USB Routing
The USB routing capabilities are as follows:
USB input TO the mixer – playback:
Traditionally speaking, USB /2 was dedicated to routing the computer’s DAW output (such as Pro Tools®, Tracktion®, Cubase®,
Reaper®, etc.) to the DLZ Creator where you could then blend that signal with the live inputs of the mixer in the headphones
for latency-free monitoring.
Additionally, USB 3/4 was dedicated to routing the computer’s output (such as Spotify®, Apple Music®, Pandora®, YouTube®,
etc.) to the DLZ Creator. This stereo signal could then be EQ’d and routed to the main outputs and headphones. In short,
this signal may be sent to nearly any desired output(s).
The key word in those sentences, though, is the word “was”. While you certainly could do the above, it is not set in stone.
If you would rather run the DAW to USB 3/4 and the other computer output through USB /2, then do so by all means!
Simply set up the source in the channel tab to USB /2 and/or USB 3/4, where channel faders 5/6 and/or 7/8 would raise
and lower the volume of that computer’s return.
Note that these are just a few examples. Any sound that comes out of your computer may be routed through
DLZ Creator. Want to use it for video conferencing? You can do so! Granted, it will be audio only, though;
the video will remain on the computer, not on DLZ Creator’s display. In essence, the possibilities are (nearly)
endless.
Routing Simplified > Examples
The flexibility of having two separate channels for (headphone) mixing is incredible. For instance, USB /2 could be set
as the DAW’s main mix for the recorded tracks, while USB 3/4 could be set up as the “more me” channel when working
on overdubs.
Some DAWs and other streaming applications have their own settings that may override system settings.
If so, please review their documentation on how to make changes to the DAW / app.
Routing Simplified > Windows Setup
. Download the USB driver from the Mackie website.
2. Follow the installation instructions to install the driver.
3. Right-click on the speaker icon located on the task bar.
4. Select DLZ Creator within Sound Settings.
5. On DLZ Creator, be sure that USB /2 and/or 3/4 is selected on channel 5/6 and/or 7/8.
6. Turn up the channel 5/6 and/or 7/8 fader to unity, then slowly turn up the headphones and/or main mix fader.
You will know this worked if the main meters illuminate and you hear PC audio through the device connected to the main outputs.
99
Page 100

DLZ CREATOR ADAPTIVE DIGITAL MIXER FOR PODCASTING AND STREAMING, FEATURING MIX AGENT™ TECHNOLOGY
Routing Simplified > Mac Setup
A driver download is not necessary on a Mac. However, some parameters will still need to be changed within macOS.
. Open the Audio MIDI Setup app using the Spotlight search (Command + Spacebar).
2. Right-click the device ‘DLZ Creator’ and select “Use This Device For Sound Input”,
as well as “Use This Device For Sound Output”.
3. Select the ‘Configure Speakers’ button and be sure it is set to ‘Stereo’.
4. Change the Lef and Right options to Output and 2 OR 3 and 4, then click ‘Apply’.
5. On DLZ Creator, be sure that USB /2 and/or 3/4 is selected on channel 5/6 and/or 7/8.
6. Turn up the channel fader to unity, then slowly turn up the headphones and/or main mix fader.
You will know this worked if the main meters illuminate and you hear Mac audio through the device connected
to the main outputs.
00
 Loading...