

Page 1

CREATIVE REFERENCE POWERED STUDIO MONITORS
WITH BLUETOOTH®
OWNER’S MANUAL
www.mackie.com
Page 2
CR3.5BT • CR4.5BT • CR5BT • CR8BT CREATIVE REFERENCE POWERED STUDIO MONITORS WITH BLUETOOTH®
Important Safety Instructions
1. Read these instructions.
2. Keep these instructions.
3. Heed all warnings.
4. Follow all instructions.
5. Do not use this apparatus near water.
6. Clean only with a dry cloth.
7. Do not block any ventilation openings. Install in accordance with the manufacturer’s
instructions.
8. Minimum distance (5 cm) around the apparatus for sucient ventilation.
The ventilation should not be impeded by covering the ventilation openings
with items, such as newspapers, table-cloths, curtains, etc.
9. Do not install near any heat sources such as radiators, heat registers,
stoves, or other apparatus (including amplifiers) that produce heat.
10. No naked flame sources, such as lighted candles, should be placed on the apparatus.
11. The equipment complies with FCC radiation exposure limits set forth for an uncontrolled
environment. The equipment should be installed and operated with minimum distance
20cm between the radiator & your body.
AVISRELATIFS À L’EXPOSITION RF – Cet équipement est conforme aux limites d’exposition
au rayonnement ISED établies pour un environnement non contrôlé. Cet équipement doit
être installé et utilisé à une distance minimale de 20 cm entre le radiateur et votre corps.
12. Protect the power cord from being walked on or pinched particularly at plugs,
convenience receptacles, and the point where they exit from the apparatus.
13. Only use attachments/accessories specified by the manufacturer.
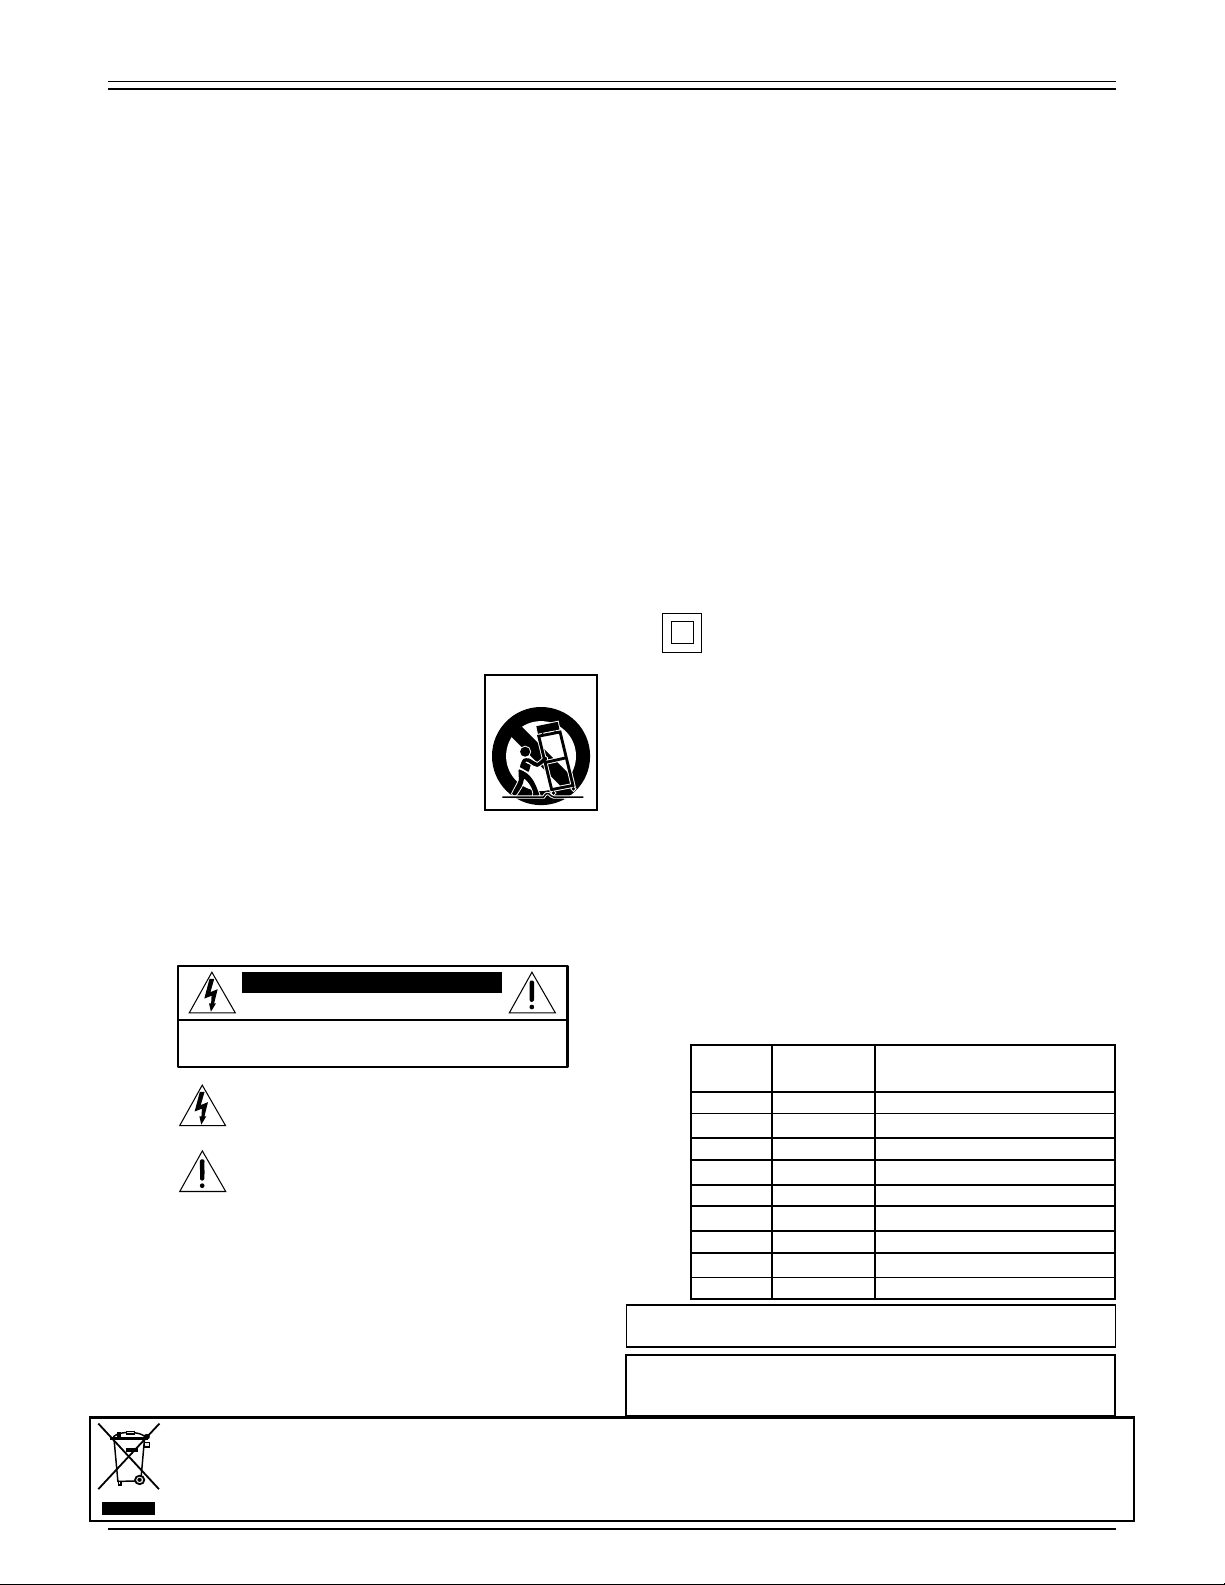
14. Use only with a cart, stand, tripod, bracket, or table specified
by the manufacturer, or sold with the apparatus. When a cart
is used, use caution when moving the cart/apparatus combination
to avoid injury from tip-over.
15. Unplug this apparatus during lightning storms or when unused
for long periods of time.
16. Refer all servicing to qualified service personnel. Servicing
is required when the apparatus has been damaged in any way,
such as power-supply cord or plug is damaged, liquid has been spilled or objects have fallen
into the apparatus, the apparatus has been exposed to rain or moisture, does not operate
normally, or has been dropped.
17. This apparatus shall not be exposed to dripping or splashing, and no object filled
with liquids, such as vases or beer glasses, shall be placed on the apparatus.
18. Do not overload wall outlets and extension cords as this can result in a risk of fire
or electric shock.
CAUTION
RISK OF ELECTRIC SHOCK! DO NOT OPEN!
CAUTION: TO REDUCE THE RISK OF ELECTRIC SHOCK DO NOT
REMOVE COVER (OR BACK). NO USER-SERVICEABLE PARTS INSIDE.
REFER SERVICING TO QUALIFIED PERSONNEL.
The lightning flash with arrowhead symbol within
an equilateral triangle is intended to alert the user
to the prescence of uninsulated “dangerous voltage”
within the product’s enclosure, that may be of significant
magnitude to constitute a risk of electric shock to persons.
The exclamation point within an equilateral triangle
is intended to alert the user of the prescence of important
operating and maintaining (servicing) instructions
in the literature accompanying the appliance.
19. This apparatus has been equipped with a rocker-style AC mains power switch.
This switch is located on the rear panel and should remain readily accessible to the user.
20. The MAINS plug or an appliance coupler is used as the disconnect device, so the disconnect
device shall remain readily operable.
21. Explanation of symbol, marking, signal lamp or similar means indicates that the apparatus
is completely disconnected from the mains.
22. WARNING: Please refer to the information on exterior bottom enclosure for electrical
and safety information before installing or operating the apparatus.
23. The maximum ambient temperature during use of the appliance must not
exceed 10–50˚ C // 50–122˚ F.
PORTABLE CART
WARNING
Correct disposal of this product: This symbol indicates that this product should not be disposed of with your household waste, according to the WEEE directive (2012/19/EU)
and your national law. This product should be handed over to an authorized collection site for recycling waste electrical and electronic equipment (EEE). Improper handling
of this type of waste could have a possible negative impact on the environment and human health due to potentially hazardous substances that are generally associated with
EEE. At the same time, your cooperation in the correct disposal of this product will contribute to the eective usage of natural resources. For more information about where
you can drop o your waste equipment for recycling, please contact your local city oce, waste authority, or your household waste disposal service.
24. NOTE: This equipment has been tested and found to comply with the limits for a Class B
digital device, pursuant to part 15 of the FCC Rules. These limits are designed to provide
reasonable protection against harmful interference in a residential installation.
This equipment generates, uses, and can radiate radio frequency energy and, if not
installed and used in accordance with the instructions, may cause harmful interference
to radio communications. However, there is no guarantee that interference will not occur
in a particular installation.
If this equipment does cause harmful interference to radio or television reception,
which can be determined by turning the equipment o and on, the user is encouraged
to try to correct the interference by one or more of the following measures:
• Reorient or relocate the receiving antenna.
• Increase the separation between the equipment and the receiver.
• Connect the equipment into an outlet on a circuit dierent from that to which
the receiver is connected.
• Consult the dealer or an experienced radio/TV technician for help.
CAUTION: Changes or modifications to this device not expressly approved by LOUD Audio,
LLC. could void the user’s authority to operate the equipment under FCC rules.
25. This apparatus does not exceed the Class B limits for radio noise emissions from digital
apparatus as set out in the radio interference regulations of the Canadian Department
of Communications.
CAN ICES-003(B)/NMB-003(B)
ATTENTION
— Le présent appareil numérique n’émet pas de bruits radioélectriques
dépassant las limites applicables aux appareils numériques de class A/de class B
(selon le cas) prescrites dans le réglement sur le brouillage radioélectrique édicté
par les ministere des communications du Canada.
26. This equipment is a Class II or double insulated electrical appliance.
27. This device complies with Part 15 of the FCC rules and Industry Canada’s
28. RF Power: <10dBm
29. Exposure to extremely high noise levels may cause permanent hearing loss.
According to OSHA, any exposure in excess of these permissible limits could result
It has been designed in such a way that it does not require a safety
connection to electrical earth.
license-exempt RSS standard(s). Operation is subjected to the following
two conditions:
(1) this device may not cause harmful interference, and
(2) this device must accept any interference received, including interference
that may cause undesired operation.
Bluetooth Version: 5.0
Bluetooth frequency range: 2402 – 2480 MHz
Individuals vary considerably in susceptibility to noise-induced hearing loss,
but nearly everyone will lose some hearing if exposed to suciently intense noise
for a period of time. The U.S. Government’s Occupational Safety and Health Administration
(OSHA) has specified the permissible noise level exposures shown in the following chart.
in some hearing loss. To ensure against potentially dangerous exposure to high sound
pressure levels, it is recommended that all persons exposed to equipment capable
of producing high sound pressure levels use hearing protectors while the equipment
is in operation. Ear plugs or protectors in the ear canals or over the ears must be worn
when operating the equipment in order to prevent permanent hearing loss if exposure
is in excess of the limits set forth here:
Duration, per
day in hours
Sound Level dBA,
Slow Response
Typical Example
8 90 Duo in small club
6 92
4 95 Subway Train
3 97
2 100 Very loud classical music
1.5 102
1 105 Ty screaming at Troy about deadlines
0.5 110
0.25 or less 115 Loudest parts at a rock concert
WARNING — To reduce the risk of fire or electric shock, do not expose this apparatus
to rain or moisture.
CAUTION – These servicing instructions are for use by qualified service personnel
only. To reduce the risk of electric shock, do not perform any servicing other than
that contained in the operating instructions unless you are qualified to do so.
2
Page 3

CR3.5BT • CR4.5BT • CR5BT • CR8BT CREATIVE REFERENCE POWERED STUDIO MONITORS WITH BLUETOOTH®
Table of Contents
Important Safety Instructions ................................................................................................................................................................2
Table of Contents ......................................................................................................................................................................................3
Chapter : Welcome ..................................................................................................................................................................................5
Introduction ................................................................................................................................................................................................5
Features ................................................................................................................................................................................................. 5
Things to Remember .................................................................................................................................................................................6
About This Guide .......................................................................................................................................................................................6
Getting Started ..........................................................................................................................................................................................6
Chapter 2 : CR3.5BT, CR4.5BT, CR5BT, and CR8BT Rear Panel Features ......................................................................................7
Power Connector .......................................................................................................................................................................................7
Power Switch..............................................................................................................................................................................................7
Input Jacks .................................................................................................................................................................................................8
Location Switch .........................................................................................................................................................................................9
Powered Speaker Position Select Switch .............................................................................................................................................9
Wire Terminals (±) ...................................................................................................................................................................................9
Custom-Tuned Rear Port ........................................................................................................................................................................10
Chapter 3 : CR3.5BT, CR4.5BT, CR5BT, and CR8BT Front Panel Features .................................................................................... 11
Phones Output...........................................................................................................................................................................................11
Tone Knob ............................................................................................................................................................................................... 12
Mood Enhancer and Intensity Level Knobs ........................................................................................................................................12
Volume Knob ............................................................................................................................................................................................. 12
Running Man Bluetooth Button / LED ..................................................................................................................................................13
Input Signal Wiring ................................................................................................................................................................................ 14
Care and Cleaning ...................................................................................................................................................................................14
3
Page 4

CR3.5BT • CR4.5BT • CR5BT • CR8BT CREATIVE REFERENCE POWERED STUDIO MONITORS WITH BLUETOOTH®
Hookup Diagrams .................................................................................................................................................................................... 15
Hookup Diagrams > Working-Playing ................................................................................................................................................. 15
Hookup Diagrams > Bluetooth Music Playback ................................................................................................................................ 16
Appendix A : Service Information ......................................................................................................................................................... 17
Troubleshooting .......................................................................................................................................................................................17
Repair ............................................................................................................................................................................................... 18
Appendix B : Technical Information ..................................................................................................................................................... 19
Specifications .......................................................................................................................................................................................... 19
Dimensions .............................................................................................................................................................................................. 22
Block Diagrams ....................................................................................................................................................................................... 24
Warranty Statement .............................................................................................................................................................................. 26
That’s All, Folks! ......................................................................................................................................................................................27
4
Page 5

CR3.5BT • CR4.5BT • CR5BT • CR8BT CREATIVE REFERENCE POWERED STUDIO MONITORS WITH BLUETOOTH®
Chapter : Welcome
Introduction
Hello everyone! This is the CR3.5BT, CR4.5BT, CR5BT, and CR8BT Owner’s Manual.
This document contains detailed information about all four CRxBT models... we hope you like it!
Mackie CRxBT Creative Reference Powered Studio Monitors with Bluetooth® combine professional-quality sound
with a tone shaping knob for moving from studio reference to casual listening to party mode.
Featuring a selection of inputs, Bluetooth® and switchable desktop and bookshelf modes, these speakers give you clear,
powerful sound in any space.
Use the tone control knob to adjust the sound, beginning with the transparent quality you expect from professional
studio monitors, then gradually adding more excitement with boom-ier bass and added sparkle.
Whether you’re using them for business, pleasure or both, Mackie CRxBT may be the only speakers you ever need.
So there you have it. Again, we hope you like it. If you have any questions or comments about this Owner’s Manual
(or other Mackie documentation), please don’t hesitate to contact us:
• -800-898-32 (Monday through Friday, normal business hours, Pacific Time)
• www.mackie.com/support-contact
Features
• Sound-shaping tone control
• Location switch with desktop and bookshelf modes
• TRS, RCA and 3.5 mm inputs
• Bluetooth® connectivity
• Built-in headphone output
• Silk dome tweeter with protective grille
• Woven woofer
• 3.5" woven woofer [CR3.5BT]
• 4.5" woven woofer [CR4.5BT]
• 5" woven woofer [CR5BT]
• 8" woven woofer [CR8BT]
• Size (H × W × D)
• 8. × 5.5 × 7. in // 206 × 40 × 80 mm [CR3.5BT]
• 8.9 × 6. × 8.3 in // 226 × 55 × 2 mm [CR4.5BT]
•
•
• Weight:
• 8.1 lb / 3.7 kg [CR3.5BT]
• 9.9 lb / 4.5 kg [CR4.5BT]
•
•
0.3 × 6.9 × 9.3 in // 262 × 75 × 236 mm
4.8 × 9.9 × 3.6 in // 376 × 25 × 345 mm
15.3 lb / 6.9 kg
35.3 lb / 16.0 kg
[CR5BT]
[CR8BT]
[CR5BT]
[CR8BT]
5
Page 6
CR3.5BT • CR4.5BT • CR5BT • CR8BT CREATIVE REFERENCE POWERED STUDIO MONITORS WITH BLUETOOTH®
Things to Remember
• Never listen to loud music for prolonged periods.
Please see the Safety Instructions on page 2 for information on hearing protection.
• Save the shipping boxes and packing materials! You may need them someday. Besides, the cats will love playing
in them and jumping out at you unexpectedly. Remember to pretend like you are surprised!
• Save your sales receipt in a safe place.
About This Guide
This guide is designed to be accessible, with subsections as complete as practical to minimize having to electronically leaf
back and forth looking for the whole story. The entire manual does not need to be read to figure out how to use the monitors.
As the saying goes, “a picture tells a 000 words”. With that thought in mind, we added quite a few illustrations, screenshots
and other images throughout to accompany the text.
This icon marks information that is critically important or unique! For your own good, read and remember
them.
There’s an illustration of a microscope, so, of course, you’re going to get more detailed information
when you see this little guy. There are explanations of features and practical tips listed here.
It’s a good idea to pay attention to text displayed next to a note icon, as this icon draws attention
to certain features and functions relating to the usage of the monitors.
Getting Started
The following steps will help you set up the monitors quickly.
If you desire a more thorough walk-through, there is a wealth of information in the following pages!
. Read and understand the Important Safety Instructions on page 2.
2. Make all initial connections with the power switches OFF on all equipment.
Make sure the monitor’s volume control is all the way down.
3. Connect black (–) and red (+) speaker wires from the powered monitor’s ± spring clips to the passive monitor’s
± spring clips.
4. Push the line cord securely into the power connector and plug the other end into a grounded outlet.
The monitor may accept the appropriate voltage as indicated on the back panel.
5. Turn the computer on.
6. Turn the monitor on.
[Rear panel power switch].
7. Press and hold the Bluetooth button to enter pairing mode, then complete the pairing process from your Bluetooth device.
8. Play an audio file, making sure the Bluetooth volume on the phone is up, then slowly turn the front panel volume control
to a comfortable listening level.
6
Page 7

CR3.5BT • CR4.5BT • CR5BT • CR8BT CREATIVE REFERENCE POWERED STUDIO MONITORS WITH BLUETOOTH®
Chapter 2 : CR3.5BT, CR4.5BT, CR5BT, and CR8BT Rear Panel Features
Power Connector
Power Switch
As a general guide, the mixer (or other signal source) should be turned on first, subwoofers next (if applicable),
and monitors last. As such, the monitors should also be turned o first, followed by the subwoofers, then the mixer.
This will reduce the possibility of any turn-on or turn-o thumps and other noises generated by any upstream
equipment from coming out of the speakers.
Connect the detachable power cord (included in the packaging with the monitors) to the power receptacle,
and plug the other end of the power cord into a live AC outlet.
Make sure that the AC outlet is matched to the AC power indicated on the rear panel
(near the receptacle).
Press the lef side of this rocker switch down to turn the monitors on. Make sure the front panel volume knob is o
[fully counter-clockwise] before turning it on. Press the right side of this rocker switch down to turn the monitors o.
The ring surrounding the Running Man logo on the front panel illuminates white when the powered monitor is plugged
into a live outlet, the power switch is turned on, and the front panel volume knob is turned clockwise until the monitor
“clicks” on. The ring will illuminate green when connected to a Bluetooth device.
7
Page 8
CR3.5BT • CR4.5BT • CR5BT • CR8BT CREATIVE REFERENCE POWERED STUDIO MONITORS WITH BLUETOOTH®
TIPSLEEVE
SLEEVE
Input Jacks
Connect the line-level signal from a computer, mixer, smartphone, tablet, or other signal source
to one (or more) pairs of these input jacks. There are three types of input connectors to choose from:
• /4" line-level signals driven by balanced or unbalanced sources.
• RCA line-level signals driven by unbalanced sources.
• Stereo /8" line-level signal driven by an unbalanced source.
All inputs may be used simultaneously. In other words, if there is a physical connection to the /4"
L/R line inputs, another physical connection to the RCA L/R line inputs, and yet another physical
connection to the /8" line input, none of those inputs will be interrupted. An easy way to look
at it is... there are extra inputs! These line-level connections sum together and do not override each other.
A balanced signal provides better noise rejection and is the preferred method, especially if using
a cable longer than 20 feet (6 meters).
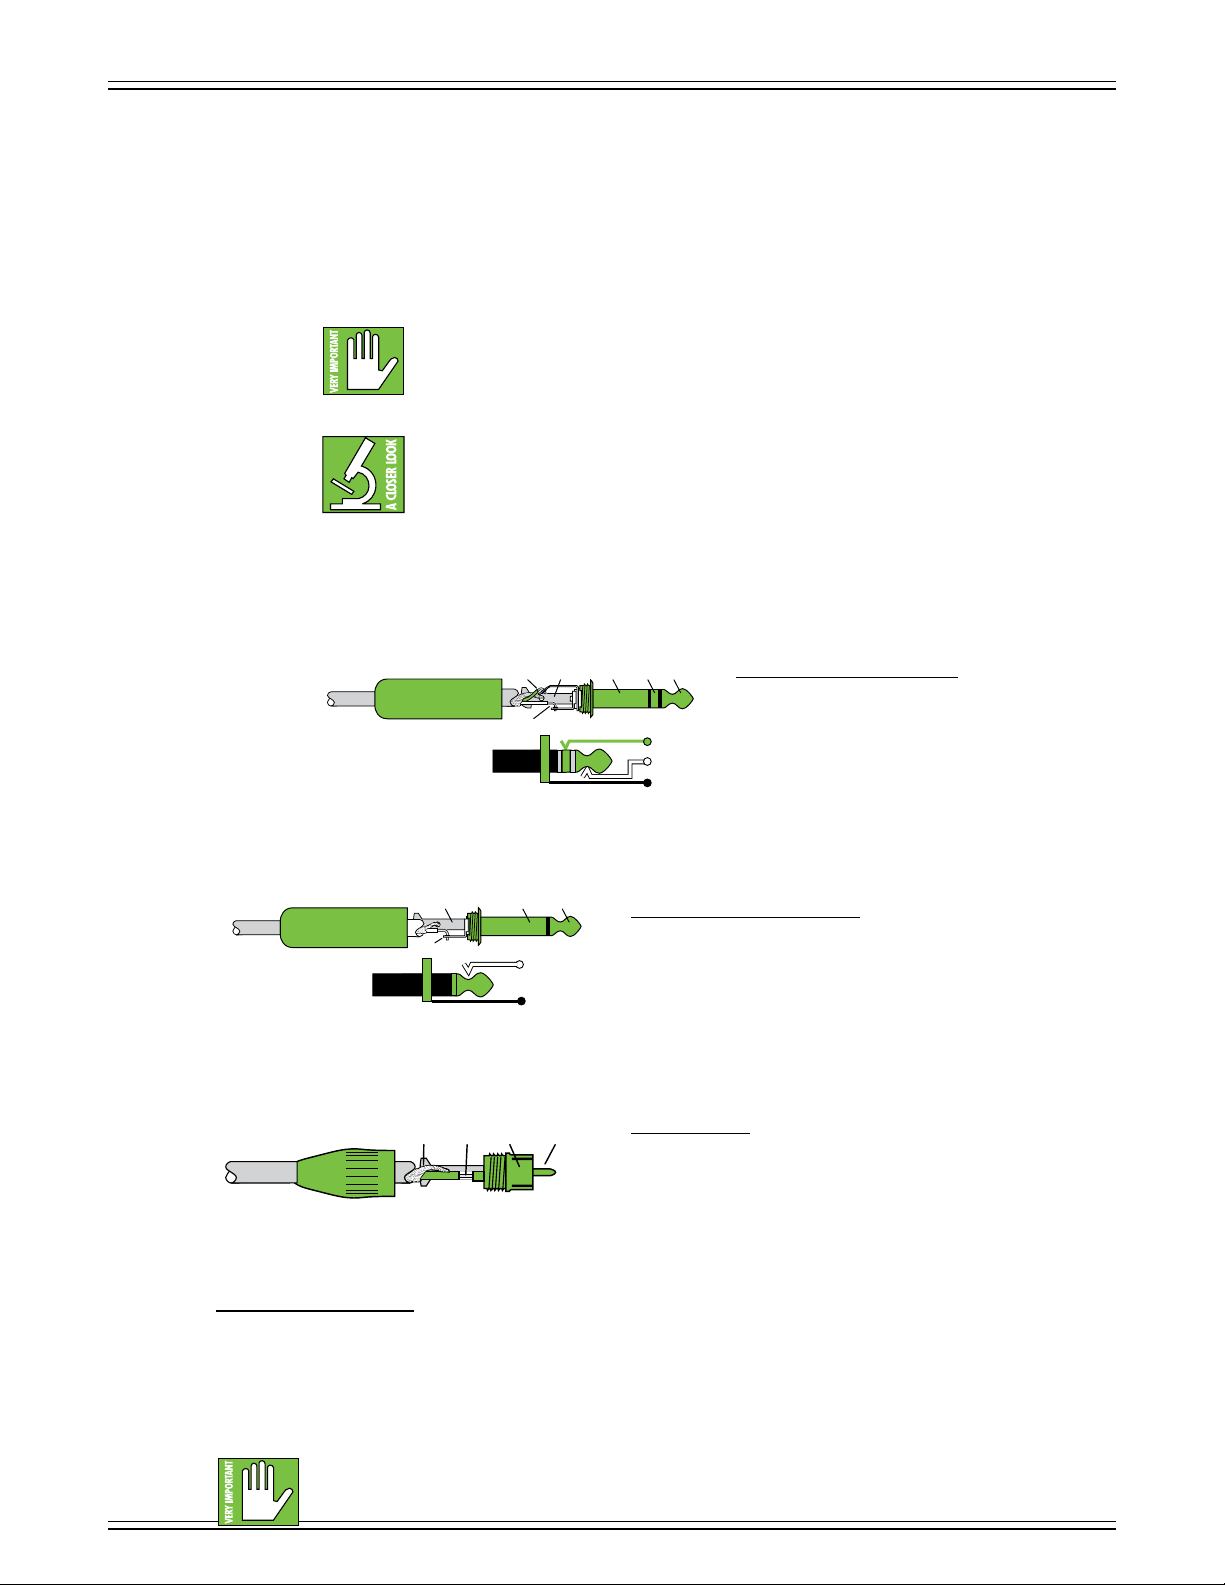
To connect balanced lines to these inputs, use a /4" Tip-Ring-Sleeve (TRS) plug. “TRS” stands
for Tip-Ring-Sleeve, the three connection points available on a stereo /4" or balanced phone jack
or plug. TRS jacks and plugs are used for balanced signals and are wired as follows:
TIPSLEEVE
SLEEVERING
TIP
RING
RING
TIP
SLEEVE
1/4" TRS Balanced Mono Wiring:
Sleeve = Shield (Ground)
Tip = Hot (+)
Ring = Cold (–)
To connect unbalanced lines to these inputs, use a /4" mono (TS) phone plug, wired as follows:
1/4" TS Unbalanced Mono Wiring:
TIP
TIP
SLEEVE
Sleeve = Shield (Ground)
Tip = Hot (+)
The unbalanced RCA plugs are wired as follows:
TIPSLEEVETIPSLEEVE
Unbalanced RCA:
Sleeve = Shield (Ground)
Tip = Hot (+)
Lastly, the unbalanced stereo /8" connector is wired as follows:
Unbalanced Stereo 1/8" TRS:
Sleeve = Shield (Ground)
Tip = Lef Channel
Ring = Right Channel
NEVER connect the output of an amplifier directly to a monitor’s input jack.
This could damage the input circuitry and we wouldn’t want that now, would we?
8
Page 9

CR3.5BT • CR4.5BT • CR5BT • CR8BT CREATIVE REFERENCE POWERED STUDIO MONITORS WITH BLUETOOTH®
Location Switch
What is the use case scenario for the monitors? Will you be sitting right in front of them or will they be placed
further away? That’s right, here you get to decide if the monitors will be positioned close to you (switch up,
desktop) or further away (switch down, bookshelf).
Another way to look at it is this: if your desire is to “fill the room” (with music playback, for example), select bookshelf
as it is more non-directional. However, if you will be a few feet away from the monitors (at most), then select desktop
as the sound will “hit” immediately with little to no chance at room reverb.
Professional engineers use terms such as “near field” (instead of desktop) and “far field” (or even “wide field”, instead
of bookshelf) to describe the same thing.
Powered Speaker Position Select Switch
Wire Terminals (±)
Connect the included black (–) and red (+) speaker wires from the powered monitor’s ± spring clips (IMAGE A below)
to the passive monitor’s ± spring clips (IMAGE B below). These clips are spring-loaded. Simply press and hold one down
while placing the wire inside the hole. Once complete, release the spring clip so it holds. This action shall be repeated
an additional three times.
Here you get to decide if the powered monitor is to be positioned on the lef side (switch up) or right side
(switch down). One convenience is that it keeps the power cord, front and/or rear panel connections
from crossing your work space. Additionally, it doesn’t discriminate between right or lef-handed users.
Simply set it up to suit your preference.
IMAGE A IMAGE B
9
Page 10
CR3.5BT • CR4.5BT • CR5BT • CR8BT CREATIVE REFERENCE POWERED STUDIO MONITORS WITH BLUETOOTH®
Custom-Tuned Rear Port
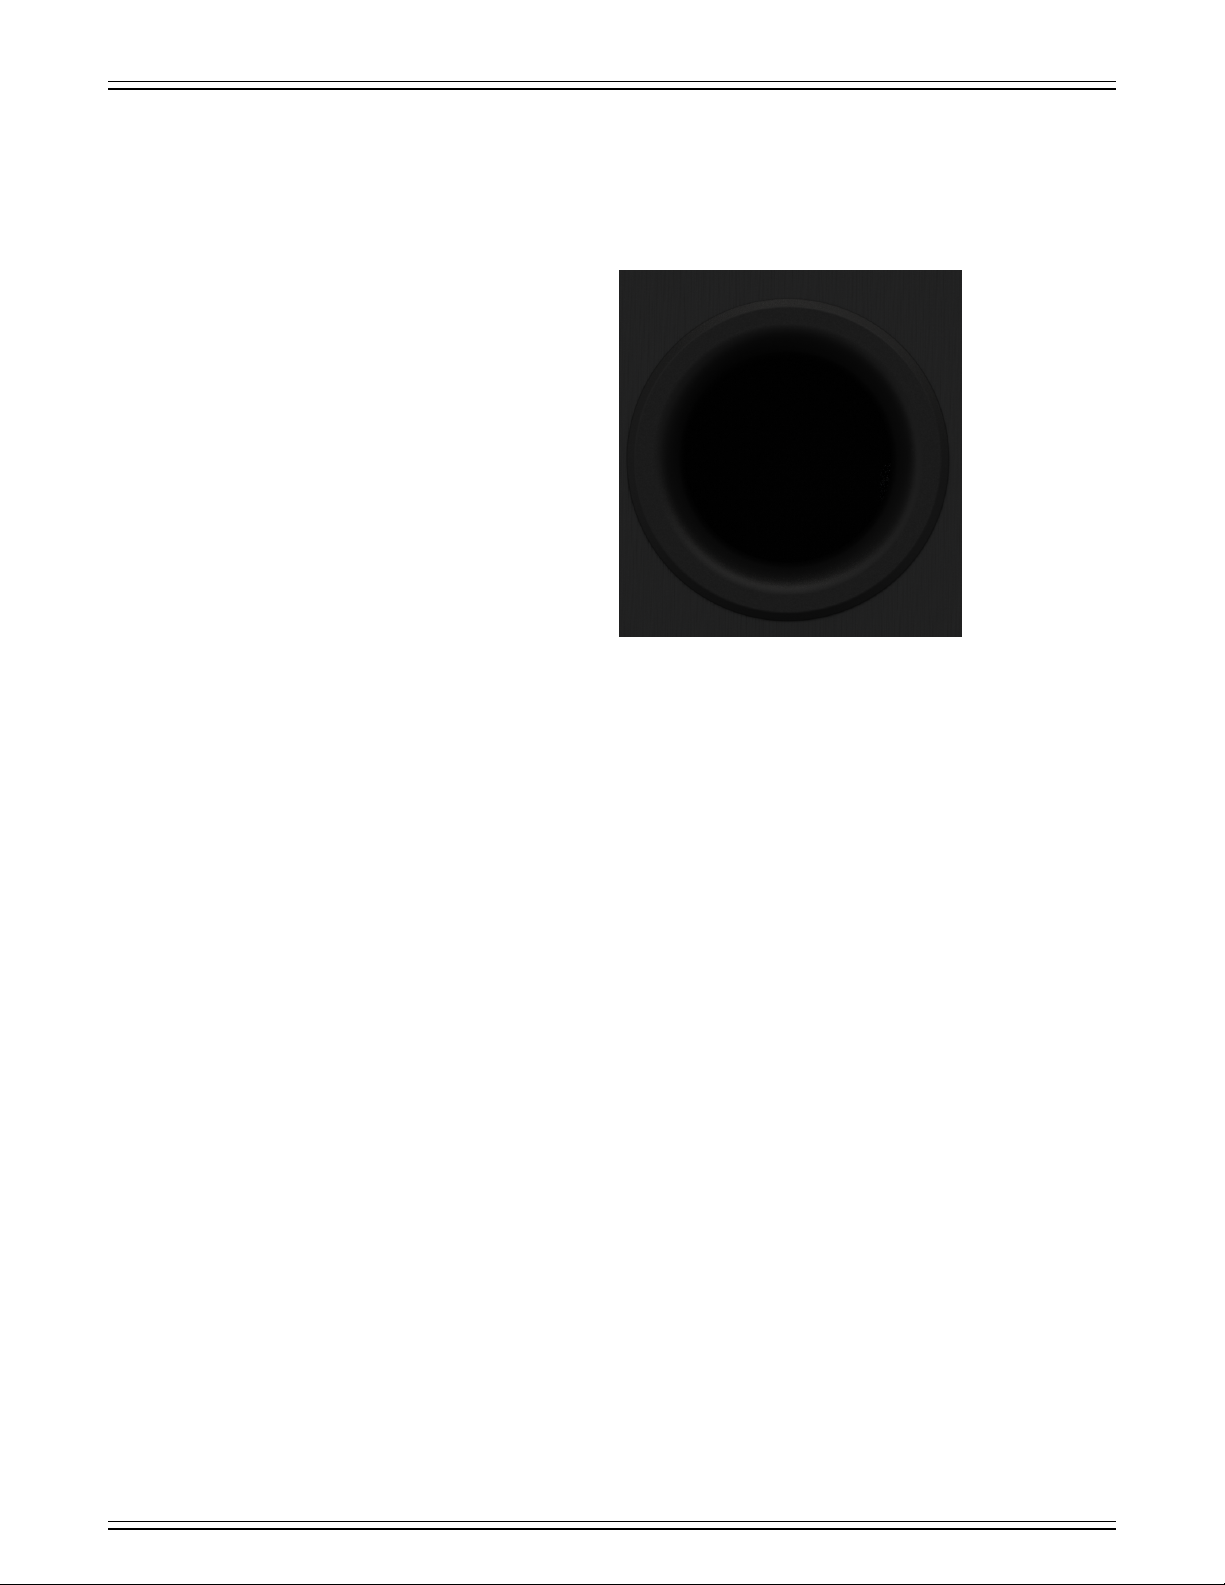
The custom-tuned rear port uses the radiation from the rear of the woofer cone to extend the low-frequency response
of the speaker. The size of the port is carefully designed with respect to the volume of the cabinet and the characteristics
of the woofer to produce low-frequency extension.
0
Page 11

CR3.5BT • CR4.5BT • CR5BT • CR8BT CREATIVE REFERENCE POWERED STUDIO MONITORS WITH BLUETOOTH®
Chapter 3 : CR3.5BT, CR4.5BT, CR5BT, and CR8BT Front Panel Features
Phones Output
This /8" TRS connector supplies the output to stereo headphones. The volume is controlled with the volume knob
on the front panel of the monitor. The signal to the power amp is killed when headphones are connected.
The phones output is wired as follows, according to standards specified by the AES (Audio Engineering Society):
Stereo 1/8" TRS:
Sleeve = Shield (Ground)
Tip = Lef Channel
Ring = Right Channel
Warning: The headphone amp is loud and could cause permanent hearing damage. Even intermediate levels
may be painfully loud with some headphones. BE CAREFUL! Always turn the volume knob all the way down
before connecting headphones. Then turn it up slowly as you listen carefully.
Page 12

CR3.5BT • CR4.5BT • CR5BT • CR8BT CREATIVE REFERENCE POWERED STUDIO MONITORS WITH BLUETOOTH®
INTENSITY
MOOD
Tone Knob
This “tone” knob can handle anything from studio playback to watching entertaining cat videos, work video calls,
general music playback, and just about anything else that you can throw at it!
The playback tone may be changed by rotating this knob. Use the tone control knob to shape the sound, starting with
the transparent response you expect from studio monitors. This is when the knob is at its most counter-clockwise position.
As this knob is rotated clockwise, though, the sound is enhanced with increased bass presence and sparkly highs.
In fact, at its most clockwise position, this EQ response resembles a “smiley face” curve due to the boosted high
and low frequency ranges, perfect for using them as immersive gaming speakers, casual listening speakers, or
all-out party speakers.
These are the two extreme settings, of course. At 2:00 o’clock, the sound is a blend between the two frequency curves,
a “halfway point”, if you will. Rotate this knob until you find a sound that works best for your use case scenario.
Mood Enhancer and Intensity Level Knobs
ENHANCER
Volume Knob
LEVEL
Located below the woofer and in-between the tone knob and headphone jack are two additional knobs
that work in tandem: Mood Enhancer and Intensity Level (of the mood).
Your mood may be changed by rotating this knob. At its most counter-clockwise position, this knob is o,
unused. Click it on, and, unfortunately, it leads with “negative” moods: Upset, sad, gloomy, anxious, et al.
As this knob is rotated clockwise, though, the mood is enhanced with increased happiness, energy,
and the best medicine of all, humor!
The intensity level knob simply indicates how much of a “bump” in the mood you would like. As you might have guessed,
at its most counter-clockwise position, this knob is o, unused. Click it on to raise the intensity level of the mood.
It ranges from (counter-clockwise) to 0 (fully clockwise).
These monitors expect a line-level signal at their input. While the input volumes are set by the devices connected to them,
this knob adjusts the volume of the output coming from all inputs.
The volume knob not only adjusts the overall output level, but it also turns the monitor on and o. Simply turn the knob
counter-clockwise until it “clicks” o.
Refer to the Quick Start section on page 6 for the level-setting procedure.
2
Page 13
CR3.5BT • CR4.5BT • CR5BT • CR8BT CREATIVE REFERENCE POWERED STUDIO MONITORS WITH BLUETOOTH®
Running Man Bluetooth Button / LED
The ring surrounding the Running Man logo on the front panel illuminates and flashes white when the powered monitor
is plugged into a live outlet, the power switch is turned on, and the front panel volume knob is turned clockwise until
the monitor “clicks” on. The ring will illuminate solid green when connected to a Bluetooth device.
The logo isn’t just for pretty looks and LED illumination... it’s also how to connect your device to the monitor via Bluetooth!
Read on...
Upon powering up the monitors, the Bluetooth function is either:
() In pairing mode. See ‘Pairing and connecting for the first time’ (below) or...
(2) ...Paired and connected. See ‘Previously paired and connected devices’ (also below).
Pairing and connecting for the first time:
As mentioned above, upon power-up, the ring surrounding the button will illuminate and flash white for approximately
one minute while in pairing mode.
While the monitor is in pairing mode, simultaneously scan for Bluetooth devices on your smartphone, tablet, or computer.
You should see the Bluetooth CRxBT monitors appear in the list of “available devices”. Select it by tapping it. From there,
your Bluetooth device should indicate that it is successfully connected. Additionally, the Bluetooth button will stop flashing
and remain solid green. If it does not, start the pairing process again, and make sure that the monitors and your device
are both in pairing mode at the same time.
If the LED is solid green (device connected) or solid white (no device connected and not searching), you may enter
pairing mode by pressing and releasing the Running Man logo for 2+ seconds – it doubles as the Bluetooth button!
Previously paired and connected devices:
The Bluetooth connection will disconnect if it’s out of range. Previously paired and connected devices will automatically
reconnect and the Running Man logo / Bluetooth button will illuminate (if the volume knob is at least clicked on).
If the LED is solid green (device connected) or solid white (no device connected and not searching), you may enter
pairing mode by pressing and releasing the Running Man logo for 2+ seconds – it doubles as the Bluetooth button!
While your Bluetooth device is connected to the monitors, you can quickly press the Bluetooth button
on the front of the unit to pause/play your audio (the same as if you’d pressed pause/play on your device).
The Running Man logo / LED only illuminates on the powered monitor.
The passive monitor’s Running Man logo / LED will not illuminate.
The Bluetooth may disconnect when aected by Electrostatic Discharge [ESD].
Manually reconnect the Bluetooth connection
3
Page 14

CR3.5BT • CR4.5BT • CR5BT • CR8BT CREATIVE REFERENCE POWERED STUDIO MONITORS WITH BLUETOOTH®
Input Signal Wiring
Included with the CR3.5 and CR4.5 monitors are multiple accessories, including:
• /8" TRS to stereo RCA cable to connect computer output to monitors.
• Stereo speaker-to-speaker cable.
Even though these cables are included, they might need to be replaced at some point [e.g. cats play tug-of-war, you ran
out of ribbon to tie a gif and used these instead]. Or perhaps you prefer to use the /4" inputs. If so, we recommend using
high-quality, shielded cables to connect the signal source to the signal input jacks on the monitors.
Three types of input connectors are provided to interface with virtually any application you may have:
• Balanced TRS / Unbalanced TS cables work well with the /4" inputs.
• Unbalanced phono cables work well with the RCA inputs.
• Unbalanced TRS cables work well with the /8" input.
NOTE: Route the cable away from AC power cords and outlets. These are common sources for hum in an audio signal.
Wall warts and line lumps are especially insidious hum inducers!
NOTE: In certain home theater applications, it may be necessary to connect the speaker outputs from a stereo receiver
to the inputs of the monitors if the receiver doesn’t have preamp outputs or other line-level output connections.
Care and Cleaning
The monitors will provide many years of reliable service if you follow these guidelines.
• Avoid exposing them to moisture.
• Avoid exposure to extreme cold (below freezing temperatures).
• Use a dry cloth to clean the cabinets. Only do this when the power is turned o and the monitor unplugged.
CAUTION: Do not attempt to connect a speaker output directly to the input of the monitor!
Speaker levels are much higher than line levels and can damage the input circuitry in the monitors.
However, it is possible to insert a speaker-level to line-level signal attenuator between the receiver’s speaker
output and the monitor’s input. Any local authorized dealer should be able to assist, or you can build your own.
4
Page 15
CR3.5BT • CR4.5BT • CR5BT • CR8BT CREATIVE REFERENCE POWERED STUDIO MONITORS WITH BLUETOOTH®
CR3.5BT • CR4.5BT • CR5BT • CR8BT CR3.5BT • CR4.5BT • CR5BT • CR8BT
Hookup Diagrams
Hookup Diagrams > Working-Playing
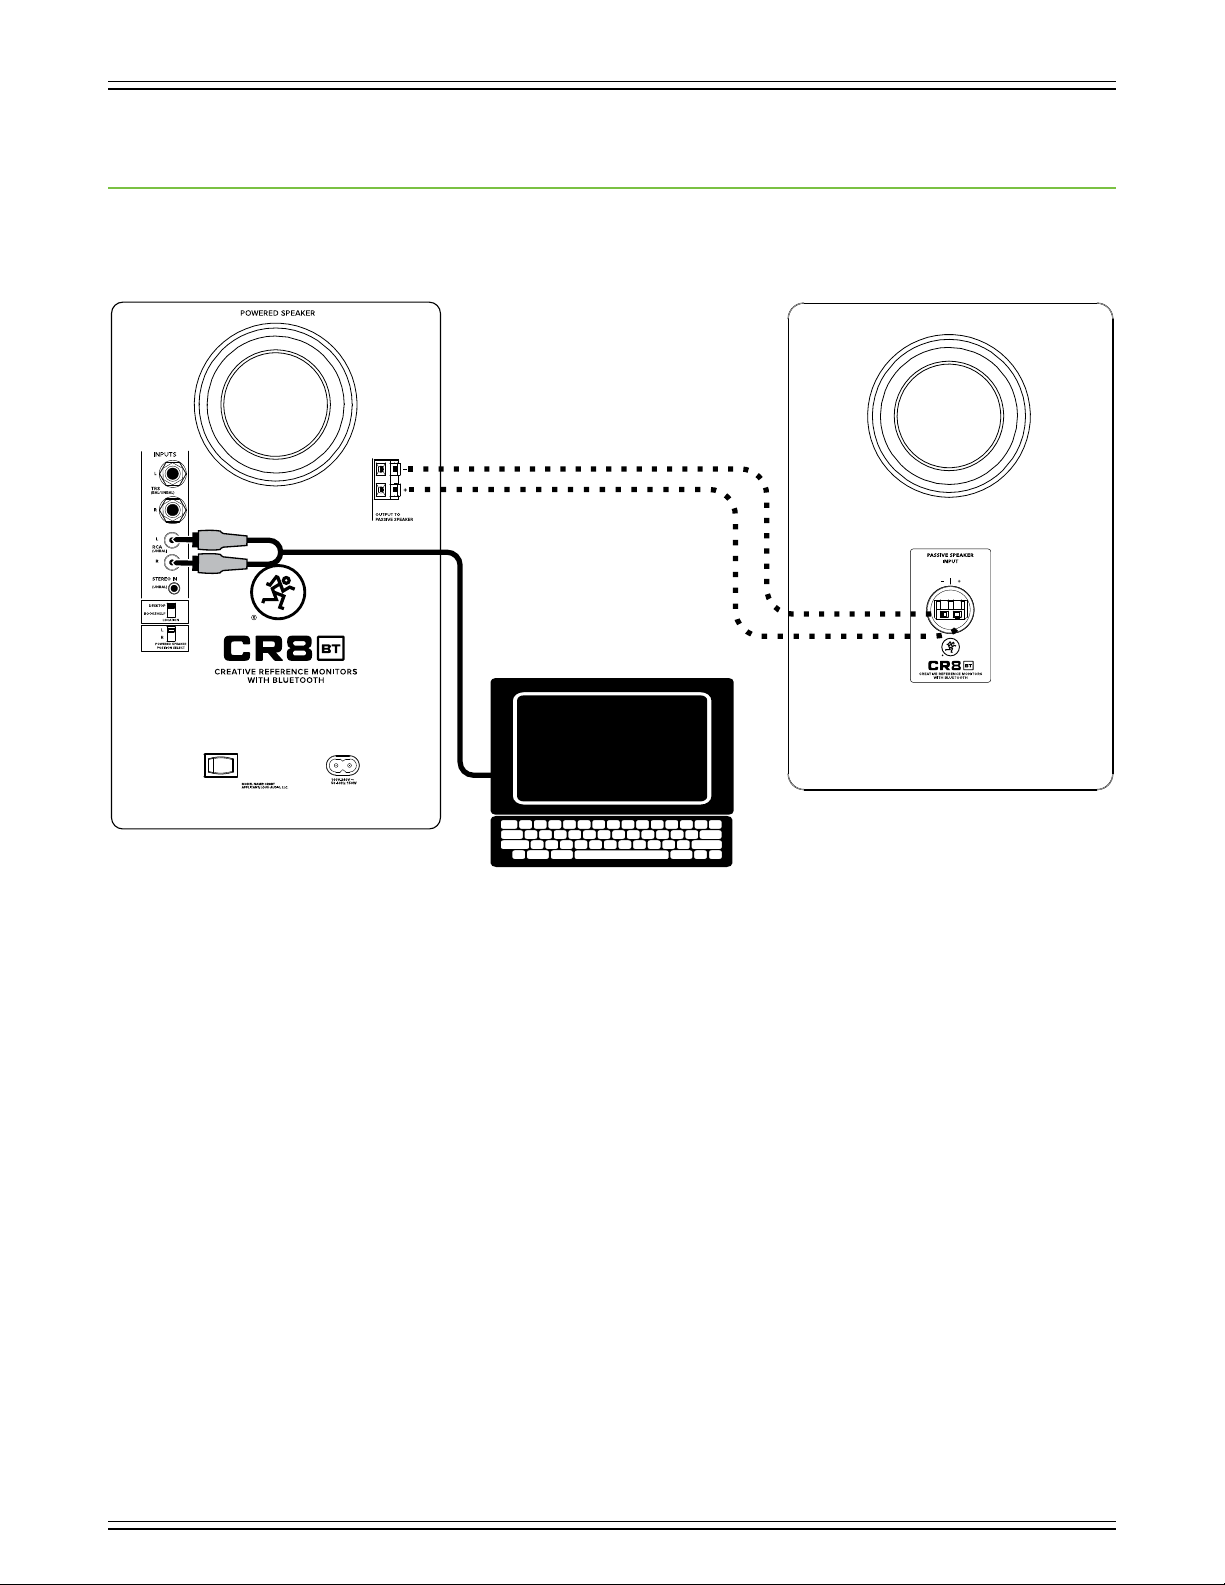
The illustration above shows a typical use for the monitors. Everyone needs tunes while working, right... or is it just me?
In this example, simply connect the (included) cable from the computer’s /8" output jack to the L/R RCA inputs of the powered
monitor. If you prefer to use /4" inputs or /8" stereo input instead of RCA inputs, those options are available, too.
Next we’ll want to connect the passive speaker. The included black (–) and red (+) speaker wires should be connected
from the powered monitor’s ± spring clips to the passive monitor’s ± spring clips as detailed by the dotted lines above:
Connect black (–) to black (–) and red (+) to red (+).
Almost there! Move the ‘Powered Speaker Position Select’ switch to either the “L” or “R” position based
on whether the powered reference monitor – the one with the volume knob – will be on the lef or right side.
Now position the monitors where you would like them. Play audio through the computer, making sure that the volume
of the computer and monitors are above “0”.
Last step: move the monitors around until the optimal sound has been achieved and adjust volume to taste.
5
Page 16
CR3.5BT • CR4.5BT • CR5BT • CR8BT CREATIVE REFERENCE POWERED STUDIO MONITORS WITH BLUETOOTH®
CR3.5BT • CR4.5BT • CR5BT • CR8BT CR3.5BT • CR4.5BT • CR5BT • CR8BT
Hookup Diagrams > Bluetooth Music Playback
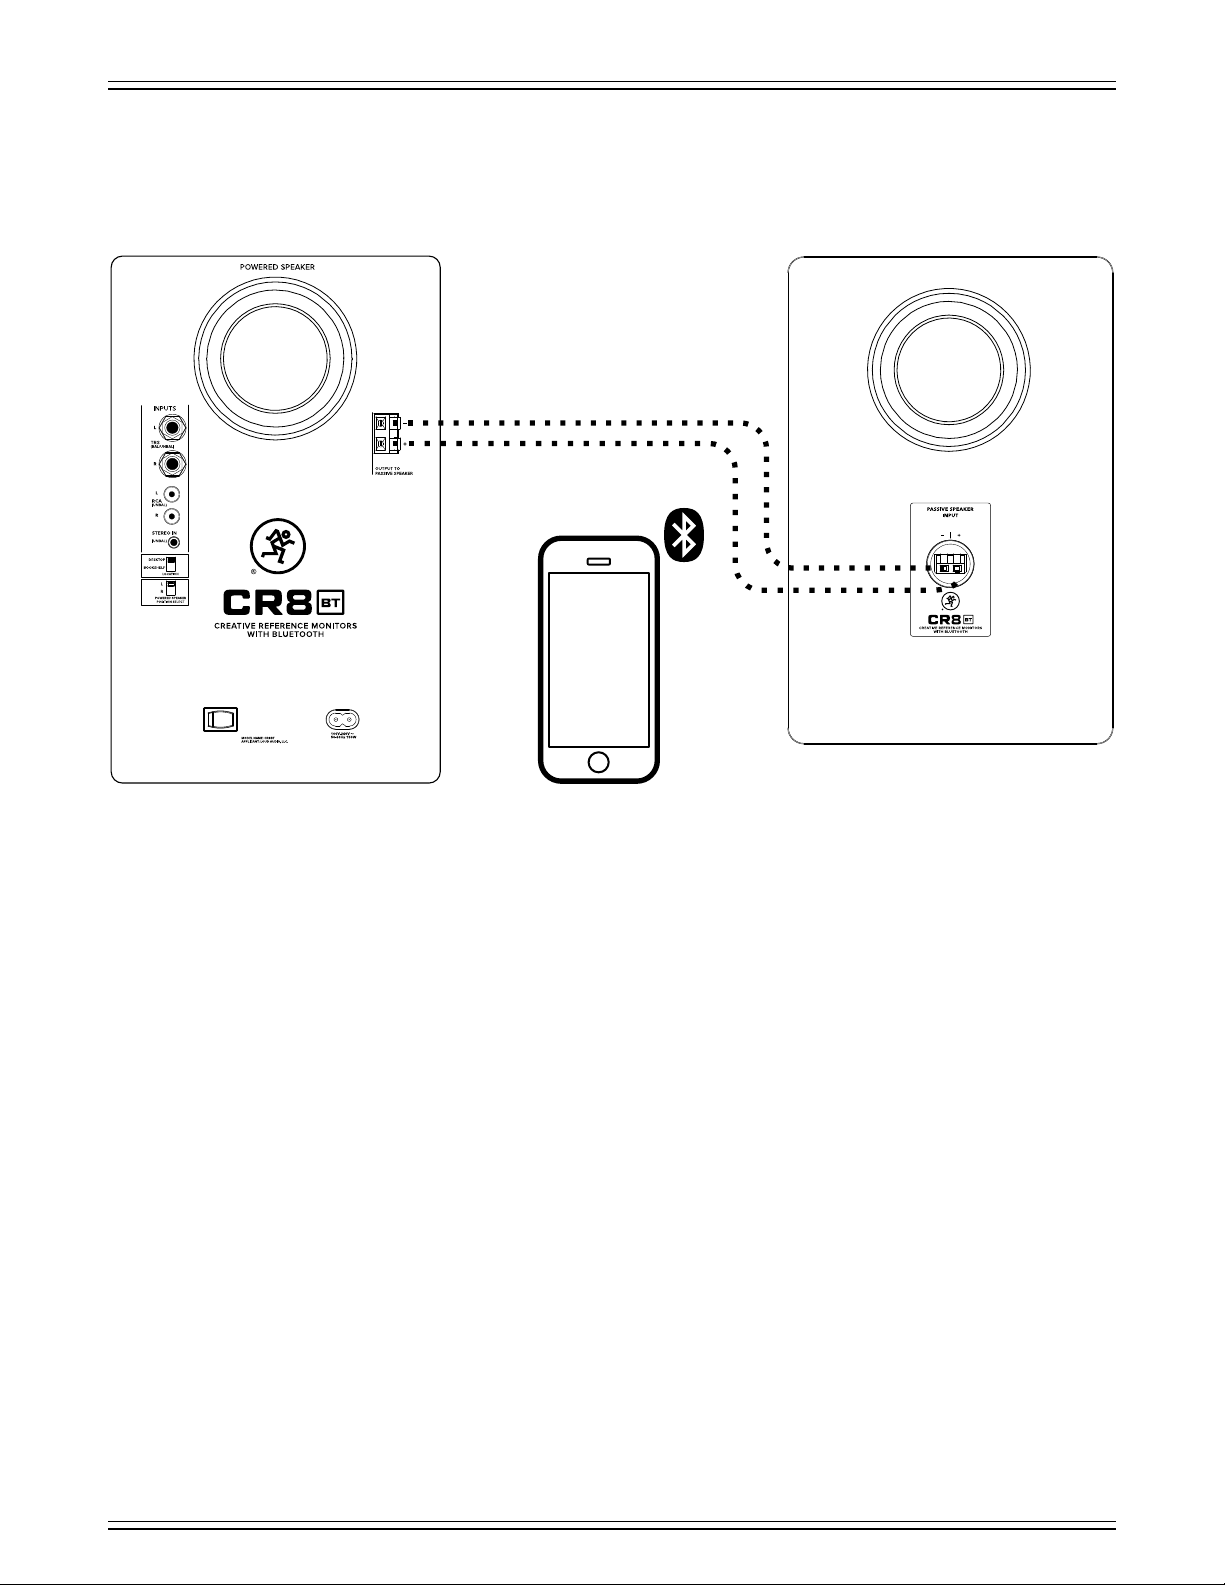
The illustration above shows another common use for these monitors. Perhaps a friend created a playlist on their smartphone
and wants to share it. With great hesitation, you finally oblige. Everyone has that one friend with terrible taste in music.
We know, it happens.
In this example, a smartphone is connected to the monitors via Bluetooth.
Next we’ll want to connect the passive speaker. The included black (–) and red (+) speaker wires should be connected
from the powered monitor’s ± spring clips to the passive monitor’s ± spring clips as detailed by the dotted lines above:
Connect black (–) to black (–) and red (+) to red (+).
Almost there! Move the ‘Powered Speaker Position Select’ switch to either the “L” or “R” position based
on whether the powered reference monitor – the one with the volume knob – will be on the lef or right side.
Now position the monitors where you would like them. Play audio through the smartphone making sure
that the volume of the smartphone and monitors are above “0”.
Last step: move the monitors around until the optimal sound has been achieved and adjust volume to taste.
Optional: plugging a pair of headphones into the /8" headphones jack auto-defeats the speaker output.
The front panel volume control then controls the level going to the phones.
6
Page 17

CR3.5BT • CR4.5BT • CR5BT • CR8BT CREATIVE REFERENCE POWERED STUDIO MONITORS WITH BLUETOOTH®
Appendix A : Service Information
Troubleshooting
If you think your Mackie product has a problem, please check out the following troubleshooting tips and do your best to confirm
the problem. Visit the Support section of our website (www.mackie.com) to get some ideas or contact our technical support
heroes. You may find the answer to the problem without having to send your Mackie product away.
Here are some useful tips that could correct any of the issues outlined below (or possibly any other issue that we haven’t
yet discovered):
Getting Started: If you are having any sound (or non-sound) issues, try following the level setting procedure as outlined
on page 6 to verify that all of the volume controls in the system are properly adjusted.
There are no user serviceable parts. If none of these tips work, please refer to “Repair” on the next page to find out how
to proceed.
No Power
• Our favorite question: Is it plugged in? Make sure the line cord is securely seated in the line cord socket and plugged
all the way into the AC outlet. Make sure the AC outlet is live [check with a tester or lamp].
No Sound
Poor sound
• Our next favorite question: Is the power switch on? If not, try turning it on.
• Is the front panel volume control “clicked” on? The power is on only when plugged into a live AC outlet,
the rear panel power switch is on, and the front panel volume control is not fully counter-clockwise.
• Is the Running Man logo / LED on the front panel illuminated? If not, make sure the AC outlet is live.
If so, refer to “No sound” below.
• The internal AC line fuse may be blown. This is not a user serviceable part. If you suspect the AC line fuse is blown,
please see the "Repair" section next.
• Is the level knob for the input source turned all the way down? Verify that all the volume controls in the system
are properly adjusted.
• Is the signal source turned up? Make sure the connecting cables are in good repair and securely connected at both ends.
Make sure the signal level from the computer, mixer, MP3 player, phone (or whatever device immediately precedes
the monitors) is high enough to produce sound.
• Is it loud and distorted? Make sure that you’re not overdriving a stage in the signal chain.
Verify that all level controls are set properly.
• Is the input connector plugged completely into the jack? Be sure all connections are secure.
• Too much bass or not enough bass? Move around the room and see if the bass response changes. It’s possible
that your listening position coincides with a room mode where the low frequencies either become exaggerated
or nulled. If so, try moving the monitors to a dierent position, or moving your listening position.
7
Page 18

CR3.5BT • CR4.5BT • CR5BT • CR8BT CREATIVE REFERENCE POWERED STUDIO MONITORS WITH BLUETOOTH®
Noise / Hum / Buzz
• Check the signal cable between the computer/mixer/MP3 player/phone and the monitor.
Make sure all connections are secure. These problems usually produce crackling noises, hum, or buzz.
• If connecting an unbalanced output to the monitor’s balanced input, make sure the shield is connected to the unbalanced
ground of the source.
• Make sure the signal cable is not routed near AC cables, power transformers, or other EMI sources
(including wall warts and line lumps!). These sources usually produce hum.
• Is there a light dimmer or other triac-based device on the same AC circuit as the monitor?
Dimmers cause buzzing noises. Use an AC line filter or plug the monitor into a dierent AC circuit.
• Excessive hiss is an indication of an incorrect gain setting somewhere before the speaker.
• If possible, listen to the signal source with headphones plugged in. If it sounds noisy there, it’s not the monitor.
Try some of the following troubleshooting ideas:
• Use balanced connections throughout your system for the best noise rejection.
• Whenever possible, plug all the audio equipment’s line cords into outlets which share a common ground.
The distance between the outlets and the common ground should be as short as possible.
Bluetooth or Other Issues
• Please email or call Technical Support if you are having any other issue not listed here:
o mackie.com/support-contact
o -800-898-32
Repair
For warranty service, refer to the warranty information on page 26.
Non-warranty service for Mackie products is available at a factory-authorized service center. To locate the nearest service
center, visit www.mackie.com, click “Support” and select “Service Center Locater”. Service for Mackie products living outside
the United States can be obtained through local dealers or distributors.
If you do not have access to our website, you can call our Tech Support department at -800-898-32, Monday-Friday during
normal business hours, Pacific Time, to explain the problem. Tech Support will tell you where the nearest factory-authorized
service center is located in your area.
8
Page 19

CR3.5BT • CR4.5BT • CR5BT • CR8BT CREATIVE REFERENCE POWERED STUDIO MONITORS WITH BLUETOOTH®
Appendix B : Technical Information
Specifications
Acoustic Performance
Frequency Response (–0 dB): .....................................................................................................................................60 Hz – 20 kHz [CR3.5BT]
55 Hz – 20 kHz [CR4.5BT]
50 Hz – 20 kHz [CR5BT]
44 Hz – 20 kHz [CR8BT]
Frequency Response (–3 dB): .......................................................................................................................................70 Hz – 20 kHz [CR3.5BT]
65 Hz – 20 kHz [CR4.5BT]
59 Hz – 20 kHz [CR5BT]
47 Hz – 20 kHz [CR8BT]
Maximum SPL Peak: ................................................................................................................................................................... 00 dB [CR3.5BT]
0 dB [CR4.5BT]
05 dB [CR5BT]
08 dB [CR8BT]
Crossover Frequency ....................................................................................................................................3.0 kHz [CR3.5BT, CR4.5BT, CR5BT]
2.0 kHz [CR8BT]
Transducers
Low Frequency: ............................................................................................................................................................... 3.5 in / 89 mm [CR3.5BT]
4.5 in / 4 mm [CR4.5BT]
5.25 in / 33 mm [CR5BT]
8.0 in / 203 mm [CR8BT]
woven woofer
High Frequency: ................................................................................................................................................................................. .0 in / 25 mm
silk-dome tweeter with protective grille
Power Amplifiers
System Power Amplification [CR3.5BT, CR4.5BT]
Rated Power: ................................................................................................................................................................ 50 watts RMS
Design: ..................................................................................................................................................................................Class AB
System Power Amplification [CR5BT]
Rated Power: .............................................................................................................................................................. 00 watts RMS
Design: ....................................................................................................................................................................................Class D
System Power Amplification [CR8BT]
Rated Power: ...............................................................................................................................................................40 watts RMS
Design: ....................................................................................................................................................................................Class D
9
Page 20

CR3.5BT • CR4.5BT • CR5BT • CR8BT CREATIVE REFERENCE POWERED STUDIO MONITORS WITH BLUETOOTH®
Input / Output
Input Type .............................................................................................................................................Female /4" TRS balanced–unbalanced,
RCA unbalanced, /8" stereo unbalanced
Input Impedance ............................................................................................................................................................................................ 0 k
Output Type ..................................................................................................................................................................... /8" Stereo Headphones
Bluetooth Information
Bluetooth Protocol .............................................................................................................................................................................................. 5.0
Bluetooth Function ........................................................................................................................................................................ Audio Streaming
Line Input Power
Detachable line cord ............................................................................................................... 00V–240V~, 50–60 Hz, 60W [CR3.5BT, CR4.5BT]
00V–240V~, 50–60 Hz, 0W [CR5BT]
00V–240V~, 50–60 Hz, 50W [CR8BT]
Construction Features
Basic Design ........................................................................................................................................................................................ Rectangular
Enclosure Construction ........................................................................................................................................................................... Solid MDF
Finish .................................................................................................................................................................................Black Vinyl Wrap
Port Configuration ...................................................................................................................................................... Custom-tuned rear port tube
Display LED ...........................................................................................................................................................................................Power ring
(surrounding the Running Man logo)
Operating Temperature ............................................................................................................................................................................ 0 – 50 ˚C
50 – 22 ˚F
Pets
Dogs: ....................................................................................................................................................Bulldog, Terrier, Spaniel, Shepherd,
Beagle, Retriever, Husky, Hound Dog,
Chihuahua, Poodle, Dachshund, Rottweiler,
Great Dane, St. Bernard, Shih Tzu, etc.
Cats: ............................................................................................................................................................. Tabby, Siamese, Maine Coon,
Persian, Burmese, Grumpy,
Himalayan, Snowshoe, etc.
Fish: ............................................................................................................................................................. Goldfish, Neon Tetra, Catfish,
Angelfish, Guppy, Clownfish, etc.
Birds: ........................................................................................................................................................Parakeet, Canary, Finch, Macaw,
Dove, Cockatoo, Budgie, etc.
Other: ........................................................................................................................................ Rabbit, Horse, Snake, Gerbil/Hamster, etc.
20
Page 21

CR3.5BT • CR4.5BT • CR5BT • CR8BT CREATIVE REFERENCE POWERED STUDIO MONITORS WITH BLUETOOTH®
Physical Properties
CR3.5BT
Size (H x W x D): ....................................................................................................................8. × 5.5 × 7. in // 206 × 40 × 80 mm
Weight: ......................................................................................................................................................................... 8. lb // 3.7 kg
CR4.5BT
Size (H x W x D): ....................................................................................................................8.9 × 6. × 8.3 in // 226 × 55 × 2 mm
Weight: ........................................................................................................................................................................ 9.9 lb // 4.5 kg
CR5BT
Size (H x W x D): ................................................................................................................ 0.3 × 6.9 × 9.3 in // 262 × 75 × 236 mm
Weight: .......................................................................................................................................................................5.3 lb // 6.9 kg
CR8BT
Size (H x W x D): ............................................................................................................... 4.8 × 9.9 × 3.6 in // 376 × 25 × 345 mm
Weight: .....................................................................................................................................................................35.3 lb // 6.0 kg
About
Part Number, Rev and Date: ......................................................................................................................................SW476, Rev B, October 2024
Disclaimer
LOUD Audio, LLC. is always striving to improve our products by incorporating new and improved materials, components, and manufacturing methods.
Therefore, we reserve the right to change these specifications at any time without notice. The “Running Man” is a registered trademark of LOUD Audio, LLC.
All other brand names mentioned are trademarks or registered trademarks of their respective holders, and are hereby acknowledged.
Please check our website for any updates to this Owner's Manual: www.mackie.com.
©2024 LOUD Audio, LLC. All right All right All rights reserved.
2
Page 22
CR3.5BT • CR4.5BT • CR5BT • CR8BT CREATIVE REFERENCE POWERED STUDIO MONITORS WITH BLUETOOTH®
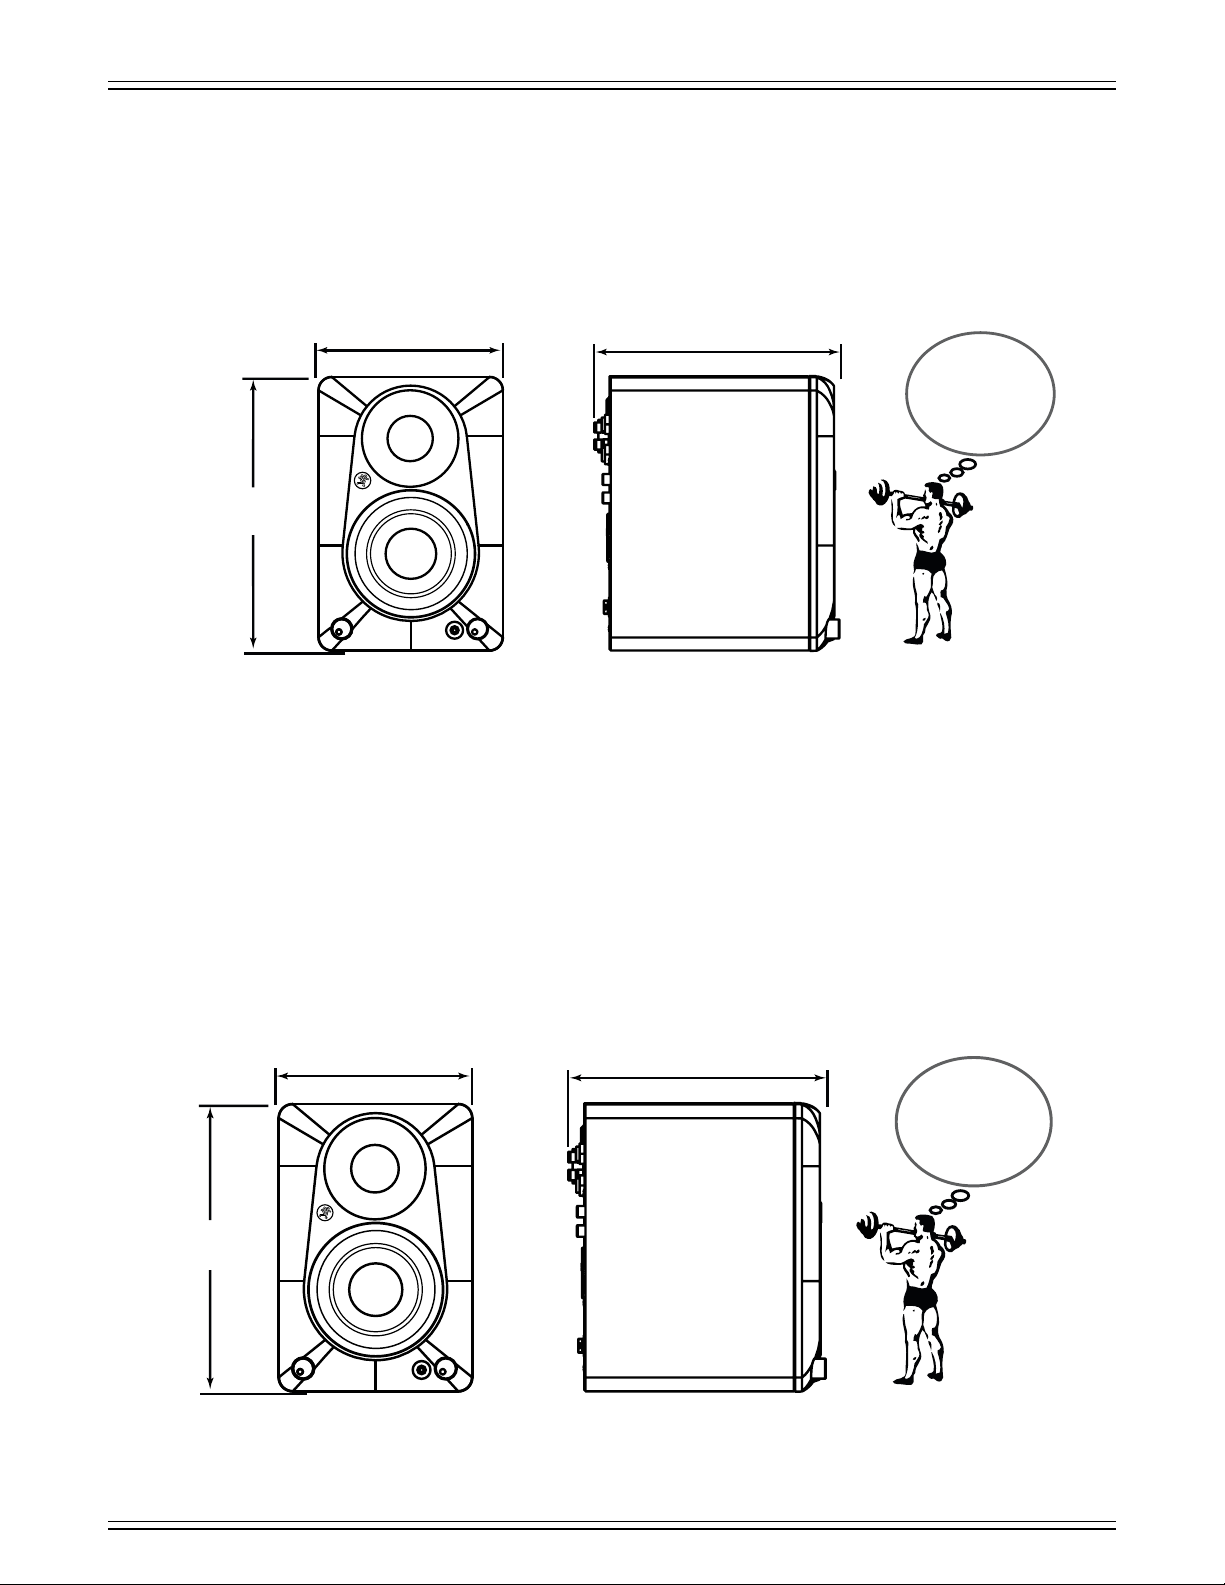
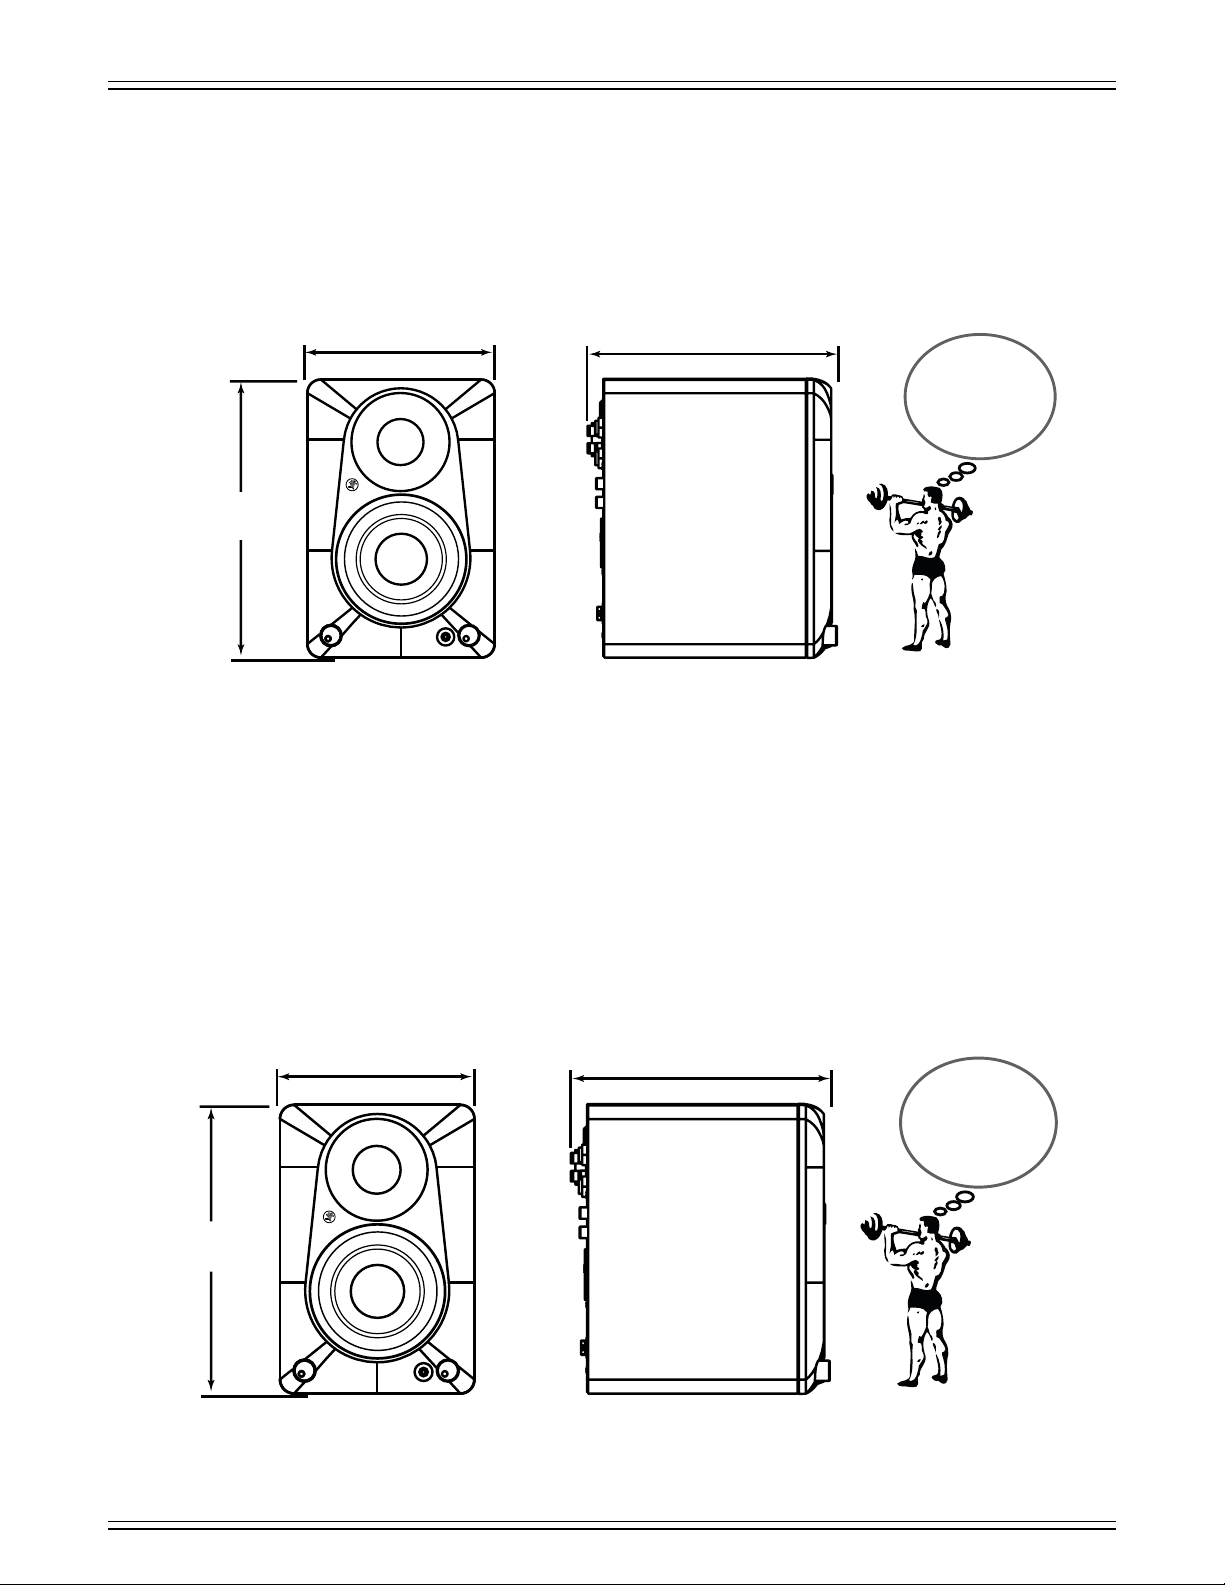
CR3.5BT Dimensions
DIMENSIONS
8.1 in
206 mm
CR4.5BT Dimensions
5.5 in / 140 mm
7.1 in / 180 mm
WEIGHT
(per pair)
8.1 lb
3.7 kg
DIMENSIONS
8.9 in
226 mm
6.1 in / 155 mm
8.3 in / 211 mm
WEIGHT
(per pair)
9.9 lb
4.5 kg
22
Page 23
CR3.5BT • CR4.5BT • CR5BT • CR8BT CREATIVE REFERENCE POWERED STUDIO MONITORS WITH BLUETOOTH®
CR5BT Dimensions
DIMENSIONS
10.3 in
262 mm
CR8BT Dimensions
6.9 in / 175 mm
9.3 in / 236 mm
WEIGHT
(per pair)
15.3 lb
6.9 kg
DIMENSIONS
14.8 in
376 mm
9.9 in / 251 mm
13.6 in / 345 mm
WEIGHT
(per pair)
35.3 lb
16.0 kg
23
Page 24
CR3.5BT • CR4.5BT • CR5BT • CR8BT CREATIVE REFERENCE POWERED STUDIO MONITORS WITH BLUETOOTH®
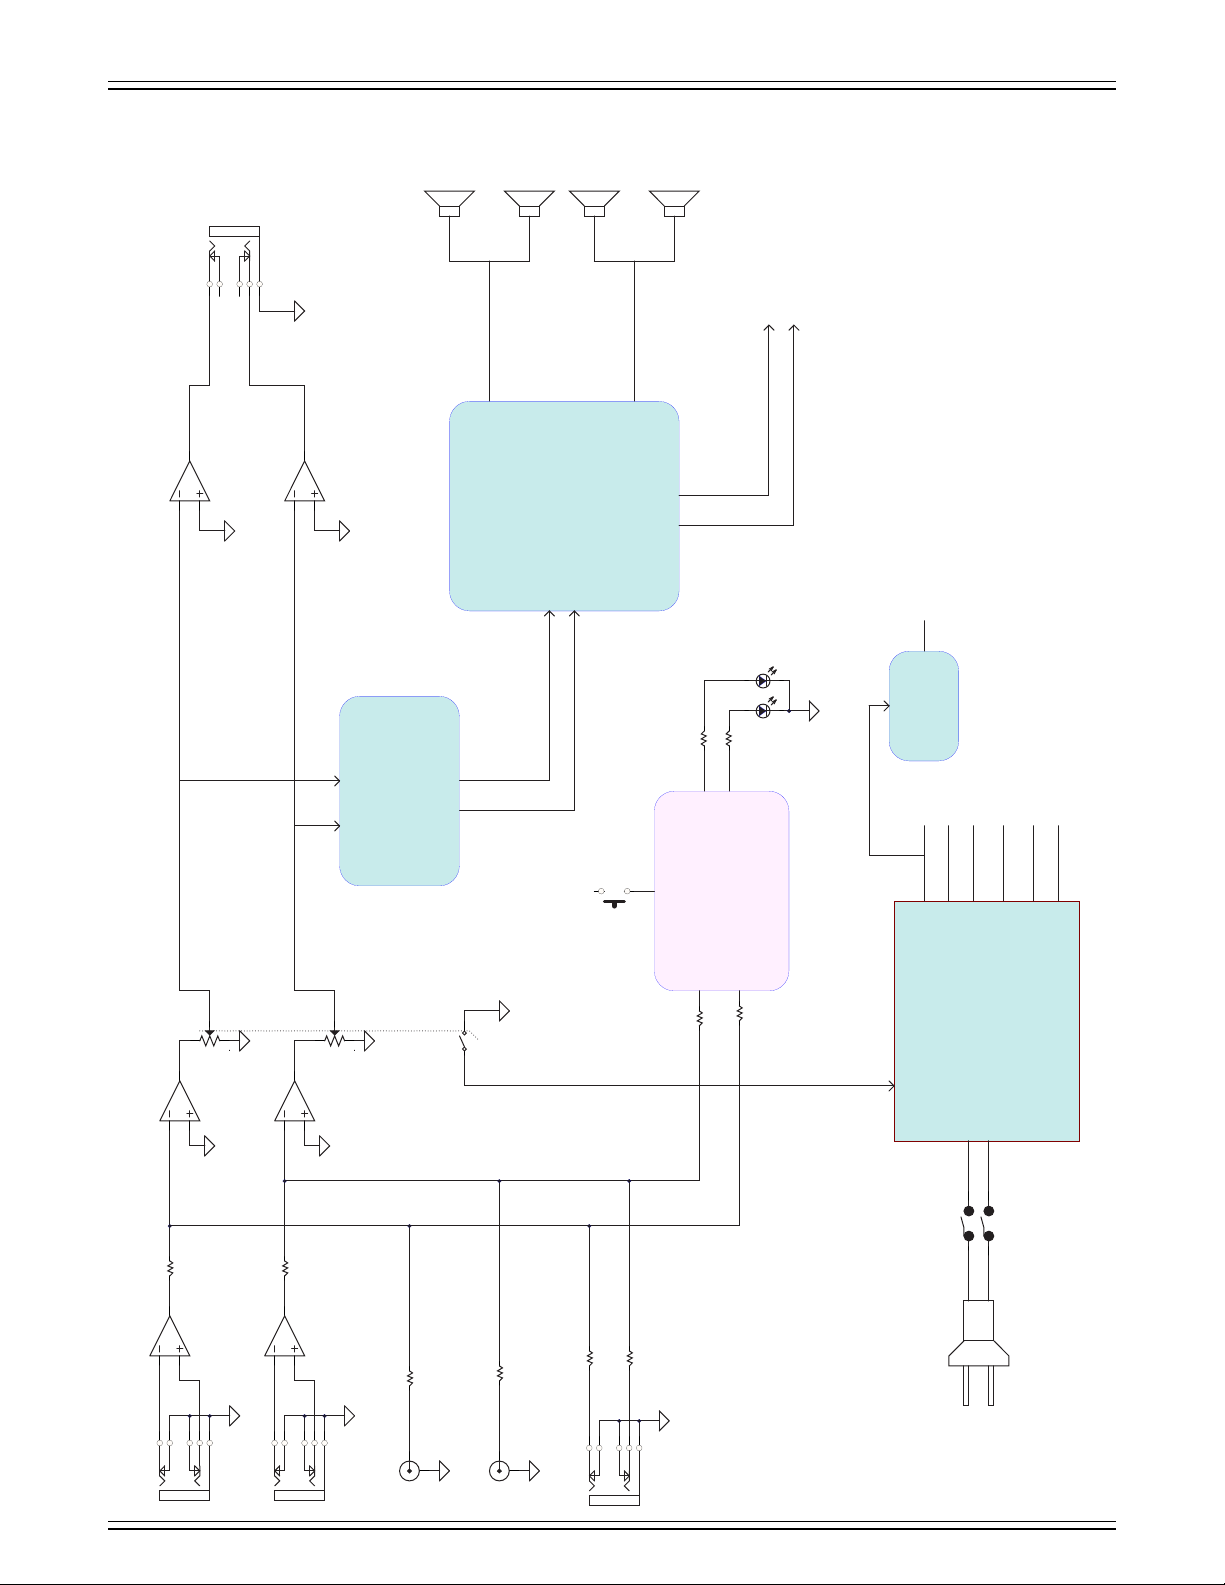
CR3.5BT and CR4.5BT Block Diagram
PHONE OUT
23154
1
3
2
1
3
2
TWEETER
WOOFER
L
TWEETER
WOOFER
R
DEAD END
AMP
LED GREEN
BLUETOOTH
DC/DC
2
L
1
1
3
123
VOLUME
POWER
LED WHITE
GROUND
–VCC
+VCC
–12V
+12V
+5V +3.7V
SPEAKER POSITION SELECT
DESKTOP–BOOKSHELF SELECT
BLUETOOTH
PAIR
SWITCH
BLUETOOTH
2
3
1
1
VOLUME
3
2
R
1
4 5
SWITCHING POWER SUPPLY
POWER SWITCH
TRS L
3
2
23154
2
TRS R
3
23154
2
1
RCA L
RCA R
2
1
23154
AC 100–240V
1/8˝ INPUT
24
Page 25
CR3.5BT • CR4.5BT • CR5BT • CR8BT CREATIVE REFERENCE POWERED STUDIO MONITORS WITH BLUETOOTH®
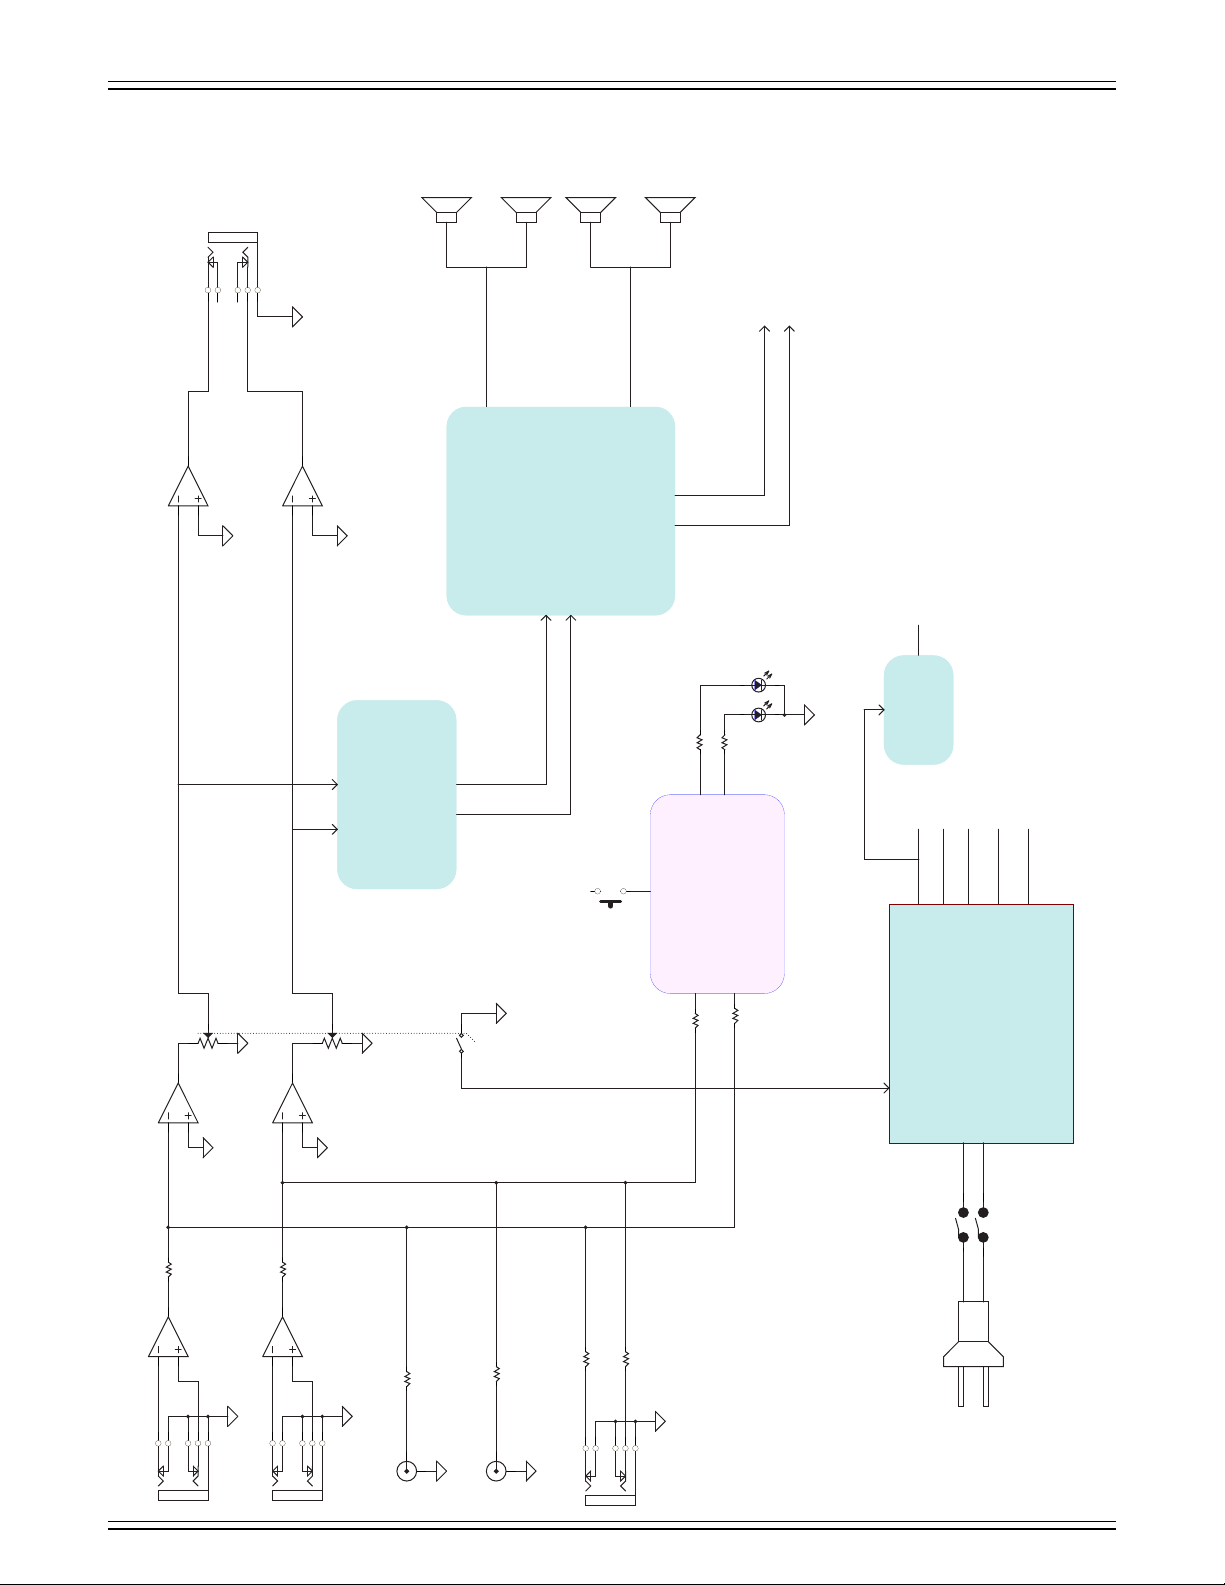
CR5BT and CR8BT Block Diagram
PHONE OUT
2354
3
2
3
2
TWEETER
WOOFER
L
TWEETER
WOOFER
R
DEAD END
AMP
+3.7V
LED GREEN
BLUETOOTH
DC/DC
2
L
23
3
VOLUME
POWER
LED WHITE
GROUND
–2V
+VCC
+2V
SPEAKER POSITION SELECT
DESKTOP–BOOKSHELF SELECT
PAIR
SWITCH
BLUETOOTH
+5V
BLUETOOTH
2
3
VOLUME
3
2
R
SWITCH
STANDBY
4 5
SWITCHING POWER SUPPLY
POWER SWITCH
TRS L
3
2
2354
2
TRS R
3
2354
2
1
RCA L
2
1
RCA R
2354
AC 00–240V
/8˝ INPUT
25
Page 26
CR3.5BT • CR4.5BT • CR5BT • CR8BT CREATIVE REFERENCE POWERED STUDIO MONITORS WITH BLUETOOTH®
• USA
Phone: 425.487.4333 • Toll-free: 800.898.32
Fax: 425.487.4337 • www.mackie.com
Warranty Statement
Please keep your sales receipt in a safe place.
This Limited Product Warranty (“Product Warranty”) is provided by LOUD Audio, LLC. (“LOUD”) and is applicable to products purchased
in the United States or Canada through a LOUD-authorized reseller or dealer. The Product Warranty will not extend to anyone other than
the original purchaser of the product (hereinafer, “Customer,” “you” or “your”).
For products purchased outside the U.S. or Canada, please visit www.mackie.com/warranty to find contact information for your local
distributor, and information on any warranty coverage provided by the distributor in your local market.
LOUD warrants to Customer that the product will be free from defects in materials and workmanship under normal use during
the Warranty Period. If the product fails to conform to the warranty then LOUD or its authorized service representative will at its option,
either repair or replace any such nonconforming product, provided that Customer gives notice of the noncompliance within the Warranty
Period to the Company at: www.mackie.com/support or by calling LOUD technical support at .800.898.32 (toll-free in the U.S.
and Canada) during normal business hours Pacific Time, excluding weekends or LOUD holidays. Please retain the original dated
sales receipt as evidence of the date of purchase. You will need it to obtain any warranty service.
For full terms and conditions, as well as the specific duration of the Warranty for this product, please visit www.mackie.com/warranty.
The Product Warranty, together with your invoice or receipt, and the terms and conditions located at www.mackie.com/warranty
constitutes the entire agreement, and supersedes any and all prior agreements between LOUD and Customer related to the subject matter
hereof. No amendment, modification or waiver of any of the provisions of this Product Warranty will be valid unless set forth in a written
instrument signed by the party to be bound thereby.
Need help with the monitors?
• Visit www.mackie.com/support to find: FAQs, manuals, addendums, and other documents.
• Email us at: www.mackie.com/support-contact
• Telephone 1-800-898-3211 to speak with one of our splendid technical support chaps
(Monday through Friday, normal business hours, Pacific Time).
Please write the serial numbers here for future reference
(i.e., insurance claims, tech support, return authorization, make dad proud, etc.)
Purchased at:
Date of purchase:
26
Page 27

CR3.5BT • CR4.5BT • CR5BT • CR8BT CREATIVE REFERENCE POWERED STUDIO MONITORS WITH BLUETOOTH®
Phone: 425.487.4333 • Toll-free: 800.898.32
Fax: 425.487.4337 • www.mackie.com
• USA
27
 Loading...