

Page 1
APPLICATIONS: CHAPTER 2
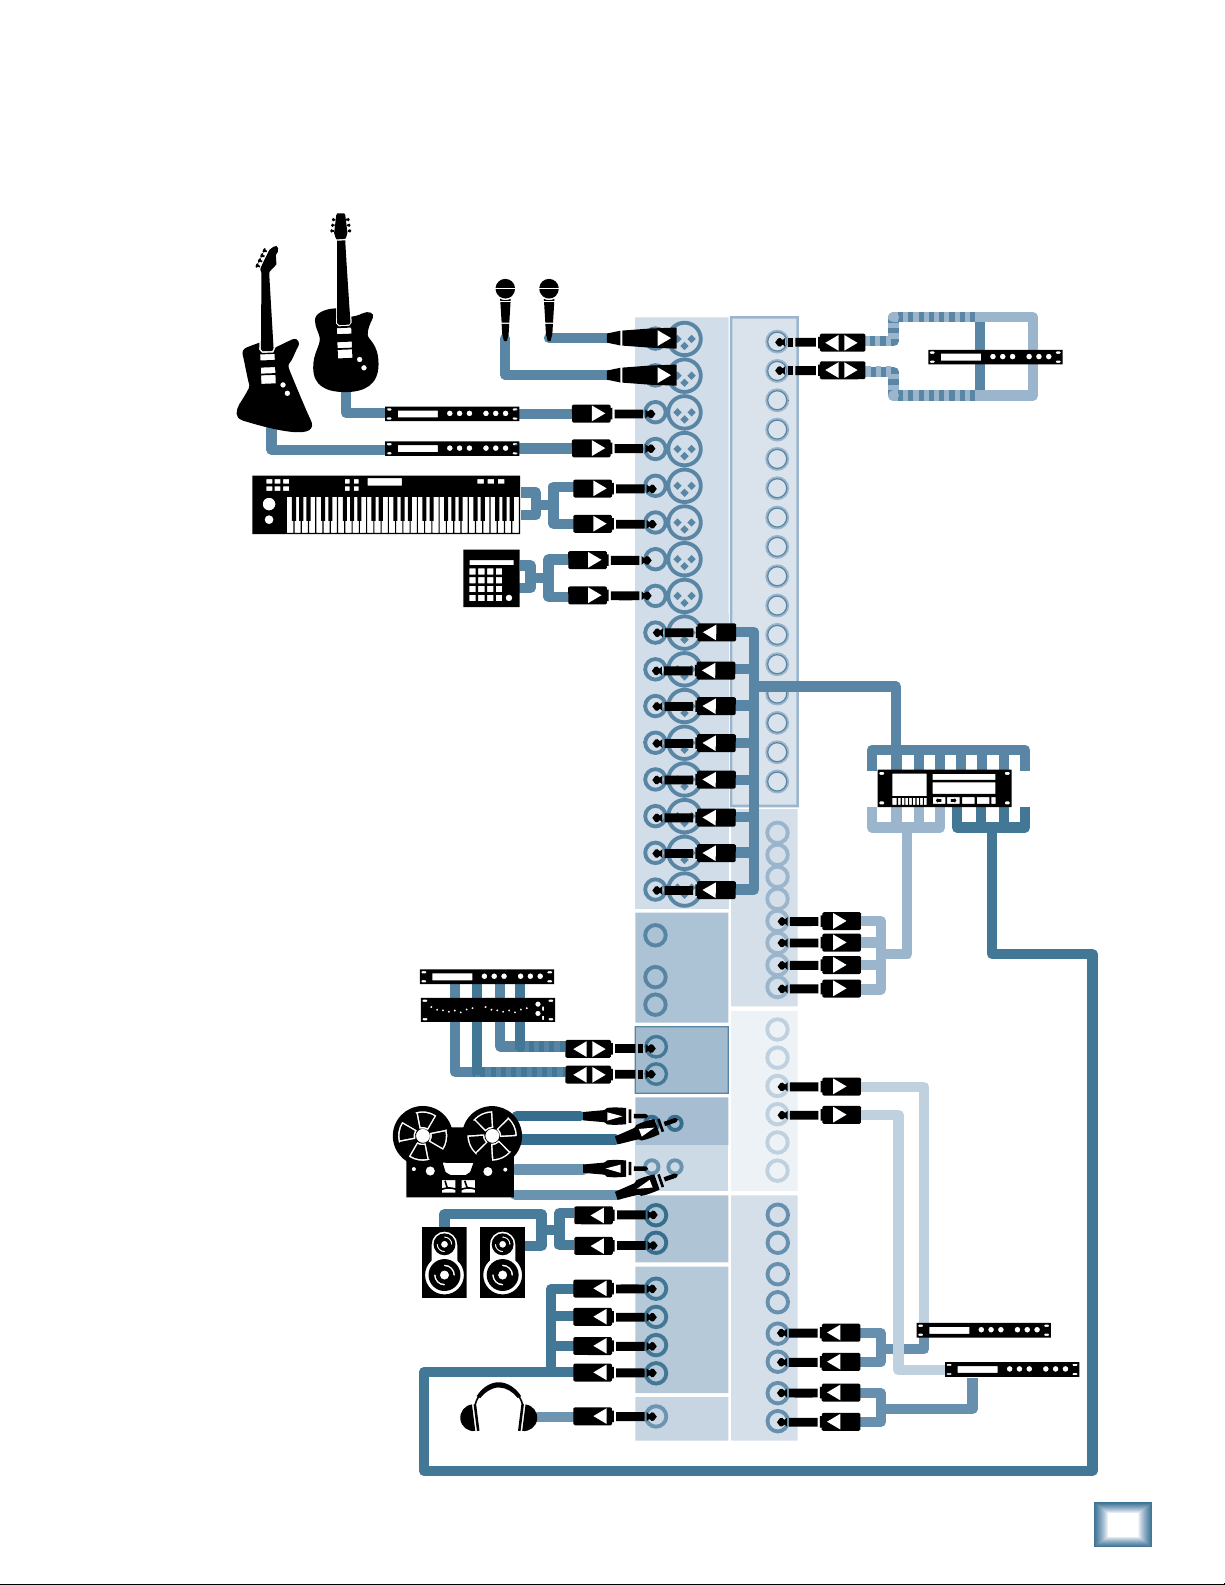
8-Track Recording Applications
1604-VLZ PRO, 1642-VLZ PRO, and Onyx 1640
Mic 1-2
Bass
Guitar
Processors
Keyboard
Drum Machine
1234
1
2
CHANNEL INPUTS
CHANNEL INSERTS
12
345678
Stereo Compressor
Multi-track
Digital Recorder
Stereo Compressor
and Stereo EQ
Stereo Tape Deck
HR824s or
other Po wered
Studio Monitors
Headphones
MONOSTEREO
MAIN OUT
MAIN
TAPE
TAPE
C/R OUT
SUB OUTS
PHONES
DIRECT OUT
BAL/UNBAL
INSERT
IN
AUX SENDS
OUT
BAL/UNBAL
AUX RETURNS
BAL/UNBAL
OUT
BAL/UNBAL
1
2
BAL/UNBAL
56
L
1
R
234
3
4
Reverb
Delay
Mono in
Stereo out
Compact Mixer Reference Guide
67
Page 2

APPLICATIONS: CHAPTER 2
These 4-Bus mixers are well suited for 8-track
recording applications. They’re compact enough to fi t
on a desktop and fl exible enough to provide real pro
studio features. We’ll describe a multitrack recording
setup using a 1604-VLZ PRO and point out the few differences when using a 1642-VLZ PRO and Onyx 1640
in this application.
Split Monitoring
This application diagram illustrates the concept of
Split Monitoring.
The lower numbered channels (1-8) feed the
recorder, while the higher numbered channels (9-16)
are dedicated to monitoring the outputs of the multitrack recorder. The outputs of channels 1-8 are assigned as needed to get the input signal to the desired
track on the recorder. The outputs of the “monitoring”
channels 9-16 are assigned to the MAIN L-R busses.
Recorded tracks playing back, as well as anything
routed to the recorder when the recorder is in the
Input Monitor mode (this mode sends the recorder
inputs straight out its outputs) will be heard when
you push up the faders on Channels 9-16.
2-Track Mixdown Recorder
The mixdown (Cassette/DAT) recorder is connected to the RCA TAPE OUT jacks, which deliver
the MAIN L/R mix at a level of 0 dBV. If you have
a mixdown recorder that operates at “pro” levels,
connect it instead to the balanced or
balanced/unbalanced MAIN stereo outputs.
It’s handy to have the mixdown recorder outputs
connected to the TAPE IN jacks, however, even if an
adapter is required. That way, you can listen to your
mix by simply selecting TAPE as the Control Room
Source.
We’ve shown an equalizer and compressor connected in line with the mixdown recorder by plugging them into the MAIN INSERT jacks. This allows
you to do some pre-mastering, touching up the fi nal
frequency balance and reducing the dynamic range so
that all the elements of your mix can be heard even
in a noisy car. We suggest that you only connect this
fi nal compressor and/or EQ when you’re ready to do
your fi nal mix. Their action could be misleading while
you’re tracking.
Since the recorder returns are assigned to the
MAIN mix, you can always hear what you’re recording,
what you’re about to record (when you’re checking
tuning, positioning mics, or setting levels) and what
you’ve previously recorded.
When a microphone channel is live (assigned to a recorder track and not muted)
and you’re monitoring that track with the
control room speakers, you can get feedback if the
mic is in the same room as the speakers. When recording from a mic in the control room, kill the signal
to the CR speakers by turning the CR volume down or
switching the amplifi er off.
Multitrack Recorder Inputs
In this hookup, we’ve chosen to feed Tracks 1-4
from SUB OUTs 1-4. Tracks 5-8 are fed from DIRECT
OUT 5-8, the channels to which, in this example,
the keyboard and drum machine are connected.
When you’re recording, Channels 1-4 are assigned to
subgroups while Channels 5-8 are assigned to nothing (neither subgroups nor the Main mix). You can,
however, assign them to L-R if you’re rehearsing and
want to hear something without the recorder being
turned on.
Effects
We’re feeding a “parallel path” reverb from AUX
SEND 4 and returning its output to the mix in stereo
on stereo AUX RETURN 2. A digital delay is fed from
AUX SEND 3 and returns on AUX RETURN 1. If you
have a mono delay, connecting its output to the left
RETURN channel centers the delayed signal in the
stereo mix.
What’s wrong with using SENDs 1 and 2? Nothing, and when you have a rack full of effects at your
disposal, there are times when you’ll do so, but there’s
a method to this madness.
We want to send a post-fader signal to our effects,
and AUX 3 and 4 are always post-fader. Chances are
you’ll be reaching for the Reverb send knob more
frequently than the Delay knob, so we’ve made the
bottom knob of the group the Reverb. That way it will
be easier to fi nd. It’s attention to these little details
that can help you to avoid careless errors after a
looooooong mixing session.
We’ve chosen to bring the two effects back into the
mix on RETURNs 1 and 2 so if we choose to create a
separate headphone cue mix on AUX 1 or 2 (rather
than use the PHONES jack), we can add effects to the
headphone mix as well as the main (Control Room)
mix.
68
Compact Mixer Reference Guide
Page 3

APPLICATIONS: CHAPTER 2
Feeding the Recorder
In this setup, we’re using two different ways to feed
signals to the recorder. Tracks 1-4 are fed from the
four subgroup outputs. By using the ASSIGN switches
and PAN pots, those tracks can receive a signal individually or in odd-even pairs from any input channel.
We’ve dedicated Tracks 5-8 to what’s plugged into
mixer Channels 5-8 (keyboard and drum machine)
by connecting those recorder inputs to the DIRECT
OUTs for Channels 5-8.
For a cleaner signal path, you might choose to feed
tracks 1-4 from direct outputs. The disadvantage of
this is that if you want to use the same mic —say the
one connected to Channel 1— to record a second vocal track, you’ll need to re-patch things. By using the
sub outputs, all you need to do is turn the PAN pot or
press a different ASSIGN button.
Note that the Onyx has Direct outputs for every
channel, but they’re not on 1/4" jacks like the VLZPRO mixers, but rather on a 25 pin D-subminiature
(DB-25) connector. See Mixer Tips, Chapter 9, for
the wiring diagram of this connector.
and bass, you must fi rst ASSIGN those channels to
SUB OUTs 1-4 using the ASSIGN buttons and PAN
controls.
Channel ASSIGN PAN
1 1-2 L
2 1-2 R
3 3-4 L
4 3-4 R
Here’s the rest of your pre-fl ight checklist:
• Chan 9-16 - ASSIGN L-R
• TRIMs - Unity Gain
• Chan 9-16 PANs - where you want them
• CHANNEL 9-16 FADERs – Unity Gain
• EQs – Flat (all knobs in their centered position)
• MAIN MIX FADER – Unity Gain
• SUB FADERs 1-4 – Unity Gain
There’s nothing sacred about this channel layout,
but we had to pick something to talk about. Adapt
it to your own choice of instruments and tracks.
Incidentally, we show the guitar and bass going to
Line inputs through outboard processors. They could
have just as well been connected to the mic inputs
through direct boxes (DIs) or by placing microphones in front of the amplifi ers.
Direct electric guitar without the help of an amplifi er or processor is kind of wimpy (though sometimes
nice when added to a miked amplifi er, but direct bass
is often quite effective. This is a good time to mention that the Onyx mixers have two direct instrument
inputs on Channels 1 and 2. Just push a button and
plug in an instrument.
Making Tracks
First we’ll describe the most straightforward
procedure using the system as shown in the diagram
– eight sources, eight tracks. Then we’ll do another
take and show you some studio tricks. First, to avoid
an inadvertent feedback path while you’re getting
things organized, pull the faders fully down on Channels 1-8.
Ready......
The keyboard and drum machine are already
routed directly to tracks. To record the vocals, guitar
• CTL ROOM SOURCE – MAIN MIX
• CTL ROOM/PHONES volume – up a bit
Set.....
Perform the Famous Mackie Level-Setting Procedure for all the instruments and mics. Don’t be shy.
When setting levels, sing and play as loud as you will
during a real take. If you’ll be recording parts one at
a time, set levels one at a time. If the whole band will
be playing together, set levels during a run-through.
Now the mixer will be happy, but what about the
recorder?
WARNING: You’re about to send the
recorder outputs to the mixer, which is
connected to the control room speak-
ers, which can be picked up by the mics if they’re in
the same room as the speakers. The mics feed the
recorder, which feeds the speakers, which feeds the
mics, which feeds the recorder.. . . This is why the
loud squeal you hear is called feedback.
If you’re recording with mics in the Control Room (along with the monitor speakers), you must turn the speakers off – re-
ally off! Switch off the power amplifi er or powered
speakers. Since, in this application, we’re using the
mixer’s headphone jack as a cue feed for the players,
while turning down the CTL ROOM/PHONES control
Compact Mixer Reference Guide
69
Page 4

APPLICATIONS: CHAPTER 2
will prevent feedback in the monitor speakers, it will
also kill the cue mix to the musicians in the studio. If
the live mic is in another room (like the studio), or
quite far away from the speakers, you’re safe.
Set the recorder to Input Monitor mode (or Auto
Input Monitor with all of its Record Ready buttons
pressed) and you should see the recorder’s meters
move as you play.
If you’re using a computer as your recorder, you’ll
have to locate those virtual buttons yourself. Check
the manual – there may be an “input monitor” button
on the track portion of the screen, or it may be in
a separate control panel. Some newer DAW programs come closer to emulating the behavior of a
multitrack recorder and actually have a “multitrack
recorder monitor” mode, which accurately mimics
the monitor switching of a multitrack recorder.
If the record levels on all channels look about right
when you’re wailin’, you’re good to go. But what if
they aren’t?
Used to be that all recorders had input level
controls, but today many (and this includes most
sound cards) don’t. If your recorder has input level
controls, use them to adjust the record level according to the recorder’s instructions. If not, you’ll need
to make adjustments from the mixer.
If the recording level is much too high, this is
because the recorder is expecting a semi-pro level
signal and your Mackie is sending to it at pro level.
You can lower the faders on channels 1-8 to adjust
the level going to the recorder.
If you need to raise the record level, as you may
with a less sensitive sound card, listen carefully for
distortion. When you push the faders up past unity
gain, you’ll be running closer to the clipping point
of the mixer channel. Remember, particularly with
digital recorders, it’s better to set the record level
conservatively than to risk distortion. See the metering discussion in the Tips section for some hints on
setting levels and why you need not worry if you can’t
turn on all the meter lights all the time.
There’s one more set of TRIMS to adjust, and those
are on Channels 9-16, the Recorder Return channels.
With the band playing and the recorder still set for
Input monitoring, perform the Level-Setting Procedure on channels 9-16. You can cheat a little here
– set one TRIM using the SOLO button, then set all
the rest of the Recorder Return TRIMs to the same
position as the one you set using the offi cial method.
You can get away with this if you set the record level
properly, because all the recorder returns will be
coming in at the same level relative to their inputs.
Once all your tracks are recorded, you’ll want to recheck the TRIMs individually before doing the fi nal
mixdown.
This sounds complicated, but in reality, once you
get the hang of it, the procedure it takes less time to
do it than to read about it.
Go......!
Now for the easy part. Start the recorder and play
like you’ve never played before. Then rewind, press
Play, and be amazed at your musical talent.
If you’re a one-person band, you’ll be recording
tracks in multiple passes (which is probably why you
wanted to get into multitrack recording in the fi rst
place).
Keep your wits about you. Once you’ve recorded a
track, don’t forget to switch the recorder out of Record Ready, so you don’t erase the track on the next
pass. And if you’re recording successive passes with
the same mic, remember to assign it to the next track
using the mixer’s PAN and ASSIGN.
When recording the second pass, if you did everything correctly, you should hear your fi rst pass playing back. This gives you something to play along to.
Pretty soon you’ll be overdubbing just like a pro. Use
Channels 9-16 to adjust the mix that you’re listening
to while overdubbing.
Don’t forget the warning about mics getting too
close to speakers. You can record keyboards, drum
machines, and electric instruments while listening
to the control room monitor speakers, but when it
comes time to record the vocals or acoustic guitar
tracks, kill the control room speakers and plug in the
headphones.
Mixdown
A really cool thing about this setup is that you’re
ready to mix at any time. No cables to patch, no buttons to press. In fact, you were probably doing some
panning, level adjustments, and maybe some EQing
of the recorder return channels as you were tracking.
These are all elements of mixing and the more you
do it, the better you get. For now, the most important
thing is to learn how to use the tools.
If it sounds great just the way it is, mixdown is as
simple as checking the record level and pressing the
Record button on the 2-track recorder.
70
Compact Mixer Reference Guide
Page 5

Do the vocals need some reverb? With AUX
RETURN 2 set to its Unity Gain position, turn up
AUX SEND 4 on the vocal tracks. Remember, you’re
working with mixer channels 9-16 now, so turn up
Aux Send 4 on channels 9 and 10. Need some delay
on the guitar? The delay is waiting for you to turn up
AUX 3 on Channel 11. If you want to compress the
bass track, unplug the compressor from INSERT 1
and plug it into INSERT 12.
Keep an eye on the LEFT/RIGHT meters as you’re
mixing. Levels tend to creep upward as you work. It’s
a fact of life. You may need to drop all the channels
by a few dB in order to keep the mix level peaking
around 0 VU. If you’ve added a lot of EQ boost on a
channel, SOLO the channel and re-adjust its TRIM to
bring its level back to normal.
Our example shows a stereo equalizer and compressor in the MAIN inserts. Once you have a pretty
good mix, that’s the time to put those into service to
see if you can make the mix any clearer or “hotter”
(if that’s your preference). There are some pretty
remarkable digital “fi nal processors” available today
that can add a lot of punch and sparkle to a mix, but
they’re power tools, and a little goes a long way.
APPLICATIONS: CHAPTER 2
Once your mix sounds good enough to show off,
check the record level on the mixdown recorder and
let ‘er rip.
Other Cue Mixes
If you’re recording bands in the studio, they may
want to hear something other than a well balanced
mix that you’re creating in the control room. A headphone amplifi er would be a good addition to your
system. A headphone amplifi er typically has several
phone jacks, each with its own volume control so the
musicians can adjust their own level without blasting
each other or driving you out of the control room. See
the hookup diagram on the next page for a headphone amplifi er suggestion.
Compact Mixer Reference Guide
71
Page 6

APPLICATIONS: CHAPTER 2
1604-VLZ PRO
8-Track Recording, take 2
Mic 1-2
Bass
Guitar
Processors
Keyboard
Drum Machine
Stereo Compressor
and Stereo EQ
Stereo Tape Deck
HR824s or
other Po wered
Studio Monitors
12345
1
2
Stereo Compressor
678
CHANNEL INPUTS
CHANNEL INSERTS
910111213141516
Multi-track
Digital Recorder
12
345678
Y-Split for
Double Bussing
MONOSTEREO
DIRECT OUT
BAL/UNBAL
MAIN OUT
Headphone
amp
1
MAIN
INSERT
IN
TAPE
OUT
TAPE
C/R OUT
BAL/UNBAL
BAL/UNBAL
SUB OUTS
2
3
4
AUX SENDS
56
L
1
R
L
234
R
AUX RETURNS
Delay
Reverb
72
Headphones
Compact Mixer Reference Guide
OUT
PHONES
Page 7

APPLICATIONS: CHAPTER 2
About Bouncing Tracks
If you like to build up a lot of layers in your recording, a quintuple-tracked guitar lead, for example,
when using an 8-track recorder, you’ll have to do a
lot of track bouncing. What this means is that you
record several parts (which could be fi ve passes of
the guitar solo, a four-part background vocal, or the
whole drum kit) on individual tracks, then, while
you still have one or two unused tracks, mix those
parts down to one or two tracks, and record that mix
on the open tracks. Now, you can re-use the original
tracks to record more parts. Using this technique,
you can make your eight tracks seem like a lot more
than eight parts.
Double Bussing
One thing that can make bouncing easier is having
the fl exibility to send any channel or mix of channels
to any recorder track. Using direct outputs requires
patching or moving cables, but as long as you don’t
need to record on more than four tracks at a time,
you can make the four SUB outputs do double duty
by splitting each one out to two recorder tracks.
In the Double Bussing Hookup Diagram, each of
the four SUB OUTs feed a pair of tracks. SUB 1 goes
to Tracks 1 and 5, SUB 2 goes to Tracks 2 and 6, etc.
The way to do this is to buy or build Y-adapters or
Y-cables, which have one input and two outputs. (A
Y-cable is NOT the same as an Insert cable) Once
you’ve connected the recorder in this manner, you’ll
be able to route any input to any track by using the
ASSIGN buttons and PAN knobs.
What we’ll do is record the rhythm section, then
bounce that to two tracks, and record lead parts over
the original rhythm tracks. Here’s how this works.
Pass 1
We’re still using Channels 9-16 for our recorder
returns, so assign them to L-R. We’ll be using the SUB
outputs, so bring the SUB faders up to Unity gain.
Now, let’s assign some inputs to tape tracks.
Channel Source Assign Pan Track
7 Drum L 1-2 L 1
8 Drum R 1-2 R 2
3 Guitar 3-4 L 3
4 Bass 3-4 R 4
Put tracks 1, 2 and 3 into Record, start the drum
machine, and record the rhythm guitar along with
the drums. Adjust the faders on Channels 9-10
(drums) and 11 (guitar) for a comfortable mix. It’s
OK to turn the guitar up too loud at this point if it
helps you to play well.
Oh, and don’t forget to program a count-off in the
drum machine so you’ll know when to start. You can
chop it off when you mix or edit the mixed song.
You might run through the song a few
times until you’re happy with the rhythm
guitar recording. Once you have it down,
don’t forget to take Tracks 1, 2, and 3 out of Record
Ready or you’ll erase ‘em quicker than you can say
“Oops!”
Some recorders and some multitrack
recording software allows you to “double
bus” right at the recorder’s input. The
Alesis ADAT® and Mackie SDR24/96 are examples.
On these recorders, you need only connect the SUB
OUTs to recorder inputs 1-4 and a button on the
recorder takes care of the other four inputs. The
1642-VLZ PRO has a double set of jacks on the SUB
outputs, so no adapters are required.
Recording The One-Person Band
Here’s an example of how you’d record using
a double-bussed setup. Let’s say you’ll begin the
project by playing rhythm guitar along with the drum
machine, then add a bass track, a keyboard, sing the
lead vocal, add lead guitar and keyboard solos, then
fi nally put on some background vocals. That’s more
than 8 tracks, isn’t it?
Pass 2
Once the guitar part’s solid, rewind, put Track 4
into Record, and play the bass while listening to the
guitar and drums. Since the bass channel is assigned
to recorder track 4, it’ll show up for monitoring on
Channel 12. Adjust the Channel 9-12 mix so that you
can play comfortably and hear what you’re doing.
Pass 3
This is a good time to add a keyboard part to the
rhythm section before buttoning it up. Let’s make it
a mono track since we don’t want it to clutter up the
mix.
Hey! We’ve just made a production decision and we’ve just started tracking! This
is one of the things you’ll need to do when
bouncing. Might as well get used to it. There’s no
reason why you couldn’t record the background keys
Compact Mixer Reference Guide
73
Page 8

APPLICATIONS: CHAPTER 2
in stereo, but it wouldn’t illustrate the next point, so
give us a break while we’re in teaching mode.
It’s time for some housekeeping. We’re done with
the drums, bass, and guitar for a while, so un-assign them from Busses1-2 and 3-4. We’ll need those
outputs for other things and we don’t want stray
electronic noise creeping in.
Now, let’s send the keyboard to a recorder track:
Channel Source Assign Pan Track
5 Keys L 1-2 L 5
6 Keys R 1-2 L 5
Note that we’ve panned both keyboard outputs to
the left, sending them to SUB OUT 1. Since that’s
wired to Track 5 as well as Track 1, the keyboard
signal will get to the desired track.
Put Track 5 into Record, and tickle the ivories
while listening to the guitar, bass, and drums. Starting to sound like a band? Good!
Listen closely to the keyboard sound
when combining stereo outputs to mono.
Patches that rely on phase shifting
between the stereo channels, lose something when
collapsed to mono. You may want to use a different
patch, or fi re the producer and record the keyboard
in stereo.
Bounce Time
Let’s take inventory of our recording so far:
Track 1 – Drums L
Track 2 – Drums R
Track 3 – Rhythm Guitar
Track 4 – Bass
Track 5 – Background Keyboard
ing to an adjacent track due to coupling between
tracks right at the record head. This is never a
problem with a digital recorder or DAW, and almost
never a problem with a standard track width analog
recorder (1" 8-track) but it’s something you should
be aware of if you’re using a semi-pro analog tape
deck.
When you’re happy with your rhythm section mix,
it’s time to record it. We’ll put it on Tracks 7-8. Unassign all the input channels (1-8). Now, switch the
assignment of the rhythm channels (9-13) from L-R
to busses 3-4.
Put Tracks 7-8 into Record Ready and roll the tape.
You should hear your rhythm mix coming in on Channels 15-16. Check the record level on Tracks 7-8 and
use the SUB 3-4 faders to adjust if necessary.
When the level looks good and the mix sounds
good, rewind, press the Record button, and see if you
can dance to it.
Now, rewind and play back your rhythm mix a
couple of times to be sure it’s what you want. You’ll be
erasing the tracks that made up that mix, so there’s
no turning back.
Pass N
The good news is that you now have a rhythm
section recorded and six more tracks available for
other parts. What you do with them and the order
in which you record further passes depends on your
song and your creativity. A basic demo might only
require a lead guitar or keyboard, a lead vocal, and
maybe a background vocal. Plenty of room for that.
Simply continue the procedure of assigning an input
to a track, recording that track, and moving on until
you’ve fi lled all the tracks and recorded all the parts
you wanted.
Play through the rhythm tracks a few times, and
work up a good mix using the levels, pans, EQ, and
effects if they’re called for. Give it plenty of thought
since, after the next step, you’ll have to live with this
mix for the rest of the project. You’ll probably want
to pan the drums fully left and right, put the bass in
the center, and pan the rhythm guitar and keyboard
fairly far off center on opposite sides to leave room
for the leads.
Note that Track 6 is still available,
You could have used that if you chose to
record the keyboard in stereo. But there’s
another reason why we left Track 6 open. On a narrow format analog recorder (1/2" or 1/4" 8-track for
example), it’s possible to get feedback when bounc-
74
Compact Mixer Reference Guide
You can continue the bounce process, though, if
you need to record more parts than you have remaining tracks. Want a fi ve-layer guitar solo? Record the
parts on tracks 1, 2, 3, 4, and 5, then bounce them to
Track 6. Want a four part backup chorus? Record on
Tracks 2, 3, 4, and 5, then mix and bounce them to
Track 1. It’s up to you.
Studio Headphone Monitoring
The mixer’s headphone output follows the control
room source, which, most of the time, is the L-R
MAIN MIX. When tracking, you may want to hear
something different in the headphones. This hookup
diagram shows an external Headphone Amplifi er
connected to the AUX 2 OUTPUT.
Page 9

APPLICATIONS: CHAPTER 2
To create an independent headphone mix, for
example, for the lead singer that’s heavy on vocals
and bass but has just enough of the drums so he can
keep in time, adjust the AUX 2 knobs on the recorder
return channels to make the singer happy. You’ll
probably want that headphone mix to be pre-fader so
the singer doesn’t hear any tweaks that you make to
your control room mix while he’s singing, so press the
PRE buttons on those channels.
Since we’re using RETURN 2 for the reverb, adding
reverb to the headphone mix is easy – just turn up
the TO AUX SEND 2 knob. On the Onyx 1640, there’s
a control to send AUX RETURN 2 to AUX SEND 6 (as
well as one to route RETURN 1 to the AUX SEND 5
bus) so if you have an Onyx, use AUX SEND 6 rather
than 2 for your headphone mix if you want to add an
effect in the phones.
Subgroups and Submixes
We’ve shown how subgroups can be used to mix
several tape tracks down to one or two, but they can
also be used to mix live inputs. In these examples
we’ve used a stereo drum machine for our drum
tracks, but if you have a real drummer with a real
drum kit, you may choose to set up several mics on
the drums, assign those channels to a pair of SUB
busses, and use subgroups to mix those mics to two
channels, which you’ll send to the recorder.
16 Tracks on the 1604-VLZ PRO or Onyx
1640?
Sure, why not? After all, they’re sixteen channel
mixers. Remembering that a channel INSERT is both
an output and an input, you can put up to sixteen
recorder tracks “in line” with the channels. The Insert Send gives you one mic preamp output to every
track, and the Insert Return is a line-level input for
every channel. On the Onyx, you can use the direct
Recording outputs to feed the recorder straight from
the mic preamps, then use the Insert Returns with
a trick plug to monitor the outputs of the multitrack
recorder.
If this isn’t a big enough hint, see the 1202/1402
8-Track setup for a more detailed description of this
setup.
Using the Insert Outputs connected to up to
sixteen recorder tracks is an excellent way to make a
live recording of your band. When you get home, just
patch the recorder outputs to the mixer line inputs
(or for an even cleaner signal path, to the Insert Returns – just push the 1/4" plug in all the way) and it’ll
be just like you were there playing on stage, directly
into the microphones.
Connect your drum mics to the lower numbered
mixer channels, assign them to subgroups 1-2, and
record as in the example. By monitoring the recorder
returns for the drum tracks (channels 9-10 on the
mixer) you can hear your drum mix and adjust the
faders, pans, and EQ on the input channels for a good
drum sound.
You may want to initially devote four or fi ve tracks
to drums, and if necessary, mix those down with the
rest of the rhythm section on a bounce pass. Typically
when working with fewer than 16 tracks, the kick
and snare get their own tracks, with toms, cymbals,
and overhead mics mixed to two other tracks.
This same technique works well when you’re
recording large groups – a string or horn section, or a
vocal chorus – as part of a multitrack project. Assign
the mics to a pair of subgroups and record the section as a stereo pair of tracks.
Compact Mixer Reference Guide
75
Page 10

APPLICATIONS: CHAPTER 2
1642-VLZ PRO 8-Track Recording
In
8 Track Recorder
Out
678
12345
1
2
CHANNEL INSERTS
CHANNEL INPUTS
Stereo Processor
From Mics, Keys,
Drum machines,
etc.
Stereo Processor
Mixdown Recorder
9/1010/11
MAIN OUT
MONO L R L R
MAIN
TAPE
TAPE
C/R OUT
DIRECT OUT
AUX SENDS
BAL/UNBAL
INSERT
AUX RETURNS
IN
OUT
BAL/UNBAL
BAL/UNBAL
12
34
BAL/UNBAL
EFX A
EFX B
76
Powered Studio Monitors
Headphones 1
Headphones 2
Compact Mixer Reference Guide
SUB OUTS
OUT
PHONES
From Sub Outs Bal/Unbal
Page 11

APPLICATIONS: CHAPTER 2
The 1642-VLZ PRO has a lot in common with the
1604. This hookup shows the 1642-VLZ PRO set up for
8-Track recording with split monitoring and using the
built-in double-bussing feature on the SUB outputs.
Refer to the 1604 operating procedures for a how-todo-it description.
Inputs and Outputs
It’s nice to have all the cables in place so you don’t
need to re-patch when going from tracking to mixdown, and that’s a plus with this hookup.
Multitrack Recorder Connections
In this application, we’re using Line Inputs 1-8 as
the recorder returns. Those will normally be assigned
to the main L-R bus so they will appear in the headphones, control room monitors, and at the inputs of
the mixdown recorder. Since the 1642 has 8 mono
and 4 stereo inputs, this layout is more appropriate
for track bouncing and one-track-at-a-time recording
than bringing the recorder returns in on the last 8
(stereo) channels.
Connect the sound sources to Mono/Stereo inputs
9-10 and 11-12. If you need more than two mic
inputs, this is an excellent place to use an outboard
mic preamp or two, such as the Onyx 800R-800. Using
outboard preamps for the different colors that they
impart often gives a nice touch to a recording.
Use the PAN controls and ASSIGN buttons to route
the signal from the mic or line inputs 9-12 through
the SUB Outputs to the recorder inputs. As with the
1604 hookup, we’re using subgroups as signal routers,
even though they may not be summing more than one
signal.
A Purist’s Recording Path
For recording with the minimum electronics in
the signal path, you’ll want to patch channel direct
outputs or insert outputs directly to the recorder
inputs. Of course you can always connect a line-level
source such as a mic preamp or keyboard directly to
a recorder input for the purest signal path.
Since only Channels 1-8 have direct outputs and
inserts, you’ll need to free those up if you want the
most direct path from the mic preamp to the recorder.
During tracking, you can move the recorder returns to the eight stereo line level inputs 9-16 (you’ll
have to move or lose the effect returns). This won’t
give you all the panning fl exibility that you have on
the mono inputs, since, with both inputs of a stereo
channel connected, each input is routed to either the
Left or Right and the PAN only adjusts the balance
between the two. It’ll do for monitoring while tracking, however.
When you get ready for mixdown, you won’t need
the direct outputs, so move the recorder outputs
back over to Channels 1-8. After a few switcheroos
like this, you’ll be ready for a patchbay.
Recording, Overdubbing, and Mixing
Refer to the 1604-VLZ PRO section for a blowby-blow description of a tracking session. The only
variations are where we’ve chosen to connect things
in this example.
The 1642-VLZ PRO provides two jacks for each of
the four SUB outputs. Connect these to the eight
inputs to the 8-track recorder with BUS 1 going to
tracks 1 and 5, BUS 2 going to tracks 2 and 6, etc.
Effect Processor Connections
The two effect processors in this hookup are fed
from AUX SENDs 3 and 4, and, in this example, are
returned to the stereo mix through the two stereo
line-level input channels 13-14 and 15-16.
The effect processor outputs could also be connected to AUX RETURNS as shown in the 1604
recording hookup. This would free up the stereo line
inputs for additional recording sources – a drum
machine, another keyboard, or four more channels
of outboard mic preamps. But variety is the spice of
mixer hookups.
Compact Mixer Reference Guide
77
Page 12

APPLICATIONS: CHAPTER 2
Notes
78
Compact Mixer Reference Guide
 Loading...