


SETUP MONTAJE
I-LINE
I-LN 120/150 S LED


CONTENTS CONTENIDO
1 x Shade Pantalla
1 x Canopy Florón
4 x Screws & wall plugs Tornillos y tacos
1 x Allen key Nº3 Llave Allen Nº3
1 x Level Nivel
No.3
* Additional Contents UL (Only for Junction Box)
1 x Cover
1 x Adjustable Back Plate
2 x Screws & Spherical nuts
1 x Allen key Nº 2,5
*
TECHNICAL SPECIFICATIONS ESPECIFICACIONES TÉCNICAS
Integrated LED LED Integrado
Class I Clase I
Led strip
120-277V: Dimmable 0-10V & DALI
220-240V: Dimmable Bluetooth BT
I-LINE 120: 30W 50-60Hz
I-LINE 150: 40W 50-60Hz
Led strip
120-277V: Dimmable 0-10V & TRIAC
I-LINE 120: 30W 50-60Hz
I-LINE 150: 40W 50-60Hz
3

ASSEMBLY INSTRUCTIONS INSTRUCCIONES DE MONTAJE
FIX TO THE CEILING FIJAR AL TECHO
1
A
2
OPEN CANOPY ABRIR FLORÓN
FRONT
Use the drill template to mark the position of
your lamp on the ceiling.
Once the wall plugs are in place screw in the
canopy support screws (A) leaving a 3mm gap
so you can click the conopy keyhole slots into
place later.
Usar la plantilla para marcar la posición de la
lámpara en el techo.
Fijar los tornillos (A) para la sujeción del florón
dejando un margen aproximadamente de
3mm para que pueda posteriormente encajar
el florón.
UL (Only for Junction Box USA and CANADA)
Use the drill template to mark the position of
your lamp on the ceiling.
Two of your screws will coincide with the
positions of your junction box.
The other two screw will need wall plugs.
Once the wall plugs are in place, screw in the
canopy support screws (A) leaving a 3mm
gap so you can slip the conopy keyhole screw
holes later.
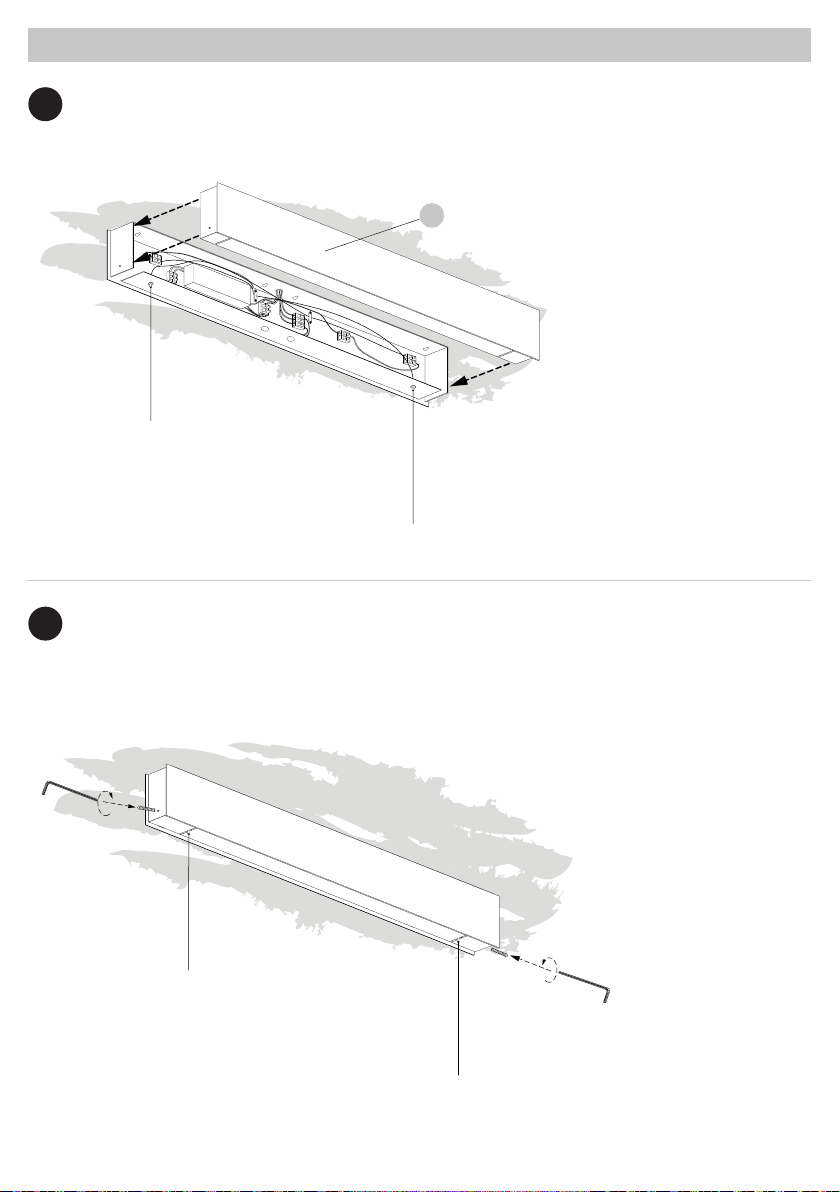
The canopy of your lamp is made up of two
halves. One has the electrical installation
(BACK) on it, and the other is the cover
(FRONT).
-Use the allen key supplied to open the canopy
and pull the two halves apart.
-Remove the 2 cable traps temporarily to
facilitate the hanging of your canopy. (Det.1)
Use allen key No.3
Det . 1
4
BACK
El florón está compuesto por dos partes, una
en la que se aloja la instalación eléctrica
(BACK) y otra que funciona a modo de cierre
del florón (FRONT).
-Use la llave Allen para abrir el florón y separe
las dos partes.
-Retire temporalmente los 2 tapones de cada
prensacable. (Det.1)

ASSEMBLY INSTRUCTIONS INSTRUCCIONES DE MONTAJE
FIX YOUR CANOPY TO THE CEILING FIJAR EL FLORON AL TECHO
3
Feed the electrical wires (B) coming from the
mains through the top side of the canopy
B
C
3mm.
Det. 2
(C). Use the canopy keyhole slots to click the
canopy into place once then tighten the screws
the rest of the way. (Det. 2)
Pase los cables de la red eléctrica (B) a través
de la parte superior del florón (C).
Utilice las ranuras de ojo de cerradura para
encajar el florón en los 3mm de margen .
Apriete totalmente los tornillos. Det. 2
UL (Only for Junction Box USA and CANADA)
2
- Feed the electrical wires (B) from the mains
through the adjustable Jbox plate(1) and the
fix the it to the Jbox.
B
- Now feed the wires through the Jbox cover
plate (3) an through the top side of the canopy
(C).
1
- Fix the canopy (C) and Jbox cover plate(3)
to the junction box (2). and use the canopy
keyhole slots to click the canopy into place on
the screws you have in the ceiling.
-Tighten the screws the rest of the way to
3
C
firmly fix the canopy to the ceiling.
5

ASSEMBLY INSTRUCTIONS INSTRUCCIONES DE MONTAJE
MAKING YOUR CONNECTION CONEXIÓN DE LA LÁMPARA
4
2
1
Det . 3
IMPORTANT: Turn off the power before
installing your lamp.
In your canopy there are two important
terminal blocks. (Det. 3)
1. Mains terminal block marked orange, used
to connect to the main power
2. Dim terminal block marked purple, used to
connect to your dimming controls.
IMPORTANTE: Desconectar la red eléctrica
antes de instalar la luminaria.
En el florón se encuentran dos bloques de
conexión principales. (Det.3)
1. Bloque de conexión de la red naranja, para
conectar los cables de la red eléctrica.
2. Bloque de conexión de regulación violeta,
para conectar los cables de regulación que
vienen de la red eléctrica.
DIFERENT ELECTRICAL CONNECTION OPTIONS
MAINS CABLE
N
L
NON DIMMABLE or BLUETOOTH or TRIAC
NO REGULABLE o BLUETOOTH o TRIAC
6
Switch
F
N
D-
D+
Terminal Blocks
Regleta de conexión
OPTION 1:
NON DIMMABLE or BLUETOOTH or TRIAC
You will have three wires coming from the
ceiling. Connect the Neutral (N), Ground (GND)
and Line (F) to the corresponding connectors
on the mains terminal block marked in orange.
Orange
Naranja
OPCIÓN 1:
NO REGULABLE o BLUETOOTH o TRIAC
Tiene una manguera de tres polos viniendo
del techo. Conecte el neutro (N), tierra (GND)
y la línea (F) en la posición correspondiente a
Purple
cada uno en la regleta de conexión naranja.
Violeta

ASSEMBLY INSTRUCTIONS INSTRUCCIONES DE MONTAJE
MAINS CABLE
D+
D-
N
L
Switch
DIMMING 0-10 V or DALI
DIMMING 0-10 V o DALI
HANG YOUR LAMPSHADE SUSPENSIÓN DE LA LÁMPARA
5
E
F
Terminal Blocks
Regleta de conexión
F
N
D-
D+
OPTION 2: DIMMING 0-10V or DALI
You will have five wires coming from the
ceiling. Power and dimming control.
Connect the Neutral (N), Ground (GND) and
Line (F) to the corresponding connectors on
the mains terminal block marked in orange.
Take the two dimming control wires +/- and
connect them to the dimming terminal block
marked in purple.
NOTE: it is important to connect these
according to the polarity marked on the
dimming terminal block
aa
Orange
OPCIÓN 2: REGULABLE 0-10 V o DALI
Debería tener cinco cables viniendo del
Naranja
techo.
Conecte el neutro (N), tierra (GND) y la línea
(F) en la posición correspondiente a cada
uno en la regleta de conexión naranja.
Purple
Tome los dos cables restantes de regulación
Violeta
+/- y conéctelos a la regleta de conexión
violeta.
NOTA: es importante conectarlos de acuerdo
con la polaridad indicada en la regleta de
regulación.
Take the electrical suspension wires (F) from your
lamp. They will be marked red(+) and black(-).
D
Pass them through the suspension traps on the
bottom of your canopy that will also be marked
red(+) and black(-) on the inside of your canopy(E).
These wires must be connected to the lamp
terminal blocks, marked in yellow (D) according to
their polarity. See Step 6.
Note: the left suspesnion cable is attached to the
right terminal block(D) and the right cable to the
left terminal block(D).
For added security put on the stopper (G) and
tighten it.
red wire - red suspender - red terminal block
black wire -black suspender -black terminal block
Level your fixture by adjusting the height of each
electrified suspension wire.
G
7

ASSEMBLY INSTRUCTIONS INSTRUCCIONES DE MONTAJE
Tome los cables eléctricos que vienen de la
lámpara (F) señalados en rojo (+) y negro (-).
Páselos a través de los suspensores situados en
la la parte inferior del florón (E) marcados en el
D
G
LAMP CONNECTION CONEXIÓN DE LA LÁMPARA
6
ELECTRIFIED SUSPESION CABLE
CABLE SUSPENSOR ELECTRIFICADO
Black
Negro
ELECTRIFIED SUSPESION CABLE
CABLE SUSPENSOR ELECTRIFICADO
Red
Rojo
E
F
V -
V +
interior del florón. Rojo (+) y negro (-).
Estos cables deben conectarse según su
polaridad, al bloque de conexión de la lámpara,
marcado en amarillo (D).Paso 6.
Nota: el cable de suspensión izquierdo está
conectado al bloque de conexión derecho (D) y
el cable derecho al bloque de conexiónizquierdo
(D).
Para más seguridad poner los topes (G) y
apretarlo.
cable rojo - suspensor rojo - bloque rojo
cable negro - suspensor negro - bloque negro
Nivele su lámpara ajustando la altura de cada
uno de los cables.
This is the wiring diagram of how to connect
the suspension cables to the yellow terminal
blocks marked red and black. Step 5
NOTE: Polorization in important so please
connect as indicated
Diagrama de conexión de los cables
Yellow
suspensores a las regletas de conexión
Amarillo
amarillas marcadas en rojo y negro. Paso 5
NOTA: La polaridad es importante, haga la
conexión como se indica.
Terminal Blocks
Regleta de conexión
8
ASSEMBLY INSTRUCTIONS INSTRUCCIONES DE MONTAJE
CLOSE CANOPY CERRAR FLORÓN
7
8
CLOSE CANOPY CERRAR FLORÓN
H
Once all your wiring is complete close the
canopy by replacing the canopy cover (H).
Una vez conectados todos los cables, coloque
la tapa frontal y fíjela enroscando los tornillos
(H).
Use allen key No.3 to fix the canopy cover.
Usar la llave allen Nº.3 para fijar la tapa
frontal.
Turn on the mains again.
Conectar la tensión eléctrica.
Use allen key No.3
9
ASSEMBLY INSTRUCTIONS INSTRUCCIONES DE MONTAJE
1. Descarga la app desde Apple App Store o Google
2. Enciende tus luminarias habilitadas con la
5. La app encontrará automáticamente todas las
luminarias que incorporan la tecnología eBLUE y
7. La app añadirá automáticamente todas las
• Realiza una pulsación sobre el icono de las
distintas lámparas para apagar o encender tus
2. Apague y vuelva a encender rápidamente (máx.
1 seg.) El nivel de luz comienzará a aumentar
3. Cuando la luz llegue al nivel de regulación
(máx. 1 seg.). El nivel seleccionado se guarda
4. Si el segundo movimiento no se realiza en 8
segundos. La intensidad de la luz alcanza su nivel
Casambi App Short User Guide
Casambi App Short User Guide
Manejo de la app Casambi
Manejo de la app Casambi
Dispositivos compatibles
Dispositivos compatibles
• Android • iOS
• Android • iOS
Primer uso
Primer uso
La puesta en funcionamiento de la tecnología eBLUE
La puesta en funcionamiento de la tecnología eBLUE
es muy sencilla.
es muy sencilla.
Compatibility
Compatibility
• Android • iOS
• Android • iOS
First time use
First time use
Casambi app is easy to enable Bluetooth use.
Casambi app is easy to enable Bluetooth use.
1. Casambi app can be downloaded and installed from
1. Casambi app can be downloaded and installed from
the Apple App Store for iOS devices or from the Google
the Apple App Store for iOS devices or from the Google
Play Store for Android devices.
Play Store for Android devices.
2. Turn on your Casambi enabled luminaires.
2. Turn on your Casambi enabled luminaires.
3. Make sure your Bluetooth is on.
3. Make sure your Bluetooth is on.
4. Open the app.
4. Open the app.
5. Casambi app will automatically find all Casambi
5. Casambi app will automatically find all Casambi
enabled luminaires that are switched on.
enabled luminaires that are switched on.
6. Tap on the ‘Take all lamps into use’.
6. Tap on the ‘Take all lamps into use’.
7. Casambi app will automatically add all luminaires to
7. Casambi app will automatically add all luminaires to
one network and open the ‘Lamps’ tab.
one network and open the ‘Lamps’ tab.
Basic gestures
Basic gestures
• To turn off or on your luminaire just tap on the lamp
• To turn off or on your luminaire just tap on the lamp
control.
control.
• Pan lamp control left or right to adjust light level of
• Pan lamp control left or right to adjust light level of
the luminaire.
the luminaire.
Play.
Play.
tecnología eBLUE.
tecnología eBLUE.
3. Asegúrate que tu Bluetooth esté conectado.
3. Asegúrate que tu Bluetooth esté conectado.
4. Abre la app.
4. Abre la app.
están encendidas.
están encendidas.
6. Pulsa en “Comenzar a utilizar todas las lámparas”
6. Pulsa en “Comenzar a utilizar todas las lámparas”
luminarias encontradas a tu red y abrirá la pestaña
luminarias encontradas a tu red y abrirá la pestaña
“Lámparas”.
“Lámparas”.
Controles básicos
Controles básicos
luminarias.
luminarias.
• Mantén pulsado y desliza el dedo horizontalmente
• Mantén pulsado y desliza el dedo horizontalmente
sobre el icono de una lámpara para ajustar el nivel
sobre el icono de una lámpara para ajustar el nivel
de luz de la luminaria.
de luz de la luminaria.
Dimming without app
Dimming without app
1. Turn lights on from the switch.
1. Turn lights on from the switch.
2. Quickly flick the switch off and back on (max. 1 sec.)
2. Quickly flick the switch off and back on (max. 1 sec.)
The light level starts to increase gradually from the
The light level starts to increase gradually from the
lowest level.
lowest level.
3. Flick the switch off and back on again at desired dim
3. Flick the switch off and back on again at desired dim
level. The selected level is saved automatically.
level. The selected level is saved automatically.
4. If the second flick is not done within 8 sec. the light
4. If the second flick is not done within 8 sec. the light
intensity reaches its maximum level.
intensity reaches its maximum level.
For more option look at the Casambi web.
For more option look at the Casambi web.
10
Regulación sin aplicación
Regulación sin aplicación
1. Encienda la lámpara desde su interruptor.
1. Encienda la lámpara desde su interruptor.
gradualmente desde el nivel más bajo.
gradualmente desde el nivel más bajo.
deseado, apague y vuelva a encenderlo rápidamente
deseado, apague y vuelva a encenderlo rápidamente
automáticamente.
automáticamente.
máximo.
máximo.
Para más opciones de regulación consulte la página
Para más opciones de regulación consulte la página
web de Casambi.
web de Casambi.


USEFUL INFORMATION INFORMACIÓN DE INTERÉS
Use and care of your lamp.
You have just purchased an original handmade product by LZF.
Your lamp is made out FSC® certified natural wood veneer treated
with our patented Timberlite® finish.
This treatment both protects and safeguards the wood veneer
against breakages.
CLEANING OF …
The shades we recommended a feather duster or a damp cloth,
clean only the flat surface of the veneer with the cloth, and please
avoid any moisture contact along the edge of the veneer.
The metallic surfaces should be treated with care and cleaned
with a soft damp cloth only. Make sure that moisture does not
penetrate joins or junctions between metal parts. Do not use
solvents of any kind.
The acrylic diffusers on your lamp can be cleaned with a regular
window cleaning spray and a soft cloth. Do not use solvents of any
kind.
PRECAUTIONS
Luminaire for indoor use only.
Unplug the lamp before cleaning. Servicing or manipulation of
the electrical installation should only be performed by qualified
electrical personnel or by the LZF service department.
Glass
Improper handling can cause loosening or chipping of the glass.
Any bubbles, or lack of homogeneity in the glass is a characteristic
feature of hand blown glass and not a defect. The surface of
the glass may also include imperfections due to its manual
manufacturing. When cleaning, use a window cleaning spray and
a soft cloth.
Avoid handling glass without gloves to prevent fingerprints and
loss of gloss.
Wood veneer
Avoid direct sunlight, strong indirect sunlight and moisture on
your lamp. Since wood is a natural material, a gradual change
in tone may occur over time. Furthermore, if the lamps were
purchased at different times, there will be differences in colour
and tone, particularly in lighter coloured veneers. This is can not
be considered a manufacturing defect or reason for complaint. Do
not install your lamp near any air-conditioning vents or ventilation
shafts as this may damage the wood veneer used in this fixture.
LEDS
If your lamps contains Integrated LED circuits do not touch the LED
surface with your bare hands as this can reduce the life of your
LED.
BULBS
Bulbs are normally not included, unless indicated. We recommend
using energy-saving LED bulbs. Please refer to the instruction
manual or visit our website www.lzf-lamps.com to make sure you
are using the best bulb for your type of lamp.
KELVINS
Depending on the color of the wood veneer we recommend using
different Kelvin light temperatures, for their optimum appearance:
Blue 28, Turquoise 30 and Grey 29: 4000k
Ivory White 20, Natural Beech 22, and Natural Cherry 21: 3000 or
4000k.
Yellow 24, Orange 25, Red 26, Chocolate 31 & Pale Rose 33:
3000k.
Learn more about Kelvins.
MORE INFO: http://www.lzf-lamps.com/guarantee/
Uso y cuidado de su lámpara
Acaba de adquirir un producto original y hecho a mano por LZF.
Su lámpara está fabricada con chapa de madera natural
certificada FSC® tratada con nuestro acabado patentado
Timberlite®. Este tratamiento protege la madera, a la vez que evita
posibles roturas.
LIMPIEZA DE ...
La madera, recomendamos usar un plumero o un paño húmedo,
evitando incidir en los cantos de la chapa.
Las superficies metálicas deben tratarse con cuidado y limpiarse
únicamente con un paño suave y húmedo. Asegúrese de que la
humedad no penetre en las uniones de las partes metálicas. No
use disolventes de ningún tipo.
Los difusores acrílicos se pueden limpiar con un líquido limpia
cristales y un paño suave. No usar disolventes de ningún tipo.
PRECAUCIONES
Luminaria para uso exclusivo en interior.
Desenchufar la lámpara antes de cambiar la bombilla o limpiarla.
La manipulación de la instalación eléctrica debe efectuarse solo
por personal cualificado o por LZF.
Vidrio
Un manejo inadecuado puede provocar que el virdrio se afloje o
se astille. Cualquier burbuja, o falta de homogeneidad en el vidrio
no es motivo de queja, este es un rasgo característico del vidrio
soplado a mano.
La superficie del vidrio también puede presentar imperfecciones
debido a su fabricación manual. Al limpiar, use un spray
limpiacristales y un paño suave.
No manipule el vidrio sin guantes para evitar huellas dactilares
y pérdida de brillo.
Madera
Evitar el sol directo o la luz intensa indirecta del sol y la humedad
sobre la lámpara. Debido a que la madera es un material natural,
pueden existir variaciones en el tono de ésta. Si las lámparas se
adquieren en diferentes periodos de tiempo, pueden mostrar
variaciones de color y tono sobre todo en las maderas de tonos
claros. No situar la lámpara próxima a un salida de aire debido a
que éste puede ocasionar daños en la misma. Luziferlamps S.L.
no se hará responsable.
LEDS
Si su lámpara contiene LED integrado. No tocar nunca con las
manos desnudas, ya que esto puede reducir la vida útil de su
LED.
BOMBILLAS
Las bombillas no están incluidas, a menos que se indique.
Recomendamos utilizar bombillas de bajo consumo LED. Consulte
el manual de instrucciones o visite nuestro sitio web www.lzflamps.com para asegurarse de que está utilizando la mejor
bombilla para su tipo de lámpara.
KELVINS
Dependiendo del color de la chapa de madera recomendamos utilizar
diferentes temperaturas de luz, para su óptimo aspecto:
Azul 28, Turquesa 30 y Gris 29: 4000k.
Ivory White 20, Natural Beech 22 y Natural Cherry 21: 3000 o 4000k.
Amarillo 24, Naranja 25, Rojo 26, Chocolate 31 y Rosa Palo 33: 3000k.
Saber más sobre Kelvins.
MÁS INFORMACIÓN: http://www.lzf-lamps.com/guarantee/
© Luziferlamps, S.L All rights reserved. Valencia, Spain. 2020 - www.lzf-lamps.com - support@lzf-lamps.com
REV. 06-2021 D88_444
 Loading...