

Page 1
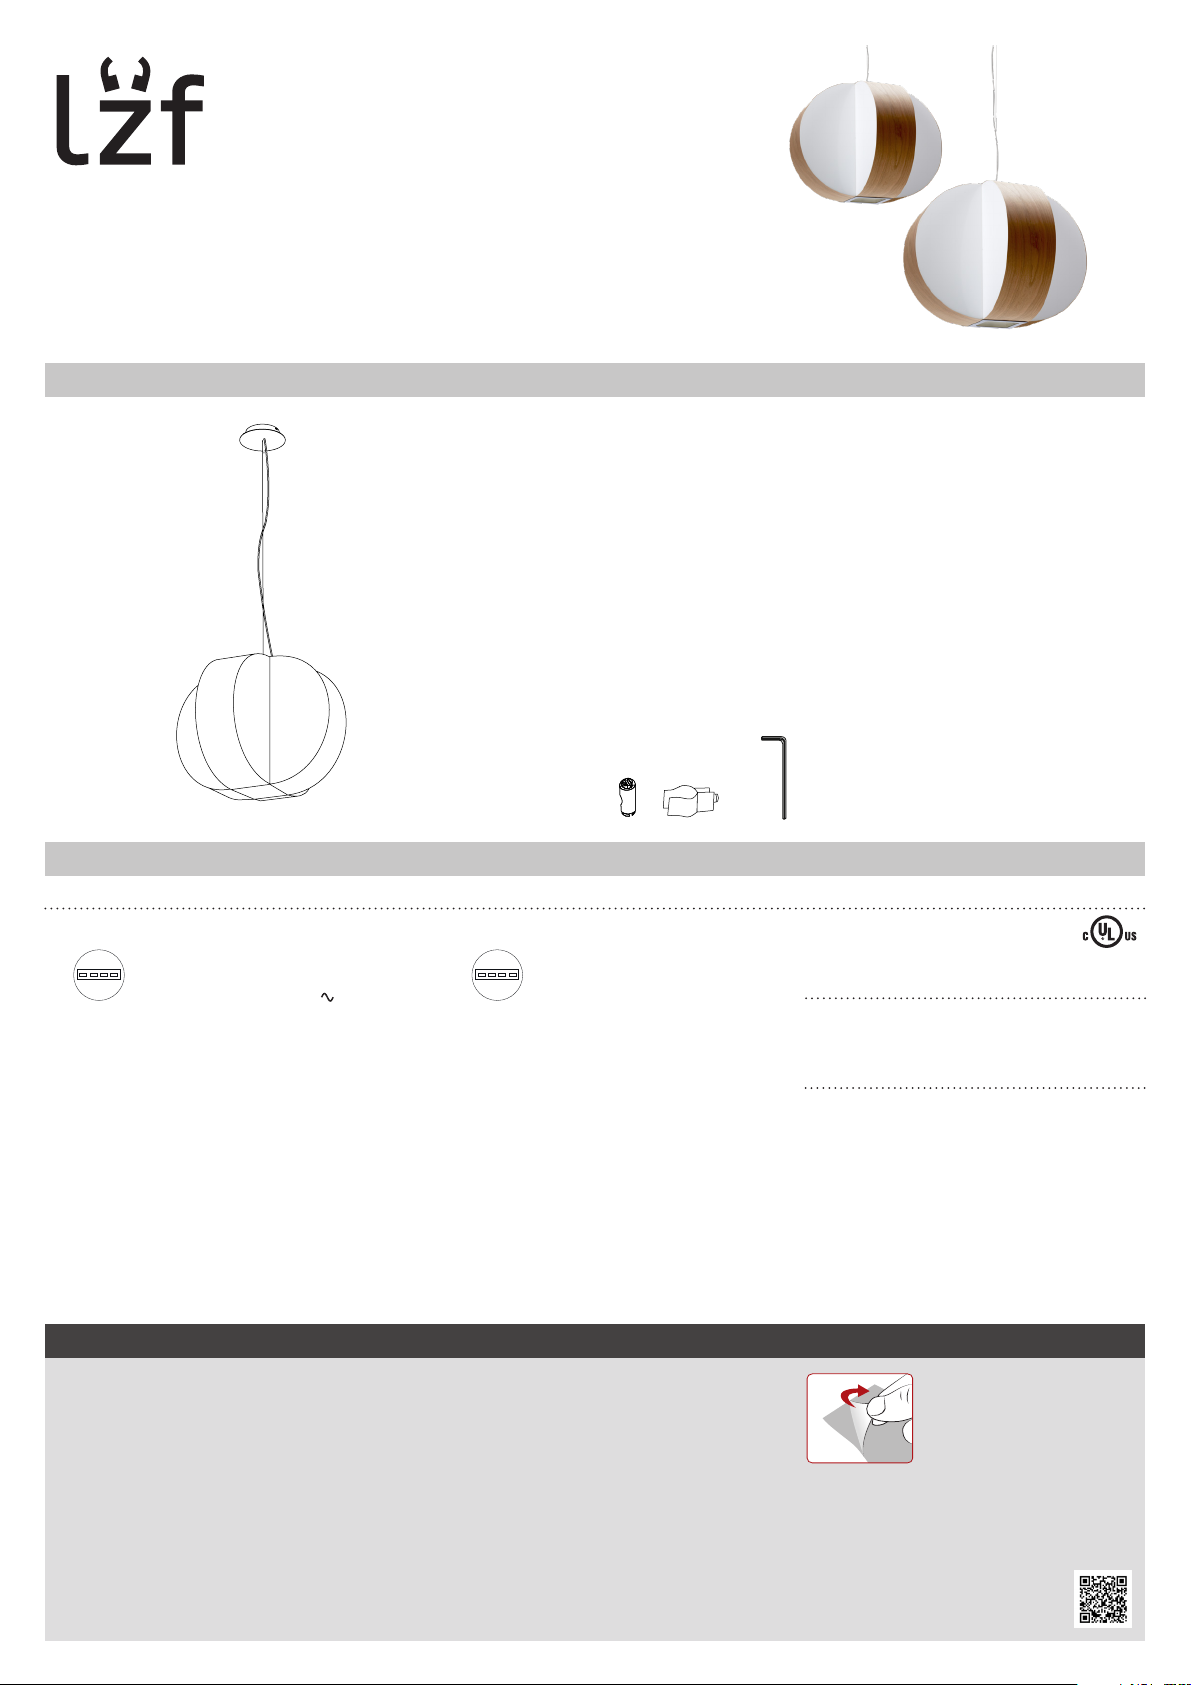
CARAMBOLA
CAR SP-SM LED UL | SET UP
CONTENTS
2
1
TECHNICAL SPECIFICATIONS
CAR SP - Integrated LED
Linear Module
4 x 5,5W - 350mA
120-277V 60Hz
25W
3
4
CAR SM - Integrated LED
Linear Module
4 x 10,8W - 900mA
120-277V 60Hz
32W
1 Shade. 1 un.
2 Canopy. 1 un.
3 Stoppers. 1 un.
4 Cable clip. 1 un.
5 Allen key Nº3. 1 un.
5
No.3
120 - 277V
WEIGHT SP SM
Net Weight 6,0 Lb 10,1Lb
Gross Weight 9,7 Lb 61,5Lb
WARNINGS
Before assembly and installing this product, carefully read the
following:
Turn off the mains before installing the lamp. Dry location only. This
lamp is for indoor use only.
WOOD VENEER: Since wood is a natural material, a gradual change
in tone may occur over time. Furthermore, if the lamps have been
purchased at different times, there will be differences in colour and
tone, particularly in light coloured veneers. Luziferlamps S.L. will
not be held responsible for this.
PROTECTIVE FILMS: Don’t forget to
remove all protective films from the
acrylic surfaces of your lamp.
MORE INFO:
http://www.lzf-lamps.com/guarantee/
1/4
Page 2
CAR SP-SM LED UL | SET UP
ASSEMBLY INSTRUCTIONS
1.
A
C
B
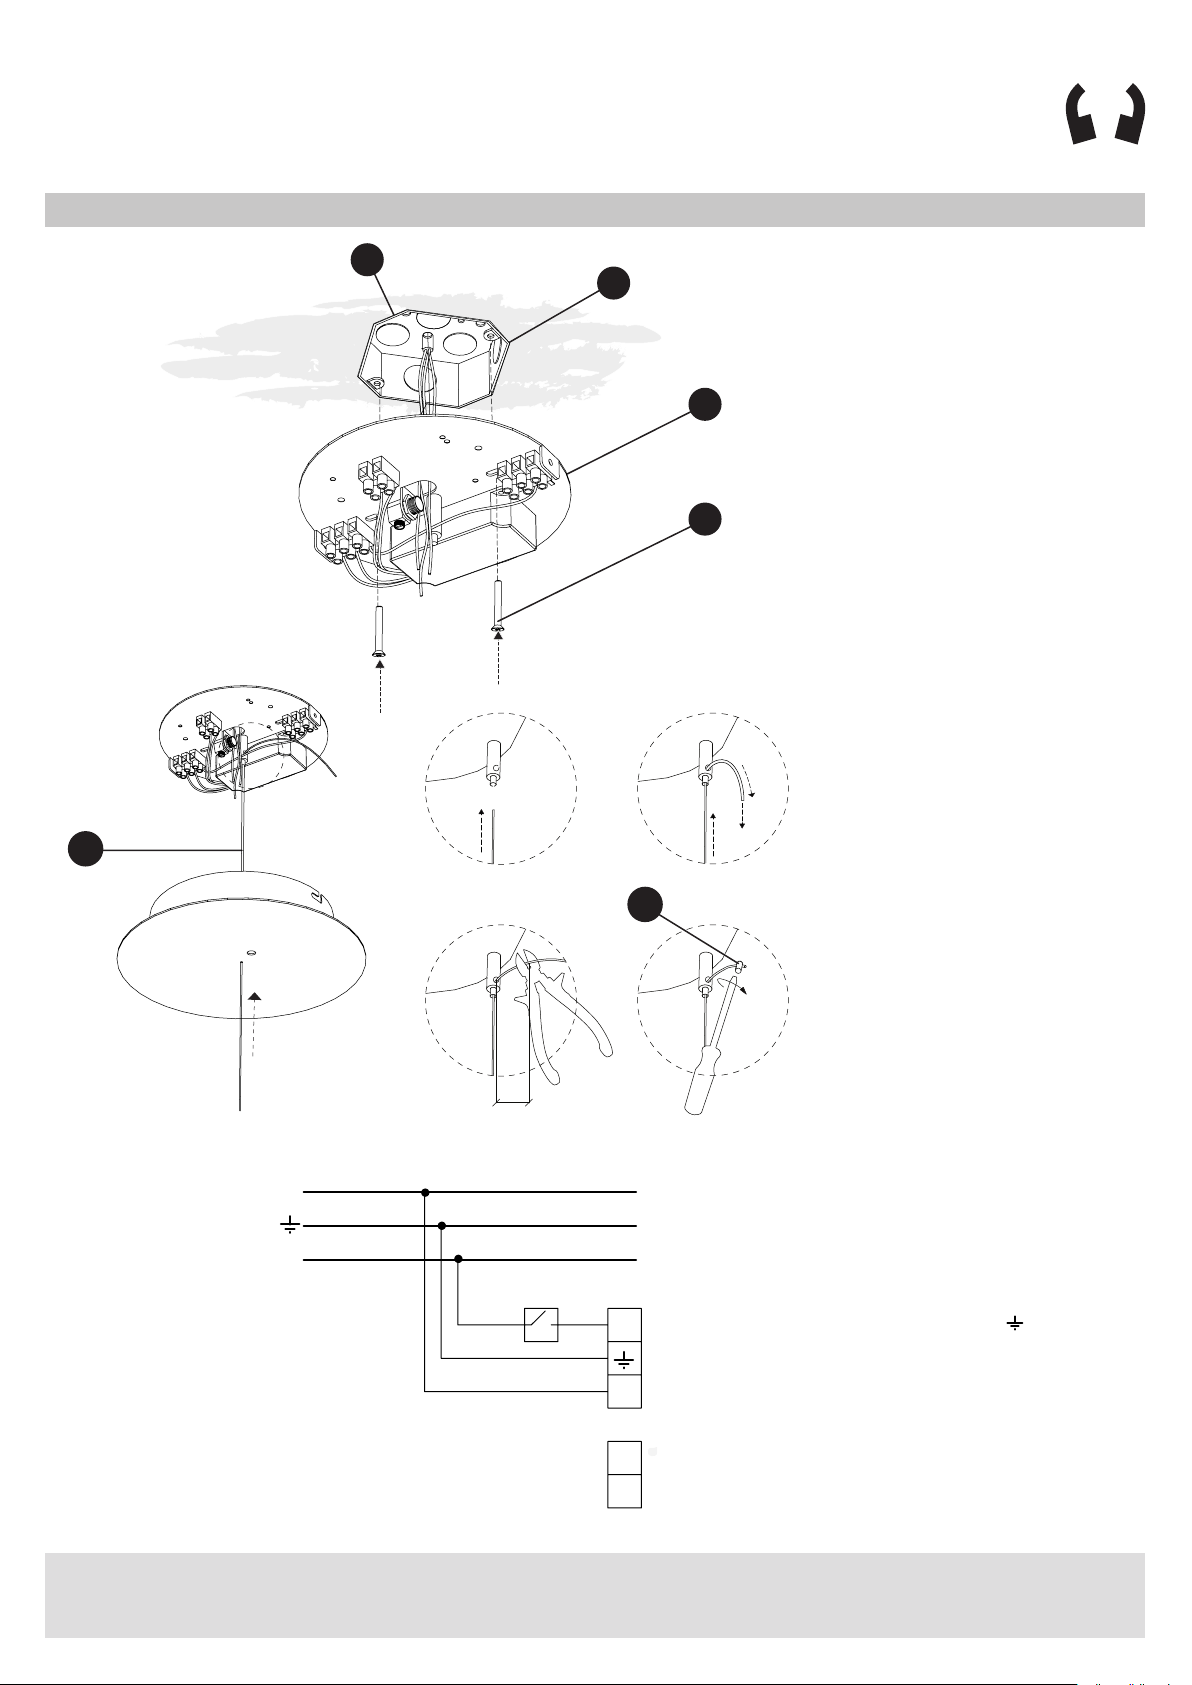
1. The canopy is made up of a back plate with
the electrical connections on it and a front
cover.
Feed the electrical wires (C) from the mains
through the electrical back plate (B), fix
back plate to the junction box (A) with the
most adequate screws (D) (not supplied) and
prepare to wire up.
D
2.
PUSH
E
2. Adjust the height of your lamp by raising or
lowering the stainless steel adjustment cable
(E) and cut off the excess. For added security
put on the stopper (F) and tighten it.
Note: if you want to roll up the excess stainless
PULL
steel wire instead of cutting it off, do so but
make sure that this wire cannot touch any of
the electrical connections in the canopy.
3.
OPTION 1
NON DIMMABLE
MAINS CABLE
N
L
CUT
0,8”
Switch
F
N
D-
D+
F
3. MAINS CONNECTION OPTIONS
Turn off the mains before installing the lamp.
Connect the lamp to the mains as follows.
OPTION 1: NON DIMMABLE
You should have a three wire cable coming
from the mains.
Connect poles N and GND ( ) as shown in the
terminal block Orange. Connect the line (L) that
OrangePink
a
goes through the switch installation to the pole
F (terninal block Orange).
Poles D- and D+ are not used.
Terminal Blocks
2/4
Page 3
CAR SP-SM LED UL | SET UP
ASSEMBLY INSTRUCTIONS
OPTION 2
DIMMING
OPTION 3
LINE DIMMING
(ONLY 120V)
MAINS CABLE
D+
D-
N
L
MAINS CABLE
N
L
Switch
Line dimmer
F
OrangePink
N
D-
D+
Terminal Blocks
F
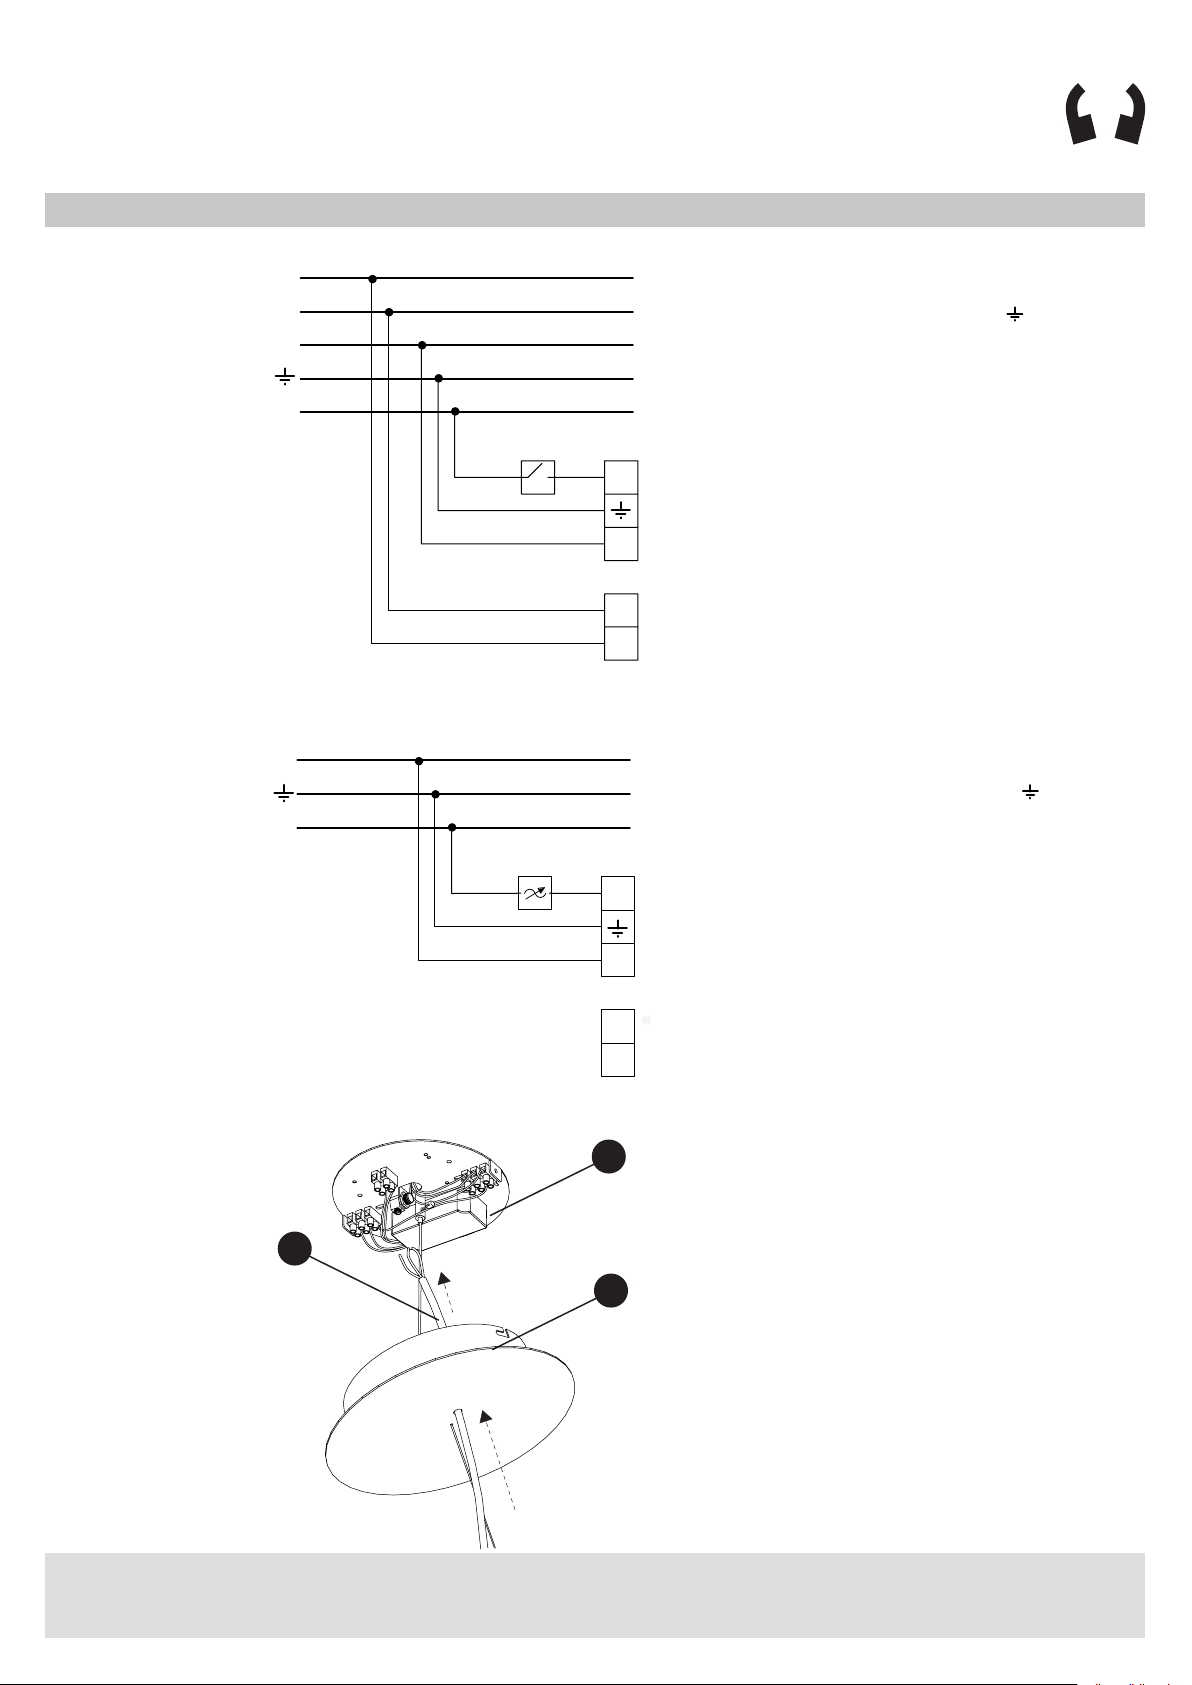
OPTION 2: DIMMING
You should have a five wire cable coming from
the mains.
Connect poles N and GND ( ) as shown in the
terminal block Orange. Connect the line (L)that
goes through the switch installation to the pole
F (terminal block Orange).
After connecting the mains wires to the
terminal block take the other two wires (the
+/- dimming controls) and connect them to the
dimming terminal block (terminal block Pink).
OPTION 3: LINE DIMMING
You should have a three wire cable coming
from the mains.
Connect poles N and GND ( ) as shown in
the terminal block Orange. Connect the line (L)
that goes through the line dimmer installation
to the pole F (terninal block Orange).
Poles D- and D+ are not used.
OrangePink
N
a
D-
D+
Terminal Blocks
4.
B
4. Now take the 3 cables coming from the lamp
(G), and feed them through the canopy cover (F)
and make the connections to the driver in the
canopy (B) as indicated at point 5.
G
F
3/4
Page 4
CAR SP-SM LED UL | SET UP
ASSEMBLY INSTRUCTIONS
5.
LAMP CONNECTION
LAMP CORD
6.
H
BLACK
RED
7.
Terminal Blocks
I
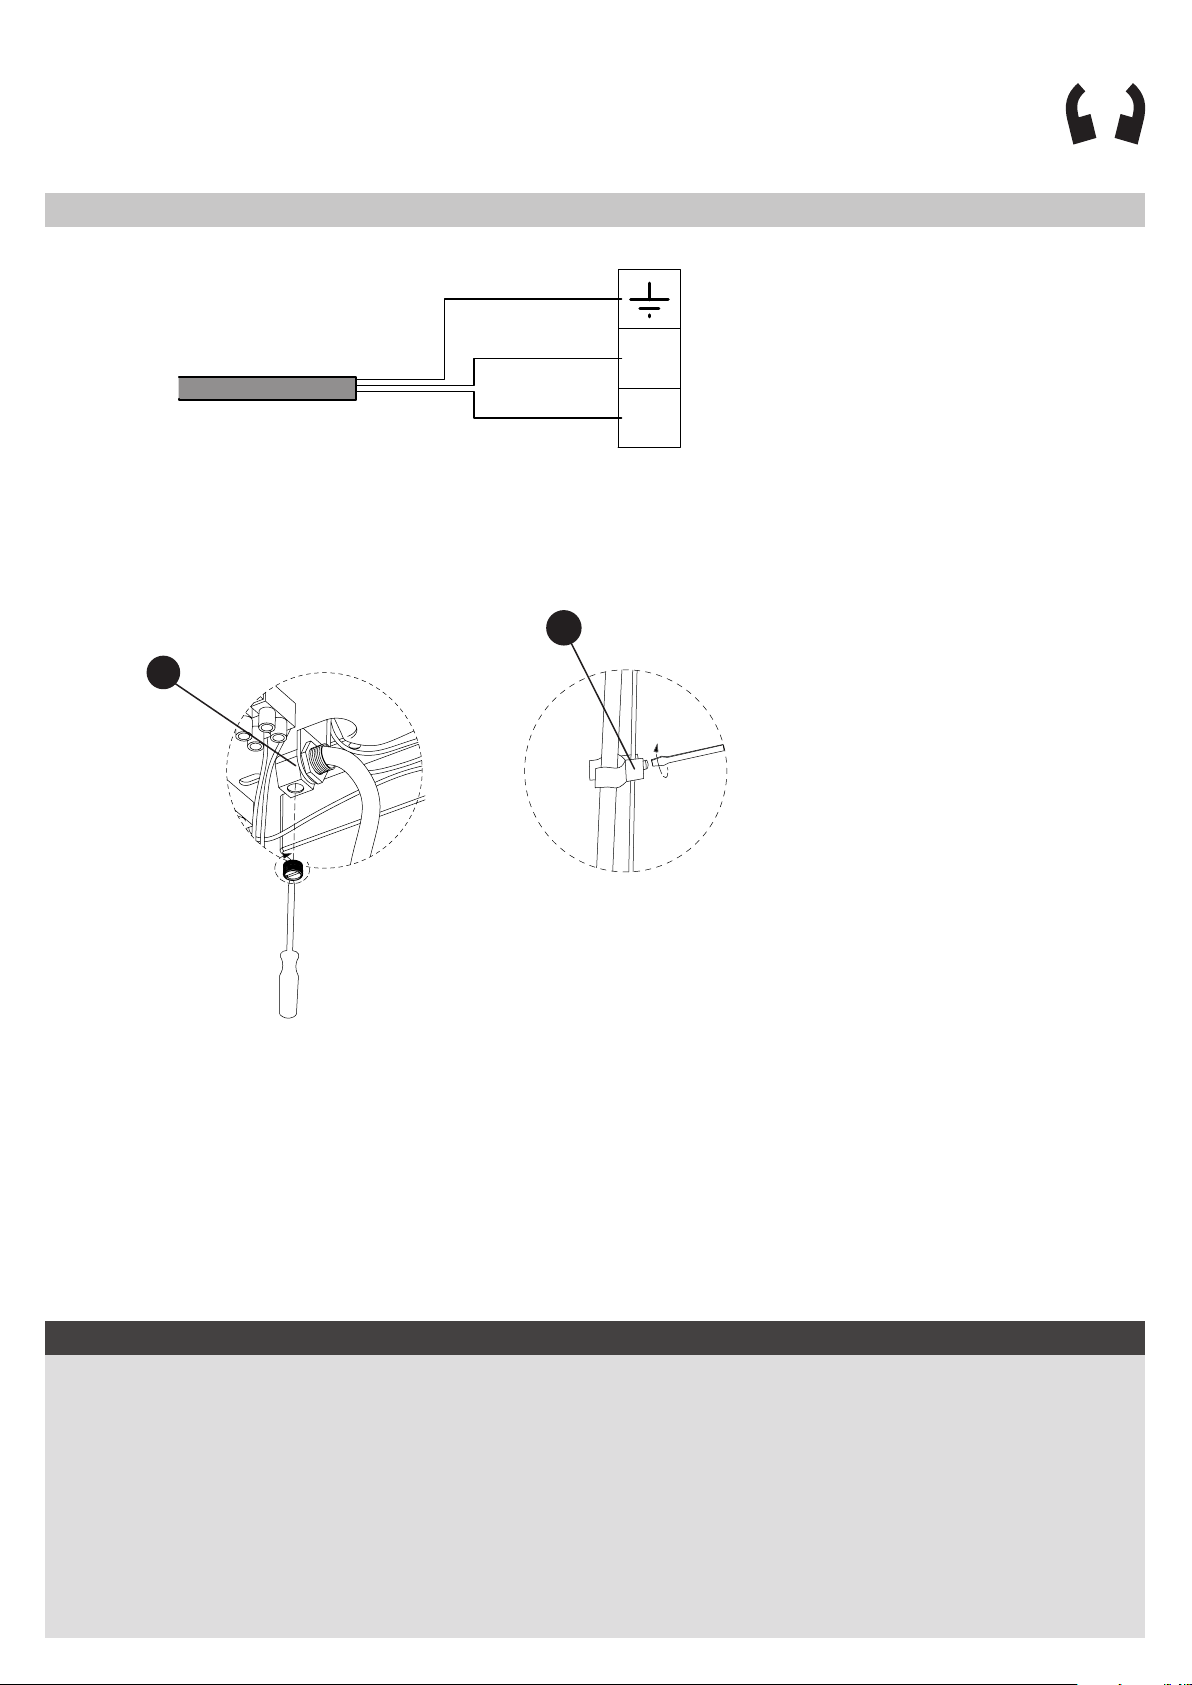
5. LAMP CONNECTION
In the canopy (B) connect the electrical cable
from the lamp to the terminal block indicated
(Yellow).
V-
Yellow
V+
6. Tighten the screw on the electrical cable
trap (H).
Once all your wiring is complete raise the
canopy and screw on the canopy support
screws that holds the cover in place.
7. Put on the cable clip (H) and clip it to the
electrical cable.
8. Turn on the mains again.
© Luziferlamps, S.L.
Valencia, Spain. 2018.
All rights reserved.
www.import-ent.com
GENERAL CARE INSTRUCTIONS
Use and care of your lamp.
You have just purchased an original handmade product by LZF. Your lamp is made out FSC® certified natural wood with our patented veneer finish Timberlite®. This treatment both protects and
safeguards the wood veneer against breakages.
Depending on the type of fixture use a feather duster, soft cleaning cloth or damp cloth for cleaning. On our more delicate shades, like those made from wood strips, a feather duster or an air blower is
preferable. In our more solid shades a damp cloth may be used. Clean only the flat surface of the veneer with the cloth, and please avoid any moisture contact along the edge of the veneer.
Acrylic Diffusers
The acrylic diffusers on your lamp can be cleaned with a regular window cleaning spray and a soft cloth. Do not use solvents of any kind.
Integrated LED
All LEDS are included in your lamp. Never touch the LED surface with your bare hands as this may reduce the life of your LED.
Precautions
Luminaire for indoor use only.
Avoid direct sunlight, strong indirect sunlight and moisture on your lamp. Unplug the lamp before cleaning or changing the light bulb.
Instalation of the fixture should only be performed by qualified electrical personnel or by the LZF service department .
REV.06-2018 D88_307
4/4
 Loading...