

Page 1
Fabricado en China
™
HybridLX
GF Health Products, Inc. no es responsable por errores tipográcos. El embalaje, garantías,
productos y specicaciones son sujetos a cambiar sin aviso.
Graham-Field® y Lumex® son marcas registradas de GF Health Products, Inc.
GF Health Products, Inc.
www.grahamfield.com
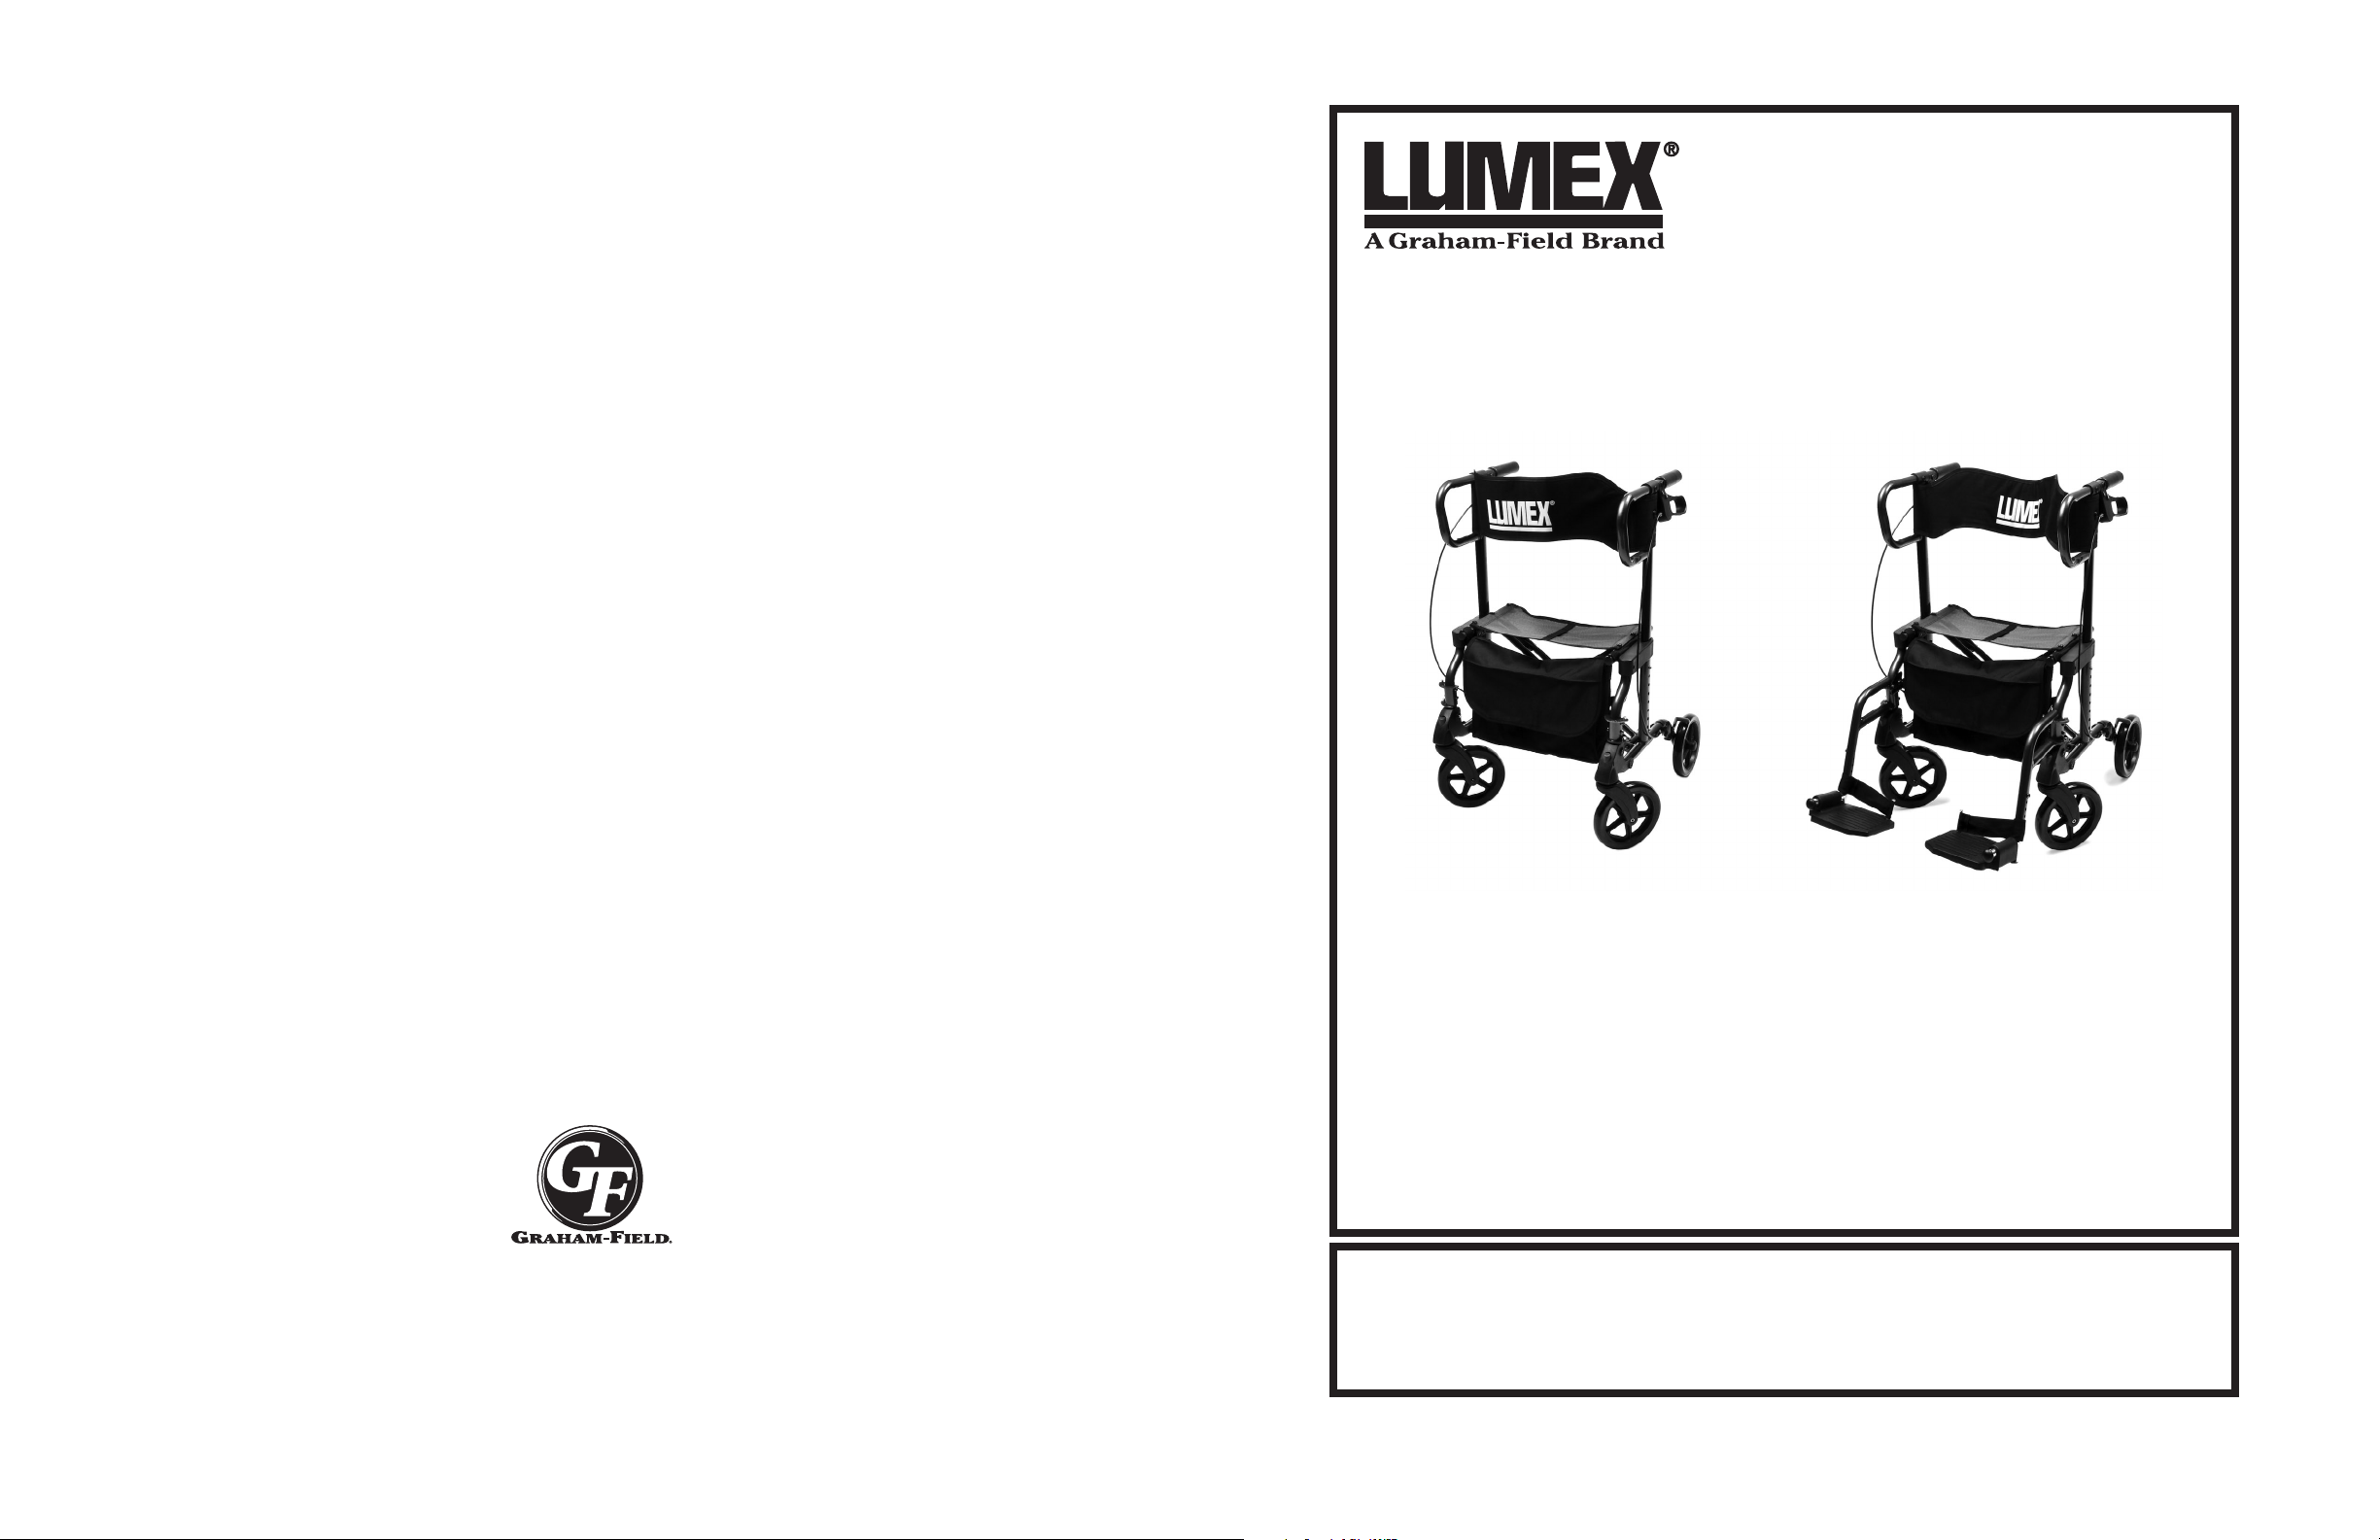
LX1000 Rollator / Transport Chair
User Manual
LX1000-INS-LAB-RevA08
© GF Health Products, Inc.
October 2008
Read this manual before assembling or using the
HybridLX™ Rollator / Transport Chair.
Save this manual for future reference.
Page 2
CONTENTS
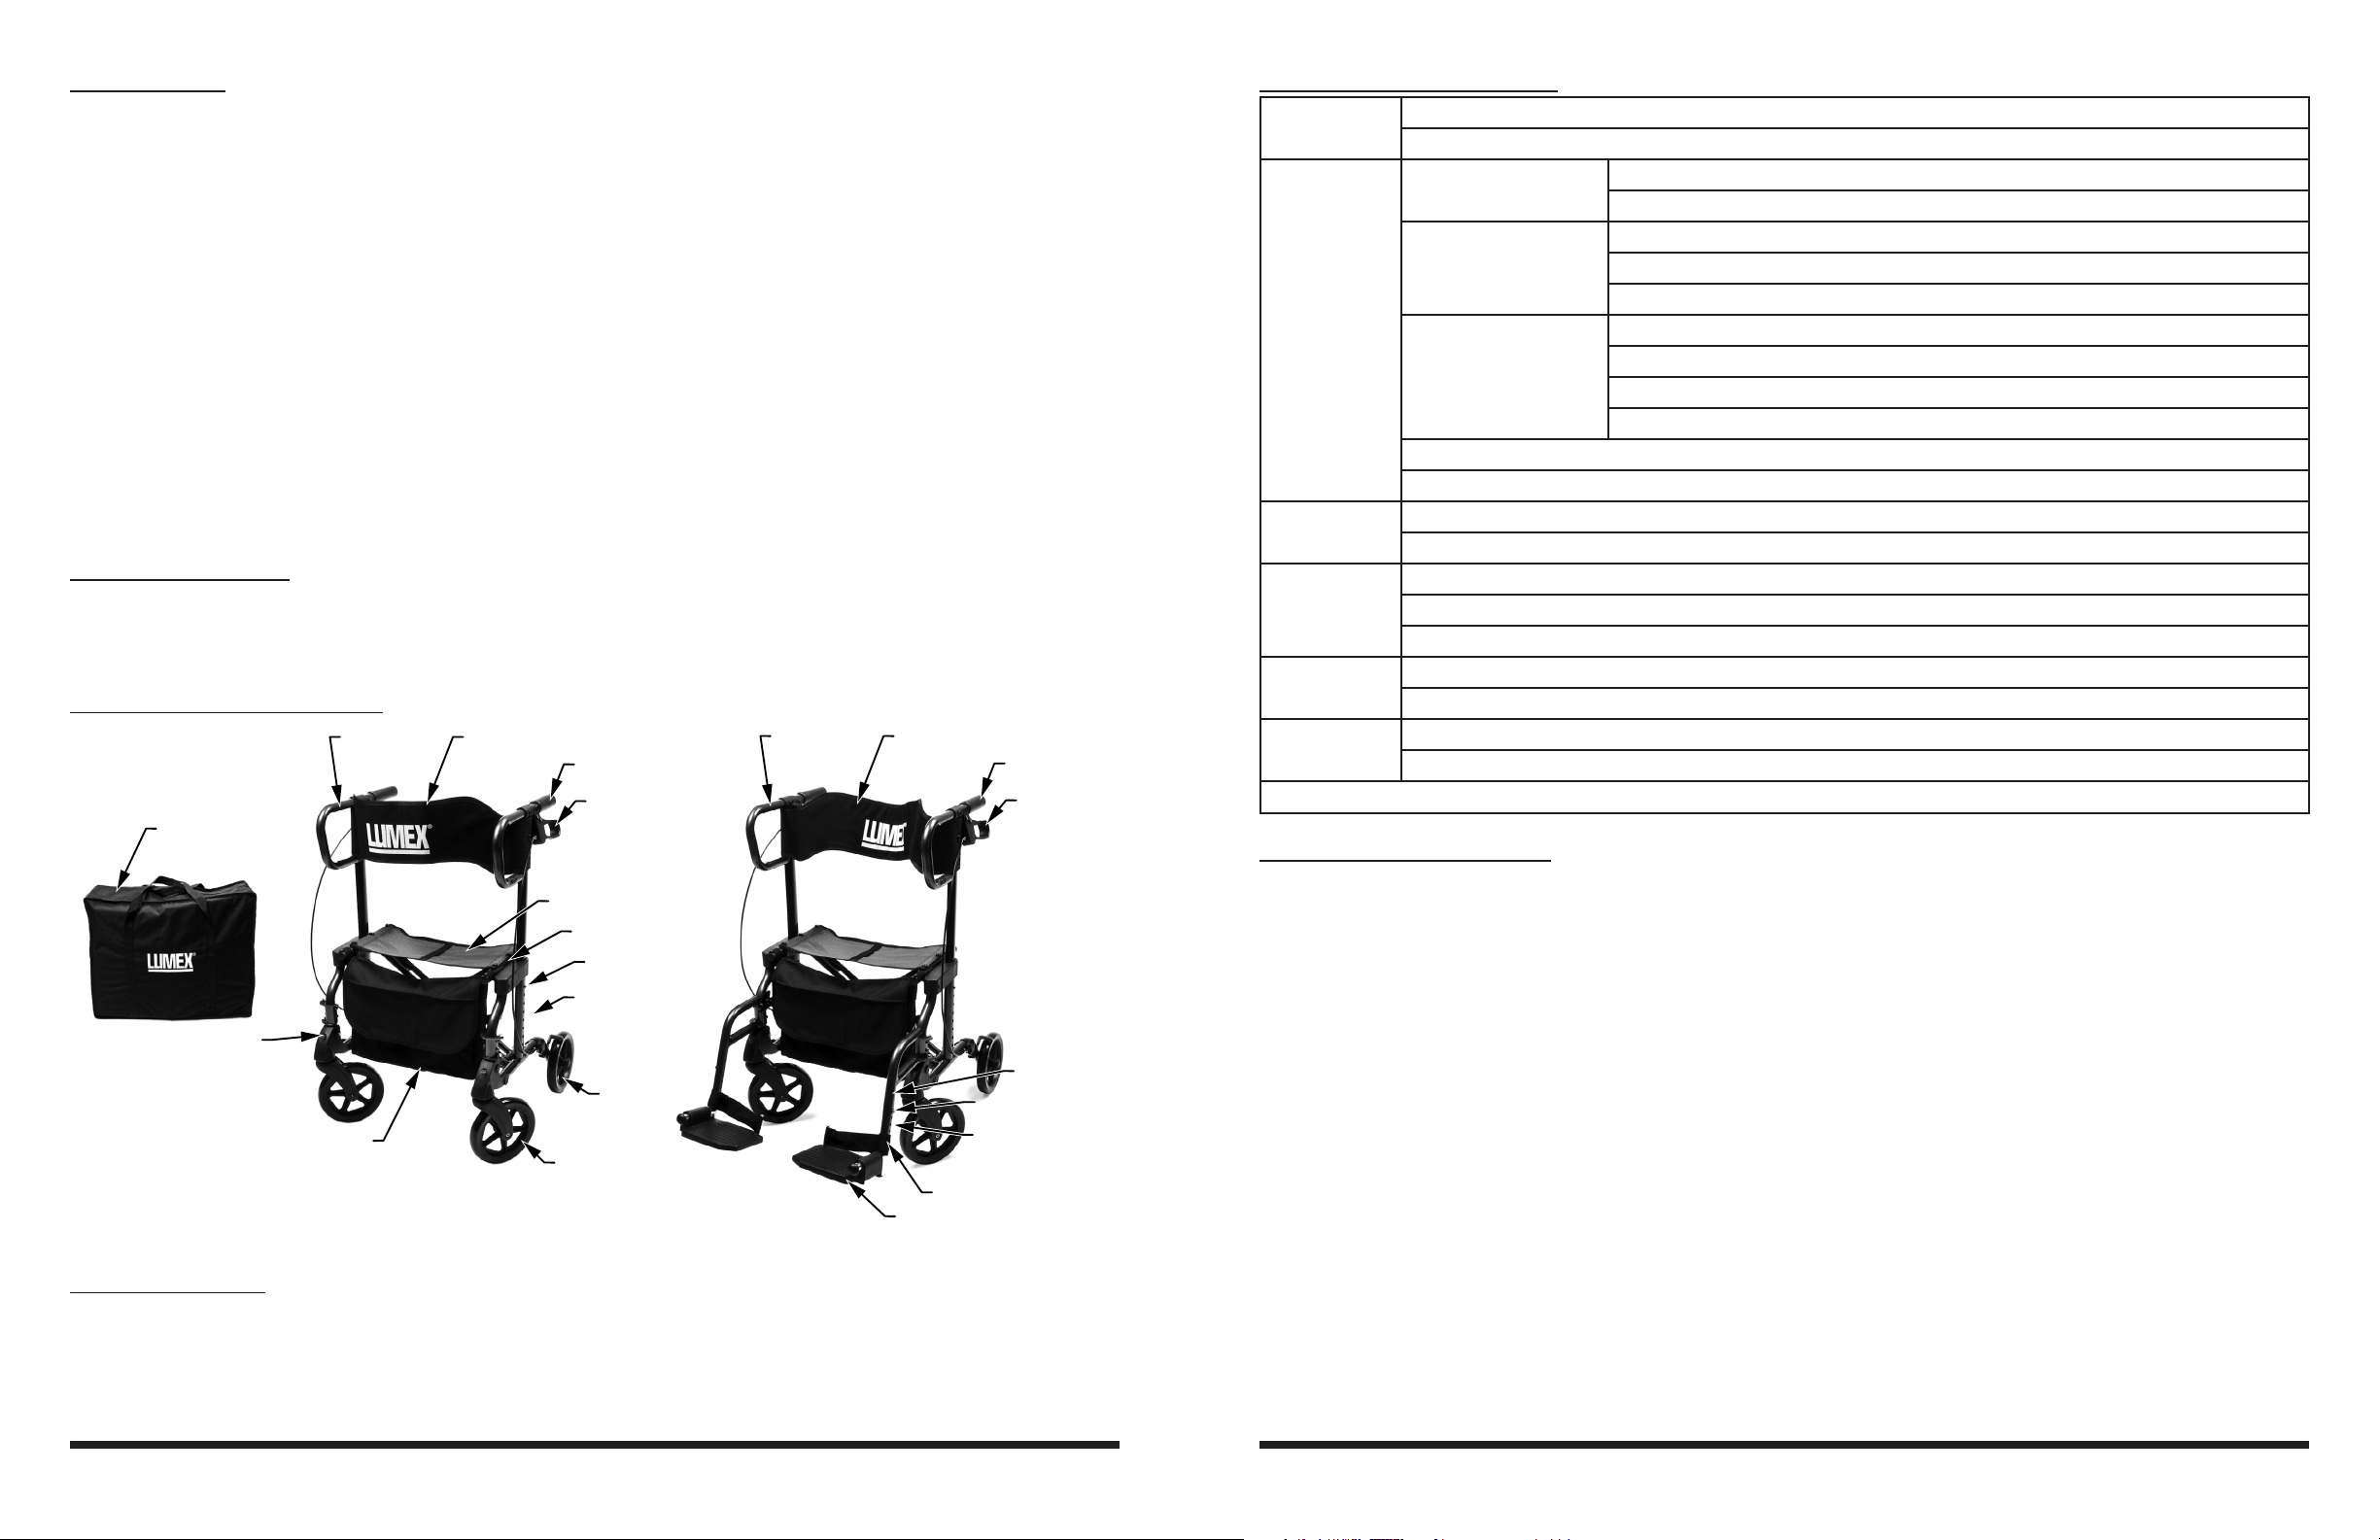
handgrip
backrestarmrest
backrestarmrest
rear
wheel
front wheel
heel loop
footplate
rollator
configuration
transport chair
configuration
height
adjustment
holes
locking button
front wheel
easy-release button
storage bag
seat
seat support bar
handbrake
handgrip
handbrake
carry bag
(optional)
extension
holes
locking button
footrest
IntroductIon......................................................................................................................................................................................... 2
Product descrIPtIon ..................................................................................................................................................................
Intended use ..................................................................................................................................................................................
safety GuIdelInes—Please read Before use ...........................................................................................................................
WarnInG / cautIon summary ....................................................................................................................................................
ramPs and InclInes ......................................................................................................................................................................
curBs and stePs ...........................................................................................................................................................................
unPackInG ...............................................................................................................................................................................................
assemBly .................................................................................................................................................................................................
front Wheels .................................................................................................................................................................................
rear Wheels ...................................................................................................................................................................................
seat ....................................................................................................................................................................................................
storaGe BaG ...................................................................................................................................................................................
footrests ........................................................................................................................................................................................
oPeratIon ................................................................................................................................................................................................
rollator mode ..............................................................................................................................................................................
transPort chaIr mode ...............................................................................................................................................................
cleanInG and maIntenance .............................................................................................................................................................
storaGe and transPort .................................................................................................................................................................
sPecIfIcatIons .....................................................................................................................................................................................
lImIted Warranty ..............................................................................................................................................................................
rodador / sIlla de transPorte manual usuarIo (en esPañol) .......................................................................................
10
11
11
13
INTRODUCTION
This manual contains assembly, operation and maintenance instructions for your HybridLX™ Rollator / Transport Chair. Read the entire manual carefully before using your HybridLX™, and refer to it
during use if you have questions.
PRODUCT DESCRIPTION
ESPECIFICACIONES *
2
2
3
3
4
4
5
5
5
6
6
6
7
8
8
9
9
Ítem Número
Dimensiones
Peso
Asiento
Respaldo
Ruedas
* Especificaciones son sujetos a cambio sin aviso.
LX1000B (Azul Majestoso)
LX1000T (Titanio)
Anchura Dentro de Mangos: 18.5" (470mm)
Total: 26" (660mm)
Profundidad Total: 37" (940mm)
De frente a Atrás: 22.44" (570mm)
Doblado: 9.448" (240mm)
Altura Mínimo: 30" (770mm)
Máximo: 37" (940mm)
Asiento al Piso: 21.25" (540mm)
Usuario Entendido Aproximadamente: 5'4" - 6'2" (163cm - 188cm)
Caja de Detalle LxWxH: 28.15" x 9.5" x 21.85" (71.5 x 24.1 x 55.5cm)
Caja de Cartón LxWxH: 29" x 10" x 23" (73.7 x 25.4 x 58.4cm)
Máximo del Usuario: 300 lb (136kg)
del Producto con Reposapiés: 22 lb (9.88kg)
Material: Malla
Anchura: 18" (460mm)
Profundidad: 11" (280mm)
Material: Poliéster
Anchura: 21" (535mm)
Material: P.V.C.
Dimensiones: 8" x 1" (203 x 31mm)
INTENDED USE
The HybridLX™'s intended use is as a Rollator, a walking aid with wheels, manipulated by both
arms. When used as a transport chair, the HybridLX™ is intended only for short rest periods.
The intended user is between approximately 5'4" and 6'2" (163cm and 188cm) in height.
LX1000-INS-LAB-RevA08
GARANTÍA LIMITADA
GF Health Products, Inc. ofrece una Garantía Limitada para el HybridLX™ Rodador y Silla de Transporte por mano de obra y materiales por lo siguiente periodo:
Marco: 3 años
Otras partes: 1 año
Durante el periodo de garantía, ítems defectuosos serán reemplazados o reparados en nuestra discreción. La garantía no incluye ninguna cargas de trabajo contraída en la instalación de las partes
reemplazados o cualquieras cargas asociadas de la carga o de envío a GF Health Products, Inc.
2
LX1000-INS-LAB-RevA08
11
Page 3
ALMACENAJE Y TRANSPORTE
Prepararse para Transporte / Almacenaje
mango
rueda trasera
ajustamiento de altura
posición más baja
ajustamiento de altura
botón de cierre
plataforma
reposapié
mango del asiento
rueda delantera
El HybridLX™ es diseñado para doblar y almacenaje fácil.
Para Doblar la Silla de Transporte
1. Dobla las plataformas hacia arriba.
2. Jale el mango pequeño en el medio
de la silla para retirar el asiento de
las barras de soporte del asiento.
3. Apreté los mangos juntos; el HybridLX™ se dobla fácilmente para
transporte.
Se puede ordenar una Bolsa de Cargar de Lumex® (Ítem LX1000-CB) para
transportación conveniente.
Para Guardar
1. Ajuste la altura del mango a la posición mas baja.
2. Jale el mango pequeño en el medio del asiento para retirar el asiento de las barras de soporte
del asiento.
3. Remueve los reposapiés (si usado) del marco; jale en el cierre de leva para retirar los reposapiés; de vuelta a los reposapiés hacia los lados del rodador, y remueva los reposapiés de los
botones grandes plateados.
4. Remueve las ruedas delanteras: Apreté los botones rojos para retirarlos del marco.
5. Ponga el HybridLX™ en el piso cuando está doblando las ruedas traseras.
6. Remueve el tornilla para doblar las ruedas traseras. Las ruedas traseras no se retiran del marco del rodador.
7. No es necesario que retira la bolsa de almacenaje del HybridLX™.
8. Ponga el HybridLX™ en la Bolsa de Cargar (si lo compre).
9. Ponga las ruedas traseras, ruedas delanteras y los reposapiés en la Bolsa de Cargar.
10. Cierre la bolsa de Cargar con el cierre.
WARNING: This product has a maximum user weight limitation of 300 lb.
WARNING: To avoid possible tilt hazard, when in transport chair mode, do not leave user
unattended. Attendant must always be behind and in control of HybridLX™ when in transport chair mode.
SAFETY GUIDELINES—PLEASE READ BEFORE USE
The safety statements presented in this chapter refer to the basic safety information that the
HybridLX™ user shall pay attention to and abide by. There are additional safety statements in
other chapters or sections, which may be the same as or similar to the following, or specic to the
operations. Please note the following special statements, used throughout this manual, and their
signicance:
WARNING: Indicates a potential hazard situation or unsafe practice that, if not avoided,
could result in death or serious personal injury.
s
Caution: Indicates a potential hazard or unsafe practice that, if not avoided, could result in
minor personal injury or product/property damage.
Note: Provides application recommendations or other useful information to ensure that
you get the most from your product.
WARNING / CAUTION SUMMARY
WARNING: Important! Read and understand these instructions before assembling or using the HybridLX™ Rollator/Transport Chair. Ensure that the HybridLX™ is assembled as
described in the following pages before use. If the HybridLX™ is not properly assembled
and adjusted, personal injury and/or damage to the HybridLX™ could result.
WARNING: DO NOT use this product without proper instruction from a healthcare professional.
WARNING: GF Health Products, Inc. assumes no responsibility for any damage or injury
caused by improper assembly or use of this product.
WARNING: If components are damaged or missing, contact your dealer immediately. DO
NOT use substitute parts.
WARNING: Inspect the HybridLX™ weekly for proper function and wear. If any component
is not in proper working order or appears worn, contact your authorized Graham-Field®
distributor for repair and/or appropriate replacement parts.
LX1000-INS-LAB-RevA08
10
WARNING: DO NOT operate the HybridLX™ on streets or roadways.
WARNING: DO NOT operate the HybridLX™ on hilly or rough terrain, sand, wet, slippery or
icy surfaces, or surfaces with impaired traction. Ensure that pathway is clear of all obstacles.
WARNING: The HybridLX™ does not offer seating or occupant restraint equivalent to the
seat provided in a motor vehicle! To increase your safety while traveling in a motor vehicle, always transfer to the vehicle seat and use the restraint provided by the vehicle
manufacturer.
WARNING: DO NOT tie down or attach anything to the wheels. This could cause tipping
and possibly result in injury or damage to the HybridLX™.
LX1000-INS-LAB-RevA08
3
Page 4
WARNING: Doing a "wheelie" (tilting the HybridLX™ backward until it reaches its balance
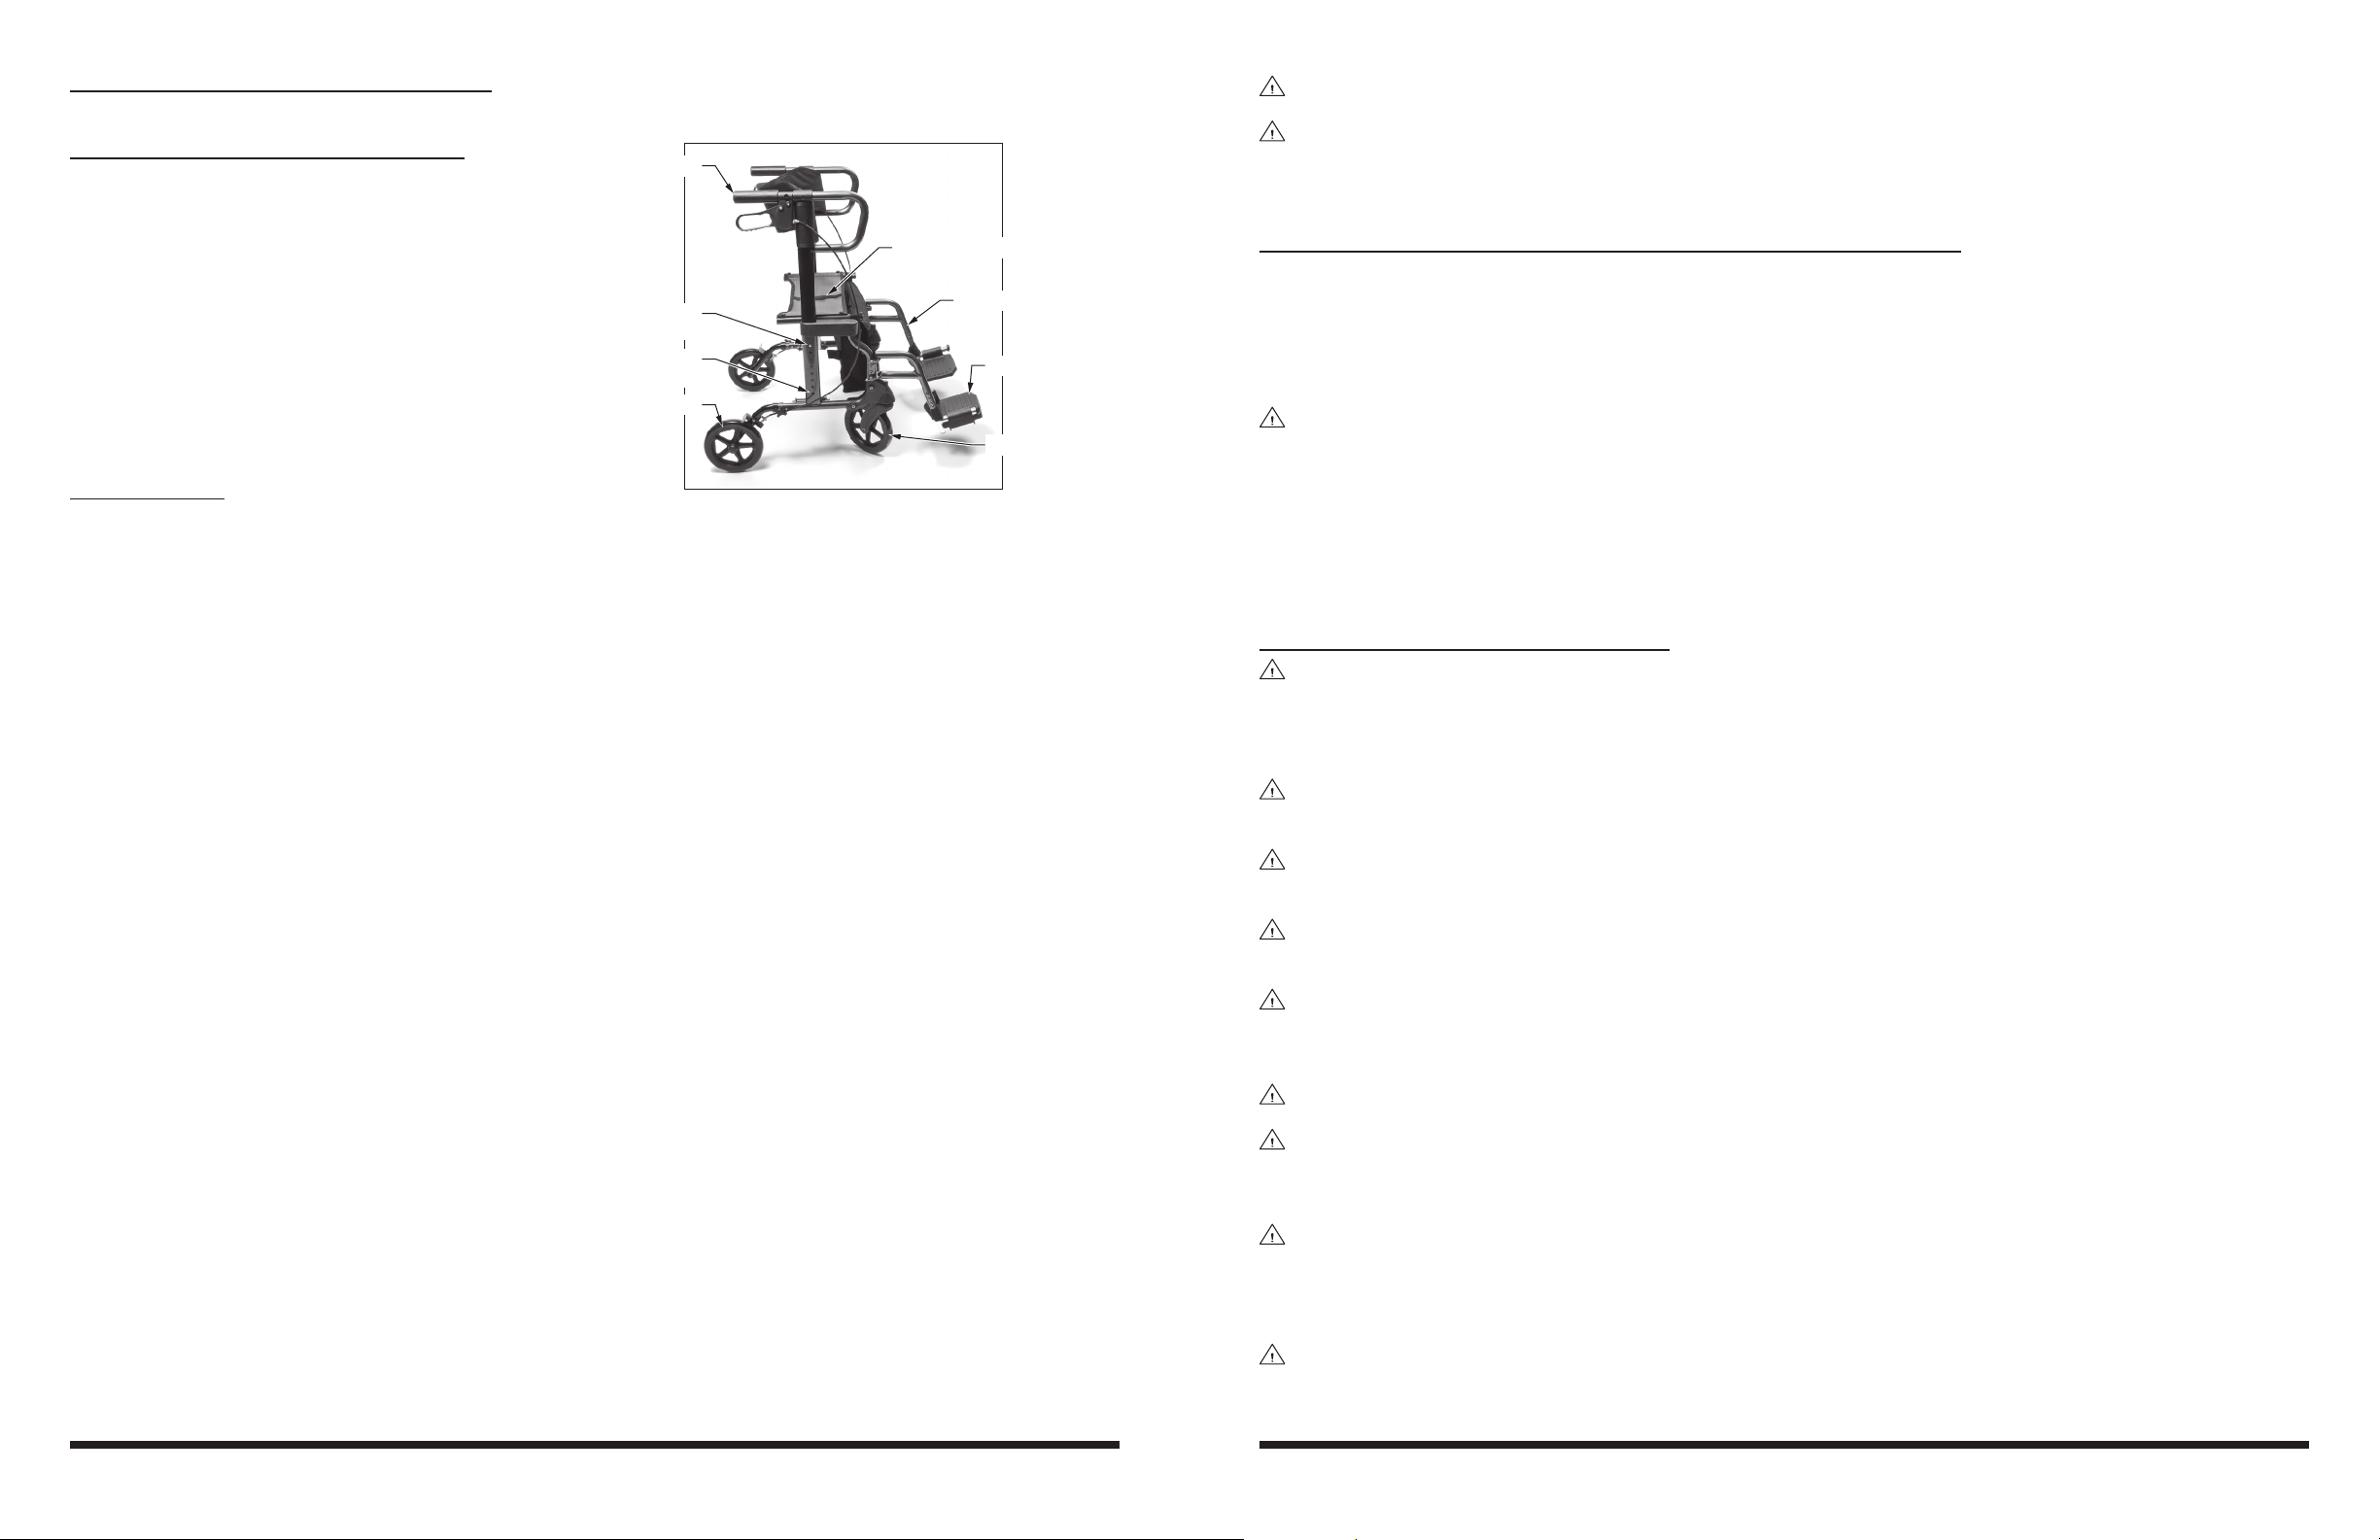
Moda de Silla de Transporte
respaldo
mango
freno de mano
asiento
apoyobrazo
reposapié
point) is dangerous and could result in personal injury to the user.
WARNING: DO NOT stand or step on the footplates while transferring to or from the HybridLX™. This could cause the HybridLX™ to tip, or could cause personal injury or damage
to your HybridLX™.
WARNING: Ensure that HybridLX™ is on a stable, level surface and engage handbrakes
before and during transfer or using an elevator.
WARNING: Unauthorized modication or the use of non-Lumex® replacement parts could
change the structure of the HybridLX™, void the warranty, and create a hazardous condition resulting in serious personal injury.
WARNING: DO NOT use your HybridLX™ on stairs or escalators.
WARNING: GF Health Products, Inc. specically disclaims responsibility for any personal
injury or property damage which may occur during any use which does not comply with
federal, state, or local laws or ordinances.
RAMPS AND INCLINES
WARNING: DO NOT leave the HybridLX™ on an incline.
WARNING: DO NOT turn the HybridLX™ while going downhill, as the HybridLX™ could become unstable or tip over.
WARNING: DO NOT attempt any incline or decline greater than six degrees (10% grade,
or one foot of rise or fall per ten feet of ramp length).
MODO DE SILLA DE TRANSPORTE
La foto del HybridLX™ que se mostrar a la
derecha es de modo de Silla de Transporte.
Para Usar en modo de Silla de
Transporte:
Tiene que tener a alguien para acompañar
para usar como silla de transporte.
ADVERTENCIA: Para evitar peligro de
inclinar, no deje al usuario desatendido. Atendiente siempre tiene que estar
atrás y en control de la silla de transporte cuando se está posicionando al
usuario o cuando la silla de transporte
está en uso.
Montaje de Silla de Transporte
1. Posicione el respaldo lo más cerca a los
mangos empujando el respaldo hacia los mangos como mostrado.
2. Use los frenos de mano para inmovilizar su silla de transporte.
3. Sujeta los reposapiés y voltea la plataforma para permitir que se siente el usuario.
4. Asegúrese que el usuario está sentado seguramente y confortablemente.
5. Doble las plataformas hacia abajo y asegúrese que los reposapiés tienen la misma longitud.
6. Abre los frenos y mueve cuidadosamente.
Ramps and inclines should only be negotiated with the assistance of an attendant. To attendant:
Practice with a healthcare professional rst before attempting ramps or inclines. Always inspect
the ramp for hazards such as holes, slippery or uneven surfaces, etc. before starting up or down. If
you can not see the entire ramp, ask someone to inspect it for you.
CURBS AND STEPS
WARNING: Never attempt to negotiate curbs or steps with your HybridLX™ without the assistance of an attendant.
WARNING: Never attempt to negotiate stairs or escalators with your HybridLX™ under any
circumstances.
Curbs, steps and stairways are dangerous obstacles that confront the rollator / transport chair
user. When you encounter curbs, nd a way around, or use the ramps now available in most locations. If you encounter stairs or escalators and there is no ramp available, avoid the stairs or escalators by utilizing the disabled designated elevators now required in most locations. Curbs and
steps should only be negotiated with the assistance of an attendant.
LIMPIANDO Y MANTENIMIENTO
Use una toalla limpia y suave con agua tibia para limpiar el marco, los mangos, reposapiés y ruedas del HybridLX™. Enjuague y deja que se seca al aire libre.
s
Caución: NO DEBE usar solventes o otros soluciones de limpiar para limpiar el marco o la
fábrica de este producto.
Asegure que todos los tuercas, tornillo y tiradores están apretados semanalmente para asegurar
que el HybridLX™ está seguro para usar.
ADVERTENCIA: Revise el HybridLX™ semanalmente para función propio y uso. Si algún
componente no está trabajando correctamente o se parece usado, contacte a su distribuidor de productos Graham-Field® para reparación y/o partes reemplazados.
ADVERTENCIA: Uso de partes de reemplace que no son de Lumex® puede cambiar la
estructura del HybridLX™, puede ser que la garantía se hace inválida, y causar una condi-
ción peligroso resultando en herida seria personal.
LX1000-INS-LAB-RevA08
4
LX1000-INS-LAB-RevA08
9
Page 5

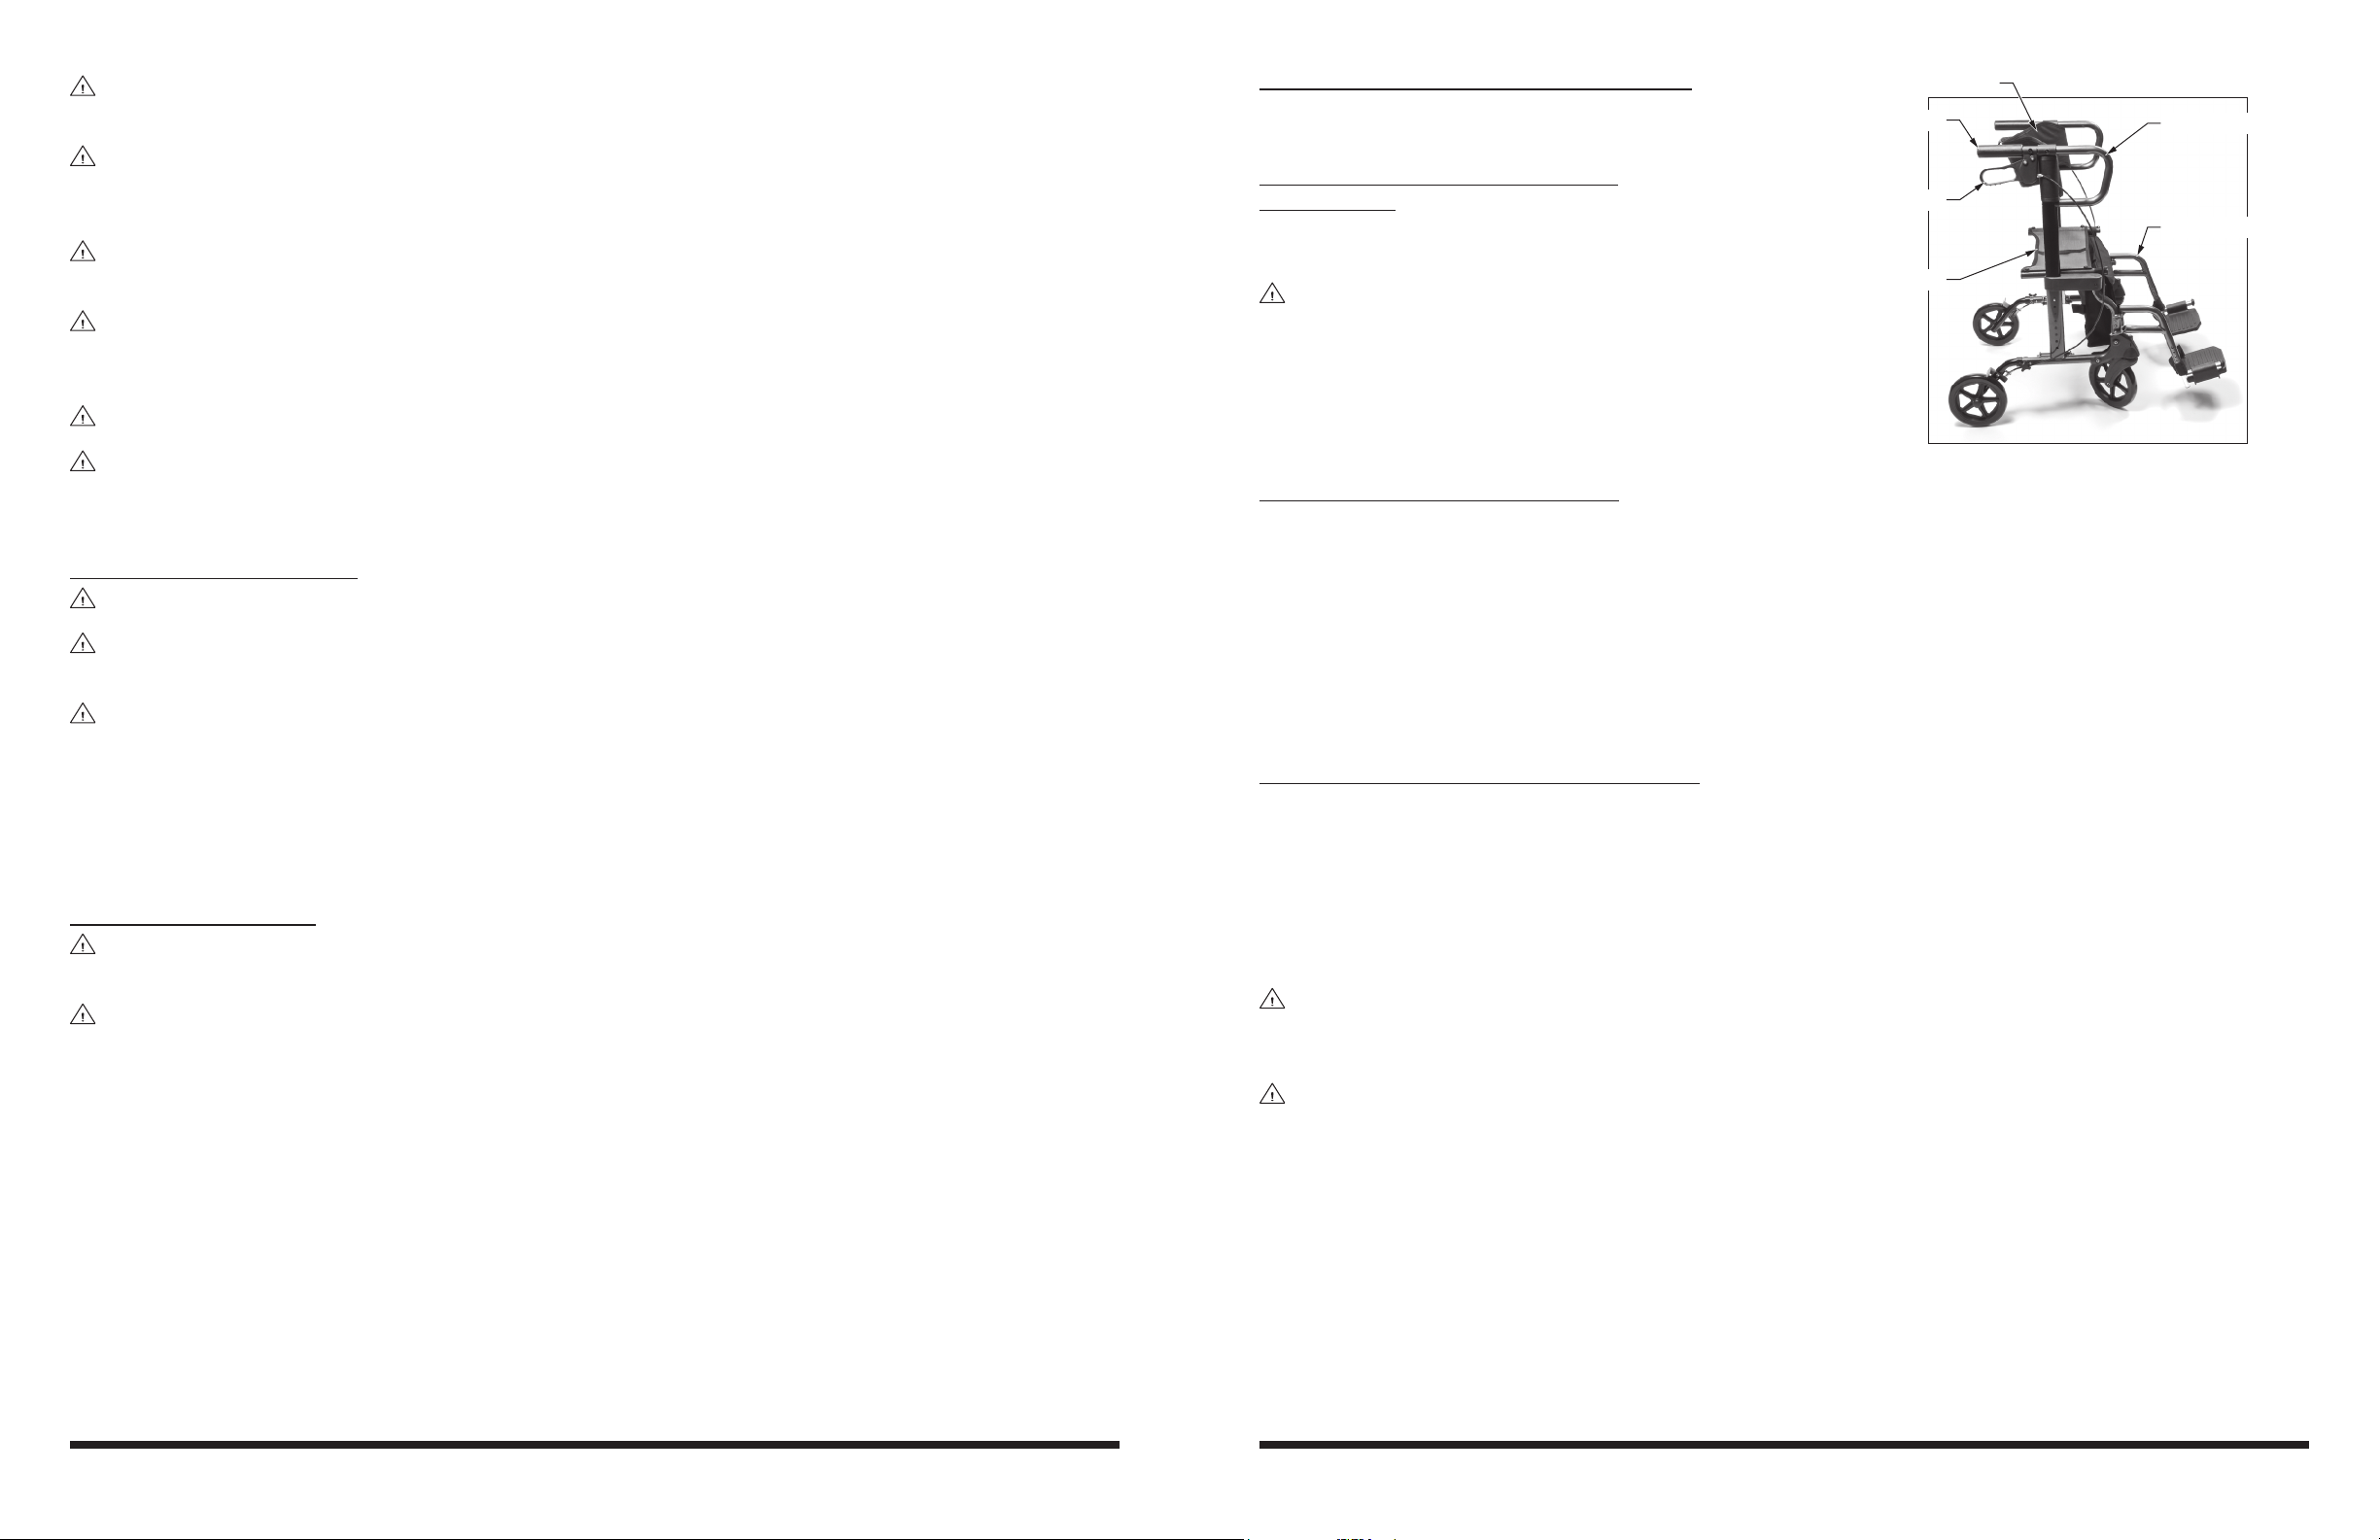
OPERACIÓN
Moda de Rodador
mango
respaldo
freno de mano
asiento
Front Wheel RemovalFront Wheel Installation
fork (pointing
toward back)
easy-release buttonframe
ADVERTENCIA: Lea la sección de seguridad y instrucciones de operación en este manual
antes de usar.
UNPACKING
Unless the HybridLX™ is to be used immediately, retain box and packaging materials for storage
until use is required.
ADVERTENCIA: Antes de utilizar el HybridLX™, asegurase que las ruedas están armados
seguramente al marco, que la silla está en su posición asegurado, y que los botones sobresalen por los huecos del ajustamiento de altura para los apoyabrazos.
Antes de proceder, asegure que todas las instrucciones en la sección ASAMBLEA han sido seguido, y que ha leido la sección SEGURIDAD de este manual.
MODO DE RODADOR
Montaje de Rodador
La foto a la derecha enseña el HybridLX™ en modo
de rodador. Para poner el respaldo lejos de sus manos, posicione el respaldo lejos de los mangos como
mostrado.
Caminando Con Su Rodador
1. Mueva su rodador hacia adelante despacio y
siempre asegúrese que las ruedas traseras estén
algunas pulgadas adelante de su cuerpo.
2. Seleccione un paso que es confortable para usted.
Parando Con Su Rodador
El rodador tiene frenos de mano de curva. Para
parar, apreté los frenos de mano hacia arriba a los
mangos. Para mantener el rodador en una posición
estacionario, apreté los frenos de mano hacia abajo, lejos de los mangos, hasta que los frenos de
mano se aseguran en posición; las ruedas traseras se aseguran en posición. Para soltar, jale en los
frenos de mano hacia arribe hasta que los mangos de las ruedas traseras se mueven fácilmente.
1. Check for obvious damage to the carton or its contents. If damage is evident, please notify the
carrier and your Graham-Field® authorized distributor.
2. Remove all loose packing from the box.
3. Carefully remove all the components from the carton.
Each box should contain the following components:
1 HybridLX™ Frame
2 Rear Wheels (with 2 rear Lock Knobs)
2 Front Wheels
1 Storage Bag
1 Pair of Footrests
ASSEMBLY
FRONT WHEELS
Para Sentarse en el Rodador
1. Apreté los frenos de mano hacia abajo, lejos de los mangos hasta que los frenos de manos están asegurados en la posición parqueados.
2. Prueba las ruedas antes de sentarse para asegurar que el rodador no va dar vuelta.
3. Antes de sentarse, toque el borde del asiento con la parte atrás de sus piernas para asegurar la
posición apropiado para el rodador.
4. Aguante sobre los mangos o la parte arriba de los apoyabrazos del rodador si necesario para
ayudarle sentarse en el asiento.
ADVERTENCIA: Distribuye su peso del cuerpo uniformemente en el HybridLX™.
ADVERTENCIA: NO DEBE inclinarse sobre un lado del HybridLX™.
ADVERTENCIA: Asegúrese que los frenos de mano paran al rodador y se aseguran en
posición apropiadamente antes de ocupar o operar el rodador. Si los frenos de mano no
operan correctamente, por favor de contactar a su distribuidor autorizado de GrahamField® inmediatamente para servicio.
LX1000-INS-LAB-RevA08
Front Wheel Installation
1. Remove plastic wrapping from wheel.
2. Insert the wheel into the front frame with the fork pointing toward the back of the rollator, as
shown at left above. You will hear a click when the wheel has been securely locked into position.
Front Wheel Removal
1. Press the red button, as shown at right above.
2. Pull the wheel out from the frame.
8
LX1000-INS-LAB-RevA08
5
Page 6

REAR WHEELS
Locking Seat Into Place
seat support
bar
seat
Handle/Height
Adjustment
push button
handle
height
adjustment
holes
storage
bag
Rear Wheel Installation
screw knob
screw
folding mechanism
(hinge joint)
rear
wheel
Instalación de
los Reposapiés
Los Reposapiés
Instalados
cierre de leva
lazado de talón
plataforma
huecos de extensión
botón de cierre
botones de bisagra
placas de bisagra
Reposapiés Instalación
Cuando no en Uso
botones de bisagra
huecos de
instalación
Rear Wheel Installation
The rear wheels, which fold down for use, are connected to the rollator frame by the brake cable. To install
the rear wheels:
1. Remove plastic wrapping from wheel.
2. Fold back the wheel with the folding mechanism so
that it is fully extended.
3. Lock the wheel in extended position: Insert screw
into tubing from inside of frame. Install washer on
end of screw outside frame.
4. Install screw knob on end of screw and tighten by
turning knob clockwise. Repeat for other side. Correct installation is shown in picture at right.
REPOSAPIÉS
ADVERTENCIA: NO DEBE parase en los reposapiés; esto puedo causar que el HybridLX™
se vuelca.
SEAT
1. Once the wheels have been securely installed, turn
the rollator to upright position.
2. Push down on both the left and right side of the seat
to securely lock the seat support bars into place.
Note: You will hear a click when the seat locks into
position.
WARNING: Avoid putting your ngers under the
seat support bars when locking the seat into position.
Handle Height Adjustment
1. The HybridLX™ handle height can be adjusted very easily. To adjust the handle height, press the push button on
the side of the rollator and adjust to the best height for
the user. Ensure that the push button locks in one of the
adjustment holes to secure its position.
2. Repeat for other side.
Note: Your caregiver or distributor should assist you in
finding the best handle height for you. A recommended
guideline for finding the appropriate handle height is
to stand behind your HybridLX™ with your arms and
hands at your sides. The ideal handle height is where
your hands are when you bend your arms upward at the
elbow so your forearms are parallel to the ground.
Instalación
1. Sujeta los reposapiés al marco del rodador montándolos en el botón grande de plato cerca de
la rueda delantera como se ve arriba.
2. Apreté el reposapié hacia afrente del rodador para asegurar el cierre de leva en posición. Repita para el otro lado.
3. Asegure que los reposapiés están asegurados antes de uso.
Ajustamiento de Largo
1. Apreté el botón y ajústelo al largo deseado. Repita para el otro lado.
2. Asegúrese que los botones están seguramente en los huecos de extensión para asegurarlos en
posición.
Remover
1. Jale en el cierre de leva para soltar el reposapié. El reposapié se virar hacia afuere.
2. Remueve el reposapié de los botones grandes plateados. Repita para el otro lado.
Almacenaje
Reposapiés pueden ser almacenados convenientes en la bolsa
de almacenaje cuando no en uso. Cuando no en uso, reposapiés
también pueden quedarse en el rodador en poniéndolos en el
botón grande plateado y el botón pequeño acerco del grande. Este
mantiene el reposapiés en su sitio y permite que el usuario mueva
fácilmente.
ADVERTENCIA: Asegúrese que los reposapiés están asegurados en posición antes de uso.
STORAGE BAG
The storage bag is already installed onto the seat support bars. The storage bag can be conveniently removed to place items and then reattached, no tools needed.
LX1000-INS-LAB-RevA08
6
LX1000-INS-LAB-RevA08
7
Page 7

RUEDAS TRASERAS
Instalación de Rueda Trasera
perilla del tornillo
tornillo
mecanismo
de doblar
rueda
trasera
Ajustamiento de
Altura del Mango
botón
mango
huecos de
ajustamiento
bolsa de
almacenaje
Cerre en Posición el Asiento
barra de soporte
del asiento
asiento
Footrest Installation Footrests Installed
swingaway release lever
heel loop
footplate
extension holes
locking button
hinge pins
hinge plates
Footrest
Not-in-Use Attachment
hinge pins
hinge plate
installation holes
Instalación de las Ruedas Traseras
Las ruedas traseras, que se doblan por abajo para uso,
son conectadas al marco del rodador por los cables de
freno. Para instalar las ruedas traseras:
1. Remueva el plastico envoltorio de la rueda.
2. Doble la rueda con el mecanismo de doblar de modo
que sea completamente extendida.
3. Asegure la rueda en la posición extendida: Inserte el tornillo
en el tubo por la parte adentro del marco. Ponga el arendela
en la punta del tornillo en la parte de afuera del marco.
4. Instale la perilla del tornillo en la punta del tornillo y asegúrelo dando vuelta a la derecha. Repita para el otro lado. Instalación correcto es mostrado en la foto a la derecha.
ASIENTO
1. Una vez que las ruedas están instaladas seguramente, ponga el rodador en la posición vertical.
2. Apreté en ambos lados del asiento para asegurar que
las barras de soporte del asiento están en posición.
Nota: Vas a oír un “clic” cuando el asiento se cierre en posición.
ADVERTENCIA: Evite poner sus dedos debajo
de las barras de soporte del asiento cuando
poniendo el asiento en posición.
AJUSTAMIENTO DE ALTURA DEL MANGO
1. La altura de los mangos del HybridLX
ajustado fácilmente. Para ajustar la altura del mango,
apreté el botón al lado del rodador y ajuste la altura
mejor para el usuario. Asegúrese que el botón se cierre en uno de los huecos de ajustamiento seguramente en posición.
2. Repita para el otro lado..
Nota: Su cuidador o distribuidor debe asistirle en
encontrar la mejor altura del mango para usted. Una
directriz recomendado para encontrar la altura del
mango apropiado es pararse atrás de su HybridLX™
con sus brazos y manos a su lado. La altura del mango ideal es donde sus manos están cuando doblas
sus brazos a sus codo para que su antebrazo está
paralelo con el piso.
™
pueden ser
FOOTRESTS
WARNING: DO NOT stand on the footplates; this could cause the HybridLX™ to tip.
Installation
1. Attach the footrest to the rollator frame by mounting the footrest hinge plates on the rollator
hinge pins, as shown above.
2. Push the footrest towards the front of the rollator to lock it into position.
3. Ensure that the footrest is locked in place before use. Repeat for other side.
Length Adjustment
1. Press down on the locking button and adjust footplate to the desired length.
2. Repeat for other side. Ensure that the locking buttons are secure in the extension holes to
properly lock into position.
Removal
1. Pull on the swingaway release lever to release footrest. Footrest will swing outward.
2. Lift footrest straight up off rollator hinge pins.
Storage
Footrests can be conveniently stored in the storage bag when not in
use. When not in use, footrests can also remain attached to the rollator by simply attaching the lower hinge plates to both lower hinge
pins as shown at right. This will keep the footrest in place and allow
the user to move freely.
WARNING: Ensure that footrests are locked in place before
use.
BOLSA DE ALMACENAJE
La bolsa de almacenaje ya está instalada en las barras de soporte del asiento. La bolsa de almacenaje puede ser removida para poner artículos y puesto de nuevo sin herramientas.
LX1000-INS-LAB-RevA08
6
LX1000-INS-LAB-RevA08
7
Page 8

OPERATION
Rollator Mode
handle
backrest
handbrake
seat
Remover la Rueda DelanteraInstalación de Rueda Delantera
horquilla (indicando
hacia atrás)
botón de desconexión
fácil de rueda delantera
marco
WARNING: Read the safety section and operating instructions in this manual before use.
WARNING: Before using the HybridLX™, ensure that the wheels are securely attached to
the frame, that the seat is fully in its locked position, and that the push buttons protrude
fully through the height adjustment holes for the armrests and legs.
Before proceeding, ensure that all instructions in the previous section, ASSEMBLY, have been fol-
lowed, and that you have read the SAFETY section of this manual.
ROLLATOR MODE
Rollator Setup
The photo at right shows the HybridLX™ in Rollator
mode. To keep the backrest away from your hands,
position the backrest away from the handles as shown
at right.
Walking With Your Rollator
1. Move your rollator slowly forward and always be
sure that the rear wheels are a few inches ahead of
your body.
2. Select a pace that is comfortable for you.
DESEMPACAR
A menos que el HybridLX™ va ser usado inmediatamente, guarde la caja y materiales de almacenaje para almacenaje hasta que uso es requerido.
1. Cheque por daño obvio al cartón y los contenidos. Si hay daño evidente, notique a su compañía de transportes y a su distribuidor autorizado de Graham-Field®.
2. Remueve todo las materiales de almacenaje suelto de la caja.
3. Con cuidado remueve todos los componentes del cartón.
Cada caja debe contener los componentes siguientes:
1 Marco del HybridLX™
2 Ruedas Traseras (con dos perillas de cierre traseras)
2 Ruedas Delanteras
1 Bolsa de Almacenaje
1 Par de Reposapiés de presión
ASAMBLEA
RUEDAS DELANTERAS
Stopping With Your Rollator
The rollator has loop locking handbrakes. To slow
down, squeeze the handbrakes upward toward the
handles. To hold the rollator in a stationary position,
push the handbrakes down, away from the handles, until the handbrakes lock into place; the rear
wheels will be locked in place. To release, pull the handbrakes upward toward the handles until
the rear wheels move freely.
To Sit in Rollator
1. Push the handbrakes down, away from the handles, until the handbrakes lock into the parked position.
2. Test the wheels before sitting down to ensure the rollator will not roll.
3. Before sitting, touch the back of your legs to the edge of the seat to ensure proper positioning
4. Hold onto handles or top armrests of rollator if necessary to help you lower your body onto
of the rollator.
the seat.
WARNING: Distribute your body weight evenly on the HybridLX™.
WARNING: DO NOT lean on one side of the HybridLX™.
WARNING: Ensure that handbrakes stop rollator and lock in place appropriately before
occupying or operating rollator. If your handbrakes are not operating correctly, please
see your Graham-Field® authorized distributor immediately for service.
Instalación de Rueda Delantera
1. Remueva el plástico envoltorio de la rueda.
2. Inserta la rueda en el marco del frente con la horquilla indicando a la parte trasera del rodador,
como se ve en la foto a la izquierda. Vas a oír un “clic” cuando la rueda está puesto seguramente en posición.
Remover la Rueda Delantera
1. Apreté el botón rojo, como se ve en la foto a la derecha.
2. Jale la rueda del marco.
LX1000-INS-LAB-RevA08
8
LX1000-INS-LAB-RevA08
5
Page 9

ADVERTENCIA: Haciendo un “wheelie” (volcando la silla de transporte hacia atrás has-
Transport Chair Mode
backrest
handle
handbrake
seat
armrest
footrest
ta que llega a una punta de balance) es peligroso y puede resultar en herida personal al
usuario.
TRANSPORT CHAIR MODE
The photo at right shows the HybridLX™ in Transport Chair mode.
ADVERTENCIA: NO debe pararse en los reposapiés de presión cuando transriendo a o
del HybridLX™. Esto puede causar que la silla de transporte se vuelca o causar herida
personal o daño al HybridLX™.
ADVERTENCIA: Asegúrese que el HybridLX™ está en un supercie estable y nivel, y en-
grane los frenos de mano antes de y durante transriendo o usando un elevador.
ADVERTENCIA: Modicación no autorizado o uso de partes de reemplace que no son de
Lumex® puede cambiar la estructura del HybridLX™, puede ser que la garantía se hace
inválida, y causar una condición peligroso resultando en herida seria personal.
ADVERTENCIA: GF Health Products, Inc. especícamente renuncia responsabilidad por
cual quiere herida personal o daño a propiedad que puede ocurrir durante uso que no
cumple con las leyes federales, del esta o leyes y ordenanzas locales.
RAMPAS Y INCLINAS
ADVERTENCIA: NO deje el HybridLX™ en una inclina.
ADVERTENCIA: NO de vuelta al HybridLX™ mientras yendo cuesta abajo, o si no el HybridLX™ puede volcar.
ADVERTENCIA: NO intente cual quiere inclina o descenso mas de seis grados (10% pendiente, o un pie mas alto o caer por diez pies de longitud del rampa.
To use in Transport Chair mode
You must have someone to accompany you for
use as transport chair.
WARNING: To avoid possible tilt hazard,
when in transport chair mode, do not leave
user unattended. Attendant must always be
behind and in control of HybridLX™ when in
transport chair mode.
Transport Chair Setup
1. Position the backrest closest to the handles
by pushing the backrest toward the handles as
shown at right.
2. Use the handbrakes to immobilize the transport chair.
3. Attach the footrests and ip the footplates up to allow user to sit.
4. Ensure the user is seated safely and comfortably.
5. Fold footplates down and ensure footrest lengths are the same.
6. Unlock the handbrakes and move about freely and carefully.
CLEANING AND MAINTENANCE
Rampas y Inclinas deben ser negociados con la asistencia de un atendiente. Para el atendiente:
Practica con un profesional de cuido de salud antes de tratar rampas y inclinas. Siempre examine
la rampa para peligros como huecos, supercies resbalosas o desiguales, etc. antes de subir y bajar. Si no puede ver la rampa entera, pide ayuda de alguien que lo puede examinar para usted.
ACERAS Y ESCALERAS
Aceras y escaleras son obstáculos peligrosos para usuarios de rodador/silla de transporte. Cuando se encuentra con aceras, busca otra manera o use una rampa que son disponibles en la mayoría de sitios. Si se encuentra con escaleras o escaleras mecánicas y no hay rampa disponible,
evite las escaleras y escalera mecánica y utilice un elevador para los decapitados requeridos en la
mayoría de sitios. Aceras y escaleras deben ser negociados con la asistencia de un atendiente.
ADVERTENCIA: Nunca trate de negociar aceras y escaleras con su HybridLX™ sin asistencia de un atendiente.
ADVERTENCIA: Nunca trate de negociar aceras y escaleras con su HybridLX™ debajo
cual quiere circunstancia.
Use a clean, soft cloth and warm water to clean the HybridLX™ frame, handles, footrests and
wheels. Rinse and air dry.
s
Caution: Do NOT use solvents and other cleaning solutions to clean the frame or the fabric of
this product.
Check t and tightness of all nuts, bolts and knobs weekly.
WARNING: Inspect the HybridLX™ weekly for proper function and wear. If any component
is not in proper working order or appears worn, contact your Graham-Field® authorized
distributor for repair and/or appropriate replacement parts.
WARNING: The use of non-Lumex® replacement parts will void the warranty, and could
create a hazardous condition resulting in serious personal injury.
LX1000-INS-LAB-RevA08
4
LX1000-INS-LAB-RevA08
9
Page 10

STORAGE AND TRANSPORT
Prepare for Transport / Storage
handle
rear wheel
height adjustment
lowest position
height adjustment
locking button
footplate
footrest
seat handle
front wheel
The HybridLX™ is designed for easy
folding and storage.
To Fold for Transport
1. Fold the footplates up.
2. Pull the small handle on the middle of
the seat up to release the seat from the
seat support bars.
3. Push the handles together; the HybridLX™ will fold easily and be ready
for transport.
A Lumex® Carry Bag (Item LX1000-CB)
can be purchased as an accessory for
convenient transportation.
To Store
1. Adjust the handle height to the lowest position.
2. Pull the small handle on the middle of the seat up to release the seat from the seat support bars.
ADVERTENCIA: Este producto tiene una limitación de peso máximo del usuario de 300 lb.
ADVERTENCIA: Para evitar peligro de inclinar, no deje al usuario desatendido. Atendiente
siempre tiene que estar atrás y en control de la silla de transporte cuando se está posicionando al usuario o cuando la silla de transporte está en uso.
DIRECTRIZ DE SEGURIDAD – POR FAVOR LEA ANTES DE USO
Las declaraciones de la seguridad presentadas en este capítulo reeren a la información de seguridad básica que el usuario de HybridLX™ prestará la atención a y que respetará cerca. Hay declaraciones adicionales de la seguridad en otros capítulos o secciones, que pueden ser el iguales que o
similares al siguiente, o especíco a las operaciones. Observe por favor las declaraciones especiales siguientes, usadas a través de este manual, y su signicación:
ADVERTENCIA: Indica una situación del peligro potencial o una práctica insegura que, si
no evitado, podrían dar lugar a muerte o a daños corporales serios.
s
Caución: Indica un peligro potencial o una práctica insegura que, si no evitado, podrían dar
lugar a daños corporales de menor importancia o a producto/a daños materiales.
Nota: Proporciona las recomendaciones del uso o la otra información útil de asegurarse de
que consigue la mayoría de su producto.
3. Remove the footrests (if used) from the frame: Pull on the swingaway release levers to release
the footrests; footrests will swing outward. Lift footrests straight up off rollator hinge pins.
4. Remove the front wheels: Press the red buttons to release them from the frame.
5. Lay the HybridLX™ on the oor to fold the rear wheels.
6. Remove the rear wheel locks: Turn the rear lock knobs counterclockwise and remove the
screws. Fold rear wheels.
7. It is not required that you remove the storage bag from the HybridLX™.
8. Place HybridLX™ in the Carry Bag, if available.
9. Place front wheels and footrests in the Carry Bag.
10. Close the Carry Bag zipper.
SUMARIO DE ADVERTENCIAS Y CAUCIONES
ADVERTENCIA: Importante! Lea y entiende estas instrucciones antes de ensamblar
o utilizar el Rodador/Silla de Transporte HybridLX™. Asegúrese que el rodador/silla de
transporte esté ensamblado como descrito en los párrafos siguientes antes de uso. Si
el HybridLX™ no está ensamblado en la manera correcta, daño personal o a la propiedad
puede ocurrir.
ADVERTENCIA: NO utilice este producto sin instrucciones de su profesional de la salud.
ADVERTENCIA: GF Health Products, Inc. no asume responsabilidad alguna por daños o
heridas causadas por ensamblaje incorrecto de este producto.
ADVERTENCIA: Si componentes están dañados o no están presentes, contacte a su distribuidor de productos Graham-Field® inmediatamente. No substituya piezas.
ADVERTENCIA: Revise el HybridLX™ semanalmente para función propio y uso. Si algún
componente no está trabajando correctamente o se parece usado, contacte a su distribuidor de productos Graham-Field® para reparación y/o partes reemplazados.
ADVERTENCIA: NO opere el HybridLX™ en calles o calzadas.
ADVERTENCIA: NO opere el HybridLX™ en terreno agreste o monte, tierra, supercies
mojadas y heladas, o supercies con tracción dañado. Asegúrese que el camino está
libre de todos obstáculos.
LX1000-INS-LAB-RevA08
10
ADVERTENCIA: El HybridLX™ no ofrece asiento o restricción de ocupante equivalente a
la silla próvido en un vehículo de motor! Para aumentar su seguridad mientras viajando
en un vehículo de motor, siempre transere al asiento de vehículo y use una restricción
próvido por su fabricante de vehículo.
ADVERTENCIA: NO amarre o sujete nada a las ruedas. Esto puede causar volcado y posiblemente resultar en herida o daño al HybridLX™.
LX1000-INS-LAB-RevA08
3
Page 11

mango
respaldoapoyobrazos
respaldoapoyobrazos
rueda
trasera
rueda
delantera
lazado de talón
plataforma
configuración
de rodador
configuración de
silla de transporte
huecos de
ajustamiento
de altura
botón de cierre
botón de desconexión
fácil de rueda delantera
bolsa de
almacenaje
asiento
barra de soporte
del asiento
freno de mano
mango
freno de mano
bolsa de cargar
(opcional)
huecos de
extensión
botón de cierre
reposapié
CONTENIDOS
IntroduccIón ........................................................................................................................................................................................ 2
descrIPcIón del Producto ......................................................................................................................................................
uso entendIdo ...............................................................................................................................................................................
dIrectrIz de seGurIdad – Por favor lea antes de uso ........................................................................................................
sumarIo de advertencIas y caucIones ...............................................................................................................................
ramPas y InclInas .........................................................................................................................................................................
aceras y escaleras ....................................................................................................................................................................
desemPacar ...........................................................................................................................................................................................
asamBlea .................................................................................................................................................................................................
ruedas delanteras .....................................................................................................................................................................
ruedas traseras ..........................................................................................................................................................................
asIento .............................................................................................................................................................................................
ajustamIento de altura del manGo .....................................................................................................................................
Bolsa de almacenaje .................................................................................................................................................................
rePosaPIés ......................................................................................................................................................................................
oPeracIón ...............................................................................................................................................................................................
modo de rodador ........................................................................................................................................................................
modo de sIlla de transPorte .................................................................................................................................................
lImPIando y mantenImIento .............................................................................................................................................................
almacenaje y transPorte .............................................................................................................................................................
esPecIfIcacIones ...............................................................................................................................................................................
Garantía lImItada ..............................................................................................................................................................................
10
11
11
INTRODUCCIÓN
Este manual contiene las instrucciones de asamblea, operación y mantenimiento para su
HybridLX™. Lea el manual entero cuidadosamente antes de usar su HybridLX™, reera durante uso
si usted tiene preguntas.
DESCRIPCIÓN DEL PRODUCTO
SPECIFICATIONS *
2
2
3
3
4
4
5
5
5
6
6
6
6
7
8
8
9
9
Item Number
Dimensions
Weight
Seat
Backrest
Wheels
* Specifications are subject to change without notice.
LX1000B (Majestic Blue)
LX1000T (Titanium)
Width Inside Handgrips: 18.5" (470mm)
Overall: 26" (660mm)
Depth Overall: 37" (940mm)
Front to Rear: 22.44" (570mm)
Folded: 9.448" (240mm)
Height Minimum: 30" (770mm)
Maximum: 37" (940mm)
Seat to Floor: 21.25" (540mm)
Approximate Intended User: 5'4" - 6'2" (163cm - 188cm)
Retail Box LxWxH: 28.15" x 9.5" x 21.85" (71.5 x 24.1 x 55.5cm)
Carton Box LxWxH: 29" x 10" x 23" (73.7 x 25.4 x 58.4cm)
Maximum User Weight: 300 lb (136kg)
Product Weight with Footrests: 22 lb (9.88kg)
Material: Mesh
Width: 18" (460mm)
Depth: 11" (280mm)
Material: Polyester
Width: 21" (535mm)
Material: PVC
Dimensions: 8" x 1" (203 x 31mm)
USO ENTENDIDO
El uso entendido del HybridLX™ es como un rodador, un ayuda de caminar con ruedas manipulado
por dos brazos. Cuando usado como una silla de transporte, el HybridLX™ es entendido solamente
para periodos de descanso corto.
El usuario entendido es dentro de aproximadamente 5'4" y 6'2" (163cm y 188cm) en altura.
LX1000-INS-LAB-RevA08
LIMITED WARRANTY
GF Health Products, Inc. warrants the HybridLX™ Rollator/Transport Chair for defects in workmanship and materials for the following period:
Frame: three years
All other components: one year
During the warranty period, defective items will be repaired or replaced at GF Health Products, Inc.
option. Warranty does not include any labor charges incurred in replacement part(s) installation
or any associated freight or shipping charges to GF Health Products, Inc.
2
LX1000-INS-LAB-RevA08
11
Page 12

Made in China
™
HybridLX
GF Health Products, Inc. is not responsible for typographical errors.
and specications are subject to change without notice.
Graham-Field® and Lumex® are registered trademarks of GF Health Products, Inc.
GF Health Products, Inc.
www.grahamfield.com
Packaging, warranties, products
Rodador / Silla de Transporte
Manual Usuario
LX1000-INS-LAB-RevA08
© GF Health Products, Inc.
Octubre 2008
Lea este manual antes de ensamblar o utilizar
el Rodador/Silla de Transporte.
Por favor de guardar este manual para uso en el futuro.
 Loading...