

Page 1

Lucent Technologies
Bell Labs Innovations
PARTNER® Voice Messaging PC Card
For the PARTNER Advanced Communications System
Installation, Programming and Use
Page 2

Copyright © 1997, Lucent Technologies
All Rights Reserved
Printed in USA
518-456-100
Issue 1
November 1997
Notice
Every effort was made to ensure that the information in this book was complete and accurate at
the time of printing. However, information is subject to change.
Your Responsibility for Your System's Security
Toll fraud is the unauthorized use of your telecommunications system by an unauthorized
party, for example, persons other than your company's employees, agents, subcontractors, or
persons working on your company's behalf. Note that there may be a risk of toll fraud associated with your telecommunications system and, if toll fraud orrcurs, it can result in substantial
additional charges for your telecommunications services.
You and your system manager are responsible for the security of your system, such as programming and configuring your equipment to prevent unauthorized use. The system manager is also
responsible for reading all installation, instruction, and system administration documents provided with this product in order to fully understand the features that can introduce risk of toll
fraud and the steps that can be taken to reduce that risk. Lucent Technologies does not warrant
that this product is immune from or will prevent unauthorized use of common-carrier telecommunication services or facilities accessed through or connected to it. Lucent Technologies will
not be responsible for any charges that result from such unauthorized use.
Lucent Technologies Fraud Intervention
If you
suspect that you are being victimized
by toll fraud and you need technical support or
assistance, call the National Customer Care Center at 1 800 643-2353.
Trademarks
PARTNER, MLS-34D, MLS-18D, MLS-12D, MLS-12, and MLS-6 are registered trademarks
of Lucent Technologies in the US and other countries.
Ordering Information
Call:
Write:
Lucent Technologies Publications Center
Voice 1 800 457-1235
Fax 1 800 457-1764
International Voice 317-322-6791
International Fax 317-322-6699
Lucent Technologies Publications Center
2855 N. Franklin
Indianapolis, IN 46219
Order:
Document No. 518-456-100
Comcode 108073784
Issue 1, November 1997
Support Telephone Number
In the continental US, Lucent Technologies provides a toll-free customer helpline 24 hours a
day. Call the Lucent Technologies Helpline at 1 800 628-2888 or your Lucent Technologies
authorized dealer if you need assistance when installing programming, or using your system.
Page 3

Table of Contents
Purpose of This Guide
Terminology
Key Sequences
Voice Messaging Service Overview 3
Communications System Features Affecting Call Answer Service
VMS Coverage 5
Do Not Disturb (F01)
Group Call Distribution (#206)
Line Coverage Extension (#208) 6
Voice Mailbox Transfer (F14)
Voice Mail Service
Security
System Security Guidelines
Installation Instructions
Important Safety Instructions
PARTNER Voice Messaging Programming
Initial Settings
PARTNER Voice Messaging Planning Forms
Using PARTNER Voice Messaging System Programming
Assigning a Mailbox to an Extension
Recording the General Mailbox Greeting
Changing the System Manager’s Password
Reinitializing a Mailbox
Reinitializing a Password
PARTNER ACS Programming
PARTNER ACS Planning Forms
Using PARTNER ACS System Programming
VMS Hunt Group Extensions (505)
Transfer Return Extensions (#306)
Line Coverage
Automatic VMS Cover (#310)
VMS Cover Rings (#117)
Telephone Button Programming
Verifying SystemOperation
Voice Mail Service
Call Answer Service
Using PARTNER Voice Messaging
Helpful Hints
Logging into the System
Listening to Messages
Transferring to an Extension
Using Dial Code/Button Features
Changing Your Password
Recording Your Personal Greeting
Help
PARTNER Voice Messaging Planning Forms
11
11
14
14
16
17
20
20
21
22
23
24
24
25
27
28
29
30
31
31
34
34
34
36
36
37
37
38
38
39
40
41
43
2
2
2
5
6
6
6
7
9
9
Page 4

Purpose of this Guide
This guide provides instructions for installing, programming, and using the
PARTNER
®
Voice Messaging PC Card with the PARTNER Advanced
Communications System (ACS) Release 1.1 or later. This guide is intended for:
The technician who installs the hardware and programs the initial system
■
settings
The System Manager—the person who is responsible for managing the
■
system on an ongoing basis
The subscriber, a user who has been assigned one of the four mailboxes
■
on PARTNER Voice Messaging.
Terminology
This guide uses the following terms:
■
Communications system (CS): in most countries, Release 1.1 or later of the
PARTNER Advanced Communications System.
■
System phones: the telephones specifically designed to work with the
communications system, including the PARTNER-34D, PARTNER 18D,
PARTNER-18, PARTNER 6, MLS-34D
MLS-6
®
, MLC-6, MDC 9000, MDW 9000, MDW 9010, and MDW 9030P.
®
, MLS-18D®, MLS-12D®, MLS-12®,
Key Sequences
This guide instructs you to press key sequences on the telephone's dialpad to
perform tasks. Each sequence includes a letter associated with a task. Since
some dialpads do not have letters, the sequences are also referred to with a
number. The numerical sequences and their associated letter sequences are
listed below for your reference:
Delete
Transfer
[ * ]
[ * ]
D
[ * ] [ 3 ]
T
[ * ] [ 8 ]
Restart
Exit
[ * ] [ R ] [ * ] [ 7 ]
[ * ] [ * ] [ 9 ]
Page 5

Voice Messaging Service Overview
The PARTNER Voice Messaging PC Card is designed to work with the
communications system. The system configuration consists of two voice
channels (ports) and four mailboxes, providing the following basic voice
messaging capabilities:
■
Handles up to two calls simultaneously and provides service for four
subscribers.
Answers outside calls, plays a customized message prompting the caller
■
to select a mailbox (1–4) for the party for whom the caller wants to leave a
message—all without the aid of a receptionist.
Allows callers to leave a private message if the called party does not
■
answer or is busy on another call. The caller can also transfer to another
system extension or the receptionist's extension for assistance.
■
When a message is left in one of the four mailboxes, the message light on
the system phone associated with the mailbox comes on.
■
Allows subscribers to retrieve messages from any touch-tone phone on the
premises or from a remote locations. The system informs subscribers how
many of these message are new and how many are old (previously saved)
messages.
The voice messaging system provides two types of service:
■
Call Answer Service. Allows the caller to leave a message or to transfer to another extension if the called party is busy or does not answer.
■
Voice Mail Service. Allows subscribers to listen to messages and to manage their own mailboxes.
Page 6
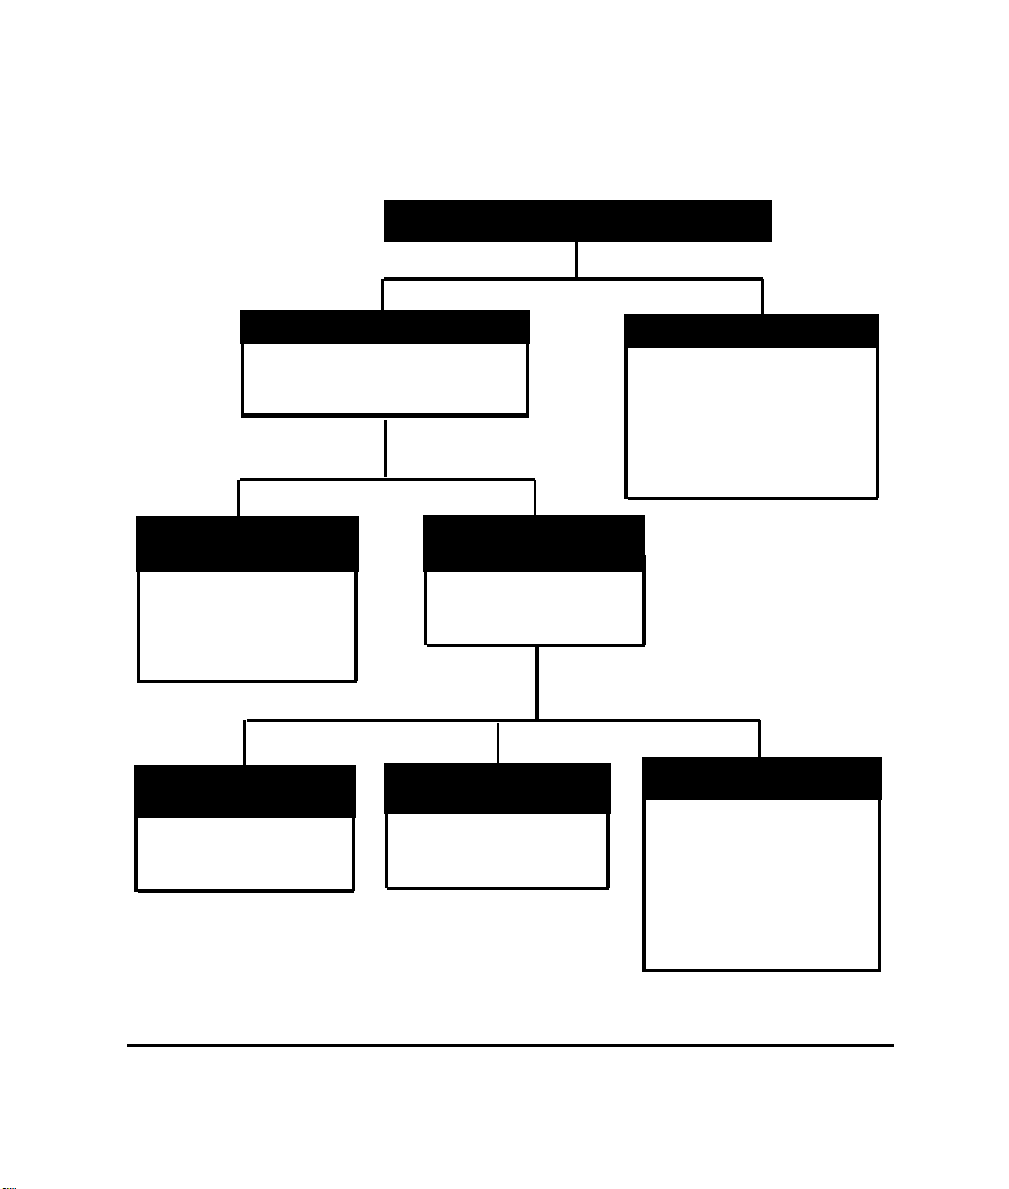
Figure 1 provides an overview of the features associated with each service.
PARTNER Voice Messaging PC Card
Call Answer Service
Prompts caller to leave a message
or transfer to another extension
when the party is busy.
Voice Mailbox
Transfer
System users press a
button to transfer callers
directly to a voice mailbox
without ringing the
extension first.
Automatic
VMS Coverage
Subscribers have voice
mail coverage on all the
time at their extension.
VMS Extension
Coverage
Caller hears the called
party's personal greeting
and can leave a message.
Manual
VMS Coverage
Subscribers can turn
voice mail coverage on
and off at their extension.
Voice Mail Service
Allows subscribers to:
Listen to messages
■
Delete messages
■
Record personal greeting(s)
■
Change their password
■
Replay Messages
■
Skip Messages
■
Do Not Disturb
Subscribers can use Do Not
Disturb in conjunction with
automatic or manual VMS
coverage. Doing so enables
callers to receive Call
Answer service
Immediately — calls do not
ring the extension first.
Figure 1. PARTNER Voice Messaging Services
Page 7

Communications System Features
Affecting Call Answer Service
Call Answer Service works with the following communications system
features:
■
VMS Coverage
■ Do Not Disturb
■
Group Call Distribution
■ Line Coverage Extension
Voice Mailbox Transfer
■
Each of these features is explained briefly below. For more information about
these communications system features, see the Programming and Use guide
for your communications system.
VMS Coverage
VMS Coverage can be either automatic or manual.
■
Automatic VMS Cover (#310): When the communications system
Automatic VMS Cover feature is assigned for an extension, intercom and
transferred callers are transferred to the voice messaging system when the
called person does not answer by the fourth ring (or by the number of rings
specified within the communications system VMS Cover Rings (#117)
feature). The voice messaging system greets the caller with the general
greeting. To leave a message, the caller selects the mailbox by dialing 1–4
or transfers to the receptionist by dialing [
■
Manual VMS Cover (F15): Regardless of the Automatic VMS Cover
setting, the communications system enables subscribers to press a
programmed button to turn voice mail coverage on and off at their
extension. To make this possible, the VMS Cover feature must be
programmed on a button with lights on the subscriber system phone.
0 ].
Page 8

Do Not Disturb (F01)
A Do Not Disturb button can be programmed on a user's phone to prevent
calls for that extension from audibly alerting (lights still flash). Subscribers who
have VMS Extension Coverage—either automatic or manual—can use this
communications system feature when they want calls sent to the voice
messaging system immediately.
Group Call Distribution (#206)
Group Call Distribution assigns outside lines to Hunt Groups. If you want an
outside line to ring directly into PARTNER Voice Messaging, instead of being
answered and transferred by the receptionist, assign the line to Hunt Group 7,
which is used exclusively for PARTNER Voice Messaging.
Line Coverage Extension (#208)
Line Coverage Extension identifies an extension as the "owner" of a specific
line, so the extension can activate Call Coverage or VMS Cover for that line.
When a call comes in on a covered line, the system routes the call directly to
PARTNER Voice Messaging if the call is not answered. The caller has the
option of leaving a message in the general mailbox, selecting one of the four
subscriber mailboxes and leaving a message, or transferring to another
extension, or dialing [
Line ownership typically is assigned to personal lines or to lines to be used for
outside access to the PARTNER Voice Messaging.
0 ] to reach the receptionist.
Voice Mailbox Tranfer (F14)
A Voice Mailbox Transfer button can be programmed on a user's phone to
transfer callers directly to PARTNER Voice Messaging without ringing the
extension first. This feature is useful when a user is handling calls for a
subscriber who is not at his or her desk.
Page 9

Voice Mail Service
Voice Mail service allows subscribers to manage their own mailboxes. With it,
a subscriber can:
■
Listen to messages
■
Delete messages
■
Skip Messages
■
Record a personal greeting.
■
Change the default password for the mailbox to ensure that messages are
kept confidential.
Voice Mail service offers callers the following options when their call is
unanswered at a subscriber's extension:
■
Leave a detailed, confidential message in the called party's mailbox.
■ Press [ 0 ] to transfer to the receptionist's extension for assistance.
■ Callers can press [ 0 ] or dial any extension before, during, or after leaving a
message.
✏
NOTE:
Until a customized greeting is recorded for the general mailbox, and for
individual subscriber mailboxes, outside callers who reach the general
mailbox, or individual subscriber mailboxes, hear a factory-set
message:
Factory-Set General Mailbox Greeting
Welcome to PARTNER Voice Messaging
Please press [
1 ] leave a message.
Factory-Set Subscriber Mailbox Greeting
Your party is not available. Please leave a message after the tone.
Page 10

The PARTNER Voice Messaging PC Card provides four mailboxes. The
factory-set mailbox assignments are:
■
Mailbox 1, the general mailbox, is assigned to extension 10.
■
Mailbox 2, is assigned to extension 11.
■
Mailbox 3, is assigned to extension 12.
Mailbox 4, is assigned to extension 13.
■
When a call is transferred to PARTNER Voice Messaging, the caller hears the
general mailbox greeting and can select the subscriber's mailbox by dialing
the mailbox number (1–4) or can wait on the line to leave a message in the
general mailbox. The caller can also dial [
When a caller leaves a message, the voice messaging system places the
message in the mailbox and turns on the message light (if available) at the
subscriber's phone.
0 ] to reach the receptionist.
✏
Subscribers can retrieve messages at their convenience from any touch-tone
phone either while on-site or from an off-site location. The system informs
subscribers of the number of new and old (saved) messages in their
mailboxes, and plays new messages first. See "Using PARTNER Voice
Messaging" on page 36 for instructions for recording a personal greeting,
listening to messages, transferring to another extension, and changing a
password.
Voice Mail Service also enables the System Manager to program the voice
messaging system. See "PARTNER Voice Messaging System Programming"
on page 14 for more information.
Subscribers can call into PARTNER Voice Messaging from a system extension
or from a remote location. To access their mailboxes they enter a mailbox
number followed by a password.
NOTE:
It is recommended that mailbox subscribers use system telephones
with message lights.
Page 11

Security
The System Manager is responsible for the security of the system. As the
System Manager, it is important that you fully understand and appropriately
administer this product to reduce your risk of incurring charges that result from
unauthorized use of the system. Under the law, you, the customer is
responsible for paying for part or all of those unauthorized calls.
Be aware that criminals called hackers may attempt to gain unauthorized
access to your communications system and your voice messaging system.
Hackers often try to trick a company's employees into providing them with
access to an outside line or an outside operator. They may also concentrate
their activities in two areas related to the voice messaging system:
They try to dial into a mailbox, then execute a transfer to an outside line.
■
Then they dial an access code, followed by a digit string to either direct
dial or access a network operator to complete the call.
■
They try to locate unused or unprotected mailboxes and use them as
drop-off points for their own messages.
System Security Guidelines
To reduce the risk of unauthorized use of your communications and voice
messaging systems, you should:
Change the System Manager's password from the factory setting. Use a
■
hard-to-guess value.
Advise subscribers to protect their mailboxes by changing their passwords
■
(a four-digit password is required) when they log into PARTNER Voice
Messaging for the first time and frequently thereafter. Subscribers can refer
to the instructions for changing their passwords in "Using PARTNER Voice
Messaging" in this guide, or refer to the PARTNER Voice Messaging Quick
Reference Card.
Monitor your call reporting system records of outgoing calls to identify
■
possible system abuse.
Page 12

You should also:
■
Ask users to tell you if any of the following suspicious activity occurs:
—
Inability to log into PARTNER Voice Messaging
—
Lost mail messages or altered greetings
—
Inability to get an outside line
—
Series of calls with silence on the other end or with the caller hanging up
—
Sudden increase in wrong numbers
Caller complaints that your lines are busy
—
Callers claiming to represent the "phone" company. Ask for a callback
—
number.
Callers trying to obtain sensitive information or asking for assistance in
—
placing outside or long-distance calls. Ask for a callback number.
Increases in internal requests for assistance in making outside calls
—
(particularly international calls or requests for dial tone).
■
Never distribute the office telephone directory to anyone outside the
company.
■
Collect old office telephone directories and shred them.
■
Never discuss your telephone system's numbering plan with anyone
outside your company.
■
Any time a call appears to be suspicious, in the continental U.S., contact
your Lucent Technologies Representative or local Authorized Dealer.
Page 13

Installation Instructions
The PARTNER Voice Messaging PC Card is used with PARTNER Advanced
Communications System processor module Release 1.1 or later (available
separately). The processor module uses PC cards for backup or restore
functions, for software upgrades, for Automatic System Answer/Direct
Extension Dialing (ASA/DXD) functions, as well as for PARTNER Voice
Messaging. Make sure that you have the required PARTNER Voice Messaging
PC Card and PARTNER ACS Release 1.1 or later before beginning these
installation procedures. If you are using Release 1.0 of the Partner ACS
processor module, you will need to upgrade to Release 1.1 or later before you
can install the PARTNER Voice Messaging PC Card. Contact your Lucent
Technologies Representative, or your local Authorized Dealer.
Important Safety Instructions
Always follow these basic safety precautions when using this product:
1. Read and understand all instructions.
Follow all warnings and instructions marked on the product.
2.
3.
Do not drop, bend, or crush the card.
4. Keep the card away from moisture, high temperatures, and direct sunlight.
5.
Keep the connector on the card clean.
1.
CAUTION:
Before starting, verify that you have batteries installed in the PARTNER
ACS processor module (if extension 10 shows the ReplaceSysBat
W/Power On message in the display, replace the batteries without
turning off the system.)
CAUTION:
To avoid damage to the PARTNER ACS processor module or to the
card, do not install or remove the card when power is on.
Power down the PARTNER Advanced Communications System before
inserting or removing the PARTNER Voice Messaging PC Card.
A)
If you have a 5-Slot carrier, turn the On/Off Switch to Off ("O").
Page 14
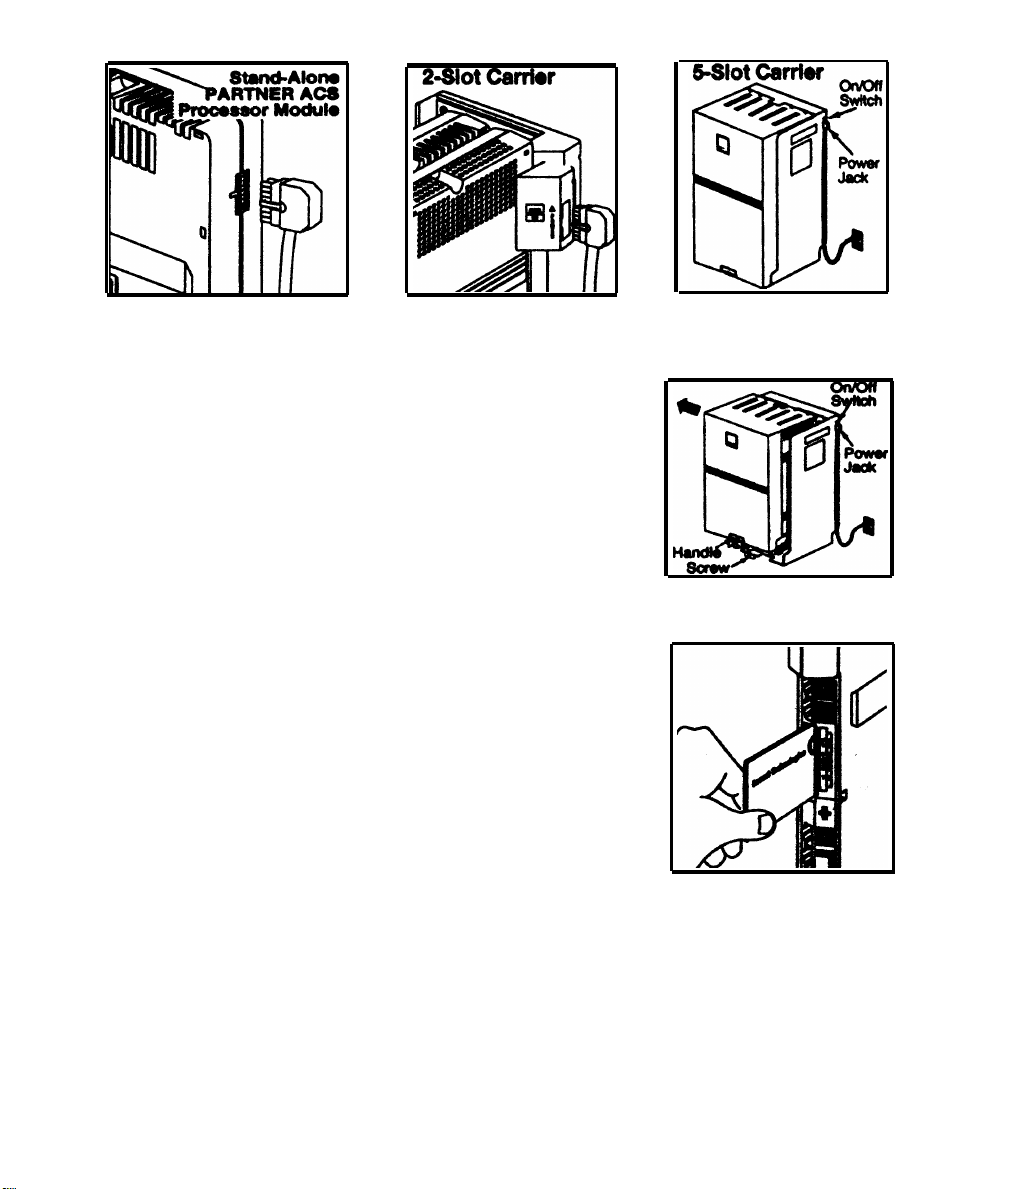
B)
Disconnect the power cord from the power jack on your installation.
2.
3.
4.
If you have a standalone or a 2-Slot carrier, skip
to Step 3. If you have a 5-Slot carrier, continue
with Step 2A.
Loosen the screw on the lower front of the
A)
cover. Then place one hand on the handle on
the lower front and place your other hand on
the top of the cover.
B)
Gently pull the cover up and away from the carrier.
To insert the PARTNER Voice Messaging PC
Card, hold it with the Lucent Technologies label
facing to the right, and slide it gently into one of
the PC card slots on the PARTNER ACS
processor module. When inserted properly, the
PARTNER Voice Messaging PC Card projects
about 1-5/8" (4 cm) from the module.
To remove the PC card, gently pull straight out
(with the power off).
Power up the system:
Reconnect the power cord.
A)
B)
If you have a 5-Slot carrier, move the carrier's On/Off switch to the
"On" position ("—").
Page 15

5.
Check that the green light on the front of each module is lit:
A)
If a single light is out, power down the system, reseat the module,
then power up the system.
If multiple lights are out, power down the system, reseat the leftmost
module that has a light out, then power up the system.
B)
If the lights are still out, in the continental U. S., call the Lucent
Technologies hotline at 1 800 628-2888 for support. Outside the
continental U.S., contact your Lucent Technologies Representative
or local Authorized Dealer.
6.
Leave the PARTNER Voice Messaging PC Card in the processor module. The
card stores message, greetings, etc.
If you have a 2-Slot carrier or a standalone
configuration, you are finished with this
procedure. If you have a 5-Slot carrier,
continue with Step 6A.
A)
Make sure all modules are seated
properly. The cover will not fit if the
modules are not seated properly.
B) To replace the cover, grasp it by its
upper edges and hold it squarely over
the control unit.
C)
Place the cover over the modules and
make sure it fits firmly in place.
D)
Tighten the screw on the lower front cover.
Page 16

PARTNER Voice Messaging Programming
This section provides the following information:
■
Initial settings for the communications system and PARTNER Voice
Messaging when the PARTNER Voice Messaging PC Card is installed
General instructions for programming PARTNER Voice Messaging followed
■
by instructions for changing the initial PARTNER Voice Messaging settings
The order of the procedures in this section enables you to record the general
mailbox greeting and change the assignments for the mailboxes before
PARTNER Voice Messaging begins to handle calls—this order is
recommended to ensure that calls are handled correctly for the subscribers
who require voice mail coverage.
In the following step-by-step instructions, note that Step 1 of each procedure
for the voice messaging system is logging into PARTNER Voice Messaging.
However, if you are already logged into PARTNER Voice Messaging, you can
skip Step 1.
lnitial Settings
When the PARTNER Voice Messaging PC Card is installed in the PARTNER
ACS processor module (see "Installation Instructions" on page 11) and the
system is powered up, some settings are established for both PARTNER Voice
Messaging and the PARTNER ACS system.
If you want to make changes to the initial settings for PARTNER Voice
Messaging, use the instructions in "Using PARTNER Voice Messaging System
Programming" on page 17. If you want to make changes to the initial
PARTNER ACS settings, use the instructions in "PARTNER ACS Programming"
on "PARTNER ACS Programming" on page 24.
Page 17

PARTNER Voice Messaging Initial Settings
The following are the initial settings for PARTNER Voice Messaging:
Mailbox 1—the general mailbox—is assigned to extension 10.
■
■
Mailbox 2 is assigned to extension 11.
■
Mailbox 3 is assigned to extension 12.
■
Mailbox 4 is assigned to extension 13.
■
The following factory-set general mailbox greeting plays if a call is
transferred to PARTNER Voice Messaging:
Welcome to the PARTNER Voice Messaging.
Please press [ 1 ] to leave a message.
■
The following factory-set Personal Mailbox greeting plays for individual
subscriber mailboxes (1–4):
Your party is not available. Please leave a message after the tone.
PARTNER ACS Initial Settings
Following are the initial settings for the PARTNER ACS system Release 1.1 or
later when a PARTNER Voice Messaging PC Card is present:
■
Virtual extensions 78 and 79 are assigned to the two voice ports on
PARTNER Voice Messaging.
✏
■
■
NOTE:
A virtual extension is an extension number that exists in system software
only, and is not associated with a physical extension jack on a module.
The Idle-Line Preference for extensions 78 and 79 is automatically set to
Intercom First.
The Intercom dial tone for extensions 78 and 79 is automatically set to
Machine.
Page 18

You must perform the following two procedures for every installation:
■
Assign the PARTNER Voice Messaging PC Card's virtual extensions 78 and
79 to PARTNER ACS Hunt Group 7 (ICOM 777) used for voice mail
systems.
Assign an extension as the destination extension for Transfer Return calls
■
from Hunt Group 7 (ICOM 777). This ensures that when a caller chooses to
transfer to another extension before during or after leaving a message in a
subscriber mailbox and the call is unanswered, the transferred call will
return to the designated system extension where it rings until it is
answered. If you want calls returned to the receptionist;s extension, assign
extension 10 or 11 as the Transfer Return extension.
PARTNER Voice Messaging Planning Forms
Before you program PARTNER Voice Messaging, obtain completed copies of
the relevant planning forms for the PARTNER ACS system. See "PARTNER
ACS Planning Forms" on page 24. These forms provide the names,
extensions, mailboxes, and other information required to program PARTNER
Voice Messaging.
You need the following forms for PARTNER Voice Messaging:
Form 1: Mailbox Assignments. Shows factory-set mailbox assignments.
Allows you to change the mailbox assignments.
Form 2: General Mailbox Greeting. Shows the script used to record the
general mailbox greeting that is played when a caller is transferred to
PARTNER Voice Messaging.
Page 19

Using PARTNER Voice Messaging
System Programming
Mailbox 0 is a special mailbox with no storage capacity that is used to program
PARTNER Voice Messaging. The System Manager uses this mailbox to:
■
Change the System Manager's password for mailbox 0.
Reinitialize passwords for mailboxes 1–4 if a subscriber forgets the
■
password.
■
Assign PARTNER ACS system extensions to mailboxes 1–4.
Record the general mailbox greeting. You can record a greeting up to two
■
minutes long.
The factory-set password for mailbox 0 is 1234. If you are the System
Manager, see "Changing the System Manager's Password" on page 21 for
instructions on how to change the password.
✏
NOTE:
Although mailbox 0 has a password, it does not have storage capacity
for messages.
The Programming Main Menu
The Programming Main Menu enables you to assign mailboxes to extensions,
record the general mailbox greeting, change the password for mailbox 0,
initialize mailboxes, and reinitialize mailbox passwords.
Page 20

PARTNER Voice Messaging
Press [
Intercom
] [ 7 ] [ 7 [ 7 ] (if calling internally)
or
Press [ * ] [ R ] ([ * ] [ 7 ]) while listening to general mailbox greeting
(if calling from an outside tine)
Enter 0 and password (factory setting = 1234) to select mailbox 0
Assign
Mailbox to
Extension
(Press [
1 ])
Record General
Mailbox
Greeting
(Press [
3 ])
Change
Your
Password
(Press [ 5 ])
Initialize
a
Mailbox
(Press [ 6 ])
Figure 2. Programming Menu
Reinitialize a
Mailbox Password
(Press [ 9 ] followed
by the Mailbox
Number:
91, 92, 93, or 94
Page 21

Accessing the Programming Main Menu
To access the Programming Main Menu:
1.
Call PARTNER Voice Messaging.
■
If calling internally, press [
button.
■
If calling from outside the system, press [ * ] [ R ] ([ * ] [ 7 ]) during the general
mailbox greeting.
The system plays a greeting followed by:
Enter mailbox number followed by a password.
2.
Enter [
0 ] and the four-digit password. (The factory-set password is 1234.)
The system plays:
To assign a mailbox to an extension, press [ 1 ]. To administer the
general greeting, press [
To initialize a mailbox, press [ 6 ]. To re-initialize a mailbox
password, press [
9 ] followed by the mailbox number.
The first time you access this menu, you should change the factory-set
password. Use a hard-to-guess value, and record it in a safe place. See
"Changing the System Manager's Password" on page 21.
Intercom
3
] [ 7 ] [ 7 ] [ 7 ] or the programmed VMMsgs
]. To change your password, press [ 5 ].
Programming Guidelines
Once you are familiar with PARTNER Voice Messaging, use these shortcuts to
save time while programming:
■
You do not have to wait for a prompt to play before entering digits for the
next step.
■
Press [ * ] [ R ] ([ * ] [ 7 ]) at any point during programming to return to the
Programming Main Menu.
■
To ensure that you hear voice prompts, turn off your microphone when
using the speakerphone to program the system.
■
Use the handset rather than the speakerphone to record greetings to avoid
background noise in your recordings. Hang up to exit programming.
Page 22

Assigning a Mailbox to an Extension
Before you begin, locate Form 1: Mailbox Assignments for PARTNER Voice
Messaging. Check to see whether mailboxes have been changed from the
factory defaults. If mailboxes are not numbered differently, skip to "Recording
the General Mailbox Greeting."
Assign mailboxes to extensions as specified on Form 1:
1.
If necessary, access the Programming Main Menu. If you are already at
the Programming Main Menu, skip to Step 2.
Call PARTNER Voice Messaging:
A)
■
If calling internally, press [
VMMsgs button (see programming instructions on page 33).
■
If calling from outside the system, press [ * ] [ R ] ([ * ] [ 7 ]) during the
general mailbox greeting.
B)
Enter [
2.
Press [ 1 ] to assign mailboxes to extensions.
3.
Enter the number of a mailbox to be changed as indicated on Form 1.
4.
Enter the extension number for the mailbox as indicated on Form 1.
0 ] followed by the password for mailbox 0.
Intercom
] [ 7 ] [ 7 ] [ 7 ] or the programmed
5.
Repeat Steps 2 through 4 for each mailbox to be changed.
6.
Go to "Recording the General Mailbox Greeting" or press [ * ] [ * ] [ 9 ] to exit
programming.
Recording the General Mailbox Greeting
To record the greeting callers hear when PARTNER Voice Messaging answers,
as specified on Form 2:
1. If necessary, access the Programming Main Menu. If you are already at
the Programming Main Menu, skip to Step 2.
A)
Call PARTNER Voice Messaging:
■
B)
If calling internally, press [
VMMsgs button.
■
If calling from outside the system, press [ * ] [ R ] ( [ * ] [ 7 ]) during the
general mailbox greeting.
Enter [
0 ] followed by the password for mailbox 0.
Intercom
] [ 7 ] [ 7 ] [ 7 ] or the programmed
Page 23

2.
Press [
3.
Do one of the following:
■
■
■
3 ] to record the general mailbox greeting.
To approve the greeting, press [ 1 ].
To re-record the greeting, press [ 2 ].
To exit without changing the greeting, press [ * ] [ 7 ].
Unlike some voice mail systems, PARTNER Voice Messaging allows you to
record the general mailbox greeting from a remote location. For example, if
you want to record instructions for inclement weather.
Changing the System Manager's Password
This section tells you how to change the System Manager's password (for
mailbox 0) that is required for changing PARTNER Voice Messaging settings.
The factory setting for mailbox 0 is 1234. To prevent unauthorized
programming of the system, you should change the default password
immediately after installation or any time the password has been reset. You
must assign four digits for a password. It is recommended that you create a
password from random, nonsequential digits.
You cannot reinitialize the System Manager's password. If you change the
password and forget it, you can contact the National Customer Care Center at
1 800 628-2888 or call your Lucent Technologies Representative or local
Authorized Dealer for instructions for how to reset the password.
To change the password for mailbox 0:
1.
If necessary, access the Programming Main Menu. If you are already at
the Programming Main Menu, skip to Step 2.
A)
Call PARTNER Voice Messaging:
■
If calling internally, press [
Intercom
] [ 7 ] [ 7 ] [ 7 ] or the programmed
VMMsgs button (see programming instructions on page 33).
■
If calling from outside the system, press [ * ] [ R ] ([ * ] [ 7 ]) during the
general mailbox greeting.
B)
Enter [
Press [ 5 ] to change the password.
2.
0 ] followed by the password for mailbox 0.
The prompt asks you to enter your new password.
Page 24

3.
Enter four digits for the new password.
The prompt asks you to re-enter your new password.
4.
Re-enter your new password.
The new password is now active.
5.
Press [ * ] [ R ] ([ * ] [ 7 ]) to return to the Programming Main Menu or press
[
*
] [ * ] [ 9 ] to exit programming, or hang up.
Reinitializing a Mailbox
To prepare a previously used mailbox for a new subscriber, you can reinitialize
the mailbox. This procedure deletes any messages left in the mailbox and
turns off the phone's message light (if on), erases the personal greeting (if
recorded), and changes the password back to the factory setting (1234).
To reinitialize a mailbox:
1.
If necessary, access the Programming Main Menu. If you are already at
the Programming Main Menu, skip to Step 2.
A)
Call PARTNER Voice Messaging:
If calling internally, press [
■
VMMsgs button.
Intercom
] [ 7 ] [ 7 ] [ 7 ] or the programmed
■
If calling from outside the system, press [ * ] [ R ] ([ * ] [ 7 ]) during the
general mailbox greeting.
B)
Enter [
2.
Press [ 6 ] to initialize mailboxes.
0 ] followed by the password for mailbox 0.
The system plays:
Caution: Initializing a mailbox erases its greeting and messages.
To exit without making any changes, press [ * ] [ 7 ].
Do one of the following:
3.
■
Enter the number of the mailbox you want to initialize.
Press [ * ] [ R ] ([ * ] [ 7 ]) to return to the Programming Main Menu without
■
making changes.
Page 25

If you entered a mailbox number in Step 3:
The system plays:
Reinitialized.
4.
Press [ * ] [ * ] [ 9 ] to quit, or hang up.
Reinitializing a Password
If a subscriber forgets the password for his or her mailbox, you can reinitialize
the password to the factory setting of 1234 so the user can retrieve messages.
Remind the subscriber to change the password immediately after logging in
for the first time.
✏
NOTE:
You cannot use this procedure to reinitialize the System Manager's
password for mailbox 0. If you change the System Manager's password
and forget it, you can contact the National Customer Care Center at
1 800 628-2888 or call your Lucent Technologies Representative
local Authorized Dealer for instructions for how to reset the password.
To reinitialize a password to 1234:
1.
If necessary, access the Programming Main Menu. If you are already at
the Programming Main Menu, skip to Step 2.
A)
Call PARTNER Voice Messaging:
■
If calling internally, press [ Intercom ] [ 7 ] [ 7 ] [ 7 ] or the programmed
VMMsgs button (see programming instructions on page 33).
■
If calling from outside the system, press [ * ] [ R ] ([ * ] [ 7 ]) during the
general mailbox greeting.
B)
Enter [
Press [
2.
system plays:
The password has been reinitialized.
0 ] followed by the password for mailbox 0.
9 ] followed by the mailbox number to reinitialize a password. The
or
Press [ * ] [ * ] [ 9 ] or hang up to quit.
3.
Page 26

PARTNER ACS Programming
When the PARTNER ACS is installed, it uses factory settings that reflect the
most common usage of the equipment. You can change these settings as
required to customize them for the business.
You can program the communications system from extension 10 or extension
11. You may find it more convenient to program from extension 11. This
capability allows the receptionist to continue handling calls at extension 10
while you program.
System Programming changes settings for the system as a whole, or for
individual lines or extensions. (Refer to the Programming and Use guide for
the PARTNER ACS system for more information about System Programming
options.)
You must perform the following two procedures for every installation:
Assign the PARTNER Voice Messaging PC Card's virtual extensions 78 and
■
79 to PARTNER ACS Hunt Group 7 (ICOM 777) used for voice mail
systems.
Assign extension 10 or extension 11 as the destination extension for
■
Transfer Return calls from Hunt Group 7 (ICOM 777). This ensures that
when a caller chooses to transfer to another extension before during or
after leaving a message in a subscriber mailbox and the call is
unanswered, the transferred call will return to the designated receptionist's
extension where it rings until it is answered.
PARTNER ACS Planning Forms
Refer to the communications system's System Planner when you are changing
system settings, and be sure to record any changes you make. The following
forms from the System Planner contain information about PARTNER Voice
Messaging:
■
Form A: System Configuration. Contains basic information about the
system. This includes the line number and type of voice messaging service
required for each line.
Page 27

Form B1: System Extensions. Contains basic information about each
■
extension. This includes the type of phone or auxiliary equipment at the
extension, and the name of the user or a description of how the extension is
used.
■
Form B2: Customized Extension Settings. Contains feature settings,
such as Automatic VMS Cover and Automatic Extension Privacy, and group
assignments for each extension.
■
Form C: Button Assignments. Specifies which features are programmed
on buttons for each extension. This includes VMS Cover, Do Not Disturb,
Voice Mailbox Transfer, and Voice Mail Messages buttons.
Using PARTNER ACS System Programming
System Programming requires a system display phone at extension 10 or
extension 11, with a programming overlay placed over the phone's dialpad.
System Programming procedures are identified by # and a 3-digit code (for
example, the procedure code for System Date is #101).
You can program the system in one of two ways:
Direct Method. You access a programming procedure directly by dialing
■
the code for that procedure. This method works best when you are using
only a few procedures during the programming session, and you know the
codes. For example, press #101 to change the system date.
■
Cycle Method. You cucle through a sequence of procedures in numerical
order by pressing [
when programming the communications system for the first time, or when
you are changing a series of related settings. However, procedures #399,
#609, and #728 cannot be changed by this method.
NOTE:
✏
You can talk on the telephone while you program. This is useful if you
need to call for support while programming. However, you must place
the call before you enter programming mode, and you must use the
handset (not the speakerphone) to talk.
Next Procedure
] or [
Prev Procedure
]. You should use this method
Page 28

The Programming Overlays
During System Programming, the normal functions of several buttons on the
phone at extension 10 (or 11 if available) change. For example, left [
becomes [
System Program
], which is the button used to enter programming mode.
To identify these buttons while programming, place the appropriate
programming overlay provided with the system over the dialpad of the phone
at extension 10 or 11.
Use the following special buttons while programming:
■
[
Next Procedure
]
and [
Prev Procedure
] cycle forward and backward through the
programming procedures.
■
[
Next Item
] and [
Prev Item
] cycle forward and backward through a procedure's
parameters. A parameter is typically an outside line, an extension, or a
telephone list entry.
■
[
Next Data
] and [
Prev Data
] cycle forward and backward through the valid list
entries. These buttons work only for fixed data, such as a line or extension
number. They do not work for variable data such as date, time, password,
telephone numbers, or doorphone assignments.
■
[
Remove
] returns the current setting to the factory setting.
■
[
Enter
] ends an entry of variable length, such as a telephone number in an
Allowed Phone Number List.
■
[
System Program
] starts the System Programming process.
Intercom
]
[
Central Tel Program
■
] starts the Centralized Telephone Programming process (that is,
customizing individual telephones from extension 10, or 11 if available).
■
[
Feature
], when followed by [ 0 ] [ 0 ], enters or exits programming mode.
Programming Mode
To enter programming mode:
1.
At extension 10 or 11, make sure the programming overlay is in place
over the system phone's dialpad.
2.
3.
Press [
Press [
Feature
] [ 0 ] [ 0 ].
System Program
] [
System Program
].
Page 29

4.
Enter specific programming procedure codes.
You must program the following for every new installation
■
VMS Hunt Group (Hunt Group 7) Extensions (#505)
■
Transfer Return Extensions (#306)
You may also need to program the following:
■
Line Coverage
—
Group Call Distribution (#206)
—
Line Coverage Extension (#208)
■
Automatic VMS Cover (#310)
■
VMS Cover Rings (#117)
■
Telephone Button Programming
VMS Hunt Group Extensions (#505)
You must use this procedure to assign virtual extensions 78 and 79 associated
with PARTNER Voice Messaging to Hunt Group 7. This Hunt Group, which is
called the VMS Hunt Group, is used exclusively for PARTNER Voice
Messaging.
To assign virtual extension 78 and 79 to Hunt Group 7:
1.
Press [ # ] [ 5 ] [ 0 ] [ 5 ].
2.
3.
At the
At the
Group:
prompt, press [ 7 ].
Extension:
prompt, enter [ 7 ] [ 8 ] for the first virtual extension num-
ber assigned to PARTNER Voice Messaging as shown on form B1.
4.
5.
Press [
Press [
Next Data
Next Item
] until the display reads
1 Assigned.
] to display extension 79 (the second virtual extension num-
ber assigned to PARTNER Voice Messaging as shown on form B1).
6.
Press [
7.
Continue with "Transfer Return Extensions" on the next page.
Next Data
] until the display reads
1 Assigned.
Page 30

Transfer Return Extensions (#306)
For virtual extension 78 and 79 assigned to PARTNER Voice Messaging, use
the following procedure to assign an extension as the Transfer Return
extension.
If a caller chooses to transfer to another extension before, during or after
leaving a message in a subscriber mailbox and the call is unanswered, the
communications system transfers the call to the Transfer Return extension. For
extensions that do not have PARTNER Voice Messaging coverage or if the
Voice Mail coverage is off, this procedure ensures that unanswered calls
transferred from PARTNER Voice Messaging return to the designated
receptionist's extension where they ring until they are answered.
If you want calls returned to the receptionist, assign extension 10 or 11. If you
want calls returned to another system extension, assign any valid extension
(10–49).
To assign the Transfer Return extension for virtual extensions 78 and 79:
Press [ # ] [ 3 ] [ 0 ] [ 6 ].
1.
At the
2.
ber assigned to PARTNER Voice Messaging as shown on form B1.
At the Data: prompt, enter the extension number for the Transfer Return
3.
extension.
4.
Press [
ber assigned to PARTNER Voice Messaging as shown on form B1).
5.
At the Data: prompt, enter the extension number for the Transfer Return
extension.
6.
Continue with "Line Coverage" on the next page.
Extension:
Next Item
] to display extension 79 (the second virtual extension num-
prompt, enter [ 7 ] [ 8 ] for the first virtual extension num-
Page 31

Line Coverage
Refer to Form A, Page 1, Line Coverage, VMS-Mail:
1.
If check marks appear for any lines in this column, use the procedure in
"Group Call Distribution" below.
2.
If extension numbers are specified for any lines in this column, use the
procedure in "Line Coverage Extension" below.
Group Call Distribution (#206)
To assign VMS-Mail lines checked on Form A Page 1, Line Coverage, to Hunt
Group
1.
2.
3.
7:
Press [ # ] [ 2 ] [ 0 ] [ 6 ].
At the
Group:
At the Line: prompt, enter the first line checked in the VMS-Mail column.
prompt, press [ 7 ].
Press [
4.
5.
To program another line, press [
number displays.
6.
Press [
7.
Repeat Steps 5 and 6 for each VMS-Mail line checked on Form A.
If extension numbers are specified for any lines in this column, use the fol-
8.
lowing procedure in "Line Coverage Extension." Otherwise, continue with
the section "Automatic VMS Cover."
Next Data ] until the display reads 3 VMS Line Cover.
Next Data
Next Item
] until the display reads
] or [
Prev Item
3 VMS Line Cover.
] until the appropriate line
Line Coverage Extension (#208)
To assign line coverage for the extension numbers specified in the VMS-Mail
column on Form A, Page 1, Line Coverage:
1.
Press [ # ] [ 2 ] [ 0 ] [ 8 ].
2.
At the Line: prompt, enter the first line for which an extension is specified
in the VMS-Mail column of Form A, Page 1, Line Coverage.
Page 32

At the Data: prompt, enter the number of the extension specified in the
3.
VMS-Mail column.
To program another line, press [
4.
Next Item
] or [
Prev Item
] until the appropriate line
number displays,
Repeat Steps 3 and 4 for each VMS-Mail line for which an extension num-
5.
ber is written on Form A.
6.
Continue with the next section, "Automatic VMS Cover."
Automatic VMS Cover (#310)
Check Form B2 to see if Automatic VMS Cover is assigned to any extensions.
If it is, follow the procedure below. If not, skip to "VMS Cover Rings."
To change the Automatic VMS Cover setting for an extension to Assigned as
indicated on Form B2:
1.
Press [ # ] [ 3 ] [ 1 ] [ 0 ] .
2.
Enter the number of the first extension to which Automatic VMS Cover is
to be assigned.
3.
Press [
To program another extension, press [
4.
number shows on the display.
Next Data
] until the display reads
1 Assigned.
Next Item
] or [
Prev Item
] until the extension
Repeat Steps 3 and 4 for each extension to which Automatic VMS Cover
5.
is to be assigned.
Continue with "VMS Cover Rings" below.
6.
Page 33

VMS Cover Rings (#117)
Check Form A, to see if VMS Cover Rings is different from the factory setting
of 3. If it is, follow the procedure below beginning with Step 1. If not, skip to
Step 3 of the procedure below.
To change the number of times calls ring before they are sent to the voice
messaging system as indicated on Form A, Page 2, VMS Cover Rings:
1.
Press [ # ] [ 1 ] [ 1 ] [ 7 ].
2.
Enter the VMS Cover Rings setting (1–9) specified on Form A.
3.
Press [
4.
Continue with the next section, "Telephone Button Programming."
Feature
] [ 0 ] [ 0 ] to exit programming mode.
Telephone Button Programming
Before you begin, locate Form C of the System Planner for the
communications system. Be sure you have a copy of the form for each
subscriber's phone.
Use this section to program buttons on subscribers' phones, including the
receptionist's phone. This section uses Centralized Telephone Programming.
When you are finished programming, be sure to label all buttons on
subscribers' phones.
Manual VMS Cover (F15)
This button allows the subscriber to turn voice mail coverage and off.
To program a VMS Cover button as specified on Form C:
1.
Press [
2.
Enter the number of the extension to be programmed.
3.
Press a programmable button with lights.
4.
Press [
Feature
Feature
] [ 0 ] [ 0 ] [
] [ 1 ] [ 5 ].
System Program
] [
System Program
] [
Central Tel Program
].
Page 34

At this point, do one of the following:
5.
■ Go to Step 3 of the next procedure to program another button for this
extension.
■
Press [
Central Tel Program
] and go to Step 2 of any button programming
procedure in this section to program a button for a different extension.
■
Press [
Feature
] [ 0 ] [ 0 ] to exit.
Do Not Disturb (F01)
Used in conjunction with either automatic VMS cover or manual VMS cover,
this button lets a subscriber send calls immediately to his or her mailbox
(instead of ringing the extension first).
To program a Do Not Disturb (DND) button as specified on Form C:
1.
Press [
2.
Enter the number of the extension to be programmed.
3.
Press a programmable button with lights.
4.
Press [
5.
At this point, do one of the following:
■
■
■
Feature
Feature
] [ 0 ] [ 0 ] [
] [ 0 ] [ 1 ].
System Program
] [
System Program
] [
Central Tel Program
].
Go to Step 3 of the next procedure to program another button for this
extension.
Press [
Central Tel Program
] and go to Step 2 of any button programming
procedure in this section to program a button for a different extension.
Press [
Feature
] [ 0 ] [ 0 ] to exit.
Voice Mailbox Transfer (F14)
This button lets any system user transfer calls directly to PARTNER Voice
Messaging without ringing the extension first.
To program a Voice Mailbox Transfer (VMBox) button as specified on Form C:
1.
Press [
2.
Enter the number of the extension to be programmed.
3.
Press a programmable button.
4.
Press [
Feature
Feature
] [ 0 ] [ 0 ] [
] [ 1 ] [ 4 ].
System Program
] [
System Program
] [
Central Tel Program
].
Page 35

5.
At this point, do one of the following:
■
Go to Step 3 of the next procedure to program another button for this
extension.
Press [
■
Central Tel Program
] and go to Step 2 of any button programming
procedure in this section to program a button for a different extension.
■
Press [
Feature
] [ 0 ] [ 0 ] to exit.
Voice Mail Messages
This intercom Auto Dial button allows the subscriber to access PARTNER
Voice Messaging with the touch of one button.
To program a Voice Mail Messages (VMMsgs) button as specified on Form C:
1.
Press [
2.
Dial the number of the extension to be programmed.
3.
Press a programmable button.
4.
Press left [
5.
At this point, do one of the following:
■
■
Feature
Press [
] [ 0 ] [ 0 ] [
Intercom
] [ 7 ] [ 7 ] [ 7 ].
Central Tel Program
System Program
] [
System Program
] [
Central Tel Program
].
] and go to Step 2 of any button programming
procedure in this section to program a button for a different extension.
Press [
Feature
] [ 0 ] [ 0 ] to exit
Page 36

Verifying System Operation
After you finish programming the PARTNER Voice Messaging and the
communications system, you should perform the tests described in this
section to verify system operation.
If your system allows programming from extension 11, you should perform these
tests from extension 11 leaving extension 10 for the receptionist to handle calls.
Voice Mail Service
Make a call to the VMS Hunt Group by doing one of the following:
■
If calling internally, press [
VMMsgs button.
■
If calling from outside the system, press [ * ] [ R ] ([ * ] [ 7 ]) during the
general mailbox greeting.
You should hear the following:
Welcome to PARTNER Voice Messaging.
Please enter your mailbox number and password.
Intercom
] [ 7 ] [ 7 ] [ 7 ] or the programmed
Call Answer Service
VMS Extension Coverage
1.
Press the Do Not Disturb button at the appropriate destination extensions
to quickly route your test calls to Call Answer Service.
2.
For extensions that do not have Automatic VMS Cover, turn on coverage
by pressing the VMS Cover button at those extensions.
Call the first extension that has VMS coverage (either automatic or man-
3.
ual). If Do Not Disturb is on at the extension, PARTNER Voice Messaging
should answer the call after one ring and you should hear the general
mailbox greeting. (If Do Not Disturb is not on, the call rings at the extension before Call Answer Service answers it.)
Repeat this procedure for every extension that has voice mail coverage.
4.
Page 37

Group Call Distribution (#206)
1.
Call in on the first line that is programmed for Group Call Distribution.
2.
PARTNER Voice Messaging should answer the call on the fifth ring and
you should hear the general mailbox greeting.
Repeat this procedure for every line that has Group Call Distribution.
3.
Line Coverage Extension (#208)
1.
Make sure VMS Cover is on at the owner's extension.
Call in and make sure the call goes to VMS Cover by the number of rings
2.
specified by, VMS Cover Rings (#117).
3.
Verify that you hear the general mailbox greeting.
4.
Repeat this procedure for every Line Coverage extension.
Page 38

Using PARTNER Voice Messaging
This system serves as your personal answering machine. Callers from inside
and outside your company can hear your personal greeting and leave
messages in your mailbox. You can listen to your messages, save them, or
discard them. You can create your own password to keep messages private.
Helpful Hints
■
While using PARTNER Voice Messaging, you can:
—
Dial the next step of any procedure without waiting for a greeting or
prompt to finish.
—
Use the following key sequences:
[ * ] [
Next Data
[ * ] [ 7 ] or [ * ] [ R ] to restart
—
Dial the person's extension to transfer.
You can press [ * ] [ * ] [ 9 ] to exit PARTNER Voice Messaging and make other
■
calls without having to hang up the handset. (This is useful when you are
calling from a pay phone or making credit card calls.)
] or [ * ] [ 3 ] to delete a message
■
PARTNER Voice Messaging turns on the message light on your system
phone when a message is sent to your mailbox, and turns off the message
light after you listen to all of your new messages.
■
Your mailbox accommodates up to 5 minutes of stored messages (or up to
30 messages).
When your mailbox is 80% full, you will hear the "Mailbox is 80% Full"
■
warning when you log into PARTNER Voice Messaging. If your mailbox is
100% full, your callers are notified that they cannot leave messages.
Page 39

Logging into the System
1.
Call PARTNER Voice Messaging.
■
If calling internally, press [
button.
■
If calling from outside the system, press [ * ] [ R ] ([ 8 ] [ 7 ]) during the general
mailbox greeting.
The system plays a greeting followed by:
Enter mailbox number followed by a password.
Enter your mailbox number.
2.
3.
Enter your password.
Intercom
] [ 7 ] [ 7 ] [ 7 ] or the programmed VMMsgs
✏
4.
NOTE:
Until you change it, the default password is 1234. The system
announces the number of new and old messages in your mailbox.
Select an option from the Voice Mail Menu:
■
Press [ 2 ] to get messages.
■
■
Press [
Press [
3
] to change your personal greeting.
5
] to change your password.
Listening to Messages
1.
Log into PARTNER Voice Messaging.
The Voice Mail Menu plays.
2.
Press [ 2 ] to get messages.
The following message plays:
To listen press [
press [ 2 ] [ 3 ].
Press [ 0 ] to play the message. The message plays.
3.
0 ], to skip press [ # ], to delete press [ * ] [ 3 ], to replay header
✏
NOTE:
New messages are played before old/saved messages. All new
messages are played in the order in which they were received.
Page 40

After the message plays, do any of the following:
■
Press [ 2 ] [ 3 ] to replay the current message header. Go back to Step 3.
■
Press [ 0 ] to replay the current message. Repeat Step 4.
■
Press [ # ] to skip the message and go to the next message header. Go
back to Step 3.
NOTE:
✏
If you press [ # ] after listening only to the message header, the
message remains as a new message.
■
Press [ * ] [
The prompt says "Deleted" and the next message header plays.
Go back to Step 3.
Next Data
] ([ * ] [ 3 ]) to delete the message.
Transferring to an Extension
You can transfer to another extension:
■ While logged in to PARTNER Voice Messaging
After hearing someone's personal greeting
■
To transfer:
Enter the extension number to which you want to be connected. To transfer to
the receptionist's extension, press [ 0 ].
Using Dial Code/Button Features
To: Press:
Call PARTNER Voice Messaging
Turn voice mail coverage on and off
Send calls to your mailbox without
ringing your extension first
Transfer outside callers to another
subscriber's mailbox
[
Intercom
] [ 7 ] [ 7 ] [ 7 ] or programmed VMS button
Programmed VMS Cover button
Programmed DND button (and VMS rover
button if applicable)
[
Feature
] [ 1 ] [ 4 ] of programmed VMBox button,
then dail the extension number.
Page 41

Changing Your Password
To prevent unauthorized access to your mailbox and maximize system
security, change your password the first time you log into PARTNER Voice
Messaging and periodically thereafter.
1.
Log into PARTNER Voice Messaging.
The Voice Mail Menu plays.
2.
Press [
The prompt says, "Please enter new password."
3.
Enter four digits for the new password. You should use four random,
non-sequential digits. The prompts says, "Re-enter password."
4.
Enter the new password again.
5.
Press [ * ] [ * ] [ 9 ] to exit PARTNER Voice Messaging or hang up.
5
] to change your password.
Page 42

Recording Your Personal Greeting
Before you record, note that callers who hear your personal greeting can enter
an extension number to transfer to another extension, or they can press [
reach the receptionist before or after your greeting plays. In your personal
greeting, you may want to prompt the caller for these options.
NOTE:
✏
If your mailbox is full, callers hear your personal greeting then the
message "Sorry you cannot leave a message now because this user's
mailbox is full." To leave a message, they must transfer either to the
receptionist's extension to leave a message, or to another subscriber's
extension.
1.
Log into PARTNER Voice Messaging.
The Voice Mail Menu plays.
2.
Press [
prompt says, "After recording, press [
3.
After the tone, record your personal greeting (one minute maximum).
Example: "This is Joe Conlin. I'm in the office today but away from my
desk. If you would like to talk to the receptionist, press [
please leave your name, phone number, and a brief message at the
sound of the tone."
3 ] to change your personal greeting, and lift the handset. The
1 ]. Record at the tone."
0 ]. Otherwise,
0 ] to
4.
Press [ 1 ] after recording.
5.
Choose an option:
■
Press [ 1 ] to approve the greeting.
Press [ 2 ] to re-record the greeting. Go to Step 3.
■
Press [ * ] [
■
greeting is activated.
■
Press [ * ] [ * ] [ 9 ] to delete the greeting, activate the factory-set general
mailbox greeting, and exit PARTNER Voice Messaging.
Next Data
] ([ * ] [ 3 ]) to delete the greeting. The factory-set personal
Page 43

Help
If you have a problem with your voice messaging system, contact your System
Manager. If the problem is not solved, in the continental U.S. call the Lucent
Technologies Technical Service Center at 1 800 628-2888. Outside the
continental U. S., contact your Lucent Technologies Representative or local
Authorized Dealer.
Page 44

PARTNER Voice Messaging Planning Forms
Form 1: Mailbox Assignments
■
PARTNER Voice Messaging comes with four mailboxes which are
factory-set with the extensions 10–13.
■
Mailboxes provide 5 minutes of message recording time or a maximum of
30 messages
Mailbox
1
2
3
4
Extension
10
11
12
13
Subscriber Name
Completing this form
To assign a mailbox to an extension other than the factory default, cross out
the factory default and write in the extension to be used.
■
For PARTNER Advanced Communication System R1.1, use an extension
number from 10–41.
■
For PARTNER ACS Release 2.0, use an extension number from 10–49
For every mailbox in use, write the name of the mailbox subscriber.
Page 45

Form 2: General Mailbox Greeting
The general mailbox greeting can supply frequently requested information so
that your staff is free to assist customers or to perform other tasks more
efficiently.
Greetings can be up to two minutes long.
Let callers know who owns each mailbox. For example, a greeting could be:
"You have reached Hair It Is Salon. To leave a message for the business, press
1. To leave a message for Camille, press 2. To leave a message for Mary,
press 3. To leave a message for Jay, press 4. If you are not sure, leave a
general message after the beep, or press 0 for Operator assistance.
Announcement:
Completing this form
Write your announcement script in the space provided.
Recording the Announcement
To record the Announcement, log into mailbox 0, and dial [ 3 ] from the
Programming menu.
Page 46

Lucent Technologies
Bell Labs Innovations
PARTNER® Voice Messaging PC Card
Quick Reference Card
Logging In
1
Call PARTNER Voice Messaging:
■
If calling internally, press [
or the programmed VMMsgs button.
■
if calling from outside the system, press
[ * ] [ R ] ([ * ] [ 7 ]) during the general mailbox
greeting.
2
Enter your mailbox number.
Select an option from the Voice Mail Menu:
3
[ 2 ] to get messages.
[
3
] to record personal greeting.
[
5
] to change password.
Intercom
] [ 7 ] [ 7 ] [ 7 ]
Page 47

Listening to Messages
Log into PARTNER Voice Messaging
1
The Voice Mail Menu plays.
Press [ 2 ] to get messages.
2
Press [
3
3
] to play the message.
The Message plays.
After message plays, press:
4
[ 2 ] [ 3 ] to replay header.
[ 0 ] to replay message.
[
#
] to save message and skip to next header.
[ * ] [ 3 ] to delete message.
Recording Your Personal Greeting
Log into PARTNER Voice Messaging.
1
Press [ 3 ] to change your personal greeting.
2
The greeting menu plays.
Press [ 1 ] to change greeting
3
Record new greeting.
4
Press [ 1 ] when finished recording.
5
6
After recording, press:
[ 1 ] to approve.
[
2
] to rerecord.
[ 7 ] to delete the greeting just recorded.
or [ * ] [ * ] [ 9 ] to delete the greeting and exit.
 Loading...