

Page 1

Lucent Technologies
User’s Guide
C
AJUN
S
TACKABLE
P333T
S
WITCH
Catalog No. 130098Rev. A. October 1999
Page 2

Page 3

Contents
List of Figures ..................................................................................................... v
List of Tables .................................................................................................... vii
Chapter 1 Overview.............................................................................................................. 1
Cajun P330 Family Features .................................................................... 1
Layer 2 Features....................................................................................... 2
Auto-Negotiation ........................................................................... 2
Congestion Control ........................................................................ 2
VLANs ............................................................................................2
Link Aggregation Group (LAG) ..................................................... 2
LAG and Port Redundancy .................................................. 2
Stack Redundancy ............................................................... 3
Hot-Swappable .................................................................... 3
Backup Power Supply ..........................................................3
Fans ..................................................................................... 3
Network Management Agent (NMA) Redundancy ............. 3
Software Download ............................................................. 3
Cajun P330 Standards Supported ............................................................ 3
IEEE ............................................................................................... 3
IETF ................................................................................................4
Durability ....................................................................................... 4
Cajun P330 Network Management.......................................................... 4
Cajun P330 Manager .....................................................................4
CajunView ..................................................................................... 4
Cajun P330 Network Monitoring............................................................. 5
RMON MIBs - RFC 1757 ............................................................... 5
SMON MIBs - RFC 2613 ................................................................ 5
Port Mirroring ................................................................................5
SMON ............................................................................................5
Chapter 2 Cajun P333T Front and Rear Panels................................................................. 7
Cajun P333T Front Panel ......................................................................... 7
Chapter 3 Applications ....................................................................................................... 11
Application 1 .......................................................................................... 11
Application 2 .......................................................................................... 12
Cajun P333T User’s Guide i
Page 4

Chapter 4 Installation and Setup ....................................................................................... 13
Installing Stacking Sub-modules............................................................ 13
Installing the Stacking Sub-module in the Cajun P330 ...............13
Positioning.............................................................................................. 13
Rack Mounting....................................................................................... 14
Connecting Stacked Switches................................................................. 15
To connect stacked switches: .......................................................15
Installing Expansion Sub-modules......................................................... 17
Installing the Expansion Sub-module into the Cajun P330 ......... 17
Removing an Existing Expansion Sub-module ............................17
Powering On – Cajun P330 Module AC................................................. 18
Powering On – Cajun P330 Module DC................................................. 18
Configuring the Switch .......................................................................... 19
Cajun P330 Default Settings ........................................................19
Switch Settings ................................................................... 19
Port Settings .......................................................................20
Cabling .........................................................................................20
Connecting to the Serial Port .............................................21
Assigning Cajun P330’s IP Stack Address .....................................22
Changing the IP Address using Command Line Interface
(CLI, Terminal Emulation) .................................................22
Chapter 5 Cajun Campus CLI (Command Line Interface) ............................................ 23
Conventions Used .................................................................................. 23
Establishing a Serial Connection for Configuration ............................... 23
Establishing a Telnet Session .................................................................. 24
Running the CLI..................................................................................... 25
Security Levels ....................................................................................... 26
Entering the User Level ................................................................26
Entering the Privileged Level .......................................................26
Exiting the Privileged Level ...............................................26
Entering the Supervisor Level ......................................................26
General Commands................................................................................ 27
Top and Up commands ................................................................27
Retstatus command ......................................................................27
Tree command .............................................................................27
Navigation, Cursor Movement and Shortcuts........................................ 28
Getting Help ........................................................................................... 28
Command Syntax................................................................................... 28
Command Abbreviations .............................................................28
Commands, Parameters and Default Settings ........................................ 29
Command Hierarchy ....................................................................29
How Commands are Organized ................................................... 29
ii Cajun P333T User’s Guide
Page 5

User Level Commands .................................................................33
Super command ................................................................. 33
Enable Command ..............................................................33
Show commands ...............................................................33
Show module command .................................................... 37
Privileged Level Commands .........................................................44
Disable command ..............................................................44
Set commands .................................................................... 44
Show Commands ............................................................... 56
Sync time command .......................................................... 56
Get time command ............................................................ 56
Clear Commands ...............................................................56
Download command .........................................................58
Reset command .................................................................58
Supervisor Level Commands ....................................................... 60
Set super password command ........................................... 60
Set defpass command ........................................................ 60
Appendix A Specifications..................................................................................................... 61
Cajun P330 Switch................................................................................. 61
Physical ........................................................................................61
Power Requirements – AC ........................................................... 61
Power Requirements – DC ........................................................... 61
Environmental ............................................................................. 62
Safety – AC .................................................................................. 62
Safety – DC .................................................................................. 62
EMC Emissions ............................................................................62
Emissions ........................................................................... 62
Immunity ........................................................................... 62
Interfaces ......................................................................................62
Standards Compliance ................................................................. 63
MTBF ...........................................................................................63
Stacking Sub-module ............................................................................. 63
Expansion Sub-modules ........................................................................ 63
Gigabit Ethernet Expansion Sub-modules ................................... 63
Laser Safety ........................................................................63
Laser Classification .............................................................64
Usage Restriction ...............................................................64
Laser Data .......................................................................... 64
Fast Ethernet Fiber Expansion Sub-module ................................ 65
Ethernet/Fast Ethernet Expansion Sub-module ..........................65
Cajun P333T User’s Guide iii
Page 6

Backup Power Supply (BUPS) ............................................................... 66
Physical ........................................................................................ 66
Power Requirements ....................................................................66
Environmental ............................................................................. 67
Safety ........................................................................................... 67
EMC Emissions ............................................................................. 67
Emissions ...........................................................................67
Immunity ...........................................................................67
MTBF ...........................................................................................67
MTBF...................................................................................................... 68
Appendix B Cajun P330 Standalone Manager ..................................................................... 69
System Requirements............................................................................. 69
Installation.............................................................................................. 69
Documentation and Online Help ........................................................... 70
Software Download................................................................................ 70
Appendix C How to Contact Us............................................................................................ 71
From the United States: .....................................................71
From North America: .........................................................71
Outside North America: .....................................................71
iv Cajun P333T User’s Guide
Page 7

List of Figures
Figure 2.1 Cajun P333T Front Panel .....................................................7
Figure 2.2 Cajun P333T LEDs ................................................................ 7
Figure 2.3 Cajun P333T AC and DC Back Panels ................................10
Figure 3.1 Cajun P330 stacks with a Cajun P550 Backbone ............... 11
Figure 3.2 Cajun P330 stacks with a Cajun 330 backbone.................. 12
Figure 4.1 Cajun P333T Rack Mounting ............................................. 14
Figure 4.2 Incorrect Stack Connection ................................................16
Figure 4.3 Cajun P333T Stack Connections.........................................16
Cajun P333T User’s Guide v
Page 8

List of Figures
vi Cajun P333T User’s Guide
Page 9

List of Tables
Table 2.1 Cajun P333T LED Descriptions ............................................. 8
Table 2.2 Cajun P330 <- -> Select buttons........................................... 9
Table 4.1 Default Switch Settings....................................................... 19
Table 4.2 Default Port Settings ........................................................... 20
Table 4.3 Gigabit Ethernet Cabling .................................................... 21
Table 5.1 Navigation, Cursor Movement and Shortcuts.................... 28
Table 5.2 User Level Command Hierarchy.........................................30
Table 5.3 Privileged Level Command Hierarchy ................................31
Table 5.4 Supervisor Level Command Hierarchy...............................32
Table A.1 Stacking Sub-module.......................................................... 63
Table A.2 Gigabit Ethernet Expansion Sub-modules.......................... 63
Table A.3 Fiber Fast Ethernet Expansion Sub-module....................... 65
Table A.4 Ethernet/Fast Ethernet Expansion Sub-module.................65
Table A.5 MTBF ..................................................................................68
Cajun P333T User’s Guide vii
Page 10

List of Tables
viii Cajun P333T User’s Guide
Page 11

Chapter 1
Overview
The Cajun™ P330 family of stackable Ethernet workgroup switches includes a
range of modules with 10/100/1000 Mbps ports and Layer 3 capability/ATM
Expansion sub-module in Phase 2. The first product is the Cajun P333T switch
which has 24x10/100 Mbps ports and an Expansion sub-module slot. The optional
expansion sub-modules provide additional Ethernet, Fast Ethernet, and Gigabit
Ethernet connectivity.
A Cajun P330 stack can contain up to 10 switches and up to 3 backup power supply
units. The stacked switches are connected using the Cajun X330STK stacking submodules which plug into a slot in the back of the Cajun P330. They are connected
using the X330SC or X330LC cable (if the stack is split between 2 racks). The Cajun
X330RC cable connects the top and bottom switches in the stack and provides
redundancy and hot-swappability in the same way that modules can be swapped in
a modular switching chassis.
The Cajun P330 is fully compliant with IEEE standards for VLAN Tagging, Gigabit
Ethernet, Spanning Tree and Flow Control. This full standards-compliance,
combined with auto-negotiation for 10/100/1000 Mbps and half/full duplex
facilitates the expansion of your network to match your company's growing needs.
Cajun P330 Family Features
• You can connect up to 10 Cajun P330 switches in a stack. Moreover, this stack
can be either in one rack or split over several racks using the X330LC Long
Cable, according to your requirements.
• Cajun X330STK - this stacking sub-module is used to connect Cajun P330
switches in a stack, via the Octaplane.
• Cajun P330 BUPS - this back-up power supply module supports up to four
Cajun P330 switches.
• One RJ-45/RS232 front panel console connector for both terminal and modem
(future release) sessions.
• Two fan units in every switch, with operation sensors.
• One virtual IP address for managing the whole stack, the P330 stack is managed
as a single entity.
• Hot swapping of one switch at a time - by activation of the redundant cable:
— Does not disrupt the operation of other Cajun P330 switches
— Does not change stack configuration.
— Does not require network downtime.
• Connection through Telnet from the front panel ports of
— multiple levels of password protection
— login and inactivity timeouts.
Cajun P333T User’s Guide 1
any
switch, with:
Page 12

Chapter 1 Overview
Layer 2 Features
Auto-Negotiation
Every 10/100 port on the Cajun P330 supports Auto-Negotiation which
automatically detects and supports the operating mode and speed of a connected
device. Auto-negotiation is also supported on the Gigabit Ethernet ports for flow
control mode only.
This means that you can simply connect the Cajun P330 to Ethernet or Fast
Ethernet equipment at full or half duplex without configuration.
Congestion Control
Congestion control is a key element of maintaining network efficiency as it
prevents resource overload.
The Lucent Cajun P330 supports congestion control on all Ethernet ports, using the
following:
• Back Pressure in half duplex mode
• IEEE 802.3x Flow Control in full duplex mode
VLANs
The Cajun P330 VLANs are fully IEEE 802.1Q compliant and can handle up to 3k
tagged VLANs.
Special VLAN (Virtual Sideband) for management provides physical security for key
applications.
Link Aggregation Group (LAG)
LAG provides increased bandwidth and redundancy for critical high-bandwidth
applications such as inter-stack links and connections to servers. You can aggregate
the bandwidth of up to eight 10/100Base-Tx ports, two 100Base-FX or 1000Base-X
ports.
Load sharing ensures that if one of the port connections fails, the other connections
will assume the load seamlessly. Load balancing guarantees that the traffic load at
any level will be evenly divided among all the LAG links.
LAG and Port Redundancy
Redundancy can be implemented between any two ports in the same stack. You
can also assign redundancy between any two LAGs in the stack or between a LAG
and a port.
2 Cajun P333T User’s Guide
Page 13

Chapter 1 Overview
Stack Redundancy
In the unlikely event that a Cajun P330 switch or Octaplane link should fail, stack
integrity is maintained. The broken link is bypassed and data transmission
continues uninterrupted. The single management IP address for the stack is also
preserved for uninterrupted management and monitoring.
Hot-Swappable
You can remove or replace any unit within the stack without disrupting operation
or performing stack-level reconfiguration. You can therefore adapt the P330 to
your requirements on the fly and with a down-time which is second to none.
Backup Power Supply
Each Cajun P330 basic unit comes with a Backup Power Supply (BUPS) connector.
If the internal power supply should fail, the Cajun P330 BUPS (available
separately,) will automatically supply power to the switch for uninterrupted
operation.
Fans
The Cajun P330 base unit fans have integrated sensors which provide advance
warnings of fan failure via management.
Network Management Agent (NMA) Redundancy
Each of the integral NMAs in the stack can serve as the stack NMA while other
NMAs act as redundant agents in “hot” standby. If the “live” NMA fails then a
backup will be activated instantaneously.
Software Download
Safe S/W download procedure – backup code always present.
Cajun P330 Standards Supported
The Cajun P330 complies with the following standards.
IEEE
• 802.3x Flow Control on all ports
• 802.1Q VLAN Tagging support on all ports and 802.1p compatible
• 802.1D Bridges and STA
• 803.2z Gigabit Ethernet ports
• 803.2u Ethernet/Fast Ethernet ports
Cajun P333T User’s Guide 3
Page 14

Chapter 1 Overview
IETF
• MIB-II - RFC 1213
• RMON - RFC 1757
• SMON - RFC 2613
Durability
• Designed to meet the requirements of TR-NWT-000063 - Network Equipment
Building System (NEBS), Generic Equipment Requirements, chapters:
— 4.4.1 Shock Criteria
— 4.4.2 Vibration Criteria
— 5.4.1 Shock and Vibration Test Methods
Cajun P330 Network Management
Lucent realizes the importance of comprehensive network management as a key
component of today’s networks. Therefore we have provided multiple ways of
managing the Cajun P330 to suit your needs.
Cajun P330 Manager
Cajun P330 switches come with free management software as standard. This
program, which uses the Lucent CajunView™ graphical interface, allows you to
manage a Cajun P330 stack without purchasing additional software. This version of
CajunView P330 Manager does not require HP OpenView™.
CajunView
When you need extra control and monitoring or wish to manage other Cajun
Campus equipment, then the CajunView network management suite is the answer.
This suite provides the ease-of-use and features necessary for optimal network
utilization.
The CajunView Suite is available for Windows® 95/NT®.
4 Cajun P333T User’s Guide
Page 15

Cajun P330 Network Monitoring
RMON MIBs - RFC 1757
• RMON support for groups 1,2,3 and 9
— Statistics
—History
—Alarms
—Events
SMON MIBs - RFC 2613
• SMON support for groups
— Data Source Capabilities
— Port Copy
— VLAN and Priority Statistics (future).
Port Mirroring
The Cajun P330 provides port mirroring for additional network monitoring
functionality. You can filter the traffic and mirror either incoming traffic to the
source port or both incoming and outgoing traffic. This allows you to monitor the
network traffic you need.
Chapter 1 Overview
SMON
The Cajun P330 supports Lucent’s ground-breaking SMON Switched Network
Monitoring, which the IETF has now adopted as a standard (RFC2613). SMON
provides an unprecedented top-down monitoring of switched network traffic at the
following levels:
• Enterprise Monitoring
• Switch Monitoring
• VLAN Monitoring
• Port-level Monitoring
This top-down approach gives you rapid troubleshooting and performance trending
to keep the network running optimally.
Note:
Note:
Cajun P333T User’s Guide 5
CajunView is required to run SMON monitoring.
You need to purchase one SMON License per Cajun P330 Stack
Page 16

Chapter 1 Overview
6 Cajun P333T User’s Guide
Page 17
Chapter 2
Cajun P333T Front and Rear Panels
Cajun P333T Front Panel
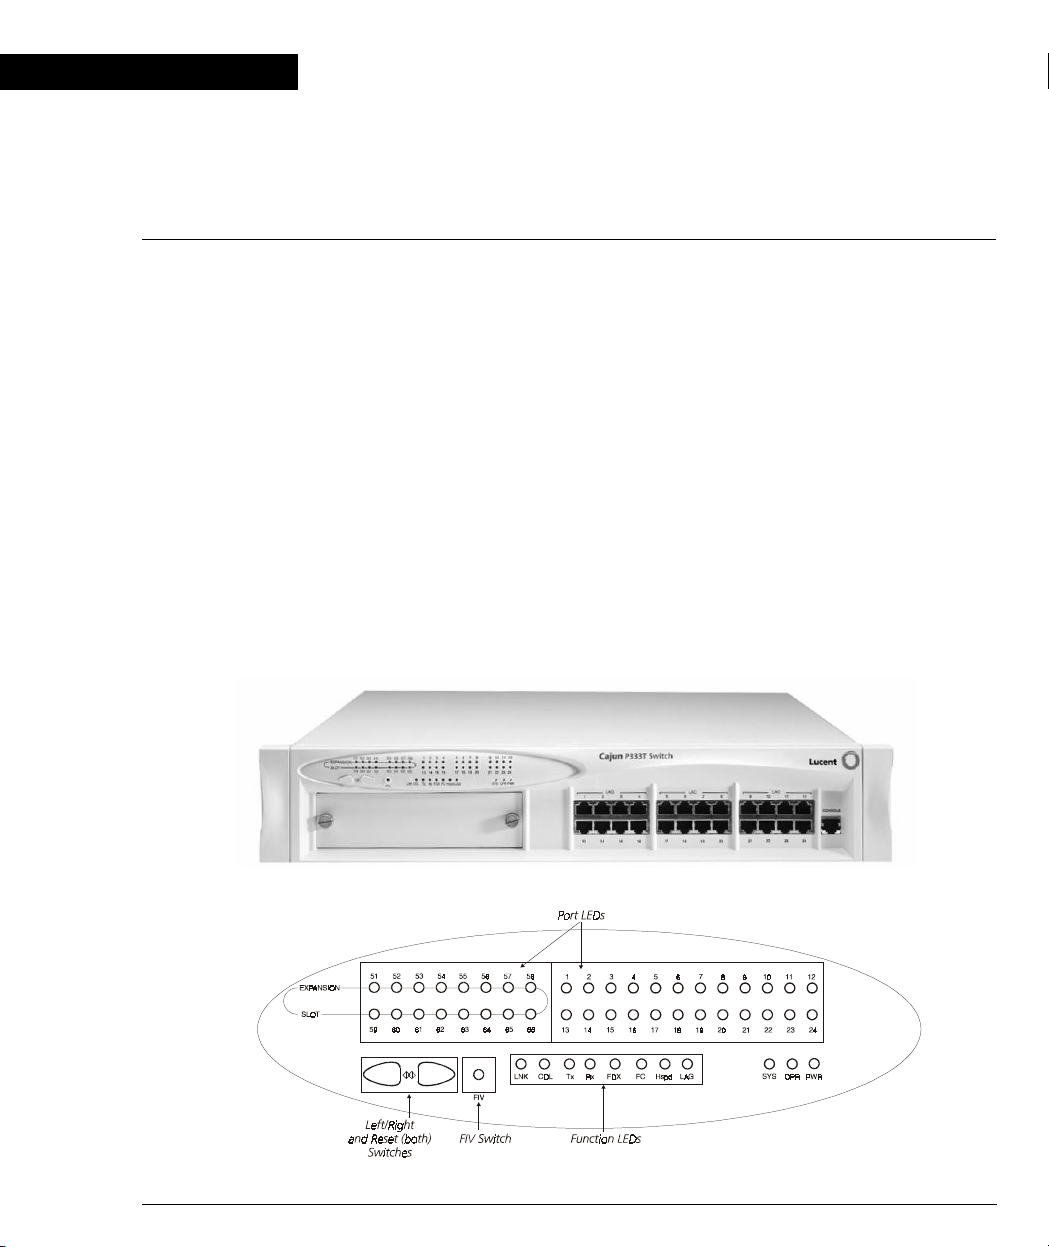
The Cajun P333T front panel contains LEDs, controls, connectors and an expansion
sub-module slot, as well as console connector. The status LEDs and control buttons
provide at-a-glance information.
The front panel LEDs consist of Port LEDs and Function LEDs. The Port LEDs
display information for each port according to the illuminated function LED. The
function is selected by pressing the left or right button until the desired parameter
LED is illuminated. For example, if the COL LED is illuminated, then all Port LEDs
show the collision status of their respective port. If you wish to select the LAG
function, then press the right button until the LAG Function LED is lit; if you then
wish to select Rx then press the left button several times until the Rx function LED
lights.
Cajun P333T front panel are shown below shows the Cajun P33T LEDs, buttons,
the Expansion sub-module slot, and the RJ-45 console connector at the bottom
right (see Figure 2.1 and Figure 2.2). The LEDs are described in Table 2.1.
Figure 2.1 Cajun P333T Front Panel
Figure 2.2 Cajun P333T LEDs
Cajun P333T User’s Guide 7
Page 18

Chapter 2 Cajun P333T Front and Rear Panels
Note:
All LEDs are lit during a reset.
Table 2.1 Cajun P333T LED Descriptions
LED Name Description LED Status
OFF – power is off
PWR Power status
ON – power is on
Blink – using BUPS only
OFF – Module is booting
OPR CPU operation
ON – Normal operation
OFF – Module is a slave in a stack
ON – Module is the master of the stack and
the Octaplane and Redundant cable are
SYS System Status
connected correctly.
This LED will also light in Standalone mode.
Blink – Box is the master of the stack and the
long Octaplane cable is not present or the
stack is in redundant mode
The following Function LEDs apply to ports 1 to 40
OFF – Port disabled
LNK Port status
ON – Port enabled and link OK
Blink – Port enabled and the link is down
OFF – No collision or FDX port
COL Collision
ON – Collision occurred on line
OFF – No transmit activity
Tx Transmit to line
ON – Data transmitted on line from the
module
OFF – No receive activity
Rx Receive from line
ON – Data received from the line into the
module
8 Cajun P333T User’s Guide
Page 19

Chapter 2 Cajun P333T Front and Rear Panels
Table 2.1 Cajun P333T LED Descriptions
LED Name Description LED Status
FDX Half/Full Duplex
OFF – Half duplex mode
ON – Full duplex mode
OFF – No flow control. Symmetric Pause
disabled
and/or port is in half duplex
FC
Symmetric Flow
Control
mode is
mode
ON – Symmetric Flow Control mode is
enabled
and port is in full duplex mode
Hspd High Speed OFF – 10Base-T port or expansion port does
not exist
ON – 100Base-T, 100Base-F, and 1000BaseX port
LAG
Link Aggregation
Group (Trunking)
OFF – No LAG defined for this port
ON – Port belongs to a LAG
Table 2.2 Cajun P330 <- -> Select buttons
Description Function
Left/Right Individual – select LED function (see table above)
Reset module Press both right and left buttons together for approximately two
seconds. All LEDs on module light up until buttons are released
Reset stack Press both Right and Left buttons together for 4 seconds. All
LEDs on stack light up until buttons are released.
FIV Force Initial Version – boot from backup initial version of the
Cajun P330 software, from Bank A (see Note below).
Note:
To perform “Force Initial Version” reset the module and at the same tme
press the FIV reset button (use an opened paper clip or other pointed object). Let go
of the reset buttons first and then let go of the FIV button 1 or 2 seconds later.
Cajun P333T User’s Guide 9
Page 20
Chapter 2 Cajun P333T Front and Rear Panels
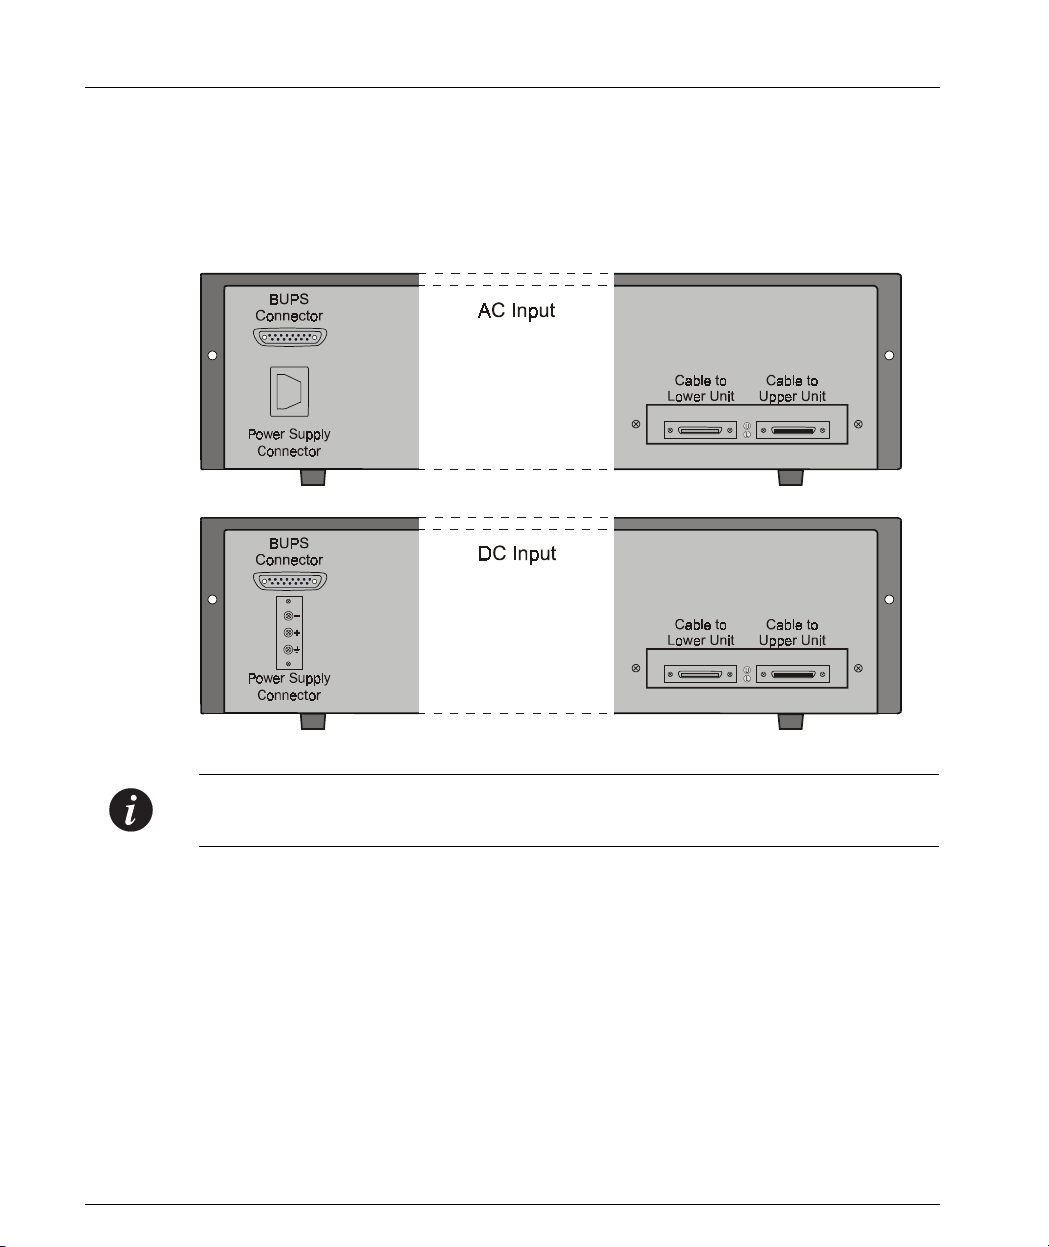
Cajun P333T Back Panel
The Cajun P333T back panel contains a stacking sub-module slot, power supply and
BUPS connector. Figure 2.3 shows the back panel of the AC switch (top) and the
DC switch (bottom) with a stacking sub-module installed.
Figure 2.3 Cajun P333T AC and DC Back Panels
Note:
AC model Figure 2.3.
10 Cajun P333T User’s Guide
Any further illustrations of the Cajun P333T Back Panel will be that of the
Page 21
Chapter 3
Applications
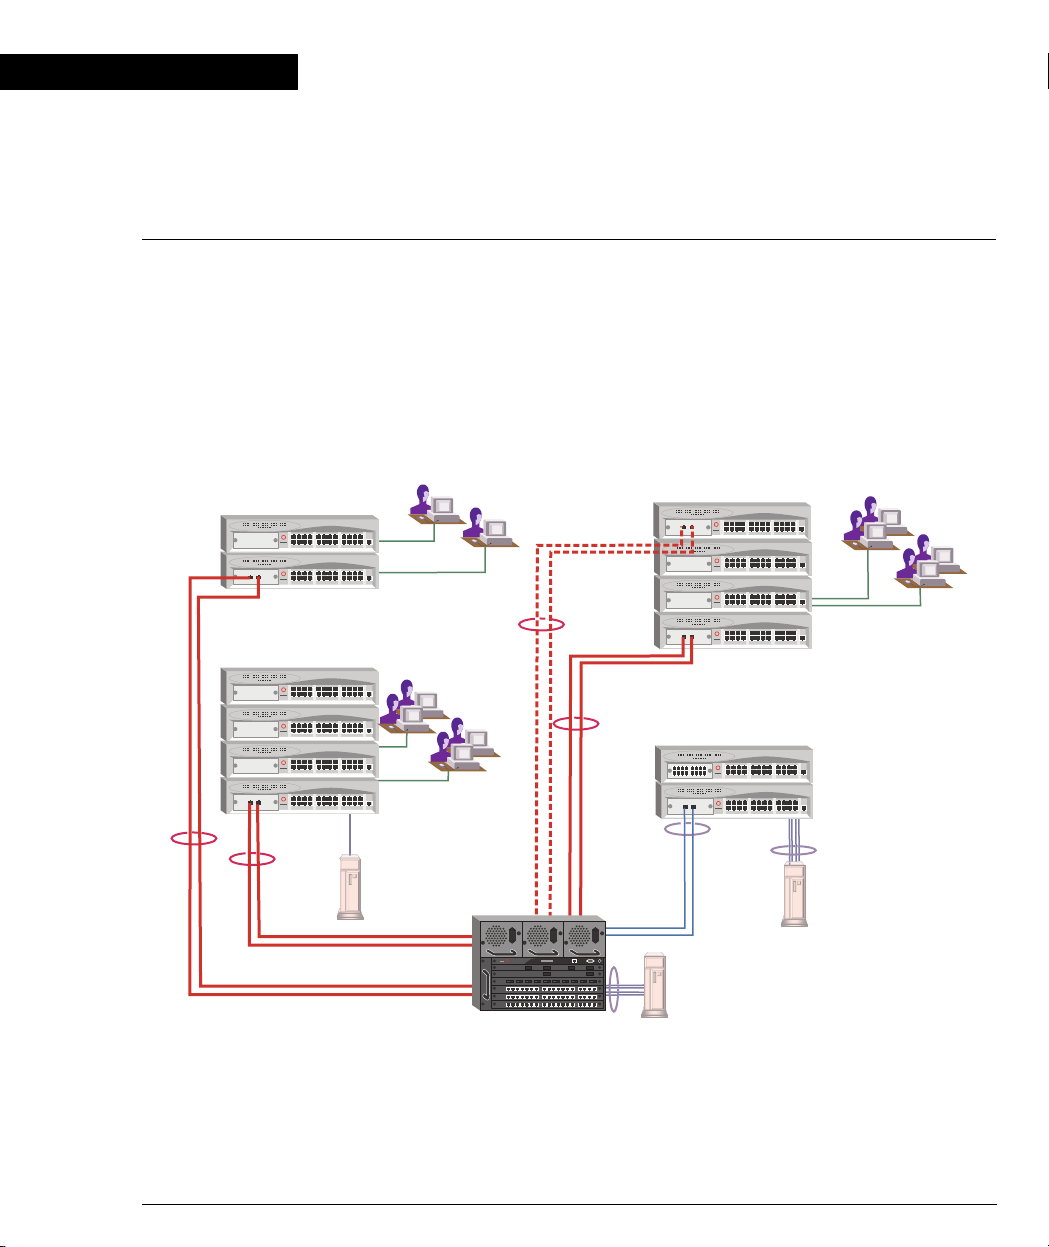
The following sections describe typical applications for the Cajun P330 in a network
with other Cajun Campus products.
Application 1
This application shows Cajun P550 as the network backbone with Cajun P330
stacks as closet devices with LAG and redundant links.
Figure 3.1 Cajun P330 stacks with a Cajun P550 Backbone
Cajun P330 Cajun P330
10/100 Mbps Ethernet
Redundant
LAG
10/100 Mbps Ethernet
Gigabit Ethernet
with LAG
10/100 Mbps Ethernet
100 Mbps
Gigabit Ethernet
with LAG
Cajun P550
4x100 Mbps
LAG
Ethernet
(Fiber) with
LAG
4x100 Mbps
LAG
Cajun P333T User’s Guide 11
Page 22

Chapter 3 Applications
Application 2
This application shows a Cajun P330 stack forming the backbone of a Small/
Medium-sized Enterprise (SME) network with CajunP330 stacks as closet devices
with LAN and redundant links.
Figure 3.2 Cajun P330 stacks with a Cajun 330 backbone
Cajun P330
10/100 Mbps Ethernet
10/100 Mbps Ethernet
LAG
Redundancy
Gigabit Ethernet
Cajun P330
10/100 Mbps Ethernet
with LAG
4x100 Mbps
LAG
Gigabit Ethernet
with LAG
4x100 Mbps
LAG
12 Cajun P333T User’s Guide
Page 23
Chapter 4
Installation and Setup
The Cajun P333T is ready to work after you carry out the installation instructions
given below. All the Cajun P333T ports provide complete connectivity and no
configuration is required to make the system work.
Installing Stacking Sub-modules
Caution:
discharge. Do not touch the circuit board unless instructed to do so.
Installing the Stacking Sub-module in the Cajun P330
1 Remove the blanking plate from the back of the Cajun P330 switch.
2 Insert the stacking sub-module gently into the slot, ensuring that the metal
3 Press the sub-module in firmly until it is completely inserted into the
4 Gently tighten the two screws on the side panel of the stacking sub-module by
Note:
stacking sub-module should be covered with the supplied blanking plate if necessary.
The stacking sub-modules contain components sensitive to electrostatic
base plate is aligned with the guide rails.
The metal plate of the X330STK (and
Cajun P330.
turning the screws.
The Cajun P330 switch must not be operated with the back-slot open; the
Positioning
Cajun P333T can be mounted alone or in a stack in a standard 19-inch equipment
rack in a wiring closet or equipment room. Up to 10 units can be stacked in this
way. When deciding where to position the unit, ensure that:
• It is accessible and cables can be connected easily and according to the
configuration rule.
• Cabling is away from sources of electrical noise such as radio transmitters,
broadcast amplifiers, power lines and fluorescent lighting fixtures.
• Water or moisture cannot enter the case of the unit.
• Air-flow around the unit and through the vents in the back and sides of the
case is not restricted.
not
the PCB) fits onto the guide rails.
Note:
Cajun P333T User’s Guide 13
Use Octaplane cables to interconnect with other switches.
Page 24
Chapter 4 Installation and Setup
Rack Mounting
The Cajun P333T case fits in most standard 19-inch racks. Cajun P333T is 2U (88
mm, 3.5”) high.
Warning:
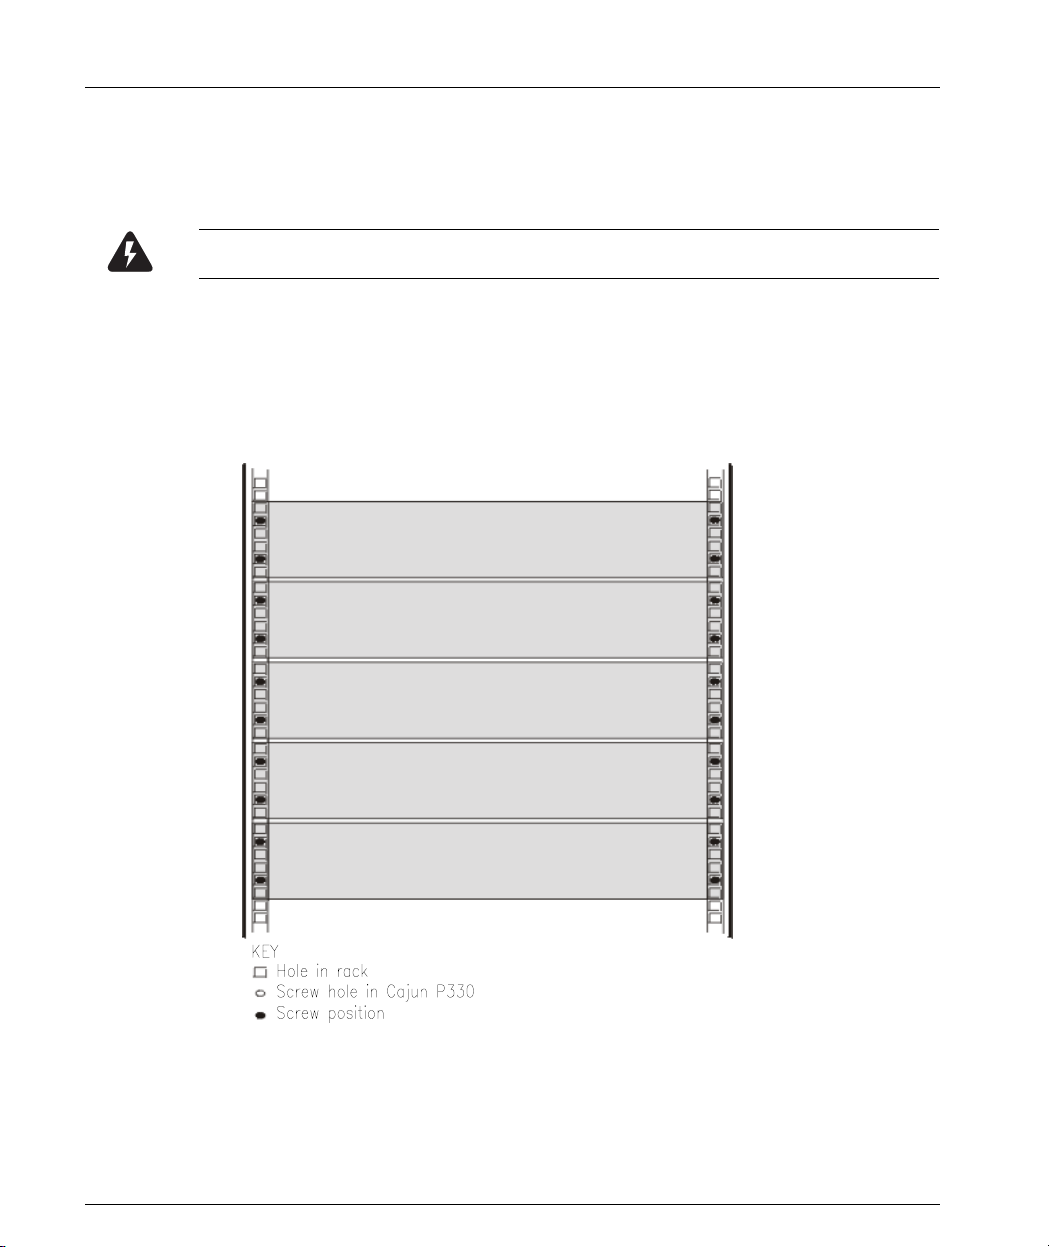
Place the Cajun P333T in the rack as follows:
1 Snap open the ends of the front panel to reveal the fixing holes.
2 Insert the unit into the rack. Ensure that the four Cajun P333T screw holes are
aligned with the rack hole positions as shown in Figure 4.1.
Figure 4.1 Cajun P333T Rack Mounting
Disconnect all cables from the unit before continuing.
3 Secure the unit in the rack using the screws. Use two screws on each side. Do
not overtighten the screws.
4 Snap closed the hinged ends of the front panel.
5 Ensure that ventilation holes are not obstructed.
14 Cajun P333T User’s Guide
Page 25
Connecting Stacked Switches
Chapter 4 Installation and Setup
Note:
Each connector can only be connected to its matching port.
The following cables are used to connect stacked switches:
• Short Octaplane cable (X330SC) – ivory-colored, used to connect adjacent
• Long Octaplane cable (X330LC) – ivory-colored, used to connect switches from
• Redundant cable (X330RC) – black, used to connect the top and bottom
To connect stacked switches:
1 Plug the light grey connector of the Short Octaplane cable into the port marked
2 Plug dark grey connector of same Short Octaplane cable to the port marked “to
3 Repeat Steps 1 and 2 until you reach the top switch in the stack.
Note:
where required.
The two ends of the Octaplane cable terminate with different connectors.
switches (Catalog No. CB0223) or switches separated by a BUPS unit.
two different physical stacks, or switches separated by a BUPS unit (Catalog No.
CB0225).
switches of a stack (Catalog No. CB0222).
“to upper unit” of the bottom Cajun P330 switch.
lower unit” in the unit above. The connections are illustrated in Figure 4.3.
If you have split the stack, use the Long Cable instead of the Short Cable
4 If you wish to implement stack redundancy, use the Redundant Cable to
connect the the port marked “ to lower unit” on the bottom switch to the port
marked “to upper unit” on top switch of the stack.
Caution:
(light-colored) cables. If you wish to cross-connect for redundancy, use one lightcolored Octaplane cable and one black redundancy cable. Figure 4.2 shows an
incorrect connection.
Note:
stack all the switches in a single rack, use long Octaplane cables to connect two
physical stacks as shown in Figure 4.3.
Cajun P333T User’s Guide 15
Do not cross connect two Cajun P333T switches with two Octaplane
You can build a stack of up to 10 Cajun P330 switches. If you do not wish to
Page 26

Chapter 4 Installation and Setup
Figure 4.2 Incorrect Stack Connection
BUPS
Connector
Power Su pply
Connector
BUPS
Connector
Power Su pply
Connector
Figure 4.3 Cajun P333T Stack Connections
Cable to
Lower Unit
Cable to
Lower Unit
Cable to
Upper Unit
Cable to
Upper Unit
Connector
Power Supply
Connector
Connector
Power Supply
Connector
Connector
Power Supply
Connector
Connector
Power Supply
Connector
Connector
Power Supply
Connector
BUPS
BUPS
BUPS
BUPS
BUPS
X330RC
Cable to
Cable to
Upper Unit
Lower Unit
X330SC
Cable to
Cable to
Upper Unit
Lower Unit
Cable to
Cable to
Upper Unit
Lower Unit
Cable to
Cable to
Upper Unit
Lower Unit
Cable to
Cable to
Upper Unit
Lower Unit
BUPS
Connector
5
Power Supply
Connector
BUPS
Connector
4
Power Supply
Connector
BUPS
Connector
3
Power Supply
Connector
BUPS
Connector
2
Power Supply
Connector
BUPS
Connector
1
Power Supply
Connector
Cable to
Cable to
10
Upper Unit
Lower Unit
Cable to
Cable to
9
Upper Unit
Lower Unit
8
Cable to
Cable to
Upper Unit
Lower Unit
Cable to
Cable to
7
Upper Unit
Lower Unit
6
Cable to
Cable to
Upper Unit
Lower Unit
X330LC
16 Cajun P333T User’s Guide
Page 27

Installing Expansion Sub-modules
Chapter 4 Installation and Setup
Caution:
discharge. Do not touch the circuit board unless instructed to do so.
Installing the Expansion Sub-module into the Cajun P330
1 Remove the blanking plate or other sub-module (if installed).
2 Insert the sub-module gently into the slot, ensuring that the Printed Circuit
3 Press the sub-module in firmly until it is completely inserted into the
4 Gently tighten the two screws on the front panel of the expansion sub-module
Removing an Existing Expansion Sub-module
1 Loosen the screws by turning the knobs.
2 Grasp the two knobs one near each side of the front panel, and pull gently but
3 Insert another expansion sub-module or the blanking plate.
Note:
the expansion sub-module slot should be covered with the supplied blanking plate
if necessary.
The expansion sub-modules contain components sensitive to electrostatic
Board (PCB) is aligned with the guide rails.
The PCB
Cajun P330.
by turning the screws.
firmly towards yourself.
not
the metal base plate fits into the guide rail.
The Cajun P330 switch must not be operated with the expansion slot open;
Note:
an operating base unit.
Cajun P333T User’s Guide 17
Expansion sub-modules are hot swapable and can be inserted or removed in
Page 28

Chapter 4 Installation and Setup
Powering On – Cajun P330 Module AC
For the AC input version of the Cajun P330, insert the power cord into the power
inlet in the back of the unit. The unit powers up.
1 If you are using a BUPS, insert a power cord from the BUPS into the BUPS
connector in the back of the unit. The unit powers up
2 After power up or reset, the Cajun P333T performs a self test procedure.
Powering On – Cajun P330 Module DC
For the DC input version of the Cajun P330, connect the power cable to the switch
at the input terminal block.
1 The terminals are marked “+”, “-“ and the IEC 5019a Ground symbol.
2 The size of the three screws in the terminal block is M3.5.
3 The pitch between each screw is 9.5mm.
Warning:
power is OFF.
Caution:
approved for use with 18 AWG copper conductors only. The installation must
comply with all applicable codes.
4 Attach the appropriate lugs at the wire end of the power supply cord.
5 Wire the DC power supply to the terminal block.
Warning:
(line to L), and negative to negative (neutral to N). Note that the ground wire
should always be connected first and disconnected last.
Before performing any of the following procedures, ensure that DC
This product is intended for installation in restricted access areas and is
The proper wiring sequence is ground to ground, positive to positive
18 Cajun P333T User’s Guide
Page 29

Configuring the Switch
The Cajun P333T may be configured using the text-based “Command Line
Interface” (CLI) utility, the stand-alone Cajun P330 Manager or CajunView.
For instructions on the text-based utility, see the CLI chapter.
For instructions on installation of the graphical user interfaces, refer to the “Cajun
P330 Manager” appendix. For instructions on the use of the graphical user
interfaces, refer to the Manager User’s Guide on the Management CD.
Cajun P330 Default Settings
The default settings for the Cajun P330 switch and its ports are determined by the
Cajun P330 software. These default settings are subject to change in newer versions
of the Cajun P330 software. See the Release Notes for the most up-to-date settings.
Switch Settings
Table 4.1 Default Switch Settings
Function Default Setting
Cajun P330 IP Address 149.49.32.134
Chapter 4 Installation and Setup
Default Gateway 0.0.0.0
VLANs VLAN 1
Spanning Tree Enabled
Cajun P333T User’s Guide 19
Page 30

Chapter 4 Installation and Setup
Port Settings
Table 4.2 Default Port Settings
Function Default Setting
10/100Base-TX ports 100Base-FX ports 1000 Base-X ports
Duplex mode Full duplex Full duplex Full duplex only
Speed mode 100M 100M 1000M
Flow control Off Off No pause
Backpressure On (only in Half
Not Applicable Not Applicable
duplex mode)
Auto-negotiation Enable Not Applicable Enabled
Administration status Enable Enable Enable
Port VLAN 1 1 1
Tagging mode Clear Clear Clear
Port priority Regular Regular Regular
Functions operate in their default settings unless configured otherwise.
Cabling
Cajun P330 modules include the following types of ports (according to the speed
and standard they support): 10Base-T, 100Base-TX, 100Base-FX, 1000Base-SX and
1000Base-LX.
Note:
To interconnect Cajun P330 switches with copper wire, crossed cables are
required.
• The maximum UTP cable length connected to a 10/100 Mbps port operating as
10Base-T, is 100 m (328 ft.).
• A UTP Category 5 cable must be connected to any 100Base-TX port, via an
RJ45 connector. The maximum UTP cable length connected to a 100Base-TX
port, or a 10/100 Mbps port operating as 100Base-TX, is 100 m (328 ft.).
• A fiberoptic cable must be connected to any 100Base-FX port, via a pair of SC
connectors. The maximum fiber cable length connected to a 100Base-FX port is
412 m (1,352 ft) when operating in half duplex, and 2 km (6,562 ft) when
operating in full duplex.
20 Cajun P333T User’s Guide
Page 31

Chapter 4 Installation and Setup
Appropriate cables are available from your local supplier.
Table 4.3 Gigabit Ethernet Cabling
Gigabit Interface Fiber Type
Diameter
(µm)
Modal
Bandwidth
Maximum
Distance (m)
1000BASE-SX MM 62.5 160 220
1000BASE-SX MM 62.5 200 275
1000BASE-SX MM 50 400 500
1000BASE-SX MM 50 500 550
1000BASE-LX MM 62.5 500 550
1000BASE-LX MM 50 500 550
1000BASE-LX SM 9 NA 5,000
1000BASE-SLX SM 9 NA 10,000
*1000BASE-LX over Multimode fiber requires a special Patch cord cable which you
can obtain from your local cable supplier.
Connecting to the Serial Port
Cajun P333T has one serial port on the front of the switch for connecting a
terminal, a terminal emulator, or a modem using the supplied adapter.
Note:
Modem connection requires a modem adapter which is supplied by Lucent
upon request.
The RJ-45 port on the front of the switch is labeled “Console”, and may be used to
configure the switch using the built-in Command Line Interface (CLI, Terminal
Emulation). In the future, this connector will also be used for out-of-band SNMP
management, via a modem.
The port settings are as follows:
• Baud Rate - 9600 bps
• Character Size - 8
•Parity - None
• Stop Bit - 1
• Flow Control - None
• We recommend using a VT-100 terminal to enable access to all CLI features.
The terminal connected to the serial port must be configured with the same
settings; this setting will work with any PC COM port over a DB9 to RJ45
connector.
Cajun P333T User’s Guide 21
Page 32

Chapter 4 Installation and Setup
Assigning Cajun P330’s IP Stack Address
Note:
All Cajun P330 switches are shipped with the same default IP address. You
must change the IP address of the master Cajun P330 switch in a stack in order to
guarantee that the stack has its own unique IP address in the network.
Changing the IP Address using Command Line Interface (CLI, Terminal Emulation)
Use the CLI to assign the Cajun P330 stack an IP address and net mask. The
CajunView station may establish communications with the stack once this address
had been assigned and the stack inserted into the network.
1 Establish a serial connection by connecting a terminal to the master Cajun P330
switch as described in the “Command Line Interface” chapter.
2 When you see the “Welcome to P330” menu and are prompted for a password,
enter the User Level password
3 At the
Console
>
prompt, enter
4 Enter the password. The default is
5 At the
Console>(enable)
norm
enable
to enter the Privileged level.
enable
prompt, type:
.
set interface <inband> <vlan> <ip_address> <netmask>
Replace
<vlan>, <ip_address>
<netmask>
and
with the VLAN,
IP address and net mask of the stack.
6 Press Enter to save the IP address and net mask.
7 At the
Console>(enable)
prompt, enter
reset
and press Enter to reset the
stack. After the Reset, perform login to Privileged level again as described
above.
8 At the
Console>(enable)
<dest><gateway>
prompt, enter
where you replace
set ip route
<dest>
and
<gateway>
with the
destination and gateway IP addresses.
9 Press Enter to save the destination and gateway IP addresses.
Note:
If there are any errors, the new configuration settings will not be saved. To
save the new configuration settings, you must correct the errors by repeating the
command.
10 At the
password (default password
Console>(enable)
prompt, type
norm )
Enter to confirm the command. The prompt changes to
exit
disable
or
with the
to exit the Privileged level, and press
Console>
to indicate
that you are in User level.
11 Exit the CLI session.
12 Insert the Cajun P330 stack into your network.
22 Cajun P333T User’s Guide
Page 33

Chapter 5
Cajun Campus CLI (Command Line Interface)
This chapter provides instructions for the configuration of your Cajun P330 using
the text-based Cajun Campus Command Line Interface (CLI or Terminal
Emulation). You can also configure your Cajun P333T using the Cajun P330
Manager with its graphical user interface (see Appendix C).
The configuration procedure involves establishing a Telnet session or a serial
connection and then using the Cajun P333T’s internal CLI. The CLI is commandline driven and does not have any menus. To activate a configuration option, you
must type the desired command at the prompt and press Enter.
Conventions Used
The following conventions are used in this document to convey instructions and
information:
• Commands are in boldface
• Variables that you supply are in pointed brackets <>
• Optional keywords are in square brackets [ ]
• Alternative but mandatory keywords are grouped in braces { } and separated by
a vertical bar |
• If you enter an alphanumeric string of two words or more, for example in the
Set system location command on Page 48, enclose the string in inverted
commas.
• Information displayed on screen is displayed in
text
font
Establishing a Serial Connection for Configuration
Perform the following steps to connect a VT-100 terminal or PC with VT-100
emulation to the Cajun P330 master switch Console port for configuration of stack
parameters:
1 Use the serial cable supplied to attach the RJ-45 console connector to the
Console port of the Cajun P330 master switch (indicated by a lit SYS LED) and
the DB-9 connector to the serial (COM) port on your PC/terminal.
2 Make sure that the serial port settings on the PC are 9600 baud, 8 bits, 1 stop bit
and no parity.
3 If you connected a PC, run a VT-100 emulation session. (You can use the
Windows® HyperTerminal.)
4 When you see the “Welcome to P330” menu and are prompted for a password,
enter the User Level password
Cajun P333T User’s Guide 23
norm
Page 34

Chapter 5 Cajun Campus CLI (Command Line Interface)
Establishing a Telnet Session
1 Connect your PC to the network
2 Verify that you can communicate with the Cajun P330 using Ping to the IP of
the Cajun P330. If there is no response using Ping, check the IP address and
default gateway of both the Cajun P330 and the PC.
Note:
is 255.255.255.0.
3 From the Microsoft Windows
Note:
Cajun P330, may be because there is already a session in progress.
4 Enter the Cajun P330 User level password. The default is
5 Enter the Cajun P330 Privileged level by typing
6 Enter the Cajun P330 Privileged level password. The default is
The Cajun P330 default IP address is 149.49.32.
®
taskbar of your PC click
from the DOS prompt of your PC), then start the Telnet session by typing:
telnet
For example:
letters (do NOT use uppercase letters). The
when you have established communications with the Cajun P330.
lower case letters (do NOT use uppercase letters). The
prompt will appear.
You can now configure the Cajun P330 stack and change its default IP address.
See the Section “Running the CLI” below.
<Cajun_P330_IP_address>
telnet 149.49.32.134
One of the possible reasons that you cannot establish a Telnet session to the
Console>
134
and default subnet mask
Start
and then
norm
prompt will appear
enable
Console>(Enable)
in lower case
enable
Run
in
(or
24 Cajun P333T User’s Guide
Page 35

Running the CLI
Chapter 5 Cajun Campus CLI (Command Line Interface)
After running Telnet or connecting to the Console port, press Enter and the
Console>
The command-line interface provides a set of commands that you can use to display
and configure the Cajun P330 stack parameters. The commands are arranged in a
hierarchy such that a command contains a group of related functions.
To perform a command, you will need to specify the command followed by the full
hierarchical path. For example:
Console>show ip route
This command shows routes in the routing table
Alternatively, you can descend the hierarchy by typing:
Console>show
This will cause the prompt to change, displaying the position in the hierarchy:
Console(show)
You can descend the hierarchy further by typing:
Console (show)> ip
This will cause the prompt to change:
Console (show - ip
You can now perform the command simply by typing
Console (show - ip)> route
The advantage of descending the hierarchy is that you can perform multiple related
commands without having to type them out in full (that is, specifying their full
path).
You can use the following commands to navigate the hierarchy:
• up - returns you to the previous level in the hierarchy
• top- returns you to the root of the hierarchy
prompt displays.
>
)>
route
, as follows:
Note:
Page 28 for general information on the CLI user interface.
Cajun P333T User’s Guide 25
Refer to the section “Navigation, Cursor Movement and Shortcuts” on
Page 36

Chapter 5 Cajun Campus CLI (Command Line Interface)
Security Levels
There are three security access levels – User, Privileged and Supervisor. The user
access level is a general access level used to show system parameter values.
The Privileged level is used by site personnel to access stack configuration options.
The Supervisor level is used to define passwords used to access the Privileged level.
A password is required to access the Privileged level and Supervisor level and gain
access to all the commands.
Entering the User Level
The User level is accessed upon entry to the Cajun Campus CLI.
Entering the Privileged Level
To enter the Privileged level, use the login command and enter the password. The
default password is
set enablepass
Console>
Enter password:
The prompt
level.
enable
enable
command.
enable
Console>(enable)
. However, it may be changed with the
displays indicating that you are in Privileged
Exiting the Privileged Level
To exit the Privileged level and return to the User level, type the command
(no password is required). The
required) returns you from the Privileged level to the User level.
Entering the Supervisor Level
To enter the Supervisor level, use the login command and enter the password. The
default password is
superpass
Console>
Enter password:
The prompt
level.
Exiting the Supervisor Level
To exit the Supervisor level and return to the Privileged level,
is required). The
you from the Supervisor level to the User level.
26 Cajun P333T User’s Guide
super
super
command.
super
Console(super)#
disable
disable
. The default password can be changed using the
displays indicating that you are in Supervisor
command (default password
command (default password
exit
norm
required) returns
exit
norm
set
(no password
Page 37

Chapter 5 Cajun Campus CLI (Command Line Interface)
Note:
timeout <timeout>
from the Privileged level or Supervisor level and returned to the User level.
If keyboard activity is not detected for the amount of time set using the
General Commands
Top and Up commands
Up
The
hierarchy. The
Retstatus command
Use the
performed was successful or not (shows the return status of the previous
command).
The syntax for this command is:
Example:
Console>(enable) set port negotiation 2/4 disable
Link negotiation protocol disabled on port 2/4.
Console>(enable) retstatus
Succeeded
Console>(enable)
command moves you up to the next highest level in the CLI command
retstatus
command in Telnet mode, you are automatically removed
Top
command moves you to the highest level.
command to show whether the last CLI command you
retstatus
set
Tree command
Tree
The
location in the CLI hierarchy.
The syntax for this command is:
Example:
Console (super)# tree
terminal
width
length
Console (super)#
Cajun P333T User’s Guide 27
command displays the commands that are available at your current
tree
Page 38

Chapter 5 Cajun Campus CLI (Command Line Interface)
Navigation, Cursor Movement and Shortcuts
The CLI contains a simple text editor with these functions:
Table 5.1 Navigation, Cursor Movement and Shortcuts
Keyboard Functions
Backspace Deletes the previous character
Up arrow/Down arrow Scrolls back and forward through the command
history buffer
Left arrow/Right arrow Moves the cursor left or right
Tab Completes the abbreviated command. Type the
minimum number of characters unique to the
command. An exception is the Reset System
command which you must type in full.
Enter Executes a single-line command
Getting Help
On-line help may be obtained at any time by entering a question mark (?) or the
help
word
command followed by a space and a question mark.
For example,
on the command line. To obtain help for a specific command type the
Console>
show ?
.
Command Syntax
Commands are not case-sensitive. That is, uppercase and lowercase characters may
be interchanged freely.
Command Abbreviations
All commands and parameters in the CLI can be truncated to an abbreviation of
any length, as long as the abbreviation is not ambiguous. For example,
can be abbreviated
For ambiguous commands, type the beginning letters on the command line and
then use the Tab key to toggle through all the possible commands beginning with
these letters.
28 Cajun P333T User’s Guide
ver
.
version
Page 39

Chapter 5 Cajun Campus CLI (Command Line Interface)
Commands, Parameters and Default Settings
This section provides all the CLI commands, parameters and their default values.
Not all groups, parameters and commands are available when the Cajun P330 boots
up from its INIT software.
Command Hierarchy
Table 5.2 shows the command hierarchy for User level commands. User level
commands are also available from the Privileged and Supervisor levels.
The Privileged and Supervisor level commands are identical with one exception:
the Supervisor level contains the set password command for the User level.
Table 5.3 shows the command hierarchy for Privileged level. Table 5.4 shows the
hierarchy for the Supervisor level.
How Commands are Organized
Command descriptions are organized into the groups in the command hierarchy
and the page number shown in Table 5.2, Table 5.3, and Table 5.4:
Cajun P333T User’s Guide 29
Page 40

Chapter 5 Cajun Campus CLI (Command Line Interface)
Table 5.2 User Level Command Hierarchy
Command Hierarchy See page
Console> super 33
enable 33
show time 33
timeout 33
timezone 33
ip route 33
ntp 34
system 34
image version 34
snmp 35
interface 36
port 36
module 37
flow control 38
cam port 39
cam mac 39
trunk 40
spantree 41
license 56
log 42
download status 43
30 Cajun P333T User’s Guide
Page 41
Chapter 5 Cajun Campus CLI (Command Line Interface)
Table 5.3 Privileged Level Command Hierarchy
Command Hierarchy See page
Console
(enable)
super 33
disable 44
set enablepass 44
password 44
logout 45
ntp server 45
ip route 45
snmp community 46
trap 47
system location 48
name 48
contact 49
interface 49
port level 49
negotiation 50
enable 50
disable 51
speed 51
duplex 51
VLAN 52
flowcontrol 53
trunk 54
Cajun P333T User’s Guide 31
Page 42

Chapter 5 Cajun Campus CLI (Command Line Interface)
Table 5.3 Privileged Level Command Hierarchy
Command Hierarchy See page
spantree enable 55
License 56
show see Table 5.2
sync time 56
get time 56
clear ip route 56
snmp trap 57
VLAN 57
cam 57
disable 55
priority 55
log 58
download 58
reset 58
session 58
Table 5.4 Supervisor Level Command Hierarchy
Command Hierarchy See page
Console
set defpass 60
(super)#
superpass 60
show see Table 5.2
set see Table 5.3
32 Cajun P333T User’s Guide
Page 43

User Level Commands
Super command
The super command is used to access the Supervisor level. In this level, additional
commands are available. The (super) prompt indicates that the system is in
Supervisor level and that commands can be entered.
The syntax for this command is:
Example
Console> super
Enter password: super
Console (super)#
Enable Command
The enable command is used to activate Privileged level. In the Privileged level,
additional commands are available, and certain commands display additional
information. The (enable) in the prompt indicates that the system is in Privileged
level and that commands can be entered.
The syntax for this command is:
Example:
Console> enable
Enter password: enable
Console> (enable)
Chapter 5 Cajun Campus CLI (Command Line Interface)
super
enable
Show commands
Show time command
Use the show time command to display the current stack time.
The syntax for this command is:
show time
Show timeout command
Use the show timeout command to display the amount of time the CLI can remain
idle before timing out. If the result is 0, there is no timeout limit.
The syntax for this command is:
show timeout
Show timezone command
Use the show timezone command to display the current stack timezone.
The syntax for this command is:
show timezone
Show ip route command
Use the show ip route command to display IP routing table entries.
Cajun P333T User’s Guide 33
Page 44

Chapter 5 Cajun Campus CLI (Command Line Interface)
The syntax for this command is:
show ip route
Example:
Console> show ip route
Destination Gateway
------------- -----------
149.49.1.1 172.20.22.201
190.20.0.0 172.20.22.202
172.20.0.0 172.20.22.96
Console>
Show ntp command
Use the show ntp command to display the address of the ntp server.
The syntax for this command is:
show ntp
Show system command
Use the show system command to display the up time, system name, location, and
contact person.
The syntax for this command is:
show system
Example:
Console> show system
Uptime d, h:m:s
-------------------
0,3:47:33
System name System location System contact
---------------- ------------------ -----------------
Admin Bld 3 Allan
Show image version command
Use the show image version command to display the software version of the image
on both Banks of a specified module.
34 Cajun P333T User’s Guide
Page 45

Chapter 5 Cajun Campus CLI (Command Line Interface)
The syntax for this command is:
show image version
[mod_num]
mod_num (Optional) Number of the module to display its image version
If a module number is not specified, the image version of the all modules will be
displayed.
Example:
Console> show image version
Mod Module-Type Bank Version
------- ---------------- ------- ----------
1.1. 24x10/100Base-T with optional expansion slot A 1.0.2
1.2. 24x10/100Base-T with optional expansion slot B 1.0.2
Show snmp command
Use the show snmp command to display SNMP information.
The syntax for this command is:
show snmp
Example:
Console> show snmp
Community-Access Community-String
_______________ _______________
read-only public
read-write private
trap secret
Trap-Rec-Address Traps Enabled
--------------------- -----------------
192.122.173.42 config, fault etc
Console>
Cajun P333T User’s Guide 35
Page 46

Chapter 5 Cajun Campus CLI (Command Line Interface)
Show interface command
Use the show interface command to display information on network interfaces.
The syntax for this command is:
show interface
Example:
To display the interface:
Console>show interface
IP Addresses & Netmasks
----------------------Inband, vl an 1 , I P ad dr ess: 14 9.49 .43. 210, netm ask: 255 .255 .25 5. 0
Console>
Show port command
Use the show port command to display port status.
The syntax for this command is:
show port
mod_num (Optional) Number of the module. If you do not specify a
number, the ports on all modules are shown.
[mod_num[/port_num]]
port_num (Optional) Number of the port on the module. If you do not
specify a number, all the ports on the module are shown.
Example:
To display the status for port 4 on module 3:
Console>
show port
3/4
Port Status VLAN Level Neg Duplex Speed Type
---- ------- ----- ------ ---- ------- ------- ------
3/4 disabled 203 normal enable full 100Mb 100BaseT
Console>
36 Cajun P333T User’s Guide
Page 47

Chapter 5 Cajun Campus CLI (Command Line Interface)
Show Port Output Fields
Field Description
Port Module and port number
Status Status of the port (connected, faulty, disabled)
VLAN VLAN ID of the port
Level Priority level of the port (normal or high)
Neg The negotiation status of the port (enable, disable)
Duplex Duplex setting for the port (fdx, hdx)
Speed Speed setting for the port (10, 100).
Type Port type, for example, 10BaseT, 10BaseFL, 100BaseTX,
100BaseFX MM, 100BaseFX SM, 10/100BaseTX
Show module command
Show module command
Use the show module command to display module status and information. For each
module with an expansion sub-module installed, both module and sub-module
type and information are shown.
The syntax for this command is:
show module
[mod_num]
mod_num (Optional) Number of the module. If you do not specify a
number, all modules are shown.
Example
Console> show module
Mod Type Ports Serial-Num C/S Sw
------ ----------------- ---------- -------------- ----- -------
1 Cajun P333T 24 007486003 1.0 1.0.2
Mod Sub-Type Sub-Ports Sub-C/S
------ ----------------- ---------- -----
1 P330F2 2 1.0
Cajun P333T User’s Guide 37
Page 48

Chapter 5 Cajun Campus CLI (Command Line Interface)
Output Fields
Field Description
Mod Module number.
Module-Type Module Type
Ports Number of ports on the module.
Serial-Num Serial number of the module.
C/S (Hardware) Configuration Symbol of the module
Sw Software version on the module.
Show flowcontrol command
Use the show port flowcontrol command to display per-port status information
related to flow control.
The syntax for this command is:
show flowcontrol
[mod_num/port_num]
mod_num (Optional) Number of the module.
port_num (Optional) Number of the port on the module. If you do not
specify a number, filters configured on all the ports on the
module are shown.
Example:
This example shows how to display the flow-control port status and statistics:
Console>
show flowcontrol
Port Send-Flowcontrol Receive-Flowcntl
Admin Oper Admin Oper
----- ---------- ------ -------- --------
3/2 off off off off
3/3 on on off off
38 Cajun P333T User’s Guide
Page 49

Chapter 5 Cajun Campus CLI (Command Line Interface)
Output Fields
Field Description
Port Module and port number.
SendFlowcontrolAdmin
Send-
Send flow-control administration. Possible settings:
• on indicates the local port sends flow control to the far end;
• off indicates the lo cal por t do es not send flow control to the far end;
Send flow-control operation mode.
FlowcontrolOper
ReceiveFlowcntlAdmin
Receive flow-control administration. Possible settings:
• on indicates the local port requ ires the f ar en d to send flow control;
• off indicates the local port does not allow the far end to send flow
control;
Receive-
Receive flow-control operation mode.
Flowcntl- Oper
Show cam command
Use the show cam command to display the CAM table for a specific port or
MAC_Addr. The syntax for this command is:
show cam
show cam mac
mod_num | port_num
mac_addr
mod_num Number of the module.
port_num Number of the port.
mac_addr MAC address.
Console>
show cam mac
00-00-81-01-23-45
Dest MAC/Route Destination Ports
--------------- ----------------
00-00-81-01-23-45 2/9
00-00-81-01-23-45 2/10
Total Matching CAM Entries = 2
Console>
Cajun P333T User’s Guide 39
Page 50

Chapter 5 Cajun Campus CLI (Command Line Interface)
Show trunk command
Use the show trunk command to display VLAN tagging information for the switch.
The syntax for this command is:
show trunk
[mod_num[/port_num]]
mod_num (Optional) Number of the module.
port_num (Optional) Number of the port.
To display the VLAN tagging configuration for a specific port, specify the module
and port number of the port you want to display.
Example:
To display tagging information for the switch:
Console> (enable)
show trunk
Port Mode Native VLAN VLANs allowed on trunk
------ ------ --------- --------------------------
4/9 dot1q 1 1-3071
4/10 off 1 1-3071
Console> (enable)
To display tagging information for a specific port:
Console> (enable)
show trunk
4/5
Port Mode Native VLAN VLANs allowed on trunk
------ ------ ----------- -------------------------
4/5 off 1 1-3071
Console> (enable)
40 Cajun P333T User’s Guide
Page 51

Chapter 5 Cajun Campus CLI (Command Line Interface)
Show trunk command output fields:
Field Description
Port Module and port number(s).
Mode Tag status of the port (on - dot 1Q tagging mode, off -
clear mode).
Native VLAN Number of the port VLAN in the tagged link (the
VLAN for which untagged traffic can be transmitted
and received over the link).
VLANs allowed on trunk Range of VLANs allowed (1 to 3071).
Show spantree command
Use the show spantree command to display spanning-tree information.
The syntax for this command is:
show spantree
mod_num [port_num]
mod_num Number of the module.
port_num (Optional) Number of the port on the module.
Example:
This example shows how to display the spanning-tree configuration:
Spanning tree enabled
Designated Root 00-40-0b-8f-8b-ec
Designated Root Priority 32768
Designated Root Cost 0
Designated Root Port 1/0
Root Max Age 6 sec Hello Time 2
Bridge ID MAC ADDR 00-40-0b-8f-8b-ec
Bridge ID Priority 32768
Port Port-State Cost Priority
-------- ---------- ---- ------ 1003 inactive 80 32
Console>
Cajun P333T User’s Guide 41
Page 52

Chapter 5 Cajun Campus CLI (Command Line Interface)
Output Fields:
Field Description
Spanning tree Status of whether Spanning-Tree Protocol is enabled or
disabled.
Designated
MAC address of the designated spanning-tree root bridge.
Root
Designated
Priority of the designated root bridge.
Root Priority
Designated
Total path cost to reach the root.
Root Cost
Designated
Root Port
Port through which the root bridge can be reached (shown
only on nonroot bridges).
Root Max Age Amount of time a BPDU packet should be considered valid.
Hello Time Number of times the root bridge sends BPDUs.
Bridge ID MAC
Bridge MAC address used in the sent BPDUs.
ADDR
Bridge ID
Bridge priority.
Priority
Port Port number.
Port-State Spanning-tree port state (disabled, inactive, not-connected,
blocking, listening, learning, forwarding, bridging, or typepvid-inconsistent).
Cost Cost associated with the port.
Priority Priority associated with the port.
Show log command
Use the show log command to display the logfile.
The syntax for this command is:
[mod_num]
show log
mod_num Number of the module to display its download process.
42 Cajun P333T User’s Guide
Page 53

Chapter 5 Cajun Campus CLI (Command Line Interface)
Show download status command
Use the show download command to display the status of the download process.
One session of download is active on the system.
The syntax for this command is:
show download status
[mod_num]
mod_num Number of the module to display its download process.
If a module number is not specified, the status of all modules will be displayed.
Example:
Console>(enable) show download status
Mod Bank Download State Activity Status Download Size
---- ------ -------------- -------------------- ----------1 A tftp-running-ip Downloading 46233
Mod Version Host File
---- ------ ------------- -------------------1 1.0.2 149.49.1.1 /users/download/
p330t
Cajun P333T User’s Guide 43
Page 54

Chapter 5 Cajun Campus CLI (Command Line Interface)
Privileged Level Commands
This Level includes all the commands of the User Level.
Disable command
Use the disable command to return to User level from Privileged level.
disable
The syntax for this command is:
Example:
Console> (enable) disable
Enter password:
Console>
Set commands
Set enablepass command
Use the set enablepass command to change the password for the Privileged level of
the CLI. The command prompts you to enter the old password. If the password you
enter is valid, you are prompted to enter a new password and to verify the new
password. The password should contain at least four characters.
The syntax for this command is:
set enablepass
Example:
Console> (enable) set enablepass
Enter old password: <old_password>
Enter new password: <new_password>
Retype new password: <new_password>
Password changed.
Console> (enable)
Set password command
Use the set password command to change the login password on the CLI. The
command prompts you to enter the old password. If the password is valid, you are
prompted to enter a new password and to verify the new password.
The syntax for this command is:
set password
Example:
Console> (enable) set password
Enter old password: <old_password>
Enter new password: <new_password>
Retype new password: <new_password>
Password changed.
Console> (enable)
44 Cajun P333T User’s Guide
Page 55

Chapter 5 Cajun Campus CLI (Command Line Interface)
Set logout command
The set logout command is used to set the number of minutes until the system
automatically disconnects an idle session.
The syntax for this command is:
set logout
<timeout>
<timeout> Number of minutes (0 to 999) until the system automatically
disconnects an idle session. Setting the value to 0 disables the
automatic disconnection of idle sessions
Default = 15
Examples:
To set the number of minutes until the system disconnects an idle session
automatically:
Console> (enable) set logout 20
Sessions will be automatically logged out after 20 minutes of
idle time.
Console> (enable)
To disable the automatic disconnection of idle sessions:
Console> (enable) set logout 0
Sessions will not be automatically logged out.
Console> (enable)
Set ntp server command
The set ntp server command is used to set the ntp server address.
The syntax for this command is:
set ntp server
<ip>
ip IP address of the ntp server.
Set ip route command
Use the set ip route command to add IP addresses to the IP routing table. You can
configure one default gateway up to ten-(10) default gateways for P330 family.
The syntax for this command is:
set ip route
destination gateway
destination IP address of the network, or specific host to be added
gateway IP address of the router.
Cajun P333T User’s Guide 45
Page 56

Chapter 5 Cajun Campus CLI (Command Line Interface)
Example:
These examples show how to add three default routes to the IP routing table:
Console> (enable) set ip route 149.49.48.0 192.122.173.42
Route added.
Console> (enable)
Console> (enable) set ip route 149.49.84.55 192.122.173.43
Route added.
Console> (enable)
Console> (enable) set ip route 10.0.0.0 192.122.173.44
Route added.
Console> (enable)
Set snmp community command
Use the set snmp community command to set SNMP communities and associated
access types.
There are three configurable SNMP communities, one for each access type. If you
do not specify the community string, the community string configured for that
access type is cleared. One community string should be configured for each access
type.
The syntax for this command is:
set snmp community
<read-only|read-
write|trap>[community_string]
read-only Assign read-only access to the specified SNMP
community.
read-write Assign read-write access to the specified SNMP
community.
trap Assign SNMP community to trap.
community_string (Optional) Name of the SNMP community.
46 Cajun P333T User’s Guide
Page 57

Chapter 5 Cajun Campus CLI (Command Line Interface)
The default configuration has the following communities and access types defined:
read-only---public
read-write---public
public-trap---public
Examples:
To set read-write access to the SNMP community called yappledapple:
Console> (enable) set snmp community read-write yappledapple
SNMP read-write community string set.
Console> (enable)
To clear the community string defined for read-only access:
Console> (enable) set snmp community read-only
SNMP read-only community string cleared.
Console> (enable)
Set snmp trap command
Use the set snmp trap command to enable or disable the different SNMP traps on
the system or to add an entry into the SNMP authentication trap receiver table.
First add the
rcvr_addr
and then change the trap configuration.
The syntax for these commands is:
set snmp trap
set snmp trap
rcvr_addr
[rcvr_addr] <enable|disable>[all|config|fault]
enable Activate SNMP traps
disable Deactivate SNMP traps
all (Optional) Specify all trap types
config (Optional) Specify the ConfigChange trap from the TRAP-MIB.
fault (Optional) Specify the Fault trap from the TRAP-MIB.
rcvr_addr IP address or IP alias of the system to receive SNMP traps
Examples:
To enable SNMP ConfigChange traps to a specific manager:
Console> (enable) set snmp trap 192.122.173.42 enable config
Cajun P333T User’s Guide 47
Page 58

Chapter 5 Cajun Campus CLI (Command Line Interface)
SNMP config change traps enabled.
Console> (enable)
To enable all traps to a specific manager:
Console> (enable) set snmp trap 192.122.173.42 enable all
All SNMP traps enabled.
Console> (enable)
To disable SNMP config traps to a specific manager:
Console> (enable) set snmp trap 192.122.173.42 disable config
SNMP config traps disabled.
Console> (enable)
To add an entry in the SNMP trap receiver table with default:
Console> (enable) set snmp trap 192.122.173.42
SNMP trap receiver added.
Console> (enable)
Set system location command
Use the Set system location command to set the mib2 system location MIB variable.
The syntax for this command is (a string of 2 words or more must be type inside
inverted commas – e.g. ‘Operations Floor’ ):
set system location
[string]
string location string. The location is cleared if this field is blank.
Set system name command
Use the Set system name command to set mib2 system name MIB variable.
The syntax for this command is:
set system name
string
48 Cajun P333T User’s Guide
[string]
location string. The location is cleared if this field is blank.
Page 59

Chapter 5 Cajun Campus CLI (Command Line Interface)
Set system contact command
Use the Set system contact command to set mib2 system contact MIB variable
The syntax for this command is:
set system contact
[string]
string location string. The location is cleared if this field is blank.
Set interface command
Use the set interface command to configure the in-band interfaces on the Master
agent of the stack.
The syntax for this command is:
set interface
[name][vlan][ip_addr][netmask]
name interface name (“inband” used for Master agent)
vlan the number of the VLAN to be assigned to the interface
ip_addr IP address
netmask Subnet mask
Set port level command
Use the set port level command to set the priority level of a port or range of ports
on the switching bus. Packets traveling through a port set at normal priority should
be served only after packets traveling through a port set at high priority are served.
The syntax for this command is:
set port level
[mod_num/port_num][normal|high]
mod_num Number of the module.
port_num Number of the port on the module.
normal Set the port priority to regular.
high Set the port priority to high.
Example
To set the priority level for port 2 on module 1 to high:
Console> (enable)
set port level
1/2 high
Port 1/2 port level set to high.
Console> (enable)
Cajun P333T User’s Guide 49
Page 60

Chapter 5 Cajun Campus CLI (Command Line Interface)
Set port negotiation command
Use the set port negotiation command to enable or disable the link negotiation
protocol on the specified port. This command applies to Fast Ethernet or Gigabit
Ethernet ports. When negotiation is enabled, the speed and duplex of the Fast
Ethernet ports are determined by auto-negotiation. If negotiation is disabled, the
user can set the speed and duplex of the Fast Ethernet ports.
The syntax for this command is:
set port negotiation
[mod_num/port_num][enable | disable]
mod_num Number of the module.
port_num Number of the port on the module.
enable Enable the link negotiation protocol.
disable Disable the link negotiation protocol
Example:
To disable link negotiation protocol on port 1, module 4:
Console> (enable)
set port negotiation
Link negotiation protocol disabled on port 4/1.
Console> (enable)
4/1 disable
Set port enable command
Use the set port enable command to enable a port or a range of ports.
The syntax for this command is:
[mod_num/port_num]
set port enable
mod _num Number of the module
port_num Number of the port.
Example
To enable port 3 on module 2:
Console> (enable)
set port enable
2/3
Port 2/3 enabled.
Console> (enable)
50 Cajun P333T User’s Guide
Page 61

Chapter 5 Cajun Campus CLI (Command Line Interface)
Set port disable command
Use the set port disable command to disable a port or a range of ports (see 4.1 for
range rules).
The syntax for this command is:
set port disable
[mod_num/port_num]
mod _num Number of the module
port_num Number of the port.
Example:
Console> (enable)
set port disable
5/10
Port 5/10 disabled.
Console> (enable)
Set port speed command
Use the set port speed command to configure the speed of a port or range of ports.
You can configure the speed of a Ethernet of Fast Ethernet interface only. You can
configure Ethernet or Fast Ethernet interfaces on the 10/100-Mbps Ethernet
switching module to either 10 Mbps or 100 Mbps. In autonegotiation mode, the
port's speed is determined by autonegotiation. An error message is generated if you
attempt to set the speed type to 10 or 100 when autonegotiation is enabled.
The syntax for this command is:
set port speed
[mod_num/port_num][value]
mod_num Number of the module.
port_num Number of the port on the module.
1|2 Set a port speed to 10, 100 Mbps.
Examples:
To configure port 2 on module 2 port speed to 10 Mbps:
Console> (enable)
set port speed
2/2 1
Port 2/2 speed set to 10 Mbps.
Console> (enable)
Set port duplex command
Use the set port duplex command to configure the duplex type of an Ethernet or
Fast Ethernet port or range of ports.
Cajun P333T User’s Guide 51
Page 62

Chapter 5 Cajun Campus CLI (Command Line Interface)
You can configure Ethernet and Fast Ethernet interfaces to either full duplex or half
duplex. The duplex status of a port in autonegotiation mode is determined by
autonegotiation. An error message is generated if you attempt to set the
transmission type of autonegotiation Fast Ethernet ports to half- or full-duplex
mode.
The syntax for this command is:
set port duplex
[mod_num/port_num][full | half]
mod_num Number of the module.
port_num Number of the port on the module.
full Keyword to specify full-duplex transmission.
half Keyword to specify half-duplex transmission.
Example:
To set port 1 on module 2 to full duplex:
Console> (enable)
set port duplex
Port 2/1 set to full-duplex.
Console> (enable)
2/1 full
Set VLAN command
Use the set VLAN command to assign the port’s VLAN. If adding a new VLAN, the
VLAN number must be within the range 1 to 3071.
The syntax for this command is:
set vlan
[VLAN_num][module/port]
VLAN_num Number identifying the VLAN.
mod_num Number of the module.
port_list Number(s) of the port(s) on the module belonging to the
VLAN
52 Cajun P333T User’s Guide
Page 63

Chapter 5 Cajun Campus CLI (Command Line Interface)
Example:
To set VLAN 850 to include ports 4 through 7 on module 3.
Console> (enable) set VLAN 850 3/4-7
VLAN 850 modified.
VLAN Mod/Ports
---- ----------------------850 3/4-7
Console> (enable)
Set flowcontrol command
Use the set flowcontrol command to set the send/receive flow-control frames
(whether proprietary or IEEE 802.3x) for a full duplex module port. Each direction
can be configured separately.
This command is supported on Fast and Gigabit Ethernet switching ports.
The syntax for this command is:
set flowcontrol
[receive | send | all][mod_num/port_num][off |
on|prop]
receive Indicate whether the port can receive administrative status from
a remote device.
negotiation set to off.
Available only for Gigabit Ethernet modules with
send Indicate whether the local port can send administrative status to
a remote device.
Available only for Gigabit Ethernet modules with
negotiation set to off.
all Send and receive (symmetric flow control).
mod_num Number of the module.
port_num Number of the port on the module.
off Used with receive to turn off an attached device's ability to send
flow-control packets to a local port.
Used with send to turn off the local port's ability to send
administrative status to a remote device.
on Used with receive to require that a local port receive
administrative status from a remote device.
Used with send, the local port sends administrative status to a
remote device.
prop Lucent proprietary flow control.
Cajun P333T User’s Guide 53
Page 64

Chapter 5 Cajun Campus CLI (Command Line Interface)
Examples:
These examples show how to use the set port flowcontrol command set:
Console> (enable)
set flowcontrol
Port 5/1 flow control receive administration status set to on
(port will require far end to send flowcontrol)
Console> (enable)
Console> (enable)
set flowcontrol
Port 5/1 flow control send administration status set to off
(port will send flowcontrol to far end)
Console> (enable)
Set trunk command
Use the set trunk command to configure the VLAN tagging mode.
The syntax for this command is:
set trunk
[mod_num/port_num][off|dot1q|plus]
mod_num Number of the module.
port_num Number of the port on the module.
receive 5/1 on
send 5/1 off
off (Optional) Forces the port to become a non-tagging port and
persuade the neighboring port to become a non-tagging port.
The port becomes a non-tagging port even if the neighbor port
does not agree to become a non-tagging port.
dot1q (Optional) Specifies an IEEE 802.1Q tagging on a Fast Ethernet
or Gigabit Ethernet port.
Plus (Optional) Specifies private tagging to port.
Tagging capabilities are hardware dependent.
Example:
To set port 2 on module 1 as a trunk port:
Console> (enable)
set trunk
1/2 dot1q
Port(s) 1/2 trunk mode set to on.
Console> (enable)
To set port 5 on module 4 as an 802.1Q trunk port in dot1q mode:
Console> (enable)
set trunk
4/5 dot1q
Port(s) 4/5 trunk type set to dot1q.
Console> (enable)
54 Cajun P333T User’s Guide
Page 65

Chapter 5 Cajun Campus CLI (Command Line Interface)
Set spantree enable command
Use the set spantree enable command to enable the spanning-tree algorithm for a
System.
set spantree enable
The syntax for this command is:
Example
This example shows how to enable the spanning-tree algorithm for the system.
Console> (enable)
set spantree enable
bridge spanning tree enabled.
Console> (enable)
Set spantree disable command
Use the set spantree disable command to disable the spanning-tree algorithm for a
System.
set spantree disable
The syntax for this command is:
Example
This example shows how to disable the spanning-tree algorithm for the system.
Console> (enable)
set spantree disable
bridge spanning tree disabled.
Console> (enable)
Set spantree priority command
Use the set spantree priority command to set the bridge priority.
The syntax for this command is:
set spantree priority
[bridge_priority]
bridge_priority Number representing the priority of the bridge.
The priority level is from 0 to 65535, with 0 indicating high
priority and 65535 indicating low priority.
Example
This example shows how to set the bridge priority to 4096:
Console> (enable)
set spantree priority
4096
Bridge priority set to 4096.
Console> (enable)
Cajun P333T User’s Guide 55
Page 66

Chapter 5 Cajun Campus CLI (Command Line Interface)
Set SMON License Command
The SMON license command enables you to activate the SMON capability of the
Cajun™ P330 stack. A Cajun P330 stack can include several Cajun P330 modules.
One SMON license is required per Cajun P330 stack. Installing the license is very
simple. It involves connecting a terminal to one of the Cajun P330 modules and
typing in a valid license number (included in the SMON License pack) using the
Command Line Interface (CLI).
For a full description of the SMON License and the installation procedure please
refer to the Installation Guide provided with the SMON License.
Show Commands
Show commands for Privileged level are identical to the show commands for the
User level. These are described starting on page 33.
Sync time command
This command synchronizes the time of all modules in a stack.
The syntax for this command is:
sync time
Get time command
This command retrieves the time from the network.
The syntax for this command is:
get time
Clear Commands
Clear ip route command
Use the clear ip route command to delete IP routing table entries.
The syntax for this command is:
clear ip route
<destination><gateway>
destination IP address of the network, or specific host to be added.
gateway
IP address of the router.
Example:
To delete the route table entries using the clear ip route command:
Console> (enable) clear ip route 134.12.3.0 192.1.1.1
Route deleted.
Console> (enable)
56 Cajun P333T User’s Guide
Page 67

Chapter 5 Cajun Campus CLI (Command Line Interface)
Clear snmp trap command
Use the clear snmp trap command to clear an entry from the SNMP trap receiver
table.
The syntax for this command is:
clear snmp trap
<rcvr_addr | all>
rcvr_addr IP address or IP alias of the trap receiver (the SNMP management
station) to clear.
all Keyword that specifies every entry in the SNMP trap receiver table
Example:
Console> (enable) clear snmp trap 192.122.173.82
SNMP trap receiver deleted.
Console> (enable)
Clear VLAN command
Use the clear VLAN command to delete an existing VLAN and return relies that
were on the VLAN to the default VLAN # 1. When you clear a VLAN, all ports
assigned to that VLAN are assigned to the default VLAN # 1.
The syntax for this command is:
clear VLAN
[VLAN_num]
VLAN_num Number of the VLAN (range is 1to 3071).
Example:
This example shows how to clear an existing VLAN (VLAN 4) from a management
domain:
Console> (enable) clear VLAN 4
This command will assign all ports on VLAN 4 to their default
in the entire management domain
Do you want to continue (y/n) [n]? y
VLAN 4 deletion successful
Console> (enable)
Clear cam command
Use the clear cam command to delete all entries from the CAM table.
The syntax for this command is:
clear cam
Example:
Console> (enable)
clear cam
CAM table entry cleared.
Console> (enable)
Cajun P333T User’s Guide 57
Page 68

Chapter 5 Cajun Campus CLI (Command Line Interface)
Download command
Use the download command to copy a software image from a specified host to the
Flash memory of a designated module. You can only perform this command a
Privileged or Supervisor levels.
download
The syntax for this command is:
host Name or IP address of host
file Name of file to be downloaded
mod_num Number of the module to receive downloaded image
<host><file><mod_num>
Note:
You must reset the switch after performing the download.
Reset command
Use the reset command to restart the system or an individual module. If no module
number is defined or the module number of the Master is defined, the command
resets the entire system. If the module number is defined, the command resets or
sets to defaults the specified module (you must type the command in full).
The syntax for this command is:
reset
<system|mod_num
>
mod_num Number of the module to be restarted
system Reset the module to its default values.
Example:
To reset the Master agent and force the entire system to reset:
Console> (enable) reset
This command will force a switch-over to the master module and
disconnect your telnet session.
Do you want to continue (y/n) [n]? y
Connection closed by foreign host.
host%
To set the Master agent and the system to their default values :
58 Cajun P333T User’s Guide
Page 69

Chapter 5 Cajun Campus CLI (Command Line Interface)
Console> (enable) reset system
This command will force a factory default and switch-over to
the master module and disconnect your telnet session.
Do you want to continue (y/n) [n]? y
Connection closed by foreign host.
host%
To reset module 4:
Console> (enable) reset 4
This command will reset module 4 and may disconnect your
telnet session.
Do you want to continue (y/n) [n]? y
Resetting module 4...
Cajun P333T User’s Guide 59
Page 70

Chapter 5 Cajun Campus CLI (Command Line Interface)
Supervisor Level Commands
This level includes all the commands of the User and Privileged Levels.
Set super password command
Use the set super password command to change the supervisor password. You can
only do this from within the Supervisor Level.
The syntax for this command is:
set superpass
Example:
Console (super)#
Enter old password: <old password>
Enter new password: <new password>
Enter New Password again: <new password>
Password changed.
Console (super)#
Set defpass command
Use the set defpass command to return the password for all levels to their default.
The syntax for this command is:
set defpass
Example:
Console> (enable) set defpass
Password changed.
Console> (enable)
Show Commands
Show commands for the Supervisor Level are identical to the show commands for
the User and Privileged Levels. These are described starting on page 33.
Set Commands
Set commands for the Supervisor Level are the same as the Set commands for the
Privileged Level. These are described starting on page 44.
60 Cajun P333T User’s Guide
Page 71

Appendix A
Specifications
Cajun P330 Switch
Physical
Height 2U (88 mm, 3.5”)
Width 482.6 mm (19”)
Depth 450 mm(17.7”)
Weight 7.5 kg (16.5 lb)
Power Requirements
Input voltage 85 to 265 VAC, 50/60 Hz
Power dissipation 100 W max
Input current 1.3 A@100 VAC
Inrush current 25 A@100 VAC (max.)
Power Requirements
Input voltage -32 to -72 VDC
Power dissipation 100 W max
Input current 3.4 A max
Inrush current 50 A max
–
–
AC
0.65 A@200VAC
50 A@200VAC (max.)
DC
Cajun P333T User’s Guide 61
Page 72

Environmental
–
Safety
AC
• UL for US approved according to UL195O Std.
• C-UL(UL for Canada) approved according to C22.2 No.950 Std.
• CE for Europe approved according to EN 60950 Std.
• Laser components are Laser Class I approved:
0
Operating Temp. -5 – 50
Rel. Humidity 5% to 95% non-condensing
— EN-60825/IEC-825 for Europe
— FDA CFR 1040 for USA
C (23-1220F)
Safety
EMC Emissions
DC
–
• Restricted Area Access: This device should only be installed in a restricted
• Installation Codes: This device must be installed in accordance with the US
• Overcurrent Protection: A readily accessible Listed branch-circuit overcurrent
Emissions
Approved according to:
• US -FCC Part 15 sub part J, class A
• Europe - EN55022 class A
Immunity
Approved according to:
• EN 50082-1
access area.
National Electrical Code, Articles 110-26 and 110-27, and the Canadian
Electrical Code, Section 12.
protective device with a 15A rating must be incorporated in the building
wiring.
Interfaces
• 24 x 10/100BASE-T RJ45 port connectors.
• RS-232 for terminal setup via RJ45 connector on front panel.
62 Cajun P333T User’s Guide
Page 73

Standards Compliance
The Cajun P330 complies with:
• IEEE 802.3x Flow Control
• IEEE 802.1Q VLAN Tagging and and 802.1p compatible
• IEEE 802.1D Spanning Tree protocol
• IEEE 803.3z Gigabit Ethernet ports
• IETF MIB-II, Bridge MIB, RMON, SMON
MTBF
• 140,000 hrs minimum
Stacking Sub-module
Table A.1 Stacking Sub-module
Name Number of Ports
X330STK 2
Expansion Sub-modules
Gigabit Ethernet Expansion Sub-modules
Table A.2 Gigabit Ethernet Expansion Sub-modules
Name Number of Ports Interface
X330S2 2 1000Base-SX
X330L2 2 1000Base-LX
X330S1 1 1000Base-SX
X330L1 1 1000Base-LX
Laser Safety
The Cajun X330S1/S2 multi-mode transcei vers and the Cajun X330 L1/X330L2 si ngle mode
transceivers are Class 1 laser products.
They comply with IEC 825-1 and Food and Drug Administration (FDA) 21 CFR 1040.10
and 1040.11.
Cajun P333T User’s Guide 63
Page 74

The transceivers must be operated under recommended operating conditions.
Laser Classification
CLASS 1
LASER PRODUCT
Note:
Class 1 lasers are inherently safe under reasonably foreseeable conditions of
operation.
Caution:
The use of optical instruments with this product will increase eye hazard.
Usage Restriction
The optical ports of the module must be terminated with an optical connector or a dust plug
when not in use.
Laser Data
Cajun P330S2 Expansion Sub-modules
Wavelength: 850 nm
Output power dissipation: Max. 0.63W
Transmit power: Min. -9 dbm, Max. -4 dbm
Receive power: Min. -17 dbm, Max. 0 dbm
Cajun P330L1/2 Expansion Sub-modules
Wavelength: 1300 nm
Output power dissipation: Max. 0.68W
Transmit power (9 µm SMF): Min. -9.5 dbm, Max. -3 dbm
Transmit power (62.5 µm and 50 µm MMF): Min. -11.5 dbm, Max. -3 dbm
Receive power (9 µm SMF, 62.5 µm and 50 µm MMF): Min. -20 dbm, Max. -3 dbm
64 Cajun P333T User’s Guide
Page 75

Fast Ethernet Fiber Expansion Sub-module
Table A.3 Fiber Fast Ethernet Expansion Sub-module
Name Number of Ports Interface
X330F2 2 100Base-FX
Ethernet/Fast Ethernet Expansion Sub-module
Table A.4 Ethernet/Fast Ethernet Expansion Sub-module
Name Number of Ports Interface
X330T16 16 10/100Base-T
Cajun P333T User’s Guide 65
Page 76

Backup Power Supply (BUPS)
Physical
Height 2U (88 mm, 3.5”)
Width 482.6 mm (19”)
Depth 450 mm(17.7”)
Weight 10 kg (22 lb)
Power Requirements
Input voltage 85-265VAC, 50/60Hz
Input current 7.76 A@100 VAC
3.82 A@200 VAC
Inrush current 70 A@100 VAC (max.)
150 A@200 VAC (max.)
Output power 4 x 27 A@ 5.5 V
Output voltage 5.5V
66 Cajun P333T User’s Guide
Page 77

Environmental
Safety
• UL for US approved according to UL195O Std.
• C-UL(UL for Canada) approved according to C22.2 No.950 Std.
• CE for Europe approved according to EN 60950 Std.
EMC Emissions
Emissions
Approved according to:
• Europe - EN55022 class B, 1994
• Europe - EN 6150-3-2 (Harmonics Current Emissions_
• Europe - EN 6150-3-3 (Flicker)
Immunity
Approved according to:
• EN 50082-1
• IEC 150-4-5
Operating Temp. 0-40
0
C (32-1050F)
Rel. Humidity 30% to 9% non-condensing
MTBF
• 200,000 hrs minimum
Cajun P333T User’s Guide 67
Page 78

MTBF
The following table provides the MTBF for the Cajun P333T in various
configurations.
Table A.5 MTBF
Model Without BUPS With BUPS
Without
X330STK
P333T 156,000 135,000 271,000 213,000
P333T+X330T16 132,000 117,000 206,000 171,000
P333T+X330F2 128,000 113,000 196,000 163,000
P333T+X330L2/
X330S2
P333T+X330L1/
X330S1
120,000 107,000 179,000 152,000
>129,000 >107,000 >179,000 >152,000
With
X330STK
Without
X330STK
With
X330STK
68 Cajun P333T User’s Guide
Page 79

Appendix B
Cajun P330 Standalone Manager
The Cajun P330 Manager provides the following:
• Device Configuration - Viewing and modifying the different device
configurations.
• Port RMON- Viewing graphical representations of the traffic on the ports of the
Cajun P330 Switch.
• Virtual LANs - Viewing and editing Virtual LAN information.
• Link Aggregation Groups (LAGs) - Viewing and editing LAG information.
• Software Redundancy - Setting software redundancy for ports in a Cajun P330
Switch.
• Port Mirroring - Setting up port mirroring for ports in a Cajun P330 Switch.
• Trap Managers Configuration - Viewing and modifying the Trap Managers
Table.
• Switch Connected Addresses - View devices connected to selected ports.
System Requirements
Minimum hardware and Operating System requirements are:
• Windows® 95 or NT® 4.0 or higher
• Pentium™ 200-Mhz-based, computer with 64 Mb of RAM
(Pentium-II recommended)
• Minimum screen resolution of 1024 x 768 pixels
• 24 Mb of free Hard Disk space.
Installation
To install the Cajun P330 Standalone Manager:
1 We recommend that you close all unecessary applications currently running on
your PC
2 Insert the Cajun P330 Standalone Manager CD in your PC’s CD Drive.
3 In Windows 95 or Windows NT, click
4 Enter the path to the CD drive and the filename
5 Follow the on screen instructions to install the Cajun P330 Manager.
Cajun P333T User’s Guide 69
Start
on the Task Bar and select
Setup.exe
and click OK.
Run
.
Page 80

Documentation and Online Help
The Standalone Manager comes with a detailed User’s Guide including a Glossary
of Terms and an overview of Data Communications concepts.
Software Download
You can perform software download using the CLI (see “Show download status
command” on page 43) or the Cajun Download Manager (part of the CajunView
Suite).
70 Cajun P333T User’s Guide
Page 81

Appendix C
How to Contact Us
To contact Lucent's technical support, please call:
From the United States:
1-800-237-0016, press 0, then press 73300
From North America:
1-813-217-2425
Outside North America:
+972 3 645 8458
Cajun P333T User’s Guide 71
Page 82

Cajun, CajunView and Octaplane are trademarks of Lucent Technologies, Inc.
All other trademarks, registered trademarks, service names, product and/or brand names are the sole
property of their respective owners.
© Copyright 1999 Lucent Technologies. All rights reserved.
72 Cajun P333T User’s Guide
 Loading...