

Page 1

INTUITY
™
Voice/FAX Messaging User’s Guide
585-310-733
Comcode 107731481
Issue 2
February 1996
Page 2

Copyright 1998, Lucent Te chnologies
All Rights Reserved, Printed in U.S.A.
Notice
Every effort was made to ensure that the information in this book was
complete and accurate at the time of printing. However, information is
subject to change.
Your Responsibility for Your System’s Security
Toll fraud is the unauthori zed us e of your telecommunications system by
an unauthorized party, for example, persons other than your company’s
employees, agents, subcontractors, or persons working on your company’s behal f. Note that there may be a ris k of toll fraud associated with
your telecommunications system and, if toll fraud occurs, it can result in
substantial additional charges for your telecommunications services .
You and your s ystem manag er ar e respon sib le fo r the secur ity of yo ur sys tem, such as pro gr a mming and confi gur ing your equipment to prevent
unauthorized use. The syst em manager is also res ponsible for reading all
installation, instru ction, and system administration documents provided
with this product in order to fully understand the features that can introduce risk of to ll fraud and the steps that can be taken to reduce that risk.
Lucent Technologies does not warrant that this product is immune from or
will prevent unauthorized use of common-carr ier telecommunication services or facilities accessed through or connected to it. Luce nt Technologies will not be responsible for any charges that result from such
unauthorized use.
Lucent Techno logies Fraud Interv ention
If you suspect that you ar e being victimized by toll fraud and you need
technical s upport or assistance, call Techn ical Service Center Toll Fraud
Intervention Hotline at 1 800 643-2353.
Ordering Information
Call: Lucent Technologies BCS Publications Center
Voice 1 800 457 -1 235 International Voice 317 322- 6791
Fax 1 800 457-1764 International Fax 317 322-6 699
Write: Lucent Technologies BCS Publications Center
2855 N. Frankl in Road
Indianapo li s , IN 46219
Order: Document No. 585-310-733
Comcode 107731481, Issue 2, February 1996
For additional documents, refer to the section in “About This Document”
entitle d “Rel at ed Reso u rc es. ”
You can be placed on a standing order l ist for this and other documents
you may need . For more inf ormation on standing orders, or to be put on a
list to receive future issues of thi s document, contact the Lucent Technologies Publi cations Center.
Acknowledgment
This document was prepared by the Product Documentation Development, Lucent Technologies , Denver, CO.
Lucent Techno logies Web Page
The world wide w eb home page for Lucent Technologies is:
http://www.lucent.com
Federal Communications Commission Statement
Part 15: Class A Statement. This equipment has been tested and found
to comply with the limits for a Class A digital device, pursuant to Part 15
of the FCC Rules. These limits are desi gned to provide reasonable pro tection agai ns t harmful interf e r ence when the equipment is operated in a
commercial environment. This equipment generat es , uses, and can radiate radio-frequency ener gy and, if not installed and used in accordance
with the instructions, may cause harmful interference to radio communications. Operation of this equipment in a residential area is likely to
cause harm ful interferen ce, in which case the user w ill be required to correct the inter ference at his own expense.
Part 68: Answe r-Super vision Signal ing. Allowing this equipment to be
operated in a manner that does not provide pr oper answer - s upervision signaling is i n violation of Part 68 Rules. Th is equipment retur ns answersupervisio n signa ls to th e public swi tche d netwo rk whe n:
• Answered by the called station
• Answered by the attendant
• Routed to a recorded announcement that can be administered by
the CPE user
This equipment returns answer-supervision signals on all DID calls forwarded bac k to the public switched teleph one network. Permissible
exceptions are:
• A call is unanswered
• A busy tone i s re ceived
• A reorder tone is received
Page 3

Contents
■ Welcome 1
■ Call Answering 1
■ Voice Mail 1
■ FAX Messaging 1
■ Intuity Advantages 2
■ Voice Prompts and Help 2
■ Terms and Concepts 3
Activ ity Men u 3
Address 3
Address Before Record (ABR) 4
Autodelete 4
Autoprint 4
Header 4
Mailbox 5
Personal Fax Extension 6
■ How to Navigate Your Mailbox Options 7
■ How to Log In 9
Creating or Changing Your Password 10
Recording Your Name 11
Creating Your Personal Greeting 12
Recording Your Basic Greeting 12
Composing a Single Voice-fax Extension Greeting 13
iii
Page 4

Contents
■ How to Record and Send Messages 14
■ How to Get and Respond to Messages 23
Composing a Greeting If You Have a
Personal Fax Extension 13
Setting Addressing Options 15
Selecting Delivery Options 15
Creating and Sending a Fax-only Message (ABR on) 16
Creating and Sending a Voice Message (ABR on) 17
Creating and Sending a Voice Message (ABR off) 19
Creating and Sending a Voice-fax Message (ABR on) 21
Sharing Fax Machines 23
Listening to a Message Header 23
Responding to a Message 24
Printing a Fax 24
iv
Acting on a Header or Message 25
Scanning Messages Quickly 26
■ How to Create and Use Multiple Personal Greetings 26
Call Types 27
Defining Call Types (the first time) 27
Changing Call Type Definition 28
Assigning Greetings to Call Types 29
Activating Previously Recorded Greetings 29
Scanning All Greetings 30
Page 5

Contents
■ How to Access Outgoing or Filed Messages 32
■ How to Create Mailing Lists 35
■ How to Create a Personal Directory 39
■ How to Use Directory Assistance 41
Accessing Outgoing Messages 32
Selecting a Message 32
Modifying a Message 33
Re-sending a Message 34
Creating a List 35
Deleting Addresses from a List 36
Scanning List Summaries 37
Reviewing and Modifying a List 38
Creating and Appending a Directory 39
Reviewing and Deleting Entries from a Directory 40
■ How to Leave a Call Answer Message 42
■ Command Summary 44
■ Tips and Highlights 45
General Message Handling 45
Leaving Messages When No One Answers 47
Sending Voice Mail 47
v
Page 6

Contents
vi
Page 7

Welcome
INTUITYTM Voice/FAX Messaging is a powerful call answer, voice mail, and faxmessag e s ystem . Besides sendin g and receiving voice mail, you can send ,
receive, forward, and voice annotate faxes.
Call Answering
INTUITY Voice/FAX Messaging answers calls when you are unavailable or too
b usy to answer your telephone. Callers may then leave messages in your
voic e “mailbox . ” Later, you can acce ss your mailbox to ge t those messages.
Voice Mail
INTUITY Voice/FAX Messaging lets you record voice and voice-fax messages in
advance and send them directly to the mailboxes of other system users without
actually calling their telephones.
Conversely, other users c an record and send voice mail messag es and voic efax messages directly to your mailbox. When convenient, you can access your
mailb ox to get those messag es .
FAX Messaging
INTUITY V oi ce/FAX Messaging lets you send, receive, and voice annotate faxes.
You can forward, voice annotate, and re-send received faxes; or direct faxes to
printers, PCs, or LAN fax servers.
You can send or forward a fax to any address within your system (and append
a voice message to the fax if you choose); or you may elect to send or forward
only a fax to an address outside your system. You can send or forward faxes
to
to internal extensions, by using system mailing lists, and/or
numbers, b y addressing your fax messages individually.
external
1
Page 8

Intuity Advantages
INTUITY Voice/FAX Messaging provides four key voice and fax adv antages:
Mobility You can acc ess your voice, fax, and voice-fax
messages from anywhere.
You can retrieve a fax from your mailbox and have it
printed anywhere a fax mac hin e is available.
With compatible fax software and a modem, you can
access and download faxes to a PC or lap top
com puter for later use.
Convenienc e You can retrieve your voice, fax, and voice-fax
messag es from your desktop, from your home office,
from anywhere in the country, or from across the world.
You can also retrieve your voice, fax, and voice-f ax
time
messages any
Privacy You control when and where a voice or fax message is
retrieved, and where a fax is printed, so you can be
sure that it ends up in your hands only.
Security Only you can retrieve your voice, fax, and voice-fax
messag es using your passw ord-protected login to
access your mailbox.
you want.
Voice Prompts and Hel p
INTUITY V oice/FAX Messaging voice prompts tell you what to do at every step in
a task. Once you have selected the appropriate Activity Menu option, you can
rely solely on the voice prompts
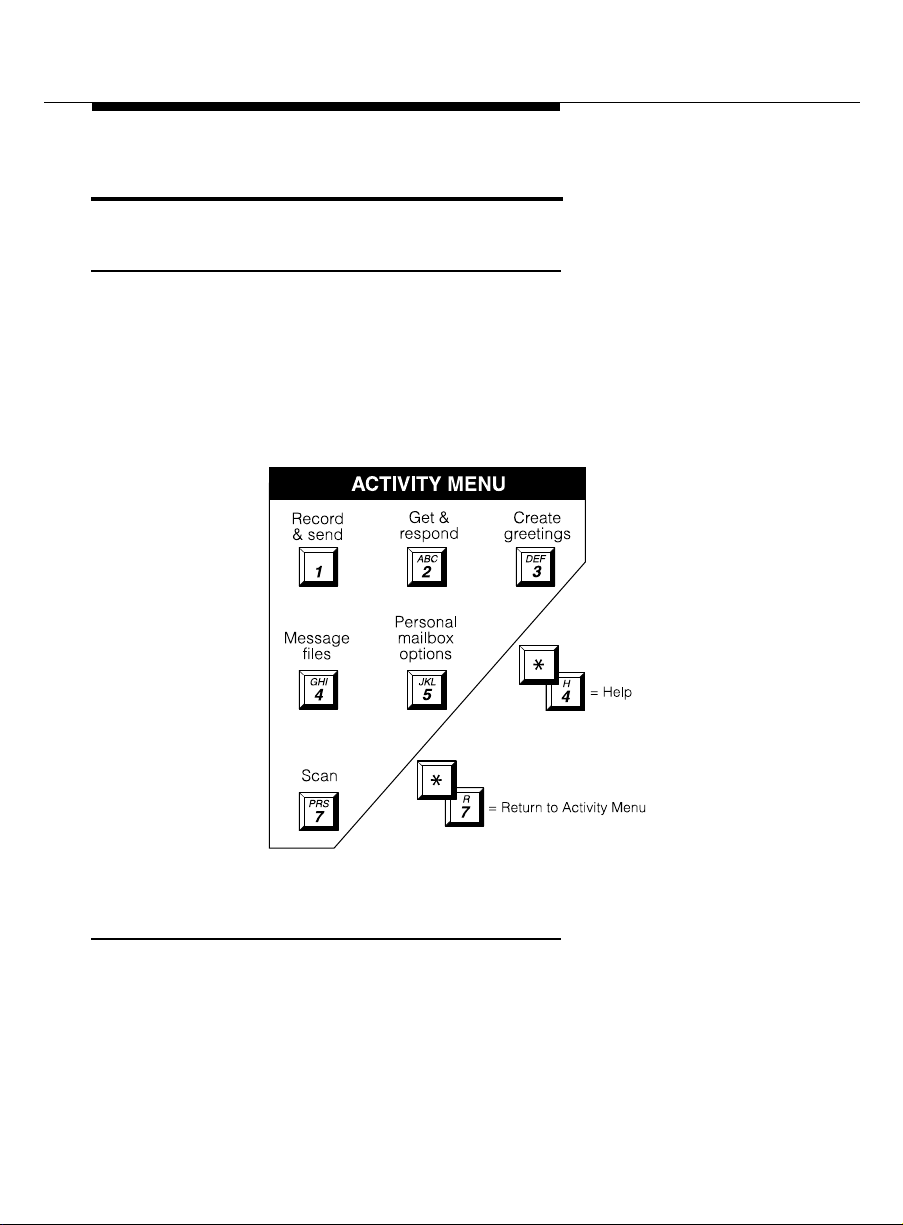
To find help at any time, press . The voice promp t s define what step
you’re on and what your options are.
To return to the Activity Menu, press ( ).
2
to figure out what to do.
H
*
R
*
7
*
Page 9
Terms and Concepts
Activity M en u
After you log into the system, you have six princ ipal keyp ad ac tivities,
represented by the Activity Menu graphic below. As you press keys in the
Act ivity Menu to access the principal functions, you move to dif ferent menu
levels and the keys change meaning.
Address
A telephone number (usually an extension) or a name specified for an outgoing
voice, fax, or voice-fax message (equivalent to an address on a letter).
3
Page 10

Address Before Record (ABR)
A user-selec t ed option (on/ off) that defines whether a messag e is add res sed
before it is created, or created before it is addressed.
Autodelete
A user-selec t ed option (on/ off) that defines whether the system automatic ally
removes faxes from the mailbox as they are printed.
Autoprint
A user-selec t ed option (on/ off) that defines whether the system automatic ally
sends faxes to a designated fax p rinter.
Header
A summary of an incom ing voic e, fax, or voice-fax message (equivalent to a
return address and postmark on a letter). It includes the length of the message
in minutes and/ or seconds, and a page co unt for fax messages. The three
header types are:
Voice message
“Message from Norman Bates, received 7:34 AM, Friday, April seventh, 70
seconds, extension 77956.”
Fax message
“Fax call from extension 40668, received 1:22 PM, Thursday, August third, 4
pages.”
Voice-fax message
“Voice and fax message from Eileen Dover, received 3:16 PM, Monday,
Dec ember twelfth, 45 sec onds, 3 p ages, extension 75433.”
4
Page 11
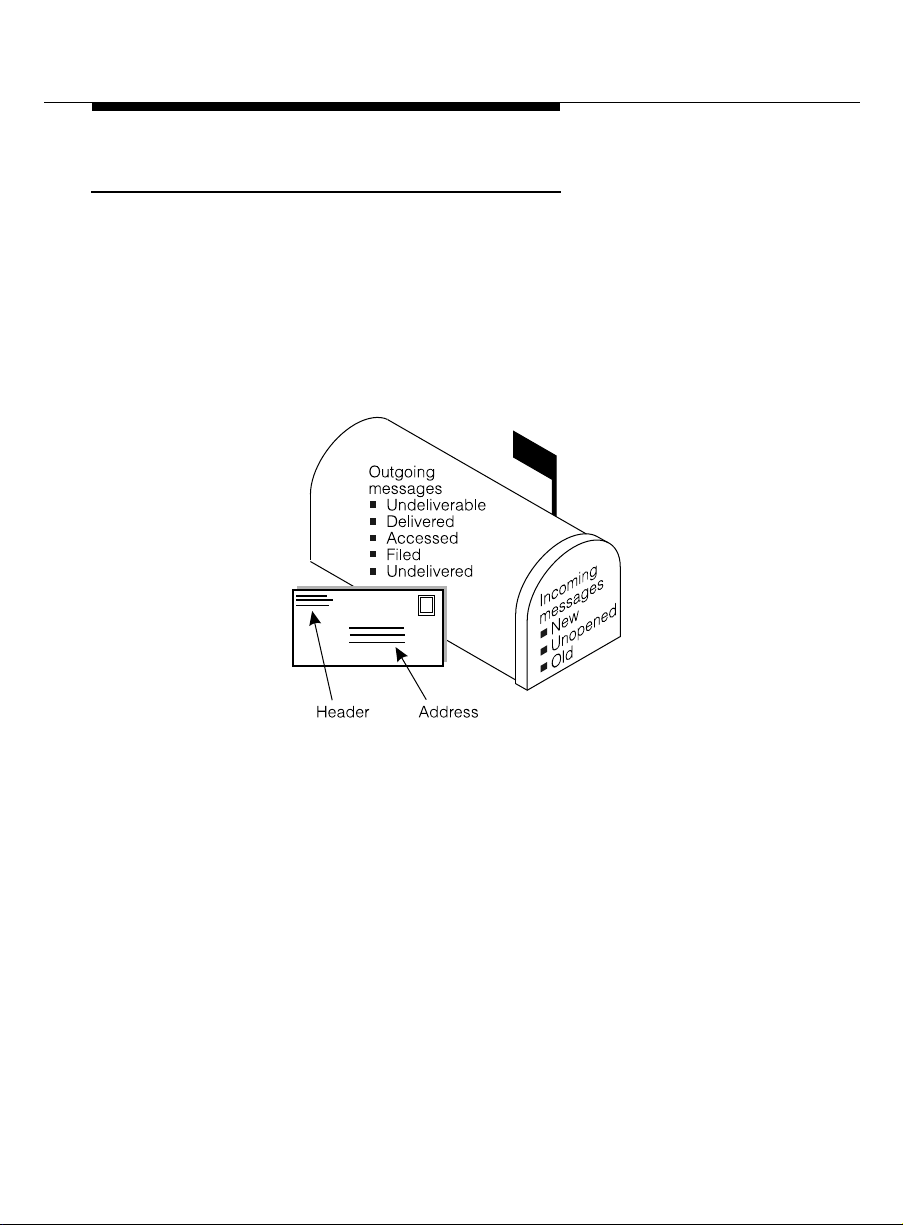
Mailbox
Your personal storage area for incoming and outgoi ng voice, fax, or voic e-f ax
messages and headers.
Your incoming and outgoing voice, fax, or voice-fax messages are stored in
categories according to their status. The system keeps incoming messages
until you del ete them or until an automatic delet ion date. Beca us e spac e is
limited, it is wise to review and delete messages regularly.
Incoming Messages (received by you)
Voice Message A voice-only transmission.
Fax Message A fax-only transmission.
Voice-Fax Message A fax transmission annotated with a voice
messag e.
5
Page 12

New Fax, voice, or voice-fax messages you haven’t
Unop ene d Fax, voice, or voice-fax message headers to
Old Fax, voice, or voice-fa x messages to which
Outgoing Messages (sent by you)
Accessed Fax, voice, or voice-fax messages delivered and
listene d to by the reci pient.
Und elive red Fax, voice, or voice-f ax messages not yet sent but
scheduled for future delivery. You can listen to, read dress, and re-record these mes sages any time
be fore delivery.
Und elive rable Fax, voic e, or voic e-f ax messages that could not be
d elivered, normally because the intended recipient's
mailbox is full. You can listen to, r e- address, and rerecord these messages.
Filed Copies of outgoing f ax, voice, or voice-fax mess ages
that you’ve saved to re-send and/or modify.
retrieved.
which you'v e listened, but have not yet listened
to the message itself.
you've listened or printed, but hav en’t deleted.
Personal Fax Extension
If you receive frequent faxes, or use your telep hone ex tens ively, your system
administrator may set up a second fax-only extension, your
extension
.
personal fax
A personal fax extension has these characteristics:
■ It stores faxes only.
■ It doesn’t accept voice messages.
6
Page 13

■ The system sends faxes and the fax portion of voic e-fax messages to
this extension automatical ly. Fax heade rs are stored in your primary
mailbox.
■ Fax-only messages addressed to your fax extension
d o not
ring your
telephone.
■ Fax-only messages addressed to your fax extension
do
trigger your
message light.
■ Activity Menu access to your personal fax extension and your persona l
mailbox extension is the same—the system
■ You
cannot
create a greeting for your personal fax extension; it is set by
doe s not
the system. Example: “Fax extension for (your name). Press
separate them.
START on
your fax machine now.”
NOTE:
If you do not have a personal fax extension, you have a single
number for both voice and fax messages. Because of the system
memory dem ands of fax messag ing, you are urged to act on fax,
voice, or voice-fax messages immediately to clear them from your
mailbo x. Your system administrator establishes your mailbox
memory si z e .
How to Navigate Your Mailbox Options
Of the princip al Activity Menu activities, Personal Mailb ox Options affec ts
the entire system more than any other. Mailbox Options contain the Subscriber
(user) Admi nistration submenu, from which you select and define the
conditions th at control mailin g lists, personal d i r ectories, fax printing,
p assword, account names, and call answer options. Each submenu choice is
exp laine d in greater detail in subsequent sections of this booklet.
5
7
Page 14

To select and set your p ersonal mailbox op t ions, you will p res s from the
5
Activity Menu, and select from these submenus:
1. Mailing list submenu
1
2
3
To create a list
To scan an existing list
To modify a list
2. Personal directory submenu
1
2
To create a directory
To review a directory
3. F ax option submenu
1
Select a default print number
Y or N Turn autoprint on or off
9
Select autodelete
Y or N Turn autodelete on or off
4. Pass word
5. Account name
6. Addressing options submenu
1
Address before record (ABR ) on or off
7. Call answer options
1
Call answer on/off
One personal mailbox option is not explained later, 7 1 call-answer on/off. If
you are away from your telephone for extended period s (illness, vacation,
sabbatical, etc.), you may wish to turn your call answer capability off so your
mailbox doesn’t fill up. To administer your call answer options, see 7 above.
8
Page 15
NOTE:
Because the system doesn’t signal a caller that call answer is off,
compose a greeting that tells callers when call answer is disabled
and, if you wish, other op t ions for reaching you.
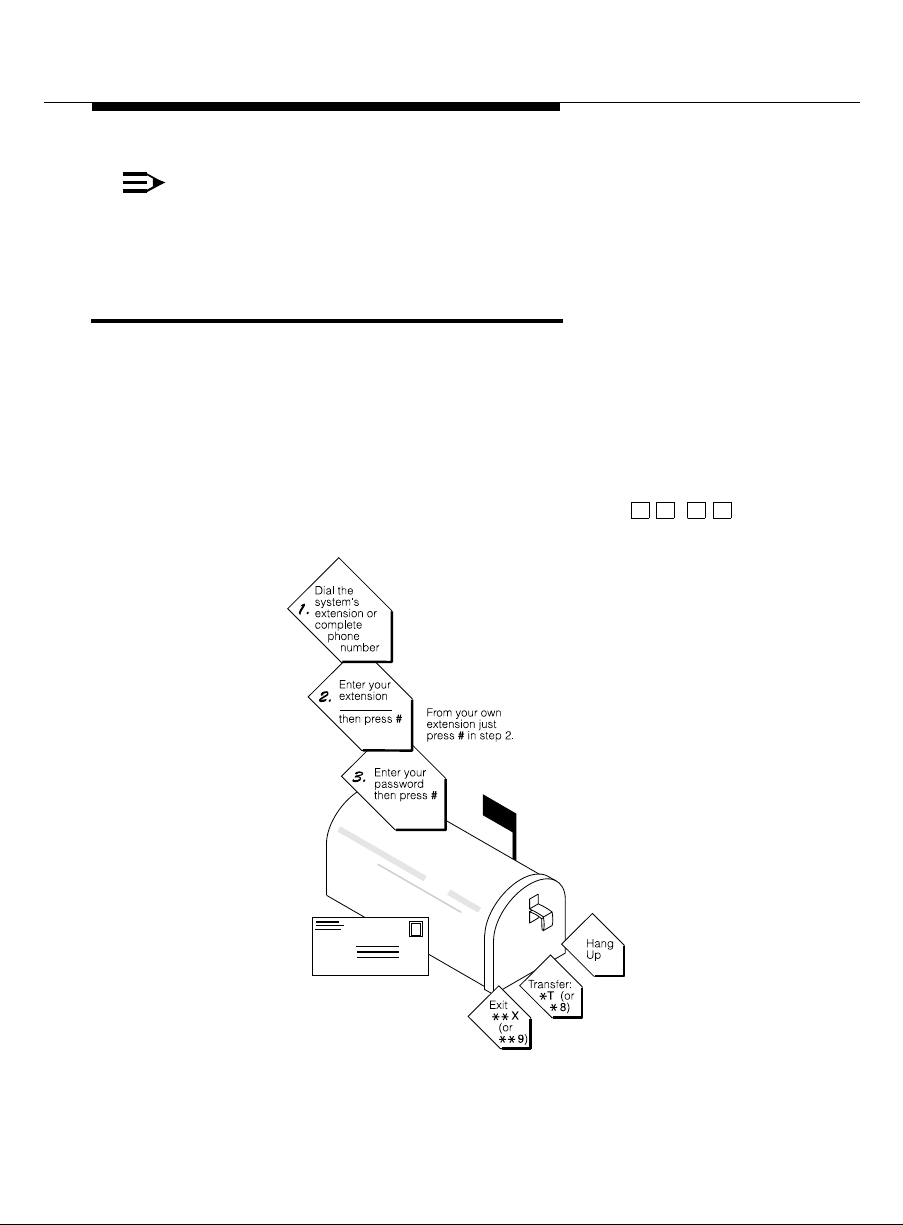
How to Log In
Your system administrator establishes your extension or telephone number and
a default password for login and assigns a system mailbox-access number,
system extension
your
prior
to logging in.
After you dial the system ext ension and enter your extension and the default
p assword, you are at the Activity Menu. The syst em voice prompts tell you
what to do and what your options are. At any time, press ) to get
information about your current options.
.You should rec eive directions specific to your system
H
*
4
*
9
Page 16

Creating or Changing Your Password
After logging in to your mailbox the first time, replace the default password with
your persona l password .
To change your password any time after logging in:
1. Press from the Activity Menu.
2. Enter new pa ssword (up to 15 digits) and press .
3. Re-enter new password and press .
!
CAUTION:
5 4
#
#
To ensu r e the security of your messages and the system, do not use a
p assw ord that uses:
■ Ascending or descending digits (for example, 1234 or 4321)
■ The same digits (for example 0000)
■ Digits corresponding to your name or initials (for example, 5646
for John)
■ The current year (for example, 1993)
■ The same number as your extension (for example, extension
3455, pa ssword 3455)
■ A reverse extension (for example, extension 3455, p as sw ord
5543)
■ Numbers that identify you, such as your social security number,
employee ID, room number, or department
■ A programmable function key or speed-dial key.
10
NOTE:
Chang e the default password to your person al password imm ediately
after you log in to the system the first tim e.
Page 17
Recording Your Name
Record your name to replace the system greeting for your mailbox. Callers
hear your voice s peaking yo ur name and feel com fortable about leaving
messages.
You can rec ord your name any time after logging in.
1. Press from the Activity Menu.
5 5
2. Say your name after the tone.
3. Press
(Optional)
4.
1
Press one of the following :
1
to re-record (return to step 2).
2 3
to play bac k.
5. Press to approve.
#
NOTE:
This cap a bility may not be available on your system.
☞ Tips
Usually, you don’t have to wait for the voice prompts; you can dial through
them to ente r a c ommand, without waiting, from anywhere in the system.
You can’t dial through error messages and important announcements the
system wants you to hear. When you try to dial through prompts at these times,
you hear a beep.
After leaving a call answer message for someone else, access your own voice
R
mailbox by pressing ( ).
*
7
*
11
Page 18

Creating Your Personal Greeting
Your system allows you to record and store several personal greetings, each
for a specific situation. You can manually activate each greeting as needed
(basic mode), or you can keep a number of greetings active at once. S ee “How
to Create Multiple Personal Greetings.”
Recording Your Basic Greeting
1. Press from the Activity Menu.
3
2. Listen to a summary of active greeting s .
3. Press to record or re-record a greeting.
1
4. Enter a numb er (1 to 9) for the gree ting.
5. Speak greeting at the tone.
(Optional)
6.
To edit your greeting:
Press to stop record ing or pause.
1
Press one of the following:
1
2 3
Play back.
D
( ) Delete (and begin again).
*
7. Press to app rove.
3
*
#
Continue recording.
8. Do one of the following:
■ Press to leave the greeting inactive.
■ Follow the prompts to activate the greeting.
#
12
Page 19

Composing a Single Voice-fax Extension Greeting
Fax messaging is a new capability and many callers will be unfamiliar with it at
first. Callers will find it helpful if you record a greeting that briefly instructs them
about your fax messaging.
Explain
how to transmit
a fax:
“This is Richard Hyatt at Gobels & Nixon. I’m away from my desk; please
leave a messag e at the tone. If you want to inc lude a fax with your
message, press
you want to send
ST ART on your fax machine when you finish speaking. If
only
a fax, press STAR T on your fax machine
now
Composing a Greeting If You Have a Personal Fax Extension
While it is a true mailbox, a personal fax extension also acts as a storage site to
red uce the memory limits of a single voice-fax extension for users who rec eive
many faxes.
Callers
cannot address
■ A p ers onal fax extension stores faxes only. If you have a p ersonal fax
extension, the system automatically sends faxes to this extension.
■ Fax messages add ressed to your fax extension do not ring your
telep hone.
■ Fax messages add ressed to your fax extension do trigger your
message light.
■ Like voice-mail headers and voice messages, fax headers addressed to
your personal fax extension are stored in your primary mailbox.
voice messages to your personal fax extension.
.”
■ In the case of a voice-fax message, a caller must address the message
(bo th fax and voice) to your primary mailbox.
13
Page 20

If you have a personal fax extens ion, you may want to list your extension on
your business card or company stationery and/or instr uct callers to send faxes
to your fax-only number.
Instruc tio nal greeting if you have a p ersonal fax extension:
“This is Diane Downer at the Commander Heater Company. I’m unable
to take your call; please leave a message at the tone. If you want to send
me a fax, please call my fax number at 332-3626.”
How to Re co rd and Send Messages
Sending fa xes and crea ting and s ending voice and voice-fax messages are
similar in all respects but one — to send a fax, you must access the system
from the fax mac hine
You can rec ord a voice me ssage and at tach it to a fax in two ways:
■ From the system fax machine from whic h you wish to transmit.
■ From any telephone from which you can access your mailbox. See
“Sharing Fax Machines.”
NOTE:
Advanced fax users will quickly not e that a fax
manual send
facsimile software. To do so, a user should follow the conventions set
forth in the fax software user instructions. It is strongly recom m ended
that users address software concerns with system administration
attempting to transmit a fax from a PC.
from which you wish to transmit.
can be
mode f rom a modem-enabled PC running comp at ible
transmitted in the
before
14
Page 21

Setting Addressing Options
Before moving into the “Creating a Message” category, it is necessary to
d e termine whether m e ssages w ill be recorded fi r st or add r es s ed first.
on
The options are address before record (ABR)
Onc e set, addressing can be left in the selected opt ion with no further action
b y the user, or modified according to individual requirements.
NOTE:
In fax-messagi ng mod e, the system use s your active phone lin e to send
the fax, then hangs up when transmission is com plete. Thus, you must
address
on
a fax
before
you send it. It is rec om m ended that you elect ABR
.
To chang e th e ABR setting:
or address before record
off
.
1. Press (Personal Mailbox Options) from the Activity Menu.
2. Press . You hear the promp t , “Address before record t urned on”
5
6
(or “off”).
3. Press to change ABR setting.
1
Selecting Delivery Options
When you have created/addressed your message, and have moved to
sending faxes or creating and sending voice or voice-fax messages, several
d elivery options are available.
Press to listen to the list of options:
0
1 1
Make your messag e private. (Press again t o undo.)
2 2
Make your messag e priority (if available). (Press again to undo.)
3 3
Schedule delivery. (Press ag ain to undo.)
15
Page 22

To schedule delivery:
1. Enter delivery time (405 = 4:05 ).
2. Enter (or ) for AM or (or ) for PM and press .
3. Enter delivery month and day (502 = May 2) and press .
4. Press to approve or (or ) to start over.
A 2 P 7 #
#
4
File a copy. (Press again to undo.)
5
To includ e a fax (in voic e-fax mode).
3
*
D
*
#
Creating and Sending a Fax-only Message (A BR on )
From the system fax machine from which you wish to transmit, access the
Activity Menu by entering your system extension and password as you would if
you were log ging in from your own telephone.
16
1. Press from the Activity Menu.
2. T o address a
1
fax-only
■ Enter recipient’s address (that is, the telephon e
messag e, select one of the following :
internal; or the telephone number, if
■ To send to a mailing list:
a. Press to access a list.
L
*
b. Enter list owner’s extension and press . (If you’re the
owner, just pres s .)
#
c. Enter list ID (name) and p r ess .
3. Press to access delivery options.
4. Press to approve address.
5. Press to input fax and send.
6. Insert fax and press
0
#
#
START on the fax machine.
external
#
extension
) a nd pres s
#
, if
#
Page 23

17
Page 24

Creating and Sending a Voice Message (ABR on)
Access the Activity Menu b y entering your system extension and password.
1. Press from the Activity Menu.
1
2. T o address a voice message, select one of the following:
■ Enter recipient’s address (that is, the telephon e extension , if
internal; or the telephone number, if external) and press .
■ To send to a mailing list:
a. Press to access a list.
b. Enter list owner’s extension and press . (If you’re the
owner, just pres s .)
c. Enter list ID (name) and p r ess .
3. Press to access delivery options.
4. Press to approve address.
0
#
L
*
#
#
#
5. Record message at the tone.
6.
(Optional):
To edit your message before approving:
■ Press to stop record ing or pause.
■ Press one of the following:
1
1
2 3
Play bac k.
Continue rec ording.
#
18
D
(or ) Delete (and begin again).
*
7. Press to appr ove voice message.
8. Press to send.
#
#
3
*
Page 25

19
Page 26

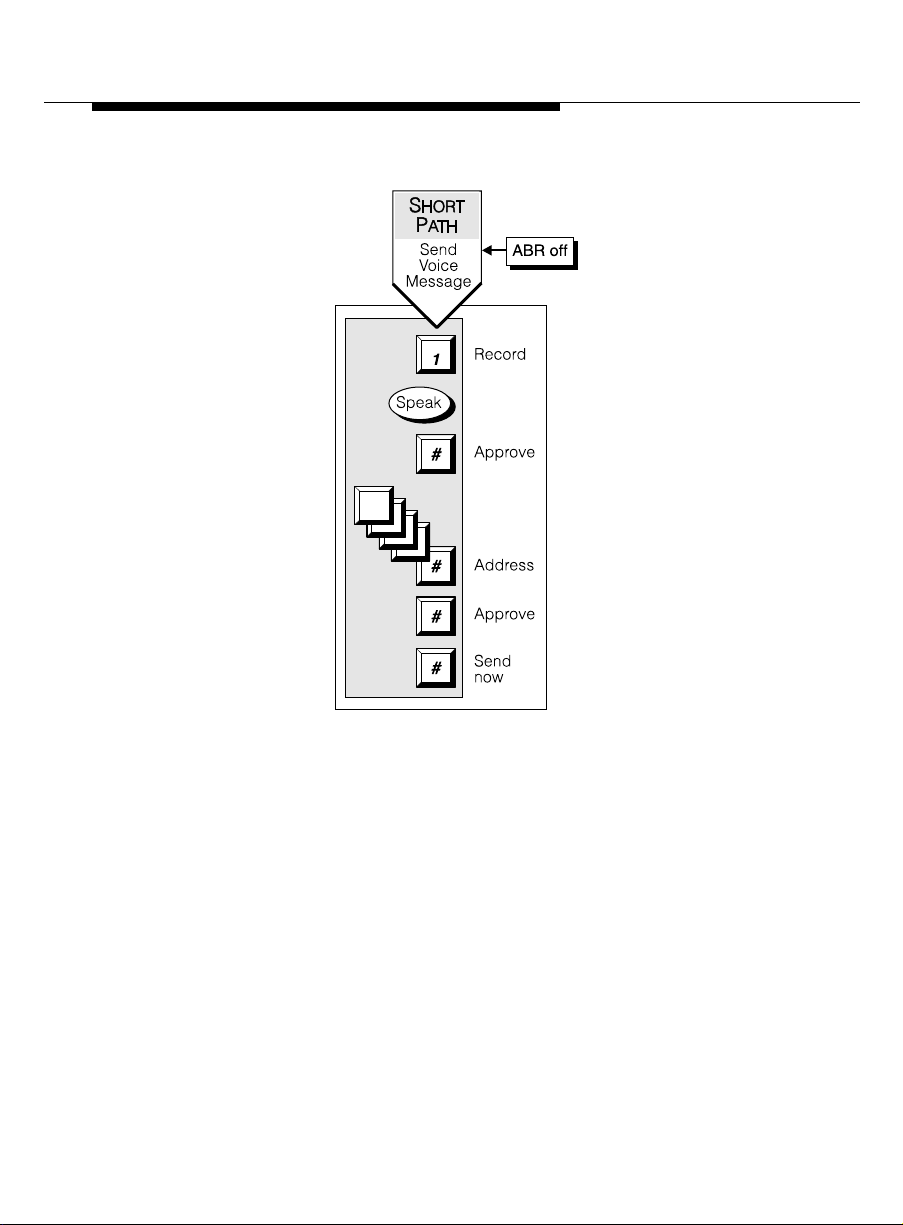
Creating and Sending a Voice Message (ABR off)
Access the Activity Menu b y entering your system extension and password.
1. Press from the Activity Menu.
1
2. Record message at the tone.
3.
(Optional):
To edit your message before approving:
■ Press to stop record ing or pause.
■ Press one of the following:
4. Press to appr ove voice message.
1
1
2 3
Play back.
D
(or ) Delete (and begin again).
*
#
3
*
Continue recording.
5. Address voice message (ABR off).
6. Press to access delivery options.
7. Press to approve address.
8. Press to send.
0
#
#
20
Page 27
21
Page 28

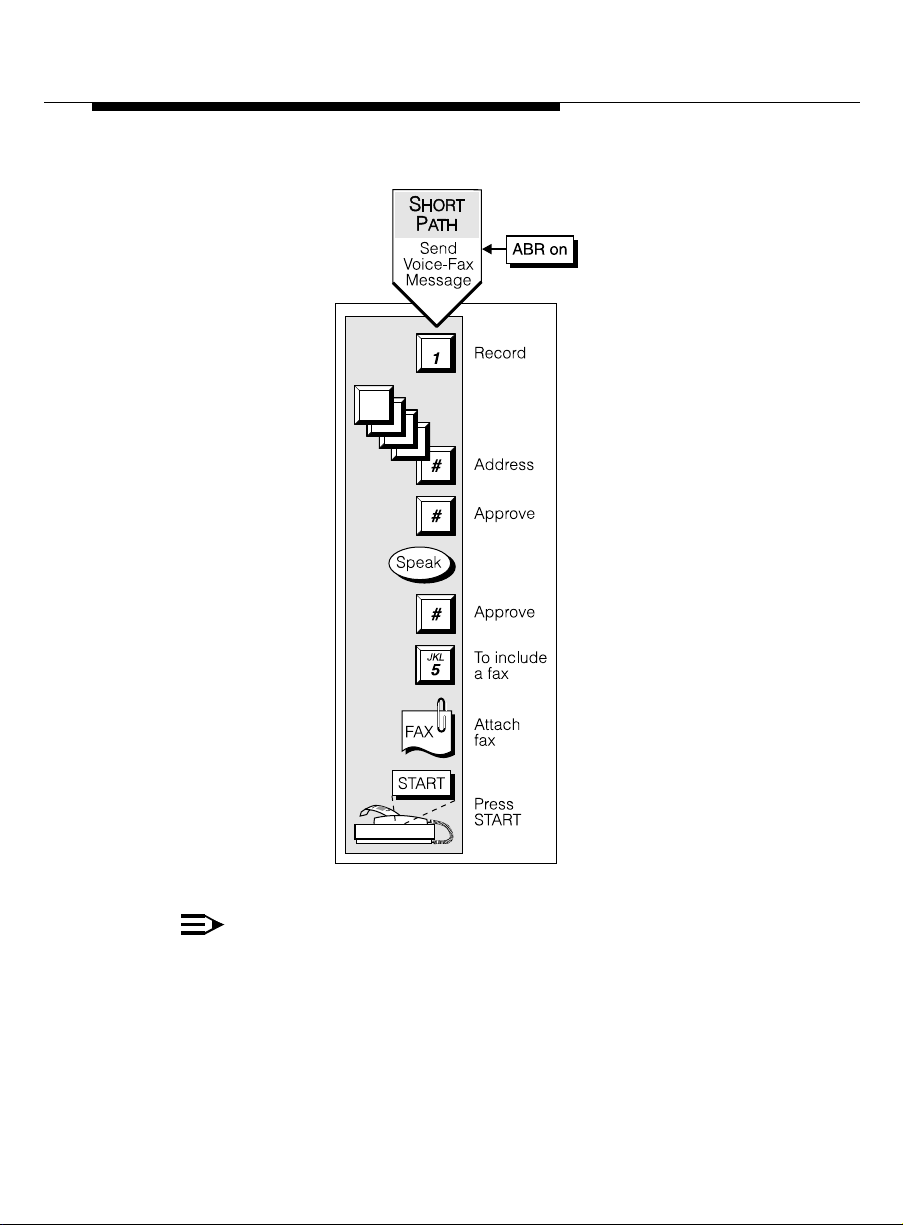
Creating and Sending a Voice-fax Message (A BR on )
Access the Activity Menu b y entering your system extension and password.
1. Press from the Activity Menu.
1
2. To address a voice-fax messag e, select one of the following:
■ Enter recipient’s address (that is, the telephon e extension , if
internal; or the telephone number, if external) and press .
■ To send to a mailing list:
a. Press to access a list.
b. Enter list owner’s extension and press . (If you’re the
owner, just pres s .)
c. Enter list ID (name) and p r ess .
3. Press to approve address.
#
L
*
#
#
#
4. Record message at the tone.
5.
(Optional):
To edit your message before approving:
■ Press to stop record ing or pause.
■ Press one of the following:
6. Press to appr ove voice message.
7. Press to access delivery options.
a. Press to attach a fax
1
1
2 3
Play back.
D
(or ) Delete (and begin again)
*
#
0
5
3
*
Continue recording.
#
22
b. Press to input fax and send.
8. Insert fax and press
#
START on the fax machine.
Page 29
NOTE:
The button label on your fax machine may be different from START .
Common alternate keys for this function are
CONNECT. At the promp t, press the key that begins the
SEND, TRANSMIT, and
transmission process.
23
Page 30

Sharing Fax Machines
If you use a shared or public fax machi ne (such as a departmental fax), you
may wish to avoid t ying it up while you transmit to multiple ad dresses.
You may want to store a fax for later use, or it may simply be m ore efficient to
send a fax from your own desk, particularly if you want to attach a private voice
message to your fax.
In any case, you can send a fax and/or fax message to your own mailbox (or a
fax-only message to your personal fax extension) b y keying your extension as
the del ivery addr ess . Later, you can access the fax and change the delivery
options and/or voice-fax message from the Activity Menu.
How to Get an d R e s p ond to Messages
Listening to a Message Header
24
1. Press from the Activity Menu.
2
2. Press any of the following:
0
2
3
Listen
Rewind (or return to previous)
Play back the header
Page 31

Responding to a Message (Optional)
You can respond to a message during or after listening to the header or
message.
1. Press to c all sender or pres s one of the following:
2. With ABR on, address your message, then
0
1
Reply to sender by voice mail.
1 2
Forward with comment at beginning.
1 3
Forward with comme nt at end.
record new message.
3. With ABR off, record your messa ge, then ad dress.
4. Press to approve.
5. Schedule delivery or p res s to send now.
#
#
Printing a Fax
You access and print faxes from the Activity Menu. If the autoprint option is
active, your fax prints automatically to a designated printer. The message and
head er stay in your mailbox until you delete them. You can reprint if you wish.
To select a default printer or specify a printer destination:
1. After listening to the header or message, press , then do one of the
following:.
1
Direct fax to a d ef ault print numb er.
5 3
Y N
Turn autoprint on/off
9
Turn autodelete on/off. If autodelete is active, faxes are
de leted after they are printed.
2. If autoprint is n ot active, access your mailbox to retrieve the fax, and
listen to the messag e header.
25
Page 32
3. Press to print the fax, and choose one of these print options:
1
*
#
<printer ext>
Print to <
#
Specif y a destination. This number becomes the
d ef ault fax machine extension or name
default for the remainder of the call.
6
Print at this fax mach ine (if you have fax capa bility
*
at your desk or are at the default fax machine or any
other fax machine, including off-site).
Wait for the
START prompt.
NOTE:
The button label on your fax machine may be different from START .
Common alternate keys for this function are
REC/PORT. At the prompt, press whatever key begins the printing
PRINT, RECEIVE, and
process.
Acting on a Header or Message
After you have listened to a header or message, you can choo se from several
op tions.
1. Press any of the following:
D
( ) Delete message
*
( ) Restore the last message you deleted
* *
#
3
*
U
* *
8
Save and skip to next message
>.
26
H
( ) Hold message in current category and skip to
* *
#
Skip to next message category
*
* *
4
next messag e
Page 33

NOTE:
If you have a personal fax extension, you receive only voic e me ssages
and fax message head e rs through your telephone se t. Faxes go directly
into your personal fax extension without ringing your telephone.
Fax headers do trigger your message light. The header may give you a
length of time in seconds. This is the length of the messag e. The header
also gives you the fax page count.
Scanning Messages Quickly
Onc e you are familiar with how to get messages, try the easier autoscan
method . Autoscan is most useful for mob ile telephone users, b ecause it
req uires touching onl y two buttons.
1. Press from the Activity Menu.
7
2. Press one of the following:
1
Scan headers and messages.
2
Scan headers only.
3
Scan messages only.
4
Print all new faxes.
3. Use the Respond and Act On options as necessary. T he system pauses
three sec onds between messages.
How to Create and Use Multiple Personal Greetings
After you have recorded several personal greetings, you may want to assign
those greetings to specific types of incoming calls. Besides the basic mode of
using one greeting for all calls, you can set up specific greetings for:
■ 1) internal and 2) external calls
■ 1) b usy and 2) no answer ca lls
27
Page 34

■ 1) prime-time internal, 2) prime-time external, and 3) out-of-hours calls
■ 1) p rime-t ime busy, 2) prime-time no answer, and 3) out-of-hours calls
The first step is to define the types of calls you want to differentiate; then move
on to changing call typ e definitions and as signing greetings to call types.
Call Types
Internal Those from callers at your business locat ion.
External Those from outside your business location.
Busy Those that come in when you are using y our telephone line(s).
No answer Those that come in when you do not answer.
Out-of-hours Those that come in after standard business hours—defined by
your system administrator.
(Weekend greetings must be activated manually—basic mode
only.)
Defining Call Types (the first time)
28
1. Press from the Activity Menu.
3 4
2. Press one of the following :
1
Differentiate internal/external calls.
2
Differentiate busy/no answer calls.
3. Press one of the following :
3
Differentiate out-of-hours calls.
4
Make no d istinction b e twee n prime time and out -of-ho urs calls.
Page 35

☞ Tips
When you select the out-of-hours c al l type, the other call types automatic al ly
ap ply only to prime -time calls.
You must make a choice between internal/external and busy/no answer call
types. T he system is not set up to handle both sets of situations simultaneously.
Changing Call Type Definition
1. Press from the Activity Menu.
3 4
2. Press any of the following:
1
Differentiate internal/external calls.
2
Differentiate busy/no answer calls.
3
Differentiate out-of-hours calls.
4
Turn off out-of-hours differentiation.
5
Use a singl e greeting for all calls (negate call type
d efinition).
3. Press to appr ove, then proc eed to “Ass igning Greetings to Call
#
Types.”
After you have recorded multiple personal greetings and defined the call types
to which you want to assign those greetings, use the following procedures to
assign greetings to call types.
29
Page 36

Assigning Greetings to Call Types
7
1. Press from the Activity Menu.
3
2. Listen to the summary of active greetings.
3. Press to activate a greeting.
3
4. Ent er a number (0 to 9) to indicate which greeting you want to assign to
a cal l type.
5. Press any of the following:
1
Use the greeting for each call type.
2
Use the greeting for internal (or busy) calls.
3
Use the greet ing for external (or no answer) calls.
4
Use the greeting for out-of-hours calls.
5
Use a singl e greeting for all calls (negate call type definition).
6. Press to appr ove.
7. Press ( ) to return to the Activity Menu.
#
R
*
*
NOTE:
To set up different greetings strictly for prime-time and out-of hours calls,
you must assign the same greeting to the two prime-time calls types
(internal and external or busy and no answer). Listen to the voice
prompts for guidance.
Activating Previously Recorded Greetings
1. Press from the Activity Menu.
2. Enter the greeting number.
3. Follow the p rompts to activate for all c al ls or for individual call types.
3 3
30
Page 37

Scanning All Greetings
1. Press from the Activity Menu.
3 2
2. Listen to first greeting status statement.
3. Press any comb ina tion of the following:
0
1
D
( ) Delete and skip to the next greeting .
*
2
#
4. Press to qui t scanning.
*
#
*
Listen to a greeting.
Re-record a greeting.
3
Return to the pr eviou s greeting .
Save and skip to the next greeting.
31
Page 38

32
Page 39

How to Access Outgoing or File d Me ssag e s
To check the status of outgoing messages, access them by following the steps
listed below, then move on to selecting, modifying, and re-sending them .
Accessin g O utgo in g M e ssa g es
1. Press from the Activity Menu.
2. Listen to the first category and message header. Categories:
Undeliverable Can’t be delivered, usually because the recipient’s
Filed Cop ies of outgoing m essages you’ve saved to re-send
Und elivered Not yet sent b e cause they’re sc heduled for future
Delivered Delivered but not yet listened to.
Accessed Delivered and listened to.
4
mailb ox is full. You can listen to, re-add ress, and rerecord these messages.
and/or modify.
delivery. Y ou can listen to, re-address, and re-record
these messages prior to delivery.
Selecting a Message
When you have acc es sed your filed m es sages, selec t individual messages to
modi fy by following the selection proced ure.
1. Press any or none of the following:
0
2 3
Pl ay back the message header.
Listen to the message.
D
( ) Delete and skip to the next message.
*
3
*
33
Page 40

2 2
#
R eturn to previous messages.
Save and skip to the next message.
#
Skip to the next message c ategory
NOTE:
For delivered or accessed messages, you can listen to the headers only.
You can’t change or re-send these messages. After you review an
accessed message header, the system d e letes the header
automatically.
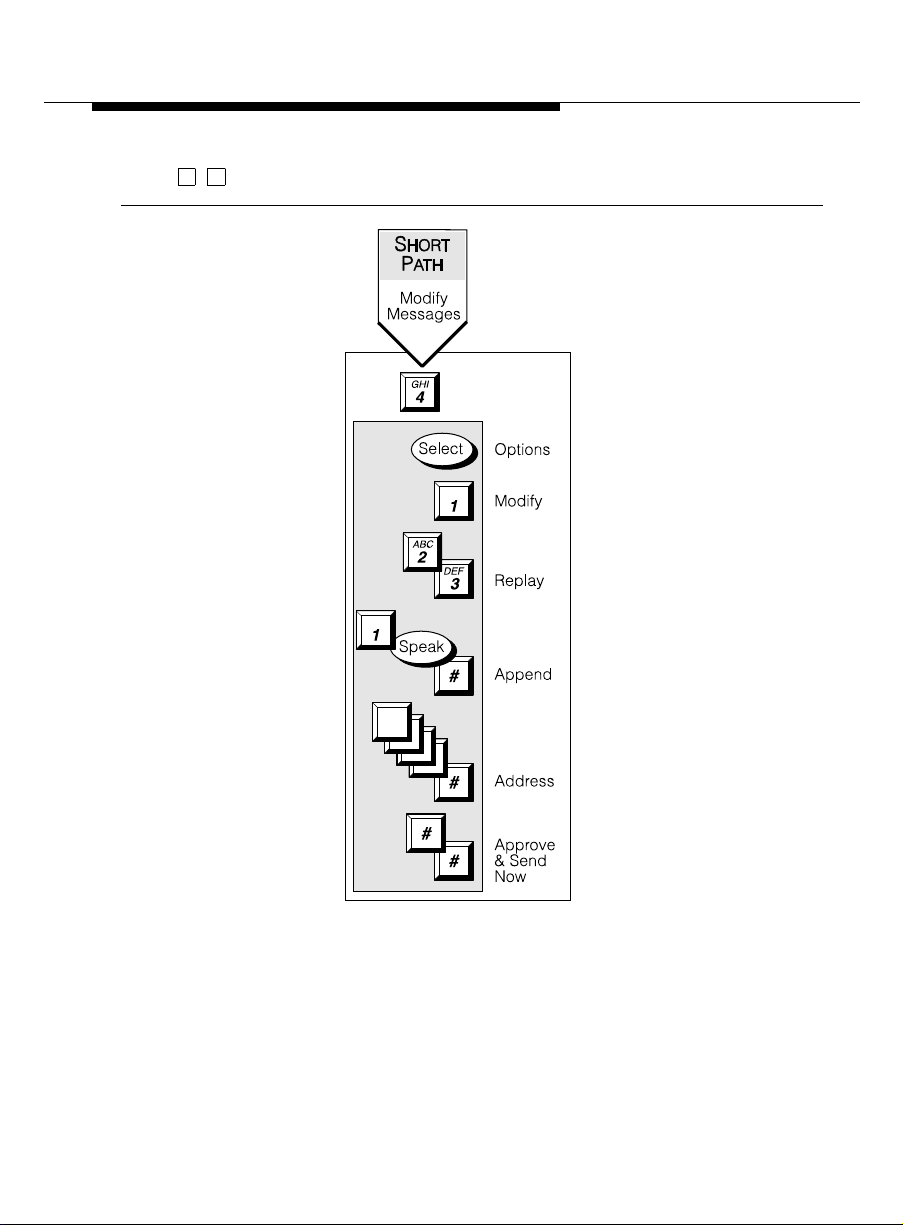
Modifyi ng a M e ssage
When you have selected a message to modify or re-send , choose one of the
following options.
1. Press to modify and/or re-send the selected me ssage.
1
■ Press to re-send the message as is.
■ To re-record the message:
#
a. Press .
1
b . Speak m es sage at the tone.
c. Edit normally .
d . Press to approv e.
#
☞ Tips
You can modify/re-send three types of outgoing messages:
■ Undelivered (schedul ed for future delivery)
■ Undeliverable (incorrec t addres s or recipient’s mailbox is full)
■ Filed
34
Page 41
Press to re-send an undelivered message to the original recipient only.
# #
35
Page 42

Re-sending a Message
When you have selected a message to modify/re-send, choose one of the
following options to re-direct your message.
1. For filed and und el iverable messages:
L
a. Enter ad dress(es) or list via ( ).
b . Press to approv e and send im me diately.
# #
*
or
5
*
c. Enter delivery options an d press .
#
2. F or undelivered messages:
a. Enter additiona l address es and pres s .
b . Press to review and edit orig inal addres ses.
1
*
#
c. Change delivery times or options.
☞ Tips
If you re-send a filed message, it leaves the file cabinet portion of your mailbox.
You must file a cop y again to retain it .
The Out going Message file consumes much of your system’s resources. Be
sure to delete messages and headers regularly.
Press to re-send an undelivered mes sage to the original recipient only.
# #
How to Create Mailing Lists
Creating a List
1. Press from the Activity Menu.
2. Enter list ID (up to 6 letters or digits) and press .
5 1 1
#
36
Page 43

3. Press one of the following:
1
Make the list private.
2
Make the lis t public
4. Enter an address and press .
#
5. Repeat step 4 until list is comp lete.
6. Press to approve.
#
NOTE:
After you address a message using a list, the system asks for more
extensions. Do not add extensions that are already used in addressing of
the list just appended.
Specify an addr ess as a number or name—pres s ( ) to switch
modes.
A
*
*
☞ Tip
2
When creating a list, you can also include an existing list by entering
5
( ) at step 4.
*
Deleting Addresses from a List
Delete ad dresses from a mailing list in two ways:
■ Review the list until you find eac h add r ess, then press
3
( ); or
*
■ At step 4 (when creating a list), press immediately, enter the address
to be deleted, and press ( ).
D
*
1
3
*
Repeat for other addresses.
D
*
L
*
37
Page 44

Scanning List Summaries
1. Press from the Activity Menu.
5 1 2
2. Listen to the list summary.
3. Press any of the following:
#
D
( ) Delete the entire list.
*
*
0
Skip to next lis t .
3
Review/modify list memb ers. (Return to “Reviewing
and Modifying a List.”)
38
Page 45

Reviewing and Modifying a List
1. Press from the Activity Menu.
2. Enter list owner’s extension and press . (If you own the list, simply
press .)
3. Enter list ID and p ress .
5 1 3
#
#
#
4. Listen to the first name, then pr ess any of the following:
#
D
( ) Delete name.
*
*
2
2 2
Return to p revious name.
1
Review from beginning.
*
1
Skip to the next name.
3
Repeat name.
Add/delete specified entries or change public/private
status, then do the following:
3
9 6
#
D
*
a. Press Y ( ) or N ( ) to c ha nge status.
b. Enter address and press .
c. Li sten to name, and if deleting, pr ess
( ).
d. Repeat b and c for each addition/deletion.
5. Press to stop adding/d el eting specified entries.
6. Press when finished reviewin g.
#
*
#
39
Page 46

How to Create a Personal Directory
The system allows you to create a personal directory of abb reviated names
(aliases) for frequently used addresses. It’s essentially a sophist icated speedd ialing feature.
Creating and Appending a Directory
You must be addressing by nam e ( / ) to
creat e
You can
1. Press from the Activity Menu.
2. Enter an addres s and press .
3. Listen to your entry’s address.
If the name is incorrect, press ( ) to delete and repeat steps 2
and 3.
4. Ent er your abbreviated version of the address (up to 10 characters) and
press .
5. Repeat steps 2, 3, and 4 to add more names to your person al directory.
6. Press to appr ove.
your personal directory in name or number addressing mo de.
5 2 1
#
#
*A*
#
*
2
use
your personal directory.
D
3
*
40
Page 47

Reviewing and Deleting Entries from a Directory
1. Press .
5 2
2. Do one of the following:
41
Page 48

■ Press to review all aliases. Whi le listening to each entry, p res s
7
2
#
D
( ) Delete.
*
2 2
Return to the previous alias.
#
■ Press to review specific aliases:
3
a. Enter alias to review and press .
Skip to next alias.
3
Stop reviewing.
#
b . Listen to corresp onding address.
c. Repeat for more aliases.
d. Press to s top review i n g.
3. Press ( ) to return to the Ac t ivity Menu.
R
*
*
#
*
☞ Tips
Your personal directory activates automatically; the system refers to your
p ersonal direc tory anytime you enter a name addr ess.
The syst e m doesn’t care what numbers or letters you use for each alias.
You should try to use 2- or 3-letter abbreviations that use people’s initials. F or
examp l e, for Mel F. Lewis, you might enter M F L instead of the longer name.
You can also use an alias when transferring out of the system with T ( ).
* *
8
How to Use Directory Assistance
If you know the name of a person, you can use the names directory to find that
person’s extension. If you know the extension, you can use the names directory
to find the name of the person with that extension.
42
Page 49

1. Press ( ) from anywhere in the system.
* *
N
6
*
2. Do one of the following:
■ To hear the extension number associated with a name, enter
the name (last name first, with no spac es between the first and
last name), then press .
#
■ To hear the name associated with an address, press (
2 #
), enter the address, then press .
*
☞ Tips
The extension you hear associated with a name is not always the entire
ad dress.
You must add t he appropriate p refix numbers for users on remote systems.
How to Leave a Call Answer Message
When leaving a call answer message, you have several options for mak ing full
and efficient use of the system. When it answers the telep hone, you can:
■ Press to dial through the greeting (if you won’t be missing information
in the greeting).
■ Leave a d e tailed messag e (it’s generally more efficien t to c onvey
information than just requesting a return call).
■ Press ( ) to d elete and start over.
■ Press to stop recording and review your message.
1
D
*
1 2 3
3
*
A
*
Before or after leaving a message, you can:
■ Transfer to another extension:
a. Press T ( ).
* *
8
43
Page 50

b . Enter the extension.
c. Press .
NOTE:
If you record a message and either hang up or go to another option, the
system automatically delivers your message to the person you are
calling. To p rev ent delivery of your message , you must delete it with
D
3
( ) Command Summary
*
#
*
44
Page 51

45
Page 52

Tips and Highlights
General Message Handling
Log ging in
quickly
Logging in from a
system telephone
Logging in from a
remote telephone
Dialing through If you know which buttons to push, push them
NOTE:
You can’t bypass error beeps and important system messag e s.
Fo r Help, press ( ). The system states your current options or
the next step.
From your telephone, d ia l the system extension ,
press (you don’t need to enter your extension),
and enter your password.
From any telephone connected to your
co mpany’s system, dial the system extension,
then enter your extension and password.
From any telephone not connected to your
co mpany’s system, dial the complete system
number, including local prefix and the area code if
long distance, then enter your extension and
password.
without waiting for the system to respond.
H
*
#
4
*
46
Page 53

Getting Messages
Scan messages
quickly
Use playback
controls
Record a personal
greeting
Delete old
messages
Answer messages
from your mailbo x
You can automatically play all your messages by
pressing just two buttons, plus either to
scan messages and headers, to scan
headers only, or to scan messages only.
3
7 1
2
Scanning is espec i ally useful with a car
telephon e.
When listening to messages, you have controls
for loud ness , speed, steppi ng back and forth,
pausing, and repeating messages.
Replac e the auto matic system g reeting with
your personal hello. Tell callers they can pres s
1
to skip your greeting and press ( )
for Help. Change your greeting everyday to
H
*
*
matc h y our daily schedule.
Your mailbox has limited s pace. When it’s
getting full, the system te lls you. Delete
messag es or greetings you don’t need.
Answer a message sent by another user
immediately after listening to it, either by
pressing to call the person or by sending
1 0
the caller a return voice mail message by
pressing .
1 7
4
Forward messages You can forward a message to another user or a
list of users immediately after listening to it. After
you forward it, you return to the original place in
you r mailbox. To fo rw ard to a m a iling list, press
L
( ) to sp ecify the list’s address.
*
5
*
47
Page 54

Leaving Messages When No One Answers
Use play back
and record
controls
Bypass greetings
and record
immediately
Use directory
assistance
Sending Voice Mail
Make messages
priority
Make messages
private
Save messages
you send
To listen to and edit the messages you leave
when there’s no answer, you have many controls.
You don’t have to listen to another user’s call
answer greeting. You can, instead, press to
bypass the greeting and begin recording
immediately.
If you do n’t know the extension of another user,
find it with your voice messagi ng system. Log in,
press ( ) and enter the person’s
name, last name first. The system tells you the
extension.
When you want someone to listen to your
message right away, send it as a priority
message.
When you want to prevent another user from
forward ing a messag e yo u send, make it private.
Before sending a message, you can save it in the
Outgoing Message file. Retrieve the message
later to use again.
* *
N
* *
6
1
48
Chec k on receipt
of messages you
send
Delete outgoin g/
fil ed messages
After you send a message, c heck your Outgoing
Message file to see if the message was delivered
and if the person listened to it.
Delete messages filed in the Outgoing M es sage
file. Saved outgoing messages use system
storage unnecessarily.
Page 55

Schedule delivery Schedule a messag e for delivery to others at a
specified time and date. Use the system as a
calendar/reminder by scheduling messages to
yourself.
Use mailing lists Create a mailing list of extensions . Then send
your message to one destination—the mailing list.
All extensions in the list receive the message. You
can also forward mess a ges to a ma iling list.
Send messages to
a name, not an
extension
To order additional copies of this d ocument, call the AT&T GBCS Pub lications
Fulfillment Center:
(800) 457-1235 (US telephone)
(800)457-1754 (FAX)
1 (317) 361-5353 (telepho ne outside US)
For more information about AT&T documents, see the AT&T G lobal Business
Communications Systems Publications Catalog (555-000-010).
When you send a message and don't know the
extension of the recipient, press (
2
).Then enter the person's name, last name first.
A
( ) switches you back and fo rth
*
b et ween exten sion and name.
2
*
A
*
*
49
Page 56

50
 Loading...