

Page 1

FAX Attendant System
Release 2.1.1
For MERLIN LEGEND Communications System
Release 2.0
System Manager’s Guide
555-601-100
Issue 1
January, 1993
Page 2

©
1993 AT&T
All Rights Reserved
January 1993
Issue 1
Printed in U.S.A.
Notice
While reasonable effort was made to ensure that the information in this document was complete
and accurate at the time of printing, AT&T cannot assume responsibility for any errors. Changes
and/or corrections to the information contained in this document may be incorporated into future
issues.
Federal Communications Commission (FCC) Statement
NOTE: This equipment has been tested and found to comply with the limits for a Class A digital
device, pursuant to Part 15 of the FCC rules. These limits are designed to provide reasonable
protection against such interference when operated in a commercial environment. Operation of
this equipment in a residential area is likely to cause interference, in which case the user at his own
expense will be required to take whatever measures may be required to correct the interference.
Security
As a customer of new telecommunications equipment, you should be aware of the significant and
growing problem of theft of long distance services by third parties, known commonly as "toll
fraud." It is particularly important that you understand and take appropriate steps to deal with this
crime because under applicable tariffs, you will be responsible for payment of associated toll
charges. AT&T can not be responsible for such charges and will not make any allowance or give
any credit resulting from toll fraud.
Toll fraud can occur despite the preventive efforts of network providers and equipment
manufacturers. Toll fraud is a potential risk for every customer with telecommunications
equipment having one or more of the following features: (1) remote access, (2) automated
attendant, (3) voice mail, (4) remote administration and maintenance, and (5) call forwarding
(remote). This is not a product or design defect, but a risk associated with equipment having one
or more of the features described above. If your new telecommunications equipment possesses
any of these features, please consult the relevant portion of your documentation for further details
and specific procedures to reduce the risk of toll fraud or contact your AT&T dealer for further
details.
Trademarks
AUDIX, Voice Power, and AT&T FAX Attendant System are trademarks of AT&T.
HP and LaserJet are registered trademarks of Hewlett-Packard.
UNIX is a registered trademark of UNIX System Laboratories, Inc.
Ordering Information
To order copies of this document, call the AT&T Customer Information Center at 1-800-432-6600
and include the document number 555-601-100 with your order.
Page 3

Contents
About This Guide
Purpose and Scope
■
■
How to Use This Guide
■
Related Documents
Intended Audience
Assistance
Conventions Used in this Guide
i
ii
iii
iii
iii
v
1
2
Introduction
Overview
■
FAX Attendant Services
■
Fax Attendant Features
■
New Features for Release 2.1.1
Telephone System Interface
■
Co-Resident Configuration
Feature and Planning Review
Review of System Planning
■
Planning for FAX Attendant on the MERLIN LEGEND
■
System
Call Coverage Paths
Calling Groups
Planning the FAX Attendant System
■
Assigning Services to Voice Channels
1-1
1-1
1-2
1-3
1-7
1-9
1-10
2-1
2-1
2-2
2-2
2-2
2-3
2-3
Table of Contents
i
Page 4

Contents
3
Assigning Lines/Pools to Voice Channels
Switch Interface Parameters
System Parameters
Fax Account Code Parameter Administration
Fax Account Code List Administration
Subscriber Administration
Types of Fax Subscribers
Service Administrator Registration
Outcalling Administration
Planning Your Fax Response Service
■
■
Customizing Voice Prompts
Implementing FAX Attendant
Entering FAX Attendant Data
■
Information Conventions
Logging In to IS-III
The AUDIX Voice Power/FAX Attendant Menu
General Fax System Parameter Administration
Voice System Parameter Administration
Account Code Parameter Administration
Account Code List Administration
Subscriber Administration
Service Administrator Registration
Outcalling Administration
Fax Group List Administration
■
Custom Voice Prompts
2-5
2-5
2-5
2-6
2-7
2-7
2-9
2-11
2-12
2-12
2-14
3-1
3-1
3-2
3-3
3-6
3-8
3-10
3-12
3-15
3-18
3-41
3-43
3-45
3-52
Table of Contents
ii
Page 5

Contents
4
Logging In to the Voice System
General Fax Mail Greeting Administration
General Fax Call Answer Greeting Administration
Subscriber Recorded Name Administration
General Mailbox Greeting Administration
Fax Response Administration
■
Entering Fax Response Data
■
Accessing Fax Response
Logging In
Implementing a New Fax Response Service
■
Administering the Main Menu
■
Logging In to the Voice System
Main Menu General Administration
Administering Workspace Menus, Announcements,
and Fax Messages
3-53
3-54
3-56
3-58
3-59
4-1
4-1
4-2
4-2
4-7
4-14
4-14
4-16
4-17
Installing the Workspace
■ Administering the Touch-Tone Gate Prompt and Goodbye
Message
Logging In to the Voice System
Touch-Tone Gate Prompt General Administration
Goodbye Message General Administration
■
Fax Response Coversheet Administration
Designing the Fax Response Coversheet
Fax Coversheet Header Information
Loading the Fax Response Coversheet
Table of Contents
4-22
4-24
4-24
4-26
4-28
4-30
4-30
4-30
4-31
iii
Page 6

Contents
5
■
Modifying Your Existing Fax Response Service
Administering Menus
Administering Faxmenus
■
Helpful Hints: Creating and Loading Fax Response
Service
Applications that Require Collecting Voice Telephone
Numbers
Allowing Callers to Return to the Main Menu
How to Best Set Your Fax Machine for Loading Fax
Response Documents
Test Your Fax Response Service
Backing Up Your Fax Response Service
System Operations
Introduction
■
■
System Management Operations
Retrieving Messages from the General Mailbox
Discarding Old Fax Messages
Viewing the Event Log
Using the Explain Command
■
Operating FAX Attendant
Starting the Voice System
Stopping the Voice System
Displaying the System Status
Resetting the Voice System
Shutting Down and Rebooting the UNIX System
4-34
4-38
4-42
4-46
4-46
4-47
4-48
4-48
4-50
5-1
5-1
5-3
5-3
5-3
5-4
5-6
5-8
5-9
5-10
5-11
5-11
5-12
iv
Table of Contents
Page 7

Contents
6
Displaying the System Monitor
Changing the State of Voice Channels
■
Backing Up Files
Restoring Files
■ Fax Equipment Operations
Fax Equipment Administration
Fax Channel Administration
Change State of Fax Equipment
Administering Fax Lines
Fax Transmission Control
Fax Equipment Diagnostics
Fax Equipment Diagnostics Results
Report Generation
■
Generating FAX Attendant Reports
Reaching the Reports Menu
Accessing System Reports
5-13
5-16
5-17
5-17
5-18
5-18
5-21
5-22
5-23
5-24
5-27
5-29
6-1
6-1
6-2
6-10
7
Troubleshooting
Troubleshooting
■
Hardware Verification
Application Operation Problems
7-1
7-1
7-2
7-5
Table of Contents
v
Page 8

Contents
A
B
User Interface
■ User Interface Information
Accessing Windows
Function Keys
Frame Management
Command Menu Procedures
System Messages
Introduction to System Messages
Software Architecture
System Message Format
System Message Listings
A-1
A-1
A-1
A-5
A-8
A-10
B-1
B-1
B-3
B-4
B-6
C
I
vi
FAX Attendant Menu Tree
FAX Attendant Menu Trees
■
Index
Table of Contents
C-1
C-1
I-1
Page 9

Figures
About This Guide
Figure 1.
Typical Function Key Labels v
3 Implementing FAX Attendant
Figure 3-1.
Figure 3-2.
Figure 3-3.
Figure 3-4.
Figure 3-5.
Figure 3-6.
Figure 3-7.
Figure 3-8.
Figure 3-9.
Figure 3-10.
Figure 3-11.
Figure 3-12.
Figure 3-13.
Status Screen
Integrated Solution III Main Menu
AUDIX Voice Power/FAX Attendant Menu
Fax System Parameters Administration Menu
General Fax Parameter Administration Form
Voice System Parameter Administration Form
Fax System Parameters Administration Menu
Account Code Parameter Administration Form
Fax System Parameters Administration Menu
Account Code List Administration Form
Extension Directory Screen
AUDIX Voice Power User Screen
Subscriber Administration Screen, Page 1 of 2
3-4
3-5
3-7
3-8
3-9
3-11
3-13
3-14
3-16
3-17
3-20
3-21
3-22
Figure 3-14.
Figure 3-15.
Figure 3-16.
Figure 3-17.
Figure 3-18.
Figure 3-19.
Figure 3-20.
Figure 3-21.
Figure 3-22.
Subscriber Administration Screen, Page 2 of 2
Extension Directory Screen
Special Purpose Extension Screen
AUDIX Voice Power User Screen
Subscriber Administration Screen, Page 1 of 2
Subscriber Administration Screen, Page 2 of 2
Extension Directory Screen
AUDIX Voice Power User Screen
Subscriber Administration Screen, Page 1 of 2
Table of Contents
3-23
3-25
3-27
3-28
3-29
3-30
3-32
3-33
3-35
vii
Page 10

Figures
4
Figure 3-23.
Figure 3-24.
Figure 3-25.
Figure 3-26.
Figure 3-27.
Figure 3-28.
Figure 3-29.
Subscriber Administration Screen, Page 2 of 2
Service Administrator Registration Form
Outcalling Administration Form
Fax Group List Administration Form
Fax Group List Editing Form
Fax Group List Administration Form
Fax Group List Administration Form
Fax Response Administration
Figure 4-1.
Figure 4-2.
Figure 4-3.
Figure 4-4.
Figure 4-5.
Figure 4-6.
Status Screen
Integrated Solution III Main Menu
AUDIX Voice Power/FAX Attendant Menu
Fax Response Administration Menu.
Fax Response Workspace Administration
Menu
Edit Workspace/Edit Inactive Fax Messages
3-36
3-42
3-44
3-46
3-47
3-49
3-51
4-3
4-4
4-5
4-6
4-8
viii
Form
Figure 4-7.
Figure 4-8.
Figure 4-9.
Figure 4-10.
Figure 4-11.
Figure 4-12.
Figure 4-13.
Figure 4-14.
Table of Contents
Edit FaxMenu Form.
FaxMenu Message Administration Form
Fax Response Coversheet Administration
Screen
Fax Response Workspace Administration
Menu
Copy Service Into Workspace Menu
Edit FaxMenu Form
FaxMenu Message Administration Form
View Service screen
4-9
4-12
4-13
4-32
4-36
4-37
4-43
4-44
4-49
Page 11

Figures
5
6
System Operations
Figure 5-1.
Figure 5-2.
Figure 5-3.
Figure 5-4.
Figure 5-5.
Figure 5-6.
Figure 5-7.
Integrated Solution III Main Menu
Fax Equipment Operations Screen
Fax Channel Administration Screen
Change State of Fax Equipment Form
Administer Fax Line Extension screen
Fax Equipment Diagnostics Screen
Fax Equipment Diagnostics - Results Screen
Report Generation
Figure 6-1.
Figure 6-2.
Figure 6-3.
Reports Menu
AUDIX Voice Power/FAX Attendant Reports
Menu
System Reports Menu
5-19
5-20
5-21
5-22
5-24
5-28
5-30
6-3
6-4
6-11
Table of Contents
ix
Page 12

About This Guide
Contents
Purpose and Scope
■ Intended Audience
Assistance
■
How to Use This Guide
Conventions Used in this Guide
■
Related Documents
i
ii
iii
iii
iii
v
i
Page 13

About This Guide
Purpose and Scope
The information in this guide is organized to help System Managers perform
day-to-day management and operation of the FAX Attendant System. In
addition, basic information is offered about connections to, and administration
of the MERLIN LEGEND Communications System as it is affected by the FAX
Attendant System. The MERLIN LEGEND, however, requires detailed
installation and administration. The System Manager’s Guide is not intended
to replace the documents that accompany your communications system. The
AT&T AUDIX Voice Power™/FAX Attendant System™ Planning and
Implementation document discusses the specific tasks and sequences of
tasks to be followed for initial implementation.
This guide describes each feature of FAX Attendant and provides information
on administration and daily operation.
This guide is divided into the following chapters and appendices:
Chapter 1: Introduction presents an overview of FAX Attendant
■
features and configurations.
About This Guide
i
Page 14

About This Guide
■
Chapter 2: Feature and Planning Review provides a condensed
description of system features, system planning, and system planning
forms. System planning is covered in more detail in the AT&T AUDIX
Voice Power™/FAX Attendant System™ Planning and Implementation
document.
Chapter 3: Implementing FAX Attendant explains how to enter the
■
data from the system planning forms to administer system-wide
features when setting up your FAX Attendant system. It also describes
system-wide tasks, with related menus and windows, required to
administer the system. Additionally, this chapter explains how to enter
the voice phrases for FAX Attendant services.
Chapter 4: Fax Response Administration describes how to plan,
■
implement, and modify a Fax Response service for your company.
■
Chapter 5: System Operations describes operational procedures that
need to be performed on a regular basis. Operational procedures
include backup, system shut-down, system re-boot, system reset,
voice system startup and shutdown.
Chapter 6: Report Generation explains how to generate reports on
■
telephone and message space usage, as well as other system reports.
■
Chapter 7: Troubleshooting explains general problem resolution.
Appendix A: User Interface Information explains how to use menus
■
and windows, describes function keys and their use, and gives general
information that is particularly helpful to the novice system user.
Appendix B: Error Messages gives a full listing of system error
■
messages together with suggested responses.
Appendix C: FAX Attendant Menu Tree provides an overall picture of
■
the menu structure.
Intended Audience
This guide is for System Managers. The information is organized to help
System Managers perform day-to-day the management and operation of the
system. Each feature of FAX Attendant is described along with information on
administration and daily operation.
About This Guide
ii
Page 15

About This Guide
Assistance
If you have questions or problems with FAX Attendant, please try to resolve
them by using this guide and other related documents. If you are still unable
to resolve the problem, contact the National Service Assistance Center
(NSAC) at 1-800-628-2888 for assistance or your AT&T Authorized Dealer.
How to Use This Guide
This guide contains a complete description of the FAX Attendant system.
During initial implementation, the System Manager should become familiar
with the FAX Attendant System by reading all of this guide and the AT&T
AUDIX Voice Power™/FAX Attendant System™ Planning and Implementation
document.
For day-to-day operations, the System Manager and the Service
Administrators should read those portions of this guide and of the AT&T
AUDIX Voice Power™/FAX Attendant System™ Planning and Implementation
document that are related to their job responsibilities.
Conventions Used in this Guide
The following conventions are used in this guide:
■
Commands and text you should type appear in this style of
type.
Values, instructions, and prompts that appear on the screen are in
■
this style of type.
Key names that are always located on the keyboard in the same place
■
appear in smooth-cornered boxes, as in
Touch-tone keys on the telephone set keypad are enclosed in squares,
■
such as [
3 ] and [ # ].
Enter .
About This Guide
iii
Page 16

About This Guide
Functions keys (keys that start with an F, followed by a number),
■
appear in boxes with the current meaning following in parentheses
such as [
The current meanings of the function keys are shown by labels at the
bottom of the screen. On the screen diagrams in this manual, each
label box may contain two labels (top and bottom). On the actual
screen, either the top set of labels or the bottom set of labels will show,
not both.
On the screen diagrams, the top label is the meaning of the function
key when the screen first appears. These meanings have been
selected to be the most useful for that screen. The bottom label is the
meaning of the function key after the [
pressed. (Pressing [
typical set of key labels on a screen diagram might be:
F3 ] (SAVE).
F8 ] (CHG-KEYS) key has been
F8 ] (CHG-KEYS) again restores the top labels.) A
iv
About This Guide
Page 17
About This Guide
Any screen information
Figure 1. Typical Function Key Labels
Related Documents
For FAX Attendant, you need to be familiar with the following documents:
■
AT&T FAX Attendant System™, Release 2.1.1, User’s Guide
Document No. 555-601-101
AT&T AUDIX Voice Power™/FAX Attendant System™ Planning and
■
Implementation
Document No. 555-601-202
About This Guide
v
Page 18

About This Guide
For AUDIX Voice Power, you should be familiar with the following manual:
■
AT&T AUDIX Voice Power™, Release 2.1.1, System Manager's Guide
Document No. 555-601-200
For the Integrated Solution III (IS III) environment, you need to be familiar with
the following document:
■
AT&T Integrated Solution III System Manager’s Guide
Document No. 555-601-010
You also need to be familiar with the appropriate manual for your
communications system:
■
AT&T MERLIN LEGEND™ Communications System, Release 2.0.
System Programming
Document No. 555-620-111
AT&T MERLIN LEGEND™ Communications System, Release 2.0,
■
System Planning
Document No. 555-620-112
AT&T Applications Controller User’s Guide
■
Document No. 585-249-710
AT&T Master Controller III User’s Guide
■
Document No. 560-407-150
AT&T Diagnostic Program User’s Guide
■
Document No. 560-407-151
vi About This Guide
Page 19

Introduction
Contents
1
Overview
FAX Attendant Services
Fax Attendant Features
■
New Features for Release 2.1.1
Telephone System Interface
Switch-Integrated Mode
■
Co-Resident Configuration
1-1
1-2
1-3
1-7
1-9
1-10
1-10
i
Page 20

Introduction
1
Overview
AT&T FAX Attendant System™ is a software application that enhances the
capabilities of all fax machines attached to a company’s telephone network.
FAX Attendant is based on the Integrated Voice Power™ System software and
the FAX Attendant Application software that runs on the Master Controller III
(80486/SX) computer.
FAX Attendant provides the following features:
■
Coverage for busy or out-of-paper fax machines
■
Plain paper printing
Message arrival notification
■
Privacy for incoming fax messages
■
Off-site access to received messages
■
Automatic retry for busy fax machines
■
Introduction
1-1
Page 21

Introduction
Fax delivery reports
■
Faxes sent to multiple destinations at one time (broadcasting)
■
Economy fax transmissions
■
Private fax numbers or personal fax machines for anyone in your
■
company
Fax information database for your customers (Fax Response service)
■
FAX Attendant interfaces with a local telephone system and processes fax
messages and controls announcements that are stored on disk memory. FAX
Attendant prompts internal and external callers to make menu choices by
pressing the appropriate touch-tone button.
FAX Attendant Services
FAX Attendant includes the following services:
Fax Call Answer
■
Fax Call Answer allows FAX Attendant to receive fax messages for
subscribers whose fax machines are busy or out of paper. This feature
also enables subscribers to use personal fax mailboxes for confidential
receipt and remote access to fax messages.
Fax Mail
■
Fax Mail allows subscribers to send fax messages to one or more fax
numbers or use a distribution list, retrieve fax messages from their
mailbox, record personal greetings, change their account passwords,
delivery report setting, and autoprint setting, administer outcalling, and
create fax distribution lists.
Fax Response
■
Fax Response allows you to dedicate a phone number for your
prospective customers to call and retrieve information on your
products or services, news or virtually any other hard copy information.
Fax Response directs callers through a series of prompts to retrieve
information on their fax machines. Callers are greeted with spoken
prompts that guide them in pressing touch-tone buttons to access the
1-2
Introduction
Page 22

Introduction
information. No more requesting information and waiting for it to arrive
in the mail. Fax Response allows interested parties to get their
information immediately by fax.
FAX Attendant Features
FAX Attendant includes the following features:
■
Broadcast feature
FAX Attendant can broadcast a single fax to up to 1,000 locations.
Using the Fax Mail service, a subscriber enters numbers or distribution
list numbers, then presses Start on the fax machine. FAX Attendant
stores the fax message in memory and sends it using the fax ports
administered to distribute fax messages.
■
Intelligent Auto-Retry
If an outbound fax message is not successfully delivered, FAX
Attendant keeps trying to deliver the message until the maximum retry
period (an administrable parameter) is reached. When this time
period expires, FAX Attendant generates a failed delivery report for the
subscriber who initiated the message.
If a fax is interrupted during transmission, FAX Attendant resends the
message, sending only the cover page and any previously
unsuccessfully transmitted pages.
■
Economy Delivery
The Economy Delivery option allows a subscriber to defer delivery of a
fax until the system administered economy time period; generally,
when the telephone rates are lower.
■
Delivery Reports
FAX Attendant can create a delivery report for every fax. One report is
generated regardless of the number of destinations. The report
summarizes the status of each delivery.
Each subscriber can choose his or her own delivery report setting.
The options for this feature are on or off. If it is turned on, the
Introduction
1-3
Page 23

Introduction
subscriber receives a delivery report for every fax transmission. The
report includes the time the fax was submitted, a reduced image of the
cover sheet, and a summary of the delivery status to each destination.
If it is turned off, a report is still generated if the system is unable to
successfully transmit to any destination.
Additionally, if the delivery report option is turned off, an intermediary
delivery report is placed in the subscriber’s mailbox after each pass
through the list of destinations. At the end of the retry period, FAX
Attendant generates a final delivery report.
Distribution Lists
■
Distribution lists provide a convenient way to send the same fax
message to many locations. Each subscriber can have up to 250
distribution lists with up to 250 members in each list. Subscribers can
use their own lists or lists of other subscribers, but cannot change lists
stored by other subscribers. Subscribers can program their own
distribution lists using any touch-tone telephone. Optionally, the
System Manager can enter long lists at the system console.
■
Call Accounting Integration
FAX Attendant can be administered so that information about each call
placed by FAX Attendant is collected by the call accounting system on
the telephone switch. Account codes can be administered for each
subscriber and for the Fax Response service so they can be tracked
separately.
Fax Machine Call Coverage
■
FAX Attendant can act as a coverage point for fax machines that are
either busy, broken, or out of paper. This feature operates only in a
switch-integrated system.
Personal Fax Extensions
■
Provided through Direct-Inward-Dial (DID) or Personal Lines and PBX
integration, FAX Attendant subscribers can have their own fax
extensions, which are routed directly to FAX Attendant. This feature
operates only in a switch-integrated system. If the subscriber does not
have a personal DID extension, FAX Attendant prompts senders to
enter the subscriber’s voice extension to identify the recipient’s
1-4
Introduction
Page 24

Introduction
mailbox. If no extension is entered, FAX Attendant sends the fax
message to the group administrator’s mailbox.
Group Fax Numbers
■
A group fax number is a fax telephone number that is assigned to a
group of FAX Attendant subscribers. The number allows group
members to use inbound fax features, such as receiving fax messages
confidentially or from a remote location. to a group fax number.
■
Receiving Fax Messages Confidentially
This feature refers to the system’s capability of holding fax messages
until the subscriber is ready to print them.
■
Remote Retrieval/Hold Fax Messages
FAX Attendant’s capability of storing all received fax messages allows
subscribers to call in from any location to retrieve their faxes. Fax
messages can be delivered to a remote site either on the same call (if
calling from a fax machine), or to a specified fax number.
Subscribers can administer their own Fax Mail IDs to do one of three
things with incoming fax messages: print on a common laser printer,
print to a fax machine, or save to the subscriber’s FAX Attendant
mailbox. When a subscriber logs in, FAX Attendant announces how
many voice messages are present (if AUDIX Voice Power is coresident) and how many fax messages are being held or have been
autoprinted.
Autoprinting
■
Subscribers have the option to have their messages printed
automatically at the system’s default destination. The default
destination is set by the System Manager and can be either a fax
machine or the system’s laser printer. When autoprinting is on, FAX
Attendant automatically forwards messages to the default destination.
When autoprinting is off, FAX Attendant holds messages in the
subscriber’s mailbox, so they can be printed confidentially or at a
remote location.
■
Message Waiting Lamp (MWL) Notification
Use of this feature depends on whether FAX Attendant is operating in a
standalone or co-resident system, as follows:
Introduction
1-5
Page 25

Introduction
—
MWL with a Co-resident System:
In a co-resident application, where FAX Attendant is operating
with AUDIX Voice Power, the MWL is lit for both voice and fax
messages. When a subscriber notices that the MWL is lit, that
person calls the Voice Mail telephone number to hear how
many and what kind of messages are waiting. For example,
“You have six voice messages and two held fax messages.”
The summary message also notes any autoprinted fax
messages that have been received. If autoprinted fax
messages exist, these faxes only appear in the summary
message one time; so that if the same subscriber were to call
the system back immediately, no auto printed fax messages
would be noted in the summary message.
—
MWL with a Standalone System:
When FAX Attendant serves as an adjunct to AUDIX,
subscribers still get notification of both fax and voice
messages in the same summary message. When a fax
message arrives, FAX Attendant sends a Leave Word Calling
message to the switch. AUDIX intercepts this message, turns
it into a Voice Mail message, and lights the message waiting
lamp. When the subscriber calls AUDIX, the summary
message notes how many voice messages have been
received. Some of these messages may say, "Leave Word
Calling message from FAX Attendant," which indicates a fax
message has been received. After listening to the rest of the
voice messages, the subscriber can log into Fax Mail and pick
up the fax messages.
Outcalling
■
FAX Attendant can provide outcalling notification of received fax
messages to a telephone number on a pager or to a telephone that
has no MWL. Subscribers can administer their own outcalling
numbers, decide when outcalling will be active (24-hours per day, or
during system administered hours, such as 8 a.m. to 6 p.m.), and turn
outcalling on or off.
1-6
Introduction
Page 26

Introduction
Plain Paper Printing
■
FAX Attendant can print fax messages on an optional system laser
printer or plain paper fax machine. The printer can be used to print
system reports and can be used as the default destination for a group
of subscribers. It is not recommended that you use this printer to print
everyone’s fax messages because you can attach only one laser
printer to FAX Attendant, and printing fax messages on the laser printer
takes longer than printing on a fax machine.
New Features for Release 2.1.1
FAX Attendant is a PC-based product that provides an integrated voice/fax
mailbox, fax broadcasting, fax bulletin board, coverage for busy or off-line fax
machines and other touch-tone based fax services. FAX Attendant 2.1.1 runs
under Integrated Solution (IS) III and offers the following enhancements to
Release 1.0:
■
Co-residency with the AUDIX Voice Power System
FAX Attendant 2.1.1 runs under the Integrated Solution (IS) III software
and is co-resident with the AUDIX Voice Power system. It is
compatible with Integrated Solution III (IS-III) and the MERLIN
LEGEND™ Communications System R2.0.
■
Integrated Administration
Certain administrative tasks in FAX Attendant, such as assigning
services to channels and subscriber administration, can be done using
the Integrated Administration feature.
Through a menu-driven interface, this feature allows concurrent
administration of the FAX Attendant and the MERLIN LEGEND switch
parameters necessary to support the FAX Attendant System.
Integrated Administration allows both the telephone switch and the
software application to share common information, such as extensions
and user names, in their databases. This information sharing saves
data entry time during initial FAX Attendant setups, and saves time for
the System Manager during ongoing administration.
The Integrated Administration feature is also used with the AT&T
AUDIX Voice Power™ system which is co-resident with FAX Attendant.
Introduction
1-7
Page 27

Introduction
■
Consolidated Delivery Reports
If a subscriber elects to receive delivery reports for each fax sent, a
single-page fax report will be generated containing all confirmation
information associated with a particular fax transmission. Since this
report contains information for all the intended destinations of a
particular fax message, this feature eliminates separate confirmation
reports for each targeted destination. If the subscriber turns this
feature off, a report is still generated if the system is unable to
successfully transmit to any destination.
■
Outbound Channel Limitations
This feature allows a System Manager to define the maximum number
of channels that will be used for outgoing fax delivery calls. By
predetermining the maximum number of fax channels that can be
simultaneously used for outbound fax delivery calls, the System
Manager can better optimize the performance of the system.
■
Customized System Cover Sheet for Fax Response
This feature allows the System Manager to create and load an optional
system-wide coversheet to be attached to each outgoing Fax
Response fax message. The coversheet design can be a combination
of text and graphics.
■
Improved Component/Port Level Diagnostics
This enhancement allows the System Manager to identify any faulty
ports during a diagnostic test run.
Additional features incorporated into the user interface include:
■
Name Addressing
Name addressing allows FAX Attendant users with the ability to
address fax messages to subscribers by dialing the last name of the
subscriber rather than an extension number. This feature can be used
wherever addressing is done in the Fax Mail, Fax Call Answer, and Fax
Response services.
1-8
■
Fax CNG Tone Recognition
This feature provides detection of the fax calling (CNG) tone of certain
autodialing fax machines. The CNG tone recognition allows Fax Call
Introduction
Page 28

Introduction
Answer to bypass any prompts and deliver the incoming fax message
to the appropriate address.
■
Administrable Fax Mailbox Size
This feature allows the System Manager to define the fax mailbox
capacity in units of pages for each subscriber.
■
Subscriber Name Administration
Subscriber name administration allows the Fax Mail service
administrator to record multiple subscriber names without having to log
on as each subscriber. This feature is especially useful since it is
desirable to have a recorded name for each subscriber to take
advantage of the name addressing feature. Individual subscribers still
have the option of recording their own names in their own voices.
Message Overflow to General Mailbox
■
This feature provides a system-wide option that sends new Fax Call
Answer messages to a general mailbox if a subscriber’s mailbox
becomes full. The System Manager can define the profile parameters
of the general mailbox so that overflow messages will or will not
autoprint.
Telephone System Interface
There are several telephone systems that can support FAX Attendant. Each
system has its own particular features and requirements. This switch-specific
information for the MERLIN LEGEND™ Communications System is discussed
in the AT&T AUDIX Voice Power™/FAX Attendant System™ Planning and
Implementation document.
Signaling information from FAX Attendant to the telephone switch is provided
over analog voice channels. This includes switch-hook flashing to transfer
calls and in-band tone signaling to control message waiting lights.
FAX Attendant can operate in either switch integrated or non-switch
integrated mode. In both modes, information is transmitted over voice
channels. The MERLIN LEGEND™ Communications System operates with
FAX Attendant in the integrated mode.
Introduction
1-9
Page 29

Introduction
Switch-Integrated Mode
In the switch-integrated mode, caller and called party identification
information is transferred from the switch. As a result, callers generally do not
have to enter extension numbers upon reaching the Fax Call Answer service.
However, FAX Attendant can be programmed to prompt callers to enter this
information for Group Fax numbers.
In the switch-integrated mode, subscribers are not required to enter extension
numbers when logging into FAX Attendant from their own extensions.
Co-Resident Configuration
In the co-resident configuration, FAX Attendant is run with AUDIX Voice
Power, allowing you to administer both AUDIX Voice Power and FAX
Attendant features at any time using the same software.
This guide explains in detail only those features that apply specifically to FAX
Attendant. For information on features that are specific to AUDIX Voice Power
consult the AUDIX Voice Power™, Release 2.1.1, System Manager's Guide.
1-10 Introduction
Page 30

Feature and Planning Review
Contents
2
Review of System Planning
Planning for FAX Attendant on the MERLIN
LEGEND System
■
Call Coverage Paths
■
Calling Groups
Planning the FAX Attendant System
Assigning Services to Voice Channels
■
Assigning Lines/Pools to Voice Channels
■
Switch Interface Parameters
■
System Parameters
■
Fax Account Code Parameter Administration
■
Fax Account Code List Administration
■
Subscriber Administration
■
Extension Directory
Subscriber Administration Planning
■
Types of Fax Subscribers
2-1
2-2
2-2
2-2
2-3
2-3
2-5
2-5
2-5
2-6
2-7
2-7
2-7
2-8
2-9
Personal Fax Number Subscribers without Fax Machines
(Class 1)
Subscribers with Fax Mailboxes but without Personal Fax
Numbers (Class 2)
Fax Machine Call Coverage Subscribers (Class 3)
■
Service Administrator Registration
2-9
2-10
2-11
2-11
i
Page 31

Table of Contents
■
Outcalling Administration
Planning Your Fax Response Service
Customizing Voice Prompts
2-12
2-12
2-14
ii
Page 32

Feature and Planning Review
2
Review of System Planning
This chapter reviews the features of FAX Attendant and the planning process
you should follow to configure the FAX Attendant system appropriately to
meet your company’s needs.
Use the comprehensive instructions and planning forms found in the AT&T
AUDIX Voice Power™/FAX Attendant System™ Planning and Implementation
document to define your system. When you have completed the planning for
your system, you can begin the implementation of your plan. Gather the
forms that you have filled out and use their content as input in conjunction
with the procedures in Chapters 3 and 4 of this guide to implement your
system. Be sure to deliver copies of all the completed forms to your
implementation team. The completed forms should also be stored safely for
ongoing administration.
Feature and Planning Review
2-1
Page 33

Feature and Planning Review
Planning for FAX Attendant on the MERLIN LEGEND System
The planning needed on the system side is discussed in general terms here.
For more information on planning for the system, please see the AT&T AUDIX
Voice Power™/FAX Attendant System™ Planning and Implementation
document.
Call Coverage Paths
The Fax Call Answer service can be used to provide coverage for calls that
are not answered by the fax machine at the called extension, and for personal
fax numbers that do not have fax machines. In order to provide this
coverage, the switch must direct the call to the Fax Call Answer service when
the switch detects that the telephone is busy or the maximum number of rings
has occurred. The designation of one or more places to direct a call is known
as the call coverage path.
The Fax Call Answer service of FAX Attendant acts as a call coverage point.
■
If the fax machine’s extension is busy or does not answer, the call will
be sent to the Fax Call Answer service.
■
In other cases, particularly when there is a personal fax extension but
no actual fax machine, calls are sent to the Fax Call Answer service.
It is necessary to plan the call coverage path for each subscriber. The FAX
Attendant System Manager must work closely with the Switch Administrator to
coordinate this effort.
Calling Groups
A single calling group assigns a single number that rings at any available
extension within the group.
The 12 voice channels that are available for AUDIX Voice Power and FAX
Attendant services must be arranged into groups for each service that will be
used. Fortunately, several of the most used services can share the same
group. The MERLIN LEGEND Communications System supplies information
about the call that allows AUDIX Voice Power/FAX Attendant to determine
2-2
Feature and Planning Review
Page 34

Feature and Planning Review
which service to provide for the call. Separate calling groups and channels
must be assigned for the following services:
Message Drop Service (usually only one channel).
■
Information Service (usually only one channel or replaced by
■
Automated Attendant).
■
Fax Response Service.
A single calling group (the Automated Attendant group) should be used for
Voice Call Answer, Fax Call Answer, Voice Mail, Fax Mail, and Automated
Attendant. The service provided is based on whether the call is internal,
external, or coverage, and whether the called extension is a voice or fax
extension. If you do not want to use the Automated Attendant Service, use
the single calling group for for Voice Mail Service to receive Voice Call
Answer, Fax Call Answer, Voice Mail, and Fax Mail.
Planning the FAX Attendant System
Assigning Services to Voice Channels
Each AUDIX Voice Power/FAX Attendant system has from four to twelve
analog voice channels to which specific services must be assigned. When a
call is received from the switch, the channel that carries the call and the
called party information determine what service AUDIX Voice Power or FAX
Attendant provides for the call. The number of channels with the same
service assignment determines how many simultaneous calls can be
processed by that service.
Before assigning channels, take the following factors into account:
Voice Call Answer Service, Fax Call Answer Service, Voice Mail
■
Service, Fax Mail Service, and Automated Attendant can all share a
group of voice channels. We recommend you use the Automated
Attendant Service for the shared channels. The information passed
from the MERLIN LEGEND Communications System to AUDIX Voice
Power/FAX Attendant can be used to determine which service is
provided. The actual service provided is based on the type of call
Feature and Planning Review
2-3
Page 35

Feature and Planning Review
(internal, external, or coverage) and the extension called (voice or fax).
The service provided is selected as shown:
External Call: Automated Attendant
—
—
Voice Extension Coverage (CA Assigned for subscriber):
Call Answer
Voice Extension Coverage (AA Assigned for subscriber):
—
Automated Attendant
Fax Extension Coverage:
—
—
Internal Calls: Voice Mail (switchable to Fax Mail)
Fax Call Answer
NOTE:
In systems that do not use Automated Attendant Service, specify
Voice Mail Service for the shared channels.
The Fax Response Service requires dedicated voice channels. There
■
is no point in having more voice channels dedicated to Fax Response
than you have fax channels. The system may have from 4 to 12 voice
channels, and from 2 to 12 fax channels. Internal and external callers
always get Fax Response Service.
When a dedicated group of channels is not provided for Voice Mail Service
and Fax Mail Service, subscribers can reach these services as follows:
■
Internal callers receive Voice Mail Service rather than Automated
Attendant. Internal callers can switch from Voice Mail Service to Fax
Mail Service by pressing the [
8 ] button at the Voice Mail Menu.
2-4
■
External callers receive Automated Attendant service. External callers
can switch from Automated Attendant to Voice Mail Service by
pressing the [
They can switch to the Fax Mail Service by pressing the [
* ] and [ R ] buttons at the Automated Attendant Menu.
8 ] button at
the Voice Mail Menu.
■
Callers to the Fax Response Service can switch from FAX Response to
the FAX Mail Service by pressing the [ * ] and [ R ] buttons at the Fax
Response menu. They can switch to the Voice Mail Service by
pressing the [
8 ] button at the Fax Mail Activity menu.
Feature and Planning Review
Page 36

Feature and Planning Review
In addition to the type of service assigned to each channel, it is necessary to
know the extension number assigned to each voice and fax channel at the
switch.
Assigning Lines/Pools to Voice Channels
After assigning services to channels, the integrated administration requests
additional information. For all services, it is necessary to specify the outside
lines and line pools that will be routed directly to this service by way of the
default calling group. Do this planning with your Switch Administrator. These
assignments are necessary for operation of AUDIX Voice Power/FAX
Attendant, and will be updated in the switch exactly as though they had been
entered through the switch programming interface. It is not necessary to enter
the information separately a second time for the switch.
Switch Interface Parameters
The switch interface parameters are specific for each switch with which FAX
Attendant can work. The specific values necessary to tell FAX Attendant how
to communicate with the MERLIN LEGEND Communications System are
automatically set by the switch interface software. The default settings should
not be changed.
System Parameters
Certain parameters control overall system performance. These parameters
must be initially set for each system and are rarely changed. The values for
voice system parameters are collected on FORM EA in the AT&T AUDIX Voice
Power™/FAX Attendant System™ Planning and Implementation document.
The values for fax system parameters are collected on FORM EF in the AT&T
AUDIX Voice Power™/FAX Attendant System™ Planning and Implementation
document.
The parameters groups are:
Voice System Parameters
■
— Voice Mail Parameters. Voice Mail parameters are specific to
AUDIX Voice Power. In the co-resident configuration you do
not have to fill in these fields since they have already been
Feature and Planning Review
2-5
Page 37

Feature and Planning Review
populated by the system. Consult the AUDIX Voice Power™
System Manager’s Guide for further information.
—
Automated Attendant Parameters. Automated Attendant
parameters are specific to AUDIX Voice Power. In the coresident configuration you do not have to fill in these fields
since they have already been populated by the system.
Consult the AUDIX Voice Power™ System Manager’s Guide for
further information.
—
Message Waiting Lamp Parameters. Message Waiting Lamp
parameters affect only the operation of message waiting
lamps. The Code to Light and Code to Extinguish
parameters are set automatically to the values preprinted on
Form EA and must not be changed. The default value for
Refresh?
Refresh?
Power™/FAX Attendant System™ Planning and Implementation
document for further information.
is
yes.
It is recommended that the value for
be changed to
no.
Consult the AT&T AUDIX Voice
■
Fax System Parameters
General Fax Parameters. General Fax parameters affect all fax
—
services. You determine the correct values to use according to
the requirements for your business.
Fax Response Parameters. Fax Response parameters affect
—
the Fax Response Service. You determine the correct values to
use according to the requirements for your business.
Fax Account Code Parameter Administration
The Account Code feature of FAX Attendant allows you to use the MERLIN
LEGEND Communications System Station Message Detail Recording (SMDR)
feature to prepare reports on outbound fax usage by account number. With
these reports, you can determine how much fax transmission time each
subscriber used and then bill the respective departments. Account codes are
optional and can be left blank. If you plan to use the account code feature,
you will need to obtain the necessary parameter values from your Switch
Administrator. Enter the account code parameters on FORM FF1 in the AT&T
2-6
Feature and Planning Review
Page 38

Feature and Planning Review
AUDIX Voice Power™/FAX Attendant System™ Planning and Implementation
document. Use FORM FF2 (on the back of FORM FF1 ) to enter account
codes. These codes can be stored in the system and retrieved during
subscriber administration for easier data entry.
Fax Account Code List Administration
Account code list administration is an optional convenience feature that
allows you to define a list of up to 30 account codes and assign it to the F2
(CHOICES) key to simplify data entry for subscribers. This feature is only of
value if you have account codes that are used by more than one subscriber.
Pressing the F2 (CHOICES) key when entering the Account Code field for
subscribers will display the list so that a choice can be made instead of typing
the account code. Enter the list of account codes on FORM FF2 (located on
the back of FORM FF1 ) in the AT&T AUDIX Voice Power™/FAX Attendant
System™ Planning and Implementation document.
Subscriber Administration
The Integrated Solution III environment provides integrated administration.
This means that data for both the MERLIN LEGEND Communications System
and for the AUDIX Voice Power and FAX Attendant applications systems is
entered only once and routed and copied where it is needed.
Extension Directory
Both the MERLIN LEGEND Communications System and the AUDIX Voice
Power/FAX Attendant system maintain databases.
■
The switch database contains information relating the MERLIN
LEGEND hardware port addresses to the extension numbers and
adjuncts, features provided to extension numbers (such as Call
Restrictions, Labels), features provided on the extension station sets,
coverage paths, calling groups, etc.
The AUDIX Voice Power/FAX Attendant database contains information
■
about the services provided to each subscriber (extension) such as:
switch call coverage, private fax extension, autoprinting on/off, etc.
Feature and Planning Review
2-7
Page 39

Feature and Planning Review
The Integrated Solution III environment allows integrated administration as
follows:
A portion of the switch database for extensions and adjuncts (the
1.
Extension Directory) is downloaded from the switch to the AUDIX Voice
Power/FAX Attendant database. The Extension Directory contains the
System Numbering Plan information already administered for the
switch.
2.
Changes are made in the AUDIX Voice Power/FAX Attendant database
when the System Manager enters data.
When the changes made in the AUDIX Voice Power/FAX Attendant
3.
database will affect how the switch operates, they are uploaded to the
switch as programming requests. This programming is done
automatically, as the database changes are made, and is reported to
the person making the changes.
4.
The System Numbering Plan and the Extension Directory are
synchronized daily by downloading the switch database automatically.
Subscriber Administration Planning
Subscriber administration is a multi-step process, and therefore has multiple
forms that match the data entry process step-by-step. Subscriber
administration follows these steps:
The Extension Directory is downloaded from the switch. This
1.
information is used to update the local extension directory used by
AUDIX Voice Power and FAX Attendant. In all cases, the information
downloaded takes precedence if the information in the local directory
does not match.
Additions and deletions of AUDIX Voice Power/FAX Attendant
2.
subscribers are recorded in the local extension directory and are
propagated to the switch by adding or deleting extensions from the
default Call Coverage group and making other changes as necessary.
Physical extensions are not deleted from the switch database, they are
only disconnected from the AUDIX Voice Power/FAX Attendant
configuration. “Special” extensions that are not part of the System
Numbering Plan are added and deleted as necessary for use in AUDIX
Voice Power/FAX Attendant.
2-8
You record the basic Extension Directory information on FORM DX in
Feature and Planning Review
Page 40

Feature and Planning Review
the AT&T AUDIX Voice Power™/FAX Attendant System™ Planning and
Implementation document.
Once the basic information has been established for an extension,
3.
other operational parameters are requested. This includes whether the
extension has call coverage provided by the switch, whether this is a
new “special” extension, whether an automatic dialing button is to be
programmed for the station set, and the subscriber’s associated private
fax extension. (For additional information, see Types of Fax
Subscribers later in this chapter.)
You also record this information on FORM DX.
The voice associated parameters for the subscriber are entered. You
4.
record this information on FORM DA. (FORM DA is on the same sheet
of paper as FORM DX.)
Finally, the fax associated parameters for the subscriber are entered.
5.
You record this information on FORM DF. (FORM DF is on the back of
FORMS DX and DA.)
Types of Fax Subscribers
Generally, there are three FAX Attendant subscriber classes:
1.
Personal Fax Number Subscribers without Fax Machines (Class 1)
2.
Subscribers with Fax Mailboxes but without Personal Fax Numbers
(Class 2)
3.
Fax Machine Call Coverage Subscribers (Class 3)
Personal Fax Number Subscribers without Fax Machine (Class 1)
Each Class 1 subscriber will have a personal fax number. This may be a
Direct Inward Dial (DID) number from the Central Office telephone switch or a
private line administered on the subscriber’s personal fax extension. A
personal fax number will:
Feature and Planning Review
2-9
Page 41

Feature and Planning Review
■
guarantee that all faxes for the subscriber will flow directly to the
subscriber’s confidential mailbox.
give subscribers one fax number for distribution to anyone who wishes
■
to send them faxes. These subscribers will have more control over
their fax communications, with the ability to retrieve faxes from any
location, any time of day.
■
alert subscribers to the arrival of all new fax messages, via their
message waiting lamp and/or outcalling notification.
The Class 1 subscriber category includes anyone who will have a personal
fax number, but does not have a fax machine. The exception will be group
fax number administrators who are discussed later.
Subscribers with Fax Mailboxes but without Personal Fax Numbers (Class 2)
Class 2 subscribers are those who have confidential mailboxes, but do not
have personal fax numbers. Incoming fax messages are sent to a group fax
number and then stored in private mailboxes. Group fax accounts are useful
for individuals who:
■ occasionally receive confidential messages and can give special
instructions to those who send them faxes in order to receive them
confidentially. Therefore, it is not important for these individuals to
have a personal fax number.
■
travel occasionally and can give special instructions to those who
would like to send them a fax while they are away. Therefore, it is not
important for these individuals to have a personal fax number.
■
often need to broadcast fax messages, but do not often require special
inbound fax services, such as those described above.
Group Fax Number Administrator
The Group Fax Number Administrator is a special class of subscriber. The
Group Fax Number Administrator will typically be the group secretary. The
Group Fax Number Administrator will need to record a personal greeting for
the group fax number to prompt callers to enter the voice telephone extension
of the person to whom they wish to send a fax. (See the AT&T FAX Attendant
2-10
Feature and Planning Review
Page 42

Feature and Planning Review
System™ User’s Guide, How to Record a Personal Greeting.) If an extension
is not entered, the fax will be delivered to the Group Fax Number
Administrator’s fax machine. The Group Administrator needs a private fax
extension and has the Subscriber Administration field System Wait for
Touchtone After FCA Greeting? set to yes.
Fax Machine Call Coverage Subscribers (Class 3)
The primary use of the FAX Attendant is as a coverage point for fax machines
that are busy, broken, or out of paper. This allows callers to have a much
higher probability of getting through on the first try. It also makes better use
of your existing fax machines.
All subscribers who have fax machines should be administered as Class 3
subscribers. The extension used for the fax machine will always be the
private fax extension of some subscriber and the default fax destination. The
fax machine being set up for coverage should be programmed to autoanswer on the first ring.
The FAX Attendant will buffer the fax messages in its memory and continue
trying to send the fax to the fax machine for the maximum retry period. If the
FAX Attendant is unsuccessful in delivering the fax to the fax machine, the fax
machine owner will be notified via the message waiting lamp.
If the fax machine will be broken for an extended period of time, the fax
machine owner should notify the FAX Attendant System Manager to change
the default printer to that of another nearby group.
Service Administrator Registration
An administrator assigned to each of the eight voice and fax services has the
authority to change the voice prompts and control other service variables. In
most cases, one person is assigned as the administrator for all services.
Initially one person should be assigned as the administrator for all services to
ensure that the voice system prompts are set up consistently.
The Service Administrators must already be registered as subscribers to
AUDIX Voice Power/FAX Attendant so that the system can identify them as
authorized to make changes. These administrators should be listed on FORM
G in the AT&T AUDIX Voice Power™/FAX Attendant System™ Planning and
Implementation document.
Feature and Planning Review
2-11
Page 43

Feature and Planning Review
Outcalling Administration
Outcalling is an optional feature that allows subscribers to request that AUDIX
Voice Power/FAX Attendant call a telephone number inside or outside the
system and inform them when new voice or fax messages have arrived. This
feature is controlled on both a system-wide basis and on an individual
subscriber basis. All subscribers who have outcalling enabled will receive
outcalls during the hours you specify, or for 24 hours a day. If you turn
outcalling off on a system-wide basis, no one will receive outcalls.
NOTE:
Outcalling messages will not be accepted as voice mail messages by
another AUDIX Voice Power system or an AUDIX system.
The outcalling service parameters specify how the outcalling will operate on a
system-wide basis. These parameters are collected on FORM H in the AT&T
AUDIX Voice Power™/FAX Attendant System™ Planning and Implementation
document.
Planning Your Fax Response Service
The Fax Response Service gives you the ability to set up a database of fax
information that you ordinarily mail to people who make inquiries. With Fax
Response, the interested parties can call your company and retrieve fax
information via an interactive voice prompt/touch tone interface. These callers
can receive the fax information on the same call or can specify a fax number
for delivery.
While FAX Attendant delivers your information, it also gathers valuable
information. For example, you can set FAX Attendant to record the telephone
numbers of the people who call your Fax Response service. These telephone
numbers are valuable for sales lead follow-ups.
Callers can do the following things once they access Fax Response:
2-12
Feature and Planning Review
Page 44

Feature and Planning Review
■
Retrieve fax information on desired products
Listen to voice announcements
■
Transfer to a specified extension
■
■
Speak to an operator
Fax Response offers the following benefits:
Enables you to get specific information to customers almost
■
immediately. This reduction in time allows you to give customers
information before the competition.
■
Enables you to obtain the phone number and fax number of each
person who requests information. Fax Response even groups the
telephone numbers of the callers with the product or service on which
they have inquired. Your sales force can use this information to build
up its customer database.
Allows you to keep track of the number of requests each product
■
elicits. You can see what products are generating interest, and which
ones are not.
■
Can also be used as your company’s automated attendant.
Setting up the Fax Response service requires extensive planning. To set up a
Fax Response service, you must:
■
Create a main menu that callers will hear when they first reach the Fax
Response service
■
Create menus wherever necessary
■
Create a spoken script for each menu
■
Enter the fax information that will comprise the Fax Response database
■
Create coversheet art and load the coversheet
Consult the AT&T AUDIX Voice Power™/FAX Attendant System™ Planning
and Implementation document for the proper forms and procedures to use
when setting up a Fax Response service.
Feature and Planning Review
2-13
Page 45

Feature and Planning Review
Customizing Voice Prompts
FAX Attendant provides the ability to customize prompts and announcements.
For Fax Call Answer and Fax Mail service, you may specify your own custom
prompts, and determine whether to use your custom prompts or the system
default prompts. Enter your custom messages for Fax Call Answer, Fax Mail,
and Fax Response on FORM P in the AT&T AUDIX Voice Power™/FAX
Attendant System™ Planning and Implementation document.
2-14
Feature and Planning Review
Page 46

Implementing FAX Attendant
Contents
3
Entering FAX Attendant Data
■
Information Conventions
■
Logging In to IS-III
■
The AUDIX Voice Power/FAX Attendant Menu
■
General Fax System Parameter Administration
Updating General Fax System Parameters
Voice System Parameter Administration
■
Updating System Parameters
■
Account Code Parameter Administration
Updating Account Code Parameters
Account Code List Administration
■
Updating Account Codes
Subscriber Administration
■
Adding a New Subscriber
Adding a Special Purpose Extension
Changing a Subscriber Profile
Renumbering an Extension for a Subscriber
3-1
3-2
3-3
3-6
3-8
3-10
3-10
3-12
3-12
3-15
3-15
3-18
3-18
3-19
3-24
3-31
3-37
Removing a Subscriber from AUDIX Voice Power/FAX
Attendant
Deleting a Subscriber’s Profile from the System
Displaying the Subscriber Database
Printing the Subscriber Database
3-38
3-39
3-40
3-40
i
Page 47

Table of Contents
■
Service Administrator Registration
Updating Service Administrator Registration
■
Outcalling Administration
Updating Outcalling Parameters
Fax Group List Administration
■
Creating a Fax Distribution List
Modifying a Fax Distribution List
Deleting a Fax Distribution List
Custom Voice Prompts
■
Logging In to the Voice System
■
General Fax Mail Greeting Administration
Listening to the Fax Mail Greeting Message
Recording Custom Fax Mail Greetings
Selecting Greetings
■
General Fax Call Answer Greeting Administration
Listening to the Fax Call Answer Greeting
Recording Custom Fax Call Answer Greetings
Selecting Greetings
■
Subscriber Recorded Name Administration
■
General Mailbox Greeting Administration
Listening to the General Mailbox Greeting Message
3-41
3-43
3-43
3-45
3-45
3-45
3-48
3-50
3-52
3-53
3-54
3-55
3-55
3-56
3-56
3-57
3-57
3-58
3-58
3-59
3-61
ii
Recording a General Mailbox Greeting Message
Changing the Greeting In Use
3-61
3-62
Page 48

Implementing FAX Attendant
3
Entering FAX Attendant Data
This chapter describes the procedures for entering data into the FAX
Attendant System from the forms that were completed when you planned your
system.
NOTE:
Use your keyboard to fill in forms and to select menu items displayed on
the screen. If you are not familiar with keyboard operations and onscreen forms or menus, refer to Appendix A, User Interface Information,
for basic instructions.
You should use the comprehensive instructions and planning forms that
accompany the AT&T AUDIX Voice Power™/FAX Attendant System™ Planning
and Implementation document to describe your system.
Implementing FAX Attendant
3-1
Page 49

Implementing FAX Attendant
NOTE:
If you have not yet completed the system planning forms, do so NOW
before continuing. Have your completed forms ready as you proceed
through this chapter. Also, be sure to update the forms in the Planning
document as you make changes during ongoing administration.
For an overall picture of the FAX Attendant Menu Tree, please refer to
Appendix C.
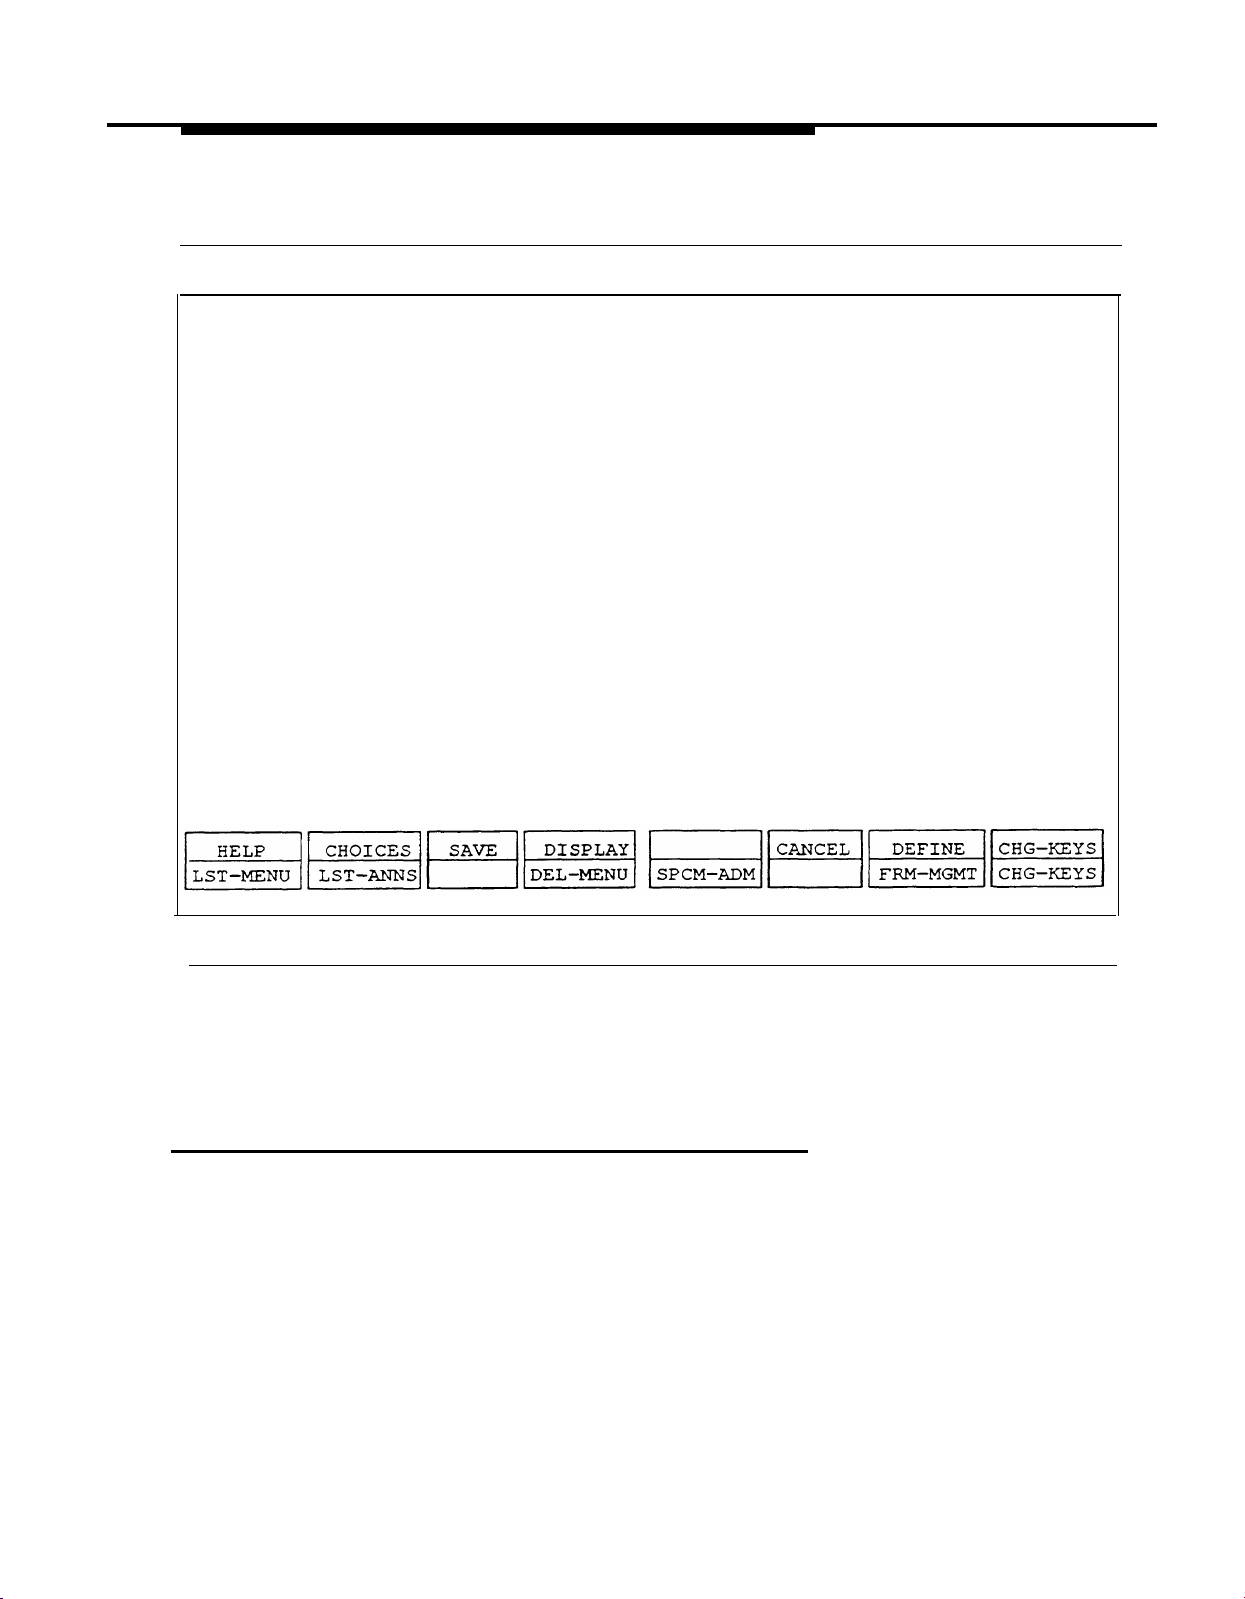
Information Conventions
The following conventions are used in this guide to describe the different
types of data that appear on your screen.
Menus
Forms Forms which appear on your screen are
Fields
Choice List
Window
A menu is a list of options which appears on
your screen or is spoken. By selecting an
option, you can access a submenu or a form.
similar to the paper forms. Forms appear
when you enter or edit data for the database.
They contain information that you can change
and blanks for you to provide new
information.
The areas in a form where you change or
provide information.
In some forms, in addition to the cursor
highlighting a field, a list of logical choices
appears on the screen for that field. This list
may show previously entered data or the
default values for the field.
A box of text that appears on the screen for
information purposes. A typical information
window will instruct you to perform a certain
action such as Press any Key to
Continue.
No data is entered in a window.
3-2
Implementing FAX Attendant
Page 50

Implementing FAX Attendant
Logging In to IS-III
Before you can enter data, you must log in and move to the AUDIX Voice
Power/FAX Attendant menu. To log in to IS-III, perform the following steps:
1.
At the Console Login: prompt, type is and press
— If a password has been administered, the system prompts you
to enter your password. In this case, proceed to step 2.
If no password has been administered, the Status Screen
—
appears, proceed to step 3.
2.
At the Password: prompt, type your password and press
security reasons, your password does not appear on the screen as you
type it in.)
Enter .
Enter . (For
—
The Status Screen appears.
NOTE:
For comprehensive instructions on how to interpret the
Status Screen items, see the Integrated Solution III, System
Manager’s Guide.
Implementing FAX Attendant
3-3
Page 51

Implementing FAX Attendant
------------------------------
Database Reconciliation last run on:
Extensions deleted:
Status Screen
Available Disk Space:
Connection to Switch:
Extensions added:
Extensions changed:
Name:
Enter Name. Press SAVE to continue.
Figure 3-1. Status Screen
At the Status Screen, type your name and press [
3.
—
The system records your name in the Status Screen Access
Log. The IS-III Main Menu appears.
F3 ] (SAVE).
3-4
Implementing FAX Attendant
Page 52

Implementing FAX Attendant
-----------------------------
Integrated Solution III
AUDIX Voice Power/FAX ATTENDANT (AVP/FA)
>
Call Accounting System (CAS)
Extension Directory
System Programming & Maintenance Utility (SPM)
User Maintenance
Exit
Move to an item using arrow keys and hit Enter to select
Figure 3-2. Integrated Solution III Main Menu
NOTE:
AUDIX Voice Power and FAX Attendant will appear as one option in
the IS-III Main Menu.
4.
The cursor is positioned at the AUDIX Voice Power/FAX
Attendant (AVP/FA) option. At this point, you can select any of the
IS-III applications that are installed on your system, or, if you wish,
simply press
Main Menu.
Enter to go to the AUDIX Voice Power/FAX Attendant
Implementing FAX Attendant
3-5
Page 53

Implementing FAX Attendant
NOTE:
If a password has been administered for the AUDIX Voice
Power/FAX Attendant system, the
Type your password and press Enter . (For security reasons, your
password does not appear on the screen as you type it.) The
AUDIX Voice Power/FAX Attendant menu appears.
Password:
prompt appears.
The AUDIX Voice Power/FAX Attendant Menu
When the AUDIX Voice Power/FAX Attendant menu appears, the cursor will
be positioned at Automated Attendant Administration and you may
press the
↓
key to select the menu item you want to administer.
NOTE:
Automated Attendant service administration is covered in the AUDIX
Voice Power™, Release 2.1.1, System Manager’s Guide. Note that the
FAX Attendant’s Fax Response service can be used as your company’s
main automated attendant. In this case, you will not be able to administer
Night Service or holidays. Also, you still must assign channels for Voice
Mail and Call Answer services.
3-6
Implementing FAX Attendant
Page 54

lmplementing FAX Attendant
----------------------------------
AUDIX Voice Power/FAX Attendant
Automated Attendant Administration
>
Fax Equipment Operations
Fax Response Administration
Fax System Parameter Administration
Outcalling Administration
Service Administrator Registration
Subscriber Administration
Voice System Parameter Administration
System Programming/Switch Administration
Highlight menu choice using arrow keys, then press Enter key
Figure 3-3. AUDIX Voice Power/FAX Attendant Menu
NOTE:
If you are administering your system for the first time, go to the next
section, “General Fax System Parameter Administration”, and continue
through this chapter in the order in which it is written. If you are updating
the system, go directly to the procedure that you need. Planning for Fax
Response is covered in the AT&T AUDIX Voice Power™/Fax Attendant
System™ Planning and Implementation document. The Fax Response
administration information is covered in Chapter 4, Fax Response
Information.
Implementing FAX Attendant
3-7
Page 55

Implementing FAX Attendant
General Fax System Parameter Administration
When setting up FAX Attendant for the first time, you must first administer the
general fax system parameters. Once these parameters are set, you will most
likely not have to change them. To enter this information, perform the
following steps:
At the AUDIX Voice Power/FAX Attendant menu, move the cursor to
1.
Fax System Parameter Administration and press
—
The Fax System Parameters Administration menu appears.
Enter .
Fax System Parameters Administration
--------------------------------
Account Code List Administration
>
Account Code Parameter Administration
Fax Group List Administration
General Fax Parameters Administration
Figure 3-4. Fax System Parameters Administration Menu
3-8
2.
At the Fax System Parameters Administration menu, move the cursor to
General Fax Parameters Administration and press Enter .
Implementing FAX Attendant
Page 56

Implementing FAX Attendant
—
The General Fax Parameter Administration form appears.
--------------------------------------
General Fax Parameters Administration
Fax Mail Parameters
Economy Time Period Begins (hhmm):
Economy Time Period Ends (hhmm):
Dial String For Outside Call:
Fax Mail Telephone Number:
Length of Time to Retry Fax Transmission (hours):
Maximum Time to Keep Fax in System(days):
Is “1” ever used to dial in this area code?:
Maximum Number of Channels to use for Fax Delivery:
Fax Response Parameters
Attendant Extension:
Destination for printing:
Main Menu Plays:
Number of entries in Fax Response Usage report:
Touch–Tone Gate Active?:
Delivery to Alternate Destination Allowed?:
Figure 3-5. General Fax Parameter Administration Form
Using Form EF, type in the information requested on this screen. Press
3.
Enter after completing each field, if cursor does not automatically go
to next line.
After you enter all of the information, press [ F3 ] (SAVE) to save the
4.
parameters.
A window appears informing you that the system parameters
—
have been updated.
Implementing FAX Attendant
3-9
Page 57

Implementing FAX Attendant
5.
Press any key to continue.
You return to the Fax System Parameters Administration menu.
—
6.
Press [
F6
] (CANCEL) to return to the AUDIX Voice Power/FAX
Attendant menu.
Updating General Fax System Parameters
To update the general fax system parameters, use the preceding procedure.
The new values will replace the old values. Be sure to record the new values
on Form EF.
Voice System Parameter Administration
Before you can perform ongoing administration functions for your FAX
Attendant system, you must administer the voice system parameters. Once
these parameters are set, you will most Iikely not have to change them. To
enter this information, perform the following steps:
At the AUDIX Voice Power/FAX Attendant menu, move the cursor to
1.
Voice System Parameter Administration
and press
Enter
.
3-10
—
The Voice System Parameter Administration form appears.
Implementing FAX Attendant
Page 58

lmplementing FAX Attendant
------------------------------------
Voice System Parameter Administration
System Operator Extension:
Pause for Touch Tone Input:
Maximum Extension Length:
Transfer to Subscribers Only?:
System Mode of Addressing:
Maximum Message Length:
General Mailbox Owner Extension:
Enable General Mailbox for Call Answer?
Allow Voice Mail/Call Answer transfers?
Auto Attendant Parameters
Touch-tone Gate Active?:
Auto Attendant Timeout Action:
Auto Attendant Menu Plays:
Fax Transfer Number:
Present Options Before Leaving Message?:
Message Waiting Lamp Parameters
Code to Light:
Code to Extinguish:
sec
Day:
Day:
sec
Night:
Night:
Refresh?:
Figure 3-6. Voice System Parameter Administration Form
2.
Using Form EA, type in the information requested on this screen. Press
Enter after completing each field. For some entries this may not be
required.
3.
After you enter all the information, press [ F3 ] (SAVE) to save the
parameters.
—
A window appears informing you that the system parameters
have been updated.
4.
Press any key to continue.
Implementing FAX Attendant
3-11
Page 59

Implementing FAX Attendant
You return to the AUDIX Voice Power/FAX Attendant menu.
—
Updating System Parameters
To update the voice system parameters, use the preceding procedure. The
new values will replace the old values. Be sure to record the new values on
Form EA.
Account Code Parameter Administration
When setting up AUDIX Voice Power/FAX Attendant for the first time, you
should first enter the Account Code parameters for the entire system as
described in Chapter 2. To enter the account code parameters, perform the
following steps:
At the AUDIX Voice Power/FAX Attendant menu, move the cursor to
1.
Fax System Parameter Administration
—
The Fax System Parameters Administration menu appears.
and press
Enter
.
3-12 Implementing FAX Attendant
Page 60

Implementing FAX Attendant
Fax System Parameters Administration
--------------------------------
Account Code List Administration
>
Account Code Parameter Administration
Fax Group List Administration
General Fax Parameters Administration
Figure 3-7. Fax System Parameters Administration Menu
2.
At the Fax System Parameters Administration menu, move the cursor to
Account Code Parameter Administration and press
—
The Account Code Parameter Administration form appears.
Implementing FAX Attendant
Enter .
3-13
Page 61

Implementing FAX Attendant
––––––––––––––––––––––––––––––––––––
Account Code Parameter Administration
Use Switch Account Code Entry?:
Feature Access Code:
Account Code Length:
Default Account Code:
Fax Response Account Code:
Figure 3-8. Account Code Parameter Administration Form
3-14
3.
Using Form FF1, type in the information requested on this screen.
Press
4.
After you enter all of the information, press [
Enter after completing each field.
F3 ] (SAVE) to save the
parameters.
—
A window appears informing you that the Account Code
parameters have been updated.
5.
Press any key to continue.
You return to the Fax System Parameter Administration menu.
—
Implementing FAX Attendant
Page 62

Implementing FAX Attendant
6.
Press [
F6 ] (CANCEL) to return to the AUDIX Voice Power/FAX
Attendant menu.
Updating Account Code Parameters
To update the Account Code parameters, use the preceding procedure. The
new values will replace the old values. Be sure to record the new values on
Form FF1.
NOTE:
Changing the Account Code length will remove all entries currently in the
account code list. If you change the Account Code length, you must
reenter the Default Account Codes on the Account Code Parameter
Administration screen. Also, you must reenter all Account Codes on the
Account Code List Administration screen (see the following procedure,
Account Code List Administration.)
Account Code List Administration
When setting up FAX Attendant for the first time, you should administer the
account codes that will most commonly be assigned to the subscribers. It is
recommended that you complete the Account Code List Administration
screen before you begin entering subscriber profiles.
NOTE:
Before administering the list, be sure you have administered the proper
Account Code parameters (see, the previous procedure, Account Code
Parameter Administration).
To enter the account code information, perform the following steps:
1. At the AUDIX Voice Power/FAX Attendant menu, move the cursor to
Fax System Parameters Administration
The Fax System Parameters Administration menu appears.
—
and press
Enter
.
Implementing FAX Attendant
3-15
Page 63

Implementing FAX Attendant
Fax System Parameters Administration
--------------------------------
Account Code List Administration
>
Account Code Parameter Administration
Fax Group List Administration
General Fax Parameters Administration
Figure 3-9. Fax System Parameters Administration Menu
2.
At the Fax System Parameters Administration menu, move the cursor to
3-16
Account Code List Administration
The Account Code List Administration form appears.
—
Implementing FAX Attendant
and press
Enter
.
Page 64

Implementing FAX Attendant
Page 1 of 1
--------------------------------
Account Code List Administration
Acc. Codes
Comments
Figure 3-10. Account Code List Administration Form
Press
3.
right-hand corner of the screen to the Ac
Using Form FF2, type in the information requested on this screen.
4.
Enter to move the cursor from the page # field in the upper
C. Codes field.
——Press
Enter
after completing each field.
If you need to enter more than one page of account codes,
press [
additional account codes. Press [
F8 ] (CHG-KEYS) and then [ F4 ] (NEXT-PGE) to enter
F8 ] (CHG-KEYS) again
when you are finished to return to the first set of function keys.
5.
After you enter all of the information, press [ F3 ] (SAVE) to save the
parameters.
Implementing FAX Attendant
3-17
Page 65

Implementing FAX Attendant
—
A window appears informing you that the Account Codes have
been updated.
6.
7.
Press
Press [
Enter
to continue.
You return to the Fax System Parameters Administration menu.
—
F6 ] (CANCEL) to return to the AUDIX Voice Power/FAX
Attendant menu.
Updating Account Codes
To update the Account Codes, use the preceding procedure. The new values
will replace the old values. Be sure to record the new values on Form FF2.
Additionally, be sure to update the Subscriber Administration screens for all
subscribers using Account Codes.
Subscriber Administration
Subscriber administration is a multi-step process, and therefore, has multiple
planning forms that match the data entry process step-by-step. During the
initial implementation of your system, subscriber information was entered into
the system using the planning forms and the Integrated Administration feature
mentioned in Chapter 2. For all subscriber administration, that is, for all
additions, changes, or deletions to the subscriber database, you must use the
Integrated Administration feature via the Extension Directory screen.
Integrated Administration provides a path to a set of administrative screens on
which you fill in data. Once these screens are completed, Integrated
Administration ensures that the Extension Directory database and the
telephone switch database share the common subscriber information.
The following sections discuss the various procedures you must perform to
update the subscriber database. These procedures include:
■
Adding a new subscriber to the database
Adding a special purpose extension to the database
■
3-18
Implementing FAX Attendant
Page 66

Implementing FAX Attendant
■
Changing a subscriber profile
■
Renumbering an extension for a subscriber
Removing a subscriber from AUDIX Voice Power/FAX Attendant
■
■
Deleting a subscriber’s profile from the system
■
Displaying the subscriber database
■
Printing the subscriber database
Be sure to update your planning forms before making any changes to the
subscriber database. For more details on the subscriber administration
process, consult the AT&T AUDIX Voice Power™/FAX Attendant System™
Planning and Implementation document.
Adding a New Subscriber
To add a new subscriber, follow these steps:
NOTE:
All AUDIX Voice Power/FAX Attendant subscribers must be added
through the Extension Directory screen. Note that you cannot add new
subscriber switch extensions to the switch’s System Numbering Plan
through the Extension Directory. Special purpose extensions, which are
never part of the System Numbering Plan, can be added only to the
Extension Directory.
1.2.Write the information for the new subscriber on Forms DX, DA, and DF
from the AT&T AUDIX Voice Power™/FAX Attendant System™ Planning
and Implementation document.
From the IS-III Main Menu, move the cursor to the
Directory field, and press Enter . The Extension Directory form
appears.
Extension
Implementing FAX Attendant
3-19
Page 67

Implementing FAX Attendant
––––––––––––––––––––––––––––––––––
Extension :
Name (first) :
Name (last) :
Extension Label :
Location :
Comments :
Comments :
Application 1 :
Application 2 :
Application 3 :
Application 4 :
Application 5 :
Extension Directory
Figure 3-11. Extension Directory Screen
3. Using Form DX, enter a valid extension number and press [ F1 ]
(DISPLAY) to display the information about this extension.
If the extension entered does not exist on the telephone switch, a
message appears saying Record Not Found, Type ENTER to
3-20
continue.
Check your entry and try again if necessary.
Using Form DX, enter the additional information pressing
4.
each field.
When all the data requested on the screen is entered, press [
5.
(SAVE) to save the data. Press
The AUDIX Voice Power User form for this extension appears.
Implementing FAX Attendant
The invalid extension number is cleared from the field.
Enter to continue.
Enter after
F3 ]
Page 68

Implementing FAX Attendant
AUDIX Voice Power User
–––––––––––––––––––––––––
Add User to AUDIX Voice Power Cover Group?
Audix Voice Power button number:
Extension:
Private Fax Extension:
Enter Y, N, or Press F2 (CHOICES) to select option
Figure 3-12. AUDIX Voice Power User Screen
Using the data on Form DX, enter the information requested.
6.
—
Be sure to enter the Auto Dial button number for the AUDIX
Voice Power system and, if appropriate, enter the Private
Fax Extension.
7.
Press [
F3 ] (SAVE). The Subscriber Administration screen appears.
Implementing FAX Attendant
3-21
Page 69

Implementing FAX Attendant
Page 1 of 2
––––––––––––––––––––––––––––––––––––––––––
TT Equivalent of Name Addressing Identifier:
Custom Class of Service Parameters
Does Subscriber have Switch Call Coverage?:
If No Call Coverage, Enter Maximum Rings:
Subscriber Administration
Extension:
Name:
Password:
Name Addressing Identifier:
Mode of Addressing:
Voice Mail Box Size:
Personal Operator:
Comments:
Class of Service:
Coverage Service:
Outcalling Allowed?:
min
Figure 3-13. Subscriber Administration Screen, Page 1 of 2
Using Form DA from the AT&T AUDIX Voice Power™/FAX Attendant
8.
System™ Planning and Implementation document, enter the information
requested on the screen. Press Enter after each field.
9.
After you have entered all the data,
— If a fax extension is defined for this subscriber, press
Page Down to continue with the second page (step 10).
If a fax extension is not defined for this subscriber, press [
—
(SAVE) to save the data. Skip step 10 and continue with step
11.
3-22
Implementing FAX Attendant
F3 ]
Page 70

Implementing FAX Attendant
10.
When FAX Attendant is included in the system, the Subscriber
Administration form, Page 2 displays.
Page 2 of 2
–––––––-------------------------------
Subscriber Administration
FAX Parameters
Private Fax Extension:
Autoprint Fax Messages?:
Fax Delivery Report?:
Default Fax Destination:
System Wait for Touchstones After FCA Greeting?:
Account Code:
Fax Mail Box Size:
pages
Figure 3-14. Subscriber Administration Screen, Page 2 of 2
Enter the data from Form DF.
—
NOTE:
If Account Codes have been administered, you may use
F2 ] (CHOICES) to simplify data entry at the Account
[
Code field on this screen. Once you press [
(CHOICES), you may select the Account Code from the
previously created list, rather than typing in the Account
Code for each subscriber.
Implementing FAX Attendant
F2 ]
3-23
Page 71

Implementing FAX Attendant
When you have filled in the fields, press [
—
F3 ] (SAVE), and the
subscriber will be added. (If necessary, press
F8 ] (CHG-KEYS) to access the [ F3 ] (SAVE) key.)
[
Press any key to return to the Extension Directory screen which
11.
displays the record of the subscriber you just added.
12.
If you wish to add another subscriber, repeat Steps 3-11, otherwise
press [
F6 ] (CANCEL) to return to the IS-III Main Menu.
Adding a Special Purpose Extension
Special purpose extensions are added to the database for purposes other
than as normal end-points for voice, fax, or data transmission. For example,
special purpose extensions can be used to provide a mail box for subscribers
who do not need a physical telephone extension but who would like to be able
to receive and retrieve voice mail (guest mailboxes).
NOTE:
For this procedure, you must use an extension number that is not already
defined in the Extension Directory database. Do not use an extension that
starts with the same digits as regular extensions and adjuncts on the
switch. For example, do not use 123 as a special purpose extension if 12
is a regular extension. For more information about special purpose
extensions and guidelines to use when creating special purpose
extension numbers, see the AT&T AUDIX Voice Power™/FAX Attendant
System™ Planning and Implementation document.
To add a special purpose extension, follow these steps:
Write the information for the new special purpose extension on Forms
1.
DX, DA, and DF from the AT&T AUDIX Voice Power™/FAX Attendant
System™ Planning and Implementation document.
2.
From the IS-III Main Menu, move the cursor to the
Directory
field, and press
Enter
.
The Extension Directory form
appears.
3-24
Implementing FAX Attendant
Extension
Page 72

Implementing FAX Attendant
----------------------------------
Extension :
Name (first) :
Name (last) :
Extension Label :
Location :
Comments :
Comments :
Application 1 :
Application 2 :
Application 3 :
Application 4 :
Application 5 :
Extension Directory
Figure 3-15. Extension Directory Screen
Implementing FAX Attendant
3-25
Page 73

Implementing FAX Attendant
NOTE:
Before following this procedure, check to be sure you are using the
correct extension number as the special purpose extension. If you
use an extension number that is currently administered on the
switch and save the new data associated with it, the old information
will be overwritten, and you will not have added a special purpose
extension. As a precaution, you can enter the extension number
on the Extension Directory screen and press
using this procedure. The system should respond Record Not
Found, Press ENTER to Continue.
with this message, check your records and use a different
extension number.
Using Form DX, enter the special purpose extension number and all
3.
the other associated information pressing
Display before
If it does not respond
Enter after each field.
4.
Press [
F3 ] (SAVE) to save the data.
The Special Purpose Extension screen appears and asks you if you
wish to add this extension as a special purpose extension.
3-26
Implementing FAX Attendant
Page 74
Implementing FAX Attendant
----------------------------------
Special Purpose Extension Screen
Extension: xxxx
This extension does not exist on the switch.
Do you want to use this extension for a
special purpose?:
Enter Y or N or Press F2 (CHOICES) to select; then press SAVE
[No/Yes]
Figure 3-16. Special Purpose Extension Screen
Press [ F2 ] (CHOICES) to select
5.
Enter
.
Press [ F3 ] (SAVE) to save your choice. A message appears stating
6.
Yes
or
NO.
Select
Yes
and press
the Special Purpose extension has been added to the database. Press
Enter
to continue.
The AUDIX Voice Power User form appears.
Implementing FAX Attendant
3-27
Page 75

Implementing FAX Attendant
AUDIX Voice Power User
-------------------------
Add User to AUDIX Voice Power Cover Group?
Audix Voice Power button number:
Extension:
Private Fax Extension:
Enter Y, N, or Press F2 (CHOICES) to select option
Figure 3-17. AUDIX Voice Power User Screen
7.
Using the data on Form DX, enter the
8.
Press [ F3 ] (SAVE). The AUDIX Voice Power Subscriber Administration
screen appears.
Private Fax Extension.
3-28
Implementing FAX Attendant
Page 76

Implementing FAX Attendant
------------------------------------------
Name Addressing Identifier:
TT Equivalant of Name Addressing Identifier:
Custom Class of Service Parameters
Does Subscriber have Switch Call Coverage?:
If No Call Coverage, Enter Maximum Rings:
Subscriber Administration
Extension:
Name:
Password:
Mode of Addressing:
Voice Mail Box Size:
Personal Operator:
Comments:
Class of Service:
Coverage Service:
Outcalling Allowed?:
Page 1 of 2
min
Figure 3-18. Subscriber Administration Screen, Page 1 of 2
9.
Using Form DA from the AT&T AUDIX Voice Power™/FAX Attendant
System™ Planning and Implementation document, enter the information
requested on the screen. Press Enter after each field.
NOTE:
For special purpose extensions used for guest mailboxes or other
features where calls should never be transferred, use class of
service 5 or 6. For special purpose extensions that are calling
groups, use class of service 1, 2, 7, or 8.
10.
After you have entered all the data,
Implementing FAX Attendant
3-29
Page 77

Implementing FAX Attendant
If a fax extension is defined for this subscriber, press
—
Page Down to continue with the second page (step 11).
—
If a fax extension is not defined for this subscriber, press [
(SAVE) to save the data. Skip step 11 and continue with step
12.
11.
When FAX Attendant is included in the system, the Subscriber
Administration screen, Page 2 displays.
Subscriber Administration
-------------------------------------
FAX Parameters
Private Fax Extension:
Autoprint Fax Messages?:
Fax Delivery Report?:
Default Fax Destination:
System Wait for Touchtones After FCA Greeting?:
Account Code:
Fax Mail Box Size:
F3 ]
Page 2 of 2
pages
Figure 3-19. Subscriber Administration Screen, Page 2 of 2
Enter the data from Form DF
—
F3 ] (SAVE), and the
3-30
When you have filled in the fields, press [
—
special purpose extension will be added.
Implementing FAX Attendant
Page 78

Implementing FAX Attendant
12.
Press any key to return to the Extension Directory screen.
13.
If you wish to add another special purpose extension, repeat Steps 312, otherwise press [ F6 ] (CANCEL) to return to the IS-III Main Menu.
Changing a Subscriber Profile
There are times when you may need to change information in a subscriber’s
profile. For example, if a subscriber has a new secretary with a different
extension, you will have to access that subscriber’s profile and change the
personal operator extension. Use the following procedure to make changes
to a subscriber profile.
1.
Write the new information for this subscriber on Forms DX, DA, and DF
from the AT&T AUDIX Voice Power™/FAX Attendant System™ Planning
and Implementation document.
2.
From the IS-III Main Menu, move the cursor to
Directory
and press
Enter
.
The Extension Directory form appears.
Extension
Implementing FAX Attendant
3-31
Page 79

Implementing FAX Attendant
----------------------------------
Extension :
Name (first) :
Name (last) :
Extension Label :
Location :
Comments :
Comments :
Application 1 :
Application 2 :
Application 3 :
Application 4 :
Application 5 :
Extension Directory
Figure 3-20. Extension Directory Screen
3.
Enter the extension number and press [
Any information about this extension existing in the Extension Directory
appears here.
4.
Using Form DX, enter any updated information, pressing
each field.
3-32
Implementing FAX Attendant
F1 ] (DISPLAY).
Enter after
Page 80

Implementing FAX Attendant
NOTE:
If you change a subscriber’s switch call coverage by changing the
option
you must also update the
Subscriber Administration screen.
5.
When you have finished entering all updated information on this
screen, press [
has been updated.
6.
Press
The AUDIX Voice Power User form appears.
Add User to AUDIX Voice Power Cover Group?,
F3 ] (SAVE). A message appears stating the database
Enter
to continue.
Class of Service
field on the
------------------------
AUDIX Voice Power User
Extension:
Add User to AUDIX Voice Power Cover Group?
Audix Voice Power button number:
Private Fax Extension:
Enter Y, N, or Press F2 (CHOICES) to select option
Figure 3-21. AUDIX Voice Power User Screen
Implementing FAX Attendant
3-33
Page 81

Implementing FAX Attendant
7.
Using Form DX, enter any updated information, pressing Enter after
each field.
NOTE:
Do not re-administer the AUDIX Voice Power button unless you
want to add or move the location of the button.
—
If necessary, using the updates on Form DX, press [ F2 ]
(CHOICES) to change the
Power Cover Group? field selection and press Enter .
8.
Press [ F3 ] (SAVE).
The Subscriber Administration screen appears.
Add User to AUDIX Voice
3-34
Implementing FAX Attendant
Page 82

Implementing FAX Attendant
Page 1 of 2
------------------------------------------
Subscriber Administration
Extension:
Name:
Password:
Name Addressing Identifier:
TT Equivalent of Name Addressing Identifier:
Custom Class of Service Parameters
Does Subscriber have Switch Call Coverage?:
If No Call Coverage, Enter Maximum Rings:
Mode of Addressing:
Voice Mail Box Size:
Personal Operator:
Comments:
Class of Service:
Coverage Service:
Outcalling Allowed?:
min
Figure 3-22. Subscriber Administration Screen, Page 1 of 2
Using Form DA, enter any updated information, pressing
9.
each field.
After you have entered all the data,
10.
If you need to change any fax parameters for this subscriber,
—
press
If you do not need to change any fax parameters for this
—
subscriber, press [
and continue with step 11.
When FAX Attendant is included in the system, the Subscriber
11.
Administration screen Page 2 displays.
Page Down to continue with the second page (step 10).
F3 ] (SAVE) to save the data. Skip step 10
Implementing FAX Attendant
Enter
after
3-35
Page 83

Implementing FAX Attendant
Subscriber Administration
--------------------------------------
FAX Parameters
Private Fax Extension:
Autoprint Fax Messages?:
Fax Delivery Report?:
Default Fax Destination:
System Wait for Touchtones After FCA Greeting?:
Account Code:
Fax Mail Box Size:
Page 2 of 2
pages
Figure 3-23. Subscriber Administration Screen, Page 2 of 2
Enter the data from Form DF
—
When you have finished entering all updated information on
—
3-36
this screen, press [
12.
Press any key to return to the Extension Directory screen.
If you wish to change any other subscriber’s information, repeat steps
13.
3-11, otherwise press [
Implementing FAX Attendant
F3 ] (SAVE) to save your changes.
F6 ] (CANCEL) to return to the IS-III Main Menu.
Page 84

Implementing FAX Attendant
Renumbering an Extension for a Subscriber
If you need to renumber a subscriber’s extension from an old number to a
new extension number that does not yet exist in the System Numbering Plan,
follow these steps:
1.
At the end of the work day, have the subscriber listen to all voice mail
messages, and empty the voice mailbox. Also, have the subscriber
empty the fax mailbox.
NOTE:
If the subscriber is unavailable to empty his or her voice and fax
mailboxes, and you have a concern the subscriber will lose
messages, you can do the following:
Before doing Step 2, make the old extension a special
—
purpose extension by entering
field on the Extension Directory screen for this extension.
special
in the
Location
—
By doing this, the subscriber’s mailbox with messages will
be preserved. At a later time, the subscriber can log in
and retrieve the mail messages, and you can then delete
this special purpose extension from the Extension
Directory.
At the end of the work day, when there is little traffic on the telephone
2.
system, have the Switch Administrator renumber the extension in the
System Numbering Plan and on the switch.
Immediately, go to the IS-III Main Menu and select the User
3.
Maintenance screen.
From the User Maintenance screen, select the
4.
Plan
—
option and press
The telephone switch database will be reconciled with the
Enter
.
Reconcile Dial
Extension Directory, adding the new extension, and deleting
the old one unless you have made it a special purpose
extension.
Implementing FAX Attendant
3-37
Page 85

Implementing FAX Attendant
5.
Add the subscriber’s profile information to the Extension Directory by
following the procedures given in the “Adding a New Subscriber”
section provided earlier in this chapter.
Removing a Subscriber from AUDIX Voice Power/FAX Attendant
You can remove a subscriber from having AUDIX Voice Power/FAX Attendant
privileges, and still keep the individual’s profile in the Extension Directory by
doing the following procedure. This procedure will remove the subscriber
from the Call Coverage Group, but preserve the individual’s name, extension
label, location, and any comments associated with the individual.
One reason you may want to do this is if there is a possibility you will need to
re-administer this individual as a subscriber at a later time, and you want to
avoid re-entering the subscriber profile information. Another reason is to
retain the extension label for this individual in the system.
NOTE:
Be sure to mark the deletion on Form DX from the AT&T AUDIX Voice
Power™/FAX Attendant System™ Planning and Implementation document.
Also, if the subscriber you are deleting is registered as a Service
Administrator, you must register another subscriber as the Service
Administrator.
1.
From the IS-III Main Menu, move the cursor to
Directory
and press
Enter
.
The Extension Directory Screen
appears.
2.
Enter the extension number and press [
Move the cursor to the Application field where AUDIX Voice Power is
3.
F1 ] (DISPLAY).
listed and press the space bar to blank out the entry.
Extension
3-38
Implementing FAX Attendant
Page 86

lmplementing FAX Attendant
NOTE:
This removes all the AUDIX Voice Power data and all the
subscriber’s mail messages (voice and fax).
4.
Press [
F3 ] (SAVE). A window confirms that the changes have been
made.
5.
Press
Enter
to continue.
Deleting a Subscribers Profile from the System
From time to time, you may need to remove a subscriber from AUDIX Voice
Power/FAX Attendant and the system completely. For example, if a
subscriber leaves the company, you should delete that individual’s profile and
AUDIX Voice Power/FAX Attendant privileges promptly.
The following procedure will remove the subscriber and the subscriber’s
profile, including the extension label, from the Extension Directory.
NOTE:
Be sure to mark the deletion on Forms DX, DA, and DF from the AT&T
AUDIX Voice Power™/FAX Attendant System™ Planning and
Implementation document.
1.
From the IS-III Main Menu, move the cursor to
Directory
and press
Enter
.
The Extension Directory Screen
Extension
appears.
2.
Enter the extension number and press [ F1 ] (DISPLAY).
With the cursor in any field, press [
3.
F2 ] (DELETE). A display appears,
asking you to confirm your deletion. If you want to delete, enter Y (yes)
and press [ F3 ] (SAVE).
Implementing FAX Attendant
3-39
Page 87

Implementing FAX Attendant
NOTE:
The subscriber and the subscriber’s profile, including the extension
label and the subscriber’s mail (voice and fax) are removed from
the Extension Directory.
4.
Press
Enter
to continue.
The Extension Directory screen appears.
Displaying the Subscriber Database
You can list the current subscriber database on your screen to assist in
administering the system. Whenever you add a subscriber, remove a
subscriber, or change subscriber information, you can display the new
subscriber list to verify the changes. To display the subscriber database,
perform the following steps:
1.
From the IS-III Main Menu, move the cursor to
Power/FAX Attendant (AVP/FA)
2.
At the AUDIX Voice Power/FAX Attendant menu, move the cursor to
and Press
AUDIX Voice
Enter
.
Subscriber Administration and press Enter .
—
The Subscriber Administration form appears.
Press [
3.
F3 ] (DB-MGMT) to display the option menu.
[
Use
4.
F8 ] (CHG-KEYS) to display the alternate key labels, then press
↓
or
↑
to highlight the
Display
option.
Press Enter to select the highlighted option.5.
Printing the Subscriber Database
If you have a printer connected to your system, you can print a list of the
current subscriber database. Use this printout when you are administering the
system. Whenever you add a subscriber, remove a subscriber, or change
subscriber information, print the new subscriber list for your records. To print
the subscriber database, perform the following steps:
3-40
Implementing FAX Attendant
Page 88

Implementing FAX Attendant
1.
Make sure the printer is connected to your computer and turned on.
From the IS-III Main Menu, move the cursor to
2.
Power/FAX Attendant (AVP/FA)
3.
At the AUDIX Voice Power/FAX Attendant menu, move the cursor to
Subscriber Administration
—
The Subscriber Administration form appears.
4.
Press [ F8 ] (CHG-KEYS) to display the alternate key labels, then press
and press
and press
AUDIX Voice
Enter
Enter
.
.
[ F3 ] (DB-MGMT) to display the options menu.
5.
Use
↓
or
↑
6.
Press
Enter
to highlight the
to select the highlighted option.
Print
option.
Service Administrator Registration
FAX Attendant gives you the ability to customize the voice prompts for your
system. To prevent unauthorized modification of voice prompts, you must
register an administrator for each service. The data is compiled on Form G
from the AT&T AUDIX Voice Power™/FAX Attendant System™ Planning and
Implementation document.
Each Service Administrator must be registered with AUDIX Voice Power/FAX
Attendant as a subscriber prior to being assigned as a Service Administrator
so that the system can identify them as authorized to make changes.
NOTE:
You must first register all the service administrators before any subscriber
or outside caller uses your FAX Attendant system. Otherwise, the system
will not function properly. For example, if you do not register the service
administrator for the Fax Call Answer service, the system will provide the
following message when answering calls:
The main menu has not been recorded yet.
Implementing FAX Attendant
3-41
Page 89

Implementing FAX Attendant
To enter the data from Form G, perform the following steps:
At the AUDIX Voice Power/FAX Attendant menu, move the cursor to
1.
Service Administrator Registration
The Service Administrator Registration form appears.
—
Service Administrator Registration
-----------------------------------
and press
Enter
.
Service
Automated Attendant
Call Answer
Fax Call Answer
Fax Mail
Fax Response
Information Service
Message Drop
Voice Mail
Administrator’s Name
Figure 3-24. Service Administrator Registration Form
2.
Using Form G, type in the name and extension number of the
subscriber(s) assigned as administrator for each of the services. Press
Enter
after each field.
Extension
When you are finished, press [ F3 ] (SAVE) to save the information.
3.
3-42 Implementing FAX Attendant
Page 90

Implementing FAX Attendant
4.
—
Press
—
A window appears informing you that the information has been
saved.
Enter
to continue.
You return to the AUDIX Voice Power/FAX Attendant menu.
Updating Service Administrator Registration
To update Service Administrator information, use the preceding procedure.
The new information will replace the old information.
NOTE:
Be sure to update Form G from the AT&T AUDIX Voice Power™/FAX
Attendant System™ Planning and Implementation document with the new
information.
Outcalling Administration
Parameters that control Outcalling must be set during initial implementation.
They are generally not changed. The information is collected on Form H from
the AT&T AUDIX Voice Power™/FAX Attendant System™ Planning and
Implementation document. To set the outcalling parameters, follow these
steps:
Get your updated Form H from the AT&T AUDIX Voice Power™/FAX
1.
Attendant System™ Planning and Implementation document.
At the AUDIX Voice Power/FAX Attendant menu, move the cursor to
2.
Outcalling Administration and press Enter .
—
The Outcalling Administration form appears.
Implementing FAX Attendant
3-43
Page 91

Implementing FAX Attendant
Outcalling Administration
-------------------------
Is outcalling active?:
Start Time:
End Time:
Retry Interval:
Initial Delay:
Maximum Number of Attempts:
Maximum Simultaneous Ports:
Maximum Number of Digits:
Figure 3-25. Outcalling Administration Form
Using your completed Form H from the AT&T AUDIX Voice
3.
Power™/FAX Attendant System™ Planning and Implementation
document, type the information for each item and press Enter after
each field.
:
:
min
min
3-44
When you are finished, press [
4.
—
A window appears to inform you that the information has been
saved.
Press any key to continue.
5.
—
You return to the AUDIX Voice Power/FAX Attendant menu.
Implementing FAX Attendant
F3 ] (SAVE) to save your information.
Page 92

Implementing FAX Attendant
Updating Outcalling Parameters
To update outcalling parameters, use the preceding procedure. The new
parameter values will replace the previous parameter values.
NOTE:
Be sure to update Form H from the AT&T AUDIX Voice Power™/FAX
Attendant System™ Planning and Implementation document with the new
information.
Fax Group List Administration
FAX Attendant allows you to create, modify, and remove fax distribution lists
for individual subscribers. Subscribers can create, modify and remove their
own lists using their telephones, but these procedures can be tedious for
large lists. If any subscribers want long fax distribution lists, give them a copy
of Form RX to fill out. A blank copy of Form RX is provided in the AT&T AUDIX
Voice Power™/FAX Attendant System™ Planning and Implementation
document. When they complete the form and return it to you, follow this
procedure for creating a fax distribution list.
NOTE:
The system automatically converts any subscriber’s private fax extension
to that subscriber’s voice extension.
Creating a Fax Distribution List
To create a fax distribution list, perform the following steps:
At the AUDIX Voice Power/FAX Attendant menu, move the cursor to
1.
Fax System Parameter Administration and press Enter .
The Fax System Parameter Administration menu appears.
—
2.
At the Fax System Parameter Administration menu, move the cursor to
Fax Group List Administration and press
Implementing FAX Attendant
Enter .
3-45
Page 93
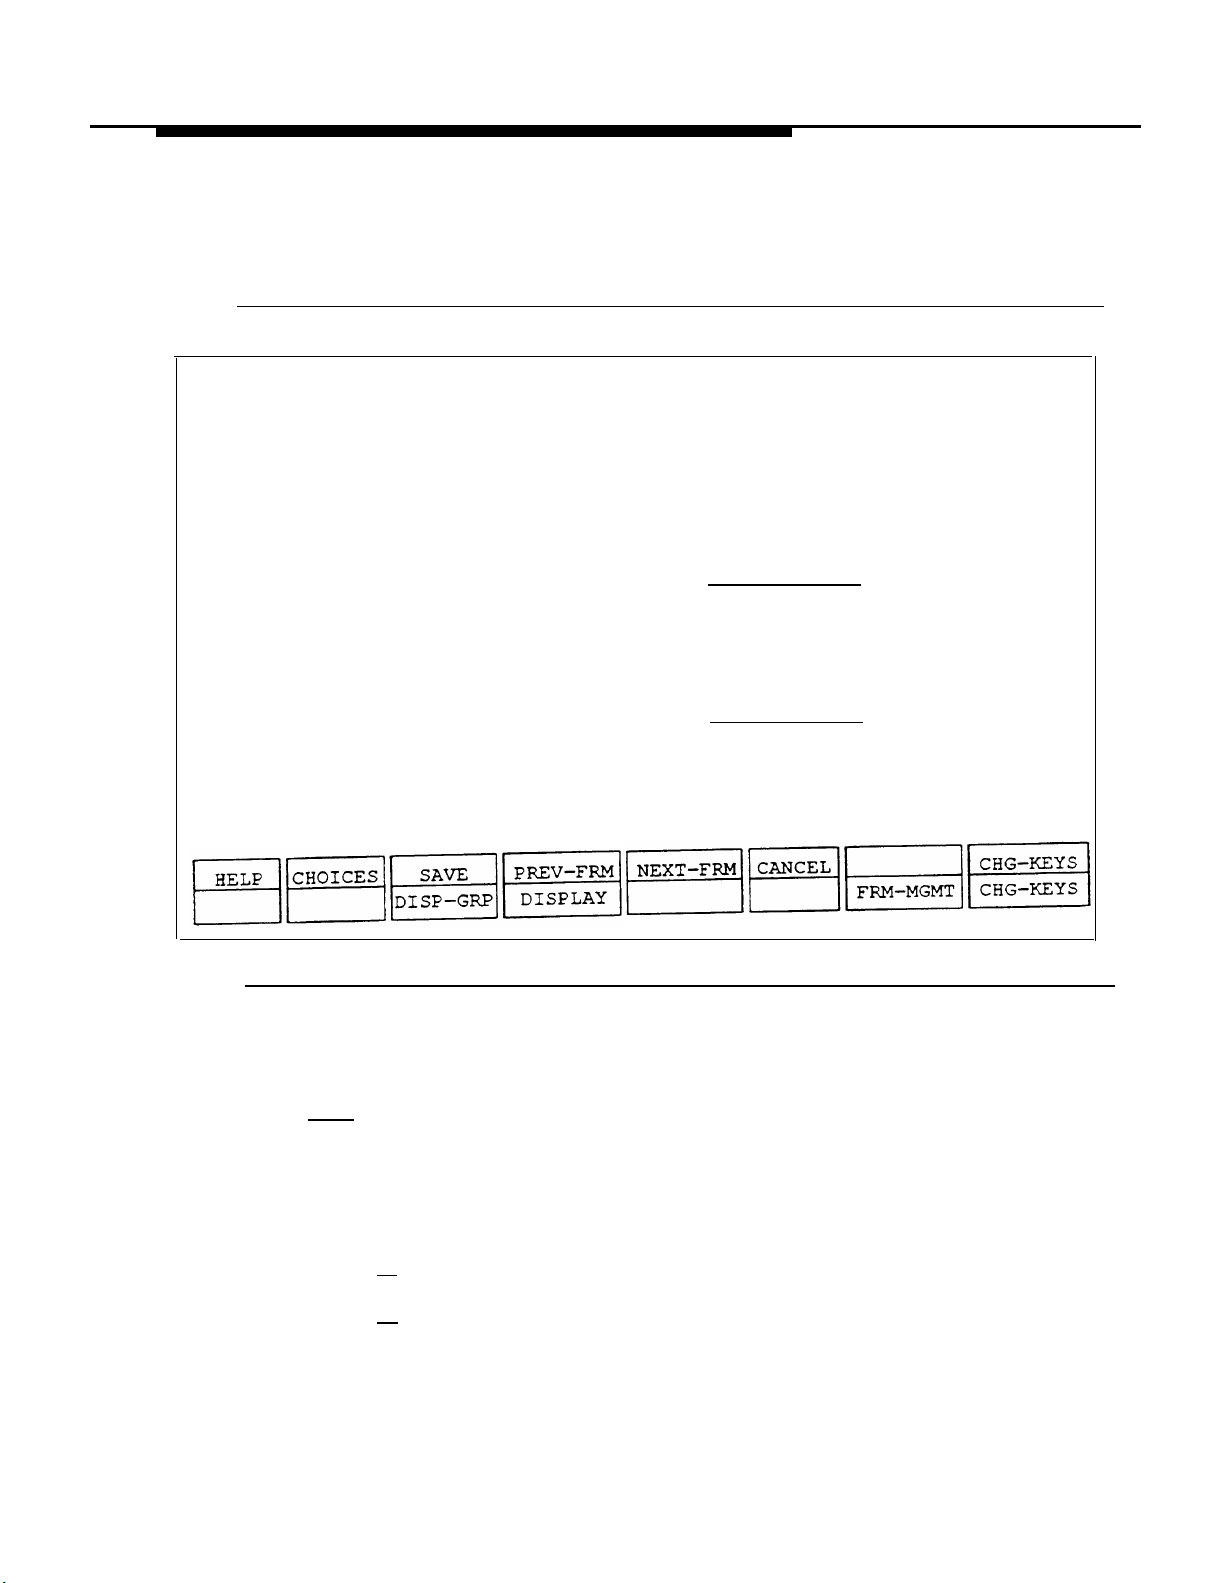
Implementing FAX Attendant
—
The Fax Group List Administration form appears.
Fax Group List Administration
--------------------------------
Voice extension:
Name:
Private fax extension:
List ID:
Figure 3-26. Fax Group List Administration Form
3.
Using Form RX, enter the voice extension for the subscriber and press
Enter
.
3-46
—
Enter the List ID (a numeric).
4.
Press [
5.
Press [
6.
—
The cursor moves to the
F8 ] (CHG-KEYS) to select the alternate keyset.
F4 ] (DISPLAY).
FAX Attendant displays the subscriber’s name and private fax
extension (if any).
Implementing FAX Attendant
List ID
field.
Page 94

Implementing FAX Attendant
Press [ F3 ] (DISP-GRP).
7.
The Fax Group List Editing form appears.
—
-----------------------------
Fax Group List Editing
Page 1 of 1
Phone numbers
Figure 3-27. Fax Group List Editing Form
8.
Press Enter to move the cursor from the page # field to the phone
numbers field.
Group list:
Phone Numbers
Enter the information from Form RX. The maximum entries per list is
9.
1,000.
If you completely fill page 1 and need to start another page, press
[
F8 ] (CHG-KEYS) to select the alternate keyset, and press [ F5 ]
(NEXT-PGE) to add a blank page. Press [
F8 ] (CHG-KEYS) when you
are finished.
Implementing FAX Attendant
3-47
Page 95

Implementing FAX Attendant
When you are finished entering the information, press [ F3 ] (SAVE).
10.
A window appears confirming that the information was saved.
—
11.
Press
Enter
to continue.
You return to the Fax Group List Administration
—
screen.
Repeat steps 3 to 11 for other lists.
12.
When you are finished, press [
13.
F8 ] (CHG-KEYS) to access the alternate
keyset.
Press [ F6 ] (CANCEL) to return to the Fax System Parameters
14.
Administration menu.
15.
Press [
F6
] (CANCEL) to return to the AUDIX Voice Power/FAX
Attendant menu.
Modifying a Fax Distribution List
To modify a fax distribution list, perform the following steps:
At the AUDIX Voice Power/FAX Attendant menu, move the cursor to
1.
Fax System Parameter Administration and press
The Fax System Parameters Administration menu appears.
—
At the Fax System Parameters Administration menu, move the cursor to
2.
Fax Group List Administration and press
Enter .
Enter .
3-48
The Fax Group List Administration form appears.
—
Implementing FAX Attendant
Page 96

Implementing FAX Attendant
--------------------------------
Fax Group List Administration
Voice extension:
Name:
Private fax extension:
List ID:
Figure 3-28. Fax Group List Administration Form
Enter the voice extension for the subscriber and press Enter .
3.
—
Enter the List ID (a numeric).
4.
Press [
5.
6.
Press [
The cursor moves to the
Use [
—
F8 ] (CHG-KEYS) to select the alternate keyset.
F4 ] (DISPLAY).
FAX Attendant displays the subscriber’s name and private fax
—
F2 ] (CHOICES) to display List IDs.
List ID
field.
extension (if any).
Implementing FAX Attendant
3-49
Page 97

Implementing FAX Attendant
7.
Press [ F3 ] (DISP-GRP).
—
The Fax Group List Editing form appears.
Make the changes to the list. To delete a number, put the cursor on
8.
that number and press the
When you are finished modifying the information, press [ F3 ] (SAVE).
9.
— A window appears confirming that the information was
changed.
spacebar .
Press
10.
11.
Repeat steps 3 to 10 for any other lists.
Press [ F6 ] (CANCEL) to return to the Fax System Parameters
12.
Enter
to continue.
—
You return to the Fax Group List Administration screen.
Administration menu.
Press [ F6 ] (CANCEL) to return to the AUDIX Voice Power/FAX
13.
Attendant menu.
Deleting a Fax Distribution List
To delete a fax distribution list, perform the following steps:
At the AUDIX Voice Power/FAX Attendant menu, move the cursor to
1.
Fax System Parameter Administration and press Enter .
The Fax System Parameter Administration menu appears.
—
3-50
2.
At the
Fax System Parameter Administration
menu, move the
cursor to Fax Group List Administration and press Enter .
The Fax Group List Administration form appears.
—
Implementing FAX Attendant
Page 98

Implementing FAX Attendant
Fax Group List Administration
--------------------------------
Private fax extension:
Voice extension:
Name:
List ID:
Figure 3-29. Fax Group List Administration Form
Enter the voice extension for the subscriber and press Enter .
3.
—
The cursor moves to the
Enter the List ID (a numeric).
4.
5.
6.
Press [
Press [
F8 ] (CHG-KEYS) to select the alternate keyset.
F4 ] (DISPLAY).
FAX Attendant displays the subscriber’s name and private fax
—
extension (if any).
List ID
Implementing FAX Attendant
field.
3-51
Page 99

Implementing FAX Attendant
Press [
7.
Press [
8.
Press [
9.
10.
Press y to confirm.
11.
Press
F3
] (DISP-GRP).
The Fax Group List Editing form appears.
—
F8 ] (CHG-KEYS) to select the alternate keyset.
F3 ] (DELETE) to delete the fax distribution list.
A window appears prompting you to confirm your selection.
—
A window appears confirming that the information was deleted.
—
Enter
to continue.
— You return to the Fax Group List Administration
screen.
12.
Repeat steps 3 to 11 for any other lists you wish to delete.
Press [
13.
Administration
F6 ] (CANCEL) to return to the Fax System Parameters
menu.
14.
Press [ F6 ] (CANCEL) to return to the AUDIX Voice Power/FAX
Attendant menu.
Custom Voice Prompts
Many of the voice prompts in the AT&T FAX Attendant System can be
customized. In fact, some of the prompts must be customized. This section
describes the procedures used to enter custom prompts from the forms you
completed in the Planning document. To administer the prompts, you will
need a telephone.
3-52
Implementing FAX Attendant
Page 100

Implementing FAX Attendant
NOTE:
Fax Response voice prompt planning and administration procedures are
covered in Chapter 4, Fax Response Administration.
Logging In to the Voice System
For security purposes, only the registered Service Administrator can change
the voice prompts for a service. For example, only the Service Administrator
for the Fax Call Answer service can change the Fax Call Answer prompts.
All voice prompts are administered from the Service Administration menu. To
access the Service Administration menu, follow these steps:
Dial the Voice Mail or the Automated Attendant Service number and
1.
wait for the system to answer.
Since FAX Attendant is co-resident with AUDIX Voice Power,
—
the system greeting for AUDIX Voice Power plays. This is
followed by a request to enter your extension number.
Enter your own extension number followed by [
2.
You are prompted to enter your password.
—
Enter your password followed by [
3.
You have now accessed AUDIX Voice Power/FAX Attendant.
—
# ].
The system announces your name, the number of held fax
messages in your account (if any), the number of autoprinted
fax messages (if any), and the number of voice mail messages
(if any). AUDIX Voice Power/FAX Attendant then recites the
AUDIX Voice Power Activity menu:
To hear the FAX Attendant Activity menu, press [
4.
The following FAX Attendant Activity menu plays:
—
# ].
8
].
Implementing FAX Attendant
3-53
 Loading...