

Page 1

DEFINITY
®
Enterprise Communications Server
Release 7
Console Operations Quick Reference
555-230-890
Comcode 108383811
Issue 3
June 1999
Page 2

Copyright 1999, Lucent Technologies
All Rights Reserved
Printed in U.S.A.
Notice
Every effort was made to ensure that the information in this
book was complete and accurate at the time of printing. However, information is subject to change.
Your Responsibility for Your System’s Security
Toll fraud is the unauthorized use of your telecommunications
system by an unauthorized party, for example, persons other
than your company’s employees, agents, subcontractors, or
persons working on your company’s behalf. Note that there
may be a risk of toll fraud associated with your telecommunications system and, if toll fraud occurs, it can result in substantial additional charges for your te leco m muni catio ns serv ic es.
Ordering Information
Write or Call:
Lucent Technologies BCS Publications Center
P.O. Box 4100, Crawfordsville, IN 47933
Voice 1-800-457-1235 Intl Voice +1-317-361-5353
Fax 1-800-457-1764 Intl Fax +1-317-361-5355
Order: Document No. 555-230-890
Comcode 108383811
Issue 3, June 1999
For more information about Lucent Technologies documents,
refer to the section entitled “Related Documents” in “About
This Document.”
Product Support
To receive support on your product, call 1-800-242-2121. Outside the continental United States, contact your local Lucent
Technologies authorized representative.
You and your system manager are responsi ble for the security
of your system, such as programming and configuring your
equipment to prevent unauthorized use. The system manager is
also responsible for reading all installation, instruction, and
system administration documents provided with this product in
order to fully understand the features that can introduce risk of
toll fraud and the steps that can b e taken to reduce that risk.
Lucent Technologies does not warrant that this product is
immune from or will prevent unauthorized use of common-carrier telecommunication services or facilities accessed through
or connected to it. Luc ent Tec h nolog ie s will not b e respo nsib le
for any charges that result from such unauthorized use.
Lucent Technologies Fraud Intervention
If you suspect that you are being victimized by toll fraud and
you need technical suppo r t or assistance, call the Lucent Technologies National Customer Care Center suppor t line at
1-800-643-2353. Outside t he contine ntal Un ited Sta tes, co ntact
your local Lucent Technologies auth orize d repre s enta tiv e.
Federal Communicati ons C ommis sion Statement
Part 15: Class A Statement. This equipment ha s been tested
and found to comply with the limits for a Class A digital
device, pursuant to Part 15 of the FCC Rules. These limits are
designed to provide re aso n ab le pr ote ction against harmful
interference when the equipm ent is operated in a commercial
environment. This equipment generates, uses, and can radiate
radio frequency energy and, if not installed and used in accordance with the instruction ma nual, may cause harmful interference to radio communica tions. Operatio n of this equipme nt in a
residential area is likely to cause ha rmful inter ference, in which
case the user will be required to correct the interference at his
own expense
European Union Declaration of Conformity
The “CE” mark affixed to the DEFINITY® equipment
described in this book indicates that the equipment conforms to
the following European Union (EU) Directives:
• Electromagnetic Compatibility (89/336/EEC)
• Low Voltage (73/23/EEC)
• Telecommunications Terminal Equipment (TTE) i-CTR3
BRI and i-CTR4 PRI
For more information on standards compliance, contact your
local distributor.
Comments
To comment on this document, return the comment form.
Lucent Technologies Web Page
The World W id e We b ho me pa ge for Luc e nt Tec hn olo gi es is
http://www.lucent.com
Acknowledgment
This document was prepa red by Product Documentation
Development, Lucent Technologies, Denver, CO.
Trademarks
DEFINITY is a registered trademark of Lu cent Technologies.
GuestWorks is a registered trademark of Lucent Technologies.
Page 3

DEFINITY® Enterprise Communications Server Release 7
Console Operations Quick Reference
Contents
555-230-890
Contents
Contents iii
Console Operations 1
■ About This Document 1
Assumptions 1
Conventions 1
Related Documents 3
■ Basic Operation 4
Console Layout 4
Status Lamps 8
Call Purpose Indicators 8
Administrable Features 9
Activate the Console 10
Issue 3
June 1999
iii
Deactivate the Console 10
Answer Calls 10
Make Calls 11
Forced Release 14
Split Calls 14
Split Swap 15
Auto Start and Don’t Split 17
Class of Restriction 17
Night Service 18
■ Feature Operation 19
Attendant Backup 19
Busy Verification 20
Call Forwarding 21
Call Park 23
Conference 23
Crisis Alert 24
Emergency Access to Attendant 25
Hold 25
Integrated Directory 26
Intrusion 28
Loudspeaker Paging 29
Page 4

DEFINITY® Enterprise Communications Server Release 7
Console Operations Quick Reference
Contents
555-230-890
Override 30
Recall 31
Serial Calling 32
Transfer 34
Trunk Identification 36
Index 37
Issue 3
June 1999
iv
Page 5

DEFINITY® Enterprise Communications Server Release 7
Console Operations Quick Reference
Console Operation s
555-230-890
Console Operations
About This Document
This document contains basic telephony procedures for using the DEFINITY®
Enterprise Communications Server (ECS) attendant console. These procedures
are done by the attendants or front desk personnel.
Issue 3
June 1999
1About This Document
All office staff personnel that operate the attendant console or do console
operations at a backup telephone should be familiar with these procedures. If you
need extra copies of this document, contact your Lucent representative or order
more copies as described on the inside cover of this document.
Assumptions
It is assumed throughout this document that the user is familiar with the basic
operation of telephones and attendant consoles. If users have access to a
multimedia personal computer, there is training available on C D-ROM for basic
console and telephone operations.
Conventions
The following conventions are used in this document:
■ Buttons you press on the console are shown as follows:
RELEASE button
The buttons shown in this document use label designations provided by
Lucent Technologies. Since the button labels can be customized for each
site, some button labeling may have different designations.
Page 6

DEFINITY® Enterprise Communications Server Release 7
Console Operations Quick Reference
Console Operation s
555-230-890
Some button labels on the console, such as Serial Call, span two lines.
Because of line spacing in this doc ument, they ar e shown acros s one line of
text, such as
■ The term “dial keypad” refers to the touch-tone keypad where you dial
SERIAL CALL.
(enter) telephone numbers and feature access codes.
■ When referring to lamps, the reference is to one of two types of lamps
found on the atten dant consol e: the s tatus la mps next to the dial keyp ad and
the lamps associated with feature and trunk buttons. The status lamps next
to the dial keypad have fixed meanings. Those lamps are shown a s f ol lows :
Position Available
Lamps associated with feature and trunk buttons are identified by their
button label (such as
■ Messages appearing on the display are shown as follows:
a= CONFERENCE 2 rc
NORMAL MODE).
When the display examples show a value within “arrows” (< >), this
represents a variable that will differ for each example.
Issue 3
June 1999
2About This Document
■ The term “attendant console” signifies the Model 302B, 302C, or PC
console that usually is found at the front desk. The term “backup
telephone” signifies either a Model 6408, 6424, 8410D or 8434 telephone
with attendant-type feature buttons. Other multiappearance telephones can
be used, but the preferred models are the 6408, 6424, 8410D or 8434.
■ When a procedure refers to a “extension,” the procedure is referring to the
extension number of a user or guest. A gues t’s room number and ext ensio n
are not always the same.
■ You will hear the following tones during normal operation:
— Dial tone — a steady tone you hear when you select an idle call
appearance.
— Ringback tone — th e normal ringing to ne y ou hear after you d ia l a n
extension or outside number.
— Busy tone — a slow on-off-on-off tone you hear when the person
you are calling is busy.
— Reorder tone — a fast on-off-on-off tone you hear when calling
facilities are not available or are out of order.
— Confirmation tone — a three-burst tone you hear after successfully
using a feature access code.
— Intercept tone — a high-to-low tone you hear when a call or feature
access code is not accepted.
Page 7

DEFINITY® Enterprise Communications Server Release 7
Console Operations Quick Reference
Console Operation s
■ The following table lists the features described in this document. Ask your
555-230-890
administrator for these co des and write them down in this table.
Feature
Answer Back (for Call Park)
Call Forwarding - All Calls
Activation
Deactivation
Call Forwarding - Busy/Don’t
Answer
Activation
Deactivation
Call Park
Issue 3
June 1999
3About This Document
Feature Access
Code
Trunk Answer Any Station (used
from the backup telephones)
Related Documents
■ DEFINITY
■ PC Console Quick Reference User’s Guide — 555-230-795
■ DEFINITY
555-230-723
®
Console Operations — 555-230-700
®
ECS and GuestWorks® Hospitality Operations —
Page 8
DEFINITY® Enterprise Communications Server Release 7
Console Operations Quick Reference
555-230-890
Console Operation s
Basic Operation
Console Layout
Issue 3
June 1999
4Basic Operation
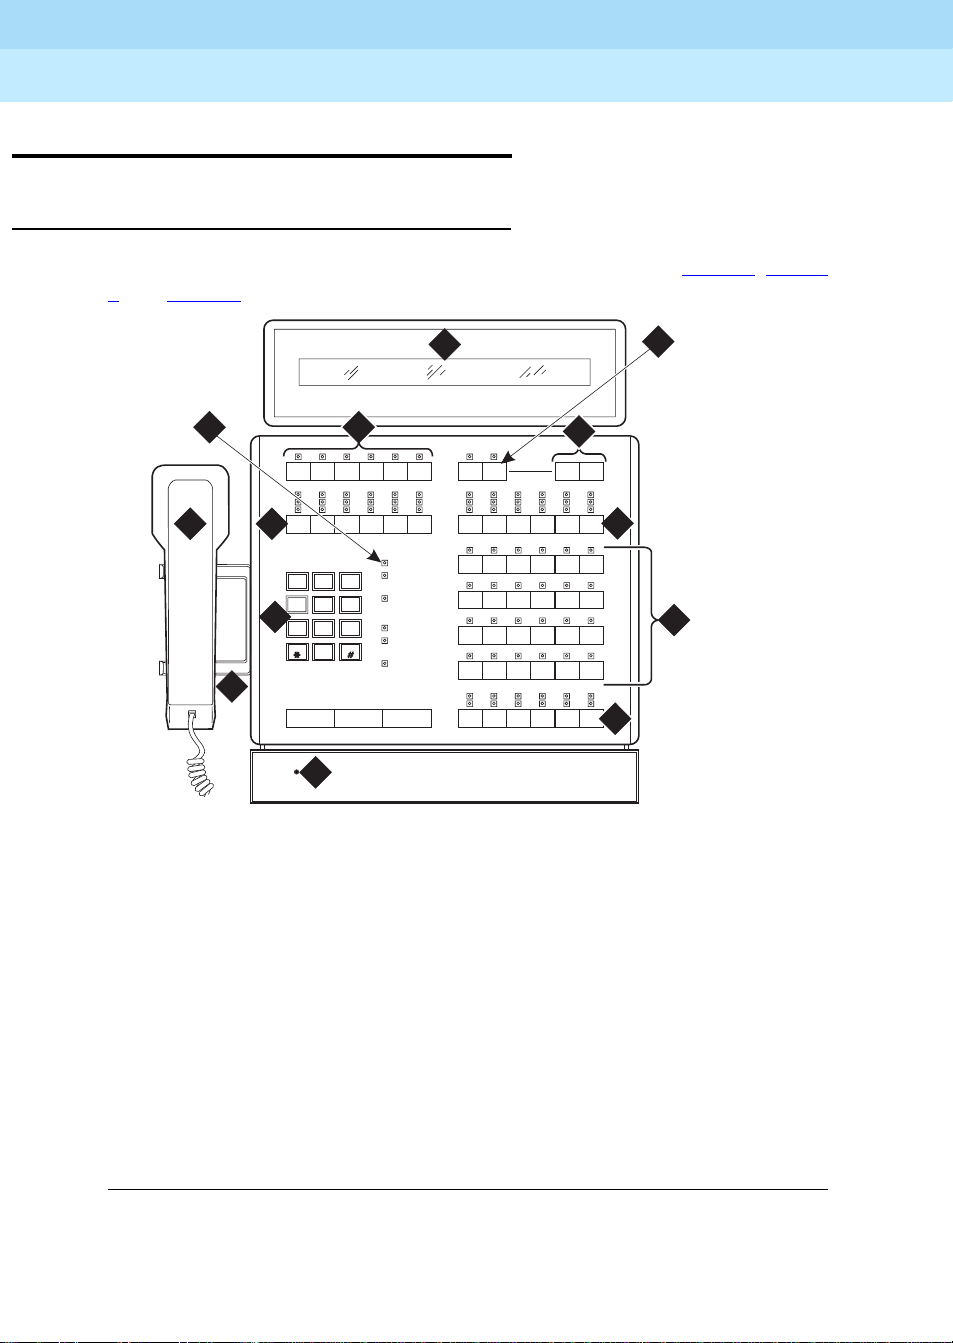
The Attendant Consoles and DXS Sele ctor Cons ole are shown in Figure 1
2, and Figure 3.
8
6
2
5
1
GHI
4
4
PQRS
7
3
Tes t
Cont
Warnin g
Busy
7
Select Volume
Cont
Warnin g
Busy
CallsWaiting
ABC
2
JKL
5
TUV
8
Oper
0
CallsWaiting
DEF
Warni ng
3
Individual
MNO
CallsWaiting
6
WXYZ
Alarm
9
Alarm
Reported
Posit ion
Available
On Hold
Start ReleaseCancel
10
Ringer
1
phdg302b KLC 031899
9
11
12
13
, Figure
1) Lamp Test Switch 8) Display
2) Handset 9) Select Button
3) Handset Cradle 10) Volume Control Buttons
4) Call Processing Area 11) Outside-line Buttons
5) Outside-line Buttons 12) Feature Buttons
6) Warning Lamps and Call
13) Call Appearance Buttons
Waiting Lamps
7) Display Buttons
Figure 1. Model 302A/B Attendant Console
Page 9
DEFINITY® Enterprise Communications Server Release 7
Console Operations Quick Reference
555-230-890
Console Operation s
8
Issue 3
June 1999
5Basic Operation
7
6
Control
Warning
Busy
1
5
CallsWaiting
DEF
ABC
3
1
2
GHI
JKL
4
5
3
PRQS
TUV
7
8
0
CallsWaiting
Warning
MNO
Individual
6
CallsWaiting
Alarm
WXYZ
9
Alarm Reported
Positio n
Available
2
Cancel Start Release
Select Volume
Date
Time
Control
Warning
Busy
Forced
Release
Split Hold
a
b
4
9
Ringer
10
Night Pos
Busy
c
d
phdg302c KLC 031199
12
e
f
11
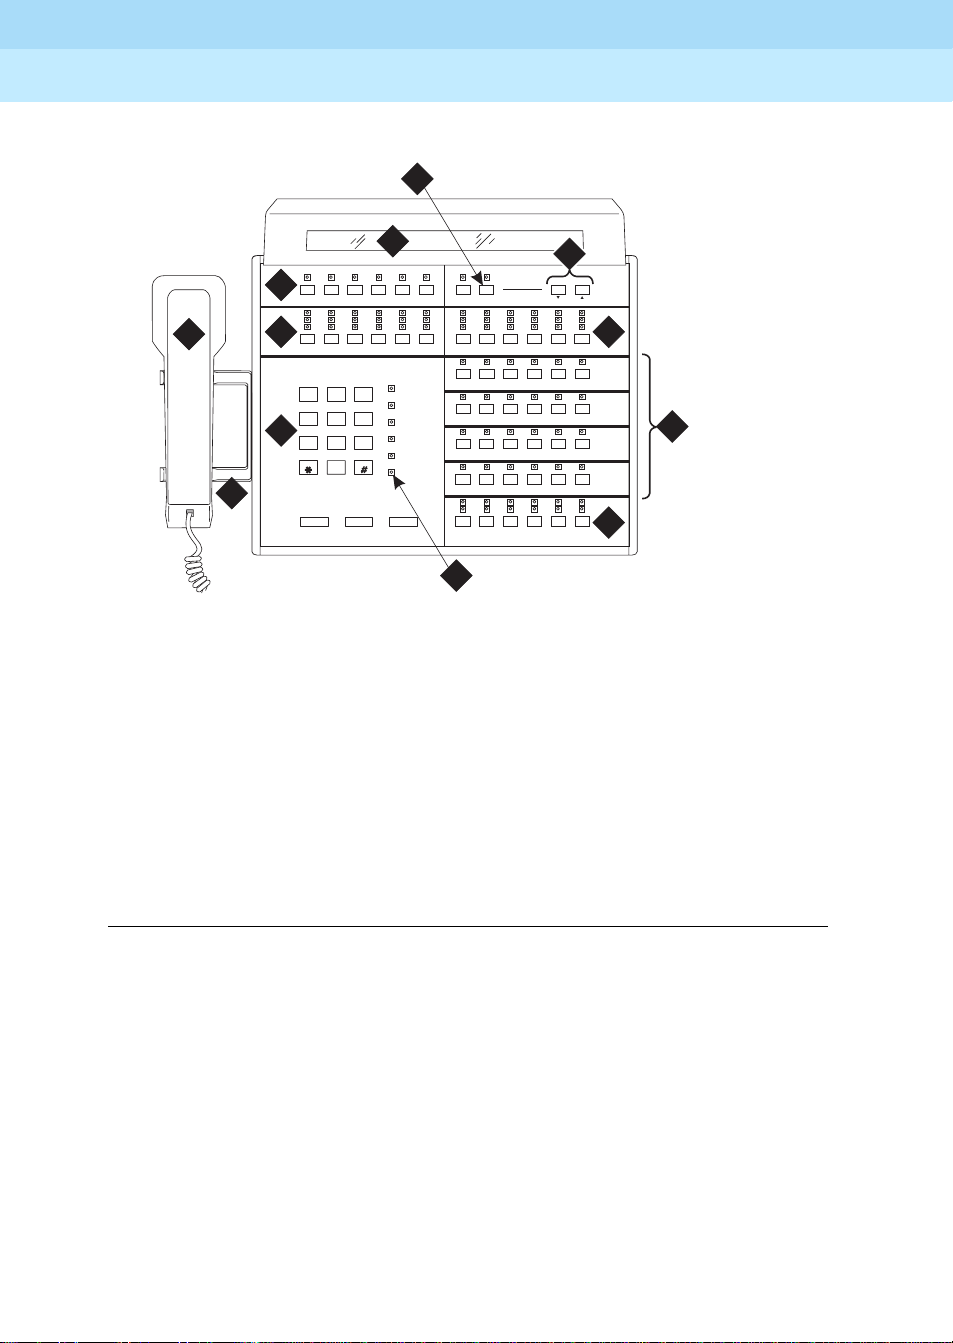
1) Handset 7) Display
2) Handset Cradle 8) Select Button
3) Call Processing Area 9) Volume Control Buttons
4) Warning Lamps and Call
10) Outside-line Buttons
Waiting Lamps
5) Outside-line Buttons 11) Feature Buttons
6) Display Buttons 12) Call Appearance Buttons
Figure 2. Model 302C Attendant Console
Page 10
DEFINITY® Enterprise Communications Server Release 7
Console Operations Quick Reference
555-230-890
Console Operation s
90 91 92 93 94 95 96 97 98 99
80 81 82 83 84 85 86 87 88 89
70 71 72 73 74 75 76 77 78 79
60 61 62 63 64 65 66 67 68 69
50 51 52 53 54 55 56 57 58 59
40 41 42 43 44 45 46 47 48 49
30 31 32 33 34 35 36 37 38 39
20 21 22 23 24 25 26 27 28 29
10 11 12 13 14 15 16 17 18 19
00 01 02 03 04 05 06 07 08 09
phdgdxs KLC 031199
Issue 3
June 1999
6Basic Operation
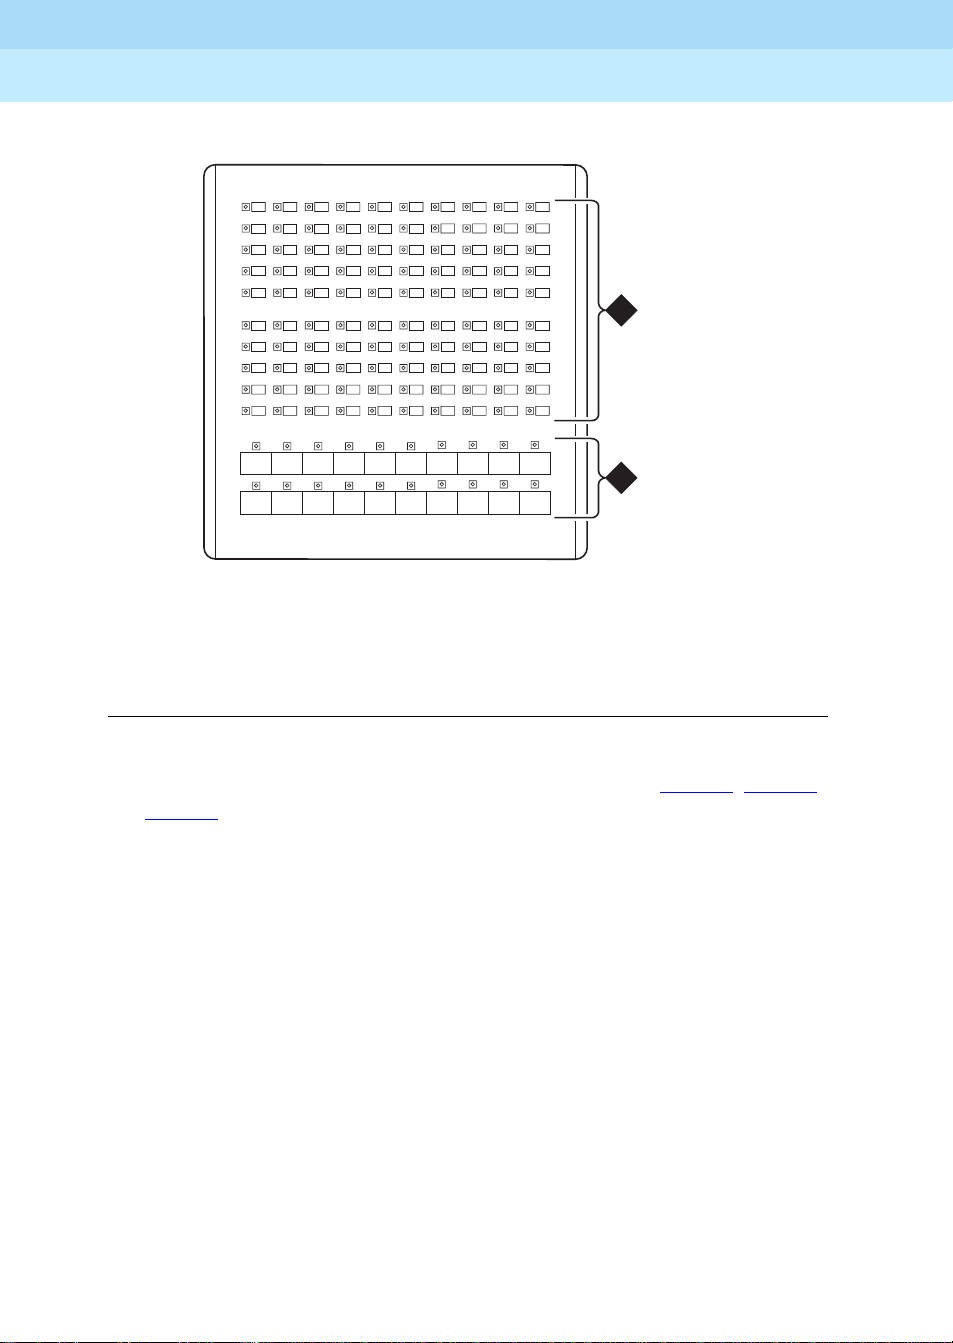
1
2
1) DXS Hundreds
2) DXS/BLF Buttons
Group Select Buttons
Figure 3. DXS Selector Console
The following list items correspond with the callouts shown in Figure 1, Figure 2 ,
and Figure 3
. All the feature butt ons, t runk acc ess bu ttons , and displa y but tons a re
on this console. The DXS Selector Console allows you to dial an extension
number and view the status for each extension.
■ Lamp Test Switch — This is a switch under the front panel of the
Model 302A/B console that allows you to test the console lamps. The test
starts when you press the switch and stops when you release the switch.
On the Model 302C console, you must press simultaneously and hold the
POS BUSY and VOLUME UP buttons to test the console lamps. The test starts
when you press the buttons and stops when you release the buttons.
■ Handset — This is a standard handset with coiled cord and a dual-prong,
phone-plug connector. The handset can be unplugged from the consol e and
replaced with an ampli fi ed headset that also uses a dual-prong, phone-pl ug
connector.
■ Handset Cradle — This is where you place the handset when it is not in
use. If you use a headset, the handset cradle can be removed from the
console.
Page 11
DEFINITY® Enterprise Communications Server Release 7
Console Operations Quick Reference
Console Operation s
■ Call Processing Area, Warning Lamps, and Call Waiting Lamps — This
555-230-890
area consists of the dial keypad, some fixed status lamps, and the
CANCEL, and RELEASE buttons. Use the START button to get an idle call
appearance to place a c all, the
and the
■ Display Buttons — These 8 buttons are used to control access to the
RELEASE button to end a call.
CANCEL button to cancel a dial ing instruct ion,
alphanumeric display.
■ Display — This is a single-line, 40-character, alphanumeric display that
shows call progress and feature usage information.
■ Volume Control Buttons — These buttons, along with the SELECT button,
control the ringer volume for incoming calls, timed reminder calls, call
waiting calls, and emergency calls. Incoming crisis alert calls (refer to
‘‘Crisis Alert’’ on page 24
) ring at a louder fixed volume that you cannot
control.
NOTE:
Always check your ringer volume to make sure it is set at an audible
level. If the console should experience a power outage, the volume
level is reset to the lowest setting.
Issue 3
June 1999
7Basic Operation
START,
■ Outside-line Buttons — These 12 buttons are assigned with trunk access
codes that allow access to outside lines.
■ Feature Buttons — These 24 buttons are used to access features such as Do
Not Disturb and Automatic Wakeup.
■ Call Appearance Buttons — These 6 call appearance buttons are used to
select a call appearance and are labeled
similar to pressing the
START button, but you can specify wh ich app earanc e
A through F. Pressi ng one of them is
you want.
■ DXS Hundreds Group Select Buttons — These buttons on the DXS
selector console are assigned the first digit or the first two digits of each
group of 100 extensions. For example, if you have extensions numbered
from 7000 to 7099, there will be a button labeled
■ DXS/BLF Buttons — These are known as the direct extension select/busy
7000.
lamp field (DXS/BLF) buttons. They are used with the hundreds group
select buttons to place calls to extensions and to determine the status of
extensions.
— If the lamp is dark, the extension is idle.
— If the lamp is lighted, the extension is in use.
— If a station has the Send All Calls feature active and is busy, the
lamp remains steady until th e station is n o l ong er busy. At that time,
the lamp goes to a flashing mode.
Page 12

DEFINITY® Enterprise Communications Server Release 7
Console Operations Quick Reference
Console Operation s
555-230-890
Status Lamps
The buttons on the console have status lamps associated with their use. These
status lamps come on, go off, or flash as you use the console features. When the
lamps come on, the feature is active. When the lamps go off, th e feature is
inactive. When the lamps f lash 3 times, yo u have pr essed t he wrong button or y ou
cannot access the feature at this time.
There are also some st atus la mps not d irectly as sociated with butt ons, and t hey are
located next to the dial keypad.
■ Calls Waiting — This lamp lights when there is one call in the queue.
■ Calls Wait ing Warning — This lamp lights when the attenda nt calls waiting
in queue limit has been reached. When this happens, any administered
backup telephones are alerted. The queue limit is an administrable value.
■ Individual Ca lls Waiting — This lamp lights when a call is made to the
console’s individual extension number and the call is in queue to be
answered.
Issue 3
June 1999
8Basic Operation
■ A larm — This lamp lights when the switch has detected a failure. Follow
local procedures if this lamp is lit.
■ Alarm Reported — This lamp lights when an alarm prompts the switch to
dial up the remote maintenance center, report the alarm, and the
maintenance center acknowledges the alarm. For some installations, this
remote alarm reporting is not available.
■ Position Available — This lamp lights when the console is available to
handle a call.
The trunk group select buttons have 3 status lamps associated with each button.
■ C ontrol — This lamp is on if the trunk group has controlle d restriction s
administered.
■ Warning — This la mp is on when so me tru nks are bus y. Select an alternate
trunk group if possible, or use this group if necessary.
■ Busy — This lamp is on when all the trunks in a tr unk group are busy. You
must select another trunk group or try again later.
Call Purpose Indicators
The following is a list of call purpose indicators that are displayed when calls are
redirected to the attendant console or to a backup telephone:
■ b or B — Busy. Indicates that the called exte nsion is busy and the call is
redirected by Call Coverage.
Page 13

DEFINITY® Enterprise Communications Server Release 7
Console Operations Quick Reference
Console Operation s
■ co — Controlled Outward Restriction Call. Indicates that a user attempted
555-230-890
to make an outgoing call, but the extension has Outward Restriction
applied.
■ cs — Controlled Station-to- Station Restriction Call. Indicates that a user
attempted to make a call to another extension, but the extension has
Station-to-Station Restriction applied.
■ ct — Controlled Termination Restriction C all. Indicates that a user or an
outside caller attempted to make a call to an extension, but the called
extension has Termination Restriction applied.
■ d — Don’t Answer or Cover. Indicates that the user did not answer the
telephone, and the call is redir ected to the at tendan t throug h Call Coverag e.
■ f — Call Forwarding. Indicates that a call has been redirected using Call
Forwarding.
■ ic — Intercept Treatment. Indicates that an incoming call has been
redirected as a result of intercept treatment.
Issue 3
June 1999
9Basic Operation
■ ld — Direct Inward Dialing (DID) Listed Directory Number (LDN) Call.
Indicates that an incoming call came in on the LDN over a DID trunk.
■ rc — Recall Call. Indicates that a call being held on the console is
requesting more help.
■ rt — Return Call. Indicates that a call transferred to another telephone or
parked at an extension was not answered, and has returned to the console
for processing.
■ s — Send All Calls. Indicates that a call was redirected becau se the called
party used Send All Calls.
■ sc — Serial Call. Indicates a recall to the console when an outside caller is
making a series of calls.
■ tc — Trunk Control. Indicates that a user attempted to place a call using a
trunk that has controlled access.
Administrable Features
Some of the featur es on the atte ndant cons ole are administrable, which means that
you may be able to use the feature, depending on whether the switch is
administered for that feature. The administrable features include the following:
■ Attendant Lockout — If Attendant Lockout is on, you cannot reenter a
conference call.
■ Attendant Auto Start — If Attendant Auto Start is on, you do not have to
press the
explanation of Auto Start, refer to ‘‘Auto Start’’ on page 17
START button or a call appearance button to make a call. For an
.
Page 14

DEFINITY® Enterprise Communications Server Release 7
Console Operations Quick Reference
Console Operation s
■ Attendant Tone — If Attendant Tone is off, you will not hear busy tones,
555-230-890
dial tones, or ringback tones for internal calls.
■ Auto Answer — If Auto Answer is on, incoming calls are answered
automatically, which means that you do not have to pr ess a cal l appea ran ce
button. This feature can be used only when you are using a headset.
■ Display Languages — The display can show messages in four different
languages: U.S. English, French, Italian, and Spanish. This is an
administrable option.
Activate the Console
T o use t he attend ant consol e, you first must acti vate the console by performing t he
following:
1. Plug in the handset or the headset on either side of the console.
Issue 3
June 1999
10Basic Operation
2. If the Night lamp is on, press the
■ T he Night lam p goes off.
■ The Position Available lamp goes on.
Deactivate the Console
If you do not want anyone using the attendant console after hours, perform the
following to deactivate the attendant console:
1. If the Nig ht lamp is off, press the
2. Unplug the handset or the headset.
■ All lamps on the console go off.
Answer Calls
To answer calls, perform the following:
1. A call c omes in to the console:
■ You hear a 1-burst repetitive ring.
■ T he caller’s name (if available) and extension displays. If this is a
call from outside, incoming trunk information displays.
NIGHT button.
NIGHT button.
■ The Position Available lamp goes off.
■ A call appearance lamp flashes.
2. Press the call appearance button where the lamp is flashing.
■ The ringing stops.
Page 15

DEFINITY® Enterprise Communications Server Release 7
Console Operations Quick Reference
555-230-890
Console Operation s
■ The call appearance lamp stops flashing, but remains on.
■ You are connected to the calling person.
Issue 3
June 1999
11Basic Operation
Make Calls
You can make calls using the dial keypad or using the DXS selector console. To
make outside calls, you can use the dial keypad or the trunk group select buttons.
T o make c alls usin g the select or console , perform the followi ng (use number 7062
as an example):
3. To end the call, press the
■ You are disconnected from the call.
■ The call appearance lamp goes off.
■ The display goes blank.
■ The Position Available
■ The console returns to the normal operating mode.
RELEASE button.
lamp goes on.
1. At the selector console, press the hundreds group select button that is
marked
2. Press the
7000. This button controls all extensions that start with 70.
62 button in the DXS/BLF button field.
■ A call appearance lamp goes on.
■ The Position Available lamp goes off.
■ You hear a ringback tone.
■ The display shows the dialed number.
■ The ringback tone stops when the called party answers.
3. To end the call, press the
■ You are disconnected from the call.
■ The call appearance lamp goes off.
■ The display goes blank.
■ The Position Available lamp goes on.
■ The console returns to the normal operating mode.
NOTE:
Before the call completes, you can press the CANCEL or RELEASE
button to end the call attempt. If you press
dial tone. If you press
operating mode.
RELEASE button.
CANCEL, you get another
RELEASE, the console returns to the normal
Page 16

DEFINITY® Enterprise Communications Server Release 7
Console Operations Quick Reference
555-230-890
Console Operation s
To make calls not using the selector console, perform the following:
Issue 3
June 1999
12Basic Operation
1. Press the
START button or an idle call appearance button.
■ You hear a dial to ne.
■ The call appearance lamp goes on.
■ The Position Available lamp goes off.
2. Dial the extension.
■ You hear a ringback tone.
■ The display shows the dialed number.
■ The ringback tone stops when the called party answers.
3. To end the call, press the
■ You are disconnected from the call.
■ The call appearance lamp goes off.
■ The display goes blank.
■ The Position Available lamp goes on.
■ The console returns to the normal operating mode.
NOTE:
Before the call completes, you can press the CANCEL or RELEASE
button to end the call attempt. If you press
dial tone. If you press
operating mode.
RELEASE button.
CANCEL, you get another
RELEASE, the console returns to the normal
Making a call to an outside numbe r requir es an outg oin g trunk. You can access an
outgoing trunk in two ways:
■ You can make a call to an outside number by dialing a code for the
Automatic Route Selection feature or a specific trunk group, or
■ You can make a call to an outside number by pressing the trunk group
select button for the desired trunk.
NOTE:
Trunk group select buttons are not available at some locations. If the
trunk group select buttons are not administered, dial the trunk access
codes using the dial keypad.
Page 17

DEFINITY® Enterprise Communications Server Release 7
Console Operations Quick Reference
555-230-890
Console Operation s
To make a call to an outside number, perform the following:
1. Do one of the following:
Issue 3
June 1999
13Basic Operation
a. Press the
START button or an idle call appearance button.
■ You hear a dial to ne.
■ The call appearance lamp goes on.
■ The Position Available lamp goes off.
b. Press a trunk group select button. Continue with Step 3.
■ The call appearance lamp goes on.
■ The Position Available lamp goes off.
■ The trunk group select Busy lamp goes on.
2. Dial the trunk access code or dial the Automatic Route Selection feature
access code.
3. Listen for the call progress tones. If you hear:
■ Dial tone, this is a valid trunk access code. Continue with Step 4.
■ Busy or reorder tone, this indicates that ther e are no out going t runks
available. Press the
CANCEL button and redial, or press the RELEASE
button and try again later.
■ Intercept tone, this is an inv alid code. Press the CANCEL button and
redial, or press the
RELEASE button and try again later.
4. Dial the outside number, and listen for call progress tones. If you hear:
■ Ringback tone and the call is answered, go to Step 5. If the call is
not answered, press the
RELEASE button and try again later.
■ Busy tone or intercept tone, the call cannot be completed as dialed;
press the
CANCEL button and redial, or press the RELEASE button and
CANCEL button and redial, or press the
try again later.
5. To end the call, press the
■ You are disconnected from the call.
■ The call appearance lamp goes off.
■ The display goes blank.
■ The Position Available lamp goes on.
■ The console returns to the normal operating mode.
RELEASE button.
Page 18

DEFINITY® Enterprise Communications Server Release 7
Console Operations Quick Reference
Console Operation s
555-230-890
Forced Release
While making calls and answering calls, you can get in a situation where you
cannot cancel or release a call. If this happens, use the
This disconnects you from the current call and returns the console to the normal
operating mode. Use this feature only when necessary.
Split Calls
You can disconnect temporarily from a call, make a call to another person, and
then connect the two people together. You always must split a call in order to
transfer an incoming call to a extension or to an outside number. Splitting allows
you to do the following:
■ Either talk with the second pers on t o annou nce the waiti ng call, or drop out
of the call before the second person answers.
■ Connect the two calls together.
Issue 3
June 1999
14Basic Operation
FORCED RELEASE button.
■ Join the calling and called parties in a 3-way connection from which you
can later drop out.
■ Return to the split calling person if the called person does not answer or
does not want to accept the call.
This feature is act ivated automat ically after you a nswer an in coming call i f you do
any of the following:
■ Dial an extension number using the DXS Selector Console.
■ Press the START button, and then dial a number (for example, an extension
number, a trunk access code, or the Automatic Route Selection feature
access code).
■ Press a trunk group select button.
While the calling person is split from the console, the Split
condition is canceled, and the Split
lamp goes off when you perform one of the
lamp is on. The split
following:
■ Press the RELEASE button to connect the split person to the called person
and disconnect the console.
■ Press the SPLIT button to establish a 3-way c onne cti on with you, the calling
person, and the called person.
■ Press the CANCEL button to cancel the outgoing call attempt and reconnect
to the calling person.
To activate and cancel the split condition, refer to ‘‘Transfer’’ on page 34
.
Page 19

DEFINITY® Enterprise Communications Server Release 7
Console Operations Quick Reference
Console Operation s
555-230-890
Split Swap
Split Swap allows the attendant to alternate between active and split calls. This
operation may be useful when the attendant may need to transfer a call, but first
must talk with each party before completing the transfer. This operation is done
using the
!
SPLIT SWAP button.
SECURITY ALERT:
The Split Swap operation can involve transferring calls per the callers
requests. Refer to ‘‘Transfer’’ on page 34
security issues.
To use the Split Swap feature, perform the following:
Issue 3
June 1999
15Basic Operation
for more information concerning
1. While active on a call, press the
■ You hear a dial to ne.
■ T he Split lamp goes on.
START button.
2. Dial the number for the person to whom you may transfer the call.
■ You hear a ringback tone.
■ The display shows the number you are calling.
3. After th e person answers, pres s the
SPLIT SWAP button to alternate between
the original call and the new call.
■ The Split Swap
lamp goes on and stays on as long as you alternate
between calls.
4. Use one of the following steps (a, b, c, or d) to complete the call.
a. To set up a 3-way connection, press the
■ You and the other two callers are connected.
■ T he Split lamp goes on.
■ The display shows a conference call in progress.
■ The Split Swap
lamp goes off an d the but ton can no longer be
SPLIT button.
used for this call.
To drop out of the 3-way connection, press the
■ You are disconnected from the call.
■ T he Split lamp goes off.
■ The call appearance lamp goes off.
■ The display goes blank.
■ The Position Available lamp goes on.
RELEASE button.
Page 20

DEFINITY® Enterprise Communications Server Release 7
Console Operations Quick Reference
555-230-890
Console Operation s
■ The console returns to the normal operating mode.
Issue 3
June 1999
16Basic Operation
b. To transfer the call, press the
together), then the
■ You are disconnected from the call.
■ T he Split lamp goes off.
■ The call appearance lamp goes off.
■ The display goes blank.
■ The Position Available lamp goes on.
■ The console returns to the normal operating mode.
RELEASE button.
c. While alternating between calls using the
may want to disconnect one of the calls. Press the
SPLIT button (this joins all three parties
SPLIT SWAP button, you
CANCEL button
when you are connected with the caller you wish to disconnect.
■ The active call is disconnected.
■ The console is connected to the other caller.
■ The Split Swap lamp goes off.
To disconnect the caller, press the
■ You are disconnected from the call.
■ The call appearance lamp goes off.
RELEASE button.
■ The display goes blank.
■ The Position Available lamp goes on.
■ The console returns to the normal operating mode.
d. While alternating between calls using the
may want to place one of the calls on hold. Press the
SPLIT SWAP button, you
HOLD button
when you are connected with the caller you wish to place on hold.
■ T he On Hold lamp at the call appearanc e button goes on.
■ The call appearance lamp goes off.
■ The active call is placed on hold.
■ The console is connected to the other caller.
■ The Split Swap
To disconnect the caller, press the
■ You are disconnected from the call.
■ The call appearance lamp goes off.
■ The display goes blank.
lamp goes off.
RELEASE button.
Page 21

DEFINITY® Enterprise Communications Server Release 7
Console Operations Quick Reference
Console Operation s
■ The Position Available lamp goes on.
■ The console returns to the normal operating mode.
555-230-890
Auto Start and Don’t Split
Auto Start is an administrable feature that allows you to initiate a phone call by
pressing any button on the dial keypad. If you are on an active call and you dial
digits on the keypad, the console automatically splits the call and begins dialing
the next call. When the Auto St art feature is enabl ed, th e
To disable the Auto Start feature, use the Don’t Split feature. This allows the
switch to send the digits you dial to the other end. Use the Don’t Split feature if
you need to send touch-tone digits to the far end to pick up answering machine
messages when Auto Start is administered.
Auto Start
Issue 3
June 1999
17Basic Operation
START button is disabled.
To use the Auto Start feature, perform the following:
1. To extend (transfer) an active call to another extension, begin dialing the
digits of the extension.
■ T he active call is split away automatically from the console.
2. Press the
Don’t Split
To use the Don’t Split feature, perform the following:
1. Press the
■ The call remains active.
2. Dial th e keypad digits for the call.
■ The touch tones are sent to the far end.
3. Press the
Class of Restriction
When users request that you place long-distance or even local calls, you should
check their assigned class of restriction (COR) before you complete the call. If
they are not restricted from certain calls, you may complete the call for them.
RELEASE button to transfer the call.
DON’T SPLIT button to send touch tones on an active call.
DON’T SPLIT button again to cancel the Don’t Split feature.
Page 22

DEFINITY® Enterprise Communications Server Release 7
Console Operations Quick Reference
Console Operation s
555-230-890
To check on a user’s COR, do the following:
Issue 3
June 1999
18Basic Operation
The COR call restri ction identifiers are the foll owing:
Night Service
The Night Service feature prevents calls from terminating at the attendant
console. Calls to the attendant console enter the attendant call waiting queue and
can be answered from the backup telephones or by hotel staff at other telephones
using the Trunk Answer Any Station feature (refer to ‘‘Attendant Backup’’ on
page 19).
1. While on an active call, press the
■ The Class (COR)
■ The display shows the user’s COR value (a two-digit code) and a
lamp goes on.
CLASS (COR) button.
four-character restriction identifier, such as:
a = <Name> 01 NONE
■ ORIG — Origination restriction; calls of any type are not allowed
from that extension.
■ OTWD — Outward Restriction; calls to numbers outside of the
system are not allowed from that extension.
■ TOLL — Toll Restriction; toll call s are not allowed from that
extension.
■ NONE — No restrictions are active for that extension.
2. Follow local procedures for handling calls from restricted extensions.
To activate Night Service, perform the following:
1. Press the
telephone (only one backup telephone can have a
NIGHT button on the console or the NIGHT button on the backup
NIGHT button).
■ The Night
that has the
■ The Position Available lamp goes off.
lamp goes on at the console and at the backup telephone
NIGHT button.
To cancel Night Service (go into day mode), perform the following:
1. Press the
NIGHT button.
NIGHT button at the console or at the backup telephone that has a
■ The Night lamp goes off at the console and at the backup telephone
that has a
■ The Position Available lamp goes on.
NIGHT button.
Page 23

DEFINITY® Enterprise Communications Server Release 7
Console Operations Quick Reference
Console Operation s
555-230-890
Feature Operation
This section co ntains us er op eration for fea tures us ed from a n att endant c onsole or
from a backup telephone.
Attendant Backup
The Attendant Backup feature allows you to access most attendant console
features from one or more specially-administered multiappeara nce tel ep hones.
The recommended telephones are the Lucent Technologies Model 6408, 6424,
8410 and 8434. When calls terminate at the attendant console during normal
operation, users a t the backup telephone s ca n answer overflow calls by pr essing a
button or dialing a feature ac cess code. You can then pro cess th e calls as if you are
at the attendant cons ole. Pr ocedur es for bas ic fea ture o perat ion are doc umented in
the quick reference guides for each telephone.
NOTE:
The Attendant Backup features cannot be used from extensions
administered as “client” extensions even if they have a multiappearance
telephone.
Issue 3
June 1999
19Feature Operation
When the attendant console is in day mode (the Night lamp is off), you cannot
answer overflow calls at the backup telephones until the number of calls waiting
in the attendant queue has reached an administered t hreshold. Until the thresh old
is reached, the only indication the backup telephones receive about calls waiting
in queue is when the Queue Calls
QUEUE TIME button to see how long the call has been waiting, but you cannot
the
answer the call. The Queue Time
and the Queue T i me lamps go on . You can pre ss
lamp starts flashing when the time in queue
warning level has been re ached ( th is is usual ly set for 1 5 se conds) . When the cal ls
waiting in queue threshold has been reached, the backup telephones will beep
every 10 seconds as lo ng a s the n umber of ca lls wai ting stays above t he threshol d.
You then can answer calls using the Trunk Answer Any Station (TAAS) feature
access code _____ or an automatic dialing button administered with that feature
access code.
When the attendant console is i n night mode (the Nig ht lamp is on) , all calls to the
attendant console immediat ely b eep at the backup tele phones and t he Queue Cal ls
and the Queue Time lamps go on. You then can answer calls using the TAAS
feature access code _____ or an automatic dialing button administered with that
feature access code.
Page 24

DEFINITY® Enterprise Communications Server Release 7
Console Operations Quick Reference
Console Operation s
555-230-890
The following is a typi cal s cenari o for ans wering ove rflow atten dant co nso le cal ls
from a backup telephone:
1. The Calls Waiting In Queue threshold is reached.
■ The backup telephones beep and will beep every 10 seconds until
the calls in queue go below the threshold or you shut the ringer off
by pressing the
■ The Queue Calls lamp starts flashing.
RINGER CUTOFF button.
Issue 3
June 1999
20Feature Operation
■ If calls remain in the queue for 15 seco nds, the Queue Time
lamp
starts flashing.
2. Press either the
■ The display shows how long the calls have been waiting in queue
QUEUE CALLS or QUEUE TIME button.
and how may calls are in queue:
OPERATOR Qtime 00:24 calls:5
3. To answer the first call in queue, dial the Trunk Answer Any Station
feature access code _____ or press the automatic dialing button
administered with that feature access code.
4. When finished with the call, hang up.
In addition to answering overflow calls, you can use the backup telephones in a
hospitality envir onmen t to handle guest r equests such as wakeu p calls. To do this,
the following feature buttons must be administered on the backup telephone(s):
■ Automatic Wakeup
■ Check-In
■ Check-Out
■ Do Not Disturb Extension
■ N ight Service (a NIGHT button can be assigned on only one backup
telephone)
■ Busy indicators for the attendant console and the other backup telephones.
Busy Verification
The Busy Verification feature allows attendants and backup telephone users to
make test calls to see if a trunk is actually busy or out of service.
To use the Busy Verification feature, perform the following:
1. At the attendant console or a backup telephone, press the
button.
BUSY VERIFY
Page 25

DEFINITY® Enterprise Communications Server Release 7
Console Operations Quick Reference
Console Operation s
555-230-890
2. Dial the trunk access code followed by a specific trunk number (such as,
01, 02, and so on). One of the following occurs:
■ If the trunk is busy with an active call, you are bridged onto the
active call. All parties on the active call receive a warning tone
(2-second burst of 440 Hz tone) to let them know that you are
bridging onto the call. A half-second burst of warning tone repeats
every 15 seconds, as long as you remain on the call.
■ If the trunk is out of service, the busy verifi cation is deni ed. You will
hear reorder tone.
■ If the trunk is idle and it is an outgoing trunk, you will hear dial
tone. You can make a call on that tr unk to ve rify that i t is in wor king
order. If the trunk is an incoming trunk, you hear a confirmation
tone which indicates that the trunk is available for use.
Issue 3
June 1999
21Feature Operation
3. Press the
RELEASE button to end the call from the attendant console, or go
on-hook from a backup telephone.
Call Forwarding
There are two Call Forwarding features you can activate and cancel for any
extension: Call Forwarding - All Calls, and Call Forwarding - Busy/Don’t
Answer. Call Forwarding - All Calls causes calls to an extension to be forwarded
immediately to a different telephone number. Call Forwarding - Busy/Don’t
Answer causes calls to an extension to be forwarded to a different telephone
number only if no one answers or if the line is busy. This feature is used when th e
user will be away from their telephone and wants the calls redirected.
!
SECURITY ALERT:
Call Forwarding - All Calls, and Call Forwarding - Busy/Don’t Answer are not
recommend ed for use to ex ten d calls to “off -premises” sites due to the po te ntial for toll
fraud. Reliable call disconnect from your local service provider's central switching
office may not always be possible, thus, allowing dial tone to be returned to the caller
and toll fraud to occur.
To activate Call Forwarding - All Calls, o r Ca ll For ward ing - Busy/Don’t Answer
for an extension, perform the following:
1. Press the
■ You hear a dial to ne.
■ The call appearance lamp goes on.
■ The Position Available lamp goes off.
START button or an idle call appearance button.
Page 26

DEFINITY® Enterprise Communications Server Release 7
Console Operations Quick Reference
555-230-890
Console Operation s
2. Dial the Call Forwarding - All Calls activation feature access code _____
or the Call Forwarding - Busy/Don’ t Answer ac tivation feature access cod e
_____.
■ You hear a dial to ne.
3. Dial the extension of the user who wants his or her calls forwarded.
■ You hear a dial to ne.
4. Dial the number to which you want to forward calls (the forwarded-to
number). Listen for call-progress tones:
■ Confirmation tone — Call Forwarding is activated.
■ Intercept tone — The feature cannot be activated because of
restrictions assigned to the forwarding number or t he forwarded-to
number.
Issue 3
June 1999
22Feature Operation
5. Press the
RELEASE button.
■ The call appearance lamp goes off.
■ The display goes blank.
■ The Position Available lamp goes on.
■ T he Call Forw arding feature is now activated.
■ The console returns to the normal operating mode.
To cancel the Call Forwarding - All Calls, or Call Forwarding - Busy/Don’t
Answer feature for an extension :
1. Press the
START button or an idle call appearance button.
■ You hear a dial to ne.
■ The call appearance lamp goes on.
■ The Position Available lamp goes off.
2. Dial the Call Forwarding deactivation feature access code _____.
■ You hear a dial to ne.
3. Dial the extension for which the feature is being deactivated (the
forwarding extension).
■ You hear a confirmati on tone. This i ndicates that the feature is
deactivated.
■ The call appearance lamp goes off.
■ The display goes blank.
■ The Position Available lamp goes on.
■ The console returns to the normal operating mode.
Page 27

DEFINITY® Enterprise Communications Server Release 7
Console Operations Quick Reference
Console Operation s
555-230-890
Call Park
The Call Park feature allows you to put a call on hold and then retrieve the call
from any other telephone within the system. Calls can be parked using the
attendant console or any telephone that does not have a “client room” COS.
To use Call Park from the attendant console, perform the following:
Issue 3
June 1999
23Feature Operation
1. While on an active call, press the
■ You hear a dial to ne.
■ T he Split lamp goes on.
2. Dial the Call Park f eatur e acce ss code _____, o r pres s the
■ You hear a dial to ne.
START button.
CALL PARK button.
3. Dial one of the administered Call Park extensions. These extensions are
designated for parking calls only.
■ You hear a confirmation tone.
4. Press the
RELEASE button.
To pick up a parked call, perform the following:
1. Dial the Answer Back feature ac cess code _____ a t the attenda nt console or
from any telephone or tel epho ne t hat does not have the “client room” COS.
■ You hear a dial to ne.
2. Dial the extension number where the call was parked.
■ You are connected to the parked call.
Conference
The Conference feature allows you to set up a conference call for up to 6 parties.
To use the Attendant Conference feature, perform the following:
1. While on an active call, press the
■ You hear a dial to ne.
■ T he Split lamp goes on.
START button.
2. Call the person you want to add to the conference.
■ You hear a ringback tone.
Page 28

DEFINITY® Enterprise Communications Server Release 7
Console Operations Quick Reference
Console Operation s
555-230-890
3. After contacting the new person, press the SPLIT button.
■ All parties, including the console, are connected together.
■ T he Split lamp goes off.
4. To add more parties to the conference, repeat Steps 1, 2, and 3.
NOTE:
If you cannot reach one of the called part ies, press the CANCEL button
to end the attempt and rejoin the existing conference.
Issue 3
June 1999
24Feature Operation
You can remain on the conference call, press the
hold, or press the
Crisis Alert
The Crisis Alert feature provides a visual, audible, and printed record when users
place a call to the local emergency service agency. This gives hotel personnel the
ability to assist emergency personnel when they arrive at the hotel by identifying
where the call came from and when the call was made.
Other than the emergency call, which can be placed from any telephone on the
switch, all user operation occurs at the attendant console.
HOLD button to place the call on
RELEASE button to drop off the call.
1. Someone dials the emer gency serv ices access c ode (for example, 911) from
a telephone on the switch.
■ The call routes to the local emer genc y servic e agency. The call does
route to the attendant console.
not
■ The Position Available lamp goes off and the Pos Busy lamp goes
on. This prevents new inco ming calls fro m interrupting this
emergency notification. All new incoming calls are queued and can
be answered after the emergency notification is processed.
■ T he Crisis Alert lamp flashes.
■ The special emergency alerting tone starts.
■ The following displays at the attendant console:
E= <Name> <Ext No.> EMERGENCY
■ The call information is logged in the switch and is printed on the
journal/schedule printer (if administered).
2. If you are currently on an active call, you may want to place that call on
hold so you can process the emergency notification.
3. Press the
CRISIS ALE RT button once.
■ The alerting tone stops.
Page 29

DEFINITY® Enterprise Communications Server Release 7
Console Operations Quick Reference
Console Operation s
555-230-890
4. Write down the emergency information displayed on the console. Follow
your local procedures for handling emergencies. Even though the console
is set to “position busy,” you can place calls to assist with the emergency.
Issue 3
June 1999
25Feature Operation
5. Press the
CRISIS ALE RT button a second time.
■ The Crisis Alert lamp stops flashing, but remains on.
6. When you are finished handling the emergency, press the
button a third time.
■ T he Crisis Alert lamp goes off.
■ The display goes blank.
7. Press the
POS BUSY button.
■ T he Pos Busy l amp goes off.
■ The Position Available lamp goes on.
8. You can now process other incoming calls.
Emergency Access to Attendant
The switch is administered to provide a way for users to place an emergency call
to the attendant by eit her taking the han dset off- hook or by dialing a fe ature access
code. It works as follows:
1. A user takes the handset off-hook or dials the feature access code.
■ If the user took the handset off-hook, the call automatically rings at
the attendant console after a predetermined amount of time (usually
10 seconds after dial t one sto ps). The c all r ings at the cons ole wit h a
louder-than-normal volume. If the guest dialed the feature access
code, the call rings immediately at the attendant console.
CRISIS ALERT
Hold
■ The following displays:
a= EXT<ext> Ext<ext> 00 in EMRG Q
2. Follow your local procedures for handling emergencies.
NOTE:
Even if the attendant console is in night service, the call still rings at the
attendant console, but it can be answered at the backup telephone with
Trunk Answer Any Station, or from a designated emergency redirection
telephone.
You can place callers on hold to answer other calls or to find information for the
caller. You can have a call on hold at each of the 6 call appearances.
Page 30

DEFINITY® Enterprise Communications Server Release 7
Console Operations Quick Reference
555-230-890
Console Operation s
To place a call on hold, perform the following:
Issue 3
June 1999
26Feature Operation
1. While on an active call, press the
■ T he On Hold lamp at the call appearanc e button goes on.
■ The call appearance lamp goes off.
■ The display goes blank.
■ The Position Available lamp goes on.
■ The console returns to the normal operating mode.
HOLD button.
To return to a held call, perform the following:
1. Press the call appearance button where the call is held.
■ T he On Hold lamp at the call appearanc e button goes off.
■ The call appearance lamp goes on.
■ The Position Available lamp goes off.
■ The person who was on hold is reconnected to the console.
■ The person’s name (if available) and extension are displayed.
2. To end the call, press the
■ You are disconnected from the call.
RELEASE button.
■ The call appearance lamp goes off.
■ The display goes blank.
■ The Position Available lamp goes on.
■ The console returns to the normal operating mode.
Integrated Directory
The Integrated Director y fea tu re allows you to find user extension number s l ist ed
in the switch’s on-line directory. The directory contains an alphabetical listing of
names and numbers.
NOTE:
This feature is available only when the names are entered via a Property
Management System (PMS) or through switch administration.
NOTE:
When the On Hold lamp flashes, it indicates that the hold time has
expired. When this happens, the console also beeps to indicate that a
call needs attention. Press the call appearance button and answer the
call.
Page 31

DEFINITY® Enterprise Communications Server Release 7
Console Operations Quick Reference
Console Operation s
555-230-890
To search for an extension number, perform the following:
Issue 3
June 1999
27Feature Operation
1. Press
INTEG DIRCTRY.
■ The Integ Dirctry lamp goes on.
2. Dial the keypad digits that correspond to the letters used to spell the name
of the person you want to locate. You can use either of the formats listed
below:
■ Last name, first name (for example, Grimaldi, Damian; use the *
button to represent a comma)
■ Single name of an organization or group (for example,
housekeeping).
NOTE:
When you dial the keypad digit for the first letter of a name, the first
name that matches that letter displays on the console or display
telephone. You can either continue to dial keypad digits to spell the
rest of the name, or you can use the
NEXT button to scroll down the
alphabetical list of names in the directory.
3. If you enter a name that is not found in the directory, the display tells you
that no corresponding name was found.
4. When the desired name displays, press the
CALL button to call that person.
5. To search for another name, press the
6. To exit the Integrated Directory, press the
INTEG DIRC TRY button again.
NORMAL MODE button.
The following special conditions apply when you use the keypad digits with the
Integrated Directory feature:
■ Use the * button for a space and a comma.
■ Use the 7 button for the letter Q (some keypads are not labeled w ith this
letter).
■ Use the 9 button for the letter Z (some keypads are not labeled with this
letter).
Page 32

DEFINITY® Enterprise Communications Server Release 7
Console Operations Quick Reference
555-230-890
Console Operation s
Intrusion
The Intrusion feature enables you to interrupt a user’s call to deliver an urgent
message or telephone call.
To interrupt a user to deliver an urgent message, perform the following:
Issue 3
June 1999
28Feature Operation
1. Press the
START button or an idle call appearance button.
■ You hear a dial to ne.
■ The call appearance lamp goes on.
■ The Position Available lamp goes off.
2. Dial the user’s extension.
■ You hear ringback tone, busy tone, or Call Waiting tone.
3. If you hear a busy tone or a Call Waiting tone, press the
■ The Intrusn lamp goes on.
■ You are connected to the user’s call.
■ The people on the call may hear an intrusion tone, depending on
how the switch is administered.
4. Relay the message to the user.
5. Press the
RELEASE button.
■ You are disconnected from the call.
■ The call appearance lamp goes off.
■ The Intrusn lamp goes off.
INTRUSN button.
■ The display goes blank.
■ The Position Available lamp goes on.
■ The console returns to the normal operating mode.
To interrupt a user to transfer a call, perform the following:
1. Transfe r the cal l to th e user’ s exte nsion as de scribed i n ‘‘Transfer’’ on page
34.
2. If you hear a busy tone or a Call Waiting tone, press the
■ You are connected to the call.
■ The people on the call may hear an intrusion tone, depending on
INTRUSN button.
how the switch is administered.
3. Announce the incoming call.
Page 33
DEFINITY® Enterprise Communications Server Release 7
Console Operations Quick Reference
Console Operation s
555-230-890
4. Press the RELEASE button.
■ If the called station is analog, the calling person is put on Call
Waiting until the called person picks up the call.
■ If the called station is multiappearance, the calling person is
connected to an idle appearance where the called person may pick
up the call.
■ You are disconnected from the call.
■ The call appearance lamp goes off.
■ The display goes blank.
■ The Position Available lamp goes on.
■ The console returns to the normal operating mode.
NOTE:
You cannot use the Attendant Intrusion feature if:
Issue 3
June 1999
29Feature Operation
■ A station is on a conference call with the maximum number of conference
parties.
■ There is one call already waiting for the called person.
■ A call is established with Data Privacy activated.
■ A station in a ca ll is administered with Data Restriction.
■ A n attendant attempts to intrude on a call on a stat ion that is a forward-to
point of another station.
■ An attendant attempts to intrude on a busy station, where the station is
talking to another attendant.
Loudspeaker Paging
The Loudspeaker Paging feature allows you to access loudspeaker paging
equipment. Nine paging zones and a paging zone to activate all paging zones at
the same time can be provided. Attendant s can page indi vid ual s by pres sing
through PAGE 9 or PAGE ALL, if provided, or by dialing an access code (the trunk
1
access code that is admini stered f or the e quipment i nstalle d for each pagin g zone).
An allowable paging time limi t i s administered on the syst em. I f t he administered
time limit expires while an announcement is being made, the call is disconnected
and intercept tone is heard.
PAGE
You can combine Loudspeaker Paging with the Call Park feature (refer to ‘‘Call
Park’’ on page 23) to connect a caller with a paged party. The paged party can
retrieve the call by dialing the Answer Back feature access code and the parked
extension.
Page 34

DEFINITY® Enterprise Communications Server Release 7
Console Operations Quick Reference
Console Operation s
555-230-890
To use Loudspeaker Paging with paging buttons, perform the following:
1. Press an idle paging zone button. If the desired paging zone is already in
use (the associated lamp is on), select another zone or w ait for that zone to
become idle (the associated lamp is off).
■ The lamp for the selected paging zone goes on.
■ If the PAGE ALL button is selected, all paging zone lamps go on.
2. Speak into the handset to make the announcement.
■ The announcement was heard in the selected zone(s). If the
announcement lasted too long, you will hear intercept tone; release
the button and try again.
Issue 3
June 1999
30Feature Operation
Override
3. Press the
RELEASE button.
To use Loudspeaker Paging with trunk access codes, perform the following:
1. Press the
START button or an idle call appearance button.
■ You hear a dial to ne.
■ The call appearance lamp goes on.
■ The Position Available lamp goes off.
2. Dial the trunk access code for the zone you wish to page.
■ If you hear confirmation tone, continue with Step 3.
■ If you hear busy tone, the zone is not available; press the CANCEL
button and try again later.
3. Speak into the handset to make the announcement.
■ The announcement was heard in the selected zone(s). If the
announcement lasted too long, you will he ar intercep t tone; try agai n
with a shorter announcement.
4. Press the
RELEASE button.
The Attendant Override of Diversion feature allows you to bypass these features:
■ Call Forwarding
When the attendant calls a user that has Call Forwarding active, the call
rings at the user’s telephone and is not forwarded.
Page 35

DEFINITY® Enterprise Communications Server Release 7
Console Operations Quick Reference
555-230-890
Console Operation s
■ Call Coverage
When the attendant calls a user that has an assigned Call Coverage path,
the call ring s at the user’s t el epho ne and does not follow the Call Cover age
path.
■ Send All Calls
When the attendant call s a user that has Send All Call s active, the call rings
at the user’s telephone and is not forwarded to the Send All Calls
destination.
To activate the Attendant Override of Diversion feature, perform the following:
Issue 3
June 1999
31Feature Operation
1. Press the
2. Press the
START button or an idle call appearance button.
■ You hear a dial to ne.
■ The call appearance lamp goes on.
■ The Position Available lamp goes off.
OVRRIDE button.
■ The Override lamp goes on.
NOTE:
To cancel an override before you place a call, press the OVRRIDE
button again.
3. Dial the extension.
■ You hear a ringback tone.
■ The display shows the dialed number.
■ The Override lamp goes off.
4. To end the call, press the
■ You are disconnected from the call.
■ The call appearance lamp goes off.
RELEASE button.
Recall
■ The display goes blank.
■ The Position Available lamp goes on.
■ The console returns to the normal operating mode.
The Attendant Recall feature allows callers, who are part of a conference or
two-party call be ing held o n the c onsole, to recal l the att endant f or assist ance. You
should treat this as you would treat any other incoming call. Users at single-line
Page 36

DEFINITY® Enterprise Communications Server Release 7
Console Operations Quick Reference
555-230-890
Console Operation s
analog telephones must press the RECALL button or flash the switchhook to recall
the attendant. Users at multiappearance telephones must press the
TRANSFER button to recall the attendant.
To use the Attendant Recall feature, perform the following:
1. When someone requests assistance:
■ The display, such as the following, i ndicates that a user is re questing
assistance:
a= CONFERENCE 2 rc
■ The Position Available lamp goes off.
■ The On Hold lamp at a call appearance button flashes.
2. To answer the recall, press the call appearance button where the On Hold
lamp is flashing.
■ The On Hold lamp goes off.
Issue 3
June 1999
32Feature Operation
CONF or
Serial Calling
The Serial Calling fe ature al lows incomin g trunk cal ls that you have trans ferred t o
an extension to automatically recall the console after the called person hangs up.
You can then transfer the call to another extension.
To use the Serial Calling feature, perform the following:
■ The call appearance lamp goes on.
■ The ringing stops.
3. To end the call, press the
■ You are disconnected from the call.
■ The call appearance lamp goes off.
■ The display goes blank.
■ The Position Available lamp goes on.
■ The console returns to the normal operating mode.
RELEASE button.
1. Answer the call the same way you would answer any other incoming call.
2. Press the
SERIAL CALL button.
■ The Serial Call lamp goes on.
Page 37

DEFINITY® Enterprise Communications Server Release 7
Console Operations Quick Reference
555-230-890
Console Operation s
3. Press the START button.
■ You hear a dial to ne.
■ The Serial Call lamp goes off.
■ T he Split lamp goes on.
4. Dial the number for the person to whom you want to transfer the call.
■ You hear a ringback tone.
■ The display shows the extension you are calling.
Issue 3
June 1999
33Feature Operation
5. Press the
RELEASE button as soon as the call starts ringing.
■ The calling person is connected to the ringing phone line.
■ You are disconnected from the call.
■ T he Split lamp goes off.
■ The call appearance lamp goes off.
■ The display goes blank.
■ The Position Available lamp goes on.
■ The console returns to the normal operating mode.
6. When the called person hangs up on the calling person, the calling person
is automatically routed back to the console.
■ You hear a 1-burst repetitive ring.
■ The display identifies the incoming call as a serial call:
a= co to front desk sc
■ The Position Available lamp goes off.
■ The call appearance lamp flashes.
7. Answer the recall.
■ You are reconnected to the caller.
■ The call appearance lamp stops flashing, but remains on.
■ The Serial Call lamp goes on.
8. Transfer the caller to the next person by repeating Steps 3 through 5.
The Serial Call feature remains activated until the trunk drops from the switch or
you cancel the feature manually by pressing the
SERIAL CALL
button.
Page 38

DEFINITY® Enterprise Communications Server Release 7
Console Operations Quick Reference
Console Operation s
555-230-890
Transfer
!
SECURITY ALERT:
Social Engineering — “Social Engineer ing” is a con game t hat hackers frequently use.
It is sometimes referred to as “Operator Deceit.” The success of this con requires
gullibility or laxity on the part of the operator or employee, of which the hacker takes
full advantage. For example, hackers call an employee, claim to have the wrong
extension number, and ask to be transferred back to the operator. To the operator, the
call appears to be an internal call. The hacker then asks for an outside line. Often,
because operators are not trained about toll fraud, they will connect the hacker to an
outside line. Anot her exa mple of s ocial engine ering i s when a h ack er call s the oper ator
and pretends to be a telephone maintenance repair person. They make statements such
as: “This is Lucent Technologies testing your lines. Please transfer me to 900 or 9#,”
or “I need to verify your DID number range.” An untrained operator may provide the
requested transfer or information, giving the hacker more ammunition with which to
crack your system.
Issue 3
June 1999
34Feature Operation
You can transfer calls to an extension or to an outside number. Some of the
reasons to transfer a call include the following:
■ A person on an incoming call (from outside the hotel) wants to be
connected to a user on the server.
■ A user calling the attendant wants to be connected to anothe r user, but they
does not know the extension.
■ A user wants to be connected to an outside number.
■ A person on an incoming call wants to be connected to an outside number,
on another trunk.
To transfer a call, perform the following:
1. Answer the incoming call. Tell the calling person that you are going to
transfer their call.
2. Press the
START button.
■ You hear a dial to ne.
■ T he Split lamp goes on.
3. Dial the number for the person to whom you want to transfer the call.
■ You hear a ringback tone.
■ The display shows the extension you are calling.
Page 39

DEFINITY® Enterprise Communications Server Release 7
Console Operations Quick Reference
555-230-890
Console Operation s
4. Use one of the following steps, a, b, c, or d, to complete the call.
Issue 3
June 1999
35Feature Operation
a. To transfer the call, press the
RELEASE button as soon as the call
starts ringing.
■ The calling person is connected to the ringing phone line.
■ You are disconnected from the call.
■ T he Split lamp goes off.
■ The call appearance lamp goes off.
■ The display goes blank.
■ The Position Available lamp goes on.
■ The console returns to the normal operating mode.
b. If you want to announce the call, wait for the called person to
answer. If the called person accepts the call, press the
RELEASE
button.
■ The calling person is connected to the called person.
■ You are disconnected from the call.
■ T he Split lamp goes off.
■ The call appearance lamp goes off.
■ The display goes blank.
■ The Position Available lamp goes on.
■ The console returns to the normal operating mode.
c. If the called person does not want to talk to the calling person, does
not answer, or the number is busy, press the
■ The outgoing call is canceled.
■ The call progress tone stops.
■ The console is connected to the original call.
■ T he Split lamp goes off.
CANCEL button.
Explain to the calling person that the called person is not available.
Take a message, or ask the calling person to try again later. Then
press the
RELEASE button.
■ You are disconnected from the call.
■ T he Split lamp goes off.
■ The call appearance lamp goes off.
■ The display goes blank.
Page 40

DEFINITY® Enterprise Communications Server Release 7
Console Operations Quick Reference
Console Operation s
■ The Position Available lamp goes on.
■ The console returns to the normal operating mode.
555-230-890
Issue 3
June 1999
36Feature Operation
d. To set up a 3-way connection, press the
Trunk Identification
The Trunk Identification feature allows you to use the attendant console or a
backup telephone to identify a specific trunk being used on any trunk call,
incoming or outgoing. This can help you find faulty or noisy trunks so you can
report them to you r local t elep hone company, thus providing bett er servi ce to your
users.
SPLIT button before or after
the called person answers.
■ The console, calling person, and called person are connected
together.
■ T he Split lamp goes off.
To drop out of the 3-way connection, press the
■ You are disconnected from the call.
■ T he Split lamp goes off.
■ The call appearance lamp goes off.
■ The display goes blank.
■ The Position Available lamp goes on.
■ The console returns to the normal operating mode.
RELEASE button.
To use the Trunk Identification feature from the attendant console or from a
backup telephone, do the following:
1. While on a trunk call where you are experiencing a bad connection, press
TRUNK ID button.
the
■ The display shows a number sequence. The fi rst n umber is th e trun k
access code, and the second number is the trunk identification
number. Write down the trunk information.
2. Continue with your call.
Give this information to your administrator to determine which physical trunk is
connected to that trunk group. Relay this information to your local telephone
company to report bad trunks.
Page 41

DEFINITY® Enterprise Communications Server Release 7
Console Operations Quick Reference
Index
555-230-890
Index
IN
Numerics
302A/B Attendant Console, 4
302C Attendant Console, 5
A
Activate the Console, 10
Administrable Features, 9
Alarms, 8
Answer Calls, 10
Assumptions, 1
Attendant Auto Start, 9
Attendant Backup, 19
Attendant Crisis Alert, 24
Attendant Lockout, 9
Attendant Tone, 10
Auto Answer, 10
Auto Start, 17
Issue 3
June 1999
37
B
Basic Operation, 4
Busy Verification, 20
Button Layout, 4
C
Call Forwarding, 21
Call Offer, 28
Call Park, 23
Call Purpose Indicators, 8
Class of Restriction, 17
Conference, 23
Conventions, 1
Crisis Alert, 24
D
Deactivate the Console, 10
Directory, 26
Display Languages, 10
Don’t Split, 17
Page 42
DEFINITY® Enterprise Communications Server Release 7
Console Operations Quick Reference
Index
555-230-890
E
Emergency Access to Attendant, 25
F
Feature Access Codes, 3
Forced Release, 14
H
Hold, 25
I
Issue 3
June 1999
38
Integrated Directory, 26
Intrusion, 28
L
Lamp Test, 6
Languages, 10
Layout, 4
Loud speaker Paging, 29
M
Make Calls, 11
N
Night Service, 18
O
Override, 30
P
Paging, 29
Page 43

DEFINITY® Enterprise Communications Server Release 7
Console Operations Quick Reference
Index
555-230-890
R
Recall, 31
Related Documents, 3
Release, 14
S
Security, 34
Selector Console, 6, 11
Serial Calling, 32
Split Calls, 14
Split Swap, 15
Status Lamps, 8
T
Issue 3
June 1999
39
Test Switch, 6
Transfer, 34
Trunk Group Select Button, 13
Trunk Identification, 36
Page 44

DEFINITY® Enterprise Communications Server Release 7
Console Operations Quick Reference
Index
555-230-890
Issue 3
June 1999
40
 Loading...