

Lucent Technologies CentreVu Version 8 Report Designer, CentreVu Report Designer User Manual

CentreVu
Version 8
User Guide
Report Designer
585-210-930
Comcode 108502196
Issue 1
December 1999

Copyright 1999, Lucent Technologies
All Rights Reserved
Printed in U.S.A.
Notice
Every effort was made to ensure that the information in this book was
complete and accurate at the time of printing. Howev er, information is
subject to change.
Your Responsibility for Your System’s Security
Toll fraud is the unauthorized use of yo u r te lecommunications system by
an unauthori zed party, for example, persons other than your company’s
employees, agents, subcontractors, or persons working on your company’s
behalf. Note that there ma y be a risk of toll fraud associated wit h your
telecommunication s system and, if toll fraud occur s, it can result in substantial additional charges for your telecommunications services.
You and your system manager are responsible for the security of your system, such as programming and configuring your equipm ent to prevent
unauthorized use. The system ma na ger is also responsible for reading al l
installation, instruction, and system admi nist ra tion documents provided
with this product in order to full y understand the features tha t c an int roduce risk of toll fraud and the steps that can be taken to reduce that risk.
Lucent Technologies does not warrant that this product is immune from or
will prevent unauthoriz ed use of common-carrier tele communication services or facilities accessed through or connected to it. Lucent Technologies will not be responsible for any charges th at resul t fr om such
unauthorized use.
Part 15: Personal Computer Statement. This equipment has been certified to comply with the limits f or a Class B comput ing dev ice, p ursuan t to
Subpart J of Part 15 of FCC Rules. Only pe rip herals (computing input/
output devices, term inal s, print ers, e tc. ) certi fied to co mply with the Cl ass
B limits may be attached to this computer. Operation with noncertified
peripheral s is likely to res ult in interference to radio and televi s io n reception.
Part 68: Answer-Supervision Signaling. Allowing this equi p ment to be
operated in a manner that does not provide proper answer-supervision signaling is in violation of Part 68 rules. Th is equipment returns answersupervision signals to the public switche d network when:
• Answered by the called station
• Answered by the attendan t
• Routed to a recorded announcement that can be administered
by the CPE user
This equipment returns an sw er-supervision signals on all DID calls forwarded back to the public switched telephone network. Permissible
exceptions are:
• A call is unanswered
• A busy tone is received
• A reorder tone is received
Canadian Department of Communications (DOC)
Interference Information
This digital apparatus does not exce ed the Class A limits for radio noise
emissions set out in the radio interfere nc e regulations of the Canadian
Department of Communi cations.
Lucent Technologies Fraud Intervention
If you suspect that you are being vi ct imized by toll fraud and you need
technical support or assistance, call Technical Service Center Toll Fraud
Intervention Hotline at 1-800-643-2353.
Federal Communications Commission Statement
Part 15: Class A Statement. This equipment has been tested and found to
comply with the limits for a Class A digital device, pursuant to Part 15 of
the FCC Rules. These limits are designed to provide reasonable protection
against harmful in ter feren ce when the equi pmen t is opera ted in a comme rcial environment. This equipment gene rat es, uses, and can radiate radio
frequency energy and, i f not installed and used in accordance with the
instruction manual, may ca use harmful interference to radi o communications. Operation of this eq ui pment in a residential area is li ke ly t o cause
harmful interfer ence, in which ca se the u ser will be requ ired to corre ct t he
interference at his own expense.
Part 15: Class B Statement. This equipment has been tested and found to
comply with the limits for a Class B di git a l de vi ce, pursuant to Part 15 of
the FCC Rules. These limits are designed to provide reasonable protection
against harmful interference in a residential installation. This equipment
generates, uses, and can ra diate radio-frequency energy an d, if not
installed and used in accordance with the instr u ctions, may cause har mful
interfere nc e t o ra di o co mmu ni cati on s. H ow ever, the re is no g uar ant ee t ha t
interferen ce will not occur in a particul ar installation . I f this equipment
does cause harmful interference to radio or television reception, which can
be determined by turnin g the equi pment of f and on , the use r is encou raged
to try to corre ct the interfe rence b y one or mo re of th e fol lowing measure s:
• Reorient th e r eceiving television or rad io antenna wher e this
may be done safely.
• T o the extent possible, re lo cate the receiver wit h resp ect to the
telephone equipment.
• Where the telephone equipment requires ac pow er, plug the
telephone into a different a c out le t so tha t th e te le phone equipment and receiver ar e on di ffer ent branch circuits.
Le Présent Appareil Noméri que n’émet pas de bruits radioé le ctriques
dépassant les limites applicables aux appareils numériques de la class A
préscrites dans le reglement su r le brouillage radioélectrique édi cté par le
ministére des Communications du Canad a.
Trademarks
●
DEFINITY is a registered trademark of Lucent Technologies.
●
CentreVu is a registered tr ademark of L ucent Technologies.
●
CONVERSANT is a registered trademark of Lucent Technologies.
●
Informix is a registered trademark of Informix Software, Inc.
●
Intel is a registered trademark of Intel.
●
Microsoft, MS, MS-DOS, Windows, Windows 95, Windows NT, and
Access are registered trademarks of Microsoft Corporation.
●
OpenLink is a trademark of OpenLink Software.
●
Crystal Reports is a trademark of SeaGate Software.
●
Solaris is a trademark of Sun Microsystems, Inc.
●
SPARC trademarks, including the SCD compliant logo, are
trademarks or registered trademarks of SPARC International, Inc.
SPARCstation, SPARCserver, SPARCengine, SPARCworks, and
SPARCompiler are licensed exclusively to Sun Microsystems, Inc.
Products bearing SPARC trademarks are based upon an architecture
developed by Sun Microsystems, Inc.
●
Sun and Sun Microsystems are trademarks or registered trademarks
of Sun Microsystems, Inc.
●
Ultra Enterprise 3000 and Ultra 5 are trademarks of Sun
Microsystems, Inc.
●
UNIX is a registered trademark in the United States and other
countries, licensed exclusiv ely through X /Open Company Limited.
●
All other products mentioned herein are the trademarks of their
respective owners.

Ordering Information
Call: Lucent Technologies Publications Center
Voice: 1-800-457-1235
International Voice: 317-322-6416
Fax: 1-800-457-1764
International Fax: 317-322-6699
Write: Lucent Technol ogies BCS Publ ications Center
2855 N. Franklin Road
Indianapolis, IN 46219
Order: Document No. 585-210-93 0
Comcode 108502196
Issue 1, December 19 99
You can be placed on a Standing Order list for this and other documents
you may need. Standing Order will enable you to automatically receive
updated versions of individual documents or document sets, bille d to
account information that you provide. For more information on Standing
Orders, or to be put on a list to receive future issues of this document,
please contact the Luc en t Technologies Publi ca tions Center.
Warranty
Lucent Technologies provides a limited warranty on this product. Refer to
the “Limited use Softwar e Lic ense Agreement” card provi de d w it h your
package.
European Union Declaration of Conformity
Lucent Technologies Business Communi cations Systems declares th at
XXX equipment specified in this document conforms to the referenced
European Union (EU) Directives and Harmonized Standards listed below:
EMC Directive 89/336/EEC
Low Voltage Directive 73/23/EEC
The “CE” mark affixed to the equipment
means that it conforms to the above
Directives.
Disclaimer
Intellectual property relat e d to t his product (including trademarks)
and registered to AT&T Corporation has been transferred to Lucent Technologies Incorporated.
Any references within this te xt to A m erican Telephone and Telegraph
Corporation or AT&T should be interpreted as references to Lucent Technologies Incorporated . The exc ep ti on is c ross references to books published prior to December 31, 1996, whic h re ta in the ir original AT&T
titles.
Heritage Statement
Lucent Technologies—formed as a result of AT&T’s planned restructuring—designs, builds, and delivers a wide range of public and private net works, communication systems and software, consumer and business
telephone systems, and microele ct ronics components. The worldrenowned Bell Laborator ie s is the rese arch and development ar m fo r the
company.
Comments
To comment o n thi s docu ment, retu rn the co mme nt card at the f ront o f the
document.
Acknowledgment
This document was devel oped by Lucent Technologies Global Learning
Solutions O rganization.


CentreVu®
Report Designer Version 8 User Guide
iii
CentreVu®
Report Designer
Version 8
User Guide
Table of Contents
1 Introduction . . . . . . . . . . . . . . . . . . . . . . . . . . . . 1-1
About the Report Designer . . . . . . . . . . . . . . . 1-1
About the Report Wizard. . . . . . . . . . . . . . . . 1-3
Contents of This Document. . . . . . . . . . . . . . . 1-4
Conventions Used in This Document . . . . . . . . . . . 1-6
Related Documents . . . . . . . . . . . . . . . . . 1-7
2 Using the Report Wizard. . . . . . . . . . . . . . . . . . . . . . . 2-1
About the Report Wizard. . . . . . . . . . . . . . . . 2-1
How the Report Wizard Works . . . . . . . . . . . . 2-1
Starting the Report Wizard . . . . . . . . . . . . . . . 2-5
Toolbar Button . . . . . . . . . . . . . . . . . 2-5
Report Selector Window . . . . . . . . . . . . . . 2-6
Creating a New Report . . . . . . . . . . . . . . . . 2-7
Selecting a Report Type Page. . . . . . . . . . . . . 2-8
Selecting a Report Layout Page . . . . . . . . . . . . 2-10
Defining a Report Layout Section(s) . . . . . . . . . . 2-13
Selecting the Table Format . . . . . . . . . . . . . 2-21
Changing Input Captions . . . . . . . . . . . . . . 2-26
Saving the Report . . . . . . . . . . . . . . . . 2-27
Finishing the Report. . . . . . . . . . . . . . . . 2-29
3 Using the Report Manager . . . . . . . . . . . . . . . . . . . . . . 3-1
Introduction . . . . . . . . . . . . . . . . . . . . 3-1
About the Report Manager . . . . . . . . . . . . . . . 3-2
Viewing or Changing a Report’s Properties . . . . . . . . . 3-3
Copying a Report to the Designer Category . . . . . . . . . 3-4
Copying a Designer Report to a File . . . . . . . . . . . . 3-7
Copying a Designer Report from a File . . . . . . . . . . . 3-9
Deleting a Report from the Designer Category . . . . . . . . 3-11
Opening the Report Designer Using the Edit or New Button . . . . 3-12

4 Report Designer Basics . . . . . . . . . . . . . . . . . . . . . . . 4-1
Introduction . . . . . . . . . . . . . . . . . . . . 4-1
Starting the Report Designer . . . . . . . . . . . . . . 4-2
Exiting the Report Designer. . . . . . . . . . . . . . . 4-3
Report Designer Menus . . . . . . . . . . . . . . . . 4-4
Menu Bar . . . . . . . . . . . . . . . . . . . 4-4
Other Attributes of the Design Mode Window . . . . . . . 4-10
Online Access to Database Definitions . . . . . . . . . 4-10
Steps Required to Create a New Report. . . . . . . . . . . 4-11
Steps Required to Edit an Existing Report . . . . . . . . . . 4-13
5 Design Mode Basics . . . . . . . . . . . . . . . . . . . . . . . . 5-1
Introduction . . . . . . . . . . . . . . . . . . . . 5-1
Copying an Item and Pasting the Item Into the Same Report . . . . 5-2
CentreVu®
Report Designer Version 8 User Guide
iv
Copying an Item from One Report and Pasting the Item
Into Another Report . . . . . . . . . . . . . . . . . 5-3
Cutting an Item from the Report . . . . . . . . . . . . . 5-4
Deleting an Item from the Report . . . . . . . . . . . . . 5-5
Using Drag-and-Drop to Arrange Items on the Report . . . . . . 5-6
Resizing an Item on the Report . . . . . . . . . . . . . 5-7
Selecting and Moving Multiple Items on the Report . . . . . . . 5-8
Changing the Width of a Column in a Table . . . . . . . . . 5-9
Changing the Column Headings . . . . . . . . . . . . . 5-10
Aligning Fields . . . . . . . . . . . . . . . . . . . 5-11
Scale to Page . . . . . . . . . . . . . . . . . . . 5-12
6 Edit | Inputs . . . . . . . . . . . . . . . . . . . . . . . . . . . . 6-1
Introduction . . . . . . . . . . . . . . . . . . . . 6-1
About Report Input Fields . . . . . . . . . . . . . . . 6-2
Adding Input Fields to the Input Window . . . . . . . . . . 6-3
Deleting Input Fields from the Input Window . . . . . . . . . 6-8
Editing the Order of Input Fields . . . . . . . . . . . . . 6-9
Editing the Appearance of Input Fields . . . . . . . . . . . 6-10
Setting Up Inputs for a Multi-ACD Report . . . . . . . . . . 6-12
Viewing the Input Windo w . . . . . . . . . . . . . . . 6-15

7 Edit | Queries . . . . . . . . . . . . . . . . . . . . . . . . . . . 7-1
Introduction . . . . . . . . . . . . . . . . . . . . 7-1
Defining Queries for a Report . . . . . . . . . . . . . . 7-2
Creating a Real-Time or Historical Query . . . . . . . . . . 7-3
Creating an Integrated Query . . . . . . . . . . . . . . 7-12
Editing an Existing Real-Time or Historical Query . . . . . . . 7-17
Editing an Existing Integrated Query. . . . . . . . . . . . 7-21
Copying a Query . . . . . . . . . . . . . . . . . . 7-25
Deleting a Query . . . . . . . . . . . . . . . . . . 7-26
8 Insert | Chart. . . . . . . . . . . . . . . . . . . . . . . . . . . . 8-1
Introduction . . . . . . . . . . . . . . . . . . . . 8-1
Inserting a Chart on a Report . . . . . . . . . . . . . . 8-2
CentreVu®
Report Designer Version 8 User Guide
v
9 Insert | Field . . . . . . . . . . . . . . . . . . . . . . . . . . . . 9-1
Introduction . . . . . . . . . . . . . . . . . . . . 9-1
Using the Field Assistant “Select a field type” Window . . . . . 9-2
Inserting an ACD Name Field on the Report . . . . . . . . . 9-3
Inserting Data Item Fields on the Report . . . . . . . . . . 9-4
Inserting Input Value Fields on the Report . . . . . . . . . . 9-5
Inserting Report Data Start Time Field on the Report . . . . . . 9-6
Inserting Time Report Run Field on the Report . . . . . . . . 9-7
10 Insert | Table. . . . . . . . . . . . . . . . . . . . . . . . . . . . 10-1
Introduction . . . . . . . . . . . . . . . . . . . . 10-1
Inserting a T able on the Report . . . . . . . . . . . . . 10-2
11 Insert | Text . . . . . . . . . . . . . . . . . . . . . . . . . . . . 11-1
Introduction . . . . . . . . . . . . . . . . . . . . 11-1
Inserting Text on the Report . . . . . . . . . . . . . . 11-2
12 Format | Chart . . . . . . . . . . . . . . . . . . . . . . . . . . . 12-1
Introduction . . . . . . . . . . . . . . . . . . . . 12-1
Formatting a Chart in a Report . . . . . . . . . . . . . . 12-2
General Tab . . . . . . . . . . . . . . . . . . . . 12-3
General Tab Options. . . . . . . . . . . . . . . . 12-3

Using the General Tab . . . . . . . . . . . . . . . 12-4
Axis Tab . . . . . . . . . . . . . . . . . . . . . 12-5
Axis Tab Options . . . . . . . . . . . . . . . . . 12-5
Using the Axis Tab . . . . . . . . . . . . . . . . 12-7
Data Tab . . . . . . . . . . . . . . . . . . . . . 12-9
Data Tab Options . . . . . . . . . . . . . . . . . 12-9
Using the Data Tab . . . . . . . . . . . . . . . . 12-9
Data Labels T ab. . . . . . . . . . . . . . . . . . . 12-11
Data Labels T ab Options . . . . . . . . . . . . . . 12-11
Using the Data Labels T ab. . . . . . . . . . . . . . 12-12
Fonts Tab . . . . . . . . . . . . . . . . . . . . . 12-13
Fonts Tab Options . . . . . . . . . . . . . . . . 12-13
Using the Fonts Tab . . . . . . . . . . . . . . . . 12-13
Legend Tab . . . . . . . . . . . . . . . . . . . . 12-15
Legend Tab Options . . . . . . . . . . . . . . . . 12-15
Using the Legend Tab . . . . . . . . . . . . . . . 12-16
CentreVu®
Report Designer Version 8 User Guide
vi
Series Labels Tab . . . . . . . . . . . . . . . . . . 12-17
Series Labels Tab Option . . . . . . . . . . . . . . 12-17
Using the Series Labels Tab . . . . . . . . . . . . . 12-17
Title Tab . . . . . . . . . . . . . . . . . . . . . 12-18
Title Tab Options . . . . . . . . . . . . . . . . . 12-18
Using the Title Tab . . . . . . . . . . . . . . . . 12-18
Type Tab . . . . . . . . . . . . . . . . . . . . . 12-20
Type Tab Options. . . . . . . . . . . . . . . . . 12-20
Using the Type Tab . . . . . . . . . . . . . . . . 12-21
3D Effects Tab . . . . . . . . . . . . . . . . . . . 12-22
3D Effects T ab Options . . . . . . . . . . . . . . . 12-22
Using the 3D Effects Tab . . . . . . . . . . . . . . 12-24
13 Format | Table . . . . . . . . . . . . . . . . . . . . . . . . . . . 13-1
Introduction . . . . . . . . . . . . . . . . . . . . 13-1
Formatting a Table in a Report . . . . . . . . . . . . . . 13-2
General Tab . . . . . . . . . . . . . . . . . . . . 13-3
General Tab Options. . . . . . . . . . . . . . . . 13-3
Using the General Tab . . . . . . . . . . . . . . . 13-4
Data Tab . . . . . . . . . . . . . . . . . . . . . 13-5
Data Tab Options . . . . . . . . . . . . . . . . . 13-5
Using the Data Tab . . . . . . . . . . . . . . . . 13-5
Fonts Tab . . . . . . . . . . . . . . . . . . . . . 13-6
Fonts Tab Options . . . . . . . . . . . . . . . . 13-6
Using the Fonts Tab . . . . . . . . . . . . . . . . 13-7
Format Tab . . . . . . . . . . . . . . . . . . . . 13-8

Format Tab Options . . . . . . . . . . . . . . . . 13-8
Using the Format Tab . . . . . . . . . . . . . . . 13-9
Headers Tab . . . . . . . . . . . . . . . . . . . . 13-10
Headers Tab Options . . . . . . . . . . . . . . . 13-10
Using the Headers Tab . . . . . . . . . . . . . . . 13-10
Sort Tab . . . . . . . . . . . . . . . . . . . . . 13-11
Sort Tab Options . . . . . . . . . . . . . . . . . 13-11
Using the Sort Tab . . . . . . . . . . . . . . . . 13-12
Summary Tab . . . . . . . . . . . . . . . . . . . 13-13
Summary Tab Options . . . . . . . . . . . . . . . 13-13
Using the Summary Tab . . . . . . . . . . . . . . 13-14
14 Format | Field . . . . . . . . . . . . . . . . . . . . . . . . . . . 14-1
Introduction . . . . . . . . . . . . . . . . . . . . 14-1
Field Format Window Elements . . . . . . . . . . . . . 14-2
Using the Field Format Options Window . . . . . . . . . . 14-4
CentreVu®
Report Designer Version 8 User Guide
vii
15 Format | Text . . . . . . . . . . . . . . . . . . . . . . . . . . . 15-1
Introduction . . . . . . . . . . . . . . . . . . . . 15-1
Text Format Options Window Elements. . . . . . . . . . . 15-2
Formatting T e xt on the Report . . . . . . . . . . . . . . 15-3
16 Error Messages . . . . . . . . . . . . . . . . . . . . . . . . . . 16-1
Introduction . . . . . . . . . . . . . . . . . . . . 16-1
Phase 1 Error Messages . . . . . . . . . . . . . . . . 16-2
Phase 2 Historical Report Error Codes . . . . . . . . . . . 16-5
Phase 2 Real-Time Report Error Codes . . . . . . . . . . . 16-11
17 How
18 SQL Query and CMS Database Table Basics . . . . . . . . . . . . . . 18-1
CentreVu®
Introduction . . . . . . . . . . . . . . . . . . . . 17-1
How
How
CMS Stores and Retrieves Data. . . . . . . . . . . . . 17-1
CentreVu
CentreVu
CMS Stores Data . . . . . . . . . . . . . 17-2
CMS Retrieves Data . . . . . . . . . . . . 17-5
Introduction . . . . . . . . . . . . . . . . . . . . 18-1
About SQL Queries . . . . . . . . . . . . . . . . . 18-2
Basic WHERE Clause . . . . . . . . . . . . . . . 18-2
WHERE Clause with Variable . . . . . . . . . . . . . 18-3
Multiple WHERE Clauses . . . . . . . . . . . . . . 18-4
WHERE Clause with a Range/List Variable . . . . . . . . 18-4

WHERE Clause for Selecting Rows from an ACD . . . . . . 18-4
WHERE Clause for Excluding Rows of Data . . . . . . . . 18-5
CMS Database Table Basics . . . . . . . . . . . . . . 18-6
Database Items . . . . . . . . . . . . . . . . . 18-8
Constants . . . . . . . . . . . . . . . . . . . 18-9
Calculations . . . . . . . . . . . . . . . . . . 18-10
Creating a Custom Data Table . . . . . . . . . . . . . . 18-13
Step 1: Access the
Step 2: Build the Table . . . . . . . . . . . . . . . 18-15
Step 3: Add Data to the Table. . . . . . . . . . . . . 18-19
Modifying a Table . . . . . . . . . . . . . . . . . . 18-22
Adding a Column to a Ta ble . . . . . . . . . . . . . 18-22
Changing a Column . . . . . . . . . . . . . . . . 18-23
Deleting a Column . . . . . . . . . . . . . . . . 18-23
Changing Data in a Table . . . . . . . . . . . . . . 18-24
Adding Rows of Data to a Table . . . . . . . . . . . . 18-24
Changing Rows of Data in a Table . . . . . . . . . . . 18-24
Deleting Rows of Data From a Table . . . . . . . . . . 18-25
CentreVu
CentreVu®
CMS Database in
Report Designer Version 8 User Guide
INFORMIX
. . . 18-14
viii
A Using the Report Designer - Examples . . . . . . . . . . . . . . . . . A-1
General Information . . . . . . . . . . . . . . . . . A-1
Creating a Integrated Report Using the
Report Designer . . . . . . . . . . . . . . . . . A-1
Modify the Integrated Report Using the Report Designer. . . . A-2
B Database Items and Calculations . . . . . . . . . . . . . . . . . . . B-1
General Information . . . . . . . . . . . . . . . . . B-1
Index . . . . . . . . . . . . . . . . . . . . . . . . . IN-1

Introduction
About the Report Designer 1-1
CentreVu
Report Designer Version 8 User Guide
1 Introduction
About the Report Designer 1
The Report Designer feature can be purchased with the Lucent
CentreVu®
Supervisor software. The Report Designer al lows you to create reports that
are tailored to your call center needs. You then run the reports you have
created from the Supervisor application.
The Report Designer allows you to create new reports, edit standard Call
Management System (CMS) and Supervisor reports, and copy items from
one report to another report.
When you use the Report Designer to edit an existing report or to create a
new one, you usually begin by creating or modifying a Structured Query
Language (SQL) query. Using the database items contained in the table(s)
referenced in the query, you can populate fields, grids, and charts for the
report. The fields, grids, and charts can then be sized, moved, and changed
on the report.
When you have finished creating or editing a report, you save the report on
the CMS server. If you assigned Global user permissions to t he report, other
Supervisor users with the appropriate per missions can run the report.
When you create
real-time, historical, and integrated reports
, the Report
Designer lets you do the following:
●
Copy existing report designs, including standard report designs
●
Edit reports by adding, moving, copyi ng, and deleting fields, grids, or
charts
●
Define Automatic Call Distribution (ACD) data for report fields, grids,
and charts
●
Enter text for field labels, column headers, row headers, or special
instructions.
historical reports only
For
, the Report Designer allows you to do the
following:
●
Merge data in a report field to include data from different entities within
an ACD (for example, defining a field that represents the percentage of
calls an agent answered compared to all calls handled by that agent’s
split or skill).
●
Merge data in a report field to i nclude data wi th diff erent time frames (for
example, defining a field that represe nts the percentage of calls
answered in an intrahour interval compared to all calls answered in the
day).
●
Include data from custom data t ables that you create and populate
within the
CentreVu
CMS database.

Introduction
About the Report Designer 1-2
CentreVu
Report Designer Version 8 User Guide
If you create custom database t ables, as described in Chapter 18,
“SQL Query and CMS Database Table Basics” make sure that you
name the tables with the prefix “c_. ” If you do not use the c_
convention, the custom tables will not automatically be backed up.
If you create custom data tables, then you need to make sure there
is enough disk space available to store the data. CMS does not
automatically check the availabl e space. If you fill up your disk with
custom data, you will lose o r damage st ored custom and ACD data.
See the
CentreVu® CMS R3V8 Administration
(585-210-910)
document for more information about disk storage.
Do not tamper with standard ACD data in the CMS database. If you
do, then you will lose stored data.
integrated reports only
For
, the Report Designer allows you to do the
following:
●
Display real-time and historical data on the same report
●
Display cumulative data that shows up-to-the-moment data since a
specified interval st art time in the past 24 hours.

Introduction
About the Report Wizard 1-3
CentreVu
Report Designer Version 8 User Guide
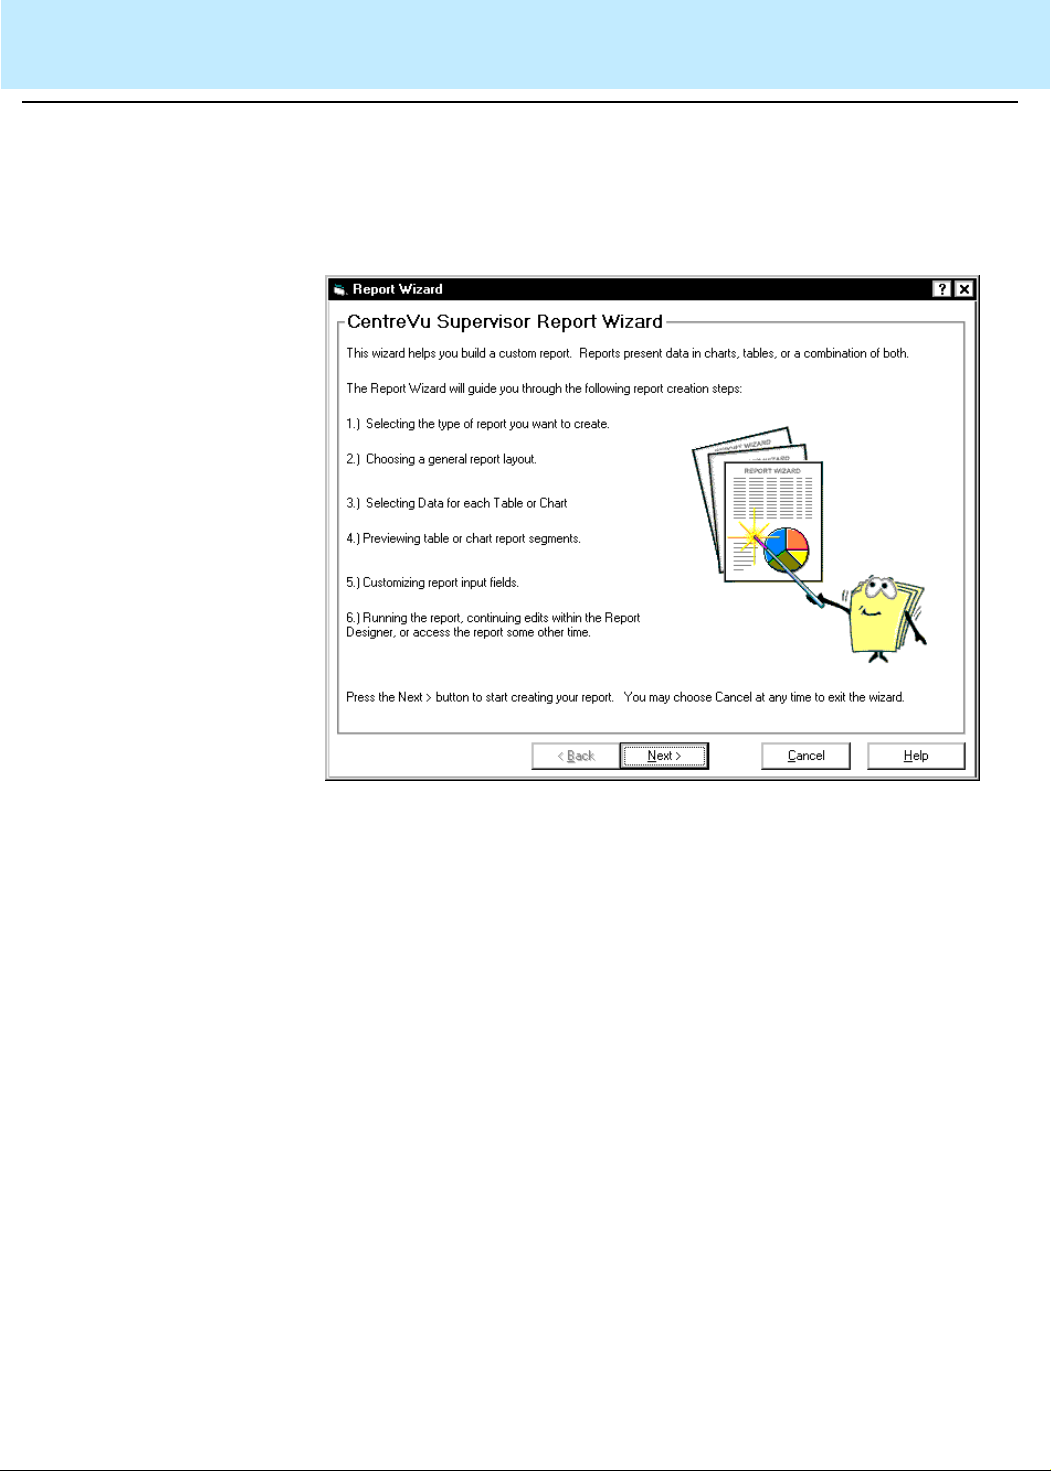
About the Report Wizard 1
Report Wizard is a supplement to Report Designer. The Report Wizard
feature delivers user ass istan ce, by way of a wizard , to quick ly and ea sily
generate new customized reports. The wiz ard provi des in struct ion al hel p
that guides you through a series of tasks that create a new customized
report.
The Report Wizard feature is available only if you have purchased the
Report Designer feature. Report Wizard can be accessed only when
Report Designer is activated on the CMS server and when you have the
appropriate permissions to access Report Designer.
All reports created using Report Wizard have the same designation and
accessibility as those created in Repor t Designer. T hus, reports created
by Report Wizard are refer red to as Report Desi gner re ports. This means
that reports created by Report Wizard will be accessible only by
CentreVu
the ASCII terminal interface.
Supervisor users and cannot be l isted, modifi ed, or run thr ough

Introduction
Contents of This Document 1-4
CentreVu
Report Designer Version 8 User Guide
Contents of This Document 1
This book describes what you need to know to
create new reports and to
edit existing report s through the Report Designer and Repo rt Wizard
book is organized as follows:
●
Chapter 1, Introduction — gives you background information on
the Report Designer application and general information about this
book.
●
Chapter 2, Using the Report Wizard — gives you background
information on the Report Wizard (features and functionality) and
steps you through the creation of a new report.
●
Chapter 3, Using the Report Manager — teaches you the basic
procedures you need to know in order to use the Report Manager
feature of Supervisor. The procedures included in this chapter are
Viewing a Report’s Properties, Copying a Report to the Designer
Category, Copying a Designer Report to a File, Copying a Designer
Report from a File, Deleting a Report from the Designer Category,
and Opening the Report Designer Using the Edit or New Button.
●
Chapter 4, Report Designer Basics — teaches you the basic
information that you need to know in order to use the Report
Designer. The procedures included in this chapter are Starting the
Report Designer, Exiting the Report Designer, Report Designer
Menus, St eps Required to Create a New Report, and Steps
Required to Edit an Existing Report.
●
Chapter 5, Design Mode Basics — teaches you basic procedures
that you will use in the Report Designer design mode. The
procedures included in this chapter are Copying an Item and
Pasting the Item Into the Same Report, Copying an Item from One
Report and Pasting the Item Into Another Report, Cutting an Item
from a Report, Deleting an Item from the Report, Using Drag-andDrop to Arrange Items on the Report, Resizing an Item on the
Report, and Selecting Multiple Items on the Report.
●
Chapter 6, Edit | Inputs — shows you how to edit the existing input
fields that are used on the input window for the report you are
editing. The procedures included in this chapter are Adding Input
Fields to the Input Window , Deleting Input Fiel ds from Input Window ,
Editing the Order of Input Fields, Editing the Appear ance of Input
Fields, and Viewing the Input Window.
. The

Introduction
Contents of This Document 1-5
●
Chapter 7, Edit | Queries — shows you how to edit the existing
CentreVu
Report Designer Version 8 User Guide
queries and create new queries for the report you are editing. The
sections included in this chapter are Defining Queries for a Report,
Creating a New Real-Time or Historical Query, Creating a New
Integrated Query, Editing an Existing Query , Copying a Query, and
Deleting a Query.
●
Chapter 8, Insert | Chart — teaches you to insert a chart on a
report.
●
Chapter 9, Insert | Fiel d — teaches you to insert a field on a report.
●
Chapter 10, Insert | Table — teaches you to insert a table on a
report.
●
Chapter 11, Insert | Text — teaches you to insert text on a report.
●
Chapter 12, Format | Chart — gives you gen eral info rmati on about
the tabs that you access from the Chart option of th e Format menu.
●
Chapter 13, Format | Table — gives you general information about
the tabs that you access from the Table option of the Format menu.
●
Chapter 14, Format | Field — gives you general informati on about
the window that you access from the Format option of the Format
menu.
●
Chapter 15, Format | Text — gives you general information about
the window that you access from the Text option of the Format
menu.
●
Chapter 16, Error Messages — lists the most common errors that
you will encounter as a result of errors in queries that you create for
reports.
●
Chapter 17, How CentreVu CMS Stores and Retrieves Data —
gives you general information about how the CMS server stores and
retrieves the data that is used in the reports.
●
Chapter 18, SQL Query and CMS Database Table Basics —
gives you general information about how INFORMIX
*
SQL queries
work and how the INFORMIX tables that are used in CMS are
structured. If you are not familiar with SQL queries, you need to read
this chapter before you attempt to create a query for your rep ort.
●
Appendix A, Using the Report Designer - Examples — provides
step-by-step examples on how to create and edit a commonly used
report with Report Designer.
*INFORMIX is a registered trademark of Informix Software, Inc.

Introduction
Conventions Used in This Document 1-6
CentreVu
Report Designer Version 8 User Guide
Conventions Used in This Document 1
The following conventions are used in this book:
●
The instructions given in this book are based on the assumption that
you are familiar with your computer and the
system, including standar d
Window
conventions, such as using the
Windows
F1 key to activate Help.
●
To use this book successfully, you must be familiar with the
Supervisor application and have some knowledge of how CMS
reports work.
For instructions on using the Supervisor application, refer to the
CentreVu® CMS R3V8 Administration
information on CMS repor t s, re fer t o the
Reports
●
●
document (585-210-929).
Windows
—
—
refers to the following operating systems:
Windows
Windows NT
95
†
‡
4.0.
Unless the right button is specified, use the left mouse button
(585-210-910) document. For
CentreVu® Supervisor Ver sion 8
whenever you are instructed to click or select an item.
●
Menu names, menu items, and window names are shown in initial
capital letters. For example: Choose Save from the File menu.
●
Italics
are used to reference other documents, to reference file
names, and for trademarks.
●
Sections and chapters that are referred to in tex t are shown i n
quotes. For example: See Chapt er 1, “Intr oductio n,” f or an out l ine of
the information in this book.
●
A graphic of each Supervisor window is not included in this book.
Graphics are provided to give you general information about a
of window , or to help clarify a procedu re that is being described . The
examples in this book are taken from Supervisor running in
Windows
95.
*
operating
type
*Windows is a registered trademark of Microsoft Corp.
†Windows 95 is a registered trademark of Microsoft Corp.
‡Windows NT is a registered trademark of Microsoft Corp.

Introduction
Related Documents 1-7
CentreVu
Report Designer Version 8 User Guide
Related Documents 1
The following documents include addi tional informat ion about the CMS or
Supervisor:
●
CentreVu® Supervisor Version 8 Installation and Getting Started
(585-210-928)
●
CentreVu® CMS Release 3 V ersi on 8 Admi nistr ation
●
CentreVu® Supervisor Version 8 Reports
●
CentreVu® CMS Release 3 Version 8 Database Items and
(585-210-929)
Calculations (585-210-939).
(585-210-910)

Introduction
Related Documents 1-8
CentreVu
Report Designer Version 8 User Guide
Using the Report Wizard
About the Report Wizard 2-1
CentreVu
Report Designer Version 8 User Guide
2 Using the Report Wizard
About the Report Wizard 2
Report Wizard is a supplement to Report Designer and is available only if
you have purchased Report Designer. The Report Wizard feature delivers
user assistance, by way of a wizard, to quickly and easily generate new
customized reports. The wizard provides instructional help that guides you
through a series of tasks that create a new customized report.
The following features are available in the Report Wizard:
●
Creating a new report
●
Previewing the new report
●
Saving the new report
●
Running the new report.
How the Report Wizard Works
All reports created using Report Wizard have t he same designation and
accessibility as those created in Report Desi gner. Thus, reports created by
Report Wizard are referred to as Report Designer reports. This means that
reports created by Report Wizar d will be accessible only by
CentreVu
Supervisor users.
The Report Wizard is based on the completion of report creation tasks. (For
a list of the tasks involved in creati ng a new re port, see the “Creating a New
Report” section in this chapter.) The report layout you choose will determine
2
the number of tasks you will have to complete to create your report. Report
Wizard presents th ese t ask s by way of p ages (screen s). The ti t le bar of each
page contains the following inf o rmation:
●
Step (task) number you are currently working on
●
Number of total steps (tasks) required to complete th e report
●
Action you are performing on that page. For example:
®
Using the Report Wizard
About the Report Wizard 2-2
CentreVu
Report Designer Version 8 User Guide
Each page of the Report Wizard cont ains command buttons to navigate
through the wizard and command buttons that help you define your
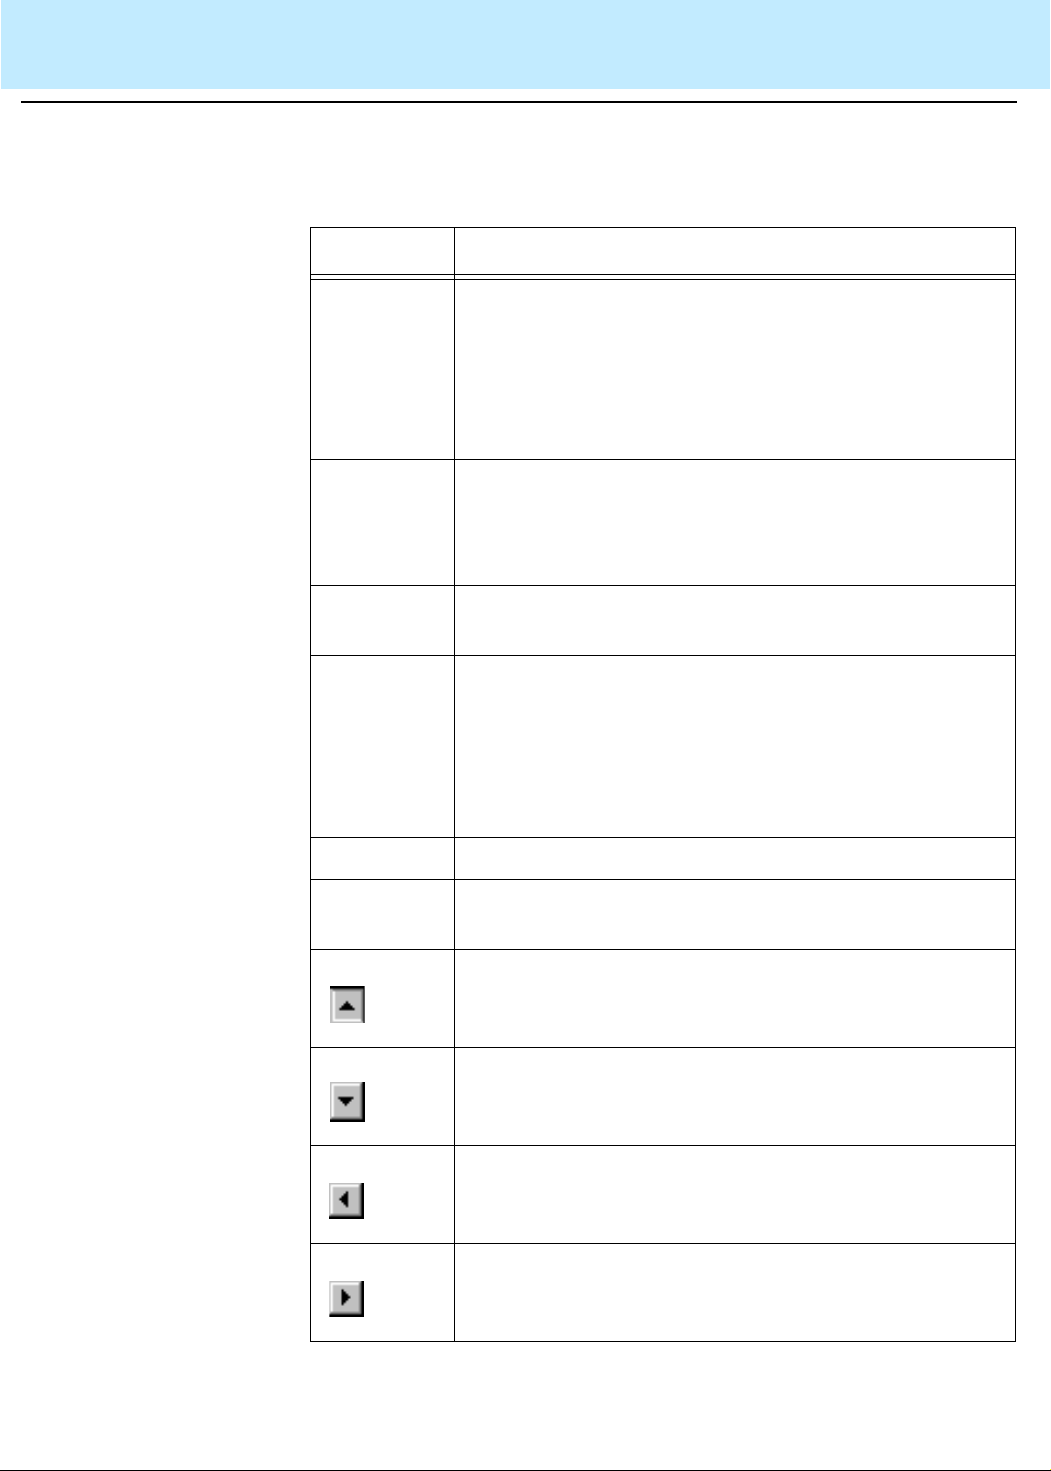
report. The following table for an explanation of these command buttons.
Command Action
<Back Returns to the previous p age. (Thi s c ommand butt on is
disabled on the first page of the Report Wizard.) When
you back up to previous pages Report Wiz ard will ret ain
the values you entered unless you back up to a
previous page and make changes that impact ensuing
pages.
Next> Moves to the next page in the sequence, maintaining
whatever settings you provided on the previous pages.
(This command is replaced wit h the Finished button on
the final page of the wizard.)
Finished Applies your settings or the default settings from all
pages and completes the task.
Cancel Discards any selections you have made (only if you
have not saved the report ), terminates t he process, and
closes the Report Wizard.
If you saved the report before selecting the Cancel
button, Report Wizard closes; howev er , you wi ll be able
to run or edit the report in Report Designer.
Help Provides information about the page.
Data Item
Definition
Provides a definition for the selected databa se item or
calculation.
Moves a database item or calculation up in the list of
Selected Data Items.
Moves a database item or cal culation d own in the lis t of
Selected Data Items.
Removes a database item or calculation from the
Selected Data Items list.
Adds a database item or calculation to the Selected
Data Items list.

Using the Report Wizard
About the Report Wizard 2-3
CentreVu
Report Designer Version 8 User Guide
Command Action
General Report
Wizard
Functionality
Edit Item
Provides a method for editing a database item heading.
Heading
Preview Captures a screen shot of your report as it is currently
defined.
The following list provides the general func tionality of the Report Wizard:
●
Report Wizard provides default choices in each task. You may
2
change any of the defaults to choices that best meet your needs.
Each time you use the Report Wizard to create a new report, the
original default choices will be shown.
●
Report Wizard can access all database items and standard
calculations. Although you can access all database items and
standard calculations, you cannot create new calculations or link
fields together with math functions by way of the Report Wizard.
However , Report Designer allows you to create new calculations
and link fields together with math functions for reports which you
create in the Report Wizard.
●
Report Wizard can create a report with charts and tables. With
the Report Wizard you will be able to create a report that contains
the following:
— one or two charts,
— one or two tables, or
— one chart and one table.
You will have to use the Report Designer to enter text or fields
containing one data item.
●
Report Wizard does not display queries and database table
names used to generate a report. If you need to see this type of
information, use Report Designer.
●
Report Wizard provides access to database item definitions.
While in the Select Data Items page of the Repor t Wi zard, you will
be able to click on a database item or calculation, and then select
the Data Item Definition button to view the definition of the dat abase
item or calculation which you highlighted.

Using the Report Wizard
About the Report Wizard 2-4
●
Report Wizard does not allow editing of a completed report.
CentreVu
Report Designer Version 8 User Guide
Report Wizard is designed to creat e new report s only. However, you
can edit a completed report in Report Designer.
●
Report Wizard does not allow reentry. Report Wizard does not
allow you to leave and then reenter to finish a partially completed
report. A report created in Report Wizard must be completely
defined before it can be saved. If you close Rep ort Wizard before
saving a report, the r eport is dis carded. To make changes to a r eport
created and saved in Report Wizard, use Report Designer.
Using the Report Wizard
Starting the Report Wizard 2-5
CentreVu
Report Designer Version 8 User Guide
Starting the Report Wizard 2
Report Wizard can be accessed only when Report Designer is activated
on the CMS server and when you have the appropriate permissions to
access Report Designer.
There are two methods available to start the Report Wizard. These
methods are as follows:
●
Toolbar button on the Controller
●
Report Selector window.
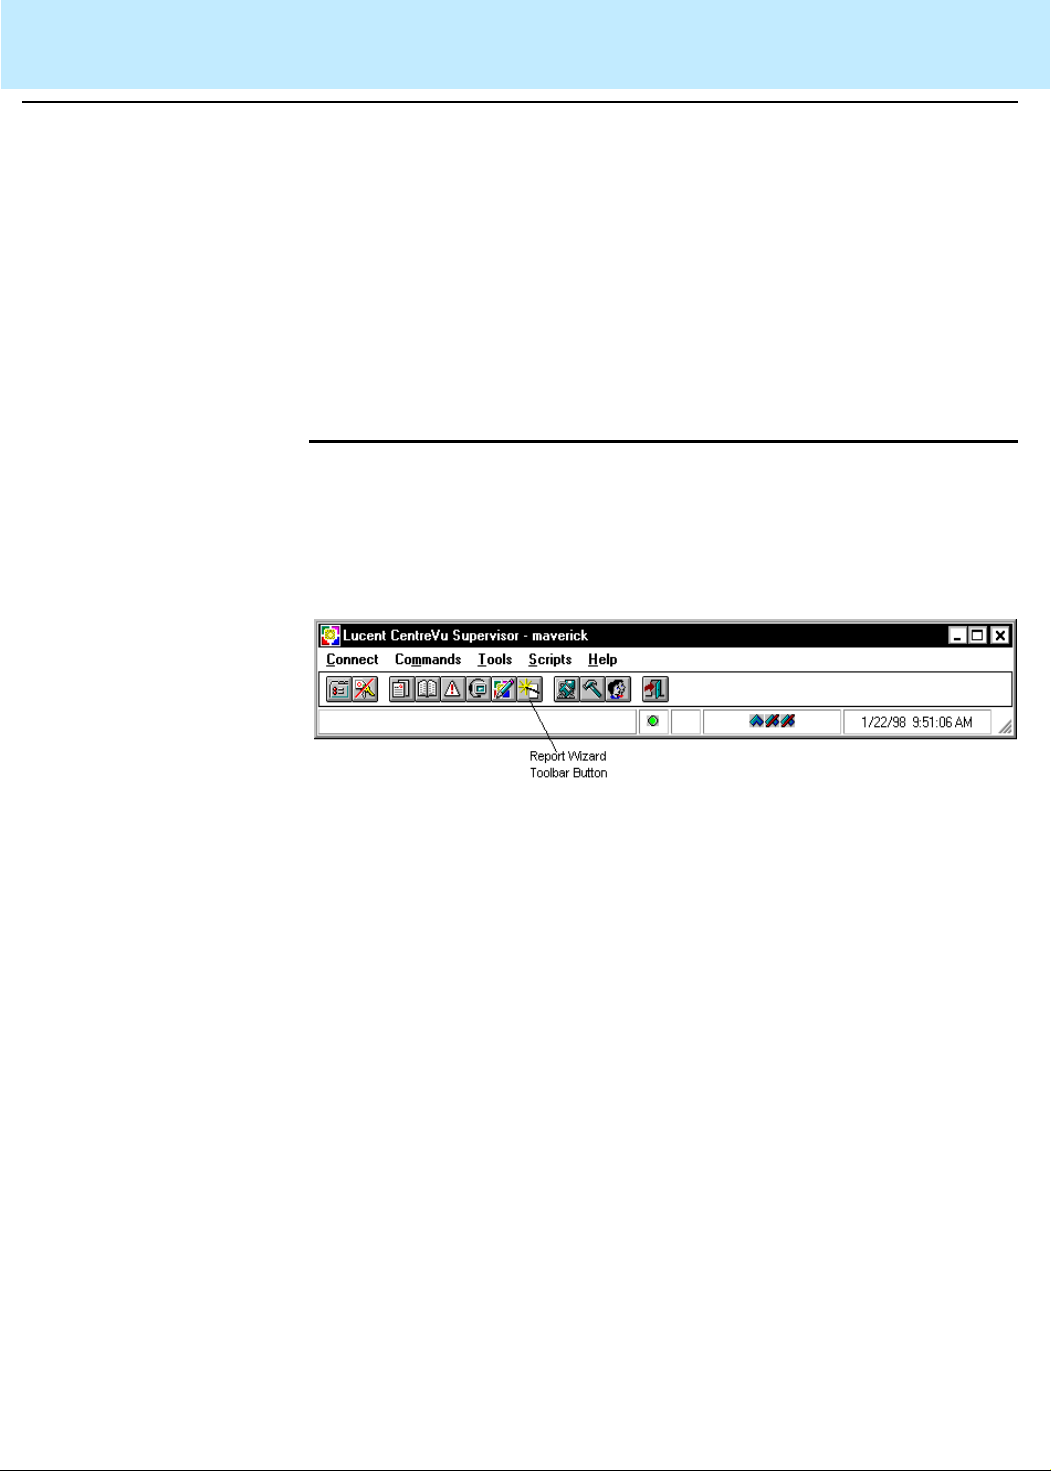
Toolbar Button 2
If you have purchased the Report Designer feature, a toolbar button will
be automatically added to the
toolbar.
Selecting the Report Wizard toolbar button will initiate the Report Wizard
feature.
CentreVu
Supervisor Controller window’ s
Using the Report Wizard
Starting the Report Wizard 2-6
CentreVu
Report Designer Version 8 User Guide
Report Selector Window
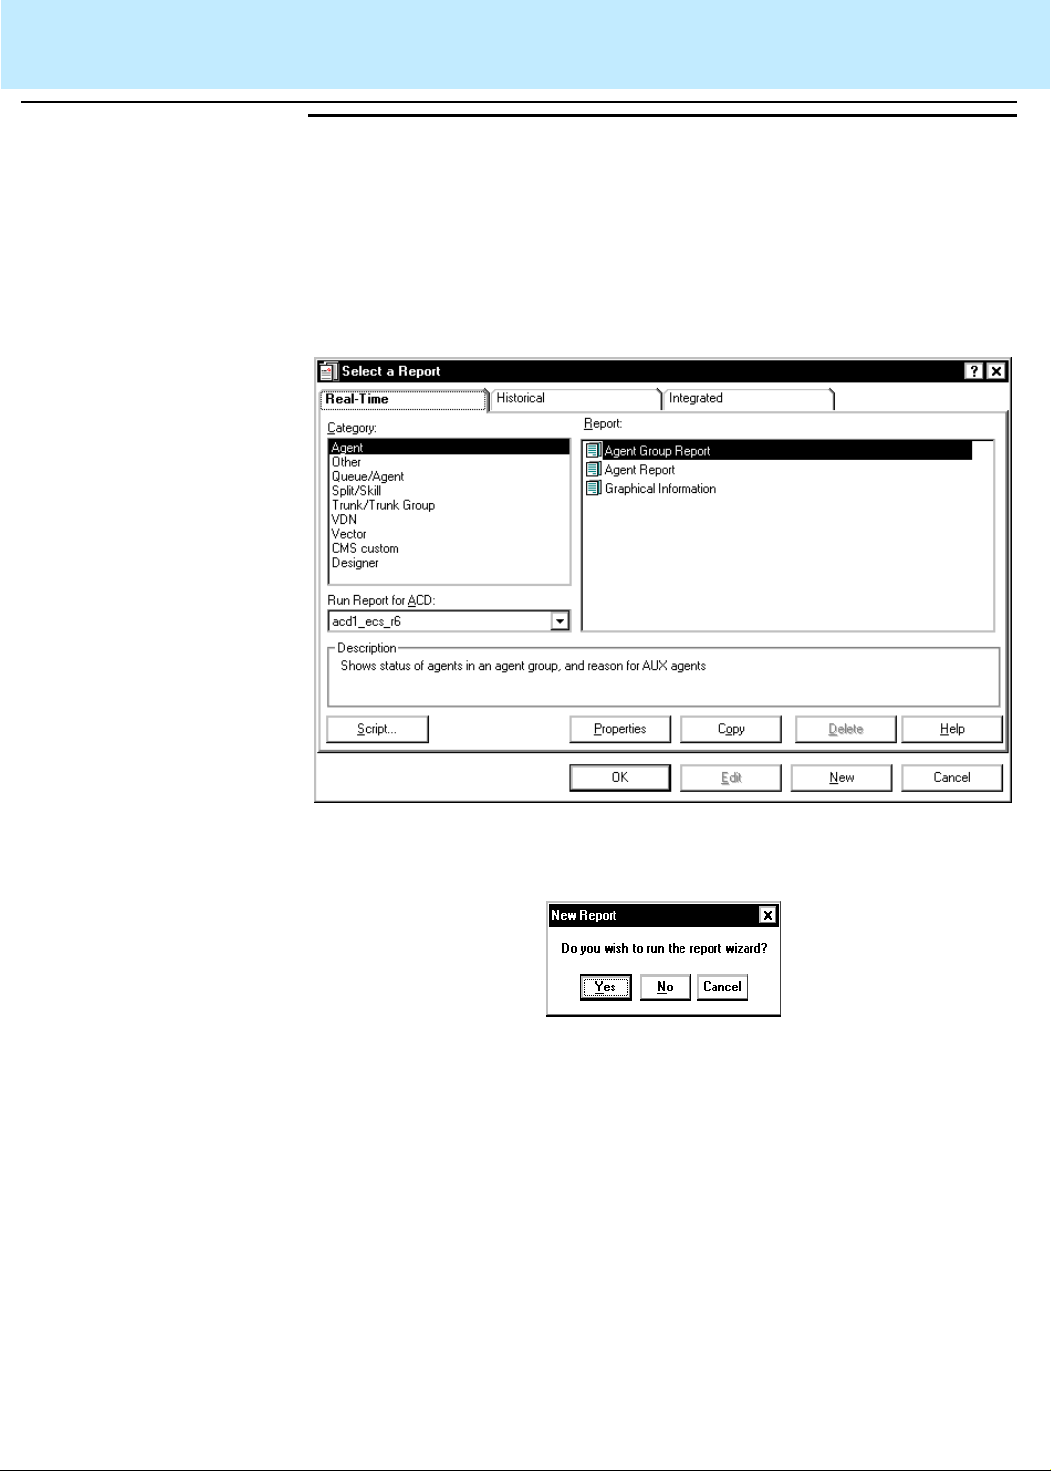
To access the Report Wizard by way of the Report Selector window, do
the following:
2
1. From the Commands menu (located on the
Controller window), select the Reports... menu item. The Select a
Report window appears as shown below:
CentreVu
Supervisor
2. Select the New button. The New Report dialog box, as shown
below, will appear and ask you if you want to run the Report Wizard.
3. Select Yes to open the Report Wizard.
If you select No, Report Designer will open.
Using the Report Wizard
Creating a New Report 2-7
CentreVu
Report Designer Version 8 User Guide
Creating a New Report 2
When you start the Report Wizard, the Rep ort Wizard page appears. The
Report Wizard page provides a list of the tasks inv olved in creating a new
report.

Using the Report Wizard
Creating a New Report 2-8
CentreVu
Report Designer Version 8 User Guide
To begin the creation of a new report, select the Next> button. This will
advance you to the Select a Report Type page of the wizard. The Select
a Report T ype page i s the first p age of th e wizard. Go to the next sec tion,
“Selecting a Report Type Page,” in this chapter.
Selecting a Report Type Page
Selecting a report typ e is the fir st task in creating a new report. The r eport
type determines whether the data in the report is real-time, integr ated, or
historical. For example, if you select a real-time report, you wil l not be
2
able to specify historical data in the report. The following list provides
information about each type of report:
●
Real-Time— Reports that refresh in real time.
Real-time reports are reports that display current ACD call activity
on agents, splits/skills, trunks, trunk groups, vectors, and vector
directory numbers (VDNs) for the current interval (15, 30, or 60
minutes). Current intrahour i nterval real-t ime report s are per iodicall y
updated as data changes during the interval.
●
Integrated—Reports that refresh in real-time and show information
that is accumulated from any point in time in the past 24 hours of
ACD, agent, split/skill, trunk, trunk group, vector, and VDN activities.

Using the Report Wizard
Creating a New Report 2-9
●
Historical—Reports that giv e i nformati on t abul ated ov er a period of
CentreVu
Report Designer Version 8 User Guide
time. Historical reports display past ACD data for various agent,
split/skill, trunk, trunk group, vector or VDN activities. You must
select a historical report if you want to include the following data:
— Exceptions
— Call Work Code
— Agent Trace
—Call Record.
The default for report type is always Real-Time.
To select a report type other than the default, do the following from the
Select a Report Type page:
1. Click on the radio button to the lef t of the repor t type you want to
use.
2. Select Next> to move to the next page of the wizard. The Select a
Report Layout page appears. Go to the next section, “Selecting a
Report Layout Page,” in this chapter.

Using the Report Wizard
Creating a New Report 2-10
CentreVu
Report Designer Version 8 User Guide
Selecting a Report Layout Page
Selecting a report layout is the second task in creating a new report. The
layout determines how your dat a will be represent ed in the repor t. Report
layouts are in the form of charts, tables, or both. Charts provide a
2
graphical representation of data, and tables provide data in columns and
rows. Each chart or table in the l ayout is referred to as a section. A repo rt
layout can contain one or two sections. See the following table for a
description of the dif fer ent types of report layouts availabl e to you in the
Report Wizard.
Charts Tables Combination
Single chart (one
section)
Single table (one
section)
Table and chart side
by side (two sections)
—Default—
Two charts side by
side (two sections)
Two charts: one on
top and one on
bottom (two sections)
Two tables side by
side (two sections)
Chart and table side
by side (two sections)
Chart on top and
table on bottom (two
sections)
Each section of a report layout must be defined. Defining a section
includes the following tasks:
●
Selecting a data group (accomplished thr ough the Select a Data
Group page).
●
Selecting data group items (accomplished through the Select Data
Items page).
●
Selecting a format for the chart or t able in the section (ac complished
through the Select the Chart Format page or on the Sel ect the Table
Format page).
●
Previewing the section (accomplished through the Prev iew page)
Optional.
To select a report layout, do the following:
1. Click on the image that represents the layout you want for your new
report. Text describing the selected layout will appear on the lower
portion of the page under the Selected Layout field.
If you specified a report layout that contains one section (for
example, a single table), go to Step 2 now.

Using the Report Wizard
Creating a New Report 2-11
CentreVu
Report Designer Version 8 User Guide
If you specified a report layout that contains more than one section
(for example, one t able and one chart), the Select ion Layout p age of
the wizard appears as shown on page 11
. This page provides the
following information:
●
Section you are about to define—a section that appears to be
pressed with an arrow pointing to it.
●
Section you have not defined—a sect ion that appears not t o be
pressed, without an arrow.
Report Wizard will guide you through each task for defining a
section. When one section is defined, the Report Wizard will bring
you back to the Current Selection page to help you define another
section. Report Wizard will continue this cyc le until you have defined
all sections.

Using the Report Wizard
Creating a New Report 2-12
CentreVu
Report Designer Version 8 User Guide
If you specified a report layout that contains one section, the
Selection Layout page will not appear. Instead, the Select a Data
Group page will appear as shown on page 12
.
2. Select Next> to begin defining the report layout section(s). The
Select a Data Group page appears as shown below. Go to the next
section, “Defining a Report Layout Sect ion(s),” in this chapter.
To redefine a previous section, select the <Back button.
For example, if you have already defined a secti on of your report and
select the <Back button, the wizard t akes you to the Preview p age for the
last section defined. From her e, you can continue to select <Back to go
back through the various tasks involved in defining a section.

Using the Report Wizard
Creating a New Report 2-13
CentreVu
Report Designer Version 8 User Guide
Defining a Report Layout Section(s)
Selecting a Data
Group Page
Defining a report layout section(s) consists of the following tasks:
●
Selecting a data group
●
2
Selecting data items
●
Selecting the chart or table format
●
Previewing the work already done on the report (optional).
The Select a Data Group page provides only those data groups specific
to the type of repor t (real-time, integrated, or historic al) you chose earlier
2
and the current section (table or char t) being defined.
Using the Report Wizard
Creating a New Report 2-14
CentreVu
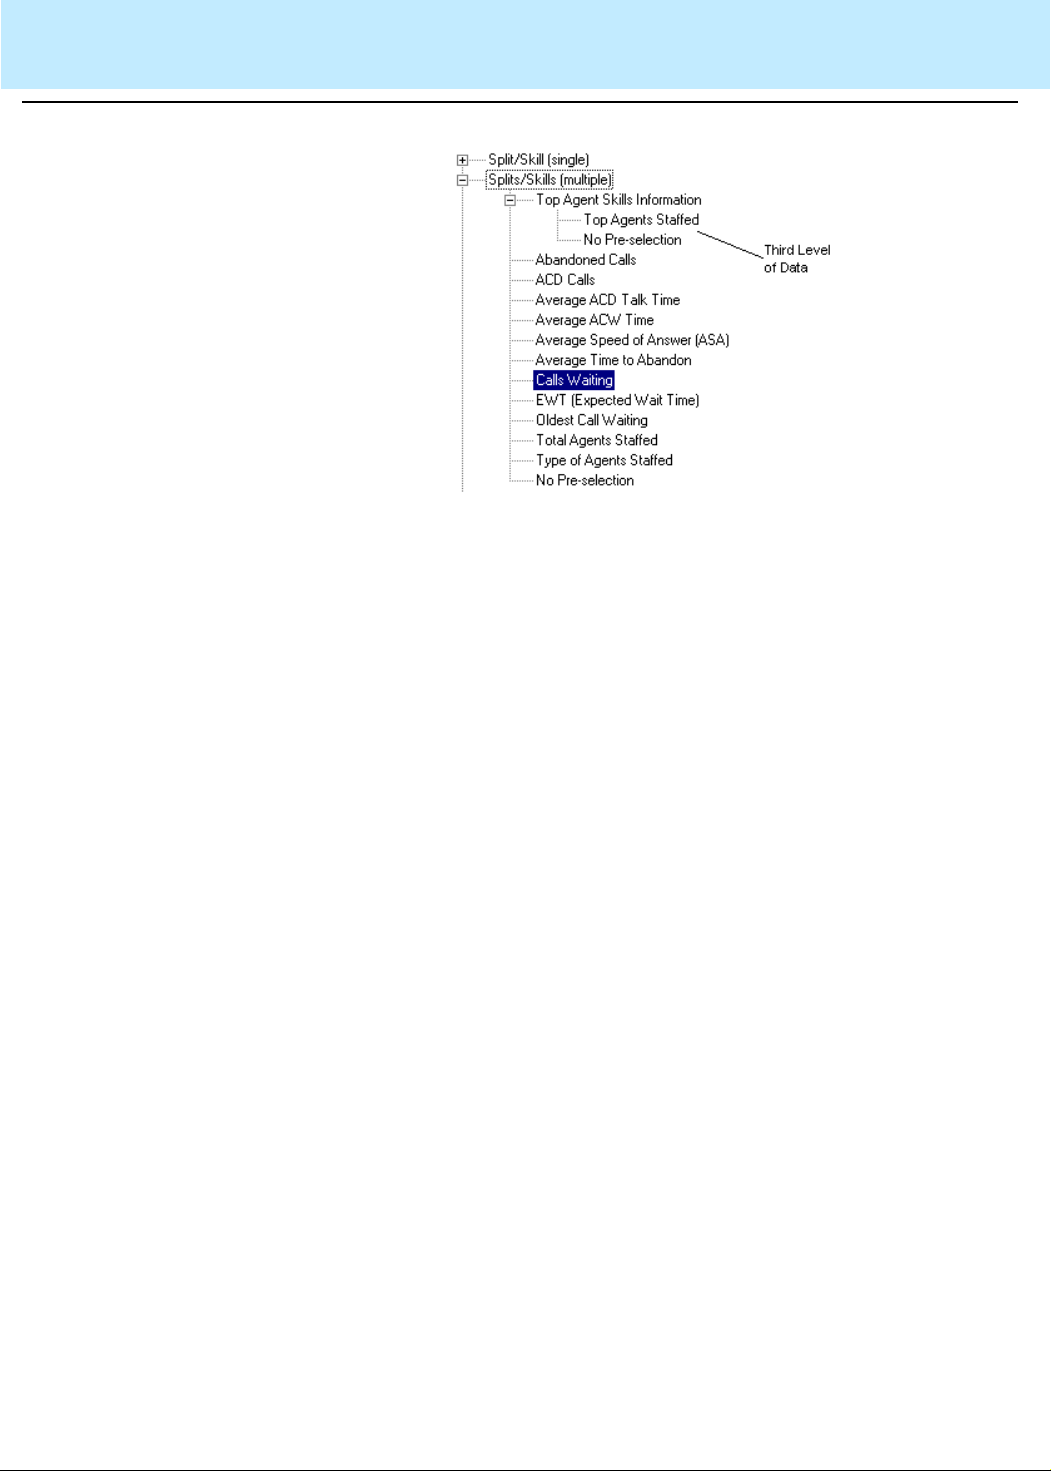
Report Designer Version 8 User Guide
The data groups available are placed in a tree view structure. There can
be up to three levels of data, the last level containing the individual data
groups. From this tree view structure, you will select an individual data
group for the section y ou are defin ing. A descr iption of the dif fe rent levels
is as follows:
●
First Level—the highest c lassificat ion level of data. For example, the
highest classification leve ls of data for a real-time table ar e Agent,
Split/Skills (multipl e), Trunk Group, VDN(singl e), VDNs (multiple),
and Vectors.
●
Second Level—a breakdown of the first classification levels of data.
For example, the second levels of data for the Split/Skills (multiple)
category are Multi-ACD, Top Agent Skills Information, Expected
Wait Time at each priority, Number of Agents in AUX Work States,
Performance, Type of Agents Staffed, and No Pre-se lection.
Individual data groups are contained under this level of data also.
●
Third Level—a breakdown of the second classif ication levels of
data. For example, the third level of data for the Split/Skills
(multiple)|Top Agent Skills Information category is Top Agents
Staffed and No Pre-selection. If there are three levels of data, the
individual data groups will be listed under the third level.
Using the Report Wizard
Creating a New Report 2-15
CentreVu
Report Designer Version 8 User Guide
Categories of data and sub-categories of data can be expanded
(represented with a “+” sign) and collapsed (represented with a “-” sign).
By default, when the Select a Data Group page of the wizard appears,
one category will be expanded with one dat a grou p selec ted. The defa ult
is based on the information (report type and report layout) which you
provided to the wizard previously.
To choose a data group, do the following:
1. Expand the categories of data until you reach the individual data
groups. (Individual data groups cannot be expanded, they are the
lowest category of data.) At this point you have not yet selected the
actual individual data group, you have just narrowed your selection
of a specific category of data. The Next> butt on will be di sabled unti l
you select a data group—go to Step 2.
2. Under the first, second, or t hird level of data, click on the data group
you want to use for the section you are defining. The data group is
highlighted and the Next> button is enabled.
Y ou ar e not required to prese lect data for your report. Each categor y
of data will include a category call ed No Pre-selection. If you choose
the No Pre-selection option, no data items and calcul ations will be
listed in the Selected Data Items li st view on the Select Data Items
page of the wizard.You will need to manually select the data items
you want to use. See the “Selecting Dat a Ite ms Page” secti on in this
chapter for more information about the lis t views.
3. Select the Next> button t o select the data items available for the
data group you chose in Step 2. The Select Data Items page
appears. Go to the next section, “Selecting Data Items Page,” in this
chapter.
Using the Report Wizard
Creating a New Report 2-16
CentreVu
Report Designer Version 8 User Guide
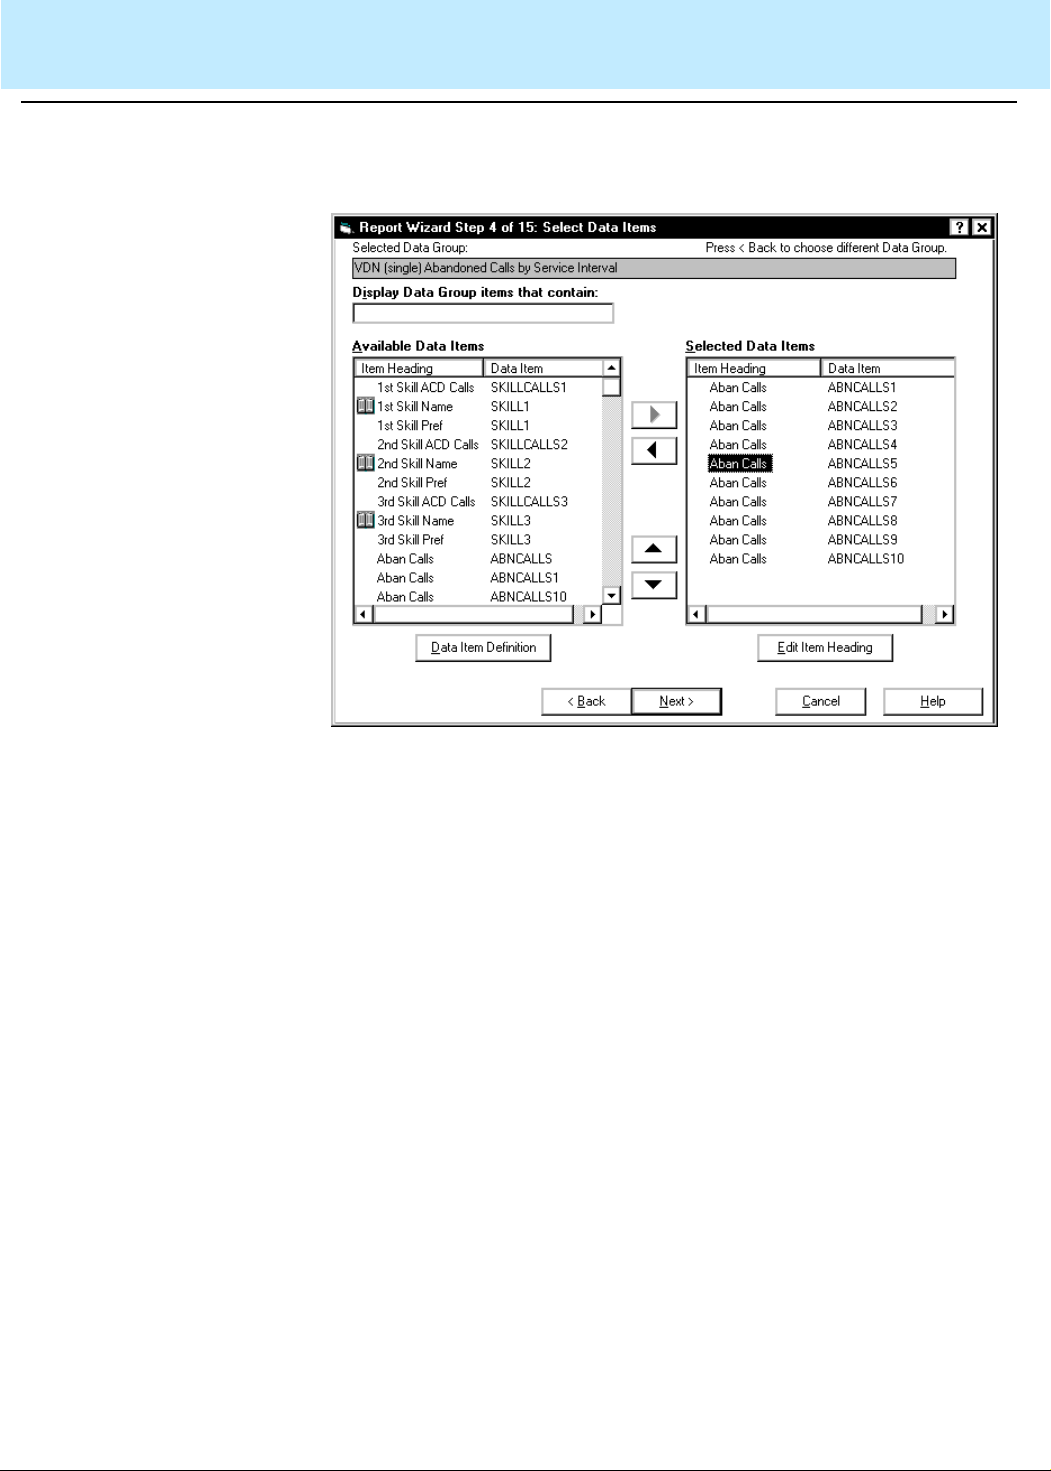
Selecting Data
Items Page
The Select Data Items page is where you finalize the actual data (data
items and calculations) that wil l be displayed in your report. Data items
2
are specific types of data stored in one of the CMS databases.
The data group you chose earlier is used to populate the following list
views in the Select Data Items page:
●
Available Data Items list view—contains all the data items
associated with the data group. This list allows you to add data
items to the Selected Data Items list view.
●
Selected Data Items list view—contains predefined database items
and calculations from the Available Data Items list that will be used
in your report.
If you remove a calculation from the Available Data Items list, you
will have to back up to the Select a Data Group page and resel e ct
the data group to have the calculation appear in the list again.
If you chose the No Pre-selection data group, then the Selected Data
Items list view will not be populated with preselected data; however, the
Available Data It ems li st view will contain all the data items available for
your report. To select the dat a items for your report, you need to manually
add them (from the Available Data Items list view) to the Selected Data
Items list view. At least one database item or calculation must be in the
Selected Data Items list view before the wizard will let you proceed.

Using the Report Wizard
Creating a New Report 2-17
CentreVu
Report Designer Version 8 User Guide
Both list views contain the following three elements:
●
Icon—if the data type is alphanumeric or has a graphi cal
representation. Synonyms that are defined for data items are in
parenthesis.
●
Item Heading—default heading for the dat abase i tem or cal culati on.
The item heading is the heading used in standard CMS reports.
●
Data Item—database item or calculation (internal name).
From the Select Data Items page, you can do the following:
●
Filter data group items that appears in the Available Data Items list
view .
●
Sort data group items in the Item Heading or Database Items
columns of the list views.
●
Add data group items to the Selected Data Items list view.
●
Access definitions for data group items.
●
Remove data group items from the Selected Data Items list view.
●
Reposition (move up or down) data group items in the Select ed Data
Items list view.
●
Edit item headings to create custom report headings.
Filtering Data Group
Items 2
Y ou can display data group i tems specific to t he characters entere d in the
Display Data Group it ems t hat contain: text box. Any string you enter into
this field will be compared against both columns of the Available Data
Items list view.

Using the Report Wizard
Creating a New Report 2-18
CentreVu
Report Designer Version 8 User Guide
To filter data group items, do the following:
●
In the Display Data Group items that contain text box, enter the
characters of the data items th at you want Report Wizar d to displ ay.
For example, if you want to list only those data group items that
contain the text “logonsk,” then you would need to enter “logonsk.”
●
To redisplay all data group items available to the data group, delete
all text in the Display Data Group items that contain text box.
Report Wizard disables the Next> button whenever the “Display Data
Group items that contain” text box has focus.
Sorting Data Group
Items 2
Adding Data Group
Items to the Selected
Data Items List View 2
Y ou can sor t the data group items by click ing on the Item Heading column
or the Data Item column in the Available Data Items list view. All data
group items will be sorted alphabetically.
You may want to add more data group items to your report than what is
already preselected in the Selecte d Data Items list view. Y ou can add any
data group item(s) list ed in the Available Data Items list view to the
Selected Data Items list view by doing one of the following:
●
Dragging and dropping the selected data group item(s) onto the
Selected Data Items list vi ew. With this method, you can drop a data
group item(s) anywhere on the list.
●
Clicking on the data group item(s), and then selecting the Add
button. Report Wizard enables the Add button only when a data
group item(s) is selected in the Available Data Items lis t view. With
this method, a data group item(s) is added to the bottom of the l ist.
●
Double-clicking on the selected data group item(s) from the
Available Data Items list view. With this method, a data group
item(s) is added to the bottom of the list.
●
Clicking on the data group item(s) in the Available Data Items lis t
view, and then pressing the ALT+right arrow key on your keyboard.
With this method, a data item(s) is added to the bottom of the list.

Using the Report Wizard
Creating a New Report 2-19
CentreVu
Report Designer Version 8 User Guide
Accessing Definitions
for a Data Group Item 2
Removing Data Group
Items from the
Selected Data Items
List View 2
Report Wizard provides definitions for all the data group items listed in
both list views. To see a definition for a specific data group item, do the
following:
1. Click on the data group item for which you want a defi nition.
2. Select the Data Item Definition button located under the Available
Data Items list view.
Report Wizard enables the Data Item Definition button only when you
select a single data item or calculation.
You may want to remove a data group item(s) that Report Wizard
preselected for your report. You can remove any data group item(s) li sted
in the Selected Data Items list view by doing one of the following:
●
Dragging and dropping the selected data group i tem(s) onto the
Available Data Items list view.
●
Clicking on the data group item(s), and then sele cting the remove
button. Report Wizard enables the remove button only when a data
group item(s) is selected in the Selected Data Items list view.
●
Double-clicking on the selected data group item(s) in the Selected
Data Items list view.
●
Clicking on the data group item(s) in the Select ed Data Items view
list, and then pressing the ALT+left arrow key on your keyboard.
When you remove a data group item(s), ensuing data group items are
shifted up accordingly.
If you remove all the data group items in the Selected Data Items view
list, Report Wizard disables the Next> butt on, and you cannot move to
the next page of the wizard. You must have one or more data g roup items
listed in the Select Data Items list view.
Using the Report Wizard
Creating a New Report 2-20
CentreVu
Report Designer Version 8 User Guide
Repositioning (Moving
Up or Down) Data
Group Items in the
Selected Data Items
List View 2
Editing Item Headings
to Create Cust om
Report Headings 2
Report Wizard allows you to reor ganize t he list of dat a group items i n the
Selected Data Items list view by moving them up or down. With this
feature, you can dict ate the or der the dat abase g roup items wi ll appear i n
the report. You can reorganize data group items through the following
methods:
●
Clicking on the data group item(s), and then selecting the up button
to move data group item(s) up or by selecting the down button to
move the data group item(s) down. Report Wizard enables the up
and down button only when a data group item(s) is selected in the
Selected Data Items list view.
●
Clicking on the data group item(s) in the Selected Data Items view
list, and then pressing the ALT+up arrow key to move data group
item(s) up or pressing the ALT+down arrow key to move the data
group item(s).
Report Wizard allows you to cha nge the Item Headi ng of any dat a item in
the Selected Data Items list vi ew. You may want to change data item
heading to a more meaningful name to use as your custom report
heading. You can change the data item heading by clicking on the
specific data item heading, and then selecti ng the Edit Item Heading
button located below the Selected Data Items list view.
When you have finished selecting and manipulat ing d ata base i tems for a
specific section, the next task for that section is to define its appearance.
Selecting the Next> b u tton from the Select Data Items page will advance
you to the correct page to format either the table or chart you are
defining. If the section contains a table, go to the next section, “Selecting
the Table Format,” in this chapter. If the section contains a chart , go to the
“Selecting the Chart Format” section in th is chapter.

Using the Report Wizard
Creating a New Report 2-21
CentreVu
Report Designer Version 8 User Guide
Selecting the Table Format
From the Select Table Format page in the wizard, you define the
characteristics of yo ur table layout. The default is a table in row order with
2
grid lines.
The following types of table layouts are available to you:
●
Row oriented table with grid lines
●
Row oriented table without grid lines
●
Column oriented table with grid lines
●
Column oriented table without grid lines.
Using the Report Wizard
Creating a New Report 2-22
CentreVu
Report Designer Version 8 User Guide
Example of a roworiented report 2
Example of a Column
Oriented Report 2

Using the Report Wizard
Creating a New Report 2-23
CentreVu
Report Designer Version 8 User Guide
To choose a format for your table, do the following:
1. Select the Fill Table by Row radio button if you want your report to
have a row format, or select the Fill Table by Column radio button if
you want your report to have a column format.
2. Select the Display Grid Lines check box if you want grid lines to
separate the data on your report.
3. Select Next> to advance to the next page of the wizar d. The Preview
page appears. Go to the next section, “Previ ewing the Report,” on
page 25
in this chapter.
Selecting the Chart
Format
From the Select Chart Format page in the wizard, you define the format
of your chart. The default is a vertical 2D bar chart that displays the data
2
by value.

Using the Report Wizard
Creating a New Report 2-24
CentreVu
Report Designer Version 8 User Guide
The following chart formats are avai lable to you:
2D Vertical Bar
Chart
2D Horizontal Bar
Chart
2D Ver tical St acked
Bar Chart
2D Horizontal
Stacked Bar Chart
3D Horizontal Bar
Chart
3D Ver tical St acked
2D St acked Area
Bar Chart
2D Pie Bar Chart
Bar Chart
3D Horizontal
Stacked Bar Chart
3D Vertical Bar
Chart
3D Line Chart 3D Pie Chart
2D Line Bar Chart 3D Stacked Area
Chart
3D Vertical Cluster
Bar Chart
To format your chart, do the following:
1. Select the Show Value radio button if you want to display your data
as a numeric value, or click on the Show Percentage radio button if
you want to display your data as a percentage.
2. Select the Display Legend check box i f you want to display a legen d
on your report. The legend is a description of the data items
contained in the chart and is displ ayed in the right corner of the
chart.

Using the Report Wizard
Creating a New Report 2-25
CentreVu
Report Designer Version 8 User Guide
3. Select the Display Dat a Labels check box if you want to show the
data labels on your repor t. Report Wiz ard will displ ay the d ata labels
as either values or percentages (depending on what you have
chosen in Step 1) and will be displayed above point.
4. Select the Use First data item as chart title check box if you want to
use the first data item as your title.
5. Click on the graphic that best represents the chart format you want
to use for your report.
6. Select the Next> button t o advance to the next page of the wizard.
The Preview page appears. Go to the next section, “Previewing the
Report,” in this chapter.
Previewing the
Report
Two-Section Report 2
The Preview page of the wizard allows you to preview what you have
defined for your report, exit the preview, and then either use the <Back
2
button to modify the report section or use the Next> butt on to advance to
the next page of the wizard. A previewed v ersion of a report cont ains real
data for each completed section; however, if the report is designated as
real-time then there will be no refresh of data. The only option while in a
previewed version of a report is to exit the prev iew
When you preview the first section of the report, you will be prompted to
provide input values for that section. When you preview the second
section of the report, you will again be asked to provide input values;
however , you are now asked to provide input values for both sections.

Using the Report Wizard
Creating a New Report 2-26
CentreVu
Report Designer Version 8 User Guide
Previewing the Report 2
Exiting the Preview of
the Report 2
Backing Up to
Previous Page 2
Moving Forward to
Next Page 2
To preview your report, click on the Preview button. Report Wizard will
display everything you have defined for your report up to this point.
To exit the previewed version of your report section, click the Exit button
or the Close button in the title bar. When you exit the previewed version
of your report section, Report Wizard returns you to the Preview page.
While still in the Preview page of the wizard you can modify your report
section by selecting the <Back button. Con ti nuing to select the <Back
button brings you thro ugh t he vari ous t asks in volved i n defini ng a sect i on.
If you do not want to modify your report section, select the Next> button
to advance. If you sti ll have undefi ned report sect ions, Report Wizar d will
display the Selection Layout page. From the Selection Layout page you
will begin to define your next report section. Select the Next> button to
advance to the next page of the report wizard (go to the “Defining a
Report Layout Section[s] on page 13
defining report layouts).
in this chapter for information on
Changing Input Captions
If you have defined all report secti ons t hen Report Wizard will displ ay the
Change Input Captions page. Go to the next sectio n, “Changing Input
Captions,” in this chapter.
When you are finished defining all report sections, the Change Input
Captions page appears. This page of the wizard all ows you to change t he
2
input captions that will appear in the Report Input window for your new
report.
The number of entries displayed in the Change Input Captions page will
depend on the data group you assigned to each section of your report.
From this page, you can change only the input captions and not the
inputs that will appear in your report.
To change the input caption(s), do the following:
1. Highlight the input caption you want to change.
2. Type the new input caption.
3. Repeat Steps 1 and 2 for each input caption you want to change.

Using the Report Wizard
Creating a New Report 2-27
4. Select the Next> button t o advance to the next page. The Save
Report page appears. Go to t he next section, “Saving the Repo rt,” in
this chapter.
CentreVu
Report Designer Version 8 User Guide
Saving the Report
From this page, you determine whether you want to save your newl y
defined report and whether your report will be available to everyone or
2
just yourself. Your report will be saved when you enter a report name and
select the Next> button. The report type and data group selections you
made for your report wi ll deter mine the category you r report will be saved
under (for example, Real-Time). Y ou are not required to sav e your report
at this time. If you do not save your report in the Save Report page,
Report Wizard will still allow you to advance to the next page (the Finish
page).

Using the Report Wizard
Creating a New Report 2-28
CentreVu
Report Designer Version 8 User Guide
To save your report, do the following:
1. Enter the name of your report in the Report Name text box. When
entering a name to save your new designer category report (global
or private), you will be presented with one of the following three
scenarios:
●
There is no existing designer category report with the name
you have selected for your new report. In this case, Report
Wizard will save the report with the name you have selected.
●
There is an existing designer category report with the same
name that you have select ed for your new report; however, you
are the owner of this report. In this case, you will get a
message warning you that you are about to overwrite an
existing report. You can either overwrite the existing rep ort or
select a different name for your new report.
●
There is an existing designer category report with the same
name that you have select ed for your new report; however, you
are not
the owner of this report. In this case, you will get a
message stating that you cannot overwrite the existing report.
You will have to select a different name for your new report.
If you do not enter a report name your report will not be saved
when you advance to the Finish page of the wizard. Neglecting
to save your report in eithe r the Save Report pag e or the Fi nish
page will discard your report.
2. If you want your report to be available to everyone, click on the
Everyone radio button. If you want your report to be avail able only to
you, click on the Only Me radio button. The following provides
information about each choice:
●
Everyone radio button (defau lt)—provide s global access to t he
report. By selecting the Everyone radio button, you give other
users the following capabilities:
— Other users can run the report
— Other users can copy the report design when designing
their own custom report in Report Designer.
The CMS user permission structure is still applicabl e.
●
Only Me radio button—only you and the
CentreVu
CMS
administrator(s) can run the report. In addition, no other users,
except for
Centre Vu
CMS administrator(s), can copy or run the
report design for use in their own custom reports .

Using the Report Wizard
Creating a New Report 2-29
3. Select the Next> button t o advance to the next page. The Finish
page appears. Go to the next section, “Fini shing the Report,” in this
chapter.
CentreVu
Report Designer Version 8 User Guide
Finishing the Report
Running the
Report
When all the required tasks are completed to create a repor t, you will
have to determine whether you want to run the report, edit the report
2
through Report Designer, or exit without doing anything (enabled for
saved report only).
When you run your report from the Finish page of the Report Wizard, it
will be run with the appropriate inputs, will access the CMS database,
2
and will produce real data. You will be running a live report.
If you run an unsaved report you wil l be prompted to save t he report upon
its completion. The report will be saved as a Report Designer report and
placed in the appropriate folder (real- time, historical , or integrated). If you
elect not to save your report, you can press the Exit button, and the
report will close, or you can select the Retur n button to return to the
running report.

Using the Report Wizard
Creating a New Report 2-30
To run your report, do the following:
1. From the Run Report for ACD combo box, select the ACD.
2. Click on the Run Report radio button, and then select the Finish
button.
CentreVu
Report Designer Version 8 User Guide
Editing Your Report 2
Exiting Report
Wizard
When you choose to edit your report from the Finish page of the Report
Wizard, the Report Designer starts. All edits to your report are now done
through the Report Designer. You can also edit your repor t using the
Report Wizard by selecting the <Back buttons on the various pages of
the wizard.
To edit your report, do the following:
1. From the Run Report for ACD combo box, select the ACD.
2. Click on the Edit Report in Report Designer radio button, and then
select the Finish button.
To exit Report Wizard without running your report or editing your report,
click on the Run or Edit report at a later time radio button (this option will
2
be disabled if you have not entered a report name for your repo rt), and
then select the Finish button. You can also select the Cancel button.
Selecting the Cancel button when your report has not been saved will
discard your report. Report Wizard will warn you if you try to cancel
without first saving your report.

Using the Report Manager
Introduction 3-1
CentreVu
Report Designer Version 8 User Guide
3 Using the Report Manager
Introduction 3
This chapter teaches you how to use the report manager feature of the
Supervisor application. The sections of the chapter are as follows:
●
About Report Manager
●
Viewing Report Properties
●
Copying a Report to the Designer Category
●
Copying a Designer Report to a File
●
Copying a Designer Report from a File
●
Deleting a Report from the Custom or Designer Category
●
Starting the Report Designer using the New or the Edit Button.
Using the Report Manager
About the Report Manager 3-2
CentreVu
Report Designer Version 8 User Guide
About the Report Manager 3
The report manager is the feature of the Supervisor appl ication that
allows you to view report proper ties, copy report s, and acc ess the Report
Designer to edit reports or create new reports.
The report manager is incorporated i nto t he Reports Selector window, as
shown below:
You can use the P
Selector window to manage the standard CMS and Supervisor reports,
and to Copy reports to the Desi gner category f or editing. You can use the
N
ew button to create a new Designer report from scratch. You can use
the D
elete button to delete reports from the Designer category (standard
CMS, CMS Custom, and standard Supervisor reports cannot be deleted).
NOTE:
For information on using the Add Bookmark button, see the
CMS R3V8 Administration
roperties, Copy, and Edit buttons on the Report
CentreVu
(585-210-910) document
®
Using the Report Manager
Viewing or Changing a Report’s Properties 3-3
CentreVu
Report Designer Version 8 User Guide
Viewing or Changing a Report’s Properties 3
The Report Manager gives you the ability to view report properties, such
as the report name, description, owner, type, folder, cat egory, and scope
(Everyone or Only Me), and the folder the report is stored i n.
To view a report’s properties, complete the following steps:
1. Open the Report Selector window.
2. Select the report for which you want to view properties.
3. Click the Properties button.
The Properties window for the report appears as shown below:
From the Properties window, you can change the name, description,
owner, and scope of a repor t.
4. To change the N
cursor in the appropriate field and make your edit s. To change the
scope, or who the Report is Available to, of a report, select either
the Ev
your changes, select the OK button to save the changes.
If you attempt to give a report the same name as an existing designer
report, the Report Already Exist s window displays. This window allows
you to overwrite the existing report or to give the report you are saving a
different name.
eryone or Only Me radio button. When you are done making
ame, Description, or Owner of a report, place the
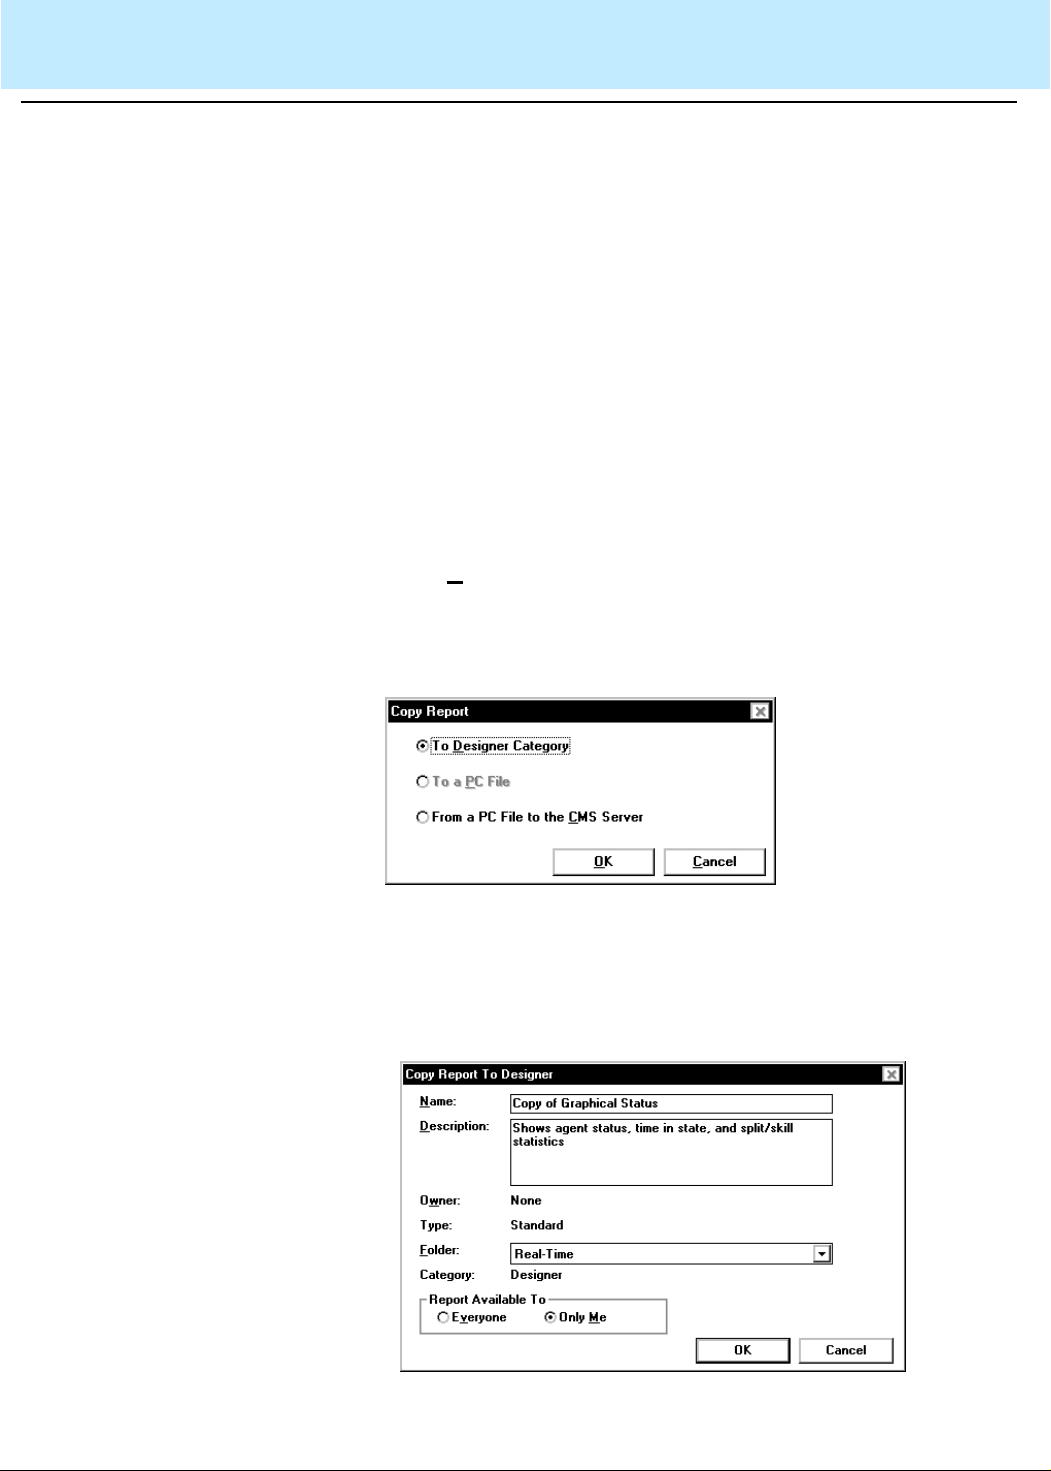
Using the Report Manager
Copying a Report to the Designer Category 3-4
CentreVu
Report Designer Version 8 User Guide
Copying a Report to the Designer Category 3
Using the Report Manager, you can copy a report from any category
(Agent, Other , Queue/Agent, Spl it/Skill, T runk/ T runk Group, VDN, Vector,
Custom, or Designer) and folder (Real-Time, Historical, or Integrated)
into the Designer category of any folder.
Reports that are created or edite d using the Report Designer can only be
accessed from the Supervisor interface to the CMS server. Therefore, if
you edit a CMS Custom Report using the Report Designer, the changes
to that report will not be availabl e when the report is run fr om the Terminal
Emulator or another terminal interface to the CMS.
To copy a report, complete the following steps:
1. Open the Report Selector window.
2. Select the report that you want to copy.
3. Click the C
The Copy Report window appears. This window allows you to select
where
file, or from a PC file to the CMS server).
4. Select the To Designer Category radio button.
5. Select the OK button.
The Copy Report To Designer Window displays, which i s where you
will define the name, description, folder, and scope of the report.
opy button.
you are copying the report to (the Designer category, a PC

Using the Report Manager
Copying a Report to the Designer Category 3-5
CentreVu
Report Designer Version 8 User Guide
To define the properties information for a copied report, complet e
the following steps:
6. Enter a name for your repo rt in the N
ame field. The name can have
up to 40 characters, including blanks. Because the name you give
your report should be unique, you may want to look at existing r eport
names before entering a name for your report.
7. Move the cursor to the D
escription field and enter a description of
the report. The description can have up to 100 ch aracter s, incl uding
blanks. It is not required that you enter a report description.
Do not use the \ (backslash), ; (semicol on), ’ (grave accent), ~
(tilde), “ (double quote), | (pipe), * (asterisk), or ? (question mark)
characters in your description of the report.
8. Move the cursor to the F
older field. Use the pull-down list to select
Real-Time, Hi storical, or Integrated. The report will be stored in the
Designer category of the folder you select here.
When you edit the report you will access the database for the folder
you select here. If you select Real-Time, you will not be able to
access the Historical database tables to define queries for the
report. If you select Historical, you will not be able to access the
Real-Time dat abase tabl es to define queri es for the report. However ,
if you select Integrated, you will be able to access both the RealTime and Historical databases to define queries for the report.
You must select the Historical or Integrated folder if you want to
include the following:
●
Exceptions data
●
Agent trace data
●
Call record data.
9. Select the Ev
eryone radio button to make the report accessible to
all CMS users who have the appropriate permissions, or select the
Only M
It is a good idea
e radio button to make the report accessible only to yourself
initially
to make your reports available only to
yourself until they have been debugged and run successfull y. This
prevents the possibility of oth e r users running reports that you have
saved but not yet tested.
Assigning “Everyone” access to the report allows other users to run
the report and to copy the report to create new designer reports.
Assigning “Only Me” access to the report means that only you (and
the CMS administrator(s)) can run the report . In addition, no other
users, except for CMS administrators, can copy the rep ort design for
use in their own designer reports.

Using the Report Manager
Copying a Report to the Designer Category 3-6
CentreVu
Report Designer Version 8 User Guide
No other CMS user other than a user with CMS administration
permissions can modify a report design you create, regardl ess of
whether the report is accessible by all or only by you. A user with
CMS administration permissions always has the ability to modify
your report design, even if you make it avail able only to yourself.
10. Select OK to save the report properties.
After you have copied the report to the Designer category, you can use
the E
dit button to access the Report Designer and edit the report.

Using the Report Manager
Copying a Designer Report to a File 3-7
CentreVu
Report Designer Version 8 User Guide
Copying a Designer Report to a File 3
You can use the Report Manager Copy button to copy any designer
report that you create to a file, either on diskett e, on your hard drive, or on
a network drive. You can use this feature to easily transport designer
reports from one PC to another.
If a report was created by Lucent Technologies Professional Services,
only a user with CMS services permissions can copy the report.
To copy a report, complete the following steps:
1. Open the Report Selector window.
2. Select the Designer Category
3. Select the designer report that you want to copy.
4. Click the Copy button.
The Copy Report window displays with the To a PC File option
enabled. This window allows you to select where you are copying
the report to (the Designer category, a PC file, or from a PC file to
the CMS server).
5. Select the To a PC File radio button.
6. Select the OK button.
The Save Report to PC File window appears as shown below:
This window is a standard
Windows
*
browse window.

Using the Report Manager
Copying a Designer Report to a File 3-8
CentreVu
Report Designer Version 8 User Guide
7. Select the File name and Folder to which you want to save the
report.
You can copy the report to any drive to which you have access,
including the floppy (usually a:\) drive on your PC.
You can save the report to a network drive by selecting the Network
button, which allows you to access the network drives that you have
permissions for.
8. Select the OK button.
9. The file is saved and, upon successful completion of the save, a
confirmation window displays.
*Windows is a registered trademark of Microsoft Corp.
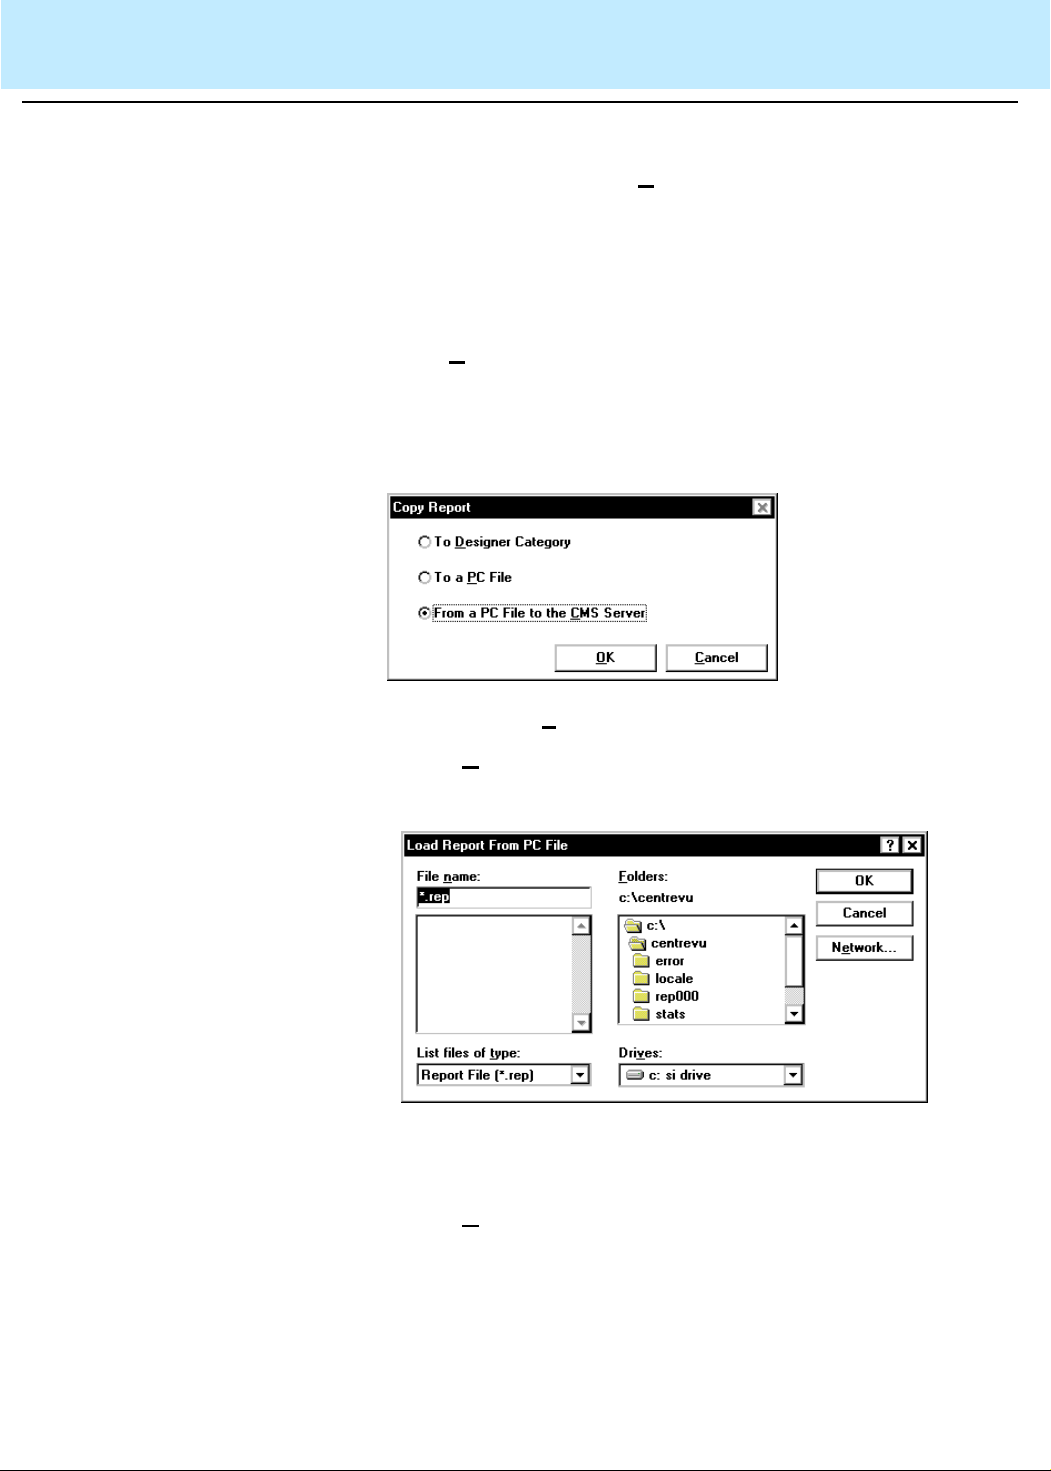
Using the Report Manager
Copying a Designer Report from a File 3-9
CentreVu
Report Designer Version 8 User Guide
Copying a Designer Report from a File 3
You can use the Report Manager Copy button to copy any designer
report that has been saved to a file (either on diskette or on a network
drive) onto the CMS server.
To copy a report from a file to the server , complete the following steps:
1. Open the Report Selector window.
2. Click the C
The Copy Report window displays. This window allows you to select
where
file, or from a PC file to the CMS server).
3. Select the From a P
4. Select the O
The Load Report From PC File window appears as shown below:
opy button.
you are copying the report to (the Designer category, a PC
C File to the CMS Server radio button.
K button.
This window is a standard
5. Select the file that you want to copy to the CMS server.
6. Select the O
7. The file is copied to the CMS server and, upon successful
completion of the copy, a confirmation window displays.
K button.
Windows
browse window.

Using the Report Manager
Copying a Designer Report from a File 3-10
CentreVu
Report Designer Version 8 User Guide
If a report with the same name already exists on the CMS server, the
following window appears as shown below:
Select the Overwrite the existing report radio button to replace the
report that currently resides on the CMS server. Select the Save the
report being copied as radio button and enter a new name for the r eport
if you want to retain the version of the report that currently resides on the
CMS server .

Using the Report Manager
Deleting a Report from the Designer Category 3-11
CentreVu
Report Designer Version 8 User Guide
Deleting a Report from the Designer Category 3
The Report Manager allows you to delete any report that resides in t he
Designer category except purchased report s form Professiona l Services .
You cannot delete any of the standard CMS, CMS Custom, or standard
Supervisor reports ( reports that reside in the Agent, Other, Queue/Agent,
Split/Skill, Trunk/Trunk Group, VDN, Vector, and Custom categories).
To delete a Designer report, complete the following steps:
1. Open the Report Selector window.
2. Select the Designer category under any tab.
3. Highlight the name of the report tha t you want to del ete.
4. Click the Delete button.
5. A message confirming the delete displays. Select OK to delete the
report or Cancel if you do not want to delete the report.

Using the Report Manager
Opening the Report Designer Using the Edit or New Button 3-12
CentreVu
Report Designer Version 8 User Guide
Opening the Report Designer Using the Edit or New
Button 3
You can use the Report Manager to open the Report Designer by
selecting a report from the Designer category and then clicking the Edit
button, or by clicking the New button to create a new report.
Y ou can also access the Report Designer from a report output window . To
do so, select Design from the Report menu on the report.
In addition to the above methods, you can open the Report Designer
from the last page of Report Wizard.

Report Designer Basics
Introduction 4-1
CentreVu
Report Designer Version 8 User Guide
4 Report Designer Basics
Introduction 4
This chapter outlines the features of the Report Desi gner and teaches you
general use of the Report Designer.
The following sections are included in this chapter:
●
Starting the Report Designer
●
Exiting the Report Designer
●
Report Designer Menus
●
Online Access to Database Definitions
●
Step s Required to Create a New Report
●
Steps Required to Edit an Existing Report.

Report Designer Basics
Starting the Report Designer 4-2
CentreVu
Report Designer Version 8 User Guide
Starting the Report Designer 4
To access the Report Designer and to run Designer reports, you must
have read and write permissions assigned for Custom Reports. These
permissions are set using the U
Call Management System Release 3 Version 8 Administration
910) document for instructions on setting up user permissions.
You can start the Report Designer using one of four methods:
●
Select a report from the Designer category in any folder and cli cking
the Edit button on the Reports Selecto r window
●
Click the New button on the Reports Selector window to create a
new report
●
Run a report and then selecting Design from the Report menu on
the report
●
Enter Report Designer from the Final page of the Report Wizard.
ser Permissions tool. See the
CentreVu
(585-210-
®
Any one of these methods of st arting the Repor t Designer wi ll t ake you to
the Design Mode window (the window will be blank if you are creating a
new report or will have report information if you are editing an existing
report), as shown below:

Report Designer Basics
Exiting the Report Designer 4-3
CentreVu
Report Designer Version 8 User Guide
Exiting the Report Designer 4
You can close the Report Designer using any of the standard
Windows
methods:
●
Select Exit from the Report menu.
●
Double-click the System button.
●
Select the Close button at the top of the window.
If you try to exit the Report Designer without first saving the report you
have been working on, a warning gives you the opportunity to save the
report before closing the Report Designer.

Report Designer Basics
Report Designer Menus 4-4
CentreVu
Report Designer Version 8 User Guide
Report Designer Menus 4
This section details the Report Designer Design Mode window. The
following picture illustrates the Report Designer Design Mode window:
Menu Bar 4
Title Bar
System Menu Box
Maximize/Minimize/Close
Window Sizing Buttons
Menu Bar
The menu bar lists the avai lable dr op-d own menus. The fol lowing menus
are available from the Report Designer Design Mode window:
●
Report
●
Edit
●
Format
●
Options
●
Insert
●
Help.
Report 4
The following paragraphs outline the options available from each menu.
From this menu, you can test the report you are working on, save the
report, and exit the Design Mode window. The R
eport menu has the
following options:
Menu Item Action
un Selecting Run takes you out of design mode and runs
R
the report you are working on. You will use R
un to test
the changes/additions you have made to a report.
ave Selecting Save saves the report on which you have been
S
working.
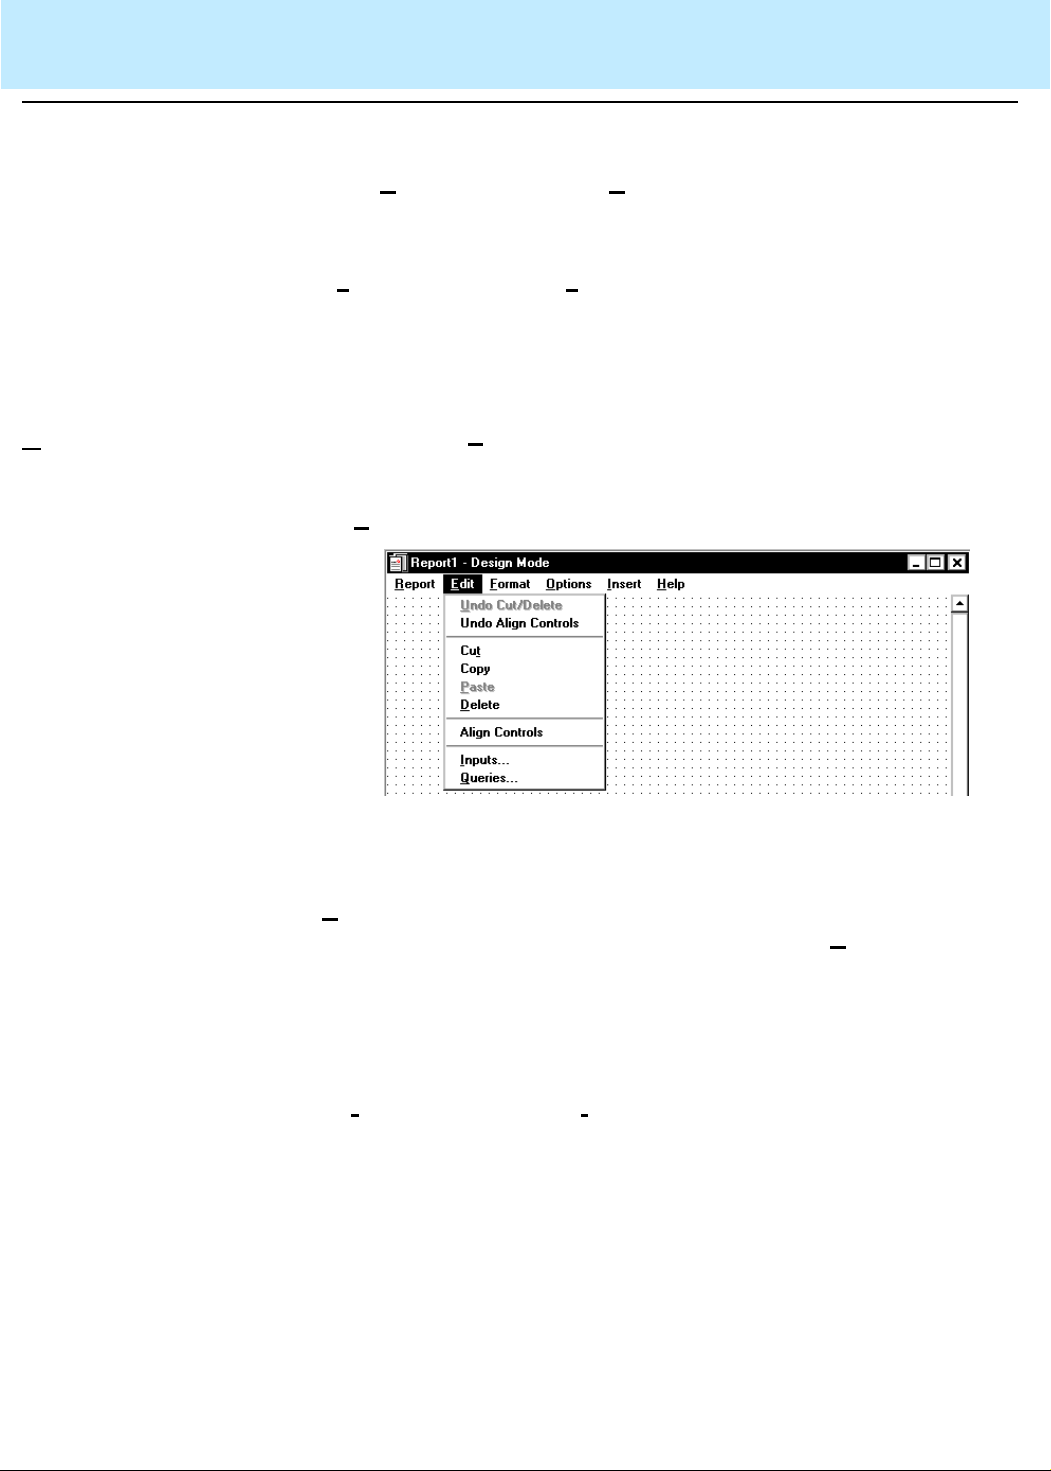
Report Designer Basics
Report Designer Menus 4-5
CentreVu
Report Designer Version 8 User Guide
Menu Item Action
Edit 4
Save A
s Selecting Save As allows you to save the report on
which you have been working with a new name or with
the current name.
Ex
it Selecting Exit closes the Report Designer without saving
the changes and additions you have made to the report.
You are prompted to save changes if you made any
modifications to the report.
You will use the Edit menu (shown below) to add information to and
delete information from the report output window, and to create the report
input window and the queries that are used t o retrieve dat a for the output.
The E
dit menu has the following options:
Menu Item Action
U
ndo
Cut/Delete
If you accidentally cut or delete an item from the report
that you are designing, you can select U
to place the item back on the report.
Undo
Align
Controls
Cut
If you are not satisf ied wi th t he alignment you made, then
you can select Undo Align Controls to place the fields
back to their original posit ion.
Selecting Cut removes the item that you have selected
from the report and places it on the
ndo Cut/Delete
Windows
*
clipboard.

Report Designer Basics
Report Designer Menus 4-6
CentreVu
Report Designer Version 8 User Guide
Menu Item Action
Copy
Selecting C
on the report and place s it on the
opy copies the item(s) that you have selected
Windows
clipboard. You
can copy only entire grids and entire charts. It is not
possible to copy only a portion of a grid or chart. If you
would like to rearrange the order of the columns on a grid,
use the Format Grid window.
You can copy from one report to another report. To do so, complete
these steps:
1. Open the report from which you want to copy.
2. Select the items that you want to copy.
3. Select C
opy from the Edit menu.
4. Open the report to which you want to copy.
5. Select P
aste Selecting Paste places the item(s) currently on the
P
Windows
aste from the Edit menu.
clipboard to the report t hat is currently selected
in Design Mode.
elete Selecting Delete removes the currently selected item(s)
D
from the report.
Align
Controls
Selecting Align Controls aligns multiple fields and aligns
them according to the control s in the Align Control s dialog
box. This option is enabled only when multiple fields are
selected.
I
nputs Selecting Inputs starts the Select Inputs assist ant, which
is where you choose the items that wi ll be included on the
report input window for this report.
For instructions on how to use the Select Input s assistant,
see Chapter 6, “Edit | Inputs.”
Q
ueries Selecting Queries starts the Create a Query assistant,
which is where you define the SQL queries that will be
used to retrieve the data to be displayed on the repor t.
For instructions on how to use the Create a Query
assistant, see Chapter 7, “Edit | Queries.”
*Windows is a registered trademark of Microsoft Corp.
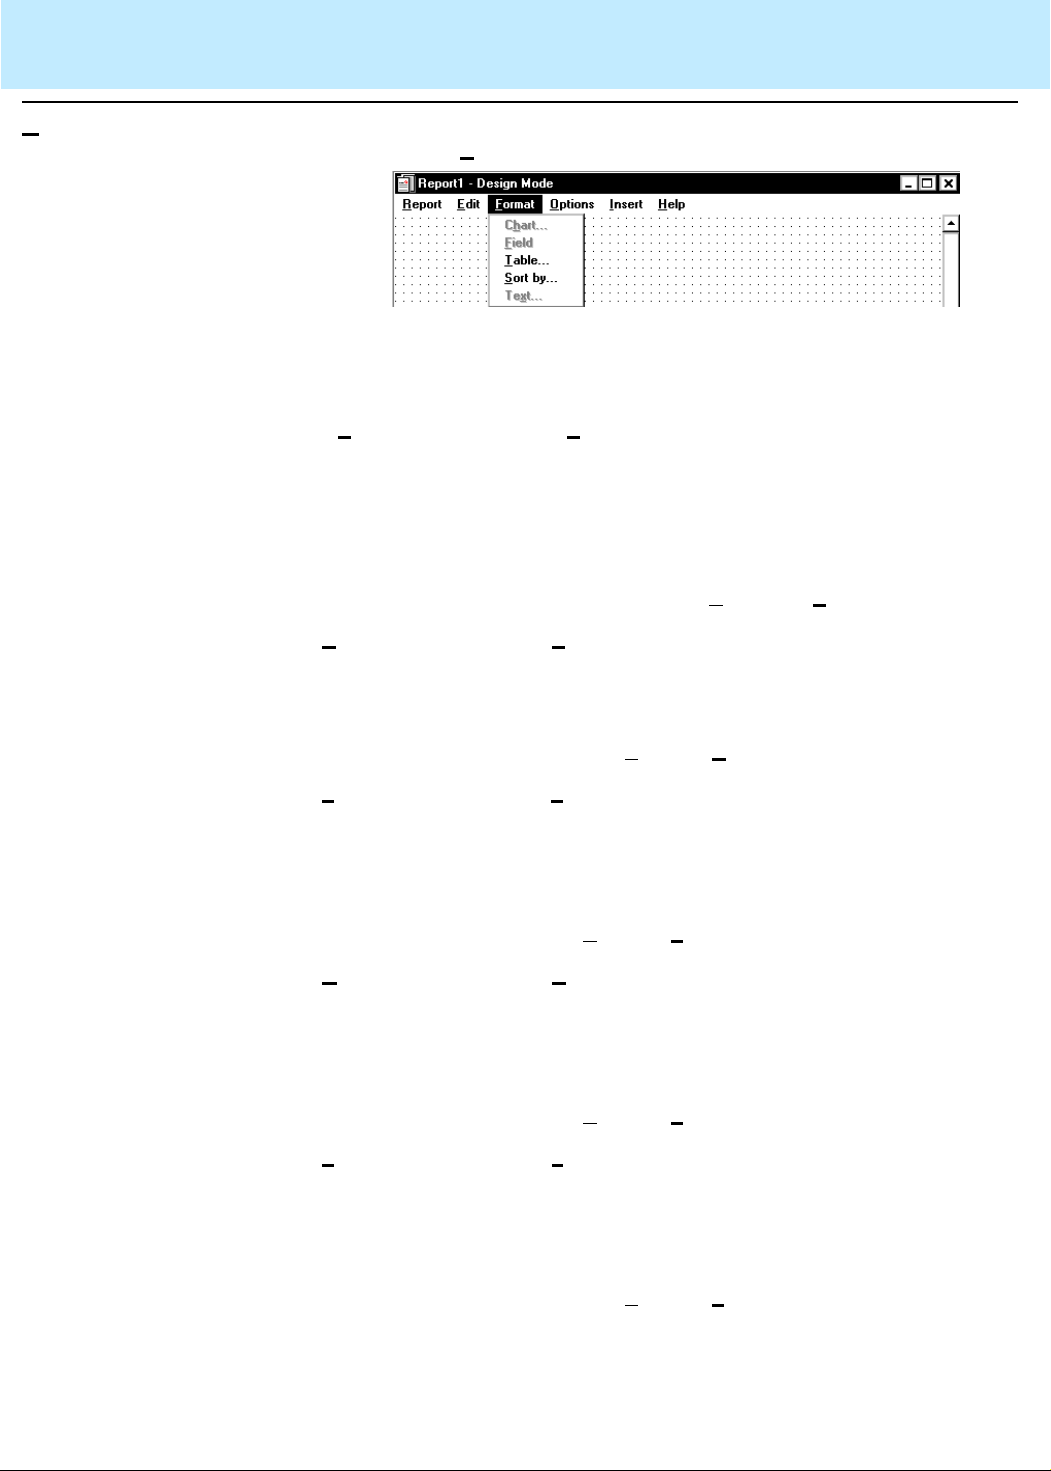
Report Designer Basics
Report Designer Menus 4-7
CentreVu
Report Designer Version 8 User Guide
Format 4
From this menu, you can edit the charts, grids , and fi elds that appear on
the report. The F
Menu Item Action
Ch
art Selecting Chart opens the Chart Format Options wind ow .
ield Selecting Field opens the Field Format Options window.
F
ormat menu has the following options:
The Chart Format Options window gives you access to
the General, Axis, Data, Data Labels, Fonts, Legend,
Series Labels, Title, T ype, and 3D Effects tabs for
formatting charts on reports.
For more information on using the Chart Format Opti ons
window, see Chapter 12, “F
The Field Format Options window is where you will
choose the formats for fi elds defi ned in queries . For more
information on using the Field Format Options window,
see Chapter 14, “F
ormat | Field.”
ormat | Chart.”
able Selecting Table opens the Table Format Options window .
T
The Table Format Options window gives you access to
the General, Data, Fonts, Format, Headers, Sort, and
Summary tabs for formatting tables on reports. For more
information on the Table Format Options window, see
Chapter 13, “F
ort by Selecting Sort by opens the Table Format Options
S
window with the Sort tab active. The Table Format
Options window gives you access to the General and
Sort by tabs for formatting tables on reports. For more
information on the Table Format Options window, see
Chapter 13, “F
ext Selecting Text when a text item on the report is selected
T
opens the Text Format Options window . The Text Format
Options window allows you to change the font display
characteristics for the selected text.
For more information on the Text Format Options window ,
see Chapter 15, “F
ormat | Table.”
ormat | Table.”
ormat | Text.”
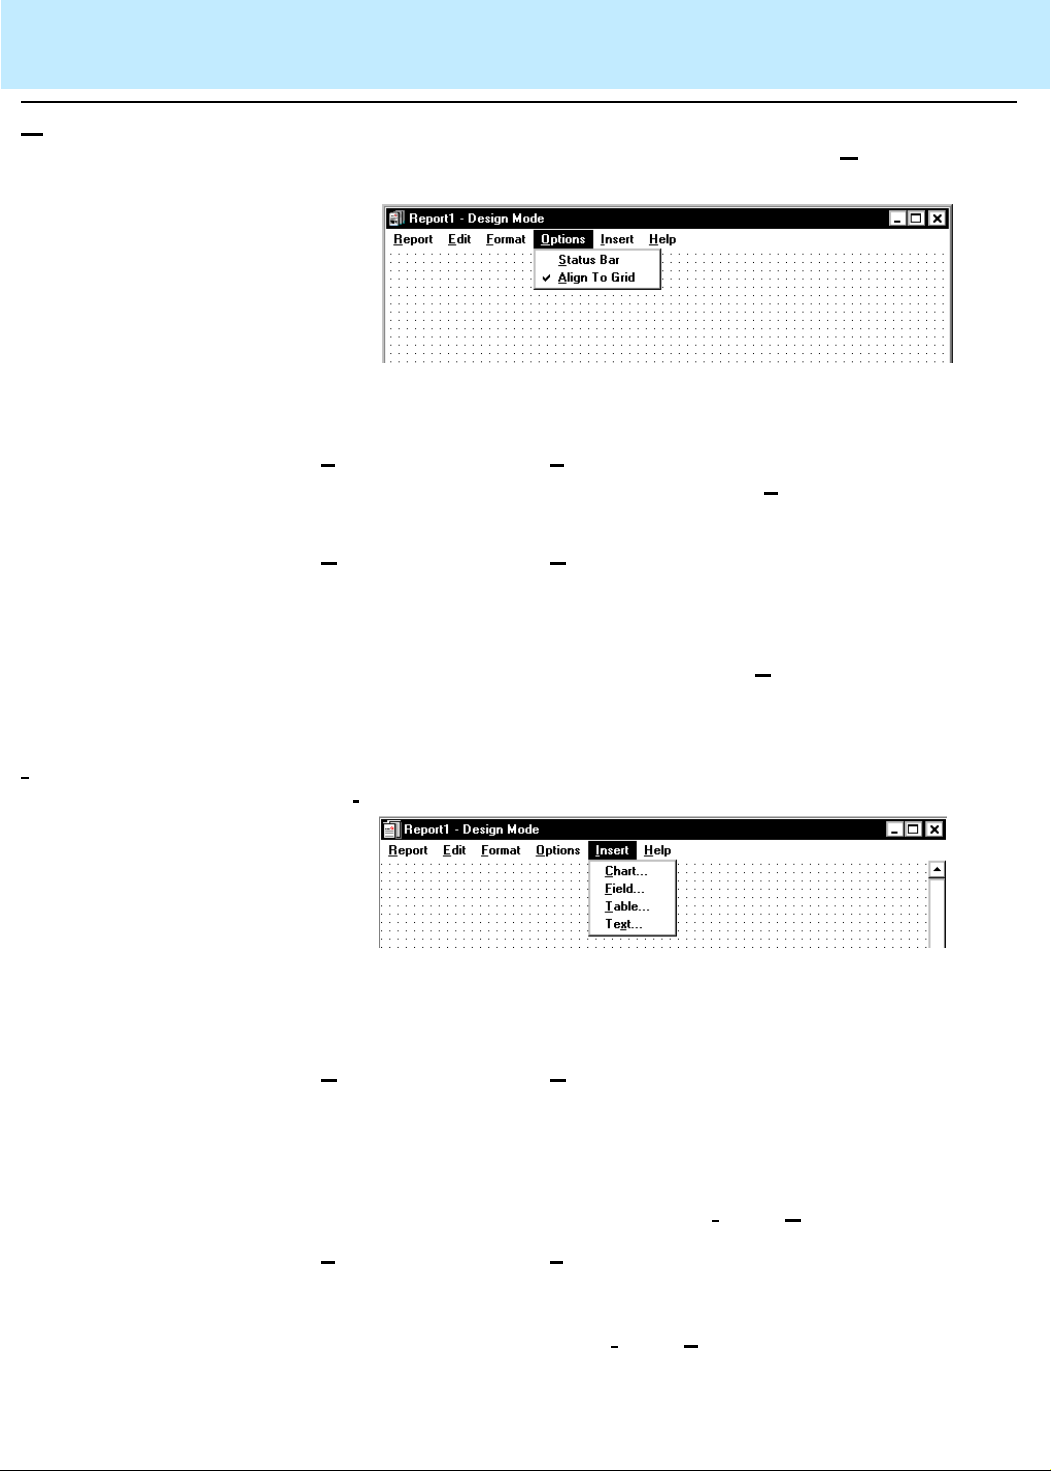
Report Designer Basics
Report Designer Menus 4-8
CentreVu
Report Designer Version 8 User Guide
Options 4
From this menu, you can define whether a status bar wi ll appear on the
report and set the alignment of text fields to grids. The O
has the following options:
Menu Item Action
tatus Bar Selecting Status Bar includes a st atus bar o n the bottom
S
lign To
A
Grid
of the report you are designing. S
when there is a check mark next to the menu item.
Selecting Align To Grid aligns the currently selected
items on the report to the Design Mode grid when they
are moved. The Design Mode grid is the grid that is
shown on the window, behind any charts, grids, or text,
when you are in Design Mode. A
when there is a check mark next to the menu item.
tatus Bar is selected
lign To Grid is selected
ptions menu
Insert 4
From this menu, you can add charts, grids, fields, and text to the report.
The I
nsert menu has the following options:
Menu Item Action
C
hart Selecting Chart opens the Chart Assistant, which is
where you define the contents of a chart (graphical
presentation of the report information).
This menu item is grayed-out if no queries have been
defined. For more information on using the Chart
Assistant, see Chapter 8, “I
ield Selecting Field opens the Field Assistant, which is where
F
you define the contents of a field to be placed on the
report. For more informati on on using the Fiel d Assist ant,
see Chapter 9, “I
nsert | Field.”
nsert | Chart.”
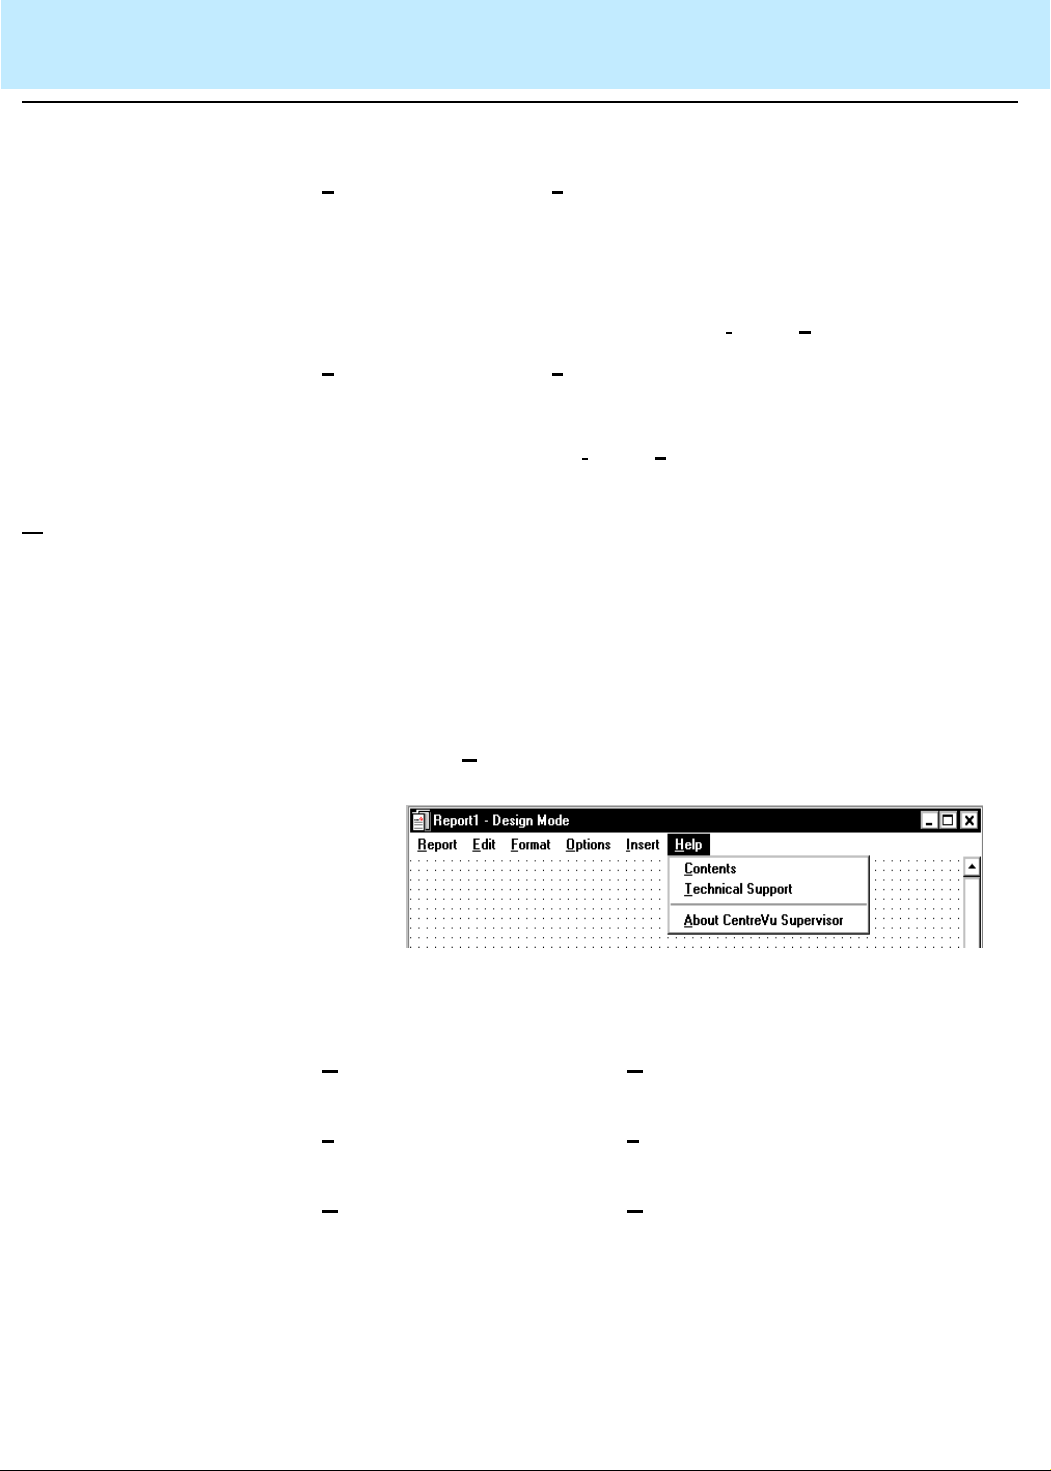
Report Designer Basics
Report Designer Menus 4-9
CentreVu
Report Designer Version 8 User Guide
Menu Item Action
T
able Selecting Table opens the Table Assistant, which is
where you define the contents of a table (standard CMS
report presentation format ) to be placed on the report.
This menu item is grayed-out if no queries have been
defined. For more information on using the Table
Assistant, see Chapter 10, “I
ext Selecting Text opens the Text Assistant, which is where
T
nsert | Table.”
you can enter plain text that will appear on the report.
For more information on using the Text Assistant, see
Chapter 11, “I
nsert | Text.”
Help 4
You can access Supervisor on-line help for the Report Designer from all
of the windows in the Report Designer. There are three ways of
accessing the help:
●
Pressing the F1 key — displays help specific to the current
window.
●
Selecting the Help button ( if available) — displays help specific to
the current window.
●
Selecting Help from the menu bar (shown below) — allows you to
choose from the following options:
Menu Item Action
C
ontents Selecting Contents opens t he Help Topics:
dialog for Report Designer.
echnical
T
Support
A
bout CentreVu
Supervisor
Selecting Technical Support opens a window
that provides Technical Support information.
Selecting About CentreVu Supervisor opens
the Supervisor Help About window, which shows
the software version number.
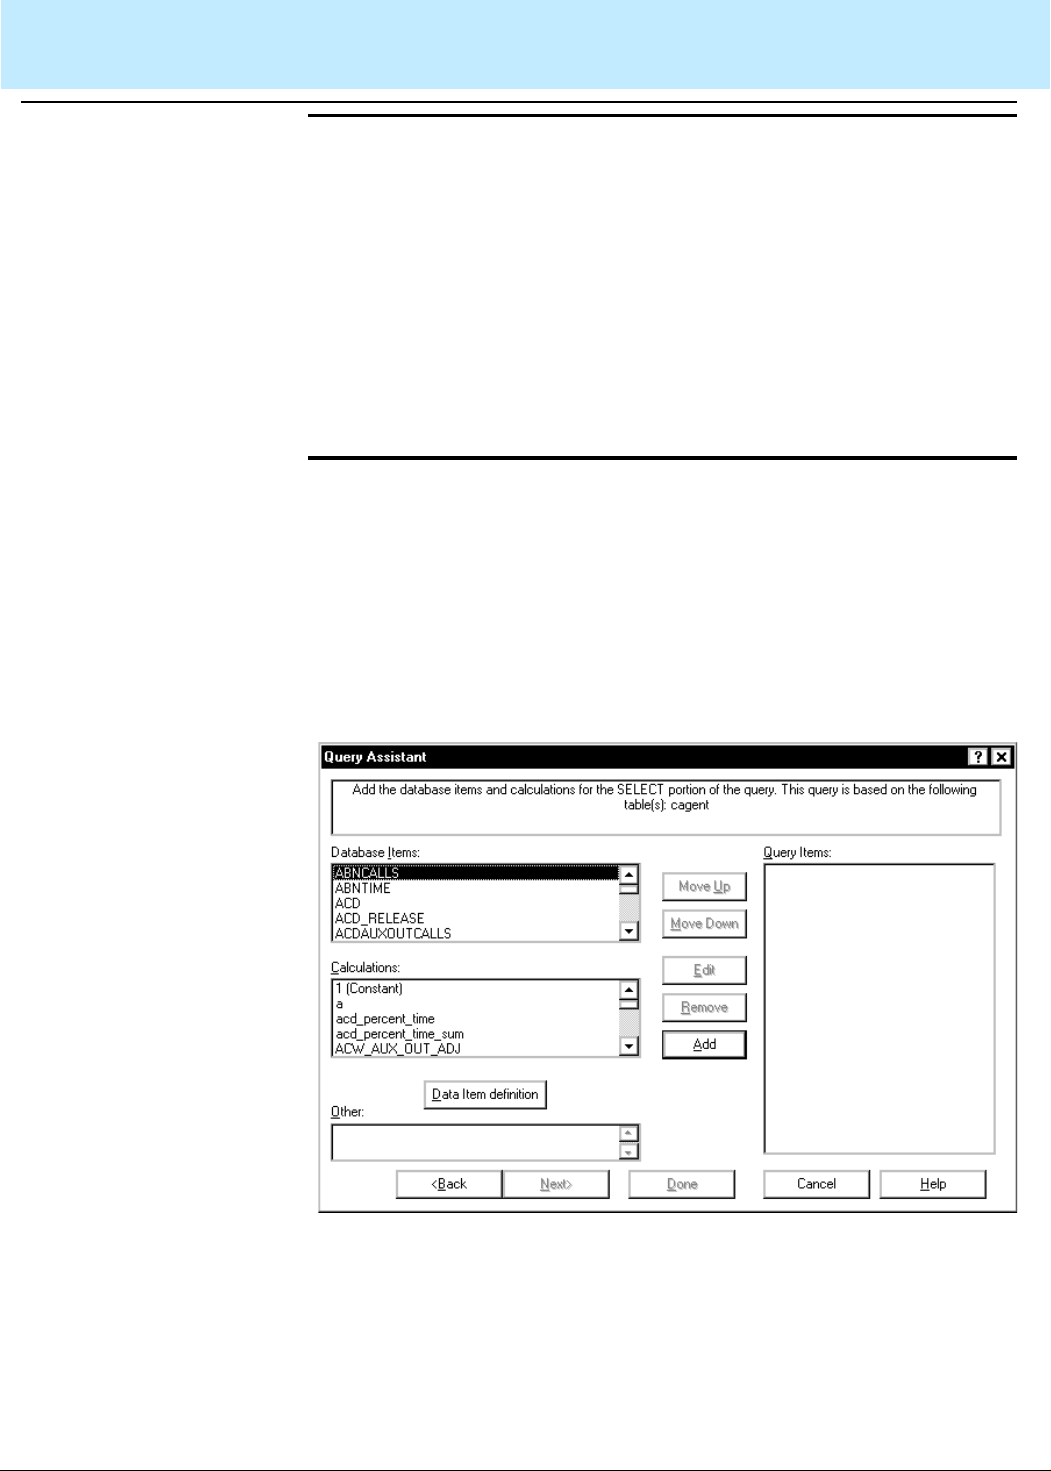
Report Designer Basics
Report Designer Menus 4-10
CentreVu
Report Designer Version 8 User Guide
Other Attributes of the Design Mode Window
Online Access to Database Definitions
In addition to the available menus, the Design Mode window als o makes
use of the following standard
●
4
4
System Menu Box — the system menu box allows you to perform
common windows conventions, such as closing the current window
or application.
●
Title Bar — the title bar shows the name of the application.
●
Maximize, Minimize, and Close Buttons — these buttons adjust
the size of the window, or close the window.
Report Designer provides access to online database item definitions
when you are adding database items and calculations to a query. With
this feature you do not have to refer to hard-copy documentation to learn
about database items and calculations. To access a database item
definition or calculation, do the following:
Online access to database it ems and calcul ations is l ocat ed in the Query
Assistant: “Add the dat abase items and calculations for the SELECT
portion of the query” window.
Windows
conventions:
1. Click on the data group item or calculation for which you want a
definition.
2. Select the Data Item definition button located under the Database
Items and Calculations list boxes.
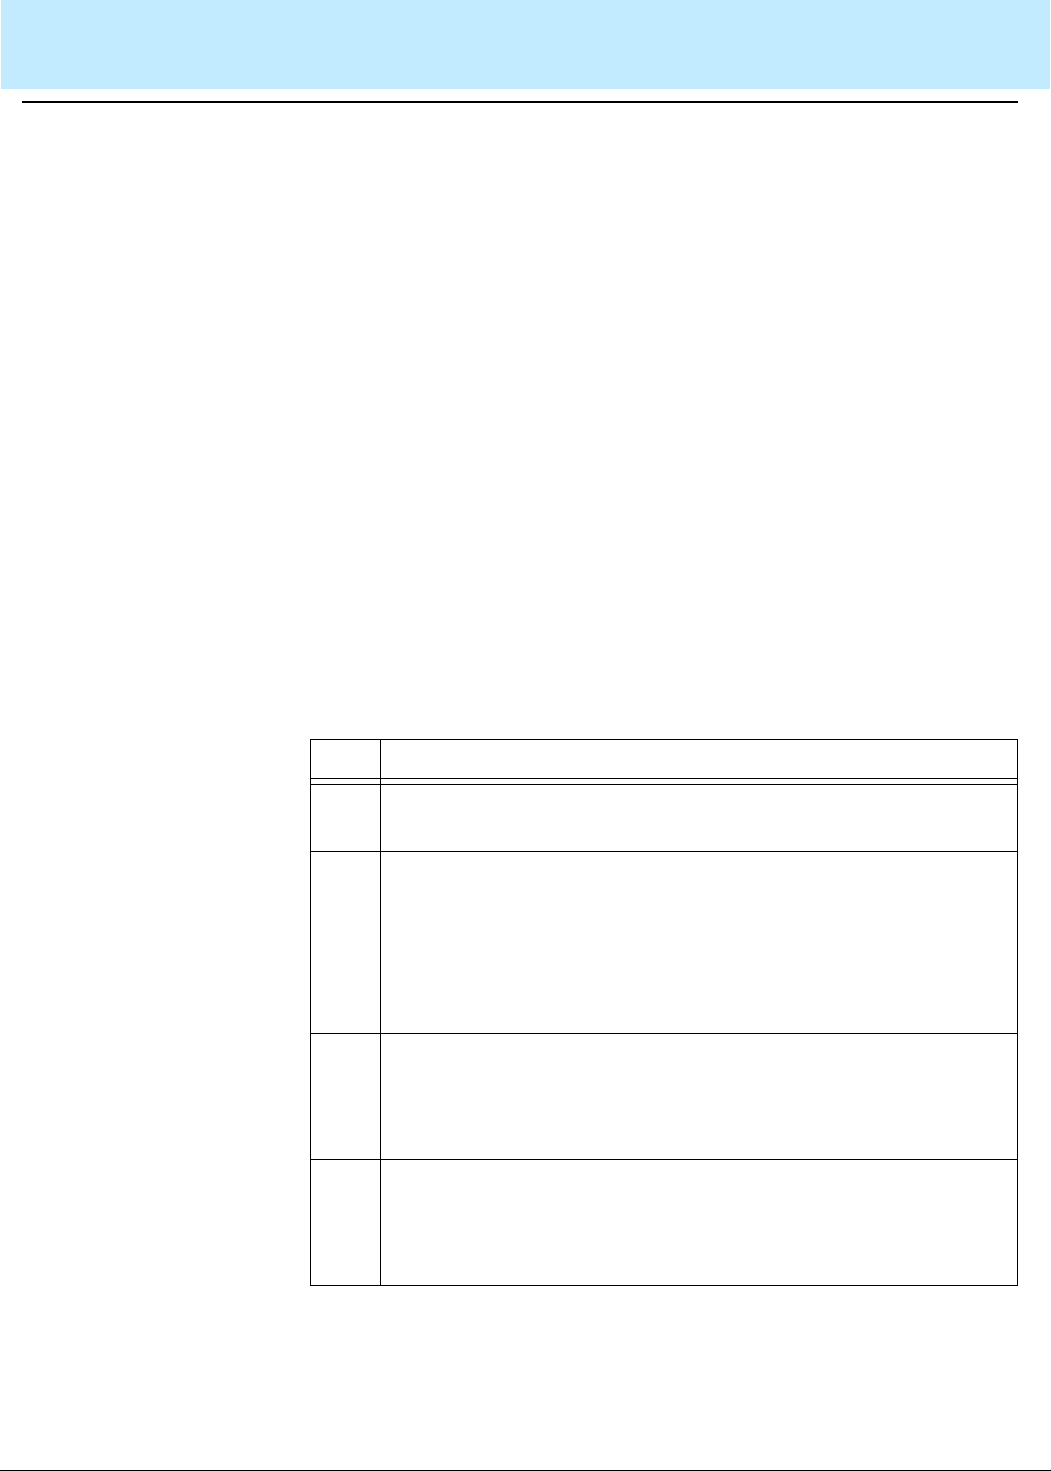
Report Designer Basics
Steps Required to Create a New Report 4-11
CentreVu
Report Designer Version 8 User Guide
Steps Required to Create a New Report 4
The following table lists 10 tasks you need to complete to create a
custom report. If you consi stently do all of these t asks fo r each report you
create, then your reports will run properly and you will be able to create
them efficiently.
Things you should know before creating a new report:
●
If you are customizing the Historical Call Record Report with
CentreVu
the numerical values for DISPOSITION, and not the state names.
See the
document (585-210-939) for more information.
●
With the addition of the split/skill I_OL1TIME and I_OL2 TIME
database items, row data will be archived for those items if the skill
row spent any time in overload 1 or overload 2. If the row (skill)
spent all of its time in the normal state, and has no other reason to
be archived (that is, no agent staffed time, no calls handled, and so
on), then it will not be archived. When creating a report thr ough
CentreVu
in order to see meaningful data.
Report Designer, the Disposition report field will display
CentreVu® CMS R3V8 Database Items and Calculations
Report Designer , data should be summed across interval s
Step Action
1. Access the Report Designer in Design Mode (Chapter 3)
Access the Report Designer so that you can design the report.
2. Define the Inputs for the Report Input Window (Chapter 6)
Define inputs for the report input window so that users can run
the report using parameters they choos e (that is, what split,
agent, time, date, and so on).
Inputs can also be defined while you are creating a query. T o do
so, select the Inputs button on the WHERE clause window.
3. Define the Queries for the Report (Chapter 7)
Define report type and rows of data from specific CMS
database tables will supply data for the grids and charts on the
report.
4. Insert Charts, Tables, and Fields on the Report (Chapters 8,
9, and 10)
Define what data from the queries should appear in each chart,
field, or table on the report.
Report Designer Basics
Steps Required to Create a New Report 4-12
CentreVu
Report Designer Version 8 User Guide
5. Enter Report Text (Chapter 15) (optional)
Enter text to provide headings for the grids and charts on the
report, and to provide additi onal i nformat ion, such as t he repor t
name.
6. Define Fields to Show Run Time/Date and User Inputs
(Chapter 9) (optional)
Define fields on the report to show when t he report was run an d
what items the report covers (as defined in the report input
window).
7. Edit the Appearance of the Report (Chapter 5)
Edit a report design using the Cut
options and standard
Windows
, Copy , and Paste Edit menu
drag-and-drop conventions.
Editing an existing report design let s you rearrange and delete
sections of the report quickly and easily.
8. Save the Report Design (Chapter 3)
Save the report you have been working on prior to testing the
report.
9. Define a Report’s Properties (Chapter 4)
Define the
name
that you use both to run the report and to
access the report design if you want to change the design.
Define access to determine whether other users can run the
report and copy the report’s design to create their own custom
reports. Define the
type
as real-time, historical, or integrated.
10. Test (Run) the Report Design (Chapter 3)
Test your report immediately after designing and saving it.
Testing helps eliminate wasted time in running a report whose
design is incomplete.
Report Designer Basics
Steps Required to Edit an Existing Report 4-13
CentreVu
Report Designer Version 8 User Guide
Steps Required to Edit an Existing Report 4
The following table lists 11 tasks you need to complete to edit an exiting
report in the Report Designer. If you consistently do all of these tasks for
each report you want to edit, then your reports will run properly and you
will be able to create them efficiently. The tasks are as follows:
Step Action
1. Copy an Existing Report to the Designer Category
(Chapter 4)
Copy an existing report so that you start the design process
with existing report headings, data fields, queries, charts,
grids, and other report f eatures. When you copy a report to the
Designer category, the original report remains int act and is st ill
located in the original report category.
You can also run a report and then select Design from the
Report menu. This takes you directly into design mode, and
you will be asked if you want to save the report (with a new
name, in the Designer category) when you exit design mode.
2. Define a Report’s Properties (Chapter 4)
Define the
access the report design if you want to change the design.
Define access to determine whether other users can run the
report and copy the repor t’s design to create their own custom
reports. Define the
When you copy a report to the Designer category using the
Report Manager , the Properti es window automatically displ ays
as part of the copy process.
3. Access the Report Designer in Design Mode (Chapter 3)
Access the Report Designer so that you can design the report.
4. Edit the Appearance of the Report (Chapter 5) (optional)
Edit a report design using the Cut
menu options and standard
conventions. Editing an existing repor t design lets you
rearrange and delete sections of the report quickly and easily.
name
that you use both to run the report and to
type
as real-time, historical, or integrated.
, Copy, and Paste Edit
Windows
drag-and-drop

Report Designer Basics
Steps Required to Edit an Existing Report 4-14
CentreVu
Report Designer Version 8 User Guide
5. Define Inputs for the Report Input Window (Chapter 6)
(optional)
Define inputs for the report i nput window so that user s can run
the report using parameters they choose (that is, what split,
agent, time, date, and so on). If you copy a report design, the
definition of that r eport’s input window is copied. You can then
modify the input fields as required.
Inputs can also be defined while you are creating a query. To do so, select
the Inputs button on the WHERE clause window.
6. Define the Queries for the Report (Chapter 7) (optional)
Define which rows of data from specific CMS database tables
will supply data for the grid s and charts on the report. If you
copy a report design, the definition s of that report’ s queries are
copied. You can then modify the queries, as required.
7. Insert Charts, Tables, and Fields on the Report (Chapters
8, 9, and 10) (optional)
Define what data from the queries should appear in each
chart, field, or table on the repor t. If you copy a report design,
the definitions of that report’s charts, fields, and tables are
copied. You can then modify the data as required.
8. Enter Report Text (Chapter 11) (optional)
Enter text to provide headings for the tables and charts on the
report, and to provide additional information, such as the
report name. If you copy a report design the text of that report
is copied. You can then modify the text, as desired.
9. Define Fields to Show Run Time/Date and User Inputs
(Chapter 9) (optional)
Define fields on the report to show when the report was run
and what items the report covers (a s defined in the report input
window). If you copy a report design these fields are copied.
You can modify them as required.
10. Save the Report Design (Chapter 3)
Save the report you have been working on prior to testing the
report.
11. Test (Run) the Report Design (Chapter 3)
Test your report immediately after designing and saving it.
Testing helps eliminate wasted time in running a report whose
design is incomplete.

Design Mode Basics
Introduction 5-1
CentreVu
Report Designer Version 8 User Guide
5 Design Mode Basics
Introduction 5
This chapter teaches you to how to use the basic
Windows
*
features of the
Report Designer Design Mode window, including:
●
Copying an Item and Pasting the Item Into the Same Report
●
Copying an Item from One Report and Pasting the Item Into Another
Report
●
Cutting an Item from the Report
●
Deleting an Item from the Report
●
Using Drag-and-Drop to Arrange Items on the Report
●
Resizing an Item on the Report
●
Selecting Multiple Items on the Report
●
Changing the Width of a Column in a Table
●
Changing Column Headings
●
Aligning Fields
●
Scale to Page.
*Windows is a registered trademark of Microsoft Corp.

Design Mode Basics
Copying an Item and Pasting the Item Into the Same Report 5-2
CentreVu
Report Designer Version 8 User Guide
Copying an Item and Pasting the Item Into the Same
Report 5
You can copy an item in one report and paste the copy into the same
report. To do so, complete the following steps:
1. Open the report from which you want to copy.
2. Select the item(s) that you wan t to copy.
3. Select C
4. Select P
The item(s) is placed in the upper left-hand corner of the Design Mode
window .
opy from the Edit menu, or press CTRL+C.
aste from the Edit menu, or press CTRL+V.

Design Mode Basics
Copying an Item from One Report and Pasting the Item Into Another Report 5-3
CentreVu
Report Designer Version 8 User Guide
Copying an Item from One Report and Pasting the Item
Into Another Report 5
You can copy items from one report to another repor t. To do so, complete
the following steps:
1. Open the report from which you want to copy.
2. Select the items that you want to copy.
3. Select C
4. Open the report to which you want to copy.
5. Select P
Note that both reports must be open in design mode in order to
copy from one report to another report.
If you want to copy an item from a report that is not a Designer report,
complete the following steps:
1. Run the report.
2. Select Design from the Report menu.
3. Copy the item to the clipboard (usi ng the steps above).
4. Select Run from the Report menu.
As long as you do not make any changes to the report, you will
automatically be returned to the run mode. If you inadvertently make
changes to the report, a message displays that gives you the option to
save the changes. Select No if you do not want to save the changes.
opy from the Edit menu, or press CTRL+C.
aste from the Edit menu, or press CTRL+V.

Design Mode Basics
Cutting an Item from the Report 5-4
CentreVu
Report Designer Version 8 User Guide
Cutting an Item from the Report 5
Selecting Cut removes the currently selected item from the report and
places it on the
Windows
clipboard.
To cut an item from a report and place the information on the
clipboard, complete these steps:
1. Select the item by placing your mouse cursor on the item and
clicking.
2. Select Cut
from the Edit menu, or press CTRL+X.
Windows

Design Mode Basics
Deleting an Item from the Report 5-5
CentreVu
Report Designer Version 8 User Guide
Deleting an Item from the Report 5
Selecting Delete permanently removes the currently selected item(s)
from the report.
To delete an item from a report, complete the following steps:
1. Select the item by placing your mous e cursor on the item and
clicking.
2. Select D
The item is removed from the report and is
pasted on the report. If you accident ally delete a n item that y ou would like
to keep on the report, you can select Undo from the Edit menu (if you
haven’t done anything else). If you do not immediately re alize that you
inadvertently deleted an item, you can use the Insert menu to recreate
the item.
elete from the Edit menu, or press the DELETE key.
no longer
available to be

Design Mode Basics
Using Drag-and-Drop to Arrange Items on the Report 5-6
CentreVu
Report Designer Version 8 User Guide
Using Drag-and-Drop to Arrange Items on the Report 5
You can move one or more items around on a report using the
drag-and-drop method. To do this, complete these steps:
1. Select an item(s) by pointing th e mouse cursor at the it em and
clicking one time.
You can select additional items by holding down the CTRL key and
clicking the mouse cursor on the items.
You will know when an item is selected because there will be either
a frame around the item or sizing handl es will di splay on the corners
of the item.
2. Hold down the left mouse button.
3. Move the mouse cursor to the position in which you would like the
item to reside.
4. Let go of the mouse button.
Windows

Design Mode Basics
Resizing an Item on the Report 5-7
CentreVu
Report Designer Version 8 User Guide
Resizing an Item on the Report 5
To resize an item on a report, complete the following steps:
1. Select the item by placing the mouse cursor over the item and
clicking one time.
2. Place the mouse cursor over one of the sizing handles on the item.
3. Press the left mouse button.
4. Drag the mouse cursor until the item is the appropriate size.
5. Release the mouse button.
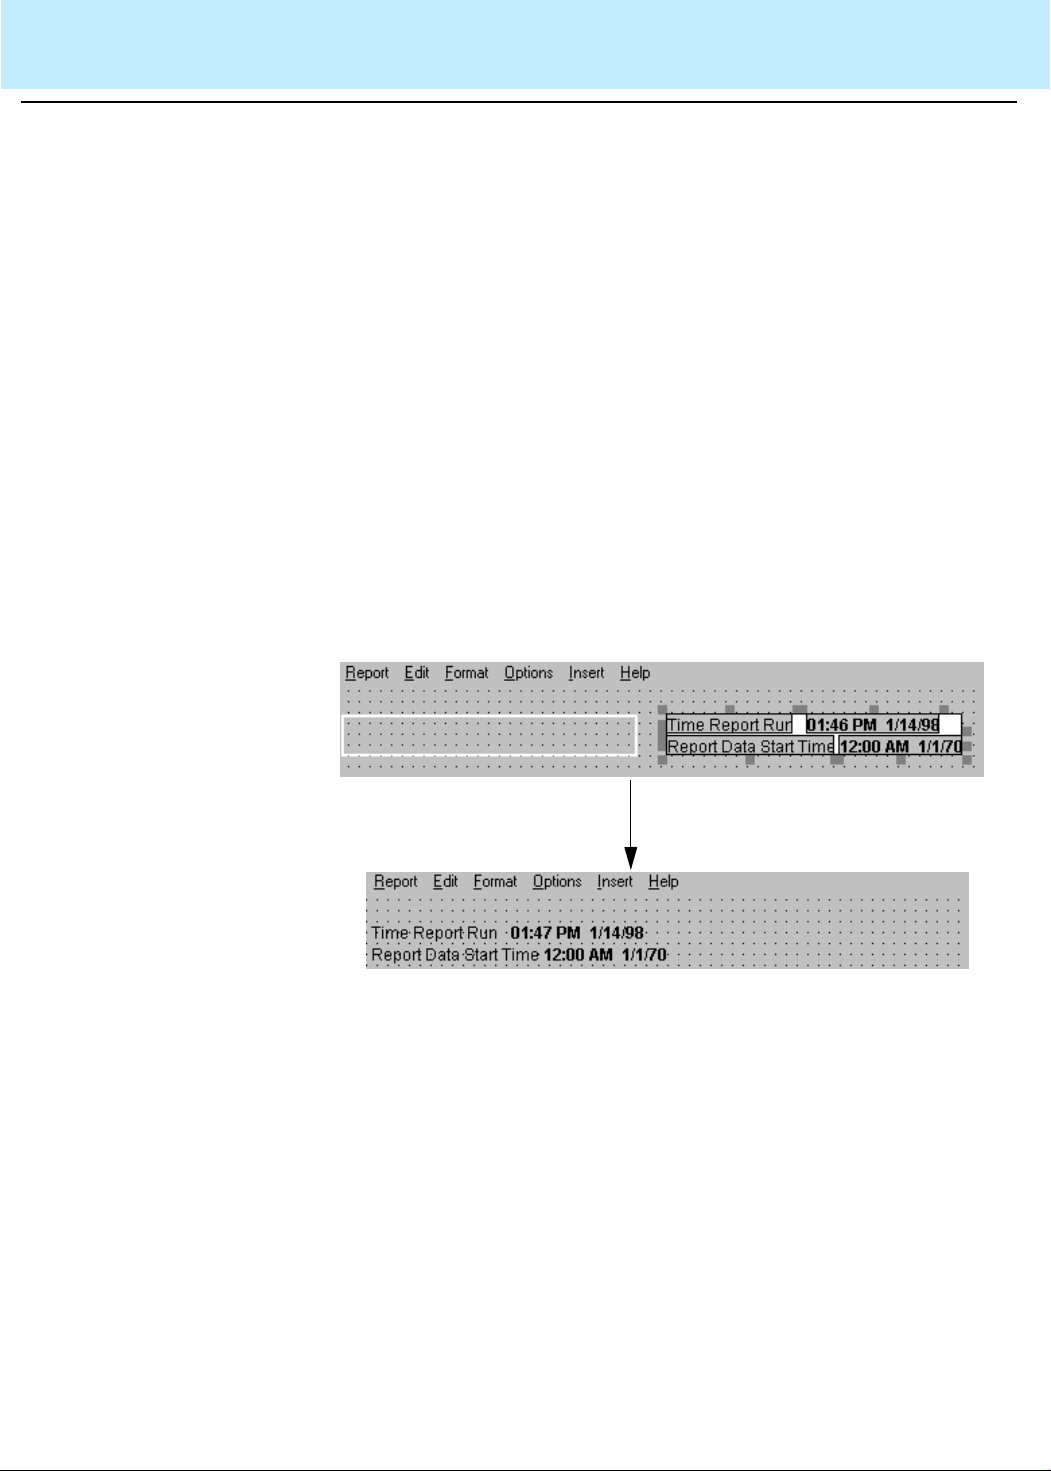
Design Mode Basics
Selecting and Moving Multiple Items on the Report 5-8
CentreVu
Report Designer Version 8 User Guide
Selecting and Moving Multiple Items on the Report 5
To select multiple items on a report (for instance, to copy more than one
item at a time), complete the following steps:
1. Select the first item.
2. Hold down the CTRL key.
3. Select the second item. Handles around the i tems appear.
To move the group of items on a report, complete the following steps:
1. Place the cursor within the selected items.
2. Hold down the left mouse button and drag the sele cted items to the
desired area. There is a visual indication that your selected items
are moving (as a group) with the cursor. As you move the selected
items, an outline of the items appears and then moves with your
cursor.
3. Once at the desired location, release the mouse button. The
selected items appear in the desired locati on.

Design Mode Basics
Changing the Width of a Column in a Table 5-9
CentreVu
Report Designer Version 8 User Guide
Changing the Width of a Column in a Table 5
You can quickly and easily change the column widths in your table while
in the design mode. To change a column width, do the following:
1. Place the mouse pointer on the border between the col umn
heading. The mouse pointer changes to the following shape:
2. Hold down the left mouse button and drag the column border to the
left or right. The col u mn width automatically decreases or increases
depending on how you moved the column border.
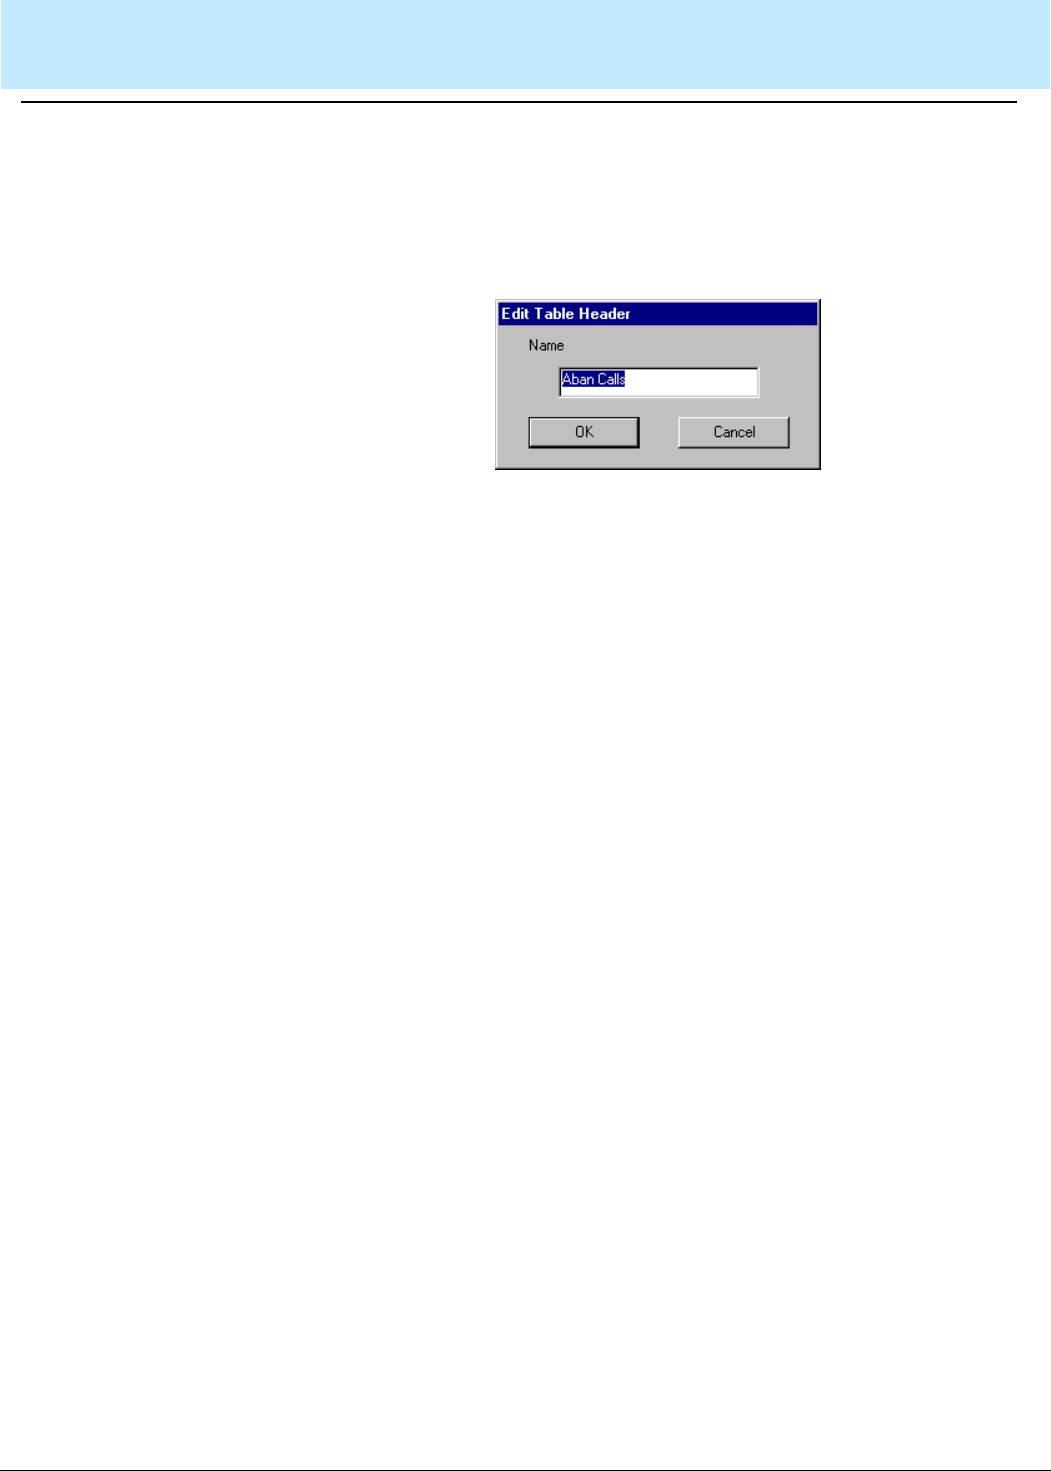
Design Mode Basics
Changing the Column Headings 5-10
CentreVu
Report Designer Version 8 User Guide
Changing the Column Headings 5
You can quickly and easily change the column headings in your table
while in the design mode. To change a column heading, do the following:
1. Click on the heading name you want to change. A dialog box
appears with the current heading highli ghted.
2. Enter the new name of the heading in the Name text box.
3. Select OK.

Design Mode Basics
Aligning Fields 5-11
CentreVu
Report Designer Version 8 User Guide
Aligning Fields 5
The Report Designer Edit menu has two new menu items: Alig n Contr ols
and Undo Align Controls.
You can now select multiple fields and align them according to the
controls in the Align Controls dialog box. In addition, you can undo the
alignment if you are not satisfied with the results.The Align Controls
dialog box provides six alignment choices. When you select multip le
fields, an outline around the fields appears. Any alignment choice you
select will align the fields withi n this outline.

Design Mode Basics
Scale to Page 5-12
CentreVu
Report Designer Version 8 User Guide
Scale to Page 5
When printing a report that is too large to fit on one page, you will be
prompted with a message(s) (the number of messages will depend on
how large your report is) asking if you want Report Designer’s Scale to
Page function to attempt to fit your report onto one page.

Edit | Inputs
Introduction 6-1
CentreVu
Report Designer Version 8 User Guide
6 Edit | Inputs
Introduction 6
This chapter teaches you about report input fields and gives you instruction
on how to add, delete, and edit the input fields for a Report Designer report.
The sections in this chapter are as follows:
●
About Report Input Fields
●
Adding Input Fields to the Input Window
●
Deleting Input fields from the Input Window
●
Editing the Order of Input Fields
●
Editing the Appearance of Input Fields
●
Setting Up Inputs for a Multi-ACD Report
●
Viewing the Input Window.
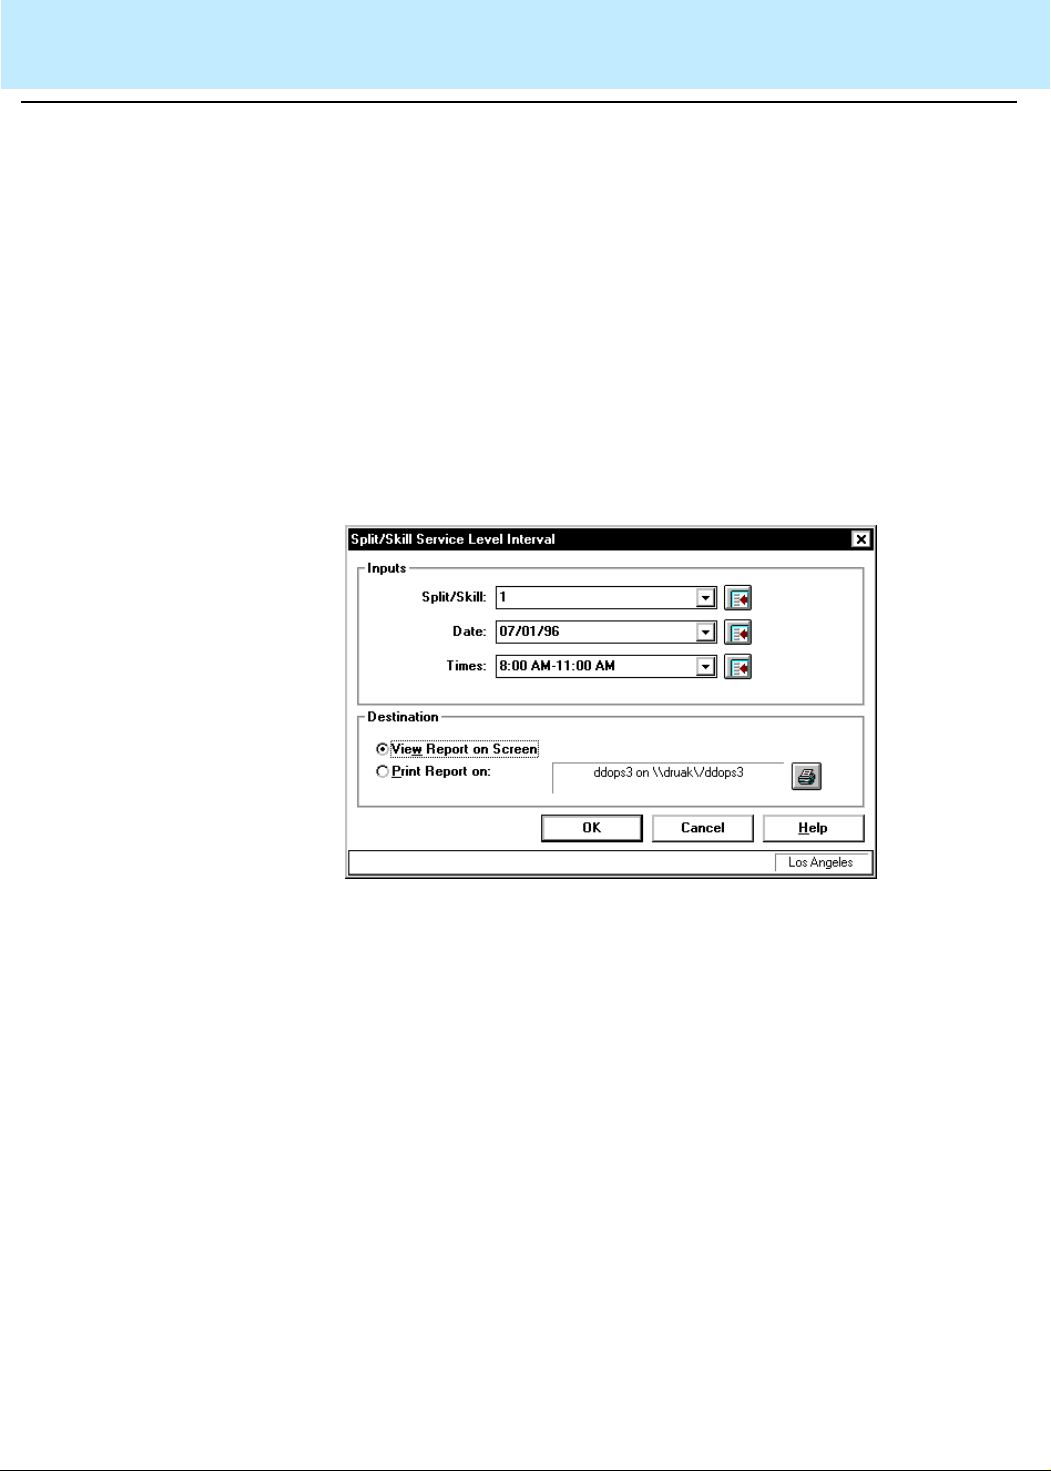
Edit | Inputs
About Report Input Fields 6-2
CentreVu
Report Designer Version 8 User Guide
About Report Input Fields 6
To run a report, you first access a Report I nput window. The Report Input
window gives you control over what data (which spl its/skills, trunks,
dates, intrahour interval s, and so on) are included in the report.
To define report input fields for a designer report, use the Define Input
window. When you or another user runs the report, this input window
appears with the field prompt(s) and the input fi eld(s) you defined.
You define fields for the Report Input window using the s teps desc ribed in
the following pages.
In the example of an input window that is shown below, the user has
entered a split number of 1, a date of 07/01/96, and intrahour intervals
from 8:00 a.m. to 11:00 a.m.
Because the report this input window is associated with is a Historical
Interval report, CMS will retrieve the dat a fo r the repor t from the his torical
database tables, which are designate d wi th a n “h ” (hagent , hspli t, ht runk,
and so on). For more information on how CMS stores and retri e ves data,
refer to Chapter 15, “How CMS Stores and Retrieves Data” and the
CentreVu® CMS R3V8 Database Items and Calculations
210-939).
document (585-
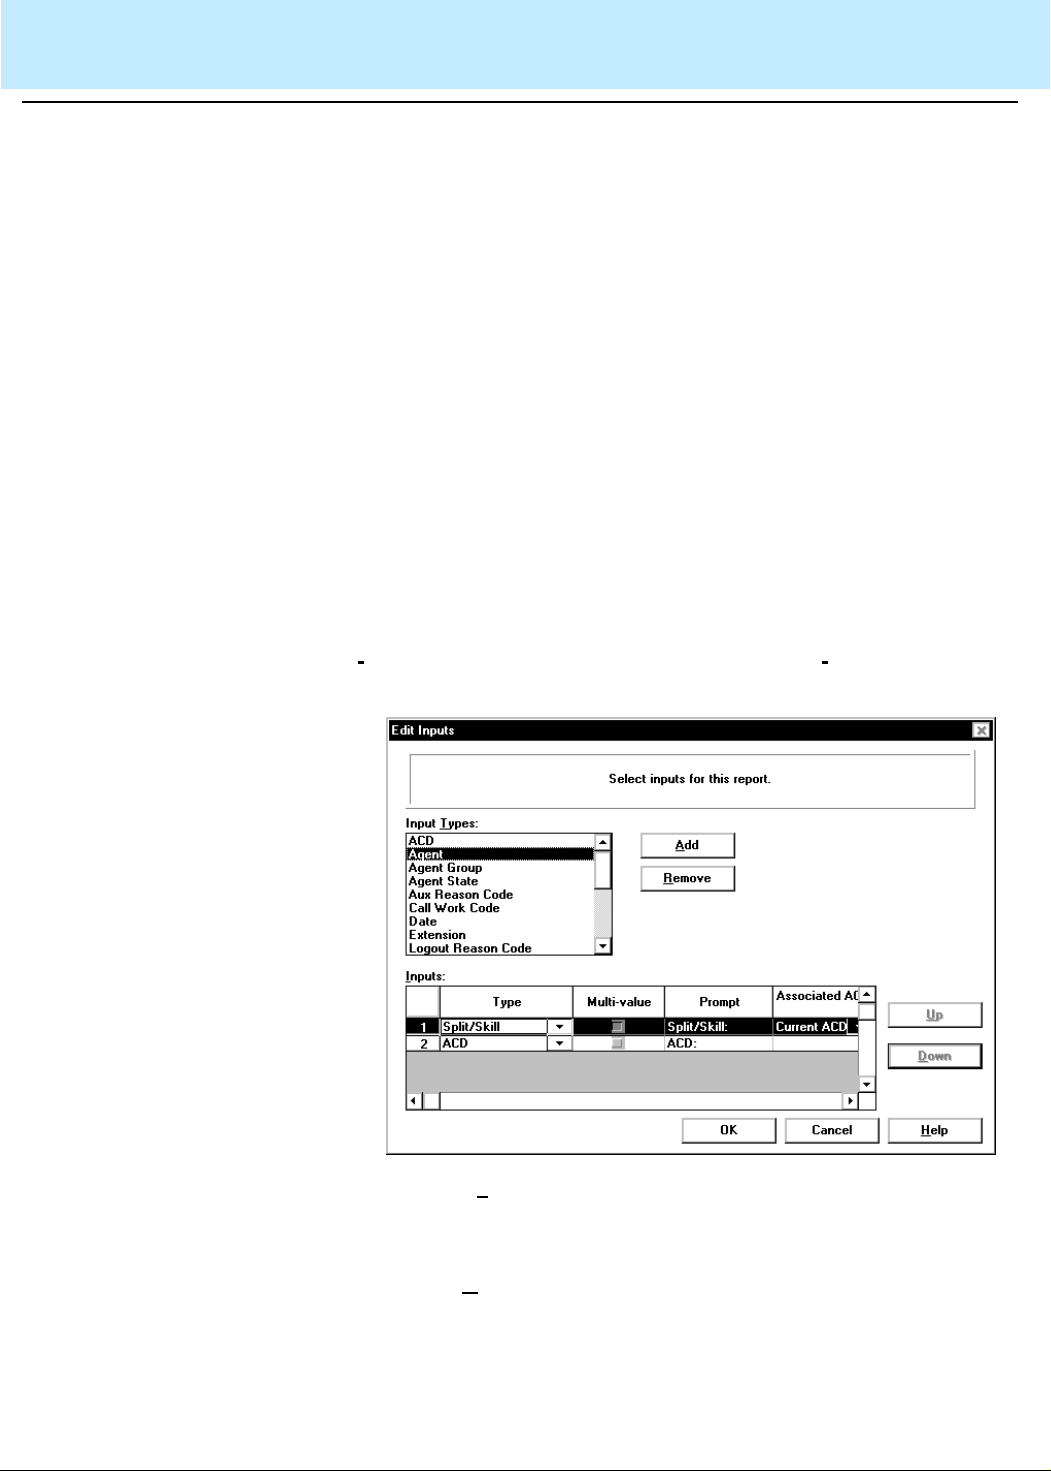
Edit | Inputs
Adding Input Fields to the Input Window 6-3
CentreVu
Report Designer Version 8 User Guide
Adding Input Fields to the Input Window 6
Defining the type of an input field enables CMS to do the following when
a user runs the report:
●
Check that the user’s entries are val id system values and are values
CMS can use to search the database tables.
●
Check that the user has permissions to run a report for the entries.
●
Allow the user to enter names defined in the Dictionary subsystem.
Add only inputs that are used in the report queries. If you add additional
inputs (that are not used in the queries), then irrelevant information that
references those inputs will display on the input window for the report.
To define the input fields for a report, complete the following steps:
1. Select Inputs from the Edit menu.
The Edit Inputs “Select input s for this report” window displays, as
shown next. If you are editing an existing report, the items that
already appear on the input window for the report are shown in the
nputs list. If you are creating a new report, the Inputs list is blank.
I
2. In the Input T
ypes list, highlight the firs t input you want to requir e for
the report. See the following table for definitions of the available
Input Types.
3. Select the A
dd button.
The item displays on the Inputs list.

Edit | Inputs
Adding Input Fields to the Input Window 6-4
CentreVu
Report Designer Version 8 User Guide
4. Repeat Step 2 until you have added all of the inputs required for t he
report.
For this type of
input:
The user must enter the following information:
ACD An ACD number or name.
Agent An agent name (as defined in the Dictionary) or
agent login ID.
The Agent input field can only be a single-value
input for integrated reports.
Agent group An agent group name (as defined in the
Dictionary).
Use the following query:
ACD=$acd and OLDEST_LOGON > 0 and
LOGID in (select value from agroups where
acd_no=$acd and item_name = [Agent Group:])
Agent state An agent state name (standard or new name as
defined in the Dictionary). Standard names are
ACD, AUX, ACW, and so on.
Call Work Code A call work code name or number.
Date A date must be entered. Dates can be entered in
region-specific format or as a relative number (for
example, -7 for 7 days ago).
Extension An extension number of one to five digits (as
administered for System 75/Generic 1/Generic 3)
or three to five digits (a s administered for System
85/Generic 2).

Edit | Inputs
Adding Input Fields to the Input Window 6-5
CentreVu
Report Designer Version 8 User Guide
For this type of
input:
Location ID
The user must enter the f ollowing information:
A location ID can be assigned to either an agent
or to a trunk equipment l ocation. For an agent, the
location ID is actually assigned to the agent’s
terminal, and is associated with the
DEFINITY
®
port network to which the terminal is assigned.
Agent location IDs are available only for reports
for agents who are currently logged in. Agent
location ID is part of the Agent Site Tracking
feature.
Trunk location IDs are assigned to the trunk
equipment location, and are associated with the
DEFINITY
port network location. T runk equi pment
location ID is part of the Multi-Locations feature
on
DEFINITY
.
Location IDs are between 1 and 44 characters.
Login ID A login ID of one to nine digits (as administered
for System 75/Generic 1/Generic 3) or four digits
(as administered for System 85/Generic 2).
Number A number, which may incl ude digits to the right of
the decimal point. This type applies if your
variable field asks for specific values about ACD
performance (for example, number of ACD calls
or percent within service level).
Split/Skill A split/skill number or name.
String A character string. Select this type only if one of
the following is true:
1. Your variable field is linked to a custom
database item that you identify in
INFORMIX
*
as a
CHAR column.
2. Your variable field is linked to a standard
database item that is a CHAR column, AND you
want to allow the user to do pattern searc hing
when running the report. See the following sect ion
in this chapter, “Input Fields That Allow Pattern
Matching.”

Edit | Inputs
Adding Input Fields to the Input Window 6-6
CentreVu
Report Designer Version 8 User Guide
For this type of
input:
Time
(duration)
The user must enter the following information:
A number , including decimals, of seconds. This
type applies only if your variable field asks for
specific values regarding ACD performance (for
example, time in AUX work, average speed of
answer, or average talk time).
Time
(point in time)
A specific time of day in hh:mm format, either as
24-hour time or with AM or PM appended.
Trunk A trunk name or number.
The Trunk input field can only be a single-value
input for integrated reports.
Trunk group The number or name of a trunk group.
Trunk state A trunk state name (standard name or new name
as defined in the Dictionary subsy stem). S t andard
names are
IDLE, SEIZED, QUEUED,
and so
on.
NOTE: If you use Trunk state as an inpu t in an
integrated report, the input must be used in a
real-time query. It cannot be used in an integrated
query.
VDN A Vector Directory Number of one to five digit s (as
administered for System 75/Generic 1/Generic 3)
or three to five digits (a s administered for System
85/Generic 2) or a VDN name.
The VDN input field can only be a single-value
input for integrated reports.
Vector A vector number or name.
The Vector input field can only be a single-value
input for integrated reports.
*INFORMIX is a registered trademark of Informix Software, Inc.
If you are defining a real-time report, you cannot and do not need to
define an “Update Rate in Seconds” input field because the field is
automatically inclu ded in the Report Input window.
If you are defining a historical report, you cannot and do not need to
define a “Report Desti nation” i nput fie ld because t he field is automati cally
included in the Report Input window.

Edit | Inputs
Adding Input Fields to the Input Window 6-7
CentreVu
Report Designer Version 8 User Guide
If you are defining an integrated report, you cannot and do not need to
define a “S tart T ime” input f ield because the field is aut omatically include d
in the Report Input window.
Input Fields That
Allow Pattern
Matching
CMS can search for values in certain dat abase items according to wild
card search patterns. As a result, you can create a report that allows
inputs based on character strings, plus either an asterisk (matches on
6
blank and all characters) or a question mark (matches on any single
character).
CMS
then includes data for all items t hat match the charac ter
strings the user entered.
The standard database items that allow this type of searching are as
follows:
●
VDN (the value is a VDN number)
●
EXTENSION (the value is an extension number)
●
LOGID (the value is an agent login ID)
●
EQLOC (the value is a 9-digit trunk location number)
●
CWC (the value is a call work code)
●
ROW_DATE (the value is a date)
In addition, any custom database items that you define as CHAR
columns in
INFORMIX
also allow this type of searching.
As an example of matching with an asterisk (*), if an input field were a
String
user could enter
type and were associated with the LOGID database item, the
1*
, and CMS would include data for all agents wit h
login IDs that start with 1 (1, 10, 1238, 190, and so on, depending on the
switch's administered login length). As an example of matchi ng with a
question mark (?), if an input field were a
associated with the VDN database item, the user could enter
String
type and were
21?0
CMS would include data for all VDNs that start with 21, end with 0, and
have any single character appearing between the 21 and the 0 (2100,
2110, 2120, 2130, and so on).
, and
If you select
String
for an input field, CMS does not check a user's
inputs in that field for appr opriate read permissions or valid switch
parameters. If you want CMS to check permissions for a VDN input field,
you must select the
VDN
field type. If you want CMS to check switch
parameters for a VDN, login ID, extension, or call work code input field,
you must select that field type, not
String
for a field, the user will not be able to enter Dictionary names.
String
. In addition, if you select
So, again, if you want to let the user enter VDN, login ID, or call work
code names to run a report, you must select that specific field type, not
String.

Edit | Inputs
Deleting Input Fields from the Input Window 6-8
CentreVu
Report Designer Version 8 User Guide
Deleting Input Fields from the Input Window 6
To delete one of the inputs you have added for a report input window,
complete the following steps:
If a field is used in a query, the input cannot be removed until the query is
removed or modified to eliminate the reference to the input.
1. Select Inputs from the Edit menu
2. On the Inputs t able, highlight the row of the item you want to dele te
by clicking on the left-hand (numbered) column of the row.
3. Select the R
emove button.

Edit | Inputs
Editing the Order of Input Fields 6-9
CentreVu
Report Designer Version 8 User Guide
Editing the Order of Input Fields 6
You can change the order in which input fields appear on the report input
window by completing the following steps:
1. Select Inputs from the Edit menu
2. Add the Input Types that will appear on the input window to the
Inputs table.
3. Select the entire row of th e input for which you want to change
positions by clicking on the left-hand (numbered) col umn of the row.
4. Use the U
one row at a time.
5. Using the Inputs list, you can edit the name of the prompt for each
input field, control whether multiple values are allowed in the input
field, and define the ACD with which the input will be associated.
p and Down buttons to move the entire row up or down
6. When you are finished editing the order of the input fields, select
OK.
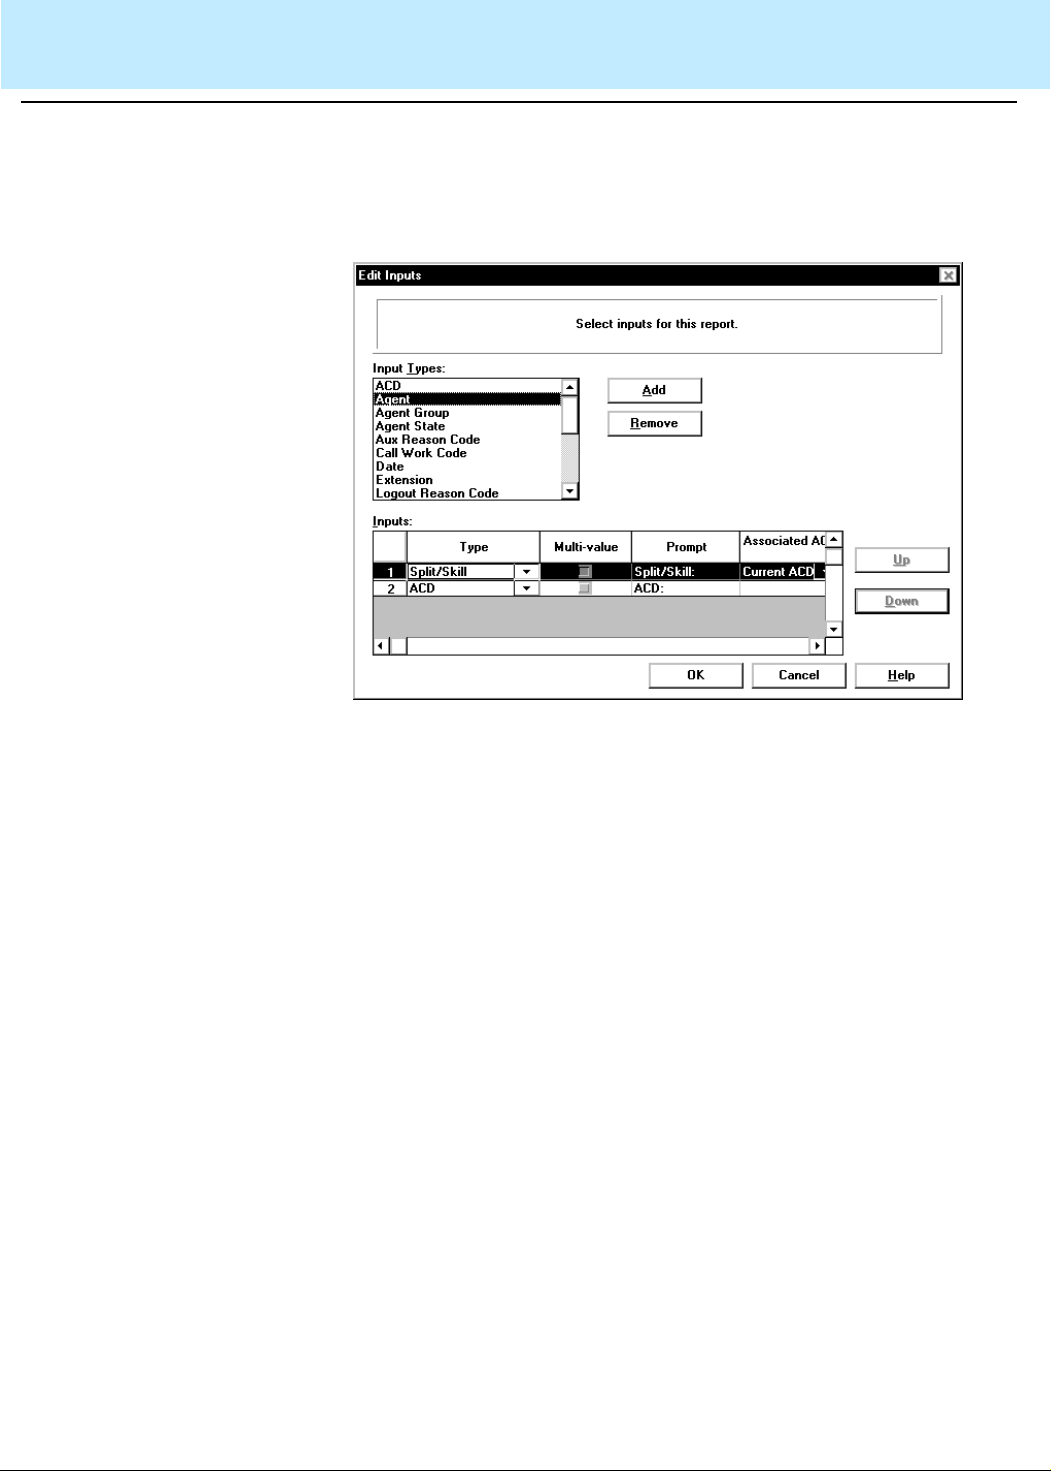
Edit | Inputs
Editing the Appearance of Input Fields 6-10
CentreVu
Report Designer Version 8 User Guide
Editing the Appearance of Input Fields 6
Using the Inputs list, you can edit the name of the prompt for each input
field, control whether multiple values are allowed in the input field, and
define the ACD with which the input will be associated.
When you add an item from the Input Types list to the Inputs list, the
columns of the Inputs table are populated with the default values for that
input item. The columns of the Inputs table are as follows:
Column Function
Type The Type column shows the input field name. You can
use the pull-down list to the right of the column to change
the input in a particular row to another type.
Multi-value Select the Multi-Value check box if you want to allow
users to enter multiple values in the input field.

Edit | Inputs
Editing the Appearance of Input Fields 6-11
CentreVu
Report Designer Version 8 User Guide
Column Function
Prompt
Associated
ACD
The prompt column shows the text th at will display on t he
report input window for this input field. You can edit the
text for the prompt by selecting the cell in the table and
then typing the text that you want to display. If you want
to delete the existing prompt text , use the backsp ace key
to erase the letters.
You can enter a name with up to 30 characters long,
including blank spaces.
The prompt name should describe the information (what
split/skill, what date, what t ime, and so on) a user must
enter in the field when orderi ng the report. For examp le, if
you want the user to enter a date, “Date” would be an
appropriate prompt. However, if the user can enter more
than one date in the field, “Dates” would be more
appropriate.
The Associated ACD column lets you use the Current
ACD or assign a specific ACD to be used for this input.
The default for this c olumn is Current ACD. I f you want to
allow the user to pick a specific ACD for the input field,
use the pull-down list to the right of the column to select
ACD. If the Associated ACD column is blank, the input
cannot be associated with a specific ACD.
Select Current ACD if either of the foll owing condi tions i s
true:
●
You have only one ACD
●
You always want the report to show data for the
user's current ACD.
Default
Value
Select ACD if the people who will be running the report
have read permissions for more than one ACD. Allowing
the user to select the ACD for the input is most useful
when you are creating a multi-ACD report.
You can define a default value for most i nput fie lds. To do
this, select the browse button to the right of the column.
The available values for this type of input are displayed.
Highlight one and select OK.
If you select a default value, the user can change the
value on the input window.
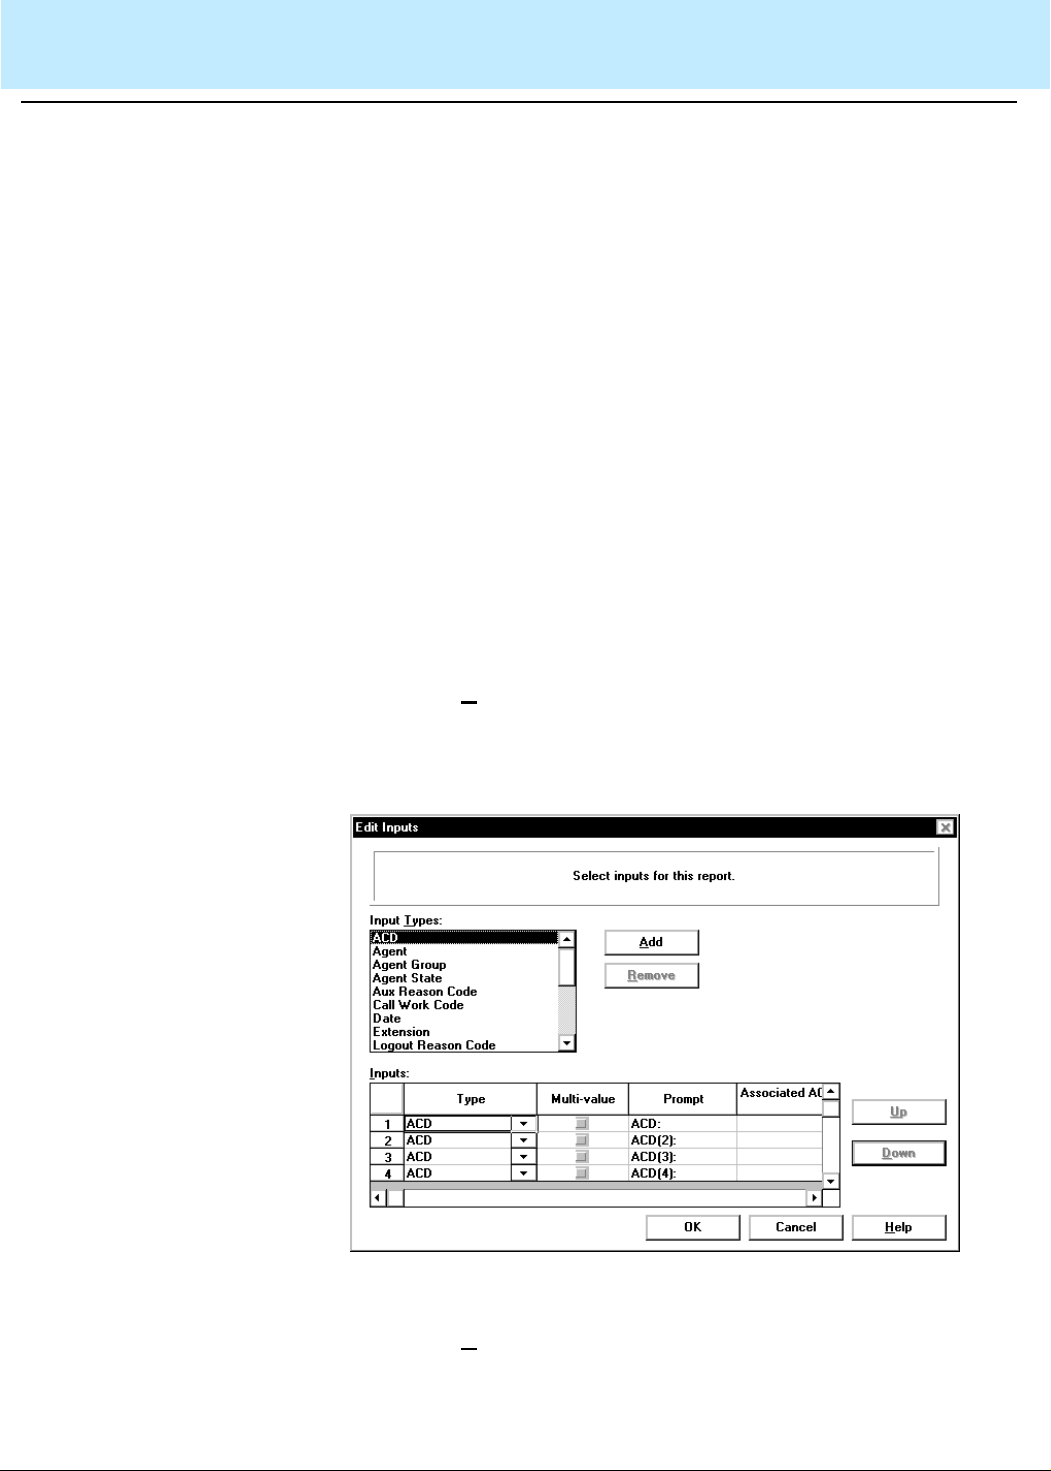
Edit | Inputs
Setting Up Inputs for a Multi-ACD Report 6-12
CentreVu
Report Designer Version 8 User Guide
Setting Up Inputs for a Multi-ACD Report 6
Two types of multi-ACD reports are available:
●
Multi-ACD reports that show data for multiple splits/skills on mul tipl e
ACDs, and
●
Multi-ACD reports that show data for multiple VDNs on multiple
ACDs.
If you are creating a multi-ACD report, you need to make sure that you
set up the inputs as detail ed below so that the query for the report will
work properly.
The following instructions use the spl it/skill multi-ACD report inputs as the
example. To create the inputs for a VDN multi-ACD report, use these
same instructions, but use the VDN input instead of the Split/Skill input.
The following instructions show you how to create t he inputs for a multiACD report that allows inputs for up to four ACDs:
1. Select Inputs from the Edit menu.
2. Select ACD from the Input Types box.
3. Select the A
dd button.
4. Repeat Steps 2 and 3 three times.
The Inputs table will look like this:
5. Select Split/Skil l on the Input T ypes box.
6. Select the A
dd button.
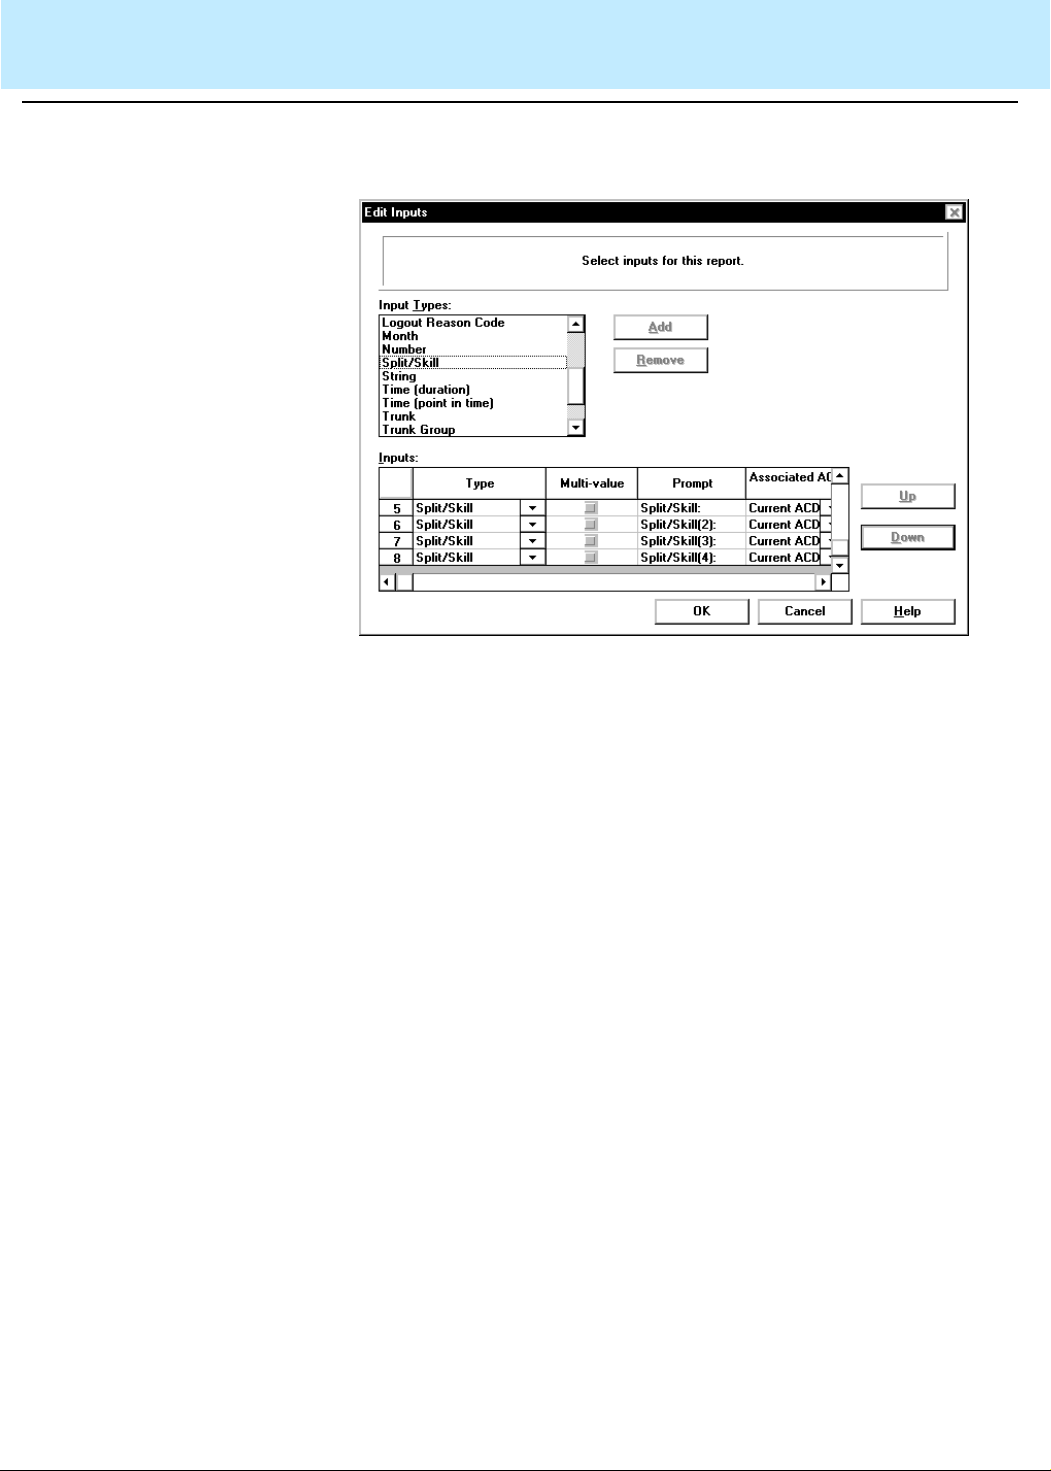
Edit | Inputs
Setting Up Inputs for a Multi-ACD Report 6-13
CentreVu
Report Designer Version 8 User Guide
7. Repeat Steps 5 and 6 three times.
The Inputs table will look li ke this:
8. For the Split/Skill(2) prompt (line 6 of the Inputs table), use the
Associated ACD drop-down list to select ACD(2) as the associated
ACD.
9. For the Split/Skill(3) prompt (line 7 of the Inputs table), use the
Associated ACD drop-down list to select ACD(3) as the associated
ACD.
10. For the Split/Skill(4) prompt (line 8 of the Inputs table), use the
Associated ACD drop-down list to select ACD(4) as the associated
ACD.

Edit | Inputs
Setting Up Inputs for a Multi-ACD Report 6-14
CentreVu
Report Designer Version 8 User Guide
The Inputs table looks l ike this:
11. Select OK to save the inputs for this multi-ACD report.
 Loading...