


CentreVu® CMS Administration
585–210–910
Comcode 108501743
Issue 1
November 1999

Copyright © 1999 Lucent Technologies. All Rights Reserved.
This material is protected by the copyright laws of the United States and other countries. It may not be reproduced, distributed, or altered in any
fashion by any entity (either internal or external to Lucent Technologies), except in accordance with applicable agreements, contracts or
licensing, without the express writte n c onsent of the Customer Training and Informa tion Products organization and the business ma nagement
owner of t he material.Produc t Develo pment Manager
Product Development Manager 1 888-LTINFO6
Notice
Every effort was made to ensure that the information in this book was complete and accurate at the time of printing. However, information is
subject to change.
Mandatory Customer InformationMandatory customer information
European Union declaration of conformity
Lucent Technologies Business Communications Systems declares that the equipment specified in this document conforms to the referenced
European Union (EU) Dir ec tives and Harmonized Standards listed below: EMC D irective89/336/EEC Low Voltage Directive 73/23/EEC. The
“CE” mark affixed to the equipment means that it conforms to the above Directives.
Heritage statement
Lucent Technologies—formed as a result of AT&T's planned restructuring—designs, builds, and del ivers a wide range of public and private
networks, communication systems and software, consumer and business tele phone systems, and microelectr oni cs c omponents. The worldrenowned Bell Laboratori es is the research and developmen t arm for the company.
Security statementYour responsibility for your system’s security
Toll fraud is the unauthorized use of your telecommunications system by an unauthorized party, for example, persons other than your company's
employees, agents, subcontractors, or persons working on your company's behalf. Note that there may be a risk of toll fraud associated with your
telecommunications system and, if toll fraud occurs, it can result in substantial additional charges for your telecommunications services.Y ou and
your system manager are responsible for th e se curity of your system, such as programming and configur in g your equipment to prevent
unauthorized use. The system manager is also responsible for reading all installation, instruction, and system administration documents
provided with this product in order to fully understand the featur es t hat can introduce risk of toll fraud and the steps that can be taken to reduce
that risk. Lucent Technologies does not warrant that this product is immune from or will prevent unauthorized use of common-carrier
telecommunication servi ce s or faci li ties accessed through or connected to it. Lucent Technologies will not be responsible for any charges that
result from such unauthorized use.
Trademarks
SunSun Microsystems, Inc. Sun Microsystems Sun Microsyste m s, Inc. the Sun L ogoSun Microsystems, Inc. Solaris Sun Microsy ste m s, Inc.
Solstice DiskSuite Sun Microsystems, Inc. SunLink Sun Microsystems, Inc.UltraSun Microsystems, Inc.SPARC. All SPARC trademarks are
used under license and are trade m arks or registered trademarks of SPARC International, Inc. in the Unit ed States and other countrie s . P r oducts
bearing SPARC trademarks are based upon an architecture developed by Sun Microsystems, Inc. SPARC International,
Inc.CentreVu
DEFINITYINTELIntel CorporationPent iumIntel CorporationMicrosoftMicrosoft CorporationMSMicroso ft C orpo rationMS-
DOSMicrosoft CorporationWindows Microsoft Cor pora tionWindows NTMicrosoft Corporation
Ordering informationOrdering information
For information about ordering , see A bout this information product .
Support telephone numbers
Technical Support Telephone NumberLucent Technologies National Customer Care Center
Lucent Technologies provides a telephone num be r for you to use to report problems or to ask questions about your call cent er. The support
telephone number for customers in the U.S.A. and Canada is 1-800-242-2121. For technical support, customers outside the United States should
call their Lucent Technologies Representat ive or Distributor.
Information Product Support Telephone Number
Call the Lucent Technologies National Customer Care Center.
Lucent technologies fraud intervention
If you suspect that you are being victimized by toll fraud and you need technical support or assistance, call Technical Service Center Toll Fraud
Intervention Hotline at 1-800-643-2353.
Developed by Lucent Technologies Customer Training and Information Products.This document was prepared by the Global Learning Solutions
organization, Lucent Technologies, Denver, Colorado, U.S.A.

Contents CentreVu CMS Administration
Contents
About this information product . . . . . . . . . . . . . . . . . . . . . . . . vii
Chapter 1: Task: startup and exit
Starting
Logging into
Adding new servers . . . . . . . . . . . . . . . . . . . . . . . 1-7
Choosing or changing your password . . . . . . . . . . . . . . . . 1-9
Closing
Logging out of
Exiting
Ta sk reference: general . . . . . . . . . . . . . . . . . . . . . . 1-13
Task reference:
Task reference: switches . . . . . . . . . . . . . . . . . . . . . 1-18
Task reference: terminals . . . . . . . . . . . . . . . . . . . . . 1-19
Task reference: printers . . . . . . . . . . . . . . . . . . . . . . 1-20
Task reference:
Task reference: using the Helpline. . . . . . . . . . . . . . . . . . 1-22
Task reference:
CentreVu
CentreVu
CentreVu
Supervisor on Windows 98 or NT. . . . . . . . . . . 1-2
CentreVu
CentreVu
CentreVu
CentreVu
CentreVu
CMS . . . . . . . . . . . . . . . . . . . . 1-3
Supervisor windows . . . . . . . . . . . . . . . . 1-10
CMS . . . . . . . . . . . . . . . . . . . 1-11
Supervisor . . . . . . . . . . . . . . . . . . . . 1-12
CMS specifications . . . . . . . . . . . . . 1-16
CMS support services . . . . . . . . . . . . 1-21
CMS training classes . . . . . . . . . . . . 1-23
iii
Chapter 2: Navigating
Using the controller windo w before you log into the server . . . . . . . . 2-2
Using the controller windo w after you log into the server . . . . . . . . . 2-4
Using the features common to all
Using the selector windows . . . . . . . . . . . . . . . . . . . . 2-10
Using the input windows . . . . . . . . . . . . . . . . . . . . . 2-12
Using the browse buttons . . . . . . . . . . . . . . . . . . . . . 2-16
Using the history list . . . . . . . . . . . . . . . . . . . . . . . 2-19
Task reference . . . . . . . . . . . . . . . . . . . . . . . . . 2-20
Chapter 3: Task: naming your call center entities in the Dictionary
Adding, deleting, or changing ACDs . . . . . . . . . . . . . . . . . 3-6
Creating or copying agent groups . . . . . . . . . . . . . . . . . . 3-8
Viewing, listing, adding, or deleting agents in an agent group . . . . . . . 3-11
Changing agent string values . . . . . . . . . . . . . . . . . . . 3-16
Viewing, adding, or changing announcement synonyms . . . . . . . . . 3-21
Viewing, adding, dele ting, or changing A U X reason code names . . . . . . 3-23
Viewing, adding, or creating calculations . . . . . . . . . . . . . . . 3-26
Viewing, adding, deleting, or changing call work codes. . . . . . . . . . 3-29
Adding constants to the database . . . . . . . . . . . . . . . . . . 3-31
Defining your own dat abase items. . . . . . . . . . . . . . . . . . 3-33
CentreVu®
Supervisor
CentreVu
Supervisor windows . . . . . 2-9

Contents CentreVu CMS Administration
Changing generic string values synonyms . . . . . . . . . . . . . . 3-35
Searching the Dictionary globally . . . . . . . . . . . . . . . . . . 3-36
Viewing, adding, deleting, or changing location IDs . . . . . . . . . . . 3-38
Viewing, adding, or changing login ID names . . . . . . . . . . . . . 3-40
Viewing, adding, or chan ging logout reason code names. . . . . . . . . 3-43
Viewing or changin g split/skill string va lues . . . . . . . . . . . . . . 3-46
Viewing, adding, deleting, or changing split/skill names . . . . . . . . . 3-49
Viewing
Viewing, adding, deleting, or changing trunk group names . . . . . . . . 3-54
Viewing or changin g trunk string values . . . . . . . . . . . . . . . 3-56
Viewing, adding, deleting, or changing VDN names . . . . . . . . . . . 3-60
Viewing, adding, deleting, or changing vector names . . . . . . . . . . 3-63
Running Dictionary reports . . . . . . . . . . . . . . . . . . . . 3-65
Chapter 4: Task: running, printing, exiting, and restarting a report
Running a report . . . . . . . . . . . . . . . . . . . . . . . . 4-2
Printing a report. . . . . . . . . . . . . . . . . . . . . . . . . 4-3
Setting up a report page . . . . . . . . . . . . . . . . . . . . . 4-4
Exiting and restarting a report . . . . . . . . . . . . . . . . . . . 4-6
Task reference . . . . . . . . . . . . . . . . . . . . . . . . . 4-7
CentreVu
CMS database items . . . . . . . . . . . . . . . 3-52
iv
Chapter 5: Task: automating your activities with scripting
Using Save as Script. . . . . . . . . . . . . . . . . . . . . . . 5-2
Scripting reports . . . . . . . . . . . . . . . . . . . . . . . . 5-6
Scripting the export of report output . . . . . . . . . . . . . . . . . 5-8
Scripting a report saved as HTML. . . . . . . . . . . . . . . . . . 5-10
Scripting windows and actions . . . . . . . . . . . . . . . . . . . 5-12
Task reference . . . . . . . . . . . . . . . . . . . . . . . . . 5-15
Chapter 6: Task: administering call center agents
Starting an agent trace . . . . . . . . . . . . . . . . . . . . . . 6-3
Listing agents traced. . . . . . . . . . . . . . . . . . . . . . . 6-7
Changing agent skills and extension split assignments . . . . . . . . . 6-9
Creating or applying an agent template . . . . . . . . . . . . . . . 6-15
Multi-agent skill change and moving extensions between splits . . . . . . 6-17
Running a split members report . . . . . . . . . . . . . . . . . . 6-22
Chapter 7: Task: administering your call center
Viewing, adding, or del eting call work codes . . . . . . . . . . . . . 7-3
Changing VDN skill preferences . . . . . . . . . . . . . . . . . . 7-6
Adding, deleting, or changing split/skill call profile s . . . . . . . . . . . 7-9
Viewing trunk group assignments . . . . . . . . . . . . . . . . . . 7-11
Running a trunk group members report . . . . . . . . . . . . . . . 7-13
Changing VDN-to-vect o r assignments . . . . . . . . . . . . . . . . 7-16
Adding, deleting, or changing VDN call p rofiles . . . . . . . . . . . . 7-19
Running vector confi guration reports . . . . . . . . . . . . . . . . 7-23
Chapter 8: Task: administering exceptions
Changing your exceptions notification . . . . . . . . . . . . . . . . 8-3

Contents CentreVu CMS Administration
Administering agent exc eptions . . . . . . . . . . . . . . . . . . 8-4
Administering split/skill exceptions . . . . . . . . . . . . . . . . . 8-11
Administering trunk group exceptions . . . . . . . . . . . . . . . . 8-16
Administering VDN exceptions . . . . . . . . . . . . . . . . . . . 8-20
Administering vector exceptions . . . . . . . . . . . . . . . . . . 8-26
Running an agent exceptions report . . . . . . . . . . . . . . . . . 8-30
Running a data collection report . . . . . . . . . . . . . . . . . . 8-34
Running a malicious call trace report . . . . . . . . . . . . . . . . 8-36
Running a split/skill exceptions report . . . . . . . . . . . . . . . . 8-38
Running a trunk group exceptions report . . . . . . . . . . . . . . . 8-41
Running a VDN exceptions report. . . . . . . . . . . . . . . . . . 8-44
Running a vector exceptions report . . . . . . . . . . . . . . . . . 8-47
Task reference . . . . . . . . . . . . . . . . . . . . . . . . . 8-50
Reference: interactions with other commands . . . . . . . . . . . . . 8-52
Reference: real-time exceptions log . . . . . . . . . . . . . . . . . 8-54
Task reference: reports . . . . . . . . . . . . . . . . . . . . . . 8-56
v
Chapter 9: Task: assigning user permissions
Assigning user data . . . . . . . . . . . . . . . . . . . . . . . 9-3
Viewing, assigning, deleting, or changing ACD access. . . . . . . . . . 9-9
Viewing, assigning, deleting, or changing feature access. . . . . . . . . 9-12
Viewing, assigning, or changing main menu addition access . . . . . . . 9-15
Viewing, assigning, deleting, or changing split/skil l access . . . . . . . . 9-17
Viewing, assigning, deleting, or changing trunk group access . . . . . . . 9-20
Viewing, assigning, deleting, or changing vect or access . . . . . . . . . 9-23
Viewing, assigning, deleting, or changing VDN access. . . . . . . . . . 9-25
Chapter 10: Task: viewing and changing system setup values
Tu rning data co llection on and off for real ACDs . . . . . . . . . . . . 10-3
Changing the
Setting up a pseudo-AC D . . . . . . . . . . . . . . . . . . . . . 10-8
Loading pseudo-ACD data . . . . . . . . . . . . . . . . . . . . 10-12
Specifying how
Archiving data in the historical database . . . . . . . . . . . . . . . 10-20
Starting or stopping external applications. . . . . . . . . . . . . . . 10-23
Allocating storage space . . . . . . . . . . . . . . . . . . . . . 10-25
Steps to set field values. . . . . . . . . . . . . . . . . . . . . . 10-27
Migrating
Setting storage intervals . . . . . . . . . . . . . . . . . . . . . 10-36
Viewing switch setup data . . . . . . . . . . . . . . . . . . . . . 10-42
CentreVu
CentreVu
CentreVu
CMS state . . . . . . . . . . . . . . . . . 10-5
CMS stores data . . . . . . . . . . . . . . 10-17
CMS data . . . . . . . . . . . . . . . . . . . 10-33
Chapter 11: Task: maintaining
Viewing ACD status . . . . . . . . . . . . . . . . . . . . . . . 11-3
Viewing archiving status . . . . . . . . . . . . . . . . . . . . . 11-7
Running a CMSADM file system backup . . . . . . . . . . . . . . . 11-9
Running a maintenance backup . . . . . . . . . . . . . . . . . . 11-13
Assigning a name and description to a device . . . . . . . . . . . . . 11-18
Monitoring connection status. . . . . . . . . . . . . . . . . . . . 11-20
Administering a printer . . . . . . . . . . . . . . . . . . . . . . 11-23
CentreVu®
CMS

Contents CentreVu CMS Administration
Running a restore . . . . . . . . . . . . . . . . . . . . . . . . 11-26
Using the maintenance error log . . . . . . . . . . . . . . . . . . 11-31
Task reference . . . . . . . . . . . . . . . . . . . . . . . . . 11-35
Reference: full backup . . . . . . . . . . . . . . . . . . . . . . 11-36
Reference: incremental backup . . . . . . . . . . . . . . . . . . 11-37
Reference: complex backup . . . . . . . . . . . . . . . . . . . . 11-39
Reference: recovery kit . . . . . . . . . . . . . . . . . . . . . . 11-41
Reference: labeling the backup volume . . . . . . . . . . . . . . . 11-43
Reference: results of daily, weekly, and monthly data summaries . . . . . 11-45
Chapter 12: Task: learning and using Solaris
Logging into Solaris . . . . . . . . . . . . . . . . . . . . . . . 12-2
Using Solaris . . . . . . . . . . . . . . . . . . . . . . . . . . 12-3
Viewing a Solaris system file. . . . . . . . . . . . . . . . . . . . 12-4
Changing a user’s password. . . . . . . . . . . . . . . . . . . . 12-5
Returning to
Administering a printer . . . . . . . . . . . . . . . . . . . . . . 12-7
Stopping or starting the Scheduler utility . . . . . . . . . . . . . . . 12-10
Restore files in Solaris . . . . . . . . . . . . . . . . . . . . . . 12-11
CentreVu
CMS . . . . . . . . . . . . . . . . . . . . 12-6
vi
Chapter 13: Task: using timetables and shortcuts
Creating and scheduling a timetable. . . . . . . . . . . . . . . . . 13-3
Creating a timetable without scheduling it. . . . . . . . . . . . . . . 13-6
Copying a timetable . . . . . . . . . . . . . . . . . . . . . . . 13-9
Deleting a timetable . . . . . . . . . . . . . . . . . . . . . . . 13-11
Editing a timetable. . . . . . . . . . . . . . . . . . . . . . . . 13- 12
Adding tasks to a timetable . . . . . . . . . . . . . . . . . . . . 13-13
Copying timetable tasks . . . . . . . . . . . . . . . . . . . . . 13-16
Deleting tasks from a timetable. . . . . . . . . . . . . . . . . . . 13-18
Editing a timetable globally . . . . . . . . . . . . . . . . . . . . 13-20
Changing timetable tas k s . . . . . . . . . . . . . . . . . . . . . 13-23
Listing all the timetables in your database. . . . . . . . . . . . . . . 13-25
Using timetables with the system clock. . . . . . . . . . . . . . . . 13-26
Creating a shortcut . . . . . . . . . . . . . . . . . . . . . . . 13-28
Running a shortcut . . . . . . . . . . . . . . . . . . . . . . . 13-30
Copying a shortcut . . . . . . . . . . . . . . . . . . . . . . . 13-31
Deleting a shortcut . . . . . . . . . . . . . . . . . . . . . . . 13-33
Editing a shortcut . . . . . . . . . . . . . . . . . . . . . . . . 13-34
Adding tasks to a shortcut. . . . . . . . . . . . . . . . . . . . . 13-35
Copying shortcut tasks . . . . . . . . . . . . . . . . . . . . . . 13-37
Deleting tasks from a shortcut . . . . . . . . . . . . . . . . . . . 13-39
Changing shortcut tasks . . . . . . . . . . . . . . . . . . . . . 13-40
Task Reference . . . . . . . . . . . . . . . . . . . . . . . . . 13-42
Glossary . . . . . . . . . . . . . . . . . . . . . . . . . . . . . . . . GL-1
Index . . . . . . . . . . . . . . . . . . . . . . . . . . . . . . . . IN-1

About this information product CentreVu CMS Administration
About this information product
vii
Purpose
Reason for reissue
If you are a
CentreVu
know to administer your call center. For split/skill supervisors with
limited access to
helpful.
This information product specifically addresses the
Enterprise Communications Server (ECS) functionality of
CMS. If you are implementing
you may have
earlier version of
earlier Generic 3 (G3) switch release.
This information product is a task-based guide to call center
administration.
The ACD basics appendix has been moved to the
CentreVu
CMS, this information product tells you what you need to
DEFINITY
R8 Guide to ACD Call Centers 555-233-503
The vectoring EAS appendix has been moved to the
®
CMS administrator with access to all parts of
CentreVu
ECS Release 8. If you are upgrading from an
CentreVu
CMS, this information product will also be
DEFINITY®
CentreVu
CentreVu
CMS, you may have an earlier ECS or an
CMS R3V8 for the f irst time,
DEFINITY®
.
DEFINITY
ECS
ECS
R8 Vectoring and EAS Guide 555-230-521.
This information product documents version 8 of
Supervisor.
CentreVu
DEFINITY
/G2 information has been removed throughout.

About this information product CentreVu CMS Administration
viii
Safety labels
How to use this information
product
Actions or inactions that may cause difficulties are labeled as follows:
Caution
CAUTION
Indicates that failure to take or avoid a specified action could
result in loss of data.
Warning
WARNING
Indicates that failure to take or avoid a specified action could
result in physical harm to the operator or the equipment.
Use this overview map to find the information you need to administer
your
CentreVu
CMS call center.
To learn about... See this task...
Accessing and using
CentreVu
Startup and exit
CMS
The
CentreVu
interface
Supervisor user
Navigating
Supervisor
CentreVu
Using the Dictionary Naming your call center entities
in the Dictionary
Reports and how to use them Running, printing, exiting, and
restarting a report
What you can do with scripting Automate your activities with
scripting
Changing agent splits/skills,
Administering your call center
creating agent templates, moving
extensions between splits, and
using agent trace

About this information product CentreVu CMS Administration
ix
Adding or deleting call work codes
Administering your call center
and split/skill call profiles,
changing VDN skill preferences,
viewing trunk group assignments,
changing VDN call profiles, and
other call center activities
To learn about... See this task...
Defining agents, split/skill, trunk
Administering exceptions
group, VDN, and vector
exceptions, and running exceptions
reports
Kinds of permissions; how and
Assigning user permissions
when to assign them
Changing
allocating storage space,
CentreVu
CMS state,
Viewing and changing system
setup values
specifying storage intervals, and
other system setup activities
Conventions used
Understanding maintenance:
Maintaining
CentreVu
CMS
backups, restores, and backup
strategy; the maintenance error
log; backup volumes and labeling
The Solaris operating system and
Learning and using Solaris
how to use it
How timetables and shortcuts
Using timetables and shortcuts
streamline your activities
The following conventions are used in this information product.
Product release
DEFINITY
Enterprise Communications Server is called “ECS” or
“switch”. Unless otherwise noted, the term ECS includes Releases 6, 7,
and 8. The functionality of earlier switch releases is noted if it differs
from that of Releases 6 through 8.
Document number
Lucent publication titles are followed by their document number. For
example, see
CentreVu
Supervisor Release 8
Reports 585-210-929
.

About this information product CentreVu CMS Administration
Typography
Courier font
x
Related documentation
designates
input
and
output
.
• Input is something you type into the user interface. For example,
Type
x
next to Printer, Terminal, or File
.
• Output is a character, word, or phrase that the system generates.
For example, Please wait for initialization .....
Italic font
example,
highlights references to file names and directories. For
/ cms
.
The following information may also be helpful:
•
•
•
•
CentreVu
CentreVu
CentreVu
CentreVu
CMS R3V5 Custom Reports
CMS R3V5 Forecast
Supervisor Release 8
CMS R3V8
Open Database Connectivity585-210-
585-215-825
Reports 585-210-929
585-215-822
91 1
•
Lucent Call Center Release 8 Change Description 58 5-210925
•
CentreVu
CMS R3V8
External Call History Interface 585-
210-912
•
CentreVu Advocate Release 8 User Guide585-210-927
•
CentreVu
Supervisor Release 8
Installation and Getting
Started 585-215-860
•
CentreVu
CMS R3V8 Sun Microsystems, Inc.Sun
and Migrations 585-210-913
•
CentreVu
CMS Sun Microsystems, Inc.Sun
Upgrades
Software
Installation and Maintenance 585-215-866
•
Lucent Call Center Documentation CD-ROM585-210-926
•
CentreVu
CMS R3V8
Hardware Maintenance and
Troubleshooting585-210-919

About this information product CentreVu CMS Administration
Other useful information
The information shipped with the following products may also be
helpful:
• Terminals
•Printers
• Solaris system software
•Switch
xi
How to order this
information product
By telephone:
Lucent Technologies Publications Center
Voice: 1-800-457-1235or international voice: 317-322-6416
Fax: 1-800-457-1764 or international fax: 317-322-6699
By mail:
Lucent Technologies Publications Center
2855 N. Franklin Road
Indianapolis, IN 46219
US
Order:
Document 585-210-910
Comcode 108501743
Issue 1, December 1999
For additional documents, see “Related Documentation” in About this
information product.
You can be placed on a Standing Order list for this and other documents
you may need. Standing Order will enable you to automatically receive
updated versions of individual documents or document sets, billed to
account information that you provide. For more information on
Standing Orders, or to be put on a list to receive future issues of this
document, please contact the Lucent Technologies Publications Center.

About this information product CentreVu CMS Administration
xii

Task: startup and exit CentreVu CMS Administration
1-1
1 Task: startup and exit
Overview
............................................................................................................................................................................................................................................................
Purpose
In this task you will find the following procedures:
• Starting
• Logging into
• Adding new servers
• Choosing or changing your password
• Closing
• Logging out of
• Exiting
Use the procedures that follow to access
CentreVu
CentreVu
CentreVu
®
Supervisor on Windows 98 or NT
CentreVu
CentreVu
CMS
Supervisor windows
CMS
Supervisor
CentreVu
CMS.

...........................................
...........................................
...........................................
E
.................................................................
Task: startup and exit CentreVu CMS Administration
Starting CentreVu Supervisor on Windows 98 or NT 1-2
Starting
............................................................................................................................................................................................................................................................
CentreVu
Supervisor on W indows 98 or NT
Steps
1 Click Start on the toolbar.
................................................................................................................................
2 Select Programs on the Start menu.
................................................................................................................................
3 Click the Lucent
................................................................................................................................
4 Click
CentreVu
ND OF STEPS
..........................................................................................................
CentreVu
Supervisor program group.
Supervisor – [your language].
Result
This is how the controller window looks before you log into the server.
...........................................................................................................................................................................

Task: startup and exit CentreVu CMS Administration
Logging into CentreVu CMS 1-3
Logging into
............................................................................................................................................................................................................................................................
Resource limits
CentreVu
Purpose
Login types
CMS
Use the Connect menu or the Login button to log into the
CMS server. When you log out, wait at least 10 seconds before trying
to log in again if
the single user.
If you run
limit you to one of the following:
• one instance with four reports running
• four instances, each with one report running
From the controller window, you can connect to the
server in either of the following ways. Note that you are limited to one
instance of a login ID per server.
CentreVu
CentreVu
Supervisor on Windows 98, available resources
CMS is in single-user mode and you are
CentreVu
CentreVu
CMS
Automatic login
Opens an input window in which you type your login ID and password.
When you click OK, the connection to the
automatically started. If you use automatic login to connect to the
CentreVu
you are logged into the server,
connection.
CMS server and the connection is broken or dropped while
CentreVu
CentreVu
Supervisor tries to restore the
CMS server is
Steps for automatic login
Manual login
Opens an interactive login window that requires you to type your login
ID, password, the terminal type FYVXS, and then to manually log into
CentreVu
and for
1 Select Login on the Connect menu or click Login on the toolbar.
CMS. Manual login is typically used for troubleshooting,
CentreVu
CMS services and administration login IDs.
................................................................................................. ..........................................................................

...........................................
...........................................
...........................................
E
.................................................................
Task: startup and exit CentreVu CMS Administration
Logging into CentreVu CMS 1-4
The Login Information window opens.
................................................................................................................................
2 T ype your
CentreV u
CMS login ID in the Login ID field or select your
login ID on the list.
................................................................................................................................
3 Tab to the Password field and type your
CentreVu
CMS password.
If the Confirm Password window opens, your password has expired.
Follow the prompts and type a new password.
................................................................................................................................
4 Click OK.
A message tells you that
CentreVu
ND OF STEPS
..........................................................................................................
Result
CMS server.
CentreVu
Supervisor is connecting to the
This is how the controller window looks after you log into the server.
The buttons and menu items depend on how your
CentreVu
permissions are set up.
CMS user

...........................................
...........................................
...........................................
...........................................
...........................................
Task: startup and exit CentreVu CMS Administration
Logging into CentreVu CMS 1-5
Steps for manual login
1 From the controller window, select Connect |
................................................................................................................................
CentreVu
CMS Servers.
2 Select Manual Login and click OK.
................................................................................................................................
3 Select Login on the Connect menu or click Login on the toolbar.
The Manual Login input window opens.
...........................................................................................................................................................................
................................................................................................................................
4 At the login prompt, type your
................................................................................................................................
5 At the Password prompt, type your
................................................................................................................................
CentreVu
CentreVu
CMS login ID.
CMS password.
6 If the Enter Terminal Type prompt displays, type FYVXS

...........................................
...........................................
E
.................................................................
Task: startup and exit CentreVu CMS Administration
Logging into CentreVu CMS 1-6
................................................................................................................................
7 If the Solaris prompt displays, type FPV
................................................................................................................................
8 At the Input Terminal Type prompt, confirm that the terminal type is
FYVXS. If the terminal type does not default to FYVXS, retype FYVXS
ND OF STEPS
..........................................................................................................
Result
The controllerwindow opens. This is how the controller window looks
after you log into the server. The buttons and menu items depend on
how your
CentreVu
CMS user permissions are set up.

...........................................
E
.................................................................
Task: startup and exit CentreVu CMS Administration
Adding new servers 1-7
Adding new servers
............................................................................................................................................................................................................................................................
Steps to start a connection
with a server:
...........................................................................................................................................................................
1 On the Connect menu, select
The Options window opens.
CentreVu
CMS Servers.
................................................................................................................................
2 Click New to add a
connection to a
CentreVu
ND OF STEPS
..........................................................................................................
CMS server from the list of available servers.
CentreVu
CentreVu
CMS server, Properties to change a
CMS server, or Remove to remove a

Task: startup and exit CentreVu CMS Administration
Adding new servers 1-8
Results
If you
Then... Click...
select. . .
New The Server Properties
window opens; you
specify parameters
for a new server in
this window.
Properties The Server Properties
window opens; the
fields are populated
with values for the
server you select.
Remove You confirm removal
in a message box to
remove the server you
select.
Note that with
CentreVu
CentreVu
CentreVu
Supervisor Release 8, you can connect to a
CMS V6 or a V8 server. If you click the wrong version of
CMS, you get an error message. You will have to re-log in.
OK
OK
OK

...........................................
...........................................
E
.................................................................
...........................................
...........................................
...........................................
E
.................................................................
Task: startup and exit CentreVu CMS Administration
Choosing or changing your password 1-9
Choosing or changing your password
............................................................................................................................................................................................................................................................
Overview
To choose a valid
password:
For system security, passwords are required for all
CentreVu
CMS
user login IDs. If you do not type a password on your first login, the
system will force you to add one.
CentreVu
only a
CMS allows users to type and change their password, but
CentreVu
CMS administrator working on the Solaris system
can replace a forgotten password. See “Task: learning and using
Solaris” for the steps to do this.
Steps
................................................................................................................................
1 Choose a password with at least six characters.
................................................................................................................................
2 Choose a password with at least one number or special character, and at least
two alphabetic characters.
See “Assigning user data” in “Task: assigning user permissions” for more
information on special characters.
To change your password:
ND OF STEPS
..........................................................................................................
Steps
................................................................................................................................
1 Choose a new password with at least three characters that are different from
your previous password.
................................................................................................................................
2 Type a new password in the New Password field.
................................................................................................................................
3 Retype the new password in the Retype New Password field and click OK.
ND OF STEPS
..........................................................................................................

Task: startup and exit CentreVu CMS Administration
Closing CentreVu Supervisor windows 1-10
Closing
............................................................................................................................................................................................................................................................
CentreVu
Steps
Supervisor windows
To close
• Use any of the standard Windows methods.
• Click Exit on the Connect menu. Exit closes all windo ws and quits
CentreVu
CentreVu
Important! If the server shuts down or changes to single-user
mode, you will see a warning message before any open windows
close.
Supervisor windows, do one of the following:
Supervisor.

Task: startup and exit CentreVu CMS Administration
Logging out of CentreVu CMS 1-11
Logging out of
............................................................................................................................................................................................................................................................
CentreVu
Steps
To log out of the server, do one of the following:
• Select Logout on the Connect menu. Logout is inactive if you are
• Select Logout or Exit on the toolbar.
• Select Exit on the Connect menu.
Results
If you. . . Then you see
CMS
not logged into the server.
Click. . .
this message. . .
Select Logout from the
Connect menu or click
Logout. .
“Are you sure you
want to logout?”
OK to log off the
server but keep
CentreVu
Supervisor
running.
Select Exit from the
Connect menu or click Exit.
“You are currently
logged in. Are you
sure you want to
exit?”
Yes to log off the
server and close
CentreVu
Supervisor.

Task: startup and exit CentreVu CMS Administration
Exiting CentreVu Supervisor 1-12
Exiting
............................................................................................................................................................................................................................................................
CentreVu
Steps
Supervisor
To exit
click Exit on the toolbar.
CentreVu
Important! If you try to exit
logging out of the
message, “You are currently logged in. Are you sure you want to
exit?” Click Yes to automatically log off the server and exit
CentreVu
Supervisor, select Exit on the Command menu or
CentreVu
Supervisor.
CentreVu
CMS server, you will see the
Supervisor before

Task: startup and exit CentreVu CMS Administration
Task reference: general 1-13
Task reference: general
............................................................................................................................................................................................................................................................
How CentreVu CMS works
CentreVu
CMS is a software product used by businesses and
organizations that have a Lucent Technologies telecommunications
Enterprise Communications Server (ECS) and receive a large volume
of telephone calls that are processed through the Automatic Call
Distribution (ACD) feature of the ECS. (In this information product,
the ECS is called the “switch.”)
CentreVu
CMS collects call-traffic
data, formats management reports, and provides an administrative
interface to the ACD feature on the switch.
The
CentreVu
CMS administrator accesses the
CentreVu
CMS
database, generates reports, administers A CD parameters, and monitors
call activities to determine the most efficient service for the calling
customers.
Solaris
CentreVu
CMS interfaces with the Solaris operating system and uses
several Solaris system utilities to communicate with terminals and
printers, to log errors, and to execute processes.
CentreVu
CMS works
with the INFORMIX database management system, which provides an
interface to the
CentreVu
CMS historical database.
ACD administration
CentreVu
CMS provides an administrative interface to the switch.
From the ACD interface, you can view or change various ACD-, Call
Vectoring-, and Expert Agent Selection (EAS)-related parameters on
the switch, and you can run reports that describe your call center
configuration.
For example, you can add agents to or remove agents from splits or
skills; move extensions between splits; change skill assignments;
change trunk group-to-split, trunk group-to-VDN, or VDN-to-vector
assignments; start an agent trace and list the agents being traced; and
create, copy, and edit call vectors. See “Task: administering call center
agents” and “Task: administering your call center” for more
information.
Call Vectoring
The
CentreVu
CMS Call Vectoring feature enables you to create, copy,
and edit call vectors on the ECS and G3 switches. Call vectors are userdefined, call-processing programs. Call vectors direct calls to specified

Task: startup and exit CentreVu CMS Administration
Task reference: general 1-14
on-network or off-network destinations; to queues in ACD splits; to
call prompting and digit collection; or to treatments such as music,
recorded announcements, forced disconnect, and forced busy.
On the switch and
purchased feature. All
CentreVu
CentreVu
CMS, Call Vectoring is a separately
CMS Call Vectoring windows are
described in this information product. A description of ECS/G3 Call
Vectoring is in “Administering call center agents” and “Administering
the call center.” A description of the Vector Contents window (which
you use to create, copy , and edit call v ectors) and the allowed v alues for
all the vectoring commands are in “Administering the call center”. See
CentreVu Visual Vectors Version 8 User Guide585-210-932
for
more information.
Expert Agent Selection
EAS is an optional switch feature that routes incoming calls to the
right agent on the first try. When you use the ACD queuing and the
vector Queue-to and Check commands, a call routes to an agent that
has the skills to handle that call.
With EAS, call distributi on is based on skill groups. Calls are queued to
skill groups and handled by an agent who is a member of at least one of
the groups for the skills a caller needs.
The ECS and G3 switches have different EAS capabilities so you need
to plan ahead to add EAS. See “Task: administering call center agents”
and “Task: administering the call center” for more on EAS.
If you do not have EAS, call distribution is based on splits.
Forecast
Forecast is an optional
CentreVu
CMS feature. Forecast enables you
to generate reports that predict both future call traffic and the resources
you will need to meet call-handling objectives. See
R3V5 Forecast
CentreVu Advocate
CentreVu
585-215-825
for more on Forecast.
Advocate is an optional switch feature that provides
CentreVu
CMS
flexibility in the way a call is selected for an agent in a call-surplus
situation. See the
CentreVu Advocate User Guide 585-215-855
.

Task: startup and exit CentreVu CMS Administration
Task reference: general 1-15
ODBC
Open Database Connectivity (ODBC) is an optional
feature that enables you to access data in the
CentreVu
CentreVu
CMS
CMS database
for use in other software applications such as a spreadsheet program.
With ODBC, you can access
CentreVu
CMS data directly from your
application.

Task: startup and exit CentreVu CMS Administration
Task reference: CentreVu CMS specifications 1-16
Task reference:
............................................................................................................................................................................................................................................................
Hardware platforms
Recommended PC
configuration
CentreVu
CentreVu
• Sun Ultra Enterprise 3000
• Sun SPARCserver 20
• Sun SPARCserver 10
• Sun SPARCserver 5
• Sun Enterprise 3500
• Sun Ultra 5
The recommended PC configuration for
following:
• Intel Pentium 133 MHz processor or higher
• A hard disk drive with 50 MB of free space
• A CD-ROM drive
• 48 MB RAM or more; if you are running simultaneous
CMS specifications
CMS is certified to run on the following computers:
CentreVu
Supervisor instances in the background, you may need additional
memory to maintain acceptable performance
Supervisor is the
CentreVu
• An SVGA monitor and graphics adapter that supports at least 16-
bit color and can be set to a graphics resolution of at least
800x600x256 colors
• Microsoft Windows 95, Windows 98, or Windows NT 4.0
operating system; if you are installing
Windows NT 4.0 operating system, you must first install the
Microsoft Service Pack 3 or higher. Microsoft also recommends
that the Service Pack be re-installed after the
Supervisor installation.
• A mouse compatible with the your Windows operating system
• For network connection:
– WinSock 1.1–compliant TCP/IP stack
– Ethernet communications board
• For serial connection:
– Serial cable correctly wired for hardware flow control and a
16550A UART communications port
– Available COM port
CentreVu
CentreVu
Supervisor on a

Task: startup and exit CentreVu CMS Administration
Task reference: CentreVu CMS specifications 1-17
• For modem connection:
– At least a 19.2-Kbps modem and a 16550A UART
communications port; if the modem is external, the cable must be
correctly wired for hardware flow control
• For each language installed on the PC in addition to English, an
additional 5 MB of disk space
Software for a Sun platform
The following software is required for R3V8
CentreVu
CMS to
operate correctly:
• Solaris 7 Hardware 3/99 CD-ROM
• Common Desktop Environment 1.3
• Sun Online Validation Test Suite 3.1 (Software Supplement CD-
ROM)
• Solaris Online DiskSuite 4.2 (Solaris Easy Access Server CD-
ROM)
• INFORMIX-SE 7.22.UC2 CD-ROM
• INFORMIX ILS 2.11 CD-ROM
• CMS Supplemental Services CD-ROM
• INFORMIX Runtime ESQL 9.14
The following software is optional for R3V8 CMS:
• INFORMIX-SQL 7.20 UD1 CD-ROM
• SunLink HSI/P 2.0 CD-ROM (Onl y required when an HSI card is
installed on PCI platforms)
• SunLink HSI/S 3.0 CD-ROM (Onl y required when an HSI card is
installed on sBus platforms)
• SunLink X.25 Version 9.1 CD-ROM
• Bay Networks Annex Release 10.0b (only when an NTS is
installed)
• Aurora Ports 6.18 8 port and/or 5.16 16 port drivers (only when an
Aurora ports card is installed on SparcServer platforms)
• Special Asynchronous Interface PCI 2.0 (only when a SAIP card
is installed on a PCI platform)

Task: startup and exit CentreVu CMS Administration
Task reference: switches 1-18
Task reference: switches
............................................................................................................................................................................................................................................................
Switch names and releases
This release of
CentreVu
CMS is certified to run with the following
releases of Lucent Technologies switches:
•
DEFINITY®
Communications System Generic 3 Version 2 load
71 and later
•
DEFINITY
•
DEFINITY
•
DEFINITY
•
DEFINITY
•
DEFINITY
•
DEFINITY
•
DEFINITY
Communications System Generic 3 Version 3
Communications System Generic 3 Version 4
G3V5
Enterprise Communications Server Release 5
Enterprise Communications Server Release 6
ECS R7
ECS R8

Task: startup and exit CentreVu CMS Administration
Task reference: terminals 1-19
Task reference: terminals
............................................................................................................................................................................................................................................................
Terminal requ i re ments
Approved terminals
You can use the display terminals connected to your computer to access
CentreVu
CMS administration and reporting capabilitie s. You can also
access the Solaris system from these terminals. If you use terminals
incompatible with
the terminals within the
CentreVu
CentreVu
CMS or if you do not properly identify
CMS environment, or if you do not
properly set up the terminal options, the terminals may not work
correctly.
The following terminals are approved for use with
CentreVu
CMS:
• 605MT monochrome
• 615MT monochrome
• 615CMT color
• 620MTG multitasking graphics
• 705MT monochrome
• 715BCS monochrome
• 2900/AWTC color
• 4000/SWTC color
Troubleshooting
• DATASPEED 4425 monochrome
• 260 LS terminal
If the screen on a terminal becomes garbled or confused, redraw the
screen by using Ctrl+L or select the Redraw menu item from the
Window Screen Labeled Key (SLK).
See
CentreVu
Installation and Maintenance 585-215-868
CMS R3V8 Sun SPARCserver
Computer Hardware
for information about
other terminal requirements and for troubleshooting. Also see
CentreVu
874
.
CMS R3V8
Terminals, Printers, and Modems 585-215-

Task: startup and exit CentreVu CMS Administration
Task reference: printers 1-20
Task reference: printers
............................................................................................................................................................................................................................................................
Printer req u irements
Printers for your system
Note that:
• All
• All printers are named during
CentreVu
CentreVu
CMS sites need at least one system printer for
CMS reports, error logs, and so forth.
CentreVu
CMS installation so you
should know the names of these printers.
• During
CentreVu
CMS installation one printer is identified as the
default printer and must be administered via Commands SLK.
• When you send a
CentreVu
CMS print request, the print job is
normally routed to the default printer , unless you have changed the
printer destination.
• For
CentreVu
Supervisor users, the default printer is the printer
directly connected to your PC or available to you via your LAN.
•Each
CentreVu
CMS login ID can be assigned a printer.
To identify the correct printer for your system, contact your local
Lucent distributor or representative.

Task: startup and exit CentreVu CMS Administration
Task reference: CentreVu CMS support services 1-21
Task reference:
............................................................................................................................................................................................................................................................
Helpline and training
CentreVu
Lucent Technologies offers Helpline support tailored to the specific
needs of your company and your
enhance the value of your
training courses and training packages on
administration, data analysis, and report design.
CMS support services
CentreVu
CentreVu
CMS investment, Lucent offers
CMS system. To further
CentreVu
CMS

Task: startup and exit CentreVu CMS Administration
Task reference: using the Helpline 1-22
Task reference: using the Helpline
............................................................................................................................................................................................................................................................
If you have a problem
Provide information
If you have a problem with
Technologies Customer Care Helpline at
CentreVu
CMS, call the Lucent
(800) 242-2121
to report
the problem and obtain a trouble ticket number. For customers outside
the United States and Canada, please contact your local Lucent
distributor or representative.
The Customer Care Helpline is staffed by trained
CentreVu
CMS
technicians at the Technical Service Center (TSC). The technicians at
TSC will try to fix your problem in a timely manner. If they cannot fix
it, they will escalate the problem to a higher level of customer support.
When you call the Helpline, be sure to report the problem as a
“
CentreVu
Call Management System R3V8 problem” and be prepared
to give the following information:
• Your full name, your organization, and a phone number where a
Lucent Technologies representative can contact you about the
problem.
• The installation location (IL) number.
The IL number is a 10-digit number from a Lucent Technologies
database that identifies the details of your
CentreVu
CMS
installation and environment.
• The
DEFINITY
and
CentreVu
CMS release information.
• The CPU type and speed.
• The Windows operating system (if you are using
CentreVu
Supervisor.)
• A description of the problem.
• The type of service contract your organization has with Lucent
Technologies, if any.
If your system is not covered by warranty or a service contract,
you will be invoiced for the Helpline troubleshooting. A service
contract may provide coverage for business hours only or for
twenty-four hours a day, seven days a week. Alternatively, the
contract may provide you with a technician dedicated to your
installation.

Task: startup and exit CentreVu CMS Administration
Task reference: CentreVu CMS training classes 1-23
Task reference:
............................................................................................................................................................................................................................................................
Training included with
Available courses
CentreVu
software
CMS training classes
Training for one person on
reports is included with the price of the
price is not for each ACD). Your Lucent Technologies project manager
should call 800-255-8988 to schedule the appropriate classes for you.
For training outside the United States, contact your local Lucent
distributor or representative.
Call 800-255-8988 for a list of available
courses.
Entitlement training is moving from instructor-led training to distance
learning throughout 2000. See Document 300 for current entitlement
offers. Document 300 can be found at http://training.gbcset.lucent.com,
select Customer Training, On-Line Materials, Summary of Training
Seats, Document 300.
Use price element codes (PECs) only if you are enrolling people in
addition to the person who receives training at no charge.
CentreVu
CMS administration and custom
CentreVu
CentreVu
CMS software. (The
CMS training
Upgrade training
If you are upgrading from
entitled to enroll in an administration course. Additional people may
enroll at their own expense. One or more people may enroll in
additional courses at their own expense.
Other
You may benefit by taking further courses (at additional charge) in the
following subject areas:
• Traffic theory/data analysis
• Host computer administration
• Switch administration
•
You automatically receive the following Individualized Learning
Programs (booklets) after one of your call center's employees is
enrolled in the
• ACD fundamentals
• Call Vectoring and EAS basics
CentreVu
CentreVu
CMS training
Advocate
CentreVu
CentreVu
CMS administration course:
CMS Release 2, one person is

Task: startup and exit CentreVu CMS Administration
Task reference: CentreVu CMS training classes 1-24

Navigating CentreVu® Supervisor CentreVu CMS Administration
2-1
®
2 Navigating
CentreVu
Supervisor
Overview
............................................................................................................................................................................................................................................................
Purpose
In this task you will find the following procedures:
• Using the controller window before you log into the server
• Using the controller window after you log into the server
• Using the features common to all
• Using the selector windows
• Using the input windows
• Using the browse buttons
• Using the history list
CentreVu
procedures that follow show you how to navigate
Supervisor.
Supervisor is your interface to
CentreVu
CentreVu
Supervisor windows
CMS. The
CentreVu

...........................................
...........................................
...........................................
...........................................
...........................................
Navigating CentreVu® Supervisor CentreVu CMS Administration
Using the controller window before you log into the server 2-2
Using the controller window before you log into the server
............................................................................................................................................................................................................................................................
Overview
Steps
This is how the main
controller window
CentreVu
Supervisor window, called the
, looks before you log into the server.
1 Use the system menu field; the title bar; the maximize, minimize, and
close buttons; and the menu bar as you normally do in Windows.
................................................................................................................................
2 Move your cursor over each button on the toolbar to see a tooltip
describing what that button does (the status bar at the bottom of the
window also shows the description when your cursor is on the toolbar
button).
...........................................................................................................................................................................
................................................................................................................................
3 From the menu bar, access the Connect, Tools, and Help menus.
................................................................................................................................
4 From the Connect menu, select Login to open the Automatic Login
window (unless you ha ve set manual login), click CMS S ervers to go to
the CMS Servers tab on the Options window, and click Exit to close
CentreVu
................................................................................................................................
Supervisor.
5 From the Tools menu, select Options to open the Options window,
where you can view or change connection settings.
................................................................................................................................
6 The Advanced menu takes you to the Advanced window, which is used
for debugging. Do not change the settings in this window unless you are
instructed to do so by a Lucent representative.

...........................................
...........................................
E
.................................................................
Navigating CentreVu® Supervisor CentreVu CMS Administration
Using the controller window before you log into the server 2-3
................................................................................................................................
7 Use the Login Status indicator on the status bar to see your login status.
This is a green light if you are logged into the server and a gray light if
you are not logged into the server.
................................................................................................................................
8 From the Help menu, click Contents to access the Help Topics window
and the
CentreVu
Supervisor table of contents, click T echnical Support
to see technical support information, and click About to see the
CentreVu
Supervisor software version number. You can also press F1
to access Help Topics.
ND OF STEPS
..........................................................................................................

...........................................
Navigating CentreVu® Supervisor CentreVu CMS Administration
Using the controller window after you log into the server 2-4
Using the controller window after you log into the server
............................................................................................................................................................................................................................................................
Overview
Steps
When you are logged into the
CentreVu
CMS server, the toolbar,
status bar, and menu bar on the controller window offer additional
functions. Your
CentreVu
CMS user permissions determine which
toolbar buttons and menu options you can use.
1 From the Connect menu, select Logout to log off the server at any time,
or select Exit to see a logout prompt and then click Yes to close
CentreVu
................................................................................................................................
Supervisor.
2 From the Commands menu, select Reports to open the Reports selector
window; select Dictionary to open the Dictionary selector window;
select Exceptions to open the Exceptions selector window; select Agent
Administration to open the Agent Administration selector window;
select Call Center Administration to open the Call Center
Administration selector window; and select Report Wizard to build a
custom report and see data in charts, tables, or a combination of both.
...........................................................................................................................................................................

...........................................
...........................................
...........................................
E
.................................................................
Navigating CentreVu® Supervisor CentreVu CMS Administration
Using the controller window after you log into the server 2-5
................................................................................................................................
3 From the Tools menu, select Options to choose report colors and other
similar options; select Add Button to start the Add Button wizard, which
helps you create a custom or standard button and add it to the toolbar;
select Remove Button to remo v e a b utton from the toolbar; sel ect CMS
System Setup to open the CMS System Setup selector window; select
Maintenance to open the Maintenance selector window; and select User
Permissions to open the User Permissions selector window.
................................................................................................................................
4 On the menu bar, select Scripts to view the drop-do wn menu, then click
the item for the action you want to automate through scripting.
................................................................................................................................
5 On the toolbar, click a button to see the drop-down description of the
button’s function
ND OF STEPS
..........................................................................................................

Navigating CentreVu® Supervisor CentreVu CMS Administration
Using the controller window after you log into the server 2-6
Reference
Default toolbar buttons
Use this button... To do this...
Options Access the window to change your
login options
Logout Disconnect from the server
Reports Open the Reports selector window
Dictionary Open the Dictionary selector window
Exceptions Open the Exceptions selector window
Agent Administration Open the Agent Administration
selector window
Call Center Administration Open the Call Center Administration
selector window
Report Wizard Build a custom report
CentreVu
Setup
CMS System
Open the System Setup selector
window
Maintenance Open the Maintenance selector
window
User Permissions Open the User Permissions selector
window
Exit
CentreVu
Status bar indicators
These indicators on the status bar tell you about the state of
Supervisor
CentreVu
CMS:
This indicator... Displays...
Login status A green light if you are
connected to the
CentreVu
CMS, a gray light if you are not
connected

Navigating CentreVu® Supervisor CentreVu CMS Administration
Using the controller window after you log into the server 2-7
This indicator... Displays...
Exception counter An exception count of the ACDs
for which you have exceptions
permissions; the count is cleared
to zero at the beginning of an
interval
ACD status Icons for the ACDs that are
supported in your call centers by
CentreVu
CMS; if the link to an
ACD is do wn, the icon is crossed
out. If the
CentreVu
CMS
server is connected to the ACD
via a TCP/IP connection and the
connection is in a transient state,
the icon changes to a straight
line; if you put your mouse over
an indicator a tooltip shows the
name of the ACD
Date and time Date and time of the
CentreVu
CMS server you are logged into
Status bar messages
Any of these messages may display on the status bar:
This message... Displays when...
Working
Successful
Error A syntax error is found in a field,
an error message with field help
displays.
Failed An action request cannot
complete. An Acknowledgment
window explains why the
request failed.
Does not exist A record you are trying to
change, delete, or search for is
not in the database.

Navigating CentreVu® Supervisor CentreVu CMS Administration
Using the controller window after you log into the server 2-8
This message... Displays when...
Already exists A record you are trying to add is
in the database: this message
also displays when you try to add
a range of items, some of which
exist and some of which do not;
the ones that do not exist are
added to the database and the
ones that already exist are left
unchanged.
Cancelled You cancelled a potentially
destructive action in an
acknowledgment window.
No matches found A Find one action completes.

...........................................
...........................................
E
.................................................................
Navigating CentreVu® Supervisor CentreVu CMS Administration
Using the features common to all CentreVu Supervisor windows 2-9
Using the features common to all
............................................................................................................................................................................................................................................................
Overview
The features that are common to all
the system tray icon, the
CentreVu
CentreVu
Supervisor windows
CentreVu
Supervisor menus, and the help
Supervisor windows are
system. The system tray icon is covered next.
Steps
1 Click the system tray icon to see a list of all the
CentreVu
Supervisor
windows you hav e open, then select a window on the list to make it the
current window.
................................................................................................................................
2 Double-click the system tray icon to make the controller the current
window or to bring another window to the front.
Several icons may be displayed:
• If the
CentreVu
Supervisor icon is displayed, the controller is the
current window.
...........................................................................................................................................................................
• If the caution icon is displayed, all reports that are running with a
caution condition are brought to the front.
• If the warning icon is displayed, all reports that are running with a
warning condition are brought to the front.
................................................................................................................................
3 Control the sort order of the system tray icon and turn the feature on and
off from Tools | Options | General.
ND OF STEPS
..........................................................................................................

Navigating CentreVu® Supervisor CentreVu CMS Administration
Using the selector windows 2-10
Using the selector windows
............................................................................................................................................................................................................................................................
Overview
Steps
Selector windows take you to input and reports windows for all your
actions (except scripting, which has its own button on the Commands
window and on selector windows).
Selector windows typically have an Operations tab and a Reports tab.
The exceptions are the Commands | Reports selector window, which
has Real-Time, Historical, and Integrated tabs, and the Tools | Options
window, which has General, Report Colors, Threshold Colors, Name
Format, Scripting, and CMS Servers tabs.
...........................................................................................................................................................................
1 Here is an example of a selector window.
On the selector window for the action you want, check that the ACD
selected in the ACD f ield is the one you w ant for this action. If not, use
the down arrow to see a list of ACDs, highlight the one you want, and
select OK.

...........................................
E
.................................................................
Navigating CentreVu® Supervisor CentreVu CMS Administration
Using the selector windows 2-11
................................................................................................................................
2 Select a folder tab to bring the window you want to the front, then use
the up and down arrow keys or your mouse to highlight the item for
which you want to open an input or reports window and click OK (or
choose a tab and double-click an item).
ND OF STEPS
..........................................................................................................
Results
The input or reports window opens.

...........................................
...........................................
...........................................
...........................................
E
.................................................................
Navigating CentreVu® Supervisor CentreVu CMS Administration
Using the input windows 2-12
Using the input windows
................................................ .................. ................................... ................. .................. ................. ................................... .................. .................. ................. ...........
Overview
Steps
On the input windows, the Actions menu lists the actions you can
choose from for that input window; the Edit menu lists the normal
Windows functions; and the Help menu lists your help options.
...........................................................................................................................................................................
1 Highlight the action you want on the Actions menu and click OK.
................................................................................................................................
2 Click the down arrow at the right of the input field or click the Browse
button at the far right of the input field to see the valid entries for the
input field. Use the History list to see information that was previously
entered in the input field.
................................................................................................................................
3 Check that the ACD in the box at the lower right-hand corner of the
window is the one you w ant for this acti on. If not, return to t he selector
window and change the ACD.
................................................................................................................................
4 Highlight or enter the item you want in the input field and select OK.
................................................................................................................................
5 Repeat Steps one through four to enter additional items on the input
window.
ND OF STEPS
..........................................................................................................

Navigating CentreVu® Supervisor CentreVu CMS Administration
Using the input windows 2-13
Input window options
These additional steps may further help you use input windows:
Use this option... To do this...
Menu bar Choose from a list of actions,
edit options, and online help
Toolbar button Add, change, or delete your
input
Input fields Type your input
History list View a list of previous inputs
Browse button Browse valid inputs
Current ACD View the ACD that your inputs
apply to
Actions menu items
Select this... To do this.
..
Add Add your inputs to the database
Cancel Cancel your inputs
Copy Group/Create Create a new agent group from
an existing one
Delete Delete your input from the
database
Exit Exit this window and other open
windows
Find one Search the database for values
that match the values in this
window
Get contents Access the members of the agent
group
List all List all values that match the
values in this window
List devices List all the devices in the
Maintenance Backup/Restore
Devices window

Navigating CentreVu® Supervisor CentreVu CMS Administration
Using the input windows 2-14
Select this... To do this.
..
Modify Change the database value to
reflect your inputs
Next After you select Find One,
display the next match found
Previous After you select Find One,
display the previous match found
Run/Start Start the process for this window .
Select tables Select tables to back up or
restore
Script Automate your activities
Reference
Rules for input fields:
CentreVu
CMS has three classes of input field: name (synonym), field
description, and number. This section describes the rules that apply to
each class.
Name (synonym)
A name (synonym) field:
• Must begin with an alphabetic character. Characters are case
sensitive.
• Can be one to twenty characters. Letters, numbers, underscores (
B), blanks, commas ( ), periods ( ), and plus signs ( ) are valid.
Pattern-matching (see below) is not allowed in a name (synonym) f ield,
except in the Dictionary. For example, in a report input windo w ha ving
a Split(s)/Skill(s) field, you can type a list of splits/skills or a range of
numeric splits/skills, but you cannot type 6D.
Field description
A field description can be one to fifty characters. All keyboard
characters are allowed except backslash ( ?), grave accent ( C), tilde (
a ), double quotes ( ), pipe symbol ( _), asterisk ( ), and question
mark ( ").

Navigating CentreVu® Supervisor CentreVu CMS Administration
Using the input windows 2-15
Pattern-matching
Here are some guidelines for using
CentreVu
CMS pattern-matching.
• If you know your entry begins with the letters “ ac,” you can type
DF in a description field. The asterisk ( ) matches any number of
characters that follow the “ac.” You might have several matches,
no match, or only one match. If you type only an in a field, you
get a list of all entries in the
CentreVu
CMS database for that
particular field.
• You cannot use an or " to search for strings in entity name input
fields that are labeled with (s) — for example, Split(s).
• A question mark ( ") matches a single character in the search
pattern. So if you type DF" in a f ield, the result ing matches w ould
be items in the
CentreVu
CMS database that begin with DF and
have three letters (for example, DFG).
• You can leave the field blank to get a list of all entries in the
CentreVu
CMS database for that particular field.
Number
A numeric entry can be a single item, a range, a list, or a combination
of range and list.
• Type a range by placing a hyphen between items (for example,
login IDs 1000–1053).
A numeric range cannot include more than 1000 numbers. For
example, 1000–1999, 1050–2049, and 2000–2999 are valid, but
1000–2000 is not valid.
• Type a list by placing a semicolon between entries (for example,
login IDs 1002;1100; 2022).

...........................................
...........................................
E
.................................................................
Navigating CentreVu® Supervisor CentreVu CMS Administration
Using th e browse buttons 2-16
Using the browse buttons
............................................................................................................................................................................................................................................................
Overview
Steps
A browse button is found to the right of the input field on most input
windows.
If your input is for a single value (such as a split/skill, vector, agent,
VDN, trunk, or trunk group), do the following:
................................................................................................................................
1 From an input window, select Browse.
A single-value browse window like the one below opens.
................................................................................................................................
2 Click the name or number of the value you want and click OK.
The input window reopens and the input field is populated with the
name of the value you chose in the browse window.
ND OF STEPS
..........................................................................................................

...........................................
...........................................
Navigating CentreVu® Supervisor CentreVu CMS Administration
Using th e browse buttons 2-17
Steps
If your input is for multiple value instances of a value (such as split/
skill, vector, agent, VDN, trunk, or trunk group) do the following:
................................................................................................................................
1 Select Browse.
................................................................................................................................
2 In the Choices field, click the names of the entities you want.
You can select the entities individually or select a range. To select a
range:
1. Select the Range of... option.
2. In the First input field, type a beginning entity number for the
range.
3. Tab to the Last input field.
4. In the Last input field, type an ending entity number for the range.
For example, if your cal l center has skills 1, 2, 3, 4, and 5, and you want
to select all of them, you can type in the First input field and then type
in the Last input field.

...........................................
...........................................
E
.................................................................
Navigating CentreVu® Supervisor CentreVu CMS Administration
Using th e browse buttons 2-18
................................................................................................................................
3 Click Add after every selection (or double-click each selection on the
Available list) to transfer it to the Selected list for input. Click Remove
to delete a choice from the Selected list and return it to the A v ailable list.
................. ........... ......... ............ ......... ........... ......... ............ ............ ........ ............ ......
4 Click OK.
ND OF STEPS
..........................................................................................................
Results
• The entities you highlighted in the Choices field and/or the range
you specified are now listed in the Selected field.
• The input window opens and the input field is populated with the
names/numbers of the entities that you selected in the browse
window.

...........................................
...........................................
E
.................................................................
Navigating CentreVu® Supervisor CentreVu CMS Administration
Using the history list 2-19
Using the history list
............................................................................................................................................................................................................................................................
Overview
Steps
To the left of each entry in an input field on an input window is a dropdown history list. If you are connected to multiple
servers, you have a history list for each
CentreVu
CentreVu
CMS.
CMS
1 Open an input window . For instance, from the controller window, select
the Dictionary selector window , and then select Call Work Codes on the
operations tab.
The Call Work Codes input window opens.
...........................................................................................................................................................................
Put the cursor in the input field.
................................................................................................................................
2 Select History List.
................................................................................................................................
3 Highlight the item you want to add to the input field.
ND OF STEPS
..........................................................................................................
Results
The history list closes and the item is added to the input field.

Navigating CentreVu® Supervisor CentreVu CMS Administration
Task reference 2-20
Task reference
............................................................................................................................................................................................................................................................
Map of the CentreVu
Supervisor user interface

Task: naming your call center entities in the Dictionary CentreVu CMS Administration
3-1
3 Task: naming your call center
entities in the Dictionary
Overview
............................................................................................................................................................................................................................................................
Purpose
In this task you will find the following procedures:
• Adding, deleting, or changing ACDs
• Creating or copying agent groups
• Viewing, listing, adding, or deleting agents in an agent group
• Changing agent string values
• Viewing, adding, or changing announcement synonyms
• Viewing, adding, deleting, or changing AUX reason code names
• Viewing, adding, or creating calculations
• Viewing, adding, deleting, or changing call work codes
• Adding constants to the database
• Defining your own database items
• Changing generic string values synonyms
• Searching the Dictionary globally
• Viewing, adding, deleting, or changing location IDs
• Viewing, adding, or changing login ID names
• Viewing, adding, or changing logout reason code names
• Viewing or changing split/skill string values
• Viewing, adding, deleting, or changing split/skill names

Task: naming your call center entities in the Dictionary CentreVu CMS Administration
3-2
Prerequisites
• Viewing
CentreVu
®
CMS database items
• Viewing, adding, deleting, or changing trunk group names
• Viewing or changing trunk string values
• Viewing, adding, deleting, or changing VDN names
• Viewing, adding, deleting, or changing vector names
• Running Dictionary reports
The following rules apply to the Dictionary:
• Names (synonyms) must begin with an alphabetic character.
• Dictionary names can have from one to 20 characters.
• Names can include the underscore (_), blank ( ), comma (,), period
(.), single quotes ('), and plus sign (+). Blanks ( ) are allowed in all
Dictionary names
except
calculation and constant names.
• Descriptions in the Dictionary can have from one to fifty
characters. Descriptions can include all printable characters
except
the semicolon (;), backslash (\), grave accent (`), tilde (~),
double quotes (“), pipe (|), asterisk (*), and question mark (?).
Permissions
• Names must be unique within each section of the Dictionary. For
example, you can name trunk group 1
sales
, but you cannot name split/skill 1
sales
.
• See the “Reference” section in “Task: navigating
sales
and split/skill 1
sales
and split/skill 2
CentreVu
Supervisor” for information on searching string fields.
These permissions apply to naming your call center entities in the
Dictionary. See “Task: assigning user permissions” for more
information.
• To add, delete, or change an ACD name, you need write
permission for the Dictionary command and for the ACD.
• To vie w A C D names, you need read permission for the Dictionary
command and for the ACD.
• To view agent groups, you need read permission for the
Dictionary command.
• To create or copy an agent group, you need write permission for
the Dictionary command.
• To view agent groups, you need read permission for the
Dictionary command.

Task: naming your call center entities in the Dictionary CentreVu CMS Administration
3-3
• To add, delete, or change an agent group, you need write
permission for the Dictionary command.
• To view agent string values, you need read permission for the
Dictionary command.
• To change any agent string value, you need write permission for
the Dictionary command.
• To add, change, or view announcements, you need read
permission for the Dictionary command.
• To change any announcement, you need write permission for the
Dictionary command.
• To view AUX reason code names, you need read permission for
the Dictionary command.
• To add, delete, or change an AUX reason code name, you need
write permission for the Dictionary command.
• To view calculations, you must have read permission for the
Dictionary command.
• To change or create a new calculation, you need write permission
for the Dictionary command.
• To view call work code names, you need read permission for the
Dictionary command.
• To add, delete, or change a call work code name, you need write
permission for the Dictionary command.
• To view a constant, you need read permission for the Dictionary
command.
• To add, delete, or change a constant, you need write permission
for the Dictionary command.
• To create custom database items, you need write permission for
the Dictionary command .
• To view generic string values, you need read permission for the
Dictionary command.
• T o change any v alue, you need write permission for the Dictionary
command.
• T o search for anything in the Dictionary, you need read permission
for the Dictionary command.
• To view Location IDs, you need read permission for the
Dictionary command.

Task: naming your call center entities in the Dictionary CentreVu CMS Administration
3-4
• To add, delete, or modify Location IDs or agent names, you need
write permission for the Dictionary command.
• To view login IDs, you need read permission for the Dictionary
command.
• T o add, delete, or change login IDs or agent names, you need write
permission for the Dictionary command.
• To view logout reason code names, you need read permission for
the Dictionary command.
• To add or change a logout reason code name, you need write
permission for the Dictionary command. See “Task: assigning
user permissions” for more information.
• To view split/skill string values, you need read permission for the
Dictionary command.
• To change split/skill string values, you need write permission for
the Dictionary command.
• To list the assigned split or skill names, you need read permission
for the Dictionary command and for the appropriate split/skill.
• To add, delete, or change a split or skill name, you need write
permission for the Dictionary command and the appropriate split
or skill.
• To view the database items, you need read permission for the
Dictionary command.
• To list the assigned trunk group names, you need read permission
for the Dictionary command and for the appropriate trunk group.
• To add, delete, or change a trunk group name, you need write
permission for the Dictionary command and for the appropriate
trunk group.
• To view any trunk string values, you need read permission for the
Dictionary command.
• To make any changes to trunk string values, you need write
permission for the Dictionary command.
• To list names already assigned to VDNs, you need read
permission for the Dictionary command and for the specific
VDNs and other entities (split/skills, agents, etc.) whose names
you want to see.
• T o add, delete, or change a VDN name, you need write permission
for the Dictionary command and the appropriate VDN and other
entities (split/skills, agents, etc.).

Task: naming your call center entities in the Dictionary CentreVu CMS Administration
3-5
• To list assigned vector names, you need read permission for the
Dictionary command and for the specific vectors whose names
you want to see.
• To add, delete, or change a vector name, you need write
permission for the Dictionary command and for the appropriate
vector.
• To generate a report, you need read permission for the Dictionary
command.
Use the steps that follow to name your call center entities in the
Dictionary.

...........................................
Task: naming your call center entities in the Dictionary CentreVu CMS Administration
Adding, deleting, or changing ACDs 3-6
Adding, deleting, or changing ACDs
............................................................................................................................................................................................................................................................
Prerequisites
Steps
Note that:
• You can add, delete, or change an ACD name regardless of the
ACD you have selected. For example, you could be in ACD 1 and
change the name for ACD 3. This change does not appear on the
changed ACDs window border until you open a new window.
• You can only change ACDs in the selector window or during a
backup. Note that if you change ACDs during a backup, you need
to close and restart the backup to register the change. See “Task:
maintaining
CentreVu
CMS” for more information on backup
procedures.
1 From the controller window, select Commands | Dictionary or select
Dictionary on the toolbar.
The Dictionary selector window opens.
...........................................................................................................................................................................
................................................................................................................................
2 Select ACDs.

...........................................
...........................................
...........................................
...........................................
E
.................................................................
Task: naming your call center entities in the Dictionary CentreVu CMS Administration
Adding, deleting, or changing ACDs 3-7
The ACDs input window opens.
................................................................................................................................
3 In the ACD Name box, type the ACD name you want to add, delete, or
change.
................................................................................................................................
4 In the ACD Number box, type a number between one and 26 that
corresponds with the name you entered in the ACD Name field.
................................................................................................................................
5 In the Description box, type descriptive information about the ACD.
................................................................................................................................
6 On the Actions menu, select Add to add your changes to the Dictionary.
ND OF STEPS
..........................................................................................................
Reference
The name you assign to an ACD in the Dictionary displays on all
reports and window titles associated with that ACD (real or pseudo).
You can script the ACDs window and schedule the script. See “Task:
automating your activities with scripting” for more information.

...........................................
...........................................
...........................................
...........................................
...........................................
E
.................................................................
Task: naming your call center entities in the Dictionary CentreVu CMS Administration
Creating or copying agent groups 3-8
Creating or copying agent groups
............................................................................................................................................................................................................................................................
Overview
Steps
You can create and copy agent groups and group agents to meet the
needs of your call center regardless of split/skill assignment. For
example, you can create a group for new employees or a group for
employees with special skills.
To create an agent group:
................................................................................................................................
1 From the controller window, select Commands | Dictionary or select
Dictionary on the toolbar.
The Dictionary selector window opens.
................................................................................................................................
2 In the ACD field, select the arrow for the drop-down menu, then select
the ACD for which you want to create the agent group. Select OK.
................................................................................................................................
3 Select Operations | Agent Groups.
The Agent Groups input window opens.
................................................................................................................................
4 Type a descriptive name of the agent group that you want to create.
................................................................................................................................
5 Select Add on the Actions menu or select Add on the toolbar.
ND OF STEPS
..........................................................................................................

...........................................
...........................................
...........................................
...........................................
...........................................
Task: naming your call center entities in the Dictionary CentreVu CMS Administration
Creating or copying agent groups 3-9
Steps
To copy an agent group:
................................................................................................................................
1 From the controller window, select Commands | Dictionary or select
Dictionary on the toolbar.
The Dictionary selector window opens.
................................................................................................................................
2 In the ACD field, select the arrow for the drop-down menu, then select
the ACD for which you want to copy the agent group. Select OK.
................................................................................................................................
3 Select Operations | Agent Groups.
The Agent Groups input window opens.
................................................................................................................................
4 Type the new agent group name.
................................................................................................................................
5 Select Copy on the Actions menu or select Copy on the toolbar.

...........................................
...........................................
E
.................................................................
Task: naming your call center entities in the Dictionary CentreVu CMS Administration
Creating or copying agent groups 3-10
The Agent Groups-Copy window opens.
................................................................................................................................
6 T ype the name of the existi ng agent group from which you want to cop y
information.
................. ...... ..... ...... ...... ......... ...... ...... ...... ..... ...... ...... ...... ...... ......... ..... ...... ...... ......
7 Select Copy on the Actions menu or select Copy on the toolbar.
ND OF STEPS
..........................................................................................................
Reference
You can generate reports on the groups you create. With these reports,
you can compare agents in a group to each other or compare one whole
group with other groups. If you add or change agent groups while
displaying the real-time agent group report, you have to exit the report
window and rerun the report to see the new or changed agent group
information. See “Task: running, printing, exiting, and restarting a
report” for more information.
You can script the Agent Groups window and schedule the script. See
“Task: automating your activities with scripting” for more information.

...........................................
...........................................
...........................................
...........................................
Task: naming your call center entities in the Dictionary CentreVu CMS Administration
Viewing, listing, adding, or deleting agents in an agent group 3-11
Viewing, listing, adding, or deleting agents in an agent group
............................................................................................................................................................................................................................................................
Overview
Steps
You can list and view all agents in an agent group and assign an agent
to a new or existing agent group.
To list and view all agents in an agent group:
................................................................................................................................
1 From the controller window, choose Commands | Dictionary or select
Dictionary on the toolbar.
The Dictionary selector window opens.
................................................................................................................................
2 Select Operations | Agent Groups.
The Agent Groups input window opens.
................................................................................................................................
3 In the Agent group name field, type the name of the agent group for
which you want to list and view the agents.
................................................................................................................................
4 Select Get contents on the Actions menu or select Get contents on the
toolbar.

...........................................
...........................................
E
.................................................................
...........................................
...........................................
Task: naming your call center entities in the Dictionary CentreVu CMS Administration
Viewing, listing, adding, or deleting agents in an agent group 3-12
The Agent Groups – Get Contents window opens.
................................................................................................................................
5 Select List all on the Actions menu or on the toolbar.
The Agent Groups – List All window opens, showing the list of all
agents in the agent group you chose in Step 3.
................................................................................................................................
6 When you are done viewing the agents, close the window.
ND OF STEPS
..........................................................................................................
Steps
To add agents to an agent group:
................................................................................................................................
1 From the controller window, select Commands | Dictionary or select
Dictionary on the toolbar.
The Dictionary selector window opens.
................................................................................................................................
2 Select Operations | Agent Groups.

...........................................
...........................................
...........................................
...........................................
E
.................................................................
Task: naming your call center entities in the Dictionary CentreVu CMS Administration
Viewing, listing, adding, or deleting agents in an agent group 3-13
The Agent Groups input window opens.
................................................................................................................................
3 In the Agent group name box, type the name of the agent group to which
you want to add agents.
................................................................................................................................
4 Select Get Contents on the Actions menu or on the toolbar.
The Agent Groups – Get Contents window opens.
................................................................................................................................
5 In the Login IDs field, type the agent login IDs to add to this agent
group.
................................................................................................................................
6 Select Add on the Actions menu or on the toolbar.
ND OF STEPS
..........................................................................................................

...........................................
...........................................
...........................................
...........................................
Task: naming your call center entities in the Dictionary CentreVu CMS Administration
Viewing, listing, adding, or deleting agents in an agent group 3-14
Steps
To delete agents from an agent group:
................................................................................................................................
1 From the controller window, select Commands | Dictionary or select
Dictionary on the toolbar.
The Dictionary selector window opens.
................................................................................................................................
2 Select Operations | Agent Groups.
The Agent Groups input window opens.
................................................................................................................................
3 In the Agent group name box, type the name of the agent group from
which you want to delete agents.
................................................................................................................................
4 Select Get contents on the Actions menu or on the toolbar.
The Agent Groups – Get Contents window opens.

...........................................
...........................................
...........................................
E
.................................................................
Task: naming your call center entities in the Dictionary CentreVu CMS Administration
Viewing, listing, adding, or deleting agents in an agent group 3-15
................................................................................................................................
5 In the Login IDs field, type the agent login IDs you wan t to delete from
this agent group.
................................................................................................................................
6 Select Delete on the Actions menu or select Delete on the toolbar.
................................................................................................................................
7 When you are done deleting the agents, close the window.
ND OF STEPS
..........................................................................................................

...........................................
Task: naming your call center entities in the Dictionary CentreVu CMS Administration
Changing agent string values 3-16
Changing agent string values
............................................................................................................................................................................................................................................................
Overview
Steps
Agent string values are the descriptive words in reports dealing with
agents. These words, such as ACD, ACW, or AUX, describe the value
of the data. Strings are changed to the values you administer when they
display as data in a report. The report heading is not affected.
...........................................................................................................................................................................
1 From the controller window, select Commands | Dictionary or select
Dictionary on the toolbar.
The Dictionary selector window opens.
................................................................................................................................
2 Select Operations | Agent String Values.

...........................................
Task: naming your call center entities in the Dictionary CentreVu CMS Administration
Changing agent string values 3-17
The Agent String Values input window opens.
................................................................................................................................
3 To change any of the work-mode default names, type the new
descriptive word in the appropriate work mode field. Agents can be in
any one of the following work modes:
• ACD — the agent is on an ACD call.
• ACW — the agent is in the after-call work mode.
• AUX — the agent is in the auxiliary work mode.
• AVAIL — the agent is available to take an ACD call.

...........................................
...........................................
Task: naming your call center entities in the Dictionary CentreVu CMS Administration
Changing agent string values 3-18
• DACD — the agent is on a direct agent ACD call.
• DACW — the agent is in the after-call work mode for a direct
agent ACD call.
• OTHER — the agent has just logged in and
CentreVu
CMS has
not yet been notified of the agent's state, or the agent is dialing to
place an extension call while in auto-in/manual-in (AI/MI), or the
agent is in AI/MI and has an extension call ringing, or the agent
has put a call on hold and has taken no further call-related action.
• RINGING — an ACD call is ringing at the agent's voice terminal
and the agent is not doing anything else.
• UNKNOWN —
CentreVu
CMS does not recognize the current
state.
• UNSTAFF — the agent is not logged in (is not staffed).
................................................................................................................................
4 To change the agent trace, work-mode default names, type the new
descriptive word next to LOGON or LOGOFF.
• LOGON — an agent is logged in.
• LOGOFF — an agent is logged out and is not available to take
ACD calls.
................................................................................................................................
5 To change the call-handling preference default names, type the new
descriptive word next to LEVEL or NEED or PERCENT.
• LEVEL — the agent's call-handling preference is by skill level.
• NEED — the agent's call-handling preference is by greatest need.
• PERCENT — the agent's call-handling preference is based on an
assigned percentage of time allocated to each skill.

...........................................
...........................................
...........................................
...........................................
...........................................
Task: naming your call center entities in the Dictionary CentreVu CMS Administration
Changing agent string values 3-19
................................................................................................................................
6 To change the reserve-level default names, type the new descriptive
word next to Reserve1 or Reserve2.
• Reserve1 — the agent begins answering calls when the skill's 1st
threshold is crossed.
• Reserve2 — the agent begins answering calls when the skill's
second threshold is crossed.
................................................................................................................................
7 To change the call-direction default names, type the new descriptive
word next to IN or OUT.
• IN — the agent is on an incoming call.
• OUT — the agent is on an outbound call.
................................................................................................................................
8 To change the call-origination default names, type the new descriptive
word next to PHONE or KEYBOARD. Agents can be on either of the
following types of outbound calls:
• PHONE — the agent dialed an outbound call using the voice
terminal dial pad.
• KEYBOARD — the agent dialed an outbound call using the
computer keyboard.
................................................................................................................................
9 To change the call-destination default names, type the new descriptive
word next to PBX or OFF.
• PBX — internal to the switch.
• OFF — external to the switch.
................................................................................................................................
10 To change the agent role default names, type the new descriptive word
next to TOP, ALLOCATED, BACKUP, ROVING, and RESERVE.
• TOP — the agent can be counted on to answer the skill's calls
(unless an agent's other skills go into overload).
• ALLOCATED — the agent has a percentage of his/her time
allocated to answering the skill's calls.

E
.................................................................
Task: naming your call center entities in the Dictionary CentreVu CMS Administration
Changing agent string values 3-20
• BACKUP — the agent helps to answer the skill's calls when his/
her top skill is not busy.
• ROVING — the agent answers a skill's calls when this skill has
the greatest need.
• RESERVE — the agent helps answer the skill's calls when the
skill is over threshold. Thes e roles v ary a ccording to call-handling
preference.
ND OF STEPS
..........................................................................................................
Reference
If you assign values that are longer than 20 characters, the values are
truncated when they are displayed on those reports. You can, however,
create a similar custom report that accommodates the longer string
values.
Any change to the agent string values affects what you see in the
descriptive data (word) fields on your agent reports. See “Task:
running, printing, exiting, and restarting a report” for more
information.
You can script the Agent String V alues window and schedule the script.
See “Task: automating your activities with scripting” for more
information.

...........................................
...........................................
...........................................
Task: naming your call center entities in the Dictionary CentreVu CMS Administration
Viewing, adding, or changing announcement synonyms 3-21
Viewing, adding, or changing announcement synonyms
............................................................................................................................................................................................................................................................
Overview
Prerequisites
Steps
You can view, add, or change announcement synonyms for each ACD.
Note that:
• Announcement names must be unique.
• Multiple values are not allowed for announcement names or
numbers.
...........................................................................................................................................................................
1 From the controller window, select Commands | Dictionary or select
Dictionary on the toolbar.
The Dictionary selector window opens.
................................................................................................................................
2 On the Operations tab, select Announcements.
The Announcements input window opens.
................................................................................................................................
3 In the Announcement Name field, type the name that you want to view ,
add, or change.
................................................................................................................................
4 In the Announcement Number field, type the number that corresponds
to the name you typed in the Announcement Name box.

...........................................
...........................................
E
.................................................................
Task: naming your call center entities in the Dictionary CentreVu CMS Administration
Viewing, adding, or changing announcement synonyms 3-22
................................................................................................................................
5 In the Description field, type the descriptive information for the
announcements.
................................................................................................................................
6 On the Actions menu, select Add to add your changes to the Dictionary.
ND OF STEPS
..........................................................................................................

...........................................
Task: naming your call center entities in the Dictionary CentreVu CMS Administration
Viewing, adding, deleting, or changing AUX reason code names 3-23
Viewing, adding, deleting, or changing AUX reason code names
............................................................................................................................................................................................................................................................
Overview
Prerequisites
AUX reason codes enable a call center to track an agent’s time when
the agent is in the AUX work mode. You can view, add, delete, or
change AUX reason code names by selecting A UX Reason Codes from
the Dictionary menu.
Complete the AUX Reason Codes window if you want names
associated with your AUX reason codes to appear in the A UX Reasons
Code standard real-time and historical reports.
Note that:
• AUX reason codes are single digits, zero through nine.
• AUX reason code names can be up to 20 characters long.
• AUX reason code 0 is used for cases in which the switch
automatically puts an agent into AUX work mode. You can
change this name.
• To use AUX reason codes, your switch must have EAS.
• Names must be unique within an A CD. No two AUX reason codes
in the same ACD can have the same name.
Steps
1 From the controller window, select Commands | Dictionary or select
Dictionary on the toolbar.
The Dictionary selector window opens.
................................................................................................................................
2 Select Operations | AUX Reason Codes.
...........................................................................................................................................................................

...........................................
...........................................
...........................................
...........................................
Task: naming your call center entities in the Dictionary CentreVu CMS Administration
Viewing, adding, deleting, or changing AUX reason code names 3-24
The AUX Reason Codes input window opens.
................................................................................................................................
3 In the AUX Reason Code name field, type the name for the A UX reason
code.
................. ......... ........ ...... ......... ......... ...... ........ ......... ......... ...... ......... ........ ......... ......
4 In the AUX Reason Code field, type the one-digit AUX reason code
number, between zero and nine.
................................................................................................................................
5 In the Description field, type the description for this AUX reason code.
................................................. ...............................................................................
6 To view the list of all AUX reason codes with their assigned names and
descriptions, select List all on the Actions menu.

...........................................
E
.................................................................
Task: naming your call center entities in the Dictionary CentreVu CMS Administration
Viewing, adding, deleting, or changing AUX reason code names 3-25
The AUX Reason Codes – List All window opens.
................................................................................................................................
7 When you are done viewing A UX reason code names, close the window .
ND OF STEPS
..........................................................................................................
Reference
AUX reason code names display on real-time reports that include the
agent state. AUX reason code names also display on report showing
numbers of agents in each AUX reason code. If you make changes to
A UX reason code names, you must rerun the report to see the changes.
See “Task: running, printing, exiting, and restarting a report” for more
information.
Interval, daily, weekly, and monthly historical reports are available for
AUX reason codes. The AUX reason code names are used in standard
reports. If you make any changes to AUX reason code names, you must
rerun the report to see the changes. See “Task: running, printing,
exiting, and restarting a report” for more information.
You can script the AUX Reason Codes window and schedule the script.
See “Task: automating your activities with scripting” for more
information.
Agent exception historical reports use the names administered for the
AUX reason codes when agent time in AUX exceptions has been
recorded. The real-time exceptions log displays AUX reason code
names when it logs agent time in AUX exceptions. See “Task:
administering exceptions” for more information.

...........................................
Task: naming your call center entities in the Dictionary CentreVu CMS Administration
Viewing, adding, or creating calculations 3-26
Viewing, adding, or creating calculations
............................................................................................................................................................................................................................................................
Overview
Prerequisites
Steps
Calculation names are abbreviated names for calculations that are used
to create reports. You can view or change standard calculations or
create your own custom calculations to use in custom reports. The
calculations for standard reports are already in the Dictionary.
Note that:
• Reports will not run if you embed calculations within calculations
to more than three levels deep.
• You cannot delete standard calculations.
• Identify your own calculations in all lowercase letters to
distinguish them from the standard
CentreVu
CMS calculations,
which are in all uppercase letters.
• You may adversely affect standard reports if you change a
standard
CentreVu
CMS calculation. Reports will probably run,
but the results may be different from those expected.
• Reports will not run if you create calculations that reference each
other in a circular fashion.
...........................................................................................................................................................................
1 From the controller window, select Commands | Dictionary or select
Dictionary on the toolbar.
The Dictionary selector window opens.
................................................................................................................................
2 Select Operations | Calculations.

...........................................
...........................................
...........................................
Task: naming your call center entities in the Dictionary CentreVu CMS Administration
Viewing, adding, or creating calculations 3-27
The Calculations input window opens.
................................................................................................................................
3 In the Calculation name field, type the name of the calculation that you
want to view, add to the database, change, or delete.
If you are creating your own calculation, use lowercase letters in the
name to distinguish it from standard calculations.
................................................................................................................................
4 In the Calculation field, type the formula for the calculation. For
example, the formula for the agent calculation “Average ACD Talk
Time” is ACDTIME/ACDCALLS.
Calculations can include:
• Spaces
• Database items (for example, ACDCALLS for ACD calls)
• Constants
• Calculation (the maximum nesting level is 3)
• Calculation names (you can have as many as needed)
• The following arithmetic operators: + (add); – (subtract); *
(multiply); / (divide); ( ) (precedents, as in standard mathematical
operations)
................................................................................................................................
5 If you want a description of the item, type it in the Description field.

...........................................
E
.................................................................
Task: naming your call center entities in the Dictionary CentreVu CMS Administration
Viewing, adding, or creating calculations 3-28
................................................................................................................................
6 On the Actions menu, select Add to add your changes to the Dictionary.
ND OF STEPS
..........................................................................................................
Reference
You can script the Calculations window and schedule the script. See
“Task: automating your activities with scripting” for more information.
The standard
CentreV u
CMS calculations are listed in
CentreVu
Report Designer Version 8 User Guide585-215-859
CMS
Reports 585-215- 85 1
Reports
585-215-822
.
, and
CentreVu
CMS R3V5 Custom
,
CentreVu
CMS

...........................................
...........................................
...........................................
Task: naming your call center entities in the Dictionary CentreVu CMS Administration
Viewing, adding, deleting, or changing call work codes 3-29
Viewing, adding, deleting, or changing call work codes
............................................................................................................................................................................................................................................................
Overview
Prerequisites
Steps
You can view, add, delete, or change call work codes and names, and
include them in standard historical reports.
Note that:
• You must administer call work codes before you can assign names
to them. See “Viewing, adding, or deleting call work codes” in
“Task: administering your call center” for more information
• Call work code names can be no longer than nine digits.
...........................................................................................................................................................................
1 From the controller window, select Commands | Dictionary or select
Dictionary on the toolbar.
The Dictionary Selector window opens.
................................................................................................................................
2 Select Operations | Call Work Codes.
The Call Work Codes input window opens.
................................................................................................................................
3 In the Call work code name field, type the call work code name to add,
delete, change, or view.
................................................................................................................................
4 In the Call work code field, type a number between zero and
999,999,999 that corresponds to the name you typed in the Call work
code name field.

...........................................
E
.................................................................
Task: naming your call center entities in the Dictionary CentreVu CMS Administration
Viewing, adding, deleting, or changing call work codes 3-30
................................................................................................................................
5 On the Actions menu, select Add to add your changes to the Dictionary.
ND OF STEPS
..........................................................................................................
Reference
Call work code 0 is reserved for unknown/unadministered work codes
so that summary data can be collected. The default name for call work
code 0 is Unadministered codes. You can change this name.
Daily , weekly , and monthly historical reports are a vailable for call work
codes. The names you add in the Call Work Codes window are
displayed in the call work codes reports. See “Task: running, printing,
exiting, and restarting a report” for more information.
You can script the Call Work Codes window and schedule the script.
See “Task: automating your activities with scripting” for more
information.

...........................................
...........................................
...........................................
...........................................
Task: naming your call center entities in the Dictionary CentreVu CMS Administration
Adding constants to the database 3-31
Adding constants to the database
............................................................................................................................................................................................................................................................
Overview
Steps
Constants are elements with fixed numerical values that you can add to
the database and use in custom reports. Constants are not in
CentreVu
CMS when it is first installed.
1 From the controller window, select Commands | Dictionary or select
Dictionary on the toolbar.
The Dictionary selector window opens.
................................................................................................................................
2 Select Operations | Constants.
The Constants input window opens.
...........................................................................................................................................................................
................................................................................................................................
3 In the Constant name field, type the name of the constant that you want
to view, add, delete, or change.
................................................................................................................................
4 In the Value field, type the numerical value of the constant. The range is
–99999 to +99999.
................................................................................................................................
5 In the Description field, type a description of the constant.

...........................................
E
.................................................................
Task: naming your call center entities in the Dictionary CentreVu CMS Administration
Adding constants to the database 3-32
................................................................................................................................
6 On the Actions menu, select Add to add your changes to the Dictionary.
ND OF STEPS
..........................................................................................................
Reference
Use constants only in designer or custom reports.
You can script the Constants window and schedule the script. See
“Task: automating your activities with scripting” for more information.
See the
210-930
2
for more information.
CentreVu Report Designer Version 8 User Guide 585-
and
CentreVu
CMS
Custom Reports 585-2 15-822, Issue

...........................................
...........................................
...........................................
Task: naming your call center entities in the Dictionary CentreVu CMS Administration
Defining your own database items 3-33
Defining your own database items
............................................................................................................................................................................................................................................................
Overview
Prerequisites
Steps
You can define your own database items, which are stored in their own
tables in the
your own data with
CentreVu
CentreVu
CMS database. This allows you to combine
CMS data on custom reports. You can
also change or delete your own database items.
You must first create the table in the database before you create a
custom database item.
1 From the controller window, select Commands | Dictionary or select
Dictionary on the toolbar.
The Dictionary selector window opens.
................................................................................................................................
2 Select Operations | Custom Items.
The Custom Items input window opens.
...........................................................................................................................................................................
................................................................................................................................
3 In the Database item field, type the name of the database item that you
want to add, change, delete, or view.
................................................................................................................................
4 In the Description field, type a description of the database item. You can
add, change, or delete this description.

...........................................
...........................................
E
.................................................................
Task: naming your call center entities in the Dictionary CentreVu CMS Administration
Defining your own database items 3-34
................................................................................................................................
5 In the Table field, type the name of the table that holds this database
item.
................................................................................................................................
6 On the Actions menu, select Add to add your changes to the Dictionary.
ND OF STEPS
..........................................................................................................
Reference
If you try to run a designer or custom report that uses a database item
you have not added to the Dictionary, you will get an error message.
You can script the Custom Items window and schedule the script. See
“Task: automating your activities with scripting” for more information.
See
CentreVu Report Designer Version 8 User Guide 585-210-
930
and
CentreV u
CMS
Custom Reports 585-2 15-822, Issue 2
more information on using and creating your own custom database
items.
for

...........................................
...........................................
...........................................
E
.................................................................
Task: naming your call center entities in the Dictionary CentreVu CMS Administration
Changing generic string values synonyms 3-35
Changing generic string values synonyms
............................................................................................................................................................................................................................................................
Overview
Steps
Follow these steps to designate a character for YES or NO in the
Dictionary, and that character will appear on custom reports that use the
new YES/NO synonyms.
...........................................................................................................................................................................
1 From the controller window, select Commands | Dictionary or select
Dictionary on the toolbar.
The Dictionary selector window opens.
................................................................................................................................
2 Select Operations | Generic String Values.
The Generic String Values input window opens.
................................................................................................................................
3 T o change th e Generic Value for each A CD, type a ch aracter for YES or NO
or both in the Generic Value field.
• For YES, type a character to display in reports for boxes that use
YES/NO. If you have not input a string, the default va lue is y.
• For NO, type a character to display in reports for fields that use YES/
NO. If you have not input a string, the default va lue is n.
Remember that the input window fields YES and NO must be
exactly one character each, with defaults y and n, respectively.
................................................................................................................................
4 On the Actions menu, select Add to add your changes to the Dictionary.
ND OF STEPS
..........................................................................................................

...........................................
...........................................
E
.................................................................
Task: naming your call center entities in the Dictionary CentreVu CMS Administration
Searching the Dictionary globally 3-36
Searching the Dictionary globally
............................................................................................................................................................................................................................................................
Overview
Steps
You can search for anything in the Dictionary: a login ID or a group of
login IDs; split/skill, trunk group, or ACD names; database items;
calculations; or agent names.
...........................................................................................................................................................................
1 From the controller window, select Commands | Dictionary, or select
Dictionary on the toolbar.
The Dictionary selector window opens.
................................................................................................................................
2 Select Operations | Global Search Input.
The Global Search Input window opens.
................................................................................................................................
3 In the Search for field, type the search pattern for the item or items you
are looking for.
ND OF STEPS
..........................................................................................................
Results
This is how the output window displays the results of your global
search.

Task: naming your call center entities in the Dictionary CentreVu CMS Administration
Searching the Dictionary globally 3-37
Global search output window results
Field Field contents
Value matched Displays the matches for your pattern.
Field matched Displays the name of the field in the
Dictionary that corresponds to value
matched.
In submenu The Dictionary submenu where your search
pattern was found.
Name The name that corresponds to value
matched.

...........................................
...........................................
...........................................
Task: naming your call center entities in the Dictionary CentreVu CMS Administration
Viewing, adding, deleting, or changing location IDs 3-38
Viewing, adding, deleting, or changing location IDs
............................................................................................................................................................................................................................................................
Overview
Prerequisites
Steps
The location ID is a number assigned to voice terminals to track
individual agents. Location IDs can be assigned to trunks and used to
track groups of agents by location. VDNs and vectors do not have
location IDs associated with them because they operate independently
of locations.
• Only the numbers one to 44 can be used for location IDs.
...........................................................................................................................................................................
1 From the controller window, select Commands | Dictionary, or select
Dictionary on the toolbar.
The Dictionary selector window opens.
................................................................................................................................
2 On the Operations tab, select Location IDs.
The Location IDs input window opens.
................................................................................................................................
3 In the Location Name field, type the name of the location you want to
view, add, delete, or change.
................................................................................................................................
4 In the Location ID field, type the corresponding number from one to 44
to identify the location named above.

...........................................
...........................................
E
.................................................................
Task: naming your call center entities in the Dictionary CentreVu CMS Administration
Viewing, adding, deleting, or changing location IDs 3-39
................................................................................................................................
5 In the Description field, type pertinent information about the location.
This is for information only. It is not displayed elsewhere in the s yste m
or on reports other than List All or Find One operations in this window.
................................................................................................................................
6 On the Actions menu, select Add to add your changes to the Dictionary.
ND OF STEPS
..........................................................................................................
Reference
You can script the Location ID window and schedule the script. See
“Task: Automating your activities with scripting” for more
information.
Location IDs are used in three reports: the Historical Split/Skill by
Location report, the Agent Status by Loca tion report, and the Real-time
Split/Skill by Location report. See “Task: running, printing, exiting,
and restarting a report” for more information.

...........................................
Task: naming your call center entities in the Dictionary CentreVu CMS Administration
Viewing, adding, or changing login ID names 3-40
Viewing, adding, or changing login ID names
............................................................................................................................................................................................................................................................
Overview
Prerequisites
CentreVu
agents. After an agent’s name is assigned to a login ID,
CMS uses agent login IDs to identify measured ACD
CentreVu
CMS
windows and reports show that agent’s name instead of the login ID
number.
You do not have to input agent names in the Dictionary, but
CentreVu
CMS administration windows and reports are easier to understand with
agent names instead of login IDs. Depending on the amount of space in
the report, agent names can be truncated.
Note that:
• The
CentreVu
CMS Dictionary listings are sorted alphabetically
(collating sequence) based on the first character you input in the
Agent name field. For example, if the agent is listed as Jane
Brown,
CentreVu
CMS sorts on the J for Jane; it does not sort on
the B for Brown. Real-time reports, however, do not show agent
names alphabetically.
• You can assign no more than one agent name to the same login ID.
• You cannot assign the same agent name to multiple login IDs.
• You can use only numbers in login IDs.
•
CentreVu
CMS only recognizes login IDs in
DEFINITY
®
R8.1 or
later .
Steps
1 From the controller window, select Commands | Dictionary or select
Dictionary on the toolbar.
The Dictionary selector window opens.
................................................................................................................................
2 On the Operations tab, select Login Identifications.
............... ...... ...... ...... ...... ........ ...... ...... ...... ...... ...... ...... ..... ...... ...... ......... ...... ...... ..... ...... ...... ...... ...... ...... ...... ..... ....

...........................................
...........................................
...........................................
E
.................................................................
Task: naming your call center entities in the Dictionary CentreVu CMS Administration
Viewing, adding, or changing login ID names 3-41
The Login Identifications input window opens.
................................................................................................................................
3 In the Login ID field, type the login ID number to view, add, delete, or
change.
Login IDs for
DEFINITY
ECS/Generic 3 without EAS can be a
number with one to nine digits — for example:
1 (1-digit logins) 423 (3-digit logins) 1234567 (7-digit logins)
999,999,999 (9-digit logins)
................................................................................................................................
4 In the Agent Name field, type the name of the agent that corresponds to
the login ID.
The Login Identifications List All windo w shows names alphabetically
(collating sequence), based on the first character you type in the Agent
Name field.
................................................................................................................................
5 On the Actions menu, select Add to add your changes to the Dictionary.
ND OF STEPS
..........................................................................................................

Task: naming your call center entities in the Dictionary CentreVu CMS Administration
Viewing, adding, or changing login ID names 3-42
Reference
If you assign names to the login IDs, agent names display on reports. If
you make additions or changes to login IDs, you must exit the report
and then rerun the report to see the new agent names. See “Task:
running, printing, exiting, and restarting a report” for more
information.
You can script the Login Identifications window and schedule the
script. See “Task: automating your activities with scripting” for more
information.

...........................................
Task: naming your call center entities in the Dictionary CentreVu CMS Administration
Viewing, adding, or changing logout reason code names 3-43
Viewing, adding, or changing logout reason code names
............................................................................................................................................................................................................................................................
Overview
Prerequisites
Steps
Logout reason codes enable an agent to give the reason for logging out,
such as training or the end of a shift.
You can add, change, or view logout reason codes and their names.
These names display in the standard agent login/logout and agent trace
historical reports.
Note that:
• Logout reason codes are single digits, zero through nine. A zero is
used when the system logs an agent out or if the agent does not
specify a code. You can change the assigned default name.
• Logout reason code names can be up to 20 characters long.
• To use logout reason codes, your switch must have EAS.
...........................................................................................................................................................................
1 From the controller window, select Commands | Dictionary or select
Dictionary on the toolbar.
The Dictionary selector window opens.
................................................................................................................................
2 Select Operations | Logout Reason Codes.
The Logout Reason Codes input window opens.
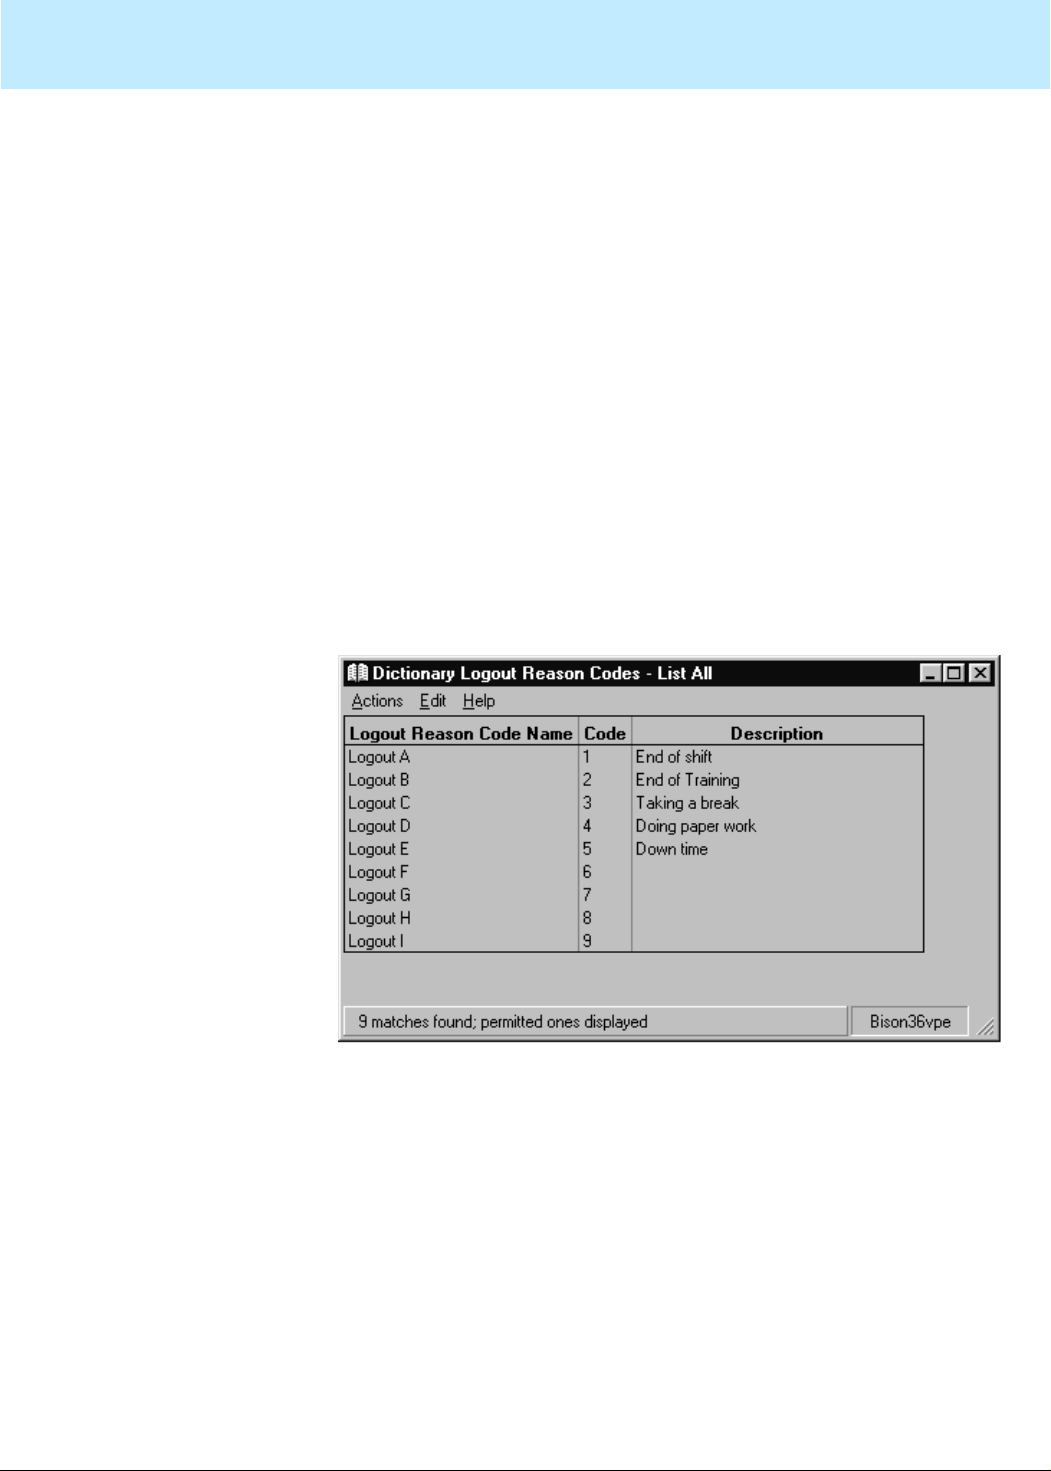
...........................................
...........................................
...........................................
...........................................
...........................................
...........................................
E
.................................................................
Task: naming your call center entities in the Dictionary CentreVu CMS Administration
Viewing, adding, or changing logout reason code names 3-44
................................................................................................................................
3 In the Logout Reason Code name field, type the name to add, change, or
view for this logout reason code. Names must be unique within an ACD.
................. ......... ........ ...... ......... ......... ......... ..... ......... ......... ......... ........ ...... ......... ......
4 In the Logout Reason Code field, type a number between zero and nine
that corresponds to the name you typed in the Logout Reason Code
name field.
................................................................................................................................
5 In the Description field, type the description for this logout reason code.
................. ... ...... .. ...... ... ...... ... ...... ... ... ...... ... ..... ... ...... ... ...... ... ... ...... ... ..... ... ...... ... ... ...
6 To view the logout reason codes with their assigned names and
descriptions, leave all f ields blank in the Logout Reason Codes windo w
and select List all on the Actions menu.
................................................................................................................................
7 On the Actions menu, select Add to add your changes to the Dictionary.
................. ... ................. ... ... .................. ... ... ................. ... ... ................. ... ... ...............
8 When you are done viewing the logout reason codes, close the window.
ND OF STEPS
..........................................................................................................
 Loading...