

Page 1
L . R . B A G G S P I C K U P S
USER'S GUIDE AND
INSTALLATION MANUAL
STRAPJACK PLUS
1. DRILLING
For proper installation, this jack requires a clean 1/2" hole in the tailblock of the instrument. Star t by placing a piece of
masking tape on the outside of the instrument over the drilling area (to avoid chipping the finish) drill a small pilot hole in
the tailblock and then follow with a 1/2" Forstner or Brad Point bit, or step drill.
2. SHIELDING
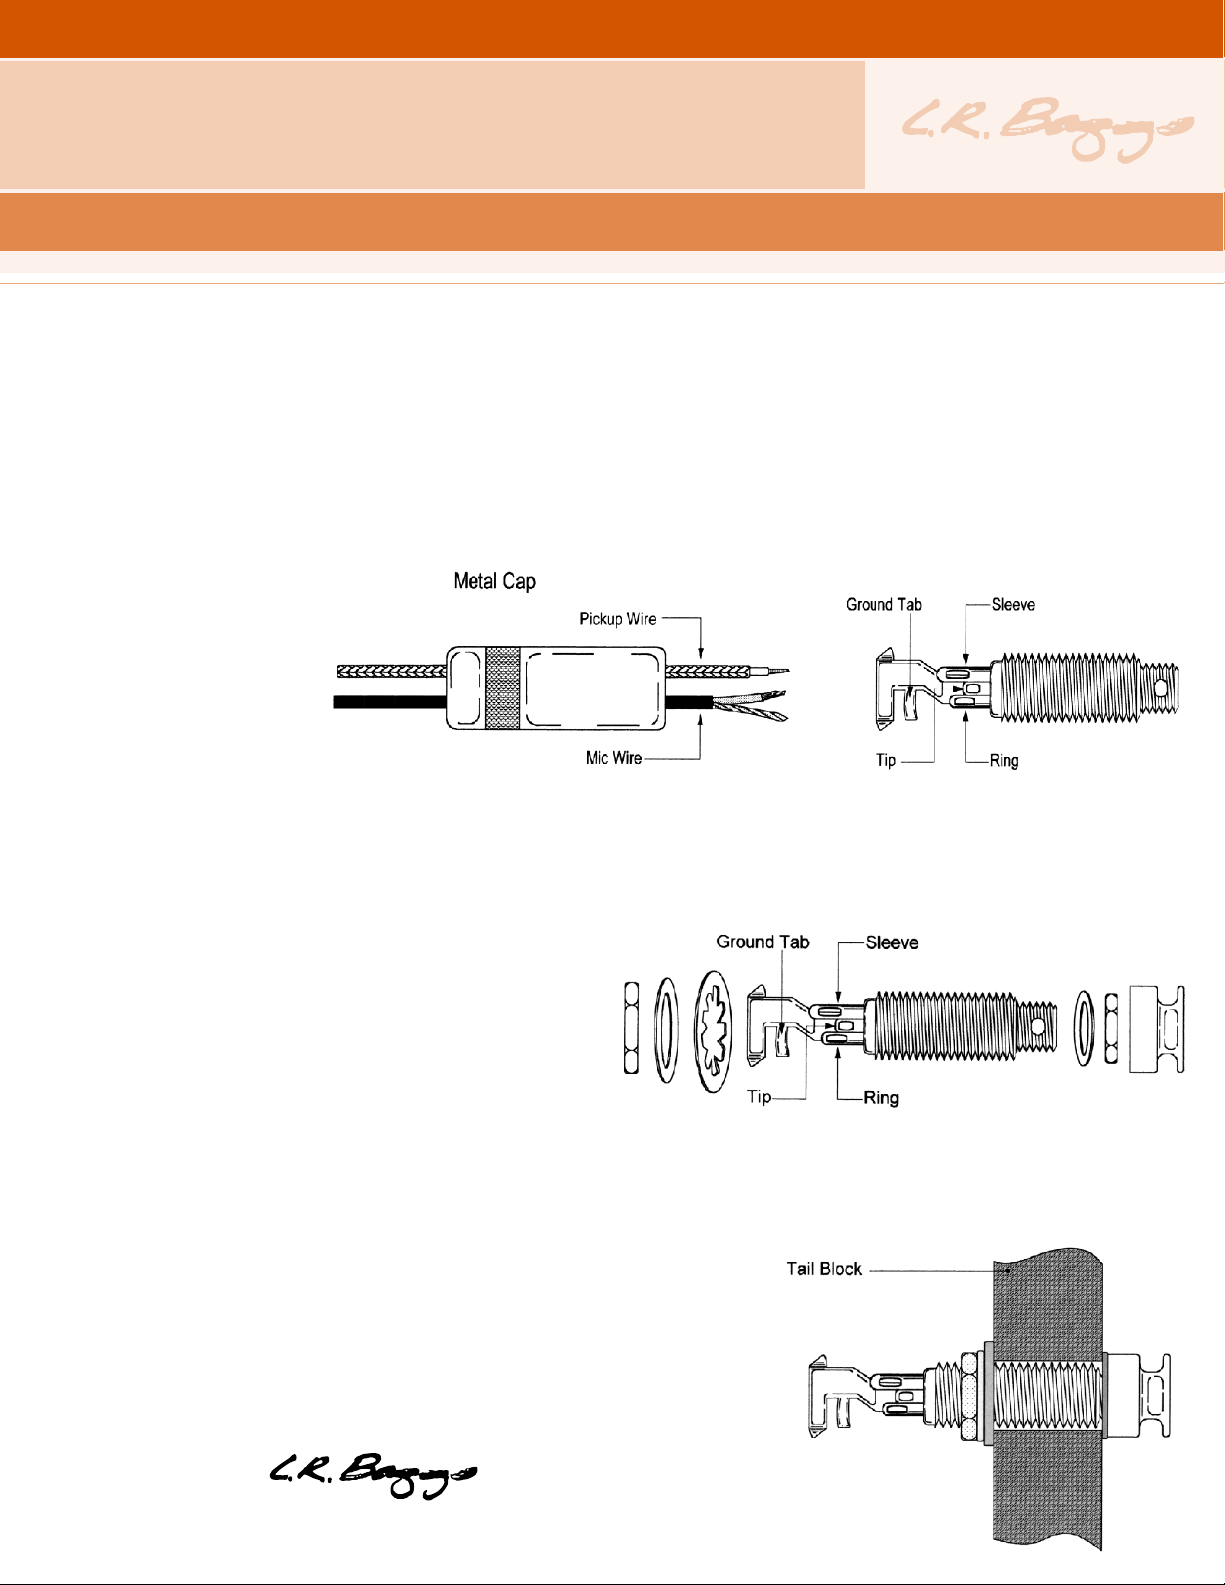
A metal cap is provided that screws onto the jack for shielding purposes. Unscrew the metal cap from the Strapjack Plus,
and thread the pickup and/or mic wires through it as shown in Fig. 1.
FIG.1
3. SOLDERING
ed
rt
e
s
n
i
s
i
k
c
a
j
e
h
t
e
s
u
a
ec
B
de
i
s
n
i
om
r
f
n
o
i
t
i
s
o
p
nt o
i
t
us
m
u
o
y
,
t
en
m
ru
t
s
n
i
e
h
t
o
t
es
r
i
w
p
u
k
c
i
p
e
h
t
r
de
l
o
s
e
h
t
f
de o
i
s
ut
o
t
s
u
j
k
c
a
j
e
h
t
d
n
e
m
m
o
c
e
r
e
W
.
e
l
o
h
d
n
u
o
s
d
e
c
a
l
p
e
b
l
we
o
t
r
o
h
t
o
l
c
a
h
s
i
n
i
e f
h
t
t
c
te
o
r
p
o
t
t
en
m
ru
t
s
n
e i
h
er t
v
o
o
t
c
e
n
n
o
c
p
i
t
e
h
t
to
p
u
k
c
i
p
e
h
t
,
b
a
t
d
n
u
o
r
g
w
s
a
s
a
ed
s
u
e
b
y
a
m
b
a
t
e
v
ee
l
s
e
h
T
.
)
2
.
g
i
F
.
g
n
i
l
t
at
r
y
n
a
t
en
v
e
r
p
o
t
y
l
ht
g
i
t
n
w
o
d
G A I N C O N T R O L S E T T I N G S
o
s
g
n
i
r
u
d
es
rt
o
h
s
,
r
to
n
i
p
h
tc
i
g
n
i
r
e
d
l
a
b
a
t
t
o
n
r
u
t
.
n
O
n
e
c
n
e
h
t
d
e
r
p
a
e
m
h
t
ry
e
v
p
o
r
c
i
N
.
p
m
a
i
s
i
g
n
i
o
e
n
o
h
p
i
l
s
w
o
i
s
o
p
n
n
o
c
e
s
r
m
e
h
t
t
et
o
s
,
n
o
i
k
c
i
p
d
a
c
l
a
h
t
r
e
d
l
t
o
t
p
u
k
c
a
b
p
h
e b
o
h
t
o
t
d
el
i
h
s
ed
d
i
a
r
e
s
(
b
a
t
e
l
d
d
i
m
,
g
n
i
r
e
w
e
r
c
s
d
n
a
k
c
a
j
e
h
t
er
v
FIG.2
4.INSTALLATION
Remove the strap ring, retaining nut and washer from the
en d of the jac k . Br i n g th e ja ck down through the
soundhole, into the body and inser t it into the pre-drilled
ho le in the tailb l ock. Using the intern a l nu t, se t the
proper depth that will allow the entire smaller threaded
section to protrude from the instrument (see Fig. 3).
Note: I t is helpful to make sure this portion protrudes very slightly from the strap button (if possible). This will prevent this
section from being recessed, which can block the jack when it is inser ted.
FIG.3
With the jack in place, attach the external retaining nut until it's tight. Finish
by attaching the strap ring (it should cover the retaining nut) carefully so as
not to crack the finish of the instrument by asserting too much pressure.
e
e
PHONE (805) 929-3545 FAX (805) 929-2043 EMAIL BAGGSCO@LRBAGGS.COM
483 NORTH FRONTAGE RD., NIPOMO, CA 93444
 Loading...