

Page 1

User’s Guide
Page 2

PACKAGE CONT ENTS
One M80 pickup with battery installed
One pre-wired strapjack assembly
One spare battery
One 3/32” Allen wrench
Two spare 3/4” pole pieces
One spare 3/8” pole piece
Two self-stick wire clips
One manual
One warranty card
OVERVIEW AND CAUTIONS
The M80 will t guitars with soundholes larger than 3.55”. Make sure that the M80 will t the guitar properly
before installing the strapjack.
Any woodworking (for instance, drilling the strapjack hole) must be performed by a professional dealer, installer. We do not provide advice or support for home or hobbyist woodworking. Installers: Please read the
instructions carefully before proceeding. We will not be responsible for any damage to the guitar or personal
injury resulting from installation.
Page 3
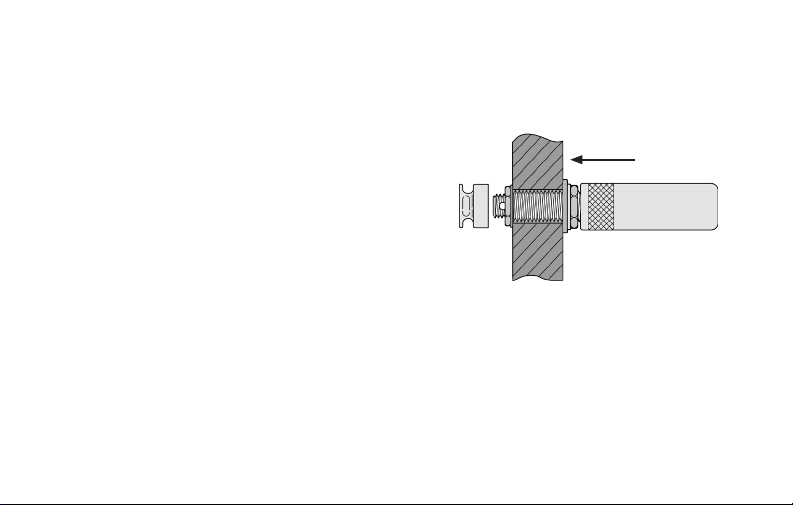
STRAPJACK INSTALLATION
Drill a clean 1/2” hole in the tail-block for the strapjack. Remove dust & debris from inside the guitar. Remove
the strap ring, retaining nut and one washer from the end of the jack. Bring the jack through the pre-drilled
hole in the tail-block. Using the internal nut, set the proper
depth that will allow the entire smaller threaded section to
protrude from the instrument (see gure 1).
tail-block
With the jack in place, lay the remaining washer over the
threads and attach the external retaining nut until it’s tight.
Finish by attaching the strap ring. Asserting too much
pressure may crack the nish.
Fig. 1
PICKUP INSTALLATION
Connect the strapjack to the pickup with the 1/8” plug. Loosen the clamp screws on either end of the M80 until
the clamps are open enough to accommodate the soundboard thickness. Slide the pickup into the guitar’s
soundhole up towards the neck and tighten the screws. Secure the wire with the clips provided. Carefully
tighten the screws until the M80 is snug. If you are concerned about the possibility of the M80 damaging your
guitar’s nish, consider applying thin cork pads (not included) between the clamps and guitar. The clamps
have been left unpadded to improve coupling between the pickup and guitar body. Because the M80 picks
up body vibrations, padding could have some aect on the pickup’s responsiveness.
Page 4

ACTIVE OR PASSIVE OPERATION
The M80 oers you the option of either “active” or “passive” settings, essentially
giving you two pickups in one (see gure 2).
Active setting - In this setting, the M80 engages a high quality, all-discrete
preamp that is specically tuned to optimize the M80’s performance. With
optimal noise cancellation and a higher output level, the active M80 can plug
directly into a P.A. or acoustic amplier without an external preamp. If your battery
Fig. 2
Passive setting - In this setting, the M80 bypasses the preamp for a battery-free
performance. This setting also allows you to use the pickup with an external
soundhole cable (sold separately) to avoid permanently modifying high-end
or vintage guitars and also makes transferring the M80 from one guitar to
another quick and easy.
BATTERY CHECK & REPLACEMENT
Press this button to check battery life (see gure 3). A full battery will light up
all 4 lights and should give you approximately 300 hours of playing time. When
dies during a performance, you can continue using the M80 by switching to the
“passive” setting and making the proper external adjustments.
Fig. 3
Page 5

only two lights are lit, you have about 50 hours of normal playing time left. If only one light is lit, replace the
battery (see gure 4). Make sure the “+” sign is facing outwards. Be sure to unplug your instrument cable from
the guitar when not in use to maximize battery life. The battery check will work even when there is no cable
plugged in.
Press down on this tab to remove the battery
Battery type: CR2032 3V lithium coin cell
VOLUME CONTROL
The volume control works in the “active” setting only.
POLE PIECE ADJUSTMENTS
The pole pieces on the M80 are factory set for bronze acoustic strings, but this is just a starting place. They are
adjustable with the 3/32” Allen wrench to obtain the optimum balance and tone. Raising the pole pieces will
increase the output of the strings; lowering them will decrease the output. We have provided two additional
3/4” pole pieces for use in the B and little E string positions with nickel or electric guitar strings, and one spare
3/8” pole piece for acoustic strings that have an unwound “G”.
Fig. 4
Page 6

REGISTER THIS PRODUCT
online at www.lrbaggs.com
 Loading...