

Page 1
www.lowrance.com
Pub. 988-0158-091
LHR-20
LHR-22
LHR-20/22
Operation Instructions
Page 2

Copyright © 2007 Navico
CAUTION
!
!
DANGER
WARNING
CAUTION
!
!
WARNING
CAUTION
!
CAUTION
!
!
CAUTION
DANGER
WARNING
All rights reserved.
Lowrance® is a registered trademark of Navico
No part of this manual may be copied, reproduced, republished, transmitted
or distributed for any purpose, without prior written consent of Lowrance
Electronics. Any unauthorized commercial distribution of this manual is
strictly prohibited.
Lowrance Electronics may find it necessary to change or end our policies,
regulations, and special offers at any time. We reserve the right to do so without
notice. All features and specifications subject to change without notice. All
screens in this manual are simulated. On the cover: LHR-20/22 shown. Other
models covered in the manual are similar.
For free owner’s manuals and the most current information on this product, its
operation and accessories, visit our web site: www.lowrance.com
Lowrance Electronics
12000 E. Skelly Dr.
Tulsa, OK USA 74128-2486
Printed in China.
IMPORTANT SAFETY INFORMATION
Please read carefully before installation and use.
This is the safety alert symbol. It is used to alert you to potential personal
injury hazards, Obey all safety messages that follow this symbol to
avoidpossible injury or death.
WARNING indicates a potentially hazardous situation which, if not avoided,
could result in death or serious injury
CAUTION indicates a potentially hazardous situation which, if not avoided,
could result in minor or moderate injury.
CAUTION used without the safety alert symbol indicates a potentially
hazardous situation which, if not avoided, may result in property
damage.
Page 3

Contents
Introduction ............................................................................................................................................ 4
Your radio has the following features: ................................................ 4
Safet y and Operational In formation ........................................................................................................5
Display ..................................................................................................................................................... 5
Functio n and Location of the Con trols .......................................................................................................6
Before Usi ng your Radio............................................................................................................................ 7
1. Charging and Installing the Li-ion Polymer Battery Pack ...........................7
2. Installing the Antenna ............................................................. 8
3. Installing the Belt Clip ............................................................. 9
Using Your Radio ...................................................................................................................................... 9
1. Turning the Power On/Off ..........................................................9
2. Adjusting Squelch ................................................................10
3. Transmitting and Receiving ......................................................10
4. Accessing the 16/9 Priority Channels ..............................................10
5. Selecting Channels ...............................................................10
6. Selecting High/Low Power .......................................................11
7. Locking the Keypad ............................................................... 11
8. Adding/Deleting Channels to/from Memory ..................................11
9. Accessing Channels Saved to Memory ............................................ 12
10. Scanning ........................................................................12
11. Using the WATCH Modes ........................................................13
12. Selecting a WX (weather) channel ................................................ 13
13. Weather Alert Operation .........................................................14
14. Selecting U.S./International/Canadian Band .....................................14
15. Resetting the Radio .............................................................14
Maintenance .......................................................................................................................................... 14
Technical Specifications .......................................................................................................................... 15
Frequenc y Charts .................................................................................................................................... 16
International Marine Channels. . . . . . . . . . . . . . . . . . . . . . . . . . . . . . . . . . . . . . . . . . . . . . . . . . . . . . . 16
USA Marine Channels ...............................................................18
Canadian Marine Channels ..........................................................20
FCC Compliance .....................................................................23
How to Obtain S ervice . . . ....................................................................................................................... 25
Lowrance LHR-20/22 Operation Instructions 3
Page 4

Introduction
Congratulations on your purchase of this Lowrance handheld marine band VHF radio. Designed
for international operation, allows you to transmit and receive on all international channels in the
VHF marine band, as assigned by the International Union (ITU). The LHR-20/22 is approved with
commercial-grade standards to give you clear, reliable communication.
NOTE: According to WEEE regulations, the user should not dispose the product when damaged,
but rather send it back to Lowrance for disposal. Refer to How to Obtain Service section for
instructions to contact Lowrance.
This manual addresses both the LHR-20 and LHR-22 models. Both models function identically, only
the LHR-22 has a CAMO pattern and additional AA Batter y tray is supplied.
Your radio has the following features:
Channel 16/9 Priority Key
Provide quick access to emergency channel 16, the universal and most frequently-used marine
channel, which is used for distress or safety communications. Pressing and holding the 16/9
channel key for 3 seconds allows quick and easy access to Channel 9. Channel 9 is an alternate
frequency for distress or safety in some areas in the event Channel 16 is congested.
PLL (Phase Lock Loop) Controlled Circuitry
Provides accurate and stable channel selection.
Squelch Adjustment
Help eliminate noise between transmissions.
Key Lock
Let’s you lock the keypad in order to prevent the controls from accidental pressing.
High/Low Power Selection
Let’s you save power by selecting a suitable transmit ting power for long or short distances.
Battery Level Indicator
Indicates the battery pack condition.
Signal Strength indicator
Displays the relative strength of the RX and TX signals.
Supplied Battery Charger
Allows you to conveniently recharge your radio battery pack.
Backlight LCD Display
Allows you to operate the radio in a darkened environment.
Memory Channels
Let’s you store channels as memory channels.
WX/UIC Key
Allows you to select Weather Band, U.S. Channel Band, International Channel Band or Canadian
Channel Band. This key is also used to select Weather Alert ON/OFF.
DW/TRI key
Allows you to Dual Watch your current working channel and CH16 or Tri Watch adding CH9 to the
scan.
Camouflage pattern (LHR-22)
“REALTREE” Advantage HD
Lowrance LHR-20/22 Operation Instructions4
Page 5
Safety and Operational Information
CAUTION
!
!
CAUTION
DANGER
WARNING
!
WARNING
Your hand-held marine VHF radio contains a low power transmitter. When the Push-To-Talk
(PTT ) button is pushed, the radio will transmit a Radio Frequency (RF) signal.
Never leave your radio in a closed car or trunk; the extremely high temperatures generated in
hot weather can damage the electronics.
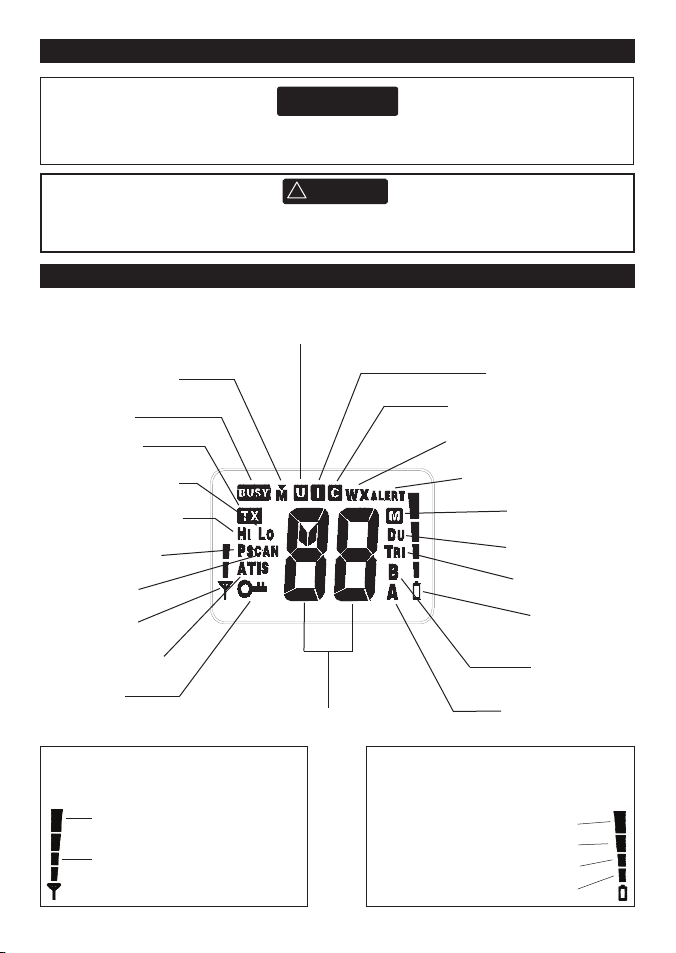
Display
Your radio comes with a multifunctional display.
USA channel indi cator
Memory M ode indicator
Receiving i ndicator
Transmiting ind icator
Low power tra nsmit indicator
High power tr ansmit indicator
Priorit y channel indicator
Scan mode in dicator
Signal level in dicator
ATIS indicator (EU ver sion)
Key lock indic ator
Signal Strength indicator
Displays the r elative strength o f the RX and TX signals .
When TX is se t to HI (High)
When TX is se t to LO (Low)
Internati onal channel indicator
Canada chann el indicator (USA versio n)
Weather stat ion indicator (USA versi on)
Weather stat ion alarm (USA version)
Memory C hannel indicator
Dual watch mo de indicator
Tri-watch mode i ndicator
Batter y level indicator
This channel can only receive
not transmit indicator
This channel can only receive
Channel numb er
(Note: Test only wh en transmittin g in HI Power Mode)
Fully charge d - Normal operation
Normal ope ration
Normal ope ration
Low batter y - needs charging
Lowrance LHR-20/22 Operation Instructions 5
and transmit by same f requency
Battery Level indicator
Page 6
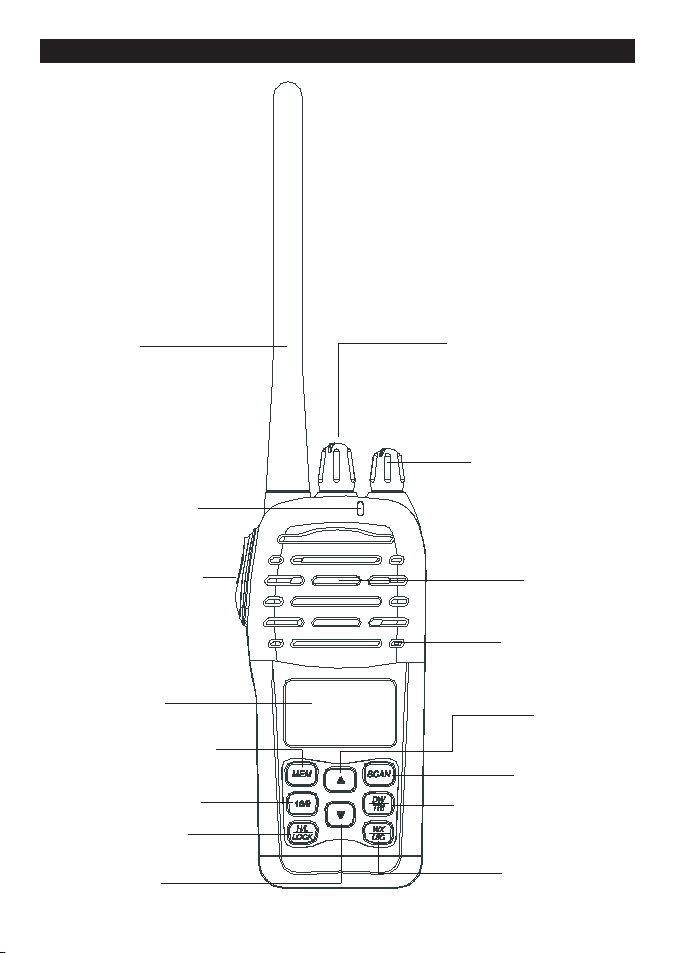
Function and Location of the Controls
Antenna
Transmitting LED
PTT (Push To Talk)
Key
LCD Display
MEM (Memory) Key
Channel 16/9 Key
H/L/LOCK Key
DOWN Key
SQL (squelch) Knob
PWR/VOL Knob
Speaker
Microphone
UP Key
SCAN Key
DW/TRI Watch Key
WX/UIC Key
Lowrance LHR-20/22 Operation Instructions6
Page 7
Before Using your Radio
(Coin)
Before using your radio, you should make the following preparations:
Carefully inspect the package contents for: the radio, batter y pack, antenna, AC/DC wall adapter,
cradle charger, wrist strap, belt clip, and this manual (including product warranty).
1. Fully charge the Li-ion polymer battery pack for a minimum 3.5 hours and install it onto the
radio.
2. Install the antenna onto the radio.
3. Install the belt clip onto the radio.
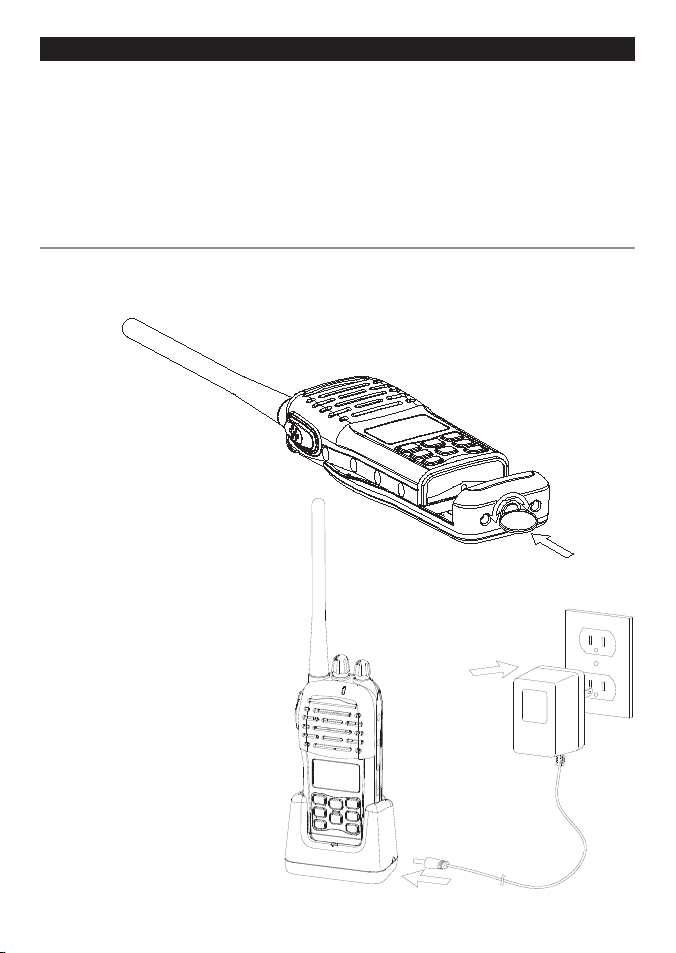
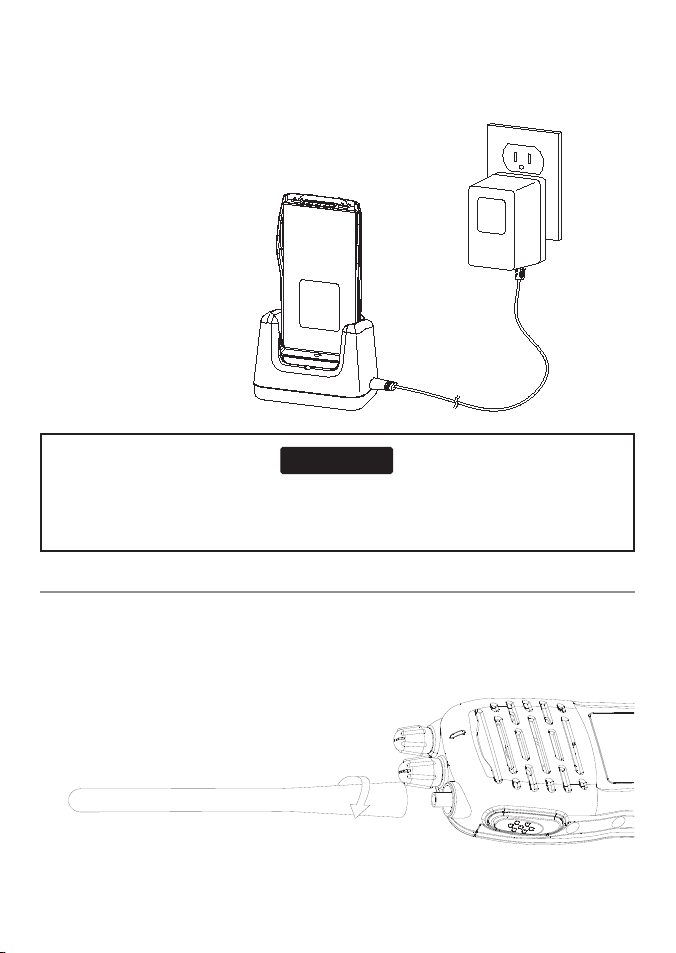
1. Charging and Installing the Li-ion Polymer Bat tery Pack
Install the Li-ion polymer battery pack onto the radio:
Use a coin or screwdriver rotate the screw lock clockwise to lock the battery pack onto the radio.
You can either charge the Li-ion
polymer battery pack when it is
attached to the radio or separated:
1. Insert the adapter plug into the
cradle charger unit;
2. Connect the AC wall adapter into a
standard wall jack;
3. Insert the battery pack or the radio
with the battery tray attached into
the cradle charger.
Lowrance LHR-20/22 Operation Instructions 7
Page 8
CAUTION
!
!
CAUTION
DANGER
WARNING
The cradle charger indicator LED on the front of the charging lights when it is receiving voltage
from the AC adapter:
RED means the batteries are charging.
GREEN means the batteries are fully charged. You should charge the battery pack
for about 3.5 hours.
Attach the battery pack to the radio when it is finished charging.
Remember to remove the radio after about 3-4 hours of charging time on the charger to
maximize battery life. Overcharging batteries may result in damage to both the battery pack
and radio.
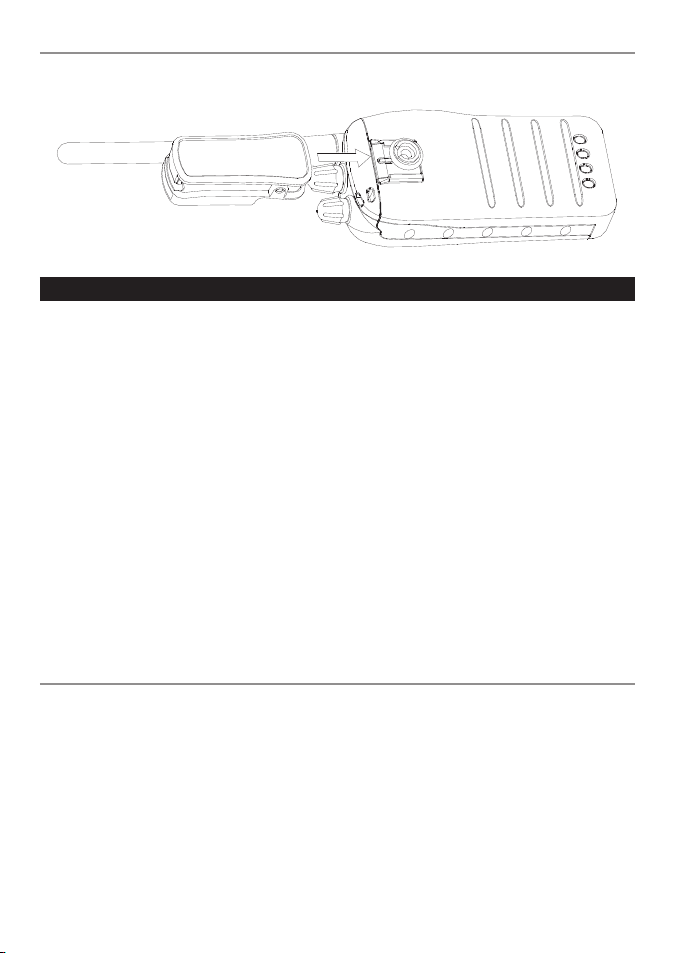
2. Install ing the Antenna
You will need to make sure that the flexible antenna is at tached to the radio. Ensure the radio is
turned OFF anytime that the antenna is not connected.
Installing the antenna:
Rotate the antenna clockwise to fasten securely to the threaded connector
on the top of the radio.
Note: Do not operate the radio or press PT T key without an antenna installed.
Lowrance LHR-20/22 Operation Instructions8
Page 9
3. Installing the Belt Clip
The belt clip supplied with your radio allows you to attach the radio to your belt. To install the belt
clip: slide the belt clip to the back of your radio, make sure that the fitting Groove is aligned.
Using Your Radio
You should familiarize yourself with the following operating procedures:
1. Turning the unit on/off.
2. Adjusting Squelch.
3. Transmitting and receiving.
4. Accessing the 16/9 priority channels.
5. Selecting channels.
6. Selecting high/low power.
7. Locking the keypad.
8. Adding channels to memory.
9. Scanning channels.
10. Accessing channels saved to memory.
11. Using the WATCH modes.
12. Selecting a WX (weather) channel.
13. Weather Alert operation.
14. Selecting U.S./International/Canadian Band
15. Resetting the radio
1. Turning the Power On/O ff
Use PWR/VOL knob to turn on the radio, once on, adjust the volume as well.
To turn on the ra dio:
1. Rotate the PWR/VOL knob to turn the radio on or off. The knob will make a “click” sound
when the radio is turned on. The last used channel will appear on the LCD display.
2. Once on, rotate the PWR/VOL knob further to adjust the volume.
Lowrance LHR-20/22 Operation Instructions 9
Page 10

2. Adjusting Squelch
CAUTION
!
!
CAUTION
DANGER
WARNING
Squelch is used to eliminate static and background noise between transmissions, and allows silent
operation of the radio until a transmission is received. If Squelch is set too high, only the strongest
transmissions can be heard, and if it is set too low, intermittent static and noise may be heard.
Squelch is controlled by SQL knob located on the top of the radio.
To set Squelch:
1. Turn SQL knob fully counter-clockwise. You will hear a lot of static noise.
2. Then turn SQL knob clockwise slowely until the static noise stops, this is the correct position
for the SQL knob.
The user is advised to adjust the Squelch level depending on your movement and/or location.
Setting Squelch too high can cause weak signals (including weak distress calls) to be missed.
3. Transmitting and Receiving
Use PTT (Push-To-Talk) key to transmit (speak) on the selected channel.
To transmit a nd receive:
1. Press and hold PTT key, then speak about 3 to 4” away from the microphone. The “TX” icon
will appear on the LCD display while you are transmitting.
2. Release PTT key when finished speaking. The radio will change to listening mode.
3. For receiving, the PWR/VOL (volume) knob can be adjusted for the best listening audio
output from the speaker.
NOTE: Before transmit ting, make sure the selected channel is not busy and is not designated
“receive only” (“B” icon showing) such as CH15. See the marine Channel charts for traf fic type
information at the back of this manual.
4. Accessing the 16/9 Priorit y Channels
The Channel 16/9 Priority key allows you to access the emergenc y Coastguard channel 16 quickly;
pressing and holding this key also allows you to quickly access channel 9, which is an alternate
emergency channel in some areas.
To access the 16/9 c hannels:
1. Press Channel 16/9 Priority key to access channel 16.
2. To access the alternate channel 9 which is available in some areas, press and hold the Channel
16/9 priority key for 3 seconds, then release.
5. Selecti ng Channels
Use or (UP/DOWN) key to scroll through the available channels.
For a list of channels and their frequencies, see marine Channel charts at the back of this manual.
Lowrance LHR-20/22 Operation Instructions10
Page 11

To select a c hannel:
Use or (UP/DOWN) key to find a channel. Stop when you find the desired channel.
NOTE: Not all channel numbers are available in INT bands, see marine Channel charts at the back
of this manual.
6. Selecting High/ Low Power
You must press and release H/L/LOCK key to toggle the transmit power between high and low.
Select high (High power transmit) for long-range communications, and select low (Low power
transmit) for short-range communications to save battery power.
To change the t ransmit power:
Press H/L/LOCK key to toggle between High and Low transmit power. When the radio is
operating at high power, the “HI” icon appears on the LCD display, and when operating at low
power, the “LO” icon appears on the LCD display. The H/L setting is applied to all the channels
in the channel bank. Anytime the priority CH 16 is selected, it will always be at HI power. For USA
operation, CH 13 and 67 are always low power initially and will go to high if the H/L key is held
down while transmitting.
7. Locking the Keypad
Use H/L/LOCK key to activate the Key Lock function in order to avoid accidental key press of the
radio keypad.
To lock and unl ock the keypad:
1. To lock the keypad, press and hold the H/L/LOCK key until the “Key Lock” icon appears on
the LCD display.
2. To unlock the keypad, press and hold the H/L/LOCK key again until the “Key Lock” icon
disappears from the LCD display.
NOTE: Once Key Lock is turned on, pressing the keys will have no effect except for the PTT key,
which is not affected by Key Lock.
8. Adding/Deleting Channels to/from Memory
Your radio can store any channel (except WX channels). The stored channels are also the channels
scanned in the Memory Scan mode.
To add channe ls to memory:
1. During normal operating mode, use or (UP/DOWN keys to select the desired channel
for saving.
2. Press and hold MEM key for 3 seconds. The “M” (Memory Channel) icon will appear, indicating
that the current channel has been saved into memory. Any number of channels can be saved.
To delete cha nnels from mem ory:
1. During normal operating mode, use or (UP/DOWN) keys to select the saved channel
you wish to delete. The “M” (Memory Channel) icon appears.
2. Press and hold MEM key for 3 seconds. The “M” (Memory Channel) icon disappears, and the
selected. The selec ted channel will be removed from the scan memory.
Lowrance LHR-20/22 Operation Instructions 11
Page 12

9. Accessing Chan nels Saved to Memory
Once channels have been saved, you can easily access them by pressing the MEM key.
In Memory mode, only the channels saved in memor y will be accessible using the Up or Down
Channel keys.
To access save d channels:
1. Press the MEM key. The “Memory Mode” icon (the “M” with the inverted triangle above
it) appears on the LCD along with “M” (Memory Channel) icon to indicate that you are in
MEMORY mode.
2. Use the
3. Press the MEM key again to regain access to all channels.
or (UP/DOWN) keys to scan through the saved channels.
10. Scanning
Your radio co mes with three s can options:
Normal Scan: If there are no channels in memory, the default is Normal Scan. In Normal Scan
mode, all channels in the channel bank set are scanned in sequence. After the last channel
number has been scanned, the c ycle repeats.
Normal scan will automatically check for transmission on the channel being scanned. If a signal
is received, the scan stops on the channel and the “SCAN” icon (flashing) will appear on the LCD
display. If the signal is lost for five seconds or more, the radio resumes scanning.
Memory Scan: In Memory Scan mode, only the channels that have been saved in memory are
scanned in sequence. After the last saved channel number has been scanned, the cycle repeats.
Priority Scan: In Priority Scan mode, you can scan all channels while alternately scanning
Channel 16 to make sure that you don’t miss distress or emergency calls. The secondary priority
Channel 09 can be scanned only if entered as a MEM channel or in TRI-WATCH mode.
To activate s can modes:
1. Press SCAN key once when no channels are stored in memory to activate the Normal scan
function. The Scan icon will appear on the LCD display.
or...
2. Press SCAN key once when there is at least one channel in memory to activate the Memor y
Scan function. The “M” (Memory Channel) and “SCAN” icons will appear on the LCD display.
or...
3. Press and hold SCAN key for 3 seconds to enter Priority Scan mode. The Priority Scan “P”
icon will appear on the LCD display just before the “SCAN” icon.
4. During any of the Scan modes, press the
direction. Up key to scan the channel upward, Down key to scan the channel downward.
5. Press and release SCAN key to terminate Scan mode.
NOTE: During Scan mode, the WX/UIC, MEM, and DW/TRI Watch keys will not function and will
sound an error beep if pressed.
or (UP/DOWN) keys to change the scan
Lowrance LHR-20/22 Operation Instructions12
Page 13

11. Using the WATCH Modes
This radio is equipped with two types of monitor modes: Dual Watch and Tri Watch.
Dual Watch monitors the current working channel and Channel 16 alternately.
To activate a nd terminate Du al Watch mode:
1. Press and release DW/TRI Watch key to activate the Dual Watch mode. The “DU” icon will
appear on the LCD display.
2. Press and release DW/TRI Watch key again to terminate Dual Watch mode and return to the
previous working channel.
or...
3. Press and hold DW/TRI Watch key for 3 seconds to terminate Dual Watch mode and enter into
Tri Watch mode. The “TRI” icon will appear on the LCD display.
NOTE: During Dual Watch mode, SCAN, MEM, WX/UIC, and
inactive and will sound an error beep if pressed.
Tri Watch watches Channel 16, Channel 9 and the current working channels.
or (UP/DOWN) keys are
To activate a nd terminate Tri Watc h mode:
1. Press and hold DW/TRI Watch key for 3 seconds to activate the Tri Watch mode. The “TRI”
icon will appear on the LCD display.
2. Press and hold DW/TRI Watch key again for 3 seconds to terminate Tri Watch Mode and to
return to the previous working channel.
or...
3. Press and release DW/TRI Watch key to terminate Tri Watch mode and enter into Dual Watch
mode. The “DU” icon will appear on the LCD display.
NOTE: During Tri Watch mode, SCAN, MEM, WX/UIC and
and will sound an error beep when pressed.
or (UP/DOWN) keys are inactive
12. Selecting a WX (weather) channel
1. Press and release the WX/UIC key to enter Weather mode. The “WX” icon will appear on the
LCD.
2. Press the UP or DOWN keys to select a WX channel - see marine Channel charts at the back of
this manual.
3. Press and release the WX/UIC key again to return to normal operation.
NOTE: During Weather mode, the PTT, H/L/LOCK, MEM and SCAN keys are inactive and an will
sound error beep when pressed.
Lowrance LHR-20/22 Operation Instructions 13
Page 14

13. Weather Alert Operation
Your radio has the ability to watch the designated NOAA weather channel for storm alerts. To
activate, select the Wx channel to monitor by shor t press the WX/UIC key and then UP or DOWN.
Press and hold the WX/UIC key for 3 seconds. The “WX ALERT” icon appears. The radio now
automatically watches for the NOAA weather warning broadcast.
14. Selecting U.S./International/Canadian Band
When operating in U.S. waters, your radio should be set for the U.S. band; when operating in
Canadian waters, the radio should be set for the Canadian band; when operating in International
waters, the radio should be set for the International band.
To select a b and:
To select a band, press and hold the WX/UIC key for 3 seconds, then release. The LCD will display
the “U”, “I” or “C” icon (for U.S., International, or Canadian). Continue to press and hold the WX/
UIC key for 3 seconds, then release until the LCD shows the desired band.
15. Resetting the Radio
You can reset any radio settings back to the factory default settings. Resetting the radio will:
Erase any channel(s) stored in memory.
Return to USA channels, if another channel bank is currently selected at the time of reset.
Return to USA channels, if another mode is currently selected at the time of reset.
Return power settings to their original state.
To reset the ra dio:
1. Turn the radio off by rotating PWR/VOL knob to the OFF position.
2. Simultaneously press and hold both SCAN and WX/UIC keys.
then...
3. Turn the radio on, continue to hold the SCAN and WX/UIC keys down for 3 seconds, then
release both keys.
Maintenance
To keep your radio functioning properly, follow these simple maintenance rules:
If your unit comes into contact with salt spray, simply wipe the affected surfaces with a sof t
cloth dampened in fresh water.
When cleaning the LCD display protec tive lens, use a chamois and non-abrasive, mild cleaner.
Do not use a chemical glass cleaner on the lens as chemicals in the solution may cause
cracking in the lens.
Take care when cleaning dirt or grease on the lens to avoid scratching the lens.
Ensure the radio and battery are clean and dry after each use.
Lowrance LHR-20/22 Operation Instructions14
Page 15

Technical Specifications
Channels .................................All U.S., Canadian and International Channels
10 NOAA Weather Channels
Channels Frequency Method ......................................... Phase Lock Loop
Frequency Range ............................................ TX 156.025~157.425 MHz
RX 156.025~163.275 MHz
Antenna Impedance… ........................................................ 50 Ohm
Power Supply ..................................................................7.4 VDC
Operating Temperature .................................................-20°C to +50°C
Dimensions ................................(With 7.4V Battery Pack) 136 x 58 x 30.5mm
Weight ...................................................(with 7.4V Battery Pack) 280g
Battery Pack ...........................................................1600mAh Li-ion
Battery Life: ...............................>10 Hours (5-watt Power 5%: 5%: 90% ratio)
>13 Hours (1-watt Power 5%: 5%: 90% ratio)
CAMO pattern (LHR-22 only) .......................REAL TREE ADVANTAGE MAX-4 HD
Cradle Charger model .............................................................B C-1
TRANSMITTER
Power Output .................................................1 or 5 Watts (Selectable)
Modulation Type ................................................................... FM
Hum and Noise Attenuation ......................................................40dB
Audio Distortion ................................................................... 5%
Spurious Suppression ..........................................................0.25μW
RECEIVER
Sensitivity at 12dB SINAD .........................................................0.3μV
Squelch Sensitivity ...........................................Threshold –12dBμV(EMF)
Adjacent Channel Selection ...................................................... 65dB
Spurious Response Rejection ..................................................... 65dB
Intermodulation Rejection ....................................................... 65dB
Audio Power Output ................................................250mW at 5% THD
NOTE: The above specifications are typical, and may vary bet ween models. Specifications are
subject to change without notice.
Lowrance LHR-20/22 Operation Instructions 15
Page 16

Frequency Charts
International Marine Channels
CH TX RX MODE TRAFFIC TYPE SHIP SHIP REMARK
(MHz) (MHz) TO TO
SH IP SHORE
01 156.050 160.650 D Public Co rresponde nce No Ye s
02 156.100 160.700 D Public Corr espondenc e No Yes
03 156.150 160.750 D Public Co rresponde nce No Yes
04 156.200 160.800 D Port Oper ations No Ye s
05 156.250 160.850 D Port Oper ations, Selec ted VTS Area s No Yes
06 156.3 00 156 .300 S Inter-sh ip Safety Yes No
07 156.350 160.950 D Port Oper ations No Yes
08 156.4 00 156 .400 S Commer cial (inter-ship only) Yes No
09 156.450 156.450 S Re creational Calli ng Channel Yes Yes
10 156.5 00 156. 500 S Commer cial Yes Yes
11 156. 550 156.550 S Comme rcial, VTS in Selec ted Areas Yes Yes
12 156.6 00 156. 600 S Por t Operations, Se lected VTS Ar eas Yes Yes
13 156.6 50 156.650 S Inter-s hip Navigation Saf ety (bridge -to bridge) Yes No
14 156.70 0 156.700 S Por t Operations, S elected VTS A reas Yes Yes
15 156.750 156.750 S Po rt Operation s Yes Yes
16 156.8 00 156. 800 S Inter national Distre ss, Safety, and C alling Yes Yes
17 156. 850 156.850 S State Co ntrolled Yes Yes
18 156.900 161.500 D Port Op erations No Yes
19 156.950 161.550 D Commerc ial No Ye s
20 157.000 161.600 D Port Oper ations No Ye s
21 157.050 161.650 D Port Ope rations No Yes
22 157.100 161.700 D Port O perations No Yes
23 157.150 161.750 D Public C orrespond ence No Yes
24 157.200 161.800 D Public Co rresponde nce No Yes
25 157.250 161.850 D Public Co rresponde nce No Yes
26 157.300 161.900 D Public Co rresponde nce No Yes
27 157.350 161.950 D Public C orrespond ence No Yes
28 157.400 162.000 D Public Co rresponde nce No Yes
60 156.025 160.625 D Public Corr espondenc e No Yes
61 156.075 160.675 D Port Op erations No Yes
62 156.125 160.725 D Port O perations No Yes
63 156.175 160.775 D Port Op erations No Yes
64 156.225 160.825 D Public Corr espondenc e No Yes
65 156.275 160.875 D Port Oper ations No Ye s
1
1W only
1
1W only
Lowrance LHR-20/22 Operation Instructions16
Page 17

66 156.325 160.925 D Port Oper ations No Ye s
67 156.375 156.375 S Com mercial, bridge -to-bridge Yes No
68 156.425 156.425 S B oat Operation s, Recreational Yes No
69 156.475 156.475 S Po rt Operation s Yes Yes
71 156. 575 156.575 S Por t Operations Yes Yes
72 156.62 5 156.625 S Inter-s hip Yes No
73 156.675 156.675 S Po rt Operation s Yes Yes
74 156.72 5 156.725 S Por t Operations Yes Yes
1
75 156 .775 156.775 S Por t Operations
76 156. 825 156.825 S Por t Operations
1W
1
1W
77 156.875 156.875 S In ter-ship Yes No
78 156.925 161.525 D Non- Commercial No Ye s
79 156.975 161.575 D Commer cial No Yes
80 157.025 161. 625 D Commercia l No Yes
81 157.075 161.675 D Port Operati ons No Yes
82 157.125 161.725 D Port O perations No Yes
83 157.175 161.775 D Public C orrespond ence No Yes
84 157.225 161.825 D Public Co rresponde nce No Yes
85 157.275 161.875 D Public C orrespond ence No Yes
86 157.325 161.925 D Public C orrespond ence No Yes
87 157.375 161.975 D Public C orrespond ence No Yes
88 157.425 162.025 D Public C orrespond ence No Yes
Special Notes on International Channel Usage
1
. LOW POWER (1W) only.
2
. LOW POWER (1W) initially. Override to HIGH POWER by holding down PT T, then holding down
the H/L key. HI is indicated in the display. Used normally in bridge-to-bridge communications.
Note: The INTERNATIONAL mode is not legal for use in U.S. or Canada waters.
KEY: S = Simplex operating channel; D = Duplex operating channel.
Lowrance LHR-20/22 Operation Instructions 17
Page 18

USA Marine Channels
CH TX RX MODE TRA FFIC TYPE SHIP SHIP REMAR K
(MHz) (MHz) TO TO
SH IP S HORE
01A 156.050 156. 050 S Port O perations, Sel ected VTS Are as Yes Yes
03A 156.150 156.150 S US Governm ent, Coastguard Yes Yes
05A 156.250 156.25 0 S P ort Operati ons, Selected V TS Areas Yes Yes
06 156.3 00 156 .300 S Inter-sh ip Safety Yes No
07A 156.350 156 .350 S Commerc ial Yes Yes
08 156.4 00 156 .400 S Commer cial (inter-ship only) Yes No
09 156.450 156.450 S Re creational Calli ng Channel Yes Yes
10 156.5 00 156. 500 S Commer cial Yes Yes
11 156. 550 156.550 S Comme rcial, VTS in Selec ted Areas Yes Yes
12 156.6 00 156. 600 S Por t Operations, Se lected VTS Ar eas Yes Yes
13 156.6 50 156.650 S Inter-s hip Navigation Saf ety (bridge -to bridge), Yes No
1W wi th Power-up
14 156.70 0 156.700 S Por t Operations, S elected VTS A reas Yes Yes
15 --- 156.750 S Enviro nmental ---- -- ----- 16 156.8 00 156. 800 S Inter national Distre ss, Safety, and C alling Yes Yes
17 156. 850 156.850 S State Co ntrolled Yes Yes
18A 156.900 156.90 0 S C ommercial Yes Yes
19A 156.950 156 .950 S Commerc ial Yes Yes
20 157.000 161.600 D Port Op erations, Ca nadian Coastg uard No Yes
20A 157.000 157.000 S Por t Operations Yes Yes
21A 157.050 157.050 S U.S . Government, Can adian Coastguard Yes Yes
22 A 157.100 157.100 S Coas tguard Liaison Yes Yes
23A 157.150 157.150 S U.S. G overnment, Coas tguard Yes Yes
24 157.200 161.800 D Public Co rresponde nce, Marine oper ator No Yes
25 157.250 161.850 D Public Co rresponde nce, Marine ope rator No Yes
26 157.300 161.900 D Public Co rresponde nce, Marine ope rator No Yes
27 157.350 161.950 D Public Co rresponde nce, Marine ope rator No Yes
28 157.400 162.000 D Public Co rresponde nce, Marine ope rator No Yes
61A 156. 075 156.075 S U.S. Gove rnment, Canadian Co astguard Yes Yes
63A 156.175 156.175 S Port Op erations, VTS i n Selected Area s Yes Yes
64 A 156.22 5 156.2 25 S U.S. Gover nment, Canadian Com mercial Fishing Yes Yes
65A 156.275 156.275 S Por t Operations Yes Yes
66 A 156.325 156 .325 S Port O perations Ye s Yes
67 156.375 156.375 S
Commercia l, bridge-to -bridge, 1W wit h Power-up Yes No
4
3
1W
2
RX only
1
1W only
4
4
4
4
3
1W
Lowrance LHR-20/22 Operation Instructions18
Page 19

68 156.425 156.425 S B oat Operation s, Recreational Yes No
69 156.475 156.475 S B oat Operation s, Recreational Yes Yes
71 156. 575 156.575 S Boa t Operations, Re creational Yes Yes
72 156.62 5 156.625 S Boa t Operations, Re creational Yes No
73 156.675 156.675 S Po rt Operation s Yes Yes
74 156.72 5 156.725 S Por t Operations Yes Yes
1
77 156.875 156.875 S Po rt Operation s Yes Yes
1W only
78A 156.925 156.925 S Bo at Operations, Re creational Yes No
79A 156.975 156.975 S Comm ercial Yes Yes
80A 157.025 157.025 S Commerci al Yes Yes
81A 157.075 157.075 S U.S . Government, Env ironmental Prote ction Yes Yes
4
A gency Operat ions
82A 157.125 157.125 S U.S. G overnment, Canad ian Coastguard Yes Yes
83A 157.175 157.175 S U.S. Gov ernment, Canadi an Coastguard Yes Yes
4
4
84 157.225 161.825 D Public Co rresponde nce, Marine Ope rator No Ye s
85 157.275 161.875 D Public C orrespond ence, Marine Op erator No Yes
86 157.325 161.925 D Public C orrespond ence, Marine Op erator No Ye s
87 157.375 161.975 D Public C orrespond ence, Marine Op erator No Yes
88 157.425 162.025 D Public Co rresponde nce, Marine Ope rator No Ye s
88 A 157.425 157.425 S Co mmercial, Inter-ship O nly Yes No
Special Notes on USA Channel Usage
1
. LOW POWER (1 W) only.
2
. Receive Only.
3
. LOW POWER (1 W) initially. Override to HIGH POWER by holding down PTT, then holding down
the H/L key. HI is indicated in the display. Used normally in bridge-to-bridge communications.
4
. Lightly shaded simplex channels 03A, 21A, 23A, 61A, 64A, 81A, 82A, and 83A cannot be lawfully
used in U.S. waters unless special authorization is obtained from the U.S. Coastguard. Not for
use by the general public.
5
. The letter “A” illuminated by the channel number indicates the USA channel is simplex.
This same channel is always duplex when selecting International. There is no “A” reference for
International channels. The letter “B” is only used for some Canadian “Receive only” channels.
KEY: S = Simplex operating channel; D = Duplex operating channel.
Lowrance LHR-20/22 Operation Instructions 19
Page 20

Canadian Marine Channels
CH TX RX MODE TRA FFIC TYPE SHIP SHIP REMAR K
(MHz) (MHz) TO TO
SH IP S HORE
01 156.050 160.650 D Public Co rresponde nce No Ye s
02 156.100 160.700 D Public Corr espondence No Ye s
03 156.150 160.750 D Public Co rresponde nce No Yes
04 A 156.20 0 156.2 00 S Canadian C oastguard, SAR Yes Yes
05A 156.250 156.25 0 S P ort Operati ons, VTS in Selec ted Areas Yes Yes
06 156.3 00 156 .300 S Inter-sh ip Safety Yes No
07A 156.350 156 .350 S Commerc ial Yes Yes
08 156.4 00 156 .400 S Commer cial (inter-ship only) Yes No
09 156.450 156.450 S Re creational Calli ng Channel Yes Yes
10 156.5 00 156. 500 S Commer cial Yes Yes
11 156. 550 156.550 S Comme rcial, VTS in Selec ted Areas Yes Yes
12 156.6 00 156. 600 S Por t Operations, V TS in Selected A reas Yes Yes
13 156.6 50 156.650 S Inter-s hip Navigation Saf ety (bridge -to bridge) Yes No
1W wi th power-up
14 156.70 0 156.700 S Por t Operations, V TS in Selecte d Areas Yes Yes
15 156.750 156.750 S Co mmercial Yes Yes
16 156.8 00 156. 800 S Inter national Distre ss, Safety, and C alling Yes Yes
17 156. 850 156.850 S State Co ntrolled Yes Yes
18A 156.900 156.90 0 S C ommercial Yes Yes
19A 156.950 156 .950 S Canadia n Coastguard Yes Yes
20 157.000 161.600 D Canadi an Coastguar d No Yes
21 157.050 161.650 D Po rt Operati ons No Yes
21A 157.050 157.050 S U.S . Government, Can adian Coastguard Yes Yes
21B --- 161.650 S Port O perations ------ -- ---- RX onl y
22 A 157.100 157.100 S Canad ian Coastguard Lia ison Yes Yes
23 157.150 161.750 D Publi c Correspon dence No Yes
24 157.200 161.800 D Public Co rresponde nce No Yes
25 157.250 161.850 D Public Co rresponde nce No Yes
2 5B --- 161.850 S Public Cor respondence ---- -- ----- - RX only
26 157.300 161.900 D Publi c Correspond ence No Yes
27 157.350 161.950 D Public Co rresponde nce No Yes
28 157.400 162.000 D P ublic Corres pondence No Yes
28B --- 162.000 S Public Cor respondence ---- -- ----- - RX only
60 156.025 160.625 D Pub lic Corresp ondence No Yes
61A 156. 075 156.075 S U.S. Gove rnment, Canadian Co astguard Yes Yes
62A 156.125 156.12 5 S Can adian Coastguard Yes Yes
64 156.225 160.825 D Pub lic Corresp ondence, Dupl ex No Yes
3
1W
1
1W only
1
1W only
1
1W only
4
Lowrance LHR-20/22 Operation Instructions20
Page 21

64 A 156.22 5 156.2 25 S U.S. Gover nment, Canadian Com mercial Fishing Yes Yes
4
65A 156.275 156.275 S Por t Operations Yes Yes
1
66 A 156.325 156 .325 S Port O perations Ye s Yes
1W only
67 156.375 156.375 S Com mercial, SAR Yes No
68 156.425 156.425 S B oat Operation s, Recreational Yes No
69 156.475 156.475 S Co mmercial Fishing On ly Yes Yes
71 156. 575 156.575 S Boa t Operations, Re creational Yes Yes
72 156.62 5 156.625 S Inter-s hip Yes No
73 156.675 156.675 S Co mmercial Fishing On ly Yes Yes
74 156.72 5 156.725 S Comme rcial Fishing Only Yes Yes
1
77 156.875 156.875 S Po rt Operation s Yes Yes
1W only
78A 156.925 156.925 S Bo at Operations, Re creational Yes No
79A 156.975 156.975 S Comm ercial Yes Yes
80A 157.025 157.025 S Commerci al Yes Yes
81A 157.075 157.075 S U.S . Government Oper ations Yes Yes
82A 157.125 157.125 S U.S. G overnment, Canad ian Coastguard Yes Yes
4
4
83 157.175 161.775 D Canadi an Coastguar d Yes Yes
83A 157.175 157.175 S U.S. Gov ernment, Canadi an Coastguard Yes Yes
4
83B --- 161.775 S Canadian C oastguard, RX O nly ------ ---- --
84 157.225 161.825 D Public Co rresponde nce, Marine Ope rator No Yes
85 157.275 161.875 D Public C orrespond ence, Marine Op erator No Yes
86 157.325 161.925 D Public C orrespond ence, Marine Op erator No Yes
87 157.375 161.975 D Public C orrespond ence, Marine Op erator No Yes
88 157.425 162.025 D Public C orrespond ence, Marine Op erator No Yes
Special Notes on Canada Channel Usage
1
. LOW POWER (1 W) only.
2
. Receive Only.
3
. LOW POWER (1 W) initially. Override to HIGH POWER by holding down PTT, then holding down
the H/L key. HI is indicated in the display. Used normally in bridge-to-bridge communications.
4
. Lightly shaded simplex channels 21A, 23A, 61A, 64A, 81A, 82A, and 83A cannot be law fully used
in Canada waters unless special authorization is obtained from the Canadian Coastguard. Not
for use by the general public.
5
. The letter “A” illuminated by the channel number indicates the Canada channel is simplex. This
same channel is always duplex when selecting International. There is no “A” reference for
International channels. The letter “B” is only used for some Canadian “Receive only” channels.
Note: The CANADA mode is not legal to use in U.S. waters.
KEY: S = Simplex operating channel; D = Duplex operating channel.
Lowrance LHR-20/22 Operation Instructions 21
Page 22

WEATHER Channels
CH RX TRAFFIC TYPE NAME REMARK
(MHz)
WX01 162.550 NOAA Weather Chan nel NOA A WX RX only
WX02 162.400 NOAA Weather Chan nel NOA A WX RX only
WX03 162.475 NOAA Weather Chan nel NOA A WX RX only
WX04 162.425 NOAA Weather Chan nel NOA A WX RX only
WX05 162.450 NOAA Weather Chan nel NOA A WX RX only
WX06 162.500 NOAA Weather Chan nel NOA A WX RX only
WX07 162.525 NOAA Weather Chan nel NOA A WX RX only
WX08 161.650 CANADIAN Weath er Channel CANADA WX RX only
WX09 161.775 CANADIAN Weath er Channel CANADA WX RX only
WX10 163.275 NOAA Weather Chan nel NOA A WX RX only
Lowrance LHR-20/22 Operation Instructions22
Page 23

FCC Compliance
Note:
This equipment has been tested and found to comply with the limits for a Class B digital
device, pursuant to Part 15 of the FCC Rules. These limits are designed to provide reasonable
protection against harmful inter ference in a residential installation. This equipment generates,
uses and can radiate radio frequency energy and, if not installed and used in accordance with
the instructions, may cause harmful interference to radio communications. However, there
is no guarantee that interference will not occur in a particular installation. If this equipment
does cause harmful interference to radio or television reception, which can be determined by
turning the equipment off and on, the user is encouraged to try to correct the interference by
one or more of the following measures:
• Reorientorrelocatethereceivingantenna.
• Increasetheseparationbetweentheequipmentandreceiver.
• Connecttheequipmentintoanoutletonacircuitdifferentfromthattowhichthereceiver
is connected.
• Consultthefactor ycustomerservicedepar tmentforhelp.
Marine VHF Radio use on Land:
You should consider acquiring a special license, called a marine utility station license, to
operate a hand-held marine radio from land -- a ship station license IS NOT suf ficient. You may
apply for this license by filing FCC Form 601 with the FCC. Refer to the FCC web site (http://
www.fcc.gov/ ) for further details and qualifications.
We recommend you record your radio’s serial number here. This number is on
the radio rear panel, underneath the battery pack:
Serial Number:
Date Purchased:
Lowrance LHR-20/22 Operation Instructions 23
Page 24

NAVICO
FULL TWO-YEAR LOWRANCE VHF WARRANTY
“We,” “our,” or “us” refers to NAVICO, the manufacturer of this LOWRANCE VHF product. “You” or
“your” refers to the first person who purchases this product as a consumer item for personal, family
or household use.
We warrant this product against defects or malfunctions in materials and workmanship, and
against failure to conform to this product’s written specifications, all for two (2) years from the
date of original purchase by you. Bat tery Packs and accessory items have a one (1) year warranty.
WE MAKE NO OTHER EXPRESS WARRANTY OR REPRESENTATION OF ANY KIND WHATSOEVER
CONCERNING THIS PRODUCT. Your remedies under this warranty will be available so long as you
can show in a reasonable manner that any defect or malfunction in materials or workmanship, or
any non-conformity with the product’s written specifications, occurred within two years from the
date of your original purchase, which must be substantiated by a dated sales receipt or sales slip.
Any such defect, malfunction, or non-conformity which occurs within two years from your original
purchase date will either be repaired without charge or be replaced with a new product identical
or reasonably equivalent to this product, at our option, within a reasonable time after our receipt of
the product. If such defec t, malfunction, or non-conformity remains af ter a reasonable number of
attempts to repair by us, you may elect to obtain without charge a replacement of the product or
a refund for the product. THIS REPAIR, OR REPLACEMENT OR REFUND (AS JUST DESCRIBED) IS THE
EXCLUSIVE REMEDY AVAILABLE TO YOU AGAINST US FOR ANY DEFECT, MALFUNC TION, OR NONCONFORMITY CONCERNING THE PRODUCT OR FOR ANY LOSS OR DAMAGE RESULTING FROM ANY
OTHER CAUSE WHATSOEVER. WE WILL NOT UNDER ANY CIRCUMSTANCES BE LIABLE TO ANYONE
FOR ANY SPECIAL, CONSEQUENTIAL, INCIDENTAL, OR OTHER INDIRECT DAMAGE OF ANY KIND.
Some states do not allow the exclusion or limitation of incidental or consequential damages, so the
above limitations or exclusions may not apply to you.
This warrant y does NOT apply in the following circumstances: (1) when the product has been
serviced or repaired by anyone other than us; (2) when the product has been connected, installed,
combined, altered, adjusted, or handled in a manner other than according to the instructions
furnished with the product; (3) when any serial number has been effaced, altered, or removed; or (4)
when any defect, problem, loss, or damage has resulted from any accident, misuse, negligence, or
carelessness, or from any failure to provide reasonable and necessary maintenance in accordance
with the instructions of the owner’s manual for the product.
We reserve the right to make changes or improvements in our products from time to time without
incurring the obligation to install such improvements or changes on equipment or items previously
manufactured.
This warranty gives you specific legal rights and you may also have other rights which may vary
from state to state.
REMINDER: You must retain the sales slip or sales receipt proving the date of your original purchase
in case warranty service is ever required.
NAVICO
12000 E. SKELLY DRIVE, TULSA, OK 74128
(800) 324-1356
Lowrance LHR-20/22 Operation Instructions24
Page 25

How to Obtain Service . . .
… in the USA:
We back your investment in quality products with quick, expert service and
genuine Lowrance replacement parts. If you’re in the United States and you have
technical, return or repair questions, please contact the Factory Customer Service
Department. Before any product can be returned, you must call customer service
to determine if a return is necessary. Many times, customer service can resolve your
problem over the phone without sending your product to the factory. To call us,
use the following toll-free number:
800-324-1356
8 a.m. to 5 p.m. Central Standard Time, M-F
Lowrance Electronics may find it necessary to change or end our shipping policies,
regulations, and special offers at any time. We reserve the right to do so without notice.
…in Canada:
If you’re in Canada and you have technical, return or repair questions, please
contact the Factory Customer Service Department. Before any product can be
returned, you must call customer service to determine if a return is necessary.
Many times, customer service can resolve your problem over the phone without
sending your product to the factory. To call us, use the following toll-free number:
800-661-3983
905-629-1614 (not toll-free)
8 a.m. to 5 p.m. Eastern Standard Time, M-F
…outside Canada and the USA:
If you have technical, return or repair questions, contact the dealer in the country
where you purchased your unit. To locate an Lowrance dealer near you, visit our
web site or consult your telephone directory for listings.
www.lowrance.com
Lowrance LHR-20/22 Operation Instructions 25
Page 26

Accessory Ordering Information for all countries
To order Lowrance accessories, please contact:
1) Your local marine dealer or consumer electronics store. Most quality dealers that handle
marine electronic equipment or other consumer electronics should be able to assist you
with these items.
To locate an Lowrance dealer near you visit our web site or consult your telephone
directory for listings.
2) U.S. customers: LEI Extras Inc., PO Box 129, Catoosa, OK 74015-0129
Call 1-800-324-0045 or visit our web site www.lei-extras.com.
3) Canadian customers can write:
Lowrance/Eagle Canada, 919 Matheson Blvd. E. Mississauga, Ontario L4W2R7 or
fax 905-629-3118.
Shipping Information
If it becomes necessary to send a product for repair or replacement, you must first receive
a return authorization number from Customer Service. Products shipped without a return
authorization will not be accepted. When shipping, were commend you do the following:
1. Please do not ship the knobs or mounting bracket with your unit.
2. If you are sending a check for repair, please place your check in an envelopeand tape it to
the unit.
3. For proper testing, include a brief note with the product describing the problem. Be sure
to include your name, return shipping address and a day time telephone number. An
e-mail address is optional but useful.
4. Pack the unit in a suitable size box with packing material to prevent any damage during
shipping.
5. Write the Return Authorization (RA) number on the outside of the box underneath your
return address.
6. For your security, you may want to insure the package through your shipping courier.
Lowrance does not assume responsibility for goods lost or damaged in transit.
Lowrance LHR-20/22 Operation Instructions26
Page 27

Notes:
Page 28

Lowrance Pub. 988-0158-091
Printed in China - 100107
MN000798A-G
Copyright © 2007
All Rights Reserved
Navico
 Loading...