


0310780CWM
ITM. / ART. 1031509
Model / Modèle / Modelo: LG Champion
Part / Pièce / Parte: 61500
Important: Read carefully, save these instructions!
Important : Lire attentivement et conserver ces instructions!
Importante : ¡Lea atentamente y conserve estas instrucciones!
WOOD PELLET GRILL
AND SMOKER
INSTRUCTIONS AND USE
BARBECUE-FUMOIR
AUX GRANULES DE BOIS
INSTRUCTIONS ET UTILISATION
ASADOR Y AHUMADOR
DE PELLETS DE MADERA
INSTRUCCIONES Y USO
WARNING: Please read the entire manual before installation and use of this electric, pellet fuel-burning appliance. Failure to follow these instructions could result in property damage, bodily injury or even death. Contact local building or fire officials about restrictions and installation inspection requirements in your area.
AVERTISSEMENT : Veuillez lire l’intégralité du manuel avant l’installation et l’utilisation de cet appareil électronique aux granules. Le non-respect de ces instructions peut entraîner des dommages aux biens, des blessures ou même la mort. Communiquez avec les autorités locales en matière d’incendie et de bâtiment concernant les restrictions et les exigences d’installation dans votre région.
ADVERTENCI: Lea el manual completo antes de instalar y utilizar este aparato eléctrico para quemar pellets de combustible. Incumplir estas instrucciones podría causar daños materiales, lesiones corporales, e incluso la muerte. Consulte a sus funcionarios locales de construcción y control de incendios para informarse sobre las restricciones y los requisitos de inspección de instalaciones en su región.
MANUAL MUST BE READ BEFORE OPERATING! | VOUS DEVEZ LIRE CE GUIDE AVANT D’UTILISER LE BARBECUE!
¡DEBE LEER EL MANUAL ANTES DE LA OPERACIÓN!

ENGLISH
DANGERS AND WARNINGS
“MAJOR CAUSES OF FIRES ARE MAINTENANCE AND FAILURE TO MAINTAIN REQUIRED CLEARANCES TO COMBUSTIBLE MATERIALS. IT IS OF UTMOST IMPORTANCE THAT THIS PRODUCT BE INSTALLED ONLY IN ACCORDANCE WITH THESE INSTRUCTIONS.”
WARNING: YOU MUST contact your local home association, building or fire officials, or authority having jurisdiction, to obtain the necessary permits, permission or information on any installation restrictions, such as any grill being installed on a combustible surface, inspection requirements or even ability to use, in your area.
•YOU MUST keep the entire grill a minimum of 45.72 cm (18 inches), or a safe distance, from all combustibles.
•DO NOT install or operate the grill under a combustible ceiling or overhang.
•DO NOT use indoors, or in an enclosed, unventilated area.
•YOU MUST clean and maintain your grill on a regular basis.
•YOU MUST, after a period of storage, and/or non-use, check the burn grate for obstructions, foreign objects both inside the grill and the hopper, and air blockage, before use. See instructions in this manual for correct procedures.
•DO NOT put a grill cover or anything flammable, on or in the storage space area under the grill.
•DO NOT allow children to use your LG Champion wood pellet grill while unattended. Accessible parts of the grill may be very hot. Keep young children and pets away while it is in use.
WARNING: This appliance is not intended for use by persons (including children) with reduced physical, sensory or mental capabilities, or lack of experience and knowledge, unless they have been given supervision or instruction concerning use of the appliance by a person responsible for their safety.
•DO NOT use lava rock, wood chunks, wood shavings or charcoal in your Louisiana Grills wood pellet grill.
•DO NOT use accessories not specified for use with this appliance.
•Should a grease fire occur, turn “Off” the control and leave lid closed until the fire is out.
•DO NOT unplug the power cord. DO NOT throw water on. DO NOT try to smother the fire.
•YOU MUST use heat-resistant barbeque mitts or gloves when operating the grill.
WARNING: DO NOT transport your LG Champion wood pellet grill while operating or while the grill is HOT. Make sure the fire is completely out and that the grill is completely “Cool to the Touch”
•DO NOT enlarge burn grate orifices, igniter holes or burn pots.
•DO NOT use your grill in the rain or around any water source.
•YOU MUST ALWAYS disconnect the power, before performing any service or maintenance.
•If the grill is stored outside during the rainy season or seasons of high humidity, care should be taken to insure that water does not get into the pellet hopper. Wood pellets, when wet or exposed to high humidity, expand greatly, break apart, and could jam the feed system.
•DISPOSAL OF ASHES — Ashes should be placed in a metal container with a tight-fitting lid. The closed container of ashes should be placed on a non-combustible floor or on the ground, well away from ALL combustible materials, pending final disposal. When ashes are disposed by burial in soil or otherwise locally dispersed, they should be retained in the closed container until all cinders have thoroughly cooled.
WARNING: DO NOT touch any part of your LG Champion wood pellet grill while the smoker is HOT. Serious bodily injury could result.
2

DANGERS AND WARNINGS
WARNING: DO NOT over-fire your LG Champion wood pellet grill. Improper Use Can Cause Uncontrolled Fire.
FUEL - WOOD PELLETS
•YOU MUST only use all natural wood pellets, designed for burning in pellet grills. Any other type of fuel burn in this appliance will void the warranty and safety listing.
•DO NOT use fuel labeled as having additives.
•NOTE: Since Dansons Inc. has no control over the quality of pellets that you use, we assume no liability caused by the quality of fuel used.
CAUTION: DO NOT use spirit, petrol, gasoline, lighter-fluid or kerosene for lighting or refreshing a fire in your grill.
CREOSOTE
•DO NOT operate the appliance if the flame becomes dark and sooty or if the burn pot overfills with pellets. Turn the unit OFF, let the appliance cool completely, and then inspect the unit. Soot or Creosote may accumulate in the main barrel and along any air leakage or exhaust areas when the appliance is operated under incorrect conditions, such as incorrect burn grate position, blockage of the combustion fan, failure to clean and maintain the burn area, etc.
•Soot or creosote is formed when pellets are burned without the correct amount of air to fuel or incomplete combustion, thus producing a tar like substance and other organic vapors that combine with expelled moisture. The smoke will have a black color to it and the residue left behind on surfaces, will also be black in color.
•When ignited, this creosote makes an extremely hot and out of control fire, similar to a grease fire.
•If creosote has formed within the unit; allow the unit to warm up at a LOW temperature, turn OFF the appliance, and then wipe out any formation with a hand towel. Creosote is similar to tar, when warmed it will become like liquid, and is much easier to clean in this state.
WARNING: IF AN UNCONTROLLED FIRE DOES OCCURE: CALL FIRE DEPARTMENT. DO NOT try to move appliance. DO NOT try to smother the fire. DO NOT put water on the fire.
CARBON MONOXIDE: “The Silent Killer”
FOLLOW THESE GUIDELINES TO PREVENT THIS COLORLESS, ODORLESS GAS FROM POISIONING YOU, YOUR FAMILY OR OTHERS:
•Know the symptoms of carbon monoxide poisoning: Headaches, Dizziness, Weakness, Nausea, Vomiting, Sleepiness, and Confusion. Carbon Monoxide reduces the blood’s ability to carry oxygen. Low blood oxygen levels can result in loss of consciousness and death.
•See a doctor if you or others develop cold or flu-like symptoms while cooking or in the vicinity of the appliance. Carbon monoxide poisoning, which can easily be mistaken for a cold or flu, is often detected too late.
•Alcohol consumption and drug use increase the effects of carbon monoxide poisoning.
•Carbon monoxide is especially toxic to mother and child during pregnancy, infants, the elderly, smokers, and people with blood or circulatory system problems, such as anemia, or heart disease.
WARNING: To prevent fingers, clothing or other objects from coming in contact with the auger, your appliance has been equipped with a metal screen, mounted inside the hopper. This screen MUST NOT be removed unless directed by Dansons Customer Service or Authorized service personal.
ENGLISH
3

ENGLISH
Dear “Champion” wood pellet grill owner:
Thank you for choosing to purchase a “Louisiana Grills Champion” wood pellet smoking’ grill.
Cooking with your Louisiana Wood Pellet Grill is about to bring you full circle from the days of the caveman when cooking outdoors with wood was a necessity, to cooking indoors in your modern kitchen and now back to the great outdoors and that savory wood flavor.
Think of your “Champion” as an extra stove available to bake, roast, grill, sear and smoke or char-grill food. Anything that can be done in your indoor kitchen can be done on your grill.
Barbecuing is a culture all on its own. Barbecuing provides a form of entertainment, which is relaxed and casual. Your meals can be completely cooked outdoors and the chef is one of the crowd. Keep it simple, be creative, and have some fun.
We’d like to take this opportunity to pass on a few important tips concerning grilling with wood pellets.
•Initial set-up of your “Louisiana Grill” is the most important step to ensure the efficient and satisfactory operation of your grill for many years to come.
•Be diligent in your cleaning and maintenance program. Taking care of your grill will add years of life and keep it looking great.
•Use only all natural wood BBQ pellets designed to burn in pellet grills.
•Ensure your pellet fuel stays moisture free. Open bags of fuel should be stored in an airtight container and empty the hopper if you are not using the grill over longer periods.
Our loyal staff, valued customers, friends and our loving families have all contributed recipes to our cookbook. We have tried to include a broad range of cuisines and styles, starting with Mom’s great home cooking and many, many, catering and entertaining experiences to current classics and new soon to be classics.
WE WANT YOU!
If you are interested in contributing a family favorite or competition winner, or any recipe, (especially if it contains bacon) please share it with us.
Fax: 1-877-303-3135, Web www.louisiana-grills.com, Email: sales@dansons.com or snail mail: to the address below.
Now go, fill up the hopper, light up that grill and get ready to enjoy,
“World Class BBQ In Your Own Backyard”
Again we want to say THANK YOU for your purchase.
Staff and Management
Dansons Inc.
COPYRIGHT NOTICE
Copyright 2017, All right reserved.
No part of this manual may be copied, transmitted, transcribed, stored in a retrieval system, in any form or by any means without expressed written permission of,
Dansons Inc.
14608 - 134 Ave., Edmonton, AB, Canada T5L 4T4
1-877-303-3134
4

TABLE OF CONTENTS
Dangers and Warnings .................................................... |
2 |
Operation |
|
|
Assembly Instructions |
|
Getting Started ..................................................................................... |
22 |
|
6 |
Initial Set-Up Procedure ..................................................................... |
22 |
||
Specs ......................................................................................................... |
Lighting - Automatic/Manual |
24 |
||
Parts Explosion |
7 |
|||
Shutting Off Your Smoker |
24 |
|||
Safety Testing |
8 |
|||
Maintenance |
25 |
|||
Wheels, Lid Stopper................................................................................ |
8 |
|||
Champion Hopper Assembly ............................................................... |
9 |
Grilling Tips and Techniques |
28 |
|
Igniter |
11 |
|||
|
|
|||
Burn Grate, Flame Broiler ..................................................................... |
11 |
Trouble Shooting ............................................................ |
30 |
|
Handle, Adjustable Chimney .............................................................. |
12 |
Parts List |
34 |
|
Heat Panel, Deflector ........................................................................... |
13 |
|||
Handles and Latches ............................................................................ |
13 |
Limited Warranty |
35 |
|
Upper Cabinet, Side Shelf .................................................................... |
14 |
|||
Grease Trays, Dampers, Grids ............................................................. |
15 |
|
|
|
Rack Supports, Oven Rack ................................................................... |
16 |
|
|
|
Steam Box................................................................................................ |
16 |
|
|
|
Power Supply ......................................................................................... |
17 |
|
|
|
Knowledge is Power |
|
|
|
|
3 Cooking Zones .................................................................................... |
17 |
|
|
|
Digital Control Center-G2..................................................................... |
19 |
|
|
|
Programmable Meat Probe ............................................................... |
20 |
|
|
ENGLISH
5

ENGLISH
YOUR NEW LG CHAMPION WOOD PELLET GRILL
Large 12.3 kg (27 lb.) Hopper capacity. Easy flip up top, with rounded edges.
Time proven metal auger feed system.
Porcelain coated cast iron cooking grids (main surface).
3 removable porcelain coated steel upper grids.
Fan forced combustion, cooling and convection cooking.
“Digital Control Center” P.I.D. Control
w/ programmable meat probe.
Fan range oven temperature 82oC - 315oC (180o to 600oF) cooking options; hot smoking to searing.
Electric igniter eliminates the need for matches and starter fluids.
AVAILABLE ACCESSORIES
Custom Cover
Silk screened heavy duty 600 denier, polyester canvas, double stitched, polyurethane interior, tightening strap.
Damper controlled chimney.
Duel rear exhaust control.
Cold Smoker / Warming Cabinet 2 oven racks.
Solid side shelf with tool hangers and hanger bar.
Hot Smoker / Oven Cabinet 4 oven racks.
Grease pull out drawers.
Heavy-duty engineered structure.
Cabinet doors and enclosure.
2 x Locking Casters.
2 x Casters.
Deluxe Front Shelf |
Hopper Extension |
30.5cm D x 60.96cm W (12 in. D x 24 in. W) |
Easy add-on w/lid. |
Clip-on Flip Down. |
Adds extra 9kg (20lb). |
Stainless Steel Finish. |
|
36.83cm (14½ in.) mounting hole. |
|
|
Extra Pull-Out Oven Racks |
|
5 pack - additional 3898.9cm / 1535 sq. in. |
6

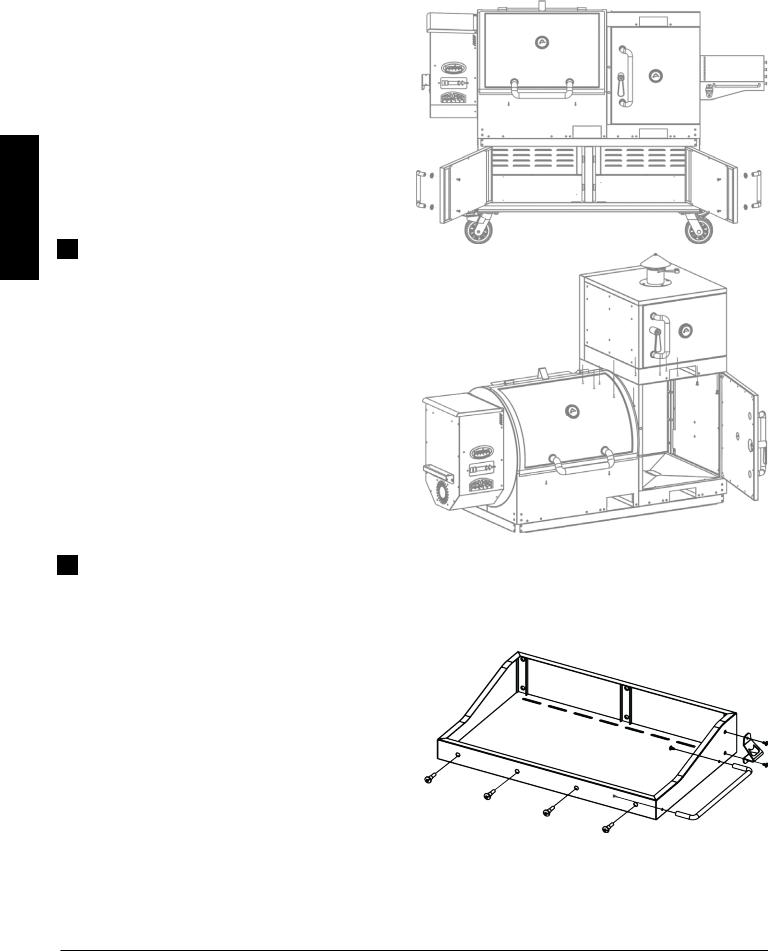
UNPACKING YOUR LG CHAMPION PELLET GRILL
When you open your smoker/grill, please ensure you have and can identify all the following parts:
Part |
Qty |
Items found in the box |
1 |
2 |
Wheels 12.7cm (5 in.) dia-locking swivel |
22 Wheels 12.7cm (5 in.) - non swivel
31 Main Lid Stopper
41 Hopper Side Handle
51 Hopper Assembly
61 Main Lid Handle with screws
|
2 |
- Bezels |
7 |
2 |
Smoker Cabinet Handle with screws |
|
4 |
- Bezels |
8 |
2 |
Main Cabinet Handle with screws |
|
4 |
- Bezels |
9 |
3 |
Grease Tray Handle with screws |
|
3 |
- Grease Tray Face Plates |
10 |
2 |
Main Cooking Grids - Porcelain Cast |
11 |
2 |
Upper Grids - Porcelain Steel |
121 Upper Grid - Porcelain Steel
132 Mid Cabinet Oven Rack Support
142 Upper Cabinet Oven Rack Support
156 Pull Out Oven Racks
161 Igniter Assembly - Igniter Cartridge
1 - Igniter Tube
171 Burn Grate
181 Flame Broiler - Main Body
19 |
1 |
- Slide Top |
20 |
1 |
Steamer - Main Body |
|
1 |
- Lid |
21 |
2 |
Slider Rods with Knobs |
22 |
1 |
Side Shelf |
|
1 |
- Bottle Opener |
|
1 |
- Towel Bar 25.4 cm (10 in.) |
|
4 |
- Tool Hangers |
23 |
1 |
Upper Cabinet |
|
1 |
- Chimney Assembly |
|
1 |
- Rear Heat Shield |
|
1 |
- Rear Heat Deflector Plate |
A |
16 |
Bolts - Wheels |
B |
16 |
Spring Washers - Wheels |
|
C |
16 |
Washers - Wheels |
|
D |
28 |
Phillips screws |
|
E |
6 |
Multi-head screws - Hopper |
ENGLISH |
H |
2 |
Phillips Metal Screws - Igniter |
|
F |
34 |
Spring Washers |
|
G |
34 |
Washers |
|
|
|
|
|
**Product subject to change without notice.
A
B
C
D
E
F
G
H
4
17
5
16
6
20
19
18
12 |
15 |
11 |
14 |
10
23
15
21
3
13
9 |
7 |
|
|
|
8 |
22
1
2
7

ENGLISH
SAFETY TESTING
In accordance with the procedures and specifications listed in UL SUBJECT 2728-2009 “PELLET FUEL COOKING APPLIANCES” AND CANADIAN ULC/ORD C2728 and CSA C22.2 #3 “FOR
ELECTRICAL FEATURES OF FUEL BURNING EQUIPMENT.” The Champion pellet cooking appliance has been independently tested and listed by INTERTEK (an accredited testing laboratory) to ETL, UL, ULC and CSA standards.
This product has been assessed and meets EU (European Economic Area) safety, health and Environmental protection requirements.
This product has been assessed and meets requirements imposed or covered by regulations in Australia and New Zealand and is represented by RCM mark and number.
NOTE: Please read the label found attached to the inside lid of the hopper, carefully. It contains important information about installation and operation of your pellet cooking appliance.
TOOLS REQUIRED
IMPORTANT NOTICE
•Be sure to inspect the entire grill after removing the protective shipping carton
•Report any damage to your local dealer immediately
•Shipping damage is not covered under warranty.
Phillips Screw Driver, Wrench, & Level
ASSEMBLY INSTRUCTION
1 INSTALL THE WHEELS
Parts Required:
1x Main Cabinet
2x Wheels 12.7cm (5 in.) Locking Swivel Wheels
2 |
x |
Wheels 12.7cm (5 in.) Wheels |
16 |
x |
Bolts (A) |
16 |
x |
Washers (B) |
16 |
x |
Spring Washers (C) |
WARNING!
Due to the size and weight of the upper cooking cabinet, the following installation step is a two (2) person job.
NOTE:
Damage caused due to ignoring warning or improper installation is NOT a warranty issue.
8

Installation:
The bottom portion of the main cabinet, has threaded plates installed to allow for two (2) locking and two (2) non-locking heavy duty wheels to be installed.
•To ease installation, place a soft protective covering on the floor, then carefully tip the main cabinet with the non-hopper end, onto the floor covering.
•Install the two (2) swivel locking wheels on the hopper end of the cabinet. Place a washer (B), then spring washer (C) onto each bolt, then begin to hand tighten each bolt.
NOTE: It is best to start each threaded bolt by hand, to ensure the thread DOES NOT cross thread or strip.
•Install the two (2) non-swivel wheels to the smoker cabinet end.
•Using the proper tool, ensure that ALL bolts are firmly secured.
•Using one or two people carefully and slowly tip unit back onto the newly installed wheels.
2 INSTALL THE MAIN LID STOPPER
Parts Required:
1 x Main Lid Stopper
Installation:
•Using a Phillips Screwdriver remove the screw, washer and spring washer already installed into the top of the main barrel.
•Insert the main lid stopper into the slot provided in the barrel.
•Line up the screw holes and re-install the Phillips screw, washer and spring washer, through the stopper and into the barrel.
3 INSTALLING THE HOPPER
Parts Required:
1x Hopper Assembly
1x Hopper Handle
2x Phillips screws (D)
6 x Multi-head screws (E)
8 x Spring Washers (F)
8 x Washers (G)
Installation:
Step 1 - Installing the Hopper Handle:
The Hopper Handle is multi-purpose. Not only is used to move the unit, but can also be used to wrap the power cord around, for easy storage.
The hopper handle also has two smaller size holes. These are used to temporarily hold the meat probe.
ENGLISH
9

ENGLISH
•Using two (2) Phillips screws (D), washers (G) and spring washers (F) secure the handle to hopper access panel, just above the fan intake, through the two (2) large holes provided.
•Begin by hand starting the threads, then use your Phillips screwdriver to secure.
Step 2 - Preparing for the Hopper:
Place six (6) Multi-head screws (E), washers (G) and spring washers (F) into the main barrel cavity to aid in installing the hopper.
Step 3 - Attaching the Grill Probe Wires: |
|
|
Your Grill/Smoker comes complete with the “Digital Control Center” |
C |
|
complete with grill probe and programmable meat probe. The grill probe |
||
|
||
has been factory installed in the cabinet, with the excess wire and connections |
|
|
run out through the left end. Be careful not to kink or damage the wires. |
|
|
The wire connections to the control board can be found inside or taped to the |
|
|
outside of the hopper. Diagram C |
|
|
To connect the spade connections, carefully lift the entire hopper to the left |
D |
|
hand-side of the upper cooking cabinet. |
||
|
||
IMPORTANT: Ensure the probe wires are run only through this large hole |
|
|
in the hopper as shown in diagram C. |
|
|
Begin by resting the bottom of the hopper on the ledge of the burn pot, |
|
|
sticking out past the barrel. Support the hopper on your leg as you connect |
|
|
the two spade connections. Diagram D |
|
|
After firmly connecting the spade connections, carefully thread ALL excess wire, |
|
|
as well as the connections, back into the hopper. The wiring must not come in |
|
|
contact with either the fan blades, or the metal auger tube. |
|
|
IMPORTANT: All excess wire and connections must be placed back in the |
|
|
hopper. Ensure that they DO NOT touch the fan. |
|
Step 4 - Attaching the Hopper to the Barrel:
•Carefully lift the entire hopper, with the attached grill probe wires, off the lip of the burn pot.
•Begin by slightly inserting the Auger Feed tube into the auger hole. Then raise the hopper, as the mounting bracket on the rear of the hopper must be raised slightly higher than the receiving bracket on the barrel.
•Push the top of the hopper tightly against the main barrel, inserting the auger tube fully into the barrel. Holding the hopper fairly level, press downward, to clip the hopper onto the mounting bracket.
•Holding the hopper in place, use one (1) of the Multi-head screws (E), along
with the spring washer (F) and washer (G) from the six (6) you put in the cavity, and
begin hand threading it into one (1) of the six (6) holes provided in the main barrel cavity.
NOTE: If the holes do not line up, the hopper may need to be fully pushed down into place.
10
Now with the hopper partially secured, hand start the remaining five (5) multi-heads screws, spring washers and washers. When complete secure firmly into place, using the proper tool.
NOTE: Taking extra care not to strip the screw heads will aid in the future.
|
INSTALLING THE IGNITER ASSEMBLY |
A |
4 |
||
Parts Required: |
|
|
2 |
x Phillips Metal Screws (H) |
|
1 |
x Igniter Assembly (located in hopper) |
|
Installation: |
|
|
The Igniter assembly has been connected to the wire harness at the factory and |
B |
|
can be found in the hopper electrical housing. |
||
•Reach in through the burn pot and carefully pull the igniter assembly forward into the burn pot area. Diagram A
•Line up the two holes on the igniter bracket over top of the two holes found in the bottom of the burn pot. Diagram A & B
•Using your screw driver and the two (2) Phillips metal screws (H) secure the igniter assembly to the burn pot. Diagram A & B
5 INSTALLING THE BURN GRATE
Parts Required:
1 x Burn Grate
Installation:
•The larger lip of the grate, notched, installs under the pellet fuel deflector.
•The bend along the larger lip should also be sitting tight to the back of the burn pot (B).
•The front lip of the grate should be sitting flush along the top of the burn pot (C).
IMPORTANT: The placement and maintenance of the burn grate is vital to a happy and full range cooking experience!
6 INSTALLING THE “ARCHED FLAME BROILER”
Parts Required:
1 x Flame Broiler Bottom
1 x Flame Broiler Slide Top
Installation:
•To ensure proper height and angle, the bottom plate of the mounting bracket (A) should not be within the pellet drop chute area. If you do need to adjust the bracket, loosen off
the three (3) Phillips screws, lift the bracket and re-tighten the screws.
ENGLISH
11

ENGLISH
•Take the Arched Flame Broiler bottom, and hold it so that the end with the cut out and slots is in your left hand. The plate then clips easily over the adjustable mounting bracket (B).
•Take the Arched Flame Broiler Slider Top, (D) and place it on top of the bottom (C). This plate is used to slide over the flame broiler opening and should be a very close fit.
OPEN for “Direct” flame searing / char broiling, Controlled flare ups Remember this will affect the convection flow.
CLOSED for “Indirect Convection Cooking”. Used in this position the majority of time.
IMPORTANT: Both the flame broiler main body and slider top have a food grade oil coating on them, when new. This will burn off during the initial burn off.
7 INSTALLING THE MAIN LID HANDLE
Parts Required:
1x Stainless Steel Handle with 2 x Phillips Screws
2x Bezel - Decorative Washer
2x Cardboard Washers
Installation:
•Using a Phillips screwdriver, remove the two (2) screws from the main handle.
•Insert one screw, spring washer and washer, through the hole provided in the barrel hood.
•Install the metal bezel on the screw end sticking through the barrel.
•Hand thread and tighten this screw to one of the ends of the stainless steel handle.
•Follow the same procedure to secure the other end of the handle to the barrel lid.
•Firmly tighten both screws until handle feels firm.
CAUTION! DO NO OVER-TIGHTEN!
Only a snug fit is required.
8 INSTALL THE UPPER CABINET ADJUSTABLE CHIMNEY
Parts Required:
1 |
x |
Upper Cabinet |
4 |
x Phillips screws (D), spring washers (F), washers (G) |
|
1 |
x |
Gasket |
1x Adjustable Chimney Assembly
Base
Adjustable Damper Chimney Cap
12

Installation:
Place the upper cabinet on a table or solid working space, to make installation easier.
•Screw the chimney cap through the adjustable damper and into the chimney base.
•Ensure to leave at least one 25 mm, (1”), distance between the top cap and the chimney base.
•Ensure the adjustable damper works freely.
•Line up the felt gasket to the holes provided on the top of the upper cabinet.
•Place assembled adjustable chimney assembly on top of the gasket.
•Using a Phillips Screwdriver install the four (4) Phillips screws, spring washers and washers, to securely mount the assembly to the upper cabinet.
9 INSTALL REAR HEAT PANEL
Parts Required:
1 x Upper Cabinet
1 x Rear Heat Panel
4 x Phillips screws (D)
4 x Spring washers (F)
4 x Washers (G)
Installation:
From inside the Upper Cabinet, use a Phillips screwdriver to install the
4 screws, spring washers and washers needed to secure the rear heat shield to the cabinet.
10 INSTALL REAR EXHAUST CONTROL
Parts Required:
1 x Upper Cabinet
1 x Rear Exhaust Control Panel
Installation:
•Remove the four (4) screws pre-installed on the back of the upper cabinet.
•Line up the four (4) holes on the rear exhaust control panel with the four (4) holes provided on the upper cabinet, hand start the screws, tighten using a screwdriver.
11 INSTALL DOOR HANDLES AND LATCHES
Parts required for each cabinet door:
4x Stainless Steel Handle with
2 x Phillips Screws
8 x Bezel - Decorative Washer
2 x Twist locking door assemblies
ENGLISH
13
ENGLISH
Installation:
Door Handles
•Remove the two (2) screws from each handle.
•Insert the Phillips screw through the back of each of the 4 cabinet doors, slide the bezel onto the screw, and then line up the handle. Secure in place.
Twist Lock Handles
•Remove hardware from the door locking assembly.
•Insert handle through the front of each cabinet door.
•Re-secure the mounting hardware from the inside of the cabinet door.
12 INSTALL THE UPPER CABINET TO MAIN CABINET
Parts required:
1 x Upper Cabinet
1 x Rear Heat Panel
12 x Phillips screws (D)
12 x Spring washers (F)
12 x Washers (G)
Installation:
•Carefully lift the upper cabinet from your working surface and place onto the top of the main cabinet.
•From inside the main cabinet, use a Phillips Screwdriver, to install the twelve (12) screws, spring washers and washers needed.
- There is one in each of the four (4) corners, and two (2) additional ones on each of the four sides.
13 INSTALL THE SIDE SHELF
Parts required:
1 x Side Shelf - 25.4 cm (10 in.) Long Chrome Hanger Bar w/screws
4 x Side Shelf - Tool Hanger w/nuts
1 x Side Shelf Top
1 x Bottle Opener
6 x Phillips Screws (D)
6 x Spring Washers (F)
6 x Washers (G)
Installation:
Step 1 Tool Hangers
•Remove the nuts from all four (4) tool hangers.
•Insert individual tool hanger into the four (4) holes provided in the side shelf top.
•Hand tighten each nut, then tighten to a snug, secure fit, using a wrench.
Step 2 Chrome Hanger Bar
•Remove the two (2) screws from the bar hanger.
14

•Insert the screws through the two (2) holes provided in front of the side shelf top, #23.
•Use a Phillips screwdriver to tighten to a snug, secure fit.
Step 3 Bottle Opener
•Remove the two (2) screws pre-installed in the shelf.
•Line up the two (2) holes on the bottle opener with the two (2) holes provided on the side shelf top, hand start the screws tighten using a screwdriver.
Step 4 Side Shelf to Cabinet
•Begin by hand starting each of the six (6) screws, spring washers and washers, then using a Phillips screwdriver tighten to a firm, secure fit.
14 INSTALL THE GREASE TRAY
Parts required:
3 x Grease Trays
3 x Face Plates
3 x Handles with screws
Installation:
•Remove the two (2) screws from each handle.
•Install the screws through the two (2) holes provided in the front of the grease trays.
•Place one (1) of the face plates onto the two screws, then line up the screws with the handle.
•Use a Phillips screwdriver to tighten to a snug, secure fit.
TIP: To aid in cleaning and reduce maintenance, line the grease drawer with foil, or a thin layer of sand.
15 INSTALL THE SLIDER DAMPER
Parts required:
2 x Screw-in Damper rods with knobs
Installation:
•Slide each of the rods through the front panel of the smoke cabinet.
•Insert the threaded ends into the two dampers found inside the smoke cabinet.
•Turn clockwise until a firm fit is established.
ENGLISH
15
ENGLISH
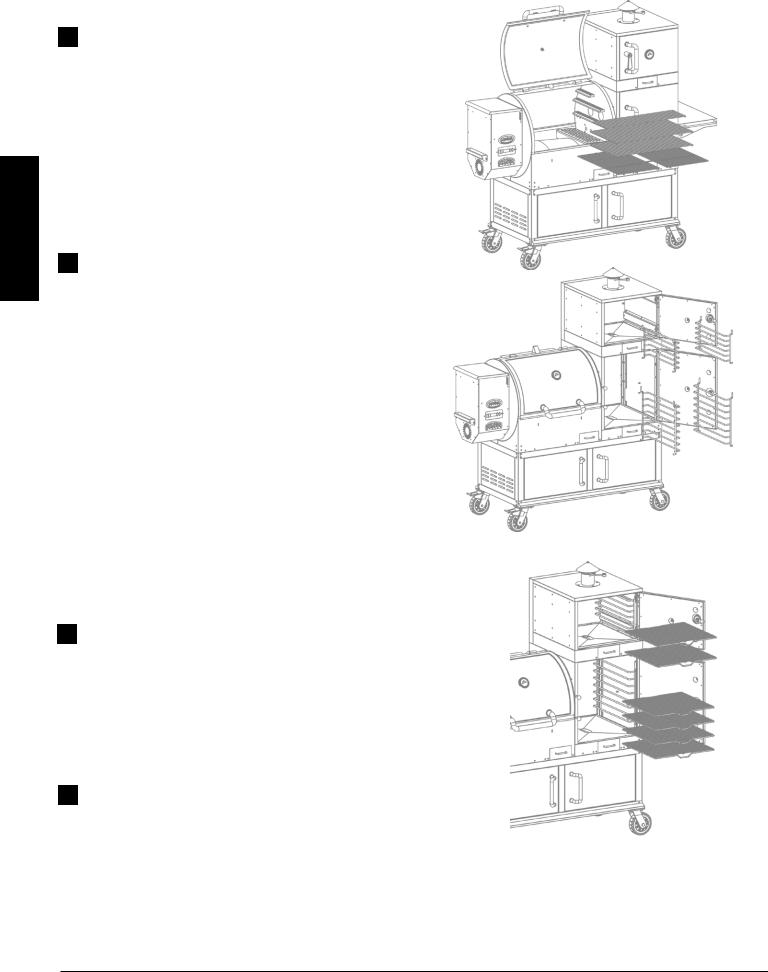
16 INSTALL THE MAIN COOKING SURFACES
Parts required:
2 x Porcelain Coated Cast Iron Main Cooking Grids
2 x Porcelain Coated Steel Upper Racks
1 x Porcelain Coated Steel Upper Rack
Installation:
•Slip main grids into place
•Set upper cooking grids into appropriate grid holders.
17 INSTALL THE RACK SUPPORTS
Parts required:
2 x Porcelain coated rack support - short
2 x Porcelain coated rack support - tall
Installation:
Step 1 - Upper Support Racks
•Start with the two (2) shorter rack supports, these will be installed in the upper cabinet.
•Hold the rack on a slight angle, and insert the top hooks into the holes provided in the cabinet.
•Slide the rack upwards, to line up the bottom hooks with the holes provided in the cabinet.
•Insert the bottom hooks, ensure a secure fit.
Step 2 - Smoker Cabinet Support Racks
•The two (2) larger rack supports are to be installed similar to the upper support racks.
18 INSTALLING THE OVEN RACKS
Parts required:
6 x Porcelain coated steel oven racks
Installation:
•Simply slide any number of racks into the support racks to configure to your cooking needs.
19 INSTALL THE STEAMER BOX
Parts required:
1 x Steamer box main body
1 x Steamer lid
Installation:
The steamer box is designed to fit onto the flame broiler and below the main cooking grids. The fan forced convection air along with the hot liquids, making it the perfect accessory for steaming, not only in the main barrel but in the additional cabinets as well.
16

•Remove the main cooking grids.
•Insert the main steamer body into the hole provided in the right hand-side of the main flame broiler.
•Fill the cavity with water or liquid of your choice.
•Cover with the vented steamer lid.
TIP: When not in use, it is best to remove the steam box from the flame broiler and unit.
FINAL INSPECTION AND CLEANING:
ALWAYS clean dirt, dust and oils from ALL stainless steel and painted surfaces before you use the unit. These can cook into the metal and discolor it.
Using a soft cloth and hot soapy water, thoroughly clean all surfaces and ensure all screws are secure. Stainless steel cleaner and a soft rag can be used on all stainless surfaces.
ENGLISH
HOOKING UP TO POWER:
AT HOME
•This appliance requires 110 volt, 60Hz, 5amp service.
•It must use a 3 prong grounded plug.
•The “Digital Control Centre” oven temp control uses a 3.1 cm x 0.6 cm (1 ¼ in. x ¼ in.), 5 amp 110 volt fuse to protect the board.
GFI Outlets
•This appliance will work on most GFI outlets. Recommended size 15 amp.
•If your GFI outlet is highly sensitive to power surges, it will very likely trip during the ignition phase of operation. During the ignition phase, the igniter is drawing 300-700 watts of electricity which can be too much power for a GFI outlet to handle. The quality of the GFI does not matter, rather the sensitivity. Each time a GFI trips it does increase in sensitivity.
Solution 1: Install a brand new GFI
Solution 2: Plug the appliance into a non-GFI outlet.
ON THE ROAD
•By disconnecting the igniter, from the main wiring harness, your grill can be run using a 12 volt, 100 watt “POSITIVE WAVE LENGTH” inverter plugged into your automobile outlet. Then light your smoker using the manual method (found in lighting instructions).
•If you do not want to continue to use the automatic igniter, it is recommended to use a minimum of a 1000 watt “POSITIVE
WAVE LENGTH” inverter.
KNOWLEDGE IS POWER
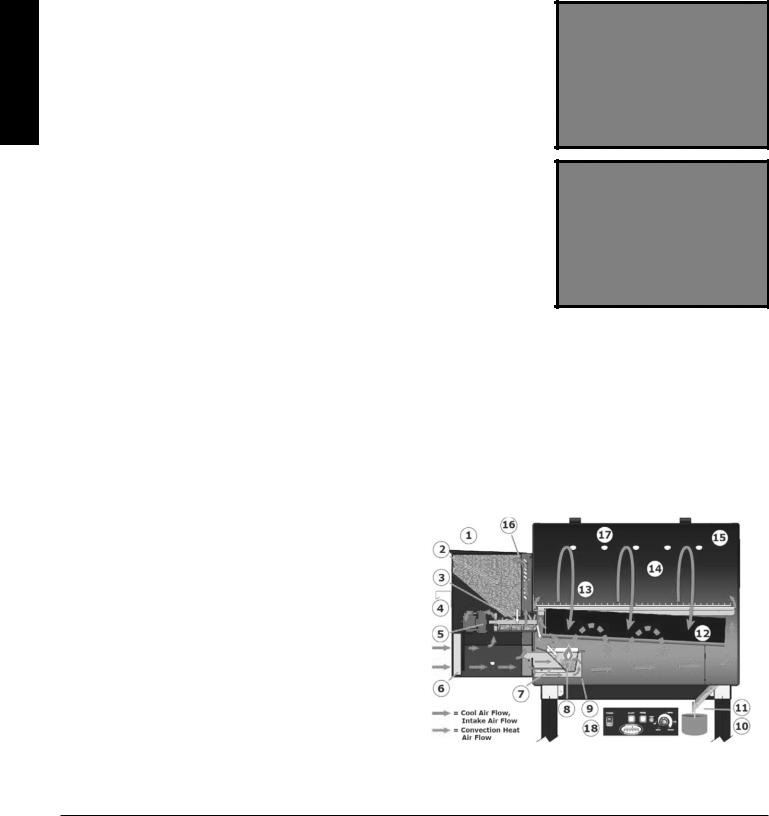
3 COOKING ZONES
Cooking Zone 1 - Main Barrel: 82o - 315oC / 180o - 600oF
•This is where your heat, air and flavor is supplied from for the entire unit. When the dampers inside your hot smoker are completely closed you will maintain convection heat within the main barrel.
17
ENGLISH
•A “CLOSED” arched flame broiler protects the food from direct contact with the flame; gives a large hot metal area to help evaporate the juices back into the cooking resulting in added flavor, channels excess grease directly to a grease pail; and distributes the heat evenly throughout the cooking area.
•An “OPEN” arched flame broiler allows for direct contact of the flame and intense heat to the food. An open flame broiler also results in less air convection within the unit.
•The natural smoke flavor produced by the burning pellets, the “arched flame broiler” and the fan induced “convection cooking” combine to give you the savory flavor and even cooking that is unique to pellet grills and will win you rave reviews each time you use it.
Cooking Zone 2 - Hot Smoker Cabinet: 65o - 176oC / 150o - 350oF
•The bottom cabinet is your hot smoking cabinet. Inside the cabinet, on the left side wall are two dampers. These dampers control the air flow from the main barrel. Play around with these to find what works best for you and your needs.
•Top damper closed/bottom damper open: Gives you additional cooking space while maintaining the convection heat in your main barrel.
•Both dampers open: Maximizes the temperature in your lower cabinet but causes the main barrel to lose convection heat.
Cooking Zone 3 - Cold Smoker/Warming Oven: 15o - 82oC / 60o - 180oF
•The upper cabinet is your cold smoking/warming oven. Use the rear exhaust control panel and the adjustable chimney to reduce the temperature inside of the upper cabinet.
DAMPER CONTROLLED CHIMNEY
•Adjust the chimney damper to create a natural updraft within the unit. This affects both the lower and upper cabinet.
TIP: Your LG Champion series pellet grill can run efficiently over extended periods of time and at different heat output levels, as long as the fuel supply is dry, the burn grate is seated correctly, and timely cleaning and maintenance is performed.
INITIAL SET-UP PROCEDURE
Please note that during shipping, or moving around on your deck, some movement within the grill may have taken place, so a complete visual inspection is required. Please follow these initial set-up procedures to ensure proper and safe operation of your grill.
TIP: It is highly recommended practice to always go through these basic SET UP PROCEDURES, after every 1 to 2 cooking’s. This will ensure proper ignition, heat output and many continuous happy grilling experiences.
Step 1
Open the main SMOKER LID and remove the cooking grids (13).
Step 2
Remove the “arched flame broiler” (12).
Remove the packing material. * The coating on the flame broiler is a food based grease.
Step 3
Remove the stainless steel burn grate (8) and inspect the burn pot (9). Remove any foreign items. Ensure that the air holes in grate (8) and the igniter (7) are clear of debris.
Step 4
Re-install the burn grate (8). Ensure that the stainless steel grate is sitting down and snug in the burn pot (9) and that the igniter is lined up properly with the hole in the burn grate.
18

Step 5
Re-install the “arched flame broiler” (12). The larger piece of the “arch” should be facing upward and the flame slots close to the hopper end of the barrel. This then sits on the mounting bracket and grease divider plate. The slot hooks over the movable hanging bracket found over the pellet fuel drop area. Ensure that this mounting bracket is snug against the barrel. The second piece of flame broiler then fits on top of the first and then slide “closed”.
Step 6
Re-install the cooking grids (13).
Step 7
Ensure all 3 grease drawers are installed, cleaned and ready to go.
Step 8
Open the hopper lid (1) and check for any foreign materials. Fill the hopper (2) with your choice of all natural wood pellet fuel.
Step 9
Open and inspect both of the smoker cabinets. Remove any foreign items.
Step 10
Pull and push on both of the air transfer rods, to ensure easy operation.
Step 11
Plug it in. Start it up. Get grilling!
DIGITAL CONTROL CENTER - G2
This P.I.D. (proportional-integral-derivative) control is very much the same as the control on your kitchen oven. The main advantages are the ability to automatically compensate for the different ambient conditions and fuel types allowing for longer, carefree BBQ as well as the programmable meat probe function.
Remember: Much like your kitchen oven, the ACTUAL temperature does fluctuate up and down depending on weather, the flavor of pellets being used, and the amount of food on the grill.
TEMPERATURE AGREEMENT BETWEEN INSTRUMENTS
The temperature inside of any grill will vary from location to location. Even the instruments calibrated together, will not agree with each other.
ON / OFF TOUCH PAD
This pressure sensitive touch pad is used to turn the control “ON”, which initiates the automatic “START-UP” mode. This is also used to turn the control “OFF”, or activate the “SHUT DOWN MODE.”
PRIME TOUCH PAD
This touch pad performs the same function as it has with any Louisiana Grills board. Asked for from the competition cookers. When the touch pad is pressed and held, the FUEL FEED system will turn and feed more pellets to the burn grate. This can be used to add more fuel just before opening the grill lid, resulting in a quicker heat recovery time.
It can also be used to add more fuel, while smoking, to increase the amount of clean smoke flavor intensity.
COOK TEMPERATURE UP AND DOWN TOUCH PAD
By pressing either the UP or DOWN arrows, the LED read-out can be moved by 5 degree increments. The temperature can be set as low as 82oC / 180oF, for hot smoking to a high of 315oC /600oF, for searing your steaks and hamburgers.
Also used to perform the same task with the meat probe.
LED DISPLAY SCREEN
This screen is used to display temperature read-outs, as well as displaying error messages, and power up read-outs. Temperatures can be displayed in either Fahrenheit or Celsius.
ENGLISH
19

ENGLISH
TEMPERATURE DISPLAY
By pressing the TEMP display touch pad, the LED display screen will show and allow movement in either the “ACTUAL” temperature read-out or the “SET POINT”, desired temperature. The small LED beside both settings is used to indicate which temperature is presently being displayed.
PROBE SELECTION
By pressing the PROBE display touch pad, the LED display screen will show and allow movement in either the “GRILL” probe temperature read-outs or the “MEAT” probe temperature readings. The small LED beside both settings is used to indicate which probe temperature is presently being displayed.
PROGRAMMABLE MEAT PROBE
Designed using the latest in solid state electronics, the digital control center now makes it even easier for anyone to slow smoke, bake or sear like a professional “Pit-master.” Not only will the control give you the ability to set and automatically maintain your desired cooking temperature (82oC / 180oF Hot Smoke to 315oC / 600oF Searing) just like your indoor oven, but now with the addition of a separate food probe, it will cook your food to your desired internal temperature, then adjust the control to a “keep warm” temperature. Along with the true convection cooking within the grill, keeping your culinary delight from drying out, all you have to do is to set it, then relax or even sleep soundly while the digital control center will do the rest.
This screen is used to display that there is no internal (meat) probe connected to the digital control center, when the meat probe selection has been selected.
PROGRAMMABLE INTERNAL FOOD PROBE
The digital control center programmable food probe is the newest addition to the Louisiana Grills family and is a “must have” tool for the beginner or professional “Pit-master.” By simply plugging the internal food probe into the board, then placing the stainless steel probe into your culinary delight, and finally setting your desired meat probe temperature, not only will it cook your primal feast, to your setting, but it will automatically reduce your pit temperature to its lowest setting to keep food perfectly done, the way you like, every time. So sit back, relax or enjoy a good night’s sleep and get ready to “Savor the Flavor.”
HOW TO:
PROBE PLUG-IN
Insert the 3.5mm (⅛ in.) audio-style plug from the food probe into this female adapter. Ensure it is inserted all the way into the plug, you will feel and hear it snap in place. This can be plugged into the board at any time.
CONTROL POWER ON/OFF TOUCH PAD
Press this touch pad to activate the control. Blue LED read-out will light up, the fan will start, the pellets will begin to feed, and the igniter will begin to glow.
GRILL COOKING TEMPERATURE
Press the probe pad to “GRILL.” Press the temp pad to “SET POINT.” Use the cook temp “up” or “down” arrow to select your desired grill temperature from 82oC /180oF to 315oC / 600oF. Press the probe pad a second time to show actual grill temperature.
FOOD PROBE TEMPERATURE
Press the probe pad to “MEAT.” Press the temp pad to “SET POINT.” Using the temp arrows, “up” or “down” to select your desired internal food temperature. The probe can be set from 10oC / 50oF to 107oC / 225oF. Press the temp pad a second time to show the actual meat probe temperature.
TIP: Based on how long you will be away from the grill, set your desired temperature 10 to 15 degrees below your liking, as the food will continue to rise in temperature somewhat, as the grill cools, and idles at the lowest temperature. Ensure it is inserted all the way into the plug, you will feel and hear it snap in place.
“SAVOR THE FLAVOR”
The digital control center will automatically cook your food until the “desired” food probe temperature is met. The control will
20
then automatically drop the “grill” cooking temperature to 82oC / 180oF. It will alert you by an audio “BEEP”, six times. The grill temperature set point will automatically drop to 82oC / 180oF.
TIP: To aid in cleaning, spray the meat probe with a non-stick spray or wipe with cooking oil before using.
TIP: All our digital controls and probes do have a manufacturer +/- tolerance. It is normal for the temperature readings to be off by a few degrees.
OPERATION:
Caution: Both the grill probe and the meat probes are made of high temperature material that can withstand high temperatures, but it is important to avoid exposing these thermocouple wires to direct flame or extremely high temperatures which can exceed their temperature ratings.
MEAT PROBE PLACEMENT
Temperature probe placement is important.
DO NOT use the meat probe when using the flame broiler in the open position.
The stainless steel end of the meat probe, should be inserted into the meat so that the tip is located in the thickest portion of the meat.
The meat should be oriented on the grill, so that the probe wires exit the grill/smoker away from direct contact with the flame or excess heat. The probe wire then can be run to the control a number of ways to aid in keeping out a direct contact with flame.
MEAT PROBE HANGER
There are two holes, found in the hopper end handle that can be used to place your meat probe, when not in use, or to keep the probe in a clean, protected area, until it can be cleaned and stored away.
MAINTENANCE
1.DO NOT leave the probe plugged into the control, when not in use.
2.DO NOT kink or fold the rugged stainless steel mesh protected wires, on either the grill and meat probes.
3.DO NOT roll up the wires in a tight ball. Wires should always be rolled up in a fairly large, loose coil.
4.DO NOT wrap the probe wires in foil.
5.DO NOT place the probe or wires in the dishwasher, or submerge in water. The water could get into the internal wires or connections and short out the probe. This will result in false readings. Once the probes have shorted out, there is no way to bring them back to working status, they must be replaced.
6.DO keep the solid stainless steel probes clean. Both the grill probe and meat probe can be wiped clean, after they have cooled down, with a soapy kitchen scrubby or cloth.
ENGLISH
21

ENGLISH
With today’s lifestyle of striving to eat healthy and nutritious foods, one factor to consider is the importance of reducing fat intake. One of the best ways to cut down on fat in your diet is to use a low fat method of cooking, such as grilling. Because a pellet grill uses natural wood pellets, the savory wood flavor is cooked into the meats, thus reducing the need for high sugar content sauces.
Throughout this manual you will notice the emphasis on grilling food slowly at MEDIUM (135-190oC / 275-375oF) temperature settings. Because of the benefit of convection cooking and the use of the “arched flame broiler” your LG Champion Grill will enable you to avoid flare-ups and maximize the nutritional value of the foods that you cook.
The following is a list of the important tips that will contribute to the cooking perfection that you expect when using your LG Champion pellet grill/smoker.
Environment: As with all barbecues, the outside weather conditions will play a big part in the performance of your smoker and the cooking time needed to perfect your culinary delights. Your LG Champion smoker, because of its single wall construction, should be considered as a 2 to 3 season grill, depending on what part of the country you live in. For greater detail on grilling and weather conditions, see the “HOT” and “COLD” weather tips found at www.louisiana-grills.com.
Grill Placement: All LG grills should always be a minimum of 45.72 cm (18 inches) away from any combustible surface behind or beside the grill. Your grill does come with wheels or casters to make movement easier. If you are able to shelter your smoker from the wind, this will aid in temperature output, heat retention, and heat recovery time when opening the lid. Turning the smoker a ¼ turn, keeping the smoke vent holes out of the wind, will result in better temperature output.
Operating the Grill:
Initial Burn Off
Before cooking on your smoker/grill for the first time, we recommend that you “burn off” the grill to rid it of any foreign matter.
Light and operate the grill on High, or above 232oC / 450oF, with the lid down, for 30-40 minutes.
Lighting your Grill
It is recommended practice to always go through the SET UP procedures after every 1 to 2 uses. This will ensure proper ignition and many happy grilling experiences. Light as per instructions, found in this manual. If the grill fails to light, this is most likely due to a dirty or full burn grate blocking the auto igniter air passages (refer to lighting instructions found elsewhere in this manual).
Pre-Heating
It is extremely important to ALWAYS allow your grill to preheat, reach temperatures over 232oC / 450oF for over 5 to 10 minutes, before cooking, each and every time. This allows the grill and cooking grids to heat up quicker; it burns off any bacteria or foreign material left over; and grill is able to maintain its cooking temperature once your food is place in the cooking area. When you do not take time to PREHEAT, you will find that it takes a much longer period of time to bring both the grill and food to cooking temperature.
Always PREHEAT your smoker with the lid closed. Set your temperature control to 232oC / 450oF, start your grill, and allow your grill to PREHEAT (232oC / 450oF OR OVER) for 5 to 10 minutes. This gives you plenty of time to prepare your food for the grill, as well it is the final step in cleaning your cooking grids.
NOTE: After Pre-Heating is complete, set your desired cooking temperature, and leave your lid open until the actual temperature is close to your desire temperature.
Lid Position
Always cook with the lid closed. Not only does this keep the temperature even, the food will cook faster, and you will use less fuel by taking advantage of the fan forced convection cooking. A closed lid also helps to create that savory smokier flavor. You can slow down your cooking by propping up the lid using a grid lifter.
CAUTION: Grease fires are caused by not properly maintaining your grill, or failing to clean the bottom of the barrel on a consistent basis. In the unlikely event you experience a grease fire while cooking, quickly remove any food items, and then close the lid. If it does not go out in a very short time, open the lid and lightly sprinkle baking soda on the fire. Be careful not to burn yourself. If this does not work, then turn OFF the control board, to stop the pellets from feeding, and shut the lid until the fire is completely out.
22

The following is a list of the important tips that will contribute to the cooking perfection that you expect when using your LG Champion pellet grill/smoker.
Note: The temperature readout on the control board may NOT exactly match the dome thermometer.
High Temperatures 204o - 315oC / 400o to 600oF
The HIGH range will give an oven temperature of over 204o - 315oC / 400 to 600oF, depending on the weather. This setting is used to quickly preheat your grill as well as to finish the cleaning cycles for the cooking grids and the “arched flame broiler.” Could also be used as a HIGH setting in extreme cold weather conditions or if cooking with the hood open. May also be used with the arched flame broiler open to create those “dirty or blue” steaks as well as flame kissed vegetables, garlic toast or even s’mores.
Medium Temperatures 135o - 177oC / 275o to 350oF
This range is best for baking, roasting, and finishing off that slow smoked creation. This range will greatly reduce the chances of a flare up, with the arched flame broiler in the CLOSED position. Great range for cooking anything wrapped in bacon, or where you want control.
Low Temperatures 82o - 122oC / 180o to 250oF
The LOW setting will give an approximate oven temperature of 82o - 122oC / 180o to 250oF. This setting is used to slow roast; to increase the smoke flavor; to keep foods warm; and many other savory things. Highly recommended for the BIG BIRD at
Thanksgiving, Easter ham, or that huge Christmas feast.
Smoking is a variation on true barbecuing and is truly the main advantage of grilling on a wood pellet grill. There are two types of smoking: HOT SMOKING and COLD SMOKING.
Hot smoking, just another name for barbecuing is generally done at 82o - 122oC / 180o to 250oF. Hot smoking works best when longer cooking time is required, such as large cuts of meats, fish, or poultry.
Cold smoking is where the food is located so far away from the fire that it smokes without cooking, and at temperatures of 15o
- 32oC / 60o to 90oF.
TIP: The temperatures listed above are all approximate and will be affected by the outside temperature, the amount and direction of wind present, the length and type of pellet fuel being used and the number of times the lid is opened.
TIP: To intensify that savory flavor, switch to hot smoke (low) temperature range immediately after putting your food on the grill. This allows the smoke to penetrate the meats, before the pores in the meat close at 49oC / 120oF.
After Cooking - “Cleaning Up”
One of the greatest benefits of your LG Champion grill is the minimal clean up required. When you are finished cooking and waiting just a little while to let the flavor set in that prime selection of meat, we recommend the following:
1.Using a long handle grill cleaning brush, brass or soft metal, to remove any food or build-up from the cooking grids, while it is still warm.
2.Turn the temperature control to HIGH (450+) for 5 minutes. Let the grill heat up, then push the STOP touch pad and you’re done. The control will stop feeding pellets, but the fan will continue to burn them properly, till they burn out, and then the unit will shut down automatically in 20 minutes or below 54oC / 130oF.
3.A quick wipe up of the powder coat surfaces, using a cloth, warm water and mild soap, will keep the unit looking like new.
4.Let the smoker cool and put your LG Champion smoker to bed with the optional grill cover.
ENGLISH
23

ENGLISH
GETTING STARTED
START-UP PROCEDURE - AUTOMATIC
Always inspect, and clean if necessary, the burn pot, burn grate, igniter, flame broiler, cooking surfaces, hopper and wood pellet fuel before using your grill.
Step 1: Plug the power cord into a 110Volt grounded electrical outlet. DO NOT break the ground end off the cord or use a nongrounded outlet or extension cord.
Step 2: Lift the hopper lid. Ensure that there are no foreign objects in the hopper or feed system. Fill the hopper with only dry, all natural wood, BBQ wood pellets.
Step 3: Press the ON/OFF touch pad. The “START UP” mode will begin. The feed system will begin to feed fuel at the pre-set software rate, the fan will begin to operate, and the igniter will begin to get hot. The START UP mode is timed to last at least 20 minutes or until the appliance reaches an operating temperature of 65oC / 150oF.
Step 4: Press the ARROW UP button to a HIGH temperature to pre-heat and clean your grill.
NOTE: FOR HEALTH SAFETY IT IS HIGHLY RECOMMENDED TO ALWAYS PREHEAT YOUR GRILL BEFORE ADJUSTING TO YOUR FINAL TEMPERATURE.
Step 5: After allowing the grill to PREHEAT, use the ARROW touch pads to set your desired temperature.
TIP: When reducing your desired temperature to a lower setting, it is highly recommended to lift the lid until the ACTUAL temperature is relatively close to the new DESIRED temperature.
START-UP PROCEDURE - MANUAL
Step 1: Plug the power cord into a 110Volt grounded electrical outlet. DO NOT break the ground end off the cord or use a nongrounded outlet or extension cord.
Step 2: Fill the hopper with dry, all natural, BBQ wood pellets. Ensure that there are no foreign objects in the hopper or feed system.
Step 3: Remove the cooking grids and flame broiler. Remove, clean and replace the burn grate. Step 4: Place two (2) generous handfuls of pellets into the burn grate.
Step 5: Using gelled fire starter, or other approved pellet starter, into the burn grate over the top of the pellets. Step 6: Light the starter using a long fireplace match or long lighter.
NEVER ATTEMPT TO ADD MORE STARTER INTO A FIRE THAT IS ALREADY BURNING OR INTO A HOT BURN GRATE. YOU COULD EXPERIENCE A BURN BACK AND COULD GET SERIOUSLY BURNT.
Step 7: Allow the starter to burn the pellets for the 3 to 5 minutes.
Step 8: Carefully replace the flame broiler and cooking grids.
Step 9: Follow the steps 3 to 5 found in the AUTOMATIC start-up procedures (above).
SHUTTING OFF YOUR SMOKER
Your Champion pellet grill will give you many years of flavorful service with minimum cleaning. An important step is allowing the grill and cooking grids to “self-clean” by running the grill on HIGH or PREHEAT temperatures for 5 to 10 minutes after each use, over 232oC / 450oF.
24

When finished cooking on your Champion, set your desired temperature to 232oC to 260oC / 450oF to 500oF. Let your grill run for 5 to 15 minutes, depending on what you just cooked, to go through its normal cleaning method. If you were preparing meats that were extra greasy, such as anything in BACON, it is a good practice to allow the grill to burn off for an extra 10 to 20 minutes. You could experience a grease fire, but DO NOT PANIC, DO NOT UNPLUG the appliance, just leave the lid closed and let the grill burn itself out naturally. Much like a self-cleaning oven This will greatly reduce the changes of “flare-up” while you are preparing your next savory meal.
When cleaning is complete, simply push the STOP touch pad. Your grill control will begin its automatic SHUT DOWN or COOL DOWN procedure.
•The FEED system will stop feeding fuel.
•The flame will burn itself out naturally.
•The combustion / cooling fan will continue to run until the unit cools to 54oC / 130oF.
•When the procedure is complete the FAN and POWER LED will turn OFF.
If you forgot to grill desert, you can press the START touch pad. If the actual grill temperature is above 65oC / 150oF the grill will continue to operate as normal. If below 65oC / 150oF it will go through the START UP mode again.
GRILL MAINTENANCE
There are two extremes when it comes to keeping the grill clean. Those that must spit and shine the entire grill, in and out, after every use, and those whom are convinced that cleaning only takes away from that barbecue flavor. One simple rule: EVERYTHING
IN MODERATION!
TIP: Be diligent in your cleaning and maintenance program. Taking care of your grill will add years of life to it and keeps it looking great.
STARTING THE SEASON OUT RIGHT
A little time and effort at the beginning of the season will not only help extend the life of your grill but will also ensure the reliability of it. Making you look like the “King or Queen of the grill!” Most of the cleaning techniques are below. Check with your local dealer, they may provide a yearly maintenance program and inspection service.
STAINLESS STEEL WORKING SURFACES
ALWAYS clean dirt and dust off all stainless steel surfaces before yo begin to cook. The dirt can cook into the metal and discolor it. These can be easily cleaned with hot soapy water and a soft cloth. A quick swipe of “stainless steel cleaner” and a soft rag will also work, but you must be careful not to apply it to the painted surfaces or interior parts. With the popularity of stainless steel appliances increasing, there are now many commercial products made to clean and protect stainless steel surfaces.
POWDER COAT OR PAINTED SURFACES
Powder coat or paint and maintaining these coat surfaces are not covered under warranty. This is part of general maintenance and upkeep.
Be sure to cure your brand new LG Champion smoker for at least 30 to 40 minutes before using it for the first time. This allows the finish to cure properly and allows for that “NEW SMOKE SMELL” and manufacturing residue to be burned off. DO NOT use oven cleaner, abrasive cleaners or pads on the finished surfaces.
Once installed, maintaining the initial appearance of any finish is a simple matter. The smoke and grime which builds up on surfaces from time to time contains moisture and salts which will adversely affect the powder coating and must be removed.
Finish coatings should be washed down regularly. The coating should be washed down with soapy water - use a neutral detergent - and rinse off with clean water.
When powder coated items are installed without damage to the powder coating and they are maintained regularly, they should be relatively permanent. The correctly applied coating, although not metallurgic ally bounded to the metal, should not crack, chip or peel as with conventional paint films.
NOTE: If for any reason you do experience scratches, wearing, or flaking of the finish, both powder coat and paint finishes can be touched up or repainted using high heat BBQ paint.
ENGLISH
25

ENGLISH
COOKING GRIDS
When new, wash thoroughly with warm soapy water, place back in the smoker and PREHEAT the grill for 20 to 30 minutes. After the completion of grilling, open the lid and with a long handle grill cleaning brush give the grids a thorough cleaning. If you do not have a cleaning brush use long handle tongs and a balled up piece of aluminum foil wrap. Next turn the grill to “High” or “Preheat” temperature until only an occasional wisp of smoke is seen (about 5 minutes). This will remove most of the material that builds up on the cooking grids.
The next time you grill allow the smoker to PREHEAT for 10 to 15 minutes to complete the cleaning cycle. Give the grids a quick wipe down with your cleaning brush. Applying a thin coating of cooking oil on the grids before placing your meat on them will also decrease your cleaning time, as well as allowing to move your food easily without sticking and tearing.
THE BIG COVER-UP
Your finish will help in protecting your grill from the detrimental effects of weather and outside pollutants. As with any outdoor product, however, a cover is only as good as the maintenance given to the grill. Following the recommended maintenance included in this manual will add greatly to the life of your grill.
Helpful Hints
DO’s
•Keep your LG grill cover clean. This is your best protection against mildew which will form on any dirt or foreign material allowed to accumulate on top or bottom of the fabric. Use a cleaner or product that will not only clean but will also protect.
•Have any small tears or punctures repaired promptly.
•Keep away from pets.
•Keep all shrubs and vines away from your grill cover as many plants contain acids, which harm fabrics.
DO NOT
•Cover your grill while the grill is still hot.
•Store anything on the top of your grill cover.
•Permit leaves, twigs or other organic debris to remain on the cover for long periods of time.
•Use high-pressure hoses or steam to clean.
•Use wire or stuff brushes, harsh detergents, abrasive cleaners or chlorine on your grill cover.
ARCHED FLAME BROILER
This requires very little work, because of its construction and type of material used. From time to time you may need to brush off any burnt leftover, such as melted cheese or that extra thick BBQ sauce. The best time to clean and inspect is when you perform the initial set-up procedures after every 1 to 3 uses.
The grease channels do need to be cleaned from time to time to eliminate build-up, allow the grease to flow freely to the grease catch area and to allow for easy movement of the flame broiler slide top.
The main flame broiler comes with notches on either end. These notches are used to hook the flame broiler to the mounting bracket. This does allow you to place the flame broiler in backwards, so that you can do a burn off of any build up, making clean up easier.
THE COOKING CHAMBER
To start the season fresh, then maybe 2 to 3 times during the grilling season, it is recommended to remove the arched flame broiler and burn grate. Then give the entire interior a good cleaning, de-greasing and vacuum, to remove everything that may have accumulated.
•Ensure that the grill is COMPLETELY COLD before using your shop vacuum or before scooping out the disposing of the ashes.
•You may want to use soapy hot water, a kitchen de-greaser, etc. to clean the entire inside of the barrel. This does reduce grease build-up and the possibilities of flare-ups.
•Check and clean any debris build-up within the grease spout.
26

BURN POT
The burn pot is the pot that the burn grate sits in. It has a solid, sealed bottom along with a slot, to permanently screw the pot to the barrel bottom as well as two screws to secure it to the barrel end.
The burn pot is also sealed to the barrel end, inside and outside, as well as along the bottom.
The main function of the burn pot is to house the igniter assembly and to channel the fan forced air into the burn grate, thus there is very little maintenance required. Occasionally you may either vacuum or brush out any ash build-up or burn debris that has fallen below the burn grate.
It is crucial that the burn is sealed tight to the barrel side wall, tight to the barrel bottom, and is hooked and screwed in place to ensure proper placement. You can check the air tightness of the burn pot, simply by placing some of the fine fly ash around the outside of the pot and turn on your fan. The seal is good if the fly ash is not blown away from the burn pot.
STAINLESS STEEL BURN GRATE
The proper maintenance and seating of the burn grate is crucial to proper grill performance.
Periodically check the air holes found on the sides of the burn grate for any blockage or build-ups.
Using a wire brush or flat-head screwdriver, scrape off any build-up or debris. If there is extreme build-up blocking the holes, you may wish to drill the holes clean.
Using “steel wool” or fine sand paper, wipe down any build-up or burn residue on the slide part of the burn grate. Any residue or debris will stop the pellets from sliding completely into the burn grate.
When re-installing the grate, confirm the proper seating in the burn pot. The grate is seated straight, igniter hole and igniter line up and there is little play from side to side in the burn pot.
IGNITER
The 300 watt electric igniter needs very little maintenance. Confirm that the igniter is free of debris or blockage. Use a coat hanger or skewer to clean any debris out from between the igniter hot rod and the housing.
Check the position of the hot rod, within the igniter tube. The hot rod should be flush or slightly inside, with the angled front end of the housing. You may have to loosen one (1) of the set of screws holding the hot rod in place.
Check that the four (4) set screws securing the hot rod into the stainless steel casing are snug. DO NOT over-tighten.
GREASE CATCH AREAS AND DRAWERS
Always be sure the grease catch area is clean and free of debris. Not only check the drawer, but check and clean the main catch air at the end of the flame broiler, as well as the tube leading from there to the drawer.
During the warmer months empty any grease build-up on a more frequent basis to avoid it from going rancid and to avoid any extra creatures enjoying your grill.
SLOWING DOWN... NOT PUTTING AWAY FOR THE SEASON
We recommend that at least once a month, while your grill is cold, that you should perform not only the above maintenance procedures, but also include the following.
1.Using a stiff vegetable brush, knock-off any build-up scale in the inside walls of your grill.
2.Using an old paintbrush, brush off any ash build-up found inside the firebox, grate and arched flame broiler.
3.Give your entire grill a good cleaning with a shop vac. when cool to the touch, then a quick wash and rinse.
4.Finally, visually inspect the powder coat or painted finish. Touch up any scratches with the proper touch-up paint.
LG CHAMPION FAN COOLED HOPPER ASSEMBLY
WARNING: ALWAYS DISCONNECT THE POWER TO YOUR GRILL BEFORE PERFORMING ANY SERVICE.
Outside the Hopper:
There are a number of very quick checks that should be performed on the OUTSIDE of the hopper assembly:
1.Check and clean any debris from the fan air intake. Eg. Spider webs, tree fluff, etc. Ensure there are no obstructions within 45.72 cm (18 inches) of the fan air intake.
ENGLISH
27

ENGLISH
2.Check and clean debris from the air vents, found on the front and back sides.
3.Inspect and clean the fuel hopper area
Remove the four (4) screws securing the hopper safety screen.
Two (2) in the hopper and two (2) on the access panel, on the end of the hopper.
To aid in protecting the galvanized metal and to allow pellet fuel to slide easily, you can apply a coating of car wax.
Inspect the metal auger area. Check and clean any sawdust build-up and debris. An excess build-up of lines will lead to improper feeding and temperature changes.
Inside the Hopper Access Panel:
You can remove the eight (8) screws securing the “access panel” to the end of the hopper assembly. There are four (4) along the top, two (2) in the middle, and two (2) on the bottom edge.
This will allow you to perform the following within the hopper assembly:
1.Check and clean any debris within the hopper housing.
2.Check and clean any debris from the fan blades or housing.
3.Check and clean any debris from the auger motor.
4.Visual inspection on the wire harness and all wire connections.
5.Ensure all excess wires are not impeding the air from the fan reaching the burn grate.
Upon completion of inspection, replace all screws. Hand start each screw to ensure proper threading.
GRILLING TIPS AND TECHNIQUES
Here are some helpful tips and techniques passed on to us from many Louisiana Grill owners, our staff, families and lots and lots of practice.
Everything is TIME and TEMPERATURE.
Remember a recipe is simply an outline.
•The first time doing a recipe outside on the grill, should be done the exact way you have cooked it inside. Then the next time, you adjust the time and temperature to achieve a new taste. Record your results.
•176oC / 350oF in your indoor oven is 176oC / 350oF in your outdoor grill.
•Before preheating the grill, make sure it is safe, clean and hygienic.
•Always preheat your grill before cooking. Set your desired temperature to above 232oC / 450oF setting, be sure the lid is closed and allow the grill to heat for at least 10-15 minutes or until the thermometer registers over 232oC / 450oF.
•Wipe off all stainless steel surfaces before preheating. Dirt and food stains will cook into the surface.
•“Mise en Place”. Three words that are essential for master grilling. The “mise” refers to basic setup of ingredients and equipment you need at grill side before you start cooking.
•Ensure the ash/drip pan is clean and free from any debris and fat build-up. You may want to line it with foil to speed up your clean up time.
•Always check your pellet fuel hopper for debris and to ensure that you do not run out of pellets before finishing. Use a shop vac to clean out any sawdust build-up.
•To prevent foods from sticking, you can brush or rub cooking oil on the cooking grids. If using a vegetable spray use it only before lighting the grill. Never spray the grill while there is a fire in the burn pot.
•Sear meats and cook with lid down for perfectly grilled food every time.
•All Louisiana Grills are designed to allow even fan forced heat circulation, so foods cook evenly on all sides. Leave at least 2.54 cm (1”) of clearance between the food and the hood for proper heat flow.
•Grilling times in recipes are based on 20oC / 70oF weather and little to no wind. Allow more time on cold windy days, or even for higher altitudes. Allow less time for warmer weather.
•To get better smoke penetration into your meats, go SLOW and LOW. Meat will close its fibers after it reaches an internal
28

temperature of 50oC / 120oF.
•Use long-handled tongs for turning all meats and spatulas for turning burgers and fish. Do not use a fork for turning, as it will pierce the meat allowing the flavorful juices to escape.
•Misting or mopping are great ways to keep meat from drying out when going SLOW and LOW. A mixture of 50/50 apple juice (not cider) and water keeps the meat moist and gives it great color.
TIP: Sauces are best applied near the end of cooking to prevent burning.
•A smart investment to purchase would be a BBQ floor mat. Because of the fan forced convection cooking, a mat would protect that expensive deck or patio stone from the possibility of grease stains or accidental spills.
100% NATURAL HARDWOOD BBQ PELLETS
They are no thicker than the eraser on the end of a pencil. People who see them for the first time think they look like rabbit food, but there is nothing small about the heat energy or flavor in a wood pellet. These clean burning wood pellets generate about 8200 BTU’s per pound with very little ash (0.13 kg per 18.14 kg / 0.3lb per 40lb bag) and low moisture content (5-7%) and are “carbon neutral”.
Barbecue wood pellets are produced in the same matter as wood pellet fuel is produced for home heating, PFI Standard Premium Grade (see pelletheat.org). Pure raw material (sawdust) is pulverized with a hammer-mill and the material is pushed through a die with pressure. As the pellet is forced through the die it is sheared off at a specific maximum length, cooled, screened, vacuumed,
and then bagged into 9.07kg or 18.14 kg (20 or 40 lb) bags.
BBQ wood pellets differ from smoking pellets, used in gas or propane grills, in that most are a combination of the main wood type and a neutral wood type. This is done because of the more intense flavor being generated when using pellets as your main
fuel.
Flavor Guide Lines
Check with your local dealer for flavors available in your area.
|
Beef |
Buffalo |
Lamb |
Pork |
Poultry |
Fish |
Veggies |
Baking |
Hickory |
X |
X |
|
X |
X |
X |
|
|
Mesquite |
X |
X |
|
X |
X |
X |
|
|
Pecan |
X |
X |
|
X |
X |
X |
|
|
Apple |
|
|
|
X |
X |
X |
|
X |
Cherry |
X |
X |
X |
|
X |
X |
|
X |
Competition |
X |
X |
X |
X |
X |
X |
X |
X |
Whiskey |
X |
X |
X |
X |
X |
X |
X |
X |
Barrel |
|
|
|
|
|
|
|
|
Hickory Blend: Rich, smoky bacon like flavor. Considered the “Kings of the Woods” Mesquite Blend: Strong, tangy, spicy flavor. Think Tex-Mex cuisine.
Pecan Blend: Southeast delicate flavor. Smoky, Bacon-like flavor. Similar to Hickory but not as strong. Apple Blend: Smoky, mild sweetness flavor. Highly recommended for baking.
Cherry Blend: Slightly sweet but also tart. Gives a rosy tint to light meals.
Competition Blend: Maple, Hickory & Cherry. Perfect blend of sweet, savory, and tart. Used by many professional “Pitmasters”. Whiskey Barrel Blend: Oak & Whiskey Barrel. Strong, sweet smoke with aromatic tang. Perfect for red meats.
TIP: Always store your pellets in a dry area. Avoid any contact or exposure to moisture. This will cause the pellets to absorb the moisture and will result in lower heat output or cause the pellets to swell and break apart. Use a moisture proof reseal able tub or bucket.
! Proposition 65 Warning: Combustion bi-products produced when using this product contain chemicals known to the State of California to cause cancer, birth defects, and other reproductive harm (Wash hands after handling this product).
This product contains chemicals known to the State of California to cause cancer, birth defects or other reproductive harm (Wash hands after handling this product).
ENGLISH
29

ENGLISH
TROUBLE SHOOTING
Proper cleaning, maintenance and the use of clean, dry, quality fuel will prevent common grill operational problems. However, when your Louisiana Grill is simply operating poorly, or not at all, the following trouble shooting tips may be helpful.
The following is not an exhaustive list. For further details or updated information, please check: our website www.louisiana-grills. com and click on “Customer Support”: contact your local authorized dealer: or contact Dansons Customer Service, toll free at 1-877-303-3134, Monday to Friday, 8 am to 5 pm Mountain Time.
DO NOT RETURN the appliance without calling Dansons Customer Service for assistance.
WARNING: Always disconnect the electrical cord prior to opening the inspection plate of your grill for any inspection, cleaning, maintenance or service work.
NEVER perform any inspection, cleaning, maintenance or service on a HOT GRILL.
PROBLEM |
CAUSE |
SOLUTION |
Control will not |
Grill is not properly |
Ensure all wire connections are firmly connected. |
turn ON |
plugged in. |
Ensure grill is plugged into a working GFCI outlet. |
|
|
|
|
The circuit board has been |
Fuse (5 amp. N.A. or 8 amp.) must be manually replaced. |
|
tripped. |
(See board diagram at the end of this section) |
|
The GFI outlet has been |
Ensure all wire connections are firmly connected and dry. |
|
tripped. |
Ensure GFCI is minimum 10 amp service. |
|
|
|
|
|
|
Temperature |
The temperature setting |
Grill must be unplugged from power source. Remove access end of the hopper. Remove |
Readout. Wrong |
switch is not set correctly. |
control board. Switch temperature slide, located on the rear of the board, to desired |
Measurement |
Board will read oF or oC |
temperature readout. |
|
|
|
"ER-1" Error |
The grill has overheated, |
Turn the grill off and allow to cool. Clean grill interior, remove excess pellets, and confirm |
Message |
possibly due to grease fire |
positioning of all component parts. |
|
or excess fuel. |
|
|
Grill probe wire not |
Ensure grill probe wire is connected correctly to control. |
|
making connection. |
Confirm wire connections and check for any damage. |
|
|
|
"ER-2" Error |
Grill has failed to reach |
Check hopper for sufficient fuel. |
Message |
65oC / 150oF within the |
Check hopper for auger jam and auger movement. |
|
allotted 20 minutes. |
Check burn grate positioning. |
|
|
|
|
|
Check burn grate and pot for ash build-up or obstructions. |
|
|
Check igniter to see if it is heating up and positioned correctly. |
|
|
Check fan to confirm operation and speed. |
|
|
In extreme cold, grill may require a second start. |
|
|
Check “actual” temperature readout of grill probe. To confirm accuracy. Clean probe, if |
|
|
necessary. |
|
Grill will not stay lit or |
Same as above. |
|
above 65oC / 150oF. |
|
|
|
|
"ER-3" Error |
Power interruption. |
Power outage during use. |
Message |
|
Grill may have been unplugged before system shut down. |
|
|
Check loose connection at outlet or within the hopper. |
|
|
|
“noPR” Error |
Meat probe not |
Meat probe not being used. |
Message |
connected. |
Ensure probe is inserted completely in board. |
|
|
Check for pinched, kinked or broken wire. |
|
|
|
30
 Loading...