


You MUST read this manual before operating your grill!
Vous DEVEZ lire ce guide avant d’utiliser le barbecue.
ITM. / ART. 085-3742-4
Model / Modèle : LG, 60800
Important: Read Carefully, Retain For Future Reference
Important : Prenez connaissance de ce document et conservez-le pour référence ultérieure
WOOD PELLET
GRILL
INSTRUCTIONS AND USE
BARBECUE
AUX GRANULES
DE BOIS
INSTRUCTIONS ET USAGE
WARNING: Please read the entire manual before installation and use of this electric, pellet fuel-burning appliance. Failure to follow these instructions could result in property damage, bodily injury or even death. Contact local building or fire officials about restrictions and installation inspection requirements in your area.
AVERTISSEMENT: S’il vous plaît lire l’intégralité du manuel avant l’installation et l’utilisation de cet appareil électronique au combustible de granules. Le non respect de ces instructions peut entraîner des dommages aux biens, des blessures ou même la mort. Contactez vos fonctionnaires de feu ou de construction locales concernant les restrictions et les exigences d’installation dans votre région.
1218780CTM |
LG800 ELITE |

ENGLISH
Dangers & Warnings
“MAJOR CAUSES OF FIRES ARE MAINTENANCE AND FAILURE TO MAINTAIN REQUIRED CLEARANCES TO COMBUSTIBLE MATERIALS. IT IS OF UTMOST IMPORTANCE THAT THIS PRODUCT BE INSTALLED ONLY IN ACCORDANCE WITH THESE INSTRUCTIONS.”
WARNING:
YOU MUST contact your local home association, building or fire officials, or authority having jurisdiction, to obtain the necessary permits, permission or information on any installation restrictions, such as any grill being installed on a combustible surface, inspection requirements or even ability to use, in your area.
YOU MUST keep the entire grill a minimum 14 inches, or a safe distance, from all combustibles.DO NOT install or operate the grill under a combustibleceiling or overhang.
DO NOT use indoors, or in an enclosed, unventilated area.YOU MUST clean and maintain your grill on a regular basis.
YOU MUST, after a period of storage, and/or non-use, check the burn grate for obstructions, foreign objects both inside the grill and the hopper, and air blockage, before use. See instructions in this manual for correct procedures.
DO NOT put abarbeque cover or anything flammable, on or in the storage space area under the barbeque.
DO NOT allow children to use your LG Elite 800 Pellet Grill while unattended. Accessible parts of the barbeque may be very hot. Keep young children and pets away while it is in use.
WARNING:
This appliance is not intended for use by persons (including children) with reduced physical, sensory or mental capabilities, or lack of experience and knowledge, unless they have been given supervision or instruction concerning use of the appliance by a person responsible for their safety.
|
DO NOT use lava rock,wood chucks or charcoal in your LG Elite 800 Pellet Grill. |
DO NOT use accessories not specified for usewith this appliance. |
|
|
YOU MUST should a grease fire occur, turn “OFF” the control and leave lid closed until the fire is out. |
|
DO NOT unplug the power cord. DO NOT throw water on it. DO NOT try to smother the fire. |
|
YOU CAN use a dry chemical “Class ABC” approved fire extinguisher. |
|
YOU MUST use heat-resistant barbeque mitts or gloves when operating barbeque. |
WARNING:
DO NOT transport your LG Elite 800 Pellet Grill while operating or while the grill is HOT. Make sure the fire is completely out and that the grill is completely “Cool to the Touch”
DO NOT enlarge burn grate orifices, igniter holes or burn pots.DO NOT use your grill in therain or around any water source.
YOU MUST ALWAYS unplug the grill before performing any service or maintenance .
If the grill is stored outside during the rainy season or seasons of high humidity, care should be taken to insure that
water does not get into the pellet hopper. Wood pellets, when wet or exposed to high humidity, expand greatly, break apart, and could jam the feed system.
DISPOSAL OF ASHES — Ashes should be placed in a metal container with a tight-fitting lid. The closed container
of ashes should be placed on a non-combustible floor or on the ground, well away from ALL combustible materials, pending final disposal. When ashes are disposed by burial in soil or otherwise locally dispersed, they should be retained in the closed container until all cinders have thoroughly cooled.
WARNING:
DO NOT touch any part of your LG Elite 800 Pellet Grill while the smoker is HOT.
Serious bodily injury could result.
2

Dangers & Warnings
WARNING:
DO NOT over-fire your LG Elite 800 Pellet Smoker. Improper Use Can Cause Uncontrolled Fire.
FUEL—WOOD PELLETS
YOU MUST only use all natural wood bbq pellets, designed for burning in pellet bbq grills. Any other type of fuel burn in this appliance will void the warranty and safety listing.
DO NOT usefuel labeled as having additives.
At this time of printing, there is no “Standard” for BBQ wood pellets, although most pellet mills do use the same
standards used to make “Home Heating” wood pellets. Further information on this “Standard” can be found at www.pelletheat.org or the Pellet Fuel Institute.
Check with your local dealer on the quality of pellets in your area and for information on what can be expected from various brands.
NOTE: Since Dansons Inc.has no control over the quality of pellets, that you use, weassume no liability caused by the quality of fuel used.
CAUTION:
DO NOT use spirit, petrol, gasoline, lighter-fluid or kerosene for lighting or refreshing a fire in your grill.
CREOSOTE
DO NOT operate the appliance if the flame becomes dark and sooty or if theburn pot overfills with pellets.
Turn the unit OFF, let the appliance cool completely, and then inspect the unit. Soot or Creosote may accumulate in the main barrel and along any air leakage or exhaust areas when the appliance is operated under incorrect conditions, such as incorrect burn grate position, blockage of the combustion fan, failure to clean and maintain the burn area, etc.
Soot or creosote is formed when pellets are burned without the correct amount of air to fuel or incomplete combustion,
thus producing a tar like substance and other organic vapours that combine with expelled moisture. The smoke will have a black color to it and the residue left behind on surfaces, will also be black in color.
When ignited, this creosote makes an extremely hot and out of control fire, similar to a grease fire.
If creosote has formed within the unit; allow the unit to warm up at a LOW temperature, turn OFF the appliance, then
wipe out any formation with a hand towel. Creosote is similar to tar, when warmed it will become like liquid, and is much easier to clean in this state.
WARNING:
IF A UNCONTROLLED FIRE DOES OCCURE: CALL FIRE DEPARTMENT.
DO NOT try to move appliance. DO NOT try to smother the fire. DO NOT put water on the fire.
CARBON MONOXIDE: “The Silent Killer”
FOLLOW THESE GUIDELINES TO PREVENT THIS COLORLESS, ODORLESS GAS FROM POISONING YOU, YOUR FAMILY OR OTHERS:
Know the symptoms of carbon monoxide poisoning: Headaches, Dizziness, Weakness, Nausea, Vomiting, Sleepiness,
and Confusion. Carbon Monoxide reduces the blood’s ability to carry oxygen. Low blood oxygen levels can result in loss of consciousness and death.
See a doctor if you or others develop cold or flu-like symptoms while cooking or in the vicinity of the appliance. Carbon monoxide poisoning, which can easily be mistaken for a cold or flu, is often detected to late.
Alcohol consumption and drug use increase the effects of carbon monoxide poisoning.
Carbon monoxide is especially toxic to mother and child during pregnancy, infants, the elderly, smokers, and people with blood or circulatory system problems, such as anemia, or heart disease.
CAUTION!
To prevent fingers, clothing or other objects from coming in contact with the auger, your appliance has been equipped with a metal screen, mounted inside the hopper. This screen MUST NOT be removed unless directed by Dansons Customer Service or Authorized service personal.
ENGLISH
3

ENGLISH
Dear “LG Elite 800” Wood Pellet Barbecue Owner:
Thank you for choosing to purchase a “Louisiana Grill LG Elite 800” wood pellet smoking’ grill.
Cooking with your Louisiana Wood Pellet Grill is about to bring you full circle from the days of the caveman when cooking outdoors with wood was a necessity, to cooking indoors in your modern kitchen and now back to the great outdoors and that savory wood flavor.
Think of your “Louisiana Grill” as an extra stove available to bake, roast, grill, sear, smoke or char-grill food. Anything that can be done in your indoor kitchen can be done on your grill.
Barbecuing is a culture all on its own. Barbecuing provides a form of entertainment, which is relaxed and casual. Your meals can be completely cooked outdoors and the chef is one of the crowd. Keep it simple, be creative, and have some fun.
We’d like to take this opportunity to pass on a few important tips concerning grilling with wood pellets.
Initial set-up of your “Louisiana Grill” is the most important step to ensure the efficient and satisfactory operation of your barbecue for many years to come.
Be diligent in your cleaning and maintenance program. Taking care of your grill will add years of life and keep it looking great.
Use only all natural wood bbq pellets designed to burn in pellet grills.
Ensure your pellet fuel stays moisture free. Open bags of fuel should be stored in an airtight container and empty the hopper if you are not using the grill over longer periods.
Our loyal staff, valued customers, friends and our loving families have all contributed recipes to our cookbook. We have tried to include a broad range of cuisines and styles, starting with Mom’s Great Home Cooking and many, many, many, catering and entertaining experiences to current classics and new soon to be classics.
WE WANT YOU!
If you are interested in contributing a family favourite or competition winner, or any recipe, (especially if it contains bacon) please share it with us.
Fax: 1-877-303-3135, Web www.louisiana-grills.com, Email: sales@dansons.com or Snail Mail: to the address below.
Now go, fill up the hopper, light up that grill and get ready to enjoy,
“World Class BBQ In Your Own Backyard”
Again, we want to say THANK-YOU for your purchase.
Staff and Management
Dansons Inc.
C
Copyright 2015, All rights reserved.
No part of this manual may be copied, transmitted, transcribed, stored in a retrieval system, in any form or by any means without the expressed written permission of,
Dansons Inc.
14608—134th Ave., Edmonton, AB, Canada T5L 4T4
1-877-303-3134
4

Contents
|
2 |
|
|
00 |
|
|
7 |
|
|
|
11 |
|
12 |
|
13 |
|
14 |
|
1 |
|
1 |
|
17 |
|
17 |
|
|
00 |
1 |
|
1 |
|
20 |
2 |
21 |
|
23 |
|
|
|
24 |
|
2 |
|
27 |
|
2 |
|
30 |
|
30 |
|
33 |
|
37 |
|
41 |
|
42 |
ENGLISH
5

ENGLISH
Safety Testing
In accordance with the procedures and specifications listed in UL SUBJECT 2728-2009 “PELLET FUEL COOKING APPLIANCES” AND CANADIAN ULC/ORD C2728 and CSA C22.2 #3 “FOR ELECTRICAL FEATURES OF FUEL BURNING EQUIPMENT”. The LG Series pellet cooking appliance has been independently tested and listed by INTERTEK (an accredited testing laboratory) to ETL, UL, ULC and CSA standards.
This product has been assed and meets EU (European Economic Area) safety, health and Environmental protection requirements.
This product has been assed and meets requirements imposed or covered by regulations in Australia and New Zealand and is represented by RCM mark and number.
NOTE: Please read the label found attached to the inside lid of the hopper, carefully. It contains important information about installation and operation of your pellet cooking appliance.
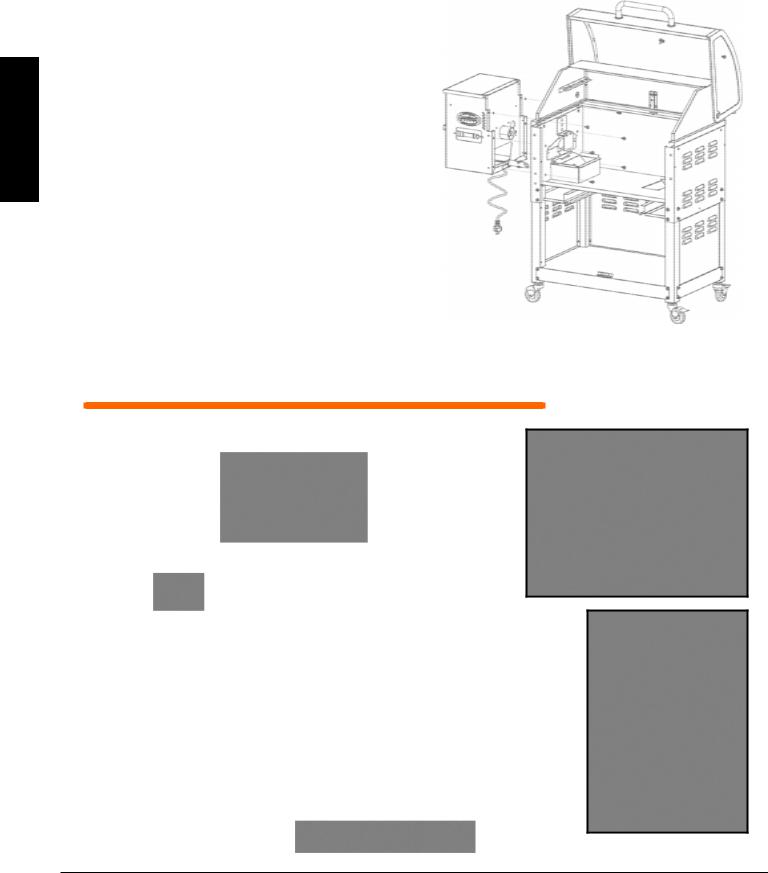
Unpacking Your LG Elite 800 Grill
IMPORTANT NOTICE
*Be sure to inspect the entire grill after removing the protective shipping carton.
*Report any damage to your local dealer immediately.
*Shipping damage is not covered under warranty.
Opening the shipping crate
When you lift the top of the protective shipping carton you found the unit covered in a protective cover bag, protective Styrofoam fillers and marketing material.
WARNING! Please discard the plastic bag and Styrofoam properly
and in a timely matter, as it can be dangerous and can lead to suffocation.
Tip ! Staple your “Bill of Sale” to the inside of this
Owners Manual for future use.
Removing the Grill
The protective cardboard shipping crate makes the perfect protective material while assembling your LG Elite 800 Pellet Smoker.
Using a sharp utility knife, simply cut the plastic straps. Then carefully lift the cardboard box up and away from the cardboard base and smoker. This will provide you easy access to remove the contents from inside the barrel.
6
Unpacking Your LG Elite 800 Pellet Grill
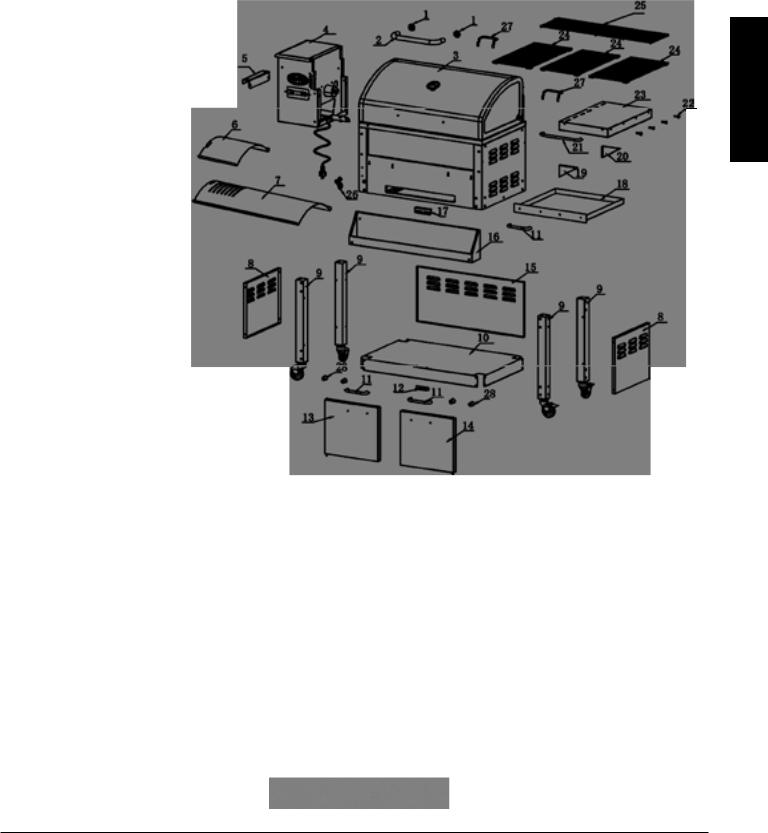
When you open your smoker/grill, please ensure you have and can identify all the following parts: NOTE: Numbers following parts names throughout this manual refer to t he component diagram below.
Items found in the box
1.Main Lid Handle Bezel x 2
2.Main Lid Handle x 1
3.Dome Thermometer x 1
4.Series 5C Hopper Assembly
5.Hopper Handle
6.Flame Broiler Top Slider
7.Flame Broiler Arched Flavor
8.Cabinet End Panel x 2
9.Legs with Locking Casters x with Non-Locking Casters
10.Bottom Cabinet Shelf
11.Chrome Cabinet Handle x 3
12.Cabinet Door Stopper—Bottom
13.Cabinet Door—Left
14.Cabinet Door—Right
15.Cabinet Rear Panel
16.Stainless Accessory Holder
17.Cabinet Door Stopper—Top
18.Greaser Drawer
19.Side Shelf—Left Mounting Brkt
20.Side Shelf—Right Mounting Brkt
21.Side Shelf—Chrome Hanger Bar
22.Side Shelf—Tool Hanger x 4
23.Side Shelf Top
24.Cast Iron Cooking Grids x 3
25.Porcelain Upper Grid x 1
26.Bottle Opener
27.Lifting Handles x 2 Stainless Steel Burn Grate
** Product subject to change without.
Items found in Hardware Pkg.
AA 1/4” - 20 x 3/5” Multi-Head Screws x 42 BB 5/32” - 32 x 2/5” Screw x 28
Printed Material
Owners Manual
Cooking Guide found @ www.louisiana-grills.com
NOTE: For customer convenience, extra screws may have been enclosed.
ENGLISH
7
ENGLISH
Assembly Instruction
ASSEMBLING THE CART KIT
Parts Required:
2 x #8 Cabinet End Panels
4 x #9 Legs c/w Casters
1x #10 Bottom Cabinet Shelf
1x #12 Cabinet Door Stopper
1x #15 Rear Cabinet Panel 16 X Screws (AA)
14 X Screws (BB)
Tools Required:
Large Phillips Screwdriver or
Phillips Drive Bit and Drill
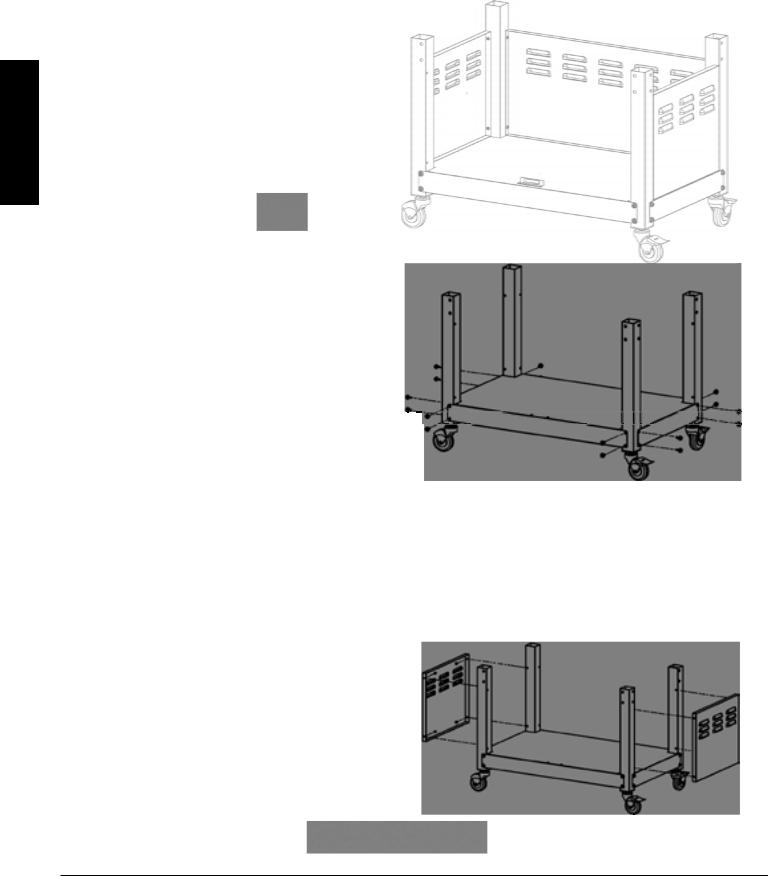
Installation:
Step 1 Attach legs to bottom shelf
The bottom portion of each of the legs, #9, has a threaded plate installed to allow for two (2) locking and two (2) non-locking casters to be pre-installed.
To ease installation, assemble the entire cart components on a raised work bench or flat surface.
Ensure that the shelf is facing with the flat surface facing upwards.
Begin by carefully sliding each of the four (4) legs
into the correct cut-out, ensuring the screw hole patterns match.
NOTE: It is best to start each threaded screw by hand, to ensure the thread DOES NOT cross thread or strip.
Using a Phillips head driver, install four (4) of the supplied (AA),
sixteen (16) in total, screws into each leg, to secure each leg to the shelving unit.
Ensure that ALL screws are firmly, hand-tight, secured.
Step 2 Attach the cabinet side walls
The two (2) vented side panels, #8, are each pre-drilled with four (4) holes to match the hole pattern found on each leg. The finished face
should face outwards and should be flush to the legs.
Starting on one end, line up face panel to the legs.
Hand start each of the four (4) screws (BB) through the panel and into each leg. Eight (8) in total.
Using a Phillips head driver, firmly secure each screw.Repeat procedure for the second side.
8
Assembly Instruction
ASSEMBLING THE CART KIT
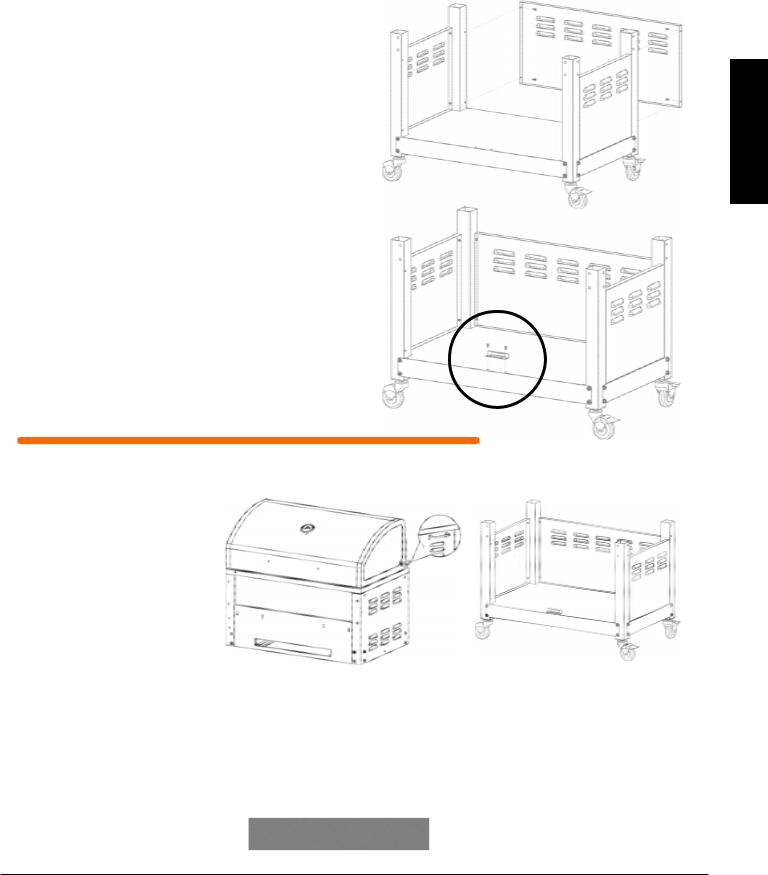
Step 3 Attach rear cabinet wall
The vented rear cabinet panel, #15, is pre-drilled with four (4) holes to match the hole pattern found on the legs. The
finished face should face outwards and should be flush to the legs.
Hand start each of the four (4) screws (BB) through the panel and into each leg.
Using a Phillips head driver, firmly secure each screw.
Step 4 Attach the bottom cabinet door stopper
This 90 degree metal bracket has the bottom plate with a metal wedge, #12.
This wedge is designed to lift, straighten and aid in securing the cabinet doors.
Line up the bracket, #12 with the two (2) holes found in the bottom cabinet shelf #10.
Hand start each of the two (2) screws (BB) through the bracket and into the shelf.
Using a Phillips head driver, firmly secure each screw.
ASSEMBLING THE CART KIT AND COOKING CABINET
Parts Required:
1x Assembled Bottom Cart
1x Upper Cooking Cabinet 2 x #27 Lifting Handles
16 X Screws (AA)
Tools Required:
Large Phillips Screwdriver or
Phillips Drive Bit and Drill
Installation:
Step 1 Secure the bottom cabinet
To prepare for the installation of the upper cooking cabinet
to the bottom cart kit, place the bottom cabinet on a flat, level surface, preferably at ground level..
Lock the two (2) locking casters in place, to aid in making the cabinet stationary.
ENGLISH
9
ENGLISH
Assembly Instruction
ASSEMBLING THE CART KIT AND COOKING CABINET
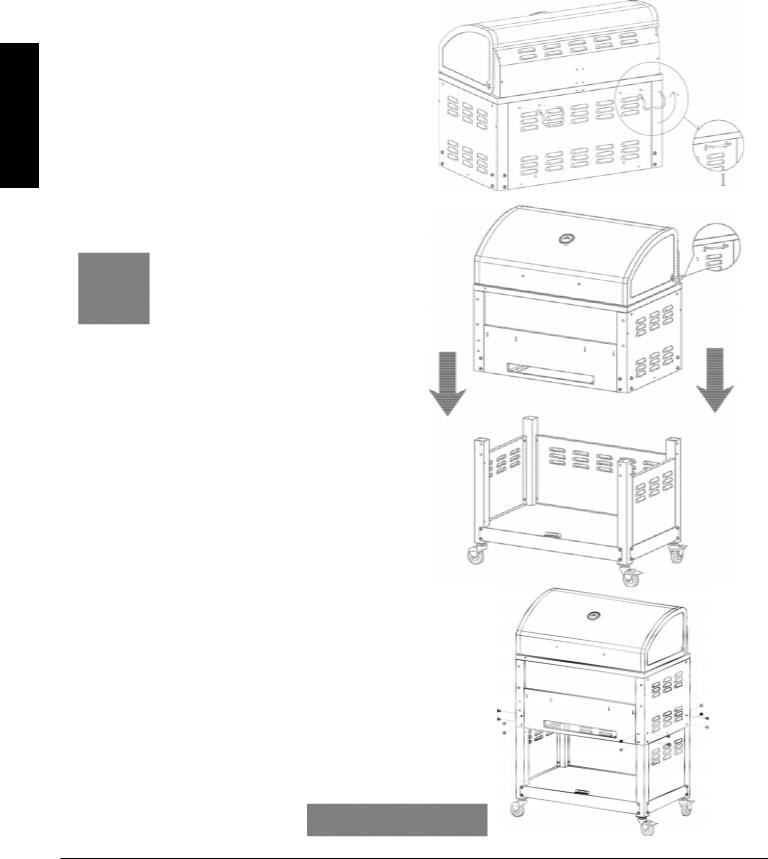
Step 2 Attach lifting handles
To aid in the installation process, the LG Elite 800 does come complete with two (2) Upper Cabinet Lifting Handles, part #27.
Following the diagram, insert each of the handles into the
rear of the upper cabinet. Gentle lift on the handle to secure in place.
NOTE: Before fully lifting,confirm stability and strength of the handle installation.
WARNING! Due to the size and weight of the upper cooking cabinet, the following installation step is a two (2) person job.
NOTE: Damaged caused due to ignoring warning or improper installation is NOT a warranty issue.
Step 3 Attach the cabinets
To aid in the installation process, use the two (2) Upper Cabinet Lifting Handles, part #27. and the grease tray access hole.
It is recommended to wear gloves
Following the diagram, lift the upper cooking cabinet up and directly over the four (4) legs.
Slowly begin to lower the cabinet onto the legs. The legs are designed to fit inside of the upper cabinet.
When fitted properly the upper cabinet should be sitting flush on the to the lower cabinet panels.
Step 4 Secure the cabinets
You will require sixteen (16) screws (AA) and a Phillips screw driver.
|
Starting on one corner, line up the face panel of the upper cooking |
|
|
cabinet with the four (4) holes in each leg. |
|
|
Hand start each of the four (4) screws (BB) through the panel and |
C |
|
into each leg. |
|
|
Using a Phillips head driver, firmly secure each screw. |
c |
|
Repeat procedure for the remaining three (3) sides. |
|
10
Assembly Instruction
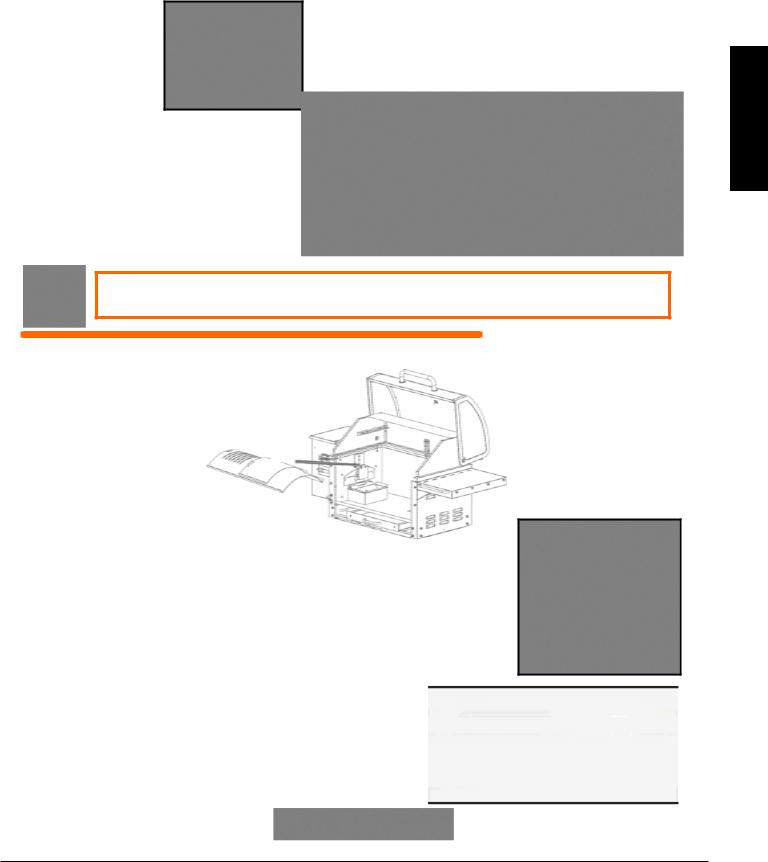
INSTALLING THE HOPPER
Parts Required:
1 x Series 5C Hopper Assembly
1 x Hopper Handle
8 x Multi-Head screws ( AA )
Tools Required: |
A |
Large Phillips Screwdriver or Phillips Drive Bit and Drill
Installation:
Step 1 Installing the Hopper Handle:
The Hopper Handle is multi-purpose. Not only is used to move the unit, but can also be used to wrap the power cord around, for easy storage.
The hopper handle also has two smaller size holes. These are used to insert the meat probe.
Using two (2) Multi-head screws (AA) , secure the handle to hopper access panel, just above the fan intake
through the two (2) large holes provided.
Begin by hand starting the threads, then use your Phillips screwdriver to secure.
Step 2 Preparing for the Hopper:
Place six (6) Multi-head screws (AA) into the main upper cabinet |
C |
cavity to aid in installing the hopper. |
Step 3 Attaching the Grill Probe Wires:
Your Grill/Smoker comes complete with the “Digital Control Center” complete with grill probe and programmable meat probe. The grill probe
has been factory installed in the cabinet, with the excess wire and connections run out through the left end. Be careful not to kink or damage the wires.
The wire connections to the control board can be found inside or taped to the outside of the hopper. Diagram C
To connect the spade connections, carefully lift the entire hopper to the |
D |
|
left hand-side of the upper cooking cabinet. |
||
|
IMPORTANT: Ensure the probe wires are run only through this large hole in the hopper as shown in the diagram. Diagram C
Begin by resting the bottom of the hopper on the inside of the hopper cut .
Support the hopper on your leg as you connect the two spade connections.
Diagram D
After firmly connecting the spade connections, carefully thread
ALL excess wire, as well as the connections, back into the hopper. The wiring must not come in contact with either the fan blades, or the metal auger tube.
IMPORTANT: All excess wire and connections must be placed back in the hopper. Ensure that they DO NOT touch the fan.
ENGLISH
11
ENGLISH
Assembly Instruction
INSTALLING THE HOPPER
Step 4 Attaching the Hopper to the Cabinet:
Carefully slide the entire hopper with the attached grill probe
wires into the hopper cut out area of the cabinet. See Diagram
Begin by slightly inserting the Auger Feed tube into the
correct hole. Then slide hopper fully into location. The hopper should be tight against the inside cabinet wall.
Holding the hopper in place, use one (1) of the Multi-head
screws (AA), from the six (6) you put in the cavity, and begin hand threading it into one (1) of the six (6) holes provided in the upper cabinet cavity.
NOTE: If the holes do not line up, the hopper may need to be fully pushed into place.
Now with the hopper partially secured, hand starting the
remaining five (5) screws (AA). When complete use a Phillips screwdriver to secure.
NOTE: Taking extra care not to strip the screw heads will aid in the future.
INSTALLING THE IGNITER ASSEMBLY:
Parts Needed: |
|
|
|
|
|
|
|
||
2 x Screws (AA) |
|
|
|
|
1 x Igniter Assembly |
|
|
A |
|
(located in hopper) |
|
|
||
Tools Required: |
|
|
|
|
Phillips Screw |
Driver |
|||
|
||||
|
or |
|
|
|
Cordless Drill & Phillips driver
Installation:
The Igniter assembly has been connected to the wire harness at the factory and can be found in the hopper electrical housing.
Reach in through the burn pot and carefully pull the igniter assembly forward |
B |
|
into the burn pot area. Diagram A |
|
|
Line up the two holes on the igniter bracket over top of the two holes found |
|
|
in the bottom of the burn pot. Diagram A & B |
|
|
Using your Phillips screw driver and the two (2) Multi-head screws (AA) |
|
|
secure the igniter assembly to the burn pot. |
Diagram B |
|
12
Assembly Instructions
INSTALLING THE BURN GRATE:
Part Required:
Installation:
The larger lip of the grate, now notched, installs under the pellet fuel deflector.
The bend along the larger lip should also be sitting tight to the back of the burn pot (B)
The front lip of the grate should be sitting flush along the top of the burn pot. ( C )
IMPORTANT: THE PLACEMENT AND MAINTANENCE OF THE BURN GRATE IS VITAL
TO A HAPPY AND FULL RANGE COOKING EXPERIENCE!
INSTALLING THE “ARCHED FLAME BROILER”:
Parts Required:
1 x #6 Flame Broiler Slide Top
1 x #7 Flame Broiler Main
Installation:
To ensure proper height and angle, the bottom plate of the mounting
bracket (A) should not be within the pellet drop chute area. If you do need to adjust the bracket, loosen off the three (3) Phillips screws, lift the bracket and re-tighten the screws.
Take the Arched Flame Broiler,#7, (C) and hold it so that the end with
the cut out and slots is in your left hand. The plate then clips easily over the adjustable mounting bracket. (B)
Take the Arched Flame Broiler Slider Top, #6, (D) and place it
on top of the main piece, #7, ( C).
This plate is used to slide over the flame broiler opening
OPEN for “Direct” flame searing / char broiling,
Remember this will effect the convection flow.
CLOSED for “Indirect Convection Cooking”.
ENGLISH
13
ENGLISH
Assembly Instructions
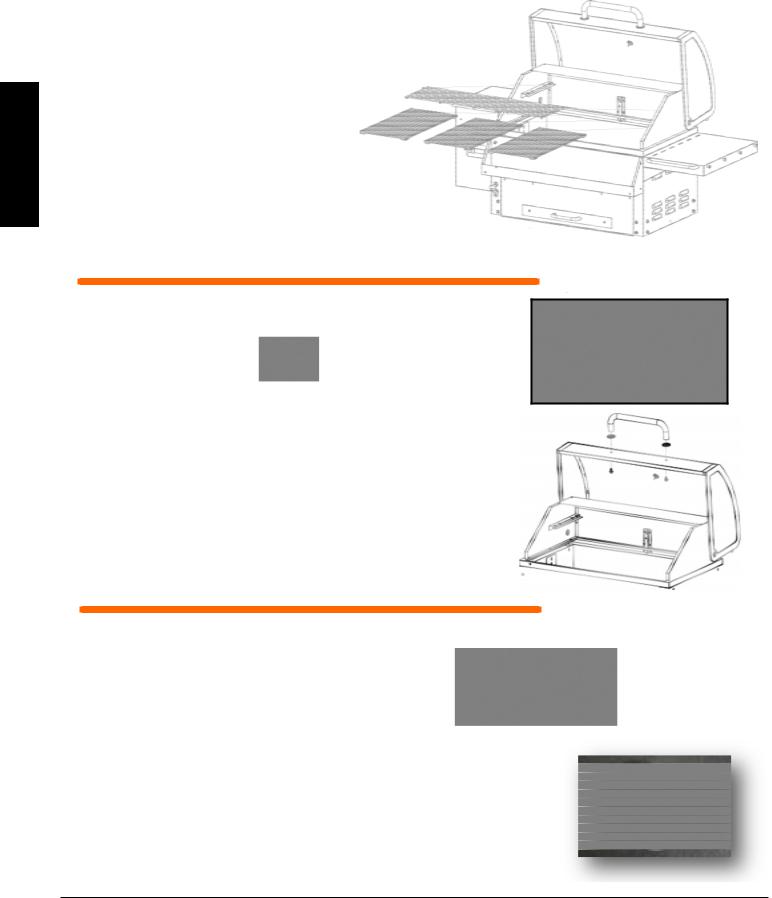
INSTALLING THE COOKING GRIDS:
Parts Required:
3 x #24 Cast Iron Grids
1 x #25 Porcelain Upper Grid
Installation:
Your LG Elite 800 Series Smoker comes complete
With three (3) Cast Iron Cooking Grids, #24 and One (1) Porcelain Upper Cooking Grid, #25 for the upper cooking rack.
NOTE: To maintain the searing and grilling performance of
your grid, as well as their longevity, some special care and maintenance is required. (refer to maintenance section)
INSTALLING THE MAIN LID HANDLE:
Parts Required: |
2 x Multi Head Screws (AA) |
||
Large Phillips Screwdriver or |
|||
2 x |
Bezel—Decorative Washer |
||
Phillips Drive Bit and Drill |
2 x |
Felt Washers |
|
1 x Stainless Steel Handle
Installation:
Insert one screw through the hole provided in the barrel hood.
Install the cardboard washer, then metal bezel on the screw end sticking through the barrel.
Hand thread and tighten this screw to one of the ends of the one piece stainless steel handle.
Follow the same procedure to secure the other end of the handle to
the barrel. |
|
Using a Phillips screwdriver, firmly tighten both bolts until handle |
Bolt |
feels firm. |
CAUTION! DO NOT OVERTIGHTEN! Only a snug fit is required.
INSTALLING THE DOME THERMOMETER:
Parts Required: |
Dome Thermometer |
|
Large Protective Felt |
|
Large Bezel—Decorative Washer |
|
Washer and 9/16” Nut |
Installation: |
|
The thermometer comes complete with its own threaded nut already installed on the thermometer.
Simply spin off the threaded nut and small washer.
Insert the dome thermometer, thru the large bezel and protective felt, before inserting through the hole provided in the top of the hood.
Then firmly hand tighten the nut back onto the thermometer.
NOTE: Do not tighten by spinning the head of the thermometer.
14
Assembly Instructions
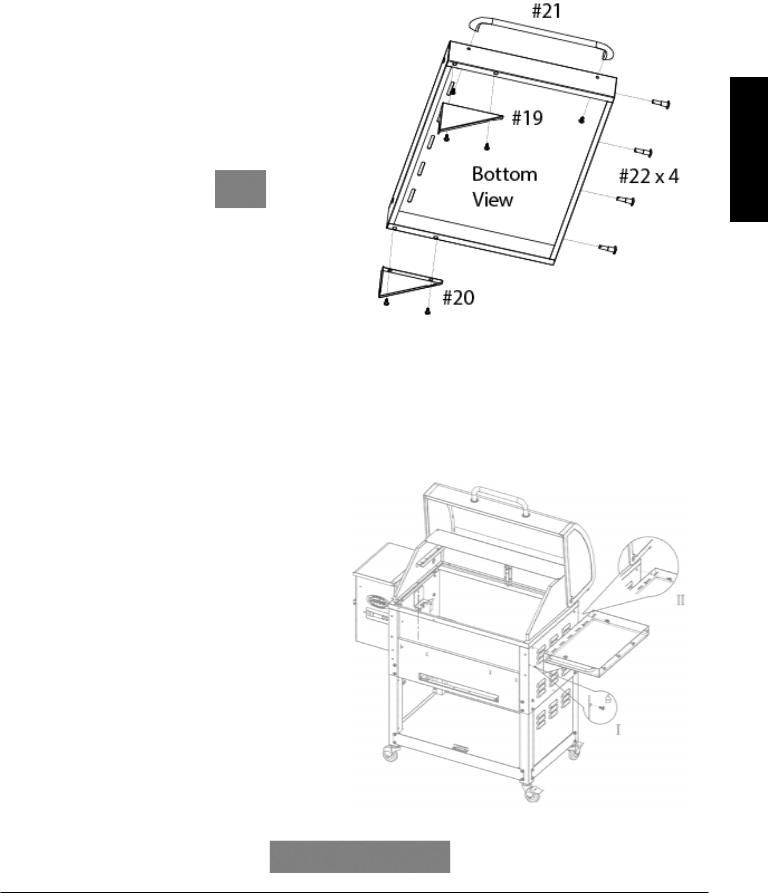
INSTALLING THE SIDE SHELF:
Parts Required:
1 x #19 |
Side Shelf—Left Mounting Bracket |
|
1 x #20 |
Side Shelf—Right Mounting Bracket |
|
1 x #21 |
Side Shelf— 10“ Long Chrome Hanger Bar w/screws |
|
4 x |
#22 |
Side Shelf— Tool Hanger w/nuts |
1 x |
#23 |
Side Shelf Top |
8 x Multi-Head Screws (BB)
Tools Required:
Large Phillips Screwdriver or Phillips Drive Bit and Drill
Installation:
Step 1 # 22 Tool Hangers
Remove the nuts from all four (4) tool hangers.
Insert individual tool hanger into the four (4) holes provided in the side shelf top, # 23.
Hand tighten each nut, Then tighten to a snug, secure fit, using a wrench.
Step 2 # 21 Chrome Hanger Bar
Remove the two (2) screws from the bar hanger.
Insert the screws through the two (2) holes provided in the front of the side shelf top, # 23.
Using a Phillips screwdriver to tighten to a snug, secure fit.
Step 3 # 20 Right (rear) Mounting Bracket & # 19 Left (front) Mounting Bracket
Line up the two (2) holes on the mounting bracket with
the two (2) holes provided on the side shelf top, #23 The straight finished face of the bracket will be flush with shelf.
Using two (2) multi-heads screws (BB) hand start then tighten using a screwdriver.
Step 4 Side shelf to Cabinet
There are four (4) screws (BB) used to secure the shelf to the cabinet. Two (2) through the shelf itself, see II, and one
(1) through each of the mounting brackets #19 & #20, see I.
Begin by hand starting each of the four (4) screws, then
using a Phillips screwdriver tighten to a firm, secure fit.
WARNING!
Extreme care must be taken when lifting the LG Elite 800. The side shelf
is NOT intended for lifting. Use the lifting handles, # 27 found on the rear of the cabinet.
ENGLISH
15
ENGLISH
Assembly Instructions
INSTALLING THE FRONT ACCESSORY HOLDER:
Parts Required:
4 x Screws (AA)
1 x #16 Front Accessory Holder
Tools Required:
 Phillips Screwdriver
Hand start each of the four (4) screws (AA).Using a Phillips screwdriver to secure firmly.
NOTE: DO NOT place or store any plastic or low heat in this holder, for long periods.
INSTALLING THE BOTTLE OPENER AND TOP CABINET DOOR STOPPER:
Parts Required:
4 x Screws (BB) |
1 x #26 Bottle Opener |
Tools Required: |
1 x #17 Top Cabinet Stopper |
|
|
Large Phillips Screwdriver |
or |
Phillips Drive Bit and Drill |
|
The top cabinet door stopper has 2 magnetic strips to aid in the keeping the cabinet doors closed. The top stopper installs to the bottom skirt of the Upper cooking cabinet.
The bottle opener installs on the left hand side main frame.
Hand start each of the four (4) screws (BB).Using a Phillips screwdriver to secure firmly.
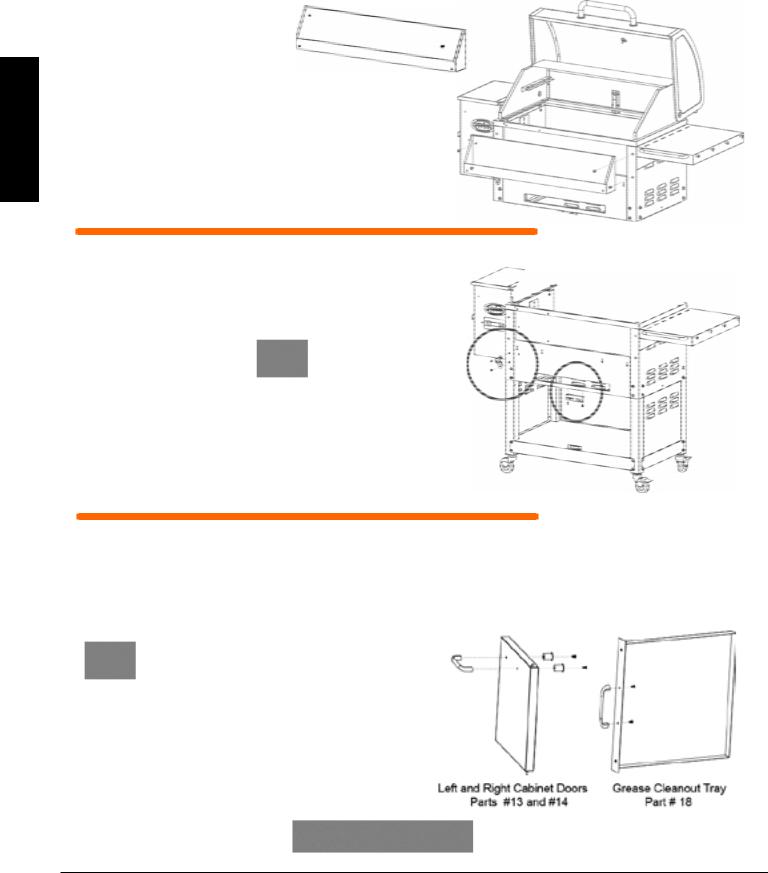
INSTALLING THE DOOR AND DRAWER HANDLES:
Parts Required: |
1 x #13 |
Left Side Cabinet Door |
||
6 x Screws (BB) |
1 x #14 Right Side Cabinet Door |
|||
1 x |
#18 Grease Drawer |
|||
|
||||
|
3 x |
#11 Chrome Handles |
||
Tools Required:
Large Phillips Screwdriver or
Phillips Drive Bit and Drill
Both Cabinet Doors as well as the Grease Drawer require the same size handles.
Hand start each of the six (6) screws (AA).Using a Phillips screwdriver to secure firmly.
16

Assembly Instructions
INSTALLING THE DOORS AND DRAWER:
Parts Required:
1 x #13 |
Left Side Cabinet Door - Assembled |
|
1 x |
#14 Right Side Cabinet Door - Assembled |
|
1 x |
#18 |
Grease Drawer - Assembled |
Cabinet Doors
To install the cabinet doors simply PUSH down on the
top door hinge pin (see diagram ) while inserting the bottom door hinge pins into the holes supplied in the bottom shelf.
When the top door hinge pin is lined up with the top Cabinet holes, release the spring loaded pins.
Grease Drawer
Simply slide the drawer into the opening supplied.
TIP To aid in cleaning and reduce maintenance, line the grease drawer with foil, or a thin layer of sand.
FINAL INSPECTION AND CLEANING:
ALWAYS clean dirt, dust and oils from ALL stainless steel surfaces before you use the unit. This can cook into the metal and discolor it.
Using a soft cloth and hot soapy water, thoroughly clean all surfaces and ensure all screws are secure. Stainless Steel Cleaner and a soft rag can be used on all stainless surfaces.
HOOKING UP TO POWER:
AT HOME
This appliance requires 110 Volt, 60Hz, 5amp service.It must use a 3 prong grounded plug.
The “Digital Control Center” Oven Temp Control uses a 1 1/4” x 1/4”, 5 amp 110 volt to protect the board..
GFI Outlets
This appliance will work on most GFI Outlets. Recommended size 15 amp.
If your GFI outlet is highly sensitive to power surges, it will very likely trip during the ignition
phase of operation. During the ignition phase, the igniter is drawing 300—700 watts of electricity which can be too much power for a GFI outlet to handle. The quality of the GFI
does not matter, rather the sensitivity. Each time a GFI trips it does increase in sensitivity. Solution: 1. Install a brand new GFI .
2. Plug the appliance into a non-GFI outlet.
ON THE ROAD
By disconnecting the Igniter, from the main wiring harness, your grill can be run
using a 12 volt , 100 watt “POSITIVE WAVE LENGTH” inverter plugged into your automobile outlet. Then light your smoker using the manual method. (found in lighting instructions)
If you do want to continue to use the automatic igniter, it is recommended to use a minimum of a 1000 watt “POSITIVE WAVE LENGTH” inverter.
ENGLISH
17
ENGLISH
Knowledge is Power
How Your LG Elite 800 Smoker Works 101
The perfect barbecue experience starts with filling your hopper (2) with all natural wood pellets.
Press the “START” touch pad (18), this activates the “Fan” (6) which is used to cool the hopper (2),
causes the pellets to burn (8) and results in convection cooking (14). It also activates the electronic Auto Igniter (7), and the pellet feed system (3,5).
A motorized Auger Motor (5) and Metal Auger Shaft (3), deliver the pellets to the burn grate (8). Your Country
Smoker uses “Top Feed” technology, which means the Auger (3,5) delivers the pellets up above the burn grate (8) and then the fuel drops into the burn grate. The strength of the auger motor (5), the metal shaft (3) and the open design reduce the possibilities of “jams” and allows for the use of less than premium quality fuel.
Adjusting the temperature setting on the “Digital Control Center” Board (18) sets the speed of the feed, thus the
temperature output. This control is fully adjustable, from hot smoke 180° F to 600° F searing and shows both “Desired” and “Actual” grill and meat probe temperature readings.
The “Electronic Auto Igniter” (7) activates until the unit reaches 150°F, igniting the pellets in the burn grate (8).
The Combustion / Cooling fan (6) cools the hopper (16); provides combustion air to the burn grate (8); and causes air movement in the cooking area (14), resulting in convection cooking.
The fuel burns in the burn grate (8) hot and intense, somewhat like a forge. The fly ash is directed downward by the “Arched Flame Broiler” (12) and can be cleaned out periodically from inside the bottom of the barrel.
A CLOSED “Arched Flame Broiler” (12) protects the food from direct contact with the flame; gives a large hot
metal area to help evaporate the juices back into the cooking resulting in added flavor; channels excess grease directly to a grease pail (11); and distributes the heat evenly throughout the cooking area.
The natural smoke flavor produced by the burning pellets, the “Arched Flame Broiler” (12) and the fan induced
“Convection Cooking” (14) combine to give you the savory flavor and even cooking that is unique to pellet grills and will win you rave reviews each time you use it.
TIP Your LG Elite 800 Series Pellet Grill can run efficiently over extended periods of time
and at different heat output levels, as long as the fuel supply is dry, the burn grate is seated correctly, and timely cleaning and maintenance is performed.

 Hopper


“Digital Control Center” Board
Locking Casters
18

Knowledge is Power
Your New LG Elite 800
Wood Pellet Cabinet Grills
Large Hoppercapacity
Easy flip up top, with rounded Dome Thermometer edges
Time proven Metal
Auger Feed System
Fan Forced Combustion,
Cooling and
Convection Cooking.
“Digital Control Center” Control w/ Programmable Meat Probe
Electric Igniter eliminates the need for matches & starter fluids.
Full Range Oven Temperature 180 to 600°F, giving more cooking options; hot smoking to searing.
Primer Button aids in quicker heat recovery or increasing smoke intensity.
2 x Locking Inline Casters
** Product subject to change without.
Full length
Upper Cooking Rack
Stainless Steel
Cabinet Doors
Stainless Steel,
Double Lined Hood
Solid Side Shelf with Tool Hangers and Hanger Bar
Full Length, Stainless
Steel, Accessory Shelf
Stainless Steel,
Grease Pull Out Drawer
Heavy-duty engineered cabinet, doors and frame
MODEL |
UNIT |
COOKING AREA |
ELECTRIC |
SIZE H X W X D |
WEIGHT |
LG |
Elite |
29.5” x 19.5” |
110 Volt 60Hz 5 Amp |
48” x 57” x 23.5” |
189 lbs.. |
|
800 |
575 sq. in.—primary |
3 prong grounded plug |
|
|
|
|
28” x 8” |
15 amp GFI |
|
|
|
|
232 sq. in—upper |
|
|
|
|
|
807 sq. in—Total |
|
|
|
OPTIONS
Custom Cover
Silk Screened heavy duty 600 denier, polyester canvas, double stitched,
Polyurethane interior, tightening strap.
ENGLISH
19

ENGLISH
Knowledge is Power
Digital
 Control
 Center G2
This control is very much the same as the control on your kitchen oven. The main advantages are the ability to automatically compensate for the different ambient conditions and fuel types allowing for longer, carefree bbq as well as the Programmable Meat Probe function.
Remember: Much like your kitchen oven, the ACTUAL G 2 temperature does fluctuate up and down depending on
weather, the flavor of pellets being used, and the amount of food on the grill.
.
TEMPERATURE AGREEMENT BETWEEN INSTRUMENTS
The temperature inside of any grill will vary from location to location. Even instruments calibrated together, will not agree with each other.
to turn the control “ON”, which initiates the Automatic “START-UP” “OFF”, or activate the “SHUT DOWN” MODE.
as it has with any Louisiana Grills board. Asked for from the is pressed and held, the FUEL FEED system will turn and feed
used to add more fuel just before opening the grill lid, resulting in used to add more fuel, while smoking, to increase the amount of
DOWN TOUCH PAD
the LED read-out can be moved by 5 degree increments.
for hot smoking to a high of 600°F, for searing your steaks and task with the meat probe.
temperature readouts, as well as displaying error messages, and can be displayed in either Fahrenheit or Celsius.
the LED display screen will show and allow movement in either the “SETPOINT” or desired temperature. The small LED beside both
is presently being displayed.
the LED display screen will show and allow movement in either or the “MEAT” probe temperature readings. The small LED beside
temperature is presently being displayed.
MEAT PROBE
in solid state electronics, the Digital Control Center now makes to slow smoke, bake or sear like a professional “Pitmaster”. Not you the ability to set and automatically maintain your desired
°F Hot Smoke to 600 °F Searing) just like your indoor oven, but a separate food probe, it will cook your food to your desired
adjust the control to a “keep warm” temperature. Along with the within the grill, keeping your culinary delight from drying out, all it, then relax or even sleep soundly, while the Digital Control
display that there is no internal (meat) probe connected to the when the meat probe selection has been selected.
20
Knowledge is Power
How the Board Works 101
START-UP mode
Allows electricity to flow to all the electrical components for 20 minutes. This is a software set program that will automatically start the combustion/cooling fan, the igniter and the feed system at a preset rate, until the grill probe reaches a temperature of 150°F. Once met, the igniter will shut off and the feed rate is controlled by the control board..
If for any reason the 150°F is not reached in 20 minutes, the control will turn OFF and an ER-2 will display on the screen.
SHUT DOWN mode
When finished “Savoring the Flavor”, simply push the OFF touch pad. The control will turn off only the feed system, allowing the fan to continue to run not only to burn out the fuel, clean and efficiently, but also to cool down the grill. When the grill probe reaches 130°F the control will shut off completely.
Fan Cooled Hopper
The entire line of LG Series Grills utilize the exact same hopper component parts.
To increase the life of your grill and its main working component parts the Combustion /
Cooling fan is used to perform 3 main functions:
1.Pressurize the internal hopper compartment to cool the wiring, electrical component parts and the wood pellets.
2.Forces constant air movement between the hopper and the grill barrel wall. Because of higher temperatures needed for searing and because of the longer length of time a pellet grill can operate, such as slow smoking a whole hog, air movement is used to provide an air barrier between the two surfaces.
Ensure the air slots found on the front and back of the hopper do not get blocked off, at any time.
3.To provide combustion air, allowing the pellet fuel to burn properly. The fan forced air is then used to provide “Convection Cooking” within the smoking grill.
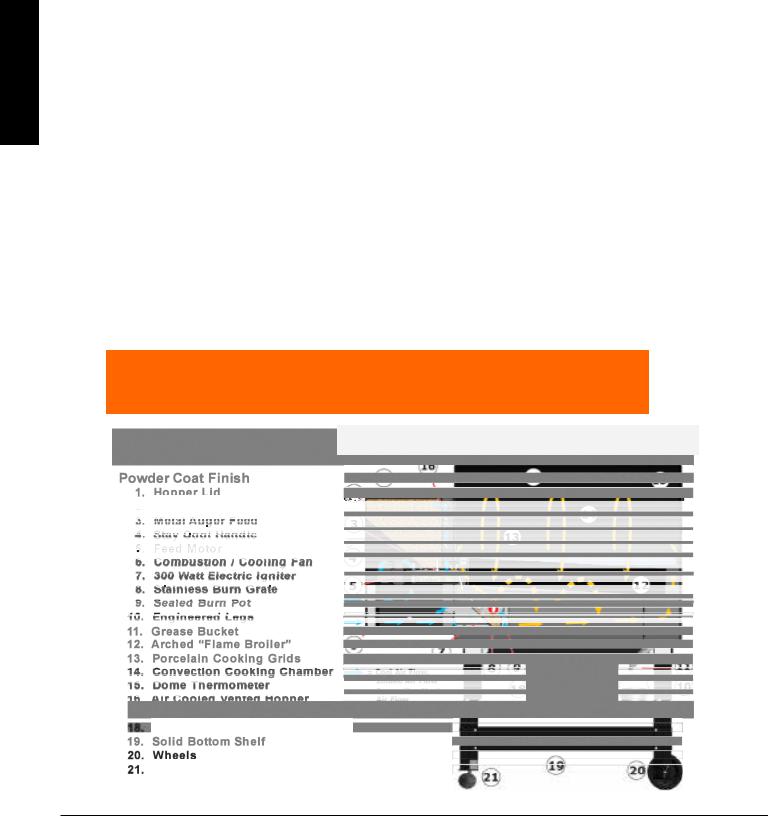
Powder Coat Finish
Louisiana Grills uses a “High Heat Powder Coat” finish throughout the entire line of the smokers. This High Heat finish is rated for 1000°F. This is done to allow for easy and trouble free maintenance, and adding to the life of your smoking grill. Powder coating is environmentally friendly and produces an excellence and superiority of finish that customers count on. Maintaining the initial appearance of a powder coating is a simple matter. If the finish does scratch, or needs to be “freshenedup” it is important to use a touch-up paint ( High Heat BBQ) to repair it as soon as possible.
(see maintenance for further detail)
Grease Drawer
All LG Series Smokers use the “Arched Flame Broiler” system that channels any excess grease, that does not evaporate, directly to a sealed grease catch area. From here any excess grease is directed to the drop spout where it is disposed in, an easy to clean or replace, metal tray.
Allow the grease to cool before removing the drawer.
TIP: Line the grease drawer with foil or a thin layer of sand to aid in maintenance.
Hopper Screen
All LG Series use a metal screen, mounted inside the hopper, to protect fingers, clothing or other objects from coming in contact with the moving metal auger. This screen can not be removed unless directed by Dansons Customer Service or authorized service personal, to perform service work.
ENGLISH
21

ENGLISH
Knowledge is Power
Arched Flame Broiler
All LG Series models come with a 14 gauge “Arched Flame Broiler”, designed to withstand high temperature and give years of performance. The Arched Flame Broiler, when closed, has been designed to keep the flame out of direct contact with your cooking surface, thus helping to reduce the chance of flare-ups. The arched design increases the amount of hot surface area to allow more fats and juices from the meats to evaporate a smoke flavor, back into meat. As well you will note the bent edges running down the length of the back and front of the angled, arched steel, these are to
Unique Feature help in channeling the excess grease directly to the one end of the smoker where it is then allowed to collect in a convenient removable pail. The unique design also directs the majority of fly ash down toward the bottom of the barrel, while allowing for the fan forced heated air to circulate around the barrel causing convection cooking.
Sliding the Flame Broiler OPEN allows for “Direct Flame” cooking and temperatures as high as 1000°F. This is used to “Flame Kiss” or broil steaks, roasts, or vegetables.
Automatic Igniter (#7)
The 300 watt electric igniter eliminates the need for messy starter fluids or gels. It is safe and easy to start, even the little beginner “Pit Master” can start a LG Series. The igniter is simply a hot rod encased in a stainless steel holder. This style of igniter has been used throughout the pellet stove industry for years. The combustion/cooling fan blows air into the back of the igniter assembly, surrounding the hot rod. Then the super heated air exits through the open end, near the back of the burn grate. As the pellets begin to heat up they eventually break out in flames, this is known as spontaneous combustion. The igniter will stay activated for 7-15 minutes.
If for any reason the igniter fails, you can start the grill manually.
NOTE: The igniter can be disconnected, to allow your LG Series smoker to run with a minimum 100 watt inverter. (see manual starting procedures, further in this manual.)
Burn Grate (#8)
The burn grate is constructed out of stainless steel and is the heart of your grill. The burning temperature in the grate can reach temperatures of 1700 to 2000°F. The air holes are designed to allow the right combination of fan forced air to force the wood pellets to burn hot and clean while grilling or allow them to smolder and produce the savory smoke while in the smoke temperature. The back of the burn grate has a large oblong hole in the back to allow the hot igniter air to come through, causing the pellets to catch fire.
NOTE: The burn grate should be checked after every MAJOR use to ensur e that the combustion air holes are not clogged and to ensure the igniter hole is clean.
Burn Pot (#9)
The burn pot is used to hold the Burn Grate, the igniter assembly, and to channel the fan forced combustion air. The pot has been designed to aid in cleaning and replacement of the igniter. It isveryimportant that the burn pot is seated and secured properly in order to ensure proper combustion and heat output.
Auger Feed System
The heart of the feed system is a time proven, metal auger (4) and high torque auger motor (5). This combination allows for different quality of pellet fuels to be used while reducing the possibilities of “jams” taking place. The metal auger design also helps in maintaining a constant and even feed of the fuel to the fire, resulting in better and consistent temperature control. The Auger Feed System is run by a 2 rpm motor. (see control board, Digital Control Center, for further information).
22

Knowledge is Power
100% Natural Hardwood Wood BBQ Pellets
They are no thicker than the eraser on the end of a pencil. People who see them for the first time think they look like rabbit food, but there is nothing small about the heat energy or flavor in a wood pellet. These clean burning wood pellets generate about 8200 BTU’s per pound with very little ash (.3lb/40lb bag) and low moisture content (5-7%) and are “carbon neutral”.
Barbecue wood pellets are produced in the same matter as wood pellet fuel is produced for home heating, PFI Standard Premium Grade (see pelletheat.org). Pure raw material (sawdust) is pulverized with a hammer-mill and the material is pushed through a die with pressure. As the pellet is forced through the die it is sheared off at a specific maximum length, cooled, screened, vacuumed, and then bagged into 20 or 40 lb. bags.
BBQ wood pellets differ from smoking pellets, used in gas or propane grills, in that most bbq pellets are a combination of the main flavor and a neutral flavor. This is done because of the more intense flavor being generated when using pellets as your main fuel.
Flavor Guide Lines
Louisiana Grills is always looking for new existing blends of wood, from coast to coast.
W isconsin Hickoryand Maple blend
Rich, smoky bacon like flavor. Considered the “Kings of the Woods”
|
eorgia Pecan and Maple blend Southeast delicate flavor. |
G Smokey, Bacon-like flavor. Similar to Hickory but not as strong. |
|
T |
exas Mesquite and Maple blend |
Strong, tangy, spicy flavor. Think Tex-Mex cuisine. |
|
N ew England Apple and Maple blend
Smoky, mild sweetness flavor. Highly recommended for baking.
P ennsylvania Cherry and Maple blend
Slightly sweet but also tart. Gives a rosy tint to light meats.
C ompetition Blend
Maple. Hickory. Cherry
Perfect blend of sweet, savory and tart. Used by many professional “Pitmasters”.
T ennesse Whiskey Barrel
Strong, sweet smoke with aromatic tang. Perfect for red meats.
TIP Always store your pellets in a dry area. Avoid any contact or exposure to
moisture. This will cause the pellets to absorb the moisture and will result in lower BTU output or cause the pellets to swell and break apart.
Use a moisture proof re-sealable tub or bucket.
ENGLISH
23

ENGLISH
Getting Started
Set Up Procedure
Please note that during shipping or moving around on your deck, some movement within the grill may have taken place, so a complete visual inspection is required. Please follow these Initial Set-Up procedures to ensure the proper and safe operation of your grill.
TIP It is a highly recommended practice to always go through these basic SET UP PROCEDURES, after every 1 to 2 cooking's. This will ensure proper ignition, heat output and many continuous happy grilling experiences.
Step 1
Open the SMOKER LID and remove the Cooking Grids (13).
Step 2
Remove the “Arched Flame Broiler” (12). Clean off any excess food drippings or grease build-up.
Step 3
Remove the Stainless Steel Burn Grate
(8) and inspect the Burn Pot (9). Remove any foreign items. Ensure that the air holes in the grate (8) and the Igniter (7) are clear of debris.
.
Step 4
Re-install the Burn Grate (8). Ensure that the stainless steel grate is sitting down and snug in the burn pot (9) and that the igniter is lined up properly with the hole in the burn grate. You may have to gently lift up or down on the igniter to align with the hole.
Step 5
Re-install the “Arched Flame Broiler” (12). The larger piece of the “Arch” should be facing upward and the flame slots close to the hopper end of the barrel. This then sits on the mounting bracket and grease divider plate. The slot hooks over the moveable hanging bracket found over the pellet fuel drop area. Ensure that this mounting bracket is snug against the barrel. The second piece of Flame Broiler then fits on the top of the first and then slide “Closed”.
Step 6
Re-install the Cooking Grids (13)
Step 7
Ensure the Grease Drawer (11) is installed, cleaned and ready to go.
Step 8
Open the Hopper Lid (1) and check for any foreign materials. Fill the hopper (2) with your choice of all natural wood pellet fuel.
Step 9
Plug it in. Start it up. Savor the Flavor !
24

Getting Started
With today’s lifestyle of striving to eat healthy and nutritious foods, one factor to consider is the importance of reducing fat intake. One of the best ways to cut down on fat in your diet is to use a low fat method of cooking, such as grilling. Because a pellet grill uses natural wood pellets, the savory wood flavor is cooked into the meats, thus reducing the need for high sugar content sauces.
Throughout this manual you will notice the emphasis on grilling food slowly at MEDIUM (275—375°F) temperature settings. Because of the benefit of convection cooking and the use of the “Arched Flame Broiler”, your LG Series will enable you to avoid flare-ups and maximize the nutritional value of the foods that you cook.
Following is a list of the important tips that will contribute to the cooking perfection that you expect when using your LG Elite 800 Pellet Grill / Smoker.
Environment
As with all barbecues, the outside weather conditions will play a big part in the performance of your smoker and the cooking time needed to perfect your culinary delights. Your LG Smoker, because of its single wall construction, should be considered as a 2 to 3 season grill, depending on what part of the country you live in. For greater detail on grilling and weather conditions, see the “HOT and COLD” weather tips found further in this owners manual.
Grill Placement
All LG Grills should always be a minimum of 14 inches away from any wall behind the grill. Your grill does come with wheels or casters to make movement easier. If you are able to shelter your smoker from the wind, this will aid in temperature output, heat retention, and heat recovery time when opening the lid. Turning the smoker a 1/4 turn, keeping the smoke vent holes out of the wind, will result in better temperature output.
Operating the Grill
Initial Burn Off
Before cooking on your smoker / grill for the first time, we recommend that you “Burn Off” the grill to rid it of any foreign matter. Light and operate the grill on HIGH, or above 500°F, with the lid down, for 30—40 minutes.
Lighting your Grill
It is recommended practice to always go through the SET UP Procedures after every 1 to 2 uses. This will ensure proper ignition and many happy grilling experiences. Light as per instructions, found in this manual. If the grill fails to light, this is most likely due to a dirty or full burn grate blocking the auto igniter air passages. (refer to lighting instructions found elsewhere in this manual).
Should your auto igniter refuse to ignite the wood pellets, it is easy to light your grill manually with a match and lighting agent. (refer to manual lighting instructions found elsewhere in this manual).
Pre-Heating
It is extremely important to ALWAYS allow your grill to preheat, reach temperatures over 450°F for over 5 to 10 minutes, before cooking, each and every time. This allows thegrill and cooking grids to heat up quicker; it burns off any bacteria or foreign material left over; and grill is able to maintain its cooking temperature once your food is placed in the cooking area. When you do not take the time to PREHEAT, you will find that it takes a much longer period of time to bring both the grill and food to cooking temperature.
Always PREHEAT your smoker with the lid closed. Set your temperature control to 450°F, start your grill, and allow your grill to PREHEAT (450°F OR OVER) for 5 to 10 minutes. This gives you plenty of time to prepare your food for the grill, as well it is the final step in cleaning your cooking grids.
NOTE: After Pre-Heating is complete, set your desired cooking temperature, and leave your lid open until the actual temperature is close to your desire temperature.
Lid Position
Always cook with the lid closed. Not only does this keep the temperature even, the food will cook faster, and you will use less fuel by taking advantage of the fan forced convection cooking. A closed lid also helps to create that savory smokier flavor. You can slow down your cooking by propping up the lid using a grid lifter.
CAUTION: Grease fires are caused by not properly maintaining your grill, or failing to clean the bottom of the barrel on a consistent basis. In the unlikely event you experience a grease fire while cooking, quickly remove any food items, then close the lid. If it does not go out in a very short time, open the lid and lightly sprinkle baking soda on the fire. Be careful not to burn yourself. If this does not work, then turn OFF the control board, to stop the pellets from feeding, and shut the lid until the fire is completely out.
ENGLISH
25
 Loading...