

Looqs MB202 User's Guide
LOOQS
MeeBox NAS MB202
User Guide

Copyright | FCC Notice
Copyright © 2009 RRC b.v. All rights reserved.
MeeBox and LOOQS are trademarks of RRC bv. Other trademarks are the property of their
resp. owners. Specifications subject to change without notice.
This equipment has been tested and found to comply with the limits for a Class B digital
device, pursuant to Part 15 of the FCC Rules. These limits are designed to provide
reasonable protection against harmful interference in a residential installation. This
equipment generates, uses and can radiate radio frequency energy and, if not installed
and used in accordance with the instructions, may cause harmful interference to radio
communications. However, there is no guarantee that interference will not occur in a
particular installation. If this equipment does cause harmful interference to radio or
television reception, which can be determined by turning the equipment off and on, the
user is encouraged to try to correct the interference by one or more of the following
measures:
Reorient or relocate the receiving antenna.
Increase the separation between the equipment and receiver.
Connect the equipment into an outlet on a circuit different from that to which the
receiver is connected.
Consult the dealer or an experienced radio/TV technician for help.
ii
User Guide MeeBox

Table of Contents
Part 1 - About Your MeeBox ................................................................................... 6
Safety Precautions ................................................................................................................ 7
Specifications ......................................................................................................................... 8
What’s in the Box .................................................................................................................. 9
Product Exterior ................................................................................................................... 10
Front .............................................................................................................................................. 10
Rear ............................................................................................................................................... 11
Note for Macintosh users .................................................................................................. 12
Part 2 - Setting Up Your MeeBox .......................................................................... 13
Connecting and turning on your MeeBox................................................................... 14
Performing initial setup ...................................................................................................... 15
Using the Setup Wizard (Windows only) .............................................................................. 15
Using the browser-based admin interface (all operating systems) ............................. 16
Adding user accounts ....................................................................................................... 18
Part 3 - Using Your MeeBox ................................................................................... 19
Using your MeeBox as a UPnP media server ............................................................... 20
Copying files into the media folder ...................................................................................... 20
Managing the media server .................................................................................................. 21
Understanding scan options .................................................................................................. 22
Enabling/disabling the media server ................................................................................... 23
Using your MeeBox as an iTunes server ........................................................................ 25
Enabling the iTunes server ....................................................................................................... 25
Copying music to your MeeBox ............................................................................................ 25
Using your MeeBox as a network storage device ..................................................... 26
Accessing a share in Windows .............................................................................................. 27
Accessing a share in Mac OS X or Linux ............................................................................. 27
Mapping a share to a drive letter (Windows only) .......................................................... 28
Accessing a second internal hard drive ............................................................................. 28
Using external storage devices ....................................................................................... 29
Using a USB drive ....................................................................................................................... 29
Using a USB memory card reader ......................................................................................... 29
iii
User Guide MeeBox

Sharing a USB printer .......................................................................................................... 31
Adding a shared printer to your computer ....................................................................... 31
Printing to a shared printer ..................................................................................................... 34
Managing users, groups, and shared folders ............................................................. 35
Why create user accounts, groups, or additional shared folders? ............................. 35
Creating, modifying, and deleting user accounts .......................................................... 36
Creating, modifying, and deleting groups ........................................................................ 37
Creating, modifying, and deleting shared folders .......................................................... 37
Using the BitTorrent client .................................................................................................. 39
Working with torrents ................................................................................................................ 39
Using the web photo gallery application .................................................................... 41
Using other preinstalled web applications .................................................................. 42
Part 4 - Advanced Topics...................................................................................... 44
Accessing your MeeBox remotely ................................................................................. 45
Setting up port forwarding on your router .......................................................................... 45
Using the web file browser ...................................................................................................... 46
Accessing files on your MeeBox remotely using FTP ........................................................ 46
Accessing files on your MeeBox remotely using Secure FTP ......................................... 48
Setting up a website .......................................................................................................... 50
Uploading website files to the server ................................................................................... 50
Editing web server configuration files .................................................................................. 51
Adding a second internal hard drive ........................................................................... 52
Installing the second hard drive ............................................................................................ 52
Verifying and formatting the second hard drive ............................................................. 53
Creating a RAID array .............................................................................................................. 54
Managing storage devices ............................................................................................. 56
Viewing storage reports .......................................................................................................... 56
Using the disk utility ................................................................................................................... 56
Managing a RAID array ........................................................................................................... 57
Updating your MeeBox’s software................................................................................. 59
Accessing your MeeBox’s command line interface ................................................. 61
Executing commands with elevated privileges ............................................................... 62
Page 4
User Guide MeeBox NAS

Product Registration ........................................................................................................... 63
Warranty ................................................................................................................................ 64
Copyright .............................................................................................................................. 67
Licensing ................................................................................................................................ 68
Page 5
User Guide MeeBox NAS

Part 1
About Your MeeBox
Congratulations on acquiring your MeeBox NAS, the most
versatile media server in the world.
Before you begin using your new MeeBox, please read the
following pages to familiarize yourself with important facts
about the product.

Safety Precautions
Please read these safety instructions and precautions carefully before using your MeeBox.
Use a grounded electrical outlet.
Place the server where there is good ventilation. There should be at least three
inches of clearance on all four sides.
Do not place the server where it could be exposed to high temperature or direct
sunlight.
Do not put wet or heavy objects on top of the server.
Do not install or leave the server, its power cable, or LAN cables in areas of heavy
foot traffic.
Do not install the server in areas of high humidity (bathrooms and areas exposed to
rain or splashing water).
Keep the server out of reach of infants and young children.
Use only good quality cables.
Place the server on a level and stable surface.
Page 7
User Guide MeeBox NAS

Specifications
Product name:
LOOQS MeeBox NAS MB202
Storage:
One or two 3.5" SATA hard disk drives
Processor:
300-MHz ARM9 32-bit RISC CPU w/ 24KB L1 cache
Memory:
128 MB DDR SDRAM / 16 MB Flash ROM
Network interface:
Gigabit Ethernet
Expansion ports:
2 x USB 2.0 (support drives, printers, memory card readers)
External drive
support:
FAT32, NTFS, XFS, ext2, ext3
Internet services:
HTTP, WebDAV, FTP, SFTP, Telnet, SSH, POP, SMTP, Samba,
OpenVPN
Dimensions:
40mm x 435mm x 210mm HWD
Weight:
2.5kg (lbs) with 1 HDD
Power:
Adapter input: 90–200V AC, 50/60 Hz
Adapter output: 12V DC, 3A
Max power consumption: 24W
Certifications:
FCC Class B, CE, MIC Class B
Operating
temperatures:
0°–40° C (32°–104° F)
Page 8
User Guide MeeBox NAS

What’s in the Box
MeeBox media server
AC adapter
power cord
Ethernet cable
Mounting screws for second internal drive (except two-drive models)
Setup CD
User Guide
Quick Start Guide
Page 9
User Guide MeeBox NAS
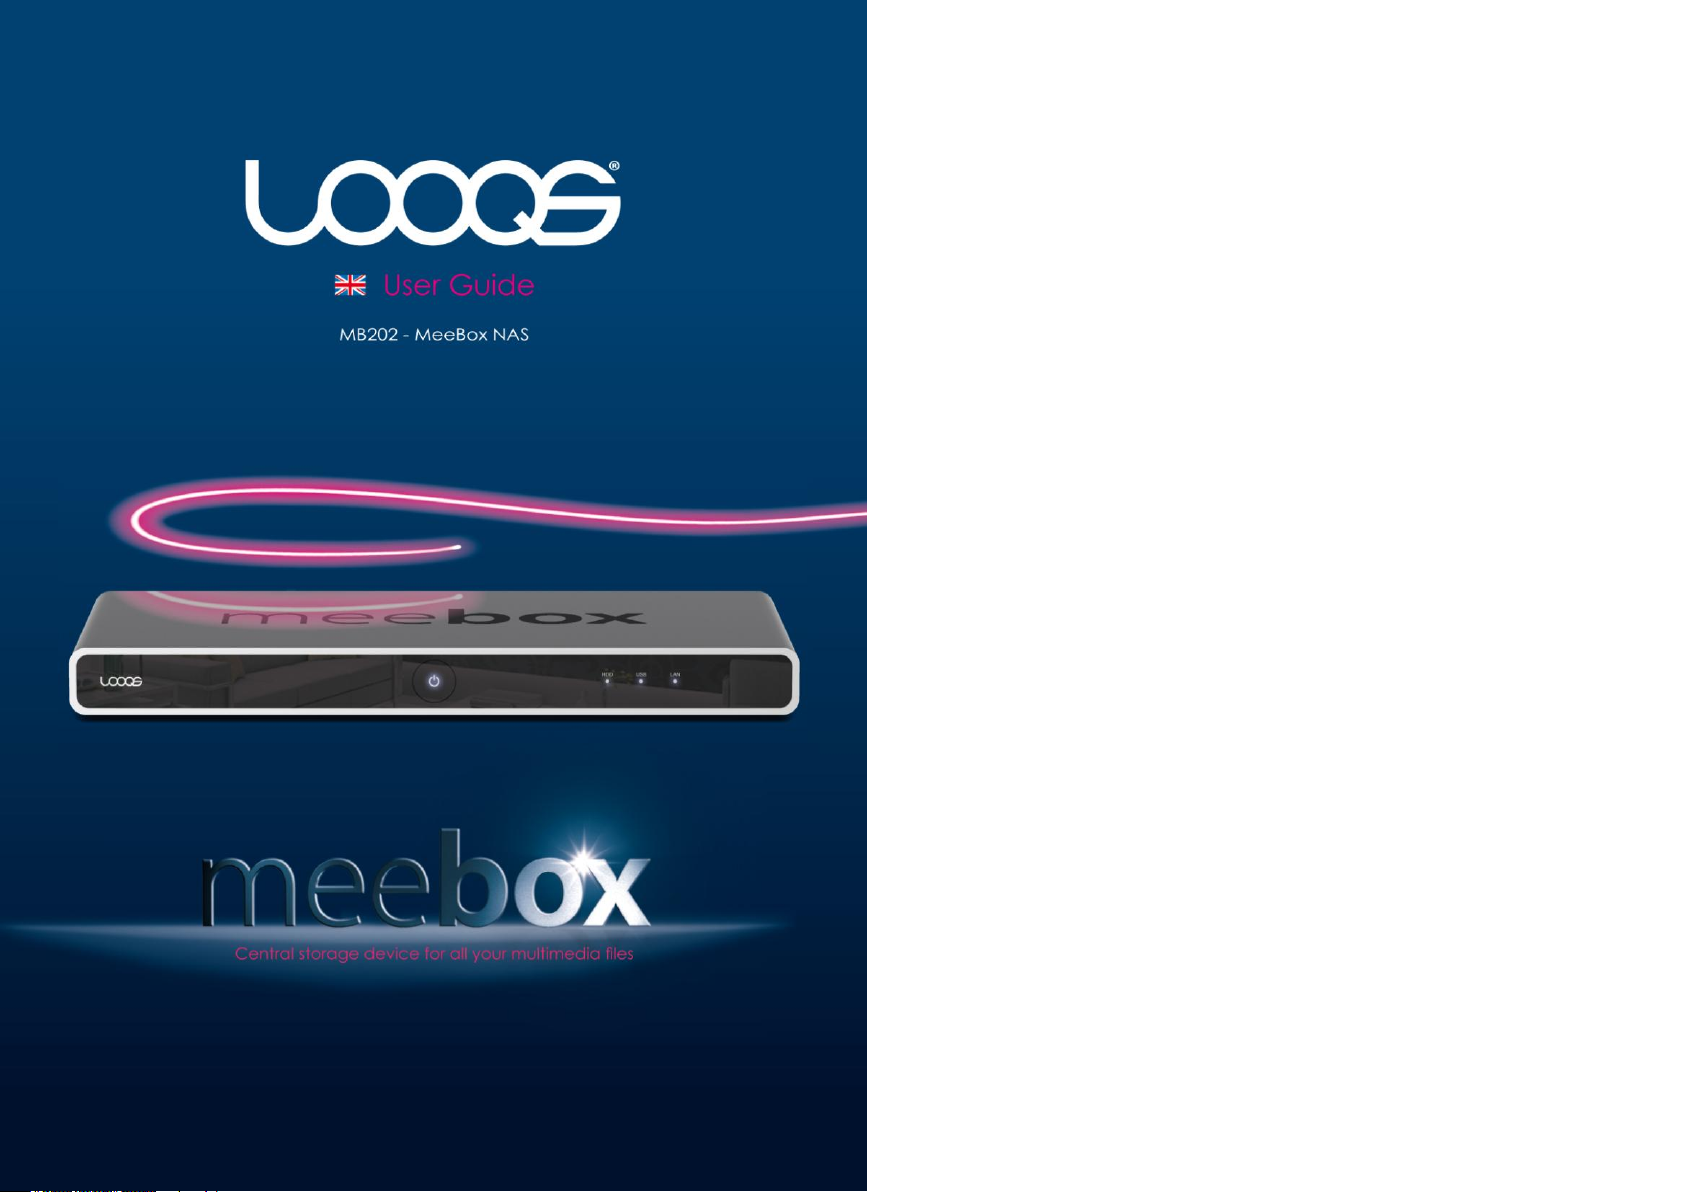
Product Exterior
Power Button
Press to turn your MeeBox on. Press and hold for at least
one second to turn your MeeBox off.
HDD Activity Indicator
Blinks when the internal hard drive is being accessed.
USB Status Indicator
Lights up when a USB device is attached.
Network Status Indicator
Blinks when there is network activity.
Front
Page 10
User Guide MeeBox NAS
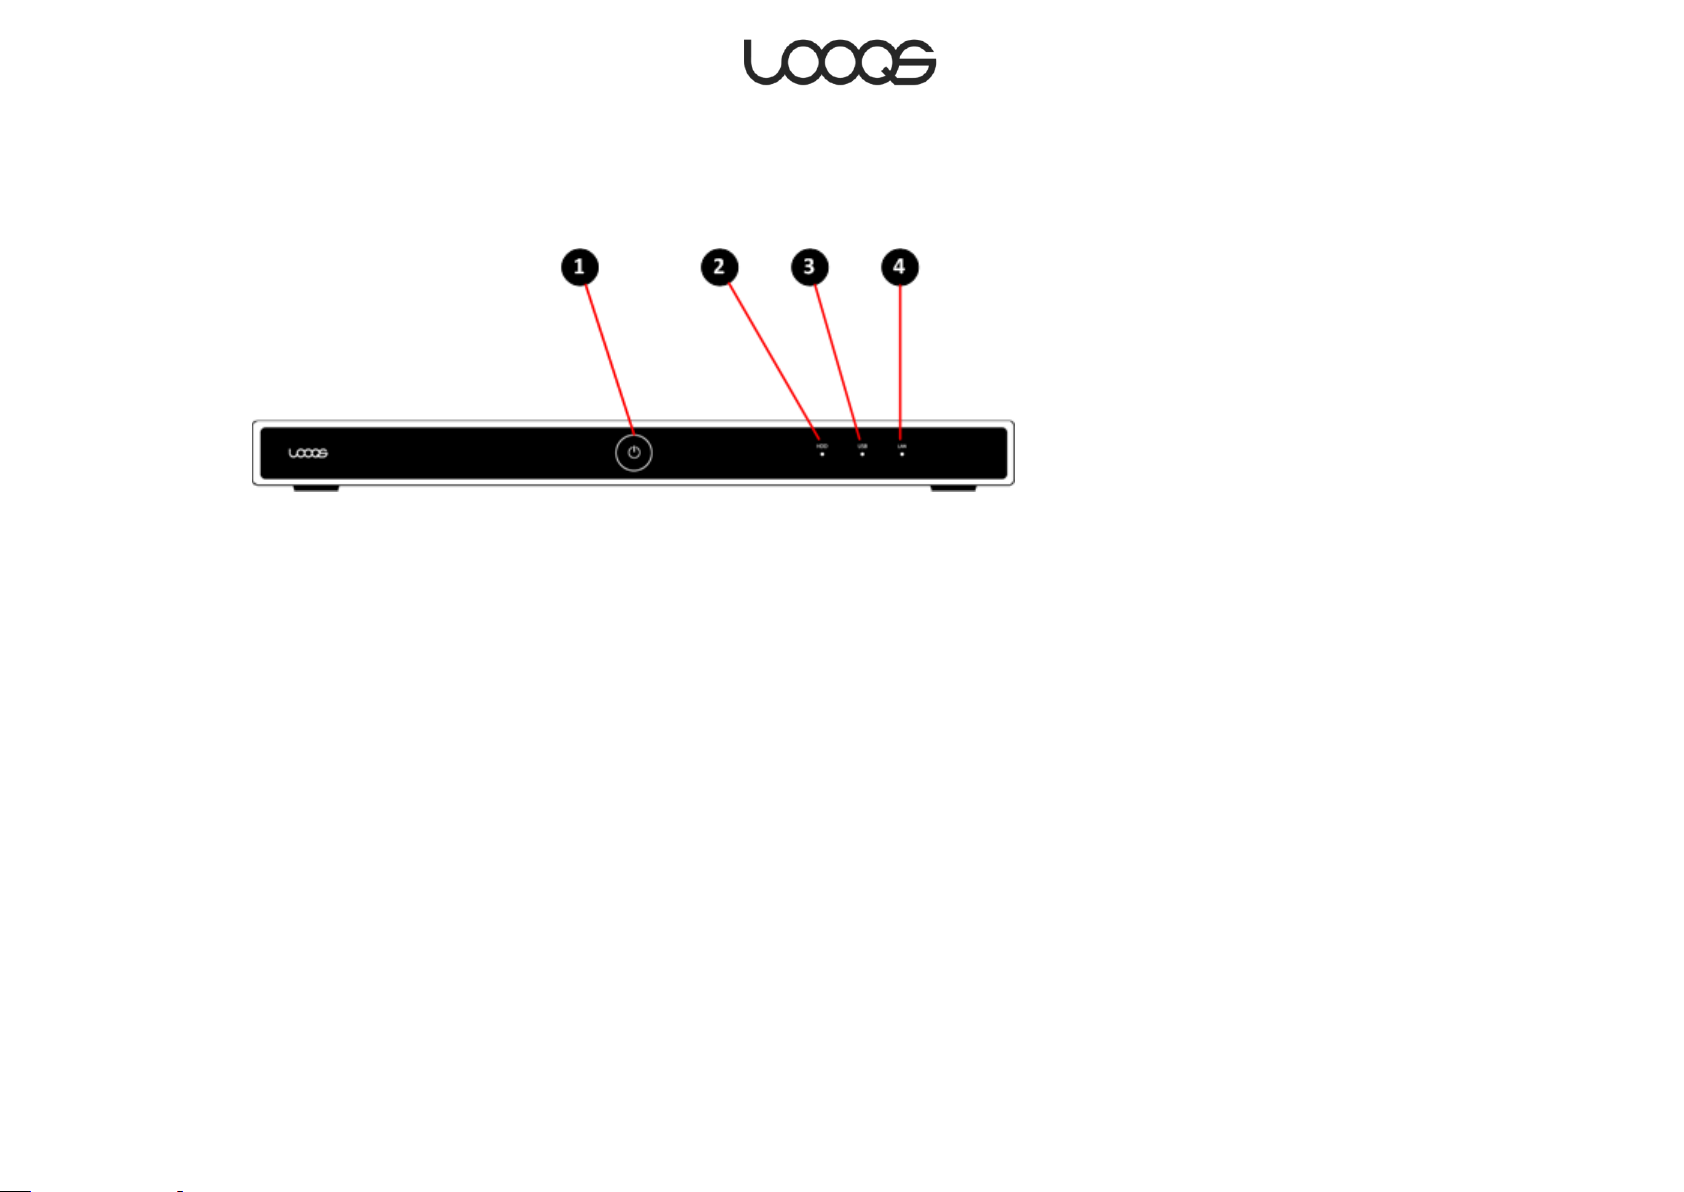
Rear
Network Port
Connect a cable to your router here.
Factory Reset Button
Using a thin object such as a straigtened paper clip, push
this to reset all settings to factory defaults.
USB 2.0 Ports
Connect external USB drives, memory card readers, and/or
a USB printer here.
DC Input
Plug the external power supply in here.
Page 11
User Guide MeeBox NAS

Windows
Mac OS X
http://meebox/
http://meebox.local/
http://meebox:8090/
http://meebox.local:8090/
MeeBox (for FTP or SFTP)
meebox.local
MeeBox (for Telnet or SSH)
meebox.local
Note for Macintosh users
Important!
When accessing your MeeBox’s admin interface or web applications from a Mac OS X
computer, the hostname you use is slightly different from the one used on Windows.
Throughout this user guide, wherever the instructions refer to the hostname MeeBox,
please substitute the hostname MeeBox.local.
The table below gives Macintosh equivalents for Windows addresses and hostnames
referred to in this user guide.
Note: The .local suffix is not necessary when accessing your MeeBox through SMB. To
access your MeeBox’s network shares, you can use the network path smb://meebox/ or
smb://meebox.local/ interchangeably.
Page 12
User Guide MeeBox NAS

Part 2
Setting Up Your MeeBox
Setting up your MeeBox is easy. The following pages will get
you up and running in a jiffy.
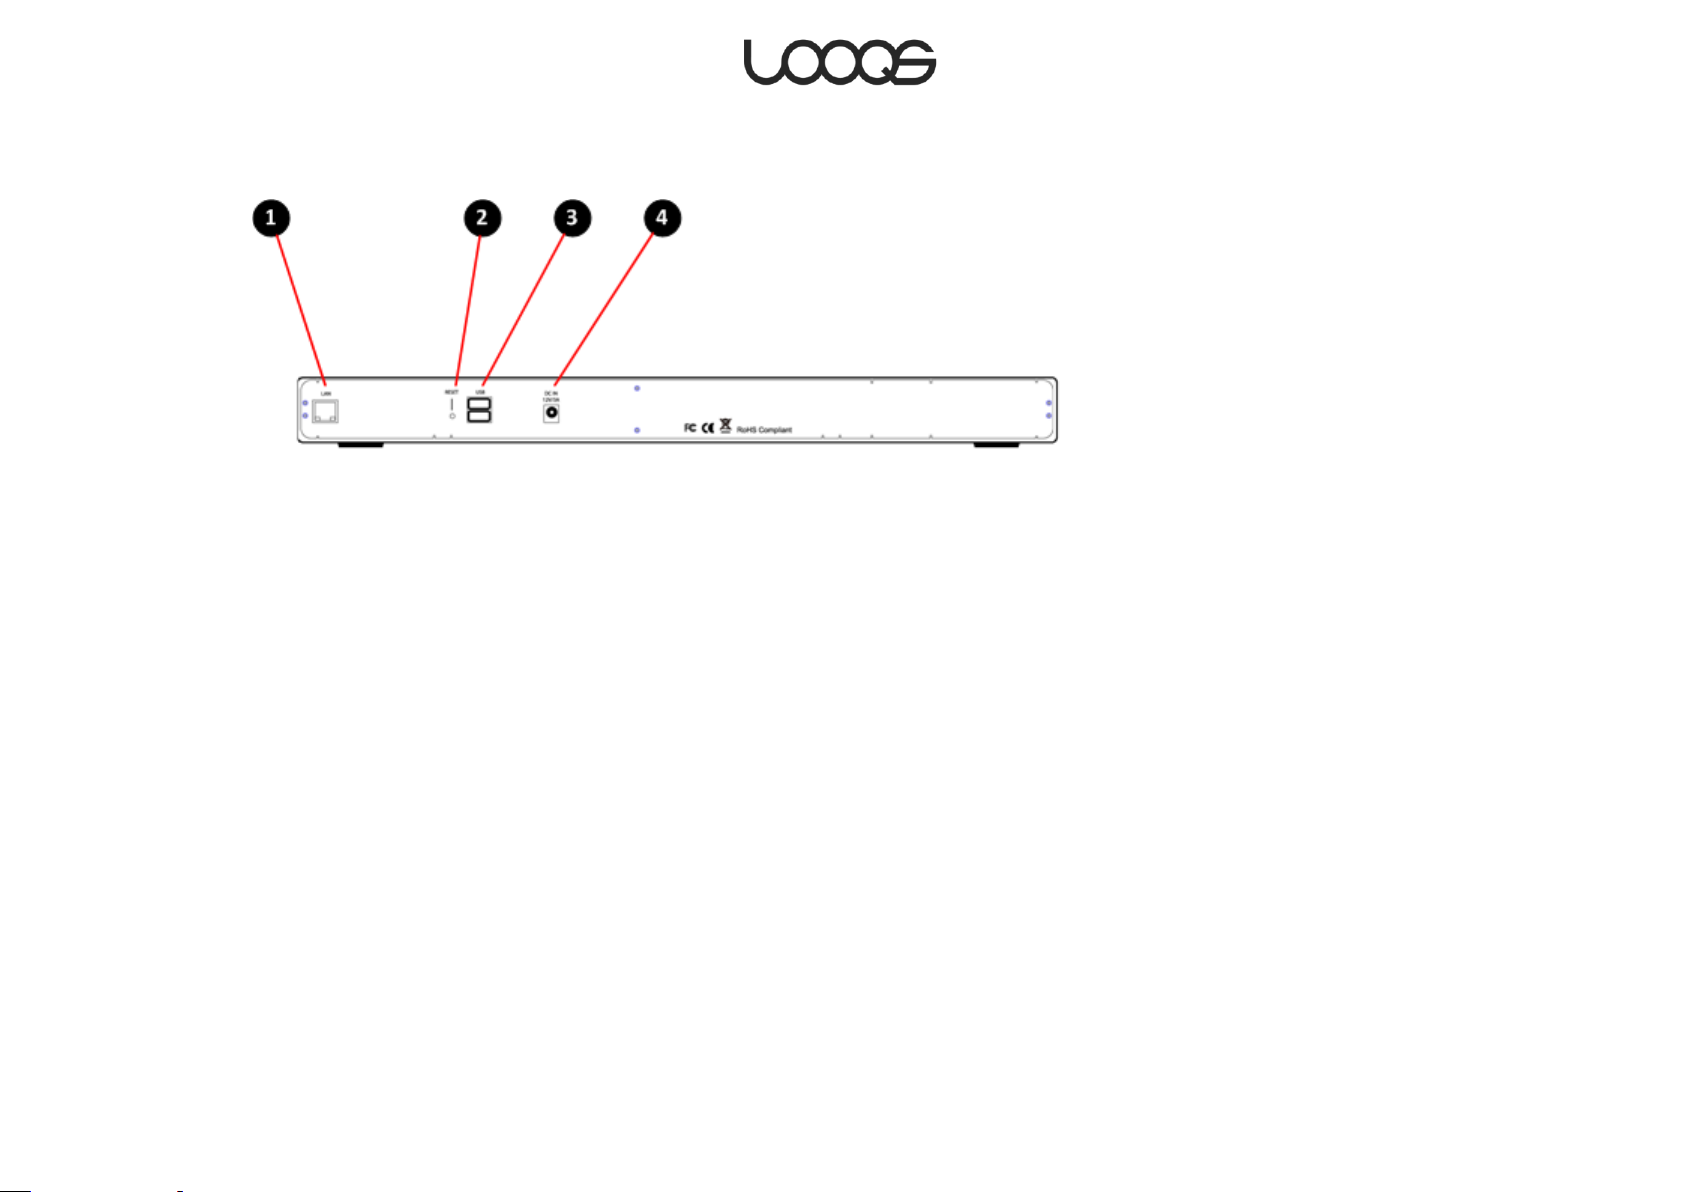
Connecting and turning on your MeeBox
In order for the computers on your network to access your MeeBox, the MeeBox must be
connected by Ethernet cable to your network router. The router can be a wireless router,
but your MeeBox must connect to it through an Ethernet cable.
Using the supplied Ethernet cable (or another that is rated at least Category 5), plug one
end of the cable into the network port on your MeeBox and the other end into an
available LAN port on your router.
Note
Some home networks do not have a separate router but instead have a router built into
the DSL/cable modem. In this case, you can connect your MeeBox to an available LAN
port on the modem.
Plug the MeeBox’s AC adapter into the power port on the back of your MeeBox, and then
plug the adapter into a power outlet using the supplied power cord.
Turn on your MeeBox by briefly pressing the power button in the center of the front façade.
Page 14
User Guide MeeBox NAS
Setup Wizard: Step 2
Performing initial setup
If you have a Windows computer on the same network as your MeeBox, you can use the
Setup Wizard to perform initial setup of the MeeBox. Otherwise, you will use the browserbased admin interface. (You can use the browser-based interface on Windows, too.)
Using the Setup Wizard (Windows only)
The MeeBox Setup Wizard is a Windows application that facilitates configuring the
MeeBox’s IP address and a few other settings before you start using your MeeBox. The
wizard is included on the Setup CD that came with your MeeBox.
To run the Setup Wizard, insert the Setup CD in a computer that is connected to the same
network as your MeeBox. If the wizard does not start automatically, do the following:
1. Click the Start button on your Windows task bar.
2. Click Run.
3. Enter D:\SetupUtil.exe and press Enter. (Substitute your CD-ROM drive’s actual drive
letter if it is not D.)
4. In the Setup Wizard window, click Setup.
The Setup Wizard has four steps.
Step 1
If you have more than one MeeBox on the network, select the MeeBox you want to
configure, then click Setup. Otherwise, just click Setup.
You will be prompted to enter the admin password. Enter the default password, which is
―meebox‖ (without quotes).
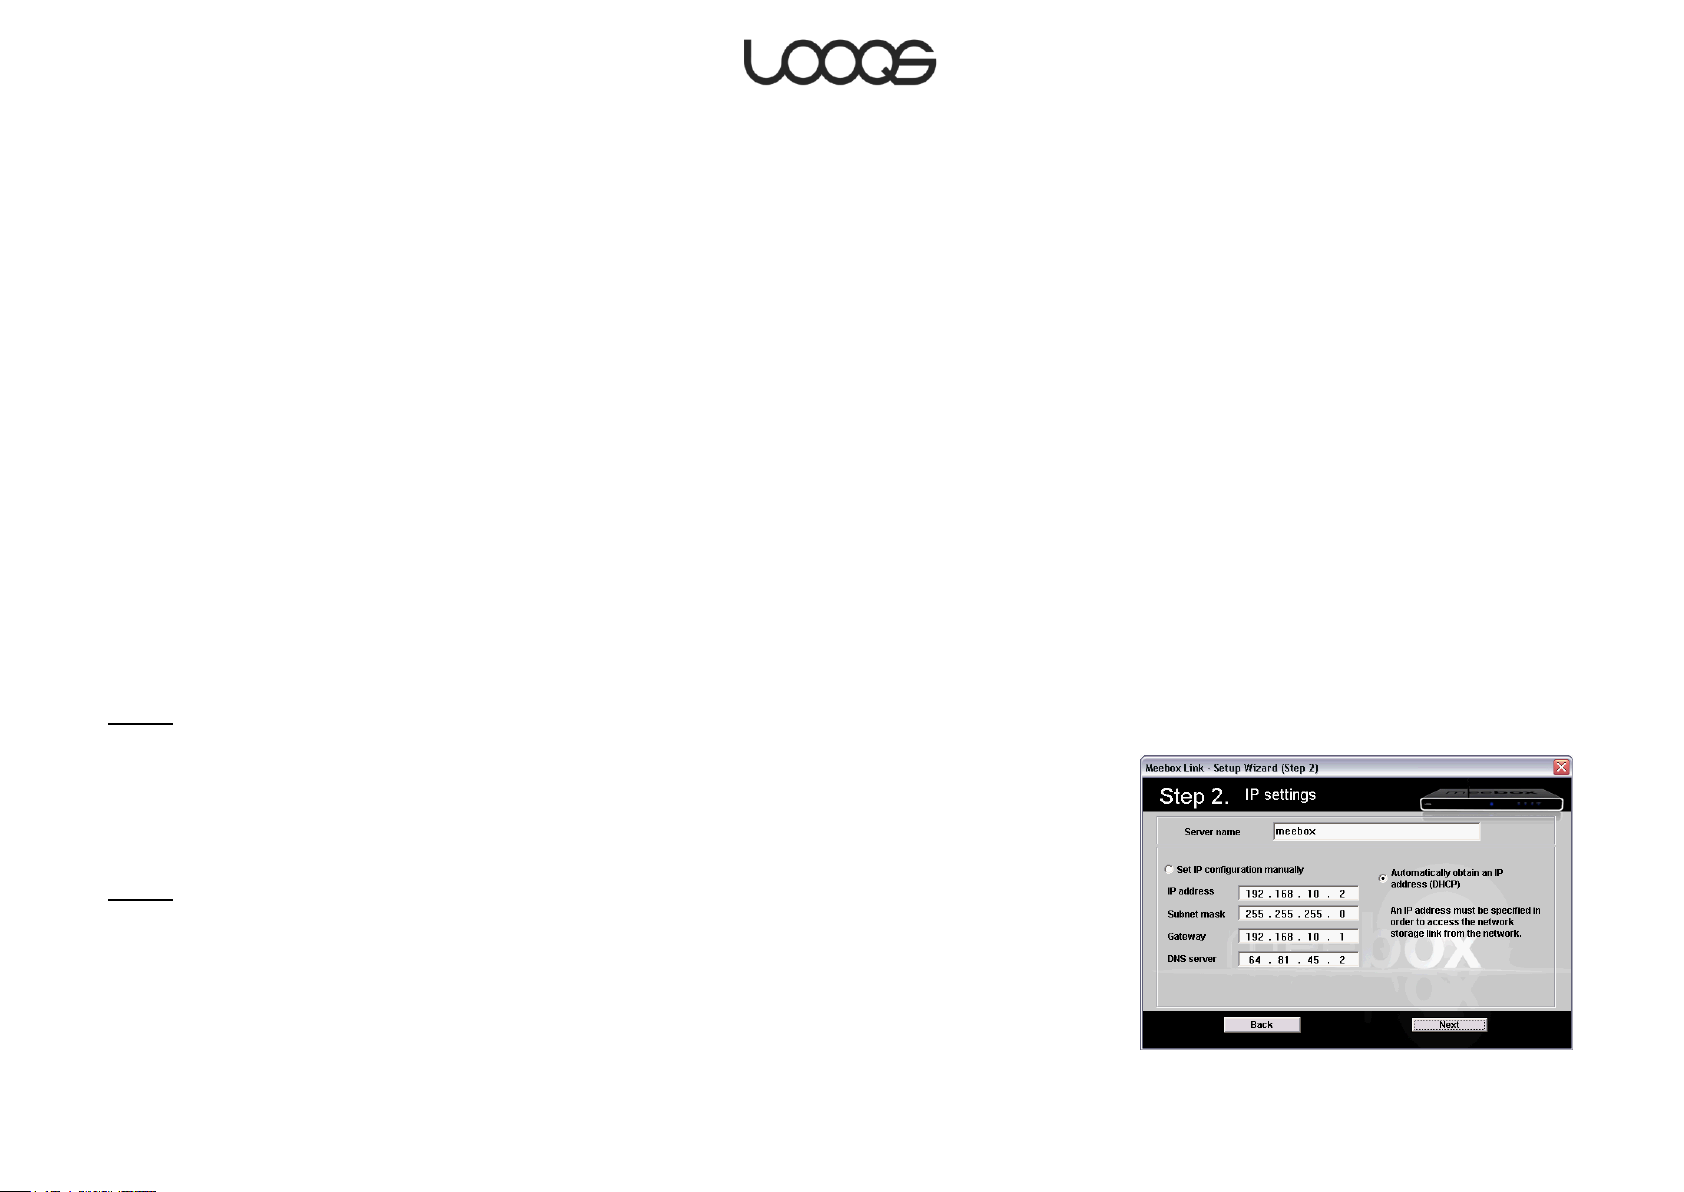
Step 2
In the Server name box, enter the network name you want to use for your MeeBox. (You
can just use the default name ―meebox‖, unless you already have another MeeBox on
the same network using the default name. Please note that this user guide assumes your
MeeBox will use the default name ―meebox‖.)
Page 15
User Guide MeeBox NAS
Setup Wizard: Step 4
Figure 1
Next, decide whether you want to have your MeeBox obtain an IP address automatically
from your router, or use a static IP address that you specify. Select the appropriate option
button.
If you choose to use a static IP address, enter the IP address, subnet mask, gateway
address, and DNS server address in the provided boxes.
Step 3
Select your time zone from the drop-down menu, and then enter the current date and
time in the boxes.
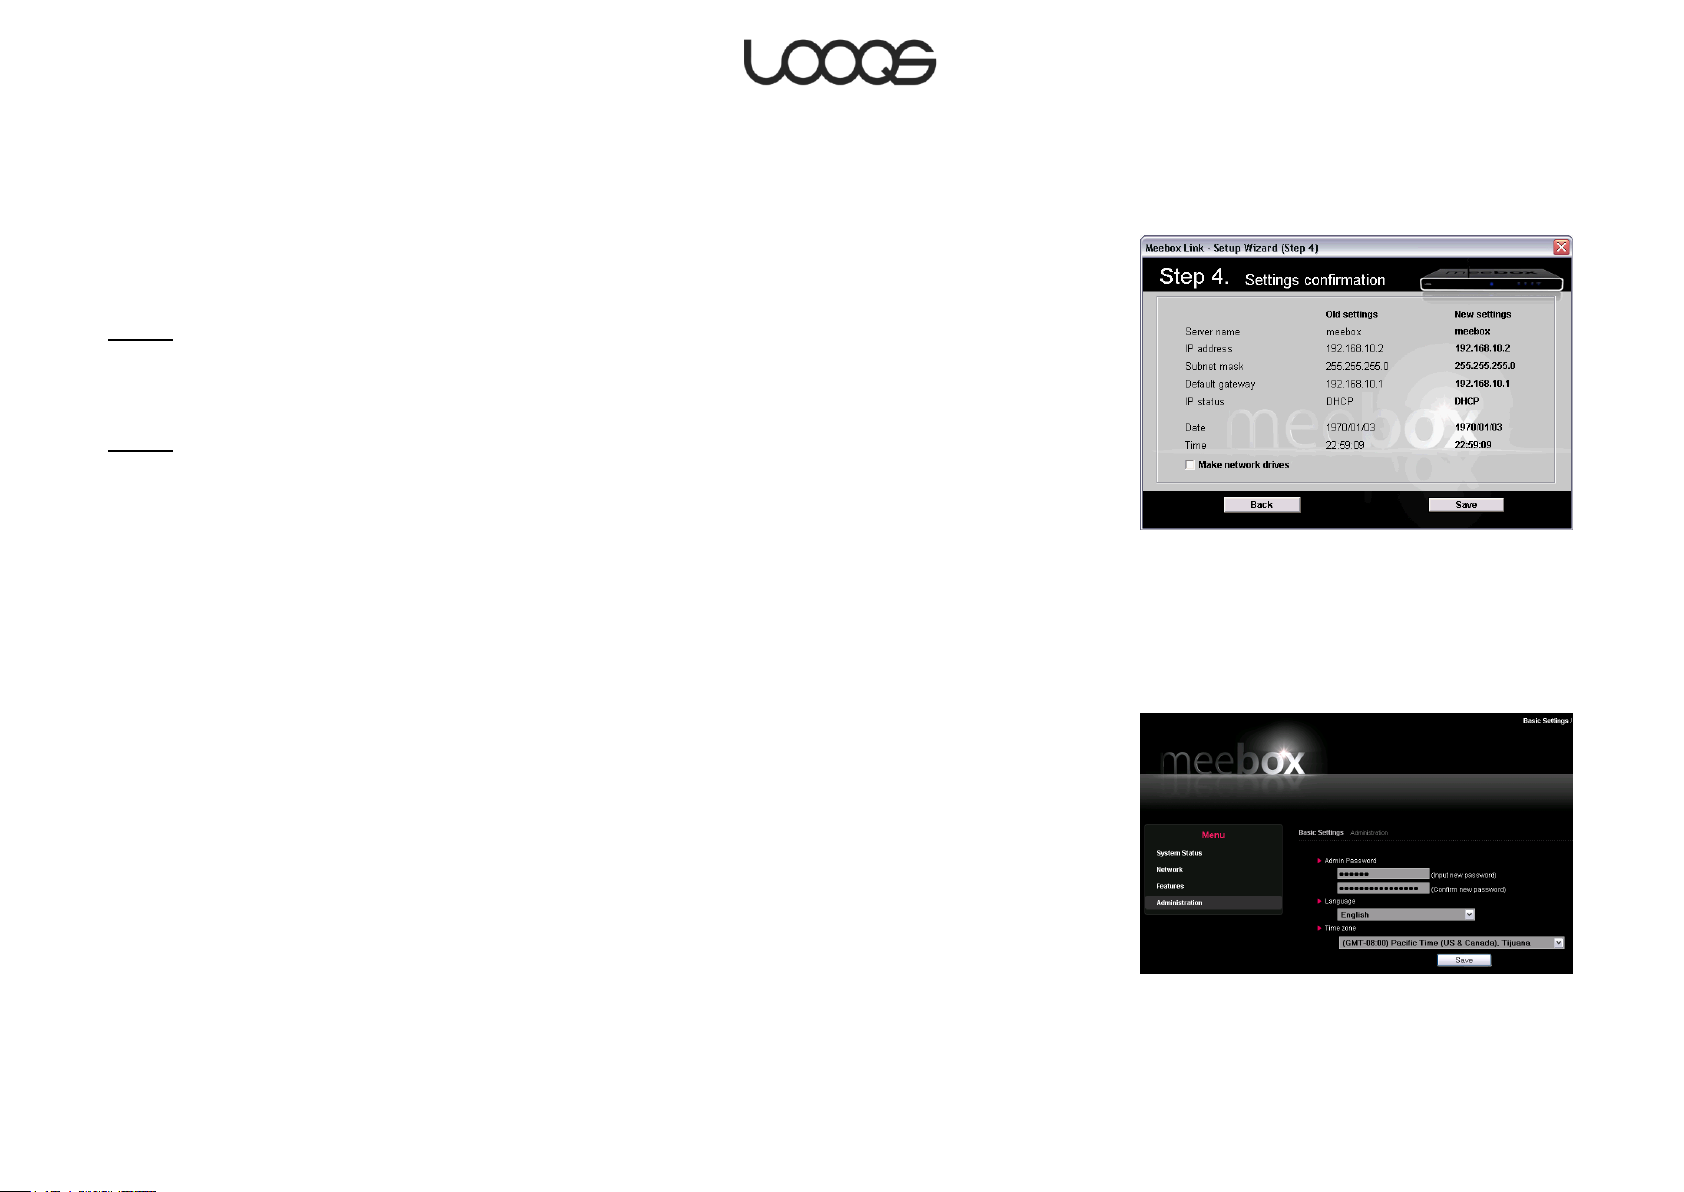
Step 4
Confirm that the settings shown are the ones you want. If you need to make any changes,
click Back.
Select the Make network drives check box to have the Setup Wizard automatically assign
drive letters to the default admin and public shares on your MeeBox. (SeeUsing your
MeeBox as a network storage device for an explanation of these default shares.)
When you are satisfied with the settings, click Save.
Using the browser-based admin interface (all operating systems)
1. In your web browser, go to http://meebox:8090/ and log in with the username ―admin‖
and the default password ―meebox‖.
2. You will be prompted to change the admin password. (See Figure 1.) Under the
heading Admin Password, enter the desired admin password in both boxes. (If you do
not change the admin password now, you will be prompted to do so each time you
log in.)
3. Select the desired language for the admin interface, select your time zone, and click
Save.
4. In the menu on the left side of the window, click Network.
Page 16
User Guide MeeBox NAS

5. Decide whether you want to have your MeeBox obtain an IP address automatically
from your router, or use a static IP address that you specify. Choose the appropriate
selection under LAN mode.
6. If you choose to use a static IP address, enter the IP address, subnet mask, gateway
address, and DNS server addresses in the provided boxes.
7. Click Save.
Page 17
User Guide MeeBox NAS

Figure 2
Adding user accounts
If you will be sharing your MeeBox with others, you should consider creating an account
for each user. This lets you control how much disk space each user can use and which
shared folders each user can access.
1. In your web browser, go to http://meebox:8090/, log in, and click MeeBox Settings.
2. Click Advanced Settings.
3. On the menu, click Management, and then click Users (see Figure 2).
4. Under Add/Edit User, enter a username, a password, and (optionally) a description in
the provided fields.
5. If you want to limit how much internal disk space the user can occupy, select Enable
disk quota and enter the limit in MB.
6. Click Save.
7. Repeat steps 3–6 for each user you want to create.
Later, if you wish, you can create shared folders (called shares) and decide which users
can access each one. You can also create groups of users, allowing you to grant or deny
access to specific shares for several users at once. For more information, see Managing
users, groups, and shared folders.
Page 18
User Guide MeeBox NAS

Part 3
Using Your MeeBox
Your MeeBox offers a wealth of functionality. This chapter will
help you get the most out of the product.

Tip
Different UPnP media players and adapters have
different ways of setting up access to UPnP
media servers. However, in general, your media
player should be able to “see” your MeeBox
media server as long as it is connected to the
same network. (If you have the router version of
MeeBox, the media player should be in your
MeeBox’s network.) Your MeeBox media server
will be identified as “meebox” in your media
player’s user interface.
Using your MeeBox as a UPnP media server
Your MeeBox can stream media files (video, audio, or photos), wirelessly or through
Ethernet, to any UPnP-AV compliant media player or digital media adapter that is on your
local network. Examples of UPnP-AV media players or adapters include LOOQS
MeeCeiver, LOOQS MeeFrame, XBMC Media Center, and Windows Media Player (running
on Windows Vista or Windows 7). If you have a MeeCeiver, for example, you can stream
movies from MeeBox to MeeCeiver wirelessly and watch them on your TV.
The UPnP media server in your MeeBox will serve any media files that are present in a
special folder on your MeeBox’s internal hard drive. On Windows clients, the path of the
folder is \\meebox\public\media. On Mac OS, the folder’s path is
smb://meebox/public/media. You can also access the media folder using FTP or SFTP at
the path /mnt/ide3/public/media.
The media folder contains three subfolders: audio, photos, and video. Any media files you
place in the media folder or any of its subfolders will be available to UPnP media players
on your local network.
The subfolders audio, photos, and video are there for your convenience only. You do not
need to use them. Even if you put all your media files directly in the media folder, or in
other subfolders of the media folder that you create, the media server will recognize and
serve them without problems. If you wish, you can rename the subfolders as desired, or
even delete them. However, please do not rename or delete the media folder itself.
The media server checks for new files in the media folder (and its subfolders) every five
minutes by default. You can change the refresh interval using the media server’s admin
interface (see Managing the media server, below). If you wish, you can also add other
folders on your MeeBox to the media server’s database, so that files in those folders will
also be available to UPnP media players on your network.
Copying files into the media folder
You can copy media files from your computer into the media folder using the same
methods you use to copy files to other locations on your MeeBox. For details, see Using
your MeeBox as a network storage device, below.
For example, to access the media folder through Windows’s built-in networking:
Page 20
User Guide MeeBox NAS
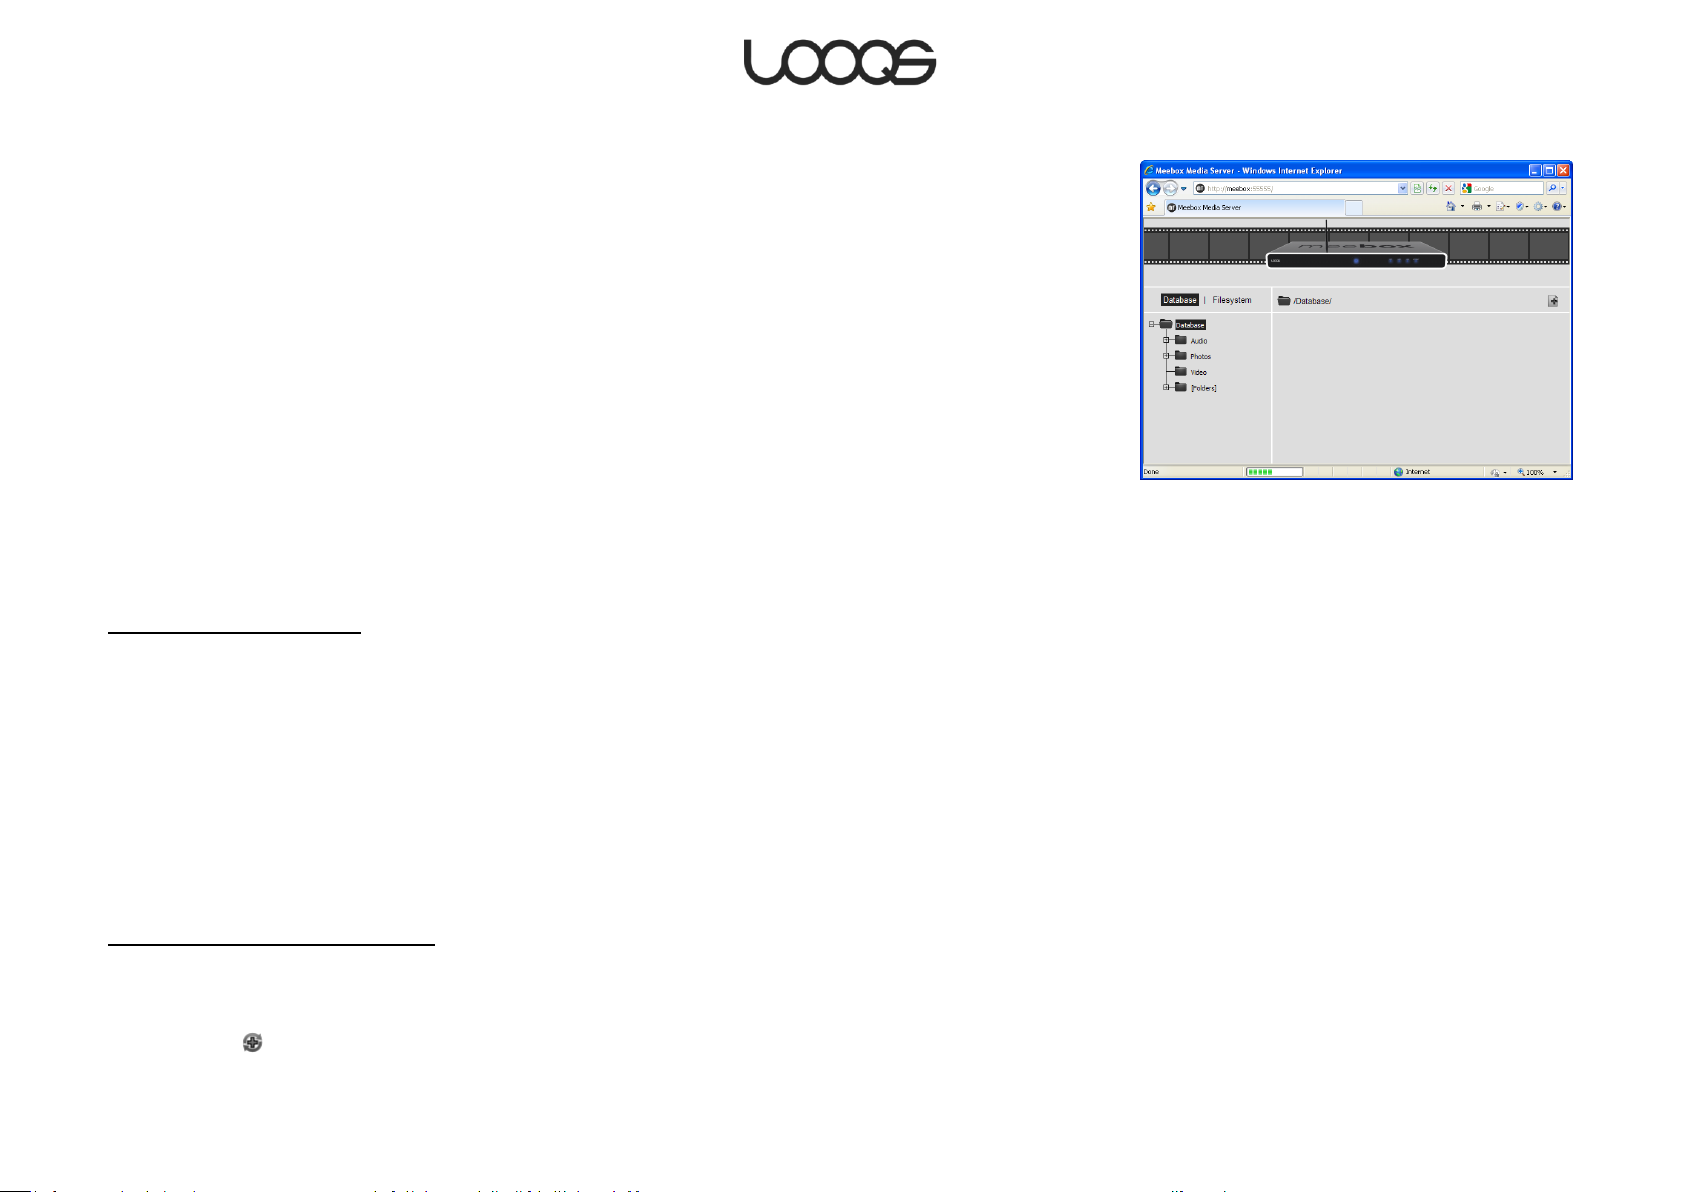
Figure 3
1. On the Start menu, click Run. The Run dialog box opens.
2. Type \\meebox and press Enter.
3. Double-click the public folder. If you are prompted for login credentials, enter your
MeeBox username and password.
4. Double-click the media folder. Copy media files into this folder or one of its subfolders.
Managing the media server
You can manage various aspects of the UPnP media server through its browser-based
management interface. To access the management interface, in your web browser, go to
http://meebox:8090/ and click Media Server. (Figure 3 shows the management interface
as it appears the first time you open it.)
From here, you can see the list of media files that have been found by the media server;
see which folders on your MeeBox are being scanned by the media server; add or
remove scanned folders; change the scanning interval; and more.
Listing found media files
Media files that have been found by the media server are listed when you click Database.
The media server automatically organizes media files into virtual folders named Audio,
Photos, and Video. Along with the physical folders monitored by the server, these are
shown in the folder tree on the left side of the window. (Note that the virtual folders do not
correspond to the similarly-named subfolders of the media folder. Even if you delete the
physical subfolders, these virtual folders will remain.)
The Audio virtual folder contains virtual subfolders such as Artists and Albums that
automatically organize your music collection. To expand a folder, click the plus sign to the
left of the folder’s icon.
Adding a folder to be scanned
1. Click Filesystem.
2. In the folder tree, navigate to the folder you want to add and select it.
3. Click the button.
Page 21
User Guide MeeBox NAS
 Loading...