

Page 1
Safety Instructions and Precautions
Please read the safety instructions and precautions below carefully before
using MeeFrame.
Installation Safety Precautions
Use grounded socket/outlet.
Use rated voltage as indicated in the manual.
Place MeeFrame where there is good ventilation condition.
Do not place MeeFrame where it could be exposed to high temperature
or direct sun light.
Install where there is no electromagnetic interference.
Do not put wet or heavy objects on MeeFrame.
Do not install or leave MeeFrame, power cable, or LAN cables in pass
through areas.
Do not install MeeFrame where there is moisture (eg. bathroom, rain, or
splashes of water).
Do not place MeeFrame near any magnetic objects.
Keep MeeFrame out of reach from infants or children.
Only use good quality standard cables.
Install on a level and stable surface.
Do not install where the product may fall.
Power Precautions
Do not use multiple power plugs on a single socket and make sure that
the plugs are inserted fully so they may not move.
Do not touch power plug with wet hands.
Make sure power cable is not forcefully bent, pulled, or pressed by heavy
objects.
Unplug the power cable and store it separately when not in use for a
prolonged period of time
Unplug the power cable and disconnect the power during lightening
and thunder strikes.
Do not use damaged power cable, plug, or worn out socket.
User Guide MeeFrame
2
Page 2
Handling Precautions
Do not insert foreign object through product vents and holes.
Keep product packaging materials out of reach of children.
Do not place containers of liquids such as water, juice, or coffee on the
product.
Disconnect power plug before cleaning, and do not splash with water
directly, or wipe with benzene, thinner, or alcohol
If you detect smoke or any abnormal smell from the product,
immediately disconnect and remove the power cable from the product
and contact our customer service center.
Do not block the product’s vents.
Keep product packaging materials out of reach from infants and
children.
Be careful in handling product packaging materials, there are sharp
corners.
Power off the product and disconnect power cable before moving the
product, and do not move the product during use.
Do not drop product and do not apply any impact to the product.
Do not disassemble, repair, or modify the product.
Do not use within a vehicle.
FCC Notice – Class B
This equipment has been tested and found to comply with the limits for a
Class B digital device, pursuant to Part 15 of the FCC Rules. These limits are
designed to provide reasonable protection against harmful interference in a
residential installation. This equipment generates, uses, and can radiate radio
frequency energy and, if not installed and used in accordance with the
instruction manual, may cause harmful interference to radio communications.
However, there is no guarantee that interference will not occur in a particular
installation. If this equipment does cause harmful interference to radio or
television reception, which can be determined by turning the equipment off
and on, the user is encouraged to try to correct the interference by one or
more of the following measures:
Reorient or relocate the receiving antenna.
Increase the separation between the equipment and receiver.
Connect the equipment into an outlet on a circuit different from that to
which the receiver is connected.
Consult the dealer or an experienced radio/TV technician for help.
User Guide MeeFrame
User Guide MeeFrame
3
4
Page 3

Product Specifications
Table of Contents
Product Name:
Display:
LOOQS MeeFrame – MF-801W
8” Touchpanel LCD Screen
800 x 600 Pixels
Internal Storage: 1 GB Flash Memory
Connectivity: 1 x Slot SD/MMC-Card Slot
1 x USB2.0 Port Typ A for connecting external drive
1 x USB2.0 Mini-B Port for connecting PC
1x DC Input
1x Mini-Stereo Line-out
Network Interface:
Photo Support:
Audio Support:
Dimensions:
802.11b/g WLAN (supports WPA/WPA2/WEP Security)
JPEG / BMP / GIF / PNG
MP3 / WMA / PCM
229 mm x 189 mm x 30 mm (WxHxD)
Weight: 0.7 kg
Power: Power Input: AC 100 V~240 V, 50/60 Hz, 0.3 A
Power Output: DC 12 V, 1.2 A
Certifications:
CE, FCC, RoHS
SAFETY INSTRUCTIONS AND PRECAUTIONS.......................................................................2
FCC NOTICE – CLASS B........................................................................................................4
PRODUCT SPECIFICATIONS.................................................................................................5
1. GETTING STARTED.......................................................................................................8
CONTENT OF MEEFRAME PACKAGE........................................................................................8
E
XAMINING MEEFRAME .........................................................................................................9
S
ETTING UP THE STAND..........................................................................................................10
P
REPARING THE REMOTE CONTROL ....................................................................................... 10
P
OWERING ON MEEFRAME .................................................................................................. 10
U
SING THE TOUCH-PANEL LCD SCREEN................................................................................. 11
S
ELECTING YOUR LANGUAGE................................................................................................12
C
ONNECTING TO YOUR WIRELESS NETWORK .......................................................................... 13
I
NSERTING MEDIA................................................................................................................. 15
2. VIEWING YOUR PHOTOS..........................................................................................17
INTERNAL MEMORY .............................................................................................................. 17
USB S
TORAGE DEVICE.........................................................................................................18
SD C
ARD ...........................................................................................................................18
M
EEBOX.............................................................................................................................18
M
EECHANNEL.....................................................................................................................19
F
LICKR ................................................................................................................................ 20
P
ICASA...............................................................................................................................21
3. BEYOND PHOTOS.....................................................................................................23
User Guide MeeFrame
WEATHER............................................................................................................................23
M
USIC ................................................................................................................................ 23
I
NTERNET RADIO .................................................................................................................. 24
N
EWS & INFO...................................................................................................................... 25
C
LOCK............................................................................................................................... 26
4. UTILITIES.....................................................................................................................27
MEMORY ............................................................................................................................ 27
F
ILE MANAGER....................................................................................................................27
User Guide MeeFrame
5
6
Page 4
5. SETUP .........................................................................................................................28
GENERAL............................................................................................................................ 28
S
LIDESHOW .........................................................................................................................28
N
ETWORK ...........................................................................................................................28
W
EATHER............................................................................................................................ 29
T
IME ................................................................................................................................... 29
T
OUCH ............................................................................................................................... 29
PRODUCT REGISTRATION...................................................................................................30
WARRANTY..........................................................................................................................31
COPYRIGHT.........................................................................................................................33
LICENSING ..........................................................................................................................33
1. Getting Started
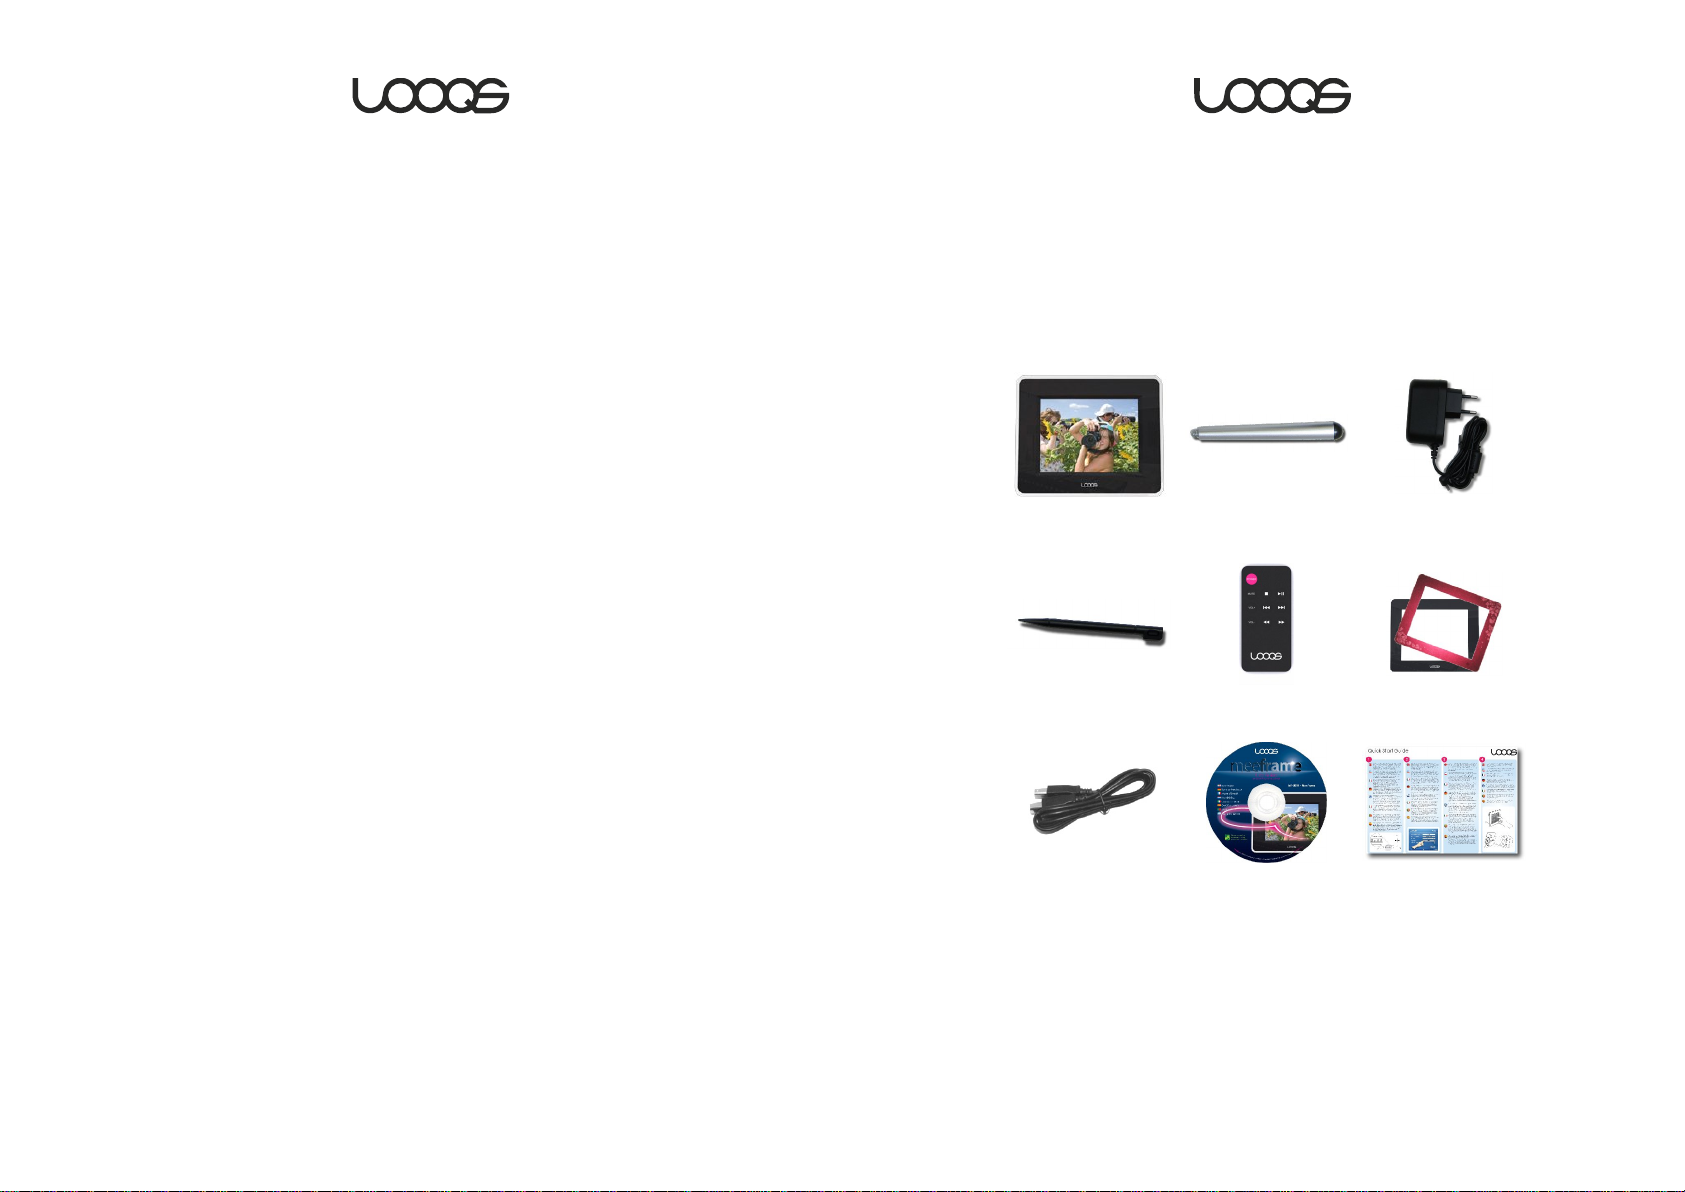
Content of MeeFrame package
Examine the content of your MeeFrame package to make sure each of the
items shown below is included.
MeeFrame Back Stand Power Adapter
Stylus Remote Control Bezels
User Guide MeeFrame
USB Cable User Manual CD Quick Start Guide
User Guide MeeFrame
7
8
Page 5
Examining MeeFrame
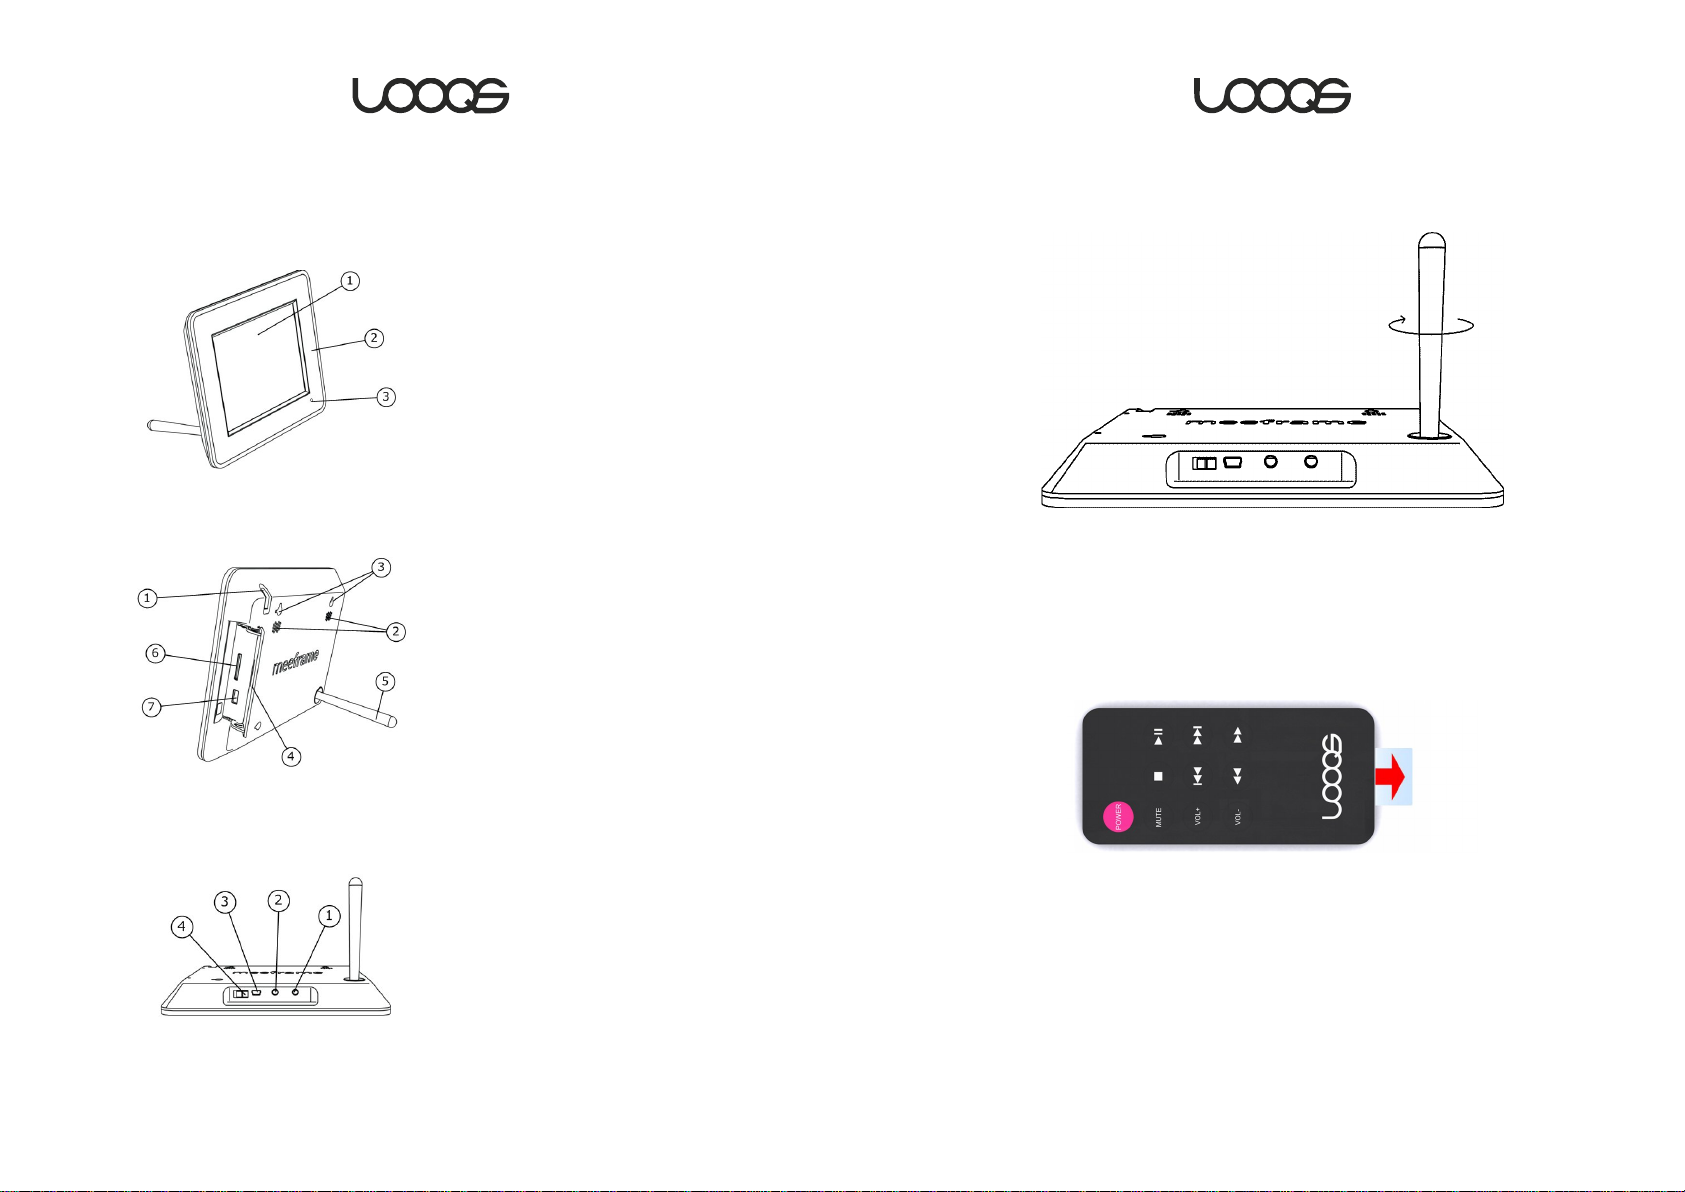
Front
Back
1. Touch panel LCD Screen
2. Exchangeable bezel
3. Remote control sensor
1. Stylus
2. Speakers
3. Wall-mounting holes
4. Media card slot cover
5. Stand
6. SD/MMC card slot
7. USB Type A slot
Setting up the stand
Screw in the stand into the slot on the backside of MeeFrame.
Preparing the remote control
Remove the plastic film to begin using the remote control.
Underside
1. DC In
2. Mini Stereo port
3. USB Mini-B port
4. Power switch
User Guide MeeFrame
Powering on MeeFrame
Connect the AC adaptor to the power port on MeeFrame and plug the
adaptor into an electrical outlet. Then set the power switch on the underside
of MeeFrame to the On position.
User Guide MeeFrame
9
10
Page 6
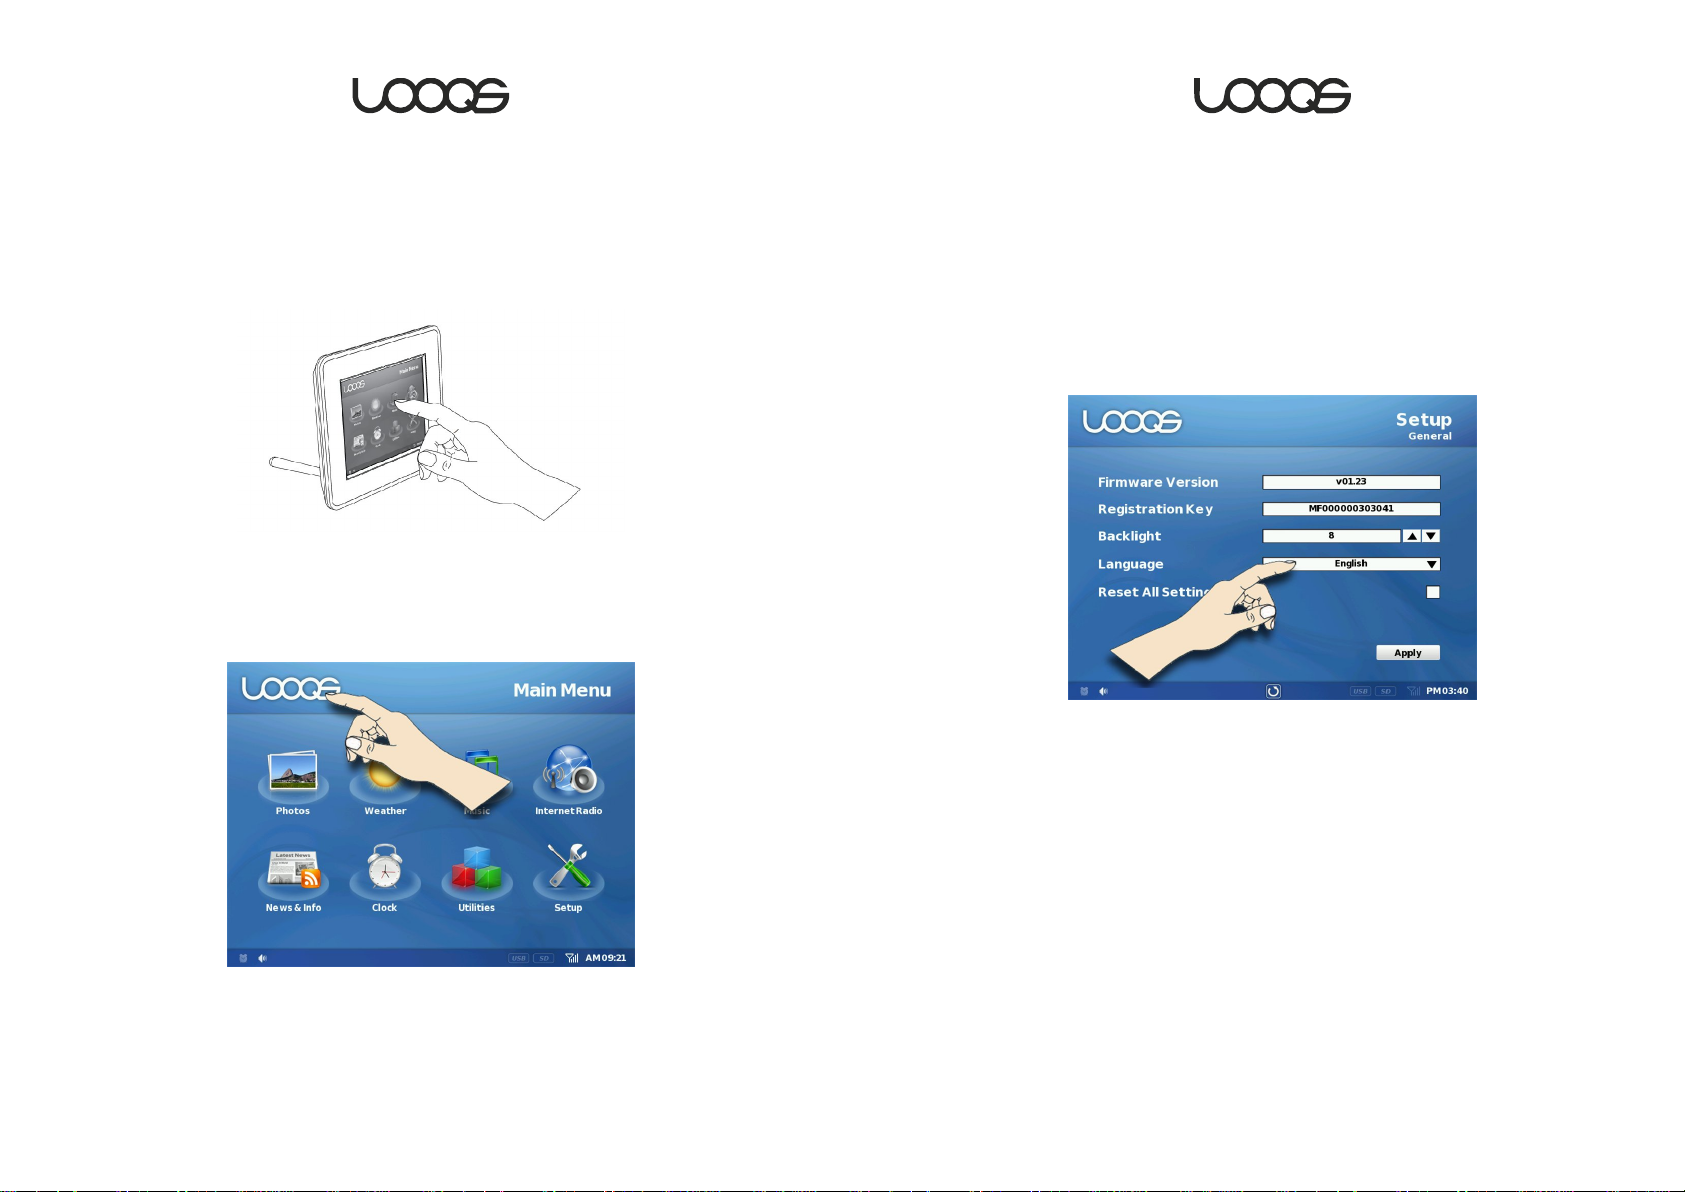
Using the touch-panel LCD screen
Selecting your language
MeeFrame is equipped with a touch-panel LCD screen. Once you power on
MeeFrame, you will see a graphical user interface that responds to tapping
and sliding directly on the screen. You can use your finger or the stylus found
in the slot at the topside of MeeFrame.
From anywhere in the graphical user interface of MeeFrame, you can tap on
the LOOQS logo on the upper left corner to return to the Main Menu screen.
Tap on the Return button to return to the previous screen of the user
interface.
The MeeFrame user interface can be set to one of eight languages (English,
Dutch, French, Italian, Spanish, German, Greek, and Portuguese).
1. Tap
2. Tap the language dropdown menu, and select the language of your
choice.
3. Tap the
Setup→General. (General Setup screen appears.)
Apply button.
Note: Using your finger on the touch-panel LCD screen will leave finger prints
on the display surface. Before cleaning the LCD screen, power off
MeeFrame.
User Guide MeeFrame
11
User Guide MeeFrame
12
Page 7
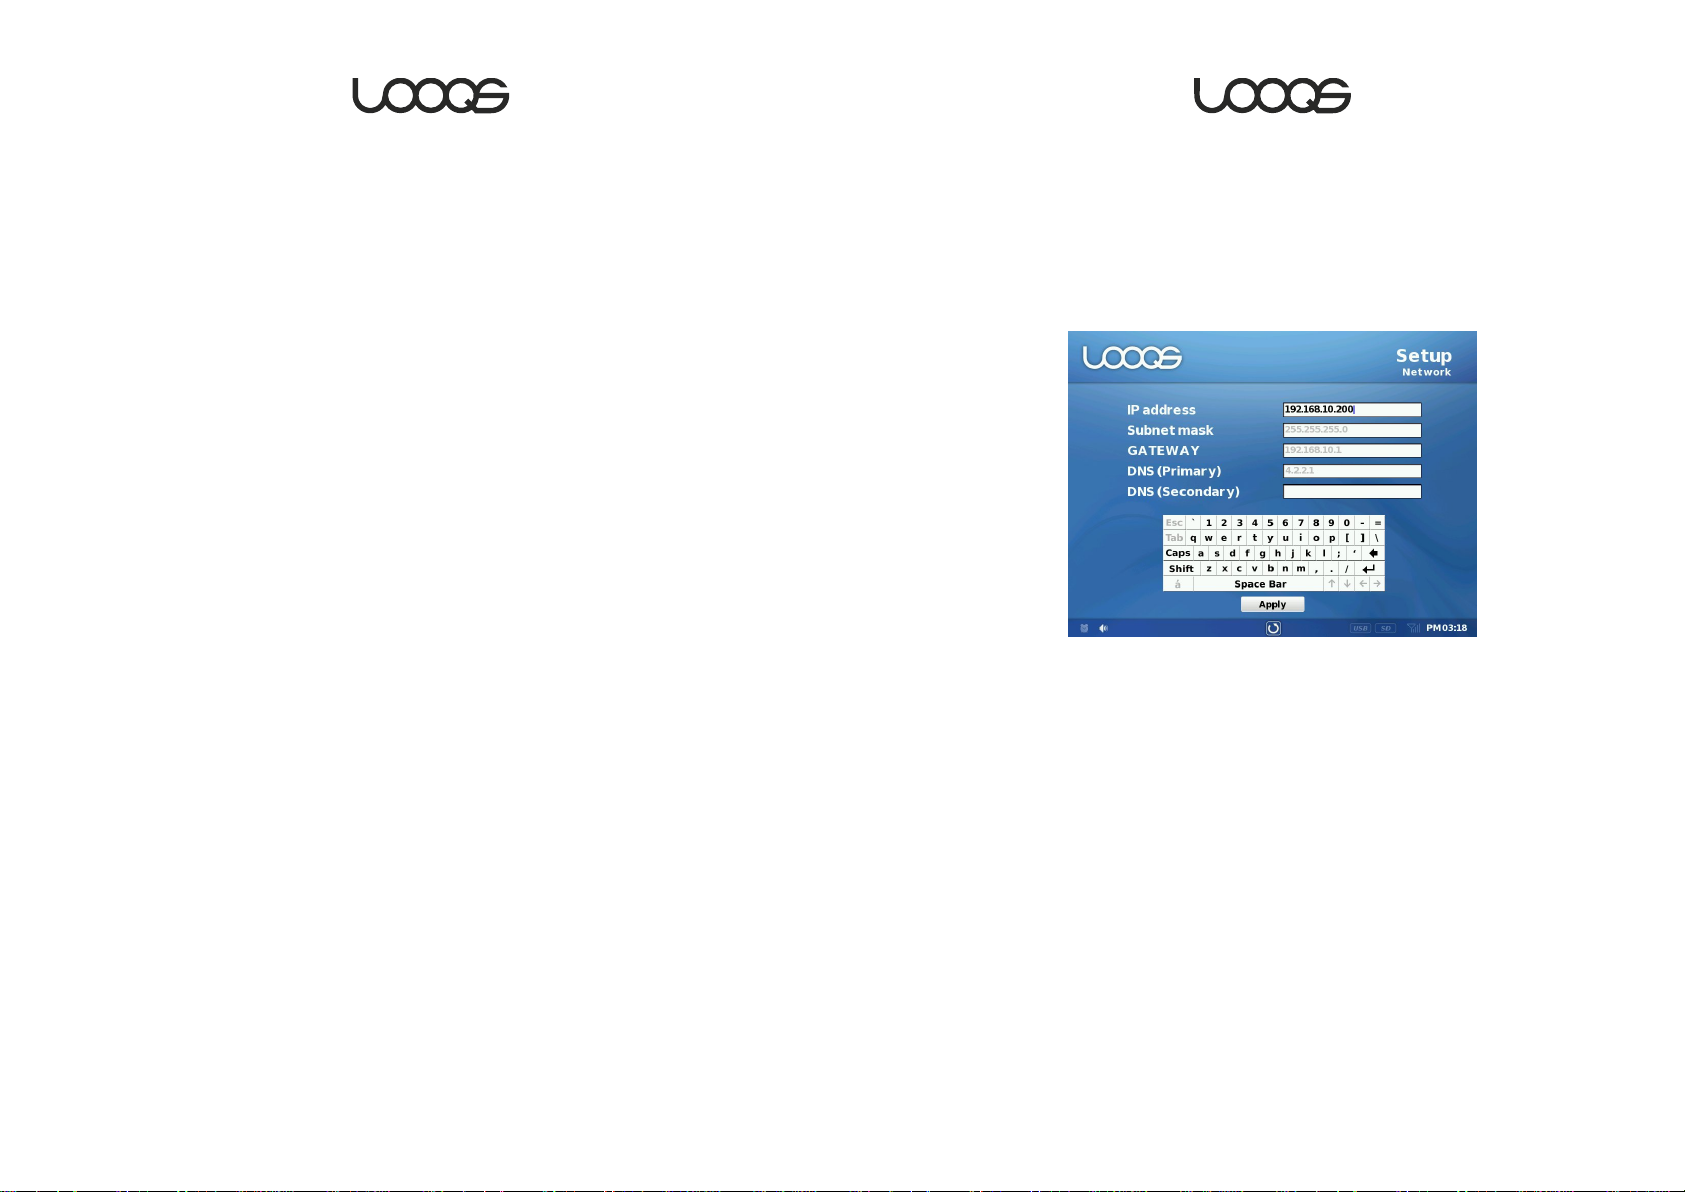
Connecting to your wireless network
MeeFrame is a wireless digital photo frame. In order to enjoy all of the
features of MeeFrame, you need to connect MeeFrame to a wireless network
that allows MeeFrame to access the Internet.
Before you connect MeeFrame to the wireless network, determine whether
your network is set up to assign IP addresses automatically by a DHCP server
or to require a manual entry of static network information. If the former, follow
the steps for the DHCP network. Otherwise, follow the steps for the Static
network.
DHCP Network
1. Tap Setup→Network. (Network Setup screen appears.)
5. Select the wireless access point of your choice and tap the Connect
button.
6. Enter the security key and tap the
wireless access point.
7. Verify the network information. (Once connected, you will see a
Network Setup screen populated with network information.)
Connect button if required by your
2. At the
3. Tap
4. Select the wireless access point of your choice and tap the
button.
5. Enter the security key and tap the
wireless access point.
6. Verify the network information. (Once connected, you will see a
Network Setup screen populated with network information.)
Static Network
1. Tap Setup→Network. (Network Setup screen appears.)
2. At the
3. Tap
4. Enter the network information using the onscreen keyboard and tap the
Apply button. (The access point selection screen appears.)
Network Setup screen, tap the Connect button.
DHCP. (The access point selection screen appears.)
Connect
Connect button if required by your
Network Setup screen, tap the Connect button.
Static. (The network information screen appears.)
User Guide MeeFrame
13
Note: If you wish to disconnect and re-connect to the same or another
network, tap
Network Setup screen. This allows you to start over with the network setup.
Note: If your wireless network is set up to hide the SSID, tap the Add Network
button at the access point selection screen and enter the information about
your network before proceeding to the next step.
Note: Once the network is set up, MeeFrame will attempt to connect to the
same network the next time it powers up.
Setup→Network and then click the Disconnect button at the
User Guide MeeFrame
14
Page 8
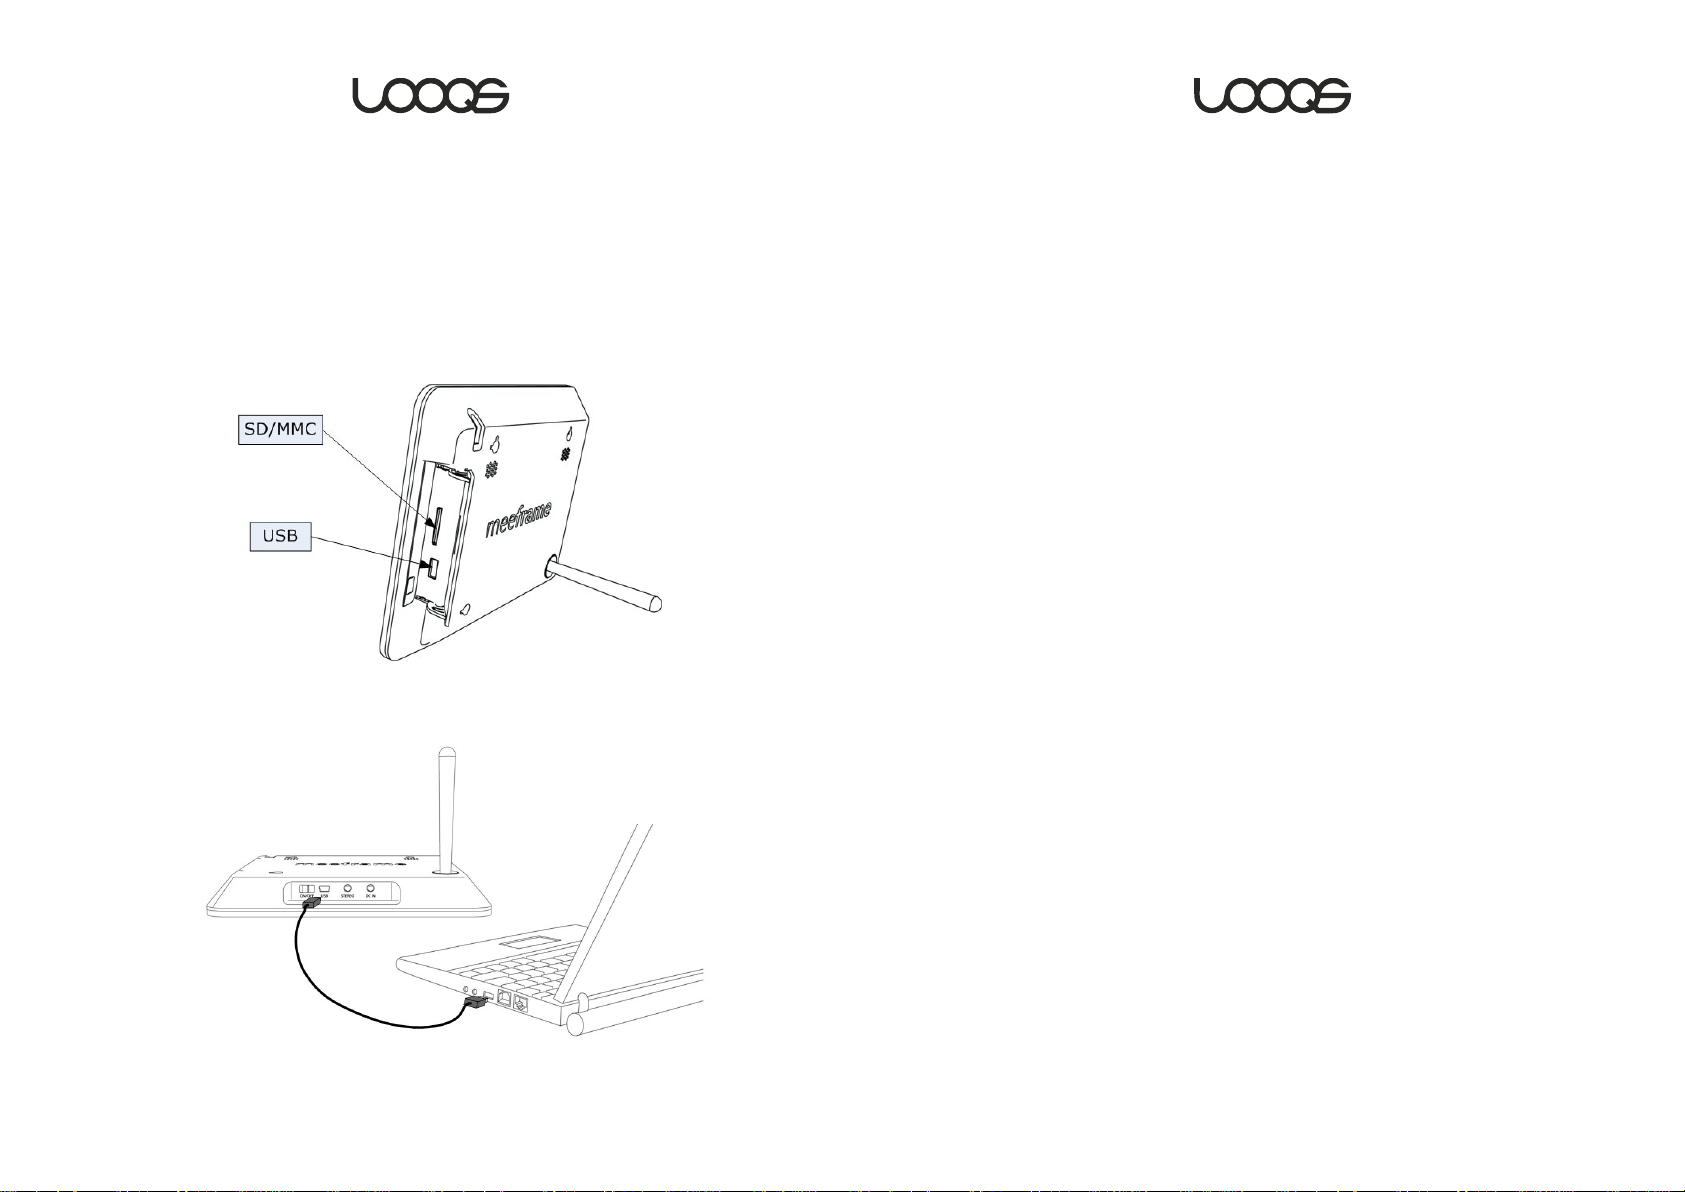
Inserting media
You can also display photos or play music from external media plugged into
MeeFrame or the internal memory.
You can connect a USB storage device (USB memory stick or a USB hard
drive) by plugging it into the USB Type A port behind the media slot cover.
You can also insert an SD Card into the slot behind the media slot cover.
In order to store music or photos in the internal memory of MeeFrame,
connect MeeFrame to your PC by using the USB cable supplied with your
MeeFrame as shown in the illustration. Once connected, MeeFrame will
display the screen shown here and you will be able to access the internal
memory of MeeFrame just like any USB storage device. We recommend
storing your photos under the PHOTO folder and music under the MUSIC
folder. You can also create subfolders and organize your media content
within them. When you have finished copying or organizing your media files in
MeeFrame’s internal memory, disconnect the USB cable, and MeeFrame will
return to its normal operating state.
User Guide MeeFrame
15
User Guide MeeFrame
16
Page 9
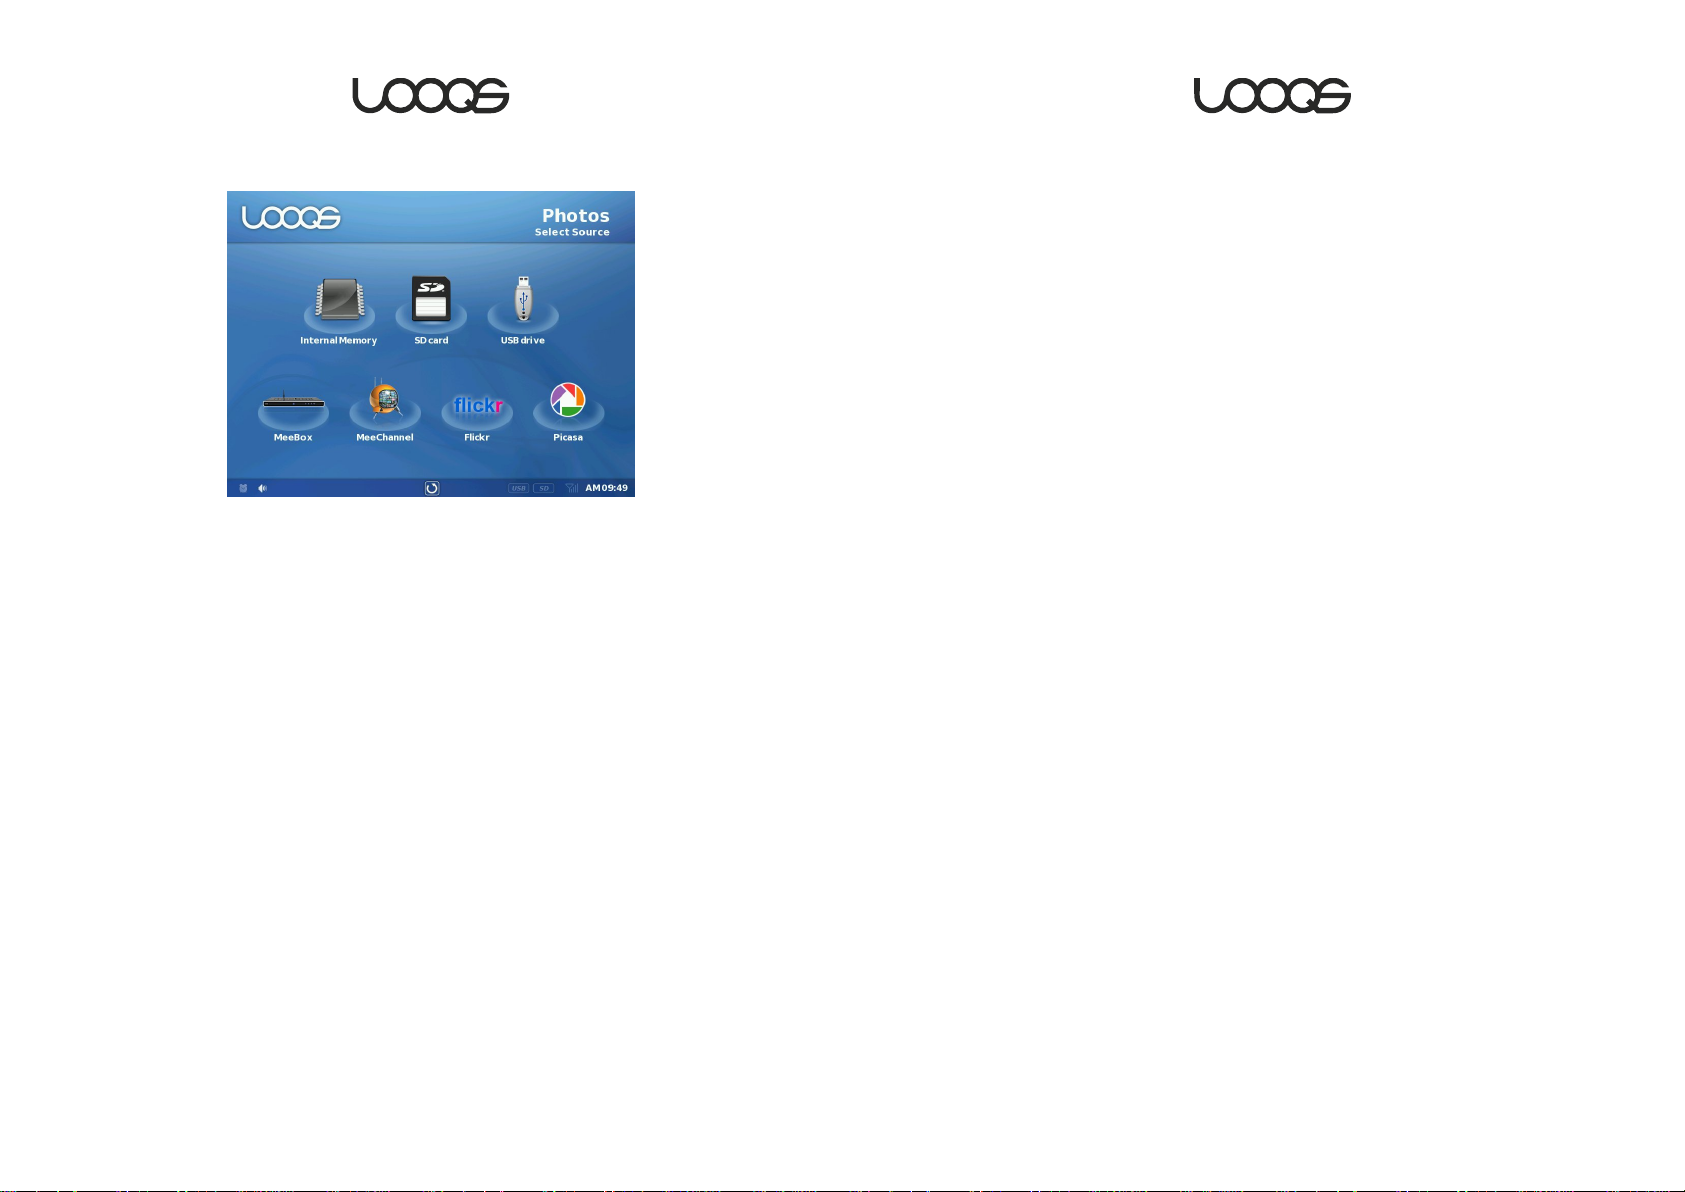
2. Viewing Your Photos
Internal memory
In order to view the photos stored in MeeFrame’s internal memory, tap
Photos→Internal Memory. Navigate to the folder where you have stored the
photos you wish to view. The thumbnail of the content will be displayed. You
can tap on a single photo you wish to view or tap the Start Slideshow button
to view all of the photos in the folder as a slideshow.
Note: The photos can be viewed in two modes— slideshow or static. In the
Slideshow mode, you can tap on the photo to stop the slideshow and enter
the static mode. In the static mode, you can advance to the next photo, go
back to the previous photo, restart the slideshow, or exit from the photo
viewer.
Note: The transition effect in the slideshow can be adjusted in the Slideshow
Setup screen.
USB Storage Device
In order to view the photos on a USB storage device, connect the media
device to the USB Type A port behind MeeFrame’s media slot cover. Once
the USB storage device is ready, you will see the USB icon light up at the
bottom of the MeeFrame user interface. Tap
the folder where you have stored the photos you wish to view. The thumbnail
of the content will be displayed. You can tap on a single photo you wish to
view or tap the
as a slideshow.
Start Slideshow button to view all of the photos in the folder
Photos→USB drive. Navigate to
SD/MMC Card
In order to view the photos on a SD or MMC Card, insert the card in the
SD/MMC Card slot behind MeeFrame’s media slot cover. Once the SD/MMC
Card is ready, you will see the SD Card icon light up at the bottom of the
MeeFrame user interface. Tap
you have stored the photos you wish to view. The thumbnail of the content
will be displayed. You can tap on a single photo you wish to view or tap the
Start Slideshow button to view all of the photos in the folder as a slideshow.
Photos→SD Card. Navigate to the folder where
MeeBox
If you have your MeeFrame connected to the same network as your
MeeBox, you can view the photos stored in your MeeBox. Tap
Photos→MeeBox. Navigate to the folder where you have stored the photos
you wish to view. The thumbnail of the content will be displayed. Depending
on your network speed and the size of the photo files, it may take a few
minutes in order for the thumbnails to appear. You can tap on a single photo
you wish to view or tap the
the folder as a slideshow.
Start Slideshow button to view all of the photos in
Note: The slideshows can be controlled using the remote control.
User Guide MeeFrame
17
Note: In order to view the photos stored in your MeeBox, MeeBox’s UPnP
media server must be enabled.
User Guide MeeFrame
18
Page 10

MeeChannel
MeeChannel.com is an online media sharing service where you can upload
photos, create albums, and share with others. Each MeeChannel account
can be associated with one or more MeeFrames. In order to view the photos
streamed from your MeeChannel account on MeeFrame, tap
Photos→MeeChannel. If your MeeFrame is not associated with a
MeeChannel account, you will see a message instructing you to register the
MeeFrame with your MeeChannel account. You can register your MeeFrame
according to the steps below:
1. Using an Internet browser, go to www.MeeChannel.com.
2. Log in to your MeeChannel account. (If you do not have a MeeChannel
account, first create an account at the main page.)
3. Using the same browser window, go to www.MeeChannel.com/register .
4. At the MeeFrame registration page, register a MeeFrame using the serial
number.
MeeFrames registered with this account that are connected to the Internet
will display a New Message icon at the bottom of the user interface.
Flickr
You can stream and view photos from multiple Flickr accounts. In order to do
so, you must first add Flickr account information to MeeFrame. You can add
up to five Flickr accounts. Each account can be added for public access or
private access. The public access mode only allows MeeFrame to display the
Flickr photos that are designated for public viewing. The private access
mode allows MeeFrame to display all photos in the Flickr account.
To add Flickr accounts in the public access mode, follow the steps below:
1. Tap
2. Select one of the empty account icons and tap the
3. Select
Photos→Flickr. (Flickr screen appears.)
Add User button .
Public access as the access type.
Once a MeeFrame is registered, you will see the MeeChannel screen when
you tap
one of the following:
Under My Photos, you can choose to view All Photos or select a particular
Under Shared Photos, selecting one of the friends will display your friend’s
To display the public photos available on MeeChannel.com, tap Public
You can send a photo message from a MeeChannel account to another
MeeChannel account. Each MeeChannel account is also associated with an
email address so that photos can be sent to a MeeChannel account using
email. When a new photo arrives at a MeeChannel account, all the
Photos→MeeChannel. At the MeeChannel screen, you can select
My Photos, Shared Photos, or Public Photos.
album. When you select All Photos or an album, the thumbnails of the
photos will appear. Select and tap any photo to begin the slideshow from
that photo. There is no static viewing mode for MeeChannel.
photos.
Photos
at the MeeChannel screen.
User Guide MeeFrame
19
4. Enter the Flickr ID or the email address associated with the Flickr
account.
5. Tap the
To add Flickr accounts in the private access mode, follow the steps below:
1. Tap
2. Select one of the empty account icons and tap the
3. Select
4. From your PC connected to the Internet, enter the URL shown at the
bottom of the MeeFrame screen and obtain the 9-digit authorization code.
5. Enter the authorization code in the ID field.
6. Tap the
Add button.
Photos→Flickr. (Flickr screen appears.)
Add User button .
Private access as the access type.
Add button.
User Guide MeeFrame
20
Page 11

Once you have added the Flickr user accounts, you will see the account’s
profile photos in the
has been added to MeeFrame, tap
photo associated with the account. You can select to view the photos from
this user by tapping Photos, or tap on Contacts to view the photos that
belong to this user’s contacts. Under Photos, you can choose to view All
Photos or select a particular album. When you select
the thumbnails of the photos will appear. Select and tap any photo to begin
the slideshow from that photo. There is no static viewing mode for Flickr.
During the slideshow, tap on the screen to stop the slideshow and return to
the thumbnail screen.
Flickr screen. To view the photos in a Flickr account that
Photos→Flickr and select the profile
All Photos or an album,
To add Picasa accounts in the private access mode, follow the steps below:
1. Tap
2. Select one of the empty account icons and tap the
3. Select
4. Enter the Picasa ID or the email address associated with the Picasa
account.
5. Enter the password associated with the account.
6. Tap the
Photos→Picasa. (Picasa screen appears.)
Add User button .
Private access as the access type.
Add button.
Picasa
You can stream and view photos from multiple Picasa accounts. In order to
do so, you must first add Picasa account information to MeeFrame. You can
add up to five Picasa accounts. Each account can be added for public
access or private access. The public access mode only allows MeeFrame to
display the Picasa photos that are designated for public viewing. The private
access mode allows MeeFrame to display all photos in the Picasa account.
To add Picasa accounts in the public access mode, follow the steps below:
1. Tap
2. Select one of the empty account icons and tap the
3. Select
4. Enter the Picasa ID or the email address associated with the Picasa
account.
5. Tap the
Photos→Picasa. (Picasa screen appears.)
Add User button .
Public access as the access type.
Add button.
Once you have added the Picasa user accounts, you will see the account’s
profile photos in the Picasa screen. To view the photos in a Picasa account
that has been added to MeeFrame, tap
profile photo associated with the account. You can select to view the photos
from this user by tapping
belong to this user’s contacts. Under
Photos
or select a particular album. When you select All Photos or an album,
the thumbnails of the photos will appear. Select and tap any photo to begin
the slideshow from that photo. There is no static viewing mode for Picasa.
During the slideshow, tap on the screen to stop the slideshow and return to
the thumbnail screen.
Photos, or tap on Contacts to view the photos that
Photos→Picasa and select the
Photos, you can choose to view All
User Guide MeeFrame
21
User Guide MeeFrame
22
Page 12
3. Beyond Photos
MeeFrame is designed to do much more than display photos. All of the extra
features are within reach from the
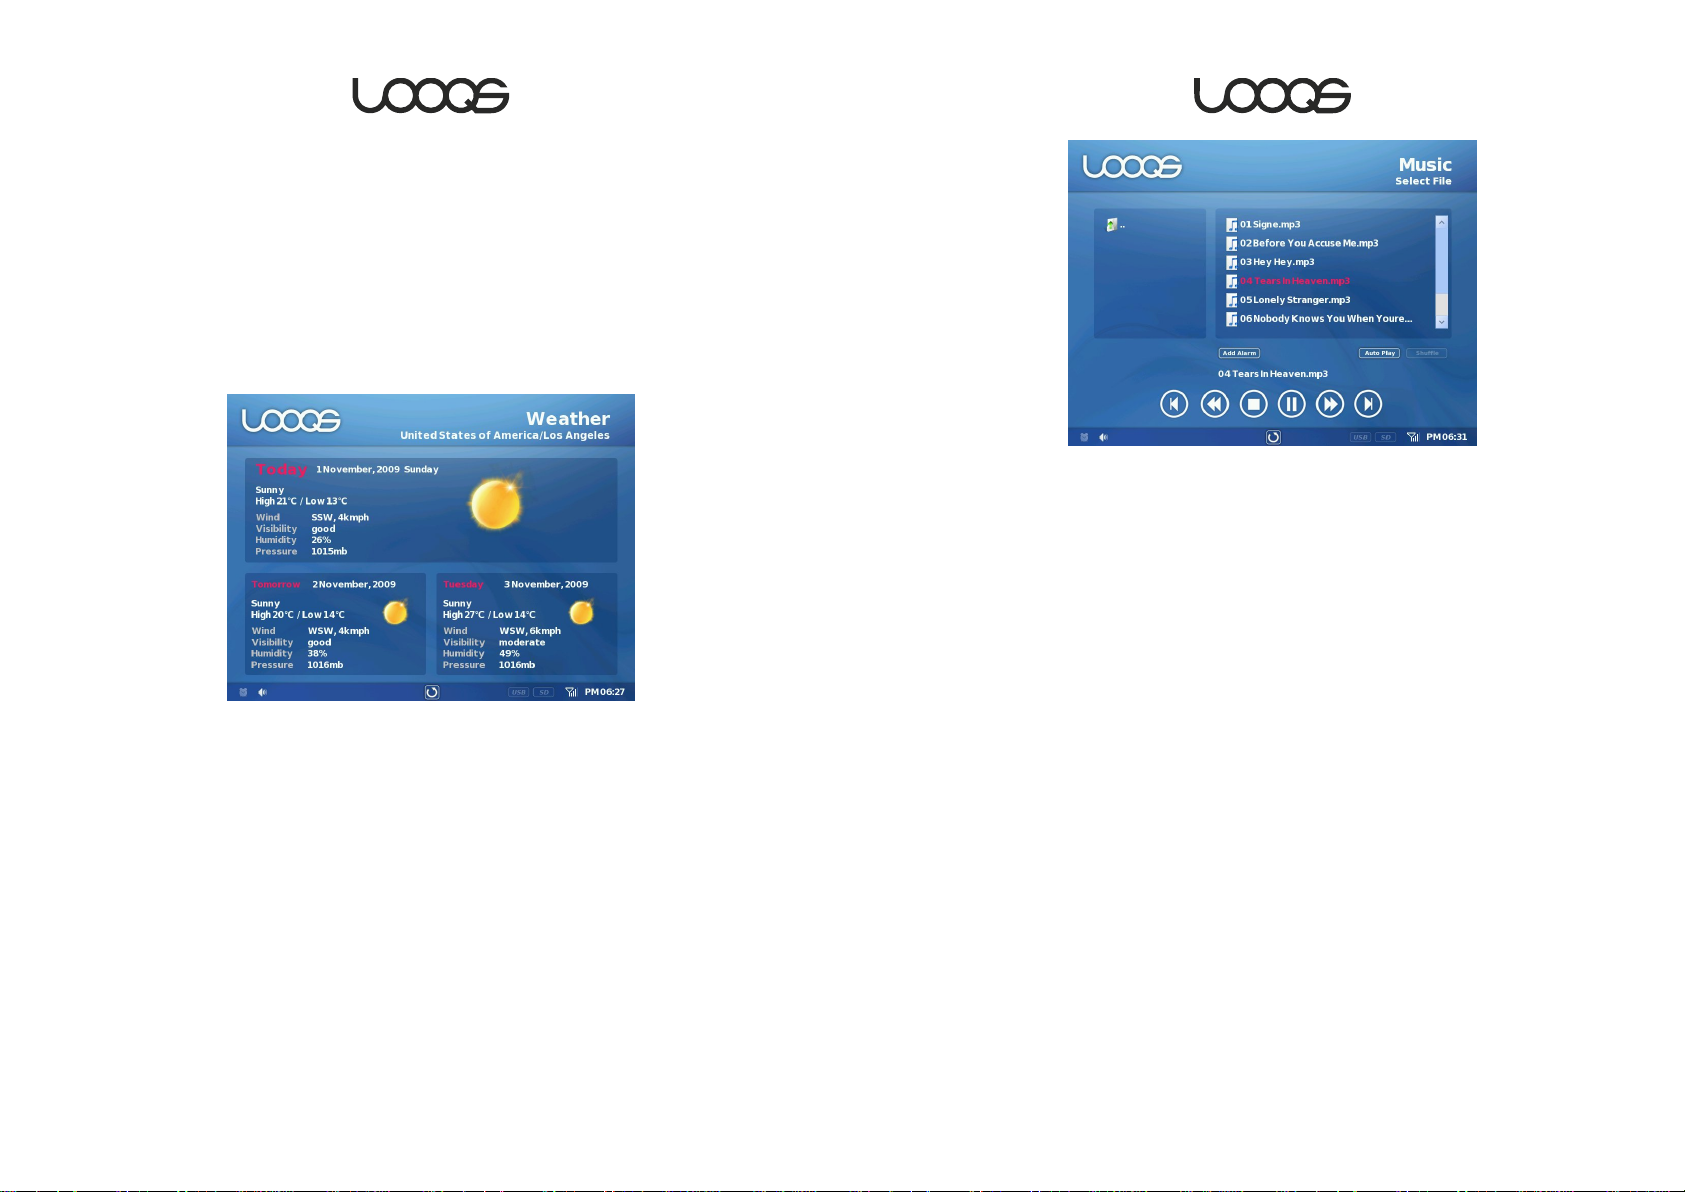
Weather
Tap Weather to view the weather information for today in a pre-selected city
and the forecast for the next two days. The city must be selected at the
Setup screen as described in page 29.
Main Menu.
Note: While the music is playing, you can click the Add Alarm button to
register the music as one of the alarm sounds. The music file must be below
5MB.
Note: Music playback can also be controlled using the remote control.
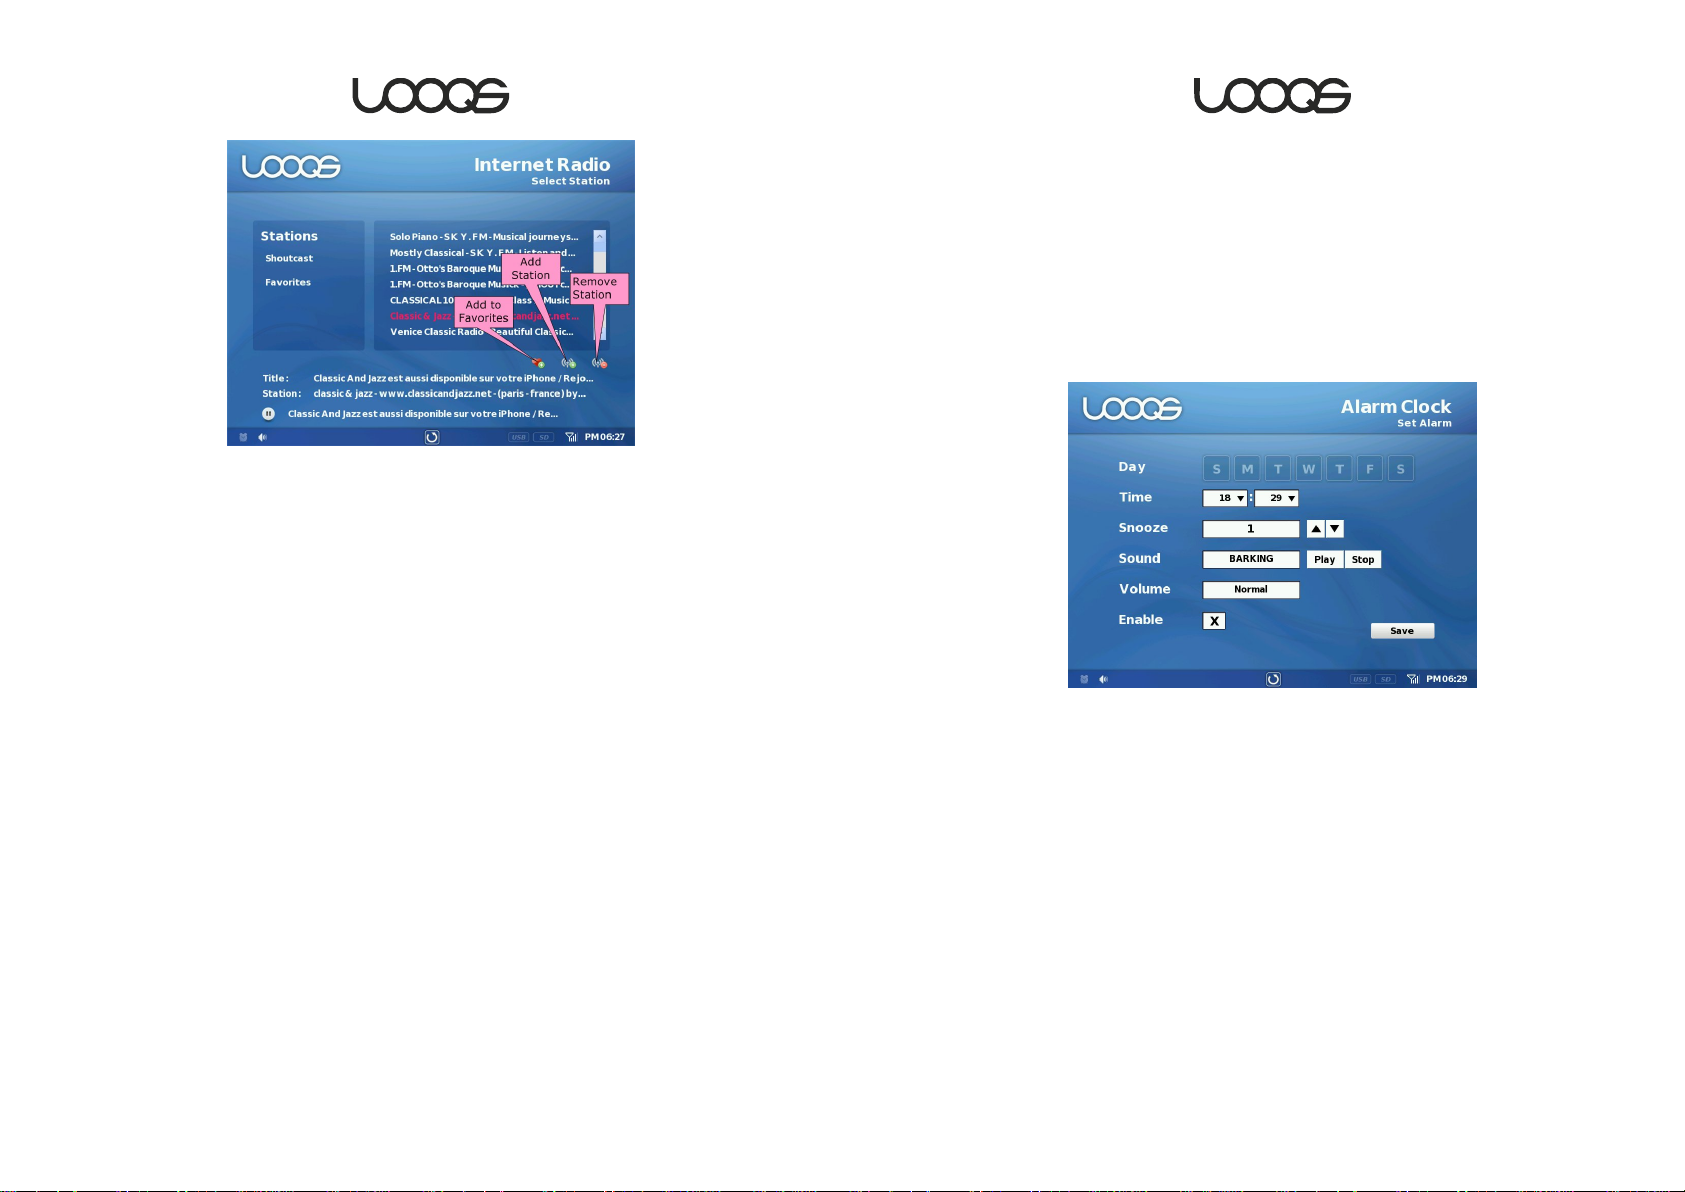
Internet Radio
When connected to the Internet, MeeFrame can stream music from Internet
radio stations. MeeFrame streams from Shoutcast server-based radio stations.
Music
You can listen to music that are stored in the internal memory or external
media. Tap
to the music file you want to play. The music will play immediately. Use the
control button below to stop, pause, fast forward, rewind, or go to the
previous or next track. You can also use the
While the music is playing, you can go back to the
photos. In order to adjust the volume, tap on the speaker icon at the bottom
left of the MeeFrame user interface and use the slide control.
Music from the Main Menu, and select the source. Then navigate
Main Menu and display
User Guide MeeFrame
23
To use the Internet Radio, tap
of the genres. MeeFrame will download the list of stations available in the
selected genre. Tapping on one of the stations will immediately start the
buffering process, and you will soon hear the radio broadcast. Tap the pause
button in order to stop the broadcast.
You can also add a radio station to your Favorites list by tapping the heart
icon while the station is playing. To add a radio station to your Favorites list by
using a URL, tap on the
button. You can also remove the stations from your Favorites list by tapping
on the
Remove Station icon while the radio station is selected.
Internet Radio and select Shoutcast, then one
Add Station icon, enter the URL, and tap on the Add
User Guide MeeFrame
24
Page 13
While the Internet Radio is playing, you can go back to the Main Menu and
display photos. In order to adjust the volume, tap on the speaker icon at the
bottom left of the MeeFrame user interface and use the slide control.
News & Info
MeeFrame also can display RSS feed from various sources of news and
information. Tap
select the category on the right. When you see a list of headlines, tapping on
one of the headlines will display the news or information on the lower half of
the screen.
News & Info and select one of the sources on the left and
Clock
You can use MeeFrame as a digital alarm clock. Tap on Clock to view the
time. You can set the time at the Time setup screen as described in page 29.
You can set up to three alarms. Tap on one of the alarm icons to set the
alarm. Each alarm can be configured to go off on specific days. In order to
use the music file that is registered as an alarm sound in the
select
User in the Sound field. Once you check the Enable field and save the
alarm setting, you will see the alarm icon light up.
Music screen,
User Guide MeeFrame
25
User Guide MeeFrame
26
Page 14
4. Utilities
5. Setup
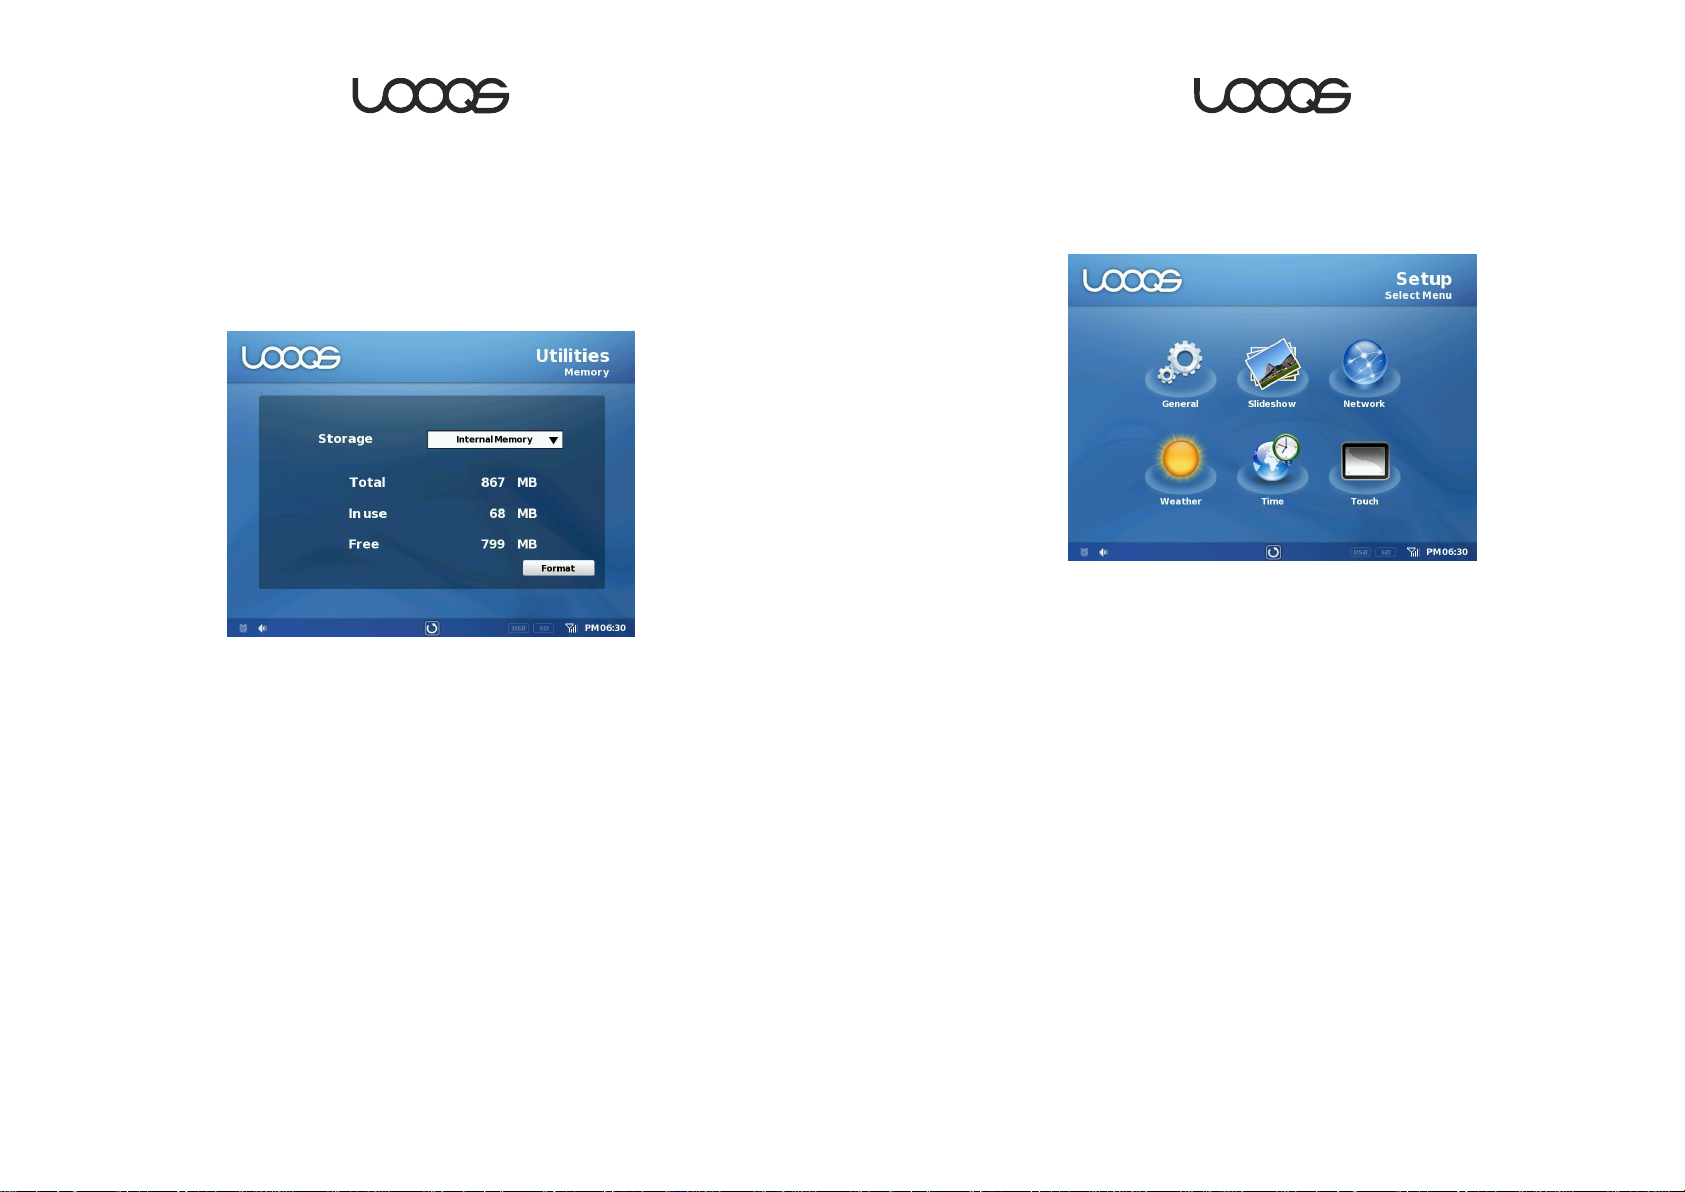
Memory
Tap on Utilities→Memory and you will the memory management screen. Here
you can view the status of the internal memory and also format the internal
memory.
File Manager
Tap on Utilities→File Manager for rudimentary management of the files in the
internal memory. From this interface you can only delete the files you do not
want on MeeFrame. In order to copy, move, or organize the files in the
internal memory, connect MeeFrame to the PC as described in page 15.
Tap on the Setup icon at the Main Menu to access configuration screens for
MeeFrame.
General
From this screen, you can verify the firmware version, set the LCD brightness,
select the language, or reset all of the settings to factory default. After
making the selection, tap the
Apply button to apply the changes.
Slideshow
From this screen, you can set the interval between photos during the
slideshows, the transition effects to be used, and the sequence of photo
slideshow. After making the selection, tap the
changes.
Apply button to apply the
User Guide MeeFrame
27
Network
From this screen, you can configure the wireless network for MeeFrame as
described in page 13.
User Guide MeeFrame
28
Page 15

Weather
From this screen, you can select the country and city whose weather
information will be displayed when you tap the
Menu
. You can also select whether you want the temperature information to
be in Celsius or Fahrenheit. After making the selection, tap the
to apply the changes.
Weather icon in the Main
Apply button
Time
From this screen, you can set the current time and the timer for MeeFrame to
go to sleep or wake up.
Under
Date & Time, you can check the Use manual time setting to set the
time yourself, or uncheck the box and select a city to download the current
time and date information from the Internet. You can also check the
saving time
with 24-hour clock. After making the selection, tap the
the changes.
In the
sleep time for MeeFrame. After making the selection, tap the
apply the changes.
box. Check the box labeled Use Military if you are more familiar
Apply button to apply
Timer screen, you can enable the timer and set the wake-up time and
Apply button to
Touch
Product Registration
Thank you for purchasing MeeFrame.
Please visit our Website and register your MeeFrame in order for us to serve
you better. We count on our customers’ feedback and suggestions in
improving our products and services. Your input would be much
appreciated.
How to register your MeeFrame:
1. Visit our corporate website at www.LOOQS.com.
2. Click on the “Product Registration” link.
3. Fill out the product registration form online and submit.
Daylight
Product registration is a good way to ensure you receive timely news about
updates to MeeFrame and technical support. If desired, registered
customers will receive news about new products from LOOQS.
Tapping Setup→Touch will immediately start the touch screen calibration
utility. You must use the stylus and tap the cross marks fairly accurately in
order to complete the calibration.
User Guide MeeFrame
29
User Guide MeeFrame
30
Page 16

Warranty
This LOOQS product is fully warranted during the period promised at the
purchase of your product. This effects from the original purchase date
against defective components and workmanship. In the event that warranty
service is required, you should return the product to the retailer from whom it
was purchased.
CONDITIONS
1. The warranty is only valid if, when warranty service is required, the
warranty card is fully and properly completed and is presented with
the original invoice or sales slip or confirmation, and the serial number
on the product has not been defaced.
2. LOOQS’s obligations are limited to the repair or, at its discretion,
replacement of the product or the defective part.
3. Warranty repairs must be carried out by authorized LOOQS Dealers or
authorized LOOQS service centers. No re-imbursement will be made
for repairs carried out by non LOOQS dealers and, any such repair
work and damage to the products caused by such repair work will not
be covered by this warranty.
4. In case the product will be used in a country other than the country it
was designed and developed for, this might result in the need for
change in the technical- and / or safety regulations effective for that
other country. Such changes are not considered material and
workmanship errors of the device and are therefore not covered by
this warranty. Any costs coming from these changes as well as any
other caused damages cannot be charged.
5. This warranty covers none of the following:
a. Periodic checkups, maintenance and repair or replacement of
parts due to normal wear and tear.
b. Cost relating to transport, removal or installation of the product.
c. Misuse, including the failure to use this product for its normal
purpose or incorrect installation.
d. Damage caused by lightning, water, fire, acts of God, War,
Public disturbances, incorrect mains voltage, incorrect
ventilation or any other cause beyond the control of LOOQS .
6. This warranty is valid for any person who legally acquired possession of
the product during the warranty period.
The consumers statutory rights in any applicable national legislation whether
against the retailer arising from the purchase contract or otherwise are not
affected by this warranty. Unless there is national legislation to the contrary,
the rights under this warranty are consumers sole rights and LOOQS, its
partners and distributors shall not be liable for indirect or consequential loss or
any damage to any other equipment or material.
User Guide MeeFrame
31
User Guide MeeFrame
32
Page 17

Copyright
Copyright © 2009 LOOQS. All rights reserved. This user manual shall not be
copied, stored in a search system, applied or transmitted in whole or in part in
any form or method (electronically, mechanically, copy through photocopier,
disk copy, or other methods) without an expressed permission from RRC BV in
a form of a document. LOOQS and MeeFrame are trademarks or registered
trademarks of RRC BV. Microsoft Windows 98, Windows ME, Windows 2000,
Windows XP, Windows Vista are registered trademarks of Microsoft
Corporation. Other product names are trademarks or registered trademarks
of their owners. One gigabyte, or GB, equals one billion bytes when referring
to hard drive capacity. Accessible capacity may vary. RRC BV reserves the
right to change product specifications without notice.
Licensing
Supply of this product does not convey a license nor imply any right to
distribute content created with this product in revenue-generating broadcast
systems (terrestrial, satellite, cable and/or other distribution channels),
streaming applications (via Internet, intranets and/or other networks), other
content distribution systems (pay-audio or audio-on-demand applications
and the like) or on physical media (compact discs, digital versatile discs,
semiconductor chips, hard drives, memory cards and the like). An
independent license for such use is required.
User Guide MeeFrame
33
User Guide MeeFrame
34
 Loading...