

Page 1
LOOQS
MeeBox Router MB201
User Guide
Page 2

Copyright | FCC Notice
Copyright © 2009 RRC bv. All rights reserved.
MeeBox and LOOQS are trademarks of RRC bv. Other trademarks are the property of their
owners. Specifications subject to change without notice.
This equipment has been tested and found to comply with the limits for a Class B digital
device, pursuant to Part 15 of the FCC Rules. These limits are designed to provide
reasonable protection against harmful interference in a residential installation. This
equipment generates, uses and can radiate radio frequency energy and, if not installed
and used in accordance with the instructions, may cause harmful interference to radio
communications. However, there is no guarantee that interference will not occur in a
particular installation. If this equipment does cause harmful interference to radio or
television reception, which can be determined by turning the equipment off and on, the
user is encouraged to try to correct the interference by one or more of the following
measures:
Reorient or relocate the receiving antenna.
Increase the separation between the equipment and receiver.
Connect the equipment into an outlet on a circuit different from that to which the
receiver is connected.
Consult the dealer or an experienced radio/TV technician for help.
ii
User Guide LOOQS MeeBox Router
Page 3

Table of Contents
Part 1 - About Your MeeBox .............................................................................. 6
Safety Precautions ...................................................................................................... 7
Specifications .............................................................................................................. 8
What’s in the Box ........................................................................................................ 9
Product Exterior ......................................................................................................... 10
Front ....................................................................................................................................... 10
Rear ........................................................................................................................................ 11
Note for Macintosh users ......................................................................................... 12
Part 2 - Setting Up Your MeeBox ..................................................................... 13
Setting up the network ............................................................................................ 14
Step 1: Prepare Your Computers ...................................................................................... 14
Step 2: Connect your MeeBox to Your Cable or DSL Modem ................................... 15
Step 3: Connect Your Computers to your MeeBox ...................................................... 16
Step 4: Configure Your MeeBox’s Network Settings ..................................................... 16
Step 5: Check Internet Connectivity ............................................................................... 17
Adding user accounts ............................................................................................. 18
Part 3 - Using Your MeeBox ............................................................................. 19
Using your MeeBox as a UPnP media server ......................................................... 20
Copying files into the media folder ................................................................................. 20
Managing the media server ............................................................................................. 21
Understanding scan options ............................................................................................. 22
Enabling/disabling the media server ............................................................................... 23
Using your MeeBox as an iTunes server ................................................................. 25
Enabling the iTunes server .................................................................................................. 25
Copying music to your MeeBox ....................................................................................... 25
Using your MeeBox as a network storage device ............................................... 26
Accessing a share in Windows ......................................................................................... 27
Accessing a share in Mac OS X or Linux ......................................................................... 27
Mapping a share to a drive letter (Windows only) ....................................................... 28
Accessing a second internal hard drive ......................................................................... 28
iii
User Guide LOOQS MeeBox Router
Page 4

Using external storage devices .............................................................................. 29
Using a USB drive.................................................................................................................. 29
Using a USB memory card reader .................................................................................... 29
Sharing a USB printer ................................................................................................ 31
Adding a shared printer to your computer .................................................................... 31
Printing to a shared printer ................................................................................................ 33
Managing users, groups, and shared folders ....................................................... 34
Why create user accounts, groups, or additional shared folders? ........................... 34
Creating, modifying, and deleting user accounts ....................................................... 35
Creating, modifying, and deleting groups..................................................................... 36
Creating, modifying, and deleting shared folders ....................................................... 36
Using the BitTorrent client......................................................................................... 38
Working with torrents .......................................................................................................... 38
Using the web photo gallery application ............................................................. 40
Using other preinstalled web applications............................................................ 41
Part 4 - Advanced Topics ................................................................................ 43
Accessing your MeeBox remotely .......................................................................... 44
Setting up Dynamic DNS .................................................................................................... 44
Using the web file browser ................................................................................................. 44
Accessing files on your MeeBox remotely using FTP ..................................................... 45
Accessing files on your MeeBox remotely using Secure FTP ....................................... 47
Setting up a website ................................................................................................ 49
Uploading website files to the server ............................................................................... 49
Editing web server configuration files .............................................................................. 50
Forwarding incoming connections ........................................................................ 51
Introduction to port forwarding ........................................................................................ 51
Choosing a port forwarding method .............................................................................. 52
Creating and editing port mapping rules ...................................................................... 53
Creating and editing port triggering rules ...................................................................... 54
Creating a Virtual Private Network ........................................................................ 56
Enabling OpenVPN and generating client keys ........................................................... 56
Installing the client certificate and key on your computer ......................................... 57
Starting and using OpenVPN on your computer .......................................................... 58
Adding a second internal hard drive .................................................................... 59
Installing the second hard drive ....................................................................................... 59
Verifying and formatting the second hard drive .......................................................... 60
iv
User Guide LOOQS MeeBox Router
Page 5

Creating a RAID array ........................................................................................................ 61
Managing storage devices ..................................................................................... 63
Viewing storage reports ..................................................................................................... 63
Using the disk utility .............................................................................................................. 63
Managing a RAID array ..................................................................................................... 64
Updating your MeeBox’s software ......................................................................... 66
Accessing your MeeBox’s command line interface ........................................... 68
Executing commands with elevated privileges ............................................................ 69
Product Registration ................................................................................................. 70
Warranty .................................................................................................................... 71
Copyright ................................................................................................................... 74
Licensing .................................................................................................................... 75
v
User Guide LOOQS MeeBox Router
Page 6

Part 1
About Your MeeBox
Congratulations on acquiring your MeeBox Router, the most versatile
media server in the world.
Before you begin using your new MeeBox, please read the following pages
to familiarize yourself with important facts about the product.
Page 7

Safety Precautions
Please read these safety instructions and precautions carefully before using your MeeBox.
Use a grounded electrical outlet.
Place the server where there is good ventilation. There should be at least three
inches of clearance on all four sides.
Do not place the server where it could be exposed to high temperature or direct
sunlight.
Do not put wet or heavy objects on top of the server.
Do not install or leave the server, its power cable, or LAN cables in areas of heavy
foot traffic.
Do not install the server in areas of high humidity (bathrooms and areas exposed to
rain or splashing water).
Keep the server out of reach of infants and young children.
Use only good quality cables.
Place the server on a level and stable surface.
Page 7
User Guide LOOQS MeeBox Router
Page 8

Specifications
Product name:
LOOQS MeeBox Router MB201
Storage:
One or two 3.5" SATA hard disk drives
Processor:
300-MHz ARM9 32-bit RISC CPU w/ 24KB L1 cache
Memory:
128 MB DDR SDRAM / 16 MB Flash ROM
Network interfaces:
1 x Gigabit Ethernet WAN port
4 x Gigabit Ethernet LAN ports
802.11 b/g Wi-Fi
Expansion ports:
2 x USB 2.0 (support drives, printers, memory card readers)
External drive
support:
FAT32, NTFS, XFS, ext2, ext3
Internet services:
HTTP, WebDAV, FTP, SFTP, Telnet, SSH, POP, SMTP, Samba,
OpenVPN
Dimensions:
40mm x 435mm x 210mm HWD
Weight:
2.5kg (lbs) with 1 HDD
Power:
Adapter input: 90–200V AC, 50/60 Hz
Adapter output: 12V DC, 3A
Max power consumption: 24W
Certifications:
FCC Class B, CE, MIC Class B
Operating
temperatures:
0°–40° C (32°–104° F)
Page 8
User Guide LOOQS MeeBox Router
Page 9

What’s in the Box
MeeBox media server
AC adapter
power cord
Ethernet cable
mounting screws for second internal drive (except two-drive models)
Setup CD
User Guide
Quick Start Guide
Page 9
User Guide LOOQS MeeBox Router
Page 10
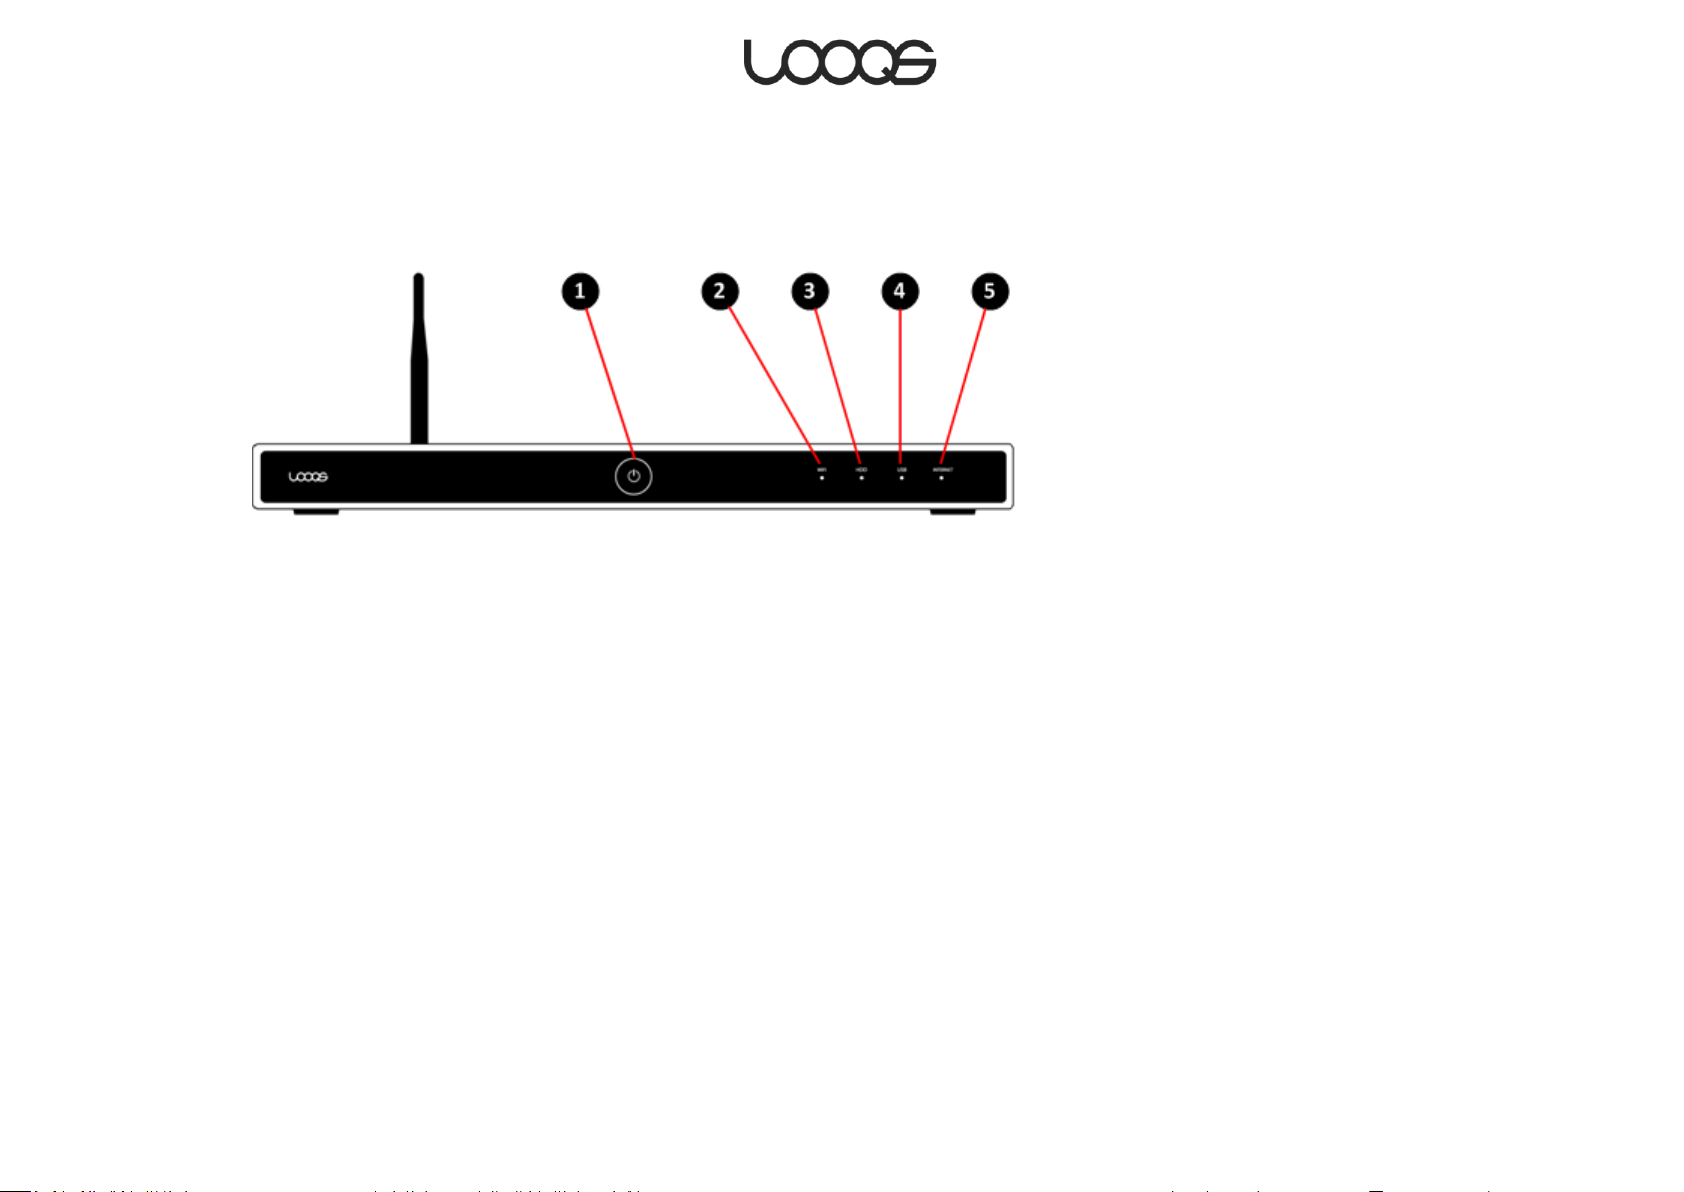
Product Exterior
Power Button
Press to turn your MeeBox on. Press and hold for at least
one second to turn your MeeBox off.
Wireless LAN Status Indicator
Lights up when there is activity on the wireless network.
HDD Activity Indicator
Blinks when the internal hard drive is being accessed.
USB Status Indicator
Lights up when a USB device is attached.
Internet Status Indicator
Lights up when your MeeBox has a valid WAN connection.
Front
Page 10
User Guide LOOQS MeeBox Router
Page 11
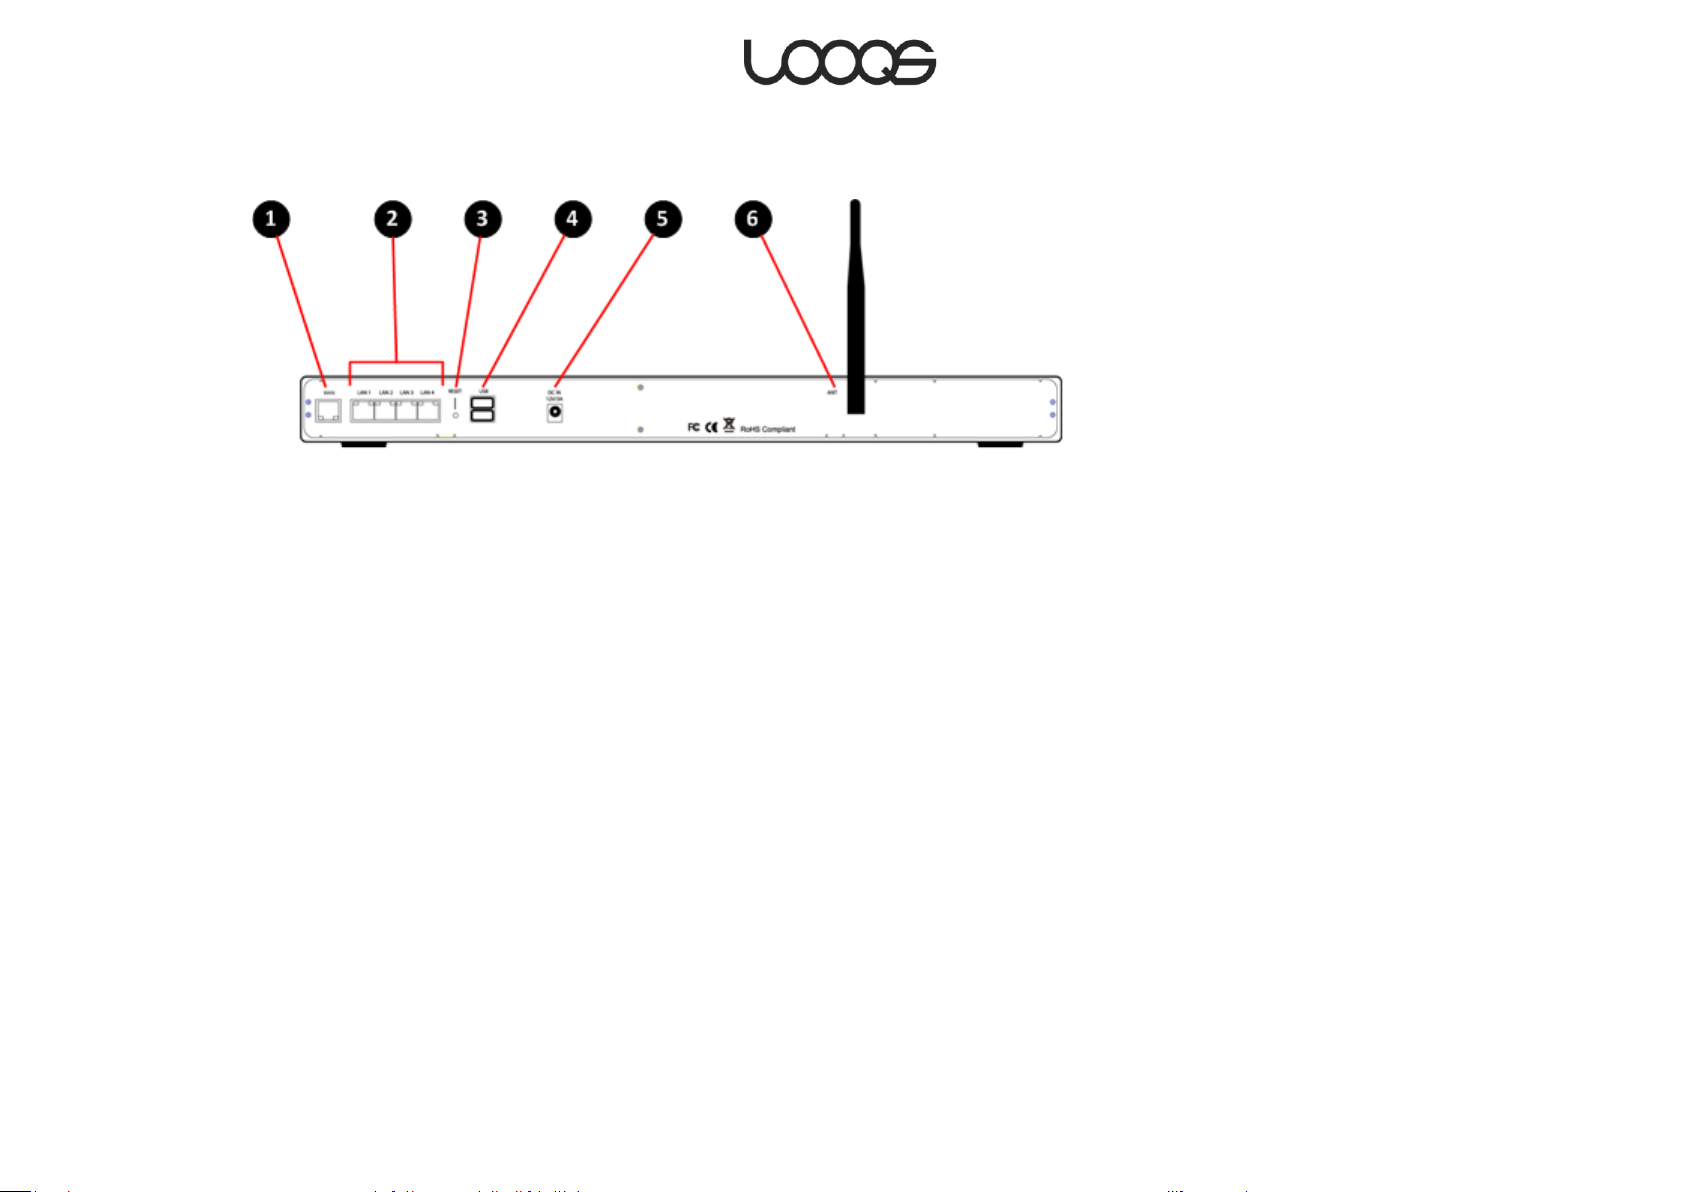
Rear
WAN Port
Connect your broadband modem or primary router here.
LAN Ports
Connect wired clients here.
Factory Reset Button
Using a thin object such as a straigtened paper clip, push
this to reset all settings to factory defaults.
USB 2.0 Ports
Connect external USB drives, memory card readers, and/or
a USB printer here.
DC Input
Plug the external power supply in here.
Antenna Mount
Screw your MeeBox’s antenna in here.
Page 11
User Guide LOOQS MeeBox Router
Page 12

Windows
Mac OS X
http://meebox/
http://meebox.local/
http://meebox:8090/
http://meebox.local:8090/
MeeBox (for FTP or SFTP)
MeeBox.local
MeeBox (for Telnet or SSH)
MeeBox.local
Note for Macintosh users
Important!
When accessing your MeeBox’s admin interface or web applications from a Mac OS X
computer, the hostname you use is slightly different from the one used on Windows.
Throughout this user guide, wherever the instructions refer to the hostname MeeBox,
please substitute the hostname MeeBox.local.
The table below gives Macintosh equivalents for Windows addresses and hostnames
referred to in this user guide.
Note: The .local suffix is not necessary when accessing your MeeBox through SMB. To
access your MeeBox’s network shares, you can use the network path smb://meebox/ or
smb://meebox.local/ interchangeably.
Page 12
User Guide LOOQS MeeBox Router
Page 13

Part 2
Setting Up Your MeeBox
Setting up your MeeBox is easy. The following pages will get you up and
running in a jiffy.
Page 14
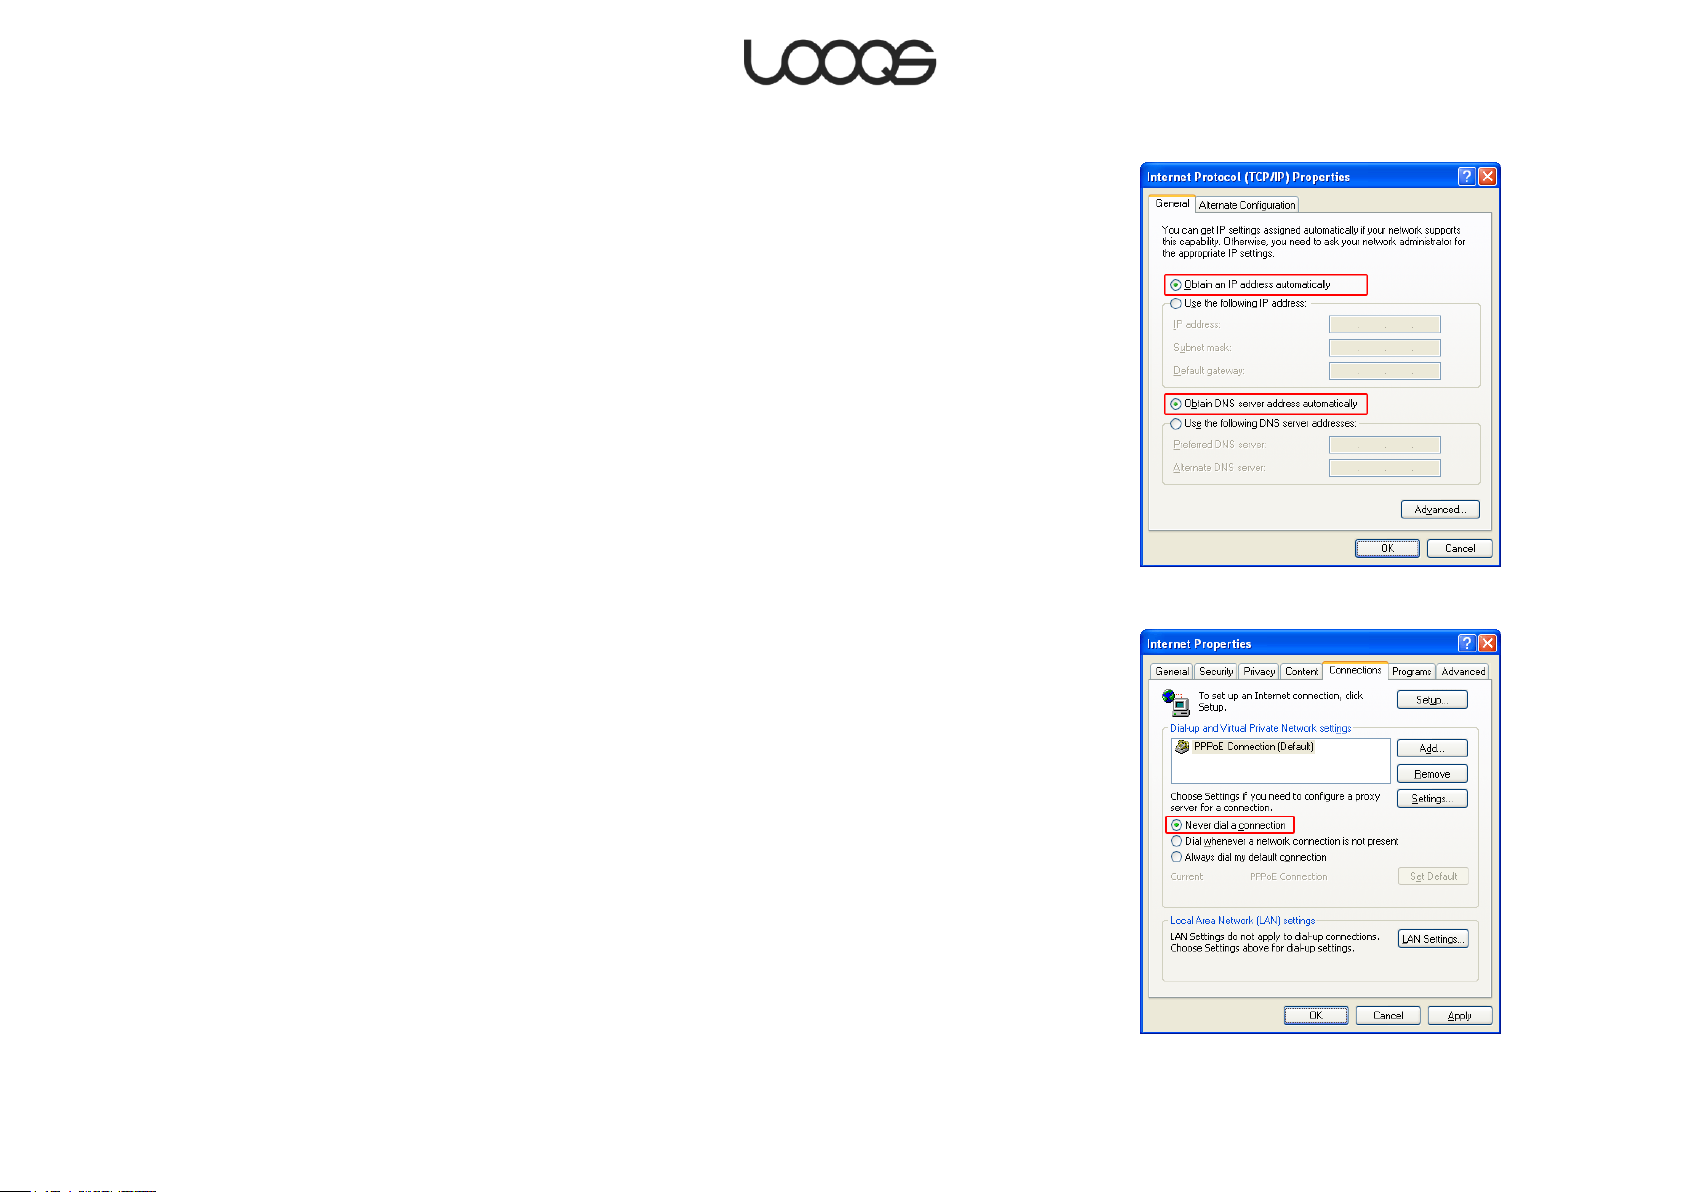
Figure 1
Figure 2
Setting up the network
These instructions assume you will use your MeeBox as your internet gateway (there is no
other router between your MeeBox and your cable/DSL modem).
Step 1: Prepare Your Computers
Configure each of your computers to obtain an IP address automatically (using DHCP).
The instructions below are for computers running Windows XP. If your computer runs
another operating system, please refer to your OS’s network documentation.
1. On the Start menu, click Control Panel, and then double-click Network Connections.
2. If the computer will connect to MeeBox wirelessly, right-click the Wireless Network
Connection icon, and then click Properties. Otherwise, right-click the Local Area
Connection icon, and then click Properties.
3. On the General tab, find the box labeled This connection uses the following items and
scroll down the list until you see Internet Protocol (TCP/IP). Double-click Internet
Protocol (TCP/IP).
4. Make sure the options Obtain an IP address automatically and Obtain DNS server
address automatically are selected (see Figure 1), and then click OK.
5. Click OK to close the connection properties window.
Note: If your Internet connection uses Point-to-Point Protocol over Ethernet (PPPoE), you
must disable the PPPoE login window, since PPPoE login will be handled by your MeeBox
from now on. If your Internet connection does not use PPPoE, you can skip these
instructions.
1. On the Start menu, click Control Panel, and then double-click Internet Options.
2. On the Connections tab, select Never dial a connection, and then click OK
(see Figure 2).
Page 14
User Guide LOOQS MeeBox Router
Page 15

Step 2: Connect your MeeBox to Your Cable or DSL Modem
1. Turn your modem off.
2. Plug one end of the supplied Ethernet cable into your modem’s Ethernet port and the
other end into the WAN port on the back of your MeeBox (see Figure 3).
3. Connect your MeeBox’s AC adaptor to the power port on your MeeBox and plug the
adaptor into an electrical outlet.
4. Turn your modem on. Wait until the modem’s Internet light is steady before continuing.
5. Turn your MeeBox on by pressing the power button on the front.
Figure 3
Page 15
User Guide LOOQS MeeBox Router
Page 16

Figure 4
Step 3: Connect Your Computers to your MeeBox
Connecting through an Ethernet cable
1. Plug one end of an Ethernet cable (Cat 5 or higher) into one of the four LAN ports on
the back of your MeeBox, and plug the other end into your computer’s LAN or
Ethernet port (see Figure 3).
2. If the computer is off, turn it on.
Connecting wirelessly
1. If the computer is off, turn it on.
2. Using your wireless network browser, locate and connect to the wireless network
named MeeBox.
Step 4: Configure Your MeeBox’s Network Settings
1. On a computer connected to your MeeBox, open a browser window. In the address
bar, type http://meebox:8090/ and press Enter.
2. Log in with username ―admin‖ and password ―meebox‖. You will be prompted to
change the admin password. After doing so, click Network in the menu on the left side
of the page (see Figure 4).
3. Change the network settings as necessary, and then click Save. In most cases, you
can leave the WAN mode set to Dynamic IP (your MeeBox will obtain an IP address
from your modem) and leave the LAN IP and SSID at their default settings. However,
you should enter a wireless key to enable wireless network security.
Note
It is highly recommended to enter a wireless key to enable wireless security. If you do not
enter a wireless key, your MeeBox’s network will be accessible by anyone within wireless
range.
Page 16
User Guide LOOQS MeeBox Router
Page 17

Step 5: Check Internet Connectivity
After you finish the setup wizard, make sure your computer (which is connected to your
MeeBox) can connect to the Internet. Try visiting a Web site in your browser. If you cannot
access the Web, you may need to change your MeeBox’s network settings. To do so,
open your web browser, go to http://meebox:8090/, log in as ―admin‖ with password
―meebox‖, click MeeBox Settings, and click Network on the menu.
Page 17
User Guide LOOQS MeeBox Router
Page 18

Figure 5
Adding user accounts
If you will be sharing your MeeBox with others, you should consider creating an account
for each user. This lets you control how much disk space each user can use and which
shared folders each user can access.
1. In your web browser, go to http://meebox:8090/ and click MeeBox Settings.
2. Click Advanced Settings, then click Management, and then click Users (see Figure 5).
3. Under Add/Edit User, enter a username, a password, and (optionally) a description in
the provided fields.
4. If you want to limit how much internal disk space the user can occupy, select Enable
disk quota and enter the limit in MB.
5. Click Save.
6. Repeat steps 3–6 for each user you want to create.
Later, if you wish, you can create shared folders (called shares) and decide which users
can access each one. You can also create groups of users, allowing you to grant or deny
access to specific shares for several users at once. For more information, see Managing
users, groups, and shares.
Page 18
User Guide LOOQS MeeBox Router
Page 19

Part 3
Using Your MeeBox
Your MeeBox offers a wealth of functionality. This chapter will help you get
the most out of the product.
Page 20

Tip
Different UPnP media players and adapters have
different ways of setting up access to UPnP
media servers. However, in general, your media
player should be able to “see” your MeeBox
media server as long as it is connected to the
same network. (If you have the router version of
MeeBox, the media player should be in your
MeeBox’s network.) Your MeeBox media server
will be identified as “meebox” in your media
player’s user interface.
Using your MeeBox as a UPnP media server
Your MeeBox can stream media files (video, audio, or photos), wirelessly or through
Ethernet, to any UPnP-AV compliant media player or digital media adapter that is on your
local network. Examples of UPnP-AV media players or adapters include LOOQS
MeeCeiver, LOOQS MeeFrame, XBMC Media Center, and Windows Media Player (running
on Windows Vista or Windows 7). If you have a MeeCeiver, for example, you can stream
movies from MeeBox to MeeCeiver wirelessly and watch them on your TV.
The UPnP media server in your MeeBox will serve any media files that are present in a
special folder on your MeeBox’s internal hard drive. On Windows clients, the path of the
folder is \\meebox\public\media. On Mac OS, the folder’s path is
smb://meebox/public/media. You can also access the media folder using FTP or SFTP at
the path /mnt/ide3/public/media.
The media folder contains three subfolders: audio, photos, and video. Any media files you
place in the media folder or any of its subfolders will be available to UPnP media players
on your local network.
The subfolders audio, photos, and video are there for your convenience only. You do not
need to use them. Even if you put all your media files directly in the media folder, or in
other subfolders of the media folder that you create, the media server will recognize and
serve them without problems. If you wish, you can rename the subfolders as desired, or
even delete them. However, please do not rename or delete the media folder itself.
The media server checks for new files in the media folder (and its subfolders) every five
minutes by default. You can change the refresh interval using the media server’s admin
interface (see Managing the media server, below). If you wish, you can also add other
folders on your MeeBox to the media server’s database, so that files in those folders will
also be available to UPnP media players on your network.
Copying files into the media folder
You can copy media files from your computer into the media folder using the same
methods you use to copy files to other locations on your MeeBox. For details, see Using
your MeeBox as a network storage device, below.
For example, to access the media folder through Windows’s built-in networking:
Page 20
User Guide LOOQS MeeBox Router
Page 21
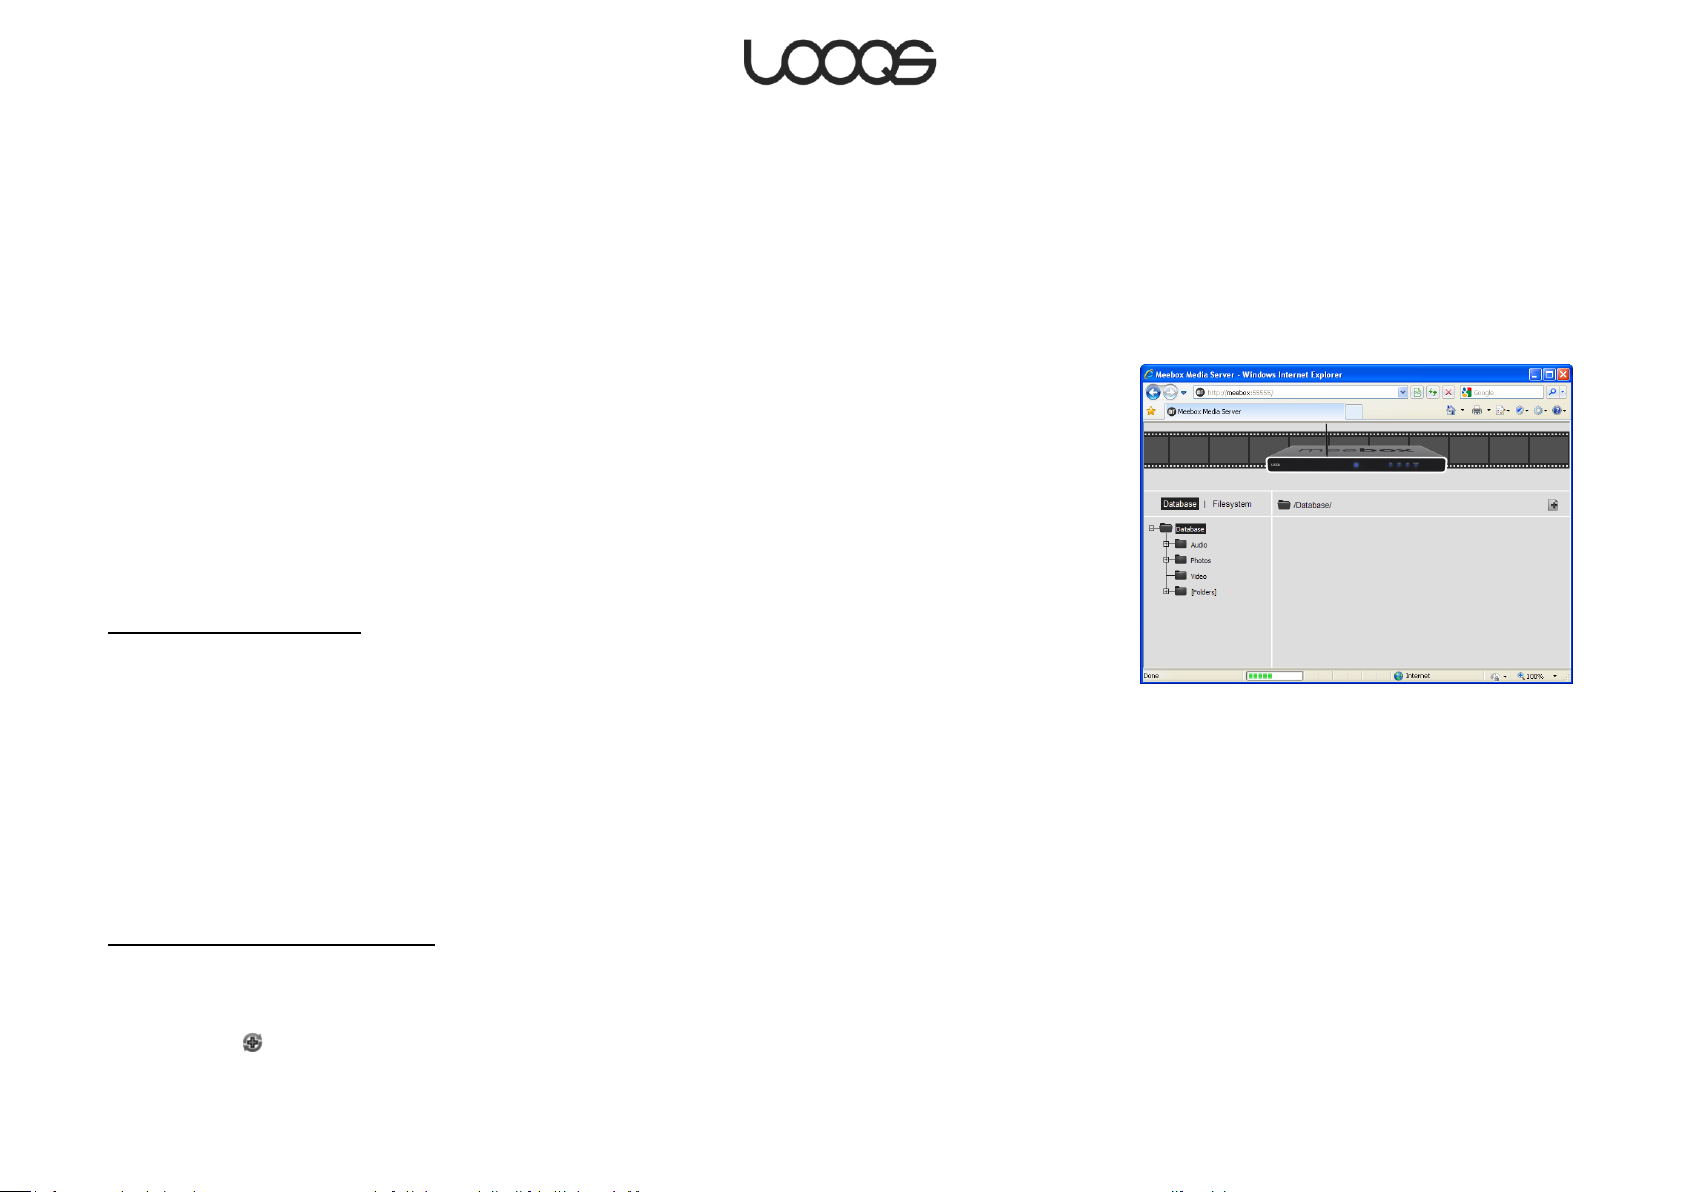
Figure 6
1. On the Start menu, click Run. The Run dialog box opens.
2. Type \\meebox and press Enter.
3. Double-click the public folder. If you are prompted for login credentials, enter your
MeeBox username and password.
4. Double-click the media folder. Copy media files into this folder or one of its subfolders.
Managing the media server
You can manage various aspects of the UPnP media server through its browser-based
management interface. To access the management interface, in your web browser, go to
http://meebox:8090/ and click Media Server. (Figure 6 shows the management interface
as it appears the first time you open it.)
From here, you can see the list of media files that have been found by the media server;
see which folders on your MeeBox are being scanned by the media server; add or
remove scanned folders; change the scanning interval; and more.
Listing found media files
Media files that have been found by the media server are listed when you click Database.
The media server automatically organizes media files into virtual folders named Audio,
Photos, and Video. Along with the physical folders monitored by the server, these are
shown in the folder tree on the left side of the window. (Note that the virtual folders do not
correspond to the similarly-named subfolders of the media folder. Even if you delete the
physical subfolders, these virtual folders will remain.)
The Audio virtual folder contains virtual subfolders such as Artists and Albums that
automatically organize your music collection. To expand a folder, click the plus sign to the
left of the folder’s icon.
Adding a folder to be scanned
1. Click Filesystem.
2. In the folder tree, navigate to the folder you want to add and select it.
3. Click the button.
Page 21
User Guide LOOQS MeeBox Router
Page 22
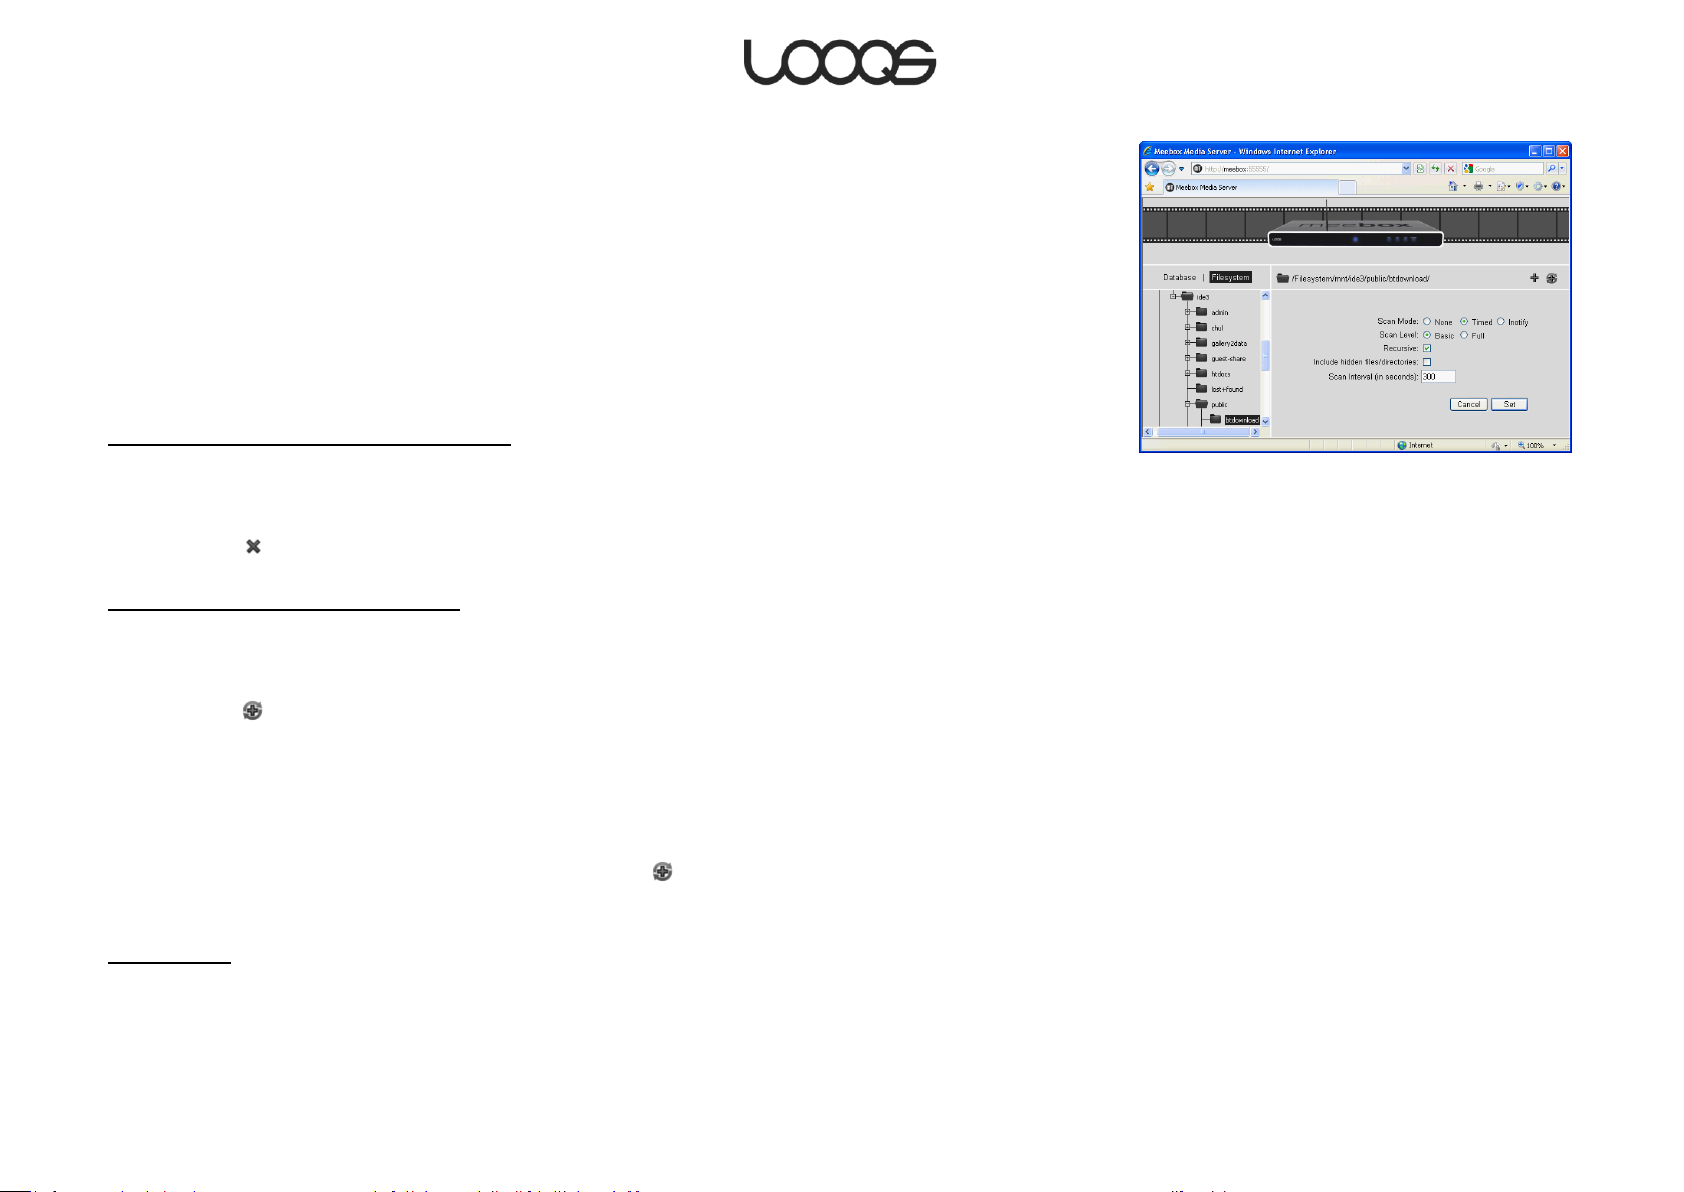
4. Set the following options as shown (see Figure 7):
Figure 7
Scan mode: Timed
Scan level: Basic
Recursive: (selected)
Include hidden files/directories: (unselected)
Scan interval: 300
5. Click Set.
The selected folder will be immediately scanned for media files.
Stopping a folder from being scanned
1. Click Database.
2. Click the plus sign to the left of the icon labeled [Folders].
3. Select the folder you no longer want to be scanned.
4. Click the button.
Changing a folder’s scan interval
1. Click Database.
2. Click the plus sign to the left of the icon labeled [Folders].
3. Select the folder whose scan interval you want to change.
4. Click the button.
5. Set the Scan interval as desired.
The selected folder will be immediately re-scanned.
Understanding scan options
These are the options available when you click the button after selecting a folder for
scanning.
Scan mode
None: The folder will not be scanned again. (Use this option if you want to temporarily
stop a folder from being scanned without removing it from the database.)
Page 22
User Guide LOOQS MeeBox Router
Page 23

Timed: The folder will be scanned at regular intervals determined by the Scan interval
setting.
Inotify: This option is not used.
Scan level
Basic: Files are scanned for metadata (such as ID3 tags in MP3 files) only once, when first
added to the database. If a file’s metadata later changes, the change will not be
detected.
Full: Files are rescanned for new or changed metadata at every scan.
Recursive
If this option is selected, any subfolders of the selected folder will also be scanned (with
the same settings).
Include hidden files/directories
If this option is selected, any hidden files or subfolders (i.e., those whose names begin with
a dot) will be included in the scan.
Scan interval
The number of seconds between rescans. A value less than 180 (three minutes) is not
recommended, as the system performance of your MeeBox may be adversely affected.
Enabling/disabling the media server
Your MeeBox’s UPnP media server is enabled by default. The media server should have
very little impact on system performance when it is not actively being used, so it is safe to
leave the media server enabled all the time. You can, however, disable it if you wish.
To disable the media server:
1. In your web browser, go to http://meebox:8090/ and log in as admin.
2. Click MeeBox Settings.
3. In the menu, click Features.
4. Clear the check box under Enable UPnP media server, and click Save.
Page 23
User Guide LOOQS MeeBox Router
Page 24

To re-enable the media server, repeat the steps above, but select the check box under
Enable UPnP media server.
Page 24
User Guide LOOQS MeeBox Router
Page 25

Figure 8
Using your MeeBox as an iTunes server
Your MeeBox can function as an iTunes server. This lets iTunes-equipped computers on the
MeeBox’s network play music that is stored on the MeeBox. The music is streamed from
your MeeBox to the iTunes software on the computer.
When the iTunes server on your MeeBox is enabled, the music collection on the MeeBox
will appear in iTunes as a shared library with the name meebox_music_box. (Look under
the Shared heading in the sidebar of iTunes.) If you select the shared library, the audio files
on your MeeBox will appear in the iTunes track list.
The iTunes server supports MP3, AAC, and uncompressed audio files.
Enabling the iTunes server
1. In your web browser, go to http://meebox:8090/, log in, and click MeeBox Settings.
2. In the menu, click Features.
3. Select the check box under Enable iTunes server and click Save (see Figure 8).
Copying music to your MeeBox
The iTunes server looks for audio files in the folder \\meebox\public\media\audio (on
Mac OS, use the path smb://meebox/public/media/audio; for FTP or SFTP, use the path
/mnt/ide3/public/audio). The server scans this folder for new audio files every 60 seconds.
You can copy media files from your computer into the audio folder using the same
methods you use to copy files to other locations on your MeeBox. For details, see Using
your MeeBox as a network storage device, below.
For example, to access the audio folder through Windows’s built-in networking:
1. On the Start menu, click Run. The Run dialog box opens.
2. Type \\meebox and press Enter.
3. Double-click the public folder. If you are prompted for login credentials, enter your
MeeBox username and password.
4. Double-click the media folder, then double-click the audio subfolder.
Page 25
User Guide LOOQS MeeBox Router
Page 26
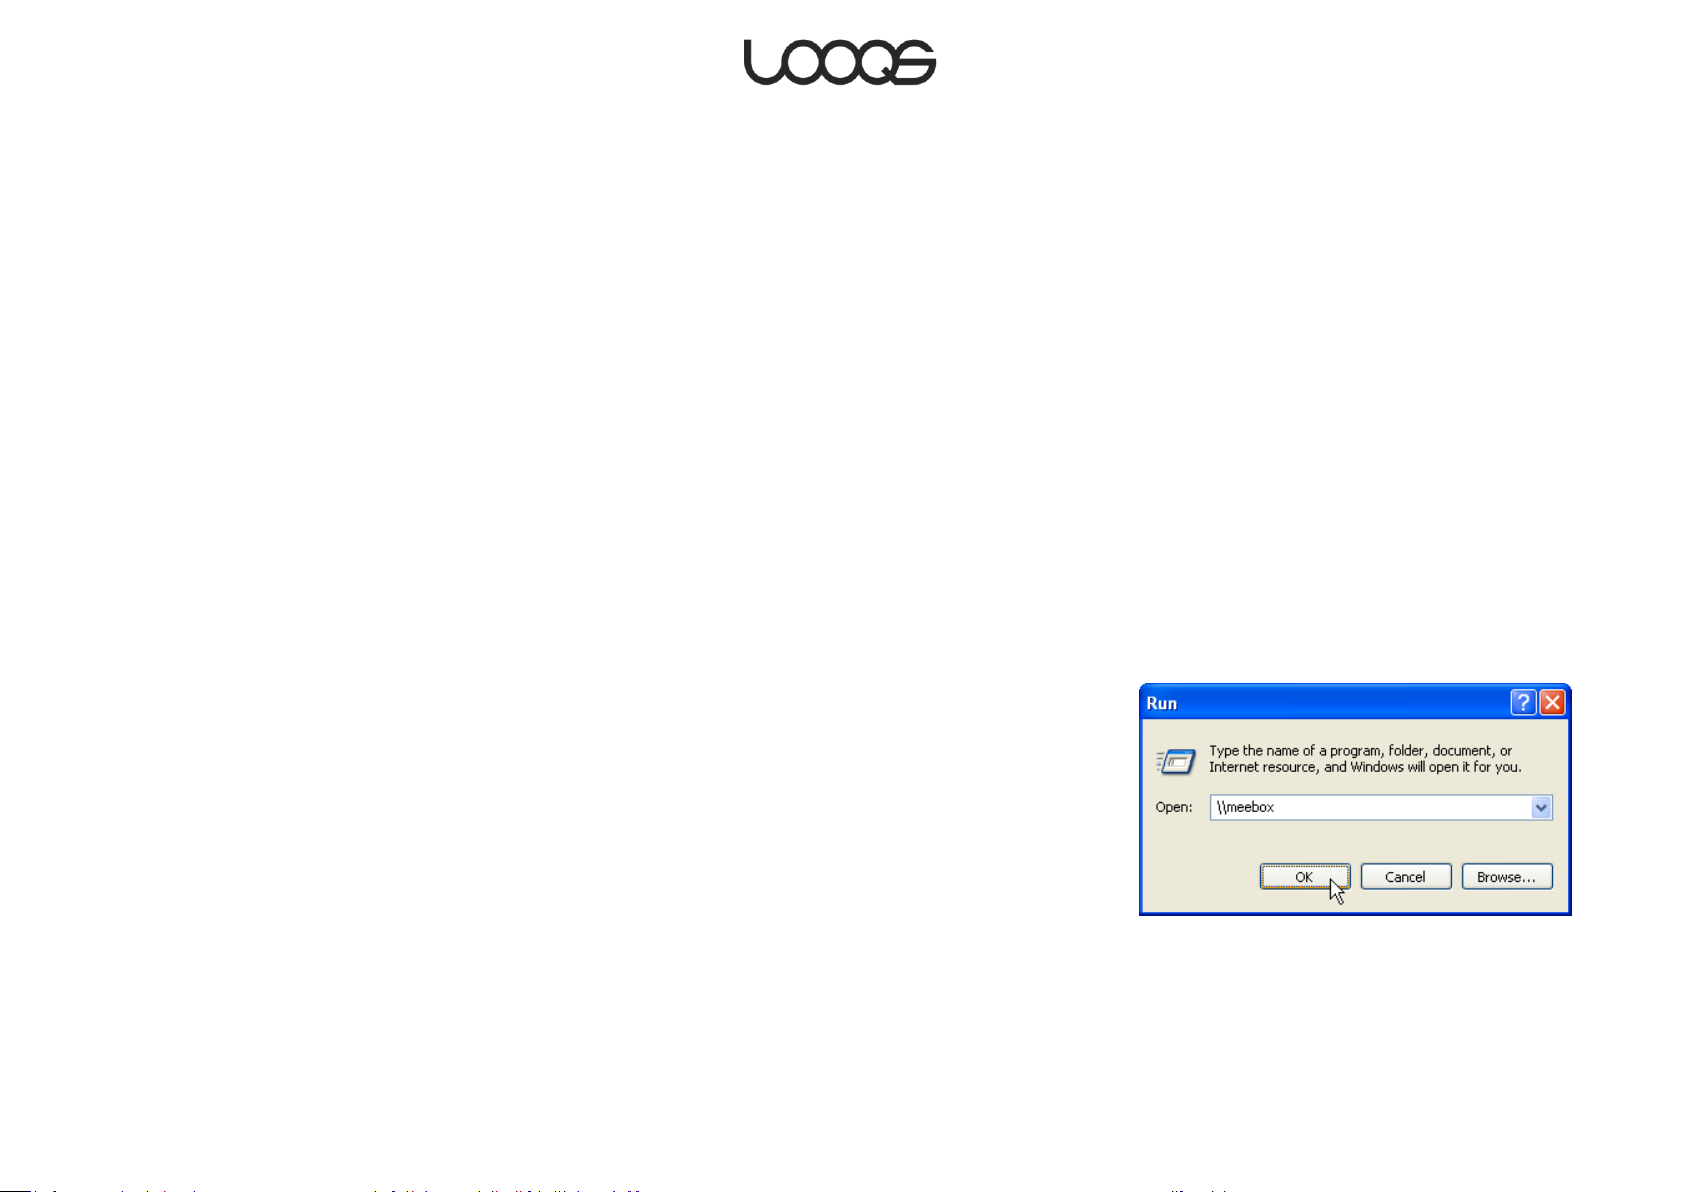
Figure 9
Using your MeeBox as a network storage device
As a network-attached storage device, or NAS, your MeeBox can provide both shared
and private storage space to all the users on your network.
Storage space on your MeeBox is organized into two kinds of folders: private folders and
shared folders. Technically, both are called network shares, or just shares (although private
folders are not shared among users). Like folders on your computer’s own hard drive,
network shares can contain both files and folders.
A private folder is accessible only by its owner (the user whose username is the same as
the folder name). By contrast, a shared folder may be accessible by all users, some users,
or no users. You can control who has access to a shared folder on the Shared Folders
page of the admin interface (see Managing users, groups, and shares).
Out of the box, your MeeBox comes with one private folder, admin (owned by the server
administrator), and one shared folder, public. You can create more shared folders on the
Shared Folders page of the admin interface. To create a new private folder, simply create
a new user account.
On a Windows PC, you can view all available shares on your MeeBox by doing the
following:
1. On the Start menu, click Run. The Run dialog box opens.
2. Type \\meebox and press Enter (see Figure 9).
An Explorer window will open, showing all the shares on your MeeBox. Double-click a share
to open it. You will be prompted to enter the username and password of someone who
has access to the share. (You can always access the admin and public shares using the
admin account (default password ―meebox‖.)
Once you have opened a share, you can use it as you would a folder on your local hard
drive. For example, you can copy a file or folder into a share by dragging it from another
folder in Windows Explorer or your desktop and dropping it in the share.
Page 26
User Guide LOOQS MeeBox Router
Page 27

Tip
If you are unable to access shares on your
MeeBox from a Windows PC, you may need to
enable the Client for Microsoft Networks service
on your PC’s network interface. To do so in
Windows XP:
1. On your desktop, right-click My Network
Places and select Properties. (If you do not
have a My Network Places icon on your
desktop, click Start > Run, type “ncpa.cpl”,
and press Enter.)
2. Right-click your active network connection
and select Properties.
3. Select the check box labeled Client for
Microsoft Networks, and then click OK.
Accessing a share in Windows
To access a specific share directly, enter a network address in the form:
\\meebox\share_name
where share_name is the name of the shared or private folder you want to access. For
example, to access the public shared folder, you would enter \\meebox\public. You will
be prompted to enter a username and password, unless you have previously instructed
Windows to remember your password.
You can enter a network address in the Run dialog box or in Windows Explorer if you want
to browse or manage the files and folders in a share. If you want to save or open a file in a
share directly within a Windows application, you can enter the network address of the
share in the Open or Save As dialog box of the application.
Accessing a share in Mac OS X or Linux
To access a specific share on a Mac OS X or Linux computer, enter a network address in
the form:
smb://meebox/share_name
or
smb://ip_address/share_name
where ip_address is your MeeBox’s WAN IP address (required if accessing the server
through an external router), and share_name is the name of the shared or private folder
you want to access. You will be prompted to enter a username and password, unless you
have previously instructed the operating system to remember your password.
In Mac OS X, you can enter the network address in the Connect to Server dialog box. In
the Finder’s menu bar, click Go, and then click Connect to Server.
To access a network share in Linux, please refer to your Linux distro’s network
documentation.
Page 27
User Guide LOOQS MeeBox Router
Page 28
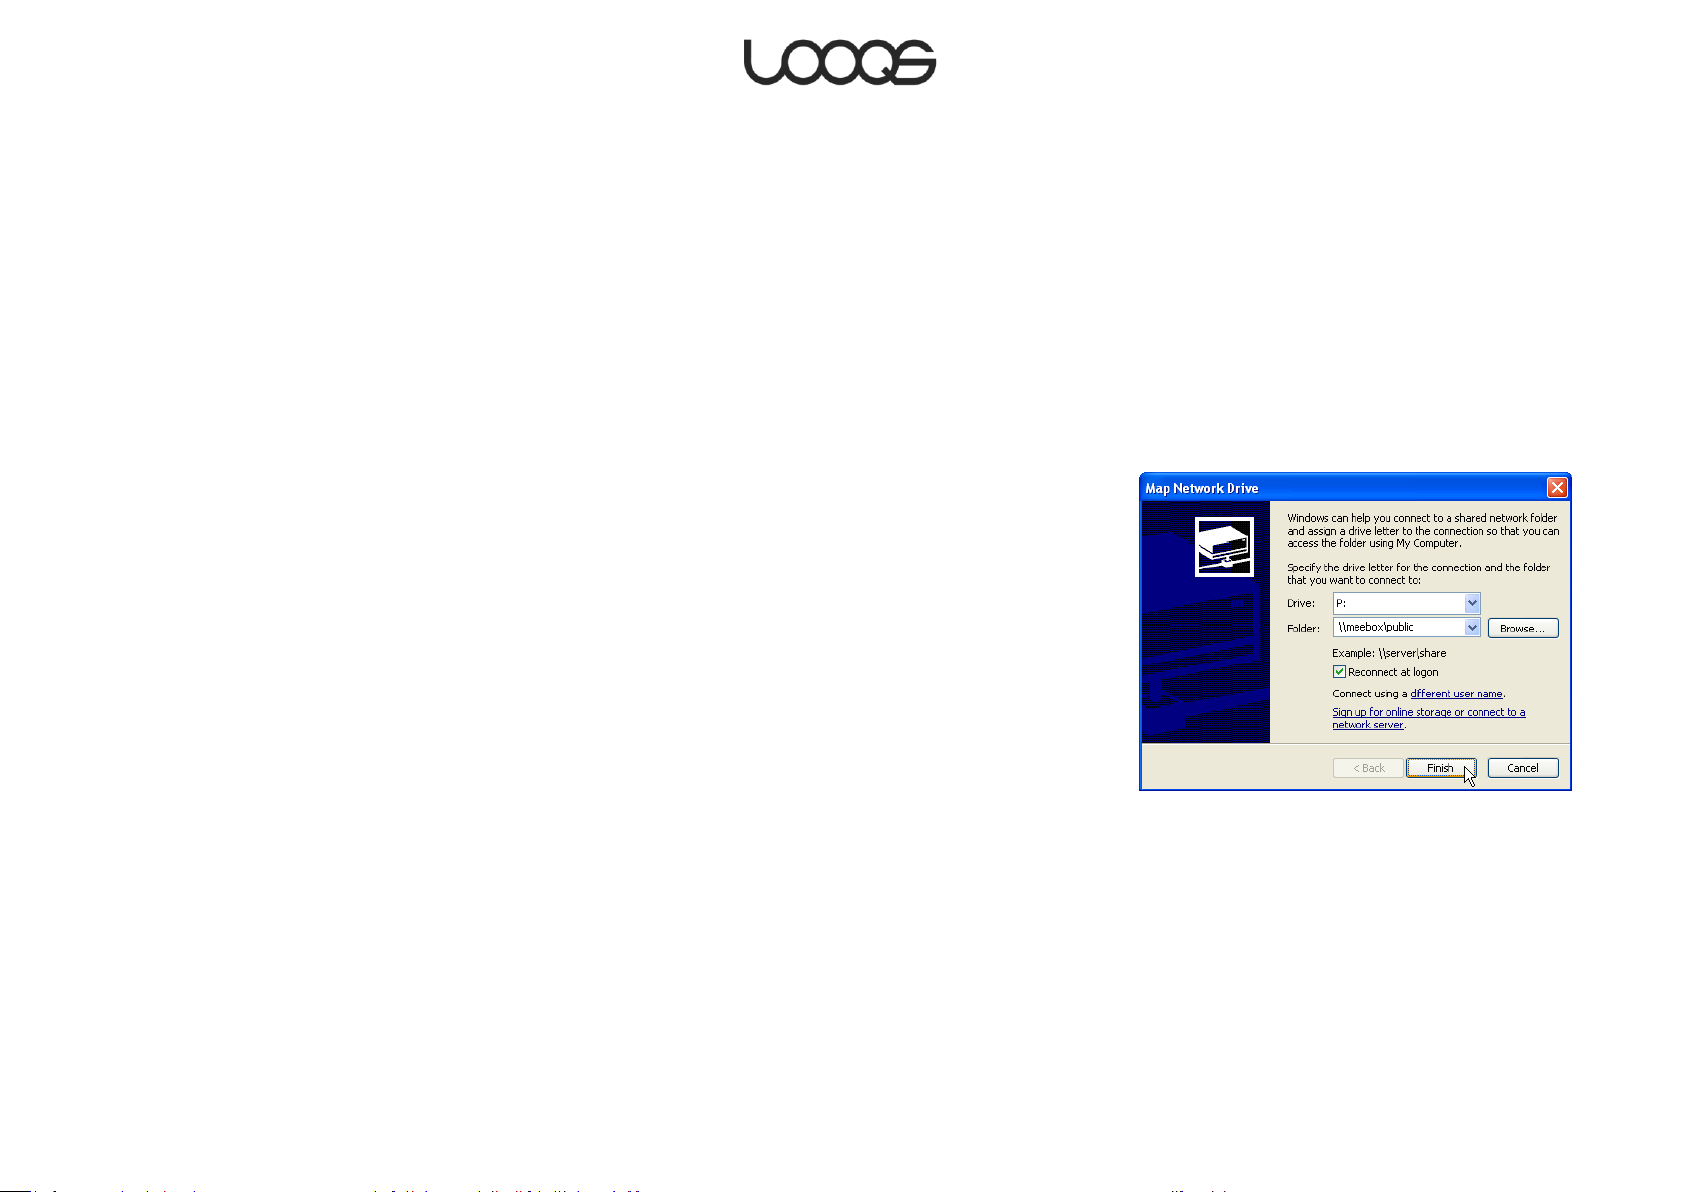
Figure 10
Mapping a share to a drive letter (Windows only)
On a Windows PC, you can assign a drive letter to a specific share on your MeeBox, so
that you can access the share more conveniently in the future. (This is called network drive
mapping.) After assigning a drive letter to a share, you can access the share any time by
simply clicking the network drive in Windows Explorer, even after restarting your computer.
It is not possible to assign a drive letter to your MeeBox as a whole, only to individual shares.
To map a share to a drive letter in Windows XP, do the following:
1. On your desktop, right-click My Network Places and select Map Network Drive. (If you
do not have a My Network Places icon on your desktop, open Windows Explorer and
click Tools > Map Network Drive.)
2. Select the drive letter you wish to use, enter the network address of the desired share,
and click Finish. (For an example, see Figure 10.)
3. You will be prompted to enter a username and password. You can enter those of any
user who is authorized to access the share. To avoid having to re-enter a username
and password every time you log onto or restart the computer, select Remember my
password. Click OK.
Note
If you change your MeeBox’s hostname after mapping a network drive, you will have to
disconnect the network drive and map it again using the new hostname. To disconnect a
network drive, right-click its icon and select Disconnect.
Accessing a second internal hard drive
If your MeeBox has a second internal hard drive that is not part of a RAID array, it can be
accessed through the shared folder ide4.
Page 28
User Guide LOOQS MeeBox Router
Page 29

Using external storage devices
You can connect various kinds of external storage devices to your MeeBox—either
temporarily, in order to copy files to the server (from a USB thumb drive, for example); or
more permanently, in order to add storage space beyond that of the server’s internal
hard drive. Supported external storage devices include USB drives, USB memory card
readers, and eSATA drives.
Using a USB drive
You can connect up to two USB drives simultaneously, including most thumb drives and
external hard drives, to your MeeBox’s USB 2.0 ports. The server supports the following file
systems for USB drives: FAT, FAT32, NTFS, ext2, ext3, and XFS.
Each USB drive you connect will appear as a shared folder named usb1 or usb2
(depending on whether other USB storage devices were already connected). If a USB
drive has more than one partition, only the first partition will be available as a shared
folder.
To access a connected USB drive, use the network address \\meebox\usb1 (or usb2).
Please note that it may take a few seconds after you connect a drive before it is
accessible.
You can also map a drive letter to the USB drive, as you would to any other share.
Using a USB memory card reader
You can connect a USB memory card reader to one of your MeeBox’s USB 2.0 ports. The
same file systems are supported for memory cards as for USB drives.
To access a memory card, insert the card into the reader before you connect the reader
to your MeeBox. When you connect the reader, the memory card appears as a shared
folder named either usb1 or usb2 (depending on whether another USB storage device
was already connected). You can then access the memory card’s contents at the
network address \\meebox\usb1 (or usb2). Please note that it may take a few seconds
after you connect the card reader before the card is accessible.
Page 29
User Guide LOOQS MeeBox Router
Page 30

If you have a multi-format card reader, please use it with only one memory card at a time.
If you connect a card reader to your MeeBox with more than one card inserted, the server
will only recognize one of the cards.
Note
When you are finished using a memory card, always disconnect (physically unplug) the
card reader from your MeeBox before attempting to access another card. If you replace
the card without disconnecting the reader, the new card will not be recognized. The old
memory card will still appear to be available at the same network address, even though it
is not.
Page 30
User Guide LOOQS MeeBox Router
Page 31
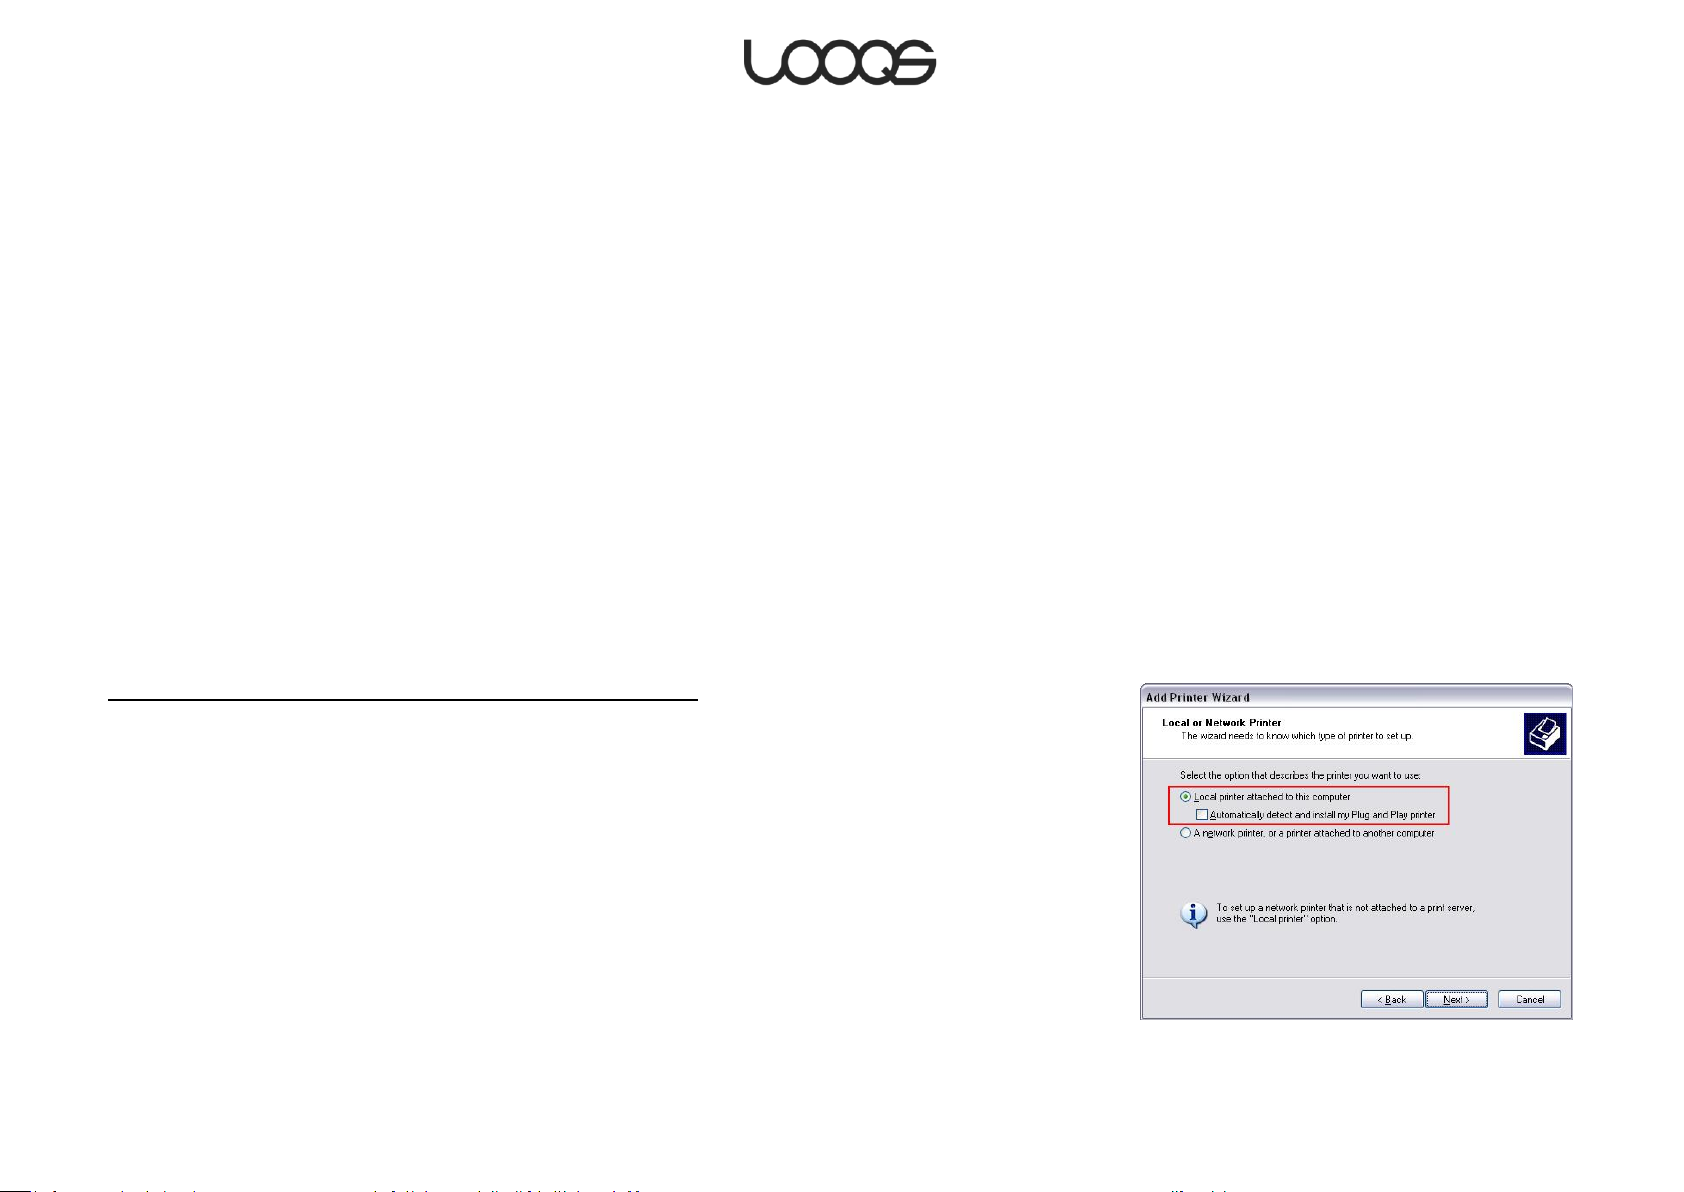
Figure 11
Sharing a USB printer
If you connect a compatible USB printer to one of your MeeBox’s three USB 2.0 ports, you
can use it from any computer on the server’s local network. Most standard USB printers are
compatible, although ―bidirectional‖ features such as reporting ink levels are not
supported. Some multifunction printers (MFPs) are also compatible, but for printing only—
not scanning or faxing. In general, if a printer is compatible with other USB print servers
using ―raw socket‖, ―port 9100‖, or HP JetDirect-compatible printing technology, it should
work with your MeeBox.
Only one printer can be shared through your MeeBox at a time.
Adding a shared printer to your computer
Before you can use a printer connected to your MeeBox, you must first register or ―add‖
the printer to your computer. Part of this process is installing the correct printer driver on
your computer, just as you would for a printer that was directly attached to your computer.
You do not need to install a driver on your MeeBox. Before adding a shared printer, please
make sure either that its driver has already been installed on your computer, or that you
have the driver ready on CD-ROM or other media.
Different ways to add a shared printer to your computer
In Windows XP, there are two ways to add a shared printer to your computer: the network
printer method and the TCP/IP port method. Instructions for both methods are given
below.
The network printer method is more intuitive and requires fewer steps, but this method is
not recommended because a printer added this way is often slow in use. This is because,
whenever you use the Print command, Windows must search for the shared printer and
determine its status. The TCP/IP port method, while it takes a little longer to add a printer,
does not result in such delays when you use the printer.
If you use a non-Windows operating system, please refer to your operating system’s
documentation for instructions on adding a network printer.
Page 31
User Guide LOOQS MeeBox Router
Page 32
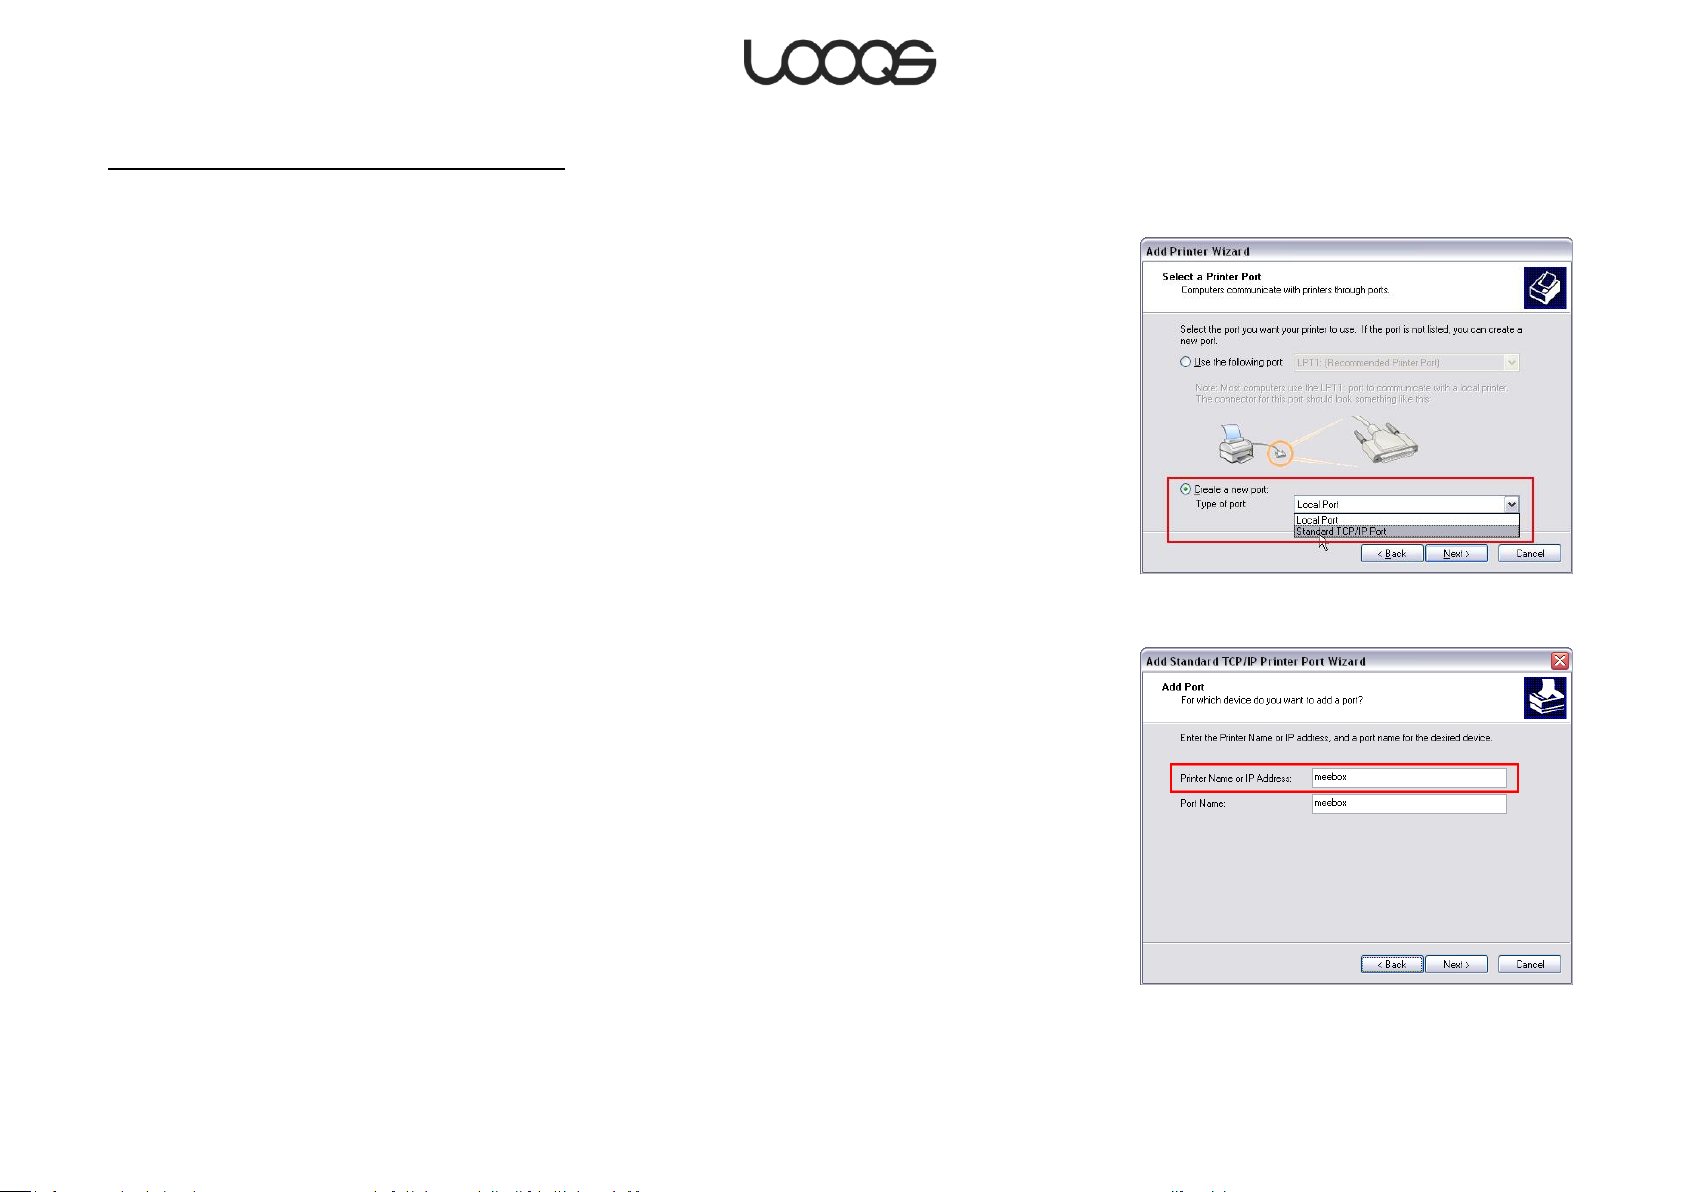
Figure 13
Figure 12
Adding a shared printer using a TCP/IP port
1. On the Start menu, click Run. The Run dialog box opens.
2. Type control printers and press Enter. The Printers and Faxes window opens.
3. Click Add a printer or double-click the Add Printer icon. The Add Printer Wizard dialog
box opens. Click Next.
4. Select Local printer attached to this computer. Clear the check box labelled
Automatically detect and install my Plug and Play printer. (See Figure 11.) Click Next.
5. Select Create a new port. In the drop-down menu, select Standard TCP/IP Port (see
Figure 12). Click Next. The Add Standard TCP/IP Printer Port Wizard opens. Click Next.
6. In the Printer name or IP address box, enter MeeBox (see Figure 13). Click Next.
7. Under Device Type, select Custom, and click Next.
8. Click Finish to return to the Add Printer Wizard.
From this point forward, follow the same steps you would use to add a printer that is
attached directly to your computer.
Page 32
User Guide LOOQS MeeBox Router
Page 33
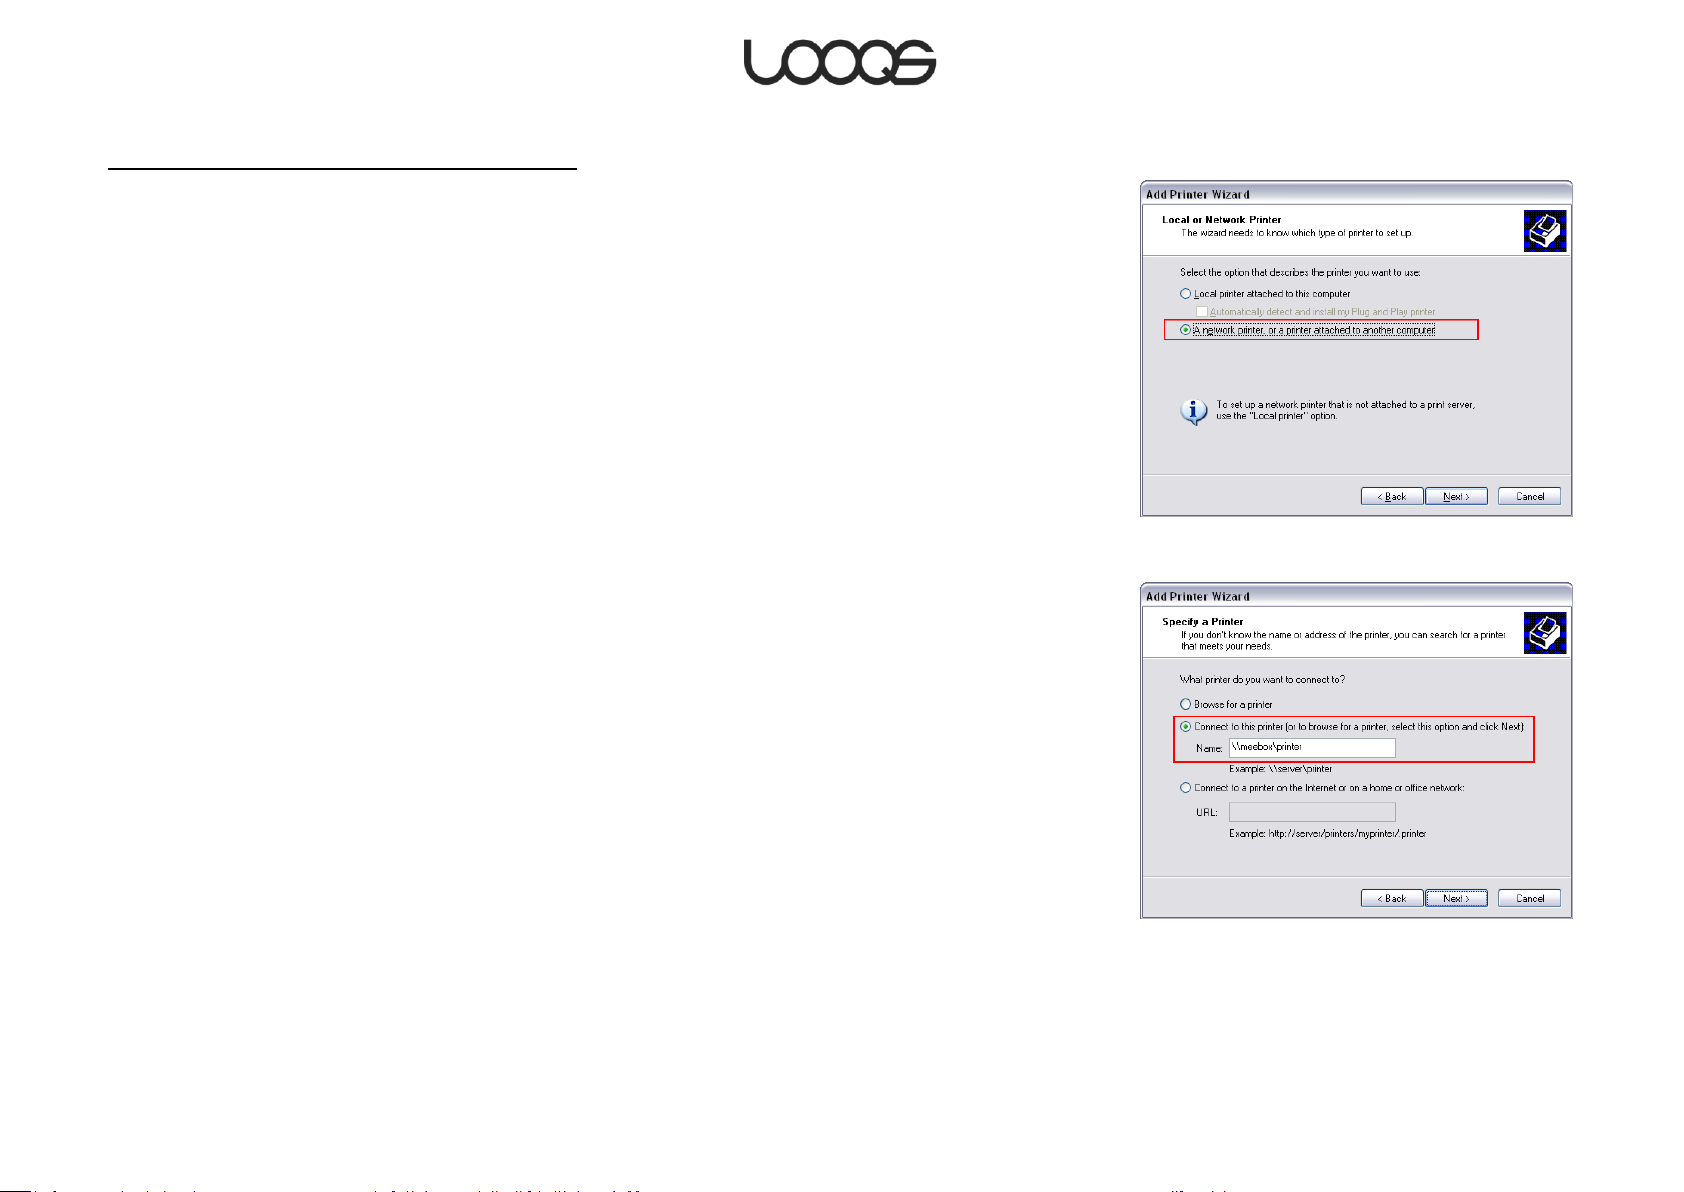
Figure 14
Figure 15
Adding a shared printer as a network printer
1. On the Start menu, click Run. The Run dialog box opens.
2. Type control printers and press Enter. The Printers and Faxes window opens.
3. Click Add a printer or double-click the Add Printer icon. The Add Printer Wizard dialog
box opens. Click Next.
4. Select A network printer, or a printer attached to another computer (see Figure 14).
Click Next.
5. Select Connect to this printer and then, in the provided field, type \\meebox\printer
(see Figure 15). Click Next. The Connect to Printer dialog box opens.
6. Click Yes. The Connect to Printer dialog box opens again. Click OK. A second Add
Printer Wizard dialog box opens.
7. If the correct printer driver is already installed on the computer, select the printer
manufacturer and model, click OK, and skip to Step 10.
8. Click Have Disk. The Install From Disk dialog box opens.
9. Click Browse. Locate the folder containing the appropriate printer driver and click
Open. Click OK. A third Add Printer Wizard dialog box opens.
10. Select the correct printer, and then click OK.
11. If a Software License Agreement dialog box appears, click Yes.
12. Click Finish to close the Add Printer Wizard.
When you finish the Add Printer Wizard, the shared printer will appear in the Printers and
Faxes window as printer on MeeBox.
Printing to a shared printer
Before using a printer that is shared through your MeeBox, make sure the printer is
connected and turned on, and that your MeeBox is turned on. Then, simply print as if the
printer were directly connected to your computer. For example, in a Windows application,
select the shared printer in the Print dialog box and click Print.
Page 33
User Guide LOOQS MeeBox Router
Page 34

Managing users, groups, and shared folders
Why create user accounts, groups, or additional shared folders?
Benefits of multiple user accounts
There are two reasons to create different user accounts on your MeeBox: security and
privacy.
Multiple user accounts enhance security because they allow non-administrators to access
shares on your MeeBox without being able to access the admin interface. This prevents
users from making undesirable changes to the server configuration.
Multiple user accounts enhance privacy because each user can have their own private
folder that no other user can open (unless they know the user’s password). Also, having
different user accounts allows you to make a shared folder accessible by some users and
not by others.
Benefits of groups
Groups are a convenient way to grant or deny access to a specific shared folder to
several users at the same time. For example, your MeeBox has ten users—five adults and
five children. You want adults, but not children, to be able to access a shared folder. If
you did not create groups, you would have to add each adult to the access list for that
share, taking care not to add any of the children. By creating two groups in advance—
Adults and Children—and placing all the users in the appropriate group, you can simply
grant access to the Adults group.
Benefits of additional shared folders
Flexibility is the main reason you might want to have more than one shared folder. Each
shared folder has its own list of users who can access it. So, for example, you could have
one share that everyone in the family can access, and another share that only adult users
can access. You can also control whether a particular user or group has read-only access
or full access. With read-only access, users can open and copy files from the shared folder,
but they cannot add, change, or delete files in it.
Page 34
User Guide LOOQS MeeBox Router
Page 35

Figure 16
Creating, modifying, and deleting user accounts
To create, modify, or delete a user account, open your MeeBox’s admin interface
(http://meebox:8090) and click Advanced Settings > Management > Users & Groups >
Users (see Figure 16).
To create a user account
1. Enter a username and password for the user.
2. To limit the amount of internal drive space the user can use, select Enable disk quota
and enter the maximum space in MB.
3. Click Save.
To specify a user’s group memberships
1. Select the user in the Users list box, and then click Group Memberships.
2. To add the user to a group or groups, select the group(s) in the Not a member of list
box, and click << Add.
3. To remove the user from a group or groups, select the group(s) in the Member of list
box, and click Remove >>.
4. When you are finished, click Save.
To edit or delete a user account
1. Select the user in the Users list box.
2. Edit the account settings as needed, and then click Save. Or, to delete the account,
click Delete User.
Note
When you delete a user account, the user’s private folder (if any) is not automatically
deleted. You can access or delete such “orphan” folders using your MeeBox’s command
line interface. For more information, see Accessing your MeeBox’s command line
interface.
Page 35
User Guide LOOQS MeeBox Router
Page 36
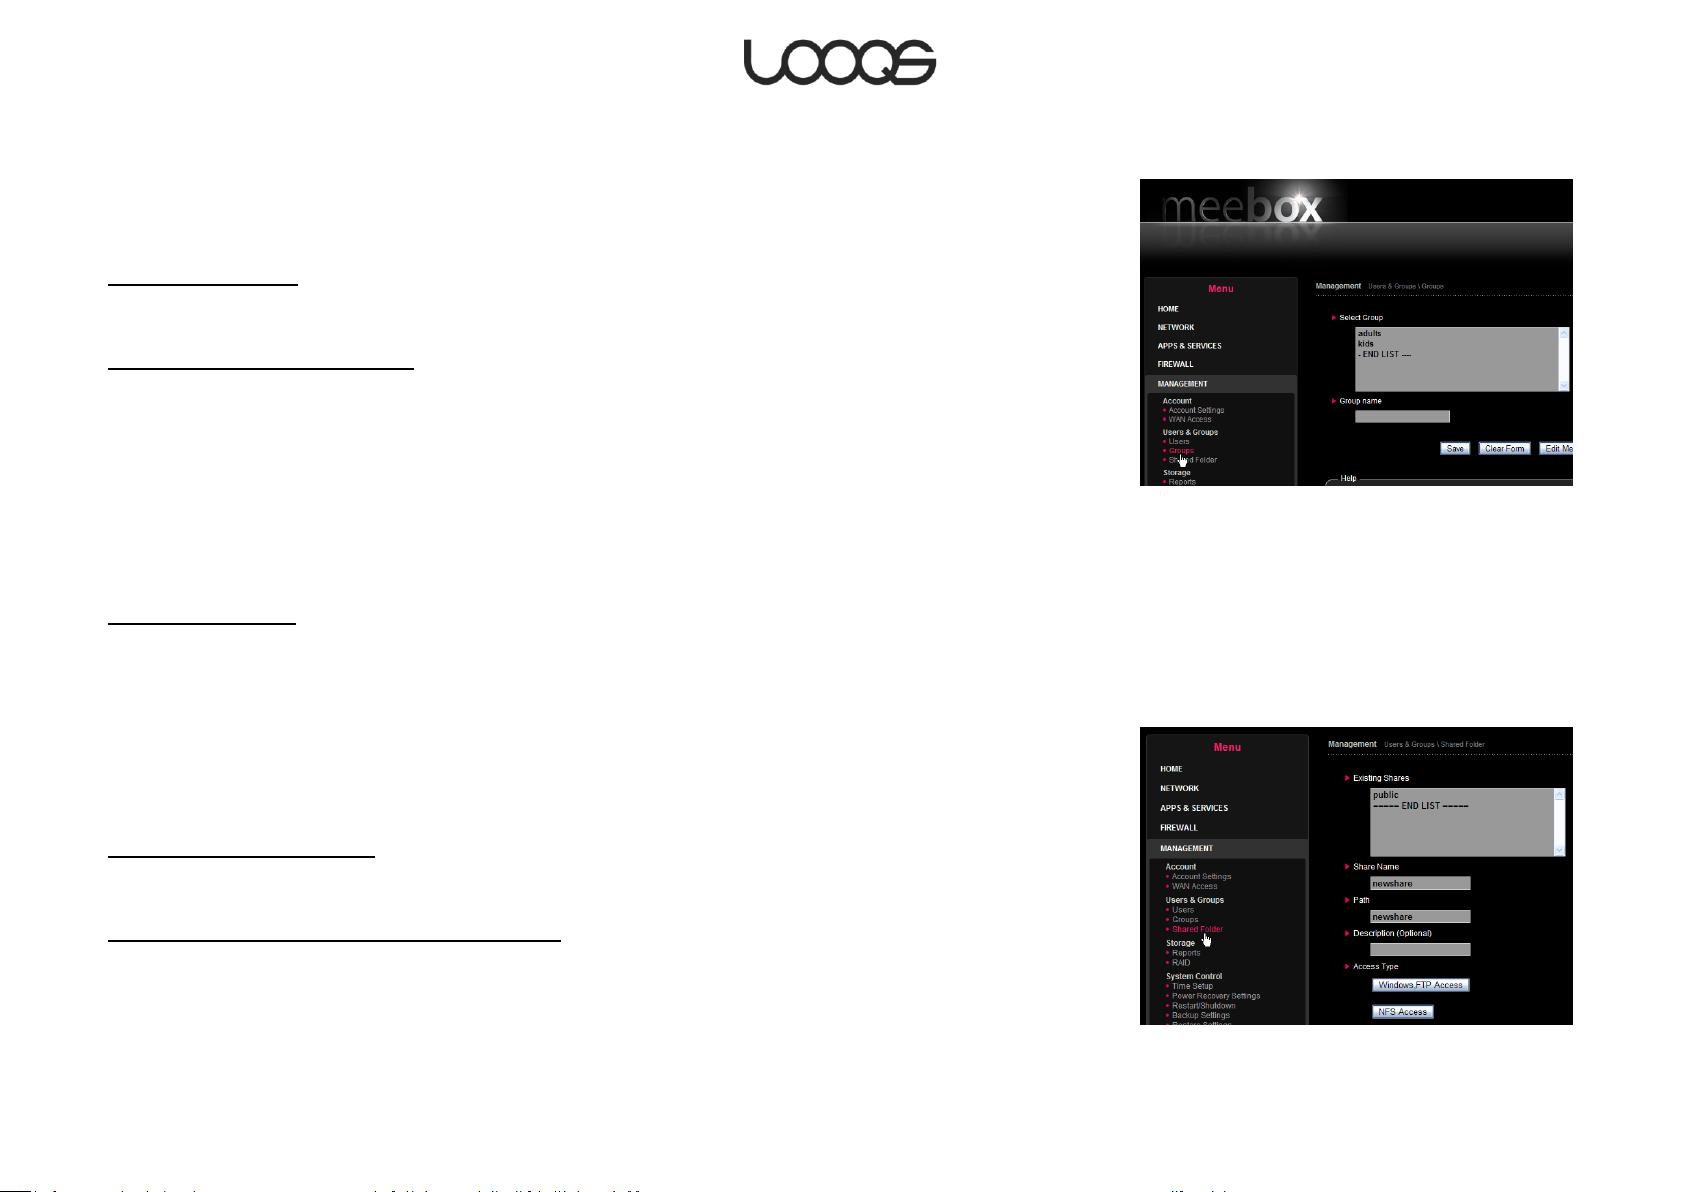
Figure 17
Figure 18
Creating, modifying, and deleting groups
To create, modify, or delete a group, open your MeeBox’s admin interface
(http://meebox:8090) and click Management > Users & Groups > Groups (see Figure 17).
To create a group
Enter a name for the new group and click Save.
To edit a group’s member list
1. Select the group in the Groups list box, and then click Edit Members.
2. To add a user or users to the group, select the user(s) in the Non-Members list box, and
click << Add.
3. To remove a user or users from the group, select the user(s) in the Members list box, and
click Remove >>.
4. When you are finished, click Save.
To delete a group
Select the group in the Groups list box and click Delete Group.
Creating, modifying, and deleting shared folders
To create, modify, or delete a shared folder, open your MeeBox’s admin interface
(http://meebox:8090) and click Management > Users & Groups > Shared Folders (see
Figure 18).
To create a shared folder
Enter a name for the new share and click Save.
To control who can access a shared folder
1. Select the desired share in the Existing shares list box, and then click Manage Access.
2. To grant read-only access for a user or a group (or several of them), select the user(s)
or group(s) in the No Access list box, and click << Read Only.
Page 36
User Guide LOOQS MeeBox Router
Page 37

3. To grant full access for a user or a group (or several of them), select the user(s) or
group(s) in the No Access list box, and click << Writable.
4. To deny access for a user or a group (or several of them), select the user(s) or group(s)
in the Allowed list box, and click Remove >>.
5. When you are finished, click Save.
To delete a shared folder
Select the share in the Shared folders list box and click Delete Share.
Note
When you “delete” a shared folder using the admin interface, the folder is not actually
deleted on the hard disk. You can access or delete such “orphan” folders using FTP or SFTP.
For more information, see Accessing your MeeBox remotely.
Page 37
User Guide LOOQS MeeBox Router
Page 38

Figure 19
Using the BitTorrent client
Your MeeBox has a built-in BitTorrent client, a program that can download files from the
popular BitTorrent peer-to-peer (P2P) file sharing network. The BitTorrent client’s user
interface is part of your MeeBox’s admin interface. To access it, on a computer
connected to your MeeBox, open a browser window and go to http://meebox:8090. Log
in and click BitTorrent. The user interface is shown in Figure 19.
On the BitTorrent Client page, you can add a torrent to download, view the progress of
torrents you are downloading, and pause or delete a torrent. You can also specify the
maximum download and upload speeds, thus controlling the amount of bandwidth the
BitTorrent client can use. (Since BitTorrent is a file sharing network, clients contribute to the
availability of files by uploading to other clients parts of files that have been downloaded.)
The BitTorrent client downloads the files contained in torrents to the btdownload folder at
network address \\meebox\public\btdownload. Please note that as soon as you start
downloading a torrent, the client program creates all the files contained in the torrent at
their final sizes; thus, you cannot tell by looking at the size of a file in the btdownload folder
whether it has finished downloading.
Note
The BitTorrent client stores .torrent files (files that contain information about a torrent,
required by the BitTorrent client) in \\meebox\public, along with .runtime files (files
generated by the BitTorrent client for tracking purposes). Please do not delete these files
until you are finished downloading the torrent from the BitTorrent network.
Working with torrents
Before downloading a torrent, you must first download a .torrent file to your computer
from a download website or other source of torrents. Then, you upload the .torrent file to
your MeeBox using the BitTorrent Client interface and start the download.
To add a torrent:
1. On a computer connected to your MeeBox, download a .torrent file and save it on
your local hard disk.
2. Open a browser window, go to http://meebox:8090, log in, and click BitTorrent.
Page 38
User Guide LOOQS MeeBox Router
Page 39

3. Under Add Torrent, click Browse. In the Choose File dialog box, locate the .torrent file
you downloaded on your computer and double-click it.
4. Click Add Torrent. The torrent will appear in the Torrent List. To start downloading it, click
the Start button below the torrent name.
To pause or resume a torrent:
Click the Stop button or the Start button below the torrent name.
To remove a torrent:
Click the Delete button below the torrent name.
When you ―delete‖ a torrent, the client program does not actually delete the torrent
contents or the .torrent file on your MeeBox’s hard drive (although it does delete
the .runtime file). If you are finished with a torrent, you can safely delete the .torrent file in
\\meebox\public manually.
Note
RRC bv does not encourage or condone the downloading of protected intellectual
property or copyrighted material without the permission of the copyright holder. Please
use your MeeBox for legal downloading only.
Page 39
User Guide LOOQS MeeBox Router
Page 40

Using the web photo gallery application
Your MeeBox includes a web photo gallery application called Gallery. You can use it to
upload photos to your MeeBox, organize them into albums, and share them on the Web
using your MeeBox’s built-in web server.
To access Gallery, in your web browser, go to http://meebox:8090/, log in, and click
Shared Photos.
To add photos to Gallery, you must first log in to the application. Click the Login link at the
top of the window and log in as admin with default password MeeBox. (You can change
the password aferwards.) To add photos, click Edit Album.
Additional documentation for Gallery is provided on the product’s home page at
http://gallery.menalto.com/.
Note
Gallery will not work if your MeeBox’s built-in web server is disabled. To enable the web
server:
1. In your web browser, go to http://meebox:8090/, log in, and click MeeBox Settings.
2. In the menu, click Features.
3. Under Enable Web/Database server, select the Enable check box.
4. Click Save.
Page 40
User Guide LOOQS MeeBox Router
Page 41
Application
Path
Software Home Page
Description
Extplorer*
/extplorer
http://extplorer.sourceforge.net/
Web-based remote file access.
Gallery
/gallery
http://gallery.menalto.com/
Web photo album creator.
MediaWiki
/wiki
http://www.mediawiki.org/
Wiki (collaborative website) platform.
phpBB
/phpbb
http://www.phpbb.com/
Web forum application.
PHPMyAdmin†
/phpmyadmin
http://www.phpmyadmin.net/
Browser-based MySQL database manager.
WordPress
/wordpress
http://wordpress.org/
Blogging platform.
Using other preinstalled web applications
Your MeeBox comes with several free, open-source web applications already installed, so
you can run a useful web site right out of the box. The preinstalled web applications are
listed in the table below.
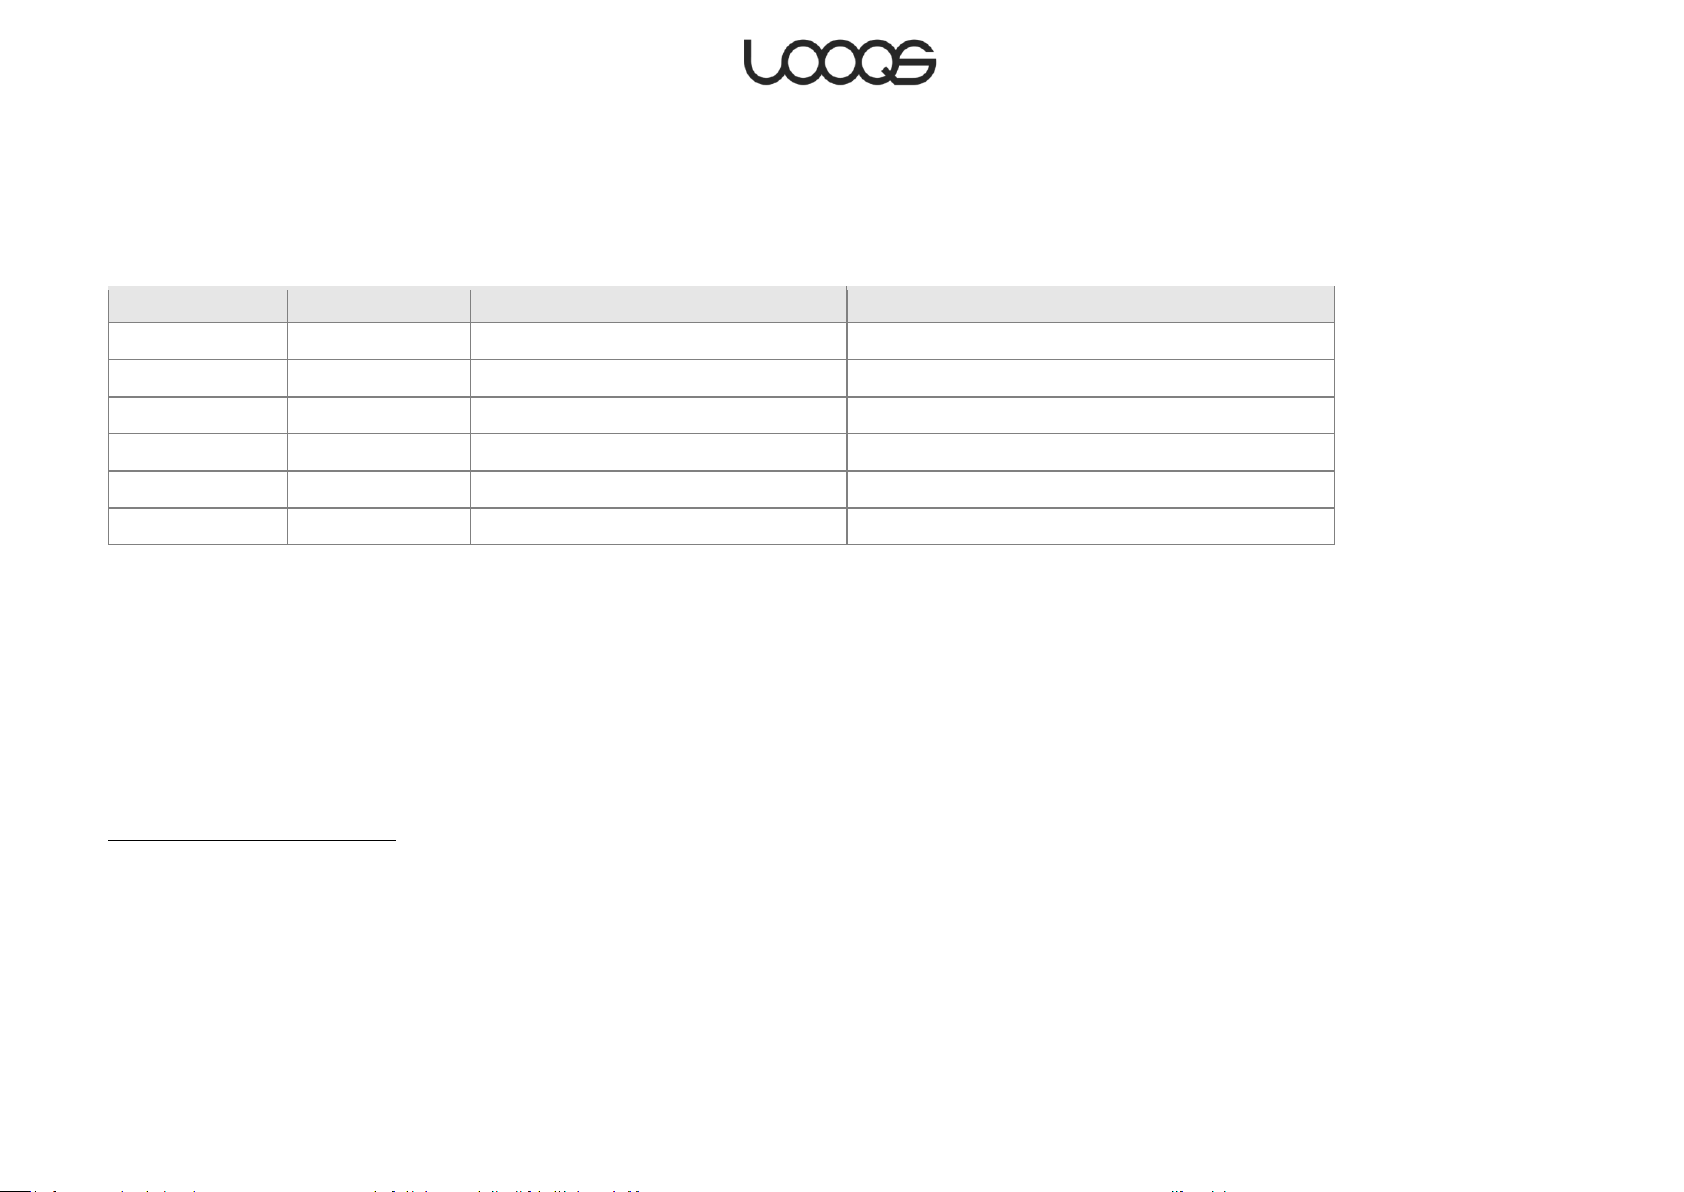
The ―paths‖ in the above table indicate each application’s location relative to your
MeeBox’s base web URL. Your base web URL is simply your MeeBox’s public IP address or
domain name preceded by the characters ―http://‖—that is, the web address of your
MeeBox. For example, if your public IP address is 208.67.219.137, your base URL would be
http://208.67.219.137. Then, to access WordPress, for example, the correct URL would be
http://208.67.219.137/wordpress.
Most of these applications require you to log in to add or edit content. Others require you
to log in only to perform administrative tasks, such as adding and managing user
accounts. All of the applications have been initially set up with one user, named ―admin‖,
*
For more information about using Extplorer, see Accessing your MeeBox remotely.
†
PHPMyAdmin is a utility to manage the MySQL databases of the applications on your MeeBox. These databases
provide data storage for most of the preinstalled web applications and for other web apps you might install yourself.
When adding your own database-driven web application, PHPMyAdmin provides an easy way to create the
application’s database, among other tasks.
Page 41
User Guide LOOQS MeeBox Router
Page 42

whose password is ―meebox‖. For those apps that require it, ―admin‖ is also the
administrator.
Instructions for working with these applications are beyond the scope of this user’s guide.
You are encouraged to explore the apps on your own and to visit their respective home
pages on the Internet for more information about them.
Page 42
User Guide LOOQS MeeBox Router
Page 43

Part 4
Advanced Topics
Page 44
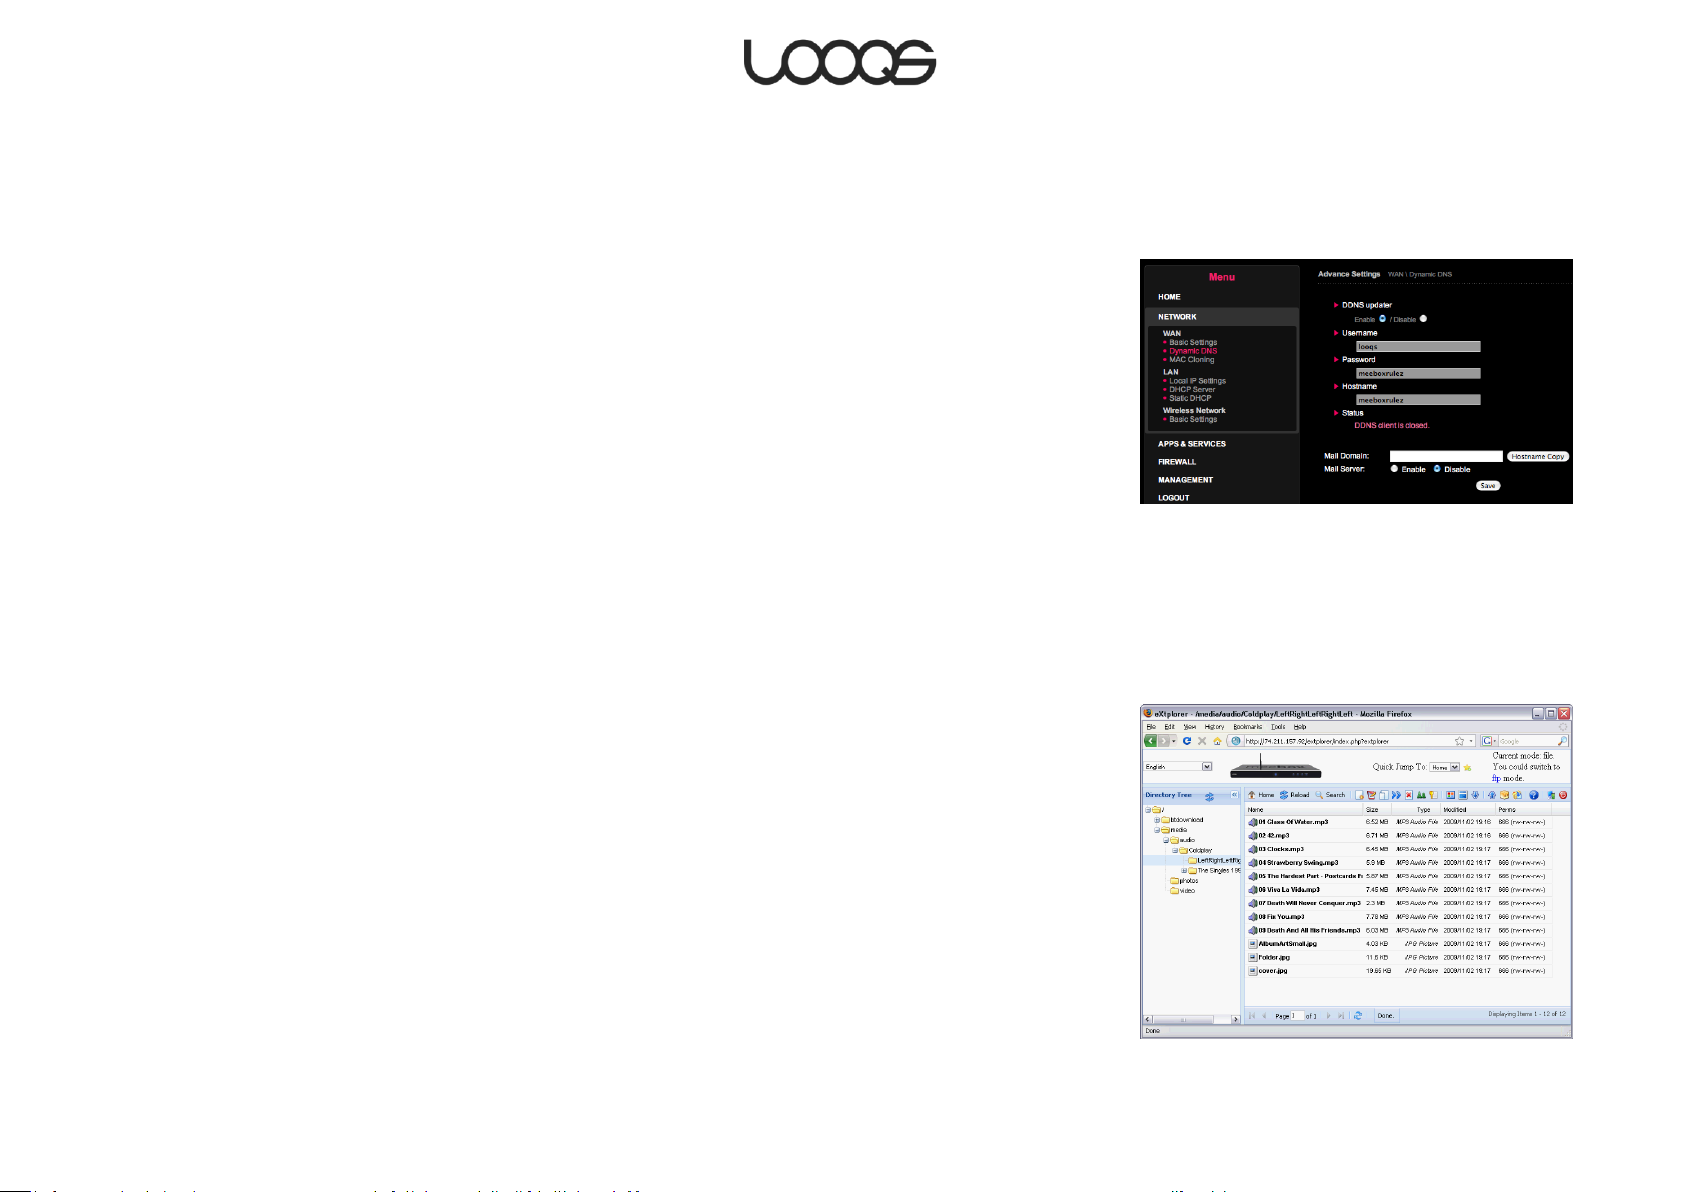
Figure 20
Figure 21
Accessing your MeeBox remotely
Setting up Dynamic DNS
If your ISP has not assigned you a static IP address, it’s a good idea to set up Dynamic DNS
on your MeeBox before accessing it remotely. Once you do so, you will always be able to
access your MeeBox using a specific hostname, even if its public IP address changes.
Note
If your MeeBox is behind another router, do not enable Dynamic DNS updating. In this
case, enable DDNS on the other router instead. Please refer to your router’s
documentation.
MeeBox’s DDNS feature supports DynDNS.com. Other DDNS providers are not supported
at this time. Before you can use your MeeBox’s DDNS feature, you must have or create an
account with DynDNS.com. (Basic accounts are free.)
To set up Dynamic DNS updating:
1. In your web browser, go to http://meebox:8090/ and click MeeBox Settings.
2. Click Advanced Settings.
3. On the menu, click Network, and then click Dynamic DNS (see Figure 20).
4. Under DDNS updater, click Enable.
5. Enter your DynDNS.com username, password, and hostname.
6. Click Save.
Using the web file browser
Your MeeBox comes with a web-based file manager called Extplorer preinstalled on the
hard drive. You can use Extplorer to work with files in your MeeBox’s public shared folder
(\\meebox\public) from any computer with an Internet connection.
To use Extplorer, go to http://ip_address/extplorer/ (where ip_address is your MeeBox’s
WAN IP address) and log in with username ―admin‖, password ―meebox‖. If you are
accessing your MeeBox from the local network, you can just click Web File Browser on the
MeeBox home page.
An example directory listing in Extplorer is shown in Figure 21.
Page 44
User Guide LOOQS MeeBox Router
Page 45

Tip
If you sometimes need to allow people without a
user account to remotely upload or download
files on your MeeBox, you can tell them to log in
through FTP anonymously (without entering a
username or password). The server will log them
in using the “guest” account. This account has
read/write access to the guest-share folder, but
no access to other folders. If you have files you
want guest users to be able to download, copy
them into the guest-share folder.
Guest access is disabled by default. To enable it,
go to Advanced Settings > Apps & Services > File
Server and select the “Enable” check box under
Guest Access Setting.
Using Extplorer, you can perform various operations with files in the public shared folder,
including:
Download files from the shared folder to your computer.
Upload files to the shared folder from your computer.
Copy or move files within the share.
Search for files in the share.
View photos in the share.
Delete files in the share.
Create and edit text files in the share.
Additional documentation for Extplorer is provided on the product’s home page at
http://extplorer.sourceforge.net/.
Accessing files on your MeeBox remotely using FTP
Using Extplorer to remotely access files on your MeeBox is convenient, but it has some
limitations. Most importantly, Extplorer does not support accessing MeeBox folders or
shares other than the public share. Also, Extplorer is awkward when you need to
download or upload large numbers of files.
To overcome these limitations, you can access your MeeBox remotely using an FTP client
program, thanks to your MeeBox’s built-in FTP server. The FTP service is disabled by default;
you need to enable it before you can access your MeeBox through FTP.
Enabling the FTP service
1. In your web browser, go to http://meebox:8090/, log in, and click MeeBox Settings.
2. Click Advanced Settings.
3. In the menu, click Apps & Services, then click File Server.
4. Under FTP Server Setting, select the Enable check box.
5. Click Save.
In your FTP client program, specify your MeeBox’s WAN IP address as the host address, and
enter the username and password of a user account that exists on the server.
Page 45
User Guide LOOQS MeeBox Router
Page 46

Folder Name Folder Description
/ ftp root
+--ide3 user partition of first internal hard drive
+--admin admin’s private folder
+--gallery2data data storage for Gallery web application
+--guest-share home folder of guest user
+--htdocs web document root
+--lost+found recovered files from disk repair operations
+--public the “public” shared folder
+--btdownload BitTorrent downloads
+--media home folder of media server
+--ide4 second internal hard drive (if present)
+--usb1 first USB drive (if present)
+--usb2 second USB drive (if present)
Folders accessible through FTP
You can access the same folders on your MeeBox through FTP as you can through
Windows networking. However, the way they are organized looks a little different. When
you use Windows networking (that is, when you access the network location \\meebox),
you see the various shared and private folders all in one place. But when you use FTP,
most of the shares—inlcuding all private folders and the public shared folder—are shown
as subfolders of the folder ide3. At the same level as ide3 are the folders ide4 (if you have
a second internal hard drive installed) and usb1 and usb2 (if you have USB devices
attached).
Another difference between FTP and Windows networking is that when you use FTP,
private folders other than your own are hidden.
There is one more difference: when you use FTP, you can see certain folders in ide3 that
are not visible when you use Windows networking. The most important of these is htdocs,
which is the folder that contains all the web pages used by your MeeBox’s built-in web
server. (See Setting up a website, below.)
Below is a representation of the default directory structure that is visible to user ―admin‖
through FTP.
Page 46
User Guide LOOQS MeeBox Router
Page 47

When you log in to the FTP server, the initial folder is your private folder. (In the admin user’s
case, this is the admin folder.) From this folder, you can go ―up‖ to ide3, and then up
again to the FTP root.
Accessing files on your MeeBox remotely using Secure FTP
For better security when accessing your MeeBox remotely, you can use Secure FTP (SFTP).
Standard FTP is insecure because your username and password, as well as all data, are
transmitted in clear text form from the client to the server. SFTP, which is based on the
Secure Shell Protocol (SSH), closes this security hole by transmitting login info and all data
in encrypted form.
You can enable SFTP access to your MeeBox by enabling its SSH service. The service is
disabled by default.
Enabling the SSH service
1. In your web browser, go to http://meebox:8090/, log in, and click MeeBox Settings.
2. Click Advanced Settings.
3. In the menu, click Apps & Services, then click Service Control.
4. Next to SSH/SFTP, select the Enable check box.
5. Click Save.
Note
When you connect to your MeeBox through SSH/SFTP for the first time, you may be
prompted to save the server’s host key (or “fingerprint” or “signature”) on your computer.
If so prompted, answer yes.
Folders accessible through SFTP
When you connect to your MeeBox through SFTP, you can navigate to any folder in the
MeeBox’s entire file system. And if you log in as the ―admin‖ user, you can add or delete
files in any folder. For this reason, SFTP access is very powerful and can be dangerous if
misused. Please do not make changes in unfamiliar folders unless you are an experienced
Linux user.
Page 47
User Guide LOOQS MeeBox Router
Page 48

User storage space is located under the folder /mnt, which is the mount point for all
storage devices. Here you will find subdirectories ide3, ide4, and so on. For a discussion of
how user storage space is organized, see Folders accessible through FTP, above.
Page 48
User Guide LOOQS MeeBox Router
Page 49

Tip
To see what versions of Apache HTTP Server,
PHP, and MySQL are installed on your Personal
Server, open your web browser and go to
http://meebox/phpinfo/.
Setting up a website
Your MeeBox is a fully-functional Web server, with Apache HTTP Server, PHP, and MySQL
software all preinstalled. The Web server is disabled by default. To enable it, open
http://meebox:8090 in your Web browser, log in as admin, click MeeBox Settings, click
Features, select the Enable check box under Enable Web/Database server, and then click
Save.
There are two basic ways to create or set up a website on your MeeBox.
The first option is to create a site using one of the preinstalled web applications: WordPress,
phpBB, Gallery, or MediaWiki. Each of these applications provides a ready-made structure
on which you add content directly in your browser, using a set of special web pages
designed to simplify content creation. Each application is best suited for a particular kind
of website. WordPress is best for blogs; phpBB, for forums; MediaWiki, for collaborative
websites; and Gallery, for online photo albums and image galleries. For more information
on using these applications, see Using other preinstalled web applications, above.
Uploading website files to the server
The other option is to upload HTML or PHP files that you have created on your computer
(or downloaded from an existing website) to your MeeBox. Store these website files in the
htdocs folder, which can be accessed through FTP or SFTP at /mnt/ide3/htdocs. You must
log in as admin to access this folder.
By default, the htdocs folder contains the following files and folders, although the
contents may vary slightly, depending on what version of your MeeBox hard disk image is
installed on your server.
Page 49
User Guide LOOQS MeeBox Router
Page 50

/mnt/ide3/htdocs
+--extplorer
+--gallery
+--phpbb
+--phpmyadmin
+--wiki
+--wordpress
+--AppsInfo
+--index.php
+--mount_root
The folders, indicated in boldface in the box above, contain the web applications that
your MeeBox came preinstalled with. For example, wb contains the application files of
Website Baker. The file index.php is the default index page, which redirects to Extplorer.
Whatever website files you place directly in htdocs will be viewable on the Internet at a
URL in the form http://public_ip_address/filename. For example, if your public IP address is
74.211.157.83, and you have a file named hello.htm in htdocs, then the Internet URL for
that file will be http://74.211.157.83/hello.htm.
If you plan to host your own website on your MeeBox, you will most likely delete the
default index.php and replace it with your own index page file, named index.php,
index.htm, or index.html. That way, when a visitor goes to http:// public_ip_address/, they
will see your own home page, not the default one. Alternatively, you can leave the
default index file in place and store your website files in a subfolder of htdocs, such as
mysite. In this case, the home page URL of your website would be http://
public_ip_address/mysite/.
Editing web server configuration files
The Apache configuration file on your MeeBox is located at
/system/hddapp/apache2/conf/httpd.conf. To access and edit this file, you must use SFTP
and log in as admin.
Page 50
User Guide LOOQS MeeBox Router
Page 51

Forwarding incoming connections
Introduction to port forwarding
Like most other routers, your MeeBox by default blocks all incoming communication
attempts from outside computers to computers and devices on the server’s local network,
unless the incoming communications are in response to an outgoing request from the
same computer. (Outgoing connections are not blocked at all.) For example, when you
request a web page on the Internet by entering a URL in your browser, your MeeBox’s
built-in router ―remembers‖ which computer made the outgoing request and to what web
server the request was made. Then, when the web server sends the requested page, the
router passes the incoming data on to the requesting computer. If a computer on the
Internet attempts to connect to a local computer without the local computer having
initiated communications with it, the router normally blocks the attempt. This is to protect
your network against unwanted intrusion.
There may be times when you want specific kinds of incoming connections to be
permitted through to your network—to not be blocked by the router—even if they are not
in response to an outgoing request. One example involves the popular peer-to-peer filesharing application, eMule. For eMule to work best, other computers (peers) on the eMule
network must be able to connect to your computer running eMule, although your
computer does not initiate communications with them. Blocking these incoming
connections causes both download and upload speeds in eMule to be reduced.
Port forwarding is provided by the router as a way to accommodate exceptions to the
general policy of blocking all unsolicited incoming connections. Port forwarding takes
advantage of the fact that, for any given Internet application, incoming connections are
almost always addressed to certain specific ports on the destination computer. For
example, requests for web pages are almost always addressed to the web server’s port 80,
and the web server is said to ―listen‖ for incoming connections on that port. (It may be
useful to think of ports as being like individual mailboxes in an apartment building, and
think of the building as being like a computer. For a letter to reach its destination, you must
specify both the building’s address and the apartment number.)
If you want to allow incoming connections to a program running on your computer—
eMule, for example—configure the router to forward connections on the port (or ports) on
Page 51
User Guide LOOQS MeeBox Router
Page 52

Tip
You do not need to set up port forwarding for the
Internet services that run on your MeeBox—such
as the HTTP, FTP, and SSH services. The ports
necessary for the server to accept incoming
connections to these services are open by default.
If you want to run an Internet service on your
computer that your MeeBox already runs, then
you should configure the service on your
computer to listen on a different port than the
default for that service, and then set up your
MeeBox to forward that port to your computer.
For example, to run a secondary FTP service on
your computer, you could make it listen on port
2121 and then set up your MeeBox to map port
2121 to your computer.
which eMule listens for incoming connections. This is much safer than forwarding all
connections to your computer. (By the way, for eMule, the incoming ports are often 4662
and 4672, but the program allows you to choose the ports on which it will listen for
connections. If you want to set up port forwarding for eMule, you will need to check your
eMule preferences to see which ports to forward.)
Choosing a port forwarding method
There are two kinds of port forwarding commonly provided by consumer routers: port
mapping and port triggering. Both are supported by your MeeBox.
In port mapping, incoming connections addressed to a designated port or ports are
forwarded to one specific local IP address—and thus to one particular computer. Port
mapping is best suited for applications that you run on a single computer only.
Additionally, in port mapping it is possible (although normally not necessary) to forward
incoming connections to a different port on the destination computer than the port to
which the connection was addressed. For example, if an incoming connection is
addressed to port 5900, it can be forwarded to the designated computer’s port 5901
instead. The port to which the connection was addressed (called the ―public port‖) is said
to be mapped to the port on which the designated computer is actually listening (the
―private port‖)—this is the origin of the term port mapping.
In port triggering, incoming connections addressed to a designated port or ports are
forwarded not to one fixed IP address, but to any local computer that makes an outgoing
connection through a designated trigger port or ports. When the router detects an
outgoing connection through a trigger port, it temporarily forwards connections on the
designated incoming ports to the computer that made the outgoing connection. Since
there is no need to specify which IP address will receive the incoming connections, port
triggering is best suited for applications that might run on any of several computers on the
LAN. (However, only one computer can run such an application at any given time.) Port
triggering does not support mapping public to private ports.
From a security standpoint, port triggering is somewhat safer than port mapping, because
incoming connections are only forwarded while the related outgoing trigger connections
exist. If no trigger connections are going out, the incoming ports remain closed. In port
mapping, by contrast, specified incoming ports remain open at all times. However, port
Page 52
User Guide LOOQS MeeBox Router
Page 53
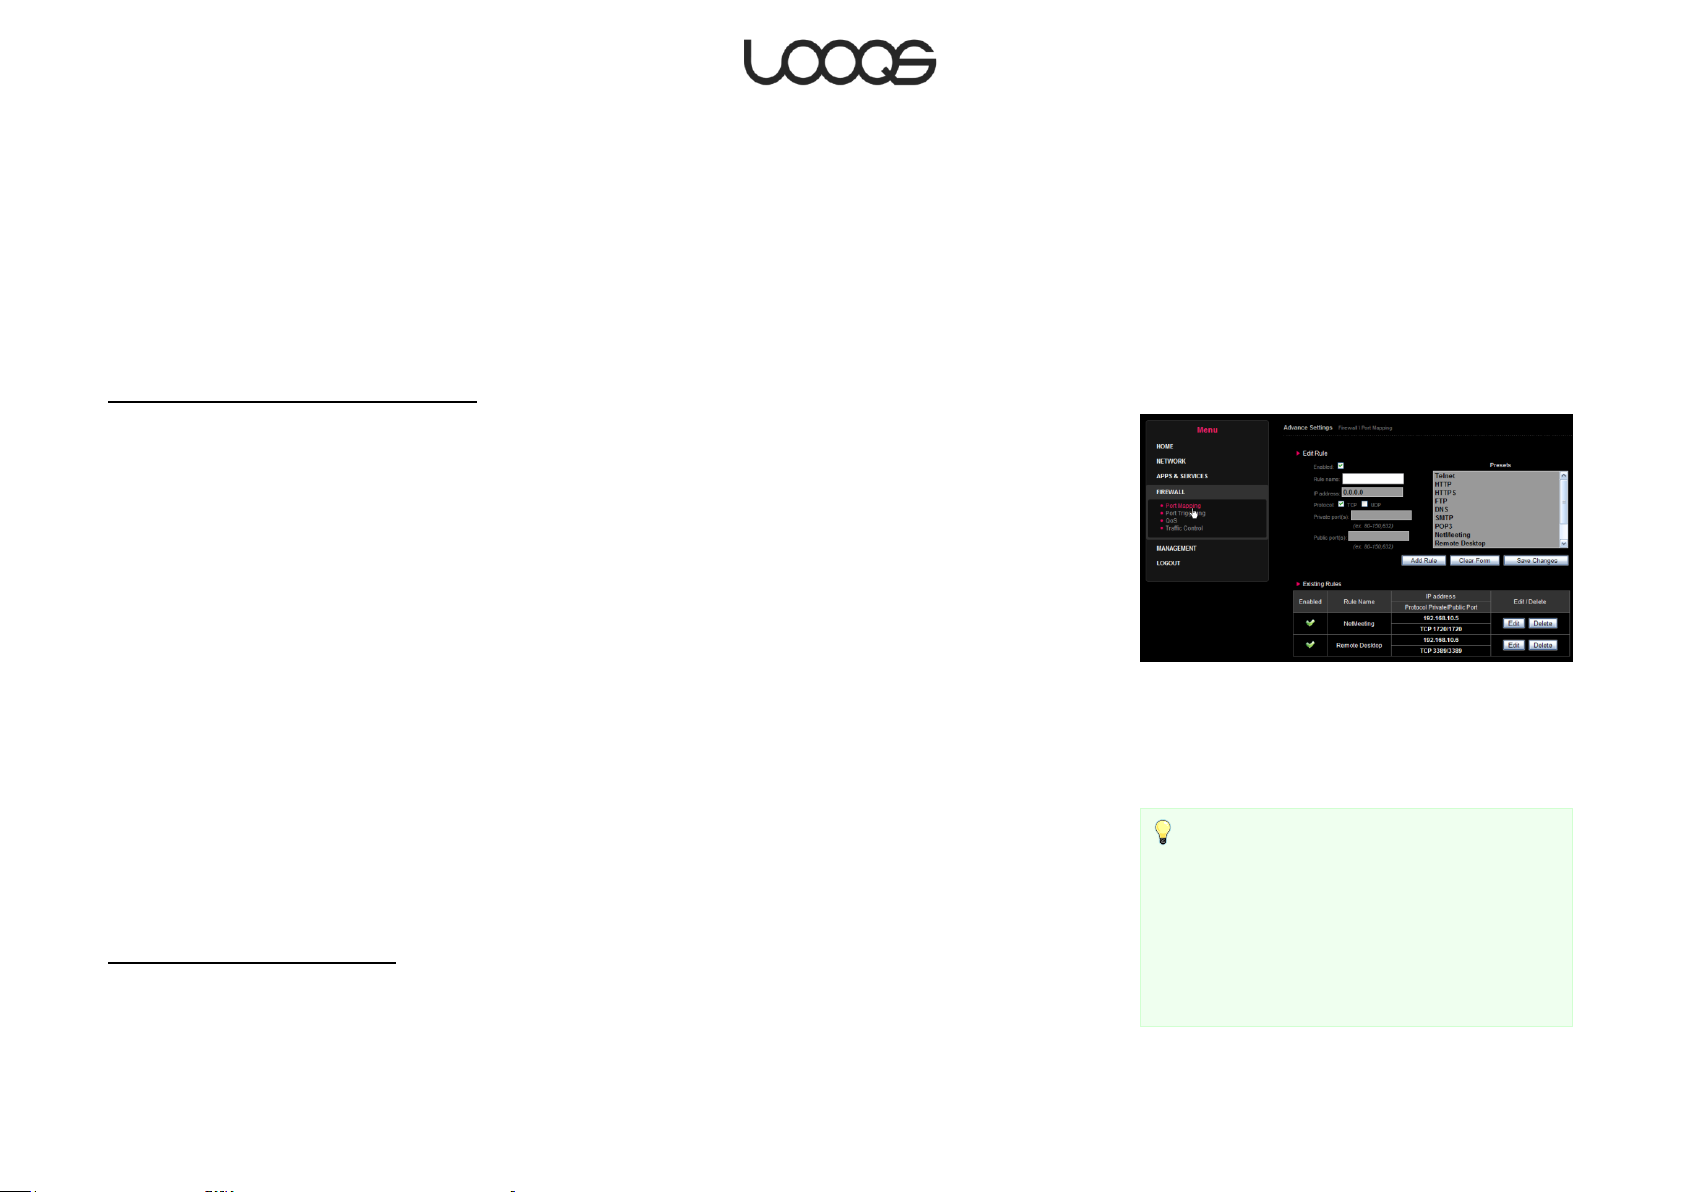
Figure 22
Tip
If you are creating a port mapping rule for one of
the applications listed in the Presets box, simply
select the desired application, and the form will
be automatically filled with the appropriate
values (except for IP address, which must be
specified manually).
mapping is the only viable option for applications that need to be able to receive
incoming connections anytime, and do not make trigger connections.
With either port forwarding method, your MeeBox allows you to create any number of
―rules‖. Each rule specifies the port forwarding details for one port (or set of related ports),
and thus for one service or application. You can create as many rules as you need.
Creating and editing port mapping rules
To create a new port mapping rule
1. In the MeeBox admin interface, click Advanced Settings, then Firewall, then Port
Mapping. (See Figure 22.)
2. Enter a name for the rule in the Rule name field. (Choose a name that will help you
remember what the rule is for. Note: After you add a rule, you cannot change its
name.)
3. In the IP address field, enter the IP address of the local computer to which you want to
forward the incoming connections. The IP address must be within your MeeBox’s LAN
subnet.
4. Select the communications protocol(s) to which the rule applies: TCP and/or UDP. If
you are not sure which protocol to choose, select both.
5. In the Private port(s) field, enter the port(s) on which the designated computer will
listen for incoming connections.
6. In the Public port(s) field, enter the port(s) to which the outside computers will address
incoming connections. In most cases, the private port(s) and the public port(s) can be
the same.
7. Click Add Rule.
To edit a port mapping rule
1. In the Existing Rules table, click the Edit button on the row listing the rule you want to
edit.
2. Edit the form as necessary, and then click Save Changes.
Page 53
User Guide LOOQS MeeBox Router
Page 54
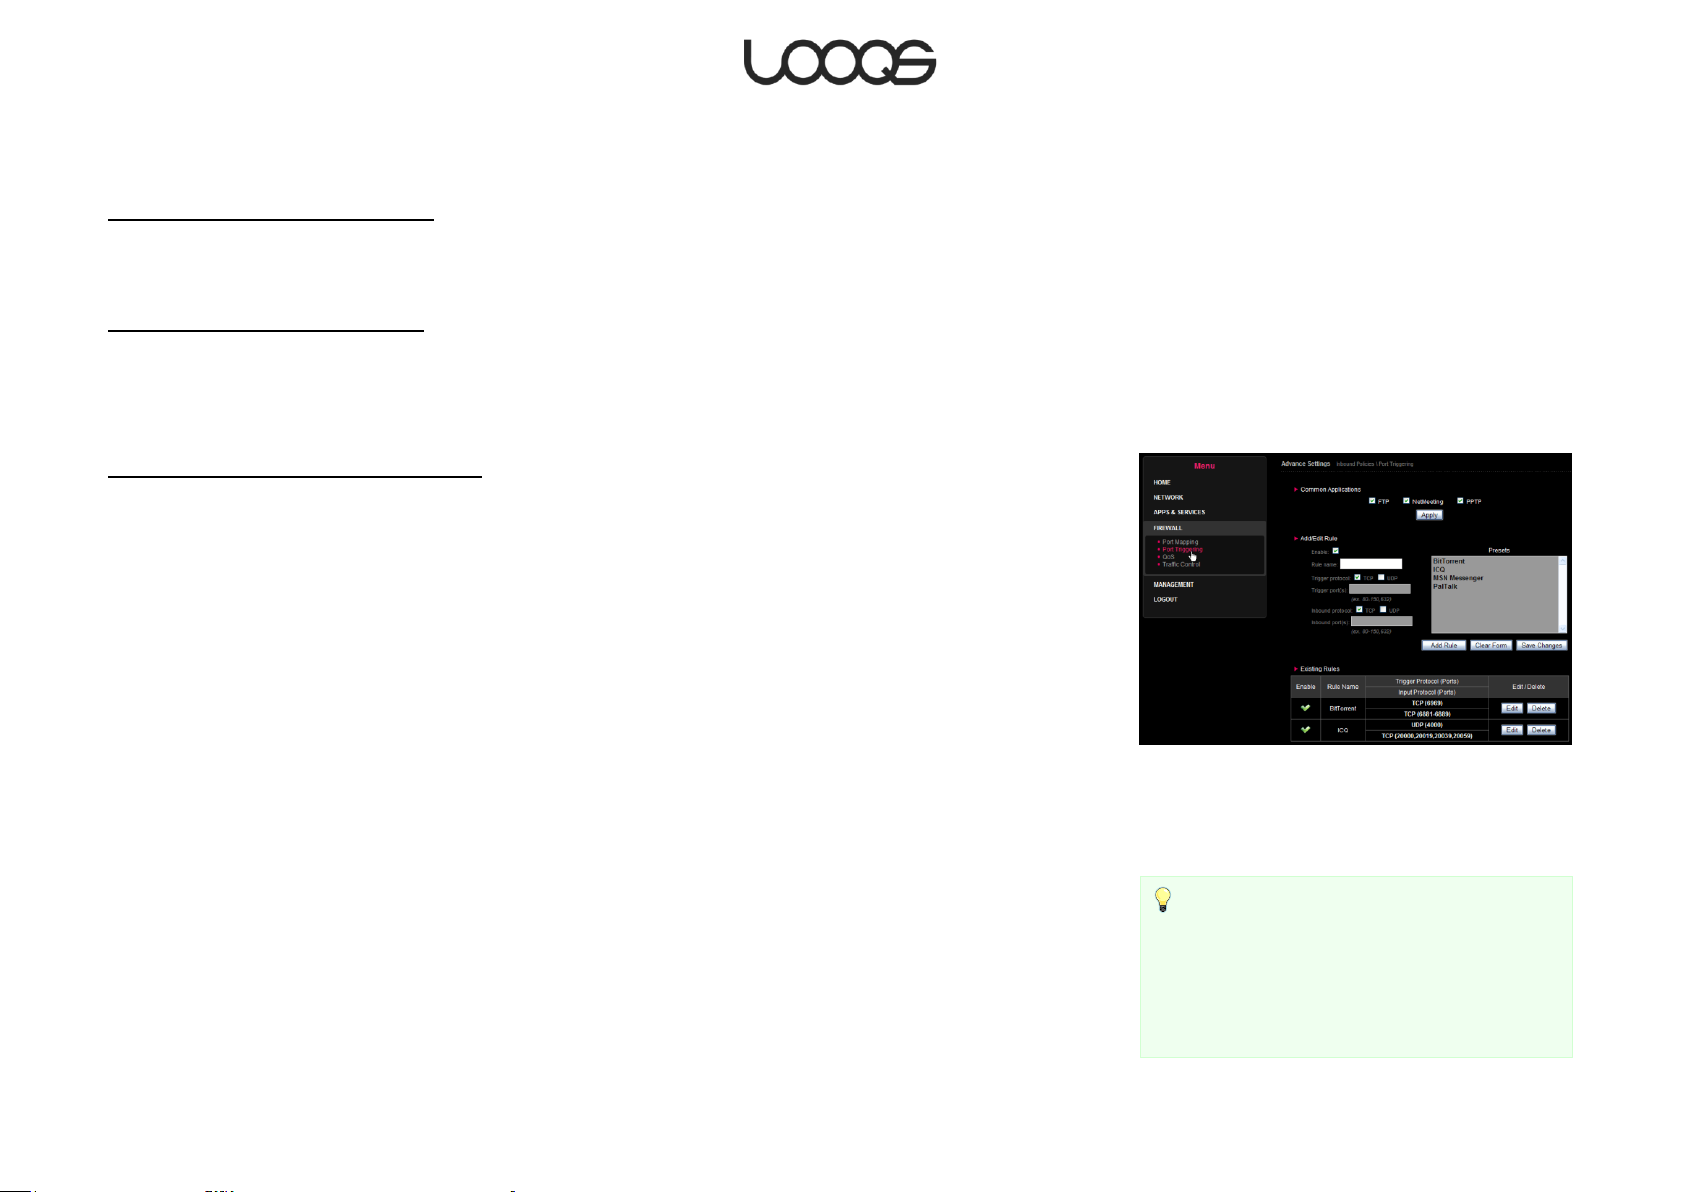
Figure 23
Tip
If you are creating a port triggering rule for one
of the applications listed in the Presets box,
simply select the desired application, and the
form will be automatically filled with the
appropriate values.
Note: You cannot change the name of an existing rule.
To disable a port mapping rule
1. In the Existing Rules table, click the Edit button for the rule you want to edit.
2. Clear the Enabled check box and click Save Changes.
To delete a port mapping rule
In the Existing Rules table, click the Delete button for the rule you want to delete.
Creating and editing port triggering rules
To create a new port triggering rule
1. In the MeeBox admin interface, click Advanced Settings, then Firewall, then Port
Triggering. (See Figure 23.)
2. In the Rule name field, enter a name for the rule. (Choose a name that will help you
remember what the rule is for. Note: After you add a rule, you cannot change its
name.)
3. Next to Trigger protocol, select the communications protocol(s) that will be used by
outgoing trigger connections for this rule. If you are not sure which protocol will be
used, select both.
4. In the Trigger port(s) field, enter the port(s) to which the outgoing trigger connections
will be addressed.
5. Next to Inbound protocol, select the communications protocol(s) that will be used by
inbound connections for this rule. If you are not sure which protocol will be used, select
both.
6. In the Inbound port(s) field, enter the port(s) to which the incoming connections will be
addressed.
7. Click Add Rule.
Page 54
User Guide LOOQS MeeBox Router
Page 55

To edit a port triggering rule
1. In the Existing Rules table, click the Edit button on the row listing the rule you want to
edit.
2. Edit the form as necessary, and then click Save Changes.
Note: You cannot change the name of an existing rule.
To disable a port triggering rule
1. In the Existing Rules table, click the Edit button for the rule you want to edit.
2. Clear the Enabled check box and click Save Changes.
To delete a port triggering rule
In the Existing Rules table, click the Delete button for the rule you want to delete.
Page 55
User Guide LOOQS MeeBox Router
Page 56

Figure 24
Creating a Virtual Private Network
Your MeeBox comes with virtual private network (VPN) software OpenVPN preinstalled. A
VPN lets you create a secure, encrypted, private connection between your computer
and your MeeBox when you have to go through a public network, such as the Internet, to
reach your MeeBox. This means you can have secure access to the files and services on
your MeeBox even when you are not on the same physical local network as your MeeBox,
such as when you are traveling with your laptop computer. Moreover, through a VPN, you
can remotely and securely access resources hosted by other computers on the MeeBox’s
local network, not just on the MeeBox itself.
To take advantage of your MeeBox’s VPN capability, you must install the free, open
source OpenVPN software on each computer from which you will access the MeeBox
remotely. Versions of OpenVPN are available for Windows, Mac OS X, and Linux. To
download the free Windows software, please visit www.openvpn.net and click the Open
Source Project tab. For Mac OS X, Tunnelblick is a free implementation of OpenVPN with a
graphical user interface.
Enabling OpenVPN and generating client keys
OpenVPN on your MeeBox is disabled by default. To enable it, do the following:
1. In your web browser, go to http://meebox:8090/, log in, and click MeeBox Settings.
2. Click Advanced Settings, then click Apps & Services, then click VPN (see Figure 24).
3. Under OpenVPN, select the Enable check box, then click Save.
Before you can connect to your MeeBox through OpenVPN, you must generate an SSL
certificate (or key) for your computer. OpenVPN will use these files to establish your
computer’s identity and allow the VPN connection. Any computer that does not have a
valid certificate and key will not be able to connect to OpenVPN on your MeeBox.
Generating a client certificate and key
1. In your web browser, go to http://meebox:8090/, log in, and click MeeBox Settings.
2. Click Advanced Settings, then click Apps & Services, then click VPN (see Figure 24).
3. Under OpenVPN configuration file, click the drop-down menu and select an option as
follows:
Page 56
User Guide LOOQS MeeBox Router
Page 57

If your MeeBox has a custom domain name (such as yourname.com), select
Hostname user input and enter your domain name in the box under the drop-down
menu.
If your MeeBox has a static public IP address (but no fixed domain name), select
WAN IP. Your MeeBox’s WAN IP address will be automatically entered in the box
under the drop-down menu.
If your MeeBox is using Dynamic DNS, select DDNS. Your MeeBox’s DDNS hostname
will be automatically entered in the box under the drop-down menu.
4. Click Generate & Save.
Your MeeBox will generate the client certificate and key and store them in a ZIP file
named clientcert.zip, which will be automatically downloaded by your web browser. The
next step is to install these client files on your computer.
Installing the client certificate and key on your computer
If you have not already installed OpenVPN on your computer, please do so before
continuing.
1. On your computer, locate the file clientcert.zip that was downloaded from your
MeeBox when you generated the client certificate.
2. Extract the contents of the ZIP file. You should now have the following files:
ca.crt
client.ovpn
clientxx.crt (where xx is a two-digit number)
clientxx.key (where xx is a two-digit number)
3. Copy all four files into your OpenVPN config folder. On Windows, this is typically
C:\Program Files\OpenVPN\config. On Mac OS X, if you are using Tunnelblick, the
config folder is usually ~/Library/OpenVPN (where ~ represents your home folder).
You can now start OpenVPN on your computer and connect to your MeeBox using the
client.ovpn configuration file.
Page 57
User Guide LOOQS MeeBox Router
Page 58

Starting and using OpenVPN on your computer
To connect to your MeeBox through OpenVPN, start OpenVPN on your computer and
activate the appropriate configuration.
On Windows
1. Click the Start button and select Programs > OpenVPN > OpenVPN GUI.
2. Right-click the OpenVPN GUI icon in the notification area of your task bar and select
Connect.
On Mac OS X
1. Open Tunnelblick in your Applications folder.
2. Click the Tunnelblick icon on your menu bar and select Connect 'client'.
Once you have established the VPN connection, you can access your MeeBox as if your
computer were physically connected to the MeeBox’s local network. In addition, you can
access shared resources, if any exist, on the other computers that are on the MeeBox’s
local network.
Note
The first time you turn on your MeeBox, and whenever you reinstall its disk image,
OpenVPN must generate an SSL certificate and key for the server. This process takes about
five minutes. OpenVPN will be unavailable during this time.
Page 58
User Guide LOOQS MeeBox Router
Page 59

Adding a second internal hard drive
Your MeeBox supports up to two internal SATA 3.5-inch hard drives. If your MeeBox shipped
with one drive, you can add a second drive to either increase storage capacity or
enhance data security (by making the second drive ―mirror‖ the first).
You have three choices in how to use a second internal hard drive.
As a second volume. If you take no further action after installing a second hard
drive, it will be treated as a second volume, logically independent of the original
volume. The new volume will be accessible as the public shared folder ide4. (On
Windows, the network path will be \\meebox\ide4. On Macintosh, it will be
smb://meebox/ide4.)
In a RAID 0 array. You can combine the second drive with the first in a RAID 0 array
to create a single volume that is the size of both drives combined. The single
volume will continue to be accessible in the same way as before you created the
array. Note: All existing data on BOTH drives will be DELETED if you create a RAID 0
array.
In a RAID 1 array. You can use the second drive as a ―mirror‖ of the first using RAID 1.
In this arrangement, the system keeps the contents of the two drives always the
same. If one drive fails, your data is still available on the other drive. Choosing RAID
1 creates a single volume that is the size of the smaller of the two drives. Note: All
existing data on BOTH drives will be DELETED if you create a RAID 0 array.
Installing the second hard drive
You will need a Phillips-head screwdriver and the four drive screws included in your
MeeBox retail package.
1. Ensure that the MeeBox is turned off, and disconnect all cords and cables.
2. Remove the three screws that secure the MeeBox’s top cover from the back plate.
(Two screws are at the extreme ends of the back plate, and one is in the middle.)
3. Slide the top cover back until it stops, then lift the cover straight up. Set the cover aside.
4. Turn the MeeBox over and place it top-down on the work surface.
Page 59
User Guide LOOQS MeeBox Router
Page 60

5. Remove the four screws that secure the unused drive sled (near the middle of the
bottom plate) and put them aside. The free drive sled will fall to the work surface.
6. Turn the MeeBox over again, top-up.
7. Attach the free drive sled to the bottom of your new hard drive using the four supplied
screws.
8. Attach the free SATA cable to the hard drive.
9. Place the hard drive (with attached sled) in the MeeBox, aligning the four screw holes
of the drive sled with the four free screw holes on the bottom plate of the MeeBox
chassis. The drive should be oriented with the SATA port facing toward the rear of the
MeeBox.
10. While holding the hard drive against the bottom plate of the MeeBox chassis with one
hand, tilt the MeeBox to a vertical position so that the bottom of the chassis is facing
you. Then, making sure the screw holes of the drive sled are aligned with the
corresponding holes on the bottom plate, carefully screw the drive sled screws into the
chassis holes. (You must continue pressing the drive against the chassis with one hand
until two screws are in place.)
11. Once the drive has been firmly secured to the MeeBox chassis, replace the top cover
and its retaining screws, reconnect all cables and cords, and turn your MeeBox on.
Verifying and formatting the second hard drive
When your MeeBox has finished booting up after the installation of the second hard drive,
check its proper operation using the disk utility:
1. In your web browser, go to http://meebox:8090/, log in, and click MeeBox Settings.
2. Click Advanced Settings, then Management, then Disk Utility.
In the drive table, you should see entries for both /dev/hdc (the primary hard drive) and
/dev/hdd (the second hard drive). The status of both drives should be ―mounted‖.
If you intend to use the second drive as an independent volume, you must format the
drive by clicking the Format button in the disk utility. You can format the drive using any of
the following files systems: ext3, ext2, xfs, and FAT32. MeeBox’s default file system is ext3; it
Page 60
User Guide LOOQS MeeBox Router
Page 61

Figure 25
is recommended that you use ext3 unless you have a specific reason to use another file
system.
If you intend to create a RAID array, you do not need to format the second drive at this
time, since the system will automatically format both drives when you create the array.
Creating a RAID array
If you have two internal hard drives installed in your MeeBox, you can set up a RAID 0
(striping) or RAID 1 (mirroring) array.
RAID 0 (striping) creates a single volume with the combined capacity of the two
drives. Your data is spread over the two drives in alternating ―stripes‖. Since the
system can read neighboring data from the two drives simultaneously, this
arrangement increases performance. However, striping also increases the risk of
data loss because it is more likely that one of a pair of drives will fail in a given time
period than that a single drive in isolation will fail in the same time period, and the
failure of one drive of a striped array will result in the loss of potentially all your data.
(If you use RAID 0, it’s a good idea to always keep a complete backup of your
data on another device, such as a USB drive.)
RAID 1 (mirroring) creates a single volume with the same capacity as the smaller of
the two drives. It ―mirrors‖ all the data of one drive on the other drive, making the
second drive a complete backup of the first. Data is always written simultaneously
to both drives, so the backup copy is always up to date. Mirroring enhances data
security: if one drive of the array fails, the array will continue working with the data
copy on the other drive. Following the failure of a drive, you can replace the failed
drive, and the system will automatically recreate the array.
Please note: you cannot use a USB drive as part of a RAID array.
Creating a RAID array
1. In your web browser, go to http://meebox:8090/, log in, and click MeeBox Settings.
2. Click Advanced Settings, then click Management, and then click RAID (Figure 25).
3. Select the desired RAID level (0 for striping or 1 for mirroring).
Page 61
User Guide LOOQS MeeBox Router
Page 62

4. Select the desired file system for the new, combined volume. (Ext3 is recommended for
enhanced data protection.)
5. Click Create RAID System.
RAID creation will proceed in two phases. First, the system will perform initial RAID setup,
and then it will automatically reboot. Once the MeeBox has finished rebooting, the system
will format both hard drives to finish RAID creation. (After the reboot, you can return to the
RAID management page to monitor the progress of the second phase.) The entire process
can take up to an hour or more, depending on the size of the drives. Please do not use or
turn off your MeeBox during this time.
When the system has finished creating the RAID array, you will be able to access the
combined volume in the same way you accessed the original, single-drive volume.
Network shares will continue to be accessible at network address \\meebox on Windows,
and at smb://meebox on Macintosh. When using FTP, the combined volume is accessible
as the ide3 directory. When using SFTP, the combined volume’s path is /mnt/ide3.
Page 62
User Guide LOOQS MeeBox Router
Page 63

Managing storage devices
Your MeeBox’s admin interface includes various ways to get information about its storage
devices and to manage them.
Storage reports display disk usage by volume and by user.
The disk utility is used to format drives, scan them for errors, unmount and remount
them, and view disk health statistics.
The RAID utility is used to set up and tear down RAID arrays (available if you have
two internal hard drives installed).
Viewing storage reports
You can get capacity and usage information on both internal and external (USB) drives
using your MeeBox’s storage reporting function. To access storage reports, do this:
1. In your web browser, go to http://meebox:8090/, log in, and click MeeBox Settings.
2. Click Advanced Settings, then click Management, and then, under Storage, click
Reports.
You can view disk usage by volume or by user. Select the desired view using the dropdown menu above the disk usage table.
The disk usage table refers to volumes by their system names:
/dev/hdc refers to the primary internal hard drive (when RAID is not in use)
/dev/hdd refers to the secondary internal hard drive (when RAID is not in use)
/dev/md refers to the combined volume of a RAID array, if RAID is in use
/dev/sda and /dev/sdb refer to the first and second USB drives, if present
Using the disk utility
To access the disk utility:
1. In your web browser, go to http://meebox:8090/, log in, and click MeeBox Settings.
2. Click Advanced Settings, then click Management, and then click Disk Utility.
Page 63
User Guide LOOQS MeeBox Router
Page 64

Tip
When formatting an external drive, if you plan to
connect the drive to a Windows PC at some point,
you should select FAT32 as the file system, since
Windows does not support ext2, ext3, or XFS. If
you plan to use the drive only with your Personal
Server, or with Linux computers but not
Windows, then you can choose any file system.
Figure 26
Each connected storage device is listed in the Disk Utility, along with some basic
information about the device and buttons for available actions.
For internal hard drives, you can:
Format the drive to various file systems—FAT32, ext2, ext3, and XFS
Scan the drive for errors (and fix them if found)
Display SMART (Self-Monitoring Analysis and Reporting Technology) drive health
information
Note
Formatting a drive erases ALL content on the drive. If the drive contains files you want to
keep, please make sure to back them up to another drive or to your computer before you
format. Also, please note that if you format the primary internal hard drive, you will need
to reinstall your MeeBox’s hard disk image after formatting. (For instructions on installing a
hard disk image, see Installing a disk image.)
For external storage devices, the available actions include formatting and error-scanning,
but not displaying SMART information. In addition, you can unmount an external drive.
Unmounting removes the shared folder corresponding to the drive, making the drive
unavailable for use. You must unmount an external drive before formatting it.
Managing a RAID array
Replacing a failed drive of a RAID 1 array
If one drive of a RAID 1 array fails, your MeeBox will signal the failure by blinking its power
button/indicator in alternating colors. If this happens, you should first determine which
drive has failed, and then replace it with a drive of the same or larger capacity.
1. In your web browser, go to http://meebox:8090/, log in, and click MeeBox Settings.
2. Click Advanced Settings, then click Management, and then click RAID.
3. You will see only one drive icon on the RAID management page, indicating that the
other drive is not operational. (See Figure 26 for an example.) The drive that is shown is
the one that is still working.
Page 64
User Guide LOOQS MeeBox Router
Page 65

4. Note the drive designator just below the icon. If it is /dev/hdc, then the second drive is
the one that has failed. If it is /dev/hdd, then the primary drive is the one that has failed.
(The primary drive is the one that is connected to the longer SATA cable.)
5. Power down your MeeBox and replace the failed drive with one of the same or larger
capacity. (See Adding a second internal hard drive, above.)
6. Turn your MeeBox on.
When you turn your MeeBox back on, it will automatically recreate the RAID 1 array,
duplicating the contents of the healthy drive to the new one. While this operation is in
progress, the MeeBox’s power button/indicator will continue to blink alternating colors.
You can check the progress of this operation by returning to the RAID Settings page of the
admin interface.
Tearing down a RAID array
If you wish to stop using a RAID array (for example, if you wish to use only one internal drive
or to use each internal drive as an independent volume), do the following:
1. In your web browser, go to http://meebox:8090/, log in, and click MeeBox Settings.
2. Click Advanced Settings, then click Management, and then click RAID.
3. Click Remove RAID.
Your MeeBox will power down. When you turn it back on, each drive will be treated as an
independent volume.
Upgrading the capacity of a RAID 1 array
It is possible to upgrade the capacity of a RAID 1 (mirrored) array by replacing each drive
with another of higher capacity. Drives must be replaced one at a time, and you must
allow the system to completely rebuild the array after you replace the first drive before
you replace the second.
Page 65
User Guide LOOQS MeeBox Router
Page 66

Updating your MeeBox’s software
From time to time, RRC bv may release software updates for your MeeBox to add features
or correct bugs in the server’s operating system or applications. Software updates may
come in the form of either firmware updates, which replace system software in the server’s
flash memory; or disk images, which replace or supplement the software stored on the
server’s internal hard drive. Both types of updates can be installed through the server’s
browser-based administrative interface.
You can download the latest firmware or hard disk image (if any has been made
available) from the Downloads section of the Support area of www.looqs.com.
Installing a firmware update
1. In your web browser, go to http://meebox:8090/, log in, and click MeeBox Settings.
2. In the menu, click Administration.
3. Under Update Firmware, click Browse. In the Choose file dialog box, locate the
firmware package you previously downloaded, and double-click the file.
4. Click Start Firmware Upgrade. A confirmation dialog box appears. Click OK to proceed.
When you click OK, your browser will upload the firmware package to your MeeBox, and
then the server will install the firmware update. Uploading takes several seconds, during
which time there will be no feedback except for the page-loading indicator of your
browser. Please do not navigate away from the current page, or the file upload will be
interrupted and you will have to start over.
Once the firmware package has been completely uploaded, the page will change and
display a message indicating that the firmware is being installed. Installation takes up to 20
minutes. During this time, you will not be able to access files or services on the server, and
you will not be able to access the Internet (if you are using your MeeBox as your
broadband router). When installation is complete, the server will automatically restart, and
then you can use the server as normal.
After firmware installation, you can confirm that the new firmware was correctly applied
by checking the firmware version number displayed on the Home page of the admin
interface.
Page 66
User Guide LOOQS MeeBox Router
Page 67

Caution
While firmware installation is in progress, do not navigate away from the firmware upgrade
page or shut down your MeeBox until at least 20 minutes have passed. Interrupting the
firmware installation process will render the MeeBox inoperable.
Installing a disk image
1. In your web browser, go to http://meebox:8090/, log in, and click MeeBox Settings.
2. In the menu, click Administration.
3. Under Install or reinstall application software, click Browse. In the Choose file dialog
box, locate the hard disk image you previously downloaded, and double-click the file.
4. Click Start Disk Image Upgrade. A confirmation dialog box appears. Click OK to
proceed.
When you click OK, your browser will upload the disk image to your MeeBox, and then the
server will install the disk image. Uploading takes several minutes, during which time there
will be no feedback except for the page-loading indicator of your browser. Please do not
navigate away from the current page, or the file upload will be interrupted and you will
have to start over.
Once the hard disk image has been completely uploaded, the page will change and
display a message indicating that the disk image is being installed. Installation takes up to
20 minutes. During this time, you will not be able to access files or services on the server,
and you will not be able to access the Internet (if you are using your MeeBox as your
broadband router). When installation is complete, the server will automatically restart, and
then you can use the server as normal.
Page 67
User Guide LOOQS MeeBox Router
Page 68

Accessing your MeeBox’s command line interface
Although the browser-based administrative interface at http://meebox:8090 is your
primary means of managing your MeeBox, the server also features a command line
interface that you can use to perform tasks that cannot be done through the admin
interface, such as deleting orphan folders left over when you remove user accounts or
shares. The command line interface (also called the CLI or the shell) is accessible through
Telnet or SSH.
To access the CLI, you use either a Telnet client or an SSH client. Most operating systems
include a Telnet client; Windows, for example, provides the command-line client
telnet.exe. A good, free Windows client that supports both Telnet and SSH is PuTTY,
available at http://www.puttyssh.org/.
In terms of accessing your MeeBox’s CLI, Telnet and SSH both provide the same
functionality. However, SSH is more secure, because it encrypts the communications
between the server and the client, including the username and password you use to log in
to the CLI. (Telnet sends all data in clear text.) The enhanced security makes SSH a better
choice when you must access the CLI remotely across the Internet, or whenever security is
a concern.
Enabling the Telnet service
Telnet is disabled by default on your MeeBox. To enable it, do the following:
1. In your web browser, go to http://meebox:8090/, log in, and click MeeBox Settings.
2. Click Advanced Settings, then click Apps & Services, and then click Telnet Server.
3. Click the Enabled check box, and then click Save.
Enabling the SSH service
SSH is disabled by default on your MeeBox. To enable it, do the following:
1. In your web browser, go to http://meebox:8090/, log in, and click MeeBox Settings.
2. Click Advanced Settings, then click Apps & Services, and then click Service Control.
3. In the SSH/SFTP row, select the Enable check box, and then click Save.
Page 68
User Guide LOOQS MeeBox Router
Page 69
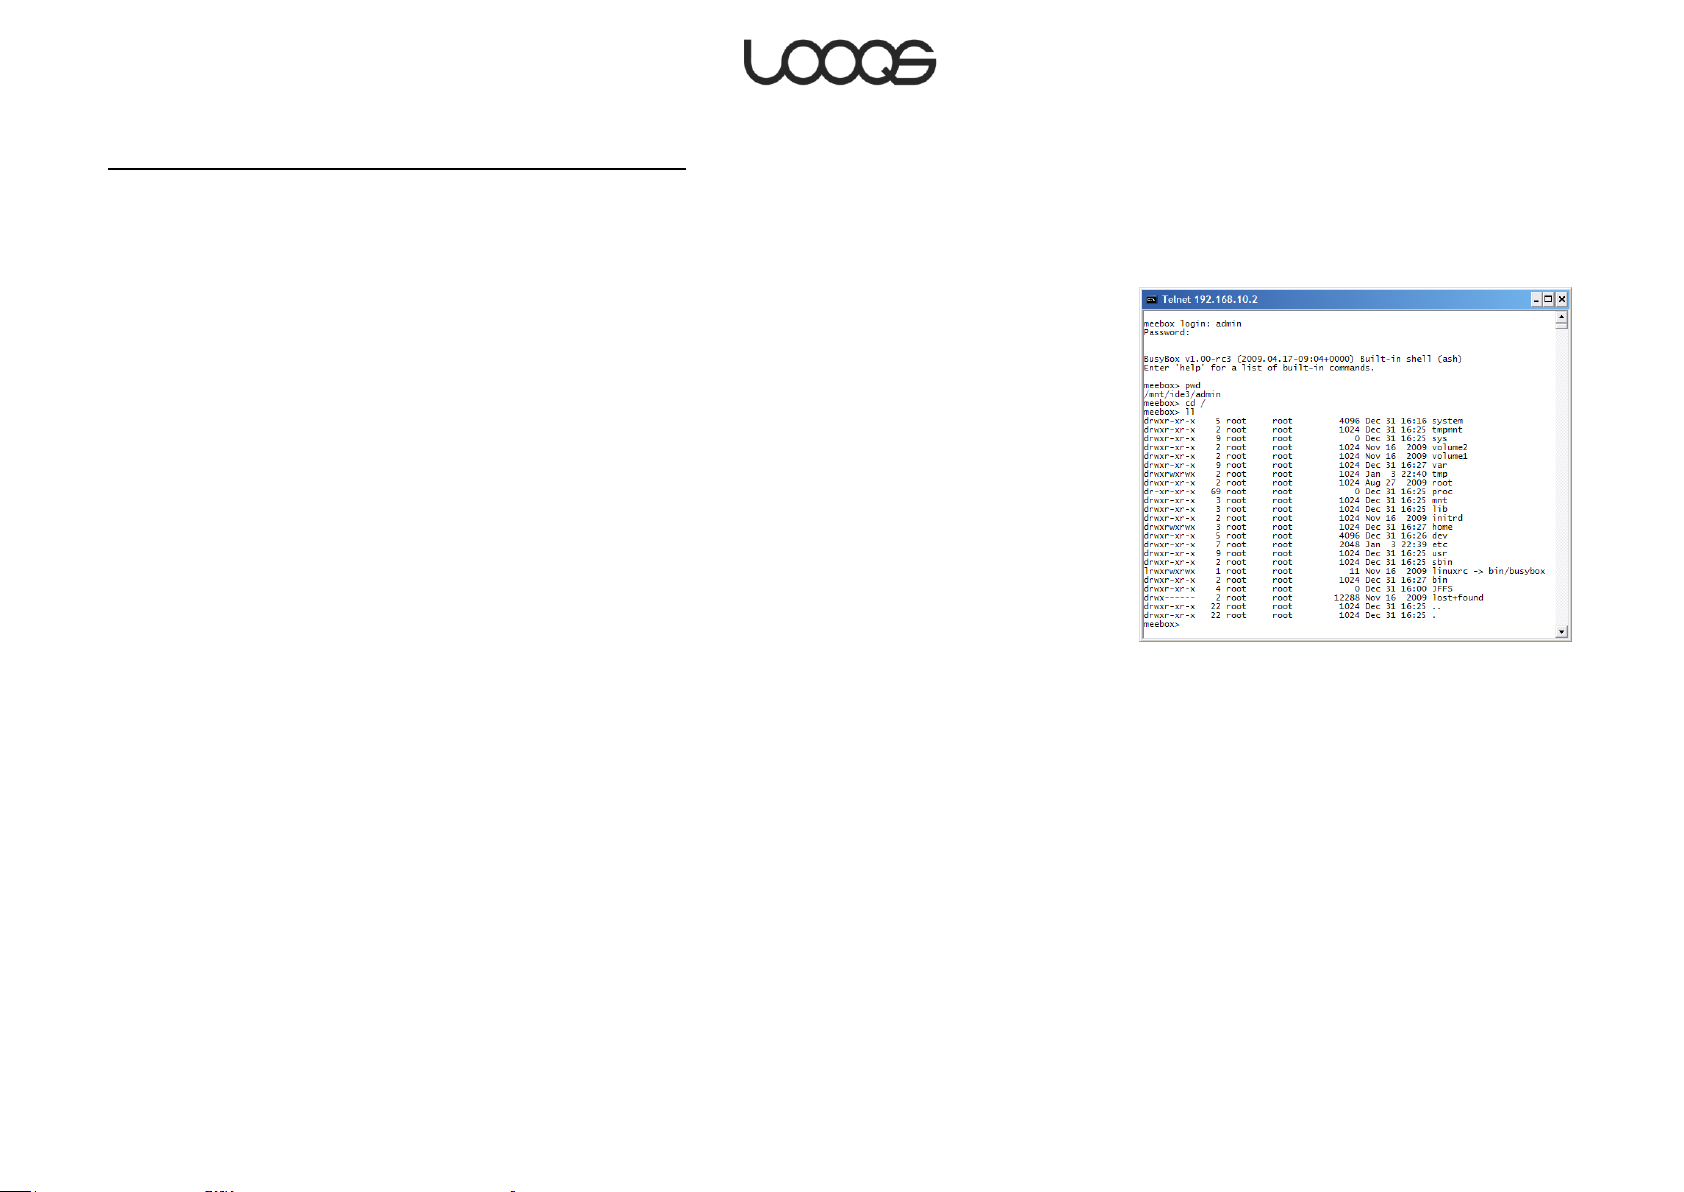
Figure 27
Accessing the CLI using Windows’s built-in telnet client
1. On the Start menu, click Run. The Run dialog box opens.
2. Type cmd and press Enter. A Windows command prompt window opens.
3. Type telnet MeeBox and press Enter. (If accessing the CLI remotely, substitute your
public IP address for ―meebox‖.)
4. At the MeeBox login: prompt, enter the username of a user on your MeeBox, such as
―admin‖. At the Password: prompt, enter the user’s password. (The password will not be
shown.)
5. At the MeeBox> prompt, enter commands as needed.
6. When you are finished, enter exit to close the CLI.
Figure 27 shows a typical CLI session in which admin has logged in, determined the current
directory (pwd), changed to the root directory (cd /), and listed its contents in long format
(ll).
Executing commands with elevated privileges
Certain kinds of operations you might want to execute in the CLI, such as deleting orphan
folders, cannot be executed with ordinary user privileges. To perform such operations, you
must log in with the admin account.
Page 69
User Guide LOOQS MeeBox Router
Page 70

Product Registration
Thank you for purchasing MeeBox.
Please visit our Website and register your MeeBox in order for us to serve you better.
We count on our customers’ feedback and suggestions in improving our products
and services. Your input would be much appreciated.
How to register your MeeBox:
1. Visit our corporate website at www.LOOQS.com.
2. Click on the ―Product Registration‖ link.
3. Fill out the product registration form online and submit.
Product registration is a good way to ensure you receive timely news about updates
to MeeBox and technical support. If desired, registered customers will receive news
about new products from LOOQS.
Page 71

Warranty
This LOOQS product is fully warranted during the period promised at the
purchase of your product. This effects from the original purchase date
against defective components and workmanship. In the event that warranty service
is required, you should return the product to the retailer from whom it was purchased.
CONDITIONS
1. The warranty is only valid if, when warranty service is required, the ONLINE
product registration form is fully and properly completed and is presented with
the original invoice or sales slip or confirmation, and the serial number on the
product has not been defaced.
2. LOOQS’s obligations are limited to the repair or, at its discretion, replacement
of the product or the defective part.
3. Warranty repairs must be carried out by authorized LOOQS Dealers or
authorized LOOQS service centers. No re-imbursement will be made for repairs
carried out by non LOOQS dealers and, any such repair work and damage to
the products caused by such repair work will not be covered by this warranty.
4. In case the product will be used in a country other than the country it was
designed and developed for, this might result in the need for change in the
technical- and / or safety regulations effective for that other country. Such
changes are not considered material and workmanship errors of the device
and are therefore not covered by this warranty. Any costs coming from these
changes as well as any other caused damages cannot be charged.
5. This warranty covers none of the following:
a. Periodic checkups, maintenance and repair or replacement of parts due
to normal wear and tear.
b. Cost relating to transport, removal or installation of the product.
c. Misuse, including the failure to use this product for its normal purpose or
incorrect installation.
d. Damage caused by lightning, water, fire, acts of God, War, Public
disturbances, incorrect mains voltage, incorrect ventilation or any other
cause beyond the control of LOOQS.
Page 71
User Guide LOOQS MeeBox Router
Page 72

6. This warranty is valid for any person who legally acquired possession of the
product during the warranty period. The consumers statutory rights in any
applicable national legislation whether against the retailer arising from the
purchase contract or otherwise are not affected by this warranty. Unless there
is national legislation to the contrary, the rights under this warranty are
consumers sole rights and LOOQS, its partners and distributors shall not be
liable for indirect or consequential loss or any damage to any other
equipment or material.
LIMITED WARRANTY AND LIABILITLY
LOOQS provides a limited warranty for its Products only to the initial person or entity
that originally purchased the Product from LOOQS or its authorized distributor or
retailer. LOOQS warrants that every hardware portion of the Products will be free
from physical defects in material and workmanship within warranty period, or the
Product will be repaired or replaced as determined solely by LOOQS
If the Product prove defective during this warranty period, you can contact the local
dealer in order to obtain assistance. You must provide proof of purchase and a bar
code number from the Product's packaging when asking for assistance. LOOQS
Products are barebones devices so LOOQS makes no warranty of the hard disk
installed, nor warranty on compatibility of all hard disks.
Page 72
User Guide LOOQS MeeBox Router
Page 73

LOOQS SHALL HAVE NO LIABILITY TO YOU UNDER THIS LIMITED WARRANTY IF THE
PRODUCT IS INSTALLED AND USED IN A MANNER NOT SPECIFIED OR DESCRIBED IN THE
PRODUCT SPECIFICATIONS OR DESCRIPTION, THE PRODUCT HAS BEEN MODIFIED OR
ALTERED IN ANY WAY BY ANY PARTY OTHER THAN LOOQS, OR THE FAILURE OF THE
PRODUCT TO CONFORM TO ITS SPECIFICATIONS CAN BE ATTRIBUTED TO CAUSES THAT
NOT THE RESPONSIBILITY OF LOOQS.
LOOQS MAKES NO WARRANTY OR REPRESENTATION, EXPRESSED, IMPLIED, OR
STATUTORY, WITH RESPECT TO ITS PRODUCTS OR THE CONTENTS OR USE OF THIS
DOCUMENTATION AND ALL ACCOMPANYING SOFTWARE, AND PARTICULARLY
DISCLAIMS ITS QUALITY OR PERFORMANCE FOR ANY PARTICULAR PURPOSE.
LOOQS MAKES NO GUARANTEE THAT ALL DATA STORED ON LOOQS PRODUCTS IS
ALWAYS SECURE WITHOUT ANY RISKS OF DATA LOSS. LOOQS REMINDS YOU TO BACK
UP THE DATA PERIODICALLY. UNDER NO CIRCUMSTANCES SHALL LOOQS BE LIABLE IN
ANY WAY TO THE USER FOR DAMAGES, INCLUDING ANY SAVINGS, LOST PROFITS OR
OTHER INCIDENTAL OR CONSEQUENTIAL DAMAGES ARISING OUT OF THE USE OF, OR
INABILITY TO USE LOOQS PRODUCTS OR RESULTING LOSS OF DATA FROM SUCH USE.
THIS LIMITED WARRANTY COVERAGE TERMINATES IF YOU SELL OR OTHERWISE TRANSFER
THIS PRODUCT TO ANOTHER PARTY.
LOOQS PRODUCTS ARE NOT INTENDED FOR USE IN MEDICAL, LIFE SAVING, OR LIFE
SUSTAINING APPLICATIONS.
REVISIONS
LOOQS reserves all rights to revise or update its Products, other products, software, or
related documentation without further notice.
LOOQS reserves the right to revise this publication and to make changes in the
content hereof without the obligation to notify any person of such revision or
changes.
Page 73
User Guide LOOQS MeeBox Router
Page 74

Copyright
Copyright © 2009 LOOQS. All rights reserved. This user manual shall not be copied,
stored in a search system, applied or transmitted in whole or in part in any form or
method (electronically, mechanically, copy through photocopier, disk copy, or other
methods) without an expressed permission from RRC BV in a form of a document.
LOOQS and MeeBox are trademarks or registered trademarks of RRC BV. Microsoft
Windows 98, Windows ME, Windows 2000, Windows XP, Windows Vista are registered
trademarks of Microsoft Corporation. Other product names are trademarks or
registered trademarks of their owners. One gigabyte, or GB, equals one billion bytes
when referring to hard drive capacity. Accessible capacity may vary. RRC BV
reserves the right to change product specifications without notice.
Page 74
User Guide LOOQS MeeBox Router
Page 75

Licensing
Supply of this product does not convey a license nor imply any right to distribute
content created with this product in revenue-generating broadcast systems
(terrestrial, satellite, cable and/or other distribution channels), streaming applications
(via Internet, intranets and/or other networks), other content distribution systems
(pay-audio or audio-on-demand applications and the like) or on physical media
(compact discs, digital versatile discs, semiconductor chips, hard drives, memory
cards and the like). An independent license for such use is required.
Page 75
User Guide LOOQS MeeBox Router
Page 76

 Loading...