

Page 1

IEEE 802.11n Wireless
1T1R Router
User’s Manual
English
Deutsch
Espanol
Francais
Italiano
Page 2
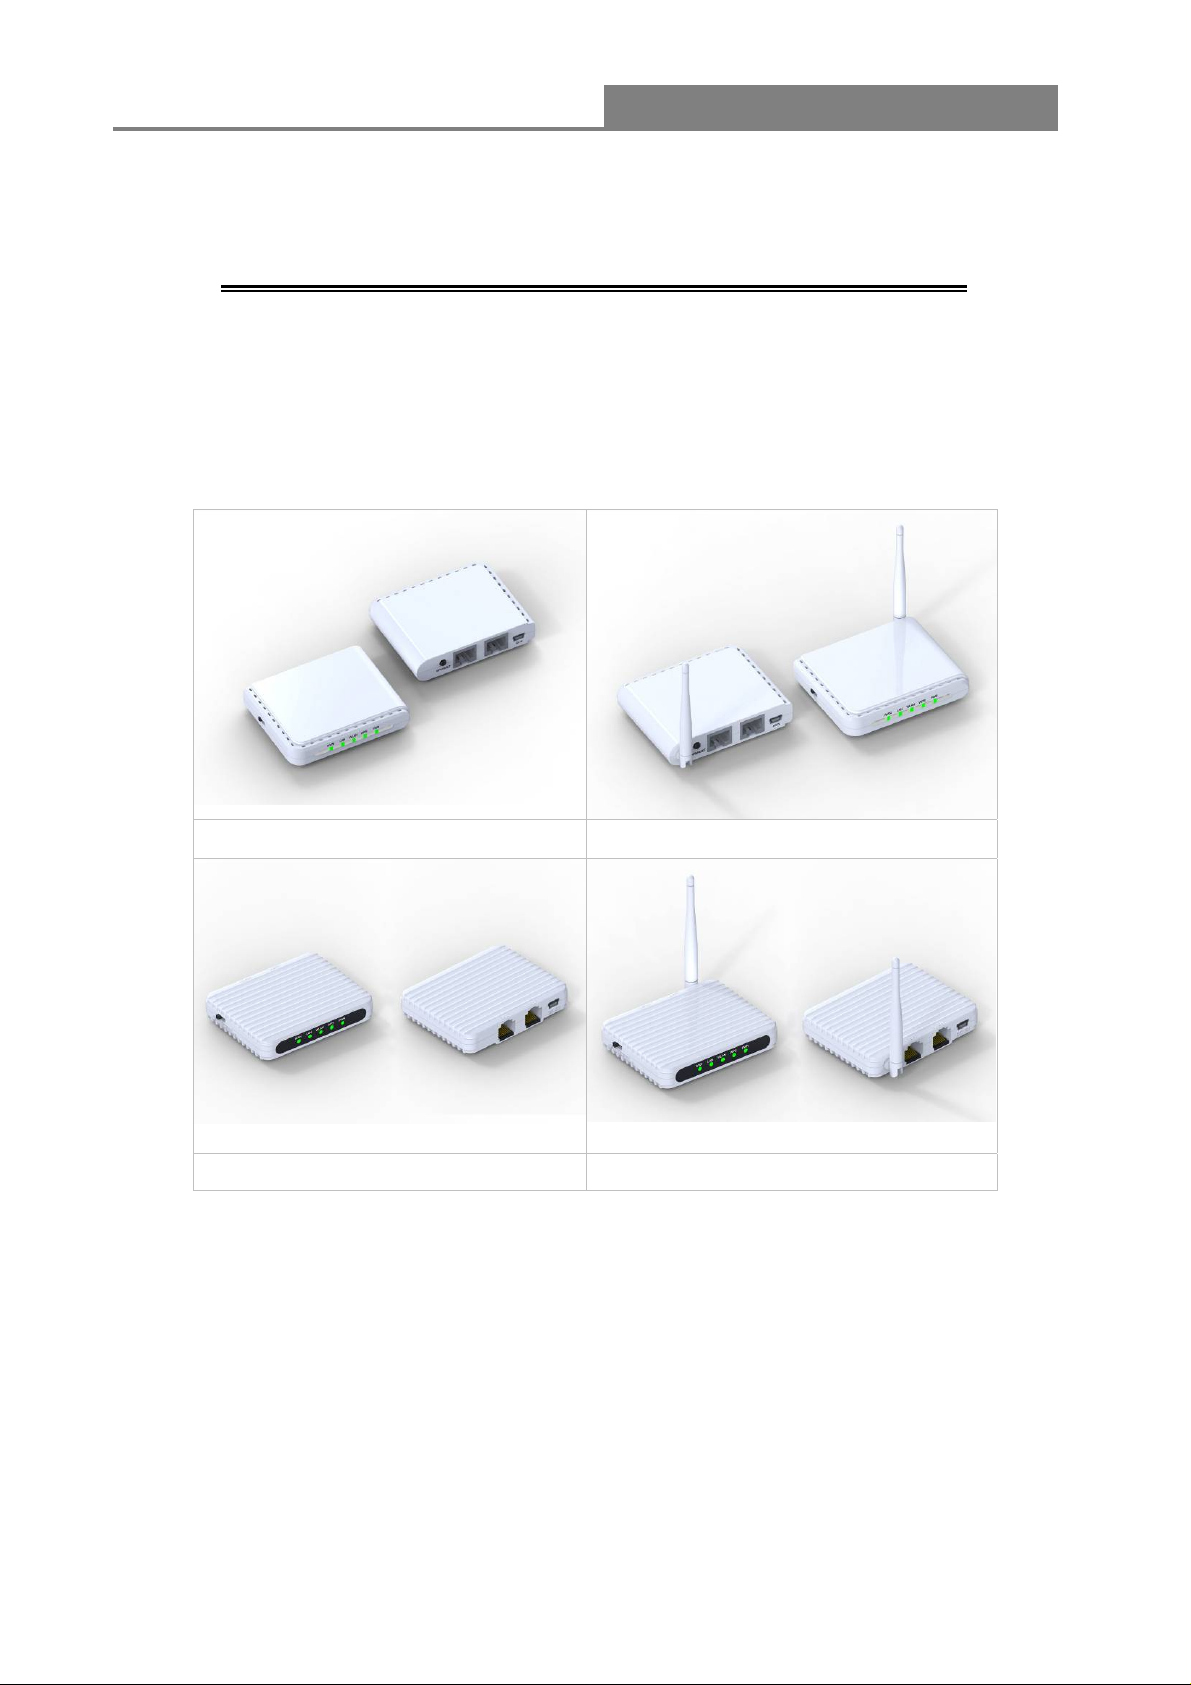
Wireless 11n 1T1R Router
IEEE 802.11n Wireless Series
Wireless 11n 1T1R Router
W142A W142B
W142C W142D
User Manual
Version 2.1
Date: September 17, 2010
2
Page 3

Wireless 11n 1T1R Router
FCC Certifications
Federal Communication Commission Interference Statement
This equipment has been tested and found to comply with the limits for a Class B digital device,
pursuant to Part 15 of the FCC Rules. These limits are designed to provide reasonable protection
against harmful interference in a residential installation. This equipment generates, uses and can
radiate radio frequency energy and, if not installed and used in accordance with the instructions,
may cause harmful interference to radio communications. However, there is no guarantee that
interference will not occur in a particular installation. If this equipment does cause harmful
interference to radio or television reception, which can be determined by turning the equipment off
and on, the user is encouraged to try to correct the interference by one of the following measures:
-Reorient or relocate the receiving antenna.
-Increase the separation between the equipment and receiver.
-Connect the equipment into an outlet on a circuit different from that to which the receiver is
connected.
-Consult the dealer or an experienced radio/TV technician for help.
This device complies with Part 15 of the FCC Rules. Operation is subject to the following two
conditions: (1) This device may not cause harmful interference, and (2) this device must accept
any interference received, including interference that may cause undesired operation.
FCC Caution: Any changes or modifications not expressly approved by the party responsible for
compliance could void the user's authority to operate this equipment.
IMPORTANT NOTE:
FCC Radiation Exposure Statement:
This equipment complies with FCC radiation exposure limits set forth for an uncontrolled
environment. This equipment should be installed and operated with minimum distance 20cm
between the radiator & your body.
This transmitter must not be co-located or operating in conjunction with any other antenna or
transmitter.
3
Page 4

Wireless 11n 1T1R Router
CE Mark Warning
This equipment complies with the requirements relating to electromagnetic compatibility, EN 55022
class B for ITE, the essential protection requirement of Council Directive 2004/108/EC on the
approximation of the laws of the Member States relating to electromagnetic compatibility and
R&TTE Directive 1999/5/EC to meet the regulation of the radio equipment and
telecommunications terminal equipment.
Company has an on-going policy of upgrading its products and it may be possible that information
in this document is not up-to-date. Please check with your local distributors for the latest
information. No part of this document can be copied or reproduced in any form without written
consent from the company.
Trademarks:
All trade names and trademarks are the properties of their respective companies.
Copyright © 2010, All Rights Reserved.
4
Page 5

Wireless 11n 1T1R Router
Contents
Unpacking Information········································································································ 6
Chapter 1 Introduction to the Wireless Router·······························································7
1.1 General Description······················································································· 7
1.2 Key Features································································································· 7
1.3 The Front Panel····························································································· 8
1.4 The Rear Panel·····························································································9
Chapter 2 Installation and Basic Configuration·····························································11
2.1 Operation Mode····························································································11
2.2 Connect This Router to Your Network ··························································11
2.3 Configure the IP Address of Your Computer················································ 12
Chapter 3 Web-Based Management············································································15
3.1 Start the Web-Based Management Interface···············································15
3.2 The Graphic User Interface·········································································16
3.3 Setup Wizard·······························································································18
3.4 Wireless······································································································· 22
3.4.1 Basic Settings···························································································· 22
3.4.2 Advanced Settings·····················································································24
3.4.3 Security······································································································ 25
3.4.4 Access Control··························································································· 30
3.4.5 Wireless Site Survey ················································································· 30
3.4.6 WPS Settings ···························································································· 35
3.5 TCP/IP Settings···························································································37
3.5.1 LAN Interface Setup·················································································· 37
3.5.2 WAN Interface Setup················································································· 39
3.6 Firewall Settings··························································································43
MAC Filtering······························································································· 43
3.7 Management ······························································································· 43
3.7.1 Status·········································································································43
3.7.2 Statistics ···································································································· 44
3.7.3 Log ············································································································ 45
3.7.4 Upgrade Firmware····················································································· 46
3.7.5 Save/Reload Setting·················································································· 47
3.7.6 Password···································································································47
3.7.7 Logout ······································································································· 48
Appendix A: Product Specifications ·················································································· 49
Appendix B: Glossary······································································································· 50
5
Page 6

Wireless 11n 1T1R Router
Unpacking Information
Thank you for purchasing the product. Before you start, please check all the contents of this
package.
The product package should include the following:
1. One Wireless Router
2. One USB cable
3. One CD
Note:
Make sure that the package contains the above items. If any of the listed items are damaged or
missing, please contact with your distributor.
Conventions
The router mentioned in this guide stands for IEEE 802.11n Wireless 1T1R Router without any
explanation.
6
Page 7

Wireless 11n 1T1R Router
Chapter 1 Introduction to the Wireless Router
1.1 General Description
This is a wireless router with 1T1R MIMO technology, providing an excellent network solution for
home, SOHO and hotspot users. It complies with standards IEEE 802.11n with data rate up to 150
Mbps, and IEEE 802.11b/g with maximum data rate of 54 Mbps. It can also interoperate with all
the 11/54 Mbps wireless (802.11b/g) products.
The router allows multiple users to share one broadband connection, as well as secures your
private network. LAN users can share files, printers, or playing network games all at a blazing
speed in a large area.
As to information security, this router supports up-to-date security encryption, such as WPA, WPA2,
open shared key, and pair-wise key authentication services, ensuring you the best encryption
types. What’s more, this router supports energy efficient Ethernet and saves power consumption,
prefering a cost-effective network connection.
1.2 Key Features
Comply with IEEE 802.11n and IEEE802.11b/g wireless standards
2.4GHz frequency band and 1T1R
High speed transfer rate up to 150Mbps
Support auto-MDI/MDI-X, backpressure and flow control
Support IEEE802.1x port-based and MAC-based network access control
Support wireless data encryption with WPA, WPA2, Open shared key, and pair-wise key
authentication services
Support Static IP, DHCP Client, PPPoE, Firewall and NAT IP Sharing
Support IEEE802.3az Energy Efficient Ethernet
Provide one WPS/RESET button
Provide one slide switch to control AP/Router/Client mode
7
Page 8
Wireless 11n 1T1R Router
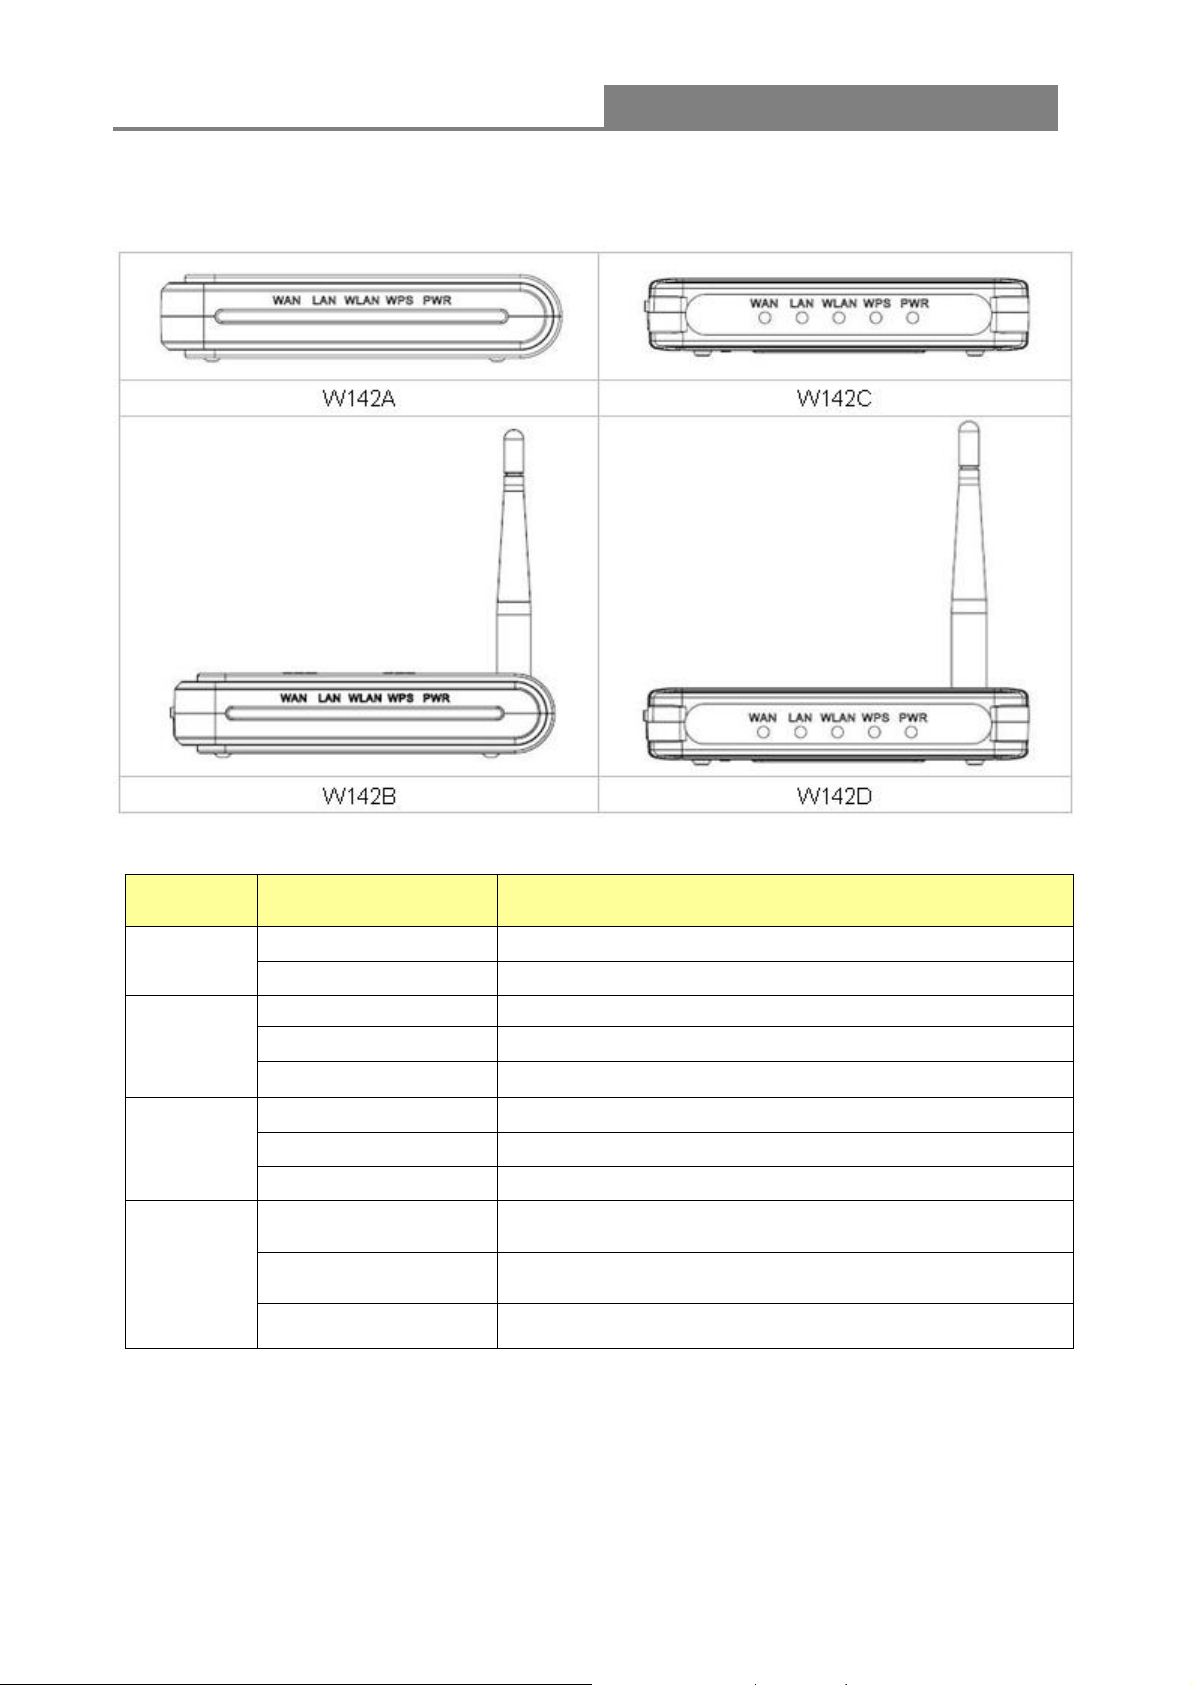
1.3 The Front Panel
The front panel of the Wireless Router:
Name Status Indication
PWR
Blink green one time System reboot
WPS
WLAN
WAN /
LAN
Green Power on
Dark Power off
Blink green WPS connecting
Dark System stability
Off The wireless function is disabled.
Flashing The wireless function is enabled.
Flashing fast Sending or receiving data over wireless.
Off
On
Flashing Sending or receiving data over corresponding port.
There is no device linked to the corresponding port or
the connection is dropping off.
There are devices linked to the corresponding ports but
no data transmitted or received.
8
Page 9
Wireless 11n 1T1R Router
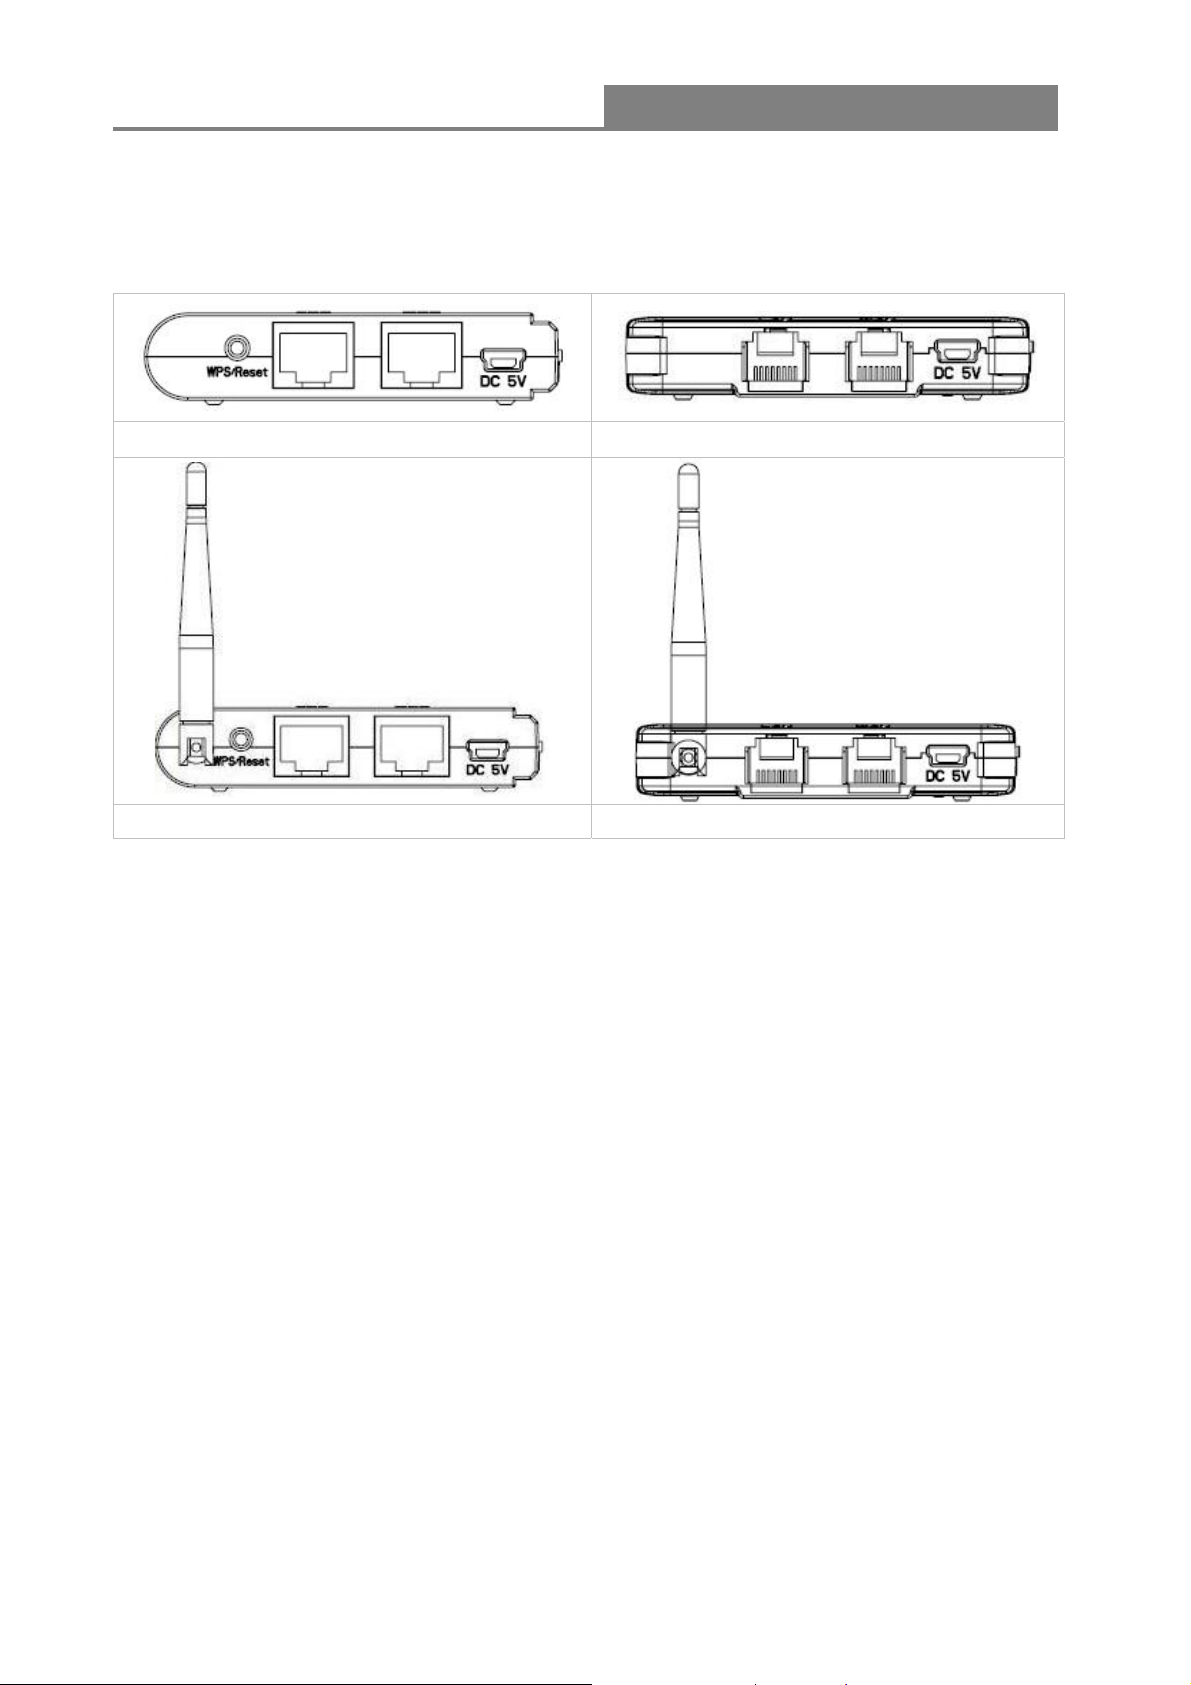
1.4 The Rear Panel
The rear panel of the Wireless Router is shown below.
W142A W142C
W142B W142D
LAN: Through this port, you can connect the router to your PCs and the other Ethernet
network devices.
WAN: This WAN port is where you will connect the cable/DSL Modem, or Ethernet.
DC IN:
Plug the circle end of the power adapter firmly into the rear panel of the router, and put the
other end into an electric service outlet, then the system is ready.
WPS/Reset Button:
Click this button for once it means to start PBC configuration method, in which users can
easy setup WPS connection.
If you push the button for more than 5 seconds and then release it, the system will return to
factory default setting. In the meantime, system rewrites flash to default value and then
system reboot. Approximately 60 seconds later, the whole system parameters have returned
to factory default value. If the process has been interrupted by any reason(like power off), the
system will fail. Before perform the process, please ensure a safe operating environment!
Antenna (W142B/W142D only): The function of the antenna is to enhance the wireless
signal and expand the range of signal.
9
Page 10

Wireless 11n 1T1R Router
Warning: Incomplete factory setting recovery procedure will cause the Wireless Router
malfunction!If you are unfortunately in this situation, do not try to repair it by
yourself. Consult your local distributor for help!
10
Page 11

Wireless 11n 1T1R Router
Chapter 2 Installation and Basic Configuration
This chapter will guide you steps by steps to install and configure the Wireless Router. We
suggest you go over the whole chapter first and then do more advanced operation.
2.1 Operation Mode
In this device, there are three modes for your selection:
AP mode
Router mode
Client mode
Different mode functions different. You can glide the slide switch on the left side of the device to
the left hand side (AP mode), middle (Router mode) or right hand side (Client mode) to choose
the mode you want.
Before installation, please choose an operation mode first and then go on other configurations.
2.2 Connect This Router to Your Network
Steps to build up the network:
1. Connect the phone line from the wall socket to the line-in port on the ADSL modem, or the
coaxial cable to the line-in port on the cable modem.
2. A---Router Mode: Connect the ADSL or cable modem to the Ethernet WAN port on the
back of the Wireless Router by using the UTP cable.
B---AP Mode: Connect a router to one of the two ports on the back of this device by using
the UTP cable.
C---Client Mode: Skip step 1 and Go to steps 3 directly.
3. Plug-in the power adapter to the modem and turn on the power. Install the Ethernet card into
the computer by referring to the User Guide that came with the card.
4. Connect the computer to the Wireless Router by using standard twisted-pair Ethernet cable
from the computer’s Ethernet card to a 10/100Mbps Ethernet LAN port on the back of the
Wireless Router. (In AP/Client mode both the ports can be used as LAN ports)
5. Plug-in the power adapter to the router and the other side to the wall outlet.
11
Page 12
Wireless 11n 1T1R Router
2.3 Configure the IP Address of Your Computer
In order to communicate with this Wireless Router, you have to configure the IP address of your
computer to make it compatible with the device.
Note: The router supports DHCP server and it is enabled as default. Users who configure his IP
address as “Obtain an IP address automatically” may skip the following IP configuration
instruction.
1. The default network setting of the device:
IP address: 192.168.100.1
Subnet Mask: 255.255.255.0
DHCP Server: enable
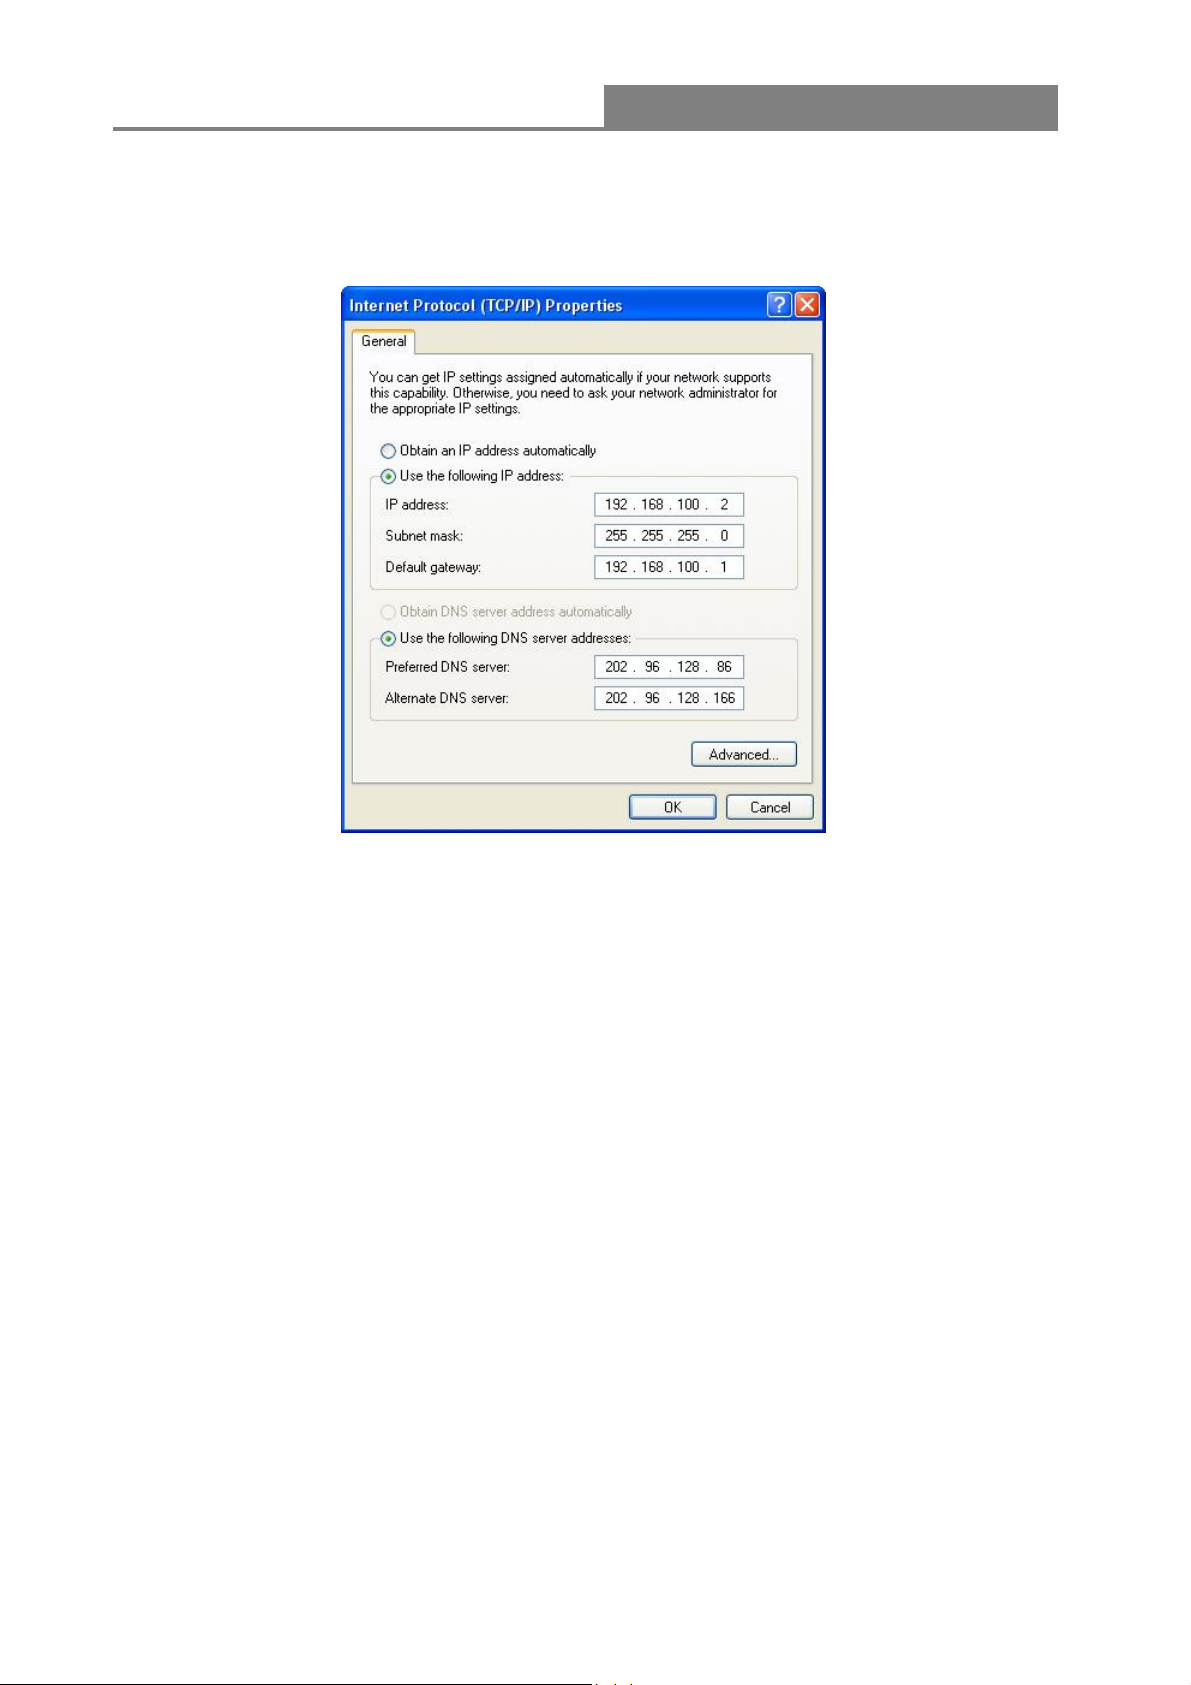
2. In the following TCP/IP configuration guide, the IP address “192.168.100.2” is assumed to be
your IP address if you want to specify IP addresses manually. Please DO NOT choose
“192.168.100.1” as the IP address, for the IP address “192.168.100.1“has been set as the
default IP for this device.
3. The following TCP/IP configuration guide uses windows XP as the presumed operation system.
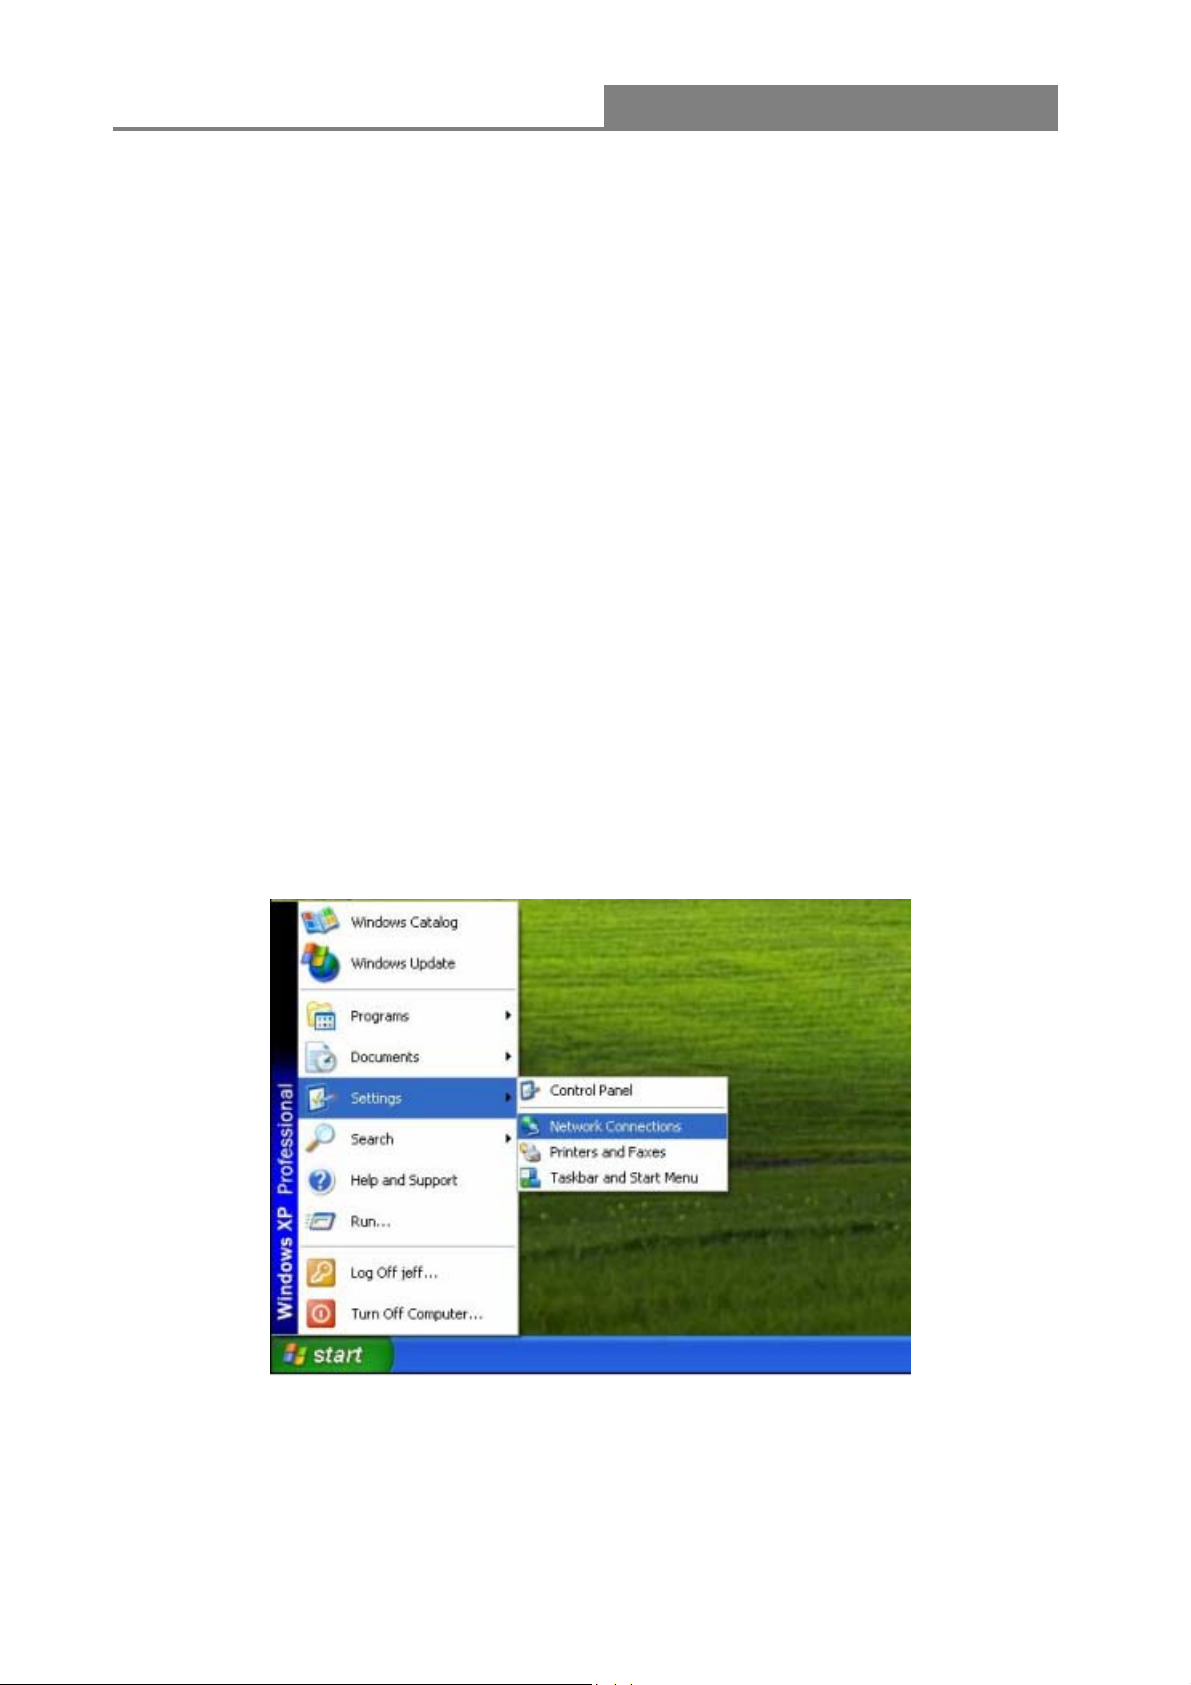
Procedures to configure IP addresses for your computer:
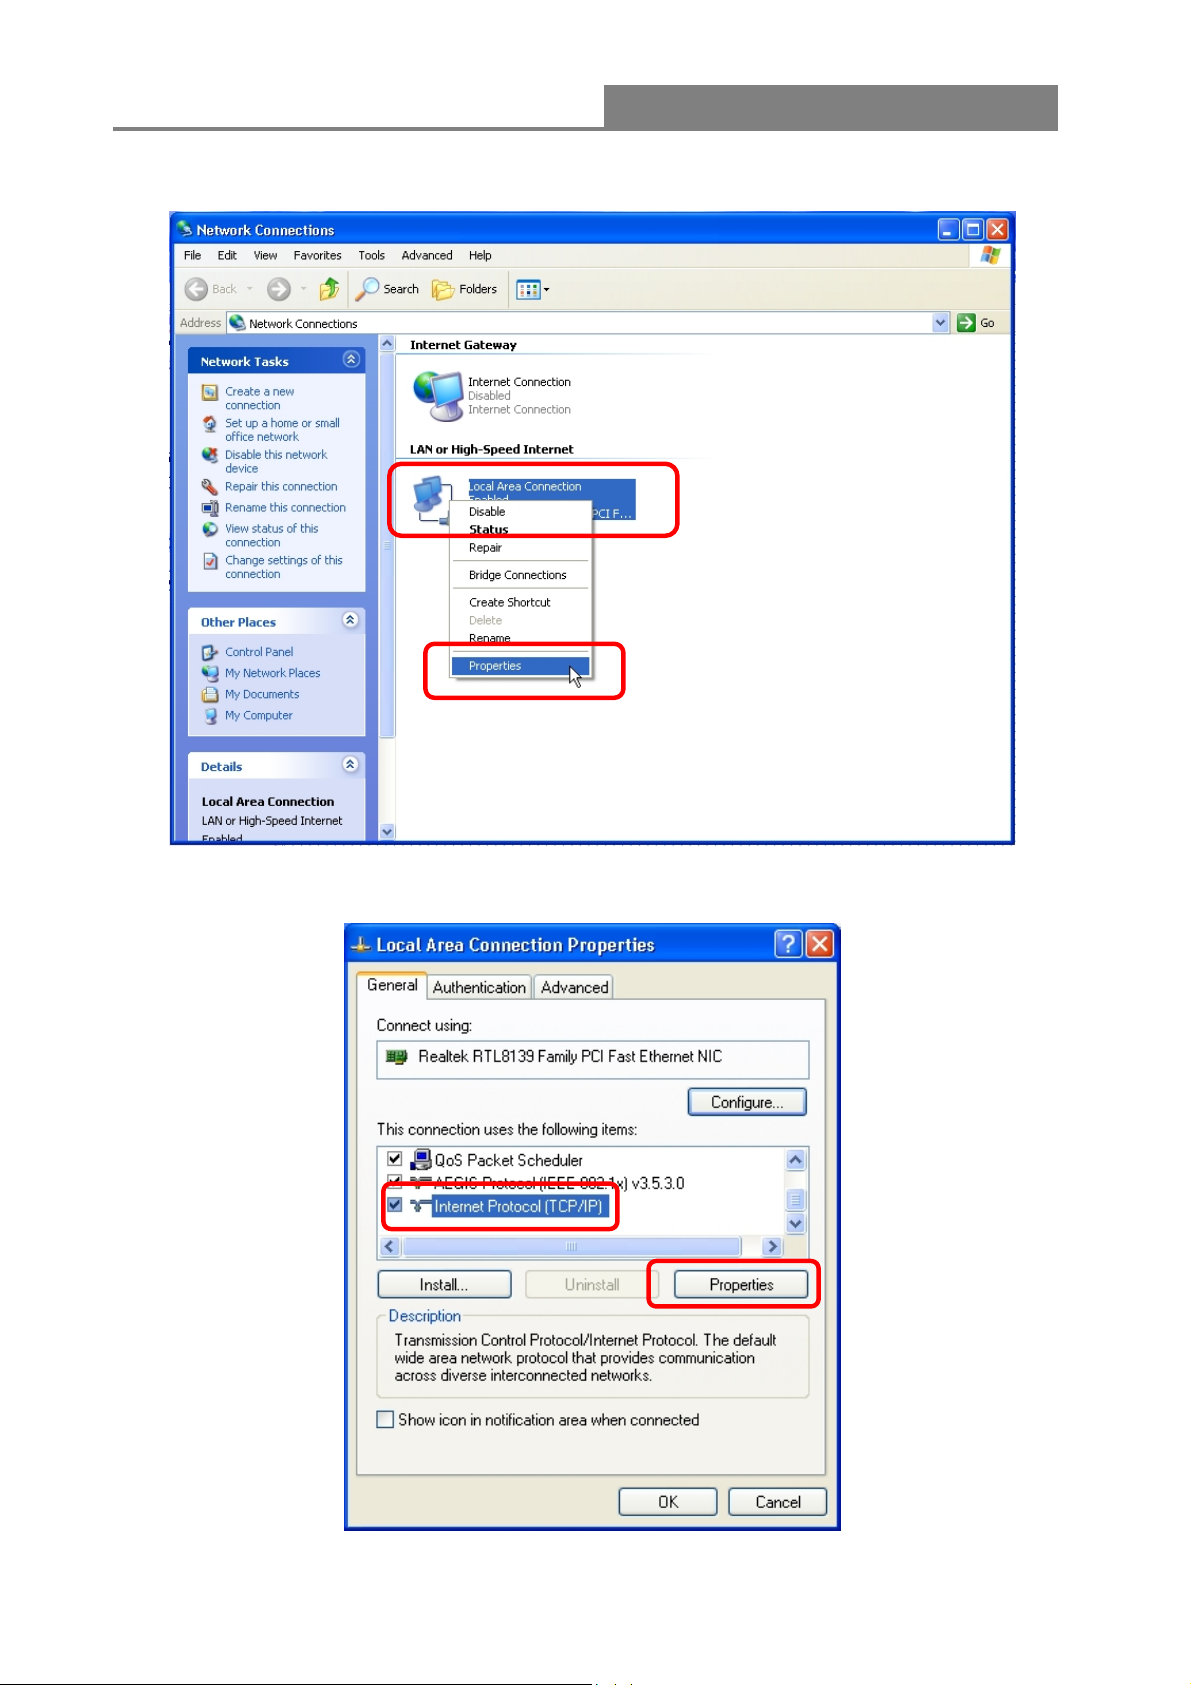
1. If you are in Classic Start menu view, click Start > Settings > Network Connections.
If you are in Start menu view, click Start > Control Panel > Network Connections.
12
Page 13
Wireless 11n 1T1R Router
2. Right-click Local Area Connection item and click Properties.
3. Choose Internet Protocol (TCP/IP) and click Properties.
13
Page 14
Wireless 11n 1T1R Router
4. You may choose Obtain an IP address automatically (recommend) to get an IP address
automatically. Or you can choose Use the following IP address to specify an IP address
manually. Please click the OK button after your configuration.
14
Page 15
Wireless 11n 1T1R Router
Chapter 3 Web-Based Management
3.1 Start the Web-Based Management Interface
The device uses Web as the management interface. You can use a browser to access the
management interface easily. Please follow the steps listed below.
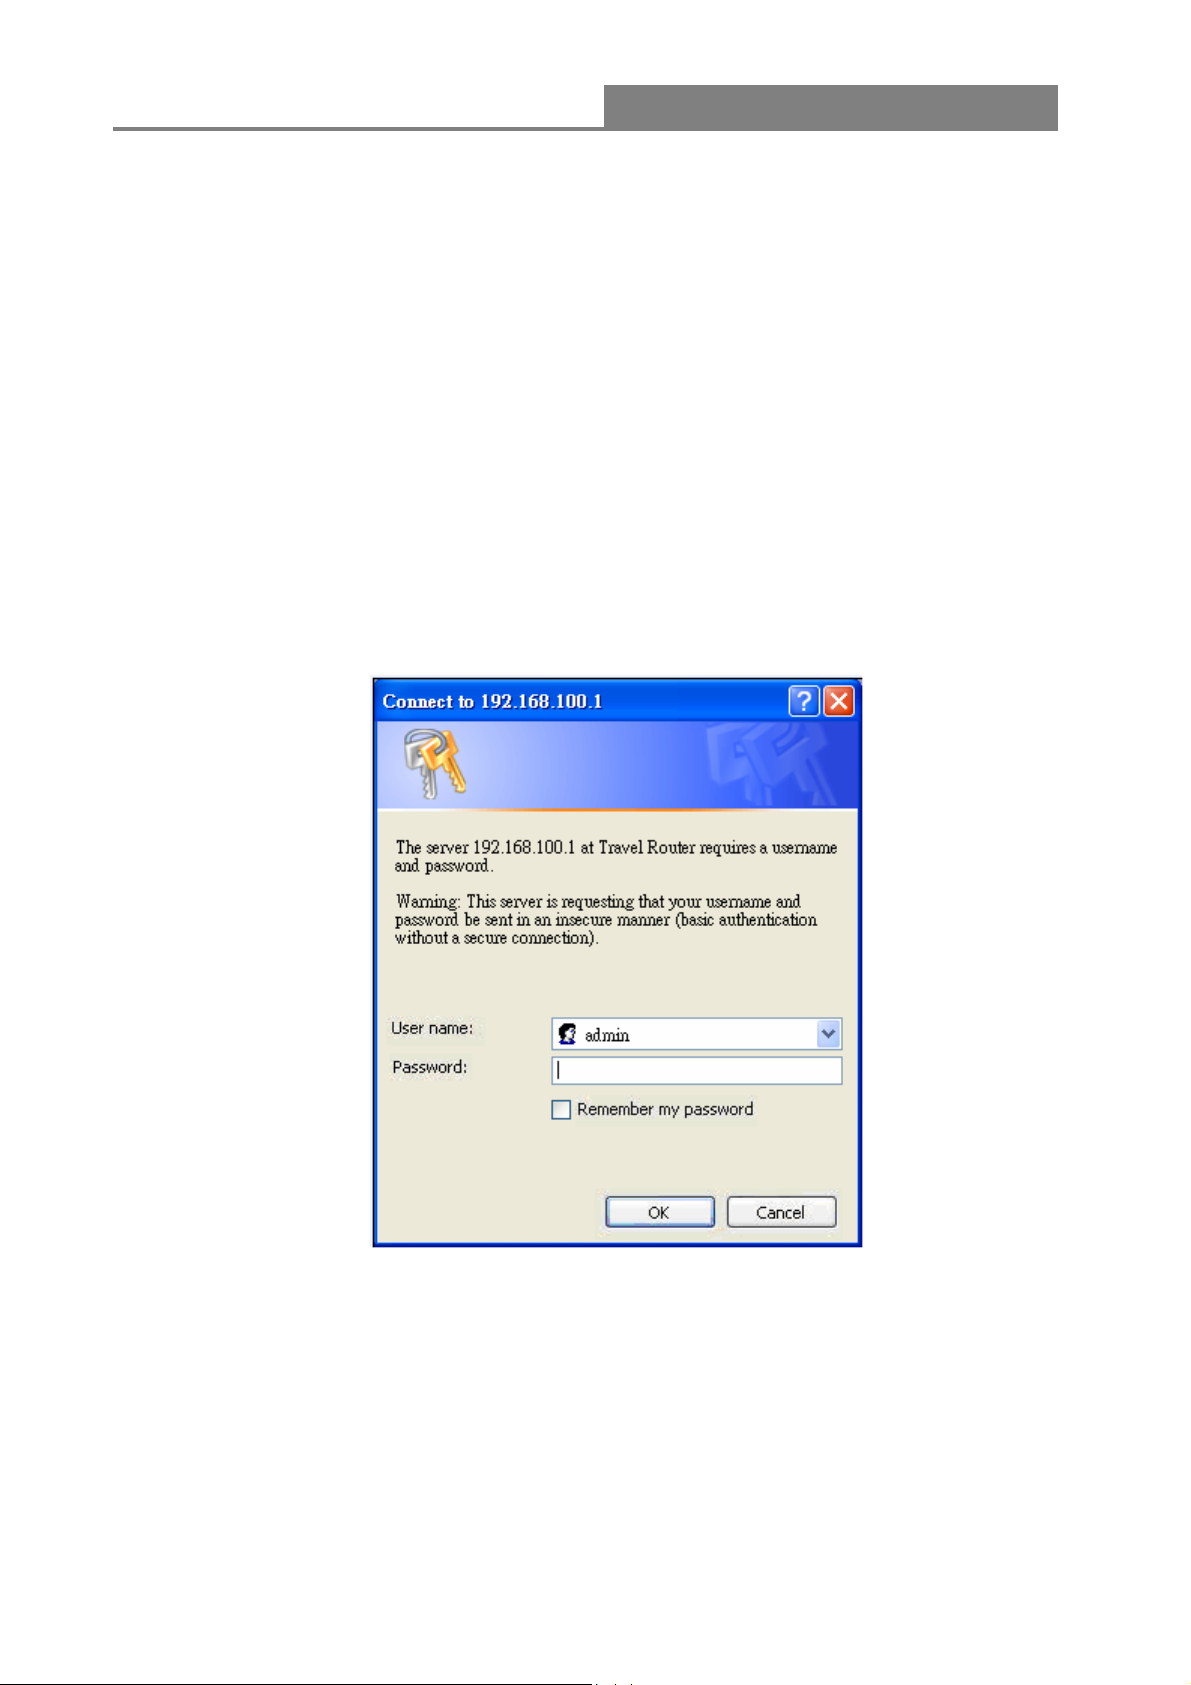
1. Open the Internet Web browser.
2. Type 192.168.100.1 into the URL Web address location and press Enter.
3. The Login window appears.
- Enter admin in the User Name location (default value).
- Enter admin in the Password location (default value).
- Click OK button.
15
Page 16
Wireless 11n 1T1R Router
3.2 The Graphic User Interface
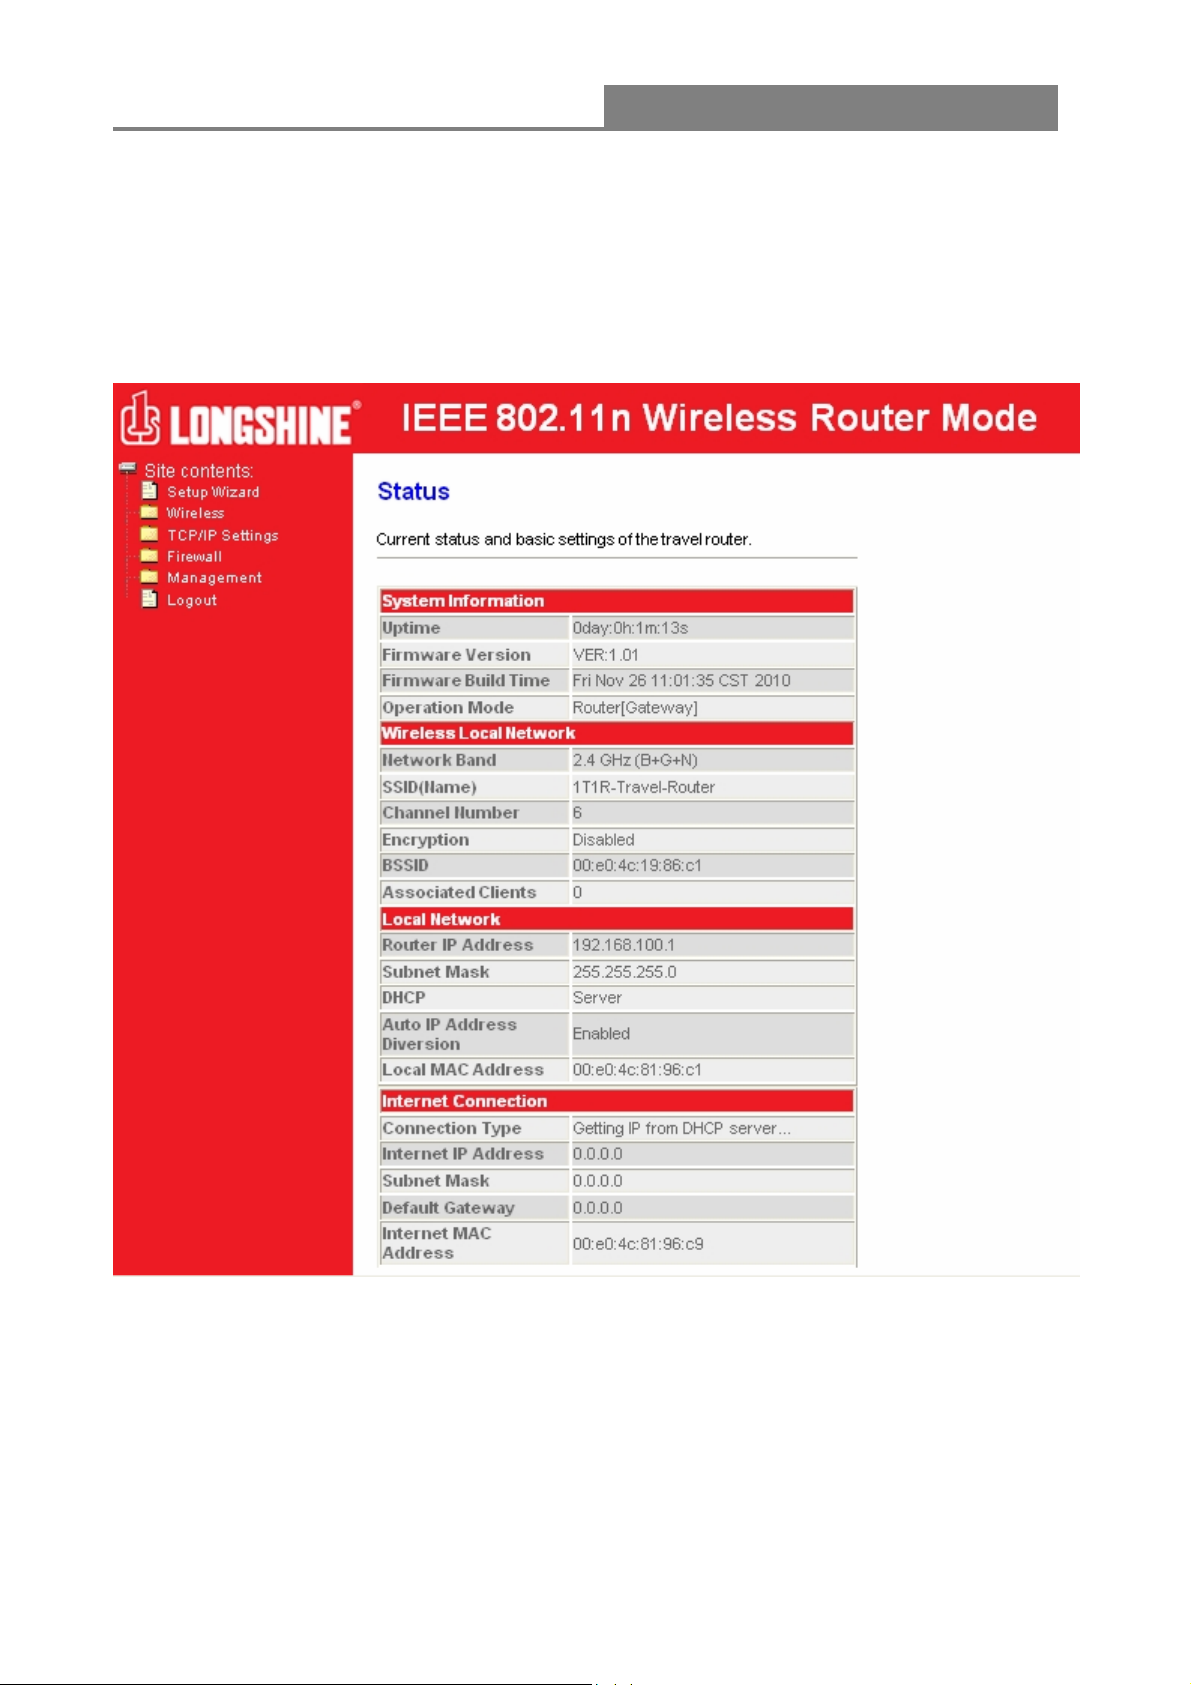
After the password authorization, the information page shows up as the home page of the graphic
user interface. You may click the menu link on left column of the window to get access to each
configuration page.
Router Mode:
16
Page 17
Wireless 11n 1T1R Router
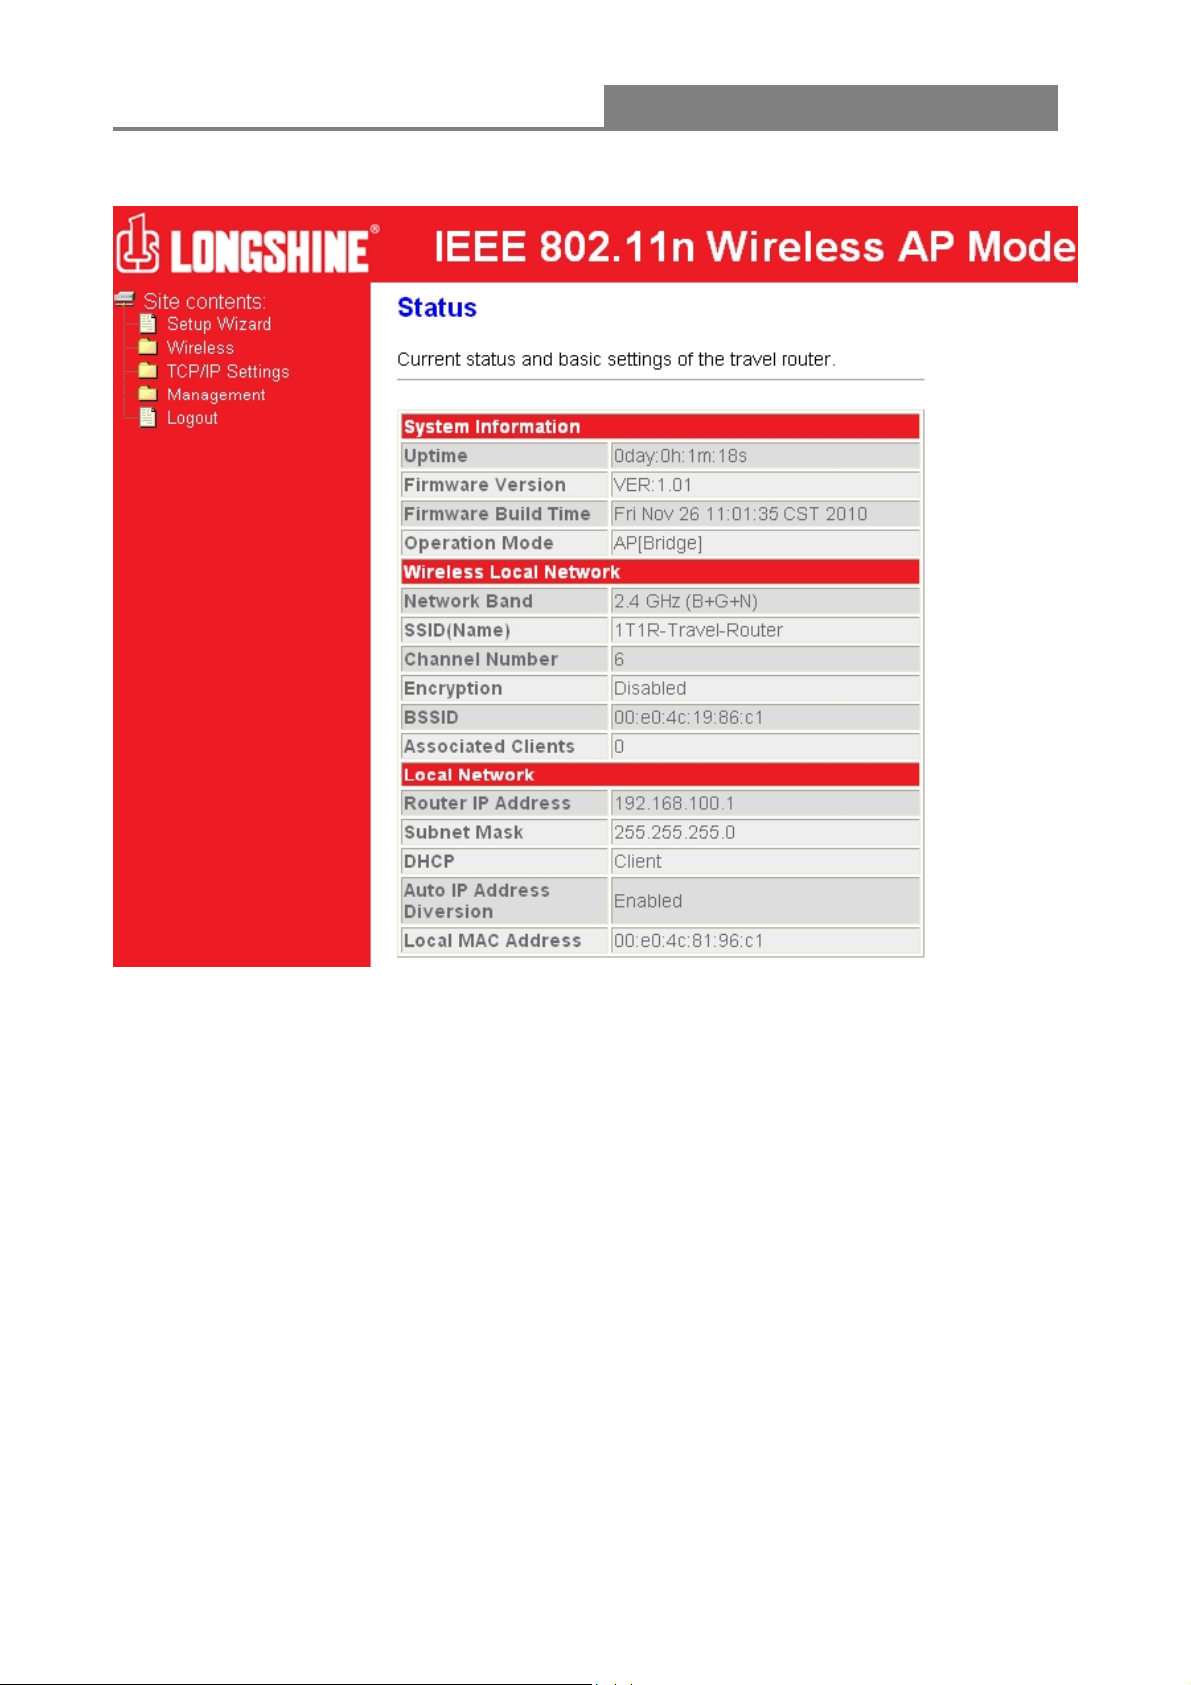
AP Mode:
17
Page 18
Wireless 11n 1T1R Router
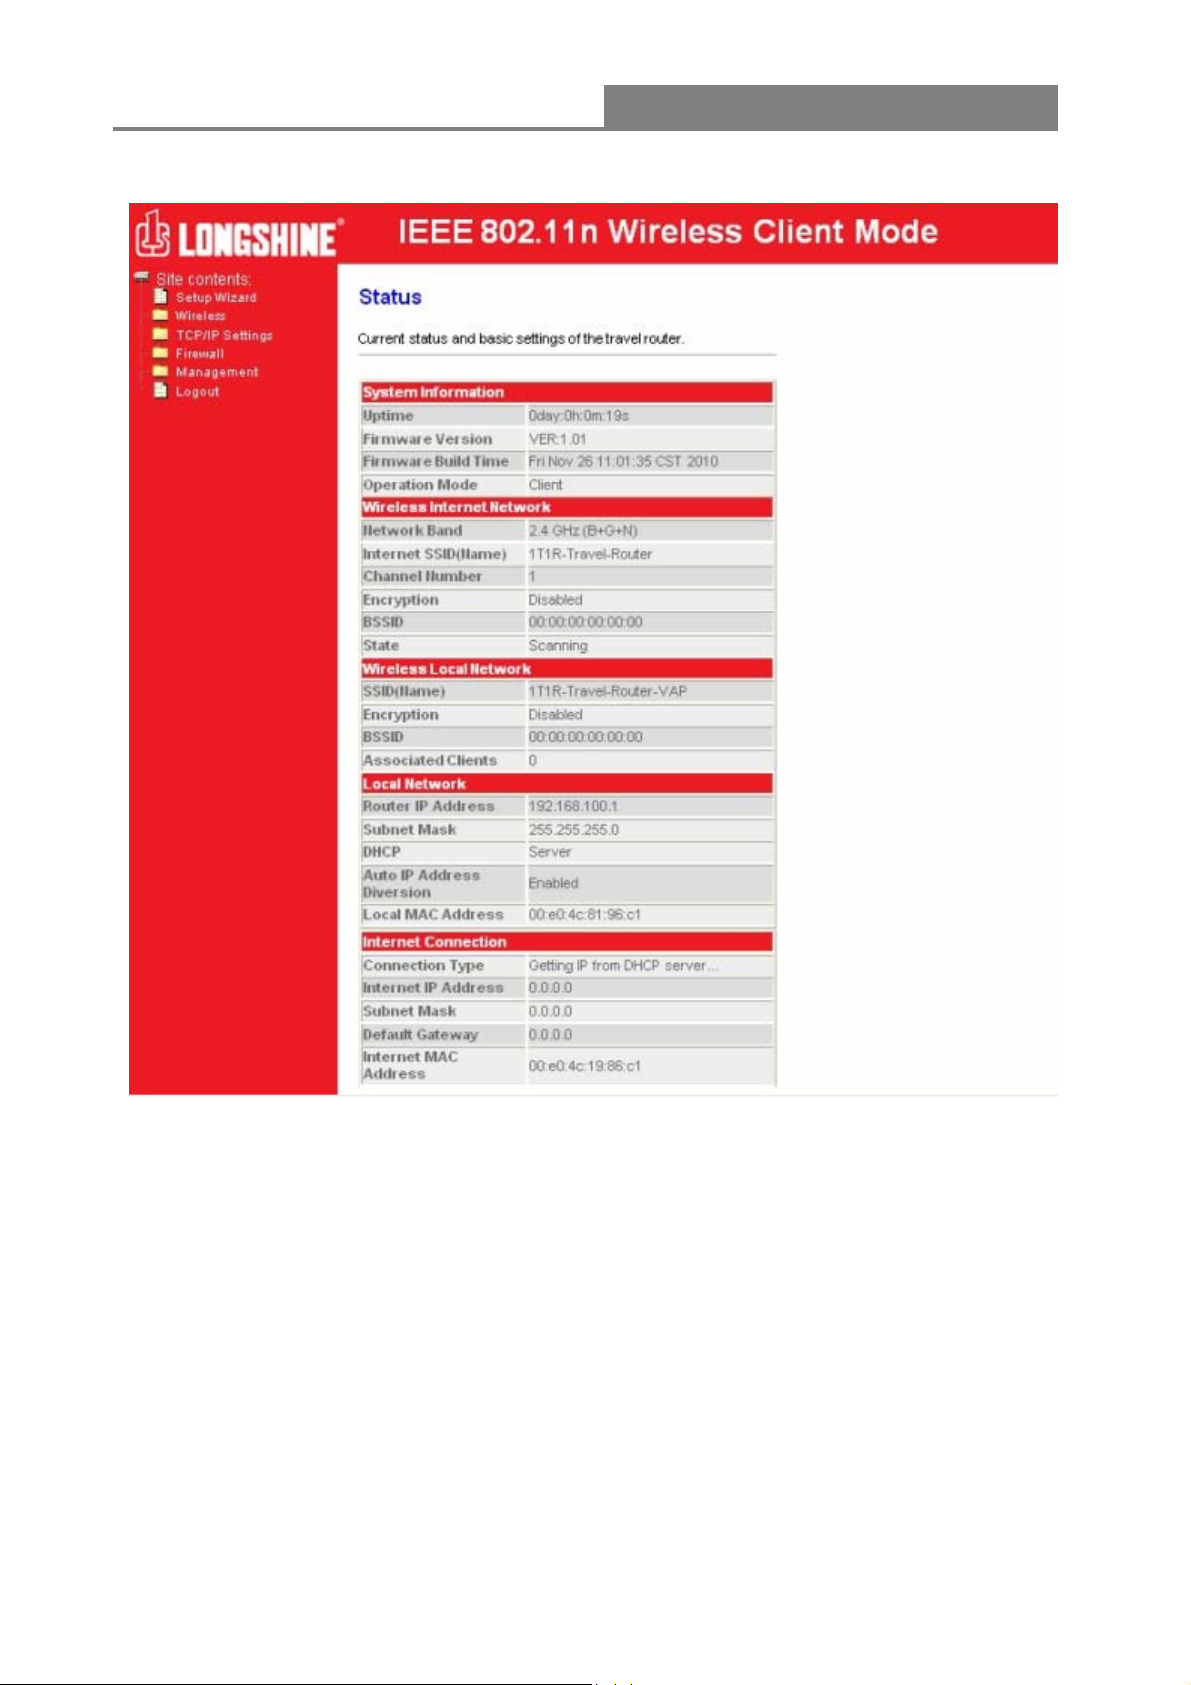
Client Mode:
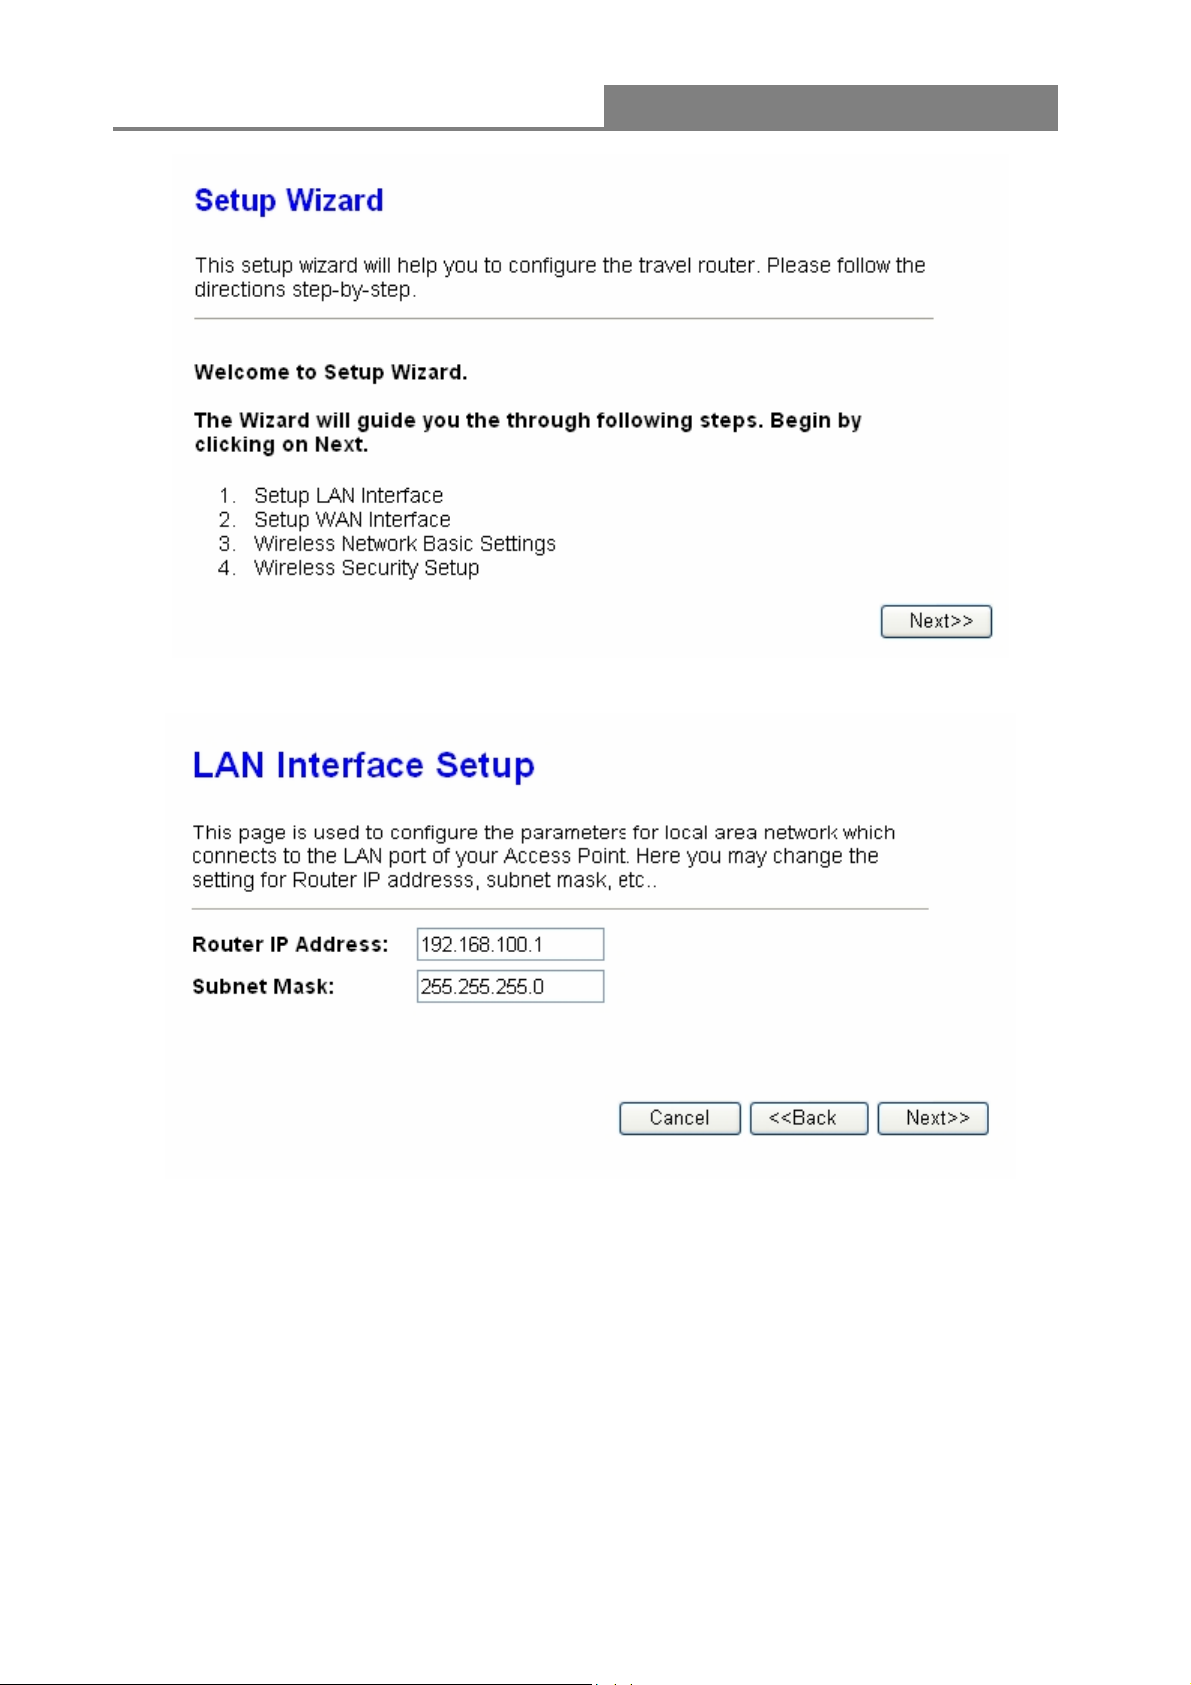
3.3 Setup Wizard (Router mode and Client mode)
If you are using the router for the first time, please follow the procedures of the setup wizard to do
a step-by-step configuration.
Note: The configurations in AP, Router and Client modes are almost the same. The following
guide mainly introduces this device under the Router mode environment. Users want to do
management in AP/Client mode please refer to the Router mode. The following instruction makes
an overall introduction to the Setup Wizard
1. Click “Setup Wizard” on the left menu link, and then click the “Next” button to proceed.
18
Page 19
Wireless 11n 1T1R Router
2. Click “Next” button, the “LAN Interface Setup” pops out.
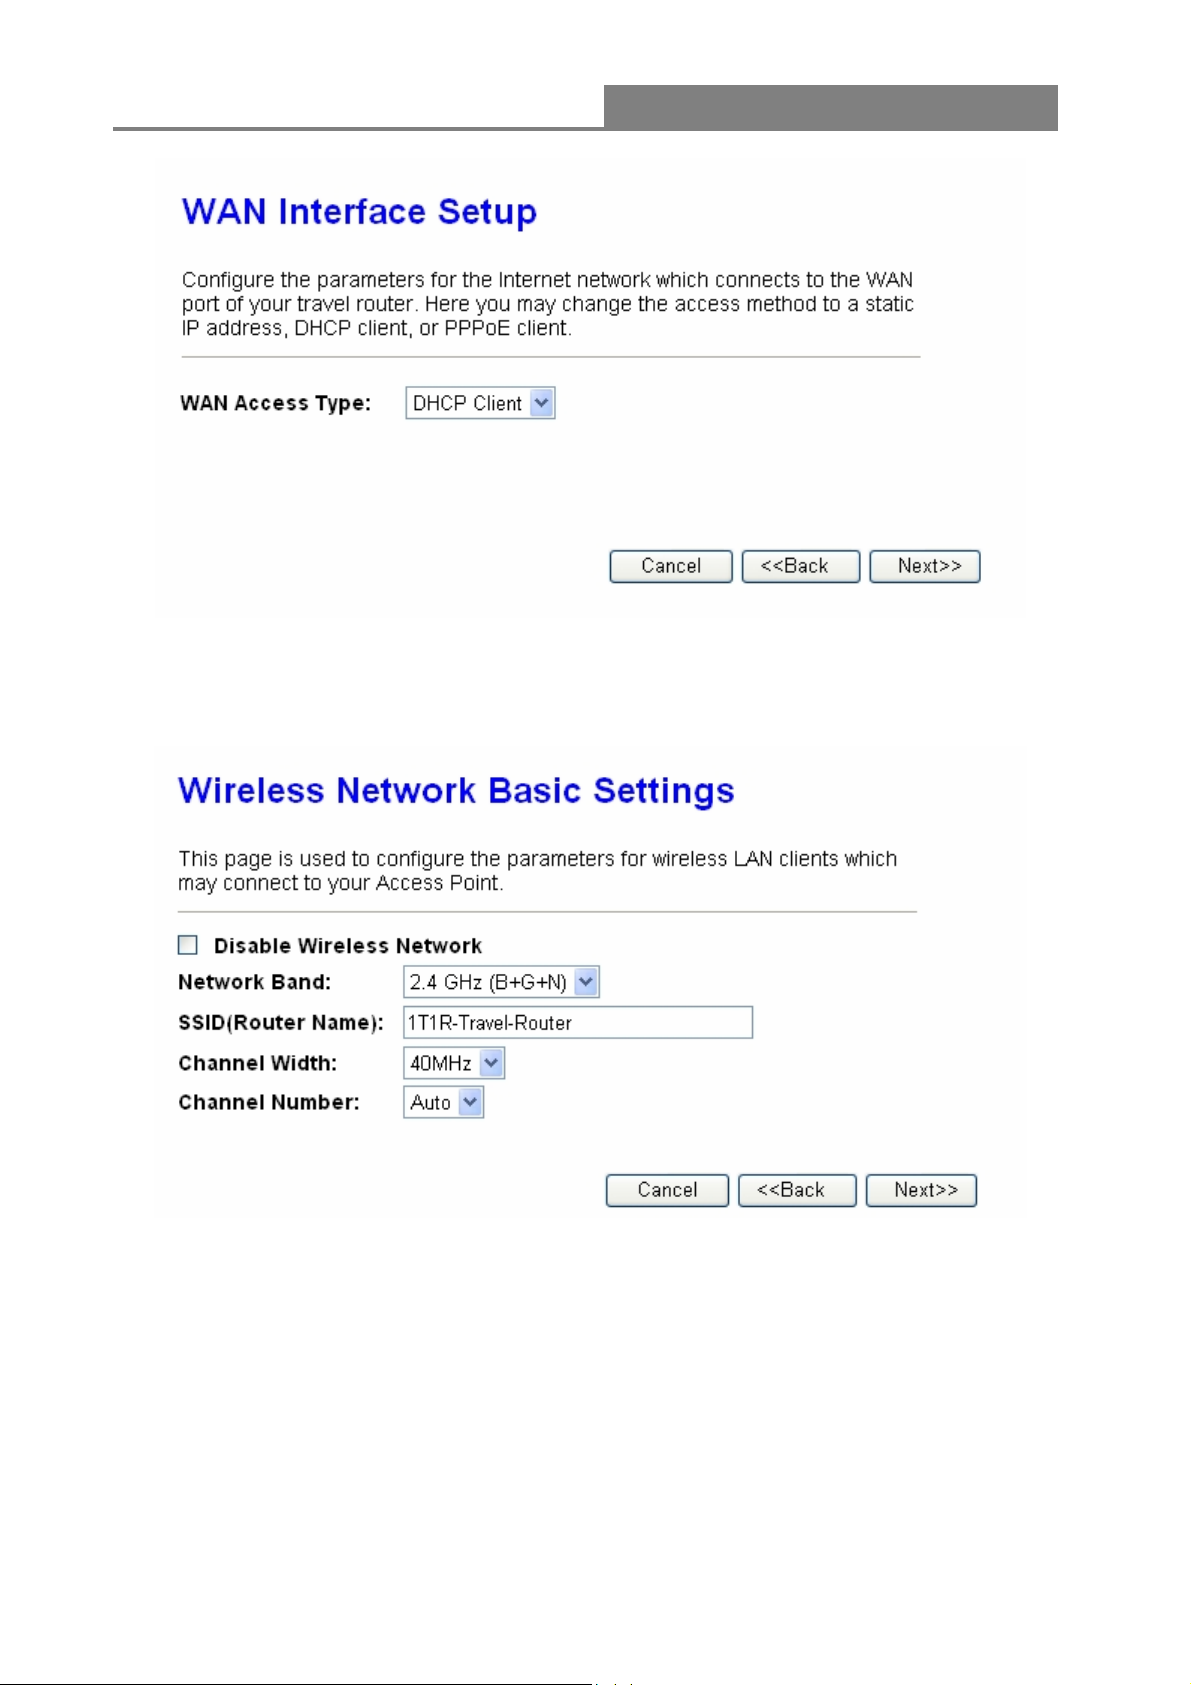
3. Click “Next” button, the “WAN Interface Setup” pops out. Or you can click “Back/Cancel” for any
changing. You may get those parameters from your ISP. WAN Access Type: Static IP, DHCP
Client and PPPoE.
19
Page 20
Wireless 11n 1T1R Router
4. Click “Next” button, the “Wireless Network Basic Settings” pops out.
5. Click “Next” button, the “Wireless Security Setup” pops out.
20
Page 21
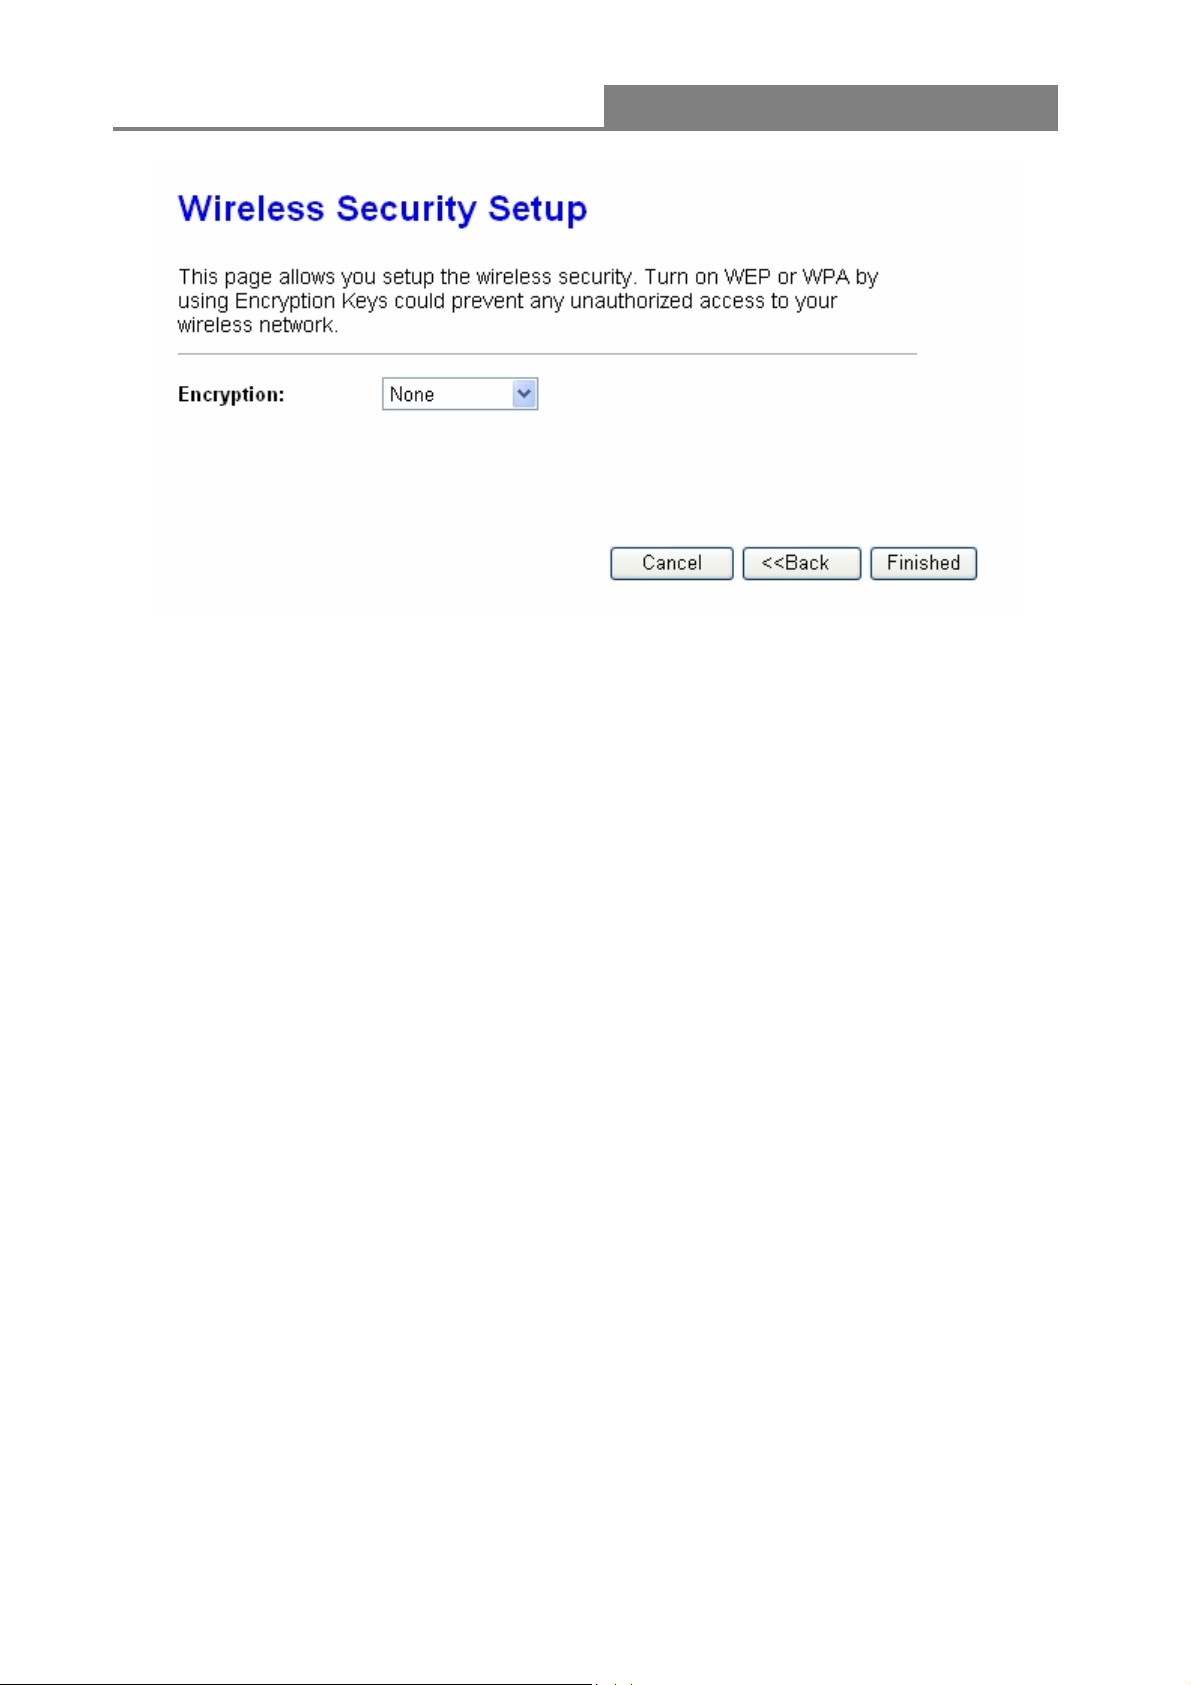
Wireless 11n 1T1R Router
Having finished these steps, you can use the router to surf the Internet. If you need more detailed
information, please refer to the following instruction.
21
Page 22
Wireless 11n 1T1R Router
3.4 Wireless
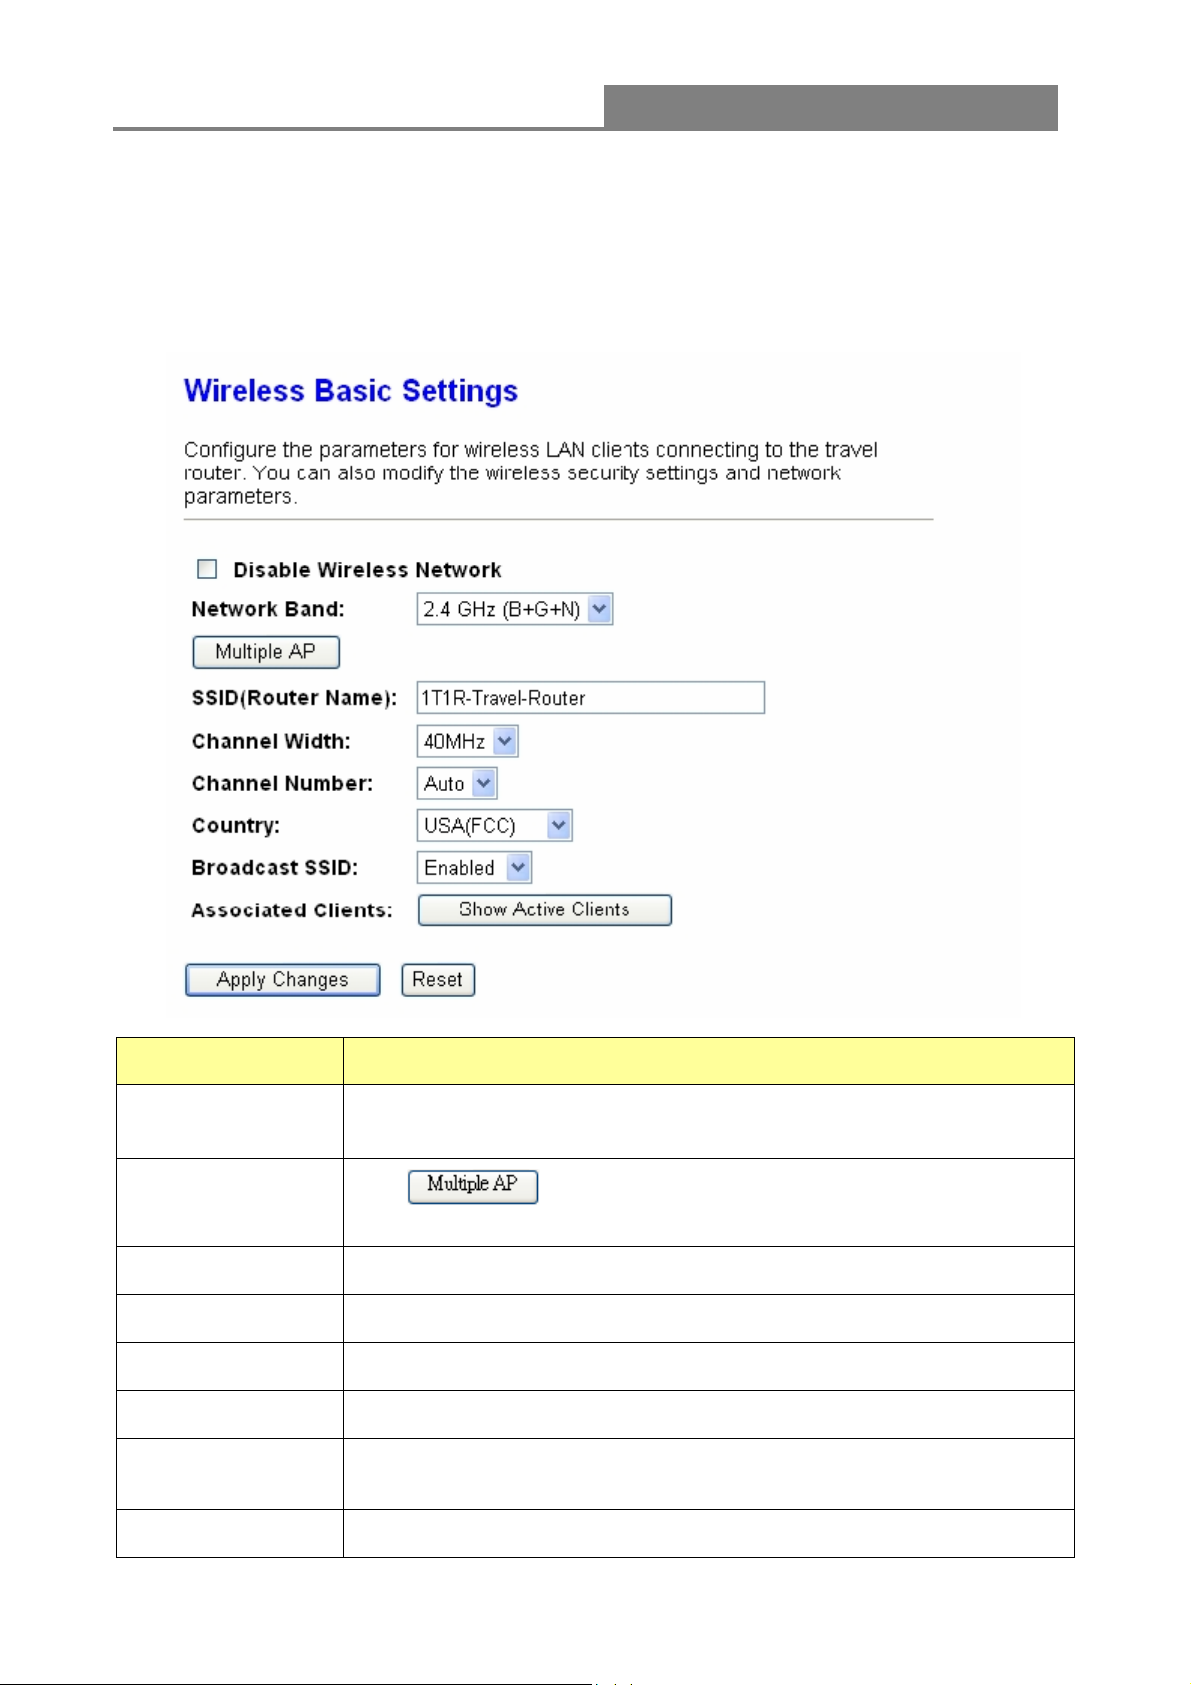
3.4.1 Basic Settings
You can set up the configuration of your Wireless basic settings and monitor the Wireless Clients
associate with your router.
Items Information
Disable Wireless
LAN Interface
Multiple AP
SSID
Channel Width
Control Sideband
Channel Number
Country
Broadcast SSID
Mark the checkbox to disable interface of Wireless LAN.
The
for Multiple APs. Click this button to do more configurations.
Service set identifier (SSID) for the name of the wireless network.
Select 20MHz or 40MHz as the wireless channel frequency.
Upper, Lower
Select a channel (Auto, 1~11) for the wireless network of this device.
It contains USA(FCC), Canada(IC), Europe(ETSI), Spain, France,
Japan(MKK) for your selection.
If you enable "Broadcast SSID", every wireless station located within
button is to show and update the wireless settings
22
Page 23
Wireless 11n 1T1R Router
the coverage of this wireless router can discover this wireless router
easily. If you are building a public wireless network, enabling this feature
is recommended. Disabling "Broadcast SSID" can be more safe.
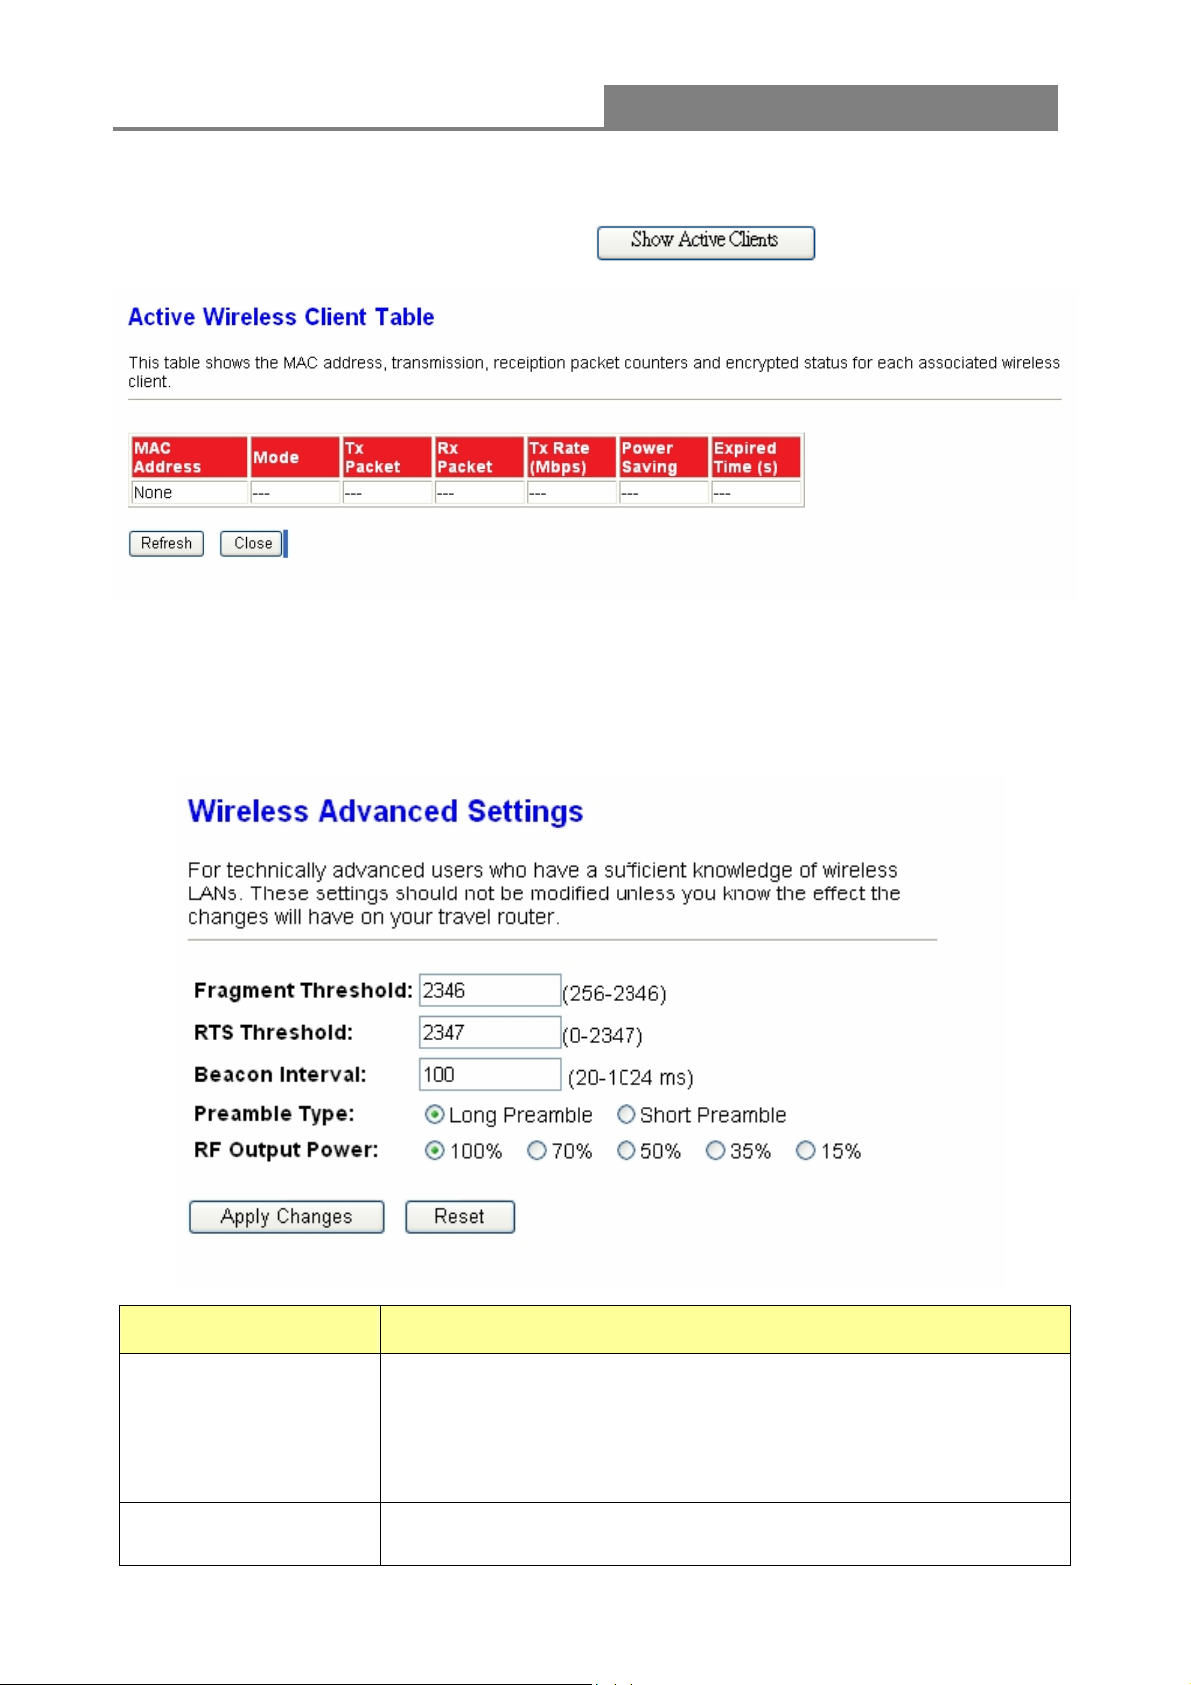
Click "Show Active Clients" button, then an "Active Wireless Client
Associated Client
* Please click on the Apply Changes button or the Reset button at the bottom to save/reset the configurations.
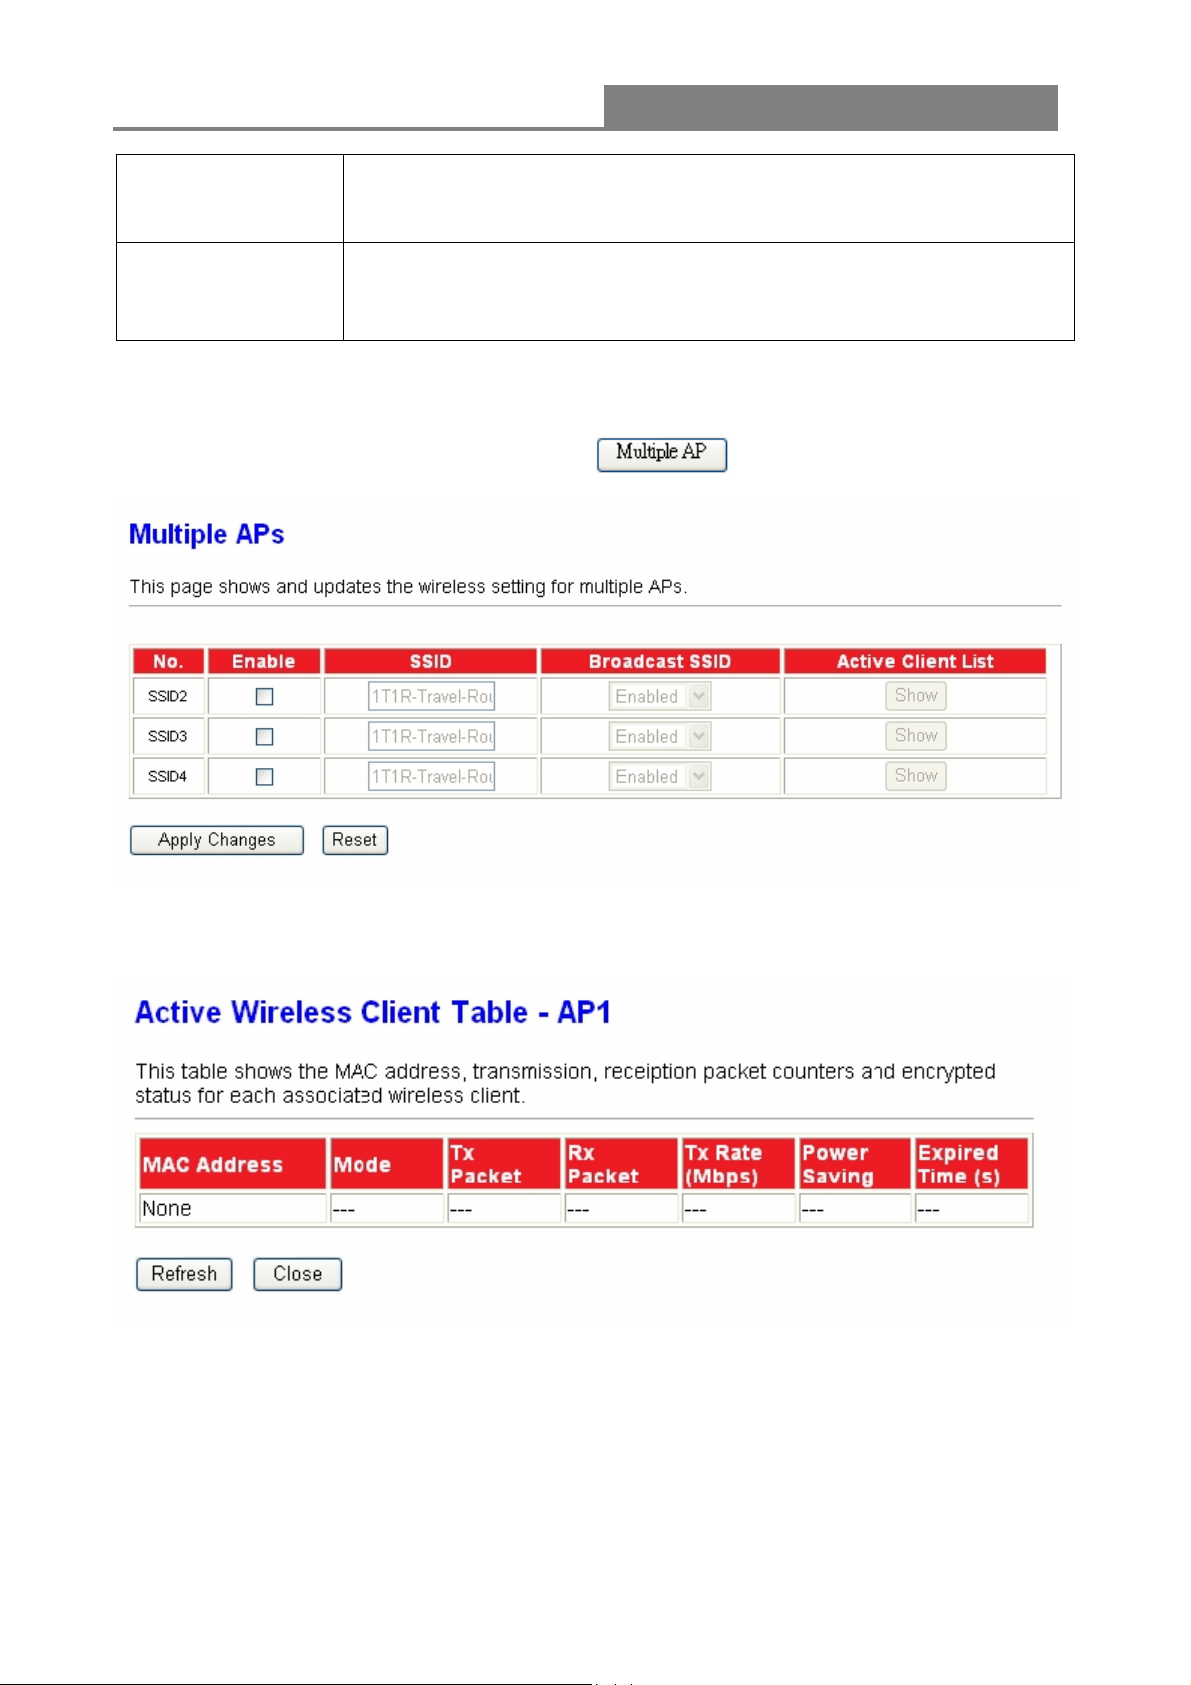
1. Multiple APs
Table" will pop up. You can see the status of all active wireless stations
that are connecting to the access point.
This is the window that pops up after clicking the
Click “Enable” to activate this AP, and then click the button “Show”, “Active Wireless Client Table –
AP1” window pops up as the following:
button.
23
Page 24
Wireless 11n 1T1R Router
2. Active Wireless Client Table
This is the window that pops up after clicking the
button.
3.4.2 Advanced Settings
You can set advanced wireless LAN parameters for this router. We recommend not changing
these parameters unless you know what changes will be on this router.
Items Information
This value should remain at its default setting of 2346. If you
experience a high packet error rate, you may slightly increase your
Fragment Threshold
RTS Threshold
fragmentation threshold within the value range of 256 to 2346.
Setting the fragmentation threshold too low may result in poor
performance.
Request To Send threshold. This value should remain at its default
setting of 2347. If you encounter inconsistent data flow, only minor
24
Page 25
Wireless 11n 1T1R Router
modifications to the value range between 0 and 2347 are
recommended.
Beacons are packets sent by an access point to synchronize a
Beacon Interval
wireless network. Specify a beacon interval value. Default (100ms)
is recommended.
Preamble Type
RF Output Power
* Please click on the Apply Changes button or the Reset button at the bottom to save/reset the configurations.
The length of CRC blocks in the frames during the wireless
communication.
Select the signal strength for the wireless network.
3.4.3 Security
The Security function protects your wireless network from invasion. We provide WEP and WPA
encryption to secure your wireless network. Please select “Disable ”, “WEP”, “WPA”, “WPA2”,
or “WPA2-Mixed” in the drop list. If you select “Disable”, any data will be transmitted without
encryption and any station can access the router.
Items Information
Please choose a SSID you have set for this router in the Wireless >
Select SSID
Encryption
Show Password
Basic Settings from the drop-down list. The SSID will be shown on
the wireless network for recognizing.
There are 5 modes for you to select: Disable, WEP, WPA, WPA2,
and WPA2-Mixed. Please refer to the following description.
Select to show the password or not.
25
Page 26
Wireless 11n 1T1R Router
* Please click on the Apply Changes button or the Reset button to save/reset the configurations.
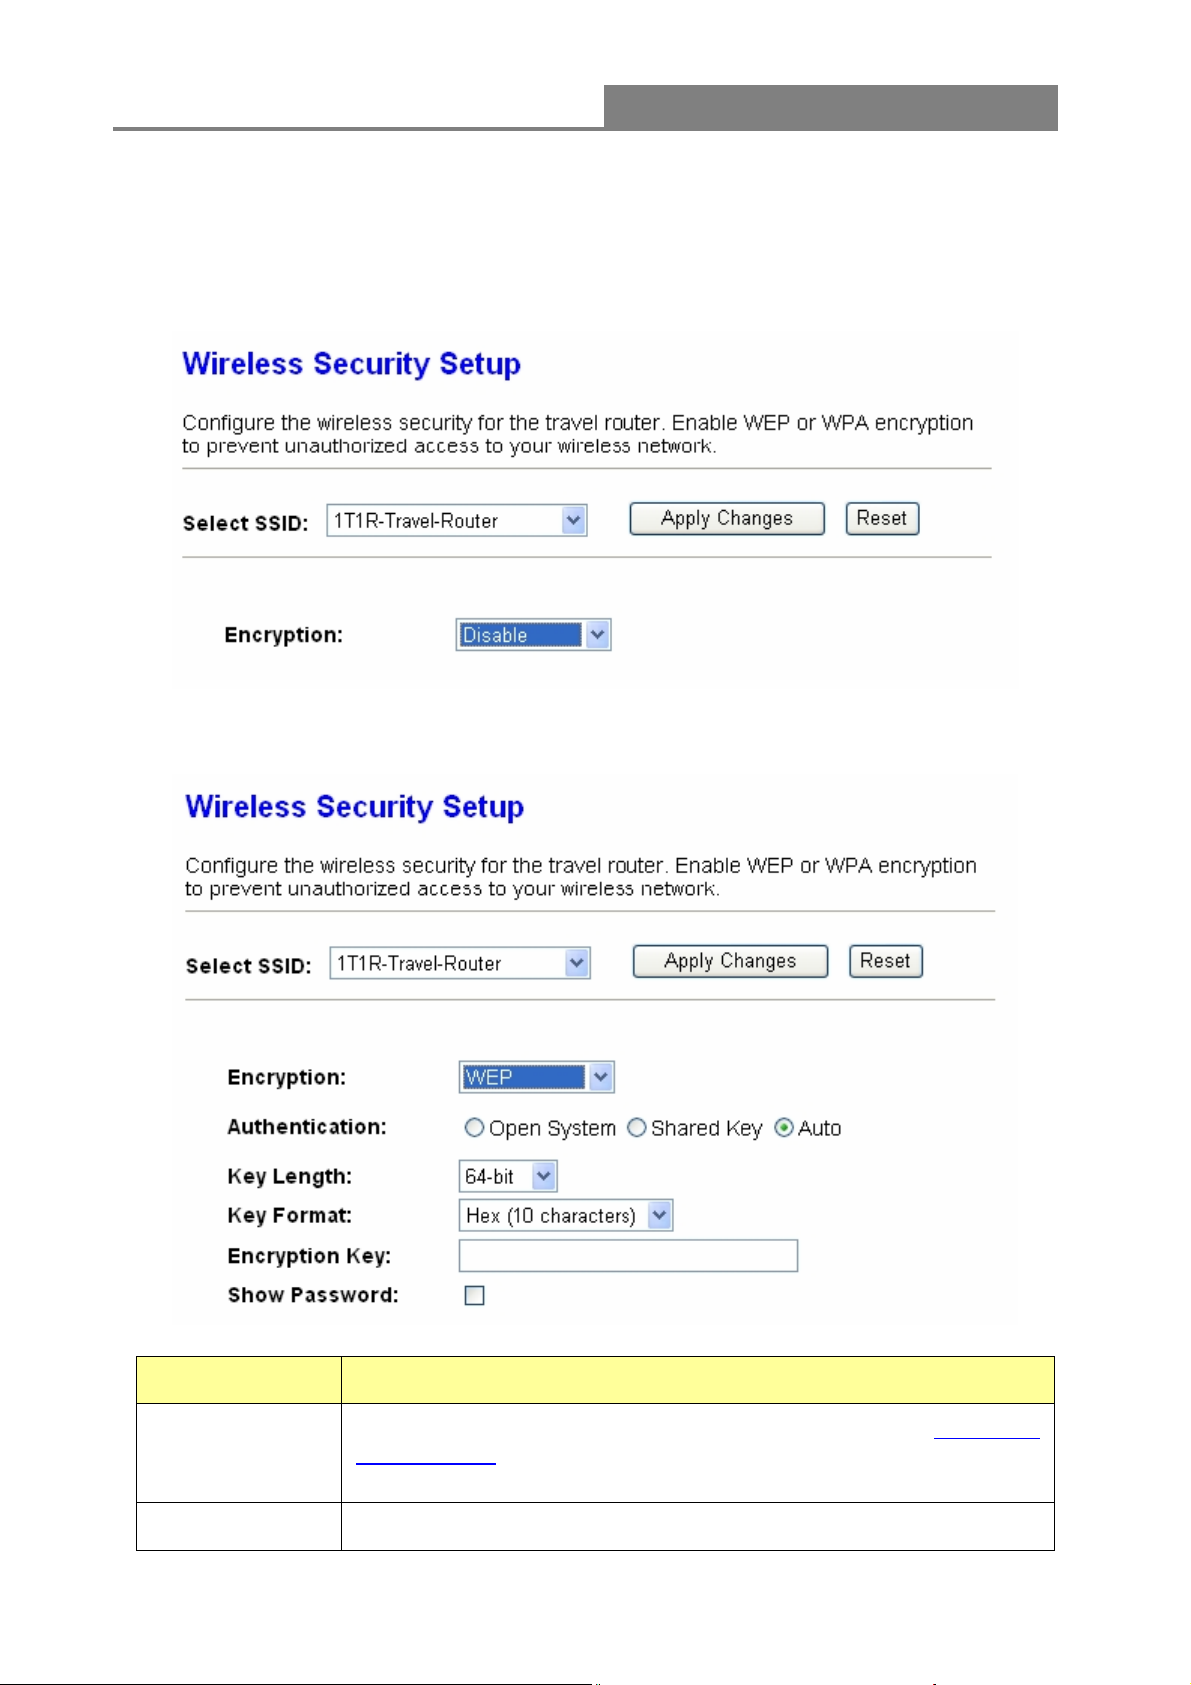
1. Security Mode – Disable
Select “Disable” means to access your wireless network without any encryption.
2. Security Mode -- WEP
Items Information
Please choose a SSID you have set for this router in the Wireless >
Select SSID
Encryption
Basic Settings from the drop-down list. The SSID will be shown on the
wireless network for recognizing.
Select a security encryption mode for this router.
26
Page 27
Wireless 11n 1T1R Router
Authentication
There provide three options for selecting: Open System, Shared Key,
Auto.
Key Length
Key Format
Encryption Key
Show Password
* Please click on the Apply Changes button or the Reset button to save/reset the configurations.
Select “64-bit” or “128-bit” as the key encryption length.
Select “ASCII
Enter the key according to the key format you select.
Select to show the password or not.
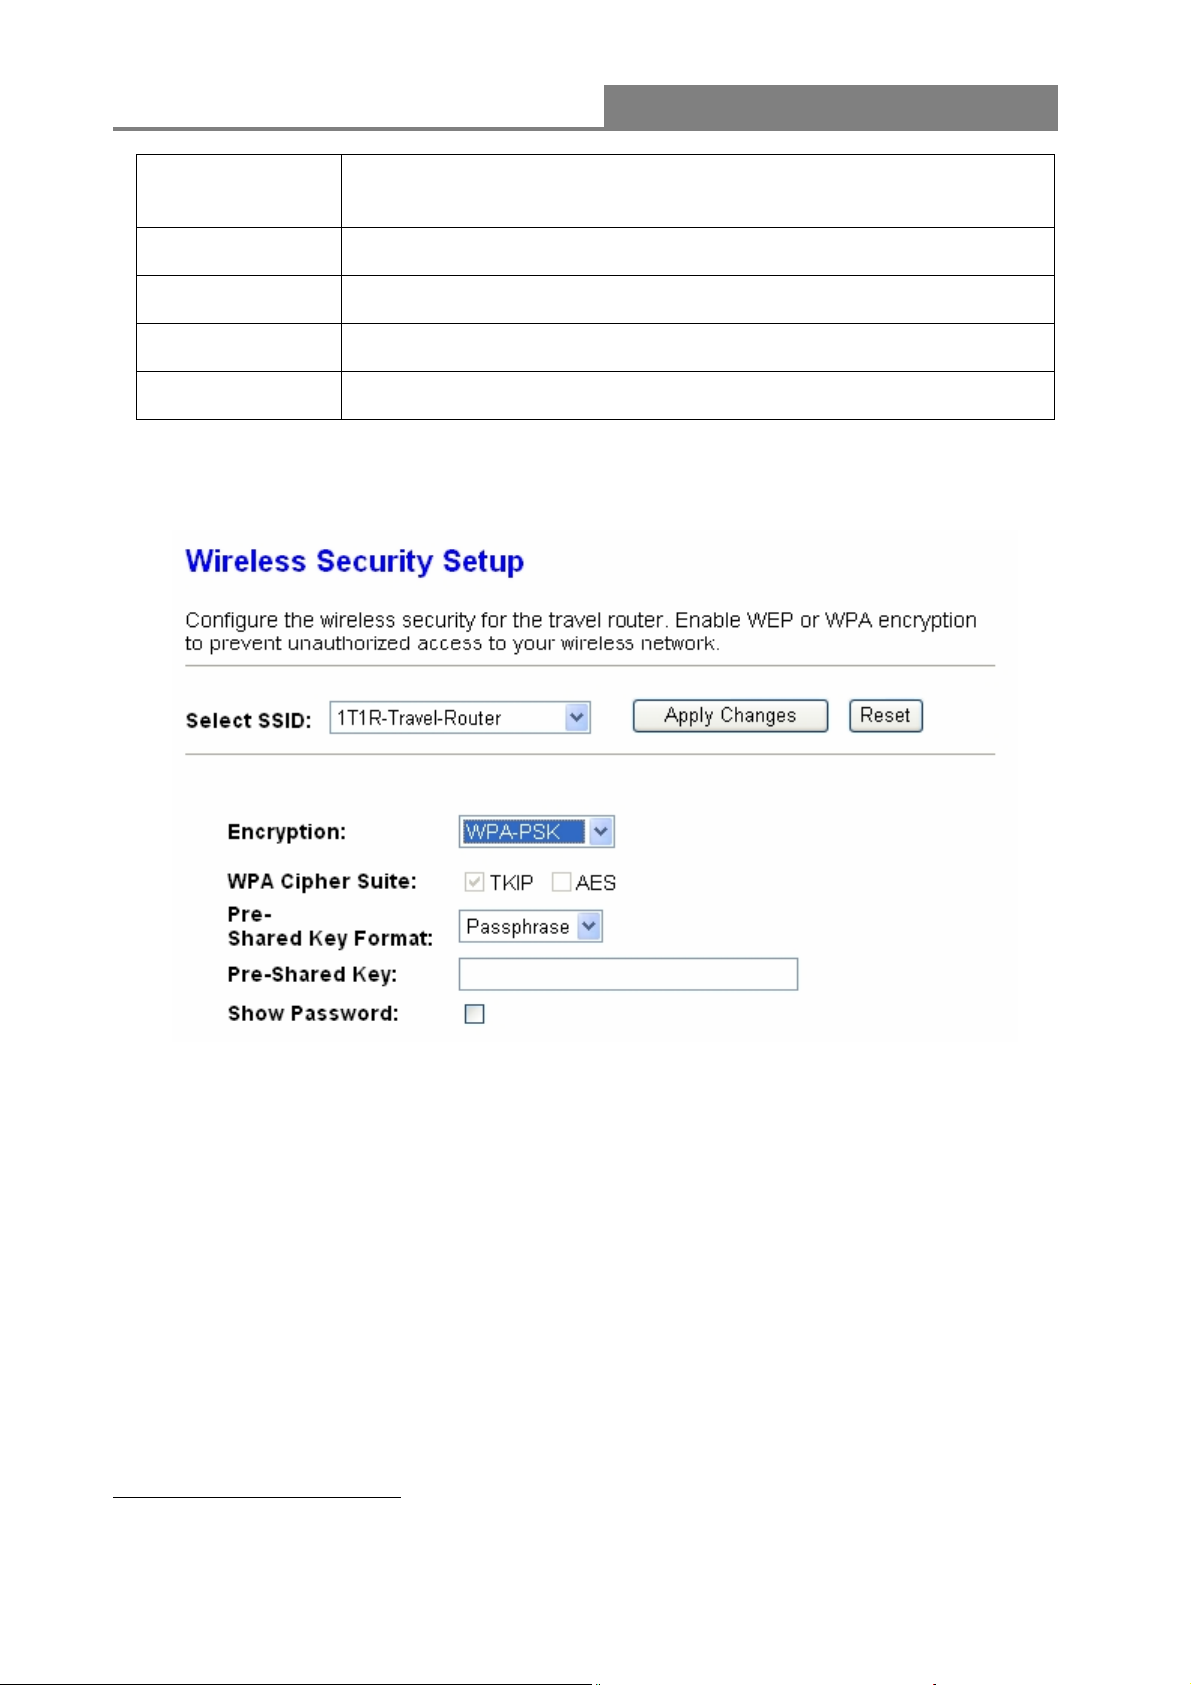
3. Security Mode – WPA / WPA 2
1
” or “Hex2” to setup the key value.
1
ASCII (American Standard Code for Information Interchange) is a code for representing English letters as numbers
from 0-127.
2
Hexadecimal digits consist of the numbers 0-9 and the letters A-F.
27
Page 28
Wireless 11n 1T1R Router
Items Information
Please choose a SSID you have set for this router by clicking
Select SSID
“Wireless > Basic Settings” from the drop-down list. The SSID will be
shown on the wireless network for your recognition.
Encryption
WPA/WPA2 Cipher
Suite
Pre-Shared Key
Select a security encryption mode for this router.
WPA Cipher Suite: the default setting is TKIP.
WPA2 Cipher Suite: the defaulting setting is AES
To decide the format, select “Passphrase” or “Hex” in the drop list.
Format
Enter the “Pre-shared Key” according to the pre-shared key format
Pre-Shared Key
you select. This is the shared secret between AP and STA. This field
must be filled with character longer than 8 and less than 64 lengths.
Show Password
Please click on the Apply Changes button or the Reset button to save/reset the configurations.
Select to show the password or not.
28
Page 29
Wireless 11n 1T1R Router
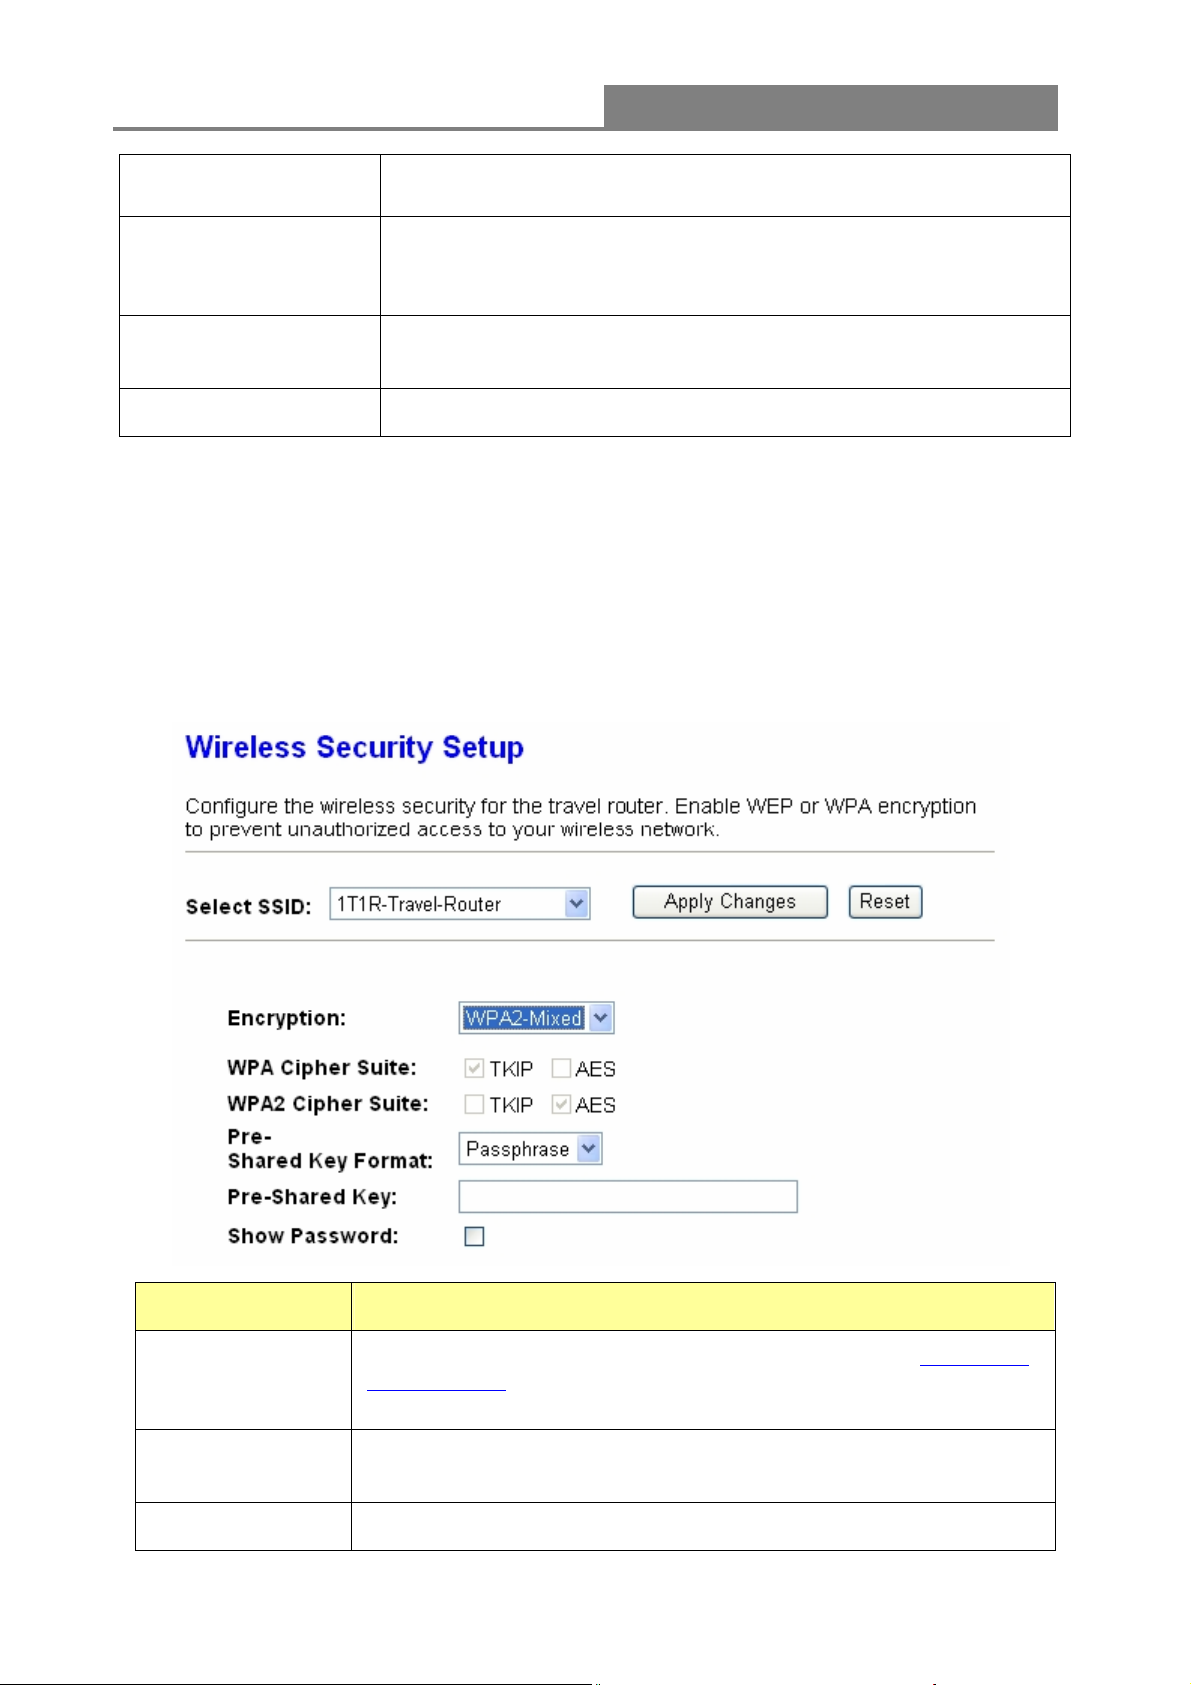
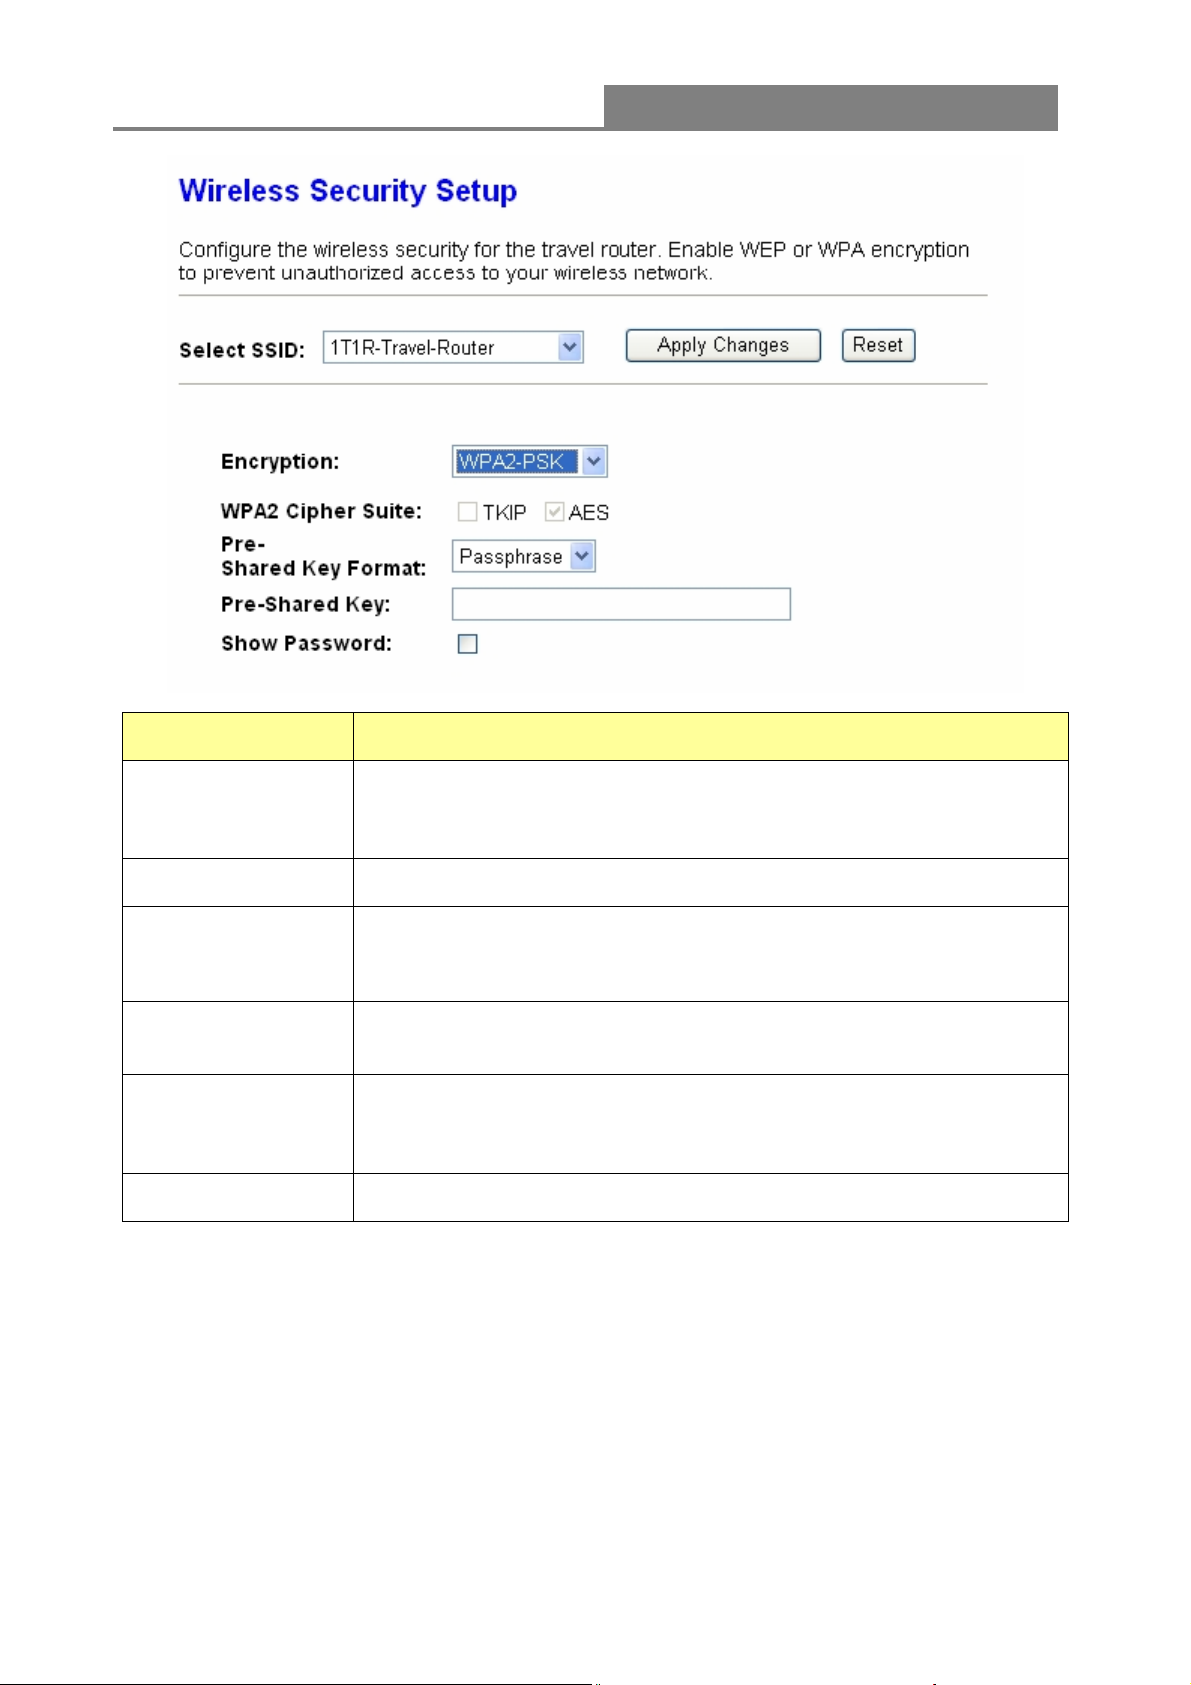
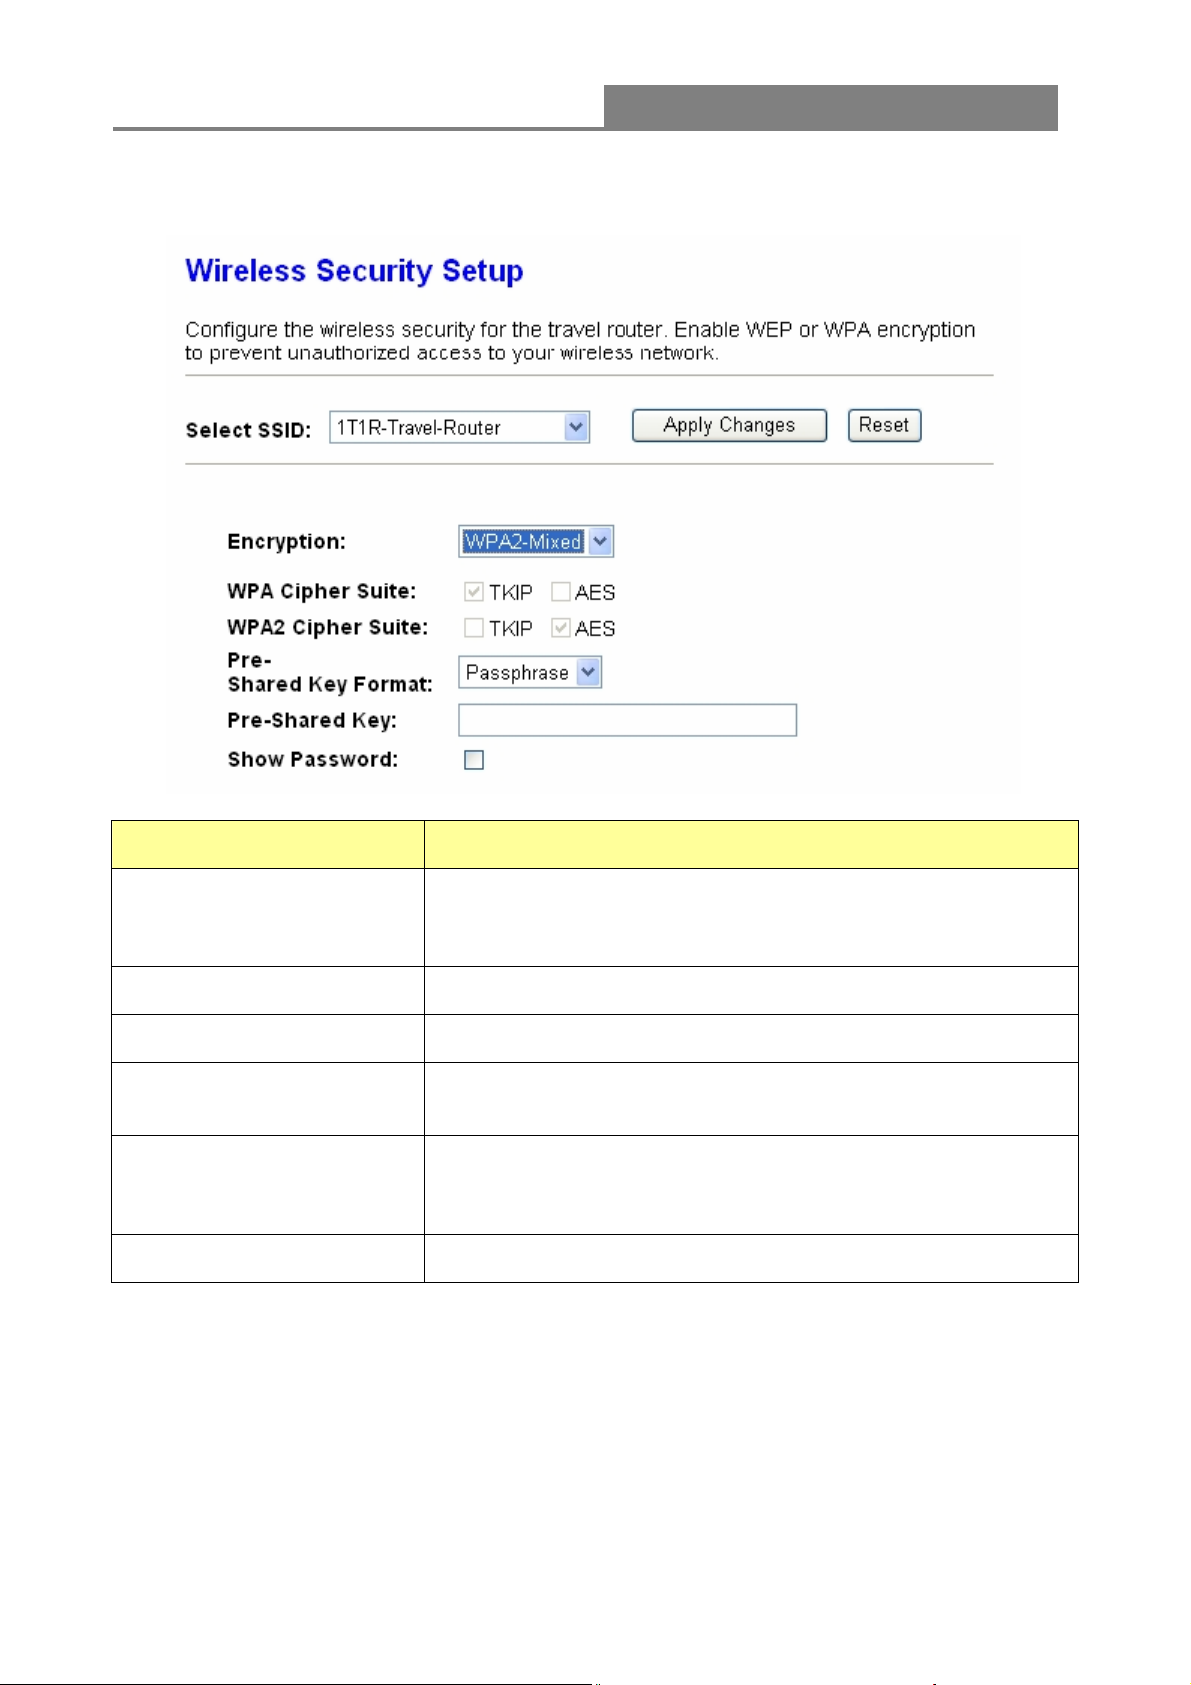
4. Security Mode – WPA2-Mixed
Items Information
Please choose a SSID you have set for this router by clicking
Select SSID
Encryption
WPA / WPA2 Cipher Suite
Pre-Shared Key Format
Pre-Shared Key
Show Password
* Please click on the Apply Changes button or the Reset button to save/reset the configurations.
“Wireless > Basic Settings” from the drop-down list. The SSID
will be shown on the wireless network for your recognition.
Select a security encryption mode for this router.
The Cipher Suite is mixed (TKIP and AES).
To decide the format, select “Passphrase” or “Hex” in the drop
list.
Enter the “Pre-shared Key” according to the pre-shared key
format you select. This field must be filled with character longer
than 8 and less than 64 lengths.
Select to show the password or not.
29
Page 30
Wireless 11n 1T1R Router
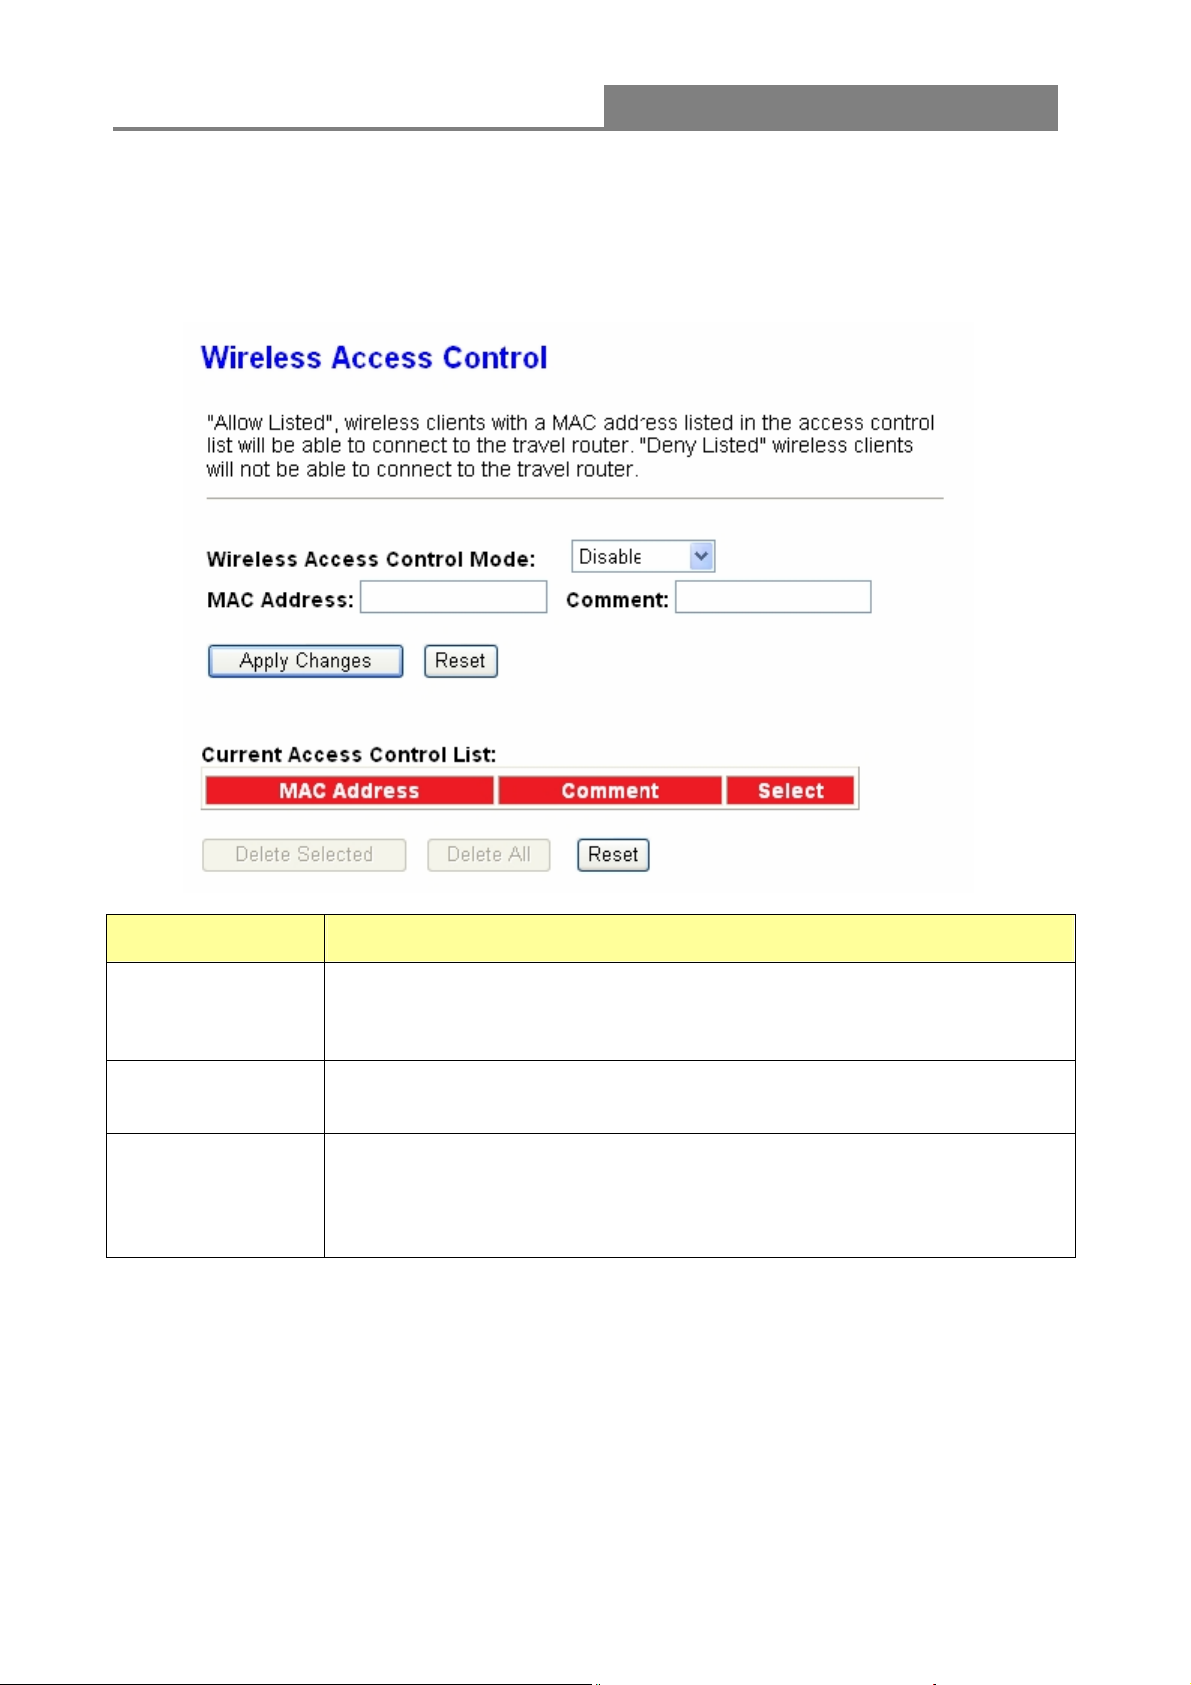
3.4.4 Access Control
To restrict the station access authentication of the clients, you can set up the control list in this
page.
Items Information
Wireless Access
Control Mode
MAC Address &
Comment
Current Access
Control list
* Please click on the Apply Changes button or the Reset button to save/reset the configurations.
Click the drop list to choose the access control mode. You may select
“Allow listed” to give those MAC addresses access to this device or select
“Deny Listed” to ban it or select “Disable”.
Fill in the MAC address that you wish to control, and give a definition to it.
List the MAC Access Control settings you have added before. Click on the
list to change configuration. To Delete the station on the list, mark the
check box in the select item and click the “Delete Selected”. If you want to
delete all stations on the list, click “Delete All” to remove all of them.
3.4.5 Wireless Site Survey (only in Client mode)
If you are under the Client mode, click Wireless > Wireless Site Surve y in the menu links to
display the screen as shown below.
1. The following page which provides tool to scan the wireless network pops out.
30
Page 31

Wireless 11n 1T1R Router
2. Click the “Site Survey” button can scan nearby Router and AP. This page shows the
available wireless networks information. When you use this device as a station (STA), you
may connect to other AP.
31
Page 32

Wireless 11n 1T1R Router
3. Select one of the networks existing in the list of the site survey table and then click “Next”
button, then the following page pops out.
32
Page 33

Wireless 11n 1T1R Router
4. In this page, you can input the selected AP’s password, then click “connect ” button to start
connection with wireless network.
33
Page 34

Wireless 11n 1T1R Router
5. In connection process, the following page pops out. Please waiting for the connection result.
6. When connection is successful, the following page pops up.
7. You can go back to the Management > Status page and confirm the connection’s states.
34
Page 35

Wireless 11n 1T1R Router
3.4.6 WPS Settings
The primary goal of Wi-Fi Protected Setup (Wi-Fi Simple Configuration) is to simplify the
security setup and management of Wi-Fi networks. This router supports the configuration setup
using PIN configuration method or PBC configuration method through an internal or external
registrar.
35
Page 36

Wireless 11n 1T1R Router
Items Information
Disable WPS
WPS Status
Self-PIN Number
Push Button
Configuration
Current Key Info
Click this checkbox to undo WPS.
You cannot manually select the items here. The WPS Status will change
from “UnConfigured” to “Configured” after you enable WPS function and
setup a wireless security key for this device.
If you use this device as a client, you can use this code when trying to
connect this device to other AP by using the PIN method.
Push Button Communication (PBC) method uses a simple action of
pushing a button on both the AP and the new STA to reach the function
of easy setup WPS connection. You can simply click the
button in this GUI page or click the WPS button under the case of the
router. After click on the button, please run the client’s WPS and push
the PBC button within 2 minutes.
This field displays the current key information you configured.
Personal Identification Number (PIN) method. Users have to fill in the
Client PIN
Number
*Please click on the Apply Changes button or the Reset button at the bottom to save/reset the configurations.
PIN code of enrollee device and click the
communication between the AP and the enrollee device. After click on
the button, please run the client’s WPS and push the PIN button within 2
minutes.
36
button to make
Page 37

Wireless 11n 1T1R Router
If you are under the Client mode, the interface is different.
Click Wireless > WPS in the menu links to display the screen as shown below.
In this page you can connect your device to other networks by using PIN or PBC methods
.
Items Information
Disable WPS
Self-PIN Number
PIN Configuration
Push Button Configuration
Mark to disable the WPS, and clear to enable.
If you use this device as a client, you can use this code
when trying to connect this device to other AP by using
the PIN method.
After the AP or router you share has fill in your self-pin
number and click the
at this moment you can click the
minutes to establish the connection.
You can simply click the
button) together with the AP or router you want share in 2
minutes for connection.
3.5 TCP/IP Settings
button in this GUI page
button in 2
button (or the WPS
3.5.1 LAN Interface Setup
To set up the configuration of LAN interface, private IP of your router LAN port and subnet mask
for your LAN segment.
37
Page 38

Wireless 11n 1T1R Router
Items Information
IP Address
Subnet Mask
Default Gateway
DHCP Client Range
* Please click on the Apply Changes button or the Reset button at the bottom to save/reset the configurations.
The IP of your Router LAN port (default 192.168.100.1).
Subnet Mask of you LAN (default 255.255.255.0). All devices on the
network must have the same subnet mask to communicate on the
network.
Enter the “IP Address” of the router in your network.
DHCP stands for Dynamic Host Configuration Protocol. It is a
protocol for assigning dynamic IP addresses “automatically”.
This field asks you to specify the DHCP Client IP address range
(default 100~200). You can also click the “Show Client” button to list
those connected DHCP clients.
Note: in Router/Client mode, DHCP Server default setting is enabled,
however in AP mode, DHCP Server default setting is disabled.
Active DHCP Client List
This is the window that pops up after clicking the button. It shows the information
of IP address, MAC address and expire time of the DHCP clients that have connected with this
device.
38
Page 39

Wireless 11n 1T1R Router
3.5.2 WAN Interface Setup (Router mode and Client mode)
This page allows users to configure those parameters for connecting to Internet. You may
select the Internet connection type from the drop list besides “WAN Access Type” and configure
the parameters for each mode. There are three modes for your selection: Static, DHCP and
PPPoE.
Items Information
39
Page 40

Wireless 11n 1T1R Router
WAN Access T ype
MTU Size
Attain DNS Automatically
Set DNS Manually
Clone MAC Address
History MAC Table
Select the mode to access the WAN as Static, DHCP Client or
PPPoE.
To Enable the Maximum Transmission Unit of router setup. Any
packet over this number will be chopped up into suitable size
before sending. Larger number will enhance the transmission
performance.
Enter the MTU number in the blank to set the limitation.
If your DNS provided by ISP is dynamic, choose “Attain DNS
automatically.
To specify the Domain Name System (DNS). The DNS server
translates domain names into IP addresses. Enter the DNS
provided by your ISP in DNS 1 and DNS 2.
There are two ways to clone MAC address.
One way is directory input MAC address in text box. Maybe you
need to save the MAC Address, you can click 'Manual Add' button
and add it to “History MAC Table” for easily backup; another is
click 'MAC Clone' button, then it will copy the MAC address from
your network card in the computer.
Note: The 'History MAC Table' can save maximum three MAC
Addresses.
To Delete the MAC Address you add before, mark the check box
in the select item on the right hand and click the “Delete
Selected”. If you want to delete all the MAC Addresses, click
“Delete All” to remove all of them.
* Please click on the Apply Changes button or the Reset button at the bottom to save/reset the configurations.
1. Static Mode (fixed IP)
Items Information
IP Address, Subnet Mask and
Default Gateway
MTU Size
Fill in the IP address, Subnet Mask and Default Gateway
that provided by your Internet Service Provider (ISP).
To Enable the Maximum Transmission Unit of router
40
Page 41

Wireless 11n 1T1R Router
setup. Any packet over this number will be chopped up
into suitable size before sending. Larger number will
enhance the transmission performance.
Enter the MTU number in the blank to set the limitation
(default 1500 bytes).
To specify the Domain Name System (DNS). The DNS
DNS 1~2
2. DHCP (Auto Config)
server translates domain names into IP addresses. Enter
the DNS provided by your ISP in DNS 1 and DNS 2.
Items Information
To Enable the Maximum Transmission Unit of Router setup.
Any packet over this number will be chopped up into suitable
size before sending. Larger number will enhance the
MTU Size
Attain DNS
Automatically
Set DNS Manually
3. PPPoE (ADSL)
transmission performance.
Enter your MTU number in the text-box to set the limitation
(default 1492 bytes).
If your DNS provide by ISP is dynamic, choose “Attain DNS
automatically.
To specify the Domain Name System (DNS). The DNS server
translates domain names into IP addresses. Enter the DNS
provided by your ISP in DNS 1 and DNS 2.
41
Page 42

Wireless 11n 1T1R Router
Items Information
User Name&Password
MTU Size
Attain DNS Automatically
Set DNS Manually
Fill in the User Name and password that provided by your ISP.
To Enable the Maximum Transmission Unit of router setup.
Any packet over this number will be chopped up into suitable
size before sending. Larger number will enhance the
transmission performance.
Enter your MTU number in the text-box to set the limitation
(default 1452 bytes).
If your DNS provided by ISP is dynamic, choose “Attain DNS
automatically.
To specify the Domain Name System (DNS). The DNS server
translates domain names into IP addresses. Enter the DNS
provided by your ISP in DNS 1 and DNS 2.
42
Page 43

Wireless 11n 1T1R Router
3.6 Firewall Settings (Router mode and Client mode)
MAC Filtering
The Wireless Router could filter the outgoing packets for security or management consideration.
Items Information
Enable MAC Filtering
MAC Address
Comment
Current Filter Table
Please click on the Apply Changes button or the Reset button at the bottom to save/reset the configurations.
Mark to enable the configuration, and clear to disable.
Fill in the MAC address of wireless stations you want to
forbid to access the Internet through the Gateway.
Input any text to describe this mapping.
Lists the MAC Filter Settings you have added before. To
delete the settings on the list, click the check box in the
select item and click the “Delete Selected”. If you want to
delete all the MAC addresses, click “Delete All” to
remove all of them.
3.7 Management
3.7.1 Status
This information page shows the current status and basic settings of this device. You could check
if the parameters match your configuration.
43
Page 44

Wireless 11n 1T1R Router
3.7.2 Statistics
This page shows users the information of data transfer, and monitors the status of this router
including receiving and sending packets. To see the latest report, click
button.
44
Page 45

Wireless 11n 1T1R Router
3.7.3 Log
This System Log page shows the information of the current activities on the router. To enable
system log function:
1. Mark the “Enable Log” checkbox.
2. To see all information of the system, select the “system all” checkbox.
To see wireless information only, select the “wireless” checkbox.
3. Click the
refresh the log information or click the
button to activate. You could also click the button to
button to clean the log table.
45
Page 46

Wireless 11n 1T1R Router
3.7.4 Upgrade Firmware
Sometimes a new firmware may be issued to upgrade the system of this device. You could
upgrade the firmware you got in this page. To upgrade the firmware, please click the
button, locate the firmware in your computer and then click the
button to execute.
46
Page 47

Wireless 11n 1T1R Router
3.7.5 Save/Reload Setting
The Save/Reload Setting page allows users to save and upload the configuration settings of the
device or restore the factory default configuration.
Items Information
Save Settings to File
Load Settings from File
Reset Settings to Default
Click the
settings.
Click
click
settings. Please wait until it is complete.
Click
to start to load default settings.
button to save the currently configure
to select the file that you save, and then
to start to update the system configuration
3.7.6 Password
To set up the Administrator Account information, enter the Username, New password, and reenter
the password on the text box. Don’t forget to click the
to save the configuration.
47
Page 48

Wireless 11n 1T1R Router
3.7.7 Logout
Click Apply Change then you will save the settings and log off the management interface.
48
Page 49

Wireless 11n 1T1R Router
Appendix A: Product Specifications
Standard
Interface
Antenna
(W142B/W142D only)
WAN Connection
Cable Connections
Transmission Mode
Security
Network Data Rate
IEEE 802.11n, IEEE 802.11g, IEEE 802.11b, IEEE 802.3, IEEE
802.3u
LAN: One 10/100Mbps RJ-45 port
WAN: One 10/100Mbps RJ-45 port
One WPS/RESET button
One slide switch to control AP/Router/Client mode
One USB DC JACK
Antenna type: Dipole
Antenna connector type: Fixed
Antenna standard: 1.2dBi
Ethernet 10/100 Mbps
RJ-45 (10BASE-T): Category 3,4,5 UTP
RJ-45 (100BASE-TX): Category 5 UTP
Auto-Negotiation (Full-duplex, Half-duplex)
64/128-bit WEP, WPA, WPA2, WPA2-Mixed
802.11b: 1,2,5.5, and 11Mbps
802.11g: 6,9,12,18,24,36,48 and 54Mbps
802.11n: up to 150Mbps
Receiver Sensitivity
Transmit Power
LED indications
Channel
Range Coverage
Temperature
Humidity
Certification
802.11n Typical -68 dBm
802.11g Typical -73 dBm
802.11b Typical -84 dBm
16dBm typically @ 802.11b
14dBm typically @ 802.11g
13dBm typically @ 802.11n
1*WAN, 1*LAN, 1*WLAN, 1*WPS, 1*PWR
USA 11, Europe 13, Japan 14
Indoor 35~100 meters
Outdoor 100~300 meters
Operating: 0°C ~ 40°C (32°~104°F)
Storage: -20°C ~ 70°C (-4°~158°F)
Operating: 10% ~ 90% RH, non-condensing
Storage: 5%~90% RH, non-condensing
FCC, CE, VCCI Class B
49
Page 50

Wireless 11n 1T1R Router
Appendix B: Glossary
802.11b - The 802.11b standard specifies a wireless networking at 11 Mbps using
direct-sequence spread-spectrum (DSSS) technology and operating in the unlicensed radio
spectrum at 2.4GHz, and WEP encryption for security. 802.11b networks are also referred to
as Wi-Fi networks.
802.11g - specification for wireless networking at 54 Mbps using direct-sequence
spread-spectrum (DSSS) technology, using OFDM modulation and operating in the
unlicensed radio spectrum at 2.4GHz, and backward compatibility with IEEE 802.11b devices,
and WEP encryption for security.
802.11n - 802.11n builds upon previous 802.11 standards by adding MIMO (multiple-input
multiple-output). MIMO uses multiple transmitter and receiver antennas to allow for increased
data throughput via spatial multiplexing and increased range by exploiting the spatial diversity,
perhaps through coding schemes like Alamouti coding. The Enhanced Wireless Consortium
(EWC) was formed to help accelerate the IEEE 802.11n development process and promote a
technology specification for interoperability of next-generation wireless local area networking
(WLAN) products.
DHCP (Dynamic Host Configuration Protocol) - A protocol that automatically configure the
TCP/IP parameters for the all the PC(s) that are connected to a DHCP server
DNS (Domain Name System) – An Internet Service that translates the names of websites into
IP addresses.
Domain Name - A descriptive name for an address or group of addresses on the Internet.
DSL (Digital Subscriber Line) - A technology that allows data to be sent or received over
existing traditional phone lines.
ISP (Internet Service Provider) - A company that provides access to the Internet.
MTU (Maximum Transmission Unit) - The size in bytes of the largest packet that can be
transmitted.
NAT (Network Address Translation) - NAT technology translates IP addresses of a local area
network to a different IP address for the Internet.
PPPoE (Point to Point Protocol over Ethernet) - PPPoE is a protocol for connecting remote
hosts to the Internet over an always-on connection by simulating a dial-up connection.
SSID - A Service Set Identification is a thirty-two character (maximum) alphanumeric key
identifying a wireless local area network. For the wireless devices in a network to
communicate with each other, all devices must be configured with the same SSID. This is
typically the configuration parameter for a wireless PC card. It corresponds to the ESSID in
the wireless Access Point and to the wireless network name.
WEP (Wired Equivalent Privacy) - A data privacy mechanism based on a 64-bit or 128-bit or
152-bit shared key algorithm, as described in the IEEE 802.11 standard.
Wi-Fi - A trade name for the 802.11b wireless networking standard, given by the Wireless
50
Page 51

Wireless 11n 1T1R Router
Ethernet Compatibility Alliance (WECA, see http://www.wi-fi.net), an industry standards group
promoting interoperability among 802.11b devices.
WLAN (Wireless Local Area Network) - A group of computers and associated devices
communicate with each other wirelessly, which network serving users are limited in a local
area.
51
Page 52

Wireless 11n 1T1R Router
IEEE 802.11n Wireless Serien
Wireless 11n 1T1R Router
W142A W142B
W142C W142D
Bedienungsanleitung
Version 2.1
Datum: 17. September 2010
52
Page 53

Wireless 11n 1T1R Router
FCC Zertifizierungen
FCC (Federal Communication Commission) Störungsmitteilung
Dieses Gerät ist getestet worden und, gemäß Teil 15 der FCC-Vorschriften, als den
Beschränkungen eines digitalen Gerätes der Klasse B befunden worden. Diese Einschränkungen
sind dazu bestimmt, angemessenen Schutz gegen schädliche Störungen bei der Benutzung im
Wohnbereich zu bieten. Dieses Gerät generiert und benutzt Funkfrequenzenergie, kann sie
abstrahlen, und kann, falls es nicht gemäß der Anleitung installiert und benutzt wird, schädliche
Störungen bei Funkkommunikationen bewirken. Es gibt jedoch keine Garantie dafür, dass keine
Störungen bei speziellen Installationen auftreten. Falls dieses Gerät schädliche Störungen beim
Radio- oder Fernseh-Empfang verursacht, die durch das Ein- und Ausschalten des Gerätes
beendet werden können, kann der Benutzer versuchen, die Störungen mit Hilfe einer oder mehr
der folgenden Maßnahmen zu korrigieren:
-Neuausrichtung oder Neulokalisierung der Empfangsantenne.
-Vergrößerung des Abstandes zwischen Gerät und Empfänger.
-Verbinden Sie das Gerät mit einer Steckdose eines anderen Stromkreises als der, mit dem der
Empfänger verbunden ist.
-Bitten Sie den Händler oder einen erfahrenen Radio- oder Fernsehtechniker um Hilfe.
Dieses Gerät entspricht Teil 15 der FCC-Vorschriften. Das Funktionieren ist abhängig von den
zwei folgenden Bedingungen: (1) Dieses Gerät darf keine schädlichen Störungen verursachen,
und (2) dieses Gerät muss jede empfangene Störung akzeptieren, einschließlich der Störungen,
die unerwünschtes Funktionieren bewirken.
FCC-Vorsicht: Bitte beachten Sie, dass Veränderungen oder Modifizierungen, die nicht
ausdrücklich genehmigt sind durch diejenigen, die für die Einhaltung verantwortlich sind, Ihre
Erlaubnis zur Benutzung des Gerätes ungültig werden lassen können.
WICHTIGE ANMERKUNG:
FCC Erklärung zur Strahlungsaussetzung:
Dieses Gerät entspricht den FCC-Strahlungsaussetzungsbeschränkungen, die für eine
unkontrollierte Umgebung herausgegeben worden sind. Dieses Gerät sollte mit einem
Mindestabstand von 20cm zu Ihrem Körper installiert und bedient werden.
Dieser Sender darf nicht zusammen mit einer anderen Antenne oder einem anderen Sender
lokalisiert oder betrieben werden.
53
Page 54

Wireless 11n 1T1R Router
CE Markierungswarnung
Dieses Gerät entspricht den Bedingungen bezüglich elektromagnetischer Kompatibilität, EN 55022
Klasse B für ITE, dem erforderlichen Schutzbedarf der Richtlinie des Rates 2004/108/EG in
Annäherung an die Gesetze der Mitgliedstaaten in Zusammenhang mit elektromagnetischer
Kompatibilität und der R&TTE Richtlinie 1999/5/EG im Einklang mit der Vorschrift für Radio- und
Telekommunikationssendgeräte.
Das Unternehmen erneuert seine Produkte laufend und es kann sein, dass Informationen in
diesem Dokument nicht aktuell sind. Bitte kontaktieren Sie Ihren örtlichen Händler für die neuesten
Informationen. Kein Teil dieses Dokumentes darf in irgendeiner Form kopiert oder reproduziert
werden ohne schriftliches Einverständnis des Unternehmens.
Warenzeichen:
Alle Handelsnamen und Warenzeichen sind das Eigentum der jeweiligen Unternehmen.
Copyright © 2010, All Rights Reserved.
54
Page 55

Wireless 11n 1T1R Router
Inhaltsverzeichnis
Packungsinhalt ··················································································································· 6
Kapitel 1 Einführung in den Wireless Router································································ 7
1.1 Allgemeine Beschreibung··············································································7
1.2 Eigenschaften································································································ 7
1.3 Frontblende··································································································· 8
1.4 Rückblende ··································································································· 9
Kapitel 2 Installation und Basis Konfiguration ·····························································11
2.1 Operationsmodus·························································································11
2.2 Verbinde den Router mit Deinem Netzwerk ················································11
2.3 Konfiguriere die IP-Adresse Deines Computers·········································· 12
Kapitel 3 Web-Based Management············································································15
3.1 Starte das Web-Based Management ·························································15
3.2 Graphische Benutzeroberfläche·································································· 16
3.3 Konfiguration······························································································· 18
3.4 Wireless······································································································· 22
3.4.1 Basiseinstellungen····················································································· 22
3.4.2 Weitere Einstellungen ················································································ 24
3.4.3 Sicherheit··································································································· 25
3.4.4 Zugriffskontrolle·························································································30
3.4.5 Wireless Netz Suche ················································································· 30
3.4.6 WPS Einstellungen···················································································· 35
3.5 TCP/IP Einstellungen·················································································· 37
3.5.1 LAN Konfiguration ····················································································· 37
3.5.2 WAN Konfiguration····················································································39
3.6 Firewall Einstellungen ················································································· 43
MAC Filter ··································································································· 43
3.7 Management ······························································································· 43
3.7.1 Status·········································································································43
3.7.2 Statistiken·································································································· 44
3.7.3 Logbuch·····································································································45
3.7.4 Upgrade Firmware····················································································· 46
3.7.5 Sichern/Laden Einstellungen····································································· 47
3.7.6 Passwort····································································································47
3.7.7 Logout ······································································································· 48
Anhang A: Produktspezifikationen···················································································· 49
Anhang B: Glossar············································································································ 50
55
Page 56

Wireless 11n 1T1R Router
56
Page 57

Wireless 11n 1T1R Router
Inhaltsverzeichnis
TOC
Packungsinformationen
Vielen Dank, dass Sie sich für dieses Produkt entschieden haben. Bevor Sie beginnen, sollten Sie
den Inhalt der Packung überprüfen.
Die Packung sollte folgende Teile enthalten:
1. Einen Wireless Router
2. Ein USB-Kabel
3. Eine CD
Anmerkung:
Vergewissern Sie sich, dass die Packung alle oben genannten Teile enthält. Wenn eines der
aufgeführten Teile beschädigt ist oder fehlt, wenden Sie sich bitte an Ihren Händler.
Konventionen
Der in dieser Bedienungsanleitung erwähnte Router steht für den IEEE 802.11n Wireless 1T1R
Router ohne jegliche Erklärung.
57
Page 58

Wireless 11n 1T1R Router
Kapitel 1 Einleitung zum Wireless Router
1.1 Allgemeine Beschreibung
Dies ist ein Wireless-Router mit 1T1R MIMO-Technik und bietet eine exzellente Netzwerklösung
für Home, SOHO und Hotspot-User. Er erfüllt die IEEE 802.11n Standards mit Datenraten von bis
zu 150 Mbps und IEEE 802.11b/g mit einer maximalen Datenrate von 54 Mbps. Er kann auch mit
allen 11/54 Mbps Wireless (802.11b/g) Produkten interoperieren.
Der Router erlaubt die Nutzung einer Breitbandverbindung durch mehrere Nutzer und schützt
außerdem Ihr privates Netzwerk. LAN-User können gleichzeitig mit hoher Geschwindigkeit und
großer Reichweite Dateien und Drucker teilen oder Netzwerkspiele spielen.
Was die Informationssicherheit betrifft, so unterstützt dieser Router aktuelle
Sicherheitsverschlüsselungen wie WPA, WPA2, Open Shared Key sowie paarweise
Key-Authentifizierungsservices, womit Ihnen die besten Verschlüsselungstypen gewährleistet
werden. Außerdem unterstützt dieser Router energieeffizientes Ethernet, ist stromsparend und
begünstigt so eine kosteneffektive Netzwerkverbindung.
1.2 Hauptmerkmale
Entspricht den IEEE 802.11n und IEEE802.11b/g Wireless-Standards
2.4GHz Frequenzband und 1T1R
High-Speed-Transferrate bis zu 150Mbps
Unterstützt Auto-MDI/MDI-X, Back Pressure und Flusskontrolle
Unterstützt IEEE802.1x Port-basierte und MAC-basierte Netzwerkzugriffskontrolle
Unterstützt Wireless-Datenverschlüsselung mit WPA, WPA2, Open Shared Key sowie
paarweise Key-Authentifizierungsservices
Unterstützt Statische IP, DHCP Client, PPPoE, Firewall und NAT IP Sharing
Unterstützt IEEE802.3az energieeffizientes Ethernet
Bietet eine WPS/RESET-Taste
Bietet einen Slide Switch zur Steuerung des AP/Router/Client-Modus
58
Page 59

Wireless 11n 1T1R Router
1.3 Die Frontseite
Die Frontseite des Wireless-Routers:
Name Status Anzeige
PWR
WPS
WLAN
Schnelles Blinken Senden und Empfangen von Daten über Wireless.
WAN /
LAN
Grün Power Ein
Dunkel Power Aus
Grünes Blinken
einmal
Grünes Blinken WPS-Verbindung
Dunkel Systemstabilität
Aus Die Wireless-Funktion ist deaktiviert.
Blinken Die Wireless-Funktion ist aktiviert.
Aus
Ein
Blinken
Systemneustart
Es ist kein Gerät mit dem entsprechenden Port
verbunden oder die Verbindung bricht zusammen.
Es sind Geräte mit den entsprechenden Ports
verbunden, aber es werden keine Daten übertragen oder
empfangen.
Es werden über den entsprechenden Port Daten
gesendet oder empfangen.
59
Page 60

Wireless 11n 1T1R Router
1.4 Die Rückseite
Die Rückseite des Wireless-Routers wird unten angezeigt.
W142A W142C
W142B W142D
LAN: Über diesen Port können Sie den Router an Ihre PCs und die anderen
Ethernet-Netzwerkgeräte anschließen.
WAN: An diesem WAN-Port schließen Sie das Kabel//DSL-Modem oder Ethernet
anschließen.
DC IN:
Stecken Sie das kreisförmige Ende des Spannungsadapters fest in die Rückseite des
Routers und das andere Ende in eine Steckdose. Nun ist das System bereit.
WPS/Reset-Taste:
Wenn Sie diese Taste einmal drücken, so starten Sie die PBC Konfigurationsmethode, über
welche die User leicht die WPS-Verbindung aufbauen können.
Wenn Sie die Taste länger als 5 Sekunden gedrückt halten und sie dann loslassen, wird das
System auf die Standard-Werkseinstellung zurückgestellt. In der Zwischenzeit schreibt das
System den Flash auf den Standardwert und dann auf Systemneustart. Etwa 60 Sekunden
später sind alle Systemparameter auf die Standard-Werkseinstellung zurückgesetzt worden.
Falls der Vorgang durch irgendeinen Grund (keine Spannung, ...) unterbrochen worden ist,
wird es einen Systemfehler geben. Bevor Sie den Vorgang ausführen, stellen Sie bitte eine
sichere Betriebsumgebung sicher.
60
Page 61

Wireless 11n 1T1R Router
Antenne (nur W142B/W142D): Die Antenne dient dazu, das Wireless-Signal zu verbessern
und die Reichweite des Signals zu vergrößern.
Achtung:Unvollständige Vorgänge zur Wiederherstellung der Werkseinstellung verursachen,
dass der Wireless-Router nicht richtig funktioniert. Sollten Sie unglücklicherweise in
dieser Situation sein, versuchen Sie nicht, ihn selber zu reparieren. Bitten Sie Ihren
lokalen Händler um Hilfe.
61
Page 62

Wireless 11n 1T1R Router
Kapitel 2 Installation und Basiskonfiguration
Dieses Kapitel bietet eine schrittweise Anleitung für die Installation und Konfiguration des
Wireless-Routers. Wir schlagen vor, dass Sie zuerst das gesamte Kapitel durcharbeiten und dann
mit der fortgeschritteneren Bedienung fortfahren.
2.1 Betriebsmodus
Bei diesem Gerät haben Sie drei Modi zur Auswahl:
AP-Modus
Router-Modus
Client-Modus
Ein anderer Modus funktioniert unterschiedlich. Sie können den Slide Switch auf der linken Seite
des Gerätes nach links schieben (AP-Modus), zur Mitte (Router-Modus) oder nach rechts
(Client-Modus), um den von Ihnen gewünschten Modus zu wählen.
Wählen Sie vor der Installation bitte zuerst einen Betriebsmodus und fahren Sie dann mit weiteren
Konfigurationen fort.
2.2 Verbinden Sie diesen Router mit Ihrem Netzwerk
Schritte, um das Netzwerk aufzubauen:
1. Verbinden Sie die Telefonleitung von der Wandbuchse mit dem Eingangsport des
ADSL-Modems oder das Koaxialkabel mit dem Eingangsport des Kabelmodems.
2. A---Router Modus: Verbinden Sie das ADSL- oder Kabelmodem mit dem
Ethernet-WAN-Port auf der Rückseite des Wireless-Routers. Benutzen Sie dafür das
UTP-Kabel.
B---AP-Modus: Verbinden Sie einen Router mit einem der beiden Ports auf der Rückseite
dieses Gerätes. Benutzen Sie dafür das UTP-Kabel.
C---Client-Modus: Überspringen Sie Schritt 1 und gehen Sie direkt zu Schritt 3.
3. Stecken Sie den Power-Adapter an das Modem und schalten Sie es an. Installieren Sie die
Ethernetkarte in Ihrem Rechner. Beziehen Sie sich dabei auf die Bedienungsanleitung, die
mit der Karte geliefert wurde.
4. Verbinden Sie den Rechner mit dem Wireless-Router, indem Sie ein Standard-Twisted-Pair
Ethernet-Kabel von der Ethernetkarte des Rechners zu einem 10/100Mbps
Ethernet-LAN-Port auf der Rückseite des Wireless-Routers benutzen. (Im AP/Client-Modus
können beide Ports als LAN-Ports verwendet werden)
5. Stecken Sie den Power-Adapter in den Router und das andere Ende in die Wandsteckdose.
62
Page 63

Wireless 11n 1T1R Router
2.3 Konfigurieren Sie die IP-Adresse Ihres Rechners
Um mit diesem Wireless-Router zu kommunizieren, müssen Sie die IP-Adresse Ihres Rechners
so konfigurieren, dass sie mit dem Gerät kompatibel ist.
Anmerkung: Der Router unterstützt DHCP-Server. Dies ist standardmäßig aktiviert. Benutzer, die
ihre IP-Adresse mit "Automatisch eine IP-Adresse erhalten “konfigurieren, können die folgende
Anleitung zur IP- Konfiguration überspringen.
1. Die Standard-Netzwerkeinstellung des Gerätes:
IP-Adresse: 192.168.100.1
Subnetzmaske: 255.255.255.0
DHCP-Server: aktiviert
2. In der folgenden TCP/IP-Konfigurationsanleitung wird die IP-Adresse “192.168.100.2” als Ihre
IP-Adresse vorausgesetzt, falls Sie IP-Adressen manuell spezifizieren wollen. Bitte wählen Sie
NICHT “192.168.100.1” als IP-Adresse. “192.168.100.1“ wurde als Standard-IP für dieses
Gerät eingestellt.
3. Die folgende TCP/IP-Konfigurationsanleitung setzt Windows XP als Betriebssystem voraus.
Vorgänge, um IP-Adressen für Ihren Rechner zu konfigurieren:
1. Falls Sie sich in der klassischen Startmenü-Ansicht befinden, klicken Sie auf Start >
Einstellungen > Netzwerkverbindungen.
Falls Sie sich in der Startmenü-Ansicht befinden, klicken Sie auf Start > Systemsteuerung >
Netzwerkverbindungen.
63
Page 64

Wireless 11n 1T1R Router
2. Klicken Sie mit der rechten Maustaste auf Lokale Umgebungsverbindungen und dann auf
Eigenschaften.
3. Wählen Sie Internet-Protokoll (TCP/IP) und klicken Sie auf Eigenschaften.
64
Page 65

Wireless 11n 1T1R Router
4. Sie können "Automatisch eine IP-Adresse erhalten" wählen (empfohlen), um eine
IP-Adresse automatisch zu erhalten. Oder Sie wählen "Die folgende IP-Adresse benutzen", um
eine IP- Adresse manuell zu bestimmen. Bitte klicken Sie nach der Konfiguration auf die Taste
OK.
65
Page 66

Wireless 11n 1T1R Router
Kapitel 3 Web-basierte Verwaltung
3.1 Starten Sie die Web-basierte Verwaltungs-Schnittstelle
Das Gerät verwendet das Web als Management-Schnittstelle. Sie können einen Browser
verwenden, um einen einfachen Zugang zur Management-Schnittstelle zu bekommen. Bitte
befolgen Sie die unten aufgeführten Schritte.
1. Öffnen Sie den Internet-Webbrowser.
2. Geben Sie 192.168.100.1 in die URL-Web-Adresszeile ein und drücken Sie Enter.
3. Das Login-Fenster erscheint.
- Geben Sie admin an die Stelle Benutzername ein (Standardwert).
- Geben Sie admin an die Stelle Passwort ein (Standardwert).
- Klicken Sie auf OK.
66
Page 67

Wireless 11n 1T1R Router
3.2 Die Graphische Benutzerschnittstelle
Nach der Passwortauthorisierung zeigt sich die Informationsseite als Homepage der graphischen
Benutzerschnittstelle. Sie können den Menü-Link in der linken Spalte des Fensters anklicken, um
Zugriff auf jede Konfigurationsseite zu bekommen.
Router-Modus:
67
Page 68

Wireless 11n 1T1R Router
AP-Modus:
68
Page 69

Wireless 11n 1T1R Router
Client-Modus:
3.3 Installationsassistent (Router-Modus und Client-Modus)
Falls Sie den Router zum ersten Mal benutzen, befolgen Sie bitte die Vorgänge des
Installationsassistenten, um eine schrittweise Konfiguration durchzuführen.
Anmerkung: Die Konfigurationen im AP-, Router- und Client-Modus sind fast dieselben. Die
folgende Anleitung führt hauptsächlich eine Einführung zu diesem Gerät bei einer
Router-Modus-Umgebung durch. Benutzer, die die Verwaltung im AP/Client-Modus durchführen
möchten, beziehen sich bitte auf den Router-Modus. Die folgende Anleitung führt eine
allumfassende Einleitung zum Installationsassistenten durch.
1. Klicken Sie auf “Setup Wizard” beim linken Menülink und dann auf “Next” um fortzufahren.
69
Page 70

Wireless 11n 1T1R Router
2. Klicken Sie auf “Next”, “LAN Interface Setup” erscheint.
3. Klicken Sie “Next”, “WAN Interface Setup” erscheint. Oder Sie gehen auf “Back/Cancel”, um
Änderungen vorzunehmen. Diese Parameter erhalten Sie von Ihrem ISP. WAN Access Type:
Static IP, DHCP Client und PPPoE.
70
Page 71

Wireless 11n 1T1R Router
4. Klicken Sie “Next”, ein Fenster mit “Wireless Network Basic Settings” erscheint.
5. Klicken Sie “Next”, “Wireless Security Setup” erscheint.
71
Page 72

Wireless 11n 1T1R Router
Wenn Sie diese Schritte getätigt haben, können Sie Ihren Router nutzen, um im Internet zu surfen.
Für weitere Informationen folgen Sie bitte der folgenden Anleitung.
72
Page 73

Wireless 11n 1T1R Router
3.4 Wireless
3.4.1 Grundlegende Einstellungen
Sie können die Konfiguration Ihrer Wireless-Grundeinstellungen einstellen und die
Wireless-Clients, die mit Ihrem Router verbunden sind, kontrollieren.
Begriffe Informationen
Wireless LAN
Schnittstelle
deaktivieren
Mehrfache AP
SSID
Kanalbreite
Kontrolle
Seitenband
Kanalnummer
Markieren Sie das Kontrollkästchen, um die Schnittstelle des
Wireless-LAN zu deaktivieren.
Die Taste
mehrfache AP zu zeigen und zu aktualisieren. Klicken Sie diese Taste
für weitere Konfigurationen.
Service Set Identifier (SSID) für den Namen des Wireless-Netzwerks.
Wählen Sie 20MHz oder 40MHz als Wireless-Kanalfrequenz.
Oberes, Unteres
Wählen Sie einen Kanal (Auto, 1~11) für das Wireless-Netzwerk dieses
Gerätes.
dient dazu, die Wireless-Einstellungen für
73
Page 74

Wireless 11n 1T1R Router
Land
Übertragungs-SSID
Angeschlossene
Clients
* Bitte klicken Sie auf Änderungen übernehmen oder die Reset-Taste unten, um die Konfigurationen zu speichern
1. Mehrfache AP
Das ist das Fenster, das erscheint, nachdem Sie auf die Taste
Zur Auswahl stehen Ihnen USA(FCC), Kanada(IC), Europa(ETSI),
Spanien, Frankreich, Japan(MKK) zur Verfügung.
Falls Sie "Übertragungs-SSID" aktivieren, kann jede Wireless-Station,
die im Bereich dieses Wireless-Routers platziert ist, diesen
Wireless-Router problemlos finden. Falls Sie ein öffentliches
Wireless-Netzwerk aufbauen, empfehlen wir, diese Funktion zu
aktivieren. Deaktivierung von "Übertragungs-SSID" kann bessere
Sicherheit bieten.
Klicken Sie auf die Taste "Aktive Clients anzeigen". Die "Aktive
Wireless- Clients-Tabelle" wird erscheinen. Sie können den Status von
allen aktiven Wireless-Stationen sehen, die mit dem Access Point
verbunden sind.
oder zurückzusetzen.
geklickt haben.
Klicken Sie auf “Aktivieren”, um diesen AP zu aktivieren, und klicken Sie dann auf die Taste
“Zeigen”, “Aktive Wireless-Client-Tabelle – AP1” Fenster erscheint wie folgt:
74
Page 75

Wireless 11n 1T1R Router
2. Aktive Wireless-Client-Tabelle
Das ist das Fenster, das erscheint, nachdem Sie auf die Taste
haben.
geklickt
3.4.2 Fortgeschrittene Einstellungen
Sie können die fortgeschrittenen Wireless-LAN- Parameter dieses Routers einstellen. Wir
empfehlen Ihnen, diese Parameter nicht zu ändern, außer Sie wissen, welche Änderungen sie auf
hervorrufen.
Begriffe Informationen
Die Standardeinstellung von 2346 sollte für diesen Wert
beibehalten werden. Falls Sie eine hohe Paketfehlerrate feststellen,
Fragmentschwelle
können Sie Ihre Fragmentschwelle innerhalb des Wertbereiches
von 256 bis 2346 leicht erhöhen. Wird die Fragmentschwelle zu
niedrig eingestellt, so kann dies zu einer schwachen Leistung
75
Page 76

Wireless 11n 1T1R Router
führen.
Sendeaufforderungs-Schwelle. Die Standardeinstellung von 2347
RTS-Schwelle
Warnsignal-Intervall
sollte für diesen Wert beibehalten werden. Falls Sie einen
inkonsistenten Datenfluss vorfinden, empfehlen wir Ihnen nur
kleinere Veränderungen des Wertebereiches zwischen 0 und 2347.
Warnsignale sind Pakete, die von einem Access Point versendet
werden, um ein Wireless-Network zu synchronisieren. Einen
Warnsignal-Intervallwert spezifizieren. Standard (100ms) wird
empfohlen.
Präambeltyp
RF Ausgangspower
* Bitte klicken Sie auf Änderungen übernehmen oder die Reset-Taste unten, um die Konfigurationen zu speichern
Die Länge der CRC-Blöcke in den Frames während der
Wireless-Kommunikation.
Wählen Sie die Signalstärke für das Wireless-Netzwerk.
oder zurückzusetzen.
3.4.3 Sicherheit
Die Sicherheitsfunktion schützt Ihr Wireless-Network vor Eingriffen. Wir bieten WEP- und WPA
-Verschlüsselung, um Ihr Wireless-Network zu sichern. Bitte wählen Sie “Deaktivieren”, “WEP”,
“WPA”, “WPA2”, oder “WPA2-Gemischt” in der Drop-Down-Liste. Falls Sie "Deaktivieren" wählen,
werden alle Daten ohne Verschlüsselung übertragen und jede Station kann auf den Router
zugreifen.
Begriffe Informationen
76
Page 77

Wireless 11n 1T1R Router
Bitte wählen Sie eine SSID, die Sie für diesen Router eingerichtet
Wählen Sie eine
SSID
Verschlüsselung
haben, indem Sie Wireless > Grundlegende Einstellungen
Drop-Down-Liste anklicken. Die SSID wird beim Wireless-Netzwerk
zur Erkennung angezeigt.
Sie können zwischen 5 Modi wählen: Deaktivieren, WEP, WPA,
WPA2, und WPA2-Gemischt. Bitte beziehen Sie sich auf folgende
Beschreibung.
aus der
Passwort
anzeigen
* Bitte klicken Sie auf Änderungen übernehmen oder die Reset-Taste unten, um die Konfigurationen zu speichern
Wählen Sie, ob das Passwort angezeigt werden soll oder nicht.
oder zurückzusetzen.
1. Sicherheitsmodus - Deaktivieren
Falls Sie "Deaktivieren" wählen, greifen Sie auf Ihr Wireless-Network ohne Verschlüsselung zu.
2. Sicherheitsmodus -- WEP
77
Page 78

Wireless 11n 1T1R Router
Begriffe Informationen
Bitte wählen Sie eine SSID, die Sie für diesen Router eingerichtet
Wählen Sie eine SSID
haben, indem Sie Wireless > Grundlegende Einstellungen
Drop-Down-Liste anklicken. Die SSID wird beim Wireless-Netzwerk
zur Erkennung angezeigt.
Verschlüsselung
Wählen Sie einen Sicherheits-Verschlüsselungsmodus für diesen
Router.
Authentifizierung
Key-Länge
Key-Format
Verschlüsselungs-Key
Passwort anzeigen
Bitte klicken Sie auf Änderungen übernehmen oder die Reset-Taste unten, um die Konfigurationen zu speichern
Es stehen drei Optionen zur Wahl: Open System, Shared Key, Auto.
Wählen Sie “64-bit” oder “128-bit” als Key-Verschlüsselungslänge.
Wählen Sie “ASCII
1
” oder “Hex2” um den Key-Wert einzustellen.
Geben Sie den Key entsprechend Ihres gewählten Key-Formats ein.
Wählen Sie, ob das Passwort angezeigt werden soll oder nicht.
oder zurückzusetzen.
aus der
1
ASCII (American Standard Code for Information Interchange) ist ein Code zur Darstellung von englischen Buchstaben
in Form von Zahlen von 0-127.
2
Hexadezimale Ziffern bestehen aus den Zahlen 0-9 und den Buchstaben A-F.
78
Page 79

Wireless 11n 1T1R Router
3. Sicherheitsmodus – WPA / WPA 2
Begriffe Informationen
Bitte wählen Sie eine SSID, die Sie für diesen Router eingestellt
Wählen Sie eine SSID
haben, indem Sie Wireless > Grundlegende Einstellungen aus der
Drop-Down-Liste anklicken. Die SSID wird beim Wireless-Netzwerk
zur Erkennung angezeigt.
79
Page 80

Wireless 11n 1T1R Router
Verschlüsselung
WPA/WPA2-Codefolge
Pre-Shared Key
Format
Pre-Shared Key
Format
Passwort anzeigen
* Bitte klicken Sie auf Änderungen übernehmen oder die Reset-Taste unten, um die Konfigurationen zu speichern
4. Sicherheitsmodus – WPA2-Gemischt
Wählen Sie einen Sicherheits-Verschlüsselungsmodus für diesen
Router.
WPA-Codefolge: Die Standardeinstellung ist TKIP.
WPA2-Codefolge: Die Standardeinstellung ist AES.
Um das Format zu bestimmen, wählen Sie “Passphrase” oder “Hex”
aus der Drop-Down-Liste aus.
Geben Sie den “Pre-Shared Key” entsprechend des von Ihnen
gewählten Pre-Shared Key-Formats ein. Dies ist das Shared Secret
zwischen AP und STA. Die Länge der in diesem Feld eingetragenen
Zeichen muss über 8 und unter 64 liegen.
Wählen Sie, ob das Passwort angezeigt werden soll oder nicht.
oder zurückzusetzen.
Begriffe Informationen
Bitte wählen Sie eine SSID, die Sie für diesen Router eingestellt
Wählen Sie eine SSID
Verschlüsselung
haben, indem Sie Wireless > Grundlegende Einstellungen aus
der Drop-Down-Liste anklicken. Die SSID wird beim
Wireless-Netzwerk zur Erkennung angezeigt.
Wählen Sie einen Sicherheits-Verschlüsselungsmodus für
diesen Router.
80
Page 81

Wireless 11n 1T1R Router
WPA / WPA2 Codefolge
Pre-Shared Key Format
Pre-Shared Key
Passwort anzeigen
* Bitte klicken Sie auf Änderungen übernehmen oder die Reset-T aste unten, um die Konfigurationen zu speichern oder
zurückzusetzen.
Die Codefolge ist gemischt (TKIP und AES).
Um das Format zu bestimmen, wählen Sie “Passphrase” oder
“Hex” aus der Drop-Down-Liste aus.
Geben Sie den “Pre-Shared Key” entsprechend des von Ihnen
gewählten Pre-Shared Key-Formats ein. Die Länge der in
diesem Feld eingetragenen Zeichen muss über 8 und unter 64
liegen.
Wählen Sie, ob das Passwort angezeigt werden soll oder nicht.
81
Page 82

Wireless 11n 1T1R Router
3.4.4 Zugangskontrolle
Um die Zugangsauthentifizierungen von Stationen der Clients zu begrenzen, können Sie die
Kontrollliste auf dieser Seite einstellen.
Begriffe Informationen
Klicken Sie auf die Drop-Down-Liste, um den
Zugangskontrollmodus zu wählen. Sie können
Wireless-Zugangskontrollmodus
MAC Adresse & Kommentar
Aktuelle Zugangskontrollliste
* Bitte klicken Sie auf Änderungen übernehmen oder die Reset-Taste unten, um die Konfigurationen zu speichern oder
“Aufgelistete zulassen” wählen, um diesen MAC-Adressen
für dieses Gerät den Zugriff zu erlauben oder wählen Sie
“Aufgelistete verweigern”, um ihnen den Zugriff zu
verweigern oder wählen Sie “Deaktivieren”.
Geben Sie die MAC-Adresse ein, die Sie kontrollieren
möchten und beschreiben Sie sie.
Listen Sie die MAC-Zugangskontrolleinstellungen auf, die
Sie zuvor hinzugefügt haben. Klicken Sie auf die Liste, um
die Konfiguration zu verändern. Um die Station aus der
Liste zu löschen, klicken Sie das Kontrollkästchen des
gewählten Begriffes an und klicken Sie auf "Ausgewählte
löschen". Falls Sie alle Stationen aus der Liste löschen
wollen, klicken Sie auf "Alle löschen", um sie alle zu
entfernen.
zurückzusetzen.
82
Page 83

Wireless 11n 1T1R Router
3.4.5 Wireless Site Survey (nur im Client-Modus)
Wenn Sie sich im Wireless Client mode befinden, klicken Sie auf den link Wireless > Wireless
Site Survey im Menü, um nachfolgenden Bildschirminhalt zu sehen.
1. Folgende Seite erscheint, die Ihnen hilft, das Wireless Netzwerk zu scannen.
2. Gehen Sie auf “Site Survey”, und Router sowie AP werden gescannt. Diese Seite zeigt Ihnen
die vorhandenen wireless Netzwerkinformationen. Wenn Sie dieses Gerät als Station (STA)
nutzen, können Sie es mit einem anderen AP verbinden.
83
Page 84

Wireless 11n 1T1R Router
3. Wählen Sie ein existierendes Netzwerk aus der “Netzwerktafel” und klicken dann auf “Next”.
Nun erscheint folgende Seite:
84
Page 85

Wireless 11n 1T1R Router
4. In diese Seite tragen Sie bitte das Passwort des gewählten APs ein und klicken dann auf
“connect”, um die Verbindung mit dem wireless Netzwerk zu starten.
85
Page 86

Wireless 11n 1T1R Router
5. Während des Verbindungsprozesses erscheint folgende Seite. Bitte warten Sie, bis die
Verbindung hergestellt wurde.
6. Wenn Ihre Verbindung erfolgreich ist, wird folgende Seite angezeigt.
7. Sie können zurück zur Management > Status Seite gehen und den Verbindungsstatus
bestätigen.
86
Page 87

Wireless 11n 1T1R Router
87
Page 88

Wireless 11n 1T1R Router
3.4.6 WPS-Einstellungen
Das Hauptziel des Wi-Fi Sicherheits-Setups (Wi-Fi Simple Configuration) ist es, das Einrichten
der Sicherheitsdienste und deren Verwaltung im Wi-Fi-Netzwerk zu vereinfachen. Dieser Router
unterstützt die Konfigurations-Setup und benutzt dafür die PIN-Konfigurationsmethode oder die
PBC-Konfigurationsmethode durch einen internen oder externen Registrar.
Begriffe Informationen
WPS deaktivieren
WPS-Status
Self-PIN Number
Push Button
Configuration
(PBC)
Klicken Sie auf dieses Kontrollkästchen, um WPS aufzuheben.
Sie können die Begriffe hier nicht manuell auswählen. Der WPS-Status
wechselt von “Unkonfiguriert” zu “Konfiguriert”, nachdem Sie die
WPS-Funktion aktiviert und einen Wireless-Security-Key für dieses
Gerät eingerichtet haben.
Falls Sie dieses Gerät als Client verwenden, können Sie diesen Code
verwenden, wenn Sie versuchen, dieses Gerät zu einem anderen AP zu
verbinden, indem Sie die PIN-Methode anwenden.
Die PBC-Methode oder Knopfdruck-Methode erreicht durch einfachen
Tastendruck sowohl auf den AP und die neuen STA die Funktion eines
einfachen Setups der WPS-Verbindung. Sie können einfach auf die
unter dem Gehäuse des Routers drücken. Nach Klick auf die Taste
Taste auf dieser GUI-Seite klicken oder die WPS-Taste
88
Page 89

Wireless 11n 1T1R Router
starten Sie bitte das Client-WPS und drücken Sie innerhalb von 2
Minuten die PBC-Taste.
Aktuelle Key-Info
Client PIN
Number
* Bitte klicken Sie auf Änderungen übernehmen oder die Reset-Taste unten, um die Konfigurationen zu
speichern oder zurückzusetzen.
Falls Sie sich im Client-Modus befinden, ist die Schnittstelle anders.
Klicken Sie Wireless > WPS in den Menü-Links, um den Bildschirm wie unten sichtbar
anzuzeigen.
Auf dieser Seite können Sie Ihr Gerät zu anderen Netzwerken mit Hilfe der PIN- oder
PBC-Methode verbinden
Dieses Feld zeigt die von Ihnen konfigurierte aktuelle Key-Information
an.
Methode mit persönlicher Identifikations-Nummer (PIN). Die Benutzer
müssen den PIN-Code des anzumeldenden Gerätes eingeben und auf
die
und dem anzumeldenden Gerät herzustellen. Nach Klick auf die Taste
starten Sie bitte das Client-WPS und drücken Sie die PIN-Taste
innerhalb von 2 Minuten.
Taste klicken, um eine Kommunikation zwischen dem AP
.
Begriffe Informationen
WPS deaktivieren
Self-PIN Number
PIN-Konfiguration
Klicken Sie hier, um das WPS zu deaktivieren und
entfernen Sie die Markierung um es zu aktivieren.
Falls Sie dieses Gerät als Client verwenden, können Sie
diesen Code verwenden, wenn Sie versuchen, dieses
Gerät zu einem anderen AP zu verbinden, indem Sie die
PIN-Methode anwenden.
Nachdem der AP oder gemeinsam genutzte Router Ihre
Self-PIN-Nummer eingegeben hat und nach Klicken der
Taste
auf dieser GUI-Seite können Sie die
89
Page 90

Wireless 11n 1T1R Router
Taste innerhalb von 2 Minuten drücken, um
die Verbindung herzustellen.
Push Button Configuration
(PBC)
Sie können einfach auf die Taste
GUI-Seite klicken oder die WPS-Taste unter dem
Gehäuse des Routers drücken.
auf dieser
3.5 TCP/IP-Einstellungen
3.5.1 LAN-Schnittstelleneinstellung
Zur Einstellung der Konfiguration der LAN-Schnittstelle, privaten IP Ihres Router LAN-Ports und
Subnetzmaske für Ihren LAN-Abschnitt.
Begriffe Informationen
IP-Adresse
Subnetzmaske
Standard-Gateway
DHCP Client-Bereich
Die IP Ihres Router LAN-Ports (Standard 192.168.100.1).
Subnetzmaske Ihres LAN (Standard 255.255.255.0). Alle Geräte im
Netzwerk müssen über die gleiche Subnetzmaske verfügen, um mit
dem Netzwerk zu kommunizieren.
Geben Sie die “IP- Adresse” des Routers in Ihrem Netzwerk ein.
DHCP steht für Dynamic Host Configuration Protocol. Es ist ein
Protokoll um dynamische IP- Adressen "automatisch” zuzuweisen.
In diesem Feld werden Sie gebeten, den DHCP Client
IP-Adressbereich zu spezifizieren (Standard 100~200). Sie können
auch auf die Taste “Client zeigen” klicken, um diese verbundenen
DHCP-Clients aufzulisten.
90
Page 91

Wireless 11n 1T1R Router
Anmerkung: Im Router-/Client-Modus ist die
DHCP-Server-Standardeinstellung aktiviert. Im AP-Modus jedoch ist
die DHCP- Server-Standardeinstellung deaktiviert.
* Bitte klicken Sie auf Änderungen übernehmen oder die Reset-Taste unten, um die Konfigurationen zu speichern
oder zurückzusetzen.
Aktive DHCP-Client-Liste
Das ist das Fenster, das erscheint, nachdem Sie auf die Taste geklickt haben. Es
zeigt die Informationen der IP-Adresse, MAC-Adresse und die abgelaufene Zeit der
DHCP-Clients, die sich mit diesem Gerät verbunden haben.
3.5.2 WAN Schnittstelleneinstellung (Router-Modus und Client-Modus)
Diese Seite ermöglicht es dem Benutzer, die Parameter für die Verbindung mit dem Internet zu
konfigurieren. Sie können den Internet-Verbindungstyp aus der Drop-Down-Liste neben dem
“WAN Zugangstyp” wählen und Parameter für jeden Modus konfigurieren. Sie können zwischen
drei Modi wählen: Statischer, DHCP und PPPoE.
91
Page 92

Wireless 11n 1T1R Router
A
A
A
A
Begriffe Informationen
WAN-Zugangstyp
MTU-Größe
DNS automatisch
erhalten
DNS manuell einstellen
MAC-Adresse klonen
Wählen Sie als Modus für den Zugang zu WAN Statisch, DHCP
Client oder PPPoE.
Aktivierung der maximalen Übertragungseinheit (MTU) des
Routers. Jedes Paket, das größer ist als diese Zahl, wird vor
dem Senden in passende Größen aufgeteilt. Eine größere
Nummer wird die Übertragungsleistung verbessern.
Geben Sie Ihre MTU-Nummer in das Textfeld ein, um die
Begrenzung einzustellen.
Falls die DNS von Ihrem ISP dynamisch ist, wählen Sie “DNS
automatisch erhalten".
Zur Spezifizierung des Domain Name System (DNS). Der
DNS-Server wandelt Domain-Namen in IPSie die DNS, die Sie von Ihrem ISP erhalten haben, in DNS 1 und
DNS 2 ein.
Es gibt zwei Möglichkeiten, die MAC-Adresse zu klonen.
Eine Möglichkeit ist die Eingabe der MAC-
dressverzeichnis in das Textfeld. Vielleicht müssen Sie die
MACHinzufügen' klicken und sie zur “History MAC Tabelle” für ein
einfaches Backup hinzufügen. Oder Sie klicken auf die Taste
dresse speichern. Sie können auf die Taste 'Manuelles
dressen um. Geben
dresse aus dem
92
Page 93

Wireless 11n 1T1R Router
'MAC Klonen'. Dann wird die MAC-Adresse von Ihrer
Netzwerkkarte in den Rechner kopiert.
Anmerkung: Die 'History MAC-Tabelle' kann maximal drei
MAC-Adressen speichern.
Um die zuvor von Ihnen hinzugefügte MAC-Adresse zu löschen,
klicken Sie auf das Kontrollkästchen des ausgewählten Begriffs
History MAC-Tabelle
* Bitte klicken Sie auf Änderungen übernehmen oder die Reset-Taste unten, um die Konfigurationen zu speichern
1. Statischer Modus (feste IP)
auf der rechten Seite und klicken Sie auf “Ausgewählte löschen”.
Falls Sie alle MAC-Adressen löschen möchten, klicken Sie auf
“Alle löschen” um alle zu entfernen.
oder zurückzusetzen.
Begriffe Informationen
IP-Adresse, Subnetzmaske
und Standard-Gateway
MTU-Größe
DNS 1~2
Geben Sie die IP-Adresse, Subnetzmaske und das
Standard-Gateway ein, das Sie von Ihrem
Internet-Service-Provider (ISP) erhalten haben.
Aktivierung der maximalen Übertragungseinheit (MTU)
des Routers. Jedes Paket, das größer ist als diese Zahl,
wird vor dem Senden in passende Größen aufgeteilt.
Eine größere Nummer wird die Übertragungsleistung
verbessern.
Geben Sie Ihre MTU-Nummer in das Feld ein, um die
Begrenzung einzustellen (Standard 1500 Bytes).
Zur Spezifizierung des Domain Name System (DNS).
Der DNS-Server wandelt Domain-Namen in IP-Adressen
um. Geben Sie die DNS, die Sie von Ihrem ISP erhalten
haben, in DNS 1 und DNS 2 ein.
93
Page 94

Wireless 11n 1T1R Router
A
2. DHCP (Auto-Konfig.)
Begriffe Informationen
Aktivierung der maximalen Übertragungseinheit (MTU) des
Routers. Jedes Paket, das größer ist als diese Zahl, wird vor
dem Senden in passende Größen aufgeteilt. Eine größere
MTU-Größe
Nummer wird die Übertragungsleistung verbessern.
DNS automatisch
erhalten
DNS manuell
einstellen
3. PPPoE (ADSL)
Geben Sie Ihre MTU-Nummer in das Textfeld ein, um die
Begrenzung einzustellen (Standard 1492 Bytes).
Falls die DNS von Ihrem ISP dynamisch ist, wählen Sie “DNS
automatisch erhalten".
Zur Spezifizierung des Domain Name System (DNS). Der
DNS-Server wandelt Domain-Namen in IPSie die DNS, die Sie von Ihrem ISP erhalten haben, in DNS 1
und DNS 2 ein.
dressen um. Geben
94
Page 95

Wireless 11n 1T1R Router
Begriffe Informationen
Benutzername&Passwort
MTU-Größe
DNS automatisch
erhalten
DNS manuell einstellen
Geben Sie den Benutzernamen und das Passwort ein, das Sie
von Ihrem ISP erhalten haben.
Aktivierung der maximalen Übertragungseinheit (MTU) des
Routers. Jedes Paket, das größer ist als diese Zahl, wird vor
dem Senden in passende Größen aufgeteilt. Eine größere
Nummer wird die Übertragungsleistung verbessern.
Geben Sie Ihre MTU-Nummer in das Textfeld ein, um die
Begrenzung einzustellen (Standard 1452 Bytes).
Falls die DNS von Ihrem ISP dynamisch ist, wählen Sie “DNS
automatisch erhalten".
Zur Spezifizierung des Domain Name System (DNS). Der
DNS-Server wandelt Domain-Namen in IP-Adressen um.
Geben Sie die DNS, die Sie von Ihrem ISP erhalten haben, in
DNS 1 und DNS 2 ein.
95
Page 96

Wireless 11n 1T1R Router
3.6 Firewall-Einstellungen (Router-Modus und Client-Modus)
MAC Filtern
Der Wireless-Router kann die ausgehenden Pakete nach Sicherheits- oder Verwaltungsaspekten
filtern.
Begriffe Informationen
MAC Filtern aktivieren
MAC-Adresse
Kommentar
Aktuelle Filtertabelle
* Bitte klicken Sie auf Änderungen übernehmen oder die Reset-Taste unten, um die Konfigurationen zu speichern
oder zurückzusetzen.
Klicken Sie hier, um die Konfiguration zu aktivieren und
entfernen Sie die Markierung um sie zu deaktivieren.
Geben Sie die MAC-Adresse der Wireless-Stationen ein,
denen Sie den Zugang zum Internet über das Gateway
verweigern wollen.
Geben Sie einen beliebigen Text ein, um diese Zuordnung
zu beschreiben.
Listet die MAC-Filter-Einstellungen auf, die Sie zuvor
hinzugefügt haben. Um die Einstellungen aus der Liste
zu löschen, klicken Sie das Kontrollkästchen des
gewählten Begriffes an und klicken Sie auf "Ausgewählte
löschen". Falls Sie alle MAC-Adressen löschen möchten,
klicken Sie auf “Alle löschen” um alle zu entfernen.
96
Page 97

Wireless 11n 1T1R Router
3.7 Verwaltung
3.7.1 Status
Diese Informationsseite zeigt den aktuellen Status und die grundlegenden Einstellungen dieses
Gerätes an. Sie können überprüfen, ob die Parameter Ihrer Konfiguration entsprechen.
3.7.2 Statistik
Diese Seite zeigt den Benutzern die Informationen des Datentransfers und kontrolliert den Status
dieses Routers einschließlich der gesendeten und empfangenen Pakete. Klicken Sie auf die Taste
um den neuesten Bericht zu sehen.
97
Page 98

Wireless 11n 1T1R Router
3.7.3 Log
Diese System-Log-Seite zeigt Informationen über die aktuellen Aktivitäten des Routers an.
Aktivieren der System-Log-Funktion:
1. Markieren Sie das Kontrollkästchen "Log aktivieren".
2. Um alle Informationen über das System zu sehen, wählen Sie das Kontrollkästchen "System
alle".
Um nur die Wireless-Informationen zu sehen, wählen Sie das Kontrollkästchen "Wireless".
3. Klicken Sie zur Aktivierung auf die Taste
anklicken, um die Log-Information zu aktualisieren oder die Taste , um die
Log-Tabelle zu löschen.
. Sie könnten auch die Taste
98
Page 99

Wireless 11n 1T1R Router
3.7.4 Upgrade Firmware
Manchmal muss eine neue Firmware erstellt werden, um das System dieses Gerätes zu
upgraden. Sie können die Firmware, die sie auf dieser Seite haben, upgraden. Für das Upgrade
der Firmware klicken Sie bitte auf die Taste
Rechner und klicken Sie dann auf die Taste
, lokalisieren Sie die Firmware in Ihrem
für die Ausführung.
99
Page 100

Wireless 11n 1T1R Router
100
 Loading...