

Page 1

WLAN GENERAL
WLAN 802.11n , 300 Mbps
User’s Guide (2)
Bedienungsanleitung (36)
Notice d'emploi (71)
Instrucciones de uso (106)
Istruzioni per l'uso (140)
Gebruiksaanwijzing (175)
Instruções de uso (210)
Instrukcja obsługi (243)
Brugermanualer (278)
Bruksanvisning (312)
WLAN GENERAL
1
Page 2

WLAN GENERAL
CE Mark Information
This equipment complies with the requirements relating to electromagnetic compatibility,
EN 55022 class B for ITE, the essential protection requirement of Council Directive
89/336/EEC on the approximation of the laws of the Member States relating to electromagnetic compatibility.
Company has an on-going policy of upgrading its products and it may be possible that
information in this document is not up-to-date. Please check with your local distributors for
the latest information. No part of this document can be copied or reproduced in any form
without written consent from the company.
Trademarks:
All trade names and trademarks are the properties of their respective companies.
Copyright © 2010, All Rights Reserved.
2
Page 3

WLAN GENERAL
GB
OVERVIEW
Thank you for purchasing this product. Read this chapter to know about your
IEEE 802.11n Wireless Adapter.
Unpacking information
Before getting started, please verify that your package includes the following items:
1. IEEE 802.11n Wireless Adapter
2. One quick installation guide
3. One Utility/ Manual CD
3
Page 4
WLAN GENERAL
Introduction to the IEEE 802.11n Wireless Adapter
The IEEE 802.11n Wireless adapter provides users to launch IEEE 802.11n wireless network at 300 Mbps
in the 2.4GHz frequency, which is also compatible with IEEE 802.11b/g wireless devices at 11/54Mbps.
You can configure this adapter with ad-hoc mode to connect to other 2.4GHz wireless computers or with
Infrastructure mode to connect to a wireless AP or router for accessing to Internet. This adapter includes a
convenient Utility for scanning available networks and saving preferred networks that users usually connected with. Security encryption can also be configured by this utility.
Key Features
y Complies with IEEE 802.11b/g/n wireless
standard
y High Speed transfer data rate up to 150/300
Mbps
y Supports auto-installation and diagnostic utili-
ties.
y Support wireless data encryption with
64/128-bit WEP, WPA, WPA2 (TKIP with IEEE
802.1x) and AES functions.
4
Page 5

WLAN GENERAL
LED Status
LED Indications Status Working Status
Radio/ACT LED
Flashing green The Radio adapter is on
Intermittently flashing
green
Fats flashing green The adapter is active and transmitting or
Off The Radio adapter is off
The adapter is connected but is not transmitting or receiving data
receiving data.
5
Page 6
WLAN GENERAL
INSTALLATION GUIDE
Attention:
Make sure to install the software and driver BEFORE
Software Installation
plugging the WLAN adapter into USB port.
Note: The following driver installation guide uses Windows XP as the presumed operation system. The
procedures and screens in Windows 2000, Vista and Win7 are familiar with Windows XP.
Insert the CD-Rom that came with this product to your CD-Rom drive. The menu window pops up automatically. Please click the “Driver” button of this product.
Note: If the CD-Rom fails to auto-run, please click on “My Computer”Æ your CD-Rom Drive then double-click the “Setup” icon to start the this menu.
6
Page 7
WLAN GENERAL
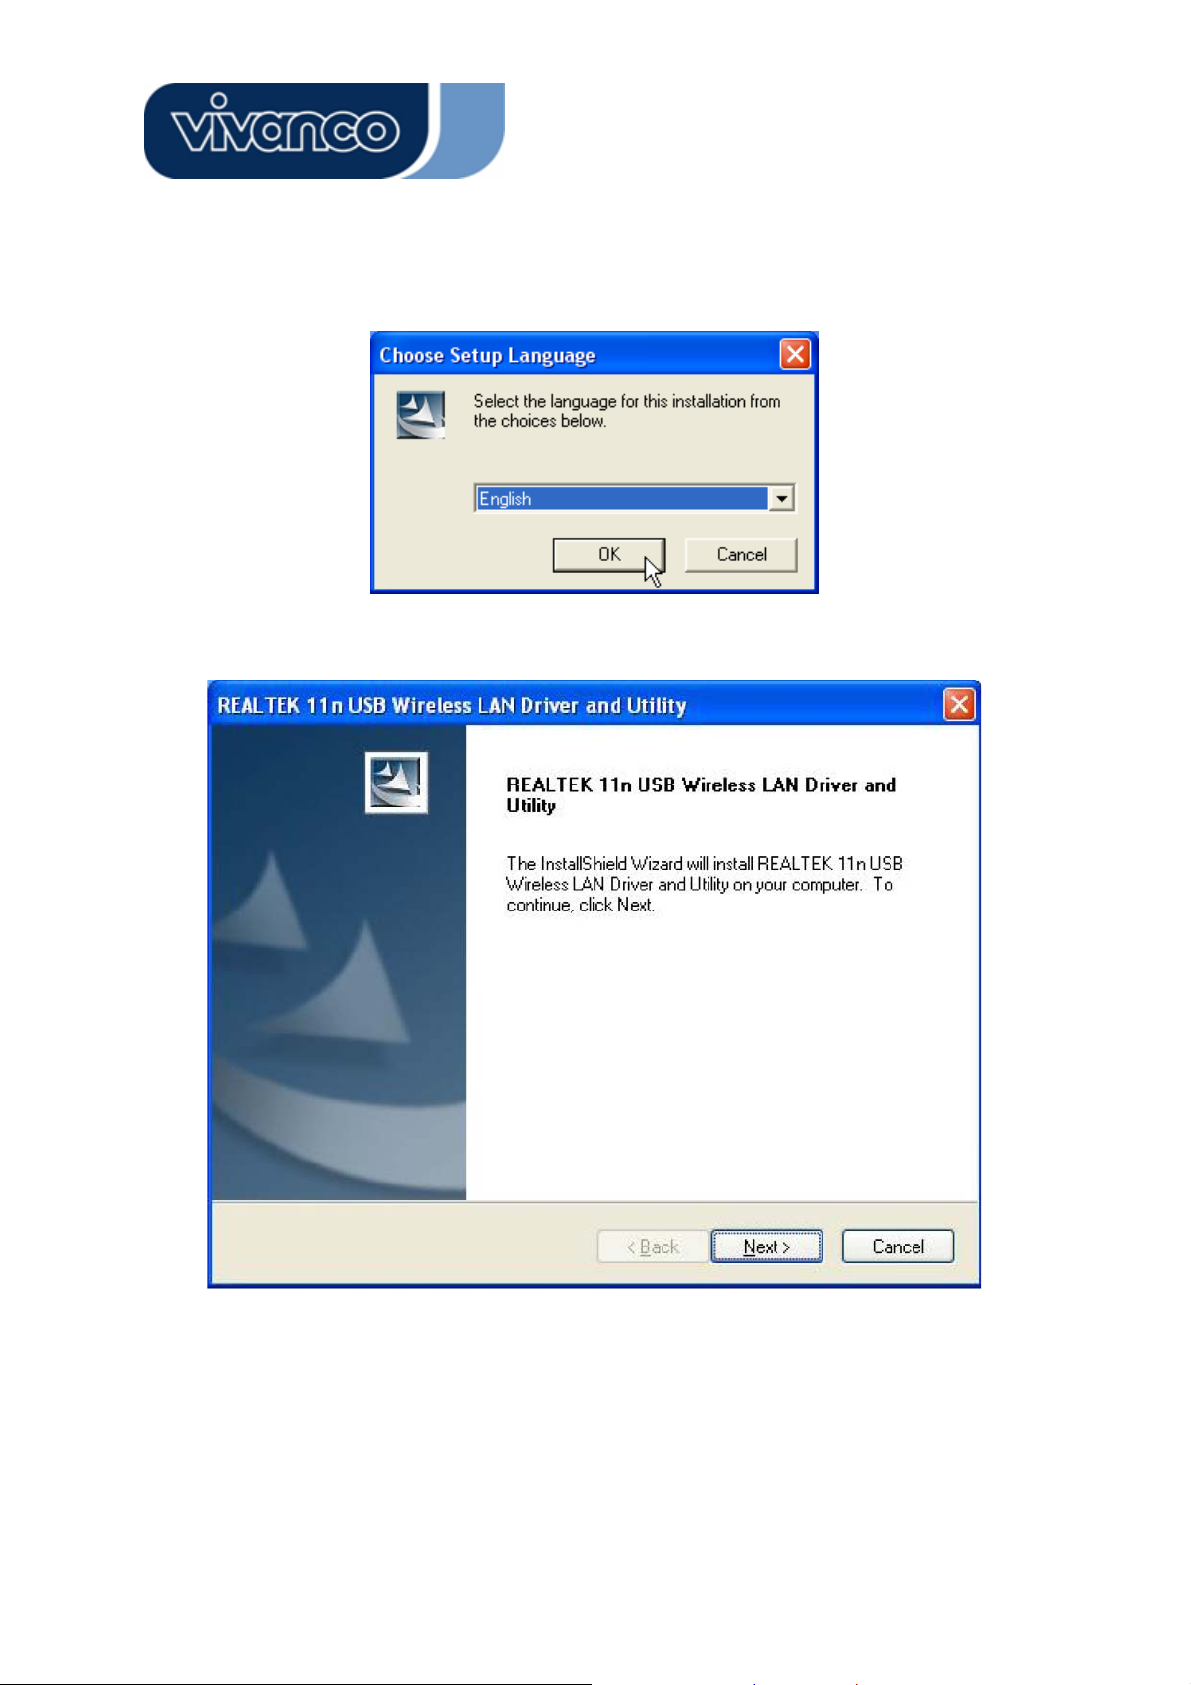
1. The language-selecting window pops up. Please select the language you use and click OK.
2. The welcome window pops up. Click the “Next” button to proceed.
7
Page 8
WLAN GENERAL
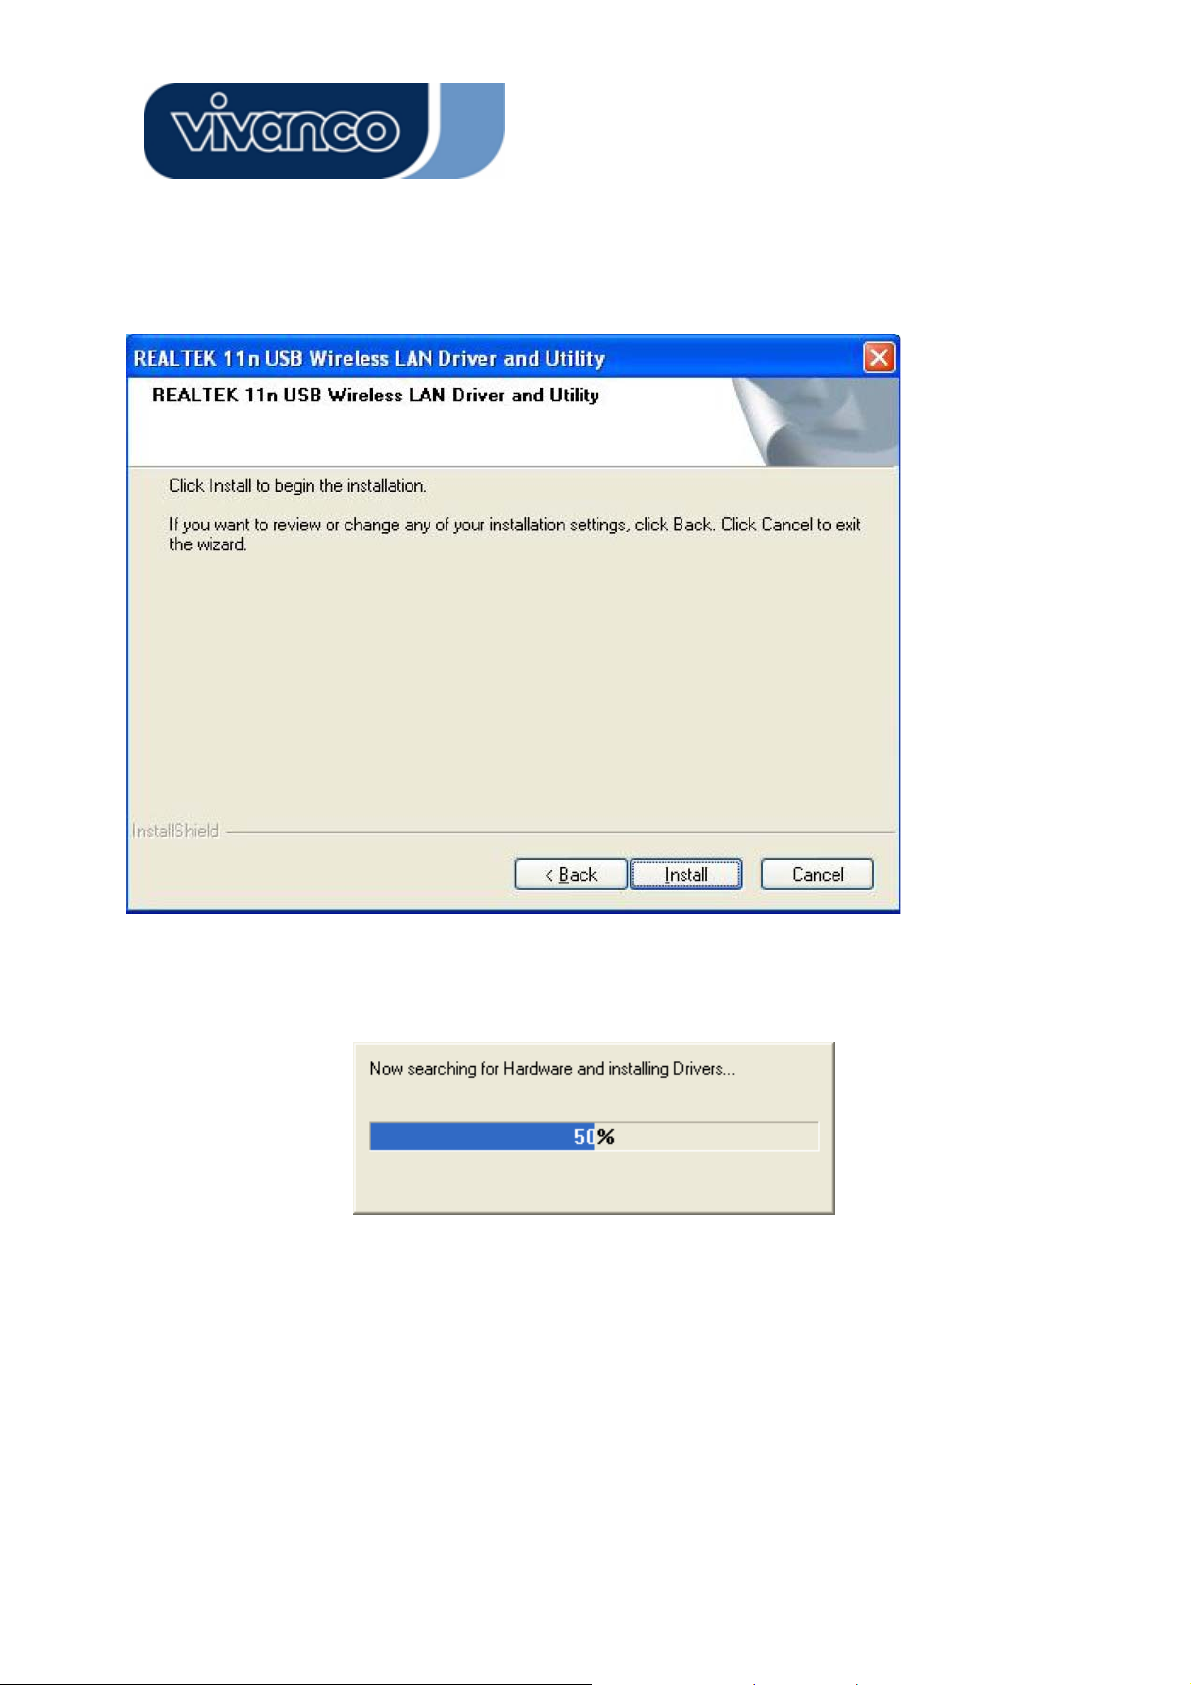
3. Click the “Install” button to start installing.
4. Please wait while installation.
8
Page 9

WLAN GENERAL
5. Click the “Finish” button to complete driver and utility installation.
9
Page 10
WLAN GENERAL
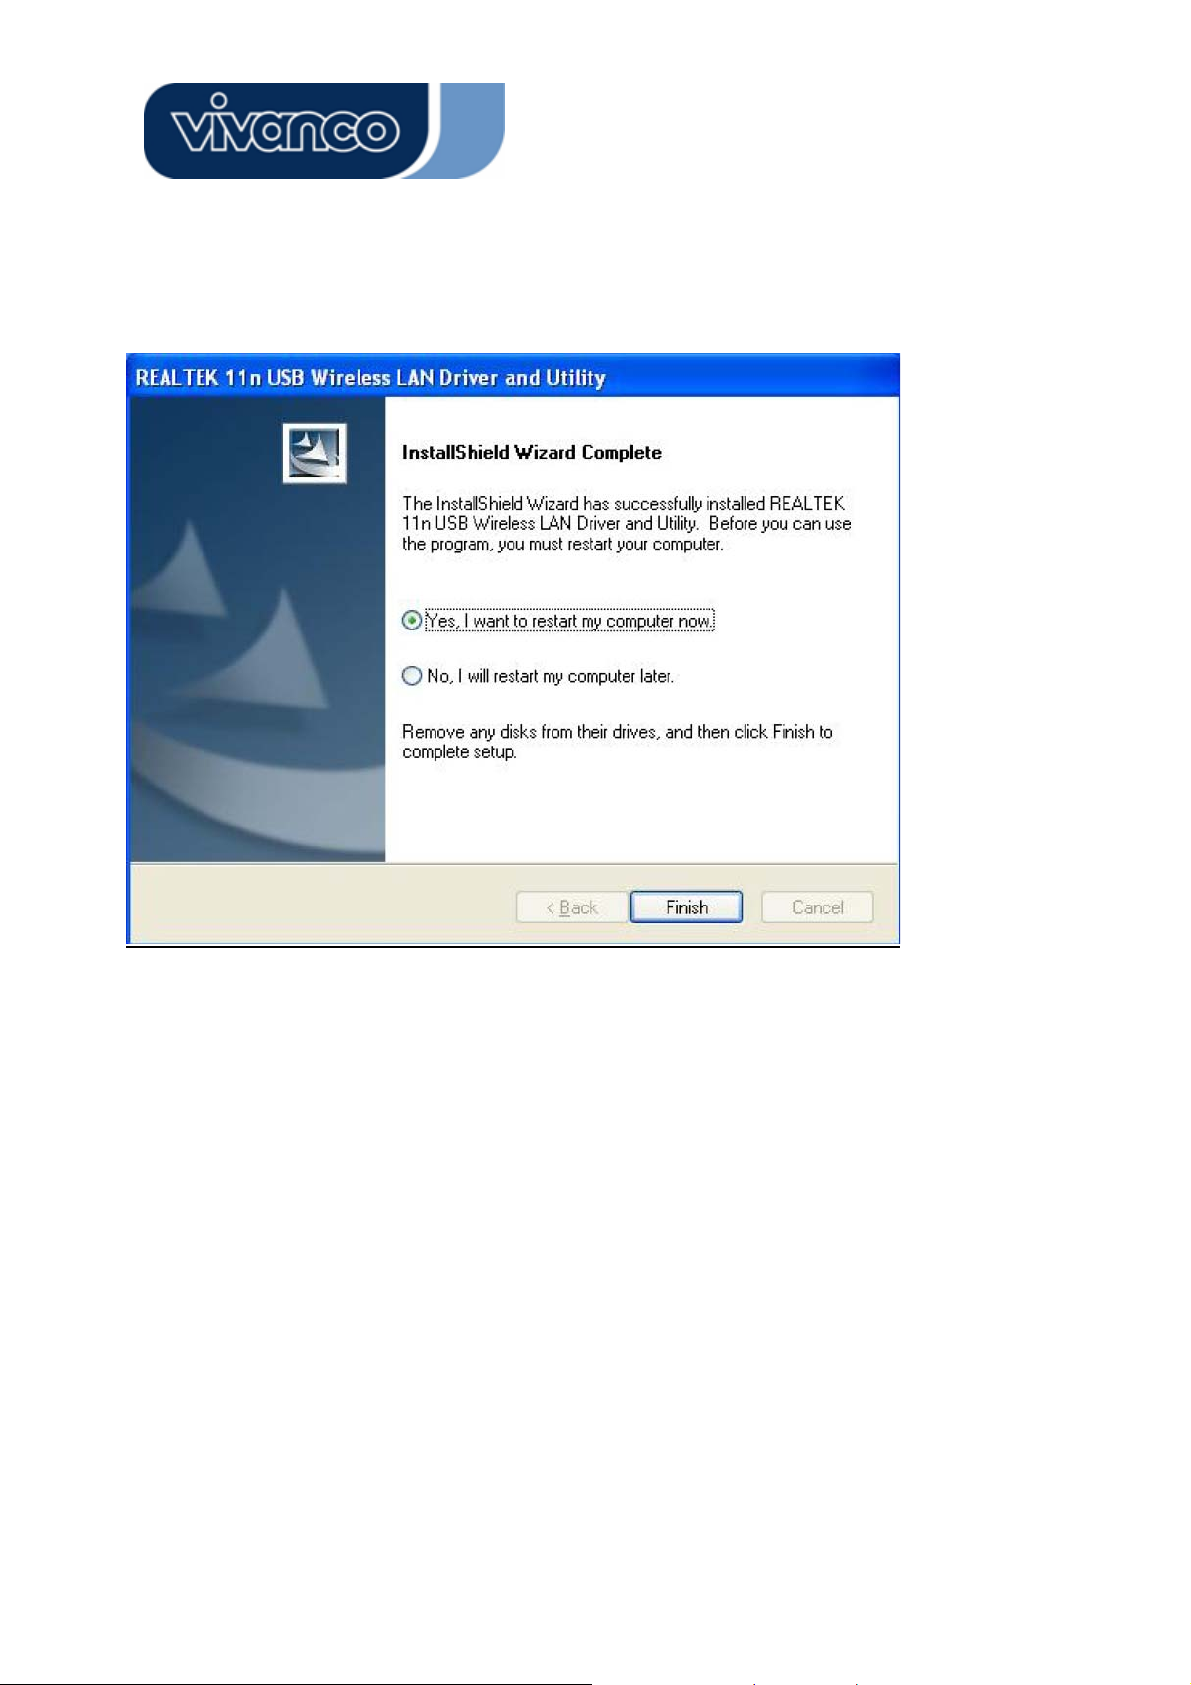
6. Select “Yes, I want to restart my computer now” and click the “Finish” button.
10
Page 11

WLAN GENERAL
MANAGEMENT GUIDE
Read this chapter to understand the management interface of the device and
how to manage the device.
Making a Basic Network Connection
Before You Start
In the following instruction for making a network connection, we use the utility we provided to configure your
wireless network settings.
Note: For Windows XP users that want to configure your wireless network using this Utility, please perform
the following procedures to disable your native Windows XP wireless support (Wireless Zero Configuration
Service)
1. Double click the icon on your desktop to start the utility.
2. Make sure that the “Windows Zero Config” checkbox is unchecked.
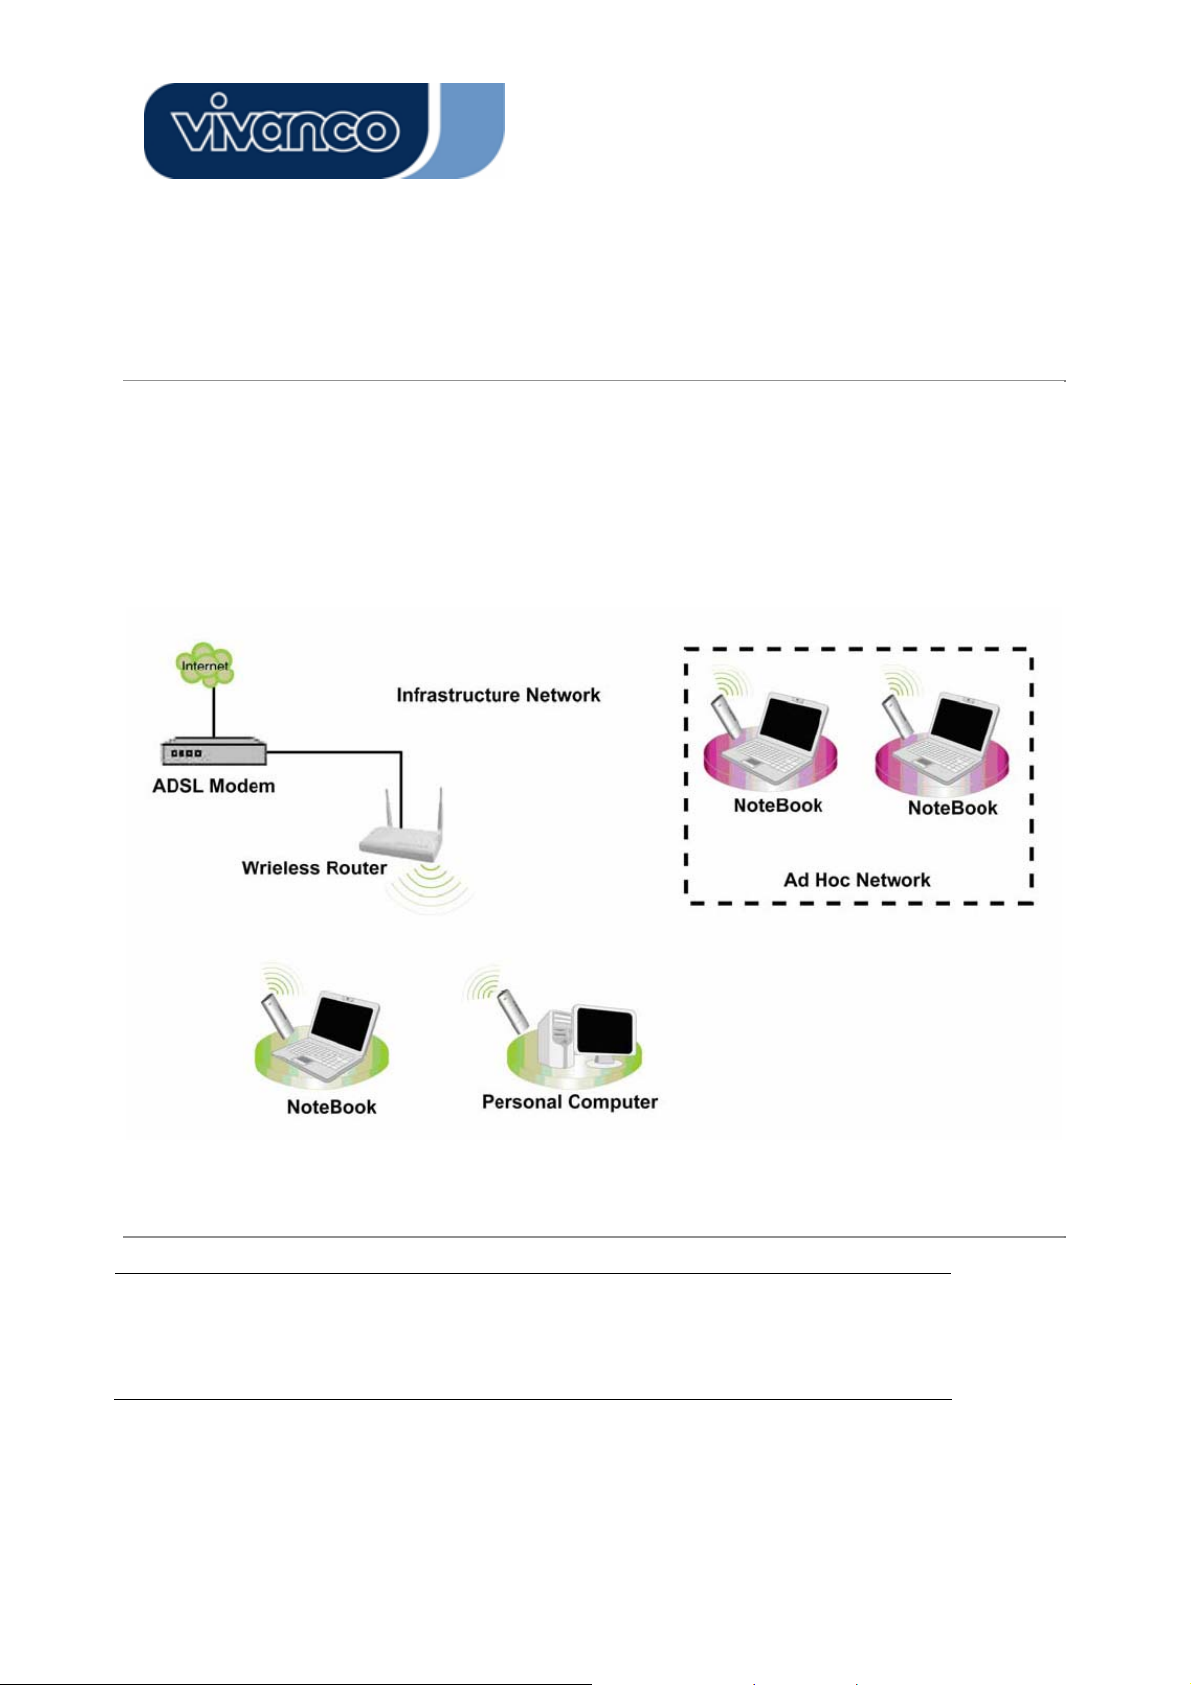
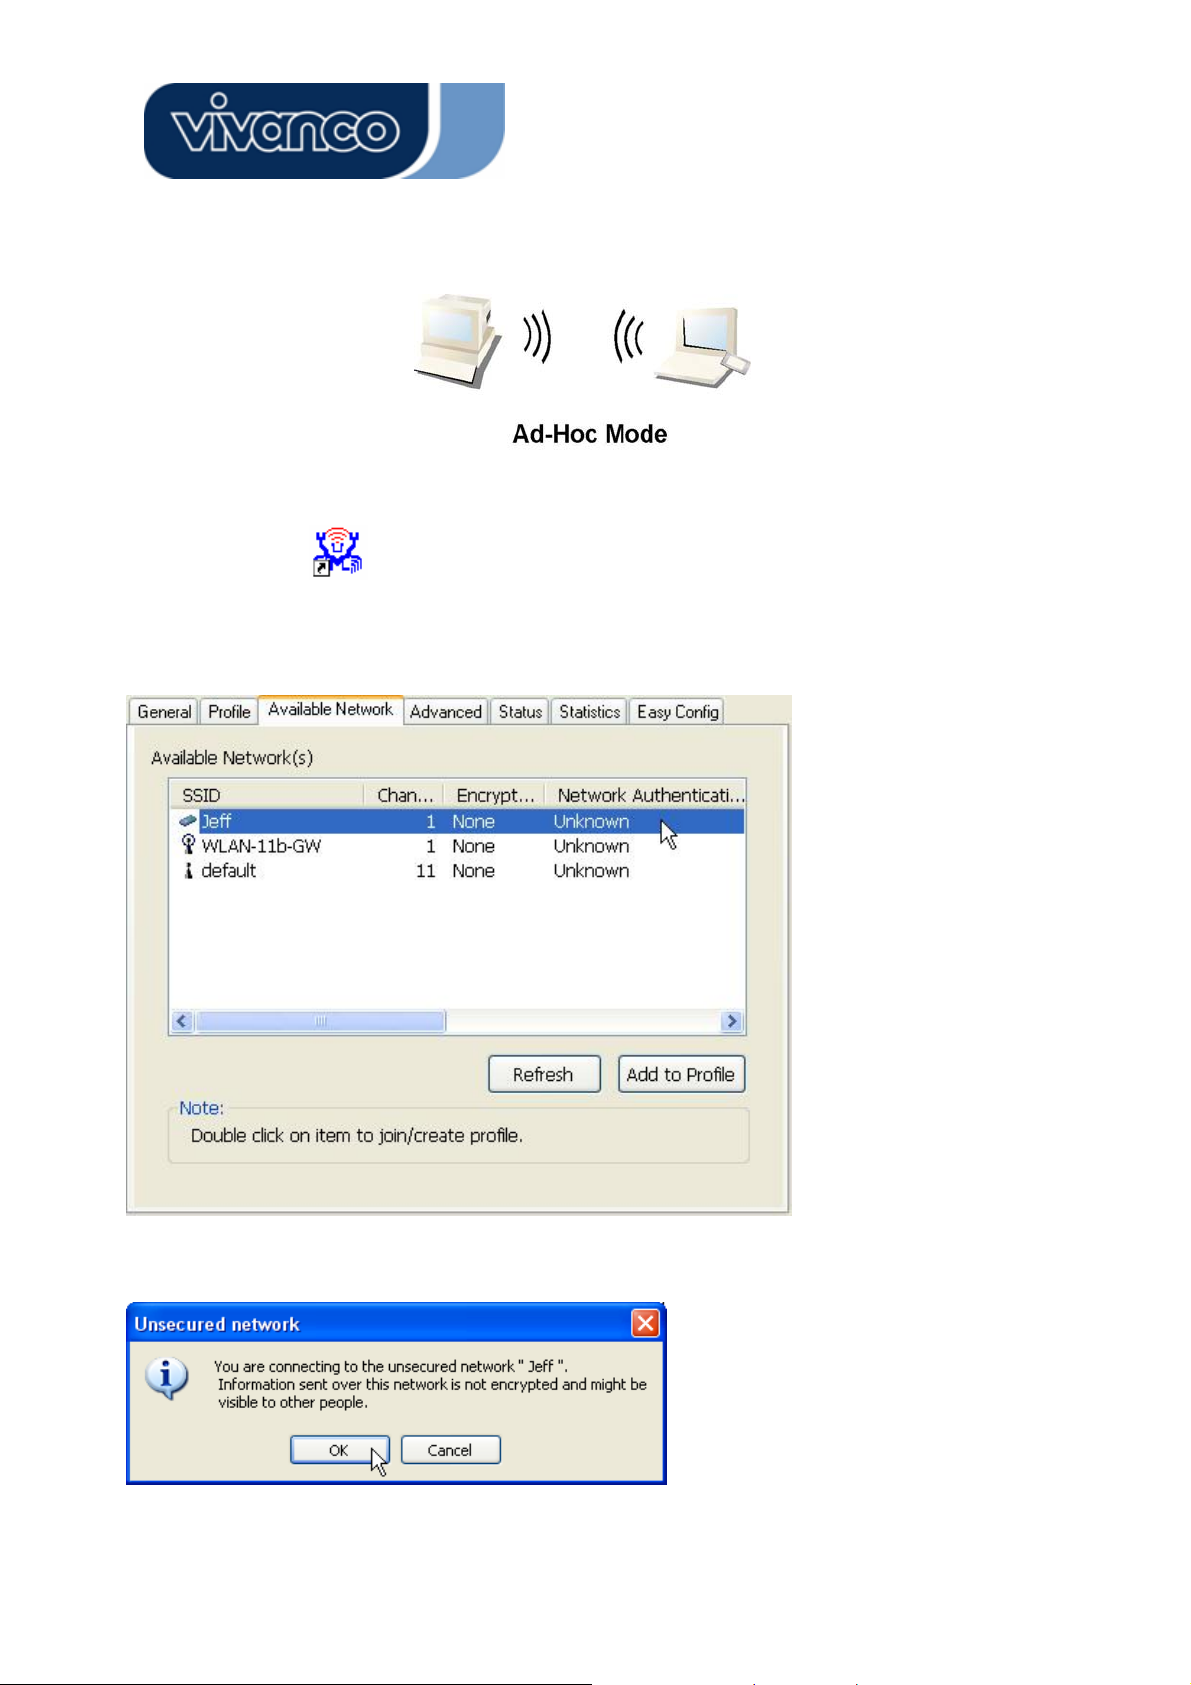
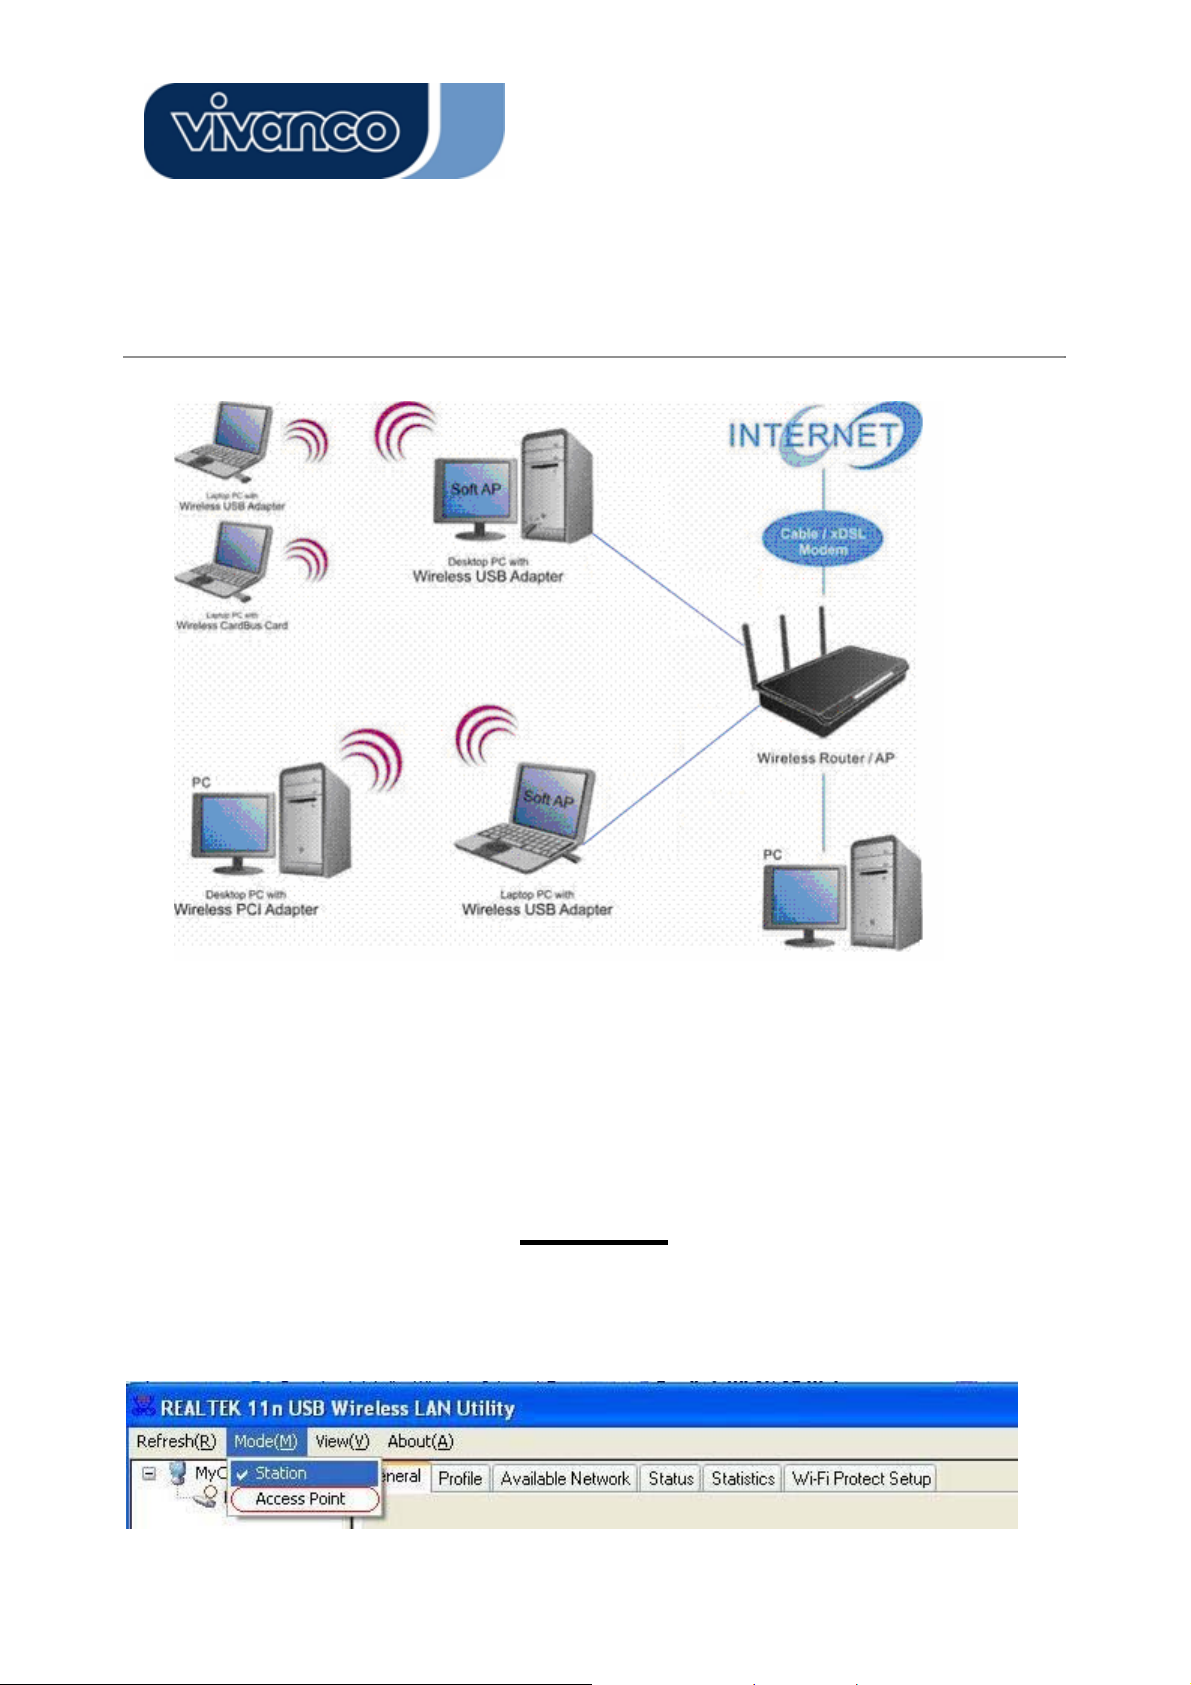
Ad-Hoc Mode
An Ad-Hoc mode wireless network connects two computers directly without the use of a router or AP. It is
also know as a peer-to-peer network. For example, we can install this wireless adapter to two computers
respectively. The communication between the two computers is an Ad-Hoc mode network.
11
Page 12
WLAN GENERAL
To use this adapter in Ad-Hoc Mode
1. Double click the icon on your desktop.
2. Click the “Available Network” button to scan available wireless network adapters. Double click on the
network adapter that you are going to connect to.
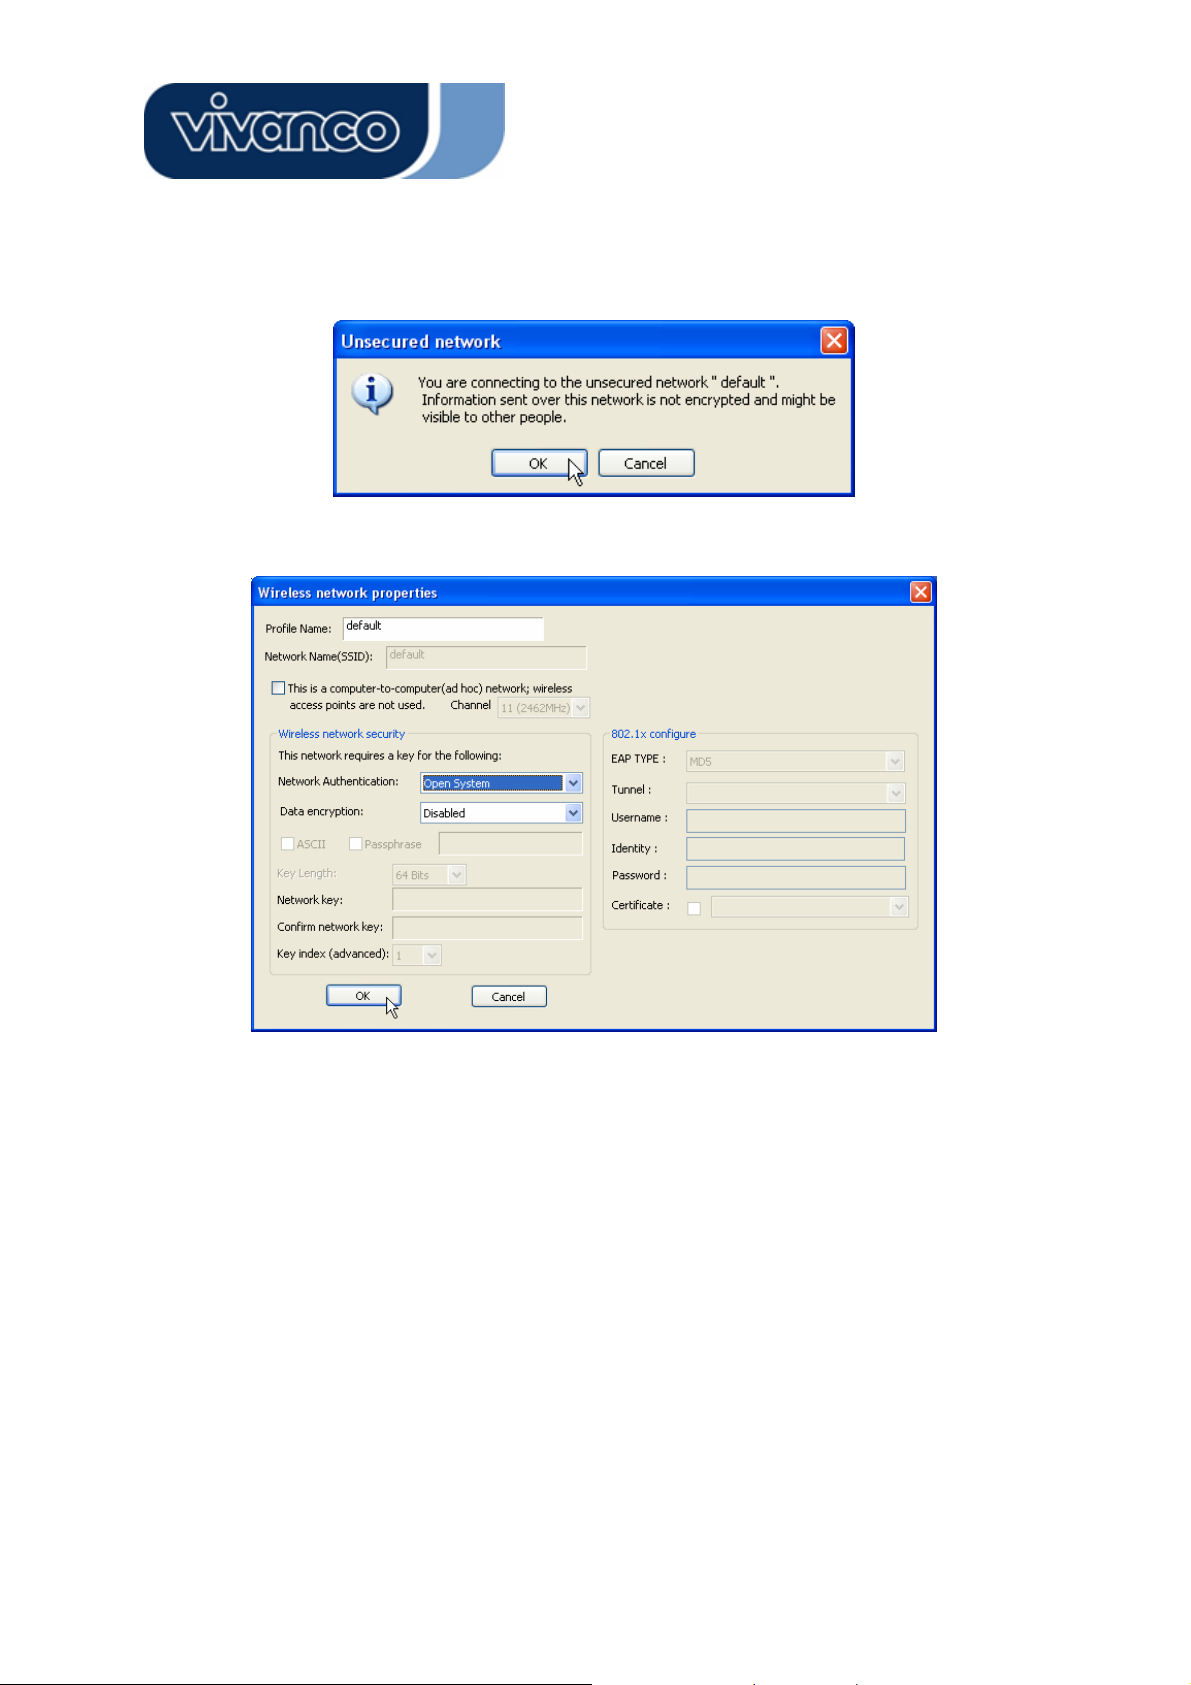
3. Click the OK button to confirm that you are connecting to an open wireless network.
12
Page 13
WLAN GENERAL
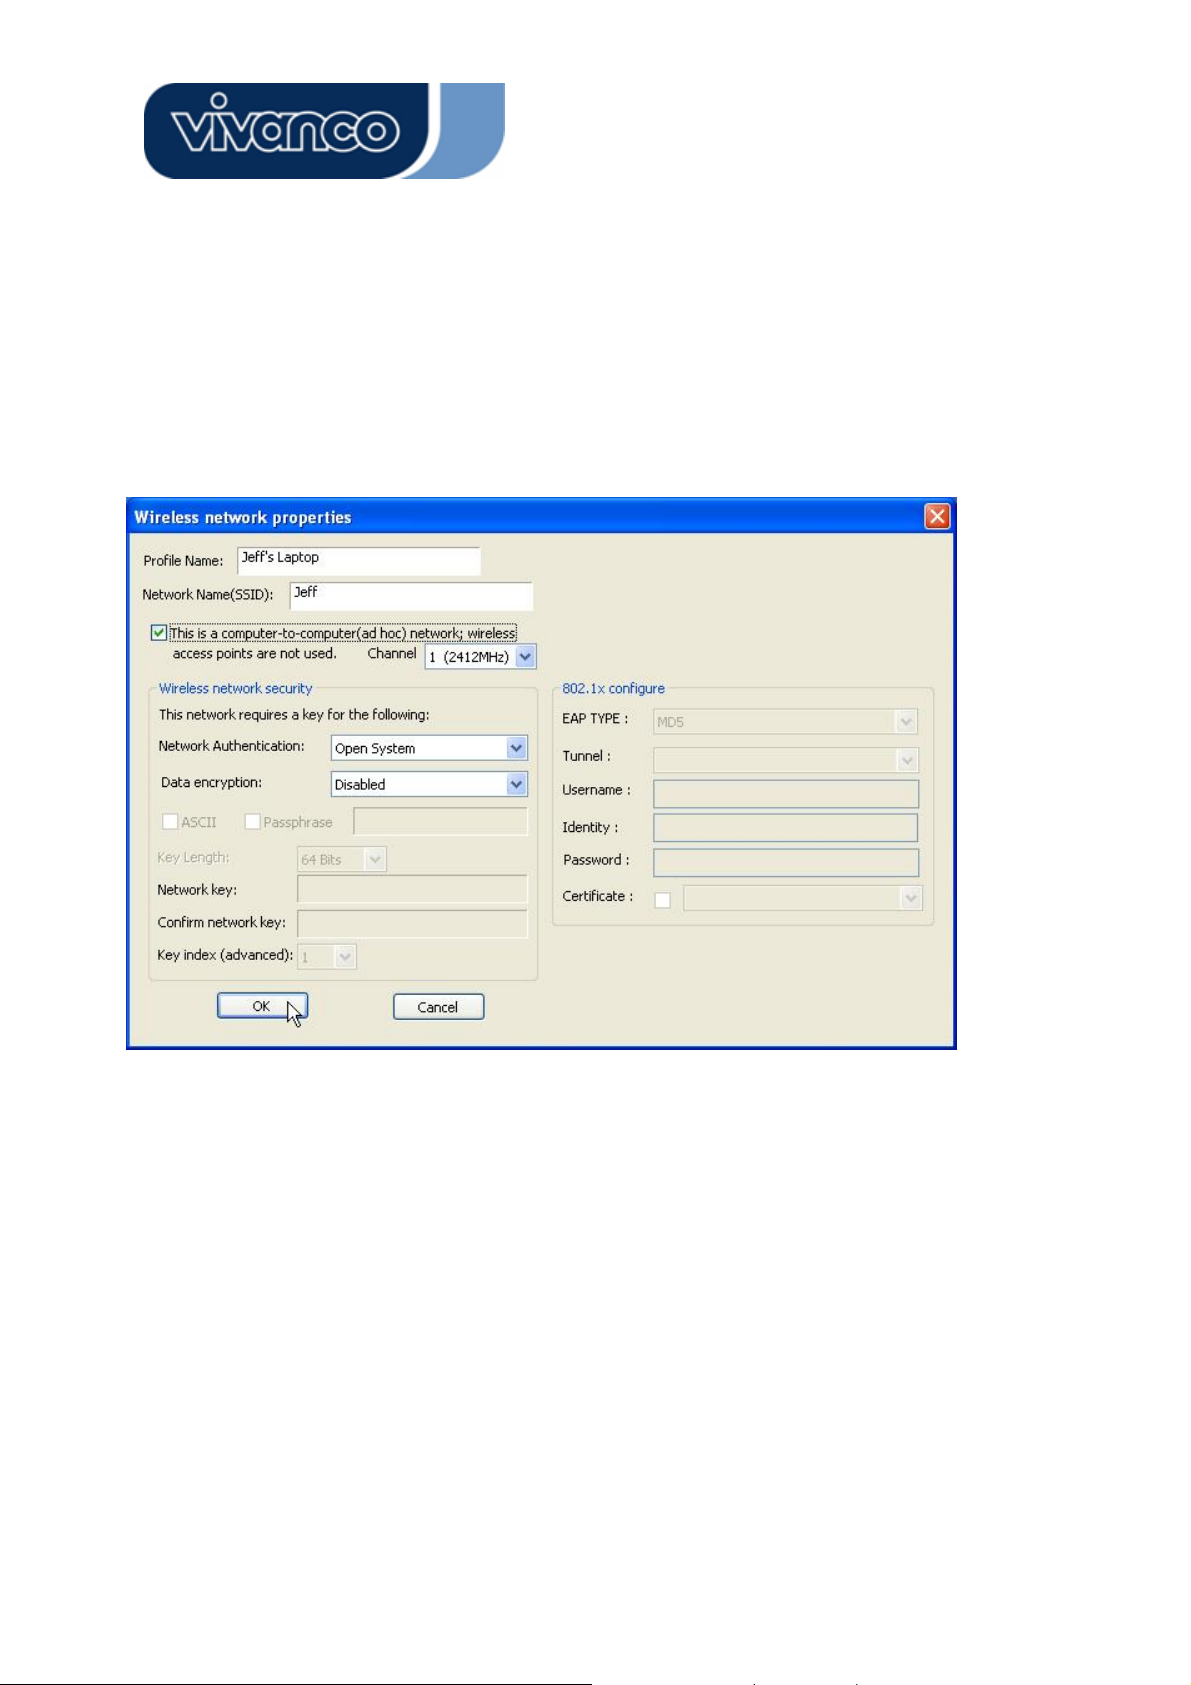
4. Click OK to add this network into the profile list.
Note: This example is an open wireless network. If you are going to connect to a Wireless adapter with
security protection, you will have to configure the encryption settings in this profile to be corresponding to
the other wireless adapter. Please click on the “Network Authentication” drop list to select an authentication method, and then select a “Data encryption” type. Fill in each required blanks and click “OK”.
13
Page 14
WLAN GENERAL
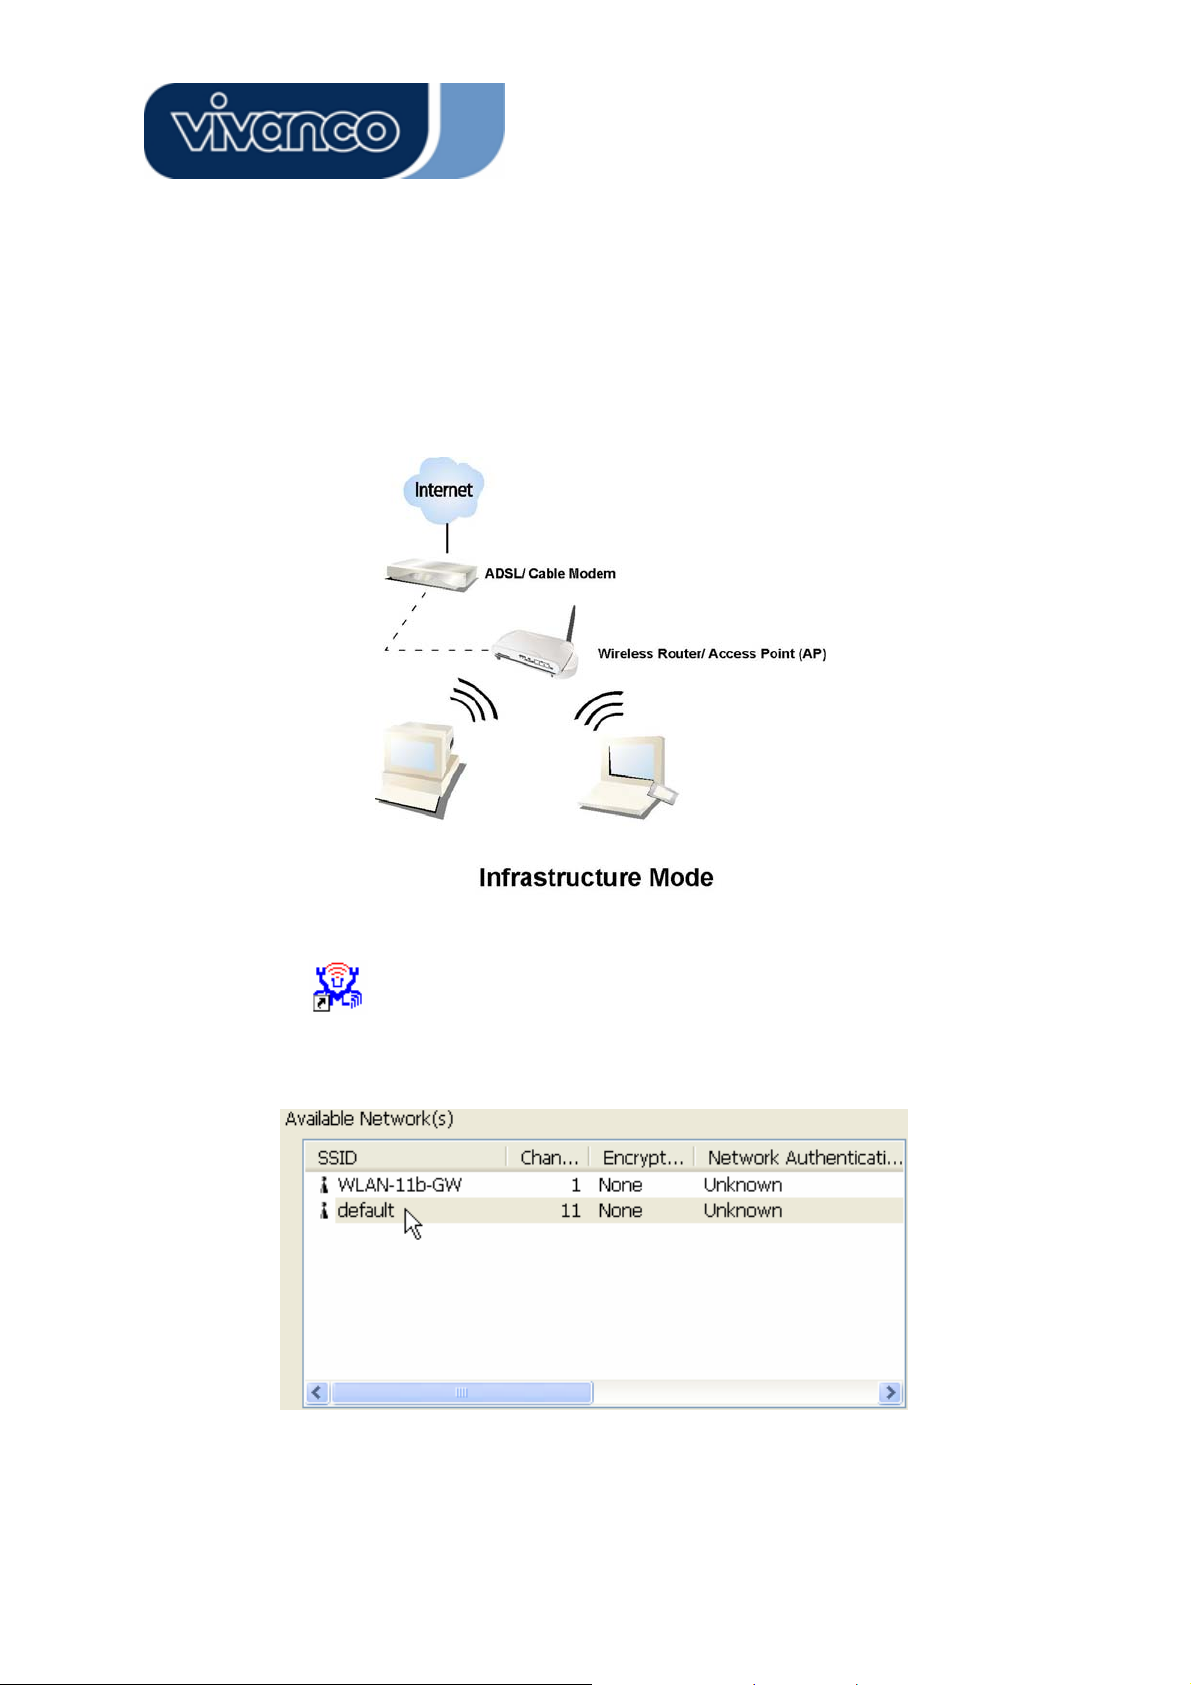
Infrastructure Mode
An Infrastructure Mode network contains at least one wireless client and one wireless AP or router. This
client connects to Internet or intranet by communicating with this wireless AP.
To use this adapter in Infrastructure Mode:
1. Double click the icon on your desktop.
2. Click the “Available Network” button to scan available access points. Double click on the AP that you
are going to connect to.
14
Page 15
WLAN GENERAL
3. Click the OK button to confirm that you are connecting to an open wireless network.
4. Click OK to add this network into the profile list.
15
Page 16
WLAN GENERAL
Note:
This example is an open wireless network. If you are going to connect to an AP with security protection, you
will have to configure the encryption settings in this profile to be corresponding to your AP. Please click on
the “Network Authentication” drop list to select an authentication method, and then select a “Data en-
cryption” type. Fill in each required blanks and click “OK”.
Introduction to the Wireless LAN Utility
Note: This management instruction uses Windows XP as the presumed operation system. Some functions
are not supported in Windows 98se or Windows ME.
Starting the Wireless LAN Utility
Double click the shortcut on your desktop. The Wireless LAN Utility pops up.
You may click on the tabs above to configure this adapter. The checkboxes below provide the following
functions:
Check this checkbox to show the utility icon on your system
Show Tray Icon
Windows Zero Config
Radio Off
Disable Adapter
tray, which is in the notification area at the lower-right corner
of the windows desktop. You may also uncheck it to remove
the utility icon from system tray.
Uncheck this checkbox to use native Windows XP wireless
support (Wireless Zero Configuration Service) instead of using this utility to configure your wireless network.
Check this checkbox to prevent this adapter form transmitting
or receiving signals. Uncheck it to communicate.
Check this checkbox to disable this wireless adapter. Uncheck it to enable this adapter again.
16
Page 17

WLAN GENERAL
Configuration Guide
This chapter describes how to configure your Adapter for wireless connectivity to your Wireless
Local Area Network (WLAN) and how to use the data security encryption features.
Configuration of the adapter in Windows 2000 is similar to configuration in Windows XP. This User
Guide uses Windows XP for example.
After Installing the Adapter, the Adapter icon will appear in your system tray at the bottom of the
screen. This icon shows the signal strength using color to indicate the strength of the received
signal (RSSI).
Purple: no connection.
White: network failing.
Partially green: good signal strength.
Completely green: excellent signal strength.
17
Page 18
WLAN GENERAL
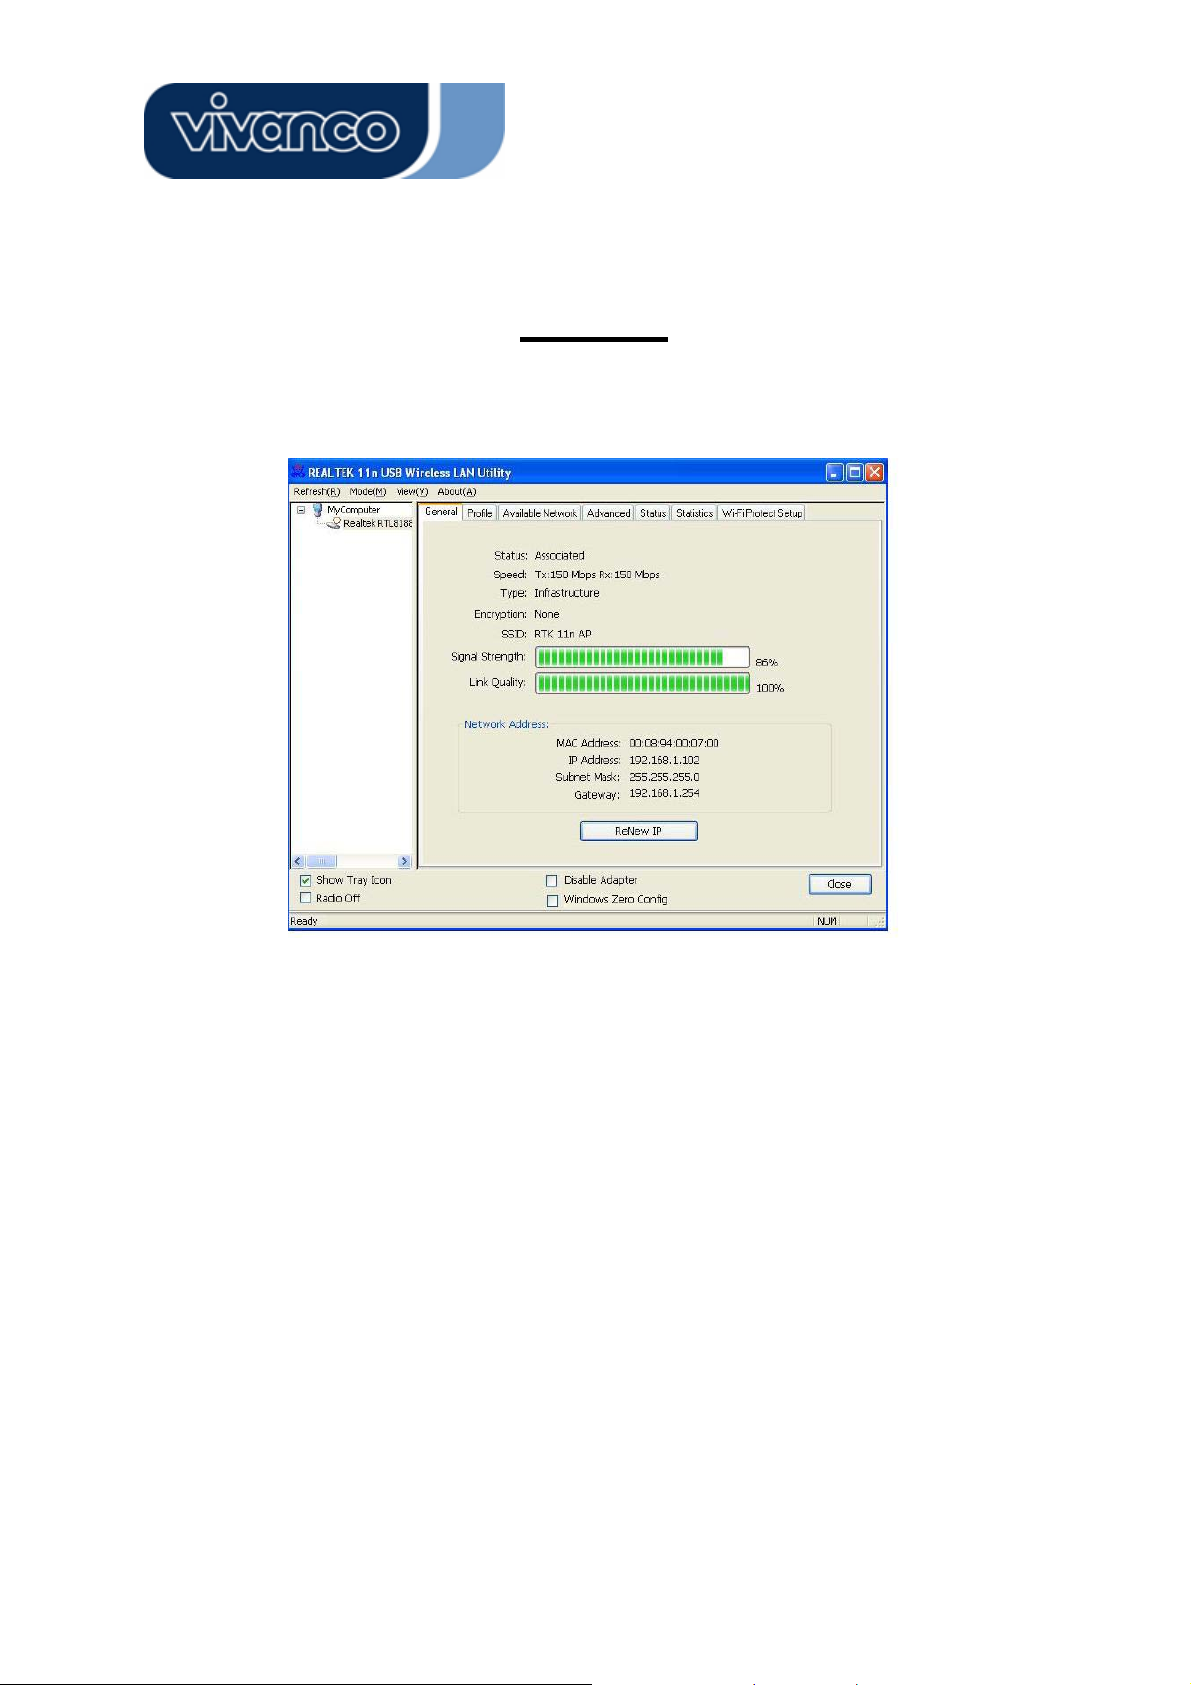
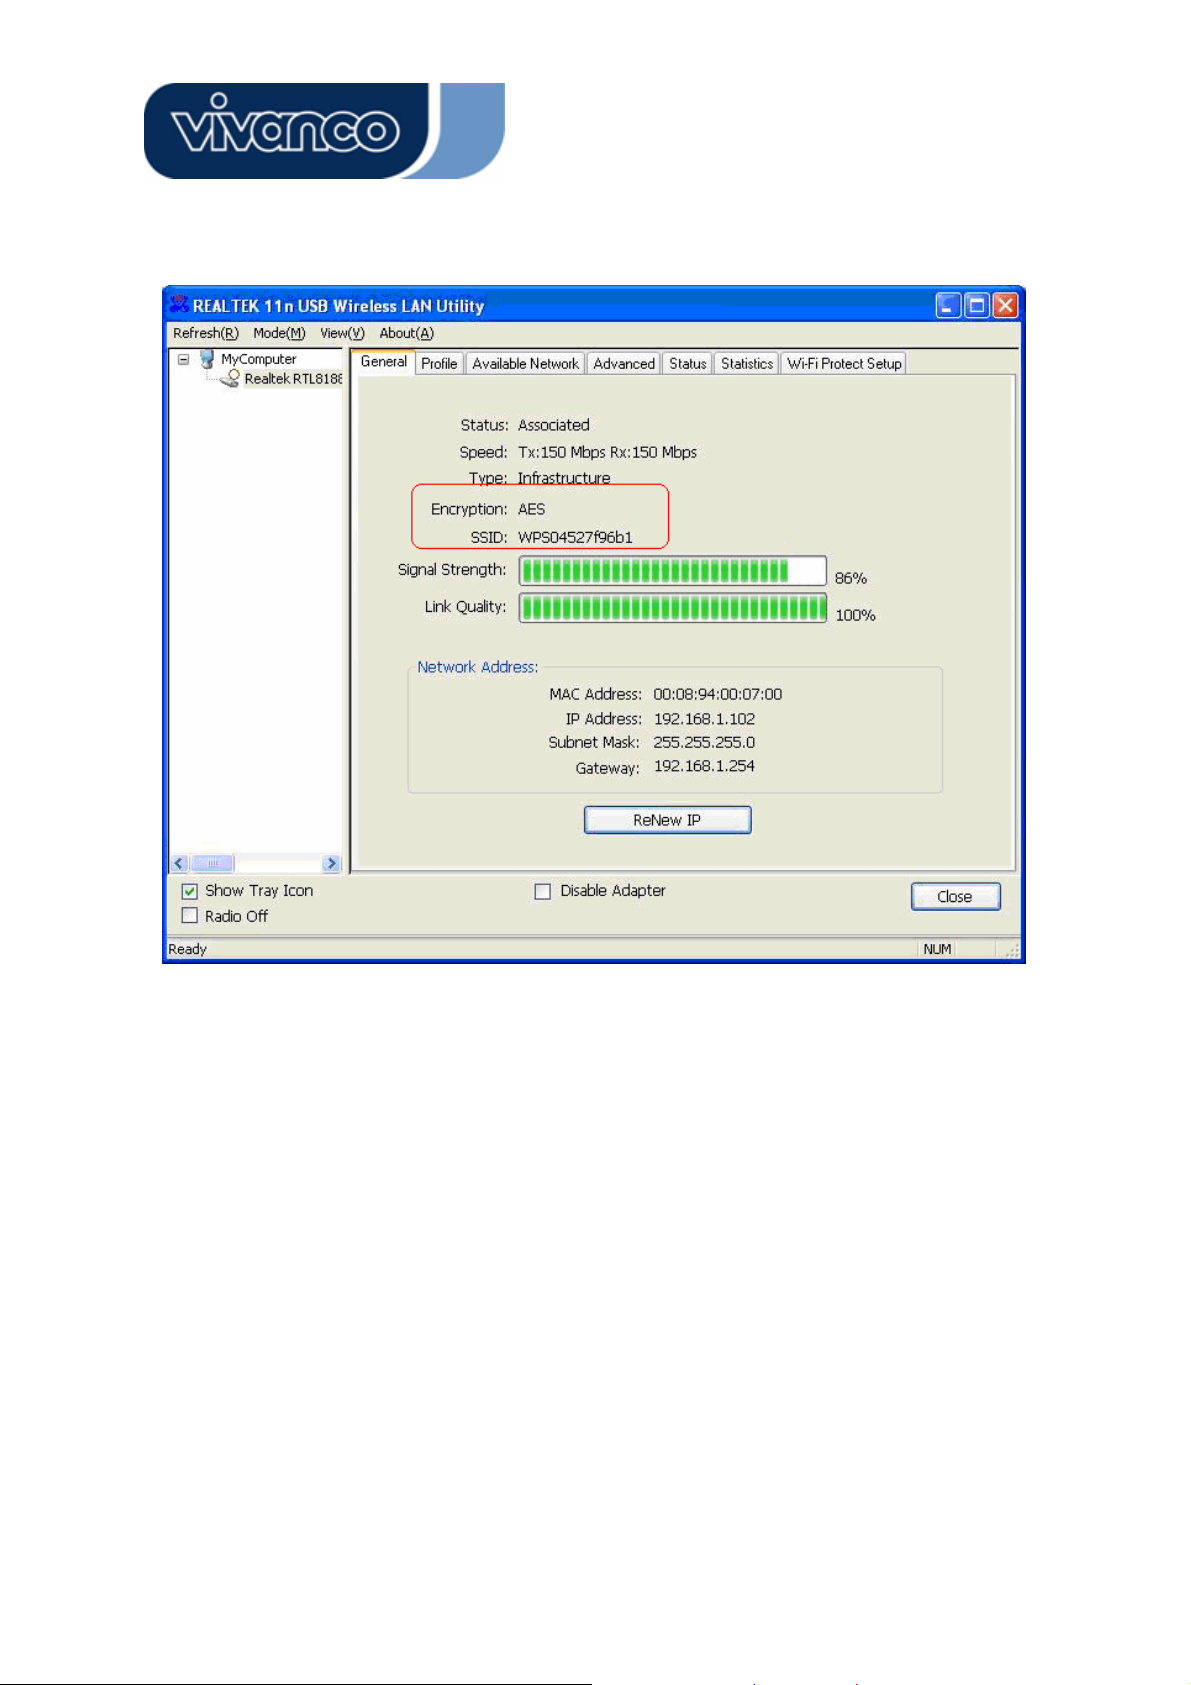
General
After starting the utility, the general page pops up This General tab provides the information of your current
wireless network connection. You may click the Renew button to refresh those listed information.
Status:
Speed:
Typ e:
Encryption:
SSID:
Signal Strength:
Link Quality
Network Address:
Check if the device associated to target network.
The current connection speed
Infrastructure mode or Ad-Hoc mode.
The performing encryption mode for connecting to current network
profile.
The SSID (network name) of the connected wireless network.
Indicates the signal strength detected by this adapter.
Indicates the link quality of this wireless connection.
Shows the current IP addresses settings for this adapter.
18
Page 19
WLAN GENERAL
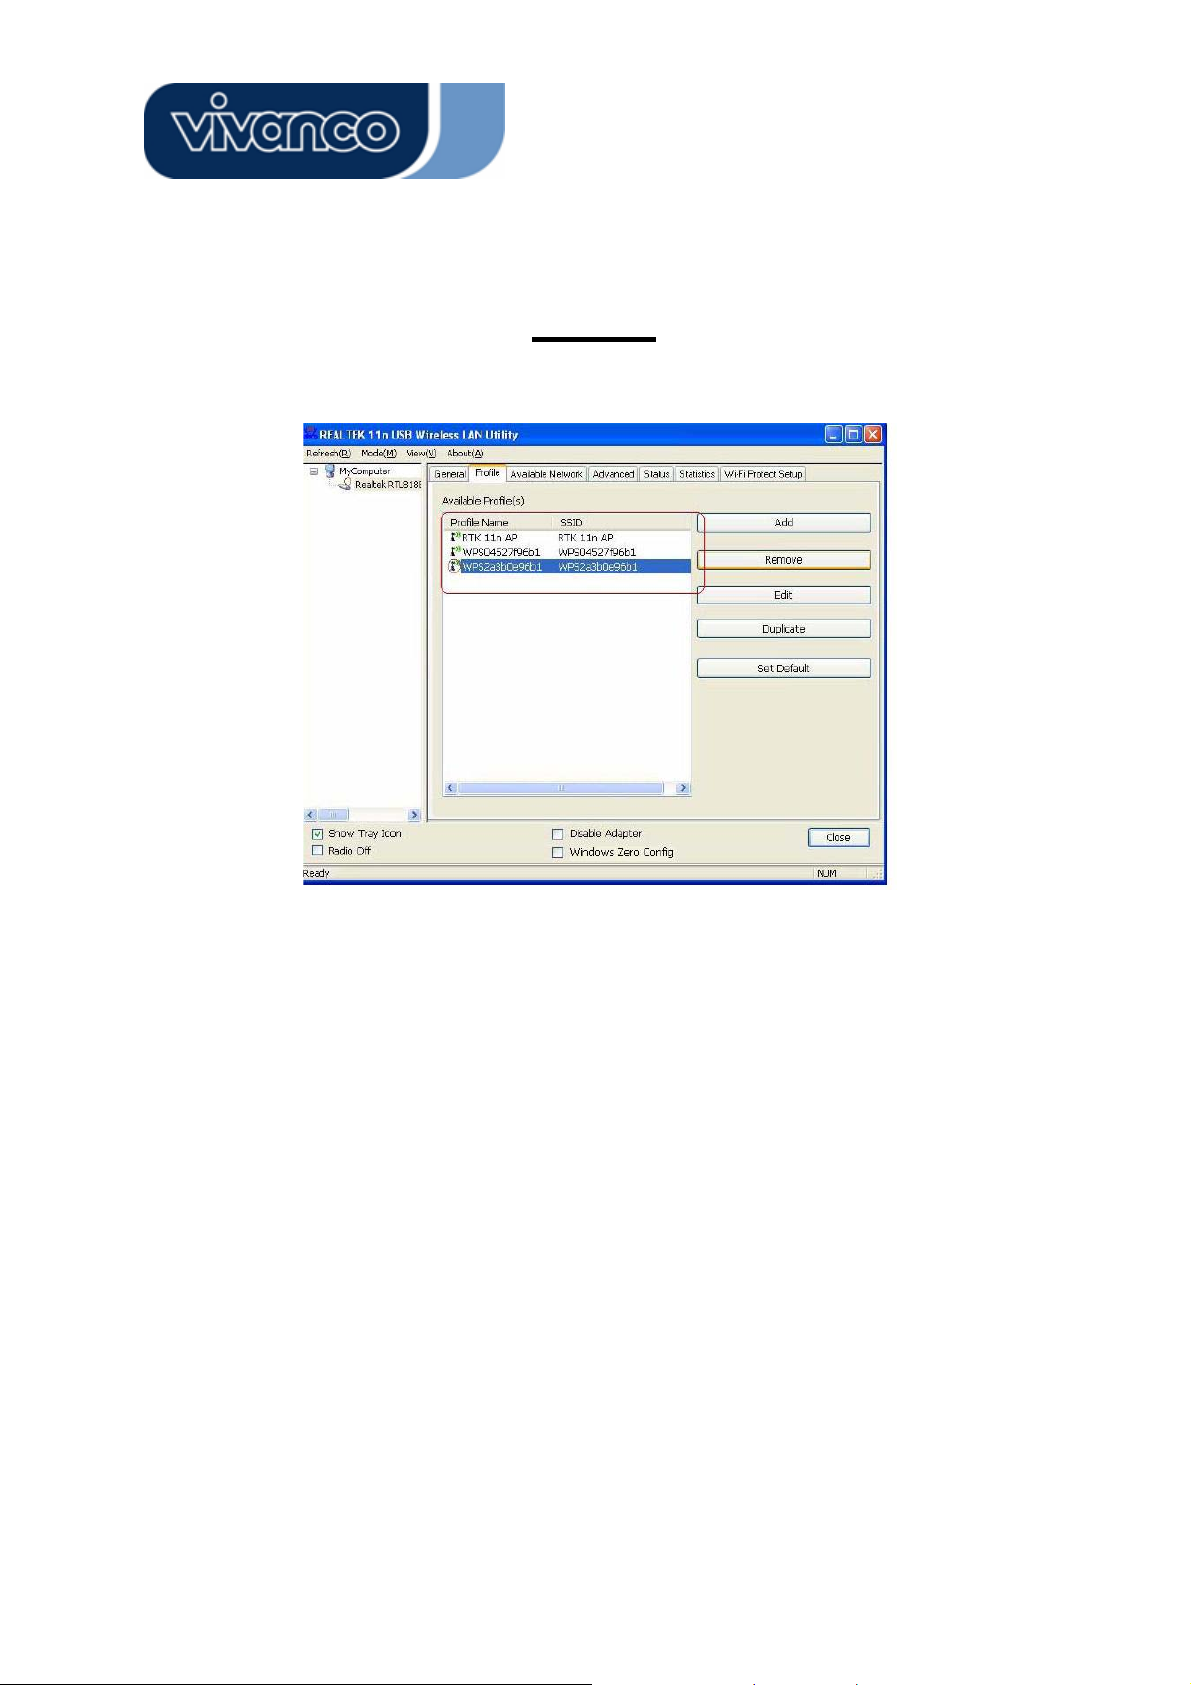
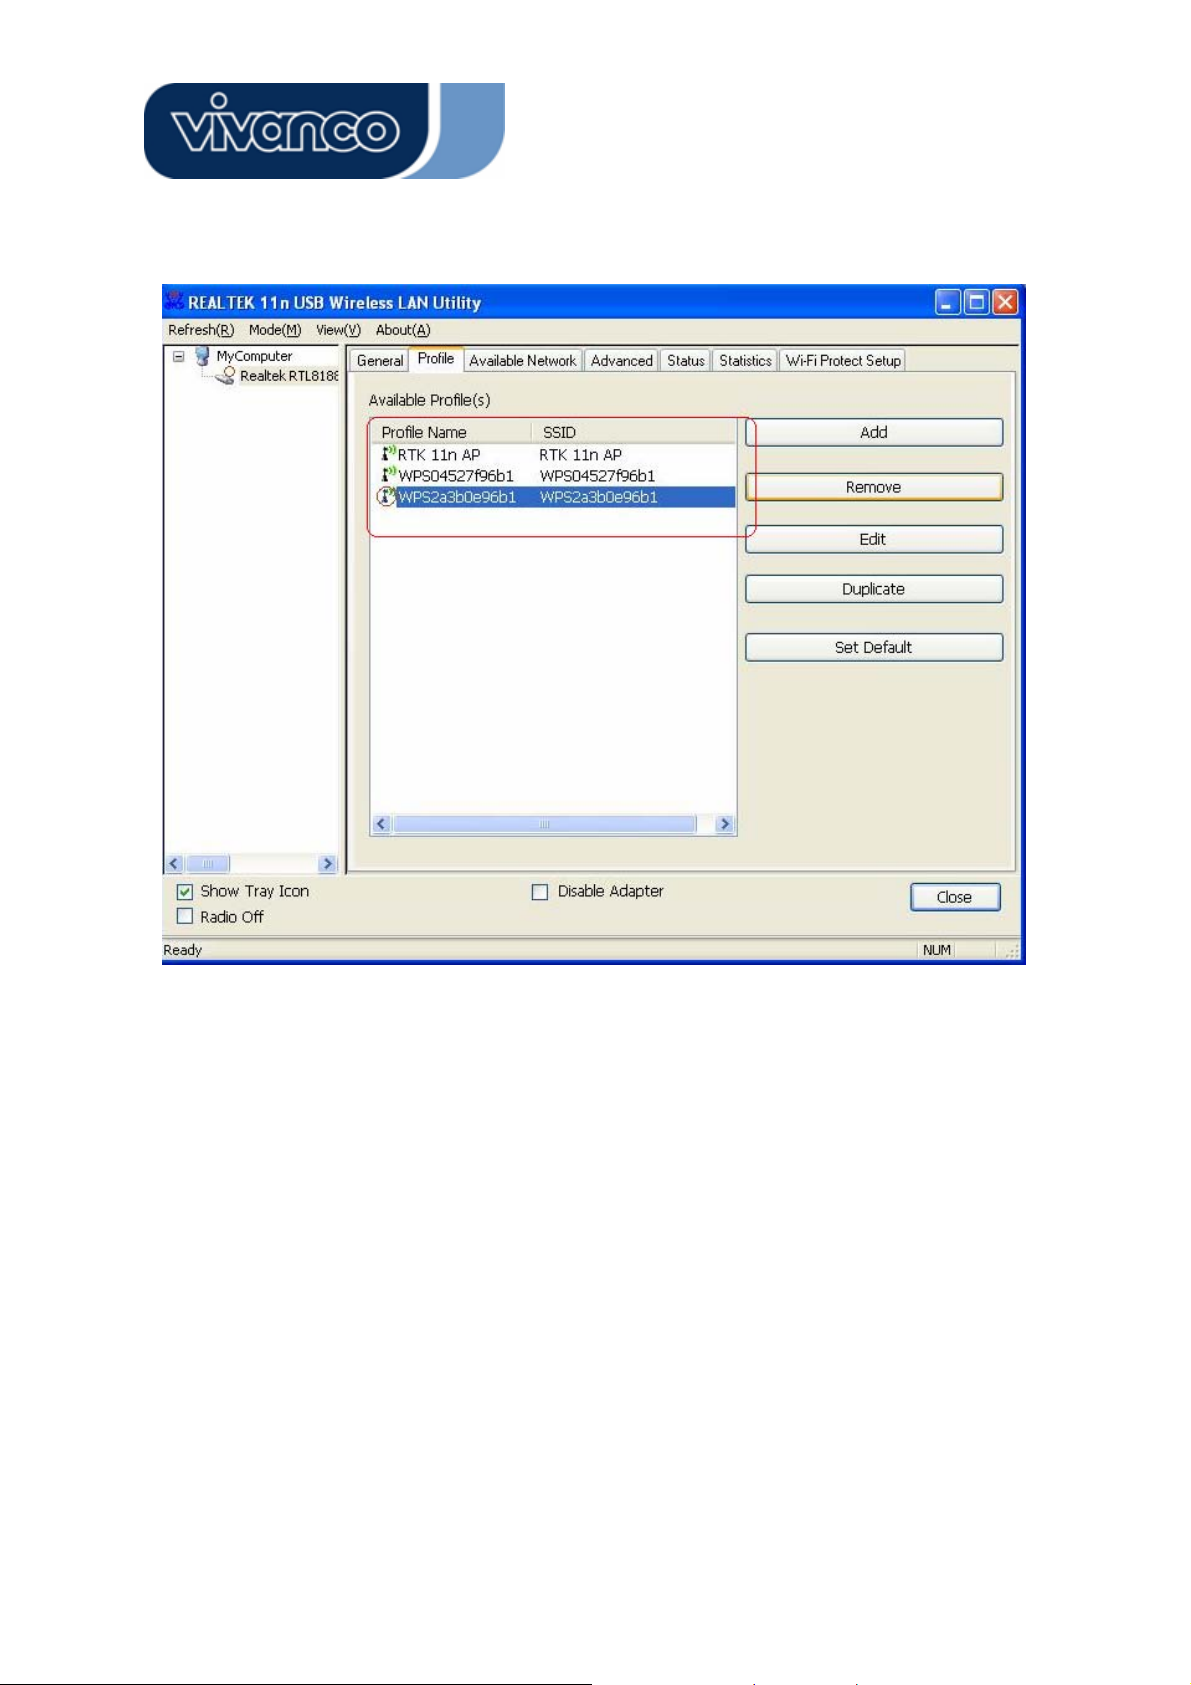
Profile
The Profile tab lists the preferred connections. You can click the buttons beside to do configure each
connection.
Add
Remove
Edit
Duplicate
Set Default
Click this button to add a connection profile for this adapter.
To remove a connection profile, click this profile on the profile list and
click this button to delete it.
To modify the configurations for a profile, click this profile on the profile
list and click this button to edit.
To make a copy of a profile, click the profile that going to be copied, and
click this button to copy it.
To select a profile as your default wireless connection, click this profile
on the list and click this button. You may also double click on each profile
to select it as your default wireless connection.
19
Page 20
WLAN GENERAL
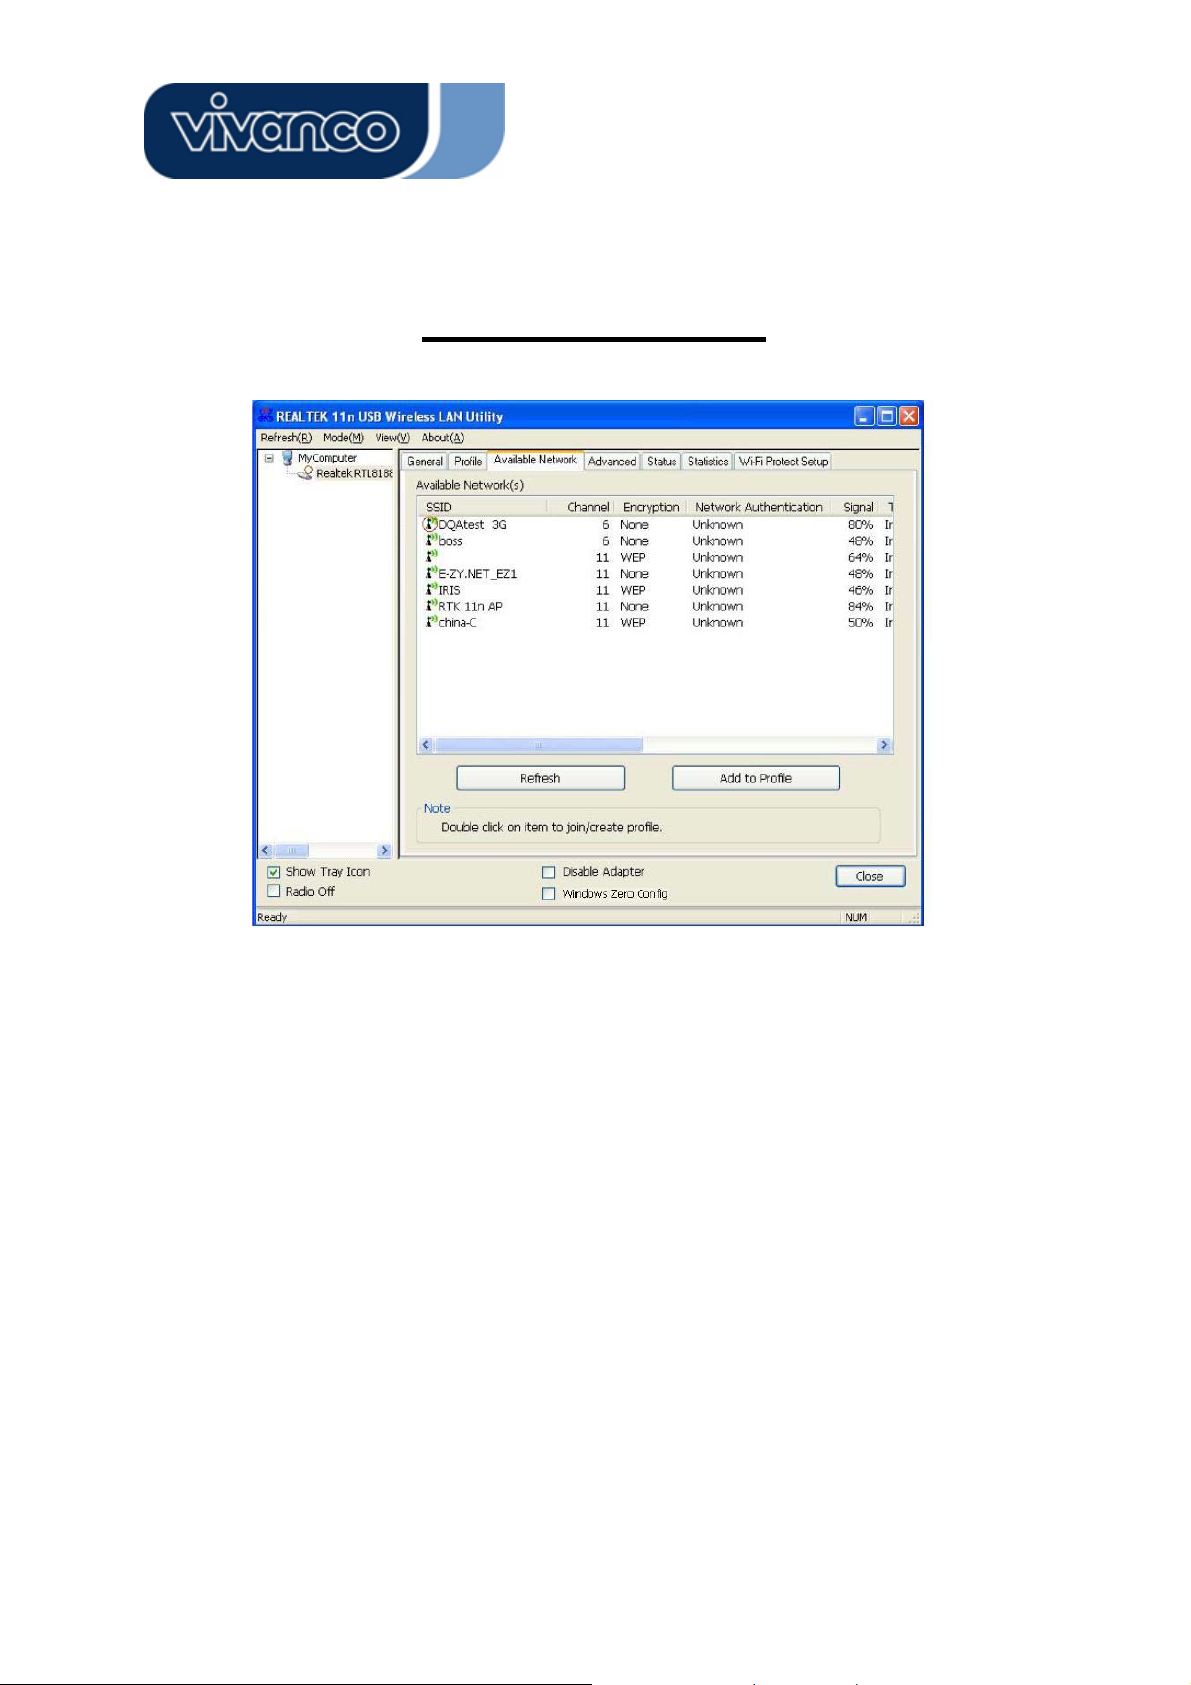
Available Network
This available tab lists the reachable wireless network of this adapter.
Refresh
Add to Profile
Click this button to rescan available networks around the adapter.
To add an available Network to your profile list, select an available
network and click this button to add.
20
Page 21
WLAN GENERAL
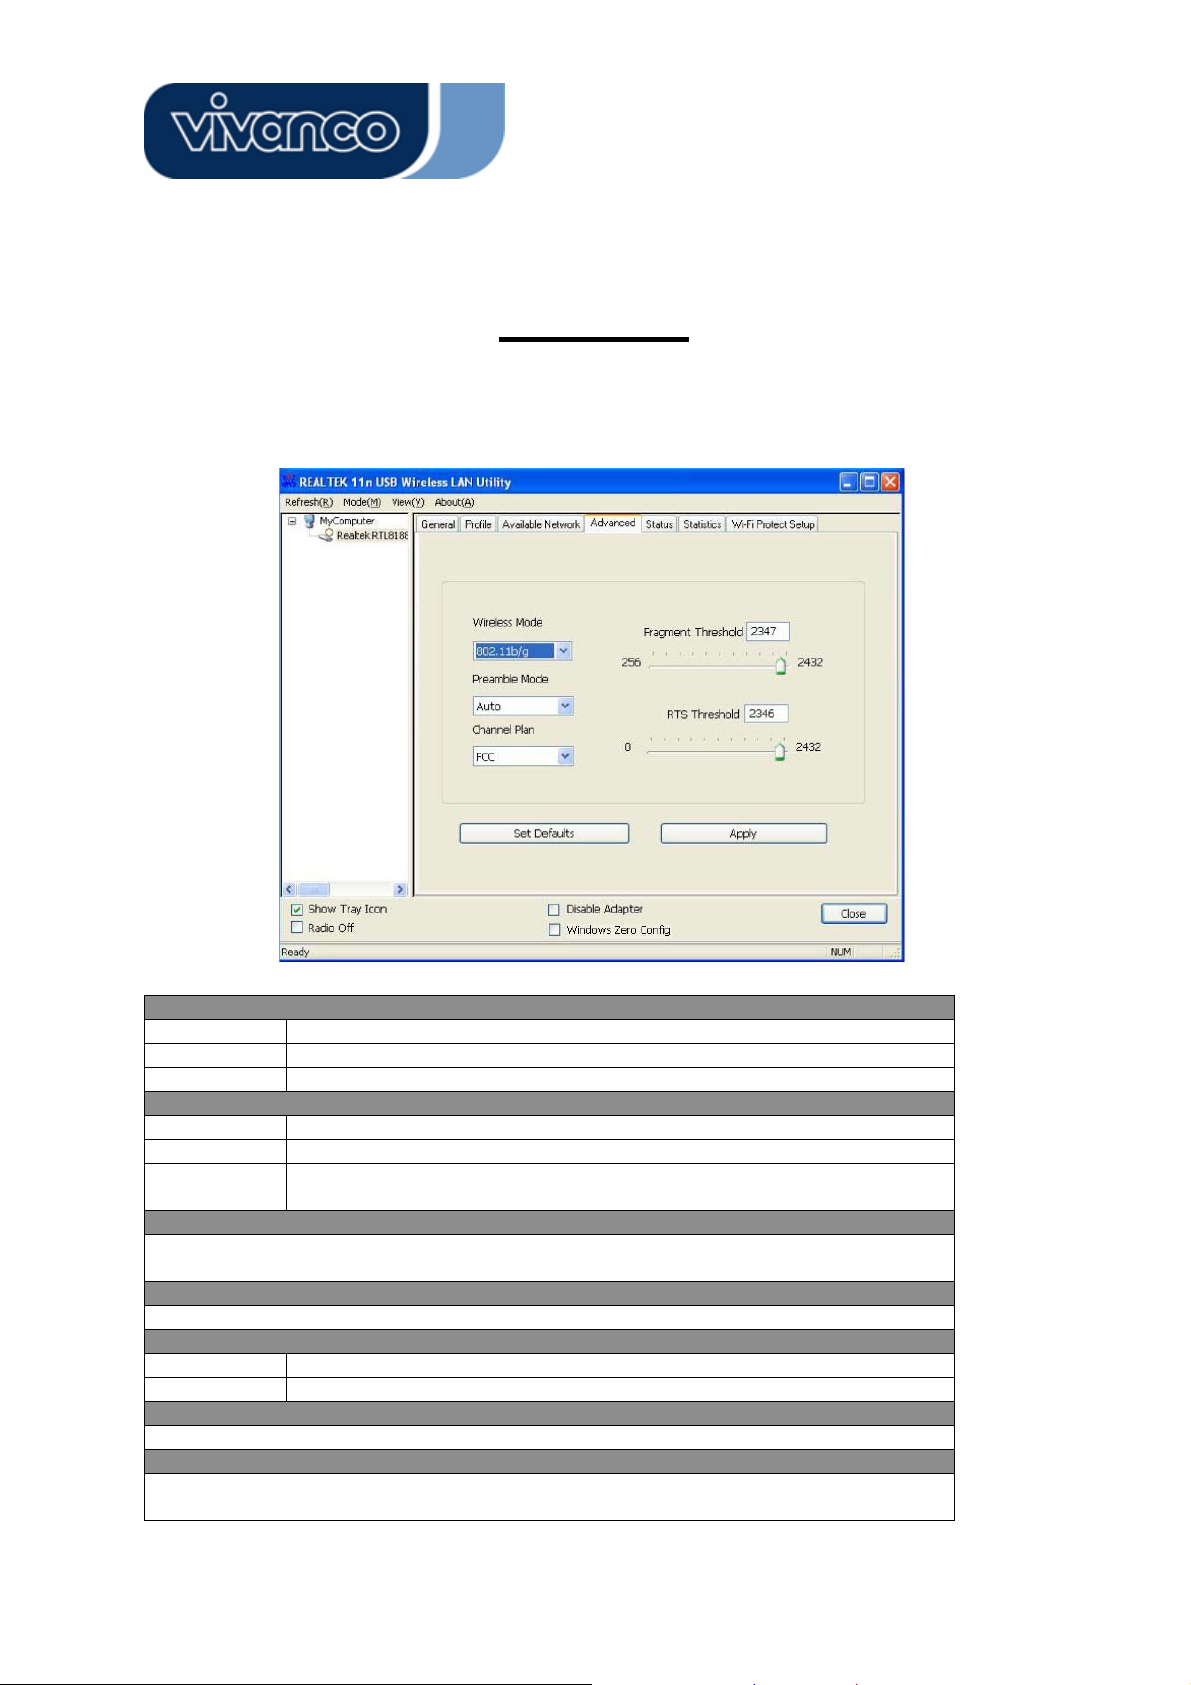
Advanced
This Advanced tab provides advanced configurations to this adapter. Every modification in this tab will be
performed after clicking the Apply button.
To restore the default settings of the advanced tab, click the Set defaults button to perform restoring.
Power Save
None
Min
Max
Turbo Mode
OFF
ON
AUTO
Fragment Threshold
The maximum size of a packet that is going to be segmented and transmitted. Select the
size from 256 to 2432(default) bytes.
RTS Threshold
Select the RTS Threshold form 0 to 2432(default)
Wireless Mode
802.11g/b
802.11b
802.11b Preamble Mode
Select the preamble mode to be long, short or auto detection mode.
Region Domain
Select your region from the drop list. Please note that it is necessary for you to select a
correct region. Selecting an incorrect region may again the applicable law.
Disable Power saving function.
Minimum power consumption
Maximum power consumption
Disable turbo mode
Enable turbo mode
Enable or disable turbo automatically according to the detected environment
Connect to a 802.11b/g network (2.4GHz/54Mbps)
Connect to a 802.11b network (2.4GHz/11Mbps)
21
Page 22
WLAN GENERAL
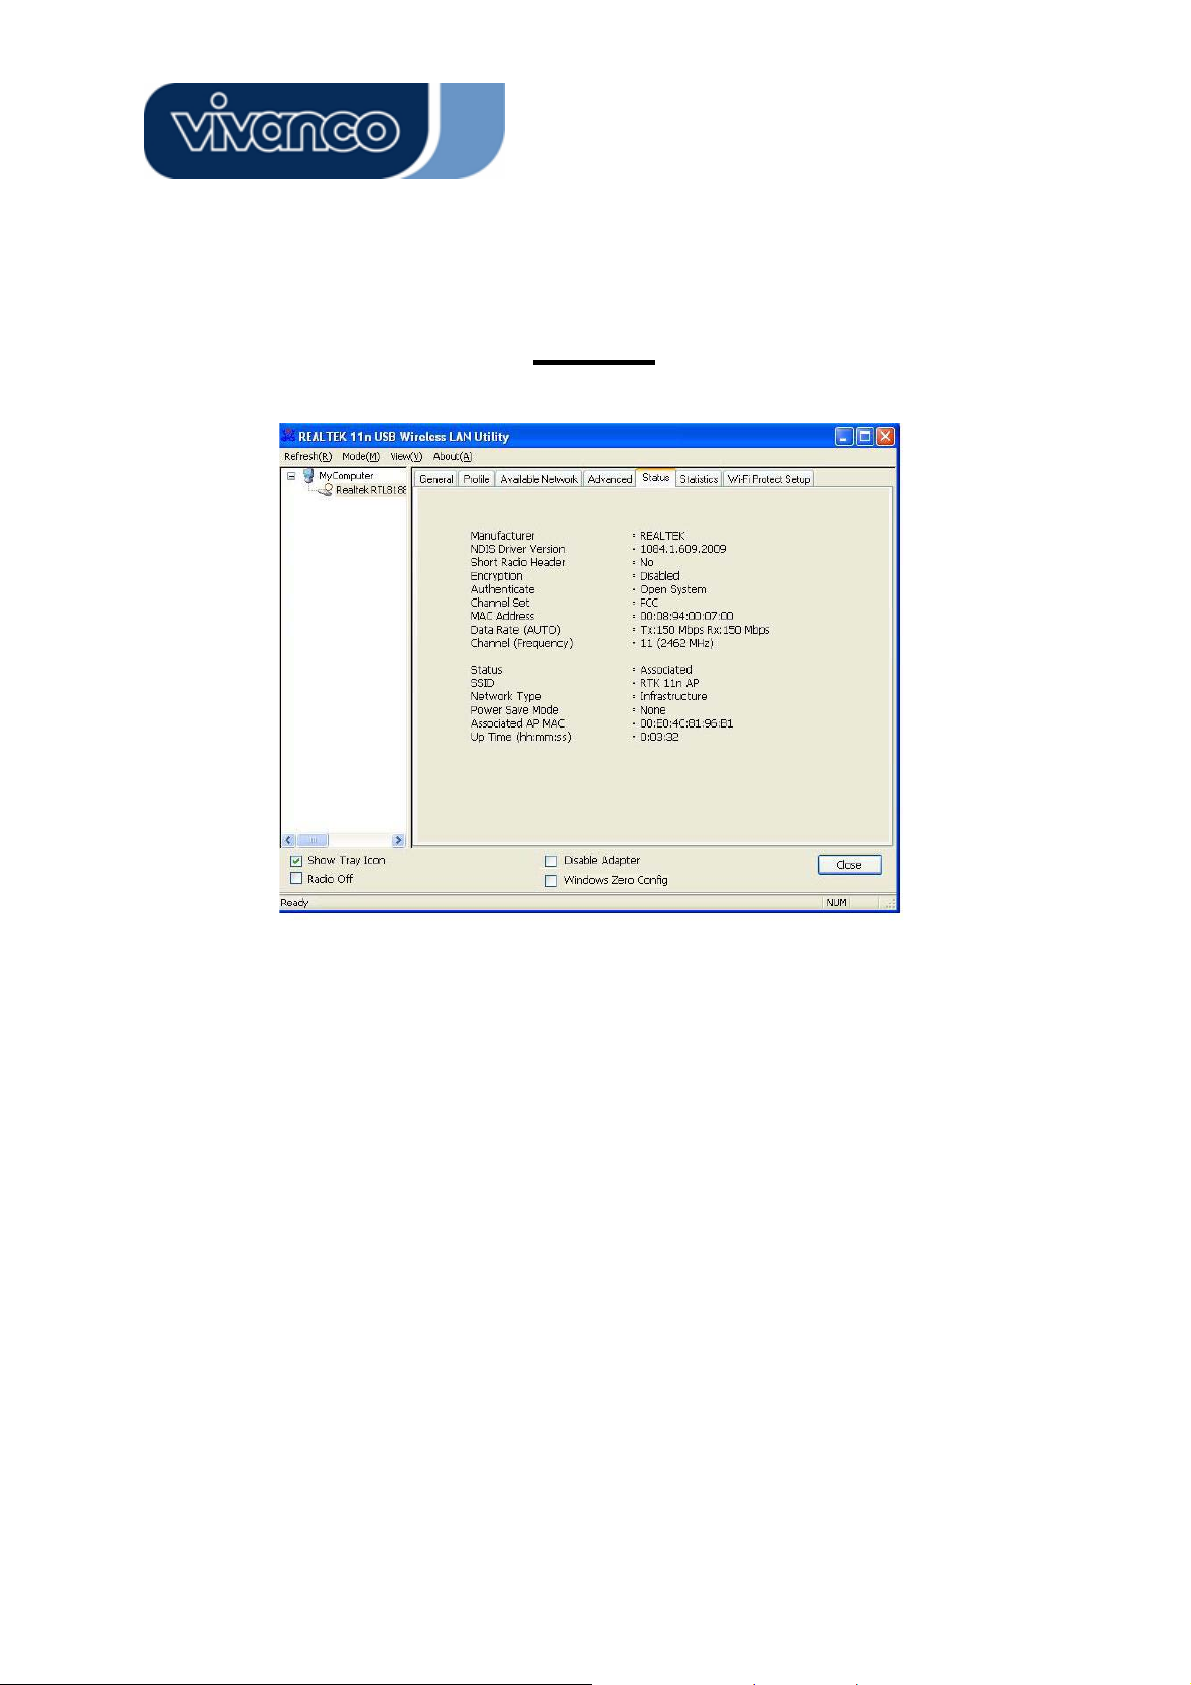
Status
This tab shows the current connection status of this adapter.
22
Page 23
WLAN GENERAL
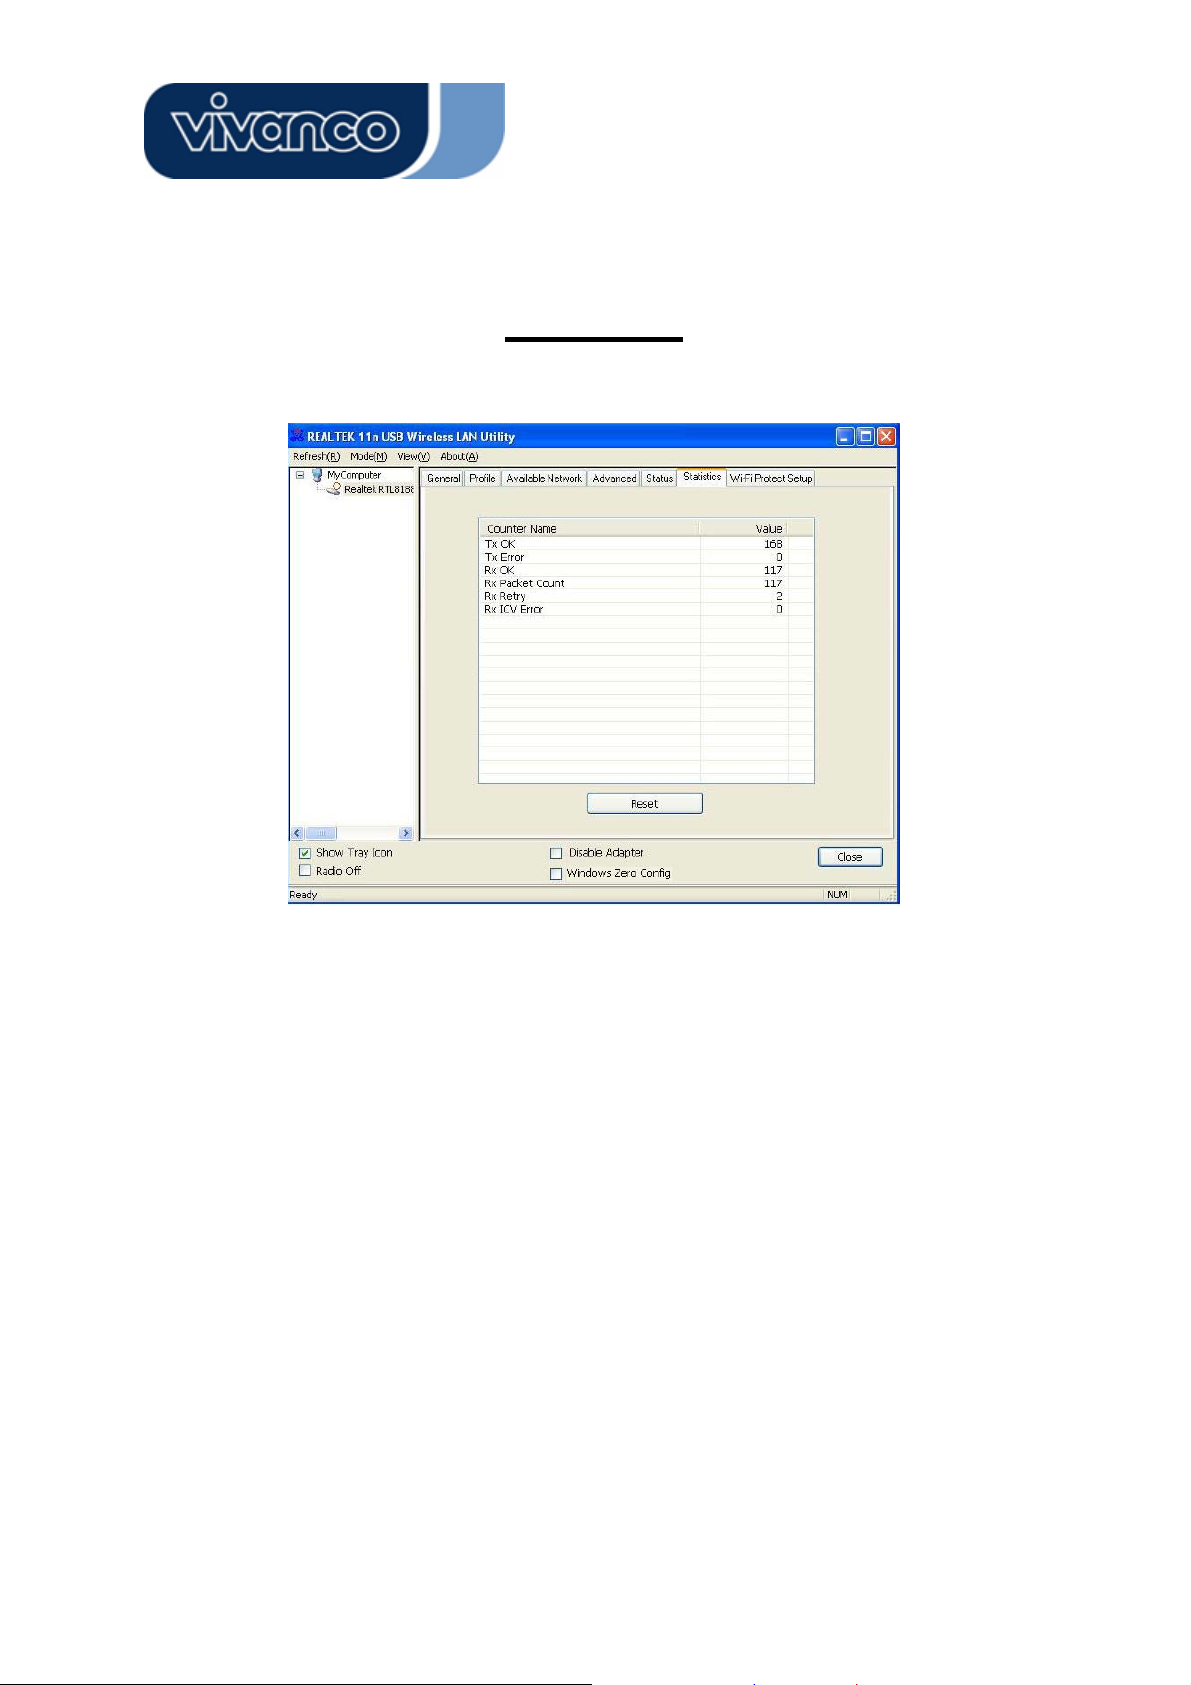
Statistics
See this tab to show the transmission activity record. Clicking the “Reset” button recounts the values from
zero.
23
Page 24
WLAN GENERAL
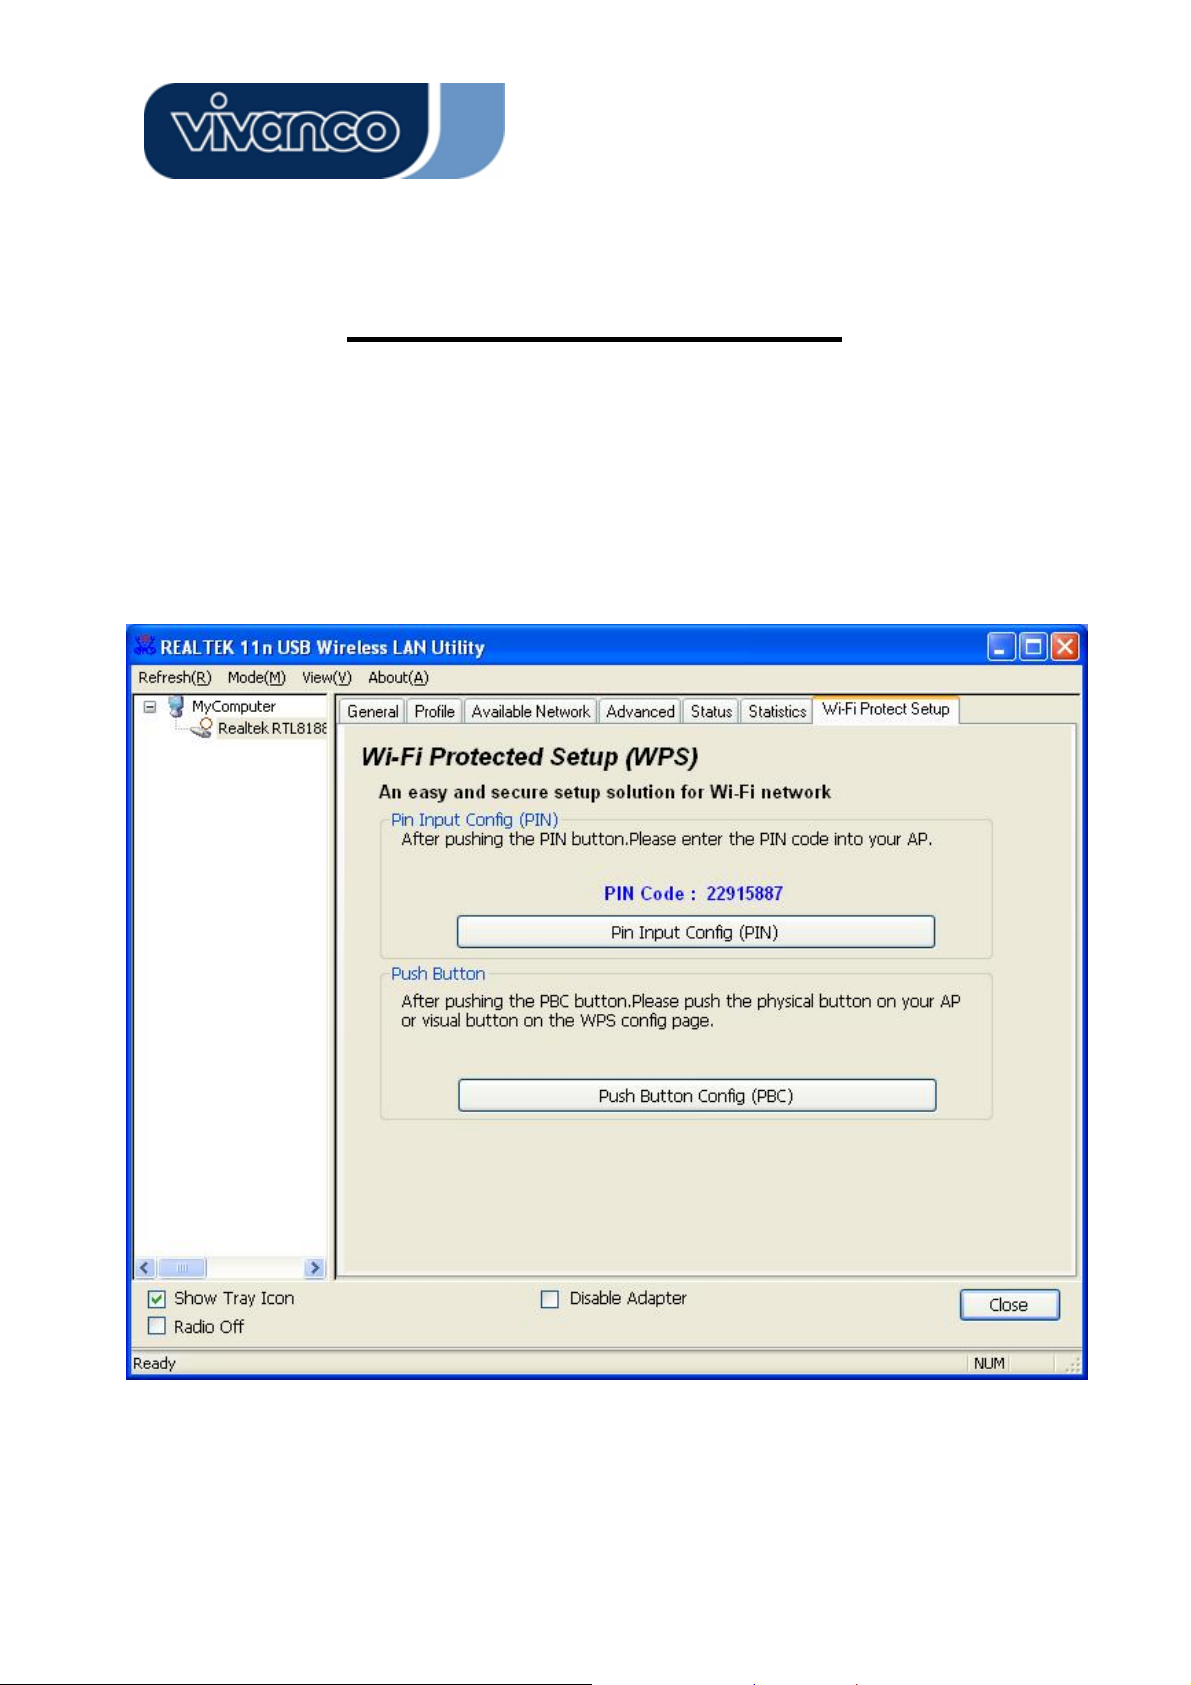
WPS - Wi-Fi Protect Setup
The main purpose of Wi-Fi Protected Setup (Wi-Fi Simple Configuration) is to simplify the security
setup and management of Wi-Fi networks. This adapter supports bith the PIN configuration
method and PBC configuration method. If the wireless card supports Wi-Fi Protected Setup
(WPS), you can set up a wireless connection between wireless card and router by using either
Push Button Configuration (PBC) method or PIN method.
Two methods of configuring the QQS are shown here.
(QSS = Quick Security Settings. By selecting the wireless router and wireless card in the QSS
window you can automatically set up WPA2 secure connection level without using the router or
24
Page 25
WLAN GENERAL
network adapter management software. This avoids the use of complex interface settings and
greatly simplifies the installation of the wireless security settings.)
Pin Code: 8-digit numbers. It is randomly generated from system
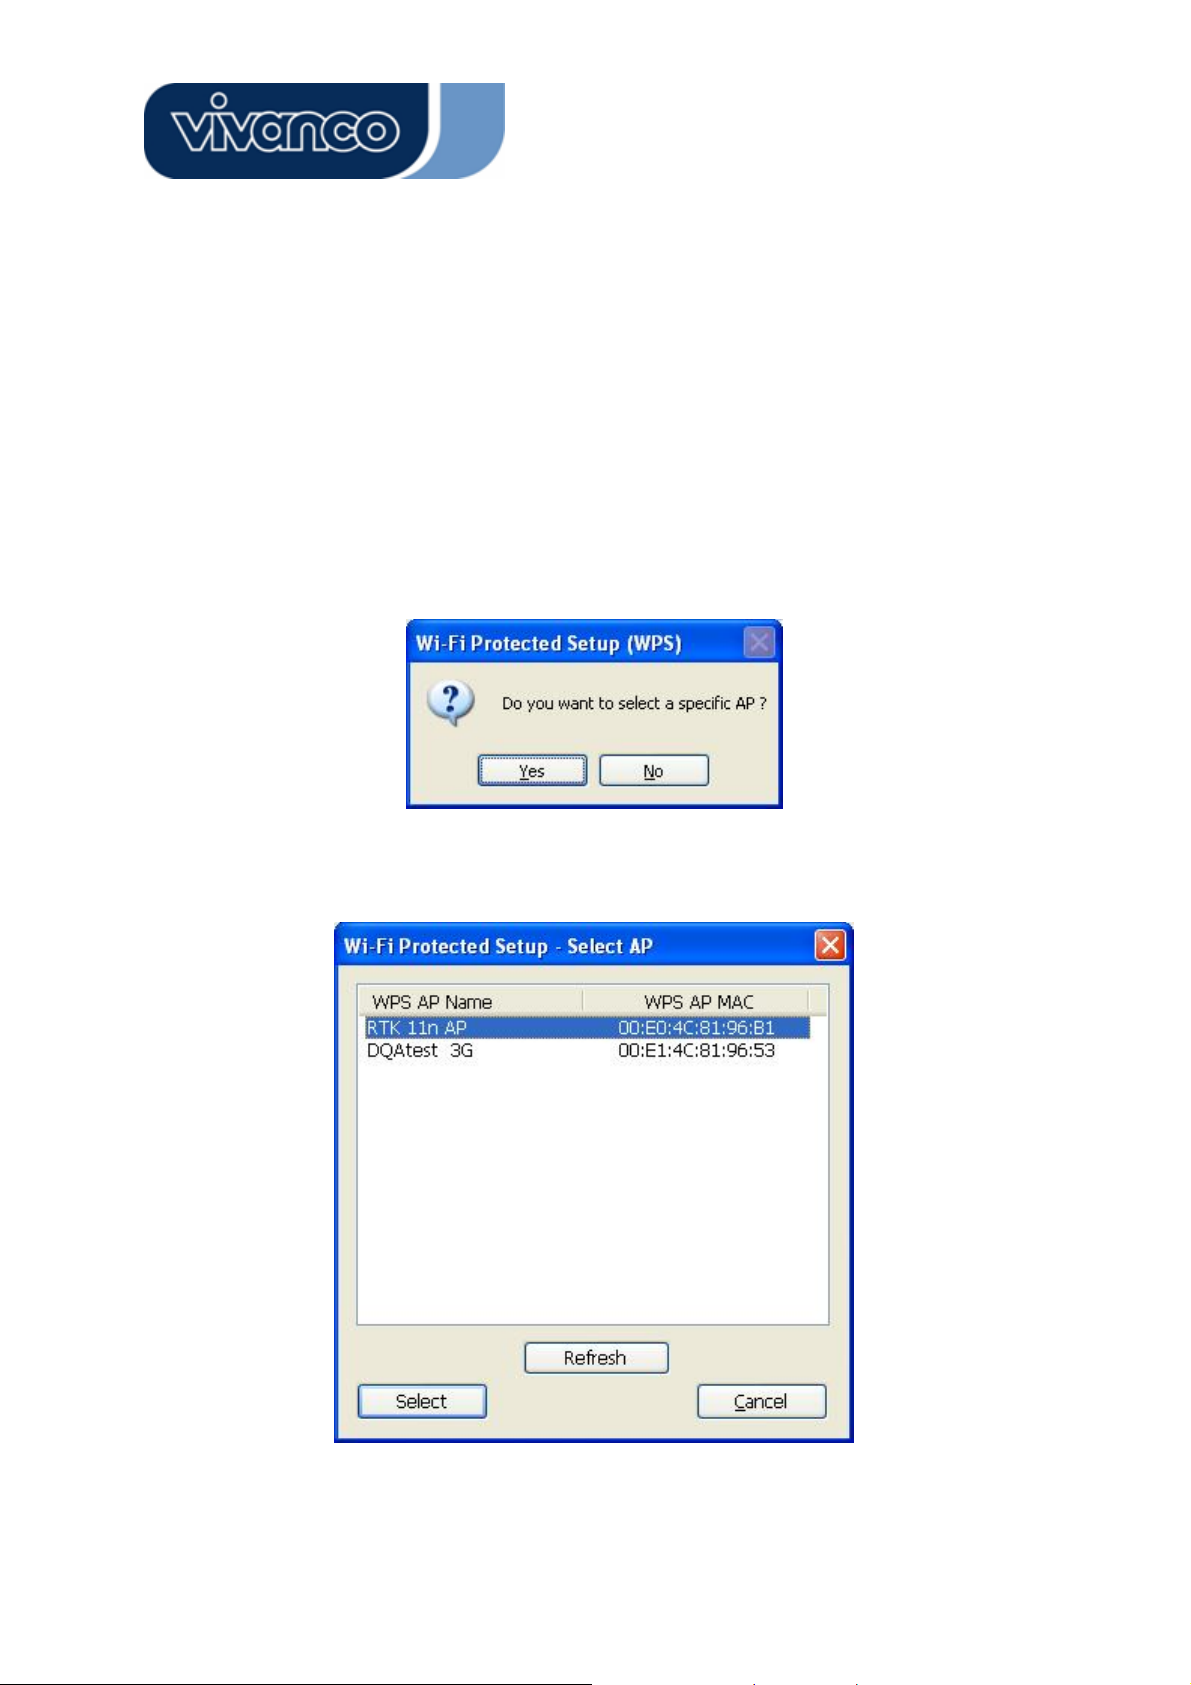
1. PIN method
Click the button “Pin Input Config (PIN)”. The following window is then displayed.
Click the button “Yes” to select an AP.
This window contains the buttons “Refresh / Select / Cancel”. Select an AP name, then click
25
Page 26
WLAN GENERAL
“Select”. You can then use the PIN method to configure the QSS.
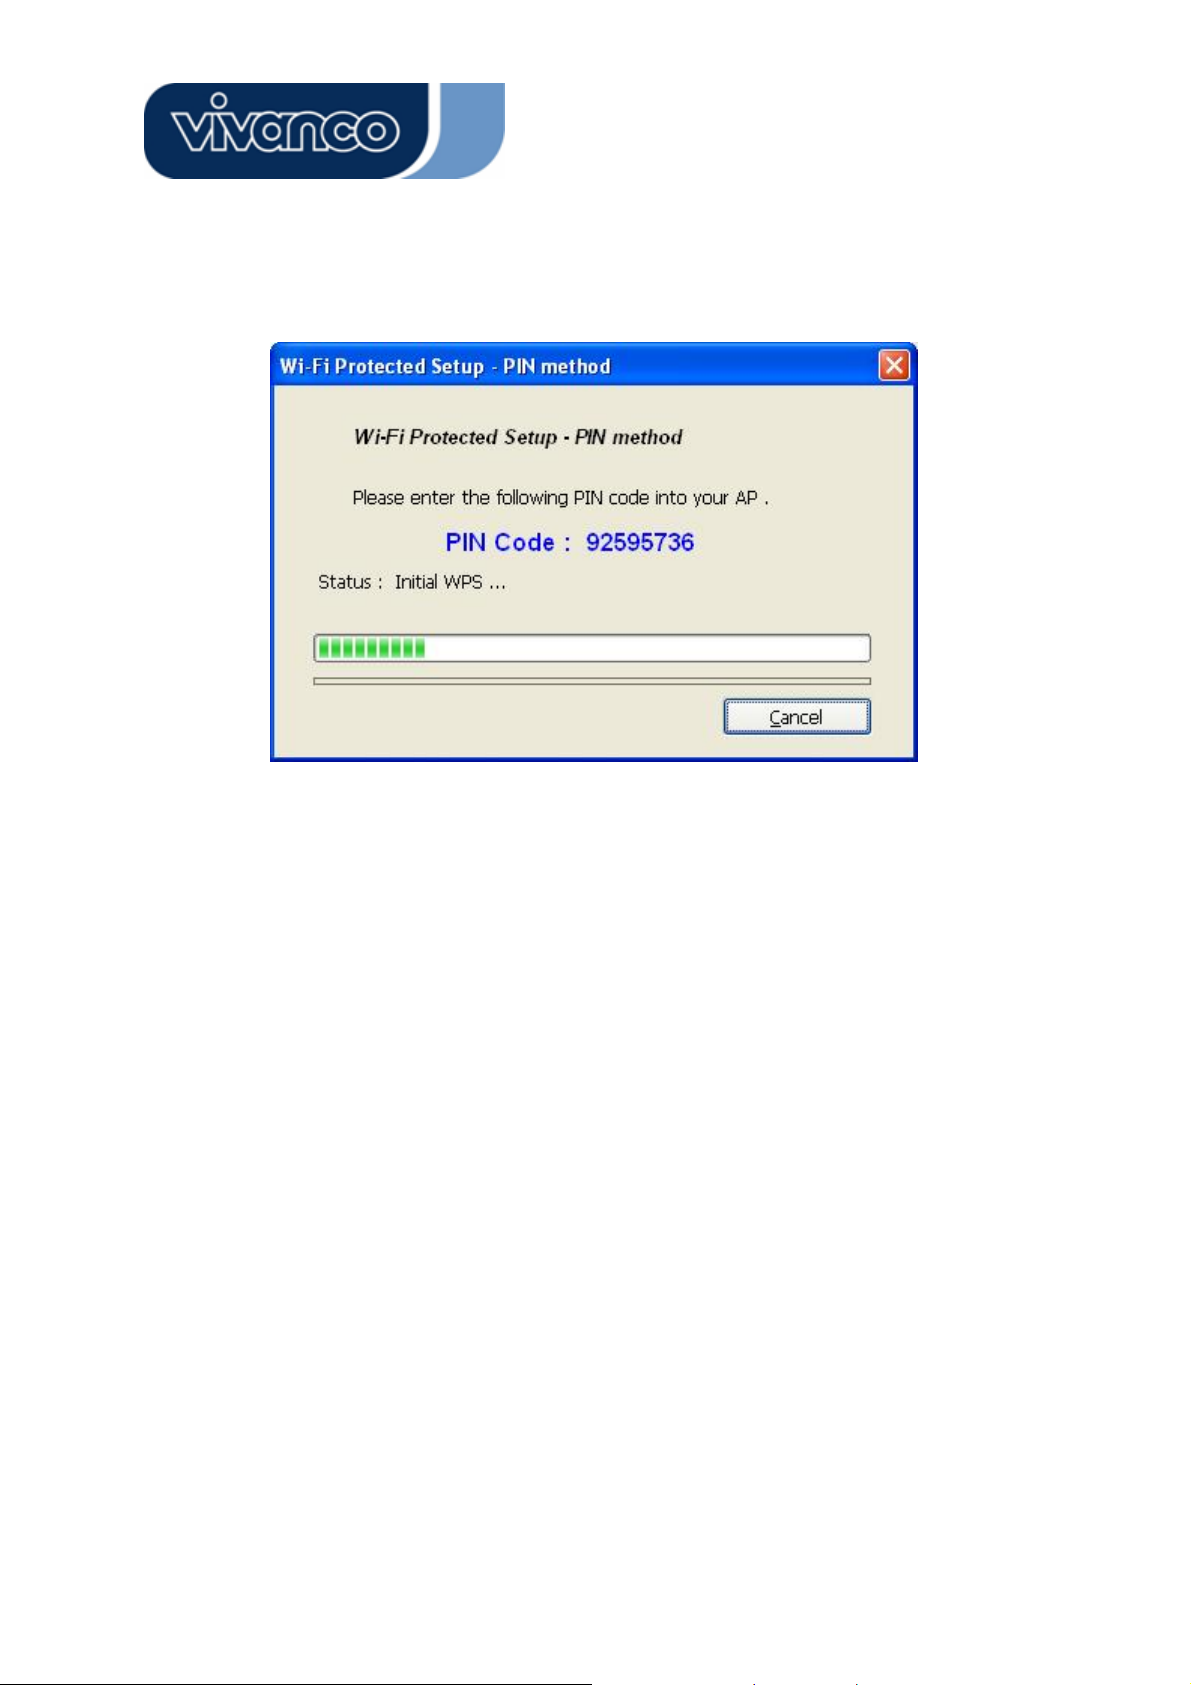
Double click the Internet WEB browser icon on your screen. Enter the IP address of your selected
router/AP into the URL and press Enter. You can then enter the configuration.
Go to the WPS ( Wi-Fi ) configuration page, type the PIN code of adapter and click the confirm
button to set up the WPS connection.
When the “General” window appears, the WPS has been configured successfully.
26
Page 27
WLAN GENERAL
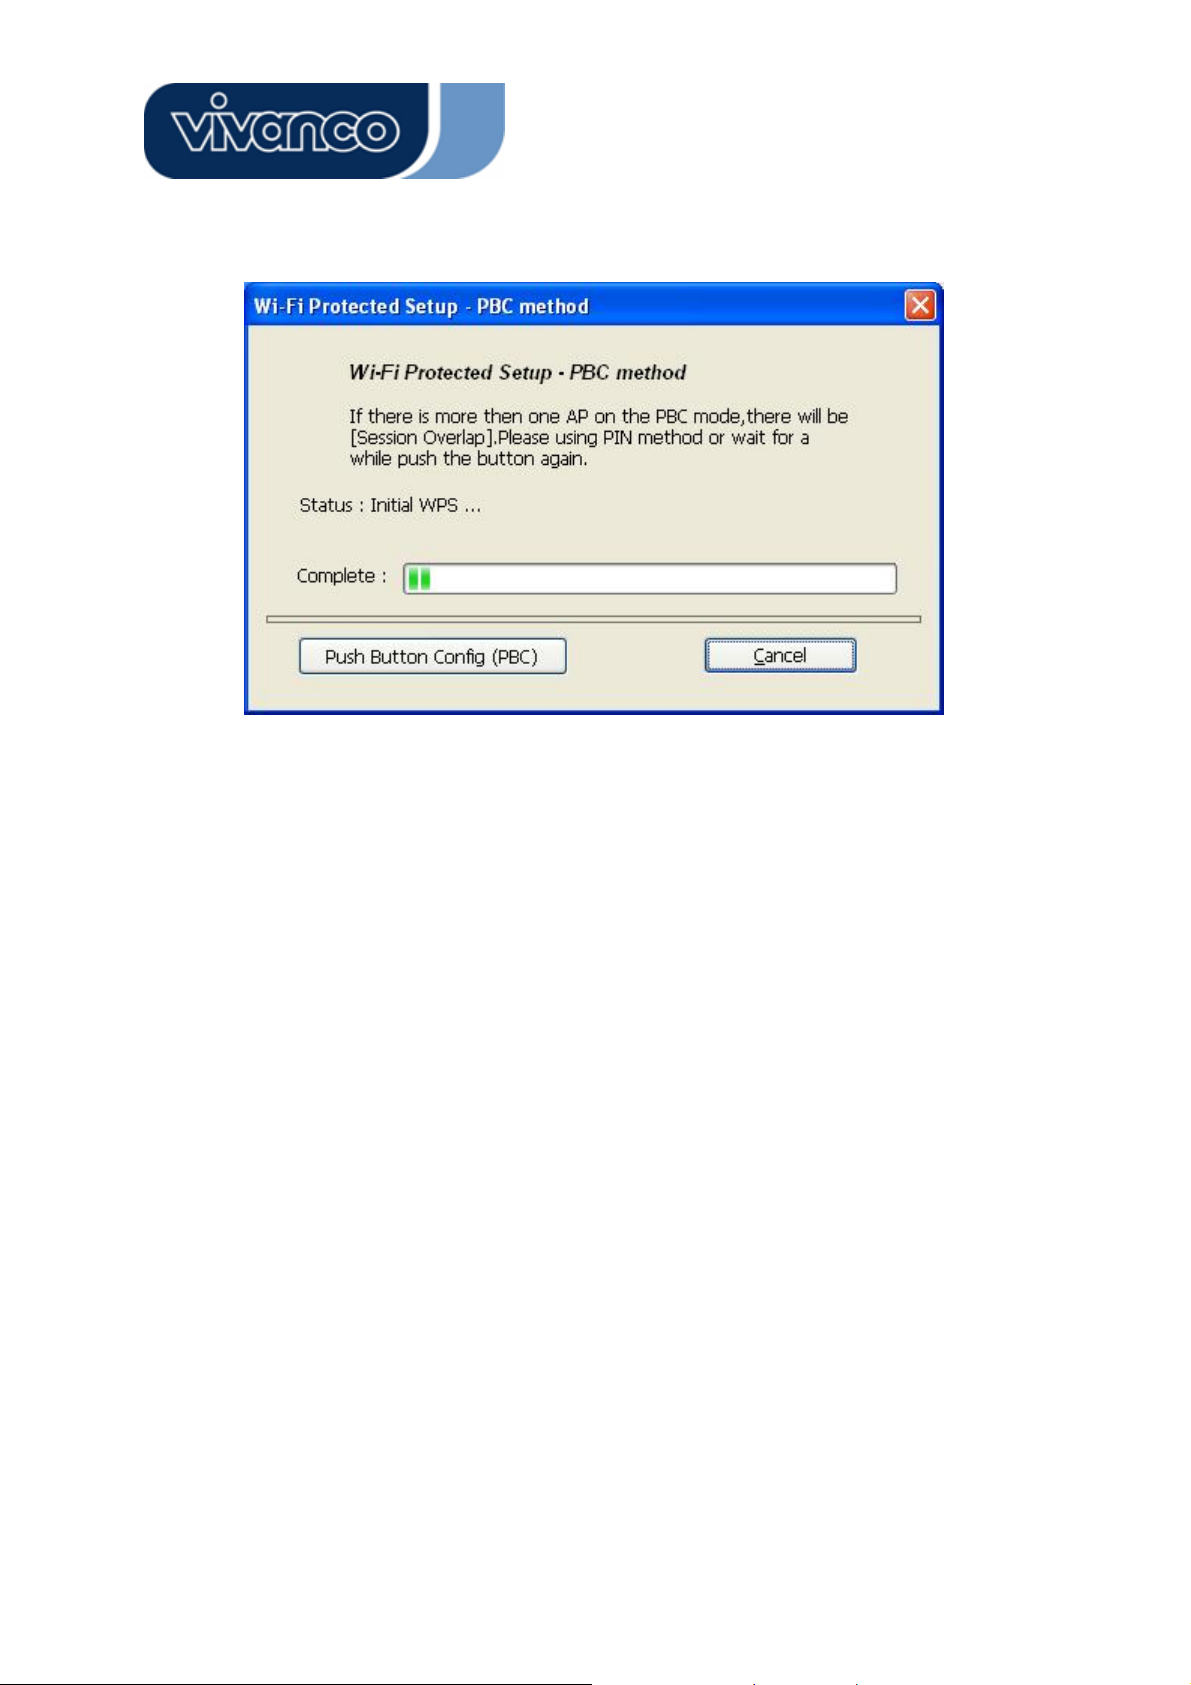
2. PBC (Push Button Configuration) method
After pushing the PBC button, push the physical button on your AP or the virtual button on the
WPS configuration page, to call up the following window.
27
Page 28
WLAN GENERAL
Call up the WPS ( Wi-Fi ) configuration page of your desired router/AP, and then start the PCB
connection.
Once the WPS has been configured successfully, the available profiles are changed.
28
Page 29
WLAN GENERAL
3. Click the “Install” button to start installing.
29
Page 30
WLAN GENERAL
AP mode management guide
General
After configuring the adapter in AP mode, this “General” page shows up, which shows the general information of this
AP.
30
Page 31

WLAN GENERAL
SSID:
BSSID: The MAC address of this AP
Config: Click this button to change configurations to this AP
Association Table: Shows the information of those devices that associated with this AP
The SSID (network name) of the wireless network constructed
by this AP.
including their MAC addresses and the time that they connected with
this device.
31
Page 32

WLAN GENERAL
Advanced
Beacon Interval: Define the interval between beacons from 20~1000
DTIM Period: Set the DTIM period between 1~255
Preamble Mode: Click the drop list to select the preamble to be long, short or auto
Set Defaults: Click this button to restore the settings above to default
Apply: Click this button to execute changes.
32
Page 33

WLAN GENERAL
Statistics
See this tab to show the transmission activity record. Clicking the “Reset” button recounts the values from
zero.
33
Page 34

WLAN GENERAL
SoftAP
This page allows users to select the adapter for connect to public network.
Please click on the device that are used for connecting to public network and click the “Select” button, and
then click the “Apply” button to execute.
34
Page 35

WLAN GENERAL
PRODUCT SPECIFICATION
Standard
IEEE 802.11n draft 2.0, IEEE 802.11g, IEEE 802.11b, IEEE 802.3, IEEE 802.3u
Interface
Complies with USB 2.0
Security
64/128-bit WPA , WPA2
Receiver Sensitivity
802.11n Typical -68 dBm
802.11g Typical -73 dBm
802.11b Typical -84 dBm
Channel
USA 11, Europe 13, Japan 14
Transmit Power
16 dBm typically @ 802.11b
14 dBm typically @ 802.11g
13 dBm typically @ 802.11n
Network Data Rate
802.11b: 1,2,5.5 and 11 Mbps
802.11g: 6,9,12,18,24,36,48 and 54 Mbps
802.11n: up to 150/300 Mbps
Range Coverage
Indoor 35~100 meters
Outdoor 100~300 meters
Temperature
Operating: 0°C ~ 40°C (32°~104°F)
Storage: -10°C ~ 70°C (14°~158°F)
Humidity
Operating: 10% ~ 90% RH, non-condensing
Storage: 5%~90% RH, non-condensing
Emission
FCC, CE, VCCI Class B
35
Page 36

WLAN GENERAL
D
CE-Hinweis
Dieses Gerät erfüllt die Anforderungen an die elektromagnetische Verträglichkeit gemäß
EN 55022 Klasse B für ITE sowie die wesentlichen Anforderungen der Direktive des
Europarats 89/336/EEC über die Annäherung der Gesetze der Mitgliedsstaaten im Hinblick auf die elektromagnetische Verträglichkeit.
Da das Unternehmen seine Produkte permanent verbessert, kann es möglich sein, dass
die in diesem Dokument enthaltenen Informationen nicht aktuell sind. Die aktuellsten
Informationen erhalten Sie bei Ihrem lokalen Vertriebshändler. Kein Teil dieses
Dokuments darf ohne die schriftliche Zustimmung des Unternehmens kopiert oder
vervielfältigt werden.
Warenzeichen:
Alle Handelsnamen und Warenzeichen sind Eigentum der jeweiligen Unternehmen.
Copyright © 20010. Alle Rechte vorbehalten.
36
Page 37

WLAN GENERAL
ÜBERSICHT
Danke, dass Sie sich für dieses Produkt entschieden haben. Lesen Sie dieses
Kapitel, um sich mit Ihrem IEEE 802.11n Wireless Adapter vertraut zu machen.
Auspacken
Prüfen Sie bitte zunächst, ob die Verpackung die folgenden Artikel enthält:
1. IEEE 802.11n Wireless Adapter
2. Eine Kurz-Installationsanleitung
3. Eine Dienstprogramm-/Handbuch-CD
37
Page 38

WLAN GENERAL
Einführung in den IEEE 802.11n Wireless Adapter
Der IEEE 802.11n Wireless Adapter ermöglicht Ihnen die Einrichtung eines IEEE 802.11n Funknetzwerks
mit 300 Mbps und einer Frequenz von 2,4 GHz, das ebenfalls mit IEEE 802.11b/g Wireless-Geräten bei
11/54Mbps kompatibel ist. Sie können den Adapter im Ad-hoc-Modus konfigurieren, um einen Internetzugang über einen Wireless AP (Access Point / Zugangspunkt) oder einen Router herzustellen. Der Adapter umfasst ein komfortables Dienstprogramm für die Suche nach verfügbaren Netzwerken und das
Speichern von bevorzugten Netzwerken, mit denen Benutzer sich üblicherweise verbinden. Die Sicherheitsverschlüsselung kann ebenfalls mit diesem Dienstprogramm konfiguriert werden.
Haupteigenschaften
y Entspricht dem IEEE
802.11b/g /nFunk-Standard
y Hohe Datenübertragungsgeschwindigkeit von
bis zu 150/300 Mbps
y Unterstützt Auto-Installation und Diagno-
se-Tools
y Unterstützt Funk-Datenverschlüsselung
64/128-bit WEP, WPA, WPA2 (TKIP mit IEEE
802,1x) und AES-Funktionen
38
Page 39

WLAN GENERAL
LED Status
LED Status Working Status
Empfangs-/Aktivitäts
LED
Blinkt grün Der Funkempfänger des Adapters ist
eingeschaltet.
Blinkt grün in langsamen
Intervallen
Blinkt grün in schnellen,
unregelmäßigen Abständen
Off Der Funkempfänger des Adapters ist
Der Adapter ist bereits mit dem WLAN
verbunden, empfängt oder sendet aber
keine Daten.
Der Adapter ist aktiv und sendet oder
empfängt Daten.
ausgeschaltet.
39
Page 40

WLAN GENERAL
INSTALLATIONSANLEITUNG
Achtung:
Installieren Sie die Software und Treiber BEVOR
Software-Installation
Sie den WLAN Adapter in eine USB-Buchse einstecken.
Hinweis: Die folgende Installationsanleitung für Treiber bezieht sich auf Windows XP als Referenz-Betriebssystem. Die Verfahren und Bildschirmanzeigen von Windows 98se, 2000, Vista und Win7 sind
ähnlich wie bei Windows XP.
Legen Sie die enthaltene CD-Rom in Ihr CD-Rom-Laufwerk ein. Das Menüfenster erscheint automatisch.
Klicken Sie auf den Driver-Button (Treiber) dieses Produkts.
Hinweis: Wenn die CD-Rom nicht automatisch startet, klicken Sie bitte auf Arbeitsplatz Æ
CD-Rom-Laufwerk und anschließend doppelt auf das Setup- Symbol in diesem Menü.
40
Page 41

WLAN GENERAL
1. Das Sprachauswahlfenster erscheint. Wählen Sie Ihre Sprache und klicken Sie auf OK.
2. Das Begrüßungsfenster erscheint. Klicken Sie auf Next (Weiter), um fortzufahren.
41
Page 42

WLAN GENERAL
3. Klicken Sie die „Installieren” – Schaltfläche, um die Installation zu starten.
4. Bitte warten Sie, während die Software installiert wird.
42
Page 43

WLAN GENERAL
5. Klicken Sie auf den Button Finish (Fertigstellen), um die Installation der Treiber und des Dienstpro-
gramms abzuschließen.
43
Page 44

WLAN GENERAL
6. Wählen Sie „Ja, den Computer jetzt neu starten” und klicken Sie auf die „Beenden“ Schalt-
fläche.
44
Page 45

WLAN GENERAL
MANAGEMENT-ANLEITUNG
Lesen Sie dieses Kapitel, um die Management-Benutzeroberfläche des Geräts
kennenzulernen und sich mit dessen Steuerung vertraut zu machen.
Standard-Netzwerkverbindung herstellen
Vor dem Start
Für die folgenden Anweisungen zur Herstellung einer Netzwerkverbindung wird das enthaltene Dienstprogramm zur Konfiguration der Funknetzwerkeinstellungen verwendet.
Hinweis: Wenn Sie Ihr Funknetzwerk unter Windows XP mit diesem Dienstprogramm konfigurieren
möchten, führen Sie bitte die nachfolgenden Schritte aus, um die eigene Netzwerkunterstützung von
Windows XP zu deaktivieren (Wireless Zero Configuration Service).
1. Klicken Sie doppelt auf das Symbol auf Ihrem Desktop, um das Programm zu starten.
2. Vergewissern Sie sich, dass die Option Windows Zero Config nicht markiert ist.
Ad-Hoc-Modus
Ein Funknetzwerk im Ad-hoc-Modus verbindet zwei Computer direkt und ohne die Verwendung eines
Routers oder AP miteinander. Dieser Modus ist auch als Peer-to-Peer-Netzwerk bekannt. Wir können
beispielsweise einen Wireless-Adapter respektive mit zwei Computern verbinden. Diese Kommunikation
zwischen zwei Computern ist ein Netzwerk im Ad-hoc-Modus.
45
Page 46

WLAN GENERAL
Verwendung dieses Adapters im Ad-hoc-Modus
1. Klicken Sie doppelt auf das Symbol auf Ihrem Desktop.
2. Klicken Sie auf den Available Network-Button (Verfügbares Netzwerk), um nach verfügbaren Netz-
werk-Adaptern zu suchen. Klicken Sie doppelt auf den Netzwerk-Adapter, zu dem Sie eine Verbindung
herstellen möchten.
3. Klicken Sie auf OK, um zu bestätigen, dass Sie eine Verbindung zu einem offenen Funknetzwerk
herstellen möchten.
46
Page 47

WLAN GENERAL
4. Klicken Sie auf OK, um dieses Netzwerk zur Profilliste hinzuzufügen.
Hinweis: Dieses Beispiel bezieht sich auf ein offenes Funknetzwerk. Wenn Sie eine Verbindung zu einem
Wireless-Adapter mit Sicherheitsschutz herstellen, müssen Sie die Verschlüsselungseinstellungen in
diesem Profil entsprechend dem anderen Wireless-Adapter konfigurieren. Klicken Sie bitte auf die Dropdown-Liste Network Authentication (Netzwerk-Authentifizierung), um eine Authentifizierungsmethode
auszuwählen. Wählen Sie unter Data encryption die Datenverschlüsselungsart. Füllen Sie alle erforder-
lichen Felder aus und klicken Sie auf OK.
47
Page 48

WLAN GENERAL
Infrastruktur-Modus
Ein Netzwerk im Infrastruktur-Modus enthält mindestens einen Wireless Client und einen Wireless AP oder
Router. Der Client wird durch die Kommunikation mit dem Wireless AP mit den Internet oder Intranet verbunden.
48
Page 49

WLAN GENERAL
Verwendung dieses Adapters im Infrastruktur-Modus:
1. Klicken Sie doppelt auf das Symbol auf Ihrem Desktop.
2. Klicken Sie auf Available Network (Verfügbares Netzwerk), um nach verfügbaren AP (Zugangs-
punkten) zu suchen. Klicken Sie doppelt auf den AP, zu dem Sie eine Verbindung herstellen möchten.
3. Klicken Sie auf OK, um zu bestätigen, dass Sie eine Verbindung zu einem offenen Funknetzwerk
herstellen möchten.
49
Page 50

WLAN GENERAL
4. Klicken Sie auf OK, um dieses Netzwerk der Profilliste hinzuzufügen.
50
Page 51

A
WLAN GENERAL
Einführung in das Wireless LAN-Dienstprogramm
Hinweise: Diese Anleitung bezieht sich auf Windows XP als Referenz-Betriebssystem. Einige der Funktionen werden von Windows 98se oder Windows ME nicht unterstützt.
Start des Wireless LAN-Dienstprogramms
Klicken Sie doppelt auf das Symbol auf Ihrem Desktop. Das Wireless LAN-Programm wird geöffnet.
Sie können auf die Reiter oben im Menü klicken, um diesen Adapter zu konfigurieren. Die Kontrollkästchen
unten bieten die folgenden Funktionen:
Markieren Sie dieses Kontrollkästchen, um das Symbol des
Show Tray Icon
(Ablagesymbol zeigen)
Windows Zero Config
Radio Off (Funk aus)
Disable Adapter
Dienstprogramms in Ihrer Systemanlage anzuzeigen, d.h.
dem Anzeigebereich in der unteren rechten Ecke Ihres Windows Desktops (System-Tray). Um das Dienstprogramm-Symbol aus dem System-Tray zu löschen, entfernen
Sie einfach das Häkchen in diesem Kontrollkästchen.
Entfernen Sie das Häkchen in diesem Kontrollkästchen, um
eigene Wireless-Unterstützung von Windows XP (Wireless
Zero Configuration Service) anstelle dieses Dienstprogramms zur Konfiguration Ihres Funknetzwerks zu nutzen.
Markieren Sie dieses Kontrollkästchen, um zu verhindern,
dass dieser Adapter Signale überträgt oder empfängt. Entfernen Sie das Häkchen, um die Kommunikation zu ermöglichen.
Markieren Sie dieses Kontrollkästchen, um den Wire-
dapter zu deaktivieren. Entfernen Sie das Häkchen, um
lessihn wieder zu aktivieren.
(Adapter deaktivieren)
51
Page 52

WLAN GENERAL
Management Guide
Dieses Kapitel beschreibt, wie Sie den Adapter für Verbindungen mit Ihrem drahtlose Netzwerk
kon (WLAN) konfigurieren müssen und wie Sie die sichere Datenverschlüsselung verwenden.
Die Einstellungen des Adapters in Windows XP sind ähnlich wie in Windows 2000. Diese Anlei-
tung beschreibt daher beispielhaft die Anwendung in Windows XP.
Nach der Installation des Adapters erscheint das Icon der Anwendung in der Taskleiste. Es zeigt
die Signalstärke durch Farben und als Balkendiagramm an. (Received Signal Strength Indication
RSSI)
Das Icon ist lila: Keine Verbindung.
Das Icon ist weiß: Verbindung zum Netzwerk verloren.
Das Icon ist grün: Gute Signalstärke.
Das Icon ist grün: Sehr gute Signalstärke.
52
Page 53

WLAN GENERAL
Allgemein (General)
Nach dem Start des Dienstprogramms wird das allgemeine Menü angezeigt. Der Reiter General (Allge-
mein) bietet Informationen über Ihre aktuelle Funknetzwerk-Verbindung. Sie können die Angaben aktualisieren, indem Sie auf Renew (Aktualisieren) klicken.
Status:
Speed (Geschwindig-
keit):
Type (Typ):
Encryption (Verschlüsselung):
SSID:
Signal Strength (Signal-
stärke):
Link Quality (Verbindungsqualität):
Network Address
(Netzwerkadresse):
Prüft, ob das Gerät mit dem Zielnetzwerk verbunden ist.
Die aktuelle Verbindungsgeschwindigkeit
Infrastruktur-Modus oder Ad-hoc-Modus
Die verwendete Verschlüsselungsart für die Verbindung mit dem aktuellen Netzwerkprofil
Der SSID (Netzwerkname) des verbundenen Funknetzwerks
Zeigt die von diesem Adapter erkannte Signalstärke an.
Zeigt die Qualität dieser Funkverbindung an.
Zeigt die aktuellen Einstellungen der IP-Adressen für diesen Adapter
an.
53
Page 54

WLAN GENERAL
Profile (Profil)
Der Reiter Profile (Profil) bietet eine Liste der bevorzugten Verbindungen. Sie können auf die nebenstehenden Buttons klicken, um jede einzelne Verbindung zu konfigurieren.
Add (Hinzufügen)
Remove (Entfernen)
Edit (Bearbeiten)
Duplicate (Duplizieren)
Set Default (Als
Standardverbindung
nutzen)
Klicken Sie auf diesen Button, um diesem Button ein Verbindungsprofil
hinzuzufügen.
Um ein Verbindungsprofil zu löschen, klicken Sie auf den entsprechenden Eintrag in der Liste und anschließend auf diesen Button, um
das Profil zu löschen.
Um die Konfiguration eines Profils zu bearbeiten, klicken Sie auf dieses
Profil in der Liste und anschließend auf diesen Button.
Um eine Kopie eines Profils herzustellen, klicken Sie auf das zu kopierende Profil und anschließend auf diesen Button.
Um eine Profil als Standard-Funkverbindung zu nutzen, klicken Sie auf
den entsprechenden Eintrag in der Liste und anschließend auf diesen
Button. Sie können ein Profil auch durch Doppelklick auf den Eintrag als
Standardverbindung auswählen.
54
Page 55

WLAN GENERAL
Available Network (Verfügbares Netzwerk)
Dieser Reiter enthält eine Liste der für diesen Adapter erreichbaren Funknetzwerke.
Refresh (Aktualisieren)
Add to Profile (zu Profilen hinzufügen)
Klicken Sie auf diesen Button, um erneut nach verfügbaren Netzwerken in der Umgebung des Adapters zu suchen.
Um ein verfügbares Netzwerk Ihrer Profilliste hinzuzufügen, wählen
Sie ein verfügbares Netzwerk aus und klicken Sie anschließend auf
diesen Button.
55
Page 56

WLAN GENERAL
Advanced (Erweitert)
Der Reiter Advanced (Erweitert) bietet erweiterte Konfigurationsmöglichkeiten für diesen Adapter. Jede
Änderung in diesem Reiter wird nach Klick auf den Apply-Button (Anwenden) ausgeführt.
Klicken Sie auf Set defaults (Standardeinstellungen wiederherstellen), um die Standardeinstellungen
wiederherzustellen.
Power Save (Energiesparmodus)
None (Keine)
Min (Minimum)
Max (Maximum)
Turbo Mode (Turbomodus)
OFF (AUS)
ON (EIN)
AUTO (Automatisch)
Fragment Threshold (Fragmentierungsschwelle)
Die maximale Größe eines Datenpakets, das segmentiert und übertragen wird. Wählen Sie
die Größe zwischen 256 und 2432 (Standard) Bytes aus.
RTS Threshold (RTS-Schwelle)
Wählen Sie den RTS-Schwellenwert zwischen 0 und 2432 (Standard) aus.
Wireless Mode (Funk-Modus)
802,11g/b
802,11b
802,11b Preamble Mode (Präambel-Modus)
Wählen Sie den Präambel-Modus – lange, kurze oder automatische Erkennung – aus.
Deaktiviert die Energiesparfunktion.
Minimaler Stromverbrauch.
Maximaler Stromverbrauch.
Deaktiviert den Turbomodus.
Aktiviert den Turbomodus.
Aktiviert oder deaktiviert den Turbomodus automatisch entsprechend der
erkannten Umgebung.
Verbindung mit einem 802,11b/g Netzwerk (2,4GHz/54Mbps)
Verbindung mit einem 802,11b Netzwerk (2,4GHz/11Mbps)
56
Page 57

WLAN GENERAL
Region Domain (Regionale Domain)
Wählen Sie Ihre Region aus der Dropliste aus. Achten Sie darauf, die richtige Region
auszuwählen, da die Auswahl der falschen Region illegal sein kann.
Status
Dieser Reiter zeigt den aktuellen Verbindungsstatus dieses Adapters.
57
Page 58

WLAN GENERAL
Statistics (Statistik)
Dieser Reiter zeigt eine Aufzeichnung der Übertragungsaktivitäten. Klicken Sie auf den Reset-Button
(Zurücksetzen), um die Werte wieder von 0 an zu setzen.
58
Page 59

WLAN GENERAL
WPS - Wi-Fi Protect Setup
Das primäre Ziel von Wi-Fi Protected Setup (Vereinfachte Wi-Fi configuration) ist es, die Si-
cherheitseinstellungen von Wi-Fi Netzwerken zu vereinfachen. Der Adapter unterstützt die Me-
thoden PIN-Konfiguration oder PBC (Push Button Configuration) Konfiguration. Je nach Mög-
lichkeiten des Routers können Sie eine sichere Verbindung entweder durch Eingabe einer PIN
oder durch drücken eines Knopfes aufbauen.
59
Page 60

WLAN GENERAL
Hier zeigen wir Ihnen beide Methoden der sicheren Konfiguration mit Hilfe der QSS (Quick Se-
cure Setup)-Funktionen, um automatisch eine durch WPA2 gesicherte Verbindung herzustellen.
Die Management-Software des Adapters erleichtert die sonst beschwerliche Einrichtung der
Schnittstellen erheblich.
1. PIN Methode
Pin Code: Eine 8-stellige Digitalziffer wird per Zufall vom System erzeugt.
Klicken Sie auf die Schaltfläche “Pin Input Config (PIN)”. Danach erhalten Sie folgenden Hinweis:
Klicken Sie “Ja”, so können Sie einen der Access Points oder Router(AP) wählen.
60
Page 61

WLAN GENERAL
In diesem Fenster stehen die Optionen “Aktualisieren/Auswählen/Abbrechen” zur Verfügung.
Wählen Sie den Namen des APs, mit dem Sie eine Verbindung herstellen möchten.
Klicken Sie dann auf „Auswählen“, so können Sie dann mit der PIN-Methode die Konfiguration
fortsetzen.
61
Page 62

WLAN GENERAL
Starten Sie jetzt den Webbrowser auf ihrem Computer. Geben Sie die IP-Adresse des Rou-
ters/AP in die Adresszeile ein und drücken „Enter“, um in das Konfigurationsmenü des Rou-
ters/AP zu gelangen.
Wählen Sie die WPS (Wi-Fi) Konfigurationsseite, geben den PIN-code des Adapters ein und
bestätigen Sie diesen, um damit eine WPS-Verbindung aufzubauen.
Nach dem Erscheinen des Hauptfensters ist die Konfiguration erfolgreich abgeschlossen.
62
Page 63

WLAN GENERAL
2. PBC (Push Button Configuration) Methode
Nach Auswahl der PBC-Schaltfläche erscheint folgendes Fenster.
63
Page 64

WLAN GENERAL
Nach der Auswahl der PBC-Schaltfläche drücken Sie bitte die physischen Schalter Ihres Rou-
ters/APs oder wählen die PBC-Schaltfläche innerhalb der WPS-Konfigurationsseite Ihres Rou-
ters/APs.
Nachdem WPS erfolgreich konfiguriert wurde, ist das Profil entsprechend automatisch ange-
passt.
64
Page 65

WLAN GENERAL
AP-Modus Management-Anleitung
Allgemein
Nach der Konfiguration des Adapters im AP-Modus wird das Fenster General (Allgemein) mit allgemeinen Informati-
onen zu diesem Zugangspunkt eingeblendet.
65
Page 66

WLAN GENERAL
SSID:
BSSID: Die Mac-Adresse dieses Zugangspunkts
Config (Konfiguration): Klicken Sie auf diesen Button, um die Konfiguration dieses Zu-
Association Table (Verbindungstabelle):
Die SSID (Netzwerkname) des durch diesen Zugangspunkt
geschaffenen Funknetzwerks
gangspunkts zu ändern.
Zeigt Informationen zu den Geräten an, die mit diesem Zugangspunkt
verbunden sind – einschließlich der MAC-Adresse und der Dauer der
Verbindung zu diesem Gerät.
66
Page 67

WLAN GENERAL
Advanced (Erweitert)
Beacon Interval
(Signalintervall):
DTIM Period
(DTIM-Dauer):
Preamble Mode
(Präambel-Modus):
Set Defaults (Standardeinstellungen):
Apply (Anwenden): Klicken Sie auf diesen Button, um die Änderungen auszuführen.
Definiert das Intervall zwischen den Signalen von 20~1000.
Legt den DTIM-Dauer zwischen 1~255 fest.
Klicken Sie auf die Dropdown-Liste, um die Präambel auf lang,
kurz oder automatisch einzustellen.
Klicken Sie auf diesen Button, um die Standardwerte der obigen
Einstellungen wiederherzustellen.
67
Page 68

WLAN GENERAL
Statistics (Statistik)
Dieser Reiter zeigt eine Aufzeichnung der Übertragungsaktivitäten. Klicken Sie auf den Reset-Button
(Zurücksetzen), um die Werte wieder von 0 an zu zählen.
68
Page 69

WLAN GENERAL
SoftAP
In diesem Fenster können Benutzer den Adapter für die Verbindung mit einem öffentlichen Netzwerk
auswählen.
Klicken Sie auf das Gerät, das für die Herstellung der Verbindung zu dem öffentlichen Netzwerk verwendet
werden soll. Klicken Sie dann auf Select (Auswählen) und auf Apply (Anwendung), um die Verbindung
herzustellen.
69
Page 70

WLAN GENERAL
PRODUKT-
SPEZIFIKATIONEN
Standard
IEEE 802,11b, IEEE 802,11g
Schnittstelle
PCI (23415); PC-Card (23416); USB (23413)
Sicherheit
64/128-bit WEP, WPA (TKIP mit IEEE 802,1x), AES
Empfänger-Empfindlichkeit
54Mbps OFDM, 10%PER, -68dBm
11Mbps CCK, 8%PER, -86dBm
1Mbps BPSK, 8%PER, -92dBm
Kanal
USA 11, Europa 13, Japan 14
Datenübertragungsrate
802,11b: 1, 2, 5,5 und 11Mbps
802,11g: 6, 9, 12, 18, 24, 36, 48, und 54Mbps
Übertragungsleistung
16dBm~18dBm
Reichweite
Innenräume 35~100 Meter
Außenbereiche 100~300 Meter
LED-Anzeige
Verbindung (Grün)
Betriebstemperatur
0- 40 0C (32 – 104 0F)
Relative Luftfeuchtigkeit bei Betrieb
10% ~ 90% (nicht kondensierend)
Emission
FCC Klasse B, CE, VCCI Klasse B
70
Page 71

WLAN GENERAL
F
Avertissement de la marque CE
Cet appareil respecte les conditions relatives à la compatibilité électromagnétique, EN
55022 catégorie B pour ITE, à la condition essentielle de protection de la Directive du
Conseil 89/336/EEC relative aux lois des Etats Membres en rapport avec la compatibilité
électromagnétique.
L’entreprise dispose d’une politique actuellement en vigueur concernant la valorisation de
ses produits et il est possible que certaines informations présentes sur ce document ne
soient pas à jour. Veuillez consulter votre distributeur local pour obtenir toutes les
informations mises à jour. Ce document ne peut en aucun cas être copié ou reproduit en
partie ou en totalité sans le consentement écrit de l’entreprise.
Marques de fabrique :
Tous les noms de marque sont les propriétés de leurs sociétés respectives.
Copyright © 2010, tous droits réservés.
71
Page 72

WLAN GENERAL
INFORMATIONS GENERALES
Vous venez d’acquérir le IEEE 802.11n Wireless Adapter et nous vous en remercions. Veuillez lire ce chapitre pour tout savoir sur cet appareil.
Déballer votre IEEE 802.11g Wireless Adapter
Avant de commencer, veuillez vérifier que l’emballage contient les articles suivants :
1. IEEE 802.11n Wireless Adapter
2. Guide d’installation rapide
3. Un utilitaire / manuel de CD
72
Page 73

WLAN GENERAL
Introduction sur IEEE 802.11n Wireless Adapter
Le IEEE 802.11n Wireless adapter permet aux utilisateurs de lancer le réseau sans fil IEEE 802.11n à 300
Mbps à la fréquence de 2.4 GHz, qui est également compatible avec les appareils sans fil IEEE 802.11b/g
à 11/54 Mbps. Vous pouvez configurer cet adaptateur en mode Ad-Hoc, pour vous connecter à d’autres
ordinateurs 2.4 GHz ou en mode infrastructure, pour vous connecter à un AP ou routeur sans fil, pour
accéder à Internet. Cet adaptateur comprend un utilitaire pratique, pour scanner les réseaux disponibles et
sauvegarder les réseaux préférés, auxquels les utilisateurs ont l’habitude de se connecter. Le cryptage de
sécurité peut être aussi configuré chez cet utilitaire.
Caractéristiques essentielles
y Se conforme au standard sans fil IEEE
802.11b/g/n
y Transfert de données haute vitesse jusqu’à
150/300 Mbps
y Supporte une auto-installation et des utilitaires
de diagnostic.
y Supporte un cryptage de données sans fil avec
64/128 bit WEP, WPA2 (TKIP avec IEEE
802.1x) et les fonctions AES.
73
Page 74

WLAN GENERAL
Etat des LED
Indications des LED Etat Êtat de fonctionnement
LED Radio/ACT
Vert L’adapteur radio est en marche
Vert clignotant L’adapteur est conneté mais il ne transmet ni
de données
Vert clignotant repidement
Arrêt L’adaptateur radio est à l’arrêt
L’adapreur est active et transmet ou reçoit
des données
74
Page 75

WLAN GENERAL
GUIDE D’INSTALLATION
Attention:
Assurez- vpus d’installer le logiciel et le pilote AVANT
Installation du logiciel
de raccorder l’adapteur WLAN dans le port USB.
Remarque : le guide d’installation du driver/pilote utilise Windows XP comme système d’exploitation
présumé. Les procédures et écrans dans Windows 98se, 2000, Vista, Win7 sont bien connus de Windows
XP.
Insérez le CD-Rom, qui est livré avec l’adaptateur pour la commande de votre CD-Rom. La fenêtre de
menu s’affiche automatiquement. Veuillez cliquer sur le bouton “Driver” de cet appareil.
Remarque : si le CD-Rom ne démarre pas automatiquement, veuillez cliquer sur “My Computer”Æ your
CD-Rom Drive, puis double-cliquez sur l’icône “Setup” pour lancer ce menu.
75
Page 76

WLAN GENERAL
1. La fenêtre de sélection de langues s’affiche. Veuillez sélectionner la langue que vous utilisez et cliquez
sur OK.
2. La page d’accueil s’affiche. Cliquez sur le bouton “Next”, pour continuer.
76
Page 77

WLAN GENERAL
3. Cliquez sur le bouton "Installer" pour démarrer l'installation
4.Veuillez patienter pendant l’installation.
77
Page 78

WLAN GENERAL
5.
Cliquez sur le bouton “Finish”, pour terminer l’installation du pilote et de l’utilitaire.
78
Page 79

WLAN GENERAL
6. Sélectionnez “Oui, je veux redémarrer mon ordinateur maintenant” et cliquez sur le bouton
“Terminer ”.
79
Page 80

WLAN GENERAL
GUIDE DE GESTION
Lire ce chapitre pour comprendre l’interface de gestion de l’appareil et
comment gérer cet appareil.
Etablir une connexion de réseau de base
Avant de commencer
Dans l’instruction suivante servant à établir une connexion de réseau, nous utilisons l’utilitaire que nous
fournissons pour configurer vos réglages de réseau sans fil.
Remarque : pour les utilisateurs Windows XP qui veulent configurer votre réseau sans fil en utilisant cet
utilitaire, veuillez effectuer les procédures suivantes pour déconnecter votre support sans fil d’origine
Windows XP (Wireless Zero Configuration Service)
1. Double-cliquez sur l’icône affiché sur le bureau, pour lancer l’utilitaire.
2. Assurez-vous que la case à cocher “Windows Zero Config” ne soit pas cochée.
Mode Ad-Hoc
Un réseau sans fil de mode Ad-Hoc connecte deux ordinateurs directement sans utiliser de routeur ou AP.
Il est aussi appelé un réseau peer-to-peer. Par exemple, nous pouvons installer cet adaptateur sans fil sur
deux ordinateurs. La communication entre les deux ordinateurs est un réseau de mode Ad-Hoc.
80
Page 81

WLAN GENERAL
Pour utiliser cet adaptateur en mode Ad-Hoc
1. Double-cliquez sur l’icône affiché sur votre bureau.
2. Cliquez sur le bouton “Available Network”, pour scanner les adaptateurs de réseau sans fil disponibles. Double-cliquez sur l’adaptateur de réseau, auquel vous allez vous connecter.
81
Page 82

WLAN GENERAL
3. Cliquez sur le bouton OK, pour confirmer que vous êtes connectés à un réseau sans fil ouvert.
4. Cliquez sur OK, pour ajouter ce réseau dans la liste de profils.
Remarque : cet exemple est un réseau sans fil ouvert. Si vous vous connectez à un adaptateur sans fil
avec une protection de sécurité, vous devez configurer les réglages de cryptage dans ce profil pour qu’ils
correspondent à l’autre adaptateur sans fil. Veuillez cliquer sur la liste déroulante “Network Authentica-
tion”, pour sélectionner une méthode d’authentification, puis sélectionner un type de “Data encryption”.
Remplissez chaque champ vide obligatoire et cliquez sur “OK”.
82
Page 83

WLAN GENERAL
Mode infrastructure
Un réseau mode infrastructure contient au moins un client sans fil et un AP ou routeur sans fil. Ce client se
connecte à Internet ou intranet, en communiquant avec cet AP sans fil.
83
Page 84

WLAN GENERAL
Pour utiliser cet adaptateur en mode infrastructure :
1. Double-cliquez sur l’icône affiché sur votre bureau.
2. Cliquez sur le bouton “Available Network”, pour scanner les points d’accès disponibles. Double-cliquez sur le AP, auquel vous allez vous connecter.
3. Cliquez sur le bouton OK, pour confirmer que vous vous connectez pour ouvrir un réseau sans fil.
84
Page 85

WLAN GENERAL
4. Cliquez sur OK, pour ajouter ce réseau à la liste de profils.
85
Page 86

WLAN GENERAL
Remarque :
Cet exemple est un réseau sans fil ouvert. Si vous vous connectez à un AP avec une protection de sécurité,
vous devez configurer les réglages de cryptage dans ce profil pour qu’ils correspondent à votre AP. Veuillez
cliquer sur la liste déroulante “Network Authentication”, pour sélectionner une méthode d’authentification,
puis sélectionner un type “Data encryption”. Remplissez chaque champ vide obligatoire et cliquez sur
“OK”.
Introduction sur l’utilitaire Wireless LAN
Remarque : cette instruction de gestion utilise Windows XP comme système d’exploitation présumé.
Certaines fonctions ne sont pas utilisées dans Windows 98se ou Windows ME.
Démarrage de l’utilitaire Wireless LAN
Double-cliquez sur le raccourci affiché sur votre bureau. L’utilitaire Wireless LAN s’affiche.
Vous pouvez cliquer sur les onglets placés au-dessus, pour configurer cet adaptateur. Les cases à cocher
placées au-dessous donnent les fonctions suivantes :
Cochez cette case, pour afficher l’icône de l’utilitaire sur votre
Show Tray Icon
Windows Zero Config
Radio Off
Disable Adapter
system tray, qui se trouve dans la zone de notification dans le
coin en bas à droite du bureau de windows. Vous pouvez
aussi la décocher, pour enlever l’icône de l’utilitaire du system
tray.
Décochez cette case, pour utiliser un support sans fil d’origine
Windows XP (Wireless Zero Configuration Service), au lieu
d’utiliser cet utilitaire, pour configurer votre réseau sans fil.
Cochez cette case, pour empêcher cette forme d’adaptateur
de transmettre ou de recevoir des signaux. Décochez-la, pour
communiquer.
Cochez cette case, pour désactiver l’adaptateur sans fil.
Décochez-la, pour activer à nouveau cet adaptateur.
86
Page 87

WLAN GENERAL
Guide de configuration
Ce chapitre décrit comment configure votre adapteur pur la connexion sans fil à votre Wireless
local Area Network (WLAN) et comment utiliser les caractéristique d’encryptage de sécurité des
données.
La configuration de l’adapteur sous Windows 2000 est identique à la configuration sous Windows
XP. Ce guide d’utilistaion prend Windows XP en exemple.
Après avoir installer l’adapteur, son icône apparaît dans votre barre de système en bas de l’écran.
Cette icône montre l’intensitédu signal en utilisant des cloleurs pour indiquer l’intensité du signal
reçu (RSSI).
Rouge: pas de connexion.
Blanc: pas de réseau.
En partie vert: bonne intensité du signal.
Entièrement vert: excellente intensité du signal.
87
Page 88

WLAN GENERAL
General
Après avoir démarré l’utilitaire, la page générale s’affiche. Cet onglet General fournit des informations sur la
connexion courante de réseau sans fil. Vous pouvez cliquer sur le bouton Renew, pour mettre à jour les
informations enregistrées dans une liste.
Status:
Speed:
Typ e:
Encryption:
SSID:
Signal Strength:
Link Quality
Network Address:
Vérifie, si l’appareil est associé au réseau cible.
La vitesse de connexion courante
Mode infrastructure ou mode Ad-Hoc.
Le mode de cryptage d’exécution, pour se connecter au profil de réseau courant.
Le SSID (nom du réseau) du réseau sans fil connecté.
Indique la force du signal détectée par cet adaptateur.
Indique la qualité du lien de cette connexion sans fil.
Affiche les réglages des adresses IP courantes pour cet adaptateur.
88
Page 89

WLAN GENERAL
Profile
L’onglet Profile liste les connexions préférées. Vous pouvez cliquer sur le bouton à côté, pour configurer
chaque connexion.
Add
Remove
Edit
Duplicate
Set Default
Cliquez sur ce bouton, pour ajouter un profil de connexion pour cet
adaptateur.
Pour enlever un profil de connexion, cliquez sur ce profil dans la liste de
profils et cliquez sur ce bouton pour le supprimer.
Pour modifier les configurations d’un profil, cliquez sur ce profil dans la
liste des profils et cliquez sur ce bouton pour éditer.
Pour faire une copie d’un profil, cliquez sur le profil qui va être copié et
cliquez sur ce bouton pour le copier.
Pour sélectionner un profil comme votre connexion sans fil par défaut,
cliquez sur ce profil dans la liste et cliquez sur ce bouton. Vous pouvez
aussi double-cliquer sur chaque profil pour le sélectionner comme votre
connexion sans fil par défaut.
89
Page 90

WLAN GENERAL
Available Network
Cet ongle disponible liste le réseau sans fil accessible de cet adaptateur.
Refresh
Add to Profile
Cliquez sur ce bouton pour rescanner les réseaux disponibles autour de l’adaptateur.
Pour ajouter un réseau disponible à votre liste de profils, sélectionnez un réseau disponible et cliquez sur ce bouton pour l’ajouter.
90
Page 91

WLAN GENERAL
Advanced
L’onglet Advanced fournit les configurations anticipées pour cet adaptateur. Chaque modification apportées
dans cet onglet sera exécutée, après avoir cliqué sur le bouton Apply.
Pour remettre à zéro les réglages par défaut de l’onglet advanced, cliquez sur le bouton Set defaults, pour
exécuter la remise à zéro.
Power Save
None
Min
Max
Turbo Mode
OFF
ON
AUTO
Fragment Threshold
La taille maximum d’un paquet qui va être segmenté et transmis. Sélectionnez la taille de
256 à 2432(par défaut) octets.
RTS Threshold
Sélectionne la forme de seuil RTS 0 à 2432(par défaut)
Wireless Mode
802.11g/b
802.11b
802.11b Preamble Mode
Sélectionner le mode préambule pour être un mode de détection long, court ou auto.
Region Domain
Désactive la fonction sauvegarde de puissance.
Consommation de puissance minimum
Consommation de puissance maximum
Désactive le mode turbo
Active le mode turbo
Active ou désactive automatiquement selon l’environnement détecté
Connexion à un réseau 802.11b/g (2.4GHz/54Mbps)
Connexion à un réseau 802.11b (2.4GHz/11Mbps)
91
Page 92

WLAN GENERAL
Sélectionner votre région à partir de la liste déroulante. Veuillez noter que vous devez sélectionner une région correcte. Sélectionner une région incorrecte peut être contraire à la loi
applicable.
Status
Cet onglet affiche le statut de connexion actuel de cet adaptateur.
92
Page 93

WLAN GENERAL
Statistics
Cet onglet permet d’afficher l’enregistrement d’activité de transmission. Cliquer sur le bouton “Reset”
remet les valeurs à zéro.
93
Page 94

WLAN GENERAL
WPS - Wi-Fi Protect Setup
L'objectif principal du Wi-Fi Protected Setupi (configuration simple du WI-Fi) est de simplifier le
setup de sécurité et l'administration du réseau Wi-Fi. L'adapteur prend en charge aussi bien la
méthode de configuration du PIN que la méthode de configuration du PBC. Si la carte wireless
prend en charge le Wi-Fi Protected Setup (WPS), vous pouvez installer un connexion sans fil
entre la carte wireless et le router en utilisant soit le Push Button Configuration (PBC) soit la
méthode du PIN.
Les deux méthodes de configuration du QSS sont montrées ici.
(QSS = Quick Security Settings. En sélectionnant le router sans fil et la carte wireless dans la
fenêtre QSS, vous installez automatiquement le niveau WPA2 de la connexion de sécurité sans
94
Page 95

WLAN GENERAL
utiliser le logiciel d'administration du router ni de l'adapteur de réseau. Cela évite d'utiliser les
réglages d'interface complexes et simplifie considérablement l'installation des réglages de sécurité sans fil).
Code PIN : chiffres à 8 caractères Il est généré automatiquement par le système
1. Méthode du PIN
Cliquez sur le bouton "Configuration entrée pin (PIN)". La fenêtre suivante s'ouvre.
Cliquez sur le bouton "Oui" pour sélectionner un AP.
95
Page 96

WLAN GENERAL
Cette fenêtre contient les boutons "Actualiser / sélectionner / annuler". Sélectionnezun nom AP et
cliquez sur "Sélectionner". Maintenant vous pouvez utiliser la méthode PIN pour configurer le
QSS.
Cliquez deux fois sur l'icône du browser internet WEB sur votre écran. Entrez l'adresse IP de
votre router/AP sélectionné dans l'URL et appuyer sur Enter. Maintenant vous pouvez saisir la
configuration.
Allez à la page de configuration du WPS (Wi-Fi), entrez le code PIN de l'adapteur et cliquez sur le
bouton de confirmation pour installer la connexion WPS.
96
Page 97

WLAN GENERAL
Quand la fenêtre "Générale" s'ouvre, le WPS a été configuré avec succès.
97
Page 98

WLAN GENERAL
2. Méthode PBC (Push Button Configuration)
Après avoir appuyé sur le bouton PBCappuyez sur le bouton physique de votre AP ou le bouton
virtuel sur la page de configuration WPS pour appeler la fenêtre suivante.
98
Page 99

WLAN GENERAL
Appelez la page de configuration WPS (Wi-Fi) de votre router/AP requis, et démarrez la
connexion PCB.
Une fois le WPS configuré avec succès, les profils disponibles sont modifiés.
99
Page 100

WLAN GENERAL
Guide de gestion du mode AP
General
Après avoir configure l’adaptateur en mode AP, cette page “General” affiche l’information générale de cet AP.
100
 Loading...